Transcripts
1. Introduction: When I started painting
with watercolors, every art tutorial
or art class told me never to start
with dark colors. Always paint from light to dark. It felt like the
pointing finger. Don't use the dark colors first. You won't be able to
correct mistakes later. Leave the white pads. Wide. Watercolors need a
lot of planning. Yeah, I started out as a very anxious painter and still sometimes M because
of advice like this, it sounds scary and intimidating
because it actually is. Mastering light to
dark gradient without messing up the colors
requires a lot of precision, planning and control
over the paint. But who has this in
the beginning, right? For my part, I
struggled a lot with keeping the white
pads wide and I was so afraid to over
paint lines that I wasn't supposed to over
pain most of the time, I ended up with
washed out results because I was too anxious to
go darker with my colors. I tried adding the whites with rather cheap acrylic
paints after I finished my painting than later, I switch to white gel pens. These methods work
but only limited. But when I discovered
masking fluid, my whole painting process
changed to the better. Hi, I'm Ilya fovea and
Illustrator at which, and treasure hunters
from the Baltic Sea. I have been working as an illustrator for
three years now. And in the beginning of
2021, I went full-time. Since I started, I worked for a government county
here in Germany for a youth work campaign
and also did follow a projects for the
voluntary worker programs, as well as commissions
from private clients. Alongside that, I'm
constantly working on personal projects
that people around the world have
purchased postcards, prints, and stickers off
in my Etsy shop online. I'm mostly known for my semi realistic animal
nature paintings, as well as my art and
lifestyle channel on YouTube, where I'll share
my everyday life as a full-time artist and many behind the scenes of paintings and other
work projects. As of lately, I also gained
some attention over on TikTok for my watercolor
and line at MMA fan outs. Up until now, I've
been drawing and painting almost
exclusively traditionally, my works usually done in
watercolor, ink, colored pencil, or fine liner, whereas
the wet mediums are my favorites in my
former watercolor class, watercolor and ink, mastering wet mediums through
playing and observing. I took you on an unhinged
play session and a river. Metaphorically speaking, exploring different
techniques and effects like the wet on
wet method and sea salt. In this new class, I'm going to demystify
and teach you what painting from light
to dark really means. That it isn't as scary and
intimidating as it might seem. That masking fluid will play a major role as a
tool to take away the fear of making mistakes and set the focus on
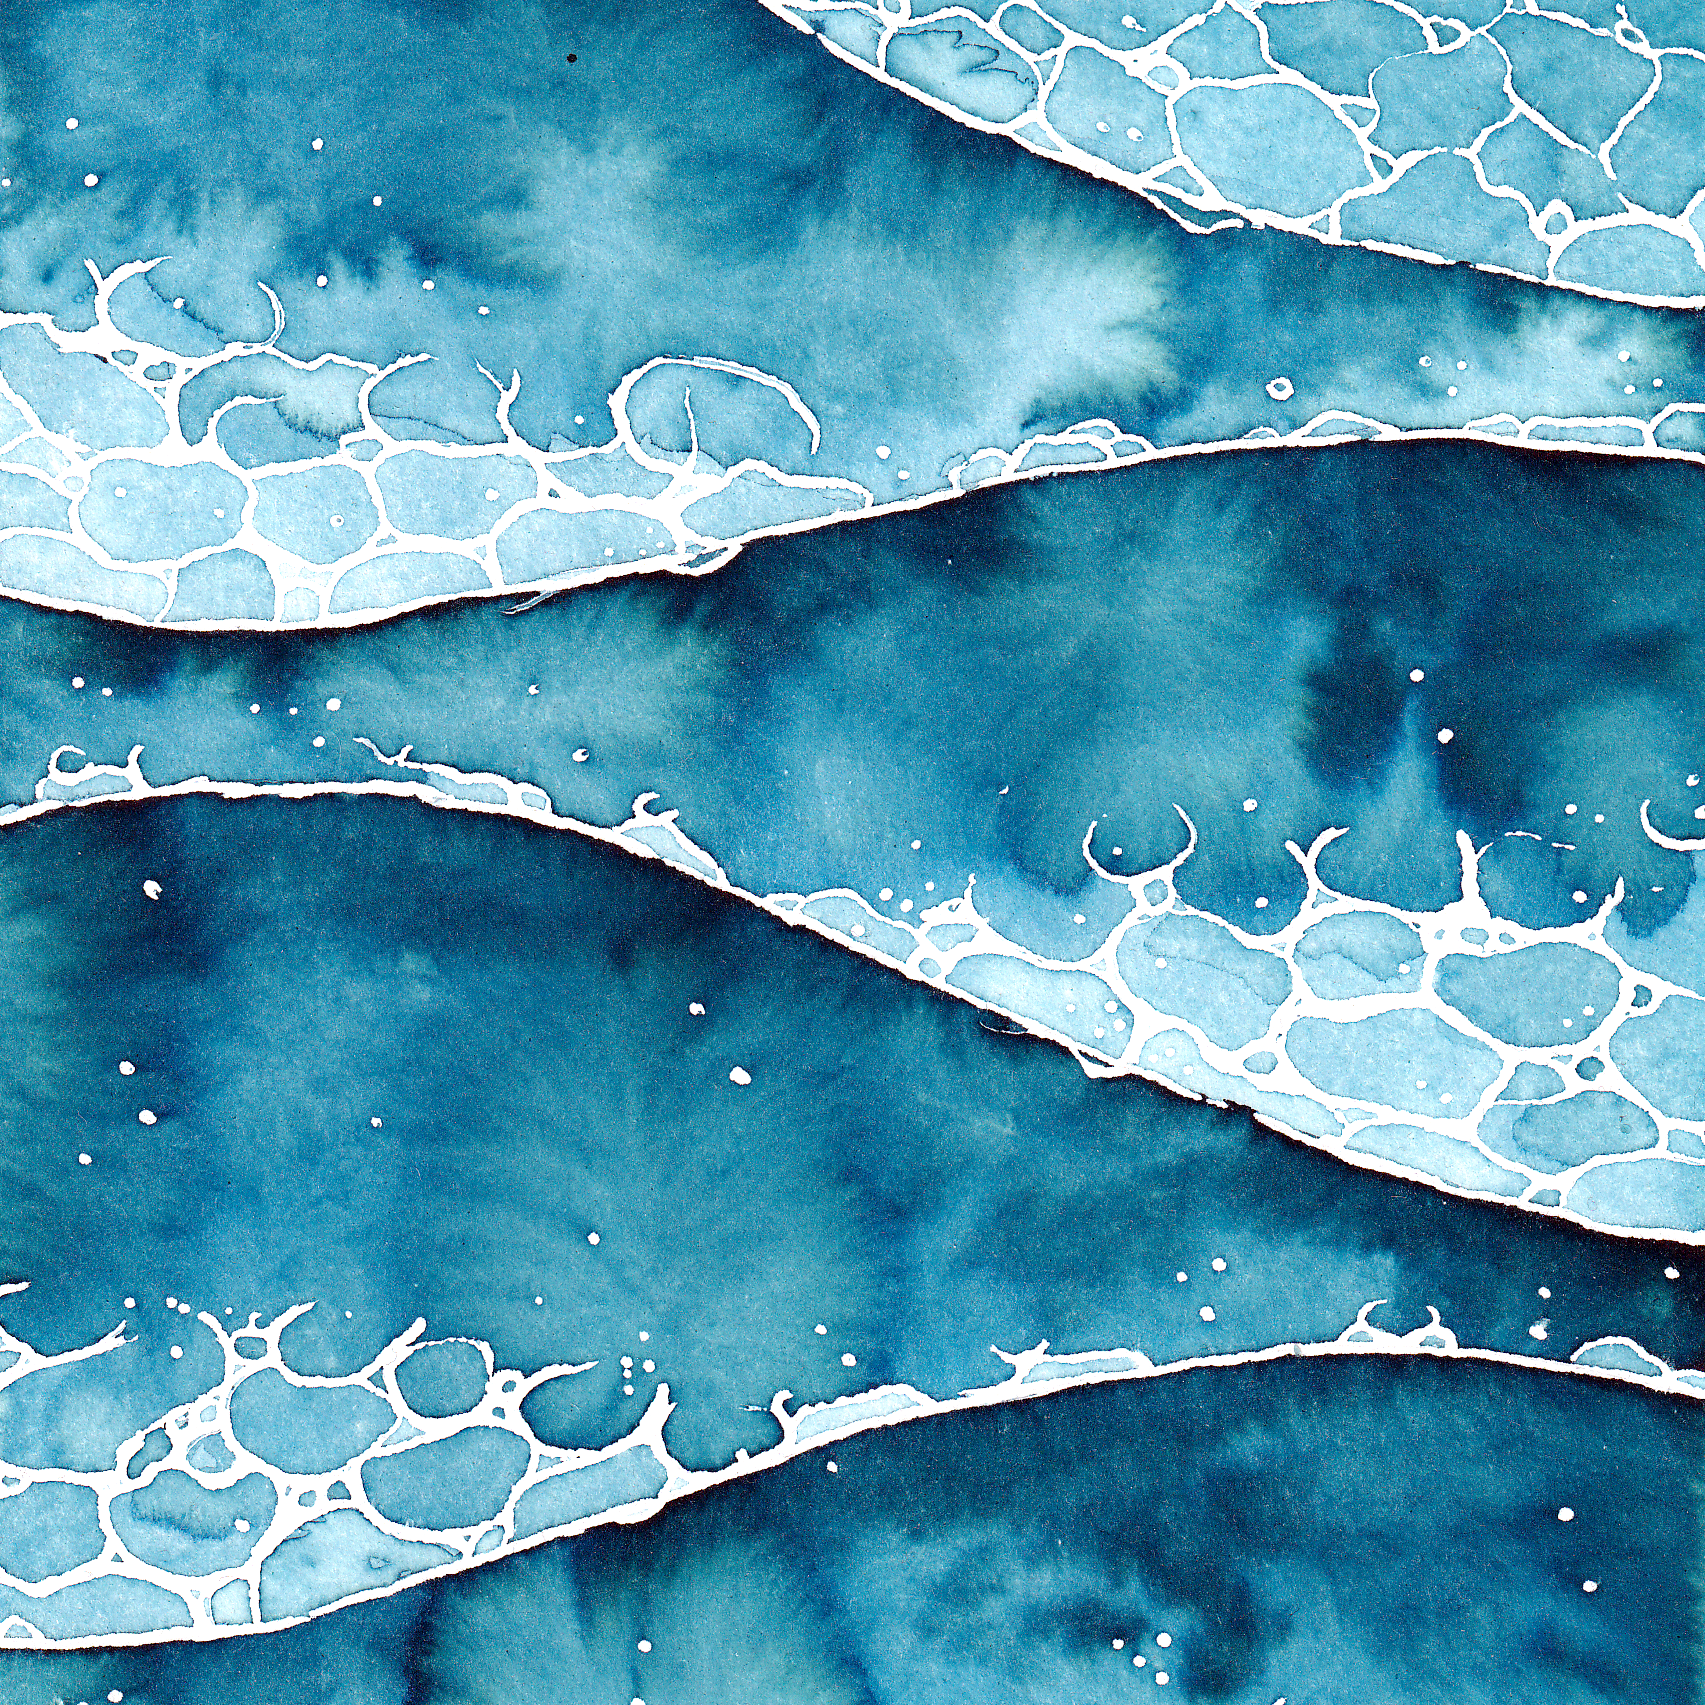
painting freely. We are going to paint the ocean from two different perspectives. First, you will get
to practice using your masking fluid by painting foam on breaking ocean waves. Then when you've got
a feeling for it, we'll dive deeper and learn
how to effectively paint from light to dark by exploring some peacefully
floating moon jellies. Additionally, I'll
share my tips and best practices on materials and how to create depth
in your paintings without complicated
lessons on perspective. And are you hooked? Great. Let's dive in.
2. Your Class Project: For this class project, I invite you to paint
alongside with me. You can either copy my
process step-by-step, use my guidance as
loosely as you like or create something that looks entirely different
from what I do. It is fully up to you
and your skill level. You are welcome to paint and explore whatever pleases you. Make sure to document
your process. Beard with photos are in
notes so that you can share it later with me and fellow students of this class
in the project gallery. I cannot wait to see
what you're coming up with and read about your
experience with masking fluid. Especially want to
know if it helped you as greatly as it helped me. So let's talk a little about materials and then
get to painting.
3. Before We Start (Masking Fluid, Brushes, Paper): I hope you're already
hyped and ready to paint. But as I do and
all of my classes, I want to give you
some tips on materials and preparation practices
before starting. Let's begin with the star
of the show, masking fluid. If you have never
used it before, this section will spare
you the frustration that I encountered when
I started using it. There are of course, many brands of masking fluid. I only have tried the
pink ones so far, so I can't give
elaborate reviews, but I have tried different
kinds of masking fluid. My favorite art
supply store sells a transparent and a colored
type of masking fluid. Imagine it like this.
Masking fluid is basically liquid rubber that changes color when
it dries down. Much like wood glue does, transparent masking
fluid dries down. Well, that's transparent. Whereas the colored version, in my case, blue, dress down to be a
slightly darker shade, translucency blue shade. That makes sense. The letter is therefore easily identifiable on white paper, and I prefer the colored
kind for that exact reason. When I purchased masking
fluid for the first time, I bought it in a glass vial. Don't do that unless
you are planning on using a lot of it in
a short amount of time. The problem with the
whale is that it has to stay open the whole
time you are using it. This exposes the
liquid rubber to air and makes it
dry out very fast. It also reacts with daylight, which it is easily exposed
to it in a glass fail, I had to throw away my masking
fluid because it turns stringy and wasn't usable for
my detailed work anymore. There was a shame because
even though it is affordable, it isn't cheap, especially not when you only
can use half of it. To avoid this, I tried out
the packaging that looks like a thick pen tool
to game changer. You can either use it like a pen and cover large
areas at onetime. Oral squeeze tiny bit on a scrap piece of paper
and dip your brush in it. The rubber isn't drying up in this container as fast as
it did in the glass veil. And it's also less exposed to sunlight since I store it nip up between other pens
now onto brushes. Have you ever had chewing
gum stuck in your hair? Yeah. Disgusting, right? Unfortunately, that's
exactly what happens to your brushes when you use
them with masking fluid. At the beginning, I used
old brushes that I had leftover from school
from ten years ago. I have them all in this old box. And let me tell you, I've been in need for an old disposable brush more often than I would
have ever imagined. Although bristle brushes were
fine with masking fluid, they clump up very fast
and make it difficult to mask a tiny little
details on your paintings. It helps to wipe them on
tissue from time to time, but sooner or later
the bristles will be so gummed up that you have
to throw away your brush. I found a better solution. Not long ago I purchased
this little silicon brush. Well, it's not a brush
and common sense, but it has the same purpose. It is basically a small
cone-shaped piece of silicon on a brush, and I use it for masking fluid only and it has never failed me. The fine tip allows me to
mask fine lines and dots. And the cone is suitable for
larger areas of my painting. It is easy to clean
while it's still wet and even easier when the
rubber has dried down. If you don't have
all the brushes nor want to purchase
a silicon one, toothpick will do two. It's great for small
lines and details, but be warned, using a small wooden stick
will take forever. Now some words on paper. If you've seen my other
watercolor classes, I already talked a bunch about
different kinds of paper. This time, I will boil it
down to the essentials. The only thing that
is important for this class is that your
paper is suitable for water. And by that, I
mean, a lot of it. The best choice would be any mixed media or
watercolor paper that has at least 300 grams per
square meter or a 140 LB. This is important
because paper that isn't thick enough
or has some kind of coating will either
dry too fast or never rip apart or
wavelike crazy. Also, although masking fluid is designed to be
removable easily, make sure to test
it on a scrap piece of your paper before
you start painting. You really don't want to ruin
your creation afterwards. As for paints, you can use whatever watercolors
or ink you have. I own some professional
watercolors, but for this class, I'm sticking with
my trustee Holober and cleaner Skype Tinder and
my favorite shade of blue. That concludes all I wanted
to say about materials. So let's start painting. Shall we?
4. Work Station & Sketch: Okay, so before we
start sketching, I'd thought I'd give you a quick tour of my
working station here. First, I have my glass of
brushes for watercolors. I use big and fluffy brushes which can hold a lot of water. Then I have two
water containers. One of them will be for
washing out the brushes and the other one will
be two, dilute my inks. This is my painting towel. I use this for
wiping my brush is clean and storing them
in-between usage. Then I have this little pipette. This comes in handy
to get the ink out of the veil because I don't like to get in there with my brushes. It's too dangerous to
tip over the whale, so it's easier with the pipette. And I also use it to
dilute the ink with water. Here, my silicon brush and my
masking fluid pen, my ink. I'm using the var and
Klinger five of five. I have two vials of this ink because one of them is almost empty and I just love this color so much
that I repurchase it. This is my little mixing pellet, although I'm not going to mix
any colors for this class, I will use this to dilute
my paints because for obvious reason I wouldn't do that in the variable directly. And lastly, my scrap piece
of paper which I will use to test the dilution state of my ink and also put
my masking fluid on. And then of course,
I have my paper which I taped down to the table. This not only prevents
the paper from like moving around and moving
out of the frame, which is particularly important for me because I'm
filming this class. But also it keeps
the paper flat. It doesn't wave as
much and it gives your painting a crisp white
frame in the end. For this class, I'm using the
Honolulu Britannia paper, which has 300 grams
per square meter. And this also hot pressed. That means that it doesn't have any structure for this lesson. And to get a feeling
for your masking fluid, how it behaves and how you can make details
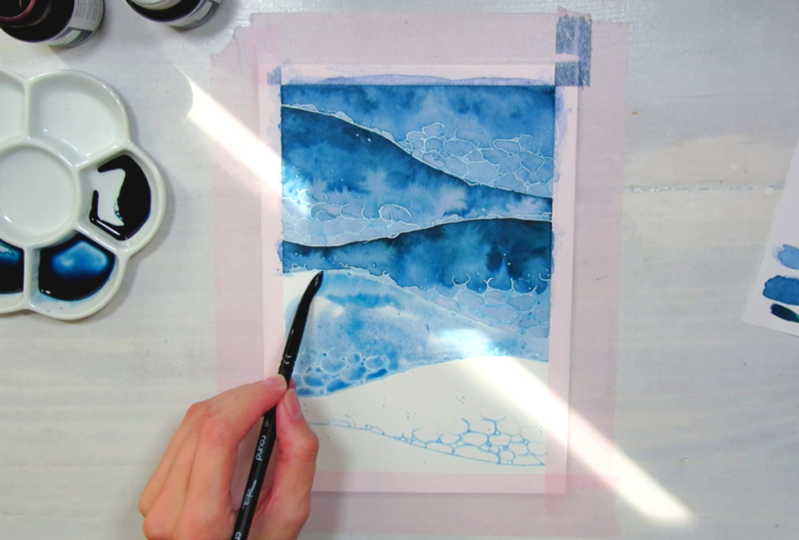
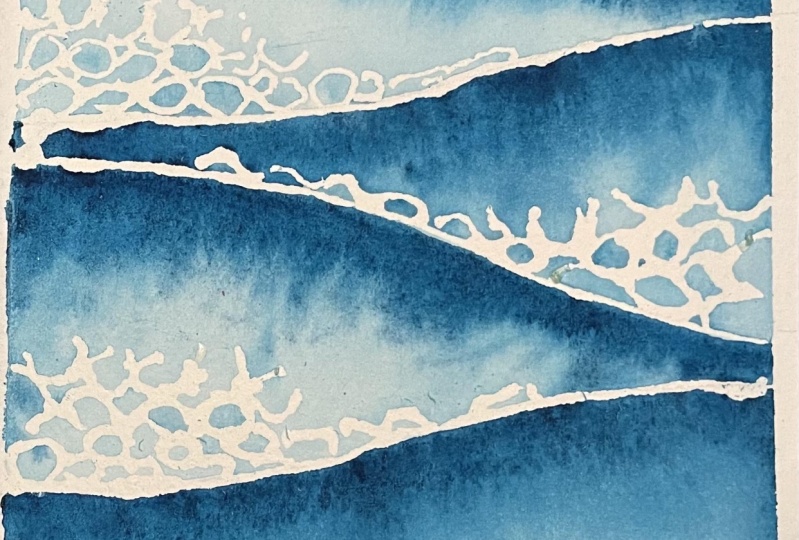
or bigger areas. We're going to paint ocean waves from a
bird's perspective. I actually painted this
already last year. That's the painting. Last year I did the foam of
the waves with a gel pen, which worked out fine. But this time I want to
try it with masking fluid. And since this is a very
easy to achieve motive, you can't really
do anything wrong. And it's a great
opportunity to learn how your masking fluid
behaves on the paper. But before we start
the masking fluid, I'm going to sketch out these wave shapes beforehand because I'm an
anxious painter and I like a bit of guidance
from pencils. So let's do this. I'm putting down the lines
really lightly here. That's it for the sketch. Of course, you can sketch out the phone lines here as well, but I will do this spontaneously with the masking
fluid in the next lesson. So let's do this, right.
5. Masking Fluid Exercise: The stick container of
masking fluid that I have here invites to just use it as it is
because it has a tip. This method is great for
covering larger areas. But if you want to do
more detailed work, I would advise you to use
this scrap piece of paper. And what I do is I put a small
blob like hazelnut sized, Not even hey, isn't that size
on it and use it as such. So I get the masking fluid
from the scrap paper onto my silicone brush and then start using and
painting with it. I put it on the right side of my paper because I'm a lefty so I don't want to accidentally
dip my hand in it. And with that, I'm now going to start making the foam patterns. Also, I'm working here from right to the left
because I'm a lefty. As I said. As you might know from my
former watercolor class, I'm going to speed
up some parts of these paintings
just for the sake of not wasting your time. So this won't be a
real-time painting lesson that I think that's
not a problem at all. Foam patterns are pretty easy to achieve
because they are like round shapes that are connected with each other through like small little blobs. Also about masking fluid. The thinner the masking fluid, the quicker it will dry. Obviously, that also,
the thicker it gets, the more frayed the
outlines are later. For this particular motif, it doesn't really
matter because we don't want a clean cut
outline for anything. But if you're masking something that needs
clean outlines, you have to be aware of that. Also, as you can see here, I'm not minding having gaps in between my
lines that I do. That's also the beauty of
this motif of ocean waves. No matter what you do, it will look like
foam in the end. There are, aren't really
thinks you can do wrong. When your brush or the silicon
tip that you have here starts to clump up because the masking fluid,
it's drying rounded. I tend to take my scrap piece of paper
and just wipe it clean on there so that I have a
fresh tip to work with. Also, of course, blob of masking fluid you have on
your scrap piece of paper will dry eventually. So I'm dipping in the
middle of it because it will dry first on the edges, on the not so thick parts. If that's the case, then use another blob
of masking fluid. And if you find that dries
too quickly for your liking, then you might work faster or choose a small head blob of masking fluid
for the next time. So you can see I'm
starting to fade out the foam patterns
here in the end. Because of this part
here is where the waves broke and here's where
the foam already receded. You can also fill in some of the smaller gaps between
the foam bubbles. This will give you great and
realistic effect in the end. A problem I have is
that I tend to make these bubbles very systematically
and it will look too. Yeah, How do I call
it unreal and staged? That the right word to
artificial in the end. So I have to let
loose a little more. Nice touch is also to add
some droplets in-between. Some random dots masking fluid. If you're putting down very thin lines or
areas of masking fluid, be aware that it will be
likely that you will move it or remove it with
your brush later. So especially with small
droplets like I did here, you have to be very, very
careful when you over painted. So you can't just go in there and rub your brush over
it because that will remove the small little details just so you're aware of this. Okay, I think I'm done. Now, it is very crucial to let
everything dry completely. As I said, the
thicker the rubber, the longer it will take to dry. I wouldn't advise
a blow dryer here to quicken up the process
because this is rubber. Instead of drying, it
will heat up and it could damage the paper or like
color the paper permanently. And yeah, just let this
sit for some time. I mean, painting with wet
mediums is sitting and waiting half of the
time anyways, so yeah. Maybe go for a walk.
6. Painting The Waves One By One: The masking fluid is completely
dry when it has turned. This translucent,
blue or transparent depending on which kind
of masking fluid you use. You can test if it's dry with your finger and tap it slightly. And you will know when
it's dry, it's dry, bad when it's not
dry completely, it will feel a bit
mushy and sometimes also sticks to your finger. I like to test this on my scrap piece of
paper masking fluid. If this is dry, then you're painting is
definitely dry as well. Also, if you want to correct anything that you did here now, this is the time to do it. You can easily remove some of the lines that you
might not like. I will leave it like this. I won't correct anything. But, yeah, the
possibility is there. Now for the painting, although this lesson is
not necessarily about the light to dark concept
that I will teach you later. We can already
practiced a little. For my first coat of paint. I'm going to dilute
my ink a little bit. Because this ink is
very potent and I don't want the painting
to be super dark. Just to demonstrate this, I will show you how
dark this blue is. Diluted. Really dark. And I don't
want to start this dots. I'm going to dilute it a little. It's also good way to multiply the paint
your house to work with. The test. Dry, a little lighter and a little
bluer than it is here. When I first started
painting with this ink, I was a bit afraid
that it was too green, but it actually tries
down pretty blue. I think I wanted to do
alluded a little more just to be on the safe side. Yeah, that's great. So what I like to do is
to wet my paper first, especially when I'm painting
loosely patterns like this. And instead of wetting
all of my paper, I'm going with pattern
that I painted. Also, this is a great way to test how much
pressure you can apply on top of the masking
fluid without removing it. It feels weird to overpay and the masking
fluids since it's rubber and your brush
kinda sticks to it, but you will get used
to It's also made, makes this squeaky sound
sometimes can then, right afterwards I'm
going in with my ink. And I'm starting here. I will push the paint
to the top of my page. Because if you think about it, the part where the wave broke, the water isn't very deep. Further you go back, the water gets deeper and actually overdid it a
little with the water. You have too much water
on your painting. You can use a clean brush, wet it a little, and then soak up the
water from the pitch. C, I'm pushing the
darker pigments back to the top of my painting. Now. Wet, I'm going in with a less diluted
version of my ink and put the darker color
just here on top so that it will bleed towards the not
so deep part of the way. Maybe I diluted the
ink little too much. Now let's actually working. And just like that, I decided to go in with an diluted ink, put in these little droplets just to give it a
bit more texture. Nice. I accidentally over
painted this part here. So what I did to not end
up with a harsh line, I took some clear water and try to dissolve the harsh
life I did there. This happens since this is just an exercise for getting used to painting
with masking fluid, it's not that bad. So with this, on the other hand, I don't want to
overpay the line. Very dark. That's also why I let the first wave dry before I started
painting the next one. Although the masking fluid works kind of like
a barrier here, I left some gaps here and there. And through those gaps, the paint would bleed through to the other wave and
S. I don't want it. Just realized that I
am very hypocritical because in the beginning
I said that I won't put my brush directly
into the ink veil. Now I did it for the first
part of this lesson. But now I'm very aware of that and put some diluted
ink into my mixing palette. Now, I let this dry completely. And then I'm going to
remove the masking fluid, which is the most exciting
process of it all, because only then I see
what I have created.
7. Removing The Rubber (Best Practices): So now that my painting
is completely dry, They are a few options on how to remove the masking fluid. The first one would
be to use an eraser. And you can do this
very carefully because you don't want
to damage your paper. This works fine. But to be honest, I'm not a huge fan
of the razor Method. I most of the time
just use my fingers. Like this. I said You
have to be careful, but you also have to use a
certain force to do this, otherwise, it wouldn't come off. So you need a bit of purchase. On the small edges. I have really dry hands
that aren't very oily. So that method with just my finger works actually
very fine for me. But if you're a person
with sweaty hands or oily fingers, by nature, you can also use
tissue wrappings around your finger
and do it like this. The only thing with the
tissue is that it will rip. Eventually, you have to
change your grip on it. That's basically it. The only thing that I
haven't figured out yet is how to get rid of all these small little pieces because they are kinda sticky. Behave like glitter. They are everywhere. What you can do is
take a dry brush, just use it like a broom
and clean up your painting. And that's it for your
masking fluid practice. I hope you got the feeling
for your masking fluid, how it behaves on your paper, how much you will need and
how you can remove it easily. So let's move on to some
more complex painting. Shall we?
8. Diving Deeper: Like I did in my other
watercolor classes. For this second demonstration, I'm going to dive
underneath the water. Okay. What do you have learned
until now is how your masking fluid works and how
it behaves on your paper. So using it won't bear
any surprises anymore. This risk is ticked off. So we can move on to some
more complex things. The motif that I'm
going to paint for this demonstration requires
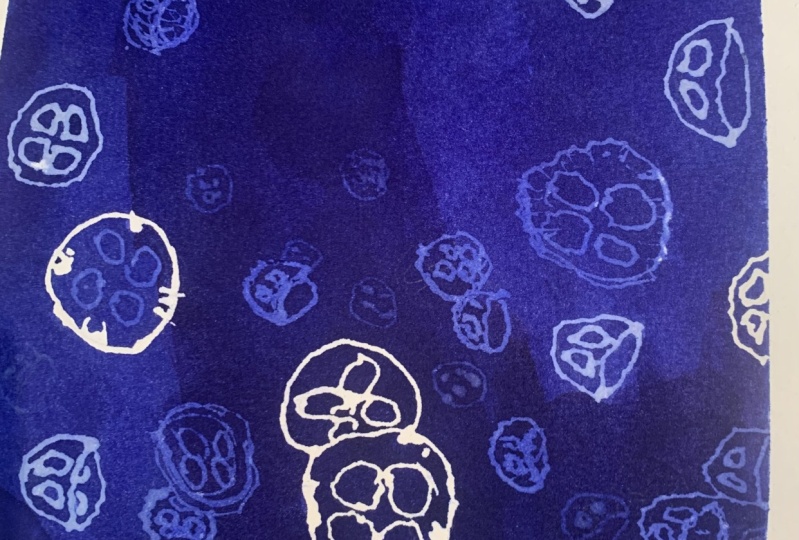
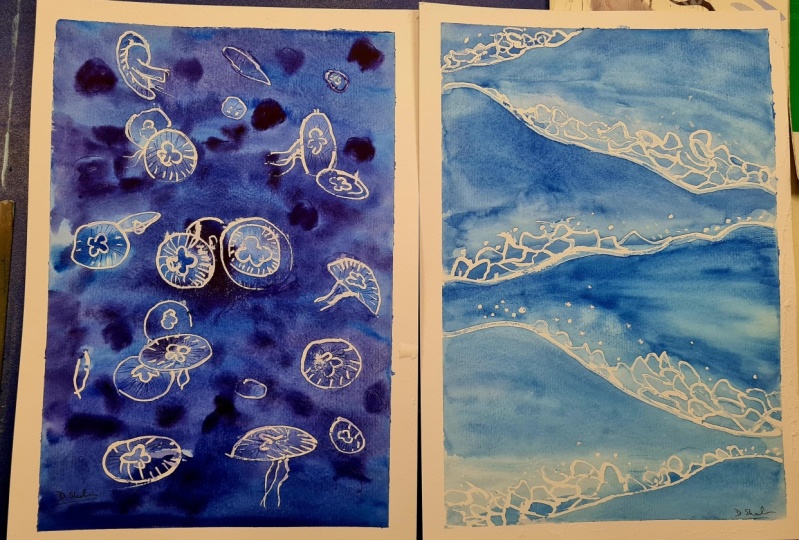
some more planning, but not too much, don't worry. Actually. I have painted this motif
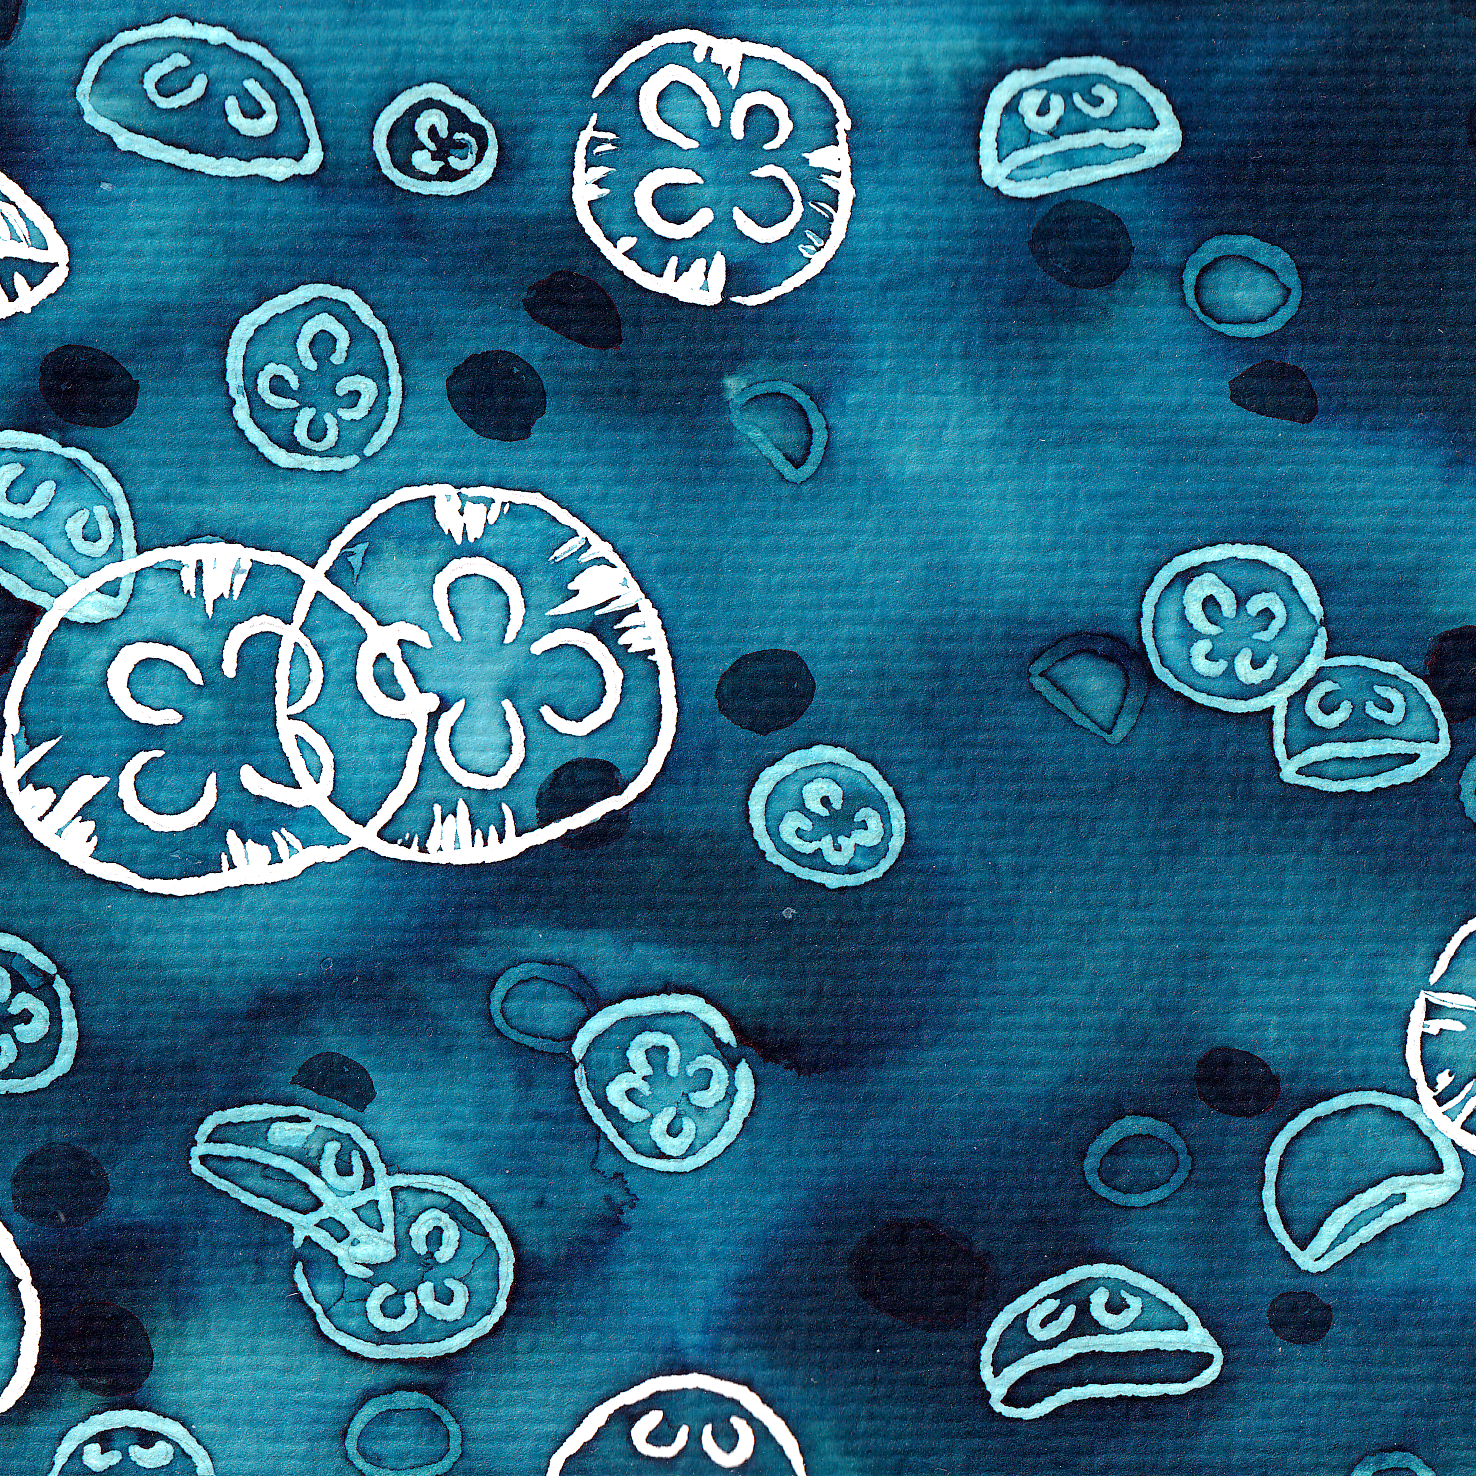
several times already. It's going to be this peaceful floating
moon jelly painting. And as you can see, the result will be quite dark. This is the result of, I think, five or more layers of ink in different stages of dilution. And this is the
essential light to dark method that every watercolor tutorial
is talking about. But let's start at the
beginning, shall we? I will start out
with a light sketch. As always, you can
skip if you like. But as I said multiple
times during this class, I'm an anxious painter. So I like to have
some pencil guidance. I'm starting out with big
round ish, moon jellies. They are really easy to
draw because they are just circles with small, not finished circles
inside of them. I'm pretty sure that the
name moon jelly comes from those unfinished crescent moon like circles inside of them. In German, they
are called colon. Colon, which translates
directly to ear jellyfish. Because those unfinished
circles look like little ears. You can, of course use
reference pictures. I bet pinterest
has a lot of them. I actually live near
the Baltic Coast, So moon jelly are
quite common here, and I already filmed
them a whole lot. They look so peaceful
when they float. But they don't feel really nice. Whales swimming because
they're all squishy. As I'm sketching them out, I try to make them
flow randomly, which isn't that easy
because my brain always tries to draw patterns. I'm trying to focus a cluster of jellyfish
on this side of the page and then
let the numbers fade out towards this side. Also, this painting
is going to have way more depth than the
waves painting. We are looking at a
three-dimensional space on a two-dimensional surface. And so to create
this death and to create the illusion of
three-dimensional space, the jellyfish
overlap each other. The sizes are varying because some of them are
bigger than others, but also the size
of them varies, which creates the illusion
that some of them are far behind and some of them
are nearer to the eye. So you can really go
wild with the sizes and shapes like overlapping
of individual jellies. This is also going to be a great exercise
for creating depth, as I said, because there's no complicated
perspective needed. Like you do need when you are drawing a room
or something like that. Because it's water, it's just round shapes and
darker and lighter spaces. Yeah. I guess that's it. When your sketch is finished, take a photo of it
with your phone. Why? I'll explain in just a second.
9. Masking in Stages: Once you've taken a
photo of your sketch, you can continue with
your masking fluid. I will start with the
jellyfish in the foreground. So these are the
biggest and most visible to the eye
of the onlooker. And yeah, so they will
be the brightest. Again, as a lefty, I'm working my way from the right to the left
side of my painting, like I did with the
foam of the waves. I'm not doing this
very precisely. I leave some gaps. I make some thick and
some thinner lines just to make it seem
really organic. And also a little abstract. I want outline every single
jellyfish I sketched here. Because since I want to create the illusion of a
three-dimensional space, I'm going to paint these
jellies gradually. The further away the jellies, the darker they get. So it is necessary to over paint some of
the sketch jellies. And at some point you
won't be able to see your sketch anymore because
the ink can get quite dark. And that's why we took a photo of it so we can
reference it later. If necessary. My masking fluid has already
dried up quite a bit. It's very hot in here today. That's why I'm working
with small amounts, so I don't have too much waste. Since jellyfish are translucent. I'm going to let
them overlap that you can see the outlines
of the one that is behind the other one through the one that is
more in the foreground. If that makes sense. Painting in some
of these lines to indicate that they are
dome-shaped and not just flat. So these parts will
stay widen the end. Okay, I guess that's it. For the most prominent. Shelley's in the foreground. I would let this
dry completely and then go in with the
first layer of ink.
10. Painting Light to Dark: Okay, so finally some proper
light to dark action. I'm going to start out, it has, the method suggests
very lightly, so I'm going to dilute
my ink or whole lot. That's really, really light. I think I'm not going
to start that light. So I'm adding a little
bit more of my ink. Doesn't see much darker. Well, at least darker
than this one. And what I realized here is
when a diluted too much, then the pink and
purple pigments of my ink come through
a little too strong. So this is better. I think that's what
we can start with. S I did. And many other
watercolor paintings. I'm going to wet my paper
first very carefully. I'm trying wet the paper but not make it like
really, really moist. I don't want puddles to form. So then I take another brush and go over it
with my first coat of paint. For this layer, I'm using
this square brush because I don't want to put in
much texture just now. I just want to have my first
layer of color, so to speak. And y naught. I'm going in with
this fluffy brush and already add some speckles of
darker paint here and there. As you can see, it's still
the same color that I mixed, the same grade of
dilution of my ink, layering it also darkens it. Okay. I think that is all that my paper
can hold right now. So I'm going to let
this dry completely and then go in with another
layer of masking fluid? Yes. You can use
masking fluid on already painted paper provided that your painting
is completely dry, otherwise, the masking
fluid will rip it part. Since my first code
of ink is very light, I can still see my sketch. So I'm going to outline the leftover jellies
that I sketched out. If you started out a
little darker than I did, You might not see your
sketch anymore and that's where you can
look at your photo. Okay. All the masking
fluid has dried. I will now go in with the
second layer of link. Link of ink. Slightly less diluted. So I'm going to add more ink
to my mixing pellet here. For the second layer of ink, I'm trying not to over paint
everything completely. I want to keep the big jellyfish in the
foreground quite light, so I'm trying to surround them. But if I'm going in like this, the ink will leave
very harsh edges. So I'm interchanging with water and add some of the undiluted or less diluted
in here and there, but also mix it with
water here and there. So I get these pretty paint
blotches. I would call them. You have to work
rather quickly so the harsh edges aren't dry before you could
blend them with water. Now the whole paper
is wet again. And now I can go in
with ink and add some deeper parts
here and there. Just as I did with the
first layer of ink. I don't really care about these
puddles that formed here. I quite like the effect for the result that
I'm going for. So yeah. That's the second
layer of paint. Ok. That dried beautifully. I really like how the dark ink bloomed here and how
it lightened up here. And there's a pretty
hard edge here, but I think I can resolve that
with the next layer of paint. But now I'm going to go
for last round of masking fluid and add just a
few more jellyfish. So it will also be very, very small because they
are very far away. You can't really see their
moon shapes anymore. You can repeat this step
as often as you like and as many layers as
you would like to paint. And of course, as many layers
as your paper can take. I think it was going to be one diluted ink layer and then I will go in
with an diluted ink. And that will be it. Another thing that I
learned with masking fluid is that you don't want to leave it on the paper for
too long, unnecessarily. So I did some
paintings where I left it on overnight and it was fine. But on other papers and other
paintings that wasn't fine. And the masking fluid had
mixed in with the paper. And I destroyed my painting
after I tried to remove it. Since I don't want these to be as dark as this
one, for example. I'm taking a lot of water, wetting it and then just try to get some of the darker
ink from the outside, inside of the masking
fluid barrier and that should work out fine. Add some splotches
here and there. This is a really loose form
of painting with watercolors. I do also stuff where
I have a lot of control over the pains that that is a topic
for another class. So this time, I won't
let this dry completely. And fact, I will go in with
an diluted ink right now. And I'm again a
hypocrite and will ditch my brush directly
into the veil just because I don't want this to
dry any further than adding. It's maybe not the best
brush for this one. When I'm adding these
really dark drops of inherent there was spread because the
paper is still wet. And it will give a really
cool effect later grade. And that was the
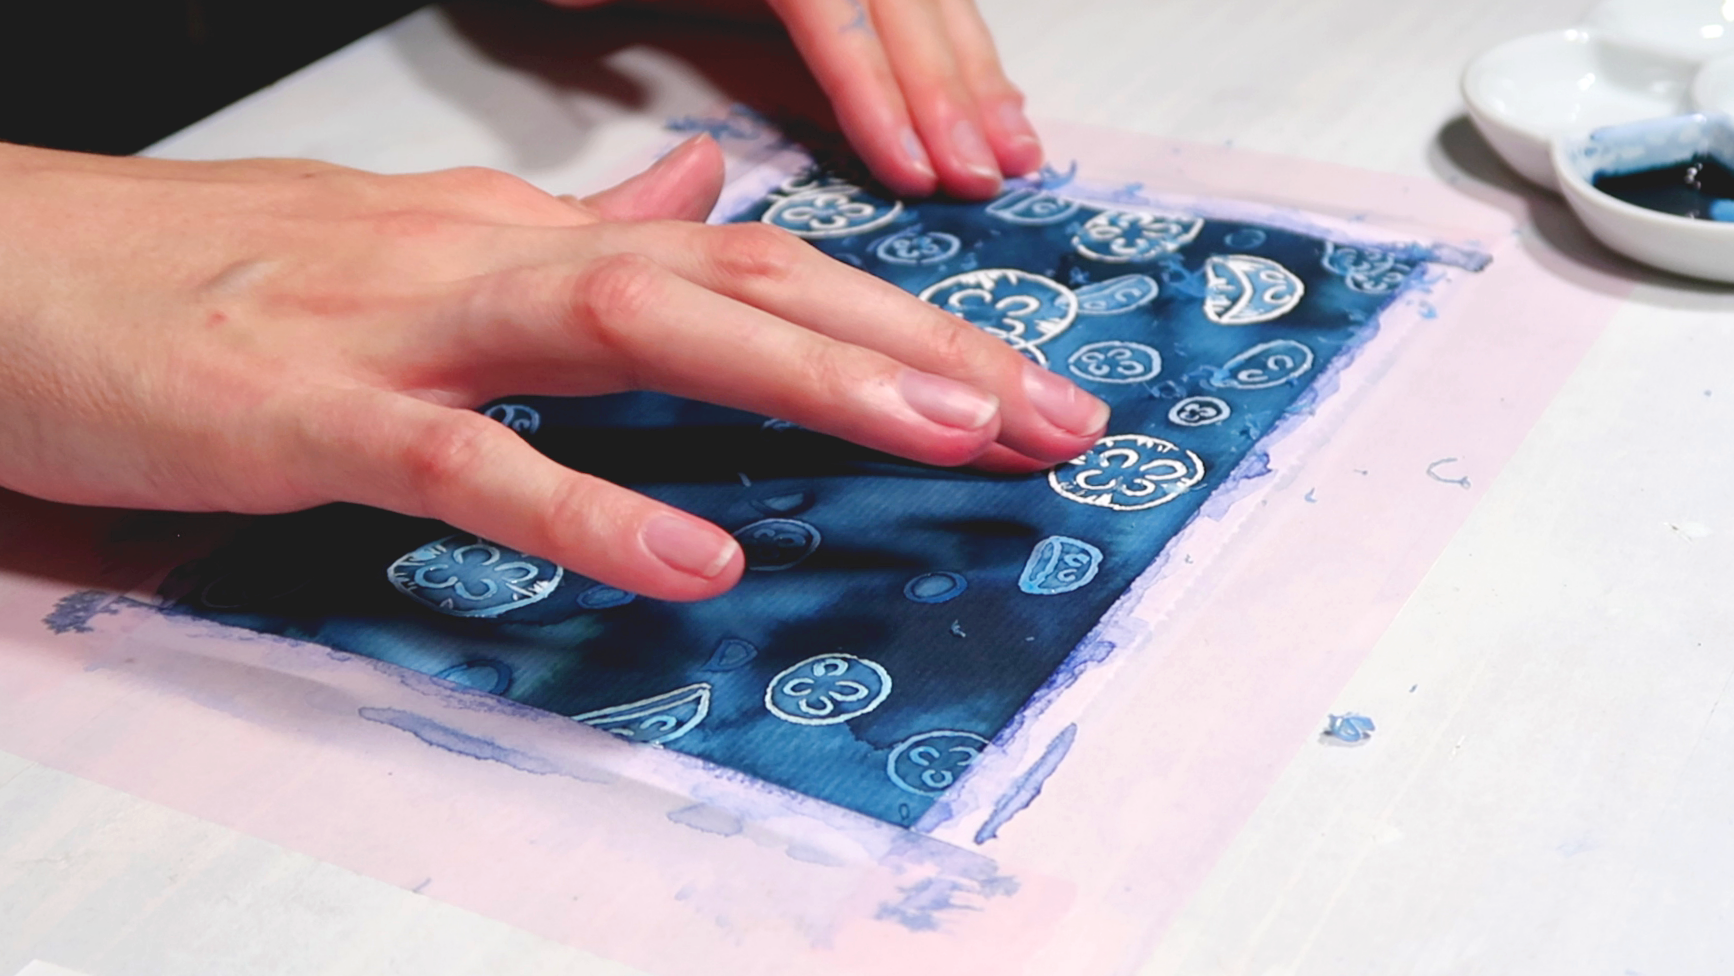
last painting step. When this is completely dry, I'm going to remove
the masking fluid. To remove the masking
fluid of this painting, I'm definitely going to use the tissue method since
it's very hot here. I'm a little sweaty. So let's start. You're going to do this
very carefully since I softened the paper a lot with all the layers of ink and water. So really don't want
to rip my paper. Especially on those
areas where I put the masking fluid on
already painted paper. Just realized that the
tissue method won't work over that long period. I'm trying to very
lightly with my fingers. I actually don't like going over painting with
my hands like this, but these small
bits, so annoying. This is actually done. Now, if you want it to be done, what I like to do is to
get a thin brush and paint some details just to create that teeny-tiny
bit more depth. And for that, I'm going
to go paint some really, really dark round shapes. Those are the jellyfish that
are way, way back there. Almost black. You could have done this before removing the
masking fluid, of course. But I like to add the details afterwards because
then I can see exactly how it will look like. I guess I'm done here. Let's remove the tape together. Shall we?
11. What Do You Think?: Now it is your turn. I cannot wait to see all your beautiful
creations with masking fluid and read about your process and
experiences with it. Also, if you have any
questions about this class, feel free to post them
in the discussions, and I'll definitely
get back to you. But before you go, please give
this class a good review. That not only helps
me as the creator, but also other fellow
watercolor enthusiast to find this class. Even a thank you for this
class in the common section, totally make my day. Make sure to follow me here on Skillshare for more
upcoming classes like this, or connect with me on my
social media channels. You can find me pretty much everywhere under my
name is Leah fovea. And lastly, thank you
for taking this class. I hope you learn something
new and had a good time. See you on my next one. Bye.
 Ellia Fabia, Artist, Illustrator & Content Creator