Transcripts
1. Introduction: Hello, I'm Leah fovea, Illustrator at which and treasure hunters from the Baltic Sea. Since I was a child, I've been a huge fan of enemy, starting with one piece to Detective Conan, to Sailor Moon and high Q. As of recently, I've seen them all and I loved them all. And I bet you who probably clicked on this class because of its title, share this law. So welcome to my class on animate. Last painting, I came across the glass painting trend on tiktok and to be honest, wasn't a big fan of it at first. Yeah, I love enemy, but what do I do with the color fully painted piece of glass in my house where my thoughts more or less, but then my sister begged me to paint one for her since she really likes the look of them. And I kinda fell in love with the craft. It's a fun and even meditative process which results in a unique piece of decoration or make a thoughtful gift for a fellow enemy, loving friend. And the best part, everyone can do it. It doesn't take any special talent or an artistic background. Just you, your hands a little bit of patience and taking the light and trying something new. In this class, you are going to learn which materials are the best, how to adjust your picture fitting for your glass sheet, how to pain sharp outlines and tiny details, as well as how to put paint down evenly for a clean and opaque result. Alongside the basics, I will share my tips and best practices on how to paint reverse and how to avoid or eventually correct mistakes. So let's start with a simple list of materials.
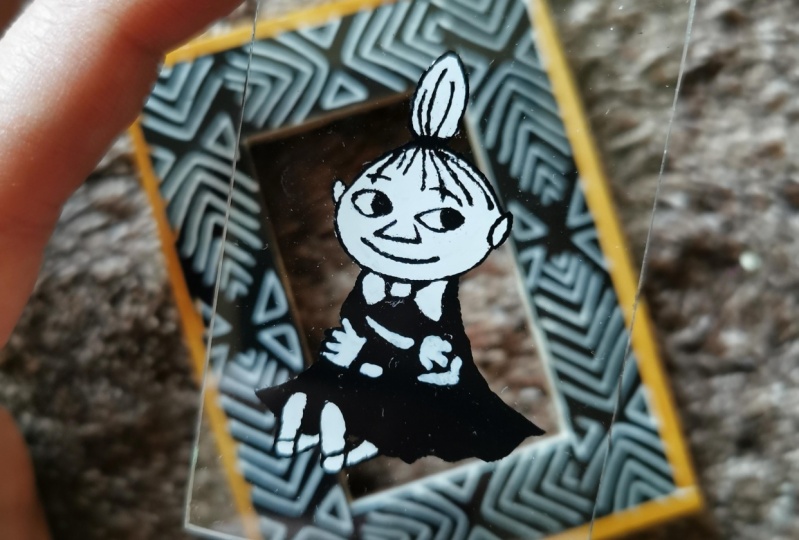
2. Materials: As for materials, you need the following and unused picture frame with a glass. When I moved in with my husband, we brought an ridiculous amount of picture frames into a household. Most of them rest in a box in our basement now. But from time to time, I get one of them out to paint their glass. If you don't have an unused picture frame, you can obviously by one. But I'm also reusing the stuff I already have. However, some frames don't have a glass, but some kind of acrylic sheet, those aren't really good to paint on, so make sure that you have one with real glass. As for the kind of frames, you have different options here. I prefer those which have the secure mechanism on the frame itself and not on the vacuum. Since I want the picture to be transparent later, I need the securing things on the frame to hold in the glass. Another variation is to put a bunch of manga penalty as background behind the glass. For those, you don't need any special frame at all. A printer, if you are confident in your painting skills, you won't need one. But for all of you, me included, who would like to trace their picture, you'll need a printer printer paper to print them, obviously, masking tape for securing the glass to the picture. I prefer masking tape because it doesn't leave any residue on the glass after removing it. The thinnest brush you can find, I'm a sucker for details. So I frequently get lost in the smallest lines when painting on glass. Therefore, you need a very small brush. My sister even paints with a toothpick to get the lines extra fine. A medium or a thicker brush. To fill your painting with color, you need a medium brush. I like to have something that is thick enough to put paint on, but also somewhat precise to not mess up the outlines. Acrylic paint, most enigmatic last painting that you will see and that I personally saw on the internet, screenshots from different shows and they are in color. Me personally, I don't really like these colorful pictures first because I don't want to have a bunch of different paints lying around. And second, I most often preferred the manga version of the characters anyways, so I'm going to show you how to paint monitor chromatically. But if you prefer the colored version, don't click away yet. The technique that I'm going to show you is the same, just black and gray. However, you need acrylic paints. Protein. They don't have to be expensive ones because for glass painting, it is rather quantity over quality, which you'll see later in the lesson about filling tissue paper or a painting cloth to wipe your brush in between.
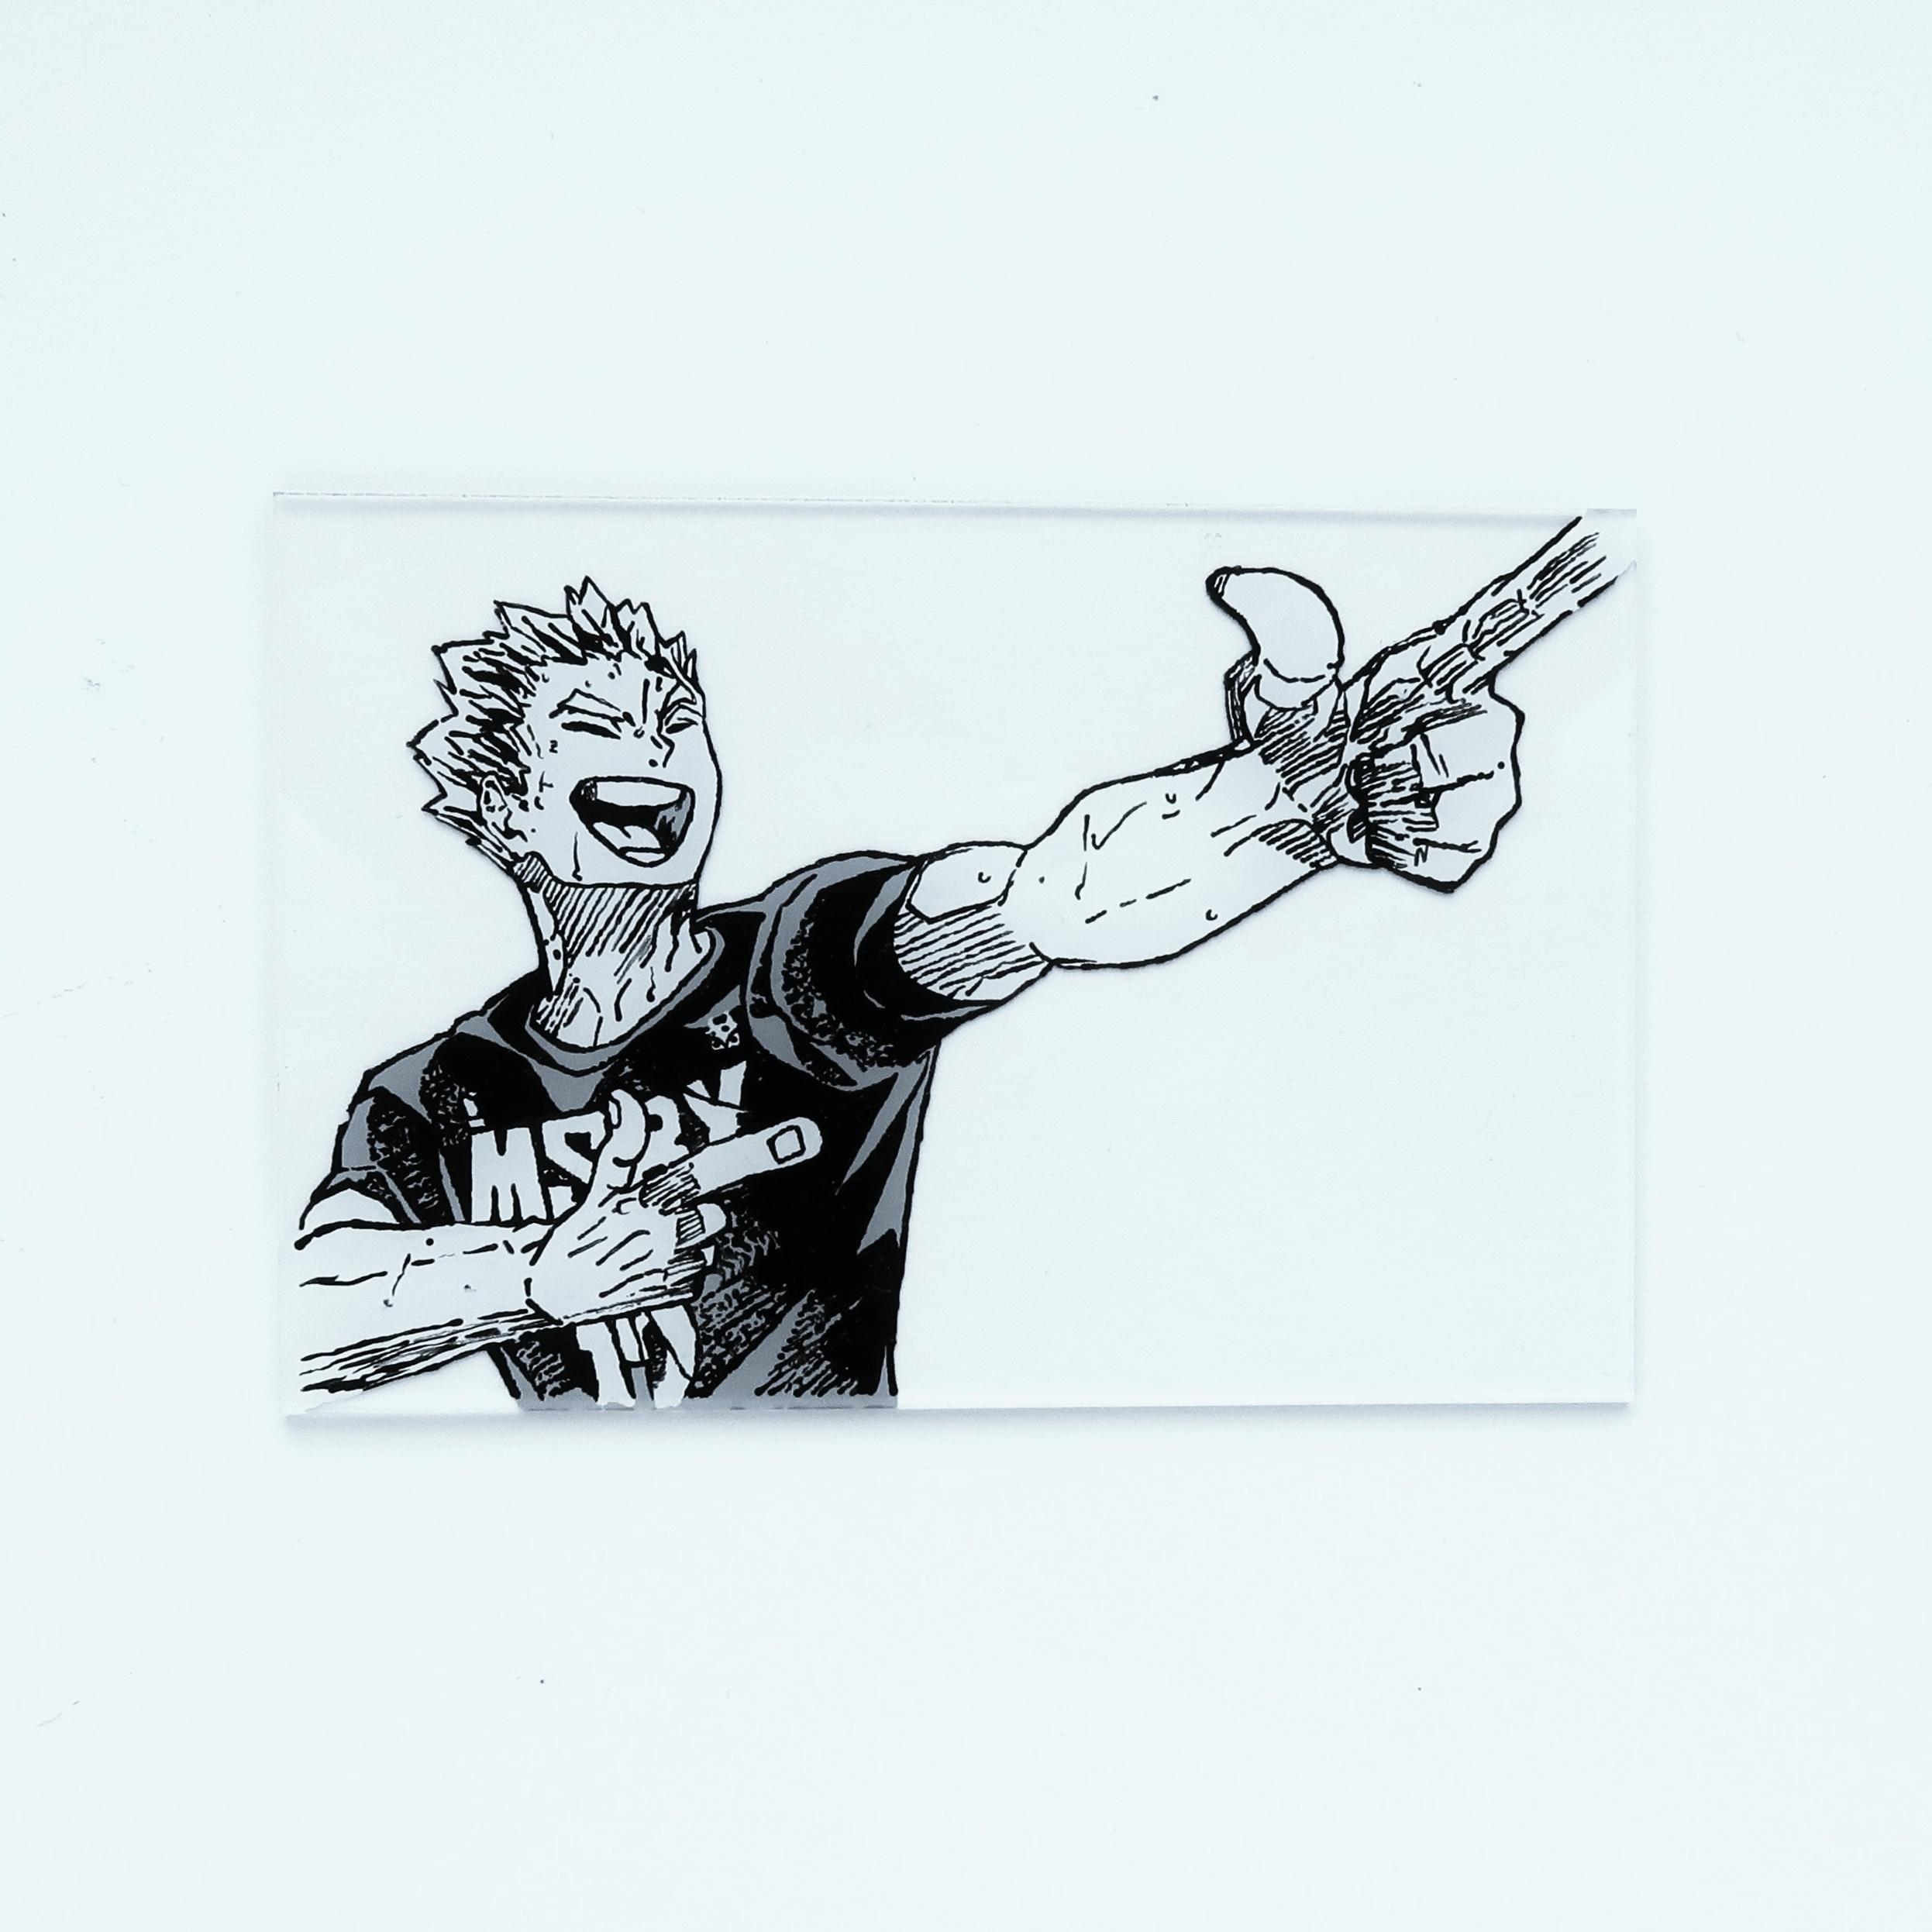
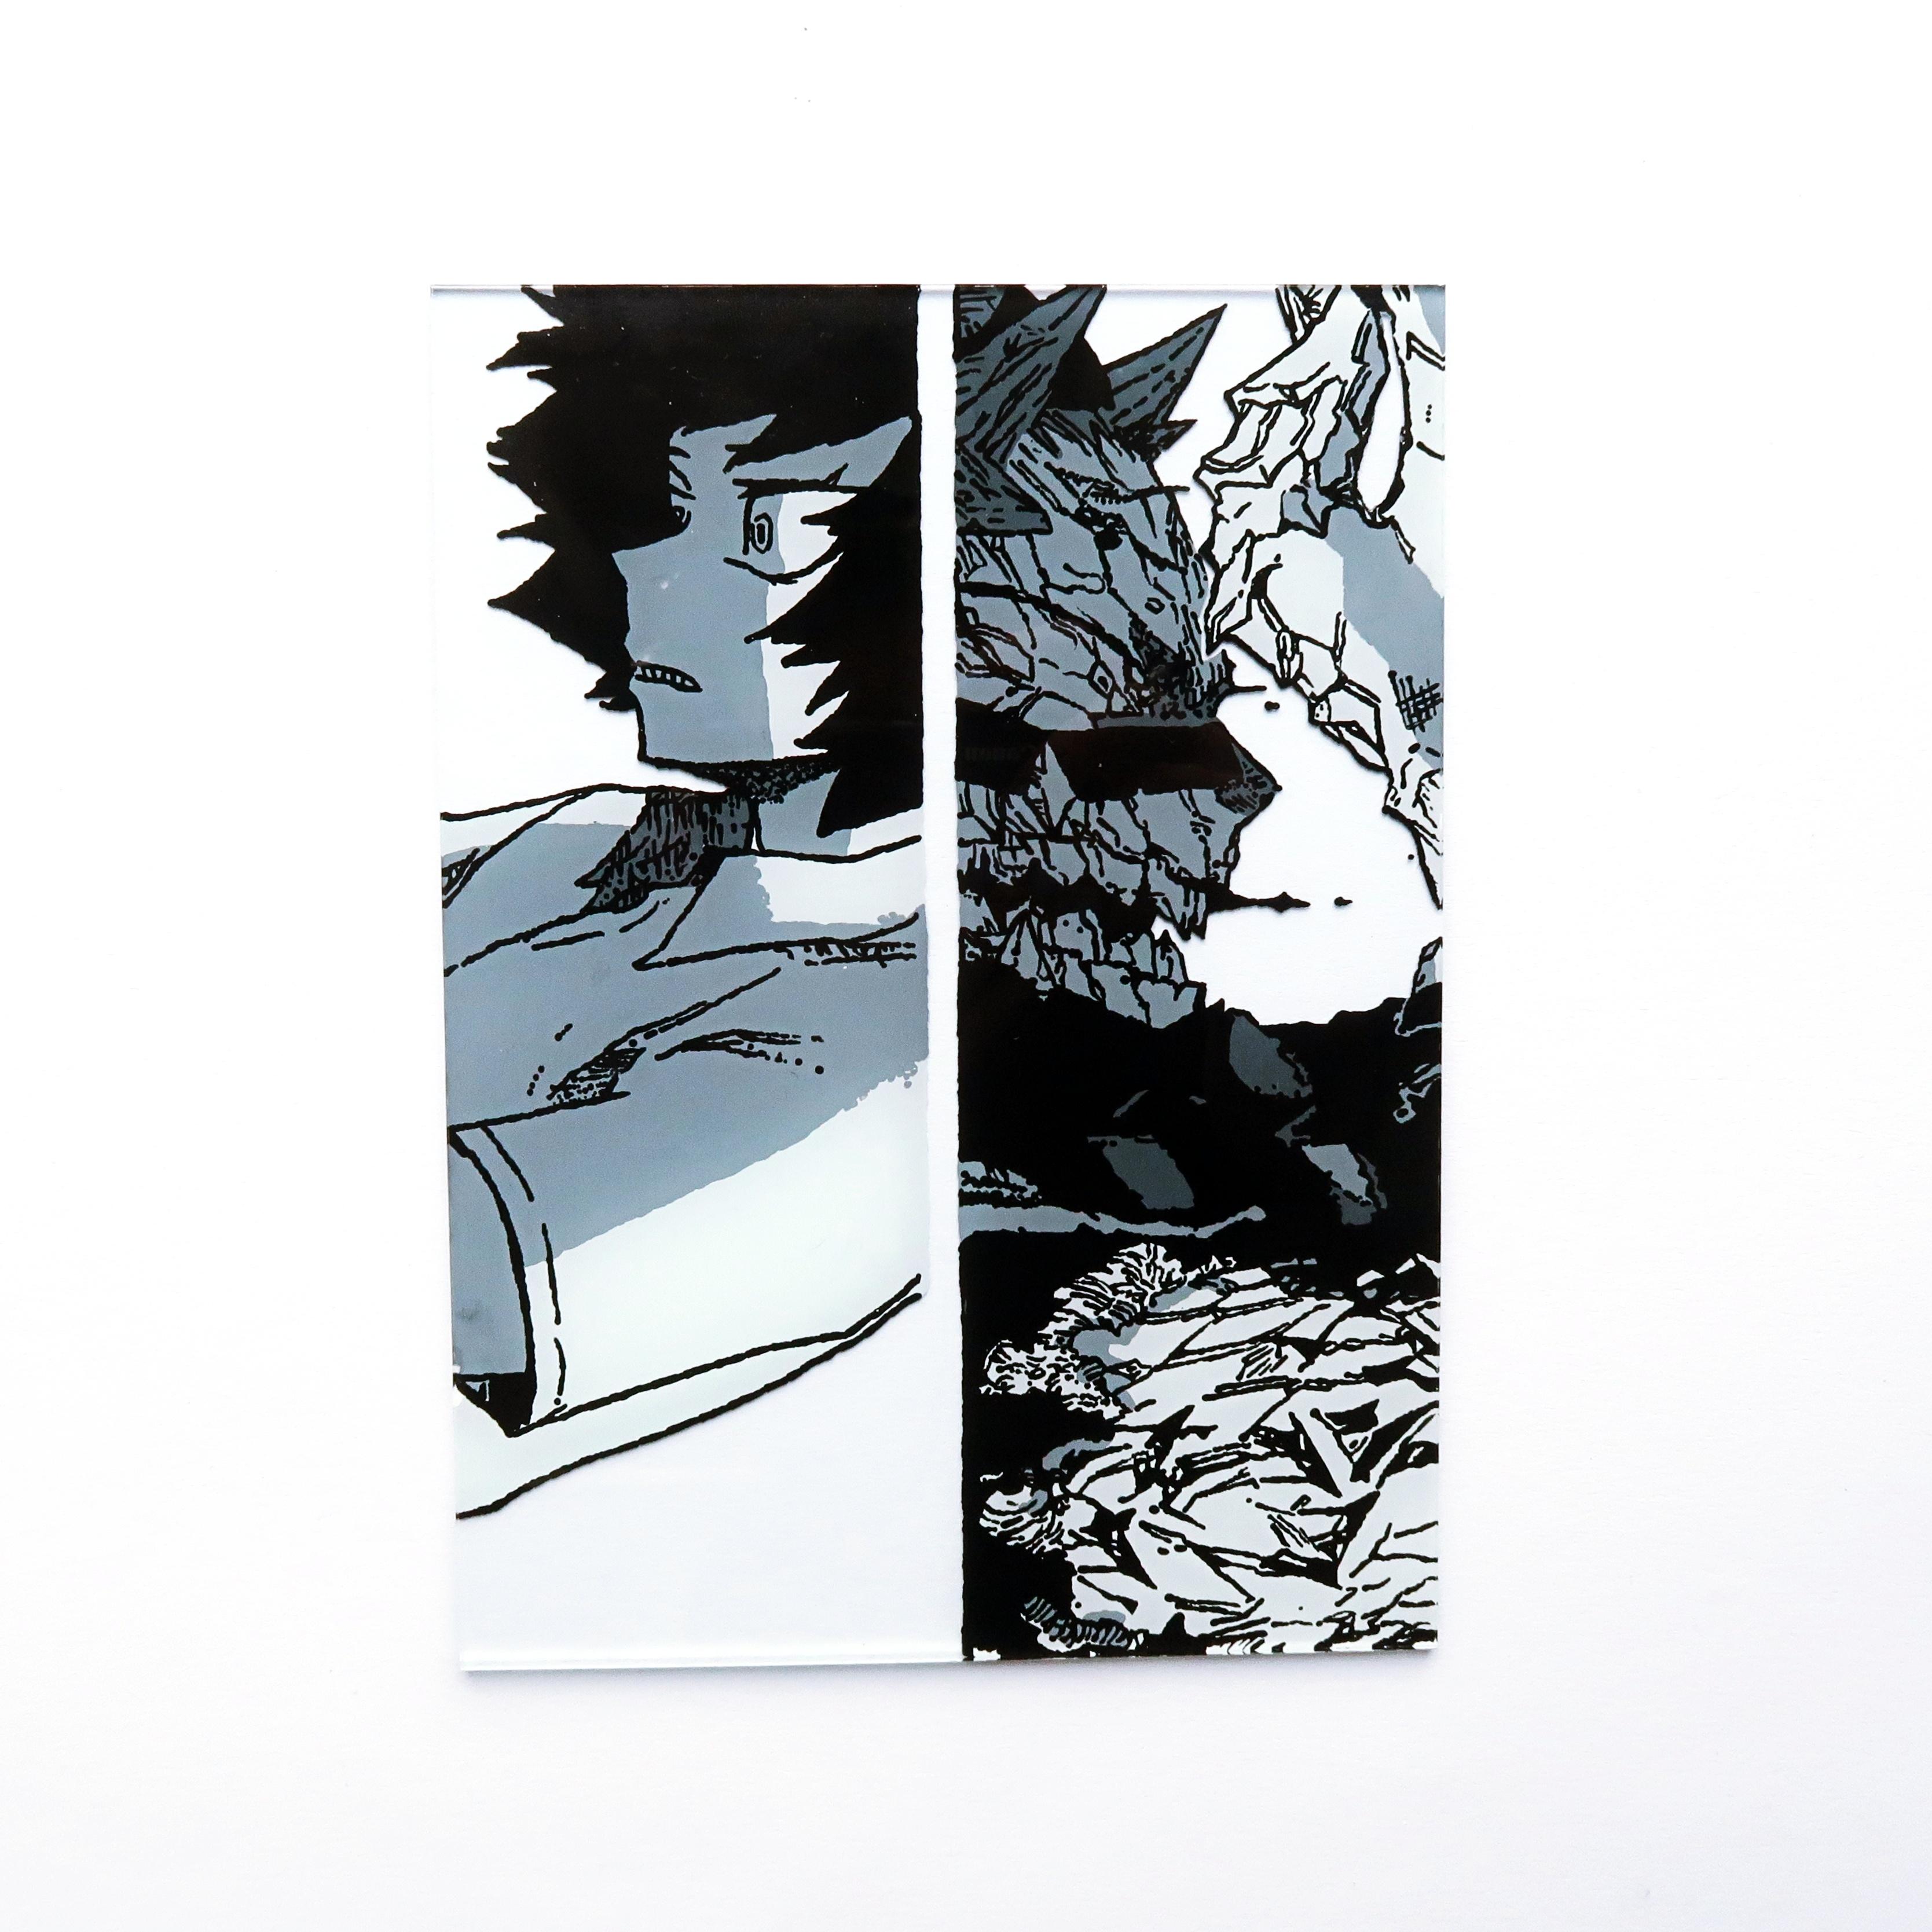
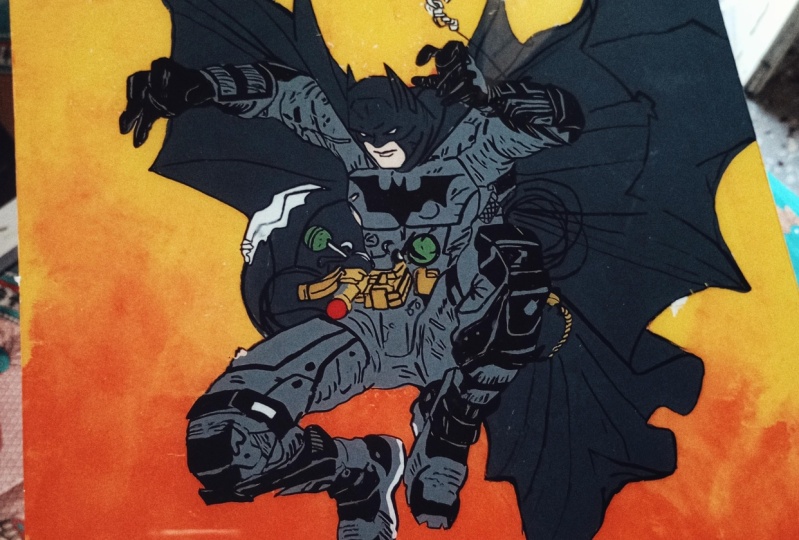
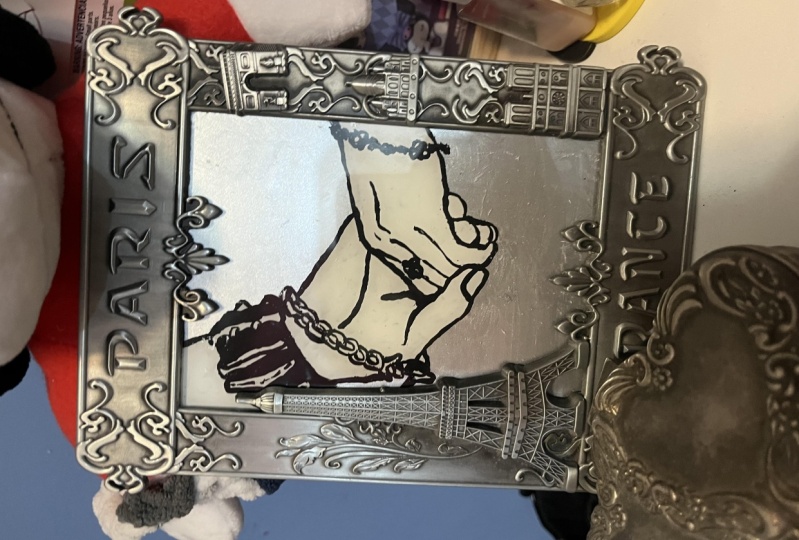
3. Picture Preparation: A little disclaimer before we start anime and manga glass painting is technically copying from another artist, since you're just putting a piece of glass on top of another artist's work and literally trace it. I have seen some people selling these glass paintings. What I personally don't like and won't encourage you to do yourself and to make last paintings, make great gifts for friends or family, or a unique declaration for your own home. And making this class to show you how easy it is and that you can do it easily yourself so you don't have to buy from people who try to make money off of other people's outward. I mean, you don't have to paint anime and manga characters and glass, obviously. Since I chose those pictures as an example for this class demonstration, I just wanted you to know my view on the whole topic, but now onto the actual thing. As I said in the class about materials, I like to paint monochromatic Manga pen has, since I personally find them very aesthetic and they're compatible with every style of interior design. And moreover, you have to buy less pains and don't have to worry about color matching anything. So the first step is to find a picture that you would like to paint on glass. This could be your favorite scene, your favorite character, or even a funny panel or screenshot. The most convenient choice would be a picture in which a character stands alone without any background, or at least a no interaction with the background so that they can be detached easily. Why no background? You ask, well, if you're planning to paint the whole picture than better do it on paper. The whole reason to paint on Glass is that parts of it should stay transparent, otherwise, it doesn't have any effect at all. I chose this picture of the three lead characters of the manga you to kaizen for the demonstration in this class, as you can see, it fulfills all the criteria. My favorite characters and a cool pose without any background, something you have to consider is your skill on painting. And if you want to put much or less effort in it, if it is your first time painting on glass, don't overwhelm yourself with this super detailed picture. The first time I painted one, I chose a huge glass and a rather tricky picture of total Rocky from my hero academia. This painting took me a whole week that I start with a smaller frame and a less detailed picture. When you have chosen your picture, you have to make some adjustments to it. The first thing is to measure the glass of your frame and adjust the size of your picture to that of your glass sheet. This can be done in every picture editing software of your choice. Keep in mind that your frame might cover some of the glass. So if you don't want your painting to be cut off, measure what will be visible in the end. Then, if you were painting monochromatic like I do, change up the contrast a little bit so that the different parts are easily distinguishable. And lastly, something you should definitely do mirror the image since you're painting reversed on glass, the picture will be mirrored in the end. So by mirroring it beforehand, you won't be surprised by a picture that doesn't look right. When you've done all this, print your picture. It might look a little wasteful at first, but it has a reason that I print my picture in the middle of the paper. The x's around it allows you to easily secured the glass with tape. Later, I shortly mentioned that you are going to paint reversed on glass. Let me explain further in the next lesson.
4. Painting Reversed: Glass painting is reverse painting. But what exactly does that mean when I'm painting on paper or digitally, I start with the sketch. Then I most often color everything in. I always leave the details for last. With glass painting, it's the total opposite. The picture that you are going to see later is basically on the opposite of the canvas. So you must pay the layer, which is normally the last 1 first. You're reversing the process of painting. That means you start with the outlines and the fine details and add the big colored spaces afterwards. And now that you know what painting reversed means, you can finally start.
5. Painting Preparation: Did I say that you can finally start now? I mean, well, you can, but I have some really good preparation tips for you. You shouldn't miss out on before you start clean the side of the glass which you are painting on with a soft cloth so you won't embed greasy fingerprints with acrylic paint that'll show later. It won't be possible to avoid fingerprints at all, but a nice wide beforehand doesn't hurt. Place your glass on the printed picture. If yours has a frame, it's easy to line it up. But if the character stand alone, like in my example, spend an extra minute to make sure that there are incentives. Then take out your tape and carefully secure the glass on the paper. Don't fold the tape over the edge of the glass. Rather put it down straight since this will prevent the glass from sliding around. I think it is obvious that you shouldn't put the tape where you have to paint later, isn't it? Here's what I like to do. I secure the glass at only two sides of it. In this case, at the top and the bottom. The tape on the top stays on for the whole process. It'll be the hinge, but this one on the bottom will function as a lever later to lift the glass. While lifting the glass, you ask, well, since glass painting is reversed painting, it is wise to keep track of the process in between. So lifting the glasses important to check here in there if you have missed out on any important details before you put down any other paint because you can't make any corrections once you did that.
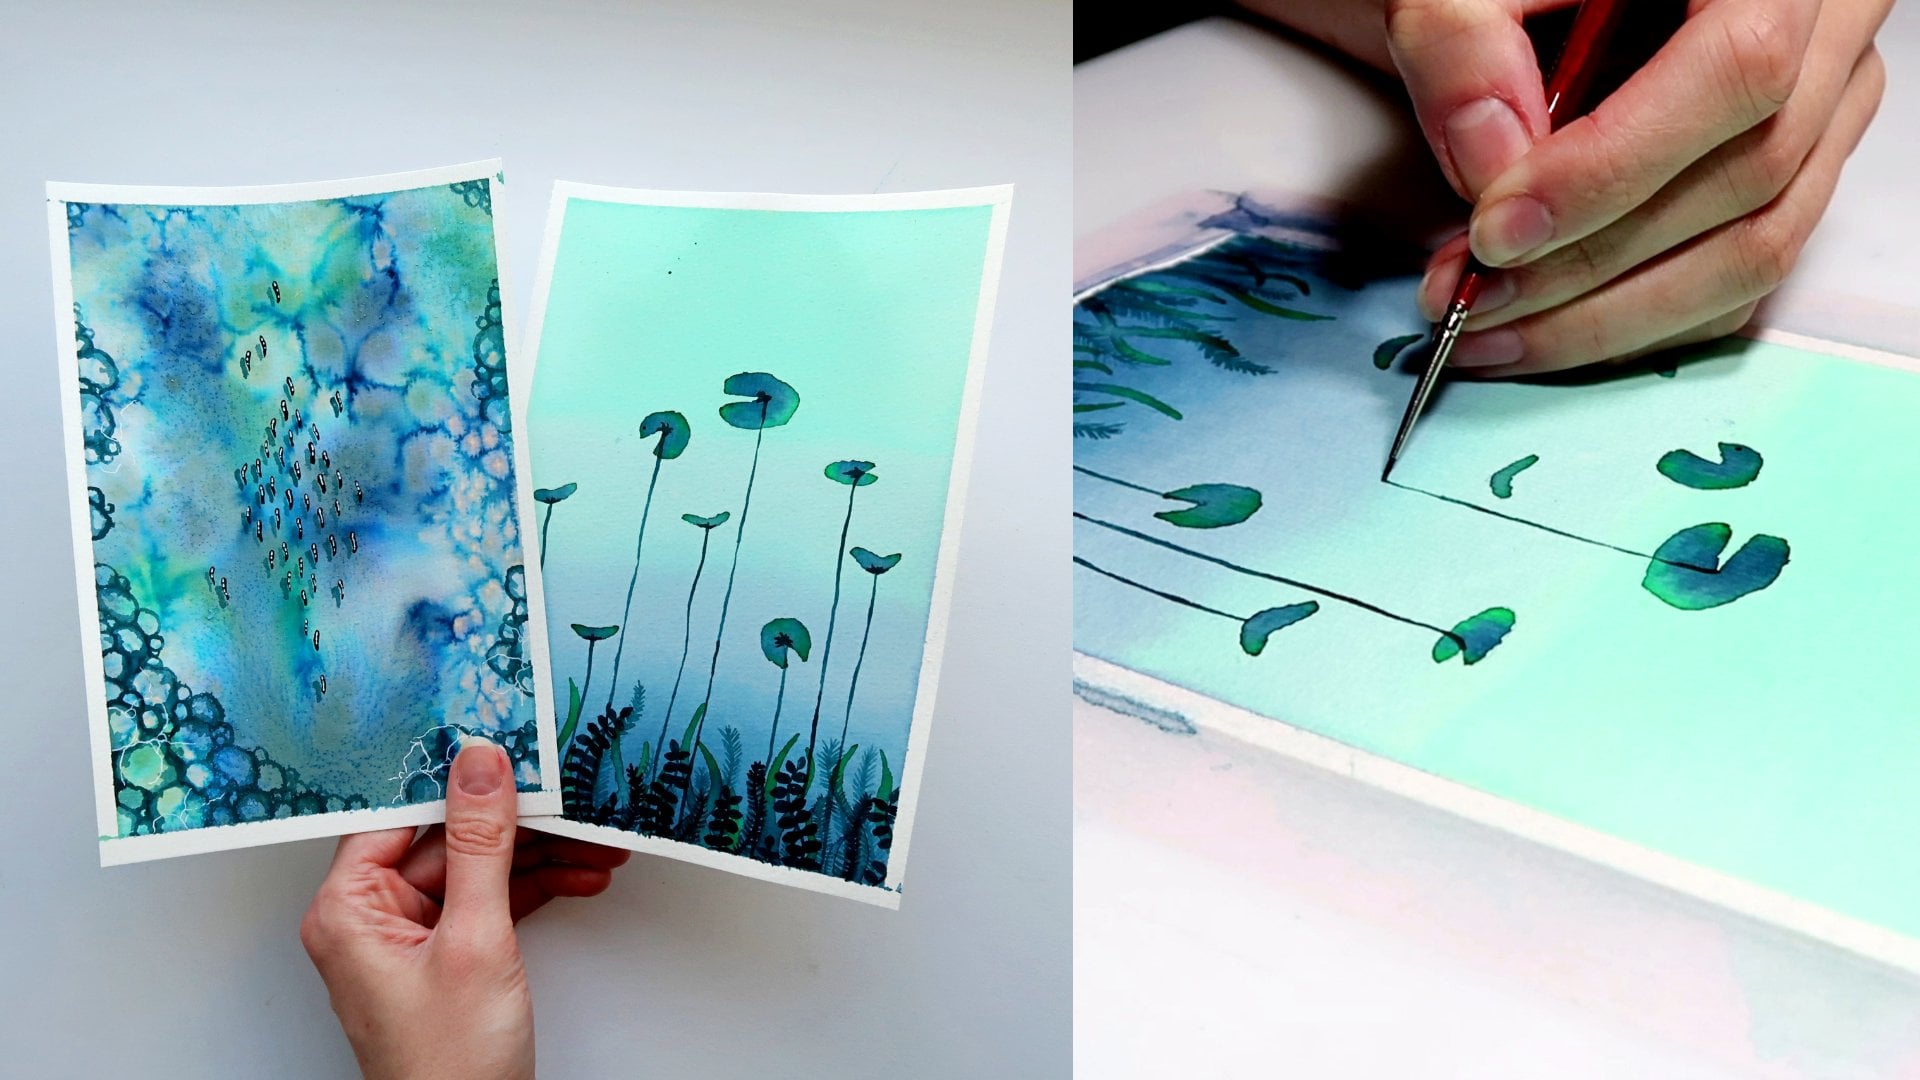
6. Details First: Now you can finally start painting. I have seen many people do the outlines of glass paintings with a marker. I tried this method and what can I say? It didn't work. So I start with brushes right away. This technique may be a little more difficult and you need some practice and patience. But trust me, in the end, it will look so much better than markets. To take the thinnest brush you have minus the 10 slash 0 by de Vinci, which is the thinnest brush I ever found and use on a regular basis, put a small drop of acrylic paint on a color palette or any old dish. You won't need a huge amount of paint right away since it dries before you can use it up. Trust me, the outlines and details take the most time, so don't waste any precious paint here that you will need later, as I said in the lesson about materials, if you can't find a brush that is as thin as mine, you can use toothpicks for the outline. My sister does this all the time and got quite a skill on it. It is clever to start on the opposite side of your painting hand to avoid smudging accidents. I'm a lefty, so I start on the right side of my glass. Also, turning the paper to adjust the direction is highly encouraged here. Did your IgG or prohibits you from turning your paper because you would mess up the perspective or the lines of you did so am I alone with this trauma? Anyways, here are some things to take into consideration when painting on glass. First, glasses is smooth and slippery surface to paint on and it won't suck up the paint. And second, since it is transparent, light will shine through the parts of paint that aren't opaque enough afterwards. And here are some tips to successfully paint on glass from the beginning. Take a little bit of paint with your brush. Then, rather than drawing a line by pulling the brush, put down the paint and small pulsing movements like I demonstrate here. Classic brushstrokes don't work because you're just drag the paint over the glass without its thing where it should. With the dipping method, it's easier to control the thickness of the lines and you will achieve an opaque result. This technique takes some practice, so start with some thicker lines first, before you do the very delicate details, I need some time to get into the flow of it myself. Every time. You will notice that you have to load up your brush with paint very often during this process. Since acrylic paint dries rather quickly, have a glass of water standing next to clean your brush in between. Otherwise, the tip will get thicker and thicker as well as your lines. I sometimes just wipe the brush clean on my painting cloth or a tissue which leaves the bristles div, instead of wet and fluffy. I use this technique whenever I'm about to paint the thinnest lines of my picture. As I said, glass painting takes patients. So listen to me and work in small chunks at a time for sharp and opaque result. Painting the outlines takes the most time and the whole process. And since it is a slow process, the paint dries rather quickly. So I don't consider smudging a big problem, but don't wipe over your outlines either. Just to be secure and not mess up your work. Also, depending on your brand of paint, it might be water-soluble or react in combination with the oils of your skin. So it would be better to avoid touching the paint once it dried. I always wear my drawing gloves so my skin doesn't touch the glass at all. But that's just an extra.
7. Filling with Paint: After you've finished the outlines, the most daunting part is done. What follows now is child's play and fields like coloring in a coloring book. First, make sure that your outlines are completely dry before you pick on the rest of the paint. This applies to every color following. You have to let them dry entirely before you add the next one. Otherwise, they will mix on the glass and ruined the sharp lines that are so iconic and manga and anime art, it is totally up to you which color you put in first. Bad, it makes sense to choose those of the most detailed parts. In my example, that would be the white and gray spaces. I start with the wife. Now you can see the concept of reverse painting very well. I'll explain by the example of UGC face. As you can see, I switch to my thicker brush and loaded it up with a lot of paint, same as with the outlines. Brush strokes won't work on glass. So put the paint down and pulsing movements. Put the paint where the white parts. And first, be careful not to paint over outlines where there's not supposed to be wide. Slap on the paint and a thick layer, since the picture will show on the other side of the glass, it is totally fine to over paint his face here, since it'll be visible from the other side. For the more delicate parts like his spiky hair or the folds in there close. Switch back to the thin brush. You don't have to load it up with paint. Just work from the middle to the outlines and also try to make it overlap with the outlines just enough so that there won't be gaps between them and the filling color later. You should have noticed my head in the frame here and there. That is because I have to watch where I'm painting directly from above. Since the glass has some thickness to it, it'll distort the picture didn't. Looking directly from above produces this effect and makes it easier to paint in the lines of the original picture. As you can see, I left all the little shadows at their feet because they belong to the background and would look like weird blotches if I painted them in. Once the paint has dried, you can check by holding the glass against the light source like I showed in the lesson about outlines before. This trick reveals any parts with the paint didn't cover the glass entirely, go in and put some more on set parts. My pain shrunk a little after dried, so I went over most of the outlines afterwards as well. And again, done with the first color, let it dry completely. I continue with the next most detailed color, which are the gray parts of their clothing. When you have to mix colors like I have to for the gray, make sure that you mix more than you think you will need. Trust me, even then, it might not be enough. I'm not for wasting paint at all. But in this case it is better to have some leftover then a shortage because mixing the exact same tone twice is impossible. Also, mix your paints thoroughly. Otherwise, streaks of white and black will show later. Again. Be careful to not over paint the outlines where there's no gray supposed to be. Let the second color dry. Then check if you missed some spots and fill them in. The last color I have to add as black. Since I painted the whites and grays first, I don't have to worry about over painting any important parts. Now, the only thing I have to consider are the outlines and eventual spaces with the background shows like here, between the arms and heads or their forum and thigh. As I said on a less than about materials, considering the acrylic paints, its quantity over quality, to make sure that the painting will be opaque afterwards and no light will shine through it. You have to take on the paint in a really thick layer. Sometimes it looks as if it'll never DRY. Of course, don't overdo it either. You don't want the pain to run over the glass uncontrollably. And now your glass painting is complete. Clean off any fingerprints you might have left on the parts that you didn't paint on, as well as on the other side of the glass, then put it back into the frame. You can either leave it at this or as I already showed on the materials lesson, put something in the background. My sister likes to highlight her paintings by putting manga pages behind them.
8. Class Project: And that's it. It's super cool and decorative piece for animals and magazines. I hope I could give you a good insight into the technique of painting on glass. And I cannot wait to see all your creations in the project gallery down below. But before you go, please give this class a good review. It not only helps me as the creator, but also pushes the class for cellular glass painters to find. Even a thanks for the class in the common section will totally make my day. Thank you for taking this class and now grab your picture frame, some acrylics and start painting your favorite character.
 Ellia Fabia, Artist, Illustrator & Content Creator