Transcripts
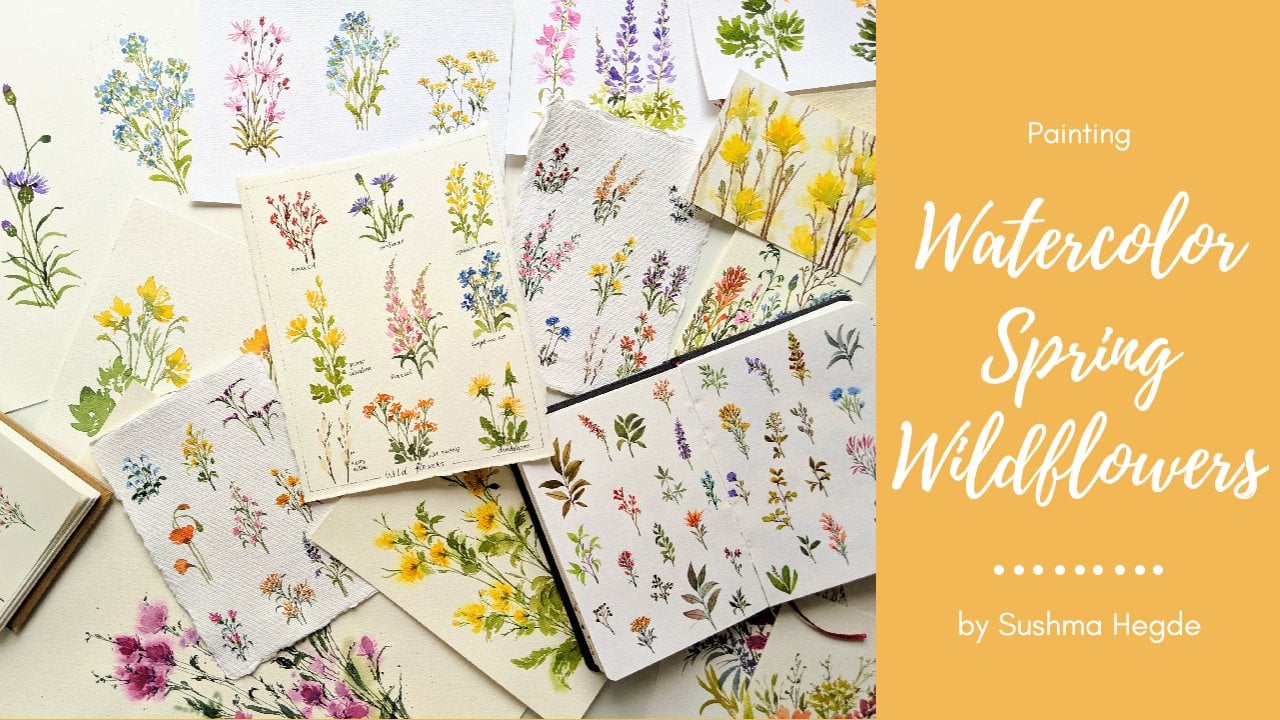
1. Introduction: Hi. My name is such, my dear. I come to my second skin shaking eyes so I mostly paint with watercolors. And one of my favorite things to being is why fellas? Lots and lots of them. And guess what to do. You're learning to paint exactly that with the entire class will not just be painting of my travel medal, but also we'll be talking about composition colors and also about my thought process by painting them. I think this will help you to come up with your own ideas and make your own compositions and create colorful by fellow gardens. So, yeah, let's just get stopped in.
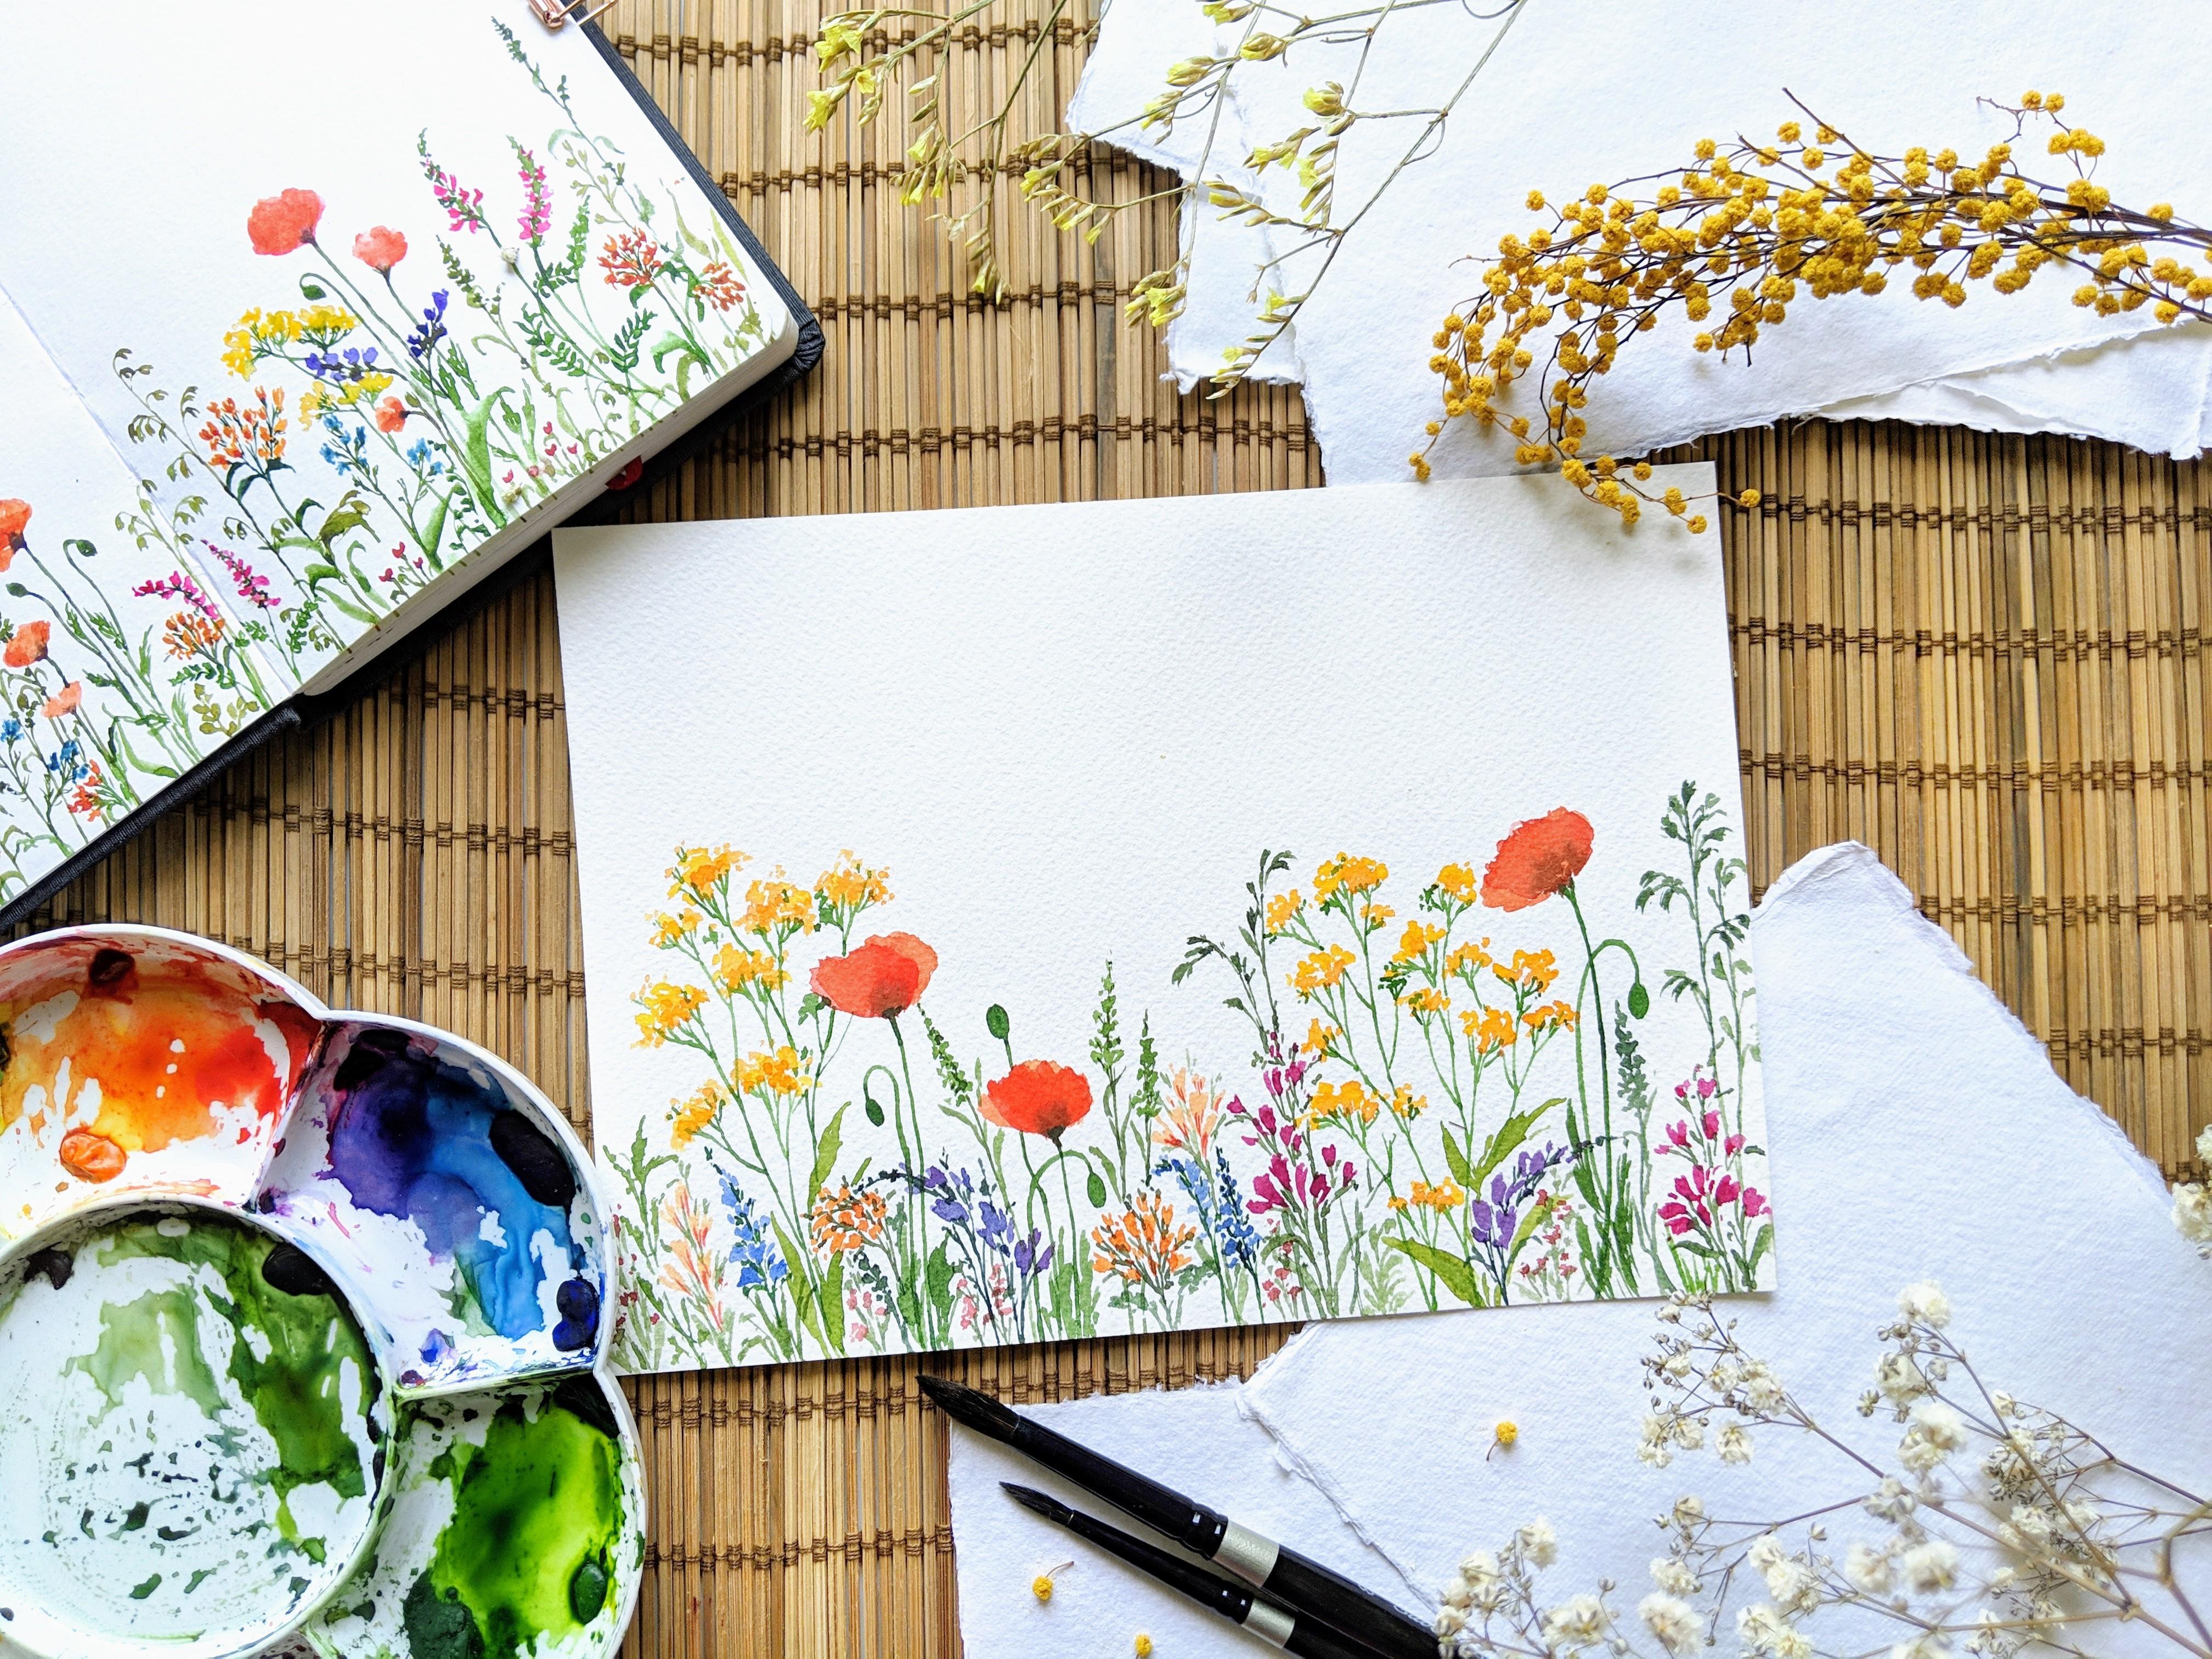
2. Materials needed: Let's start off by talking about all the supplies that I'll be using for this painting. First is the people I'm using. Fat Piano Artist to go 100% Court in cold pressed paper I'm using Silver Black well with 2000 s around Russia's size eight and four. Mostly size for because I'm painting on a smallest sheet of paper. Almost if I size, you can use any brush, but just make sure it's wrong. And it has the nice find dip coming toe pains. I'm using artists, greed watercolors from Daniel Smith and White Nights, and I pulled them from tubes into the span it and I'll be using this palette for the whole painting again. You can use any water colors. Just make sure there are discrete and it can be from any brand. And you'll also need a jar of water and paper, double or some shoes to dab off excess paint. That's it. We'll get started
3. Practice lesson: before we begin without mean painting. Let's start off with some practice exercises. These exercises are toe help. You loosen up your strokes and to paint with less control. First, we start off by drawings to Swift Street lines. Now let's try this in different directions. This will help us to paint the stems in our life level medal. Let's want painting leaves the paint leaves. I load my brush completely with the water color and press the complete brush down and then swiftly lift it. This helps us to give a wide leave and a nice find dip at the end. Let's try another kind off leave for this army. Sharp swift strokes and bring them together, leaving little white spaces in between. This gives it a nice enough for you. Look, and make sure you try painting these leaves in different directions so that it gives movement to your painting. When the papers still where you can act, little are dabs off. A doctor don't off the same color to give it a nice radiation. I show you a quick and easy way off painting poppy flowers here. I'm only showing you how I paint the patterns. The entire plant. I'll be showing you in the coming videos to paint them. I gently capital paper with the red pigment, and I just spread it across because these flavors have a broad structure. It's okay, have you shape them, but just make sure the edges are not to shop and they're more rounded. So that was an easy way off. Painting poppy flavors. We'll try another kind of flammable for this. I made little dots and leave some white spaces in between. So this will be another flower that we'll be doing over there dia class, so you'll have a lot of time to practice this. Andi, I just show you how I make the battles. The rest will be learning through the class. I want to show you another kind of lose flavors that I mean, I just gently made these little marks over the paper, and I just add them in different directions, leaving lots of wide spaces in between. As a more I meet the strokes a little smaller and let's added nearly dark cologne. Besides, let's join them with some stems and add a few leaves, and then we'll be done with this level that was pretty quick and simple. Right now, what we can do is we'll try the same technique but will pain flowers in a different shape. So I'm making these little brush months again. And this time, as I move upwards, I made a strokes to 90 now, so I give it a nice, fine point on the top and that's it. We have another flammable. We could try that again. We can make flowers with the same technique, but in another shape now. So I'm sharing this little secret with you guys. So what I do for filler flowers is this. I use the same technique, but I just keep making different lovers with different shapes and different colors. And you get a wild where I deal with the same strokes. So that's pretty simple, right? Let's add the stem and leaves for these two Now, in order to add some more variation to these flowers in self, just adding a doctor, don't the tip off the battles. I sometimes add little strokes on the battles. So here on the orange, I'm taking red, and I'm making little swift lines over the patterns. This gives it a nice texture. Under the flower. We can try another interesting shape with the same technique that we just learned. By painting these, I make sure that the lower part is a little bigger and on top, it's a little dinner and the strokes are a little smaller on top. We can try the same thing again in another direction, so that's another fill off level for you. So we joined them together with some little brush strokes, and we're done with the flam Elice. When we're painting a wife level medal, we can't just focus on the flowers, but we should also consider all the long grass stalks or weed or bushy leaves that surround these flowers. And we need to practice a little bit on does as well. This one is similar to the flubber We painted audio, but it's slightly smaller and that's why I mean these little dots and I leave a lot of white spaces in between as you can see, and I add log stems to them. We can also pain these Finau grass elements using the same technique that we used for the flowers. So we make these little brush marks and bring them all together. But again in a different shape. So basically, I used this technique for painting a lord of varieties off flowers and grass so you can try and explore and come up with your own designs with these. So I think with this practice lesson, I've given you a summary of what will be painting throughout the class, and I'll be explaining all of this in more detail through the class. But if you are a complete big now, I would suggest you try this a few more times before we start with the class.
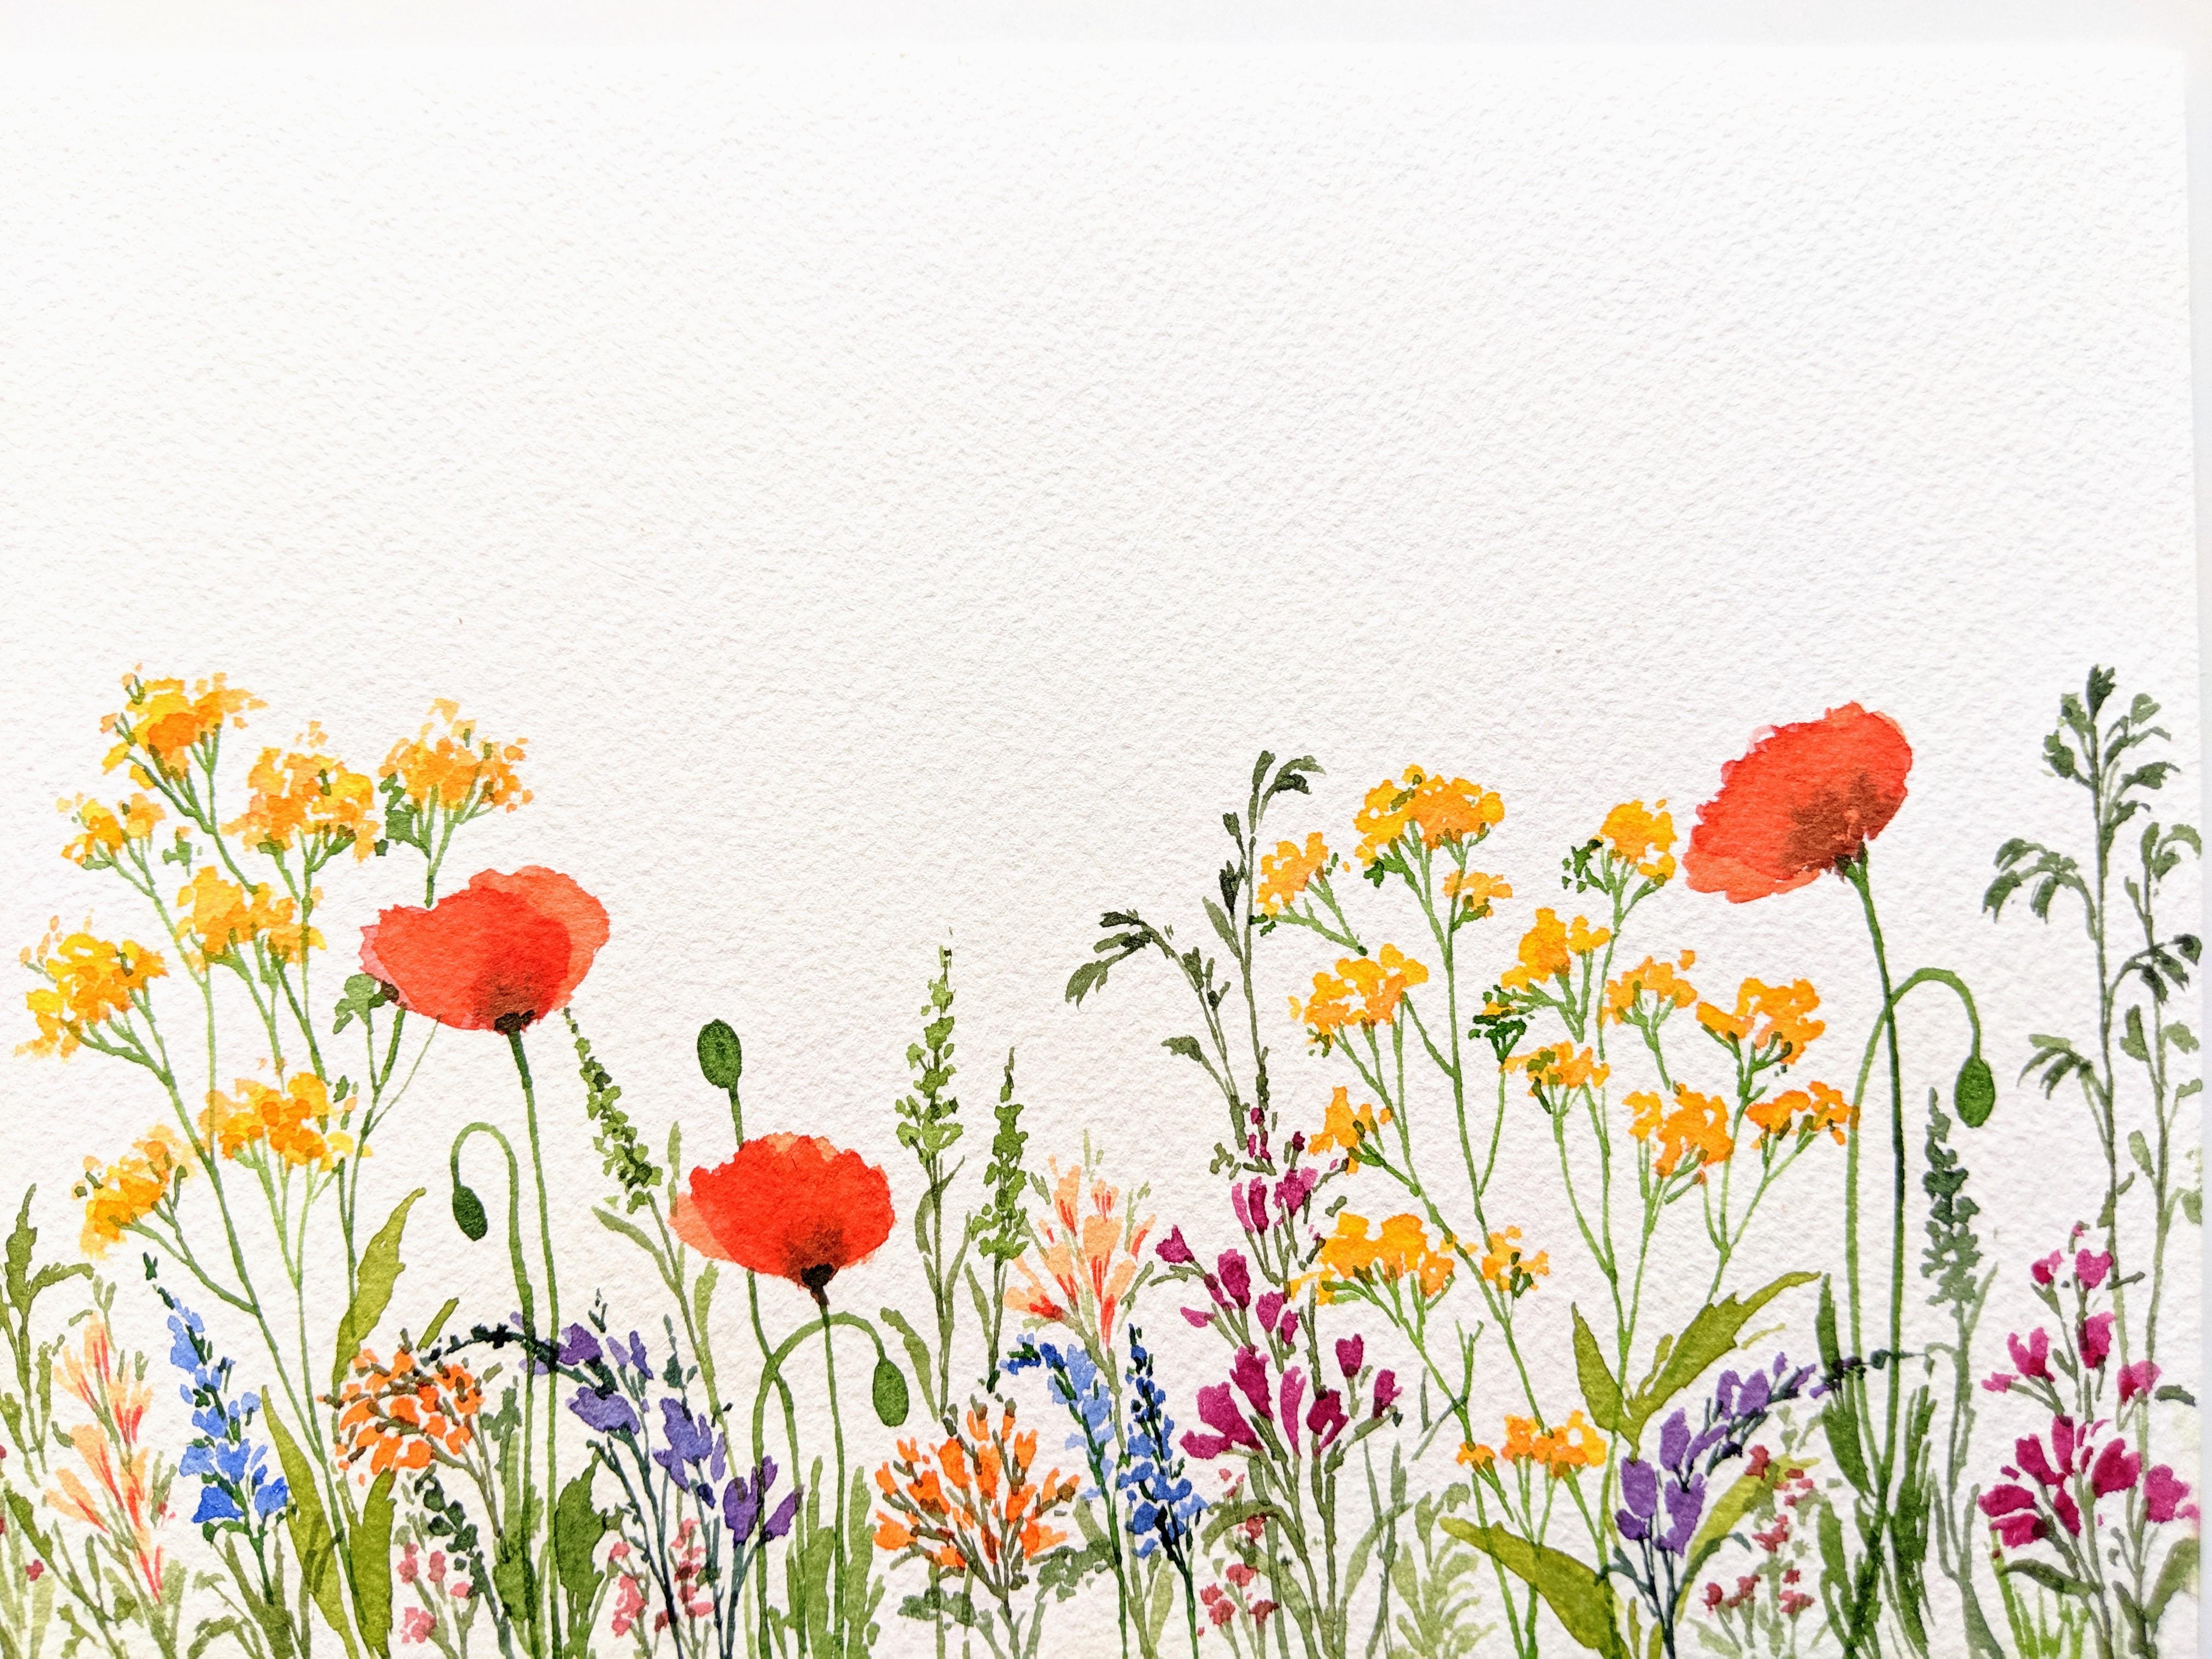
4. Let's talk about composition: Now that we're done with the practice lesson, I want to talk a bit about how I composed his wife, Lama Meadows, on how you can do the same with any flowers of your choice. Okay, when you look in these, the first thing that catches your right at the red Indian paintbrush flavors on this one and the yellow flowers on this one. So basically the biggest flavors are the main focus in these two meadows, and they stand out in the whole painting. Now as to keep watching the painting. You'll see other flowers as well. Maybe these or maybe the blue ones next. So basically, I made these a little size smaller than the big main focus flowers. Then there are the small fell off levels and leaves, which finally complete the painting. Now let's look at the composition off this painting in a little more detail. You look at this painting, what's the first thing that you see? It's the yellow flowers, right? When I painted this, I wanted the focus to be the yellow flowers, and I want my viewers toe view the entire painting and not just one part of it, So I make sure distribute these flavors throughout the painting. Now come the second set of flowers. I make sure that these flowers are smaller than the main focus flowers, but they're not too small that they hidden in the whole thing. But off course, I add tiny flowers to cover up, some off the white spaces below. Another element that I add in my wife level meadows are thes long grass stocks. I think these are very essential toe. Make the whole medal look wide. One more thing that you can observe when you view this painting as a whole is that the other party has more white spaces and the flowers are spread across. But when you see below, it's filled and it's crowded with a lot off grass leaves and lots of stamina. Little flowers and generally that's how meadows are. Right now. Let's look at another painting, and into these class will be painting something very similar to this one. Unlike the previous paintings in this one, that was, attention goes to both the yellow flowers on the red flowers, and these were my main focus off this painting. Next ask. The eyes linger on the focus faults on these little pink flowers and then maybe the blue ones. And then the focus goes on all the time. Little flowers. So I think this really helped to share my thoughts and my ways off composing a wild flower Meadow will be learning lots more throughout lesson. So let's start painting now.
5. The main focus flowers: Okay, so now that we're done with the B six, let's get started with painting the main wife. Lower middle. So I'm taking some red, and I'm painting some Barbies here and there on the page. Since I would like this painting to give a more somebody by. I've chosen warm colors as my main focus and especially have chosen poppies and wild personal bests. My mean flowers. So what I do is I stopped by painting work. My main focus is so that is Bobby's and the wild person, and I make sure they're highlighted throughout the big now to being these Bobby flavors. I have, ah, direction in my mind. That is where these poppy flavors should be, pointing the words and based on that, I have my brush here and there. And yeah, it's pretty simple to paint these poppy flowers because they're big and they have a very broad structure. One more thing. Don't keep all the poppy flavors on one part of the page. Just make sure you spread it across the bridge so it doesn't matter which flower it is. Just make sure it's spread all over the page and not just classed or didn't know one part off it. So it gives a nice why they look to it. You're on adding a little more red on some parts off the level so that it gives a nice shadow kind off effect to it at some say pr to the base off the flowers or when it is still wet so that it dumb gently spreads across it. But make sure you don't have too much pain so that it doesn't spread all through the flubber. And only the base has that little brownish tinto it He started painting the wild parsnip flourless Now, So I have taken you gumbo George and Lemon heirloom mixed together. And I'm just making little dots, um, around the poppy flowers. So just make sure these dots are let not too big, and they have little white spaces between them, and you just put them here and there. There's no set order or anything, and later we can add the stems to these. You can see that the poppy flowers have drive a little dull now, but that's okay because we'll be adding one more year off, read through it s so that we can give a feel that there are two layers off battles overlapping on one another. So for now, let's leave it like this and we'll add the second layer leader. Let's add some orange at the base off these flowers to give some depth to it. I'll continue adding these dots on another part of the page eso that these flowers look more distributed over there, tired of painting and our me still the main focus of the building. So I speed up that part of the video. Now let's start adding the stems. Now I've taken sap green with a little bit off alone. It and I started making these we kind of structures. And then I bring them all together in my mother's kitchen class about painting spring wildflowers. I teach in detail how to paint this the wild person flowers. So if you want to know this in more there, you can have a look at that class. One more thing. If you're new to watercolors, then for these stems getting these fine lines with this brush could be a little difficult, especially water control for these lines. So, yeah, it could take some time to get used to it so don't worry. And don't stress yourself too much about this. And you could also try using got in a brush like size tour size one to paint these. If this size is a little too big for you when I'm painting these times, I make sure they're not all straight and pointed upwards. But they bent a little, pointing towards the right or towards the left, giving it a nice flow to the whole painting. As you can observe, the flowers are more plastered and more number on top and as you go down there, more distributed and lesser number so we can add more leaves and the other little plans here, there as we go down. What as I go down, I make sure that I don't complete the entire plant there itself, and I leave some gaps in between. I don't this so that I can add the other leaves or other plans later. So instead of painting the entire plant and then adding, go other leaves our plants over that which gives it more room crowded. Look, I tend to just leave that space just like that so that I can come back and add or different fillers. Their leader. Now that we're almost done with this plan, we can want to the next one s. So if we want to add the deals, we can add later. But for now, let's leave it at this. - So now we're done with domain flavors. So we're leaving this one a little incomplete and will come back later. Toe act that after we had that flavors, even the poppy stems and on completed. But we will plant that According toe work flowers we add next. So, yeah, let's move on to the next part.
6. Second set of flowers: Okay, so now we can start with the second set of levels since Bobby's. And while passengers are our main focus, we make sure that the second set of flavours are not as biggest. The first ones and the colors are not exactly the same as the first ones, because we want that to be the focus. So and also its summary painting so we can go ahead and take any color and make it colorful as long as we don't use to much Brown's. It's OK, so we're free to use any color here. So go ahead, try any color and just have fun as you bring. This have used conducted own rules for these lumbers. So I want to create a balance between the warmth of warm colors that were used by using little cool colors now similar to what we learned in one of the previous sections. I'm just making these little brush marks, and I'm just making sure they're bigger at the bottom and as they go up there smaller also make sure that they're not. The flowers are not so big. Astor main Focus flowers, and maybe I'll just add these two so that it's not too much on the page. We'll add some global flavours now. I use the same technique that I use before, but I'm just changing the shape off the flavors. So feel free to try different shapes. But just make sure that they're not too small, not too big, as big as the main focus flappers. Okay, one more thing. Dough are mean. Focus. Flavors are red, yellow and mostly warm colors, and we want to give it the summary vibe. I'm still using purple and blue, Um, but I just make sure that it doesn't it's It's not very prominent, but adding these complementary colors makes our action main focus pop out. So, yeah, when you want to give your whole painting colorful balance, it's always nice to use complementary colors, even though it's in a lesser quantity so that our actual color stand out. I'll continue adding stems, connecting all of these little packets together. Eso When you're making these stems, make sure you don't draw complete straight lines, but just these little dashes connecting them together so that it gives it a natural look. Yeah, so after this will be done with the second set off lovers And then we can continue with the third set off levels which will be smaller than these while painting these green stems. I mean sure that the condos are a little similar to the flowers. So for this green, I added a little bit off blue. Do it because I'm painting blue flowers. There's no rule as such, but sometimes I tend to do that okay, and finish adding the stem for the other flower s way. And after that, we can want to the third side of flowers.
7. Poppy stems and leaves: before we begin with that thought set off levels, I think I'll add the stems off thesis poppy flavors. So now that we've added the second set of flowers, we know where to place the stems, and the stems of poppy flavors are very long and winding. So I make sure I beg that in the painting. So carefully add these two lines, make sure they're not to take and the curry on our direction so they look nice. And Louis Oops, the stem looks a little unrealistically long, but that's OK. We'll add another stem overrate and some leaves and cover it up so that it doesn't look so long. I love Adam, these little seed boards. I think the beauty off this plant is not just the bright red petals and the dark center, but also these seaboards, which are dancing in all directions. And they add to the total beauty off this painting every time. So you make some really 10 walking sticks and then add the seat boards at the end. Okay, this Stam looks a little unnatural, especially at that Kobe, and so it's just trying to fix that. Maybe I'll just add one most m over it so that it doesn't look so walk Word. See, it's not so bad now. So you have your damn it. This time we can want toe painting. More flammable is now.
8. Third set of flowers: Okay, now we're going to the third set of flowers. Remember, these are not as a guest. The second set off levels there. Mud, small O. And yeah, for this. Also, I'm using the same technique that we used before. Just changing the shape off the flowers. Maybe I'll make a rounded one. This time. I had some thoughts off a doctor shape to give it some depth. And maybe I'll paint one more off this kind off level, this time in a different angle or pointing in a different direction. Okay, we'll make this one pointing a little downwards, like as if it's bending down due to its weight. While this one dries, I'll add some tiny blue flowers here and there again using the same technique as before, but making it smaller and smaller each time. - As I said on your adding complementary colors like blue and purple gives the whole painting off more beautiful look. But I stop it at this. I don't add more off these colors and make my main focus color stand out. - Okay , I think I like one more level to cover up some of the gaps here on the left and even in the center, and I've taken a very light shade off orange mixed with a little bit off pink, and I'm keeping it as light as possible so that it's not exactly like the orange flowers that we just painted. Maybe I'll add little red over toe, give it a different kind of look. So as you can see the shape off these class that different from the previous one. But the technique used is very similar. So we are. You can just keep experimenting with this technique and create shapes off your own. And maybe you could make oh, by flower garden with just these. Even that would be fun. Instead of adding just red dots at the end, I'm making these thing great strokes on the petals. This gives it a nice texture to the level, and that's it. We're done with a major part of the spending. Only leaves and Filosa left
9. Adding the leaves: when you see a wild flowers and drill, it's not just about the gorgeous, beautiful colors, but there's a lot of green also. So we're gonna pain just that. Lots of leaves and grass. And so we're mainly focusing on the lower part off the painting now because we want to corrupt that part with most of the leaves and leave the upper buds with mainly the flowers . Poppy plants have thes so leaves, which are little dark, and they are ruffled. So we're going toe paint, gentle strokes, which makes it look a little rougher, not the need. Kerby believes that we usually paint One more thing that I want to add him is that by painting these leaves, it's okay toe Adam or something that you've already painted. Sometimes I hear some off. My students say that they have been to this part really well, and they want to cover it up with something else. But that's OK, because if you want to give back to your painting, you have toe overlap some off the stands and leaves over each other, and that adds to the beauty off your painting. One more thing. Remember to use different kinds of greens all over the painting. So sometimes I use a darker green and sometimes a lighter one. Sometimes I makes blue and yellow to get my own kind of green. So experiment with your greens and try different ones all through the painting so that it doesn't look ready, bland and monotonous. One more thing that I do is I keep reading the amount of water that makes with my color. This way we get a variety off bones off green s so that we can use it all through the painting. Observe the leaves that I'm painting as well. All each one gram painting is off a different shape and they're pointing in different directions and some are made with the little dots and some are just Jenkins strokes here and there. So give it a nice where I t all through the painting. As I told you before, I want to add another Leo for these poppy flavors to make it look like petals overlapping and also to give it more color. So I take a darker shade of red mixed with little yellow and then paint over the whole pattern and gently add a little extra little outside what I'm already big did and don't rub over too much so that the previous Lear is also seen through it. Let's try it again for the flubber. See, the flowers look so much better now. And also the Brown doesn't look too prominent and looks like it's actually inside the flat . So yeah, that's it. Now we'll continue adding some fellows to cover upon the gaps.
10. Filler flowers: So now that we're finished painting all the flavors like let's add some grass stocks to cover up all the white spaces on dog, we should make sure that we don't smoke out the up abortion because we still want, I mean, focus to stand out. But obviously adding these grass stocks is very attention in this painting because they actually make this whole painting look more wild and natural. Of course, I used the same technique that I used all year and explained in the practice lesson Being these grass stocks, when you're adding them, make sure that they're pointing in different directions, making it looked like this wing with the wind. This one is similar to painting off level, but I use bring for this completely, and I mean these little dogs and join them all together. But I make sure leave little white spaces in between. As I mentioned on your try using aware idea off greens all through the painting, you could combine blues and yellows and even add little hands of brown or red to give it a more look to the painting. I'll continue adding a few more off these grass dogs here and there and, um, and speed up this part of the video. - I am more leaves with the different greens on different shapes and sizes below, so that it looks a little more dancer down there. Let's add a tiny little flowers at the base to cover up the white spaces. I'll take a reddish pink mixture and add living dots here, in there at the bottom. I'll continue adding these little dots and cover on the white spaces that you see your own , and then I like some stems and we're done with this part.
11. Final touches and conclusion: Okay, so now we're almost done with this painting. We added the flowers. We add the little fill of lovers, the leaves and then the grass stalks. And we can complete some off these flowers that we left halfway in the beginning. So I'm adding a few highlights here. They're making the flowers, letting DACA where there are necessary. If you feel that the flowers are so small now you can add a little more dots here in there and make it more fluff. Yo and dancer. Generally, when I think I'm done with the painting, I just keep the painting at a distance and looking at it from far and see if there's anything else needed. And right now I feel the right side is a little empty and I can add some elements there. So maybe I add the's glass stocks and cover up that space. We're almost done with the painting now, so let me know how you like this class. Share your reviews and comments, and also, if you try this painting, please add them in the project section. I would love to see it if you are interested to see more off these wild flower Gardens. You can find a lot of inspiration on my instagram page. Allow painting wife lovers and you can always see me painting more off them there. If you're interested to learn some off the specific flowers in morning, I have another class on painting wife flowers here on school ship. So do check that out as well. I hope you had fun. And I really hope that I meet you again in my next class.
 Sushma Hegde, Watercolor Artist