Transcripts
1. Introduction: I painted in woodcolur
for quite a long time before I discovered that
washes are actually a thing. Washes are very, very cool, really fun to make and really important as
a fundamental skill. So in this class,
we're going to look at three types of washes,
how to make them, and then we're going
to use the wash in a little painting
of a sky and at Sbrds. I'm Catan Jennifer.
I'm an artist and in person woodcolur instructor and a top teacher on Skillshare. This is a quick, fundamental
washers class for beginners, so I hope you will join me. It
2. Project: Project for the class is to paint the three different
types of washers. It's up to you
whether you do it on dry paper or wet paper or both. And then once you've done that, have a go at putting the
wash into practice by painting a variegated wash sky and then adding some birds. When you finish your project, please upload it to the class
Project Gallery so that I can see what you've done and offer you some
personal feedback.
3. Materials: Materials you will need are your standard watercolor paints, a nice big fat quill mop
brush that holds a lot of paint and some good
quality watercolor paper. And then you'll also
need a board and some tape to tape
your paper down. So gather those things now
and we will get started.
4. Preparing Your Wash: The first thing to know
about washes is how to mix up a wash. You need
a small container. The best kind of
container would be a ceramic dish that you can get from a
Chinese supermarket, but I don't have one of those, so I'm using this
little plastic tub. And what I've done is I've put my little bit of paint on
the side of my dish there. And then I'm going to put a small amount of
water in my dish, and I'm going to draw the
paint from the side into the wash. You don't
want to just dump a whole load of water into your tub and mix
it all together, because if you do
that, you can't control the strength
of the wash. Sometimes you're
going to want a wash that's very strongly pigmented, and other times, you're going to want a much more dilute wash. So this is a way of controlling the
strength of your wash. It's really important when you mix up a wash that you mix up enough paint for the
entire wash. You don't want to run out of paint as you are
creating your wash. So I've added a bit
more water there, and I'm mixing it all together. You want to make sure
that there are no lumps of more intense
pigment in your wash. This is a beautiful
thalo blue, green shade, which is a cool blue,
and it makes for a really stunning,
transparent flat wash. It's a good idea
to test your wash before you go onto
your actual painting. You can do this on a
palette like this, have a look and see
how strong it is or on a little bit of paper. So here's a bit of test paper. That's a beautiful
strength of wash. I might just add a
little bit more water.
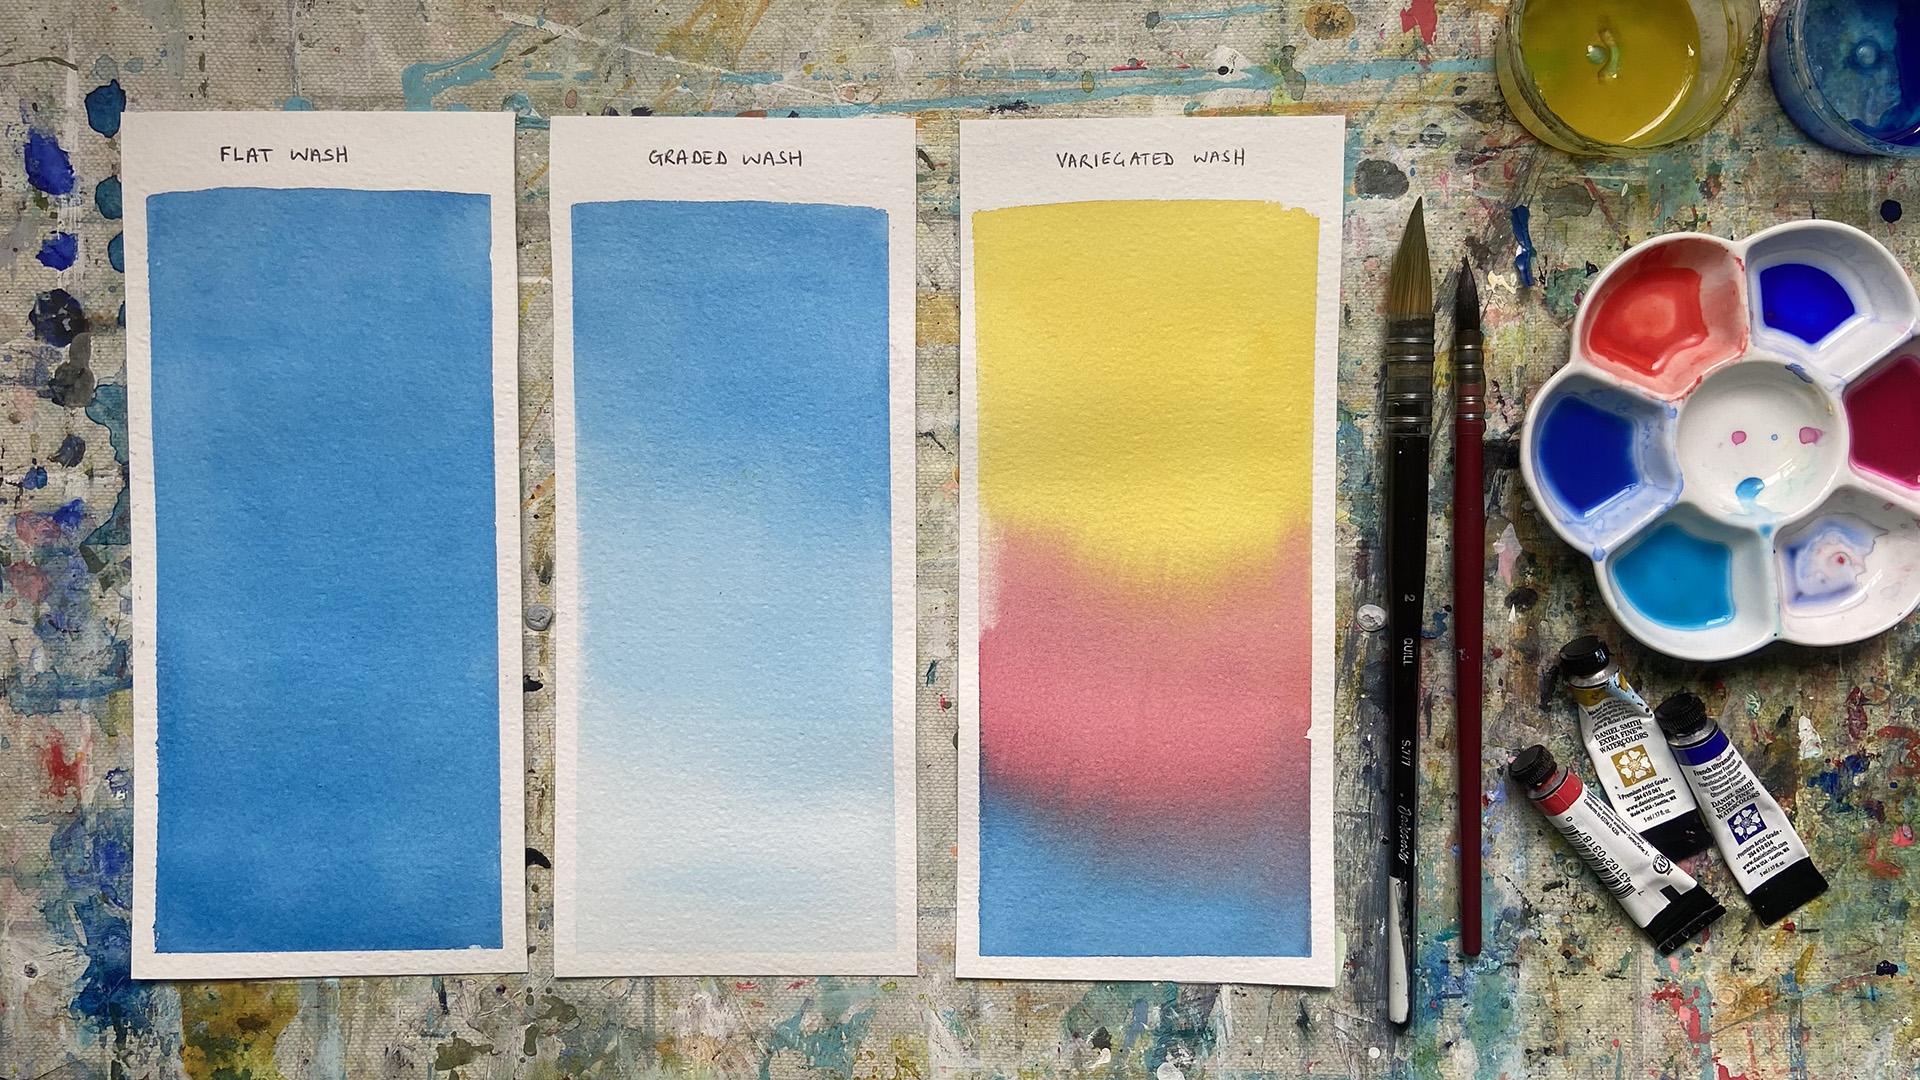
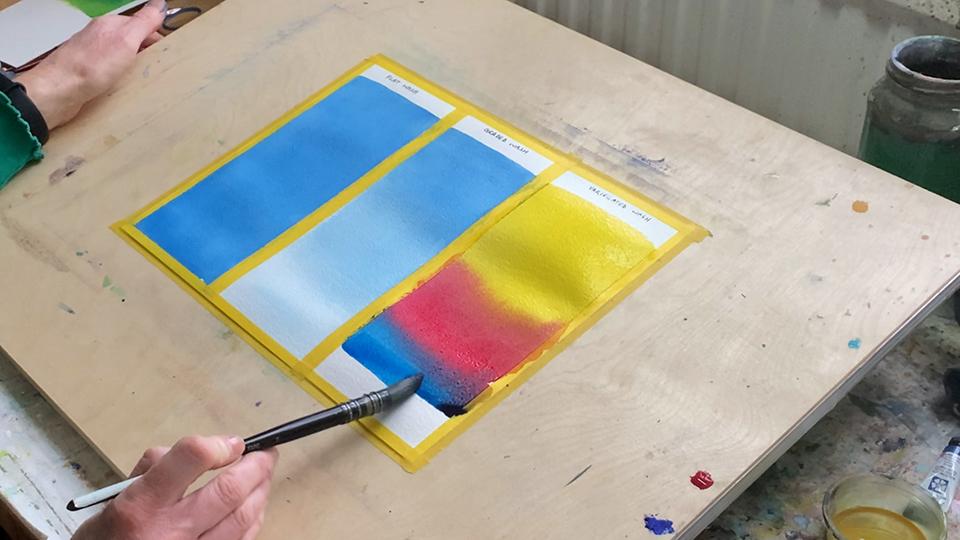
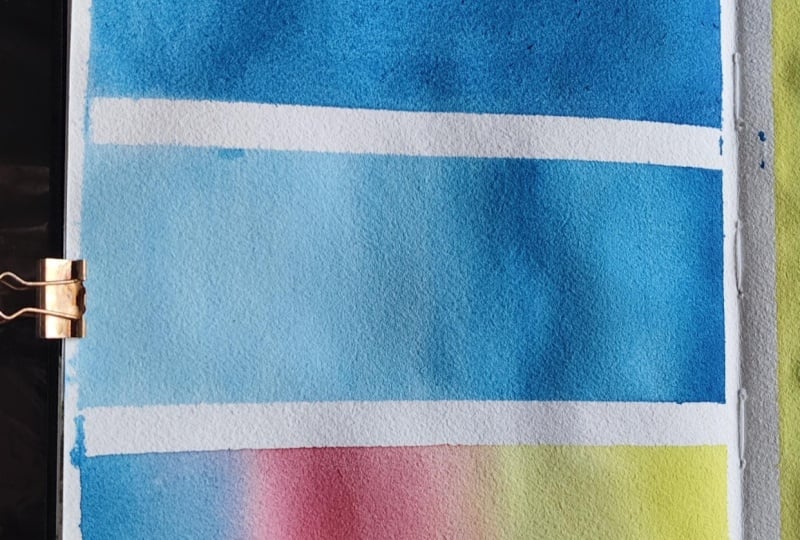
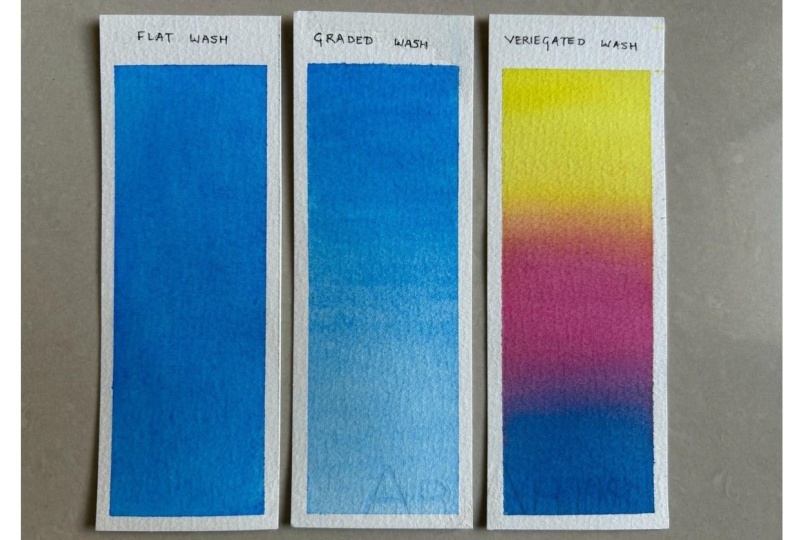
5. Flat Wash: Now we're going to look at
the three types of washers, a flat wash, a graded wash, and a variegated
wash. You can do all three types of washes on either wet paper
or on dry paper. The method you
choose will depend on what kind of
painting you're making. There's pros and cons
to either method, and you'll probably discover which one you prefer
by having a go. For a flat wash, I have found that working wet on dry gives me the best
control over my wash. So I'm going to do a
flat wash over here. I've got my board on
about a 15 degree slope. So what I'm going to do is fully load my brush. That's
really important. I'm using a big brush that
holds a lot of paint, and I'm making sure
it's fully loaded. Not just the tip of the brush, but all the way up
to the ferrule. And then I'm going to
start my wash at the top. I'm going to angle my board
even a little bit more, and I'm going to make a
stroke across my page. Very quickly, I'm picking
up another load of paint, and I'm going to
go into the bead. So do you see here how the paint is pooling
at the bottom there? That is called the
bead. And what I want to do for my
next stroke is go just above the bead with my loaded brush and
carry the bead across. I'm going to pick
up some more paint. Go about just above
where the top of the bead is and carry it across. And you just repeat the process all the way down the page. It's important to
work quite fast because you want your
wash to dry evenly, and you don't want it to start drying before you've
created the stroke, and then you might get streaks. So as you can see, I'm working really quickly. Each time I get to
the end of my stroke, I'm picking up more paint
and making my stroke. If you find that your
washes are streaky, then there's a few things
you could be doing wrong. You could be not overlapping
your bead enough. In which case, try going a little bit higher with
each brush stroke, or it could be that you
don't have enough of a bead. If you don't have
enough of a bead, tilt your page a
little bit more and vary the pressure of
your brush on the paper. Press a bit harder, basically, to release a bit more of
the paint with each stroke. And just keep going down your page until you
get to the bottom. When you get to the end, make your final stroke and then take some clean tissue
and very carefully wipe the excess
paint off the tape. It's really important
that you do this. Otherwise, you will get
what is called a back run, which is when the
pigment runs back into the wet wash and it will spoil your wash. You should also wipe down each side of the tape, and the best way to
do this is to turn your board around so that
you don't accidentally damage your wash. Then lay the board down flat
and allow it to dry. I've still got a
little bit there, and it's so tempting to go in and try and fix
that with the brush. But if you do that, you
will mess up your wash. So the best thing to
do is just let it be.
6. Graded Wash: That was the flat wash. Now
we're going to have a grow at the graded wash. A graded wash is where you start with
quite an intense color, and then you gradually decrease
the amount of pigments, so you're going from intense
to basically transparent. I'll show you how to
do that. Again, you want to start with enough paint. To cover the whole area. You do not want to run out
of wash halfway through. So again, I'm
working wet on dry. And I'm going to make
my first stroke. My brush was less fully loaded at that time,
but that's okay. I've still got a bead there, and just means for my next one, I'm going to take a bit more, and I'm going to make
sure I overlap enough. So there we go. I'm going to
do one more of full pigment. I can press a bit harder to release a bit more
of the pigment. Now I'm going to start gradually decreasing the
intensity of my color. And to do that, I'm
going to gradually take a bit of the pigment
out with each stroke. So I've got my water jar here. And all I'm going to do is a
very quick dunk in the jar. Okay? It's just releasing
a tiny bit of pigment, and I'm going to make my stroke. Now I'm going to release
a tiny bit more, just shake it off the edge
there and make my stroke. Release a tiny bit more
and make my stroke. And I'm just going
to keep doing this, still carrying the
bead down the page, still not fiddling with my wash. But gradually, the amount
of pigment is reducing. So just dipping in my water, using gravity, and carrying
my bead down the paper. As I get nearer the bottom, I can shake out even more of the pigment and basically
almost work with a clean brush. It might feel
extremely strange to work with the paint so wet, especially if you
spend time trying to learn how to
control the paint. And now I'm basically
telling you to use the paint so wet that it's
difficult to control. So just trust the process because you will end up with
very beautiful washers. Now, for the last bit, I am going to control
it a little bit more. I've cleaned my
brush. I've tapped on the edge of my water jar, and now I've got so much water here that I'm just bringing that bead down to the end with a slightly less
wet brush each time. And it's slightly less wet because I've just
tapped out some of that excess at the
top of my jar. Make sure you cover
the whole area, and then once
again, lay it flat. Beautiful. Do the same
thing with your tissue, clean up any excess
that's on the sides. And then lay it flat to dry.
7. Variegated Wash: That was the graded wash, and now we're going to have a go at the variegated wash.
Those two washers, the flat wash and
the graded wash, I did onto dry paper, and that's my preference for
those two kinds of washers. But for a variegated wash, my preference is to
work on wet paper. This allows the
paint the different colors to mingle more easily. So hopefully, you can see that that section
of paper is wet. The secret with working
on a wet page is timing it so that you begin the painting at
exactly the right moment. You want the shine to have
just come off the paper, but for it not to
have dried too much. And I've mixed up my
three wash colors, so they are ready to go. So I'm just following
exactly the same process with a couple of
minor alterations. When you work onto wet paper, you need to have slightly less of the paint and
water in your brush. If you work with
a very wet brush, you can end up with a
flood on the wet paper. And the second thing
is, you may not have quite as much of
a bead as you can see here there's
very little bead, but that's fine
because the wet paper underneath is helping the
paint travel across the page. Now I'm going to switch
into a beautiful pink. This is permanent ezarin crimson mixed up and ready to go. Again, instead of really
wetting the brush like that, which will give me a flood, I'm actually controlling how much is in there,
tapping a bit off, and then I'm going
to just overlap with my yellow and come
in with my pink. I got a little bit of a streak
there and I'm going to fix that by just very
quickly coming in. I'm going to take
my painting off the slope and rather
work it on the flat. I want more of a mingle
between the red and yellow, so I'm going to because
I'm being quite quick, I'm going to go over that again. But you should be very careful about going over your
wash more than once. If you do do it, make sure
you do it very, very quickly. Bring that down one more time. And now I'm going
to switch into my blue this is my lovely sal blue. Again, instead of
overloading the brush, I'm controlling the amount. I've got a bead there. Notice that I'm
changing the tilt of the board depending on how
much of a bead I've got. Now, I've tainted the
brush with the red. So I'm going to clean the brush. Otherwise, I'm going to
taint the color in my tub, picking up some more,
and I'm going to go back into that bead
and carry it down. Again, I'm washing,
tapping on my cloth, picking up some more,
taking the bead. Washing, tapping on my cloth,
picking up a bit more, but controlling it,
bringing it across. You have to make peace
with the fact that you can't control it exactly. But actually, that's one
of the joys of watercolor. Now I'm only in the blue, so I don't need to clean
it in between strokes, and I'm going to
load flat and allow those colors to mingle
however they want to.
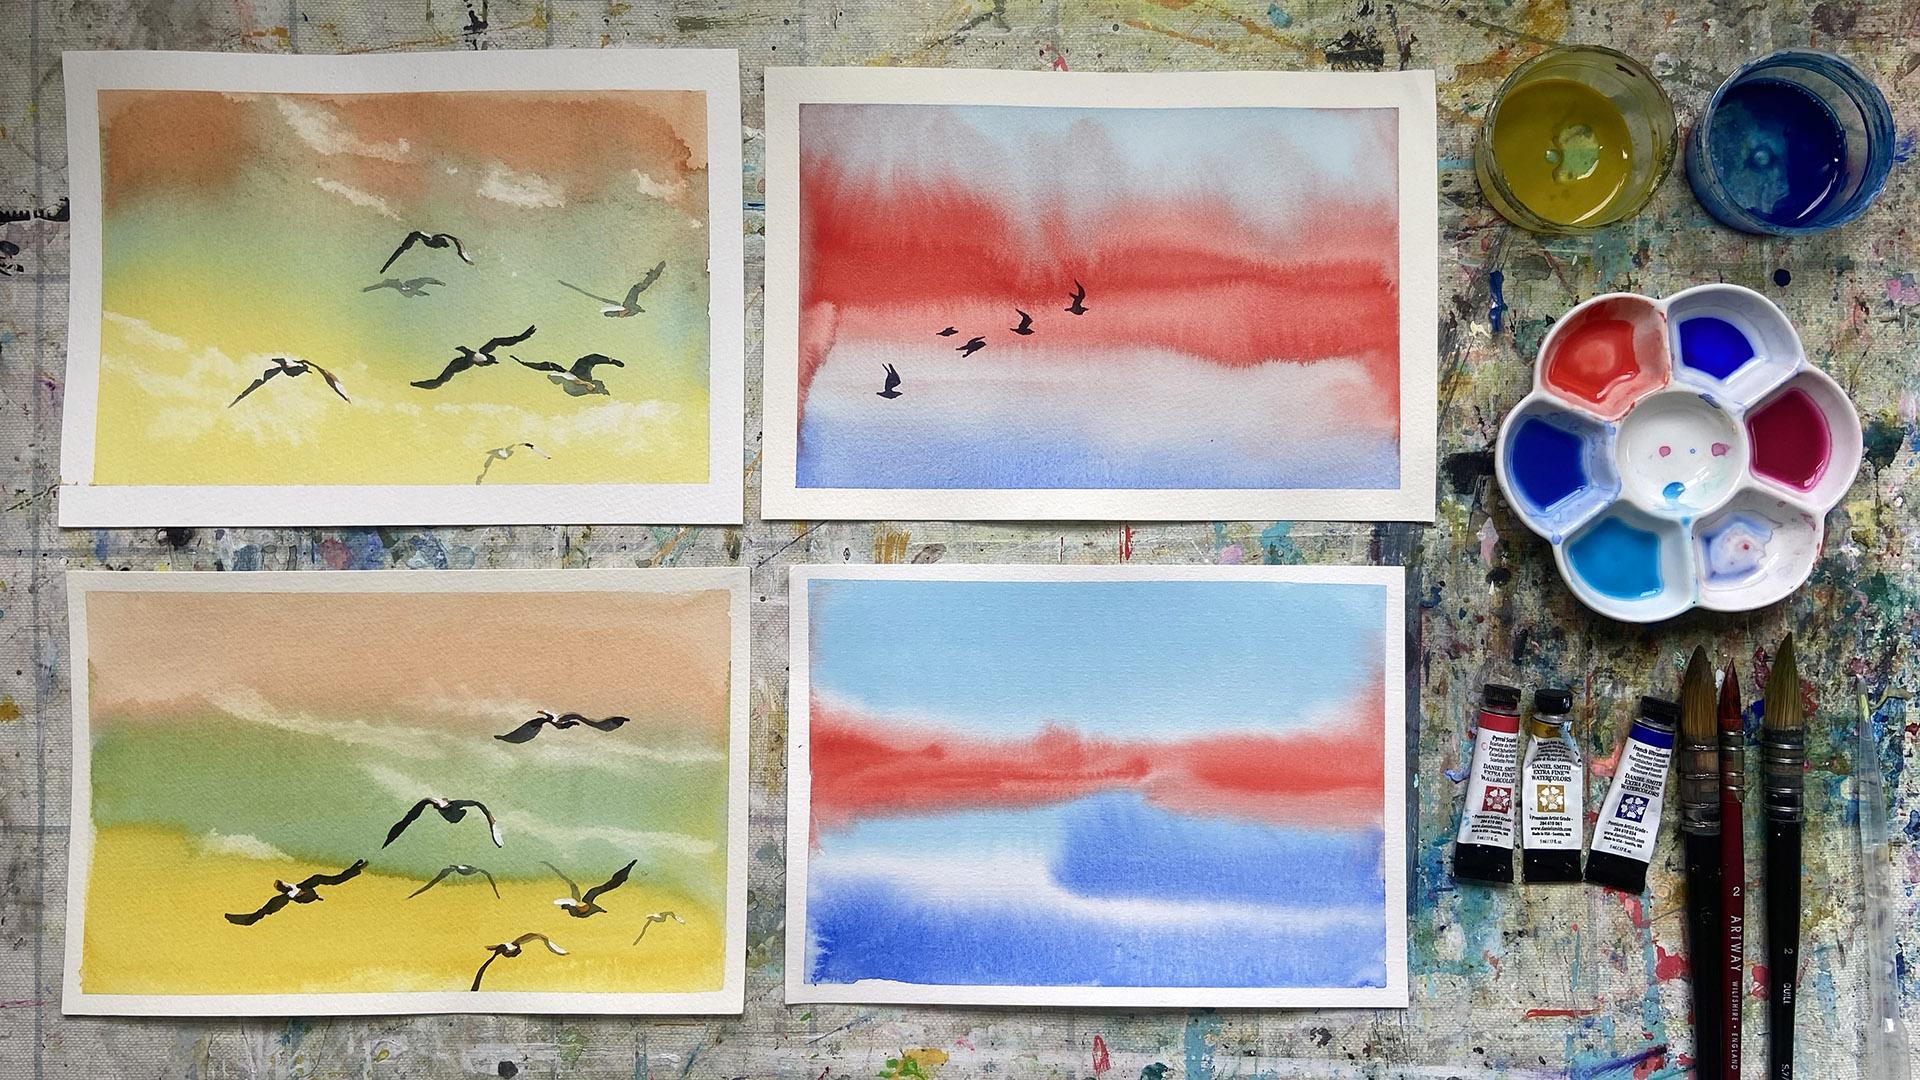
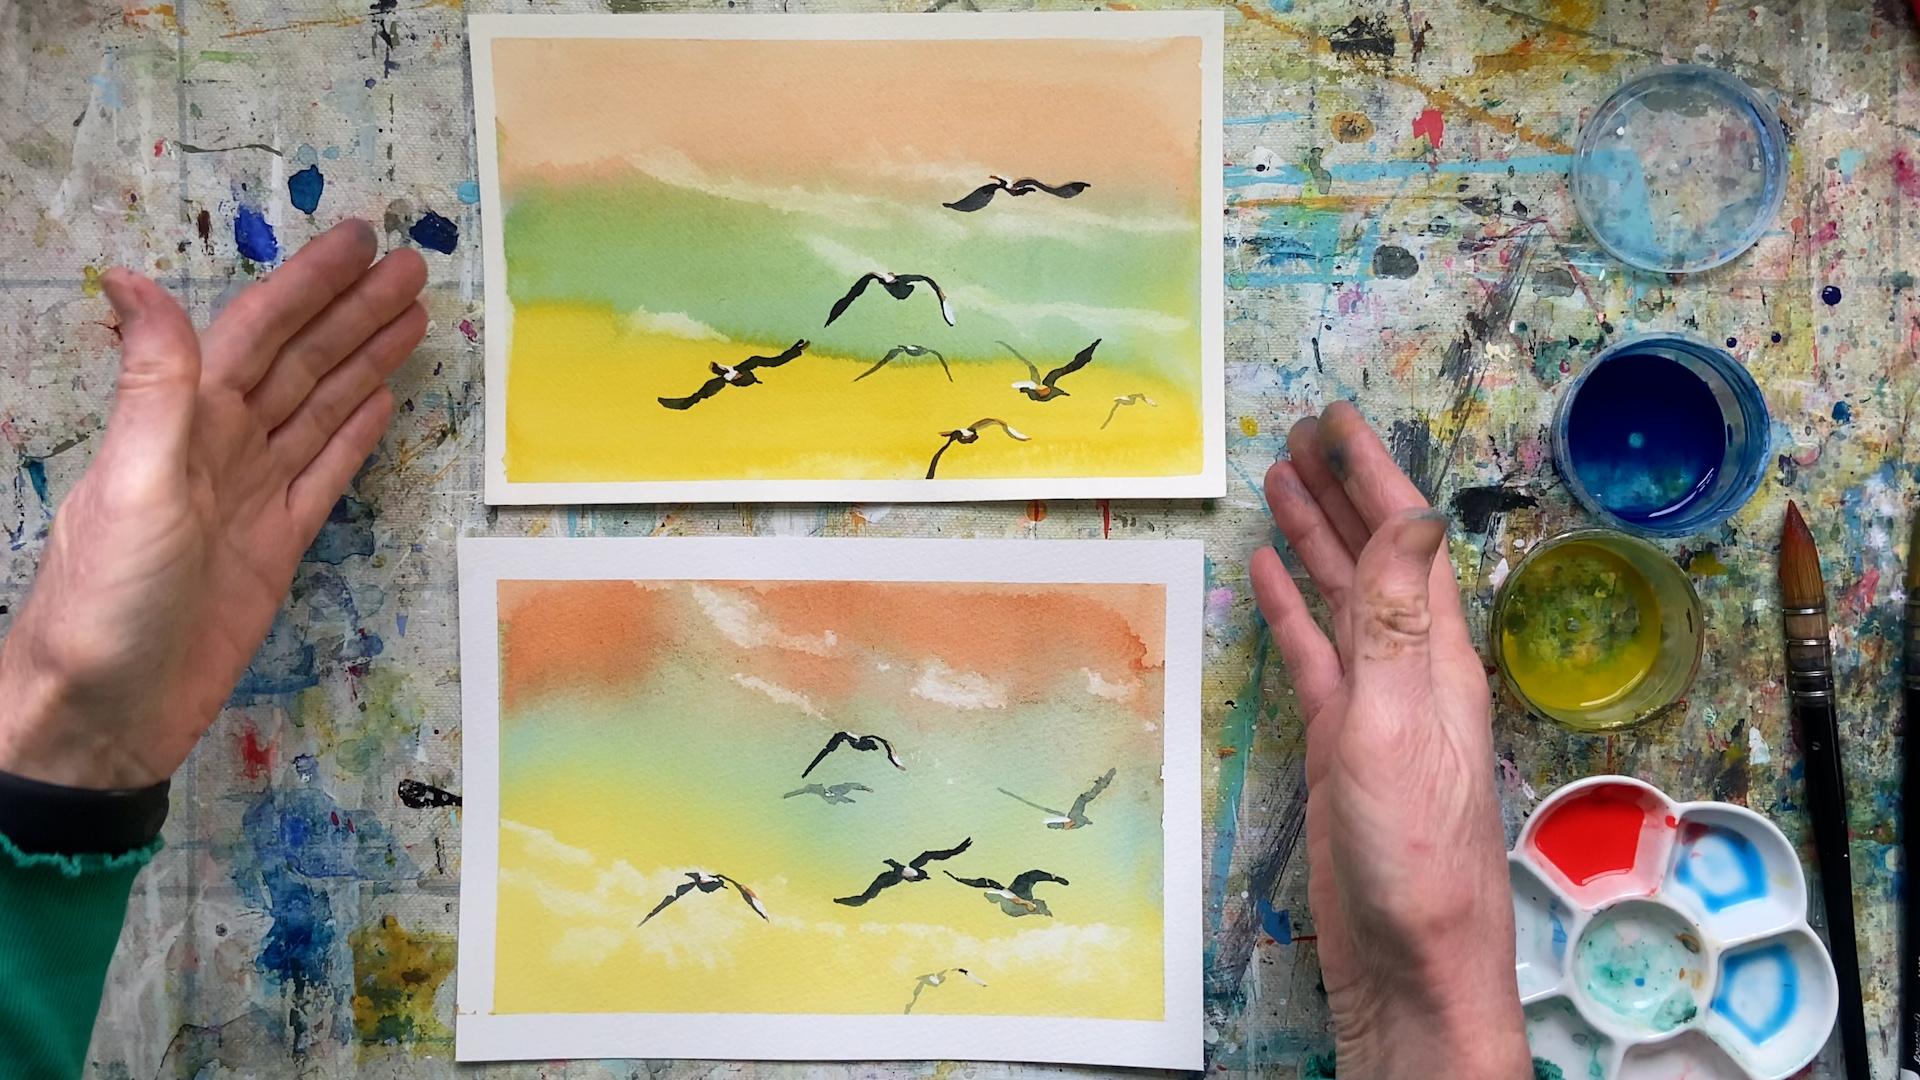
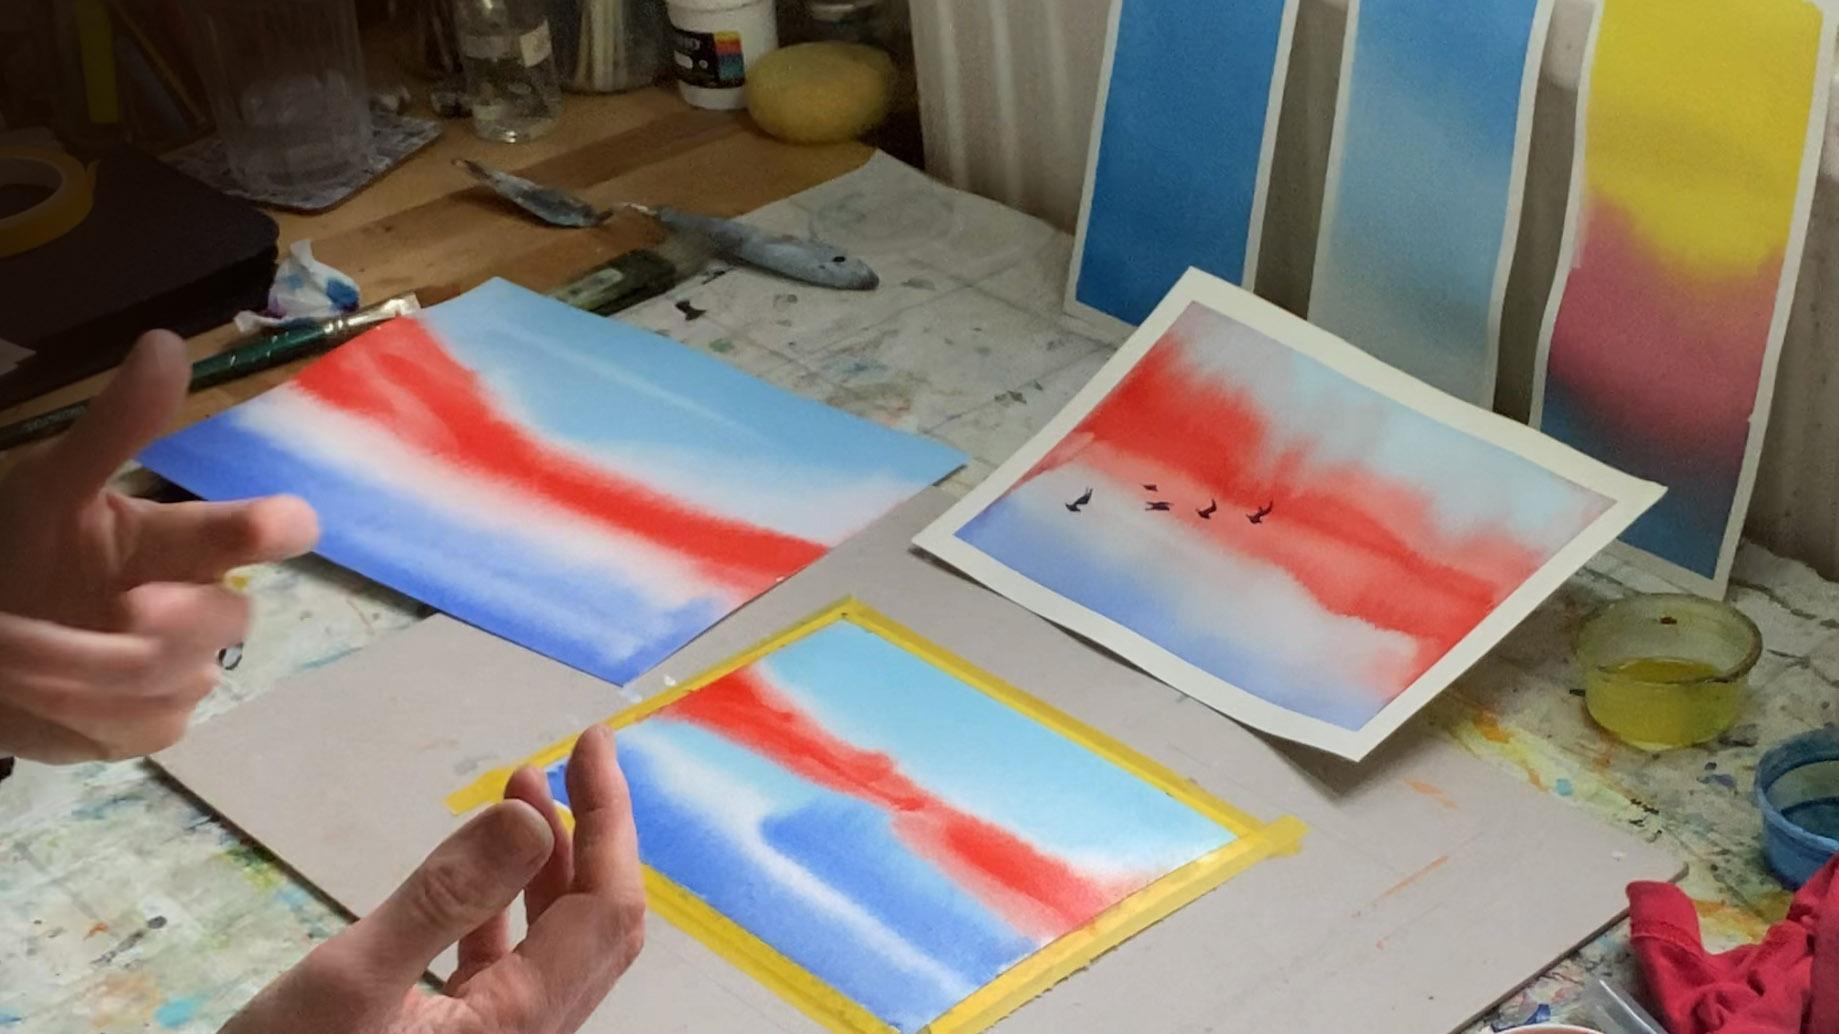
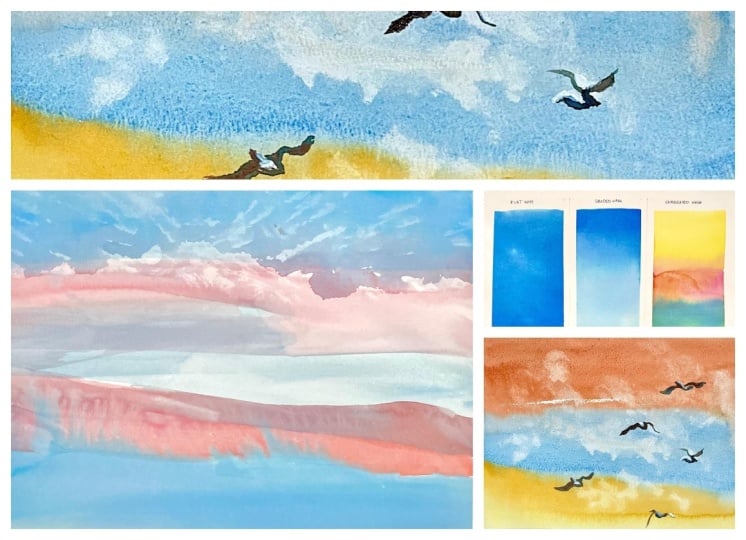
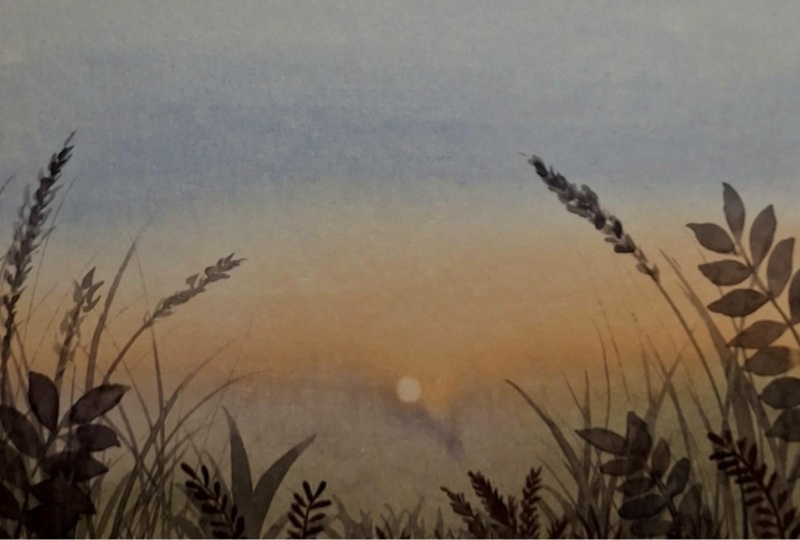
8. Painting a Sky: Now we know how to make
the three types of washes, but it's one thing to do a
little exercise on paper. It's another thing to actually use the washes in a painting. So we're going to
have a go at painting a sky using a variegated
wash. And once we've done it, we're going to check on
a few birds. Job done. I'm going to use this
photograph as my source image, but I'm not going to try and replicate these exact colours. At the top of my painting, I'm
going to use burnt sienna. Then I'm going to
transition into Cerlean blue hue and then
use Nickel Azo yellow. So I'm going to start at the
top with my burnt sienna. I'm working on dry paper, and this is a little
more challenging than the previous exercise
because the papers wider. So we're going to need to
go a little bit faster. So I'm making sure
I'm picking up lots of paint in my brush, and I'm just going to make
my stroke across my page. Very quickly, make
my next stroke. And I'm picking up the bead and pushing it along the page. I'll do one more brown.
Enciena. Okay, and now I'm going to quickly change
color into my light blue, serlem blue, and I'm
picking up the bead. And moving it along.
Now, I'm washing my brush because it's
tainted by the brown. Back into my blue, pick up
the bead, move it along. Wash the brush, pick up
the blue, move it along. Now I'm not touching
the brown anymore. I'll do one more wash
just for safety's sake. And now I'm just
working in my blue. I'll do one more blue, and now I'm going to
transition to my yellow. So clean brush, picking up my yellow. Working
into the bead. Love this yellow.
It's so strong. This is a professional pigment, and it's really
strong and powerful. I got a bit of dry brush
there on the paper, but that's okay
because I'm going to just come over it there
because I was very quick. And for my last stroke, I'm just going to
use a clean brush. I'm not picking up paint, and I'm just working across. Great. Now, very quickly, I'm going to wipe my edges. Now I'm going to lay
my wash flat and allow it to dry a little bit. But before it dries completely, I'm going to pick out
some of the cloud shapes. So this is just clean tissue, and I want a smallish
edge that I can control. And I'm just going
to touch down into the wet paint to pick
out some clouds. Then I'm going to fold that
bit, take a clean bit. I can get fancy with some
strokes like this if I want to the timing for
this is important. If you try and pick up your cloud shapes
and you're too late, nothing will happen because
it will be too dry. I'm now going to let that dry completely and then I
will add the birds.
9. Adding Birds: Painting has dried completely, and now I'm going
to paint the birds. I'm going to use two
colors to create my black. The first color is
permanent Alizarin crimson. And the second color is
Thalo green, blue shade. This is one of my
favorite methods to create a black. You can
see the green there. And if I take a bit
more of that pink, you can see the pink here. And when I get them
together, it's like magic. Because I get this beautiful,
deep, interesting black. And I'm using a small brush that it's a little
quill mop brush, a size two, a very cheap brush, but it's lovely because it comes to this
really sharp point, and it's perfect for
this kind of detail. And now I'm just going
to paint a few birds on. I'm not going to
draw them first. I'm not going to worry too
much about getting it perfect. I'm just going to
use the weight of the brush to get
the main shapes in. You don't have to
paint all the birds. You can be selective about
which ones to include. As they get further away, I'm going to make my
paint tiny bit less dark as they go
into the distance. So I've just taken a bit of
the pigment out of my brush, and you can see I've
got this lighter gray. At the moment, I'm
just leaving gaps where the white of the birds is, and also where there's a bit of brown on them. I'm
just leaving gaps. I need a darker
color for the swing. If you pay attention to how much weight you're
putting into the brush, as you make these wings, you should be able to get
them hopefully in one stroke. If we do about five
birds, and this one, I'm purposefully going to chop off the bottom of the wing, so I'm activating the bottom
edge of the painting. I'm paying attention to
where the wings join the body to try and get
the shapes exactly right. Now I'm going to cheat
and I'm going to use a tiny bit of acrylic
gouache for the white, and I'm using this
number six round brush and I'm going to pop in just
the highlights on the birds. There we go. And then
as a final step, I'm going to take a little
bit of bird sienna. I've got some here back
to my soft pointe brush, and I'm going to pop
in a third color into my birds just to add that
little bit of extra definition. So it's just detailing, not much, just a tiny
bit here and there. Simple, three colors, no fuss. And the final one. There we go. Take the tape off.
You don't want to leave tape on your
picture for too long. As soon as you can take it off, do take it off
because otherwise, it becomes harder to get it off without
damaging the paper. And there we have a simple variegated
wash with some birds.
10. Playing with Washes: Now you know how to create
three types of washes and how to have a go at a
variegated wash as a sky. So now I want to invite you just to play
with your paints. I'll show you a
way of doing that. So I've wet my page. I hope you can see there's a
little bit of a shine on it. I'm just going to explore
a few different colors. So this is Cotman Windsor Newton Cotman,
serlean blue hue. And I know that this because
it's a student grade paint, it's quite a weak color. So I'm going to use quite
a lot of it in my brush, and I'm just going
to play with a wash. And I might put a
little bit here. I'm just going to wet the page again because it's got quite dry and softening that
blue edge beautifully. Lovely. I'm going to come in at the bottom with a little bit of
ultramarine blue. This is a beautiful color. I don't have to put
it all uniformly on. I might put a little stripe
here, see what happens. Then I'm going to take just
for fun, a contrasting color. This is a beautiful
pearl scarlet. She's a very strong
vibrant orange, and I'm going to
just come right in here and see what happens. I'm going to wash that off and put another stroke of it
here coming from the side. Take a little bit out and
just ease that along. And now I'm going
to wait and see. It can be very
calming just to watch and observe as your
paints merge together. I'm going to soak up
the excess paint, and this time I'm doing it
with the tip of my brush, which can give you a more
accurate and precise way to soak up excess paint. You just need to keep taking the moisture out of the brush in
between each pickup. While that orange
is still quite wet, I'm going to come in
with a smaller brush and a thicker amount of it and just make
another stripe in here. I'm taking out the orange on the edge where
I don't want it. And I'm going to just let that
dry and see what happens. Here's one I did with the same colors that came
out really beautifully, and I added a few birds. I've been trying
to replicate that. So far, I haven't been able to get it as beautiful as that. Here's another example. What is noticeable is that French ultramarine is
famously granulating. And I decided I didn't want such a granulating
blue at the bottom. So I bought this tube
of Hodam Aquile paint, ultramarine finest, which
is less granulating, and that's what I've used here. The point is you can
play with your paints, and you will learn a lot about
the different strengths of each paint and about how far it travels and
about the granulation. And it's a really great way
to practice your technique with washers and your timing
with the wet and wet method. So this little painting
has now dried, and as you can see, it's got some really lovely
things going on. The darker blue, the
ultramarine has worked its way up into
the cerulean blue, and I've got these
beautiful soft edges. And where I've painted the thicker orange in it's left these
interesting streaks. And this could now become
whatever you can imagine. So I could add some birds in
the distance or I could add some trees in the front as a kind of silhouette it
becomes a playground, and it all started with just
play and see what happens. So there's so much fun to
be had with this method, and I really hope you
will give it a go. And then the last thing I
want to show you is this was the painting I did
before with birds. I decided to add a
couple more birds going further into the distance. This is the same
three colors and the same method
working into the bead, but it was done on wet paper. And as you can see,
the mingling of the colors has happened more
successfully on this one. So have a play with lots of
different variations, timing, wetness, dry paper, and just enjoy exploring
what your paints can do.
11. Conclusion: I hope you found that
useful and feel like you've got a new skill
under your belt. Washes are really fun to create. We looked at the three
types of washes, and then we put that into practice in a little painting
of a sky with some birds. Don't forget to take
a quick photo of your exercises and
your final painting of your sky with birds
and upload it into the class project
gallery so that I can offer you some
personal feedback. And if you enjoyed the class, I'd be really grateful if
you could leave a review. If you want to connect
with me on Instagram, you can find me at
Catherine Jennifer Designs, same on Facebook and
same on YouTube. Until next time,
thanks for watching.
 Catherine Jennifer, Artist, Art Educator, Designer