Transcripts
1. Class Introduction: Have you been telling yourself that you've been
wanting to paint more trees and that you want to practice and
you want to get better. Well, you've made it. Here is where we are
going to take color. We're gonna play with
color. We're gonna play with so many
different brushes. And we are going to test
out our tree skills. We're going to try different
ways and different things, And we can use Annie paints, and we're going to just
practice, practice, practice. I'm hoping to show you the way I do trees and maybe
that will inspire you to do your
trees your way and you'll adapt to a new
way that works for you. The idea of this tutorial is demonstration is that you get a way to embrace
the way that you want to paint your trees the way that you want them to look. And that you'll come up with
in a way of your own that works for you within your
skills and your level. So join me and let's paint
a forest of our own.
2. Class Description: Hello and welcome. Let's talk about what
we're going to do today. We are going to paint trees. We are going to play with skies. And we're going
to put our trees. And we're going to
play with heights. And we're going to
play with shapes and widths and brushes. And we're going to play with ways to bring them
forward and backward. We are going to also just
strictly practice trees. We're going to play with
skies more, lots of skies. We're going to play with
misty and total value and see what that does and
what that doesn't do for us and what
it can do for us. We're going to play
with a lot of wet on wet and see how that
can work for us. Again, we're going to
suggest these trees, right? These are not perfect trees. You do not have to be perfect at trees to take this class. This is why you're
taking this class, so you can get lots
and lots of practice. Then we're going to paint a gradient filling tree,
lighter trees in the back. And we're going to bring
the colors forward and we're going to
see how that plays. And we're just
going to have fun. Most importantly, we
are going to have fun. We're going to stay
curious, explore. And you can go off the
path if you need to. You don't have to
stay on the path that I'm setting for us. You can go on your own. You can take little bits
from here and there and merge them together and
do what works for you.
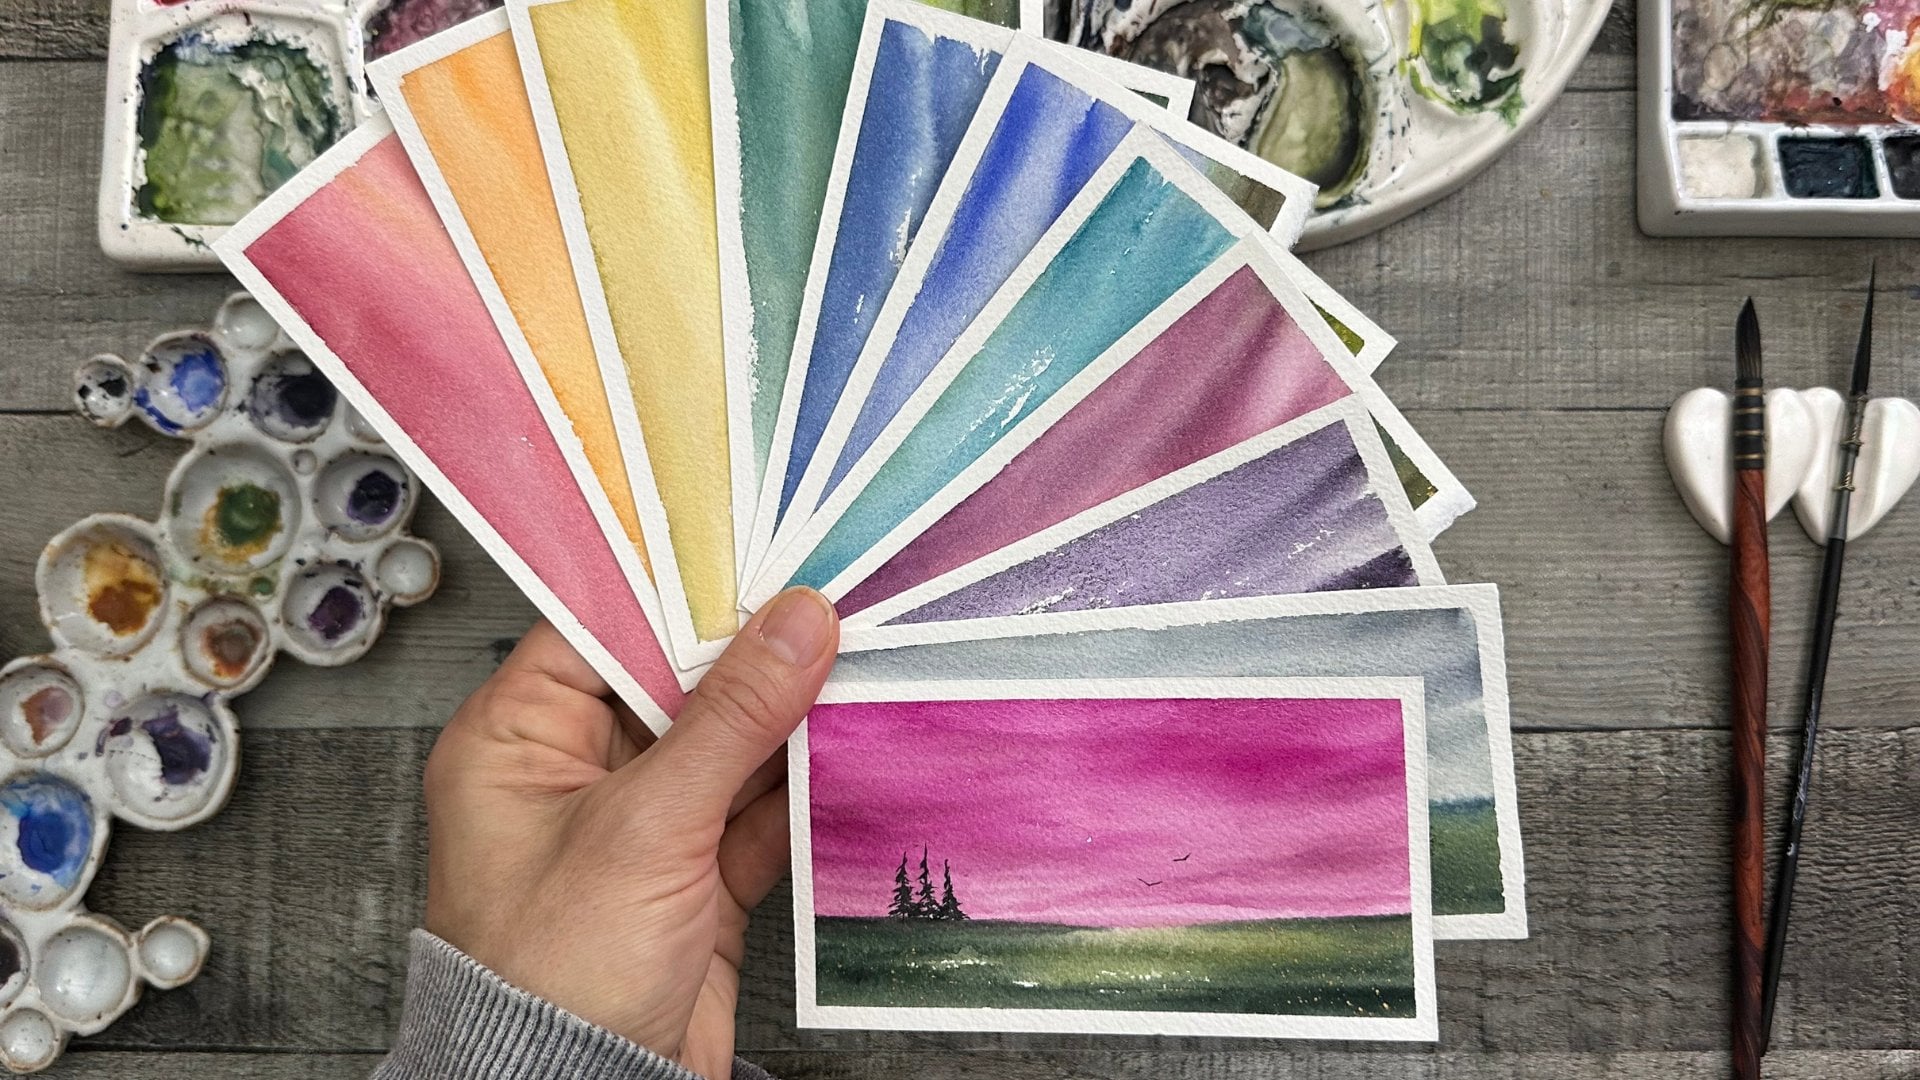
3. Materials & Supplies: Let's talk supplies.
What I like to use. I buy arch paper
in bigger sheets. Big big sheets, I
just cut them down. Your most important piece or tool in this practice will be your paper.
Paper is most important. You're going to
want 100% cotton, 140 pound, 300 GSM paper. The most important
100% cotton will make a huge difference in your experience and in your
painting journey brushes. There are a lot of
different brushes. We can, we can use flat brushes, we can use round brushes, we can use script liners. And you're not going to
need all these today. That one doesn't go in there. There's a rigor we can use. We can use a we can use a mop brush and we
can use another round. You can, if it works for you, try a smaller brush. You can try all the brushes. That's what I want you to do. Explore. I find a flat brush handy for wedding
paper. Not necessary. Also a water bottle. Not necessary, but handy. Do like to use a hockey brush. This one's still dirty from this morning's practice,
but I do like to use that. Holbein tape is my favorite
tape, highly recommended. I do use a plexiglass
to take my pieces down. All these supplies
will be listed in the resource section and you
can find a whole list there, more extensive list
and also paints. I'm a sucker for
handmade paints. This is one of my
handmade paint sets and I'll be using
handmade paints. I love handmade paints. There I go to between
get lots of colors. You can mixture colors. You
can have convenience colors. It's all up to you
what you prefer. You can stick with primaries and just use those and
you'll do just.
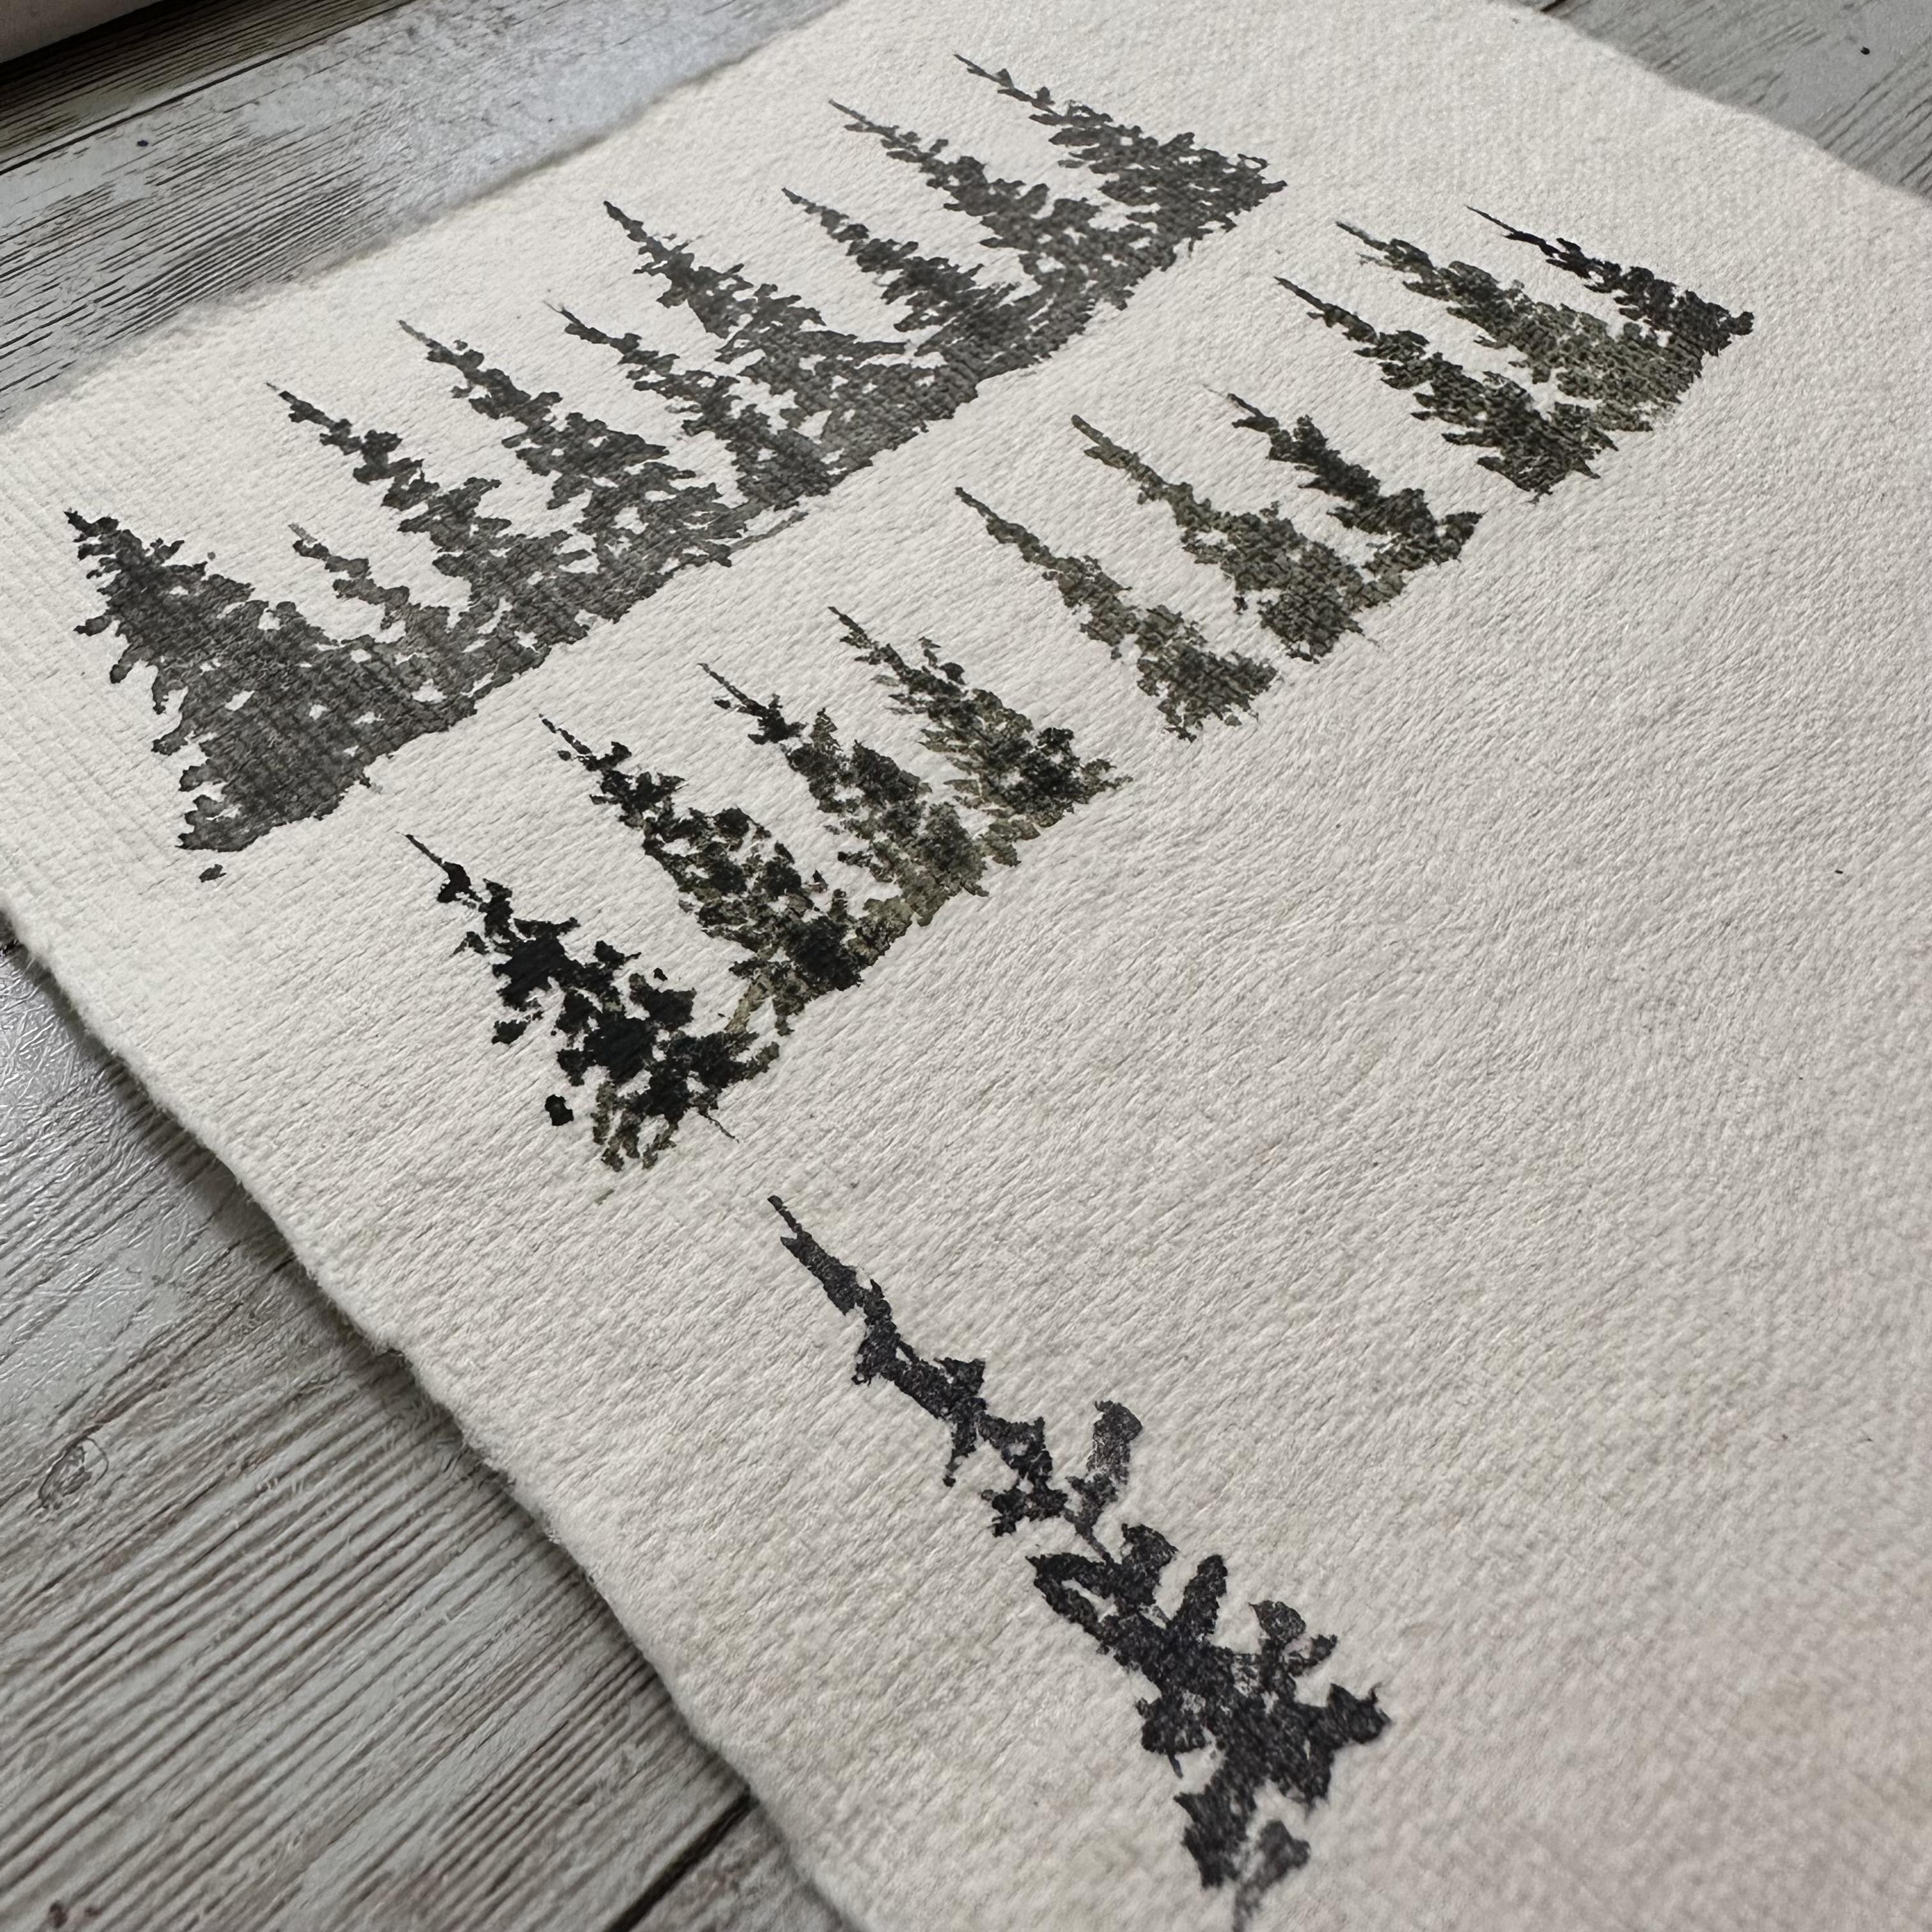
4. Tree Demo & Practice: Let's go ahead and talk
about painting trees. This is a piece of
handmade paper, it's 150 grams for
tree practice. You can use whatever you like, whatever you're most
comfortable with, whatever you're familiar with. This is a newer to me paper and I usually
wouldn't recommend painting something that you want to be comfortable
with on paper that you are not comfortable
with going out on a limb here on a limb
while we're painting trees. So let's see what we can do.
This exercise is just going to be us practicing our
trees over and over me. Maybe going through
the steps that I take. I do tend to paint my
trees pretty fast. My apologies in advance. I'm mixing up some
paint right now. I'm just grabbing some green and some neutral tint
which is closest to a black only so that
you can see what I'm actually painting
really well. We'll probably zoom in a bit. But we're going to talk
about brushes first. Well, I'm going to stop mixing. I'm going to try a rigger today. I'm going to maybe try a mop. I'm going to try a round, a smaller round size four. I'm going to go ahead and
try a caligraphy brush, a new inexpensive dollar
store tree style brush, to show that you
can get stuff done even with inexpensive brushes. Really your most important
thing is almost always paper. Paper is very important. We are going to use any paint. This doesn't matter
for this practice. Again, I'm only using
dark so that you can see. Let's see, I have a
liner, I have a round. Trying to think of
what other brush that you might have
that you could try. You can use a dagger
if you had that. But let's go ahead and start with my very thin rigger brush. This is a size, this is plan of Bright's rigger. I don't remember
what size it is. She only has one. I think
it's a size zero or one. What I do with my line
down, thin, light line, then I start at the
top and I start making a small marks on
each side of that line. I just made very small and they get
bigger as they go down. And I'm just varying them. I'm not trying to be s specific, I'm not trying to be exact. I'm not trying to make it look like anything
in particular. I'm just going to
go back and forth. My paint might be a little
too watery, but that's okay. This is just practice. We're just going to make
trees, all different trees. You can go back and
drop more paint in there and darken up some
areas if you'd like. Again, I did use
pretty dark already. We're just going for the
triangle shape, the very basic. I'm not saying it's
very easy for me, this wasn't easy
for some people. I see that they can
do it very fast. You can use less marks like this go for a skin tree, right? You can leave more
****** in between so that you have more
light shining through. Trees are not the same, right? They're never ever the same. Nature is imperfect as well. So we can be two,
you can go back in, drop some more color drop
some more like maybe if you have too
many empty spots in the middle or you
can leave empty. You do always want to
vary the heights of the trees and you can put them closer together,
farther apart. You don't want to do anything
that is too uniform. That's when it starts
to get a little, trying to be picture perfect. You don't want that.
It's okay if they touch. It's okay if they
run into each other. It's okay if they're too close. It's okay no matter what. Right. You can squeeze one
in right in here if you want to stick a little one in there. Again, it's suggesting
trees so they don't have to look exactly like what you
think a tree looks like. Okay. Line down side to
side real fast, real loose. Okay. This paper
is very textured. I do skip a lot how the brush, it's okay for crooked like that. Trees can be crooked. Okay? Let's, let's try back and forth. Maybe that will be different
method. Let's go like this. Just going back and forth more trying different ways to see what works
for you Is key here. The way I do it might
not work for you. You're going to want to try
a lot of different things, different methods,
different ways. Basically, on that one I did loosely zigzag lo
zigzag down this line. I made my line start
of the top, very tiny, zigzag back and forth,
back and forth, right back and forth,
back and forth. I finally just went
back and forth, back and forth, back and forth. And there you go. You can do a tree like that if you like. If that works better for
you, try it that way, then as you evolve and
get more comfortable, then you can do these
more loose side to side. I don't personally love as much. I think they can
have a cute place. I think they could
look really cute on a holiday card or something. Wintry thing. Wintry fun. I think they definitely
have a time and place, but for the most stuff I do, I like these more loose
abstract, free flowing trees. It's just literally
bouncing side to side. I'm not going equal to
side, right? I'm slowly. When I'm doing, I do my line
right and I go one side, I go a little bit lower
for the next mark. I go to the next side,
a little bit lower. And each side, I don't do it. I'm not doing it side
by side by side. I'm doing it this way, if that makes sense, right? At varying angles,
they're not side by side and they're not even
and nothing is uniform. Don't try to make it that way. Just try going fast, see if it works for you, then try going slower and see
if that works for you. If you're the person
that just is like, nope, don't like
these loose kind. I need to be more
precise. I need to make each branch do that. Works. Do what works for you. What you are comfortable
with. You're just going to want to keep
going with these rows. So far we have ready
123-456-7899 tree in about, what is that, 7 minutes. So let's switch brushes. Let's try this
calligraphy brush. This is a very
inexpensive copy brush. And I'm just going
to load up the paint again and we'll do the next row. Same thing, I'm going
to make my line, I'm going to go back and forth. This brush has a finer
tip if you can see. Let's zoom in a bit for you. You can see that I'm
getting more detail, right? More variances in actually in the actual tree Back here
we're getting more blobs. Paint also might be
a little thicker. You can play with those
different things. You can play with the
water level in your paint. You can use less water. You can use more water. You
can use a bigger brush. You can try a smaller brush. You can try all these things
and see what works for you. Because I say this works for me doesn't mean that's
what will work for you and what you'll
be most comfortable with and what will flow
the best for you, right? Maybe you'll do this way and
it just feels super awkward. But it works okay, but
it feels super awkward. Maybe you can
incorporate your way and another way together and it ends up being the
way your new way. Right? I just like to stress that just trying things
your own things, different ways, you know,
is really the key here. It's not doing exactly what I tell you because I don't know. It just doesn't
work for everybody. I painted so many
trees and followed so many tutorials and tried
so many different ways, and I just, I was really,
really struggling. And I reached out to my mentor
and I said this before, reached out to her and
said, what am I doing? What am I doing wrong? Or how do I do these? How
do I paint trees? And she said, you just
have to keep painting them over and over and over and
over and over. Here I am. Let's try this silver brush round and again, side to side. You'll kind of tell
what brush needs a little more water on it
and what brush does not. This brush has a round or belly, so I did end up having to add
a little more water to it. Let's do a toll ski one. This brush definitely
holds water differently, especially on this paper. This paper is a little bit
different and there you go. Just just play with the different brushes and
see what feels right, feels what works for you. Okay, we're now taking
a very pointy mop. Again, you may have
to adjust your paint and water levels when
you switch brushes. Not everything picks
up the amount of paint and plays on the
paper the same way. You'll just have to play
what really works for you. I know I say that a lot, but
I can't stress it enough. And you could literally
just go side to side, blo, blo, all right? And then go back in and drop in some darker
colors if you want. And you can always
go back in and give yourself a few little
finer details of the tree. Again, when you get a
whole forest of these, nobody's going to be
picking apart each tree. Say if that one's Walkie, people are just going to
see the general forest. They're not going to
look at each tree like, wow, that doesn't
look like a tree. We're just going to do row
and row and row and row. Just fill a page with trees. I have so many pages
filled with trees. You can try a flat
brush if you wanted to. You could try a dagger. You could try a oval, cat's tongue, oval
was different. Brushes have different
names, right? You can try a script liner
just like the dagger. You can try a small round. Two, the list goes on, right? You can try many, many brushes, but I want you to
just keep trying them all and see
what works for you. Thanks for joining me in plant and painting our own
little, very own forest. And I'll see you
in the next cuss.
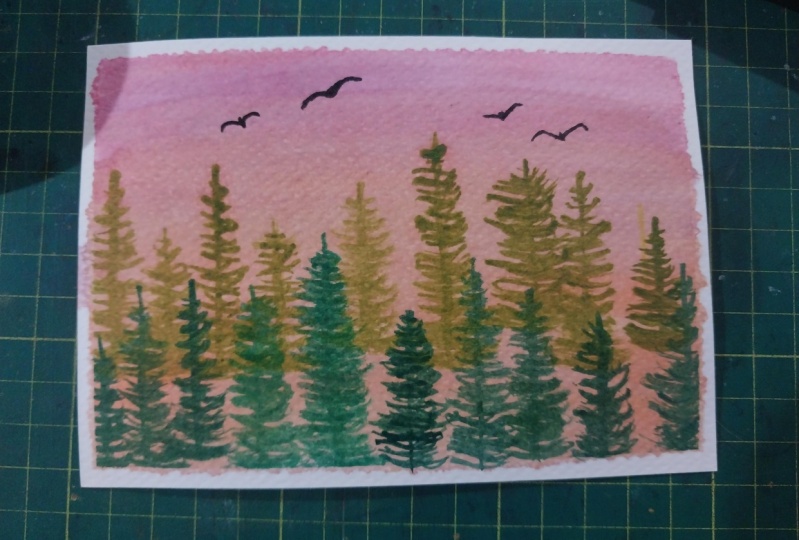
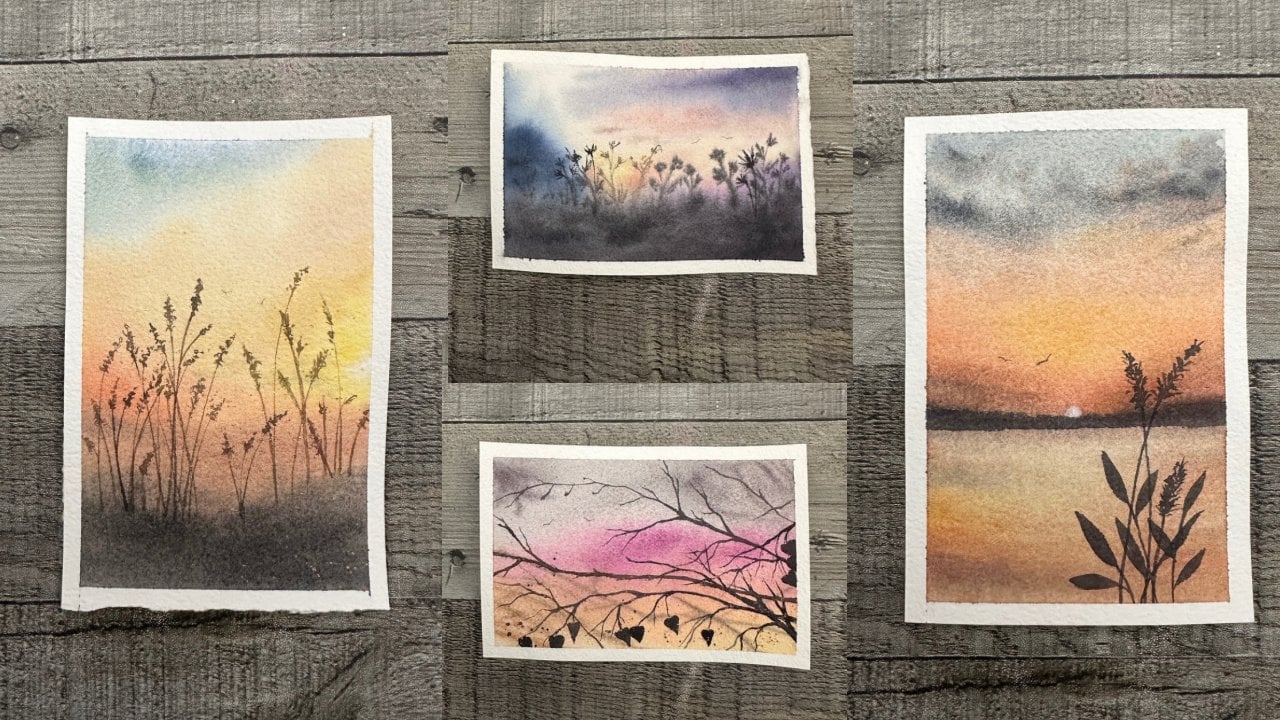
5. Project 1: Misty Forest: So in this lesson, I thought we'd
paint just a lot of trees and get some warm up, some memory, muscle memory. So I'm going to first
tape off the paper. I'm going to tape it
on this plexi glass. I like to be able to
move my paper around. I like to have the
protection on my table. I'm going to soak
the entire paper. I like to use a spray bottle
to kind of do a pre wet. And then I use the brush to just kind of make sure
it's an even coat. I love paper cloth
towels, by the way. I use paper too and I tend to re use it until
it's like dead. And so the cloth I really like, I'm using a mop brush here and I'm just loosely getting
a background color on. I'm not doing anything
in particular here. You could use any color.
You can use a warmer color. A cooler color,
whatever you wanted. Really, I just went with this
kind of light to blue to give myself something other
than a white background, maybe, so that it could kind of look like a
mist coming through. And I'm going to start trees. So I want you to play around
with different brushes. I don't want you
to just reach for either the same brush or a brush that maybe you're
not comfortable with, or just try every brush, so I'm going to use this Tintoretto one and they
really love these brushes. These are awesome brushes. They have amazing tip to them, but it might not work for you. And I do want to stress that. That's why I keep saying to use all the different
kind of brushes. And I think that that's where
you discover what works for you in making trees and painting trees
and not only that, but just doing them
over and over and over. I mean, just in
this one picture, you'll see how many
trees we end up with. Quite a few. I'm just going to blur the bottom a little
bit with some wet water. Wet water, some water. And just to kind of loosen
everything up a little bit, I don't want anything
to be too tight. These trees are suggestive,
they're not perfect. They're not going to
look like the ones you see exactly in the
forest. They're loose. You know, I'm making
a straight line and I'm just going side to side with my paint brush along each side really quickly. The less I think about it, the better my trees
happen to be. If you do trees and you have to go slow meticulously
to make them work, Do that, do what works for you. Just because I do
mine fast and quick, like this, doesn't mean that
it's going to work for you. It might, and that's
awesome if it does, but if it doesn't,
that's okay too. Do what works for you. And if I'm going too
fast or too slow, you can speed me up
or slow me down, you can fast forward,
you can pause me right. So tailored to you
make it work for you. And, you know, if you're, you only want to do like a
few trees, do a few trees. But if you want to practice and really get more comfortable, I highly suggest keep going
with these trees like I am, just keep doing them and
doing them and doing them. I once asked a
person I considered kind of a mentor how to do trees 'cause I couldn't do a
tree for the life of me. And she said, Amber,
I painted thousands. I was like, oh, and so I'm well past my thousands now and
I'm much more comfortable. Is it perfect? No. Do they
turn out great every time? No. Do I have the magic brush that makes perfect trees
every time I do not. I do vary my brushes.
I switch them up. I'll use a rigger,
I'll use a round, I'll use a pointed round,
I will use a liner. Sometimes you'll see me using
all different brushes and maybe that helps
me stay loose and helps me keep them different, right, rather than the same. And you don't want them
all the same height, so make sure you're
varying those heights. Higher, lower, shorter,
fatter, skinnier, less branches, more branches, darker, dropping
some darker colors. You'll see me going
back here right now and kind of just dropping a little
bit more color in places. And you know, you
do want these ones, we're doing this first layer. We do want them fairly
lighter, right? We don't want to
go too dark with our tonal values quite yet. We're going to do
some more layers. And so we just want
to keep, you know, slowly, slowly, kind of dropping in a little bit of
more color here and there. In a minute here,
you're going to see me kind of loosen up
that harsh edge, that hard edge I
have here right here below on the on the
left hand side. So I'm going to take my brush, I'm going to wet it.
Not too wet though. I'm gonna dry some water
off up right there. I'm going to kind
of smear that to loosen it up so I don't
have such a harsh edge. I think harsh edges
can be really cool in some instances instances and this one we're not
going to do that. We're going to blend it and I'm going to
take a dry flat brush. Actually, that brush is not
dry, that brush is wet. I do like to use a dry one, but I'm using it wet
right now and just kind of blurring it all and
kind of feathering it out. A dry brush would work better. It wouldn't be taking
away what I did. So I did let that layer dry. I used a heat tool, which I love if you don't have one,
you can eat a hair dryer. Or if not, you can just
wait probably about 10:15 minutes until you can feel
your paper is completely dry, not cool the touch you
want it to be dry, and anything cool
means it's still damp. And if it's damp,
your trees will bleed and you don't
want that right now. So now I'm taking a darker
color of the same color. So we're just darkening
the value of it. Which just means I'm using
less water, more pigment. And I'm just going to keep, I'm counting the trees to make
a point of how many trees. I really do paint in
a day, in a session, in one piece even so really repetition is what
is working for us here. We're just doing
it over and over. We're practicing again. You can switch brushes
throughout this one practice. This one piece can just be a completely, completely
practiced piece. You can grab your
rigor and just, do you know, one row of rigors. You can do one row of
rounds and that's okay. Again, nature's not perfect. Trees are not perfect. You're going to have all sorts of different shapes and sizes. And so I really want to emphasize that none of
this has to be perfect. And it's just paper. We can grab another piece
of paper and we can dry in. So there I go, blurring
out the bottom again. We do have a harsh line there. See how the land has created
one and that's okay. You can blur that out if you
prefer or you can leave it. I think I'm going to leave
it for a little while. I'm going to fill up this
little area up here with some more trees and
you don't have to follow my route if you like. That white space that kind
of looks like fog which, or fog or miss which I
think it actually does now. I kind of wish I didn't cover it up, but you don't have to. And you can learn
from me saying that I maybe wouldn't do that next time and maybe
you would. I don't know. Maybe you would stop
with where it was now and just add some trees in the foreground and call it done. You don't have to
do what I'm doing. You don't have to use
the colors I'm using. You can use any colors you want. You can make a pink
magical forest. You can have a green forest. You can have a purple forest. Do whatever makes you happy. And again, it's just paper. So you can do it again
and again if you want or never again
if you don't want to. Right. It's all about you
and it really is about what works for you and what helps
you and what's good for you. If this practice you're like, I'm not sure about this one. Skip to the next one',
try the next one. You know we're fast forward and see if it's something
you even want to get to. A lot of people will
recommend watching the video first all
the way through. I'm not a huge element. I don't have a lot of time, so I often will not do that. I'll just dive right
in and go for it. So do what works for you
if you have a lot of time. I think it's awesome
to be able to watch the video beforehand. But I do like to watch
it during my paint time. I pause, sometimes
I'll rewind often. I do a lot of skillshare
classes myself, so I'm pretty well versed in what works for
me with tutorials. I've been doing a tutorial
day since last Fall, and so I feel like tutorials
are something that you really need to make work for you and learn what
works for you. And be okay with where you are and what
skill level you're at. And be able to adapt to
the tutorial and what you are capable of doing instead of focusing on, well,
I can't do that. Do it your way
then, right? Do it the way that you are
comfortable with. Skip things if you
don't like them, right? If you're like don't like that, just skip it. Do something else. Do what you can do or do
what you're comfortable with and make it yours, right? So now I'm going to add just some big old
trees and you'll be able to see how I do these
details a little closer. It really is me just blobbing
my brush back and forth. But this Tintoretto, it
really does help the job. The tip on this brush is so
fine that I can just bounce back and forth like
this and end up with these perfect little
like branch like lines. If there is a magical brush, this one is pretty darn close, especially for
these larger trees. Just it really does
handle a lot of paint and water and so I'm just going to give
this tree a friend. I do tend to work in odds. I think, you know,
there's some sort of, I think there's some
sort of design rule. I did go to design school
and there was some sort of rule of odds or three
or something, right? Never just have
two of something. So I think I took that a step
further and was just like, well then we're just
going to do, you know, three of everything or
odds of everything. Here's my little
family of three, but you know, I'm not
going to stop there. So we'll end up adding
some more trees. But I do love how these ones
got even darker, right? So less water, more pigment. And if you're not getting
enough darker in your tone, you can always add a
touch of neutral tint. You can add a to just a touch of anything that will
bring your color darker. You could add black if
you really wanted to. My black is neutral tint.
So I'll see. There you go. I had absent a little
more trees here, these key trees can either be peaking up or they
can just be smaller. And I don't know,
you just can get so much practice in and it's
kind of endless for me. You just keep going
and you know it, just every little brush
stroke, I feel like I learn. And it feels like it helps me to retain and to be able to
do this without thinking. I feel like when I
was practicing trees, sometimes in the beginning
I was overthinking it all. I was trying too hard to do these perfect steps and perfect strokes that
everybody else was doing. That I just don't work that way. Right? I like the
chaos and the kind of abstractness of the way that I've kind of
adapted to painting. I don't know if I could say
it's a skill or anything. I could just say
that I really have adapted what I can do, what I'm capable of doing, into a way that works for me. And I think that's
the key, right? Not everybody's gonna
paint the same. We don't want that.
That's not very fun. We want everybody to have
their own way and their own unique style so that we
can recognize that, right? Isn't that the best
thing to be like, hey, I knew that piece was yours before before I even
saw that it was yours. That's like one of the best
compliments I've ever got. I was like, oh really? You can like I knew it was
like I know it. Okay. That's it, That's it. I found my style,
I found my way. And it's really exciting
when you finally get that. So that's why I'm so
adamant about not necessarily always just
recreating what I show you. I want you to find you and if that's recreating mine in the beginning or anybody
else's in the beginning, that's fine too. I mean,
we've all been there. I've done that. We all
do it. And that's okay. It's part of how we learn. So I do have those
three trees floating. I was just going to say
those are super floating. So I'm going to
try to, you know, use some water and
loosen that up a little bit so it doesn't look like they're just floating an island. And I wouldn't say I do the
best job of stopping that. They're still pretty floating. But that's okay. It is what
it is. It's all practice. It's even practice for me
even doing these demos and showing you what I like to do and how
I like to do it. It's all practice for me
too. It's not perfection. I don't have this end goal of, you know, looking
at a piece going. It needs to be perfect. It just, it just,
that's not my goal. My goal is to share with you and kind of just really
just share the joy of the magic and the magic
of watercolor and what it can do and how it can help us and how it
can be there for us. And it gives us just an outlet that not anything else does. So everything other craft
I do is very exact, right? You have a recipe for baking, you have a pattern
for sewing pattern, for embroidery
pattern, or, you know, all these set of rules and specific outcomes
for every other craft. But watercolor, it's
different every single time. And there's just so much
magic in that for me. I can't remember if I
counted the trees in this, but there's quite a few, so I highly recommend you add as many as you want,
as few as you want. You can add different
colors if you want. You can make each layer of these different
colors if you wanted to. There are no rules. Just because I stuck
with one color and change the tonal values, doesn't mean you have to
make that dark row pink, the next row purple, the next row indigo.
You know what I mean? It doesn't matter.
Just have fun with it and do what makes you happy. I know I say the same
things over and over, but I feel really strongly
about those kind of things. And I hope that, you know, that you realize that it's okay. It's okay to not be perfect. It's okay to try
five or six times. I, it's so funny when people tell me I tried this
and it didn't work. I said how many times
did you try it? And they're like, we, you
know, once I'm like, no, you might need to try this
seven or eight times. I'm not saying this one.
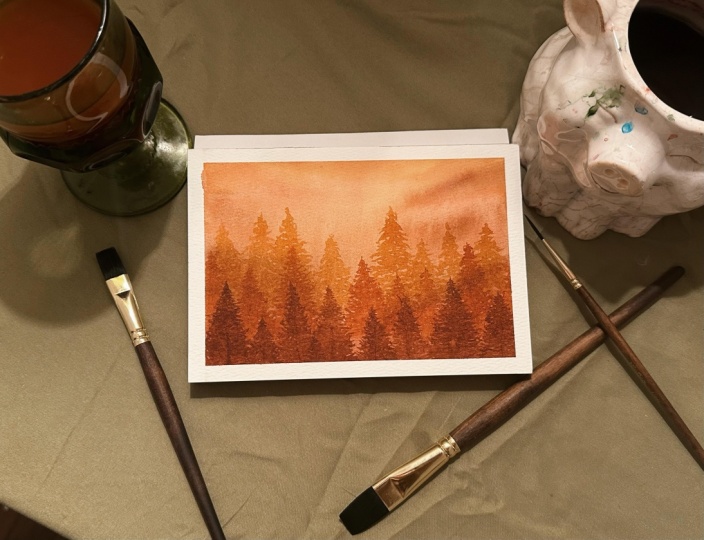
6. Project 2: Part 1 Gradient Trees: Hello. First things first,
let's go ahead and take down our 100% cotton paper. Let's do right on the wet. We'll get a nice
background going first, and then we'll dry that, and then we'll come back
and we'll add some trees. I mean, I get some yellow
on there. Yellow, och? I'm just going to bring it all
the way up and all the way down my side there. Let's decide what
color comes next. Let's do a slightly
orange color. This is a rustic pumpkin orange. We're just going to start
blending it in with our ochre. Maybe you want to
grab our ochre? Again, I'm not one, not that I don't love
perfect radians. I do, but I'm not one to necessarily encourage
that I like the flaw. I don't know, I won't
call them flaws, but I like the
differences in texture. I like the different
sweeper intensities and tones. I like that. That's something I enjoy. I know it's not for everybody. I know some people probably real love that perfect
gradient. That's great. If that's what you want to do
today, awesome, go for it. I'm going to let the textures happen and I'm going
to be okay with that. I'm going to let
the sweeps happen. I bring a little
red down in there, That's okay if I bring a little orange too
far into the yellow. If I want to go back in the grab some more ochre,
I'll do that too. If the red mixes down there. I'm okay with that as well. What I do want to
bring in is maybe pinkish purple and we're just going to sweep
that through. Maybe we'll grab some more. You do want to be careful
not bring too much water. I often will roll my belly of my brush to get the excess
water out of the brush. I'm not introducing a ton
more water onto my paper, especially if it's starting
to dry, which is not yet, but soon enough it will, that could be not fun later introducing too much
water to some fun shapes. Again, if you don't mind
those, it's all fine. I don't particularly mind them. A ton. For me, it's okay. These larger sweeps
I'm good with up top. Right. These are good. You want to get your
sweeps up high, You can get them bigger. Okay. But as our sweeps of clouds come down
towards the horizon, we want to thin them
out a little bit. That might mean
switching brushes. I'm going to go from my mop
brush to a smaller mop. I'm going to add my water. I'm going to dry off
my brush a little bit. And I'm going to use
this part of my brush just to sweep a little bit. I'm going to grab my yellow
ocher again and maybe a little lighter yellow,
little lemonis yellow. I'm just going to fill
in this bottom area with a little more yellow. I think our tree line
will be down there that we can have them
peeking through the yellow. Got lots more tree practice. Let's go ahead and I happen to have some
leftover purple here. We'll just bring in some swoopy, some darker clouds haven't
decided if I was going to make them just straight
across or if we were to do what you feel
in the moment. Sometimes I'll swoop
and sometimes I'll just make lines and
be okay with it. And sometimes I'll decide
that I don't like any of it and we'll start again
or we won't even start again. We'll kind of brush it up. I can take my hockey brush and
I can just sweep it. Okay. So maybe it's more of a high
deserty looking sunset. And if you don't like
that, that's okay too. We can do something else. We don't have to
keep it that way. Let's give ourselves a
moment to think about it. Oh, and see, I dropped water
in there and that's okay. We'll pick our hockey brush back up and we'll just try
to sweep it out of the way. If it doesn't, that's also okay. It's just practice, right? It's just paper.
It's just practice. And that's what
this is all about. It's testing your limits and finding out how to fix things. If you do make a mistake, right, or if you er, or if you do something
you didn't want to do, Something surprised you or
something unexpected happened. Those are all okay. This sky
is going to be really light. I can tell it's
going to dry a lot lighter if we wanted
to take some more. Red. And we can do that. If we wanted to drop some more purple in there, we
can do that too. That red and purple will
really darken up that area. You may or may not want that. Okay? That's okay. Whatever you like. Okay. We can look at it again. Sometimes tilting it will give you a different
perspective. Maybe you want to hold it.
Sometimes I'd like to do that. I introduced more water. Now we're going to, whenever
you introduce water, it pushes the pigment, right? So you end up with this
bloom or this bare space, space where the water
pushed away the pigment. And so it cleared the paper
away for you, so to speak. Clear the paint from the paper. See, now I have a
big mess there. And we can just sweep
this all like this. We can leave this like, you
could turn this around. It could be an ocean scape. It could be a seascape. It
could be a red sea, right? With the sun beating down, you could clear out a
little sunspot right here. But for now, now it looks wrong. I turn it this way, that's okay. Now we're let's just dry this and see what
happens if we don't like it. After it dries, we can
always re wet everything and add another layer.
That's okay too. Sometimes it's good to dry it, see where you are evaluate and then just do
another layer at all. And start again, that's
100% acceptable. 100% encouraged. While I was drying that
I came up with an idea. I'm going to grab
my rigger brush. I'm going to leave it as is. I'm going to start with
some orange, yellow color. I like the uncertainty of the paint each time I like
that it can be different. I started with a
lighter, lighter, slightly lighter
warmer Okra up top. And I'm just going to bring this color and these big trees down all the way to the bottom. For now, I probably should do a few in
the background. I probably don't need to do
all the way to the bottom. I'm not really sure
what I'm doing yet. Actually, like I said, as I was drawing, I was thinking I want to do gradient trees. I think it'd be fun
to do the orange, yellow ones and then maybe pick up a brighter
or darker orange. And then go for
the pink ones and the purple ones and layer
them on top of each other. I thought that would be
fun. That's what I'm doing. Again, I know it's funny
that you're taking a class from somebody that doesn't know
what they're doing. That's exploring and
being curious as they go. And I think that that
sometimes gets lost. I've taken a lot of tutorials, many tutorials here
on skill share I've been taking on a day
at least since last Fall. So it's about nine months of
tutorials every single day, Sometimes 123 or four,
but at least one. No matter what, I've taken
a tutorial every day, I feel that sometimes tutorials can get very
stuck in their ways. This is it, this is the way, not that they don't encourage
you to do what you want, but I feel that sometimes, um, I don't know,
we're not all experts. I guess that's what
I want to say. We're not all experts.
Do what feels right. Do what feels good to you. Explore when it feels right. Right. If something feels
wrong, you're like, I don't know how to do
this way, I don't like it, or I don't care for
this, Do it your way. Absolutely 100% do it your way doesn't have to be
done the way you see it. Just because the territorial says to or just because
they're doing it that way. Right. We're not all experts, some of us are just very passionate watercolor
hobbyist artists. Right. Some of us want
to share our passion and our love with you and just encourage and be
able to inspire, hopefully you and I guess
that's also what I want to say. Again, the trees, these are
pretty walk as I'm talking, I feel like they're
getting walker. That's okay too. This is just an exploration. It's seeing where it takes us
and if we like the result, that's okay too, right? It's okay if we don't
like what we make, it is just paper. I don't know if feeling this was the whole idea or a
good idea of leaving. If I should blur the ground. I'm not going to, I'm just
going to dry this as is again. See where that takes us. See
where we end up in the end. Let's just go for it.
If we don't like it, we can just go over it again. I'm not sure. I wanted it to be too dark, so this
is going to be good. It's going to dry
lighter, right? But at a little bit more red, maybe a little more purple, I think this will be good. Drop that in there to
mix it up a little bit. Trees aren't perfect. If you change your color
and decide that, love that color, it's okay
if you change mid tree. You can always go back in
and drop some more up there. I'll do that often. Just drop
some more color in there. Because trees aren't
always the same color. They're different colors,
they have variances. And there are different hues
and tones and different all over your trees do
not need to be perfect. They need to be practiced a lot. And that's what, this is,
just a lot of tree practice. Wholesome, good,
fun tree practice. All right. Try to
keep those tips. Different heights, different widths, different everything. So that more textures
and more things in your, you can even take
that dark color that you already, that
already mixed up. I'm just going to drop a
little tiny bit of that in just a few of these
right in the middle, because in the middle of the tree seems to be
a little bit darker. So I just wanted to drop
that in there. All right? I try to keep my tips up here as pointy as I can.
Thinner at the top. Just adding layers of trees,
maybe a little more dark. That one seems to blend
right in. That's okay too. It doesn't you don't want to
stick out like a sore thumb. Right. Blending is good. And layering those so they don't look like they're just stacked on top of each other. Which at the moment they are. Sometimes I get sad
because I'm like, oh, really good, like looking tree, I
have to cover it up. But I try to get over
that and I try to just think about all the
practice I'm getting. I am right, I still
need practice. I've painted thousands
of trees and I'm still happy to practice on 100% daily practice. All right, let's get a
little small one here. Let's see, we did 123 456-789-1011 in our
first layer, right? 1234567 in this one.
Let's do two more. I do stick in odd numbers. Let's like this one at lower. We'll bring it a bit forward. Come into the line of R.
Okay, take a little bit dark. Since this one is closer,
I'm going to add, this one's a little
bit closer to. I'm going to add a little bit more dark in the center here. This one is a little
bit closer as well. Those ones, they're a
little bit further back, so I'm not going to
add dark to them. Okay, 1234567. I did say a few more, didn't I? Okay. Let's throw a few more. Let's throw one in maybe here. Okay? And then we'll toss
another one in, right here. Okay. And then we'll dry again.
7. Project 2: Part 2 Gradient Trees: There let me go a little
more of a brown color. I think I'll stick with that. I did initially think
I wanted to go purple, but sometimes I did think I wanted to go
purple initially. But sometimes things
just to work out a certain way and we're
going to go with that. And again, just loosely
painting our trees. Try not to do what I just did. I got a line in a line, right? A tree lined up with
a treetop of a line. Probably not ideal for me. But again, it's just paper.
And it's just practice. And that's okay. That's okay. You stick a little tree in here. These are all the same height
and I should have gone a little shorter on one of these
or taller on another one. We'll try to fix that by
adding some more in between. You don't really want your
trees the same height, right? A little too much paint
on that brush though. Let's go right here. We'll just have a
little tree there, and then we'll go here
with a little tree again. Imperfections are welcome. Nothing's perfect in nature. We sure don't expect your
trees to be perfect, nor do I expect
mine to be perfect. They really aren't, okay? They're just illusions
and suggestions of trees. We're just going to keep
filling up a little bit here, keep filling, deal like trees get larger the closer they are
to you, you know. This is just for fun. We're not going to be crazy about
certain sizes and heights. I always say and see that
when I lined up to I'm not big on like huge on the shadow. Must be exactly correct. I'd rather just
have you have fun and explore versus getting all those little
details perfect. You have plenty of times for those things in life,
We all do, right? We have plenty of those
things in life already. As it is 1234567 odd
number. Let's start there. Let's just add some neutral tint to what we already
have going on, which is basically my
version of a black. I'll use neutral tint a lot. I love neutral tint.
It is my black. If I were to use a black, now I've made, oh, look at what I did, exactly
what I've said not to do. So let's go ahead and
turn those into birds. This is going to be a big bird. There we go. All right. We've got a big bird out there. That's okay. We're just going
to leave the two for now. Maybe wild more
later. Maybe not. And that's okay. It's
okay. It's okay. It's okay. Right. You
can do what you like. Let's now, I can't decide if I want to
do these bill trees. And I did not dry.
So let me Did I dry? I did not dry. Right.
No, I did not. Okay. Let me I'm just going to just one tree and then
we're going to dry. See, it's much darker now
and I'm not sure. I love it. It's okay and I can't
say that enough. You don't have to love it. Okay. I'm gonna dry
because I want to do some taller spindlier ones versus all these fetch
Christmas tree looking ones. All right. Let's keep going
with our, our trees here. Just bring a big old
one in here. Okay. And then let's bring
And some of them, yes, we'll absolutely 100%
cover up whatever you've, whatever you've painted, created and that's
okay right now, we're just after the practice them. Perfect. Even
after painting, you know, all these
all of a sudden, I just I don't like this one
and that's okay. Happens. It's just going to say I'm
not going to mess with it, I'm not going to keep messing
with it because I will. Then I'll make it worse.
Let's just keep going. The more I think about painting
trees, the worse it gets. I don't know if you
can somehow get out of your head while
you're painting the trees. I think it's very
helpful for me. Anyway, I think the
more I think about the shape of what
I'm trying to do, the worse it comes out right. The more blobby, less
organic feeling, just the less there.
Look at that. A giant, We'll
just make this one super tall too. Super tall. Let's go even taller. Yeah,
it turns out worse and worse. Honestly, at this point, I would like to scrap this one. But I'm not going
to for the full on sake of saying that it's okay. Right. I tell you it's okay. So it has to be okay
for me as well. It has to just make
it okay. It's okay. Things don't work
out the way you want them to all
the time in life. We may as well just
get used to it. Maybe this can help us embrace
those harder times during our regular hours of life versus our free time of art where we're in our little
bubble safe bubble. Not trying, but I am essentially getting rid of that
yellow along the bottom. That wasn't necessarily my thought process
in the beginning, but I'm preferring it gone. Now that I see it gone, things change. And
that's okay too. You process your ideas, will, that's a thing my way. I am very intuitive. I don't plan what
I paint for me. Doing these classes and making these demonstrations
is quite challenging. Because I don't plan things. It's hard for me to plan out
what we're going to learn. I try to just sit down
and paint and see what happens. That's
the way I prefer it. These, I try to
treat the same way, but in some ways I
have to plan a bit. It's new for me and I'm
trying to adapt to that. Let's add one more little
one right here so we can get rid of that
yellow and cover that up. Sure, I could just
go in and make a mountain a thing
where it covers up all that yellow, but
123-45-6789 Okay. We've got an odd number, we've got an even number of birds, which I feel like we
need to even that out. Probably need to
add another bird. And I just keep
them very simple. I just do the V shapes or the upside down
V, and that's it. I always end up making a face. So I'm trying to be very mindful of where I'm
placing this other one. I think I'm just going
to do them off here. An upside down one?
Yeah, that's it. I'm just going to keep them
very light. That's all. Let's take the tape
off and be done. I could dry again before I take the tape off, which
is probably smarter. Let's go ahead and
do that first. We could do what I'd like to do right before we do this is I'm going to take some
of my darkest color. I will cover it so that
I don't just use my hand like I often do and set a
bad example for everybody. Let me show you how
you should do it. Okay, I'm going to cover
this just like this. I'm just going to splatter
in a little bit of darks to break up
the tree shape, tree shape, tree shape. You know, I feel like it's
a little too much, right? So let's just, I don't know, let's just add some texture. And you don't have
to do this part, you never have to do any of the steps that I
tell you, right? These aren't necessary
steps. These are more suggestions
and encouragement. And those things, what I
see this little corner over here and I feel like it needs just something a
little dark right here. How about we put a little
little baby friend right there? Okay, Make sure I'm very
careful about my frame. I like to think about my frame. And then the contrast when
you take this tape off. The contrast with
this really dark tree right here is going to
frame your picture, right? Same with this bottom
line right here. Make sure I'm going
to fill in any I see some little gaps there. You want to be
careful filling in? I'm using the same color and
hopefully it doesn't show. Sometimes it will,
and you'd be like, oh, I should have done that. That's okay too.
It's all practice. You're learning. I like to
think about where my frame I like to keep these
two Dirk Dirk, this this little shape
dark right over here. I like to keep this whole area dark and I like to keep
my bottom my border dark. The side borders I'm
not as concerned about. I do like to keep
these ones but up here I'm not as
concerned but Okay. Let's dry. I do re use my
tape. I grab it at the top. I follow it down to the end. I grab it at the end. Otherwise, it will
twist and curl on itself really fast and
you'll lose your nice tape. This tape, I can reuse it. I don't 567 times, it's such a great
tape. I love it. So I clean it off after two. I'm grab it just at the end there and I
put it on my table. I just tape it to
the top of my table. It sits there and waits
for me till next time. And then can wipe it clean with a wet towel
or my paint brush. All right, here we are. I was a little bit
of a longer one. My apologies. And my giant, maybe
that's an owl. I think it's an owl. I'm going with the
owl. Thank you for joining me and
I'll see you next. Thank you for painting with me and I'll see you next time.
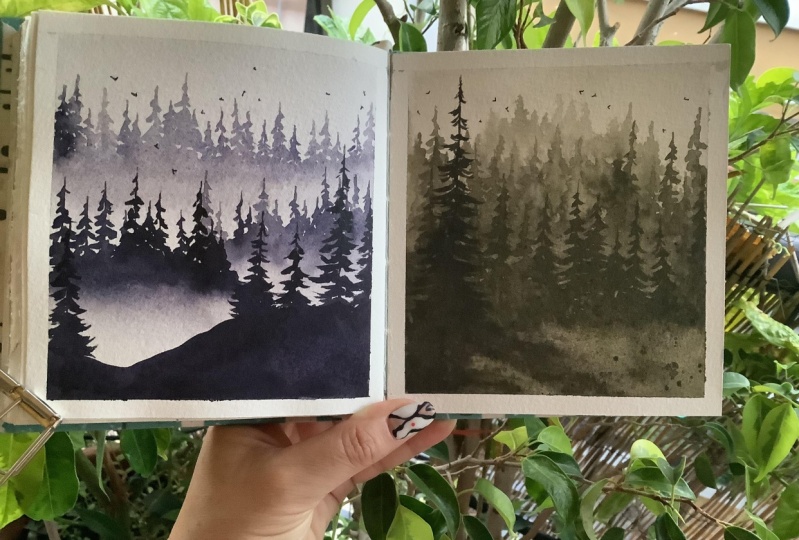
8. Project 3: PNW Rainforest: For this piece, I thought we
would paint a really loose, suggestive, misty, green,
a magical feeling forest. I have my 100% cotton paper. I'm going to tape it down
to my board once again so I can move my board around a
paint and flow nice and loose. I'm just going to
press all sides down because I'm using a lot of
water here on this piece. So you want to make sure your tape is really pressed down. I'm going to pre wet with base. Brayer do have a little bits of paint on there I'm going
to try to wipe off in a minute here I'm using a actually I'm using a cotton cloth to
wipe down my sides. I don't want too much water
dripping off all the sides. I do want the paper
pretty darn wet. But I, I'm going to work with
my rock well and actually, Rock Pasha handmade paints versus commercial probably
use a little bit of both. We'll see. So I'm just going to start getting lots
of paint on the top. I do have my board elevated, which is also another reason I like using the board because you can elevate and I also
will pick it up often. I'll twist and turn and raise
and lower it and whatnot. So I'm just going to keep adding some more paint and then
I'm going to spray a little more to get the paint
flowing even more and the water moving and
it all just flowing. I'm really just trying to get the paint to go from
the top to the bottom, to move throughout the piece. To self granulate, if you
will not self granulate. Self gradient make my
own little gradient without really trying, right? I want the organic
feel of the drips in the just kind of
the flow versus, you know, we could
go in and wash darker from lighter
to bottom or whatnot. We could absolutely
100% do it that way. And if you are more comfortable doing it that way and
that's what you prefer, you can 100% do it that way. When I make these tutorials, I just there are more
suggestions, right? And now I'm splattering just
to kind of to encourage that more about free flowing feel versus just the drips, right? So I'm just using any kind
of way to get the paint on and to get it flowing
and to get it moving. Lots of water, lots of paint. Lots of just playing around and you can do what
works for you. Again, this is about you learning what works for
you, what you enjoy. You might not be using
100% cotton paper and it might not
work the same way. So you do with most of these, you really want to
try to invest in 100% cotton paper
bag or reshare. My favorite arch is a
little more expensive. Baojun is super affordable. Both are worth it. And I rotate between
the two and use them almost all the time. I have a few others
I really like, but for the most part, these are my top two 100% cotton traditional style papers, right? Not handmade cotton
but this traditional. So I'm going to dry
that first layer and you can see I have, you know, water at the bottom, and I'm not really worried
about that right now. After I dry it, I'm
going to rewet it again. Again, lots and lots of water. I'm going to take a
darker tone this time. I'm going to use a bit of an
olive green from my rock. Well, and I'm just going
to let that drip down. Lots of water, lots of pigment. You can also see here
how when I sprayed, I didn't fully wet the paper. So you're going to see some
harder and softer lines happening. And that's okay too. If you don't, if you decide
you don't like those, take your brush and kind of just mess it up a little
bit and loosen it up. But ideally, we're trying
to get some shapes here. Happening, starting
to happen, right? I'm trying to bring in some, maybe some branches, maybe some parts that
look like trees. Starting to add more, a
little color in there. A little more depth. A little
more darker tone, right? So I'm using more paint, less water now and just focusing
on getting some depth in there and some things to come forward and come back And just, you know, I'm soaking
up the water, so there was a big
puddle right there. I just decided that
was a little too much. And so you're going
to want to just play and see where
it's going for you. If you're getting
too much water, you're gonna soak it up. If you want to tilt
your paper back the other way and let the
water wash back over, that's also an option. There are so many
things you can do here. You don't just need to
follow what I'm doing. Do what it feels
right in the moment. And if you don't know,
that's okay too, do what I'm doing so
it can go either way. If you're ready to explore
on your own, do that. If you need a little
more guidance, maybe follow along mostly. And here we go. I'm gonna
flip it over and see what happens and see if perhaps
that's the way I want it. And when I did first
start this piece, I did think maybe
that's what I would do. And I wasn't 100% sure. I was, you know, like
probably 80% maybe 90% But I wanted to explore
it that way without the, without the expectations of, you know, making it look
exactly like a forester tree. So anyway, once
you flip it over, you can start to
define some ******, define some darker areas, and just start filling
in some trees. I always start my
trees with a line. And again, if that's not
the way you do yours, do the way you're comfortable. If you're not sure, try the line and just balance your
brush from side to side. You know, starting at
the top, very thin, getting wider at the bottom. And I'm not making
particular brush jokes, I'm just letting the
brush do what it did. And so you'll see maybe I might jump ahead on a few of these.
I don't miss too much. But occasionally I'll get a bad shot and maybe
my heads in there. So that's why you'll see
maybe some missing pieces. You're not missing
anything major, Just a lot of just building up these trees just
like I'm doing right here. Just a lot of lines back and
forth, squiggles in there. Some darker, some
lighter. Mostly darker. Now to build again, build upon whatever we
already have as a base. Right. All that upside
down work was our base. And now we're just kind of finalizing and
adding in the layer after layer and trying to get darker and darker
on those layers. And we're varying a
lot. Right, nothing's. Exact, Nothing's the same,
everything's different sizes. And I did dry again.
I used my heat tool. I've been using my
heat tool a lot, saves a ton of time for me. I'm using the olive green again and I'm going to try
not to use too much water because I do want
it to be pretty thick on these last
few layers so that we get a lot more darkness here. You'll see my picture does look a little bit faded.
Right. But that's okay. Because that allows us
now to even go darker. Right. And so it's
not a bad thing. I'm going to test my
colors right here just to see if I mixed
up what I like. So I have one color that I
think that was my base color, that's just straight
from the pan. And then this next color is
the one that I mixed up. Actually, no, that's
the olive green. So I just wanted to
compare my shadow green on the right and my
olive green on the left. So one's handmade one's tube. And I think I was just just reiterating which one
was a little darker, so I mixed those two together. And then I might even throw in when I'm ready to
do my darker one, I might even throw in a little
neutral tint or indigo. And that's okay to do. This does appear to be a
monochromatic piece, but you know there
are no hard rules. You can add in colors
if you need to. You can do what you want. You can switch up the greens. You can use eight
different greens on here. You can use all blues. You can mix and match. You know, there are no rules. Just because I'm doing
my green does not mean that you need
to do yours green. Just because I'm using a pointed round brush doesn't
mean you need to. You can use a dagger, a round a liner. You can use whatever you want, whatever you're
comfortable with, whatever feels right
to you in the moment, and if it's not
working out for you, switch brushes, I
do it all the time. You'll see, I think maybe
it wasn't this one. But I think like
I will often grab my rigger and just start
painting with that one that I was my tree brush for a
very long time and I'm trying to remind myself as well
to use different brushes. So that's why I'm using this
pointed round right now. It does make really great
trees and I do love it. So I'm trying to kind of get
acclimated with or not re, acclimated, but I'm trying
to acclimate myself with this brush because I'm so
used to using that rigor. So again, even you know me
who's been painting trees, thousands of them, it's
okay to mix it up. You don't want to get
stuck in a rut where you have to use the same
brush all the time. I think it's good to be able
to use lots of brushes. So I've painted how many trees
in this one little thing. So many trees. So again, I'm just mixing some
more paint and see this. Okay? This is what I'm talking
about. I wasn't crazy. That is my rigger brush. That
is my plana bright rigger. And so I go in with a plena
bright rigger which is like a thick script liner And I'm just going to get that,
those big trees in. So see you can use just any kind of brush that you're
comfortable with. And like I said, this
is my tree brush. So I do feel quite comfortable
usually with this brush. But again, I have my off
days like look at the tree, it's pretty wonky
And that's okay. You're just suggesting
these trees. Nothing's like
dead set in stone. Nobody's gonna say that
does not look like a tree. When you have 50 of
these trees on one page, they're gonna know
the trees, right? You're not going to
have to tell people that it's a tree,
they're gonna know. And I switch back brushes
and that's okay too, change at the moment, if
that's what you need. Sometimes, sometimes
when I'm doing these demos or
tutorials or, you know, any kind of, any kind of
presentation type thing, I will switch brushes
without telling somebody. Because it's just what I do. It's so quick for me to just mix colors and do
things intuitively. I don't really plan it out. None of this is ever planned, so these pictures are
not planned out before. When I sit down, I
kind of have an idea. Maybe that, okay, I wanted to
do this piece upside down. That's kind of all
I knew. I wanted to drip the colors down.
That's kind of what I knew. I didn't know exactly what I
was going to the painting. I knew I wanted to
do trees, right? I knew this was a
series on trees. So that's as far as
I know. So you can be a planner or you
cannot be a planner. You can fall
somewhere in between. You can use reference photos. You can do whatever is easiest, whatever is most fun for you. What makes you curious? What you want to explore? There are no set hard fast rules or step by step that you have to
follow to get you know, to a place where you want to be. If you enjoy just, you know, painting tutorials all
day long, do that. If you prefer
reference pictures, if you prefer, you know, emulating after other
people, that's fine too. You'll eventually find
your own style coming into your parts too, in your pieces. And so that's kind
of how I evolved. It just kept doing
things over and over and different styles and different tutorials and finally just kind of found
my own way here. I'm just darkening
up these front ones just to bring a little
bit more, you know, because of course everything
up close is going to be a bit darker. Not
everything, but a lot. Most things are close are going to be darker
and more clear. Right. As the farther
you get back, what's the atmosphere
gets lighter. So, and I probably
even just using straight neutral
tint here just to get some really
dark ones in here. And again, this is
just messy, fun, chaotic play and let it
be that doesn't have to be these perfect trees all in align with the perfect
miss and the perfect fog. Just have fun practice your
trees and get them on there. Right. That's all
we're trying to do. Just explore and trying
and keep trying. Like I keep saying,
it's just paper. Sometimes it'll
take you one time and sometimes it'll take
you at 78 or even 12. Some things just, you know, some of us just take a
little bit longer. I am one of those
people, it takes me longer to grasp
things. All right. So I'm gonna dry
that last layer. I'm going to pillow
tape and that is it. We are done. We completed this. You can try this with
all different colors. You can go back with more
detail, less detail. You can do half the
amount of trees. You can do different colors. There are so many different
ways you can do this and explore with this and
just have fun with it. And again, there are no rules. You could have kept
it upside down if you like, just just try. And you know the worst case is you try again and you use
a little bit more paper. But you explore, you have fun. And that's all I can ask for. So I'll see you next time.
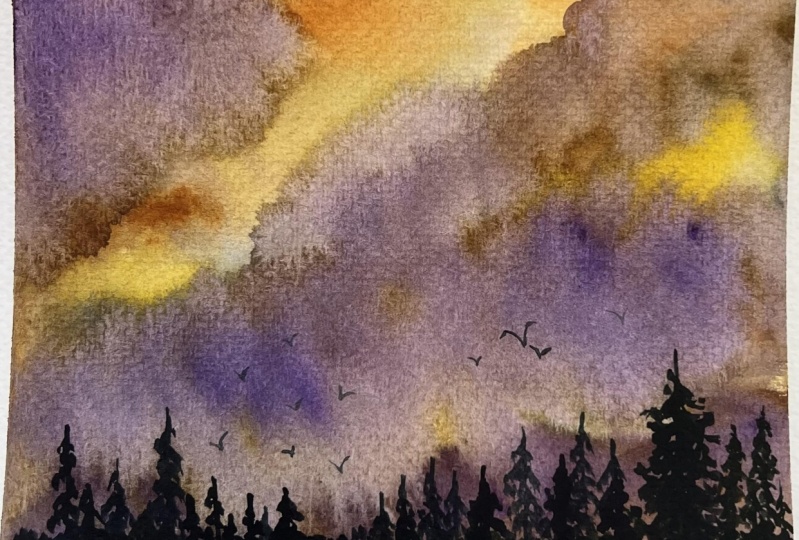
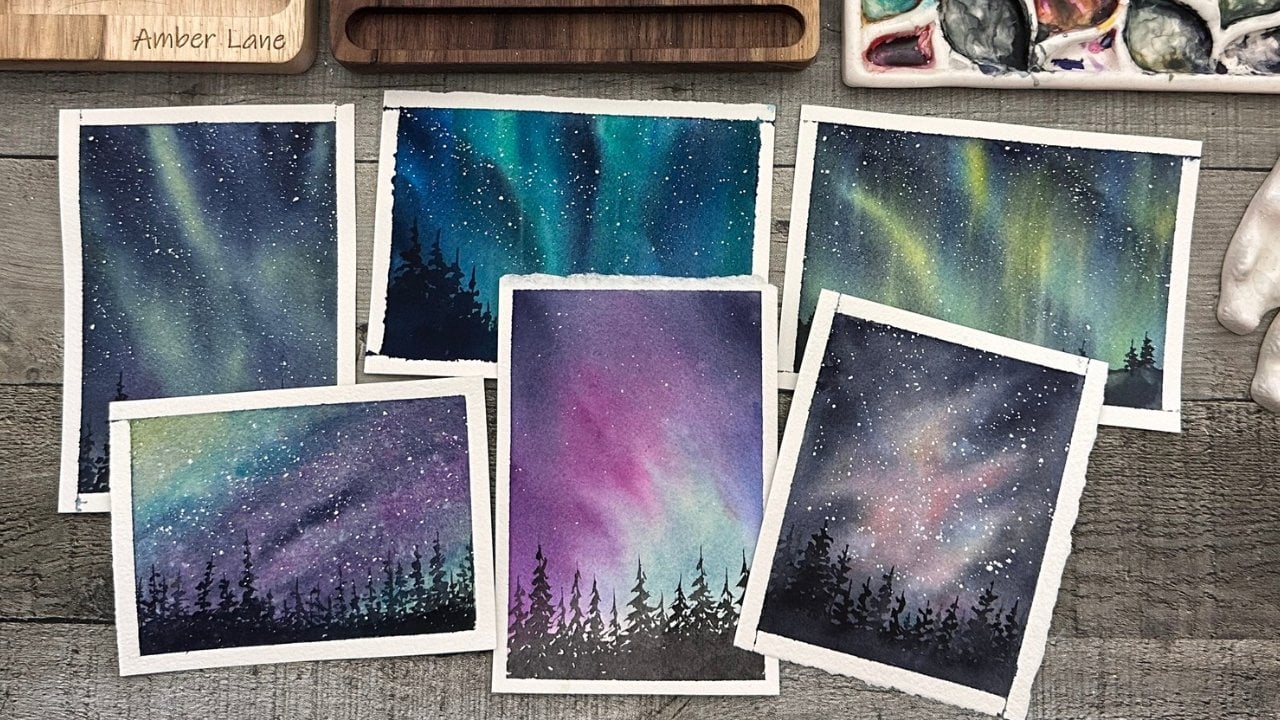
9. Project 4: Moody Sunset Tree Line: Hello and welcome back. So I'm going to
go ahead and jump right in and wet my paper. I'm going to make sure I
do it horizontally and vertically so the water
absorbs in ischial spot. I'm going to dive right in
and use orange in the sky. This is going to
be drop in colors. Just play with colors
you like together. I don't know how many
colors I use in this one. Probably probably going to end up using like three
or four, maybe even more. I like to use a
lot of colors and they want you to explore
the colors that you like. They don't have to
be the same brands. They don't have to
be the same makers. They can use
handmade commercial. You can use whatever
you like. I do water them down quite a bit
for this kind of thing. And again, I'm using oranges
and reds and yellows. And I'm just dabbing them in. And I'm just going to let these colors work for me and
see where they want to go. And then I'll go around and not really self rescue
this one necessarily, but try to melt them and see
what I can come up with. I'm just going to
create some sort of sky that feels good,
that feels right. And I'm going to keep working it until it does feel right. So I'm just going to keep
dropping in these colors. And the colors I'm
grabbing right now are pretty
super granulating. So they have more than just one pigment color in
each color that I'm using. So they're playing
with each other. Right? And so I'm not just
using say, three colors, because a lot of them
have more than one pigment within that one color. So I'm really just playing
with a lot of colors here. And will it turn muddy? It could Do I mind? No, I don't usually
mind if it turns muddy. I feel like it's
kind of when I get the most interesting
things happening. And you can always save yourself if I did too much blue there, you can dab it up with a tissue. You can pick it up
with a thirsty brush, which just means that you drink your brush off really well. Tap it dry a little bit on a cloth and then
you just pick up the paint and you can pull that back out if you don't like that. You can mist it with
a spray bottle. You can do what I'm doing there, just kind of washing it out or kind of loosening
it up a little bit. You know, you saw
how dark it was initially and it's
already fading. And there I go, I use a
spray bottle to kind of loosen everything up and
you can tilt that board. That's why I paint on a board. So you can pick it up and
move it from side to side, up and down, and see
where the colors go in. Is really exploring what's
in front of you, right? Being in the moment and just
painting and just playing, just having fun and being
curious in trying new things. I do periodically wipe down my sides of my
paper like that. With my brush, you
could use a tissue, but I find my brush works
the best with tissue. I sometimes end up with a
little pieces of fuzz in there. Now, I'm just going to drop
some darker colors in. I have a lot of
light going on and I wanted to darken it
up a little bit. Just wanted to see where
that would take me. My paper has been
wet this whole time, that's why you're seeing
a lot of looseness. If paper does start to dry, you can dry it all the
way and then re wet the entire thing and jump
right back in where you were. So no big deal. If your paper starts to dry, you'll
get harsh edges. Hard edges. Harsh edge
if you don't like them. Yeah. Like I said, let it dry. If you don't mind
them, go with it. I don't I don't really
super mind them. I know they're
slightly frown upon. So now I'm going to do what
I was talking about earlier. I'm just gonna tilt my board. I'm going to just play that way and see what happens and
let things kind of move. And I'm going to pick up
the puddles on the bottom, of course, because those will
go back in your painting. And again, that stuff doesn't
really bother me very much, but I kind of got in the
habit of doing it now. So turning it sideways, you'll also get some fun
bleeds going that way and just seeing where the paint wants to go,
what it wants to do. I'm really liking
the glow at the top, so kind of happy with
that and I don't know, it's kind of
therapeutic for me for some reason to pick up
the paint like that. I don't know why I do. I don't know why I do
find it so therapeutic. But I do and what I was going to say is
I do re use my tape, so that's why you'll
see my tape and wonder how did she get it so
dirty and why is it gray? I re use my tape hole bine tape really holds up really well. This is of course 100%
cotton paper I'm using, Arch the brush I'm
using is either, what is it, my plena
or my tintoretto. I usually swap between the two. This looks like my plena. They're my two favorite brushes. If you get any two brushes, I would absolutely
100% recommend plena in the Tintoretto. I love them, I love the
Tintoretto travels as well. Again, though, this
isn't about rushing out to buy the stuff
I have or I use, or that I say I love. I will only say
things I love though, and also to say if
I don't love them, but I want you to use
what you have and you can absolutely 100% do this
with what you have already. Speaking of things I have,
I love that palette. It was one of my
favorite newest pieces. I also love my
little eggy palette, which is the one next to the one I call
affectionately Buzzy. So we have Buzzy and Eggy. Again, I did drop in
that orange at the top. Even though I said
I love that glow, I felt like it would
help add some depth. I usually do like to add darker
colors around the edges, in the corners to bring your eye in or just give it
more balance and more depth. And I don't know, I just play and it doesn't
have to make sense to me. I know often people are like, oh, the shadows are light. It wouldn't do that, it wouldn't come
from that direction. That's just not how I work. You're 100% absolutely welcome to do that if that's
what works for you. Me, I just wanted to
play with colors today. I wanted to show you that you
could just play with colors and then we can see where
that takes us with the trees. Eventually, I promise,
finish up with this, but didn't want you
to feel rushed. I could have sped through
this and sped up the video, but I wanted to see it
happen and I wanted to see that you could
take the time to explore. And it doesn't have to feel rushed or be rushed.
And I don't know. I just find it very relaxing and a lot of fun to watch the colors do their thing, like look at this beautiful
purple. It's so pretty. This violet purple. Not
purple, but violet color. It does have some purple
in there because I put so many layers on
there and I can't even count how many colors I
have going on in there. But, you know, it's just paper. If I decided this was not going where I wanted
to, what would I do? Probably just
finish this up and, you know, maybe try
another one, maybe not. Okay. So I do have those
funny lines there, right? So what am I going
to do with those? And obviously have
huge drips, right, all over the place, getting so therapeutic to pull those up. So we have the magic of a board and you can use a
piece of cardboard, you can use a cutting board. You find it, you know,
a Thrift store or something you have around your
house or the dollar store. I prefer Thrift store versus Dollar store, but
that's just me. You can use what you have. I found this in my
craft supplies. I didn't buying more because
I wanted more of them. And the one that set I have, one of them is used
for a de cutter, so it's pretty tore up. But this one was the top plate and so I end up using this. And so to fix those,
there you go. It's about time,
about time member. So I use my hockey brush and it's a dry brush.
Do not get it wet. It's a very dry brush and
I'm going very lightly, okay, everything's really wet. If I go too hard right now, it's just going to
smear that paint. You started seeing it do that. The top right corner
a little bit. You can see where I just kind of picked up the paint
versus moved it, but I got rid of those
streaks and now I probably want to
think about adding. I can't remember if I
add a little bit to the bottom there or if I
just kind of leave it. See, I'm thinking,
just like I am now, I'm debating on what to
do but these brushes. A dry brush and you don't have to have the style brush either. You can use a Quill brush. You can use any brush you have. Okay? But I did pick up my
rigor and this has been my go to tree brush
for quite some time. Now it's up to you what you use. Again, these classes
aren't going to be necessarily step
by step of how to build a tree or
how to draw a tree, or create a tree,
or paint a tree. But I want you to get
in here and practice. That's why we're doing so many so that you can find your way. Yes, I make the straight line. Yes, I go from side to side with blobs and very loose
and very fast. And that's the way that
works for me to get it done. But I want you in
these classes to kind of explore the ways that
work for you, right? I want you to figure out
what works best for you, because my exact way may
or may not work for you. And you just have to feel
over and over, you know, hundreds and hundreds
and maybe thousands of trees before I'm still
working on my trees. I'm still perfecting it. I'm still, I'm still, you know, trying to
find the perfect brush. Yes, I call this my tree brush, but I feel that I should
be able to pick up most any of my brushes
and be able to make a tree with it.
So that's my goal. My own personal
goal is to be able to use all my brushes
for trees if I want to. Also, you might
want to be careful. If you have a favorite brush and you decide to
use it for trees, you might want to be slightly
aware that you could potentially damage
the pointy tip of your brush. Doing
it over and over. I've ruined. Ruined. But okay, I've ruined a few brushes
by doing these trees. And I paint so many that some of my pointed pulling
a bright rounds are ruined. Because I paint a lot of trees. And so you want to be aware
of your wear and tear, possible wear and
tear of your brushes. So you could potentially, maybe I recently came
across an artist who uses maybe like a
Princeton, a cheaper Princeton. And she calls that
her tree brush. I've tried that
same brush for me and doesn't do the magic
that it does for her. And that's okay, that's
what I'm talking about. You kind of really have to
find what works for you. And if you want to
dedicate one of your nice brushes to trees and it works for you because
it works for you, then you might want to just
do that for a long time. My planas really did work
really well for my trees and now I'm still using a
plena. It's just the rigger. So it's more of a
script liner brush and it's a thinner brush. For me, it does the trick. I'm working on about a little smaller than four x
six paper, so it is small. And so I tend to use a
smaller brush for my trees. And so for me that works, but I've also used a
giant cats tongue. I have like I think it's
a half inch cat tongue. I don't remember
what size that is, but it's a large
brush and it has such a fine tip that I can
also make trees with it. So don't discount any brush because you think the
size might be too big or, you know, try them all. Do like we did in the tree
demo on that one page. And just fill page after page if that's something
that appeals to you. If you really want to
find your style of tree, it's kind of what
you have to do. You know, that's what
I did. I've done pages and pages of trees. Like I said, I'm still
on that mission to find my perfect tree and I'm
hoping to get there one day. I'm hoping to just be
able to replicate, uh, you know, a tree line just of trees
that I just absolutely love. And sometimes I love my
trees and sometimes I don't. I still don't love
them sometimes, and so I always say this, but when you have a whole
tree line of trees, a whole line of trees, you're suggesting the trees, right? You're not so
focused on the one, so if your one
doesn't look great, like I don't love one
of those right now, And you know once I fill this
whole line up with trees, you're not going to be so
focused on that one, okay? So when I'm doing
these like forests, it's so much easier than right, painting a picture with one, you know, deciduous tree
right in the middle. And it has to be the
center of attention. So these, for me, are much more therapeutic
because they can suggest a forest versus being
the main focal point. And so I love doing these, just painting line after
line and row after row, and just practicing them
over and over and over. I usually will pick up a different brush and try
those with different pictures. With one picture, I do
think I tend to stay with the same brush unless I randomly decide
to put a huge tree, like right in front,
like in the foreground, Then I would probably pick
up a different brush and try that brush, or maybe not. Sometimes I'll use
the rigger for a giant tree and go with
it. And that's okay too. Again, this is about finding the things that work for you and the ones that
don't let it go. Right. Just because
I'm doing it this way, I don't want you to get stuck in your head that you have
to do it this way too. I want you to find your
way. What works for you. Take things from other people, from me, from many others. Anything you see on Instagram, on you Tube here on Skill Share, wherever you see it, use it, take it, and make
it work for you. I've done so many
skillshare tutorials and I've learned so much just
from doing those tutorials, but I've also learned so much that I don't care for
that I don't like. Right. And if I don't like
something in tutorial, I step back. I don't step back. But I like say to myself, okay, you know what, you
can try it this way, get frustrated or you know, this isn't your style
something you really love. Why don't you just
do it the way you know how to do it that
you're comfortable with? Since tutorials
are all new to us, typically it's
sometimes helpful to take that step back
and use the tools that we do know and replace
the ones maybe that we're not really understanding how to do with what we do know, and I think that can be
really handy for me anyway. All right. I think I finally I'm about finished
with these trees. I know it's a lot of trees. I did use a neutral tint here. I feel like I might have
mixed it with something. But you can use
any kind of dark. I don't want you to stuck on colors like I always
say that too. I know, but usually
usually neutral tint. You could use sepia,
you could use indigo. You could use a paint's gray, you could use whatever
you have and whatever you like and make it work for you. Right. Oh, I guess I
decided to add more. I'm not quite done A, I, I mean adds some
birds. Alright. So my birds are
pretty darn simple. They're literally V
shapes upside down, right side of little lopsided. I try to do less more,
I try not to overdo it. I'm not an expert at
these birds either. I still struggle. I don't
get the formations right. The shapes aren't always right. Some are heavier than others and some are lighter
than others. And so I just keep trying. Just like with trees,
I try over and over. And that's all you
can really do, right? You can do pages of
these two over and over, and usually if I try to go
darker, I mess them up. So just go with your
gut and leave them how they are. And I
think that's about it. We're gonna peel the tape
off here and love our edges. I think I think they all
came out pretty darn good. And once I see a leak, I'll
throw that paper away. So there we are. Yeah.
I love this one. This was kind of
done on a whim and I love how loose and flowy that sky is and how free it was and just how much fun
it was to explore. I really hope that
you enjoy it too. And I hope that you find
your own exploration and you enjoy it
as much as I do. And I will see you
in the next lesson.
10. Project 5: Stormy Ridge: Hello, welcome back. Here we are with
100% cotton paper. Again, you can use either side. I'm using arch and with arch
you can use either side. I was going to say
bow hung. Not always. I don't always love
the other side. I'm just speeding this
up through this part. I'm taping down my paper. I do reuse my tape. As you can see, I use it
until it starts bleeding, so I'm spraying down
my paper a little bit. Then I'm going to use my flat
brush and I'm going to just brush that in a little
bit and get it wet. So it stays wet for
a while, right? So I did horizontally and
vertically the water. And once I thought
it was wet enough, I'm going to use some yellow. Use whatever colors you want. Whatever yellow you want. We are going to, I would recommend sticking to a
yellow for this part. This is going to be kind
of our glow, of our sky. And so I think yellow works
really nicely for this glow, and I'm just kind of smearing it in and trying to make sure that it kind of blends and keeping it kind of in that area where
I'm kind of showing you. And I don't want
it to go too high, I don't want it to go too low. But you'll see it doesn't
matter if it does, really. I'm just kind of
setting myself up a little bit and I kind of like that dark streak.
So there you go. Add some more, the yellow ochre. I love a yellow ochre.
It's such a good color. I know rosen is
pretty darn close, but I often reach for yellow
ochre versus raw sienna. I try to use raw ciena because so many
tutorials call for it. So I often will use what the tutorial will call
for if I have it. But I just love yellow och re, so I'm getting it in
there more heavy. And then I'm going
to go ahead and kind of blend it out, if you will, and try not to lose too much of its vibrancy because I really
do like it on that side. And I'm using a mop
brush right now. I love my polar polina,
bright mop brush. And as I go, I like
to clean up my sides. And that just means
putting the brush on there and picking up the
excess paint and water. You can use a rag for this. You can use whatever you like. I prefer the brush. It doesn't leave little fuzzes from say, like a paper towel or something. And so that really works for me. I'm going to use a
heat tool to dry that. You can wait 5 minutes or 8
minutes or whatever it takes. And I'm going to spray it again. I'm going to rewet it again. Now, why wouldn't I just
put my next color on top? Well, because it's yellow
and I don't want to lose that completely within. So here I am thinking about
what color I want to use. I often do that,
I'll pause and like, Hmm, Do I really want
to use that one? I like to just go with my gut. So these classes are sometimes a little
more challenging for me because it makes me
think like pre plan, right? I don't prepare plan very often. I kind of paint intuitive
intuitively and just go for it. And so I pick some gray. I'm not going to call out colors like I
always say, right? Because I kind of want you
to pick your own colors. I do throw in a little bit of gray, a little bit of purple. I want my sky to be moody. I want it to feel something. I want it to, you
know, add some color. And so I'm going to keep layering and I'm
going to keep adding color and I'm going to
keep playing with it for me overworking and being kind of heavy handed
and all these things. Maybe sometimes I know you're supposed to start
off really light, but sometimes I go right in. I don't follow so many rules and sometimes that
will fail me right. And sometimes I'll have to
wash this whole thing off. Or sometimes I'll use
my flat brush and just kind of smear it
over a hockey brush. And I'll brush it lightly. I'm just trying to
work in some clouds and the bigger ones a top, and then I'm getting them
finer at the bottom. And maybe I'll switch
some brushes around to see if I can get some more
wispier clouds in there. And that's what I'm doing here. I switched to my
silver brush size. I think that's a
round size four. The numbers have long been
rubbed off most of my brushes. If I use them a lot, he'll know if I use a
brush a lot because there'll be no more numbers on it everywhere I rub them off. Now here SS looks a
little sporadically, not like clouds, right? Sometimes I do this and then sometimes it works and
sometimes it doesn't. And it's okay if it doesn't. Right? Some things
just don't work. And I'm not sure what I'm
contemplating so long here, but I certainly was probably
contemplating how to make those clouds
look like clouds and not squiggly lines.
And that's okay too. Sometimes it takes
us longer than others and sometimes
it comes right to us. Sometimes if our
papers, you know, too wet, sometimes we
have too much flow. Sometimes if our papers too dry, we get our harsh edges. And all these things
are just things that you're going to learn as
you do this more and more. You know, I practice
every single day. I paint every single day. I do a tutorial or two or
three every single day. So, you know, and
I'm not perfect, so it takes a lot of time. And here I am with that
brush I mentioned, it's a very dry brush, Extremely dry, no
water, it's been dry. I don't use water on this
brush ever, if that helps you. This is strictly my dry brushing brush and so it will
never have water on it. And so I'm just using
that to kind of brush out those crazy lines and, you know, will I
leave it like this? No, but it does
help kind of give me an idea of what
I have to do next. Do I need to dry? Do I
need to add more color? Do I need to, you know, try a different, a whole
different approach? What do I need to do?
So it gives me a minute and I did cover up some
of my pretty yellow, but I mean, that is ultimately. What was going to happen anyway. So I'm going to now, you know, kind of add some more
back in because I did take quite a bit
away with that brushing. It's a give and take,
right watercolor. It always seems to
be a give and take. You add some, you take
some, you add some more, and then you'll move
some more, right? It's kind of this dance
of getting it right, of trying to figure
it out right, trying to figure out what works. And for me, that often means doing a lot of the same
things over and over. I don't have all the answers. I don't have the perfect
way to make a sky. I don't have the perfect
way to make a cloud. I learn as I go. I make errors as I go. I redo things, I take them
away. I'm not an expert. I am a very passionate
person about watercolor and I think
it's very accessible. I think that anyone
can learn it. I think it takes
a lot of practice and it's not one
of those things. Like, you know, you
have a pattern or a recipe and you're going
to be great at it in, you know, ten tries,
like sourdough bread. I bake, you know, ten loaves
before I got a great one. And some people do it once
and they get a great one. You know, it, it
just is what it is. And, you know, it's different for
everybody and that's okay. It's sometimes can be
intimidating because some people are so good
at so quickly even now. You know, sometimes
I do wish maybe I was better at things or
faster at learning them or, or could do things in a way that other people can and I
can't, and that's okay. 'cause I found my
way to do them. And I found what works for me. And I found what I'm passionate about and what makes me happy. And that's sharing all
things, water color, right? I love love, love
sharing and showing. And just kind of maybe making you more
curious or inspiring you. And even if this piece
doesn't inspire you, maybe it will inspire
something else. Like oh, I like that color
combination. You know what? Maybe I will try, you know, my other favorite
piece might go to comfort piece in these two
colors or something like that. You know, it doesn't have
to be this exact piece. I want you to just
feel inspired and, and ready maybe to pick up the brush more often or
try different things. So anyway, I did add a little too much water there
and you're going to see me mess this up a little
bit, but that's okay. I feel like every time
you mess something up, it just really gives
you the chance to kind of correct yourself and, and learn from
your own mistakes. And probably right
now, I'm probably not realizing that I should probably put this
down and dry it. Yes, I keep doing this, right? My paper is in that weird state. I can tell by looking at it now. I don't know why I didn't,
you know, realize it before. But I need to put this
down. I need to dry it. So hopefully, I realize that soon before I keep adding
more paint to this. Why am I doing this? Here we go. Come on, come on E. Okay, so now we're going to the focus
on our foreground, right? We've got our sky
kind of oddly moody. Is it realistic? No. Is
it kind of fun and funky? Sure. I'm kind of liking it
now, you know. It's okay. It got to a point where I
was like I was okay with it. So we're going to add
this foreground and it can be any shape you like. See what I
mean about the yellow? The yellow, It's just
just your horizon. Just that hint, that peak, just that little bit of
that glow, you know, when the storm kind of goes or comes or whatever it's doing
it. You got that hint. So now we did that
first layer and we're going to go ahead and dry
that first layer or no, wait, I'm going to
do my trees first because I want the
trees to kind of bleed. You'll see do I am
to call it the stem. I did the trunk. And then
when you hit that line Right. It's going to make that
that pretty bleed go on. Sorry. My I think my kid turn on the light
there for a second. Real life, right? It is hard to keep all the imperfections
out of these things, hence the voice overs. So I've tried many times
to chat and paint as I go, but oh my gosh, life just gets in the way the air
conditioner turns on. Right. The doorbell rings. You know, something beeps or something ticks or
something hums. And so it's really
quite hard to get it all perfect to do, you know, studio quality
paint and chat the same time and also sometimes honestly they turn
out a lot longer. I do love the candidness of, you know, painting and
chatting as you go, but I think that
also comes out in voiceovers because you're kind of slightly improvising and you're slightly kind of
remembering what you're doing. And you know, it kind of inspires a different
train of thought. So I appreciate both and
I hope you do as well. Because I can't always do
live time, you know, chats. I do love doing those in
real time other times, but oftentimes on these kind of classes, they just can't be. So we're just going
to keep adding trees. We're going to make
them different sizes. Different shapes
like always, right? We're adding short and tall, fat and tall and
short and white. And we're going to
do them quick and loose so that we're not too focused on what they look like. Right? We're just getting that
general suggestive shape of the tree and making sure
that we leave light too. We don't want to take too much light away,
that lovely glow. We don't want to lose it by covering it up with
a bunch of trees. So I decided to kind
of group my trees. I usually like an odd number, Hopefully, I stuck with that,
so I stay by my word here. These little pairings of twos are a little too
much. So there we go. We got a third one going on, and I love the light behind
them and I love the way the clouds are getting
really small by the tops of the trees
that really worked out. So things to consider are definitely the placements
of your trees. So they're losing your
good clouds, right? So if you had a cloud
you're not a fan of, you can obviously cover that up. Which I love about watercolor, It's pretty darn forgiving, although at times it doesn't
seem like it is it really, really can be, in my
opinion, quite forgiving. So these pieces are really, I hope that you're really taking the opportunity to practice
your trees and not be too hard on yourself
and just kind of let them be, you
know, little ones. Yeah, I love the
little baby ones. I love always adding those and just just trying
your hardest and Yeah, add the small ones
where you don't want to take up too much
of your sky space. I clearly do that here,
right, and over to the left. I don't love the sky as much. So that's where I'm going to probably put a few more trees
just to kind of, you know, cover that up since it's not my favorite area and not
that it needs to be covered, but just fill in with more trees since this is the focus
of the class, right? And so I usually would make those trees in the
back, maybe lighter, right? I did go pretty dark, but I feel like for this piece we're going to
drive with a heat tool. But with this piece, I
feel like it's okay. Because we're kind of going for that more silhouette,
feel, feel right. Even though the
foreground is lighter, but nothing has to be realistic. Just have fun with
it. Do what you like. And for me, I like the feel of that tree line being darker against that kind of
paler sky, if you will. The moody clouds
up top are dark, but the ones that
midground area, horizon midground
is kind of light. So I'm really enjoying the
dark against that light sky. Okay. Bigger trees,
we're closer foreground, so we're going to do
bigger trees here. I'm still using my pulling, a bright rigor which use what
you're comfortable with, use what you make good trees with what feels right to you. This tree isn't my typical tree and feels a little
often. That's okay. Right. I'm just trying to
see if I can make trees, make big trees, larger trees
with this rigger brush. And it's good sometimes to force yourself to do something. And I'm going to be sad because
I do have to see as like, don't want to color
that yellow up. I really like that
glow right there. But I want to add those
trees because you know, the foreground, it, it, it makes everything
else the darker. And I did go darker, obviously, right, with these
foreground ones. Because I want that contrast. The contrast is what gives
you the depth, right, and the feeling of
everything kind of coming forward or going back
and pushing it forward. Pulling it forward
and pushing it back. And so I just keep adding
a few more and again, I could speed these up for you, but I kind of feel when
I do tutorials myself, sometimes it feels very rushed. Even though I know I can
pause, right, I could pause. I'm struggling with this one. So I would love your feedback. By the way, if you want to
give me feedback on this, if you, if you want to hear me chatter while
we paint each tree. Or we can just speed this up and I can show you one tree
and then you know, speed it up and show you how we end up with
all the trees, especially with tutorials and demos like this that are
very, very repetitive, right? These are very, very repetitive. So it's not like you're learning a whole heck
of a lot in the, you know, 23 to a half of these videos
with all these trees. It's very same thing
over and over. But for me, when I was doing
a lot of territorials, I felt that sometimes
I would feel rushed or I would feel pressured
and I wasn't keeping up. Even though I knew they
were fast forward. Right. They were sped
up and I knew that. But I would feel some sort of pressure and I didn't
love that feeling. So that's where I'm torn is I kind of think I should
leave it full time so that you can feel it in real time and that
you're not rushed. And you can always speed
up. Absolutely, speed up. If it's going too slow for you, you can either fast forward, you can speed up my time, right? You can go by 1.5 to
two times the speed. You could also slow it down if I'm talking too fast for you, But I also don't want to drag it out so much so
that you are just, oh my gosh, Amber, hurry up. Right. I want you to find
it valuable and, you know, inspiring and something that you feel like you can do
without being rushed. I'm an ad, some
tiny little birds Just hints at birds,
nothing major. Just the tiniest little
hints just so that you see, maybe see that we got a
little too heavy handed. I am so not good
at my birds still, and I try not to make faces
Often when I add three birds, I make a face, two winky
eyes in the mouth. So there I go, adding a few, too many, which I often
do if I add three. So my ideal I think now is
two. I think my ideal is two. I'm not good at the flock, the formation, so
the two is perfect. Do what you like, do what
you're comfortable with, make them how you like them. This is moody, so I can get away with kind of just hiding
them in here. I think. I feel like maybe you
can't really see them anyway unless I point
them out like I am. So maybe see I'm
counting 'cause I like the odd number of the
birds too. All right. It's tape peel time. Let's take, let's tape off and see if our tape is reusable. Yep. That piece we
can reuse again. It didn't leak. We're all good. Yeah. Alright. I hope you enjoyed this one. I
really enjoy this one. I love this kind of moody feel. I love the cloud. It was
really fun. I liked the glow. So I hope you'd
enjoyed it as well. And I'll see you in
the next lesson.
11. Bonus Project : Welcome back. Okay,
so with this piece, I am recreating what
I'd already done. So the piece you'll see in the initial picture that went along with the introduction to this class just a minute ago, Against the green
background is the one to the left and the one I'm
painting will be the new one. So I'm using 100% cotton
rag paper for this. It's a handmade paper. I'm a mop style, this is a really what I'm using, my Polina bright brush and I am just getting some
color on this very loosely. It's wet on dry. I'm just kind of making these super loose clouds
for our background. I'm not going for
anything particular, I'm just dropping in maybe two
or three different colors. You don't have to
have specific colors. I'm just using
some blues, grays, and a touch of a brown
actually. So I let that dry. And I used a heat tool actually. And now I picked up my rigor and I'm going to
start on my trees. And I don't really have a
true plan for this one. I just want once again to
practice our trees and to kind of play around
and play with shapes, and play with placement. And see, I'm trying to figure
out where to draw them. I actually didn't let this
paper dry all the way. I kind of meant
to, and I didn't, so I kind of went with
it here for a minute. I do dry it here in a
second because I'm not liking how loose those
tops of those trees are. I do tend to like my
tips of my tops of my trees a little like this
one right here on the right. I like them to be crisp, and so I often will go back in and crispen that
up is not a word. And so again, I'm
taking my brush and I'm going to get some water and just kind of loosen
up those bottoms. And this is, again, a rag paper, so sometimes it takes a
little more water to loosen it up Because this
paper is so absorbent, it takes more water
to kind of, you know, help loosen all that up and soak in and get
back to the paint, get to the paint
and do its thing. And so I just wanted
to show you that you can use any paper
often with these, you don't have to
use 100% cotton with a quick sketch like this. But with the ones we did before, I do recommend using
100% cotton with a lot of those wet on wet techniques and a lot
of those layers, if I were to layer about
seven or eight on here, paper would not be liking it. It would not be appreciative. It would probably start
to pill up a little bit and just start to be kind
of unhappy in general. And so I'm just, I think I'm using super granulating
schminky colors here, but it doesn't matter
the color you use. You can use whatever you want. I do like the field though of this blue kind of
monochromatic piece. And that's what inspired
me in the first place, was my old piece was
done on the same kind of paper but had a
blue tint to it. So the blue tint with
the blue monochromatic. I really like that
feel actually. I'll make sure I leave. Oh, actually you know what,
If you want that paper, just ask me the
discussion part of this, of the scale share
and I can go ahead and make sure I get that to you. I probably won't link supply
exact supplies in my list. I tend not to do that
because I don't want you to rush out and buy something or think that you
have to have it. But I would like to,
you know, let you know if you really wanted
it or liked it. So anyway, I'm just
continuing with the trees, we've done this
whole time, right? I start I switch brushes
for the trees here. I might use my Tintoretto
brush here has a nice tip. I really like the
tip on this brush. I'm a little hesitant to
use it on all these trees because I don't want to ruin my brush or
cause it to fray. And I do have a tendency
to make a lot of trees, it's not just for this tutorial. I paint trees all the time,
thousands upon thousands. And so I feel it does kind
of wear tiny brushes. So, you know, I know I've warned you before and
other of these classes, but I just want to make
sure that you understand that it could add some
wear on terror brushes. It's not going to
ruin them quickly. It's not going to, you know, be something that you're
going to notice overnight, but over time you would. And so I just want
to keep going with these trees and see I'm trying all different
kind of brushes. I'm spraying a little
bit of water to kind of get things to go
a little bit more loose. I'm not spraying a lot. Just enough so that we
have some soft edges and we have some harsh
edges and we have some bits of water there that can do some magic with unexpected magic with
these paints, right? Like these little shrubs I'm adding at the bottom
and different layers. Sometimes the water will just
allow it to do something a little extra special that maybe just you and your
paint brush can't do. And it just adds a little bit of unexpected out of control. Just not out of control but a little less
controlled environment. And I think for me, that adds to my creative process, right? It just adds one more thing that I can do to help me along and help explore some
different avenues when I'm painting instead of, you know, doing the same
thing over and over and over. And I think that's another
thing that helps me stay out of artist art ruts is trying so many
different things and different tutorials and just
different ways to do stuff. Instead of trying to
do the same thing, which I often I do paint the
same thing over and over. But trying all these different
methods in different ways, I think really helps
to prevent getting in that rut where I'm like
over painting landscapes. So I hope, I really hope that one day I'm not
over painting landscapes. I love them. They're my
favorite things to do. I love painting trees and
I love painting skies and, you know, suggestive,
all these other things, you know, because I'm
not a realistic painter, so I don't like to
necessarily paint things that look exactly like they
do in nature or in real life, or, you know, even in
a, a book or whatnot. So here I am just crisping up
these tops of these trees. I'm using a very pointy, fine tipped brush right now to just kind
of crisp them up. I think this one happens to
mean my silver silk brush, silk, silver silk,
or Silver City 88. They do have nice
tips on them and just some splatters and that's kind of kind of it on this one. I just wanted to keep it really kind of
loose, really quick, kind of a nice little hurrah, You know, kind of
like a wrap up. And just to loosen those last
things up in case it was, you know, a little challenging
to paint so many trees. But I hope you enjoyed it.
I enjoyed painting it, so thank you for joining me.
12. Final Thoughts: Thank you so much for
painting with me. Thank you for painting tree
after tree after tree. And I hope that you've perhaps maybe found a little
bit of your style of tree, or at least now you
can further along in your journey of trees. Today, I would
love if you'd like to leave a review that really helps me work on these classes and what works
and what doesn't work. Also, if you'd like to
post your projects from this class on the Projects and Resources tab, that
would be awesome. And I'll see you next
time. Bye for now.
13. Final Thoughts & How to Upload Class Projects: Thank you so much for
painting with me. Thank you for painting tree
after tree after tree. And I hope that you've perhaps maybe found a little
bit of your style of tree, or at least now you
can further along in your journey of trees. So today I would love if you'd like to leave
a review that really helps me work on these classes and what works
and what doesn't work. Also, if you'd like to post your projects from this class, you're going to want to head to the Project and Resource tab that I put a little arrow to. And then you're going to
click on the Submit button. You're going to
upload your image, write a title and description. And once you're done,
you're going to push publish. And that is it. And I can't wait to
see your project. Give some feedback and
encouragement and support. Thank you. Thank you so much for painting with me and I'll
see you next time. Bye.
 Amber Lane, watercolor landscape artist