Transcripts
1. Class Intro: Hello, Hello, hello.
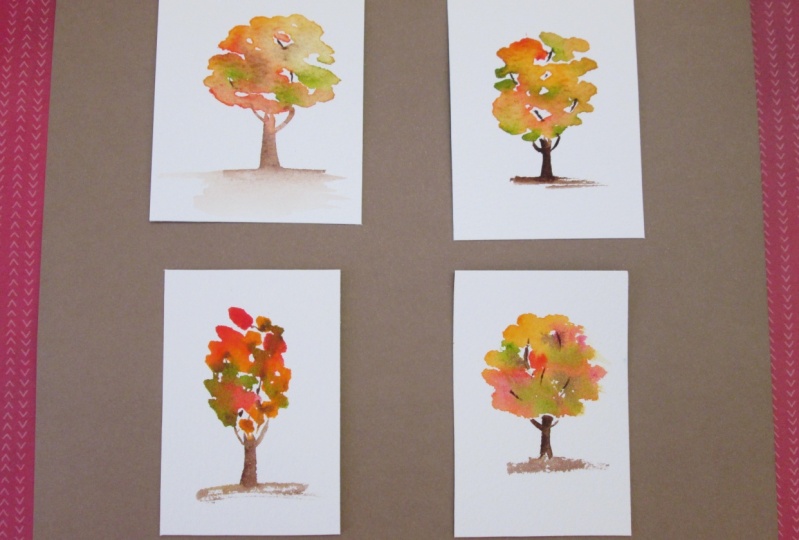
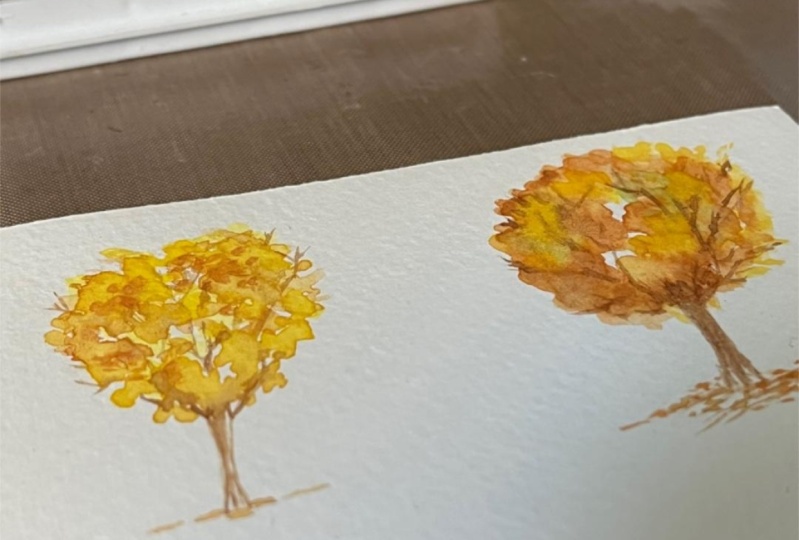
Welcome. Today, we are going to paint
these loose trees. Have you ever wondered how
people get these beautiful, loose and carefree bleeds
with the feel of autumn. These that look like they're
about to lose their leaves. Which minority have done here? I paint a lot of trees. Why should you want
to paint with me? Because I really
love painting trees. They're one of my most
favorite things to paint. I love using different brushes. I love using different
color paints. I'm not particularly one of those people that's going
to call it which colors. I really want you
to use what you have and play with
what you do have. That way you'll learn
if it works for you and if it doesn't
get other stuff, right? I love trees. I'm very passionate
about painting trees. I've painted thousands
and thousands of trees. It's one of my all time
favorite things to paint. And I love exploring and
experimenting and playing. Hopefully, today we'll get to
do that together and we'll explore different brushes
and different paints. You can use handmade paints. You can use tube
paints you have. You can use sets of pans of
paints. Use what you have. We'll explore, we'll try different things and different shapes and different styles. And I'm just too
excited to get started.
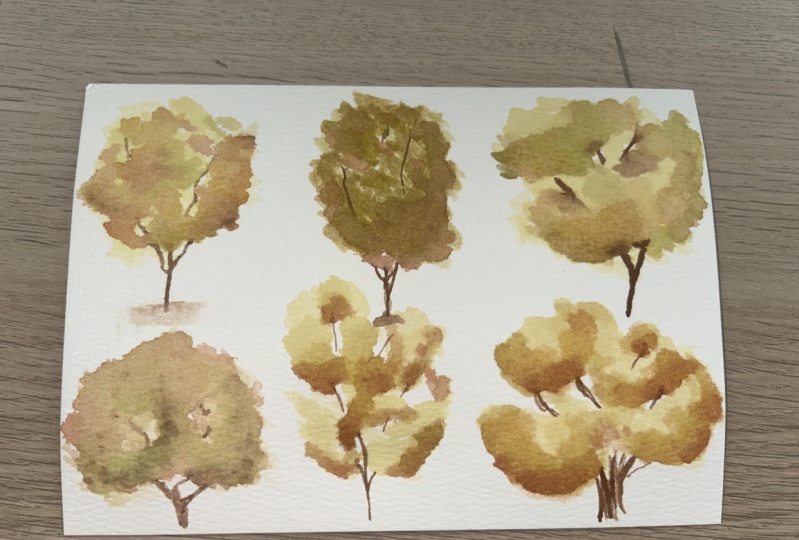
2. Class Description: For today's class, what
we're going to do is we're going to focus on
six different trees. We're going to focus
on different shapes, different techniques,
wet on wet. We're going to focus on how to let the
color work for you, let the water work for you, and let the texture of
the paper work for you. Also, we'll make sure that we're focusing on
negative space, as well as using the space
you have as well as shaping trees as you go and trying
to adapt with maybe some fails that maybe something's not going
quite so right. And we'll talk about
how to rescue yourself, a little bit about
fails and rescues, which is pretty much
a constant for me. And then we'll talk about the
brushes and we'll make sure that you practice
different shapes and not try to do to
me the same shapes. Sometimes it happens
they're very similar. But we can mix things up and change them and make
them a little bit different. By the end of the class, you should have six
different trees. And hopefully you will have
these trees and you'll be able to post them on the
projects and resources. And I cannot wait to see
what you paint today.
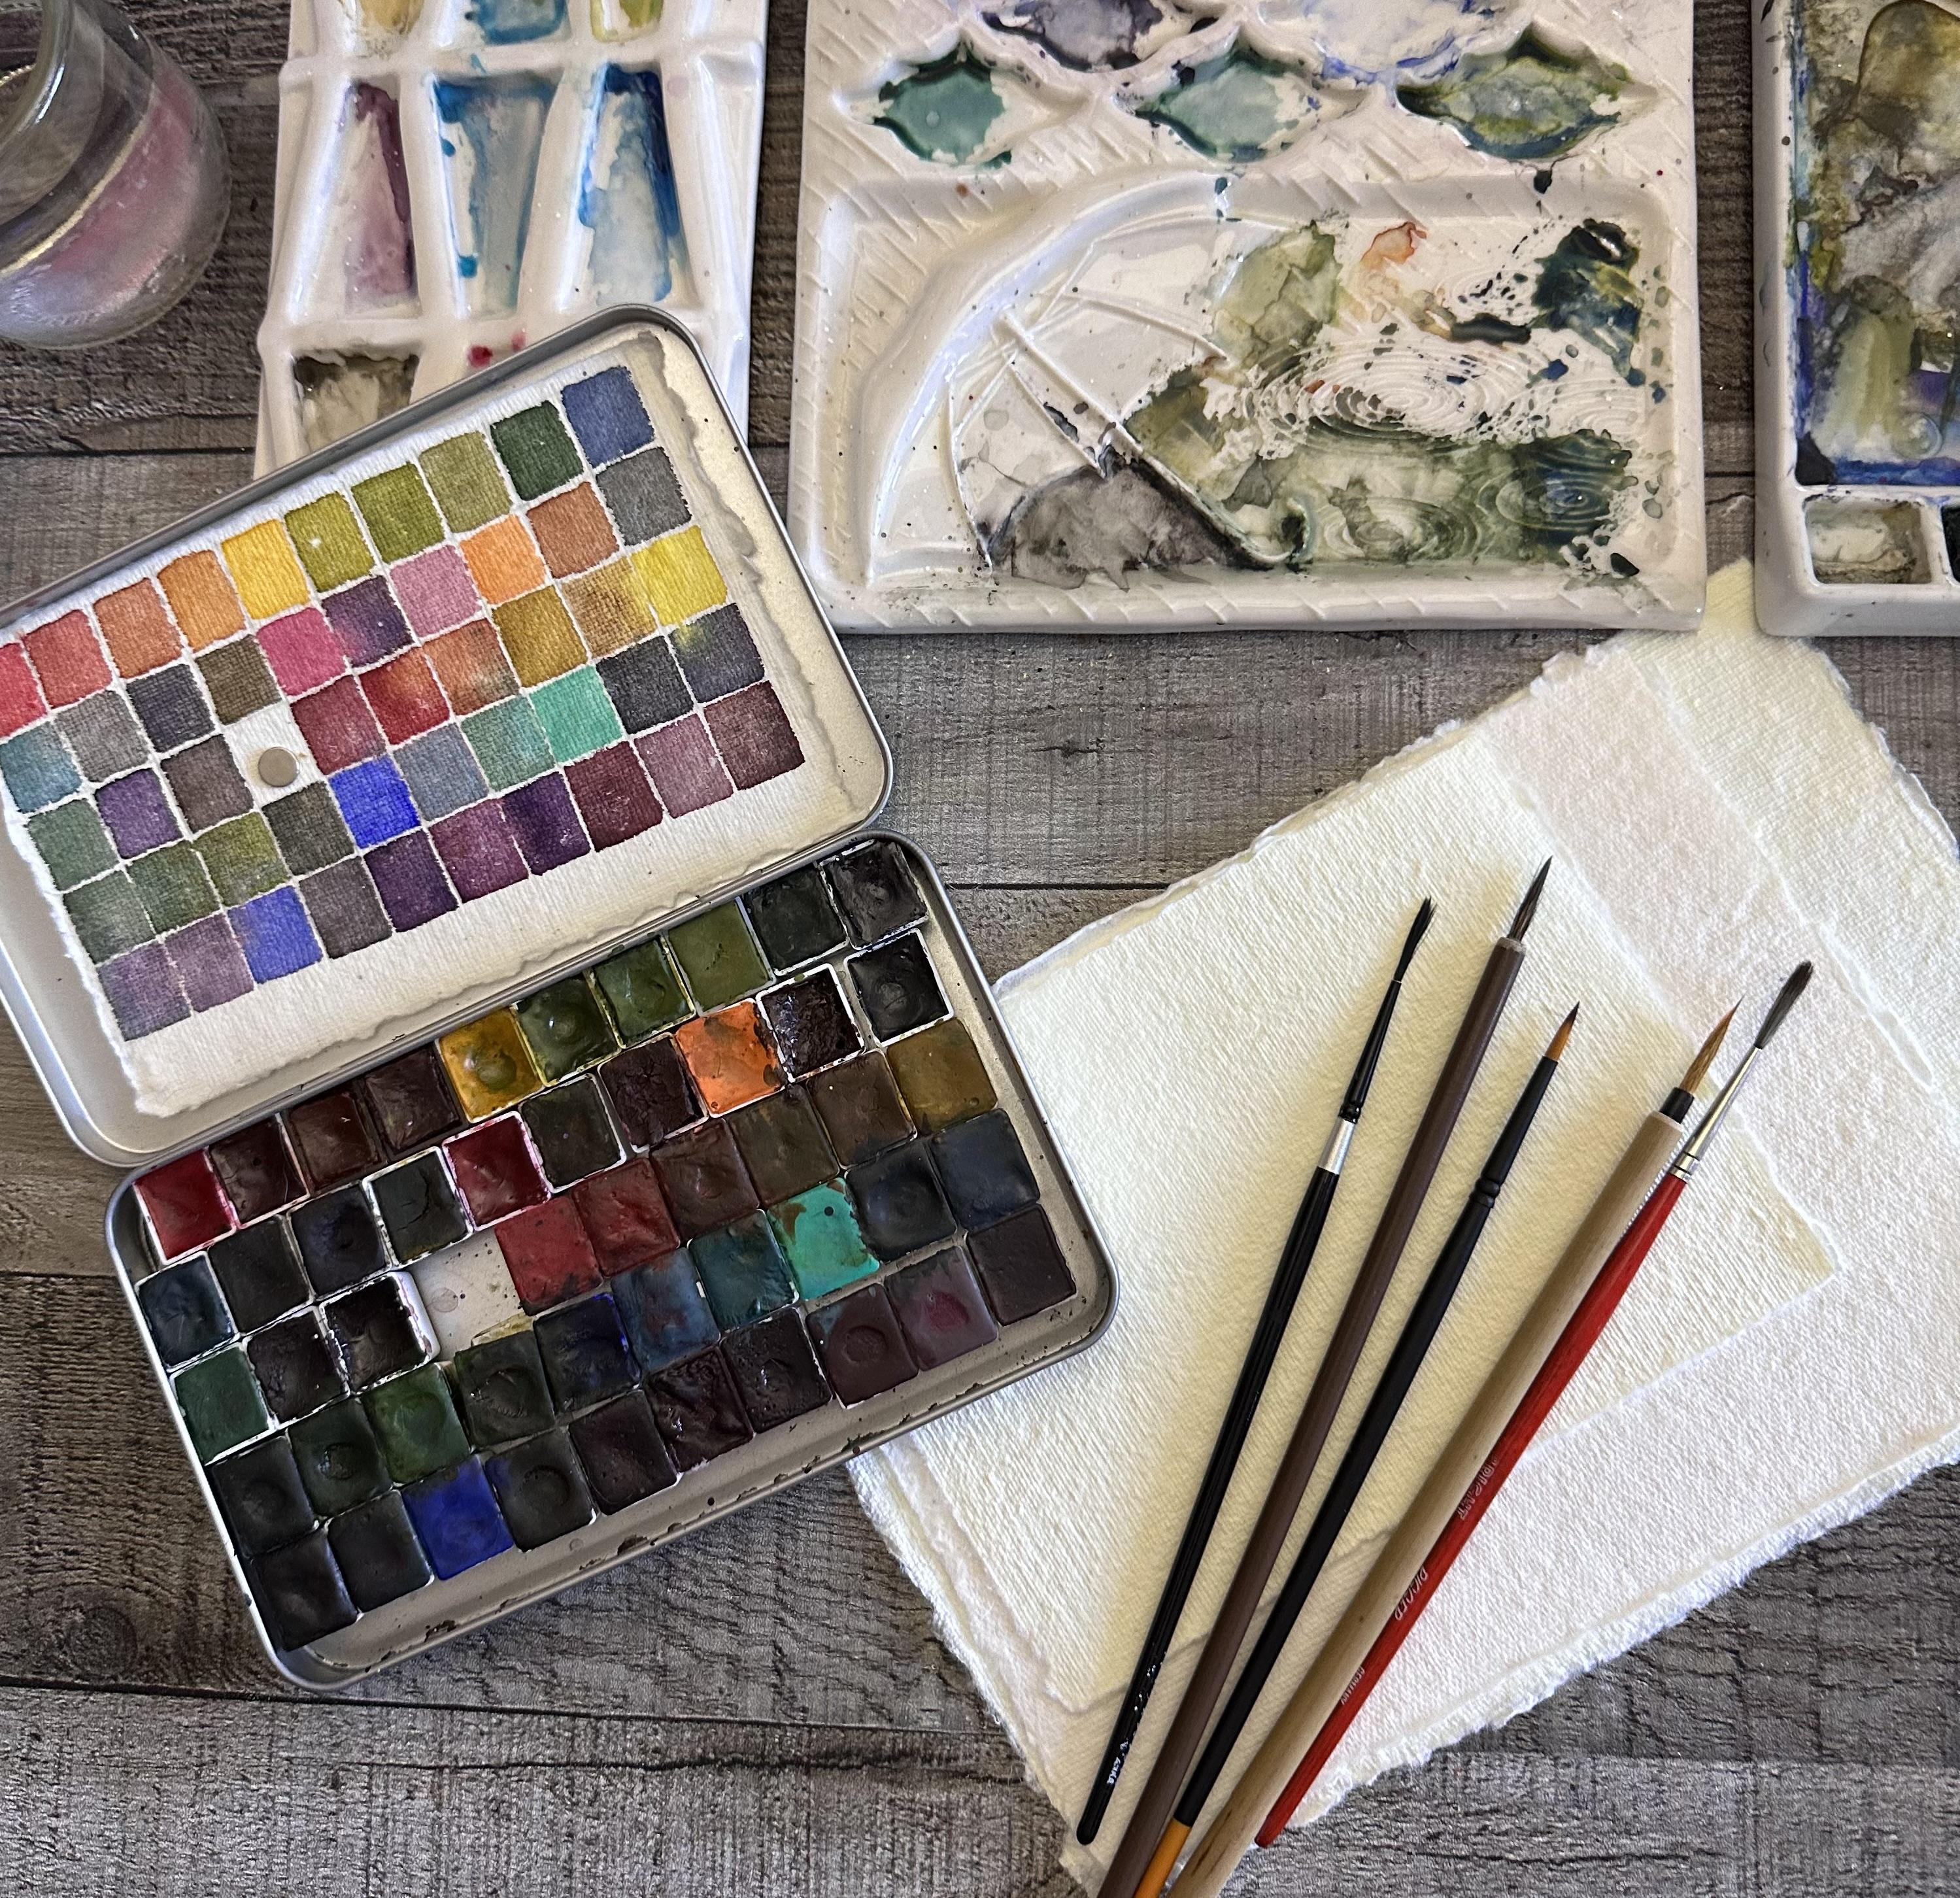
3. Materials & Supplies: The materials and supplies. What I like to use
for things like this, for single objects like
we're painting today, not a landscape scene. I do like to use 100%
cotton rag of paper. As you can see, I've done
more trees on this side, it holds up to both sides. It holds up to a
lot of water use. I like this paper.
I would recommend 100% cotton of some type. After that, most
importantly is paper, then I would go to the brushes. I have a lot of
different brushes here because I want
to tell you that you don't have to go out and buy a certain brush to make trees. You can use a lot of
different brushes. You can use a liner brush that
has a very, very fine tip. You can use inexpensive
caligraphy brush. You can also use another
thin type of liner. This is a little bit
different. Has a skinny belly. This one has a big fat belly. You can see there's
a big difference. Same labels, brushes. This is a liner and
this is a liner. But the difference
is the belly, right? You're going to hold
a lot more water and pigment in the swim
and less in the swim. And this can be really good for those little tree details. You want to get
the little sticks and twigs and all the things. You can use a round for these little areas,
these little sections. You can use a dagger to
get yourself really loose. You can use any brush
that works for you. What I would suggest doing is trying all the
different brushes, like to have some
like dirty old rags and towels laying around
that you can use. I don't use a pencil
or eraser for these, I just free hand these
if you wanted to. You can absolutely, you know, give yourself the
overall shapes. You took a pencil, you
could do overall shape. If you wanted to do
three shapes here, you could give yourself
the three shapes, the five shapes
here and so forth. Supply wise, I also always have a big vessel of water
and that's two sided. And then I also
have another one. I also keep a spray
bottle nearby. You won't really need this
for this particular class. And that's it. We've got
paints, let's see paints. So I prefer handmade paints, so these are the ones
I'll be using and maybe a little bit of these
handmades between the two. There's lots of options
I would suggest having maybe three to
four to 53 to five, Yellow, orange, red and browns. I'd like a sepia or
a Van **** brown. But also, again, if you wanted
to mix up your palette, you do not have to
do these colors, use what you have
highly suggested. You don't have to have
different colors. You can mix the
different colors. You can have two colors,
a yellow and say a red. And just mix those reds and yellows together and see
what you can come up with and mix up a brown or
have a brown on your own self. I'll see you next lesson.
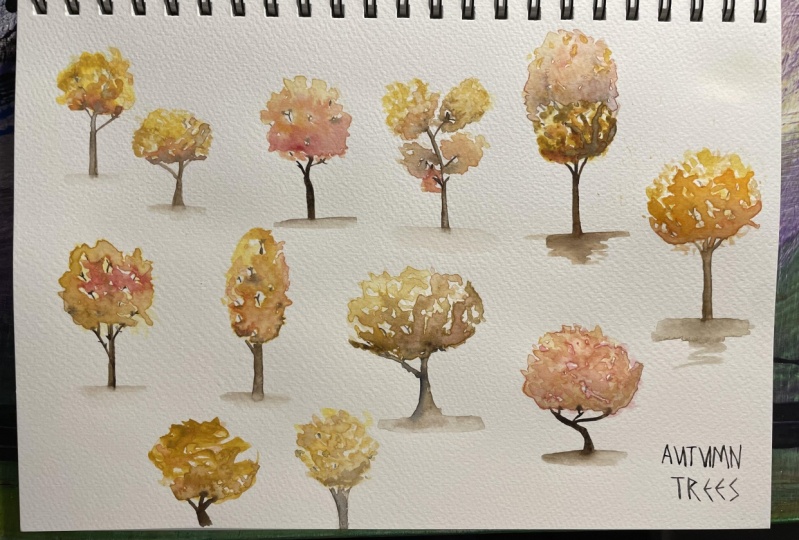
4. Fun Color Warm-up: Hi, hello. Welcome to our
first little demo type. I wouldn't call it
a lesson quite yet, but I thought we would
do a little warm up and I could share a few little things
that I like to do, things that I like to
incorporate into my practice, and things that kind
of help me relax and maybe give me ideas
of what kind of colors I want to
use and what kind of colors I want to play with. And what kind of tools I might
want to try and test out. And really, I should do this
every time before I paint. So I'd like to encourage you
to give it a try as well. That being said, let's get. So I thought we'd
talk a little bit about the colors
we're going to use. And not that I want you
to use the same colors, but I want you to play
with your colors. Maybe mix them together. Right here, I just
took three yellows and I mix them together. Why? Because I don't love
any of them on their own, and I feel like they get
a richer color together. I thought it would be
pretty to mix them. So let's just get our colors on this page. Paper right here. Hey, we're going to
use a yellowish, hey, we might use a touch of green, but now we're going to go, I'm going to move on to
this orangish color. And again, I'm taking a
few different oranges and mixing them
together until I find an orange I like because
often I'll pick up a color like that is more
of a peachier color, not a color I'm super
gravitating towards. Then I'll take another
little bit of orange. Maybe I'll tap a little
bit of brown in there. I'll pick up a
little bit of brown, we'll add, and I still don't
love what I'm getting, so I'm going to take
a little bit more. Maybe burnt a, a touch of burnt N in there just
to make it more rich. There we go. That's a color
I like much better here. The colors we're going to try to match the colors
we'll play with. Maybe we'll introduce
a reddish color. This happens to be
a coral ish color. Then of course we're going
to use a bit of brown. We can mix all these together. Right then we're not just using these five colors,
we're mixing them. And we can even use a little bit of this screen I talked about, we can tweak that green a little bit and make
it a little more rich, if that's what we
want, we don't have to use the color that comes
out of the pan, right? We can use all different
blends and mixes of colors. There we go, we have the colors. And then we can
take these colors, start with the lightest value. We can make a blob. We can make another
blob right here. Okay, this is wet on dry. And we're not wetting
the paper first, we're just using our brush and letting it dance
and move around. That's all we'll do. We'll take a little bit of our orange. Just play with dropping it in. See how the paint moves. We're not going for a super
particular shape right now. Maybe drop a little
bit of that green in, maybe a little bit of that
red, and drop that in. Okay, playing with the colors. And then just to see how this works, this is
just your practice. This isn't your final tree. You're just going
to take some brown. Whatever brown you have,
you can mix your own. You can use sepia. You
can use Van **** Brown. You can use any brown you
have in your collection. To paint handmade paints, you can use student
grade, artist grade. You can use whatever you
want. Just draw that trunk. You can go from the
tree branch from down to the trunk or whatever it was more comfortable for you. I tend to go trunk up, but I should probably
try the other way. Try the things that you
normally don't do that way. You're playing different
options, right? You're trying
different things and seeing what works for you and trying all the
different brushes. That's another thing I did, I did want to show you. Then you can add to the
shape of your tree, right? If something fills off, if you just want to
keep playing with it, keep dropping these colors in to test them out to see what you like and
what you don't like. What works for you. Then when we sit down and do our six trees, you'll have a better idea. Okay, Very loose. You can also just take the colors like this
themselves, right? Let's take our yellow, Take
all the pressure off, right? We'll take all the pressure
off. We'll take our yellow. Okay, And we'll take a
little bit of orange. Let's grab a little more. Take a little bit
more of orange here. There we go. A
little more water. Maybe you just got to play with the ratios until you get
to see what you like. We can watch these colors
move together, right? We can take this yellow,
and we can let it blend. Take your yellow, right?
And blend it here. See what you get. Take
your red, blend that here. Let's grab a little more red. That red got potent fast. Let's water that down a lot. Otherwise, we're going
to get a lot of red. But that's okay.
Let these colors play together and see
what works for you. What makes you happy.
Looks nice together. Maybe you decide doesn't
look nice, right? You can drop these browns in
as well and just play with color to see what you like. I'm just touching it all
around so that we can literally see what it looks
like touching all the colors. Then we can go back in
and drop in more colors. We can also splatter a little bit of water in to
see how that moves, right? Those almost make fall
leaves in themselves. At this point, you could
use salt if you wanted. It might be a
little bit wet, but we're not going to
go into that today. I just wanted to let you know you could use a
little bit of salt. You could take your
fine liner right now and just play and see how the brown looks when it gets mixed in
with everything else. That will give you a great
idea of what is to come. Just to give you a
little bit of practice, maybe you do three of these
little thumbnails, right? Just loosen up to get the color
questionables out, right? Maybe you're really
just hesitant to even do this at
all and you're like, I don't know what
she's talking about, I can't make those trees
that she showed us earlier. But maybe you just
do this and call it for now and just
play with those. And then when
you're comfortable, you can move on to the lessons. If you're not, that's okay too. But I would suggest
trying the lessons, at least listening
through to them first and then seeing where it takes you. But I think this is a great
place to start as a warm up. I hope that you
try this warm up, and I hope that you also post
them to the class project. This is part of the
class project, right? This is part of the
class learning. And I think it helps for other people to see what
you've learned, even if it's not what
you think is the best. Even if you think like,
wow, that was a really great like what I really want to post this for
everybody to see. Not really, but I do want
to show that you can have fun just doing
a simple thing on a piece of scratch
paper, right? What did we do? We got some
pretty play with colors here. We changed the total value
of colors by just adding a little bit of different things or rather the hues, right? And then we just play
with this little thumbnail and you can go back in with some tissue or whatever and soak up
some of that paint. If you wanted to leave a
little more white space and just play with things that, that was too orange for
you, you could just take it and just blot
a little bit out. It'll dry a lot lighter. Let it go ahead and let it dry or play with it or
whatever you want. And then after that,
you can even add more. If you sucked up some of
your twigs and branches, if you feel like they might
have gone away a little bit, just play with
your liner, right? Your thin, thin liner. So that you can get a
feel for what it does. What it can do, what
you can do with it, right, is more important
than what it can do. I feel sometimes
like these were hard for me to work with in the
beginning, They still are. I can't get the
exact shapes I want. Often with these
little thin ones, I don't have the control or the patients just play with it. I can't wait to see
what you come up with. So we'll see you in
the next lesson.
5. Project 1: Lollipop Tree: Our first tree. I don't want to get too caught up on
what brush to use. Maybe a size four. The number has been long rubbed
off this brush. I've had it for probably
five or six years. I'm using a loose color
of a lighter value. If you don't want
to do a fall theme, you can go light green. I'm doing a mix of yellow, ochre, maybe a touch of brown. And I don't want you also
get hung up on the colors. It's more about relaxing and loosening up and
getting the shape down for these versus then
getting the right colors. But I do want there to
be pockets of dark, pockets of light,
pockets of you. Say for instance here, orange, brown, maybe a tiny bit of red. You can try all different
kind of things. Here, I'm dropping in a
little bit of a darker, maybe like an ochre and
slightly a more brown color. A brown ochre. You
can mix your own, you can use convenience colors. I don't want you to
have to run out and buy any color that I say. I just want you to
have fun and let the brush dance around in. You're not using a ton, a ton of pigment here. Just maybe on this last
layer, this reddish color, I am using a little bit more
pigment just to kind of brighten up and add a little bit of contrast
and depth to the tree. Because we want to do those
layers of color, right? The lightest to the
medium, to the darkest. What I like to do is just drop
in the darkest at the end. And sometimes I'll do my trunk and branches even
after the first color. And sometimes I'll do it now, like after I've done the
four or five colors. I love to do it when
it's still wet. That's my way of helping the depth happen in these o
so that we are getting more, just more without
having to add too much. And I feel like for this
loose style, it works okay. It works well. But I did
switch to a liner brush, just in case you're wondering. I have more control
with a liner brush. I don't have a lot
of control with a small round and
that's just me. If it works for you,
use what works for you. I wouldn't suggest Eno
running out and buying different things that
other people say work because often I found
it doesn't work for me. I have to just keep trying all these different brushes and doing all these
different things. And then finally it kind of clicks and something
ends up working. So that's always what I suggest is just try
what you have first. And then if nothing works
after you've tried at all, then maybe come back
and be like, hey, you know that brush used on that first tree,
What exactly was it? I think I need to try
that, but I wouldn't. I don't want that to
be your first thing. I want you to really
just use what you have, use the colors you have,
and basically just play. The idea is for you to explore and to maybe push
your boundaries a little bit. Try things you haven't tried in a way that
you haven't tried. And if you decide it
doesn't work for you, that is perfectly okay too. I'm, you know, definitely in the land of loose is
better for me and faster. But if it helps
you to slow down, absolutely slow down, right? This is only a four
minute video on a tree. So if you need 8
minutes, it's okay. Take 8 minutes, right? If you can do it in two,
that's awesome too. You don't have to do exactly
what I do and how I do it. Just so that you are exploring things and trying something that maybe you're not used to doing and maybe that maybe
try a different way. Right. And again, if it
doesn't work, don't use it. If you find something else that works better for you,
absolutely use that. So I'm just going
back and adding just a few more
touches of brown. I'm kind of, you know, helping the branches move
along a little bit, just adding a little more
depth and of course, blurring out the trunk so
that we have, you know, a ground for our tree to be on so that it doesn't look like it's
just floating in midair. Although we are not making a
landscape with these ones, these are just us playing and experimenting and finding
what works for us. So this is tree one, and I'll see you back shortly, and we will tackle
tree number two.
6. Project 2: Cotton Candy Tree: Welcome back for
tree number two. I'm going to call this kind of an egg cotton candy type shape. We're going for the
oval look here and I'm using some yellowish
ocher color mixed together and just kind of
keeping it in that oval shape. I'm not following any
particular rules. As you can see, it's
kind of hodgepodge and it's kind of blended
together and it's okay. It's just, exploration does not have to be
perfect by any means. Just play with the shapes, play with the color,
drop them in. I'm taking a little
bit of a orange, brownish color and putting it down on the right hand side. We're going to say
that the lights coming from the right and that the right side is going to be a bit darker, especially
near the bottom. And so I'm just going to soften up the edges
a little bit. I realized I had a little
harsh lines and I wanted them to be less sharp like that. And so I'm just
taking a brush that is clean and a
little bit of water, but wet but wiped off. So it's a wet brush,
but not soaking wet. And I'm just going to
smudge those edges. Then I'm going to take
some red and drop that in. You can do red, darker
brown, a darker orange. You can even use a little
green at this point. You can use whatever you like. Explore these colors.
Now it's trunk time. I love putting the trunks in
because I love the bleeds that happen when I use
some dark color like this. And so I love to do
with still wet like I mentioned before and I just like to play with different shapes in different branches and different angles
And is it perfect? Absolutely not.
Does it have to be? Nope, And guess what?
It's just paper. Try, try and again, and keep going, and keep playing and use
different brushes. I switch to a liner brush here, and I have probably four
or five liner brushes, and yes, surprisingly, they all feel very,
very different. Use what you have,
explore what you have, and switch back to my round, because I'm going
to drop some more. And I often often drop more in after it
settles a little bit. Sometimes it dries lighter and as long as it's
still wet, I do that. And you can still do
it when it's dry too, but I like to do
it when it's wet. That's the best
you get the most, like fun, pretty colors. Otherwise you're
kind of batting. Then you're battling
the after it dries the weird lines,
right? The harder lines. And I really like the
soft lines. All right. So we've just about wrapped
up tree number two, adding a few little
dry touches on the bottom there, extra leaves. And we'll be on to tree
number three soon.
7. Project 3: Light & Loose Tree: Welcome back for
tree number three. I think I just
wanted to say that. So I am using a lighter yellow. I feel like it might
be a naples yellow. And again, it doesn't matter
what color you're using. I'm just showing you how
light I'm going and I think I quickly realized it was too light and I
wasn't a big fan. And I'm not varying greatly on these colors of
these trees today. And sometimes I will, but I also, again, even though I've said
this over and over, I want you to work on more being loose and the
shapes you're going for versus doing the colors
and making the colors either look like mine or
different than all the others. And you can do it
however you want. If you want to make
blue and purple trees, make blue and purple
trees, right? If you want spring green trees, make spring green trees, do any trees you
want any colors, you want this shape. What I was going for was you
can see the top left clump, clump to the right, and the
clump sort of at the bottom. So almost like two eyes
and a nose, if you will. And so I'm trying to keep those clumps individual yet
blended with the others. I tried to drop in
some Spring green wasn't a huge fan of that, so I'm mixing and kind of
contemplating not liking it. And I often do this with
things I don't test a lot out. So you'll often see meddling, if that's a word,
fudging it as I'm going. So see I kind of covered
it up with some orange. And, you know, if
green gets too crazy, just drop some orange in there. And it'll kind of, you know, mute it out and
tone it down a bit. So that's what I did, and so my three clumps are kind of blurring together.
And that's okay. You can help define that in a little bit with
some darker color, so it's not the end
of the world if that happens and you do want to
keep your darker colors toward the bottom of each clump and toward
the right hand side, we're going to pretend
that the main light source is probably coming
from the left here. But again, we don't
have to be so crazy picky about that because we're just exploring
and we're just having fun. There are plenty of
videos out there. If you want to learn how
to do perspective and light coming from certain
directions and if you want to paint specific trees, right, I'm not the
girl for that. I'm, I'm here to
hopefully have you enjoy a little bit of water color with different
colors and brushes, and exploring different things. And again, I'm using the PA, the darker brown,
the Van **** brown. Any kind of dark brown you want, you can mix it up
yourself if you'd like. I'm using that to draw
the trunk and then bring in the
branches and kind of lead them through
this, you know, fluffy tree foliage and out
the tops and out the sizes, and really just dropping
any dark marks anywhere. You don't have to be super
picky in an ideal world. Yes. You'd want
it to make sense. Right. All the branches are kind of angling from
that center area and, you know, focusing it there
and then working around that. So I did it light and
then I'm going to take some more color and I'm going
to drop some more color in. And I'm just going
to kind of stick with those kind of clumps that I had originally started with
and kind of just color those, maybe add some extra
leaves off the sides. If I did, oh, if you do some extra branches that are
kind of like just floating, just add some leaves
to them and they kind of, you know,
blend back in. And I feel like I definitely lost my three
shapes in this one. And so if you wanted
to keep your shapes, I would maybe try that a
little more, but that's okay. Let's move on to
tree number four.
8. Project 4: Cauliflower Tree: We're back for tree number four. This one, I did switch
to a larger round brush. This is my Polina
Bright, probably size, I think it's my size one, which is maybe equivalent to a size eight in typical brushes. Although sizes of
brushes differ so greatly that it's
really confusing. I did my lighter color and right away I dropped in some dark, a warm, not a heavy brown,
but a lighter brown. An orangey brown. And I just started to try
to form a little bit of shape in this tree and it decided it was going to be
a shorter and squat tree. Almost like little mushroom head or an umbrella, I
guess you could say. And I wanted these
branches to kind of also bleed obviously, right? That's how I love to do my
trees and you can go back in other of the other trees but they're still damp
and drop in color. I don't really show
doing that here, but it's absolutely an option like that one on the top right. It did get a little
bit lighter and so you could absolutely
go in and drop more color if it was still wet And there's ways around
that if it wasn't wet. So I'm dragging
out some branches, I switched to a round size two. I love these etcher brushes. They're awesome brushes if you need just a
basic set of rounds. And so you got to
add that ground a little bit and
just kind of put a branches sticking out up there to kind of
just add and then see, I wanted to add more
leaves on there because that branch was just
oddly sticking out. Sometimes I really worked with
the branches sticking out, and sometimes if it looks funny, just add some leaves
on top of it. And I feel like it kind of
makes everything better. But I love dropping in the
darker color like that. It'll diffuse and
it'll dry lighter. But it really does add
the depth and gives a tree much more character like the one on the upper right. It's just almost like, it's like the leaves
are about to fall. It's about to die, you know, and it's not going to
be alive much longer. But hey, now we're on
to tree number five.
9. Project 5: 5 Clump Tree: Okay. We are now back
with tree number five. I'm back to my size four ish brush and I'm going to make little
clusters this time. And see where that leads me. It doesn't, doesn't mean I have to commit to
these clusters, right? We can change
things up as we go. And that's kind of how I like
to work with watercolor. I like to change things as I go. If they need to change,
then change them, right? You don't have to
stick with a plan. So if you're following me and the plan's not
working or it's not going how mine is going or how you wish it were
going, then change, right? Change it up. You can flip
this paper over, start over. You can do five of
these papers and have five different
sets of trees, right? And tell you, get
what you like and what looks good to you
and what feels right. I mean, this takes practice. I've painted thousands and
thousands of pine trees. I mean, so many pine trees, a ridiculous amount
of pine trees, but I do really love
this color of this one. I just kind of kept it more
simple and kind of soft. And I love the way the brown the spa looks in with
these two colors. And I don't know, it was just a fun little mix
up of difference. So I always try to
do odd numbers. So I did keep an odd number of tree clusters of
the little foliage. So there's 12345, right? And I'm just going to drag
those branches kind of up towards each one so it looks like it is connected.
Doesn't have to be perfect. Again, your lines don't
have to match up. It doesn't have to
make exact sense. Just make your eye, you know, believe what it's seeing
and convince it right. And this is pretty convincing. Without being perfect,
without being super detailed, and without going, you know, into such great depths of
making it look perfect. And I'm not all about perfection,
I'm about imperfection. I find the beauty in
the imperfection. I find nature is full
of imperfections. Gets perfect within
the imperfect, right? And I think that once we kind
of embrace that in our art, I feel like we can let go in ways that we couldn't before. And let go of the standard
that we hold ourselves to. And let go of the standard that we see that
other people do. And I get caught up
in that a lot, right? I see things that I
like, oh, I want, I want be like that
or do like that. But I can only control
what I'm doing at the moment in my
attitude and my mindset. And so focus on that and focus on just practice.
Practice, Practice. A daily practice is
the best practice. And I'm dropping in
darker now whether or not I do like it, actually I do. And I kept the clusters, so I left those dark
colors in the clusters. And I'm just going to kind of spread that out a little bit so it's not as, you
know, prominent. And so I'm just using a wet brush that I
kind of dried off. And that is it for
tree number five.
10. Project 6: Stocky Tree: All right. We're on our
last tree tree number six. Let's get our
lighter color going again. Same round brush. It's kind of a cross between a round and a mop
because it holds enough water and paint that it gives you time
to work, right? I'm not dipping
every other second. It gives me a little
bit of time to play. And here I feel like I kind
of made a cauliflower head. There's the cauliflower floret thing in the middle and
then the toile sides. And you know, my shapes aren't
perfect and that's okay. This is an invitation
to explore. An invitation to play. An
invitation to use the paper. To use the paints. To use the brushes, you have to use the
supplies you have. Right? We've all taken time
to pick out these supplies. Sometimes we hoard them
in our carts for a while. Now is the time to use them
and enjoy them. Right. And practice with
the good stuff. Because the good stuff
is going to show us what our potential could be. You know, it's going to
give us just a leg up. The good paper is
going to really, really help elevate
our experience, our practice, and
our learning, right. Using good supplies
can really just boost the learning curve
and shoot you up higher. I held on and used
cheap paper for way too long, big regrets there. But it is what it is. I'm glad I learned the hard
way, I suppose, because now I can show you
that that's not the right way. Just because it
was the frugal way doesn't mean it
was the right way. So taking some color and using my damp brush dried
off and just kind of blending things and
making sure they mix together so there's not
giant pockets of color. I just love playing with
the color this way. I think it's very theo, therapeutic, It's very calming. It's just a good way to explore your paints and your brushes, like I keep saying, right,
and your paper, it's, it's just a great way
to get all three of those practices and supply
materials in your playtime. And so, like I said, I did use the same color
palette for most of these. I think there's only one
that I dropped the green in. And for the most part, you
know, they're all different. So this doesn't
remind me of broccoli totally looks like
a broccoli tree. And I do lollipop trees, I do broccoli trees, right? And this is definitely
a broccoli tree, but it's not green, so it's not as obvious. Usually my broccoli
trees are very obvious because they're
very green, right? And they literally look
like a chunk of broccoli. And so this one I guess, would lean towards cauliflower. I can't explain the brown trunk, but maybe you can, and maybe yours won't
look like cauliflower. But I'm super
excited to see yours and super excited to see
what you come up with. And I'm sure I'll see yours
and it'll give me ideas, and I'll be like, ooh, I
wish I thought of that, or oh, I should have done
that, or Oh, I'll try that. Learning is like a
forever thing, right? I call myself a forever
beginner because I'm always learning new
things. New things. To try picking up things from different people and taking them and bringing them
into my own practice. Right. And then leaving the things
that don't work for me. And maybe I try them
once or twice or five times and they just don't
work and that's okay. So thank you for joining me
on these six trees and we'll see you very soon
in the next lesson.
11. Final Thoughts & How to Post Project: Thank you so much for
joining me today in painting these six trees with
me and doing the warm up. I really hope you don't skip
the warm up and if you did, maybe go back and try it. I think it's a lot of fun.
Those little thumbnails just really can let us loosen up
and let us explore color. And in a way that maybe
we haven't before or maybe that we're a little
too intimidated today. If you would like to
post your class project, which I would absolutely
love you too. Because I want to be
able to cheer you on. And I want others to be
able to cheer you on too. And I think it's
super encouraging to share our projects with people. And I feel that it
also helps us step outside of our comfort zone and it welcomes us to
try more things. And it just feeling that like, oh yeah, we're doing
this together, we're in this together. Post your class project under the Class Projects
and Resource tab. What you want to do, you're
going to want to click on the Little Create button and you're going to
create a project. You're going to
name your project. And you can put a
description if you'd like. And you push post and
there it will be for all of us to see and we can
cheer you on together. You can also start
a discussion or ask questions or anything. As always, feel free to reach out to me here on Skill Share. I'm also on Instagram
where you can tag me in anything that you post after you post
your class project. I'd love to have you go over to Instagram and post
it there as well. And I love community and I
love sharing this community. I love sharing, creating, and the journey of creating. The more about the adventure
than the actual perfection. If you don't create
anything today that looks like this, it's okay. I've painted a lot of
trees and it's just paper. Get some more paper, right?
We all have a lot of paper. And if you don't buy more and then you'll have
more paper too. And you give many,
many, many trees. Pages and pages and
pages of trees. That's what we want to do. Thank you for joining me today. I super appreciate it. I'm so happy to
have you and I'm so excited to see your
class projects. Thank you again and
I'll see you next time. Bye. In case for some reason it's confusing how to post your project or another
project resource tab, I've put it all right
here for you once again. So if you need to slow down, pause the video, take a screenshot. It's
all here for you. And I am really just excited
to see your class projects. And thank you, thank
you so much again for joining me and I'll see
you next time. Bye.
 Amber Lane, watercolor landscape artist