Transcripts
1. Introduction: Do you want to learn to make
giant watercolor swatches, otherwise known as moody
watercolor backgrounds, dreamy gradients, lush
watercolor washes, or your very own watercolor fan. Me too. [NOISE] [MUSIC] Hi, my name
is Marie-Noelle Wurm. I'm an artist, illustrator, and top teacher
here on Skillshare, where I've taught
more than 70,000 of you to help unlock the doors
to your own creativity. As a full-time artist and illustrator for
more than a decade, I create artwork
that's delicate, and dream-like, and
sometimes a little dark. In this class, I'm
going to demystify the number one
watercolor secret. I know that sounds clickbait, but it's literally
the thing that I wish I had known when I started
working with watercolor. I would have saved
so much time if I had known how to do
this from the get-go. In this class, you'll learn what the number one thing you
need to pay attention to, and that is how waterworks; how it moves, how it drives, how pigments move
within the water, and by the end, you'll walk away with an array of giant watercolor swatches so that you can feel like tiny little fairy in a
giant world of color, enjoy, or create beautiful, moody backgrounds and come away empowered
with the knowledge that you've gained in order to make watercolor work for you. I hope you join. [MUSIC] Do you want to learn
how to do that? I got you, baby. Go get it. What are we doing here? [NOISE]
2. What You'll Need For The Class: Let's talk about
the art supplies that you're going to
need for this class. It's actually pretty simple. You're just going to
need some watercolor. I have brought out some of these tube watercolors because I do think that
for our purposes, two watercolors will
be a little bit easier than pan watercolors. Though you can use those. It's just it's much simpler
because in terms of the quantities when
you're wanting to cover a large surface, it's just a simpler
way of going about it. I brought a few
different brands here, but there's no specifications
in terms of the brand. You can use whatever you want. Of course, you can actually
use gouache as well. But for the purposes
of showing you how it can work with watercolor, I'm going to be using watercolor rather
than gouache today. You're also going to want
some watercolor brushes. I have a few here. I have one synthetic one
and two natural brushes. But again, no specification. Use whatever it
is that you have. It is better though
to use a brush that's made for
watercolor simply because it's going to be able to hold
that much more pigment and water and be easier
for the task at hand. You can also see here
that I have what is called a mop brush. These are brushes
that are actually specifically made to carry
huge amounts of water, which can be even easier
for our purposes today. But the technique also works with brushes that
aren't mop brushes. It's not an issue if you
don't have a mop brush. Of course, you're going to need some water, some
watercolor paper. I have a few different
ones here to show you. For a long time I used this paper by the
brand Hahnemuhle, which is made from bamboo
rather than cotton, even though for watercolor, a 100 percent cotton is amazing and super
fun to work with. But there are other types of papers that work fine as well. This one which is made of
bamboo fiber works great. Any paper that is
mixed media and says that it works with
watercolor will do well, and of course, specific
watercolor paper. Arches is one of the
most well-known brands. They do hot pressed, which means that it's
a very smooth surface and cold pressed, which has a little
bit more texture. Of course there's a few
other textures as well. We won't get into
the details of that, but they can be very
fun to play with. They do react differently so it's interesting to discover how different papers will
work differently with your pigments in
your watercolor and the different effects
you can achieve. I also have a Winsor and Newton
block of watercolor here. Again, there's no specific
brand that you need. But if it is your
first time doing this, I would recommend maybe not
going as big as I am going, but maybe going for
something smaller, something like
this or even an A5 size just so that you can
get used to how it works. Then once you are really
comfortable with that, then you can move into
bigger and bigger formats. Of course you're going
to need some palettes, and a rag or paper towel so that you can plot out
your brushes when needed. I also recommend having some artist tape if
you want to make clean borders around the
edge of your artwork, but it's not obligatory. Another small note, you
might want to protect your table because this can
sometimes be a messy process, especially the first
few times you do it, juggling, water levels, etc. You might want to
lay down either some newspapers,
some craft paper, something to protect
your table from watercolor spills even
though watercolor, it's an easier paint to clean up in comparison to
acrylic paint or whatever. But just to be safe, if you want to make
sure that your table is nice and clean,
prep it beforehand.
3. The Class I Wish I Had: If you're familiar
with my classes, you'll know that I'm all about learning intuitively,
experimenting, embracing the process, playing, making tons of mistakes, and making fun discoveries
along the way. Sometimes though, it's nice
to know thought shortcuts that can help you with
what to focus on. In this class, I'm
going to be giving you the thought shortcut
that I wish I had had way back when I started my watercolor journey and
that would've saved me so much time in
terms of achieving the kinds of textures that
I was looking to create. I'll give it to you
in one sentence before we dive into the nitty-gritty and hands-on
application of it. But it boils down to this. The most important
thing about watercolor is understanding how
your water works, how it moves, how it dries, how the pigments move
within the water, and what the sheen of the
paper can tell you about your water levels and where your water is at in
the drying process. For a couple of years in
my watercolor journey, I would get lost marveling at how the pigments
moved in the water, how the colors would
flow and merge, and then how that would
look once it was dry. I would get lost in it in a fun, relaxing, peaceful,
almost meditative way. Though that's very important, sometimes I was also
frustrated because I would be trying to get a certain
texture, more often, a smooth gradient or
create a background and I thought I would
have it and it was looking good and
then as it dried, stuff would go wrong. Weird, unpredictable
textures would show up, there would be watercolor
blooms that I hadn't expected, and I just didn't understand
why sometimes I would get these watercolor blooms and
other times I wouldn't, I didn't realize that I was
looking at the wrong thing. I also wanted to
be able to build more complex images with my watercolor and It
felt like I was missing a piece of the puzzle in
order to accomplish that. Don't get me wrong, I always recommend working with mistakes. There's so much that I've learned through trial and error, like way more than you think. But sometimes, you do want to
look for a specific thing. If it happens over and over
and you're still frustrated, then you might not be focusing
on the right aspect of it. That's what was
happening here for me. How could I create
these beautiful, ethereal, misty, moody watercolor washes
that I was looking for and what piece of the
watercolor puzzle was I missing in order to
feel like I fully understood the personality
of my watercolor medium? In this class, you'll be
learning what I believe to be the most important principle
for any watercolor practice. We'll be creating four moody watercolor
washes in order to strengthen our
hands-on understanding of this underlying principle. Before we embark on our
wash making journey, I'd like to show you a few
examples of some of my artwork where the moody wash plays an important part
in the final piece.
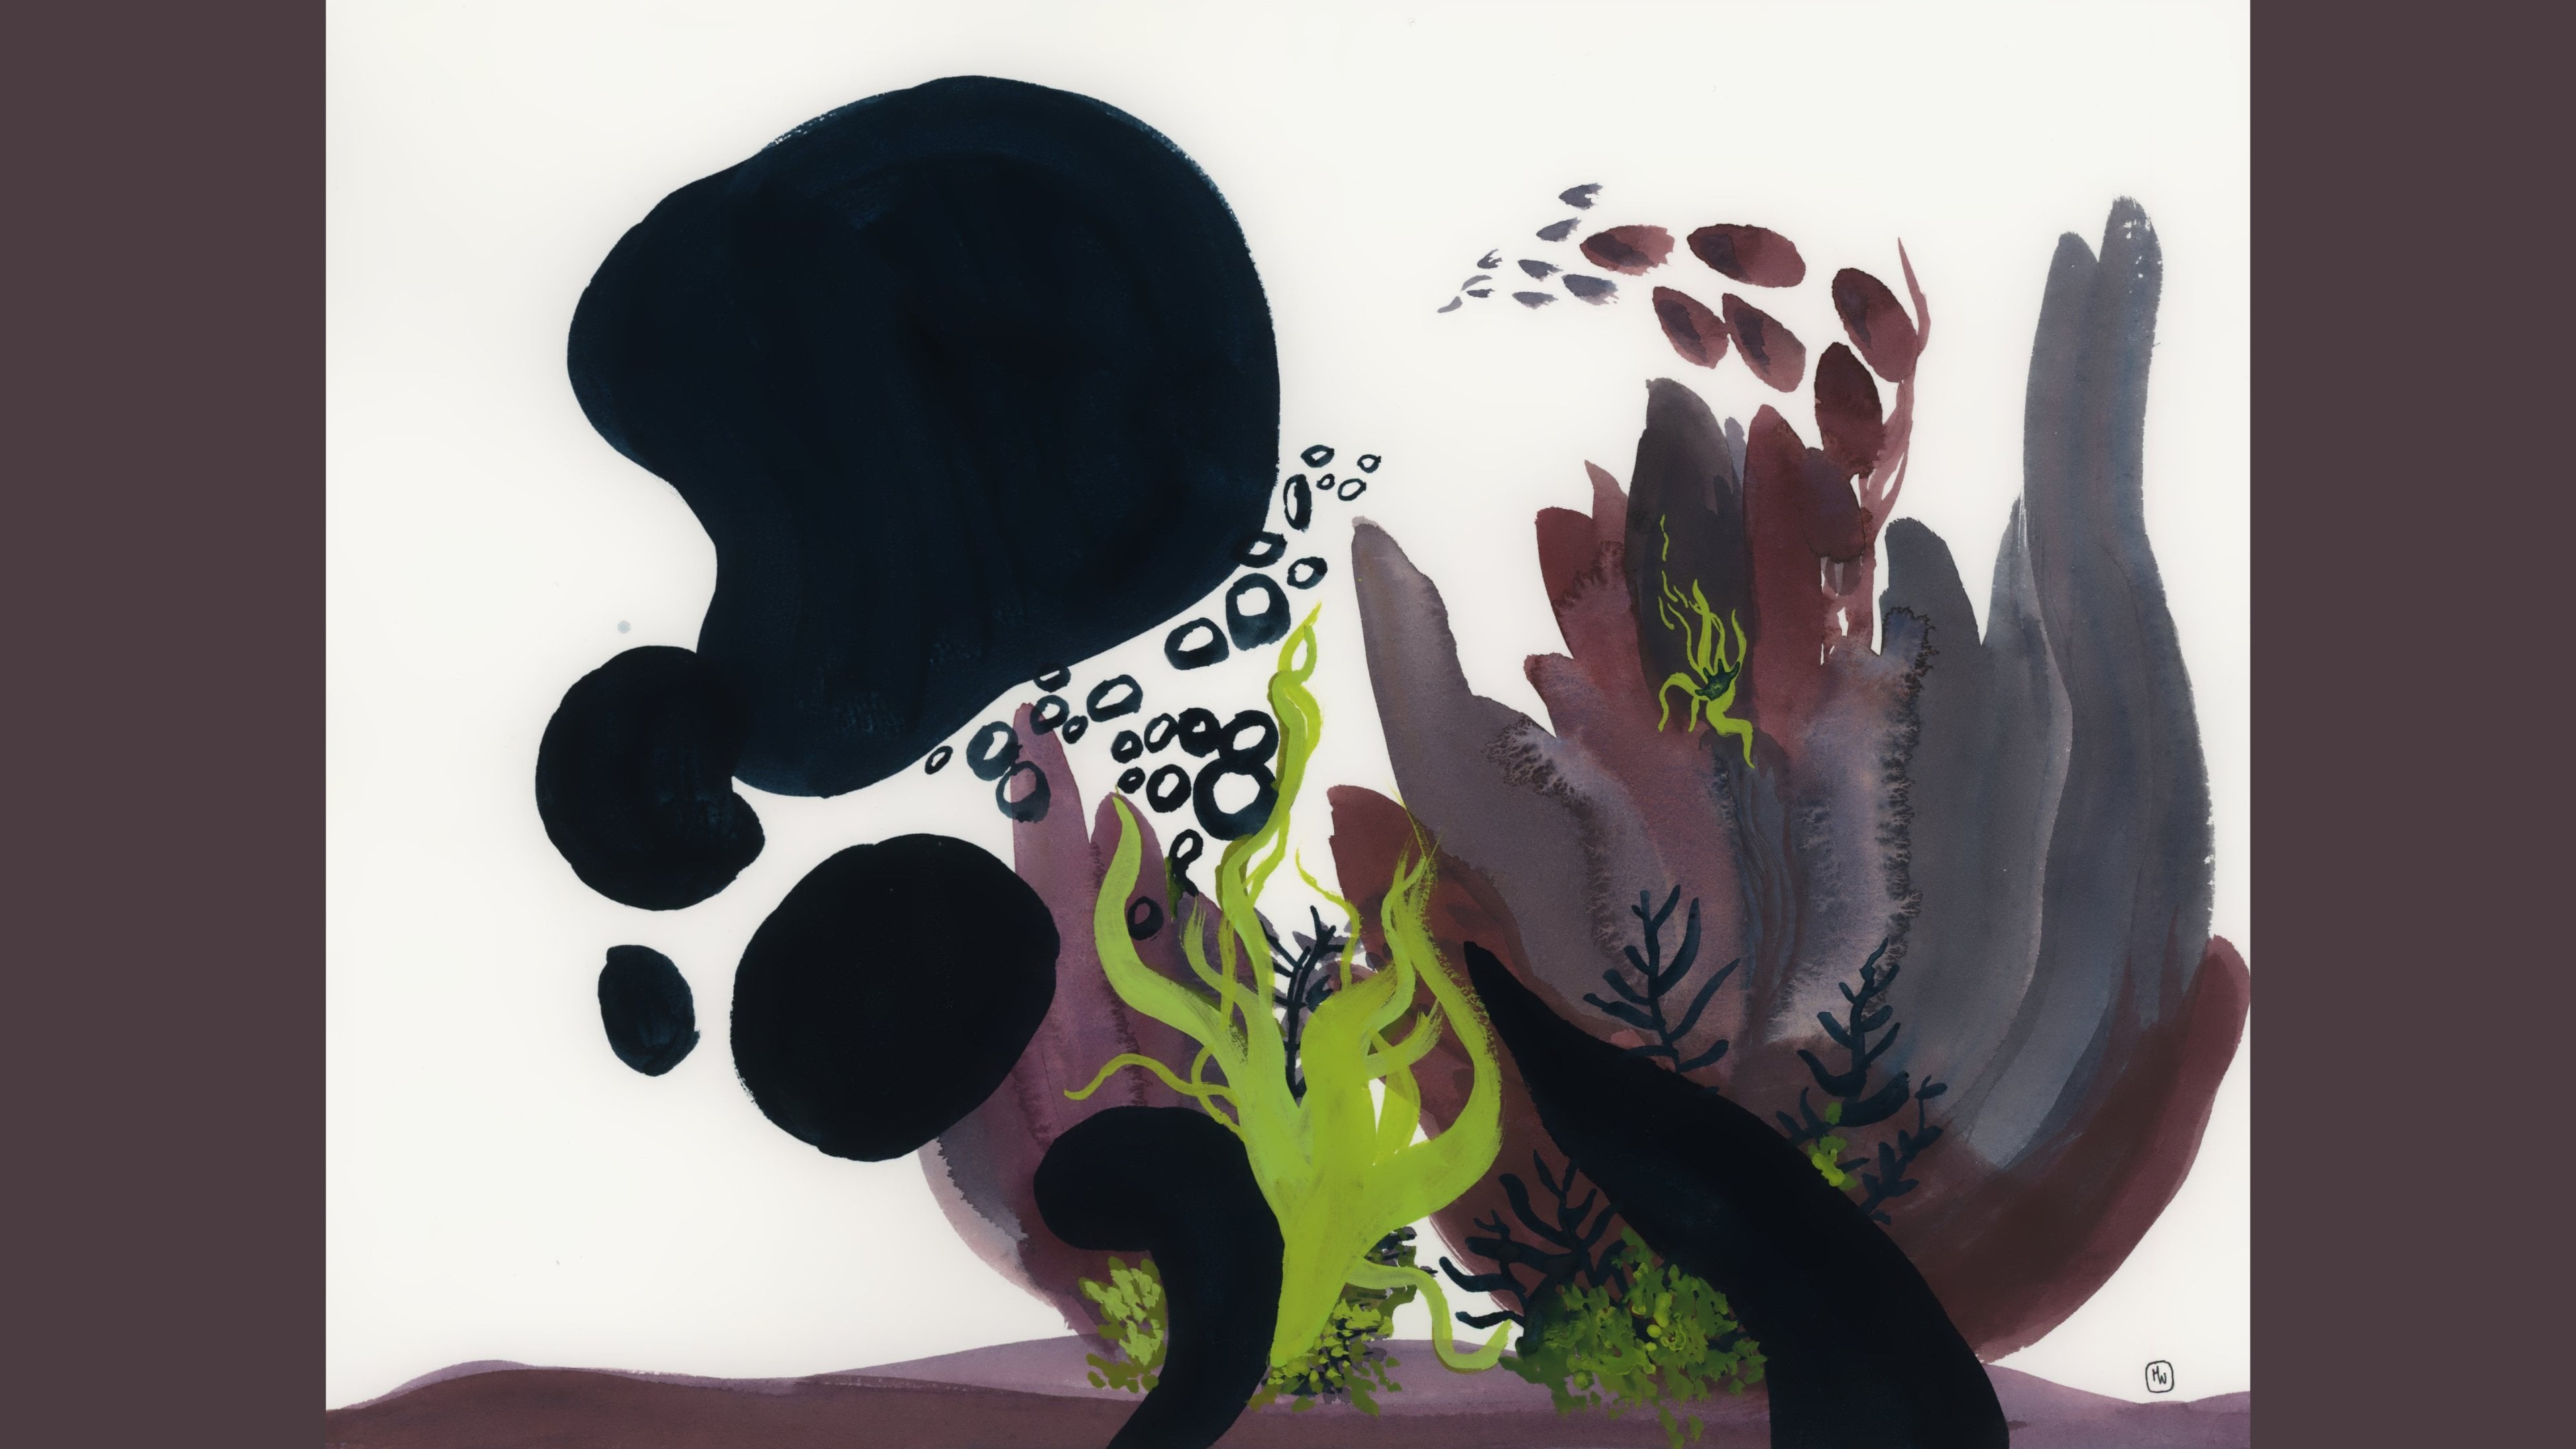
4. Why The Moody Wash? Some Examples : First, I want to show you two
pieces that I made before I'd understood the principle that I'm teaching you
in this class today. At this point, I already had a couple years of working with
watercolor under my belt, so through trial and error, I had already figured out
how to make something akin to the moody wash that we're going
to be doing today. I had figure out part
of that principle, and you can see it in the blue background
of this one where you can really tell that the
pigments were able to flow more freely with the water. But if you look closely, there are other parts of this piece where
that falls apart a little and you see way more
brushstrokes and hard edges. You can see it even
more clearly in this piece just because
of the colors that there are these parts where there
is an accumulation of pigments that lead to
hard edges being present. Now I want to show you
a few pieces that I made after I'd understood
this principle. In this first piece, I used the moody wash to evoke the feeling that
you can sometimes have in a wintry landscape where the snow and the sky
are indistinguishable. I used the granulation of this specific watercolor
pigment in order to create that sense of flurries of snow and wind in this
wintry landscape. If I'm not mistaken, I think this specific
watercolor pigment was made by Simone Michiels, and I think it was a
collaboration palette with Anna Jane Searle. The fact that I
was able to create this entirely
consistent wash really contributes to the
feel of the piece and to the message that
I was trying to convey. In the second piece, you'll notice I also have a
moody wash as the background, the grass, but I did something
a little bit different. I added a second wash on
top of my first wash, and that's this
lighter green here and I made that one
a little bit more hard edged so that
you could really get this sense of movement
and wind in the grasses. Also, while I was creating the first part of
this moody wash, I actually knew that I was going to have a forest
on the top right. So I used the principles
that we're going to learn about in this class in
order to create a texture, something granular
with hard edges in order to evoke those trees. That's why I think
learning about the moody wash is so important
in your watercolor journey because if you're able to have a range from making
something that's very smooth and uniform
all the way to very textured and you understand
truly how they work, then you're able to create
artwork that conveys the mood, atmosphere that
you're looking for. In these two images,
which by the way, I made for Folktale Week, which is a really
fun art challenge that I found through Instagram. Sorry, this is a total aside, but art challenges are super fun and can really help
further your art practice, so definitely check out the Folktale Week challenge
that's in November usually. I also have a class called
the Fearless Art Challenge, which is with all my favorite
things pushing you to be creative and think outside the box and all that fun stuff. Anyway, shameless plug, but I just wanted to
mention that because art challenges are a great way to further your
artistic journey. I can say that I probably
would not have created these two pieces if I hadn't participated in the
Folktale Week challenge and I'm very happy
with both of these. That just emphasizes how fun and important
challenges can be. In these two images, I integrated the moody
wash as part of the image, as building the scene and as evocative of the elements
within those scenes, but that's not necessarily the only way that
you can use it. This is a piece that I never quite finished as you can tell, but I thought it
was a good example of a case where you
can use a moody wash, not as an integrative part of the image that
you're creating, but rather as a backdrop for other elements that are the
main object of your image. The main point that I'm
trying to illustrate here is the moody
washes can be used and applied to a variety of different styles and for a
variety of different aims. You can use it to create
something abstract, something semi-abstract,
something more realistic, figurative, or illustrative. Most of all, it's about using the colors and the
textures that it offers in order to strengthen the message of the artwork you're
trying to create.
5. Definitions: [NOISE] Let's go over a few little
definitions and terms. You may have heard the
term watercolor wash, but what is it exactly? It's a technique that results
in a semi-transparent layer of color where no brush
marks are visible. That means it's smooth, often uniform, and can be used to cover a
big surface area. If there are color transitions, whether that's different
colors merging together or the color of your watercolor merging with the
white of the paper, then those transitions
are often gradual, characterized by a softness
or a blurriness to them. This transition is called a soft edge in opposition to what
is called a hard edge, where there's an abrupt, clear distinction between
one color and another color. Wet-on-wet is a technique
where you're applying wet paint onto an
already wet surface. That can be either
your watercolor paper or a still wet previous
layer of watercolor. Wet-on-dry is a technique
where you're applying wet paint into a dry surface, whether that's just the
white of the paper or an already previously
dry layer of watercolor. In this class, we'll be using more of a
wet-on-wet technique, but you should know that you can also create this using the wet-on-dry technique just
with a few little changes, but all right, let's get to it.
6. Let's Get Started! Prep Your Paper: Now that we have a few terms and definitions in
our back pocket, I want us to start
getting our hands dirty. The reason I want this is
because we learn by doing. In the next lesson
I'm going to give you some additional theoretical
knowledge that's going to help you strengthen and understand what is
actually going on. But before going into that, I think it's very valuable to start with applying
paint to paper. There are a few reasons that
we're going to do that. One of them is that often we can get caught in these
loops of trying to absorb all the knowledge before thinking that we're ready
to actually get started. I want us to practice breaking
that notion altogether. You can learn so much
even if you don't have the theoretical framework
behind to support you. The second reason that I
want us to do that is, that it allows us to tap into our inner knowledge to try to figure out what it
is that's going on. Of course, I'm going to come and give you some added info, the stuff that took me hours and hours of practice
in order to learn, and so that you can
have a shortcut in order to know
what to focus on. I don't want you to worry
because I'm not going to just throw you in the
deep end of the pool, I'm going to be guiding you
through the entire process, even in this first attempt. But what I would like
to do is invite you, if you haven't yet, to grab your materials, pause the video, and then
join me as we get started. So let's get started. I'm going to grab
my artist tape. You can use washi tape
if that's all you have, though this is the
cheaper alternative. We're going to be making a
frame on our watercolor paper. One little
recommendation is that some papers don't like tape
as much as other papers. For example, the bamboo
paper that I was showing you in the
materials section, that one will often rip
if I use tape on it. So you have to test it out on your paper, but then again, since these are practice sheets, it's not really that big
of a deal if it does rip. But one thing I am going
to say is it can help to make your tape a
little bit less sticky, so I'll just use my shirt. Sometimes the shirt isn't the best thing
because you can get little tiny threads that
come out in your drawing. [NOISE] But yeah, sometimes I'll do that anyway. Or maybe on your
jeans it's easier or on even just a piece of wood. Just to get a little bit of that dust covering on your tape, so that it's a little
bit less sticky. I'm just going to go all
the way around here. Doesn't have to be perfect, but just so that you can play around with these
nice clean edges. Of course, you can do this [NOISE] exercise
without making the frame. That's also fine as well. I just thought it would be
a fun added little element. [NOISE] If you're using something that's a similar size to
what I'm using, which if I'm not mistaken, I think it's 10 by 14, 9 by 12, something like that, I'm actually going to recommend
that we do two of them. So we're going to take another
piece of tape [NOISE], down the central line, to split our page into two. If you really wanted to be a little bit more
perfectionist about it, you could put two rows of tapes so that each
one of your squares, once you've cut them out, rectangles will be
exactly the same size. I don't know if that's
going to work. I promise I know how to do this. [LAUGHTER] You just
want to eyeball it. Again, it doesn't
need to be perfect. You just want to
get it straight. This one's a little bit
bigger than this one, so I'm just going
to maybe adjust it, before I press it down. But you do want to make sure
it's a little bit straight. Now we have that ready. Now comes the fun part.
7. Wash #1: The Flat Wash: All right. Now we're
going to get to painting. I'm going to just grab a
color that sounds fun to me. I'm thinking of
maybe using a blue. This is a Holbein blue. I think it's called
peacock blue. It's pretty faded because
I've had it for a while. I'm just going to
squeeze a fair amount down on my palette. We're going to be
covering a large surface. We're going to actually be
doing this in two parts. For this first part, I want you to just
gather some water onto your palette whether
you're using something like this or
something like that. We're just going to put
a fair amount of water down and just pull in just tiny bit of that color. The reason is that we
want to be creating this lightly pigmented juice. This step is not necessarily obligatory every
time that you do this, but it can be helpful
especially in the first times because
what we're going to do is we're going to apply
this lightly pigmented juice on top of the entire
surface of our paper. The reason that we're
doing that is we want to make sure that we are really saturating
the entire area with water. I made it lightly
pigmented so you can see if there's any of these little spots
that you're missing. I think I forgot to
press down this tape. Press down your
table really well. Just sweeping a lot of this water onto your surface. We're just going to be
doing the left side and then we'll be
doing the right side next after we're
done with this one. If you feel like you
have enough water, go ahead and add a little more. A few key things here to note. You don't want it
to be dripping wet. We're going to be adding a second layer of
watercolor onto this. If it's already two
dripping wet in this phase, then it's going to be a
little bit more challenging in the second phase. You also don't want
it to be too dry. This is where it gets a little tricky and let me tell you, it's highly likely
that you won't get it right the first few
times that you do this. But that's fine, that's why we're here,
that's why we're practicing. Double-check that you
have water everywhere. I often double-check the corners and the sides
because that's often where you end up having
these little dry zones. Now we're going to go in
and really pull all of our watercolor
into this water so that we can create a
really deep rich color. For this first one, we're
going to be trying to create a more homogenous wash.
Once that's nice, a deep rich blue, I'm going to come in and
start dropping it in. What you'll notice is
that I'm already angling my paper in order to allow the pigments to move freely
onto this surface area. This is going to be a key of this entire technique movement. But first I want to
make sure that I have a fair amount
of pigment all over. That it's all nice
and saturated, all nice and wet. Now, I begin movement. What you're trying
to do is really get this even coverage of water, even coverage of pigments. You don't want one section to be dripping and then another
section to be dry. The movement is what
is going to help you achieve that even coverage. You'll notice as
you're moving it, the water starts to pool. When it pools in one edge, that's a signal that you
need to start moving it around so that it covers
evenly everywhere. This phase is one that
requires a little bit of patience and a little
bit of mindfulness. Because honestly, I think this is a pretty
meditative part. You can have fun looking
at how the pigments are shifting as you
move your surface. Depending on how wet
or dry your layer is, it might take a little
longer or a little shorter. The key thing is that
you want to keep moving your page until
everything stops moving. This is what happens. There's something that
fell into my water and I'm going to try delicately pull it out without touching it. Because if I touch it, then the oils of my
fingers is going to create its own little watercolor
repellent mark. It's starting to stabilize a little bit more in the center. But often it's the edges
where it gets a little trickier and if you stop
moving your page too soon, you're going to
see that effect in the end when it's done drying. You really want to make
sure that those edges, you keep moving them as long as there's a
little bit of puddle of water gathered
in those edges. You can think of it as
dancing with your watercolor, which sounds fun
to me [LAUGHTER]. Often, it'll take slightly
longer than you think. Another thing that you
can pay attention to is how the color is
shifting as it dries. You can also start observing
how the water moves. This is going to be key
when I explain to you the principle behind
this technique. The other thing that
you can pay attention to is the sheen of the water. [MUSIC] How is it glistening? You'll notice that that
glistening shifts as it dries. [MUSIC]
8. Wash #2: The Flat Wash: Once everything has
stopped moving, it's not dry yet, your watercolor is still wet, but you've noticed that the pigments have
stopped moving, there's no more puddles, even in the corners, even on all the edges, that's when you can relax, let go of the movement, take a breather, and
wait for it to dry. While this is drying, we're already going to
start on our second one, because that's how we get better at learning
how this works. Going to give you a few more
pointers along the way. You can use the same color, either you can use
your leftover paint, so it might be a
little bit more of a diluted wash for
the second one, or you could use a different color altogether,
and that would be fine. I think I'm going to use a
different color just so I can see how the pigments react a little bit differently this
time compared to the first. I'm going to clean up my palette and then get
started on the second one. Another thing that's
important to note, and I didn't do it this
time, but in general, it's not always a good idea to leave your brushes in the water because over time your brush will deteriorate more quickly. It's best to try to keep your brushes out of
the water, clean them, and then dry them, and let them just sit
and do their thing, until you're ready
to use them again. For this one, I'm going to
go with a different color, but I think I'm going
to stay in the blues. Somehow I didn't notice, but I must have had a
little bit of water in my hands or sprayed it when
I was cleaning my brush, and a few of those
little droplets of water have landed in my
drying watercolor. This is the stuff that happens. These are the happy accidents
that sometimes happen. I'm sure you're going
to have a bunch of them when you practice this. This is case in point, proof in the pudding, that stuff is going to sometimes go wrong when
you're doing this. Luckily, it's just the
tiniest little drips. I'm still going to be able to
show you the final result, but that's something to
note is that if you add any water at any point
during this drying process, you're not going to get
that homogeneous coverage that we're looking for. That being said, let's
do the second one. I'm going to work
[NOISE] with a blue, but I'm going to go for
an ultramarine just to see the difference
with my peacock blue, and I thought it could be fun to do something a
little bit warmer. I'm going to use that one. I'm going to proceed in
exactly the same way that I did for the first one. Since my water is
actually already tinted, I could actually just use that immediately as my
lightly pigmented juice. It's not the end of the
world for me that it's a different type of blue
because it's so diluted, but if you're using a
color like a yellow or something that's very different from your original color, that's when you might want a second tub of
water that's fresh, so that you can create your lightly pigmented
juice again. I'm going to be very careful
when I pick this up to not place my fingers on
the drying watercolor, but also you want to
make sure that you don't touch your other sheet
with your fingers, again, because of the natural oils that are on our fingers and
that become water repellent. I'm going to go in
exactly the same way, double-checking that I am not
forgetting any little zone. As we were observing
the sheen of the water, your water levels, I want you to also pay
attention to that here. [NOISE] Now I'm going to
go in to my blue, make my nice pigmented layer. I'm actually going
to add a little bit more of this blue, because I really want
to get something quite rich, quite pigmented. With watercolor, of course, transparency is really fun, but I also really enjoy those really dark colors when
you're able to get them.
9. Finishing Touches: Hopefully, you've
gotten to a spot where all the water
has stopped moving. This is going to
continue drawing. Some people will
use a hairdryer in order to accelerate
the drying process, so that's something
that you could also do. It's not something that I do just because I don't
have a hairdryer, but that's definitely an option. I hope that you've enjoyed this first attempt at
getting our hands dirty. In the next video,
we're going to be looking a bit more in depth into the things
that I asked you to pay attention to while
we were doing these. How the pigments move, how the water moves, how it dries, how
the shin shifts, and learn why building
a relationship with your water levels is the single most important
thing that you can do, when you're working
with watercolor and trying to achieve
different effects. My watercolors are entirely dry, but I'm going to
take the tape off, because I'm impatient like that, and also so that you
can move forward into the next section
of this class. Also, taking the tape
off is very satisfying. Sometimes I actually
reuse these frames, if I'm able to take
them off in a way that doesn't ruin my
painting or the tape. But I would say that
when it's this size, the frame is maybe a little
bit more difficult to reuse, so I might just get rid of it. If I'm using more of a
smaller size of tape, then it's a little bit
easier to do that. What I do want to make sure
as I'm taking the tape off, if my painting is still wet, like mine is right now, is not to drop my tape
into my painting. Because the drying phase
is the most critical part, and any contact with anything will really
ruin your painting. So I'm trying to be
a little careful. But if you are actually being a little bit
more reasonable, you would be more patient
and wait until it's completely dry in order
to remove the tape. That's just the truth of it. [NOISE] Yes. I got it. It wasn't too bad. I did have
a little bit of wetness, and so there's a little bit
of blue on my frame here. But this already gives you
a good starting point. I worked with two
different types of blues, which is fun to observe, one that's a little bit colder, one that's a little bit warmer, and one that is definitely more granulating than the next. If it's your first time
using a watercolor block, you might not know
how to actually separate the sheets
of your block. So I want to just demo that for you just so you can
see how it works. You have this edge all
around your block, which is holding the pages
together and helping your sheet not warp as much. Actually now that I think of it, this is completely dry. This one's not completely dry. I'm still going to show
you because these are practice sheets and
it doesn't bother me. Even sometimes I will
use sheets that are warped and then in the end
I'll iron them face down, if they're are too warped, if they end up turning into
a final piece or something. But you'll notice
here that there's a little white part in the
middle of all this black. That's actually a space
where there's none of that glue to hold
the pages together. I use a palette knife, but you could use a letter
opener or something like that. You just slide it in, and just start going all around the edge of your sheet [NOISE] until you reach the beginning
again. There you go. Now you have your separated
sheet and a whole new sheet for our next ones.
10. The Main Takeaway: Water & Color : Watercolor. The
name of the medium carries within and everything that you need to know about it. Water and color. Imagine water, how it feels, how it flows, its properties, its energy, its personality. Now imagine a fish, this is your color. The fish in the pond
are your pigments. Wait pigment don't move
over their own volition. Maybe their paper boats naturally they're fish but
they're not regular fish, they're little tin fish
with a tiny propeller for a tail that activates the
water flows through it. Your fish are in a pond and in the pond they spread out evenly, each taking up their
own little space, not too crowded, not
too isolated just a lovely little community
of tiny tin fish [NOISE]. Now mind than the sun
drying the pond little by little until all that's left is the tiny tin fish
grunting in the sun. From far away all you can see is the color of the fish
where the pond used to be. This is a flat wash, a homogeneous, even
distribution of pigments. But we're the ones who create
the pond and add the fish, so let's go a little deeper. Imagine is sandy expense. This is your paper, these are the banks in
the bottom of your pond. Now imagine rain, [NOISE] water pouring
in and spilling out, turning it into a river [NOISE]. The tiny tin fish
start flowing out faster and faster and they're
rushing with the current. It rushes so fast that it
creates grooves in the sand. On the edges of the river, the fish start gathering and
clump together in puddles. Then the river slows and stops, the storm passing over. The river, becomes a pond again. The sun comes out and
starts drying it out. [NOISE] But let's look at
those puddles on the edges. As the river dries the fish
settle where they landed, but the puddle still remain. When there's a lot of
water next to a dry spot, the water pushes back
into the drying area, trying to even itself out. In doing so, it pushes the
tiny tin fish that had settled there forming a clumpy
frontier of pilling tin fish. This is a backrun or a bloom, a place where the water
pushes back into drier land. The clumps of piling fish, those with the hard edges
of your backruns or blooms. Now you get to see why understanding your
water is so important. Your water levels in your
drying time are going to have the biggest impact on the
textures that you create. Whether that's
something smooth with soft edges and soft gradients, or whether that's
something with hard edges, something a little bit more
textured and granular. If your water levels
are too different, they're drying times
are too different, and your tiny tin fish or your small paper
boats are going to clump up together
forming uneven, scattered, chaotic
frontiers with hard edges and a textural look. If your water level is dry at a similar or more less
homogeneous rate, your fish can find a
good little spot to land in without getting too
clumped in with its friends. In the case of the cloud-like
wash or variegated wash, which will experiment with next, the tiny tin fish spread out evenly but in varying
concentrations. They gather in small
organized groups, but there's no clumping or
chaotic distribution here. We'll you want to
become familiar with is your water levels and what that means about where it's at in your drawing process. This is where the sheen
of your water comes in. The sheen will tell you how
deep your water level is, how wet or dry it is. When it's deep and
flowing it shines. You can add pigments
here freely, they still have time to move and find their
spot to settle in. But as the water starts
drying, it shifts, going from shiny to
satiny to matte to dry. It's a gradual shift, and with practice
and observation you'll learn when it's still okay to add paint and maybe
when it's better to refrain. If you're looking for a
soft edge wash that is. The movement we give to our page allows the
water to spread evenly across the surface
to even out the kinks, prevent the puddles,
and make sure each fish gets its own
little space to shine.
11. Dirty Hands: A quick little note on learning. You can watch all the videos in the world and learn a
lot intellectually, but you got to get
your hands dirty. You really have to just dive in and actually
do the exercises, because that's where
we learn the most. Sometimes we can get caught
in loops watching videos, thinking that we need
accumulate all the knowledge before actually
getting to our paper. I would argue that that's
an avoidance tactic. If you've been guilty of that, please don't feel ashamed. I think we've all been there, we've all done that. But please remember, you have
to get your hands dirty. Show me your dirty hands, the water spills on your table, your kajillion failed attempts. Show me that you've tried and failed and tried
and failed again. That's where the magic lies. I know it's a hard
truth, but that's truth. Please share your attempts in the project section
so that I can see it, so that other
students can see it, so we can be inspired by
each other's journeys, by our failed attempts, which are actually
veiled successes. Give yourself a loving, supportive pat on the
back and let's get to it. Show up for yourself. Future you will thank you.
12. Wash #3: The Cloud-like Wash: Now that you have a
better understanding of how watercolor pigments
move in water, how the water moves, how it dries, and why
that's important. Why don't we go ahead and do a few more watercolor washes
to practice this principle. In the first example, we were going for more
of a homogeneous look. In this second attempt, third and fourth, actually, we're going to be trying to play with varying values
or in other words, varying levels of pigmentation. That means that we'll
have lighter spots with less pigments, darker spots with more pigments. But you're still not going to see any brushstrokes either. We're really looking
for that soft gradient of the watercolor wash.
No hard edges here. We're going to start
off in the same way that we did with the first ones by applying the tape
and prepping our paper. [MUSIC] I know that this would be a problem. For the second color, I was thinking that it would
be fun rather than using a pure pigment to do a
little bit of a mix. I'm going to keep my
ultramarine blue, but I'm going to include
a little bit of red, a little bit of crimson, just to make it a
little bit warmer. Of course, since I'm
going to be using again just a different
version of a blue. I'm going to go ahead
and use my water that I already have as my
lightly pigmented juice. If you're exploring
another color, you'll have to make it separately
with some fresh water. I'm going to go in with
my lightly colored juice. Make sure that I'm covering
all areas of my page. Again, you don't want it
to be too wet or too dry. If you're struggling
with this part of knowing what is too
wet or too dry, remember that that's
totally normal and that it's just
with practice that you're going to start
really understanding the different
subtleties between what is too wet and what is too dry. Because that's the truth of
it is since we're working with where those water
levels are very thin. The difference between
too wet and too dry is a little bit tricky to
hone at the beginning. The more you do this,
the more familiar you'll get with what level
you're actually at and the sheen of the water again is what is going
to inform that decision. I'm going to actually
make mine a little bit more wet here as I prep my color for
the next phase. Not too wet, but just a little. I'm going to start out
with my ultramarine. But here this time
we're going to do something a little bit
different than the first time. Instead of making a
homogeneous coverage, we're actually
going to be looking for a varying coverage. I still want to prep my
color in the beginning. I'm just going to
add a tiny bit of this crimson and I might
darken it as we go. I just want to make sure
that I have the right hue. This is really beautiful. I like how it's a
little bit more muted. Now we're going to
go in with our paint into our lightly
pigmented juice. Since I'm not looking
for an even coverage, I'm just going to drop it in different sections that I'd
like to see this color. I've have some spots
that are going to stay lighter and others that'll have a little bit more pigment. Remember that what we want is an even distribution
of the water. Distribute your water evenly, even though your pigments
are not distributed evenly. There's a certain time-frame
in which it's still okay to add more pigment into your wash. But you have to make sure
that when you're doing this, you still have enough water
to sustain that addition. If you're adding pigments when your wash is already
a little bit too dry, then you're really going to get that overworked look where you'll see the marks
of the brushes and lose those soft edges
that we're looking for. When you're working with a little bit more variation in terms of the values
of your piece, you're going to notice
that it's easier to get distracted by what your
pigments are doing. Remind yourself that even though the pigments
are very important, the most important thing here is to observe your water levels, observe the sheen of your water, and keep moving your
page in order to keep that distribution equal. [MUSIC] You could even if you
wanted to drop in a tiny bit more paint just at the edges and that's
going to just have this darkening effect around the edges of your wash, which can be a fun
effect as well. But again, you
want to do this at a point where it's still okay, you don't want to do this too late in your drawing process. Right now the water is flowing
pretty well on my piece. It's still very far from dry, I'm able to do that
still around the edges. Remember to give your little
paper boats lot of space. For example, in the middle
of my piece right now, the water is too dry. If I went in and added
pigments in the middle, then I would actually be
lifting those pigments or moving them around
so that they're no longer equally distributed. I can still do that
along the edges, but not in the
center of where it's already in the midst of
that drying process. But you can already see as
it's drawing that I have different values
on my sheet here, I have these very
white sections and then these darker
sections all around. That's because I just
dropped in my pigments in certain places and didn't try to distribute those
pigments evenly, even though I was
distributing my water evenly. Now I'm getting to
that point again where the water is stabilizing, it's almost no longer moving
even in the corners and the edges where it
pulls more frequently. I'm just going to keep moving it a little bit just to make sure and when I'm satisfied, I will set it down
and let it dry. Also, can I just say
I love observing my watercolor palette and seeing the beautiful colors
that are often on there. Now we're going to work on the second one and I'm actually going to
be using two colors, but rather than mixing them on my palette
before dropping it in, I'm going to try to
keep them separate and let the wash
create that color, create the mixes and
you'll really have those two pure pigments and
the merges of those pigments. I'm just going to use
this little extra palette that I have in order to do that.
13. Wash #4: The Variegated Wash: Why don't we move on to our second one while
this one is drying. For the second one, I'm actually going to
also be using two colors, but rather than pre mixing
them on the palette, we're going to keep
them separate on the page and let the
water mingle them. It's the water that's going
to be creating the mixes. And you'll really have
these two colors with a few areas where the two will mix and I think that's a
really fun background to make, a fun wash to do. Because it creates this
mystical moody effect. I'm going to go ahead
and clean my palette. Let this one dry
a little bit more as I'm prepping the color. I'll be right back. Just
going to clean this. I admit I've been a little bit obsessed with my blue colors. I'm going to switch it up and try a different color combo. I was thinking there's, one of my favorite
colors is shadow green. This one is by Holbein, though I think that there
are other shadow greens by other brands, but I really love this color, so I think that would
be a really fun one. I might try to mix it with
a different type of green, which is by Schmincke called phthalo green and so
it's a much brighter, this one is much more
muted, lot darker. Whereas this one is quite
bright, quite vibrant color. I thought that would
be fun just to see how these two interact. Honestly, I've never
tried this color combo, so it's going to be fun
for me to explore this with you and see what
the effects are. I haven't used my
phthalo or actually, no, I did use my phthalo
green yesterday and it got a little stuck. Sometimes if you don't watch
out your watercolor cap, watercolor ends up drawing in the cap and it makes
it harder to open. That's what happened here. All these little pieces
of dry watercolor. I'm going to put some
phthalo green on that side and some shadow
green on this side. Since this time I'm working with a different color than
I did previously. I'm going to use my fresh tub of water and I don't know
if you've noticed, but already you can see
the value differences in the first one that
we made as it's drying. Which is a really fun
thing to observe. Depending on the types of
colors that you're using, you might see separation
of your pigments. That means that, I don't know if you can tell on this video, but some of the
red pigments are, even though it's all
blended into one. They've separated a little, so you see a red sheen
shining out through the blue. That's a really fun
thing to explore with your pigments because
some pigments will do this and some pigments won't. Certain mixes of
pigments will create a very homogeneous color
and others will have this separation
and that's due to actually the weight of
the pigment itself. That's at least one
of the explanations that I've heard of and I think it's a really fun
thing to experiment with, to observe and to notice
how different each one of your paints is just by the
nature of the raw pigment. Let's get back to this one. I'm going to make my juice here and since out of
both of my colors, my phthalo green is lighter
than my shadow green. I'm just going to
use just a touch of that for my lightly
pigmented juice. Each time that we do this is
an opportunity to practice observing water levels and understanding them
a little bit more. I had a little bit of a drip of a little bit of the blue from my previous one that's
going to appear here, but it's not a very big deal. Sometimes you'll
find little hairs in your paint like
I just did or a little piece of thread and I use my brush to push that out. If I use my finger than I run the risk of depositing some of the natural oils
onto my paper and then creating that
water repellent effect, which I really don't
want at this point. Just going to add a little
bit more here to make sure that I have the
right water level. Let's go in and
have fun with this. I'm going to take a lot of this. This might be a
little bit too much actually of my pigment, I want to make sure that
I have the separation, but if I overwhelm my water
with both of these pigments, then they'll just mix
indiscriminately and I won't get that different blocks of color. I'm just going to go in with a little bit of this
one in some areas. You'll notice actually that
for all of these I have a tendency and I've
used the term drop in. You really want to drop in
your color rather than like mix it in just because it allows the water to be free in
terms of how it moves, where it wants to go. I'm going to do the same
thing with my phthalo green. I'll maybe drop in
a little bit there. But again, remember to observe your water levels
and not forget that, that is the key factor
here in your final effect. I actually want to add
a little bit more of my shadow green just because
it's a color I really love, especially when it's
very pigmented. Now, you get to again practice your
multitasking abilities. [LAUGHTER] I'm going
to come and drop it in in a similar spot than where I initially
brought it in. [NOISE] There's only so much thing
you can control when you're doing this effect, because really it's the
water that's going to determine where
your colors end up. You can really only
determine where you're dropping in your color
but not where it ends up. You can a little bit as
you're moving your page, but of course,
there are limits to that because what we're aiming for is that even distribution. I also left a few
white sections just to exaggerate this effect that
we also had in the first one. You can premix your colors, or you can separate
them, but of course, you always have that
option of keeping the white of the paper present in certain sections
in order to have that real highlight coming out. [NOISE] This is messy business, I warned you in the beginning. I'm definitely
[LAUGHTER] getting a few drips in onto
my desk as well. [MUSIC] Of course, each color has a value
in itself, that is, a level of lightness or darkness that
corresponds to that hue. That's something that
you can also use to your advantage when you're
creating these pieces as, think about the
value of each one of your colors and how that's going to create contrast
in your piece. If you're interested in color theory or don't
know much about it, I have a huge class warning. It's a long class, but it's packed full
of information about these principles of color, hue, how you can get a little
bit more subtlety in your color mixes, and also to fun creative
color collecting. That class is called
Color Collector. You can definitely check
that out if that's a subject that you
want to dive into. Because even though that class is a class that I made
with acrylic gouache, it can be applied to anything. All the things that
I've learned in color theory using
acrylic is stuff that I've used in
my artistic journey even when I'm using a different
medium like watercolor. As this is getting closer to its final drying point where I don't need to
move it any longer. You can already see
how it's shifted drastically from how it
was when we started out. If you remember, I was dropping some of the darker
color, the shadow green, up in these sections, and the phthalo green more
in these bottom sections. I had much more white space
than what you see here. That's what I mean by
saying that there's only so much that
you can control. You have to understand that
water is going to move, the pigments are going to move. That's also part of the fun, is to see where it goes
and allow yourself to notice these shifts
and play with them. The more you practice
it, of course, the better able you're
going to be able to control the amount of pigments or blank spaces
that you want in your piece. I'd also argue that control isn't the be-all
and end-all, and rather, that there's a lot of
learning in letting go and surrendering to
the process as well. It's like just this
interesting balance between learning to understand
how we can better use our tools but also
enjoying the times when we can go long for the ride
and see where it brings us. The water has stabilized over on this corner,
but on this edge, I still have a little
bit of shift happening. A very small amount. [NOISE] Now, as I allow both
of these to dry, I could, if I wanted to and if I had a different watercolor block or even just a watercolor
sheet of paper, do a few more with what I
have left over on my palette. I'm going to leave
it at that for today in terms of
the demonstrations, but I'm going to also show you all of the ones
that I've made, at least in prepping
for this class, just so that you can
also get a range of the different things that
you can obtain and talk you through different paths for experimenting with these
watercolor washes. What it is that you
can keep looking for, what it is that you
can keep practicing, and other alternatives
for doing this thing.
14. Final Results & Reminders: We're going to just remove
the tape for these, even though my green
one isn't dry yet. Of course, I'm
just too impatient and want to share the
final result with you. Again, we're trying to
be super careful to not get the tape to touch. [NOISE] If you've
succeeded in doing this, then you'll be able to see this effect that we were
trying to look for, which is a smoky blurry,
mystical effect. The both reveals the beauty of the pigments that
we're exploring, but also the light that shines
through with the paper. Of course, watercolor, that is what watercolor is best at. I hope that you've managed
to figure this one out. If you haven't, please remember that it's
absolutely normal. I've literally done this like, I don't know, dozens,
hundreds of times. If it seems like I
make it look easy, remember that it's
just because I have a lot of practice
under my belt. The more practice that
you have under your belt, the more quickly
you'll be able to achieve these results
that you're looking for. I just want to put
side-by-side this with the two other attempts
that we started out with. So that you can really see this range of
possibilities in terms of a very homogeneous
watercolor wash or something a little
bit more varied with more value shifting
happening within the image. Both of these are useful
for different things. Personally, I find both
of these effects really beautiful and which is why
I invite you to do both, after having explored a
little bit more theory and practiced with
these final two. If you want to go back to
the first ones and try to better obtain that
homogeneous watercolor wash, then please remember that
you can go and do that. I would actually invite
you to go and do that. The point is that these
are starting points. These are just the beginnings of your practicing journey of
this specific technique. When you forget what it is that is important
if you stumble, if you get frustrated with not being able to achieve the
effects that you'd like, remind yourself of
the key element that we learned
about watercolor. What is it that is the
most important thing? Understanding your water levels, reading your water levels, learning to read the sheen
of your water on your page. Building that relationship
with how your water moves, how it dries, and how it
interacts with the pigments. I hope that you had
fun doing that. I know I had a blast and this was the first
time that I was exploring this
specific color combo, and I think it created
something really beautiful. That's something that I might
use for a future piece. In the next section
of the video, we're going to go over a few other tools and techniques that you can use for
further explorations, as well as the value
of looking back at your practice sheets
and what it is to look at and what
to learn from them.
15. Fail Like a Pro: Often when we create something
that we're not happy with, we have this impulse
to throw it away, rip it into small pieces, hide it in a drawer, never look at it again. [LAUGHTER] I say that because I've done
all of those things. But today I'd like to
invite you to counter this very normal impulse
that I think we've all had. Rather to go back, and try to integrate your failed attempts into
your artistic journey. I talk about this a lot
in many of my classes. For me, I think it's such a vital part of a
healthy art practice. I invite you to go back, and look at your
failed attempts, and try to see what it is
that you can learn from them. What does it say about the process that you were
using when you were doing it? What lessons can you take
away for the next attempts? These failures are actually just springboards for learning. I'm going to go
through some of mine so that you can see what I mean. For example, in this one, you can see here that there are three quite clear lines in my otherwise pretty
homogeneous wash. To me, that's an indication that probably the water
level when I was using these brush
brushstrokes was too shallow. My water level
wasn't deep enough. There wasn't enough water to support balance out counter my brushstrokes
that I was doing. That's something that I would
keep in mind for next one, make sure that my
water levels are high enough that the pigments
are really moving around, and have the space
to move around rather than getting
stuck in one place. Another indication
that it could be is maybe that I
simply overworked it. Maybe I went too frequently in this one
spot with my brush, and so disturbed the natural
flow of my pigments there. That's another lesson that's really important
when you're using watercolor is that we very
easily overwork our pigments, and our pigments love it
best when we guide them, but let them go. [LAUGHTER] I'm sure
there's tons of metaphors in their [LAUGHTER]
take it as you will. Here are Hear other examples. In this one, you see very
clearly that I have a bloom or a back run or another term that I discovered today in ouzo, which I think is
the best word ever. Probably what I did here, and this is my guess is that
when I was moving my page, I set it down, and I didn't notice
that I still had one section at the bottom
edge here that was a puddle. Since I wasn't moving
my page around, and this section was almost dry, that puddle merged back into
the slightly drier layers, thus pushing the
pigments to accumulate. That's why I kept saying in the demos to always
watch out for your edges because that's really
what is going to be the downfall sometimes
of your washes. Something similar
probably happened here, but I'm actually
thinking that I came in maybe with a brush that had too much water to pigment ratio compared
to the rest of it. That's just a few examples, but I hope that you'll take this opportunity to look
back at your attempts, and figure it out what the learnings are that you can take away for your next ones.
16. Further Explorations: I want to give you
a few more ideas of things that you
can experiment with, in order to observe
the difference in results that you're
going to obtain. One of those things is paper. I talked about it a little bit in the materials
section of the class, but there are a lot
of different types of watercolor paper that range from ultra
smooth to ultra textured. Those differences in the
way the paper is made is going to have an impact on how your watercolor washes look. Experiment with different paper. Notice how that affects the
texture of your watercolor. How the granulation of
your pigments is either revealed or exaggerated by the rough texture of the paper. Use the same color
on multiple types of paper in order to really
reveal the different effects. There's a lot of room
for exploration there, and I hope that you'll have fun discovering these gems about how your paper can really affect the mood of your artwork. Another thing, of course, that's going to have a huge
impact is your watercolor. What type of pigments are
in your watercolor tubes? You'll have granulating pigments and non granulating pigments. That's going to have
a huge impact on the overall look of your piece. Especially if you join that up with varying textures of paper, you're going to see
that it's going to have a big effect on
the final result. Of course, if it's granulating, you might see more of
these little dots of where the heavier
pigment has landed. If it's non granulating, you'll get a much
smoother effect. Take some time to
learn and explore the different watercolor
pigments that you have. Have fun admiring
the differences and subtleties that exist there. Having that knowledge
is also going to help you because when you're creating an artwork in the future, you'll be able to better know which specific color
you'd like to go for. Yes, you want a blue color, but do you want a granulating blue or a non granulating blue? What is that final
texture that you're looking for and that
you're going to have fun playing with, in your final piece? I'm going to give
you a few tips for some further explorations that if you feel sharing in
your project as well, that would be awesome. At any point during
your drying process, you can lift the watercolor. What that means, is it means removing the pigments
from the paper. You can use either
a dry brush or a paper towel or a
rag or even a sponge. What you can experiment with is the timing of the removal. What if you do it right at the beginning of
the drying process? Somewhere in the middle? Or right at the end when
it's almost completely dry? As you can see, there's some really interesting
textures that can emerge when you try
to lift the watercolor. I hope you'll have fun with
that little exploration. You can also experiment with
using a slightly wet brush and coming to disturb the peace
amidst your uniform wash. It can create some really interesting textures
though of course, you have to be careful if
you don't want it to turn into either a bloom or lifting. That one requires a
little bit more subtlety, little bit more practice, but it can really create
some very nice effects. You can also try creating shapes with a pencil
before your wash, and then leaving those parts out while you create your wash. This can be really
useful if you want to paint something specific within those shapes that doesn't
have the underlying color of your wash. Also allows you to keep the
white of the paper, which you can then use for
example, for highlights. You can of course do this
also with masking fluid, which is maybe an easier
method than this, where you simply mask out
the shapes that you want and then remove the masking
fluid once it's dry. You can also experiment
with squeezing out some of your watercolor
tube directly onto your paper and then creating
the wash from there. I also mentioned
that the first step, the lightly pigmented juice, is something that is
helpful but not obligatory. You can also try to strengthen your practice and
understanding of this by skipping that first step
altogether and trying to create your wash right away without that lightly
pigmented juice. It'll just require a
little bit more attention to make sure that you don't forget any sections
of your paper. Lastly, experiment with
the size of your paper. Notice how it makes
it either easier or harder to create washes if you use papers of
a different size. All these explorations are very valuable time
because they'll help you become more familiar
with your tools and also practice
how your waterworks. How the watercolors
work with the water. Any information that
you can glean in terms of the personality
of your materials is going to help you in
your journey towards creating the types of artwork
that you like to see. As always, this is
just a small step in your watercolor journey. I hope that you'll take away some of the little gems
that you found in here. If you feel sharing in
the project section, I would love to
see what you made. Your fellow students would too. I'd invite you to share your third attempt
and maybe your 20th. So that you can also see
the progression and see what it is that
you've learned as you've embarked
upon this journey. Take notes, observe. Spend a little bit more
time with your colors, your watercolor, your water.
17. Outro: Thank you so much for joining
me and trusting me to be your guide in this
journey about watercolor. I hope that you
enjoyed it and that you learned a few
things along the way. The nice thing with what
we've done today is that even though they
were practiced sheets, we've basically
taken the first step in the next step of your
watercolor journey. What that means is that
you can use these as backgrounds for your
watercolor pieces. Whether that's something that is more abstract or
more figurative. I also have a class that I released a few years
ago all about how you can create a piece of abstract
watercolor painting using both a free form technique and improvisational
intuitive technique, all the way to a
planned techniques. You could use these as
the basis, for example, for one of those pieces
in that class or any other class or project it is that
you want to work on. You could also just keep these
for yourself as reference in order to remember
what colors it is that you have
and how they react, whether the granulating,
not granulating, and just have this array
of giant color swatches, which in itself is,
I think it's already a very fun thing to do. You could also simply
hang these on your wall. But of course, what
I really hope is that you've started
falling in love with watercolor because it's
a fascinating medium that can be both extremely
challenging and very simple, and there's a lot of beauty
that lies in pulling apart all those complexities
and subtleties that can really help further to you on your artistic journey. Whether it's something
that you like to do as a hobby, to relax, to unwind, or if you're someone who's a professional or
an aspiring professional. On that note, thank you
so much for joining, I hope you share your experiments in the
project section and that you comment on each other's
projects in order to support each other on
this artistic journey. If you enjoyed this class, I hope that you'll
leave me a review. [MUSIC] Of course, you can also follow me here by clicking on this button
or going to my profile, and that'll notify you
when my next class is out. Of course, we can also become
Insta buddies on Instagram, where I share the daily ins and outs of the artwork that I do, and my Skillshare classes
when I make them. Finally, we can also
connect on Patreon, where I share exclusive sketch
book tours where I go more in depth into my artistic
process and my art practice, as well as host monthly
live drawing sessions, which I call the moon lost club, and where we come
together to further our art practice in a smaller,
more intimate setting. Also, can we take
a little moment to celebrate all the awesome
work that you did today or over however many days that you decided
to take this class. I mean, you made as many as me. You've made many, which
I think is pretty cool. [MUSIC] I also have a bunch of other Skillshare
classes which are all geared around the idea of creativity and how
to tap into it, how to overcome art blocks, how to overcome fear
and really stay true to yourself in your
creative practice and tap into your artistic voice. That's something that I'm
really passionate about. If that's something that
you'd like to focus on more, I have a bunch of classes for you that talks about just that. I've had a blast
making this class. I hope that you enjoyed your experimentations
on your end and I can't wait to
see what you made. Thank you so much for joining. Bye. What you want to become filming. [NOISE] I think we're good. We're going to proceed in the same way as we did before with
applying our tape. That is lame. Is it lame? This is just the
beginning points of your practicing journey. I said follow me on Instagram, follow me on Skillshare, leave me a review. Share your project. I have my other classes. That's it. That's a wrap. [MUSIC]
 Marie-Noëlle Wurm, Artist, illustrator, HSP