Transcripts
1. Welcome To The Class !: Space is made of dust, darkness and billions
and billions of stars. And if you look up at the
sky from a humble planet, you get to witness a stellar
view of majestic Milky Way, our very own home galaxy. If you ever wanted to paint that magical picture
onto your paper, you're in the right place. This is a watercolor artist. And Theta I have been teaching watercolors for the
past four years. Demystifying the
watercolor medium, making it simple and easy
for you guys is my goal. So today I'm back
with a new exercise. Come on, let's paint to starry skies with the
Milky Way galaxy. These two simple
projects are designed in a way to let you
relax and unwind. And I will be here
guiding you step-by-step. It'll begin the
class by discussing about all the art
supplies we will need, followed by a short
color palette video. And then moving on to
the main class project. It's class project is broken
down into three parts. First layer, Second
layer, and final details. In this way, it will
be easier to paint along without
overwhelming yourself. Take this time to breathe and focus only on the process
and not the end result. This class is perfect
for the beginners as well as intermediate
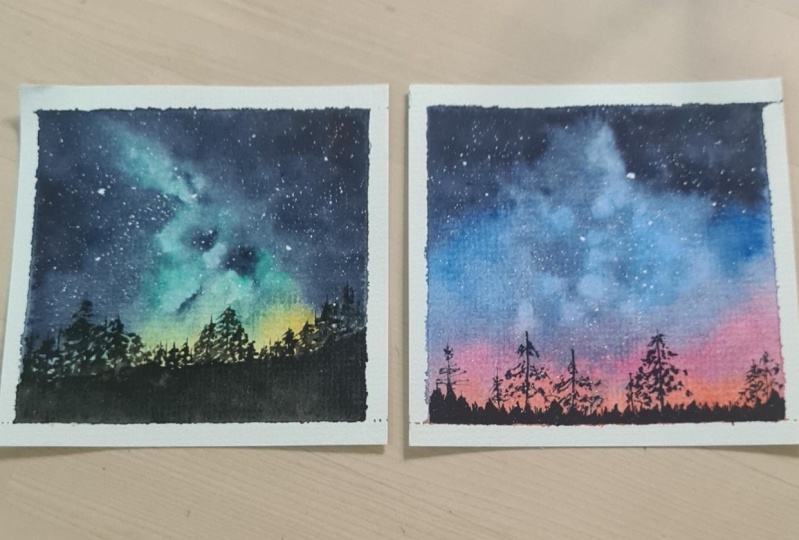
level artists. By the end of this class, you will have two class
projects with Milky Way galaxy. You can use all the
techniques and tips taught in this class to paint your own galaxy
projects in the future. Are you ready to get started? Then let's move on to the
next video where we will discuss that supplies we
need to begin the class.
2. Art Supplies : Discuss that supplies
that we're going to need. These are all the supplies
that you're going to need to start the class. First, I'm going to tell
you about the papers. This is Arches, 100% cotton, 300 GSM paper and a
cold pressed as well. I buy the papers in
roles and I cut them up into these sizes
that I wish to paint. And you can buy the papers
in parts as well blocks. So today I have cut
them up in a mini size. And you can use any
paper that you want. But make sure it is 100%
cotton because we're going to be blending a lot of colors together in
this class projects. And for blending, it's always good to have
a good cotton paper. I'm going to the
brushes I have used only for brushes
for today's class. I have mostly use
these two brushes, silver black velvet number 14, and number six, to paint
all of these backgrounds. And this small brush
I have used to paint a few details and
foreground mostly. And this is also from Silver black velvet and
it's a hockey brush. I used it to just wetting
the paper initially. And this is from DaVinci. It's a rigger brush and
it's one number one size. I have used it
mostly to splatter the white paint and also a
few trees on the foreground. And a water jar,
a color palette. And this is a ceramic
palette that I have used. And tissue papers, the
most important part. So please keep them handy. This acrylic board that I
use to stick the paper, of course, a masking tape. I have used colors
from three brands, camel and White
Nights and earlier, the camera one, I have
used only for white color. I did not use any other
color from the brand. So each class project has
different color palette. So we're going to discuss the exact colors just before
we paint the class project. So that is all for
that supplies. In the next video, we're going to discuss
about the color palette of class project one. So
I'm gonna see you there.
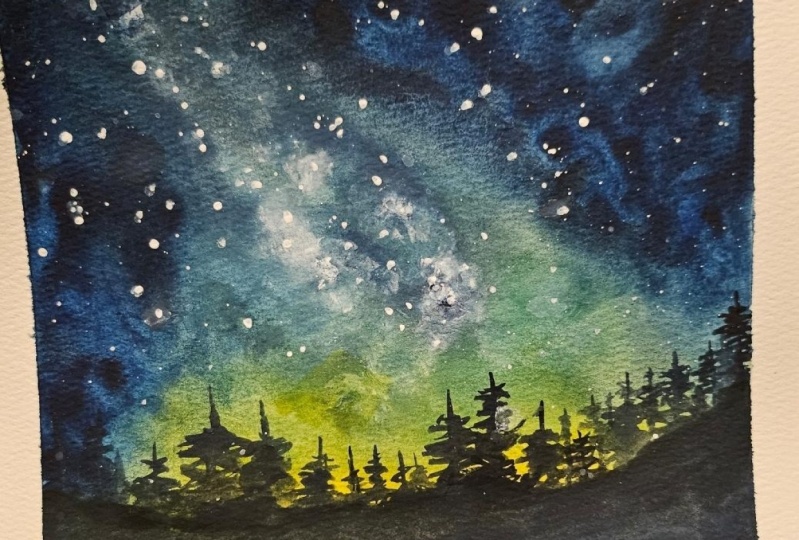
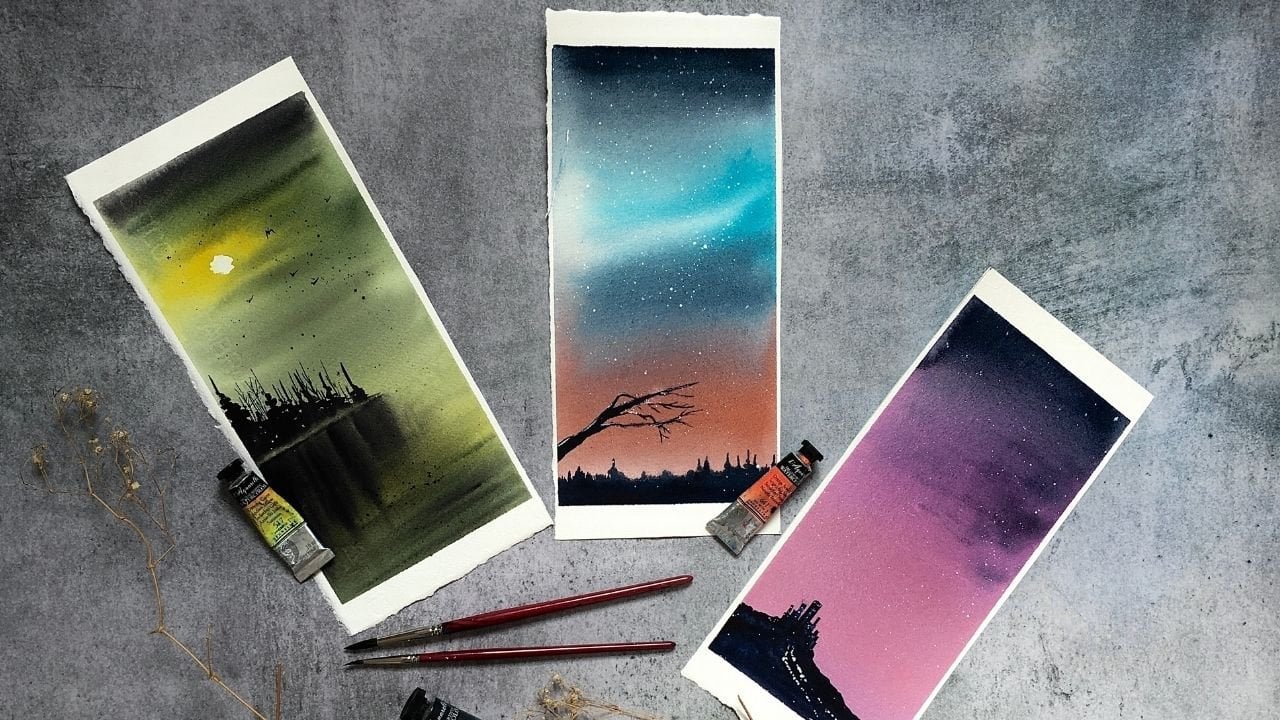
3. Class Project 1 Color Palette: Let's discuss the color
palette of class project one. Good news, there are
only three colors. This is turquoise, green
from White Nights, indigo from White
Nights as well, and Naples yellow
from a Sennelier. Take these colors onto
my palette later, we're going to swatch them. Have taken a clean paper now. And I will first start
with Naples, yellow. I'm going to swatch tacos
blue color from white knight. Final color, indigo. That's it. That's the
color palette that we're going to need to paint
the class project one. And of course the white
color from a camel. So in the next video, we're gonna get started
with class project one first layer. So I'm
going to see you there.
4. Class Project 1 First Layer: Let's begin class project
one with first layer. Wet the paper with clean water. Although my water
is not that clean. And I'm using hockey
brush for this. I have taken my silver black
velvet number 14 brush now. And let's get started with
the colors and mixing. Turquoise blue with
Naples yellow. And I get this
bright green color. So my brush strokes
very carefully. I have started first to paint a cone shape in the
middle of the paper. And now I'm going to
add a little bit of yellow color at the bottom
of this cone shape. And then I'm going to paint another cone shape
on the right side, my right of the paper as well. But you can see there is
a white line in-between. So it's important to
leave that whitespace. I will tell you why in a bit. Now, I'm going to add a law as we go down towards
the bottom of the paper. And then followed
by lots and lots of indigo at both
sides of the paper. Adding indigo, it is time we blend all these
colors together. For blending, it's important
to wash your brush and remove all the excess water from your brush using a tissue, and then just blend
these colors together. I'm trying to keep the
whitespace that we left without adding any
more color onto it. This is why I told you to keep that whitespace
in the middle. As you can see, it
is turning out to be the Milky Way galaxy
usually see in the picture. Now it is time to add
a few more details to the Milky Way galaxy while
the paper is still wet. So I'm taking indigo
and I'm just going to add a few random dots of paint. Then if you think these, these are looking too sharp, you can blend them using a damp brush like we
have just done before. I have taken my silver
black velvet number six, the smaller brush, and I'm going to do the same thing
with white paint. That is, I'm going to
add a few random dots. Then I'm going to
blend these dots. Now repeat the
process once more. That is now I'm going
to add indigo color, those random dots and I'm
going to blend those dots. But by adding the
white color as well. So I'm going to leave the
paper for drying now. And in the next video, we're going to start
with the second layer, but make sure you keep the
paper for complete drying. Do not attempt to paint
the second layer just now. So yeah. See you in a bit.
5. Class Project 1 Second layer: Let's start with Class
Project 1, s layer. This video will be
very small and short. So my paper has dried up. Now I'm going to paint one
more layer of the color. I'm going to start by
wetting the paper. You can see how
gently I'm reading. It's important to not
press your brush against the paper or else the colors that we have
already painted will come off. So be gentle. I'm going
to start with indigo. In galaxies, the
background sky should always look darker agonist
this light colored Milky Way. So that's why I'm adding one more layer of
the indigo color. Unlike the indigo, come near this milky way that we
have already painted. We're at it. Let's also brighten up the Milky
Way in the middle. So I'm going to add
white color first and later I'm going to add
indigo, those random dots. After adding these torts, blend them very carefully. By the way, your paper should be wet or at least
Stamp while you're painting this milky way so that the blending
will be easier. If you sense your
paper is drying, then please stop painting, rewet, and then continue. Because you can't blend any colors while
the paper is dried. Now I'm going to let the
paper to completely dry. And in the next video, we're going to paint
the final details of class project one. So I'm gonna see you there.
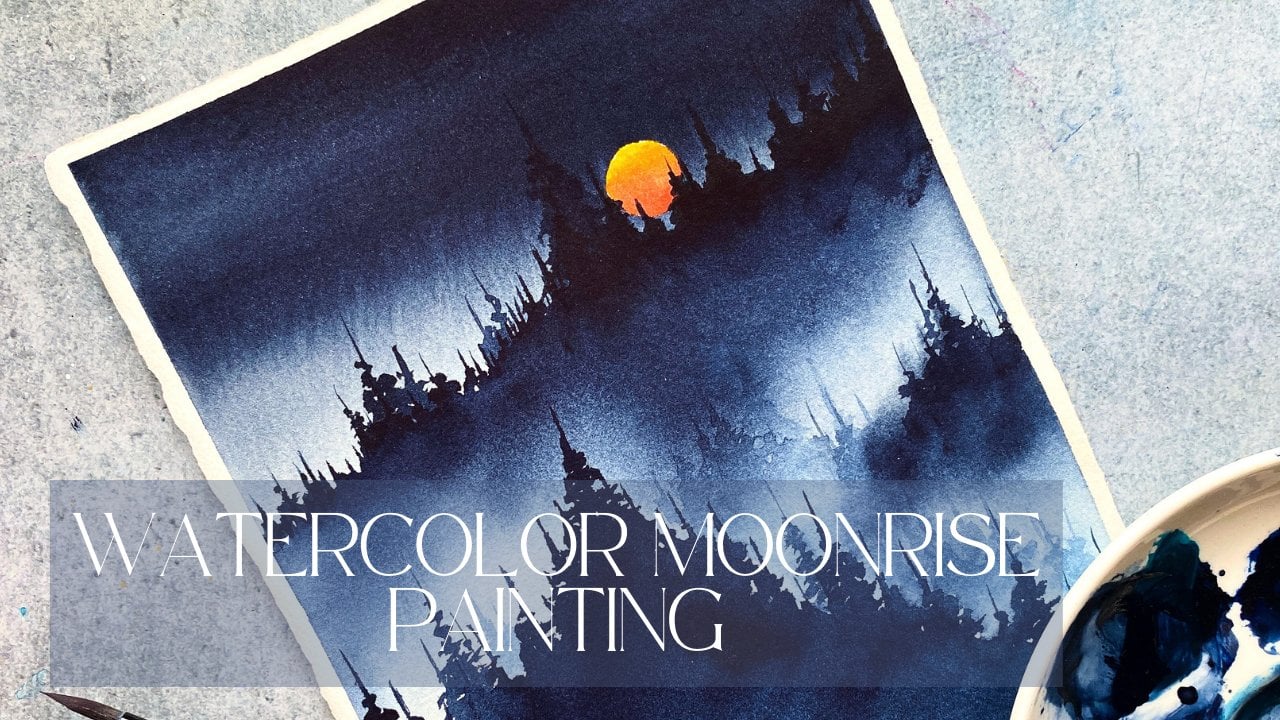
6. Class Project 1 Final Details : Let's begin class project one. Final details. I'm using my silver
black velvet number six, brush and indigo. And I'm gonna get started on painting the pines
on the foreground. You can see at the
bottom of the paper, I did not paint it
with any colors because that area will be
covered up with the pine trees. Pints is not very hard. In most of my previous classes, I have mentioned a
few easy techniques on how to approach
the pine trees. If you already seen any
of my previous classes, you would know one of my favorite technique
that I would recommend to a beginner to paint pine
trees is the first step, is to draw a straight line and then move your brush
in a zigzag manner. And that automatically creates
the shape of a pine tree. Like you can see here. You still are not sure on
how to approach pine trees. You can take out a rough
paper and then practice, like I have mentioned just now. So you can paint confidently while you are going for the main
class project. Another important
thing to keep in mind while painting
pine trees is that do not paint them in
a same shape and size. I've been painting
these pine trees in this video in various
different sizes. It's because the
more different sizes and shapes that you show
for the pine trees, the more depth you
create in the landscape. That is actually the
most important part while you're going
for pine trees, or just any other trees, just to not paint them
in a uniform shape. The process of covering the entire foreground
with pine trees is a bit slow and we can
easily get bored. So if you want, you can fast
forward this video as well. I suggestion, especially
if you are a beginner, is to watch how my
brush is moving and how the shapes of the
pine trees are forming. So that you will get an idea
on how to paint the pine, pine trees in your
own future projects. Now, after painting
the last pine tree, I'm going to cover up
the entire whitespace with indigo paint. Now. I'm going to
take the white paint. And I have also taken
the rigger brush. And I'm going to
splatter the stars now. Splattering is a
very fun process, but it's important
to not overdo it. With the same rigor brush. I'm going to highlight some stars with the
same white paint. Alright, we are done
with class project one. Remove the tape only when the paper is completely
dry that up. Now I'm gonna see you guys in the next video where we will discuss about the colors of class project two.
So see you there.
7. Class Project 2 Color Palette: Let's begin the class project. Do with the color palette. I will first list
out the colors. Later, I will swatch them. That is going up drawn
rose from White Knight. And this is orange
color from Sennelier. And this is blue
from a white knight. And of course, my
favorite color, indigo from a scenario. And I have this
very special color from White Nights
called royal blue. If you don't have this color, you can use cobalt blue or
ultramarine blue instead. And then of course, the white watercolor from a
brand called Gamblin. Me first take these
colors onto my palette. Later, I'm going to swatch
all of these colors. I'm going to change
the paper now. This is a 25% cotton paper I use for switching the
colors, especially. So I'm going to get started
with light color to dark. So that means I'm
going too fast. Take Sennelier orange, followed by quin rose
from White Nights. And this blue color
from White Nights. This is actually very
similar to ultramarine. So you can use ultramarine
color here instead. And for royal blue, you can use cobalt blue. You can even mix a little bit of white color to the cobalt blue, then you will get the
royal blue color here. Finally, my personal favorite, white knight, indigo color. And obviously I'm not going to swatch the white color here. So this is it. This is the color palette we need to paint the
class project too. So I hope you guys got all
of these colors with you. Now, without delay,
let's get started.
8. Class Project 2 First Layer : Let's start the class
project to first layer. I'm going to wet the paper with clean water and I'm
using my hockey brush. Now. I have taken my silver
black velvet number 14 brush, and I'm using orange color. I'm going to get started
on painting the sky. So we're gonna start
with light to dark. So fast, orange, letter
comes, Queen Rose. The colors are looking
very bright here. But that's okay
because watercolor always tries to shades lighter. So do not hesitate to
go for a darker shade. Now, I'm taking a white
knight blue color. I'm going to get started on
painting with the blue color, just about the Queen Rose. And see that while you're blending the blue
with Queen Rose, you get a very
dull purple color. And that is perfectly alright. It's very common as
well to get that shade. Now, I'm roaming
all excess water from the brush using
a tissue paper, and I'm going to blend all of these three colors together. Let me take royal blue color
and then followed by indigo. Having 100% cotton paper really, really helps in
blending of colors. That is what I'm doing here. I'm blending all of these colors together and the paper
has to be wet as well. Now with a tissue paper, I'm removing all
the excess water that is present at the edge of the paper to remove, to avoid the backflow. Now, watch this part
very carefully. While the paper is still
wet using a tissue, I'm going to just
remove some paint. And I'm going to remove
it in a triangular shape, as you can see here. Now it is time to make it look like a milky way
galaxy for that time, taking White Nights blue color, and my paper is
getting dried up, so I may have to hurry. Now. I'm going to take white
color and I'm gonna just add a few random dots like
we did in class project one. But it's now clear that
the paper has dried up. So I think I may have
to stop painting. One of the most important tips that I can give
you in watercolor, if you send your paper is drying and you're not
yet done with your work. Leave it, leave it there. And you can come back later, re-wet and continue work, but do not paint while
the paper is drying. Following my own advice, I'm going to stop painting and I'm going to let the paper
to completely dry up. And I'm gonna see you guys in the next video where we're going to paint
the second layer.
9. Class Project 2 Second Layer: Welcome to class project
to second layer. To begin rewetting. First step is to check if your paper is
completely dried up on, not only when the paper is dry
it you can start riveting. And wild riveting. Do not push your brush
against the paper. Go with very gentle strokes
that you are seeing here. Let's start with indigo and
let's start from the top. In class project one. We did not disturb
the Milky Way galaxy. In while painting
the second layer, we have painted around it. That's what I'm doing here. Later, I'm going to walk on the Milky Way galaxy
here. Indigo. I'm going to paint
with a royal blue, followed by white
knight blue color. And then the Queen Rose
and the orange colors. We have painted with blue, royal blue onto the Milky Way
galaxy in the first layer. So I'm just going
to paint around it. But it is looking as if we are painting over
that. But it's okay. It will still look like
a Milky Way galaxy and then paint with orange
and pink colors. And I'm going to blend all
of these colors together. Once again, It's not let the paper dry. So we're going to
have to work faster. I have just changed my brush. I've taken my silver black
velvet number six brush, and I'm using a Queen
Rose and blue mix. And I got this purple color. So I'm gonna just add a few random dots
onto the Milky Way. As you can see, when the
paint touches the paper, the paint is just spreading. That's when, you know, the paper is still wet and that is the right time to paint. I have just added
the white color and I'm going to
blend these colors now using a damp brush like we have done in
class project one. It's perfect. Now I'm going
to take this purple color that is there on my palette
and I'm going to add few more random
details, random dots. Blend them. Remove all the excess paint and water that is at
the edge of the tape. And we're gonna keep
the paper for drying. And in the next video, we're going to paint
the final details. So I'm gonna see you there.
10. Class Project 2 Final Details : Let's paint the
final details and make sure your paper is
completely dried up. I have taken my silver
black and white number six, smaller brush and indigo color. I'm gonna get started on
painting a layer of pine trees. These spines are very small and will only cover about an inch
at the bottom of the paper. The pine trees, the foreground
for our class project two will be a bit different
from a class project one. Here, after painting this
layer of pine trees, we're going to paint a few
dried a pine tree branches. There's going to be interesting. So now that I'm done with
this layer of pine trees, I will change my brush. I'm gonna take my rigger brush and I'm going to use
the same color, indigo. And I will paint the pine trees with lots of dried-up branches. That means there are not
going to be an ileus here. We're going to only paint a few horizontal lines
are zigzag lines. To get that fine picture. I'm not going to paint
a lot of pine trees, dried pine trees here. I'm going to only paint
a very few of them. This is the last one.
Now, I'm going to take the rigger brush and I'm going to take the white paint as well. And I'm going to
splatter the white paint onto the paper to create stars. Later, I'm going to highlight some stars with the
same paint and brush. Do not overdo the splattering. And once your paper is dried up, you can remove the tape. And that is all for
today's class projects. I hope you enjoyed
painting with me today. I'm gonna see you in the next
video where we will discuss some few important things about painting Milky Way's. So
I'm gonna see you there.
11. Final Thoughts !: Congrats on
successfully completing the class and class projects. In these two class projects, we have learned two ways of
painting a Milky Way galaxy. The first project
is about painting the Milky Way Galaxy using the whitespace
in between the colors. We did not use any other
technique like lifting. In second project, we
have used exactly that. The lifting technique. We have used a
tissue paper to lift the color off and
then paint around it, creating a Milky Way galaxy. I hope you guys use
these two techniques to create your own Galaxy
paintings in the future. And I'm gonna be waiting to see your class projects so you can post them down below
in the project section. And if you have any doubt
regarding the class, I'll be happy to help
and happy to answer. Just post your query in the
discussion section below. If you guys like the class, please consider leaving a review and follow my profile
here on Skillshare. And I'm going to see you
guys in my next class. Thank you. Thank you so
much for joining me today.
 Sukrutha Jagirdhar, Watercolor Artist I Creative Entrepreneur