Transcripts
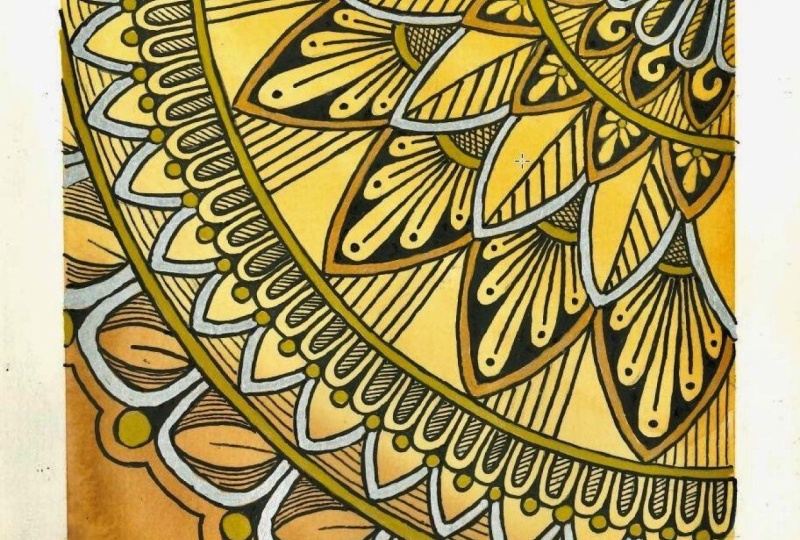
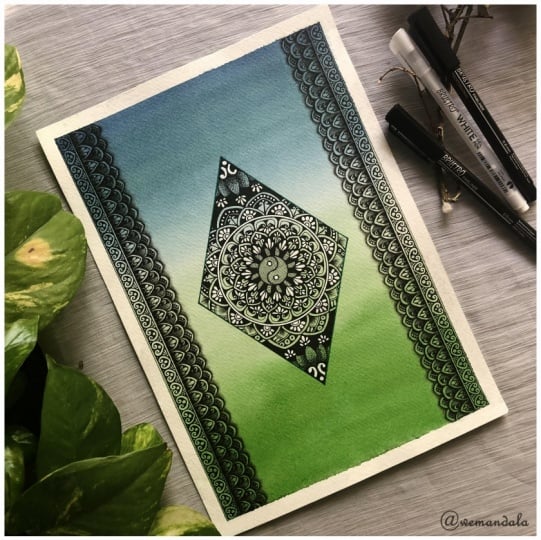
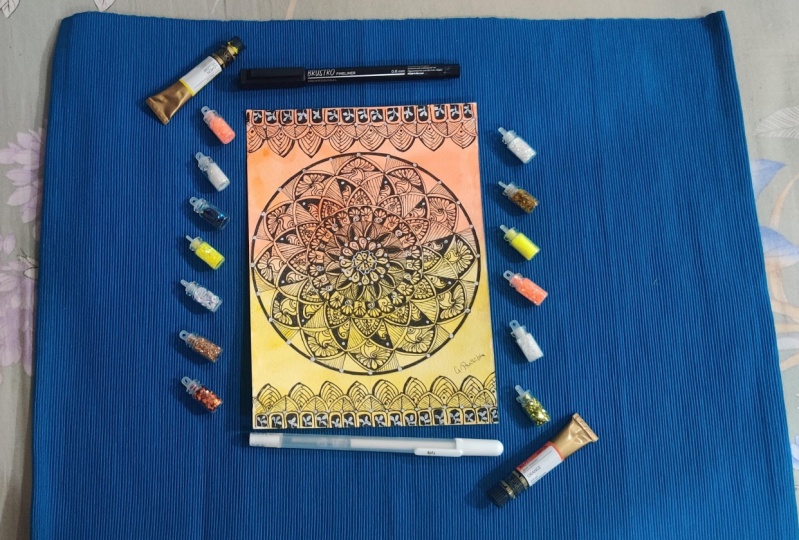
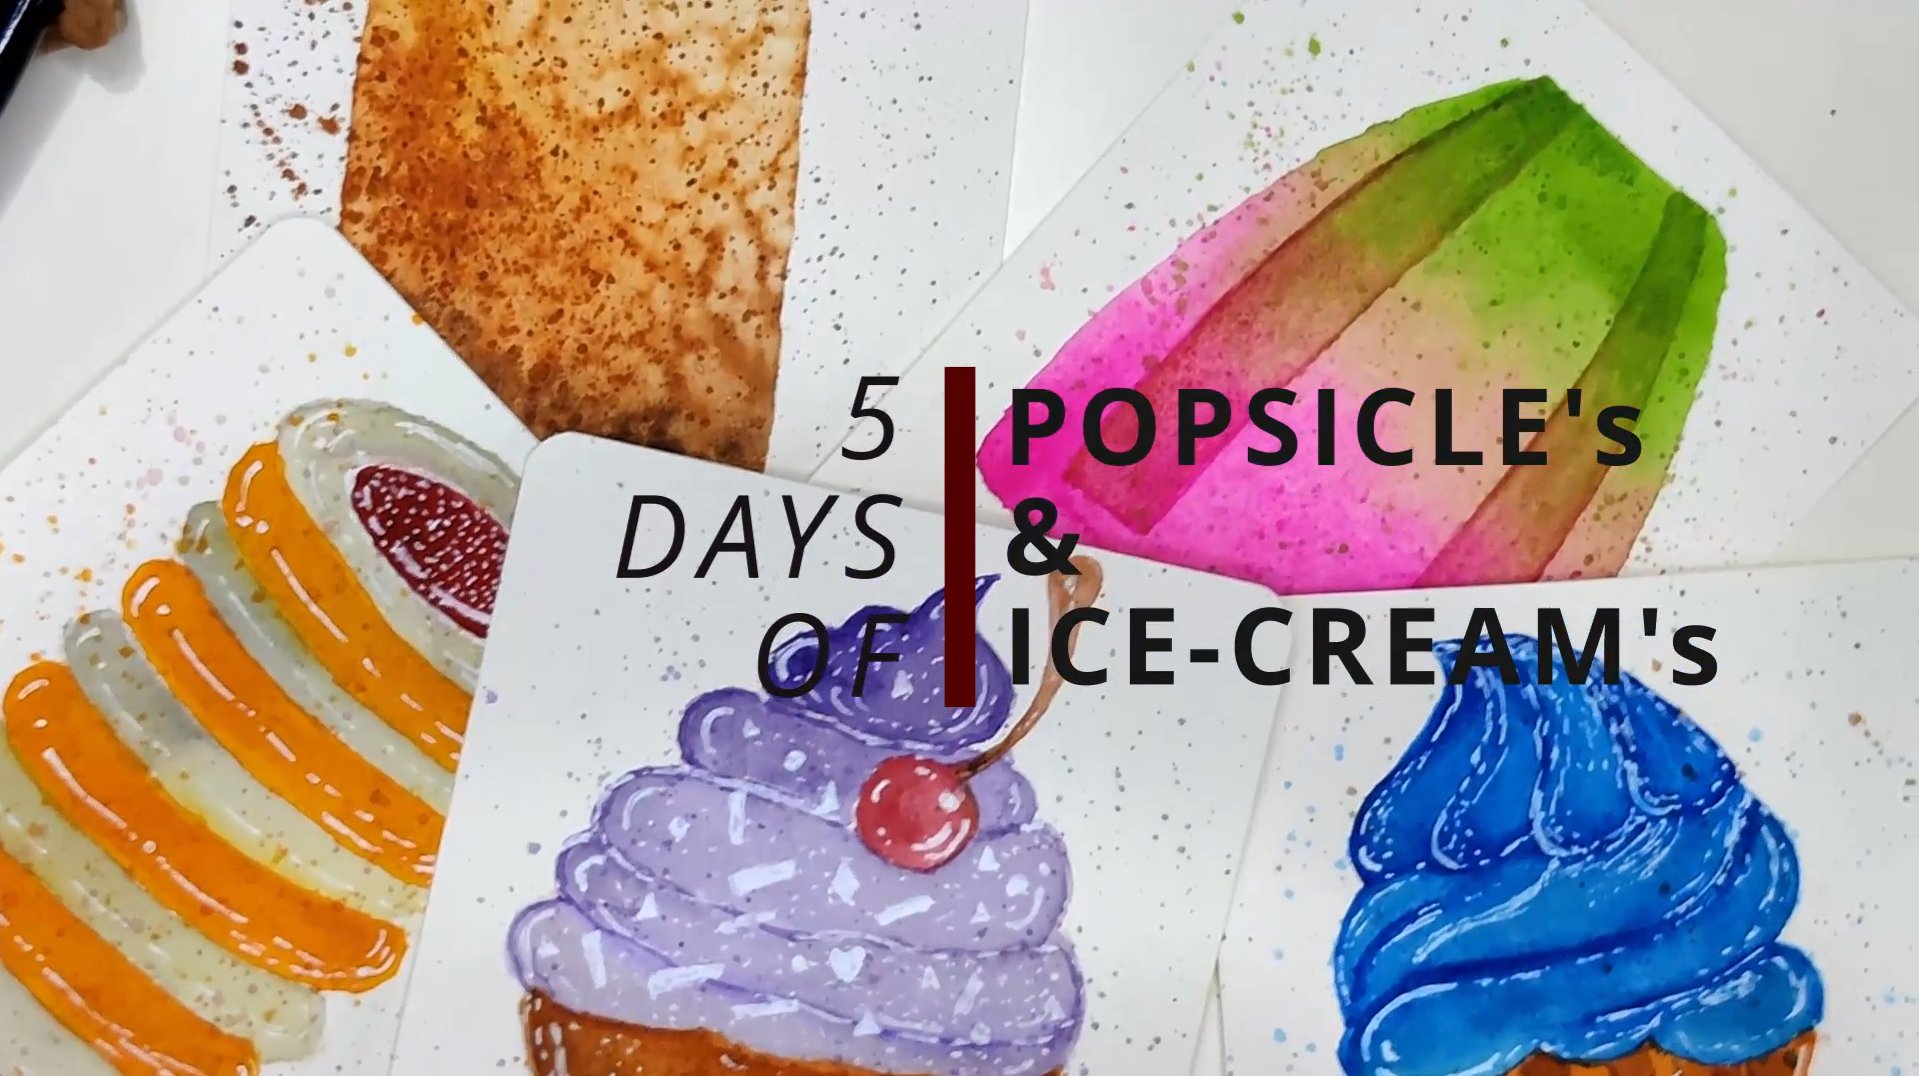
1. Introduction: When the Ally is a symbolic picture of the universe, it can be a painting on a wall Canvas created using sand and in many more reads with or without any visualizations. Symmetry of these patterns is what I loved them more. It helps us to stay in a calm and meditative state of mind. For me, walking on Mandela's is an enlightening process. Each time I come up with new Biden's and execute them to bring the best out of me. This is maliciously, I am an environmental planner, artist and an educator based out of India. You can find me assays really underscore odd and Instagram. I have a great passion towards teaching and teaching odds is something that makes me really happy. I always love to explore a lot of mediums like Mandela, I lose gauze, acrylics and many more. With this fashion of experimenting, I came up with experimenting watercolors and Monday, nice beach you can learn in this beautiful glass. Come join me without any for the delay in this meditative process of learning what development LMS. In this class, I will walk you through step-by-step manner from the type of people have to meet Mandela grids, whatever law background wash, pattern-making and its techniques. And finally into a beautiful lambda y, bring Mandela. After this class you will get Conference to create a Mandela on your own with unique patterns and some beautiful background combinations. The classes perfectly ordered for beginners who wanted to do when the laws and looking for some help. Also, for the budding artist who want to explore the touch of watercolors do without any for the delay, let us discuss about the materials required for this class in the next lesson.
2. Materials Required: In this lesson, we will go through all the materials that are required for us to complete this work. To eliminate. The paper I will be using is color 300 GSM hot pressed people. It is available in India mostly. And alternatively, you can also use Canson 300 GSM people. If you have a tool that green like this in the cold pressed paper, sometimes the fine liners will not work. That is the reason I am going with hot pressed paper or the fans and want to watch it before. Now coming to the abdomen it easier is the most importantly DDL for doing Mandela's is a compass. I may be using a map and compass of any of these two types. This is an extreme double compose where you can walk on E3 as well. And this have a nice interlocking systems are go then that you can also go ahead with the campus open normal one with a fine liner can also put in it, which we will be seeing in detail in the photo sections. In addition to this, we will be requiring shock scale or a long scale, whichever is available with you and a protractor. This is a very key for the perfect Mandela. We even get to know how it will be useful in R For the lessons. The major tool which we will be using for making Mondelez is fine liners. I will be using Micron, find my nose. You can also go ahead and use the Bruce Roe's fine liners. These artists adopt eight and these are a set of six of different widths. Like you can see, he'll be even get elaborated on the widths and the importance of all these fine liners in R for those sessions. You can also go ahead and use micron fine liners of this AD. Should I really be using this particular edition as I am in love with the black color outfit of it. Next important aspect in London us is we need a pencil. So it can be a normal pencil as well. I'm using Gamblin mechanical principle for making the grid outline. And then as it is a watercolor Mandela, we will be needing watercolors, BBB using warm watercolor sheets. So these are from glutes, Dr. Lee be using Bruce draw sheets of cadmium yellow and cadmium orange hue. If you don't have this, don't worry. You can go ahead with Faber castle. Well, in fibo castle, you can go with cadmium yellow and dark cadmium orange. Don't worry if you're not having any of these materials, you can definitely go ahead with watercolor peaks or whichever brand available with you. And also we need an eraser for this and a masking tape because it is a watercolor Madonna, we need a masking tape to fix out paper to the bad or the soil phase which you're working on. And a Jelly Roll pen. This is from boost draw white gel pen. Also you can get it in Sakura Gelly Roll pens. So I'm just going to use the white one to add some highlights and beauty. Do a woman, dahlias. I have some issues with me because it's being a watercolor. Mandela. Coming to the brushes, I will be mostly using brushstrokes, mop brush. This one off size number 8 or size number 4. You can also go ahead and use any of the flat brush off any of that thickness you have. I will be using otherwise flat threshold two inches to wet my background. These are the brushes ideally be using for making them. And you can go ahead with any brand which you have. In addition to these, we need a glass of clean water. If you have two glasses that as well inward, but one glass would do because we will be just going with the background wash. That does it for the materials section. Come join me in the next class, we will discuss which paper a suitable NYU, but some quick demonstrations.
3. Selecting Suitable Paper: In this lesson, we will be seeing the behavior of watercolors, three different types of people. This is a very normal people off around 100 GSM or ED GSM, which is available from the local store. The seas 300 GSM cold press watercolor paper with a bit of external met. And this CEO or 300 GSM part first, before we really seeing how watercolors are going to behave on these three different types of. Before going ahead, let me squeeze the colors which we will be using for our project. That is cadmium yellow and cadmium orange. Make sure you have some tissues on the glass of water by your side before getting into the behavior of the people. And ideally be using brush size number 4 branch and a gambling size number 12 brush as well. The difference between mop brushes and the normal brush would be within these 3. First, I will be starting with the normal Depot. I will be applying water onto above this using Gamblin brush. Just a background water cord. You can see how the beavers behaving with the water. You can see that the paper is bending a lot. And you can see the transparency of the people. And it can be done easily. So this is not preferred if you're going to do a background watercolor wash or any watercolor technique on to your Mandalas. This is perfectly alright if you're going with a normal like your, I am using a fine liner, which is it is a water-soluble fine liner. You can see I have put a line on the water that does not predict a toy. So this is completely fine for normal Mandela's without any background washes and galactose. Now let us see the difference between the mode pull pressure and heart rate. Both are 300 GSM. It is just having the thought and this is not having the tools. So I am taking a fine liner and drawing line. You can see the difference and both of these in the hard-pressed, you can see the lines properly and in the whole breast, there is some tooth which is not allowing you for such a small structure as in the hot press one. That is why we will be performing the hard-pressed people. And since these border watercolor papers, I will be going ahead. By wetting the background. I am just reading the backgrounds of the board and you can see that the fine liners are not spreading because they are waterproof. And the people will not bend the sphere once you tape it down. Let me show you. I'm digging AS proposed BY masking T's and taping it down on one side and the other side as I would be doing the same for non know why my answer. Now let us introduce some color on both of these so far as to either be going with yellow on top of this. I'm washing my brush thoroughly and not digging some audio engine going on top of lameness. You can clearly see the difference between the full length 1 plus 1. So here it has a smooth surface and this has a grain and external myths. That is the basic difference. And we are going to use the speed bar and you can see how well people is behaving normal before. So it is very important to Jews, or 300 GSM or 140 LB people from reachable brand new n1 available right? Now, let us dive into the next lesson where we will be seeing different techniques of watercolor washes.
4. Watercolor Techniques: In this lesson, we will be seeing various techniques of watercolors, which is majorly wet on wet and wet on dry. Wet on wet is a process. We will break the entire people and then drop color on top of it. And in wet on dry process, we will apply directly the wet paint on the dry ice IPO. I am completely wasting the people with the brush cam links in size number 2, one, branch two can go ahead and use the more brush has very few are available. More branch generally holds a lot of water and it will be very easy to work on wet-on-wet techniques. Now, on top of this, I am going to draw a hint of orange. On to the top. I'm going to do a variegated wash, which means half of it will be of Orange and the rest half will be with the yellow. At the job, I will be taking a very intense tone of orange and white coming down. I will be reducing the color of it without taking any excess and stopping in between like that. Now go ahead and rinse your brush completely. I am going ahead by taking your local law. And from bottom, I am repeating the same step which we have done for the orange in dense color at the bottom. And by going to the between. And it's in density is reducing. This is the exact wash which we will be doing in our project. Now, I will show one more technique of gradient wash without mixing two colors using the wet-on-wet technique. But this time I will be using my mop brush. I am feeling the brush before getting it onto the people. And I'm applying water onto my second section of the people. And the people which I am working on now is a scholar, 300 GSM hard-pressed people, which is used in our final project, Tasman, the seeds of A5 size and I have mass with a masking the bond, the four sides divided into four equal sections to show the techniques. Now, my background is completely wrecked with Watteau and onto this I will be taking a dendrite of orange and doing the Iranian wash. I am picking up orange color. And with an intense tone on the top. I will be dragging the color to the town without taking any extra color or what. Onto my brush, on habit, the shoe on my hands and my year ordering china's be immune to this ideal line. I'm feeling good. You can see how beautifully it passed on though I am applying a bit of intense color on the top. You can observe that I haven't taken any excess water because a bizarre more blush and it holds on good amount of water. So these are the Dubai government technique snobby. Go ahead with the overdrawn dry techniques. For that, I will be going in Heyne by making some water onto my unbranched and diluting the paint bucket. Because we didn't wear the paper. I'm picking up a book audience than Kazakhstan do Libra, but we'll deal with that. The Shrew novel I'm digging the diluted a lot very valuable. You can absorb the consistency or with your novel I'm digging this yellow being unduly be applying without reading the background and trying to draw a breeding Porsche. If you think it doesn't look like a gradient wash, You can go ahead and wash your brush and then remove excess want job. It was at this along branch and run on top of it from the bottom so that you will get a lighter tone on the bottom. Now I'm going to just go ahead and the glue, the variegated wash with wet-on-dry for that was I am little bit diluting the orange follow norm.inv too much. This is a mop brush and a lot of water. And I am applying to the half and I'm taking the Indian scholar and applying on the door. Make sure you move your brush in horizontal strokes. Because we are doing by Dawn dry it does really important. Now I'm I'm taking a bit of yellow and then coming from the bottom to the middle. In the middle I'm kind of mixing both of these fellows well, but because Don't have a wet background so we don't blend by itself like it happened here. We have to make sure that it does blended. For that we have to run on brush multiple times since the masking tape is really thin, I am losing Colorado fit. I will just pick either repeated issues. Cleavage, log-space, this issuing the final project because we have a very thick of masking tape. Now I am running my brush all along from orange. Do you need a yellow asthma? And cleaning my brush, removing excess water, taking the yellow again and coming from the bogged down in things normal via lower the water and then running all low-water and then stone or orange onto the dog. I'm doing a little bit of water to spread. The major issue with Brian Weathers, it is really useful for detailing, but for the background washes, it is always preferred to go on wet-on-wet technique. You can see this tiny lines forming ray. So we don't want that to happen. That is why we always prefer wet on wet technique for backgrounds. And now I'm digging a bit of yellow Again, it's clean. My brush has not been properly. And then going ahead on top of it. So this is how it looks. This is a difference between both. You can see that right? Parts have done or don't. Lighter than what we'll apply, that does occur more in watercolors, even this will dry up, don't lie, don't really wait for it to completely dry. And then go ahead by removing the masking tape and naming these techniques. So the paper is completely dried. Now you can see that this competing dry. Now let us go ahead and remove the masking tape. Make sure that you remove at an angle so that you will not pick up the color and you will get a bean borders. Like how I'm getting heel. You can see in the fourth one, we are, we have done dry background, like using a wet color on a dry background. You might have observed that I have views.py allow multiple times and hence that resulted in a darker tone compared to this event. Here are a few use of pigment and washing new. We get the same result by the drawback. And using this technique is leaving get these lines very much visibility in our complete work. So we want this kind of background a little darker one, then you will still follow some add-on radiation. I knew where you get this. Lever your head by naming all of these techniques for our future to friends. So this is going to be on Binet did wash. And this is with Tom Brady and wash. And this one is let on dry brush. And this one is wet on dry eradicated Walsh. Not that we have learned all these four techniques. You're going to go ahead and use any of these techniques for your final project. Also as shown in the previous lesson, slogan was a boy, hey then the broader background wash after drawing the Mandela as well. We will step into the next lesson where we will learn how to make gossip law gray rectangular grid to complete our entire Mandela in a vibrant domino.
5. Grid Construction: In this class we will be learning about construction of grids and the thicknesses of various pens. So before going into construction of grids, I'll show you that thickness of each of these spins here. And on backside offer it, I will draw a grid construction with the compose the paragraph door bends and scheme. So I will show that the mass of each of these one-by-one to you, not this is the CMS shock all 0.03 which is used for detailing works. You can see how the medius and next to that is 0.05. These both have already minute difference model. These are the dealing spends our fine liners which we will use Woman dialyze. This is 0.1 pen. This way meals to draw some returns. Detailed patterns is 0.2, which is again used for patterns. With their practice, you will understand which thickness span to be used for what kind of patterns, don't worry. 0.3. This is the band which I mostly use for drawing the outlines of the Mandela more depths are the vitamins we will get to know water motifs and patterns in the next lesson. We will be using this particular friend most of the time in our final project. And next comes 0.4. So if it is a bigger drawing, if you wonder batons to B3 quicker and everything beading be using the zero-point for and makes one is 0.5. This is mostly used for the outer line, our dorsal conference, outdoor software love the Mandela's like this outer circle of the Mandela's and everything we will be using mostly 0.5. Also this really be building a getter gaps or the positive species billing, whichever style you prefer. This is the 0.5 fine liner which we will use most lipophilic or possess, along with 0.8. So if there's a bigger artwork, we want to fill it very quickly. We will be using zero-point 85, 90. So these are the fine liners. You can see different thicknesses as radiations from 0.3 is still 0.8. Don't worry if you're not having any of these bind Lennon's, you can go with a novel pen as well. Just. It is water resistant. That's an if you're using a gel pen, then we are doing watercolor background washes. There is a high 80 expected issue that the gel pen spreads into the balloon watercolor and bleeds, which doesn't make your button pop out. So make sure if you are using any other pen, make sure that it does water this instantly. You can go with any of the normal pens available in the market, ball pens, uni-ball or any other venue. And coming into white gel brain are the white gel pen, which are what you call it. So this is from Bruce draw this and piloting. Since we have a watchable a bank loan line, I'm dropping some dots on doodle. Black color you can see, right? So this is how it looks. It helps in giving some highlights to the spaces which we have left in the watercolor by nouns. Now, Lehman see how to construct Amanda logarithmic so that we will be needing a skis. First, maybe be identifying the same dewpoint. All Souls emphasis E5, it is going to be around 20 ones. And Demeter's that goes for staying. Find phi you ASM and fine. Make sure every citizen saying DO YOU CAN also roughly identifying sender, but just for the neatness of the world, we will go with the stairs. And then on the other side as well, measure. It is coming around 14.6, that is 7.3. I will be keeping two docks to make sure that the line is Christ. And then going ahead joining it, make sure that this is the light candles are the ways you can erase it. If you're doing a watercolor wash before that will be difficult for you. Because at times it gets big data. So the background color really get picked up to your edges are like cousins. So if you're not confident with the lighter tone, all these grids, you can go ahead and do watercolor wash at the end. Now I'm taking my protractor and placing it the same 2-point. You again, go ahead by mocking every 10 or 15 degrees up to your wish. So I will be marking for 15 degrees. That means 15, 30, 45, 60, 75, and 90 is while learning data. And from this side it is one naught, five, 120, 135, 150, 165, and 180. We will do the same step on the other side as well and join all those dogs would the lines. And quickly going ahead with the same step. If you have around arbitraries of incomplete, so hopefully you can go ahead and use it as well. I have rebounder by that is exceeding the size of 25 people. That does why I'm not using it in this particular glass. So the Vigo, a lot of smudging has happened. Your maybe I have a lot of pencil marks to my protracted I think I'm good and using them off and making sure that I'm not erasing the dots which we have kept now. I'll quickly go ahead and join them with my scale. Make sure that you're not crossing the center point. You again, draw baby of paper, free me, add your own bees. Even by doing the one, the last we will go ahead and, or did that before. I call this as also pull up, great. There is also a rectangle over the norm of a squared breed, whichever you call it. We will be doing that as well. A lot of smudging is happening maybe due to the pencil or the Bieber and I'm not talking to spending one. Don't worry. We'll make sure that this does not happen in our final project because we have a bag zone. Okay. I like with the areas this module in Dallas and come back. Now next important step for $1 is the Salford. So I am fixing my mic down. It goes medicine from gambling, making sure that these both are at the same distance. So I am using my compose and fixing it so that it will not. So this is my radius. You can date for the radius of maximum extent possible. And then drawing the sample, make sure that you are not holding on any other place except the top of the compass. But their body with Seok and draw concentric circles, you're going to measure their main role. Or you can go ahead and draw them roughly as well. Maybe measure and draw in our final project as a practice. And that. And five to be void main, drawing these enough random width, r, the radius. This is the biggie BOD, and this ended up wind. Make sure that you reduce your height of the pencil so that you will get different muscle, but otherwise, it will not to get a nice SOPA me extra paper. And you can rotate your paper if you're not comfortable rotating your converse and the smaller size. Like Hawaiian, don't know. There we go. Now we have completed Amanda lump grid or for circular type, we can also do a rectangular buried. I will show you at the borders, we will draw the rectangular grid for the borders. So I will be marking two centimeters like this. And then drawing the scribe lines, or this can be a square or rectangular grid. Ball it. I'll do the same on both ends of the people. Thus does a border for this Mandela, if you are using us for s0 before this might not be required synthesis in a rectangular sheet, this will add the Beauty drew them under law band we have such models and it may be both flocking when we frame this up. So there we go. And now what I will be doing is at this end, I will be marking every five degrees or so, or if there's roughly 14. So I can go ahead by harking is one centimeter or half a centimeter now by go ahead with one centimeter. So I'm just rocking or rough. Lines don't go with us. I enter, this line is ignored. So there we go. We will do the same on the other side and then draw the lines. That gives us a square or rectangular grid and leaves a nice border and losses for new patterns to walk on. So there we go. Now by drawing these lines, I will draw lines on little. They're like only for those two lines. Because I don't want to disturb the environment the line. Remember this in mind that these lines where you Near East after completing your Mandela and you have to make sure to give these lines as light as possible for you all to understand. I am doing an orbit, Dakpo be, but you all have to make it very light in your final project and deliver very helpful if you have done this exercise. Because this helps us in attaining the whole fiction in our final Lambda Law. This admin keys VOD really beautiful mandalas and if takes a little bit of patients and dying, do it at your own pace. Dorm, Harvey, getting the Biden's right. You will be in brewing based on that black this, so don't do DVT yourself. Also, the important aspect of Mandela's is the grid construction. So if you construct you are good at properly, even if you have drawn some mistake or some factors exhausted by the asymmetric God, I never really get close up just because of the construction of a perfect grid. So these are the two types of goods which we may be using common dilemmas. I basically show you one or two pi to start with. So this is 0.8. Fine liner. So I'll just show you a brief how we will draw the add-ons before going into a batons lesson. So supposing that that is a grid or with your flight from here to here. B will be going.gov is obvious like this. And then on the other side, asthma. So this is how the icons are going to be in the so columbaria. I will try to keep as simple as these for the first project, like this and for this one, so it's the same. You can go ahead, I haven't brought these motives in the slide. In addition to that, you, if you want a smaller ones, you can put a dot and which means roughly, and then draw this and this. I will share more tips and tricks in the next class, we will learn about the Badlands, how to build them. Have to do shading, filling and everything. Giant beam annex glance.
6. Mandala Patterns & Techniques: In this class we will see pure Biden's that we will be using in our final project. I will be roughly showing you the patterns or will he or you can try them at your end and do them in your final project, it is very important to try them before directly and during routing final project, the false factor in which we will be using is a very some blow one. It doesn't drop shape like this. So if this is the line, this is the drop shape which we will be drying. And the second part, each of you and even breezy riding that in Doha. And then seeing with this kind of lines, also we will draw a double line and then shade this up completely. Dubliners, very important when we're drawing multiple patterns. Like if you see now, I have this pattern and abundance, I have some other button. And if I'm not drawing a double line, it will look a bit clumsy like you're seeing here now. I am repeating the same pattern for both of these models. Really love flee. So you can see that it does not getting that is the different look. But if we draw the double line like this, for example, we will be drawing double line here, the double line for all of these. And for this one as well. And draw this same pattern here, but this will give a different and complete look. Also. There is a positive and negative space filling. So if this ADR, this is called positive speeds fillings, and this leaves the negative space filling. You can see the difference between both of these. Always bot for negative space filling most of the time, once you're fine print of one new patterns that show up on mingled, what we've done, new ones. And that's that. Now b will be on to the store factor, which is a leaf more tariffs. So even call it as a leaf or difference just like this. And then inside that we will be drawing of SLA Hall, small flower kind of structure. And we will be having these on below this. So I will show you how it looks. So this is the shape which we have below and on top of that, we are drawing this one. So here the routing, the smallest one like this. And then on the above. We'll draw a flower like this. Okay? Now, for part B, really just fill up the gaps that we have yolk. The fourth pattern is just going to be the lines like this. These are called fellows, dots, lines or some bubbles like this and then shaving though the radius. These are called US fellows and these are phantoms. Has now been structure is called emotive. Okay? Now the next pattern would be the same leaf if we have a small and so below here, this will be a double line and maybe, and then we may have the same flower bend structure which we have drawn before in a different manner. And then filling up these negative spaces in the next pattern that is going to be a little big O one. So it's like this probably and having a double line and then we make it into half. Since we have already done the side button, we will be doing lines on the side, having the small motifs like this and then outline of that so that the scope is retained after shading or this could even be shading all this. I'm not going in detail, and it was in the project section. You'll get to see these innovating new data and mono. And the mixed-mode defaults already be quite large like the previous one, because thus all conferences huge and B will be drawing a double line and he'll be really meet some code like this. Okay? And then we will be making a big O Flavell In this week. Maybe having guidelines. Hell, why we're doing the final project don't really, and this area will be shaded. I'm showing with the help of this because we will be keeping this on top of this. That is the reason why I'm drawing these and showing you. And at the end the bees space will be filled up in the lines. Don't worry, this is a very rough understanding of the Biden's and techniques. We will do a remix in our final project. In addition to these, we have some samples like this. May really be filling this up with white light. Suppose we have liters. We will be taking our wipes by n and then filling up here in between. We have this as one of our buttons and then we have bonded. So on this we will do in the circular grid which we have drawn. And if the rectangular grid, we will be making 23 pantheons. I will show here, suppose this is the grid, this is the fat and the ongoing to me. And then small ensembles or what he earned as fillers of that species. And onto up offered we will have two lines like this and then covering those board and maybe making a leaf motif again. And on top of that, we will be making one more leaf motif which is more low. And in each of these motifs we will be covering in the small div, we will just redrawing the lines on both the sides. And in the borders. We will not be using any kind of double line. I just want to cover both of these in a single piece and want to show you how it looks at the zoo. Reason I'm covering both the double lines and without double line works as well. And on top of this baby having my favorite pattern actually. So this is the motif and this is the line parallel to it. One more line parallel to it. Like that. We will be building upon and finishing the button. Don't worry at all. In the original projects section, I have shown this very slowly and deliberatively. So this is all for the technique section. Now, let us get into the final project by starting ahead with reading the background gallows grid, making patterns, highlights, everything drives me there in the final project section.
7. Project: Watercolor Background: Iot arm, jaw and finding project novels or this, these all see how richly Islam 50 plus people from this color. So this is a frame side effect. I always draw borders before mosque induct on all four sides with a really light hand that does one dip board technique which I followed through but a feeling bored or I'm Will do doing the baby born, I'm drawing the lines in your fuel tank angle of the recto preferred hours of Bordeaux. Now line going they haven masking its own on the four sides with a one-inch masking D. You can go ahead with the half-inch masking day boss will it does completely off. Do you knock out via radio with the Maschine D? You will get by. But I simply just with that, your scheme as well to ensure that the water order but there is more going out of the border. I'm leaving us a wedding need more geometry. One, I voice enhanced by repeating the people your friends take Amy size, but Auschwitz you. I will be using more branch of Sysmon will aid from Bruce draw, taking a pain water and rejecting the people. You, Wendy. Make sure to wet the people radii when need to get a beautiful blend. Give a nice I'm on both wash spanned. Don't do three minutes of time. Do get the wash. Nice EBIT was that does the one which says What a beautiful out butch. Now bb use the antidote size of brush, which is Sysmon bars. For the SRO brush. I'm going Hayes by doing or by the GitHub Rosh. I'm taking a little amount of water and it bends. Don't have law. You can see it how Indians I have become since we already have water onto this, I am applying that a law with very intense storm on the thaw and bringing it gradually down the left-half me. Now painting my brush and they gain orange. And doing this same thing from both done. So I observe that data, some excess water onto the orange ADR. So I'm taking so we are removing along the axes co-authored. I'm now going on leave exempt famed. As we have already a bind known what Dudley Or and we're doing wet gone there. We can completely avoid aid with the intense amount of paint directly to get a beautiful blend. I am running my brush multiple times to ensure the blend. Now bye and painting them rush. They've been a little amount of orange again and then going into the page. So if you want, you're going to add some but a low asthma. If you're not satisfied, blend and in-between. We actually have to run both of these follows like this. To Bergen, nice blending between dual those onto your completely satisfied with the loop of the background. If you have balances, could be the watercolor techniques session. This would have been much of a problem for you. It is just in Greece in those size and we are doing the same thing we are with the same bellows was all. So telling me that doesn't mix of orange and yellow in a lighter shades. Now my day, my brush and go with orange ones I gain. And that's it. Baby rate for the tokamak, ladies bland and calm ABI between shapes by itself. I've seen it here are the colors Ladin less than this times wheezing a book of followers. And then going edited by applying, I thought taking much Well done with Mozart be by looks almost dry. So I'm not seguing much of the water exists. The kingdom fades end up lines. Okay, I have some The own, I'm trying to pick it up at this. Ok. So this is how we get the beautiful blend. If you want, you can again run of the dam for branch by removing all that excess water and just like that. So in short, the blend so that the zip and mouse dropping it over here. I don't want you to give out. If you want your students to help people learn a bit like this. Alloying though yellow color to calm down and on the other direction as well, yellowing though. Orange color to go to the other side and make a beautiful mix. Knob letters laid flat and read for it to completely dry. Cato, which we can go ahead and make a Monday lab Redondo of it. If you want, you can remove the masking tape, ones that describe, since the Mandela takes a rotation and everything for it to come perfect in all directions. They just meet. In the next class, we will construct a grid on top of it. Both the software grid as well as the rectangular grids to give the beauty to it. If you want, you can remove the masking tape and go ahead before doing the sublime rendered than liquids.
8. Project: Grid Construction: The paper is completely dry now, and in this class we will construct a grid upon this. For that I am using gambling mechanical pencil and my long scale. First we will go with identifying the center of the speech. Since I have tape the edges, the total length from here to here is showing 19.7. Though midpoint over it could be it doesn't 9, 4, 18, and 19. It is going to be 9.5. And after 9.5 we have seven MM. So it really did around 23. And in-between the RN for them. Mm-hm. It need not to be so precise and just go with a very rough center. And this time do it with a very light hand. I'm like you have done in the practice session. You might not see this with camera angle, but it is visible to my naked eye. And you can also see on your people and the listening we, I will be marking the others interests. If you want the stroke length to be precise, you can mark by measuring both the horizontal runs in the upper and the lower direction, like I have shown in the grid making session. We got our center point for the walks fees now. But what the next step we will be going to do is placing a protractor on the center point and marking 15 degrees in domain. So on the upper side it will be the 15, 30, 45, be 75, and 90 is already there. Here comes hungered and 51 doing D, 135, 150, 165. Even though this seam on the other side as well. Don't find next door slowly. Take your time. Make sure that you are doing light handy because we have already colored background and we don't want to erase too much and pick up the background. Now the goal, we have kept the dots. You'll again see the closer low, right. The next step I'm going to do is fixing my mechanical pencil daughter come bus. Now, if you want to go by taking listen deme does have a repaying. I will roughly take six, sending me dose on my scheme. So this is the six centimeter radius, which is the outers of confidence or foreign Mandela. And I am going to draw this with a lighter hand. If you are going to absorb, I am holding my compass on the dog. Don't worry, we will dark in this hour bus OCL with friendly TO. Now what I will do the immediate next step, these, I will draw these diagonal lines. Because if I draw this or P4's and then join the diagonal lines, my pencil marks maze much because of that reason I'm removing my pencil from the compass. And then going ahead by joining these lines, you can use short scale or flung Scale, whichever it is available with you. I will be using shot scale and make sure that your angular lines at the so-called point. Also make sure that they are light enough. Don't make it too dark. We need to address them if they are too dark. If your dorm one do I use them, you can keep it that way as well. Or what time the pencil marks where you get free day. So in the same way, I'm going to construct these on the other side as well. Confused, don't panic, do it slowly. And if you seasons, modules, dormitory but fluxes your way, you get even I'm getting a little smudge over here. That does. All right. Just being your scale completely and then go in here. Also, you can rotate your the ball if you're free, you are not comfortable walking that way. You can always rotate your people. Debating your papers. One of the best technique and we do that Apollo Figma Nala on all sides I enjoy achieve that symmetric meditative output. You will be seeing meet or they think that people why making dumb or nulla. Though folder lists. Now we have completed novel a circular grid. We have to make our rectangular or square grid as well. So for that case, I am likely it using the Spark door to the very light hand. Since my pencil marks of a real-life high good arrangement without picking up the background color. If you think you are picking up the background color or if you're not buying from the mouth, as I mentioned before. Go with the migrant after completing the Mandela, as these pens are water soluble or water proof. All right, now let us go ahead and make though rectangular grids. I am taking 0.5 centimeters, but till one centimeter. And I will be drawing on the other side as well to ensure that my lenses try it and not slanting. Now I'm rotating my paper, I'm comfortable can't draw vertical lines and horizontal lines. So that is the reason why I'm turning my free box. And make sure you do this with light hand as well. So they have a goal. But even though this A1 now, this height, first I'm going by mocking bind fives and do WE DO. Okay. And then going ahead by joining them, Northern Uganda and Guardia. Handed even if it does get things mod, don't worry. Maybe be covering them up with bad debts. So there we go. Now we will be marking time centimeter, sorry, 0.5 centimeters. O ij. To me, don't square grid. Now this is roughly around 13.5 centimeters, so we can easily divide them into 0.5 centimeters. Oh, I'm just marking the little dots. On both the sides. We will mount these dots and then join and make them great. Make sure that you are doing your good with the Madoff patients because this is what helps us in attaining a Bolshevik Mandela. And they may be repeating the same step on the other side as well. This takes a little time, but this is very key for some windbreak and a beautiful mandalas. You'll see how good in this donning beautifully already. And a bowl for grids means above equation nulla. The word at your own pace don't DOD. This isn't meditative process. And more slowly you do, the more you understand and the more you enjoy the process knob, I'm joining them like we did only do those portions. Make sure that you are joining both the points so that you won't get the slanting line and make sure you're doing it light handed me continue dong it. If you think there are some slanting lines, exit Ron Don boy, with the buttons, we will cover them up. By now. You must have understood why I'm making this squid gradation bar. It gives a nice border Dojo Mandela, and it gives them a nice effect. Our layer border and everything. You can see here it has Mazda, but don't worry, we will see after filling the patterns are first to look and see that enables modular remit fido ETS it the 12 RD much about this magenta detain, maybe refilling the factorials. What we have learned in our previous lessons. In the Python standards techniques lesson, we have learned some patterns the same backends are going to be incorporated into this Mandela. You can also come up that new patterns if you want to. This will take a little diamond, even the complete Mandela. So we'll be taking a little time. If you cannot follow through this, you can watch it completely and then rewatch it and do along with it. This is a real-time video. That is why it is so long and digging little time. I don't want to do a time-lapse because I want you all to know how much exactly the time it will consume in making this meditative process and how beautifully it will do an hour after completing it. Observed by now, I didn't remove the masking baby yet. I may be moving it at the end as element of suspense of the dean bottle. If you want, you can remove them asking Dave, once the paper is dry it and then walk on these. It is completely up to you. I like it this way. That is why I'm going into it in this manner. We are on to the last grave. If you're thinking that going five centimeters is a very lengthy process, you can reduce it to one centimeter. Arise when and try in your project. Now once we have completed the square root of boric, that is one element that is remaining in the brick construction. That is the circles, concentric circles. Now I'm placing my Columbus with my pencil, mechanical pencil. I'm now going ahead by taking five centimeter radius. So I will loosen it up, take the five centimeter radius, and then lock it up again. So this is the face and immediate radios and then I'm locking it that so that it belonged. Move. I am going ahead and doing this all day. You can rotate your paper as well. There we go. Some Hopfield, the cytosol pillars of but not equal. So what I will do is you can always correct these kinds of mistakes. So what I'm doing is I'm taking the six centimeter radius once again, maybe not from this Gail and from heel. And then locking it up and then running all over again. So that if there are any corrections, we can do it now itself. So see there is a little correction of what that is. All right, you can cover it up again with a double line and everything like I have mentioned in the Mandela patterns class. Now on behalf they can six and Demisto, fives and Demeter. And then now be, they be going with force and Demeter radius. So I'm again opening the log, taking four centimeters from the scheme. So this compass helps industry. So if we have a locking system, a predators and getting the exact radius. Now my land of both of these is not equal, so I am a buck making sure it does equivalent so that I will get a nice circle. Okay? Now I'm openings a loss and then picking the force and the meadows and then making it long. Going ahead or draw the force and deme dorsal fin. You'll get always or debut of paper like I'm doing. You can also see that my scale coming from this angle are the same and there's compete you. All right. Now, I'm going to be going ahead by taking threes and Demeter radius, opening the lock again as usual. And then going ahead to draw. But it'll be a drawing with me should be ready gave with it. So that this way I have corrected this mistake nominative. So then we will get to know and we are drawing the circles. But Ben, now even though two centimeter and one sending, we've done that, does it? You get older? So boy ahead with in-betweens ending we does. But for the false class, I wanted to be released on parole and wander took hours this week. For the smaller dimensions at this radium fought input or devo paper only then you will get the full pixels. There, the regal and the ones tend to me don't want, don't stress out too much if you're not getting this one thing they may do one, you can roughly draw 1.5 as rule. I am a bit extractive. So they'd be gone. We have completed our grief construction. Let us get into our next lesson where we start feeling this Mandela bit patterns.
9. Project: First layer patterns: As we have discussed in our Mandela patents and techniques listen, IVB using only these four fine liners that G is 0.1 thickness. Maybe be using this for drawing patterns. The database engines, 0.3 for drawing the motifs, 0.5 for drawing the so-called outer circles and everything and fulfilling as 0.8 also as a substitute of 0.5 if we require at times all of these penances side so plus re recall by making the outer circumference with our combusts. For that, I am taking my combos and fixing the 0.5 finally know, so this is 0.3, this is 0.5. I am fixing this fine liner. Do my Columbus. Make sure you have a compass of this kind. Will, you'll get depend also fixed like this. And I am tightening it up. Now as we already have a benzene, it's all good. I am just going ahead by that. I forgot to lose an eight and then this has been there. So make sure that the small things do not happen as we are dealing with plane now. Ideas and I'm locking it there. And now I am going to make the soften with Ben. I'm running on it or would do three times to get the colon, you can shift true 0.8 as well if you're not sure about the 0.5 mm thickness. So there we go. We have completed our outer circumference, decide if is a little lighter, maybe there is a more tolerant win-win. No worries. We can go on and slowly and then we can dive. So there we go. Now without any measurement, I am loosening though law. And inside offered the elliptical bit. I, to stoke it, it'll be around bind to MM maybe. And then I am logging it again and drawing another circle. So 0.22.3 and members should be disease. And then drawing another font is Hendrix also with. Remember, this software will be haven't drawn but PennSim, we are the repeat drawing with Spain. And you can see me rotating the people in which or what direction I want to get those local broker list. It does really important form under laws to reduce your people in this week's. Now, once this is done, we don't want any darker circles in between all of these. So we will be leaving mine do 33 circles in the CMB, however they are now. And then we will take some random, so maybe one, doom the third one and all the seam B. So this is a three centimeters one and I'm launching it. Now going ahead by drawing the circle B little gainfully feel fine liners not walking change your fine liner or a repeated 0s so that it works. So stewards with the light handed so that it works if we wanted to so much of stress on it in my workflow because we already have a watercolor background zone. This does not happen in case of normal people, since we have a waterfront about known down, this will happen sometimes will not flow. This happens only when we are drawing the sidechain of concentric circles. While trillion Biden's, it will be smooth enough for all of us to walk. So I have completed the three centimeter. So Bill, now, if you want the open draw, but it cannot double line for this. So I am just spreading my compass on birth. So by religion, not so much like this. This is because we want to add some high lives. That is the reason why we have begun it a little wider. This is like a round 0.1 lemon. You can just roughly they get without measuring and complete this awful. Who can hear some birds tripping your. So there we go. That does it for us. Okay. Now I'm removing my fine liner from the Columbus. As we discussed in the patents listener. And the inner circle will have a very thin lines. So for that case we will be going with 0.3 fine liner. So this is 0.3. I have to keep them in order. I think this is 0.8.1 me also that I was not confused every time. So this has 0.3. And then as we have learned, so phosphorus atom, we will be going from the sender and making them drop shapes. For that BBB, they can prove that it's a day diet. You can see here like this. Sure you closely. So a line like this and then two lines and making them drop shape. Let us now go ahead and complete this pattern for the entire muscle belly before jumping into the next part. Take your time like how I'm doing. I'm rotating my paper and making all of them the same direction, the DOM direction. So this technique of rotating paper really helps us in a dreaming such as the main tree. The reason by me do this because our hand will be habituated and nothing real direction for any kind of bulb AUG codon. For that reason, we keep rotating the paper and then doing it, even if it is a book, even if you're doing and a wonderful fellow journal, David and door knob that we have completed those and grill bon vivant, step ahead with the second pi. As we discussed in the buttons lesson does again by John is going to be the same of what we have discussed back before. Stepping into that, we will add a little addition of sulcus in between a small circle like this as an added beauty. And make sure that it does not crossing the existing so beloved fences. So that it looks as a constant Folks. Small circles just to complete one layer of your Mandela before jumping into the next layer. This way, beheaded preferred his door blue highlights with our white pen and fill in the gaps if there are any like here and there, there are small gaps like this. I'm going ahead and filling them with those seem fine. 90. So now we have completed the inner circle completely. Let us now go into the second button. We'll be building these 20 points and make good you. You're going to observe how I'm doing little slowly and studying. Make sure you also make it in this manner so that you will get the perfect look for that month. Patience is the key for a successful lard walk or a nice dark wall, border wall. You want it to be. Patients practice. These are very important to obtain Pulp Fiction. So these are the three P's from my side was zoomed equations plus Bs and then you will get profits in like this. So what does now we are going to draw some in not the dealings Also or double line for that I am using 0.1 final. I know we should patiently go again along this. So this is a little patience, this thing down. All of these, make sure you draw as precise as possible. Don't worry, for those not exactly the same on all the sides. Once we complete this, it will look really beautiful and very minute and rows will not be seen. So don't worry too mountain stress yourself out. Just enjoy the process and embrace their beauty of Mandela. If you wanted to skip the second line, you can skip bit about if you add it, it will look really beautiful. Now for this, it is going to be the simple lines like we have learned before. So I am drawing the same deadline, which is already with pencil on all the sides. Now let us go ahead and fill those leaps kind of structures. Here is a small player. What I may do is I free all the leaves from one site for us and then come to the other side. You can see here involve like this I will do for one side all along so that I get this handy. This patiently, don't worry at all. If you'll think background wash is difficult for you to know what the before, after completing the environment. Also, you can do it like I have shown in some of the lessons. In the behavior of the people, are selecting suitable people lesson, I'll be showing you that these are water-soluble by an enzyme hands, they won't spread. You can also go ahead and do the watercolor background after completing the entire Mandela. Or if you just want to retain with them under law, you can just do them under law itself. Now, since one side we have combi days. We have two options. One is we can shade this are beginning to the other side as well, even though we're shading so that it looks view different. So I am taking 0.8, finds a no for this case through filler area could be this is how our fine liners will hand. I am just gainfully use a link though in diarrhea following those guidelines. So that's it. Whichever I don't you all coming up with, make sure to draw the double line to enhance WD will understand why I am so much stressing on the double-blind. After completing the entire Mandela. I am distorting my people and doing the double line. Just keep on rotating your paper and do this shading or filling. This exercise is as equally important as we lift up our console here. If you see I feel that these leaves as occupied most species, it is just the feeling I am drawing a head with one more line and then baking a cookie. So that has a home. You can correct your mistakes. Asthma. At times, sometimes it does not possible and you have to change the entire pattern. So it doesn't bought in to get to know about the techniques rather than completing about is what I believe in. So there we go. We have competed one more layer and coming to the door bond. So this is going to be asked some Boulez what we have learned. So we will be going ahead thinking these two points and then making of your visa fees. This is called a leaf motifs, like we discussed. Now here it is again at this. So let me join. Before you'll see that it does not so much precise. So for that, what I will be doing mostly is I will draw one side. Go ahead, four to five motifs. I'll show you that now. Like this, what three motifs I have drawn rate. And now Bible done the beeper and Mike Armenian DRI and then draw the other side of it. One of the ECB way and you'll get a dime, the perfection. Now let me complete the entire virion, these models. Based on practice you will understand but just comfortable to you and which you want. Oh, boy, Henry. So it does mark like you have to know the CMB I'm doing if you are comfortable doing the complete more, therefore at one goal, that is completely okay and super. All right. Now this side it does have these complete the soft first and then do the other two of the sides. So it does completely up to you how view was through a stent on your paper. And do it as the double line is very much important time going to take the point 1 finally nerve and do the double lines and plotted on the line or this liable follow that same trip. As I am repeatedly mentioning dual, it was EPI in a calm mind. So here my fine liner is not well feel I have a rough paper. I will just draw some lines so that it will boil off. This happens when Neil walking with water Bella back down. At times, you'll find linen is completely good and it does not spoil. Don't worry about as wind, we didn't really mention that too big of hot pressed paper instead of a full breast because in cold pressed the daughter brain and it will be even more difficult for you to walk it on. If you are a beginner, that will be very difficult. If you're walking on a hot press paper. It does. Okay. Knob, I will do the other side as well. And the fielding your domestic fine liner is not working just to switch to another with the mass off your fine liner. And that should completely solve the purpose. And I can see this is not equal, so I'll just do this since we'll be filling the remaining part is completely okay to do it that way. So a lot of mistakes do happen for any level of artists to be a bigger now be the indole media and media explode for everyone mistakes happen. It does just really embodying that you'll know how those cover those mistakes are. Correct them and presented beautifully. So, but just really important aspect. So again, this is not working. I can test it on the spot study. This was a highly big Mindon background. Because taking little bit of time for me to complete this. Now what I do is since this is taking so much of time for me and it does get him bride. I will quickly pick up my point to find line so that I can complete the readings. You can go ahead but going to a point when the target is, DO I just don't I just 0.3 because we are working on details. Now. As we discussed in that our pattern, if there's going to be the line, He swore like this, the signs and joining them heal the flow. Right? We are going to do this all along and then fill it up. And from here, lot of feelings. Will it be done and done next lesson, once we compete all the Mandela in Dyamand DLA, just for the reference sake, I will see one and give birth so that we will not forget in the highlight session, do fill it out. So when leaflet this one, I will be filling it up and then keep this next lesson where we will fiddle leaves and add highlights with our YJ or events. So I could show you, but don't again in the data over here and I'm competed and smell are numbered and show you the pattern in detail again. So I am just drawing the line on soil on the side and joining them here. And then a flower with 520 slight. We have flat basing our session previous session. So we'll continue this pattern all along with a bunch of patients and everything. This has been yoga, same but all along. Sometimes like your CEO sends arrows mark falling exactly the way you walk them. That is okay again, Lidl with me, kill by add-ons like how I have done for the previous one as well. And then make sure that it does falling in place as a whole. The small arrows will not be seen. Like I'm saying, like we, they need. So two more or dream or more depth slab here DO which really fill this with just the line. Like we have learned. The difference between no more deaf sign for Lowes, right? So in that release this up when the lines, thus the lines. So there we go, even fill this in black in the later. Now I am picking my 0.3 fine liner. So I have so many in Hanoi I have to check which's going three. This is 0.359. And now with that, I'm going ahead to draw those lines like B have buskers, we will draw in a bit symmetrical manner. So for that, I will be joining this line first and then four to five lines on this side. So it has become five lines. Now we have to continue the same thing, all logo, four to five lines that has to go. Let us show you what the closing. So this is the same deadline and often this is fine. Lines 4 and 5, one spot bleeding one side. The women DO on bond. Those are you guys with that? So as I mentioned for me, this direction, the lines are more comfortable. That is the reason why I am Going a maid and going, this goes sort of lines. By turning the paper all around. This gives me pull fiction for a seismic and meekness. You can twist time build on your paper and when toward direction new theme park do is just turn. It still is a naming word that slipped out of my mouth. So there we go. We have competed one side often, not even go ahead and do the other side of a dance move, so forth that I'm keeping it in this direction so that I can go buidling beliefs in the anticlockwise. That's it. Now we pass to me again four to five lines. In the same way we are going to fill that in. On ADL. There are four more last week with the gums, bleed them and we'll do the next part. So they've evolved. I'm not doing this in time-lapse just because there will be some beginners who want to see it step-by-step and in a more general time and everything. So to make it in the original video and real-time video, I'm not doing these Biden's in the time-lapse. Hope you're enjoying this process and being ready, ingestive towards head.
10. Project: Second layer patterns: Now VDB going ahead and doing these three layers of Python's for that, maybe beekeeping abroad or Biden's like we have discuss, it will be a very broad Owens became continue at any of these two points. So I don't want the same symmetry over here. So I'm starting from this point and then making the scene and leaf motifs. And alternatively, I am making like you can see, I am making these using my 0.3 fine liner. This is the most stigmas. Fine liner. I use radio-frequency. And there are someone dialogues detailing Mandela's which I made using just this file handler at times. So I complete the other side as well. In this lesson, we are just being with the same water, Different witness maybe in my photo Skillshare lessons, I will be teaching different patterns, how to incorporate shading and everything. So speed beyond the door, my Skillshare classes sign DO follow me for more. We will now quickly draw the second layer of this has been using the same thickness fine line. No. You can clearly see and observe that I am very comfortable in rotating who might be burned and doing one side first and the other side makes sense why ISE, if you have arrived at a point where you can decide which just comfortable to you, it will be very helpful for future walk sign your own projects. I know Mandela's are a bit time consuming, but it does a very relaxing process and it doesn't meditative process. The amount doxy McCrea you attain off if I'm beating a Mandela and the joy that it gives you immense isn't deep. The material default to attain the same pattern, repeated pattern, and the same, similar kind of full fiction, a redial. Has, we have already discussed in the baton section for this, it is going to be again, a flower with the same ground like this. And then. No leaves on the other sites. I will show the Firestone clearly against just some gobies. Leave our flower or the rule you'll see, it's just reopening with the draws, the drop shapes. This is a key for Mandela's. Let us now go deep on beat every dorm rational, large nor done but patiently. Sometimes you only get the exact same file. That does. All right, when we shade everything in black, it will look beautiful. Shared everything. I mean, learning it up species. I have CALEA explain the negative rainbows are those pieces in my previous lessons, if you haven't checked them, they're highly recommend you to go back and see that lesson once again. Retries on Mandela, vital enzymes like me. We are on the last motif now. So there we go. And for this we have to fill in. So for now I'm using the point 3 MMO Leanne doing the full name. So that we'll remember that we have turnover. All right, now move on to the next layer, VR going with the same motor. This is going the big O1. If you have seen this video before, I dumping at the odd n and if you wanted them to reduce the width, mess all of this. So often you'll go ahead and meet dust appoint five or seven centimeter dose open and feel things. This is a very big goal motive for you. Do all five. I am continuing with the same zero-point VMM find. I know. Then BBB, going ahead and doing a double line for this as well. Also sometimes have for everybody. So thinking too low though, flattens completely. So at this time what I did was I will do the next layer as soon. And you wouldn't see how just that Biden's are the outlines with look so beautiful. Continuing on to the slides. Don't continue the same line like that. Sometimes it may not feel as also being and sometimes we may think of doing some other patterns. So I once our district will continue the same line from here or do other end that small little breaks and joining. So his ward that gives you peaks nor leave a feedback in the feedback section upon how you are liking this. So that it helps me to streamline my next project and come up with a beautiful concept. Do you? Now b will draw double line. Like you can go ahead by drawing it in any direction. So what I will do is I'll cover both of bees. Actually. You can do individual we want to do. If you are absorbed Lozi, I am running bulldog these double lines at once and making sure that it does not join me. Complete this for the end DYAMAND law before getting into the Germans inside these lofty cliffs. You can also see that eats and they rely on here is a book baby and she gave times. Now just completely all right, if you look at this end diode zombie thing, you cannot find those little, little mistakes at all. Vine, I'm going in and doing the other side of it. The only thing that the step of making one side at a time as helping you. It helps me a lot and this is wartime follow for more stroke my Mandela's even if for the circular Mandela or a monologue, just a bygones like how are your four b's? So whichever typo from the Law grid I am digging, I will try to follow this function so that it helps me do enjoy the meat mass. We are almost enough. The process is really important for us rather than down to concentrate on the process Sloan it so that you can come up with your new ideas on this concepts. So now that we have some rigor now 90 days, I will be going ahead and make stuff Adams inside this, like we have seen in the previous Patton's section. This one beyond willing to give, but a little bit simpler because it does all the visual heavy and this ADR solve event. Just be repeating this phantom again when we heal. So I am just on the McKinsey was already running my pen on those things align exist. And then making the motive saw these leaves but in the other direction because it is always a B drawn here. I just wanted to be fees the scene. So since at this other directions, I am just telling me might be both and I'm doing them. So there we go. On the other side, instead of completely filling it down, we really go in and with this motif in this video. So for lean back Viva, the door just wanted a friend's me even fit a full one. And then underneath it the Biden, and in the next lesson or even fill the entire ADR. And since this will be coordinated for your fill it up, what I will be going to do is drawing the line around it like this so that the button is visible. You can shift to any thickness, fine liner, fulfilling so far, suppose novel, I'm baking point 55 psi naught. We'll go ahead and find the needle. Does spike done all along the whole bath? Ready, come back and do this again. Since these are striped Lyons, it will be good enough for us to walk on in this manner. So always break your artwork into different sections. Like I'm doing it here now, soar, break it into different sections. Even a does a watercolor or wash whichever medium you're walking on. Make sure you break into different sections to really get to know how to break, where to break, where to straw to continue only if you have enough practice or dad will ban, you know, completely about what you're going to do. So this comes with apraxia. Hi, I'm just finishing all these lines before going ahead and drawing the whole or the client don't actually cause more deaths are accompanied him for the entire month. We're on to the last one. So there'll be gone how they buddy, go ahead and call the zip practice. So this is how I'm doing this. You can see it closely. And then we'll post on Bordeaux for us. Right? I know. You'll come up with your own design at this point if you don't want to do this or if you think the goal and everything is complicated, you can just fill up the area like we have done in one of the before motifs in the before Neil Simon. And skip this side are if you want to try a new pattern or anything, you can definitely go ahead and try new pattern instead of this one, you are free to choose. Our own style, your own, but don't just grab the techniques and put them in the practice. That does have I have learned from scratch and I hope everyone does this scene. Don't worry if your output is not so neat. I have done mandalas for your now. And not on like a full-time, doesn't Your then really I started doing mandalas from my colleagues, time mine from any order. I am doing it a 3D. So it takes time and patience to get the Beaufort. Don't worry about it. We have now completed this layer, now VR on to the last layer. Actually the last but one, this last layer is going to be the same lines which we have filled out. And this layer is again going to be a simple one. Don't stress out too much. I'm continuing the same point v final. I know he'll they built us to draw some shape like this roadshow, that gap because we need that breathing spaces for them underlies discussed before. And then going with OBS, the golf level like this. These make sure you have five characters rather than three because that enhances the Musee. And then drawing the center line with the same find 90. Then filling this up. So this filling body will duly HDR as the skills for each and every modus. Just that I want to show you have Though filled one looks like before getting into the next lesson. So I am doing a sample of all one. Even be doing what, 0.8, so that it will not take so much time fulfilling. Let me put a complete this pattern all along. Okay. Does not right thing. I will just do this. Okay. I know today that does funny things, but sometimes find lenders behave this mean. If you absorb, I am dotting this dog and that makes runs on bird in-between and the last one at the end. So that the gills that did this a Nixon look thin, beautiful loops. So make sure you also follow the scene. Plausibility all end in failings or filling a negative gaps. I prefer to do all of them at once. Because at times what happens is when I am feeling in-between, I lose that hand off making that particular pattern. That is the reason why I will keep all the black filling those areas to the end, like you would have seen now I have lost that, please. Again now because I have fun. Ok. So that that happens to me at times. Maybe it will happen to you all saw. Maybe after seeing all this triangle I'm going through by making Mandela. You will definitely go ahead and do them by growing leader. I feel that welcome video align both gills, molecules. Thus your age, whatever many books old or get the fine liner completely dried before stepping into your background coloring, you feel annoying it acts making them or neither? I nor does it. What does want the Min and max us know when we mental tools for that effect your drawings that such emo more depth left, Let's meet with legal and complete them. These lines in between is completely outdoor, your tires. Thus the five guns are solved big bad as y i now being good news the lines and between lunula, beautiful look. So now we have completed Naaman, not all dirt AVI and B does have left with these. This may well continue with the same lines that we are doing here. So let me complete them could be that the little wider. So this is how we will be knowing. It bends like around 11 lines that Doug, I'll name. This is going to realize till runtime big Requires off so many lines. And if you aren't audiogram brilliant up with some modified donors, worry if you will, staunch time-consuming for you. I thought of leaving the other side and we'll deal me like this so that it looks like a different Manza lot. So we believe the other side, I'm drawing the lines. If you have drawn on the board decides and abroad not doing like how I am doing normal leaders, even if you're wrong window size again, looking beautiful. And thus that I thought of bringing this way and this coin. So that is why I am just drawing on one side also if and then analyzing it. There we go. We have completed rules, tougher Biden's aspect. Join me in the next class. We are BBB doing the model, it IaaS, and the border of this Mandela before stepping into the highlight session.
11. Part 5 Border Patterns: In the previous part, we have completed doing the Mandela and we have filled some species which we will be filling for the entire Biden's in them liter glass. And in this class VBA me drawing some factory door, the socket, and complete these, I'm stepping into the next class. So I am going ahead and using the 0.3 fine line 10. So this is the point 3, 5, 90. Now let me go ahead and make some sulcus or where he all since that you can see your pencil line, your for your monologue or lighter pencil lines will be even make a socket just on top of this stuff changes in diarrhea. And this point, all the pencil points we even lead try and meet the sulfur. These are the highlights which Hegel bubble Mandela to look more beautiful and vibrant as a complete piece. Even though the restaurant, the areas with the black color so that it looks really beautiful. You can see me on standard lead or they'd been in each and every lesson. It does really important to a dangerous event. B often wonder aloud, Three more lifetime MOOC for more actually. So there we go now, but the ticker MM, fine line now we can go ahead and fill it out. So be a little bit extra info, lead the borders. So a lake that we will be filling in. I am just showing you a sample. So they're not even go ahead and make the buttons on the bottom. So it does going to be the same hydrogen on both the sides. Maybe be using four bullets into dying. And make these border of items in two ways, from the side to the side, from the side towards inside. So we even made from this side to what's inside. So for that we will be using the same zero-point three fine line. And for the force line, I wanted to be very SEM and your sheep one. And then we will go with the leaf motif on top of it. So for the Jushi by I'm just digging point 5s and the medulla each and drawing these U-shape more deaths. Just boy ahead and make this U-shape promote this check with the old twins consistency as Lynn CB have completed this role. So what does one even windowing is for this phantom? Even fill them alternatively like this. So we will fill though alternative models and leave the other ones like that without any filling that really give the beauty of the model. We have to repeat the same step other side, which I will not be showing who were live. We will complete one pattern. And then you come back by completing the other button for the next lesson before getting into the highlights, hope that should be all good for you all. Because I have shown this and dieting step-by-step sends a specific button on goddess site. I hope you will be able to do this by yourself, like we have done in one of our previous patterns by putting some surplus or where you are, we are going to do the same or will heal. To make it look more beautiful. Let us quickly go ahead and make this sulcus. Thanks to make sure that you're not crossing though, how does I'm going to line which is already existing? Looks maybe make on to knowing when the same leaf or BRFSS and the lintel middle roughened by now and where we need to be doing, Let's try to link your and then going ahead. Also we will not be making double lines for this one. You can see the difference of low double lines I'm gonna meet men that they use by comparing different sections of the same module. So there it goes via not going to do double line for this, I might quickly complete outer layer as well before going in willingness. I am doing the same or bears repeatedly just with varying sizes and shapes. The Scala leave more girlfriend, I am doing the same loop if we can see it right, if you want, you can even use this ADR. You can draw a line for the scale and see female try raising. Is it for this seem very dark. We will call me then continue with some other Biden over the years. Since we have very light handed lead down the pencil, ma, we can reuse them. You can see these lines are invisible and does not picking paint. So we will not do any walk on top of this. Now. We will be filling some backdoors. Sabi will be goiter and with our board all lines. So the sign will be made the lines on both sides, the leaf lines. I hope you all are enjoying this process of making lambda line and step-by-step manner. And we are making these. Now. Don't stress out too much. We just use really minimal by Josiah and we just receive it those five bones in different ways and forms. They are balsam along. You can come up with new patterns by dangle this glass and Buchanan got them in. Your project walks IN shared with me as well. We are almost about to complete the side and we have truly been the same stamp on the other side. I will not solve the stool free up dying diode area with the black on the left side of this motif, just because we have been feeding the soil. And so we will go ahead and fill this in the next class, soul if what happens, so use these both will look black. If your food is sand, it does not. So laws have the stability to make all the areas in Adobe. And I, we have seen your Vimeo, some breathing space for this, but I wanted to show some beautiful pattern which is my favorite. It's this we did discuss in the patterns sections. So this one is just rebuttal be making a line like this and a line from the top view and then continuing with the C minor. Disasters and velocity is legally be by medulla, your balance drawn to and then following the parallel lines. It may or may not be from the center of this line. So don't worry and go with this. How much precises I'm loci or getting to your rock. It would be great if you ban, join us the same door and make these points from the same doors so that it looks so nice. You're going to eat like this substance. So the view you can see how I have an indent this one. So normally the lines don't stress out too much, just go with the flow. You can see a clear difference between how a bajillion without double border and a Biden with double border. So he owe, you can see that distinction between each of these five domains which is missing at this point. And this is a model. I want to keep the border and this V, You can go ahead and draw the double line if you think this is good. Slide, if we copy the same patterns, not coffee actually, I'll redo the same patterns on this side as well and come back to the next class. In the next lesson, we will be filling all these gods, but the black one. So come back and join me my next class after completing those opium underline, the Biden strips on the both of the sides. We ready, go ahead and fill these ADRs and add some highlights with our twice Rousseau plan in our next lessons. Come and join me. This.
12. Project: Highlights: I have completed the other section as well, replicating a seem designed before going ahead by filling everything. If there are indifference and marks that you can see, you can erase them off with the help of neorealism. Nikon, I'm doing now just to run it very gently. If your pencil marks are light and then running there is religion key will ensure the removal of your pencil marks. You can see here all my pencil marks are born on the side. I'm going to repeat this upon the other side as well. So they're reborn here in between. I could find some lines like this. So even these I'm going to resolve before stepping onto the highways and even missing drill far since we have begin two-part to me the flower all in the same area. So I'm discreetly reusing all these. And I realize if you're picking the pigment color really tiny bit that does oaky. Make sure that the fine liner bar does not getting released too much. So that desert we will stop with that. I will just clean my please. Okay. And I'll even go ahead and fill all the negative spaces with the help of 0.8. Fine liner. I have my ground rules row with me, so sensible stopping in between I have kept both of them and the white Jelly Roll pen at the end. So I'm going ahead and filling all of and negative spaces for psi will be doing with the mortal. Hope you have enjoyed the look of our Mandela. So you can see it does not working at times. Do it extra copy for me because this is the last stairs. Don't lose your patients at all. If you feel stress, then give it a break in between. You may be gone back on the next day and then continue. You can also see that I am rotating my people even by filling this cologne. Don't stress yourself much. You can take any number of reads you want while you fund industry so that the ink flows would be and it will not stop because of the war developed background. So that striae, the fossa. It looks like you can see in the video now. Take your time and for learning diary, yeah. We have completed the outer portion now, let us go ahead and fill these anyons one by one. Take it slowly one at a time. And use this glow motions do for lift so that you are allowing the ink to flow nicely. Use this elliptical dynein. So below motions live, you're seeing your tiny so blow more shirts. Do I ensure that it is flowing all the time? Completed to all the flavours by taking your time. I will meet you back by computing all of these. I am on to the last slide of this row heroes. Next. I'm going with smaller circular motions to fill this out. Take your time and free for a refactor. Sense of this. Just the filling part I haven't shown for each and every motive. I have done in the same process for each and every factor. And you'll let us now go ahead and fully for the next layers, this one. So this seems so I'll blur motion side. I'm using up this one. If you are using on the door die for fine line Amores, which is having a wide parallel like this. There is one set of binary tree you will get to just kind of a Marco CD marker bind off when you can use that for freeing for records Bob Ross's I just boil Hayman new 0.8 fine liner, which is the maximum size. Ugly and mostly available in the market to do the spilling. It appears tiring job, but still the output and the happiness that Gilson completing such ambitious outdoor is what my dues. Just to enjoy the process of the shading NASW like I'm doing now. I enjoy a lot to do this shading. Sometimes there will be half then artworks at stylists give back to them just to sit and sheep. Auto starts to do a new drug or something like that. You might have observed that this now I have changed my frame because that does not working properly the previous one. So this scheme, one or two different sizes or friends with deal of 0.50 C. I'm checking the appends here again before going ahead and shading them. If you have a CD marker with you, we'll then go ahead with that as well, because most of the CD markers will be waterproof. Not sure whether you are paying me is waterproof or not. Don't apply the macron watercolor. Skip this step and learn the background obligation by its whole life as a separate topic. I will come back after completing all the same shading for the restaurant, five or six petals that are left it filling for all this layer of patterns. Now, even go ahead and do the same with the small motive, which we have to be careful at these points. And make sure you're not jumping on taking the line onto the so-called extra people. My doing this with a very slow Einsteinian. If you're not confident by doing this with 0.85, please. Story or 0.5 or 0.4 or three, whichever you have with you. That will really help. I'm just continuing with my 0.8 fine Leno. I just have formal motifs left since this is the smaller pattern and also the seeking less time for me to complete this and hence I and doing it, or real-time one is instead of going back down to eating them, then coming back again. One more moderate left. You can clearly see how it does donning viewed differently. And so NPP already. Now baby boy ahead and fill these tiny gaps on this one. Do it really carefully. If you're not confident enough, nice, rich too, or less salty place, fine line. With black beans. You will understand how boom, the small feelings with the, the goal fine liner as we'll be switching now to alternate find 90, 0.3, I have the gain and then filling these, because these over e tiny gaps does give me a minute. So you can switch to any other fine liner live. Now I have switched to my point 3, find 90 to do this quantity. Because it does really tiny. You can also draw a 0.5 as well. Let us completely up to you. If you have absorbed I accidentally about to see in this area this be careful and be in a calm state of mind while doing this Uganda accident days shade the other area and then you have to change the budget. And sometimes it turns out, though, Don't be dissolved and therefore does not coming this way. And if you accidentally colored some other area and your pattern looks don't be, don't get dissolved and at all that does harm that everyone learns. And when I have gone from day, just go again, gum up with a fresh mind on the other, the ending, again, practice. That does all what gives the best output. Don't, don't stress out too much. I am repeating this again and they gained on $2. Look forward for the seam out. Company did in your own R3. And if you are satisfied by limbered, if you're not satisfy the 2k and get back to the listening beam, watch it all over again and then start from the scratch. Now B has completed the shading part for the $1 and you're not touching anything more on this. But here there is a shading which is lift out the chat. We have to do alternative shielding which behalf started heal. So I quickly filling about not sure how this is going. To turn out too, because mind find lameness as stopping a bit higher, you get back to you after doing this shading on both the sides. Now the additional stuff which I'm talking about, these though, white highlights. So thus we are going to do on these whitespaces which we have left with the Gelly Roll pen. I'm just taking the Gelly Roll pen and putting white dots your, I'm filling this open spaces which we have left that this white Jelly Roll pen. You can clearly see how flowing consistently this Jelly Roll pen is in. It does but different from fine liner sign, it does mostly use to do our drugs on black people. It is mostly used to do our drugs on black people. I love to work with Julie doors and was really rolls, that was really important to have a side scribbling this RBs of paper because sometimes a trumps flowing and for dissidents DO bolded striped. Mostly not the fine liners, but for jelly rolls that was very important to avoid. And this angle while walking, you can see that I even like I'm walking with this angle on this. If you want to add some dots on the black strip, you can go ahead and add them as well, like dots like this. I don't want too much highlight, so I'm sticking to this. We have few more dots left here and I am going in and filling them. So recall we have filled this in dialogue with that. You can see how beautifully this is looking, how beautiful and God's years that is looking. If you want, you can add this highlights here as well, a little red. And I am just filling the small, small goals we have or what he does ride dabbing a little bit. There we go. It's completely up to you where all you want to add the highlights I am board this week as a final data, if you want, you can add these small circles with this one. This is the final and I don't want any editions are other than this. Once this is done on both sides, I will be going ahead and removing the masking the and have a look at our final project tab is, has done doubt, beautiful season when people leave and enjoy the field of completing an artwork. I'll do the other side as well. And I hope you all are enjoying the process. And if you want, you can add even more highlights, like I have mentioned, but I feel this is good enough. And sometimes all we're doing in the art world, there are charges of reeling gate, so I am not going in it and doing any extra paint. Let us now go ahead and remove the masking tape. A few HIV remove the masking them before it sells tab as well then good. Always remember to remove masking tape in an angle like this. How I'm doing the record, this is I will complete Mandela. You can use this in any of these two directions and even in this direction or does looking to see. I hope you have enjoyed the class.
13. Final Thoughts: This is what we have made as a final project. Thank you for joining me in this beautiful glass of water below Mandela's. You can reach out to me over Instagram or Facebook or YouTube, whichever is comfortable for you, I will be seen as Israeli underscore odd and Instagram. Hope you will enjoy this class and do it along with me. I would love to see all your creations in the project section to do upload edge towards the aegis at the stage of watercolor wash. And after completing Mandela or in-between, you feel comfortable. I will be very happy to go through all your projects and leave a feedback upon all of the world's. Do follow me for more such water Bellarmine, the lab rejects or any Mandela projects. You can also give me a feedback on how the class is organized in the feedback section. Also leave a comment on what you want to do as an experience year project from me. Thank you for joining me in this wonderful meditator Mandela class with a watercolor touch on it.
 Bala Eswari, Eswari Art