Transcripts
1. Welcome all: Welcome you all to this brand new and
amazing glass of fibers. So we'll be dealing
with projects with different techniques
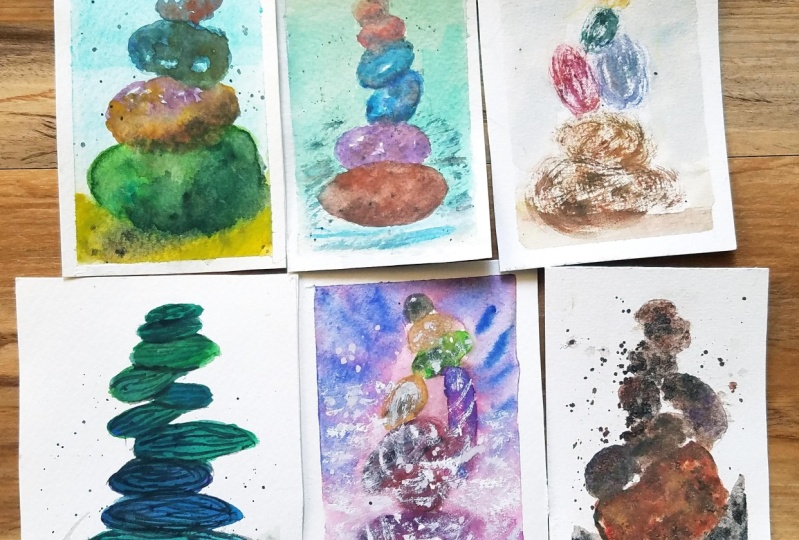
are something which are very soothing
to watch at the seashore. They are at the heart when you read the C and
the cost of this C, they are something which are beautiful texts can
be observed upon. You can also find along the streams and small
canals as well. It will be so soothing
and scenic to observe. Labels are the rocky kind
of pebbles laying it on the side that hits the
movement of the water. And amazing about this honed our splashes happening
at that moment when it hits. You can also see a lot of pebbles stacking
up on each other. I request you all do observe this photograph for a moment for the lights and shadows that we will be exploring
in our class. I hope this exercise
will help you so much. I am Alice really
and I am an ad, this ad indicated
on the PhD student. Currently I go by the Instagram
handle Adelaide insuree. In this class, I go through
all the techniques for you in detail while making
the project done by tedious. I don't require to
make these projects. It is completely beginner
friendly and I'll take you through very slowly
throughout the process. By explaining each and every
step of making of these, you'll be learning a bunch for new techniques for
sure in watercolors. Have to create different
textures in the background. How to create different
textures on the role of vitamin way to dry
brush techniques of pores, the radiations and
dry brush technique. How can you mix colors within
the dry brush technique as some kind of difference
flattering methods where we'll be exploring
have to go with the flow and hands are broad or the painting
that we're looking for. So I hope so far so good now how you all are with
me and I am sure that you all are excited to explore all the projects
with me in this class. I can't wait to welcome you all once again to this amazing, glad for this amazing
watercolor month of July. So I hope you all
join me and enjoy this world watercolor month and these beautiful paintings. Once again, I welcome you. On. Next section will
be on my deviance and then we'll be
diving into projects.
2. Material Final Upload: We really go through all
the materials that are required to paint
all these projects. So I will detail out all the materials in the dance so that you're not
understanding what all I mean. The paper I am using that Anastasia is 300 GSM
cold pressed paper. This is a handmade
paper and it has a very rough grainy structure, which helps me to
give that texture to the concept or the subject that we're looking
at in this class. So I have taken
this in A5 sizes. So this is the A4
size fats are made in file size sheets or you
don't require so many. Alright, next comes
the watercolors. I'll be using Netskope
electron sonics, this yellow-colored a box set a. So it has most of
the colors that I'm going to use for the project. And in addition to this, I have a few sheets that I
have collected for myself, which includes our
darker shade of blue and Payne's gray because pains phase nodded in this set to have a few basic shapes with me. So if you don't have to cheat, you can mix with my gosh
and meet those sheets. So I'm in detail on
all the colors for each of this section. Right? Now. As you might hear, is this side, we will use a solid and few of the projects and so
this keep it aside. It is just normal table salt to give out due to
predict stroke. Coming to the brushes. I will be mostly using my
silver black velvet brush. Flat and mom brush border
are waiting the background. So this lab brushes from
Princeton and business. So of size number 64, I have sized them with zeros. So the jelly beans,
if they acquire this, don't worry about the brands
and the brushes right now, just follow the technique that will give you the McDonald's. And they have a
plate on my site. So the ceramic plate and I have a separate section where I
can use my conscious require. I have another kind
of palette as well. So just rotate one
plate which is available at your
end and tissue role. So we've got having
these shoes go with it, otherwise, you can
use applaud as well. So it is up to you. But make sure you have some
immediately next to you. Scotch tape and the
glass important actually two glasses of water and
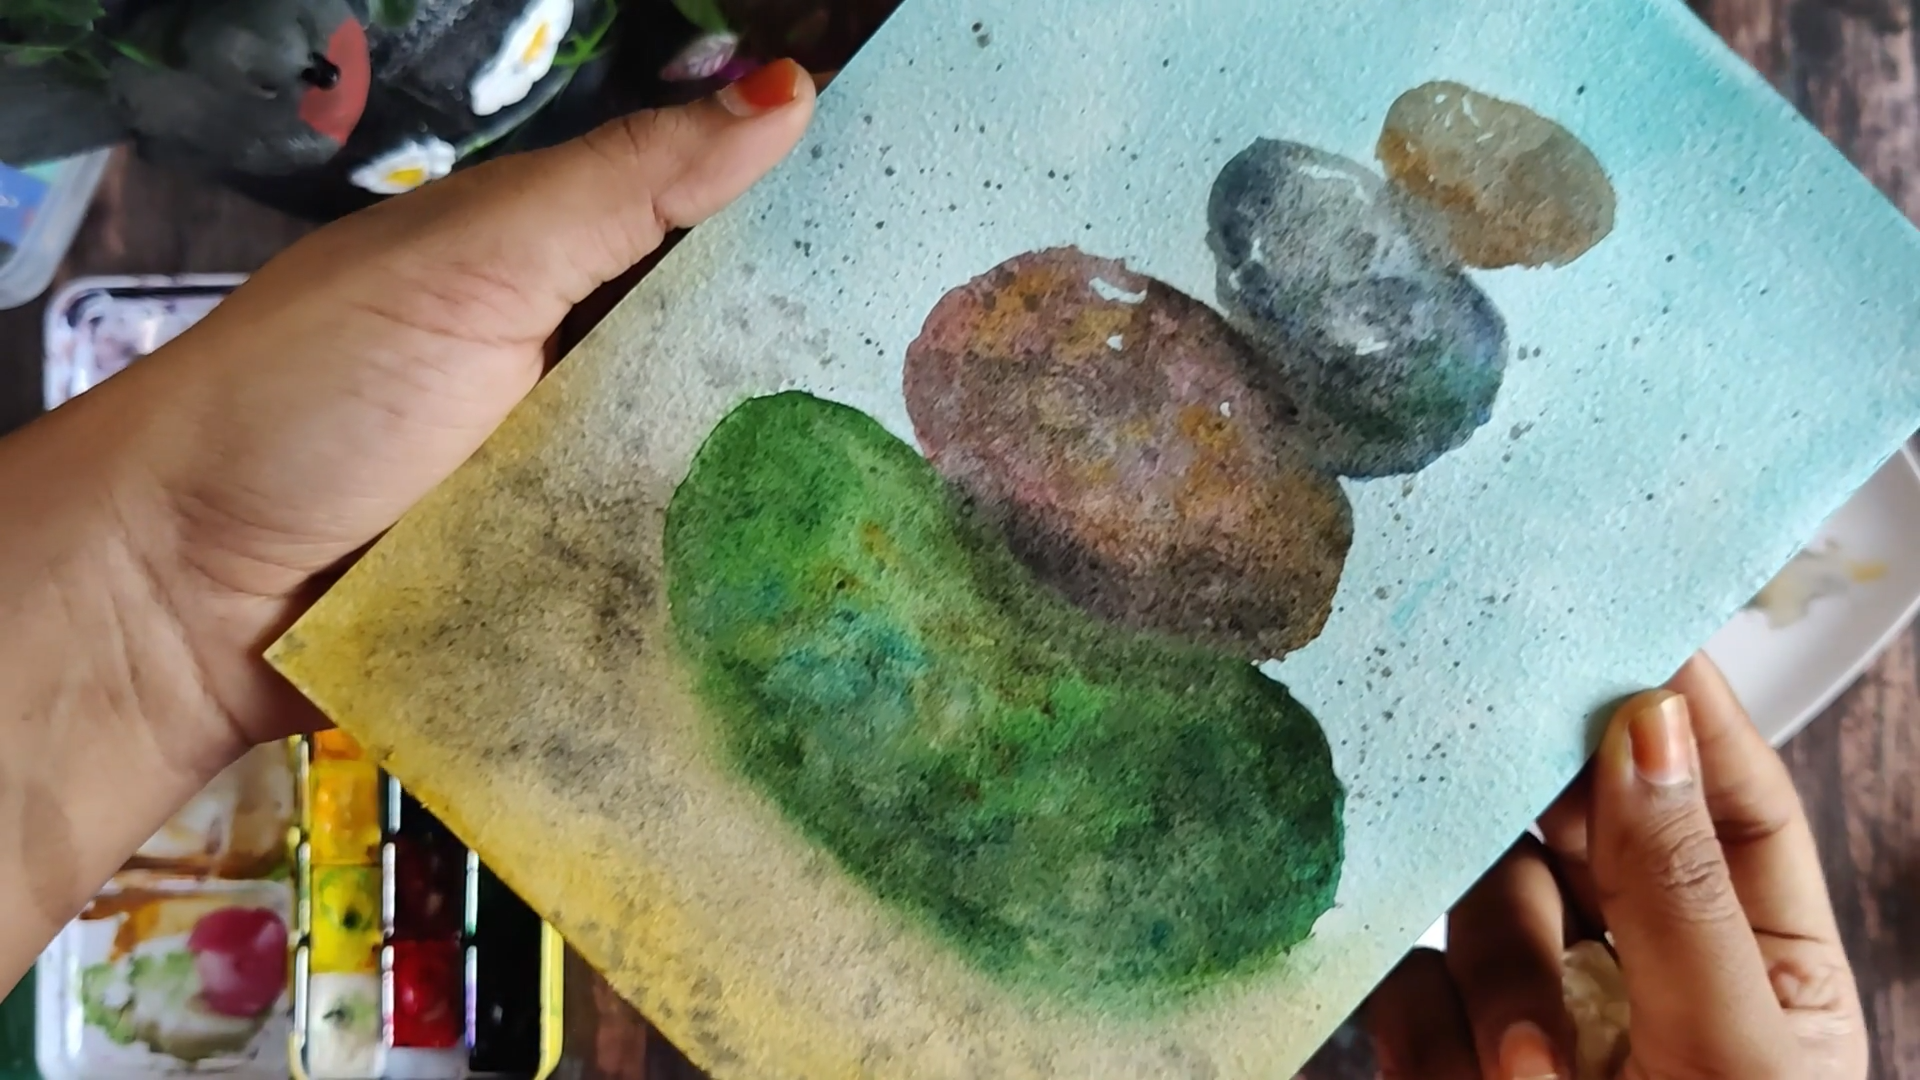
I require and that's it. This is a smaller sample project which I have experimented
before starting this class. And you can see how beautifully the texture and
everything is seen. So I'll see you in the projects.
3. Colour Splash: Hello everyone. Welcome to the D1. Though, I will
start with telling about the hallway down my paper. So I just don't make me better. And that would be taping down at for this for this project. So we are not having
side borders. So I'm using the entire paid. So in this way I will save down all my four sides and the same gender as
well. As you can see. Now I'll flip my paper bag. I stuck it to them. So you can use a cardboard
as well if you want. But this, we don't have any such exercises
where we need to alter the cardboard in direction and let the water flow so you can just go ahead and step
into your table. Alright. I'm just changing
my colors so that I can be prepared for the process and make
sure you have an eraser. And if answer now we'll go
ahead and start sketching. So you'll be making
three to four pebbles from bigger size
to smaller size. A very simple sketch. Just don't stress out yourself or you have to make it
exactly the same betas. Go ahead and make it the way you want it to
look like this door. Make sure that the
sizes are different. Sizes and shapes. You are
about to complete our sketch. It's almost done. So just
as a precautionary step, make sure you erase them
so that the grip fight on the pencil outline is not being spread when you're
applying water or water. So I made sure I do this step of erasing
and making them lighter. It will be visible to
your naked eye shot. And I can also see in
the spleen mass of now, we will go ahead and start
wetting the background. I'll just open the site
and keep on my side. I need to keep on reading. As you have seen.
Well, the colors were already mentioned
in the starting. Now, just go ahead and
read the paper thoroughly. Don't bother about the sketch. No need to leave any
space for the sketch. Just go ahead and wet the entire background
with the water. We will work out in layers. So don't worry on wetting your paper even on the sketch that we
have asked me, right? Make sure you're not
putting any blobs of water. Make sure it is evenly
spread and then shine. Hold on young people. And we are almost done with
repairing lot of papers. This comes as a part of
preparing our paper right now, but I will take a shade of blue, most preferably deep blue. So I am taking a bit of teal blue and already
the background is wet. I have taken a very
light shades so we can directly go ahead
and apply on it as well. But different strokes. So make sure you are starting
at the edges of your paper. What unbearable you
find those pebbles. Just make sure you just put a little lighter shade
on top of that pebble. Just pick up the color, applying with different
tones and then intensities. So if you're not a beginner, you might have already
been abroad in applying these ways
for the beginners, Just don't worry and
go with the flow just since the background
is already wet, then this drop in some
color in between and just with some part
of joint motions, you'll just have more
spread the color. Make sure you're
not spreading in that paper because we
need some ocher shade for the bottom part of our
seashore as well, right. Now let us take some
of those sheets so it can be whatever it is
available at the other end. You can just avoid ahead and apply it onto the bottom
part representing the sand in your PC to
ensure we have a sandy area, the water area, right. So to present that we are putting this yellow sheet and the bottom to the present in the sandbox or just use the same technique and
printed along with different tone values that it looks bright and
vibrant after drying. So one important thing
which everyone of you has to keep in mind is
that watercolors dry, lighter shade, that whatever you are putting on the people. So keeping that in mind, you have to make sure that
the tone or the color, intensity, that doable
thing is Vinci. Now just go ahead
and drop some water. Using your brush as I'm doing, this really gives some
beautiful background effect. So this is some new pink that you are learning
in this class, as the name says. So this project colorful splash. So we're slashing
some water on top of this background off sky, sea lion and the short. Just go ahead and continue
with this process. This renewal fee, like
stopping this topic and this is how it looks. Once it is completely dry. You can see those blooms and textures that has formed
in the background, which will give a
very beautiful look to our final outcome. And still I'm arranging
my palette once again so that it is
convenient for me to mix up. Go ahead with the feathers. So if you arrange the draw
before you can connect it, like how I'm doing it right now. So as I said, in the materials, so I'm
going to use mop brush. Size number two from
the straw because it's convenient and easy for me to spread for a larger portion. And I am mixing two colors, which are sap green and green deep from White
Nights on a sheet. So to get a beautiful shade of green and I'm
diluting it with water because I need the
transparency add values to be captured
while painting this drops. So just go ahead and
mix on your palette. You can see how much diluted
consistency I have taken. And since we're painting
on top of this guy, does dawn border if your sky has made it into the
pebbles, just go ahead. And now in this painting we are taking light as falling from the left hand side or right
side area of alveoli. Little darker. So far that I'm adding a little
bit darker tone, which is a deep green,
showing variations. And now and just
start dabbing in pure darker green sheets are a few areas to
depict the texture. So this process is continuous
throughout the project. We will do layers upon layers and use various techniques
to depict that texture. So desktop does the process, even if it is not coming
exactly the same way, this being just don't give up, as I always say, just don't give up and thus
the process and complete it. And definitely the output
is pointing to the new. So now I'm taking a little
but all burnt umber to give a darker
tones here and there. And again, using the
dabbing technique, I'm just dropping in few
colors here and there, which will be blown by itself and Palmer
different texture. So one beautiful thing about watercolors is you cannot
do picked out with, and everyone's output
can only be exact. So now we will not paint the immediate one because
the beads will happen. So we will above one. So which is the third one? So this is one more
basic step that will follow
throughout the class. So far this IMRT
give a little bit off wireless sheet of
inches violet light. Going ahead. You can drop into violet light inside this as well to give
it some texture and depth. And you can play
with the colors. Sky is the limit of course, and if you want, you can
add some yellows as well. It's completely up
to you how you want to look your project to be. Here, I'm taking
in depth on blue. So you can take any data that
is available at your lens and the boy handle for this. So go ahead and take
enough quantity with a diluted version
on your palette. And we can actually
make some color as well to get some body shape
instead of blue. So you can go ahead and mix some burnt sienna to get
some different shape. And I'm putting down diluted shade or what
did just make sure on the left side of the
pebble it should lie to somebody and say, you're going to add
some darker shades like once you know what
Dumbo paint the walls. Black, initiate
through, intensify the depth of the
particular pebble you up being displayed. Play with the diluted versions
and the intense version. Just play with the colors. If you're wonderful.
Show bond CNum1, just put burnt sienna more
if you want to show no more blue more on top
of this wet on wet. So this is how we explore the subject and the subject
is very fun and colorful. Actually. I took some reddish
shade and I have applied on top of it
when I proton shape. League rows actually
just still play with the colors whichever way you want to pick
up and just mean. So. Now we have completed
two pebbles and it's time to
paint the code one, so the bottom part
is lethal, diluted, all dried already
so we can work. I want to add a little
bit of teal on to this first pebble
that we have painted. So I'm just going
ahead and adding a few diluted versions of
the to get the texture. As I said, top portion is already dried so
I'm not touching that part and I'm working towards the bottom
portion on me. You can go ahead and add a
bit of opcode or yellows, but just be careful
while adding yellows, make sure your brushes
completely picking them. So this gives a bit of vibrancy to the rock that
we are painting. Alright, desktop. But at the time you can see how beautifully the
balloons are happening with the T yellows and greens. So that is exactly
how you will have V1. Now what I'm doing is I'm giving a lethal effect at this age, like the water is just touching that pebble with a damp brush. I'm just running it or worsens, the bottom part is already wet. You can see how
nicely the bloom has happened at a subtle
bloom has happened. And then add a bit of
a harder just fonts. So you just have them using a walker or
using the desktop. So just go ahead
and do this step. But this is a beautiful
effect that we can create with dust and water. Contact of water. Of course, veins are there as a medium because otherwise
it won't do that. Also there I am, but I'd be sure
that you can notice the balloons that are
happening at all these places. Now by pink RV cannot
ship above board. The second one, I will be taking a bit of
blue shade again, which is also blue. And just before going
to the second one, just add some texture
to the second, the third variable, which is the second one that
we have painted. So compared to the green one, it looks extra less
so I have taken blue. You can use ultramarine
blue as well. And stroke has been just to do some dabbing technique to
provide some external to that. Oh, here comes the fun part. So I am just taking all
the water and making the brush and making some
extent with the brush. So this is some kind of a
fun, again, omega1 texture. So as I mentioned in the start, making textures and different differently
throughout the class. So we have done with water
splattering, dabbing, and now this is a little
bit of lifting technique. You can see just playing with the brush and just lifting
up a few places if you want, you can just lift up some
color with your brush as well. If you want to make some extra. It's completely about
your perception and how we want it to be. Right now, we're finally
on to the second one. So on the fourth one is
again a little smaller ones. So now we will take
the second one. I am taking the madder lake
red does so it is a shade of red and violet make soy if they're not having this
color, you can mix it. But if you have
any shade of pink, dark pink, you can
go ahead, dilute it. So we are following the
same steps throughout. Just a light color and
the first pen on top of darker tones to
get tonal values. Capturing shadows,
capturing the effect of light, orange to it. Give some differentiate. And then the left side, I am applying that again, leaving some gaps as possible. And on towards the right side, we'll apply one and then
add on top of an inch. Just don't hesitate to pick
up the color again and again. You can see I'm picking up
very light color and then walking and walking on it
again and again and again. So this is all, you will
understand. Your subject. Subject, both in watercolors is all about working on layers. So once you put the background
color, you'll understand, okay, you're the right
side and the shadow. So I have to put
this mixture, okay, so the site, it has
to be light here. I can put more texture. So that is how you will walk. So I'm adding a little bit
of yellow deep holes on this vibrant color so that it forms a nice
opposite shade and right, because on green also we
have a little bit of yellow, so it will look good way
once you've seen all true. So this is also important. You have to imagine yourself. Look all through how
my output may be. Basic idea or not. You can visualize
them that painting, of course, because
watermelons, when it's born, just enjoy the process and it will definitely
come up with a beautiful. They keep on adjusting so that the left part
looks lighter. Come back to those right back. Alright, now is the
time I think we have to move on to a bovine. So the color I'll be
choosing is orange. So I have taken a bit of
orange and I'm diluting it. You can take a
complementary colors. Maybe any blue,
ultramarine, blue as well. Make some different
shade out of it instead of using such vibrant
orange on the top. Especially because if you see that we have used
a bit of muddy, muddy sheets for all things. So it wouldn't be for border
in terms of composition if you use very bright
orange on the top, you have to also see that already this painting floors or experiences a lot
of colors already. So putting such a
bright color on the top doesn't
give so much loops. So that's where I have called
diluted orange and blue. More of oranges visible because the intermediate
store this already. So this is how I've worked on my color compositions and I. This explanation helped you
all and working on yours as I'm playing in the same way, using the colors that are
left on the palette of Payne's gray or
burnt umber you can use for shadows will
not write what sites. That's an important thing. Don't forget to add
the texture on the two that we have
painted right now, like how we have done
for the two before. Alright, Now there is
one more thing pending, which is adding the shadows. You can see that there are shadows on the rightward
side that is dark, but still we need to
have more shadows to the pixel libel
switch towards my silver black velvet
size number six or four brush and I'm
taking ivory black, all the darker shades. So I'm this mixing whatever
is there on the palette, I will take Payne's gray
and the darker shades. Want sienna, burnt umber. Maybe you can take
the lake red, violet. So based on whichever
variable you are painting, you know the base color of that. So maybe for the second one, the base color is mostly
madder lake or violet. So I'll mix that with the blacks and try to get a darker shade off it and apply it on the right word bottom side where the families
are touching the other, but you just didn't need
not apply it very vibrant. You can just run your
brush very shallowly on the grenade part of it so that the texture
beneath it is visible. I've been showing you exactly
how to do that, though. I just tried to
make some colors. As you can see, bleeding,
muddy, muddy colors. I'm just dropping
in some places, making sure it is at
the age of the bottom. And you can see how
beautifully this turning out. So just don't apply
it and the edge just dropping in view
any loss and Debussy, in some areas it
was not working. That you can walk
in that way how I'm working for the green one, just spread it out with
your tip of the brush. Don't just put the complete
bulge area of the brush and just paint that will make you lose that texture that we have painted underneath. So we don't want that, right. I hope this is clear the spot and you will
maintain all you'll keep this in mind while painting
other classes or other papers in
this class itself. Also, we need to add some
shadow towards the bottom and the entire shadow
of the ROC area towards the left side,
the bottom area. So just go ahead and
continue with the flow of adding shadows and make
sure that no dark, sorry, no harsh edges forming. As you can see, I am making them like boobies that alleges that
each and every step. So this is the shadow part
of the entire Bible slow, so you can just add a diluted version if you
feel it is very darker, you can just start dabbling
with your tissue or spread along the area so that it turns out to
be a proper shadows, very subtle one and make
sure that no harsh, it just our fault. It is very, very important. So does continue walking on it unless and until you are
satisfied that the spark, this will take at least
two to three minutes sometimes to get it correct. So just don't worry and
boy head but no flow. And I am doing a little bit splattered on the sand bar and we are almost coming to
an end of this project. So on the sand also, if you splatter little bit, entire sand does
not yellow, right? You can see some
black particles. So that's where I did
a very small splatter. And I'm adding all the shadows. So wherever the pebbles would, the pebbles are touching and
those pods, you will have. The shadows. So he are mostly
designed with the black and the one down
but a little bit so that it is not so everyday, but the shadows there. So we have omega. And make sure you're not
touching the left side buds on the levels where the
light is falling because it's very
important to capture. This also applies to get the painting output
as very beautiful one. I'm going with the
final layer of shadows in this bottom area, so it will be a
little bit darker, but once it is dry and
it will turn out good, Just don't worry and just dab your brush if you
feel you are applying more water or more color because these are
already dried and B can't afford putting
more water on this part, I just wouldn't form
and it won't look good. So make sure you are not using very diluted paint if you
observe in the stabbing, I have put a lot of water, but these areas I'm
putting a lot of color, a lot of water, but still it, it is depicting the
shadows, right? So once the paper is
about to dry and all, you should not put
more water on it. It will spoil the
entire painting output that we're looking for. If you want, you can add some textures in
the last minute, so it's completely up to you. Play with your painting. It looks almost
complete, but still, if you want to add
something in view areas, just go ahead and do it
without any hesitation. Like as you can see, I thought of adding even
more darker shadows. I feel fine. So I just went ahead
and added them. So we need splattering. What can we see in sort of
defect that seem deeply need some splatters in
the background notes. So just go ahead with whatever
paint on your palette, you can just go ahead and paint many light
and mild spatters. We don't want them to be
very open this flatter on the rocks also just don't bother about the
subject on purpose. You can just
splattered all along, but very mild
splatters and diluted. So let us do a beautiful look. Alright, this is almost done. We can now know how much I was plotting we
want to do first. And I am abroad not stopping myself in splattering
and it's high time I should stop and just dab at some areas like that
to depict the stand, but it's completely fine. So we'll wait for this
to completely dry and have a final look before
winding up this class. So this is how it
looks once it is completely dried and it has turned out good fully with
a lot of extra us you can see from all the four rocks and you can depict
the light as well. And I hope you
enjoyed throughout this process of
painting by bells. So this is our first
class project of colorful splash or
colors Flash movie, and I'll see you in
the second project. I hope you all enjoy this Watercolor Month
with the scenes.
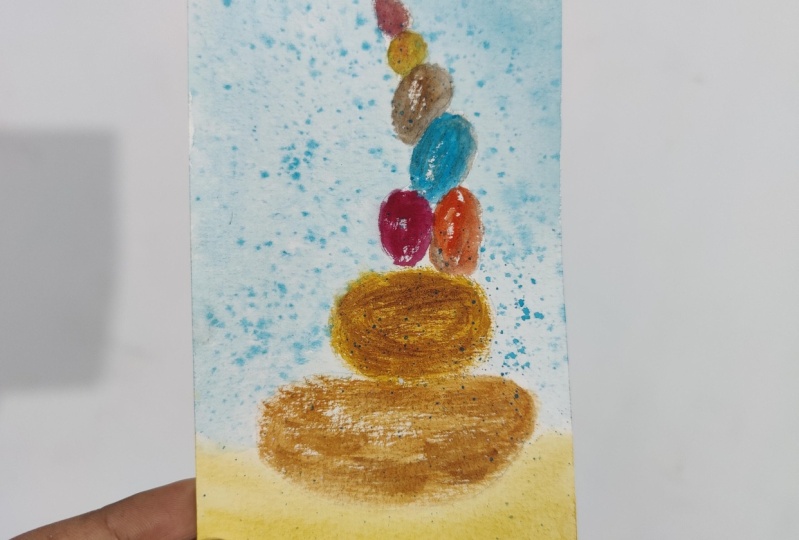
4. Pastel Drama: Welcome to the second project, and today we'll be using Garvey style sheets to make
a beautiful peppers so far. So we'll go ahead
and sketch them out. So starting with the
bottom of the guests, and you can completely value all shapes and sizes and
you'll see your tires. So this boy, hey, then bring some
drama in your bevel. So as you can see in
some places you can see this kind of standing out. So they might not be
a complete balanced, but still they will balance out. So we are trying some sort of that end of pebbles
today's project. So I have drawn these small pebble outlines and we are done with
our rough sketch. Just go ahead and is
easily on top of it because we don't want
the graphite to blend in with water and create different
sheets on other people. So this is a very important step and you should go through, but outset, I think they will be adding
some light shades and light will be falling, so we'll go through
it in the process. So I'll take you
through slowly with all the colors you must have seen already in the standing. Now just go ahead and video backgrounds thoroughly
parallelly means varied how religions don't miss it out at any point of reading your paper. Spend enough, amount of time to wet your paper
because it is very much important to ensure that your payment stays long until unless you complete
your bending. So sometimes what happens? You want to go another Leo and still the background
is the trade off. So then you are
unable to make it, hey, make sure there's
enough water on your paper. Otherwise, you will have to go via the weighting technique and the upper challenging
to beginners. So sometimes you
may end up going in your Roebuck so better
just beforehand, but tell people how to live so that it will stay wet
for a longer duration. All right, I'm almost done with the background and now we'll go ahead and take
the color and put it in the backbone so the Skype, but I am taking a mint shade. If you're not having the sheet, you can just know boy hand by mixing green
with white gouache. And you will get this shape. Don't worry for
the exact sheets. And as this project sees, it is mostly based on colors. So if you're not having babies still follows
with you just go ahead and mix those colors
using white gouache as the colors are already mentioned in the
introduction part. Before coming into the project, you can just mix them
in Hebrew so that you can find along with them. So I am using different tones and intensities and just playing with the sky, just go with your
infusion and let the colors do its
magic is required. You can go on a
second layer also, and then we will go
ahead with other colors. Just apply this mint color
thoroughly in all the places. So leaving the pebbles file. If you are feeling tricky
to use the same brush, touch kind of ages, you can switch
your brush as well and go ahead and
doing this process. Does don't worry in
changing the philosophy and using different types of brushes than what I am using. You'll just have to explore that technique in your own way. So just hang on to
their technique. You can go with any color, any brush that you are going
to use and doesn't go. Right. And I think
I'm almost done with this shade and we'll add
a few well-known to Palo. So because it looks very
same throughout for me. So I'm just blending it view AT. Since this is not so
much transferring color, this project will look a little bright compared
to other projects. So keep that in mind. And just to wash
off all the paint from your brush before
picking up the next color. And the color I'm
picking up here is a beak so you can mix it
with yellow and white. Gosh, I'm just
putting that span. The motor realism attached
to the background. So we have not yet been
started doing the pebbles. So for any subject that
a little bit background, really ground or foreground or the result
horror is in lines. So these are few things
you have to capture some picture that you
are referring to. The next color I'm taking
his celestial blue. So this, you can mix it
with cobalt blue and white, gosh, the lightest blue
maybe you can say so. I'm just putting view
waves and blending at the bottom pebble age or to form a natural shadow
by itself after drying. So coming back to what I'm saying about the horizon lines. So when I'm drawing
the blue part, it is a kind of
horizon line for us. And above that is our
sky area below that is. See you on the sandy part
that we are looking at. So these are few things
that they'll help you look at broad subjects
in different ways. And I just change the brush and the time to blend
it all in so that there are no very
hard it just alright, so remember these thumb rules
and it will help you lay down and Maine do
yourself from a subject. And yoga is one more beautiful
deep actually in this, I have actually is
For surrounding area. I can say. So. I'm just giving it that
before using hairdryer vibe, it was sometimes more water
is made on the surroundings. Even though while
using hair red, it will blow up
onto the painting. There are cases
that I have faced, the white that I'm
just cleaning up with a very thin layer of tissue which is absorbing all of this. And now we will set
it for completely dry and then come back
to paint the petals. All right, this is how the dried version looks and
it is completely dried. And you can see that
I'm using extrude on the sky and on the
seashore as well. Now, once you're done
painting the pebbles and the first color that I'm
picking up as a mother when she does so you
can make any kind of darkest shades of maroon
or brown with whitewash. And you will get this
shape so you can make so number one, number two actually enforced I applied a very light shade
over here on top of it. I will go with a very
intense or Leo's. Just keep in mind the light and shadow effect that we have
talked in the first class. It is very elaborated and try to apply them in
all the projects. Since, Hey, students sheets. So we don't need to go
so many layers because it will dry dark anyway
compared to other projects. So just a boy, Hey, with one layer, good enough amount of layer if you want to add the layers, don't worry and don't
hesitate at all. Just go on and you can see
how much darker I'm adding. I'm just playing with the fellows and allowing
them to blend by themselves. Just, I request you
to concentrate on the brush movements so that you will get the hang of
them with what movement, what kind of texture
will be the output? That is the biggest
takeaway I'm dropping here and there are a
few water droplets because that is the horizon. And I want to show like the
water is hitting that area. So that's where it
gets dropped into water drops so that
it will blend bytes. And the second color
I took it as a shade of violet and mixed
with the wife gosh, so very little amount
of violet and more amount of white because you
have to put to me the shape. If you have this
sheet available, just go ahead and use it. Black darkness storms on this
left butt and I'm diluting this metal sheets that
I have used for the before Babylon just start
trying to put the darpa doors. So in our first project we have used are different,
different shades. Darker shade, so for black
as well as the one Dumbo. But in this project we are
going to mix and match the colors above and below
pebble and make those shadows. And if required at the end, you can have a catch-all brown, which is a maroon in this case, to enhance the shadow effect. So since you have
understood this process, now, we will go on repeating the same for all there
before bubbles. So just pick
different colors and I am picking us and
let's do blue here now. So I'm just still
building up that color, leaving some gaps and few
areas so that it does not looking very full
because we need some gaps. And you can bring variation
using different colors also, if you want to use the multiple colors in the same family, you can just go ahead
and do that. We asked. If you observe for the rest of that is happening with the
celestial blue and relax. That's okay, Let it be, we can figure it out
with the shadows and I feel the maroon one
is becoming lighter. So I will add a few more drove color or pigment to it so that it gives the output of what
I am sorry, designing for. Alright, and even
a beautifully lag, so then the edges
properly blended into it. So you have got the
hang of it, right? So that is a bead that is
happening so too strong but with very less amount of
water and more of color, I'm just collecting your autos. You can wait for some time
and then collect it all. It's completely up to
you and how you operate, but as behaving
at that moment of your painting and
on top of the cell, I am applying a bit of
luck because the pebble below that is having
a base coat of Leila. The bleed, we will cover up
the bleed in some time of deciliter when they lack the board that was
adapting for sure. So these are some, I can
see my way of working out the mistakes or maybe you will learn it
eventually by yourself. And the next color I'm using as a royal blue shade so the
doctors to blue and mix. So for my gosh, it is a very lightest shade now, I'll pick up a
little darkness to turn off it end
up life directly. So does, don't worry if you are, painting is not done in a
very exactly the role of this class is to
make you understand how to approach these scandals
subjects without fear. And you should be in
a position to paint your own subjects
in the near future. But the help of this class, if it is not turning out exactly the same
way, don't worry, you will be understanding the technique and
you will be able to master it for sure by the
end of all these projects. Alright, so I am
correcting the edge of celestial blue
and black pepper, which is the second
third Butler. Then you can just
go on working on it until unless
you are satisfied. The third, fourth, and
looking very same for me. So I have taken a bunch of
scores and applying on it. So this coral shade is again
a mix of red and white gosh. So it's a kind of pinkish. And I'm applying the same onto the pop bubble of what we
have applied for that, as I mentioned in the study, we are using the same colors that are maintained in all of these six variables so that
it gives a beautiful mix. It's chores as well as
composition aspect. Alright, now, above that, I go with B to gain, which is the lightest
shade than on top of that also it will be does
seem sheets so you can blend and make sure that
the texture is visible. So if, for instance, I am thinking that the beach and Kotler looking same
for me before drying. So if that is the case, you can put more beach
on the second one or more on the second one or any other darkest shades so
that it turns out to be a different and the
drama of light and shadow is being observed
and then died from. So that is how you have to work out by working with watercolors because it is a
very unpredictable and explore and each
book has different. That is why they always
say that bump that you're making out of calling these is your own
artwork and we are here, I'm here to guide you. So I was doing corrections are running each of these again and again now to establish show it just that I'm
looking for and I'm playing with different
colors that are left out on my palette as Alberto for blues are bit of blue mix
with page rubrics with the yellow border lot Beach. I'm just playing with these blue sheets and giving
it a proper definition. All right, and this
looks almost done, but there are a few elements that are still
needs to be added. Those that needs to be added. And there is a water bath
that needs to be added. And we'll be playing with some few drivers techniques also as a warm up for
our next project. So we'll go ahead and
enhance the shadows part. So I'm adding the brown sheets
made it wasn't required. And for other areas
of these pebbles also with the pebbles or touching
or on the other side, so the light is not falling. So all these areas you have
to keep in your mind and make sure you add darker sheets. So if you look at all
these six variables, which is the darker, it
is the middle, right? So you have to put metal
in all of these so that it enhances and
gives the painting, you just have painted all
the pebbles and you are feeling that realism
is not coming. Model does not looking natural. This is where domestic. Alright, so any time you paint later and you
feel something is missing, this might be your mistake. Before you have attempted
the subject and you think it is not coming
how you have expected. This is just a way
of hand and it just seemed go up all these shadows and I hope you were
able to follow. And we're almost done
mirroring the completion part, the dust up into diverse techniques and plateaus and then wipe it
up. What this plot. But some celestial blue and what we're left on the ballot,
little darker shades. I'm just adding some
dry brush technique so they've got the water has hit this blue someday
my goal and when then there is a backdrop, not some time ago,
just a few seconds. And then there is the
bedroom drama that is happening where
there'll be a link. So we can see some
splatters up tall because it just that moment
this is captured. And also you can put a
pendulum from brown shades and more of blue,
Monday's blue shade. So the big thing that the
water and the moving water actually mostly make sure that these are
diverse techniques. So if you don't know how
to use this technique, it's just a you have to make sure that your
brushes very bad. Audits remove excess water using a tissue and then use the
color and just run over it. If you're using
hot pressed paper, this technique might
be better to keep. But if you're using
cold press paper, this technique is very
powerful to depict your extras on the paper because the texture of
the cold pressed paper, I lost you for this
beautiful x just to pop up. So we are almost done with the BBS bond order and
the drivers techniques. Five, with multiple colors, I have just to run
my brush across. So I hope well, it is easy to follow as well. Alright. I'm adding more water into it so that it
is convenient for me to splatter
because the love I have worked on drivers take me, just go on and splatter in
some areas and as I said it just to keep my bills make
sure near the pebbles also, there is some kind of good
amount of force flattering. All right. Let's continue on
the landless Josiah. Just don't worry about the
Harvard is going to turn out because I understand
me but I should randomly on top of prevalence
also can give some fixed. Also one more interesting
and additional part that you can do from this is using
differentiates or splatter, of course, and then
putting some drama in which we be doing. Now. So just putting your brush in different
directions this time the limited Genki
do this step if you feel when you are painting, just give this fight
but very gently, you can see very less
colors there on my brush. And I'm just doing
some random strokes so that some movement
is a captured, that it is helping
us to capture that. It just hit the water,
just lashing out. And in that moment we
are actually alright. And this is how it
has turned out. It needs a little bit, but most of it is dried. So this is how it looks
once it is completely done. And I hope you followed
through tail here and enjoy. And I am waiting to see
you all in tomatoes. Robbed of its width, just logically, seawall
in the project. Thank you.
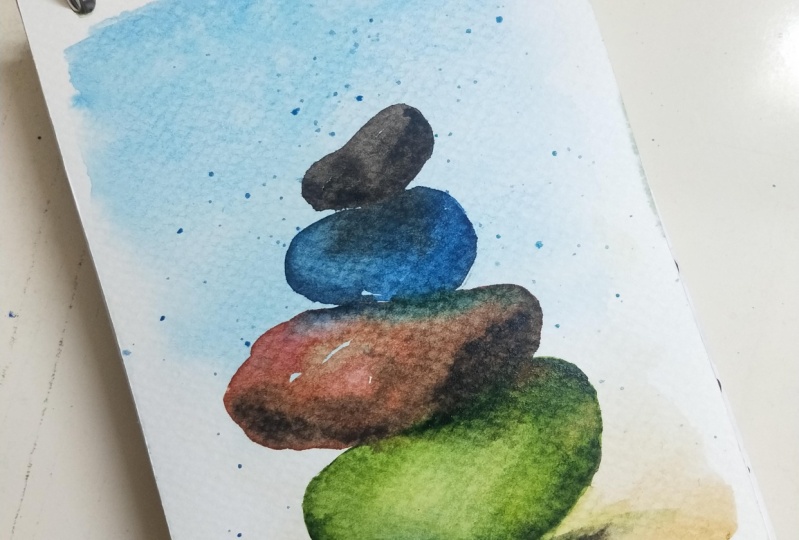
5. Dry Brush: Hello everyone and welcome
to our date the project. And today we will be using
a dry brush technique and even does go ahead
and start sketching. So as the thumb rule, bigger rock at the bottom
and as you bought the top, you would make the
box smaller, right? So we will tweak the
subject a little bit in this one and go ahead. But some drama in
the back I can see. Alright, so I'll be keep on
collecting and sketching out. The Bible says, so
just go ahead and do make sure that
it looks natural. So if you observe
or the one that I have drawn prior to this, it has the curve
is not a profit. It's lawn looking natural. So I'm just going ahead and correcting Even at this point, I'm just going ahead and connecting so that
it looks natural that one pebble is based
on the other variable. So it looks like the
balances maintain that simple step that it is important to capture while you are doing the
sketching for Pebbles. Right? So just go ahead and complete the diode sketching of these variables and healthy
putting a tiny pebble on the right and the
sketch is done. We'll just put another laser
on top of it because we don't want to get it to spread Oliver while
we're painting. So just gently than you already. And it is a little bit so that it will be perfect for painting. Alright, let's go ahead
and read the background. Oh, please don't do this because this is dry
brush technique. So we're not going to
wet the background in this step and suddenly a
little water falling down. So not doing that and we're
not reading the vagal tone. I'm just taking the colors and going ahead with
the tribalistic. Before that, we'll just go and spread the bottom
area of the Bible. So I have taken
yellow ocher a little bit and very diluted version, if you can see, it is my
golden ocher actually. So you can take any kind of
ocher and walk out with it. And so just go ahead and
split it at the bottom of your variables so that the base of the
shoreline is swapped. I'm just taking a very
diluted version of one CNS with landa just walking on it to give summed
up good at doing so. Just go ahead and work on it. So this particular bubbles is going to be mostly,
are different, different sheets with diverse
techniques or really make the bottom area mostly of
this brownish and all. Alright? Make sure hard edges
are not formed and make sure that background, foreground and background line, horizon line is made. Alright. You can also walk with one CNS. So just go to three different
shades and meet this bot. And I'm putting a little
bit of black balls. So with mixed with one CNR. And just going ahead during
the dry brush technique. So this is one of the
very amazing technique of your textures first and going with the lightest
shade on top of it, I'll go with a darker shade. Make sure your
brushes not having more water because this is a dry brush
technique and for that, we need as much less water
as possible to your brush. If you are not getting
this technique, just a practice it on a
piece of paper beside you before going on to
the actual project. Okay? So if you don't want
that technique, what you can do is
take a tissue paper and dip your brush
into the water, drainage to the
brain all the water. If you attach the tissue
paper with your brush, all the water will be
absorbed by the district. Then you take the
faint and that is how your brushes little dam and you will get
them tribalistic. You can check out my
previous classes to clearly understand
what is the technique, because I have discussed
in my previous class. Alright, so I am
doing or different, different angles of
this dry brush so that it forms an
amazing fixed jaw. And even in the background
I am giving a little bit of extra so that water
reflection is seen. Alright, and I am taking yellow ocher directly
for the second pebble. When going ahead with
the dry brush technique. So as I mentioned just now, this is how I make my water released from my
brush and absorb the patient. Or should I just
go ahead and undo your painting with
a different shade? So based on the colors
that I have mentioned earlier in this lesson, I am taking a little
bit of burnt sienna, yellow ocher for the second. It kind of felt like a bit of yellow ocher can be put on the bottom pebble as well. So just go ahead and mix and
match these three shades. And if you're using burnt umber, use it with a very diluted
consistency very often. So you can see there are some strokes which are
not actually dry brush, but a mix of dry brush and normal strokes is what
we're looking for. And if you can see the paper is not as compared to our
previous projects. So the water constancy is not so huge as compared to
our previous projects. As you can see, I am taking out water every time when Eve, I feel that it is important
and this required. So that is how
citizens by mistake, I am figuring a lot of
water to mix in my palette. So I have absorbed all the
water using this show and I'm applying here and a
bit of lamp black to give or darker
stone to the bottom. Right. This. So go ahead and I'm taking a little bit of
ultramarine light and playing for the beautiful effect of shadows that really
get after drying. In the darkest portion, you have to go ahead
and apply some colors, maybe blue or green. So that's some kind
of uniqueness and drama is being captured
in your painting. Alright, and the
next shade I'm going the madder lake red with the diluted consistency
and going ahead. So as you can see, now, I have got a very normal stroke
which is not a dry brush. So I've removed water and
with a very thin strokes. As you can see, the movement of my hand, very gentle strokes. I will be painting
this so very gently, as you can see right now, very gently like sketching with very light hand like that. I'm painting this bubble. So that is how we have
to control water content on your brush and
master this technique. So go ahead and paint. As you can see him
trying to control the water on my
brush or the shoe. On other hand, I am always removing excess
water and trying to paint whatever is required on the painting
that we are doing. So at tomatoes, I am dropping
the bad cholesterol. So when, once I ensure that
my brushes completely dry, so this is how you
have to change your brush on the
paper while working with this kind of techniques
because sometimes it fires. So yeah, I imagine quinacridone. And I couldn't shade actually
madder lake shade on top of this second level also to
give some drama like how we have done an audit
project to send matching the sheets of eyeball
envelope pebbles and getting some shadow
and mixed views. And for the next one I am taking a blue ultramarine light. So if you have
alternating colors with a very diluted consistency, you can go ahead and I have little bit yellow
ocher on the ballot, so I have mixed it that say it's become a little bit
different shape. Nevertheless, we can go
ahead and make it as ultramarine sheets that only the diverse technique
and if you want, you can add a little
bit of turquoise color, greenish, blue orders
to give some Gamma. Right? So just go ahead and
these are small pebbles. So it is very
important for you to walk on this wall
that was very good, especially in the
dry brush technique. Or if you wish to
switch your brush size, just go ahead and switch the brush size to
get the puppets. Alright, so I'm correcting
that a little bit. And then we will move ahead to the next term. Here. I have taken yellow shade of yellow light and I'm
going ahead as you can see, I felt water is very high, so I'm removing
all legs as water. Just taking a bit
of tad bit of paint and just going ahead with
my dry brush technique. So this is the very
important that you'll be learning in
this particular class. We're removing the
excess amount of water at each and every
step to attain a forfeit. Dr. Rusty, I am putting a little bit of yellow on
top of all the pebbles also which I feel it is required and the which I feel it
will give a beautiful logo. And we have a one
more small pebble before which I'm mixing
a little bit of red. The whatever that
on the palette. A little bit of blue actually. And they're still going ahead
with that small bevels. So very, very
carefully you have to do this above pebbles because these are very tiny and it
will occupy your brush size. That's right. So we're almost done, but without the sky, it is not looking
complete, right? So we will go ahead and learn
that technique Iceland, once we're satisfied
with this look. So I'm just taking
another shade of yellow and putting
for some highlights and for some kind of for Dhamma as they always mentioned
in this particular class. That is very important because with that
effect of the light, the shapes and the colors of the rock also will be changing. It will look beautiful
in the morning. It we looked at lemonade. Lot of variations we will see when particularly
dry brush rocks. So it is like very different
kinds of rocks that we are, peppers, chili that
we are painting. So the shades with the angle of viewing reflecting
color change, right? So that's really
important to add colors with the dry brush itself so that we will
get that background. One more tiny bubble is there. So what we will do for that, so I have taken a
little bit of green and at the very edge of my brush, I am just trying
to fill it up with some sport of white gap. Okay. This be very careful
while painting this one. I'm telling this
repeatedly because there are chances that you may
put the complete color. Use a different size
of rash if you're not comfortable using
the same brush. Alright, so now we will
do the sky background. So I will just go ahead and but the entire background
area with water. So you have to do wetting this background very
carefully because we have already painted the pebbles in other projects till now, we have not done this step, so we should be very
careful at the edges. So with little bit
of a headache, this boy hid and but the
background completely don't at all hurry while
wetting your background, you can see how slowly and with full bus I am working on
this wetting the background, but because we have already painted the pebbles
and we cannot afford water to seep into them and turn it into
normal strokes, right? We have learned dry brush
strokes and we have a potent effort to painted to give some beautiful loop, right? So with that, you
cannot mess it up. So just very carefully with
a very attentive mind, just go ahead and wet
background thick enough time. Don't rush in waiting
the background. It is very, very,
very important step. Right time they can
go shade of blue, so you can take any
shade of your desktop, go ahead and do the
background very light shade. So as you can see
him this printing, since the background is wet, I'm just spreading it up quality with and any shade
of blue would do. This boy had Skype. Mostly. You can paint everything,
what if you wanted to? But Cloud ethics,
you can just dab your brush here and there
to get that Cloud ethics. As you can see initially, I'm just going ahead with very lighter tone
because this gives me an idea of which of that I have to put more
pain. If you absorb. Most of the watercolor
artists go with a very lighter layer first
and upon that, we will layer. So this is one important step that I have learned
or what practice. So just go with a lighter tone, then you will understand, okay, which area you have more colors, which area you
have to work less. And I'm doing a little
bit of splatter, boohoo, some drama and I'll be
merging it again to make a sky so you can skip this step if you feel it is
difficult for you, but you can give it a try. Nevertheless, even
some splatters on the stone doesn't matter, I mean, on the pebbles. So I am just splattering
for high satisfaction and IB or merging few of them
to get some sky effect. So I'm just dabbing
and modern view of the dots to get some sky effect. As you can see, my brush, I'm holding very loose and letting the
watercolors do its job. So that is how confident you
will achieve after attending this class for sure by their discuss the
techniques and all. We are done with the sky. We'll wait for it
to dry and see. This is how it has turned
out once it has completely dried before or it was
very white background. And now we have the tad bit of blue which has given some kind of depth to the picture or the painting that we are doing. So this is how beautiful that extra dry brush
has turned out. I am loving this texture
and this is one of my, definitely my favorite projects. And that green on
top of yellow it is. But you'd think, and I hope you all enjoyed
painting this along with me and I'll see you all in next day project which we'll be discussing the technique
of painting this purpose. You will in the next project in Canada than happy creating.
6. Zen Pebbles: Hello everyone and
welcome to the before starting
with us pitching. So this is going to
make inventor birth. So I'll be trying to elongate
it and do like chimps. So we'd definitely
going to be a fun, it is a very simple sketch. This out yourself. Oh, make the sketch
more beautiful. And the building code would
fly up this building. But very, very few
fibers to people. So that you know, that
dependence is may have been seen in almost my sketches done, maybe one more week
on the top one. And that's it. If you compare this sketch
with the previous projects, you can see that the paper
sheets and defending this one, and I went in
collecting fuel sheets to get that more than
feeding into it. All right. I think I'm
satisfied with my sketch. I'm just sit on it
and on top of it. So then the graphite on the
top layer of the paper is good so that it will be
easy for us to paint. Anyways, we're not going
to render the background for this particular project. We are just going to paint
the petals one-by-one. So we're not waiting
for the background. I'm just cleaning
my brush to take off any excess paint that is leftover from my
previous paintings. And I taking or
decoy Shiva dissolve greenish blue shape
and just apply a light color and
the bottom panel. So I didn't leave wind up in densities and the
colors upon each other. This is the first rebel. I just try to make it lighter. Once I start walking
on the other fibers, I put some more darker
shades to the downwind. So we'd be walking. If you are going
through the project and the painting
at your own style, at your own pace, then this will be
very helpful to get a what color I'm doing. But this class will
help you know how to walk bodily with two people on how to
mix different colors, like how we have done
in previous projects. As I am just taking some darker intensities and lighter density is just
applying it on it. Don't worry about this. We be doing it at the end, just supply the Carlos. And I took a little bit of ultramarine blue
and just dab there. And now we can move
to the second pebble. Lot of wet on wet and not
much of water I'm using here. You can just go in
the sequence of the pebbles rather than
going alternative, right? So I have just the
ultramarine light shade and it paid off sheet
and just going ahead and completing this feminine sides and stored a little
darker consistency and just applying from one site. So this you can eventually end and now
you're on the before, so you are valid with
how you have to show that contrast and the higher
and lower intensities at work on it now, beeping oh, while it's beep. So don't worry if you're
not having the exact shape, you can just use any kind of violet that is
available with you. And on top of this, I'm going with this Jordan, it look carefully even if it is seeping at the point
where it does joining, it's okay because we
will be adding shadows with black and that part
will be taken here. Don't worry. And as you can see, high this till around my
brush onto the bottom bubble. So this is how I'd been textures and different sheets on different sides of
the constraints. So that gives some Non cheater feeling instead of just painting some
of blank rack rate. So that is what we are exploring this class
and I hope this is helpful to everyone.
For beginners. Does don't worry at all. Just let the
watercolor do the job, just enjoy the
process and learn. I sincerely request you
all to what we will want. It is you're not satisfied once because if you're
a complete beginner, you might not get
the same output, but you can practice another time and
definitely will get it. So I just added two strokes
and now I am just taking green and adding it to whatever
they're on my palette. It's a kind of for
forest green shade. And you can just apply it or you can just meet
some of those sheets also, I just took over eat and
drink, light violet. And it is almost coming
as a greenish shade. So very, very niche side, it's a kind of greenish Ocean
Navy shaders like that, but upon that vivo layers with black and other
colors so that our output sheet that's born
walking on it, pebble vitamins. I just took again, why let deep and going
on to it and I sell a little bit darker consistency. So I'm just dabbing my brush and removing all the x's color. Okay. I'll just correct
the ship little bit. I think these small
errors can be rectified. So we have to learn how
to work on these old without getting upset
with the entire painting. And I think I covered most
of the deaths in Dixon, my class, how to
overcome such things. I request you to go through my Christmas
celebration class. I have thought about how have you been worked with the sizing of people as well. So that would be helpful
because I have got a lot of messages that they are experiencing sizing
issues with paper, so you can still walk on
them for your practice. Instead of just
knowing them and time, they give a little
bit of clean sheets. So before I have used a deep bring this a
little bit off or a spleen actually are mostly
towards the olives sheet. If you don't have the same
exact thing, as you can see, I'm mixing 34 colors in one pebble so it
doesn't really matter. That's all If you're not
having the exact same, I just want you all to learn the technique and
implemented in your own way. You can totally differentiate the shapes of all
the pebbles old. So I have color green
and blue palette. You can follow the red
and yellow palindromes. I'm randomly experimenting
with different shades. I'm just putting a
bit of blues and violets on top of
grains as well so that all the pebbles look on the same
sheet and harmonious. And of course on top of
this we're going with a black lines and it
is going to kill him. Shades lighter for sure because we are doing
wet on wet now. After drying it will
definitely become lighter. So keeping this in mind, you have to put them on the
screen that was required on your knowledge,
sap green itself. So the lightest shade
of green and mix it with whatever
is on the ballot. If you're not having all
these things on your palette, just add a bit of violet
to the sampling and get some of those Mondays shaped rewards while
it didn't make sense, then just go ahead. So don't worry if
you're not getting the exact sheets and repeating
this again and again, don't panic and go
with the smoke. Now I got a little darker. The bottom one looks
a little bit pale, so I have just a few points because my bottom
petal is still wet. If you're bought up by bellies, are not stay red even then, no problem, you can just
go ahead on top of it. Nothing is going to happen. But without my
wife for me, haha, they just you can
just run your brush, a damp brush towards the
edges so that holiday or not. I'm just picking three shades by diluting it and mix it with
someone and painting though. So I thought I have
loaded on my brush and I use it then and still using
the same color immediately. They get more of a green and a little bit trying
to differentiate. The sheets are among
those top pads, if you observe from bottom
we have bluish and then little bit towards all kind of a schematic flow
we have followed. So that it looks good when
we look at the window. And then mostly using lighter
green sheets on the top. So I'm using only sap green
mixing water whereas been palette and also trying to
apply it directly as soon. Alright, we're almost done with the first layer
of the painting, and now you can add
a darker values. Here. We're not adding with black. We're not adding with black because we will use
it for shadows. That's where I'm
using up my slope for violet and running
it will work on all my pebbles that give a nice tinge of
violet to all of them. And just as I said, How did this on there? So you have to blend it out as M moving for the second
and the third. Right. I hope you understood
the process till now and just mix and match few bylaws and you're walking
until you're satisfied. So if you take this as well
fit for you in, stop, right? It's been going on with
the layers that I'm going. I'm also adding a
little bit of black. The bottom radius because
I felt it was very, very transparent
cover, maybe because of the pigments that are
there in those colors. So I just added a very thin, very light black because the doctor drumbeat
we added earlier. And now I am just
going ahead and adding the shadows file that Beta-1
little pebbles are catching, you just have to put a
bit of darker shade. So this is a lamp,
lamp, black sheets. So you can use
Payne's gray as very end now with a very **** brush, I'm just going in living it. So this is the same
technique that we have followed in all
the three projects. And I think by now you
would have mastered it. So this is the basic thing that you have to
follow for pebbles. You can just extend it
also from the joining. But make sure that the lighter
like how I'm trying to think if the left edge and just leave it that way so
that it looks very natural. Now, we will do some background
in the bottom little bit. For this one we're not doing site will be more
of a neutral gray. So I'm just taking a job for
black-owned veggie light. It doesn't seem
like some colors, they're just run your brush along in dividend as required, we will add a second layer while adding details on the babies. In this one, we're not
doing Skype or purposefully because it is also blue and
the composition or so work. So maybe it is a
very sunny sky where though colors of the rock are being seen in
the bluish tones. And I'm just trying to make the backgrounds
are filled by doing a bit of blending with my brush and softening the edges
so that it won't look up. And we're almost done here. And we have to wait
for this to dry before adding VPNs
to one, right? So we will wait for this to dry. I'm using a hairdryer and
if you have one new node, so go ahead and set
color for governance. So this is how it is looking once it is completely
dried and you can see how light the
sheets and become an amusing size limit z will silver black velvet round brush. Right? Now, we have gladly deal. So whichever the smallest
brush that you have with you, you can go ahead and slip if you have a liner brush
or wrinkled brush, just go ahead and I'm just making some lines on top of these members to make
it as us and vegans. So this isn't a real time
process and this is also enjoying well moment
where you will get lot of deals onto your Bibles. Go ahead with a little
bit of patience and a bit of outline also for the pebble is required
and very smooth lines. So make sure you are making very thin lines so
that it gives some UP. So just add different colors. So sorry, not the colors, different consistencies
of the pain so that it looks
even more naturally. So just continue going forward are all
dependents and then now we will be or winding up this project once that fight. So the things that
you have to add. So while watching the class or learning such techniques as the How's my hand is when and where I'm
touching the brush. So these are some
important things that you have to lose so that it is water and that effect
is seen very natural. So you can see as the holding of very loosely and
just avoiding it. Initially, maybe the brush might go out of the pebble
also, but it's okay. It's okay. It is a process of learning
for this boy, Hey, than pain does not stop
because of very small. As you always see it in your watercolor painting
is your community. To help you all just embrace
the process of these that you need not to be exact
at knowing why coming down. So since the pebbles that are bottom are very close to us, so we need more support. Curvy lines instead of a
straight line, curvy lines. And from the bottom 3D, they make even more of them. This is something that
gives a depth and perspective what the subject is. Alright? Make sure you are
making some nice, So you're still probably lines. So even though it breaks
also in-between, it's fine. So just make sure you're
making nice for that. But the role and it is giving the 3D dimension
of the painting. So that's what it is important. The aspects of the detail. Here's the color combinations
of those shadows. All these play a
very important role in giving dimension
and perspective. I'm not talking about. But if you see, okay, this is a rock and this is in the front and this isn't a bag. So that is what is being depicted if you
add such fields of shadows and any minute details of this curvy lines on the top. So this brings a lot
of snow paintings. I'm almost done, these lions and it looks really
amazing how it was done. So since it is very
dull, the bottom bar, I am just adding a very light shade of
lamp black and just smudging it out so that
it is very soft and a bit of shadow off the
pebble is the water as such. Alright? So just make sure you're
softening the edges. When you're doing this step. You don't want very abrupt. It just now, my favorite part of
splattering is left, has small splattering
it bold want to do it. Don't do it. But I lost flattering
personally, and I also often make
my table dirty because it sounds tidy for every person. So this is maybe my signatures title of
tweets that I mean, not all, but wherever
it is possible, I'll make the baton violet also because that team
is dead and they started painting of
this set of parameters. So flattered little bit band. You have almost done
with this project and you have to wait
for it to break. Of course, because this
part is a little wet. I'm adding and I'm doing with the more
brush a little bit. You don't adventure all these
things because there is one project dedicated where we are going to interact more. Alright. We will see
the dried was shin. So this is how we're going
to look once it is bright. Let me just remove
that deep so that if at least grade so you can see those nice texture
that has water on the paper because of those
lines that we have added. So this is how the xin
by belly looks and it has the colors have
not very briefly. And I hope you really
enjoyed this project. There'll be days
and the shadows. I'm loving this one. It's like a meditation, as the name says, then pebbles and I'll see
you in the next project.
7. White Gouache: Hello everyone, Welcome
to the D365, DVB, or single technique using white gouache to
give that gushing, water splashing on and some
different kinds of flavors asked to dbVar stopped By the sketch tab and
click the bottom. It says, we are not
having much sure. Nine as such, what this one main thing
that out in the process. So I'm just going ahead
with the sketching in the same format or the bigger
pebbles at the bottom. And by going up, it uses its size. And in this one, we are going to experiment or
different harmonious desktop follow to
this sketch and make the necessary corrections as well at the end of your sketch, it is very important
to turn your sketch perfect because for this pebble, we need sketch a little perfect so that we know
the outline of our fibers. Right? And I'll be adding
one vertically standing now. So I'm just figuring out
which extends three. So now second, by both the
V and this is almost done. Our sketch bar. This
look pretty funny. I just go to the sheep
so that it doesn't look like it is grouping
to the other ones. So does still the
sheep has dropped. Sketch. And we are done with
the sketching part now, VDB going ahead and
painting the petals. So I'm not, but I think the
background for this one, so we'll be doing one by one. Alright. So fast I started
with rose madder lake. She'd done, it's a
kind of pinkish red. So if you have any kind
of spring this way, Hayden, I'll be using the shader often in this
particular project. So as a thumb rule for stay very light layer and then
build upon yours and yours. Just go ahead and if
you want to bend, leave some white spaces. Yeah. I just realized
that I haven't it is to get them clarified out, so I'm just doing it right away. You don't speak tonight. I might have invested
very carefully. Okay. I think I told the
dust and now I'm just going ahead and the
dropping in fuel darker sheets. And this is not red, so we have to walk. Elizabeth would be because
the background is not wet and only the water that
you're putting along with the paint is only
dead on the beach ball. Hello shy. Just doing it. I'm doing the bevel is
completely filled with the color white ones. You can leave
anybody be covering, heat up the white board. So we are building up our darker tones on deodorant
dance on the right. That does have, and
now I'm just adding little green deep
shade on top of this. We're going to be a
little bit muddy. And it's playing because
we need that pinch off. Violet ish or pinkish
shave at the bottom and the top layers and what its emphasis be
handed to use Amanda, it takes a lot of
layers of paint. We need that the bottom
and on the top it can. Because she filled that is
how we build upon Laos. And once it is bright, it will definitely be done
in a different and B. So now I'm thinking of a dose orange and
mixing with water. Well, this pattern,
it has fell down and now I have to pick up
that orange color spot. So I'll be using my flat brush
and a little bit of water. So I purposefully did
Monday did this part because I wanted to show you
how this thing can be done. So just to be comfortable
for water and remove the topic when some
that Aegon, he was an issue. Shoot people doing
lifted up the x is what? All right, and now for
the second bubble, I'm just still going
ahead and mixing a little bit of my lily regarding water orange and then stop it with
a bit of drivers, but go ahead and fill the entire gamut. Was moving somehow. I missed this five week okay. Explaining what I have done. I have taken black and
applied and through that time job it doesn't
read with the bluish green, orange and then made the shape. You can use burnt sienna. I'm well-mixed as the lake
will just mixing these. So that is what I have done. My camera was moving in a different bad action
without noticing it, I get this five of thing, thing. So I hope you can cover it up since it is a fifth project, you might have gone to the techniques that I have
told the full project, so it shouldn't be a
problem much probably. Hmm. Alright, I'm adding a bit of black this to give
that darker tones, which I have done for the
bottom defibrillate as soon, just to let in light of it so we don't want it to be
ready much visible. It's a very dark
but very alright, and now we'll be taking a bit of violet light and mixing it
with a red on the next sheet, the salon and mixing
it with a red shade. So this slide is a
little bit darker. You can use this. And I'm just stopping being
the words that we have. I don't know why I
adding a little bit of blue tone on top of this
to give a darker shade. So I'm using a random blue. So you can use any
type of boo, boo, but not the cobalt blue
because it's very light shade. So that will not pop up. So if you use any blue, ultimately, it would be good. And I'm adding up things on the bottom one and
just as munging it out so assad won't be switching. So that is how when
you are doing, you will understand
your people it and won't get caught me now I begin orbitals yellow
deep and mixing up a toast. Very tiny bit of inaccurate. And she'd automatically
ship medicine this year. And just going ahead and fill the another paper
so you can pick all could, I'm not having good. You can directly use of birds, which is then all I need to. Shade of water is already like a tenth
of a crowd of mine. I have bacon and just
dabbing on top of it. And so every tiny
bits you can see how much amount of
paint I'm taking him to the extent that I'm diluting
it so that the minutes, these are wet enough. Due date the layers because
we did not buy them back. Right now I'm taking a bit
of a light green as well. This is the sap green color, so I'm just dabbing UTR and
they make all we have done. The full project will
give that depth, Florida. Alright, And for the
next one, which color? So we'll go with
stomach soft green. So we have taken
a deep green and just in the diluted colors, whatever I have on my palette, I'm just dabbing my
brush to fill that. And now I'm taking like
consistency of black actually want and just
dropping it on it. As you can know, yellow and violet, blue, and the green ones
look where it does. Come back to the bottom one. So we have to add black to it. A deep end. And so when
you look at your paper, you'll understand
what composition you, which elements are missing. So based on that, you can
go ahead and pull up on it. You can walk on the
adding black liter. The bending of
about two pebbles, Asbell And I'm
using burnt umber, burnt sienna mixed and the water is very
much in this one. So I'm just taking off, but avoid using this
shoe and just going in. And actually you can see a little bit of green
seeping into it, but that's all dry. And I'm taking a bit
of golden ocher as me. You can use yellow
ocher interested on your brush as a wise one, there are different shapes
that are being seen. So that's when doing this part, the bond, this bond that I
did on that, this offer. And now we have to add
black to all the pebbles. As you see your people dry, you will understand how much more darker tone
you have to add. And based on that, you have
to work on adding shadows. Since I'm having a
feminine elongated one on the right side of this table. I'm forgetting right now, I'm adding shadows
towards the right side and the left side
because it has, if I blow on top of it
and to the right of it when most of the shadow is
seen towards the right. So that's how you have to understand the effects
of light and shadow. I paint along in your
paintings does give more Rob. Realism feeling for
your paintings. Feel tied such onto the floor and feeling that it
is not coming out. Well, this might be the reason. The small one is some mixture that is there on the ballot and the green
sheet I have taken. So you can add a bit of
violet aspirin alone to it and make it sound
different shade and left for the shoreline. So I'm just adding
a diluted paint, the Soviet not wetting the
backbone for this one, as I have already mentioned, and I see make up painting all the background with a
lighter tone now somehow. So I just changed my plans
and using madder lake red and just going ahead in the bottom and really continue avoiding
your head in the sky. Well, and then we go
veg on which shoreline maybe just continued doing so you will understand how you
have your background without wetting the background so
that they can light tinge of the valor and just apply
it as I'm doing it right now. So this is one
technique which you can paint your backgrounds
without wetting your paper. So if you know what colors you are going
to use for the background, so you can just
evaluate those colors and then add it in
the background. But more of water because
people is not wet. So you want to go or I can lay off the bathroom instead of bar. Think of any reason we'll
just have to dilute the paint and just avoid head on now building the bank
loan as I'm doing it, I make sure that you are stopping the more
amount of water where you're stopping your brush
so that it won't dry by the time you pick up the
paints on the ballot. So as you can see, I am putting more water and they just met, I'm stopping and then
that is how to speak. Thank you. Also, if you want, you can add some more
fluffy clouds are so I think it has become
monotonous of malicious. First time I lingo
the water area like I assume that the
pebble is underwater, so that is why I'm running
my brush on the parabola. Small, very light,
very light. Hand. So don't pull your paints so much that the edges
of the Babylon one, you have to make this a very light pink it was going to
do when you're painting, just skip this boggle of
funding your brush on your side, on this side. So feel Bevan, you'll
probably be intact. But the balance that you have. And now I will be painting some call-outs and so
does with a stroke. So how I'm doing a very
small school, big strokes. As it comes down, you have to put it as a
small strokes or an urban it is on the top you can
get one big strokes. And I want to make this
very cloudy look so that when we add
the gushing water, splashing water, it will look very beautiful and so continue doing this until unless you
feel satisfied with your sky. In the process, we have made the hardest hi
Nashville horizon line. So just put this
guy and I'm letting the water and we're almost
done with the sky part. We will see how it looks
once it has dried. So this is how it is
done now, after drying, since I have listed some pain
using the brush before bed, you can see some model,
but that's fine. Now I'll take my gloss onto my palette and the boy hate and apply that gushing reviews as well as the
lines on the bevel. This to be mostly dry
brush technique and I'm using silver black velvet
size six brush to this. This hasn't been a pointed tip. It didn't help me
in my paintings. Alright, so I'm just
taking a whitewash onto my palette and just guide you a little bit with them often. It's a kind of very milky
consistency and I'm taking all the excess water since
we have we want a dry brush. So I'm just running
it on to the bevel. And if you have seen these kinds of swap
papers where they will be white lines on them. So that is what we are
trying to depict using this diversity IQ
or a light wash. So since gosh isn't big medium, so if you draw on top of
the line to be this white, even after just a boy hate add that these are lines
on all the parameters. So these are some different
kinds of pebbles you even find in particular
places in the world. So that is the
essence that and wait to capture in this
particular project. Your dry brush techniques help form a danger
to the painting so, so you can just avoid
the bool sample, random dry brush techniques, but make sure you're
not painting. It's like walking on
the smaller pebbles. Ability to cancel
with your brush. When. So don't do
rigorous brush move wins. This is my tip because I sometimes the
rigorous, that's fine. Now, but we will start painting that area below the shoreline where the water is coming in, getting this pebbles and splashing out so
you can just stop. Now very dry brush on, onto the bottom
pebble completely, but just make sure that
the people who lost. So this is how I'm going
to make this one unique. So such paintings
comes from infusion or from the scenery that he's
had seen some days before. It is very, very unique
constants that come out. So just go ahead and
brush all along. So just start on your brush on the go orange bought as well. And the third, as you can
see from the horizon line, I am putting my brush
strokes towards the elbow. So from bottom to the top
so that this gives me all settings of water
splashing onto it. So based on the
direction of the stroke, you are trying to depict
the movement of the water. So that is one
important technique that we can take away from this projectile
using white gouache. You can detect the
motion of your water. And I'm not depicting
much of water on the right side because from
the left water's getting, if that is the case, on the right side, you won't see much movement of water, right? So and without splattering
icon and the projects, so I'm just doing a little bit Delft was flattering
and making my paper. But this is some part that
they always love doing. So for these kind of projects are included with
water-related ethics, it is important to have this splattering so that
it gives somebody not to look to your paintings of you are done
with this project. Once you are done,
those flattering five, and I just move my mouse from the table and they'll give you all but a
closer look to the painting. So we need not wait for
it to dry because it is a dry brush technique
and this planters, you just have to be careful
about avoiding the paper and the rest all
is the safe hands. So this is how the
project has turned out. I particularly love that. Got one under the horizon line that's splashing water pot. That does my favorite bonds. And this painting is completely from my infusion
and I'm loving it so much and more projects that left hand is
the next project.
8. Rocky - Salt: Thanks Joe. All the gains of pebbles determined
by the name and said, you know, figured out that
it is going to be Jones. Does the boy, Hey, bad debate. The pencil, sketch? Just the editing team. Outbreak has to be learned. Going near the bottom one, I'm making a very big fibers
and as I said, it is at all. Keep it Belle-V one. Kind of look for Ralph
Evans and Rocky Mountain, things that are rocky shore. So big that you haven't
got different shapes. Depending upon the balance
that we're trying to capture. Almost about to be done on us. All right? So we always have to
look back and forth. Seems proportion
part and the end. And I'm done with
my sketch and now the leading going to
flying colors to this, I'm going to do background
for this one to mean disappointed and
guiding them to apply. For this, we need
to produce water. So what we have done
in that project, going back to the ribbon and then go and
apply color on top. Maintain the little longer time. That is, maybe I'm
doing this tip, otherwise we could have gone
with this type of project, maybe have medically started the mix-up going
downward sloping. Don't stress out
for this project, for this lever because it just wasn't ready. So I'm just adding
these two colors. Just trying to be extra
fast. Just kidding. It was wrong about CNN. I picked up some
mongoid in office so you can go ahead
with the an offer and just dropping it in
few places and I take a darker shade of land
plaque along with one term, but you can leave it as cities. But since we're using
this technique, I'm going to solve this snippet. We will go with them. Now. We will drop in salt
on top of this. We can go ahead and work that. I have just absorbed in the
salt. In the first level. I'm doing this because I want roping saw it didn't necessarily
show can be attained. The menu drop it. So that's where I don't want
my pencil to die off and moves the points shown
before I dropped my soul. That's where the soils. Now I'm going to make the papers as you
can see, the soul. I think, but that's okay because all these bubbles are going to be told me it doesn't matter. You have the whole thing. And even though the
color that is being spent as very light color about defendants forehead
and this is what I save and I always
mentioned that don't stop. It is not exactly coming. Just go ahead and I just took
a photo for my Delete and blue sheets so that they can use some color for this composition. Very diluted consistency. I'm dropping in
just to make that. Once you mix all these bluish green shade projects, because as I already mentioned, this project is
going to be most of the rules or do any less. Most of them all but CMM black and I'm just still adding this or things
of different colors. Just give some definition. A unique ports hold on. I just took a bit of violet, mixed it with all land
plant and just applying it. This is what I told. I'm mixing a little bit of
others so that when the salty, the color is in the
thesis is absorbed and the places where
the feathers meeting, I'm making it dark, as you already mentioned, deodorant on this part of the power that so that it looks like vendors and
moving with my daughter. She needs all on the bottom. I'm just dropping my lab. We have just stopped me. I have also completed
adding darker tones. Before instead of
evidence I got wrong, and now it's the day before. Oldest ones, but this
time I'm starting from the top load of water and see, hey, that doping it. There are some, you can see how again, for me I'm going to combine. So that's in using both my gosh, I want that gap in-between. So I guess randomly dropping
into August, see that? Instead of making it
on a bit of violet to mix with the swiftly because I already talked about now the
background is white. I know that the
paint will be on. Dropping these medical me. Make sure that you are thinking
he'll behave just drawing as dropping the color that
I just don't meet a dog. No chance tonight. I
haven't missed them. I am using Wave, be sure to know the color
of the petals are joining. This is a step I can see
part of this project. We are doing it
while projects and making sure that we're managing it this way
because of the shadow. So just continue doing
the same technique that works all of this. I'm using my issue
a lot of times. They remove the excess
water from my brush phase. This is what you'll understand how much amount of water
should be on the paper, how much water should
meet with the brush. So all these things
you will get to experience on what
time and you can see nice fellows are being spun off from the bottom
for prevalence bad, we have already put the sorry. So you're wondering
why I'm putting the paint even on Bhopal, sorry. Did you give more
depth and definition? Well, that basal forgot
to put some numbers. She'd overshadow the
song and then dropping it on the bottom when
it is necessary. Obviously, I have some
kind of spattering, by the way, is the
project does not end. This dispatching
wonderful course. You want to give more things
for these small dots. Again to the unsolved
by the salt, would prefer things done on this normally instead
of dropping paint. So I'm just going to go back and show that it
is water that because it shows that the effect of the shoreline processes for proudly have blocked
out there it just on the shore live without
forming a habit, just using a very
light shade on. So I am just adding value or short area and
then dropping it. So I realize now that
after the opening, all the colors at all. So I'm thinking more colors
and this is what I'm telling you can solve as well. This was solved my brush, I might not work for
your next painting. Right now. I haven't just
done drop-in fuel. Our machine as maintain the
harmony in the water as well. You can see those bonds
up perceive or may not be a very nice thing
using the bushes. You can see this volume, since I haven't slept
with them all pressures. In other cases haven investment. This project. I'm
using both nationally. This thing. I'll tell
you again how I am. So just make sure enough I
won't know what a loaded on your brush with the
students and staff. So that will give this kind
of this whole dollar bonus. And I suggest that this applied because you
will definitely love how this meaning with the
knowledge and new environment. This is a really unique
thing that I have explored myself in this
particular project and I'm doping all over. Dissolve is pain, don't know, prefabs is dropping
and enjoying painting. This is some of my
entire thing is that the solid is robbed and nice texture hasn't been
performed all the knee you can see a lot of granulation happening
because of the salt. Wait for this to dry and I
think I should stop matching. Seriously, I should talk. By David is really my
painting, this vendor. So we will see this one, right? So this is just
looking ones I eat, I have the sponge brush, which I'm dusting off the salt. And the salt is very hard so I have to scrape
it off so don't worry if your veins are completely dried so you can go ahead
and raise your hand off your salt on the paper
as it is completely fine, it is the best way then
the sleepers available. It will be similar
to what I said, the stupid by hand
as you can see, but sometimes and so on. So you can see the same. But just a couple of
times to get inside, all the solids will be
off from the people. That's the best of all the
soil that you're done with. This. Explain to you how to find those things that
don't form with the soil. Particularly this
painting. Be exempt me, see if I can do for
them and solve it using my goodness named
Dan, Happy reading.
9. Conclusion: Thank you everyone for
joining me in this class and learning all these
beautiful day. And I hope you really enjoy knowing and exploring different techniques along with me because it's just not a
one way to paint something that we can then
put our face and we have explored the
six types of them. Come into the details. Can this rocky when
I have this flash, but it looks very natural. Lake water is hitting the spot. The dry brush technique is the way we have drawn this n elements with on top of the valence we
have drawn before. And the drivers technique
completely using dry brush technique but with
one, the peaceful sheets, how you've done
drama if the water was the first project
where we have learned from the
basics of light, shadow, and depth Netflix. And I really, really
hope you enjoyed making and learning
all of these projects. Continue your rocks with your own references in this theme or anything like
that in which you live. And I'll see you in
my future glasses and they won't give up your passion
towards happy greeting.
 Bala Eswari, Eswari Art