Transcripts
1. Welcome : Hello and welcome to this class. I'm highly enabled, guide you through the beautiful season of autumn with the beautiful color palettes that you haven't seen yet right now. Let's create four frames that you can use are sad cat, Oskar's greeting cards or to decorate it. Germane tax when you add hosting a party. In this class, I have discussed with new The most important a practice that any app does need to have in the ballot. And we are going to design, we're going to make practice on how to bend and lives with a deliberate, and of course we're going to create to gather them beautiful violets of every is based off this season. Autumn is a better golfer season and we began a profit from the beautiful combination of colors. I hope to excited the status glass and don't forget to Dichotomy injured in Santa east, you upload your clasp 3x over their salaries that to the so please sign up for this class and I would love to see you in class. See you in the next video.
2. Supplies: Welcome to this class. Here we're looking at this, we are going to be using during this class. But remember, you can use whatever you have at hand that is similar to what I am using. For general details. We are going to use white paint. Always good to have black water color IN using also gold watercolors to make some details on, on the paintings. And I have here a color palette for autumn colors. And here you can take a look at the whole name of this water colors so you can find some similar colors are the same. This brand is called Holbein, and I did already my watercolor chart. If you know my class on how to make this color chart, I will put the link in the description for this class. And you will also need a mixing pan to mix the colors. For the paper. I am using watercolor paper, 300 grams, and I am cutting my own frames in the size I will share with you. Now. I have two sizes, one smaller and one a little bit bigger than this one is 15, white for high, almost the size, like a postcard. And it's like a rectangle. You can choose wherever size or form, shape do like. I decided to take these two shapes. And the other one is 15 for 1515 wife or 15 high and is a like a square. So I can make this like a greeting card or something like that. So these are the two sizes with which I will be working with Duke anesthetic. Choosing yours. You will also need fine liners in different sizes. A pencil. This is, this one is a watercolor pencil. I will be using this one for the sketching and a round shape and a ruler for their lunch, you're going to use a cup if you don't have this coaster that I found in a restaurant while ago or anything else. You can use Saron tracer brushes in different sizes. Here I have a four sizes. But depending on what you are doing, you will need more fine, fine brushes or bigger ones. A towel to clean the brush and plague glass with water. I found that if I had that lead to close up my cup of water, it is better to prevent accidents. And, you know, sometimes they were their gun turnaround and make a messenger desk. Finally, you will need a sun worship tapes to fix up a paper on the surface. And of course, creativity to make a juror designs new frames the most beautiful way. See you in the next video.
3. First Stage Autumn: Observation and Warm up Exercises: Welcome to this class. As you can see, I have gathered so many autumn leaves and then different sizes and different shapes in different colors that symbolize the changing of the season. I wouldn't work in this class in four stages of autumn. And as you can see, we start with greenery and then going to more Oakridge, yellow or deep jello toast, and then shifting to Orange until we go to the darkest ones, the warmer colors like this one, more brown, dark red. And the color that the sign of the changes in nature, nature is the most perfect artist. And she tells in, teaches us how we can mix colors to get a more understanding about the shapes and the colors of this season, autumn. And do you need to use the technique that is called oxidation? Every artist and need to take the time to observe every thing they want to reproduce or to create. So it is more natural when you are a transitioning from the mind of RUN derby swells to the paper or to the digital instrument and what you are seeing. So they needed time to observe the thing you want to paint. In this case, our botanical or leave. And just take at least ten minutes to OK, say that shapes the color. There. They'd actions, mixing the blending. And you will see that it will be more easy for you to transfer those things to the paper. Now we are going to start warming up, doing some sketching of different elif that I have here in different sizes. I will show you two ways or how to do it. The first one is just tracing the leaf at the this take the leaf and put it on the paper and estar just tracing that shape. It will help you to make them memory most memory muscle or yeah. Methodic. Most muscle when you when you take the cheap and raise it at the peace, your hand will like upsurge that movement and will be easy for you to transfer Osterwalder's. This is why when you are learning too bright, I don't need to do so many repetition and repetition and repetition. Now we can start tracing the live without the shape, without the shape of the leaf. You will see that then do live during natural creativity and your intuition. Guys do unmaking that shape of God. We are not looking here for perfection. And we're looking here to just translate what we see on into the paper. And then we can play with that tape and make it more toward style. We can play it and make it more Mercutio, more subtle. Or some people like to make them very realistic. And thus is a really deep understanding of the shapes and colors in how these lines played together to form the things you want to play? Or do you want to paint into the, into the paper? Just take your time and do as many repetitions as to like do gun downsize the shape. As you can see, I am doing so. Like doodles. Or you can make it bigger than it is, or smaller, finer in another direction. Allowed yourself to play with this exercise is a very fun and it will teach us, do many things that you will appreciate, appreciate it later. I will do this with different leaves and it's always the same. I will start just tracing the shape of the leaf on the paper. And then I will trace that shape without the guy off the leaf. And I played with sizes, I would play with the direction. So just take your time and have fun. I will let this VEVO Iran on real time because I want you to see and to take the time to follow me doing these exercises because this is very important for you if you want to learn how to paint the leaves and to have a deeper understanding of what does it mean to go deeper in your drawing skills. The more you do these exercises, they're much sharper during muscle memory becomes and you would be able to break the rules. You know, this is saying that do need to acquire the rules but then to come break them. So let's continue to play with this shape. And you will discover that Duke and, and be very creative. And do can then start to create your own leaf designs. And who knows? You can discover new Harvey or a new passion for leaps. I didn't really like this. J is so cute if almost look like her. And it's so easy to do and easy to combine. I am duly lobbying this exercise. I hope you are doing this exercise with me in the door. Having fun and discovering how easy it is to create this Gibbs. So next leaf, this is one of the shapes that is more related to author because it looks like the maple leaf. And they are very, they are like, like this sign of autumn or fall, like in some countries. They named this season four as well. So I am repeating and repeating this process because it helps me to ingrain the process of creating this lives in one eye or painting this ion looking and observing further the direction of these lines, of these veins of the leaf. In taking in the natural form of God is not always easy because some shapes are more intricate and we can, it can become difficult to reproduce them, but don't hold yourself, just try. If you're not right, you cannot learn anything. And you know, you have on a laser, you can always erase mistakes and establish again, as I did here, the lift was not working for me and then I take the time to observe their shape again more deeply and then come back again and start tracing the leaf without judging myself. We can be so ready judgmental, and thus is not. Good for us. We just need to try and do the exercises. Does this all we need to do? I think getting the hang of it. After so many thrives. And I ended up loving this design and that has so many ways to form this shape. I think I will play with this a little bit more. I will do another one in the upside, upside down direction and see how it goes for me. And I will downsize the size of this leaf to see how can I integrate it in my further, the signs when we are constructing or creating the frames later in the glass. And it is so amazing. Doctors need to be gentle with yourself and everything will find its blaze. And you will love to do it and thus is the most important part. They are looking pretty clear. I think I will do another one and another is moral one. But in a more easy way, so to speak. And see how it was for me. And you having fun repair exercises. It is very important that doing joy, the thing to do and do, you know, do can always bright to me in the comments for this class, I would love to interact with you. I will next, I will domain next leaf. This is a beta-pleated leaf. They kind of see that the blending of these colors, red, yellow and green in darker Sienna there. This, this lift is very pretty. I found it in order for this work and I call them assist to take it from the front, the floor, front from the ground. Really pretty relatively brief. So and this had this maple shape, these maple tree shapes, maple leaf. And it's so wonderful. And so they found this, this leaf. Maybe in the country where do you live? That is not Autumn. And I hope you get the idea. Just seen my leaves. And the two can enjoy the season to reduce eyes, at least. And I hope you can visit a country that had this season as well. So you can know how amazing this season is. And if you're in a country where it's always sunny in, always hot. So you are so lucky. Do gun may be desc, then leaves from your country and use the colors of author. Can you imagine a monster data? Delhi CEOs are in autumn colors or they can look so pretty plausible idea. Maybe you can do it for me and told me how to do it. So we are done with the exit sizes, warm map, sketching the leaves. And I hope you get the importance of these exercises and you can do it whenever you want. You can always come back and practice. Do drawing skill will improve immensely. See you in the next video.
4. First Stage Autumn: Sketching The Frame: Welcome to this class. Now is the fun part of this class. Let's start sketching and drawing, or fairest frame, or domed botanical frames. I have here the color palette. And I would start with fear stage of this season, which includes the color greens, yellows occur, and those more natural colors that you see at the beginning of the autumn. I will do first my color chart for this particular frame. And then I will start sketching on this frame and using the 15 by 15 a size. So let's start. I will do my mini colored chat for this particular piece. And I will do my sources of the colors that I will be using. So I can have a better idea on how to organize my creation. Creation, my frame, and intercepting with the ochre, yellow. And these colors is celebrating. And as you can see, this is the same color as the leaves that you are seeing on my desk. And they are really the same color. Now, I am blending in their permanent jello lemon. This is a more bright Jell-O. And you can find these colored in their lives. When you walk in the forest that are leaves that has this color, and they are symbolize the color of the autumn. This last colored is the permanent yellow deep. So from the jello range, permanent yellow deep. These colors is so pretty and I think this is the color that you can find most in nature when autumn starts. And now we have here the BDD and Q. And this is a green chain. And this is the color that getting that I will be using in combination with the olive green, This is very perfect color for this. So I have here my mini colored chat and I will start painting, or We'll start with my process of creating my fears frame. For this class. In this class, I will start with the round shape, but I will not do the ground completely. I will just do the half of this round shape or this cycle. And using my watercolor pencil to do the sketching. Because when do use their water colored pencil. This pencil doesn't need to erase it. It blends with the water colors when you use it then does it saw marsh EC when do you need to use water colors? So I will, I decide to use a different shapes. And you can use, or you can choose the shapes of the lives that you liked the most. And let's create. In this particular frame. This particular frames represents the fifth stage of autumn. And thus this why I am using these colors, green, jello and three difference. Chase is the jello, okra, the permanent yellow deep. This is a more beep jello and the permanent jello lemma. And for the green suddenly I am use embedded_in WHO and the olive green for the early stage of the season to come find still so many green leaf. And then it started to change. The combination of the colors. Look so amazing and so perfect. But they do learn from nature. Of course. I will combine some small leaf m bigger lift. So my half circle looks more cohesive and more PDT when we've finished our design. Be asked DAT after gap. You can do the same as I am doing here. Or you can, of course, do creativity flows and create your own style, your own lives, styles and your own frames that I beat up. The process of sketching lives on this design because we are going to ink this design. And you will see the whole process again. So I would just be that from here. You think my fine line and in the biggest TPP and another medium tip, I will ink all this design. And you will appreciate more how this design is an looking. And you can get an idea or you can get inspired to do the same, or to introduce into your design some elements that I am sharing here. It is. Process but this very long. So be patient with yourself. And they did time. If you need to make a break, just make a break and then come back again. And you're gonna add always some more elements or details us to go because you will see what is missing in the peace or what is necessary to add. And that is important that you pay attention and they breaks. That is no need to rush. It always is better when do you have don't enjoy what you're doing. Okay. Another of my fine line x. On this side, you would see when you use a mark or a mole. It is. So not noticeably if you can notice how changes happen in your design. So we are work and you can always try before deciding what sizes to use. And to get the best decision. I will do the all them veins and the lines that are needed and the leaves. And I will exaggerate a little bit in Psalms because us, after this, we will be adding colors and you will see that it will be needed. This is a very long process, but we are almost there. So be patient and take the time. Take a break if you need it. And thank you for being so patient. Ok, I decided to add some more platonic culls in using a finite fine line. And this one is 0.3. And you will see that this more finer, fine line is perfect. To do this, adding to my piece is iron iodine, so like little leaves to the stems. So it looked more fuller or something like that. I think is a little remote depth to my, to my design. You will say that when you are creating the pieces, do will know intuitively what is needed or what is not needed. We'd accordingly to that eyewitness B that a little bit because it takes a very, very long and they'd be there would be too long for you to what? But, you know, INGOs are then these little leaps to my design. I am ready with inking. Now, let's proceed to the next behavior, to the colors and some details. See you in the next video.
5. First Stage Autumn: Adding Watercolor : Welcome to this class. Here. We're then there was a recorders. I want to start combining my colors of the ballot that I decided to use for their fetus stage of autumn. And I will start with the green at the bottom. And then I will get adequately incorporating the rest of the colors, mixing and blending them together as if they were a leaf that is changing the colored. Thus, this is the idea that they want to recreate IN using that technique. Or wet and dry. If you don't know, if you haven't taken my class on this technique. Please do check the description for this video because I'm sharing with you the link to that particular class. So do gun know how this technique works? And you can have the better results? I am adding the color green at the bottom with only with my brush IN, dipping it into the water and then into the paper so the color gets lighter and lighter. Reframe to use here a French paper with what she tapes because they want, this'll look more, not too that a more spontaneous like nature is. And yeah, I like how the gardeners of the frame, we look at the end. I am forcing the green color on the bottom and the lighter color on the top. So when I use the next color, either will blend easier. I use always more water to liquidity, five colored, and to gain more flexibility on the paper, I would be either in the jello jello, lemon here. To brighten up this section of the frame. Do you always need to be making decisions of adding more water or less water or more color to emphasize the color in some places that you like. And thus, it's very important that you are aware of this process because you can take a look at a painting and decide what calmness next. More water, less, what their weight too bad. The pain that I suddenly the beat or that the paper axle. Or if you need more pigment in some places like here, I am adding more green on the coordinates of the leaf and on the other details. Because I feel like they need more color in as I am seeing how the weather galleries that I am getting drier and the color is fading a little bit. And I want these to be Briar on some butt off my painting. I will do the same in the whole process where when I am painting, when you see that, sometimes I add some color here and that do make the spot all my BCE show up or Bride that apps. Now I already begin to add my next color. And this is just because the bigger brush service, more entertaining, more water. So I can play and I can use the color longer in some places before their eyes. And I want to highlight some places for some parts of this painting with this olive green on, what we are looking here is for harmony that color such harmonized and the highlights in the dry places. And you can do this only with intuition. And I, for the repaint. And knowing where do you want the colors to be and how can the color blends better? And using the magic of water to make the color more flexible and make them as do wish is very easy to work with. Was it colored? When do you know how flexible they are? And that you can play around and mix the colors so fluently and make the world more, more easy. Now, I will add the yellow to go in the direction of finishing this paint. And from this color is very bright and it's sort of reaching pigment that I love it. I wanted to make like the coordinates of the painting darker and the, neither of the painting more lighter. So I am a fleeting that effect and I am loving this very much. My bad things and the message maybe now I would be adding more highlights to some places that I ended up working. And it's not. And then I would let it these painting that I completely to proceed to the next step in the experience. And, but be aware to look for those little details that you see, you need to be more appealing and more beautiful and more brighter colors. Because do you know when there were the colors that I, they become more pay or fades a little bit. But you always can add more, more, more, more color here to help the paint. Is they ask you what? I went though this add-in, some meetings here and there, and some in some yellow leaves. So that the delis Mughal BB. I really led this painting that I completely to proceed to the finite details and they quote, See you in the next video.
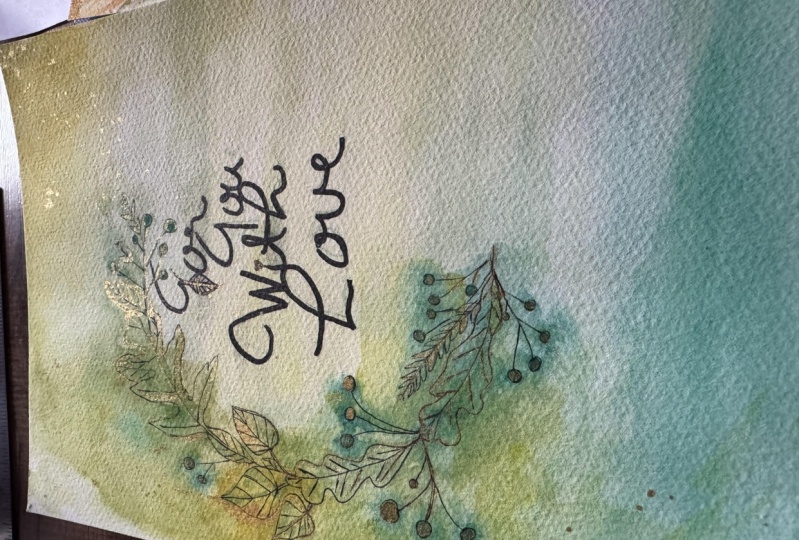
6. First Stage Autumn: Adding quote and Gold : Welcome back. This is the final part of our class. And I have here my goals. And I will activate this watercolor, adding drops of water and let it sit for about three minutes. For this, using this watercolor, I will use a very fine brush. This is a number 0 and it will allow me to add some fine details on my painting. So e, then I will write it the quote in the developed part of the painting. So let's start by adding certain guidelines. So my lettering will look more cohesive and harmonic. Do the lettering, you have many options. In this particular case, I will use a brush pen, but you can use fine liners. You can use the Brush itself with watercolors are with ink that is waterproof. And see how this goes for you. I have my bendable torch pens. They are perfect for this idea that they have. And I will try to color the brown and the black and see how they look on this column, how they enhance the painting and drawing here, the brown one. And now I would guide the black one and see which one I prefer. One is adequate for this piece because of contrast in a way that is the way that I chose for this part. With love. I love adding some flourishes to the letters and all pieces, almost ready. When we finish the quote, we will proceed to the gold. And the gold will enhance this painting very much. You will see it. Look how the color, the watercolor is activated in. They look so glossy and shiny. And the effect would be very, very pleasant to the eye in really pretty. Let's add some details to painting. I do this always. By, I, by intuition. I tried to maintain the harmony in the herpes and add the highlights where I see it's needed. Let's play with it a little bit. And you can also decide to add a note, not a Gold watercolor bug. Read maybe, or white is for you to the size. I am adding the goal watercolors because I want to maintain the feeling of the fifth stage of autumn, these changes that are occurring. And they leave us changing from green to light, jello, and then ochre yellow. And sometimes when the sun shines, the light makes the least chance. To notice this is very magical and mesmerizing to look at the forest when the sun is shining about. In the afternoon. Normally, the sunshine's upon the lives and they look magical. I will add some Dash. Our framed for the first stage of autumn season is ready. And I ended up in those glittery and thus Chinese banks. And the whole composition of this painting. I can't wait to see what you create with this piece remembered, you can upload your products to the class session gathering. For this class, I will be very happy to comment on them. See you in the next video.
7. Second Stage Autumn : Painting leaves excercises: Welcome to this class. As you can see, the colors are changing and we are entering in the second stage of atoms. And these are the colors, all the develo, the grids and that in a little bit of olive green. It is so beautiful. The changes so smooth, but they last not too long. And we need to be careful to not miss out. Look at this leaf here. We have all the colours of nature, greens, yellows, and reds in nature has collected. Then m1 and this little red elif is from my blue barely S3 is so beautiful and so small and so pretty. I hope they give off many, many blueberries. And as you can see, the blending and the colors in the list. And like myths mix it. And you can find still in this stage, in the second stage, these dark yellow. And, but most of the colors are in the direction of red. Dark reds and unbidden with of getting to confine but not too much. And with of Jello. It depends on the kind of three you have in the forest. I have made are ready my color chart. And these are the Coursera would be using to create the frame for this second stage of the season. And I will be using the frame 15 by 1050 mm wide by then high. And I will be using it in this, in this direction. Before we start creating the frame, let's practice making the leaf. We did brush. I will guide you step by step. And in this process you will need three sizes of brushes. It is, it doesn't matter how big or how small. If Mars, how big is your paper in which you will be working on? Because the sizes of the brushes gave you the sizes of the leafs you will be creating. I will start with my finest brush and I will show you how to make their lives make to brush wet, and then pick up the painting, whichever do like, I am using the auger color. This is how we are going to, for the leaf with the brush. Just make a little line verifying and then pressure onto the paper and then leave your brush again. And we're law, you have to live. This is a very smart because that deep off the brush is very small. You can correct the lift and you can try again. Ally, a very fine line, the pressure in the middle, and then leave your brush. Repeat this SSIs as many times as you want, because this is the key to learn how to use your brush to make the elifs put a brush in the paper, pressure in the middle and then belief. You can always make the leaf rounder or create the sense of movement in your lives. I will do many more and I hope you join me on the subsets exercise. So you may muscle memory. Yes, ready to use the next brush, which will we, the middle size. Let's try this leaf with the color orange. To see the steps more clearly, make a fine line. But in the leaf toothbrush. Again, press the module, press on the middle. The bigger the belief will be, the multi practice, the more you live will look harmonic and you will gain consistencies in you're making beliefs. Now I am just making my brush with water. And as you can see, the color is more faded. And we really need some transparencies to make or a frame. So it is important that you practice this one. And also notice that I am leaving some whitespace in the leaves. This gives the effect of light and looks very nice. Now, let's practice a width or be guess. But Ash. Let's make some leaps. Let me get rashes. They retain more water. Can I am showing you here this technique, shape of the leaf, which we just water and then apply the colour. Just following the shape of the lives. Because it's a really cool. Now let's do one using ordered Nick. Thrashing in the middle, the lifting, the brush. Remember you can always collect if you feel like the Leaf doesn't have that shape, do you desire? And you can always try to make your work be as pleasant as you like. Thank Here, I am just making the leaf looks like I want. With my finest brush, I will do some branches, and then I will add some leaves. So we can start to look how we can combine and make a composition with the leaves and the branches. And so then we are just getting an idea of what we can create an applied in this same technique to make the leaves, the leaves. And then I will be at some colored lives and see how the colors work together. Now, I will be adding some leaves to see how the colors work together. Please do this exercise until you feel comfortable making the lives that you want. And then you can proceed and feel more confident. Either creation, continue playing with the lives and create as many as they want. And I will see you in the next video.
8. Second Stage Autumn: Sketching The Frame: Welcome to this class. I have here are rarely a sketch. It's a little bit of my frame. I just make this line to have a guide where I went to paint my leaves. So it is easier for me to not go out of the context here. What I want to create, I will start painting the leaves from the bottom to the top. And then the underlined set is of leaves. And I will start with the color. And then I will gradually mix all the colors that I have in my palette. I will, of course, using the technique we just learned to a forum and the tapes of the leaves. And I will be alternating with my brushes. As you can see, I am starting with my biggest brush to make the biggest leaf first. So they look like they are in the background of that peace. And then gradually I will be adding more leaf in different colors with the others. Sizes of brushes that I have. This process is very repetitive, so I will speed up in some parts of the painting because the media will be very long and it doesn't change anything. If we do a little bit of a speedup, I will finish defeats legend using the color or correct, and then I will transition to the next colored in my palate. If I need to tell you something during the process, I will just talk to you. So I'm here with you along the way. When you start adding the next color, please don't don't stop the bleeding then are occurring between the two colors that you are blending. Because we are looking for that. Those progressions blending are the most beautiful thing about watercolors, that they blend naturally and then make it your paint, more appealing, more beautiful, more attracting. So as, as you can see here, some bleeding are happening. Though on those parts where the paint over the water calls is still wet. And when I apply the next column, the two colors just blends. They looked really pretty. I will continue with the, all the colors in my palate. So from here I will speed up a little bit. Okay, it is important that you make digital work pleasant, embedded, comfortable for you. So if you need to turn the turn around the patient do eight because it will make you just forget about the in commodities. Blend with creation, with my finance, but I will add more green leaves or start to add a beginning lives. Because this gives the paint a more natural look and assembles the nature. Because on this second stage of autumn, we can still find some green anys morning there way like olive green that gets green. And it is important to keep this that way because we are just being inspired by this season, him by nature. Of course. Now it's time to add some details. I will look for those places where I think we need to add more lives in different colors. And we also will be adding some little berries because we can find in the furnace many burglaries at this time of the year. And some, some thing out to eat, but some of them are not edibles for us, but for the birds and for the forest animals. And they are part of this ambience. So I am adding or painting is looking very nice. By now. It is time to add some highlights with my white paint on the leaves and wherever I think we will emit, these are giving off highlights in maybe bangs for the lives. It will be look very eyes. In just adding a little bit of water to the paint to make it more fluid. So my, my brush absorbed the color and I can move the paint into my beliefs, the paintings dry and this will work that way. If it is just a little bit with them, the color will mix in maybe that we are not looking for that we have done with the white highlights. Now I will add some getting to my pain to get more contrast. And we can find this already in the model. That is typically or painting Selma's FAB. Now, let's add the quote that I have chosen for this. And I am using my 59 and CDO 0.01. Bigger a medium. Tpp is good for this car because I want this to be elegant. So we are writing in the phrase, thank you because we can use this frame for search method is to give thanks to someone or just greetings. Mbc style is embedded barely Kate and elegant. To convince whatever medium do you want to break this phrase? And you can choose to read wherever do you like, better. In chosen to brightest with the fine line. And because it is this, modern, elegans lead minimalist. And I find this looks very well with my lips on the side. We can say seconds. Stage frame is ready at this point. I like very much how this Luke and all the elements are very harmonize. But we can also add a gold frame, or you can choose another color if you like. And if you see this, gold is a little bit more dark. And I find this proper for my idea. The other one is more lighter in color and it was more appropriate for the first stage of autumn. I will activate when watercolor. Then meanwhile, deadlines or the idea for the lines. And then I went to face this with my brush and the paint. If you like. If you don't have this watercolors, do wish. Now we can say their piece is gravy, this second stage of autumn frame. And I really like this thoughtless of cold on the right side. And I hoped you liked these. Which one of these two styles to do live better? I can't wait to see what nucleate and police do upload creation to the gallery of the glass project for this class. And I will take a look at what did it. I see you in the next video.
9. Third Stage Autumn: The Frame: Welcome to this class. In this class we are entering the stage of autumn and look at this color. They are more warm, they are more ad, the colors, they are darker. I have already my palette here for you. We are using the mark reds and in Sienna and OCR colors in that thing. Also, we are using brown colors here, like the palette we have in joining for autumn iron using a brush, medium-size, annihilated the sketching, inking. Joe's combining the different. It leaves that we're learning here in this class. And I did my collage of this elifs and I use that around tracer for this, but the killer frame. So let's start adding the water colors and doing this, adding the water colors, you just need to be mindful about the variety of colors and tried to make the decision to combine the colors into the frame. Chosen. The colors. For example, if you're isn't red, then try to add more browns to make this more harmonic. It is a very nice process and you can just lead target activity flows in this process and decide the colors are still wish to look to your palate. Ins that denied in the green some lake discourse is very bright and very dark. And when it dries, it looks really pretty. I will, during this class, I will speed up a little bit more because the process is very repetitive. And, and we can spur time does by adding the colors. As to maybe see here IN combining, trying to imitate the leaves that I have, I am trying to blend some colors in the same lives. For example, ion adding Sienna with the red or brown with that red. So I have r more harmonious blending on the leaves. And you will see when, when the bed, the whole painting dries, it will looks very pretty and we had the disbelieving into the lives. And they will look very realistic in a way. We are not looking for realism as here. We are just trying to combine all the colors in this pilot, in dream, resembling the autumn. And that the last stage of this season in it is, it happens about the month of October, in the middle of October, till the end. And then we go to the fourth stage that is more Day, November colors. And we'll see that. The next B bill for this class. Remember to make dirt work comfortable for you. You can rotate your paper to add the colors. You will save yourself for having the Johanne upon the colors that are at a still wet. Just play with it as you wish. And an add-in, some darker colors in the coordinate. A, just a resembling the nature of the leaves in how they change with time. Remember the in autumn day or getting to this stage in this season, in the, in this stage of the season they or their lives are getting ready to fall off from the trees. So they are like dying in a way because autumn resembles the depth of the leaves that went off in April for this brain. And then from the ones that came up on duty in summer. And now their lives are just closing the cycle of life and showing us the life changes and day by day, minute by minute. And we need to embrace those changes. So I take autumn like this reminder that life has cycles and we need to go with the cycles and tried to embrace them. So I think of my whole painting, the lives, this Rayleigh now look at the wind doing idea. I am just wetting my brush in water, in cooling water and the NGOs pooling the colors from the lives until the whitespace that I have here. So I have a background for my car, for my frame here. And it is very easy to Justin is a little bit of water and then just pull the color from the lives and do we'll have this more transparent effect for the background. If Justin journey, that remark of colored Egypt can just pick up a little bit of color from their ballot and add these to the painting. Now I have here my gold, and this is the more darker gold and the white. And I will add some highlights to the lives and to make them more beautiful in to pop up into painting. Ingos, tracing this into the banks of the leaves. And I will do this with all the lips. Here I just my, my brush with a little bit too much with with white-collar. So I will repeat that in a minute. And it will show you how to do it. Again. Now, I will just pull the color in the leaves and then I will pick up a little bit more red for this cream, some lake and add to my, to my lips. And then I will let it dry. And then I will do the highlights, Hagen. And I think here the gold atoms. And because these will make the frame pop up look more beautiful. When we, when we finish to do all the highlights that I am doing here, I am painting more the small leaves and the batteries. As you can see. And adding gold to the lives that we paid to Reaper here. Look at how it's looking with very, very pretty. And now we are, we are going to add the phrase that I choose for this a frame with goal there brush that I'm using here is called a script. And it is very nice to make beautiful things in this more elegant style. And if you don't feel comfortable because to have another skill for Latin integers can use a brush band, or you can choose another type of handwriting. Or you can use a gel pen or a fine line and to make your work more easier if you don't have the lettering is skill. But remember, you can always lend this skill if everyone can learn this. And I am thinking on making very soon a introduction for lettering for beginners. And I hope many people are interested in on this because I have had this question on my other classes. And yeah, I am thinking, thinking on doing this beginner plus for later. If you're interested, let me know in the comments for this class. So ultimately it's also a season of the year. We're in some countries of the world is celebrated dance giving. And it is, I choose this messages to embrace that beautiful celebration in the war. And we're adding here grateful, of course. And I think it's very important that we celebrate gratefulness in life. This brush is another one. This is a number CDO. And I use this for bright to bread in this style of lettering. I hoped you liked it, this beautiful frame. And I can wait to see what you create. And please be creative and upload at your work. You can work, you can upload your estate by step or dukha and upload do whole piece to the gallery section for this class. Look at those shines of this beautiful car. It will make as my, anyone that received this. In the next video.
10. Fourth Stage Autumn: The Frame: Welcome to this class. This is the last stage of autumn, and here you can find different colors, but mostly you will find that guess browns and threes without lives because all the leaves have fallen funded trees. For this class, I will use my whole palette because I want to make a composition with all the colors. And I went to introduce some elements that belongs to this season. Like for example, icons. You can use parkings. I didn't paint plantains for this one, but you can if you like. And my I am using this frame in the size of 15 by ten. I witnessed that adding the weather color, I will not ink this sketching. I want this more loose. I realized that by painting may burst that he drank. D3 is very abundant, very emblematic for author. And here we have many, many of them in the forest. And we can afford the looking of the drunk tree from birth very easily juices that with a dark color ion Choosing block here for the trunk. And when it is dry, I will add some highlights in white and you will see how cool this effect looks like. Don't do too much in the black because we need a dose of white spaces into the painting, into the, into the lines where doing here as a trunk. Then let it dry and start painting the other elements. And afterwards we will be adding their white highlights on the trunk. Now I am painting and the archons. It is very easy. Just choose a brown color for the bottom part of the car and a lighter Sienna for the upper part of the icon. And then proceed to add the color to the other elements. From now on, I will spit out a little bit at the painting process and you can follow me along. Now I will be adding CNN for the upper part of my Acre and then wait, then wait until this drive to proceed. Paint in the rest of the elements on this painting, which our lives and some berries. And I will choose the color from my, from my pilot to get more consistent and harmonic. Piece. To pain may lives. I will choose the two corners that took routines that I have here, the olive green for one branch prosper leafs. And I will start with the better that olives, olive green in, then I will just add a little bit of water on my brush and make a more lighter effects on the color of the leaves as you are seen here in the painting. I chooses this size frame because I want to make some guards for my friends enforced stance giving. And I find this size to be perfect for that, but this size of frames is perfect for a name tags. If you're hosting a denier or a party, this will do the best for you. Let's pass it to pain. The other branch with the other green that I have, the permanent green. Vivian who, to be specific. And we are gaining here buddy consistence, appearance of the composition, very harmonic colors in the composition. And it's looking good, Betty, Great. For the vertices using the green some lake and the dark that I have in my palette. But you can use another colors and more darker color so we can find dark, very dark like a blackberries in the forest at this time. And they have made a very nice contrast with all the other colors that we find during this season. That is, this is a very, very colorful season in the time to start painting beliefs. And we're using the same technique we learn. Some babies are gold. You can take it up again if you need. And I am using three colors for the lips there. One is the olive green that I have here. In the other ones are cn. And get him some lake to make a very harmonic composition of the colors. I'm trying to introduce all the colors that I can in this model frame. But you can choose whatever other palette, colour combination of the methane palette, x2, which I am trying to, because this is the last stage of the autumn season and we are very close to Christmas. Then I tried to make this more colourful. So we have an start to the new isn't aswell. But all these color belongs to autumn. Now that are bearish. Three tanks are dry. Let's add the highlights, a width white pane. And you see how this will transform this feeling of a birch tree in our frame with Debra's, just add a little white lines on a boss sizes of the tree trunk overlapping them. Yeah. This is the look of the birch tree. Now, let me some splashes than I just in orange. And I am using Crimson Lake for this blushes very little, not too much. Time to add the quote for this. A little scar didn't carry this photon scaring. So I will add the phrase happy dance giving in. I am using the brush pen tote because they are very colorful and easy to use in this frame, I will alternate between the three colors, brown, orange, and I will do the hand lettering in realtime. So you can get satisfying sensation for these leveling piece. And maybe you can try to replicate what I'm doing here. This is called Burdash unlevering. And as I told you in the past video, may be you are interested on learning in IM, thinking in, and making a beginner's level in class. So you can as well learn how to make beautiful and easy Han lettering. With me in the future. Basin. I use for my 0s, I always use a herd tape alike. Thought. Because I love these tapes and I love the beautiful sweetness that this hurts. The litany. Again, a little reminder. If you are knockoff of comfortable using brush pens, you can use a fine liner because it's easier to bribe them and adding some flourishes here. And now I am writing the happy with a brush pen, but using it in block, illiterate in style, which is more easier to do. So here we have it. Or habitants given garb that we can send to our friends or our families. I hope do like this design as well. And I can't wait to see your beautiful creations in the glass product, a gallery for this class. And of course, I will see you in the next video.
11. Your Class Project - Thank You: Congratulations dude, the do finish their glass in Alonso, but out of you. Now for two glass Burnet, do can Ted with us in the gallery discussion for this class? Do work-in-progress. As Gettier's during TAP colors, do finish his thesis. There 12 order four of them with us. And I really saw glad to comment on them and see them. And if you check your work or where any Instagram, please. So I can take dude working my studies. Thank you so much for taking the class and I hope to see your email next glass. Happy painting.
 Artjourneywithme Heidi, ARTIST AND FACILITATOR