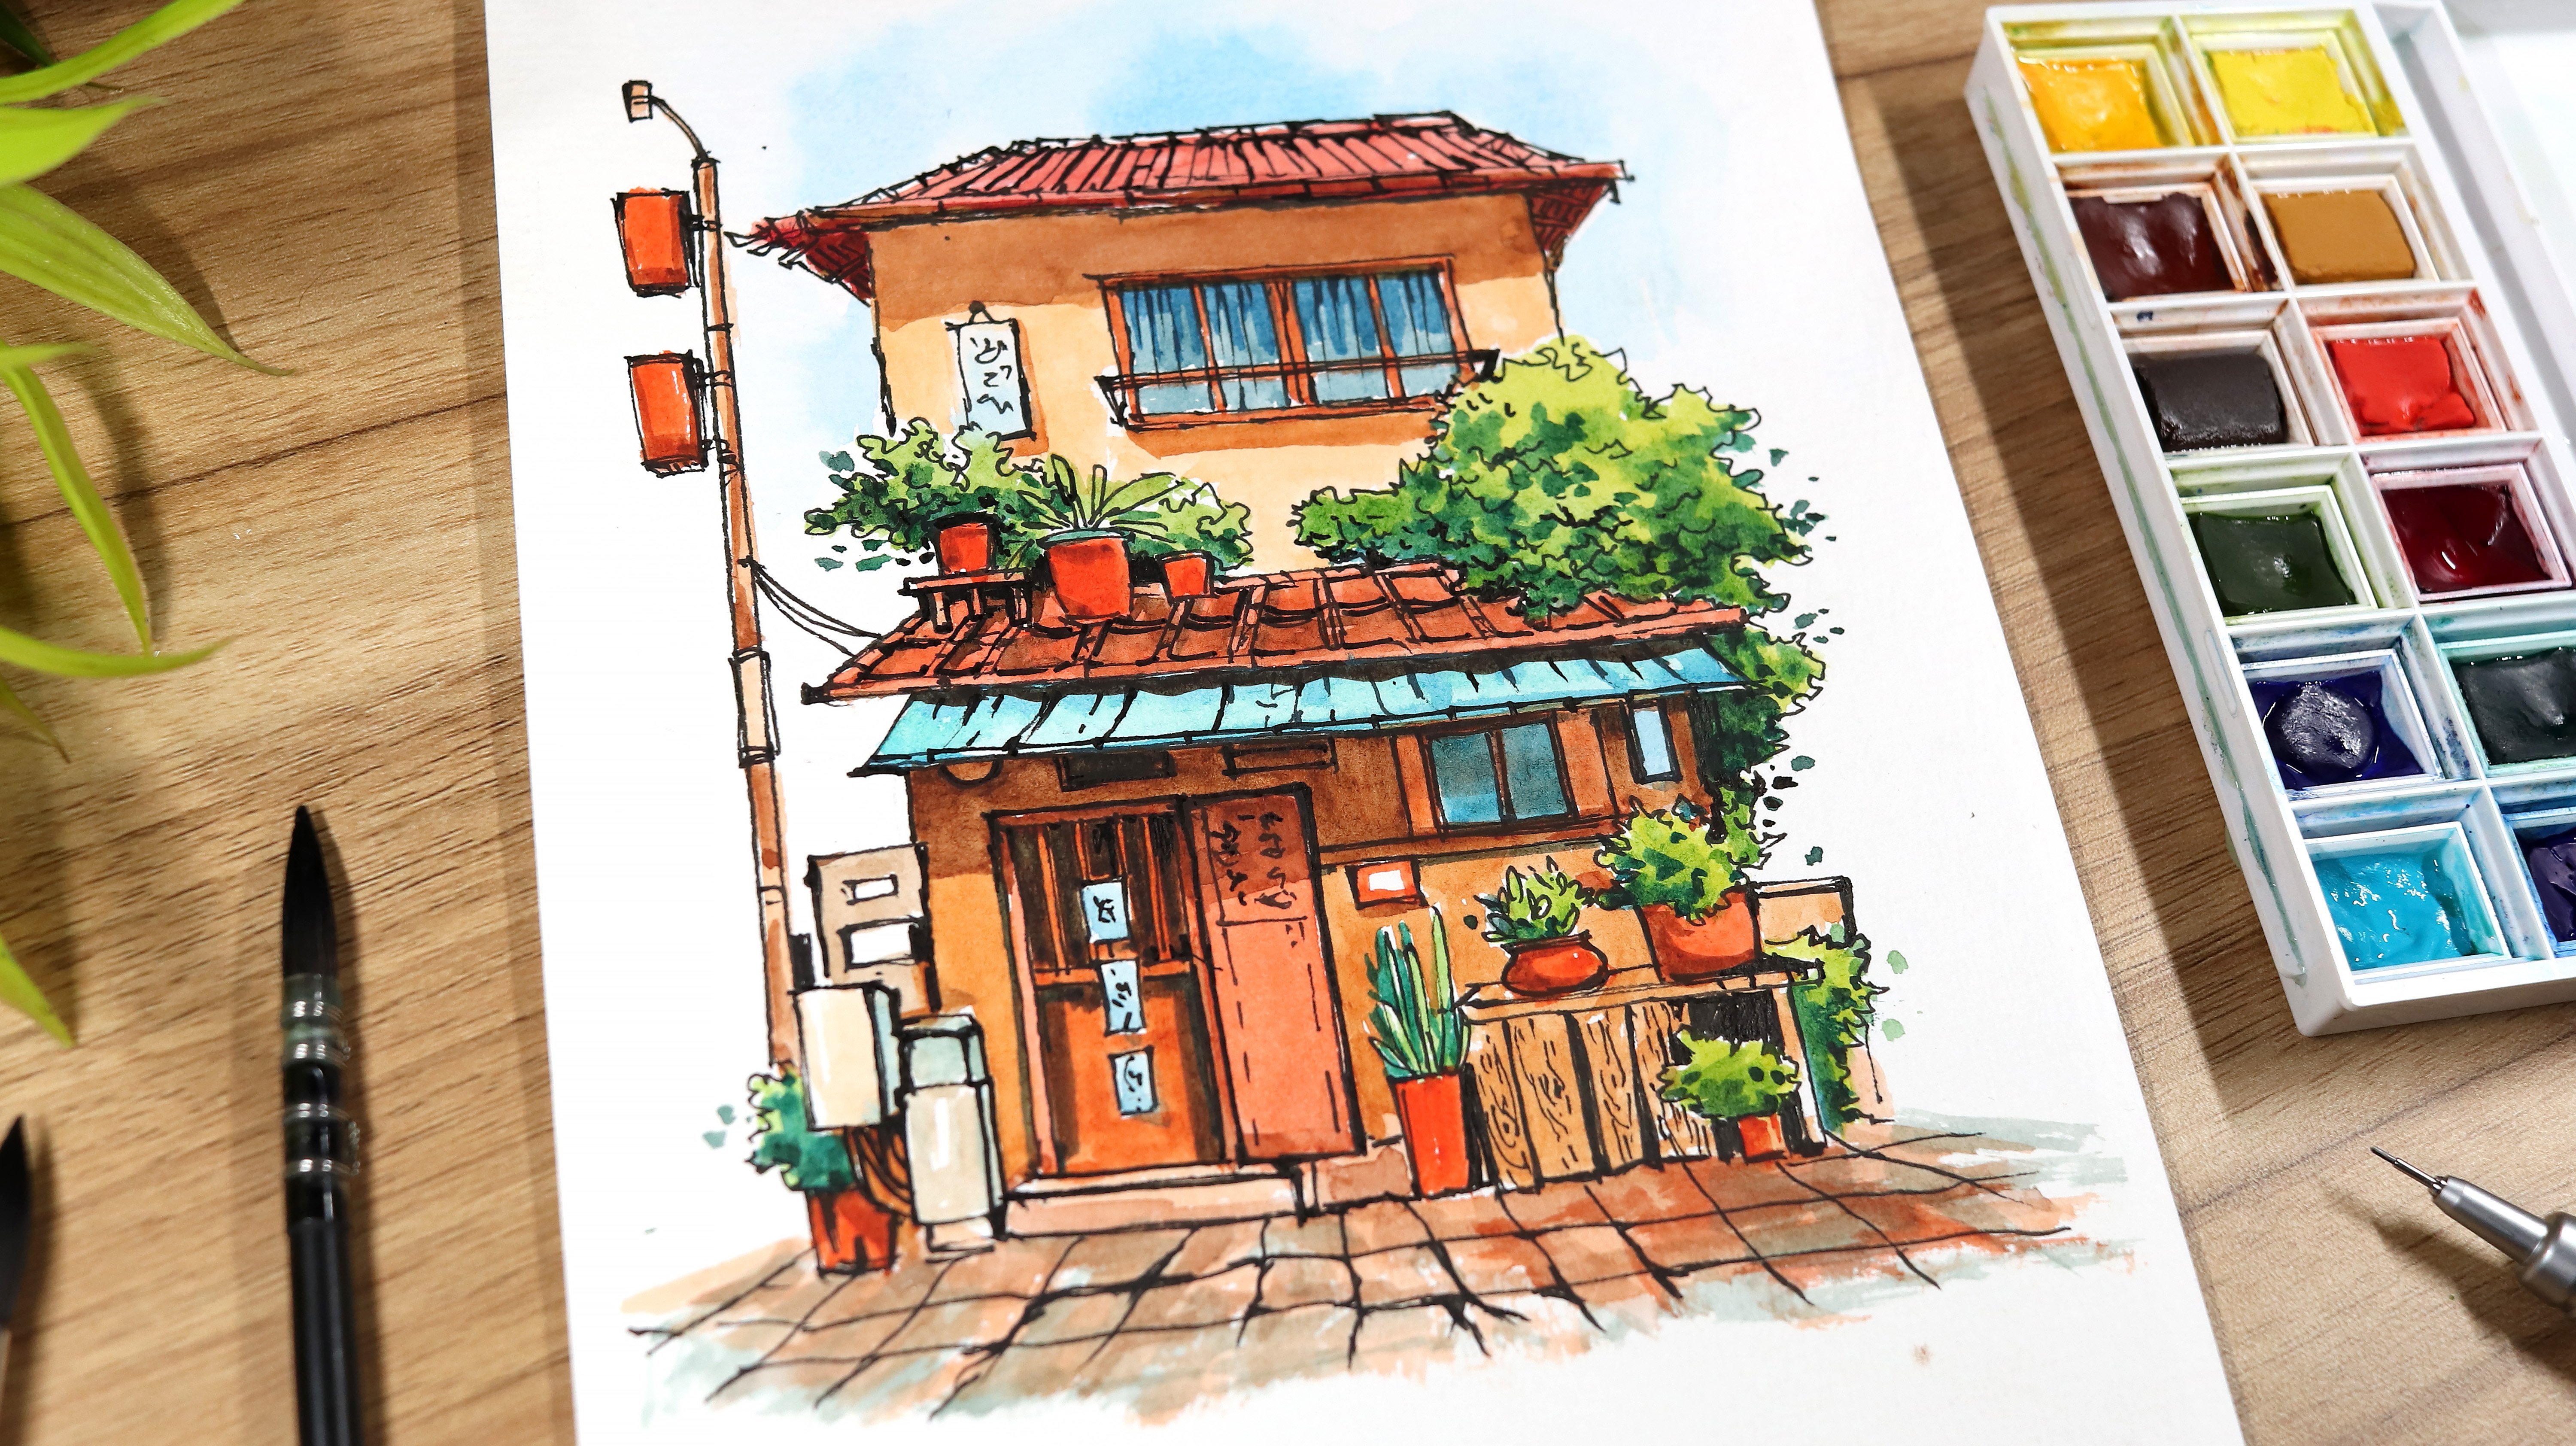
Transcripts
1. Introduction: Hello everyone. My
name is Siobhan. I'm a painter from India and one of my specialization is
in landscape painting. I love to do
watercolor paintings, mostly the old rural areas, the cityscapes, landscapes, birds and animals,
and much more. I tried to keep
my paintings more vibrant and full of rich colors. The same thing you will find today in my watercolor
painting class. The topic I will be covering
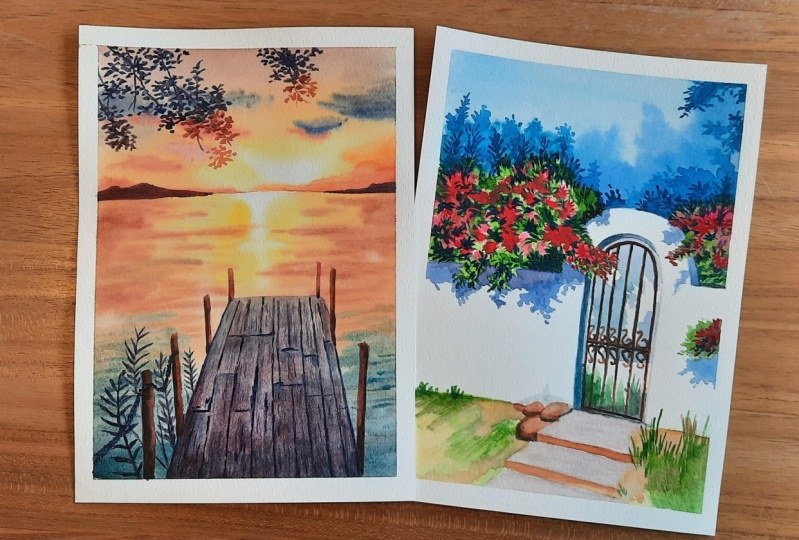
today is a scene of a beautiful sunset
landscapes and a beautiful flowery dude
with cherry blossom trees. As we know that watercolor
is a very daunting medium, and it's not that
easy for that reason, I've used some
simple steps to pin this beautiful scenery that
you can easily understand. This class is not for
absolute beginners, but these are for
those who have already tried a few
watercolor tutorials. And I've gained a little
hold on the brush. Now you don't have
to worry because I have explained some simple steps throughout the painting
process which will add some extra to your
watercolor knowledge. I'm very happy that you
have chosen this class. Let's quickly jump onto
our next part and see what materials we need to
make this beautiful paintings
2. Materials Required: Hello everyone, welcome back. In this part I
will be discussing the materials are used
for watercolor paintings. For the people I'm using Fabriano artistic or
watercolor paper, 300 GSM, cold pressed. I'm using a cool
press because it creates beautiful bouquet
effect in your painting. And it doesn't dry out soon and gives you more time to
work on a painting. These comes in cutout
sheets of various sizes. But here I'm using an A5
size for the brushes. I'm using three mop brushes and one liner brush
for the details. Now these three mop
brushes are sufficient to make a painting
of a face says, if you don't have
a similar brush, you can use any brush
you have it just that you must be comfortable
while doing the painting. This is a macron ballpoint
pen from Shakira. This helps in adding details
in case you want to draw some branches or you want
to draw some wooden sticks. The colors which I'm
using is from Winsor and Newton Cotman, student
grade watercolors. This color is very good for anyone who wants to start their beautiful
watercolor journey. The name of the colors on my palette is displayed
on the screen. As you can see, I have replaced my white color
from the palette. And in place of that, I have pleased the cobalt, turquoise from the White Nights. As I don't use white
in my paintings. I'm using a half-inch
masking tape to tape down my people at a time while painting so that
my paper doesn't get buckled up once we
apply water to it. I'm also using a jar photo. If you want, you can
keep two jars of water, one to clean the brush and other one as
I'm mixing medium. And this is a
hairdryer which I will be using to dry my painting. After each layer. I'm
using a cotton cloth to wipe any extra color pigments from the brush while
doing the painting. So these are the
materials I will be using for this painting class. So quickly grab and join me, and I see you in the next part.
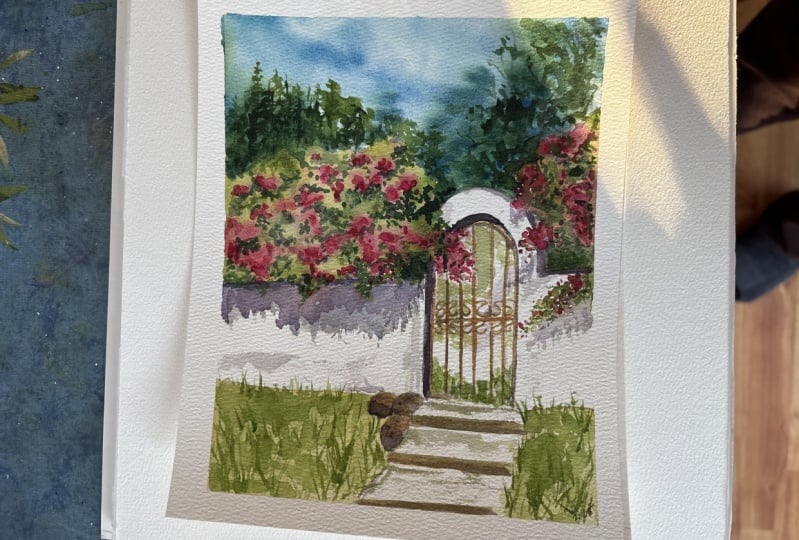
3. Part 1: Flower Garden and Door: Hello everyone, Welcome back. So in this part, I will be painting a beautiful
flower garden with a door. So before we start the painting, Let's apply the masking tape. We will apply this
masking tape on all the four corners
of the paper. We are done applying
the masking tape. It's time to draw the
beautiful sketch for this, I'm using an HB pencil. If you don't have the HB pencil, you can use any lighter pencil. Just try to create some
lighter marks on the paper. So let's sketch the door first. As you can see, this door
is around at the top, so we will draw a curve. Let's draw the outer curve. I'm drawing this half curve to give the door or 3D effect. So once we have
completed the sketch, we will remove these extra lines using the kneaded eraser. So VF completed drawing the door to draw the outline
for the leaves and flowers. For this, I'm just
drawing the outline as a guideline where I will be placing the leaves and flowers. Once we have drawn the outline for the flowers and leaves, we can remove the extra
line of the door. Now I'm drying the iron
gate of this door. For this, I am drawing
some straight lines. If you face a problem in
drawing these straight lines, you can use the scale as well. Let's draw the stairs. For this. You can draw
some straight lines and connect the way I'm
doing on the screen. To add beauty to the spending, we will draw some small stones. Now, I'm using a kneaded
eraser to lighten the sketch. Before we jumped on to painting the first
layer of watercolor. I will start drawing
the background first. For this, I am adding
water to the background. The blush which I'm using, this brush number two, which is a mop brush for the sky. I'm mixing cobalt turquoise
with ultramarine blue, and then I'm gently
applying to the background The tree leaves at
the background, I'm mixing viridian green
with ultramarine blue. You can change the amount
of cobalt, turquoise, viridian green to
bring variation in color while drawing or
painting the leaves. Now I've added a little
bit of ultramarine blue to bring variation in color while painting
the background leaves. Completed painting
the background. Now it's time to
draw some leaves and flowers, which
is at different. So before we start the painting, we will apply the water the same way we added
to the background. So first, we will
wet the areas where we will be painting the
flowers and leaves. And then we will apply paint. Here I'm using crimson
red to draw the flowers. Adding color to the
already wet area will give you this puffy
effect, as you can see. For the tree leaves, I'm mixing cadmium yellow with sap green. Now we will apply this green on all the areas which
are left unpainted. You can reuse the amount of sap green to make your leaves
little darker in color. This will also help you in adding variation to
your tree leaves. Let's quickly add some more
crimson red to draw flowers. Let's quickly draw the flowers
and leaves on the right. For this, we will use
the same process. First, we will apply
water to the background. So let's quickly add some crimson red to draw the flowers. If you want to draw
some other flowers, you can use some
different color. Now we will add the mixture of cadmium yellow mixed with sap green on all the areas which are left unpainted
to draw the leaves. Let's add some more crimson
red to draw the flowers. I'm also adding a little bit of sap green to draw the leaves. Lime using brush number
four to draw the shadows. First, we will draw the
shadow of the door. For this, the color
mixture which I'm using is ultramarine blue mixed
with crimson red We will use the same mixture
of crimson red mixed with ultramarine blue to draw
the shadows of the trees. Now I'm adding a little
tint off viridian green to increase the
interest in the shadow. Let's quickly draw the
shadow of the tree leaves. For this, I'm using
the same mixture, which just crimson red mixed
with ultramarine blue. Now I'm adding a little bit of cadmium red to the shadows. Now this will give the
shadows a little ovum effect. Let's quickly draw some shadows of the tree leaves on the right. For this, I'm using
the same mixture, which is concentrated mixed
with ultramarine blue. Now I will paint the area
which is inside the garden, which we can see
through the gate. I started painting
with a loose wash of ultramarine blue and then
I've added sap green. I'm still using
the LDL mixture of sap green mixed with
ultramarine blue. Let's mix a little bit of cobalt turquoise
with crimson red. And we will apply a very
dilute mixture effect. A little bit of sap
green to draw the grass. And at the base of
the grass we will add a little bit of crimson red. I'm using the same mixture, which is the light wash of crimson red, to draw the ground. Again, to draw some
grass, add the ground, we can switch the
color to sap green. Let's draw some more tree
leaves on the right for this, I'm using the same color, which is sap green. And then I'm adding a
little bit of crimson, red to draw the floss. For painting the shadow,
I'm using the same color, which is crimson red mixed
with ultramarine blue. And we will apply it at the
base of the tree leaves. For adding texture to
the walls of the door, I'm using the same
color which is concentrated mixed
with ultramarine blue. Let's quickly draw
the ground for this. First, we will add a light
wash of the cadmium yellow. Now quickly add a mixture of
sap green mixed with cadmium yellow to all the areas where we want to
draw the grasses. Now we will paint some stones as well as this stays for this, I'm using the mixture of cadmium red mixed
with sap green, and this will give you a
natural brown if you want. You can also use burnt
sienna directly. But I prefer using a mixture of cadmium red mixed
with sap green, because this gives
you a natural brown and it looks a little
bit red in color. Now I will use a mixture of crimson red mixed with
ultramarine blue. And we will use this mixture to paint textures on these stairs. So let's draw some more details using the mixture
of cadmium red. So friends, I hope you have
enjoyed the first part of this beautiful flower
garden scenery. In the next part, we will
be in some more details. So let's jump onto
our next part.
4. Part 2: Flower Garden and Door: Hello everyone, Welcome back to the second part of
this painting session. In this part, we will
be working on details. And we'll add a second layer
to this watercolor painting. For this, I'm using
brush number zero, which is a mop brush. And before we start painting, let's quickly clean the palette. Let's paint the
tree leaves first. For this, I'm using a mixture of sap green mixed with
ultramarine blue. We will apply this
paint on all the areas where we want to draw the
shadow of the tree leaves. You can see once we have added
the shadows of the trees, the walls are looking so well-defined and it's
popping out of the shadow. So you can see at
one of the areas, we can add a little bit
of more ultramarine blue and lessen the
amount of sap green. Now this will give
you a darker leaves. So you can play with
the radiations to add variation to
the tree leaves. Let's draw some more tree
leaves on the right. For this, I'm using the
same mixture which just sap green mixed with
ultramarine blue. So for painting the flowers, I'm using the
concentrate directly. Crimson, red when you exactly has a good
amount of saturation. So we can use this statically to paint the shadows
or the flowers. Let's paint some more
flowers on the right. We will use the same crimson
red to add the shadows. I'm using the wash off ultramarine blue direct link to draw the shadows of the door. You can increase the amount of ultramarine blue or decrease according to the variation
you want in your shadows. Let's add shadows
to these stairs. For this, I'm using
the mixture of cadmium red mixed with
ultramarine blue. So we will use the same mixture
of cadmium red mixed with a little bit of ultramarine blue to paint the
shadows of these tunes. Now I'm using a light wash of sap green to draw the grasses and their shadows is also helps in adding
details to the grass Let's add shadows to the
glasses on the right for this, I'm using the same sap green. Add the portions
where you want to draw the glasses a little faded. You can take the
help of Bordeaux. Now I'm using a mixture of sap green mixed with
ultramarine blue and a little bit of
intense blue to draw the tree leaves which
are at the back. I'm also adding a
little bit of water to the mixture at
some of the places where I want the
leaves to look less saturated and less defined. So you will see once we have added these leaves
at the background, the front leaves and flowers
would look more defined. And they will look as if they are at the front
of the painting. Painting these leaves
which are at the left, I'm using the same
mixture of sap green mixed with cobalt blue
and in dense blue. You can see once we have
added these layers, the front leaves, the flowers
are looking more defined. Now let's add some
more shadows under. Now adding the shadow
will make the door more prominent and it
will look more clean. I'm also adding or the same
shadows on the right side. You can see as I'm adding, the dude is looking more
cleaner and well-defined. I'm using the same mixture
at some of the places. Also, I've applied
the intense blue directly where I want the leaves to look
more darker in color. Now I'm using this light wash
off intense blue to draw the shadows of the
stones as well as glad some details
to the grasses. I'm using the same mixture,
which is the wash off, intense blue, to add details to the grasses
on the left side. Now it's time to add
some details for this, I'm using the liner
brush number two. The color via
mixing right now as cadmium red mixed
with cadmium yellow. I will use this color to draw
the iron rods of the door to make our iron rods look a little bit darker at
some of the areas. And you can just take the
help of little bit of intense blue and mix
it with cadmium red. Then you can get a
lighter brown color, which you can add
to your iron rods Now let's add some details
to your iron rods. You can use any design here I'm drawing some small S shapes. Now it's time to add
some shadows for this, I'm using a mixture of cadmium red mixed
with intense blue. To add final details
to your flowers, you can use the
mixture of crimson red mixed with in dense blue. Now I'm using a wash
off intense blue. And I will be adding to the
tree leaves which are at the back to add final
details to those tree leafs. Here I'm using a light wash off intense blue to draw
the third steer. Similarly for the first
and the second step, we will use a mixture of crimson red mixed with intense blue. Let's use a wash
off sap green to draw the glasses which
are inside the door. So for instance,
we have completed painting this beautiful
flower garden door. Now it's time to remove
the masking tape. While pulling the masking tape. Tried to pull your masking
tape outward at an angle so that you don't tear your paper while pulling
the masking tape. So friends, I hope you have enjoyed this beautiful
painting class. My next class we
will be painting on beautiful sunset landscape
with a riverside doc. I hope you will enjoy that too. So let's quickly jump onto
our next painting class.
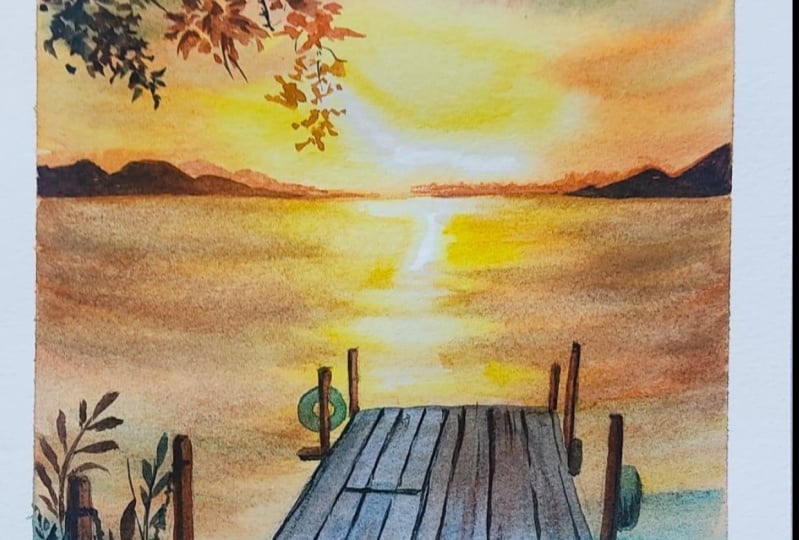
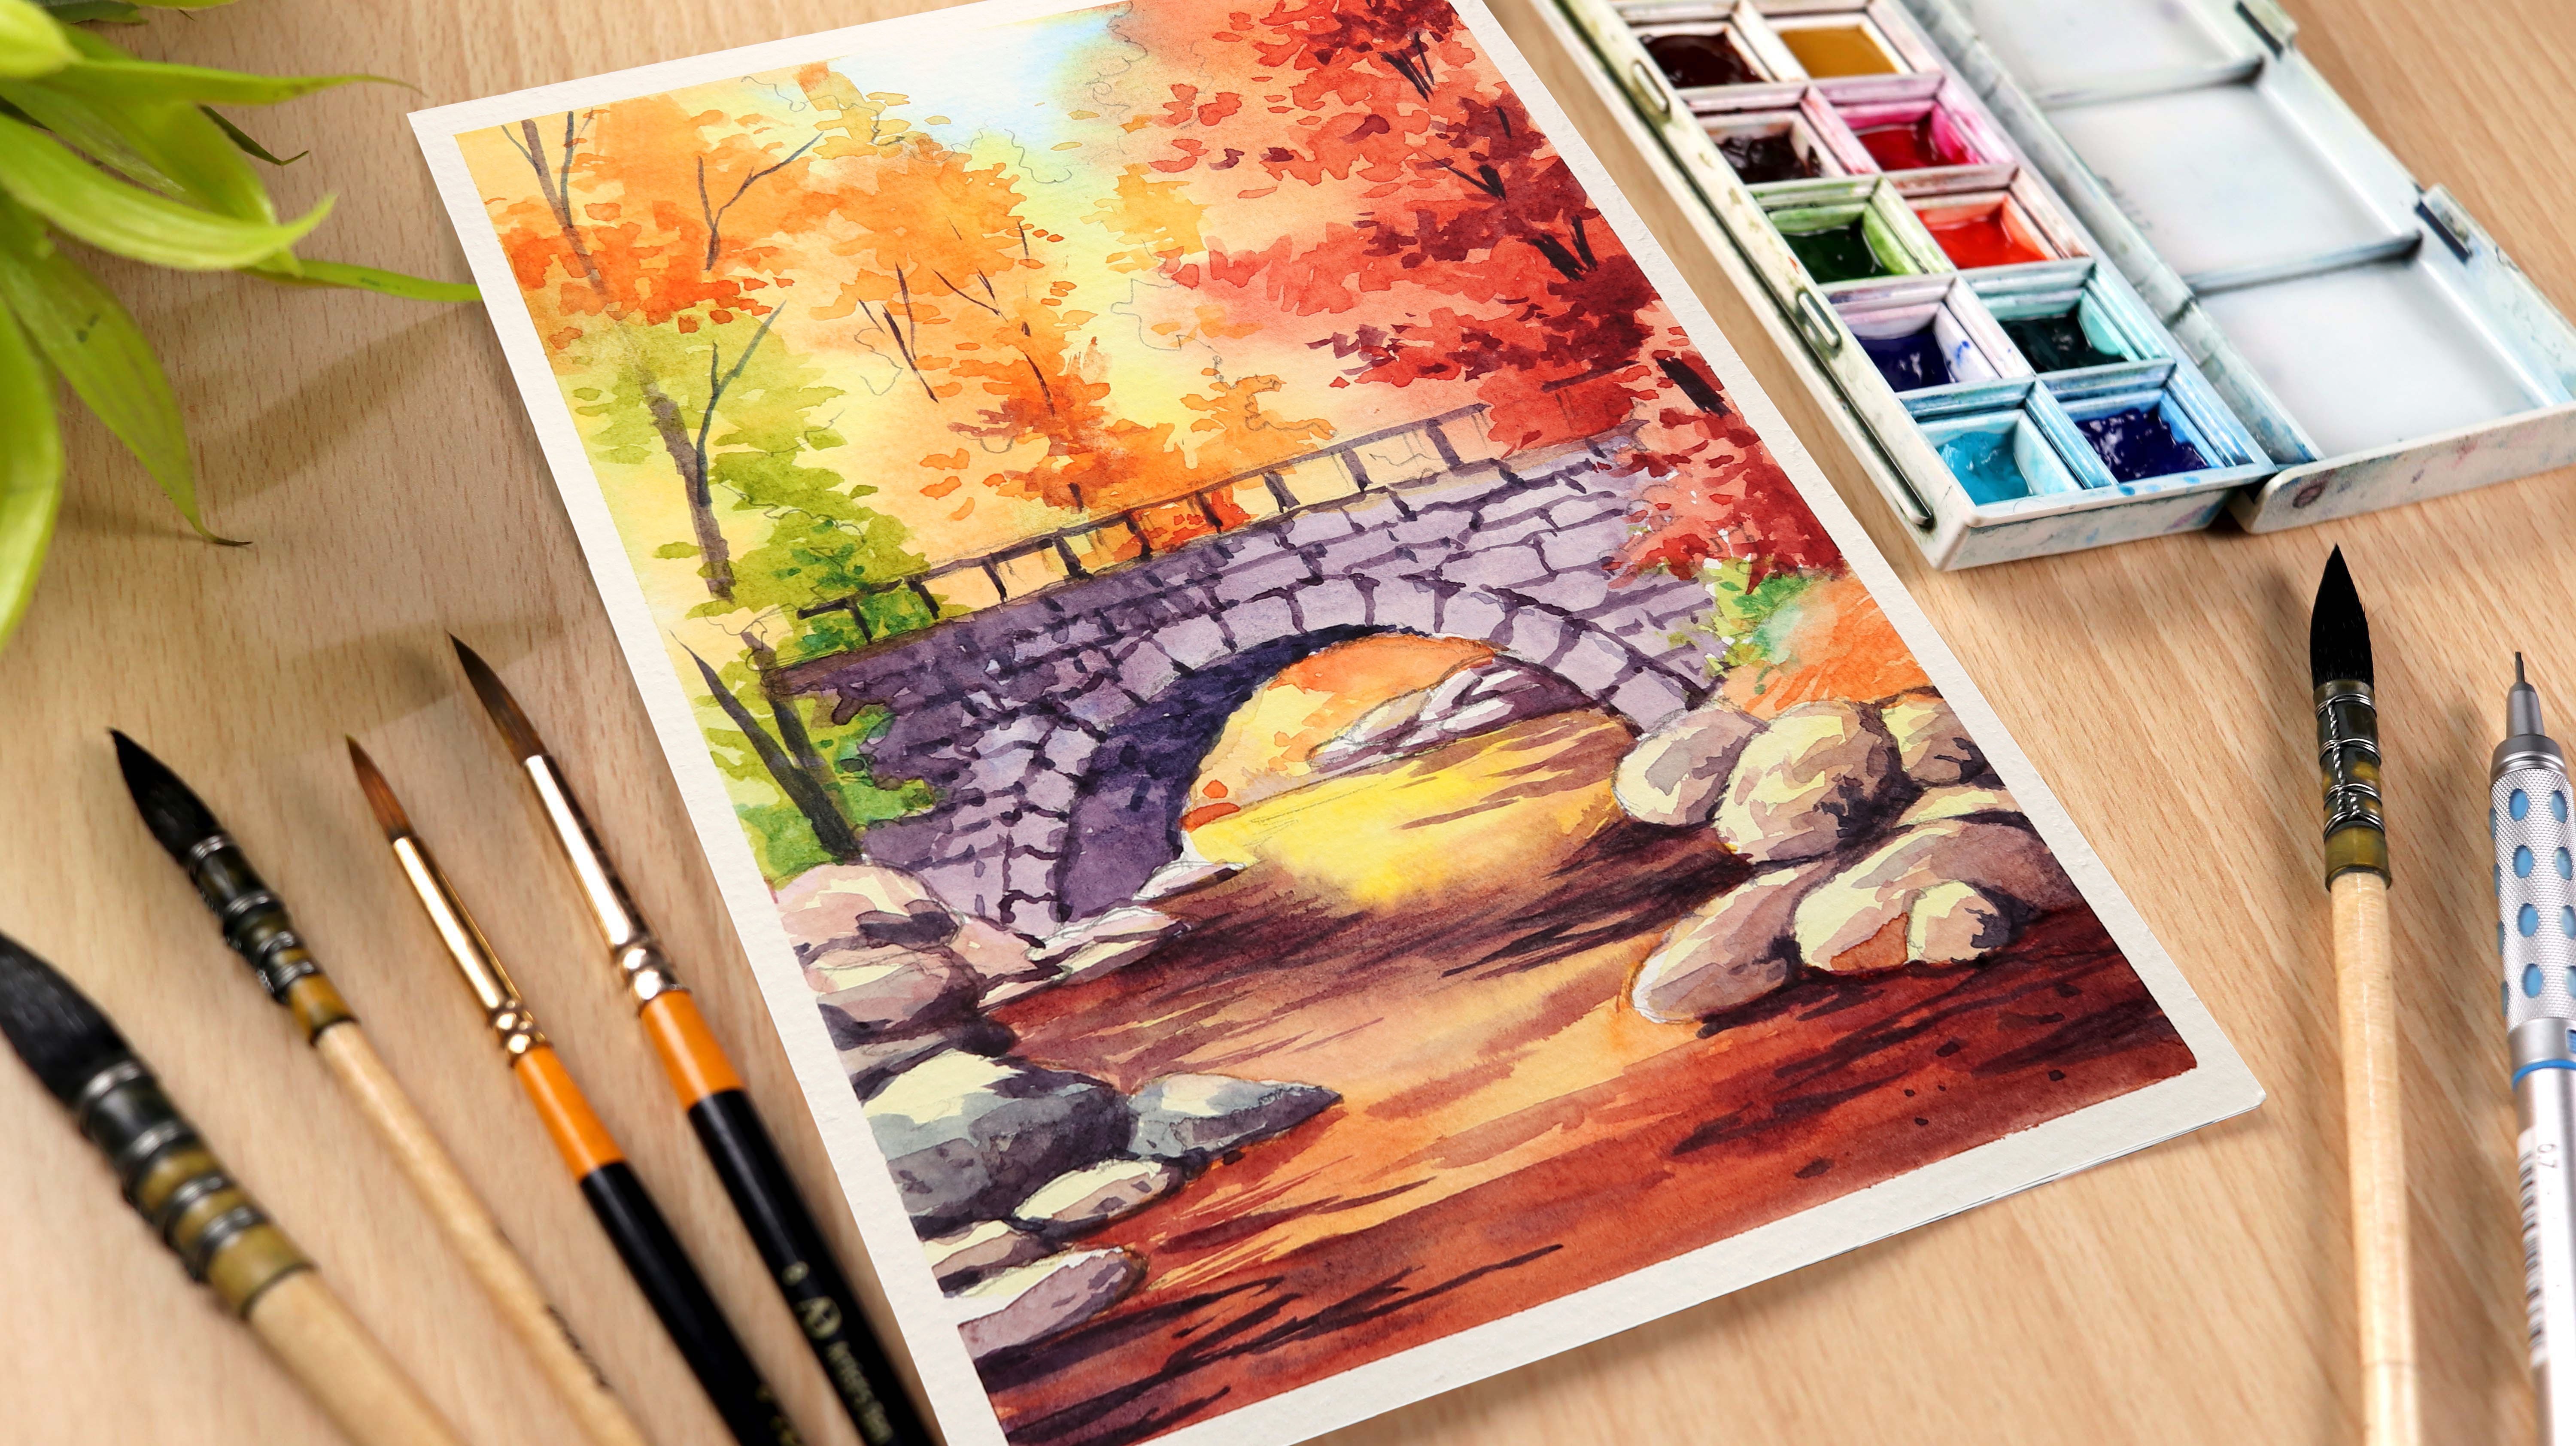
5. Part 1: Sunset Landscape: Hello everyone. Welcome
back to the first part of this beautiful sunset landscape painting with the Riverside doc. Let's quickly apply
the masking tape before we start the painting. Here I'm using a blue
color masking tape. If you have some
other masking tape, you can use that as well. Let's apply masking tape
on all the four corners. So friends, we have completed
applying the masking tape. Let's draw this sketch for this, I'm using an HB pencil. So while sketching, we will try to keep the pencil a little lighter on the paper so that it does not create dark marks. Also, you can see like I'm
only drawing the outline. For the horizontal. I've just drawn a straight
horizontal line. And for the dog, I will be drawing a tropism,
as you can see. Once we have completed drawing the basic shape of the dog, we will add some wooden logs. So you can change the shape
of the logs as you want. You can make some of them
a little smaller than others so that it
looks unnatural. Let's add some more wooden logs. Let's sketch some wooden planks. We will draw the wooden
planks one by one. But before that we will draw a straight line in the middle so that it can guide us as well as our perspective
remains right? Throughout the painting. Sketching the wooden planks, you can make some of them a little smaller than the others. Because the more variation
you will bring in the blanks, it will look more natural. So you can see Lake Whaler
drawing the wooden plank. I've just drawn a street lanes, but I have break them at some of the portions so that
it looks more natural. Now I'm sketching a roofs
which had been tied to this foot and locks to add
more beauty to the painting. Once we have drawn this sketch, it's time to make it light
using a kneaded eraser. I have removed this
extra lead or using a kneaded eraser because
sometime this led get mixed up with the color and the
color becomes little friends. We have completed
drawing this sketch. Now it's time to paint
with watercolors. So before we paint the sky, we will apply the water
first using a mop brush. Here I'm using a mop brush
number two nights good. To apply one to two
layers of water because The people would remain wet
for a longer period of time, and which will
give you more time to add details to your sky. Now I am a blank cadmium yellow. Let's mix a little bit of cadmium red with cadmium yellow. And then we will
apply to the sky. You can see the colors
are blending so easily. It's because the paper is wet. Now I'm applying this color, which is the cadmium
red mixed with cadmium yellow to all
the required areas. For that portion of the sky. At the top, we will use a
mixture of three colors. The first is intense blue, then the second one
is a burnt sienna, which is the brown, and the
third is the cadmium red. So we will mix these three
colors and then we will apply, as you can see on the screen. Now I'm adding a little bit of intense blue to the mixture. A little bit of cadmium red. Now this color we will
use to draw the clouds. You can also use a
mixture of cadmium red mixed with intense
blue to draw the clouds. If you want to make your
clouds look a little darker than you can increase
the amount of intense blue. Let's mix a little bit of cadmium red with cadmium yellow. And then we will
apply this color at the lower portion
of this guy. So we can also use this color to draw the clouds which
are close to the sun. The clouds which are
close to the sun, they actually get
the direct sunlight. This is a reason they look a
little bit orange in color. At the origin, we will apply a little darker
mixture using more of the cadmium red
and cadmium yellow. And then we will apply. Let's clean the palette. Let's pin the reverb for this. I am applying the water first using a mop brush number two. Now I'm adding some drops
of water, as you can see. Now, this will guide
you to know the amount of water that needs to be
applied to the people. I'm applying this water to all the portions
including the dock. So once we are done with
applying the water, it's now time to
paint for the color. I'm using cadmium yellow first. We will apply a light
wash of cadmium yellow, leaving a white portion in the middle to show the
reflection of the sun. At some of the portion,
you can increase the amount of cadmium
yellow if you want. Now let's add a little bit of cadmium red with cadmium yellow. And then we will apply to the area which is
Avi from the sun. You can see the colors
are blending so easily. It's because the
paper is still wet. Now I'm applying a little
bit of more cadmium red. Let's use a little bit of burnt sienna for
the darker areas. We can use this burnt sienna to draw the waves of the water. Let's mix intense blue
with cadmium red. Now this will give
you a darker tone, which we can use to draw the portion of the river
which is close to us. You can see this mixture is looking a little
bit blue in color. It's because the amount of intense blue is more
than cadmium red. Using the same brush, you can blend the color, but you can only blend this color when the
paper is still wet. Let's add some more water waves. For this, I'm using
cadmium red directly. Let's add a little bit
of intense blue with cadmium red to draw waves
which are darker in color. Let's draw some more water
waves which are close to us. For this, I'm using
intense blue directly. Let's add a little bit of more cadmium red to
draw the water waves. Now I'm using a damp
brush or to pick some of the colors from some of the
areas to show the reflection. So this is all about
the first layer. We have completed
our first layer, and now I'm drying it
using a hairdryer. I hope you have enjoyed this first part of beautiful
landscape painting. In the next part, we
will be working on the second layer
and adding details. Let's quickly jump onto our next part. And
I see you there.
6. Part 2: Sunset Landscape: Hello everyone, Welcome
back to the second part of this beautiful sunset
landscape painting. In this part, we will be
working on the details. Let's paint the dark
first for this, I am mixing intense
blue with crimson red. So I'm starting by
applying a light wash of concentrate mixed
with intense blue. And as we will move down, we will be increasing
the amount of colors as well as we will also
bring variation in color. I'm adding a little bit of water to make the
potion lighter. Now I'm adding a little bit of cadmium red to bring
variation in color. Let's add a little bit
of more cadmium red. Let's add a few
strokes of cadmium red to add details at
some other portions. Let's pin the wooden
logs for this. I'm using the same cadmium red. You can increase or decrease
the size of these logs. A changing shape
and structure will give this painting
more natural look. I'm also adding a little bit of burnt sienna to draw the
shadows of these logs. So let's be in the logs which
are close to us for this, I'm using cadmium red mixed with a little
bit of intense blue. Let's use a mixture of
intense blue mixed with cadmium red to draw shadows
of these wooden logs. I'm using the same technique and only two colors to draw
all these overt and logs. For the lighter portion, you can increase the amount
of cadmium red. And for painting the shadows, you can increase the
amount of intense blue. Now I'm using cadmium
red mixed with intense blue to draw this and
darker color would unlock. If completed painting
the first layer of this river, say dog. Let's try using a hairdryer. Friends, we have completed
drying the first layer. Now let's add shadows. For this, I'm using cadmium
red mixed with intense blue. Let's quickly draw the shadows. You can see the wooden blocks
which are on the left. I have added the shadows
on the left side. Similarly, the wooden logs
which are on the right, we will be adding shadows
on their right side. If you want your shadows
to look a little bit more darker than you can increase
the amount of intense blue. Now let's add shadows in
between the wooden plans. For this. I'm using
the same mixture, cadmium red mixed
with intense blue Here I'm using a liner
brush number two. Now these brushes are
used for adding details. This is a reason I'm getting
very sharp lines and I can easily draw
these wooden planks. So you can see while painting the shadows of these
wooden planks, I'm not making them
very straight. I'm keeping them a
little zigzag and shape. This will add more
beauty to the painting and the Moodle logs
would look more natural. So you can see my all wooden
planks and not of same size. Some of them are a little small. And at some of the
push and I have drawn them a little
longer in size. Now adding these variations in shapes will add more
beauty to the painting. And the wooden planks, as well as the painting
would look more natural. I've completed
painting the shadows of these wooden planks. Now let's add some texture. For adding the texture
I'm using the same color, which is cadmium red
mixed with intense blue. Let's mix a little bit of
cadmium red with intense blue. Now we will use
this color to add shadows to these wooden logs. Let's paint the ropes. For this, I'm using
the same mixture, which is intense blue
mixed with cadmium red. But the amount of intense
blue is little more. So this is the
reason the color is looking a little
bit blue in color. For adding the shadows, we will increase the amount of cadmium red in intense blue, and then we will apply. Now let's be in
the land for this, I'm using the same color, which is intense blue
mixed with cadmium red. As I'm getting
closer to the sun, I'm increasing the
amount of cadmium red. Let's paint some grasses
as well as leaves. For this, I'm using a mixture of intense blue mixed
with cadmium red. You can increase the amount
of intense blue if you want to make your grasses
look a little blue in color. And similarly, if you will be increasing the amount
of cadmium red, your grass will look a
little orange in color. I have drawn the stems first and now I'm drawing some leaves. So let's quickly draw
all the grasses. Adding shadows. I'm increasing the
amount of intense blue Let's add rubber tire to
these food and locks. For this, I'm using a dilute
mixture of intense blue. Let's add one more rubber
tire on the right. For adding texture to
these wooden logs, I'm using a very dilute
mixture of intense blue. Let's add some more texture. Let's increase the amount
of intense blue and cadmium red to draw the wooden textures
which are close to us. So you can see I'm using a very dilute mixture of intense blue mixed
with cadmium red. But the amount of
intense blue is more. This is a reason
our dilute mixture is looking blue in color. Let's quickly dry it
using a hairdryer. Now let's draw some
tree leaves for this. I'm using cadmium red and a very little
bit of intense blue, which is already
there on the palette. Here I'm drawing the tree
leaves a little orange in color because it
is close to the sun. In the evening, during sunset, all the colors get muted. So basically the colors which we see are these sand colors, which consists of
orange, red, and yellow. So for painting the leaves
which are away from the sun, we will use a mixture of intense blue mixed
with cadmium red. And as we will move
away from the sun, we will be increasing
the amount of intense blue to make
our lives more darker. Let's paint some
more tree leaves. Now I'm increasing the amount of intense blue as well
as the cadmium red. For painting the shadows
of the tree leaves, I will be using the same color, which is cadmium red
mixed with intense blue. So France, you can see how beautifully we have
drawn the tree leaves. If you want, you can
draw some more leaves. For the branches of
the tree leaves, I'm using the same color, cadmium red mixed
with intense blue. Let's paint some
more tree leaves. For this, I'm using
cadmium red more Because I want to
draw the tree leaves which are close to the sun. So we will be using
cadmium red more as well as we will try to keep
the mixture a little dilute. Let's add a little bit
of cadmium yellow, cadmium red, and then we
will paint the tree leaves. Let's use a mixture
of cadmium red mixed with intense
blue to add shadows, as well as to draw branches. For painting the tree
leaves on the right, we will be using the same color, which is cadmium red
mixed with intense blue. Now let's draw the tree leaves which are little
closer to the sun. For this, I'm using
the mixture of cadmium red mixed
with cadmium yellow. But you can see my colors
still looking a little darker because I already have an
intense blue on my brush. Let's add some more cadmium
red to intense blue, and then we will draw
the tree leaves. Now I have added a little bit of intense blue to the cadmium, red to draw some
darker color leaves. You can see that the leaves
are looking a little blue in color because the amount
of intense blue is mode. I'm using the same darker tone to draw the shadows
of the grasses. Let's add some final details to the shadows of the
wooden planks. Further details, I'm
using the same color, cadmium red mixed
with intense blue, and add some of the portions. I'm also using this color
to add some texture. Next, add some more shadows
to the wooden plants. For adding the
shadows to the tire, I'm using a mixture of intense blue mixed
with cadmium red. Let's draw the
land on the right. For this, I'm using a mixture of intense blue mixed
with cadmium red. But the amount of
intense blue is more. For painting this land, I'm using a brush number zero, which is a mop brush. So friends, we have
completed painting this beautiful sunset landscapes
with the Riverside dark. Let's quickly remove
the masking tape and reveal our
beautiful painting. I hope you have enjoyed
this beautiful painting. Don't forget to share
your thoughts and your paintings in
the project section. And I see you in the next part.
7. Conclusion: Hi everyone. Thank you so much for
joining the class. I hope you have enjoyed
this painting session. If you have any doubt or queries you can ask me in
the discussion tab. Also, don't forget to try
this painting and share it with the community at Skillshare in the
project section, given to all of you, it would be a great
experience for you, for me, as well as other
students and teachers. We all know that every
day is not Sunday. Similarly, we
cannot come up with best of our paintings
on the first try, but that should not stop us. As sometimes we have to
let go the thought of competency and focus more
on the learning aspects. Yes, paint and share
with the world. So this is all about today. I hope to see you soon with a new class and with
a new experience. Till then, take care
and stay blessed
 Shiba Basan, Art influencer and Content Creator