Transcripts
1. Welcome to Class Exploring Loose Watercolor Florals: Today we're going to be
doing this painting, and I'm going to walk you
through it step by step. This is watercolor
along with a pen, and I'm going to tell you all about this and
we're going to get this ready for you so that
at the end of the class, you're going to be
able to frame this and hang this on the wall and feel
really proud of your work. Don't worry, we're going
to go nice and slow, and I'm going to walk
you through this. If you're a beginner,
you may want to have tried some of my
other classes out so that you understand the different
supplies that I like to use and my techniques or just
go ahead and jump right in. I'm going to walk you
through this very carefully. If you're a little
bit more advanced, if you've done watercolor in
the past, you're welcome. I'm so glad you're
here. We're going to work on this and
see what we can do. I am positive that
you can do this. It looks like it's
a little bit more complicated than it actually is. And with a nice quiet
relaxing technique, we're going to get
this done together, and I can't wait to see
what yours looks like. I know that you're going
to want to upload, take a picture of it and
upload it right into the class project so that
other students can also see it and so that I
can celebrate you and your accomplishments yours might look very different from
mine once you are finished. Maybe you chose
different colors. Maybe you chose to
only do one flower. Maybe you put a whole bouquet
together. Totally fine. However you end up making it
is going to work out great. We're going to start
by practicing. You're going to grab a sheet of paper that maybe you've
already played with, maybe you've already
used for practice, and we're going to
make a little flour, and we're going to
practice the technique. Once we've had that
technique practiced, then we're going to go
ahead and put it into real practical sense and put it onto a piece of paper that you're going to
be able to frame. Welcome to class and I can't wait to see
what you've designed.
2. Practice 1 What We Are Learning and How Wet on Wet Works: Welcome to our practice lesson. If you've taken any of
my classes in the past, you know that I am really big on practice and that
the more you practice, the better you will become. What I typically do when
I sit down to paint is I will typically find
a piece of paper that's something I've
used in the past, and I will find a small
corner of something and reuse that section because I don't like to waste my paper. So on my desk, you
would look right now and see so many different pieces of scrap paper where I have played around with and
you but for this one, I would look at this
and say, Oh, look, you can use this corner, you
could find something here, we could play with
something over there. Then of course, I also have the back that I can play with. I encourage you to keep
your pieces of paper. Sometimes I even
just cut it down and then I use the
backside and I just cut it so that
I have lots of little scrap papers
to cut and use, whether it's for
a technique that I'm trying or maybe
a color combination. So make sure you save your
scraps and use it like that. It's really great to
have these kind things. So when I sit down to
paint something new that maybe I haven't
painted in the past, maybe I've seen something
that inspired me and I go, I wonder if I could paint that. What I will first do
is practice it here, see what I like, see
what I need to change, see what techniques worked
or what colors worked. And then I take it from here, and then I make a project and I paint it on a
full sheet of paper. Now this one I'm going to consider still my
practice piece. But sometimes, even though it's my practice piece
that I want to show you, this might end up
being the one that I like better than the one
that I make for the class. It all just depends. When you are painting you know, everything is going
to be just fluid. Maybe you have more water, maybe it's a hotter day, maybe, you just are too busy in your mind and the first one you painted
just flowed better. It's totally fine.
It's why I start with a brand new sheet of paper
because I don't know. Maybe my first practice
is actually my best one. I'm going to encourage
you that when you get from working on a scrap paper to working on your first draft and
to see how it works out, make sure this first draft is
on a clean piece of paper. Cut to the size that
you want it to be or taped off so that you make sure that it's going
to be the right size. What I did when I
painted this is I just used the full sheet and later I realized that I
had painted it too large and it's not going
to fit inside of my frame. If that happens to
you, totally fine. Here's what I do is you can see that that is
not going to fit there, you're not going to get a
chance to see the whole thing. But what I will do in this case is find an
area that I can mat. Even though I don't get
to see the whole thing, I will find an area in here that I really like, and I can say, Well, that's the spot
that I want it to be and that's going to be
inside of my frame, and I can just cut
away this extra part. The rest of the picture is behind the mat, but
that's actually fine. I like that. I like when things just fade off and underneath. It gives a little bit of a
mystery to your artwork. So don't worry. If you've painted
something too large, just go ahead and reframe it and figure out what
area do you like. And because of it's a mat, you can really move this mat around until you
find the exact spot. We're going to go ahead
and get started on this, but we're going
to do a practice. And so I'm going to
save this sheet of paper for when we go to
make the class project. I'm going to come over
here and use this one. I'm going to use side and we're going to
practice a flower. I'm going to show you how
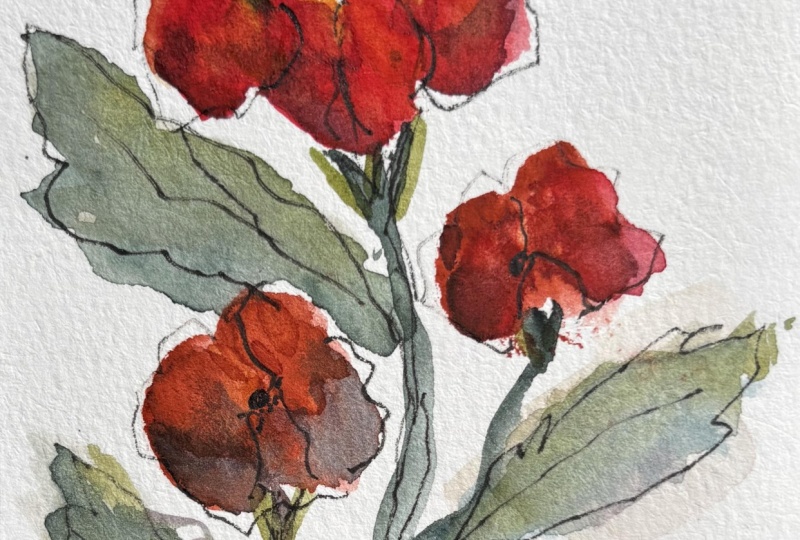
to make a flower like this. You will see that there are
multiple different colors. There's a pink, there's almost
a dark purply wine color. There's even a yellow going
on inside of the flower. Then you see that there are
pen marks on the outside and even a little bit
of a darker blue and a darker brown
on the inside. These colors can be
any colors you want. I'm for the sake of consistency, I'm going to go ahead and
use these same colors, then you'll notice that
there's these leaves, and I call them leaves, but they're very,
very loose, watery, has a great watercolor effect, and they don't really look like leaves when you first start out. They only start to
look like leaves when you start to draw your
pen marks on here. The pen I'm going to be using
for this is a micron pen. I like the micron pens. They come in all
different companies. I have a bunch of
them on my desk. They're different sizes. This happens to be a size
I think it was an eight. Yeah. There it is.
It's size eight. This micron company
I really like the technique you can use
this in a really loose way. I'm going to show
you how to use that. To get started on
this first flower, I want you to take notice of the direction that
this flower is facing. It's almost like you're looking at the side of the flower. That this is the edge of the flower and then this is
the backside of the flower. Then you're just able to see
the inside of the flower where the pollen would be just a little bit
here in the center. That is the concept
behind this flower. Then because we're looking
at the side of the flower, we get to see the stem where the stem meets
the flower head. That area is going to be
a little bit thicker. And then my stems are
always very, very jagged. I try not to make a
straight stem at any point. Straight stems sometimes lead to looking more like a lollipop
and a little artificial. I often make my stems very
organic with a lot of jagged, some extra little lines in here, we're going to work
on that as well. I first want to show you
my watercolor palette. This is something that I have
had for a couple of years. I was gifted to me, and I am so excited to be able to
have something like this. If you don't have
this and all you have is a palette that has
all the colors in it, that is also perfectly fine. You just might want
to have some kind of a plate or something
where you can mix some colors so we can get some
of this watery feel here. Because if you can see here
that this is really watery in here and you're going to want to have that ability to have
something that's really, really thin and not
too thick with paint. So I'm going to be using some
of these reds over here, some of the blues,
some of the greens, and I'll even dip
into this yellow.
3. Practice 2 Simple Brush Strokes and Petal Techniques: Wet paint brush. I'm
going to dip into my my pinky red color. We're going to paint this
first little flower part here, the part that's facing us. You can see that
it's a large area, but it's jagged and
not real precise. To make that, I'm
going to be holding my brush halfway up the brush. I don't want to have
it really close. This is not detail work. I'm going to be holding
it up here just to keep a really nice loose feel laying the brush head
down on the side. And just pushing up. See what I just push
up and then lift up, you get a jagged look. That's what I'm going for.
That maybe is this section, and now I'm going to do
this middle section. I'm going to just come down
here and just push up. Again, not being real precise, don't really care what
it's going to look like. This is going to look
different than this one, and that's perfectly
fine and to be expected. I can just make another little swish in that general area. This is my base here and
this is this top area here. And maybe I want
to bring it over around and make it a little bit rounder,
which would be fine. You do yours, however
you'd like to. I'm going to do that so
that I have a spot here to put the base of the
flower stem in this area. Now, we do need to work a
little on the quicker side so that this doesn't
dry because I do want to be able to drop
in the other colors. Now I'm going to be working on these flower petals at the top. I'm going to do
this one over here. If you have to move your
paper, go right ahead. Again, I'm just starting
halfway up and pushing out. I'm going to make
another one here. And then another one here and just kind of working my way
around this flower top. Now that I have the
base of the flour made, I want to add in
the other colors. I'm going to use
maybe this purple and I want the centers of my flower in here to
be a little bit darker. While that's still wet, I'm going to dip in some
of that purple. Maybe I even want the base
of the flower itself, the inside of the flower darker, and then the base here darker. Just dripping in a couple
little bits of that color. Might grab some of that
yellow before we get too far along a little yellow and just dabbing it here
and dabbing it there. It's going to blend in and
that's perfectly good. I rinse off my brush
really nicely. I can dab it off on my
paper towel or my rag. I think I want to
actually add in a little bit of a blue for fun. I'm going to put that
in here along the base. Really, really
faint. Not too much. Just to make that inside of the flour a little bit darker. Then maybe I'll come back in
and use a little bit more of a concentrated red and add
some more red in here. Like I said, yours is going to look very
different from mine, and that's fine, just like mine looks very
different from this one. Now, that has a lot
of paint on it. And a lot of water, and I'm just going to pull this up here so that
you can see it. That is a lot of
water and paint. I'm not going to move
it around too much. I want that to just
dry naturally. But I'm going to go ahead and show you how to make this stem. Using a green, I'm going
to just create some little jagged the
base of the flour, and then I'm going to make
my stem just really jagged. See, I'm holding my
brush really high. It's so that it stops
me from having control. This is where relaxation
really comes in for me with watercolor is I'm not trying to make this look like
a specific flower. You might say, Oh,
that's a rose or, that's a peony or oh
that's a whatever flower. That's great. If
you think that's what it looks like,
that's wonderful. To me, being too precise and
too rigid makes me a little tense and I would
rather to just paint something that looks
beautiful and fun and loose, and it is what you think it is. I am holding my paintbrush
really high to lose control. I don't want to
have that control. It allows my brain to
just relax and see what happens sometimes it works out and sometimes it doesn't
it doesn't work out, I just grab another piece of
paper and practice again. So because I'm holding it way up here and really kind
of loose in my hand, I'm letting the paint brush
do what it wants to do. And sometimes it puts a brush
stroke where I like it, and sometimes I go,
that was different. So now I want to show you
how we're going to be putting in some of these
little the wet spots. So using just a very clean
paint brush with just water, so just a clean brush. I'm just going to
put little paint little swishes here and there. Not in any particular way. Well, I think maybe there'll be a leaf there and maybe there's a leaf over here and maybe there's something
going on down here. Now, I'll grab some greens
and I'll just drop in the green color drop it in over here, where
that paint is. Maybe use a different green, add in another green over here. Maybe I will grab a little
bit of that pink that I used and put in just a
tint of pink in there. And using my clean paintbrush, I can go, Oh, these
are too solid. I want to get those
watery. I can do that. Maybe I want to add in
a little bit of yellow. Maybe I want to grab
a little blue and add a little splash of blue. This is where intuitive painting comes in where there's no plan. I'm not really making a plan. Yes, I have this, but you can see it's going to be
very different because it's just an intuitive
painting of me just painting where I feel like putting
a little splash of color. Now, if I feel like anything has too much color somewhere, I can come in with
a clean rag and just pick up some
and drip it off onto my paper towel and can
loosen it up that way. I also come in with
a paper towel like this and dab it and say, I feel like maybe
there's a little bit too much and then I
could dab off some. Very very relaxed. While this is drying, I'm going to add in just a
little bit of that brown. I have the sepia color here and I'm just going to add
in just a little bit, and it's going to touch and it's going to bleed and that's okay. So now that we have
this practice done, I'm going to go ahead and dry
it off with my heat tool. I just have a heat gun here. You can use a hair dryer or you could just let
it dry naturally. If you use a heat gun like
this or a hair dryer, make sure you hold the gun up high enough because if
you bring it down here, it's going to really
move this paint around and you're going to
lose some of that effect. Just be careful when
you are blow drying it. Okay, so this is
pretty well dried, um, and you can look at
that and you can say, Oh, but I don't understand
where are the details? The details come in
with your micron pen. I'm going to show
you how to do that, um and finish this painting up so that you can get over
to your class project.
4. Practice 3 Adding Ink for Definition and Value: So using your micron pen, we're going to outline
the different petals. If you can see here
in my example, there's this outline
that comes around here and sometimes it goes
even outside the painting. But each one of the petals is in a really sketchy
loose line drawing. Then sometimes there's even
some extra little bits of pen inside here and I even drew out a little bit of
the lines and here. And then when you go
to make your leaves, you're going to be just kind of making the general
shape of a leaf, and then the inside gets filled in with that paint that
you had already put down that was really
water coolory that's how that effect is made. So let's go ahead and
practice that on here. So to start, we're
going to outline the different leaves and petals. This first one, I can see that there's a
petal right here. Again, using this really, really light because
we're just sketching. I'm not drawing. I'm not making a
deliberate line. I'm going to be holding it up here again, to lose control. I'm just going to let the tip of my pen just rest on the page and just push it around and purposefully make
it a little jagged. And I'm purposefully wiggling the brush around or pen
around until it is nice and jagged like that
and going outside the lines of where I painted
just to create that really, really loose, jagged look and just outlining each
one of the petals. Purposefully moving
it around jag it. Now, in the center,
I might want to make some more circles. Maybe I want to add in
some of those little lines with little dots for the things that are
inside of a flower. Maybe you don't want to
do that, it's up to you. Then I also like
to sometimes add in the little lines that
are inside a flower petal. Holding it up high again, might just add in some
little sketchy lines. Sometimes coming from the top. If I feel like an area needs a little bit more definition, maybe I'll scribble back
and forth a little bit. Again, this is just all
just very intuitive. There's no right or wrong. Then when I get down, I feel like that needed something down into this area,
I'm going to again, just holding it really nice
and loose so it gets really sketchy outlining that area, giving it a stem, and then coming out to where
my leaves are going to be. This is going to
be a leaf, maybe I want to come all
the way up to there. I'm just going to
make it jagged. And I can. And there you kind of
have it. That's it. That's what we're
gonna do. So that's a great way to practice it. Um, I think because this flower head is
just a little on the different side from maybe what you've done in the past, I'm going to show it to
you one more time here. Um, and this is my
scrap piece of paper, so I'm just going to go ahead and make another one right here. So, to help you out, we're going to just paint
it one more time using this really put my finger in paint. So using this really loose and lots of water.
Lots of water. We're just going to
make this base part by pushing up a couple of different times and then put
in some petals at the top. Maybe that's it. Then I'll drop in some color, some added extra color. If you want to
just make this out of one color and you don't want to add in other colors,
that's perfectly fine. You can make it
however you want to. Go to add in a little
bit of purple, I think. I like that a little bit of yellow splashes.
Something like that. Really, really wet. Lots of water. Moving
it around. Okay. Blow dry that one, keeping it way up high so I
don't move that paint around. That one's not quite dry yet, but I'm going to
go ahead and paint a little bud so that I can show you how to
paint a little bud. So a bud like that, I had
that one facing down. So I'm just making
a kind of a circle, leaving a little bit
of space here and there, something like that. That's my little bud. Or I could make a smaller
flower, and again, just pushing up, pushing up, maybe making a smaller
flower like that. That's really all that is, is
just the same thing just on a smaller scale when
without as many petals. Then again, you could add in all the different colors
if you wanted to, or you could just leave it plain and not add in the colors. I'm going to go ahead
and let that dry. Okay, so because I know not everybody is going to have
a micron pen on hand, you could use any marker. You could use just a
ballpoint pen to do it. But I also want to show
you this technique where you can use just a
small detail brush. This is just a
really, really tiny, like size two little brush, and I'm going to use
that using my paint. So I just wanted to show you that this whole technique can be done the same way by
just using my paint. And I'm going to use
this dark brown, which is like a CPA color. So if you don't
have a micron pen, but you have a really
small paint brush, you can still get
this technique done. Sometimes I trade them off and sometimes I like
the pen better and sometimes I like a brush
better. It's the same thing. I'm just dipping into
my little brown color and I'm going to hold my
paint brush up high again, and I'm just going to loosely
make some little squiggles around where the petals
would be and outline them. Again, going outside
the lines as I need to Sometimes adding
in little extras. You have to be careful because your paintbrush is not going to be as fine as
your micron pen, so you don't want
to add in too much. Then if you had painted
something here, you could add in your
stem and your leaves. Then you can do the same
thing for your little buds. See how fun that is? It adds such a great texture and little dimension by just
adding in this little outline. Maybe this one is upside
down because it's, you know, there you go. There's a second option. You can add in the
little extra details. Use this size or smaller. I don't happen to have
a small one right here. The size two was the
best I could find. But you can see how
it's a different look, but it's just as much fun. Choose whichever way
you'd like to do. Thanks for practicing. Make
sure you fill up a whole page of doing this flower head and maybe even practice
some of this really, really loose watercolor effect. And when you've
had enough chance, maybe it's several
different pages or you used your notebook and you're keeping all your different flower
heads inside of a notebook, which I highly
recommend you doing so that you can always
refer back to this. Then come back and we are
going to grab a fresh sheet of paper and we're going to
do our actual class project.
5. Class Project Part 1: Paint Your Watercolor Floral: We're ready to start
the class project and I can't wait
to see your art. Make sure that you
load up a picture of your art into the class project so that we can all celebrate
what you've accomplished. If you'd be so kind, just
take a minute and give me a review so that I know if I could be improving
on something. It also helps the other
guests that come, all your students,
your fellow students so that they know if this is a class that's right for them. Go ahead and give me a
quick little review. It can just be a couple words. It doesn't have to be long,
any reviews really help. So when I go to paint
something and I know that this is the mat I'm going to be using
or I have a frame, I like to take this
piece of paper, and either I measure it out
with a ruler and I say, Oh, this is a five by seven, and then I put little
dots in there, or I sometimes take my mat
and I line it up like this, and then I will take a
pen or pencil, really, really fine line with
a pencil and just make a little tiny fine line
on the different sides. Because then I know that
I need to paint within that space so that I paint or when I put
this down on top of it, it's not going to be too large and that
I've missed the mark. Now, I don't mind, like I
had said at the beginning, I don't mind if my
painting goes beyond it. I'm just going to make
sure that I try to keep my three main flower
heads inside this mat. I actually keep ant. You can see that this
one all buggered up because I put
my fingers on it. Sometimes it gets
paint on it and stuff. I just keep one of these around because I know
this is the size that I often paint in and so this is my practice one
that I can use. These marks are going
to be able to be rased. I can use an eraser to get
rid of them at the end. I'm going to be making
my finished art piece, very similar to this with the three different buds flower and di three different stages. I think I'm going to stay in
that same color way as well. Take a slow breath
in and let it out. As you settle in to begin
your project painting, allow your shoulders
to relax and soften. This is your time
to create something peaceful and entirely
of your own. There is no rush here. So feel free to pause the
video whenever you need to to catch up or simply
take a moment to breathe. As you paint, remember
that you already learned every technique you need
in the earlier lessons. If you ever feel unsure, you can always go back and watch those practice
videos again. I go over every stroke
and step in detail there. For now, you get to
just enjoy the flow. Let yourself paint at a gentle pace without pressure and without
worrying about the outcome. This is your space to explore. Try to release any
thoughts about perfection. Art is not actually
meant to be perfect. It's meant to reflect who
you are in this moment. It's a place to experiment, to discover what you enjoy, and to learn something new each time you pick
up your brush. As you work, I want to
encourage you to show a photo of your project in the gallery when
it's all done. No matter where you are
on this journey of art, you deserve to be celebrated, whether you consider
yourself a beginner somewhere right in the middle
or already more advanced. Your artwork has value, and it represents your time, your heart, your effort, and your courage to create. And if you feel comfortable, leaving a review is
such a helpful way to support this class and
help others find it, too. And both mean so much to me. Let's take another deep
breath. Notice your brush. Notice the colors
you're choosing, and let your
movements stay soft. If something unexpected
happens on this page, try not to react
with frustration. Instead, pause and ask yourself what it might
be teaching you. Every mark is information. Every attempt is
actually progress. You may notice
that as you paint, your mind wanders to thoughts
about how it should look. That is actually
completely normal. When you feel that pull towards
perfection or approval, gently bring your attention back to the joys of the process. Ask yourself, what part of the experience is feeling heavy? Is it the desire to
get things right, the need to impress
a color choice that doesn't feel
quite right to you? Sometimes just
noticing these things helps to soften those thoughts. I often paint the same project
several times in a row. Sometimes it's just two
times and other times five. Each attempt shows
me something new. Each version becomes part
of the story of learning. There's no shame in
practicing it again. In fact, it's one of the most beautiful parts
of being an artist. You grow through repetition, and you grow through curiosity. So if you finish this project and you feel the pull
to try it again, follow that instinct
with kindness. As you continue painting, let your breath stay slow. Let your hand move gently. Let yourself enjoy
the small details. This is your time
to be fully present in a way that daily life
does not always allow. Silence is part of the
creative process, too. So feel free to pause
whenever you need to take a break and look at what
you've accomplished. Decide on your next step. And once again, when you're
completing your painting, I would truly love to see you upload a photo to
the project gallery. Seeing your work brings me so much joy and it helps
me connect with you, and it inspires
other students, too. If you feel comfortable
leaving a review, that is another small way
to support the class. It lets others know that this is a safe and encouraging
place to learn. We're coming towards the end
of this peaceful moment. Take one more time to breathe
in and slowly release it. Look at your painting with
a soft, gentle perspective. Ask yourself what you learned. Maybe it's something
about the timing or color or water or patience,
whatever it is. Let it be something you
carry into your next piece. And remember, if
you're not having fun, it is important to
pause and reflect. Something within the process
might need adjusting. Maybe it's your
expectations, your pace, your color choices, or even the pressure that you
are placing on yourself. Take time to notice it. Once you see it, you can try
again with a lighter heart. Thank you so much
for painting with me during this first
part of the project. I hope you're feeling calm, encouraged and proud of
what you've created so far. In the next video, part
two of our class project, we will add the ink details that brings everything together. This step is gentle, simple, and such a beautiful way to
finish your floral painting. Once you've completed
both parts, I would love for you to explore my other watercolor classes
here on Skillshare. Each one is designed to help you grow in a comfortable pace. Try new techniques and build confidence in your
own artistic style. You can move through them in any order that
feels right to you. Thank you again for spending your creative time
with me today. When you're ready, go ahead
and join me in part two. So we can add those
final ink touches. I can't wait to see
your finished piece.
6. Class Project Part 2: Adding Ink for Final Details: Thank you for
indulging me in just having a voiceover while I
did the actual art project. When I paint intuitively, where I don't really know where the next brushstroke
is going to go, it's really hard for me to talk and paint at the same
time and be intuitive. I am going to need to do those voiceovers when I
do that kind of work. Because it literally is just me letting go and
seeing what happens. Thank you for allowing
me to just do a relaxing voiceover for that. But now we're going
to do the pen, and I think on this one, I'm
going to stay with the pen. I did show you how you
could use a paintbrush, but I think for this
one, I'm going to use the pen and keep
it nice and light. I'm going to start by doing
the pen work on these. Again, I'm holding my pen up on the higher side so that
I lose control a little bit and just outlining where the different
petals might be. And just kind of doing
a nice outline going outside of the lines where
appropriate and coming inside, maybe even adding in some of the little bits that are
on the inside of a flower. Each one of my petals gets
its own little outline. And sometimes I double and I, you know, put in little extras. I put little double
lines around it. The more upright you hold it, the more solid line
you're going to get. The more angle you
get it, you lay it, it's going to be a
little bit more sketchy, it just depends on what
look you're looking for. I'll just add in some of these. Some dots. Okay. I never know where my pen
is going to go. I'm not preplanning this. This is just very, you know, loose and it just
kind of happens. So feel free to just
let that all go and happen, really,
really loose. Maybe put in some of my leaves. I think I'm going to have a
leaf here and here and here. I already have it kind of
mapped out from what I painted. Jagged leaves. Okay. I think that's about done. And then, again, pulling over my Matt and figuring out about
where this is going to go. It's going to go
about like that. I still want to go in
and erase those lines. You can see that I
didn't paint it exact, I have a little bit too
much headspace and I went just a little bit too
low, but it helped me. It helped me contain. I'm
going to go ahead and do that and put it about there, and then I know I'm going to
sign it about in this space. I'm going to go
ahead and sign it. Make sure you always
sign your artwork. It's so important, even if you're not planning
on hanging it on the wall, you're going to put
it in a drawer. Make sure you sign your artwork. Sometimes I even like
to put a date on it so that I can
refer back to it at a later date and know what
year it was that I painted it. So I'm going to come in with
my little eraser and just erase some of those
pencil marks. After you've painted
over the pencil marks, they are a little bit
on the harder side. Make sure you get yourself a
really good eraser though. You don't want to be
using an old eraser from a number two pencil. Those sometimes leave marks. So make sure you buy yourself
a really good eraser. But I think that's
good. I did that. Any other random
marks I can erase? There you can see that
my artwork is similar, but they're not the same,
they're not identical. And now I can frame
this one and put it into I can mat it and put it into a frame and be really proud of this. When you get yours done, make sure that you hang this up. Maybe this is going to
go into your bedroom or into your bathroom
or into a foyer, put it on a little table. It'd be something
maybe this is a gift. Maybe you're making this as a Mother's Day gift
or celebration gift. Make sure that you
mat your paintings and put them in frames. You're going to be
so amazed at how much more professional they look as soon as they
get inside of a frame. Come back to the
last lesson and I will show you this all
framed up and ready to go.
7. Outro Final Thoughts and Your Next Creative Steps - Please Follow Me: Thank you so much for spending this creative time with me. I hope this class brought
you a sense of calm and joy and that you learn something new about your own
style along the way. When you finish your piece, I would love for you to upload your project to the gallery. I check that area
often and it makes me so happy to celebrate
your artwork with you. If you enjoyed this class, taking a moment to
leave a short review is one of the most helpful
things you can do. Reviews help other
students discover the class and support me in creating more
lessons for you. If you're feeling inspired, I would love for you to explore my other watercolor classes that I have here on Skillshare. Each one is welcoming, beginner friendly
and designed to keep you growing
at your own pace. Thank you again for
painting with me. I cannot wait to see
what you create next. Have a blessed and wonderful day and keep exploring that paint.
 Brenda Jones, Watercolor Artist & Teacher