Transcripts
1. What will you learn today?: their glistening, translucent flowers, which are glowing site when backlit by the sun. The petals look like based on colored issue. People off printed draw self cloth. The tall, slender stems are topped by bright, smiling. Flowers were actually in all colors off the rainbow but blue, with many hues in between. The ring off prominent yellow stamens enhances the colorful blooms. The dancing green buds simply look as if they're going to burst with some kind of magic and Freddie Iceland poppies. I saw I painted and I got hooked on. I have been painting these blues for quite some time now, and I thought it was the perfect season to share them with you in like today's class. Hi, I am Pooja, the artist behind the Instagram and YouTube account by the lakeside out studio. I'm a watercolor artist based out of North America, and I welcome you to my ninth skin share class. You can read more about me and my arch journey on my skill share profile. In today's class, we're going to master everything about painting poppies in a loose, effortless style. We will begin by starting these flowers in detail and capture the main features that uniquely define these blooms. Going ahead, we will switch all the colors we will be needing to paint this based on color bright poppies. As a final project, we will paint a beautiful waste filled with colorful poppies and parts. I will paint this project that you in real time. This project is designed to ensure that you paint poppies from different angles and facing in all directions. By the end, off the glass, he will be confident being to pop in every possible color and style. So what are you waiting for? Let's jump right into this and being a stunning bunch of Iceland poppies.
2. What supplies will you need?: for people. I will be using a cold pressed watercolor bloc coalition, Stonehenge Acqua This 100% Gorton People is £140 has a beautiful deck show. I recommend using 100% Corton paper to get satisfying results. I will also be using cold press block by art philosophy for brushes. I will be using round brushes from Princeton around Well from the Heritage Series is a big size brush, which allows you to make nice big patterns. In one sweep. I will also be using a size six round brush from the Heritage cities to pain stems and birds and lastly, a size four round brush from the Princeton well bridge scenes to work on the centre's off the flowers for pains. I will be using the art philosophically. What took a look infected set? This is a perfect goto palette with a perfect mix of all the colors that you may need for painting floors, especially the poppy colors. I will also be using some shapes from my custom palette. I will be using some wash colors to paint the centers off the poppies and the ways Hoosiers off clean water to rinse your greens and things. We want the poppies to look fresh and bright, so make sure you don't mix your greens and things in the same shot or else the muddy brown water will start transferring the doneness to your poppies. People travel to clean your brushes. Hold right. That's pretty much what we need today. Now let's look at the color swatches.
3. Let us explore them poppies!: before we start painting poppies, let's look at some pictures off these blooms and understanding basic features. I looked up for Iceland poppies through my Pinterest search bar, and these were some off the search results. As I started scrolling through the photographs, I meet some basic observations. This particular type of poppies are bright and colorful. They're mostly in the shades off yellow beach, red orange blush things, and all are predominantly leaning towards. Based on shades. The stems are visibly tall and slender. Most bookie arrangements that I saw had long stems sprouting. Out of the ways is the birds of Iceland. Poppies are quite full O and are mostly drooping down from the depart system. Lastly, I observed that the stems are slightly textured and have a Harry feed to them, so we will try to evoke that in our painting. So now that we have a fleeting image of the flowers in our heads, we know the direction to proceed for the we will be in the big bunch of poppies pleased in it. Always, we will keep our poppies colorful but based and try to pain them in assorted sheets just to make RB slope right and interesting.
4. Color Swatches: we're going to use over idea of warm colors to paint our poppies. Today, every swatch that I sure here is going to be used in making based on washes, auras, darko values to around the initial washes. Don't be afraid to mix your oranges with your yellows and pinks with reds or things with yellows to build these lovely based all shades the secret lies and mixing the colors into each other and crossing those boundaries off, using the paint as it is. So keep these shades as a guideline. Well, wrapping up your palate.
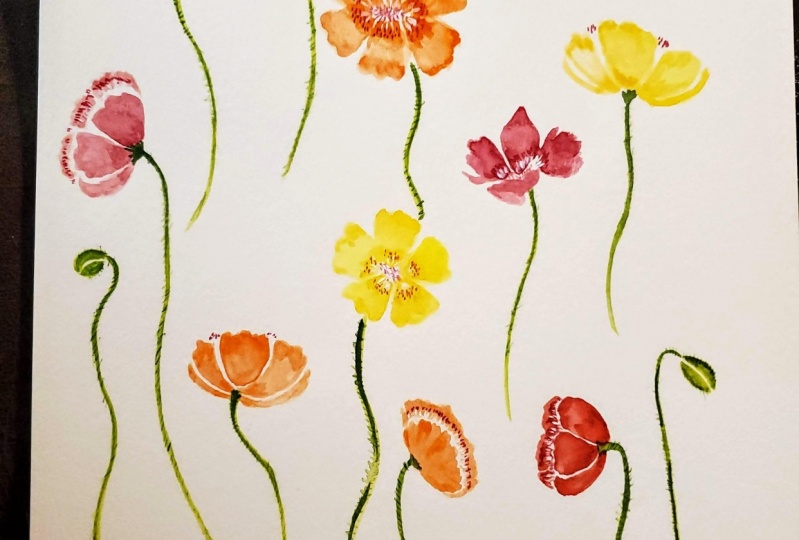
5. Let's practice painting buds: for painting stems and buds. I will be using sap green and green appetite genuine by Daniel Smith. I will start with a light wash up, sap green and draw a long Corbis system, then at a darker value from the sights and let it march with the first wash. Once the stem is in place, we will like to small notes attached to the stem. I'm going to keep the Bard stripping down, and then when the body is in place, we will drop in the darker green appetite genuine from the sites. Now to add the Harry take shirt on the stem, I'm simply going to pull out some small brush strokes from the stem. The color is still wet, so you will simply have to stroke your brush slightly in the outward direction. And we will do this throughout the stem, including the Bard. Okay, let's try doing one more stem. Keep in mind that the poppy birds are quite Fulham, and hence most of them are always drooping down from the stem. You can try painting them facing in different directions and practice to loosen up your hand while drawing the long Corvi stems
6. Warm up poppies: Okay, So before we jump into our final project, let's try to loosen up a little and practice some warm up strokes for a puppies. So I'm using a very light of make soft of melon Carlo from the artfulness off weaken Freddie batted and just trying to make a poppy that does facing the viewer off friend facing Poppy. So I'm just making these brush strokes very close to each other to form a pattern. Keep your hand and wrist very relaxed and try to make. He's really floppy battles, which are not very big and not very small. We warned medium sized flowers for our project, so make sure that your flowers are not very small at wise. They're just going to look really sparse on the page. We want to fill up the entire nine bite with age with our puppies. If you're using a beach that is offer different size, make sure toe paint poppies, which are in proportion with that size, just using a doctor makes and dropping it around the center and around the edges. This is just a very basic warm up that I'm tryingto, uh, being too. But in a final project we will be going through every poppy in but most detail. So don't worry too much about this practice session. Just try to loosen up your hands, try to make some colors, try toe makes new shades of pinks and oranges, and we're going to paint more than 10 to 12 poppies in a final project. So that's going to give you enough practice, and I will walk you through each and every poppy that we will be painting in that in the final project, along with the details of the shades that we will be mixing. So this is just a quick demo off port you're going to be painting today. I just spent a couple of poppies that are facing front facing on the side. Be seeking a backside and we will just put all these poppies together and I find a project . So just mix for lighter shit off, being on my bandage and trying to paint a big size side facing copy, just making these really easy flowing big bedrooms with my around 12 brush. The pigeons are quite full. Oh, and take having some back patterns, which are nothing but brush strokes and the upend Armando. If you're observing walking quite fast because I don't want my mission, there's too dry. But you don't have to speed up so much. Just find a base that works for you well, adding a doctor mix of pink at the base. The whole idea off this class today is to focus on painting a lot of different poppies, which are in different shades different colors facing in different angles. So there's going to be a lot of exercise and practice for painting. Your Bobby so doomed worry about it, and I assure that by the end of the class will be really good at painting poppies in various angles. So let's just get started with these warm or pieces, mixing a bit of green and adding a long stem to this copy. Going for the I'll be using my size six Wrong rush to add the stand just to not take a risk off, adding really takes them with around 12 brush so most of the time is going to be using around six for doing my stems. I have mixed all slightly darker shoot off red and doing a side facing poppy that does. Facing the left hand side. Now I think the doctor value but the base and at the base off the back patterns. Rensing my brush off Merging the DACA bandy with the initial wash taking off the excess condo with my brush and with a mix of green. I'm just going to add a long, curly stem. Again. I'm intentionally netting the green lead into the patterns, and that's over. Side facing GOP Now let's try to do a yellow OPI, which is facing the back. We're not going to show any back pensions because it is not enter towards theme. So just adding a couple of patterns, which come together at the point where the stem will start. Adding will be took doctor about you. Just a hint of orange marching all the countries together and then just adding a long stem. Do it. That's our back facing Poppy. Next, let's try to paint a poppy that is slightly tilted towards the user. So in that case, we're going to draw a bigger Flatow front battle, and because it's tended towards the user, we're also going to see the back patterns and the inside off the flower. So this is our flat looking French pattern? No, I'm just making some strokes to form the backpedals with a very light wash of red and pink mixed together, - adding a bit of Dhaka value at the base, something netting the colors bleed into each other naturally and then adding with stem again. So when we start painting our final project, I will walk you through in details to show how to paint the centers on, also at some Harry text show to the stems and the birds. So on off those minute details, we will take care off and we actually jump into the project and builder composition step by step. So let's go ahead and see what we can do next.
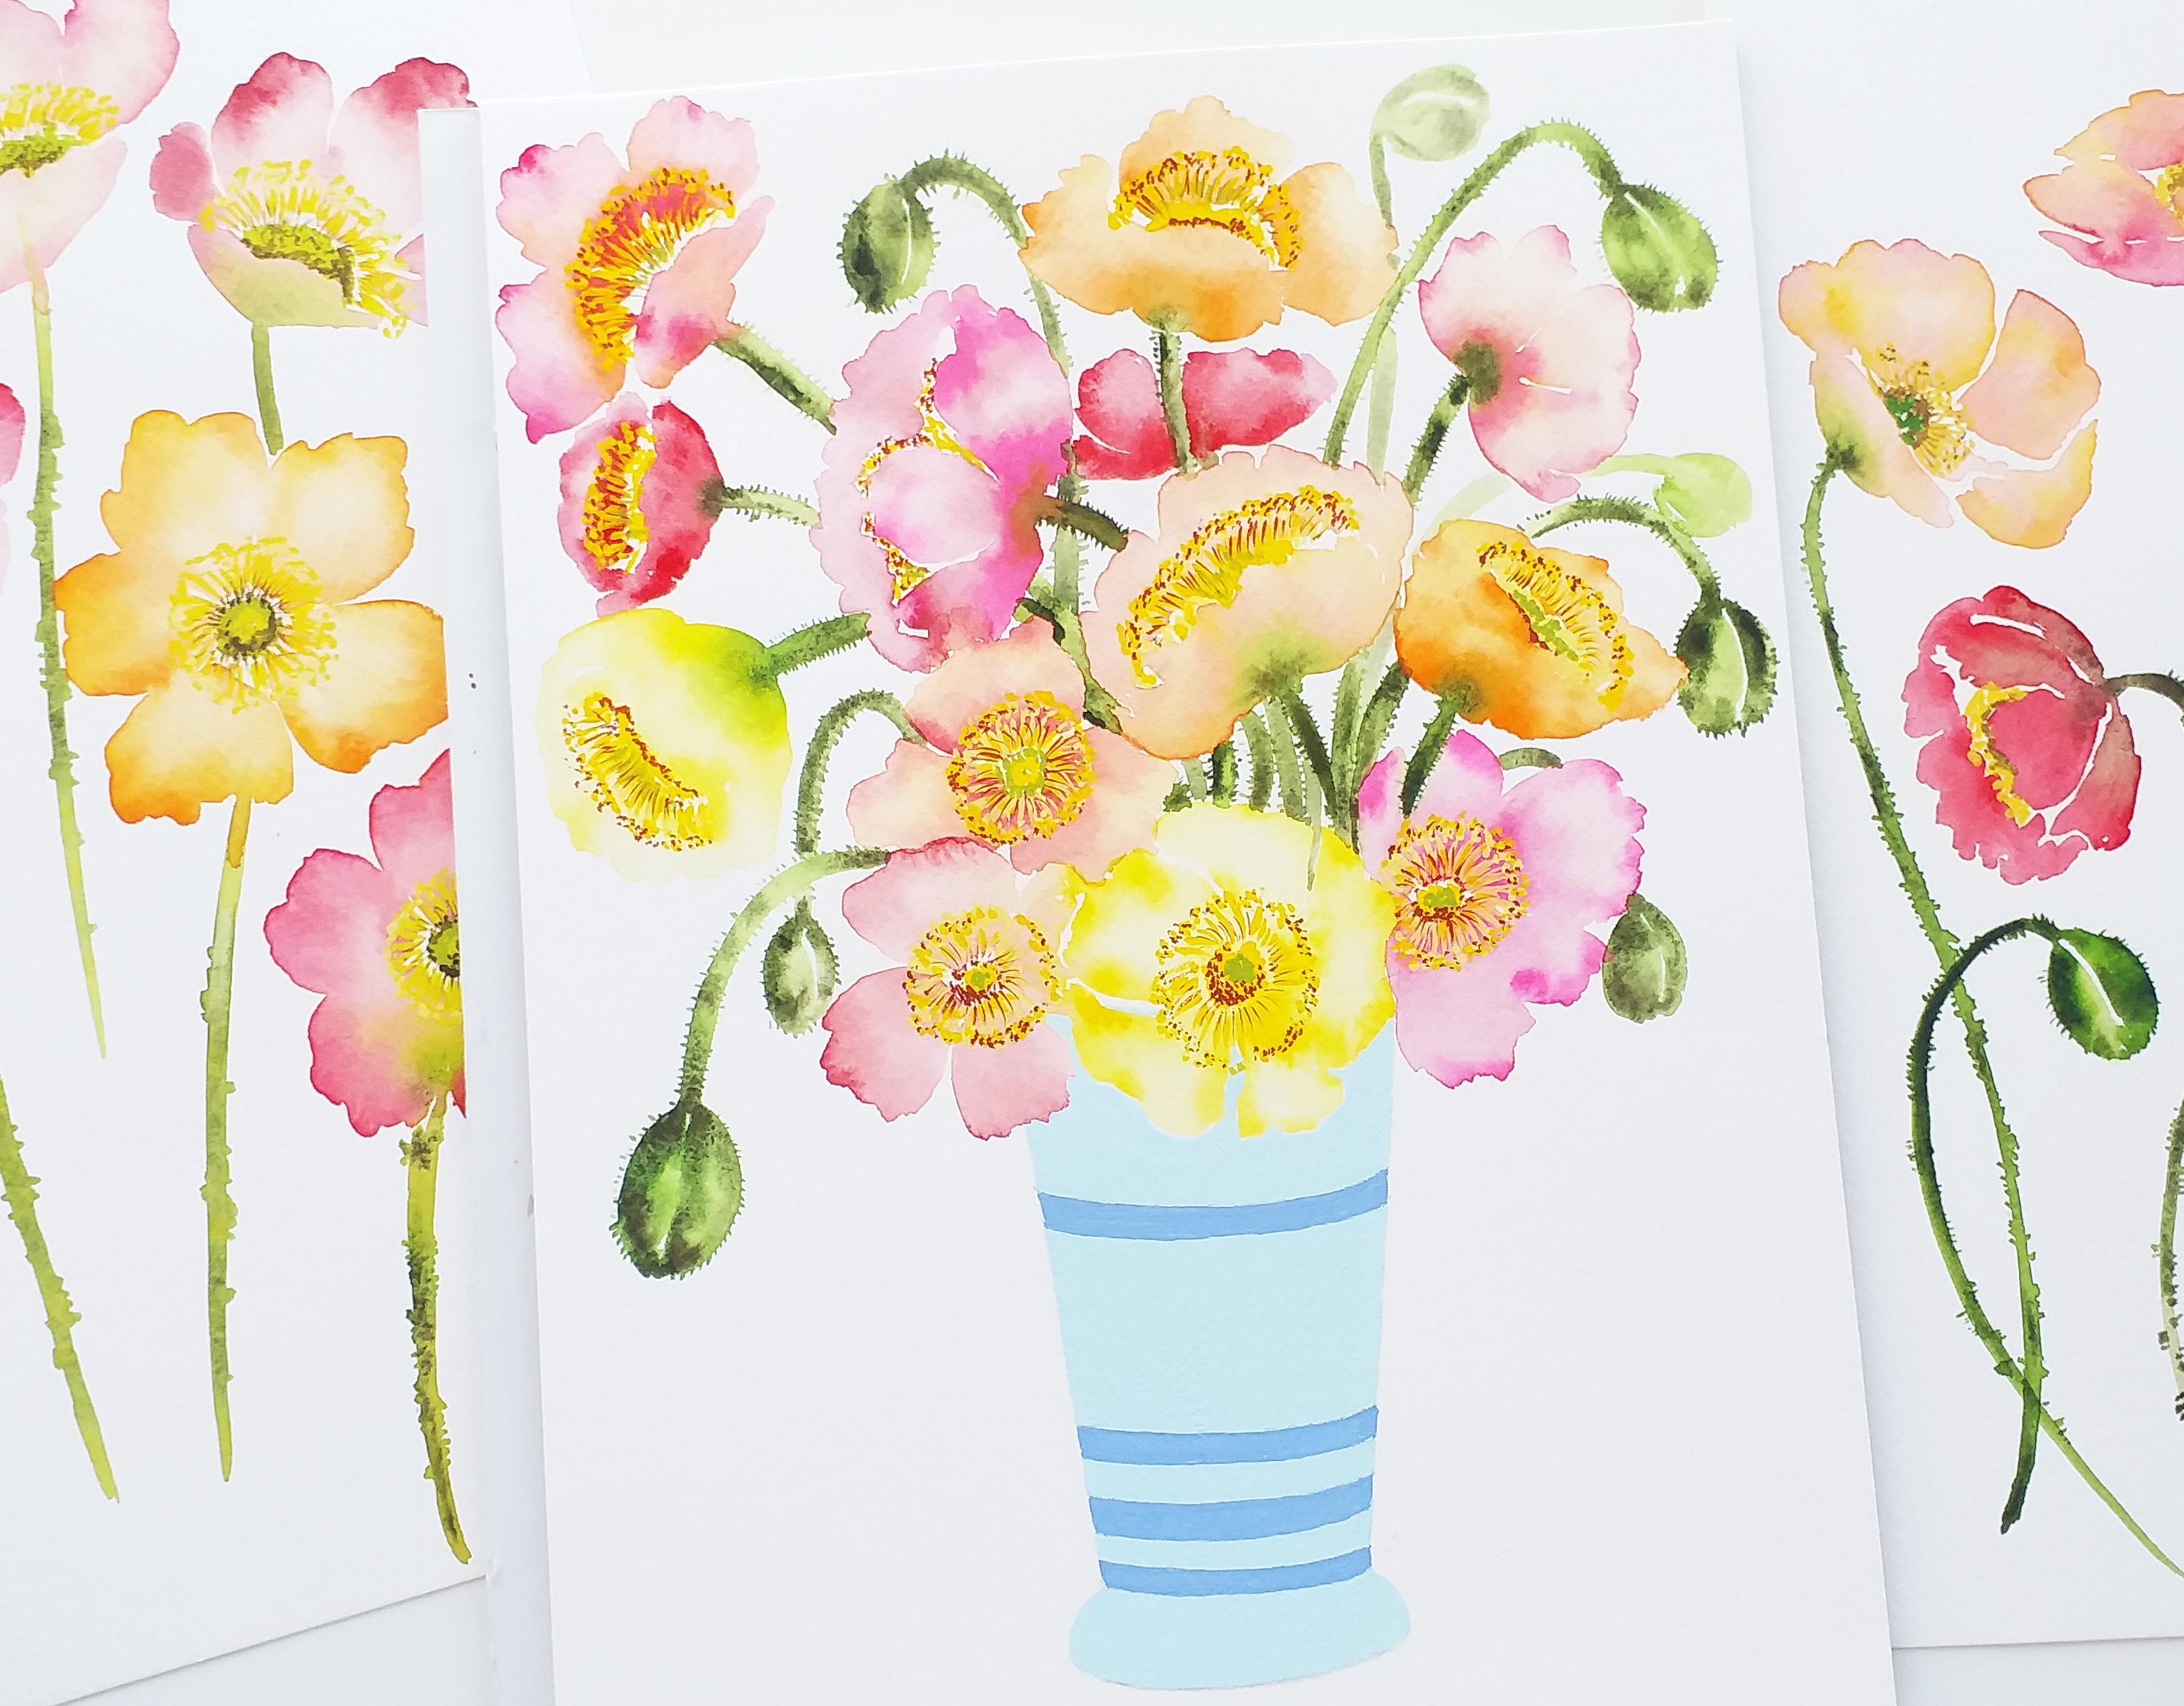
7. Sketching the vase: Okay, So before we begin painting the main poppy bookie, I want to make sure that the basic structure off the waste is in place. This will allow me to have a reference point for placing my poppies. And I would know the area left for me to play after sketching out the place for the ways. So keeping in mind that the mean highlight off the project of the poppies, I'm going to keep my ways very basic and simple. I'm thinking of drawing A We shape ways with around base if you want the jazz up your ways a little bit to feel free to look up for references and try to sketch it out to make things easy for the painting process. - The height off my ways is slightly less than half off the page that I'm using. So my pages nine by 12. So the height of my waist is roughly about five inches, so the area that is left on the top will be used for painting my poppies. So that's the reference point that I'm trying to use here. So make sure that your ways is not oh so tall that you don't have enough space to add your blooms on the top because we're going to add roughly about 10 to 12 poppies, so make sure you have space on the top to fit all of those. And that said, I think I'm okay with the sketch and I'm going to proceed and start painting the poppies now.
8. Final Proj - P1 Let's paint a poppy or two on a blank canvas!: Okay, so let's start painting our mean project for today. I will start by mixing a very light, watery wash off after she had called melon from the art philosophic confetti said So, as you can see, I'm keeping my initial wash extremely light and adding lots of Porto just to make sure that it's runny and fluid when I start using it on people. So let's start painting our first poppy, which is pleased just above the ways I will start by making a slightly bigger better. It's going to look a bit floppy and a bit more spread out. So I've been start making these oh fluid up and down brush strokes, too. Show this better. Maybe he won't be able to see the special right now because the initial washes very light. But as I start building on layers, you will be able to see it properly. I'm sorry, but my camera went slightly out of focus in this in this particular position, but you won't be missing too much, so everybody about that. So after the Friends of Metal, I added a few strokes at the back to show the Britain's at the bag and, uh, That's pretty much the shape, the sideway shape that I want for my body to have. After the initial washes in place, I will use a slightly darker value off the same culo, mended and just on that color to the base off the French pattern and a bit of the backpedal store. Remember, you want your poppies to look really pay still and light colored, so I understand that it's going to be very tempting, you know, to darken your shades and just play around the Lord. But we want these flowers to be really translucent, and and we want them to look really airy, so make sure you use really subtle and light washes throughout this entire project. So the initial values that I added, I'm simply merging them with a clean brush. And then I'm going ahead and adding the slightly darko shade, which is very close to orange. But it's not orange. It's called marigold from the same gun Freddie palette that I showed earlier. So again, I'm just cleaning my brush and more jingle condo into each other. There is no particular time as to when you have to stop merging and mixing your colors But it's just about, you know, keeping a close eye on how you want your flower to look like. So I'm just like, you know, taking it really slow and mixing my colors gradually the way I need them. So I am here and mixing a very light wash off, feel ping and just dropping tiny but offered near the patterns. And just to show that you know the sharp edges off the flour, and that's that's exactly what I want to show your. I'm just taking my own sweet time to finish every poppy flower and not rushing into things , because when you see these relief or time lapse videos, it comes across is as if it's going to happen very quickly, and it's very easy to, you know, build these flowers. But actually it's a very slow process in real time. And that's one of the reasons why I decided to show you every flower pain today in real time, you know, without skipping any step in between. So now that I'm happy with the way my poppy flowers looking, I'm switching to my size six round brush, mixing a bit of sap green and Danyon Smith Green appetite genuine and with this makes them just drawing a small stem and letting it march or letting it touch the poppy flower, and you'll instantly see the bleed. And that's the whole idea off adding the stems instantly as we start building the flowers, I'm not going to wait till the end to add the stems. So as and when we start going ahead and start painting about, these are going to add the stems as well. So let's won't want to painting our next poppy for the next one. I'm going to make a very light shades off. So Hansa yellow medium from the Dandan Smith selection range again. I'm keeping this color extremely light. I'm just starting lots of water and building a very light initial wash, and this time this flower is going to be overlapping the ways and it's going to be facing the viewer. So it's going to be an open flower seen from the front. So that's the perspective that we're going to try and being here, using a very light wash on building the front battles and just trying to overlap. It's slightly over the ways. Make sure that your pencil lines are really light so they won't be seen through the color. And that's that's something you have to take care off when you do your pencil sketches and just he raise it off a bit beforehand when you know that your poppy is going to overlap the ways. So this is how my poppy is Looking from the front anger facing the viewer, I'm making sure that the initial washes wet. So when I drop in my darko value, it will instantly bleed into the wash. I have the dark over new off the same yellow on my brush, and I'm just adding a bit of Carlo to the petals from the outer ages. Just letting it more John. It's old, and if any help is needed, I'm just going to clean my brush and help it march into the ignition wash. So here I am, making an effort, or rather not making an afford to oh, you know, to make everybody look alike. My If you see every button that I painted your is different from Oh, he Chado. So don't worry about making your flower look perfect, especially when it comes to poppies. There really flowy and soft and you know there's not much to it if you really try toe, I said the flour and try toe painter there really, really easy to paint, but it's just about keeping the a sense off the flower as a whole. Just take your own time to add the darker values. And, uh, I think that this is how I wanted to be. So I'm just going to call it complete. So moving on to our next poppy, I'm mixing a very light bill being wash on my ballot. And I want this poppy to be placed next to the yellow poppy that we just painted and also overlapping the edge off the ways. So as if it's falling out, we'll try to show as if it's peeping out from the ways having a shorter stem. So it's placed in the front near the edge of the ways, and the petals on the right side are folded behind the yellow poppy. So I'm just going to show a slight color there to depict that it's overlapping the yellow flower. This time I'm just adding some news, spread out pictures, and then, once the initial Porsche is in place, I relied a doctor mix of pink from the art philosophic, Unfriendly said, and then again mortared with the initial wash. So the process off painting the poppies is going to be seen that this is exactly what we will do for every every poppy. But the idea is to place them correctly and build up our composition step by step. Now I'm using a Dhaka value off the Eliza Green Crimson from Senator Leo. We're just adding it at the outer edges, off the petals and some value to some value near the center and letting it bleed.
9. Final Proj- P2 Let's add few more: So now let's move on and paint our fourth poppy for this Poppy. I'm going to makes the shade called Mericle into my initial wash appear low that I already had on my palette. So I'm just mixing these two colors, building up a really light watch, placing this poppy right next to the 1st 1 that we painted earlier. Now I want this poppy to be again sideways and facing the right inside. So I'm going to paint it exactly the way we painted our very first Poppy by showing a very floppy big front pattern, which is facing us and then making some up and down brush strokes at the back to show the back petals. I'm leaving a white gap in the center, which is where the stamens are going to be pleased and using a doctor makes off orange. I'm going to add my taco values near the base off the front bedroom and at the back and then using a clean brush, just marching it all together. So when you're painting beside facing poppies and make sure that you leave a gap between the front and the back patterns, and in this gap later on you're going to add use demons, which will define the front and the back off your flower again. Using a clean brush, I'm going to keep marching the color. Instead, it really starts to look soft and be still because all the poppies are warm toned. We have to make sure that we bring out a lot of different values and Hughes to our poppies . Otherwise, all of them are just going to look the same with yellow pings and reds, so try mixing your candles into each other. Try to build a maximum shades, and that will really help your book. A look warm to Jesus, if subtle and fresh. No, I've been switched to my size. Six. Wrong brush. Use a mix of sap green on green appetite, genuine and just add a stem. It's a slightly taller poppy. This times we're going to add or longer stem. Let it march into the base off the flower. I had some hair like that should on the stem, and that's it.
10. Final Proj - P3 Starting to feel comfortable: Let's start painting on fifth Poppy to be this poppy. I'm using a light wash off the melon shade that we've used earlier for the first poppy. And this time I want this poppy to be facing behind completely. So we're not going to see the back petals and the stamen as if it was leaning towards our side. But we're not going to do that. We will paint it completely facing the back side. So for that I'm painting a few petals without showing the Backpackers. And after the first wash of color, I'm going toe add appeal pink, followed by a very light shit off marigold orange and just march it all together. Now, if you realize I have mixed a lot of shades here, I started off with a light wash off men in, which is also very close to a peach Carlo. So if you don't have this exact melon color, you can use or make your own peach color. So far, stand started off with that. Then I added a bit of pink, followed by a very light orange. And then right now I'm putting in a very dark oh mix off in Kano and just merging it all together. So that's exactly what I mean. Oh, you know when I say that you should makes up a lot of colors to make your poppies looked bright and, um, have the difference? Oh, in the share for every flower. So every flower looks unique and beautiful, adding a bit more off the darker value. I really wanted to be dark at the base, off the flower and a slight contrast towards the edge. And then, using my size six wrong brush, I'm adding a stem. Do it now. This flower is at the back off the ways, and also it's placed at a slightly higher level compared to the poppies. We've painted only oak, so that means it has a longer stem, and I'm going to show that by overlapping it behind the poppy center in the front. So that's it. This is our foots Poppy in please. I'm going to march the green color properly and have that Harry takes show on the stem. Let's move on to the next Poppy. I'm again mixing a very light building condo on my planet, adding lots of water, and this time I want to draw a puppy next to the yellow flower, so that is also going to be facing the front side. It's going to face the you're like the one next to it. So I'm adding some medium to big size battles and keeping this from flower overlapping with the previous yellow one. So some off the petals are behind the yellow yellow flower. And then I'm placing a dark of and you off pink near the center, allowing it to bleed in the initial wash. I really want this poppy to look fresh and bright, so I'm not going to add any beach or yellow in this one. I'm just going to use two shades of pink. The 1st 1 is a very pale pink, and the 2nd 1 is a bright wild rose being, I suppose, from the confronted bandage. And then the last one that I'm adding in is a doctor makes off opened, upping. I'm just stopping some callow near the center and at the edge of the patterns. I really like that. Go on, trust off the dock, coping with the light wash and then using a clean brush. I'm just going to soft him on the edges. Let's move on to being our next poppy. Now this one, I'm going to place a slightly higher level than the ones we've painted so far. And I wanted to be slightly leaning toe what's the we were. So I'm going to draw the front pattern slightly small O and the back petals will be bigger . So that way it will appear as if it's slightly tilted towards us. And for this poppy amusing A very night wash off the Miracle Cano. It's slightly golden yellow leaning to its orange, but not exactly orange, and then a mixing danger off boned orange. It's my Daniel Smith into my night shade of orange and just hiding the darko value near the base off the front, better and near the center and the edges off the flower. And then I'm just marching it all together using a clean brush. I'm still using my size 12 round brush. I think one off the main reasons why I decided to use a science 12th brushes because the bigger brush allows you to make patterns in just one sweep, whereas if you use a smaller brush, you have to go back and forth again to make you petal bego in size, especially if you want to paint or big flowers like peonies and poppies, so see the difference for yourself. Try using a smaller branch post and then home increased the brush size to say 10 or 12 or maybe even age and just see the difference in your brush strokes. And I'm sure you will find it easier to paint your poppies with a bigger round brush. Ah, as compared to a smaller round brush neck size four or six. So try experimenting with that as well. I'm switching to my size six round brush to do the stem. When you were adding stems, make sure that you consider overlapping and fill up all the white caps and try to imagine how your stem will flow. Oh into the bouquet and make sure you fill up those white gaps by adding the stems in the background variable necessary. So just remember to extend your stems as you go riding the texture. I feel that painting every poppy or in real time with you guys allows us to bring out the composition together. So that way, when you're actually sitting down to pain, I don't want you to have any doubts of such as, you know, I should at the next poppy over the should at the stem first. Or how should I fill up this white gap? So all of these are thoughts that come to your mind when you actually sit down. Toe paint are very important photo address, and that's one off the reasons why I decided to in every poppy in real time it may look repetitive, the process off painting the poppy. But the process of building the composition is something on which we want to focus on.
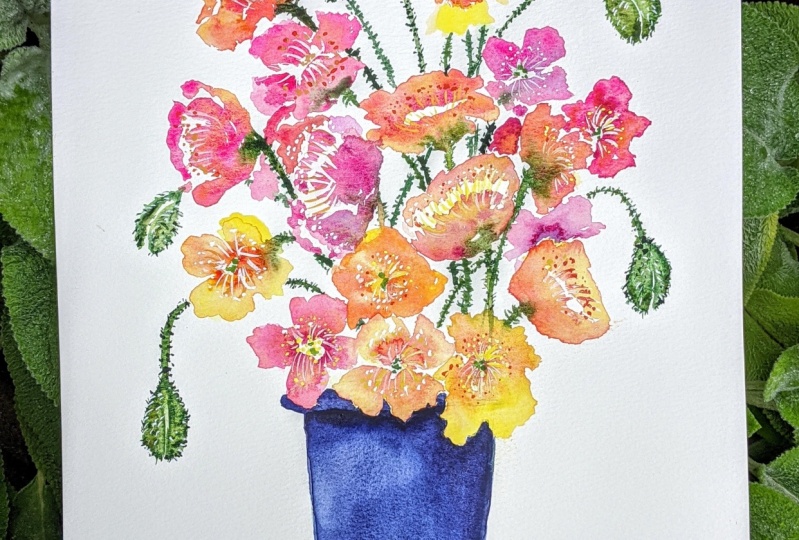
11. Final Proj - P4 Going with the flow!: So let's look at the image off our final project and we are going toe paint that pink poppy right there, which I have marked in the image. So that's a very big size poppy that I'm going to paint. And again, it's going to be side facing this time. It's going to be facing the left hand side, and it's not completely facing the other side, but it's slightly tilted at an angle, so we will try to show some back petals and stamens. So for this, I'm using a very light wash off. Ah, blush pink color. You can use any pink off your choice, but all make it really, really light because later on we're going toe. Add at least 2 to 3 different sheets of pink. So this is quite a big poppy that I'm trying to pain because it's kind of centrally locator in the book. It and I really wanted to be attracting the attention off the viewer, so make sure that you please it nicely in your book it. And after my initial wash, I'm going to try and add some Darko values and keep marching them like we did for the previous poppies just go very slowly so you don't end up just adding a big blob off taco value. And then later on, it will be very difficult to take off that paint. So take your time goes slowly at the values really one at a time. Now I'm merging the initial wash with this doc. Wish it off, being that I just added next time, adding a bit off polystyrene crimson from sending deal at the base, off the front battles and at the edges off the back bedrooms. Margin nicely, and now I'm dabbing some fresh pink onto the floor. It's open upping from Dandan Smith. I want this flopper to looked bright and fresh, and I think this pink walks the best to make your flowers really pop out. The colors are really bright off in, really as compared to what you see on the camera. So if I compare this with the painting that I'm holding in my hand, it's quite bright in really. So the colors that you're using, I know must be looking brighter than what you see on the screen, and that's exactly what we want. So don't worry if your things and yet those are looking brighter than what you see on my screen right now. And then I'm adding a stem to this flood, calling it down, noting it march into the patterns extending the stem Don't woods.
12. Final Proj - P5 Adding poppies strategically: In this video, people proceed further and pained the next three poppies, which have marked in the image on the side. So let's start by bending with a poppy that's between the surrounding flowers. So the way I tackle this is that I realized that there is going to be a white gap in that area and simply adding stems at that spot and painting poppies that are coming outwards, it's not going to help. So I thought off putting a flower right in that white cap, and that's exactly how you should approach building your composition when there are a lot of flowers involved. So in this gap I have placed an overlapping poppy, which is slightly placed behind the front two flowers that we painted earlier. So I added a wash off light orange, and now I'm just grabbing some darker value off the dark orange. Watching it all together. This orange that I'm using here is slightly beachy in Congo, but the camera is picking it up as a hard core ordinance, gonna, but it's slightly on the beach side. I'm now adding a angel, Fred Carlo near the centres and slightly darkening the edges off the pedals. If you observe, I haven't used rectal before while painting their stopped of flowers. I just introduced just now in the painting because I realized that I've used a lot of things and yellows and blush things, and now it was time to make something else with my oranges, which have not mixed earlier. So that's the reason I decided to bring in my red and make a poppy that does looking slightly different than the ones we've painted before. So this time I'm using read Hello to bring that change in the shed. Moving on. Let's pained the yellow poppy like you see in the image on the side. This one is going to be beside freezing Poppy facing the left side. I'm using a very light wash off Lemonier Lucado from the art philosophic confetti said, And this puppy is slightly circular because it's not completely blue. That's exactly what I want to show here, and I'm going to just keep it a bit closed. If you see the other puppies are slightly more opened up. So this is one type of poppy that we should really try to paint and so keep the shape off the body of the ground. And that's how this poppy is going to look different in the book. You. I've left a small gap in the center, and that's where the statements are going to come in later, without the statements and the centers defined, the poppies are going to look in complete at this moment. But you really need to be patient till we get to that stage. And when you start adding centers and stamens and although beautiful details, so and that's exactly when you're poppies will come to life. So be extremely patient to defend, intial the flowers and then we can talk in the centres separately. So I just added a stem through this flow away, overlapping it, adding a darker value off green, the green appetite, genuine working on the next show, the small details and the texture that we've been adding to all the stems. It's really going to bring out your piece in the end, the overall image or the feeling that the painting that live walk was he really, um, defined yet soft and these small details will, um, make your painting look really different. I feel a mixing a lighter shade of pink on my planet. Add in some water and let's move on to the third Poppy in this video. Now this one is again going to be, ah, tending towards the viewer. So the French pattern is going to be really small, and the back patterns are going to be big. And as a viewer, people be able to see this 10 mins and the inside off the fly because it still did towards us. So using a very light wash of pink and the same process to follow and add a doctor mix off orange this time initially on the pain. Think we added a doctor sheet off pink, but this time a body of the trip orange that look on those march This poppy is coming really off the book it. I intentionally placed it in the corner off the page to show that it's really tall and it's protruding out of the book. A. The bouquet is arranged off in a very random I wouldn't see that it's disorganized, but I just want to show it as if it's got poppies off. Different lens are placed in the book it in a very easy going manner and That's the feeling that I won't do evoke with us. Okay, I added a bit off pink as a darker value after adding the orange on just blended all the colors together and I'm switching to my size six fresh. Adding the stem. I'm just thinking the placement of the stem, how I wanted to be, But it's going to be a bit more street and out or Corby. But I think if I want to show it as if it's coming out off the book, it, um I think I would like to see it slightly called just placing the stem at a called anger, extending it down Woods and we'll just go ahead and are all the details to the stem?
13. Final Proj - P6 Let's add some buds: at this find, we are pretty much done with adding all the main flowers that we want to add, and I'm going to take a step back and start adding some birds. So this book A. Because without the Bard's, the bouquet is really going to look, um, less exciting. So let's go ahead and add some stems and barks. I'm going to keep the stems really flowing, and most of the birds rather all the bard said I'll be painting will be drooping down just the way be practiced. Oh, in the old gov do using a very light wash up submarine, I'm making a light sketch off the ball and then adding the doctor of and you using the green green appetite genuine and just adding a bit of character to the Bard by placing the DACA value at the right points, merging the cutters together. And we will also add the extra to the but understands, just like we did for the poppy stems. So that remains the same. I think the birds will instantly bring the book a to life, and I think the green element will look really pretty against the colorful contrast that we have here. Try to look for big gaps in your painting and start putting in the bard's over there. Moving on. I'm adding one more, but between the orange on the painting flower because I want to break the color thing that's going on there and just introduced a green in between making this bag group really down, you will instantly see the difference in the way your book it starts to go after you start adding these being butts. Job full. No, and don't go moving the head. I think I want to add a few parts on the left hand side now just to balance out the entire look off the booking. So I'm adding this stem, which is really coming down to What's the floor, adding about at the tip. Keep your strokes very free flowing so your hand can make really nice girls. We don't want the stems to look Jagger, because if you observe, poppy stems are really called me and place for, so make sure that when you making those calls, your hand is really losing out, adding some texture to the bard. So I see that there are quite a few gaps that I want to fill up. Now let's out about on the top to fill up the white. Yeah, Between the three flowers just going to add a drooping butt again extend McCorvey stem from it going down, overlapping behind the flowers. I'm using the light warships up clean, darkening the bud in the stem netting The hunters march. At this point, my bouquet is starting to fill up. But I think there are still a lot of white gaps that I want to go ahead and on Take care off. So in the next video, we will tackle all those remaining bite spaces and see how the composition comes out. So I'll see you in the next part.
14. Final Proj - P7 Crucial White Spaces!: if your composition is similar to mine, If you have been following the placement off your puppies Oh, just like I did then I think you still should have some white gaps that we need to fill up . So as you can see all the measure the right hand side, we still have place for about two poppies and a couple of bars here and there, which we can call in the background. So let's start doing that. So first, I will start by filling up the white Gap, which is just under the orange or poppy. So I'm going to being a red poppy, which is going to be slightly smaller, utilizing the space that I have there. So I'm just using a light wash of red, and I'm letting the orange poppy being the front so the stem is going to overlap the red poppy. I'm just placing it behind the orange flower, adjusting the petals in the space that I have, and it instantly looks fuller that white spaces old oh, looking occupied. And it's giving a character to the bouquet, just adding Sadako van you off the red. I'm using the shade going similiar, read from Senate deal. So with this red one in the book, every finally have copies of all the colors included in our ways, and that's it. I think that looks OK then. Now let's tackle this white space on the left hand side. I think it's quite a bigger space. So I'm adding one more red poppy there between the blue poppy and the pink and orange poppy on the top. So I think a pain red poppy should look really good here. It's going to be sideways slightly smaller because I don't have much space there, and I don't really work the patterns off the poppies. Two overlap each other, so I'm just utilizing the space I have there and adjusting the size of the petals for doing the smaller poppy. I'm using a size six brush this time and now switching to my green color and adding a stem . I hope by now you've gotta hang cough it, and you're really comfortable painting this book here with me, so it should be easy going here on. There are not many old composition elements left. Now we're almost going to It's the end, riding a stem extension to the orderly apartment that will be interred. I love how it's looking, then snow. It's looking fuller and with the centers coming and I think it's really going toe, um, you know, look cohesive and the peace will start coming together. I'm not backing this white space, which is right next to the red light red poppy that we painted. I fighting there still some please to fit in a drooping barred there. So just adding a very light wash of green. - I'm just making sure that all the stems are extended correctly. Like I said, Oh dear, we don't want any stems to be just hanging around with no reference point. Okay, so now the right and the left hand side looks quite full. O onda. We don't need any more additions on the left hand side, but I still see space on the right hand side, which could be filled up, especially near the pink flower. So I'm adding a small bar there. Adding bags is not going to take too much time. It's quite easy to just, you know, drop the stamina at a bud to the dip. So this is quite first. Okay, so there is some space left between the two flowers on the top, the orange flower and the pale pink flower. So I'm just going to add one stand right there. I'm going to keep this bird slightly light. Oh, to show that it's in the background and maybe one good. But between the orange flower on the building, one I'm going toe overlap it and place it behind the pink flower. As you can see with tackled all the bite spaces that we're seeing Olio And now I think it looks quite full, and I'm happy with the spacing off all the flowers and the Bard's, and at this point, we can stop adding elements to the book in and proceed to the next part.
15. Final Proj - P8 Painting the vase: now moving on to the ways I want my ways to have a matte finish look, So I'm going to use gosh Connors to painted. You're amusing to shades off, basically white and a turquoise blue and mixing the true Connors have prepared this really light wash of blue, which is very close to sky blue, just a danger of turquoise, blue and white. And here's a swatch. If it I think this blue will be a good contrast to all the warm Carlos that reviews for the book it. So let's go ahead and paint it to get all Matt finish. If you have any other color options on your mind, please go ahead and select the follows you like. You can take a swatch if it on a piece of paper, put it against your flowers and see if it will look nice. At this point. I really thought this blue should work, and I hope it looks good by the end of it. So I'm using my well vintage round four brush to apply this wash Lear. I'm applying a thick coat. If you don't have gosh pains, it's okay to use your watercolors. You can just tell Watered down some kind of such as a civilian blue are light shade of gray and then use wet on wet technique or to paint your ways. You can apply a warship, clean water and then just add some great from the sides. Um, you know, to give it a very nice watery effect that would look nice to, or else you can go for a nope eight look like a one doing so let's go ahead and finish this washing blue and I don't see you in the next part.
16. Final Proj - P9 Filling in Centers: Okay, so we're finally here to work on the centers or off our poppies. For this, I'm going to be using permanent hair loss or it's a wash and mix it with some white to make this lighter yellow sheet. This will be the first layer that we're going to use for painting our centers. I will start by making these small strokes that are coming from the center and going in the outward direction. I'm using my velvet church size four brush to work with this wash. Pained. I think what's really stands out on the water colors, maybe any shared underneath. You can also use a doctor makes off your water color. If you don't have gosh, maybe you can use a permanent yellow deep, which will really stand out on the right things and reds, and maybe to use it with a yellow flowers. You can mix it with a danger of brown or walker, so it's not necessary to use Gosh, but gosh would really stand out Indian. And after drawing the stands, I'm just going to play some dots around it, make a ring off darts around the sermons, using the same share of yellow that we mixed earlier. I think I didn't send those to all the parties. Is one off the most important parts of this project? Because the moment you start adding the centers, your flowers are really going to come to life and it will just evoke that freshness and had nice crease to all your puppies. So the poppies that are facing sideways, we will add statements and the white cap that we've left in between baxam steam ins and then act some dots around it. So this is just a force layer that we're working on in a similar way. I will go ahead and continue adding this first layer to all the rest of the poppies and we will see how to proceed. After that, I'm not switching toe a darker shade off yellow. I'm using permanent yellow deep as it is from the tube and adding my second layer to the flowers on which we were just working on. And for the rest of the flowers are probably used the darker shade because I realized that the flowers are quite based on, So the first share that we mixed is not going to look as bright on them, so I'm just going toe. Finish the rest of them with the darko value. I'm adding second layer to the earlier poppies, and I quite like how it's looking bright. This process will take some time, but the results are going to be really nice. So be patient during this process off adding the centers, just adding a ring off darko darts. Make sure that the wash mix that are you that you're using is thick enough so the dots stand out because of if it's very Bortolini, the daughter going to feed off and it won't be asked, prominent as it should be. I'm also re working on the statements to bring them together, adding a darker value again and just continue the step for the rest of the poppies. Okay, so now for the next layer or off the centers, I'm going to use Bon CNO. It's awash color again. I'm just going to take a mix up the scandal and Axum stamens and notes around to add a character to all the centers. This Brown will really bring out the way the centers look. They're just going to pop out instantly, so I'm just repeating the same process with this brown condo. You can also use a shade of brown in watercolor, but I just continue using the gorge for all the center details. So I'm not going to be very heavy handed with this brown color, but just adding a slight character to the centers by using this at some places, a big near the center on a bit around the statements and the antidotes just adding a feeding off shadow. I think the lettering is really looking nice on all the poppies. So let's just continue to add these brown details on all off the poppies, and then we will see how it looks and not for the last part. I'm just mixing a bit of green. You can use your watercolors. It's absolutely OK I have this leftover green or coercion My bad. It It's a light shade of green mixed with a bit off them in your law. I'm just mixing this and having small center details to all of the poppy is just a hint of brain in the centers, and that's about it, - and that's it. I think we're done but working on our centers, and I think they look really nice and happy
17. Final Proj - P10 Touch-ups & Conclusion: Okay, so let's have some finishing touches to the ways I think the waste was looking ovary plain and opaque. So I just mixed up or darker shade of blue, and I'm just going to play some rings on the surface, off the ways. I just pleased them away from each other with some space and the dream. And I'm just going to paint this simple actor on top ofit. Just think blue lines, which are not equi distant if you want. You've been totally skip this step or at any other design or any other pattern to it. But I really want the focus to be on my poppies, so I'm keeping my ways really simple. I had a lot of ideas to off, you know, draw awesome Chinese pattern design on it and then fitted up with wide and all sorts of ideas running in my head. But I just decided to keep it really simple and ended up with some darker bands of blue. So let your ideas work in the two ideas playing in your head. Maybe you can try for some other composition, maybe lesser number of poppies. So if you have any other ideas means feel free to tried And I would love to see what you create. And as we move on to this last stage of the project, I hope you were able to follow with me in this project and my own intention off doing this really time waas to be ableto paint with you and see off fuller piece that you paint with me So I really hope that you have a nice project coming up and I would love to see what you create. So don't forget to upload your projects in the project section below. And if you posted on Instagram do tag me so I can show you work in my stories and all of us could have a look at it. So thank you so much for joining me into these class. And I would see you again in the next one. - Uh
 Pooja Kenjale-Umrani, Author of MODERN WATERCOLOR WORKSHOP