Transcripts
1. Intro to Watercolor Halloween Gnomes: Gomes are a fun
aesthetic to create. They're whimsical, silly in
nature, and very likable. In today's class, we'll create watercolor Halloween
nomes. Three of them. We'll use wet on wet
techniques and wet on dry, where we build up layers to
create a lot of intensity, a lot of natural highlights, and some shadows, too. There's a class download with a template on it
for three images. And then in class, we have two lessons for two
different nomes, as well as a bonus one,
for the third nome. Now, all of these costumes
are vintage costumes. There's a witch and a
Frankenstein and a mummy. And on my YouTube channel, I have an additional download
with two other nomes, as well as a brief
watercolor lesson on creating candycorn, which is really
tailored to beginners, but that's perfect with
our Halen aesthetic. So let's get started.
2. Class Supplies: So these are the supplies
we'll use for class. I have an assortment of brushes, and I'll include the
exact brushes that I use, as well as the exact colors
that I use on the download. But you don't have to
use the exact same ones. Usually what brushes
you're comfortable with, the watercolor colors
you're comfortable with. And then I have a
downloadable template. And I'm going to
show the nomes here, these two, and then
there's a bonus nome. So I think that's kind of
a fun activity to have. I like to outline my drawings
with a waterproof pen. This is a micron eight by Pigma. You can also use
just a light hand with a pencil and then erase
your marks when you're done. You could use a watercolor
pencil. It's up to you. I also have a jug of water, my cloth to dab my brush. The next chapter we'll go
over using the template.
3. Using the Template: So now, you could draw
your image free hand. You could cut it out
with a pair of scissors. And trace around it
to create your image, or you can use a light source. This is just a light pad. You can use a window
just the same, or you can use your
computer screen, you can just open the download and then trace your
paper or your book, whatever you're going to
create your image on that way. You just make sure you have
illumination from the back, whether the window or
the computer screen. Now, you can take your
paper. This is a nine by 12, or you can cut it down. You can use a watercolor
journal as well. You just put your paper
on top of your image, and then if I shut
off my studio lights, I get to see this image
a little bit better, and so I'll just trace it. Like I said, I'm using
this waterproof pen. You could also use a
pencil just as easily. I take my pen and
just go around. Now, you can modify
the template as well. The first off, I'm just
going to trace the template. But you can alter the image, just using the basic
structure here. So the hat, if you
want to make it more rickety or smoother.
You can do that. You can elongate the ends. The same thing with
the beard, you could change the shape drastically. You can change the object
that the nome is holding, and you can vary this
according to what you like. You might want that
hat to be really exaggerated or really short. That's up to you. So depending
on how you alter it, you get different character, different personality
with your nome. So feel free to do that as well. The next chapter we'll
start our painting. Oh.
4. Painting the Hat and Clothes: So if painting my nomes, I'm going to start with
the hat and the clothing. I like them to all be the
same color and just really make the beard and the face and the little
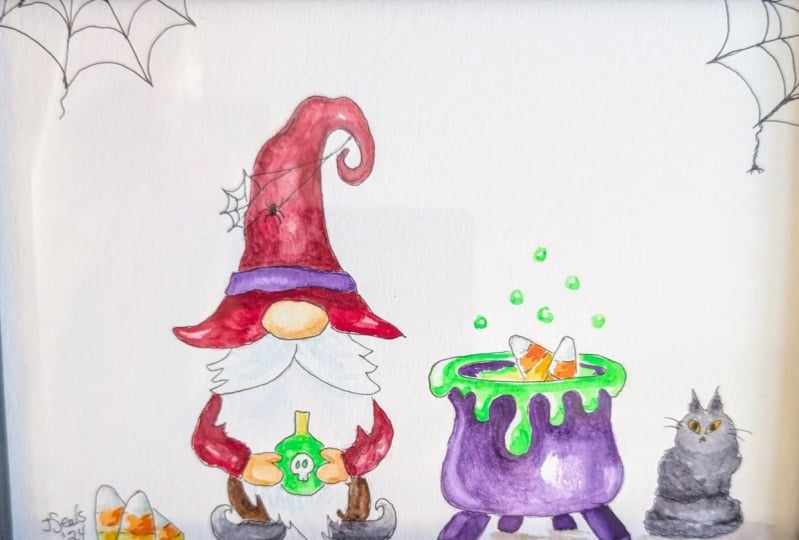
subjects standing out. Like this little vial of potion. So this is a witch nome. I'm going to take my number
six brush and wet it. Remove some of the water
so I can control it, and I'm just going to wet
the center of the hat. I'll start with the hat first. Can always add a
little more water. Now, because I don't want
it to be a black hat. I want it to be reminiscent of a black hat, but not black, so I'm not going
to use pines gray or dark gray, Mrs black. I'm going to mix my own color. I'm going to put some
water on my palette, and I'm going to
take some dark blue here, this Prussian blue. It's a beautiful color. Then I'm going to
take a little of this purple and mix it in. That changes the
color. I'll make another puddle here and I had a little more
of that purple. I still want a
little blue with it, but I want it to be a little
more purple than blue. And then with whatever's
left on my brush, I'm going to make a puddle here and take a little of that gray. I don't want to use a lot of it. I'll clean my brush
and take some more of that Prussian blue to
mix it in that gray. It's still very dark, but
it isn't solely that color. Can you even mix in a
little of that purple? Now, with a very sharp point and not too much
paint on my brush. I'm just going to go
around the outline here, and I'll start up top of
the hat and just drag it. I like to leave some of
the white area of the hat. And I like to let that
paint do its thing. Right now it's looking
a little blue, but we're going
to build that up. While the paper is still damp, I'll dab in a little
more of that color, then I'll come back in here with my colors that I've mixed, the blue, and the purple,
and just dab that on. I'm not even
cleaning my brush in between, I'm just dabbing it. You can add as much
pigment as you like. The beauty of the
water color is having some of that white
paper exposed. I'll do the same
thing over here. Create the edge with that
dark color that we mix. Again, I'm leaving some of
the white of the paper, and then I'll come in here
with some of the color. That really just
plays around with it. Water color dries lighter
than what you see here. We might come back and
put another layer on. I'll do the same thing
with the outfit here, avoiding the beard
and the shoes. I have just clear
water on my brush. Just wetting a little
bit of that area. Then because it's
a smaller area, I'm going to switch
to a smaller brush. This one is about a number one. I'll come in with
that dark color and just dab it in places. I wanted to just look like
it coordinates with the hat, but I don't need to fill
in that area completely. And the same thing
with the pants. I really want to pay
attention to the areas underneath the beard where
it might look like a shadow. Again, before that dries, I'll come in with my
color and dab that on. Pick up some of that
purple and do the same. Then I'll let this layer dry. It will only take ten
or 15 minutes to dry. You can use a heat
gun as long as you're not causing the
water to blow around. But I'd like to
just leave it for 15 minutes, go get a cup of tea, then we'll come back
and assess this layer, see if we need more color
to make it more vibrant.
5. Adding Depth to Hat and Clothes: Now the first layer is dried. I'm pleased with how that looks. I like the overall tone, but I do want to create a
little bit more layers on that. I'm just going to start again
with my number six brush. Pick up that dark color. I can rewet it or
remix it if I need to. Again, I'm just going
to go around the edge, but I'm not going
to go over all of the area that I've
already gone over. I just want to create
some dimension and some additional
depth of color. I tend to stick
to the perimeter. You can choose one side over
the other if you'd like. And I pull that color up. I'll take some of that
blue and add it in places. I'm not trying to go over
the exact same placement that I've already done
in that previous layer. Just to really emphasize
it a little more. Come here on the
bottom of the hat. Some area. Then lastly, just on some of the darker areas where the shadow would
fall underneath the beard, underneath the arms,
and down by the shoes. I'll just choose a few
little colors as well, the blue and the purple gives a little variation,
and I like that. We'll let that layer dry, and then we'll come
back and start building up our wich nome.
6. Painting the Nose and Shoes: So the layer is dry, and I
like how that's coming out. I see all this depth, all these different
variations in the color. It's quite pleasing. I'm going to work on
his nose right now. Now, I'm using this pale orange. It's already right
from the tube. It's kind of a flesh tone. You can make it darker or
lighter, however you'd like. You can add more brown
to it, more orange. I'm going to add just a little bit of this brilliant pink. You can add a little reds or So when I have that
kind of the way I like, I'll just take a clear brush
and just dab it on the nose. I'm also going to dab on
the shoes while I'm here. Again, just using
that clear water. So now I'm going to pick up some of that color for the nose, and I just want to go
in the bottom here. As we know it dries lighter, so you can get a very pale
look or a much deeper look. Take a little more
of my pale orange. Makes a little orange
in with it this time. Again, I'm not trying
to fill in the nose. I just want to color in
some of those areas. Take a little more pale orange. And that's all there is to it. Depending on how it dries, I might come in add a little
more color, but I like this. The water, where it was wet, is just feathering
out that color. For the shoes, you can
choose any color you want. I'm going to go right in there
with this dark color here, black, and I'm going to add just a little bit
of purple to that. I'm not going to add
the blue this time. I want that purple effect. Because this is a small area, I'm going to use that
number one brush, and I'm just going to go around the top here to
create the shape, just carve it out a little bit and then come in the bottom. And you can determine
exactly how much you want to add
to these shoes here, how much you want the pigment
to show, and the vibrancy. This one is bleeding
the way I like, but this one seems
to have dried, so I'll just go in
there with some water and reactivate this. And just play around
with the shape. Now, this is a gray, but it's very heavy
on the purple. I like that. It's definitely
different than the outfit. When this dries,
we'll come back, work on the beard, the stripe, the hands, and the vial of poison.
7. Painting the Hat Band and Vial: I. So now to decide on the colors,
choose the colors you want. Halloween colors tend to
be orange and greens, but you can use any
color you like. Because we used blue. We relied heavily on the
blue, also some purple. I can go with orange or yellow
for that little stripe, and I can match it or choose
a totally different color for this little vial of
either poison or potion. And then I'll choose a
color for the mits here. So let's start with
the band here. I'm going to take my
number one brush, and again, just put some
water in the center. And I'll do the same thing very gently with this little vial. If you change this to make it a pumpkin or another object, you can do the same technique. I think I'm going to go
with yellow to orange. Taking some of this
yellow orange. It's a warm yellow. Wet that up, make a second
little puddle here with that yellow orange and take a little of this
beautiful orange color. So now, I'll clean my brush. And again, I'll take
that yellow orange and just pull it
from the outside in not trying to cover all
the area with pigment, but I do like that effect. That blend, that soft
blend. I'll rinse my brush. Make sure it's clear. Bring some clear in between,
just like that. And then I'll go and
pick up this orange and just dab it on the ends. And I like how that introduces
just a little warmth. The water will make
it continue to blend. Now for this vile, because
his beard is going to be white with hints
of color for shadow, I think I'm going to make it green that will
really stand out. So I'll take a little
of this yellow green, and I'll take this lemon yellow. This is a cooler yellow
than the one we used before. And then I'll
take this green. It's a veridian hue and
I'll mix that in here. I'm going to start at the bottom because
I want there to be a gradient with this Vidian hue. Again, picking up that color, maybe taking a little
bit more here, so it's nice and vibrant
and depositing it. I'll rinse my brush to make
sure it's clear again, and then I'll wet the top of this because I want that yell, that lemon yellow
to really show. I want that to blend
with the green, and create a lovely gradient. I can help it blend along. Then I'll come back in that
green in the bottom here, really play with it, making
it as vibrant as I like. I'll even come in with a
little bit of that orange, just a small amount on my brush, and dab that in on the bottom. It'll add some depth and
some darkness to that green. And so now I want to
let that completely. We'll come back and work
on the beard and the mits.
8. Painting the Beard & Mittens: So to finish up our witch nome, we're going to work on
the beard in the mits. I'm going to take my number
six brush because it comes to a nice sharp point just wet the area of the
mustache and the beard. Not a lot of water,
but just enough so that the paper is damp
by the time I get to it. And then I'm going
to take my brush and I want to mix just a
little bit of color. So I'm going to take
my Prussian blue. And mix it on my palette here. And it's a little darker than
I want. I want a shadow. I don't want him to look
like he has a blue beard, so I'll grab another
brushful of water. And I also don't want
it to be stark blue. I'll take just a little
bit of purple on my brush. Maybe another There we go. Starting to get
the color I want. Take even one more
brushfll of water. Now, with the pigment, the very muted
pigment on my brush, I'm just going to go
underneath the beard, creating just a little
bit of a shadow, and the same thing
underneath here. Just barely stains the paper. Go to rinse my brush again, so it's all clear and
just blend out the edge. I don't want there
to be a solid line. Really, I'm just
creating that shadow. Then I'll come back in
with that light color and just pull some color down
right from the nose. Clean my brush again
and just blend it out. Just a hint of color there. There's any harsh lines.
I'll blend those out. Let that dry a little
bit. Clean my brush. And now I want to come in
with my number one brush, very sharp point to
work on the mittens. I'm going to take some clear
water on the brush and just gently wet the entire
mitten on both of them. I don't want there to be a
puddle of water on the paper. I just want to take advantage
of the way the water flows, the pigment flows
on the wet paper. So now I'm going
to come in there, and I'm going to take a
little bit of this purple. And Prussian blue until I get the right combination and just the tiniest
bit of this black. And now I'm just going
to go at the bottom here and just blend in
some of that color. I'll rinse my brush again, dry it on my towel, just kind of play
with it to give it a little bit of a hint of color. I B cute to do those mittens
in different colors, but I like that effect, the way it is there like that. Last thing I want to do with the beard is take a
little of that purple. Going to take that color we just use for the shadow
of the mittens, make it just a
little more vibrant. That's too vibrant, so I'll
mix some of this blue. And now with that number one
brush, get a sharp point. I just want to pull some purple, creating the direction
of the hair, all around. It's very subtle. It
just draws the eye. And there we have our
watercolor witch. Oh, adorable.
9. Painting the Mummys Beard and Nose: So now for the watercolor mummy, this is a challenge because we want the strips
to look white, the beard to look white. And so we're really going
to play with shadows. I'm going to start this
one with the beard. So taking my number six
brush and some clean water, I'm just going to wet
the entire beard. Not going right to the edge, I just want a lot of
water on that beard. That's the main focus here aside from the
nose over there. Now I want to just
mix a little bit of this Prussian blue
and the purple. I want to distinguish the
beard from the strips. One's going to
have a little more purple and one
will be more blue. If you wanted to make the strips grungy like an old mummy, you could do that
using some browns, but I like the bright
cheerful colors. I'm just going to mix that up with a couple of
brushfuls of water. I want it to be very
subtle when it dries. And with a sharp point and
not too much on my brush, I'm just going to pull down underneath the nose
along those lines. Then over here, I'm
just going to follow the general guide
of the beard hair, which direction it goes in. I'll rinse my brush, dab it on my paper towel, and when it's dry, I can just
move this around gently, picking it up so that it's not quite a purple beard, smooth, and it's got a
little bit of color, a little shadow,
that I come back in, take a little more color
underneath that mitten, little bit at the bottom here. And that's pretty good. While I'm here, I'm
going to do the nose, so I'll put some clear
water right on that nose. Again, I'm going to take
my pale orange color here. You could also mix
your own color by taking a little
yellow orange or a warm yellow and a
little bit of vermilion. You get the right
combination that you like. I like to combine them.
Add a little pink. I don't want it to
be quite so orange. Then I'll just add that
at the bottom here. Come back in and add
it at the bottom. Then I'm going to let
these layers dry. We'll come back and start working on the additional parts.
10. Painting the Mittens and Shoes: Now, because I want a lot
of contrast with this nome, I'm going to paint the mittens and the shoes the same color. I go to take my
number one brush, get some water on it and
just wet those areas, mostly the bottom three quarters
of each of those areas. And now I'm just going to take my brush with another
brushful of water, and I'm going to take
some of this black, and I'm going to mix in just
a little purple with that. I want this to be pretty dark
because there's going to be contrast with the wraps
here and the beard. Once I have that, I'm
going to just gently paint and start with one
of the mittens right around the edge here. Then I'll rinse my brush. It's clear. I might have to
rinse it a couple of times. Again, I just want to
make it blend softly. It doesn't have to
be a perfect blend, but I like that look
the same thing here, on the other mitten, going around the base with
the darker color, particularly the edge where
it interacts with the strips. Then I'll just choose some color and go back in and
just play with it to see how much
coverage I want to get. I like to have a little bit of the background paper showing. If that's not the look you want, then you
don't have to do that. I'll do the same thing
here with the shoes. I like there to be a highlight
on the top of the shoes. Right over here, the highlight
would be in this part. And then I'll just come in there and add a little more pigment. Now I can see everything's
nice and wet. I'm going to take a
little more purple mix it with the pigment
we've already mixed, so it's a little more purple and just dab it
in certain areas. This gives a very This gives a little bit of
depth to our color. That's looking pretty good. I'll let this layer dry, and then we'll come
back and work on shadowing all those strips.
11. Painting the Mummy's Wraps: So now that the mittens
and the shoes have dried, I don't really like how
solid the black is. So I'm going to come in
and create another layer. I'll take my mars black, get it nice and intense,
a little bit of purple. Now I'm just going
to paint some of the areas just to give it at more depth where I want
there to be mo shadow, just a little variation. Try not to go over the
areas that are white. Then I'll just wet my brush
to mute it a little bit, dilute it, and just help blend it out just
ever so slightly. I'm quite happy with that.
I'll rinse my brush, and now we'll start
working on the shadows. I'm going to start with
my number six brush and some clear water. So this doesn't dry too quickly, we'll work on one
part at a time. We'll start right here at this major part around the nose, that little band of the hat. I'm just going to pull in
water from either side, and then right above
it, just on one side. I'll go around the bandages
that are close to this area, just dabbing some water, I'll clear just to
get the paper moist. So now I want to mix my color. Because we painted the
beard with purple. I want to work on more blue than purple on the strips here. So I have my number one brush, make sure it's nice
and saturated. I'm going to take a
little cobalt blue. And again, I want this
to be nice and light. And right next to it, I'll dab just a little bit
of whatever's left on that area and take a
little Prussian blue. And again, I want to just add some more brushflls of water. To both sides. It's just a slight
variation between the two. So now that I have
my small brush, I'm going to come from the
outside and just pull in. It's very, very subtle. And I'll do this every
now and again on some of these strips
that we lay down. I'm going to rinse my brush, dry it a little bit and
pick up that other blue, and just add some more color. And I'll continue
this all the way up. When I have the strip going up, I know I want some
shadow underneath, some shadow underneath here. Just a little variation. So I'll add some water. No covering the entire
piece with water. Normally, I'd go in
with my darker color, but they're so close in
color right here that I don't think it really matters which one of these
two blues I use. It's a very subtle difference. I just want to finish
this entire hat. So I'm quite pleased with
how that's coming out. I'll do the same thing beneath
here beneath that beard. So I'm just going to put
a little bit of water on the areas under the
strips that overlap. If I make a little mistake, it's not a big deal.
It's clear water. I can either wait for it
to dry or I can it up. It's very forgiving. I'm
going to take that color, go to come out
underneath the beard. It'll blend a little. That's the beauty
of the water color. Just not filling the
strips in completely. It's giving a little
bit of shadow. Some strips I'll leave bar, and others, I just put
in little bit of color. So I'm going to let this,
then we'll come back and add a few highlights
and a few details.
12. Adding Details on the Mummy: So I'm overall, very pleased
with how this is coming out. I'm going to take my
very small brush here, 12/10, fine tip. Use whichever brush
you're comfortable with. And I want to add a few
details with the beard. So I'll wet my brush, add a little more purple to it. So it's just slightly darker
than the purple that exists. Maybe pull up a little
blue to tie it in. And now I just want to
pull kind of hairs. Of that beard. Again, I'm just trying
to create the momentum, the direction of the beard. It's very subtle. It will dry lighter, but I'm
happy with that. I'm even going to go in wet my palette again with
some brilliant pink. This might require a
little more than the blue, and just pull a few
strands as well. It's very, very subtle, but it differentiates itself
from the strips here. Then lastly, I'm going
to take a little of this Vidian hue and some water. Again, I'm using
the small brush, and I'm just going to choose some areas to add a
little bit of green to. This makes it that much more
different than the beard. I'm not trying to fill in
all the areas of the strips, but just to have a cute effect with just a hint of
color for our guy here. I really like how this came out. He has so much character. He's doing a little dance. And I love the contrast. The dark hands, the dark feet, the warm nose, and then
everything together. It can be a challenge
to work with the white, the weight of the beard,
the weight of the strips.
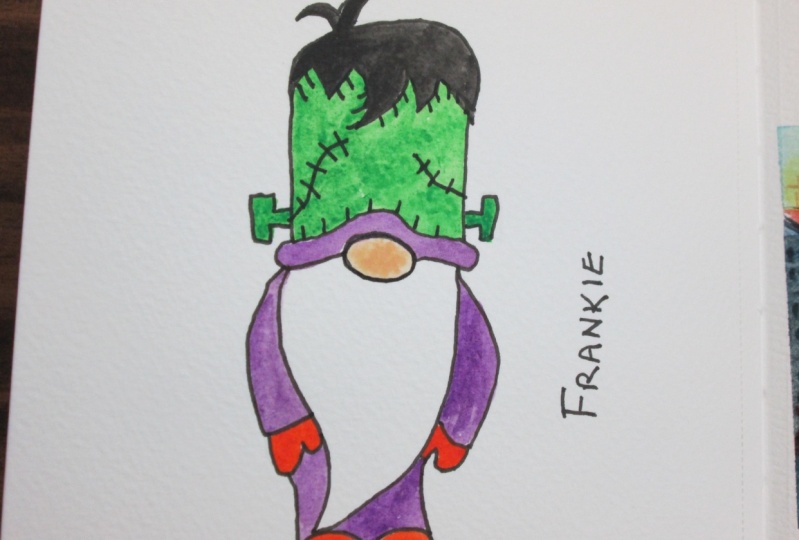
13. Bonus Class Frankenstein Gnome: Now, for the bonus image, I'm going to speed through this. And you can see how
I create the piece using different colors,
the same technique. I start by wetting the paper, and then I add layers upon layers to get the intensity
of the color that I want. With the greens, I wanted it to look kind of dy,
green, dungy green. So I mixed yellow
green with green, and then I added a little
red in there as well. It changed the color
ever so slightly, but you can use whatever
color you want. I worked on the beard, adding just a little bit
of blue highlights. I thought that would look nice, offset against the green. That's the main element here. For the hair, I
wanted it to be dark, just like the witch's
hat in our first nome. So I went with blue as
the main color there. I darkened it up and
added layers as well. The highlights really
worked for me in this one. I enjoyed that look, those little shines in his hair. Now, the hair kind of bled into the green of the mask or
the hat he was wearing. So I'll just dab that
with the paper towel, pick up the pigment, and then go back in adding that green. I don't want to
rough up the paper. I just want to absorb the color so that I get the
pigment that I want, the green effect,
and not the blue. Sometimes a little bit of
that color bleeding together. Well, it's very effective. So I'll see how it goes. I can always dab it up
again and add more color. It's important to get that area dry if I don't want
the color to bleed. I'll continue along with my
little Frankenstein here, starting with the pants, and I decided to go
brown with those. I was trying to come up with an alternative
color to the black or the darkness like in
the hair and the shoes, and that's why I
went with brown. To give the silver effect of the little bolts on
the side of the neck, I just did a gray that was
very heavy with the blue. And as always with watercolor, I just continued
to coax it along, adding a little more
pigment here and there, maybe a little wetness, just to move that pigment. And so that's how I complete
the Frankenstein nome.
14. Class Wrap Up: M So to wrap up the class, we have the three nomes, the two lessons, and
then the bonus image. Which you can find right on that template that
you can download. There are some variations
you could make depending on
variations in color, how you use the template. So let's just take a look here
at the Frankenstein nome, a little different, less
texture in the beard, less variation, but
still effective. And the same thing with
which here with the mummy. These are just great
images to use. You can actually
create a whole slew of characters using
the templates. If you go to my YouTube channel, I have a video
where I show how to do watercolor Cdcorn
for very beginners. But I also have a
downloadable template for more images, a ghost, a devil nome, this cauldron,
if you want to use it, and then the Cdcorn, and I show some
variations on that image. The devil and the
ghost are really cute, and I just think
the abundance of colors and characters
really comes to life. I hope you've
enjoyed this video. Please feel free
to leave a review. Thanks for joining me today.
 Daniela Mellen, Artist & Author