Transcripts
1. Intro: Hello, everyone.
My name is Dinesh. Here is something most bigness don't realize
about watercloor. You don't need detail
to create atmosphere. You don't need control
to create beauty, and you definitely don't
need experience to paint a peaceful winter
landscape scene. Welcome to this
Skillshare class. In this class, I'm going
to guide you step by step through painting this
calm winter landscape using very simple shapes, soft colors, and bigner
friendly techniques. This class is designed,
especially for absolute bigners. If you're new to watercolor, or if you ever felt nervous, stuck or or warmed, you
are in the right class. And as we paint together, you will generally learn some essential
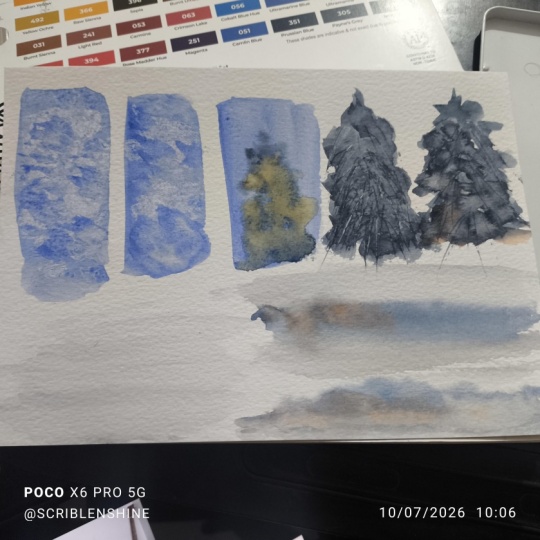
watercolor techniques, including wet-on-wet for
soft skies and snow, layering to build depth, glazing to enrich color, and lifting to bring back light. Scratching for subtle texture and how to simplify
your composition. So the painting feels
easier and more enjoyable. I'll guide you through
everything slowly, clearly and calmly
so you can relax, enjoy the process, and build confidence with
every brush stroke. So let's grab our paints
and get comfortable, and let's start creating this peaceful winter
landscape together.
2. Sketching: Okay, this is the
first project we're going to do of a
snowy landscape. Again, if you see the reference, there's a lot of
things happening. So the first thing is
to simplify, simplify. And I'm going to draw a sketch. I'll be going a
little bit faster. But I do will provide the sketch of this in
my reference section, so you can download it
and you can copy it. And first thing,
first, I want to establish the
foreground element. So it's kind of going
in an angle like this, but I'll make the angle a
little bit steep like this. So now we establish the
foreground element. Then we're going to
place a focal point, and I'm going to place
it exactly here. And again, when you paint, you have to simplify stuff. So I'm keep on comparing
each and every things. And whenever I sketch, I
think about is it in shapes? What shape is it and
what angle is that? And you can see that by
in some simple steps, I was able to block this
house with snow in. And there's a couple of
trees here. I'll do that. So then there's a
mountaineer like this, which comes here, and
I'll put it here. And there's a line going here. There's a line going there. And there's also a bigger
mountain at the back, so we'll just put it like that. And these are the snowy trees. There's also trees
here like this, and we can put some cones here. And there's also a couple of
house which are buried here. So what I'm going to do is I'm going to ignore
the house here, but whereas this one, and
I'm just going to add it just because it's
going to give us a depth. It's kind of like
far away for us. And we also have a figure, which is kind of coming here, and I'm also going to
make it even a little bit like a long path. So this is kind of I'm thinking
about composition, too. I'm not just copying acids, I'm trying to create a scene which kind of tells
the story as well. And our figure is kind
of like walking here. So we have to place the here. So what I will do is, and I'm checking here where
the figure is. And I'll just make him a path for him because he's kind of going off the path. And there you go. So now you can see that we cannot place
the foreground element, so we are constantly
comparing everything. So one more thing I don't do is, like, copying things as it is. I try to change a lot of
stuff in my composition. So this way, you're
not restricted, and you are painting
really freely, not worried about, you know, what's in the reference. Even this one, you can see
that I changed quite a lot. And I'm also thinking
about the shadows as well. And again, I'm going to provide these references for you guys. So the sketch I'm just
blocking the shadows. I think the shadow
should be this side, I'm just checking this side, the shadow should be this side. There's also a lot of the
sky, so we go and ignore it. You can see how
much we simplify.
3. Techniques: Before we jump in to start the painting and this is
the finished painting, but I'm going to
show the techniques what I've used in this class. It's easier when I'm
showing the painting, you can understand a
little bit better. The first technique
is called lifting. The lifting doesn't mean that you apply a wash or you apply a color like this you can apply any color you want and this is what we're
going to use for the sky. You will see it will
create a lot of beautiful magical once we apply a wash, so we can take a tissue paper, and you can take
any tissue paper, soft ones or harsh
once it's up to you. Then what I'm going to
do is I'm just going to create some
textures like this. Now you can see that I lift
out some of the paints, it creates this really
nice texture for us. What I can do is now on
top of it, since it's wet, I can rotate my brush and create this beautiful
texture like this. At the bottom, I'll
just do the same thing. You can see that we able to use a lift of
technique to create some cloud textionT is
what we're going to use to create these beautiful
clouds. Next technique. The next technique is
called wet-on-wet. I think you have seen this in a couple of tutorials
on my class. Wet-on-wet is
nothing but you wet the paper first, like this. Let's do some let's do some French ultran
blue or any kind of blue. You can see this the
wash is still wet and you can see the shine from the paper from the light,
which is reflecting on it. Since it's wet now, what
we could do is we can add some things like this and let
it blend and do its thing. I'm going to introduce
different colors just to show us just to show us a
technique, not to do anything. You can see that we
created this really nice, like a snowy tree with different variations
and colors in it. You can see that it looks
like some oranges there. This is wet-on-wet. You can do a lot of
stuff with wet-on-wet. I can also put some
water here and there and gives blooms and it creates this snow stecture
too on top of it. It looks like there's
snow in there. And we'll be using War were to create the shadows and
beautifully able to you can see that there is a lot
of blues and a little bit of French ultra blue as well
as Pain's gray in the tune. This is war wear and
we'll be using for the mountains and the
shadows behind it. The next technique I'll we'll be using is called a
scratch technique. Scratching can be used in
all other paintings as well. So scratching need to be done
with a dry brush stroll. You will know in a second
why I'm saying it. I don't want dark thing. This exact way I did
this snowy trees. You will see once we start painting and you will
see the chapter, how I used the snowy technique, maybe even make it darker. You can see that it cannot
looks like a tree now. But the thing is, I want to create some
snow and textures. What you could use, you can use your nail or you could
find anything you want. You can also use
anything sharp like this and you can use anything what I will use
is I'll just use my nails. And don't wait too long
because if it gets dry, then we can able to
create this texture. Now you can see
that it looks like it created this really
nice snowy texture. On the top of it, wherever
I see these things, I can just go and add some colors underneath
at the bottom because at the bottom there's
going to be a lot of darker values or darker shapes. And you can see that we use
the scratching technique. You can also use
it for a couple of other things even for
the mountains here. You can also use this with conduction of adding
some snows on top too. It's really hard to get texture like this
when you paint it. So on top of it, let's
create some snow. I'm going to take
some this Chinese white and I'm just going to put wherever the
scratching is done. This also gives randomness for our snow snow trees as well as it gives this
beautiful variation as well. It doesn't look like it's
automatically painted. I look at that. That looks like a really nice
complex snow trees. You can never paint. Now
we learn three techniques, lifting out, we down
wet and scratching. Now I'm going to show
another technique is called creating this mounts which
is happening in the snow. This is the easiest technique, even Charl could do it. What I'll do is I
can take this blue. I'll just make sure it
doesn't read that much. But you can see that the lines I'm making it just clean water, nothing, anything fancy
or anything like that. I'll just make it a
little bigger like this. Now you can see the shine. Maybe I'll just do a couple
more lines like this. What I'll do is I'll take
some koba blue and do this. You can see that
just by adding it, we create this really
nice texture of this snow which is
happening on the ground. You can also take some
clean water and take some things off the lifting. We can also create this
really nice gradient as well. You can see that it also
whites sharp edges. It gives really nice
smoother edges for us. In this one, you can
also use wet-on-wet. Since it's wet, I'll just
take some darker color. I don't want to go super dark, take some french ultra blue, and pansy paints gray, and I'll just create
some since it's wet, it's going to create this
really nice texture for us. You can see that it's already
looks like snow for us. Creating this mound, this is
called wet-on-wet and you're using conjunction to show how to create texture in the snow. The last technique I
used was to adding the shadows and even the
softer shadows here. What I will do is
the tree is here, what I'll do is I will make the shadow of the tree which
is happening like this. In order to get this
softer transition right here, which
is happening here, what I'm going to do
is I'm going to wet the paper where I want
the softness, like that. I'll just wet it like that. Now you can see that it's wet. Now what I'll do
is I'll take some blue and this paints gray. What I'll do is I'll just
create this texture, which goes like that and make some mounds and
everything like this. Now, what I'll do is I'll
take another clean water. I'll just rub it off like this. You can see that we created this no texture just
by wetting the paper. It's wet-on-wet and this is how I got the
softer transitions. You can see that
I also couple of this nice colors
which is happening. What I'll do is I'll just
add some this burnt sienna. What I'll do is, you know what? Let's add some oranges too. I don't want this to look
muddy, so I'll just do this. Since it's wet, and I can also add another blue on
top of it like that. I'll just create
really nice soft water what I'll do is I'll take this thing and I'll just
come ahead like that. This is how I created this software
transition at the top. I also able to put some colors, blending and everything
to work together. I want to show this
technique before painting the oral painting
because I think this will be really useful for students because
when they paint, they can usually practice this before they can
come and practice with.
4. Painting Sky: Welcome back to
the next chapter. So in this chapter, we're
going to add the bigger shape. That's the sky. For the sky, what I'm going to do is I
want to create a gradient. So what I'll be doing is I'll be adding a little bit
of serlem blue, and you can see this blue. And I'm going to put
some more water, mix I'm going to keep it
a little bit lighter. Again, when I'm doing this, this also helps me to sculpt
my mountains behind it, and we can get some
free shapes like that. And I also want to
go over the roof. The reason I'm doing
is we can use this as snow. Now put some more. So now we established
and there you go. Maybe if you want, you
can just put some more. So it gives like this mountain shapes
really sharp and nice. And you can see that now we can establish our focal point and
everything, my sky sorry. Now what I'm going to do is I'm going to put some oba blue. And I put some koba blue, and I'll just mix it
going sideways and blending it with my serlem
blue at the bottom, like that. Maybe what I'll do is I'll
take some more cobalt blue because I want to create a gradient and
a darker gradient. So I'll just do that, then
I'll just blend it like this. So one thing we can do is, if you see in my
other tutorials, I use a lot of tissue
paper to create textures. So now what I want to do is I want to create those clouds. So what I'm going to do is I'm going to take a tissue paper. And this one, I'm just going to keep it as
it is as a reference. So I'll just make some
texture like this. And let's make some clouds. And that's it. And I won't touch it and
leave it as it is. Sometime what you can
do is you can also go ahead and go around since it's wet and we can
get some textures like that. I'm just putting up the top. And since it's
wet, it's going to give these really
nice hedges for us. Again, you can do
one more like this. And you can see that,
you know, now we create the texture
for the landscape. So now what I'm going to do is, I'm just going to let it
dry and we can focus on the foreground and the
snow for everything.
5. Mountain Shadows: Welcome back. So now we are able to add the snow for the base, and now I'm going to add the
shadows for the background. For the shadows in
the background, there's going to
be a lot of blues, and I'm squinting
my eyes and taking some cobalt blue and a
little bit of serian blue. And you can also
add a little bit of French ultrammblue, too. So I'm just going to take this. And I'm just checking
the shape of it. And that's all I'm
doing. And I'm just going to add the
shadows like that. And I add the shadow here. There's also this shadow, which kind of comes here. And I'll just come it like that. Again, since it's
a big notorial, I'm just simplifying
everything for you guys. So you guys don't get confused. When you paint,
you paint freely. And there's also another
one I can add here as well. There's another slope
I can add like that. And I'm going to add
the big one here. And this is a really good
one because what this does is this helps to frame our
house in the foreground. And I'm trying to paint this in simple strokes as possible. And you can see that
we are able to do it. So before it dries out, I'm going to take a little
bit of Nutle tint like that. And I'll just put
in certain areas to separate the mountains. And you have to do
it once it's wet. And this also what it
gives is it kind of gives a little bit of mountain
peaks and everything. Now it looks darker, but I'm pretty sure
that after a bit, it just disappears, create
a really nice texture. And there's also one thing I
don't like it is this peak, which is kind of
sitting by itself. So what I will do is, I'll just create some texture like this, so it kind of goes and
connects with this mountain. And there you go. And you
can see that now we kind of created the shadows
for the background. Minus while I have this,
what I'm going to do is, I'm going to do here, take that. I'm just going to
put it here like that and take some clean water. And I'll just do some trees
like this, and that's it. Now we can see that we
can add the shadows for the mountains for the
background as well as for the things. There's one more thing
we can do mine as well, is take some more water
and this one I do it, use the side of your brush and just show there's
something's happening there. This showing the slope
of the mountain. Or else it's going to be really
white, and there you go. I'm just going to keep
it simple and that's it. We're not going to
add anything else. I'm going to let it dry, then we can go and add the midground.
6. Mid Ground: Okay, so now I'm
going to connect the background to the
midground element. So I'm going to take the
same thing, what we had. I'll take Librov You can
use This is Pains gray. You can also use neutral tint. I'll take Libro solium
blue and this one. And I'm going to take
some more water. And I'm going to
create this slope in our I'm also making sure to leave some white
snow piles here and there. It's in the reference, and we'll do the exact
same way as well. And I'll just connect
it like this. It's all about connecting
shapes together. And that's a really
important thing. And I'll just make
sure this mountain is going like that,
and there you go. Now we create the
mountain for this one. And while I'm here,
I'm going to create the darker trees for
the docker trees. And again, I'm going to make
this as a single shape. So what I'll do is I'll
keep on using my start of my brush. I'll just
keep doing this. You can see it here, and I'll connect the shape
with a mountain. And I don't want everything
to look symmetrical, so I'm just breaking
the shape here and there, and you can see that. So now, then I can go here. And I'll just connect
the shape here as well. And what I'll do is I will just combine this
one to this one. And at the bottom, it's
going to be lighter, so I'm going to take some water, and I'll just do this. And I'll do the same thing here as well. I'll take some water. I'll just blend it like this. There is a variation there, and I'll just bring everything down. And I'll just do this. And I'll just frame
the house like this and the head of a guy. And I'll just combine
it like this. I'll go here and
I'll just put some. And now you can see that we created this midground
with a thing. And I'm going to let
this sit for a bit. Then we can add the snow
trees in the foreground. And now we can see
that we cannot create the background, the
midground, and everything. So now we have to add the trees, which is in the midground. And we can also add it now, but I want to keep it dry, so I want to get some
dry brush strokes.
7. Mid Ground SnowTrees: Now what we can do is we can add the midground snow trees. So there's a lot of
snow trees there. So what I'm going to do is
I'm going to simplify it, and I'm going to
use a little bit of Burn Sienna and Pains Gray. And the first one is
kind of like here. And what I'm going to
do is I'm going to use a trick for you
guys, so it's easier. And I'll go here,
which goes below, and there's one which goes like that and which goes like that, and there's one more, which goes like this. Maybe we can just
make it bigger. And before it dries out, we're going to use
the same technique, what we did for the clouds. What we'll do is
we will just make some texture with
our tissue paper. You can also use your
nails too, like this. See that this also gives a
really nice texture as well, but you have to do it once
the pigment is there. Now what I will do is I'll go here where I put the nail marks. And I'll just go and put
a mark there like that. Now we can have
this texture there. And once we put the nail mark, and you can also do
it again as well, like Now you can see that we created this
really nice snowy trees. I'm just going to
leave it as it is. Even if you want. I'm going to do one more step like this. This is to frame our character and showing that there's
something is happening there. I'll take some clean
water and I'll put some more things here, it looks like some
fog happening there, and I'll just blend
it like this. There's textures
which is happening here. And there you go. Now we can see that we can
finish the midtones already. So now what we can do is we
can go on finish the house, then we can add the snow
texture in the foreground.
8. House: Had the house. For the house, what I'm going to
do is I'm going to take some burnt amber. No, sorry, amber, which is here. I'll add some burnt
sienna Amber. I'll put a little bit
of this cobal blue, and now we have
the cabin texture. What I'll do, maybe I'll put this and this a
little bit darker. And again, I don't want
to have a straight line. So what I'll do is I'll make
some marks here and there. So there's kind of, like, snow, which is kind of piled up. So it's not a really
straight line. So we're kind of creating some kind of variation
at the bottom. I will do the same thing here as well, and I'll combine it. And what I'm going to do
is before it dries out, I'm going to take you can take
bon tamber or pain scray, but it have to be a dry
brush. I'll take both. Before it dries out, I'm
going to put it like this. What this going to do
is this going to act as a shadow for our cabin. You can see that as
soon as we added it, it cannot work really nice. Even at the bottom, you can just put some
marks here and there, that helps to anchor
on the snow as well. While it's drying,
I'm going to add the the background
hours as well. I'm keeping it a
little bit lighter because it's far away there. I'll do the same thing here as well. Maybe I'll just do this. And I'll put some blue there. Since it's far away, we need
some kind of blue there. So I'm going to take
some solium blue maybe, and I'll just add it like this. So it doesn't read as
warmer as this one. And here, what we can do is
we can also add the rim. So for the rim,
I'm going to take some solium blue and raw amber. I'm just going to
add it like this. Maybe I'll add
something like that. Then I'll leave it as it is. Now we can see that we can add the cabin things with anything in it, just
a plain old thing. What I'm going to do is, I'm going to dry it, then we can add the next
value on top of it.
9. Snow Base: So the last chapter
we did the sky. This chapter, I'm going to
create a base for the snow. So when I'm creating the base, I usually put some warmer value. So I'm going to put a little
bit of this windsor o. And I'm going to take more water and a little bit of
pigment in there. And I'm just going
to for the snow, I don't want to be just white. And if you want,
you can also add some blues. You
can just put this. And you can see that
amount of water I'm using in the snow texture. I'll just go here and
I'll just do this. Even for the mountains, I think for the mountains,
what I'll do is, um I'll keep this little
bi yellow tinge on it. And I'll just bring it down,
and I'll keep it lighter. It's a little bit
darker than this. So now, there's not any
white paper in our scene. We kind of create the
snow base texture for the house and even
for the foreground. So now I'm happy with it. So this is snow base,
and I'll let it dry. Now let's go and
add the midground.
10. AddingFigureFinal: Okay, welcome to
the next chapter. So this chapter, we're
going to add the figure. And the figure has I'm going to add the
jacket first, like that. He's also carrying
something. You know what? I'm going to let him have a dog. And I'm just going to clean it. And I'm going to give
him like an orange at it blends and does
whatever it does. Then we can give them or
give her a black pants. She's walking like that, she's walking in
there like that. There's a dog accompanying her. I'll do some dogs. Put it like this, like
a poodle or something. And the dog is wearing, like, a red sweater as
well. There you go. And we'll connect it later. Okay, let's add some details. It's dried quite a bit. So I'm going to add the details on the shadows for
the character. So I'm going to
take some dark red and like that, like that. Now I'm going to add
some add some this Hudi And there you go. So now, I'll just
connect it to the dog. And now you can see that we can add the character really nice. So there's only a few
things spending is like, adding the shadows and adding the shadows of the person and
the shadows for the house. Then that's it. I think we can call
this painting it.
11. Snow Pile: So now the snow looks
really plain and weak, even though we
added those colors, you can see that it kind of, like, disappeared,
but it's fine. So what I'm going to do is so I'm going to
create some pictures. So I'm going to take
some clean water, as you can see here. So this is just to show how
our snow is going to look. So for example, if I
do this and making some lines and it's
thick in the foreground, as it goes in the background, it just, like, gets
tiny and tiny. It's the same concept
here as well. I'm going to show here and you can see the
water says there. I'll do the same thing here. I'll do maybe one here and
just making some lines. Now there are some water there. What I'm going to do
is I'm going to take some serlum blue and a
little bit of this amber. We get this color and we can
also put some blue in it. You can put any color you want, but make sure there's
a lot of blue in it. I'm just going to make
some lines like this. Wherever I put some water, And the same thing here as well. Showing the slope
of the mountain. And you can see that
now, it doesn't look. I put some water here and
there to break the texture. You can see that now we can
create a store sexture. In the foreground,
I'll just even make it more and where at the
bottom, I'll just do this. I'll use my fingers to create
this texture like that. That's it. I don't want
to show that much. You can see that now we create this really nice snow texture. Now you can see
that there's planes and everything is going now. Now you know how to the snow texture and
don't overwork it, leave it simple as possible
and this is more than enough. Once we are done,
now let's go and add the figure and let's go
in the next chapter.
12. SnowPath: The shadows. I want to do one thing is adding
the footpath. The footpath, all we can do is I'm going to take some water. I'm just going to
keep on keeping dots. As I said before, things are
closer or bigger as it goes, it gets lighter and lighter. And what I'll do is
I'll take some serlum blue and cobal
blue and I'll just just create this snow
texture here and there. And there you go. So now you can see that we kind
of create a path. But before it dries
out, I'm going to add another darker texture
just to give some depth. So wherever it kind of goes because light
is heating here. So I want to put some
darker valleys here. So it kind of looks
like the light is heating from this side, just showing I'm not trying to overdo this, I just leave it as it is.
13. What We Learned: Okay, let's summarize what
we learned from this class, and this is the final painting. You can see that I also add the shadows on the
foreground and I also add the shadow for the person
who's walking in the mound. It's the same thing what we did, and this is the
thing we learn in the techniques class
before we started the painting and we did the sky with the
lifting out technique, and we also created the mountain shadows
using wet on wear. We put up cobalt blue, then we add a little
bit of paints gray and a little bit of
French ultra blue on it. So then we add a soft wash here. Then we can create the scratching technique which
is really fun to do. I also showed in the
technique class section. If you're not sure, you can
also go back and check it. And we also use some
scratching technique to create this really
nice snowy trees. Then we learn how to create texture for the snow
like wetting the paper first and creating
subtle color variations to create this variation, the snow pile, which
is on both sides. Last thing I added is
just wetting the paper first and creating a shadow like what we did here, exactly. Using softer shadows and we also use wet-on-wet
on top of it.
14. Outro: Congrats. You did
an amazing job. Whether your painting
looks exactly like mine or
completely different, what matters most is that
you showed up, practice, and allowed yourself to explore watercolor in a gentle way. In this class, you
learned how to build a winter scene
using simple composition, soft layering, wet
on wet washes, lifting, glazing,
and subtle textures. And these are skills you can now carry on into all of
your future paintings. I would absolutely love to see what you have
created from this class. So please don't forget to upload your paintings
to the project section. Sharing your work not
only helps you grow, but it also inspires other
students in the Skillshare, who are just starting
their journey. And thank you so much
for painting with me. Keep practicing, keep it simple, and most importantly,
enjoy the process. And you're always welcome
to check my other classes, and I'll see you
in the next class.
 Dinesh Subramanian, I love painting!!