Transcripts
3. Painting The Truck Part 1: For this next segment, I go ahead and get out a
couple of your round brushes. It's nice to have one brush that's strictly just
for laying down water because we are going to be using a wet into wet technique. Meaning if this is your first time experimenting
with that, we're going to layer the initial ground with water and then lay
paint on top of that. Truly, this whole painting is going to be a lot of layering. It's not my typical style, which is more
gestural and loose. We're just mixing
colors as we move along and not really adding more on top of
that once they dry, but just leaving
them as is here. We're going to allow
things to dry, add another layer, but also be working wet into wet as well. Maybe have a brush
that's strictly just your water brush and then have another one for
actually laying down the paint. How we get this result
here is by, like I said, you can either put
the color on top of the painting and then while
that color is still wet, you will mix a different ratio. We'll have more of like a cough syrup ratio rather than a broth, which would be attributed here. And you darken around
the edges here. And I'm going to show
you how to do that. But just wanted to mention beforehand that's
how we achieve that. Or you can completely
layer a layer of water and then move forward and start
layering here one color, go back in and add
another layer of color. Hopefully that all makes sense
and you'll be able to see, obviously, as we move forward
and paint this together. If you want to have this
off to the side, you can. It was more for the illustration
than anything else, not necessarily the actual
water color concepts. But I did want to just
mention that we have that available off to the side if you're wanting
to refer to that. Along the way, I've squeezed out a bit of the
greenish umber onto my palette. I'm going to go ahead
and mix that now by taking a wet brush and dipping
straight into the paint. And I'm going to
pull that color out here onto the palette, mix up a really nice
Cough strip consistency. If you'll remember from
my previous classes, that is 70% paint and 30% water. Really get into the paint here
that we have a nice thick, thick coat of color. Then come one step
out, mix a new pile, begin adding water for
broth consistency, rather than completely
do a layer in water. I'm going to head in with
a really washy broth, meaning that it's heavy
on the water in my brush, rather than like blotting off my brush and then
picking up color. I'm leaving quite a
bit of water on here. Because what I want to happen is I want this to stay
wet enough so that I can head back in with my
cough syrup ratio and add another layer of
color while things are wet. We're also going to
do it when it's dry, but we're going to do a little bit of everything
squeeze a bit more. Greenish temper
doesn't go a long way, like colors like Prussian
blue only need a touch of it to really just like
maximize that color. But I find with this color, you really do need
to be generous with it and have enough
on your palette to move through however
much of it that you need. Okay, we have a nice thick pile here and a nice broth
here to touch more water. If you want, go ahead off to the side on a
separate piece of paper. Make sure you have your
consistencies here. You can see that, remember, water color dries two to three times lighter than what you see. You need to
accommodate for that. This is the top here and the
broth is the bottom here. You might want to do that off to the side just to be sure. Then we can move that off to the side and
begin layering in. What we're going to
do is we're going to stop at each segment. This will be a segment, and
then this will be a segment. And just move through in pieces, rather than doing the
whole thing at once and feeling very
overwhelmed as to how to keep moving and keeping
track of exactly what's wet. Okay, I'm going to lay a
nice coat of paint here. Pick up a little bit of water and just begin moving it down. I'm just pulling it down,
pulling it sideways. I want a nice base coat here. Picking up a little more water, a little bit more paint. I'm going to come up all
the way through here. Up through the top, all
the way around the window, it's okay if you go a little bit over, there's room for air. Don't feel like you
can't make a mistake. And plus you have the file. If things go completely awry, you can always just reprint
this nice little line here. Moving that through, this helps working in segments to
not feel overwhelmed by the, the size of the painting. This is a rather small painting, but sometimes we have a lot of surface area to cover
and it can be daunting. Continuing to work through here, things are still nice and wet. I'm just pulling the paint, our broth consistency, and then also picking up water
as I move along. I don't want to go too
dark initially because there's no room for me to darken up things
along the edges. You can already see we have something that's a
little bit lighter. I'm just going to
stop right there. We'll be able to b***d
that when we need to. Okay, we have a nice
light coat here. What I'm going to
do while things are wet is pick up a
little bit more of that broth consistency and head back in right here along the edges that things are
just a little bit darker. If you're wanting to use
your reference picture, you can see that that's exactly what's happening
in the painting. Just right here, dropping it in. The important thing in
the beginning is to make sure that you have
a nice wet surface. If it's too dry, this
isn't going to happen. Your paints not going
to move at all, then I want to make sure that I don't go over this barrier here, because in our painting, it's going to be a quite a bit lighter than what we
have going on up here. Just letting things
dry for a moment. That, I wouldn't say downside, but you have to be a little
bit more patient when working wet into
wet because you're really just waiting on the paint to do what it wants to do. You hot environment, things are going to
dry very quickly. If you're in a cooler room, then it might take
a little longer. It's just taking note along the way. Okay,
this is drying. I can see this is very
wet. This is drying. So now I'm going to head
into my cough syrup mixture, which as you
remember, is the one that's just a little
bit thicker here. I'm going to work on this area. I'm just going to lay that
color here along the top. I'm going to do the
same right here. Just moving the paint along and then we just have
to give it a moment. Then what you can do if you
have your Filbert brush, what I like to do is
I dip it in water, make sure it's clean, blot
off that excess water, and then we can lift out a little bit of the paint and then blot that
on a paper towel. Like I said, it's a
damp brush and I'm just running it
along the surface here where I want there
to be not so much color. There we go, Moving that along, lifting out the color bit, dipping back into
my cough syrup. I'm going to come here just a
little bit more paint flow. It's such a beautiful process. I don't work this way very
often anymore because I'm usually moving quickly
as I cover a large area. This is nice to just have
like one segment at a time. I can see that this area
is drying over here, so I can do the same thing, taking my cough shirt mixture and coming right here
along the edges, letting that paint do
what it loves to do. Just sit there and lay on top. This is how we are creating
depth and dimension. We're going to do the
same thing down here. Moving along, taking the toe of the brush and just gently
dabbing the wet media. You can do is take your brush that you're using exclusively
for water as well, and just begin to b***d
some of the color together. You can also pick up the broth consistency
if things are looking too separated and just touch it up against
the edges here, create some really
pretty bleeds. This is one of those classes
where I want to give you free rein to paint this,
how you want to paint this, Giving you the education, but allowing you to really play here and find your happy place. I like where things are at
right now with the paint. We're going to definitely need to do a little bit more work. But let's continue
moving forward and painting the whole
body of this truck.
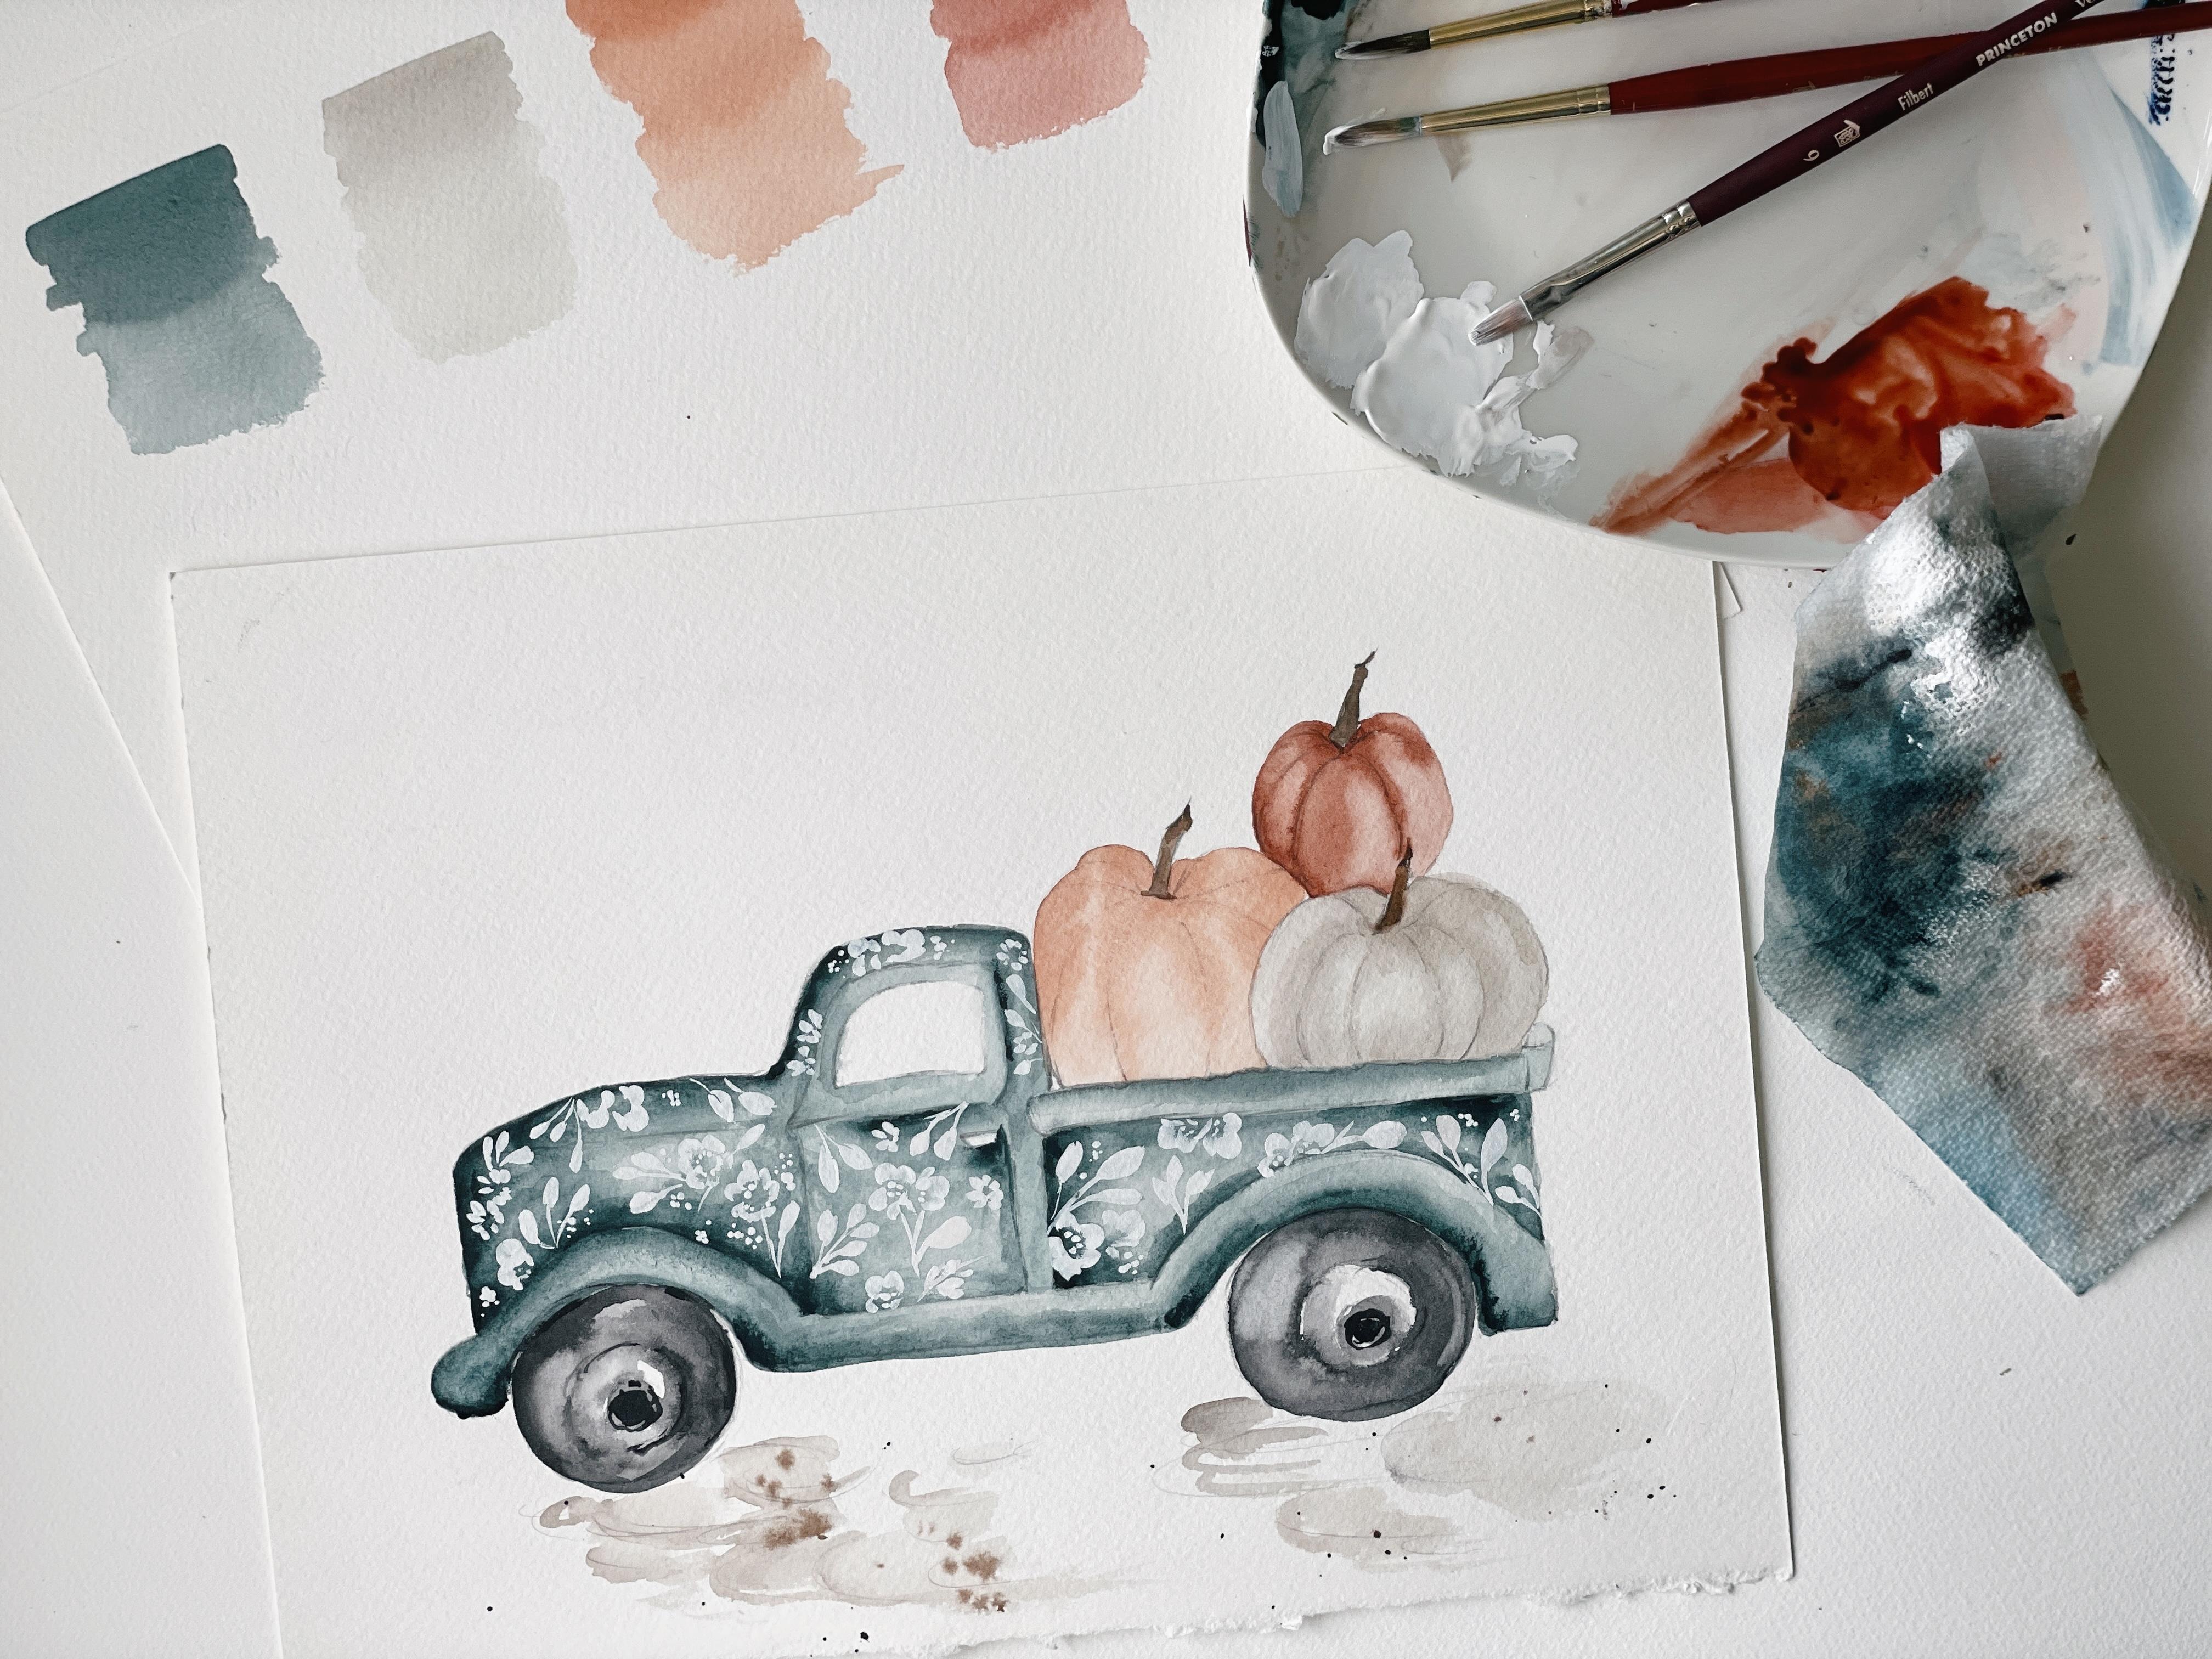
6. Applying Gestural Marks: This last and final
step is optional. It is a nod to just
my style of painting. What I coined, what I call back in the day
now as Lutanical, which is just a b***d of loose watercolors and
botanical concepts, it involved a lot of this. This is really where my
roots are with layering. And really taking my
time through painting, gradually moved into more of
a gestural and loose style. Not simply just
out of preference, but also because
being able to move efficiently as I brought
children into my life. I started out as having no children and moved
into raising a family. That style is more
suited to my lifestyle. However, I still do love
to paint like this. Occasionally one of the
things I do like to do is to add gestural
markings to my painting, which just add character. It makes it unique, it just
makes it feel like my own. Again, very optional, but I'm going to show
you how to do it. You can decide if
you want to or not. What you're going to do
is take your Filbert brush and you're going to dip it immediately just into the paint to pick up
a very thick ratio, even more so than Cough Sir, this is more like horse radish. If you've purchased
my book or if you've worked through
any of the material, we talk about those
three consistencies. And this would be like
the horse radish, it's a very sticky
pasty texture. Looking at this painting,
I've added one right here underneath the door
handle to create a shadow. Basically, what I did is I took paint and I just dragged it underneath the door handle here and b***ded it
as we did elsewhere. But what we can do is add
that in other areas too. Just to rough up this
truck a little bit, I'm going to take the paint and I'm just going to come
along the edge here. I'm just going to drag
it just gesturally. Then I'll take my round brush and just a little bit
soften things up, but I'm going to leave the
bulk of the paint here so that it just serves
as a nice dark mark. And I'll do the same thing here, just adding a little bit of
character to the truck here. I'm going to do the
same thing right here along this line. Like I said, again,
this is more of a nod, just to my style of how
I paint not necessary. Taking the brush and
moving through the paint, leaving areas where
it's a little bit more texturized. Do the same thing. Here you can see this just adds a nice
element to the painting. I feel like it gives the
painting body volume depth. It adds imperfections,
which, you know, I'm all about leaning into the imperfect and
embracing mistakes along the way and figuring
out what to do with them. Taking my brush and just
softening off here, trying not to cover up this
little highlight here, because we love that. At least I do. I'm going to add just a little shadow
around the window here. I didn't want to skimp
you on those details. I could have just added them and left it and then
come back and said, hey, this is what I have now. But I want you to feel like you got to go through the
entire process with me. Even though these are
just, like I said, very innate to just how
I intuitively paint. I want to show you
that so that you can opt to include that or not. I'm going to do
one last one here, pick up a little bit more paint. It is something that I may
do after the fact too, because I'll look at the
painting and think, okay, well it just needs
a little bit more and add it post production. But for the most part I'm
happy with where things are. Again, you can continue to just move around the
painting like that. Those areas where it's dark, that's where I find it's best. It just is a really
pretty fun way to add some character and
depth to the painting. We're going to stop there
and then we're going to come back and do tires together.
7. Painting The Tires: Let's go ahead and dip into
our Jane's black, right here. And pull it out onto the
center of the palette. Make yourself a
Cough consistency. Then let's pull it
out one more time for something a bit softer. Broth consistency, we want to make
sure we have those two ratios to work with. Go ahead and put that
off to the side. I'm going to use my round
brush and I'm going to dip in here to my broth and begin
to layer in the paint. And just move it down. I'm going to move
a little quicker here since we've got
the concept down. It's just really the same thing. I'm not going to be overly
careful here but just making sure I get the majority, hey, I'm going to
cross that barrier and then pick up a little bit of the cough strip consistency. And let's head in here and go ahead and add some
nice little bleeds into here. And appear again using Cough strip consistency
around the edges. I use my second brush, just throw it across the room. I'm going to use my
second brush that has mostly just water on
it to fill in here, just because I don't want
this giant white space. So I'm just going to b***d that together for a nice there we go, so we just have like a little
peak of the white here. Then again, in consistency, I'm going to go
around the perimeter leaving just a bit
of white space here. And again, do the
same thing down here. Cost consistency while
everything's still nice and wet. Picking up my Filbert brush, just b***ding a little bit here. Let's go ahead and do the
same thing on the other side. We'll start with
broth consistency, just continuing to
move that paint around and crossing over
that threshold, bringing a little bit more
paint into the nearly center. I'm going to leave a
touch of white there. Again, we'll just start with the layering of the Cough ser, consistency along the
perimeter of the wheel. And this is a little
dark over here. So I'm just going to lift
a bit of that paint out. Just moving all around
here as I see fit, pulling out a little
bit of the color using that Filbert brush. I also have my other
brush in my hand. And just working here, dabbing, while things
are nice and wet. I also don't want my tire
to look like a flat tire, so I'm going to curve
that out a little bit. Here go. I'm bring this one down just to touch too by creating a new barrier. Then we have here in the
middle of very dark spot. So let's fill that in. Do the same thing
on the other side. It doesn't have to be perfect. We're making it our own here, adding a bit more cough
syrup around the edges here. I'm going to take the
toe of my brush and just run it along
the pencil line here to create some details. This area is still a little
bit too wet to do that. I'm just going to
leave that as is, again just darkening up
the areas around there. You can see this was very dark and now it's lightening up. Same thing is going
to happen over here. We'll help it along by lifting
out a little bit of color and running it up against the very edge of the
bottom of the truck here. I like how there's
some rough areas over here where the paints
not fully saturating. You can choose to crisp up those edges or leave them
a little bit rougher. It's completely up to you. But in essence, this is pretty much the entire tire painting. You can, like I said, we things are a little bit
drier and then take the toe of your brush
and just Gt line. But as you can see doing that now things are still
a little bit too wet. You would just wait till
things are a little drier. Then taking the
toe of your brush, just move your way around, creating some
markings in the tire. Again, completely optional. This is where I leave it to you to decide how much to omit, how much to add. It's
completely up to you.
10. Painting Pumpkin 3: Our final color mixture is
going to be the burnt umber, with our Jens black touch. More burnt umber, there, something that looks
right about there. We're going to use
this mixture to create a very light color,
not necessarily white, but just a soft linen beige tone by taking a bit of the color, making a new pile,
adding water to it. This is one version of white. Again, referring back to
my vintage color guides, I have one that is solely focused on how to
create white tones. And this is a very
similar mock up. I believe we use a
lamp black and burnt umber or lamp black and
sepia to create white. This is very similar to that using genes black
and burnt umber. Okay, now we are ready to
paint our third pumpkin. I'm going to use my
Filbert brush just because it's nice for
those curved edges. But you can use your point
round two if you like. I'm just going to begin
to lay in the color here. Don't really mind these
two colors up here where I spilt over a bit. In fact, that is a technique
that you could readily invite and encourage
for these colors to b***d into each other
if you wanted that more, really loose light look so
many ways to paint this, that's why I wanted to
give you the blank file so that you could
again and again just opt to do different
things with it. Fling it in here, adding just a touch more color to it. And I'm going to come
along the bottom here, along the side here, right up here near the stem. Will create some shadows by coming behind
these little lines, again, just darkening
up a little bit along the edge just to create
a bit of dimension here. Then we can, if we need to
feel like we need to use our, rinse it off and then pull
out a bit of the color. Don't need it so
much on this one, but you can find those areas where you want it a little bit lighter or
to create a high light. You can even go over things
when they're dry too, and pull out more color. Let's say you wanted it
lighter through here, you would just wet that
brush and then continue to execute those strokes by
lifting out the color. We're going to use our
burnt umber for the stem. I'm going to put a
little bit of that off to the side of my palette here. You can either use your
point brush or your filbert. You'll get more of a loose
gestural feel if you use bert. Whereas your point is
more for precision, just take that into mind. I'm going to use my filbert. I'm going to just
come around the edges here and just repeat again. It doesn't have to be perfect, invite imperfection
into the painting. You can move that, brush around, get those corners if you like. You could do different
colored stems, you could do some green. I like the cohesiveness. Could you have a little area? I have a little area
where it's still wet. And you could put the paint
for the stem down and let that flow into the area
of the pumpkin too, and that looks really lovely. For example, you just touched
that there and now you have the paint running into it. You can create some shadows. There are so many ways that
you could approach this. I'm just giving you one
of them. There you go. You can continue to
layer if you like, or you can leave it like that. Pulling out high lights, adding more color in the
areas where it's darkest, essentially, that's that step. I'll leave you to it there, and then we're going
to come and add just a little bit
of paint down here just to make it
look a little bit more rustic, a
little more vintage.
 Cara Rosalie Olsen, Floral Designer + Watercolor Instructor