Transcripts
1. Introduction: In this class
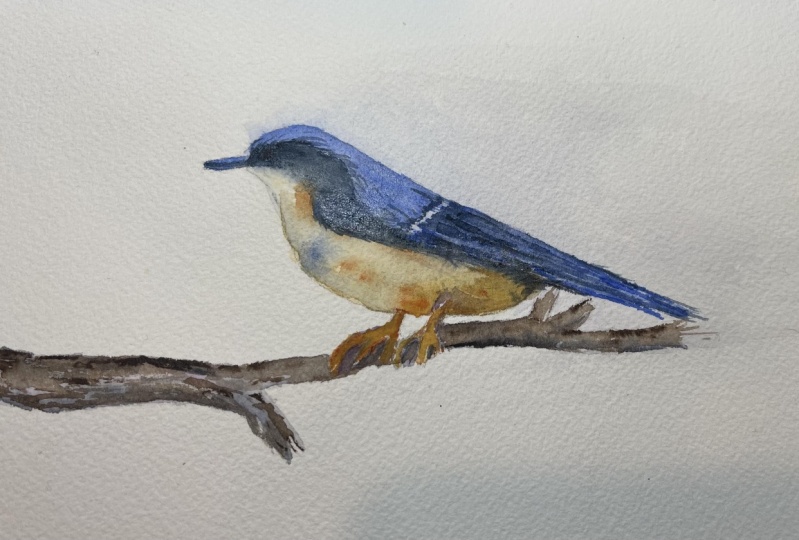
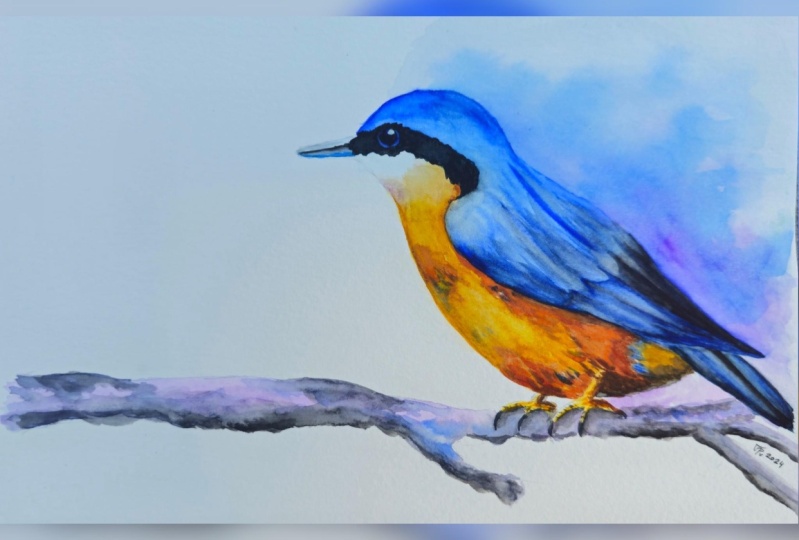
you'll learn how to paint this beautiful bluebird. You'll be learning how
to paint wet into wet. I'm also going to show you some little tips and
hence that you can use to make your paintings
a little bit better. You'll learn how to simply add texture to the branch area. Will be talking you through
my paints towards the ratios, the consistency of the
paint that I'm using when I apply it down onto the paper
to create darker markings, to create texture and
depth within the birds. I'll also be showing
you how you can create these beautiful
shadows to create the separation in
the feathers and give the bird lots of
depth and definition, will also be painting the feet. This is a really simple job and you could follow
along with me. I'll also teach you how to paint a really simple but realistic
looking eye as well. So if you're going
to follow along with me and paint this bird, I recommend watching
the whole class once and then grabbing your paints on having
a go yourself. That's grab your paints or grab a cup of tea if you're
going to watch me first, and I really hope you
enjoy this lesson today.
2. The Paint Colors: With my bids on the paper
now I'm going to show you what colors I'm going
to use for the beds. I found this beautiful image
on a website called Pixabay. This is a copyright-free image. You are free to use
this however you wish. I will put this
reference photo in the projects and
resources area for you. I'm going to use
ultramarine blue, which is a beautiful warm blue. I'm gonna be using this
on a lot of the beds. I'll also be using
some indigo ons. I am going to use this for the darkest markings on the bed. As you can see with hardly
any water mixed into it. Indigo almost looks black. But I did want to have a blue
sort of feel to this bird. I am going to use
burnt sienna as well, which is a lovely reddish brown. Also some yellow ocher, which is more of
a mustard color. I'm gonna be using
dioxazine violet as well. I am actually going
to use a little bit of Payne's gray as well. But I'm only going to be using the tiniest amount of face. You could swap bought up for indigo if you don't
have Payne's gray, we'll use a little
bit of black instead.
3. The Supplies: For this tutorial, you'll need something to mix your paint on. I like to use a ceramic palette. If you've got a
plastic palette or an old dish than not
will work great too. Also, some paper I'm
using watercolor paper. It's 100% cotton and
it is by Canson. I loved this paper is lovely
quality jar of clean water. I like to use two jars. You'll also be needing your
favorite watercolor paints. I'm gonna be using tube colors today by Winsor
and Newton Cotman. Whereas if you've got pans, then go ahead and use those. You'll also need a
hot lead pencil. I'm using a mechanical pencil. This is a rupturing Tukey
and I got this from MS. Then you'll also need some scrap paper to
test your colors on. I always find it handy to have scrap paper to hand to
test my colors out. And also your favorite brushes through most
of this tutorial, I did use a silver black
velvet size ten brush. It's a lovely quality,
pointed round brush, which helps me to get in some really fine
corners in details. But you just use whatever brush you're the
most comfortable with.
4. The Drawing / Sketch: I'm going to sketch the blue. Don't know, I'm gonna be
using a mechanical pencil. This is a rotten ticky and
I got this from Amazon. You could also use a
non photo blue pencil. This is a current
dash that I've got. Love it. It's actually lovely quality and has an eraser at the end. You'll also need an eraser
on a piece of paper. This is just cartridge paper or playing printer paper that
I'm going to use today. And then I'm going to
use a soft lead pencil. I'll be using this
discriminant over the back of my design to transfer it. You'll need a soft lead pencil, like 3D or six B or
any beat on the pencil will be soft enough to be
able to transfer your design. I'm going to start off by roughly pencil in the
outside shape of the bird. I'm mainly looking for what angle the back of
the beard is printing in. I wanted to get that in first to be able to get the correct
proportions of the bird. I'm just going to be used
in CVs of straight lines. I'm not too worried
at the moment about the curve and actual
shape of the bids body. I wanted to make sure that I get the correct positioning and proportions of the
birds before I actually work on the exact
shape of the bird. At the moment, I'm figuring
out whether I should sit. I'm going to do a beak
to eye line level. This is where the center line of the beak is going to sit. Then I'm working out where in the head thought I would be. So I'm just putting
in some lines just to guide me a little bit. What I've worked out a few sits the eye on that middle
line of the beak. It normally works
really well for a boot. I'm going to start sketching out the correct outside
edges of the birds. Now, I'm just
carefully looking at my reference photo and walking
my pencil along slowly. You might see me stopping, but that is just because
I'm looking back and forth my reference photo and having a really good thing
about widows, correct proportions
on lines should sit. Don't think of this as a bird's. If you just think of this as
a CVS of shapes and lines, then you'll be able to draw the Bode how you see it
in the reference photo. Not what you actually think
a beard should look like. Because if you think back to
school times, when we add, we will actually taught
that good might have just a round body and a little
sausage heads suck on top. Actually, birds are all
different shapes and sizes. If you just think of
these as simple shapes, then you are really going
to find this a lot easier. I just lightly
sketched in that wing, but I'm going to stop
here because I wanted to work out without marking around the eye is going to be first. If I get the correct
positioning of that marking, that I couldn't have
a little look at my drawing and figure
out where that wing needs to be
because I do believe that I've sketched
it slightly wrong. I'm going to get that
locking in first. Then I'll use thoughts
mocking is a guide to where I need
to put that wing. If you'll have a look at
the space between the wing and the chest of the beds. Then you'll be able
to grasp where you really need to draw the wing, how big that we needs to be. And also the positioning of those little scallop feathers
that I'm drawing in now. Those scalloped
families don't need to be overly complicated. Just draw them simply because
we all go into erase them. But we do need that shape there. And you'll see a little bit
further on why ongoing to continue to drew in these little feathers
underneath that wing as well. I'm using those
little feathers to figure out where
this tail feather starts and also what
angle does it sit on? I'm using a little
guideline at the bottom to figure out where that
tail feather stops. Then I'm going to draw in
those little scarlet feathers. I'm also going to draw in this
back further here as well. There are a few little feathers
that I'm going to get in. I do like to draw
in the fine details because I would like
to remind myself I need to actually
paint those in. I'm also carefully looking at the angle of these very
back tail feathers. They don't all sit
the same length, so I'm concentrating on that. Then I'm going to use
those tail feathers as a little guide as to where
it needs to put the feet. I'm looking at that
mark tail feather. I'm figuring out where those
feet and legs needs to sit. I did find this the
most difficult area of the verb, to be honest. I have a good look of you are struggling with the
positioning of the feet. It really does
make a difference. You can use some
guidelines to help you. Now I'm rounding off
the front of the birds. So and just carefully looking at the overall shape of the
chest and the tummy area. It is not a straight line. You do have lots of dips and curves within the
body of the bird. So I'll just have a
careful look at that. And then I'm going to
carefully draw in the feet. Those feet are CVs
of curves and bumps. Feet are not
completely straight. And I did want to get those claws curving around
the branch as well. To be honest, the clues were probably the most tricky area. I found these a bit
tricky, so just solve it. Good luck on your reference
photo and just figure out where those caves
are within those feet. You do really need to cuv those
clothes around to make it look like those clothes are
wrapping around the branch. Now using the feet as a guide, I'm going to start
drawing in the branch. Just remember that a
branch or a twig or a log will not be
completely straight. Tweet logs, trees,
they all have depths and knocks and cracks and they
never ever sits straight. So you can see me wiggling my pencil and drawing
the lines of the logs in-between those clothes to make it look like the
closer wrapping around the branch on keeping white lines on pencil
markings really irregular. You can see that I'm drawing in some little curves and bumps. Then I'm gonna take my
eraser and carefully erase any of the lines
that I don't need. You could use the end of
a pencil if you find that easier to erase small areas. Once your pencil design
has been erased, get your soft lead
pencil and color over the back of your design. I covered the whole
of my design and then flip it over and
use a pointy pencil. I'm using my
mechanical pencil to trace over the
lines of the birds. What this says is
this will transfer your design onto your
watercolor paper. It means that you can transfer your design without having to erase on the watercolor
paper and damage your paper.
5. The Background and First Layer of the Bird: I've got my bid popped
stone onto my paper now. And although in the
original reference photo there are some
beautiful flowers, I'm going to simplify this and just painting the
beard and the branch. I've got some clean water now on my brush and you feel wondering
what brush I'm using. This is a silver black
velvet, size ten. I'm going to take the water all over the back of the boat. I'm going onto the
background area over the sides of the birds. I've just swapped to my Da
Vinci Carson nail brush. This is a lovely size 12 brush and it was
slightly bigger. So that's why I've swapped. I'm going to take that water all over the back of the bids, slightly onto the
bird's body as well, just the top tail
feathers and also underneath his bottom
tail feathers there. Now I've got some very
diluted ultramarine blue. I'm gonna pop that
onto the boots, but I do want lots of this color to bleed out into the
background as well. But I don't want that to go
on all of the backgrounds. So it only want it at
the top of the bird 3D, just in the one area. I'm going to carefully
paint this ultramarine blue around those top feathers. I'm avoiding the belly area. I'm also not painting the
marking or going to the eye. I'm also going to paint in
those fairly back feathers and also take a bit of this color
underneath his bottom area. So I do want this area that
I'm painting at the moment of more in the background or
a more of a blurred feel. You can see that my board and just allowing some of
that paint to drip down. If you're finding that it's not dripping as much
as you had hoped, just adds more water and allow that water to push
the paint outwards. You've got a lovely drip effect. By doing this, I'm
going to drop in some dioxazine violet
certain areas as well. You could see that
I'm using my brush to blend out that paint on. Now adding some clean water and just allowing that
paint to drip down. I'm moving my board around. And if you find that, you'll go to more
of a streaky look, you can just use some water to blend out that
streaky look under. Now I'm just taking
a clean cloth or paper towel and just dab in the edges of that water
to take off the excess. We're going to allow this
thin first layer to dry now. And then we're gonna be painting
the value of the birds.
6. The Belly and Beak: First Layer: I'm using some clean
water now to paint around the bottom
of the eye marking. I'm also going to take
it into the tummy area. You can see that I'm avoiding those blue feathers at the top part we've
already painted. This is just clean water. I'm going to carefully paint
this all over the term area, just underneath the
leg area as well. There's a nice even layer of water on the tummy
of the beards. Now, as I've got some
diluted yellow ocher, I'm going to start dropping
this into areas of the wet boots on just allowing
that to work its magic. I'm going to not allow
this just to bleed out wherever it wants
to go at the top. So I do want to keep that
underneath the chin here. White. I am avoids in that area there, I'm gonna take
this yellow ocher, which is a very thin
layer of yellow ocher. And if you have too much
water on the paper, you can dab your paintbrush
onto a class and then use it as a sponge and soak up
some of that excess water. You can see I'm just using
my brush to smooth out thought yellow ocher to
Catherine, lovely even layer. I'm going to paint it underneath his bottom feathers as well. So just avoiding those
white feathers on top. Now I've got some
ultramarine blue and they're gonna start just painting in
these back tail feathers. I'm just going to
do one layer all over those bottom
tail feathers because we will work on top
of the sale fathers and add some extra color on top. But for now this is
just the first layer. I've got some clean water on my brush and
I'm just going to paint in these white
feathers underneath. So although they white, I do want to add a
little bit of color, a little bit of shadow, because sometimes when
something is completely white, it actually isn't fully white. You do have shadows and reflected colors
within white areas. I'm just using the tip
of my brush to pull them some feathers strokes. So you got a negative
painting feel on it looks a little bit
like feather separations. And then I'm just using a very diluted wash
of the ultramarine. There was hardly any
paint on my brush at all. But it's super, super light, so it looks more
great to be honest. I'm also going to
paint a light wash of ultramarine blue all
over the beak area. So just using the
tip of my brush, I'm using quite a large brush. If you wanted to swap to a smaller brush size
for a size two, if you prefer that, and then go ahead
and do that by, I'm quite confident
with these brushes on. They're just going to
paint over this beak area. This area we're going
to allow to dry before we work on
the next section. Allow this area to
really dry properly.
7. The Log: First Layer: We're going to paint
in the branch now, I've got some clean water. I'm going to paint that
all over the branch area. I'm making sure not to
paint over my pencil marks. I do want to get a nice even
layer of the water as well. So I'm making sure
I haven't gotten any puddles on my paper. I'm going to carefully paint that water around those clause because I don't want any of that water to be on the
closed because otherwise, if I apply the paint to the
paper wherever that water is, the paint is going to travel. If you paint the water
over the clothes, you're going to end
up getting bleeds of paint in those close there. I'm also going to paint
the back of this branch. I'm just further off some of that water into the background. So we got a nice blues effect. I'm going to
carefully paint that around the back tail feathers. We don't want any of this paint to go on to those tail for this. Now I've got a pale consistency
of the dioxazine violet. It's called lots of
water mixed into it. I would say that this
is a tea consistency. It's very opaque. It's very light. You can see that I'm painting not dioxazine violet all
over the branch area. And you're probably
wondering why I popped water onto
the paper first and not yours to keep
my paper nice and wet so I can work on it faster. It creates a nice even
layer for the branch area. Then it also means thoughts. I can get a nice
even color results. I'm carefully painting
around those clothes with the dioxazine
violet on them. I'm going to allow some of that paint bleed up
into the backgrounds, or do you want some
of this color to seep into the background area? So don't worry if you
see your paints go in into the distance or
insula backgrounds. But that's exactly
what we want to do. You're going to get nice, soft, fuzzy feel there where it
looks a little bit we'll blue doubt and a little bit
more in the distance fan. I've got Payne's
gray on my brush. And this is also a lighter
mixture of the Payne's gray. This is also more of
a tea consistency. It's got lots of
water mixed into it. I wanted to get that
Payne's gray on the branch while that dioxazine
violet was still wet. You can see that by applying
some water onto the branch first and then pop in the
dioxazine violet over the top. You're allowing not paint or paper to stay wetter for longer so you can continue to work wet into wet for a
little bit longer. I do want to paint the Payne's
gray around those claws to create shadows just at the
back of those clothes ons. I'm going to run it
along the bottom of the branch and take a little
bit into the backgrounds. And you can see that
because there's lots of water on the paper at the black, it's creating more of
a diluted feel and more of a soft,
fuzzy feel there. I'm just using a damp
brush now to blend out this color and kind of
bring it all together, I've got some
dioxazine violet is a little bit thicker than the background color that we used. So he's got a tad more paint mixed into it towards
means a tiny bit. Well, sorry, that is
my accent that fluids. And I'm just adding
a little bit of the dioxazine violet around
the bottom of the feet, also into the back off
the branch as well. I've got a pale wash of ultramarine and I'm going
to drop some of that into the branch area to going
wild with the ultramarine. I do just want to dab a
little bit here and there. And why left to do
with branches or logs? When there is a bird sitting
on the branch or log, I like to take the
colors from the bird and sort of incorporate
them into the branch. I'm using some clean water now and dropping it into the paint. While the paint is dry
and birth It's still wet. And that's going to create
these little blooms, backgrounds and create
a little bit of texture within the branch area.
8. The Head: Building Colour and Texture: I'm going to build up the
color of the bird's heads. Now. I've got some clean water. I'm going to
carefully paint that around the marking or the eye. I'm avoiding the marking arms. I'm going to paint that water all over the top feathers there. I'm going to avoid
those bottom feathers. So you can see there is a separation within those top feathers on
the back feathers. I am avoiding those
very bottom feathers. I'm just trying to like
clean water all the way to the bottom
of those scalloped, farthest left you can see now I've got some
ultramarine blue and it's darker than the first
layer that we put down. Got more paint mixed into it. I would say this is more
of a coffee consistency, whereas the first consistency
I would say is more like T. So it's a bit less transparent. But we all go into low some of the thoughts bottom layer
to showing through. I'm going to avoid certain
areas. You can see loss. I'm not painting the whole of heads in this second layer
of ultramarine blue. I am before we did a little
earlier so that we got that lighter color
shining through. That's going to
create interests, make this look more
two-dimensional, is going to create highlights
and lightness within those feathers and really
bring the boots to life. I've just avoided a little area just at the top of that wing. We got a nice light color, nice loads highlight at
the top of that wing area. Anju can see that in
carefully painting that ultramarine all the way down to the bottom
of those feathers, these kinds of flicking,
not paint down. So creating some streaks. I'm using my brush to pull
down these streaks of color. And if you use a
slightly dry your brush, thought paint is not going
to spread out that far. So you're gonna get
some lovely texture within those wings. All I'm doing is just
using the tip of my brush to bring
down some streaks. Now I've got some
more ultramarine and it's a bit thicker, so there's more paint
mixed into this. I'm just going to apply it into some areas of the heads
a little bit around the back of that marking just to create those mid tones
within the birds. I'm also adding a few
more streaks with a slightly darker
pigment in-between those feathers to create a
real variation in the color. You can see that I'm leaving lighter patches
in-between those strips. You get in a variation within the darker
color of the blue. The light color showing
through allow that layer to dry now because we're going to work a little bit
further in the beak. I've got some clean water. I'm going to paint that
all over the beak area. Now I've got some more
concentrated ultramarine blue. One would say this is a
single cream consistency. I'm going to leave a
little white strip on the top of that week. So you can see that I'm avoiding the very
top of that beacon, a void in a lighter area there. I'm going to paint
this darker color all over the beak area. You can see that I'm also
leaving little strip of the lighter color
showing through at the very bottom of
a beaker as well. With the beak
touches the heights. With a slightly darker mixture
of the ultramarine blue. I'm going to paint the
bottom of the beak. Also that's going to create
the middle line for us. I'm just using a damp brush
to blend out the edge.
9. The Belly: Adding Definition: I'm going to use an eraser on these back feathers
just to take off most of my pencil marks. I do want to leave a
lighter layer showing through just so I know
where those feathers all. But it was light enough
for me to still see them. I've got some ultramarine
blue on my brush now, and this is a nice thin mixture. What I'm gonna do is
I'm going to paint that onto these bottom tail feathers. I'm going to use the
tip of my brush to paint around those top feathers. I'm using a bit of a
negative painting vibe. All I'm doing is simply
using the tip of my brush to pull some
thought paint up into the dry area ons I'm painting around those lighter
feathers at the bottom. That's why I loved
those bottom feathers quite light because I did really want them to
stand out on top of the ultramarine blue
that were in our painting. We're going to allow
this tail feather to draw completely because we all going to work
on top of this, we're going to add
some lovely tale phi the markings on the crinoids do that actually because
it isn't loads of fun. I'm going to paint
some clean water and then mocking on his face now, just on his tummy area as well. And then around his leg. Then I'm going to take
some yellow ocher. This is thicker than the
first layer we put down. It's got more paint
mixed into it, so it's a bit darker. It's more of a
coffee consistency, I would say ons, I'm going to apply that
to the wet area of the birds just in AVS to create a nice a
bit of definition. Create some color within
those Valley area feathers. I'm just using the tip of my brush to create
little markings. I'm also going to pop in a
light diluted mixture of ultramarine blue just into the tummy area so on his chest. And also a little
bit around here in the only time you may
need around with the legs. And using the tip
of my brush to sort of bring those feathers
around and curve them. So you've got a lovely sort of curved shape to the term year. We're also going
to paint some of this ultramarine underneath
those bottom tail feathers. Now I've got some burnt
sienna on my brush. This is a nice thick mixture, so it's more of a
double cream mixture. And then going to add
thoughts into areas of the tummy of
the birds as well. Bringing it around
the top of the leg. And then just using the tip of my brush to make a
little feather flicks and Mark canes and
also paint that around the bottom of those
blue tail feathers. You could always
use a damp brush to blend some of that color out. If you feel it's looking
a little bit too harsh. I've got slightly thicker
ultramarine blue nylons. I'm also going to add that
to this time your area. And then using a dump brush, just blending it out to sort
of bring it all together. Now I've got some indigo
and then I'm gonna run that along the bottom
of this feather here. This dark color is
going to create a lovely shadow underneath
thought gluing. Gluing is really going
to look like it's on top of the tummy feathers. Not these are real separation
within those feathers. So you can allow this to dry now completely and we're
gonna work on the feet. So I've got some clean
water here and I'm going to apply it all
over the feet area. And also avoiding those clothes. Just bringing it up
the leg and trying to avoid the yellow belly
that we just painted in. I've got some light
yellow ocher now, this has got lots of
water mixed into it. I'm going to apply it
all over the feet area. You can see that's
in certain areas. I am leaving part of the paper show in the
white paper showing. And now he's going to create a lovely highlight on
top of those feet. We all supportive
imagining not the light is pointing down from the left-hand
side on top of the boot. We all want to in
some of that light to hit that area of the bird. Now I've got some
burnt sienna and I'm gonna drop it behind the leg. I've got some Payne's
gray now and I'm gonna run that
along the bottom of his bottom tail feathers
or his bottom bottom area. I'm going to hit
also apply that to the top of the leg
to create a shadow. So it looks like, but leg is really tucking
up into those feathers.
10. The Head: Dark Markings Around The Eye: I want to add the darkest
markings to the beak. Now, I've got some concentrated
indigo on my brush. I'm gonna apply a nice
concentrated mixture of this at the
front of the week. And I will also going
to use the tip of my brush to run that along the pencil mark and create that lovely beak separation. I'm taking that all the way
to the back of the beak. Then I'm going to rinse
my brush off really well. Just use a damp brush then to bring some of
that color down. It's going to blend
that color out lovely, but it's really light
and you're going to get a nice soft blends just
using a dump brush there. I'm going to paint in the
dark mocking around the eye. Now. I've got some clean water on my brush and I'm
going to paint in that lovely strip in front of the eye and behind the
eye with the clean water. But I'm going to allow some
of that water to come out onto the boot in the
surrounding area. I do want to keep this rock in nice and soft on the edges. I'm just painting
a little bit of that water just over the
edges of that market. Now I've got some indigo
and this is quite thick. There's lots of paints
mixed into this, so I'm going to apply
this into that market. And while the paint is still wet or while the
paper is still wet, this is going to dry lighter, so we are going to add a
little bit more darkness to this area a little bit further and try to add a little bit of water to your indigo
because we want a slightly lighter version of that indigo showing through
a little bit later on. But we all going
to make this area nice and dark to begin with. Indigo is a nice
dark color anyway. So this is always going
to be dark no matter how much you mix into it. If you do have too much water, it will make it look quite pale. I'm just using a damp
brush now to bring some of that color down
to try and feather it out and create some little
sort of further markings. We're going to still continue to work wet into wet because we're going to build up the
color of this market now, I've just added more
paint to my mixture. There is quite a lot
of pigments within my brush now and
not much water ons. I'm going to apply
that to that mark in while the paint is still wet. You can see that the paint
is bleeding out within the wet area and creating
a nice soft feel. You're going to get
a nice blue dots, sort of fuzzy edged marking, which is gonna look more
natural rather than a harsh edged mark in there.
11. Tail Feathers: Adding Detail: I'm going to work on
these little feathers underneath the wing. So there were three little
feathers I'm going to work on. I'm going to use
this ultramarine. I'm just painting in these
three little feathers. I'm going to work on
these back tail feathers now going to go into tissues, some ultramarine on this
very back, farther here. I'm going to leave a small
strip of white in-between. And then I'm just going
to paint this using a mixture of ultramarine
blue and some indigo, So it's mostly dark. But I'm going to try leave a little strip of
white in-between, paint that in there. Don't worry if that happens
and it starts bleeding on the other feather actually are quite light but thought, look, then I've got some quite concentrated
ultramarine here. I'm just going to paint that
onto Back for the button. I'm going to leave a little
strip of white in-between. So just a very small
strip of white. What you can do if you've
got a bleed like this, just take a damp brush and
just take that color out. He could always blend
it and move it, move it around a little
bit so you got a bit of a blend while the
tail FISA is drying. I'm going to add the credit
to the front of the bird, so I've got some
clean water here. I'm going to add
some clean water to the underneath of the
birds chin and neck, the tummy area, and
avoiding the blue wing. I'm going to
carefully paint that around those blue wing feathers. I'm going to carefully paint
it around the leg as well, taken it onto the back feathers just underneath his bottom area. I've got some yellow
ocher on my brush now and this is a double
cream consistency, so it's quite pigmented. I'm going to paint
that onto areas of the birds to add some
texture and feather details. And you're also going to
build our depth as well. So just add in a little
bit of that yellow ocher. You can see it's a little bit thicker now where I'm using it just around the top
of that leg there. I'm also going to take it
underneath his bottom area, just surround the
leg there as well. I've got some burnt
sienna on my brush now. And again, this is
quite pigmented. And then we're going
to apply it to underneath that
blue wing feathers. While the paper is still wet, you can get a nice
soft, blurred edge. But I do want to use the
tip of my brush to bring up some feather detail in just so you've got like a
separation in the feathers. It's gonna look like
feathers sense. So usually a little bit
of negative painting. I'm going to paint that
around the top of the leg. I'm just using the
tip of my brush, really just add some
little dots and markings to adds a little bit of
interests and feather detailing. I've got a damp brush
now and I'm just going to use that to feather out this bottom area just to make it softer on the edge
with the burnt sienna. I've just applied some
clean water so that ends of the bottom area
as you could just see. Now I've got some ultramarine
on my brush and I'm just dropping some little markings in while the paint is still wet. I'm also going to add
some blue ultramarine to this little area underneath
the tail feathers as well. I'm also just added
a little bit of burnt sienna underneath
the wing there. I've got Payne's gray
on my brush now, I'm going to drop that in
while the paint is still wet. It is quite dark, so it's got lots of pigment mixed into it and
not much water. But because these water on
the page on the paper is wet, you're still going to get
a bit of a diluted feel. I wanted to pop a little
bit of the Payne's gray underneath these tail
feathers here that will blue wing above just to make sure that
that adds a little bit of a shadow under makes
those feathers look like they're coming
over the belly area. I'm wetting these
three little fathers now with some clean water because I do want
to work on these and add some shadow
and depth to them. This is gonna make those
feathers look like they're separated or they're
on top of one another. So all I've done is I've wet That's bottom,
farther separation. And then I'm using some indigo just to run that
along my pencil mark. This is not very pigmented. It is quite light, still. Got water mixed into it. So I'm allowing that
paint to bleed down while the paper is still wet and you got an a lovely soft feel, then this actually creates
a lovely little separation. It's a really good
way of adding shadow, making those feathers
look separate. I've got some ultramarine
on my brush now and I'm going to paint onto
the dry paper. I'm just using the
tip of my brush to create these little lines. And that is going to create
those lovely tail feathers. They look like they
are separated, but I'm going to use
a mixture of blue, which is ultramarine
blue and also indigo. I've got indigo now on my
brush and is quite light. I haven't made this really dark. It's got lots of
water mixed into it. I've got some ultramarine
blue on my brush now, and it's got lots of
water mixed into it. So it's nice and light. And by varying the
paint to water ratio, you're going to get a
nice interesting painting where the paint colors
are really varied. There's some Payne's gray
on my brush and I will get because I've added
lots of water to this. It's nice and light, so it's a bit lighter than the
indigo that I popped down. And although Payne's gray
can be a very dark color, if you add lots of
water to it, actually, you can get really nice
light gray from it. I've got some ultramarine
on my brush now and you can see it's actually got a bit
more paint mixed into that. It's a bit darker than the ultramarine
that I popped down. You can see that it's so
interesting because I've varied the amount of water
that I've added to the paint. It changes up the color and mix the paint in a greedy
interest in an icecap during I've got some indigo on my brush now and this does have lots of water
mixed into it, so it's not very dark. I've applied that to the ultramarine paint while
the paint was still wet. So you get an a lovely
blue doubter effect. I've got Payne's gray on my
brush now and this has got lots of water mixed
into it and I'm painting on the dry paper. You can see that on
carefully painting around those top feathers
to create a bit of a negative painting effect. I do want to make those tail feathers look
like they're coming over the top of that Payne's gray that I'm
painting at the moment. I'm so sorry. You were
literally out of shot there.
12. The Feet: Building Depth and Shadow: While the rest of
the base is drying, I can go into work
on these clothes. So the little feet area, I'm applying some clean
water just to the feet. I'm thinking to apply it
over both of those feet. So being very careful not to
touch the body of the bird. Then I've got some burnt
umber and I'm just going to drop that into certain areas. There are a few
different shadows on the bids feet that I can see. They just wanted
to get those in, so I'm just going to apply
that paint wherever I can see those lovely
brown markings on. Don't worry about
the details for now. We will come back and add some details in a
little bit later on. Well, when this is all dried up, then apply it to this
back foot as well. Welcome my paint brush across
my pencil mark at the back. Then I'm just dabbing as well to allow the
paint to bleed out. I'm going to continue to drop Boone's EMBA into areas
of the feet to create shadows and texture and build up this fee to make them
look a little bit more 3D. I've got some lights being
turned over there on my brush where I've just
put lots of water into it. So it looks almost perfectly
but it is burnt umber. I'm just going to run
that over certain areas, add some little markings
with the tip of my brush, bringing out those
clothes a little bit. And now I've got some very, very diluted ultramarine blue. So this almost looks great. I love to dilute ultramarine
blue and use it as a gray, especially on animals
and these claws. I thought it would be the
perfect color for those close. I'm just covering that in
the light, ultramarine blue. And then I've got the
dioxazine violet. I'm going to run that across
the front of the claw. This has got water
mixed into it. It's more like a single
queen consistency now, so it's a bit thicker. I'm going to use that
underneath that CLO to create shadows and
a bit of depth and just make that looked
like those closer on top of that branch and not
just one part of the branch. I do want to make
those clothes look separated from the branch
because at the moment, it looks like they're
just stuck on markings. I wanted to get a
bit of a shadow underneath those claws to really bring them up off the
branch and make them look a bit more three-dimensional. I'm going to use a diluted
layer of dioxazine violet. Now, this is like
a tea consistency. It's got lots of
water mixed into it. But because it's purple, it's going to help
to push thoughts back a little bit
into the shadow. And I'm going to use it
underneath the leg as well. This is going to help to make that leg look a little bit more rounded and a 3D shape rather
than just a flat shape. I've got some dark
Payne's gray now, so it's not got much
water mixed into it. I'm going to use that to add the shadow underneath the
light to really darken it up. And that's an detailing to
the clothes and feet as well. I'm also going to use some
of the dioxazine violet. So this is a lighter
mixture of it. I do want to keep
this nice and light. And I'm just going to add this
two parts of the feet just to create those little
wrinkles that Buzzfeed have. I've also got a nice thick
mixture of the Boone's and then going to use that to
add some markings as well. But it's also to add a shadow underneath this lag here
because that's going to make that Valley Area
look like it's coming over that ligand
creating a shadow. I'm also going to use
it on a little area of the tummy to create
some further markings. And also at the
bottom of that leg, I've got some dioxazine
violet now create a little shadows around
the feet unlike area, and really taken up at the top of the leg area and created
some feather markings. If you just use the tip of
your brush and really use some negative painting
thoughts going to help to create the
illusion of feathers. I've also got some
dioxazine violet and I'm taken out onto
the back of the bird. As you can see,
I've just created some shadows really
without leg is going to be casting a shadow underneath those
bottom tail feathers. And now I've got some
Payne's gray, so this Scott, some water mixed into
it, but more paints. So it's quite a thick
mixture enzyme painting this onto the dry paper. Then I'm taken a dump
brush and just blending up those edges a little
bit to soften them.
13. The Dark Markings On The Head: Building Up The Color: Now I want to really
darken up that lovely dark walking
around the eye area. I think this is probably my
favorite part of the boots. I really wanted to darken that up and make it really stand out. I'm painting on some clean water underneath his chin area, taken it across that blue market and also a little bit onto the heads and those
blue feathers around that blue marking. Now I've got some
concentrated indigo, so this hasn't gotten
much water mixed into it. And I'm applying that to this blue mocking while
the paper is still wet, it's keeping these
dark markings. Quite blue's a little
bit softer on the edges. But because there's lots of
paint mixed into my paint, you're gonna get that paint
stay in where it's put. Its also going to
look nice and dark. I'm going to paint
some of that color around the eye as well. I'm also taken this opportunity to add some shape
to that marking. And then you're gonna take some little feathers onto the back, just using the tip of my
brush just to bring some of that paint out and create
some little feather flicks. I'm also going to take
a little bit onto the front of his face here. So just before the beak, just using this to define
the eye area now as well. Now I'm going to paint in the pupil will the
main part of the eye. So I've got some very
diluted ultramarine. I'm going to paint that
all over the eye area. I'm going to build up
the shape of the branch. Now. I've got some clean
water and I'm going to paint that all
over the branch area. So it's just clean
water and then we're going to carefully paint
that around the clothes. I really don't want
to go touch in these colors because
I don't want any paint to be bleeding
onto them very carefully. Just painted that around those colors and taken
it onto the back area. I'm going to allow this area to stay nice and soft and fuzzy. Little bit blurred out
into the background. I've got some Payne's gray on my brush now and this
is nice and dark. I'm going to run my paintbrush along the bottom of the branch. I'm also going to
take it up into areas of the top of the branch,
but not too much. I'm mainly going to focus on the bottom of the branch area. And you can see
that I'm being very irregular with my brush marks. I do want to create
texture because a branch is not
completely straight. You do have sort of dips
and knocks, little cracks. And if you have a
look at a twig, it really is not straight
as very irregular shaped. If you just use
random brush marks, you'll go into create that
feel with the branch. You can see that I'm
carefully taken that Payne's gray around the clothes as well. So just be careful
with the color area. Maybe use a smaller
brush if you don't feel confident with a big brush. And you can see
that my paper dried on me towards the
back of the branch. I'm just using a damp brush just to blend that
edge out there, make it nice and soft. I'm just use a damp brush at the end of the branch
to soften that area. Now I've got some
clean water again and I'm gonna run that
ALU for the branch. Then I've got some
dioxazine violet. I'm going to start
dropping this in. It is quite a thin mixture. I'm dropping that into areas of a branch just to create a
little bit of interest. Now with a slightly thicker
mixture of the ultramarine. So this is like a
coffee consistency. I'm just going to paint
in part of the eye. You can see that I've left a little bit of a lighter color showing through to create
a bit of a highlight. And then I'm using some thick
Payne's gray to really add shadow and define
around the eye area. I'm running around to the front and also the back of the eye, given that pupil
shape ons and I'm filling in some of our eye as
well with the Payne's gray. You've still got the two tones of the ultramarine blue
showing through to create interests within the eye and create a bit of
a highlight as well.
14. Finishing off and Project: I've got a mixture of indigo and Payne's
gray on my brush now. And this is quite
a thin mixture, but I'm just going to darken up this little area under the wing. I feel like this needs a bit of a darker
shadow because that top wing is actually
over that bottom wings. So I just wanted to show that
now I'm using the tip of my brush and some indigo to add some little further details. Your project now
is to go and paint your own bird using the skills that you've
learned in this class. I would love to see
your projects on finished masterpieces in the
projects and resources area. Happy painting. Have a lovely rest of your day. I hope to see you
in my next class. Bye everyone.
 Lindsey Dawn Art, Watercolour Artist