Transcripts
1. Welcome!: Hey there, I'm Jan of
DJ Sweeney designs. Welcome to my studio. In this class, we're
painting wild flowers. We use our wedge brush and
the limited palette to paint these beautiful florals on
a soft blue background, you can use these designs and techniques on so many things. Let me take you behind
the scenes and show you a little bit more
with classes all about. I first explain all the supplies that you will need for class. And then we jump
right into practicing some strokes with
our wedge brush, few pedal strokes and
a few leaf strokes. We prep our paper for some quick and easy
background washes. I love this moody blue
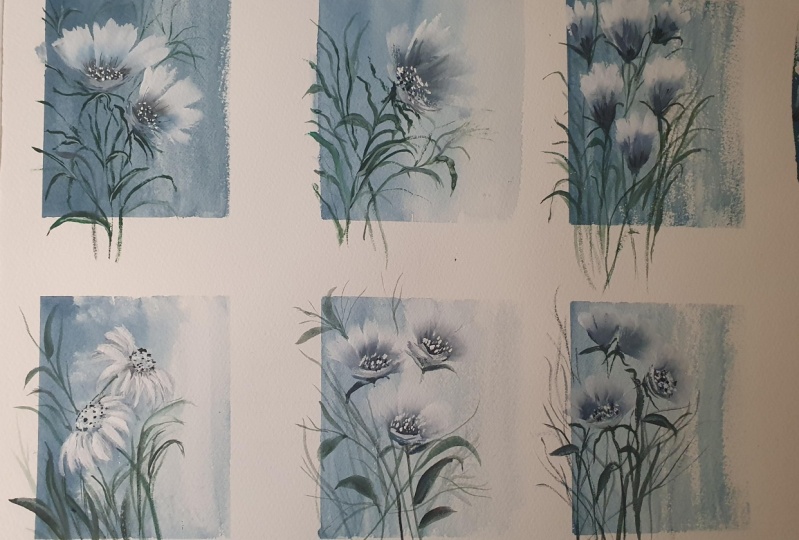
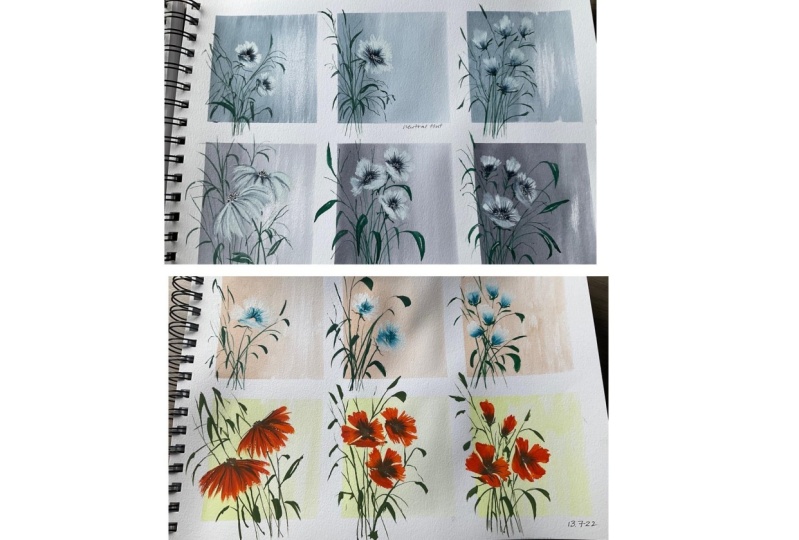
color. One stride. We create six wildflower designs
using a limited palette. By the end of class, you'll
have a beautiful nine by 12 piece ready for framing. This class is designed
for all levels. Some knowledge of watercolor and the wedge brush is
helpful but not required. I showed you my process
step-by-step in real-time with no voice-overs. And stick around for the
last lesson where I show you some ideas and inspiration
for your project. Are you ready to paint
these wild flowers? All right, I'll
see you in class.
2. Class supplies: All right, Let's talk supplies you're going to need for class. One inch painter's tape, size six wedge brush. If you don't have a wedge brush, you can certainly substitute a Princeton petals brush
or a triangle brush. I would recommend
the small size. You'll need a large round
brush for our background wash, I have a size 12. Whatever you have is
gonna be just fine. A couple of black markers
and a couple of white pens. This is the Gelly Roll pen
and the Signo uni-ball pen. I love these two. As for our paints, I have ash blue, gouache by Holbein, and
permanent white also by Holbein. Then perylene, green,
Winsor and Newton. If you want to use all gouache
in class, that's fine. If you want to use
all watercolor, perfectly fine too, or a
mix like I'll be using. Grab a towel and old towel
to dab off your brush. And then the paper I'm
using is Arches watercolor, cold press paper, a 140 pound. Have some scrap paper to go. Let's see. Oh, I always feel
like this is obvious, but your palette, water jars and then if you have
bleed proof white, you can certainly substitute
that for the gouache too. That works just fine. Alright, let's head over
to the next lesson.
3. Practice strokes: Let's talk through some
of the strokes that we're going to use all
throughout class. The very typical common way to do petal strokes with
the wedge brush. Got a couple of examples here. We'll go through this
little by little, but as it's dry, I want to show you
how I do that. You see my hand is way tilted over this way my hand
is on the table. The tip of my brush is pointing in about the
five o'clock position. I will land my brush and
then just wiggle it around, keeping that tip always
pointed towards the center. One petal stroke,
just like that. I tend to start with this back petal stroke first when I'm making
a full flower. Again, brush tip down, always pointing
towards the center, staying in contact with the
paper, moving it around. Then I either do this
petal or this petal next, but it's all the same stroke. Can turn my paper if I need to. Landing the brush and
wiggling it around. Now this stroke down here, I refer to that as
the smile stroke. The way to achieve that. The point of my brush
is about nine o'clock. I'm going to land
my brush and just do a quick sweeping motion. Very quick, very gentle. The buds. All that is is one petal stroke. And then I just touch
the brush to the page. You can make those as little
or as big as you want. For these daisy,
cone flower strokes. It's all pretty much the same. Very light wispy strokes
coming from the center. And I'm just moving my
brush around the page. If you've taken any
of my classes before, you know how to
make these leaves. But I typically start tip is down depending on where the stem is and where
I'm placing my leaf, of course, but for this example, the tip is about seven o'clock. I land my brush gently, pull off the page. I come back to that
starting point. Land the brush and
kind of wiggle it around for that second
smaller stroke. I do like to leave a little
bit of whitespace in-between. You don't have to,
if you don't want too, then these leaves. Lot of times I'm
using the brush, this side of the
brush or actually what I referred to as
belly up position. When you see this yellow stripe, you'll know I'm using my brush
and the belly up position. Obviously we'll
talk through that as we're making our designs. But just to give you a heads up, if you've not been any of my
in any of my classes before, this yellow stripe indicates the wedge portion of
my brush is facing up. It's a kind of awkward
feel to your brush, but you'll get used
to it after awhile. And then I love making these wispy gentle
leaves and stems. Let's get some paint. I've got my blue gouache. I'm going to use
my largest well, be using that for our
wash very soon here. Little bit of water here. Just flopping my brush back and forth, loading
those bristles. I do have it fairly
thick right now. It doesn't really matter
the thickness of it. We're just going to
practice these strokes. I do leave a chunk of concentrated pigment
off to the side. Because the way to get
this lighter edge, we're going to use less pigment and I'm going to dip the tip into this concentrated pigment
for this darker center. Actually get a little
bit more water in here. I'm going to dab off my brush. This brush holds so much water. Sometimes I typically dab
on a towel or paper towel. And then I take just the tip, poke it right into that
concentrated blue. Come over here. Tip is down at five o'clock, gonna land my brush. Wiggle it around. You can see how this darker
center shows up here when you dip that tip into
the darker blue, can even make this a
little bit lighter. Sometimes what I'll even do
once I flop my brush around, drag it off the edge, off camera, I will just dip it in my water jar to get a little
bit of that pigment off, dab it on my towel, got to dip the tip back into
that concentrated blue. Another petal stroke. By rinsing my brush, taking some of that pigment off, I get this nice blue light blue back petal portion of the petal. And then this darker tip area. Dipping it in my water, dragging the brush off
the lip of the cup, tapping it a little bit, dipping it into the
concentrated blue. Landing my brush. Keeping it always in
contact with the paper, keeping the tip pointed
towards the center. I can come on this side, do the same stroke. I didn't feel like
I needed to reload. My brush felt pretty saturated and I feel like now it's drying out
after that second petal, but let's just see what we get. Not too bad there. What I do is dip my brush
into the water again. I know I've got some
pigment in there. And then I go in for
that smile stroke. The point is that nine o'clock, I land the brush and just
do a quick sweeping stroke. Dab it on my towel. Sometimes I will get back in my paint depending on
how my brush feels. A little bit too much
there and then just add another one or two side
swiping, sweeping strokes. Again, this smile stroke. Quick side stroke of your brush. Let's do one of these
buds over here. Again as we do the designs, I'll talk you through
everything that I'm doing. Just one petal stroke. Moving your brush around. I do lift it up
the page a little bit to get some dimension here, a little bit of height on that
back portion of the petal. Then I would just land my brush
and touch it to the page. Now that's a bigger bud than
what I would normally do. But just to demonstrate, let's do that one again. Just rinsing my brush and water, dabbing it on the towel without rolling it in the liquidy
part of the blue. I'm just going to go right
into the concentrated blue. And then just do
one petal stroke. That's pretty light there. We might not be able to
see that back portion. But sometimes I like to just have the brush loaded with water only and just dip the tip into
the concentrated pigment. Now down here, the way
I like to do that, this time I'll flop my
brush back and forth, dab it on the towel
a little bit. If this being the
center of my flower. The tip is pointing maybe a
down about eight o'clock. And I just land the
brush and start making almost like
little leaf strokes and just go around the flower. Lot of times this is
different every time I do it. But I'm just utilizing
this side of the brush. As I go around the flower. We could do smaller flowers up here at the front or
the top if you'd like. But I tend to keep mine
like this sometimes. Just kind of changes as I go. These strokes are almost
like the smile stroke here. I'm just landing the brush
gently into the page. One round and round where
that center would be. Okay. We're going to go ahead
and do some leaves, but I'm just going to
use the blue for that. Don't need to get
my green out yet. Many different ways
to make leaves. This be in the two stroke
leaf, I would say, I land my brush gently
lean it into the page. Gracefully come off like you're coming off
like an airplane. If I go back in for
a second stroke, I go right back to
this starting point. My brush is going to be a
little bit more perpendicular. Land the brush. And just add that second
stroke right next to it. I'm following the line of that
first leaf. Do that again. Land the brush. Come off the page gracefully. Get right back in there. Just wiggle that brush around. For that second smaller stroke. I wanted to do leaves like this. That's just very simple. One stroke leaf can come down this way and
do the same thing. If I wanted to add
a second stroke, I go right back to
where I started, land the brush and
just wiggle it around. These are a lot of
fun to do because you just get a little bit wild
and crazy with those. Where it might take
the tip of my brush, kind of wiggle it up the page. Then just some random
light brushstrokes will do a lot of these when
we're making our design. I love the look of that wilty, blowing in the wind kind
of stems and leaves. Easy enough for a quick warm-up of the strokes that we're going to talk about or with all the designs in the class. If you have never used
the wedge brushed before, I would take some
time and practice these strokes first and
really get a good handle on your brush and moving
it and manipulating your brush for these
strokes because I'm just bending, not bending. I'm twisting, rolling my brush sometimes and you'll see
that all throughout class. Keep an eye on this yellow
strip to if I don't actually tell you its belly up but you see this yellow line. I'm using my brush and the belly up position for just some quick leaf strokes to doesn't look like a whole lot of leaf strokes right now. But once it's together
in a composition, you'll see how they
look like leaves. Alright, I'll meet you
in the next lesson.
4. Taping your paper: Alright, let's get our
paper all taped up for that super nice crisp border. I'm just taking my tape top edge going right up to
the top of the page. I like to do on one edge is
put a little flap on it, makes it a whole lot
easier to remove it. Next time. We're gonna do
that all around the sides. One inch border. If you wanted to tape this to a board to work on,
that's totally fine. I've done that and that is
nice to do as well. Trying to get as close
as I can to that. Sorry for moving
the table so much. Making the camera shake. Okay, next up, I need one piece right through
the center here. And then two down the side. I could maybe should
measure this out, but I'm gonna guess
and just go for it. Now, if I was doing this
for a commission, yes, I would totally make sure it's
very equal, very straight. We're just gonna go with
our eyeballs today. Think that's a little low. We need to more probably need to readjust these, but let's just see. Make sure you've got
nice occlusive edges. We will be good to go.
5. Background washes: Alright, tons of fun to
do background washes. You want to have a
scrap piece of paper. We are going to do a wash
on this because as we do our petal strokes for
the designs on here, we want to practice on this. Grab some tissue, your large round brush and
your blue plenty of water. And we will get started a couple of different ways that
we're going to do these. Some similar, some a
little bit different, but a very quick and easy
way that I like to do my background washes. Just rolling my
brush in the blue. I'll drag some off. Then I'm going to turn my paper. I typically have the majority of the color on the left side. And then as I progress over, It's more of a dry brush effect. I don't want to go
super dark with these either because our florals are going to go on top of those. The wash of course, and then sometimes it just
looks a little too convoluted and you can't really
tell if you've got dark florals on a
dark background. Here's how I like to do it. Just take my brush and just
quickly lay down the paint. If I need to go
back in to my blue, I do but trying to work quickly. Then just pushing the brush to the edge for some dry
brush effect there. Sop up some of the
liquid on the tape here. I'll just leave that alone. All right. The other way I can
do it sometimes as well that maybe you've
done wet on wet. I'm not worried about having
some blue on there already. Lay down water and then get
right back in your pigment. Just some gentle strokes. I'm going to dab a
little bit off my brush, keep pulling it
down to go lighter. And then just walk away. It's so tempting
to keep getting in there and overworking these. All right, Getting
back in here are going to do the same thing. I'm going to do wet-on-dry. Start on this left side here, turn the paper so it's
comfortable for you. And then just get on in there. You can hear that brush, just scrubbing it on the paper and I'm gonna
get back in there right away and sop up some
of that darker blue. Dabbed off my brush. As I just said,
don't overwork it, but we've got a
little time here. I am trying to get to the edges, so we've got those
nice clean margins. Going to walk away. I love that dry brush effect. Alright, let's go down here. Now. This one, I'll do another wet and wet, tissue in hand and then I'm going
to dab some areas out, lift some areas with a tissue, the hair off the paper there, whatever that was, some fuzz. And then get back in
with my blue drop that. Then just laying down my brush, just my tissue paper. Actually toilet paper,
not tissue paper. And just dab some areas out. Leave that one go. Another dry brush background. I'm rinsing my brush and water, dragging it on my towel. And then I'm just going
to quickly get in there. A couple of extra strokes. They're just trying to
cover some of these edges. Last one sounds kind of harsh. So I'm rubbing this
brush onto the paper. I think it sounds worse
than actually how much I'm really putting pressure on it, sounds
worse than it is. Little bit more in there. Alright, then we're
going to let these dry completely and come back and
start adding our florals. Nope, one more thing I forgot, have to add practice page of
a wash that we talked about. Alright, just make
this one long wash or a couple of separate ones
wherever you want it to be. Not overly worried
about how this looks. Trying to match the
colors a little bit. It doesn't have to be exact. Might actually grabbing
another paper and have two of those ready to go and we'll see how much
I use this or not. Sometimes I do,
sometimes I don't. But getting your water
to pigment ratio between the white and the
blue can be a bit of a challenge sometimes that's
nice to have a practice page for that. All right. Now we need to let
all of this dry. We'll get the tape
off once it is dry and then start
adding our florals.
6. Tape removal: All right, everything nice
and dry looking good. Your paper probably
did warp a little bit. We used a fair amount of water. That's not a big deal. What I do sometimes is just gently try to bend
it back in place, lay it down flat, put maybe tracing paper over it, stack some books on top of it. Obviously, after all
the florals are done, I would do that. I wouldn't worry so
much about it now, but don't be surprised if your paper is warping
a little bit. Typically happens anytime you do watercolor like this
with a big wash like that. All right, let's
get the tape off. Wonderful tape peel. Try to keep your
paper or your tape flat as you're rolling it back. Sometimes it will
tear your paper. If you just yank it right off there and really pull
straight up with it, so try to keep it flat. Alright, there we
go, looking good. Now we're gonna get our pallet
full of green and white. We've already got our blue and we'll start adding our florals.
7. Wildflower 1: Alright, adding in our
White, a good squeeze of that, as well as the green. Add just a drop or
two of water for now. Again, leaving a nice chunk of very concentrated
gouache in the corner. Same for our green. Probably have way too much green right now,
but that is fine. I tend to do that. I just squeeze out more than I
need, but that's okay. Can always use it in the future. Alright, so grabbing
my size six, we're going to start
up in this corner here and move across the page. Having our practice page here, let me show you how I
like to load my brush. Now this is the part
that can be a little bit difficult to get a handle on because loading the brush like this is going to
be different for me. Going to be different
for you depending on the humidity in your home, where you're painting and
a lot of factors go into it. So I can't really say two drops of water and
you're good to go. You might need more. You might need
less. But I do want this white to be fairly thick. I would say that is
cream consistency. It's fully loaded with white. I'm going to drag it
off the edge a bit, tap it on my towel. Going to dip that tip right into that blue, that
concentrated blue. And I'm going to go
ahead and just do a quick practice of Petal Strokes
like that. I like that. Now, I wish I would've
done that right there. Sometimes it's hard to get the same thing that you
do on a practice page. But I did that mainly to see how the thickness
of my white paint, if I like that, if it was
too thick or too thin, I think I'm going to
stick with it for now. It is pretty warm
in my house today, so you'll see me adding
some more water. But for now we're just
going to go for it, drag it off the edge, dip that tip in there. A little bit off the
back on my towel. Try another one again. I think that's going to work. All right, so let's
just do a floral. Couple of florals on this one here starting up in this corner. Wiggling that brush around. Now I'm going to go
back into my blue, the concentrated part there. I went a little bit stronger
blue in that center. Dipping it back in there again. I'm going to add
this smile stroke. Now I'm going to leave
that one alone for now. Going back to my water
rinsing my brush. Really good. Get back in that white,
fairly thick white. Drag it off the edge. A little bit on my towel. Same process. Looks pretty good and let's hurry up and get one down here. Let's do right here. Dip my tip back into that blue. You didn't see that but just
add a little smile stroke. I felt my brush drying
out a little bit. Now sometimes
there's a little gap right there and I might just add another touch of
the brush to the page. This floral is getting a
little bit lost in there. Not a big deal. We can go back. Once this is dry
and do it again. I'm not a big advocate of continually going
over your petals. It just tends to
really overwork it. Going to get into my green. We're going to go a little
bit dark right off the bat. Then in a little bit, add some white to our green
to layer on top of that dark. Again, this is fairly thick. Dragging it off the side. that's good for now. All right, so taking
the tip of my brush, so I wanted to get the center. I don't want my stem over
here way off to the side. I gauge it by my back
pedal, imaginary line. And then I just come down, start drawing that in, painting that in
same with it here. Imaginary line from
the back pedal. Not going for perfect. You see I'm just using the tip, drawing in that stem. Then the fun part, starting to add some
squiggly fun leaves. So I'm just using the tip and I just start randomly
adding some lines. Maybe coming out here. I'm just trying to gauge where
I want to add some leaves. I like to build up this
area here underneath the florals with some
thicker squiggly leaves. I might do a little
V-shape here. I keep my stems a
little bit thicker, trying to not overthink it. I'm just using the
tip of my brush, adding in some leaves here. Very light touch. Do a thicker leaf. a double stroke leaf. This is where you'll have fun depending on where
your florals are, where you want to
add the leaves. But I always come off the side. Just think that looks so pretty. I try not to take up
the whole square. I like to leave a little bit
heavier on the left side, a little bit lighter
on the right side. Just being very carefree. that Wildflower look where
you've got stems and leaves just kinda
sprouting all around, just gently framing
your flowers. And these are just
lines right now. I'm just doing some
of these lines and then you'll see me go in and add just some squiggles. We're just indicating
some leaves here. You don't want to
overdo it because these florals are soft as it is. And even some of the dry
brushing with these leaves. I really loved that. Let's
leave that go for the moment. Now that's going to
dry pretty quick. So what I'm gonna do over here, rinse my brush really well. That green really gets
in your bristles. So you want to rinse, well, I'm going to scoop
up some of this white and bring it over here. Rinse my brush again. Then scoop up some green. Mix those together for our lighter green that we're
going to layer on top. Add water if you need to. This is gonna be the color
that you want it to be. I tend to just go
back and forth. Adding white, adding green. I just want to add another
element of contrast. I get right back in here and then just some squiggly lines. Sometimes what I'll
do is go right over this green here,
this dark green. It's going to lighten
it up right away. If I think, oh goodness,
it's too dark. Get back in there with some
of this lighter green. That is the cool part
of just layering. Just using my tip. If you get in there and you
lighten it up too much, you can get back in there
and darken it up again. All right, I think I'm gonna let this one go as is for now. At the very end, we'll
take a good look at all of our flowers and
see what we need to add. We'll just let this
one go with the paint. I am going to grab black marker. And what I like to do is just add some dots down here
in this open area. Sometimes I leave it just as is, just to draw the
eye in that center. I take my white pen. Sometimes add some white
dots right over it, a little bit above it. Sometimes I'll leave
it like that or take my Micron and add a little bit more interest
to that center with some long graceful lines.
And then walk away. Don't overdo it. All right, we'll leave it alone, will come back to it and let's
move on to this one now.
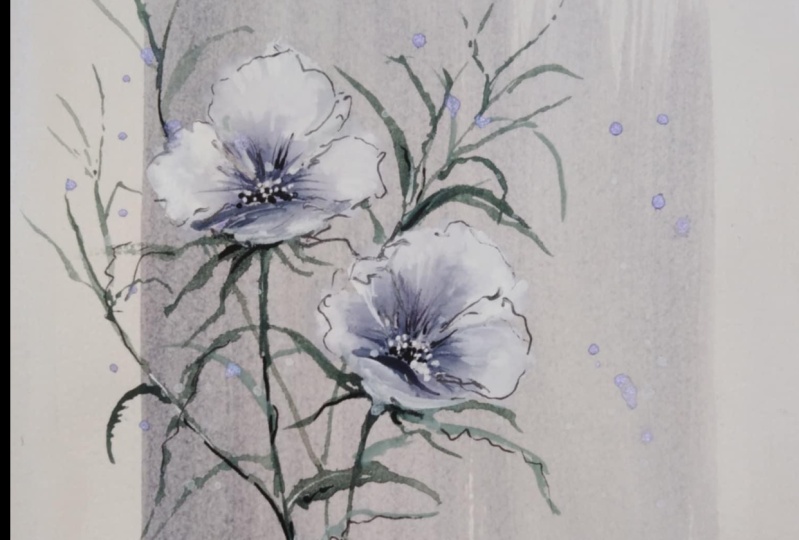
8. Wildflower 2: All right, For our next floral, we're going to have just
one flower in the center, will have a C curve stem and the floral is facing
off to the right. We're going to use the
same floral strokes. But what I like to do first
with this type of flower, which I don't know what
the name of it is, but it's a lot of fun to make. I just use my pen, I gauge where I want
this center to be. Now you could certainly
use a pencil if you don't want to go right
in with a marker. But I'm going to go ahead and just kind of like
the cone flower, but just add a little bit of that center to help my
eyeballs of where I'm going to place those floral strokes then grab my brush. Same process. Getting it in the white. Dab it on your towel, dip the tip into the
concentrated blue. Do a test stroke if you want. Think I want a little
more white on my brush. I'm going to pull some
of the concentrated white into this area
that I'm working from. Pretty thick. Little bit better. All right, So I'm gonna start on this
front part of the floral. Just do a stroke. I'm going to use couple
strokes from this. One, loading of the brush. Dip that tip just
back in the blue. Now I want the flower to
curve towards the right here. I'm actually pulling out
some of the strokes, kind of forcing it, forcing the eye
to look that way. I'm going to rinse my brush. Same process, getting
in that white, tipping the tip into
the blue again. Try it or not, I do want to extend this
out a little bit more. So here I go, going
right over my petals, which I said before,
don't overwork them. But I want that to be
a little bit bigger. Now I'm going to do some
really short strokes down here at the bottom. Still curving out this way, if that makes sense. And then I'm just
landing my brush. Let me get that tip
back in the blue. Couple of little smile
strokes underneath there. I'm going to build
that up some more. I want that to be a
little bit larger. Getting my brush
back into the white, dipping it into the blue. Let's see if that's too much. I can get a little
more white on that. My tip back in the blue. Force this out a
little bit more. Using the tip to kind of
feather some of that blue out. I'm gonna get in my
green and do the stem. The stem is going to
come around that way. Because here's the middle
of that bottom section. And I just go ahead
and do the line first. Then I just start flipping my
brush back and forth again. Watch where that yellow
is sometimes because I tend to roll it and flip
it and forget to tell you. But I'm working fairly quick. Light carefree strokes. I even get up into that blue
and white I just laid down. so it doesn't
look like the flower is just sitting right
on top of the green. Kind of bleed some of
that green up in there. Back in with some
squiggly lines. We'll go ahead and
thicken up some of these leaves in here. All right, Now I
want to get back in the lighter green that
we mixed up earlier. Do the same thing, adding some of that
contrast in there. Just going to give the eye a little hint of something
different there. Not too much at all. Put my brush down and
grab that white pen. Then just add a couple
of dots over this. Even maybe extended to the top part a little
bit and even below. Again, if that's too white, you can add some dark
on top of it again. I think I might do that
once this dries get back in here while I'm just
looking at it a little more. All right. We're going to
let this one fully dry. Move on to this and we're gonna
do some buds on this one. But just looking at this one, I might get back in here. I'm trying not to
overwork it right now, but I might get back in here and add some more petals
on top of this flower, but we'll see how it goes.
9. Wildflower 3: All right, We'll
do a collection of buds over on this one here. And you remember that's
just one pedal stroke with a little bit of the
smushed brush on either side. Alright, let's get in the white. Keeping that fairly thick. Rolling your brush to
load all those bristles, dabbing it on your towel. I'm going to sound like a
broken record after awhile. Keeps saying the same thing. Let's do a little test. I like that. Rinsing
my brush again, I'm going to try to do
exactly the same thing. Dab on the towel
right in there. Let's see real quick. Okay, we'll do that. Let's see. One a little higher up. Pushing right into the page. Going right back into my blue. Now I still have
some white on there. I'm going to rinse
my brush and I keep loading my brush
exactly the same way. Sometimes I just
leave it like that and don't do that extra
push on the side. Go over this one. That a little more dramatic
there and overwork this one to hopefully not
overwork it too much. Rinsing my brush
back into the white. It's drying pretty quickly. So I added some more water, pulling this back away from the concentrated
segment of that. Dab, my brush, dip the tip. Just do one more. Maybe two. We'll see. Now sometimes with this
white and white here, you can't really see it. What I will quickly do, dab my brush and then feather
some of this blue out. Now this one's
kind of dry, but with the idea and just
extend it a little bit. Go over this one just
a little bit more. Same with this one. Dipping my brush into
the white again. In the blue, I can tell that
this think it looks dry. I think it is dry
and I just want to extend that a
little bit more. We will live with that. We'll get back into our green. Can tell some of these are wet, but I'll try to be careful. So I'm just going
to use the tip and pull down some stems. Then what I like
to do is go around the side of these
buds with some green. Just a couple of little lines. Indicate that the flower
is not quite open yet. Trying to be careful
because I do see that some of this is still wet. Get a little bit of
a bleed in there. Not a big deal. Now these, I think
I'm just going to do some long lines
indicating the greenery. with the leaves I just don't
want to get too busy with these leaves since the buds
are really soft and gentle. You're just indicating
some movement here. These wiggly lines. There's plenty of
times my lines don't even connect and that's fine. I don't want to overwork
this either here. I want to let these centers dry a little bit more than I am going to build up
some of the greenery right underneath
these little buds. Now, still taken my brush, I'm gonna get up in here
a little bit further. Brushes belly up, just painting in a little bit thicker area. I don't want to cover up that blue that we just
worked hard to get. But I will hug the
greenery right next to it or right next to this
side or to the side of it. All right. I'll do
the same thing. We'll get back in
our lighter green. What I'm gonna do is put a
little more green in my brush. Grab some other white. Rinse again, get a
little bit more. Alright, we're going
to add a whole lot more. Could've, should've
probably made a whole lot more to begin with. But that is not a big deal. Only using it sparingly, so it does not have to be exact. But I want to get it close. I'm not going I'm not to do too much on this
one since we've got plenty of these darker
squiggly lines, but I am going to
get back in some of the real dark areas and
just use this lighter green as highlight or for some contrast and just
soften that darkness. Alright, let's
let that one dry. We'll start working
on our fourth one.
10. Wildflower 4: Alright, For this one, I'm going to add
two cone flowers. Again like I did here
when I added the black to help my eyeballs out a
little bit for composition. What I'll do with this
one sometimes is just go right into that white paint. Then plot out where I want
to do my cone flowers. You could use pencil if this makes you nervous
to just go for it. Go ahead and put one right here. Cone flowers, daisies, these all can look
really pretty similar. This one will be facing out to the right with a
stem coming this way. And then I add the
other one here. Stem will come down this way. Certainly build up
these centers more. But just for a start, you're getting the hang of this, starting with our white and then dipping
it into the blue. See what that looks like. Pretty good. Alright. I will start with this but
turning it. Let's see. Yeah, we'll just
keep it like that. I start on the sides or
sometimes in the middle. Let's turn it up a little
bit. Sorry about that. Then I'm just working
fairly quickly. Getting those
initial petals down. Very light strokes,
mainly using the tip. Softening some of that blue and these a little bit more. That's a good start on that one, let's work on this one. Get a little bit less blue. Maybe. Try that again. I'm going to have to reload, but let's just go for it. Definitely very light. I'm going to go over this one, but I just really
wanted to just get the initial placement
of the petals first. Going to collide like
that, which I like that. Alright, so I'm gonna get a little bit more
concentrated white dab, dab, then dip, and then
we'll get back in here. Let's just see a
little bit more white. Adding more white,
but I'm going to probably go back in and add a little bit more blue
if I just dip my tip, just kind of playing
with it as you do these, I'm gonna rinse my brush, work on these petals down here. Getting into the white
little bit of the blue. Can dip my brush back into
that blue a little bit more. While that's still wet, can add some soft blue in there. I'm just really trying to define some of where
these petals are. Some of the outer edges
get back in the white. If I wanted to soften
some of this blue. Again, try not to
overwork these too much. Alright, let's just
leave these go for a minute, let those dry. We can get back in
the center here. Add some black dots, even extend it a little bit, make that little dome shape. Sometimes I'll take
a little micron and do those tiny little
hairs at the top. Let's see one little spot
there that's bugging me that I want to
add a little petal. See how this goes. Pretty dry. Here we go just to round that out and make it a little
bit more even there. Okay, let's add some greenery. Pulling the stem down. Same with this one. Go up a little further. You know, the drill
squiggly lines, add the leaves.
Where do you want? Even some extra lines? We're making wild flowers. So this is just a field
of pretty flowers and leaves just
bending and blowing. Going to define
where the stems are for both of these
a little bit more. Alright, let's get in
the lighter green. Do a little bit
more, not too much. Sometimes it's so light, you can't really even tell. I'm going to add a little more white to this green over here. Really pretty light, not
much of a difference there. Sometimes I will take
that light green and go down one side of the stem. Other trick I like to do, probably a good spot to mention that taking your white pen, if you want to highlight
some areas that way, I'm certainly do that. Just very subtle marks. I would get back in here. Maybe up by the bottom
of that flower. Me just touching that, that'll take a little
bit of that off. You could use the
Gelly Roll pen too. But sometimes just a little pop of that white really helps
it stand out even more. This spot right here, I've been eyeballing that. I want to add another and
another leaf in there. I don't know why that
spot was just bugging me. Caught my eye since we added some thicker leaves on this one, it seemed like it was left on its own there
a little bit too much. Walkaway, Jen, walk away. Alright. Looking
back at this one, what do we want to do
with that, if anything? I do, I think I want to get back in on some of these petals. Try to gently pull
out some more white. Is the fun part about
class as you can just really go for it sometimes. Not a commission. Alright, Just
have fun with this. Just adding little
bit thicker strokes. Part of the reason I'm doing
that, this background, it was all just kind
of melding together. Wasn't sticking out as
much as I wanted it to. But I don't want to
overwork it anymore. We will let this dry and
move on to our next one.
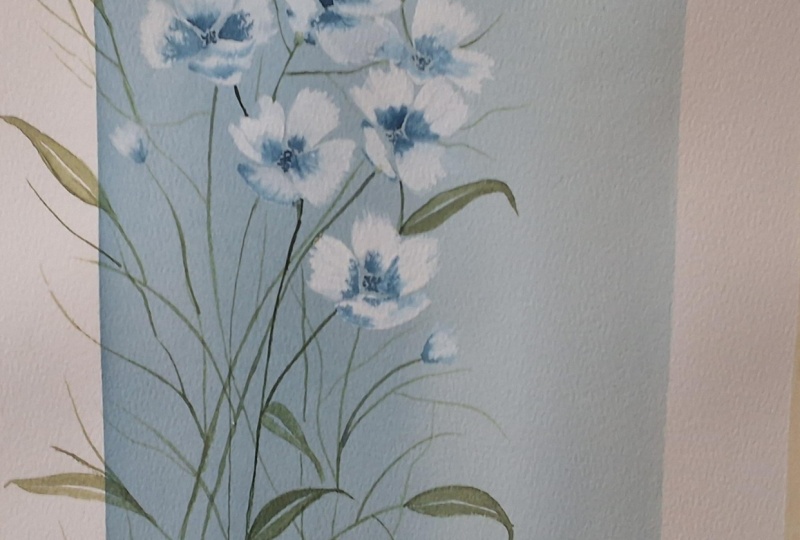
11. Wildflower 5: Alright, For this
one, we're going to get back and do some of these florals like this that
we did in our first one. I had to replenish my gouache. I was running out there. Usually, like I said, I add too much, but we're using a lot of
this dip that tip tested. If you want to start up here, I'm going to go
right back in that blue dip a little bit more of my tip into the gouache. Little smile stroke in there. And we'll leave that go. Load your brush. Next one we'll put up here. Angle it this way a little bit. Let's do one more
right about here. Rinse my brush, reload
with white and blue. Make this one smaller,
little bit smaller. Have our stems
turn this way. So we'll just come over here. Like a little V-shape. Under that bottom. They're going up their stems and then add a little bit
thicker leaves on this one. At least for some of them. I'm just pushing the tip of my brush in a little bit
into the side of the page. When I do these little leaves, not much pressure at all. Pulling this down a little bit, just trying to eyeball
some of these. I just I love coming
off the edge like that. Just some random lines just
indicating that greenery. All right, let's go ahead and do these
centers and then we'll get some lighter
green on top there, grabbing our black pen. Little dots. Bounce back to this, see I'm all over
the map sometimes. Just wanted to get some of these dots a little bit thicker. I start at the base and
then I gradually go up, typically leaving one
side a little bit darker. Back to the white pen. Still a little wet, so it's a little better. This one I think I
will just leave as is. I won't add these extra
little, extra little lines. All right, let's
get back in now. Let's lighten some of that
up. Here we go again. I got to add more
green than more white. All right, just a
little bit here. You could go a whole lot lighter
on these and maybe, Maybe I'll do that once we're all done and we sit
back and we look at it, that's really not
a lot of contrast. So actually let's
just do that now. And getting a little
bit more white in here shows up a little bit more. Very, very light
touch with the brush. Hardly touching
the paper at all. Let's let this one go and
we'll work on our last one.
12. Wildflower 6: Alright, almost done here, rounding out this last square, I think going to do
some florals like this, maybe add some buds. I had a general idea
of what I wanted to do with each one
of these squares. But I'm kind of winging
it a little bit as we go. Just what it feels like as we move along and what
it looks like overall. Just trying to keep
it cohesive to add a little bit more
blue on that one. Keeping this same amount,
the same thickness. Trying to alright. Let's do it down here. Like that was a
pretty loaded brush. I can probably get
all three strokes. Maybe this smile stroke, Yep, little bit there. Let's do a bud up
to the left here. We'll do two. I'm gonna go ahead and put
another floral up here. Right around this area. Getting a little bit lost
on that side, there. Might need to add a
little bit more blue, but actually it's
coming together there. All right, let's get
the greenery in here, see if we want to add any
more florals after that. Hoping this area is dry
here, looks like it. I have been surprised before using that tip. Forgot what I was looking at. Over here. Given
your leaves movement. Sometimes I just look for open spots that
I want to fill in, whether it's just a
green squiggly line or an actual leaf, just trying to keep it balanced
but not perfectly set. It can be a little
heavier on one side, a little bit squiggly. On the other side, just you want balance but you don't want it to
be perfect either. Not a lot of room up
here on this one, but need a little
bit more greenery. Alright, let's
get lighter green. You see I tend to go right back where some of the
darker green is. Get in there and lighten that up first or go over part of it. I don't want to go
over all of it. Little bit more and then
we better call this done. Well, I've got the light green. Get back on this one
a little bit more. Let's add our centers. Now just keeping
this very simple, if you wanted to add some color, other color in
there, some yellow, some orange to make
those centers pop. You certainly can. But I'm trying to
just keep it really simple and just vary this
muted blues and greens. Some of my favorite colors are these moody jewel tone colors. Go ahead and add some lines
to this main one here. That one pop a little bit more. This one we can
add a little bit. This flower got a
little bit lost there, but it's all right. Let's see what else. Tell you what we're going to
let this dry all the way. We're going to step back, look at it and see what we
need to add if anything. Alright, I'll meet you
over in the next lesson.
13. A few additional details: Alright, I'm gonna
try and take some of my own advice and not
overwork these petals. I am going to add a little bit darker greenery
to this one down here. But as off-camera, I'm looking
at it and I thought, Oh, I could do a little bit
more here with this petal, pull this one out
a little bit more. And I thought, no
walk away, leave it alone. Let the painting stand as it is, except for this greenery. So I just wanted to
darken up some of these because I
felt like this one compared to these five. This one was a little bit too
light and I'm not trying to get the greenery all
perfect by any means. But I want to have
just be similar. I think darkening up some of these lines will do the trick. Then we'll clean up some of the centers and we
will call it a day. I don't know if I
have more fun making the greenery or the flowers. Both pretty fun with this brush. See, there's things
we lightened up, things we darkened up, then we went back to lighten up. It has been a back-and-forth
day, that's for sure. Alright. A couple more things
on these centers. I think I'll get in
here a little bit more. This is where we run the risk
of really overworking it. Definitely don't
want to do that. These are very gentle,
soft flowing flowers. We don't need to
get so caught up in all the tiny little details. Add a little bit of white on this one up here because that's what
we did on the others. So just keeping that
a little bit similar to a little bit. I promise you I'm not going to, once we get done with class, I'm gonna leave it alone. I'm not gonna keep working it because that's not fair to you. I'll show you exactly
what I'm doing. Alright, What do you think? Are we done? Are we done? I think we should call it done. All right, Let's go ahead
into the next lesson. I really want to show you some different things
that I've done off-camera and give
you some options of how you can use
these designs.
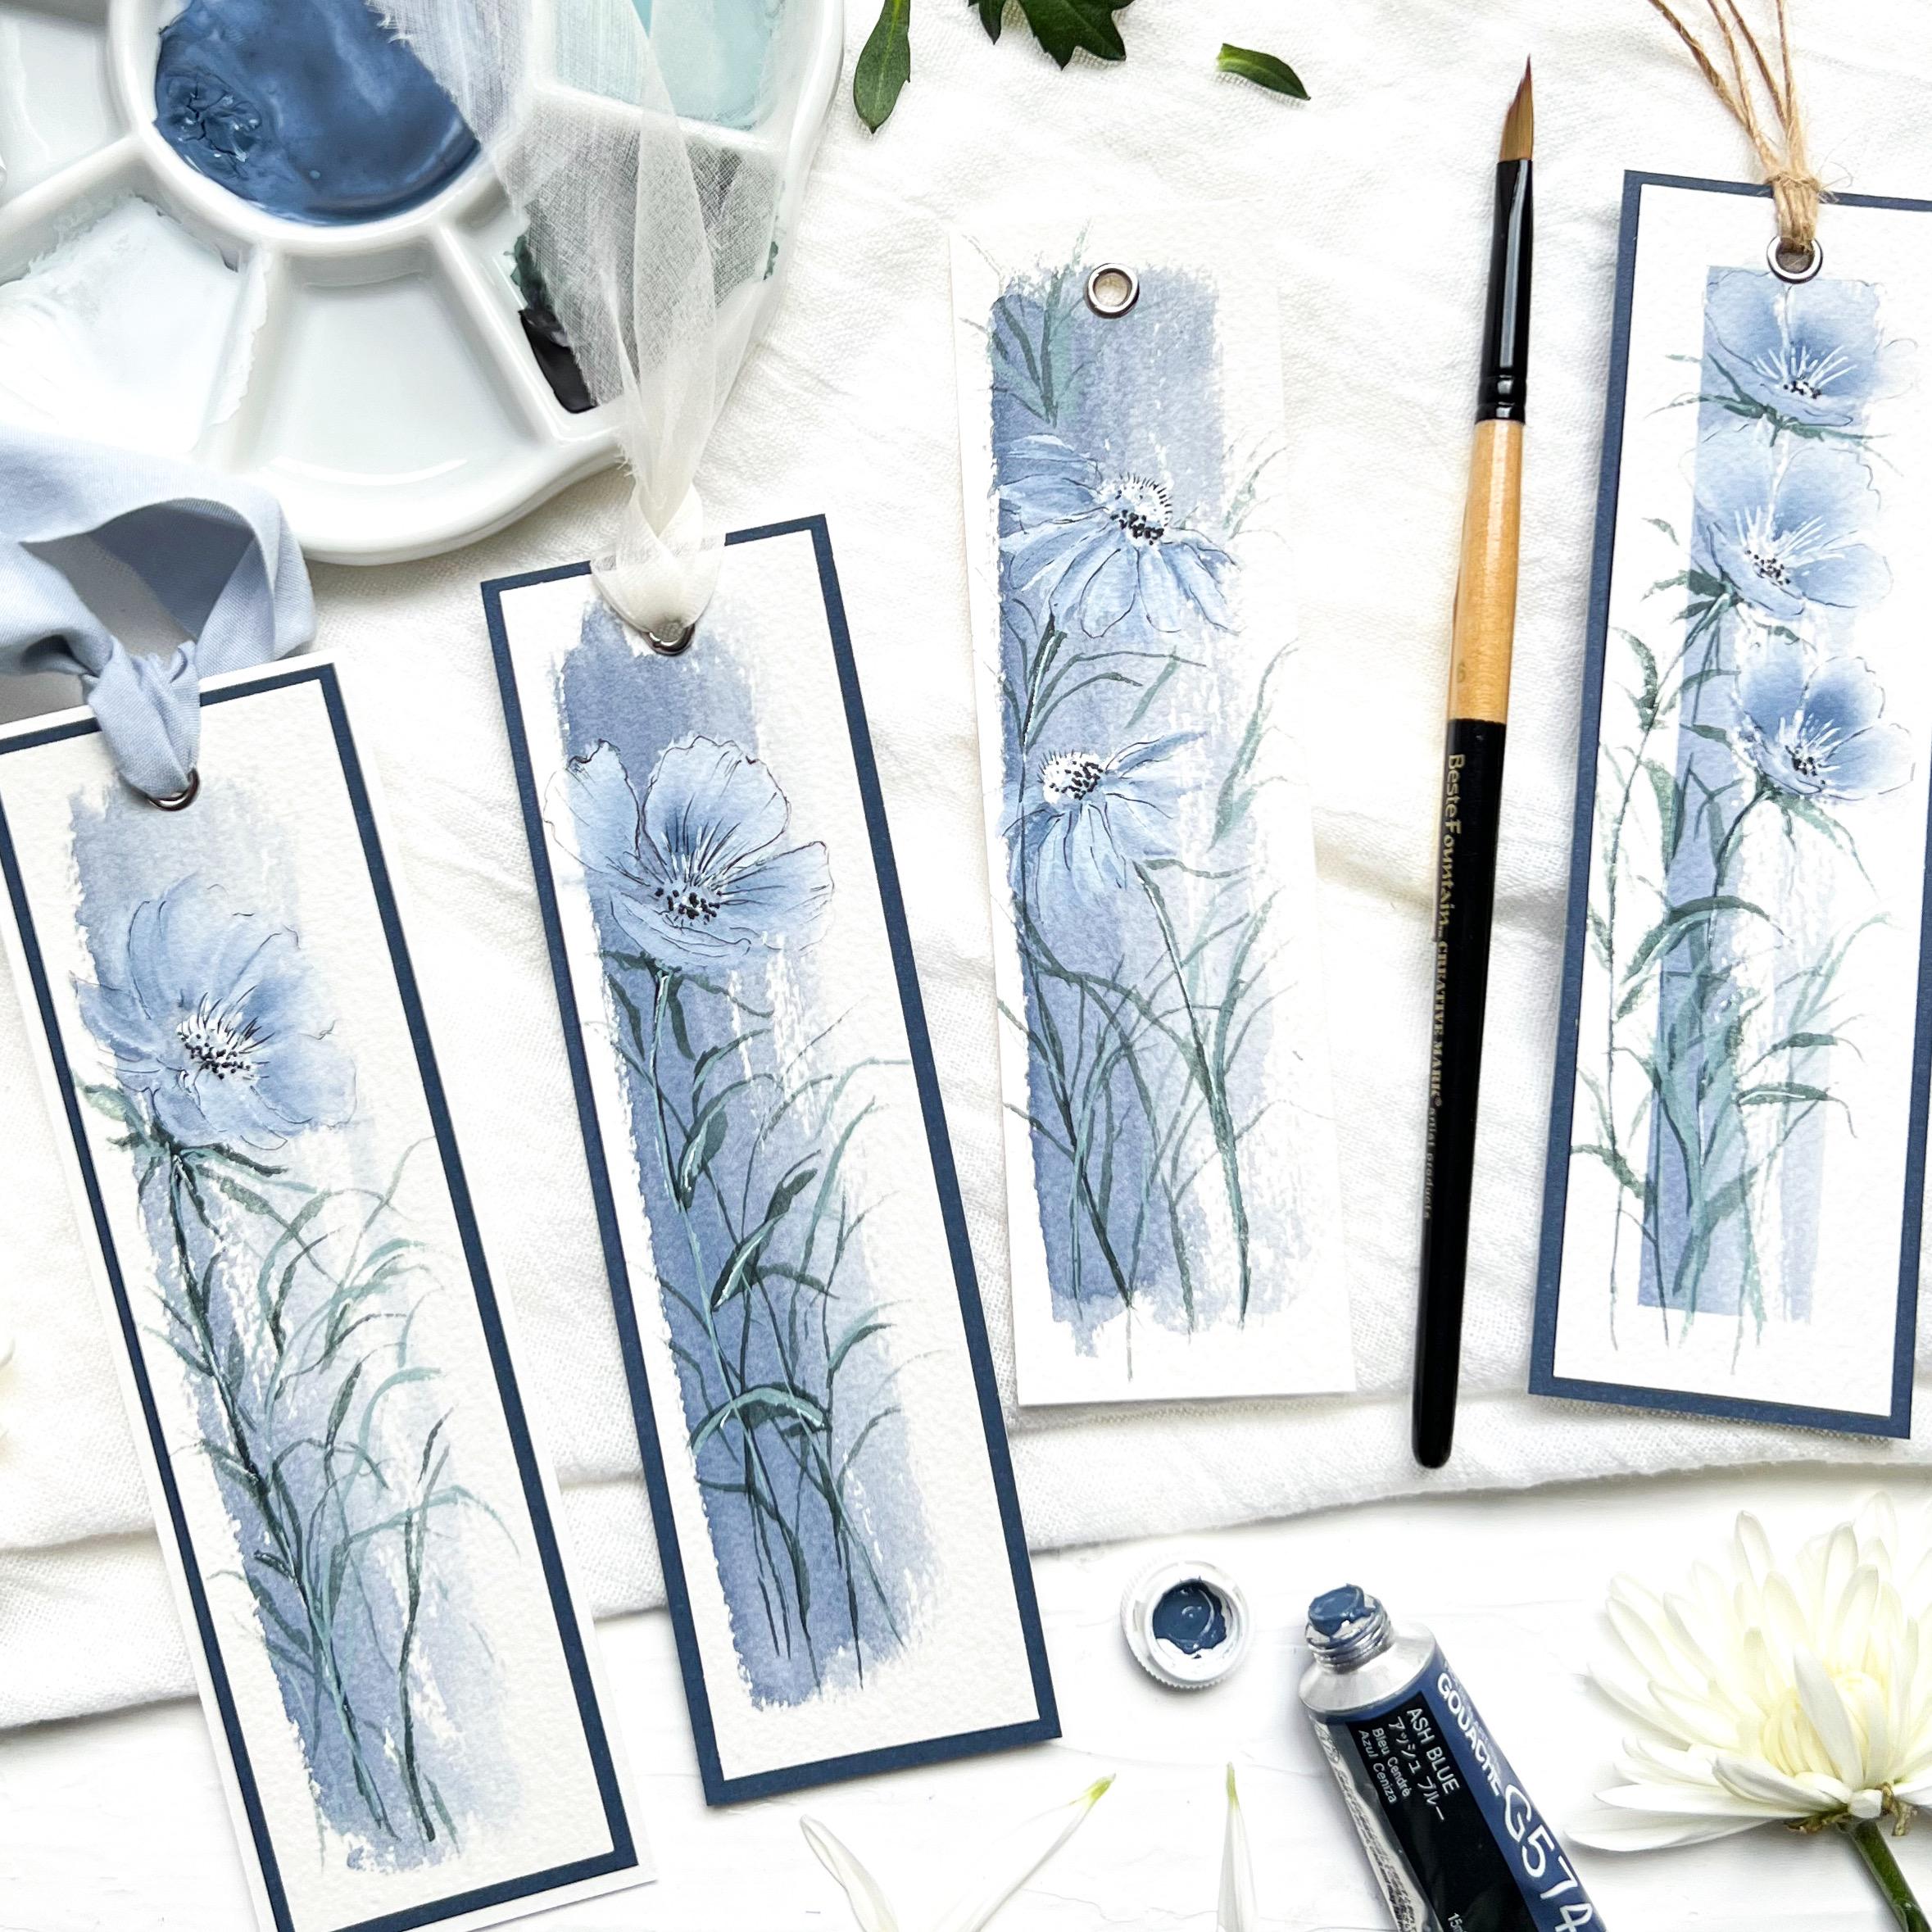
14. DON'T MISS THIS...Project inspiration & ideas: Alright, as I was
preparing this class, since I love these colors, I love this technique
and design. I made a bunch of stuff and I wanted to share that with you. Maybe give you some ideas
for your class project. Certainly what we did in class, I would love to see that. But to take it a
little bit further, some things that I did, move this off so we can
see these one-by-one here. So this one I did
on handmade paper, cotton rag paper four by six. Same way with a wash, same way with layering
the florals on top. This would make a fantastic
card or just to frame it as is this one, kind of like a larger size Polaroid but just
taped my paper. This is also four by six. Can add some
lettering down here. Use this as a card or just
frame it as is this one. I did add some
yellow on that one. That's the only difference
that I did all of these. But I placed this on blue card stock just
from my local craft store. Then if I wanted
to write a letter on the back here with white pen, I could do that or calligraphy. It goes right into
a square envelope. And then bookmarks. I always love the bookmarks. I did not even measure this. I just eyeballed this. I did which one? This one here, I did
tape this and that was a little bit tedious and I thought, I don't
need to tape it. So I just did the
background wash on these and then layered
the florals on top. I added some outlines,
some micron outlining. Sometimes that makes your
florals pop a little bit more if they start to get
lost on your background. I could potentially do
that on some of these, but like I said, I wanted
to just leave it alone. Discovering new ways to make your florals
pop is always fun. This one I just left plain. This one I added the
blue card stock. Same with this one. Pretty, pretty bows, pretty ribbons and
bows are always fun. And then I added some white
on the back of this one. Make it a little
bit extra fancy. Then the last one I did, I went ahead and I
think this is about a four by six as well. I just did three in the
center, taped it off, did exactly the same thing, and then get this
in this frame here. But what a fun gift to
give that to someone. I can't wait to see what kind of projects
you come up with. I know you're gonna have
all kinds of great ideas. Please upload those into
the project gallery. Or if you're on Instagram,
go ahead and tag me. I would love to see
what you come up with. But thanks again
for being in class. I hope you enjoyed painting
these wild flowers, these moody blue and
green wild flowers with your wedge brush. Alright, you have a great day
and I hope to see you soon.
 Jen Sweeney, Watercolor, Calligraphy, Cycling