Transcripts
1. Introduction: Hello, everyone. I'm
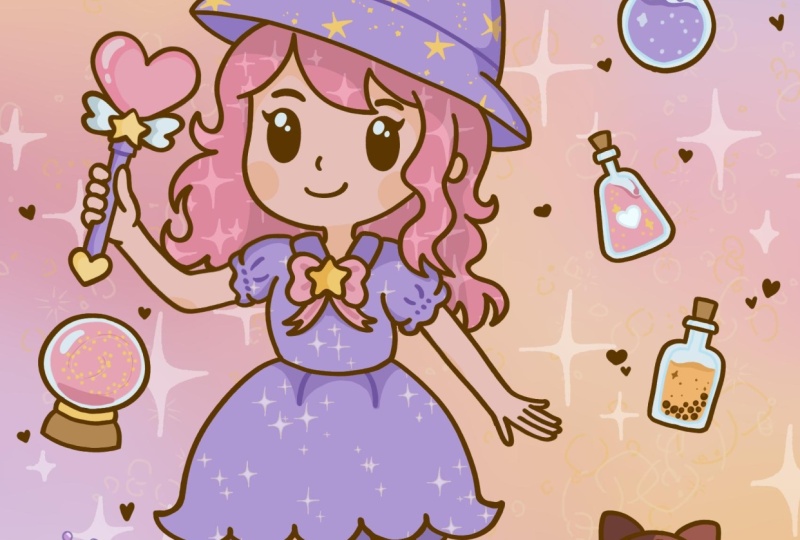
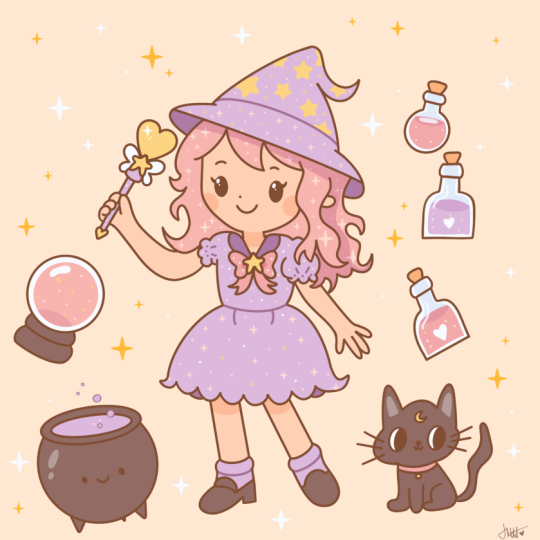
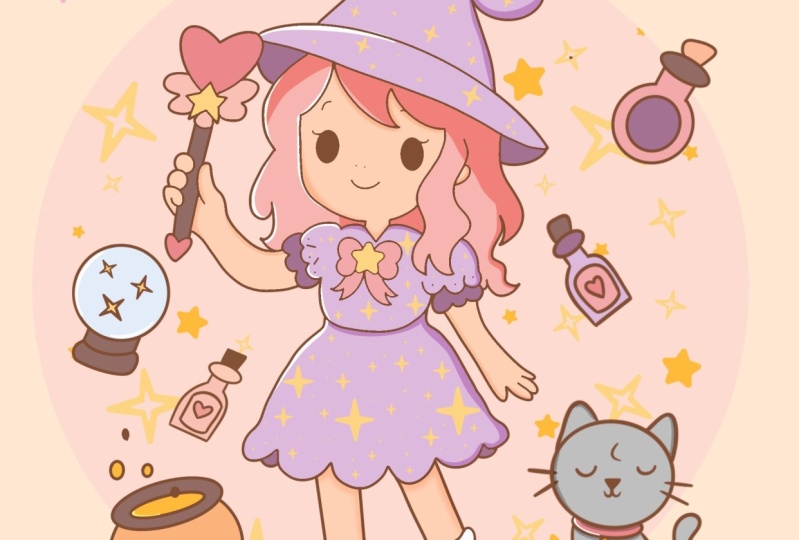
Uni, and in this class, we are going to draw this
cute cow why illustration of an adorable pastel
wich girl in procreate. During this class,
you'll get familiar with a lot of useful features
like symmetry tool, liquefied tool, recoloring with reference, clipping masks, and blending modes, and learn the basics of drawing
in procreate. By the end, you'll not only draw an adorable illustration
you'll be proud of, but also feel super
confident using procreate. And now let's spend
some time drawing.
2. Preparations & Guiding Lines: Let's begin our class firstly by deciding what kind of
canvas we're getting sing. Today we're using a
standard square canvas from Procreate with our Pixel Weed and Pixel
heats at 2048 pixels. DPI are set at 300 and color profile is set aSRGB
with this loan number. When it's all done,
let's get done. Let's get to our new canvas, and let's begin our
preparational part. So firstly, to have all the materials that we will
see throughout this class, please go under the project reso Sap and download everything. And when you have done it, let's go to our brush library. We will go to this brush
that you downloaded with the title Dow flat Pencil,
and we will select. When you have the selected, let's go to our layers. We'll go to the
background color layer. We'll go to the color
palette that you download. We'll go to the palette right
here onto the bottom and we also will go on the cards
to see the colors names. Now, let's select the color with the title background and we will change the color
of our background. Now when we did this, let's go to our actual color palette, you can go under this color
palette that you downloaded under color palette right here onto the bottom and under card, and we will select
the first color to help us with creating our
little guiding lines. Let's go and select this
red color right here. Now, when we did this, let's do one more thing by going to the Range icon
over the top plat. We'll go under Canvas and we
will toggle drawing guide. We will need to
have these cells, but we will need to start
everyone from the same place. Let's go to eight
drawing guides, and we will go and set the
grid size to 65 big cells. When we have the
results like that, let's hit down over our
top right and let's begin creating our
little guiding lights. Firstly, we'll go over the
top and we will count down to 2.5 and we will create a straight line going
through the whole canvas. Hold your Apple pencil at the end of the line
and hold one of your fingers onto the screen
to make the line straight. Now when you have this
line, straightaway, let's go to the top and
we will write down hat, so we will know what we
will use this line for. And when we have this line here, let's go and deal
with the bottom part. Again, counting 22 from the bottom and creating our
straight line right here. Hold your Apple pencil, hold one of your
fingers on the screen. If you see that you
missed the line, you can lift up
everything and go to the spooked up option
line right here and then hold your Apple pencil
at some link space and move the line to where
it's supposed to be. When you are done, just tab on the screen to
accept the changes, and let's go and
write down bottom right here underneath
this bottom line. So when we have the line
for the bottom part, we will go and deal with this
area that we have inside. Firstly, let's go and count to seven from the top
to create another line. One, two, three, four,
five, six, seven. We will count to seven, and we will go when we have this markdown to the opposite side with our straight line, and again, holding
everything that we need to hold to create
a straight line. Let's go and try down head. When we have the
line for the head, let's go underneath
it and we will need to create another
line for the chin. Let's go from this line
that we've created for our head and we will
again count to seven. One, two, three, four,
five, six, seven, create an L markdown
and again go into the opposite side
with our straight line. Holding everything
that we need to hold, and then let's go and try down chin right here over this line. Now, when we have the chin, we are done with the top
part of our illustration. So let's go and deal
with this bottom part. Underneath the chin,
we will need to have the line for the waist. So let's go and count to four
from this line of the chin. One, two, three, four,
Make a tal markdown and go into the opposite side to create our straight line. Holding our line, holding
our Apple pencil, and writing down the waste
right here onto this line. Now when we have this wasteland, we will go to the area that
we have on the bottom, and we will need to again, count to six from this line that we have for the waste to create our last line. One, two, three,
four, five, six, making a little markdown and going and creating
our straight line, going to the opposite side. Hold your line, go and write down skirt right
here onto this line. Now when we have this line, this is our last line that is
supposed to be horizontal. Let's go and create one last
line of our guiding lines. That will be this time vertical. We will go from the left and it doesn't matter if you go from
the top or to the bottom. We will count 215 from the left. Let's go and do this. When you found the 15 mark, we will go and create a
straight line the same way as we did on the
horizontal axis. So go and holding
everything that we need to hold and when we
have doors out like that, we are done with
our guiding lights. Let's go and do the following. We will go to our layers. We'll go to this layer where
we have our guiding lights. We'll tap onto the icon, and we will adjust
the opacity to the level that will
be useful for us. We will need to see what's happening here onto this layer, but it doesn't need
to be very bright. Find the level that
works for you. When you are done, tap onto this layer to
close this window and then we'll tap on the plus icon to create a new layer on top. Now when we have the
results like that, we are done with
the guiding lines, so let's move on
to our next part. We we'll create the basic scheme for our future illustration.
3. Basic Scheme: Let's begin this part
firstly by going to our color palettes and we will select some contrast color. So for example,
the dark profile. Now, on this new layer
that we've created, we will go between the lines
of the head and the chin, and we will go right here to the middle and with one line, create a shape of the circle. To make sure that it
is a circle, firstly, we are holding our Apple
pencil at the end of the line, and also we need to hold
one of our fingers on the screen to make sure that it's a perfectly
rounded circle. If you need to
adjust the size of your element while you
are holding erythin, move your Apple pencil
from side to side, find the size that
works for you, so it will need to fit this area that we
are right now at. And when you have the
size and everything done, let's lift up erythin
and let's move the shape slightly
towards the center. We'll go to the booked up
auction circle on the top. We'll hold our Apple
pencil and we will drag this shape so
it is in the middle. When you have the
result like that, let's tap on our layer to
accept the changes our canvas, actually, and we
will go and continue creating our additional
guiding light. So firstly, let's go toward the line that
we have for our head, and we will go from the central
line, the vertical one, and we will count to
three right here, and we will make a little
markdown right here. So when we have this markdown, we will go and start making other markdowns right here
to create the actual head. So firstly, let's go toward the line that
we have for our head, and we will go from
this line to the last from the middle line
and we will count to three. Now when you have it,
we will need to go towards this line and we
will go and count to five, one, two, three, four, five, but also we want to create a
bit of the til tread here. So we will need to move
this line slightly down. So let's go two or even
three little excels down, so we will create
a line like that. Now when we have
it, let's go and connect all of these
lines together, creating our lines the
same way as we did before by holding our Apple pencil at
the end of the line. And when we have the
result like that, we have the future hat
right here on our canvas. Now when we have the
result like that, let's continue by going toward
this area between the chin and the waist and we will create some of the
future body right here. Let's go toward our
middle line as always, and we will count to 2.5 from both sides right
here onto the line, and we will make two
marks down right here. As for the bottom right here, we will go to two points
and we will again create the markdown and when
we have these markdowns, we will go and create the
guiding lines like that. So when we have this
future body shape, we will go and create the
future shape for the skirt. So let's go to this area that we have right
here for our skirt, and we'll go to this
line on the bottom end from our central line,
we will count to six. So let's go like three, six, and we will do the same onto the opposite side,
three and six. And we will connect these lines together with our
straight lines like that. So when we have the
results like that, we have our future skirts. Let's go and work on
our legs right here. So for the legs,
firstly on the top, we will go to this
line that we have for the skirt and we
will count to 1.5. So we will create another
markdown right here. As for the bottom, firstly, let's go to the bottom
line and we will step from the
bottom one cell up, creating a little
markdown like that, and also one step from
the central line, and we will create a
guiding lingon in that way. So now when we have this line, we will go to the
0.3 right here, and we will create another
guiding line like that. So later on we'll create
a little boot right here. Now, as for the second leg, let's go again to the
top line right here, and we will again count to 1.5, creating another
markdown right here, and as for the bottom, we will need to go
to the four point. Again, let's step one
cell from this line, and we will go with the
little markdown like that. So again, connecting
our lines like that and creating
a straight line. Now, when we have
the shape like that, let's go and deal with our
little arms right here. Firstly, we will go
toward the left side. We will go to this markdown
right here on our body, and from this markdown, we will go slightly down. So we will again go
and count to 1.5. So let's go toward
this line right here and make a little
markdown like that, and then we will go
towards the side. So we will go right
here to the left, and we will need to count to
five from the central line. One, two, three, four, five. Let's make a little
markdown right here, slightly lower than this shape, and we will create the
straight line like that. Now when we have it, we will go towards the area right here and as we will create the girl that will be holding
something into the hand, we would want to create this
hand shape right here too. So let's go towards
this area right here, and we will count to eight
from the central line. So let's go run two, three, four, five, six, seven, eight. We will make a little
markdown right here. And as for the
length right here, we will need to
go four cells up. So we will go and create the
little markdown right here. So let's go and create
this line here. And when we have it, we will
go to the opposite side and create another
shape for our hand. So one more time, going toward
this markdown right here. At our shoulder or something, and we will go one more
time, 1.5 cell down. Creating a markdown right
here and then we will go towards the error right
here onto the bottom. We will have the loose hand
right here, loose arm, and we will go from this line of the waist and we will count 23 right here. One, two, three. Let's make a little markdown
and we also will go from the shape that we have right here and we will need
to count to two. The markdown that we have
right here is the right. And connect these T shapes like that with our
straight line, and when we have the
results like that, we have the basic scheme
for our future girl. When we have this scheme done, let's go to our next part, where we'll create
the actual sketch.
4. Girl Sketch: Head & Body: Let's begin this part firstly
by going to our layers, and we will go and
reduce the opacity of our layer with our scheme. So let's tap onto the end icon and move the slider
toward the lot. Again, we will need to have
something not that bright. So when you found the level
that you prefer tap onto the layer and create
one more layer by tapping on the plus icon. Now, when we have
this new layer, let's go to our color palette to select a different color. So for example, we can
use the same color that we use for our guiding lines, it was this red color. Now when we are all prepared, let's start by recreating
the shape of the head. So firstly, we will
go towards this area, we zoom in our canvas
and we'll go toward the left side to this
little tip right here, and we will turn it
into a straighter line. Let's go and create
something like that. When you have it, we will go
and basically we will repeat the shape that we have for
our shape of the circle. If you want, you can go and
maybe move this line slightly down so we will have no that
lifts up check right here. Go along the ship and creating a similar shape to what
we have on our sketch. If you need to adjust something, you grab your eraser and erase the parts
that you don't need. Now when we have
this basic shape, let's get back to a
brush if you were using your eraser and let's go and
work on our facial features. For the facial
features, firstly, let's go from the bottom from the sland that
we've created. We will go two cells up and we will go a little bit down
from the two cell point. Let's go to something
around 1.5. When we have this
little marking down, we will go to the left side and we will start to create
the mouth like that. You can go with a
more rounded shape with a more open shape, maybe with even different shape right here, it's up to you. Create a very soft
smile like that, and when you have the result that is looking like a mouth, let's go and create
a little nose. For the nose, we will go
to this little area a little bit higher and we will create just a dot like that. Now when we have the
dots for the nose, let's go and deal with the ice. So for the ice, let's go on the same level where
we have our nose, so the same cell, but we will move slightly
toward the right first. Let's begin with the right part. We will go one cell to the
right from the central line, and we will go and
start to create the shape that will
look like an p. You can go with a bigger shape with maybe smaller shape if you prefer with
different shape, again, if you want to create the shape like that,
and when you have it, let's go toward the top part and we will create a
little cat win like that, some kind of eyelash right here. When we have it, we also
can go and map out that later on we will create some kind of the
highlight right here, so it will look not that scary. When we have the
result like that, let's go to the
opposite side and create the second
eye right here. As we are creating a bit
of a tilt onto our hats, we will position it a
little bit differently. So this time, let's go to the line that we
have right here. Again, we are using our
ls to map out everything. We will go to the same line that we have for our first eye, and we will go slightly higher. Let's go and make a little
markdown like that, and we'll create
the similar shape, the similar size
onto this little. So let's map out what we
need to create right here. Again, trying to create
this eye size wise, similar to what we have
onto the opposite side. So if you need to look at
the previous shape right here and match it with this one that you're
creating right now, go and do what you need to do. And when you have the
shape one more time, going over the top part and creating this little
eyelash right here. Now when we have the
result like that, if you see that you can go
and maybe erase some lines, so it looks similar to what you have onto the opposite
side, go and do that. And then let's again go and create this little
highlight over the top, go onto the same
side that we have the first highlights on and create a similar shape
onto the opposite side. Now when we have the
result like that, let's go and work a little
bit on our eyebrows. For the eyebrows, let's go
first or the left side, we'll go slightly higher and create a little shape like that. As for the opposite side, let's go right here, again, slightly higher than
our eye and create the similar shape right
here, but slightly lower. Now when we have the
result like that, let's go and start
working on our hair. Basically, we'll start with
the fringe right here. So for the fringe, let's go slightly higher than the shapes that we have for our eyes. So we will go and create
the shape like that. Let's start from the middle
part and we will go higher and create the basic
curve like that. Now when we have it, we will go and we will
need to create some kind of the shapes that
will look like a fringe. We will start to create the triangular lines
going in that way. When you have this
first triangular shape, let's go maybe slightly
higher with it. Again, right now we
are creating a sketch, we are mapping out everything so it doesn't need
to be perfect. Let's go towards
the right part and create another very
soft curve right here. Going like that, maybe
going slightly lower. You can always take a
look at your illustration from the distance to
decide whether you like what you are creating
right now or whether you need to go and
maybe aja some parts, make them slightly differently. Go and create this curve
and when you have it, we will go toward the
opposite side and we will create the line that will go
to the opposite side too. Let's go from here and create another shape that will look like a triangle
right here on the top, and we will go with
something like that. Now when we have these parts, let's go and work more our head right here to finish up with the top part of
our illustration. We have this guiding line
right here as our trianra. Let's go and elongate it. Lonate and creating the
similar ship right here, going slightly
outside the ships. And when we have the
result like that, let's go and create the top part that we
will have right here. Let's first map out where
we will want to finish up, creating our bottom
part of the head. Let's go from our middle line that we have right
here and we will go and count to five
right here, on the left. And as for the right, we will go and deal with
it a little bit later. When we have this five point, let's go and elongate our line slightly to this point
and when we have it, we will go and continue
creating our head by creating a rounder shape
going inside the sheet. So for now, let's
map it in that way. And when we have the
result like that, let's go and work on this line. We will go slightly higher
than this line and we will create the curve inside
this very straight line. So very, very soft
curve like that. Now, when we have it, we are ready to finish
up this part. So we will go
slightly higher than this line that we have
as our bottom part, and we will create, again,
rounder shape like that. Let's go with
something like that, and if you need to go grab your erasa and erase the
parts that you don't need, go and do what you
need to do right here to clean up your sheep. So for example, let's go with something
like that for now, and again, if we need to
fix something later on, we will go and fix it later. When we have the
result like that, let's go and finish up creating
our top part of the heat, and we will do it very
easily by continuing to create this shape in
rounded element ratio. So going down with another curve and creating
the rounded shape like that. Now when we have the
result like that, let's go to this line that
is our headline and from it, we will step a bit, one cell on top, and we will have the bottom
part of our heat right here. Let's go like that and
create the sheep that will go up and we will have the
tip of our heat right here. Create the curve
like that firstly and then let's continue creating our shape right here and connect it
with our top part. Creating a very, very
soft tip like that. Now when we have the
result like that, let's finish up
creating this part. Again, going toward this
line and again turning it into a very soft curve instead
this very straight corner. Going like that
and creating line, going slightly higher than
the sheet that we have right here as our tip and then connecting everything
in that way. Now when we have the
result like that, let's go toward this
part and we will go and finish up creating our
actual shape for the hat. From this shape that
we have for our hat, let's go and count two, three, and when we have it, we will
go more toward the right, and we will finish up creating the shape that we
have right here. Doing basically the
same thing as we have onto our left and creating this rounder shape for our bottom part of the hat. Again, if you want to maybe
go to the opposite side to match it with this side that you're working
on right now, go and do it and
when you have it, let's go toward
the top and create the continuation of
the hat in that way. Again, trying to make it
similar to the opposite side. Again, remember that
now we are mapping out everything that we would
want to recreate later on. And if you have
some extra lines, go and erase them with the
help of your eras right here. And when you have the
result like that, let's also go towards
the top part right here. Where we have these
intersections between the bottom part of our hat and this sheet
that we have on the top, we will step slightly
higher and we will create some kind
of the line like that. So when we have it, we
will continue by going toward the bottom and creating some shapes that
will look like hair. So let's take a look at
everything from the distance, and maybe we will fix this
part of the hats on the right. So work with your brush, work with your erasa and create the shape
that will look nice. Try to make it
similar to the shape that you have onto the
opposite side too. So now when we have
the results like that, let's continue by going to the sides and working
onto our hair. So firstly, let's go probably to the left side and we
will create the hair here. So we have this little shape
right here onto the top. Let's go to word our hat. So we will go to this line that we had as our guiding line, and we will go and create
the little shape like that. Now when we have the shape, you can go and maybe
work more on it and create the more rounder
shape, it's up to you. When we have it, we will go
and create a little deep, and then we will go
and continue creating the shapes that we
will use for the hair. Firstly, you can go and maybe map out what you want
to have right here. So something curly,
probably maybe something going slightly higher than the
shape right here. And then we can map out
after we've mapped out, we can go create
the cleaner lines, the cleaner look for everything
that we have right here. First of all, let's go and
create the basic shape. For example, going
up, going inside, going slightly down right here. We will need to
go and finish up, creating our here right here underneath this line that
we have for our chin. So when we have the
results like that, let's go and maybe create
the cleaner shape by using our eraser and our brush and creating the
overall look like that. So when we have the
shape like that, let's go toward
the opposite side and create the hair here too. We will go to the shape that we have for our head first and we will go slightly inside the shape and we will start to create the
hair right here. Let's go with the first curve
like that and then again, mapping out what we
want to see right here. So for example, let's go
with something pretty curly, and we will go toward this line, toward this intersection
that we have between our shoulder and
our arm right here. So basically going
toward the arm. So going like that and starting to maybe create some
lines like that, starting to add some
thickness toward the element. So creating the parallel
curve toward the right here and finishing up with
these shapes onto the bottom. So when we have the
result like that, we also could go and add the additional
elements as the ear. So for example, let's go
right here where we have this little dip and we will create a little ear right here, maybe slightly smaller shape because we don't want
it to look too weird. Now when we have the
shape for the ear, let's go and continue creating
our shape for the here. So going slightly
towards the side right here of our head and
starting to create again, mapping out the shape that we
want to have for our hair. Starting with some
curls like that, and we will want
to finish creating our hair somewhere closer
to the line of the waist. For example, let's go and map out half of this
area right here, and this is going to be the
bottom part of our hair. Let's go and continue creating some curls and create
something going in that way. So again, right now, don't
pay too much attention, create the basic shape that you would like to
see for the hair. If you see that you could go and maybe erase some lines
that are overlapping or the lines that you
don't want to see right now onto your screen,
onto your skage. Go and erase everything that
you don't like right here. And when you have the
results like that, let's pay closer attention
to the connections where we will need to have the hair
right here onto the top. Between our head and the hair, and we will go and start to figuring out what we
can fix right here. So when we have the basic
shape for our hair like that, let's go and work
on our body parts. So firstly, we will go towards the chin area and we will go underneath it right here
at the middle line, and we will go down with
two little lines like that. So this would be
our little neck. So now when we have the neck, let's go and create the shoulders and the parts of our little dress right here. So firstly, going towards the
sides after we've created our neck and we will go and create the very rounded
shape like that. So let's go toward this element that we
have for our shoulder, and we are creating
the shape like that. Going towards the he parts and creating a very
rounded shape like that. Now when we have it, we will
go slightly down and we will start to create some kind
of the ruffles right here. Going inside the shape and starting to create
the shapes like that. Let's create three
of these elements, and then we will go closer
to the shape that we have right here and we will create a rounder
shape right here too. So instead of this very
straight lines that we have in our sketch, we will create the rounder shape right here, maybe
not that rounder. So work a little bit onto the
line, and when you have it, let's finish up creating our
sleep right here by going to these little ruffles that
we've created and we will go and create one
more layer of them. Again, going right
here to this area and starting to create three of
these elements right here. Let's finish up with the
shape going in that way. Take a look at everything from the distance to see whether
you like the result or not, or maybe you want to clean up some lines that you have
for the here, for example, or match it nicely with
the shape that you creating for the ruffle and for the overall
shape of the sleeve, you can figure out
it on your own. When you have the
result like that, let's go towards
this little line and we will continue creating our shape for our dress
right here. Let's go to it. Again, we will go and create a slightly rounder shape right here going toward
the opposite side, creating the very nice shape for our middle
part of the dress. When you have it and when you cleaned it up with your eraser, let's go to the opposite side, and again, we will create
a sleeve right here. Firstly, let's go and create a little ship that later on
we can turn into the lapels. So what we need to do
right here is to create a little line like that that will be some kind of similar
to what we have right here. We can actually go and create the little ship right here, too. So let's create a
smaller shape like that. And we will use our eraser to create some kind
of bump like that. We will go toward the
opposite side one more time. We will continue creating shap. So when we have it, we will go towards the sleef area and we will start to recreate the same things that we have
right here on our left. So let's go toward this area. We will need to go to the
line that we have right here, and we will slightly
go higher from it. So let's go and make a
little markdown like that. We will go slightly higher to
recreate firstly this part. We will need to save the space for this bottom part
of the ruffles. Let's go and make to
mark down right here. Then we will go toward the ship that we have for our
body right here and we will go slightly toward the side and start to create
the ruffles here too. Going like that and starting
to create three shapes and don't forget
that we will need to have the shape right
here on the top, so it will be a
continuation of our sleeve. You can go and
start to map it out alone the shape that we have for our hair and then later on, we can use our eraser to erase this part
that we don't need, so we will have the
nicer shape right here, the nicer look for
this overall line and nothing not too weird. If you see that maybe
you can go and benefit by removing the shape that we have for our hair
or if you want, we can go and maybe try to
create it in a different way, so we will have a
nicer look right here. For example, let's move it
slightly towards the left and we will have more space right here for our little shoulder. When we've moved it
slightly toward the left, we will go again and repeat the same things
that we had before. And we can go and if you want to move this line
slightly to the side, we can go and do it
in a different way. So we will go to
the ribbon icon. We will use the
free hands method, and we will go and select
this area that we have for our hair like
that, fully selected. And when you have it selected, we will go to our okey. We will use Uniform method, and we will drag the shape slightly towards the left side. So now we have a nicer shape for our hair and also our ear
doesn't look too weird. So when you move the
shape and when you are satisfied with
the placement for it, let's go and tap onto the
first option that we used. It was our exurban icon, and let's continue
working onto our sleeve. So let's go again toward
this bottom part. Let's go and work onto
the overall shape of the sleeve right here and create something
in that way. Again, if you want to clean
up everything that you have right here for the hair
and also for the sleeve, you are welcome to go and do what you need
to do right here. So now when we have
the results like that, let's finish up creating
this little part, the ruffle part on the element. We are going slightly towards the inside part of the shape of the little sleeve
that we have and creating the same thing as we have right here on our left. Now when we have the
result like that, one more time, take a look at your illustration
from the distance, decide whether you want
to fix anything or if you are satisfied with
everything as it is right now. Let's go and work on
this area right here. We will create a little boo. Firstly, let's go to these little bumps that
we've edited at the end, and we will go from them
toward the middle part and create a little
neck cut like that. You can spend some time here and figure out what you
want to have right here. Maybe you want to create
not a triangular, little cut right here,
but something different. When you have the first lines, let's go and create two
more lines right here where we have the ends of our
bumps and when we have it, let's go toward this middle area and we will create a
little steroid here. So for the star, firstly, let's move closer to our left side and we will create the star
gone in that way. For now, let's go like that, map out what we want right here. And when you are satisfied
with the size of these elements and with the
position of these elements, let's turn it into
something more cute. So we don't want to have these very angular pointy
little shapes right here. We want to turn them
into a very cute star, and the cute star will have
the very rounded elements. So for now, we are working with 14% of the size of this brush, so you can go and tap
onto this checkmark, the slider thing right here, and you will have
this little window. You can remember the size that you are working
on right now. So you will need to tap onto
the plus icon right here, and then let's go and
make it slightly smaller, and we will work precisely
onto the shape of our star. So let's go over the
lines that we have right here and let's soften
up the overall look of our star by turning
the straight corners and very pointy angular
things right here into a very nice and
cute looking star. We also can go grab our erasa and erase the
parts that we don't need, go with a bigger size
of the eraser with a smaller size of
the erasa to see clearly what you are doing
and whether you need to go and maybe adjust
some parts or notes. Figure out what you want to
see for the star right here. Maybe we will go and create these little parts in a
smaller way and again, working with our brush,
working with our erasa, creating a very cute
look for this element. Again, take a look at
your illustration from the distance and decide
whether you want to adjust it in
any way or if you for now is satisfied
with everything here. If you are satisfied with it, let's go and create the
actual shape of the bow. Firstly, go toward the
right part, again, with a smaller size of the brush if we want to and going toward the top and starting to create a very rounded shape like that. When we have it, we will go towards the middle part that is supposed to be a middle of our bow and we'll make a
little deep right here. When we have it, we will go toward the bottom
and we will finish up by creating the second
part of our little bow. So again, create it in a nice
way in a very rounded way. When you have it,
let's go toward the opposite side and create
something similar here. So again, starting by going to the top and creating
a rounder sheep. Again, don't worry if it doesn't
look too good right now, we can fix everything when we are done with
creating the shape. So for now, mapping out what we want to create right
here for our little bow. And then we can create
it in a nicer way. Create the basic shape and
then maybe we could go towards the two parts and we can turn them into a more
triangular shapes, still rounded, but a little
bit more triangular. Let's work with our brush and
with our eraser to create the ships that will look nice right here on side
this illustration. When you are done with
the basic sap, again, if you want to fix something, we can fix it later for now map out what you want
to see right here. For example, we can go with slightly bigger sheep right here onto the top of the star, so we fill the area right
here with some elements. When you are satisfied with it, let's go toward the middle parts of our bow and we
will create some of the little shapes right here that later on we
will recover differently. When we are happy with it, let's go toward the
bottom part and we will create the loose
ends of our bow. Let's go from the middle of
our star toward the site. We will first create two
very three lines like that, and then we will add
some thickness to them and finish up everything by
creating the lines like that. Let's go toward the
opposite side here too. Let's try to remain
the same thickness for this element and create the element
going in that way. One more time, take a look at everything from the distance, decide whether you want to
maybe adjust something, maybe you want to try
out something else, maybe add more thickness
towards some areas right here. Maybe you want to work more on the boo or on something else, go and do what you need to do to create a nice look
for this element. And when you have the
result like that, let's go and continue working on this little part
because we will need to finish up creating our body. So now when we have
the result like that, let's go again to the previous
size of 14% of the brush, and let's work on the skirt. So for this skirt, firstly, let's go toward this line
that we have right here, and we will create a
little curve like that. A very even curve. You can hold your
line at the end if you see that it's not too even. You can go toward this
edit mode on the top end, adjust your curvature by moving the nodes that
you have right here. You can go and maybe make it slightly smaller,
position in the center. Go and create the nice curve
right here that will be the bottom part of our actual skirt that we are going to be
creating right here. Don't go too high with these nodes that
you have on the sides. And when you are overall
satisfied with everything with this general look of the
bottom part of the square, tap on the screen
and let's go and work on the overall
look of our skirt. Let's go to the
line that we have as our triangular
shape and we will go and turn them again into something very,
very soft right here. Let's go to where
this intersection and create a nice and
soft curve like that. And doing the same onto
the opposite side too. If you need to
rotate your canvas to create this line and do that, we are not going with this curve to the end part of our skirt. So we are trying to have
some space right here. And when we have the
result like that, let's go and create the
peculiar shape for our skirt. We will go and firstly create the rounder element like
that onto the bottom, and then we will go along this line that we've
created on the bottom, and we will create peculiar
little patel shapes. Let's go like that
along this line, and we will create a couple
of these details right here. Following the direction of
this line that we have created on the bottom and creating a couple of these
details right here. Again, to finish up
with everything, we are creating half of this element right
here on this side. And now take a look at
everything from the distance, decide whether you want to go with the small
elements like that, or maybe you want to go and turn them into
something bigger. So for example, we
can go and maybe create not so many of them, so we will have less details
to recreate later on. So let's go with our
eraser, for example, and see how it will look with the smaller amount
of these elements. So for example,
let's go and create four of them right here
inside the bottom. So for example, let's go
with something like that. We can go with our eraser and erase the parts that we
don't need right here. If you want to work more on the bottom part right here and erase this line
that we don't need, go and clean up
your illustration, your sketch part right here to see clearly what you are doing and whether
you like it or not. So when you have the
result that you like, let's go towards the areas
that we have right here onto the side and we
will need to create some kind of the back
part of our skirt. We will go right here
and we will create one more little
detail like that. Now when we have the result like that to finish up
with our skirt, let's go toward this
little line right here, and we will go with two
little curves on the sides.
5. Girl Sketch: Legs & Arms: So now when we have
the result like that, let's go and deal with
the legs firstly, and we will do it in that way. We will go to the
left side firstly. We will go slightly
toward the side from this little guidance
line that we have right here. So some kind of one cell or slightly smaller
than one cell, and going like that and creating two parallel lines like that. To finish up with
the second leg, let's do the same thing here, following the direction
that we have on our guidance line and creating
the line in that way. When we have these
two little elements, let's go and work
on our little boots or some kind of the
shoe right here. So for the shoe, firstly, let's go toward the bottom
to this little line, and we will do the following. We will go and go in slightly higher than the oral
shape right here, and we will create the
rounder shape like that. So when we have
this rounder shape, kind of create more flat
shape onto the bottom, and then we will finish
up everything by creating a little shape for our heel. Let's go closer
to the shape that we have for our guiding
line in the center. So going like that with the
hell part and then going toward the bottom and creating a little heal the
actual one like that. So when we have it, we will continue creating the
line going in that way. And if you want to
go and maybe work with your eraser to
flat up this sap, you are welcome to
go and do that. So when we have the
result like that, we will continue working
Osa our top part. So let's go and maybe make
it less rounded right here. So again, working
with our brush, working with our erasor, creating some kind of this shap, again, mapping out everything
that we have right here. Doesn't matter how it looks, whether it's not looking
too good right now. When we have the
shape like that, let's go toward the
heel right here, and we will create the parallel line to what
we have right here, Osa layer with the guiding line. Let's go and work on this part. Now when we have this part, we will go and create the
line yo inside like that, and then we will go slightly
towards the top part and create some kind of the detail
right here on our shoe. Creating something
y in that way. Now, when we have
the shoe like that, let's take a look at it from the distance and maybe we will go and create these parts in
a slightly different way. Let's go some kind
rounder and again, working with our brush and working with our
eraser to create a nicer look for the always take a look at your illustration
from the distance, maybe go here and create
something in that way. For example, we can
have some kind of the heel of a different
shape right here. Again, creating something that we would like to see right here. If you want to create
something different, you are welcome to
go and do that. So when we have the
result like that, let's go slightly higher
than the shoe and slightly to the side from our shape that we
have for our leg, and we will create some
kind of a soak right here. So going like that on this part and creating
a line like that. And then we will go
toward this part and we will create
rounder shapes, so some kind of the rods
little soak right here. So creating it in a pretty
nice weight right here. So having some space between the elements and then
going to the sides and creating the continuations and the closing parts for our socks. Now take a look at everything, see whether you need to go to some areas and
maybe work on them. If you see that the
heel is too big, you are welcome to
go and work on it. Decide on your own
when you are done, let's go and work on
this leg right here. Again, going with our
leg going like that. So let's go toward
this legs that we have the lines that is supposed
to be our leg, go like that. Then when we have the level
of the soak right here, we'll go to this little shape right here and we will
create the soak here too, creating the same shapes. For example, go
slightly higher right here to match the opposite side. When we have it, go and adding
some thickness to it and creating these rounder
shapes onside the sides. Now when we have it, we will go toward the bottom
part right here, and from the bottom, we will go and start to create
a rounder shape like that, creating some kind of
a nose of our shoe. So creating it in a
rounder way and then going toward this part
and starting to create a peculiar look for our shape right here for the shoe and creating something
in that way. So creating some kind of a deep right here
once at the side. Again, if we need
to go and clean up our shape and create
something different, for example, we will
go and do that. Creating the basic shape for our shoe and then going higher like that and finishing up creating the shape
going in that way. To be honest, the little heel
will be seen right here, so we can go and create some
kind of shape like that, very, very tiny element, and then we'll go to the top right here and we will need to recreate this little
part on the shoe. Let's go and do it in that way. We will go and firstly create the straight
line like that, and then we will create the
rounder shape or the top. So now when we have
the result like that, let's take a look at
everything and maybe fix some parts if we
need to fix them. So for example, we can
go and work more on these little parts so we don't
have a weird connection. And when we have the
result like that, let's go and work on our hands. So let's first go toward this part and we will
create a hand right here. So let's go towards our little shape that we
have for our guiding line, and we will go closer to
the shape of our skirt, and we will create the
shape going in that way. So very, very soft
curve like that. When we have it, we will go to the opposite
side and we will go closer to this line that we
have for our guiding line. And when we have some kind
of sausage shape like that, let's go towards this
part right here, and we will create
the actual hands. So first, let go and creating the little
shape going like that. So we will start by
creating a little met. So let's go and create
the rounder shape like that and one shape
going in that way. So smaller shape right here and then we will go and divide
this part right here, too. So let's rotate our canvas, and let's go with a
smaller size of brush. Let's go toward this
part and we will start to create a little
finger right here, so going like that and then figuring out what we
need to do right here. So starting to go and let's
not create four fingers. Let's create three
fingers like we are in the animated
film or something. So we already have one
finger right here, so let's go and create two more. We will go toward this part, we will create the
finger right here. So let's go with the
shape like that. And when we have it, we
will need to connect everything with our first
finger that we have right here. We will need to go and create the similar shape to what we
have for our first finger, and then let's go
grab our eraser and erase all the confusing lines
that we have right here. Let's erase everything
that we don't need, and then we will clean
up everything if we need to clean
everything or anything. So when we have the
result like that, we can definitely see that
the fingers are a little bit too not proportional
to one another, so we will need to
go and work onto the thickness of
them one by one. So they should look pretty
similar to one another. And let's go and
start to do this. For example, with the
smaller size of the brush, let's start to sculpt
the shape right here and when we have it maybe
slightly longer this time, go in with our eraser and starting to erase
the parts that we don't need to see clearly what we are actually
doing right here. Let's work more on
these elements and create our nicely looking
fingers right here. And now in the same way, we can go and work more on
the oral shape of our arm and maybe work with our
brush and work with our eraser to create
a nicer shape. So when we have the
result like that, we can also go towards some of the ruffles right
here and fix them up so they will look nicer with the oral shape that we have for our hands and our
arm and everything. We can go and create the connections with
the arm right here. And when we have the
result like that, let's go toward
this part and let's create our second
arm right here. So for this part, let's
go and do the phone. Firstly, we will
go and figure out where this line that we
have for the chin is, and we will need to go slightly
higher than this line, and we will create a
little line like that. That way we will know that
here starts our little pump. So we will go toward this
part first and create it. So let's go toward this line. We will go to the side from it, so our line will
be in the center, and we will go and start to create the rounder
shape like that, and we are connecting
it nicely with the overall shape that
we have for our dress. Again, mapping out what we
need to have right here. And when we have this line, we will go towards the
top and we will start to create the shape that
will be that rounded. So we will need to create
something in that way. Again, for now, if we see that something
is not looking nice, if our little hair is
not behaving right here, we can go with our eraser and erase the parts
that we don't need. Basically, what we need
right here is to create the shape that will
be not that rounded. Creating more like a
sticky part right here. So when we have this stick for our top part of
the hand, the arm, we will go and start working on our additional
element right here, and then we will wrap
the palm around it. So we will create some kind
of the magic one right here, and we will go and firstly, we'll need to map out
the direction oh. So let's go and create the
little shape like that, maybe not that diagonal. So we will have slight diagonal
with a line like that. When we have it, we will
go toward the bottom part first and we will create
the little secret here. Let's add some thickness
to this element. Go on like that and starting to create a very nice
shape right here. When we have it, we will
go toward the bottom end. Let's finish up creating our little ones with a
little heart right here. We can go and erase all the
lines that we don't need, so we will see clearly what
we are doing right here when we have the bottom
part of our ones, we actually can
finish up creating our little fingers right here and the overall
shape for the pum. Let's go and start
creating it in that way. We will go closer to
the shape that we have for our ones on the top, and we will create
the big finger here. For the big finger,
we will need to create the shape that
will go slightly toward the ones and create the very rounded
shape like that. Then we will go to
the opposite side and create the shape that
will look like that. So creating some kind of
the sausage right here or the bean shape and erasing all the parts
that we don't need. For now, we can definitely
say that it's off, it's not matching with our hand. We will fix it later. We'll move it after we are done
with this part. So let's first
create this hand and then we will move it
to the needed place. Now when we have the
shape like that, let's go towards the
opposite side of the one and let's start to
wrap around our fingers. Going like that right
here onto the top slightly higher or on the
same level that we have for our finger right
here and starting to create the pointing
finger right here, firstly, so going like that and starting to create
other fingers here, too. So again, we are
creating three fingers. So let's go and start to
create them in that way. Wrapping around the
one right here, our fingers and finishing up by creating the very
rounded shape like that. For now, mapping out again, everything that we
want to create, finishing up by creating
a little shape like that. Let's go grab our erasa and erase all the parts
that are overlapping. So when we have the
result like that, let's go and finally match it with the overall shape that we have right
here for our arm. Again, go into our Traban
icon, free hand method, selecting this
element right here, the full go into our yoke and moving
the shape to the site. If you see that the
hand is too small, we can go to one of the corners and adjust the shape right here, the side and create
something going in that way. As for the overall size
of this little element, we will need to go two cells right here from the line
that we have for the chin, so we will have the
size of the finger like that and a little bit higher
right here onto the side. When we have the result
like that, one more time, probably moving it slightly
towards the right, so we will have the matching
element right here. When you are satisfied
with the placement, let's tap onto the urban icon because it was the first
option that we used, and let's grab our
eraser and start to work onto the continuations
of the shapes. Let's go right here
towards this side and start to figuring out what
we are doing right here. So we will need to create the back part of our
little hand right here, and we'll go and
do it in that way. So creating the
slight curve right here and going down
with a different shape. So let's also work on these little parts,
grab your eraser, grab your brush, create a nicer shape for the oral
arm that we have right here. Let's probably go and make
it slightly less thick, so it will match with the arm that we have
onto the opposite side. Or if you are quite satisfied
with everything right here, we can fix everything later on when we are going to be
fixing everything anyway. Let's go along these
ruffles right here and let's match them
with the oral shape that we have for our
hand right here to and also we can figure out what we have right
here for our hair. You can go and create something
different right here, create a nicer curve maybe, work with your brush,
work with your eraser, create a nice look for
the hair here too. For example, we can
go slightly toward the inside part and create
a nicer shape right here. Now clean up everything, and when we have the
result like that, let's continue working onto
our magic want right here. For example, let's go and continue by going
toward this part. We will create a rounder
shape right here, slightly beyond the frames
the overall shape of the wt. So when you have
it, let's go and create another
shape of the star. So if you don't want to create another star the same
way as we did before, we can go and steal
the star from here. So again, go into
our Ruben icon, freehand method, selecting
this element, going around it. When it is selected, we use three fingers. We will swipe them down and we will first use the option copy. Now, again, swiping
three fingers down using the option paste and when
you have this bounding box, you are free to go and move
the start toward the one. You want to rotate it,
go to the green notes, hold your Apple pencil there and rotate it in a way that you
want it to be right here. Find the placement
for these elements. Let's put it onto this little
parts maybe slightly lower. If you want to go
bigger with this shape, go and adjust the size too. Find the size and the
look for these elements, and when you are done, tap on the arrow key
on the top left. When we have the
result like that, we will go to our
list and you will see that you have the inserted
image right here. So let's tap on the lee and
use the option merge down, and then we will grab
our eraser and work on this inside part or onto some other parts
that we need to fix. And when we have the
result like that, let's go towards the sites
from this Littel star and we will create some kind
of the wings right here. Let's go like that and
create them in that way. Creating something like that
and doing it on both sides. Let's go with a bigger
shape on the top and smaller shape on the bottom and create something
going in that way. So try to make them
similar on both sides, not like I did it
or try to create it in a nicer when you have
the result like that, let's finish up everything by creating a big heart on the top. If you are overlapping
the shape of the hat, go and overlap it nicely. Nicely overlapping
will be if you go to the shape but
not go in that way. So if you are touching your
line with another line, that won't look too good, better go with a bigger
shape and go inside the shape and overlap
the hat in a nice way. You don't create the unnecessary tension
between the elements. Now, when you have
the oral shape, grab your eraser, go and erase all the parts
that you don't need. Now when we have the
result like that, let's go and create some
additional elements, and then when we are done with all the elements that
are supposed to be here, we will fix some parts.
6. Additional Elements Sketch & Sketch Fixes: Firstly, let's go and create the additional element in the shape of the cat
right here on the side. So let's go to this
bottom area right here, and we will go and create the
shape of the head firstly. So we will go and
we will start to create a shape in kind of
the bean shape like that. So let's go firstly with
the shape of the ellipse. So very freely create the shape, and then we will go
and create it more like a wider shape
on the bottom, so something going in that way. Create the shape like that,
and when you have it, let's go toward the top and create the ears that
will go slightly higher than the line that we have as our guiding
line for this crud. Go to the sides and create
the ears right here. Try to make them
very nice and very pointy or a little
bit less pointy. So when we have the
result like that, let's go towards the
middle part and we will work with our nose and our
little mouth right here. So let's go toward
the middle part, as I mentioned before, slightly
lower than the middle. And first, let go and create
a little nose like that. Again, you can go with a
smaller size of the brush to precisely create the elements in a way that you
want them to be. So for example, the nose doesn't look too nice right now
because it's too big, so let's go and erase
the bottom part, and then we will go
toward the sides and create the mouth like that. Now when we have the mouth, let's go toward the sides and we will create
the eyes right here. Let's go with the
similar shapes to what our girl has and we will go maybe slightly bigger
with the overall shapes, and we also will go and add a bit of the thickness to them. Or we don't want to go and
create some thickness, we will go and create
the irises right here. Let's go and create
something like that. Our little cat will
look to the side. Can go and shade away
the things right here, maybe create
something like that. Let's also go toward the sides and create
the whiskers here. So when we have the
result like that, let's go with the bigger
size of the brush again, we will go toward the
bottom part right here, and we will create a little
shape for the color. So let's go and step a bit
from the side that we have for our overall shape of the head and create the
rounder shape like that. So we are creating
this line parallel to the line that we
have for our head. Now when we have the
result like that, let's go toward the
left side and we will create the line going
down in that way. When we have it, we will go
closer to the line that we have as our bottom line and create a rounder
shape like that. When we have this line, let's go slightly toward the side and create
another leg right here. We will go and create the
rounder shape like that. Try to make it
similar size wise to the first little pull that you have onto
the opposite side. If you need to connect
something in a better way, you are welcome to
go and do that. If you want to
maybe make the pow slightly the overall shape of the pose slightly
bigger on the bottom, you are again welcome to go and do what you need
to do right here. Don't go too far away from this line that we have
for our bottom part. And when we have it,
we will go toward the opposite side and we
will create these very, very nice bam element. So let's go with the
soft curve like that. Then we will go and create
the bottom the back leg, and we will do it in that way. Going toward the top, starting to create a very rounded shape like that and then going toward the bottom and creating the
continuation of our leg. So again, if you want to
maybe create something different or work more on the oral shape that
we have right here, you are welcome to
go and do that. We also can go and maybe add
some beautifications here, some kind of the pendant right here or
something like that, going towards the bottom part, the back part, and starting to create the tail right here. So let's create some
peculiar shape for the tail. First let's create it
with one line like that, and then let's go and add
some thickness to it. So going like that
and starting to create the oral
shape for the tail. Again, take a look at
everything from the distance. If you see that maybe you can go and try it
out one more time, maybe make it slightly less big, you are welcome to
go and do that. Maybe try out a different
shape right here. When you have the
shape that you like, let's take a look at
everything from the distance. Again, right now, we
are creating a sketch. So if you want to go and maybe adjust some parts,
go and adjust them, you can clean up
your little sketch right here to see
clearly what you are doing or if you want to add maybe additional
elements, for example, we can go and maybe create
some kind of the moon right here on the
head of our cat, you are welcome to go and add as many details as you
prefer right here. And when we are
done with the cat, let's go and add a
couple more details. So for example, let's go
to the opposite side and balance up everything by creating a little
cauldron right here. So let's go again, toward
this area that we have for the bottom parts between
the skirt and the bottom, and we will start by creating a rounder shape onto
the top right here. So let's create an
oval shape like that. If you want to go a
little bit bigger, you are welcome to go with the more open shape right here, so slightly rounder shape. When you have it,
let's go toward the inside part and repeat
what we have right here, but pay more attention toward the sides right here and make them a little
bit more pointy. And when you have them, let's go slightly toward
the middle part, so step in a bit from
the side and with one curve creating the
rounder shape like that. Again, hold your
line at the end, and let's go to our
182 over the top and adjust the oral shape that we would want to have
for our cauldron. So play with the
notes right here, adjust the size of them, create something that you
would like to see right here. Move the shape again,
maybe if you want to make the orall shape smaller
when you are at the 18 mode, you can go right
between the notes, hold your Apple pencil there, and move the shape
toward the inside part. So when we have the
shape for our cauldron, so for example, let's go
with something like that. We will tap on the
screen firstly and then let's go and create
some legs right here. So we will go with very soft
triangular shapes like that. Firstly, going toward the
sides and creating them. And if you want,
you can also go and create one little leg
at the back here too. Again, pay more attention
toward these part. If you see that you went too
far away from the cauldron, you are welcome to
go and maybe try to reconsider the shape that you have right here for
the overall shape of the cauldron on the top,
figure out what you want. When you like the result, let's go toward the middle part right here and let's of course, create the face because we are creating a
cute illustration. Let's go to the middle, and
let's create the eyes like that and a little mouth
right between the eyes. If you want to add more details, you are welcome to
go and do that. For example, we can go and we can create the bubbles right here inside the cauldron and maybe some going
outside the quadron. So for example,
let's go and create some kind of a pattern
with our little bubbles. Let's go like that. Let's
create a couple of them. You can go with different
sizes or with one size. You can go inside this
part that we have on the top of the cauldron and
create something in that way. Now when we have
the cauldron done, let's go slightly
higher and let's create the crystal
ball right here. So with one line, we will create the
shape of the circle. So again, hold
your Apple pencil, hold one of your fingers,
create the shape. If you want to move it, go
to the 18 mode and move it. So let's create it in that way. We will have to fill
the area right here. If you want, you
can go slightly, not with a perfect
circular shape. You can go a little bit
longer with the shape, but still remain the
oval shape like that, and you are down
tap on the screen. And let's go and create
the bottom part. First let go where
the bottom part, creating a little
shape like that, some kind of stunt right here. And then when we have it, we will go slightly
bigger with the shape. Go underneath the first one and create a rounded
parallel curve. And finishing up by creating
something like that. If you need to go and maybe erase some parts,
go and do that. And also, we'll need to
go right here to create some kind of the back part
of this little stand. So as we have the crystal
shape right here, it will be kind of transparent. So we'll need to
show it right here. And also, we can go and
maybe try to create some peculiar little details that later on we can recreate. So you can go with
some sparkles. You can go with
some elements that are some kind of highlights or so and create
something like that. So now when we are ready
with the crystal ball, let's go to the right and add
some bottles with potiots. So firstly, let's
go toward the top. I will go to this
headline, and again, we will create half of
the circle like that, so hold your line and then you. If you don't want to, you don't need to create
the full circle right here. When you have the
shape like that, let's go toward
the top and create two little lines that will
be parallel to one another. We have it, we will go
toward the top and create a little shape that will
be our bottle right here. So again, creating
something like that, two parallel lines, creating the rounder
shape on the side, and then we are finishing up everything with a
little core right here. So let's go like that and
create the shape like that. Again, mapping out everything
doesn't need to be perfect. When you have the
shape that you like, let's go toward the middle
part and we will map out that here we will have
some kind of the portion. So let's go with
something like that, maybe slightly bigger
with the shape. Now when we have
the first bottle, let's go towards
the line that we have for the chin and create
another one right here. This time, let's go maybe
with a different shape. We will create two
parallel lines like that. We will create the
shape on the bottom, and then we'll
create some kind of shoulders right
here in that way. Again, we will finish
up everything by creating two lines on the top, if you need to go
and straightaway, create the clean look
for your illustration, go and erase all the parts
that you don't need. Go like that, create the
top part right here, so rounder shape and then finish up everything with
the quirk as always. So again, creating
something like that. If you want to go and maybe add some details right
here onto the bottom, you are welcome to
go and do that. Firstly, create the liquid part right here and maybe create
some kind of I know, like a heart or some
details right here, so it will be like love
potion or something. And to finish up with everything right here
for the details, let's go and create
one more bottle. So you can go and for example, if you're feeling quite lazy, you can go to the ribbon
icon, free hand method, select this little
bottle right here, free fingers down copy, free fingers down paste, and use the second
bottle right here too. So for example, let's
make it slightly smaller and maybe position
it differently. So for example, let's go
with something like that and fill the area with
the last bottle. To finish up with it,
let's go to our list. Let's go to this
inserted image layer, tap on it, and use
the option merge. Now when we have everything
that we need for our sketch, let's go and take a
look at it without the lines that we have
for our guiding line. We'll go to these
checkmarks right here. We will tap on them,
and then also, we will go to our wrench
icon over the top left and we will toggle drawing guide right here because
we don't need anymore. And when we have the
result like that, if you want to adjust
something, for example, the placement or anything, you are welcome to use firstly, the S Rribon icon
freehand method. For example, we can go to the
CAT like that, select it, go to the Aoki and maybe
find a different placement, maybe kind of closer to
the girl right here. So find the placement, find what you are looking
for right here. When you are done, tap
onto the S Rbon icon, and if you want to go one by
one to all of the objects that you have right here
and maybe readjust them, maybe resize them or do
something with them, you are welcome to
go and do that. Spend some time right
here with these two tools and find the placement for every object that you want to have onto your illustration. And when you are satisfied
with the placement of all the elements that you have right here, we can
do one more thing. So for example, you
want to fix something, but you don't want
to go manually with your brush and with your eraser and adjust some
parts right here. We can do the different
thing right here. We can go to our magic
Qantol over the top plat. We'll go liquefy and we'll
be using the option push. So you have the side
slider right here. You can go and adjust the size of the brush that you
are going to be pushing with and we are not
touching anything right here that we have as
different sliders. So with this push
option and size slider, we can go to some of the
elements and we can push them and adjust the overlook
of our illustration. So for example,
if you want to go and play around with these two, you are welcome to
go and do that too. So for now, let's just
go and spend some time adjusting some of the elements if we want to adjust
them with these two. When you are done,
adjusting everything with your push option
and liquefy too. Let's tap onto our
magic one tool twice. And if you see that you
can go with your brush and maybe adjust some elements to
create them in a nicer way, you can go and do that, too. For example, we
can go right here for our little shape
that we have for our fringe and maybe make it slightly bigger or create
something different right here. You can use your brush, you can use your eraser and create different elements right here
or clean up your sketch. A you won't be confused of
what you are doing right here. For example, you
can go right here to these little parts that we have onto our head and recreate
it here in a nicer way. Maybe create a bigger
shape for the ear right here and maybe work more onto the overall
shape of the hair. If you feel fancy to go and create the cleaner
look for your lines, you are welcome to
go and do it right here onto your layer
with the sketch. Later on, it'll be
easier for you to go and create the clean lines. Again, let's spend
some time here and maybe adjust some
lines manually. And when you are satisfied
with how your sketch looks, let's me on our next part. We will create the clean lines?
7. Clean Lines: Head: Let's start working
on our clean lines, firstly by going to
our brush library, and we will switch
the brush by going to the calligraphy folder and
choose moonline brush. And as we are creating a
very cute illustration, we want all of our lines
to be very, very smooth. So let's tap onto
our moonlineush, go inside the brush studio, and we'll go under
stabilization on the lab. We'll be adjusting the amount of streamline and amount
of stabilization. So you can tweak these options
to your liking or you can set them the same way that you see right now
onto your screen. You can try it out right
here onto a drawing pad, find what looks good for you
and what feels fine for you. And when you are
done, let's hit the. And then we will go to
our layers one more time. We'll go to our layer
where we have our sketch. We will tap onto the
N icon one more time. We will reduce the opacity, so we will see clearly what
we are doing with our lines. Now when we found the
level that works for us, let's tap onto the layer to
close this window and then let's create one more layer
by tapping on the plus icon. Now, the last thing that
we need to do is to go to our color palettes and
change the color to lines. Now when we have the
result like that, let's go to our
slider with the size, and let's set our size
to something around 6%. One more time, you can go to your Canvas and try
it out right here. If you want to go
with the smaller size or with a bigger
size, it's up to you. When you are already, let's go and start recreating all the lines
that we have right here. Our main goal for this part
is to create closed outlines. That means that all
of the lines that will be outside will be closed. If we have some elements
inside, for example, here where we have our face and our little neck right here, we can go and create
some little gaps so everything that will
be recolored with one color could have
some gaps inside. So one more time, our ingle
is to create the clean lines. Our ingle is to create the closed lines and
also the smooth lines. So we will be working with all the tools that we used before. You can go and hold
your line in the end to go to the editing mode
to adjust your line. So you can go right
here and play around with these little
node right here to create a nice connections between the lines and nice little
shapes right here. So when we are at this point where we are
creating our lines, we will go through all of the elements that
we have right here, and we will also need to create nice and
smooth connections. So if you see that you are going a little bit
beyond the frames, again, we are going
to our editing mode and we are adjusting our shapes. And of course, we don't need
to recreate everything with 100% of similarity to what
we have on our sketch. So if you see that you can go and maybe adjust some parts, maybe reduce some elements right here or create
more details, you are, of course, welcome
to go and create the details in a way that you want to have them right here. So when we are all set
to creating our lines, let's go through all of the lines that we
have onto our stage, and let's go and start
recreating them. You also can skim
this part if you want to go on your own
and recreate the lines, but if you want to follow along, let's continue by
going and starting to recreate all the elements
that we have right here. We are working with our
brush and we are working with our erasa and we also will need to make sure that all of the lines
that we are creating have the same value and the
same volume inside them. So the thickness of the lines
will be even everywhere. Now let's go through
all of the lines, and we are again starting
to create all of the elements that we have
sa layer with this sketch. So go through all of the
lines and start to create the similar lines to what you have ta your ler
with this sketch. If you see that you have a
very complex shape right here, you don't need to
go with one line. You can go and maybe try to
create a couple of lines, but make sure that
you are connecting everything nicely
and that your line doesn't look very jagged or if you see not the
seamless connection. So if you have not the
simils connection, go with your eraser, go with your brush, and adjust the shapes to make
them look nice. Now one by one, let's go and
start recreating the shapes. Again, you can experiment. You always have a room to
experiment right here. Basically, what we need
to do is to recreate what we have Ota Ali with this gauge. Always good to take a look at your illustration
from the distance when you are creating it, because that way you will
see clearly what you are doing and whether you need to go and maybe adjust some parts. From the distance, you will
see it in a nicer way. So let's go and continue
creating this strength of hair, and again, we'll take a look
at it from the distance. And one more time, if we have some jagged connections or something that doesn't
look very right, we will go with our eraser and erase the part
that we don't need. We also don't want to create
the connections like that. So if you have some
extra lines that you need to go and get rid of, you are welcome to go again with your brush and
with your eras. And adjust these parts. So now let's move on
to the irate here, and with one line,
we'll create the sap. We again, can hold
it at the end. We can go to the 18
tool right here onto the top and adjust the
shape to our lining. We can go with slightly
different shape, so it will match the overall
look of our face right here. You can move the sheep
while you are at the 18 mode to
again, readjust it. When you are down,
tap on the screen. And again, if you
have the extra parts, go and erase them
with your eraser. And when we have the
results like that, let's go and recreate
the shape that we have for the overall
shape of the face. Again, going right
here and creating that nice shape right here,
making nice connections. If we need to hold our
line, we will hold it. If we need to go with our editing tool or with our eraser or with
anything else, we will go and use all the
options that we used before. And again, as I
mentioned before, we can go and create
some gaps right here, so we will have a
nicer connection with the overall
shape of the hat. I will probably try to create the bottom part of
the face one more time because I quite don't like how this
bottom part looks, so I would want to go with slightly flatter
shape right here, maybe created in that way. Let's go and try
it out right here. When we have something
like that one more time, we can go to our editing mode. We can adjust the
curvature here. Always take a look at your illustration from the distance, as I mentioned before,
and when you have the result that you like,
let's tap on the screen. Let's go to our eraser two, and we will erase the extra
parts that we don't need. Now, when we have the
top part of our face, we will go toward the
bottom part where we have the neck and we will continue creating it right here. So let's go and create a very nice little
shape like that. So this part will
be a little part of the shoulder later on, and we will then move on
to the opposite side and continue recreating the
shape for our face. Again, if we want to hold it, we can go and hold it. If we want to go manually, we can go and do everything
manually right here. So when we have this part, let's finish up by creating
our hair right here. And again, we don't need to recreate it with
100% of similarity. If you want to try out something different, go and do that. So for example, we can go
to our 18 mode and maybe add a little bit more weight
toward the bottom part so it will look a little
bit better because naturally the hair
behave in that way. When we have it, let's go
and work a little bit onto this little gap or a
little deep right here. Again, we are trying to
create a nice connection. So if we need to go and maybe go slightly beyond
this shape that we have on the top
and connect it in a different way
with the next shape that we are going
to be creating, we will go and manually do it. Now, let's go toward these little strands and maybe we will create
slightly different shape. So we don't want to
go with the shape that will have a very rounded
connection on the bottom. We would want to have something a little bit more angular. So let's go and try
to do it right here. Again, taking a look at
everything from the distance. If we need to go with
our editing tool, what we need to do, we will go and do it with our editing tool. And again, manually, we will try to create a nice
connection right here. Now when we have this shape, let's finish up by creating the last strength of hair
that we have right here. Again, you can experiment
a little bit and maybe create the more
peculiar shape right here. For example, let's go with something like that, or
if you don't like it, we can go and maybe
create a free strength like that and turn it
into the top part. When we have something
going in that, let's go and with the
same size of the brush, we will work on our head. So with one line or if you want, you can use a couple of lines. Let's go and create a very
soft curve like that. And when you are holding
your line and when it is going toward
this straight line, we can try to lift up our Apple pencil and go
to this line option. You probably will have the
option arc right here. I don't have it, so if you have it, you can
use it from here, but if you don't have
it, we will need to go back to our canvas
and one more time. Try to create this curve and
create it in a rounder way. Hold your line at the end, and if you need to adjust it, go to the 18 mode, take a look at it
from the distance, decide whether you
want to go a little bit maybe further
away with this line, so you will have a
finished shape right here. We also will need
to connect it with our shape right here
with our fringe. If you see that you later on
will need to go manually, you can try to go right now and swing this line
that you are working on right now and maybe
try to connect it with the shape that you
have right here on the bottom. Or if it doesn't bother you, you can go and tap on the
screen and then manually go toward this little part and connect it with the
shape of the hat. Now when we have this
first line for the hat, let's go and continue creating the lines
over the top part. So for now, let's go
with the line like that. We will go toward the
middle part and we will create the overall
shape for our hat, so the bottom part of the hat. And if we see that we
have some gap right here, we can go and either
create it, but actually, we don't need it because we will have the overlapping
part right here. But for now to create a
nice shape right here, let's go and create this line. Now let's go toward the bottom right here, onto the right, and let's maybe go
and firstly work on the overall shape of the
here that we have right here, so we will have the
finishing point right here. Again, if you want to, you can go with a
different order to create to recreate the
parts that we have right here. If you want to go one by one to every element that
you have right here, so you first maybe want to
go and work with the hair, go and finish up the
whole lines that you have for the he and then move
on to the next part. If you are okay with a
little bit of chaos, you are welcome to
continue creating the lines in the same way
that I'm doing it right here, or again, it's up to you create the lines in a way that
you prefer to create them. Now let's try to create
a nice curve right here. Maybe we will need to go with
a couple of at tantra here. We will need to have a
bit of a gap right here, so when we are creating it, in that way, when we see
it from the distance, we will have a nice
overall look right here. So when we have it, let's go and finish up by creating a
little shape like that, a little bit of the curl, and the whole shape will
be closing in that way. Going right here to our dress and creating a
rounder shape like that. And now when we have
the shape for our hair, let's go and finish
up with our hat. So let's go toward this part
that we have right here, and we will need to make
sure that we are creating it in the same way that
we have it on the left. So we are going creating the
similar shape right here, going slightly towards the shape that we have right
here onto the top. So slightly overlapping. If we need to go to the 18 mode and adjust something here, maybe adjust the
overall shape or curvature or anything else,
we will go and do that. For example, let's make
it slightly smaller. And when we have the
results like that, let's tap on the screen
to accept the changes. And if you see that you
will need to go manually and create a nice line right
here, a nice connection. Go and do that. If you see that some other places will need your attention
to the connections, for example, you are welcome
to go and work on them. So for example, we
can go right here, create a nicer connection
between the shapes, and when we have the
result like that, let's go and finish
up with our head. Go right here and starting
to recreate this line, again, trying to create
a curve right here, holding it at the end, and when you have
the curve like that, let's go to the tip and
let's recreate it here too. Going like that and again, creating something similar
to what we have on ARSke. Go with your brush
along the lines if you see that you can
go to them and you can adjust the
smoothness of the lines or the overall weight or
the connection parts. Go and adjust this part. And when you have
this tip like that, let's go and create
this line firstly. So you can rotate your canvas, so it will be more
natural for your hand to go with the floor right
here with a direction. And when you have
it one more time, holding our line in the end, taking a look at arfin
from the distance. If we like it, we can keep it. If we want to fix it, go
into our editing mode. When you have the
result like that, let's go and work on this tip. We are going slightly
lower than the end part of our middle part
right here and we are going to the top with
a little tip like that. Again, holding line in the end, if we want to go to
our editing mode and maybe adjust it slightly,
we will go and do that. Make a nice connection, make
a nice shape right here. When you are done,
tap on the screen. Make sure that the
connections are looking nice. For example, right here,
we can go and make a very slight
adjustment by creating the more rounded shape right
here and it will make you some points right here in acuteness of the
overall illustration. It will look like a finished,
polished illustration. Now when we have the
result like that, let's go slightly higher than these little
overlapping tips onto our heads and we will create this line that we have
right here onto our sketch, slightly higher creating our
shape going in that way. Again, with one line
holding it at the end, go into our 18 mode
if we need to adjust. Let's take a look at
it from the distance. If you like how it looks, we will tap on the screen. And now we also will need
to go to our slider with the size and we will need to remember the size that
we are using right now. You need to tap onto this
little slider thing right here and you will
have the plus icon right here where I right
now have the minus. Make sure that you
remember the size, and when you have the
size, remember it. Let's go and make it slightly
smaller, for example, 4% or so we will
go and work onto our e it will be easier for
us to create them right here. Let's go with one line and
create the shape right here, so holding line at the end. If we need to adjust it, go into our editing mode and
starting to adjusting it. So what we need to
achieve right here is the straight look of the eye, so it doesn't look too
crooked toward the side. So try to make it pretty
solid right here. When you have the result tap on the screen and straightaway, let's go toward our icon with
the color on the top right, and we will drag the color
right here inside the shape. Now let's go and create this
little part right here, so you can go and try it
out a couple of times, maybe create it in
a different way. If you want to maybe switch the brush to have a
little tip right here, you are welcome to go and from the brush library,
go, for example, to the ink and folder and select studio pen brush or
maybe technical pan brush. If you want to go manually, you can get back
to Monoline brush and create a thicker
look right here onto bottom part
and maybe work with your eraser and create a nicRTp
right here onto the top. So it's up to you. When you
have the results like that, we can either go and
recreate the same shape onto the opposite side or we can make a copy of these elements. So for example, let's
go with a copy. We will go to our
Strobe and icon. We will use the
free hand method, and we will go around the shape. We will select only this shape
and when it is selected. We know what we need
to do. We'll use our three thinkers,
we'll swap them down. We will first use
the option copy. And then we will do
it one more time, three fingers down
using the option piece. Now, to make sure that we are not blurring our
lines right here, we will need to do
one more thing. We will go right here onto the bottom panel under the
second from the right icon, where I have right now bicubic. If you have something different,
set the interpllation. The thing that we are working on right now, this
is interpllation. We will need to set it to
bicubic, and that way, your lines won't be
that blurry when you are adjusting them and moving
them across the canvas. When you set this
option to bicubic, let's go to the flip
horizontal option. We will tap on it, and then we will move the shape
to the opposite side. Now, if you see that maybe you can go and rotate the shape, for example, slightly, we can go to this green
note over the top. We will hold our
Apple pencil right here and we will make
a rotational movement. So also go and find
the placement, try to match it the position that you have onto your sketch. When you are done, tap onto
the Aoki onto the top left, and when you are done with this, we will need to go
back to our list and make sure that this
inserted image, or copy of the eye
is not separated. It's on the same layer with our overall thing that we have right here
for our clean lines. So let's tap onto
our inserted image, and let's use the
option merge down. And now when we are ready, let's get back to our 6%
of the size of the brush, and let's go and recreate the eyebrows right here
with one curve like that. And also right here
onto the opposite side, probably it will be a little
bit hidden right here because we have a little
shape for the hair. Now when we have the
result like that, let's go and recreate
this little node by creating a little
dot like that, and then the same way as we
have it onto our sketch, we will recreate a little mouth. Again, hold your
line and the end, go to the 18 mode if you maybe want to go and
adjust something here, maybe let's go and make it a
little bit kind of crooked, so our shape onto the right
will be slightly bigger. Again, take a look at
it from the distance. If you like how it looks,
tap on the screen, check it out one
more time without these dots and nodes
and everything. And when you are satisfied, let's go and continue
creating other details
8. Clean Lines: Body: So let's go toward these parts, and we will make them a
little bit more defined. So we will have some space
between our shape of the bottom part of the head and the shape that we are going to
be creating right now. So let's repeat
them the same way as we have them onto our sketch, but we will go slightly lower. So when we have this thing, let's go and maybe start to recreate it completely
right here. So we will need to create a little rounder part right here. And then we will go to the parts and continue creating
this shape right here. Now, to finish up with the overall thing that we
are working on right now, the color part, we will go to the opposite side and
recreate it here too. So when we have the
results like that, let's continue by
going to the sleeve, and let's recreate it here too. Let's go, again, a little bit
lower than we have it onto our sketch and connect it nicely with the sheet
that we have right here. Now, let's go toward this little part and
we will recreate it. Going into the second layer of ruffles and creating
these little parts. Again, if you want
to maybe play around with the overall sheep
or with something else, maybe with the size or
the placement go to the 18 mode and
adjust it from here. Let's finish up by going to the bottom and creating
these shapes right here, trying to make nice
connections so they don't look too
weird or too bulky. When you have the
results like that, let's tap on the screen. Probably, we can go and make
this part slightly smaller. When we have this
part, let's go toward the bottom and we will create another line that
will go like that. We will have the first layer of our ruffles right here done, and when we have
it, we also can go straightaway and add some
beautifications her. For example, instead of creating these lines that we have
right here onto our sketch, let's go and do
something like that. For example, we
can go and create a couple of dots like that, and then we will go and create some kind of
defaults right here. Let's go like that and
create them in that way. We probably can go with slightly smaller shapes
for these elements. If you want to try to create these elements with a
smaller size of the brush, you are welcome to
go and do that. But we want to be consistent, so let's go with the
bigger size of the brush. And let's finish up creating this element by recreating this line that we
have right here. Again, try not to create a
very rounded shape if we need to go and maybe adjust it right here with
our editing mode, we will go and do that. And now we can decide what
we want to recreate next. Either it will be a little bow or our hand right here and arm, the orall shape, let's
probably go with the so with one line or
with a couple of lines, let's go to the bottom
first and create these little shape right here going like that,
creating our line, going to the opposite side, and starting to
recreate it here, too, connecting it nicely
with both our hair and our sleeve and making
nice connections here. Now, if you see that you can go and maybe manually
adjust some parts, some connections
or anything else, you are welcome to
go and do that. Let's go toward the handwrite
here and let's recreate it. So we'll create the
curve going in that way. So we'll have the big finger. So probably with a
couple of lines, it will be easier, creating
a little soft curve, creating two parts like
that, and when we have it, we are going to
the opposite side, and probably it will be
easier to start with the bottom part and
recreate it like that. Now when we have it, we will go toward the
top and we will connect everything with
one little line like that. Now when we have it, let's go and probably work on our one, but it will be easier for us to create it in the new layer. Let's go to our layers, create one more layer right
here and let's go straight away
very boldly like that and create the
lines like that. Again, holding our
Apple pencil at the end of the line and
creating something in that way. Now straightaway,
let's go and create the bottom part by creating
a little heart right here. You can go and try to create
it in a couple of attempts. As always, when
you have one half, go to the opposite side and
tra create it here too. Now when we have it, let's
go and straightaway, we are going to be getting rid of all the overlapping lines, so we are getting our eraser and starting to erase all the
overlapping lines. Now when we have the
result like that, we will get back to our list
and we'll get back to our previously where we have all the lines that
we have right here. We'll get back to our brush, and we will continue recreating the fingers that we
have onto our sketch. So, again, the same way as
we have them onto our skage, let's go and recreate them. Go like that, starting to create our rounder
shapes for the fingers. For now, just go
and recreate them. Try to create nice
connections as always with everything that you have right
here, all the connections. And when you have the
result like that, let's go back to our s to this layer where we have
our base for the ones, and we will grab our
eraser and one more time, we will go through all of the overlapping lines
and we will erase them. So again, we will see clearly
what we are doing and whether we need to go and adjust some connections here too. So when we have the
result like that, we don't have more
overlapping parts right here, so we can get back to our list and merge these
two lays together. So let's go to the
lay on the top, tap on it, and use the
option merge down. Now, if you say that you can go with your eraser and maybe work on some connections or
some little lines right here, you are welcome to go and
soften everything up, make nee connections, make everything look very
cute and very right. And when you have the
result that you like, let's go and continue
creating other details. So let's get back
to our brush and you can decide whether
we will continue with creating our one or if we want to go and continue creating other
details right here. So probably let's go with the one and we will go
and recreate it here. So let's go with this
shape right here, starting from the bottom, starting to create a very
rounded shape, going like that, going toward the sides, trying to create again, an equal element right here. If we need to go to
our editing mode, go and recreating the
parts right here. Now when we have the
result like that, let's go toward our start and
let's create it here too. Going toward the
bottom and again, manually starting to recreate our little details right here. Going like that and starting
to create the elements. If you see that you don't want to go and create the
elements on both sides, we can do a little
trick right here. So let's go toward
our ring icon. We will go toward the
canvas one more time, and we will use the drawing
guide one more time. But this time we will use the different option right here. So we'll go under
endin drawing guide and we will use the
option symmetry. When we have the line like that, we will move it toward our ship so we are going to this
blue note right here. We are starting to move the guiding line to
the middle of the one. And let's go toward
the green note right here so we can
rotate the sheep. So we can go slightly higher with our green
note right here, and it will be easier for us
to go and rotate it straight away right here when we
are at the Zoom option. So let's try to make it in
the direction that we need, and also we will need
to position it in a way that it will be in
the center of our want. When we have the
result like that, probably I will rotate it slightly toward the
right a little bit, and we will have
the nice result. So when we have the nice result, let's tap onto the D option. Let's make sure that now
our layer is assisted. And actually, if
you don't want to mess up with
everything right here, we can go and create
one more layer on top. So to make sure
that we can use our assisted two onto the slay, we will need to
tap onto the slay, and we will need to use
the option drawing assist. Now, when we have it
done in that way, let's go toward
one of the sides, and we will try to recreate
the shape for our start. And you can see
how easily we are creating on both sides
at the same time. So let's go through all
of options for all of these lines that we
need to recreate for our star and let's
go and recreate it. If we need to go and
adjust something, so it won't look the
same as we have it earlier with the sketch,
we will go and do that. For example, let's go
with something like that. Maybe we will see it from the distance and decide
we want to adjust it, but I think it looks pretty fun, so we can go with it and let's go and continue creating
other details here. Let's go to these little
wings that we have. Let's go like that, and
let's start recreating them. So now when we have
the results like that, let's go towards the top and we will recreate our
little heart right here. So going toward this line
that we have for our wing, starting from it and
starting to go to the top and recreate
this element right here. Again, taking a
look at everything. If you think that you
can go probably from the top and will be easier for you to recreate
it from here, you're welcome to
go and do that. Always take a look at
it from the distance as always and make a
nice connection right here into the middle part. Make sure that these connections
are looking nice too. So if you need to
go and manually adjust something,
go and do that. We are trying to achieve a very nice look right here and a very nice connection
between the parts. So if you need to go with your brush and with your eraser, maybe with the small
inside of the eraser, let's go and adjust everything to make a
nice illustration. If you see that you can go to some other places and
maybe adjust them too, you are welcome to
go and do that too. When we are done with this task, we are done with the one itself, so we can go and turn off our assisted drawing because
we don't need it anymore. So let's go to our range icon. We will toggle drawing
guide when we are at the canvas and also we will
need to go to our layers, and we will need to turn off assisted drawing from
these both layers. So tapping on the layer
on the top and choosing drawing assist right here and doing the same under
the bottom layer. Tapping drawing assist, and then we will
go to this layer, the bottom one, where we
have this overlapping part. Let's grab our erasa and let's go and erase
this overlapping part. Going like that and
very easily erasing everything that we don't now
when we are ready with it, let's get back to our list. Let's go to our list where we have the additional elements. We'll tap on it and we will
use the option merge down. Now let's continue
recreating other elements. So getting back to our brush and starting to recreate
other elements here. If you want to cheat a
little bit and maybe still this little shape that
you have for the star, you can go and do
that because we don't want to go right here and
recreate it one more time. So let's go to our Strian icon free hand method, and very, very accurately, we will go and cut this little
shape right here. So going like that
with our brush, try not to go to some other eras and create the extension
of the work later on. So when we have the
result like that, when this element is selected, three fingers down
using the option copy, three fingers down
using the option piece. And now moving our shape
towards the area right here. So let's go like that.
Let's find the placement. Maybe we will need to
rotate it slightly. When we have the
result like that, when you found the
placement, take a look at it from the distance. As always, when you
are done with it, let's tap Ota our Aro key. Let's grab our eraser, and we will probably have some elements that we
need to work on, so we will need get rid of all of these extensional
lines that we don't need. Let's go very easily, very manually, and erase this
price that we don't need. Now going along all
of the parts that we need to work on
probably right here too, so it will be easier for us
to work with other parts. When we have it set in that
way when you are satisfied with everything with the
position and all the things, let's go to earliest
tapping onto this inserted image layer and using the option merge down. Now, getting back to abrash and continuing to recreate
other details right here. Let's go toward the actual shape of the bow and let's
recreate it here. You can go closer to
the shape of the here, but not too close. Again, we don't want to create the very unnecessary tension
between our elements. You can either go
and make sure that you are not connecting the
parts like touching them, but you can go and overlap
them if you need to. When we have this part done, let's go to the opposite
side and create the second half right
here of our bow. Trying to make it
similar to what we have on the opposite side
when we have it, I'll probably make it
slightly smaller on the bottom and maybe
on the top, too. So, let's go and try
it out one more time. We will go like that. We will try to recreate it like that. When it is looking
nice or decent, we will need to work on
our connections firstly, so going on like that, trying to make nice connections
between the shapes. We also can go right here
and create a little line, so it will be a continuation
of our color right here. So going like that and creating
a little line right here. When we have it, let's go toward these parts and we will
recreate them too. Go with our brush and again, either trying to create
what we have ta or Leo with the sketch or maybe experimenting a little bit and creating
something different. It's always taking a look at everything from the distance
and deciding whether we want to adjust it or if we are satisfied
with how it looks. Going to the opposite side, stepping a bit from this line so it doesn't
look too weird, go like that and starting to recreate this element here too. Let's probably go with something like that,
something that big, and we will finish up creating our peculiar little
shape onto the bottom. Again, working with our brush, working with our eraser, making nice connections with everything where these nice
connections are needed. So let's get back to our brush, and let's continue
creating our dress. We are not going to be recreating
these little elements. We will add some kind of
the shadows later on, so it will look nicer. If you see that maybe this part looks a bit
too overwhelming, we can go and slightly
readjust our start here. So we will make the bottom
part slightly bigger. Let's go and try to do that. So go slightly bigger with
the lines right here, go slightly to the bottom part, and then we will
grab our eraser and we will erase the parts
that we don't need, and we will try to remain the same line weight right
here onto the bottom. So if you need to go to the outside part right here
and work on this part here, too, go and do what you need to do to achieve
a nice result. So paying attention
to the lines right here to the weight of
the lines and going like that and erasing and maybe restoring some parts that are
supposed to be right here. So now when you have
the result like that, when the star is looking nice, let's go toward
the second sleeve and let's recreate it here too. So let's go firstly
toward the top, and we will go with the
curve going in that way. Again, holding our line, if we need to adjust it
going into the eating mode. When we have the
result like that, let's go and create slightly bigger shape right
here so we are creating the similar things
that we have onto the opposite side,
some ruffle thing. When we have it,
we will go toward the bottom and we will start recreating these
elements here too. Let's go and maybe make this little line that we have right here
slightly smaller, going with our eraser, creating the thing like that, and then connecting everything with smaller shapes right
here onto the bottom. Let's go with half
of the circles, half of the ellipses and create nice connections
between them as always. If you need to work on
some other connections, you know what you need to do. Go and work on
these connections. Let's go right here, create a little final piece
of our ruffle parts, working with our eraser, working with our editing mode. If we need to when we have
the result like that, let's go toward this
little part and create the final part of our
sleeve right here. So let's go with
something like that, going slightly towards
the side right here to the inside part and creating some kind of a
rounder shape like that. And to finish up
with our sleeve, we will need to repeat this
little pattern right here. So let's go again and create
three little dots like that, maybe a little bit
more in a nice way. And we also will go and create two little lines that will be some kind of
default right here. When we have the
results like that, let's finish up with
the top part of address by creating this little
line going inside. So again, holding our line, if it's not going in
a way that you need. If it's straight, instead of this very curvy little line
try out one more time, go to the editing mode and
adjust the part right here. It's always take a look
at it from the distance. When you are done,
let's go and create this little line with one line going like that and try
creating it in that way. If you see that maybe you can go and soften up the
corners right here, you are welcome to
go and do that. If you are okay with them, let's go and create
this arm right here. Let's go toward the bottom part first and create it with
one line like that, going toward the top, trying to create the parallel
curve right here. If you need to hold it, hold it. If it's not happening for you, try it out one more time or
try to go to the 18 mode and maybe you will have the option arc probably you won't. So create the line in
a way that you like. Take a look at it
from the distance. Maybe it's a bit too rounded. So let's go in that way by
using our editing tool. And then let's go toward the fingers and let's
recreate them too. So repeating what we have
onto our o with the sketch, probably it will be easier
to start with the side, so we will have the
overlapping parts right here, and also we'll need to make sure that our fingers and everything and the arm overall is similar to what we have
onto the opposite side. So try to remain the same
weight for this element. Let's try it out one more
time with the finger. If you see that maybe you
will need to go and maybe work on the weight right here and make nice
connection right here, you are welcome to go with your eraser and erase all the
parts that you don't need. Now, when we are ready with it, let's go and recreate
this point finger. Going like that,
starting to recreate it, and then go and starting to recreate other fingers here too. Trying to overlap
them in that way and then finishing up with this
little finger right here, going slightly toward the side. Now let's take a look at it, and if we see that
we can go with our eraser and work a
little bit more on lines, we will, of course,
go and do that. So if you need to go over some lines and maybe you
have the jagget line or if you have some kind of the gap or something like that, we will need to go
and get rid of it. Let's go with our
eraser over the fingers right here and make nice
connections between them. So going like that and starting to erase the parts
that we don't need. Let's work on this
pointing finger two. And when we have the
result like that, we are done with this hand. So let's get back to our brush, and let's go and recreate
our little skirt. So for this skirt,
we have the shape, so let's go and recreate it. We will go toward these little
lines right here and maybe we will adjust it slightly
by holding our line firstly, go into our 18 mode, and we will make it
nodes that rounded. So let's take a look at
it from the distance, decide whether we
like the roundness, how it is right now. If you don't like how it looks, we will make it a less rounded but a little
bit more slopy. We will create something. In that way, we will tap on
the screen and let's go and try to repeat it onto the
opposite side here too. So again, starting by going
to this intersection, starting to create a
rounder shape right here, go into our editing mode to match it with
the opposite side. So trying to create something
similar right here. When you are sure that you are kind of similar to what you
have onto the opposite side, tap onside the screen, and let's go and work onto
these little lines right here. So we are creating some kind of default right
here one more time. If you need to try it
out a couple of times, you are welcome to
go and do that. These little lines should be quite parallel to
the outside part. So try to make them quite
parallel or maybe a little bit more going towards
the central part, so not too rounded. When you have the shape
like that, again, if you need to maybe work
with it into the time, you are welcome to
go and do that. And when we have the
base for our skirt, let's go toward the
bottom part and let's work onto it here too. Go first, let's toward
the outside part, go on with a slight
curve like that. If you want to go and erase the parts that you don't
need straightaway, go and do that. When you have it,
let's go and start creating these little
bumps onto the bottom. So again, we can go and
recreate everything in the same way as we have it onto our sketch or we can maybe
try out something different, maybe try out something a bit nicer and more
consistent right here. Let's go toward
the opposite side, so we will have this little
peculiar shape right here. So repeating the same thing as we have it onto
the opposite side, making a very nice
connection right here. Trying to match it with
the opposite side, and when we have
it, let's go toward the bottom and create
the curve right here. To make sure that you are doing something similar to what you have onto the opposite side, let's lift up our Apple pencil when we are holding this thing. Let's go to our editing mode. And let's go toward
the opposite side, and we will go right
here to this shape, and we will match it with it, so we will have the
same size right here. Now when we have the same size, let's move it back and
we will also need to go and find the different
rotation right here. We right now are looking only
at the size of the element. Make a nice
connection right here when it is nicely connected. Let's tap onto the screen, and let's go and create the rest of these
petals right here. We'll need to have
three more right here. Let's go and start
recreating them again, holding our Apple pencil
going to our editing mode. If we need to go like that, probably we will go right
here firstly to create the shape from the outside parts and creating this in that way. It will be size wise, similar to what we have right here onto
the opposite side. When you are done, let's create the last thing right here, probably going slightly lower, creating it in that
way and if we need to go with our editing mode,
we will go and do that. If we need to go with
our eraser and create the nice connections
right here and create the like the overall shapes
for the connections, we will go and manually create
these things right here. Again, you can try to
work with your brush. You can try to work
with your eraser to create a nicer looking shapes. And when you have the
results like that, let's take a look at it
from the distance first, and then we will
again add a bit of weight right here to this little part and make
a nice connection. Now when we are done with our skirt or the top
part of our skirt, we also need to go right here to these little parts and create smaller shapes right here as
the back part of our dress. So let's go and do
it on both sides right here on the outside part. Like closer to the outside part. When we have it, let's go
and work on our bottom part. Firstly, go into our legs. Nothing very hard right here, we'll need to create two
lines that will be our leg. When we have it, we will
try to make them parallel firstly and then we'll go and recreate this little
soak right here. To go in with a soft
curve like that, go outside the shape and starting to create
nice connections here. To go into the opposite side, trying to match it with the
previous size and finishing up by creating this little
shape that we have on the top, so the line should be
parallel to the first one. Again, if you need to go to the 18 mode and match it nicely, go and do what you
need to do right here. Try to make the line parallel,
as I mentioned before. When you add an
tap on the screen, if you see that you can go and maybe work onto some corners, if you have some corners, if you accidentally
created some corners, go with your brush, go with your eraser and work
onto these elements. Now when we have the
results like that, let's go and continue working
on our sock right here. So go on like that, starting to create the line right
here, going right here, creating a little line here, going toward our boots
or our shoes firstly, and let's work
onto it here, too. Let's go right here.
Let's recreate it. If you want, we
can go and soften up this little corner
right here and overall continue to recreate the lines as we have them onto
our layer with the sketch. Of course, if you
want to experiment, you are welcome to
experiment a little bit. So for example, we can go
and maybe make this part slightly going towards
the middle part. So when we have it, let's
go with one curve probably. We will try it out
right here and we will create our shoe. When we have it, if you see
that you can go and work onto your lines onto the connections and roundness and everything, go and work on it. When you are done
with this part, let's go toward this
little top part. So again, creating
a little curve, go into our editing
mode if we need to trying to make
a nice connection, trying to match the
direction that we have on our layer with this gauge. When we have it, if we have a little gap to work
on it manually, we will go and work on it. Let's go and add the similar weight to the whole line right here and when we have the
results like that, let's go and recreate this
last piece of our shoe. So now when we have
the result like that, let's go to the next leg to the last leg that we have for this girl and
let's recreate it. Firstly, again, starting to
create these parallel lines to create the actual shape of the leg to go on like
that with two lines, trying to make a nice
connection between the shape of the
leg and our skirt. So if you need to elongate
the line, go and do that. Then let's go and one more
time, recreate the sok. Go on like that probably
with a less of the curve, go onto our editing mode, going toward the bottom. You want to go to
the sites first, you are welcome to
go and do that. Try to make this bottom line parallel when you
are working on it, and then let's
connect everything with rounder shapes
on the sides. So going like that, again, if you have created
some corners, go and soften them up. Again, inside and
outside the shape. When you are done, let's go and create the shoe right here. So going with our brush and starting to create a
rounder shape right here. Going like that,
probably it will be easier to go from both sides. So let's go and create
something going in that way. So again, if we need to try
it out a couple of times, we will go and try it
a couple of times. When we have it,
let's go towards the bottom part and create
a curve right here. So connect it with
the overall shape. If you need to go
to the 18 mode, go and do what you need to do with your editing
tool right here. Again, when you are
done, tap on the screen, if you have some corners
or jagged lines or not so pretty connections
work onto them. Make the overall look
of the lines very, very nice, very, very smooth,
very, very everything. When you are done,
let's go toward this part and let's
recreate it here, too. So probably we will create slightly different
shape right here. Let's go closer to the bottom part and we will
create the thing like that. So we will go toward
the sites like that, and then we will just create
a little part like that. So when we have it, we also can go and try to recreate
this little part, but probably with this thickness of the lines, it won't be seen, and probably we will also need to work onto these
little parts right here, so it will be seen right here. So spend some time here, create a nicely looking shape. And when you have the
result like that, we are done with our girl, the lines for our girl. So let's move on and very quickly recreate all of these
little additional elements.
9. Clean Lines: Additional Elements: Let's go one by one and start to recreate our additional objects. Probably let's start with
something not so hard. Let's go to this little shape of the bowl and let's
recreate it here. So let's go with one line with the same weight that we
are using for our brush. So again, holding our line at the end with
our Apple pencil, holding our finger
on the screen. If we want to go with
the rounder shape, go like that, create
the shape like that, and let's go underneath it somewhere to the
middle and start to recreate the overall shape that we will have for
this crystal ball. So going like that,
starting to make parallel lens to what we
have for our main shape of the ball and going
toward the bottom with slightly rounder shape going slightly outside
this first shape. And when we have it, trying to make it even on both sides. So if you see that one part is a bit smaller or something, we will go to our 18
mode and adjust it, tapping on the screen
when we are ready. And let's go toward the
side and continue creating our crystal ball creating these rounder shapes
onto this side. You can go with a full
circular shape or you can go with some kind of the shoulder
shape right here. Again, if you see that you
can go and adjust some lines, make nice connections and the overall weight of the
lines even everywhere, you're welcome to
go and do that. If you want to go and maybe try out to create rounder
shapes right here, you're welcome to
work with your brush, with your eraser, create
something goon in that way. Take a look at it
from the distance, decide what kind of look you
want to achieve right here. If you are satisfied
with rounder shape, go and do the same onto the opposite side here
too. Let's go like that. Probably I erased a
little bit too much, so I'll try it out
one more time. Going like that, trying to make the weight even everywhere. If we need to go over the
line, we will go and do that. For now, we will go only outside the shapes and
we will recreate them, so we are not going inside and creating these
additional elements. Let's get back to our
brush and let's go toward our little
cool run right here. Let's go toward the top. Again, with one line, we will recreate the hold
line and the end, go into our edging mode if
we need to adjust something. Example, let's go with
slightly smaller shape. So we are adjusting
our notes right here. If you want to go with
a less open shape, go and do what you
need to do right here to achieve this look when
you tap on the screen, and let's go inside and recreate this little
part right here too. Again, with one line,
creating our shape, trying to make it similar to the main shape that
we have right here. So we will need to have the same level of space
right here on both sides. If you need to go
and maybe make it slightly open, go and do that. Try to make it even when
you add tab on the screen, and let's go with one line and recreate this shape
onto the bottom. So again, holding our
line and the ends, go into our 18 mode if we
want to adjust something. So for example, we can rotate it slightly to make
it more rounded. I want to if we're a little bit beyond the frames
on the top, it's okay. We can adjust it later on. So for now, spend
some time here and adjust the roundness of this
little body right here. When you are here, when you add, tap on the screen, accept the changes, and let's go and firstly recreate
this little gap. So we are creating
the line right here, and then we'll get rid of this line that we
have onto the top. So with your eraser, work on this line
when you are ready, let's get back to our brush, and let's go and re create
this little silly legs. So go on like that and with one line or with
a couple of lines if you need to go on and create these very soft
triangular shapes. If you want to recreate
this little one right here, you're welcome to
go and do that. And straightaway, let's go and create these little
facial features. I'll probably make
it slightly cuter by moving the facial
features slightly higher. So go on like that
with our brush, creating our first
shape for shape of the e. So you can go with a rounder shape with maybe
not that rounder shape. So create the shape like
that, tap on the screen, go to the opposite side, try to create something
similar right here. So with one line,
create an R shape. If we need to make sure
that it's similar, we can move it closer to the previous shape and
work on it right here. So we'll need to
match the rotation, but it should be mirrored. And when we have it,
moving it back to the opposite finding the
placement for it, when we have the result that we like, let's tap
on the screen. If you see that some
parts are crooked, go and adjust them, of course, and then let's go towards
the middle part between our eyes and create a
little smile right here. If we need to go and
adjust it with our 18, to go and that try
to position it straightly at the center between our little
eyes right here. And when you add in tap on the screen and take a look
at it from the distance, decide whether you
like it or not. If you want to adjust
it, go and adjust it. But if you are
okay, let's go and start creating our little
bottles right here. So for the bottles,
let's go first toward the bottom part right here
of the rounder sheep, going like that, holding our
one finger on the screen to make sure that it looks
like nice and everything. So again, trying it out one more time because I
accidentally accepted it. So again like that,
creating a rounder shape, you can go with a bigger shape with a smaller shape,
it's up to you. When you have the
result that you like, let's tap on the screen. Let's go and get rid of this little part because
we don't need it, and we will recreate this
part right here onto the top. Again, with straight lines, creating two parallel
lines on the sides, you can go slightly more toward the inside part
right here on the bottom, making a nice connection
as always, right here. Going to both of the sides, making nice connections with our previous shape,
working with our brush, working with our eraser, nothing new here going
toward the brush one more time and starting to recreate this thing right
here onto the top. Very softly going like that and starting
to create our shap. Creating a very, very soft rectangular shape or if
you want to experiment, maybe you want to go with
not a rectangular shape, but with more rounder
shape or elliptical shape, you are welcome to
go and adjust it to the way that you
want it to look again, work with your brush,
work with your eraser to create a clean look
for these lines. Work on both sides evenly, take a look at everything
from the distance. As always, when you have
the result like that, we will need to go and
create this quirk. So it is a little bit
crooked right now, so we will need
to go more toward the center and create
our lines right here. Go on like that with
slightly diagonal lines, go to the opposite
side here too, trying to match the direction, taking a look at
everything, one more time from the distance
when we are done, continuing to create our
quirk by creating a very, very soft curve right
here on the top. Now when we have the result
like that one more time, if you want to go and maybe work on these little connections, soften them up, go and do
that both inside and outside. Work with your brush and
work with your eraser. As always, go to both sides and create them
evenly on both sides. When you are done, we're not going to be going toward the
middle parts right here. We are not recreating
the details right now, going toward our next bottle
and re creating it here too. So one more time. If you want, we can go and create the bottle the same way as
we have created our one. So we can go again to our
wrench icon over the top left. We can go under Canvas,
drawing guides, go into eight drawing
guides and moving our sheet by drigging the
blue note right here, go into the green note right here, adjusting the direction, starting to move it
toward the center, so it will metre here. Find the center or an approximate center
of these elements. When you're done, tap Done, go toward the layers. Make sure that you are on the layer where
you have the lines, or if you want to go and create a new layer for this element, you are welcome to
go and create it. We'll need to tap
onto the layer, and we will need to use
the option drawing assist. Now, let's go toward the bottle and let's
recreate it right here. So going toward the
bottom part first, let's create a straight
line, holding it at the end, going toward the top part and starting to create
this bottle shape. So let's go like that, and also we will work onto this
corner right here. Of course, we will soften it up, create a curve into
very straight corner, work onto the outside
part here too. Make sure that the
weight of the line is everywhere similar to everything
that you are creating. When you have it,
let's go and create this little shoulder
part of the bottle. Again, trying to make
nice connection, trying to match it with the
previous shape so we don't have the extra work later
on with our eraser, when you like the shape, tap on the screen,
go toward the top, create this additional
little line, the neck of our bottle. When we have it, we will
go towards this part, and of course, we
will recreate it too. Making a nice connection between the shapes right
here in the middle. For example, we can go with
slide curve like that. Try to make a seamless
connection right here. If you see that it looks
a little bit bulkier. In the middle, use your eraser and erase the
parts that you don't need. Now let's go over the top
and do the same thing here. Try to make this line parallel
to the one that you have. On the bottom, again, if it looks a little
bit bulkier right here, on the middle part, go with your eraser and erase the parts that
you don't need. Now let's go and recreate these parts right
here on the side. Working with our brush, working with our eraser, trying to make nice
look for this part. Now the last thing that
we need to do right here is to recreate our quirk, going like that,
creating two lines. Actually, we are
creating one line. It's automatically creating
onto the opposite side, so let's go over the
top and finish up creating our little
shape right here. If you want, we can
go and make the copy of this bottle or if you want to maybe create
a different bottle, you can use the same tool
that we are using right now. So I will probably make
a copy, but firstly, let's go to our
ring icon and turn off our drawing guide and
also go into our list, tapping on the layer with
our lines where we have this assisted little tool and selecting
drawing assist from the list to be able
to freely go to everything that we
have right here on our canvas and adjust
it to our liking. So let's go to our
S ribbon icon. We will use the
free hands method. We will go and select
this bottle right here. Again, three fingers
swiping down, copy, swiping down, paste. Now moving the shape
slightly down. If you need to make it
smaller or rotate it, we will go and do that. So find the placement for it. And when you have changed
the size of the object, you also change the
size of the lines. So we will need to go and
adjust it right here. So firstly, accept the changes, tap onto the arrow key
onto the top plat, and we will need to
grab our eraser. Again, we want to be
consistent with our lines. So we will go along the lines
that we have right here, and we will make them
slightly bulkier right here. So go and alon all
of the shapes right here and starting like, making the lines right
here one more time. So very quickly,
let's go and do that. Now, when we are done, if we need to go with our eraser and aja something,
we will go and do that. But also we'll need to go
to our lyrics and make this inserted image a part of
all the lines that we have. So tapping on it using
merged down Opta. And now let's go and t create
our little cat right here. So again, going with our brush, going with our eraser. Probably we can do
it in that way. Let's go and create the shape of the ellipse or
probably a circle, hold your line at the end, hold one of your fingers on the screen when we have
the result like that, let's go again to
our Rb and icon. Free hand method will select
this thing like that. Go into our Aoki on the top left and we will use
the option war right here. You can see we have
this bounding box so we can go and adjust the shape very easily by going with our little
notes right here. Let's go and make the
shape slightly whiter on the bottom and slightly a little bit not
wider on the top. So we are creating some kind of the bread loaf or
something like that. Create the thing that you
would like to see right here. I know that we are adjusting our lines right
here, but it's okay. We can fix everything later on. So create a nice
shape like that. Probably can go a
little bit bigger. So try to make it
even on both sides. When you have the
shape that you like, let's tap onto the first
icon that we were using. It was our Euban icon. And now let's go and adjust
our shape a little bit. So probably, how can we do
that? We can go to our list. We can create one more lay on we will go back to our layer
where we have our lines. We will tap on the icon and adjust the opacity to
the level that we can see on our screen but when it's not that bright and
disturbing as always. Going back to our new layer, and let's go over
this line that we've created right here and we
will recreate it right here. The same way as always,
creating our curves, creating them in a nice way, making nice connections
right here. We are doing it because
we want all our lines again to be consistent
and to look nice, going over these lines and creating the shape in that way. So let's go to the
opposite side. Let's create the sheep. So going like that, trying to make nice
connections as always, holding our lines where we
need to hold it and making nice connections right
here and not creating any gaps and jagged
lines right here. If we need to go either
over the line or with our eraser and erase the
parts that we don't need, we will do what we need to do. Now when we have the
result like that, we can probably go and make it. In a nicer way, I'll try
to do it one more time. So probably with this
part going like that and creating the more like
an open shape right here, trying to make it even
to the opposite side. So when we have it again, go and fixing all the lines that we don't need right here. When we are overall done with
creating this nice shape, let's get back to our list. Let's go to our main layer
where we have all the lines. We will wrap our eraser and we will erase this part
because we don't need it. Then we'll get back
our maximum apasity tapping onto the icon,
adjusting it like that, go into this shape that we've created for
the hat for our cat, tapping, merge down, and continuing to create
other details. Let's go toward the ears with one line or with
a couple of lines. Let's create them.
Go on like that starting to create
nice connections with the oral shape of our head. Go on like that, making
nice connection right here. If we need to go with a
smaller size of the eraser, we will go and do, we will
make a nice line right here. Going toward the opposite side, trying to match the
second ear with the first shape going like that and creating
something in that way. Probably too big, so trying
it out one more time. Now when we have the
shape for the second ear, let's go toward the body and
let's recreate it here too. Firstly, let's go
toward the color. We will go and create
it in that way, creating the rounder shape
like that and then creating the parallel line to what
we have for our head. When we have it, if you
think that it's too thick, you are welcome to fix it. If you are okay with it, let's create this little
pendant right here, creating something
like that, maybe. And when we are done, I'll probably go and with a
smaller size of the brush created so it look a
little bit better, so creating some kind
of this shape and going toward the
shape for our color. Getting back to our previous
size of the brush of 6% and starting to recreate
our legs right here. So let's go and create
this leg right here, going with very soft shapes right here because it's a cat, because cats are soft. Going like that when we have it, let's go toward this little leg. And if you want to
recreate it the same way as you have it
onto your sketch, you are welcome to
go and do that. If you want to experiment a little bit and maybe
create something different, you are again, welcome to do what you want
to do right here. So let's go with our eraser and erase all the lines
that we don't need, making everything very cute and very soft and very smooth. When we have it going toward this back leg and starting
to recreate it here too. So going like that first
creating this bottom part of it and going toward the
very bottom part and starting to create a very
rounded chip right here. Maybe going slightly
bigger with this part. Let's try it out one more time. Let's go with
something like that. And again, we will
finish up everything by creating this rounded
chip for the bump. When we have the
shape like that, let's go and recreate our tail. So let's go with similar shape to what we have onto our sketch, and let's go and create
the thickness here too. Go and creating
the parallel line to the first one
that we've created. Now when we have it,
let's go and recreate the whiskers firstly with the same size of the
brush to go on like that, very boldly creating these
two lines on both sides, and then we will change the size of the brush something
slightly smaller. Again, 4% or so, and we will go and start to
recreate our facial features. Let's first go to the nose. Let's recreate it here, creating it in a bigger way
in a smaller way probably. In a smaller way,
we'll look cuter. Let's go with very soft
triangular shape like that, trying to make it
even on both sides. When we have it, go to the bottom middle of the
nose and create a mouth. Take a look at everything
from the distance, decide whether the nose is enough of the size or if you
need to go and adjust it. When you have it, we will
go and recreate the ice. So let's go with one
shape like that. So again, holding
our line at the end, go into our editing mode. If we need to take a look
at it from the distance, decide whether you like the
placement and the size. If you want to adjust the size, go right between
the nodes and drag the sheep with your
Apple pencil outside. When you are satisfied
with the shape like that, let's tap on the screen. Let's go and create another
line right here inside. Go on like that and creating the space for our
IRS right here. Straightaway, you can go and add the color inside like that. Now, let's go toward our
Etraband icon one more time, free hands method, making a copy of this element, select it, free thingers down,
using the option, copy firstly and then using
the option paste again, firstly by slide
three fingers down. Moving the shape to
the opposite side, finding the placement for it, finding the same
level for the eye. When we are done with it, tap onto the Ao key, go to your layers, tap onto the inserted image and use
the option merged down. And if you want to recreate this little element right
here, let's go and do that. Let's go with some kind of
a moon shape right here, holding line in the end, go into our ten mode if we need to and creating the
thickness for this part. Probably we can do it
slightly in a cleaner way. So let's go and try
it one more time. Hold an line in the end. If we need to go with our eraser with the smaller size of it, we will go and clean
up our lines manually. Now, when we have the
results like that, we can also work onto
this part slightly. So we can go, for example, to our Rubon icon, select this element, go to our Aokey and if we want to
rotate it, we will rotate it. If we want to make it smaller,
we can make it small. Take a look at it from the
distance when you are done. Tap onto the first icon
that you were using. It was our rubon icon. And when we have the
result like that, let's go to Earliest. Let's go and hide earlier
with this gauge by tapping onto this check mark and check out how
everything looks. For now, we need
to make sure that every line that we have
outside is closed, so we don't have any gaps
with the environment. If you are sure that
everything is closed, we are done with
this part and we are ready to move on to
the coloring part.
10. Base Colors: Begin our coloring part
by doing the following. So firstly, we are
going to our layers, and we will need to find our
layer with the clean lines. We will need to tap on it and we will use the
option reference. So that way, we will be able
to use these lines onto this layer and recolor everything that we have right
here on separate layers. So now when we did it, let's go underneath this layer
with our lines, and from here, we'll
create one more layer. Now when we have the new layer, it's time to begin
coloring parts. Firstly, let's go to
our color palette, and let's begin by selecting the color
with the tattle skin. We will go grab our icon with the color and drag it to
some of the skin areas. For example, let's
go to the face. Then when we did it,
we will go to the continued filling over
the top and we will go to all of the rest areas that we need to recolor
with the skin color, and we will go ra color
them by tapping on that. Let's go through the
arms, through the legs, and through the fingers too, and when we recolor everything, we will tap onto
this check mark on the top where we have
this color drop option. Now, let's make sure
that everything that we recolored is recolored. If you have some small areas, they might be not recolored, so we'll need to go manually to these areas and recolor them. And when we have
everything recolored, let's get back to our
layers and we'll create one more layer on
now when we did it, we will go to our color
palette one more time, and let's switch
our color to here and we'll go to the hair areas and we will recolor our hair. Let's go with our continue filling entry color
these parts here too, and actually we'll go to
this little part entry color it's here too because we
have the hair in the back. Also, we'll need to recolor this little part right
here as our fringe part, and when we are done with it, let's again tap onto this check mark as our color drop right
here onto the top. Now when we recolor the hair, let's go to our layers one more time and create one
more layer on top. Let's get back to
our color palette and select this purple color. With the purple
color, we will give tricolor everything that
is going to be purple. So let's start from our hat. Go into the hat, dragging and dropping the color
and continue filling, going through all of these additional elements
that we have on the hat. Our little dress will
be the same color, got to all of the areas
that we have right here for this part and
recoloring them too. Except our little bow
right here and also go into these little back parts of our dress and
tricoloring them too. With the same color, we will go toward our socks
and tricolor them. And also, we can go
toward this middle part of our little cauldron and tricolor this
element here too. When we did it, we
also could go to the stick of the one
and tricolor it too. Entry color this little
part here onto the top. Now when we have this, let's one more time go to our list and create
one more layer on top and we will grab the
color with the title Bo. With this color,
we will go toward the main shape of the bow and we will
recolor this little thing. We can go one by one and
recolor it in that way. When we have the result like
that, let's one more time, go to our lease and
create one more layer on top and we will
change the color to, for example, yellow sparkles. With this color, we will
give tricolor the stars. Let's select one
of them with color and we will go right here and tricolor this part here too. You want to go to some
other areas, for example, maybe this little part onto
the ones and tricolor it too, you are welcome to
go and do that. We also can go right
here to the cats and tricolor the moon part and
this pendent part right here. With this color and when we
have the result that we like when everything that we want to be yellowish is yellowish, let's go to our lays and
create one more lay on top. Now, let's switch our
color to blackish, and we will go with this
color to some other areas. Let's first go to our shoes, go into both of them,
recoloring them. It also will go to our cauldron. Everything that belongs to the cauldron should be
recolored with this color. First if you want to experiment
and use different colors, you are welcome to
go and do that. When you are done
with the cauldron, let's move on to our cat. Let's recolor everything
that we have right here. As we'll go to the
bottom part of our magic bow right here and tricolor this
element here too. When we are done
with this, either tap onto the check mark on
the top or straightaway, go to the layers, create
one more layer on top. Let's go and switch the color
to something different. For example, let's go
with the color of white. With the white color,
we will go through all of these additional elements
that we have right here. So for the ball right here, for the wings that we have onto our one to these little parts right here onto the bottles too. So we will need to recolor
these parts here too. Let's go through all of these elements and also
we'll go right here to our eyes in the cat on the cats and we will go and recolor these elements here too. Now when we recolored
all of these elements, I actually wants to go and maybe recolor the hard
parts in yellow too, so we can go very easily back to the layer where we have all
the yellow elements and switch the color to
yellow sparkles one more time and drag the color
right here to this area. Now also we will need to go to these parts
and tricolor them, but we will need to select
a different colors. For example, we can go with orange and we actually can go to the same layer where we have all the yellow elements and tricolor these parts here too. Let's go to our quirks
and tricolor them one by one or by using our continued
filling option on the top. Now the last element
that we will need to recolor will be
our little color. Let's recolor it, for
example, with pinkish colors, so we can go to our layer
where we have the bow, so we won't be confused. We'll go and select the same bow color and tricolor this little
part here too. Now when we have the
result like that, we don't need our reference anymore onto Rl with the line. So let's go to our list. Let's go to Rl where we have
this reference on W tap onto the lay and we will turn off reference by
selecting from the list. Now to finish up with
our basic colors, let's go and add some additional
little elements right here inside the bottles and
our little bowl right here. So we will go to our list
and we will find our layer where we have our white elements and black elements here too. So let's go and create one
more layer right here. We will tap onto this lee and we will use the
option clipping mask. We are doing it because
we want to stay inside the sheps and it will be easier for us
to do it in that way. So firstly, let's go toward
our crystal bull right here, and we will use the hair color. And let's go inside the ship, and we will create another
circle right here. So let's go like that with
one line creating our shape, holding it at the
end of the line with our Apple pencil and holding one of our fingers
on the screen. Go into our option
of 18 mode over the top and dragging this
ship more toward the center. Now when we are
done, let's tap on the screen and dragon drop
the color inside the ship. And then let's go toward these little elements right
here onto our bottles. We will switch the
color to blue, and we will first go toward
the middle parts right here and create the bluish
outlines right here. So basically, with this color, we will need to go with probably smaller size of the brush. We will go and step a bit from the side of our bottle and we will go and
recreate the ship. Very easily and very quickly,
let's go and do that. We don't need to go with very much of the precision
right here. We just need to go and
repeat the shapes, and we need to do it by using the method
that we used before. We need to not have any
gaps into our lines. So when you created the shape like that,
dragon drop the color, and let's go through all of the bottles and create
something similar here too. So stepping a bit from
our sites and from all the lines that
we have outside and repeating the shapes that
we have for our bottles. Now let's go through all of these elements, creating
seamless lines, try not to have any
gaps because other way, we can't add colors inside. Dragging down the color
when you are ready, if you see that you
can go and maybe create something manually right here that will look nicer. You are welcome to
go and do that. Let's finish up by creating this rounder
shape on the bottom, the same way, holding
our Apple pencil, holding one of our fingers, creating our shape,
going and finishing up, creating the shape, by
creating the lines on the top, closing the shape, and dragging
and dropping the color. Now the very last thing
will be to go right here to these bottles and
add some liquity parts. So as a part of our
basic coloring part. Let's get back to our
list, and one more time, we'll create one more
layer on top, and again, we will tap on the lay and select clipping mask right here. So now we want to go inside these bluish elements that we've created and we want to
fill them with the color. How can we do it very easily? So we will get back to our previous layer where we
have these bluish outlines, we'll tap on the lay and we
will use the option select. Now we've selected
these bluish parts and we will go back to our lays. We will go to this new layer that we've created and we will then go to our color palace
to select some colors. For example, let's go with
hair color or bow color, and let's go and recolor
two of these elements. Very easily, we are going
toward these parts right here and starting to
create the liquidy parts. So you can go with a bigger
size of the brush and very easily go like that and
recolor these little elements. If you need to adjust something, select the eraser and adjust
the parts to your lichen. For example, we can go with maybe different
sheep right here. You can experiment and create something that you would
like to see right here. Now, when we did
it with this part, let's go toward the bottom
and with the same color, for example, we will create slightly smaller parts
right here onto the bottom. And when we have the
result like that, let's one more time switch the color to, for
example, purple. And when we have it, we'll go to the last bottle that
we have right here and create this liquid
de part right here too. Now, when we are
done with this task, let's tap onto our traban icon to see clearly what
we did right here. If you want to go and
maybe adjust something, maybe adjust the liquidty
part or something else, you are welcome to
go and do that. When we are done with this task, we are done with this
basic coloring part. So let's move on to
our next part where we'll add some additional
little details.
11. Shadows: Let's begin this part firstly by going to ear layers as always, and we will start
from the bottom. So we will go to
Earlier where we have our skin and we will
add some details here. Let's create one
more layer on top. We will tap into this new layer and use the option
clipping mask. When we did it, let's get back
to our color palettes and we will first use the color
with the title cheeks. So for this element, we will go to our underneath
parts of the ice. We will select the smaller
size of the brush, and we will go with
the shape like that. Create the shape,
hold it at the end. If you need to move it, go to the 18 mode, adjust it slightly. So for example, let's go
with something like that, not too big, not too small. When we have it, we will need to make sure that the
ship is closed, have no gaps inside
this shape and dragon drop the color
inside when you are ready. Let's do the same onto
the opposite side here to go into
the opposite side, curtain R shap, try to make it similar size wise to what you have onto
the opposite side. So if you need to adjust it, go to the editing mode. When you find the placement,
tap onto the screen, make sure that you have no gaps into your line and drag and drop
the color inside. Now when we have
it, let's also go and change some parts
by adding the shadows. What we need to do is to either
use this same color that we are using right now or
create a different leaf. So for example, let's
try with the same color. We will go underneath the
shape of our hat first, and we will elongate
the line that we have right here for our
main shape of the hat. When we have it, we
will go slightly down and we will go with a bigger size of the brush and very easily add the
color like that. That way we have a nice
shadow right here. Let's add one more shadow, but we will di it right
here once our legs. You can rate a canvas
like that and we will go slightly lower than
our skirt ends. For example, somewhere here and we will create a
little shadow like. When you have it, we will go to the opposite side and we
will do the same thing here. Following the direction,
you can go with a slightly rounder
shape right here. We will have some of the
illusion that our legs are not just two
lines like that and they are not two dimensional. So when we have the
results like that, let's go to some other areas and we will add more shadows. Firstly, let's get back to our layers and let's
work with our here. Let's create one
more layer on top. Let's tap onto this lay and let's use the option
clipping mask one more time. So when we have it, we
also would want to go to the icon right here and we
will change the blending mode, so it will be easier for us to add our shadows right here. So let's go to the
apate slider and set it to something
around maybe 40%. If it's not enough or too
much, we can fix it later. So when we did it,
let's get back to our color palettes and
select this purple color, and we will go towards some of the areas right
here once are here, and we'll add the color here. So let's first go
underneath the shape of the heat and we will go
with a big curve like that, following the direction on the line right here
and it's curvature. Adding the color inside the line and when we have
the result like that, let's go to the back
parts of the hair. Right here underneath
the shape of the face and right here
on the opposite side. You can go and create some
kind of shadow like that. As we'll go right
here underneath the shape of the hair one
more time underneath the ear, and we will go and
create some kind of peculiar shadow like that. Go with a brush, creating some kind of a shadow, you can add some
kind of volume with this shape and create
something very, very nice right
here and following the direction like that and creating something in that way. Now let's take a look at
everything from the distance and decide whether we are satisfied with the
amount of opacity. We can probably go to this layer where we
have our shadow, tap onto the icon and
adjust the opacity slightly so it will be a little bit more
voluminous overall. Now, when we found the amount of opacity that works for us, let's tap on the layer
to close this window, and let's continue by
going to our shapes with the purple elements and we will go and add
some shadows here too. Select the layer, create
one more layer on top, tap on it, select clipping mask, go to the N icon, change the blending
mode to multiply, and one more time, let's
go with something round, maybe 50% of apaste. Let's switch the color to this dark purple and
let's go right here to the back parts of our hat and let's add the shadows right
here onto these elements. Now, when we have
these parts done, let's go toward these little
parts and we will recolor them differently too to add
some interest to the picture. Also, we will just need to
go to these little parts, the back parts of our skirt and create the shadows here too. Decide set the
amount of opacity. If you want to go a little bit further with the opacity level, you are welcome to go and do it. You can go with maybe
slightly lower opacity level or slightly higher
opacity level. It's up to you. Find what
you like right here. And when you are
done with this task, let's continue by going
to our next layer. So it is our pinkish layer. Let's go to it,
select it firstly, create one more layer on top, tap on it, clip in mask, go into our multiply
blending mode. Let's one more time switch
the opacity to something around maybe 50% and changing
the color to the bow color. With this color, let's go toward our bow and we will go right here toward
the middle parts. As you remember, we had these elements onto
our sketch and we will go and create these little parts right
here, some of the folds. If you want to go to the part, you are welcome to go and
add some details here too. If you are satisfied
with everything, let's go to our next layer, which is our yellowish layer and the layer with the quirks. We don't need to add
anything right here, but we will need to add
some elements to our cat. Let's find the
layer where we have our additional elements
right here for the cat. So let's go above all the
layers that we have right here, all the layers that are clipped. We will create one
more layer on top, tap on it, create clipping mask, and we will go to our color palettes and
switch the color to white. With this color, we
will go and firstly, we'll need to figure
out what amount of opacity we want to see right here because we
are going to be working with our inner
parts of the ears. Let's go, for example,
with something around 35% and we will
change it later if we need. Now with the smaller
size of the brush, let's go inside the sheep
that we have for our ears. Let's go and create
something going in that way. You can fix it with your
eraser if you need to. And also with the eraser, we can go and add
some interest by creating a little
detail like that. We also will go to
the opposite side, of course, and add the
similar thing right here. If you have some extra elements to erase, go and erase them, create this little element
right here on the middle part, so we will need to match it with our previous ear and
create it in that way. As we will go to our brush, and we will go with
the bigger size of the brush to our little
cauldron right here, and we will add the
peculiar little detail in the shape of the
halt right here. When we have it, we
need to see whether we like the color that
we use for this element. If we don't like it,
if we want to go maybe with something more
interesting, more peculiar, not that super white, but something that will
benefit right here and make the color interesting. We can go and do the foam. We can go to our layers. We can go to this layer that
we have our details on, tap on it, and use
the option Alpha log. When we did it, we can go to our color palettes
and, for example, switch the color to red
orange or off white sparkles, and we can go with a bigger size of the brush and try
it out right here. So this color is a
little bit too dill, so we can go maybe with the background color with
skin color, red orange. You can try out different colors right here and find
what works for you. For example, let's
go with maybe off white sparkle color and
try it out right here. The color look nice, and when we have the
result like that, we are done with our cats and we are done
with our cauldron. So let's go and work
onto our bottles and all of these little
additional elements. So first, go into our layers. We don't need our alpha
log right here anymore, so let's tap on the layer
with the alpha log. You can find it by taking the right here and you
will see the checkerboard. So let's tap on
it, and let's turn off Alpha log by selecting
it from the list. And then we will go
and start adding additional details right here onto the bottles
and our crystal. So firstly, we will need to find where we have
these elements. So this is right here. Let's go and create one more
layer on top, tap on it, like clipping mask, and we will need to use
this middle parts. We will go to the
layers where we have the inside parts
of our elements, and we will tap on this lay and we will use
the option select. Now, getting back to the new
layer that you've created, and we will change the blending mode to
multiply one more time. Let's again go with something
around maybe 40% of opacity and we will first
go with the pinkish color. Let's go and select this
bow color and we will go toward the bull firstly
and with one line, we will go and create
this bottom part of it. If you don't like how
this color looks, you can go and maybe try
out the purple color. Let's go and try it right here and we can use this purple color for every bottle and every element that we have
right here onto this. So let's go toward
this pinkish part or purplish part with the color
that we already selected, and you can see that it doesn't
work right here because we are selecting not this
part that is purplish, but the part that is
our whitish part. Let's go again to our
layers and we will find the layer where we have
the additional colored part. We'll tap on the layer and
use the option select. Now when we have this selected, going again to this
layer where we have our little bottom part of the crystal ball and we
are going to the top part of these little elements and adding our additional
color right here. Let's go over the top
right here and add some of the volume
to these parts going towards the bottle right here maybe with this color,
let's try it out right here. If you don't like it,
switching the color to, for example, blue or red, even red, going right here and adding the
additional color. As for the two parts, we don't want to go right
here and add something here. So let's go and deselect everything by tapping
to S ribbon icon. Now, when we have the
result like that, we are done with our shadows
and we can move on to the next part where we will add as many sparkles as we like.
12. Final Touches: Begin this part firstly
by working on our hat. For the hat, we want to add
some pattern right here. Let's go to this folder
that you downloaded, so we will go to our
brush library and we will go to the UniSA brushes. Let's find the brush
that has the full star. So the brush is
called star full. Let's select this brush, and let's go to
our color palette to switch the color
to yellow sparkles. When we did it, let's
get back to our layers, and let's go and find the
layer where we have our hat. We have one layer clipped on it so we can go above
it or underneath it. Let's probably go and select the layer that we have
for the mint color, and we will create one
more layer from here. Now, without changing
the blending mode, we will go toward the
top part of the hat, and we will go and with a
bigger size of the brush, start to add some pattern
to our top part of the hat. So go like that, and you can see we are not going
beyond the frames. We are edging our little
stars very nicely. You can either go
toward the bottom right here and add
maybe a star right here and try not to go to the area that we have on
the bottom of our head. So when you are
satisfied with it, let's go towards our brush
library one more time, and we will change the brush
to sparkle full steel. Let's select this brush,
and with the same color, we will go and add
some sparkles. So let's go with smaller size of the brush probably even
smaller than right now, something around maybe 5%
or so, let's try it out. 6%, 6% looks nice. Let's go and try
not to overdo it, but add a couple of these
yellowish sparkles on the hat. So for example, let's go with something like that,
and the same way, we will go towards
the dress right here and we will add a couple of these details right here too. For example, let's go with three of the sparkles
of yellow color. When we're done with it, let's switch the color to off white sparkles and let's go and add more
sparkles to our head. You can go with the same size of the brush or you can go with slightly bigger size to have some difference into the
additional elements. And let's go all over the place and add our little
sparkles here. And when you are down with
the top part with our hat, we will go toward our dress and we will add the
sparkles here too. For example, let's
go with something bigger size wise right here and go all over the skirt and
add more of the sparkles. For example, let's go
with something like that, and when we have the
result like that, let's get back to
our brush library. We'll get back to our
calligraphy folder, we'll select our monoline brush, and we will go with a
smaller size of the brush, and we will add
more sparkles here. Let's go to some blink spaces
right here and we will go and add some beautification
in the shape of the dot. Going like that to address,
creating these details, going to the top
part here too to add some interest here
too, for example, and then continue by going to our hat and maybe adding
some details here too. Again, try not to
overdo create it in a very nice and very even way. And when you have the
result like that, let's go and do the same
with other elements. Let's go either one by one to all of these
elements right here, or we can go and create
just one layer on top and add the
sparkles in that way. Let's go toward the top to
this layer that we have on the top before our layer with the lines and create
one more layer here. Onto this layer, let's go
with our off white color, and let's start adding some
sparkles to some other areas. For example, let's
go to the cauldron. Let's add the smaller
details right here. Let's go toward this part and
add some details here, too. You can switch the size
of the brush and add the bigger size and smaller size shapes right
here to the elements. Let's go through
all of the bottles and add the details here too. You can either go toward
the corks and maybe add some peculiar little touch
right here with this element. And when we have the
result like that, let's go and switch
the color to white. So when we have the
white color selected, let's go toward the top part
right here of our bowl, and we will go and create
a big sparkle like that. So creating a rounder
chip like that. If you need to change something and maybe smoothen up something, we are welcome always go to our eraser and adjust the
parts with our eraser. If you want to go maybe with even smaller size of the brush and add
some sparkles here, too with white color, you are welcome to go and do that, too. Let's go again to
our bigger sets of the brush and let's go toward our bottles right
here and maybe add some peculiar little additional
elements right here. For example, this will
be our love potion, so we can go right here and
add some kind of the heart. So very easily go either manually or you can go to this
folder that you download. You can find some
hearts there too. Create the element
and if you want to go some other bottles and maybe
add something there too, you are welcome to go and create these additional elements there. Here we can go toward the top and add some peculiar
little details. So for example, going like that and creating something
in that way. If you feel that this part is a little bit too bright to be a sparkle or some kind of the glass elements,
we can do the fol. We can go with eraser. We can select it,
and we can go to the slider that we have
right here onto the bottom. So let's go and reduce
the opacity of the brush, something around maybe
20 something percent or 30 something percent. And we can go to these
parts and reduce the opacity of this element to the level that we would
like to see right here. So when you found the
level that looks good, we also can go to
some other areas. So for example, to other bottles and we can
follow the direction like that and create some
kind of the glass effect. And when you have created
these elements, again, with our eraser and with the reduced opacity
or the eraser, we can go and add this
nice effect right here. Let's do the same with
this little bottle, maybe creating something
peculiar and one more time, reducing the opacity to the
level that will look nice. And when you are
done with this task, don't forget to get back your maximum opacity
for the eraser, and let's get back to our brush and see what else we
can do right here. So for example, we
can go and maybe add some pattern to the
color right here, so you can go and
maybe add some dot or something like that
to add some interest. And when we have the
result like that, let's also go with
the smaller size of the brush to
some other areas. So for example, to the
dress and maybe to the bow and some
other little parts, and we will go and add a few
more sparkles in that way. Now when we have the
result like that, let's go toward our one. Let's add a couple
of sparkles here, maybe to the stick
right here too. Then when we have the
result like that, let's go and add some
sparkles to the hair. As we have them on
a separate layer, let's go and find it firstly. This is our lay with the here. We will go to this
layer where we have our mint color and we will create one more
layer right here. Let's again start by selecting
the color that will be off white sparkles and
we will go again to this folder that we
used for our sparkles. Unit brushes, sparkle
full steel brush and go into the hair and starting
to add the highlights, the sparkles all over the place. You can again experiment
with the size of the brush that you
are aging the sparkle with and just go along the whole shape of the hair
and start aging the sparkles. If you want to
switch the color to white or to some other color, maybe something yellowish, you are welcome to
go and do that. If you did something, if you don't like the pattern
that you came up with, you are welcome to
erase some parts with the eraser and maybe try out something
different right here. When you're done with
the sparkles here, let's get back to
our brush library. We'll go to the calligraphy
folder, one Line brush. We will switch the color
to white one more time, and we will go and add
some dots right here to add peculiar little details. You can go again with a
different size for the brush. Try not to overdo it, try to create just enough of these elements so it doesn't
look too overloaded. When you are done
with this task, let's go towards the ice, and we will add some kind
of the highlights here too. So let's go toward As. We will go to Ayer where
we have our lines. We will create one more on top. And let's go toward our eyes. We will go to the
top left parts and we will start to add
the highlights here. So go with a big
highlight like that, create one more
underneath if you want to and do the same onto the
opposite part here too. So try to match the size right here and the position
of these elements. If you want to go a little
bit bigger with them, you are welcome to
go and do that. If you want to create
the different shape, maybe use the brush
that you have into your folder and create
theples in that way. Now let's finish up
creating some elements by going to the cauldron and
adding some bubbles here. So for the bubbles, firstly, let's go to our color palettes and select dark purple color. We will change the
size of the brush. Let's try out, for
example, 13%, firstly. This is a little bit too small, let's go slightly bigger, maybe something around 20%, and we will go and start to
create a bubble like that. We will go and change the
size to something smaller, creating the bubble inside, and then go in with some
pattern outside the shape. So you can again, go and
switch the size of the brush. Now when we have the
bubbles like that, let's go and change
the color to purple, and we will go inside with slightly smaller
size of the brushes, and we will be aging the
inside parts of the bubbles. Let's go through all
of these elements and let's start aging our inside
parts of the bubbles. When you are done
with this task, let's go and add maybe some sparkles right here
inside the crystal ball. So let's change the
color to yellow sparkle. Let's get back to
our brush library, unison brushes,
sparkles still full. And we'll go right here and add some peculiar little
sparkles right here. Again, try not to overdo
it if you want to go some other areas and
maybe add sparkles there, too, you are welcome
to go and do that. And when you are done
with these sparkles, we are mostly done
with our illustration, but if you want to go
a little bit beyond the frames of the illustration and add some sparkles outside. Let's go and do that. We will
need to go to our layers. We will create one
more layer on top. We will go and change
the color to orange sparkles and with the same brush that we
are using right now, we will go outside the
shapes and we will go and add some sparkles
here to fill up the empty areas and create some peculiar little
details outside the shape and add the final, the finished look for
our illustration. So again, go with different
sizes for the sparkles. Try not to overdo it. You can use different
colors here too. So for example, don't limit yourself with only using this color that you
have right now. You can go and
switch the color to either off white
sparkles or to white, and let's go and work
with this color too. For example, let's
go with some kind of smaller shapes right here or something.
Different right here. So again, try not to overdo it at enough of these elements, and when you are satisfied
with the sparkly parts, we can get back to our brush calligraphy
folder, moon line brush, use the same white color and go with some dots
right here, too. So add some little duets right here with this brush
that you are using, and when you are done, we
will do one last thing. We will go to some
of the lines and we will soften them up to
create a nicer look. So let's get back to our layers. We will go to our layer
where we have our lines. We'll create one
more layer on top, and we will tap on the layer and use the option
clipping mask. So let's go back to our color palettes and
select dark purple color, and we will start by going to this line that we have
right here onto our head, and we will go and recolor it. So manually very accurately, go like that and starting
to recolor this line. Probably it will be easier
to start with the very, very small size of the brush, go toward these outside
parts, make nice connections, and then change the size
of the brush something bigger and either with one line or with a couple
of lines like that, very boldly recolor
the rest of the lines. Now with the same color, we will go to these
little parts that we have for our folds and for our
peculiar little details, and we will recolor them. So going like that, starting
to recolor these lines, we also will go toward
these little parts. So basically, we are going
to main lines that we have inside and we are
recoloring them with this softer color. So
let's go right here. We will create the nice
connection between the shapes. We will go toward the opposite
side right here, too, and then with the bigger
size of the brush, recoloring the rest of the line. And going to these two lines
that we are created for the faults or for
some volume right here onside the skirt
and recoloring them too. And the very last thing
will be to go right here to the sock and we will recolor
this bottom line right here. Again, the same way as before, creating nice
connections between the main shape and adding the color to the
rest of the line and doing the same onto the
opposite side here too. Go toward the opposite side
and recoloring the line right here by the same way creating the nice
connection right here. Now let's take a look
at everything that we have right here
and if you are satisfied with everything
if you don't want to recolor anything else and
maybe add some details, we are done with
our illustration. Thank you for
watching this class. Let review if you
liked it and can tin subscribing for Mirkai
videos in the future. Looking forward to
seeing your projects.
 Uni Corn, ⭐Kawaii Art Enthusiast⭐