Transcripts
1. Introduction: There. Now, do you happen to have ideas that you just want to dump on a piece of paper in the quickest and
simplest way possible. And do you want to
start thinking in a more visual way and be able to go back to your
notes and kind of understand what it was that
you were thinking about? That's what I cover in
this class. Hello there. I'm Map, and I'm an
architect, writer, and visual artist, who's
based in At Salva EPA. I've run design session with mobile booksellers through a
Berkeley Prize program and conducted visual
brainstorming sessions and graphic recording
for organizations like the Packard Foundation, Best Western Plus
Hotel, and E Catalyst. Many of those experiences
involved doing some visual thinking with people who don't
usually do that, but adding that
visual element always made our meetings so
much more fruitful. So you won't need to
have a background in drawing whatsoever, to be able to think visually
and to take this class. It's all about
trying to get down your ideas with the least
amount of friction possible. This class, I'll be sharing two methods that
I've been using over the past decade or so to
organize my ideas on a page. The first will be about how to group together different
points or ideas, and the second one
will be about how I connect different
ideas on a page. All you need to follow along are a piece of paper and
any writing tool. It could also be a journal, iPad, or anything that
you take notes on. For our class project, we'll be creating what
I call a visual index, which you can have in the
beginning of your journal, sketchbook, or any other
medium that you use to be able to refer to it when you're taking visual
notes in the future. I also have one on one sessions open here on skill share
through which we can talk about how we can customize the different techniques I
share to work for your needs. In my bonus lesson, I'll be going through some
pages from my journals and sketchbooks to share how I use the methods I
share over the years. These simple techniques
that I'm about to share with you ing and coming up with different
solutions. A lot more fun. And I hope that it
makes journaling, brainstorming, and taking notes a much more effective
thing for you as well. Let's get started.
2. Class Project: Halo. For our class project, we're going to be making
a visual index using the different visual
elements that you choose from
within this class. We're going to have
that in the beginning of your sketchbook, journal, or any
medium that you use. This is just going to be
something that you can use for reference reasons so that
whenever you take notes, you can have a little dictionary that you can go
back and see, Oh, I can use this or
maybe I can use this method and go
ahead and use that. So Today, I think I'll be
making my visual index on Mdy dot graph
journal, which I adore. It's what I'll be using today, but I've used these techniques
on all sorts of papers, on large chart papers, on smaller, posted
notes, and so on. So you can use whatever
is available to you. The main thing you need
is a writing medium, like a pastel, a pen, a pencil, I have my pencils right here to my
color pencils, a marker. It does not matter,
and a writing medium. So a piece of paper, a notebook, a chart paper, whatever you want to start with. Then I encourage you
to take a picture of anything that you started for your visual index and upload it
3. Grouping Methods: Hello there. So here are some of the techniques I use to
group different ideas. And I'm using this
normal printer sheet. It's just a normal for paper. And I'm using this Japanese pen, the Marv drawing
pen, which I adore. It's in the 1
millimeter thickness. And I like using pens with bold that can help me
produce bold strokes because I feel
like it just makes me or forces me kind of to be confident when I'm just
making a statement on a piece of paper or just
writing down ideas or drawing. It just pops more.
And it just makes me feel like I'm being bolder
with my I don't know, with the ideas that I have. And it helps your
visibility as well. So I'm going to start with the simplest one
or the easiest one. I have in my resources section, the resources section
here on skill share, you can find a PDF file where I have compiled all of
these different elements, and you can download it and have it use it for reference
whenever you want. So the easiest thing or method
I have, it's not a method. You probably know this.
It's just bullet points. So dots or other pointers. So it's just It's just dots. You're saying this is point A, let's say, this is point B. You can go on forever, you can keep on adding dots. You can also add different
kind of bullet points. You can add circles, let's say point C,
point D, and so on. You can add arrows. Some people like to use
arrows, long dashes. It doesn't matter.
It's just a matter of listing things
down like this. You can even use arrows. The thing is, I'm going to
show you an arrow is going to appear in the connecting
ideas section. You can use one simple
drawing element for anything, so it doesn't matter. It's not really strict, and you might know
a lot of these. But I think having them listed
down like this would be a cool reminder if you
want to add a few more to your drawing box or your
visual ideas or ideation box. Speaking of boxes. The next one is just
boxes, simple boxes. I use boxes to sometimes, you know, just have two
columns, let's say, so I'll draw two
boxes like this, and I'll have like box, the first box and
the second box, and let's say I'll
have pros cons. And then let's borrow the point pointers from
the first example. I'll just list down
my different points inside the box within the box. This can fill up
like an A five sheet or half an A five sheet.
It doesn't matter. Sometimes I don't really
like using bold lines. Sometimes I like to
use just dotted lines, so it can be like a
dotted box like this. So I would just write down, let's say a paragraph, and then I would line
it with a dotted box. And I can you can roll
the box with any shape. It can be like a thin box, it can be a long horizontal box. Everything I share
here can have a vertical and a horizontal form. It doesn't matter. It's
just a matter of your need. Sometimes I will
write down something, like there will be a paragraph
that I write in my book. Or my sketchbook or whatever. And it's going to be like
after I write it that I circle it with a box because I wrote a lot of other things. And this can also help if you're doing
something on a piece of paper or you're taking notes, and then you have an idea that you want to
remember later on. So if you want to
kind of differentiate that part from the
rest of the notes, you can use simple
box, you know, just literally set it apart, box it, or put it in a different category,
a different box. So I also like to use these. I call them architectural boxes, ones which feel more
sturdy and like, you know, you're doing
a concept house plan. We used to do this a lot
in architecture school. That's why I call it that. So they're just boxes, but lines the lines kind
of cross each other. So there's wherever they meet, they kind of overlap. So this kind of just conveys confidence in
architectural drawings. And I think also in
other drawings as well. Next, I want to
talk about blobs. These are friendlier, cuter. I use these a lot. So these are just
like the boxes, but let's say you wrote
something that's, you know, very messy or kind of shapeless. You can just, you
know, draw a bubbly A blob around it or
a bubble around it. You can draw it double hatch
or double line the bubble. You can make it a dotted bubble. I like dotted anything. If it's a thin pen
that you're using, you can create emphasis by drawing over that
area multiple times, and you can do this to a
singular word or you can do it to a text section
that you wrote. You can do this in any shape. It can be like other
amorphous shapes like this. Let's say if you wrote down something that can't
really fit a box. Or you kind of want
to make more fun, and this is really cool for me to use with
arrows, let's say. So these serve the same
purposes as boxes. Sometimes I like to use
just normal circles, like just circle one, circle two, and connect them. We're going to get to the
connecting part later. I also like to use brackets. I use these quite a lot. With brackets, I just kind of like to use dotted brackets. Like this. So these are
kind of my go two brackets. But I also use solid
line brackets. And these can be vertical, they can be horizontal.
It does not matter. And let's say you're going to try to write down
a lot of things. Let's say you're going
to have a pointer or you're going to
write down point a point be point C, and so on. And then you're going to have another section around here or, like, you're going to
write something else here. You're going to write
something else here. You kind of just
want to categorize or kind of visually compartmentalize the different
elements in your page. You do this as you go so that it helps you fill the page more and more or kind of
continue to pour out your ideas on your page without kind of getting them
jumbled up to each other. Let's if you have
a bunch of writing here, another box here, another text box here, let's say you can do a dotted
line around here like this. Now, this kind of
it does its job. It conveys that This is a
separate thing from here. Let's say, especially if
they're close to each other, let's say if this continued
writing till here. And let's say these
two are similar. That's why you use the
dotted bracket here or the dotted line instead of the solid
line bracket here. The more you use these, the more I feel
you're going to kind of intuitively make decisions, little decisions like this
as you go so that you don't really think about
it much, and you do it. Not as a way to kind of make it aesthetically pleasing
or make it beautiful, but just to kind of compartmentalize
these different ideas on your page as you go, instead of reflecting on
it later on and going, Okay, where was I starting? We was I going? I feel
that sometimes you need this kind of freedom when you're working or when you're coming up with
ideas for something. So put the idea down first, put the point down first, then come up with a way of, should I, let's
say, circle this? Should I dot surround it
with a dotted bubble, Should I do something
else entirely, should I. So it's like these decisions
you can make as we go. Another thing that
I like to do is to kind of have a twist
on the bracket form. So let's say I'm going to
have point A or IDA A, and then point B IDA B, point C, and point
D on a bracket, but like with offshoot. So it's kind of
like a plant stock with different stems coming out, and you can do this
horizontally as well. And maybe you can apply this to any time that you're categorizing different points
that you have in your mind. And this is going to get a
lot easier with practice, and this kind of serves as a way to connect different ideas simultaneously as you're
putting them down. You don't need to take a lot
of time. Drawing these down. I also want to share how you
can use let's say one color, just as a accent color, to one help you highlight different points
within piece of paper, and two to help you kind of divide different points or
group different points. So let's say, going back
to my first example, this would look like, let's
say, I'll take the cello. This is my non brilliant
yellow marker. It's a water base,
so it's not going to leak It's not going to
bleed on the other side. So I can just circle the different points
that I have here. Let's say there's
a different set of points here that I think, these are this is a
completely different thing, and now I want to join what is here to here, and I can do that. Sneak peak into the next lesson by connecting this
to this point. I can even draw a little
bubble with a color. This is just if you want
to spice things up, you and I can write down my
different points right here. Let's write Idea two, Idea one. This can happen after you write down what you
were going to write. Idea three, and then you
can go on like this. These are how group different
ideas on a piece of paper. I'd be as easy as
listing them down. Or you can just start
being a little fancy, not fancy, but just a little interest to your page
and to your exercise, your brainstorming
exercise by adding color, by adding these
different shapes, depending on the mood of the work that you're
doing and depending on whether you want
to use this as a simultaneous
exercise for yourself. So I hope that this made sense. I'll be sharing my note. I'll be sharing this in the
class resources section, so you can download
it for your own reference, the grouping methods. And I hope you have
A wonderful time. See you in the next lesson.
4. Connect Your Ideas: So now I'm going to be talking about how I connect my ideas, which, again, this is even simpler than the previous
lesson that I share. We're going to have
or I'm going to share some of the little
droming elements that I use. The first one being
the most obvious one, one you've probably, which is the arrow and it's
different variations. So There's the
straight normal arrow, the solid arrow, there
is the dotted arrow. I frequently use this arrow to emphasize the end
point, right here. I use this arrow. Let me draw it a little bigger
so that it's more visible. I would just draw a triangle
and then come back. And double line it, so make it a thick triangle. This one doesn't turn out
very good, but it's okay. It can be dotted. I kind of do this to add
some lims to my drawings, an arrow that's not
exactly straight. So it can cur downwards
as well, like this. I like to do this
to my arrowheads just to kind or darken
them otherwise, just to bring attention to them, like the most attention. Here we go. I like
to do this as well. I like to make my
arrows more fun even, like have a little loop. You see, what's
the I don't know. I feel like this is
the advantage of using a pen with
a thicker stroke. It kind of helps to have these
little drawing elements. Otherwise, very simple
kind of standout. I would even use a sharpie if I had like a
thicker paper and if I didn't hate the
smell of a sharpie. So you can even use
like a thicker arrow, What is up with my arrows today? You can use More
dramatic arrows. Let's say feeling
a little bored, and you want to make this more fun for yourself.
You can do that. You can use a turtles
all the way down. I'll just call it the
turtles all the way down arrow because what
else can I call this? The book cover. Do you know the turtles all the way
down the John Green novel? So you can do this
kind of arrow, and you can hatch your arrows, you can color them. I like to sometimes if
I have a minute even. An arrow would be a nice thing to color because it's kind of showing going from
point A to point B. So let's say if you have a blob over here and another blob over here or these different
points, ID one, two, three, four, and then
you have a bracket over here, and let's say another
bracket over here with idea, x, y, z, then let's say you'll have an arrow that connects
them like this. You can make a little fancy, and you can You can leave a little space
in the arrowhead to color. Because I feel like this is or how you connect your ideas, can be a good highlighting
point on your page. Because once you fill
up an entire page with these different
ideas and points, not everything's going
to be useful for you, not everything you're going
to take to the next step, whether it's planning
a schedule or it's coming up with a
new skill share class, let's say, It's not
very likely that you're going to use every
single thing that you dumped. The whole point of
this is dumping, and I'm just sharing the why of the dumping or sorry,
the how of the dumping. So how you can use these different little
elements to kind of just connect one box. To another or one
grouped idea to another one part of
your page to another, you can, let's say, have
a huge bubble in here, and then have another
bubble across the page. And then you'll have all these different things
sitting in the middle. And you kind of want to
group them in their own way. Let's say you want to group this as a box, you want
to group this. In the dotted line. You can do this in such a rush. Let's say, now you want
to highlight that, oh, you realize while
you're working, that these two ideas
are very similar. So you're going to
take your marker, and you're going to I also like to highlight
my arrowheads. This can add just a little
pop of color to your page. If you color or if you just choose to
highlight your arrowhead, and this can be a
simple way to do it. So whatever ways that you want to highlight
certain points can really differentiate what's
important or what you want to take to the next
step from everything else that you can kind of leave
behind because this is a first step thing in whatever idea or whatever
thing that you're working on. This is the first step,
the ideation branch the idea dumping
that you want to do. So it's not like you're going
to use everything here. So idea dump. Again, So I want to show how, let's say you can connect
different ideas here. You can use a colored marker or you can use a color pencil, let's say, and you can
connect, let's say this one. To this one, this idea at this
point right here to this, or you can be like,
Oh, my goodness. Let me do something
a little more fun and go around in a circle to connect this list of group of ideas to
this group of ideas. You can realize,
oh, let me try to not create much of a mess
on the page because for me, the dotted lines help to make whatever connector
you using be understated, but at the same time,
it is connecting this point to, let's
say this point. So I can be like, Hey, I want to connect these
two points, let's say. So and you want to kind of highlight that this is
the originator here. So you can even highlight the different idea
containers here. I also want to
call them buckets. I kind of thought of
calling these buckets. This one, especially, I was thinking of
calling it a bucket, like just to make it
easier to remember. So I'll just this a
bucket right here. So this can just be a
container for your ideas. So This is it for my
connecting ideas lesson. One more tip I wanted
to share is that if you want to highlight
different points, it they don't have
to be connected. Let's say I individually
want to highlight this part. So I could use a color. I love using a dot or the idea of using a
dot marker for this, but if you don't
have a dot marker, you can use a color
marker like this. You can use a color pencil. You can even do something
as simple as like a star. So let's see here, I will
just do a little star. Right here. Anything that
you think will okay. I'll go back here and
I will notice this. I also like using this
sticker collection by slogy. It's a the sticker. Washi tape sticker,
but I've really been enjoying using these for my
sketchbooks, my notebooks. This is if you want to take
it to just the next step, let's say you have a
whole full page of ideas. You can then say, Okay, I want to refer
to this later on, let say put a
sticker right there, and then you'll go
back and you go, let me find the stickers. Those are the points that
I want to see later, so you will look at it. So these come in
different colors. But again, not necessary, you can use, let's say, anything that you think
will grab your attention. It can be a very big
twinkling star like this. And you can use that to mark. You can even circle
different points. So let's say I want to
circle point B over here. I can circle it to a with a
marker or I can circle it. This isn't just to
group the idea. You can also use the circling
to highlight the perc. So let's say I can highlight, I can underline like
double double double line. If that's the only thing that's underlined in the whole page, it's kind of going
to stand out to you. So these are the tips
that I have so far. In the next lesson,
we're going to take different visual elements from the connecting ideas and
grouping ideas section, and we're going to add that to our visual index or wherever
it is that you take. B.
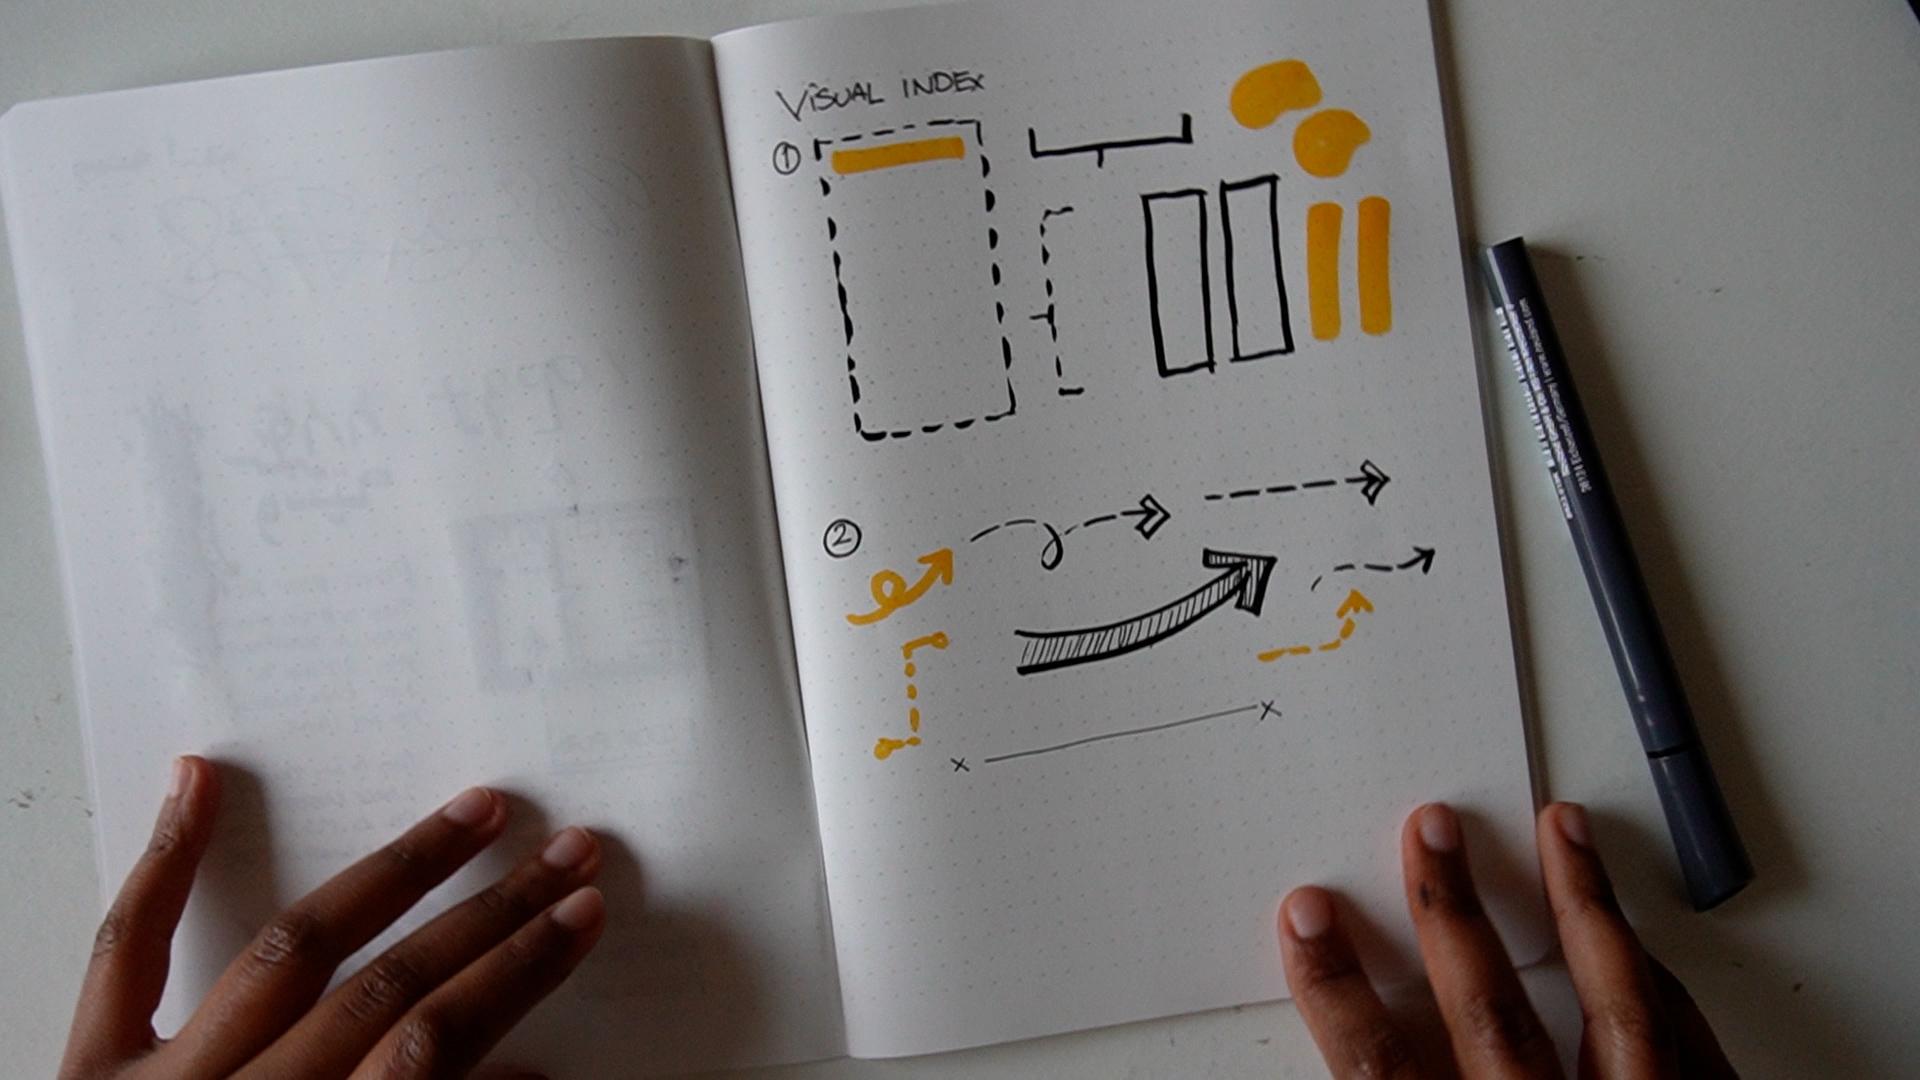
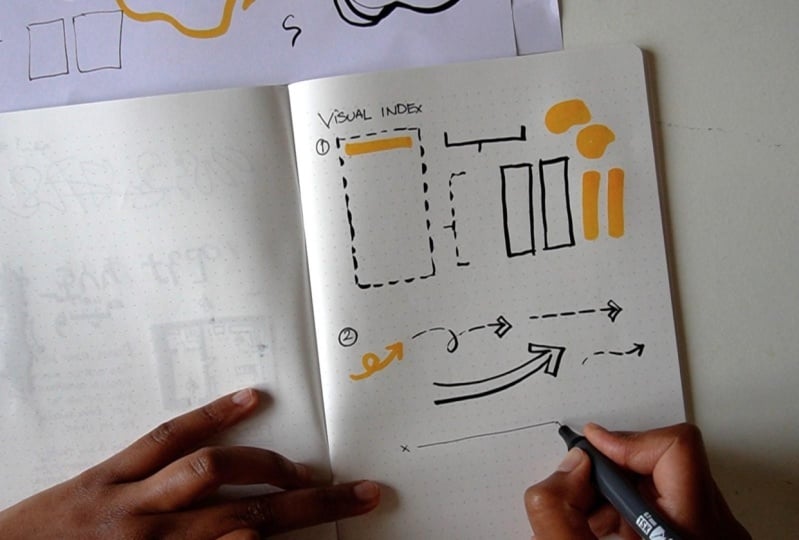
5. Create Your Visual Index: All right. So now we can
jump to our class project. We have our collecting idea
sheet and our grouping IDs. These are the arrows and the different little
doming elements for connecting ideas, and this is how I group my IDS. We're going to pick
a few of these to add to the beginning
of a new journal, an iPad, whatever it is
that you take notes, just so you can use it
as a visual reference. You can only take let's say five or six or however number
of elements that you like. I'm going to be using my
Mdy a dot grid notebook. And so far, it just looks great. I'm going to create
my visual index here. I will be using my I
don't know what to use. Should I use my I think I'll be using this non fine one sketch. This is in the 0.7. So I'll just say visual Index. And I'm going to number as I go. So I just wrote down
the first number, and I want to pick from the
grouping idea section first. So I want to pick I
want to pick this. I think this is my favorite
one, the dotted square. And I want to pick a blob. I want to pick this
and also a bucket. I kind of like my buckets. These. And my columns. I use my columns a lot. So we can pick your
favorites from any of the elements that I
shared with you and you can add it into your visual ex. So I add these from
my grouping section, and I want to add this one, this one and this from my Oh, and I also kind of like maybe this one for my
connecting idea section. So I'm just going to put that in the front and can I do
this maybe with a marker? Thinking of using this marker. I don't know if it's going
to be too much. I can. Why not? So I'm
going to start with my dotted My dotted box. And my what else is there? My bucket. I kind of
like my bucket here. And I kind of wanted to also
come in the vertical form. And I also is that
it for this one? Oh, I also kind of
like my columns. So I kind of probably
just do this. Colon one and Clun two. And my blows. So I like to I like to use
this technique to classify. I also like to do
that in column form. I'm going to do that.
Can probably also use that as a title to highlight
a title in the beginning. This is my first one and then my second one will be
for connecting ideas. I'm going to use my go to
flip to the other side. I'll take my arrows. So let's say, I want to
use a colored arrow. And I want to have kind of a dotted arrow like this. And I a straight arrow, but with a fancier edge. And is this? Is that all I picked for the
connecting idea section? Perhaps perhaps it is. Maybe I also, yeah, I also like this one. This is a hit or miss for me. I really like when I have
a good arrow on a page. I feel like it
really kind of makes it fun, makes it look fun. So I think this is it
for my visual index. I probably just do a little
I want to do it with this. A little marker to
say that this is it. I think I want to color this or maybe hatch
this Hatch color hatch. No. Hatch. This will also draw attention,
just like the color. Okay. Oh, I also kind of like
the connecting like this. You know, with the dots. So it's kind of like a line, but a bit more fancy. So this is it for
my visual index. I hope that you made a
visual index of your own. I think this is going to help or it's going to be a pretty
way to start a journal. So now whenever I come
in here and start ID, the brainstorming,
doing any of that, this is going to be a
nice reference to follow. In the next lesson, I'm
going to be showing you a few more examples from my sketchbooks and for my
journals over the years. Just to show you how I use these different visual
elements and to see you there. A.
6. Examples From My Journals: Okay, so I just want to
share a few examples of how I use the drawing elements
that I shared just now. And let's start with
something From very long ago, I believe this is
from 2016 or 2017. I'm not sure. And I used I just wrote
something in the middle. It was during class. This
is a class class note. And he was talking
about building systems. It was electro on
building systems. And by the way, these
are skitch books that we made in
architecture schools. So yeah, some of them got
really worn down, worn out. And so I wrote something here, and then I would just
kind of as you can see. I'm writing over my old notes. Added these arrows to show
the different elements. It wasn't written like this
on the lecture presentation, but I wanted to show that
this is the central thing, and everything else was
kind of coming out of that. So these spider legs
are just kind of pointing to the all
these other elements or all these other things
that I have to remember. So Next, I have another simple example from my I made this little
very simple sketch book. It's very few pages, just to kind of sample markers. So I just divided the pages into different sections
with a yellow color pencil. I actually used this one, and I would swatch
the markers on there. So I wanted to share this one. It was a graphic recording
job for a client. I would just list down things
that I needed to remember. So this is kind of a to do
list that I have for that day. So for one, this is
something that came up on the spot or ideas that I kind of wanted to execute
right there. And I couldn't have
done this beforehand because I kind of knew
this when I was there. So You can see the
dots that I used. I also added circus just to add checklists so that I can
take off whatever I did. And so I can remember. I don't know why I did this five times the
adding borders. Maybe it was the borders
for day one, Day two. I don't know why the other two. And so they are the
main categories, which I used Roman numerals for, one, two, three, four. And then they were
the subcategories under the main categories. So the subcategories,
I just used a bullet, you know, the bullet point. A dot. So you can do
this on a blank sheet, you can do it on a grid sheet. But it really helps you organize yourself on a blank
sheet, especially. The remaining sheet, still, this is just my paper. This was I mean, this is
just for me to use right there for the client's purposes or for the job that I had. So I was also testing out
the marker that I had. This was a big marker that I kind of wanted to check again. This is Nolan big one. And so I would check
the different inks. I would even write reminders. So this was something that I would add to my graphic note, and I don't want to forget. I circled them or I wrote
them in a different ink, so it wouldn't confuse
me or it wouldn't jumble up with anything else that I was writing on the paper. So I have a very simple example. This one is a little
more elaborate or a little more maybe jumbled up, but I used the same
techniques that I mentioned, so I used my dotted
container bubble circles. I used these arrows and lines, this lines just to show where
there were connections. And I kind of used a larger font to depict something that was
most important to me, or I thought would be a
central figure in my planning. I was planning for
the coming year in the beginning of the
year when I was doing this, or I believe it
was the end of no, I think it was the
beginning of the year. So these were the different
ideas that I had. I was just putting them down. So I was just thinking, Okay, write down a paragraph. Or write down a
note, take a phrase, take whatever idea that it
is that you have right now. So I was thinking of what
do I do next and what do I kind of put out as a project. So these two dos, I would just kind of do in
little paragraphs like this, like this pitch partnership, or I want to or it
could be statements, you know, reminders
that I don't want to forget right then. So let's say if
there were things that I was more tentative
about, I would use Or I could use
these dotted lines, dotted line bubble or square. It was something that
I thought firmly, yes, I need to include
this in my list. Then I would use these kind of more solid line
circles or squares. I don't really like using
squares in my work. I feel like I kind of want
to have something with something with more curves or something more
circular and blobby, just feels more friendly to me. And some things I kind of left out of the island sea,
like things like this. I didn't really circle already. Like, I just kind of
left them in floating. But because everything
around them is circle, you kind of know that
they're on their own. And it also helps that, sometimes I just vary my
handwriting a little, so I would use a
lower case font here, but then I would go back to my regular bold writing
right under it. So you kind of know they're talking about two
different things. But I could have even, you know, circled this just to kind of differentiate or group
this whole thing because this is
one idea kind of. So this is another
way where I was or another instance where
I was just brainstorming. I was just thinking on paper
of, Okay, what do I do? At the end of this,
I didn't kind of I don't think I had a proper decision of
what I was going to do. But I kind of wanted
to let it out. And a lot of this I kind of left or don't really
consider anymore. But I wanted to put
it down on paper and to ponder about it
once it's all on the page. And these little drawing elements really
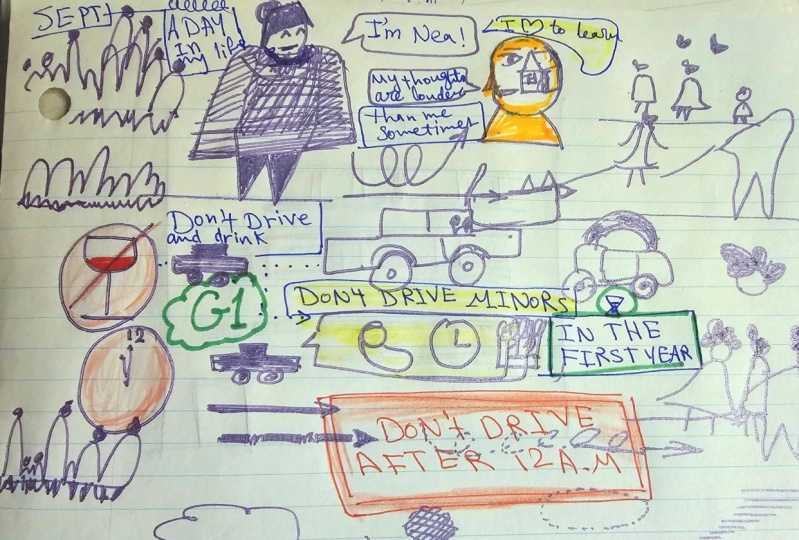
helped me with that. Next, I have my Other
slightly elaborate example. This is from back in 2021. It's a bit more disorganized, but it still has some of the same techniques
that I mentioned. I just kind of numbered. And when I number my
points, I circle them. So I don't just write like
let's say one like this. One, and then dot.
I would circle it. And I would kind of
emphasize the circle just so that it's something
that I pay attention to, and I go, Okay,
this is the order, or this is kind of what I want to prioritize
or something. So Wherever your point starts, I think should be clear, so you can mark it either
through numbers or through if you're going to put a box around
the whole thing, then you draw a bubble
around it or something. Just make it clear that, let your eyes have a guide
or something to follow. These were two, I believe
or three different days because I stopped thinking
about writing ideas. The title is right here.
I wrote down writing. Sometimes I use a title or I write a title at the very end. Sometimes I don't
write a title at one because the central idea
is going to be there, let's say in the
middle or somewhere. Here, this was the central idea, and I kind of differentiate that by making it the thickest. And since I know what this is, I didn't really feel
the need to say brainstorming about
next steps in my life. I just wanted to be
all about the ideas, just the ideas and not about coming up with the titles and, you know, turning this or packaging this into
something it's not. This is a simple to do list. This right here is a
simple to do list. And I just listed the things
down with the numbers. So it was just like one,
two, three, four here. I listed down
something else because this was another
idea that I had. This one is on the messier side, but it still kind of
served me at the time. It was an idea dump
that serve the purpose. This is another little sketchbook
that I made from 2020. This is another to do list. I was quite busy in 2020,
actually. Surprisingly here. I was I was trying to kind of
finish a little project by myself before I got summoned back into university
to finish my pieces. So I had the d I had the days
written in a bolder pen. This is another way that you can differentiate the sub or whatever points you
think are clear. Let's say, or you
want to highlight. Let's say you want
to do to do list, or you want to do a little
plan of your week ahead. Let's say in that case, you can use a thicker pen
or marker for the titles. So let's say the
dates, Wednesday, Thursday, Friday,
Saturday, Sunday, along with their dates,
or you let's say highlight them with a
marker or something. Just to bring your
attention to it. You can even let's say circle Or draw a square box or
something around it just so that when you're
quickly looking around, you can go, k, this is my
Thursday. This is my Sunday. This is my but to me, it was efficient to
I had another pen, so I was using that darker pen for the for adding the days. So the little points
of highlight. You can even differentiate it
by making that part bigger, just like I had done in my brainstorming for
the coming year. So that's what I did here. I also sometimes do this This
is kind of just journaling, like, just journaling about
the day as we were going. We had a very prolonged
power cut in July of 2020. And apparently it was on the 14th of that month of July that the electricity came back. I was Tuesday, sorry, Internet.
It was an Internet cut. It was 14 July on Tuesday. And I wrote down that this is when the Internet came back. So these old days, I believe, wouldn't
have Internet. And I was just journaling
what we were doing. So I was writing down that I recorded or I journal that
day or this was a bad day, let's say, I used the red
pen here. I don't know. But I probably had it at hand, and I wanted to bring
attention to this section. That Saturday of July
2020 was not good. 11 July apparently,
for whatever reason. And you can use a
different color pen to highlight something
on your page, just like you can use
a different took size or different thickness
of pen to bring attention or a different size of text to bring attention to what you want
to bring attention to. So this is another
example of to do list, and I used dashes here. We can see. These are
I use some dashes. I used points right here. Use these little bullet points, little circles like this, these little tiny circles. And final example I
want to share today is from this is a beautiful
leather notebook that I got back in 2020,
also, I believe. This was from a bible study, and as you can see, I didn't use a lot of elements, but this was I used the bullet point
over here, another point. And on the side,
I also wanted to remember something
that I wanted to do later and or something that I wanted to
remember for later, let's say to write about. And I numbered these down. So you see this little line
that I have over here. This I used to kind
of differentiate the to do list from
my bible study notes, and I was taking
notes of what people were saying. I colored. I had a color pencil, I believe. So I would highlight
different sections or this I found important, and I would circle words, circle different words
within the text, write down who was saying
what and I also used arrows, this arrow and a cloud and this fancier
arrow here to kind of make a visual note of something that our
moderator was saying, I believe, our bible
study moderator. And I also do that here. This is another
bible study note. This has a lot more space. I drew a seed right here. What does a wet seed look like? So I kind of just drawing what was coming to my
mind as we were going, and I would write or kind of cut off a section for
different notes right here. And I even added
a little visual. You can add little doodles
as you go as well. I feel like that really kind of helps you remember whatever
you're taking note of. And so as you've seen, I've used this to take notes, whether in school
settings, bigle study, wherever it was that I wanted to learn something or to
remember something. And to have a nice, beautiful, visual
outfit, as well. And I've used it for my
personal purposes as well. And it was helpful for both. So I hope that these little elements or
visual elements help you. And I hope to see you there.
7. Closing: I want to thank you for spending your precious time
with me today, and I hope that
this class kind of nudged you to pick up pen and maybe a journal that
you've abandoned or a piece of paper and
get going on a page. The whole point of
this whole class or the series of classes that
I've been doing here on Skillshare is to
use the bias that our brain has for visual information to
your favor so that when you capture
notes in a way that involves some visuals
or is in a way that's fun or just kind
of more intuitive then it would be
more likely that you remember what it is that
you've been writing about, whether you're taking from
someone else's notes or ideas or you're coming up with your own and you're
brainstorming on your own. And I hope that
you are a lot more comfortable with thinking
visually by the end of this. You're invited to check out my other classes
on visual thinking right here on skill share. Now, if you make
a visual index or even start adding a few
visual elements there, I encourage you to take a
picture of what you made, or if you're working on an iPad to take a screenshot or to export your picture and to upload it in the class
project section. So want to remind you
that I'm open to one on one sessions right
here on skill share, just in case you want to get
into more detail or you want to customize the techniques
I share to your needs. Thank you again.
And I hope you have an abundantly blessed rest
of the day and beyond. Bye.
 Winta Assefa, Architect & Visual Communicator