Transcripts
1. Introduction & Materials Overview: This going to end up with
something like this. Hi, I'm Mikel Nau a lettering artist and
designer from the Philippines. I've been lettering since 2014, and beyond creating
lettering art and designs, I also teach
workshops, give talks, and do live art demos both
locally and internationally. I love designing lettering
tools, both annual templates, and digital brush
toolkits to help make the process easier
and more fun for everyone. Welcome to my digital
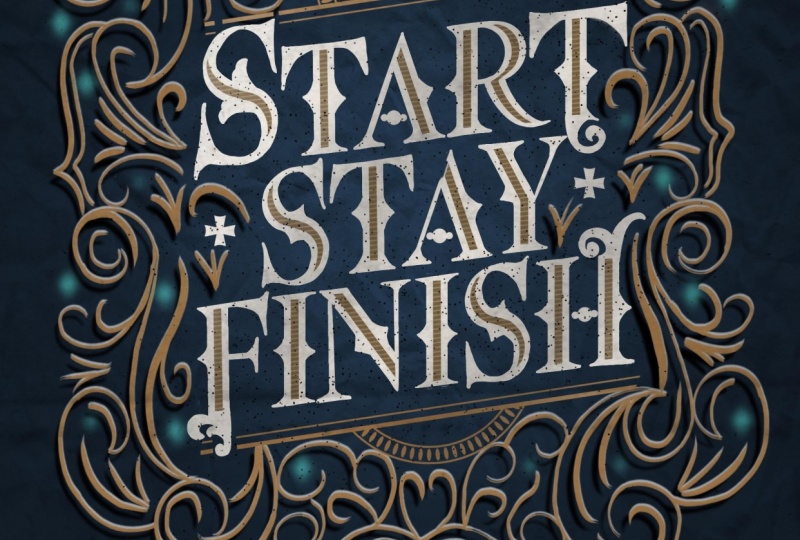
lettering workshop. The project is going to be a vintage lettering
piece like this. A nice coat in the
middle surrounded by this beautiful, intricate
ornamental design. We will be using the brushes from my
vintage lettering pack. If you don't have this pack, you might need to manually
draw some of the elements, but the process is going
to be straightforward. We're going to start
with this lettering. Oats. We're going to add
details, as you can see. Then the next step
is we're going to start drawing our letters. Then yeah, we're going to
have something like this. Then after that, we're going
to add in some elements. Next is we're going to use the ornamental stamps
of the vintage pack. And then after that, we're
going to add some shadows. And next is we're going
to add some reflections. After that, we're going
to add some glowy effect. And the next is
we're going to add some texture to make
it look more vintage. I hope you're
excited. Let's begin.
2. Understanding the Process & Tools: Hello. Welcome to another one of my digital lettering workshops. For today, the project
is going to be a vintage lettering
piece like this wherein we're going to have
a nice at in the middle, and then it's going to be
surrounded by this beautiful, intricate ornamental design. So before we start, I just want to go through the process so that it's
going to be easier for you to process or
maybe it'll help you picture what we're
going to create as we go along rather than not knowing what's going
to happen afterwards. So let me just quickly
share with you the process before we start
recreating this piece. But before that, we will be using the brushes from
my vintage ring pack. So if you don't have this pack, you might need to manually
draw some of the elements, but the process is going to
be straightforward, anyway. So if you have this pack, make sure to download it and impart it into
your Procreate app. So to get started, we're going to start
with this lettering. With vintage lettering, if you notice other vintage
lettering work, you'll notice that it seems like the letters
look too perfect. That's because for
vintage lettering, it is advisable to use a font to use a serif font as reference when
drawing our letters. So yeah, that's why I don't really recommend you to draw everything from scratch. You can do that if
that's what you want, but let me show you the
easier way by using fonts, but we're not going
to use it as is. We're just going to
use it as reference, and it'll help us
space our letters properly because we don't want the spacing of our letters to
mess up our final artwork. So we will be using a font, and then we're
going to manipulate and then we are going
to redraw everything from scratch by inserting or inputting inputting
our own twist to it. So we're not just going
to trace the font as is, we're just going to
use it as reference in the sizing and
spacing of our letters. So we're going to
start with our font. When you type it down,
we're going to manipulate it like this because personally, I like the letters to be at a slope like this,
it's not horizontal. As you can see, if you notice, it's going to be sloped a bit. I feel like a simple
manipulation of the text like that
adds so much to it. And also, if you notice
the S is bigger, so we're going to enlarge it. So basically, we're
just going to enlarge it. Enlarge the font. But if you enlarge the font,
it's going to be thicker. But we're going to
manually draw everything, so it's okay to
manipulate or to scale or resize certain elements
because we're going to redraw everything with
more consistency later on. So we're going to use a font, we're going to type
down our coat, and then we're
going to manipulate it to make it look more interesting. That
is the first step. Second step is we're going to add details,
as you can see. So vintage lettering designs, if you notice, the words
are not plain and simple. Some of them have little
details like this. So we're going to use the
vintage lettering Pack. The Pack has some stamps to make us easily add
some designs too. Words. Aside from edge designs, we're also going to change the serif design of
some of the letters. Usually, it's the
first and last letter. But since our first letter is the letters, it has
a lot of curves. It can be a bit challenging
to redesign that. So we're going to redesign some of the serifs
like this, this and this. So these are just stamps from the Vintage Pack. So,
yeah, there we go. We're going to stamp
in just to realign it, for example, rotate it a bit for the letter A,
something like that. So you have a lot of
options in the brush pack, but this is the one
that I went with. So that's the second step
to stamp in some designs. Then the next step
is we're going to start drawing our letters. If you notice some vitash style, or most vintage tiles, you have some designs on
the inside of the letter. But for this specific project, we're going to use
the scroll brush. So this pack has a scroll brush, and this is where
you're going to use it because I I mean, before I got some
questions asking, Hey, how do you use this
brush or where are we going to use this scroll brush? Scroll brush is like
you have two lines, and there's a gap in the middle. So is where we're
going to use it. So instead of drawing one and two, like two
different strokes, it's just going to be
one simple stroke, and we're going to
get that consistent with or space in
the middle, always. So that's the advantage of
using this scroll brush. So we're going to
use the scroll brush to brush in the thick parts. It's okay if we go over
because we're going to clean that up later
on the next step. Oops. This. So this from this, we added design, added the
middle part or the scroll, the stroke, the brush
stroke using the scroll. And then we're going to clean
that up from this to this. So we're going to, like, draw the serifs and draw in, like, the edge designs. And then, yeah, we're going
to have something like this. So from this oops, this this to this. And then after that,
we're going to add some designs on the inside like this simple the next is we're going to
oops. It's happened. Okay. Next is we're
going to color it. So I usually leave
coloring after I finish designing the letters because when designing
the letters, you want to focus on the
quality of your letters. That's why I always work
on black and white. And when I finish designing the letters
or drawing the letters, that's when I start to color it. And aside from coloring, if you notice the
letter A, instead of just the horizontal crossbar. I use one of the
stamps to design it just to give it a little
bit more personality. So aside from coloring the
letters and the inside design, we're going to swap out the horizontal crossbar
with a simple design. Then after that, we're going
to add in some elements. So this is just some
border stamps and circular stamps that we
just merge together. Also added some designs here and add a little
bit of design here, which you can just
draw anything, but I think this one, I just got some stamps from the Vintage Pack to
add some design. It doesn't really have
any meaning to it. It just looks nice. Next is we're going to
use the ornamental stamps of the vintage pack to
assemble this piece. So we're going to have a top and the bottom crown and then
some designs on the edge. Just make sure that they
touch each other so that is a nice smooth flow. Then after that, we're going to redraw everything with pressure. So this is the before after
you want to redraw everything because we want it
to look more natural and have the thick and
thin stroke combination, which makes our design
look more elegant. Okay. And then next is it
feels a bit too empty to me. So the reason the next step
for me is added more details. As you can see, it is before, just a few strokes,
and this is after. So basically, we're
just going to manually add some strokes just to fill in the empty space to build
our composition better. And then after that,
we're going to add some shadows from this to
this, adding some shadows. And next is we're going
to add some reflections. So we have some
brushes for this. After that, we're going to
add some glowy effect just to this piece some life. And the next is we're going
to add some textures, the background textures to
make it look more vintage. And then we're going to
add some grainy effect and then add some spotlight
and some more texture. So from this, we're going to end up
with something like this. So I hope you're excited. Let's begin.
3. Preparing the Quote & Lettering Guide: Include this file in the
downloadable section, so make sure you download
this Procreate file. So basically, this is just
appropriate file with a quote. So I already typed it down, so we can skip that step. And then I also included the color palette right here
so that we could just color pick and then color it easily and exactly
as how I would do it. So if you haven't
downloaded this file yet, please download it and import it to Procreate by simply locating the file from your folders or selecting it and then
sharing it into Procreate, which you should have
this file right here. So once you have imported the Procreate template
file, let's now begin. So the first is to manipulate this into a
more interesting layout. So make sure you
select that layer and then hit transform and
switch to distort. So we're going to just slightly move it up just
a little bit, like that. See that? So before and after before, let's
do that again. Go to the transform
using this tort. I'm going to hold and press this middle anchor
point right here, right middle to nudge it
like this a little bit. There we go. After that, want to
emphasize the first word. So we're going to
select using free hand, select the letter S like this, they hit transform zooming out. Then that's just oops. We're still on distort,
switch to uniform. Then let's just increase the
size of this a little bit. There you go. Like that. That looks perfect
before, after. Again, don't worry if this is thicker because
we're going to redraw everything with
more consistency.
4. Designing Your Vintage Letterforms: The next step is
we're going to reduce the opacity so that we can
stamp in some designs. So after you reduce the opacity, open up a new layer because this is where we're going
to add the designs. We don't want to add it here on the same layer because we
want to move them around. So go your brush set and then
look for the vintage pack. So we have vintage composition
and vintage lettering. So if you're going to work
with a different coat, you can explore these
different composition guides, dump it in and then just
fit your words into it. So for the first step, we're going to use the
vintage lettering brush set, and then you're
going to have these. So you have these sections. Go to the section for letters, stamp edges, and then we're
going to choose a design. So for the big S, I like this edge flower. So let me just switch to black first and then zoom in
and then stamp it in. Okay. So if you stamp this,
it's going to be vertical, so all you have to do is just select and then rotate
them like this. Okay, Magnetics is still
turned on and snapping, so I'm going to switch
that off so that I can adjust this to
however I want. And then with the
uniform turned on, so just try to position it
how you want it to look. So maybe something like this. It's okay if it's not touching because we're going to manually
draw everything, okay? So we're done with that. Next is the edge spike
edge. Here we go. So you can, like, try to resize it to get
the perfect size for you. Cate. Seven. Okay. I think this is the right
size, about seven. Okay. So I'll just
tap, tap, tap, tap, tap, tap, tap, tap, tap, tap, tap,
tap, tap, tap. And then I'll just select things manually and then
just try to position it. Maybe here. For
the A, of course, you have to rotate
it, right? Here. This one may be here. So basically, I'm just trying
trying to position things. There you go. I want to position it somewhere
in the middle. For the S, slight it, and then rotate it,
they divide this. T, try to position
it to the center. For the A, we're going
to rotate this again, then move it down
to center it a bit, for the Y, maybe here
on the diagonal part. And then for the F, select this, move it up, I select it. I'm using two hands. One to select these
controls over here on top, the selection and transform, and the other is on
my pencil so that I could easily select
it transform and rotate it to speed up my
process because I don't want to spend so much time
doing this manual work. So it here, the S rotate it
again here in the middle. And then for the H, Okay. So this and see the other side. Woops. Let me just
center this a bit more. Like this. Perfect. Okay. We now have our edge
design guide right there. Oops. Next is we're going to redesign some of the serifs just to make our
piece look more interesting. So here under the
Vintage serif stamps, you have a lot of different
options to choose from. Okay? Example this one. The T O is too big.
Okay, like this. Whoops. I'll just reduce the
size, stamp it like that. Here. I'm going to select
this, then just smooth it. I'll try to increase
the size a bit. Get this perfect. That looks perfect, right?
And for the age here on top, there's some space here that I can fill it with the design. So I think I'm going
to choose this one. Stamp it. Then we need to
select this, transform. Woops. I want it to
be vertical still, so I'll just flip
vertically like this and then resize this. And reposition this maybe here. This looks nice, right? And for the F, I feel like
I can add something here or do something with the
F. So maybe something. Let's try this one.
Okay. Let's select this. Move it here. Like that. Okay. There we go. You're now finished adding or adding the guide for
the design of the serifs.
5. Creating Letter Gaps for Vintage Details: Reduce the opacity so that it's not going to be too
distracting while we're going to add in the
scroll brush stroke. So using the brush set or
going back to the brush set, let us find the scroll brushes. So here Oops. You have three right here. So this is the narrow gap. Then the next is the white gap. The next is the
lined middle, okay. So basically, it's up to
you what you want to use, but I'm going to
use this white gap so that I have more space
to add some designs. So I'm gonna undo
those and make sure I'm working on a new
layer like that. Okay. So basically, what
we're going to do is just draw a
straight line like this. Let me just resize this. Okay? You can choose how wide or how big you
want your brush to be. If that's too small. So let me just Yeah, maybe increase it to 31. Okay, I think this
is the perfect size, or let me make it slightly
bigger. Two third two. Yeah. That's perfect. So basically, this is
what we're going to do. Just draw it a straight line like this down in the middle. There we go. See that? And for the A, we want to, like, rotate the canvas
diagonally a bit. And then just position it
somewhere we think it is right. Okay, so the vertical
ones like the T, the straight ones are easy,
like the easiest to do. For the diagonal ones, you might want to rotate
your canvas a bit. But what about the S? So let's go back to the
letter S. This is harder. So what you want is
I want to make sure that When you do this, it's going to be vertical. So you want to align your
what do you call this, your canvas or you
want to rotate your canvas such that
this spine is vertical. Like that. So just draw, like, a short line, anything the line so I
could move it easily. So yeah, just make a little or like a short
spacing like that. In the middle, when
you're done with that, we're going to draw
like an arc like that. Don't worry if it's ugly
because we can always fix it. So on anything, where in the arc is going to go
smoothly from there. Like that. Do you see that?
Okay, let me do this again? Okay. You might
need a few tries. There you go. I feel
like this is smoother. If you see that, I'm
going to connect it here and make sure
it's within the guide. Do you see that? So I'm gonna do that on the
other side as well. Like, draw a curve like this. I'm holding the pen so that
I could adjust it even more. So I'm going to edit the
arc and then try to get it. There we go. The, if we have some excess,
like I said earlier, we're going to clean
this up later on. So down that. Next is the R. So the R, this is going to
be vertical line. So I'm going to hold my
fingers so that it locks at a vertical angle. And then for this
one, this is curve, so let me just curve it nicely
like this. You see that? And then I'm just going to
edit that and move it to position it nicely like that. Then this one like that, this is like a
curve There you go. You don't have to
follow it exactly. Yeah, we're not going
to trace the letter. We're just going to
use it as a guide. There you go. This one is just going to be a straight
vertical line like that. For the S, let's do that again, rotate it such that the
spine is somewhat vertical. Then just add, like, a
little straight line right there before you Oops. I'm going to rotate this
slightly draw a curve, hold your pen so you can move it and edit the arc
such that it's going to it's going to merge or fit nicely here and
do it on the same. Do the same thing
on the bottom part by drawing a curve,
holding your brush, until you can precision
it nicely like this. Whoops. There you go.
See that. Easy, right? So for the for the T and A, I'll just copy paste these two so that I don't have
to worry about those. And then the Y, we're
going to rotate a bit, edit the line. So let me just move
this to the side. I just want to make
sure it's aligned to the curve of the Y, like that. And then whoops, make sure I'm vertical or like
the canvas is vertical. Then just strong this for you, come on. Like that. Perfect. For the F? Draw a vertical line for that, for the I as well, draw a vertical line. If we need to move
it, feel free to just move it, this, then. Okay. Edit. I want to
make sure it's aligned. There you go. They position
it here like this. The I, I'll just copy
Past and the S as well. I'll just double keep that
to make my life easier. And for the H, I'll just draw two vertical
lines like this. If you need to move
it, move it now. It's easier to adjust things at this stage rather than later on. Okay, we're done with
this step. Okay.
6. Sketching Vintage Letters Using the Ornamental Guides: Next step is just to draw
and finish our letters. So I'm going to use
what am I going to use? Maybe this round lib. Okay. No, I feel like that's too
thick, so pointed nib. Okay, so that I can work
with pressure this. If you notice, I have
pointed nib one, pointed nib, that's just point
and nib. This one has one. Basically, this is just
like a duplicate of it, and I use it for a
different project, and I adjusted the
brush a little bit. That's why I have
this pointed nib one, but don't worry about it if you don't have this because
we're going to use this pointed limb because as
someone who designs brushes, I can't stop myself but tweak certain brushes to
fit certain projects. So, yeah, I always duplicate
and adjust things. And since I don't want to
change the original brush, that's why I just duplicate
it and adjust the duplicate. So, yeah, that's just a
little bit of insight on the little weird little
extra brushes that you see. So this S is harder. Let's just start with
letter T so that I can show you what we are
going to do next. So the next step is
to clean this up and draw our final letter by
using all of these guides. So as you can see, the T
is what do you call this? It goes beyond this top bar and beyond the
serif or the base. So go ahead and
grab your eraser. So I'll just use eraser and just erase this part a
little bit right there, so that it's going to fit
the letter T like that. Okay. Next is we're
going to fetch the letter So this has, like, a Top bar like that. Okay, I want to
break this lower. And there. Take that. Okay, that looks nice. I want
to break this serif lower. The curve it back up like that. Okay. And this one, I just want to shade
this a little bit, give it some space, what I bet. And then I'll just Oops. I'll just color drop it. But I'm going to make sure that I adjust the threshold so that it's going to be completely
covered like that. And then from the edge, I'll just trace over
like this. See that. Like that smoothly. Here we go. For the T, the serif the
bonaparts going to be a serif, so I'll just manually,
draw it like this. Then I'll just shade this
a little bit so that it's not too thin down below. There we go. So this is what we're going
to do for all the letters. We're going to draw the letter by using all the guides
that we have so far. Okay? Now, going back to the S is going to
be a bit harder, but let's start with
this edge design. Like that, you see that? Whoops. I knocked down IV. Okay, stay here, IV. Do. There you go. So I'm just
going to try to draw this. As you can see,
it's okay if it's not touching because basically, this is just some guide to help us draw it more
consistently, okay? Then with that now
for the S, for the S, I kind of want to make
the surf like this with a little pointy tip on top and the bottom at
the bottom, as well. You go. Then now let's just try to draw this more consistently and smoothly
like that. You see that? Okay, the other side
as well. There we go. You see that? Let's
do that here as well. This one is going to
be pointed like that. Connected to the curve. Okay, this the curve. This curve it. So basically, I'm
curving connecting this to this by following
the font guide. They're just customizing
the surf design. There you go. Okay,
I feel like this could be smoother still. So let me just add
another curve stroke like this and make this part thicker because I feel like we need to balance
it a little bit more. There you go. Here's
your letter S. So if I hide the
guides, there you go. Pretty, right? I feel like
this feels a bit off, so let me just erase that part
and try to recreate this. So maybe I'll just add, like, a curve stroke like that, just to design a
little bit more. What do you think? Yeah. I think that's nicer. I feel like this is too big, the top part, because the bottom part has
to look heavier. So I think I'll
adjust this as well. I'll just add, like, a simple
curve and connect it here, especially when this is our first letter,
and it's bigger, so we need to make this stand out a bit
more. There we go. It feels too thin here, right? So I'll just make a sticker. There you go. Now the S looks more stable
compared to this one, where it feels too
thin over there. There you go. Okay, next
letter is a letter A, let me just erase
this a little bit. Okay. So I'm going to press real hard right here so that I get a really nice thick
line like that. And then try to close this that. And then draw in my cerus. Try to get it as
smooth as I can. There you go. But again,
does it have to be perfect? This is still hand lettering. I'll increase the brush or the
eraser brush a little bit, so it's going to be
easier to erase. Okay, here you go.
Curving the serif. And here, I'll just
add some thickness. Oops. There we go. If you remember, we're going to change the horizontal
bar, right? So I'm going to
leave that empty. And for the edge design, I'll just add it to one side because if we add it
to the other side, it's going to make it
look super messy there. So we're just going to
use that guide to draw our own spiky edge
detail like that. There we go. A is done. Next is a letter R. So I just need to erase
this top part a little bit. Here we go. Curfas. Then I feel like I need
to make this thicker for consistency because
this is too thin, right, compared to
this thin stroll. So I made it thicker, as well as you can
see right here. Make sure you do that
and here as well. Make this thicker, just a bit. Then erase this excess. You want to make
sure that the gap is nice and clean like that. And also, you want to
create like a gap here. Because this thick
part or, like, the hollow part is going to continue from here
to here, right back. So I'll just clean things
up a bit like that. There you go. Nice and clean. There for the serif, like this, manually curb this manually curb this
to cause the serif. I make thicker. Okay.
Then for this one, let's just completely
clean this up and re draw this bottom part to make
it cleaner and smoother. Like that. Nice,
right? There you go. And for the T. Okay, let me just erase this top part, then try to redraw that. But if you remember,
consistency, we made this thicker and I mean, we made this lower, right. So make sure you lower
this serif part as well. Then we curve all
the way up here, curve it all the way here. Then make this thicker
like what we did. Let's just fix that pointed
tip and color drop. There you go. For this
one, there you do. So we just follow the edge guide by drawing this from the edge to the pointed tip back
to that edge right there. And for this one,
let's erase this because this needs to have
unique design, right? So I'm just following
this guide. Okay. So I'm drawing an arc and holding my brush
because I want to make it as nice and smooth as I can. And I want it to be adjustable for need, as well. There we go. Do I go to draw this curve
by curve. There we go. So I'm just tracing this
edge guide. Fill it in. Like fat. This is gonna
be a fritic line. Read it here. And prove
to coast this nicely. There we go. Now, I'll just
extend this bar right here. You fill this shape, and then just add some thickness to that and
fill this in. There we go. The letter T is on. Okay, next for the
letter S, same thing. Remember, we did this wave. It's in a different direction, but it's still a wave, and then add some thickness to this. We like curve the serf in, and then we're going
to follow this curve to complete our letter S
smoothly and nicely like that. Like that. Nice, right. Color drop this, fill it in. And for the bottom
part, let's clean this up a bit before we start to draw this part. There you go. The serif is going to follow
the curve, right? And then let's close
the bottom curve by starting from this right here
all the way down like that. And then an adjust and
complete our letter nicely. Okay, I know the S
is a bit tricky, and don't worry if you
don't get it at first try. Just try to keep on working it until it looks more
clean and natural. And if you need to
clean the inside a bit, feel free to do that. Okay. Back to tip
or pointed tip, and I forgot to draw
the edge design. So there you go. Done. Okay. Now for the T and A, let's just use the
selection tool, select se. Then duplicate. The
fingers scroll down, Duplicate, then I'll
just move it here. Okay. I think I cut
this part right here. So I'll just redraw
some parts so that, I'll just erase some
parts and redraw them so that it's
not 100% identical. So That's just like
a little quick tip. You can duplicate certain things and then just erase and redraw some parts just so that it's
not super duper identical. I mean, it's still a copy of it, but at least there
are some variations. Oops erase this entire serif. Redraw this again write
this Color drops. Color drop. Here we go. And then the Y, erase
I'll erase this excess. Woops. Since we duplicate
it, it's on a new layer. Make sure you merge
them together. And then using eraser, let's erase the
excess here as well. Here, as well. The go. You see that before and after. Just clean it up.
This one as well. This one the struck serif. Here made this thicker, like the other ones and
color drop that part. For this one, yeah, it's
okay if it touches. For this, we want to
make it thick, right? So I'm pushing my pen hard just to get that consistent
thickness that we want. Okay, drawing the serif, color fill, almost done. Don't forget the spiky
detail on the edge. I feel like this needs to
yeah. Be adjusted to it. There you go. So,
as you can see, I didn't follow it exactly
because these are just guys. Okay. Trust your instinct. And you're going
to recreate this, okay? Trust your gut. So doing the serif. Make
this thicker, then shade in. There we go. One more word. Okay, I kind of forgot
to talk about the code. So this code is start,
stay, and finish. All these steps are very
important in everything we do. That's why I chose to work
on this because yeah, this code resonated
with me, too. It's important to start. And when things get hard or you don't have
enough time to work, stay stay and then make
sure you finish as well. So that's why I really
like this quote start, stay and finish all
three important parts because the process is going
to get harder sometimes. Just take a break if
you need, but stay, don't abandon your work
and make sure you finish it to enjoy the
fruits of your labor. So anyway, that's just
a little quick segue or like, quick break. Anyway, let's continue
finishing the lettering. Let's erase this excess right
here, this one, as well. I mean, let's just erase
all the excess right now, just so that it's gonna be faster for us
to finish. Here you go. Okay. Just follow the guides. Here we go. Okay.
F. So F here. Okay. The serif you're on top and
go to extend it as well. Since I extended the top
serif of the T earlier, I'm going to extend this one as well just for consistency. With this thicker
if you remember. You have to remember
what you did to the other letters
and make sure you apply that to the rest
of the alphabet. So it's going to be
thick like that. And then this needs
to have a serif. As you can see from
the font guide loops, it's supposed to be
a color drop there. Okay. And the spike is just on the other side because it's
going to intersect that part, the spiky edge, nice and
clean. If for this one. Okay. Let me just
do this quicker. So I'm still using
the smart shapes. So I'm just holding
reh like this. Curve it by fabs
curve it like this. Oh son's calling my
phone, but n it's okay. That draw vertical like this. Okay. Okay. I'll try to fix this because this is going to
go beyond the edge show. Let me just nicely
draw this light path, then shade the
inside. There we go. Because if I follow
this guide exactly, the curve is going to go over, which is look nice. So yeah. So we close that, shade this a bit,
t just color drop. There you go. Our F now has a really nice little design
at the bottom. Easy, right? Okay, next is the
letter. I Like that, shade this a bit. And this one as well. The bottom part, draw the syrup. Fills it by it and
this one as well. Color drop? Color drop Oops. Color. Oh, no, IV fell again. Let me just move here, IV. So you can still keep me company and not block my way, oops. Okay. My palm is touching
this and it's undoing, which is annoying
a bit, but yeah, if that happens to you, you can wear, like,
the artist's glove. I just don't mind wearing
it because I don't know, I feel like my palm
needs to breathe. There you go. Power drop. Oops. Call the drop. Okay, next is N. Okay, we're almost done.
Okay. Shade this. Remember, we're
going to shade that. And this is gonna be
like a vertical stem, so it has to be thin. So make sure you dry it with right thickness. There you go. Just draw this, then manly
draw the serif. There we go. Okay. Can we draw this
free col straw right here? Let's just clean it up a
bit. Do you like that? Yeah, I think, yeah, this
is enough. Very tall. Oh, don't forget the
spiky edge design. Try it and color draw. Try and color raw.
There you go. Okay. For the I, let's double K the
I and S. But before that, let's just finish
the H first. Okay. There you go. Oops fill this in my bat. Okay. One of the reasons why
I don't do a lot of vintage lettering is because I find it very time consuming. Because with vintage lettering, there are so many details, so, so many details. But it's okay. I mean,
sometimes I sell create it because it looks really nice and I feel like the result or the final output is worth the effort if
you do it properly. Okay. Another design
for the serif. Okay. Here we go. I'm just trying
to recreate this, but make sure that
it still works. So I'm not going
to just trace it. I'm adjusting some parts
just to make it work more for what I
already have. I do. Okay, as you can see, I didn't follow this exactly because we need
some space there. Perfect. The H is done, so I can now select the
I and S to duplicate. The finger swipe, double kate, and then just move it here. And then the eye as well. I cut a little bit of the serif of the
end, but it's okay. It always is that. Okay, merge everything. No, not everything, the layers of the lettering so that when you
hide everything, you know, have the
lettering layer. So yeah, you should have
something like this by now. Wow, that's a lot
of work, but I feel like doing this manually, like, redrawing everything
gives your work some unique character that
by just using a font, using a font, which using
a font doesn't give you sing to find it hard to
look for the right words. But anyway, if you notice
some of these are lighter, some of the strokes are lighter. That's because the scroll
brush has some texture to it. So just to clean it up a bit, simply duplicate it and then
just merge those two layers. Now it's solid black.
Before it was like this, now it's solid and
clean, how we want.
7. Coloring Your Letters & Organizing Layers: So I'm going to hide everything except for the lettering layer, and then the next step
is to add the design, so for now, let's select
a different color. Maybe just red so that it's going to be easier for you
to see what I'm doing. Because if I use white and start coloring and white and see everything because
the background is white. So we're going to add a new layer just below
our lettering layer, switch to the color red
and make sure we turn on reference on our
lettering, okay? And then make sure the
bottom layer is selected. And then let's just color drop
the inside. There you go. Click Continue filling. Then just tap all of
the inside like this. Done. Okay. So we now have a layer for the inside,
which is what we want. Actually, I think we could
already start coloring this. So if you bring back
the we call this, the color guide, we can select you
forgot which one is it. Okay. This third color,
there's a first color here. You just can see clearly it's almost white
first second, third, or the middle color right now, this one, and then we're
going to color everything. So the shortcut is, since you already
colored it red, it's like Alpha loc fill
layer, and then remove Alpha. There you go. Easy.
8. Filling Letters with Patterns & Decorative Elements: Okay. Next is for the design, let's open up a new layer, and then we are going to add the horizontal line
design, right? So here we have the horizontal thick
die right here or maybe the fill pattern pred no
horizontals or the xs, so it's up to you
what you want to use. So let me just color drop this lighter or tan color because that's what
we're going to add. But I think let me try this. Make it smaller now. Okay. I think I'll
use the horizontals. So for the horizontals, make sure you're on
a new layer on top of the dark tan fill. So we're just going to
draw horizontal line, hold it, draw horizontal
lines like that. Okay. And then transform distort or maybe just use
distort and do the same thing. You want to give
it the same angle as The levers like this. Perfect. Okay. And
then let me just erase like half of it because we need this to just
cover the word start. You see that? Like that. And then we're going to
duplicate this, move it. Whoops, move it, so
it covers the word stay without overlapping. There. Okay. Then duplicate it. Move it down so that it's
going to cover finish. Because if we didn't erase it earlier, we
just duplicate it. It's going to merge here. You see that?
Instead of just dei, you're going to add it here that we don't
want that to happen. That's why we erase
top half of it. From here, just move it down until it covers
the word finish. The merge all three
layers and tap it, and click on clipping mask. Here we go. You have a
nice line inside detail. Okay. The next step is we're going to add
some more details. We added some design here, right to fill the empty
space around the word stay. So on a new layer, we can now remove
the reference layer, so tap on it, click on reference again just to remove
the reference layer. Okay. So on the new layer, let's switch back to lack. And then we're going
to add some design. So I think yeah. I think I use this
inline stamp cross. So it's like that, and then
just stamp it like that. And let's position this nicely. Maybe like this. Okay,
somewhere in the middle. Okay. Like that. That looks nice. And then
for the horizontal bar, instead of horizontal bar, let's use this inline
stamp circles. So if you stamp it, it's
going to be vertical, right? So let's just rotate
our canvas 90 degrees so that when we tap
it, that went back. Okay. It's okay if it's
not perfect because we can always select and move it. There you go. Oops, select
this because it's touching. Let's just move it
a little bit there. And this one as well, select this and maybe move it higher. Here you go. What do you think? It's looking good so far, right? Then when we're done, let's
just merge this layers. We have one layer for
the lettering layer. Okay. When we're
done with this one, we can now start to color because we're done
with our lettering. If you remember earlier I mentioned that we want
to work on our lettering first in black and
white so that we can focus on designing
the letters nicely. Once we're done with
that, we can all start coloring so we can start to see our piece come
together nicely, okay? So create a new
layer behind this, which is going to be the
background color layer. So let me color drop this or
select this not color pick. So you can color
pick by clicking this little box icon
and then moving it, or you can use your
finger to hold and move it around to get the right color
which is this one. And then I'll just color
drop it in like this. Okay. And then what's next? Oh. Sorry, it's supposed
to be below this because we still need
that design, okay? And let's bring the colors
up to the topmost layer. So it's always on top. And then we want to
color our layering with these almost white. This is not 100% white. It's a little bit Biji, super, super light beige, okay? And then since we
already have this, and we don't want to collar
drop this one at a time, what you can do is turn on alphaa and tap it
to fill the layer. So it's just going to fill that completely where
the lettering is. And then remove Alphao.
9. Building the Ornate Swirl Frame: Okay, the next step is
to add some designs. So let's create a new layer just above this background layer because we want the lettering
there to be on top. Okay. And we're
going to add okay, let me just review
that again for you. So we have this horizontal
bars in this circle, right? Horizontal bars in this circle
stamp with something on the inside and then p like this, we're going to recreate this
and then add a display, then add some details, and add the rest of the effects. Okay? Okay. So make sure you're
on a new layer, and then let us go to Vitas composition and select this angle banner or maybe
a horizontal banner. It's fine. And let's select this gold flat gold color right beside the
background color, and then just tap it there. And then let's move
this and distort this until it has the
same angle like that. Okay. If zoom in closer, you'll see that this stamp
has this line right there. So let's just erase this
nicely and cleaning like that. Perfect. Okay. And then you want to center it. So let's bring back snapping and magnetics because we want
to center everything. So let me just move it
to the left and right, center it this here like that. Just some space.
Just add some space. Like what do you call the
space from this baseline. And then we're going to select the top half transform and
move it all the way up with the same little space right above or between the
bar and the lettering. There you go. Next
is add a new layer. We're going to stamp
in V circle design. So on the same brush set, you have circle stamps. You have a bunch
of designs here, not a bunch, just
six design options. So I think I'm going to
choose you let's see, layout two, layout three. There you go. So stamp it in, move it to the vertical center. There you go. Move it up and down until you have the
space that you want. This is too small. So maybe like this. Okay. And then I'm going to select
the lower half and move it down by using the selection. So make sure it's on free hand. I'm going to tap
this bar right here, the thick bar and
the thick bar right there and close it to
select the bottom half. Transform to move it
all the way down. And for the bottom part, I just want it to be
smaller like this. I don't want it to be
like the same size because I don't want
to put anything there. I just want it to have
the same base design. So let us erase it. You can select this
or use the eraser. Takeke this and three fingers shake to erase. There you go. So we have that nice
little design right there. Next is let's add the
little detail there. So I created a new layer, and you could draw
anything you want, but I think I want to just stamp something
to make it easier. So here at the vintage
littering, yeah. Yeah, I have this, so
just stamp it like that. Add a new layer,
no, duplicate it, and then flip horizontal
and then move it to the side like this, merge them, and then maybe
add something in the center. So on a new layer, I'm just going to
stamp in a design that's fitting for this. Maybe this one. Stamp it. It's too small. Let's
make it bigger. Yeah. I think this looks nice. I'll just add it here, Duplicate it, and move it
up again. May move it up. There you go. This is
a super random design, merge everything
and then move it here at the center,
place it inside. There you go. So let
me just rotate this. I'll remove magnetic so I could rotate this to any
angle that I want. So I'll make sure that
it has the same angle as this bar right here,
and I'll center it. Oops, make it smaller
with uniform selected. There you go. A nice little design
to add to the inside. You design you can add
any design that you want. This is just, like, a quick
little detail that I added. Okay. When we're done with this, let's just merge everything. Not everything, like
the horizontal bars, the circle, and the design. And then let's clean this
up a bit using the eraser. Okay. So we don't
want it to intersect. So let's just erase
this a bit just so that it doesn't
touch the letter S, and I remove everything else. For this one a Zo, erase a bit, so it's not touching
the letter F. There you go. Okay, maybe
a little bit more. A go. And for this one, I'll just cut some diagonal
shape right here, so it's not like
parallel here as well. This is just like
a little detail. Okay, we now have the border
to frame our lettering. The next step is to add what do you call this, the
ornamental design. So make sure you are
working on a new layer. But before that, let's just group all of these four layers. Okay? The lettering layer, the horizontal line layer, the inside shading,
and the border. Let's select all of
these and group them so that it's clearer
and all in a group. You want to rename
this lettering. There you go, so
that it's easy to remember rather than have
so many layers, okay? Okay, now let's start
adding some designs. So make sure you
have a new layer, switched on, and then we are
going to start stamping. You don't have to draw
everything from scratch. If you have this
path, simply go to the vintage layering
set and you have some ornament crowns on top. So just choose one. I think I'm going to
use six here on top. Stamp on it, and then just try to center it where it center. Okay, I think I'll hide the lettering so I
could find the center. The center is the orange
line right there. Bring everything back in. Okay. I'll bring
magnetics back so that I can lock it
vertically like this. Okay? I think I'll move it here. You want it to move
a little bit up from this Alright, like that. And for the bottom,
I'm going to create a new layer and stamp
in another design, maybe crown three like this. I'll flip vertical, so it's
facing down or pointing down. Let's center this and move
it up and down like this. Okay, there you go. So the bottom part, let me move it slightly down a little
bit more like that. Perfect. And then let's
create a new layer. And then let's add
some designs the side. So Here under
ornamental dividers, you have a lot of
designs to choose from. So maybe this divider nine. Let me just stamp it, move it, rotate it like this. Okay. Maybe like this so that it's
diagonal because you want to give a rounder edge Okay. Like that. I think this
looks nice. Oh no. Let's try to rotate. Let's try to flip it vertically
and rotate it. Yeah, I think this is error. Okay, so as you can see, I'm making sure
that it touches so that everything feels
connected, okay? I'll create a new layer
and add something here because this still
has an empty spot, right? So maybe Hmm. Let's try I don't know, maybe the same stem, okay. It can work. So I'll
just rotate it. Until it touches like that. Perfect, right? Okay. Yeah,
I think this looks nice. So I made sure it touched there
and touched here as well. Okay. So I'll merge the two on
the left side, duplicate, transform, flip horizontal, so that it touches the
other side as well. Okay. And then merge them. And then just to make
sure it's centered, I'll recenter it like this. Perfect. Let me just hide the
colors so that you can see the final composition. So I feel like it's
too high, right? So I think by now I can merge everything and then just
bring it down a little bit. There. Maybe slightly a bit. Okay. It feels like there
are some empty spaces here. So let's just manually
draw some waves. So I'll just grab my
light sketcher on top. Okay. And then I'm going to turn on the drawing assist because the design
is mirrored, right? Whatever you draw here, you want it to reflect
the other side, right? So drawing guide
on under actions. And then click symmetry. So whatever you
draw on one side is going to reflect
to the other side. So from here, you just
want to connect it here. So let's just draw
a wave there so that this curve
touches here because I feel like there's an empty
spot right there, right? And here, so it
feels empty here. So you could just
from this curve, draw another curve like
that. You see that? Before it feels empty. Now it has something there. Next is here. So from this curve right here, let's just draw something
to touch it like that. And this feels empty. So from here, let me draw like a curve just to touch that base. Okay. There you go.
10. Redrawing the Frame for Contrast & Flow: Next thing to do is to redraw them with
pressure this time. So let's break the opacity down and create a new layer and make sure to
tap drawing assist. So whatever we draw on one side, it's going to reflect to
the other side as well. Okay? So let's our pointed nib and then redraw
everything, okay? So I think I can hide, you know, I'm going to duplicate
this lettering layer, merge the duplicate,
hide the original, and bring the opacity down. Take this, just so that I can still see where
the layers are. And make sure we we
select the correct layer, the assisted layer
that's still blank, and using the pointed nib, let's redraw everything, but
with pressure this time. You see that? I'm using smart shape still. So that I can make these hoops, make these nice and
smooth like that. There you go. Okay.
So for this one. This perfect. Oops. I'm going to erase
this a little bit. And this one as well. So it's easier for me
to connect these two. Oops, let me just
erase everything, and then just
manually draw this. From here. Oops c
all the way there. So I'm not going to
follow the guide exactly. Because it's easier. Oops,
it's not that clean. So maybe sometimes you
just erase some parts and then just redraw them. Think back. Okay. I think I want to add some
thickness here. So, here it is a
thickness there. Maybe smooth this curve
a little bit cleaner. This one Yeah. Just try to type this
nicely. There you go. And here, curve this up here. Curve this down with
some thickness. Extend this little bit.
There you go. Okay. This step can be a little
bit time consuming, but I feel like
it's very relaxing because if you don't hurry
or if you're not hurrying, we can slowly do
the purse nicely. There you go. Let me lighten the guide. So it's clear for me to
see the final output. This raise this a bit. L C. Okay. There cool. Just some nice
curves. There you go. We're done with the bottom part. Let's work on the top part. Oops. This can be
thick and thin. So there's no, like, strict rule on the
thick and thin. For me, I just want
to keep, like, the intersections thinner
so that it's not too messy. So just make sure you
connect them nicely. You don't have to follow
the guide exactly. Follow your existing drawings. And try to make the curves as smooth as you can, like that. This won't curve this
just to make it cleaner. Do you see that? Okay.
So it intersects here, so I'm going to continue, but
it doesn't intersect here, so let me just continue this. And I'm going to stop here
because we don't want anything above the bars. The two horizontal bars. But that. Perfect. Then for this one, let's
just make it smaller. Okay. Then I did a spy hand. Like that. Okay. All that's
nice. It's not perfect, but. Sometimes you need to
speed up to make it easier for you to make
the curves smoother. Cigna sin. Perfect. I got Okay. That's faking thin. Make sure it connects smoothly. Oops. Fin flake thin. There we go. Okay. Next dopes. Sometimes you need to rotate
the canvas so that it flows more naturally when
you draw it by hand. If it is larger, it's
going to be easier. There you go. For this one. Yeah, like that. Because
this feels awkward. So I just added, like, a curve stroke to make it
smoother and nicer. Okay. For this one. Make this real thin
because it's intersecting. And just add the thickness. Let's do this again. Okay. You'd be like this.
Yeah, that's easier. Yeah, as I said, maybe you
need to rotate the canvas to find the easier
or a nicer flow. Curves and sin. Okay. Nice. Now this one. Okay. It's crossing this moon, so I'll just connect
it nicely here. Like that. And Curvis separately. What wind pressure I've got ik. Nice. Okay, that looks weird, so huh. It's intersecting there,
so let me try something. I wanted to connect smoothly to this circular
stamp that we did. Sinein Here we go. This one. We'll just
connect it here. The nice look like that. For this one, yeah. I feel like it feels too empty. So let me just try
to connect these. You see that? So yeah, just added this to connect. So try to make the curves look flowy
and smooth as you can. Okay, I think I want to
bring back the lettering. Here you go like this. So I can see it more clearly. So here's what we have so far. I'll just remove or hide
the guide. There you go.
12. Shadows, Embossing & Golden Highlights: Okay. Remember, earlier we duplicated the lettering layer
and flattened it so that we have something
that's flat that we can reduce the opacity too. So let's delete this. Make sure you still have
the original layer. Okay, because you
don't want to delete your hard work, okay. So now that I have
these layers, Okay. Sorry. Let me just duplicate the
layer again like that. Hide the lettering
layers and flatten this and bring
these three layers to the top because these are going to be our
working layers, the layer for the lettering, the layer for the
ornamental background and the background color. So I'll just drag all
these three up here. Like that. Okay. Now we have three
working layers. So at this point, you need to have these
three working layers. Okay. Let's add some
background shadows, okay? That's what we want to add next. So we're going to duplicate the laying layer and the
Ornamental layer, merge them, bring it down, right above
the background layer, and then we're going
to make it completely black by going to hue
saturation brightness, drag brightness all
the way to none. Okay? And then using transform, we're a way to nudge this down just a little
bit. Do you see that? Just a little bit. Okay, let me zoom in this
before and after. So a duplicate that's black
and move a little bit down. And then we're just going
to add Gashi and blur. Just a little bit about 3%. This is the before and after. Okay. There you go. You
now have some shadow underneath our lettering
and the border design. The next step is, let's
go back to the border. If you can see, if you feel like some parts are not yet opaque, simply duplicate the
layer and merge them. You see that? This is before. It feels light here, right? After Oops. This is before and
after. There you go. You want to be
more filled, okay? Next step is we're going to add, add a three D effect
to this, okay? So this is going to be
a bit more complicated, but follow me because
in Procreate, we don't have the option
to what I call this? The option to make a three D effect or like a bevel effect, you have to do it manually. So what we're going to do is, okay, create a new
layer on top. Okay. Select white. Click this, what
do you call this? This border layer
and click Select. Go layers, the new layer, select this and
click Fill layer. Oh, sorry. My mistake. Okay. Again, select this layer, the border layer or the
metal layer, tap it. Select. Make sure you
click Invert first. Okay, because we want
to get all the area outside. Invert. Tap the layers,
tap the new layer, fill layer. There you
go. You see that? And then clipping mask. Right now, you don't see
anything because you created white
outside everything. Okay. And then we clipped it
to this ornamental layer. That's why you don't see
anything, just some glow. And then using transform, we're going to move
this slightly down a little bit just until you
see some white show up. Do you see that? Like that. This before. Move it
down a little bit. You should have
something like that. As you can see, we now have a little bit of a
manual three D effect. Okay. Let's do
this again because I forgot that we need
to add it to what do you call this the
lettering layer as well. Okay. Sorry. I mean, we need to add
it to this as well, because this layer is still
part of the lettering layer. So let's take that
apart first. I'm sorry. Forgot this step. Take this apart because we need to
apply it here as well. Select that. It's
just the bottom. Part sed, cut and
paste. There you go. This needs to be part of
this ornamental layer, so we're going to merge
these two layer. Okay. Okay, now, now we're
getting it, okay. Sorry for the confusion. Okay. So we should have something
like this right now. Let's do the highlights and the shadow effect again,
create a new layer. Tap on the ornamental
layer, click Select, hit invert to select
the area outside, go tough layers, tap on the
new layer, tap it again. Click on fill layer, and then clipping mask that
to the ornamental layer. You should see nothing. So next is transform, making sure that magnetics
is turned on so we can Oops, transform and move
it up and down. Oops. Yeah. Okay. Make sure you
select the right layer, okay? This white layer, hit transform. Move it slightly down just
a little bit like that. You see that? It adds a three
D effects before and after. Okay. Next is we're
going to duplicate that, set the bottom layer, and we're going to
move it up until the white shows from
the bottom part. There you go. And then next is select that and tap invert. Here you go to make the
shadows. Do you see that? You now have white highlights
and black shadows, giving it a three D effect. Now, we want to
soften the effect. So if you want, you
can merge those two. It's totally fine and
select Gaussian blur. Just blur it a little bit, maybe about 1%, just to soften
it a little bit like that. Then just reduce the opacity. To maybe like 65
so that it's oops, so that it's going to be subtle, this before and after. There you go. You now have a three D effect for the
ornaments here in Procreate. Next step is to make
it shine, okay? So we're going to
create a new layer right above this ornament layer below the highlights
and shadow layer, making sure that it is still clipping masks turned
on still, okay? Or maybe let's bring
it all the way up. First so that you
can see the effect. Now I wait to rotate
this diagonally like this and go to our
vintage lettering pack, and below, we have this
reflective gradients. So it's just like one.
I think this is seven. Straight then switch to
black and maybe six. Let's add it again.
There you go. So it's like gradient effect. And then let's just soften it a bit, turn on Bloss and blur. Maybe about not so much. Maybe about 15%. There we go. And then bring this back down
right here and then change, let me zoom out and remove
the lettering layer so you could only see what you
call this this frame. As you can see, this
is the normal one. It looks very flat, right? When we add this, let's just
change this to soft blight. Do you see that? And then just remove or
reduce the opacity a bit and bring everything
back. Do you see that? You now have a more reflective
golden, like, ornaments. So you can actually play with the blending mode if you
want a different effect. For example, like this add
actually looks nice, too. This is soft light. This light. Oh, I
think this is nicer. But the blurs being
more For an after. Yeah, I feel like this is nicer. Okay, let's just use
this instead. Okay. So we now have this. Next is we're going
to add the glow. Okay. Just add a little
bit more color to this. So on a new layer, I'll
just what do you call this? Go to the letter Ilight stamps and just use
the sparkle, okay. Let's use blue or cyan. Okay, maybe this one. Tap? Okay. Make this
bigger. Okay, there. So basically, I'll just
tap a few like this one, two, three, four, I think
about five and then change to, like, a smaller size. Then add a bit more to the empty spaces. There you go. Here. Just try to
balance it out. And then Bloom. Okay, not bloom.
Caution blur, sorry. There you go. So it
should look like you have some little glowing little glow effects
around the ornament. If it's too, like, small, you can just duplicate it, merge them, and add
more gaussian blur. Is that, not so much so
that it looks like you have some glowing like glowing
lights around it. Something that looks
like fireflies. Okay, here we go. And then we're almost done. Let's now let's now
add some textures. So let's create a new
layer right above the background layer.
Let's choose black. And I really like the
crumpled paper texture effect of this what do you call
this, this vintage pack. Oh, it's getting too dark. How do I? Okay, let me just
try to adjust the ISO. Sorry about that if the
video looks too dark. As I said earlier, the weather
is really, really weird. Now it's super dark suddenly. Anyway, going back, I really
like the crumpled texture. So on the layer right above the background layer,
let's just add that. Food, do you see
that? Looks nice, right? The crumpled texture. Let me just choose the
light wrinkle texture. There you go. I feel
like this looks nicer. Okay, I'm gonna brush it a
few more times just so that I could see the fold better. Nice, right? Okay. Next is, we're going
to add a spotlight, okay because we want to
like a vignette effect. So to do that,
where is the okay, we're going to add
a new layer on top. Before that, let me just
add one more layer. Here in the Vintage Pack, you have a lot of
vintage paper stamps. So maybe choose one. Let's try number four. Just tap it. Make sure that
it covers the entire page. Okay. I'll just duplicate
this a few times, merge them and make sure
it's all the way up here. Okay. And then I'll just
lighten this a little bit by bring the pastry down. And then I'm going to create a new layer and
draw a big circle. Okay. Maybe you brown. Draw a big circle in
white. Like that. Fill the center and make sure
you center it. Is center. There you go. And then
add Gashi and blur. And then change the
blending mode to Overlay. I think I'll bring
this all the way down. Now, where should I put this? This too bright. No. Hm. Okay. Yeah, I think here is
okay. Where is this? Right below the
shadows layer, okay? So I think the shadows layer
I want to bring this down a little bit more to
make it more obvious. Okay, bring it down
a little more. There. So the words are
going to stand out more. You see that? Nice, right?
13. Final Grain, Spotlight & Finishing Effects: Just add a few more texture
because for vintage, we want it to look
more age more, add some wear and tear effect. But right now, the words
look very clean, right? You can leave it as it
is, but I personally want to add some texture or
some effect to that. So I'm going to create a new
no, not create a new layer. Select the lettering layer, create a mask, so
tap a layer mask. And using the brush tool
on the vintage pack, you have this light green brush, and we're going to
select the black so that when you draw,
you see that effect. I'm going to add some grains. You see that? Add some grains. So just brush in a little bit to add some grains to your
lettering. There we go. Okay, I kind of want to create, like, a big net effect, so I'll just create a new layer. Select black, color drop black, and select this like
the spotlight layer, select and erase
using three Whoops. Sorry. After you select this, make sure you select
the top layer again, the black layer, and
erase. There you go. You have a nice spotlight. And then we just change
the blending mod to just multiply and bring the
opacity down a little bit. This is before, this is after. Let me just increase the
size of bit and center it. There you go. Then pass it up. I'll increase the
size of it more. I think it's okay. I'll just increase the size
of the spotlight. So it's all about balancing and making subtle changes until
you get something you want, which is this beautiful
vintage lettering. So yeah, hope you are
able to follow along. And if you feel like you want to adjust certain things,
feel free to do so. For me, I kind of want to make these glowing things brighter. So let me just select that layer and adjust the hue saturation, pump up the brightness
a little bit, and maybe duplicate that to
make that look more obvious. Okay. You have this. So this is the final piece. I hope you were able to
follow along and you enjoy creating this
beautiful vintage, very elegant vintage
ornamental vintage halo. I keep saying the word vintage. I don't know what else what
other words to describe it, but hope you're able to
create something like this. If you have any questions, feel free to comment them below. And yeah, if you
finish this work, feel free to share it with
me. I would love to see you. If you have your own
color palette preference, feel free to recolor
this based on what you I like to
color yours with. So yeah, this is the vintage lettering workshop.
This is what we have. And yeah, I really enjoy
recreating this piece. I wasn't expecting to have
fun recreating this because I already made it
before, but had fun. So I hope you did
have fun, as well. So yeah, have a great
day and stay creative. Bye bye.
 Nico Ng, Lettering & Design