Transcripts
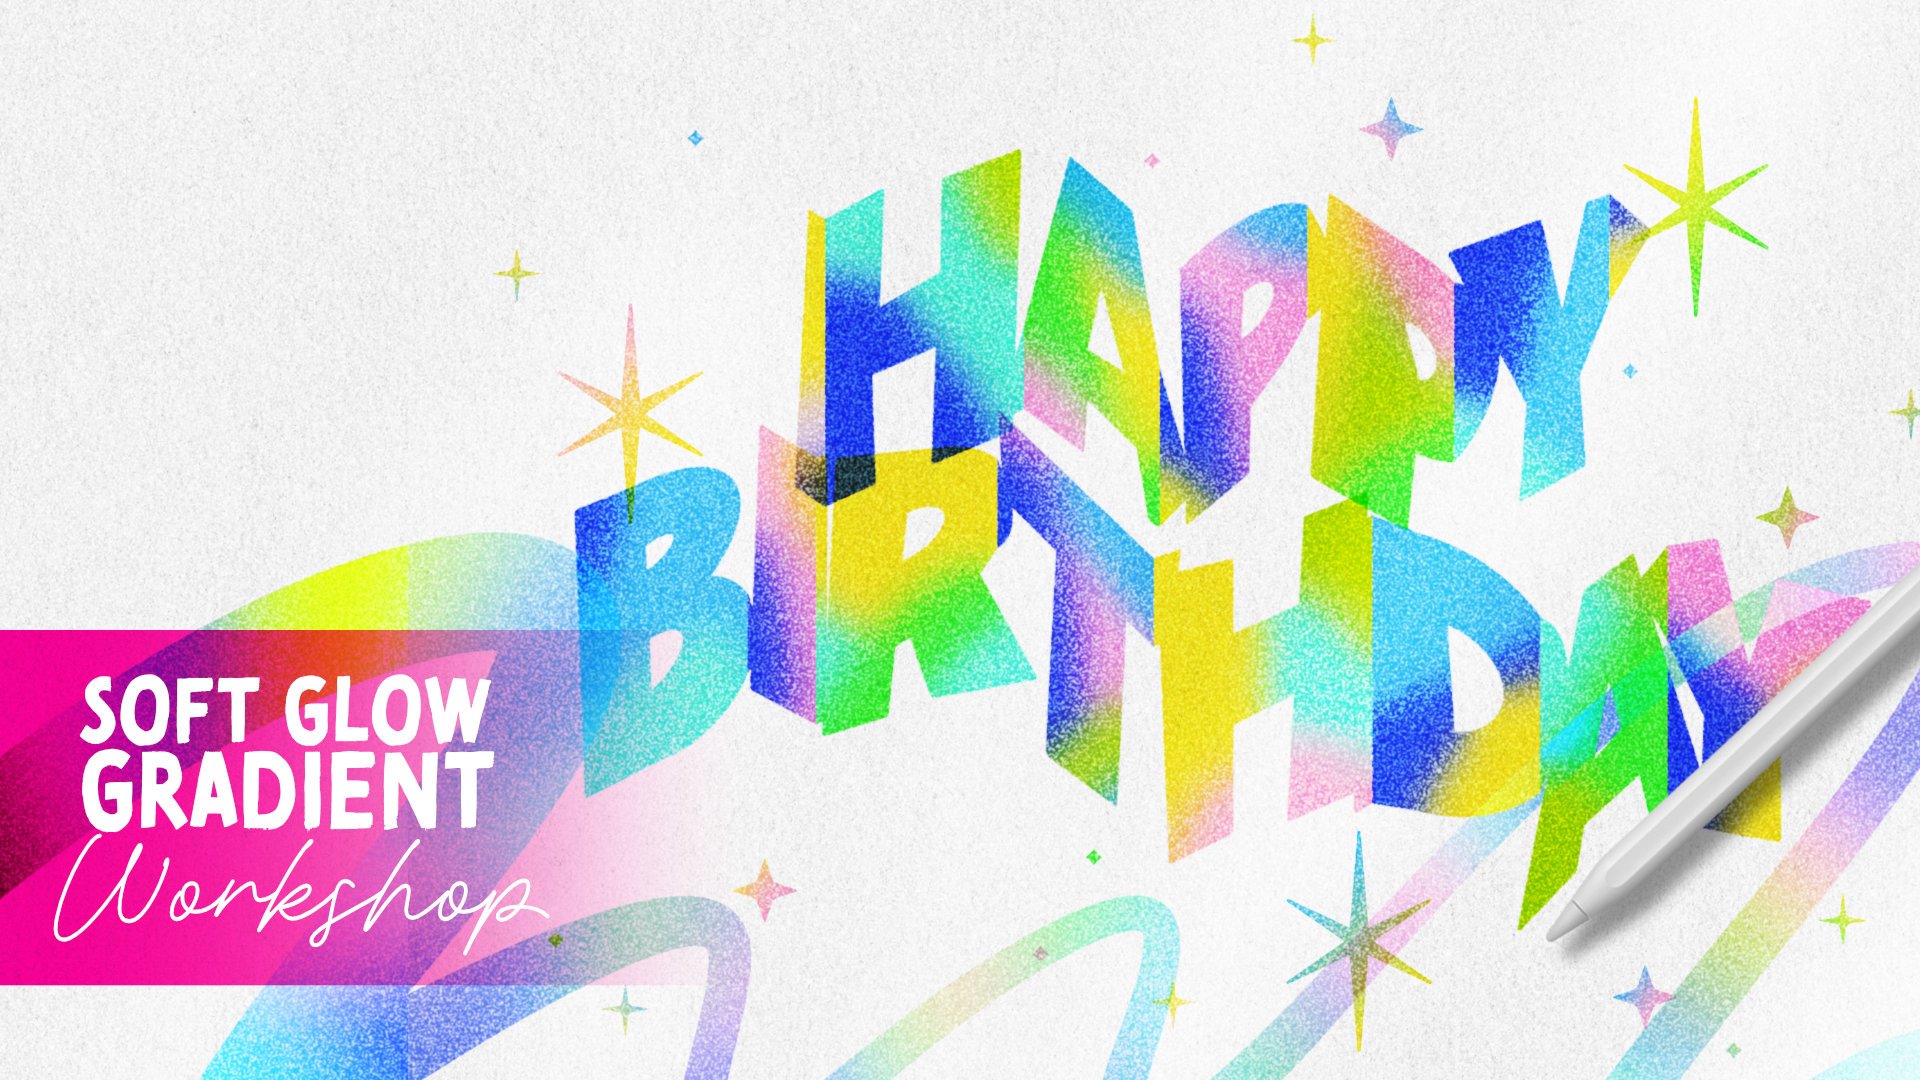
1. Skillshare Intro 3 Retro Futuristic: Do you want to
learn how to create this eye catching retrohrome
lettering effect? Hi. My name is Niko Nang. I am a lettering
artist, designer, and educator based in Manila. I have been lettering
since 2014, both analog and in
digital formats. And I'm really passionate about sharing my
love for this craft to other creatives like
you through my courses, my workshops, my analog
lettering templates, as well as my
digital brush pads. Because as a lettering artist, I really want to make
the process easier for you to create
beautiful lettering art. In this class, I'm
going to walk you through the step by step
process on how you can create this stunning
retrochrom effect in Prograd starting from
designing and building the costume brush to designing the type
designs all the way to the different layers of
effects that we need to add in order to
achieve this effect. So if you want to
explore this style, whether it's for your
personal project or for some client designs, then this class is
perfect for you. There are free
downloadable templates included in this class, so be sure to download them before jumping into
the first lesson. I can wait to show you
how fun and easy it is to add this effect
to your type designs. So let's get started, and I'll see you in
the first lesson.
2. Making Your Custom Round Brush: Okay. So let me grab my pencil. Here are what do you call this the layers included
in this template. So you have the sample artwork. If you want to use reference, you can go ahead and
export this or share this as JPEG so that when
you have it in your gallery, you can add it as a reference, which is what we're
going to do now. Go to Actions, Canvas
and switch on reference, and then image,
select Import image. It will open up what do you
call this your gallery, and then just select the image. And now you have a reference
that you can use later on. So let me just Okay, I always have a hard
time in this reference. Let me try to make
this smaller, smaller. Okay. Why is it working?
I'm trying to pinch this. It's not it's not
reducing in size, there you go. Okay. Since it's smaller now, I'll just drag it to the side, so that it's not going
to be to the drafting. And then I think I'm
done with this layer, so I'll just delete this so that I have more layers to work with. Now you have your color scheme. Let us hide this. For now, it is this one on
the side right here. We don't need it now,
so just hide it first, because the first step
we're going to do is create a solid round brush. Okay, let me just hide
this and hide this. So we just need the brush shape right
here, a solid brush. Since if you notice this, the later that we're going
to make, it is actually, let me just open up
the lettering guide. So this is what we want
to create later on. And as you can see, the
edges are round, right? And all of the sides or the edges of the
lettering is solid. Basically, we want to create a brush that's fully rounded
and completely solid. So we want to turn off
all of the pressure and speed speed changes because
when you create a new brush, I think the default is there's some pressure sensitivity which you're going to see later. So basically, we
just need a super super basic round
brush for this. So we just draw these in one strokes, and
then we are done. We don't need to, like, draw shade and fix so many things. So sometimes with these projects to speed up your
lettering process, you just need to have
the right brush. Oh, when you're going to create
the shape of your brush, make sure you work
on a square canvas because if you have
a rectangular one, whether it's landscape
or portrait, if you copy that canvas and paste it to the brush later on, it's going to squish
them into a square. So make sure your canvas is square if you want
to create a new brush. Okay? So let me just hide this lettering again and
open the brush shape. Okay? So we're going to need a super simple round
brush right as you just saw earlier from the
lettering guide, like that. So we want when we draw horizontal line, it's
going to look like this. Completely round here and
completely round here, and the lines are straight. So that's why we need a round shape source
because for brushes, you have two source images. First is the shape image source and then the texture source. Since we need just a
solid solid brush, we don't need any
texture source. We just need a solid shape brush or shaped source right here, which is this rounded shape. So since it's already
here, otherwise, you just grab any brush, draw a solid circle, fill it in, center it. Basically, that's
how you make this. But since we already have this, let's go to actions and
then add copy canvas. So there is going to
copy that canvas. And then on a brush set. You may want to create a
new set right here so that you don't include your new brush on your existing brush sets. So for me, I have this
pencil case brush set where I dump. I just dump all of my
experimental brushes. So yeah, as you can see, it's all untidle brush. But anyway, let's create a
new brush by clicking on this plus icon right here and
then create a new brush. Okay. As you can see, this
past is for you to draw. And as you can see, we have some faded effect. We
don't want that, right? We want something
completely solid. So let us go to
our shape source. And actually, if you
create a new brush, by default is already round, so you don't need to paste
the canvas we copied earlier. But if ever in the
future, for example, for example, for example, this is the shape source, okay? And you want to paste whatever you drew earlier,
just go to edit. Import and just hit paste. It's going to paste the
image we copied earlier, which is the round shape, right? And then for brushes, you want the shape, the actual shape to be white and the background to be black, but now it's inverted, right? So if you see, it's going to be square
with an empty hole. So to simply flip it, you just use two
fingers to tap it and it's going to invert it
into a white circle, which is what we need to get
that rounded brush shape. Okay? So basically, this is it. But if you notice, let me try to increase the
size so that you can see. Do you see that? I brush lightly here and increase
the pressure here, and you can see that there
are a lot of light circles. We just want to make sure
it's completely solid, right? So under stroke path, we can bring the spacing
closer like this, maybe about eight or seven. As you can see, what
do you call this? The shades are overlapping
cleanly right now. There's no, ghost
images like this. So you just want to
bring it closer. You can space it to none, but you can't increase
the brush size that much. That's why I think eight or seven or eight is a
sweet spot right here. And then it's now fixed, like the ghosting or
what do you call this? You don't see the overlapping
circles anymore, right? We fix that using spacing. But now the problem is,
it's light here, right? So we want to go to
Apple pencil right here. And the reason why this
is faded or faded is because opacity is being
changed with pressure. So earlier, this
is light and dark. I mean, light pressure and
heavy pressure, right? So it means that the light
pressure is still I mean, the light pressure you get or you adjust
the opacity of it, so it becomes lighter
because of the setting. So if you don't
want your pressure, your light pressure
and heavy pressure to change the opacity
of your stroke, just go to Apple
Pencil and bring opacity all the way to non. And then you're done.
Check. Oh, tap on it. If you want to rename
it, just go to this about this
brush and rename it. I think you can rename
it outside now. I think that's the
update of Procreate. I'm not really sure, to
be honest, but yeah, you could just hold
it and rename here, like solid round brush. Because before, have to rename it here inside
the brush studio. But anyway, if you want
to write your name and your signature here
and your image for this brush because you made
it, feel free to add that. But I don't really mind because it's a super
basic round shape. Okay. So now that we have
our solid round brush, we can now let me hide that and on a new layer,
toss it out, okay? I'm going to change
to black like this. So increase the size.
It's like this, right? So this is the maximum size, but I feel like
it's too too small. You see this? It's too
small for what we want. So we can adjust that
by tapping the brush, and then we're going
to go to properties. And then we can increase
the maximum size like that so that we can create bigger strokes
using that brush. See that? Because earlier
the max is I mean, we've already set our
brush size to maximum, but we're just getting these
smaller strokes, right? That's how you
allow your brush to create bigger size by going to properties and increasing
the maximum size. Okay? Let me erase this again. And then the next
step is to start, what do you call this, to start drawing our lettering because we now have the
brush that we want. Well, it's too big. Let's
make it this smaller. Yeah. We now have the solid
brown brush that we need.
3. Sketching Tall Rounded Letters: I Okay. For the next step, we are now going to draw
these tall round sands. But for this one, we want to draw each strope
in a different layer. Okay, that's all you want. So I think we can delete
the brush shape now. Okay? And then make sure
you're working on a new layer. And then we want to adjust our brush size
to be exactly that. As you can see now
it's too big, right? So I'll just make this smaller. Now it's too small, right? Oops. 16 is too small. 19 is too small, still. 22. Yeah, it's still too small, right? Let's try 27. Oh, it's too big.
26, still too big. 24. It's slightly too big. So I think 23 is a perfect size. Yeah. As you can see, 23 is a perfect size for
the brush that I created. So you may have a
different size. Just make sure to resize your
brush to the correct size. Okay. I just want to
save this just in case I accidentally touch
the brush size. So I'll just tap the
slider and click on the plus just to save that
preset right there, okay? Now let's start drawing. So I'll just draw this. Okay. I'll draw a straight line and hold my pen like this. Okay. And I'll move it here. Make sure it has a say top
right here and try to align. Okay. As you can see, I am making this longer because the guide says
it stops there, right? But I am making it longer. That's because if you look
at our reference, Oops. Let me just. It's faded, right? It's fading. So the ends
are going to be fading, so we want to extend
that little bit just so that we can create that
effect a bit more. So that. That's the first vertical
bar of H. Second, let's duplicate that so
we don't have to redraw. As you can see, the
top part is faded. So when we move this, we want to align it to the base. There we go. Because this
is going to be faded. Next is the horizontal bar. Let's just create a new layer and just make like a horizontal. And then just move
it somewhere here. Let's just place
it here for now. We can always
adjust it later on. Okay. Now for the letter O, in the example, we're going
to have that loop, right. But for me, I feel like
it's kind of hard to read. If you see the head of
the stroke right here, I feel like it's making the letter O a bit more
difficult to read. So let's simplify that just
for the sake of readability. So on a new layer, going to draw a circle because we're going to
create this just as a whole, no more like the moving
head thing right there. So we want to create a circle. Okay, wait. A circle that's
perfectly this width, okay? So we want to carefully
draw a circle, hold it, use your finger to
lock to a circle, and then we can now adjust
it to get the right size. It doesn't have to
be super perfect, but yeah, try to get
it the right size. So I am going to bring this up. We tried to center it. B.
Okay. That looks good. So we need to move the
bottom half below, right, because we only
need a half circle on top. I'll show you a quick
trick for that. Hit transform, snapping, make sure magnetics and
snapping are turned on, and then just move it up until it snaps in
half right there. That way, it's going to
cut it perfectly in half. Then we just bring it down
later and then duplicate it, select, flip vertical, and
move it up right here. There you go. And do
the bottom part now. Wipe this. Snap it. There we go. Okay? Okay, I'll just
make the background lighter like this so
that it's not too harsh, but you can still see it. Okay. Next is
create a new layer. We're just going to
draw the vertical line here like that. And then using transform, we're going to make sure
it touches the edge. There you go. Okay. And then we're going
to erase the excess by going to selection, rectangle. And then let's just
select just up to here before the edge and then
clear, there we go. We're going to erase this,
right? It's like this. It's like maybe here and
erase. There you go. If you zoom it in, it's just
a little bit misaligned. So I kind of want to, like, merge it to the Oops. I want to push it to the side. Just so that it matches better. I mean, that's just
a tiny detail. And then you want to duplicate this and
move it to the side, and the short step to do
that is select that layer, the top and bottom, and then transform, hit
horizontal, then there you go. You now have your letter O
in this tall rounded sense. Okay. Next letter is the
letter P. So for the letter P, we can duplicate
this one right here, which is this one, this layer, and we want you to bring it up. So you know the
shortcut of Procreate, you can drag the
layer to the center. It's going to duplicate that. And then you can move
it like this move it to the P. There you go, oops. I think I move my iPad to
it. Oops, there you go. Let me hide this so that we
can see this more clearly. Then on the new layer, let's draw this quarter
circle right here. So, same thing, we are going to draw like a circle
or using or holding our finger to lock
it into a circle so we can adjust and resize it. Maybe like this. All right. It doesn't have to be perfect. Just try to get it as close. And then same technique, you want to cut this one
fourth accurately, okay? So to do that, just go to
transform and bring it to half like that on the side and half again on
the edge where you get, like, a one fourth
that's perfectly cut. You want to make sure that let me undo this and do it again. You want to make
sure that the yellow or orange line shows up. It tells you that you're cutting it perfectly in half
like that, okay? Let's move it back like this, and let's flip it very
cly horizontally. And move it to where we
need it to be like that. Okay, let me push it to the
left a little bit more. There you go. Okay. And then
let me just duplicate this. Oh, before that, let me
add this part right here. And as you can see
from the example, it's going to fade. It's going to start behind O, so it can be long or we
need to create it longer. So let's just wait
is this a duplicate. Okay. I'll just work
with one first, create a new layer,
and then just like a simple horizontal
line like that. You can actually use your
rectangular tool to trim ops. Let me just do this again without overlapping so
you can see clearly, create a horizontal line. Make sure you use your finger
to lock it horizontally, and then we don't need
this round, right? So let's use a rectangular
selection and erase that half so that when we
move it down, there you go. It's going to match
perfectly like that. Okay? Then you can
now merge them. Easy, right? Okay. So you want to duplicate this, move the duplicate
all the way down, flip it vertically to complete
the bottom half like that. Okay? And then on a new layer, you want to close these, right. So just create like
a vertical line, and you can reduce
the opacity so that you're going to see it because everything's
too black, right? Now, let's just move it
to clip to the side and use the selection tool to erase the excess erase like that, Azing selection tool, we
go to erase. Here we go. Then return the opacity, and then we can merge
everything together. So let me just hide
everything like this and show you how it looks. It's okay if it looks
like that because we're going to clean that
up later, okay? Next is a letter E for the letter E. Since the
bottom part is fading, we're going to
duplicate this right here by just dragging
the layer to the center, and it's automatically
going to create a duplicate on the
topmost layer, and then let's just move it to the side and position
it correctly like this. There you go. Okay. And you hide this
and on a new layer, we're just going to
draw like horizontals. Like that, we're
going to move it. Wait, let me open that
up so I could snap it perfectly like this
and like this. Perfect. And then duplicate
that for the base. We're going to move it down
a little bit like this and nudge it to the
left a little bit. It's okay if it's like
that because we can hide it later on and move it one last time and move
it all the way down. Okay, let me just show all of these again so that
it's going to snap easily. Snap here at the
base. There you go. So it looks messy. I know it looks
messy, but we are done for our What step is this? Yeah, second step. So it looks messy, but trust me, if we clean those up later on, it's gonna look really
nice and clean, which is what we're going
to do on the next step.
4. Adding Strokes, Shading, and Depth: Okay. Now to the next step, we are going to
layer the strokes, and then we're going
to add the shaving. Okay? So first thing we're going to do is
we're going to change the background color to black because in our final artwork, the background is black, so just double tap here to
get completely black. And then we can hide
the lettering guide because we don't
need that anymore. Okay? Now let's work on one part of the one
stroke at a time. So let's just hide all of the and strokes
we've done so far, so it's not going to
be too distracting. And then we're
going to hit invert on the first one to see it. Okay? And then we want to
add the fade effect, right? The shadow effect. To do that, we're going to switch
on Alpha lock and change our brush to color
black. It's already in black. And then, let me open the other one and
invert it as well. And recall this
create alpha lock, just so we have a reference on how like the base for letters. So going back to
the first layer, since Alpha lock is turned on, if we like, brush anything, it's going to lop to that space. So that's what we're
going to do. Brush it till about maybe here, and then gash and blur. Yeah, that maybe about 24, so that it visually somehow
looks like they're on the same page or same light. Now, let me just increase
this a little bit more, add more black and add
more Gaussian blur. So the blur is going to
be longer like this. Nice, right? Next
is the top part. So this is the second stem. Alpha make sure Alpha
lap is turned on, okay, before you try to, like, color or brush over the black color and
then add Gaussian blur. Not too much because if you add too much, you're
going to see the end. We don't want the end to
be visible, like this. Nice, right? Okay. Next is the horizontal bar. We're going to show that, click Invert, and
turn on Alpha block. There we're going to color
one like that with black, and then turn on or
add Gaussian blur. K. So we can move it
up or down later depending on where we
position this and K. So now it looks like this. Okay. Next is the O. Okay, I think for the
O, we can show all of the layers hit invert. And I think for this one, it's okay if we merge everything in one layer
because we're going to treat it as just one
layer. Your O is done. Next is the P. So let me show and invert all of the letter P of this no lumber letter P. So
we only have two layers. Okay? So for the letter P, for this one, let me just
hide the other layers first so that we can just focus
on the letter P for now. So for this one, we're going
to Oh, not this one okay. We're going to turn
out Alpha lock, okay? Alpha lock, like that. And then we're going to
let's focus on this first, okay? This part right here. So for this part, okay, you want to brush in some
black here on top, right? So it's going to
fade under leads. So turn on Gaussian blur
and add the blur like this. Nice, right? And then
for the bowl of the pea, this side is fading, right? So make sure it's like that layer, and then
we're going to, like, brush it a little bit like
that and add gaussian blur. Okay, maybe a bit more. Oops. Oops. Add more black. Then add Goshen blur. Like that. Looks nice. Okay. So this part right here is
on top of the vertical, but this part right here is
at the bottom or behind it. So what we need to do is we actually need to cut this, okay? So using our selection
tool under rectangle, I'm going to select
the bottom half, but I'm going to extend
it up to here maybe. Okay? And then three
fingers slide down, cut and paste, so that the
bottom part is in layer. And then make sure
you turned alphaa on flop back on for those two. The O isn't I mean, flop isn't turned on for the O, too, so let me just
turn on the flop there. And then for the bottom part, we're going to color
this black right here. Okay. All way here. And then turn on Goshumbl Oops. Okay. Before that, let me
just bring that layer down behind this bar right here, then that's when we're
going to I'm going to brush it at an angle like this and turn on Gauchmbler.
I tally see that. So that it looks like it's
underneath the P. All right. So let's bring back our oh, no, but before that, let's just hide those and work on the E next. So turn on all layers of E, and then we're going to invert them invert and then invert. Okay. So for this top bar, we want to connect it
to the long base here. So let's move this up here and merge them
together like that. Okay? And then turn
on Alpha lock. And as you can see,
the bonapt is fading, so we're going to
brush this like this. I'll maybe a bit more. Then
turn on Gaussian blur. W bad. Okay. So it looks like this beam
is moving that way. And then this is the
middle one, right? For the middle one,
turn on Alpha lock, Color the other side,
and then Gaussian blur. There you go. So
it looks like it's underneath. Right? Ooh. Let me just reduce
the maybe up to oops. Maybe up to here, so
it's not too far. Like the black isn't too far. So when we add some blur, a little bit of blur
is still white. Here we go. And then this base right here, which is this one,
it has to be on top of the bar of
the E like this. And I think we want to
extend this a little bit. So I'll just duplicate
this and then move the duplicate to the right like this and then merge them
and then add alfa lock. I could just color it by that with black and
add Gaussian blur, maybe a bit more bit more
like here, up to there. And then add Gaussian
blur. Like that. Now let's bring out all of
our letters. There we go. So as you can see, some are overlapping
incorrectly, right? Like, this one, O has to be
on top of P. So let's just bring the letter O on top of P, which is this, yeah, like that. AC that. And then for this one, the bar, we're going to decide if it's overlapping
which and which. So I think for this bar, okay, this is the bar, right? So I kind of want to change
it from, like, the example. So I want the bar to be
on top of this but below this, something like this. Okay? And then we want to add
some shadow to this, right? So we're going to duplicate
this in the bottom duplicate, we're going to make
it completely black. So change the brightness
all the way to zero. So if we hide the top part, it's going to look like that, and then we're going to
add a bit of gaussian blur just tops manually
add some drop shadow, but make sure you turn
off Alpha lock. Okay. Then Gaussian blur.
There you go. Do you see that shadow?
It's maybe ten. And I'm just going
to bring it. Okay. No, I think I'll
bring it back up again like this so that
I can see it more. And then I'm going to move
the shadow just a little bit down like that. Yeah, I think it's better
this way, okay? So, yeah. We're now done with
the part where we layer the strokes
and add shading to it. It looks I already looks
really nice, right?
5. Coloring with a Blue-Purple Gradient: Now to the next step, which
is a fun step, I think. So the next step is we're going to color and add
gradient to this. So we're going to follow
the coloring guide we have here in our reference. So to color this, um, Okay, right now you
have so many layers, right? If you don't have
a lot of layers to work with, it's completely okay. You can just merge
some of those. Just make sure not to merge
the what do you call this, the layers that are overlapping, like the horizontal bar of H, don't merge it with,
like, any of these. Okay? Any of the varical bars. But for me, since I think I have enough
layers to work with, so I can now start to color. So before we color, let's move our color scheme all the way up right there and switch it open so that we now have the color
palette that we need. So for coloring,
what we're going to do is we are going to create a new layer on top of each stroke and turn
on clipping mask. For example, this
horizontal bar, let's start with
this one right here. So it's this layer. We're going to create a new layer on top of it and turn on clipping mask. Okay? And then, as you can
see from our reference, it has, like, a white like
white rainan to, like, purple and, like, sorry, purple, like violet, like, pinkish, fucha I
think it's fucha, like white fuchsia, and then
like a darker blue color. So on this new layer layer, let's color, maybe this purple. So I'm going to completely
fill it like this. So right now it looks
like this, right? So for the layers,
like coloring layers, make sure you switch on
multiply so that it's going to follow what do you call this the shadow Because
if it's not multiply, it's going to color
the entire thing. So the shadows that
we did earlier is going to be useless, right? So, make sure you
switch to multiply. And then we're going to use
the brush, maybe, like, make it smaller and then
we're going to color pick this and add it like this, like a curve to the edge. Just a little bit
like that. Okay? And then the darker blue, we're going to color pick
that our darkest color, and maybe made like
a ankle like that. There you go. And then we can now turn on
Gashi and blur like this. Just blur it a little bit. There you go. So that
is our first blur. Next is this bar right here. Let's like that layer,
create a new layer with clipping mask turned
on and switch to multiply. Then let's color pick maybe this again and
fill it like that. Now let's start to color it
blue because as you can see, the top part is blue right here. So let's color it like that and switch to the white because as you can see,
there's some white there. So maybe white this. Let me make. Okay. Okay, I want to do
something real quick because this is
like a solid brush. I want to create, like, a
more pointed triangles. So let me just edit
this brush real quick. So I tap on the brush, and for the Apple pencil, I'm gonna increase the
size under pressure, okay? So I can make thin and
thick strokes, too, okay? Tops. So thin and thick
strokes like that, okay? So I want to call it
this part, white, right? Dips. Oops. Okay, I move my iPad again. I
want to color this. So it's all about coloring or
drawing shapes to gradium. So it's not always
horizontal or diagonal. Feel free to work in
other shapes as well. And then let's add the darkest
color maybe here below. Here. Okay, that. And then once you're happy with the
combination of colors, you can turn on Gaussian blur or switch Gaussian blur this. That. For the other stem of the H, create a new layer,
turn on clipping mask, and switch to multiply. For this one, let's color
it blue completely, and then using the
darker shade maybe no. Maybe white first because you can see there
are some white here. So just trying to
imagine that maybe it's like this. Like that. So I just want to
create the triangle here like that and then add that purple then. Like that. Let's try this. Add Gaussian blur. Okay,
I feel like the white. I need to add more
white here. Like that. Shade it even if you
don't see it, okay? And then add Gaussian blur. Yeah, I think that looks better. Yeah. Okay. Next for the
letter O on top of O, create a new layer, and then clipping mask and change the
blending mod to multiply. For this one, this
is going to be a bit trittier Let's color
this blue first. Okay. And then let's
call it white. Let's look for areas with white. Okay. I think it's here, right? Like that. So right now,
it's going to overlap, but we're going to fix
this later on, okay? And then you have this
dark color right here, the entire base, and a little
bit of this herbal here. And you have the blue
and then the dark again. Like this one. Right. Add a little
more herbals here. And the blues here Tray. And then some white here. Okay, it looks weird right now. Let's try to a Gumbler
Okay. It looks a bit off. That's because what we
want to do is right now, if you blend, it's
blending to both sides, right? You don't want that. So what you have to do is you have to make sure
the colors are clean first. Like for this one, there's,
like, a bit of blue here. So just color that up. This one, it has
a bit of purple. Let's color that right there. For this one, let's increase
the blue up to here. I maybe bring this up
a little bit more. Maybe color this blue. Just try to clean
this up a little bit. You may want to make
your brush size smaller so you can color this
properly, a bit. Okay? And then look at what
I'm going to do, okay? So I'm going to use selection free hand because we need to separate the
left and the right. Otherwise, it's all just going
to blend together, okay? So I'm going to move it
all the way up here. And tap the middle
bar right there, and tap the bottom
part right here, tap here, tap here, okay? And then I'm going
to cut and paste. So let me turn on clipping
mass that you'll see, okay? So the first part is just
this one right here, okay? And then the next
part is this one. So now the colors are in two different parts so
that if we add Gashiblur, it's not going to
mix together, okay? So we're going to turn
on Alfala on both falla. Then we can now start
to add Gashenbler. So maybe 15 here. And this one, Gchander
will try 15, too. There you go. Do you see that? The purple isn't
mixing here anymore. That's what we want because we separated the two layers, okay? So next is for the
letter P. So for the P, the vertical bar,
let's add a new layer, clipping mask, and change
wending mode to multiply. And then let's color this. This is dark. Let's color everything
that dark color. And then it's going to choose the purple
and maybe whoops, maybe make a triangle here. Like a like that, you see it like a
little white over here. So maybe something like this. Try to cover it. Like that. Okay. Let's try to
add Gaussian blur. Yeah, I think it
looks nice. Perfect. Then for the top part,
create a new layer, clapping mask,
change to multiply. Okay. So for this one, let's color it blue. Or maybe the white. And then we're going to pick the color
blue and try to color it. And I think the dark color, we need to add some here in the middle and add a
little bit of white here. And then, add
goshonwar. About 15. Okay. Then for the bottom part, which is this layer right
here, create a new layer. Alpha lock. No, not alpha lock, sorry, clipping mask and then
change to multiply. There you go. Let's color it the same color so that is going
to be seamless like that. You don't see the
white one, okay? You want that? Then
maybe just a dark color here and add a lot of blue
on the edge like that. Then you turn on Gaussian blur. Just a little bit. There you go. Okay, next is the letter E. So let's start with
this vertical bar, create a new layer on top, clipping mask, go to multiply, and then let's
color this purple. Okay. And let's color
pick the white color. Oops, add, like a
Dan ray like that. Then maybe the blue here on top, like reg and get the purple, do the purple again here. Now we get the dark blue
with a darker color. Do that. There you go. Let's try to add
Gasmblurnice, right. It's like the
colors are dancing. Next is this one. So on a new layer, create
a new layer on top, clipping mask and
same thing, multiply, change the blending
mode to multiply, and then let's color
it the white color and maybe just add a little
bit of blue here. Just a little bit.
Gashi blur. Nice. And for the bottom part, let's
create a new layer on top, try it on clipping mask and change blending
mode to multiply. And then let's give it this dark color and
switch to the purple, just to add a little
bit of, like, x and here on top. You see that? It
maybe a little bit of blue here at the bottom. There you go. And
then Asian blur. Okay. Nice. Let's now hide the color scheme. We now have finished. Let's move this to the
side, how do I move this? Okay, I hate this reference. I always have a hard
time moving this. Why can't I move it? Whoops. Oh, no, I moved my iPad. And I knew Snoopy. It's hard to move, but
anyway, I hate it. I'll I'll just hide it, okay, hide the reference. So annoying. Okay, so when you're done with
coloring and adding gradient, the next step is to add
the retro grainy effect.
6. Applying the Retro Grain Texture: Okay, so I actually
really like it now. And if you need to
do some adjustments, feel free to do
it at this stage. Like, for example, this
feels a bit too dark, right? So maybe there is this layer? Is this layer, right? I'll move the entire the color down
a little bit like that. Do you see that? Or maybe, like, reset, drag it, pull
it down like this. Nice. Okay. So it's up to you
how you want to make any adjustments that
you want to do. But now we're going
to add some grains, and it's really simple. You don't need to
create any brush. All we need to do is
create a new layer on top, switch to white, completely fill it to white, and then we're
going to add noise here on adjustments,
go to noise. Like that. Just drag
it maybe halfway to 153 and increase the scale a little bit to maybe about 14. You can choose
what kind of like, shapes for the noise. I think clouds are okay. I just want to scale
it up a little bit. Maybe about 20% or
21% like that. Okay? And then what I like about
noise is sometimes you could see the like some
sort of pattern. So I just like to
transform it, like, rotate it a bit
and sorry, reset. Go to Uniform first,
rotate it a bit, and then just try to increase
the size a little bit. There you go. Because
sometimes I don't know. I just see some sort of pattern, and that's just how I
try to get rid of it. So for the first one, we want to it's the bottom one, okay? You want to change the blending
mode to soft light soft. There you go. Okay. So before now, after you
have a little bit of, like, gradent to it, okay? Next is we're going to
create another noise layer. So drag that in,
do the same thing, noise and maybe about. You want it to be super
dark, okay? Maybe 157. If you feel like you
want to make it darker, you could just go to curves, pull these down a little bit. There you go. So this
is before and after. Only if you want
to make it darker. Oh, this is what I'm saying,
right? You see this? If you zoom it out to, like, a specific zoom, I don't
know if you can see, like, there's some
sort of, like, grids around here. I don't know. That's why I like
to rotate it a bit, but let me just remove magnetics so that I might not be stuck with like 615
degrees here you go. And then for this one, I'm
going to do soft light again. There you go. So we have bigger greens and smaller grains of soft blight. Then we're going to duplicate
this and change to screen. But move it or change
or lower the opacity to about 25, I think, 25%. See that? Looks nice, right? You now have, like, a
green effect for this. So I started with this, let me move it to the side. Added some greens. Okay. Let me just
zoom in a little bit. Okay. No grains, a bit of green, another green, and
another grain. So, yeah. I think for the screen, that's the screen, let's just
make it overlay, I think. No, screen. 25. Let me try to release these. Let me just try to do
something real quick. Okay, I'm sorry. I feel like I forgot something like DC this? DC the P. We're supposed to add
some shadows there. I kind of forgot that. So let's just do that,
too. I don't know. Maybe it's throwing I feel like something's missing
or something's wrong, and I'm sorry, I forgot to
add that shadow right there. So let's look for the layer of b. I think it is this
layer right here. So let's just create a new layer on top and
just switch to black. And then using a brush pan, like normal brush, try to, like, curve it similar to that and then just
turn on Goshen Blur. There you go. Yeah,
I feel like that's missing. Before
it was like this. Now, yeah, I think
that's better. Okay. Then after that, one thing we need to do is all of outweight return all ease. Okay. Yeah, I think we
can settle with that. Let me just lower
this. I feel like something's off for me. I forgot what it is. But I feel like we can move on from now and
just fix everything later for the finishing touches because sometimes you feel
like something's wrong, and you kind of need to
oh, I think it's the P. Again, I feel like
there needs to be, like some shadows here, too. Okay? Let me roof that. Okay, I think it has shadows. Yeah. I don't know what's
throwing me off. I feel like we're gonna
figure that out later. Okay? So for now, we're finished adding
that retro feel. Oh, I think maybe it's a
bit too dull right now, but we're gonna
fix that later on. Yeah, I feel like that's
what's throwing me off. It feels or it looks
a bit too dull. But yeah, we're gonna
fix that later on. Or maybe fix it now. So we're gonna hide everything.
I'm sorry. Okay, I kind of thrown
off because I feel like something's missing
or something's wrong. So for the next step,
we're gonna fix this, maybe fix the lighting and
the intensity of the colors. Okay, I feel like that's it. So, I'm gonna hide these grains. I feel like the grains are okay. It's just like the colors
feel a bit too dark and dull. So for the next step,
that's what we're gonna do. We're gonna fix the
lighting first.
7. Adjusting the Lighting Glow: Okay, now we're
going to fix this. I kind of know how to fix this. So let's hide the background. So we have just this, our lettering with
transparent background. Make sure the what
do you call this, all the noise are turned off. And then we're going to do
is we're going to duplicate the finished work on top several times and add
some blending mode to, like, make this pop
a little bit more. So to do that, make sure
all layers are turned off. We're going to go to actions, add copy Canvas, and then
hit paste, here you go. So we now have a new layer
that's merged on top of it. And then for the first one, we're going to move to screen. There you go. It instantly, like,
brightens it, right? So this is before. By adding a doublate with
screen, there we go. That's all we want. Okay? I
feel like that's missing. And then we're going to
duplicate this again and switch to overlay to deepen
those dark tones. This is before and after. But I feel like it's too
much, so maybe let's bring opacity down
to maybe about 40%. There you go. And then we can bring back our noise layers
in the background. There, okay, I feel like, I feel like we're
onto something. Okay, maybe for the
screen for the noise, I feel like it's
still too light. So maybe I'll just go to
hue saturation. Oh, sorry. I'm selecting the topmost
green hue saturation. Let me just try to lower the
brightness a little bit. So this is normal, so let's lower it a little bit. This before and after. Yeah, I feel like
that's doing the trick. And then one more
lighting change. So I really like to add a little bit
of external lighting. So I create a new layer, switch to white,
and using my brush, I'll increase the
size a bit, okay? Then maybe draw
like an oval here, even oval No, a smaller
oval here. Like that. Okay. And then we're
going to Gaussian blur. A Gaussian blur,
something like this, and then experiment
with the blending mode. Let's try SofttOlay. Yeah, I think overlay
or soft light, overlay. And bring the opacity. Now soft light and bring the opacity a
bit down. Oh, sorry. Okay, let me do that again because I feel like
the colors are wrong. So first is add, like, a normal gray ring opacity back up. Okay, start
with the gray. I'm sorry about that. I feel
like something's wrong, so yeah, and then white, switch to white, and then draw. You don't want, like,
a black background. Yeah, I remember now, okay? Like this, two ovals,
and then Gashimblur. So you have that kind of
two spotlights right there. And then switch
to soft light and re pass it down a
little bit. Yeah. I don't know. I just like
to add some spotlight so that the lighting
isn't completely even. Yeah, like this. Okay.
I kind of like it. So let me bring
back the reference. Okay. I feel like
there's something wrong. I feel like there's something
wrong with the gradent. Let me hide the reference again. I'm sorry. Sometimes,
when I create this, I feel like something's wrong, so I want to, like,
try to fix it. So what if I feel like one of these because both of them are soft light, I feel like, let's
change one to overlay. No, not this one.
Maybe the bottom one. Yeah, I feel like through
this, this before. You can see the green is
not that smooth, right? So if we change this to
overlay, yeah, it's nicer. Yeah, I feel like that's
all we need to do. Change the middle green
layer to overlay. Yeah. I think I'm happy
with this now, okay? Or maybe lower the brightness. Yeah, yeah, okay. I
think I got it now. Sorry about that. Sometimes
with all these layers, it gets a bit confusing. So for this, let's just Okay, I'm selecting the
bottom graded layer and hidden adjustments
brightness, adjusting brightness down. Let me zoom in here.
Do you see that? You want it we don't
want to see this. I'm not sure if it's clear.
Like the colors are visible. Okay. So we don't
want to see that. Right. Oh, sorry. My hand touched. Yeah. So you want
to go to the last, what do you call this last grain and bring the brightness
down a little bit. Not too much. Maybe
about 33%. Yeah, okay. Like that. Perfect. And make sure this is soft light still. Okay, because I remember both
of these are soft light. Both of these greens. I mean, we have three green
layers, right? I remember that I
created this screen, soft light, and the soft light. Okay. Okay, I think
we're good now, and I'm happy with this, but we have one more
effect left to add, which is the edge
glowing effect.
8. Adding the Edge Glow: Okay, now for the last effect
that we're going to add, it's actually simple,
quite simple. So all we have to
do is just add like a white glow on the
edge of each segment. So to do that, we're going
to create a new layer. Okay, wait, let's
start with this one. This bar right here, okay? So, create a new layer on top of what do you call this on
top of the colored layer, add clipping mask, and then we're going to
color completely white. Okay, don't panic yet because we're going to select
back to the base layer, select that tap that
layer, click Select, go to our layers, go
to the white layer, tap on that and hit clear. So if you look at this layer, it's basically white except
for that piece right there. Okay? So after that, we're going to go
to Gaussian blur. You see that do you see that? The edge if we add
Gaussian blur, like the edges are
starting to glow. So I think let's stick with 10%. Let's try 10% first, and then we're going to change the blooding
mode to overlay. Let's duplicate this
a bit, maybe twice. Okay. Yeah. Now we're
starting to see the globe. So I'm going to hit
Undo, go back here. I'll just duplicate this twice. Make sure it's
still normal, okay? Then I'm going to
merge those three and then change it to overly. Now, I don't think it worked. Okay. Okay, I forgot what I
did here. Yeah, I know it's. Okay, let's do what
I did earlier. So just change it to overlay and duplicate it twice so that
you can see, like, the glow. This is before without the
glow and after the glow. So it kind of lifts
everything up, right? So, yeah, that's what
we're going to do all for each what do you call this
each of the segments. So now let's move
on to the next one, create a new layer on top. Then turn on clipping mask, color drop to white, and then select the base layer. Select that. And then go to layers on the white
layer, tap that. Clear. There you go. And then switch to overlay. Then the duplicate
twice. Oh, sorry. I forgot to do the
Gaussian blur. That's why I didn't
see anything. So add Gassmblur and maybe ten. Did you say ten earlier
and duplicate it twice. Cy see that? You now
have a light glow. Before there's no globe, now there's a nice
it glow over there. Let's do the same thing
for the next layer, which is this horizontal
bar right here, create a new layer on top, clipping mask, color it white, select the layer of
the base like this, go back to the layers
on the white layer, hit clear, turn on
caucium blur, at 10%. Change blading mold to overlay. And we're gonna duplicate
it twice like that. So we're going to do the
same thing for the entire. So it's quite repetitive,
but it's okay. Next is the letter
O for letter O, create a new layer on top. I think by now, we can merge the two coloring layer because
we're done coloring it, clipping mask and
fill it with white, select the base layer,
go through the layers, clear the new white layer
and add Gaussian blur, which is around 10%, right? And then switch to overlay. Duplicate it twice like that. If you want to highlight
it more, you see this, you can duplicate one more time just to increase the glow. But for me, three of
these is already okay. So next is a letter P.
So for the letter P, is it is going to get a bit more complicated for this part because there are
two parts, right? So create a new layer on
top of this vertical stem, clipping mask, color it white, select the base, go to new layer and hit clear
Gaussian blur, 10%. Overlay Lubricated twice. You see that light globe. It's subtle, but it's nice. Next is for this one. Okay. So for the P, you see that? Create a new layer on top. This is going to be
slightly different. Okay, I'm going to try something different so that it's easier. Color be white. Then select the first part. Clear it on the new layer, and then select the
sorry the bottom part, this one right here, just
this one, select it. Clear it on the new
layer we created. Clear like that. So if you isolate this, you need to have a layer like that, ok and do that. And then we're going to add the same the Gaussian
blur, ten, right? And then we are going to
select that segment again, select and then mask
mask it this time. And we select the base, select. And then the mask that
was created hit clear. There you go. Do you see this? Do you see the glow now?
Yeah, the glow that we want. Okay? But we want to
cut it here, right? So we're going to select
this bar right here or maybe just use the
rectangular selection because you can see it
all the way there, right? So just select it
until the edge. Then go to the mask
layer and hit no. Just use the eraser bigger. Then just erase that part. Erase everything so
that you have the glow only where you need
it to be with that. Then just merge
them, and then go to overlay and duplicated toys so it's going to be
the same as last time. So this is before the glow. Now you have the glow
in the right position. Okay, now to our last letter, the letter E, same thing. So just start with
this one, the stem, create a new layer, turn
it on clipping mask, color it completely
white, select the base, and then clear the white part, then create or add Gaucho blur, 10%, and then change
to overlaid and oops, duplicate it twice like that. And then this part right here, this more, same thing,
create a new layer, clipping mask, Color it
white, select the base. Looks not greening,
but select the base and clear the new layer, add Gautam blur around 10%, change to overlay
and domicate twice. You see the glow, it
looks really nice, right? Lastly, don't forget this one. This little bar right here,
create a new layer on top, clipping mask, color it
white, select the base. Clear new layer and add
Gassmblur 10%, and then overlay. Duplicate it twice.
Then there you go. You are now finished with your new retro futuristic
lettering artwork. So I hope you enjoyed
creating this piece. I had so much fun
recreating this piece. Like the position and
the playfulness of the graniut looks really nice and looks really interesting
and adds so much to this. If you want to intensify, like, the edge highlights, I
feel like you want to, like, intensify or increase the what do you call
this, the glow. So maybe I'll just duplicate
the overlay layers, one more for each. It's this one. Yeah, this one. Just duplicate it
to highlight it a little bit more or highlight
the edges a bit more. Yeah. There you go.
9. Final Touches & Exporting: So, yeah, that's it
for this workshop. I hope you're able
to follow along. Like, always, if you
have any questions, feel free to let me
know the comments. And, yeah. I don't know. I just really
enjoyed this piece. I didn't expect to like
this style this much, but I hope you like
this style, too. So don't worry if, like, your artwork doesn't
look 100% exactly like this because we manually
like shaded the gradients. You might have, like,
created in a different way, but it's totally fine. So I hope you enjoy and learn this new technique on how to create a new solid round brush, how to create this tall, rounded sans lettering style, and how to create this
retrofuturistic, glowing effect. Feel free to try this with other color
combinations as well. As always, I would
love to see your work. So if you shared it, tag me so I could see your work. Thanks again for joining
me in this workshop, and I'll see you in my
future Lettering workshops. Have fun. Keep creating. Have a great day. Bye bye.
 Nico Ng, Lettering & Design