Transcripts
1. Intro: Victorian Paper Ornaments: Hi, and welcome to
Victorian paper ornaments made from recycled papers. So this class has two kind
of cool components to it. The first is you get
to make something fun. So we're going to make
some paper ornaments using recycled book pages, decorative papers,
and all kinds of fun textures and colors that
you get to put together. The bonus part of this class is, it's actually a
great skill builder, if you ever want to go on and do more classes in
bookbinding or box making. So the skills that we're
going to use to cover the cardboard insides
of these ornaments are the same techniques that you use to make hardcover books or to cover paper boxes if you're doing an art form
called cartonage. So you get kind of
two skills in one. You get to make a fun project, and you get a little
fundamental bookbinding. So this class uses basic
bookbinding tools, and you can do the
entire thing from recycled paper and materials that you find around your house. So paper ornaments
like this were really popular in
Victorian times, sort of the late 1800s. It was really kind of a fad to make ornaments from
embossed and die cut paper, from decorative papers, and then to decorate
them with glitter and sequins and tinsel,
those kind of things. And so we're making ornaments as inspired by that tradition. But using our own kind
of modern materials, and the way I especially
like to use them is to recycle books that
have seen better days. So I like to find books
from the Thrift store that are not really readable anymore and be able to give them a new life as something fun. So in the next lesson, we'll talk about what our
project is for this class, and then we'll jump
in and get started.
2. Class Project: At the our project for this
class is a simple one, and you're going to
learn some great skills that you can use for all
kinds of other projects. So we're going to learn how
to make a wrapped board. And by board, I mean, we're going to use a kind
of a thick cardboard piece. We're going to wrap it
in a decorative paper, and we're going to
put some kind of an art piece on the front of it. So you can choose to
use your own artwork. You can repurpose
thrift store books that have seen better days. You can use decorative papers. Pretty much anything
you got around your house can be part
of these ornaments. You just have to use a
little bit of imagination. The next lesson,
we'll talk about the materials and the tools
you'll need for this project, and you can gather your supplies and get ready to
make some ornaments.
3. Materials & Tools: Okay, let's jump
in and talk about the tools and materials
you'll need for your project. So I'm going to start with you will need some
kind of a cutting blade. This is my favorite kind
of folding cutting blade, but an exacto knife, a utility knife,
anything like that. Make sure it has a new
sharp blade in it. In addition to the blade, you'll need something to
use as a straight edge. So I like these
metal rulers with the cork back on them.
Those work great. I also think it's really
handy for this project. If you have a transparent
or translucent triangle, this is hard to see on
camera because it's clear. But because we're going to
trim down some illustrations, I think it's helpful
to be able to see through my cutting tool, which I can't see
through the ruler. So some kind of a
transparent straight edge would also be helpful. A bone folder will
be a helpful tool. If you don't have a bone folder, a popsicle stick or a tongue depressor would work
great. But we'll use those. You will want an all
if you want to make a hanger on the top of your ornament so that we
can punch a hole through. So this is just a bookbinding, stainless steel
with a sharp point. These are pretty easy to
find at the craft store. You also could probably get
away with using a push pin, like a bulletin
board tack push pin that you could use to
make a hole in a pinch. We are going to use glue
stick for this project. And for a couple of reasons, I have done a lot of this
similar kind of project, and you can use glue on a brush. But glutick has the advantage of being pretty dry as glues go. And so it's not going
to make your paper ripple up as it's drying. And so I think it works better for this project than
using glue and a brush. Now, we'll talk about some
of the kinds of paper. If you're using a heavier paper, you might need a stronger
kind of stickier glue, and you might switch over to a glue with a brush that
you're going to brush on. I recommend that you get the kind of glue
stick which is clear and not the kind that has
the purple coloring in it. That purple dye that they use is supposed to
disappear completely when it dries and I have seen it kind of come back and show again. I always try to find
the clear stuff if I can and not use the purple. You will want a
pair of scissors, just for doing some
trims of paper. And if you want to put a hanger again at the top
of your ornament, it's helpful to have a
tapestry needle that you can use to thread either a piece of decorative thread or
some narrow ribbon. I have some just
narrow metallic ribbon here that I'm going
to use for mine. One other optional
material you might want. I have some little silver
spangles here, little sequins. These are really common for
this kind of decoration, and so I like to add them
as a fun little accent. This example here, I put a
couple just on the front of it that kind of go along with the theme that I created
for this ornament. So that's an optional material. Okay, so that kind
of takes care of the tools that you'll
need for this project, and I'm going to move
these out of the way. And then we're
going to talk about the materials or the
papers that you'll need. So the first thing is, you need some kind
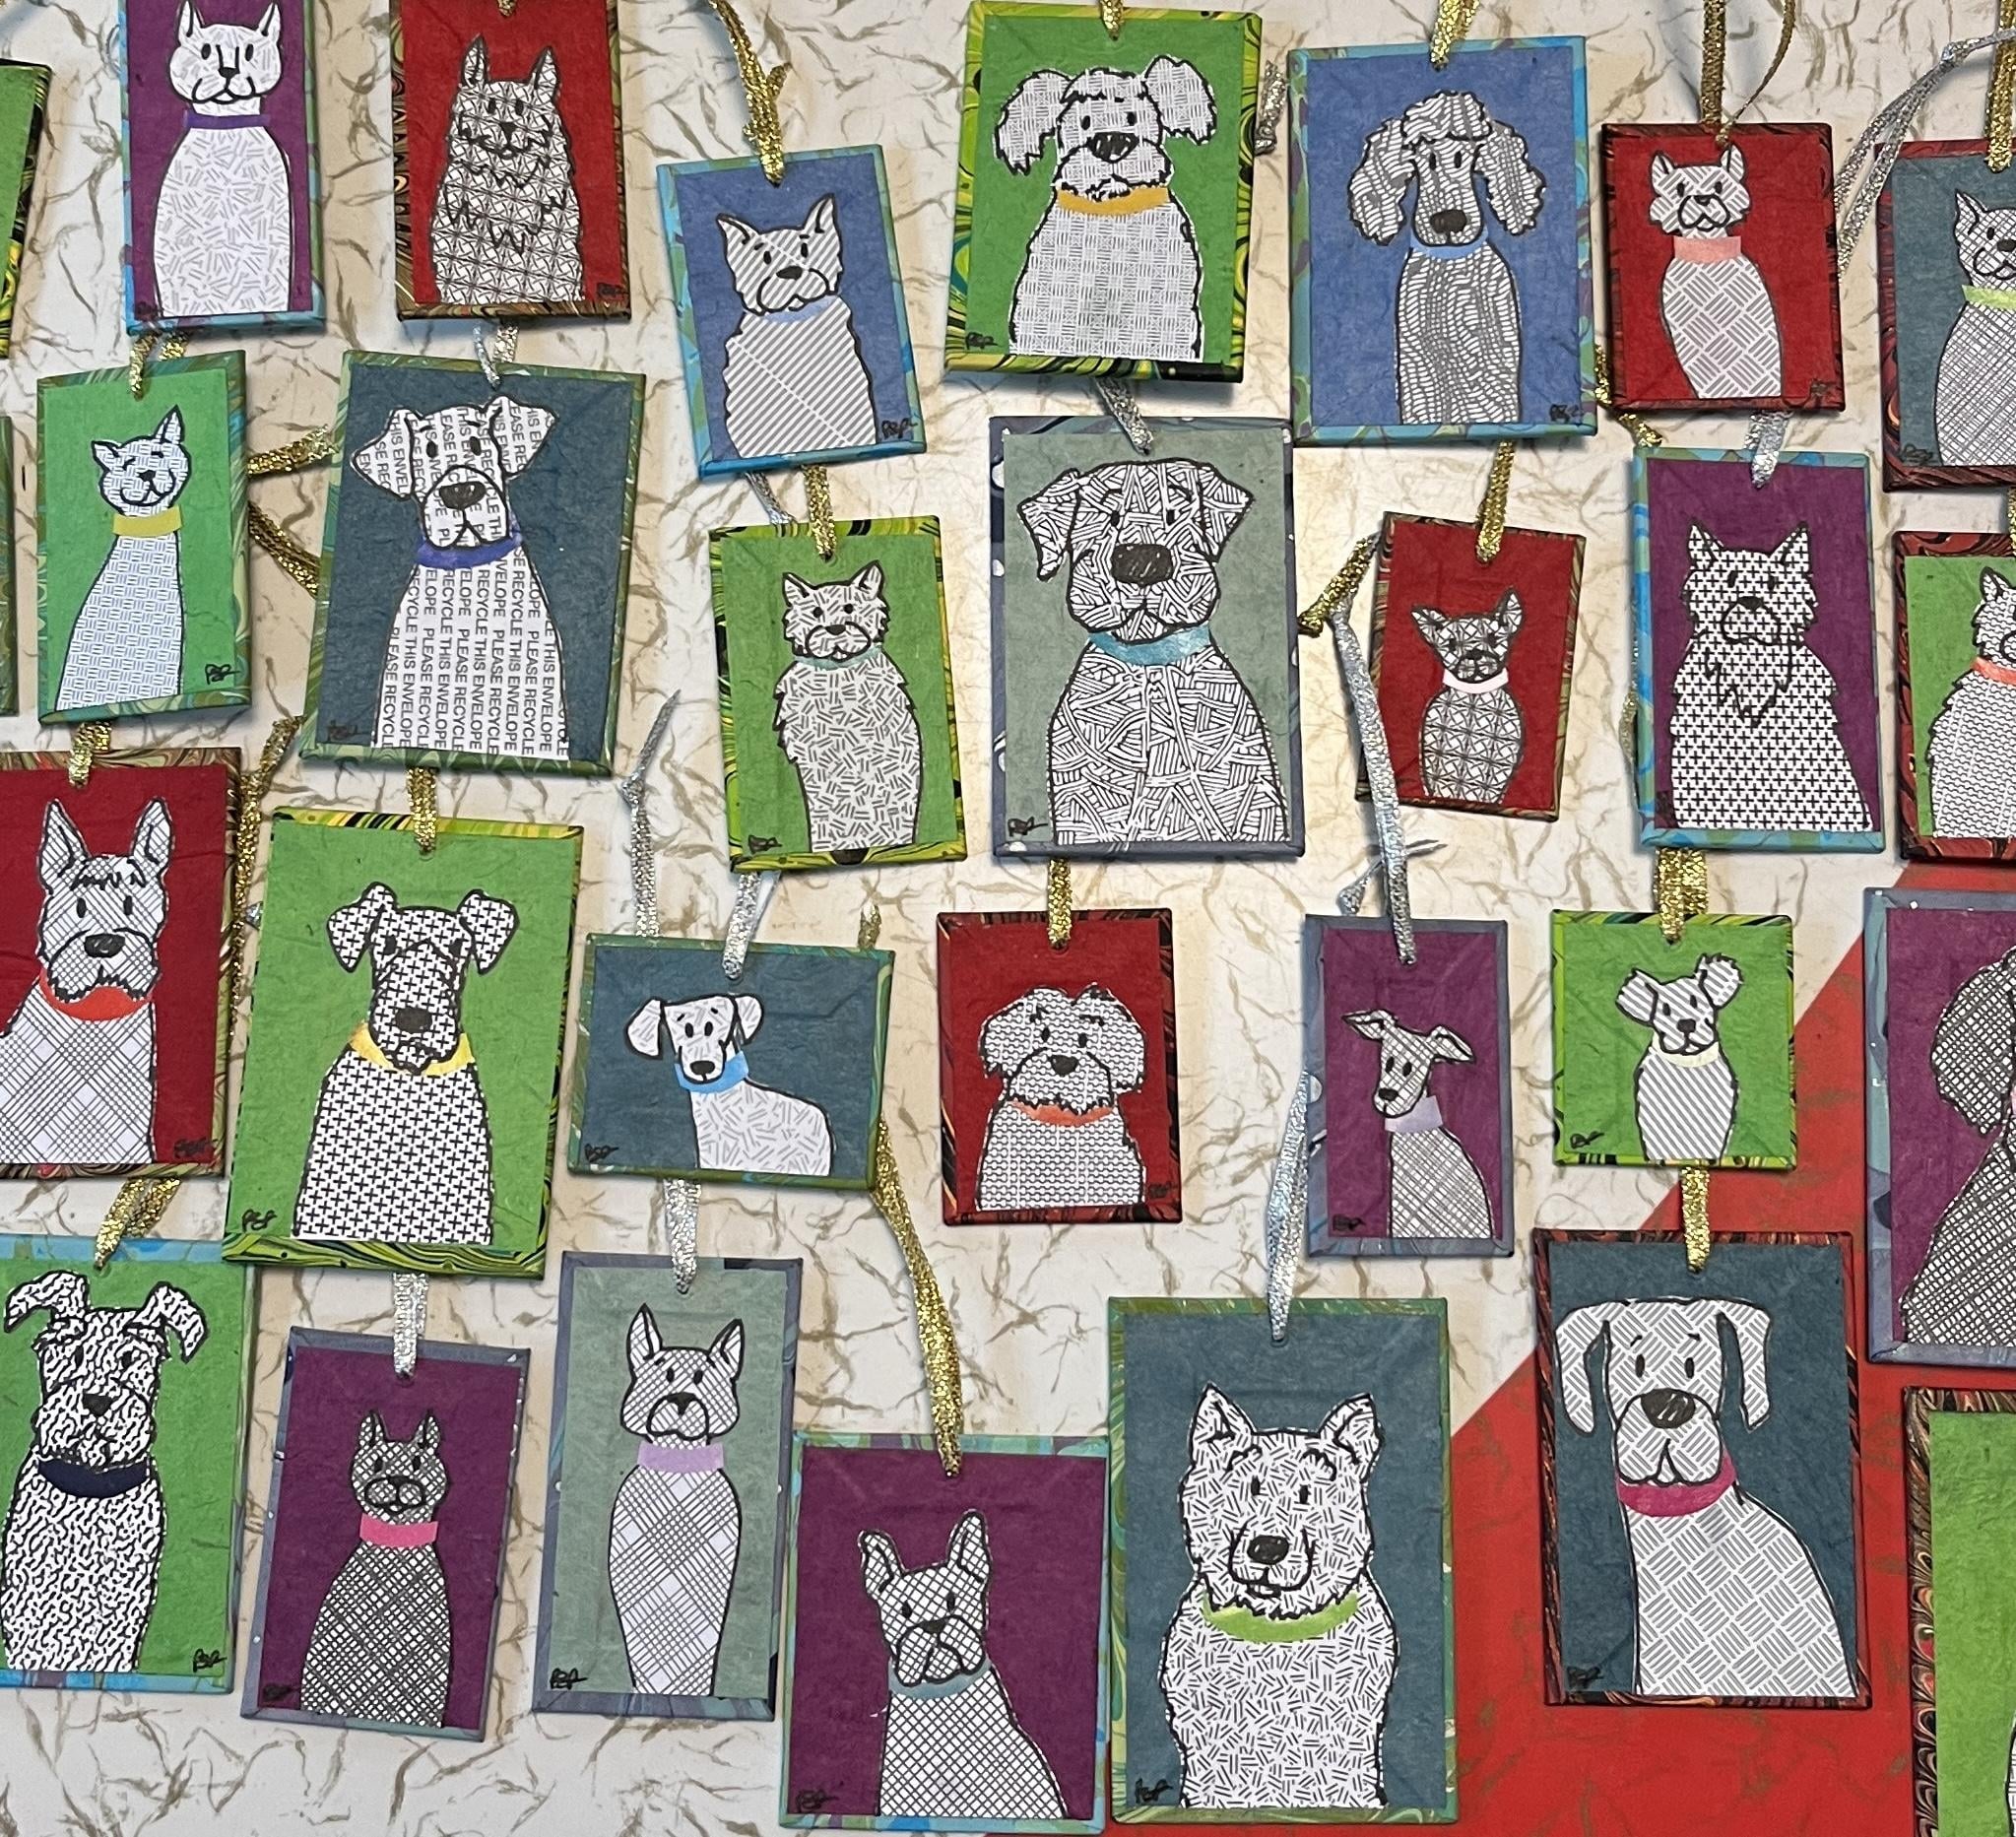
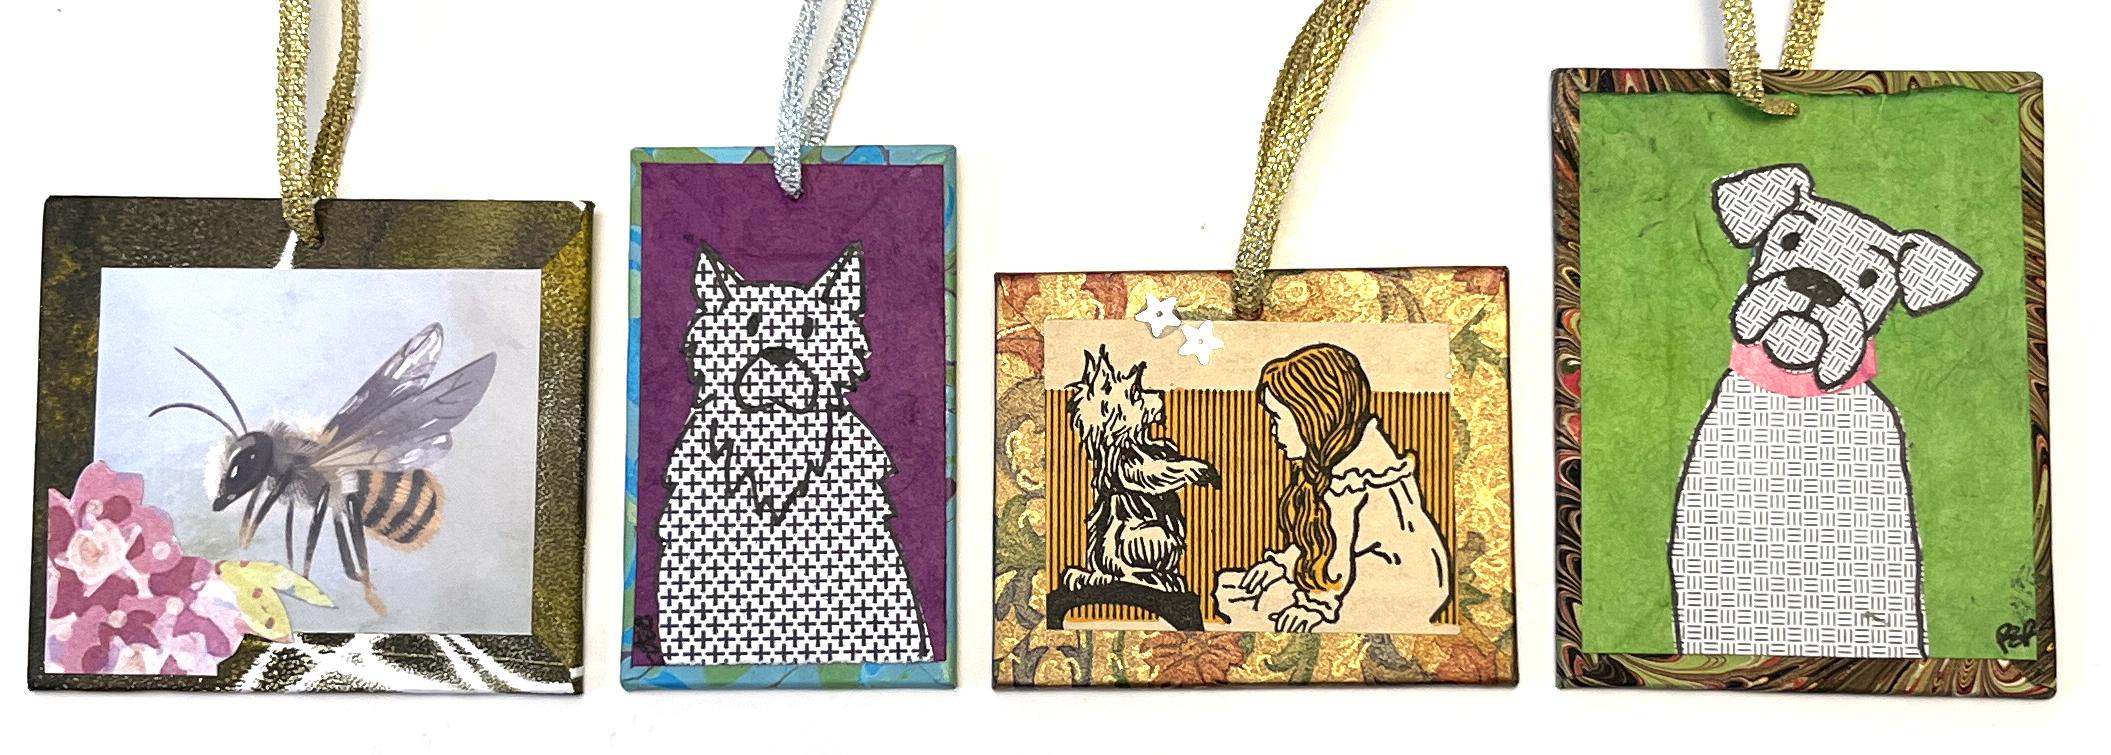
of an illustration. Now, I have this example here. This is actually just an
illustration that I did. So you can use your own artwork. Absolutely. So this is a little drawing of
a dog that I did. It's on a piece of recycled
security envelope. I did a whole
series of these for friends that I illustrated
their dogs and cats and other pets and made those as ornaments last year
for some friends. So you can use your
own illustration, or I have a bunch of examples, and what I'm going
to do in class is to use a recycled
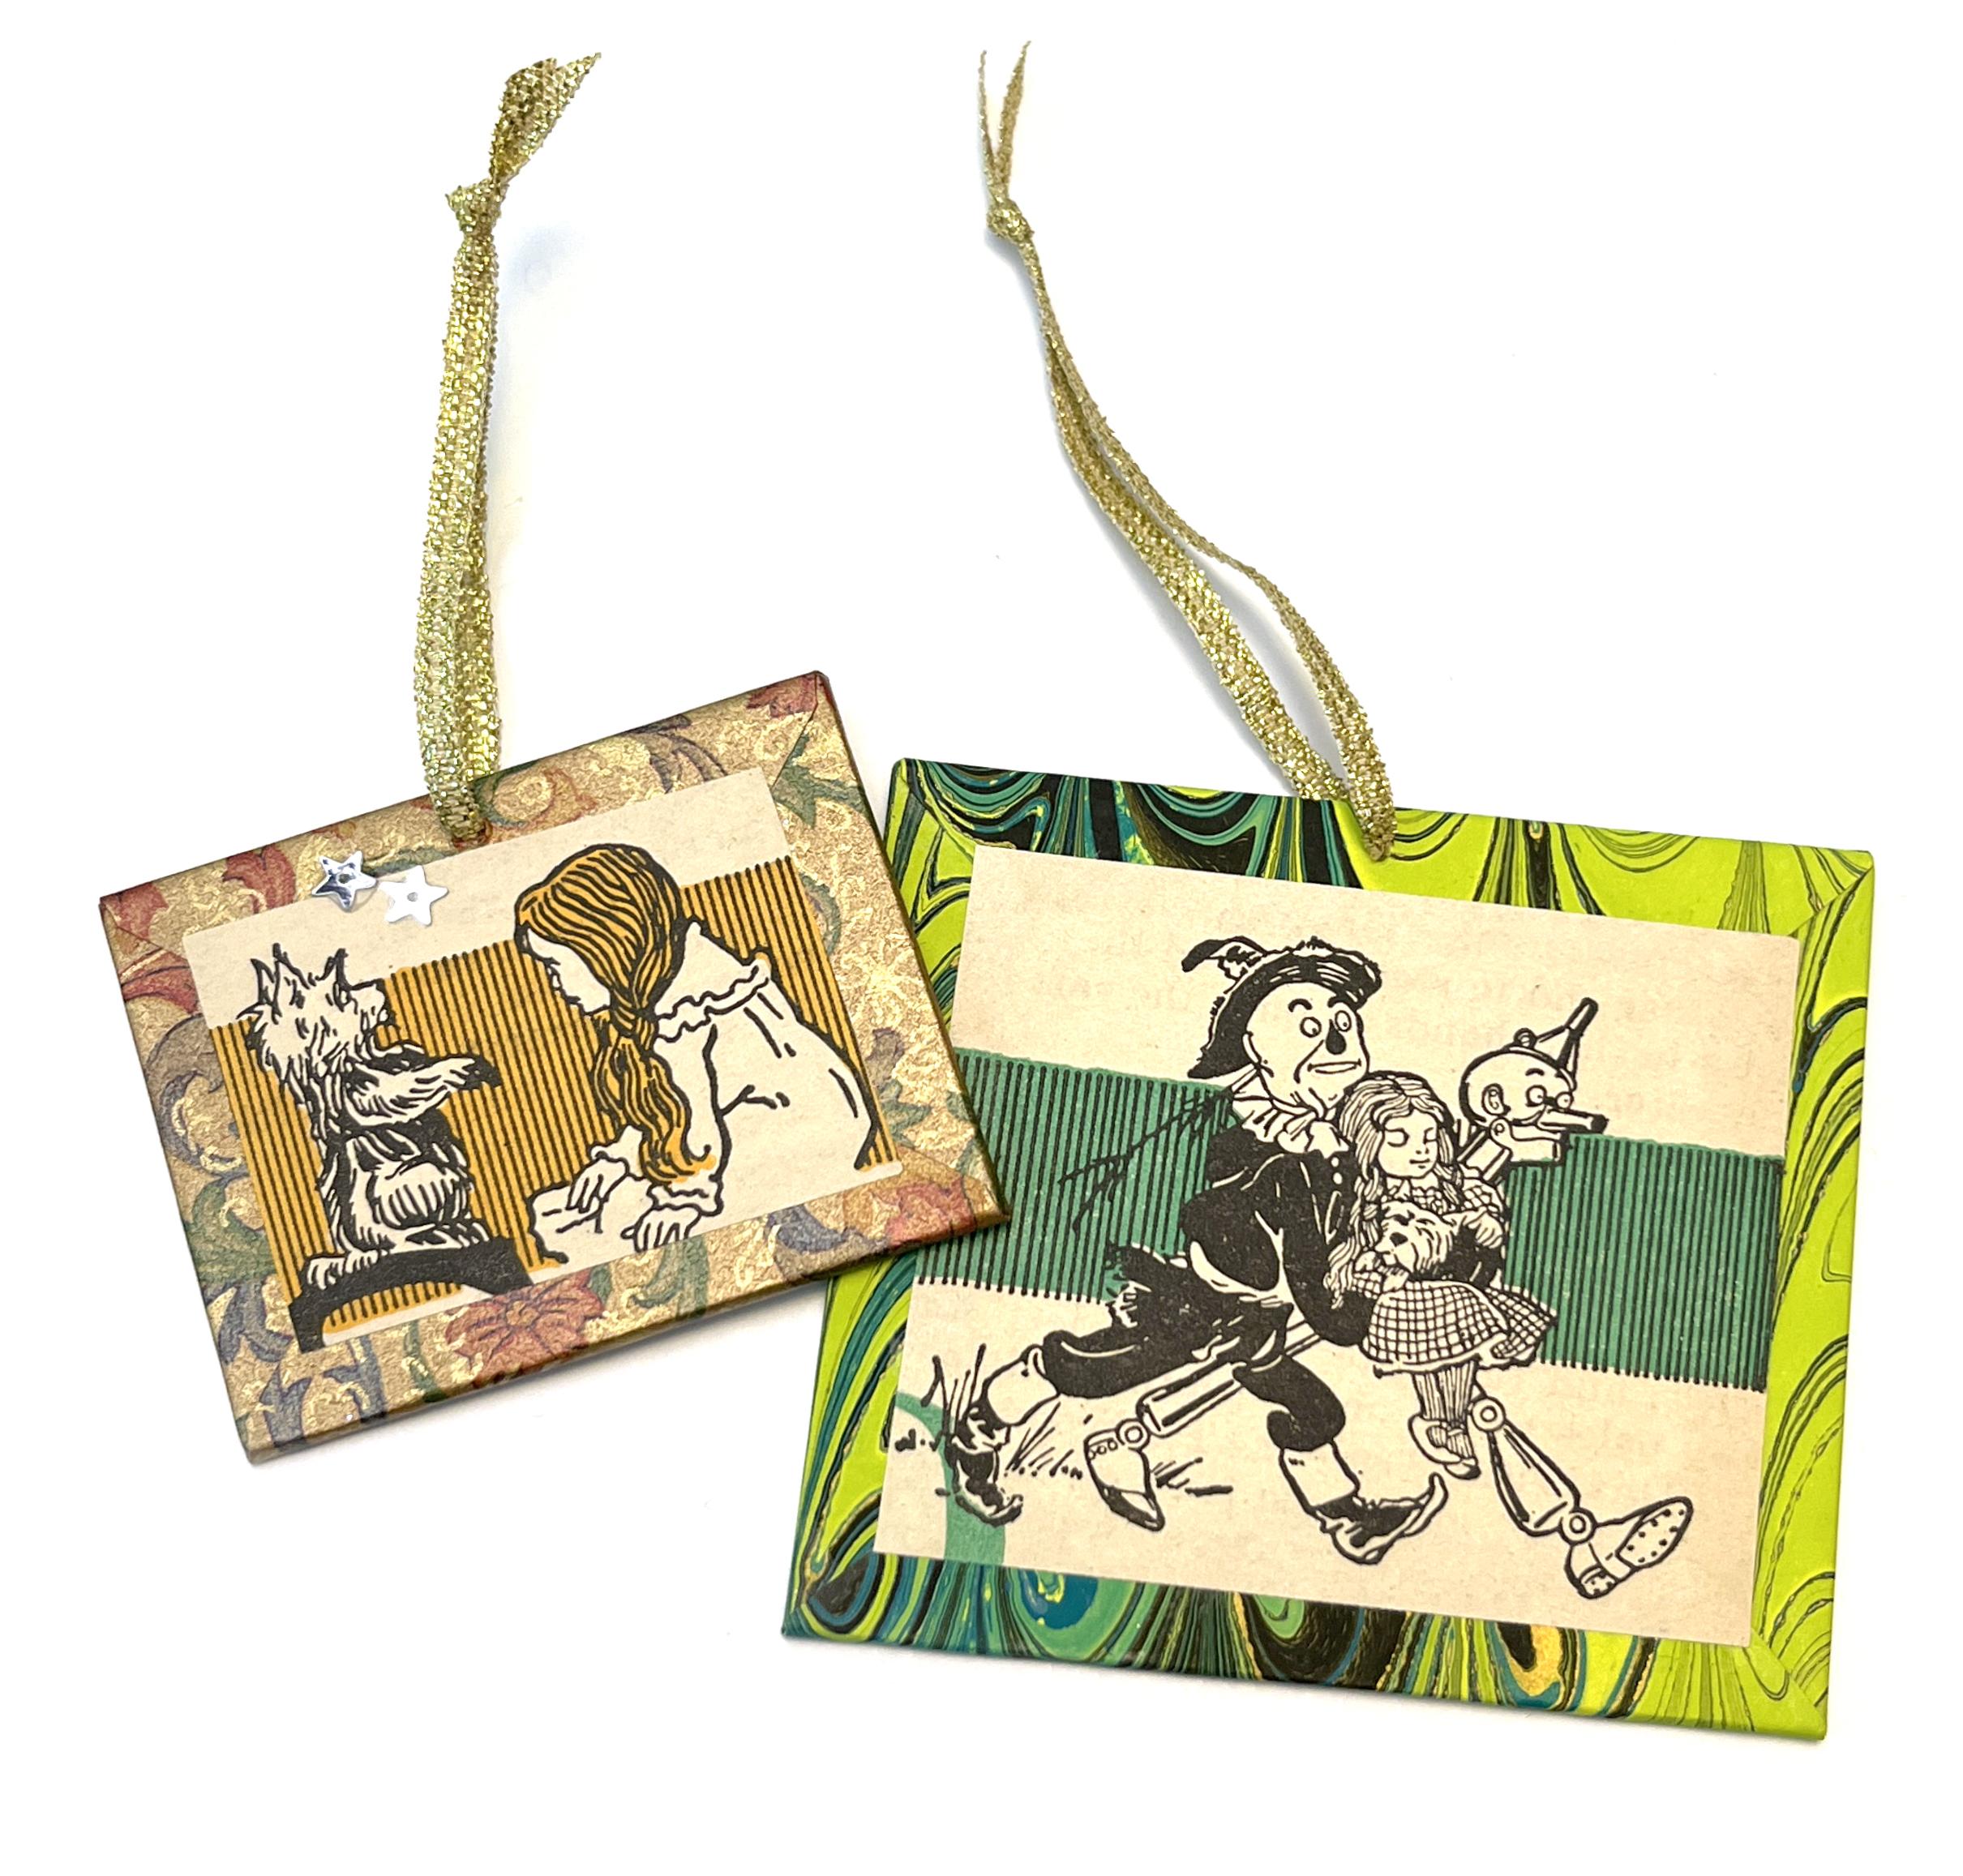
book illustration. So I was lucky enough
to find a copy at the Thrift store with really beautiful illustrations
of one of my very, very favorite books, which
is the Wizard of Oz. This one was in kind of terrible
condition falling apart, so I am happy to
reuse the pages. And so I've just pulled
out some that have some really fun
illustrations on them, and I'm going to use
those for the examples. I also pulled one other
thing which I think is fun. This is a calendar that
I had from last year. This little B here, I think would be awesome
to cut out and use as my sort of focus art piece that goes in the center of this. So I have that as an
example, as well. So the first thing
that you need is whatever artwork you want to kind of frame you
want to feature. So it could be
recycled anything. Holiday cards, fancy papers, book illustrations, you name it. That could be the
feature. The other thing that you need is
something to be the back. So this is where I like to use all kinds of
decorative papers. This is a marbled paper here on the left
side that I made. On the right side,
this metallic paper is actually an origami
paper that I found, but it's such a
beautiful gold metallic that I use it for a lot
of different things. So I pulled some examples of different kinds of art
papers that you could use. So these two are
both origami paper, have these really awesome, beautiful patterns on them, and the gold one is kind
of metallic, which is fun. This is a piece of marbled
paper, which I created. These two are both a handmade, like a mulberry paper
that I got from the art supply store that have some silkscreen
printing on them. One with kind of glitter and this one has got
some gold metallic. I think anytime, especially if you're making a
holiday ornament, that you can add some kind of metallic that catches the light, I
think that's really fun. So those are handmade
papers. As is this one. This was leftover
from another project. This is like a Japanese
printed paper. And then one other
one I pulled out. This is actually a page
from a vintage magazine. It's a set of magazines from my local County History Museum that they
were giving away. And I took a bunch of
pages of those and just painted over them with
some acrylic paint. So they have this great kind
of paint stroke texture, and you can read a little bit of the words from in between. So those are an example
of some of the kind of decorative papers
you could use to wrap the outside
of your ornament. I think if you're
choosing a paper, try to pick something that is probably light to medium weight. We do need to wrap it all the way from the back to the front, and so it has to make sort
of a big bend around. And if your paper
is really stiff, it's sometimes is
hard to do that. Okay, so we have the outside
papers, the cover papers. Then I want to talk
about what goes inside. So there are lots of
different materials, again, you can use to
put on the inside. These two this dark
colored cardboard, this is called Bookboard. And you'll find this at
the art supply store. It is a really dense, hard kind of cardboard. It's very similar to, like, what cereal boxes are made
from, but just much thicker. Um, so you can find this at places like your
local art supply store, and this is what they use
to make hardcover books, which is kind of what
this process is based on. So this bookboard works great, especially if you
have small scraps. If you don't want
to buy a bookboard, you don't want to go
find some, then you can look for any
kind of cardboard. You want something that is about an eighth
of an inch thick. So you can check it
with your ruler. These two pieces are backer board that I got from a place that
sells packaging for, like, packaging paintings
and prints that artists do. And so it's just
a piece of, like, plain cardboard that's
meant to make it stiff, so you can ship prints
and that kind of thing. So actually, this backer board, this thick one is
my favorite one. And I'll put some of these
that I've mentioned, some of these resources in
the handout for this class. So you can see some places like my favorite places to get
some of these materials. Okay? So you're going to need a piece of kind
of medium weight, eight inch thick or so cardboard to make the kind of
interior of your ornament. Okay, then finally, the last tool or
material you'll need. If you look in the
handouts for this class, in addition to those resources, I'm going to put this corner
template in your handout. This is a not required
but really helpful tool that's going to
help us trim down. We're going to need to cut some corners at a
45 degree angle, and this little template
will help us do that. So if you want to go
ahead and print that out, you can either print it and trace it onto a
heavier weight paper or just print it directly if your printer will do that
onto a heavier weight paper. That's going to be a really
helpful tool when we get to the step that we need
to trim down our papers. Okay, so that takes
care of all of the materials and tools that you'll need
for this project, and we will start creating our ornaments
in the next lesson.
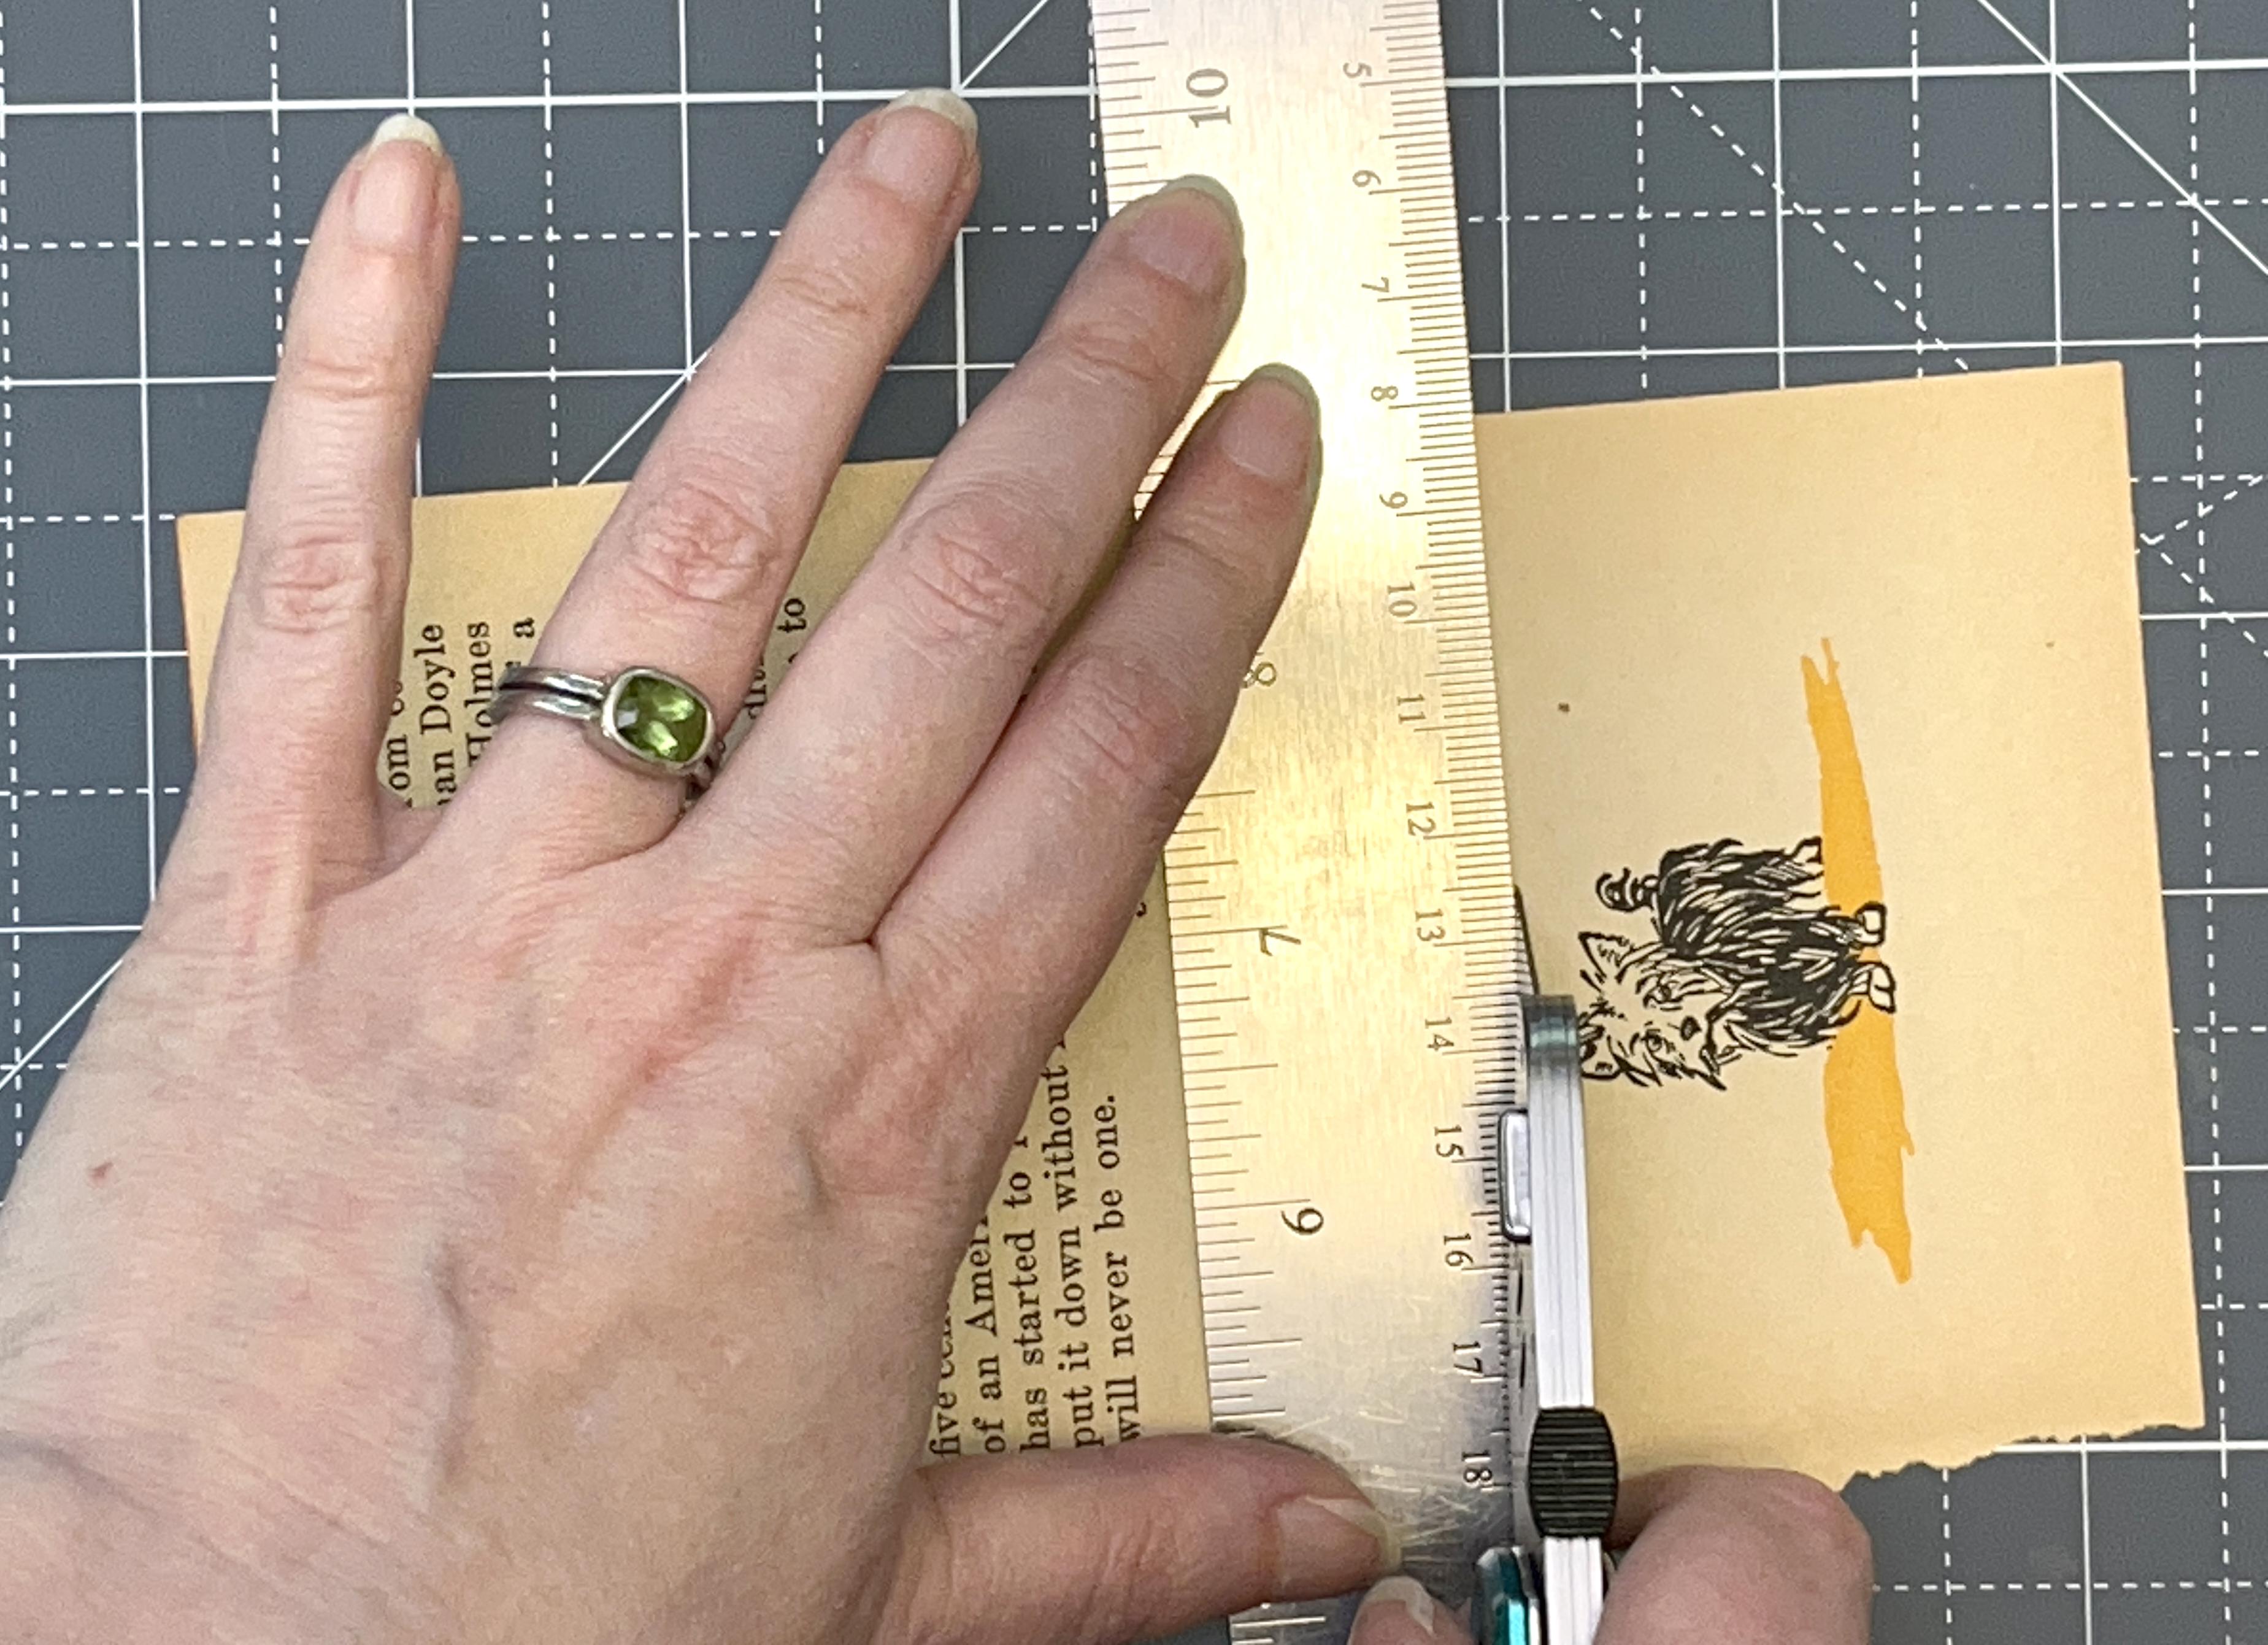
4. Trimming Your Art: A Okay, our first step is we want to
prepare the illustration, whatever the feature
art is going to be. So I'm going to use one
of these pages from the Thrift store book that I
have, and I love this one. This is one of my
very favorites. So this is the one
I'm going to use. So the first thing I need
to do is trim this down into the size that I
want for my ornament. And this is going to vary. Everybody's will be a
little bit different. So a couple of tools
for this part. You ruler, this
clear triangle or L, if you have one of those and your razor blade,
you're cutting. I'm also going to
use the cutting mat underneath here because I
can line up the edge of my page and try
to cut everything square so that I can
get this trimmed down. So the way I'm going
to tackle this, I think is I'm going to line up my page on the cutting mat. And I'm first going
to just make a cut across kind of
underneath their feet. I'm just going to eyeball this. This is where your
triangle can be helpful. So I don't like to cut
against the triangle because it's plastic and
it's easy to cut into it. But I can use that to figure out where I want to make that cut about there and then line
up my ruler against that. I can use the 90 degree triangle just to make sure I've
got everything square. There we go. And then
move it out of the way. So I'm going to start
with one cut there. I'm going to set this
just off to the side. And let's see. I'm just going to keep
working my way around. So I just want to
trim this down. So all I'm seeing is
the illustration. I'm gonna go about here. And if you are in doubt, always trim it a little
bit bigger than you think you'll need because
it's easier to, you know, easy to go smaller. You can't make it bigger
again. It looks pretty good. I'm just using my cutting
mat for each of these, lining it up so that I keep
everything kind of square. I'm going to use my triangle again to kind of help me place. I don't want to accidentally
cut off the top of the scarecrow's hat.
That's about right there. Alright, and one more trim. And it doesn't really matter
what size this turns out. We're gonna measure all the
other pieces from this one. Um, I want to make
sure I get that. Like, as tight as I can.
That looks about right. Um, I totally put that
on the wrong side. Now, I can't put my ruler
down. Let's try that again. Okay, so I have my
illustration now trimmed down to the
size I want it. So that's going
to be the center, the feature in the
middle of my ornament. Okay. In the next lesson, we're going to grab
our cardboard piece, what's going to be the
interior of the ornament, and we're going to
cut that to size.
5. Cutting the Inner Cardboard Layer: Okay, ready to cut
down my cardboard. I'm going to use this kind of thick backer board that's my
favorite for doing these. I need to cut a piece
of cardboard that is a quarter of an inch
larger on each side. So a total of half
an inch larger, half an inch wider and
half an inch taller. So I am going to measure this and get kind of an
approximate size. So my piece here is about
two and three quarters. By about 2.5. And I don't have to be
super exact about this. So, you know, you can go to
the closest 16th of an inch. Okay, so this
measurement is 2.5, so I want to add a half an inch or a quarter of an
inch on each side. So I need a three inch piece. So I'm going to start by
just cutting this down. So I've got a piece
that's 3 " wide, and I'm once again just
using my cutting mat and my ruler together
not quite straight. Try that. Okay. And this thick
cardboard sometimes take us a couple of
passes to cut through. There we go. It feels like
I'm all the way through. Okay, so there's 3 ". So that should be the
height of my piece. All right. And then it was two and three quarters
two and three quarters. So I'm going to add
a half an inch, so that means I want
three and a quarter. So I'm going to cut got a
little tear on that end, so I'm going to
cut from this end. So three and a quarter. And I'm actually
going to measure this and mark it with a pencil because my cutting mat only has half inch increments
and not quarter inch. So I'm just going
to make sure that I have some guidelines
to work from. So three and a
quarter, and I'll make one more little mark at
three and a quarter. Okay, now I can line up my
ruler between those two marks. Okay. So there is
my cardboard piece, and I can just do a test
fit with my artwork. I set it on top. And what I'm looking for is
that there's a quarter of an inch around each side
a little bit bigger. So it makes a nice kind
of frame for this piece. All right. Once you have
your interior piece, your cardboard piece cut, then we will go on to the decorative paper
in the next lesson.
6. Cutting Your Decorative Cover Paper: Okay. Now I've got
my decorative paper, which is going to show on the
back side of my ornament, and then it's going
to wrap around to the front and
you're going to see a little frame of that paper
around the front edge. This marbled green paper seemed like the obvious
choice to go with this one. And so this piece, we're going to measure off
of our cardboard piece. We need to add instead
of a quarter of an inch, we need to add a half an inch on each side of this and on
the top and the bottom. And in fact, I'm a little bit generous with
a half an inch, so I like to add maybe five eighths of an inch
just to account for. We're going to wrap it around the thickness of this cardboard. And so I like to have just a little bit of extra
to go all the way around. Okay. This is where it
might be helpful to have a piece of scrap paper and we're going to make
a little note. So I'm going to grab a piece of scrap paper from over here. My cardboard piece is three and a quarter,
five, three. Okay. So three and a quarter by three, I want to add five eighths of an inch on all of the sides. So I need to add five
eighths of an inch on the left and five eighths
of an inch on the right. And then same
thing, five eighths plus five eighths on
the top and the bottom. Okay? So that's going to
give us a piece that's big enough to wrap
around all the sides. So five eighths and five eighths is the same
as an inch and a quarter. So this is one and a quarter. Three and a quarter and one
and a quarter gives us 4.5. Same thing here. This actually
equals one and a quarter. This will be by
four and a quarter. Okay. Okay, so I'm going to pull
my decorative paper over and I'm going to
cut a piece that is 4.5 by four and a quarter. I'm going to measure
and mark this from the back because
it's easier to see. The front side of
this is really busy, and I'm going to use my cutting
mat and my ruler again. Okay, so 4.5. Here's 4.5. I'm going to make a couple of little marks. Okay. And then by four and a quarter four and a quarter, I've just done up. Okay. So now we've got
our decorative paper, which is now five eighths of
an inch larger on all sides. Okay, so we have finished
cutting our three pieces, and we are ready to start assembling and we'll start
that in the next lesson.
7. Wrapping the Board: B. Okay, we are ready to start covering
our board, our cardboard. I've grabbed a piece of
just plain copy paper. I'm going to use that as an extra kind of catch because we're going
to glue this paper, and I don't want to get
glue all over my table. Now, I often use
just pages out of catalogs and magazines
as my glue paper, but it is a little hard to see
on camera what's going on. So that's why I grabbed
a sheet of plain white. Okay, so I'm going to grab my cardboard and
my decorative paper. We're going to start
with that first. And I am going to put the
decorative paper face down and my cardboard piece. I need to glue down
first thing is centering it in the
middle of this space. Now, if it helps you, you can make some pencil
marks on the back. Otherwise, you can eyeball it. It's totally fine
to just look at the four sides and make sure
that you've got it centered. This is where we're gonna
pull out the glue stick. I'm going to encourage you to be very generous
with glue stick. We want to make sure that
we have plenty of glue to stick this together so that it's not going
to come apart. Um, so don't be don't be
stingy with your glue stick. So I'm going to put glue on the entire back surface
of my cardboard piece. And I like to do that, so I kind of keep control
of where the glue is. I do a specific kind of
motion to add the glue, which is I make kind of
a starburst shape where I start in the center and I
go towards the outside edge. And I'm just going around kind of like in a
radiating circle. Now, why I do it this
way is if you go the other direction and you
pull towards the center, it's really easy to get globs of glue on the
edge of your cardboard, and that's not um
really helpful. Then you get glue that kind
of oozes out everywhere. So I try to do glue kind of
going towards the outside. Make sure I've got some
right in the center. And when I'm pretty sure I have the whole backside of it done, you want to work kind of fast because this glue dries quickly. I'm going to flip it over
and get it centered on my paper and then just press
down with my fingertips. To get it to stick on, put the cap on my glue stick. Then I'm going to
flip it over and grab my bone folder, and
I'm just going to use, the flat side of the
bone folder to do that same radiating motion where I'm going from the center
towards the outside, and I'm just making sure
that this paper and the cardboard have made really good contact
with one another. I'm going to get any
little lumps and bubbles or anything else
like that out of it. Okay. So there's our
first step, glued down. Now you're going to need that
template that we created. So this is our corner template. I'm going to just cut this out. Now, I have these made up in some acrylic plastic that I use in my studio because
I use them all the time. But this one made out of paper is going to work
great for this project. So I'm just cutting
out on the lines. Now, mine is printed on
just plain copier paper. I kind of recommend
that you print it on a little bit heavier paper or trace it onto a piece of
a little bit heavier paper. There is my corner template, and I'm just going to move my white paper out of the way so you can see a little better. I'm going to use this to draw some 45 degree
angles at the corners because we need to trim
away some of the corners here so that we can wrap this around the front
side of our cardboard. And this is spaced out so that that little gap
that's right here in the center is about
an eighth of an inch, which is about the thickness
of your cardboard. So that is kind of the distance away from the
corner that we want to go. So if you have much thicker
cardboard than I'm using, you might need a little bit of extra space when you
draw these corners. If it's thinner,
it should be fine. So here's how this
little template works. You're going to take the corner, like inside corner of the
template and just rest it up against the cardboard corner. And you can see this makes a
nice neat 45 degree angle. When I first learned how
to do this kind of cover, which you use for
making hardcover books, my teacher just
eyeballed it and just just cut a 45 degree angle. I like the precision of
having this little template. So I'm just going
to draw a line. And take my template away. And so now I have
a 45 degree angle, and it is about an
eighth of an inch away from the corner
of my cardboard. So I'm just going
to do that same thing on all four corners. I'm gonna nest my little
template up against there. Oops. Pencil going a
little all over the place. That's why a thicker
paper helps a little bit. Gives your pencil something
to go up against. Okay. There are my four corners, and I usually just trim
these with scissors. It's hard to get a
straight edge in here because the thickness of the cardboard
and all of that. I usually do this step just with scissors and follow
my pencil lines. So I'm going to trim
off all four corners. Like so. All right. Now we are ready to wrap these four edges around to the front of our cardboard
piece. I usually do this. I start with the short ends and then do the long ends next. It doesn't really matter, but that's just my habit,
my pattern of doing them. I'm going to bring my
extra waste paper back. What I want to do is
I want to put glue on this entire tab right here. On one side, I do these one at a time because
this glue dries fast. Again, be generous with the
glue and make sure that you get all the way out to all
the edges and the corners. Glue stick. I'm going right up against the cardboard as much as I can, so I get
right in there. Okay. Now I'm going to pull the paper
away from underneath. This is my favorite trick
for getting this to curl around in a really
nice smooth way. Instead of using my fingers, I'm going to take
this is the glue tab. I'm going to set it
down on the table. So it's flat down on the
table in front of me, and then I'm going to lift up my cardboard piece and I'm
pushing down to the table. I'm just rolling it up so
it stands straight up in the air and then all the way down flat on the
table towards me. That's going to make a really
smooth fold right here. Okay. Then I'm going
to pick it up. I'm going to grab
my bone folder, and I'm just going to do the same thing we
were doing before. Use the edge of the bone
folder to just smooth the whole way
across the surface. And then I usually stand my bone folder up on
edge and just go down the edge as well to make sure that the glue has made contact with the cardboard
the whole way. Okay. Now we're going
to do the opposite tab. So I'm going to bring
my paper back over. Make sure that I'm
not setting it down in someplace that has
some wet glue on it. If I were using a catalog, I would turn the page, so I had a clean page. And I'm going to
do the same thing. I'm going to put
glue on this tab. And I'm going to make sure
I get the whole thing with a generous amount of glue. Okay. I'm going to pull
my paper out of the way. The tab that I'm
gluing is facing me. I'm pressing down into the
table and standing it up on end and then rolling flat down towards me and
giving it a little press. Okay. Then we'll do the same
thing with a bone folder. Just press over the whole thing and then stand it up
and go along the edge. Okay, so we've got
two opposite sides. Now, we're going to
do one little trick before we do these remaining
two tabs, which is, you will see if I
hold this up close, right at the corner here, there is a little corner
of paper there focused. And we want to kind of tuck that in so that it doesn't stick out. And I'm going to use my
bone folder to do that. I'm going to zoom down with my camera so you can see
this a little bit closer. I'm going to take
my bone folder. I'm standing it up on edge, and I'm going to lay it against the edge that I've
already glued. Then I'm just going to make a little pivot motion
with my bone folder. As I'm sliding it
here to the corner, I'm just going to pivot it
around and go that way. It's like you're turning
a corner in your car. And what happens when you do that is you'll see right there, there's a tiny little corner of paper that gets folded in. I can hold this up to
the camera a little bit. There's that tiny little
corner of paper folded in. That's what we are trying
to accomplish there. All right, I'm going to do
it on the other side here. I'm going to run along the side that's already been
glued and then I'm just turning the corner and you'll see that little fold, folded in. That's the motion that I'm
doing is I go straight down that side and then
follow the corner around. I've done the two ends on
this side of my ornament, now I need to do
the opposite end and I'm going to zoom my camera back out a little bit again. Standing my bone
folder up on edge, coming up and
turning the corner. Tucking in that little triangle, and then I'll do the other side coming up and
turning the corner. That one popped up a little bit. I'm just gonna push
it down. There we go. Alright. It seems like
a funny little step, but just that little bit
of attention is going to make these corners
turn out really beautiful when we
turn these last two. Alright. Last two corners. Once again, I'm going to
make sure that I'm setting it down on a clean
space on my paper. I'm gonna zoom my camera back out so you can
see the whole thing. Grabbing my glue
stick again and I'm going to glue now
the opposite tabs. Same way, be careful
when you get to that little tab
of paper that you don't catch it with
the glue stick. I try to move the
glue stick coming in. Sometimes you'll get
a little glob of glue stick right there
because the papers thicker. Just be conscious
of where your glue is so you're not getting it where you
don't intend it to be. Okay. Got a little extra
glob of glue there. I'm just going to wipe off. Okay, so I picked it up. I'm moving my wastepaper
out of the way, and I'm going to do that corner the same way I've done before. I'm going to put it
down flat on the table. I'm gonna stand
it up towards me, and I'm going to roll it over. And when I pick this up, you should see we've now got these beautiful
mitred corners. I once again want to make sure I go over it with a bone folder. Once in a while, you'll get a little tiny
bit of glue that comes out that you just want
to catch, wipe away. Got a little corner
of paper there. Your bone folder can
fix a lot of things. If you see anything
that's sticking up or a fold that doesn't
quite look right, you want to just hit it
with a bone folder and make sure everything is making
really good contact, and then one more time
against this edge. Okay, so we've got a beautiful
finished corner there. Now we're going to do the same thing on the opposite side. I'm actually going to
just fold my paper in half because I can see I've
got glue kind of everywhere. I don't want to get it on
the front of my piece. All right? One more
time. I'm getting glue. I'm just being careful
at those edges that I have a glob
of glue there. Just make sure I don't get
that where I don't want it to be Okay, moving that out of the way, pressing down into the table, standing it up, and
rolling it over. Ooh, I had a little bit
of glue oozing out there. I just want to catch that quick. Use just the edge
of my fingernail. Don't want that coming off
on the front of my piece. And then one more
time going over everything with the
bone folder just to make sure that it's really
good and stuck down, catching any little bit of glue. If you've got anything kind
of sticking out at a corner, you can use your bone folder
to kind of round it over. Okay. And there is the
finished wrap from the back. So there's our backside
wrapped to the front. Okay. And now we just
need to add the art. So that piece is going to go right here because we wrapped a half an inch around to the front and we left a
quarter of an inch border. That means your art
should cover up all the edges. Are there. So now I just need to
put some glue stick on the entire back surface
of this art piece, and then I can glue it down. One more time I'm going
to just fold over my paper so I make sure I don't get glue where
I don't want it. And I'm going to use that
same motion I did before with the glue stick where I'm coming from the center to the outside. I don't want to
catch the edge of this paper and tear
it or wrinkle it up. So I'm going to do this
same making kind of a star burst by going from the center to the outside
all the way around. And then make sure I've got
a little in the center. Then if you set it
down really gently, you can adjust and you have a few seconds
to move it around. Here we go. Got it centered. Once I'm happy with
where it is, again, bone folder is important. A little extra glue there. But I'm going to go around
the whole piece and just make sure that it's made
contact everywhere. Okay, at this point, I like to take this
piece and put it under a little bit of weight and let it dry for a
couple of hours. We have added moisture
in the form of the glue to all of these
different paper surfaces, and they are going to want
to try and curl and crinkle. And so what I do is I grab this is just a roll
of waxed paper, and I use this a lot. So I have pieces on here. That have been well loved. I use waxed paper
because then it doesn't stick to whatever I'm putting on top of it
or doesn't stick to my desk surface just in case
there's a little extra glue. So I'm going to put a
piece of waxed paper just underneath I'm going
to put one on top. And then I'm just going to
put some kind of a weight on top of this and let it
sit for a couple of hours. So I have a little book weight. This is one that I just
use for book binding, but you could use a heavy book, a can of soup, anything like that that just has a
little bit of weight to it, and you want it to cover
up most of your piece. And then you want
to let this sit and dry for a couple of hours.
8. Finishing Your Ornament: Okay, I have let
my ornament dry, so I'm going to unpack this
now from the waxed paper. And now we can talk about
how to finish this up. Now, this could be done
exactly how it is, and we could put a hanger on it, but there's a couple of
other fun things you can do. So here are some other examples. On this one, I decided
it would be fun to take some words from another
page of the book and make a little story
on the back of it. Now, I just kind of played, I don't know, Madlib
style with this. This wasn't actually a
sentence from the book. I just made my own sentence. So it's kind of like I'm writing my own little bit of the story. That I cut out from
the rest of the pages. And because I talked about the
little stars on the front, I added two of those little sequin stars because I thought that would
be a really fun addition. On this version, another book
that you might recognize, this is another one I found
at the Thrift store in colored on and falling
apart condition. I found a couple
of phrases that I put on the back of
this one as well. If you are doing something
like making your own artwork, like illustrating pets,
this one I left blank, but you could put the pet's
name, you could put the date. You could put a little
message, anything like that, that you can either cut
out of book illustrations, you could use stickers,
you could write on it with a paint marker
or anything like that. I want to add a little bit of story to the back of this one because I
think it will be fun. I'm going to look at the pieces
that I set aside and see if there's something fun Okay. I think what I'm going
to do is I'm just going to use the phrase on to the Emerald City because I think that goes with the
picture on the front. So I'm just going to
cut that part out I'm going to use the little
phrase onto the Emerald City, and I have some little
glittery sequins that are green hearts, which I think is going
to be perfect to go along with onto
the Emerald City. So I'm going to
add that as well. I'm going to use a little
bit of craft glue, some tacky glue to stick
down the sequin because I don't think the glue stick is going to hold it in place. But I can use glue stick to stick down the little
phrase that I cut out. Now, you don't have to
add words, of course, or you can take them
from other places, anything like that,
but I think this is fun since I have that page. And let's see. I'm
going to put it down here on the Emerald City. And then I'm going to
put a little dot of craft glue so I can add this little green
heart that I have just because it seems kind
of perfect to go with a theme. To the Emerald City. Okay. All right. I'm going to let those things
dry for just a few minutes. Then we'll talk about
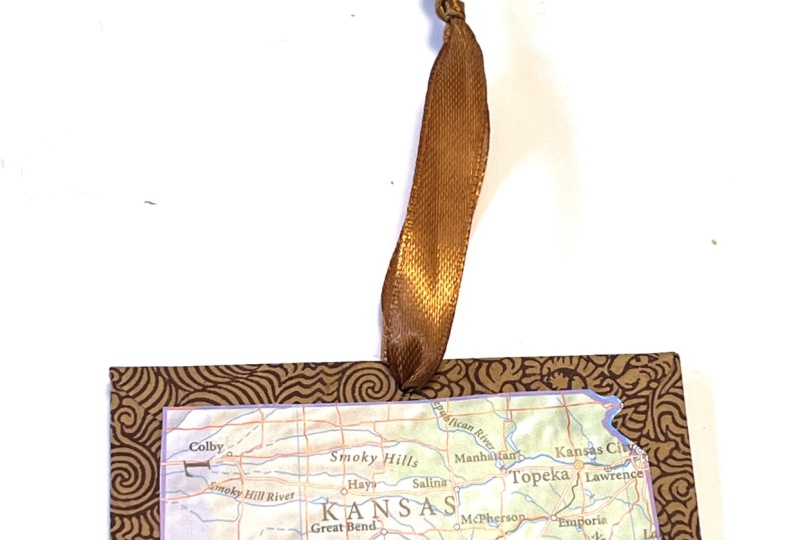
finishing up Uh, you can put a hanging loop on the top of it and make it
really just like an ornament. These ones, I just
punched a hole with an all and threaded
through a ribbon. So I think I'll do
that with this one. But I wanted to show
you one other example because I think this
one is really fun. So this is a fortune
from a fortune Cookie, which I thought
was really funny. And I made this
one into a magnet. I just glued a magnet
on the back of it, and it is usually
on my file cabinet behind me because I
thought this was really a funny little phrase. So that's another way
you could finish these, especially if you have a
small one like that. Okay. I think that's probably dry enough to go
to the next part. So I have my, and I want to make a hole if I'm
gonna hang it that is in the center of the top so that it is gonna hang
kind of going straight. So I'm gonna need to measure
that to find the center. I have three and a
quarter, so that's 1.5 plus another eighth
that I need to go over. I just want to go far enough
down into the cardboard so that it's not going to
just pull right through. So 1.5 plus another
eighth should get me right in the
center. About there. Okay. I have a mat underneath here so I can just use my all to kind
of punch through, make sure that
you're not punching into your table or
something like that. I've got a little
hole at the top, and I'm going to cut
just a little piece of my gold ribbon and
this tapestry needle. You could also use metallic or a decorative thread,
anything you want to. I like to stitch the
ribbon through versus just gluing it on because
I think they are sturdier, they stay put better. Okay. And then I'm
just gonna tie the ends with a ribbon together. And there's the back.
9. Wrap Up : Okay, just a little recap
so you can think about what you want to do for your
project for this class. So a couple of ideas
we talked about. You can use some vintage
book illustrations. It's especially great
if you can rescue some books that maybe aren't
good for reading anymore, but you can give
them a new life. So we did that with
several of them. On some of them, we
put a little bit of a story on the back side, so you can add some text or some personalization,
if you want to. We also repurposed things
like fortune Cookie. Fortune to make that magnet. Or you can illustrate
your own artwork. I did a cat and a dog
here and mounted them on a little bit of
solid colored paper and put them together
the same way. So you can recycle any kind
of paper that you want to and add some fun details
like some little sequins, different kinds of paper,
recycled paper ephemera. That would be a very Victorian
kind of thing to do, especially if you
add things that add some sparkle or some
metallic to your design. I would love to see what
you do with your ornament. So be sure to post
your project photo and tell us a little about it in the project section
for this class. And I hope to see you for another class with
me sometime soon.
 Becka Rahn, Artist & teacher, paper & fiber art