Transcripts
1. Intro: Hi, and welcome to my studio. My name is Becca Ron. I'm a full time teaching artist, and I work in a small studio
in Minneapolis, Minnesota. My work is primarily
in fabric and paper, so I do a lot of
things with sewing, with embroidery, but also
combined with paper. So I do a lot of
mixed media kind of projects kind of like this project we're going
to do today in class. We are making mini wrapped
matchbook style notebooks, and we're going to
use recycled paper. When I first started
learning bookbinding, one of the things
that I found the most intimidating was that there were so many specialty
tools, especially papers. Every teacher I took a
class from talked about very specific kinds of papers
with names and weights. And it was really hard for me
as a beginner to understand how I could make another book
using those same papers. So I try to, in my classes, give you as many different
alternates as I can, because there's no one
way to make a book. I love being able
to use DIY tools, things that you can find in your house that you already have, and especially recycled
papers where you can use whatever you have because there are no rules
about making books. So jump over to the next lesson, and we'll get started
talking about what our project is going
to be for this class.
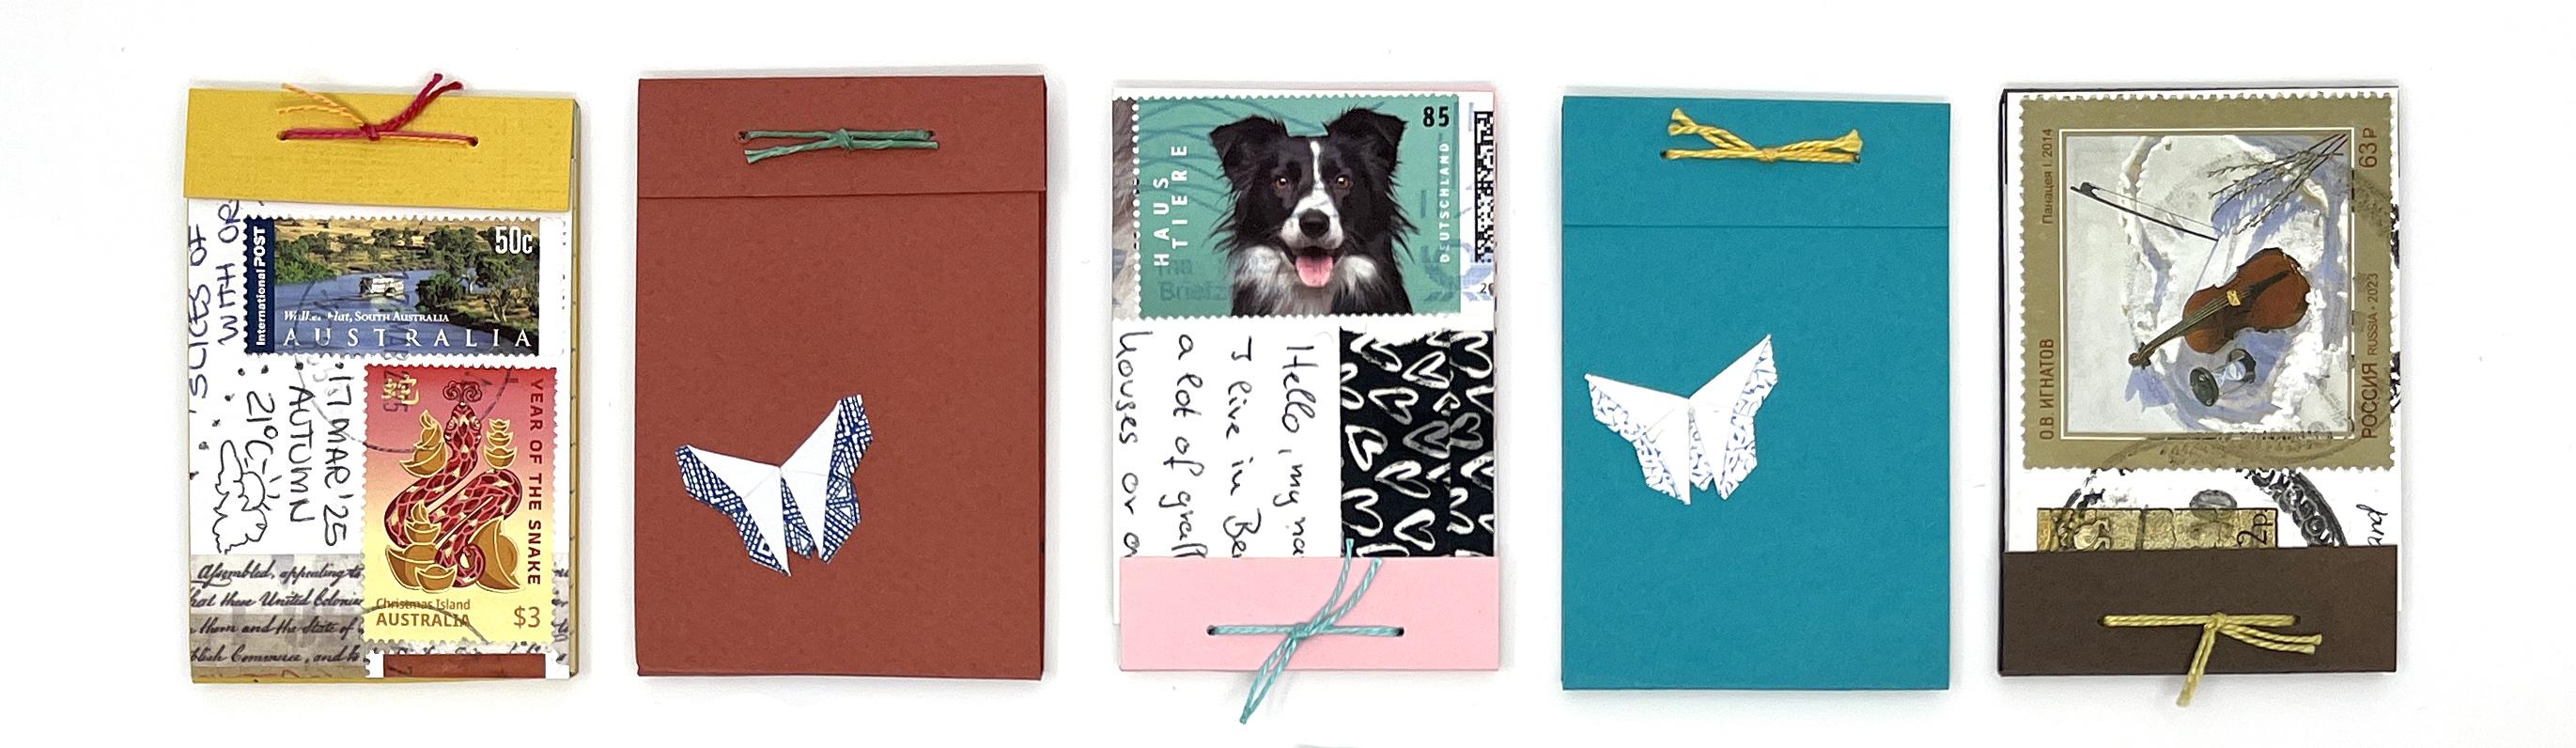
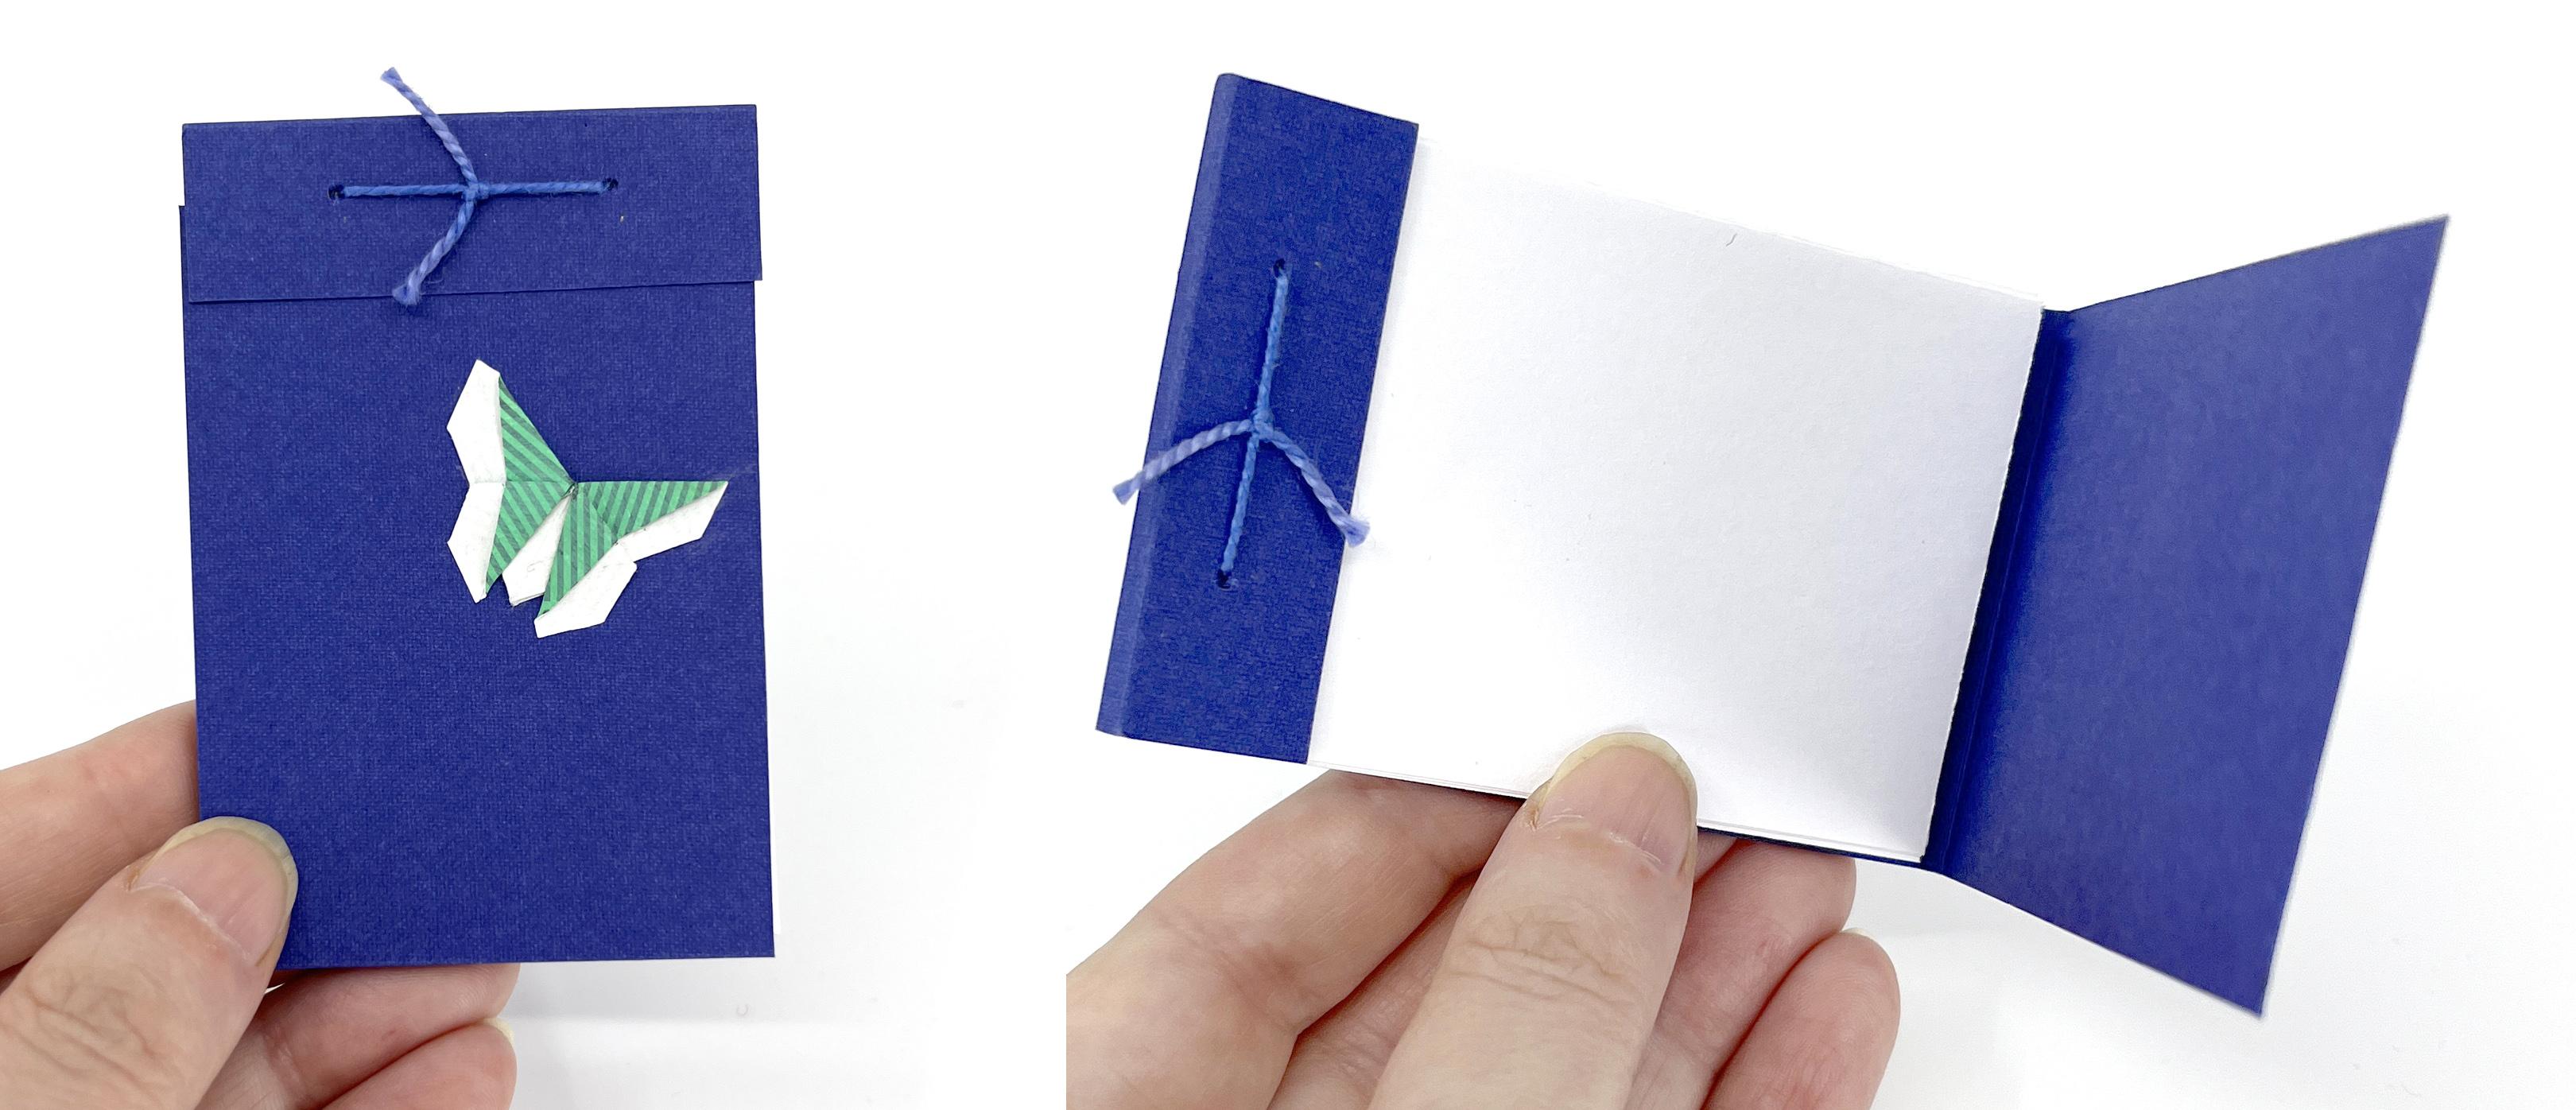
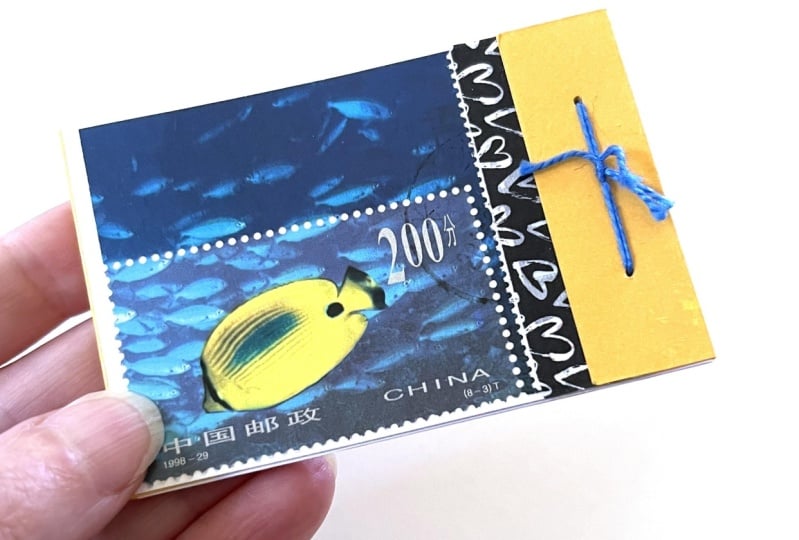
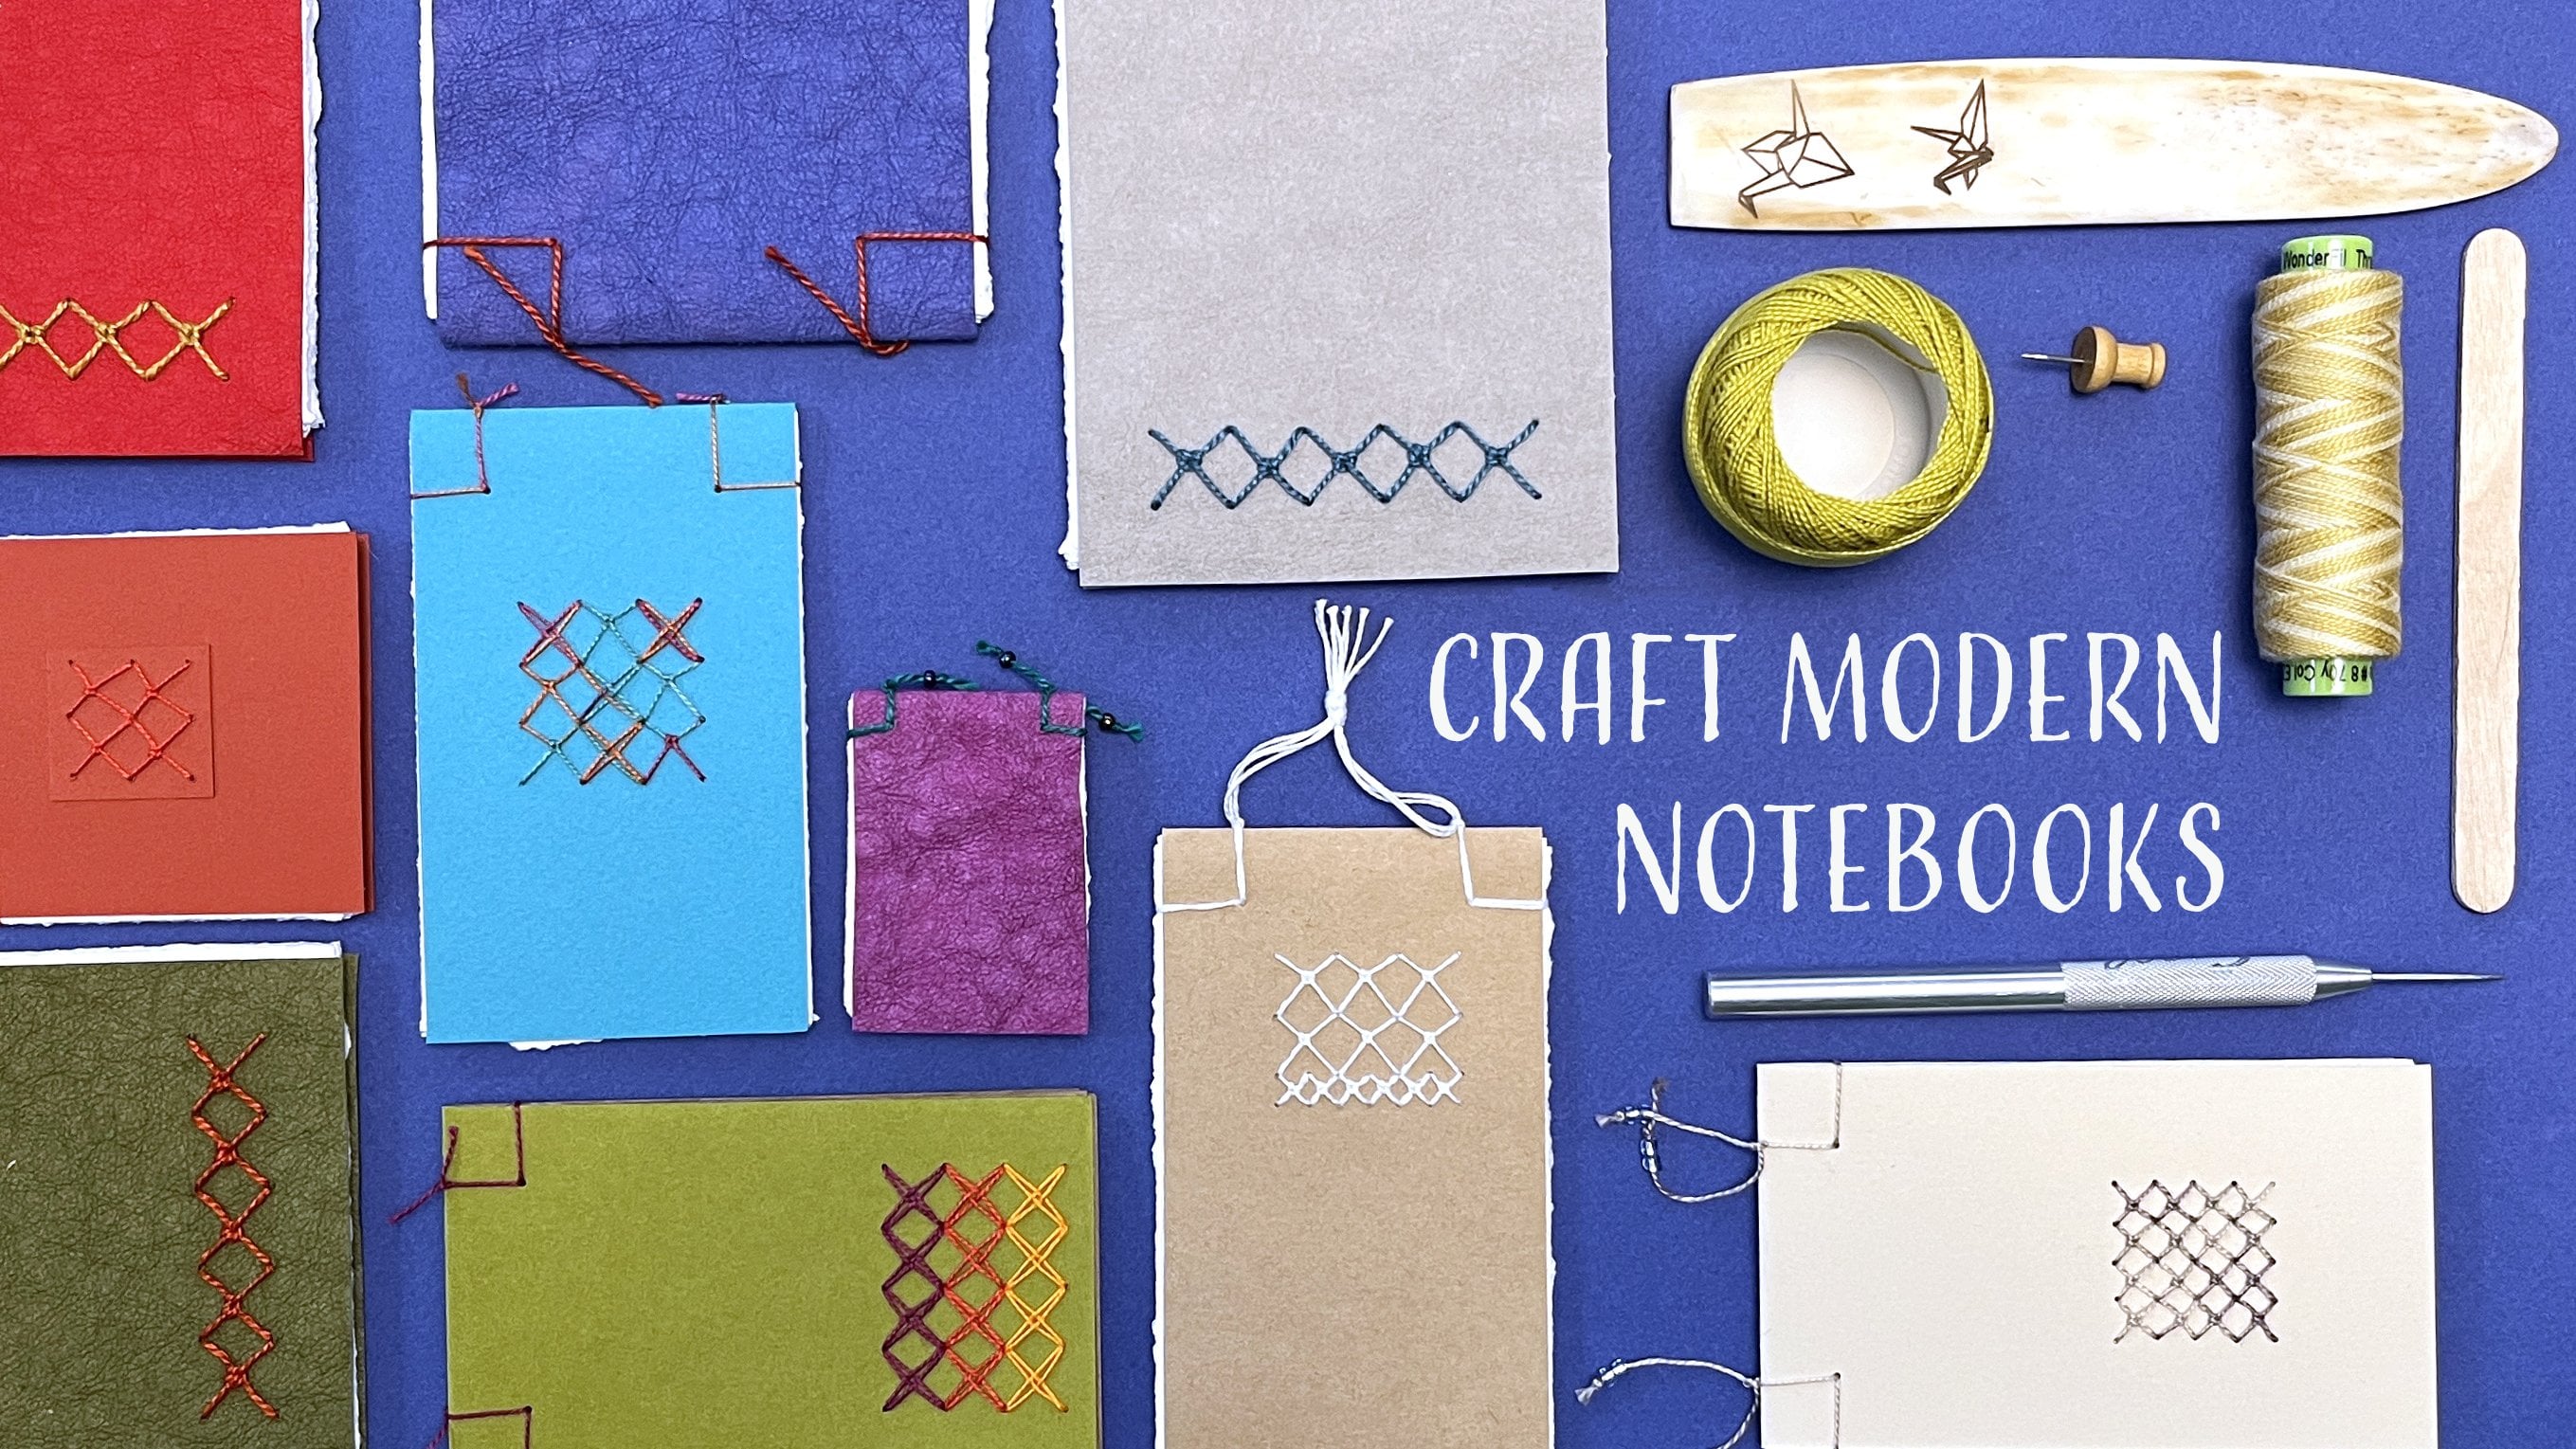
2. Your Project: The project for this class is to make these mini
wrapped notebooks. So this is a really cool design that has a little flap that comes over onto the front and covers up part
of the front cover. It's kind of like a match book. And so when you open these up, just by bending that
little flap out, the cover wraps all
the way around, so it protects your
pages on all sides. And then you can tuck the flap back in to
keep your book closed. So we're going to
make our books from any kind of recycled
paper you want to. This is a great book structure that you can make out
of almost anything. In my examples in class, I'm going to use two different materials that I
think are really fun. First, we're going to
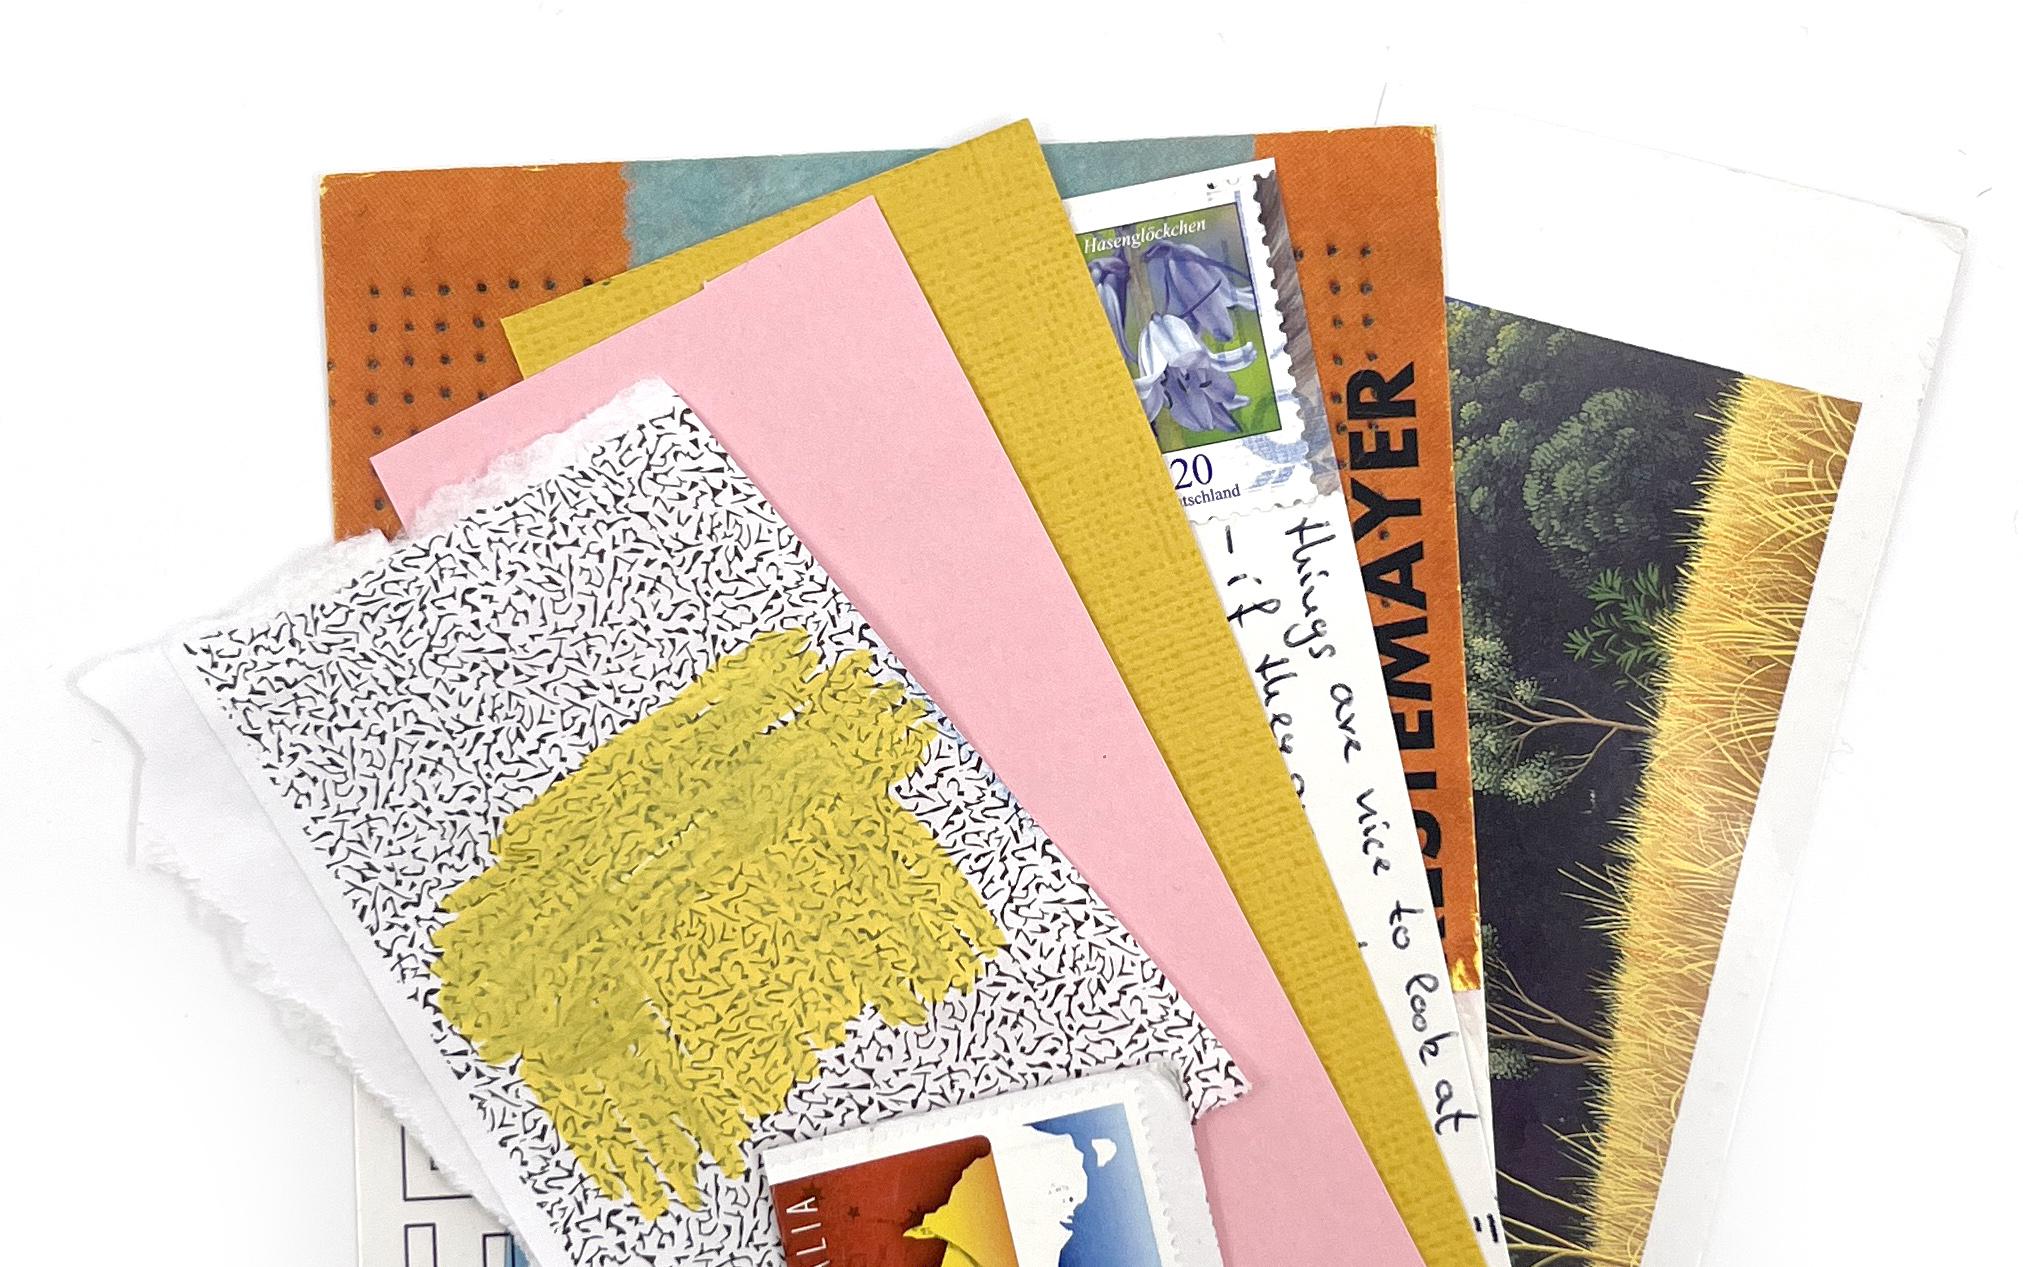
recycle some postcards. So you can use the art, the pretty side of the postcard, but I think what's even
more fun is to use the back and the really
cool looking stamps. So we're going to use that
for one of our designs. The second one, we are going to grab some recycled
security envelopes. Now, if you don't
know what that is, these are the kind of envelopes that your bank statements and
things like that come in. And when you open
them up, they have these great black and white patterns printed on the inside. This is a great source of some fun patterned paper
to use for your designs. We're going to take
those security envelopes and we're going to make teeny, tiny little origami butterflies using that security paper. So that's two ways
that you can use different kinds of recycled
materials to make your books. And we'll talk about
a whole bunch more. In the next lesson, I'm
going to talk about the tools you need to
make your project, and I'm going to give you as
many alternates as I can. So I'll talk about the
bookbinding tools that I use, but also DIY kind of
things you can find like popsicle sticks
that you can use to create books that
are just as awesome. So jump over to the next lesson, and let's get started
talking about the materials you'll
need for your project.
3. Materials & Tools: Et's jump in and talk
about tools and materials. I have a lot of things
out on my desk, but most of them are going to be things that are
really easy to find. Let's first start by
talking about paper. This is the place where you get to personalize your project, and I designed this project, so we're going to use a lot of recycled paper or scraps
from other projects. It's a small size, so
you should be able to use up odds and
ends that you've got. Now, the really cool, like, featured part of this
project, I think, is I designed it to use
some old postcards. So I participate in a group
called Post Crossing, which is an international
postcard exchange. And so I have a lot of cool postcards that
people have sent me that I want to recycle
into some art pieces. And so I picked out two that I'm going to use to make
examples in this class. That have really cool stamps. Most of these, like the picture on the other side is okay. But for me, the part that's really exciting
is the stamps. So in these two examples, I made up two little books using the stamps that
were stuck on postcards, and we use part of the
postcard to make the cover. So that's one material that you can use to
make your covers. So if you have a cool postcard, you could even use a
postcard like this one, which doesn't have a
very exciting stamp, but this was from
an art opening. So this has some cool art on the other side
of the postcard. So, postcards are a great source of both an interesting design, and they're usually a little bit heavier weight card stock, so they make a great cover. Now, you can use other kinds of postcards, like
advertising postcards. This one is just from my
like county recycling. I'm not sure I want
this as a cover. It's kind of boring looking, but you can always do
all kinds of things to change the paper
before you cut it up. You could use paint
markers like these. You could use washy
tape or stickers. You could collage
over top of this. And that way, you're
using this kind of heavy cardboard to
make the cover, but you can do more
interesting things with it. Okay, so that's one set of recycled paper we're
for sure going to use. Another one is some
security envelopes. This is one of my favorite
art making supplies. So these are just regular, like, business envelopes that I
got bills or statements in. But if you open them
up on the inside, they have these great
black and white patterns. I love to use these patterns for all kinds of art projects. If you don't want to stick
with just black and white, I also add a little
color to this one. This was one of
these paint markers, which I didn't
like quite as well because it kind of made the
paper a little bit ripply. But the thing I really loved was I just pulled out
a piece of chalk. And added some color over
top of it with the chalk. So you can still see
the pattern through. You could also use watercolors
or colored pencils. You could add all kinds
of color to these. So we're going to use these recycled
security envelopes to make one of the other
designs that we're going to do, which are these little
notebooks that have a little origami
butterfly on them. So I used a colored card stock, which I'll talk
about in a minute to make the covers for these, but then recycled paper to
make the little butterflies. These butterflies will also work in any kind of
lightweight paper. So magazine pages or
like some decorative, wrapping paper or
scrapbooking paper would also be a great
choice for those. So those are the two kind of recycled papers that I'm for sure going to
use in my examples. Now we'll talk about some of the other papers you might need. So for all of my examples, I made the covers out of
some lightweight card stock. Now, you could find
recycled sources of these, but I just pulled
some out that I got at the scrapbooking
section of the craft store. You could also get card
stock like this at the art supply store,
like drawing paper. It's just a little
bit heavyweight, and so it'll make a good cover. For these, I have
both a smooth paper and then this yellow one has a little bit of a
linen texture on it that I'll use for
one of the projects. So I've just got
sheets of those. This is great to use up
scraps from sheets of paper like that if
you have a bunch of scrap booking or
other kinds of papers. Okay? So a heavish weight
paper to make the cover. I'm going to set those aside. And then you need something
to go inside your notebook. And I think this can
be a really fun source of different kinds of papers. So whatever the pages
are that are inside. So this one has just
got plain white, like drawing paper in you could use all kinds of things to make the inside pages. So you can work from any
size paper you have. So I could tear a few sheets from this other
notebook and have, like, a colored lined paper
would be a great one to use. These pieces are from a coloring book I got
at the Thrift store. It had only been colored on, like, a couple of
different pages. And so I cut up all of the
pages that were still blank, and I'm going to
make one of my books using coloring book pages. They're blank on the other side, or at least some of them are. So that you can write
on the other side so we could use this notebook
several different ways. You could use some graph paper. Here's two different
examples of graph paper that I have just scraps of that would make a great inside page. This one's kind of a newsprint, and this is like a green engineer's paper
or ledger paper. And then finally, you can
use Plano copy paper. So when you're thinking
about your interior paper, you want something
that's about the weight of photocopier paper
or printer paper, a little bit lightweight. If you use anything
that's too thick, it's going to be hard to punch the hole through
that we need to. So thinking about a
lighter weight paper that could make
your inside pages. Okay. So we've talked about all the different kinds of
paper that we're going to use. Now we need to talk
about some tools that we'll need to create
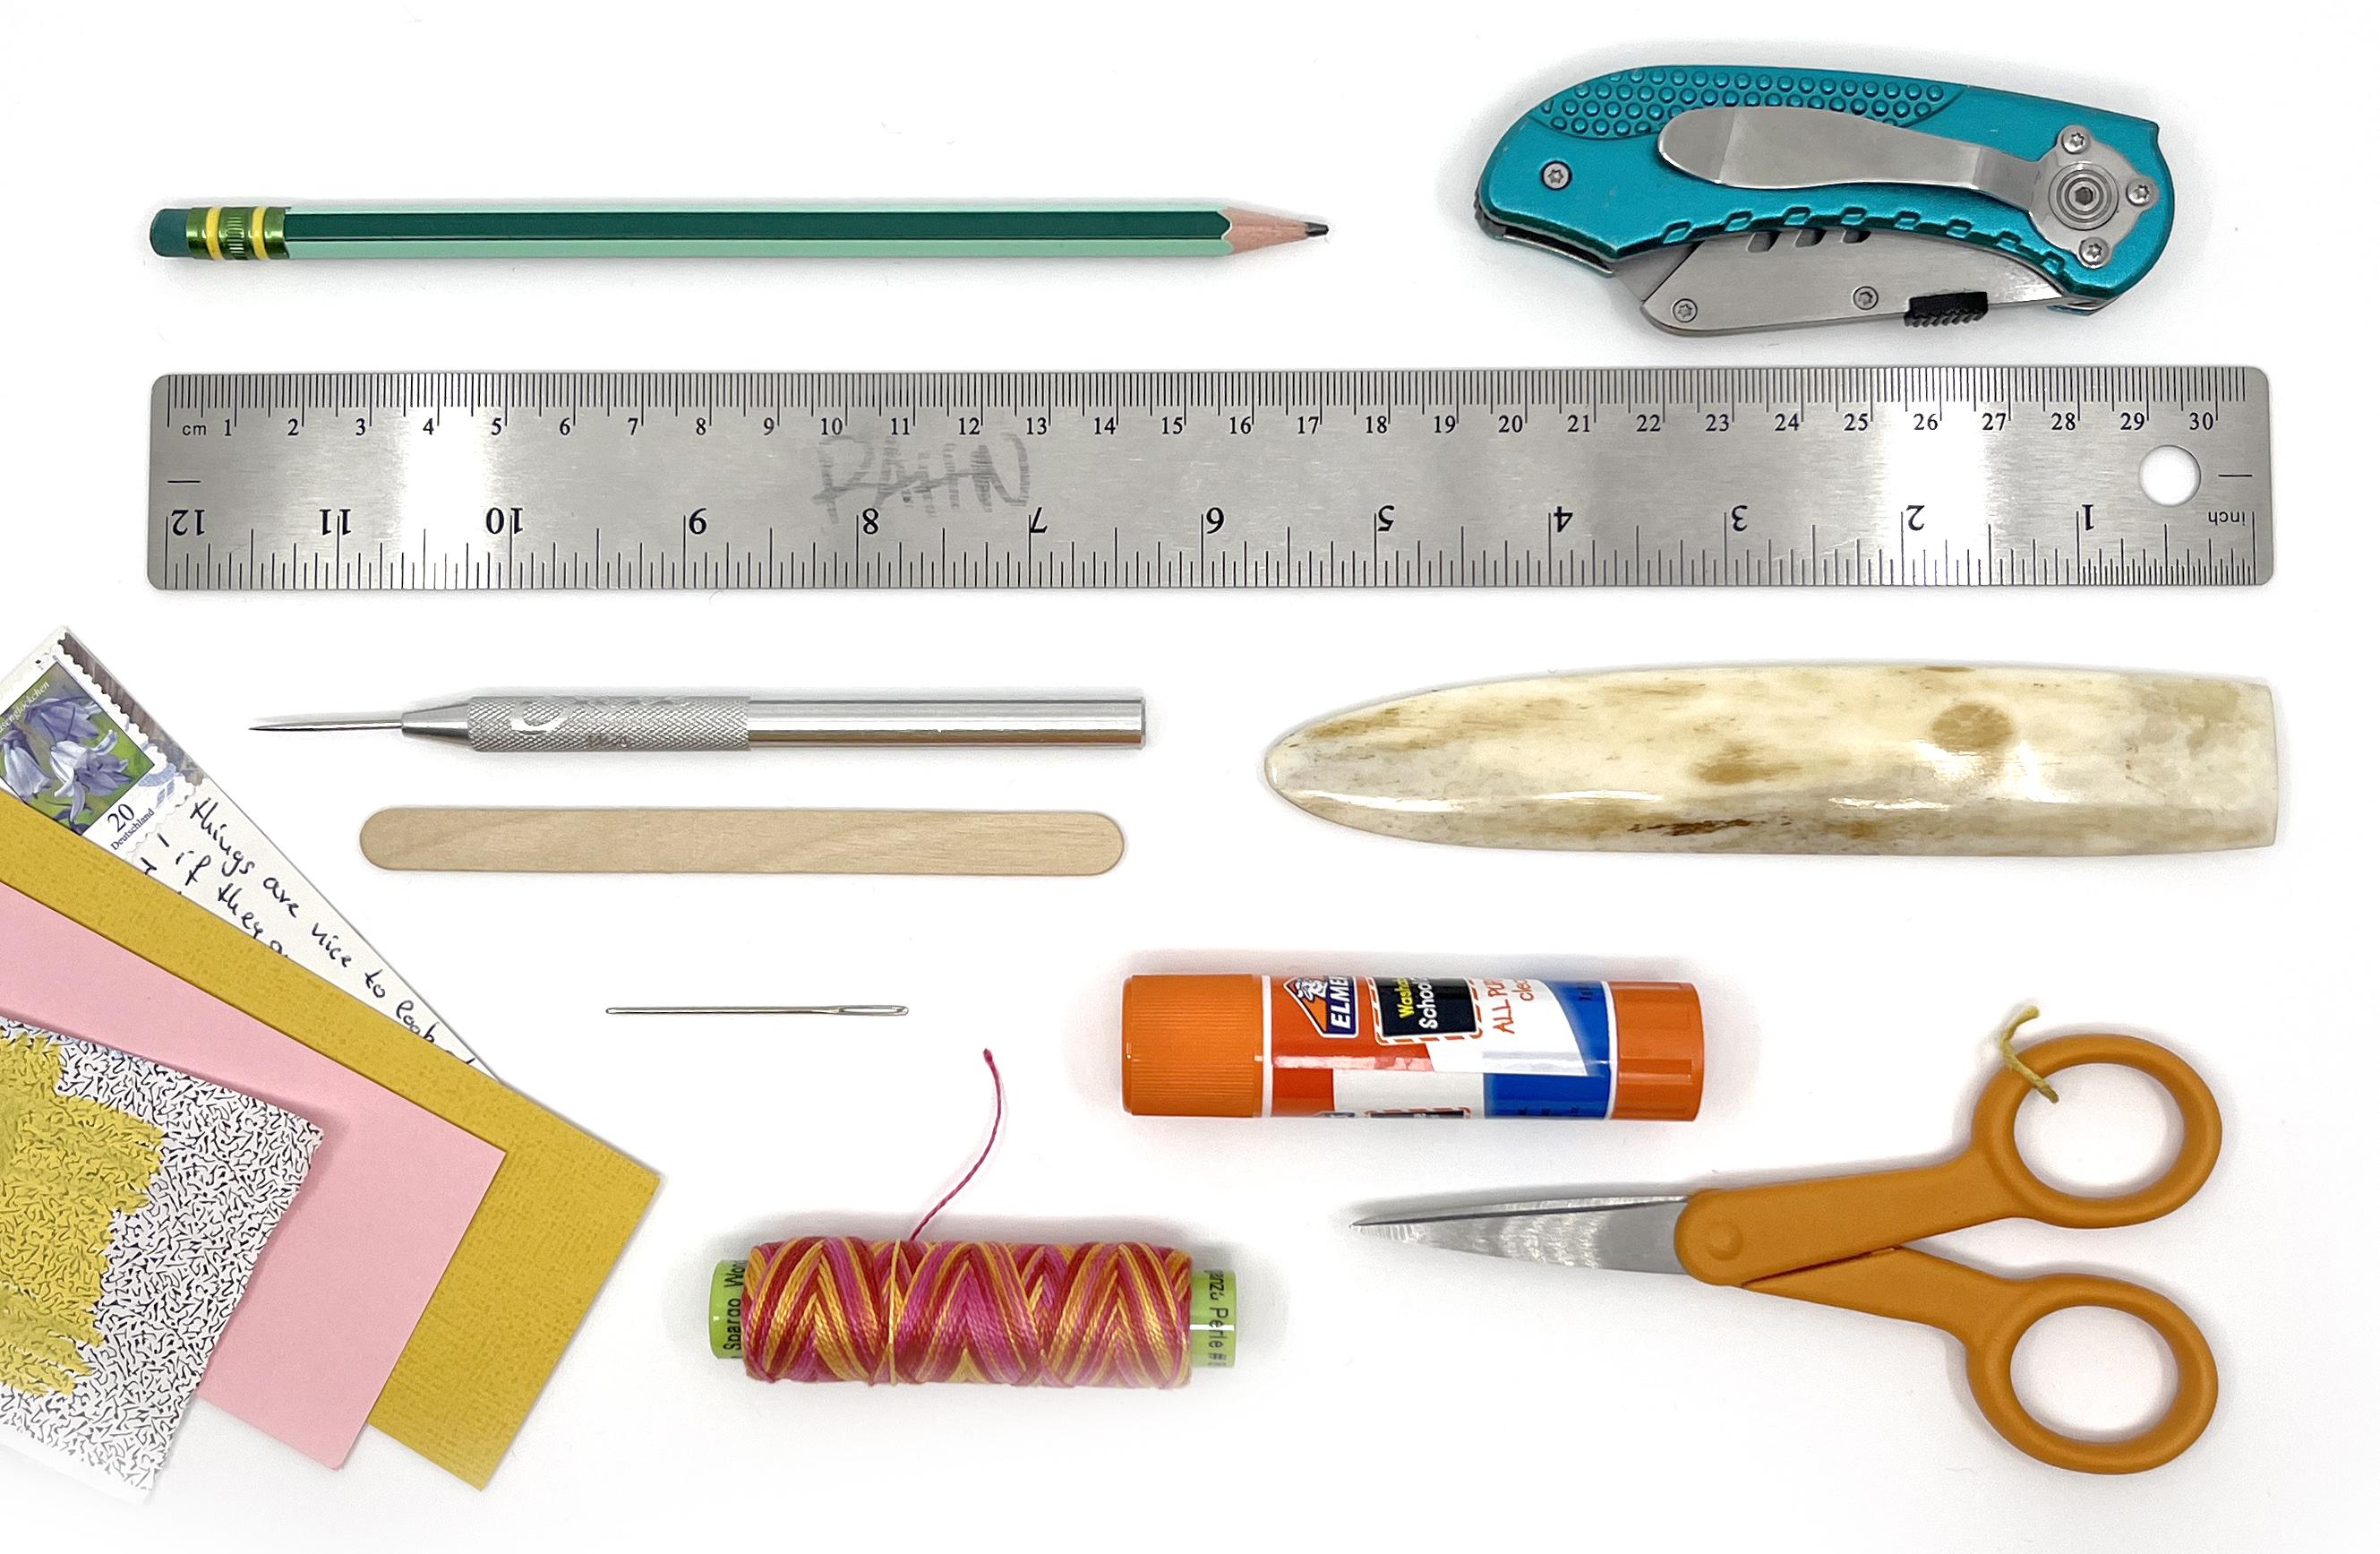
your notebooks. So first one is a ruler. I really, really prefer
these metal rulers. This is like a
stainless steel ruler. It has a cork back
on the back of it. You don't need the cork back if you've got one
that's just metal, but we're going to use this as an edge that we cut against. And so it works a lot better
than a plastic ruler, where you can kind
of kick that with your razor blade and stuff
when you're cutting paper. So this is my favorite
kind of ruler. Speaking of blade, you will need some kind of a razor blade.
This is my favorite. I have this little
folding utility knife, which I love to use for my book binding because
it's got a nice big handle. It's easy on my hands. You can also use a
regular exacto knife. You could use a
rotary cutter blade. You could even use
scissors, if you want to. Whatever cutting
tool works for you, you're just going to be
cutting sheets of paper. You will need a folding
tool of some kind. So I have a bone folder
that I like to use. This is a bookbinding tool that's just made from some
kind of horn or bone. If you don't have one of these,
don't go out and get one. You can also use
a popsicle stick. It makes a great
substitute bone folder, especially for the project that we're doing where we don't need to fold a bunch of
pieces of paper at once. So a bone folder of some sort. You will also need a
tool for poking holes. So in bookbinding, I use a bookbinders A. This is
what mine looks like. It's a stainless steel one, so it's really sturdy. I've also seen ones with
wooden handles and then it has a really sharp point
on it for punching holes. This works great
if you have one. Again, don't go out and get
one if you don't have one because the other thing
that works really awesome is just a
little push pin. So you've seen these
for bulletin boards. I got a whole container of these just at the
office supply store, and I use these all the time as kind of a quick and dirty
all for punching papers. So a push pin like this
is going to work great. I like these, especially
because it has a nice handle to hang onto
versus trying to use, like, a sewing needle
or something like that. Okay? So a push pin or an
all, whatever you've got. And then you need something to put your all or push pin into. My favorite thing to use
for that this is actually just a drink coaster that's
made from really thick felt. Um, and I love it as a
punching mat to punch into. You also could use things
like corrugated cardboard, if you had some thin styrofoam, anything like that,
that will let you punch your all kind of
all the way through the paper into some
kind of a backing. Okay? Then a couple
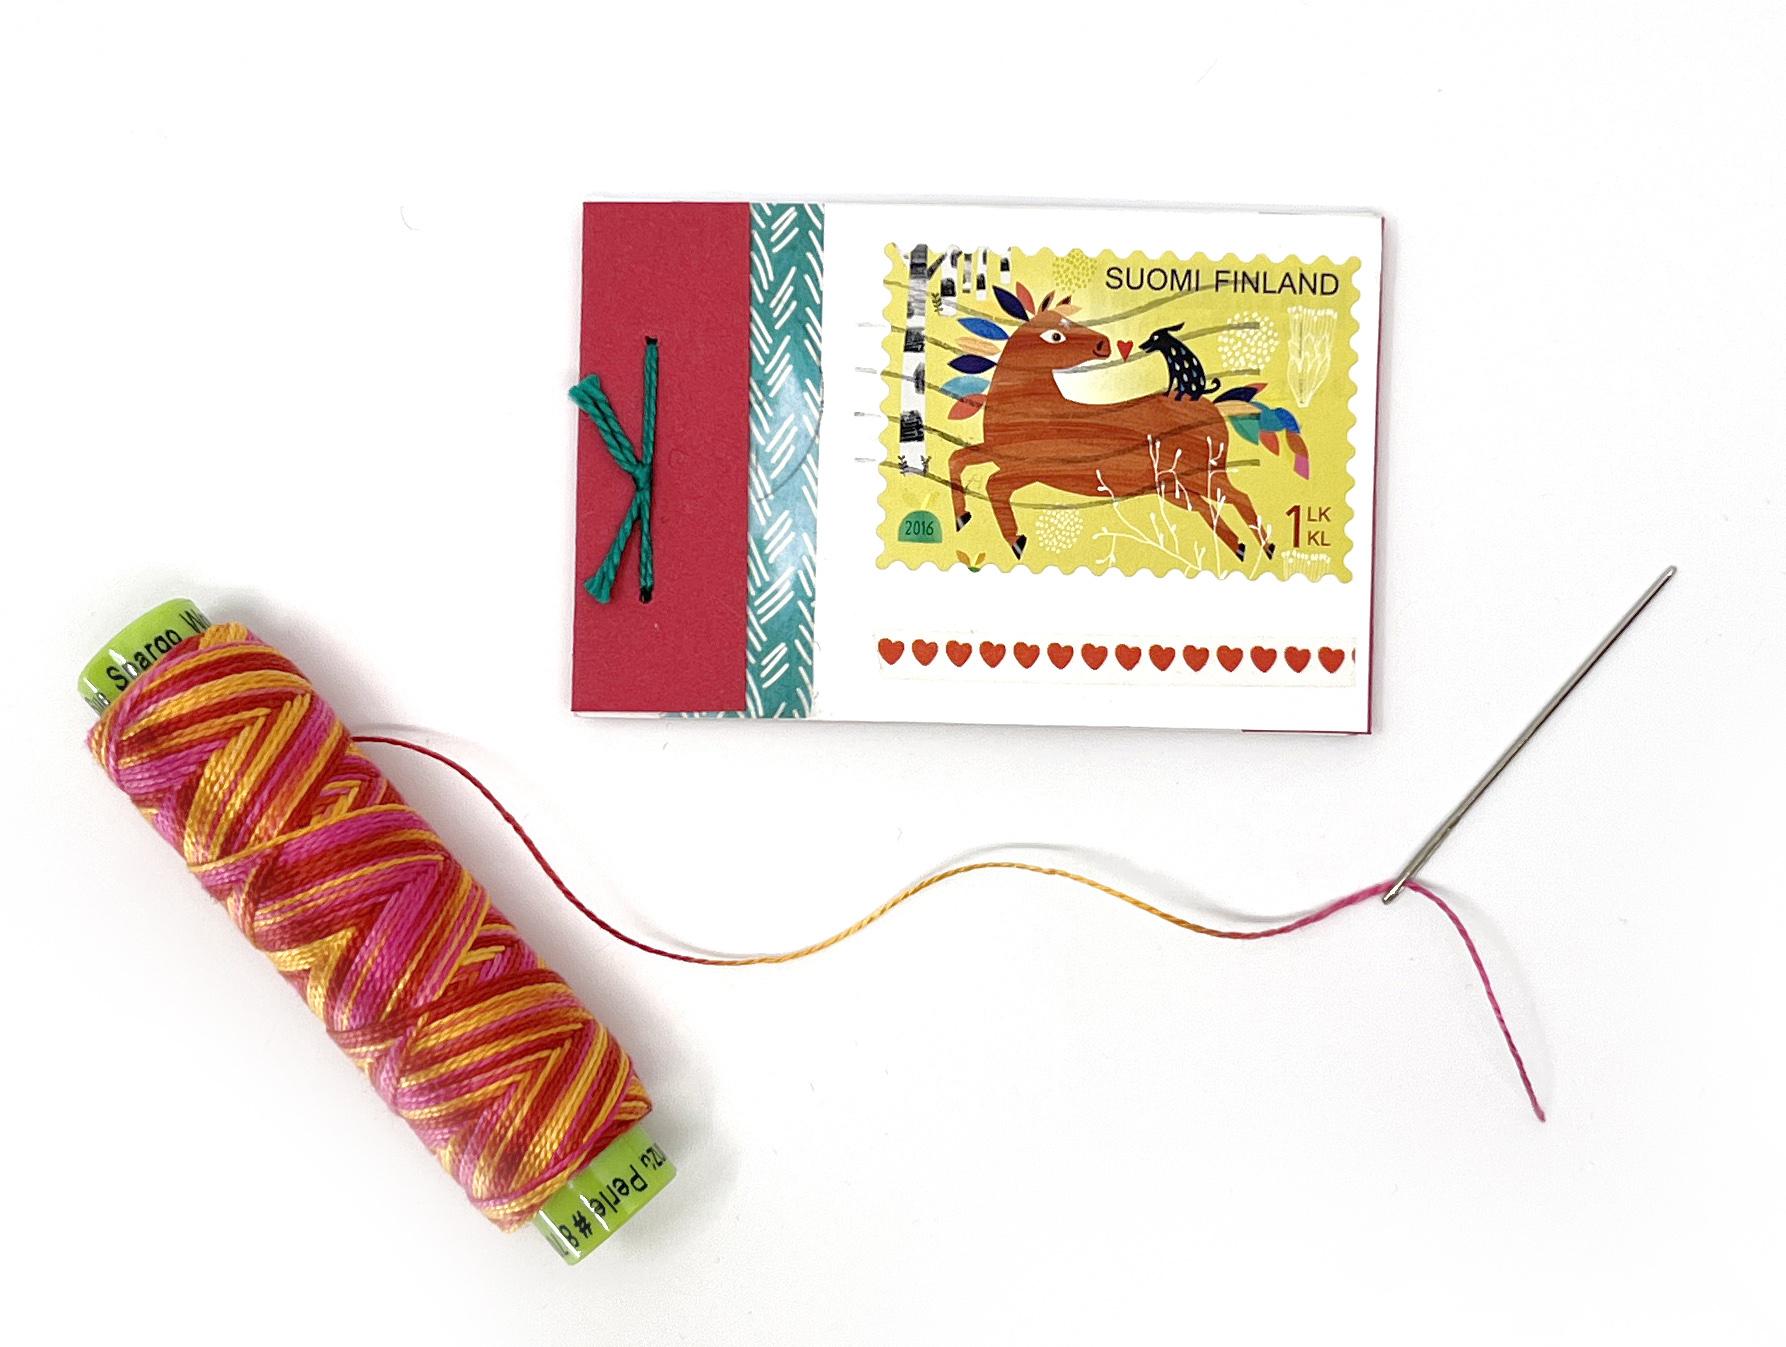
of last things. You'll need just a little bit of thread to tie together
your books at the top. You can see they've got a
little stitched binding there. For all of my examples, I used some pearl cotton
embroidery thread. This is what I love to use. This right here in my
hand is a size eight. You could also use a
size five for this. Size five is really common to find at places like
Michael's and craft stores. Size eight is a little bit
more it's a little thinner, but you could also use
embroidery thread. Bookbinders use waxed
linen thread all the time. Any kind of a nice, sturdy, smooth thread is
going to work great for this. Um, you want to make
sure that it is small enough that it will fit through the holes that you
all would make. So trying to use something like Baker's twine or a yarn
probably is too thick. So think something that's
a little bit thinner. You'll need a needle that
your thread can fit through. This is just a small
tapestry needle. It has a blint point
and a big eye, so it makes it easy to thread. And these you can just find
in the craft needle section. Bigger ones just
like this are used for darning and knitting
and that kind of thing. So I've got a needle to do my stitched
binding at the top. And then last tool you
need is a glue stick. We're going to use a
glutick to put together the layers of our
collaged covers. I like glue stick because
it stays pretty dry, and so this won't cause
your paper to ripple up. And that's kind of a
problem with liquid glue is that your paper will kind
of ripple when it's wet. So glue stick, I like better for putting together these
kind of projects. And I have just a
couple other things here we talked about before. I've got some paint
markers and some chalk if you want to add
some more color and design to your recycled
paper and kind of make it look more
fun. All right. That is all you need to
create these projects. So if you want to gather
up your materials, find some recycled paper, we're going to start
in the next lesson creating our cover first. So the first thing you'll
need is that piece of heavier paper like the scrapbooking card stock
or something like that, and we'll create
our cover kind of template to get started.
4. Creating the Cover: A Okay, we're going to start by cutting the cover paper for our
notebook before we decorate it. So our finished notebooks for this class are going
to be 2 " by 3 ". I decided to just pick a size. You can change the size
for these anyway that you want to with one little caveat, which is your notebooks can't be much thicker than
these that I've made. These are an eighth of an inch thick that will
accommodate the pages. If they get too thick, it's really hard to do the
stitch binding at the top. So you could make yours wider. You could make it
taller if you want to. You can use up a special piece of paper or something like that. But for these examples, we're
going to make a book which finished size is 2 " by 3 ". Okay? So the first thing we need to do is cut a strip of paper, which is 2 " wide, and it needs to be at
least say, 7 " tall. So I could cut this out of this piece of card
stock either way because I have an 8.5 by
11 piece of card stock. So I'm just going to cut a
long strip from one side. The way that I like
to do this is I'm just going to measure
over from one side. Now, if you're using
recycled paper that might not have
a square edge, the first thing you might
want to do is just cut a new, like, clean square edge. I know that mine has a
really good straight edge. So I'm going to measure
over about 2 ". I'm going to make a
tiny little mark, and I'm going to do that in three different places
down the edge of my paper. Then I'm going to
line up my ruler. My little trick with these
rulers is I'm going to flip it over and put
the metal side down. The reason I do that is the cork has a little bit of thickness, and so if I put it with
the cork side down, it sits a little bit off the paper and I like
it to sit flat down. So I'm using it
the opposite way, I guess, than they intended. I'm going to line up my edge of my ruler with those
three marks that I made. I'm sure those are
hard to see on camera, but you should be able
to see what I'm doing. I've got it lined up there. I'm going to open
up my cutting blade here and I'm just going to cut the whole strip
all the way down. I now have a two
inch strip of paper. So this one for the cover
needs to be 2 " wide, and it needs to be six and
five eighths inches long. Okay? So be sure to look at
your ruler for a second. I'll put a close up photo
of that up on the screen. But you're looking for
six and five eighths. So that's going to be
right here on my ruler. That's the five eighths mark. Okay. So I'm going to
do the same thing. I'm going to mark
starting at one end, and I'm going to go
six and five eighths. Because this is really narrow, I'm just going to make two
little marks this time. Okay. I'm going to line
up my ruler again. Oh, I just saw my paper twist. I'm going to double check that again before I finished cutting. I wasn't holding it quite firmly enough down
on my cutting map. Okay, now I have the
correct size for my cover. So this is 2 " wide and six
and five eighths inches high. To kind of finish up the cover, we are going to
score some lines. We're going to make
some folds so that it will fold around the pages
that we're creating. So kind of when I open this up, we're going to make
two little lines that are going to make
the crease that goes around the end of the book, and we're going to do two
lines at this edge that'll make the crease that goes
around this end of the book. Okay? So we're going to create
four scored lines. Going across the book,
starting from one end. And if you have a directional pattern or
something like that, we're going to start
from what will be the front cover of the book
and we'll measure across. So my front cover is
going to be here, and the little tab that
goes around the top of the book is going to be
on this side. All right. So here are the measurements, and I will put these up
again on the screen. I'm going to do
these one at a time. Okay? So first measurement is going to be at two
and three quarters. So I'm going to line up
my ruler and I'm going to mark two and three quarters. These little pencil
marks will be easy to erase if you
can still see them. You could also do
this on the inside of your book. Either way. Now I'm going to
line up my ruler. Like, so on those two marks. And this time, instead
of cutting it, I'm going to use the edge of my bone folder to
score this line. You could do this also with
lots of different tools. I've often used a knitting
needle to do this, but I'm going to use
the pointed edge or the sharper edge, and I'm going to draw a line
but using my bone folder. I'm just pressing hard. What that's going to do is it's going to make a little
dent in the paper. Hopefully you can see
that a little bit. It looks a little shiny camera. That's going to help it fold exactly there where
I need it to. Okay? So that's the first mark
at two and three quarters. We're going to
make the next mark an eighth of an inch away. So we're going to
do the next one at two and seven eighths. So I'm going to take my
ruler, lay it down again. Two and seven eighths, which is really close by. An eighth of an inch is
a really narrow bit. Okay, so I got my
two marks there. Lining up my ruler. Again, the point
of my bone folder makes a little
crease right there. I've got my two marks here
on the left hand side. Now I'm going to make two
mower over on this side. So my next two marks, the first one goes at
five and seven eighths. Five and seven eighths. It's almost at the end. Five and seven eighths. Lining up those two marks. Scored that line, and then
last measurement is at 6 ". And at six. So those pairs of
lines are just an eighth of an inch
away from each other, and that's going to form the
two ends of our book. Okay. So your cover is now cut and the lines are scored to help
us fold in the next step. So I don't actually pre fold this quite yet
because I like to work with creating the designs on the cover before
it's been folded. So I'm going to leave it flat, but know that I have these lines here that are ready
to be folded. So in the next two lessons, we're going to talk about the
ways to decorate your book. So I'm doing two different
versions in this class. So we'll first
talk about cutting down and using a
stamp or the artwork. Um, from a postcard to create your decorative cover.
That'll be the next lesson. And then the following one, we're going to talk about how to cut paper and make these
little origami butterflies. You've got two different options for how to design your book.
5. Cutting Postcard Covers: I Okay, for this first version, I am going to use the stamps from these postcards to
make a cover for my book. So I'm going to cut a piece and I'm going to open this
one out so you can see that just covers the front
part here of our book. And so I want to cut it so that it just
fits in the section of our cover that's in front of that first scored
line that we made. So I'm going to need
to cut a piece that is 2 " wide and two and three
quarters inches tall. Um figuring out how to cut it from your postcard is kind
of the creative challenge. So I'm going to
start with this one. So the stamp I want to use
is this cute dog face, and I need to make a couple
of design decisions here. Now, part of the
stamp or whatever your design is on the cover is going to tuck underneath
that front flap. So you can see that you
lose about a quarter of an inch because that tucks in to close the
book and hold it closed. So when I'm thinking about
how to cut this dog, I don't actually
want to have this be the end down here because then I'm going to cover
up part of my dog face. So I'm going to cut mine so that the dog is kind of
like here on the book. I think that's my strategy. So the first thing
I'm going to do is cut this down to 2 ". Now I can grab my
ruler and kind of see. I think this stamp
is just a little bit narrower than 2 ". That's great. So I can kind of just
make a choice about where I want to have that centered and how much I see of
the other things. I like this kind of scrappy
version where we're going to see some
of the text and we're going to see all
kinds of different things. You can also add
things to this if the parts of your postcard
that you don't like, you could cover things up,
for example, on this one. This end here had kind
of an ugly postmark. And so this is just a
piece of washi tape. Um, that I put over
top of it because I thought it was really
pretty with the stamp, and that part kind of tucks
underneath the flap there. So I might use a little washi
tape on this version, too, because I think we're going
to end up getting part of this ugly part where
the address is, and I think I'm going to cover that up with some washi tape. So first thing, I want to
trim this down to 2 " wide. So I'm just going
to make a decision. I think I'm just going
to cut it about there. And this is a great place
to use a cutting mat. If you have one
with a grid on it, can help you make sure
that you're cutting it kind of square
and not crooked. So I'm going to
line up my postcard with the grid on my cutting mat. And I'm going to push that over just a little
bit so I can use the line. First to cut this edge. So I'm going to cut
this edge first. Okay, so I've got a
left side of my cover, and now I want to
make this 2 " wide. I'm just going to make
some little pencil marks, so I can do that. So that's going to
be about there. And two inch mark there. All right. Same
thing we did before. I'm going to line up
on those two marks. You could also use the marks on your cutting mat to
help you cut 2 ". Okay, and I'm going
to cut that. Okay. So that's a pretty good width, I have some kind of cool stuff. I like that it says hello. Now we need to cut
this to height. The height of this needs to be two and three
quarters inches. Once again, I'm going
to measure and mark. So two and three quarters. Yep, I'm getting
just a little bit. I just covered up my address
on these since they were going to be on camera with
a little white sticker. Okay. Two and three
quarters. Okay. So this is going to be the
decorative cover for my book. It's going to fit like this so that the flap covers up a little bit of this
and not part of the dog. I like the part of this
that has the text on it. I'm not wild about this where I've blacked
out my address. So I'm going to
grab a little bit of washi tape and
just cover that up. It could be a sticker. I
could use paint markers, I could do any kind
of thing, just to make that part of the
cover a little more fun. Alright, there we go.
I covered up kind of the boring part with the
sticker and the address. I found some cute black
and white washi tape. Okay, so now I have this piece that's going to fit on
the cover of my book. I'm going to cut one more so we can do a couple
of examples here. So I got this one
kind of squared away, and I really like
this stamp here. That's this year of the snake. It's got a little bit
of sparkle on it. But there's a lot of fun
stuff going on here, so I'm actually going
to cut this one going the other direction
on this postcard. So I'm going to use my mat, again, to help me line this up. So it needs to be 2 " wide. And this time because there's a lot going on in this postcard, I'm just going to
use the lines on my cutting mat to
line up at 2 ". Okay. So there's 2 " wide. And let's see. I now need to pick two and three quarters
inches piece of this. So I'm going to
kind of cut it out of the middle a little bit. So I think I'm going
to cut one edge right here to start with. And I'm just going
to trim that first, and then I will decide where the other edge needs
to be measure. So I'm going to cut off
that part of the postcard. Great. And then I'm going to measure two and three
quarters inches and this one I'll mark with
my pencil because my mat doesn't have quarter
inch markings on it. So two and three quarters. A little bit harder
to see. There we go. Okay. So this one
is fun already. The person who sent it to me put a little bit of washi tape. It's got the date and
the weather on it. So I'm not going to do anything extra to this one. I
think it's really fun. Okay? Now we're going to add these decorative covers to
our cover paces that we cut. So they are going to go on
the flap and that's longer. So we've got a short end. We've got two tiny lines there. We've got the piece
in the middle, and then there's a flap
that's the long side. This is going to be the
front of your book. So I'm going to line up this and glue it to the front
of the flap here. So this piece should
fit right here. And I want to make sure that
it doesn't go past where my scored line is so that I can still fold the
cover right there. Now, keeping in mind, again, whatever end of the
decorative piece you put here is going to get
tucked underneath the flap. So I'm going to let this part be tucked underneath the flap up here that has a little bit of
the airmail sticker on it. Okay? I'm going to put some
glue stick on the back. One little trick
with glue stick, and I'm going to grab just
a piece of scrap paper so I don't get glue stick all
over my cutting mat. I like to when I
put glue stick on, make my glue go in a
starburst pattern. So instead of just
putting the glue on every which way so that you get some on the front side
of it accidentally, I always take the glue and I work towards the outside edge. You can see I'm just
going every time to the center and then pushing
towards the outside. And I'm going all the
way around because I want to make sure that
I get every part of this covered in glutick and
then I'm going to pick it up and I'm just carefully aligning it side to
side with the tip, the edge here. Okay. And then the very best
thing to do with this is to put a weight on top of it and let it dry
for I don't know, 20 minutes or an hour or so. Any kind of a weight is
going to work great. I have some book weights that because I do a
lot of bookbinding, this is just like a
cardboard box that has some heavy it's nails
and screws in it. You could use a book, a can of soup,
anything like that, but I'm just going
to put that on top, and I'm gonna let that dry
with the weight on top of it. Okay? And then I'm going to
glue this guy down, too. Let's see. I'm gonna
this be the outside. I'm going to put it
facing this way. No, actually facing this
way because this end, again, is going to
be the one that tucks underneath the flap. I want that to tuck
in at that end. I'll grab my scrap paper again and I'm going to put
glue on the back here. Okay. That lining that up with my scored line and all the
insides and outsides of peace. Looks great, and
I'm just going to actually stack that up
underneath my weight so both of those
can dry underneath the weight while we move
on to the next lesson. So in the next
version, I'm going to show you how to cut
the paper and make little origami
butterflies that could be an alternate way or
even an additional way. You could add a butterfly to a stamp piece and also make
an awesome cover design. So next lesson, we're going
to work on butterflies.
6. Folding Origami Butterflies: All right. Let's make
some origami butterflies. I cut two more cover
pieces like so. This is actually that
county postcard, which I decided to just cover with some washi tape
and some marker. So I'm going to use
that for one of these and then a
solid colored one. And to make our butterflies, we're going to use the
recycled security envelopes. So, I am going to cut a piece to make my
butterflies out of, and I'm going to use this part
that I colored with chalk, and then I'll do one in
just plain black and white. So first thing I like
to do when working with a big piece like this is to just kind of rough cut it down. We're going to need a piece
that is 1 " by 1.5 ". So a very small piece. So I've cut one good
line there, one edge. So I'm going to
come over and cut that an inch and a half wide. And for this one, I can just use the grid marked on
my cutting mat. I could also measure
it in pencil mark it. I'm just going to
use the cutting mat. So that is 1.5 " wide. And then it just
needs to be 1 " tall, so I'm just going to cut
a little section out of the blue section there
that I colored with chalk. Okay. There's 1 "
and then 1 " wide. So these are tiny little pieces. Okay, so there's a blue one, and then I'm just going
to cut another one from a section that's just
the black and white here. So you can kind
of see both ways. You are going to see both
sides of this piece of paper, so you might glance at the other side of it
as you're cutting, just to see if you have
any postmarks or anything. Both of mine are nice
and plain white, but you might have
other markings on the back of your envelope that you might want
to cut around. I've got my two pieces
that are 1 " by 1.5 ". And we're going to
Origami fold this. So I'm going to zoom
my camera down on the screen here because
this is pretty tiny. And you have one design
decision to make here. So it's really clear
to see on this one, where the colors are
really distinct. You are going to choose
what color is the kind of accent color on the inside of the wings? That's
the white here. And what color is kind
of the main color of the wings that'll show up as the outside of the wings and the little bit
of body that shows there. Each of those is one
side of the paper. So when you start this out, the side that you're
going to fold in when we make our very
first fold in half, whatever ends up
inside is going to be the accent color here on the
front part of the wings. Okay, so this first one,
I'm going to fold so that the blue is
that inside color. Okay? So our first fold, I'm going to take my little
tiny piece of paper, and I'm going to fold this
matching the short sides. Fold it in half. Oops. Stuck to my finger there
and flipped over. So I'm going to fold it
in half. I'm matching the short sides. Okay. I'm going to give
that a little crease. You can use the edge
of your thumbnail. You could grab your bone folder. You want these to be
pretty sharp creases because this is a
really tiny model. Okay? Now, we fold it in
half now the short way. We're going to fold it
in half one more time, again, matching the short sides. So both layers of the paper, I'm going to bring
short sides over to short sides and fold it in half. I'm going to grab
my bone folder this time so I can really get
a nice sharp crease. Okay, so we've now folded
it into this teeny, tiny thing in quarters. All right. Next, we're
going to make what is called a squash fold in origami. We're going to pick
up the top flap. It's actually two
layers of paper, but we're opening
it up like a book, picking up that top flap, and I'm going to
get my finger in between the two layers of paper. You can see like
that. When I do that, I push them apart. I should be able to take this little folded part and I want to push it straight down. If I move my finger
out of the way, you're going to see how
that makes a triangle. Okay, so I'm just pushing on the fold of paper right here, pushing it down towards the table so that I can
flatten out that triangle. And you just want the fold of the triangle to match
the fold underneath. So it's not tipped to
one side or the other. Okay? And once you have
that triangle kind of set, I'm just going to press it down, and I could take my bone folder again and kind of
crease each edge. Okay, so we made
one squash fold. Now we're going to do that
again on the other side. So I'm going to flip this over. I'm going to pick up this flap again and kind of stand it up. I'm going to work my finger in between those two layers of paper to open it up. And now I'm pushing
on the fold down toward the table so that I can make that little
triangle and squash it flat, and it should match
the one underneath. Your two triangles should stack up one right
on top of the other. Our last step is we're
going to open up the wings. And to do that, I'm
going to reach in. I'm going to start
on the right side in between the two
layers of paper here, and I'm going to kind of
take this front piece and I'm folding it towards me. And you can see it's
at a little bit of an angle because we're
going to squash this again. You can see there's
a little part that's sticking up right here. We're going to do the
same squash fold, but we're going to do it
slightly unevenly this time. So that our top of our wing is at a little
bit of an angle. And you can decide what
angle you squash that at. You can push it a
little towards the top. You can push it a little
towards the bottom. Once I've got that, you can see how that side kind of
looks like a butterfly wing. Okay, we're going to do the
same thing on the other side. I'm going to pick
up the top layer. I'm going to fold it,
bend it towards me. And as soon as I see this
little flap sticking up, I'm going to squash it down. And I just am trying to make
it match the other side. So my other side, there we go, came down just a
little bit farther. There is your tiny
little paper butterfly. So on this one, we put that blue inside when we
did the first fold, so the blue ends up being the
accent color on the wings, and the rest of it we're
seeing the back of the paper. Let's fold one more together, so we've got two butterflies. This time, instead of putting the patterned
paper on the inside, I'm going to put
it on the outside. So I'm going to flip it over. So my first fold, I'm going to fold it in half, matching short sides together. Okay. Like so. I'm going to fold
it in half again, matching the short sides. Short side to short side. Okay. I'm going to open
it out like a book. Open that top flap. I'm going to put my
fingers down in between the two layers so
that I open it out, and that lets me take
this flap and push, push, push it down and make
a squash, squash fold. Okay, then I'm going to flip it over and
do the same thing. Turn it the other way. I'm
going to take this flap, kind of stand it up, put my
finger inside and open it. Try to move my hand
so you can see that. And then I'm going to push on the point right
here so I can push, push, push, push it flat. Okay. It looks kind of like a
little arrow, little heart. Now I'm going to
open the wings out. I pick up the top flap, and I'm just kind of
rolling it back towards me. And then this little
part that's sticking up, I'm going to squash down. And that makes one wing. Then we do the same thing
on the other side. I'm picking up the top flap. I'm just folding it back towards me when I see that
little curve pop up, I'm just squashing it
down and just trying to make it match on both sides. Then I'm going to just give
this a little crease with my bone folder so it lays
down as flat as possible. I'll do that with
the other one, too. Just so those folds
are good and creased. Okay, there are our
origami butterflies. I'm going to zoom my
camera back out again. So now we can add these
to our cover pieces. So I didn't score these
ones yet, I realized, but we're remembering
that our cover is kind of one third
of the edge here, so I want to put my
butterflies on that third. And you can think about whether you want your book to kind of be vertical like this
when you're looking at it, or you could think about
it being horizontal. So that will determine where you put your butterflies
on the cover. So you could put one.
You could use both. I think I'm going
to put one on each. I'll do the black
and white one here. I'm going to do the
solid colored one first. My scored line when I put
it in here is going to be two and three quarters inches over, so it'll be about there. I'm going to make this
one be horizontal because all of my other
ones I did vertical, so I'm going to make this
be a horizontal one. I'm going to put
the butterfly kind of down in this corner. Remembering that about
a quarter of an inch of this flap is going
to get covered up by the top edge of our book. So I don't want to
put it so close there that it's going to
get caught in the flap. Okay? So I'm going to put
my butterfly about there. Again, I'm going to grab
a little scrap of paper. I have some extra postcard here. I'm going to put glutick
on as much of the back of this butterfly as I can
because I really want it to stick down very well. Okay. Got it all the edges
and put it about right there. Sometimes with these,
this top flap pops up and you might need to put just a little bit of
glue underneath that. Sneak it down underneath. Then again, these
are going to stick, much better if you put this under weight
for a few minutes. I'm just going to sneak this one in underneath our weight. Like so. And then let's see. I might do this one
horizontally, too, actually. So I want to pick a spot where this
butterfly is going to show up, maybe against the black, kind of up here or my
tape is coming up there. Maybe I'll put it
down here. Kind of in the same spot on both of
these, I guess, right? One more time, put
some glue on the back. You could also use double
sided tape for this, but I like to get as much of the butterfly glue
down as I can. Okay. The. Adding
to our collage, I have one little wing, both wings actually that are
popping up a little bit. I'm going to sneak a little
bit of glue underneath them. I think it didn't want to
stick to the washi tape quite as well as the cardboard. Okay. And again, I'm going to stick
this underweight and let it dry so nothing pops up and it gets really
well stuck down. I'll just hold that one up
close so you can see made a wild and crazy
cover there. Okay. Underweight. You want to leave those covers underweight
for a few more minutes, maybe 15 or 20 minutes
to make sure that all of the embellishments you added are really
well stuck down. In the next lesson, we're
going to talk about cutting your inside papers that are going to go
inside the notebook.
7. Cutting Pages: Okay, it's time to
do our inside pages. So we talked about
there's lots of different kinds of paper you could use for the inside pages. I for sure want to
do one with coloring book pages because I think
this would be really fun. You could color on one side and actually write notes or
something on the other. So I'm going to use
that, and I think I'm going to do another
one in graph paper, so we can just cut some up while I kind of talk
you through it. So our inside pages
need to be 2 " by 3 ". That's the finished
size of our book. And these books that
we created will fit between about
12 and 14 pages. So you'll need to cut 12-14, maybe 15 rectangles
that are 2 " by 3 ". Now, everybody's going to have a different sized
piece of paper, so you can decide how to use your paper most economically. I'm going to measure
these pieces I have. So this is not quite
5.5 " by seven. So I can get it looks like
two across and two down, so I'll get four
sheets out of that. This one's just
about the same size. So I'm going to try to do that, which means I won't have
quite enough pages. Maybe I'll put in some just
plain white ones, too. You can stack up
your inside pages and cut a couple at a time. The more the thicker
your stack of paper, kind of the less accurate
your cuts are going to be. So usually I don't do more
than two pieces at a time. I'm going to go ahead and
cut these two coloring book page ones together. And again, you can either use a cutting mat because 2 " by 3 " is a really easy measurement to cut using a cutting
mat and a ruler, or you can measure and make little marks with your pencil. I'm just going to use my ruler
and the marks on my mat. So let's see. That's 2 " wide. Right there. Okay. I'll cut another two inch strip. Okay, these ones are
too narrow for this, so I'm going to
set that aside in my scrap paper kind of file, and then I I'll make
these be 3 " high. Get them kind of lined
up a little better. And let's see, one,
two, three, So Okay. So there are two pages. I cut just a few more here. And there's another
two by three. You could also tear these down if you know how
to tear down paper. In another one of my classes, I show you how to tear down
sheets from a larger one, and you could do that for
this project as well. If you don't like the ruler
and the razor blade method. Okay, and one more here. So I will have eight
sheets of this one of the coloring book pages by the time I get done here. So I need just a few
more to go in here. Alright? I'm just going
to continue cutting, but I'm going to
speed up the video because this part is
really straightforward. You don't need to watch me talk through
cutting all of these. So I'm going to cut enough
for two more books, even though we've
made four covers. I'll just cut two more on camera so you can kind
of watch as I do that. I've got two stacks of
paper to make two books. They have about 14 sheets in each one, so there's
enough to do two. In the next lesson,
I'm going to show you how to put the books
inside your cover and how to stitch all the layers together to finish up
your book binding.
8. Putting It All Together: Okay, time to add the pages. So I've sorted my
pages out into stacks. I decided to just kind of
shuffle them together, so these alternate
with coloring book and blank pages because I
thought that would be fun. And so I'm going
to do two books, one of each of the
covers that we did. I'm going to start out
with this one with stamps. And the first thing
is, I want to make some creases along those
score lines that we made. So I like the best way
I like to do that. We want these folds to
fold towards the inside. So I'm going to
put the inside of the book up and I think it's a great idea to use
either your bone folder or your ruler to
help kind of make these folds end up straight
and where they belong. Let me move these papers
over out of the way. And so I'm just going to
lay my ruler one more time against that score
line that I can see. And then I'm going
to pick up the edge of the paper and just gently sort of bend it up
along that score line. And you can also grab your
bone folder if you have a thick piece and kind of run it along the
edge of the ruler. I'm just going to
work my way down and do that on
each one of these. So that's the next score line. I'm going to pick
it up. There really is not a lot of distance
between these two lines. That's why I think
the ruler helps with this step is that it holds
down the rest of the paper. So I've got those two folded, then I'll do this pair down
here. Line up my ruler. I can pick up this whole
big flap this time. Okay, and then one more line. Right there. Again,
kind of carefully picking it up and folding. I just need these to
be kind of started, and then I can reinforce them, put a sharper crease in them. I could go over them
with a bone folder. These look pretty good.
So I get an idea. This is what my finished
book is going to look like, the little flap
and it should tuck in underneath the top there. Okay, we've got our
creases in place so we can see the shape
the cover is going to be. I want to open it out flat
one more time because we need to mark where
we're going to punch the holes on this top flap. So I want to make sure that I'm looking at the
outside of the book, and I've got it open, so I'm looking at the top flap. And we're going to
make two little dots so we know where to
punch with the all, and they are going to come in a half an inch
from either side. So I'm going to come
in half an inch from this side and a half an
inch from this side, and they're going to be
one quarter of an inch, no more, a quarter of an
inch from the first fold. Okay. Grab my pencil. I think it helps to
line this up with the grid underneath helps
me keep things straight. I want to make sure that
I come a quarter of an inch down from the fold. I'm going to line up my ruler. I have a half inch line marked right here
on my cutting mat. I'm going to line up my
ruler with that half inch. Now I'm coming in a half
an inch from the side, and I'm measuring
from the fold line. This is the farthest
out fold line. I'm going to measure
just a little shy, maybe 3/16 of an inch. I don't want to go
more than a quarter. I'm going to put a little dot. Then I'm going to do
that on the other side. I'm going to line it up a
half an inch from the edge. And just shy of a quarter, maybe go to 3/16. There, I'm going to hold
this up close so you can see my tiny little pencil marks
where they are. Okay. Now I'm going to put
the pages in the book. So I'm going to grab
my stack of pages. I am going to take a second to just make
sure that they're lined up as close together
as I can get them. So I want to make sure
that this whole edge, they're as, like, as straight as they can get at that edge because
that's the edge I'm going to put in the
fold of my book. So I'm going to put
that edge that I really got straightened
out at the top, lining it up at the
bottom of my fold marks. So that when I fold
my cover over, they are tucked down as far as they can get
down in the cover. I can see mine aren't
quite there yet. I'm actually going to stand
this up and push them down. They are right down as far as
they can get in the corner. I'm making sure that they're
lined up side to side. I'm just pushing on
it with my fingers. Okay. So I've got all of that
as aligned as I can get it. I know some book binders like to put a binder clip
on this at this point. I'm just going to hold on to
this one with my fingers, and I'm going to set
this whole stack making sure I don't
scooch anything around. I'm going to set
it down on my mat, I'm going to punch two holes, and I'm going to
punch all the way through the entire
stack of paper. Through this top flap, through all the paper and
through to the bottom. It seems like this is a lot
of paper to go through, but if you have a
nice sharp all, this isn't hard to do at all. So I'm going to put
one right there. I'm going to put all basically straight up and
down as much as I can get and just give it a nice push until I can feel it's
gone all the way through. Okay. Got two holes punched and I'm just
going to double check. Yeah, they're all the way
through to the backside. Awesome. I'm going to set that down
a second because now I need to get some thread to
bind together the top. I'm going to use this
turquoise color. Because this is a little
bit thinner thread, I'm actually going
to double mine up. If I were using a
thicker thread, I would only use one strand
and I'll grab my needle. I'm just going to thread this through and I'm going
to double mine up. Okay. The stitch for doing
this is really, really simple. I'm going to pick
up my whole stack. I'm going to try not to
get them out of alignment. I'm going to go down from
the top through one hole. I'm going to come up
through the other hole. Then I'm going to
tie a square knot. I'm going to just
snip the end of this so that I can put my needle aside. Then a square knot. Okay. There are several ways to remember how to
do a square knot. But the one that I learned
that I remember is I'm going to start with the thread that's
in my right hand. I'm going to take the
right hand thread and go over the left one, so it crosses over and then put the ends through the loop that ties
one half of the knot, and I'll pull that right
down tight against my book. That was right over left. My second knot, I'm going to start and go left over right. My left hand one is going to
go over the right thread. I'm going to tuck the ends
in and pull it tight. I'm going to pull mine
tight in a couple of steps here because it gets
a little bit loose. So I'm just holding
it with a finger while I pull on the
top part of it. You might get someone else with a finger to hold your knot
so you can pull it tight. They don't have to be super tight as long as
it's got a stitch. You could put one
more knot there for security to make sure
it doesn't come undone, especially if you have
a slippery thread, and then you can trim the
tails however you like. And that is the whole binding for your
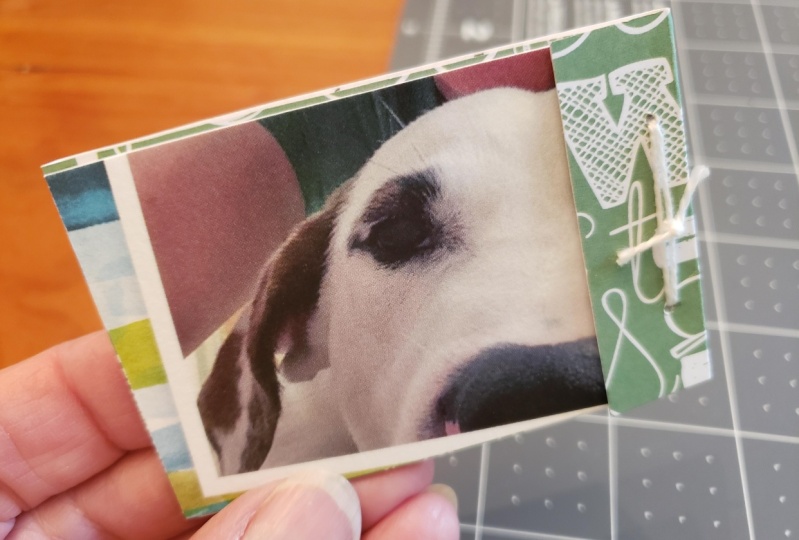
matchbook style book. Then the last little
bit to finish it up is your cover wraps around like this and there's
a little flap, a little overlap in front
that you can just bend the cover back and it should tuck right in the
top of your book. There's our border collie, our puppy dog version, and we'll do one more
since I have it here. Okay, so I'm going to first crease those score
lines on this one. They're harder to see on this because this is a
thicker piece of paper. I might actually
just bend these from the front side because I can't see them from
the back side. But even though I'm
bending it the wrong way, it'll be easy to see
then where they go, and I'll transfer them
to the other side. So I'm just going to
start the score here, kind of bending it
the wrong direction. I could also use a
pencil and transfer the lines to the other
side so I could see them. There we go. See, now I can see where they
are on the back side, because I've got creas
elines to follow. If I can get the
light to hit that, there we go. You can see them. So now I'm just going to
do the same thing from the other side now that I can see where the lines
are supposed to go. And it should fold pretty
easily now on those lines. Okay. I'm just going to flip this around because I think it's going to be a little
easier to see. One more fold. This is a much thicker piece
of card stock. So I am going to take the bone folder and just reinforce those
folds a little bit. Like, make them a little bit sharper before I put
my book together. And there. There we go. Okay. So I've got my cover kind of all
put together here now. I need to now make marks so
that I can punch those holes, which is going to be
a little bit hard to see on this black washi paper. So I might actually use I have this little
this orange marker, and I think I'll use that to make my marks so I can see them. I just need a tiny dot. Okay, so I've lined
it up against my cutting mat one more time, and I'm going to measure a half an inch in from the
side using the cutting mat, and then I'm going to
go a quarter of an inch just a little shy of
a quarter of an inch from that outside fold, that's going to be about there and same thing on
the bottom side. Dot that worked
actually pretty well. I can see those really
easily on the black. Stack my pages really well. Okay. I'm going to
tuck those in the top, the short flap and wrap around them and then just double
check it that I've got them pushed up in there
as far as I can get them, and they're aligned
side to side. Okay, two holes to punch. I'm going to do this
one with a push pen just to show you. So one pushing down. And there's two. Punch
all the way through. It was a little
bit thicker paper, so harder to do. Alright. And let's see.
I have some orange. I'm going to use the
orange thread on this one, kind of a variegated thread. I'm going to do the same
thing and double it up because this is a
little bit thinner thread. Alright, now we're going to
tie a square knot again. So our square knot
we remember to do, we're going to go
right over left and then left over right. So my right side piece
is crossing over the left one and then tucking
in to the middle, and I'll pull that tight and then kind of hold on
to it with my finger. And now my left hand piece in that hand goes
over the right one. Tuck it through. Okay. And then get somebody to hang on to that for you or you can pull it tight and kind of hold it with one finger and
pull the other one tight. Ooh, knot got a
little bit loose. I might pull it out and tie it again because mine's got a
little bit of a gap there. Okay. Once you got your square
nut, you can trim the end. Like so. And then we'll
close this one up. Again, I'm just bending
the cover slightly so it'll slip underneath there,
just like a matchbook. And I guess the butterfly
is right set up there. So here are our two don't forget your challenge
is to make a notebook. So I'd love to see what
you decide to recycle, whether it's a postcard or
some security envelopes. Maybe you'll do both and put a butterfly on
top of another one. I'm going to finish
up these, too, so I can add some pictures to the class so you can see
how those turned out. And I hope you had
a great time making recycled paper matchbook
style notebooks.
9. Wrap Up: Alright, don't
forget your project for this class is to make your own matchbook
style notebook using whatever awesome recycled
materials you can find. So be sure to post a picture
in the project section for this class and let us know what recycled
material you used, and what are you going to
use your notebook for? Um, I keep one like this in
my knitting bag so I can make sure I know what row I'm on or if I need to have a
stitch count on something. I also have another
one that I carry in my tote bag that I have
every day for writing down things like
great books that people tell me about or podcasts
that I should listen to. So there's lots of ways that you can use these tiny
little notebooks. I hope you had fun
with this class, and I can't wait to see
what you've created.
 Becka Rahn, Artist & teacher, paper & fiber art