Transcripts
1. 1 Introduction: Hello and welcome to my first Vector Works class on skill share dot com. This class is designed as an introduction to Vector works for those who have never used it before. Vector Works is a program for architects and interior designers. It can also be used by different disciplines as well. Such a stage design and product design. There are many, many different uses for it. I will start by taking you through some of the most basic tools in the program, getting you familiar with that. Then I'll build on these tools learned to create a basic house plan. The class project will be to create your own house plan on, then upload it to skill share dot com. When you have completed the class, don't forget to click the follow bottom and leave a review below. Right, Let's get to the lessons
2. 2 Basic Document Setup: Hello. In this video, I'm going to show you out a set of basic document in vector works. The first thing you do is check the page sizes correct. So under file, you go down to page. Set up Andi. If your size of paper is a well known to you and you want to specific one like an eye so page size, you click on the printable area here where it says Chu size on available in print to set up you ticket. Then when the sizes a drop down menu that says one print of page. You click on that and then you select the page size you want. So in this case, I'm going to select a free or ace away. Free to call it the correct name. Now I always turn show page breaks off and show watermarks off. Then a double check the wheat from the heights. Correct it is. I'm happy with that. And then I hit. OK, now under the file menu I go to print on my printer will be set to my specific print of that I own. Yours will be different, so when it prints, it'll do a tile print of our A free sheet using the biggest size paper back to your printer support. So in my case, it's an A for printer, and it will print out for a four sheets to fit won a free sheet on it on that will center it on the screen. So this is all good, so I can hit. Cancel Now. The next thing we do is check that the measurement systems correct. So that's under the file menu again on the document setting again Onda Document preferences . Sorry, it's not on the document preferences. It's under file document settings units. So in here, you check your measurement systems. Correct minds in millimeters. So that's correct. For me, the area look is in square meters perfect, but the precision is a bit too precise for my needs. I normally have a two decimal places. The volume is in cubic meters perfect, but again, the precision is wrong. So I'm gonna put that two decimal places under angle. It's on degrees, and it's precision. Is it two decimal places? That's perfect. Now in the top left corner, it's a show unit mark, but the pens a millimeter sign to the end of any measurements on the page. So I'm gonna take that and then I'm gonna hit the okay button. So now, across the top of your page on down the left, you'll see the measurements are appearing on the zero is centered on our A three page and you'll see that is in millimeters. Now, the final thing to set up in a new document is the scale of the document. Now what I do is in the top, right corner, there to black arrows. I click the top warm, and I make sure that layer scale is ticked. This will show me a ruler icon, top center of the page, and then oneto one next to it. Now, whenever you draw in this view, you draw 100%. So you're always drawing life size measurements on the few here. What we do is scale them down. Using this ruler, I can't. So we click it and you'll see you've got the imperial scales on the left. You've got enlargements in the bottom left, and then you got the metric scales in the top, right? So for this video, I'm going to be drawing a one in 50 drawing. So I click one in 50. Remember, in the UK, we only ever use metric measurements and we only really use Ivor Millimeters or on really large scale drawings meters. If you want a custom scale, you can put it in this box here. And if you want all layers and you're drawing to match, you take this box on out of habit. I always take that off. Why was I confused myself using different scales on different design layers. So now I'm gonna hit. Okay, Now the background grid might disappear. Don't worry about it. I never use it anyway. But when you zoom in at a certain level, it will show up again. So basically, the grids too small. But I don't use it anyway, so it's not a big loss. If anything, it quarters the screen up. Okay, Now, basic navigation. You put your mouth on the page, you roll the wheel that will zoom you in and zoom you out. If you click your middle mouse button down, which is the wheel on amounts like a bottom, you'll see a hand appears on. Then you can drag the mouse around. So that's how you pan around a page. So you zoom using the wheel and your pan used in the middle mouse button. And on that note, I would say, Always use a proper mouse with a left click right click on the middle mouse. Well, you don't need to spend their form. One very cheap mouse will do the trick and will probably last you a lifetime. But instead of using a track pad on a laptop, it's a far better option.
3. 3 Drawing and Selecting Lines: in this video, I'm going to introduce the usage of the line tool on the selection tools to draw a simple line. It lives on the top left pallets called basic. You click on it, you click somewhere on your page. You pointed the direction you want to travel, so it can literally be any direction you want. I'm gonna point this one straight down, and then you type the distance in. Now, remember, I work in millimeters, so if I want a six meter long line, I will down type 6000. And then it returned twice. Okay? And that draws me one line. Now I can hover over an end amid or the over end like this, and it will highlight those points. I can click on them. I can point it in the other direction, and you'll notice it will snap horizontal vertical at a 30 degree angle or a 45 degree angle. Okay, So you pointed in the direction you want to travel. I'm gonna say I want to free meat a long line, so I'm gonna type 3000 and then I hit return twice. Now, you can also type in an angle as you're going along. So I'm gonna start this one off by clicking the endpoint and I'm gonna go straight down now I type how long I want to be, So I'm gonna type 3000 again. But this time I'm going to hit the tab key on the keyboard in the top left corner. It's normally immediately above the caps lock key. So now I can type in angle in zero degrees, starts normally in the top, right there, facing to the right than it goes or over and then down. So I'm gonna type zero in and then hit return. And actually sorry I got that wrong. Zero is facing to the left. So on a clock face, zero degrees is the six oclock position. Sorry. The known oclock position. So in the top right here you've got the object info palette. If you ever lose it, it's on the window and then pallets. Now this means Delta X and Delta y, and then it gives an X and a y coordinate. I don't find that particularly useful. So the icon here with a circle on, not the grid, you click the circle. This will give you length pre meters, angle zero and then in X and Y coordinates. And that coordinate is for that right hand side of the line. And I know that because the black dot is on the right hand side of the line. So if I type zero degrees in on the angle and a face to the right So I was right earlier when I said it was a free oclock position. Ah, Then I contort 90 that point it open 18 He should point it to the left and to 70 should point it straight down like that. If you change your mind on the length of a line you see you've got the line length above so I can say I want four meters. So 4000 than hit return. Perfect. So you've got the length you've got the angle. The line tool is up Here you click where you want to start. You pointed in the direction you want to travel. So I want to travel to the right for 1000 return twice. So if I want to measure hope now, I could do my sons and work out what form what over that measurement there Waas bought. There's an easier way. I can infer now got the line working. I can hover over that point until see a little wet red square and it's a Zen point. Then I can come to the right and it will just snap when it's in the right position. So the overall measurement there, too. There was 10 meters, so if I double check my numbers, I can click my black arrow. So let that first line you see that was six meters long. Close four meters long, six plus 4 10 Therefore, that's 10 meters. So with the black arrow, you can literally single click lines and select um and this will tell you the information about them on the right. You can also do a drag selection, and it's only stuff that's fully inside the selection that will select. So if a line is partly in like that one waas, it went up to the selection. So now I'm going to join the dots at the top of my building like that, and that gives me a basic building plan using just the lion tall
4. 4 Connect and Combine Tool: Hello. In this video, I'm going to show you how to use the connect and Combined tour. First off, we need some lines to play with. So this is gonna be a tall get line about the way I used the escape key there to quit that all. And then I'm just going to draw a few lines. Just click point a point. Like so Like that. Okay, now, the connecting combined tall is this one. Here it looks like a cross, basically with the dark, the bottom half dark and bold like that. Now it's got four modes in the top left corner Standard one is a single object connect mode . Now, with that warm, you click your line, you click your target line, and the 1st 1 look will extend out to meet it. So you're that one to that one. So if you imagine a T shape, it's the vertical part of the tea that you click first to the horizontal part. Now the second mode is called Jewell Object Connect mode. You click it, you click one line, you click the overline, and then it will create a junction between them so I can click that one to that one, and then I'll create that junction there now. So I've got something to work with are gonna hit commands that which is also edit on do and that will just bring me back a bit. So if you're on Windows, that will be controls that. But the edit menu and long do should be there in the top left corner of your screen. Now, the third mode is this one here. This is Jules Object combined mode. If I click women Black Arrow on one line, look, you see, it's all individuals Now, with the connecting combined Tall, I click that third mode along the jewel object combined mode. I click one line. I click another line like that, so that has joined the two lines together now. So if I select it with a black arrow, you'll see that it selects is one line, and it's no longer a line. It's called a poly gum, So if I click a normal line will say line, knock in the top right? If a click backed, it'll say polygon. Now the polygon in this case has got Frevert to see so 12 free, and it's saying for you Verte sees here. It's saying the perimeter link for those two edges is 14 818 millimeters long, which is 14.8 meters, pretty much so from there to there to there is roughly 14.8 meters long. Now the white area is appearing because it's got a solid white fell on. On the area of that is 27.17 square meters. So this is useful if you want to work out an area if you're trying to work out a quantity. So if you're trying to buy carpets or flooring that kind of thing now on the bottom right, you've got closed. So at the moment it's not ticked, meaning it's an open edge, meaning this area here without the black line is open. If I click the close button that will close the shape and now look, you say I've got free lines or joined to each other, and that's one close shape and because of effectively added, another line in the perimeter is now 24 78 free millimeters long so roughly 24.8 meters long. The area, however, won't change because it's still the same area. So just then, by closing it rather the third line, which then gave us this longer perimeter. So the Firth orthe mode sorry is the multiple object connect mode. So again, I'm just going to use my black arrow. I'm gonna delete this close shape, and I'm just going to draw a nice long line across the page like that. Now, on that fourth mode, someone connect combined. Basically, the first click is your target line. The second are the lines that you want to hit on that. So the ones that want to extend out and you'll see the little extend like that now if you've got lines going through, so let's draw a couple of lines going through. I'm back on the Connect combined, so I clipped a target. Then I click the line. I want to connect to it, so click that bit you'll see it'll take the rubbish off. So if I want to keep that piece of loan and get rid of that, I'll click that piece. You'll see that it gets rid alone on the other side so I ever extends a line or shrinks it back on one of dawn. I always put it back to that first mode there. So that is the single object connect mode. See you in the next video.
5. 5 Trim Tool: in this video, I'm going to show how to use the trim tour. The trim tool is this one here with the pointing finger with the Paris scissors over the top. Now, before we can use it, we've got to use the line tall so that we've got somethingto work with. So I'm just drawing some random lines that cut across each of, Ah like that. Now I activate the trim tool, and then it's a case of put in the pointy part of the finger on the line that you don't want and then clicking so you can literally click any line you want like that and you'll see it will go away like that. Now, if it's the last piece of line like that one there, it'll delete it so I can delete that one as well in the same way. And then you can see. Look, I could go right back to the beginning until I remove all the lines. Okay, so you can use it as a delete er, but you can also use it as a trimmer, So any line passing any over any other line will do that
6. 6 Chamfer and Fillet Tools: in this video, I'm going to shout to use the Shumpert all, which is this one here on the Philip Tool, which is this one here. Now I'm going to use the line tool. So I've got something to work with and you see that I've gone obvious gap between the ends on the point there. I'm also going to do one the overlaps like, but so I'm on the sham fertile now I never use in the first mode I always use in the second mode. I'll explain why in a second now I put my first line distance to 500 Mel on my second line to 500 mil. So what it's doing is it's imagining this line, carrying on and hitting this line. If that was carried on to a corner and then it's measuring back 500 and then back 500 again from the corner. So then give me a a diagonal line across. So if I click this one to this one, you'll see what I mean. So it's imagine this one and this one extending out to a corner, and then it's measured back 500. And that's what the two lines therefore here. Now, if you've got lines overlap, you click one to the over and you'll see that it will do this look. So it's creating a new line from them on when it's actually done is it's not got rid of these pieces. Here is kind of broke thumb so I can click on them and it can delete them like that. So if I don't do that a couple of times, so that's Command said on the Mac controls that on Windows or edit on do on both, and I just get my lines back. So that was the sham fertile on that mode there. Now, if I use the trim mode and go from that one toe, that bomb, well it will do is it will get rid of the overlap. So the 1st 1 kind of breaks the lines of the to long, so it'll even extension out, which will be a separate object on the third mode. Gets rid of the overlap brings them right into like the corner like that. Now, if I draw myself another two lines, so one on day two and you see there they're definitely not touching each other. I can use the champ. It'll with the distance is set to zero. So both for on zero first on second and click one line, I can click next, and that should bring it into a corner like that groups. So it didn't do that in that case. So in that case, what I would do is I would overlap the lines, so click on the line and click the blue dot but that then I'd go for the sham Fertile. Make sure the numbers are at zero, so zero return in each, like so click one, click the over and again it's default into the last number. So what you can't do is you can't bring him into a corner like that. So for that one, you'd have to extend the line out using the connect combined tool, which I showed you in the previous video and then trim it back that way. Now, if I just clear my screen of seconds, I'm hitting command day and then delete or backspace to get rid of them. I need a few more practice lines again, but about that, So the Philip Tool is this one here. Now, the fill it too will have a radius some and by default mindset to 25. So if I put mine to 2000 that's a two meter radius. Ah, click one line. I'll click the next line and you'll see it gets rid of the excess, and it puts a two meter radius arc between them. On that ark is tan gently perfect, so that line smoothly flows one into the over. So that's useful if you kind of laying out a road or a path down a golden, that kind of thing, and I'm using it in the third mode there. So that's the trim mode again, and it's very similar to how the shampoo it'll work. Just now, you've also got the split mode, which will split the lines. So let's go from this one to that one, and you'll see what it's done is it's split. That one is a separate object to that one, so I can delete that one manually now. And it's also split that one from that one. So again, I can delete that manually. So the quickest way of using the fill it all is in that third mode there. If you just want to cut it straight off on the first mode again works exactly the same way as in the sham. Fertile. So you click one, you click the over, and it will leave the excess behind. But, you see, the lines are actually intact like that. Okay, so that's the freeway. So when I'm using, fill it attend to have it on that third option there.
7. 7 Offset Tool: in this video, I'm going to show how to use the offset tool, which is this tall here, next to the blue and pink, A race at all. So that's the line tool there. I'm going to draw myself a basic building plan, something that I can offset against. So I'm gonna draw myself a straight line. I like that. I drew himself a little bit of interest to it. What? That And then I will return around to the side and finally close it like that. So all it did there was use the line tool to make a basic building plan. Now, using the Black Arrow, I'm going to de select the offset Tall is this one here? I give it a click and you'll see at the top of the screen log. It's as distance. So that's how far it's gonna offset the line by. I'm gonna click in the and I'm going to use a value of 300 millimeters. Now, to the right of all of these tools, you'll have instructions like this. So it's saying, use the command key to select objects, so hold down command a click of online and by default, vector words freaks out on does this and gives me an error that's always on the first time . But thereafter it behaves itself. I don't know why it does that quick of the program. Now I've got it selected. It goes orange, I wonder. Offset it to the right. So I click to the right. So now, command, click on the next line. And then a ball groups It went and did another. Not that I like on my machine. So in command, clicking each time and then I'm clicking the side of the line that I want to keep again It like that were for me there. Cool. So that gives me the line now to fix these overlaps in the corner, I'm going to use the trim tool that I showed earlier. So I'm gonna click on it. I'm gonna click on the piece of land I don't want. And it might be a good idea to zoom in here as well. Just to make life easier on yourself. Whoops. Zoomed out to four then. So you click on your overlaps, and then you get that. And finally, I've got these two here. Now I've got these two lines here. So for that one, I'm going to use connect and combine. And I'm going to use it in that second mode in the top left corner here. So I'm gonna click that one on that one, and that will connect and combine the lines. So I've shown you the offset tool there. I've used the trim talk to clean it up, where overlap. And he is the connecting combined tool to fix the areas that weren't touching.
8. 8 Compose Lines and Attributes: OK in this video, I'm going to show how to compose lines which links them together. And I'm also going to show how to use the attributes palette here, so toe link these lines together. At the moment. If I click on A with the Black Arrow, the selection tool, you'll see the role individuals and they'll select as individuals, and they will go oranges individuals. So what I'm gonna do is using the black arrow and holding down the shift key. I'm going to shift click around the edge of my building. So to get one continuous orange line around the inside there, then to group them together, which kind of worlds the ends together but non permanently, You go to the modify menu and then down to compose. So now, instead of it being an individual line like this one here, when it's saying line when I click on it, it will fill in in white by default, and they'll say polygon here on the right. On the object info palette, Andi will say how Maney Verte sees you've got else a closed. If you've done it correctly, we'll give you a perimeter length, which is the fuse to walk all the way around the edge. And then it will tell you the area of that building is now 31.36 square meters. Excellent. So now I'm gonna do it on the outer line in exactly the same way. So I'm shift clicking all the external lines. Then when they're all selected, I go to modify and then compose that will then white the mount in the middle like that. Now, if I want to put more prominence on the outer lines of this wall of the building, I can select the line I want to make thicker. That will select all of them now because they're now composed. And it's a polygon that's closed on the Attributes palette, which lives under the window menu under pallets, um, on their attributes. So window pallets attributes. That's the fill color. That's the line style, and this hair is the line thickness. So if I click on that and I pick a thicker line like that when I d select, you'll now see I've got thicker line. Okay, now, if I click on an internal line, I can also change the fill call. A sits on solid at the moment. In the book, it means Phil style. The pencil means line style. So we're on the solid one. I can click on the white box and now you don't have many colors by default. So the bottom of the screen you have got standard vector works colors. Now they're not particularly punchy. So I'm gonna go with classic vector works colors. So now we can literally pick any core I want, and then it will fill in in that cooler. Now I'm gonna put this back toe white and instead of a a solid white fell on the outer one , I want to put a hatch on instead. So go toe. It's a solid under the fill style when I select hatch. Now, I don't like that hatch. So to edit it, we go to this drop down menu here, and then we click on default hatches on. Then we look down this list for the style we want on Brick Hate, Chef, is the star line going where? So I'm gonna double click it and then you'll see you've got a diagonal kind of line repeating line, which then gives the walls a bit more visual interest
9. 9 Line Hierarchy Compose and Decompose: now in this video, I'm going to add an extra wall in the middle here, across this piece in the center, on going to add an overhead line here. So this could represent something like a lentil going across the top of a doorway, for instance. So first, the de clutter the screen. I'm gonna click the external line, modify and then decompose. This breaks it into its constituent lines again. So instead of been all one line, it's now 123456 individual lines. Now, I'm also gonna break this one, so I'm gonna select it. Modify, decompose and notice. Now the styles disappeared on both of them. This makes it easier to add it. Now, using the line tool, I'm gonna find the midpoint on the line. If the mid points not there, make sure you've got all these snaps on your screen. The snapping palette lives on the window Pallets. Now with the line tool, I'm gonna join that midpoint across to the right, and it will kind of snap when it gets there. When it does, click now my walls of 300 thick in this building. So I'm gonna use the offset line toe, half fat to get centered on this room. In fact, I'll use it to the bottom of that because I can do this one. No crew is going across here to 300 and then that will be incented. So I'm going to use the offset tool. It's set to 300 already locked, but if yours isn't, set it and click below that. Now, next up, I'm going to extend this line out to there. But I'm not going to use the extent, Tal. I'm just going to use a normal line. The reason being is I want to change the look of the line in a second, so it's gonna be an individual. Now I'm going to go to my offset tool. It still should be on 300 from the last time you used it. I'm gonna click below like that. So now I can use the trim tool. Where's it gone? There is So that's the pencil with the scissors. Be sorry. The finger with the scissors. I don't want that little piece of line. All that one. I want to keep these two. Now I can select those four lines at the bottom some shift clicking on on with my black arrow and then I'm going to go to modify composed They're not do the same with this one, this one, that one, that one. That one. And finally that one. And then I modify composed them again. And finally, I do the external lines for these, so I'm just shift clicking on them all. You can't see it on the recording very well, but they are going orangey when I look at them. Modify, compose. You'll see. Look, it's remembered the hatch from before. So now I've got one room and I got second and I've got some lines above now. These lines, I want to put very low priority to them, so I'm gonna change the lane higher hierarchy. To do that, I'm first gonna shift click on them both. Then they only have to do it once. Then on the line color, he's It's solid black. I'm gonna make it less important by clicking that color block, I'm picking a medium grey. So now in a de select look, they look less prominent thin, the lines running around the edge of the room. So now I'm gonna click on them both again. I'm gonna change this style of them toe a dash. To do that, you click on this drop down here on first, check the line weight nor point, not five. Perfect on the style comes from where it's a solid here, next to the pencil. So I'm gonna click on it and go toe line type. Now what we do next is we click on this drop down menu on going to go to default line types and I'm gonna pick a style. But I like the look off for this now I'm looking for I so owe free because I know it's a nice open dash in a double click that I'm gonna de select. Now you'll see that I've got a dotted line running across with quite low importance because it's very faint. It looks like it's Lovering you the importance of it
10. 10 Add Doors and Windows: Now in this video, I'm going to add some doors and windows around the building, and I'm gonna put an extension on the right hand side of this building here. Now, I could decompose and recompose, but that's quite a long way around of doing it. So first off, I'm going to zoom in on the top here, and they're gonna locate where I'm gonna put a door to do that. I'm going to use the circle tool. So the circle tool is this one here. Now click on the corner. I come out to the side on the circle, needs a radius. This radius is gonna locate the edge of my door. Not going to say I want the door to be one meter in, so I'm gonna type of 1000 and then hit Return twice. So now where that circle cuts that line is exactly one meter in now to draw the door itself . I could use the line tool, but because I got the hatching there, I'm going to use the rectangle tool instead. So click on it. I click on the bottom left corner and I click anywhere on that top line to the right now the circle is no longer needed, so I can click it on. Aiken. Delete it. Now if I click the rectangle in the top right corner. Look, you see these? These little black There's this little black dot on this little grid of white dots. The black adult is the one that's fixed, so the top left corner is fixed. So if I change the whip on, I'm going to change the whip to 900 and hit return. That will change the overall weight for the line to 900. So the door is now one meter in a 900 wide. Now, if I want to put a little bit more prominence on it, I'm going to change the line. Wait, which is here on the attributes palette, and I'm gonna make it a little bit thicker. So I'm gonna go for 0.5. And now I've got a nice prominent door now to make the dorm or interesting, I'm going to zoom in on it. I'm going to use the line tool from the middle and draw all the way across. So all it did there was joined the mid points. Now I'm going to say that the frame of the door is going to be 50 mil thick. That's a center line that I've drawn. So I'm going to use the offset tool and set it to 25. I'm not gonna click above it. Thank Clem and click on the bottom line on below it. So that's the thickness of the framed on the door dome. And then I'm going to use the offset tall. I'm going to use the line tour. Sorry from that point to that point. So the top left side of that door frame to the bottom left side there. And then I'm going to use the offset tool to the right twice. So that's giving me some guidelines to work again so I can select that one and delete it. And there's one hidden in that line that can also delete. And then I can use the trim to get rid of the overlap line. Now I'll do exactly the same on the right hand side. So lying tool top point to bottom point, offset, left, left. Then I'm going to use the black arrow to select that line and delete it on the one hidden in the wall and finally the trimmer to get rid of the overlap blind. So that's a bit of detail drawn on the door. Now I'm gonna use the circle tool on that corner point there on the bottom. Right. Sorry. Bottom left, and then go to the bottom right on this. Select like the swing line in a second of the door. So I'm gonna go for the pencil. The line Sorry from that center to that bottom point there. Then I'm gonna come to the right 50 male, remember, Hit returned twice and do the same appear groups that one went wrong. Thunderstorm doing it. That and then I'm gonna join that point down to that one. Now, we don't need the rest of the swing line. We can't see what we're doing with it. So I'm going to use the trim tool to get rid of that piece of line. Andi. That tiny piece of their Then we can get rid of this main large lump, which gives us this. Now the Phil is on this shape, which is obscuring the door. So on the left, we turn the fill to non and then the line toe a dashed line which is a line type. So under the line area here on that drop down Andi, I used I so free before, so I'm going to use again. So now when I d select, I've got a dash line on a swing line like that. So the door looks a little bit more interesting. Now I'm gonna add an extension to the right hand side is building to make it look a bit more interesting. So to do that, I could decompose it all again. I think I will, actually, I'm gonna click on the external line, modify and then decompose. Now I'm going to use the rectangle tool from that point. And I'm gonna touch that bottom point there and come off to the right. And you see now an inference line coming off the bottom left. So I'm going to give it something. Where from? Just going to click down now, because I know it's snapped in. And then in the top, right, Because the anchor points fixed in the top left corner. I could give it a little bit more whipped, so let's give it five meters. They're perfect. Now that's giving me the shape. Now there is a line hidden below here that I can't reach at the moment because this rectangles covering it. So I'm going to click the rectangle right click it and go to send to back, which then puts this line here visible so I can select it and I can delete it. It's not doing anything so we can get rid. Now I need an internal wall fitness on here several ways. I couldn't do it. I think I'm going to go to the modify menu and decomposed, though I think that would be the quickest. Now I'm gonna use the offset tool again checklist. It's a free 100. It's a 25 on mine because we did that door and then we hit return. So now I'm gonna command click on that line. It goes wrong the first time, remember? So I'm gonna click it again. So you hold down command, you click the line and then you click the side you want to go to, and then I'm gonna command click on that line and then the side of one. I have finally that one on the gulf. So we got these overlapping lines. So that's a trim tall again so I select the lines I don't want with the pointy finger. Whoops commands that. So if you screw up commands that and you get rid of the pieces, you don't want there the effect now that Finn line isn't needed and that Finn line isn't needed. So what I can do now is I can use that one. If a click on it with a black arrow and you can click the Blue Point look and then you can click Way Wanted to torch. So that's kind of the rough way of moving a line, so that stretches it. And then finally, for those check on my line, wait on that one. I did that one at North 10.5 millimeters, so this one needs to be at North 10.5 millimeters as well, the one on the right. That and then I can shift. Click on all the lines I want to compose together into a continuous one and then go to modify and then compose are that now it's lost. The um, it's lost the hatch on it, but that's no problem. We go toe hatch on the filled style, and then you make sure that your picture brick HF one perfect where it would be for actually drew it. So something's gone wrong here. I'm just gonna try and work out. What? So it wasn't kind of selected even though it looked selected? It wasn't because, you see, it's gone white, so I clicked again. This is highlighted. So now inferior should go to Goto Hatch. Now the hatch appears now. Another problem. It's lost this bottom line, even though it can see its there. And they're so that's ah, drawer. That's the the order of the drawing that's getting in the way. So I'm gonna click this box this hatch right click send to back, which then reveals these extra lines. So now I'm going to click on one and then shift, click on Lee over free and then modify, compose, and that then composes them into one continuous object. So what I'm gonna do now isn't gonna go around the building. I'm going to add a few more doors here and there. And to do that, I'll just locate the corners off them. So I'm gonna have one in this corner. So I've clicked the corner, a type the number, and I wanted to base over 1000 and then hit return twice. It doesn't matter if it hatches in, we're not going to keep it. Now this door here, I'm doing a drag selection to select it. And then I'm going to go to edit, Sorry, modify and then group and that groups into one kind of object again. It's not the best way of doing it, but it works for what we're doing. Now I'm going to zoom in on my my circle of my door. Hey, out of steel, Maitland. Bigger. Not quite so big, though. And then I'm going to hit, edit, and then copy, then add it paced. So command C Command V. If you're on a Mac or control C Control V if you're on Windows now, what I do is with its selected I'm going to go to the rotator, which is this one. Here I click on the corner. I click on a nine point and then I can rotate it into the directional Want. I can actually type the number, but here, if I rotated to the right angle, look, it goes to 90 degrees so I can just click Cool now with the black arrow de select the shape I could grab the top left corner and put it exactly where I want it to be. Whips. Now there. I wanted it that right hand corner to be on that corner. So I just got the wrong point. So I'm gonna drag it there. Then the circle could be deleted, so the circle measured it in for me, and then I was copied and pasted the door object where I wanted it, so I'm just gonna put a couple more of them in. So I'm gonna vote drag now, And that's the quicker way of duplicating an object instead of command C command v. So you hold down the old key, you click in your drag on windows. I think that might be the control key. I'm not sure likes I don't use it on Windows. Now this one is going to need to be rotated. So I want the swing to go down into that bottom left. So with its selected I go to rotate, click that bottom left corner, click that top left corner on going to spin it for 90 degrees. So now the swing line is in the right position and I want this to be a couple of 100 mils in from the edge. So circle tool on that corner 200 return return. Then with the black arrow, I can drag the top left corner of my door to the right hand side of that circle. It will snap, and then I could get rid of the circle. So then I'm gonna put another door in down here and again, I'll have it about 200 mils in from the corner. So circle on the corner. 200 return return. So the double returns important narrow vice. It doesn't confirm it. What I'm gonna do is I'm going to duplicate that door. So I'm gonna bolt drag it into the rough area like that that I can zoom in de select on drug, the bottom left corner to the top of that circle like that, and then hit, Delete. And I've done the same error again here. I want that corner to be there, but not a problem. I can drag it from a to B, and now it's in position. Perfect. So now we've got a simple ground plan and you do the windows in exactly the same way we did the door. So, in fact, what I'm gonna do is I'm going to zoom in hit pace because we got a door in memory on drug , it clear of the building like that. I'm gonna on group it, using the modify menu and then on group on, I'm going to get rid of the elements that make the swing line of the door up. That so that's clean the window. That's good for me in the door open. That's going to become a window for me. I'll select it all and then I'll go to edit. Sorry, modify and then group. So now that's a group. Now I'm going to use the top midpoint top CenterPoint to drag it onto that wall. What about? That's good. I put one on there as well, so I'm out dragging to duplicate put it roughly in the area. I want it, and then we shall find a snap point on it, find where we want and then drop it into place. So I like what I've got there now. I'm going to vote, drag it again on that top center and in a position on this top edge. Andi just gonna free form the position of it now, So I'm literally dragging it where I want, So I'm eyeballing it basically. So this is just to speed the process up a bit and I'll do the same over here and each time , just make sure you d selecting, and then it behaves itself better. There, that's good. So I just place them in by I I want one more down here in this little area. So it's gonna be like a corner office with two windows them. This one will need rotating, though. So with its selected rotate, click the corner. The other corner in the mouse down to it says 90 and then it's a 90 degree bend. So then I can diesel ect grab a midpoint, found the midpoint on the wall and then drag it into place. So I'm gonna say that that war doesn't have any windows in on that wall. Doesn't have any in Ivor. Okay, so that's the doors and windows in place for this project.
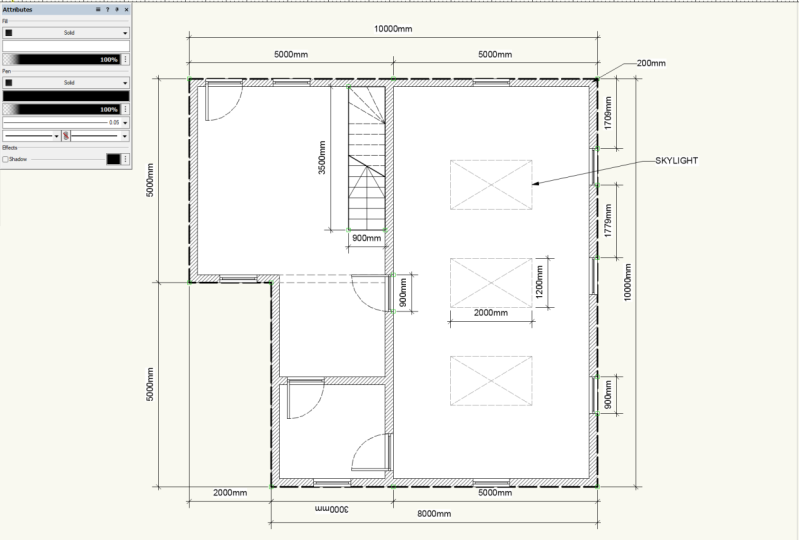
11. 11 Add Skylights and Staircase: now in this video, I'm going to draw free skylights down here. Undergone draw staircase in this corner. Now, to begin with, I'm going to locate where I want the skylight to be. So I'm gonna say it's free meters down on about two meters in there. So in a draw, a rectangle so can locate it in that top black right hand corner. I'm going to come down and left. Now I make sure the anchor points in the top right corner by clicking that top right doctor on, then put a whip thin so that top right corner is now fixed because the anchor point is there. So if I put I did say two meters, I think I'll go for 1.5. So I 1500 wide, Onda said. Free meters. But I think to would work better. They're so now that represent that bottom left corner represents the top right of the skylight. So now I'm going to use the rectangle again, go from there down and left. Cool. Now two meters works for me on the Web and on the height, I think let's call it 1200. Okay, so now the guide object here is no longer needed. But I could use it down here. So if I drag it clear and then de select, I could drag the bottom right corner into the bottom right corner. So now that could be the basis for the other skylight at the over end of the building. So I'm gonna select this one. It doesn't need a hatch on this one. So I'm gonna click on it and go to non, which creates me just a line like that now, because it's an overhead line. I'm gonna dash it. So I'm gonna click on it, go to solid and go toe line type, and then trains the dust style. So I so free. No particular reason again. It's just a nice wide open dash. Okay, so now you see, it's there now because it's an overhead window. I'm gonna put a cross in it, just so it shows up a bit better. So a drawer a line from one corner, 20 over, and you see it'll snap like that. So when I when I've drawn them both for, select them with the black arrow and then change the line type to my eye. So free. Perfect. So now I've got on overhead Mark on the drawing. If I wanted to as well, I could change the color of those free lines. So I'm gonna select. Um, I'm gonna go to my line color, which is here. I'll click it and I'll go for a medium grey. So now I'm going to group it. Modify Group de select. And now it's a nice light, grey dashed line. So then I'm gonna hold down the old key and in the bottom, right corner, drag it to the side of my guide object remembering to let go the keyboard Last and finally I just deleted my guide shape. Now, if I wanted another window in the middle of them, I could use the line tool enjoying one corner to another corner. That line will have a midpoint on it. So I can oh, drag from a midpoint there to a midpoint on the line. Then select my guide and then delete. So that's given me free skylights in the roof. There. If I wanted to, A could mark the most skylights as well. Now, in this area here, I'm gonna put a staircase in. So to do that I'm gonna draw a rectangle from the top left corner down here. Now the fill on it needs to be just solid on a pure white, which is what I've got now, now, next stop. I've got to sort the width of it out because the top left corner is in the position where I want it. That will be my anchor point on this little grid here. So I click the top left corner. The width, however, is way too small for a staircase in the UK, so I'm gonna is gonna make this 900 wide. Okay? Brilliant. Now, the run of the stairs is the height here, and I'm gonna have it free and 1/2 meters. It's nearly there already. So I may as well just around it. And that gives me that. Now I need to put some steps on the staircase. This was 900 wide. I wanted to go around a corner when it hits this corner here, and that's going to start 900 down. So I'm gonna use a circle on that corner point. I'm gonna come out 900. Okay. Which then gives me a point and click on and go across from excellent, so the circle is no longer needed. Now I've got a line here. I'm gonna draw a line from there to the with its selected I go to modify drafting AIDS, even divide. And I'm going to change the number of divisions on it to 10 and then hit Return. So what's that? That's done for me is it's given me divisions I can follow. So then space out the steps. So what I'm doing now is I'm deleting every over step line so I can clearly see weather meant to go. And if a click on one, I can see that the length of the step, the tread of it is taunting 60 minutes long, which to me, seems like a decent number for a step. Now I'm gonna go drag the midpoint of that step line to the end of this line here. I'm going to do that all the way down the building. Some just don't dragging midpoint to end point each time. Perfect. Now these mid lines are no longer needed, so I select them on. I delete them the now, as I said, this turns into a landing. The step will go around a corner at that point. So to do that, I'm gonna click corner to corner like that. And I want one. That's kind of on the midpoint as well. So what I'm gonna do is I'm gonna direct that to a midpoint here, which I haven't actually got. So to do that, I'm gonna draw a circle from this corner remembering that the staircase was 900 wide. So I need Ah, whip of 4 50 A diet. Sorry, A radius of 4 50 on the circle. So I talked about in and hit return twice, and then I can join that point there where it meets the edge to the corner on both pieces whips, but they're screwed up the position. So it's got that going for that again that then the circle can then be deleted. So now I've got some lines going up. Now I'm going to select the edge of the staircase. I'm gonna make slightly thicker, so it stands out better so on the line thickness. And I'm going to go for point free five. So now it's just throwing out a little bit more prominently on the drawing. What? I'm gonna do next is drew a diagonal line across it like that, and I'm going to use the trim tour, the trim off the lines to the right of that diagonal because normally they would be a dash line. Now it might seem strange, but I'm going to redraw them now. This is so that I can put a dash line on just those pieces. So now if I select those lines, so this is a black arrow job on the ones that go open around the corner, I can change their style, then to a line type that is I. So I'm free my lattes and I've got dash lines. Now it's common practice to drawing or para one a staircase. So I'm going to draw a mark on the bottom there toe where it hits the um, it's where it hits the and line their the diagonal line. I'm going to draw a nice long arrow head down, so that indicates which will the stair is going to go, so people have different styles for them, But that's my style of drawing them on because that's a brake line. I'm gonna change its thickness 2.5 like that just so it shows up would get better. Cool. So I've got all the lines. Now that make a stare up, I'm going to drag over it to get them all selected, including this division line. And then I'm gonna group thumb, So modify Group Perfect. So now I got the overall building drawn in the next video. I'm going to show you how to put individual elements on two classes, which are layers in an effect.
12. 12 Classes: now in this video, I'm going to show how to use classes to use classes. Use the navigation palette in the bottom right corner of the screen. It's got these six icons on you need the left most one blue. So you click on the left most one, and by default you'll have a layer corden on on a layer called Dimension. Now, if I click on one of my skylights and look on the object info palette, it's class is currently set to non. So what we're gonna do is because I got free skylights. I'm gonna shift click on them. So that'll freer selected, I'm going to go to class and I'm going to go to new class. So now we name the classes that we want to call it. So this is gonna be called sky lights and then I hit. OK, so if this appears it always do the selected action and then hit, yes, so now is a layer called skylights. So if a D select, you'll see that this free columns here below visibility. So next to the skylights on the left, most one, the black eye means it's visible on that class, so the middle warm is across, and that's turned them off, so that makes them invisible. The 3rd 1 turns them gray, and you see them there really, really faint now, so it overrides any settings on them and just graze them out. The 3rd 4th column Sorry, is this one here? You see, it's got tick in it. Now that's the active leader that you're drawing on. That should always be really on the non layer until you get really comfortable withdrawing in the program on applying things to classes. Why is it can really mess the drawing up? So to change the active layer if you click to the left of it in this fourth column So to the left of dimension in this fourth column that would change it to that was being the active layer. So if you want to put it back to non to the left of non in this column, you click on that puts the tick there. So now I'm gonna put the skylights too visible. Not that now I'm going to select all my door objects. Not that on on the object, Tim for palate class. I'm going to go to New class. It's gonna be called doors. Okay, so that gives me a dole's class. Then I'm going to select all my windows, the shift clicking here with the arrow so that the black arrow selected class in the top right corner is on non. I wanted to be new class and I want to call it windows. Okay, Now I want to Stackley case class. I'm gonna click on that top, right New class. Call it stair case. Always do. If that pops up and then say yes. Cool. Now on the right here and now google these classes to play with. So I want to turn the doors off. I could go to invisible next to doors. Click it. And now all the doors have gum. I want to turn the windows off. I can click invisible next to windows, and that's all of them gone. And then you can turn them back on Look so visible, invisible grey. And the 4th 1 is active. Now, I'm not quite happy with how the stair symbol looks, so I'm going to zoom in on it. I'm going to double click it. That edits it. I'm going to use the trim tool to get rid of these end lines that pop out the side. Now, I don't like the thick line, so I'm gonna click on it. I'm gonna slim it down to naught point Naught five. And to make it more interesting, I'm gonna draw a little break line symbol. So I'm kind of free forming this a little bit. So I'm zooming in so the snap doesn't get in the way. And then I'm gonna draw a kind of diagonal line across it, something like this, and then use the trim to get rid of the lines that could throw it like that. Okay, so then if you happy with it, you exit the group and now the staircase look slightly less imposing on the drawing, and it's easier to read. Some people also like to put a word saying up or down at the end of it, so I don't know which way it's going. But now we've organized the drawing successfully
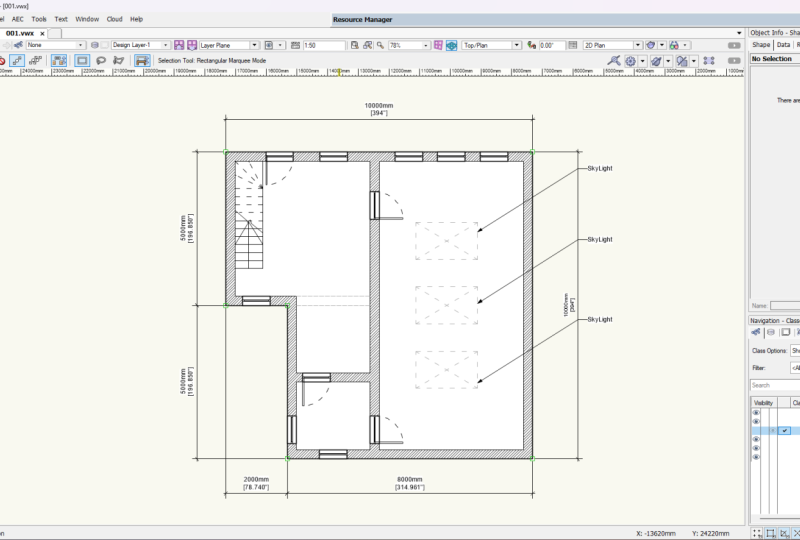
13. 13 Measurements Callouts and Notes: in this video, I'm going to show how to measure the drawing and label it. So to measure it in the bottom left corner, you're looking for the tall sets palette, which lives on the window pallets, and then Paul sets. So this will give you this Here. Now, at the bottom of that palette is a pencil and ruler icon that's called dimensions and Notes or dims and notes is the correct sir term on the site on the program. So you click it and you want a constrained measurement on all constrained measurement if used on a line that such an angle, a constrained one is used, one that's on that straight and level. So I need constrained you. Click the first point, the second point, and then you click where you want your measurement to bay Now minds coming up with a hatch over the number. That's because the attributes set toe hatch on the Phil. So I'm gonna click that and go to Solid, which would set it toe white, which makes it ledge abril and makes it 10,000 mills long, which is 10 meters. So to stop that happening, every time I'm gonna de select, and I changed the attributes Nom de selected to solid. And then every Finn, newer create will now have a white fill in the black line. So I'm gonna put a few more measurements down in here, so I'm going to go to Constrained. I'm gonna measure that point to that point and then drop it down there. So five meters, then that one. So that one bring it out. And if you want them to let Matt job find a point on an existing measurement like this, end point and click now at the bottom, I'm gonna have a measurement from the bottom across there, down eight meters, and then that one toe the down and hook it onto that bottom one. And that gives me two meters. So, in theory, the top one, if my songs right should be 10 meters long, so that gives us some measurements to look at. Now, if I shift, click thermal. So this is a black arrow holding down the shift key. So let them all. I'm gonna put him onto a class called Dimension. And in fact, it already knows the dimensions. So it's already applied. Um, meaning on navigation classes in the bottom, right? I can turn them off by clicking that middle column and then turn it back on my click in the left column. Now, if you want to put a call out onto marks and continue drawing, that's this icon here that just below my black arrow What you do is you click way, you want it to appear, and then you click where you want it to point out. Then you take what you want it to be typed in there. So I'm gonna call this skylight and then I okay it and you'll see, Then you've got a call out court skylight pointing at it. If you wanted several of them, you could don't drag them down. But that might make the drawing look a little bit cluttered. I'm gonna do it. Now you see here this is a classic warmer. It clutters the drawing. So this one actually does need coming down a bit lower. They're so I try not to obscure measurements if I can. Now, if I select those three skylights, I can then put them on their own class. So classes non at the mo. So I'm gonna put it on new class. I'm gonna call the class, call out call outs and then OK, it. Excellent. Now the final thing. I want to do his name, these rooms. So that's the big letter T here on the left, you single click where you want your typing to bay, and then you can type what you want to have written down. So I want this to be called a Garrod. I just did crush my program last time you used it. Hopefully, it won't this time. It's a bit like E. I think that's got something to do with screen recording that I'm using. It's normally not that slow. Just wait it out. I don't want to hit anything. Otherwise it might freak it out and then hopefully fracture. Then write it down. And I think that particular tool really doesn't like my screen recording software. Cool. So that's how you put measurements into a drawing and how you know, annotated and how you put a call out in
14. 14 Class Project: Okay. Now you know the basics effect works and two D drawing the class project will be for you to have a go drawing your own plan. Make your own measurements soap. And when you've got it, get a view like this. Show all the details. All this call outs have made any note ship put on, um, any details of drone do a screen capture on their not loaded to the project area on skill share. Full this class. Remember, if you enjoyed it, leave a review. Andi, remember to hit the follow bottom to find out what I'm doing in future with more lessons. See you again soon.
 Matthew A., A Teacher of all things Computer Graphic