Transcripts
1. Intro: Do you love to create patterns
in Procreate but have heard that you need
to create all of your patterns with vectors? Well, first of all, you don't. Raster patterns work just
as well for most purposes. However, if you find yourself in a situation where you need to vectorize a
Procreate pattern, this class is for you. I'm Maja Faber, a surface
pattern designer and online teacher and I have created thousands of
patterns in Procreate. In this class, you
will learn how to vectorize patterns made in Procreate in Adobe Illustrator, but not in the boring
and frustrating way that you may be used to. Instead, I will show you a new method that's
not only more fun, but also provides
a better workflow. This class is suitable
for all levels, whether you're a
seasoned Procreate user or a complete beginner
at creating patterns. All you need is
basic understanding of Procreate and a desire to learn how to vectorize
your patterns in an effective and enjoyable way. As a bonus, I've included some free resources
in this class. You will get two free
Procreate brushes and one color palette that we will use to create our
patterns in Procreate. I've also included a free
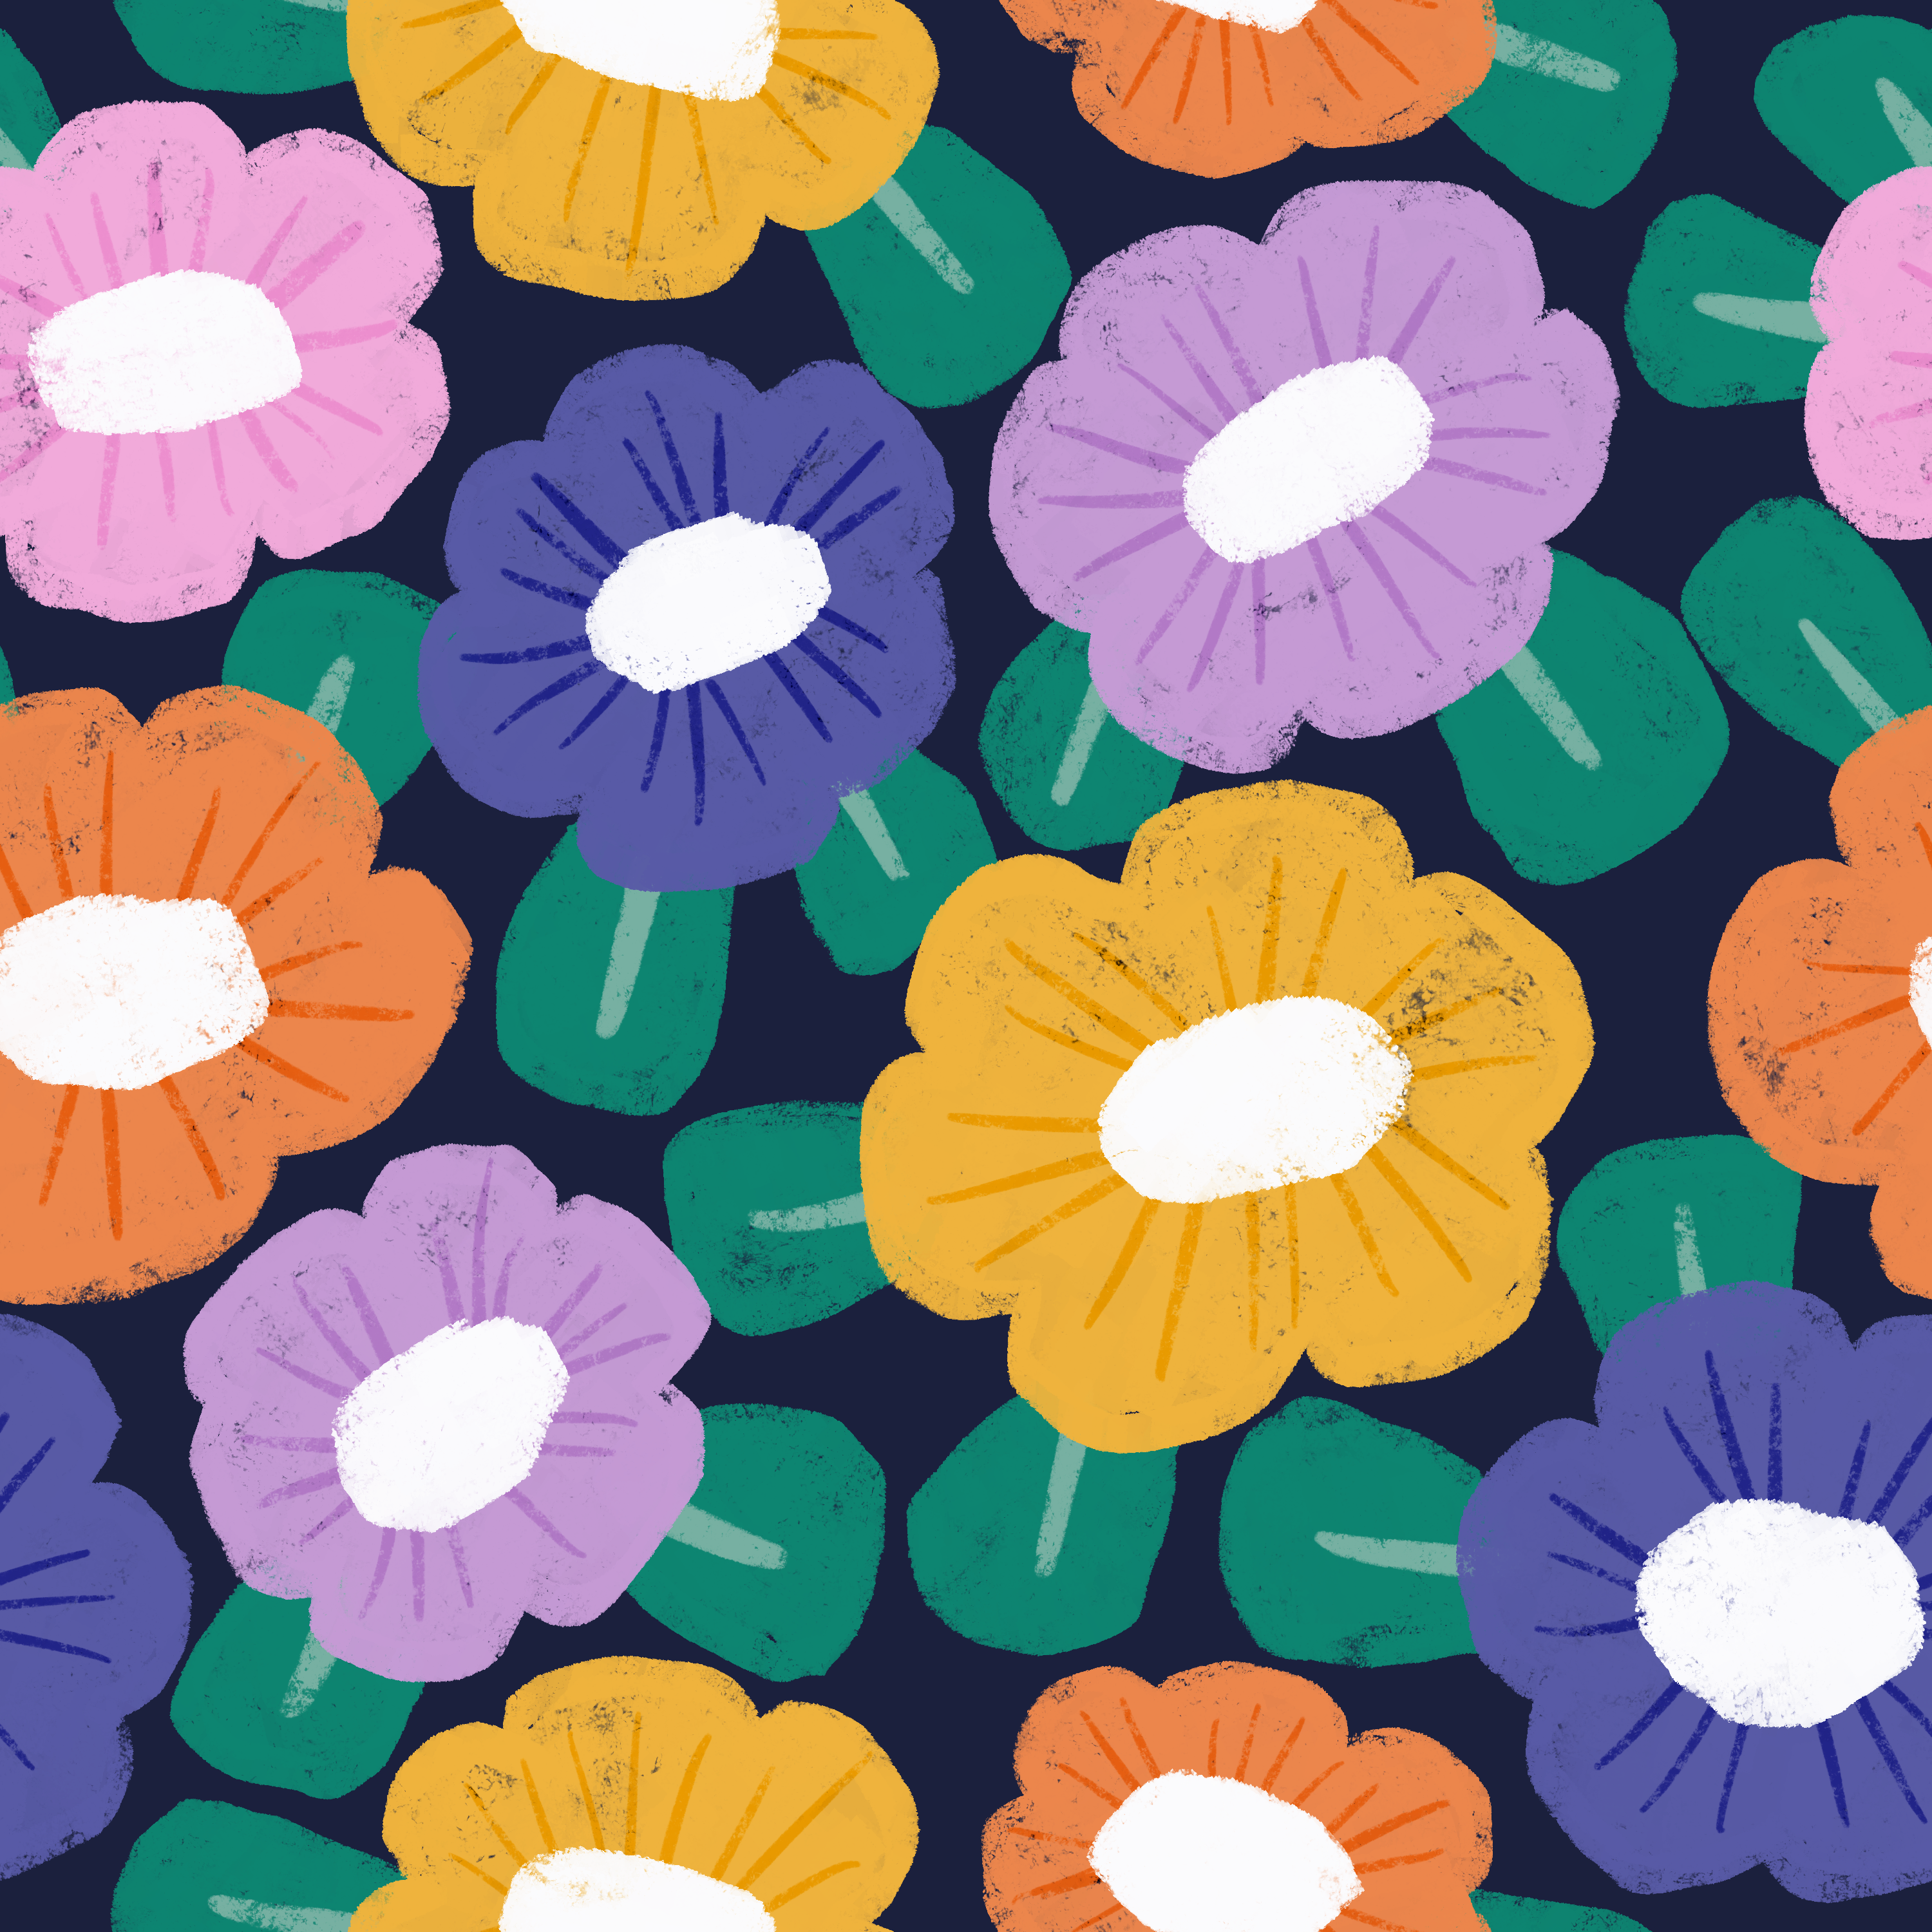
pattern layout template, which I will show you
how to use in this class to create a stunning
bold floral pattern. This layout template
is one out of 30 that I've created for the members in my membership Pattern Rebels. If you subscribe with an annual subscription
in my membership, you will get a pattern toolbox, which include not only 30
pattern layout templates, but also four of my personal favorite
seasonal color palettes, and an exclusive brush set with pattern elements that will make your pattern-making process
much quicker and easier. You will also get my
exclusive course, the pattern layout lab, which will guide you through
the process of creating patterns by using
pre-made templates. If this sounds exciting, go to patternrebels.com to join my membership
for pattern lovers. But all of that said,
I hope that you're ready to dive into class.
2. Your Project: Your project in this class
is to Create a pattern in Procreate and vectorize
it in Adobe Illustrator. You can download the
free resources and create the exact same
pattern as me if you wish, or create your own
unique pattern. Make sure to share
your project in class. I can't wait to see
what you create.
3. Free Downloads: In this class, you will get one free procreate
color palettes and three free
procreate brushes. You can use these brushes
and color palettes as you wish for both
personal and commercial use. Let me just show you what is included in the class and it's one pattern layout
template brush, which I will show you how
to use later on in class. This pattern stamp
brush will save you so much time and frustration
when creating a pattern. This is one of the
brushes that is included in my
pattern layouts brush set that you will get
as a bonus if you subscribe with an annual
subscription to my membership. You can also buy this brush set within the pattern tool kit, which is available outside
of the membership. If you don't want to
subscribe to my membership, you can buy it as a
standalone product. It's called the
pattern tool kit, and it includes four
seasonal color palettes, two procreate brush sets, the pattern elements
and the pattern layouts and one course that's
called the layout lab, where I show you how to create each of these patterns
with the pattern layouts. But in this class, you will get one
of these brushes. If you're interested
in getting more, go to patternrebels.com
and you will also get two other
brushes to draw with. You will get the
tapered texture, which is a tapered brush with a texture and you will get
the square and texture. You will get all
of these resources for free when you
watch this class. To download these resources, tap the PDF that is
available to download here in class and tap where
it says tap here to download. This will take you to a page on my website where you
will type in your name and your e-mail address and tap Unlock to unlock your freebies. That will take you to a Dropbox folder where you
can download your files. To download the files, tap one file and tap Download, and then tap Back, tap the other file
and tap Download. Then tap your files
to import them in procreate Here you have your files installed
in procreate, your procreate brush sets and your procreate
color palette, free for you to use for both
personal and commercial use.
4. How to use the template: Let's start this
class with having a look at the pattern
layout templates. I will start with
creating a new Canvas, tap the plus sign new
Canvas and I will use my standard size for
creating patterns at the moment, which is 3,000 pixels. I will use 300 DPI. That will bring me
a maximum layers of 204 because I have a
huge storage on my iPad, but we don't need to
have many layers. It's okay if you don't get as many layers as
I go to get there. Then we tap the color profile, that is the first sRGB that
you find on the RDB settings. Then we tap Create. The very first thing that
I wanted to show you is this pattern layout
template that is included in the free
brush set in this class. First, let's have a look
at the layout templates. You will get one of these layout templates included
for free in this class. I will show you now
how to use it and we will use it in the
next lesson as well. But I just wanted to
show you what it is. This is a stamp brush. I usually use black as my color and I tap one time on my Canvas, I will increase the
size to around 60%, and I tap one time on my
canvas to place my stamp. When I then tap the Transform
tool and tap Fit to Canvas, I have a template for a layout for a pattern that's pre-made. This will save you so much
time, so much frustration. You can decide for
yourself what you want to draw in this template. For this, I've made it
as a floral template, but you can of course draw whatever type of
motifs you want to. The general idea is that you draw one motif in
number 2 and you repeat the same motif or at least the same color and
other number 2 circles. Here are supposed
to be some leaves, which I will show you later on. This is a bold floral design. But as I mentioned, you can
use this template to create so many other designs as well. Experiment with it, try it out and see where you
can come up with. I can't wait to see what you
create with this template. This template is a part of my
pattern layouts brush set, which is included
as a bonus when you subscribe with an annual payment to my membership panel ribose. If you subscribe with
an annual payment, you will get a total amount
of 25 pattern layouts. That will save you so much time and so much frustration
when creating patterns. I really recommend
to check that out if you're interested in
more of these layouts, now that we try them
out in this class. But for now, this is the one that we will
use and I just wanted to show you how to use it
so it's made to use as a template so you're not
supposed to draw on this layer. We're actually going to decrease the opacity
to whatever you want. But I usually go at
around 15 or 20% here. Then I will just use this
as a template layer. I will add a layer on top and draw my motifs on that layer. That is how you use this
template and in the next lesson, we will create a pattern
actions so that we have everything ready
to create our patterns.
5. Make Pattern Action: We are in the same Canvas, that is 3,000 pixels
width and height, 300 DPI, sRGB in color mode. We created that in
the previous lesson. Now, we will create the pattern
actions in this Canvas, in this file, so
that we can create our pattern easily later on. Just follow along with my steps here and we will
do this rather quickly. First of all, I will just
turn off the visibility of my pattern layout
template layer. I will just rename this to layout so that I know which
of the layers that that is. I have a new layer on top here. I will add the color, I fill that layer
with the color. Then I will tap to
add a new layer. Fill that layer
with another color. You can choose to fill it with the same color and just
duplicate that layer, but I will do it like this. There are many ways
of doing things, but I find that it's
easier to keep track on my layers if I have different
colors on the layers. The next step is to create
the pattern action of this. What I will do is to
tap the first square, tap the Transform tool, and I will tap in the
top left corner node, type in half of the
size of my Canvas, which is 1,500 pixels. Make sure that you have your little chain symbol
tapped in there. Then I will just
tap the next layer. Tap in the top right corner node 1,500 pixels and tap
the Transform tool. Then tap in the orange layer. You can tap in the bottom
right corner node, 1,500 pixels and
tap the next layer. Tap in the bottom left corner
node and 1,500 pixels. Now we have 1, 2,
3, 4, 5 squares. The next thing that
we will do is to save these as selections. We'll tap the blue
layer, tap "Select", and then save and load in the Selection tool and
tap the "Plus" sign, which I've saved this
selection as Selection one. Then I will tap the
next layer, select, which is the purple layer, and tap "Save and load"
and the plus sign. That has saved that
square as Selection 2. Tap the next layer
and tap "Select", save and load, the plus sign. Now I have selection number 3. Tap the last layer,
the pink one, save and load and tap the "Plus" sign and I
have selection number 4. I just tapped the selection tool there to de-select
and then I can actually delete these layers because we have saved
the selections, which will make us able to create the actual
pattern later on. But for now we don't
need these squares, so I will just
delete those layers. Then I can turn on the
visibility of my layout layer and I'm ready to create the
sketch in the next lesson.
6. Sketching: The next step is to create
a sketch for the pattern. When I create these more
complicated patterns or complex patterns, where we really
need the motifs to get a good flow together
as also they're so dense, so we need them to be placed really perfectly together so that we get a good
flow in our pattern. When I have these
patterns to create, I usually sketch
the whole pattern, meaning that I sketch two
motifs and then I flip around the selections to create
the pattern and I make the second part of the sketch so I sketched the whole pattern. That is what we will
do in this lesson. I will do it rather quickly so that we are moving along in this process of creating this pattern that we
will vectorize together. Let's just start with adding a layer on top
of our layout layer. I will just rename
this to sketch, and then I will use the tapered
texture brush to sketch. You can use any type of sketching
brush that you want to. I will use that one and
black as the color, and then I will sketch
out some flowers. The brush size is around 3-4%, and I will just draw some
really bold flowers here. I will move my hand a little
bit back on my Apple Pencil, which will make my
strokes a little bit more chunky and not so smooth lines so that is the look that I
want for this pattern. If you feel that the
layout is in the way, you can always drag down the opacity even
more on that one. Now I have around 7% capacity
while I create my sketch. First, I draw the flowers and
on the little lines here, there are supposed to be leaves, but let's just draw
the flowers first. I'm just drawing these
really simple floral shape, trying to keep them a little bit rough and the edges
for that hand-drawn, nice look and I'm drawing all of the motifs
that are inside of my Canvas so I won't draw the motifs that are
cut in half here. I will only draw the
ones that are inside of my Canvas for the whole
flowers so this one is left. I'm drawing that one there, and then I will draw some
leaves where these lines are. Let's just start by adding some almost square
shaped leaves there. I will fix the
details here later on when I draw the
actual motifs. But for now, I just want to just get a look and fill
for the pattern and see if I can get it to fit
together in a good way. I'm not sure if I want
to add a leave there. Maybe maybe not. Let's see. I will continue on
all of these that are inside of the Canvas
to have something left. I have something there, but I will keep it to
I've drawn that flower, so here I have some
thing left there. Now I have a few leaves, a few flowers, and I'm
happy with how this looks. Now, I will create
the actual pattern. I will flip around
my selections, flip around my squares, and be able to draw on the
motifs that are falling off the edges so you can just
follow my lead here. What I will do is to add
a background layer first, we need that to be able to flip around the whole
square so I will tap the plus sign to
add a layer and I will drag it beneath all
of the other layers, and I will go and fetch my
color palette and just use the white as the background and tap and drag to
add a background. The next step is to swipe to the right on all
of these three layers. Tap group, select
the whole group, and then we tap
the Selections 2. Save and load selection 1, tap the Transform tool, flip vertical and
flip horizontal. Tap the selection 2 again, save and load selection 2, transform tool flip vertical
and flip horizontal. Save and load selection 3, the transform tool, flip vertical and
flip horizontal. Save and load selection 4, transform 2 flip vertical
and flip horizontal. Then I will twist this around so that I have the pattern
in the right direction. Then I will continue
to draw the number 1 here that is free from the
edges on the sketch layers, I will choose the sketch layer, choose black as the color and I will just make sure that I have tapered texture as my brush and make sure that
I have the opacity 200. Sometimes when I nudge
the screen with my hand, it goes down in opacity. I will just continue to draw the flower like that and add the leaves that
I haven't added here, There it went down in
opacity so just adjust that. Let's see, here I have a leaf 2, let's see if I have something left on any other
out of flowers. No. Now we need to flip the outer parts of the pattern to be able
to draw this one. What we do then is
to select our group. Tap this Selection 2, save and load selection 1, tap the Transform tool,
and flip horizontal. Tap the selection tool again, save and load selection 2. Tap the Transform tool
and flip horizontal. Tap the selection tool again, save and load selection 3, the transform tool
and flip horizontal. Selections tool
again, save and load selection 4 transform
tool and flip horizontal. Then we can tap
that arrow and just flip it horizontal so that we get it in the
right direction again. Now, I will draw the
last floral sketch here. Last flower and the last leaves. That looks pretty good
and let's turn off the visibility of the
layout layer and yeah, I think that looks good. I will add some more lines to the leaves and I will also
add lines to the flowers. But I actually don't
need to do that on the sketch because I know that I want to do that later on, but let's just add
it to 100 flowers so that we remember that we
want to add it later on. Now this looks good, but we will need to try out
the flow of the pattern. What I do then is that I swipe
down with three fingers, copy all swipe down
with three fingers and paste and with my
flattened image here, I will go to the pattern
tester on my website, which I have linked
to in this class, is a free resource
on my website, which you can tap and
drag an image from procreate or from
your image app, for example, and check
out your pattern. As this is a sketch, it might be a little bit hard to see the flow as we don't have any color and we don't
have any finished motifs. But as far as I can see, it looks like this pattern
has a really good flow to it, and I'm happy with this sketch. Then let's head back to procreate
and in the next lesson, we will draw the actual motifs.
7. Draw Motifs: Now it's time to
draw our motifs. We have our sketch
layer and we have our layers layer beneath
the sketch layer. In this lesson we will tap
on and off the visibility of the layout layer because if
you can see the numbers here, the numbers mean that
this motif that is named number 3 can be in the
same color as this motif, and the number 2 can be in the same color
as this number 2. That is why I've named the different circles so that we will get a good flow in the pattern when it comes
to the color choice. I will show you what I
mean just in a minute. I will turn on and off the
visibility of the layout layer as we draw this floral pattern. First, I will start with
the number 5 flower here. I will turn off
the visibility of the layout layer and
I will drag down the opacity of the sketch
layer to around 20%, then I will tap to
add a new layer on top and here I will
start to draw my motifs. I keep all of the colors
separated in layers, meaning that if you draw an orange flower here and
an orange flower there, they will be in the same layer, but I won't mix the blue and the orange and the yellow and the green on the same layer. Partly it's because
I usually do this. This is my standard
way of creating patterns because
it will be so much easier to recolor
your pattern later on if you color separate layers, but it's also going
to be easier to vectorize the pattern
later on in this class. First, let's start
with this flower, it's the number 5, and I will tap and drag
out my color palette. I will use the orange color in the color palette and the
square and texture brush. First, I will use around three or four in
brush size and I will just go in and draw this
floral shape rather quickly. I want it to be a little bit chunky and then I will
increase the size of my brush to round 7-8%
and fill in the shape. I will keep a little
bit of texture because I want to give
an example of how it looks when we vectorize these textures shapes
later on in class so keep a little bit of
texture both on the edge and in the shape
of your flowers. You can go in and
adjust the details like that and then we will
continue with a new layer. Tap the plus to add a new layer. Then I will toggle on the
layout and I can see that this and this flower is
supposed to be the same color. I will draw a purple
flower there, so tap the purple color and with the same brush and a lower size, I can toggle off the
layout if it's in the way and just
draw my flower here, increase the brush
size to around 8%. I've saved my brush
size so I've tapped the plus and the brush
setting here to save the brush size so that
I easily can toggle between the smaller and
the larger brush size. I'm filling that
in, and I know that this one was number 2 as well, so that one will be
in the same color. With the smaller brush size, I will draw the shape of
that flower like that and increase the size to around 7-8% and then
draw in the shape. We have the purple flower, let's move on to the next one. This one is a stand alone, it's the number 4. I will just create a
pink flower there, I think with the same
square and texture brush, 3% in brush size, and increase the size of the
brush and fill in the shape. Then the number 3 and
number 3 will be blue, so tap to add a new layer, I can toggle off
the layout layer with the square and texture, the blue color and around
three in brush size, I will draw the blue flower on that layer and adjust the brush size to
larger and fill it in. That was the same as
this one, the number 3. I will continue to draw the
blue flower on that layer. Adjust the brush size
to the smaller one, the number 3, and I will draw this flower. Then increase the brush
size to around 7 or 8%, and fill in the shape.
That looks good. Now, I want to add a dot in the
middle of the flowers. I will do that on
the same layer. I will tap to add a new layer, and I will choose the white
color here and I will just add a dot in the
center of the flowers. I want it to be a little bit chunky like that.
That looks good. Now, we want to add the leaves. I will tap to add a layer
beneath all of the flowers. I will draw the
rest of the flowers in a minute when we flip
the pattern around. But first, I will
draw the leaves that are supposed to be
on these flowers. I will tap to add a
new layer and I will use the darker green color, and let's see if I
want that brush size. No, I think I want
the smaller ones so around 3% in brush size and
I will draw in these leaves. I can just draw in the shape
of the leaves first and then I can fill them
in in a minute. Something like that, and I'm just keeping
it to the ones that aren't falling
off the edges. That looks good, and
then I can just increase the size and fill in the shapes. Like that. If you
think that it's disturbing that is
shining through here, what we can do is just to
go in the leaves layer and you can tap the layer that you want
to delete beneath. Tap, for example, the layer with the
purple flowers and tap Select and then tap the
layer with the leaves, tap the eraser tool
and you can just use any type of brush to erase. Let's just use the same
square and texture for this purpose and
then you can go in and erase the parts
that are beneath this flower if it's disturbing you that
it's shining through. That's a little tip.
I won't do that for this whole pattern as I'm
not that disturbed by it, but if you are, that's how
you can fix that problem. The next step is to
add a few lines here. I will tap to add a layer
on top of my leaves layer. On this layer I will use
the tape or texture brush. Make sure the opacity is 100, and the color palette I will use the lighter green color
and here I will just add some chunky lines to the leaves like that, and then I want to add some
lines to the flowers as well. I do that on one layer
with the blending mode. This is a really good trick
if you want to be able to recolor your pattern
a whole lot. You can create different blending modes
with the textures. I won't go in detail
about that in this class, but I am talking about
that a whole lot in detail in my membership
pattern [inaudible] so if you're more
interested in that, you can check out the
courses in the membership, but I will just show you
quickly how to do it here. We tap to add a new layer, and I will choose a gray color, so to the very left and somewhere around
two-thirds up in gray, and here I will draw
with a taper texture, some lines on the flowers, and as you can see,
they are gray. But when I tap the N symbol
and drag to color burn, they will be colored the same color as the
motif that is underneath, but a little bit darker. That's really good. If
you want a lighter color, you go for a lighter gray color. Let's just try that
out once again. We have our layer and we
have color burn selected. I think that I want to go down a little bit in brush size here, so maybe around 11% and that was not as dark
as I want it to be. Yeah, maybe somewhere
around there in the color panel
and I will just draw some lines here on
the flowers really quick, just to add a little bit of more interest to these flowers. Also to add some more text
here that we can use when we are vectorizing in Adobe Illustrator later
on in this class. The more texture the
better when we are creating the example of
vectorizing this pattern, because I think it's
important to see what happens with our textures
when we vectorize. You can't save all
of the texture, the textures won't be the
same when we vectorize. You can use vectorize
texture but it won't be looking exactly the same. But you will see later on
what I mean when we're heading into Adobe Illustrator and vectorizing this pattern. There we have our pattern. Which way was up and down? I have no idea. I think that it was this way. Yeah, that looks good. Now we need to flip our
pattern around so that we can draw the rest of the motifs. Let's try that out. I will tap the group because everything is included
in one group. Tap this lecture and to
save and load selection 1, transform tool flip
vertical flip horizontal, selection 2, save and
load selection 2. Flip vertical, flip horizontal. Save and load selection 3, flip vertical and
flip horizontal. Save and load selection 4, transform tool flip vertical
and flip horizontal. Now I can tap the Transform tool and
rotate this pattern four times so that I get it in the
same position as I draw it. Now, I will check my layouts layer and I
want to make sure that I keep the same flower
on the same number. I think that that
orange was number 5. If we just turn off the visibility of the
orange layer and turn off the visibility of the white dots that are in the way
you can see that the orange was number
5, so that's good. That's the one in the edges. Then we have number 1, which is a new color and I
will use yellow for that. But let's start with number 5. I go to the orange layer and square and texture as a brush and choose
the orange color. I will choose around
3% in brush size, and I will draw the
five flower over here, the number 5 flower, like that. Then I will, on the
white dots layer, I will just add a
dot to that flower, maybe something like that. Then I will add a
not a pink flower, a new layer with yellow flowers. I will drag that beneath the white dots layer and the stripes on the
flowers layer. I will use the yellow color, the brush size 3% and
just draw that flower. I will keep that
flower until I flipped the pattern because
it's cut off. I will use about eight or 7% in brush size to
fill in this flower. Now I will go to the
white dots layer and add a dot to this flower. Now I also want to
add some leaves here. I will tap the leaves layer, tap the green color, and add some leaves. Use the 3% in brush size and just add
a little leaf there, add a little leaf here, and add a little
leaf over there. I wasn't quite happy with that, but now I think it looks better. Then we want to add the lines. I tap on the leaf line layer, choose the lighter green color, the taper texture and then I can just draw the lines
on the leaves. Now I also want to draw
the lines on the flowers, so I will tap on that layer. Now I need to fetch the
same gray color here. As I didn't say that color, I need to tap the color mode
and drag down to normal. Now I can zoom in and fetch
the same gray color here, so that I can draw the lines on the flowers like that. It's a little bit
thick, isn't it? Yeah. It's thicker
than the other ones. I will just undo and bring down the size to
around 6% and redo. If you find that
it's hard to see, you can always go to Color
Burn again on that layer. It might be a little bit more inspiring to draw when it looks good. Something like that. Then the orange flower will add a few lines on that one as well. That looks good. Now we have one flower left, so we need to flip our pattern around the
top and the bottom. Tap the group, tap
the selection tool, save and load selection 1, tap the transform tool
and flip only vertical. Then tap save and load
selection 2, flip vertical. Save and load selection 3, transform tool flip vertical, save and load selection 4, transform tool and
flip vertical. Now we can tap the Transform
tool again and flip vertical again so that we get the number and the motifs
in the right direction. Then we will draw the number 1, and which was the number 1? The number 1. Let's just turn off
the visibility of the white dots layer
and let's see. Yeah, the yellow was number 1. We will draw the
yellow flower there. Tap the yellow layer, tap the yellow color. With the square
and texture brush, we will draw that flower and increase the
size of the brush to around 8% and draw in the flower shape
with the yellow color. Then I will head to
the white dots layer, tap the white color
and just draw a dot. I wasn't happy with that
dot. Now I'm more happy. Then I will go to
the leaves layer, tap the green color
and the square and texture and the 3% in
size of the brush. Now I will draw in the leaves
that are missing here. This one and I'm just filling
it in with the green color and here supposed to be a leaf
and one over here as well. That looks good. Then we want the lines. I will tap into the lines layer, tap the lighter green color and the taper texture and I have
around 6% in brush size. That was a little bit too small, so I will go up to 11% and draw in the lines on the leaves. That looks good. Now I want to draw in the
lines of the flowers, so I'll tap that layer
and I need to fetch the gray color again because I forgot to save it once again, so I will tap the
blending mode and drag down to normal
on that layer, fetched a gray color
and then I will draw with that on the flower, but I have two large brush size. I will go to 6% again
and draw the lines. Like that, and then I will tap the N symbol and drag to
color burn on that layer. Now we can turn off
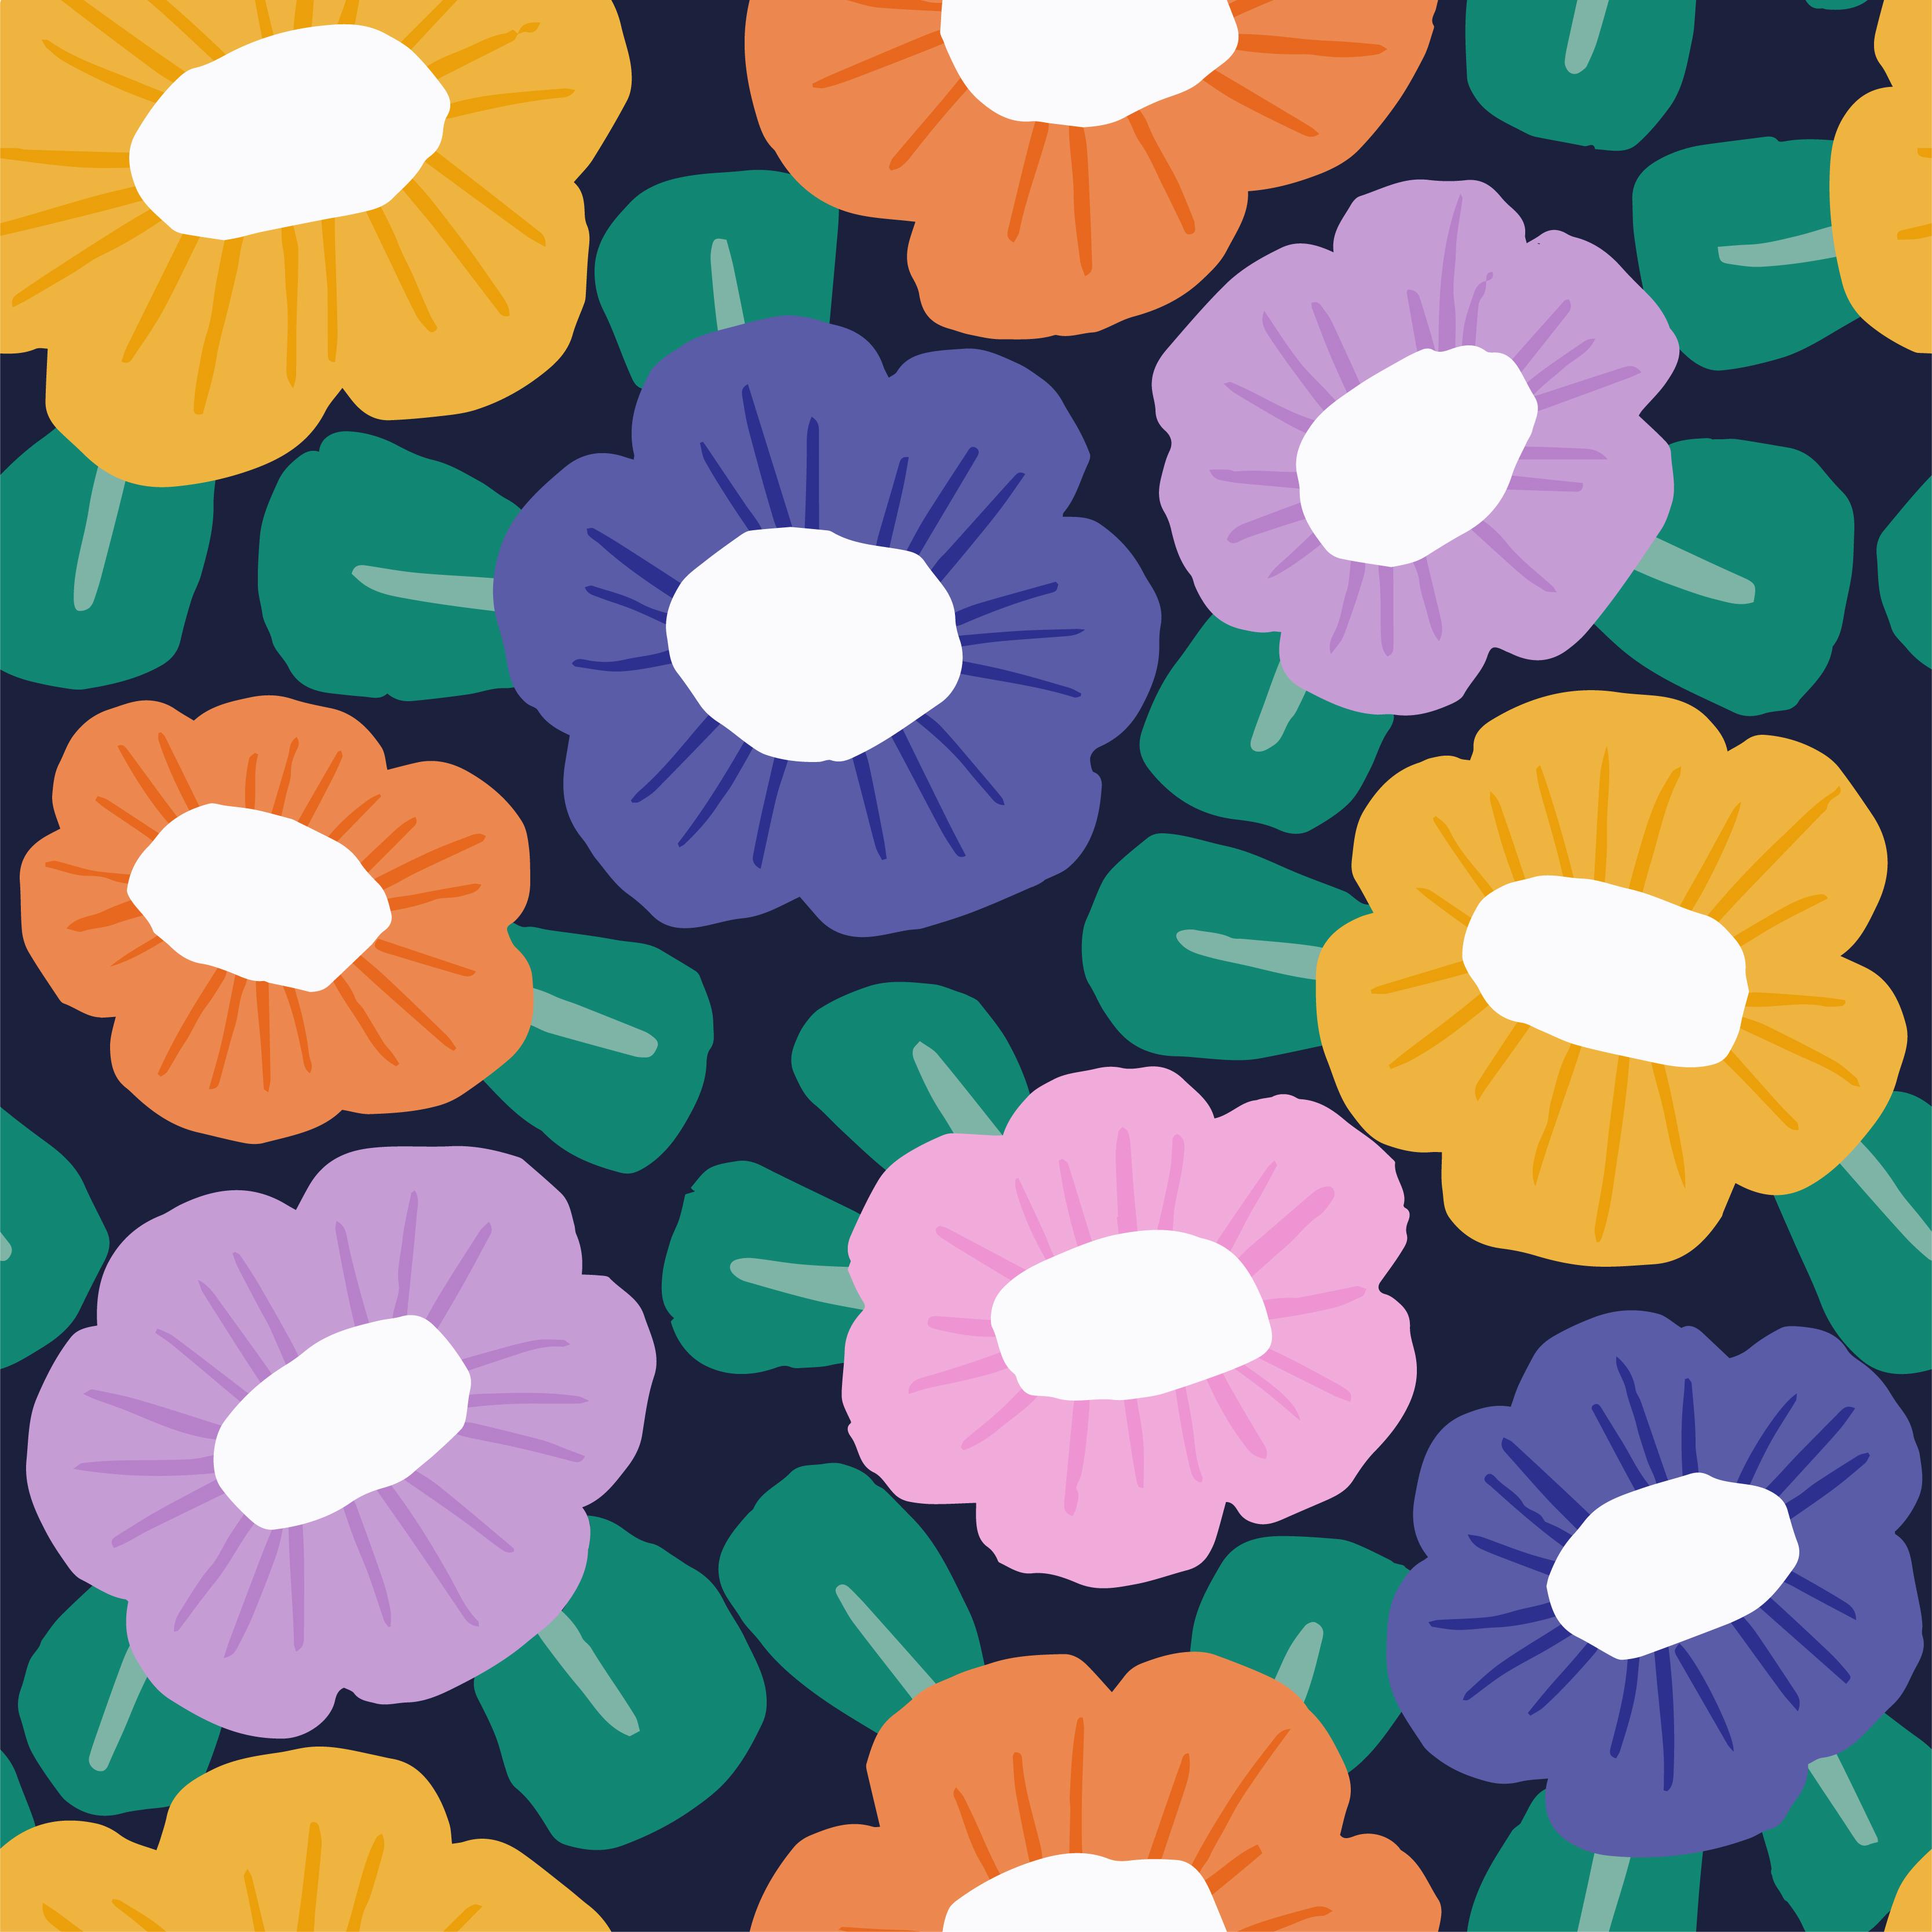
the layout layer, turn off the sketch layer, and we can have a
look at our pattern. For this pattern, I want to create a darker
background colors. I would choose the darker
blue background color, and on my background layer here, I will tap and drag to fill that color with the
darker background color. Now we have created
a finished pattern. In the next lesson,
we will check how this pattern is repeating.
8. Test The Pattern: The next step is to try
out our patterns just to see that we like them and that they have a good flow to
them and all of that. What I do is that
I tap the top of my group and I swipe down with three fingers to copy all, and I swipe down with
three fingers to paste. The first way of testing your pattern
that I wanted to show you is to try it out in my
pattern tester on my website. Go to my
favorite.com/patterntester or tap the link that's shared in the description of this
class and then you will tap your flattened image layer and drag it into
the pattern tester. Here you can see your
pattern repeats in small-scale and large-scale and you can just see if you
think that you have some flaw in your pattern or if you're happy
with the result. I'm really happy
with how this looks, so our pattern is finished now. But I also want to
show you how to try out your pattern
in Procreate. I will swipe to the
right to duplicate this layer so that
I have five copies. On the first image, I will tap the
top-left corner node and type in 1,500 pixels. On the next image, I will tap the Transform tool and the top right corner node and type in 1,500 pixels. On the next image, I will tap in the
bottom left corner node and type in 1,500 pixels, and on the last
layer I will tap in the bottom right corner node
and type in 1,500 pixels. This is how your
pattern is repeated. We can merge these layers together and this is
your pattern tile.
9. Export Pattern From Procreate: In this lesson, we will prepare this pattern for export
to Adobe Illustrator, and as I mentioned previously, we don't need to make it black and white
and we don't need to do all of those things
that are just frustrating, and that at least I think it's a little bit overwhelming and take so much time to do. So let's head back to gallery
as a first thing to do. Here, let's just name
this too bold blooms, and I can just name
it to original so that I know that I always
have my original file here. I don't want to mess
with my original file, but I want to create
a new file now. So I will tap this and duplicate it and then I will
tap into my new file. But first, let's just
rename it to export, for example, or
whatever you want. Then I will tap into new file. Here we will prepare our
pattern to be exported. What we want to do in
Adobe Illustrator, is to not need to
rearrange the pattern. We don't want to draw something. We don't want to fix more
things with the pattern. We just want to vectorize it
and just repeat the edges, and then it's finished. So to do that, I came
up with this method. I hope that it
works good for you, and that is also why
I wanted to draw this pattern together so that we can vectorize
it together. So you can see my results
in your own screen. That way, you know what
we are talking about when we're talking about texture and the repeat and all of that. So if you're using
your own pattern, then that's completely
fine as well. You might not get the
exact same result as me with the texture
and everything, as all of brushes and all of the texture and everything
might be different. But if you have drawn
this pattern with me, let's go ahead and prepare
your file like this. So the very first thing
that I would do is just to delete the sketch
layer and the layout layer. In this file, I don't
want any extra layers, so that is really important, especially if you reach
your layer limit. I have a bunch of layers
to work with here. But if you have a smaller
storage on your iPad, you might need to
really tighten up your layers here so that you don't exceed your layer limits. So the next thing
that we will do is to turn off the
visibility of these too. I want to export them as well. If you reach your layer limit, you can export them each of these layers and
then just delete them. But for me, I will keep them
there so that I will export everything on its own file and I will show you
just how to do it. So the next thing
that we will do that you don't
absolutely have to do, but we will do it in this class to keep everything organized, and also so that
we can talk about the same thing is
to name the layers. So usually when I
create patterns, I don't name all of the layers. But when I create
classes like this, and I need to talk
to you and you need to understand which
layer I mean, it's easy to rename the layers so that we know that we're talking
about the same layers. So tap, Rename on the background layer
and I'll just name it background and tap Rename
on the leaf layer, and I will rename the lines on the leaf to leaf
lines or whatever, and the orange
flowers to orange, the purple to purple, and rename the pink to pink, the blue to blue, yellow to yellow, and then rename this
to flower lines, and the last layer
to white dots. So now we have renamed all
of the layers in the group, and now we will
prepare this file to export, and to do that, we need to have the
repeated pattern, but with the layers separated. So you can do this in
a few different ways. It depends on your layer limit. So I will do it in a way that makes the amount of layers
as low as possible. But if you don't reach
your layer limit, you can do this
quicker and easier. But I want everyone
to be able to follow along so you can use my way, or if you figure it out, another way that you can
use, you can do that. But to create this in my way, I will tap the group and swipe to the right
to duplicate the group, and then I will
tap the new group, tap the Transform tool, and that was actually the
oldest group, the old group, and tap in the top
left corner node and write in 1,500 pixels, and then tap the Transform
tool to place it. If I turn off the visibility
of my other group, I have actually lower the
size to the whole pattern to half of the size of the canvas so that I
will get four squares. So that is what we will do
with all of these squares. So I will tap the New Group, and as we want to
save layers here, if you don't need
to save layers, you can just duplicate
this group four times. But if you need to save layers, you can do it like this. So tap the Transform
tool and then tap in the top right corner and
write in 1,500 pixels, and here we have our
two tiles repeated. The next thing that we will do, is to merge these two together. So we will select both of
the background layers, tap Group and tap
Flatten on the group. Then we will select both
of the lease layer, tap Group and tap
Flatten on that group. Select both of the
leaf lines layer, tap Group and Flatten. Select the orange layers, tap Group and Flatten. Select the purple
layers, tab Group. Oops, it ended up over there. Tap Flatten and bring it
down to over the orange. Select both of the pink layers, tap Group and Flatten. Select both of the blue layers, Group and Flatten, select the yellow layers,
Group and Flatten. Select the flower lines
Group and Flatten, and select the White
Dots Group and Flatten. So now we have a
group over here. This group is empty, so I'll just delete that, and we have a group
with the patterns, repeat the next to each other. So it's actually a rectangle. Now, we can duplicate this and tap the New Group and
make sure that you have snapping and magnetics
turned on and drag it to the bottom
corner of your Canvas. Make sure that it snaps so
that it's placed perfectly and you don't have
any white lines in the center of your pattern. The next thing
that we will do is to flatten these layers again. So we will again swipe to the right on
the background layers, tap Group and tap Flatten, swipe right on the group, on the leaf layers, tap Group and Flatten
the leaf lines, Group and Flatten, then the orange, group and Flatten, purple, Group and Flatten, pink, Group and Flatten, blue, Group and Flatten, yellow, Group and
Flatten, flower lines, Group and Flatten, and white dots, Group and Flatten,
and now we have a group that's nothing in it. So we can just
delete that group, and here we have 1, 2, 3, 4, 5, 6, 7, 8, 9, 10 layers with our pattern
all separated in colors, which is pretty amazing. Now we have two
layers up here with our repeated image and our
original pattern tile. So this is how we
export this pattern, and the next thing that we do is to make sure that we have
the visibility turned on, on all of these layers, and then we tap the
Actions panel share, and we want to share
the layers as PNG file. So that means that all of the layers will be
separated files, PNG files that we can vectorize
in Adobe Illustrator. So tap, Share Layers, PNG files, and I will just
AirDrop them to my computer.
10. Import The Images To Illustrator: It's time to import our
files into Illustrator. I'm using Adobe Illustrator
from 2023 Version 275. That might help to know if you're experiencing
that your program works differently then this is the update and the version that I'm using of this program. The first thing that we will
do is to tap "File" and "New" and we will choose 3,000 pixels in
width and in height. Actually, the size
you choose here really doesn't matter
because we are creating a vectorized pattern, meaning that we can rescale this pattern however
we want in the future. But I'm using my standard
size, 3,000 pixels. If you feel like it, you
can use the same size too. I will just rename the
file to Bold Flowers and I will have my color mode set to sRGB
and then just tap "Create". Here I have my document
in Adobe Illustrator and the very first thing
that we will do is to import our PNG files. To do that, I will
tap "File" and "Place" and I have my
images on my desktop, so I will just choose
all of these images. I've gathered them
in a folder that we exported from Procreate and
then I will tap "Place". When I get this
little symbol here, it means that I can choose where I want to place my files. So I'll just scroll up a bit and then I will
tap for each file. There's 12 files. I will just tap one time
and make sure that all of these images are placed
correctly like that. The next thing that we
will do is to just remove these two files because these are just our
reference images. We can use them to
reference the colors from our original pattern and also how the original pattern
are supposed to look. I will actually just lock
those because I won't use them when we are creating
the vectorized pattern. I will just select
them, tap "Object", and tap "Lock Selection". You can also use
command to lock. Now we have imported our files and it's time
to Image Trace them.
11. Make the Image Trace Preset: In this lesson we will
vectorize these PNG files. The first thing that
we will do is to make a preset in the
image trace panel, and I will show you what
I mean in just a minute. Basically, we will
arrange these files in a little while to vectorize
them in the correct way. But before we do that, I just want to make
sure that I get the result that I want
in the vectorization. To do that, I will do a preset. I think these yellow
flowers are good example. I will take that image and
you can tap Command C and then Command V to paste it so I have a duplicate
of that image. I will just drag it
over here so I'm not confused by my original
images over there. This is just a
test to understand which type of
settings we want to use in the image trace panel. To open up our
image trace panel, you tap Window and Image Trace. Here we have our panel. What we want to do now
is to just zoom in on, I would say that it's enough
with one of these flowers, and then we will
make some settings. After that we will create a preset of these
settings that we can use over and over
again on this pattern, on all of the other PNG images, but also on similar types
of patterns in the future. I'm all for creating quick
and efficient workflows. This is a part of creating
presets so that we can be really efficient in
the future when we create this pattern
and other patterns. I'm zooming in really closely. I'm tapping Option and
zooming in with the mouse, and then I will change
these settings. You have to make sure that
you have your image selected, otherwise, all of the options
here will be grayed out. I will tap my image, and then on the mode here I will tap where it
says Black and White, and I will tap Color. That's the first step. I want my colors to be
unlimited because we have exported our color separately
layers from procreate, so each color that we create
motifs of in this pattern is on a separate layer and
that's how we need it to be to be able to
vectorize this perfectly. As we only have one
color on each layer, if you zoom in, you will see that you
have a little bit of lighter yellow and a
little bit of dark yellow, but we only selected
one color on the layer that we've
drawn this motifs on. Then as it's texturize, you will get a little
bit darker and a little bit lighter
yellow and also white, but we only want
to choose that it will vectorize one
color, the yellow. What I do is that I have the
mode color palette limited, and then I tap this little
setting here that says colors and I drag it all
the way down to two. If you tap in the preview here, you can see what
happens when we are creating these
settings and I will do that now because
now we want to make some other settings
and I want to show you examples of what happens, but if you feel that it's moving too slow with your program, when you have preview
selected here, you can create all
other settings and then tap Preview afterwards. Before this example, I'm tapping Preview now
and then I tap Okay. Basically, what this means
is that it will show me how it will look
when it's vectorized. This is perfect for our example, because now we want to
select some other settings. You have three options here, the path, corners, and noise. If I just tap up path, we can see what happens. You can see that you
got a little bit more like wonky lines and edges. You can choose to have
that if you want to. It's a matter of preferences. You can also go really low
and see what happens then. Then you get the
more smooth look. I will keep the path at
50% for this example, but feel free to
experiment with it. Maybe your motifs
in this pattern or in the future looks
a little bit different, and then you might want
them to be smoother or even a little bit more wonky. Then we can experiment
with corners. If we zoom in a
little bit more here, and we can drag up all
the way to 100% in corners and see
what happens there, I think it meant that you got
sharper corners like this. I don't like that look, so I will just drag it down
all the way and see what happens and that smoothens
out the corners. I like the basic settings, the standard ones, that was from previously, so I will just type in 75 again, but feel free to experiment
with those settings as well. Let's check out the
noise settings as well. Now it's on 25 pixels, let's drag it up to 100 pixels. I need to zoom out a bit to
see what happened there. There you can see that I got even more wonky edges there, so I can drag it
all the way down, and that smoothen things out. As you can see here, when I smoothen things
out here with the noise, it was on 25 pixels. Let's go up there. Again, you saw that I got some other different parts
here that were not filled in. Depending on the look
that you're after, let's try to go all
the way down in Noise and then see if
we like that better. I feel that when I'm using
this takes-dress look, I don't mind that
much that there are some small dots in
my motifs like this. Although I think it
looks better like this than with larger
dots like that. I will just drag down my noise, but it depends on the look
you're after and you can just see for yourself how you
like the look of that. You can always go in and
change these details also in your motifs later on
if you feel like doing that. Now we have created
some settings here. We have changed
color mode to color, palette, limited, colors down to two, path, 50%, corners, 75%, and noise, 1%. Leave this little first box checked in here under Method, and then we want to
tap Ignore White. If we tap Ignore White, it will ignore the background
when it imaged traces, and that is the look
that I'm after. For almost all of
the PNG images, there's one that we need
to untap this checkbox, but I will show you
that in a minute. Now we have created all of these settings and I
will save this preset. Tap the little
hamburger menu up here, and save as new Preset. Then we can save it as
raster textured motifs, for example, or maybe
just textured motifs. Something that you will
remember so that you can select these different presets when you are creating different
vectorized patterns. I will just choose to
name it Textured Motifs. Then I will just delete this image because we
don't need that anymore, we have our original up here, and now it's time to
vectorize our PNG images.
12. Vectorize with Image Trace: Now it's time to use our preset and vectorize
our whole pattern. The next step is that we will image trace
all of these files. We have 1, 2, 3, 4, 5, 10 layers that we
want to image trace. We don't want to do it
separately like this, because then we will have a hard time to
collect our pattern. You will understand what I
mean in just a little while. What we want to do is to
select all of these 10, and then I want to
tap the Align Panel. If you don't find it, you
can tap Window and Align. Let's just place it here. Here I want to tap Align
to selection over there. I want to tap
horizontal align center and vertical align center. Now I have placed all of these images on
top of each other based in which order we
placed them in this document. The order we placed them in
this document depended on the order that the layers were
in our Procreate document. How we exported the
PNG file depended on how the layers were on top
of each other in Procreate. Then put them in a
folder in a way that when we import them
into Adobe Illustrator, they will be placed
on top of each other in the right order. I will shut down the align panel and now we
will start to image trace. The first thing that
we will do is just to tap this first image. Now, it's really important
that you don't accidentally tap and drag because then it
won't work this technique. You just want to tap the image and make sure that
you don't move it around. Tap the image and tap your
preset textured motifs, and then I will just have cancel here
because I want to change something in this. I want to change, Ignore
White and we're doing that only for this first image. That is because on
this PNG image, we have the white dots that
are on top of the flowers, but we have placed them
on a white background. If I scroll in really closely, you can see that the
white dots are in another white color than
the white background. It's really hard to see, but there is a
difference in the hue. Meaning that if we
tap off Ignore White, we will still image trace
these as different motifs, the background and the dots. This won't work if you have the exact same white color on the dot and on
the background. In that case, I will
suggest that before you export the white dots
layer from Procreate, you can just recolor it to another color and
then export it. Import it into Illustrator
image trace it, and then recolor
it again to white. But as we have a different
heuer white here, this will work if we
uncheck the Ignore White. For this image only, we uncheck the Ignore White. Then we tap Trace,
and then we tap Okay. Then we need to tap Expand. As you can see here, we got our first layer
vectorized image traced, and as we did in Ignore White we still have the background. What we do then is to untap the image and choose
the group selection. Then you make sure that you tap the background and not the dot. Tap the Background and
then we tap Back key. Now, we have our little white dots here even though
you can't see them. They are grouped. They should be grouped together. If we tap them again, I will just lock them
because now we will image trace all of the layers
underneath each other. I don't want to mess around with the layers that are on top, so what I do is
that I lock them. You can do this
by tapping object and lock selection Command 2, and then we tap the next layer. Under all of the
rest of the layers, we don't need to uncheck
the Ignore White, so that was only
on the first one. Then we tap Textured
Motifs and just Okay, and that will image
trace that layer. Next we tap Expand. It's very important that you tap Expand in between all of
these image traced layers. Tap Expand, and after you
tap Expand tap Command 2. This will feel a
little bit repetitive. But I promise you that it's a super smooth and quick
workflow if we just get through this part of the process where we do image trace on all
of these layers. Next, tap the Next layer, tap Preset, Textured Motifs, Okay, Expand, and Command 2. Tap the Next layer, Preset, Textured Motifs, Okay, Expand, and Command 2. Command 2 locks the layer
after you vectorized it. Tap the Next layer, Preset, Textured Motifs, Okay, Expand, and Command 2 to lock it. Tap the Next layer, Preset, Textured Motifs, Okay, Expand and
Command 2 to lock it. Next layer, Preset,
Textured Motifs, Okay, Expand, Command 2 to lock it. I can understand if I sound
really repetitive now, but I just want to
make sure that you follow on all of these steps. Otherwise, it won't work to create the pattern
with this technique. Moving on to the next
layer or the next file, Preset, Textured Motifs, Okay. Expand, Command 2 to lock it. Then the next, Preset, Textured Motifs, okay. Expand and then
Command 2 lock it. Then we need to make sure that we have the background as well. So I will tap the Background, Preset, Textured Motifs, Okay, and then
Expand and lock it. If we have vectorized image
traced all of these layers, you should have locked
all of your layers now. If you try to click
and move around here, you won't select any layers. That is how you know that you have vectorized
all of the layers. Now, we have imaged
traced our whole pattern, and what we need to do now is to make actual pattern out of this because this image at the moment doesn't
repeat correctly. We also have a repeated pattern
tile for tiles repeated, and we only want the
one pattern tile. In the next lesson, I will show you how to create
a pattern out of this. Then in the lesson after that, which is about troubleshooting your pattern and fixing details, I will show you how to
fix some details of your motifs if you would want to do that after you
have image traced. But to move on in
the process and to try to keep the workflow
as smooth as possible, we will directly
create a pattern out of this image in
the next lesson.
13. Make the Pattern: Let's create a pattern out
of these vectorized images. The first thing that
I will do is just to unlock everything
on my art board, so tap "Object", tap "Unlock" and now we
have everything unlocked. The very first thing that
I will do is that I will duplicate this whole group of motifs and that is just because I am going
to show you how to troubleshoot this and change some things in the next lesson. If you want to follow along
in that lesson and go through the troubleshooting and maybe changing your motifs, then you can also duplicate it. What I'm doing is that
I just tap "Command C" and "Command V" to copy that whole group of images and then I will
just drag it to the side. I will lock these three again. Tap "Command 2" to lock them and now we will work
with these images. The very first thing
that we will do here is to choose the layer with the gray little lines
here because we want to change the blending mode here just as we
did in Procreate. I will choose that layer
and I do that with tapping the layer
with the black arrow. Make sure again that you
don't move around the layer. You just want to tap it. Then you tap "Transparency". If you can see that window, you tap "Window" and
you go to transparency. Then we tap "Normal" and we just scroll
down to Color Burn. That's the same
blending mode as we used in Procreate and now we have created all of these
layers in the right color. That was step number 1. Step number 2 is to group this whole bunch of
images together. I will select all of them, tap "Command and G" to group or you can tap
"Object" and group. Now we have grouped all of these and we have them as a unit. The next step after we have
grouped it is to create a bounding box at the
very bottom so that we can create a
pattern out of this. To do that we need to
know its original size and it won't work
to tap it and tap "Transform" because this is a vectorized version of
the original square, the original file
that we imported, so this won't be correct. What we can do then is to just tap "Object", "Unlock All", and we can select one of these original images
that we imported here, and then we tap "Transform". This seems like it's
correct, it's 720 pixels. The original files
that were important. When we have vectorized it, it has become a little bit maybe scruffy in the
edges or something. So there's a little bit of
difference there in the size, but we want to go for
the original size. Then we can just lock
all of these again. Select them, Command
2 to lock them. If you look these types of
objects in your document, it will be faster to work with your document than if
you have them open. Now we have our little group of artwork here and
what we're going to do is to create a rectangle, a square actually, that is half of
the original size. It's half of 720. You can do that by tapping
the Rectangle tool, tap once with your mouse, and then we will write
in the width here, 720/2 and tap into other box
and that will give you 360, and then we can just copy that and paste
it in the other box. Now we have a rectangle that
is a square with 360 pixels. This square should
be in the very back. I will tap "Object", "Arrange", and "Send to Back". Then I don't want any color
in the fill or the stroke. I will tap this little symbol to have no color in the
fill and the stroke. Then I will select both the
invisible rectangle and our artwork that is
grouped together and I will tap my Align Window, which you can find under Window and Align if you
can find it elsewhere. Then I want to make sure that I have aligned to selection, selected here and then Horizontal Align Center
and Vertical Align Center. Now we have a bounding
box at the very bottom of this group with our artwork. The next thing is that we want to bring out our swatches panel. Tap "Window" and tap "Swatches" and here we
have our Swatches panel. I will just clean up this
a bit because I think it's easier to see if we just
remove all of this. I will just tap the red
color here and holding Shift and tap at the
color at the end, and then I will just tap the little bin to delete
all of those swatches. The next step is to select
this whole artwork group and the bounding box at
the very bottom and tap and drag it into
your Swatches panel. If you ever created a pattern
in Illustrator before, you will notice that
that looks really good. That looks like it's
supposed to look. Now we need to just try out this swatch because there
might be some trouble in it. We don't know that yet. I found that
sometimes this method works perfectly from
the start and it gives me this perfect pattern
and sometimes I need to troubleshoot and see if I
need to change some details. I just created a rectangle,
tapped and drag, and I filled it
with the pattern. Now we can zoom in and see. Zoom in really closely. I know that these four
yellow flowers are the pattern tile and then
you can zoom in and see so that the motifs that are on the edges of your pattern looks flawless and looks like
they are repeating seamlessly and in this
pattern it looks perfect. We don't have any issues here
and we've actually created a finished pattern really quickly with image trace
in Adobe Illustrator. But there can be some
issues and you also need to know how to clean up your files. In the next lesson I will show
you how to change some of the motifs if you want to and also how to work more
detail with your pattern. If you have some issues
with the pattern, how it's repeated after
you created the image traced files and after you
created the pattern like this, then I will show you how to
fix that in the next lesson.
14. Troubleshooting and details: We have created a
finished pattern, but we need to look at
what to do if you for example want to change some
details in your pattern before you create the
pattern tile and also, if you end up with a pattern that aren't
repeating correctly, for example if you
have a white line over here that shows that your pattern aren't
repeating correctly, then we need to know
how to fix that. I will just tap and drag this over here
and I will lock them. This is our original
pattern over there, and I will lock those. Then I have my copy over here. I need it to unlock
everything now, so I need to lock it again. But I have my copy over here so that I can show
you what to do if you want to fix details in the pattern after
you image trace it. Now I will just hold
down my Option key, click and drag, I need to select all
of the layers there. Hold down my Option key, click and drag to make a copy. Now I will lock everything over here and then tap
command and two. In the next lesson, where I will show
you how to save and export your file so you can share it in
class for example. I will show you how to
create file out of this, how to place it on an art board, and how to export
it as a day pic, for example and
things like that. But for now we will just
keep it there as a copy. Now we want to work
with this file. The very first thing that
we want to do again is to select the gray layer
that we did previously. Then I want to tap the
transparency panel again. If you can't see it, you tap
window and transparency over there and then you tap
normal and color burn. Now we have all of the
colors fixed in the pattern. We can just shut down
the transparency panel. The next thing that
we might want to do is to clean up this pattern. I would suggest that
if the technique worked for you that we did in the previous lesson
then just go for that because that
is much quicker. But if you want to
change some details, let's say that I have these details here on the orange flower that
I want to change. I don't want those little dots there and that really
sharp line there or that I need to change
my motifs that are on the edges of the pattern because it doesn't
repeat correctly, then this is how we do it. The very first thing that we do is to select all our
layers and group them. Command G to group them. Now we have this as a group, and then we need to create a rectangle that is half of
the size of its original, exactly like we did in
the previous lessons. We tap the rectangle tool, we tap one time on the
art board and we have 360 pixels in width and
height and then we tap Okay. Then we will select both
of these and tap Align. Make sure you have aligned to selection and then we
tap horizontal align, center, and vertical
align center. Now when we have aligned this, we want to create a
duplicate of this rectangle. We tap Command C and Command F. If we drag that to the side, you know that you
have two of those, then we tap Command C to make sure that they are in
top of each other. Now we have two of those. With one of them selected, we can tap object, art board and
convert to artboard. Now one of those have become an art board which
is at the bottom. We can select the
other rectangle, make sure that we don't have
any fill or stroke on that. Now we're creating
the bounding box and we need to place
that at the very bottom, so we tap object, arrange, send to back and now we have a bounding box at the very
bottom of our pattern. The next thing that we
want to do is to lock this bounding box so that
we don't move it around. We tap Command 2, to lock it. Now we have our group
with our artwork and we have a bounding box at the
bottom that is locked. Now we can go in and fix
details of this pattern. First, let's have a look at how to clean this pattern
up and what to do if your pattern tile
aren't repeating correctly when you
tried the method from the previous
lesson and just created the pattern directly. What could have happened
there is that if somehow your image trace
didn't work that good, you can end up with a pattern that won't repeat seamlessly. This hasn't happened
to me that many times, but if that will happen to
you, this is how you do it. Basically, you will go backwards in the pattern-making process. You do that by
tapping your group. Then you tap object and ungroup. Now we need to go in
and be really detailed. Then we want to
ungroup everything. We don't want anything
to be grouped. We need to select
everything, object, ungroup and just want to make sure that
everything is on its own. Nothing is grouped. If that didn't work for you, you might need to
select everything again and tap ungroup again. Now we have
everything ungrouped. Now what we want to
do then is to select everything that is outside
of our bounding box, outside of our art board. We also want to select the
duplicates of the motifs. Basically, when you
create patterns, what is falling off
the edge on the top is also falling off the
edge on the bottom, and the same with the
right and the left. We want the whole
flower to be there. Because if we will want to change this pattern
in the future, we don't want to cut it off, not in the original
file, at least. You can cut it off when
you for example sell this pattern or share
it with someone. But for your own sake, keep the whole motifs. Moving on, what we want to
do is to make sure that all motifs that are on the top aren't repeating
anymore on the bottom. To do that, I will go ahead and just start to select like this. I forgot that I need to
lock the background. Tap the background layer with the background color and then we tap Command 2 to lock it. Now we have a locked background. Now we will select images. Select over here. Then we can just delete that. You want to make sure that this flower is only over
here and not over here. All of the motifs that
are falling off the edge, we only want to keep them
on one of the sides. I will keep the ones that are on the top and the ones
that are on the left side. Then I will remove the ones that are on the right
side and the bottom. This one is at the
top and this one too. I will just delete that one. This one is falling off on
the right and at the bottom, so I will delete that one. I will just delete everything that's a part of this flower. I will make a group
of that later on. Then I will zoom in, and I want to keep
those on the left side. This yellow flower is
the same as this one, so I will just delete the flower shape and
all of these and I will just keep
the leaf there that are in that edge over there. Then I will delete all
of the things over here. Also this one, everything that are
falling off the edge here. As you can see, this is a
little bit more detail work. If it works for you to
vectorize and create a pattern like we did
previously in the last lesson, then I suggest that you
do that because this is a little bit more work
to do it like this. Now we can delete
everything that are over here as well that aren't even touching
our pattern tile. Let's see, scroll
down over here. We can delete
everything over here. Now we're basically
just cleaning this up. It's a little bit hard to see with the background
here and the art boards. I will actually just unlock
and I will tap the art board. I will actually just
save that color. I can just open up
the swatches panel, window swatches and I can just tap and drag the color into the swatches panels that I have the background
colors saved there. Then I can just change to a white background color or another color
of the background. Let's just change
to another color so it's not so confusing. I will tap the color panel and I will just drag it up to
maybe a little bit pink. This is just so
that we are able to see the box of the art board. We will change the color of the background again very soon. Everything that is
falling in the edge here will stay there and
the other part can go. This can go and this. We need to lock the
background again, tap Command 2 to lock
it and then we can just delete everything that aren't
falling in the edge there. This is falling in the leaf but the flower isn't so I can just delete that
and all of those. As you can see, I'm moving over the edges here first
and then I can go over the whole pattern
to the left later on. I know that I have that
leaf falling inside there, so I will just delete it here. Then over here the flowers, I can just delete all
of those because it's only the yellow flower over there that are
falling off the edge. Moving over and just deleting those because I have
those leaves over here. Then we can delete this flower
because it's coming over there and delete all of those. But then I have a little leaf there and I don't
have that leaf there, so I will keep it
and I don't have that leaf. That looks good. Then we will select everything
that's outside here. We don't need that anymore, so just select everything over here and now we have
our pattern actually. The next thing that we
can do now before we create an original
pattern out of this, is that we change the details. Let's zoom in. Here, we have a little
yellow thing over there, like a little hole in the
yellow and then I can go in. For this, I would use
the shape builder tool I think and I will just tap
and drag to fill that in. But you could also
use the blob brush. Let's do that with another one. We can just double-click
the blob brush and make it a little bit
smaller here in size. Let's go for another motif that we want to
change, maybe this. This is a good example. If we want to change that, we can tap the blue there and we have the blob brush selected. Maybe we want it even smaller, maybe only two points. Here we can go in and draw, so we will draw a little
bit and fill that in. Maybe we have something else. We have something
here on the orange. I will hold down command which will select
my previous tool, which is the Selection Tool or I can just tap the
Selection Tool and tap that object and then with
the blob brush selected, I can just go in and
fix these details. Usually on these types
of patterns, for me, there's not too many
details to fix and I might even like those
little wonky parts. But I will go over this so that you can see
how you can do it too. I will tap the selections tool, tap the object that
I want to change, and then just fill it
in with the blob brush. Is there something else? That is a little bit wonky. Maybe this over here, tap the selections tool, tap the object and just
fill it in and let's see. Something over here on the leaves so I will just
tap the Selection Tool, tap the object, fill in
the green part there, fill in the green
part over there. Maybe tap the Selection Tool, tap the Blob Brush, fill that one in as well. Is there something else? I think I'm happy with this, but you get the picture here. You can go over this
pattern and fix how many details that you want to because now you only have
the original motifs here. You make the changes before
we create the repeats. Now we have the bounding box at the bottom that is invisible
and we have an art board. We have the motifs that are
suppose to be repeated. The first thing that
we do is just to unlock this box at the bottom. I will tap that box and I will tap the right
color of that one. I don't need it to
be filling out of the art board anymore so I will tap the
Transform Tool and I know that my art board is
360 so I will just uncheck that chain symbol and type in
360 in width and in height. Then I will make sure that it's aligned perfectly
to the art board. It should be, but I
just want to make sure. I tap the align
panel, tap Align, Horizontal Align Center
and Vertical Align Center. It wasn't perfectly aligned so that was good that I did that. Now we have our
background layer. We can just lock
that once again now. I will tap the background layer tap Command
tool to lock it. The next step is to change
the blending modes of the gray and the stripes here. What we do then,
I will just make sure that I lock everything else here so that my program
doesn't run so hard. Swipe on all of those and tap "Object",
"Lock", "Selection". Now it should move
a little bit more. Then we will select a motif with the gray
color because we have locked everything else here in our documents so we know that we don't have anything
else selected. I will select the motif
with a gray color, and then I will tap "Select", "Same", "Fill Color". That will select all
of the color with the gray and then I will tap the
"Transparency" window again. If you don't have it,
you tap "Window" and "Transparency" and tap "Normal"
and change to Color Burn. Now we have changed that and it looks perfect so we're
happy with that, and that was a quick fix. The next step is to repeat the motifs that are
falling off the edges. What I do then is that I
know that my art board is 360 pixels so I will tap Command K to go into Preferences
and then under General, I will tap "Keyboard
Increment" and 360, which is the size
of my art board and then I will tap
"Okay" over here. That's all you need to do. Basically what this
means now is that when I select some motifs over here, I will select everything. Oh, the bounding box is not locked so I need
to select that one. That was a mistake by me. I need to select the
bounding box and just lock it. Lock, Selection. Now we don't have
anything over here, not the background box and not the bounding box
that you can select. They are both locked. The next thing that
we will do is just to select all of the motifs that are falling off the
edge and what I do then is that I just tap and drag
with the selections tool. Tap and drag until I reach
the edge here and then I will tap Option key
and the down arrow. That will place the motifs
that were falling off the edge here in the position that
they are supposed to be, the exact position on the edge. We have duplicated the motifs that were at the top
and now we need to do it to the ones that
are here at the sides. I will tap and drag to select
here and then I will hold option and tap with arrow to place those
motifs over there. Great. Now we should
have a pattern of this as well after we
have changed the details. To try it out, just tap
"Object" and "Unlock All", and then tap somewhere
to de-select. Then I will just
select everything here and tap and
drag it inside on my swatches panel and then
I will make a square or a rectangle with the
rectangle tool and fill it in with my pattern. Now you can see if there
are some problems here, and I can instantly
see some problems. For example, these leaves are on the top and not on the bottom so I need
to change that. I need to change
that the flowers are on the top. Let's do that. Let's go in here and we
will need to change that. This flower, for example, I will just lock the background box and
the background again. Select those two
and tap Command 2. Then I want to make sure
that the flower and the dot and everything here
is on the top of the leaves. I select the yellow flower
and I can actually select the yellow flower and I
want to make sure that I select the lines
and the white but not the leaf in itself
and then I tap "Object", "Arrange", and "Bring to Front". That looks good now. Next, what we need to do,
it was a blue one. It was this one. We need
to do the same with that. We make sure that we select only the blue flower,
the white dot, and the lines and
then we tap "Object", "Arrange", and "Bring to Front". That should have fixed everything and now let's
try out our pattern again. Tap "Object", "Unlock All". Tap and drag on your
art board to select everything and drag
in your new pattern. Make a rectangle
again to try it out. Tap the new pattern, zoom in, and now
it looks perfect. Now we have created this pattern
and we also have changed the details and have
troubleshooted the pattern. In the next lesson,
I will show you how to save and export the file.
15. Save & Export: Now it's time to
both save this file as a professional file that
you can use in the future, and also export it as artwork that you can
share in this class. Let's start with creating a
file that is professional. Basically, what I do
then is that I will rename this first
layer to original. I can delete things that I
don't need on this layer. Let's say that we have all of these extra things
that we don't need, I will just delete that. I don't need that anymore. I also have this over here. If you don't need that either, you can just delete it. It depends on if you want to keep it or if you
want to delete it, let's keep it there for now. Then we go into our file here. I want to name the
layer to originals so I will rename the
layer to original. Then I want to
duplicate this layer, so I tap the layer, tap the hamburger menu
and tap Duplicate. Then I have original copy, and I will name this
to final, for example. On the final layer, the first thing that
I will do is just to uncheck the visibility of the original layer and
lock that layer so that we don't mess around with the things on the
original layer. You always have your original here so you can always
make changes to it, and that's good to have and
good to never get rid of. But on the final layer, I will remove the things that
I don't need so I remove those and I will move
this box as well. Then I will head into
my pattern here. The very first thing that I will do is to copy my background box. I will just tap the
background layer, tap Command C so I have it
copied to my clipboard now. Then I will select all of this, everything on my artboard, including the bounding box and the background box and tap
Command G to group them. Then I will tap
Command F to paste in that background box
on top of everything. We can just make it white so that we separate it
from everything else. Then the next step is
that I will select everything here and
I will go to Object, Clipping Mask, and Make. Now, I've made a
clipping mask of this whole pattern and
I can move it around, I can re-scale it, I can do whatever I want. Let's just keep this
as the original one. You could go for 3,000
pixels, for example. I would tap the Artboard
symbol and tap the Artboard, and then I will type in 3,000 pixels width and
3,000 pixels height. Let's say that you want
that large artboard. We already had an artboard over here actually that is that size, but let's tap that one and remove it because I
don't need that one anymore. Then on my new artboard, I will tap my Artwork here that is grouped and has
a clipping mask on it. Then I will tap Transform, tap in the little
chain symbol here, and I will type in 3,000 pixels in the width
and in height. Then I will tap the Align panel and I make sure that I
aligned to artboard. Then I tap Horizontal
Align Center and Vertical Align Center, so I make sure
that everything is aligned perfectly
on my artboard. Now, we have actually changed the whole size of the pattern. What you can do now,
I will just make a copy here because I don't want to mess around
with this if we need to go back in the process. I will just make a copy of the layer of the pattern
with the clipping mask here. I can just lock that one. We know that that's
the clipping mask, and then I want to merge this. To do that, I will
tap the layer, and then I will tap Window. Where is the pathfinder? Here, I will tap Merge, and that will cut
everything off that's on the outside of the edge
of my artboard here, and it will make a
perfect pattern. Now we need to try
out this pattern before we are finished
with the file. Tap the merged file and tap and drag it into
the swatches panel, and tap and drag to make
a square above here, a rectangle, and just
tap your new swatch. We can go to Object, Transform, Scale, and scroll
down here, uniform. I don't want to
transform the object, I only want to transform
the pattern so just scale it down because I
want to make sure. I will shut these panels so
that we see what we're doing. I want to make sure that
the edges are perfect. They should be, and they are. Now, we have created a
perfect pattern out of this. This is a great way of saving your file if you want
to share it with, for example, a client. If I would do that, I would also select
everything here and tap Group and just Okay to save all of the colors that are
used in this pattern. Then I would save it as it is, and you could send this file to someone who wants to
print it on something. This is a huge file,
it's 3,000 pixels, and we don't need to have that huge file to
share it in class. The first thing that I would do is just to select that one, tap Command C and
Command V to copy it. Then I will tap
the Transform tool and just type in, for example, 800 pixels in the
Transform tool, and then I can export this. What I want to do is to create an artboard that
is 800 pixels here. I will tap and drag
to make an artboard, and make sure that it's 800 pixels in width
and in height. Then I will tap and
drag my artwork, tap Align, align to artboard and Horizontal Align Center
and Vertical Align Center. Then I want a duplicate
of that artboard, so I will tap the
Options tool tap and drag to create
a new artboard. I will delete that artwork
and I want to create a rectangle that is 800 pixels, so I tap with the rectangle
tool one time and then write in 800 pixels in width and
in height and I tap Okay. Then I tap Align and align Horizontal Align Center
and Vertical Align Center. I make sure that I have my
new pattern checked in here. Then I tap Transform, Scale, uncheck transform
objects so I only have transform patterns and then
I can scale down my pattern. Here, I have my
repeated pattern, and here I have my pattern tile. That looks really good, and now we can save this. We'll just rename
the artboard first. Let's tap the first
artboard here and name it bold flowers pattern tile. Then the next artboard
and I will just name it bold flowers
repeated, tap Enter. Now, I want to export this so I need to know which
artboards it is, so it's Artboard number
2 and Artboard number 3. I tap File and I tap
Export, Export As, and I will save it on my
desktop as JPEG files. I only want to use artboards
range two till three, and then I tap Export. I make sure that I have
maximum selected here, baseline optimized under
compression method, 300 ppi in resolution and art
optimized super-sampling, and then I tap Okay. Let's see how they look. This one over there, and this one over here. That looks really good. Now you can share
these files in class. They're only 800 pixels big which is perfect to
share online like this. You also know how to save
your file professionally, if you want to send it to
a client or anyone else who are producing products
with your patterns.
16. What is next: That's all for this class. Thank you so much for watching. If you enjoyed to
create this pattern with the pattern layout
template in Procreate, check out my pattern toolkits. This layout template that
we used in this class is one out of 25 that I created
for the pattern toolkit; the ultimate set
of resources for pattern design made
easy in Procreate. With 25-layer brushes,
30-element brushes, four seasonal color palettes,
two pattern templates, a pattern layout
lab video course, and a pattern style guide, this toolkit has
everything you need to improve your workflow and create stunning
patterns with ease. Make patterns quicker
and easier than ever before with my
Pattern Toolkit. The pattern toolkit is
available to buy it with a one-time payment
as well as it's included as a bonus
when you join my membership pattern rebels
with an annual subscription. Go to patternrebels.com/pattern-toolkit
to read more. With that said, thank you
so much for watching. I hope that you
enjoyed this class. If you did, hit the
Follow button by my name to keep up with
my future classes. You can also visit my
profile page here on Skillshare to access all of my classes
available to watch. If you have any questions
or comments at all, please don't hesitate
to post them in the discussion section
in this class. Feel free to leave a review to let me know if you
enjoyed this class. Your feedback is
always appreciated. Thanks again for
watching and I look forward to connecting with
you again in the future, either here on Skillshare or within the Pattern
Rebels community.
 Maja Faber, Surface Pattern Designer