Transcripts
1. Intro: If you want to
learn how to create half-drop repeated
patterns in Procreate, this class is for you. I will teach you three
different methods from the most simple and
quick half-drop patterns to more complex which will
allow you to use many motifs, colors, and layers
in your patterns. I'm Maja Faber, a surface pattern designer
who have started to create many of my patterns
directly in Procreate. Why? For me, creating
patterns in Procreate is fun, intuitive, quick, and easy. I enjoy being able to create
the full pattern from sketch to finish repeat
directly on my iPad. [MUSIC] This is an
intermediate class for you who have at least
basic understanding of how to use Procreate. You probably have created a few patterns in
Procreate before, but if you haven't, I recommend to watch my
beginning primary class called Create an Editable
Pattern in Procreate with Color Variations before
you watch this class. [MUSIC] I've included
three free resources that you can download when
you watch this class. There's one free
Procreate color palette, and two free premium Procreate brushes from me and the
[inaudible] Brand Paper Company. These resources will
enable you to create the exact same pattern as you wish for a course smooth
learning experience. You can of course use
these brushes on all of your future art projects both for personal and commercial use. Follow the instructions in class to download the resources, and if you're
interested in more of our brushes, go to
majafaber.com/shop. With all of that said, let's get started creating
our half-drop repeats.
2. Class Project: Your project in this
class is to create a half-drop repeat pattern using one of the methods
that I'll teach you. If you follow along
with me and create all of the three different
half-drop repeat patterns, then feel free to
share all three of them here in your
class project as well. I can't wait to see
what you create.
3. Downloads and Resources: I've included three
free resources to download in this class. Two of our favorite company, premium Procreate brushes and one Procreate color palettes. The Procreate brushes are the smooth filler from
our dry ink brush sets, and green stamp number 2
from our green brush set. I will give you
these two brushes for free when you
watch this class so that you can follow
along and create the exact same pattern
as me if you wish, for a smooth
learning experience. But feel free to
use these brushes for your other art
projects as well, both for personal
and commercial use. If you enjoy using
these brushes, you can check out
all of our premium Procreate brush sets at my
website, majafaber.com/shop. The ones that you get
in this class are from the dry ink brush set
and the green brush set. To download the free
Procreate brushes and the color palette that I
will use here in class, you can either download
the PDF file under projects and resources in the
right column here in class, or go to the URL that
you see on screen now. If you have downloaded
the PDF file, you tap to download and that will take you to a
page where you can type in your name and your email address,
and tap "Unlock". When you tap Unlock, you will get directed to this Dropbox folder
where you can download the favorite company
free number 6 brush set and my happy fruits
appropriate color palette. To download these files, tap the file, Download, and Download. Then you can go back, tap the color palette, Download, and Download. This will add them to
your downloads folder. I'm using Safari as a browser. If you use another browser, it might look a bit different. But you will find the files in your Downloads
folder or your iPad. To add these files to Procreate, tap the first one, "Happy_Fruit Color Palettes"
and the second one, "Faber Company Free
Number 6 Brush Set". Your favorite
company free number 6 brush set should be added to the top of your
brush library with the smooth filler and
green stamp number 2. The color palette for me, at least strangely enough, is added to the bottom
of your color palettes. You can either drag
it to the top or just set your color
palette as default. Let's just tap "Set as Default". When you tap the Classic option, you will have your happy_first color palette
right around here. That is how you add the Procreate brushes and the
color palette to Procreate.
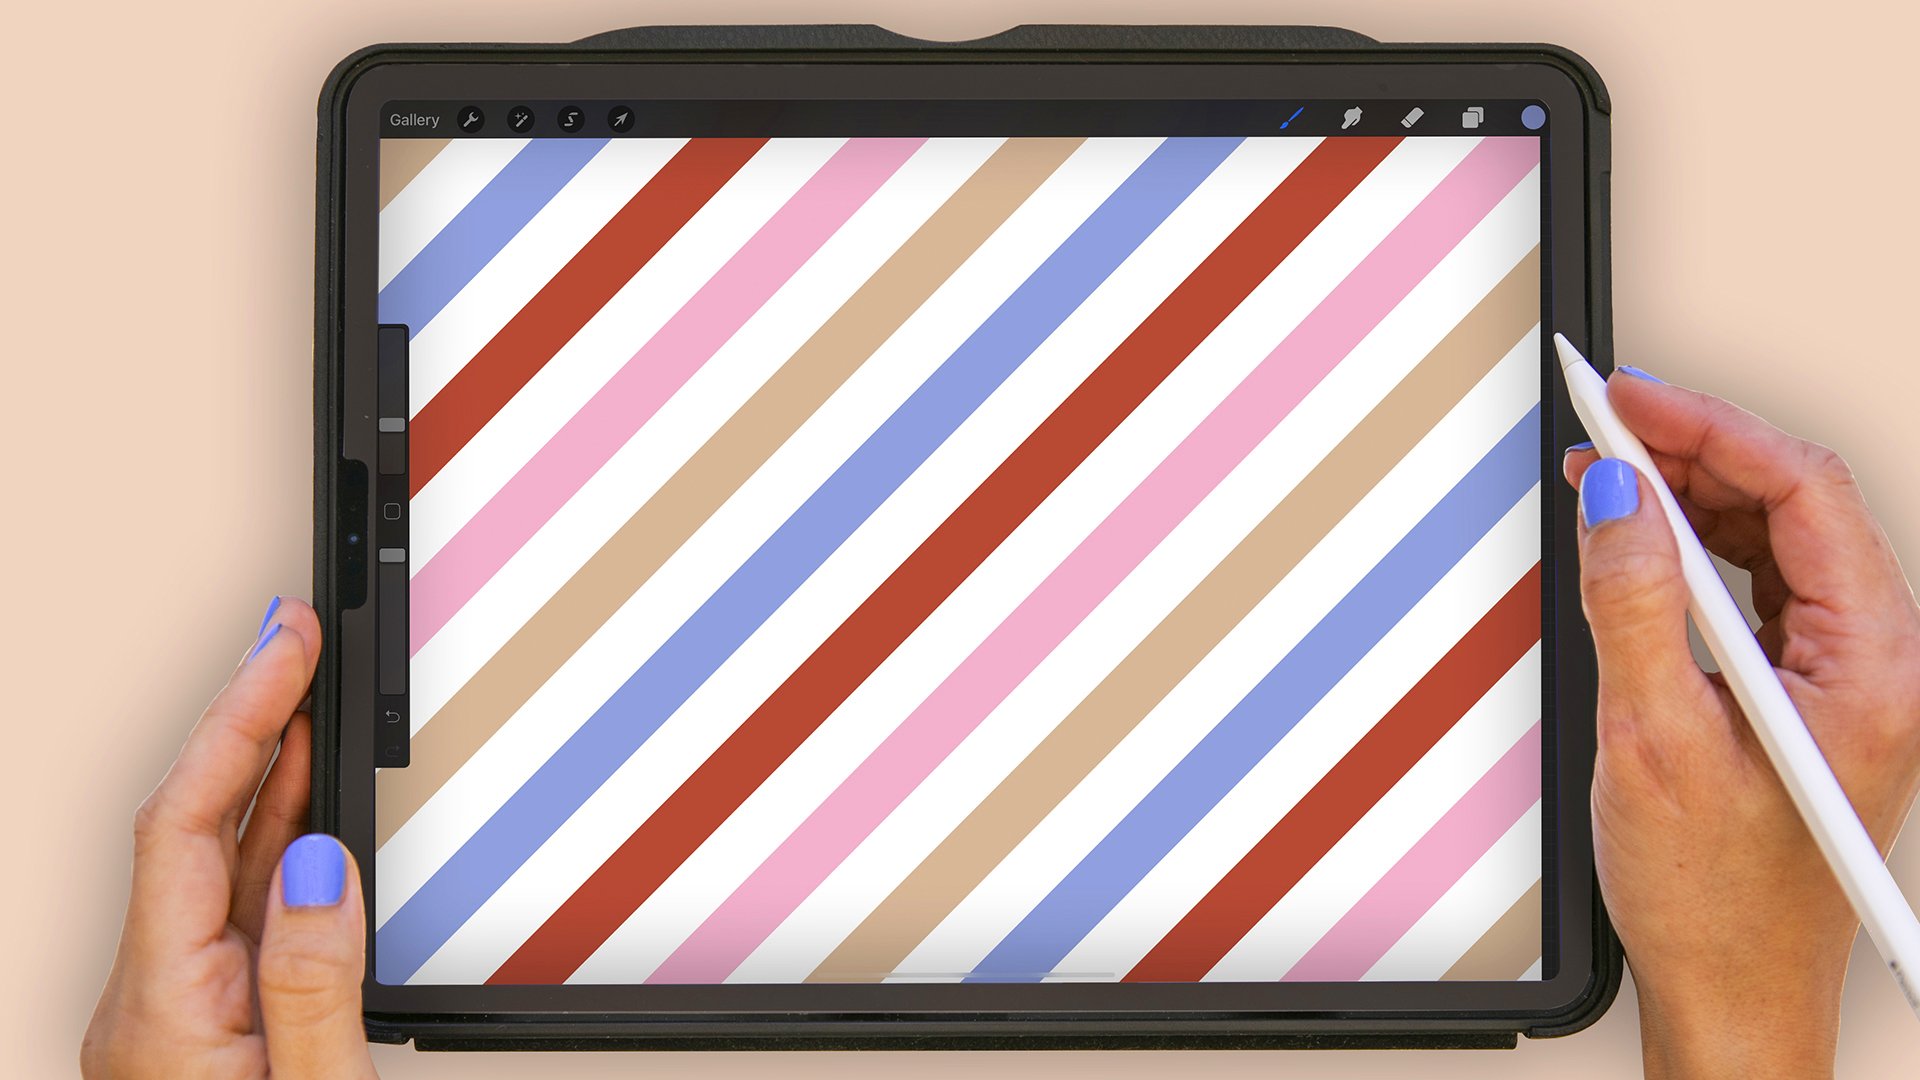
4. What is a Half-Drop Pattern: What is a half-drop
repeated pattern? Well, to simply explain what a half drop repeat pattern is, let's start with the full drop, or as it's also
called block repeat. This is the most common, and simplest form of
created repeated patterns. A full dropped pattern is repeated horizontally
and vertically, just by placing
the pattern block next to one another, like this. As you can see, the
motifs that are falling off the edges
to the right, left, top, and bottom side
of the pattern block, is repeated directly
to the next block. What is a half drop
repeat pattern? Well, simply explained, your pattern block will still be repeated the same vertically, but horizontally the
block will be repeated a half size of the block
downwards, like this. Why would you want to create a half drop repeated pattern? Basically, it's a
great way to hide where your pattern
block starts and ends. You can get away with
creating a few simple motifs. When you repeat them in
a half-drop pattern, it will look more organic
and more complex, just by the way the
motifs are repeated.
5. Why 3 Different Methods: You might be wondering
why I will teach you three different
methods of creating a half-drop repeated
pattern in this class. Why not just stick to one? Well, the simple answer is
that I myself use all of these different methods
depending on how simple or complex my
half-drop pattern is. I always aim for
streamlining and simplifying my methods and not spending more time than I need to
make the actual repeats. So if I'm just repeating
one simple object, I will use the most
simple method, which therefore is the quickest, the method number 1. But if I'm creating a more complex pattern with
a bunch of different motifs, colors, and layers, I use the third method. This technique isn't
that complex as it might look at the first glance once you get the hang of it. But it takes a bit
longer to create the pattern with it than
with method number 1. As for method number 2, I wanted to show you a
way that is in-between. You can use this one for more
complex patterns as well, but you might reach the
layer limit in Procreate. It's also a
time-consuming method to use for more
complex patterns. But if you, for example,
have a pattern where you are okay with flattening
all the motifs into one layer before
making the repeats or a pattern with
only 2-3 colors, then this method can be
very efficient to use. I will show you this more in the lesson about
method number 2. In the end, it's the matter of preference and complexity
of your pattern. So join me and create
one pattern for each of the methods to see which one you like to use
for your pattern. My favorite method is number 3. It takes a bit longer to learn, but once you get the hang of it, it's a great way of creating all sorts of half-drop repeated
patterns in Procreate. Follow my step-by-step
instructions here in class, and once you practice with
this method for a while, maybe you enjoy it
as much as I do.
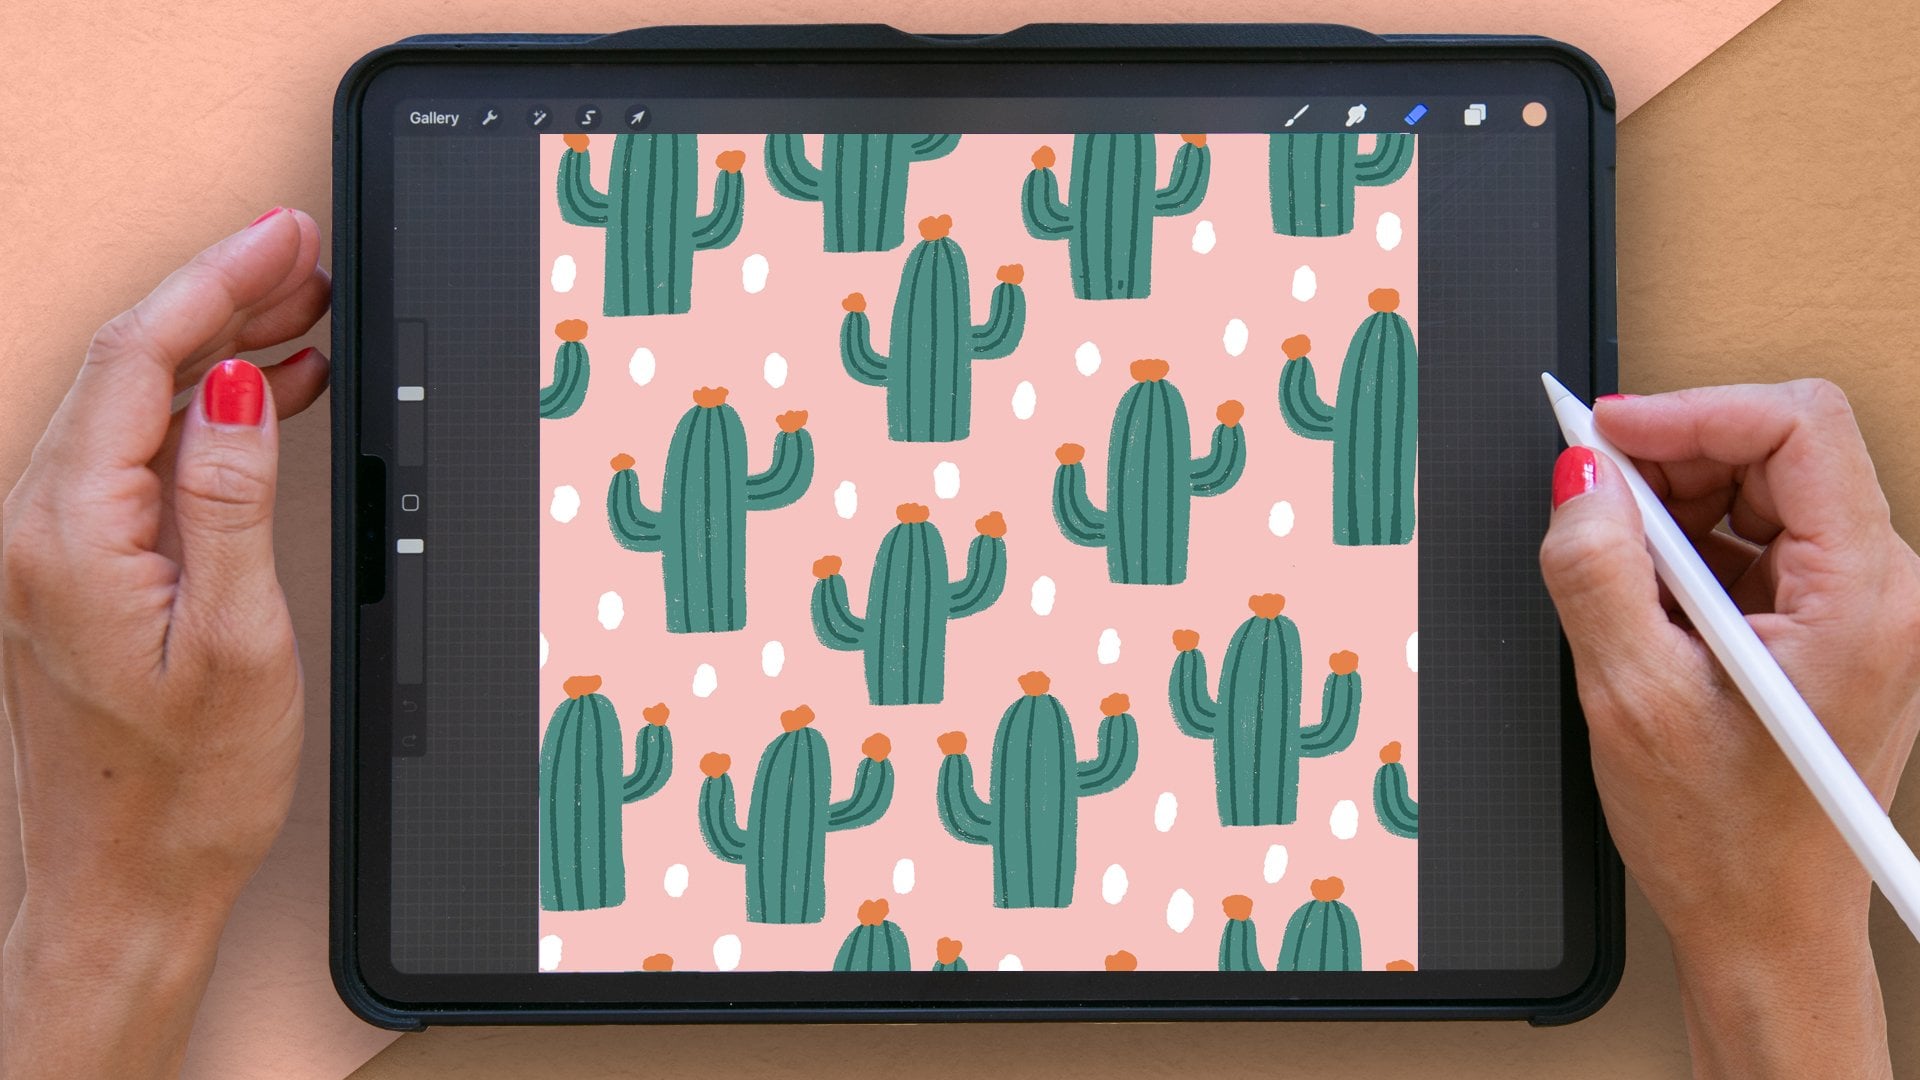
6. Method 1 - Fake Half-Drop: Let's start with the
practical parts of this class and create our first
half-drop repeated pattern. I will show you
the first method, which is for simple patterns
and actually this is how to create a fake
half-drop repeated pattern with only one motif. I will show you exactly
what I mean in a minute. First things first, let's create a new document in Procreate. Tap the plus sign and
let's go for a new canvas. At the moment, I create a lot of my patterns for Spoonflower. I have a standard size that
I use and that is 3,600 pixels square or
7,200 pixels square. Before this first pattern, Let's go for 3,600 pixels. The DPI 300, which will bring
us a maximum layers of 47. Tap create, and here
we have our canvas. The first thing that
I always do when I create patterns is to
add a background layer. For this type of repeat, we actually don't
need a background box to create the actual
repeated pattern, but I always have some
background color, so I will just use the green white in my happy
fruits color palette that is included in this class so that you can
use the same colors as me. What I usually do when I draw my patterns in Procreate is to make some kind of sketch first. In this class, I will go through the sketching part
really quickly. If you think I'm
moving too fast, checkout my other class, create an editable pattern in Procreate with color variations, which is a more beginner
friendly class that are moving a bit more slowly on some parts of the
pattern-making process. But let's go ahead now, we create a new layer
to draw our sketch on and I will just quickly draw up the strawberry, something like that. I find it easier to
draw from some sketch, even if it's really rough
than to just go on and draw directly with my colors. When I have my sketch, I will tap the opacity, bring it down to wherever you feel is comfortable
for you to draw on. I will keep mine on about
50 percent or a bit above 50 percent so
that you still can see the sketch on screen, but maybe you want to
go lower than that for your opacity so that your sketch won't be in
the way when you draw. Let's create a new layer and I will draw a
strawberry with the pink color and smooth filler from
our favorite company, free number 6 brush set. At the smooth filler, I will use size of, let's try out about 20 percent and I will draw a
strawberry shape like this. The smooth filler will give
you a little bit rough edges, but overall it's
pretty solid brush. If you want to add
some more texture, you can draw in your
shape like this. But for the purpose
of the class, to move a little bit
more quickly forward, I will tap and drag my color
to add it to my strawberry. If you find that you get a little line from
where you draw the outline and where you
filled in your shape, you can just draw a little bit amongst the outline of your strawberry to make sure
that you have a solid shape. Then I can tap and
drag to get my sketch above my color layers so that
I can see that one as well. And then I will tap to add
a new layer and I'll use the green color in my happy foods color palette and also with the smooth filler, I will go back to 20 percent
in size and add the green on my strawberry. Something like that. Then I
will turn off the visibility of my sketch layer so that
I can see what I've drawn, and maybe I want to
adjust my drawing a bit so that I'm happy
with how it looks. I'm pretty happy with my
strawberry right there. Then I will actually go in and select both of these layers, tap the transform to turn
off magnetics and snapping, and that will just
drag down the size a bit of my strawberry
by tapping and dragging in one out of the blue little dots
of your solution , something like that. Here we have our
motif and it's time to create half drop pattern
of this single motif. As I mentioned before, this is a way of creating
a fake half-drop pattern. It will look like the motif is actually repeated
in a half-drop way. But we haven't created a pattern block that is
repeated in half drop. Let me show you what I mean. First, we can just delete the sketch layer and then I will select both of the layers
with my strawberry, the green and the pink and we can group those together
so that we have the motif, the strawberry in one group. Then I went to tap to the right and duplicate that strawberry. If you want to make
sure that you have placed your strawberry exactly in the center of your Canvas, you can tap your
first strawberry, tap off the visibility of the second group and just
turn on magnetics and snapping in the
transform tool and drag your strawberry until you
have two yellow lines. It's probably around here. If you don't want to eyeball it, you can tap Canvas, edit drawing guide and drag
up the grid size to maximum, tap "Done" and here you can see the exact center of your Canvas. I'm pretty happy with where my strawberry is
placed like this. Now it's time to add the other strawberries
to this pattern. What we will do
is to repeat them at the edges of your Canvas. Turn off your copy
of the strawberry, tap the transform tool, make sure you have magnetics
and snapping turned on, and then tap and drag your selection with the copy of the strawberry to
the top right corner. Here we want to place
these blue dots denote exactly at the edge. If you zoom in, you can see that this
is exactly on the edge. Zoom in to the top. Here we need to move
this one a little bit. We zoom in and zoom out, and make sure that
we have both of these two blue dots
exactly on the edge. Then we tap the transform
tool again and we have placed a quarter of a strawberry
at the top right corner. Then you tap the
first group again, the strawberry in the middle, swipe to the right, duplicate that group, tap the transform tool, drag up your strawberry
to the left side. You can zoom in to make sure
that you place it exactly on the edges with blue dots and tap the
transform tool again. Next, swipe to right again on the first strawberry and
make another duplicates. Zoom in to make sure that
you place this exactly to the top left corner and that the blue dots in the middle of your strawberry selection
are placed exactly on edge. Tap the transform tool again. For the last one, duplicate your strawberry
again and drag down your selection to the
bottom right corner, make sure your blue little
nodes are placed exactly on the edge, like that. Then tap the transform tool. Here we have created a fake
half-drop repeated pattern. We only have one
motif, the strawberry, and it's repeated and what will look like a half-drop block. But if we would
repeat this pattern, let's go in and select
all of these layers, swipe down with three fingers, tap "Copy all" swipe down
again, and hit "Paste." This will bring you
an image with all of the objects in this group
flattened to one layer. Tap that layer and drag your image down till
you reach 1,800 pixels, which is the exact center
and middle of your Canvas. Tap the selection tool again, duplicate your layer,
drag it to the side. Make sure you place it exactly at the bottom right corner. Swipe right again,
duplicate your layer. Drag that one up. Swipe right again and
duplicate your layer and drag the last
square to the side. If we turn off our drawing guide under the
actions panel in Canvas, turn off your drawing guide. You will see how your
strawberries are repeated in a way that looks
like it's half dropped. But when you repeat the
actual pattern block, you repeat it in a
full drop way so you have your pattern block here and you just repeat
it to the right, and to the top, and to the
left, and to the bottom. The last thing that I
want to show you in creating a fake half-drop
repeated pattern with one simple object like
this is that to preserve your colors to be able to go back in your layers and change
the colors of your object. You can open up all groups, swipe to the right of
your green layers, drag those above the groups and swipe them together
to merge them. Then swipe to the right
on our pink layers, drag on top of the group
and merge them together. Swipe to the right on all of
the groups and tap "Delete." Here you have all
of the objects with pink and all of the
objects with green. Later on in class, I will show you how to recolor these objects, but for now, this is a good base to be able to make changes to
your pattern in the future. Let's turn on these
image layers again to see how our pattern
is repeated and check out our fake
half-drop pattern which is made in a very
simple way in Procreate.
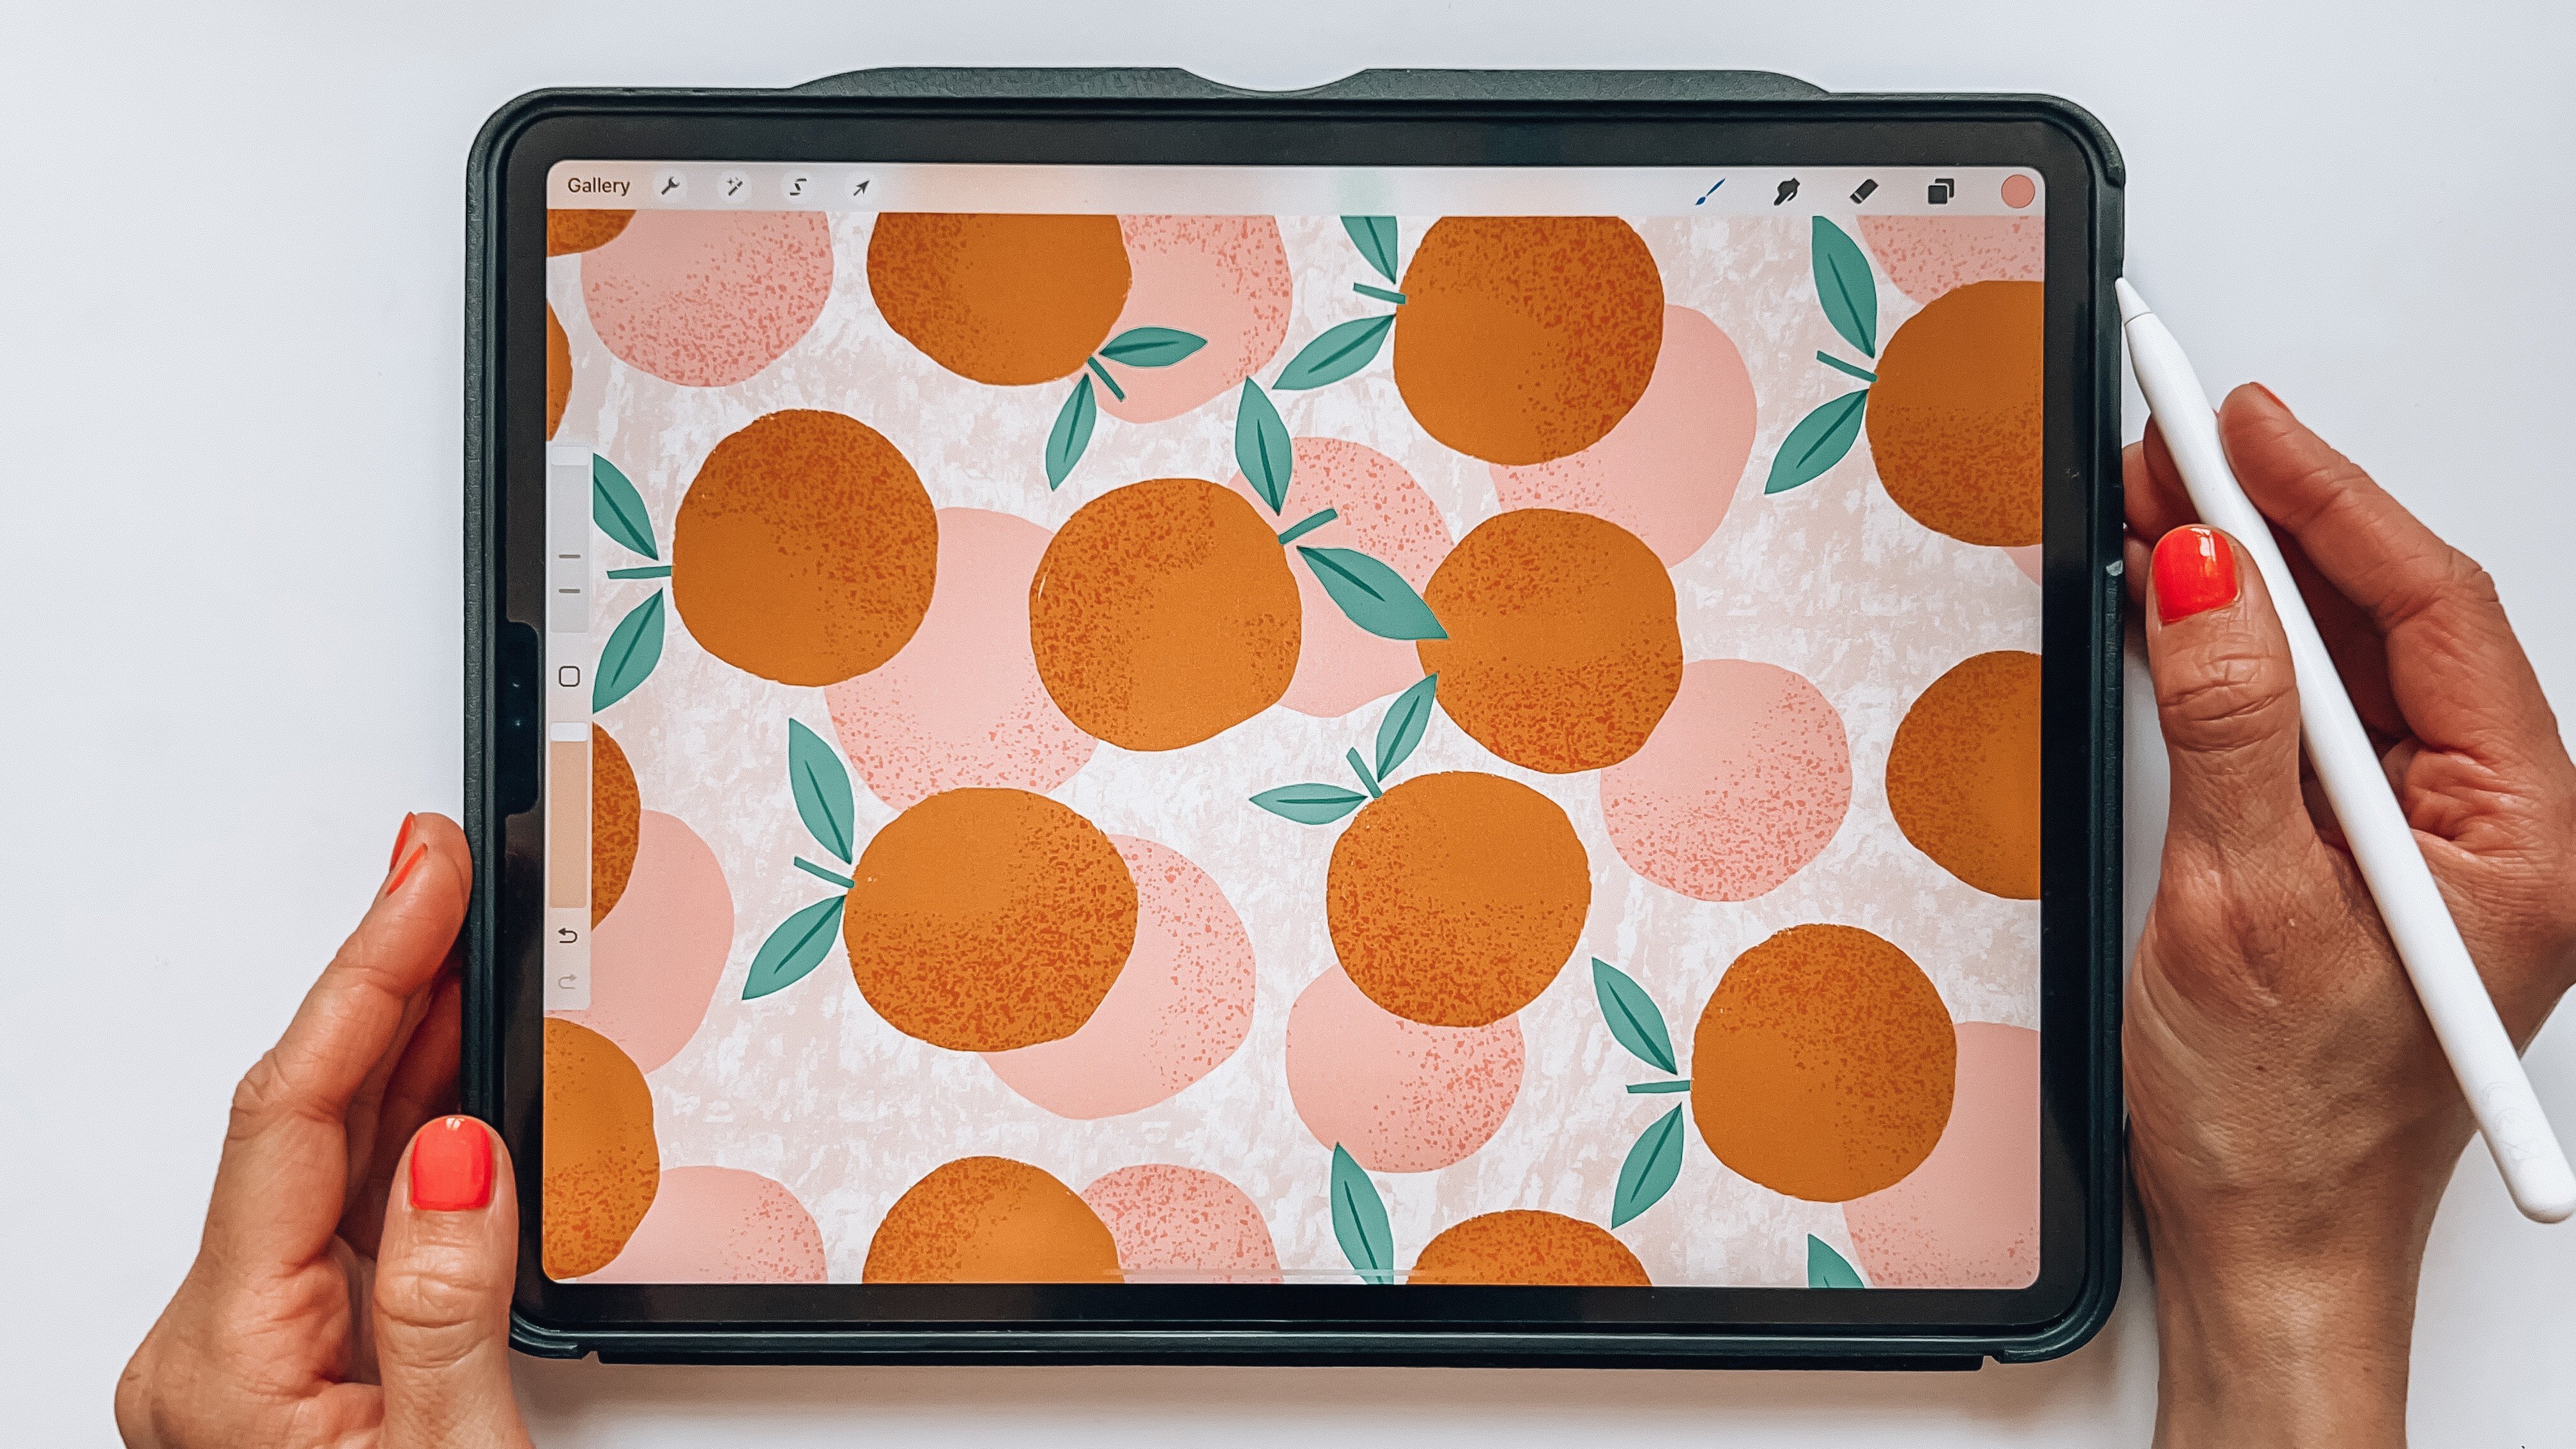
7. Method 2 - Part 1: Let's move on to the next method of creating a half drop
repeat in Procreate. This is method number 2 for, I would say, medium
complex patterns, not just one motif. You can have many motifs and you can actually have a bunch
of different colors. But this method is
best if you can flatten your motif
layers to one or two, or at least just a few layers because this method
will get more complicated and you can also
reach the layer limit in Procreate if you use it
with too many layers. Let me show you what I mean. Tap the "Plus" sign and we
will just use the same canvas. So 3,600 pixels, I have
mine saved over here. Three thousand six
hundred pixels square, exact same canvas size that
we did in the last lesson. For this method, you need
to have a background layer. Let's add a background color. I will use the
cream-white again. Tap and drag to add a square with a background
color at the first layer. The next thing we
will do is to draw some bananas for this pattern. I will just sketch up a few
bananas really quickly. In this pattern I want
my bananas tossed, so I'm just drawing them
to be tossed around. That one looked a
little bit crazy. What you do when you sketch up your motifs here is
that you make sure that you don't reach the
edges of your canvas when you draw your bananas and
just toss them around. The placement of your motifs
doesn't need to be exact. We can always move
them around later on, but just draw a few bananas. We can adjust these later on. Something like that. Now we have a few tossed bananas
to start to draw. The first thing that
I will do is to add a new layer on top
of my sketch layer. Drag down the opacity of the
sketch layer a bit and then start to draw the
actual colored objects. In a new layer, I will use a color. Let's use the pink for
the first banana and smooth filler and I will
use 10 percent in size. Let's just check that out
and see how it looks. That would probably be good. Just draw one banana
and fill that in. For this method, I
would like to have as few layers as possible. Maybe you don't know
when you start to create the pattern how many layers
you will end up with. Maybe you don't know how
many colors you want in your pattern and that's
completely fine. But in this class, for the method number 2, I will show you how to
draw all of the motifs in one layer and then add a few
details in the next layer. All of the bananas will be in one layer and I will draw with different
colors in that layer. Doing this, I know that I don't want to
change the colors of my objects after I've created this pattern because if I would like to
change the colors, at least I would like the different colors to have different layers so
that I can change the colors smoothly and
make sure that all of the objects in one layer are perfectly colored
in another color, if I wanted to do that. This is a great
method to use if you just draw with one color or two, or if you're like me know
that you don't want to change the colors of
these objects later on. Let's go ahead and draw the rest of the bananas in the
same layer this time. I will draw a green banana. Fill that in. Yellow banana. Let's go for purple. It's the same here. If you can see that you have a little line where you
outline your objects, you can just fill that in. I won't do that detailed
work here in this class as it's the pattern making process
that we are focusing on. But I just wanted to let
you know that that is how the smooth filler brush will work as it's
textured in the edge. You might not get a perfect
edge where you fill it in. Now we have a purple
banana and let's go ahead and create orange. Now we can turn off the sketch layer and here you have a few
different bananas. If you want to go in
and fix some details now that you turn off
the sketch layer, just do that before
we continue to add another layer
with some details. I will tap Layers
panel and tap to add some black or really
dark purple details also with the smooth filler. Here, I will just add
a black square at the top of the banana and then a little thing
at the bottom and I will do the
same with all of the bananas in this pattern Something like that looks good to me. On the same layer that we have the black top and bottom
parts of the banana, I will decrease the size of the brush to maybe around
four percent and I will add some black little dots to add texture and a little bit
more interest to my pattern. I'm adding these details s to show you what will
happen when you have different layers when you use this method of creating a half
drop pattern in Procreate. You can have a few
layers but you should have as few
layers as possible to not make this method too complicated and also to not reach the layer
limit in Procreate. Now we have our bananas and I will actually add another
layer with texture, so I will just tap and hold
to use my background color and now I will use the
Grain Stamp Number 2 and the maximum size and just tap a few times to add
some nice texture. Now we have drawn
our motifs and it's time to make the pattern. What I will do is to turn
on the drawing guide, I found that you
don't need to turn on the drawing guide every time you create
patterns in Procreate, sometimes it just snaps
exactly where you want it, but sometimes the snapping
is a little bit off. For the purpose of
this class and to make sure that you
understand what we're doing, I'm turning on the drawing guide and adjusting the
width size to maximum, which will give me four squares and the cross in the
center of your Canvas. The next thing that we will do is to delete the sketch layer, and I will group all of
the layers to a new group. I will swipe to the
right and duplicate this group and then I
will take this group, drag it to the left, make sure that you
snap at the center of your Canvas, the
vertical center. You will be able to see these yellow or golden
lines when you're at the center and you
will also be helped by your drawing guide
that we just turned on. When you have it in the center, tap the selection tool. Then go ahead and swipe to the right on your
original layer, duplicate it again, tap the selection tool and drag your new group to
the top right corner. Make sure that you are in the perfect center and
tap the selection tool. Then you have your last group. What I usually do is
that we will move this group to the bottom
right but usually, I just duplicate this so that
I have my original bananas that I draw over here if
I want to use them again. I just duplicated that
group again and turned off the visibility so these
are copies of my bananas, we won't use these now
but maybe you want to use those further on when
you create your pattern. Tap the group that
you duplicated, drag it to the
bottom right corner, and tap this mixture too. Now we have made the first step of our half
drop repeated pattern. What I normally do to make sure that I have everything
organized is that I swipe to the right on all of the layers that are
at the top of the group, Layer 5 in my case, tap and drag those
up above the groups, swipe them together to
merge those layers. Swipe to the right on the next couple of layers with black details and the same
with our colored bananas. You can also choose to either swipe to the
right on the background, drag that up above the group, and swipe those
together to merge them. Or you can just create
a new background layer by filling in a new background
box with the color. I will swipe to the
right on the groups that are empty and
tap," Delete". Now we have all of our
bananas in one layer, all of the black
details on one layer, and the white texture
in one layer, and background box in one layer.
8. Method 2 - Part 2: The next thing that
we will do is to add bananas to the places
where it's empty. Otherwise, we will
be able to see where our repeat starts and ends. For this one, it's a little
bit tricky because my bananas are cut in half for
many of the objects. The only banana that is
free is this yellow one. What I mean with free is that it doesn't move out of the edge. As you can see here, this orange banana
goes down here. So the only one that is
free is the yellow one. I will use that to
make my pattern. I will move this banana
a little bit to be able to draw a new banana
here in the center. To change the position
of the yellow banana, I will swipe to the right on both the object with the yellow color and the
object with the black details. Then I will use the
Selection tool. Tap and drag with free hand selected around my object and make sure that
I've selected it. When you have dragged around, you can tap the Selection
tool and I will just turn off Magnetics and Snapping and
tap the Selection tool. I dropped the selection. Tap the Selection tool
to move my banana. Now, I can move it around to somewhere where it looks like it will bring a nice
flow to my pattern. Maybe I want to change the rotation of it to
something like that. There, I place my banana
in a new position. Now, I want to draw a
new banana over here, but I can see that this
green one is a little bit in the way because I want to
draw something around there. Actually, in this case, instead of going
backwards and doing the half-drop repeat
backwards again so that I will get my
green banana free, I will actually just redraw this or at least this
part of the bananas. I will tap the green layer and just use the eraser to
erase that part of the banana. Then I will tap the black detail layer
and erase that part. I made sure that the edge of the banana that is over
here is repeated here. So I won't delete that edge, but I will redraw the part of the banana that is over here. Let's just start with adding that part of the
green banana again. I'm using the smooth filler, make sure that I'm on
the colored layer. Then make sure that I
don't draw over here at the edge because then your pattern repeat
won't match up. But you can start to draw
over here, for example. Maybe I want my banana
to go somewhere around there so that I can
fit another one here. So let's try it out and see
what I'm able to do here. I think that this
might look good. We will see how that actually
looks when we create the rest of the
repeat, but for now, go to your Layer Number 4
with the black ticks with the black details and just add the black detail at the top
of the banana that I erased. So now, we have some
space over here and I will go back to the
layer with the colors and let's use the blue color. Let's see which way I
want this banana to go. Maybe somewhere here and up
there would look pretty good. So something like that
and something like that. Let's try it out. That looks pretty good, I think. We'll move on to the
black detail layer with a smooth filler and add the
black details of that banana. [NOISE] Change the brush size to four and add the little black dots that
would bring some texture. This looks pretty
good at this moment. Now, we have the last part
of the repeat to create. We will see how
the actual repeat looks after we made
this last part. As for the white texture, I think that it looks
good like this. Depending on what type
of texture you added, you might need to go in and add some more texture after each step of creating
the half-drop repeat. This looks good to me. Now, I will again select
all of these layers, group them together, and then I will
swipe to the right, duplicate that layer, and I will use the
new layer to drag it instead of to the left
as we did last time, we will drag it to the right. Turn on Magnetics and Snapping, drag your layer to the right, make sure you're in the
exact center of your canvas, and then tap the Selection tool. Then I will swipe to
the right again on the group and duplicate it. Tap and drag it to the
top-left corner and you will see that your objects
meet up in the edges. Then we have the last group. You can choose if
you want to make a copy of that group as well to preserve the blue banana and make sure that you can make changes to that in the future, but I won't mind that for now. I have my original bananas here and I will just keep them. But for this group, I will tap the
selection and drag it down to the
bottom left corner. Make sure it's in the center
and tap the Selection tool. As you can see, when you create half-drop repeat patterns
with this method, you use groups and
duplicate the groups. If you would have, let's say, for example, 20 layers
in each of these groups, you wouldn't be able to create this half-drop
pattern even if you don't save
your original group. In this document, I have a layer limit of 47, so it depends on what type
of canvas you're using. But I always try to use as
large a canvas as possible, which also brings
me a layer limit. This technique is
great if you just have a few layers and we will
open up the groups, the three groups, tap on Layer 5, swipe to the right the Layer 5, tap and drag to move
them above the group, and merge them together. [NOISE] Swipe to the
right on Layer 4, drag them above the groups, and swipe them together
to match them. The same with the
colored banana layers, Layer 3, and the
same with Layer 1. Swipe to the right
to select them, drag them above your groups, and merge them together
by swiping them together. Swipe to the right on the
empty groups and tap Delete. So now, we actually have created our whole half-drop
repeated pattern. Now, we can try it out. If you would have some empty
space here in this stage, you would draw another banana or you can move the
objects around, but for me, this
looks pretty good. Maybe I want to move this yellow banana a
little bit because I feel that it will be a lot of empty space around
it in the pattern. Then I will turn on
the Layers panel, swipe to the right on the colored objects layer
and the black details layer. Drag around the yellow banana
with free hand selected, tap the little dot, use the Transform tool, make sure that I don't have Snapping and
Magnetics turned on, so they should be off, and then I can move that
banana around a little bit. Zoom out. Let's try
it out like that. Maybe I also want to move the
pink banana a little bit, drag around that one
with the Selection tool, and place it to somewhere where you feel that it will look good. I also might want to try to move this purple banana just a little bit,
something like that. How you move your objects is something that you can try out. When you practice
this for a few times, you probably will
feel that it will be easier and easier to know
the balance of your pattern, but we still need to try it
out to see if it looks good. When I moved all of my objects, I want to select all of the layers except my
original group layer. Swipe down with three
fingers, copy all. Swipe down with three
fingers again and paste. That will bring me a flattened image layer that I will drag to the top
of my Layers panel, and this is how I can
try out my pattern. You can also, if you wish, share your image as a JPEG to your camera roll and
insert it as a photo. It will give you the
exact same result. Now, it's time to
try out our pattern. Tap your Image layer, tap the Transform tool, and drag it to the left. We need to have Snapping
and Magnetics turned on. Then you drag your image
to the center point. Your image should be placed in the left center of your canvas. Tap the Selection tool again, and to not be confused, we can turn off our layers with the drawing so that we
only have our Image layer. Swipe to the right to
duplicate that layer. Tap your Transform tool
and drag your image so that it will meet up your pattern block on
top of the first one. Then go back to the
original image, duplicate that one again, and drag it so that it meets
your image at the bottom. Tap your Selection
tool to place it. Now, we have placed
our pattern block at the bottom and the top, and we can see that it
lines up perfectly. Then we tap the original image, swipe to the right to
duplicate that one again, and this one, we will
place at the top left. Here, you can find that it's a little bit hard
with the Snapping. So zoom in and make sure that you place it perfect at
the top-right corner. Swipe to the right again
to duplicate that one and drag it down so that it
meets up the ends of your pattern block and
tap the Transform tool. I will turn off
my Drawing Guides to see how my
pattern is repeated, and you have your
finished pattern block. If we turn off the Image layers and turn
on your Drawing layers, this is your pattern block.
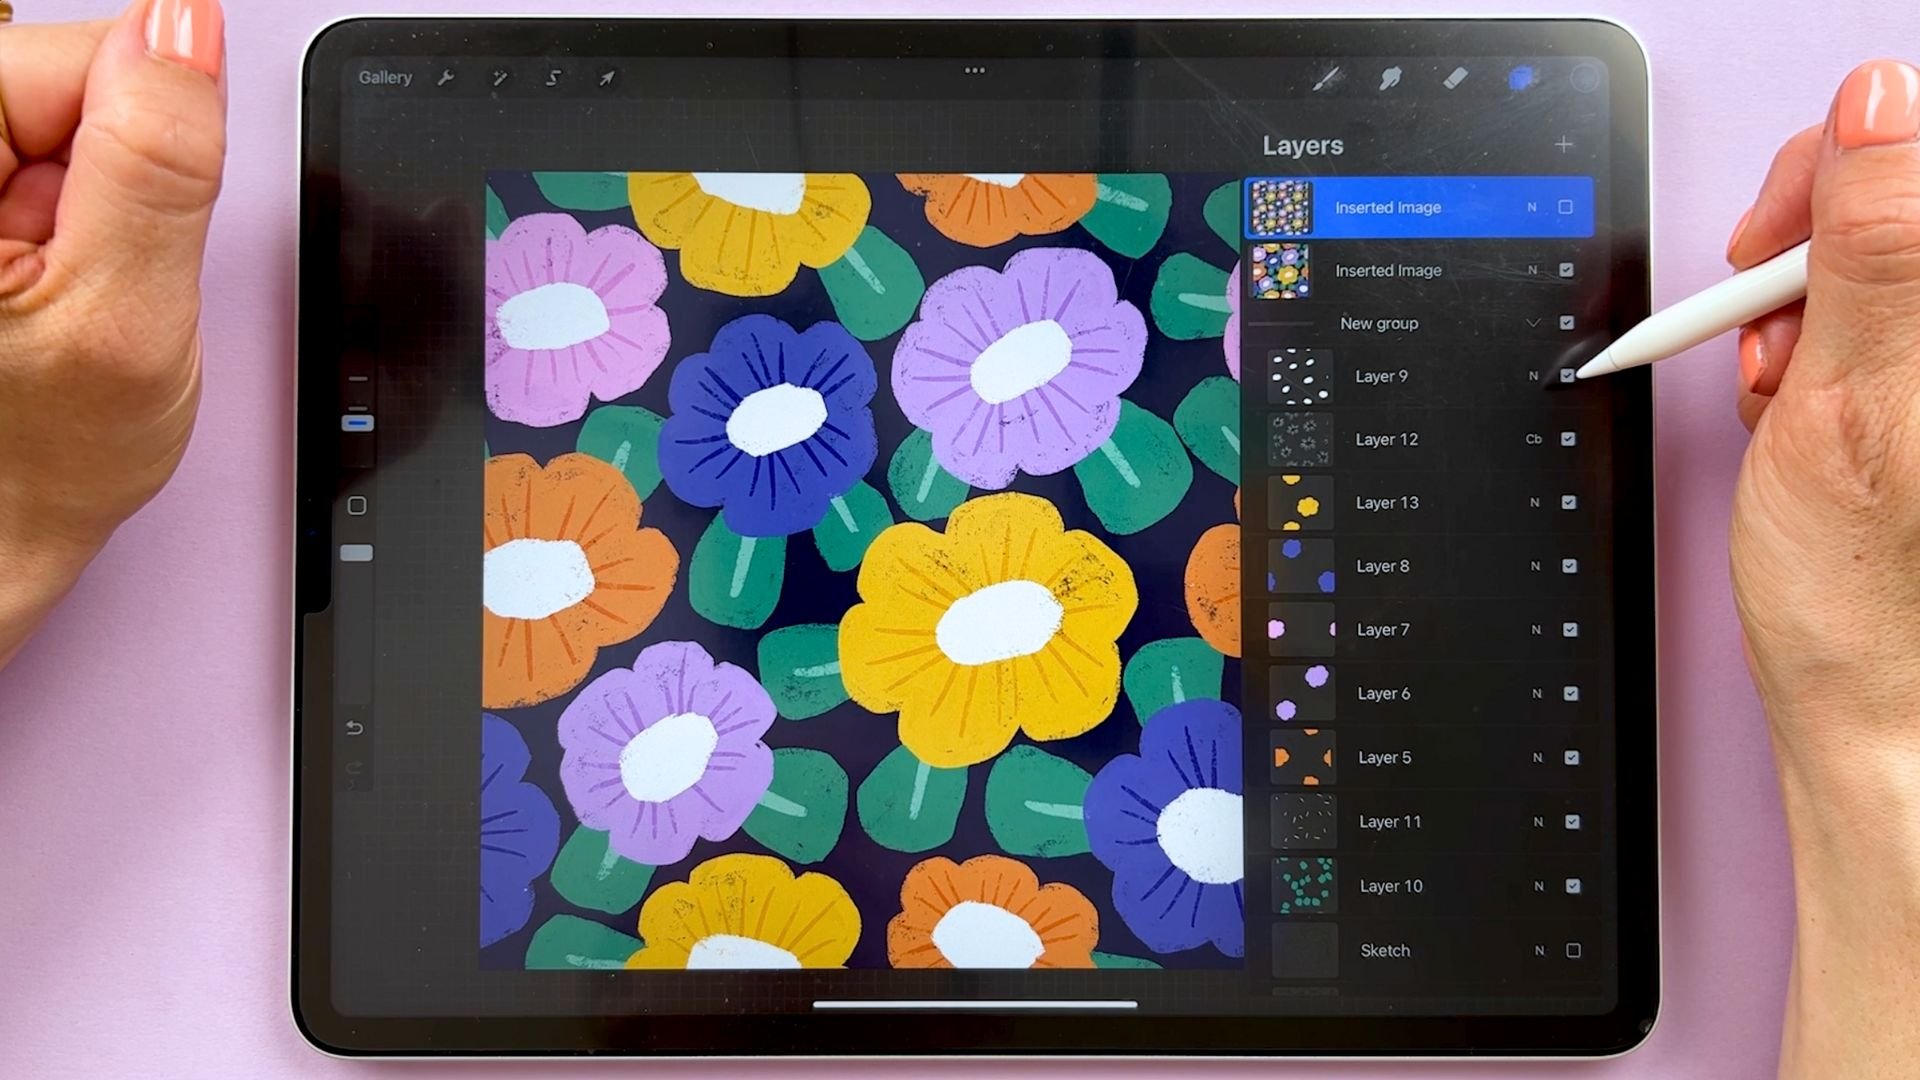
9. Method 3 - Part 1: Now it's time for
the third method and this is the
most flexible one, meaning that you can have many different objects
with many colors and as many layers as your document size in Procreate
will allow you to have. To give an example of this I will create
a larger canvas for this pattern and that will bring us lower amount of
maximum layers. Let's go for 7,200
pixels and this will bring me eight layers as
a maximum in this document. Tap Create and here we have a very large canvas that we
will create our pattern in. The first thing that we will
do is to draw our objects so let's create the sketch
with a black pencil. I will use the 6B
pencil and for this, I will draw a few different
motifs, some fruits. Let's draw orange. We'll just quickly draw this to not spend more
time than we need to on the sketch as it's
the method of creating an object that we are
focusing on in this lesson. Maybe I want strawberries, I would draw a strawberry here. Oops, that's a big strawberry. Something like that and lemon. I'm just placing out a few
different motifs in my canvas, and I make sure that they aren't falling off the
edge in my canvas. For this pattern, I will just draw one or just a
few of each motif. I will just arrange them so that I have space to draw all of
my different fruits. Maybe put the lemon there, the strawberry
there, and this is the start of my pattern. Let's draw some berries
here, some smaller objects. Berry over here and of course I have made these
patterns before so that I would know what to
draw with you in this class. Otherwise, it will
probably take me a bit longer to figure out where to place them
and what to draw, and things like that. But as the purpose of
the class is to create a pattern with these
different methods. I'm just moving through this sketching phase
rather quickly. Here I will place another berry and maybe another
blueberry around here. That looks pretty okay. Let's use the transform
tool to place them about in the center and move them
around a bit so that I'm happy with the flow on where
the fruits are placed. This is the start and this is where we
will draw our objects. Now in this document, I know that I have
a layer limit of eight layers so I know
that I need to keep it to eight layers and that
is also how I can plan my pattern because I want this pattern to be
completely editable. Meaning that I want
each layer to have separate color so that I can
change the colors later on. I will plan to have one, two, three, four, five, six, or seven colors
on the fruits and one background
layer so let's say six colors on the fruits
and one background layer, that's eight layers and then
I have one spare layer. It's always good to have one or a few extra
layers to work with. But let's try it out and
see if my plan will work. First things first, let's just draw these fruits on
different layers. I will tap a ''New Layer''
and use the orange color and the smooth filler
to draw the orange and fill it in. Let's turn off the sketch
layer to see if I'm happy with the shape
of the orange. Maybe I want to fix
the edges a little bit. Something like that. Turn on the sketch
layer and I will have a layer for the berries, blueberries, purple blueberries , something like that. The banana I will use this yellow-orange color on a new layer to draw the banana. I can't fix the
details later on, but let's just do
it like that for now and a new layer
for the lemon so maybe something like that. Then the strawberry, the
pink on a new layer. Just filling in where the
outline meets the fields that I don't get any white
strange lines over there. Here I have one,
two, three, four, five colors and six layers because they have
a sketch layer as well and on the next layer, I will draw the green
on all of the fruits. Maybe I will use 10
as the size with the smooth filler and draw some leaves and some
other details of the fruits. As you can see, I'm moving through this part
of the process rather quickly as we are focusing on the
pattern-making process, but I still want you to
be able to follow along. If it's moving too
quickly for you, you can always pause the
class to draw your fruits, [NOISE] and then play
again when you're ready to move along
creating the pattern. Then I will turn off my sketch
layer to see how it looks. I will actually delete
the sketch layer so that I don't use more
layers than I need to. Now you can go in and
adjust some details to make the fruits look
as you want them to look. Now let's count our layers. Oops, I've drawn the orange on the [LAUGHTER] wrong layer. [NOISE] Let's just erase
the orange from that. Its easy to make that mistake, to draw on the wrong layer. But that was easy
thing to fix as well. Now we have 1, 2, 3, 4, 5, 6 layers and we had a
layer limit of eight. Next, we will
create the pattern. To do this, we will need
to save some actions. I will create a new layer, and I will actually turn off all of the layers with my drawings. Then I will turn on the Drawing Guide under Actions Panel Drawing
Guide, Edit Drawing Guide, and drag up the grid
size to maximum, so that you get four squares perfectly centered
on your canvas. Now we need to save some
actions to be able to create our pattern without duplicating all of our
layers all the time. This doesn't make
sense at this point. You will know what
I mean later on. Just follow these steps with me. Make sure that you have a color selected so that you can
see what you are doing. Then tap and drag
on the new layer to fill your whole square. [NOISE] Tap the
"Transform tool", and I will tap "Freeform" and turn on Magnetics
and Snapping. For this first selection
that we will save, you will drag your square so that it covers the whole
left side of your canvas. When you are sure that it's in the perfect center
of your canvas, tap the "Transform tool" again. Then go into Layers
panel and you can either type select
on your layer, or just tap with two fingers
to select that layer. With your rectangle selected, tap "Save and Load"
selections, and the plus sign. Now we have saved this
selections as Selection one. [NOISE] Moving on, take your square or your rectangle as it
is at this moment. Drag it to the right. Zoom out a bit so you can
see what you're doing. With Freeform and Snapping
and Magnetics turned on, tap and drag so that you get
a square that is a fourth of your canvas and that is placed
at the top right corner. [NOISE] Tap your
"Transform tool" again. The Layers panel. Tap with two fingers on the
layer in the layers panel, and you can see that you have your square at the top
right corner selected. Tap "Save and Load" in the selections tool
and tap the little plus sign to save
this selection. [NOISE] Tap the "Transform tool" again and drag
down your squares. Tap with two fingers
on the layer in the layers panel to select it. Save and load, and save the selection as
Selection number three. Then you can go ahead and
either drag up so that you make a new
rectangle on this side, or you can just fill in your whole square
again and drag it so that you have your right side of your canvas covered
with the new rectangle. How you create this
rectangle doesn't matter. What matters is
that it is placed perfectly to the right
side of your canvas. Tap the layer again with two fingers in
the layers panel, tap "Save and Load", which will save it to
Selection number four. Tap the "Transform tool", drag it to the left. With Freeform and
Snapping selected, drag it up until it meets perfectly with the top-left
corner of your canvas. It should say 3,600 pixels
in width and height. Tap the Transform tool, two fingers on the layer
in the layers panel, Save and Load, and save it as Selection five. [NOISE] Tap the
"Transform tool" again. Drag down your
selection to the bottom left corner of your canvas. Tap the "Transform tool", two fingers on the layer
in the layers panel, Save and Load, and save your Selection
as selection six. Now you have [NOISE] six different selections in your Save and Load selections. Now we made the actions
that will allow us to create this half
drop repeat pattern. You can delete that layer, you don't need that anymore. Then you can turn on all
of the fruit layers. [NOISE] I will
create a new layer, drag it to the bottom, and drag a color, I will use the
green white again, to add a background box.
10. Method 3 - Part 2: Now we want to make
the first step of our half-drop
repeated pattern. I'm happy with the placement
of my fruits here. If you think that you
want to move them a bit, you can do that in this step, but you can also
wait to see how it turns out when we create
the actual repeat. Just make sure that
you don't have objects falling off the edges. Then we will select
all of our layers. Tap Group. You have all of
your layers in one group. With the group selected, we will tap the Selection tool. Save and load, tap Selection number 1. Tap the Transform tool and flip horizontal,
flip vertical. Then tap the Transform
tool again, save and load. Tap Selection number 2, flip horizontal
and flip vertical. Tap the Transform
tool to de-select and then tap the Transform
tool again, save and load. Then selection number 3. In the transform tool, flip vertical and
flip horizontal. As you can see at this point, we have made the first step
of the half-drop repeat. As you might also see you
have flipped the pattern, so you can either just flip it over like this, your canvas, or as I usually do, tap the Transform tool
and rotate it four times 45 degrees so that you will end up in the same direction
as it had before. Now we have made the first step of our half
-drop repeated pattern. Now we will continue to draw
some more motifs and to rearrange our motifs so that we feel that we have
a balanced pattern. The first thing
that we'll do is to move my orange a bit because I think that it will
look good if it feels out this whitespace. I will select the layer with orange and the layer
with the green, and drag with the
selection tool. Make sure that I don't have magnetics and
snapping turned on. Then I will just rearrange my orange to a place where I think
that it will look good. Maybe something like that. The way I arrange this
is that I want to make sure that I don't have
too much whitespace around any object, but that the motifs
are balanced. As I mentioned in
previous lessons, it's a matter of practice, how you place your objects. Also, it depends on how you would like your
pattern to look. But for me, I'm just
trying it out and using my eyes to see that
the pattern looks balanced. I think that I want to move
these blueberries as well. I will select the layer with the purple blueberries
and green. Maybe I want to place them
around here somewhere. I also feel now that
I might want to rotate the orange
a little bit more. Maybe something like that. For the strawberry, maybe I want to move
that one down a bit. Let's try out some
place around there. Or maybe no, I want
to move it up here. Maybe I want to draw an apple. Like last object here is
a good place for an apple it feels like,
let's try that out. Place the strawberry
around there. I will add a new layer. I have 1, 2, 3, 4, 5, 6, 7 layers, and I actually have one more layer to
draw a new color on. I will add an apple, add a new layer, and use the light blue-green
color with a smooth filler. Here I will just draw an apple
freehand to make it quick. Maybe something like that. Then I would want to
move it a bit so that I can have the green
parts over here. Select that layer with
the green objects. I will draw some green parts
of the apple this way. Maybe something like that. Now I feel that I want to
move the strawberry as well. Select the two layers
with the strawberry. Then twist it around, move it around to some place
where you feel that it fits, maybe it fits there. That looks pretty good. It might look a little
bit strange that I have a round shape of apple and an orange
next to one another. Maybe it would've been better
to make the apple a pear because then it
won't look the same. Actually now when I look at it, I think that it will
look better with a pear. I will just erase some
parts of this apple. Maybe I will just erase the whole apple and
draw a pear instead. Something like that. I think this will look better as it's not the same
shape as the orange. It would just bring
it a better flow. Let's select the
green parts and I will just move the green parts so that it's aligned
with a pear. Then I will also select the pear layer and
the green layer, drag around the pear and twist it around until
I feel that it looks good. Zoom out. Maybe I want to decrease
the size a bit of the pair. Let's try out to have it
somewhere around there. This actually might look good. To fill these empty spaces out, I will use the blueberry shape. Select the layer with
the purple blueberries, and I will just add a few more blueberries where
I have some empty space. Of course, this depends on how you want your pattern
to be balanced. I typically create patterns
that are pretty dense. I create patterns this way, but if you would like to have more space between your motifs, then you should just
go ahead and do that. Of course, this is just an example of how
to use this technique. But if you want to draw something else that works
better for you, then do that. The technique will
work exactly the same. Then looks pretty good
with the blueberries. I will select the
green layer again and draw the green parts
of the blueberries. That looks pretty good to me. Now we have created the first step of our half
drop repeated pattern. Now we will go ahead and
create the second step. Just follow my steps now. Select your whole group. With the group selected, tap "Save and Load"
and we already used 1, 2 and 3, so now we will use 4, 5, and 6, so tap number four. Tap the transform tool, flip horizontal, flip vertical. Tap the selection tool again. Save and load
selection number five, flip horizontal, flip vertical, the selection tool again, selection number six, the transform tool and flip
horizontal and flip vertical. If you are like me, you might want to rotate
it so that you have it in the same position
as you meant it to be. For now I will just turn off the drawing guide so that
I can see a bit more how my pattern is balanced
and I feel now that I want to change the position of the orange here a little bit, so I will drag around the orange with
the orange layer and the green layer selected and change the position
of the orange a bit. Maybe I want to change the position of these
two blueberries as well. This is a little bit
of detail work and you can go ahead and try it out and see where your objects should be placed for
them to look balanced. Typically, when I create patterns in Procreate like this, I just move the objects that are free and are touching the edge. So at this point, this looks pretty good to me. Now it's time to see how
this pattern is repeated. To do that, as we have reached the layer limit, as you can see, your maximum layer
limit is reached, I can just go ahead
and copy all. Tap "Gallery",
create a new canvas. You can do this
whatever size you wish. I will do it at
7,200 pixels again. Swipe down with three
fingers and paste. Here you have your
flattened image that we can duplicate and
repeat to see how it looks. Turn on snapping and magnetics. If you wish, you can go
ahead and try to see if you can do this without
the drawing guide. It looks pretty okay for me. There's nothing at this moment. So I will tap and drag to the
left part until it reaches 3,600 pixels and are in the middle left
side of your Canvas. Tap the transform tool, duplicate the layer, drag it up so that it
meets the top edge. Duplicate the layer again, drag it down so that it
meets the bottom edge. Duplicate the original square. Drag that one up, here here usually I need to zoom in so that the snapping
will work in the edge, and then duplicate the layer
again and drag it down. Now we have created a half drop repeat pattern where you don't need
to duplicate all of the layers which means
that you can use the maximum layer limit in
your appropriate document. Depending on how you would
like your pattern to look, you can look at your result
here and see if you would like to make any changes. Maybe I would like to add one more blueberry
here above the orange. That would make it look perfectly
balanced in my opinion. Then we can go back to our original document
and I will tap the blueberry and I know that I wanted to add a blueberry above the orange and it looks like
it's just here and there. So let's move the orange just a little bit to make space
for another blueberry. Turn off snapping and
magnetics and just move it a little bit down so that I have space for
one more blueberry here. Maybe this will do the trick. This is typically how I work
with patterns in Procreate, I adjust the motifs and add
motifs depending on how my pattern looks when
I try it out repeated. Now we can make sure we have
our whole groups selected. Swipe down with three
fingers, copy all, tap 'Gallery" again and we can
go back to our new canvas. You can just swipe
those layers together, turn off the visibility, and drag down with three
fingers and paste. Now we have a new layer
with our image and we will do the exact same
thing, drag it, we need to have magnetics
and snapping turned on, drag it to the center
of your left side. Swipe to the right on the
layer with the image. Drag that one up so that
it meets the top edge. Make a new duplicate
of the layer, drag that one down. Make a new one again, and drag it to the
top right corner, and duplicate the one on the top right corner
and drag that one down. This is our finished half-drop repeated pattern with
method number three for the most complicated patterns where you might reach
the layer limits and you have a bunch of
different colors and motifs that you want to repeat. But you still want to
have editable features, meaning that you want to have your different objects on different layers depending
on the color that you use. This is the original pattern look and here you have
your pattern repeated.
11. Recoloring: Now, I will show you how to recolor the objects
of your pattern. I will show you
how to do this in the method number 3 pattern, the ones with all of the fruits because in
the banana pattern, we have all of our
bananas in one layer, and we already decided from the start that we don't want
to recolor that pattern. In method number 1, the strawberry,
it's pretty simple, you have the two
different colors in two different layers. How to recolor is the exact same way as we
do in method number 3. I will select that pattern
and tap, "Duplicate", so that I will make
a copy of it and not change that
one, original file. Then I will tap into my pattern. Here, I can make changes. I will zoom out a bit. I can change the colors of all
of these different motifs. That is also why I have placed
them on separate layers. You can recolor objects in
different ways, in Procreate. The way that I do it when I have take [inaudible]
brushes like this, to make sure that I
color all of the motif, all of the nice
texture is this way. If you want to
recolor an object, you tap that layer, and you swipe to the
right to make sure that you get the Alpha
Lock on that layer. You can also tap the layer
and tap "Alpha Lock". Then you tap the new color
that you want to use. Let's say I have some red
color up here, I think. Let's go for a red
color on the orange. Then I will tap that layer
and tap "Fill Layer". This will have recolored
my object perfectly, so even if I zoom in, I will see that all of the texture is colored
to the new color. That is how I go about it, so let's recolor
the pear as well. Swipe to the right to
turn on the Alpha Lock, and let's go for a
bright pink pear. Tap "Fill Layer". There you have your new color. This of course also works with the objects that are
falling off the edges, so let's recolor the strawberry. Maybe we want peach, strawberry, fill layer, and we have recolored
object to peach. We can also try out to
recolor all of the green, so let's just use now the green. Swipe to the right
with two fingers to hit Alpha Lock on that layer, tap the layer, and
tap "Fill Layer". That is how you go
about to recolor your pattern created with
the method number 3.
12. Thank You: That's all for this class. I hope you enjoyed creating these half-drop
repeats with me and that you found it
useful to learn all of the three
different methods. Which one you use
depends on, of course, which one you prefer, but also probably the
complexity of your pattern. Thank you so much for watching. If you liked this class, hit the Follow button
by my name to make sure that you don't miss
out on my future classes. You can also tap my name to go to my profile page
here on Skillshare, where you'll find all of my
classes available to watch. If you want to have
a look at all of my premium Procreate
brushes available to purchase and use
in your artwork, go to majafaber.com/shop. If you use any of our
favorite company brushes, feel free to tag me on
Instagram with maja_faber. If you have any
questions at all, please ask them on the
discussions page here in class. Feel free to leave
a review to let me know if you
enjoyed this class. I would love to
hear your thoughts. Make sure you share your
project here in class. If you post it on Instagram, feel free to tag me
with maja_faber. Thanks again for watching.
 Maja Faber, Surface Pattern Designer