Transcripts
1. Stay Awhile and Listen: Hey, I'm Mark. During this class we're going
to learn more about lines, vertical lines in
Affinity Designer. During our first project, we're going to
explore pencil tool. We're going to trace this nice coffee cup
using pencil tool. But that's not all. We're going to
apply our technique called one line or
continuous line. So we will limit ourselves
to just single line. That's very interesting
minimalistic style for this first project. And after we are done
with this first project, we will move to
the serious deal. We will move to pen tool. First, I will show you
how to use this tool. It's one of the
most powerful tools in any vector editing software, like in our case,
Affinity Designer. But it's works very similar
across the industry. So whatever you learn here, you'll probably be able
to apply that in also up Adobe Illustrator vector Enscape because pen tool is quite
similar across software. So back to our topic
during the second project, we're going to use pen tool. After I show you how
to use this tool, we will trace a portrait. We will use our reference
layer and then we'll be tracing that we've
precise strokes. After we finish with
the second project, you will have a
better understanding of this very powerful pen tool. I hope you are ready to
learn more about lines, pen to pencil tool in
Affinity Designer. If your answer is yes, just start the first
lesson. See you there.
2. Affinity Designer Interface Overview: We aren't going to use
Affinity Designer. So before we move forward, let's do a quick overview
of the interface. Here in the center
of your screen you will see your current artboard. This is your document. The size will vary, depends what your setup. We can navigate using navigators slider here to zoom
out and zoom in. But the method I prefer is
actually to use shortcuts. So I tend to click
Command Plus on Mac or Control plus on
Windows and other way, command minus or Control
minus to zoom out. You can also hit Command Zero to go this default level of zoom, this dedicated Zoom tool, but I do not recommend using the app because by
clicking on Zoom tool, you switching from
your current tool, use navigator or keyboard shortcuts for
zooming in and out. You can also move up, down, left and right why
you are in Zoom in position so we don't need
to zoom out all the time. To do that. You can just hold spacebar
on your keyboard. If you are on Mark, you got magic mouse. You can simply scroll up and
down 11, right, as well. As you can see on the left side, we've got all our tools. If the two got this
little triangle mean, we can open down and see the tools hidden
below in the same group. On the very top, we got ruler. If you cannot see this
element, go to view. And from here we can
turn it on and off. And that's for any element
in your interface. If you cannot see some windows, some elements that are
here in this video, you will need to
refer to the view. This way, you will be
able to turn on and off elements, even whole panels. Panels In Designer
are called Studios. Let's take a second
look here, views. And then you got Studio menu where you can search
for different panels. You can turn them on and off. And they've got little
checkbox next to the name. So if something is off, you cannot see this panel. You need to turn
it on from here. You can always reset
the view as well. This will be the
default setup for any Affinity Designer like this. I using almost exactly the
same thing as the default one. I tend to switch to
navigator like this. And I got a little
bit bigger fonts and icons because I'm recording
my screen for you. At the very top, we got
our snapping options. Snapping will help us out to align our
shapes, our objects. So for example, let me just
quickly draw two shapes. Don't worry about
it for now and take a look with snapping option off. If I tried to put them
next to each other, I cannot really tell when it's the correct moment
to release my mouse. But if I turn on
snapping over here, now that we're kind
of stick, just snap, click like bricks, pump snapping for me so
it's much easier now, in addition, you will
see Smart Guides. You saw this like red lines drawing when
I'm moving to shape. That's giving me lots of
information about alignment. So I recommend you to use snapping by default and
just from time to time, switch it off when you need it. All right, so this was very brief overview
of the interface. Now we are ready to
learn more about fill color and stroke color.
3. Fill and Stroke: Every vector object
have two properties, two colors, fill color
and stroke color. So let me just quickly draw a
shape here using oval tool. And I will also draw straight line next to
it using Pen Tool. Alright, and we got
something to talk about now. So let me select my
shape here on the left, this huge red circle. As we can see, we
got two colors here. The main one, the full circle
indicating fill color. This is the main
color of the shape. Easily to adjust the ball
with this color wheel. And then the second wheel, more like the circle of the
hole inside like donot, while indicate a stroke colors
truck is around the shape. In our case, even I zoom in, I can not see this black color because the stroke
is set up to normal. We don't have any stroke here. We need to add a width to it. If you move this slider
right now we can see our black stroke
around the main shape. That's one way to do it. There's also similar panel over here around the color area. Stroke the same panel. But we don't need to open and close this
popup all the time. And from here we can use
the same slide as well. Take a look. Stroke can be known. Dan. And the second
option is regular stroke. That option as
dashed line and then texture stroke with brushes we're going to talk about later. Alright, so let's jump
back to regular stroke. We can also adjust other things. We can put the stroke
inside the shape like this. And outside the shape, by default is in the
center of the line. But when we talk about a simple line that I draw on the right
side of the screen. We can of course,
adjust the stroke, but we cannot move
it to derive to the center because we don't have the inner part of the shape. This is open shape, this is just the line. We can adjust the tip
of the line here. We've got rounded
one or straight one and then extended
straight one. If I make a little bit more
complex line like this, you can see we've
got something like corner now it's
rounded by default, but we can change that. We can make this straight
corner lying it is. Let me just open to angle a little bit so you can
see the difference. This is the street corner and we can even cut it out like this. So we've got three
different corners rounded. We can cut through, I'll make it straight. Alright, we got ending and
beginning of the line. So we can add a heads to it
if you want to make arrows, for example, awesome diagrams, you can pick the headphone, start and the end of each
line from this menu as well. I tried to scale my
line down like this. It's still very tick. We change the shape of the line but didn't change the
size of the stroke. So let's turn on Scale
with the object. And this way, the stroke will scale down with the
ship without it. The width of the stroke
is exactly the same, even scale down the object. Of course, we can
adjust the color of the stroke from here
from our color panel. Same way we adjust the
fill color before. Nice. We can add fill color
but take a look. This is open shapes, so we will have only like this fill in-between
outside points. That's not really recommended. Let's take only with
stroke colorful lines. All right, Keep in
mind our objects are located on a layers here. So each object is
on separate layer. You can see a layer
panel on the right. If I drag this layer below, now the circle is
covering my object. I cannot see the
whole line. Now. Keep that in mind. Our lines, our shapes are all separately
on different layers. All right, That's enough
about fill and stroke colors. Let's move to the next lesson.
4. Pencil Tool: Okay, it's time to pick
the tool that we're going to use for
our first drawing. In this tool is
called pencil tool. It's over here on the
list on the left side. So pencil tool is quite easy to pick up because it's exactly ask them normal pencil
so it will draw the line after your cursor. Let me just pick the
stroke color here from the color panel on the
right side where you can pick any color we
want for the stroke. And then keep the
fill color blank. We can adjust the size of
the stroke using this style, as you may remember, are ready. Alright, uh, something
like this will do. Now we are ready
to test this tool. So let's make a first stroke. Just click and drag your mouse. You will notice that
the line appear. Alright, this is very much
like a normal pencil. It's easy to use
because it's AG, exactly asked the normal one. So the line appear
after your cursor. You might notice that there was a little bit distance
between the tip of the pencil and the line because we got
stabilization here. If I switch it off and I draw the same thing
one more time, the program will not try
to make my lunch smoother. So it's a little
bit more distally. The two basic modes that
we can use for this tool. One is the basic one without any extra help
from the software. And the second one
we can turn off this option to earn
on this option here. And there are two
modes for that. Let's try and both of them. Now we can adjust the distance between the
line and the cursor. Take a look. Now it's really long. It's almost like pulling something behind a car
and that we are driving. The line is not appearing
directly next to your cursor, but it's more like you're
pulling the line and behind it. The effect, it's a
little bit different. It's a little bit
harder to control, but you will have a
little bit fewer nodes, so line will be smoother. Of course, this
was quite extreme example what I like to do. I like to use the distance
something around ten points. Take a look. Dance what I
like about this feature. It will be very hard to do
smooth curvy lines like this. Using my mouse. Currently I'm using my
mouse, not a tablet. So this is really helpful to make the line appear
after the cursor, not directly on it. Alright, let's
delete that and try again with this
feature sculpture. So let's turn it on and off. Let's try without it first. So this is without sculpture on. I tried to draw rectangle. Let's check the result. I end up with four
separate lines. So every time I click
and mega stroke, I make separate
line with sculpture on my line will try to
stick to the previous one. I like one long line
instead of four. Of course this is
not closed shape. Take a look. This is
still open shape. We need to close the
shape by clicking function at the very
top of the screen Boolean function over
here, click that. And the ship will close for you. Don't forget to
close your shapes when you're drawing them. All right, that's
the difference. When you get sculpture of, you will draw separate
lines, sculpture on you. We'll continue with
the same line. Alright, let's get rid of those examples and jump
back to our pencil. This also pressure control here and normally is set to
none because I'm using mouse, so I cannot use the
pressure itself, but I can play with
velocity like this. As you can see now my line is thicker and thinner paths
based off my velocity here. If you're using graphic
tablet or Apple pencil, you can set up to be abnormal
pressure from the pencil. We can also check that
later on, take a look. There is a nice graph
here showing the pressure along my stroke so
I can adjust that. I can even clear that out, reset and move this myself. I can make adjustments
after I draw the line. That's the beauty of
vector art that you can adjust everything even
after you make your stroke. Alright, so the few features
that we're going to use during our first project, don't worry if you didn't
memorize all of that. We will talk about it
one small while we are actually working
on the project itself. See you in the next
video and we're going to practice with pencil tool. We're going to do
some practice line to warm up before the main project.
5. Pencil Practice: Before we jump into
our first project, Let's spend a few moments. It's playing with
this pencil tool. Alright, so I'm going to try to draw a few different lines, so we will focus on drawing
lines, not shapes here. I'm setting up my
tool. As you can see. I will stabilize my
line from time to time. I may change some properties. So let's try with this setup. Try to draw lines that kind of intersecting
in the center. As you can see, it's not than is in this tool is
kind of doodling. We cannot have control. We don't control points here. We just draw the lines and points are added by the program. So we got a little bit
less control comparing to other tools for drawing
lines that we're going to introduce later. Let's go back. I'm using this history
panel on the right side now to go back few steps. This is something like undo. Now I will try to
redraw this element by using same tool but a
little bit different settings. Let's change mode
to Window mode. We can adjust our stabilization
tool here as well. As you may remember,
we are kind of like dragging the line
behind the cursor, not drawing the line
directly on the canvas. That's very helpful if
you using mouse-like me, as you can see, is give us
a little bit better result. Not perfect, but that's kind
of nature of this tool. So we will just use
it like this. Cool. Let's change this to be
a little bit shorter. All right, and now I will
try to draw this guy here. So we just moving the
mouse and the line will be drawn almost exactly
on your mouse cursor. It's a little bit
of distance between the mouse and the line to
make the lines smoother. But still it's definitely
look like hand-drawn. That's kind of the
feature of this tool. If you need lines that look
very organic, very natural, hand-drawn style, use
pencil tool for that. We can make this a bit longer
to get more smoother line, Let's try from this side. Alright, so the line is
just a little bit smoother because I make this longer, this little robe that I am
dragging the tool honest a bit longer and give us a
little bit smoother line, but also a little
bit less control. Alright, so feel free to
experiment web settings. This lesson right now is for
you guys to experiment with different settings
for your pencil tool before we jump into projects. So I'll try to draw six
different lines, just like me. If you are not happy results, you can always use
the history panel that is located on the
right side of your screen. Next to navigator, you can go and undo your steps using
this hand, the slider. You can undo steps and
then you can redraw some elements here
if you're not happy with the result, keep in mind. Pencil tool is not
very precise one, so you will always have
this hand roll vibe to it. That's kind of why
are we going to use it for the first project? All right, two more
shapes, two more lines. To practice. Here we got more
sharp, sharp turns. Alright, and the
last line over here, you can zoom in a little bit. And again, in my case
I'm using mouse, so that's best I can
do with my mouse. If you are on your
iPad right now, probably your lines are
a little bit precise, a little bit better, but
still there will be wildly. This is Pencil
Tool, not Pen Tool. Alright, and that was
our practice lesson. Your task here is to draw six
different lines like this. Please do it before we
jump to the next one.
6. Reference Layer: All right, We got
some warm-up with this practice
activity and now it's time for our real project. You need to set up your canvas to be
square like this one. Check out my documents settings. I use 1920 pixels
time 1920 pixels. We got a nice square here. Create a new document
with similar dimensions. And now we are ready to
search for reference image. We're going to use a reference
for this first project. The project itself will be about continuous line drawings, so we have only one
line, one long stroke. That's really exciting
way to do that. First open your stock panel. If you cannot see your stock
panel and go to View and studios and check that you got this little
checkbox next to it. We can switch this off. I don't have stock
panel now and go to View Studio and turn on
the stock panel here. Perfect. Here's my stock panel from here, I can search for
reference images. So maybe something simple
like coffee or tea. You can scroll up and down and search for
the image utilize, you can pick the
same one asked me, oh, I'll need to be different. That's alright. I think I will go with this one, so I simply click and drag
this inside my art board. It will load your image. Now it's definitely much
bigger than art boards. I will zoom out a little bit so I can see the
edge of the image. So we use the
navigator zoom out. That's good. And now you can
just scale it down by dragging the corner inside. Alright, That's perfect
position for me. And now I will
adjust this layer. First, I can
double-click to rename. This is my four daughters,
my reference photo. Now, I will also reduce
the opacity of this layer, so it's a little
bit transparent. We've just reduced
opacity and new name. I'm ready to lock this layer, so click this little lock here. This way, you will never
select this photo by mistake. All right, in the next
session we're going to draw our line
above this image. We will try to kind of trace it, but not one-to-one, more
like in the artistic way. So our task is to create
just one stroke, one line. So this is just one line art. We will try our best
to draw one line from the top to the bottom covering the whole overall shape
of this coffee mug. Alright, see you in
the next lesson.
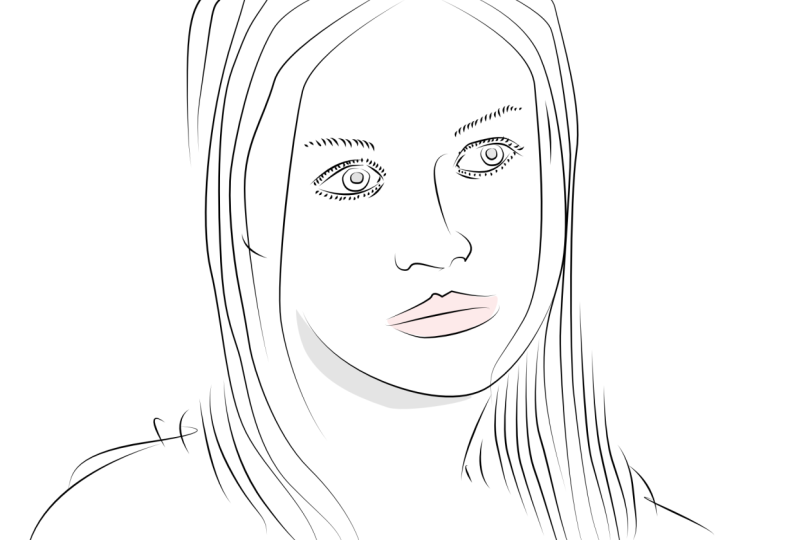
7. Continuous Line: All right, It seems
like we are ready for our long stroke. In this first drawing, we're going to use
only one single line. Very long lines are going to select pencil
tool on the left. I will go with very dark
gray color, almost black. We can adjust width
and give it a try. Try it first before we start, because this will be
just one single stroke. We cannot change it
anything on the fly. None. We will stabilize my movement
by this tool as well. Okay, like this, not too
much, just 8.6 here. I can try with
this mode as well. And I think I would go
with the second one. And the window for this
mode will be seven, as you can see here. So my curve will be a
little bit smoother. Let's change this to five. And I think I'm
already so delete my test lines and I will start over here above
my reference picture. I will draw some kind of smoke coming from
this hot coffee. And then around here, the top. So don't stress too much. If you already see that your line is not perfect,
That's all right. We just need some basic contour. We can work with it later on. We can adjust our
line as we want. But first we need
some starting point. And so I tracing this, keep in mind this is
not one-to-one trace, more like artistic one because we're using
just a single line, a single stroke here. I continue with
the same line here and then two here all around. And I'm going to
end my line here. I was able to trace all important elements
from this photo. Let's take a look
on the line only. So I can hide a
reference picture for a moment by clicking this checkbox on the
layer panel here. This way I can see
the line itself. It's not perfect, Definitely, but it's a good start. In our next step, we can use Node tool
to adjust this line. We can make it much smoother or even add in details to it. Alright, so EPR line
is not perfect. That's totally fine. This is just the first
step for this project. So I will see you in the next
lesson where we're going to use Node tool to
adjust our long line.
8. Node Tool: All right, so we got our
one continuous line, but that's not the
end of this project, it's actually just beginning. Now we're going to adjust
this line using Node tool. Take a look. Node Tool is over here, and it looks a little
bit like a white cursor. This to allow us to
move nodes in our line. This is really long line
with multiple nodes, so now it's time to adjust them. I can click on the node and
I can drag it to the left, to the right and the
line will follow. I can also simply delete the node by clicking
Delete on my keyboard. And I can add the
node to the line by clicking on the line
directly like this. We can move control points
for the line to change the curve above and
after the point. Alright, so our task now
is to go from the top, from the beginning to the end of our line and adjust our notes. By using pencil tool, we probably generate
too many points. We don't have control over how many points the program will add while we
drawing with this tool. So probably you will need
to remove some points. That's what I'm going
to do right now. If I think that the
point is unnecessary, too close to other point like
this one and just delete. I click on it and then hit
Delete on my keyboard. Also, I'm adjusting the curve of lines so it's all
stacked nicely together. Go from the top, from the start of
my line to the end, adjusting my notes right now. The most important is to remove unnecessary note that will
make your line March smoother. Alright, so if you feel like
the note is not necessary, it's too close to other node. You can delete that.
And then you can use a neighboring node to
adjust the curve later. Delete this one. Delete, use this one to adjust. All right, it's almost
like cheating here because in vector art we can always edit lines
after we draw them. That's not the final design. We can just go everywhere
and edit our lines. All right, Take a look. I will term and this point
here into sharp note. Now this is normal
curvy node like this. I want to be very sharp
turn, I click here. Now I got very sharp turn. I convert my node to shop. I will convert back to curvy. We've got control
points, we got curve. Now I click over here. And I got sharp node
represent with little square. So sometimes you
will need to convert your note into sharp
one if you need very, very sharp U-turn like this. All right, keep in mind, and this is not
photo-realistic artwork. This we adjust inspired
by this reference layer. But we can make some
creative choices on the way. We can change how it's look, alright hue, I will do
a big modification. I did not cover this area. Well, why drawing the lines? So I'm going to add multiple
new nodes right now, take a look very quickly. Just by clicking on the line, you can easily add new node. Keep in mind if you've got
sharp turn like this is good to make this
node sharp as well. All right, over here. Just adjusting. Delete unnecessary one
That's important part, if you got too many nodes
close to each other, line will look strange. Keep zoom in for now
to fall my first pass later on our zoom out and
take a look from above. But first, let me
just go through this whole line from
beginning to the end. We are kind of halfway
through right now. Delete, delete. This one over here, maybe little changes here and there. Right? Let's follow the line. We can make this one
sharp definitely. And then follow the line. This one is too close, so delete and adjust
the neighboring one. Nice adjustments. The next one is too close, I can see it straightaway. So delete. Delete, this one. Delete and end of the line. Alright, I think we
didn't go around the cup, so I didn't adjust this
part of the line just yet. So let's take a look here. New node. You'll note it's very messy. You can delete that
and add a new one. Replace that with the new node. Let's put this here, delete, adjust existing one. This one will be
deleted and we could just few more nodes
left, almost there. As you can see, this node
tool is really powerful. It's allow you to
customize any line, any shape in Affinity Designer. This one definition to be sharp, sharp turn here just below
this primary line at the top. The first one we draw, alright? We kind of like going to
the beginning of this one. Too many nodes here. So delete this one. Move this one to the center. Delete this one as
well as you can see, the most common change I make here is to simply
delete unnecessary nodes. That's something that
will make your line match smoother. Less nodes. To worry about. Seems like we just finished
our first adjustment paths. So I took note tool, the white cursor and
go from beginning of the line 2D and
adjusting my curve. I can even make something
more fancy like this. Take a look. And then we will adjust this
end here as well. Let's pull it down a little bit. Seems like we got
some troubles here. I will move this away. It is like two points together, so I delete one. This one is not
necessary anymore. And that's our first pass. And still we can make
some changes now. It's our already
saw much better. Let's extend this
line. Overdose. Starting like this. More elegant I believe. Okay. I'm kind of doing the
second pass right now. I did all necessary
changes already. Now I will make more
like some artistic, creative choices
to move some lines around to get our
overall better. Look. Maybe this one down here. Kind of trials and errors. Now, I can switch off the reference picture to see the line on
layer like this. All right, who can already
see the improvement comparing to what we got at the
beginning of this lesson. Much better line. Now we can make few, let's say creative,
artistic changes to it. Let's modify this area. I don't like the look
of this area here, so I will make some changes. Right? This one was math
software right now. We can flip it like this. Keep in mind in this
project we tried to mimic the lawn line art style. So this Taiwan artists
use only one line. So something like this is quite common to see in
the drawings like that because they need to make terms and go into other
direction with this one line. This one a little bit
lower, I'm already better. We get rid of this
very sharp curve here and then we got this
nice banded one instead. We can also cross lines like this to indicate that
kind of end of displayed. Nice. I liked this new
look of this right side. So feel free to use Node tool for adjustments,
adjust your line. We draw it previously
with pencil tool. This tool is not perfect. Usually it's at too many nodes. So your primary task
during this lesson is to get rid of access. So we want to remove unnecessary nodes to
make our line smoother. We could just one
line in this project, but it's very, very long. Alright, so we finished adjusting
this line with no tool. And in the next step we will add some colors to this picture.
9. Adding colors: Thanks to the adjustments
we made with no tool, we got very nice line now, but we can still add
some additional shapes. Our goal is not to
color everything, but to add one or two shapes to make this image
more interesting. Alright, so I'm going to set up a fill color here that I'm going to use later for my first shape. So I can adjust the
sliders like this. In search for new color, I can also switch to
something called color wheel like this might be
a more familiar with this way of
selecting colors. You can select the color
from the color wheel. Not we will use this color later after we got
our shape ready. Okay, So same to us before
pencil tool and I'm going to draw a dark
shape here at the top. And I will make this irregular, just kind of like random pattern here to mimic a
milk in the coffee. Now, I'm going to add my color from the
palette here it is. Keep in mind, this shape
is not closed just yet. I mentioned that before when
you're using pencil tool, you will have open shapes. So this area is
empty. Take a look. If I add temporarily
some stroke, we don't have stroke here. This is empty area. We need to click Add. Now we got normal clothes
shape to work with. All right, so I will move
this down below my main line. Now, I can use my
favorite Node tool to make some post adjustments.
That's the best way. In Affinity Designer we can adjust shapes after
we draw them. So you don't need to be very
artistic, talented person. You can always make
adjustments after you draw something and it will look good. Thanks to adjustments. Alright, so don't be, don't walk too much
on details here. We still need to have this
hand draw doodle vibe. So take it Is it make a few adjustments
but still keep it. Let's say natural organic. Alright, I don't want this shape to cover
everything completely. You see, I got this wide hole in the center because
this is cup of coffee, so I want to mimic milk or something like
that in his coffee. All right, and
just move it here. I might be this one.
Move back, Ali to bid. Just few adjustments
here under always, you can remove some
unnecessary nodes by clicking on the node and then Delete
on your keyboard like this. And you can use the neighboring node to
fill this gap later on. As I mentioned, our
goal here is not to color all elements in
this illustration. The main part of the
illustrations are a single line. Now we just adding some extras. In my case, I've
put the color of the coffee at the
top of the cup. Also, I will move, make a second shape
for the table, kind of the background for it. And that's it. Just two shapes to colors. We don't want to make
too much detail. We don't want to
take attention from this nice-looking line doing some adjustments to
the line as well. Okay, I think
that's enough here. Let's zoom out and see it. Cool. I think
that's really good. Addition to my illustration. For the second shape, I'm going to of course
use the same tool we build this
project all around. This pencil tool. Let's use pencil to one small. And this time I will draw
some kind of backdrop, backdrop like table-like thing here at the bottom
of the screen. Now we can add color to it. And don't forget to
close your shape by using this art feature here. Cool. This is my second shape and I will not draw
any more shapes here, just simple rectangle to cover
the whole image like this. And this will be my
main background thing. I wouldn't need to
drag this down on the layer panel because
it's background, so we can even name it backdrop. Here. We can type the
name of this layer. Then we can lock it so it will not select the
background by mistake. We still got this
reference picture here. As you may remember,
take a look. It's here. But we will not need
this any longer. We finish tracing this so I can just delete
this layer for now. It's gone. Now we could just four layers. Go to shapes and
main line by group. Color one color two,
backdrop and line. It's good habit to name your layers in your projects
so you know what is, what exactly it in if you open
your project after awhile. Alright, let's clean up the
bottom part of the project. There are a few ways we
can do this operation, but I think I will use
geometric operations. So I will draw one more
shape and then intersect this custom shape I draw with pencil tool
with normal shape. So let's go and pick rectangle. Let's draw a rectangle
around here. Alright, bit smaller and
pick the same color. And now I will intersect
those two shapes. So I select two shapes together. We've Shift and then select
intersect here at the top. Only the common area will stay and everything
else has gone. Now we've Node Tool, we can adjust this curve here. Remove unnecessary
nodes like always. You can even click on
the line directly. Not only on nodes. Make it like this. Again, we are not trying
to make this line perfect. We still need this
hand-drawn vibe to it, so don't overdo it. Here's my final image. I add color to the table, color to the background, and color to the coffee. And that's enough. We still, our line is still the main star of
this illustration. We cannot overdo it. I will even make
this color brighter, so the lie is popping up more and this one will be
blight brighter as well. I make my background
March brighter so we can see this
nice-looking line. All right guys, the few
lead to changes we can do to our line and then
we'll be ready to export. I will show you
how you can export your artwork to
some common files. In our next video.
10. Export to PNG / JPG / SVG: As a final refinement
to our first artwork, Let's select the main line. Now. We're going to Stroke
panel on the right side. From here, we can change
the width of the stroke. But also we can simulate
pressure on this line. Let's play with
this for a moment. Here's our pressure chart. This is beginning and
the end of the line, and then we got
everything in-between. So by doing our collect this, we will show the program to reduce the pressure at the
beginning and at the end. As you can see, it's
very fine and very thin. Then in the center of
the line, It's normal. That's a little bit too much. So let's reduce pressure at the beginning and at
the end of the line. But just a little bit like this, maybe even less like this. Alright, so just little
finishing touch to our line. Cool. And now we can export our artwork if
everything's ready. So I will go to File menu
and top left corner. Then I will hit Export. Don't forget to save the
source file as well. Alright, let's open
export pop-up. It's very clear here we've got multiple file types
at the very top, so we can pick whatever we need. Let's see the preview here. Nice. Png is good format for
sharing your artwork. Easy to share in PNG format, SVG is perfect because it will memorize your
vector shapes. This is Scalable
Vector Format and JPEG is the most common
format of the Internet. So depends what do you need? You can select the
format you like and then export
your whole artwork. In case you want to export just the line with
transparent background. You can select only
the line File Export. And after you select PNG, you need to change the
area to your selection. This way, you can export only the line without
background and colors. All right guys,
it's time for you to export your first artwork and then we will continue
towards our second project.
11. PenTool: Well done with your
first drawing. For the second project, we are going to use
a different tool. It's called Pen tool. It's over here on the left
side just above pencil tool. Take a look. I will try to use this tool right
now on my art board. And let's see, As you can see, I didn't draw any line just yet. The line only appear after
a click, the art board. So it's different than pencil. We're not drawing the line. We are drawing nodes, points, and then the line
appear between them. So it's much more precise. Of course, we can use Node tool to move our points are nodes. After we draw them, we can even turn
this sharp node into curvy one with control
points like this. Why not to draw curvy
points from beginning? We can do it as well. So simply click and drag. Don't release your mouse. Just click and drag. And a point will
be the curvy one. Click and drag here. And we got nice curvy line. Click and drag. Also here, click and drag. Now we got curvy lines. We don't need to only draw
straight lines with pen tool. Very handy trick if you
hold Command or Control key now on your keyboard
you can move your nodes. So it's kind of like
temporary using Node tool, but you still got your
pen tool selected. You don't need to switch back between node two and
pen to all the time. Simply hold Command or Control
Y you are using Pen Tool. Alright, so let's jump back to Penn to regard
few modes here. Default one is pen mode, is also smart mode, polygon mode to this
one is very handy for like sharp curves. So we've got a very
straight lines. We cannot make any
curvy line here. There is one more line
mode here at the very end, only for drawing lines. So there'll be
only single lines, even the steel selected, there'll be not
connected every time I click I make a new line. So we didn't need to deselect your old thing because we will create
new line anyway. There's also something called rubber band mode are
the variant here. Let's turn it on, go back to pen mode and take a look
when I use rubber band mode. Now, we can see
the preview line, this little blue line
that gave us the preview. What will be the next line? That's very handy and
I recommend you to use this rubber band
mode. Take a look. I got preview, but I can
click and drag to change it. And now I got preview
for this line. Perfect. Robin mode gives you this led to Blue Preview before
you draw the line. That's nice. Pen tool, as you may notice, is much more precise. The pencil tool, we
can trace objects, we can draw organic
objects easily. Many believes this is the most powerful tool in
any vector editing software. This is your go-to tool
if you need to draw precise line pansy to use before It's more for like
natural duty, like line. Maybe you want this
kind of style. This one is more precise line. We can even draw a circle. Take a look. One node here. One node here. Please note here, just one more here. We've got nice circle. It will be not possible
why using pencil? Pen tool is much
more powerful than pencil tool and
we're going to use this for our next project. But first, let's
practice with this alittle bit more in
our next lesson.
12. Pen Tool Practice: Pen Tool is much more
precise than pencil tool, but it's also a little
bit harder to use. So let's do a little
bit of practice. You can download this
practice file from our class project area and then simply open it up in your Affinity Designer
and try to follow along. I got my pen tool ready and I'm going to draw my
first line here. This is curvy lines. So I click and hold,
click and hold. Click and hold to do
curvy lines, curvy notes. Alright, not too many, just one here and
another one here. You don't need any
node in-between. That's kind of common mistake for beginners using Pen tool. They are too many notes for
the shapes, for the lines. Cool. We got our first line. We can click Escape on
the keyboard to deselect. This way we can move
to the next thing. Maybe let's use polygon
mode for this one. Click here. Then I can click here, here. Here it's really easy to draw straight lines with pen tool. You can also hold Shift, then it will be
sure that your line is exactly where
you want it to be. 90% angle. Alright, We can do
similar thing here. Just a straight line. Click escape to deselect this way you can start
your next line. Maybe we'll start
here going down. Again, up. And we got one curvy line
here at the very top. Just like this. Join in here. And it's already
closed shape, nice. Inside. There is a triangle. Cool. And we got a line here. We've kind of curvy endings, so let's click here. We make the curvy one
here and also here. It's not perfect.
So I'm going to hold Command on my keyboard. This way I can temporarily
switch to note tool without turning off Pen Tool. Alright, We almost dirt just
two more shapes to trace. Click here, let's
make it curvy one. So click and drag,
click and drag. Then for the straight corner, we just click below. Click, click. Careful. We got curvy one here. So click and drag. Colleague here and
close the shape. Nice. Our final challenge, Let's draw something
like a circle. So click and drag. Click and drag. Click and drag. One more time. Click and drag and
close the shape. Nice. Alright guys, I
really want you to finish this little training
practice worksheet that you can download from our class project area before we jump to
our second drawing. Good luck with this
literate training, and I will see you in
our second project.
13. Artboard for the Second Project : It's time to set up our redesign a for the
second project. As you can see, I got to
square art board once more. This is exactly the same size
as for the first project. So I use 1920 times 1920 pixels. But this time we going
to use artboard tool. So let's insert art board to
release this size like this. As you can see now the
background color change, it's much lighter and
also can just modify the size of the
artboard as I want using those transformation
boxes around. I can also type the
size over here. I can go back to
the original size by typing my size here, confirm with Enter and we
are back with the same size. This is our upper one, but we can insert more than one. That's perfect. If you want to work with a document
with multiple pages, if you export that as PDF, you will have multiple
pages later on. Alright, let's delete this one. Keep in mind you can use artboard of different
sizes as well. So we can use artboard width, vertical one together
with the horizontal one. That's really handy feature. But for our project we just
need one art board like this. Now I'm going to open my
stock panel on the right, and let's search for a face. This time, we're
going to inspire ourselves with like the
portrait picture of a person. So let's search for the face. I will drag and drop
this photo over here. This time we are not going
to resize the picture, but we are going to
re-size the artboard itself too much the
size of the image. So let's just resize the artboard and keep the
image in the original size. Now in the layer panel, I can of course double-tap to rename this layer
so I know what is it? Reference photo. I need to change this picture
into black and white. Click on the layer with photon. Go up here to the Layer menu
and search for adjustments. In the adjustment manner, you won't be able to select
black and white adjustment. Over here. This would
pop up and will lead to a window here we can
modify some sliders. If you are happy
with the contrast, you can just merge this new adjustment in your
picture by clicking merge. Alright, we got our
photo adjusted. Now I will reduce the opacity voltage whole layer
of the picture. We got our black
and white image. We've reduced opacity. Now we are ready to start
our second project. Don't forget to lock this
reference layer like before.
14. Trace Eyes: It's time to set
up our pen tool. So please select Pen tool
from the menu on the left. And then we will pick
the black color. For our stroke. We will add some kind
of pressure here, so we'll fake out the pressure, move it all the way down. This is the normal
one, standard one. And we will adjust that. So as I mentioned, we will move it
all the way down. Let's click on the
stroke, the pressure. Then in the center, make a new point and pull
it back up like this. Thanks to that, our line
will look like this. This will be very fine at the edge at the end of the line. Imitating like strokes by Penn sealed by paying
brush, my marker. We will use this kind of line with pressure applied to it. We don't need any special
stylus, anything. The pressure will be applied automatically based on
the curve withdrawal. Take a look in the
center and tiny edges. Alright. Let's start by
doing separate lines. So you need to deselect after each line by pressing
Escape on your keyboard. Otherwise you will continue
drawing the same line. We will start from ice, so we've got eyebrows here. Legos don't be too stressed about the final result just yet. This is all vector art, so every line can be selected
later on with Node tool, as you may remember, we can make some
adjustments here and there. So everything is fixable, everything is editable
or something like this. As I mentioned, we can pick know to make some adjustments. If you need to move some nodes to change the curve of the
line, you just draw. You can do it right now, or you can do it at the end. After you draw every frame. Let's jump back to the pen tool. And now we're going to
draw a line over here. Starting here, one note here. Remember click and drag
to make curvy line. Cool. Now from here we can start
doing short line like this. Additional one here that we need around four
different nodes here to make a
circle like shape. One more time here. Close your shape like this. And then we are ready to
draw a line over here. So let's make a
one below as well. Then we can trust on a
ledge here, short lines, maybe we won't have to
adjust the thickness of this line later
on we will see, keep in mind, you need to keep de-selecting after each line. After each line, I
press escape this way I deselect the line and I can
start with the newline. Otherwise you will be
continuing drawing one line. I click one time, and for the second click I hold to bend the line a little bit. Alright guys, you
can see the process. We're going to trace all around this reference picture using simple black lines like this. From now on, I'm going to
speed up the recording. This will be a
little bit faster. I think you can still follow up, but it has no point for you to just keep staring of
me doing this slowly. So just for your
information from now on video is a little bit speed up. It seems like we
almost Dharma here. We're going to use a very similar technique on the other side
of her face here. Again, short strokes
here at the top, I click first and then
for the second note, I click and drag to make
it curvy like this. If you feel like your mess up, align, feel free to switch
to Node tool for a moment. That note too is this white selection
tool, this white cursor. This way you can
adjust your lines, adjust your notes as you want. The thickness of the
line is not final. This is something that
we can adjust after we got our photo traced already, then we can make some
creative decisions about Live light, lines, thickness and stuff like that, or even modify the colors and pressure chart that we
draw for our lines. So everything here can
be modified later. That's the beauty
of vector graphics. Seems like we are done
here in the next video, we're going to
continue with tracing. And we will trace her, her using longer strokes.
15. Drawing Hair: All right, let's continue
with our project now. We're going to take her off
a longer stroke, so forth. We're using exactly
the same tool, pen tool with our stroke, the one recreate in
the previous session, we apply some kind of
pressure chart on it. As you may remember, it's
really fine at the end and at the beginning of the line and then normal thickness
in the center. Now you can really see it
because we are applying this effect on much
longer strokes, are going to simply trace
her, her like this. We are not going to draw
the shape of her face. So it will be kind
of like mask out by creating this
nice effects on, instead of doing a line
here from her chin, we are going to simply draw
her out of it like this. And by creating this
negative white-space above, everybody will be able
to kind of see her face. Thanks to that. Our goal is to not trace
everything we see. We need to pick elements
that we're going to trace to make a
nice composition. Our main building
block is line here. So we are building this
illustration around lines. And as I mentioned before, we still using pen tool. So you are drawing notes, as you may notice by now, this video is speedup, so it's twice as fast
as normal because you already know that technique behind this tracing methods. So to respect your time, I speed up, speed up
this video slightly. Alright, I got right side, almost finished. Ligo ways. If you feel like your
line is not good enough, you can delete this one
line or even better, you can select no tool
and try to adjust that. Alright, so during this
session focused on adding her. Then during the next
lesson we will add more details to work. Alright, it's important
now to just get this part done before
we go into details. Now on the left side again, I doing something very similar, starting from here,
from the center. I bending this up first and then down to have some
kind of pattern. This one is crossing
the another one, so I will need to
delete that later. All right, So the methodology, that technique is
exactly the same. So please continue
on your own project. Then I will see you in
the next lesson where we go into art, more
facial details. Why
16. Adding Details: It's time to add more
details to our drawing. So we will continue
using same tool. Pen tool is the main
tool for this project, but you will have to zoom in. So you can use Navigator, you can simply click Command
or Control Plus to zoom in. And let's start over here. Keep in mind to make
the line curvy, you need to click
and drag your mouse. And then I go here to the center and way back
to close my shape. And then line and below that it's don't need
to be connected. You can make space
between your lines. That's your artistic decision day artistic choice,
creative choice. Now, smaller strokes within and to add some texture to it. Line is our main way to add volume add
texture in this drawing. So we adding additional
one here under. And I can already see that because we apply a
pressure to our stroke, it's much more heavy on the
left side and the right side. The line on the right
side is very fine. So we can try to counter that. We can fix that other way. We can actually divide this long stroke into
two different strokes. That's where we will
rebalance this line. So take a look. I can click on this
long stroke here. This is closed shape all around. And I will select Node Tool. I will select this
node over here, and I will divide this breakdown shape here and
also break the shape here. And now I got two
separate lines. And it's exactly what we need. Now the tick line is in the center and thin line is
at the edge on both sides. So now it's much more balance. So the closed shape is not only the best choice
in this kind of projects, sometimes you want to keep it in a few shorter shapes
instead of one, long one. So keep that in mind. We got this pressure apply. So if you make line
or shape really big, the pressure will be
applied only in the center. So if it looks strange, consider dividing
this line or shape into smaller pieces like I
just did using Node Tool. You can select any node you
want and then break it apart, break it into two
separate lines. This way the pressure
will apply and will be more even for
both separate lines. Alright, so now it's
time for extra details, something we missed before, for example, at one
more here, one more. Little changes lead
to modification we already add or
facial details. So now it's time for
some extra strokes. Revisit areas you'll
finish already. Maybe you should add or
remove some strokes there. Or maybe you need
to use Node tool to make some refinements,
some adjustments. So now it's good time
to go into details. Take care of the
parts you don't like. Alright, I'll make
more even very top. Look a little bit strange here. So maybe at one molar will help. Let's scroll down
as you can see, I'm still kind of
halfway zoom in so I can see more details
online here. Can help. All right. Don't rush through it and now
it's time to log on it and decide to add or remove some elements before we
move to our next step, cleaning up and adding some
colors before exporting. All right, one more here
we'll do about this side. Maybe we can indicate
that this is arm by adding one
more line here. Maybe one more here. Definitely more
hair on this sign. Like this cool. Flowing down here. Let's add just few more here. Punch better already. How about this side? We can fit one more
stroke in-between here. Maybe one extra. On this side. We focus on long
strokes by drawing her. So now we are adding
shorter strokes to fill in gaps in-between
this long strokes, as you can see here. One more here.
Definitely. So far all our strokes are
exactly the same. We set up thickness to be four pixels in case of
my project at least. So all strokes
whenever it's her or Eyes or nose, It's four points, whatever it is, long one or
short one, it's four points. So that's something we will need to adjust slightly as well. To make this process easier, we can try to group. We got so many lines now take
a look on our layer panel, so many layers, each
line is separate layer. Let's switch off the
reference photo for a moment. That's nice. We almost there. Next step
in our project will be two, differentiate long lines on her hair from shorter
lines on her face. So to do that, I will need to group my lines. I will group my lines
into two separate groups. If I click on the line, I can still modify
that we've Node tool. So if you see something you
want to change right now, do it before we move
to our next step, grouping lines, rhyme, maybe this one as well. Now I'm using Node Tool. I'm not drawing new lines, I'm just modifying the old ones. We've node to node to look like this white cursor, very handy. It's almost like cheating
that we can always grab Node tool and modify
our lines afterwards. One more here and
as I mentioned on raster it now in
this session we got time for lead to staff,
lead to details. We almost their project
is almost finished. That's our last chance
to refine details here. As I mentioned, we
will separate lines on her heart with
lines on her face. This way will be much easier to navigate through the project. So I'm selecting lines on her face right now
with Move tool. When you hold Shift,
you can select, multiplies multiple objects. So just hold Shift on your keyboard to select
more than one line. You can click, click, click to add to selection and remove from selection
while holding Shift. Need to add this one, this one and also this line. We've all lines
selected, align this. We can group data so we can, we don't need to select
that again. Grouped up. We could group now and all
lines are inside this group. And the group is like a folder. So everything else is
outside this folder, thoughts everything else, and we can now modify the width of it. I secure my strokes for the phase in different
group and now everything else is here so I can select that and change
the width to five. I make her hair a
little bit thicker. Alright, so I will see you in the next lesson where
we're going to add some textures and colors and
export this second project.
17. Texture and Export: All right, at this point your project should
look similar to mine and we got everything,
trace it nicely. At the end of last session, we also adjust the width
of our line so we got a little bit thicker
line for the hair and thinner photo phase. So that's really
the last chance for us to make any, any changes. As you can see, I got two groups on my right side on
the layer panel, one forehead, one
just for the face, the one we create a last time. So we've got this
nicely separated in a set in two
different folders in case we want to
make some changes just to one of those groups. Alright, you've got
multiple layers, like in this project, it's good to keep them
in separate groups. Alright, I think we need a few more little details here
around eyes. Keep in mind. And we, very, very soon we're going to kick out this
reference photos. So this will be mostly
black and white image. So extra details will
help us out here. Alright, little wrinkles
here under one inside. We got more texture. Look. Alright, so before we
kick out the main image, double-check your
eyes that everything is all right in this area. If you see the area that need a little bit more
texture at the lender, keep in mind we are not
using much color here, and this will be
mostly black and white image with few gray areas. So if you need texture, you need to make a new line. Maybe over here as well, going a little bit
different direction to close this gap nicely. All right. More texture here. Above ***. Inspect your image for areas that got
not enough texture. You can still add
some lines there. If you already, you can
switch off the visibility of the reference photo to see all of your lines on the
white background like this. I just draw a few more
lines so I going to drag them into groups
that I made before. I got one group for
phase one for her. So I just drag newlines I made inside those designated groups. Select. Then you can simply drag them inside this little
folder. You may be four. Nice, everything
is in the group. Again. Now we are ready to add some color by color
Hyman, the gray area, we're going to add
a little bit of gray to indicate some shadow here to separate the
head from the neck. So let's draw a shape
here like this. This one a little bit shorter. Keep in mind if you're
using pen tool, you can hold Command
or Control to switch to node two
just for a moment. Alright, let's
kick out the line. We don't need the line anymore
and now add a gray color, very light gray color. Cool. So now for coloring we will use gray color without stroke. We got strokes, we got lines are already another gray area I
want to add will be here. Her lips. I'm using Pen tool to trace all around us one shape. This needs to be a closed shape because we're going to
fill it with a gray color. As you may remember. If your shape is not perfect, you close the shape. Just like me, then you
put the gray color in. Not good enough. You can always use node
to keep that in mind. The Node tool is our friend when dealing
with vector graphics, drag this below our lines, so the lines need to be added
up above our gray color. Now using Node Tool, I will make slightly
adjustments here under ryan, Let's bend this down to match the original curve,
the original stroke. Over here. Nice. I think we are
done in this area. We can go back to
this shape over here and make a few
adjustments here as well. I tried to align my
new gray shape with existing lines here
using no two right now. Also here are the very top. I got too much of the gray
shape on the left side. Let's drag this down. Alright, now it's hidden
behind the light. Perfect. I thinking about adding one more gray
area around the eyes. In this case, I don't think
I need to draw anything. I got closed shapes
here already, so let me just select
the correct one. Let me adjust this
shape a little bit. Let's make this a
little bit bigger here. The iris is matching
the outline of the eye. If you are working on the
shape that is in the group, you will need to tap it twice
to go inside that shape. If you click it only ones, you will select the whole group. That's not what do
we need. It's why I tap twice because it's
inside the group. If you go into work a lot
on shapes that are grouped, you can ungroup them and
then group them again. That's kind of the
easiest way to do that. All right, Now I'm
going to select this area and this area and fill it with the same
gray color. Like this. There are already closed shapes, so I don't need
to trace over it. And that's only colors
we're going to add. This little gray areas are, are head-neck, lips and eyes. Main part of this
project is a line work, so we don't want to
take away from it. Optionally, you can
also search for the texture using
built-in stock panel. So I'm searching now for
some kind of paper texture. I can drag and drop this
here to my art board. Go to the layer panel and rename this layer to texture
so we know what it is. You will need to scale it down. That texture is too big. Let's scale it down. If you are happy with the size, you can right-click on it
and trim and rasterize. It should match your art board. Now I will also adjust the
color of this texture. I need to, I need to have
black and white image, so I will adjust this texture
using black and white mode. This saturate the image like we did before with the
reference photo merge. And we got a nice black
and white texture. Now we can adjust the blending
mode for this texture. You can experiment here, but I recommend you
to keep it simple might be something
like multiply will do. Alright, I will go with
multiply n. Of course I need to reduce this
opacity is too strong, jazz a little bit, 20%, 15 percent, something like that. So I got to adjust a
little bit of paper like texture at the top
of this illustration. And that's how you can finish
up your second project. I hope you got similar or even better results
on your part. Let's export this project. So File Export. And again, we can choose several
different formats. You can save it as a
PNG JPEG, PDF, SVG, if you want to keep this
as a vector graphics, save as SVG if you want to
share this over the internet, JPEG and PNG will do. Keep in mind, JPEG
got some compression, but the file is smaller, but in PNG the fire is
MATLAB, but also cleaner. So I recommend you to save
it in both vector form, unlike SVG and raster
formats like PNG and JPEG. Alright, that was the
last actual class. We got one more video here. So in the next final video, I will summarize this whole
class and also give you some ideas and suggestions
for your next project. So see you in the last video.
18. Class Summary: Congratulations on
completing both projects. So let me quickly recap what we did during our first project. We use pencil tool. It's suitable for this kind
of freestyle dawdling. It's not very precise. It's a little bit
better when you got a graphic tablet or using iPad version of Affinity
Designer with Apple Pencil. Why using a mouse? We can use stabilize
feature and what we did, why tracing our little
coffee cup here, we use reference
layer and then by pencil tool we draw
one continuous line. Very funny project. And then some finishing touches, additional colors and shapes. That was our first project focused all around Pencil Tool. Then we become a little bit
more serious and pick up the real weapon for
line design Pen tool. The Pen tool is one of the most powerful tools
in any graphic editor. If you can master pen
tool, you can draw, you can trace any shape
you want wherever it is, illustrations like we did, or maybe logo, icon,
anything you want. So Pen tool is not easy to use. It's got some kind
of learning curve. It's not very intuitive
for beginners, but it's totally
worth the time that you put into learning
and mastering pen tool. During our second project, we use Pen tool to
trace a portrait. We use reference photo
and then we put lines. We trace it exclusively
with lines, we focus on lines. Also. We apply some kind of
pressure to our lines. Look more like a brash, more like a marker
than mono line. That was our second project. It was a little bit
more time-consuming because we went precisely and draw multiple lines comparing to the first project with
just one single stroke. Alright, so how you can continue this nice practice
with line tools? I recommend you guys to flip
the projects right now. Approach the first project with the techniques
from the second one. Draw this cup of tea or coffee on any other
object you like, maybe flower, using pen
tool, using precise strokes. And then tried to draw a
portrait someone's face using just one line with pencil
tool, that will be fun. All right, so you can continue your practice with those tools just by swapping
the principles of our project starts
will be really, really nice practice for you. Okay, so that's the last lesson, that's our little summary, frank, you for learning with me. And if you are interested in Affinity software like Affinity
Photo average designer, I think the publisher, click follow here on Skillshare, so we'll be able to
see my next class. And also you can find
some of my tutorials about Affinity Designer
on YouTube as well. So I hope I will see
you in my next class. And good luck with your
next creative project. Bye-bye.
 Mark Krukowski, Kru Mark Tutorials