Transcripts
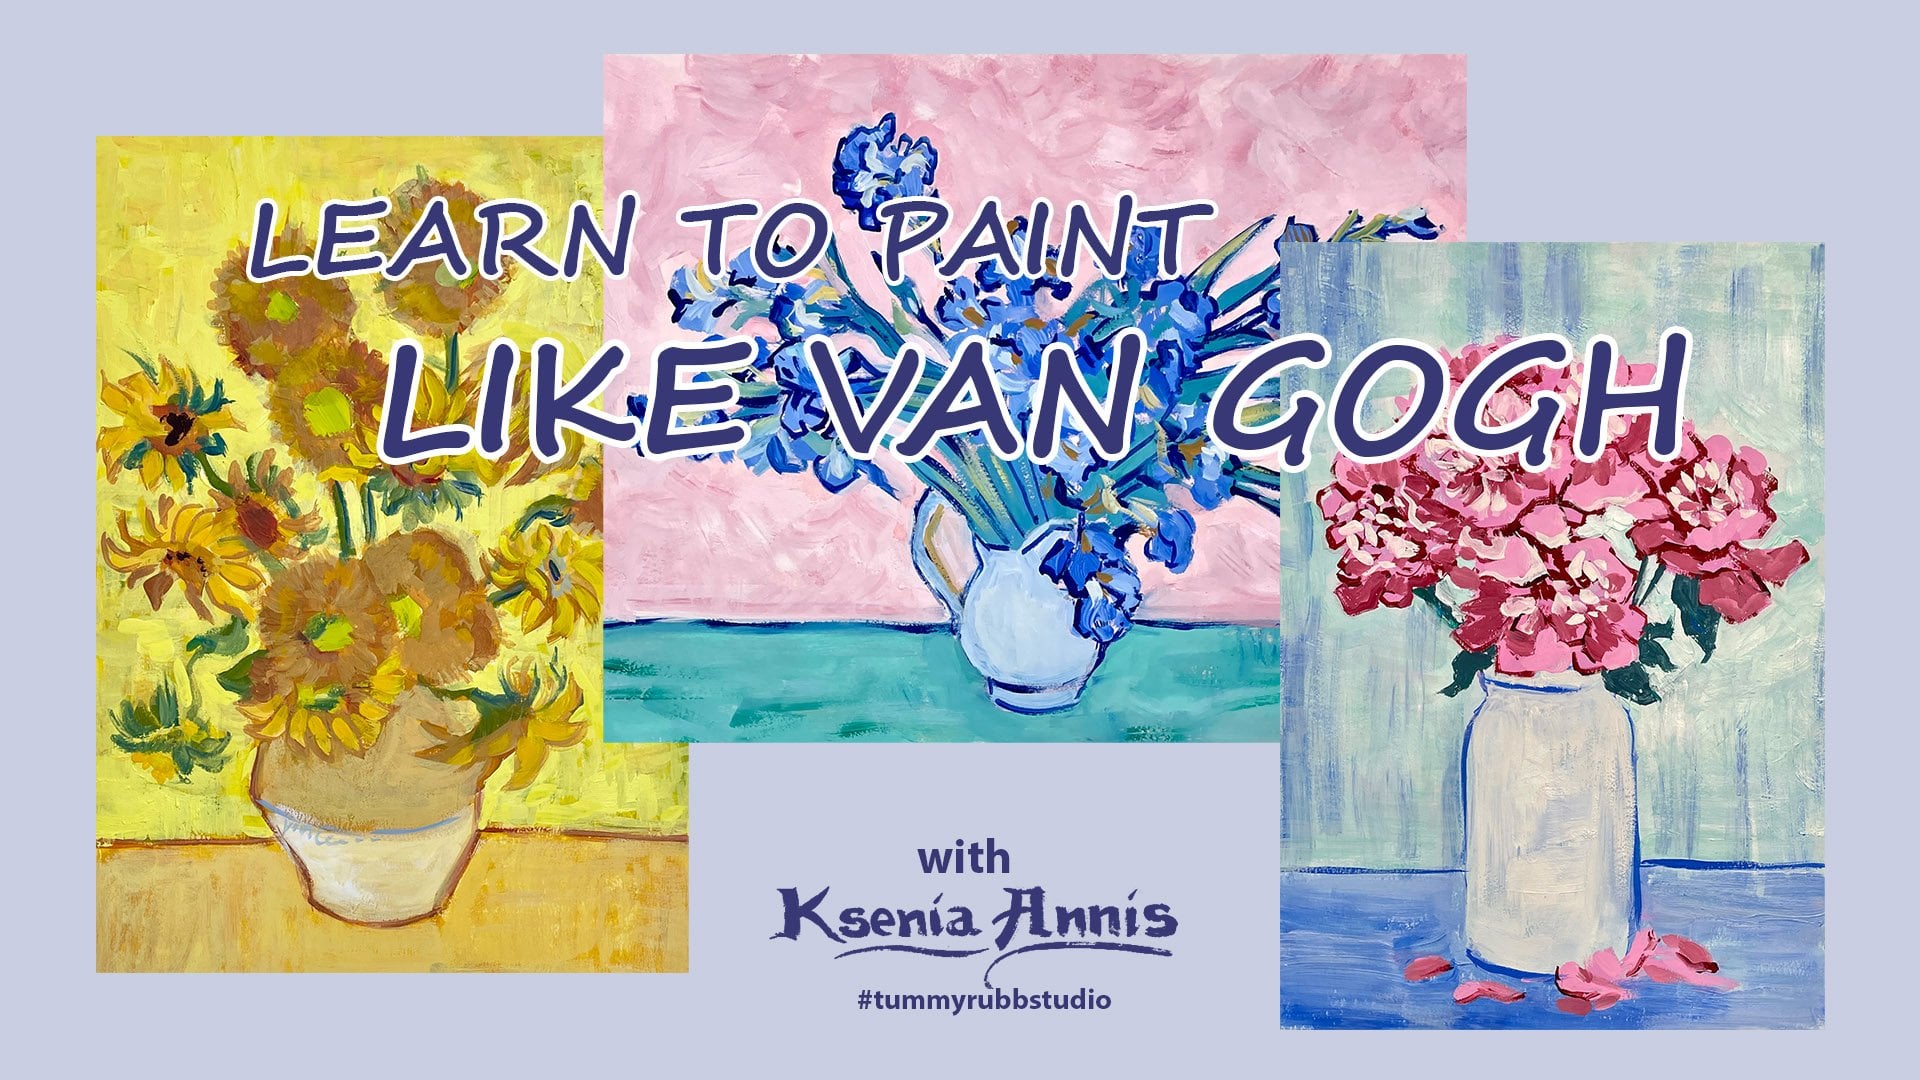
1. Class introduction: Do you love the art
of Vincent Van Go, do you want your colors to
be as clear, and bright, and brushstrokes, as
energetic and descriptive. My name is Ena Ans, and this is my masterclass
Ango style dog portrait. No, with oils. But in this master class, I will be using watercolors in combination with
white gouache, an opaque water soluble paint that I use a lot in my artwork. Our watercolor palette will be very simple and very limited. We will only use three primary colors in
combination with opaque white. The result will be as colorful and joyful as famous
Vanco paintings. Vo didn't paint any
animal portraits, but we will still use one of his paintings
as inspiration. During the class, you
will find out which one. This master class is a live
painting demonstration, all the lessons
are in real time. There will be no jump
cuts or speed ups. I will fully explain my
thought process and basically talk about every breaststroke and every decision that I make. I hope this class will
be a fun exploration of the famous Dutch
painters style and it will also help you to take
your animal portraits and your pet portraits to the next
level. Let's get started.
2. Materials, reference and inspiration: What we need today is a
piece of watercolor paper. Mine is 300 pounds, just the paper that I prefer. The brand is Kilimanjaro.
It's very stury. I basically only pin it in the corners to my
foam core board. I don't have to do any other
prep for this technique. Actually, a little
bit thinner paper, maybe 140 pounds
will work as well. 300 grams, this is 600 grams For those who
understand metrics better, we will start with
watercolor wash. I will show you, of course,
what we're going to do. It was going to be very simple. We need our water
color, the technique. I will show you
today how to paint black without using
black pigments. The colors we'll
be using will be the three primaries I'm
using, Daniel Smith. They tell us that
primaries are Pilin, Red has yellow medium,
and French Altra Marine. You need basically
red, yellow, and blue. I think exact pigments
will not matter. I think instead of
French Altra Marine, I'm actually going to use
Tallow Blue because it's a lot more intense
saturated pigment. You just need three
primary colors, whichever pigments,
whichever brand you have. Another very important
material that we will need today will
be white gouache, because as you see, the doggie has a
lot of white and he also has like those
orange patches on him. And we will not be painting
those with pure water color. We will use white gouache, opaque white to help us. So I have titanium white. This is M grams
gouache Artist Gage. Something similar
will work as well. You can have other brands, Windsor and Newton
makes good Gage. It's called designer Gouache. I think white ink, if you have like really opaque white
ink that will work as well. My preference is
for white gouache, it just has really
good coverage, it goes on really creamy. And it's easy to control. It's much easier to pin
than with then watercolor. And also artist and designer guash can be
mixed with watercolor. And that's how we're going to
do some details on the dog. So this will be very
important material today. And I have a separate
little container for it because I
don't want to mix it, you don't want to
contaminate my whites. I have two water containers. This one I will be using
to wash my brush and I'm saving some clean water for
working with white Gage. Again, you don't want
dirty pigmented water mixed with your Gage because
you want pure white, right? I have my brushes set out
as well. I have a pencil. We will do very, very
basic pencil drawing, and I didn't draw anything yet, but I will in a minute. I have my inch and a half Princeton Heritage
flat ankle brush. I seem to work to use those flat ankle brushes
the most lately. So I have three sizes, they're all by Princeton. So this is an inch and a half, three quarter inch
and a half an inch. And that gives me enough
control to paint, basically anything
I want for details. I have a couple of brushes. I have a dagger brush. This is Royal and Langnickel, but you don't have
to buy that brand. You just see this is an
angled brush as well, but it has more pointy end. It's easy to use for details. I have also a liner. Rarely use this, but I
think for this painting, we might need like a thin brush. The brushes have some
paper towels right here. I also have this little
Hindi he had gone. It's this little craft tool. I will use it to dry the war color because we
don't want to sit here, you know, for hours and
wait for Warcl to dry. We're close to holidays
and I wanted to do something special
and I thought, well, maybe a cute puppy
with, you know, he's got a lot of red in him, some green, some like
garland in the back. I thought this feels very
holiday, like very Christmas. And I thought, you know, I want to paint him in the
style of Van Go, but the problem is that Van Go didn't paint
portraits of animals. He just, I guess, never
got around to it. So I was like, what can
I use for inspiration? I was looking at the
dog and I was like, He really reminds me
of somebody And I was going through Ng's paintings
and this is what I found. This is a portrait of a
postman that Ngo painted. He actually painted
this guy several times. I think five or six.
They're all different. But I thought the beard and
the way he did the face, we can use that the
brushstrokes and the color approach as inspiration to paint
the fur on the dog. I just love that background. There are several of
them like I said, and this one has
yellow, greenish, yellow background with
all the flowers on it. So I thought that
was a lot of fun. That's what we're going to
do in our painting as well. And the reference
photo is horizontal, but we will paint vertically, so we can do something
similar to what Van Go did.
3. Watercolor layer: I am going to sketch just a very general
outline of my dog. Let's see. All I'm going to do is draw the
outline of the dog. I just want to make sure
he fits on the page. And you will see in
a minute why I don't need a precise drawing here. Just general outline. Sure he's wide enough. He's a big do, I want him to take up
quite a bit of room. Okay, this is all we're
going to do for the outline. And I'm going to start painting. Of course, I will start
with the lightest color, which will be yellow, right? Spray my colors. I'll do it right
now, real quick. Yeah, I'll just a little bit. I will be mixing
colors on paper. I will be using my palette
later, but not right away. A little bit of
water on my paper. If you're using thinner paper, don't spray it
just on dry paper. And we're going to start
with our primary yellow. Mine is close to primary yellow. This is new gumbo. It's primary yellow is
a little bit lighter, but it totally doesn't matter.
Use whatever you have. Don't worry about the outline of the dog too much. We
will use it later. Right now it doesn't
matter either. No's background is all more
or less even yellowish green. But I want to make mine
a little more varied. I'm going to take some
ultramarine blue and mix it right away directly
into my yellow. Of course, when we
mix yellow and blue, we get green, right? To some extent. That gives me a chance
to hint at that. Christmas garlands that the dog has behind it or you
just can't do it. Even just transitions a little more yellow
towards the bottom. Let's maybe transition
to red. We can do that. The red I'm using
is Windsor red. Again, maybe it's a little
cooler than primary, but it's close enough. Like I said, the outline
of the dog doesn't matter. This first stage is going to
be very messy, let's say. But it will all work
out in the end, dropping some blue
into that red as well. Not everywhere. I want
to keep some of the red, red stuff behind the dog
so we can keep that, okay? Now we need to work on the dog. This is all going really fast, I'm sorry, but we really
need to be moving with this. Nothing dries and we can
keep mixing colors on paper. I'm splattering stuff
everywhere, but it's good. We can even do
this a little more on purpose to paint the dog. The dog is black, but I don't
want to use black pigment. It will look too
dull out of place. I'm going to use those same three primaries
to paint the dog. Scor theory teaches
us when you mix three primary colors,
you get black. Let's put that theory
to the test and paint the dog without leaving
any white of the paper. That will be too hard and
too time consuming to do. We're just going to
drop color on paper. Imagine that the dog
is completely black. You will see how much
faster this process is if you do it this way. When you mix colors on paper, I'm going to switch
to my fallow blue. I think it's a lot more intense. We could probably get away
with just using red and blue, but it's going to be
a little purplish. I think adding some
yellow will be good to neutralize
it a little more, but you can evaluate
yourself and see what's happening
on the page. I'm basically painting a
black outline of the dog. I'm going to skip that bandana. It's too hard to
detail to paint. We can add it later
when we work with gas, I will show you what
we will be doing. But in my opinion, it's just not strictly speaking, in this painting, because
I'm working on wet paper, I'm getting a soft
outline, right? That's what I want. The dog is soft and fluffy. We don't want him to
be super defined. We want, we want him to be soft. Important in this case
to use a flat brush. I'm using a flat angle brush because I need a lot of pigment. If you use a round brush, you most likely will
get very pale painting. And it will take you many layers to get it to where
it needs to be. But using the flat brush and really saturated
colors straight out of the wells will give you
good saturated results. And your painting
will go really fast. Mixing color like that on paper also gives us advantage
of color variation. When I get this done, I'll show you a little bit closer and you will see
that this is not flat, dull black color
that we would get if we just painted
with one pigment. I get really nice
color variations, very interesting combinations. Very close to what Van
Go did in his painting. Okay, this is getting
close to being done. It looks horrible, I know, but that's what we want,
that's our starting point. I'm just making sure I
have enough pigment in the darkest areas and we'll go over him one more
time if we need to. Okay, I can stop now. Let me show you a
little bit closer. This is basically what you get when you mingle
three primaries on paper. They neutralize each other
and you get a dark color. It's not exactly black, but it's dark enough
to pass for black. And we will dry this
and it will lighten, of course, as water color does. But this will be a good starting point
for us to keep working on this and get the result
that we want. Let me show you. I need to make sure that this
shape doesn't look right. Let me correct this
a little bit better. I think I need to
take this further out so that dog has a
little more substance. Of course, my
outline disappeared. Right. That's why I told
you that just doesn't make any sense to
really worry about the drawing because it's
going to disappear under all the paint using Tallow blue instead
of ultramarine blue. If you have it, we'll just make this process
faster for you because I'm getting a lot more saturated
result very quickly. Okay, I saturated all my
paper as much as I could. We will continue working on it.
4. Watercolor layer: lifting paint: Let's take a closer look at our reference just for a second. The guy was obviously
wearing a black coat, but no, didn't use black, right? Impressionists taught him that you get rid of the black and he mixed his black from blue and red like we
did, very similar. Also, if you look at this coat, it's actually different
shades of blue that transition into a very
dark blue that looks black. Black is never completely flat, it will have lighter areas. He painted those lighter areas with a little bit of yellow. With lighter blue, that what gives the painting volume and that's what gives painting life. Look at the cap here, you can see it really well. That's what we're basically
trying to do on the dog, All that pigment
that we piled on, we had to work quickly because we wanted the
colors to mix on paper. We didn't want them to dry out, but now we need to lift
some of the color to create slightly lighter
areas on the black dog. The dog has a lot of marking, so it's a little confusing. But try just looking at the black areas and see
where it's a little lighter. I can see on the ear, I need to lift color that will
be drawing with our brush because our outline
disappeared and we didn't really draw anything
on paper very much. But we can just evaluate what those areas need to be and we can correct them later as well. But for now, let's just do
as much as we can and lift certain areas to give ourselves
a head start on the dog. His face is just so cute. When I looked at him, I
thought I got to paint this dog and he's
very good looking. Okay. I think that's good. We will do the face
after we paint the the nodes and the
white the markings. Just mark it a little
bit to make sure that my drawing do we need
to let this dry now? We did everything
we needed to do. All right, let's dry this dog. He's already dry, but I can see a lot of sheen here
in the center. This is how I know that
the color is not dry. You don't want to touch it just yet if it's kind of shiny, so you want to make
sure it's dry. And if you see no sheen,
you can touch it. And if it feels kind
of cool to the touch, then probably the paper fibers are still saturated with water. If it feels room
temperature, then it's dry. Okay, the sheen is gone. I'm going to stop drying this. Let me do on the bottom here
a little bit and before our eyes how this
painting lightens, right? He doesn't look so dark anymore, so we will definitely need to add more pigment
to certain areas.
5. Working with opaque white: Move on. It's time
for us to start using the opaque white and start working on the
details on our *******. I'm going to try and wash
these brushes a little better. Okay, I'm going to prepare
my space for opaque white. I have a separate
little container. Important thing to avoid
contamination of your white. Because we want go to be fresh. Don't squeeze it out in advance. Just squeeze as
much as you need. You can use dry gah
for certain things, but it's never going
to be as opaque and as creamy as fresh
out of the tube. I'm going to squeeze mine out. We will need quite a
bit because the dog has my painting is fairly large, so I'm squeezing
out quite a bit. If you paint in a
smaller format, you obviously will need
just a little bit. I am going to use a
smaller brush and I'm going to paint the face of the dog and the chest
and the white markings. If you need a little bit
of help with drawing, it's a good idea to print out the reference photo on just
regular paper to scale the size that you want to
paint it and wrap charcoal on the back side and try to
transfer the drawing. You might not see it very well on black,
but you will see some. Or maybe even use like white
choco something on the back and transfer just where the
eyes are and the mouth. If you have transfer
paper that will work to don't hesitate to get a little bit of help with
the drawing if you need to. I'll just try to eyeball it. I wet my brush. I switched to half an inch brush and
I'm going to pick up my gage in very creamy
consistency and try to paint the markings on the
dogs, on the dog's face. You see I'm getting a little
bit of dry brush effect. Of course, I'm feathering
out my brush strokes, but I'm also getting paint gets a little bit of texture
because is only dam, I don't have a lot of
water and that's what we want fur texture to
look really natural. We don't want hard edges, versatile technique,
and very easy to use. And it works for, for a lot of subjects,
especially animals. I want to leave his nose. I can add it later, but I want to leave it black. I'm going to paint
around the nose. I want to make sure the distance between the nose and
the lips is correct. It seems like I need
a little bit more just going over with white
painting negatively. Right? I'm painting
around the nose, around the black areas which
I already have on my paper. Okay. So this is his chin, and I'm moving on to the chest, leaving his mouth for now. Also, I'm leaving those orange
markings alone for now. Here we can go to
town with texture. If you look at Van's painting, let me show you real quick, See all those multicolored
feather brush strokes that he used on the beer. That's what we want to do
on the dog's chest as well, to make it look van style. We will add some other
colors in a minute as well. I'm not painting his bandana. See, I get a little
bit of color mixed in. And it's fine because some
areas will be in shadow. We can let this layer
dry if this happens, and then apply another
one on top that will help with keeping
the whites white. I started to say,
I'm not going to paint his bandana.
It's too hard. If you want to try
that, go ahead, but I'm just going to skip it. Lots of white. You can see that he finally starts to look a little
more like a dog. Again, I'm looking at
the reference photo and you see some of the areas, if you look at it
on your computer, it's hard to see here I know. But some areas here are very white and some have a
little bit of an orange, pinkish tint to it and
some a little bit bluer. That's what I'm
going to, it's not a flat white shape, right? I'm trying to create
realistic for texture on him and the then go
style brass strokes. Okay, I think this is, we're getting, making
progress here.
6. Working with other opaque colors: We obviously need to work
on his orange markings and on his face and
the mouth here. We will take advantage
of our ability to mix white gouache with
water color pigments. They have the same binder, so it's going to work
perfectly that way we can get that pink color that we need for the mouth.
Let's do that. I'm going to put some white
on my watercolor palette. Since I will be mixing it, I don't need to work
in the same container. See, I was using primary red. Let's mix in primary
red in here. And we get very nice pink color. We can paint his mouth, his tongue sticking out. I will show you how to paint
that shadow in a second. That's going to be his
mouth on the side. If you do this,
you might bring in some white Gl into
your water colors. But you can clean them out
with clean brush later. Don't worry about it. Okay, here's the mouth
and I need to paint. I need to transition to
the shadow on the tongues. To just clean water and
lift off the white. The black that already have there will help us to get
that shadow very easy. Just lift with the clean
brush here, I did too. Black lip is showing
under the tongues. I'm going to do the same thing. Stuff already dried. Let me get a little stiff brush. Trouble lifting this,
just flat brush will work a little bit stiffer
than my little dagger brush. And I can also add
water color back in certain areas if I need to. Okay, and let's
work on his nose. I need to see how the top
of his nose is lighter, so I need to soften this. I need to bring a
bit of down here. I can also bring
some white to create those highlights on
the nostrils. Right? Bring this in. Here's his nose. Under the nose, it's all
slightly lighter here. Not exactly black.
Not exactly white. Maybe give him a little
bit of pink under there. I think his upper lip is tinted
with pink slightly. Okay. Let's paint his
markings To get orange, I need to mix red with yellow. And I'm going to mix it into
my white to give it some. But I'm going to do it color right in a
very saturated way. I'm picking up a pigment and
just a little bit of white. He has a couple of
markings here here. The sole helps me
to build the form and verify my drawing. I need to paint his eyes to
I'll get to it in just six. He's got orange
here. Orange here. I need a little more white, which I can now bring in. I have it separately. It's clean. I didn't contaminated
with my other colors. Feather this out a
little bit better. His white chin is going to be here in the area under the chin will have a tiny shadow
so we can mix in a little bit of orange
to separate that area. Again, feathery breast strokes, no style breast
strokes that we have. And here we yeah, this area is way too textured So I'm going to smooth
it out a little bit. You see it's not
like a one time deal that you apply the
white and you're done. We just keep working on it and keep getting the
results that we want. I forgot to paint the
orange area right there. Let's mix a little more orange. My color is starting to look a little dirty, but
it's no big deal. I can always clean
them out later is what do you think? I
think it's taking shape. We just need to
paint the eyes and we need to work on the
background a little bit more.
7. Adding the eyes and other details: Eyes are a little
difficult subject, so we need to go lightly and let's just figure out what they're going
to be thinking. This one, I'm using
that same mixture of orange that I have used
to be darker though. He's got a little bit of brown in the eye
around the pupil. This eye is going to
be somewhere here. He's got pink inside of the
lip that we see right there. It's going to be lighter. I'm using more white eyes. He's got a little bit of
lighter color on top. He's got a highlight
in each eye. I left the pupil as just the black that
I already created. I'm going to add highlights
and he turns into a real dog. Let me give him a little
bit better nose here. White go. When it dries, darkens a little bit. The areas that you
thought were very wide might not be wide enough. Just apply another
layer, you'll be fine. I have some clean
gosh, right here. The nose is the lightest area. It needs to be really bright. Flat, white feathering out. We want a lot of texture, right? We don't want straight lines, we want to feather him out. Another thing we can
do, see how he ears, even though I lifted paint, they're not exactly as highlighted as they are
in the reference photo. And you get a hot spot there, but there's quite a bit of
light on top of his head. What we can do is actually
mix some blue with our white. This will help me to give somewhat definition
to the face as well. Let's take ultramarine blue
and mix it into our white. If look at Ng's painting,
see how he did it. On the cap, for example, he has those light
blue breast strokes. So that's what
we're going to do. Let's add some blue highlights
to make this dog even more like we can give
him a bit of eyebrows. There are some
lighter ears on the, a little more texture
on the ears in general. Let's see, there's a
little bit lighter under the eyes on this side. Gives him that puppy eyes, puppy expression on his face. Maybe a little
more texture here. I want to give him a little
more texture on this side. Okay, it's good to step away from your
paint and check the, you know, that you
did everything, everything is in its place. That's what I'm doing right now. Do a little touch up.
If certain area that you painted dark enough, what we can do is we can always go back to
our water colors. I'm going to pick up
some tallow blue, and I want to work on
the mouse just a bit. Maybe mix it with red
to make it even darker. Okay, I want to give a
little more definition to his front surface of his nose. The nostrils are dark. The slower portion of his nose, he has got heart shaped nose, so this is going to
be darker as well. I have a little bit
of spread there, but I want to get rid of it. He's got that mustache, and this will be a
dark in the shade. I can make sure irises are where they need to
be as well with a color, even if you apply just blue
on top of what we painted, it's going to look
black because we have so many layers on there. Just a little more definition to his face and we will
work on the background. It will be a fun process, we can get really creative there making sure all the
black areas are black. With a second layer
of my mixed black, I'm now mixing it on the palette because I need
really saturated color. Going over certain areas
and darkening them. Feathering out my breasts
strokes because I want that go energetic look. His signature style,
very expressive style. I, I think this looks good. It's got a lot of dark under this ear and the body,
I think looks good. I lost a little bit
of white black here. I can add it back. All righty, I think the
dog is looking good. So this is what he looks like.
8. Painting Van Gogh style background: Detail that will make all
the difference for us is the background van has all that wallpaper on the
background with flowers. But for this one I'm
thinking maybe we can try something
more Christmasy. Let's, it's not
going to be white, it's going to be pink. We're going to paint maybe
like Christmas bow ties. Makes him look like a girl dog, but we don't know
if he's a male. Maybe some bunches of holly, just some dots or
something like that. I'm just playing. You can
do whatever you like. You can do any design, you can copy it from, if you prefer, do
your own thing. So this is totally random. Now, just having a good
time playing with colors. We can maybe do a little
more with orange. Maybe do like a Christmas
ornament or something. Okay, I'm just going to town
here with different designs. I just want him to
look festive and fun is done on his chest. I think I did a little
too much with color. I wanted to show
you the last step usually in my painting
is doing the highlights. I'm going to squeeze out
a little bit more fresh. Again, wanted to be clean
and I want it to be fresh. I'm going to give him some
more highlights on his chest. If you overdid a little bit, there is too much color, color, not quite in the right place.
Don't worry about it. Just go over it one more time. And we also can increase
capacity this way. Guash mixed a little bit
with water color because the underlying layer is
so dark and saturated. But we can bring it all
back with some highlights, with some more white, and get it all nice and bright. Again, just a little
bit more down here. Okay, I think he's done.
9. Class project and summary: The creative and go
style dog portrait. We started with a
water color layer using three primary colors. We painted the background, then we painted the
silhouette of the dog. Mixing three primary
colors gave us black. And for the time
being, we ignored all the white and
brown markings on the dog and the details
like the eyes and the nose while the
paint was still wet. We lifted some of that to create lighter areas, watercolor dried. We added the white markings on the dog using white gouache. By feathering the
brush strokes and also applying Gah thicker or
thinner in certain areas, we created the illusion of her and also the illusion of volume. By mixing white with the same
three primary water colors, we got other colors
that we need to paint. The brown markings on the dog, his pink tongue and lips. Some colorful shadows
on his chest, his eyes, and the
highlights on the coat. Certain black areas had to be intensified with another
layer of water color. In this case, we only use blue to finish the painting and
make it even more ango style. We added some fun details
on the background using the same white gage
tainted with watercolor. And that completed
our dog portrait. I hope you enjoyed the class. Now let's talk about
the class project. For the class project,
Paint Bernese mountain dog in Ngo style using
watercolor and white gage. All the reference material, including the reference photo, is attached in the Pda format to the project section
of this class. If you prefer, use
a different photo, paint your own pad,
just a favorite animal. Using the technique that I
explained in this class. Post your artwork in the
project section with a brief explanation and I would love to see
what you created. Please visit my Youtube
channel to find more tutorials including a
Hope playlist on painting, pets and animal portraits. Examples of my art and links to my social media pages
are on my website, Tamyrab.com I hope you enjoyed this master class and
I hope to see you in other classes that I
teach here on skill share.
 Ksenia Annis, Figurative artist