Transcripts
1. Introduction: Using blending modes in
digital art is a lot of fun. It can help you create the illustrations with
engaging scenes and mood, expressing your unique
creative ideas. Hi, my name is Eva Miklos, and I'm an illustrator and designer based in
Central Europe. Creating scenes with a
specific mood by using blending modes helped me to work on story and concept
art for Lego. Also books spreads full of details and other
exciting projects. In this class, we will create
a starry night in a jar, a beautiful magical
night mood illustration in Procreate by
using simple shapes, blending modes,
composition tips, and sketching from references. I will take you step-by-step through my illustration process. So you can end up with an awesome illustration
that you will love and can infuse with your own unique likes
and preferences. You will get to know different blending modes and their effect. New ideas on getting the
most out of Procreate app. And in the resource section, you will find color
palettes that you can use as inspiration for
your illustration. So whether you are interested in learning to use blending
modes in Procreate, practice your
composition skills, or just have fun
creating and fun illustration with
a magical mood. This class is for you. Before we start, don't forget to follow me here on Skillshare to get notified when I
release new classes and make special announcements
about the giveaways. So you get a chance to win
Skillshare membership. I also invite you to follow me on Instagram
where you can see my newest artworks and stories
from my life as an artist. So without further ado, let's start creating magical
Starry Night illustration. See you in the class.
2. How Blending Works?: Before we start working
on the class project, Let's discuss the core concepts behind the blending modes. We will start with
a visual preview and some quick theory of what you can imagine
when we talk about blending modes
in simple terms, blending mode, also
known as mixing mode, is a tool in most digital
painting software that you can use to achieve awesome
effects and colors, e.g. it helps you to create
glow and other magic. And they are different
blending modes available depending on
which software you use. To use blending mode, we need a minimum
two main layers. The top layer, which we
will call an active layer, and the layer below that
called passive layer. And by using a blending mode, that active layer on top will be influencing one or all
of the layers below. So now let's look
at it in the app. As you can see, I have a
colorful texture on this layer because I wanted you to have more fun while I'm
explaining this concept. And of course, if you want, you can have only one color on this top layer
instead of a texture. Now we have this other layer. We can call it a passive layer, or we can also call it an
original artwork layer. To go with the project
theme of our class, I illustrated these
simplified cloud shapes and stars on this layer. And by the way, if you're wondering about the
grade diamond shapes, they are not important
in this case, I only added them to visually represent the layers
that I'm talking about. So to achieve the
interesting effect, when you apply the active
colorful top layer to our clouds and the stars layer and use some of the
blending modes, you will end up with
something cool and even with little bit of
unexpected colors like this. In the following lessons, you will discover
how you can choose the right blending mode for your illustration and find out which one would work nicely
with the color palette for the Starry Night theme of
our class illustration. In addition to this, you will also learn how you can use the clipping mask to easily control the textures and apply them only to the areas
where you want them to be. So let's get to
the next lessons.
3. Procreate Blending Modes: Now let's play with the blending modes and
the effect they create. So you can choose which ones to use for your illustration. And I will also take you through a couple of helpful
Procreate features. They do work nicely with
the blending modes. Now, I will open
the artwork you saw in the previous lesson
in a new canvas. In this new canvas, Let's open the Layers panel, which you can find here
in the top right corner. This icon with two squares. If you are familiar with Procreate humans
probably already know the rest of these tools
in the top navigation bar. But if you don't, you will learn a little bit
more about them in the class. So open the Layers panel
by tapping on the icon. You will see here the top blending layer
and the artwork layer. Below the blending layer. You can disregard the
other layer under the first two layers
for this example. Now, regarding the
background layer at the bottom of
our layers panel. As you probably know, you can change the color
of this background layer, but you can't do much else. But what I want to mention
here is that when considering blending and blending modes,
the background layer, it's considered a
layer to the color you have on this layer will influence the other
blending options. When you play around with
all of these options. Then you can also
uncover and cover the layers by tapping on the checkmark on the
right side of the layer. Like you can see here, the checkmark is not on because this layer
is hidden right now. So I have the original artwork
layer with the clouds. We will be using the
blending modes to apply the texture from the
layer above these clouds. Now, I will uncover the
top layer by clicking on the check mark to see my
colorful texture on this layer. To create this type of texture, you have a few options. You can paint
traditionally using e.g. guage or watercolors or
markers or whatever you like, and take a picture and import
the image into Procreate. To do that, you can go to the
Actions panel by tapping on the Add button and then insert
a photo from your gallery. And it will become a new layer. And other option here is that
you can paint it by herself using any of the texture
brushes available in the app. Now, let me show you a few of my favorite brushes to
create texture like this. You can go e.g. to the painting folder
or Artistic folder. You have a selection of these interesting brushes
with nice textures here. You can also create dry brush look with some of these brushes. If you want to add little bit of rough texture when
blending the colors. So you, if you want to achieve this kind of look and texture, I would recommend either
this folder in some of these brushes or this folder with selection
of the brushes here. You can also download some
free brushes with textures or by some premium brushes to get different textures
you want to try. I actually put together a helpful article on
my website listing all kinds of resources
where you can find interesting
Procreate brushes. And you can find the link
in the resource section. Coming back to our exercise, before we get to
the blending modes, I want to show you
another fun layer tool which are used very often, and that is the clipping mask. I will be almost lost
without the clipping mask, I use it so often. So I want the texture to appear only on
these clouds here. And the clipping mask will
help me to just that. Use the clipping mask. We also need at minimum
two layers, same as here. Original artwork, which defines the shape and the
visible boundaries. And the layer on top, which we will clip to the
original artwork layer below. So tap on the thumbnail here and select clipping mask
from the drop-down menu. Now the texture is visible
only on the clouds. Pretty cool, right? So the shapes on the original
artwork bottom layer, define the visible
boundaries of the top layer, mask the rest of the
texture on the top layer. To confirm that the
clipping mask is active, you will see the small arrow next to the thumbnail
of the layer. To deactivate the clipping mask, you can tap on the
layer thumbnail again and select it from
the drop-down menu. Like this, you release
the clipping mask. So let's activate it again because we need it
for this exercise. Now, let's play with the blending modes and
the layer opacity, which will help us to modify the intensity of
the Blending Mode. You will notice this letter N on the layer next
to the layer name. It indicates that the layer
is in a normal blending mode. To access the
blending mode type on this letter N. And another drop-down menu
will open for us. And you can see that
we have the option to change the opacity of
the layer as well. Opacity of the layer
means how much of it is visible to us and how
much it is transparent. Which is pretty obvious, right? So you have the maximum
opacity with the slider to the right and the
minimum opacity with the slider on the left. If you drag the
slider to the left, the opacity of the
texture on the top of these clouds and the layer
will go to zero visibility. And we will not see it
because it becomes invisible. And we can see the maximum opacity if we
slide back to the right. And you can adjust
the opacity by using the pencil or a finger
to move the slider. Now, under the opacity layer, we have all the blending modes
with all of these icons. For the blending mode. For now, we will keep
the opacity to maximum. So we can see the options. What do we have here
for our blending modes? From the previous lesson, you will remember that the blending mode is
basically how the pixels and the colors on this
layer interact with the layer on the
original art or below. The opacity slider, together
with the blending modes, allow you to blend the
active top layer with the layers below by making
the active layer translucent, which makes the layer
below to show through. Depending on the digital
painting software, the blending modes are usually
categorized into groups. So let's talk about these groups and where to
find them in Procreate. I will also tell you
a little bit more about what each of these
blending modes does. The ones which are making
the artwork darker. Then we have the group
of the blending modes which make the artwork lighter. And then also we have another group with different
combinations of those. Above the normal blending mode, we have the blending modes, which make the artwork darker. And below the normal
blending mode. We have the blending mode group, which make the art or glider. So if you slide through
the blending modes, you will see the effects
right away on your artwork. So you can tell which
one fits the best without committing to
one of them just yet. So let's fly through some of these blending options to
see how the top layer with the colorful texture
can blend with the colors of the Cloud
on the layer below. Let's try the first one
here on top of the list. As you can see, it's making
everything much darker. But we can still see some of the texture from the top
layer if we zoom in. Now, the panel closed down. So let me open the
panel again with the blending modes so we can
look through more of them. You can see if you choose
this first blending option. You can see that the
letter indicating the blending mode next to
the layer name changed. So it's not lighter n anymore, but it's m four multiplied. You can test out the second one, which is clearly behaving differently than the
multiply blending mode. It is still darkening
the layer below, but it's not so intense as
the multiplied blending mode. There are so many options. So at the end of this lesson, I will also tell you, which are some of my
favorite blending modes that I use very often. So now back to the list. Of course you don't
have to remember what each of these
blending modes does. But it's good to
slide through them to see if you find
your favorite look. E.g. the color burn is little
bit different to multiply. If you just compare these two, color burn is
intensifying the colors. And if you go to Linear Burn, it's little bit different. Again, depending on
the colors you use. You can see the
difference mainly on this white color
here, on the stars. So if your artwork
has a lot of white, then this blending mode will be maybe quiet
interesting for you. Then the darker color, you see it mainly working on the darker tones in
my texture here. It's not influencing or
intensifying the yellows here. When you compare it to
normal blending mode. So it's focused on
these darker tones. If we slide back to the
normal blending mode, you can see these
lighter shades. Now, if we slide through
the normal blending mode, we can go to the group of
lightening blending modes. We have the lightened blending
mode, as you can see, it interacting mostly with a lighter tones of our texture. Then if we go to the
screen blending mode, you can see it's interacting
with more of the colors, but it's much lighter
than this option here. As you can see. Then if we go to Color Dodge, it creates some very interesting
play of colors here. It's interacting with
different colors and exposing the lightest
colors in our texture. Then if we go to
add blending mode, it's quite similar
to color dodge. But now it's even lighter
in some of the parts of the texture interacting with
the original artwork colors. If we go to the next group
of the blending modes, we have the overlay here
is one of the first ones. Overlay blending mode helps you to create contrast
in your colors. It behaves like a
screen blending mode on the lighter pixels in combination with
multiply blending mode on the darker pixels. If we go to the next one, which is a soft
light blending mode, it is similar to overlay. It also creating a
contrast in colors, but little bit more organically, keeping some parts transparent in the shadows and
highlights area. So you can slide more through
these options obviously to see what works the
best for your artwork. And maybe if you have other
texture as well, e.g. in these Hard Light
blending option, I quite like that there
is still a lot of purple showing through from the
base colors of the cloud. The hard light is similar to
the overlay blending mode, but it creates more harsh light. So it creates this loop where the pink and yellow tones are more intense in our example. And the greens are
quiet, subdued, which will fit nicely to the Starry Night theme
of our project, I think. So maybe this one can be one of the blending modes we
can use for our example. So we just need
to remember which look like they're most
when sliding through. So maybe just remember it or write it down so
you don't forget. Then if you look
at the other one, which is vivid Light, which is also quite
nice for this artwork, but maybe too strong
for my taste, because the colors might be
too saturated in this case. So vivid light usually
creates more harsh effects. As you can see. It's up to you. If you like this look, Then we have a linear light, which also creates harsh
effects similar to vivid light. As you can see, you
can notice the blue is very intense in our example, because this blending mode
behaves like a combination of the linear dodge blend mode in the lighter areas
of your artwork, in the linear burn mode, the darker areas
of your artwork. Then we have been light, which is making the yellow
into being in this artwork. This is quite an
interesting look. If you want to create something unexpected and using
these blending mode, it can result in removing the mid tones of your
artwork completely. As you can see, I lost the
rest of the texture here, which I don't want in this case. But I sometimes use these blending mode for
underwater illustrations, which I think fits very nicely. Then we have a Hard
Mix blending mode, which can be
considered another of more extreme blending modes
as it creates more contrast. This type of luke reminds
me of more cartoony type of Luke in a comic book where the colors are very
intense and contrasting, which might be very interesting
look for you as well. Then another blending
mode, which is different. As the name suggests, you can create a dear friends. Similar colors cancel
each other when blended, and they are creating darker
areas in your artwork. Then we have the
exclusion blending mode, similar to difference. But instead of dark black areas, you get great where
similar colors interact. In our example, it doesn't
really influence our colors. Now we're moving
to the next group, which is cancelled type of
a group of blending mode. In this blending mode, similar colors cancel each other and you get a black color. The divide blending
mode typically results in extreme highlights, and Blake stays the same. So this Blending Mode
option can be quite interesting for our
project as well. Because these purple pink
outcome can be quite fun for romantic or very
cute Cloud setting. I haven't considered this color palette for our project yet. So this is one of
the main reasons why I like to test out
different blending modes, because you can come
up with some fun, unexpected color combinations. That takes us to the next group where we have Hugh
blending mode, which I really like to test with many artworks
because it combines the original artwork
from the bottom layer with the colors of
the top active layer, in our case, the texture layer. So with these blending mode, you can just test out hues on your artwork on
the bottom layer. Next we have the
saturation blending mode. And this blending mode keeps the saturation of the top
active layer and blinds the luminosity and the hue from the bottom layers
with the original artwork. Here you can see that the purple is more
intense with some of the colors from the texture
on the top active layer. Then we have a
color blending mode where only the color of the texture layer would it be applied to our original artwork. This blending mode
keeps the color of the active layer and
blends the hue and saturation of the
active layer with the luminance of
the lower layer. And this is one of
my favorite ways to test colors on a separate layer. If I have a gray
scale, value artwork, especially if you want to draw your artwork first
in black and white, just in values, and just test out the colors on
a separate layer. This is a blending mode for you. Then we have the luminosity. So this is another one which
I quite like in this case, because it's working
with the lightness and darkness of the
original layer. Here. You can see we ended up
with only purple tones, which is very interesting. Look for this project. Now, if we think about all the blending modes we'll
look at for this example, I think what I liked the most is the overlay
blending mode, because it's changing
the texture quite a bit in very interesting way. If you select your
favorite blending mode, you can always
reduce the opacity. If you feel like that
the change is too much. So this was the
basic overview of the blending modes and what effects you can
achieve with them. Spend some more time
playing and getting more familiar with them to
choose your favorite ones. And here are my favorites. It is multiply blending
mode, overlay blending mode. And apparently I'm not
alone because some of the most commonly
used blending modes among artists are multiply, screen, overlay and soft light. Now let's go to the
next lesson to start working on our project and applying some of these
cool blending mode. See you in the next video.
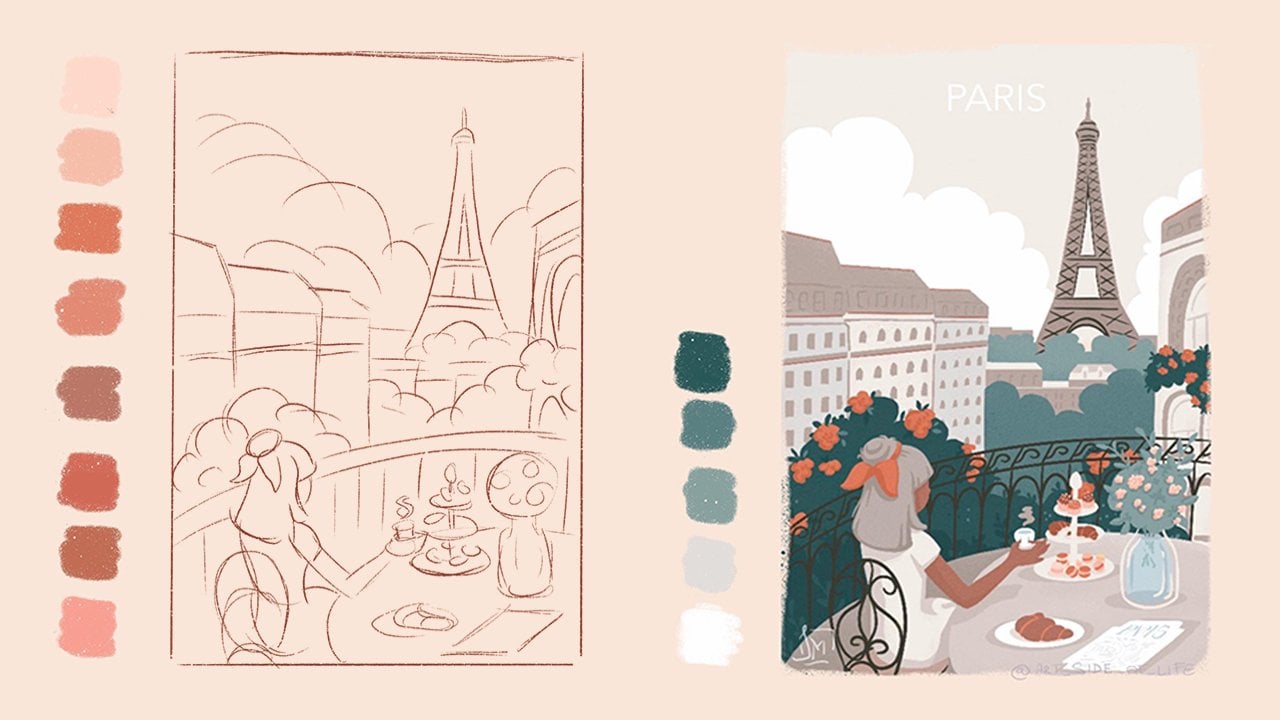
4. References: Now let's start working on our class project by collecting inspiration and references for our Starry Night in
a jar illustration. Before you start searching
for the references, write down a few ideas of what you would like to
include in your artwork. It can e.g. be a night
sky photography, northern lights, shooting
star, fluffy clouds. And when mentioning
fluffy clouds, didn't know that they are
actually called cumulus clouds. I find this quite
interesting name. Anyway. Then I will need some
bottles or jars references. Or maybe a terror
barium with plant, which I think can be a nice
addition to the starry night. Some plans. So I will write down greenery. Okay, I think this is enough
and maybe I will come across something
interesting while looking at the references. And if you haven't done so yet, write down some keywords and start creating
a mood board of references in your iPad
or maybe on Pinterest. And it can be also books
and pictures saved in your phone or wherever you like to collect
the references. For your own references, you can just search
images based on your keywords and adding a
word, photographic to it. E.g. you can search for
Starry Night photographic. And now I will show you
my take on our theme and the collection of
images that I put together in a mood
board on Pinterest. I collected a bunch
of different images. And the first group that you
see here are the night sky photographic images From the
keyword that we wrote down, as well as Van Gogh, Starry Night artwork
for color inspiration. On this reference, I like the
darker tones in combination with the yellows in variety
of blue color tones. And here you can see another
artwork from Van Gogh, which I think is
quite interesting, color combinations for the
nighttime mood of artwork. And then when we look at
the night photograph, you can see the
sparkling stars and different colors of the sky as an inspiration for
your color palette. Then I also saved some
of the images with the lamps and the light from
the street lamps at night. Because they create very
interesting glowing effect which we can use in our artwork. In addition to the
blue night sky images that we just saw, one of the images that you
see here has purple sky, which is quite nice option
for the color palette. In this example, you can also see a little
bit of red color, which is quite interesting
for a color variety. As you can see on
this inspiration, you can play with
different color palette for your backgrounds
within this topic. To create the color
palette for the sky, I will mark down the colors I like the most from
these references. Also, as I mentioned when
writing the keywords, the clouds are
quite interesting. Object to include it in
our project artwork. So I saved some images with
interesting cloud shapes, which I will use as a
reference for sketching when talking about the night
sky and night illustration, many of us naturally
think of stars, and therefore, I
wanted to include those in the project
illustration too. I say it quite a
few star and star constellation here
on the mood board to get an imagination
for our illustration going when creating the sketches in the following lessons. When drawing the
star constellation, you can choose your
zodiac sign or your family or friends
star constellation to add a personal touch
their illustration. You can also just draw random stars if you prefer
debt in your design. As you can see from
these references, you can include Sun and Moon and maybe even a falling star in the sky in your illustration. Next, we need to come
up with the shape of a jar as a base for
our illustration. So I save this image of these cute small lights
in these glass bottles. As I quite like the
shape of the bottle actually end the color
palette of these lights. Maybe this can be one
of the designs for the jar shape which you
can use in your concept. In the sketching phase, try to explore different
shapes for the jar to find the shape you find most
interesting for your design. I believe that is best to
combine different references. E.g. what I find
interesting on some of these references
are the cork covers. Or you can just draw the top
part without the lead or a cover just as a simple
glass shape like this one. After finding references for the jars and the glass bottles, I looked for different
gloss planetarium x2 because they're usually in
interesting glass shapes. So you can come up
with something unique. What is more, I think
adding a few flowers and plants to our
drawing is always nice. When thinking about flowers, I quite like the water lily
idea for this illustration. I saved some of the
water lily images here. When looking at references, you can save also fake
flower designs or state use, not only real plans,
images like that. You will have bigger variety of references and shapes
to get inspired by. I also saved some plant images for the leaves that are Francis. I saved quite a few
of those actually, as you can see, I have more options to choose
from when I'm sketching. So try to think which flower
or plant if you like, and would like to add to your design and try
to find variety of references for this plant or flower so you can create
something unique to you. And here is a pro tip. Focus on references
in a side view. So it's easier for
you to sketch and simplify the shapes
from the reference. To sum up, find some references for the
keywords that you wrote. For me. It was color palette of
a night sky, clouds, leaves, flowers, stars,
and star constellations. After we collected the references,
Let's start sketching. See you in the next video.
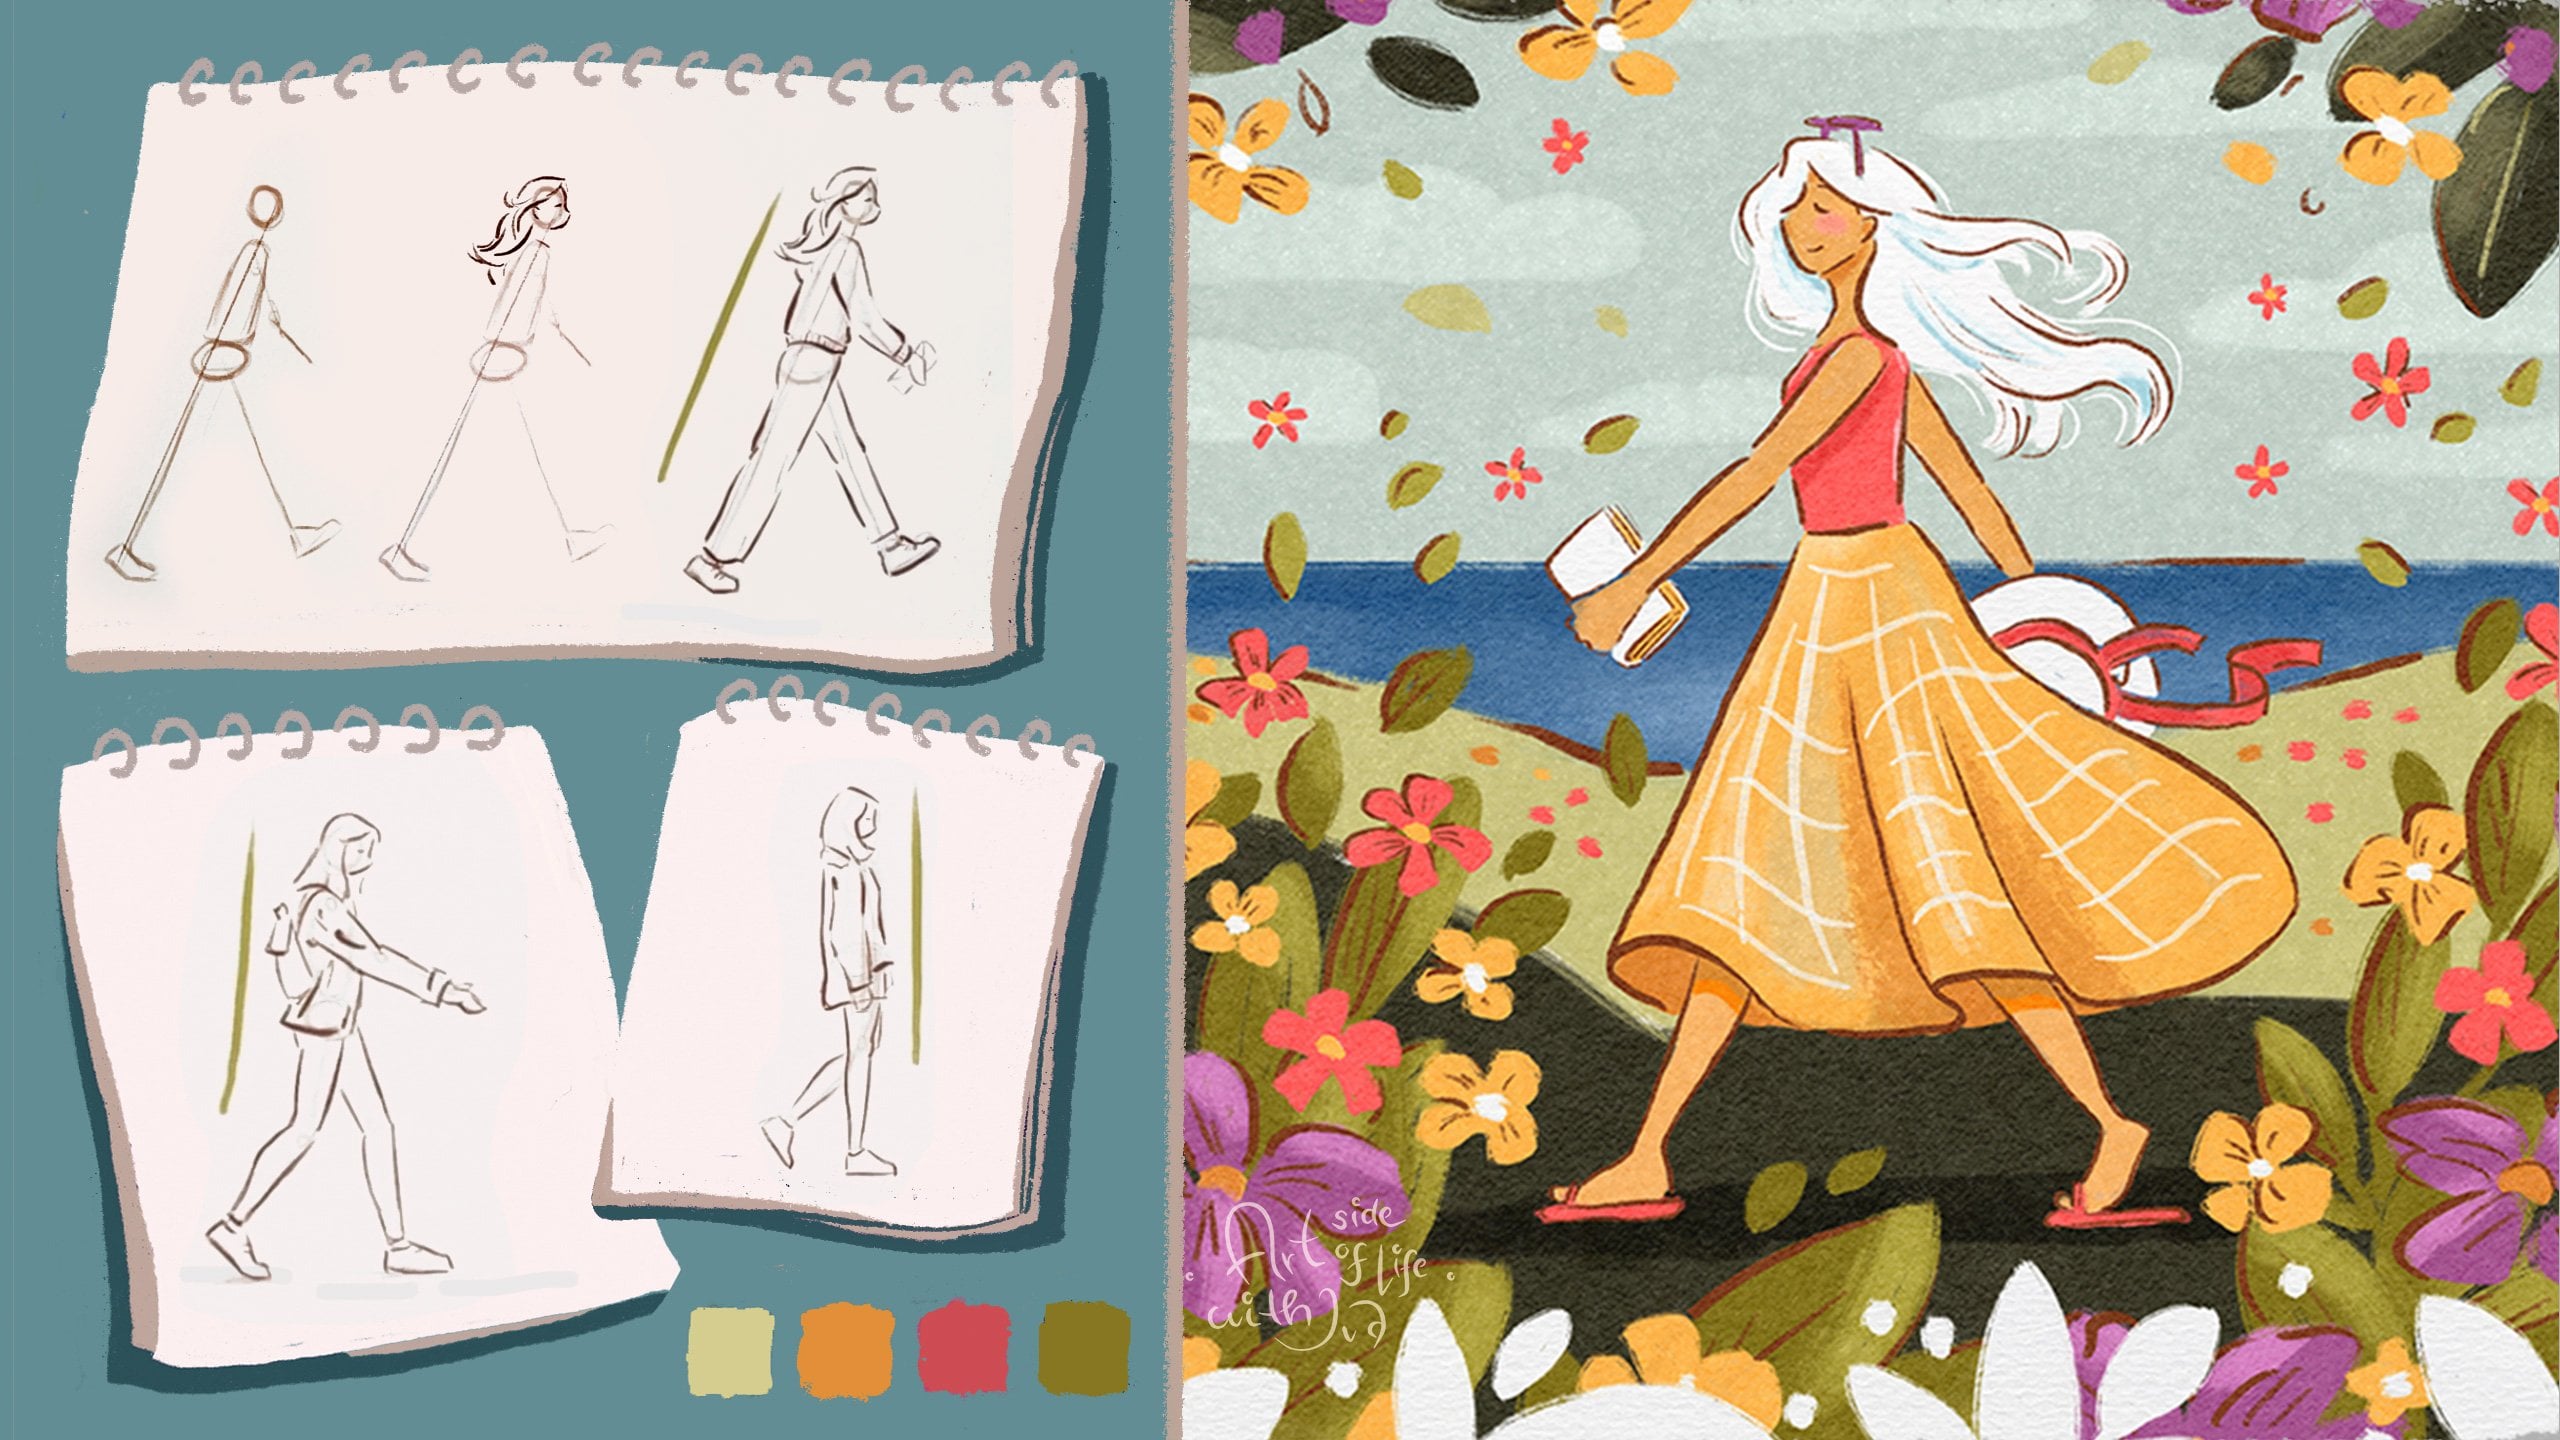
5. Sketching: And now let's start
sketching the concept for our study night in the
jar class project, I will show you an example
of sketching the clouds. And then you can use the same process for
sketching the stars, the moon, the jar,
and the flowers. Based on the references. Shake things up a bit. Let's get in the sketchbook. If you decide to
sketch on the paper, I will quickly show
you some of the tools I currently like
using for sketching. Traditionally. Here I have a spiral sketchbook with a smooth white paper, which is nice for
sketching with a pencil. The spiral bound allows me to fully open the
pages when drawing, which is quite helpful, is for the pencil, for rough and loose sketching. I'm not very picky and I don't
have a strong preference. I think you can use any pencil you have at
home for this exercise. But let me show you these two, which I tried and are
quite nice if you want to test out something new for
your art supplies Collection. First, this one is very light
if you consider weight. It has also very nice grip, so it's easier to hold it. In this second one, which is called
palomino black wing, is little bit heavier when you think about
holding a pencil. Obviously it's not such a big
difference. Buddy, notice. Also, I like when the pencils
for sketching have eraser, especially when drawing outside. I like to have a compact
amount of our tools. So I prefer these so-called
two-in-one pencils. If we consider the pressure
you have to use with these pencils and the
color of the stroke, how opaque it is. These pencil from
Faber Castile make the drawing a little bit softer and lighter look of the strokes. This other one makes
the strokes darker. As you can see on the pencil, half the pressure,
twice the speed. So even with a low
pressure when drawing, you can do quiet, nice opaque, dark strokes. Sometimes I like to combine
these two when sketching. When I do that, I use this
one for first light sketches and then I will outline
and define the sketch more with the darker strokes
with this other one. And I will show you how
I do that in this class. Also, during the sketching, I will try not to erase what
I draw to manage to avoid going back and forth
with the design and rather draw more versions. Which is a very good
exercise to force yourself to commit
to what you draw. Just draw more examples. During the process. I will be also cross referencing the images I saved on Pinterest. And I'm having my
iPad on the side of the table so I can look
at it when I need to. So let's begin
sketching some clouds. I will start with a curved
shapes of the clouds. I like to draw fluffy
and soft clouds. So the illustration gets
these dreamy and soft look. You can try the same style
as mine for learning, but it's better if you try different shapes to create more unique
illustration for you. E.g. you can make clouds which are more
geometric and symbol, or clouds with many details. Also, you can sketch
clouds with e.g. straight bottom
part, like they are. I think before the storm
or after the storm. I'm sure you saw that before. Or you can make the whole
cloud more curvy and fluffy. So as you can imagine, you can create quiet few
different cloud shapes with just small changes in
the curves that you draw. You can draw a few of these
based on your references. Again. Here is another way how
you can draw the clouds. I think this is
quite fun shape to draw because it's
not overly complex. You can still create
a lot of variety. Then e.g. this one is
little bit more abstract. Let's fluffy. And it looks a
little bit more like a bottle after the rain. But I think it's still
glad find the shape to do. Then if you remind yourself some of the references
that we saw, I can draw something like this. So as you can see, not only you can play with
the outer shape of the cloud, but you can also add some of these cute details
within the cloud shape. Another thing to consider is to change the size
of the clouds. It is nice to have the
variety in your illustration. So when you find the shape
of the cloud that you like, try to draw a few clouds in the same style, in
different sizes. And then you can add those in the jar composition later on. I'm thinking like maybe
four different clouds in the jar illustration. So try to think about
how many clouds you can imagine in your jar,
Illustration composition. And as a reminder,
while drawing, try not to erase
much and just draw another shape and other
shaving other shapes. If you don't like the
previous version. I believe when you draw
and practice more, you can improve much faster. And now, as a next object to draw and explore are the stars. One of the options we saw in the references where
these small circles to represent the stars. So that can be one way to stylize the stars from
the photo references. I mean the real
photo references, right? Note the drawings. Once again, you can change the size of these
shapes to create interesting combination of
shapes in your composition. Then another concept
we looked at and discussed was the idea for
the star constellations. To do that, you can
just draw circles. Then you can connect them with simple lines is a
stylistic choice. You can draw a few of these
based on your references. Again, this example that I'm sketching here is not any specific star constellation. Then to create a
slightly different style for this star constellation, you can maybe draw a dotted
line, something like this. Another option for the star
and star constellation and stylistic choices you have is more iconic shape like a
starfish for the star. You can draw a few of these based on your
references again. Then maybe you can
also draw some of the stars in a gym shape
or like a precious stone. Because you know,
the stars kind of reminders also, these
precious stones. You do there. Sparkling and shining, major, shining and glowing
look in the sky. Another shape idea
for the stars is more narrow shape,
something like this. You can finish off
the shape either with the round corners or a sharper, longer, spiral-like
shape corners. Then you can also
imagine this kind of hanging style
declaration like in acute room on the
wall or on a window. To create a more
interesting composition and little bit of depth. You can also hide one of
the stars behind the cloud. One last thing to
sketch and draw for these glowy objects
here would be the moon. If you followed along, you might have
also ended up with a full page of different
shapes and designs, which is great because
we have a lot to choose from for our class
project illustration. Before bringing the
sketches to digital form, let's outline the sketches we like to make it
easier to transfer. Like this. The sketches will
have cleaner lines, so it will be easier
for me to draw the colored shapes and silhouette based on these
sketches on the iPad. To draw on top of
these rough sketches, I will start drawing
the cleaner shapes with more pressure with the second
pencil I showed you before. I will start in the
left corner of my paper so I don't smudge what I draw on dog with
this second pencil. When trying to draw more solid, confident lines for these
clouds and maybe other shapes. I'm lifting the
pencil after I finish each of the top curved
lines of the clouds. This helps me to create
smoother lines easier with just one movement of the hand and then move to the
next shape and curve. So what helps me is to always leave the pencil
when drawing new curve, rather than outlining the
whole cloud shape in one go. And to draw more straight lines, it is easier for me to draw the line with the one movement. If you are not fully happy with the shapes of your sketches, don't worry, you can always adjust them when
drawing in digital. And now I will continue sketching with the
other references, the jars and the bland. So you can do the same. And I will talk to
you in a moment. I feel two more pages
because I didn't want to limit my inspiration
by space on the page. One page is dedicated to
flowers and the leaves, which I can use mainly
in the bottom of the composition of the
Starry Night illustration. And the other page, I filled with bigger jar shapes based on the photo references. I quite like the
bigger, wider jar. So I will use that one
for my composition. When you are happy
with your sketches, take a picture or scan them, and then import them
in your iPad so we can start painting in
color in the next lesson. See you in the next video.
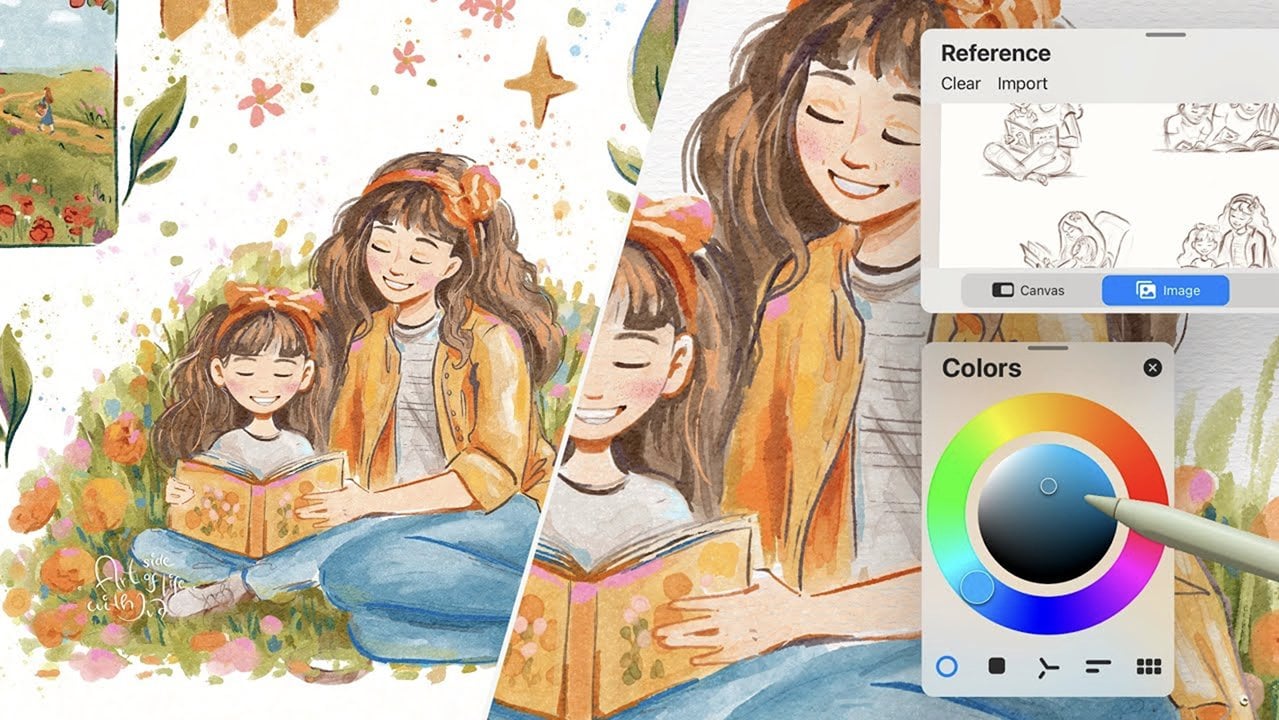
6. Import & Set Up: So let's move to the digital and let's create canvas
for our project. Import a photo of the
sketch and use one of the blending modes to prepare
it for the illustration. Let's do that. To import the photos of
your sketches to procreate, slide up from the bottom of the screen and open
the Procreate app. It will open the gallery
overview of your artworks and canvases to create a new
canvas on the plus icon here. For our class project, I will create a square
canvas because I think it works nicely for
this type of illustration. I previously created
a canvas like that, 4,000 by 4,000 pixels, which are used quite often. Or for social media, I sometimes use 3,000 by 3,000. That's why you can see here
on my list of canvases. If you are not sure how to
create a new canvas like that, and you are not sure what
the best settings are. Let's create one together. So from this selection, I will choose pixels. You can choose inches,
centimeters, or millimeters. If e.g. the client
brief requires it. I will go for pixels because I plan the artwork for
the screen use only. Here you can see the
amount of layers available with this canvas size. So I will go for 4,000
by 4,000 pixels. And the DPI, I will keep it
as it is for this project. As you can see, I have 61 layers available and I can
rename my Canvas as well. I will name it Starry
Night in a jar. Okay, that's it for
the Canvas setting. And now tap on Create. You will have a new canvas. I created a color palette
which I want to use for this project based on the
references we looked at. If you want to learn
even more about how I create color
palettes in detail, you can go and watch my
color palette class. Will I explain my colors
discovery process? You will find it in
my teachers profile. But there's a quick summary
for this color palette. I was inspired by the images in my reference mood board with
the night sky and stars. You can get inspired by the
starry night painting, e.g. or other images
that we looked at. I will be using more
purple and blue colors for the background
of the image too. And then I will be
using light and darker blue views for the Cloud and some of the yellow and maybe white color
hues for the stars. Now, let's import a photo
of the sketch and look at the blending modes
that will help us with this step
of the process. To insert a photo, you can tap on, Import from the menu and select your sketch
from your image gallery. It will appear in your
Canvas quite quickly. And we will start with the
jar to create a base for our composition and the rest of our elements in
the illustration. To find the right size, kill the imported image with two fingers approximately
from the middle. And because it's just a sketch, I can scale it and even use a
wider version of it without being worried that it will
get distorted or pixelated. So now we have a separate layer
with the imported sketch, but it would be
hard to draw based on the sketch
without difficulty. So we're blending modes
can help us a lot. So e.g. you can use Hard
Light blending mode and you will almost lose
the whole background, which is great if
you want to create cleaner and brighter looking
version of EarSketch, maybe even without
adding colors. If you prefer the look of
minimalistic line art. Then you can also create very interesting chalkboard
look with this setting. As you can see, you
will end up with a white sketch on
a dark background, which I find pretty cool
if you want to test out the type of illustration
style and look and feel. So this is another idea, how you can translate your
sketch into digital form. But for this exercise, I will go with a
multiply blending mode. So I can draw the colors
under the sketch easily. I will also reduce the
opacity of the sketch layer so I can draw the colors
under the sketch layer easier and multiply blending
mode on this sketch is one of my favorite
ways of working with imported sketches
and blending modes. So once again, the
multiply blending mode on the sketch layer
will allow me to easily follow the shapes from the sketch in color
on a separate layer. And I want to create a jar in white color to
represent the glass. And before doing that, I will change the
background color to dark purple because I
wanted to create night sky. And also it will help me to make the jar stand out from
this darker background color. Then I will create another
layer under my sketch layer. And to do that, I can press the plus sign
to create a new layer. In the new layer will
appear above the sketch. But I want to have it below, as I mentioned before. So I will just drag it under
the sketch layer like this. Now I can start illustrating on this
layer in the next lesson. See you in the next video.
7. From Sketch to Color: So let's illustrate
the foundation for our composition, the jar. And we will fill the
composition with some of the Cloud
from the sketchbook. For this project, I will
be using just few brushes. I created a separate folder
for these brushes so I can find them quickly while
creating this illustration. The great thing is that all of these brushes come
with procreate. So you don't have to buy new brushes if you
don't want to. You can find this first brush
originally in this folder. The second brush here, and the third brush
in this folder. So let's start
drawing the jar based on the sketchbook,
sketches and explorations. I will take the first
brush that I showed you, which will help me create
some nice subtle textures. And I will choose a nice bright color to
contrast with the background. Let me show you the texture and behavior of this brush quickly. I will make sure I am on a separate layer and
draw a few brushstrokes. Now, after growing
few brush strokes, you can see that the brush has this nice subtle texture
when you draw softly. And when you press harder, you will have less
texture with this brush. And that's one of the main
reasons I like to use it. Here is a quick gesture deep. I can erase everything
on the layer, scrubbing the canvas
with three fingers, which is pretty cool. And here is another tip, if you're not
familiar with it yet, to make a straight line hold
and then release the line. This will also allow you to
adjust and edit the shape. For this project, I
will aim for more hand-drawn and
slightly wobbly feel. So we'll try to draw
all the lines more straight without using
this quick help. The lines will be a little bit verbally and not
exactly geometric. But it's up to you, which
look you would prefer. Now, I can start
illustrating the jar. I will adjust the brush size so the jar outline is thick
enough to represent the glass. Okay, I think this
thickness works. You can always draw
the strokes more times until you get the
lines that you want. Okay, I think this is fine
and I will make the edges rounded so the shape is more
cute and friendly looking. Then I will also sketch a
few lines on the top of the jar shape to
suggest that there are some details on the
top of the jar. Okay, I'm pretty happy
with the jar outline. And now you can add a
simple shape to ground the composition and suggest that the jar is placed on something. You can take a darker purple, are basically darker color,
then your background. And draw a line to
suggest a table shape. Then you can quickly drag and drop a color into this area. When you fill in the shape, you can always adjust the edges. If it's not exactly
how you imagined. To help the jar shaped stand
out from the background. I will add another color
within the jar silhouette. In addition to this, it will help me to
create the illusion that there is another
world in this jar, in contrast to the rest of the scene and the illustration. So add another layer to create the night sky look and feel
within the jar silhouette. I can delete the sketch layer because I don't need it anymore. Then choose dark color, are basically darker color. Then your background. And draw a simple shape for the night sky and
base for the clouds. And after you created the
outline for this darker color, you can just fill it with
the color you chose. Ok, and now I have
the base color for the night sky and
base for the clouds. Now, you can import the
second sketch with the clouds that on Insert photo and wait until the image shows
in your Canvas. When I have the Cloud
sketch imported, I will change the blending mode on this layer to multiply. So I can see the sketch
of the clouds better. And what I'm drawing
on the layer below. For a balanced and
interesting composition, I suggest that you start
with two main clouds, which will be the two
more dominant clouds in the composition, together with the stars
and the moon later on. And to balance out
the composition, I suggest to place them
evenly in the jar. E.g. draw one cloud on the top right part
of the composition, and another cloud on the left bottom part
of the composition. Then you can move this
sketch with your clouds, where you would like to have
this in your composition. And here is a quick
reminder when moving objects like the sketch too much out of the canvas and then release the part of the
sketch will be cut off. So how to go around this? Well, simply you can duplicate the sketch layer or the object. Do you want to move
as a backup for later use and high the
duplicated layer for now. So this will be a position
for the Cloud one, I will choose this cloud
from the sketches. For these two clouds, choose one lighter color, so they stand out from
the background and still using the textured brush
that I showed you before. I can zoom in and I will draw the Cloud based on my sketch. Okay, I think this is
nice to double-check. If you created the
shape that you want, you can disable and enable
the clipping mask by clicking on the layer thumbnail and select the clipping mask. Now, I will draw a second
cloud in the bottom-left. To balance out the composition. As I mentioned previously. You can reposition the sketch to help you draw
the second Cloud. Of course, I think I can use maybe longer
cloud shape this time to create variety because these two clouds are
in the same color, so I need to differentiate
them in a different way. So maybe I can take
this cloud shape. So I will sketch the second
cloud on the same layer as the first cloud to
limit the amount of layers because we already
have quite a few. When Dan, you can hide
the sketch layer. Now, when comparing the clouds, I think they still look
too similar in silhouette. And I want them to be slightly different
because as I said, they are in the same color. So I will adjust the
silhouettes lightly. As you can imagine, the sketches are
not set in stone. You can, of course, adjust the shapes for
your drawing later. When you are happy with
both shapes for the clouds, you can start applying the blending mode to
see which one can help you to make
these two clouds stand out more in
the illustration. Before doing that,
let me mention that I think I will search in a
group of the blending modes, which are making
the illustration lighter because I think
brighter colors for these clouds will
help me to make them stand out in the
composition the best. So let's do that. Okay, I think this works great. And now let's create more
depth in our illustration. And to create more depth in our composition and
the illustration. Sense of a sky and even like
a universe with the stars, will add more objects
into the illustration. So easy way to create
more depth in this case, is to add more clouds in the darker color
behind the clouds, in the lighter color. To speed up the process, you can just duplicate the
clouds that they already have, because the secondary clouds
will be less visible, that they are duplicated because they will be
in another color, plus, we will not see the
full silhouette of them. In addition to this, you can always flip the shapes. They appear different
to the viewer's eye. Then try to find the right placement for
these secondary clouds. Maybe I can put them here. Okay, I think that works. To double-check. If you created the
shape that you want, you can disable and enable
the clipping mask by clicking on the layer thumbnail and select the clipping mask. Then try to find the right placement for
these secondary clouds. Maybe I can put them here. Okay, I think that works. When you are happy
with the shape and color of these first Cloud, we are ready to move to the
next part where we will add more depth to our illustration to improve our composition. So see you in the next video.
8. Adding Depth: So now let's add more depth in our composition and let's
balance it as well. We will also create
a sense of sky and even maybe the
universe with the stars. And you can imagine
planets are Milky Way or whatever sparkle you would
like to add to the sky. But first, let's talk about
adding the depth will do, will help us to do so. These adding more objects
further away from us, we will use the objects
that we already have to make our life
easier, the clouds. Now let's try some blending
modes to find interesting, darker look for these clouds. E.g. this one, I think this blending mode creates
quiet interesting look. Although maybe now
the clouds are not visible enough compared
to the background. I want them to be
more subtle than the lighter clouds,
but still visible. So I can try a different
blending mode. Maybe this one. It adds a color variety to my overall color palette
in the illustration. When you are happy, you can
duplicate the layer again. And as you can see now the blending modes are
on top of each other. So it intensifies the loop and these objects are
now very vibrant. I don't want to
have this type of Luke in this illustration. So to avoid that, I can just move the Cloud
to another position. They are in the look,
I want them to be. And again, to create the visual variety
in the composition, I will flip the Cloud again. To balance the composition. Again, try to avoid the same placement of the
clouds below each other. I mean, so they are not in the same distance from
the edge of the jar. And you can also
scale it down to create more variety in shapes. And when you have two clouds on the same layer and you
want to move just one. Use the selection tool, draw around the object
using the free hand option, and then you can easily move just one object from that layer. Okay? When you're happy
with the position, you can test out the
blending modes of your layers and tried
to find the right look. Okay, I think this works quite nicely together with
the other colors. You can adjust the
opacity of your layers. Then to balance the composition. Again, I will duplicate this
layer because I think I will use this cloud here on the
top just to fill the space. To match the load with
the other clouds. I will select the same blending
mode, which is divide. I think I like the look
now, but if you want, you can experiment with more blending modes to find
the right look for you. Now, as I'm happy with these, and if you are happy as well, you can merge these
two cloud layers to limit the amount of layers
in your illustration. But before doing that, I don't recommend merging
layers with lowered opacity in case you want to adjust these layers and
then look later. Because when merging
layers like this, the opacity stays lower
on these merged layers. So before merging these two
layers, I will remember, I want to keep 35% layer
opacity and mount. And now I will put
them to full opacity, then merge them like that. And then lower the
amount to 35% again. And again to create the visual variety
in the composition, I can just move the Cloud
to another position. They're in the loop,
I want them to be. Now, there is an interesting
overlap of these two clouds, maybe like in screen printing. But I don't want this look
for this illustration. So I will just erase this part. There are different methods
how you can remove this part. But to keep this process simple, I will just erase the part
that I don't want anymore. Plus, I can always copy
another cloud to be spliced if I want to get
the same silhouette. So anyway, I think
I'm pretty happy with the clouds and their
placement in the composition, and also the color variety that he created by using
the blending modes. And I hope you are happy with your progress so far as well. Now, let's move on
to the next lesson, where we will draw
the greenery and the flowers to make our
illustration more lush. So see you in the next video.
9. Adding Greenery: Okay, in addition to adding greenery and making our
composition more lush, let's also find more color hues to add to our illustration. I want to show you another fun way to
discover a new colors. And that is by using
the blending modes with the colors that you already
have on your canvas. So what I will do now
is that I will take one of the colors that
we used for the clouds. I will use this lighter blue. Then on a separate layer, I will test how
it interacts with the purple background while
using the blending mode. So let's open the blending
mode selection and test a few to see what color
combination we can find. Let's test out some of
the lighter versions. E.g. I. Can see that the
lightened screen and the color dodge blending
mode doesn't give me much of a different
color in this case. So let's test some of the
other ones to see if that makes it more interesting and we can come up with some new color. Let's try this one, e.g. I think the outcome
is quite interesting. I like this lighter purple and darker purple look and feel. But it might be too similar to the cloud colors that
we already have. So maybe that's not the best choice for
this illustration. If we want to
create more variety while still keeping a
coherent color palette, then we have a hard
light blending mode. Maybe not vivid Light
doesn't work either. But it's always nice to
scroll through most of them. You might find something
that you like. E.g. these darker
green color outcome can be very interesting
choice for our plants in the jar color at night
because the color is less saturated than the bright green you would see
during the day, but it might still be too
bright for this night scene. So I will skip over this
blending mode for now. Then. This one creates a
nice lighter version of the green for
our color palette. So maybe this one can work, especially for
adding highlights to the plants if you
decide to build it. Okay, I quite like
this lighter purple, especially for the flowers
in the foreground. Maybe in a slightly less
saturated version, again, because we have a night
scene illustration, so I want everything
less saturated. So I will sample these
purple color with the color picker and save it to my color palette
for the later use. I will go to this layer and slide through
the options again. Then next new idea
for the color, for our color palette can be these subtle green look, okay, maybe it's more
blue-green color, but I think it can still work nicely for some of the plants. So I assemble and save this green blue collar as
well in the color palette. Even though it looks very
similar to blue color tones, we can adjust the
hue slightly so it will be a little bit more
suitable for the leaves. Now that I'm saying you
can create blue leaves, but we already have blue clouds. So the leaves would be nicer in a little bit
different color tone, but still work together with
the color of the cloud. So this is another
huge colored topic. What colors work together with which color
palette and so on. Because colors
appear differently in relation to other colors, they are next to them. So we need to test the
color in the illustration, not only as we see it in
the color palette preview, I talk more about this topic
in my color and light cores, which you can find in
my teachers profile. If you want to dive in more
into color and light theory, I find it fascinating. So going back to
our project now, let's look at the
color blending mode, and I will sample this color
with the color picker, save it to my color
palette for the later use. So now it's slightly closer to the green
hues rather than blue. So I will keep these
newer version and I will delete the
previous color hue from the color palette. Now, after just a few tests
with the blending modes, we have two additional
fan color hues, new purple and new green, to create very coherent
look in our illustration. So in addition to the other blue purple
tones for the sky, now, I can delete this
testing layer and bring my plant sketches so we can
start drawing the leaves. After importing
these new sketch, I'm considering
where I can place some of the plants
within the composition. I want to add some plants on the top of the
composition and the flowers and
some other leaves at the bottom of
the composition. So they look like
they're growing, lagging the variance in the jar reference photos
that we looked at. By the way, if you want to
learn more about compositions, word my popular class
about conversations, which you can also find
in my teachers profile. Before drawing the leaves in
color on a separate layer, I will set the sketch
layer to multiply blending mode and
reduce the opacity. And I will create a layer
for the leaves to draw on. Then I will move the layer here so it creates the clipping
mask automatically. As the other layers, I need to zoom in to see
the shapes better now. And I will reduce the sketch
layer opacity even more. Now, I can taste the green blue color tone
that we just saved recently. So let's see how it looks
compared to the cloud color. As you can see, the
color is pretty similar to the cloud color. So what I will do
now is to adjust the saturation and I can make it slightly darker and
less saturated. Let's also hide the sketch
to see if the colors work well together with the
rest of the composition. Okay, I think this
works quite nicely. It is less saturated
as I mentioned. So it works well for
the night team setting. Now, I will uncover
the sketch layer again and I will draw the rest
of the leaves here. I will make this leaf
slightly longer to fill the bigger part of the composition to balance
the other elements. And here is another tip, how to get another bonus color that works with the rest
of your color palette. Simply sample darker color down from the multiply
sketch layer on top. You can use it as a color for
the details on the leaves. Now, I can just draw
the details with smaller brush tip
size with this color. E.g. this darker
green on top of the leaf works super nice
as a detail color. To double-check if
you like the color, hide the sketch layer for
a moment and zoom in. Because the multiplies
sketch layer on top is making our colors to look slightly different than they will be in
the final illustration. Okay, I think this
works quite nicely. So I can add few of these line details on
the other leaves too. Oh, I can see that I
forgot some color here. Okay. I can fix that pretty easily. And after doing that, I have all the leaves ready
in the top part of the jar. Yeah. Okay, so I can move on. I will keep these
two layers with a normal blending mode because I'm pretty
happy with the color. And I don t think we
need to add blending color modes effect for this
part of the illustration. And as a quick reminder, before going to the next part, don't forget to save the new color tones you
created in your color palette. Now, I will add few more leaves at the
bottom of the jar and the composition
on the same layer using the same color
and the similar shapes. Before going to the next lesson where we will be adding flowers. I will speed up this
process a little bit. So see you in the next video.
10. Adding Flowers: And now let's draw
some flowers to add nice floral decoration
in color to the bottom part of our jar
composition and illustration. We will be using the sketches for this part of the
process as well. You can always go back to your
references if you need to. And we will, there's the one of the colors that we edit in the previous lesson to see how the saturation fits
within the illustration. So let's do that. Now. I will turn on the
opacity of the sketch layer. Then I will rotate the
sketch so I can position it where I think the flowers would work best for the composition. In addition to
rotating the sketch, I will scale it down. And after doing that, Let's see how it fits. Always keeping in mind the references that we
looked at previously. Okay, I think it all looks fine. Or maybe I can place
them more here. Plus make it a
little bit smaller. As you can see, you can always, there's different placements
of your sketches to find the right composition before you start drawing the elements. Okay, now, I think this
works even better. Now, I will start with
this flower and I will test the purple that we saved
in the previous lesson. To do that, create
a new layer for the flowers and select the purple color or the other color you
decided to go for. Then test if you like, the saturation and
the brightness of this color compared to the
rest of the composition. Again, to compare
the colors easily, draw a small square next to your other colors to see
how they work together. For the look and feel I want to achieve with
this illustration, the selected color is still
too saturated for my taste. I want the flowers to be less
saturated, if you remember. So I will reduce the
brightness and saturation. To do that easily, I will just drag the
slider down here. Maybe something like this. Now, I can test the color
on the flower to see how it works next to the other colors
and on the bigger shape. Okay, I think it
works pretty nicely in terms of brightness
and saturation. So I will color in the
full flower shape. It is good to see
how the colors work also without the sketch
layer and multiply, as I mentioned before, because that influences how
the colors look through. Because we, the sketch layer
and the multiply option on, it's still kind of
skews our perception. Okay, now, looking at the
bigger shape with this color, I think I will still slightly
reduce the saturation. And it's very easy to do because the shape is on a
separate layer. If you have more
complicated illustration, you can also play with
adjustment menu in the settings. But in this case, I will adjust the color
with the color wheel and the drag and drop
function into the shape. As simple as this. Okay, I think this works better. And now I will sketch the silhouettes for
the other flowers. And you can do the
same based on the flower shapes that you chose
for your illustration. Okay, I like how nicely the purple flowers feel the
bottom of the composition. So now it's time to add
a few details to them, similar to how we edit
details to the leaves. E.g. I. Can add few darker lines to keep the illustration style
here consistent. And as we did before, the great thing
about blending modes is that to find
slightly darker tone, further details, I can just sample the darker purple tone. Created from the multiply
blending mode of the sketch layer on the
above our flower layer. To finalize the other flowers
based on our sketches, you can just rotate and
move the sketch layer more times to match the position
of the flowers that you want. But as a quick reminder, try to avoid rotating
and scaling up the finished flower shapes because it might get pixelated. So only rotate the sketch, which I don't mind
to get pixelated. Now, I will continue adding details to the rest
of the flowers on a separate layer about
the main shape flower layer. Okay, I think the
flowers look nice, but I still need to
add some greenery to make them look like they're
growing from somewhere. So I can draw the
leaves and stems of the flowers on the same
layer as the other leaves. So I don't mess up the purple shapes and the
silhouette of the flowers. Just make sure that
the layer with leaves is under the layer
with the flowers. So you are more
flexible and drawing. And because this flower, this leaves overlap and
cover these other leaves, I will create another layer
just below the flowers layer. For these extra leaves, I will use the same
green shade as I used for the leaves before
on the top of the jar. And the other leaves to keep consistency in colors
and the greenery. And I will draw the rest of the greenery based on my sketch. To move the leaves
and its details, select both layers by swiping
to the right on each layer. Take the selection tool, draw the selection around
the leaves you want to move, and then you can
move them easily, fit the current composition. You can also make them smaller. You can move the elements
if you want to adjust the composition without making
your drawing pixelated, moving, without rotating
doesn't pixelate the moment. Because sometimes
in my experience, when I rotate some elements, they get slightly pixelate it depending on the
resolution of your canvas. So I tried avoiding rotation. What works for me? I can flip the objects and that doesn't seem to
pixelate the elements. Afterwards, I can
continue drawing more leaves and
greenery the same way. And you can do the same now. And I will talk to you
again in a moment. If you want to add more colors and details to your flowers, you can create another layer
for the flower highlights. E.g. you can add a brighter
color tone with some of the lightening
blending modes with the same purple on the
edges of the petals. As you can see, I added few
more leaves with details. Again, thinking back to
our reference images. Okay, let's summarize
what we have so far. I have the original
sketch layer with our reference sketches for the flowers in multiply
blending mode. Then I have the layer for the silhouette base,
for the flowers, layer for the details, and the layer for
the other leaks. In case you want to
adjust something, you are always more flexible
if you have more layers. On the other hand, if you are limited
with the amount of layers because of the type
of the iPad you have, you can merge some layers
if the shapes are not overlapping because
that will limit your flexibility of moving
the object separately. And just a quick reminder, always try to copy
your artwork canvas in a gallery before merging if you are not sure about your changes. Also notice that these layers are in normal blending mode. You can get a different
result and merging layers in different blending
modes on top of each other based on the bottom layer. So I can merge these two
layers to save space. So always think about which layers you can
merge to save space. And always try to avoid objects which overlap when
merging layers. Okay, and now let's move to the next lesson where
we will add the stars, star constellations because
they are always fun. And the moon as
final elements to our illustration composition
and some of the details. So see you in the next video.
11. Stars, Moon and the Glow: So let's create the
magical atmosphere by adding glowing stars and the
moon to our illustration. First, we will add the cute
stars into our composition. And then I will show you two
techniques on how you can achieve the glowing look
quiet quickly and easily. Now, I'll organize
my layers of it. I will delete the layer with the leaf sketch because
I don't need it anymore. Then I will import the
sketch with the stars, star constellations,
and the moon. First, I want to draw the star
constellation because it's one of the bigger and
more important elements in the composition, together with the moon. And later, I will fill in the space with the
smaller stars. I want to position the
sketch higher so I can trace the star constellation
in the right place. But before that, I will
duplicate the sketch layer. After duplicating the layer, I will hide one of
them for later use. Then I can move the
sketch layer here without being worried that
part of it will be cut off. Because as I mentioned before, it will be cut off
when you move it too far outside of your canvas. When releasing the move tool. Then I will make the sketch
layer slightly smaller. And I will set the layer
to multiply blending mode. And I will draw on the layer
under the sketch layer. Then I will choose the
white color for the stars. I will use this brush because I don't want too much texture on the stars because
they are quite small compared to the other
objects in the illustration. And I want more defined shapes. As we sketched before, I will draw a few circles
to indicate stars. To draw a perfect circle, I will touch and hold with
my other hand on the screen. Because it's pretty tricky
to draw perfect circles. The color them in. I will make sure that the
shape is closed and I will just fill in the shape with
a drag and drop function. By using the quick gesture, sliding down with three fingers, I will duplicate the shape, and I will just
move the same star to another position
based on the sketch. When you want to
duplicate this star and it is on the separate layer, you can just duplicate
the layer by sliding to the left on the layer
and selecting duplicate. But if you have more stars or
other objects on one layer, like we did with the leaves, you need a different approach. Now to reduce the
amount of layers, again, I can merge few layers. If you remember, we use the selection tool when we
want it to move the leaves. And this is the same principle. What I usually do is to
use the selection tool, draw around the star or
other object I want to duplicate and then I can duplicate it when the
object is selected. So I use these two options
to duplicate the object, either duplicating the
layer or selecting the object on the layer with selection tool and
then duplicating it. Then I will add the lines that
create the constellation. If you want to make
the line straight, just hold after
creating the line. Okay, I quite like this outcome. It's pretty cute. Now to create more visual there, ideally like we did
with the sketching, I will add few more stars in
different style and shape. I want to draw two
of these shapes. So I will move this sketch so I can draw based
on the sketch. Actually now, looking at these different
shape of the star, I can change one of the stars in the constellation to be in a different style and make the constellation little
bit more interesting. I will rotate the
sketch and redraw the shape on top of the
previous star shape. Okay, this is quite nice to have a slightly different
shapes in the stars. In this case, I will
not duplicate the star. So I will draw one more
star similar in shape, but not the same in
a different place. Maybe here, overlapping
the Cloud slightly. I think this is pretty nice. And then I can draw a few of these extra small
stars somewhere around the canvas to
feel the composition. So let's move and reduce
the sketch size again. Okay, now I can use another
color for the stars, maybe yellow for a change to bring more color to this
part of the illustration. Because bottom part of the illustration has
already some extra color, because we already
have the flowers. The stars in yellow
color will help bring more color to the top part
of the illustration as well. I think this is pretty cubed. And now I can go ahead and hide the sketch and
duplicate the stars, which I already have to feel
the composition even more. If you remember with the Cloud, we flip them to avoid the copy paste look
throughout the illustration. So here I will use
the same trick. Just flip the stars
horizontally and vertically because we already have some variety of the shapes. This simple thing
helps me to create more visual variety and speed up the process a lot
while still having a lot of details in
the illustration. Now, I can merge these
layers because I can always move and copy part by
using the selection tool. If you remember, then I
will copy this yellow star, so we have more of them. Another tip to avoid
the copy paste look is to change the
size and the composition. So I can make this star smaller using the uniform selection
tool when resizing. Now, it's not the same as
this one and this one here. Okay, I think this
is a nice progress. So I can merge the layers again. And now I can use the original sketch layer
that we duplicate it. I will flip it around because I think
the moon will look nicer facing the
other direction. And I will set the layer
to multiply blending mode. I will reduce the opacity to see better what I'm
drawing on the layer below. But before drawing, I will
delete the other sketch layer, which I don't need anymore. And then I can start
sketching the moon. When drawing the moon, it can be tricky to get the
exact shape that you want. To create more geometric shape, how the line after drawing
the initial shape. And then click, edit the
shape here on the top. Then you can drag and position the line into the area you want. This tool is super-helpful and convenient for some parts
of the illustration. For the whole utilization
if you want to. I will address the edges
slightly so they are less sharp because I liked
the more cuter look. And now I will use the brush to color in the shape
instead of dropping the color because I want
to keep some texture from the brush we are
using on the moon shape. Okay, I think the
moon looks pretty nice because I want to balance out a little bit of this part of the composition
with more details. I will add even more stars. I will hide the sketch
so we can see better. And I will copy some
of these stars again. Okay, I duplicated
the stars within our composition and it
already looks pretty great. And now I will show you two
techniques so you can make the stars glow and create
even more magical feeling. This is super cool part. So before doing that, I will do two things. I will merge all the
stars into one layer, and I will delete the sketch layer because
I don't need it anymore. Let's look at the
first technique. We will use a soft brush. I will select this brush. And first select one of the stars you want
to add the glow to. And I will softly
pain the glow with this soft brush on the
layer below the stars. So it already starts to
look like it's glowing, which is super awesome. By just using one brush
below the star layer, you can create the soft glow. How quick and cool is that? Now, let's use the
blending modes that will help us to change this to
something even cooler. E.g. we can use
screen blending mode, which already helps
the glow to be slightly lighter and looks
like it's actually glowing. Also, the blending mode with the interaction with the
cloud is quite nice. We can try a different
blending mode. And actually I quite
like this one. Or you can try hard
light blending mode, which is quite nice. So you can compare them and
choose the one you like. Then I can reduce the
opacity slightly as well. Then I can also change this layer to the screen
mode, blending mode. And you can see it's changing the colors of the
stars slightly. And you can play
with these effects even more and try more versions, which is quite fun. After tasting few of these, choose one of them, the one which is your favorite. Obviously, I chose the ED
blending mode in this case. So this is one of the methods using the soft brush
and the blending mode. And now let's look at
the second option. The second technique
you can use, which is even quicker and more convenient for more
complex artworks. And the artworks
with more details. To save time, maybe you
don't always want to draw with a soft brush
behind every star. So I will hide this layer
for now so I can show you this other technique. To use. This other technique, I will
duplicate the whole layer here and put it under the
layer with all the stars. Then I will change the blending mode to the
one we just looked at, which was this one. Then I will change this
layer back to normal. Afterwards. On this layer, I will use the blur tool. And I will slide little bit until we start seeing the
glow around the stars. Which is super quick and fun way to actually create the glow. And you will see the
amount changing in real time while you slide
your finger on the screen. So you can easily
decide how much of the glow you actually
want around the stars. E.g. this might be
too much as you almost don't see them anymore
as it blurred out a lot. But something around this
spectrum can work quite nicely. Okay, it already looks super nice because the stars
look like they're glowing. Let me show you how you
can enhance it even more. To do that uncovered this layer, especially if you want to add more globe to some of the stars. Okay, How cool is that? If you want to add
even more glow, you can just duplicate
the layer again. And it will intensify the look, which is super cool. When you are happy, you
can merge these layers. Okay, that's it. I hope you love
your magical look in your Saturday
night illustration is I love this one because the globe makes it
look so spatial. And I think the mood
is so cool with all the glow in the sky
and all the details.
12. Tips for Uploading Your Project: So big. Congratulations again on finishing your magical
illustrations in Procreate. I can't wait to see what you
created with this class. So please, please upload your project to the
project gallery section. A quick tip here. If you have a trouble uploading
the big project file, I found that the
easiest way is to take a screenshot
of your artwork by pressing the top
inside button on your tablet and then
upload that one. You can find it just under the
Project and Resources tab. If you are short on time, feel free to upload a work in
progress and your sketches. You can always re-watch
the class and work on the project when you can and upload the
final illustration. When you are finished, you get the options to
upload a cover image, edit, title, and description. The cover image should
be 690 by 388 pixels, which is aspect ratio of 169, which is like a widescreen
or wide rectangle. In the description, you can include both texts and images. So you can upload
the same image as the cover image or
add work in progress. Here, it can also be a square, not only a rectangle. By the way, I love seeing your
art work in progress too. So please feel free to
share your sketches, color explorations, or whatever you
created along the way. Once you are finished, click Publish on the top right. And your project will appear in the student's
project gallery. And I will get
notified by email. You can see all the other
projects here to eat. It's always nice if you
guys support each other and like and comment on
each other's work too. And I regularly
scheduled time to check all your awesome
illustrations. Share some of my comments and tips so we can
connect better. Any of you like me to also share your illustrations on Instagram. Go ahead and tag me
at art side of life, in the post image and in the description of the
past or in the stories. So I get notified and I can help you and your art to be
discovered by more people. Speaking of sharing
and discovery, I will be sharing your
projects from time-to-time, also in my newsletter. So you can be discovered
by more people too. I hope you had a lot of fun
with your illustration and learn a thing or two about blending modes and
using procreate. By the way, if you want to take your knowledge and skills
to the next level, also check out my other
classes about composition, color palettes and
color and light. Colored palette class
will help you to get more confident
while choosing your own color
palettes that you love while creating firm
illustrations. To take your understanding
of color to the next level, watch my color and
light masterclass, where we deep dive
into a variety of aspects which influence color. So you will be like, Aha, that's why when trying
to figure out why some artworks look so vibrant
or have a certain mood. And in the composition class, we will dive into variety
of concepts which you can apply to your illustrations to make them even more amazing. Please visit my teacher
profile to find them. And don't forget to
follow me here on Skillshare to get
notified as soon as I release a new class
around giveaways where you can get a chance to
win Skillshare membership. And if you like the class, please leave a review, even a super short one, because first of all, I appreciate it so much. And second, you will also help other students who
discovered the class. So thank you so much for
joining me in this class. And I just want to
say, Stay creative, stay you and see you
in the next class.
 Iva Mikles, Illustrator | Top Teacher | Art Side of Life