Transcripts
1. Introduction: One of the things I
enjoy a lot about drawing characters is bringing
them to life on the page. There is something
incredibly rewarding about making a character feel
alive on the page, and which is also a core element of character design
and illustration. Hi, I'm Eva, and I'm a
full time illustrator. It reminds us of the
characters we cherished in children's books and the stories we resonated with in animation. In this class, I will
guide you through the steps to create an
illustration that feels dynamic, and it's full of motion while still using simple
and stylized shapes. If you haven't seen my
dynamic poses class, I recommend starting
there first. In that class, I dive deeper into concepts
like character weight, posing, and character
action line, which I will be
using in this class. This class builds
on those ideas, focusing specifically on
drawing characters in motion, especially in a walking pose. We will explore different
walking references, and I will show
you what to focus on when studying these poses, helping you emphasize movement in your character illustrations. The main project, we illustrate a walking character
on a summer holiday. As a bonus lesson, I will show you
how you can easily fill the composition
with leaves and flowers using simple shapes when you are finished with
your character illustration. So I hope when you follow
and watch this class, you will feel super happy about your project illustration, and you will share
it with others. So if you are ready to add energy to your
character designs, join me and let's draw a lively character
illustration in motion.
2. Drawing Practice #1: Before we dive into the final project illustration
in the later lessons, I find practicing
observation from real life, it's great to
improve your skills. But in this case, let's take the second
best thing and that's practicing
observation from photos. I prepared three
different reference with different of motion. We can compare them at the
end of each session practice. At the end of each of
these video lessons, I will share with
you what to notice. Let's just sketch
this first pose. She already has the
intention to go somewhere, but it's more static feeling pose because we have
this straight line, and I am using my sketching
brushes for this part, but you can use any of your other favorite
sketching brushes. So I will sketch
a straight line, and then we have this leg here. So I will just sketch
an action line here to help me figure out the
pose of the character. This is just my way how I
think it's quite easy to compose the poses
before we look at the joints and other
parts of the body. If you prefer to start drawing character just from the head, that's also very good approach. It depends how you
like to start. Some people start with torsos. This character is from the side. We can just sketch a simple
triangle for a torso, and then we can add the
head, we can add the neck. Here we don't see really
where the hips are, so we can just do val for that. Now we can add the
joints for hips, knee, and the foot. I'm trying to keep it fairly
similarly distributed. For the foot here, I'm going for a simple triangle. Then for the other leg, she has a little bit behind. The knees are approximately
in the same height. This one is a little bit higher. Then if you look at
the legs or the feet, they're approximately
in this height, I mean the angles. The other angle would
be somewhere here. Then the second foot, it's like mid air, and you can also do a triangle. Now we can just add the arms. Which end somewhere
in the mid tie, and then we have the characters hair falling
onto the shoulders. But as you can see, this pase is not so active as I mentioned. Let's just define the character
based on this sketch. I will take a different brush. I'll make it a
little bit bigger. Here we can add the chest. We have the shirt. I also have the class about
drawing simplified outfits. Maybe I'll another class
about oversized outfits, which are like cozy and
cute to snuggle in. That might be quite nice. I think this pose is nice
weight because we have a slight movement in
the pose already. Now we have the shoe here. And here, just make sure that the legs have
approximately same length. It doesn't look like one leg
is longer than the other, and then we need suggestion of the hand and here
just simplified face. If you want, you can of add the bag as well
and here as well. We can look at it
from the distance. We have one character
We already have some indication to
what's happening here, so she is moving forward. But it's still quite
like slow pace. Her hair is resting
on her shoulders. The shirt and the shorts
are just resting, and then her head is somehow
little bit tilted downwards, she is little bit more maybe upset or just looking
where she is going. This is our first catch. We can group these layers and I can move it
here to the side. All right, this
first catch is done, and now let's move on
to the next example.
3. Drawing Practice #2: Oh. Here is our next reference, and I'm sure that we
are already noticing how different it is compared
to the previous one. You can see that on this one, we already have more movement. So I can exaggerate this
leg a little bit more. So if her step is this long, we can do that with
that exaggeration. We can now use oval
for the torso. We can have hips here, and her head is again
slightly forward. Then we also have the arm here. We are using the same
techniques as before, so I can put the joints here. Evenly distributed. This is just action line,
this is not the leg. One leg is somewhere here. This time, the foot is a
little bit on the ground. You have the ball of your foot and then the
rest is in the air. Here, as you can see,
how I sketched it, the knee is too high. We need to move it
a little bit lower. Then the second leg
is somewhere here. Again, the knees and the foot. Notice where they're
placed on the ground. This one is even though
it's a little bit bent, it's still outstretched forward. I can actually cut out the
action line because I could have placed it on
a separate layer. Well, now it is,
not from the start. Reduce the opacity. Now we can check all
of these things. I think I can reduce the
opacity of this one. Now we can redefine this sketch on a
separate layer as well. She has similar hairstyle
as the other one. Of course, if you prefer to draw male characters,
please go ahead. It's always great to
see different things. I'm just choosing female
character because of the outfits and photo
references that I found. Here, I can add the same
outfit as we see here. If you want to create
more original paintings, you should combine
different references. I also have class on that topic if you're
interested in doing so, so you can explore that. Maybe I will do a
different hand pose here. Maybe something like
this works here. Right here, I can also add
the backpack because why not? Because I think it
also helps us to show how hunched she is. Here, we already have slight
movement to the jacket, which I think it's nice
because that helps us understand that there is certain movement
to our character. Now we can add legs and the tis. I mean the tights If you have photo references
with characters in tights, it's better for references
because you can see how the muscles are and
you can also exaggerate them. Now I gave her a little
bit bigger calf. We have the shoe, and now we need to
sketch the second leg. I think the jacket here, it's too tight, so we need to make it a
little bit bigger. Also, the second shoe
is like a triangle, but we cut end of the triangle. So you don't draw the point
or the edge of the triangle. Here, I will
emphasize the jacket. We have n she then we have
hair on the shoulders. And you can add a little
bit of the shadow. We know where is the ground. We'll hide the action line. With this one, you can already feel the movement
of the hair here. Even though her head
is still tilted, then we already have the
movement of the arm, which is helping us to move
the character forward. As you can see, we also have
both of the legs in motion. We can feel like her step is faster and more determined compared to this
other character, which is walking slower
and both is not so active. Let's look at another reference.
4. Drawing Practice #3: All right. Here we have
another reference. As you can see, this is already more faster pace looking
or more determined. Let's just start with
the action line. I see this more horizontal,
not horizontal, but diagonal action line because this character is
determined to go somewhere. So I will leave this
on a separate layer. I will make the other two
character a little bit smaller so they can
fit onto my canvas. I will reduce the
opacity of this one and again sketch
on a separate layer. I will take the softer
brush for that. Maybe I'll take
this one this time. I will start here
with the torso. I can always make the character smaller to fit the other ones. We have the torso here. Then the head is more
looking forward this time, and then we have the hips. And one leg here in the back almost lifting
from the floor. I can make it here
like half step. Like here in the previous one. Then the other leg
is also mid air. I'm using these simplified
triangles again, just to quickly shape the foot. But here we already defined it. Maybe let me go back and I will sketch the
triangle again. We have the shoe here
front of the shoe. You can draw the
same shoes of if you prefer them to sneakers. Then she has the bicycle here. The arms are in a more
awkward position, so we don't see them. Let's just redefine the
character, reduce the opacity. It will make everything
a little bit smaller. I started way too big compared
to the other characters. So now new layer, I will swap to where is it here? This brush, which I like to
use for outlines quite often. Let's make this reference
a little bit bigger. What we see already
on this character is a little bit more
movement in the hair. I need to make her look forward. First of all, compared
to the other characters. Here we have that slight
movement of the hair. You can see there is this
little curve of the hair. Then we have few strands of hair coming out from
the hair style. Then we see the ear as well. As you can see, I made her a little bit more
tilted forwards, then you see it
in the reference. You can decide how much you
want to exaggerate or not. Here, I'll just
make a simple palm. You can imagine her
holding something, maybe we can give her
a phone or something, so she holds something or
you can give her flowers. Yeah. Because here I don't want
to draw the whole bicycle. Here, we don't see
under the arm, the shadow here that much, but I think that's
quite all right. Here, this foot is forward, I mean, in the foreground, so we can here we have a little bit
more loose pens. Here you can see
already a little bit of curve on that fabric. I think that's a nice
thing to add here because that already
adds a little bit of our movement or more interest as well in our illustration. If you want to draw the
joints, while sketching, that's of course great
because as you can see, I move the leg a little
bit too far down, so it doesn't fit with the foot. I need to move it slightly, but on the sketch level is usually fine because you
can redraw it easily. And you don't mess up
the whole drawing. It takes you less to rework rather than
final illustration. Maybe she has a letter here
now and I'm looking at it. Maybe she's going
determine to post office or give a
note to someone. We are starting to have
a story here, I think. Here, we have the sweater, Now our feet are not aligned. See, this one is lower, so I actually have to move
this one a little bit lower, even though it's in the air. And then you have to check if the shoes are the
same like the size. Either you are going for the sneakers or you are
redrawing this other shoe. Now if we compare, I will flip this one so we can see it a
little bit better. I'll group it and I'll make this one a
little bit smaller, they are the same size. You see on this character, it's more tilted forward
compared to this one, which is still more like this, and this one, the first one we sketched is more
or less straight. How you pose the character can indicate more movement
That's one of the things. Then this one, the head
is very much tilted. This one is still tilted, but more looking forward, and this one, her gaze
is more forward looking. You can see already more
of these differences. I guess we need to flip this one so we can
see it even better. This doesn't fit anymore. It was basically this, so we see these differences, and then you can also compare
the movement in fabric. For example, in this one, we have the slight movement
in this hem of the shirt, which is pretty nice
that helps the movement. On this one, we already have
the movement in the hair. So the hair is moving down
and up and basically, we have much more
movement already in this sketch because we
have the hair moving, and here we have
some fabric moving. Now in the next part, let's create a new pose, and we can combine movement of the fabric using
different references, walking, movement
of the character, and then we can add
movement of the hair. Let's do that.
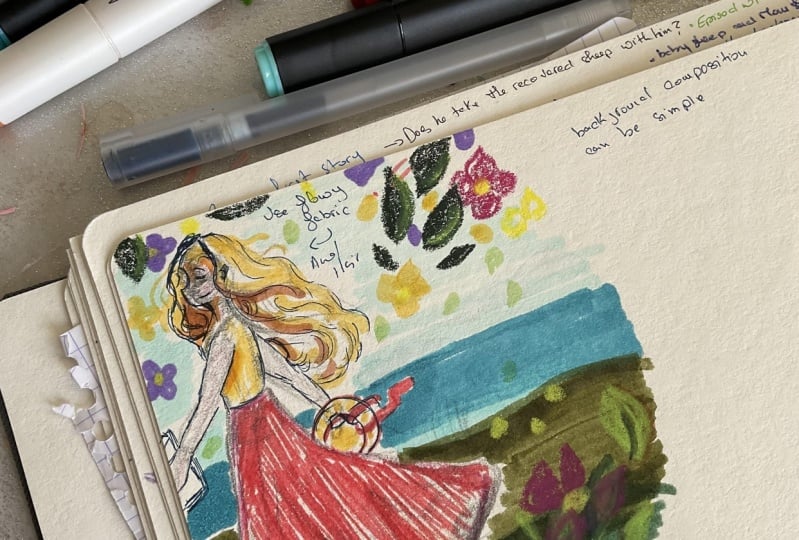
5. Project: Character Concept Sketch: All right. I imported the references from
the previous sketches. I just save the canvas
as JPEG or PNG. You save it to your camera roll, and then you can
import it without keeping it on the separate
layers as a reference, but you can keep it also on the canvas if you prefer that. Now, we will combine
these two poses and then add some nice floating
fabric and floating hair. Be I think I want the pose of the character more relaxed like strolling maybe by the
water in the summer with the summer breeze and maybe skirt or dress
floating in the wind. This one is maybe
too goal oriented, like she's walking too fast, not holiday pace, still
fast and a nice stroll. Anyway. Let's sketch. We will need to have Torso, which is a little
bit more straight. Then the back leg will
be somewhere here, so the action line will look
like something like this. Now I can reduce the
opacity of this one. If you see more layers here, I opened a new document with
my watercolor paper texture. Later I can have more additional
textures in the colors, but you don't need
for this class, but I think it's
definitely fun to use. Anyway, I wanted
to just tell you what these extra layers mean. Now I will sketch the torso. The torso will be now a
little bit more straight, so not so tilted forward. Then I will have the hips here. The head will be looking forward almost
like this character, but not so tilted
forward, as we just said, here is the neck, and then
we'll have one leg here. Knee somewhere in the
middle ankle hips and the other foot will be here. For this one, I think I will use the whole foot on the floor. We can just catch a
simple triangle for now. Here, the ankle is too low, so I just need to move it
higher to match the other leg. This one, we will be balls on the ball on the
feet here of the foot, and then the leg will
be somewhere here. I think the arms can be not
as stretched as this one. But I think you can still have this nice stroll with one arm
forward and one backward. When you are just swing the arms around you walking
happily during the summer. Then the hair will be floating somewhere
behind the character. This is the basic sketch,
what we have for now. Now I can look at
some references. We can look at the flow of
the skirt and the hair. We have this reference here
where you can see that the hair is flowing nicely outward and
she's on the beach, and then there is a skirt
floating nicely in the wind. I can flip my canvas horizontal so I can compare it easier. So here, you can already imagine I need to sketch
on a separate layer. I can already imagine
some floating hair here. You can of course
adjust the hair, so it doesn't have to be
exactly like this reference, but this is just to
give us the first idea. But you can see already
this nice flow of the hair. It's adding so much
movement to our character. Here I wanted to add
some nice floated dress. But I think the shape here
doesn't communicate well what we want to create here
because here I think it would be better if you paint
like transparent fabric. But in this case, I think we can look at different
reference for the skirt. Here is another reference. Now I will flip the
canvas back and what I like about this sirt is
basically this shape. You have this nice
floating motion here, and then you have
the shadow here. When you're drawing
skirts like this, you can create shape
like this quite easily, and it already starts
to look like fabric. This shape in the reference is your friend if you want to
create more floaty fabrics. Let me switch the
color and then we can add some nice floaty
skirt to our character. Here, I'm also looking at this part because I think
it's nice start of the shape. I will start the
shape around the leg, go down slightly more exaggerated than this line because you can see
that it's curve down. It's not completely straight, but I'm exaggerating it. Then I will create
this small curve here and then go
down and up again. Then here, you can see as well that the line is not
exactly straight, so it's not like this. But it has this feeling to it. So it's broken silhouette. What I can do here, I can create this soft curve and then create
another curve here. But because it's
floating so nicely here, this one, this character
is standing in the spot. If I drew the skirt like this, it wouldn't give us
that sense of walking. Here, I need to make this
other line more straight. That will help us
exaggerate this part in the back and help us create
this nice floaty movement. I can create also the high
waist skirt like this one has. Now as I showed you, you can now add
fold in the fabric. We'll have it here and
slightly here as well. Because you can see every time
the fabric has that fold, it's darker there, so
we'll add a shadow. Here, I will make this
fold even more pronounced. You can play with
this type of shapes, I will do that here. Basically, we will have
a shadow here and here. I will delete this one. Now we just need to add the legs based on the images
that we sketched before. Now I can just draw this leg
here at the simple triangle. Maybe she has flip flops, so we can add simple shoes, and then you can look
at this reference. I think here, it would
be a little bit nicer if the fold is not in the
same place as the leg. I need to move the leg a
little bit further out, or maybe I can actually move the part of the
skirt little bit. We just need to make
sure the curve is still. Maybe something like this. We also want to add these curves or folds in the skirt
going out of the waist. They're not going
straight like this, but they are slightly curved. Because the fabric weight
is pulling backwards, because the character
is walking. We have that pull
of that fabric. Now I will sketch the other leg and we can add that flip flop here or you
can give her sneakers. However, you prefer Maybe
with the other hand, she is holding like a heat. So maybe then here, we can even add some ribbons
of coming out of the heat. And that will help us even
more with adding movement. She's on this summer holiday. What you can do, you can
exaggerate this hair. I can pull it out even more. There is this stronger wind. Basically, we need to keep the same hair on
top of the head, and then we can just add
this nice curve on the top. Then we have still
some hair here. We just need to
have a nice silete. Maybe some hair is
floating the other way, and you can look at different
floating hair references, or you can look at my
hair drawing class. I can do another
class specifically about drawing floating hair if you would like.
Just let me know. Maybe we can give
her closed eyes. Need to add the ear. And then just redefine
the sketch a little bit more if you want
before we add some color. Maybe we can give her ice cream or a phone or
whatever you would like. To emphasize the
movement of the skirt, we can then later add
also some pattern. Now let's move on to coloring.
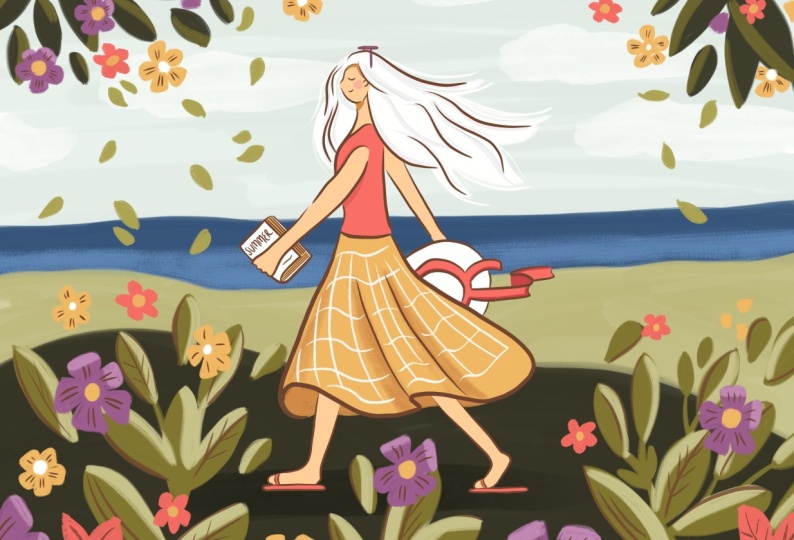
6. Project: Coloring the Character: All right. So now
I also gave her a sunglasses and a book here. So I will have a little bit more of that
summer storytelling. Here, I can swap to Canvas. So we can see our
character better. I can reduce the opacity because we don't
need it anymore. You can also hide it completely. Now I will set this
layer to multiply, and I will add the
base colors under it. Then I will use the gah
brushes for this part, and you can use any other
brushes either with texture or basic brushes
because we will add base colors as well as shadows. I will take one of my
favorites with a texture. Then I created also
color palette, which I will link in the description if you want
to use the same colors. But of course, you can use different colors
for the character. For the base of the skirt, I will go for a
bright yellow color, and I need to make
the brush bigger. I will just fill in the area. Then for the shadow
under the skirt, I will use darker yellow. Here I don't have it
defined at the bottom. You just need to imagine
a line connecting the fabric and here as
well behind the skirt, connecting the fabric
behind the legs. Now we can also add the shadows, which are here ad. I'm on a se layer. I think for this shadow, I will use something more with texture I have more
textured edge here. But let me do it on a separate layer so we can
decide on the intensity. So we can play with the
opacity of this one. Perfect, and then the
same here for the shadow. Now on the same layer, I will take the other
brush which I just had. If you want more intense colors, you can always
duplicate the layer, and then you can merge them or play with the opacity here. I think here this one, I will reduce the
opacity a bit as well. Now I will take the
bright pink because I can imagine that it can be a
nice fit for the summer. For the shadow under the arm, I don't have the
shadow color there, so I just need to add
the shadow color. It will be just a little
bit darker under the arm, and then maybe I can add
the same color on the head. Perfect. Now I will
add also a skin tone. For the skin tone, I think we can use something
like a beige honey color. We can try it out how it looks. Yeah, I think that
works quite well. Maybe it can be slightly warmer. I think I need to have
it a little bit lighter, so it contrasts well
with the skirt, so it's not the same color. Perfect. I think
that works well. Then we can add The color also to the legs. The flip flops can have the
same color as the shirt. I think that's pretty nice. Now we can also redraw some parts of the
sketch if you don't want to have such a thick lines. You can reduce the opacity
of the previous drawing. Take the brush that
you used before for outlines and you can make thinner outlines to
define your drawing. You can always stilt
the canvas as well. Because that helps you to
draw the shapes easier. Now just heading
and the flip flops. Same goes here. Here I need to add the
lines as we created before. Here we had that nice curve. I need to turn the
canvas so I can create this nice line again. I'm sorry if it made you a little bit
dizzy, hopefully not. Here I'm adding that head. Here we have a bow Of course, you can work with
thinner lines from the start or work with no lines. You can also create
sketches and drawings. Of course, without any outlines. It depends on the style. Also maybe on the mood. Sometimes maybe you
like to create stuff. I mean the artworks, with outlines, and
sometimes without. Here, I'll just define this
part a little bit more. We'll keep the face
more simple like this. And here we have the sunglasses. I need to turn the canvas again, so I can create that line. Don't forget that you can always turn the canvas if that helps you to create specific
lines in specific angles. Now I need to double check. I can see that the
length of the flip flop here is a bit longer
than the other one. And then the foot is
placed a little bit lower. I either move this one a
little bit lower or this one. I think I can move
this one and fix it. I can place it. They
are in the same height. What you can do with
actually this part, you can liquefy it as well. But I think here in this case, I will just draw it because I want to have that
nice shape there. And here I can just add
the color again with the brush that we
were using here. Perfect. We already have so much
character in this character. Now we can also a nice details. For that, I will take smaller brush and I will create
a pattern on that skirt. It helps us to emphasize
that movement. I will follow the
shapes of the skirt, how it's twisting
from the w out. I This is like a suggestion of the pattern and here the skirt is
already floating out. Now I can add some of
these horizontal lines, but they are also more
curved because of the fabric is moving. Here, I can just
add these lines. We can do this and here
it's moving as well, and here we have
another fold Perfect. Already, this simple
suggestion of a pattern helps your fabric or illustration of the fabric feels like
it's actually moving. I think that's pretty nice. I think that's enough. All right. Here you finished your lovely character
drawing in motion. Congratulations. Now to take it to the next level
in the next lesson, I will show you how you can add a simple background to create an environment
for your character.
7. Project: Background for the Character: Now let's add some nice
nature simple background. I will create a new layer. I will hide this one because
we don't need it anymore. Then first, I will take the lightest blue here
and from the brushes, I will take something with
a higher opacity and I will make this one s and paint a sky. We want the horizon
to be somewhere here. Be we didn't paint her hair, we will still need to
fill it with color. Let's do that. I will take the white. We'll keep the
same brush now for the hair because it has
this nice rough edge. Oh. I also need to fill in
some of the gaps here, which we change after I change the silhouette
a little bit. Then I can also add
shadow under her chin, so we can define
the character more. I will take a darker color and add the shadow
under her jaw, and then we can add a little bit of the shadow
here under the hair. Then we can also add shadows
to the hair and to do that, we can sample the color
as well from the canvas. Something like maybe darker
blue or maybe something which is not the same
as the background. Maybe let's take
something more bluish. Like bright blue. And then you can
blend it more with the hair depending how
visible you like the shadows. I think that's great.
Then I can add some loose hair strands because that adds to the
hair movement quite a lot. Perfect. Now let's go
back to that background. Now I will take this
dark blue and I will create straight horizon because
we want to create water. I need to do another line. Perfect. We still need to add color to that book. We will do that. No worries. Now I will take this lightest green and I will create like these small hills in the
background, like curved hills. And then I will
use the des green, and we will create
this nice hill in the foreground and
we'll do two of them. And here I can just fill in this space without
adjusting the threshold. We have two green
symbol hills in the foreground and the
sea in the background, and then we can lighten up the sea a little
bit closer to us. I can do it with softer brush It's like the soft gradient. I can also take this one, which will help me create
that gradient on the water. Then I will go back
to the dry brush, and I will repaint this
hill a little bit. Of course, you can work on a
separate layer on this one, so it will be easier. Perfect. Now we have
some simple background. In the next lesson, I will show you how you can
feel the composition with a simple shapes like leaves and flowers and help your
character to pop.
8. Project: Adding Details and Final Illustration: In this lesson, we'll fill the composition with
leaves and flowers and these floating leaves and
flowers in the composition will help you to add
even more movement to this character illustration. Here, you don't need to
sketch if you don't want to, you can just paint bigger
leaves here and there. Then we will also
add some flowers. This is very
simplified background which you can create by just adding some simple bushes and
shapes to suggest nature, which I think it's pretty nice. It's relaxing to create these
shapes just with a brush. Now we can add some
bigger leaves here. Of course, you can play with
palm leaves if you prefer. And then we can add some
of these leaves here. We can imagine that
she's walking through some lush green path. Maybe some of the leaves are
just floating in the air, adding to that nice movement. Now we can take the
darkest color and we can add some of the also
here to the top. Also on this side, Now you can the Alphag by
just swiping to the right, or you can tap and
activate the Alphag then I can add some nice highlights or shadows to half
of the leaves, by just painting on
the half of them. And the same on these lighter ones,
like adding highlight. Then we can also add
simplified flowers. I will take this purplish color and you can paint flower
shapes that you like. I will create maybe
simplified shapes which are inspired by daisies, but they are more like abstract, and you can just
play with that idea. Then you can add the middle
yellow part of the flower. And just add more flowers around the canvas to evoke that
feeling of holiday. I add another one here. We can also add some
yellow flowers as well. So the colors are more distributed around
the canvas as well. And you can do the same with the shading
for these flowers. You can add some
lighter parts on top. I will add that
color for the book. I think here, it would fit
if the book is also white. It stands out against
the background. I think that's pretty nice. Maybe her head is also white. Her glasses may be
this nice purple, like we had on the flowers. Maybe the inside of the
book is also purple, maybe it needs to be
maybe a lighter yellow. It's not so contrasting. Yeah. I will add
few more leaves. We add more stuff
to the composition. We have some leaves
flying around, which I think it's quite nice. It feels like there is
stuff moving in the air, and then we can add simple clouds and I will use
some softer brush for that. With lighter color, I will
add some simple cloud shapes. And I will add
some shading here. First, the clouds, I'll
reduce the opacity bit, and you can also add the
shadow under the character. To do that, I will use the same color and
set the layer to multiply and reduce the opacity and you don't have to keep the
outlines on the character. If you prefer to have
it without outlines, or you can add outlines
to the flowers. You have the look and feel
across the whole illustration. Now I can just add few
lines to define some of the shapes. Oh. All right. I think we can call
this illustration done for practice how to add more movement to your
character illustrations. I hope that you enjoyed the
process and you can play more with adding textures and colors into the composition, maybe add more flowers or other
details on the character. I can't wait to
see your version. Don't forget to share it with others and see you
in the next part.
9. How Did it Go?: All right, so how did it go? I added a few more
flowers and leaves to the overall composition
with the same technique as we just did in the
previous lessons. I hope that you
enjoyed this process. If you want to expand on the knowledge you
learned in this class, you can watch my other
classes about characters, and also about colors called color palette and color
and light Master class. Visit my teacher
profile to find them. And if you would like me to share your projects
on Instagram, please take me in the
Instagram stories in the post and
post description. So I can help you and your art to be discovered
by more people. So thank you so much
again for watching and I hope that you are very
happy with your illustration, and you will share
it with others. And thank you so
much again for being here and see you in
the next class. Bye
 Iva Mikles, Illustrator | Top Teacher | Art Side of Life