Transcripts
1. 1.0 - Introduction: So what is going on guys? Hope you are ready to create explosions in Unreal Engine, because that's what we are going to do in this course. So what are you waiting for? Come on and join me on this fantastic lectures where we will dive into stylized visual effects and learn how to create from scratch this stylized explosion. Which is so cool! We are going to use Niagara, one of the most powerful particle systems, and I'm going to show you a variety of concepts. For example, how to build simple and complex shaders with Material Editor. So that we can scroll, mask, erode, distort, dissolve, and more. You are also going to experience Material Maker, a substance designer alternative, that will help you a lot with the process of creating procedural node based textures for ground cracks, burnt marks, and pretty much any texture a professional VFX artist needs. It's a fantastic tool. Oh and check the stylized smoke we are going to create and this ground crack and so much more. So come on and join me! I'm Gabriel Aguiar, your host, founder of the game company Golden Bug Studios and of the YouTube channel Gabriel Aguiar Prod, which has more than 10 million views related to game dev but mostly focused on Visual Effects. Plus, this is my sixth course on this topic and if you are new to this area, I highly recommend to check out my other courses. They will certainly help you get started. Nevertheless, this is also a great course for total beginners. I'm going to guide you through so you don't get lost. And if you do, there is always the QA section full of solutions and where you can freely ask your questions. And I will try to answer as soon as possible. But if you are interested in other courses, we get this Unreal Engine beginner to intermediate course where we learn Niagara from scratch too and create these attack and these projectile skills. It's definitely a very complete beginner course. So what are you waiting for? Come with me on this explosive adventure. It will be a blast!
2. 2.1 - Download Project: Welcome once again, guys. And now that you have enrolled on this course, we just need to set up a few things before we move on to the stylized explosion. And the first thing is to download the project which is attached to this lesson or incorporated in the course files. It's called the stylized explosion underscore start. It's a zip file. If you open this up, it contains the config, the content, and the unreal project. You can unzip this. Enter here and essentially double-click the stylized explosion zero zero. But by the way, with right click if you want or if you need, you can actually switch the Unreal Engine version directly here, just in case. But I highly recommend you to follow this course with the same version that I'm using, which is 5.3, so you can learn in a comfortable way and not worry about changes between versions, because what really matters is what you are going to learn, that knowledge you can apply to other versions. So double click to open this unreal project. Unreal will compile it. And after a few seconds or minutes it will open this. As you can see, it's a very basic scene, the one that Unreal provides. Actually, I've only added a cube and organized everything nicely into one folder. And down here in the content browser, I actually already created the folders that we are going to need throughout the course. If you don't see the content browser, you can go to window and right here you will find it as well. Before we move on. It's actually important to go to edit and in plugins. Just make sure that if you scroll down here to FX, make sure that Niagara is turned on, the plugin. And out of pure curiosity. If you want this scene to open automatically each time you open this project in edit in project settings. You can assign it right here. So on the next lesson, we are going to actually have an overview of Niagara. While we create some sparks, I think sparks is always a beginner friendly exercise once we are trying to learn a new particle system. See you soon!
3. 2.2 - Niagara Overview Part 1: So let's play a little bit with Niagara before the explosion. Let's have an overview while we create some sparks. If we go down here to the content browser, as you will notice, we already have a particles folder. And within this folder we have the Niagara Emitters and Niagara Systems folder. As maybe some of you know, Niagara Systems are composed of Niagara Emitters. And please, if you want to learn more about this. If you want to feel more comfortable before taking this course, I highly recommend you to check out my previous one, this beginner friendly course. Even though it was made in Unreal 4.24, the knowledge there is still valuable and useful today. So inside Niagara Emitters with right-click we can go to effects and create a Niagara Emitter. This prompt appears and well, we can create a new. We can copy or create an empty. Let's create a new emitter. And select from the templates. The simple sprite burst. And rename these to NE, which stands for Niagara Emitter. Underscore. Sparks. Let's create another one. Another Niagara Emitter. New emitter templates and use the simple sprite burst. But this one is NE_ Sprite Burst. Just to quickly show you that now, if we go to Niagara Systems and with right click go to effects and create a new Niagara System, or go up here. We can say we want a new system from selected emitters. If you press next. We have a couple of templates, but if you go to the parent emitters we will have these two templates, these two Niagara Emitters that we just created. And we can select both with shift or add one at a time by clicking this plus sign and then press finish. This one we can rename it to NS, which stands for Niagara System, underscore sparks. Double click to open it up. Let me just dock these around here. And I made it this way to show you that. As you can see, we have these two Niagara Emitters that we just made, even though they are practically the same. Let's go back to our folder content browser and in Niagara Emitters. We are going to start working on the Niagara Emitters underscore sparks. Double click to open this one up. So now that you know that Niagara systems are composed of Niagara emitters, Niagara emitters work as well as prefabs, as a parent. So we kind of need to think of this as a generic emitter for this purpose, in this case for some sparks. If you have several instantiations of this and we want to make a change to it, we can do it in the parent in the Niagara Emitter instead of doing in each Niagara System. So quick navigation tips for this. With left mouse button you can rotate and look around and while holding right click, you can zoom in or zoom out or simply scroll up and down. And if you hold down the middle mouse button, you can pan. Here's a quick tip. In my case, I don't like this to be inverted. If I pan to the left, I want to go to the right as if I was dragging. If that's your case, you can go to editor preference and search invert up here and down here you will have invert middle mouse pan. At least in my case it's super useful. Makes more sense to me, but that's a personal taste. Right. So. Another useful tip is if you go to window we have the preview scene settings. Which is quite useful. If we click here we can change the environment. Hide it, for example. Show floor. Even change the environment color or the environment cube map. Control post-processing effects and so on. Even lightning. It's quite useful. In this case. I'm going to leave it as it is. Show environment turned on. And that's it. For this very quick overview on our next lesson we are effectively going to start the sparks!
4. 2.3 - Niagara Overview Part 2 - Sparks Emitters: And let's start with the sparks. So these orange sections. Represent the emitter options. We have emitter spawn. Emitter Update. Down here. The green section its related to each particle. The particle spawn and the particle update. And down here we have the renderer which takes care of how the particle is going to look. So if we think of this as sparks well we need this to be continuously spawning particles right. And on the emitter state we have a burst which means it spawns one particle at a time each second, which is not quite what we need. So we can actually delete this by pressing the delete key. And on this plus sign of the emitter update we can search for spawn rate. It's actually already here, as a suggestion. Spawn rate of, let's say, 100. We may not see them, but they are there. They are just overlapped. By the way, if you go to show on this preview window, you can see a couple of things that are interesting, but in this case the particle count. As you can see, we can see the current particles that are alive. And if this Niagara Emitter is active or inactive. Why is this happening? Because of the template that I've selected, the emitter update is set to a loop behavior of once. It will only loop once. It will only play this once. We could have a burst of sparks eventually, but let's aim for a continuously looping spark. So, the loop behavior needs to be different. And if you look down here, as you can see, in the timeline. It has a loop duration of two seconds, and after two seconds it stops emitting these particles. If we change the loop behavior to infinite, the loop duration kind of loses its purpose because it is going to keep on spawning particles. As you can see up here on the statistics 200 particles currently being spawned, it will eventually go back to zero because this timeline works as a preview. And it is clamped to 10s. As you can see, it could be shorter. It could be longer. It is a timeline. But theoretically, if you were to place this Niagara Emitter on the scene, which is not possible, because it needs a Niagara system, it would keep on spawning particles forever. And our next stop now is at the particles spawn, where we have the initialize particle, and it's the place to declare a few properties the particles should have like lifetime, color, position, sprite size. For example the lifetime, if this is a generic Niagara emitter for the sparks, probably random will be useful between 1 and 2. That's fine. In the Niagara system we will specify that. The color for example, we should leave it at white because this is a generic sparks and sparks could be, well, orange or even blue, or even another color, depending on the purpose. One thing we can already take care is the size. For example, we have mesh attributes, ribbon attributes. We don't need them because in the render we are spawning a sprite render. You can even collapse these tabs. And on the sprite size mode we have a few things. For example random. It will keep it uniform. But none uniform means we can stretch this sprite on the X and on the y. While random uniform, we can still stretch it, but with a minimum and a maximum size. And that's exactly what we need for these sparks. They are going to have a random X and a random Y. X could be random between 1 and 10 and Y between 8 and 60 for example. They are all overlapped indeed. Then we have the particle update where this comes as default, like kill the particle after the lifetime has come to an end, scale the color. Basically, it will fade out towards the end of the lifetime. It will become transparent. And then we have. This solves force and velocity. If we turn it off, actually nothing happens. But if we leave it on and up here we search for velocity, which is actually suggested up here, like add velocity, this one. As you can see, they react well, they go up. But if solve forces and velocity is off we get this little warning on the add velocity that this model has unmet dependencies, more specifically a post dependency, which means after this model we need something and it is the solve forces and velocity, do Niagara can calculate, can do the calculations of this add velocity module. It has detected that it is already added, and it even suggests us to enable it to fix the issue. If we turn on, everything goes back to normal, as you can see. And in the add velocity, we have the velocity mode, which is linear from a point. Which basically goes in the 360 direction. And in a cone shape. Let's use the cone shape. It's going to be useful. We can leave the cone angle for later on the Niagara system, but the velocity, probably we need it to be random. If we click on this arrow, we can repurpose properties, change properties to have a different meaning, to have a different purpose. In this case it's going to be a random range float. You can even convert vectors to floats and floats to vector, and integers to floats, and so on. You can play with the data type on these arrows. For example, let's say something between 100 and 500 for now. And here we go. They are going on in a cone shape. It's getting closer to sparks. The only thing, as you may notice, is that they are stretched and they are, well, always vertical, always facing up. They don't align properly to their velocity. And that's exactly the key words we need to search. If we go to the render to the sprite render, you will notice we have a few things like material, alignment, facing mode and so on. We have default pivot. If you play with this, you will offset the pivot of this sprite of each sprite as you can see. But for this to be aligned with our velocity vector, we need the alignment instead of being automatic. We can switch it to velocity aligned and it will align the sprite to the velocity vector. Because there's vectors that go in all of this direction, in direction, we have set in the other velocity in the cone shape, and we need the sprite to be aligned with that velocity vector. On the particle update. Now we can add a gravity force. But we can also add it up here on the particle spawn. But we will have unmet dependencies, which is an apply initial forces. We can fix the issue, but as you can see. It doesn't react properly. It is as if the particle was born with that force and it goes straight to that point, to that direction. Instead of being born with that force, with the gravity. Let's remove this. We want it to be applied over time. We want this gravity force to be updated to the particle each frame. As you can see, it looks much better because we have the add velocity, which is giving force within that cone shape. Let's increase the force up here in the add velocity to a 1000 and 1500. And, as you can see, this is a generic sparks. It's okay to leave it as it is. On our next lesson we are going to focus more on the Niagara system.
5. 2.4 - Niagara Overview Part 3 - Sparks System: So our Niagara Emitter is ready. If we go to the Niagara System. Nothing has changed. Mostly because we haven't saved this asset. If we save it up here and go back to the Niagara system, as you can see, it has applied the changes to this instance of the Niagara emitter. But in the sprite renderer, the alignment is still automatic. And if you ask me that's a little bit strange. And I would say it's probably a minor bug or a minor inconvenience for the user experience, because we have specifically said that in the parent in the Niagara emitter sparks the original one, the alignment should be velocity aligned. Even if you compile in. If you save everything, nothing will update the Niagara system, the child of that Niagara emitter. But it is an easy fix. If we go to the alignment now in the Niagara system, we can say it is velocity aligned. Great. And here we go. We have some sparks. The rest is all the same, compared to this Niagara Emitter. But another thing that is most likely going to be useful. We already have the fade out at the end. It's probably the scale sprite size in the particle update. We might probably need to scale down the particle throughout the lifetime. So let's add a scale sprite size, and instead of going from small to big, we can in the templates up here, choose this one from big to small. And now in each Niagara System, we could decide if we want the scale color to be disabled or if we want both, for example. And as you can see, it updates accordingly here. It even has a lock, which means that this model is inherit from a parent emitter. That cannot be moved or deleted on its instances. It needs to be on the parent Niagara emitter. Now let's work a little bit on the sprite burst. For example, we have a spawn burst instantaneous, but instead a spawn rate would be more useful. We want this to be some bright flashes that happen really fast. Ten for the spawn rate, for example. And on the particles spawn, since we want this to be some. Some quick flashes. Let's say the lifetime is random range between 0.1 and 0.3. And while we are here on the initialize particle, let's also say the sprite size mode is random uniform between 50 and 100, more or less. Here's one thing. Let's see if you can tell me what's happening here. As you can see, the flashes are not firing. They only happen once. Think a little bit about that. Let's actually go back to the Niagara Emitter sprite burst. And as you can see, there is even a node saying that editing this emitter will affect one dependent asset across all versions, because this is the parent. And on the Niagara systems we have the child the instance of this Niagara emitter. Let's actually already add in the particle update, which is going to be useful a scale sprite size. So we can shrink this from big to small. This curve right here. Let's save it. Let's go back to Niagara sparks. Here we go. We have the scale sprite size, but it's still only firing one time. If you have guessed by now, it's true. We need to go to the emitter update and say that the loop behavior instead of once it's infinite. Exactly like this. As you can see, we have some bright flashes. Of course, the texture is not well, the best one. It's the default material we are using. We are just overviewing Niagara for now, but it is continuously spawning these sprite bursts. Let's go to our map. Let's save this Niagara system. And on the content browser. By the way, if you go to an emitter and try to drag it, as you can see, unreal doesn't let us do it because Niagara Emitters are to be used in Niagara system. So let's drag the Niagara system we created for the sparks more or less around here. And there's a couple of things going on. First one is if you look closely, we have this outline on every sprite, on every spark going on, which is not useful when we are developing visual effects, it becomes visually cluttering. So on these three lines icon, let's go to Advanced settings at the bottom. And let's search for selection outline. We can turn off this use selection outline. Here we go. Close this. And. Ufff, that's much better. By the way, if you don't want to see the icons, you can press G on your keyboard. As you can see, it hides all the icons, all the gizmos. It's also very useful when we are developing visual effects. So as you can see, we have our Niagara system on our map. But there's a few more things that I want to show you. For example, this Niagara Utilities. It's quite useful. You have this reset to test the effect as many times we want. Well it's a reset quite useful. And then up here we have scale. We have the Niagara and then lightning. And then we have user parameters. We have a couple of things down here. But we have user parameters that are super useful if we go to Niagara system to our sparks. As you can see we have user parameters right here on this blue node. This blue node basically represents this specific Niagara system. And below the preview window we have this parameters tab. Where we have a bunch of system, emitter, particle, module, attributes that we can add. It's enormous right here. But then we have this user parameters tab. And if you click on this plus sign we can search for data type for example linear color. And call it the Sparks Color. Which we can assign here on the Niagara Emitter sparks. In the particle spawn this color right here. If you click the arrow, we can search for sparks color. And here we go. We have the parameter we just created. And nothing changed because, well, it's still white. Let's do this again. Let's add another linear color, but this time call it the flash color. For example, just want to show you something. Let's repeat this. Let's go to the sprite burst. And on the particles spawn. This time we want to search for flash color. Still the same. It's still white. And now let's search for another data type, in this case, a float. Exactly. And this one is going to be for the sparks rate. And let's add another float for the flash rate. Flash rate at 10. Sparks rate at 100. And now we can go ahead and assign them to this spawn rate. Replace this value with our user created float the sparks rate, and then the flash rate accordingly. Because I want to show you something. If we save this, go back to our map, to our level. Now in our user parameters, we have these parameters that we just created. And we can control this Niagara system outside of Niagara. This opens up many doors, many possibilities. Another thing that I want to show is that, for example, let's imagine that we wanted the sparks parameters to be altogether and the flash parameters to be in another section. Essentially, we want to organize these even better. It's also possible, which is awesome. If we click this edit hierarchy, we can, for example, add the category and call it the sparks. Let's add another category for, well, flashes or flash or flashes. Yeah. And the thing is that we can drag the sparks color to this section, to this category, more specifically the flash color as well to the flash and then the sparks rate and the flash rate. If you close this window, save this. As you can see, it's already organized in here. And if we save this, go back to the stylized explosion map. As you can see now, everything is nicely organized and this is very useful. I wanted to show you this. It's possible to do this. And now, for example, another cool thing is let's say this is 10 the R, 2 for the G and 0.5 for the B channels. We get a nice orange bright orange right. Let's choose another color for the flash as well. The only thing I want to show you with this is these changes that we are doing right here. They only stay on this specific Niagara system that exists on the scene, on the map, on the level. These changes are local and are specific to this instance of the Niagara system. If I go back to Niagara, it's still white and it hasn't changed. As a matter of fact, we even have these arrows next to the property that we changed. And if you look closely, it will say reset this property to its default value, just so you know. Right? Okay. Let's actually say the color in here in Niagara system is 10, 2, 0.5 for the sparks color. And down here let's go with something like 5, 1 and 0.25 for example. It's a blob. Its... texture isn't great, you know. But anyway, it's totally fine to use this for an overview of Niagara, right? A quick exercise before we jump in into the main course, into the stylized explosion. And we have pretty much seen a little bit of everything. If we save this, go back to our scene. As you can see, the colors have been applied to this Niagara system and we essentially have now some sparks. One last thing that I want to show you is, for example, let's imagine you want this to collide with the ground. What would you do? Would you add something to the particle spawn or to the particle update? Would you do this in the Niagara Emitter or on the Niagara System? Well, it depends, but essentially if you go to the particle spawn and search for something like collisions, you won't find anything because collisions need to be constantly updated, continuously updated. It's something that, unreal needs to check if the particle has collided with something. So it's in the particle update section. If you search for collision, here we go. Now they will collide. We have a couple of properties here like bounce and friction, which are important. Let's say it's 0.5 for each. For the bounce and the friction. Let's save this. And now, in our level, in our map, the sparks are colliding with the ground, creating a more realistic effect. Could we add this to the Niagara emitter? Yeah, probably. But it's also fine to add only on the Niagara system. Perhaps we don't want all our sparks to collide. Depends on what we are trying to do. And that's it guys. For this overview of the Niagara while creating some sparks, we haven't yet created any material, which is also a very important step, but we are going to create a few along the way while we are developing the stylized explosion. So get your things ready, because on our next chapter, we are going to move on to the most interesting parts of this course. I'm going to close everything, press save, and leave this ready for the next lesson. See you soon guys!
6. 3.1 - Explosion Studies: So welcome to the third chapter, the core chapter of this course. And on this first quick lesson, we are going to see what a typical pre-production work looks like before creating anything in unreal. So normally you would well gather some reference and visually cultivate yourself before jumping into sketching. In this case, I'm using Google to search for explosion reference videos. Images are always welcome. It's useful to understand colors and what elements are the most common, and so on. You could as well use Pinterest for example, and a few other tools. For example, we got the real time VFX forum where there is always good reference and then you got Artstation as well, and a few other places. Basically you would gather some reference and from there you would sketch something, right? And the sketching part normally focuses on the core elements of the effect in question. In this case there's going to be an anticipation, something maybe a projectile, an arc projectile. Then it's going to hit the ground. We are going to see this bright explosion, this bright impact with some particles flying everywhere really quick. Probably the explosion shape would be something like this, some that looks like clouds, you know, and some spheres maybe. And probably that's going to be a shockwave as well. And it would expand like this. It will go up and it will look like a pyramid, basically. And maybe there's a few more shock waves along the way and particles still keep on flying. But then eventually that was the climax, right? We would think about the anticipation, the climax, and now we would probably sketch a few things for the dissipation, for the aftermath. For example, the smoke could dissolve away, it would rise up, obviously, and it would dissolve as it rises. And there is a ground crack left behind. We start seeing those bright cracks on the ground and some particles coming out of it slowly, for example. And eventually the last picture would be the bright ground crack on the ground, with some smoke trails coming out of it, as well as some particles flying over. This would probably be a typical pre-production process if we didn't know what we would create, right? That's what a VFX artist does before jumping into an effect. It would gather reference. It would think about the anticipation, and then it would think about the climax and eventually how the aftermath, how the dissipation would look. So this is just for you to get an overall perception of what the workflow would be if we didn't know what we would create. And I highly recommend you to check out my previous courses where you can get a better perception of pre-production. And like I said, it's a great beginner course, especially if you are new to this area or if you want to feel more comfortable before this stylized explosion. And you can obviously check out my channel, there's plenty of tutorials, great tutorials that can help you as well. But yeah, in this case, since we already know what we are going to create, we can take advantage of this and go into Unreal Engine and create all of these elements. And for example, clearly the core of this effect is the explosion, those clouds, those spheres, you know, the smoke. So in our next lesson that's going to be our starting point.
7. 3.2 - Starting the Explosion: Let's get started
with the creation of the stylized explosion as
we have seen previously. We are going to start with
the explosion itself, the car, the spheres. That's exactly what we
are going to start with, with the spheres itself. And then we will move on
to create a proper mesh. But what we really
want to achieve with this lesson is the
proper motion and location of this part of the
explosion in our project. First thing we can
do is actually hide the sparks on this icon. Go to the content browser, which you can open with
control space bar. By the way, in nagar meters
folder with right click, we are going to create
an nagar meter, even though this is
going to be a mesh. I'm still going to start with the template,
single sprite, burst, press finish, and rename this one
underscore explosion mesh. Double click to open it up. And like I said, it's going to be for a
mesh. What should we do? Well, on the render down here, instead of a sprite renderer, you can click on the
plus sign and search for a mesh render exactly this one. We can remove the sprite
render with Delete, and as you can see, it's
pounding the axis object. By default, we are going to create our
explosion mesh in a moment, but this is a good
start to build the motion of our explosion,
at least the beginning. The first layout, this
is going to be used three times in our Niagara
system, probably even more. If you want to create
other types of explosion, this needs to be a generic
explosion emitter. Probably most likely
we are going to need more than one particle at
time, more than one mesh. We can increase the
spawn count to ten. They are all being spawned in the same location,
let's avoid that. Let's make sure that
we have a module that can spawn in
a certain area. For example, a shape
location module. As you can see, it's
spawning inside the sphere volume,
which is clear. When we look at the
shape primitive of the shape location
module. There's a few more. As you can see, the one
that I found to be the most useful for this specific
case is the cylinder shape. We can control the
I and the radius. We can basically create a
very small circle If we decrease the cylinder
eight to 20 or even less, and the sander radius to, well, 20 as well, it's still
going to be a cylinder, but the idea is that we have a small area where our exposure meshes
are going to spawn. We can control that
in Nagra system later on. What else
do we have here? The initialized particle? We can control the size here, a few more things obviously, but as you may note, we cannot control the rotation
of the mesh. We can control the
sprite rotation. But this is not at, but not the mesh rotation
for some reason. Fortunately, we
have a module for that if on the particles
Paw on the plus sign and search for initial
mesh orientation or simply search for mesh, this is the one we want In here. We have the orientation
and the rotation. The mesh orientation
mode is already set to random as you can
see on the preview. It's random indeed, but if we set it to none
and turn on rotation, and I'll say that this
rotation vector is going to be a random range vector
0-1 in all of the axis. We get the same results. Just trying to show
that sometimes there's two ways of
doing the same thing. As you can see, mesh
rotation mode to random is exactly the same as the random range vector
for the rotation. In this case, let's
leave the rotation on and the mesh
orientation mode to non. Another very important thing we are going to need in all of our explosions is a little
bit of velocity and motion. Let's add a velocity module. Velocity mode is linear
and they are going up because that's why it is velocity vector 50 in
the Z, that's why they go up. We could actually use
this, this would work, but there's a little problem if on the velocity speed scale, we convert this to
a curve so we can slow down the speed towards
the end of the lifetime. As you can see, nothing
really happens. They don't slow down. They still don't slow down. Let's have a look at
the meter update. It's set to loop pavor of one, loop duration of two. That's why it repeats
after 2 seconds. But it still doesn't slow down because this
curve right here is in particle spawn and won't help even if the
lifetime is one. As you can see, it doesn't
slow down towards the end. Let me say it back to two. I'm going to click this
arrow to reset this. Exactly. Instead of linear, let's use it as a cone. It's going to the
left as you can see, because the cone axis
is set to one in x. But let's switch this
to be one in the Z. It faces up as you can see. Very nice. And that is
the direction we need. Actually, velocity speed is
going to be one because we are going to take care of
this in the particle update. We are going to
control the velocity. I'm just going to increase
the cone angle to 60. It spreads a little bit more to the site in the particle update. Let's use a scale velocity. As you can see,
we have a vector, but instead of a vector, we actually need this to
be in separate taxis. If you type break, it will appear a make vector. That's correct. We want
to break this vector, or in other words, make vector. It's a weird name, if you ask me on
the x and the y, we are going to leave it at 150. It goes a little
bit to the sides, as you can see the Z, that's where we are going
to control the motion. We are going to convert
this fold to a curve. Let's search for a curve on
this arrow exactly like this. And the first key,
instead of one, it's going to be 360. You can click these two arrows, this icon to zoom so
it fits all the keys. I'm going to push this down so you can see
everything nicely. Yeah, it seems like
it's going fast, but we will just later
on in the nigro system, you can have this generic
motion where as you can see now it slows down
towards the end. That's exactly what we wanted, that's what it is important because that's the motion
of this explosion. It's really fast in the
beginning but then it slows down the smoke generally smoking explosion slows down
towards the end. All right, the motion
is pretty much there. Another parameter
that's going to be useful in random is a lifetime. I'm going to click this arrow and search for random range. Float 16-21 Very
specific values, but we will adjust
them later on. Color, it's going to be white. Yeah, this bright size
mode, we don't need it. It's not doing anything
because this is a mesh. We can click this arrow, it goes back to
its default mode. We can even collapse this
in the mesh attributes. The mesh scale mode, that's the one that is important for us because we
are using a mesh. We want this to be
random uniform. I'm going to say these values
by default are going to be 05-065 very small. Because the mesh we are going to create will fit better
with this size. But we still need
to adjust it later. Probably anyway, it's random, it's there in case
we need it for the particle for
the Niagara system. Finally, one of the
last things we can do, it will be useful, is a Flocs. This is not rotating, it's always going in
the same direction. And it then slows down, but a little bit of rotation
would go a long way. To make this effect better, let's already add a
mesh rotation force. As you can see,
we get a warning, it hasn't met dependencies. In this case it's a post
dependency and it's related to the missing apply
initial forces module. If you fix it, it will add it but I don't feel
like this is organized. What I'm going to do is push the shape location after the
initial mesh orientation. Looking good. This
mesh rotation force, all we got to do it is a vector. Indeed, it's says that the x
and z are going to be one. If you look closely, they are rotating only on the x and on Z. It will look good with
our mesh explosion. Finally, a scale mesh size
definitely going to help. We can control a
little bit the size of this mesh along its lifetime. But as you can see,
it is a vector. We could actually convert
this to a vector from curve, but the thing is that
we will have the x, y, and z axis separated. Each one will have a curve. This is sometimes useful,
but not in our case. I'm going to revert this
and I'm going to first convert this vector
to a float like this. Then convert the
float to a curve. It's much more
straightforward and simpler to use than
controlling each axis. And it's going to go
from small to big. Let me just make some room here. Fit at the keys on this button. The thing is if we select
all of these keys, we can now with click, instead of being linear, we can say it's auto. And it will create these
nice busier curves. Instead of starting at zero, probably not going to be useful. Let's say it starts
at something like 05, which is half of the size that we have set in
initialized particle. It grows, it slows
down towards the end, and it stays there until
it will be eroded. That's it, guys, to conclude our first initial approach to our generic Niagara
meter explosion mesh. This is the motion
we have created a few modules that are
going to be useful now. We need to really take care of this axis object and instead
create our explosion mesh.
8. 3.3 - Explosion Mesh: So for this course we are going to use Blender. Since it is free and it is quite easy to pick up. Plus there is a ton of documentation and tutorials to learn from, but don't worry if you never touched it. I'm going to guide you through, the best that I can. If you don't have it installed, you can google it. Click on the first link, click on the download, click on the download button and you can even choose the platform you want if it is an installer, a portable version, or even Microsoft Store and so on. Once you have downloaded and installed it, you can open it up and well, this is blender. I am using 3.6.0. And before we move on, I got to tell you something. If I go here to edit any preference, especially in the Keymap section, I am using blender 2.7 shortcuts. You see, I've been using blender for quite a long time and actually never ended up adapting to the new shortcuts that they created for some reason. It's probably fine to follow along with the new blender shortcuts, because I'm still going to guide you through and show you where you can click instead of using shortcuts, but I think it's good for you to know that this is the way I use blender. I select with right click as you can see, and the spacebar on my case is for searching. All right. So let's move on. I'm actually going to turn on screencast keys. So you can still see the keys that I'm using. All right. So let's start by selecting everything with A and then press delete. We want a clean scene without anything. And with Shift A, we can add an icosphere. Or you can go up here and also add it here without moving this sphere or doing anything. Let's click down here on this bottom left panel and say that the subdivisions are one. Because now we are going to use the modifier. We can click on this icon. And on this dropdown menu select Subdivision Surface. Because by doing so we get a different mesh a different result than having subdivisions on the Icosphere. Now with this sphere selected, I'm going to press Shift D to duplicate it and place it to the right more or less. And then duplicate it again with Shift D placed on the left. Once again place it in front. And another one to complete this cross, basically. See, this one is a little bit high. So we're going to lock it in the Z. So it moves only up and down. And I'm going to push it a little bit down more or less like this. It doesn't need to be super uniform guys. It's all right to have these spheres at different levels. What I'm going to do now is push this sphere in the middle with G, lock it in the Z axis, push it a little bit up. And then I'm going to select that icosphere in the middle. And we Shift D. Duplicate it and then press Z. So I move it down and only down. Right, something like this is all right. Now with B. We want to select everything, make sure that everything is selected. Because now we are going to press Control J to join everything into one mesh. As you can see, it was like that and now it is like this. You can see here on the hierarchy that now we only have one object. And now if I press Z to see through, you will notice that we have a lot of meshes inside of this object, which is not good for performance. They are not visible, they are unnecessary. Plus this doesn't look that good. Fortunately we have here a modifier called the Remesh modifier. And you can even use it as blocks. Which is quite interesting, but let's go with voxel and let's turn on smooth shading. Nice. Much better. If you enter in edit mode with Tab, you can still move these spheres around. And select everything with A, and then you can select each sphere near a vertex by pressing L, and it will select this island. This isolated object. And then with G you can move it around. Or with S you can scale it up and down. It's really up to you. But as long as you have something similar to this, everything will be all right. I'm just going to make a few adjustments here and there. So it's a little bit more concise because now we can see how it looks with this modifier with the Remesh modifier. And yeah I think this is all right. One thing that it is important to do is the voxel size. Set it to 0.2. As you can see, it becomes a little bit more uniform, a little bit more smoother. By the way, the adaptivity parameter on the remesh will create a low poly of these. It will start cutting polygons. I'm going to leave it at zero anyway. Now let's rename this. You can press this icon here. And for example, explosion mesh zero one is a good name. And now we need to apply each modifier because we need to take care of the UVs. And this needs to be as one object. So let's apply them from the top to the bottom on this arrow. Apply the subdivision and apply the Remesh exactly like this. Great. And before we move on. It's always a good practice to and it's very important. Press Ctrl A to apply all transforms. Otherwise this may look different in unreal. This way, the location the rotation in scale will be set to the default values to zero, zero zero and scale to one one. All right. So this is pretty much done. We are missing the UVs. And the UVs are extremely important because it is the way softwares apply a texture to a mesh, the way they can map a texture to a mesh. And without them, our shader, our material in Unreal Engine will not work well. So to take care of the uv's, let's first drag a window from this bottom left corner by clicking and dragging. And up here on this icon let's select UV editor. To see the UVs, we need to enter the edit mode with Tab and select everything with A. But as you can see, there is nothing because there isn't any UVs. And to create UVs of this mesh, it's actually a little bit complicated if we were to do it by hand. Fortunately, we have a very easy method. If we press U to enter the UV mapping. What we have down here is sphere projection. There's a few ways to unwrap this, but the most useful one for us is the sphere projection. Blender will unwrap this as if it was a sphere, which is the closest shape we have right now. And look at this. If we look at the end result, it's actually very good. There's just a few vertex that are outside of our UVs boundaries. Let's first scale this with S only in the X axis, a very small amount. Just so all of this fits inside. Not all of it. With G, while everything is selected, push it a little bit to the left until the vertex touches the boundary. They should not pass the boundary exactly like this. Now these vertices that are outside, I'm going to select them with B and with G. Lock it in the X, I'm going to push them to the left so they are inside. Exactly like this. Going to do the same down here. Select them all with B, push them with G, lock them in the X axis so they move horizontally only. Push this one as well. And those three, up here. So make sure that all of your vertices are inside this area and everything will be all right. Otherwise, when we apply the texture, it won't look good and it will look like it's cut. All right. Looking good. Everything is done and ready to be exported. We just need to get out of edit mode, make sure our mesh is selected. And then go to File export. Select FBX. Turn on selected objects and navigate to your projects folder, for example. Navigate to the contents and we are going to export to the models folder. Rename this to Explosion Mesh zero one. And press export fbx. And now, by the way, you can also save this blender file by pressing Ctrl S. Save it to a folder that you have around for this project, just in case you might need to change something. You never know. Let's navigate to Unreal Engine to our project. And there is this panel at the bottom right corner. It says it has found a file. We can say yes, we want to import it. And this FBX import options panel appears and we can say import all. And that's it. We can clear this message log close it. And if you go to our content folder, to the models folder, here we go. We have our mesh, just going to press F2 to rename this to to add a prefix which is SM underscore which stands for static mesh. All right. And we have our mesh and we are ready for our next lesson which is to apply this mesh to our Niagara emitter, and then create the erosion shader and eventually start to build the effect on the Niagara system. So yeah, see you soon.
9. 3.4 - Erosion Material Part 1 - Material Basics and Voronoi: All right. Great. So on this lesson let's apply this to our Niagara emitter explosion mesh. All we got to do now is go down here in the render, select the mesh renderer. And on the mesh replace this with the one we have, the explosion mesh. And here we go. Would you look at that. Looks very nice. As you can see they are rotating a little bit. They are also slowing down towards the end. But yeah that's pretty much it. They disappear out of nowhere and well it doesn't look like an explosion right. So that's when shaders come in when materials come in. So let's go to our materials folder to our original materials folder because we are going to have instance of materials in a moment. This is going to be an original material not to be used on any Niagara, meet or Niagara system, because we are going to use only the instance of this. And let's have a view of our first shader material, which is not usual type of material or shader you would start in visual effects. That's why I always recommend you to check out my previous course, Beginner to Intermediate, where we have an overview of simpler materials, and then a little bit harder materials. We'll right click here. We are going to create a new material for our erosion Voronoi. We can rename this to M underscore Erosion Voronoi. So it is an erosion material in erosion shader. More specifically based on Voronoi noise. There's plenty of noises, textures, by the way, and the Voronoi one fits very well for this type of explosion and fortunately unreal as a procedural one. So here's the material editor. This is the preview window. We can even change our meshes to a plane to a cube. I like to use the sphere. Up here we can show stats, hide background, show grid, which kind of doesn't show right now anyway. We also have perspectives if we want this to be lit or not. Make sure real time is turned on. By the way, that's important. You can even show FPS. And so on. And then we have these two panels details and parameters or parameters. Super important. We have this node here which adapts itself to the selection we do on the details panel. We are not going to view everything we have here. Right. But I'm going to show you for example, the material domain is important. The surface. Then we have the blend mode. Either it is opaque mask translucent additive, the shading model if it is lit or unlit, for example unlit. Most of this will be disabled, as you can see, because it is not affected by lights. So we don't need the metallic specular roughness and so on properties. If it is two sided, basically if we see the back and front face of the meshes. And so on. What is very important for us is to go down here in usage, and just to make sure that everything works out well, let's turn on used with Niagara sprites. Niagara ribbons and Niagara mesh particles, specifically mesh particles, which is the one we are going to use. And just out of curiosity. Down here we have the stats and we can see the instructions. The shader counts. Of course, the higher these numbers are, the heavier the shader will be. And that kind of gives us an insight of the performance of our shader in case you are worried about it. What is important now for this erosion shadow to work is, as you can see, the way it is. We don't have opacity nor opacity mask. And if you think about it, erosion well, it kind of requires some kind of opacity, right. We are going to erode a mesh. So we kind of need the opacity to influence that, the erosion. And on the shading model for example switching to translucent we'll turn on opacity and translucent blend mode is like an alpha blending mode, also known as alpha blend. Then we have additive. Opacity is also on, but not the opacity mask, which is an alpha clip threshold. Basically. How it clips the opacity, how it clips the alpha, how it clips the transparency. That's how erosion is done, is by clipping transparent values. But if we choose mask, we will have plenty of options and opacity is off. But opacity mask is on. And that's exactly what we need. So for now, let's leave it as it is. These material properties. Our next very important step is the Voronoi. Like I was saying. Unreal engine is a procedural Voronoi, which is a little bit heavier than using a texture. But let's go with it. And if you search for Voronoi, nothing will appear. You can search with right click nodes by the way. But if you search for noise, we have this node. That if you select it, our details panel will change. It will adapt to what we are selecting and on the function. As you can see, we have a few gradient options. And down here we have the Voronoi options. Perfect for us. Let's select it. And if, for example, we connect this right away to the emission color. This is very confusing at the beginning. But, if we set the scale to something like 0.1, we can see what is going on. It was just too big. Increasing quality will also increase its instructions. It will become a little bit heavier, but I'm going to select a four. Because it gives a really nice detail to this. And the thing that is causing this to not look like a Voronoi is the turbulence. We need to turn it off. Still not quite the Voronoi we need. It's very noisy. That's because of the levels down here. They are set to six, which is way too much for us. We can leave it at one. And now we have something that looks like a Voronoi. This node is actually very complete, by the way. Very awesome because now we have the output minimum and output maximum, which is basically a remap function, that says that the zeros are going to be like that and the ones are going to be like this. So for example, our zeros currently are set to minus one, which we will have much more black spots. If we set it to minus two we will have even more. We can leave this one at zero. Here we go. Now this looks like Voronoi. Very beautiful one. At least for our specific explosion. This is exactly what we are looking for. And the output max will increase the whiteness. Basically, the ones will become trees. For example, it will become more intense. Let's leave it at one. Another very important thing is we want this to be tileable. So we don't have any hard edge, so it becomes seamless. Let's turn it on. And let's say the repeat size is at least 1024. Make sure to always use power of two values for this. All right. So our node is ready. I'm going to set the scale to 0.07. And that's pretty much it. This noise is ready. So that's it for the first part of the erosion shader. And our next lesson we are going to see how to control the voronoi speed, the scale and a few more things.
10. 3.5 - Erosion Material Part 2 - Voronoi Functions and Material Instance: And now we need a few more things. Well, we need to erode. And if you connect this directly to the opacity mask. Here we go. We have erosion. That's it. Our shader is done. Just kidding, guys. But it is important to notice that the black spots, the darker areas have been clipped. As you can see, they have been eroded. Which means that if we multiply this with a certain value, we can erode even more. That will be useful in a moment. For now, let's create something very simple, which is a color, but you can search with right click nodes by the way. But if you search for color. You'll have quite a few things, but not a specific color property. The way it works is by searching for parameter. We want a parameter, a vector parameter more specifically. Let's rename this to Base Color, by the way. And this vector has four outputs. As you can see, the first one is the RGBa. And then we have the RGB and A separated. Let's connect the RGBA the first one to the base color. Let's disconnect the opacity mask. And let's choose the color that I'm using, which is alpha at 100%, which is one. And then the R is 0.0075. And the G is 0.00125 and Blue at zero. We will have this dark brown, this dark red, burnt. You will see how it looks in a moment. It's very nice color. This will be the base color of our material, which is not visible right now. But in a moment you will notice it. For now, as you can see, our noise has two inputs the position and the filter white position. If you connect a parameter which sometimes is useful to understand how things work, and other times looking at Unreal Engine documentation can yield some very interesting information. You can even learn how to bake these textures. Really amazing stuff. But I want to show that if you connect here a parameter and then play with it. As you can see on the preview, nothing really happens. Even with small values or with higher values, nothing changes. But upon further inspection, I noticed that if we use the word position. Connect the x, y, and z to the position. Nothing really changes. But if we multiply this. With a value, for example, two. We are able now to control the size of this noise of the Voronoi. So that's going to be super useful. Let's leave it like that. And if we can control the scale of this, we can also control if it scrolls or not. If it pans, if it moves. But every time we need to move something, to animate something in a shader, we are probably going to need the time variable. So let's create one. Let's search for one and create one. And the way this works is we will be able to pan this, scroll it in the X in the Y. So let's search for a scalar parameter, which is basically well, a float that is going to be exposed and we can control later on. Let's rename this one to Voronoi Speed X. And with Ctrl C and Ctrl V, create a copy. This one is Voronoi Speed Y. And in order for this to work out, we just need to multiply each one of these parameters with a time variable. Let's do it again for the Y. And now each one of these multiply nodes outputs a value. But up there in the absolute word position, we are using x, y, and z. We are using three values. So essentially we need to create a vector three. The way we do it is by appending by searching for append. We have append many and append vector. Append vector as you can see, it will output, if you hold Ctrl Alt, you can read a little bit more about about specific parameters, what they do. And essentially this one will create a vector two. So it is not quite what we want. We need a vector three. In this case append many Append Many will become useful because as you can see it has three outputs RG, RGB and RGBa. In our case, we can connect the X to the R and the Y to the G. The B will always be zero because it's two dimensional the texture on itself. And that's enough. And now we can add these information before connecting to the noise position just like this. And it worked because we are multiplying two vector threes. Otherwise this won't work. Let's replace the connection up here. And now, if we test this out and say that the Y, for example, is one, if you look closely, very closely, it is indeed moving but super slow. Let's increase it to ten. Here we go. Very nice. Awesome result. Our Voronoi is finally moving and panning. It seems like it's fading in and fading out, but that's essentially because it is a sphere, and Unreal Engine is taking care to make sure that we don't have any cuts, any hard edges, and it keeps it tileable awesome stuff. If we switch to a plane, you can see it's scrolling to the right, as you can see. And a cube. You will notice that Unreal Engine is fading in and fading out in some phases. Right. Let's keep these in a sphere. And let's save this. And before moving on to our next lesson, let's go ahead and create a material out of it. The material instance with right click. Rename these to MI_ MI_ Explosion zero one and make sure to drag it to the materials to drag it outside of the originals like this. Because this is the material we are going to use here in our Niagara Emitter explosion mesh. Now we can turn on enable material override. We can create a new array on this plus sign. Open this. And here we go. Explicit material. We can say it's the MI underscore explosion zero one. Make sure it's the instance that you are using. And here we go. Our explosion mesh is finally starting to look a little bit closer to the explosion we need. On our next lesson we are still going to make some improvements to our erosion material. It still needs to erode. And a few more things as well.
11. 3.6 - Erosion Material Part 3 - Erosion and Dynamic Parameters: So now that we have applied
the Voronoi erosion shader to our Niagara
meter explosion mesh. We can improve on top of that. For example, if we go to the particle span and
increase the R to ten, for example, as you can
see, nothing changes. It stays exactly the same. It is as if Niagara
cannot communicate with the material with the
shade, and that's true. We need to give it access. If we go back to our
original erosion Voronoi, we can give Niagara access to this material with the
particle color nodes. Then all we got to do is
multiply the RGB with the output of the noise and replace the connection
to the emissive color. Save this. If we go back to our Niagara
meter, let it compile. If we test here a value of
ten and the R, Here we go. As you can see, it's
quite red, it's working. I'm going to leave
it at white for now, let's approve a few more things. One is a very useful tip, which is after the noise, connect this to a power node. Power node will be able to and replace the connection
to the multiply to the particle
color, by the way. Like I was saying, a
power node will be able to solve this noise. It dissolves anything
we connected to it. If you increase
this, as you can see it becomes even more
dissolved and so on. Let's leave this at one, which is a default value, no dissolve at all.
Let's save it. Finally, one of
the last things we need to take care
is the erosion, which is the name of the shader. We have seen that we need
to connect something to the opacity mask and it's true. It's very simple. If we drag a line from the noise
and not from the power, you'll see in a moment why. We can then connect this
to the opacity mask. And this value right here will control how much
it will be eroded. Zero is totally eroded. And for example, a value of ten, it's no erosion at all. I mean, we still see a
little bit, actually. Just to be safe, let's
leave this at 15. Now, as you may notice, we have here a few
values that we would be interesting to control them in the Niagara system in
the Niagara meter. Like for example, the
scale of the Voronoi, the erosion, and the power. These three inputs that
we have right here, we are going to control them
via niagara how do we do it. We do it with a dynamic
parameter node. Even the name suggests
something dynamic. The cool thing with this
is it has four parameters, and we can, for example, say that the first one,
it's for the rode. And then connect here. If we open the default values, we can already say, Well, this is going to be
the 15 by default, and then we can connect this to the multiply after the
noise exactly like this. For the second
parameter, for example, we can say that this is
for the Voronoi power. And then connect right
here to the exponential of the power nodes with the
value of one, correct. And for the third
one, we can say it's the Voronoi scale and connect
it up here to the multiply. Awesome. Let's save this
and let's go back to our Niagara meters and
see how this works. As you can see the scale
is a little bit too big. Let's control that already. The way we do it is in the particle span or in
the particular plate, search for a dynamic parameter. Dynamic material parameters, more specifically, here we go. Exactly the same
names we have chosen, but the values for
some reason are zero. That's a mystery to me still. We have up here this
index zero in x one, in x two and x three. This means that we
can actually create four of these dynamic
parameters and then increase this parameter index as you can see to create a different
group of properties. In this case, it's in the
zero parameter index, the first one, the first index. Let's go here to index zero
and say that the road is 15, the vary power is one and
the scale one as well. There we go, it looks
exactly the same as before. For example, we want to erode this over time
over its lifetime. Let's say that the road
is a float from curve. But yeah, it's starting eroded because
the value is probably one. And still, as you can see, it does not rode. It should be completely
rolled throughout the end of the lifetime of
these measures, but it isn't. And we have seen this before. Do you remember why this is happening mostly because we
are in the particle spa. If we drag this to the
particle plate, here we go. At the end, it dissolves
away. Very nice effect. The particle plate keeps on updating properties
of the particle. Let's fix this curve. Let's select everything
and say it's out first. Let's fix this handle, push it up, And the first key instead
of starting at zero, let's say it starts
around zero four. All right, that's getting
interesting. Okay. Let's take care of
the Voronoi scale already and say that it's 0205. I found this to be a great value for the stylized explosion. But you can play with
this, of course. And the Voronoi power, let's also use it as a curve. We didn't connect
the Voronoi power to the erosion for some reason, and we'll see why right now, it will create a very
interesting effect. So Voronoi power, float
curve, and the first key. Let me collapse this up here. So the last key, actually,
it's going to be a ten. And the cool thing is
if with the power node, we start dissolving the Voronoi, we will get these dark areas, these black spots, and it
will seem like it is smoke. In the beginning, it
will be super bright, but at the end, thanks to the power node, it will become dark. The Voronoi will be dissolved. It's actually say this is auto. Let's add the key more
or less around here, six and say that this is ten. It transitions to black earlier, and we see more smoke throughout the end
of the explosion. All right, looking good. This is very nice stuff. On our next lesson, we are going to make
a few adjustments to the shader very small ones. But essentially, we are going to work on the color of this. So it looks more
like an explosion.
12. 3.7 - Explosion Aspect: Currently, if you look
closely at our explosion, we can see some brightness, some smoothness,
some glossiness. Call it however you want, but it is reflecting light. That's not really correct for an explosion
material as you can see. Fortunately, it's
a very simple fix. If we go back to our
material, the original one, we have the metallic
and specular properties that are definitely
influencing the. The way we solve
it is by creating a scar sclar parameter,
call it metallic. Say the default value is 02. For example, control C, control V to create a duplicate. Let me push this up,
but this one is for specular default
value of 01. Save it. If you go back now to the content browser and open up our instance of
the explosion material, now we are going to
insert specific values, like for example,
let's turn it on. By the way, let's say it is one for metallic and specular. If you go to our
Niagara explosion, now you can see the
difference which is huge and definitely not
what we aiming for. The values that are
found to be good are 01 for metallic and
zero for specular. We go something more like this. Now we can see that brown, dark brown color that we have
chosen for the base color. Obviously the vina is
still completely white, but we are going to fix that immediately on the
color property, on the particles pond. Let's already pick
a color for this. Again, the colors that
are found to be good, you can try different ones, obviously is one
for the R channel, red channel, 024 for
the green channel, and 007, the blue
shadow. Here we go. Now that looks more
like an explosion. We will increase its
brightness later on, but the color is there and it fades to black
as you can see. Let's make sure that we
actually improve that. Let's make sure it
goes really to black. At the end on our scale color, we are going to turn our
scale RGB once again. If you convert this to a curve, since this is a vector, we will have the
three axis separated. Not super useful. Let's actually combine this to a float and then convert
this to a curve. Now we can do
stuff, for example, say that the first key is three. Actually, it becomes
really bright in the beginning at around zero. At four, it stays for 40% of
its lifetime at that color. And then we will fade it out. We can actually add
a key around here, more or less around 05 at one, then it fades out. Let's select all of these
keys and say they are auto. Let's just fix this
just like this. In the end it's dark
at around zero, at eight, exactly like this. As you can see, it's
bright at the beginning. We still see the Vn
is being dissolved, text to the power node, and then it goes into black. And we see the base
color of our material, and we get this feeling of really nice, stylized explosion. Plus we have the
erosion going on. Of course, when you
combine all of this, we have this awesome result, as you can see, the last
key, if you push it back, it will become darker sooner. Obviously, we're going to leave it as it was exactly like this. Just maybe adjust a little bit. Handles, that's pretty much it. This was a quick lesson for the aspect for the
color of our explosion. On the next one, we
are going to start to build the explosion
body in Niagara system. You will finally see the
explosion take shape.
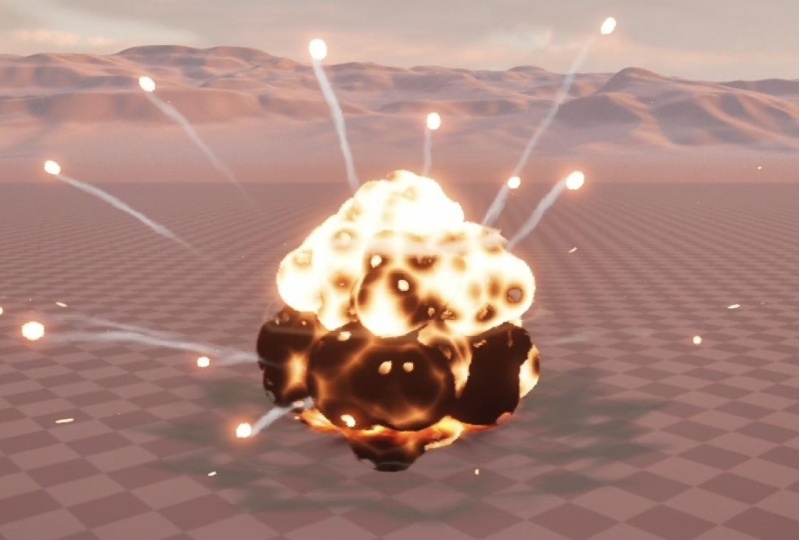
13. 3.8 - Explosion Body: Let's finally put all
of this together into a Nigro system and
build the shape, the body of our
stylized explosion. Let's go to our contact browser. Navigate to the
Particles folder and the Niagara System folder
with the right click. We want to go ahead and
create a nigro system, A new system from
selected emitters. Yes. Navigate to
the parent emitters and select our Niagara
Emitter Explosion mesh. Click the plus sign
and click finish. Rename this to NES, underscore
Stylized Explosion. Double click to open
it up. And here we go. We have our Niagara
meter explosion mesh looking good, right? As we have seen previously, we need three stages, three phases, three sections
for our stylized explosion. Let me just make
some room here for the preview window
and the detail panel. All right, let's start by
renaming this one with two, by the way, to explosion top. Now with control D,
we want to duplicate these for the explosion met again with control D or control C. Control V,
the explosion bottom. Now, the way this works, or the best way to
make this happen, is to go through each module and adapt it to each section. The explosion top is
more or less on point, but the Id and the bottom
one will need adjustments. Let's start from the top. For example, we have the
spawn burst instantaneous. They all are set to be ten, but the explosion
mid needs to be 12, and the explosion
bottom needs to be 15. Because they need
to cover more area. They are going to
have a bigger radius if we want to create
a very nice sensation of spoke dissipating from
the bottom to the top. The bottom needs to
have less lifetime. Let's say for example, the
meat will be between one dot 4.17 and the bottom between a maximum of 14
and a minimum of 09. If we play this
clearly we cannot distinguish it because
they are all overlapped. We in need to offset them
and create some stairs. There's a parameter,
initialized particle, that allows us to do so, which is the position offset. But before that, let's
actually take care of the color really quick by
creating a user parameter, which will then
eventually be useful if we want to change the color
directly on the level, on the map, on the plus sign. Let's search for linear
color explosion color. Let's copy this
values, one for red, 024 for the green channel, and 007 for the blue channel. Now the thing is let's
multiply this by ten, because as it is now, it is still a little bit dull and we need to
increase the intensity. R is going to be
ten, is going to be 24.07 Now all we got to do
is go to the particle spoon, or to initialize
particle on color, click the arrow and search
for explosion color. Do the same for the middle
one and for the bottom one. Here we go. Now it's
a little bit better, brighter in the beginning
and it fades to black. Really nice. Right.
Like I was saying, we need to have set this
as if it was some stairs. We have the position of St. Let's turn it on in the explosion top and
say that the Z is going to be 150 for
the explosion meat, we can turn it on
and say the Z is 100 and for the
explosion bottom ten, only it's going to be pretty
much close to the ground. This will start to
distinguish these sections. It's still in the
cylinder shape, the overall explosion shape, but instead we want this
to be a cone shape. There's a few things that
are going to be useful, the radius and the velocity. But before all of that, the
size is also very important. Explosion top is all right. But explosion de and bottom, they need a few adjustments. We can say it's 07-08
for the bottom, maybe 085-095 Let's
see how that goes. Once again, we are putting
these valves in a stairway. Now it's getting a
little bit closer to the cone shape we
are aiming for. But I think the bottom one
could be larger size 09-11, for example, and the middle one. 08-09 instead. A lot of the times when we
are creating visual effects, we need to iterate these values to make
a few adjustments. Try values to get a
proportion, right? Yeah, that's definitely getting closer to the common shape. Now, the next one is
initial mesh orientation. That one is fine, it's for random rotation. Now, the shape location, yeah, that one
needs adjustments. For the explosion top, this is all right, the eighth and the radius
of the sender. But for explosion med, let's say the radius is 60 for the explosion bottom 100 with a s under
eight of only ten. This time we will
see a big change. Here we go, they are indeed getting closer to a cone shape. And bottom one fades first. Then the middle one
and the top one. Nice. But we still
can improve it. We haven't taken care
of the velocity. This add velocity is to give
it direction, basically. There's a few ways to do this, but this one gives
the direction, and that's essentially it. Then there's a mesh rotation
force which is all right, if it is the same, let's
have a look at the velocity. The scale velocity is
what's taking care of the motion on
the explosion top. It's all right. But
on the middle one, we want this to go
more to the sides. The x and y will be 300, but not so much in the Z, not so much the curve. The first key, let's go with
250 for the bottom one, We want this to go even
more to the sides, 340, but not so much upwards. Let's say the first
key is actually 150. If we test this
out, now there will be a bigger difference. And you can see the
bottom one stays there, doesn't go that much up the middle one goes a
little bit higher and top one year it creates this really nice explosion
as if it was one big cloud. Because we created these stairs for the lifetime, for the size, for the velocity, for the radius of the
sender, and so on. It creates a really
nice outcome. Let's see how it
looks on our map, on the level editor. But before that, we could
actually create a thumbnail. Select a nice frame for example, and click up here thumbnail. Then save again in
the content browser, we will have this
nice thumbnail. That's a really cool
feature actually, that we can create
thumbnails for our Nagar systems and
Niagara emitters even. All right, let's drag this
more or less around here. Cool Nagar utilities, we can press the resette
button to see the explosion. That's very nice. It's really
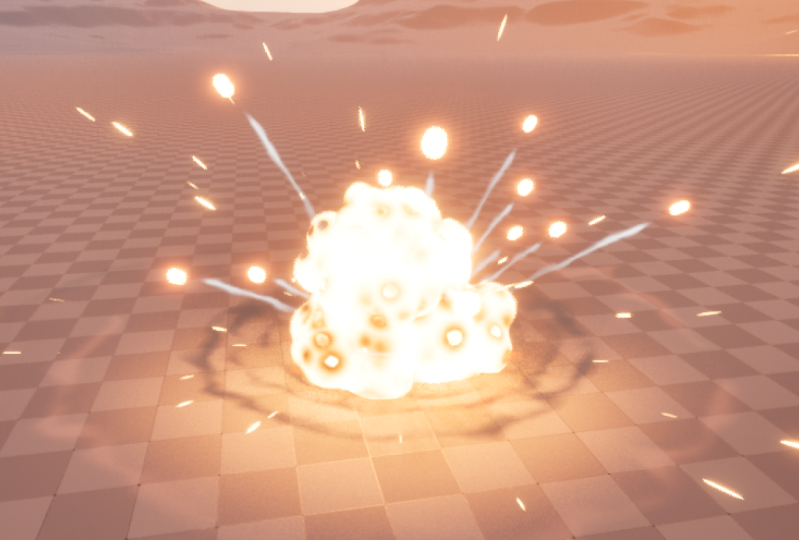
cool that it is irradiating light around the
explosion because we are using the emission
property in our material, it adds that really nice glow. Standard default scene also has some post
processing effects. That's why we have this glow. But most importantly,
if you look closely, this is not going
to black entirely. The ethemath of this explosion still has a lot
of orange values. The problem could come
from two or three curves. If we go back to
our Niagara system, we could change it here, but it's much easier to go to the Niagara meter instead to the parent and change
it only one time, and the other ones will
update accordingly. In here, we have the
dynamic material parameter, which is taking care of the power of the
dissolve of the Voronoi. But that doesn't seem
to be the problem, even though here on the preview
window it goes to black. But since we have increased the brightness on
our Niagara system, what I think could
solve this is in the scale color, this last key, Instead of being at one
in position in time, let's push it back to around
075, The key in the middle. Instead of 05, let's
try 04514 value, but the time 045, adjust the endle a
tiny bit like this. Let's actually say
this last key to make sure that goes to black
instead of being zero. Let's say it's minus 01, for example, which I
believe it is too much. But let's save it. Let's
go back to our map, to our level and
see how it goes. Reset? Yeah, it's
definitely working. It improved and we
see that base color, that dark brown that we have
chosen, looks much better. But we can still try and say that in the dynamic
material parameter, the Voronoi power the curve. The last key could be 13. Let me just say that this key in the middle is in auto mode. Exactly. Basically, it will
dissolve even more the varna, let's say it goes,
if you try this, let compile the shaders. Yeah, we can see that
it made a difference. But I think it's going
to black too fast. We have the orange and then
suddenly it goes to black. What I'm going to do, instead of this going to below zero, the last key here
in the scale color, I'm going to say it
goes to zero indeed, and that the position is 08. Instead, it doesn't need
to abruptly go to black. Want it smoothly fade to
black exactly like this. That looks much better
as you can see. Sometimes we need a
little bit back and forth so we can balance
these values properly. It's a little bit
of trial and error. That's it for this lesson, we have finally the
shape of our explosion. In our next one, we are going to start to
add some details, like for example, some
particles impact.
14. 3.9 - Particles Impact: And on this lesson, let's add a little bit more impact to this by creating some particles, some kind of sparks that happen when there's a big impact, a big explosion. So let's navigate to the Niagara Emitters folder and we right click in effects. Let's create a Niagara emitter. We can say new emitter. And then on the templates let's start with the directional burst. You can press finish and rename it to NE underscore particle burst. Let's open it up. Double click. All right. I'm going to close a few things. For example, the erosion Voronoi material and the material instance explosion. All right. And on the Niagara explosion mesh. Let's select a nice frame, by the way, and press thumbnail to create a quick thumbnail. And then press save and here we go in our content browser we have that thumbnail. Cool. Now back to our particle bursts. The idea. Well, it's to have some sparks. And the first thing you will notice is that they are stretched already. Nice. They have velocity, but they are not following their velocity vector. If you remember correctly, the way we align these to their velocity vector is. Exactly. On the sprite renderer, there's this drop down menu. On the alignment drop down menu, we can select Velocity Aligned and here we go. Much better. And if you look closely, will notice one thing that it has velocity indeed, and it is in a cone shape, which is true if you look to the particle spawn, you will notice that the add velocity is in cone mode, but it's going to the left side and in a very cone shape. So there's two things we need to change. One is the cone angle. Let's amplify that to 160. So we make sure that it goes to the sides and up. But we don't want this to go to the left only, so, on the cone axis. Instead of being one in the X, we can say it's 0 in the X, but 1 in the Z. So it faces up the cone. And this way we will have this nice motion, as if it was an impact. Something strong hitting the ground. Right. This will be useful. Let's see a couple more things. For example, we have a spawn burst. That's all right. We can adjust it later. Initialize particle lifetime is random. That's okay as well. And down here we already have randomness for the sprite size. That's why it is stretched. And we can control that a little bit better later on in the Niagara System. And then we have some gravity in the particle update. This could be random. So they aren't all pushed in the same way. Let's create a ranged vector zero zero for the X and Y in the minimum and in the maximum, and then for the maximum -980 and a minimum -460. Yeah. Gives a little bit more randomness. I always think it adds a nice touch to play with the gravity, even though it's not physically realistic. And the drag, which is the force that pulls, it's basically the air, the force that pulls the particle to slow down. Let's say the minimum is 0.6 instead of 0.8. So they can fly a little bit further away and freely. But for now, let's save this particle burst. Because it's ready to be used in Niagara system and in here. The cool thing is that now we can add Niagara meters very easily by going down here on this plus sign that says track. And then we can navigate to our parent emitters. And in here, select the particle burst, which if you want, you can go back to the particle burst emitter and select a nice frame. Zoom in and whatnot and take a screenshot. Take a thumbnail and then save again. Yeah, it's not going to be super visible, but it's there. All right. So. Niagara immediately adds this block right here, this particle system right here. I'm going to push it to be aligned with the ones above. And with F2 I'm going to call this particles impact. And let's already decrease the spawn bursts. It's quite a lot. Let's say it's random even between 30 and 40. If we play this right now, it seems like nothing is happening. It seems like the particles aren't there, but in fact they are. They are just not strong enough to be seen. So we kind of need to increase a few values in the velocity, for example, and in the radius. By the way, down here on the timeline there's this icon. If you press it, it will isolate the specific emitter which is useful. As you can see now you have a better notion that the size is really small of these particles in comparison to the explosion. And despite the particles not being visible, I'm still going to decrease the lifetime because I'm going to decrease a lot their velocity in a moment, and they will fly for quite some time if the lifetime is like this. So the maximum is going to be 0.8 and the minimum of the lifetime 0.4. The color, yeah, we can already take care and create a linear color. User property, user parameter and call it particles color. I'm going to actually create a very intense color which is 20 in the red. 6 in the G and 1.5 in blue. And then I'm going to assign it here to our particles impact, in the color, search for particles color. And here we go. Another thing that I'm already going to take care. It's the size. They are quite small compared to the rest of the explosion. So I'm going to say. The minimum is 2 and 8 for the X and Y, and the maximum 10 and 70 for the X and Y. Like this. They seem like they are huge and they are huge indeed. But we will take care of that in a moment. So as I was saying previously, the velocity really needs to be strong to convey that feeling of impact of impactfulness. So I'm going to say the maximum velocity is 2500 and the minimum is 500. And as you can see, they are super stretched if you play with this, with the timeline, in relation to the explosion some people like this, but in my case we are not going to aim for that right now. But this is mostly happening because of one module that we have right here, which is scale sprite size by speed. The stronger the speed, the more stretched it will be. I'm going to disable it. And as you can see now, it goes to reasonable size. But instead of fading them out, which I don't really like, I'm going to turn off scale color. And I'm going to go back to the Niagara Emitter. And in the Particle Update add a scale sprite size, so we can shrink them throughout the end of the lifetime. And we want to select this curve right here. But the handle. The last, of the last key will be more like this. Something a bit more arched. Let's save it. Let's go back to our stylized explosion. We have here the scale sprite size. In my case, I'm going to disable the scale color and the scale sprite size by speed, but the scale sprite size I will leave it on and this is what we will add. Very nice stuff. By the way, I'm going to disable here the show stats and oh it's in the show particle count. It's getting in the way of our explosion. All right. So I think that's essentially it. We can save this and go back to our level, to our map to see how it looks. And yeah, yeah, here we go. This really adds a nice touch. An impactful touch. And in our next lesson, we are still going to add a few more particle impacts. And some floating particles, some floating embers.
15. 3.10 - Particles Floating: So we have added some impactful particles, and we are going to reinforce that idea by adding some sparks that fly along the ground. And then we will move on to the floating particles. So on our Niagara system, stylized explosion, let's press Ctrl D on the particles impact. And then F2 to rename this to particles circle ground. They are going to be very close to the ground. We can press this icon here to isolate this emitter. And what I can tell is, if we use only the add velocity module in code mode, we can't achieve that. We are going to need another module which is called the shape location module. Basically the particles will be spawned according to this shape. As you can see on this dropdown menu in the shape primitive we have sphere, cylinder, box, torus, ring and cone. The one that is useful to us is the cylinder. And the trick here is to say the height is only 10. But as you can see, they are still going up in our preview window. And that's mostly because in the add velocity we need to increase the inner cone angle. Let's first increase the cone angle to 180. So it goes all around. And then say the inner cone angle is also 180. And now, as you can see, they don't go up. They only go to the sides. And if we get out of isolation mode and play everything together. We can see in the beginning we already have some sparks very close to the ground. And that's essentially it for this one. Now let's take care of the floating particles. We are still going to use the same emitter. So we can start by duplicating these particles circle ground with Ctrl D. Oh by the way, we actually don't need gravity force for the particles circle ground. We want them to be parallel to the ground, so, it's unnecessary. Now for the floating particles we can still use the same emitter. We can even duplicate the Ctrl D the particle circle ground. Rename it to particles floating with F2. And isolate this one on this icon. And if the idea is for them to float, well, we actually need the shape location. It's going to be useful. But the cylinder height it's going to be something like 230. And the radius 200. And we can even squeeze this cylinder and make it taller. For example, in the X and Y 0.8, but taller in the Z with 1.2. If they are going to be floating and it's part of the aftermath, we can already say the lifetime is going to be longer. A maximum of 2.5 and a minimum of 1.6 should be fine. Another thing we can already take care is these ones are not going to be stretched. So what should we do? Well, on the sprite size mode you can say it's random, but uniform. And we are left with these two floats, one for the minimum and for the maximum size. We can say it's between 1 and 15. And as you can see, we get these uniform sprites, these round sprites. The only thing happening right now is that they are still aligned with their velocity vector, and since they are not stretched, we actually don't need to align them to their velocity. So on the sprite renderer, the alignment, we can say it's unaligned and it will basically always face the camera. Now for their motion they are going all around. As you can see all over the place basically. Let's confine them to something a little bit more floaty. They go up a little bit slowly. It's like some red embers after the explosion. So on the add velocity, instead of being so strong, you can say it's between 100 and 300, something much calmer. And the cone angle, it's going to be less. We want this cone to have a very decreased angle, something like 20. An inner cone angle is 0. So they can use the whole volume of the cone. And now if you play this, as you can see, they are going up. They are. Well, that's the only thing they are doing. They are not floating. They are going up and then they slow down. If you have a look at this with the whole explosion, you will notice a few things. Immediately, in the beginning they are visible, which is not quite what we are aiming for. If this is going to be some floating particles for the aftermath, they need to have a certain delay. The way we delay this is on the spawn burst instantaneous or on the emitter state. We also have this loop delay, but let's go with the spawn burst. Instantaneous delay. The spawn time here, it's going to be delayed by a value of 0.3, something very small, but as you can see in the beginning, they aren't there. They only are played after that 0.3 seconds. Right. So, that's taken care of. Another thing that I'm noticing, they are a lil bit too many. So I'm going to decrease the spawn burst instantaneous the minimum to 20 and the maximum to 30. Right. So let's still improve that motion. They are only going up and not that much. We basically want to add some turbulence, some noise to their movement. If on the particle update we search for turbulence we won't find anything. But if we start searching for noise, we will have two noises and the curl noise force is a good option for what we are trying to do. By default, nothing really changes. But if we decrease the noise frequency. To be less, like 20 and the noise strength to be random. Yep, a random range float between 400 and 1000. Now you will notice that curl noise, that turbulence. And they swing a little bit to the sides and they still go up. It really adds a nice touch. You can play with these values and test different things, obviously, but that's essentially it. What I'm still going to do is open up a little bit more. The cone. To around 30, perhaps 50. So they go a tiny bit more to the side, you see. Yeah, that seems all right. And one of the things that we want to make sure is to use a different color. We want this to be red a little bit more inclined to the red side of the color spectrum. So I'm going to reset this by pressing this arrow. And then I'm going to create a new user parameter for another linear color. And call this the particles floating color. And the values that I'm going to use here is 25 for the red channel, 4 for the green channel, and 0.8 for the blue channel. And then I'm going to assign it here. Search for floating. And here we go. There are a tiny bit more red. Perhaps this should be even more by decreasing the green channel. But for now, I'm going to leave it as it is. I'm going to turn off isolation mode and yeah, that's all right. That's basically what we need. Some floating amber floating particles at the end. If we save this and go back to our map to our level. Here we go. We can have a better perception of what's happening. And I think it's all right. Perhaps the radius of the cylinder could be bigger. So that's what I'm going to do. I'm going to go back here and say the shape location. The radius is 250, perhaps even more like 300. Yeah. Save this again. I want to see it in the level on the map. And yeah, that's pretty much it. We see embers flying around, floating around. Nice. So, that's it for this lesson and our next one, we are going to introduce a new element. And we are going to need a mesh for that element. Basically it's going to be the smoke ring. We are going to add a few smoke rings for the shockwaves and so on.
16. 3.11 - Ring Smoke Mesh: So, the part we are going to focus on, on this lesson is a ring of smoke that comes out of the explosion, several rings of smoke. But for that we are going to need a mesh that is very similar to this that I'm drawing. It's going to be like a ring, like a cone shape mesh. So let's open up blender, a new blender file. Let me just turn on screencast keys. All right. And we want to start with a clean scene. So let's select everything with A and then press Delete. Now with Shift A. The mesh we are going to start with is the cylinder one. Once you create it, please don't move it because we want to go down here to the left on the add cylinder panel and say the cap fill type is nothing. If you move the mesh, this panel will disappear. You can delete the mesh and re add again the cylinder so you can see this mesh. Then we want to go to object and select shade Smooth right. Let's enter edit mode with Tab and with B I'm going to select this top edge loop all of these vertices right here. And then I'm going to press G and Z and push it down a value of -0.5 and then press enter. Now with S, we want to scale this up. A value of around 3.7. You can literally type. 3.7 and then press enter. And here we go. But if we get out of edit mode in object mode. Now, if we scale this up, as you can see, the pivot is up there instead of being at the bottom. That's not going to be useful for us. So I'm going to enter the edit mode with Tab, with B, select all of these vertices down here. The bottom edge loop. And then press Shift S to choose cursor to selected. If this shortcut didn't work out for you, you can press F3 to search for cursor to selected, or spacebar to search depending on what you are using to search. And then we want to get out of edit mode by pressing Tab again. And in object mode you want to press Shift Ctrl Alt C to set the origin to 3D cursor. You can find that one up here in Object, Set Origin as you can see to 3D cursor. This way, the mesh, every time it's scaled, it's going to grow from the bottom. Much useful to us. And then we can press Ctrl A to apply all transforms. So we make sure that the scale the rotation are all right. I'm just going to drag a new window down here on this corner so you can see the UVs, which I'm going to select up here on this icon UV editor. And now I'm going to enter edit mode on the right window select everything with A. And I'm actually going to press this icon which is UV sync selection. So we can see what we are selecting in the UV directly in the model. And I'm going to make sure that this top vertices right here represents the outer edge loop. This edge loop right here the one at the top, the bigger one. And make sure the bottom edge loop on the UV editor represents this bottom edge loop on the right window. Once you have made sure that everything is all right, you can get out of it its mode and rename this to ring zero one on this icon right here. And then we can go to file in export select FBX. I'm going to navigate to our project folders, and I'm going to export to the models folder and rename this to ring zero one and turn on selected objects and then press export FBX. And once we go back to our project, this window on the right bottom corner is going to appear. We can say import. This FBX import window appears and we can say import all, we can clear this message. Close it. Go to our content folder models folder. And here we go. We have the ring zero one. I'm just going to press F2 to add a prefix for SM underscore which is static mesh. So you can keep this nicely organized. And for this lesson, that's it. On our next one we are going to see how to use this with our explosion. It will add a really nice touch. We just need to create a new material.
17. 3.12 - Ring Mesh Emitter: So on this short lesson, let's with right click in the Niagara Emitters folder. Create a Niagara emitter. New Emitter Yes. And from the templates we can select the single sprite burst. This one can be renamed to NE underscore dust mesh, for example. It's for the smoke and also for the impact. Double click to open this up. And. First thing you will notice is on the render. We are rendering a sprite renderer. In this case it is a mesh that we are going to use. So on the plus sign, let's search for the mesh renderer and delete the sprite renderer. On this mesh renderer, we can already say replace this axis mesh with the ring zero one we just created. And at first it may seem like there is nothing, but if you rotate around the preview window, you will notice the ring we created. The thing that is happening is that it's only visible from one side, but we are going to fix that in a moment. Let's keep it more or less in this perspective so we can see what's happening, because there's a few things that you can already take care of. Let's make sure on the spawn burst we have a count of one only. And on the emitter state the loop behavior is only once and then on intialize particle, two seconds for lifetime for now is all right. What we really want to change is. This is not a sprite. So let's click this arrow to reset this value, because we are going to use a mesh scale with a mode set to non-uniform in case we want to make this larger and flatter. For example something like this, we will see. Let's leave it at 1 1 1 for now. And if you look closely it's spawn always with the same rotation. And most likely we are going to need to give it a little bit of randomness on the rotation, especially in the z axis. So on the particle spawn on the plus sign, let's search for initial mesh orientation. Let's not use the mesh orientation mode. Let's set it to none and instead turn on rotation down here and make sure it's a ranged vector. 0 for the X and Y of the minimum and the maximum, and for the Z a minimum of 0 and a maximum of 1. Exactly like this. As you can see, every time it spawns, it has a different rotation only on the z axis. It will add a nice touch to the randomness of the effect. Another very useful thing we are going to need is for the particle update, a scale mesh size so we can control the scale of this throughout its lifetime instead of scale. We actually are going to convert this to a float. This vector here. And then from a float to a curve. And yeah, instead of shrinking, we want this to grow. So I'm going to select this curve right here. But the first key it's not going to start at 0 Let's already say it starts at 0.5. Half of its final size. Let's select everything and make sure we right click. This is in auto mode so you can control the bezier curves to create an arc similar to this one. It slows down towards the end of the lifetime. Looking good. And for this lesson, that's pretty much it. On our next one we are going to create the texture and then eventually the material to erode the texture.
18. 3.13 - Ring Smoke Texture: So before we create a new material to erode, to scroll this and a few more things, we need a texture. There are several ways of doing textures, like with Krita or Photoshop or with Material Maker. For this specific one we are going to use Krita, and then later on we will use Material Maker for other textures. So can have a little bit of both workflows. But in case you did my previous course, you already practice a lot drawing textures. Today we are going to use Krita, which is very, very similar to Photoshop, but it's free. Plus, there's plenty of documentation in case you want to learn more about it. So after you have gone to Google and searched for Krita and clicked on the Krita website, once you are in here, you can download Krita. You can choose the version or the platform. In my case, I'm going to download Windows Installer and. And after it is installed, let's open up Krita. And this is it. We can start by pressing new file. And say that it is 2048 by 2048 pixels. Make sure it is pixels. And then in the content we will have two layers and the background color must be black. It's useful, so we can see what we are doing. Here we go. One empty layer and a black background. On this empty layer. We are going to select the brush tool. And up here. On the brush presets, we are going to choose Hair Brush soft. If you click on this icon, you can edit this specific brush. I made sure it's all a bit more softer. As you can see on this curve. With this brush. Now we are going to select white for the foreground color. And while holding Shift, you can increase the brush size. 1000 pixels is all right. If you cannot get past 1000 pixels, you can go to settings in configure Krita. In the general section you can go to miscellaneous and maximum brush size. You can increase to 2000 pixels or even more and then press okay. So with a brush size of more or less 1100 something like this. If you press Shift W, you enter in Wrap mode, which is an awesome feature of Krita because it allows you to create seamless textures easily. Tileable textures basically, Shift W to enter, Shift W to get out. The idea is more or less on this corner. At the bottom it's to create a zigzag like this. This is not an easy process, but I'm going to guide you the best that I can. I'm going to pass again with a smaller brush size, but it doesn't do much. Because now what's important is that we remove this excess by clicking here on the eraser. And decreasing the opacity to around 30 pixels. Now the idea is to erase the excess and create some sharp triangles, as you can see. What I'm doing here is creating some pointy parts with only one stroke or so. And then I do the same on the bottom. As you can see, as if it was a zig zag. And still with the erase tool. Now I'm going to remove some of this excess here and there. Create a bit more of cavities here at the bottom. We are basically eroding these manually a little bit. We are creating a stylized impact texture that will look cool for the ring smoke. Once you have removed a little bit, not too much. We want to go to the brush presets and select the blender smear brush this one. This is what it does, as you can see. Let me do a Ctrl Z. It is too strong the edges. So I'm going to go to the brush editor on this icon. And I'm going to say the fade is 0. So it becomes smoother. As you can see, to control the strength of this brush we can decrease the opacity to around 30, a softer strength. And the idea now is to push this pointy ends. As you can see, push them up. Some of them go down the ones that are at the bottom. And then create eventually some cavities exactly like this. And create a few more pointy ends. I'm going to increase a little bit the strength, which is the opacity to around 40 and still with a medium brush size, I'm going to create these pointy ends. It also adds like a sensation of motion blur when we do this. With this tool, I'm going to pass these all around, as you can see. And then with the even smaller brush size I'm going to add some details, some very cool details. As you could see, my strokes are always vertical. Exactly like this. We are adding details to this. I'm going to do this pretty much all around. Create some cavities. Sometimes we need to push from the black areas to create a cavity. If we push from the white areas, you are increasing the white area. Basically. The idea is to have kind of this gray scale. Where we have black, then we have grey, then we have a grey that is almost white, and then we will eventually have white, because when we are going to erode this, those values that go between black and white, the more they are, the better the erosion will look. Right? So once you have arrived at the point similar to this, you can always turn on or turn off the wrap mode to see how it goes, but never paint outside of wrap mode. Otherwise you might break the pattern, you might break the tileable stuff. And it's very important that this is seamless. Right. So once you have. Arrived at this point. What I'm going to do now is save this Krita file because we might need it later. I'm going to call it the stylized impact 01. And now I'm going to get out of wrap mode by pressing Shift W and hide the black background, and eventually export this on file. Export as a PNG. Very important so you can keep those transparent values. And I'm going to export this texture directly to the Unreal Project, more specifically to the texture folder. Exactly. In Unreal. Now on the bottom right corner, it asks us if we want to import. We can say import. All right. And if we go now to our, content browser. In the textures folder, we have our stylized impact. The only thing I'm going to add is a prefix, which is T_ T_ that stands for texture. Right, double click to open this up. And here we go. Looking good. On our next lesson we are going to finally apply this to our mesh via a shader a new shader that we are going to create.
19. 3.14 - Texture Erosion Material Part 1 - Pan and Tiling: So now that we have the mesh, the emitter and the texture, we got all we need to move on to the material to the shader. It's a very specific material. We have previously created an erosion procedural Voronoi. Now we are going to see an erosion for texture. But it will have a few more features like scrolling, distorting, soft edge, and so on. So let's move to our materials folder. To the originals one and with right click, choose material. This one, we can rename it to M_ Erosion texture. And then double click to open it up. Let's take care of the material properties. For example, the blend mode is not going to be opaque. This time it's going to be translucent. That's one of the big difference compared to the last one. And it's going to be two sided. And we will see later on if we need this to be influenced by lights or not. For now, let's make sure to turn on used with Niagara sprites. Niagara ribbons and Niagara mesh particles as well. Just to make sure it works with Niagara 100%. Okay. So it is a texture based material. So let's start by, with right click, search for a texture sampler parameter 2D. And it's going to be for the main tex. We can rename it like that. And since we already have the texture here on the details panel instead of the default texture Let's select our stylized impact texture. Great. So first thing we can do is connect the RGB either to the base color or to the emissive color. The difference is that emissive will indeed emit light, and it's much more appropriate for visual effects. So let's connect it there for now. And yeah, it's weird because we haven't taken care of the opacity, of the transparency. So let's connect the alpha directly to the opacity. And let's save this shader. And now let's test it out. Already in our Niagara emitter. In the Content browser with right click. Let's go ahead and create a material instance from the M underscore erosion texture. Rename this one to Mi is material instance underscore. We can have the same name of the texture which it is stylized impact zero one. And let's drag it to the materials folder, because this folder is only for the original materials. The instances are going to go outside exactly like this. In our Niagara Emitter underscore dust mesh. As you can see, we only see it from one side. But with our new material, this will be fixed by going to the mesh renderer. If we enable material overrides and then add an array for only one material, we can then in this index, the explicit material select the Mi underscore stylized impact zero one, the one we have created, and here we go. First thing you will notice is that it's visible from two sides, from the front and from the back. And that's because we have turned on two sided in our shader. If we save this, go back to our material. As you can see, we have two sided here. Which enables us to see the mesh from the front and from the back. So let's improve this by adding the possibility to control the scale of this texture. We are going to do it with two scalar parameters. This one is for main tex tiling. X. Which by default must be 1. And then with Ctrl D you can duplicate it and with F2 rename it to Main Tex Tiling Y Y Both with a default value of 1. Now let's create a vector with these two floats. Let's append vector. And we cannot connect this directly to the UV input of the main texture. We need first to have the UVs separately, and then we will add this information or multiply it. If we search for UV, we won't find what we are looking for. There's a few things, but not the one we are looking for. In Unreal Engine it is named texture coordinates. Which is basically what the uv's do. Its coordinates on how the texture is going to be mapped to the mesh. Now we can simply multiply the append with this texture coordinate. And then connect it to the UV. And if you go to the parameters tab and increase the tiling X to 2 or 3, for example, as you can see, it's repeating the texture. And that's why it is important that the texture is seamless. Tileable. So we can do this. As you can see, we don't see any hard edges in the middle of our plane. This texture repeats itself nicely. Let's save this. And before playing with this in our Niagara emitter, let's add another thing, which is, the ability to pan this, to move, to scroll the texture, we are once again going to use a scalar parameter. We can indeed press Ctrl D on this main tex tiling y, for example, and rename it to main tex speed X, which must be with a default value of 0. We can duplicate it for the main tex speed y Y Going to set them to 0. Default value. And now we need to once again create a vector from these two floats. Append vector. Exactly. But this time, as we have seen, if we need to animate to scroll to move something, probably we are going to need a variable based on time. So we right click. Let's add a time node. And this one can be multiplied with the append vector down here. And the way we add this to our, to our chain of commands, to our chain of nodes is by indeed using an add node. We do it like this and then replace the connection to the multiply. If you go to the parameters tab and increase the speed y or the speed x, as you can see it is scrolling. It is working very nicely. Positive and negative values both in X and in Y. Very nice. The cool thing with Y is if it's a sphere, it does this kind of effect. As you can see because of the UVs of the sphere. Right. So this is going to be useful not immediately but later on in the course. It's going to be super useful. Now if we save this. We can go ahead and see how it looks in the Niagara Emitter. For example, I'm going to click on this icon here with a folder on the material. So it opens up the content browser and it redirects us to the material being used, which is quite useful. I'm going to double click this material to open it up. And in here I'm going to select this plane. And I'm going to undock this window. Make it small like this. The only thing we want to see is these values right here. The main tex speed, the tiling. They are going to be useful so we can see the changes directly in our Niagara Emitter. The dust mesh Niagara Emitter. Right. So let's first, I think it would be cool to increase the tiling on the x, so the texture repeats itself 2 or 3 times, perhaps three times. Looks very nice. And that would be enough. Yeah, that's very cool. Immediately if you look closely you will see some artifacts in our mesh. Mostly because our mesh is super low poly and that's something very easy to take care. If I go to wireframe, you probably won't see it, but these gray lines represent our cone and basically it's super low poly. It needs a few more faces so it doesn't stretch this texture that much. And it looks weird, looks cut. Looks like it has some artifacts. So in our next lesson we are going to take care of that. And we are going to make a few adjustments to the shader and to this Niagara Emitter as well.
20. 3.15 - Texture Erosion Material Part 2 - Color and Erosion: Right. So let's take care of the mesh. And we are in need of the erosion which is the purpose of this shader. So to fix this we are going to go back to our blender file where we created the mesh itself. And the fix is super simple. I'm going to enter in edit mode with Tab, and we want to add a few more faces, a few more edge loops, so we can use Ctrl R, and if we scroll up or down you can increase or decrease the amount of edge loops. In this case we want to add 3 actually 4 edge loops. And you can press Escape so they stay in the same position. If this would be for mobile or for a low end platform, this step right here would have to be taken with carefulness because it could impact the performance. And if we have a quick look at our UV maps, everything is nicely cut. Now let's export again these FBX mesh. We want to replace the one we have directly in our project. And if you look closely, if you press import. You will see the difference. This is how it was and this is how it looks now. Sometimes very low poly geometry will affect how it looks. Careful with the amount of faces you use in your meshes for effects, it may impact the performance depending on the platform you are developing to. So I'm going to close. I'm actually going to dock this stylized impact material up here. And now we are going to take care of, well, a few things. The first one is if we try to change the color, nothing will happen. As you can see, 10 in Red doesn't change anything. We have seen this previously. If you remember correctly, we need a node in our material to give us access to the color of the mesh and that node is called the particle color. We can use the RGB information and multiply it with the RGB of the main texture. And then replace the connection to the emissive. And we can do the same for the alpha. Multiply the alpha with the main texture. And replace the connection to the opacity. If we save this and go back to our Niagara Emitter now, yeah, now we can change the color directly on the initialized particle and it will take effect. And it will do stuff right. Now for the main purpose of this shader, which is the erosion. Let's finally take care of that. We are going to approach this in a different way. On the other material we used the opacity mask. But this time we don't have it and we are going to do it in a different way. There's a few ways to do this, but I like to use the power node. If we connect the result of the alphas multiplied. To a power node. And replace the connection to the opacity. But to control that erosion directly in Niagara, we need another node that we have also seen previously. Do you remember which one it is? Well, it is the dynamic parameter node. We can rename the first index to Erode and the default value is 1. Indeed. Let's connect this to the power up here. Save it. And let's play with this. As we have seen previously, to access that dynamic parameter node via Niagara, we are going to need the Dynamic Material parameters module. As we have seen previously, the Particle Spawn will not allow us to animate it. So let's add to the particle update and for some reason this is all set to 0. But we can see the erode is 1. So we can see something and we can already go ahead and actually convert this to a curve. Float from curve. Exactly. And the way this will work is. Let me make some room first. We can start with this curve right here. You can select everything and say it is auto so you can get the bezier curves. And it's not going to start at 0, otherwise it will look very strange. Power node starts at 1, at least at 1. And the last key. Let's try for now 20. And let's fix the handle. So it is like this. So it is arched. And if we play with the timeline and scroll back and forward, we will see immediately that scale color is not being useful. It's fading out at the end. We have an erosion shader so we can take care of how it fades out in a different way. And as you can see, it creates a very beautiful effect actually. And I would say that it could start somewhere like this, for example. Instead of the erosion starting at 1, we can say it starts well, something like 2, perhaps a little bit less. 1.25, 1.5. Yeah, 1.5. Seems like a good value. And then, as you can see, as it gets closer to the end of lifetime, it is not eroding completely. That's a little problem that the power node has, because these values right here are really white, too white. So we need to increase quite a lot. The last key before increasing it. Let's add another key in the middle at 0.5. Let's say it's in auto mode and let's say it is 15. And the last key? Its 100. Yeah, quite some crazy values. Let's fix this handle right here. Let me show the entire curve. Let's fix the last angle. Like this. All right, looking good. And if we scroll this back and forward, as you can see, it almost erodes everything. Let's increase it to 200 to see how it is. Oh, as you can see on the preview, it almost has eroded everything. 500. It gets closer and 1000 it gets even closer. But it never erodes completely. And that's fine, because our eye will assume that it will disappear when it's closer to being totally eroded. If we leave it at 1000, which is a lot. And if we play this, as you can see, we have a really nice effect. Probably at the end we will use scale color to fade it out, but for now, let's leave it as it is. It's looking very nice already and it is a good start. So let's make sure to save this Niagara Emitter. And in our next lesson we are going to start to use this with our stylized explosion.
21. 3.16 - Smoke Waves: So let's put everything together in our Stylized Explosion Niagara system so we can see that stylized smoke dissipate on the ground like a shock wave like dust. It's also used to make wind sometimes. Let me just close this Niagara Emitters, explosion mesh, particle bursts. All right. By the way, in our NIagara Emitter dust mesh. Let's go really quick. Create a thumbnail. Select a cool angle, something like this. Click thumbnail and then press save. Let's go to our Niagara system. And in here we can press the track button. Plus track, in emitters go to parent emitters and select the dust mesh. Right. I'm going to align it more or less with the others. We have explosion at top particles in the middle. And now. And now we can rename this with F2 Smoke Ring Big. We are going to have also three rings for the smoke. And let's start from the beginning. The spawn burst is all right, one particle, lifetime for this one can be 2, color will take care in a moment. Let's just increase this mesh scale to 2.6 in the X and Y and 1.2 for the Z. And if you go to the beginning of our timeline, it is quite big, this mesh, mostly because of our scale mesh size that begins at 0.5. But we can also decrease the mesh scale to 2.4. In the X and Y. We will see how it goes. On the scale mesh size. I believe it is important to say the first key is actually 0.3. 0.25 I'm looking to the preview window as well. See how it is in the beginning. Yeah. 0.25. Adjust a little bit this curve. And if we go to the end of the timeline. This seems to be all right. Yeah. If we save this, we can go to our map now. And see how it looks. So first thing you will notice it is that, it seems like it's glitching right, that there's some bug going on. I don't know, something broke, but in the end what's happening is that our cone for the smoke is intersecting the ground, which doesn't look good. It cuts the geometry and the texture immediately as soon as intersects the ground. What I'm going to do really quick now is push this stylized explosion a little bit above on the Z like 50. It will not solve our problem, but we can see that indeed it is the smoke cone intersecting the ground. Before we fix that on our shader, let's first go to our Niagara system. And choose a better color for this. What we can do as we have done previously is create a new parameter, user parameter, search for a linear color and call this one the smoke color, which will work for all of the smoke rings. Now I'm going to choose some very peculiar values like 0.005 for the red channel, for the green 0.004 and for the blue 0.003, and for the alpha 0.95. A tiny bit of transparency. It is mostly black. It is a dark orange brown, super dark. Just going to go in here and decrease the saturation to 0.23, something like that. I know it is some very specific values. Once we have the color, we can assign it here to the color search for smoke color. And here we go. It is indeed black if we have a look. In our map because the lightning is different. As you can see, it looks very nice. You can even choose a darker color if you feel like it. But if you look closely, we still have that hard edge cutting our cone smoke. Even if I go try to go a little bit below the ground. Just like these. More a less like these. And if I play this, you will notice that indeed the cone is below the ground. Fortunately in Unreal Engine that is an easy fix if we go back to our erosion texture material to our shader. And with right click search for Depth Fade And with right click search for Depth Fade We get an input for the opacity and another one for the fade distance. This is perfect for our specific case. We can connect what is supposed to go to the opacity, make it pass through this node like this, and then replace the connection. And for the fade distance we can use this dynamic parameter and control that via Niagara. We can even call this the, for example, soft edge factor. It's going to make our edge softer. And for the G channel we can leave it at 1. Yeah, that's all right. Let's just connect this green channel to the fade distance of the depth fade node. And we are good to go. Let's save it. And in our Niagara Emitter, the original one, the parent one in the dynamic material parameters. We can say the soft edge factor is something between like 15, 20. That should be all right. I'm going to go with 20 so you can see the effect in action. Save it. If you go back to our map this should update automatically. And if you look closely now, we don't have that hard edge anymore. It's gone. It's fixed. It's fading every time. Now it touches any geometry, it gets faded. That's what that specific value to soft edge factor will do. From now on. Every time any geometry touches any other geometry, it will fade its edges. It will become smoother, as you can see. And it looks very, very nice. You can try different colors. For example, if I push this all the way to black, if I push this a little bit above, it becomes white. We will see what's happening if it's something happening. But if I push this down to black values, as you can see, it gets also very nice. Now let's take care of the other smoke rings. It's going to be easy, because we are also going to use the same method to create these rings in a stair kind of way, like we did for the explosion by steps. For example, let's duplicate this smoke ring big and call this the Smoke Ring meet. And then we can duplicate it again and call it the smoke ring. Small. Let's start in the initialize particle in the lifetime. The big one is. All right. Let's focus on the mid one and say that the lifetime is 1.7. I'm decreasing 0.3. And in the smaller one I'm going to say 1.5. Actually the smoke ring. Let's, let's actually say that the size, the mesh scale size is 2.6 in the X and Y. And in the middle one is 2 and in the z is 0.9. For the smaller one, it's going to be 1.6 for the X and Y and 0.6 for the Z. So these are our values, our stair. Let's see how it looks in the in our map. Yeah, I think that's all right. Perhaps there's a few adjustments that we could do, but we will see how it blends with all of the elements that we are going to add. We still need some cool shock waves, some really bright impact on the ground, a lot of stuff. We'll see how everything will blend together and we will adjust it. I'm just going to say the color is going to be a little closer to gray instead of being completely black. So on the value I'm going to say 0.005, perhaps even less like 003. Yeah, that should do it. We will see how it goes with the rest along the course, but it's getting very nice. As you can see, we already have some very interesting elements. In our next lesson we are going to add some orange rings. We are going to take advantage of what we have created to create some quick shock waves, for example.
22. 3.17 - Impact Waves: So in this lesson, let's take advantage of the assets we have created so we can add a quick shockwave to this. An orange one a bright one. In our Niagara system, we can start by with Ctrl C and Ctrl V, or with Ctrl D. Create a copy of the smoke ring big. And with F2 we can rename this to the impact ring big and not bug. Sorry guys. Big. Exactly. I'm going to isolate this emitter by pressing this icon. And let's start from the top. The burst. One particle is all right. For the color. Let's remove this one by pressing the arrow. And as a matter of fact, we can even add a linear color in our user parameters. And we can try 2 for the R channel, 0.45 for the G and 0.23 for the B. I know very specific values. You can try different ones. These are the ones that I've used on the original explosion. Now let's go ahead and assign this color right here by searching for impact ring color. And we should see the color applied. Exactly. Good stuff. So if this is the shock wave, the lifetime must be quicker. Let's try 0.8. And by playing these we can see how it looks. The first thing that I'm noticing is that it could actually fade out at the end. So I'm going to turn on scale color. And yeah, this is a little bit too quick. Some of you may like it and you can leave it like that. That's totally fine. But what I'm going to do is click here to choose this curve right here. And on the last key, I'm going to push it a little bit up like this. So it takes a little bit more time to. Fade away. As a matter of fact, in the first key, I'm going to push it to around 0.15. So it's brighter in the beginning for a little longer. That seems all right. I'm going to get out of the isolation mode by clicking here again, and go to the map to see how it looks. And yeah, well, what I'm noticing now is that the mesh itself is too big on the Z axis. We can make it flatter. So on the particle spawn or in the initialize particle for the mesh scale, I'm going to say it's 3.2 for X and Y, and for the Z 0.5. So it becomes flatter and larger, essentially. And. Yeah. Wow, this is quite intense. I'm clicking really quick to see where it begins, and I'm noticing that it could start smaller. And it could fade sooner, perhaps. Let's go back to our Niagara system and in our scale mesh size, instead of starting the first key at 0.25, let's try 0.2. And let's soften this curve right here at the end. We want this to grow slowly at the end of the lifetime, but not that slow. And I'm going to go back to the map to see how it looks. And that's a little bit better. Yeah, it's quite impactful. It adds really a nice punch to this doesn't it? Okay. So. I think it should fade sooner. The first key of the scale color. I'm going to say it's 0.05. And the last key. I'm going to soften this end like this. Right. Very tiny adjustments, I know. Very specific adjustments. I'm actually going to push this. Handle even lower so it isn't so intense at the end. Yeah, perhaps something like this looks a little bit more balanced. Looking good. Let's add another smaller shockwave. You can press Ctrl D on this one or with Ctrl C Ctrl V create a copy. And I'm going to select both. And we right click I'm going to say isolate it so we can see only these two emitters. It's quite useful. The first thing I'm going to change is the lifetime. This one is going to be a tiny bit shorter like 0.7. And then it's going to be smaller on the mesh scale 2.1 for the X and Y. And we can leave 0.5 for the Z. Let's see how it is on the map. On the level. I'm just going to make it a little bit smaller on the mesh scale to for the X and Y. All right. It's a very cool effect, actually. The erosion really adds a nice touch. Now let's see how it is with everything else. I'm going to select again these two emitters and disable isolated, and on the map yeah that's very nice. It really complements the whole idea of this stylized explosion. --. That's impactful. Very well done, guys. If you have arrived at this point, really nice. I hope you are enjoying. So that's it for this lesson. On our next one, we are going to dive again into texture creation by hand, but this time it's a flipbook.
23. 3.18 - Impact Flipbook Part 1 - Frame 3: So in this lesson the idea is to create an impact. Flipbook, so the explosion in the beginning becomes really bright. It's going to be a flipbook of only four frames, something fast. This way you will also have the opportunity to create a flipbook in Krita and you will see how easy it is to create interesting flipbook effects in Krita. So let's open it up and with Ctrl+N I'm going to create a new document 2048 by 2048 as well. You can go to content and make the background color black as well. And you can press create, make sure you have a paint layer and a background. And since it's a flipbook, we are going to need the animation timeline. So let's go to settings and in dockers we want to turn on animation timeline. It will appear down here. Probably. And as you can see, we also have the layers right here, the paint layer 1 and the background, and this is the frame selection. For example, if you go to the first frame zero, pick the brush tool. Select the hairbrush soft. Make sure this softness curve is similar to this one. If we do this and choose a white collar. If we paint in the first frame, go to the next few frames. As we can see, it is the same. But if you paint something else in the first frame, for example, you still see it in the first frame. And that's happening mostly because let me just do a Ctrl+Z We need to create down here with right click a blank frame. As you can see. And this becomes a blueish square, which means that we can select it. And, if we paint something here, move to the next frame. Do another brush stroke. Go to next to the same. And so on. As you can see now we have a simple animation and we are using one layer only which is quite useful. If you press play, this will go to, it doesn't stop basically. And the way we can fix it is, if you click on these three lines, we can say that the clip end is in our case 3. We are simply going to create 4 frames and it starts counting at 0. So it's 0, 1, 2, 3, 4 frames. Now we can select all of these and with right click remove keyframes so we can start fresh. And we actually want to start in the third frame. More a less, in the middle. So with the right click, let's create a blank frame. By the way, make sure the opacity is around 40 - 30%. And now you can imagine you are painting a circle with spikes with only one stroke as you can see. And yeah, in this case, I'm going to push it up. I'm going to select the arrow, press Ctrl+T and try to center this more or less. It's actually very important to center this properly. Otherwise it may look like it has an offset in unity. I'm going to push this anchor to the center of the drawing. And then in the tool options we're going to say the X is 1024 pixels as well as in the Y. And and now as you can see, it's a little bit more centred. But along the way, we are going to make sure it's centered. Now we want to focus on repeating the same process once again. It's basically the same technique. We want to add a little bit more white to this. And then we can shrink the brush size, the brush radius. Pass again another time, as you can see. And basically we are starting to define the shape of our impact. And now we can shrink even more the radius and add a few more details to this. I'm going to repeat the same process. Pass again. And then I'm going to give it a little bit more glow by making the radius bigger. And add in a few spots that I want to highlight. Okay. Once you have arrived at this point, you have a good balance between white and greys. The idea now is to select the eraser, increase the opacity to around the 80%. And we are going to remove the excess. In my case, I'm going to make the ends a little bit more pointy, as you can see. By erasing from one side and then from the other. It kind of creates these triangles all around this circle. Then from here, we want to go ahead and select the the blender smear brush. We want the press here to enter in the bruh editor and make sure the fade is 0 so it's smoother so it doesn't create hard edges. Then we can decrease the opacity, which is basically the strength to around 40 or 50. And now the idea is to go from the inside to the outside. Pass simply one time and make sure you go exactly from the center. In pass in the middle of the spike, as you can see, just like this one time, it's enough for now. Then you can pass another time all around and push this. And basically we are highlighting these spikes and these pointy end by blending these white and gray values, by blending together these white and gray values. And it kind of creates this very interesting texture, as you can see, and we can actually go ahead and already save this Ctrl+S Make sure you save this to a folder that you know what it is. I have a folder with everything that I created for this course, for example, all of the textures and all of the meshes. You can go ahead and save it there. I'm going to call Impact zero one and underscore two by two because it's going to be four frames. So it's going to be a grid of two by two frames. And now we have created the first frame of our flipbook. In the next lesson, we are going to create the first and the second and retouch the third frame.
24. 3.19 - Impact Flipbook Part 2 - Frame 1 and 2: So in this lesson we are going to finish the impact flipbook and we can start by copying with right click the third frame we have created select the second frame and with right click again paste it. And the idea now is once again with the blender smear brush. We are going to push these parts right here to the center, always to the center. We're also going to push the spikes just like these, make sure it's around 50% of capacity, which is the strength. So you don't push everything all at once. We want to keep on pushing and keep on pushing. By the way, there is this onion skins button. That will show the previous and the next frame. In this case, the next frame is green. But yeah, in my case I don't really like to use it for this type of flipbook because it blends everything together and we kind of understand much of what's going on. What I like to do is switch between the next and the previous frame and compare which parts do I need to change, for example, in this bottom right corner. I need to push this a little bit to the center, even more like this. And now with a smaller brush size, I'm going to push these parts even more to the center, because basically in the first frame, you are going to make this much smaller. So I need to go towards that objective. Okay. Yeah. The first frame will need to be adjusted sooner or later. For now, what I'm noticing is. This is not quite well centered. So what I'm going to do is. Go to the third frame and push the guide from the left until it's exactly at 1024 pixels in the X. And then push another guide from the top until it's exactly at 1024 pixels. This way we know the center of this document. Now we simply need to push this, as you can see, until it's centered. We are going to do the same for the second frame. More or less like this. You can switch between the two frames and make sure they are centred. It's very important. Once you have done it, you can go to view and turn off show guides. For example, instead of removing the guides, we can simply hide them. Great. Okay. Back to the second frame. Now, the idea is to shrink these with Ctrl+T Exactly like this. Until more or less of this size. And now we can copy the second frame. Go to the first frame and paste keyframes. Exactly like this. Well now. And basically we repeat the same process. We are going to pick the blender smear brush. And with around 40, 50% of capacity, we want to push this to the center even more. Just like this. Make sure you go all around your texture and push everything to the center. Always from the outside to the inside and then a little bit from the inside to the center like this. Now we can compare it with everything. The first and the second frame are matching well, but yeah, the third frame will need some adjustments. That's fine. You obviously need to switch between the first and the second frame and make them more related to each other. For example, I'm going to go to the first frame. And decrease even more the size with Ctrl+T just like these, as you can see. If you switch between the first, second and third frame, you can see it's growing. And now once again, I'm going to push this even more to the center in the first frame. It's a repetitive process. But I think that's mainly it. Now I'm going to do a small trick. I'm going to switch to this brush and. With around 40% of capacity and with the white color selected as well. I'm going to click a few times around here to add... To make this brighter, as you can see. Looks very good. The idea is that the first frame is super bright and then it kind of fades away. We can also do that with the particle system, of course, with color over lifetime. We could also increase the size with the size over lifetime. You always have the two options, but in our case, we are taking care of that directly in Krita. Okay, so let's adjust the third frame really quick. We are going to pick once again the blender smear brush. At around 40, 50% of capacity. Now we are going to do the same, which is push these parts right here towards the center. And then push the spikes towards the center as well. Exactly like this. Push the spikes even more. Yeah. That now looks related to the first and the second frame. Much better. Cool. Maybe push even more from the inside to the center. I'm noticing that it's not matching quite well. Okay. We are only doing four frames, so and it's going to be super fast. So yeah, this is a good exercise for you to have a taste of how to create flipbooks in Krita. Obviously I'm switching between the first and second and third frame to see if I can make them even more related to each other and basically trying to make sense between each frame. And we are almost done now. Let's leave it as it is. And in the next lesson we are going to do the last frame and probably adjust a bit more the other frames and then export as well.
25. 3.20 - Impact Flipbook Part 3 - Last Frame and Export: All right. So this last lesson of the flipbook, we are going to create the last frame and then export these as a PNG sequence and join everything into a flipbook. So without further ado, let's copy the third frame and paste it to the fourth like this. Then the idea now is to push this all the way outside. With the blend smear brush. As you can see, you can push this all the way outside. From the center to the exterior. Make sure you push those spikes really well. And then you can push. The parts that are closer to the center. Right. So if you want to play this, you can press the play button. But as you can see, this is super fast. You can slow it down in this speed percentage. I'm going to leave it at 30% and play this. Yeah. So you can have a better idea of what's happening. It's only four frames. You cannot perceive it very well. But for example, in my case, I'm noticing that the third frame. It's quite different from the second. So in the third frame, I'm going to push a little bit more from the center. Towards the pointy end of the spikes. So it kind of matches with the second frame, so it makes more sense. Okay. Looking good. And now one of the final tricks we can do is select the first brush. This one, pick the eraser, set the opacity to around 30, increase the brush size, go to the second frame and all around we want to remove a little bit, not much because it is the second frame and we still want this to be bright. Now in the third frame, we can erase a little bit more. But still always around our texture And then a little bit in the inside. Only in the first frame. In the last frame now the idea is to erase even more. We can erase in the inside area and then as well in the outside area, we really want to make this much more dull, much more dissipated away. We don't want this to be super bright at the end. Actually noticed that I did the changes in the fifth frame. So that's fine. I'm going with right click on the fifth frame press copy key frame. And paste it to the fourth frame. And that's it. Problem fixed. Now, if you play this as you can see, I think it's in a good state. So what we can do now is export this. And the first thing we want to do is hide the black background. As you can see it hides in all of the frames, which is great. And then we can go ahead to the file, select the render animation. And make sure you have image sequence selected and the first frame is 0 and the last frame is 3 and the file format is PNG image. And now we can select the folder to where it's going to be exported. And I'm going to create a new folder and call it the Impact01_2x2 And the base name. It's going to be something like Impact01_ We want this to start numbering at 0 and then we can press. Okay. We may need to wait a little bit for Krita to export this, but once it is done, as you can see, if we navigate towards the exported folder, we have all of the four frames. You want to make sure that the frames don't have any background. Okay. Now, to join these 4 frames into a flipbook, we are going to use a free software, which I have been using for quite some time, and it never disappoints me. You can go to Google and search for GlueIT and if you don't find it, please let me know in the comments. We could go to the first link, the GitHub link, and in here in the green button we can paste download zip. Once you download this piece of software, you can open the program. And it's very simple. The first step is to add the frames we want to join. We can navigate to the folder we have exported the frames, select the four, add them, and then the second step is to tell it how many columns we want. This is going to be 2 by 2. So we want two columns and then we can press the glue it button. This window appears, the preview window appears. We can close it because now we can go ahead and save this and we can rename it, for example, to Impact_2x2 Impact_2x2 And that's it. We have now, as you can see, the four frames in a flipbook texture style. And now we can animate this in Niagara. We can play. Let's just import this to our Unreal project. We can go to textures folder. With right-click on this Textures. Now let's paste it right here. Ctrl C from here and Ctrl V to this folder Ctrl C from here and Ctrl V to this folder And in Unreal We can say import on this panel Let's go back to our textures folder And let's just rename this with F2, let's add a prefix, T_ Which stands for Texture Being organized is super important when it comes to big projects Even in smaller projects. It's always important, and useful. Right so, that's it, in our next lesson We are going to see how to use this with Niagara Because we need a new material.
26. 3.21 - Applying Impact Flipbook Part 1: Okay, so let's see how to use this flipbook in Niagara. It's also a very important step because Flipbooks work in a little bit different way. First we need a new material. So on the materials folder on the originals one, with right click, let's create a new material. This one is going to be called M underscore particle flipbook particle, because it's going to be used in a particle system like Niagara and Flipbook because it's specific for flipbooks. And you will understand why very shortly. Right. So on the material settings the blend mode can be changed to translucent. That's more than enough. And we don't need this to be lit. So the shading model is going to be unlit. Let's also turn on two sided. And down here turn on used with Niagara sprites. Niagara ribbons and Niagara mesh particles. Right. So usually we would start with right click and search for text or sample. We want to sample a texture and we would choose the texture sample parameter 2D. But, since it is a flipbook and since we want to use a little trick called blending, we want unreal to blend between each frame. Because it's only four frames. We are going to need a texture sample parameter SubUV SubUV By selecting this node down here, we can already assign our impact 01, texture 2 by 2. And we could connect this to the emissive color. But, as you may have noticed, if we want to change the color in Niagara of this material, we need another node. And if you remember correctly, it's called the particle color. Now we can drag a line from the RGB search for multiply and connect the RGB from the texture just like this, and connect to the emissive color. On our preview, clearly, we need to take care of the opacity of the transparency. So let's multiply both of the alphas, one from the particle color and the other one from the texture. Just like this. Oh, by the way, it's alpha, not RGBa. Sorry, guys. Alpha like this. Exactly. Both of the alphas. And connect this to the opacity. And that's essentially it. Another thing we can already take care is it's very likely going to be useful, perhaps, to have these dissolve the edges if it touches with any geometry. If it intersects a geometry, we use a depth fade. Connect the opacity here and replace the connection to opacity. So every time the mesh using this material, this shader, if it touches another mesh, it will fade. It will smooth the edge, instead of, clipping immediately and creating an hard edge. It's there in case we need it. It's very simple. The only thing missing is the dynamic parameter. So we can control this directly via Niagara and the parameter one. We can rename it to Soft Edge factor. Let's leave it at 1 and connect this to the fade distance. And that's it. We have our material for the Flipbooks. Let's save this. Let's go back to our level on Content browser now with right Click. We can up here, create a material instance and rename it to MI underscore the name of the texture, which is impact zero one. Underscore 2 by 2. The 2 by 2 is useful. So we know the size of the flipbook itself without the necessity of opening and counting this case. It's a small flipbook, but if it was big one, it would be super useful. It's a good practice. Let's move it back to the materials folder where it belongs, because it's an instance and the original materials stay in the originals folder. And now we also need the Niagara emitter for this to work. For us to use this we need a specific Niagara emitter. We have one for dust mesh explosion mesh particle burst sparks sprite burst. But we need another one. Yes. New emitter templates. We can select simple sprite burst. And we need this emitter for the NE underscore ground flipbook. The flipbook that is going to stay parallel to the ground. So as you can see, this is following the camera everywhere. It's following our eye. It's facing the camera everywhere. Not quite useful if we want this to be parallel to the ground. So on sprite renderer we have alignment and facing modes. The alignments we can say it is unaligned. But it's still facing our camera. And if in the facing mode we say custom facing vector. Guess what? It still follows the eye. It still follows the camera. The way it works is on the particle spawn. There's a module for this. For some reason, it's not on the renderer. We need to press the plus sign and search for sprite facing and alignment. Now as you can see it's facing the X axis always. So we are close to what we need instead of 1 in the X. Let's set it to 0. We can say 1 in the Z. And now it faces up. It faces the Z axis. And that's essentially it. Another thing going to be useful is a dynamic material parameters. So let's add it on the particles part. Nothing really shows up because this material does not have a dynamic parameter. Let's assign the material. Recreate it. The Mi underscore impact ring 01 2 by 2. And here we go. We have our flipbook. And in dynamic material parameters, we can say the soft edge factor is 1. Its default value.
27. 3.22 - Applying Impact Flipbook Part 2: But as you could see, it's showing all of the frames. The way we solve this is in the sprite render. In the sub UV, we can say it's two by two four frames, two by two, and now it clips correctly each frame, but it is showing only the first frame. That's normal. If you think about it, we need to animate this. So it's something that needs to be updated. Yeah. So in the particle update let's search for sub UV. And we get this sub UV animation module exactly what we need. Nothing really happens because we have here a little warning saying that there is no sprite renderer selected. It's very easy to fix in the Sprite Render dropdown menu. We can choose well the sprite renderer. And here we go. It is already animating, but just to be sure, I like to specify the start frame. It's linear as you can see, but I like to specify the start frame and the end frame. So I'm going to say it's 0 the start frame and the end frame is 3. Good. Nice. There is a few other options if you want to explore, but that's essentially it. To animate a flipbook. Now what you will notice is if it is for an impact, lifetime could be small like 1. And the size could be bigger, like 250. And probably it's going to be all of these bigger or shorter. We are going to adjust it in accurate system. What I want you to notice is the following. If you look closely it shows each frame and that's it. It's not blending between each one. Fortunately we have a feature in Unreal Engine. In other engines, that is the ability to blend between each frame, creating in between. It's very useful specifically for this type of textures. If we turn it on. As you can see, if you look closely, it's blending. It's fading in and fading out between each frame. It looks super smooth. It's very nice. If you turn it off, it changes frames abruptly. If you turn it on, it becomes smooth. That is the beauty of creating a specific shader for flipbooks and just out of pure curiosity. If we go to the materials folder and for example, press Ctrl D on the stylize the impact. You don't need to do this, by the way, and I'm going to call it test. I'm going to open it up and assign our flipbook to the main texture exactly like this. Turn off main text styling. And go back to the Niagara Emitter ground flip book and assign here the test material I just created. It might seem like it's working and it is working. It is animating our flip book. But the thing is, if you look closely, it's not blending even though it's turned on. That's the major difference of the sample texture sub UV nodes that we have selected in the material editor. Even if it is enabled or disabled, nothing really changes. Because this material is not adapted to play a flipbook with blending on. So I'm going to switch it back to impact ring zero one and I'm going to delete the test material. It's a huge difference. Oh, let's actually take care of the thumbnail. Let's zoom in nicely. I'm zooming in with right click. By the way get a nice screenshot thumbnail save. Yeah I'm going to delete this test material. And let's already take care of adding this to our Niagara system. In here we can press the plus sign. Track emitters, go to Parameter Emitters and select the ground flip book. Very well. Let's see where Niagara adds this. Let me zoom out and organize this a little bit better. I'm going to add it here to the right because it's in the same category which is impacts rings basically. And I'm going to isolate this on this icon. And then with F2 rename this to Impact Flipbook. Great. Yeah. Let's actually. All right. Take care of the color, create a linear color and use the parameters and call it the impact flipbook color with a value of 3 for the R, 1.4 for the G and 0.7 for the B channel. And then in the initialize particle of our impact flipbook, let's assign it here by pressing the arrow and searching for impact flipbook color. Here we go. Let's see if it takes effect. It does indeed. I'm going to disable isolation mode to see the size. And yeah it's super small. So on the initialize particle the uniform sprite size. Let's try 1250. Yeah that's all right. Yeah. There's too much yellow in this color. The green channel I'm going to push it down to 1. And the B channel push it down to 0.5. Yeah a bit more orange a bit more reddish. Looking good. Right. So let me play this back and forth. What I'm trying to do is understanding. Yeah, this is living for way too much. I noticed that right now we only want this to be a fraction of a second. 0.2, for example. Yeah, exactly like this. As if it was pushing the other impact rings, the big and small one outside. Exactly. What I've noticed now is a scale sprite size would be useful on the particle update. You can click this icon to go directly to the Niagara emitter to the parent, and then in Particle Update I'm going to search for a scale sprite size. Let me expand this. And the first key. Yeah it does need to start at 0. I'm actually going to say it starts at 0.4. And that's it. I'm going to save it. And go back to the Niagara system. It's already here. Our scale. Sprite size. And yeah, it looks much better because it was way too big at the beginning. And now yeah, now this looks awesome. Let's save this Niagara system and let's see how it looks in our map, in our level. I'm going to press G to hide the icons. And here we go. That's impactful. Even more. Wow. Very nice. So guys you have learned how to create a flipbook concrete and how to use it in Niagara. And you have seen how important a flipbook is. It's not the best flipbook in the world, but you can see its potential. It's very, very important to know how to draw Flipbooks my opinion. So that's it for this lesson guys. Very well done. In our next one, we are finally going to see now how to create texts procedurally by using Material Maker.
28. 3.23 - Material Maker Overview: All right. So now that we have the climax of the explosion pretty much done, it's in a good state. What we are missing here now is the aftermath of the explosion, the dissipation. And as you have seen before, we are going to leave a mark on the ground. We are going to leave a ground crack, which means we need to create the texture, a specific texture, and we could actually use Krita for that and start from scratch and draw out the ground crack and the ground impact and a few other textures that we are going to need. But there is a tool that every VFX artist should use, and it's a free version of substance designer. It's called the material maker. And personally, I think it's an awesome tool that you are going to enjoy very much. It will streamline the process and revolutionize the way you create textures for your effects. And it's fairly simple to use. So let's go straight to Google and search for material maker. You can go to their websites and as you can see, you have an awesome library of materials which you can learn from. I'm really amazed with what's possible with this software. So let's click on the download on Itch.io button. It will redirect us to Itch.io. And in here. Well, you can download it. You can make a donation if you want as well. I think it's totally worth it. Down here you have a few versions, as you can see, for different platforms. So I have downloaded the Windows version. But once you have the software, you can open it up. And this is material maker. So let's have a quick overview before we proceed to creating a ground crack texture and a few other textures we are going to need along the way. So basically this is node based and we start with this PBR material. If you are familiar with shader graph, or other node based tools. This is super similar. I think it's worth mentioning that up here you have the grid option. It's awesome. If you want to keep your materials, organize it. The notes, you can obviously increase the size of the grid, which is awesome as well. And then you have this grid mini map, which is super useful. When you have a bunch of nodes and you want to navigate around. Now, one of the most important panels here is the library where you have all of the nodes you need. And that's one way to search them by categories. We have transforms. We have noises which are so useful. We have patterns as well and shapes. And there's a bunch of things. If you click appear on the icons with left click, it will open that category. But if you click with the right click, it will hide that section. And down here we have one of the most useful windows, which is the preview 2D and the preview 3D. As you can see, the previous 2D doesn't have anything. You can change the environment here. You can even change the the mesh. In this case, it's a cube by default. But a really awesome feature is the preview 2d window. For example, you can add nodes with the right click or with spacebar. And if we add a circle, if we select, as you can see in the preview 2d window, well, we can have a preview of the selected node. And that becomes super useful when you are creating combinations, when you are blending stuff, when you are multiplying or using a power or using a voronoi, you can get a preview of the result when combining nodes. For example, if you add a noise node, you can have a preview of that noise and its resolution. But then there's another awesome thing. For example, if you connect to the Albedo input. On this bottom left corner, we have two buttons. One is for 2D preview and the other for 3D preview. 2D preview will basically set the background to whatever state the material is in. And then we have the 3D where we have the cube. You can rotate down here and it will show you how the material is looking, applied to a cube or any other mesh. It's basically the same windows we have here on the left, but the preview 2D will give you a preview of each selected note, which is super useful, for example. We can join the shape and the noise nodes by using a blend note. And if you select this blend node, now you can have a preview of what's happening there. In this case, the blend node will have several options on how to blend with multiply and overlay similarly to Photoshop or other image editing softwares like Krita. Then you have the opacity, which is the influence in this case, as you can see. In this case of the shape, you have several parameters where you can control the radius and so on. And now if you connect the blend to the albedo. 2D preview doesn't have much, but the 3D will give you exactly what's happening in the material right now. The result. For example, if you want transparency, you can connect this blend to transparency input down here and in the background, we will see the cube updated. You can also use this preview 3D panel window. So that's a quick overview of this awesome tool. You can then go to file and export your materials, as you can see in unity, blender or godot or unreal. But yeah, that's basically it we already have what we need to progress. Now you are going to learn much more when you move on to creating the ground texture.
29. 3.24 - Ground Crack Texture Part 1 - Voronoi Nodes: So in this lesson, let's start the ground crack in material maker. By the way, you can go to file and new material or simply close and open again Material Maker. Once you have only the PR material. Well, what we are going to recreate is this kind of texture. So as you can see, we need something to procedurally generate these lines, these cracks. Right. And then another procedurally generated noise to create that distortion in the middle. And this type of lines they can be achieved with a voronoi noise. It's a super powerful type of noise that can create a lot of different effects. Oh, and by the way, last lesson I forgot to tell. You can move around by pressing the mouse wheel down and holding, and you can zoom in and zoom out while holding control and scrolling up and down. Okay. So like I was saying, the voronoi is a super useful noise texture, procedurally generated noise texture and material maker as one. In fact, it has several noise textures which I highly recommend you to check out actually if you have the time. So let's with spacebar, search for a voronoi And if we select it as you can see in the preview 2D window, that's how I like to work with the preview preview window open. This is what we have and we want to take advantage of these random lines. As you can see. We can control the scale right here in the X and in the Y, you can actually squeeze this in the Y, for example, or stretch it in the X. Let's start with 6 by 6. And then you have this randomness slider. If it's 0, they become squares, as you can see. Let's make sure it's 100 or 1. Now if we hover this output, the first one, as you can see, it says grayscale pattern based on the distance to the cell center. If we drag a line from here, we can control the black and white levels, not with the level node, but here it's called the tones node. As you can see, we get the spectrum of black and whites. If we push the first key, we are clipping the black values and the key in the middle will control the grayscale values. And the last key, well, it controls the white values, as you can see. But just by playing with this, as you have noticed, we cannot extract only the lines. So there must be another output that we can use. And there is in fact this border's output, which is a grayscale pattern based on the distance of the borders. If we connect this to the tones, that's what we get. We get the borders of the cell, but they are black. And would it be cool if we could invert this? Because that's exactly what we want. The opposite of these black values. So let's try with spacebar to search for an invert node. And here we go. We have one. The first one which is in filters. And if we select it, as you can see, that's exactly what we need to do. White lines of the voronoi cells. Now we just need to adjust the tones values. And in this case, what we want is to extract the white values. I'm only playing with the grayscale value, the key in the middle, because I'm trying to clip the excessive amount of white. I'm going to leave it around here closer to the black key, to the first key to the left. And then we can use another tones after the invert to extract exactly only the white values these lines. Basically, if we push the first key, if we clip the black values, that's exactly what we get. We get a very similar texture to a broken glass. And if you push the grayscale key to the right closer to white, as you can see, we get exactly the lines only, without the glow. But yeah, we want some glow. So let's push this key more a less to around here. Yeah. Something like this seems to be a good. We have a nice white line. That's great. But now there is another problem. As you know, the crack the ground crack that we are trying to create is in a circular shape. And this is in a square shape. So if you think about it, there's probably a transform node that can transform this well literally to a circle shape. And we have, for example, let's go to the transform dropdown menu. We have quite a few things. For example, let's use the shear just to see what it does. You can test things just like these by connecting them and then as you can see, the shear will basically tilt this. There's a mirror, there's a kaleidoscope. There's always values to play with, as you can see. Kaleidoscope is kind of crazy. But there's this one, which is the circle map. And it's exactly what we need. It has literally transformed our square image to a circle one. And you could control the radius and how many times it repeats. The square texture. Don't worry about these radial lines around our circle because we are going to mask this out. That's our next step. I just want to say that this repeat option. You can control it here. Zero. It becomes a circle if you leave it at one. You can then go to the voronoi and increase the scale, for example, and you get a different feeling. But yeah, I'm going to leave it at 6, the scale and the repetition at 2. Of the circle map. So yeah like I was saying, we need to kind of mask this out, extract only the circle and erase or hide the radial lines that we have all around our texture. The way we do it is actually very simple. We have shapes, and if we connect something to a shape, it will adapt, well, to that shape. So we have a circle shape that will be very useful to us. As we can see, it's already masking things out, but everything has become super white. So we need control. These values, not the first one. That's the sides and the circle as an infinite amount of sides. So you can leave it at 2 or 0. That's the same. As you can see, you have other shapes as well, by the way. This is really a complex software with a lot of options. It's amazing. But let's focus on the circle shape. Let's say that this value, the radius is around 1or 1.2, more a less, and then we have this fall off option. We want to leave this in a way that is faded from the center towards the outside. Like this, more or less not looks fine. And now we have the first step of the crack texture, basically, which is creating the lines of the ground crack. Now, in our next lesson, we need to subtract the center of this voronoi, which is too predominant and add a little bit of noise to this and some glow as well.
30. 3.25 - Ground Crack Texture Part 2 - Noise Nodes: So in this second part of the ground crack texture, let's add some noise to this. And that's exactly what we are going to search, the noise keyword. And as you can see, we have quite a few and we got to use the FBM node. For example, we can set the scale to 3 by 3. And up here. In this dropdown menu, you have even more noises that you can play with. We are going to leave it at the value. Nice. Then we want to mask this out, to a shape. If we use this directly connected to a circle shape like we did before, well, this is what we get. And personally, if we were to remove this to the ground crack, it won't look that good. So let's disconnect this. And we are going to use a new node, which is from the transform section. It's called the warp node. And it does something pretty cool, which is it will warp an input according to a height map texture or according to a noise texture. So if we connect the shape and then the FBM noise, what we will get is a distortion of the shape according to the noise. As you can see, this could be already a texture that, for example, for a particle, for a beam, it's used quite a few times. But we want to, for example, increase the first value, which is the strength to 2.8, the strength of the slope, and then decrease to the minimum the epsilon, which is the offset to 0.05. As you can see, we want to get this shape, this texture. We can adjust the shape, the radius, something like 0.6 and the falloff as well. to 0.7 or 0.6, something like that. We will adjust these values when we have the whole ground texture, by the way. And now we want to go ahead and subtract this image to the ground crack, to the voronoi, that we created earlier. So with a math node, we can do exactly that. Let's connect it like this. If we select the math nodes, we can see the preview and it's exactly adding two textures to one another. Basically, we actually want the opposite. We want to remove A from B. And we actually want the opposite of this. We don't want to remove the ground crack to the FBM noise. We want the opposite. So let's switch the Voronoi to A and the FBM noise to B. And here we go. We got something very interesting. The middle of the voronoi, was super persistent and too bright. And now we eroded it. We removed something from it, we remove the noise, and it looks much better. But yeah there's a few more things we can do. For example, we can control the white values of these FBM noise. We can use the tones like we used before. There's another one I'm going to show you just out of curiosity. And we could basically clip black values, as you can see, because it was too big. We just want to remove a little bit in the middle. And then there is the tonality node, which is a curve. It's very similar to the other one, but in this case, we control a curve, the angles of this curve, if we push it like this all the way down, as you can see, we are clipping gray values and white values as well. We could obtain the same, or more a less the same result with the tones node. Yeah. By the way, you need to press okay on this curve. Otherwise it will disappear too. Will not apply the effect. And we could basically get the same thing with the tones node. But if you look closely, you'll notice that the tonality node gives us a little bit more of gray values we can adjust as well, the tones for that. And it will work well. They are very similar to each other. But when we remove, the tonality node, from the voronoi we get these, we get these nice gray noise all around the texture as you can see, while with the tones since we clip them, we don't get those values. So that's why in this case we are going to use a tonality node. Because, it doesn't clip as much the gray values and it creates this very interesting outcome. You can then obviously play with the shape of this FBM noise, the circle, the radius and the falloff, as you can see. It will yield different results. Very different results. And yeah, you can as well play with the circle map of the voronoi down here. You will get a different result with the repetition. If you play with the scale of the voronoi only in the X, you get a different feeling or only in the Y. So yeah, as you could see, this is super, hyper mega customizable. I'm going to give you my values, which is 6 by 6 for the voronoi. And then the shape here of the the circle. I'm going to leave it at 1 more or less for the radius and 0.9 for the falloff. And then we can connect this to the albedo. Now, if you go to the preview 3D window, as you can see, we don't have transparency, but to obtain it, it's actually easy. You can simply connect this last node to the transparency input and we will get only the crack. I'm going to change the environment to studio so we can have a better perception of what's happening here. And I'm also going to switch the model from a cube to a plane. And there's a little problem here because it's repeating the ground crack. And the way we can solve it is by going to this configure option and say that the UV scale is 1 by 1. Just like these. And now we get simply the ground crack texture looking very nice actually. And, well, we are pretty much done at this point. In our next lesson we are simply going to add a glow to this and then export this texture.
31. 3.26 - Ground Crack Texture Part 3 - Glow and Export: So in this very short lesson, we are going to do the final touches of the ground crack by adding a glow. And then we are going to export this. So to add a glow to this, if you think about it, it's super simple. We already have the nodes. We need to control the white values. If we select these tones node after the invert, we can easily control the amount of glow we want. But we also don't want to add too much glow. So what we can do is copy this node right here. Connect the invert. And now we can control the amount of glow we want by pushing the black key a little bit back, and then adjust the gray scale key, which is the one in the middle, to more or less around here. And we get a nice glow. But how do we add this to what we already have? Well, we need as well the circle map. So it becomes round. And then we also need the shape node to mask this out. We basically need the same nodes. We simply needed to adjust the tones value okay. So as you can see now we have some much thicker lines. And we can add these and kind of give that glow sensation to our ground crack. And yeah we also need to remove the FBM noise from this Voronoi, copy this node the A minus B node exactly like this. But now we need to join these two together. Let me just rearrange a little bit the nodes. I could be using the grid, but it's fine. So, now, it's only a matter of joining these two textures. In here we can do it with a math node with the A plus B option. Connect this to the A and that one to the B, and if we select, we get a really nice glow as you can see. Maybe a little bit too much, but. The way we control the amount of glow we want, it's in fact, very simple. If we multiply this last node. Let's switch this to A, multiply it by B, and in this case it becomes completely black because it's multiplying with zero. So we don't see anything. But if we increase the B option to around 0.8, 0.7 and then replace the connection to the A plus B node, what we will get is an interesting glow, and we can control its amount as well, and even control the thickness of that glow. If we go back here to the tones node, as you can see. So it's really crazy the amount of control you have on these textures. I think it's awesome and it's powerful. Every VFX artist should use this and yeah, we are done. Now it's a matter of you choosing how much glow you want, and then replacing the connections to the static PBR material node. Replace transparency as well. And here we go. You may not notice it here, how much glow it has, but those gray values, those gray pixels around the cracks in unity, they are going to glow. This is how it was. Only with a crack lines. And this is how it becomes with a glow. Really nice stuff. Okay, so let's export this. It's very simple. We can go up here to file. An export material, we can select Unreal, Unreal Engine 5 in this case, this will specifically export the material. What really matters for us is the texture actually. And I'm going to navigate to my course folder. And down here, rename it to Ground Crack zero four and then press save. Once you have done it, this is what we will end up with. We have the texture and the .py file, we can delete it. Here we go. Here's the text. Looking good. On our project in the content folder. What I'm going to do now is navigate to the textures folder and with right click. I'm going to then choose show in explorer. Let's go here and let's copy with Ctrl C. And then paste it here with Ctrl V. In Unreal, on this bottom right corner we can say import. And in our textures folder let's rename this to T underscore. And I'm going to remove the albedo at the end. Just like this looking very good. And in our next lesson we are going to see how to apply this ground crack.
32. 3.27 - Applying Ground Crack Part 1: All right. So on this lesson, let's apply the ground crack to our explosion. We have the texture we only need now the material. So on the materials folder. Fortunately we don't need to create any new material for this one. We can, as a matter of fact, start by duplicating with Ctrl D. This Mi underscore stylized pack zero one and rename it to my underscore ground crack zero four. I'm only renaming it to zero four so it matches my texture name, underscore erosion because this has the erosion feature. Actually, this one should also have the same name. The Mi underscore stylized impact zero one underscore explosion. It's a nice practice to keep things organized, right? So let's open up this new material. The ground crack. And in here we can say the main texture is going to be this new texture where we have. As you can see, it looks weird. I'm going to select the plane down here, by the way in the preview. And it has a repetition of the texture because main texture tiling X is set to 3. We can disable it or set it to 1. Great. Let's save this material. And now in Niagara Emitters. We actually need a new one. So, we have the ground flip book. Yes, indeed. But it is specific for flip books and to keep things nicely organized, we are going to create a new emitter. As a matter of fact, if you open this ground flip book, it has a little problem, which is it's always facing the camera. As you can see, I have Googled about it. I have tried to fix it, but it is always facing the camera. Even though we have the sprite facing alignment, it still faces the camera every time we rotate around. So the easiest way to solve this is to go to blender. Open a new blender file. For example. Let me just turn on the screencast keys exactly. And to create a plane. The way we do it is by selecting everything with A and then press Delete to remove it. And then we Shift A Or up there on the add dropdown menu we want to add a plane. And that's it. We have a plane. I'm just going to rename it to plane zero one just in case Unreal has a plane as well. Or in case a new plane is needed it will become 02. Keeping things organized, it's super important when it comes to game development. Now we can go to file and in export select FBX, navigate to our projects folder and in contents in Gabriel Aguiar Prod. In models we can rename this to plane zero one and make sure Selected objects is on, export exactly and go back to Unreal Engine. A panel will appear at the bottom right and we can import these FBX import window will appear. Let's say import all, clear this message log. And in our content browser here we go. We have the plane. I'm just going to rename it with F2 add a prefix for SM underscore which is static mesh. And now we need a new emitter. Yes indeed. Because the other one is for a flipbook. And it has that little problem of always facing the camera every time we look around. So right click effects Niagara emitter. Go to templates and select Simple Sprite Burst and press finish. Rename this to NE underscore Ground plane because it's going to be, well, a plane on the ground. Double click to open this up. And. Since we are dealing with a mesh with a plane, let's go ahead and in render, add a mesh renderer on the plus sign. And remove the sprite renderer. This mesh renderer on the meshes. Let's say that it is the plane. Exactly like. All right. Let's enable material override so we can assign our material, and click this plus sign to add a new array for a material override. And in here we want to select the Mi underscore ground crack. Exactly. Nice. Let's just make sure the emitter state the behavior is set to once, the spawn bursts, the spawn count is one and initialize particle. We can already say that lifetime it's going to be higher. Four seconds. It's going to leave for more time. We can undo this sprite size mode by pressing the arrow, and on the mesh scale mode, we can actually say it's uniform, and maybe a value of one will be enough for now. Another thing we can already take care is. Since we want to erode this at the end of its lifetime, we are going to need the dynamic material parameters. Since this is already an erosion material, it will work. But we need it in the particle update so we can animate it as we have seen previously. Let's say that the erode is a curve. Float from curve. Indeed I'm going to expand this a little bit. The last key can be 20. Yeah. Okay. We need to fix the first key and say it is zero so it doesn't start eroded. I'm actually going to say it's 0.5. That will look better. Yeah, something like this. And then it's eroding and fading out. I'm actually going to leave both the scale color and the erosion on. We might need both, depending on the situation. So let's leave it as it is. And that's pretty much it. Let's save it. Actually, let's create a thumbnail out of this. With right click. I'm going to zoom in and zoom out holding right click. Create a thumbnail and then save.
33. 3.28 - Applying Ground Crack Part 2: And in our Stylized Explosion in the track. Now, if you go to emitters to the parent emitters we have here our NE ground plane, we can add it. Let's see where it goes. Yeah okay. I'm going to add it below right here. It will be used for the things that are on the ground, specifically on the ground. I'm going to leave a little space actually, because on top of that we are going to add a few other things. Right. So let's see. Yeah, it's super small. We don't even see. Barely see it. I'm going to isolate to see how small it is. Oof! That's small compared to our explosion. So on the initialized particle, on the mesh uniform scale, I'm going to say 2.5. I'm going to get out of the isolation mode and see if. Yeah, yeah, it's all a bit too big. 2.3. Okay? Okay. We still see the cracks on the ground at the same time as the explosion is happening, I don't think that looks very well. So what I'm going to do is on the spawn burst instantaneous, in the spawn time, I'm going to delay it, by a value of 0.2 exactly like this. Perhaps a little bit less like 0.1. And now let's take care of the color. Let's add a linear color. We are only going to create user parameters for the colors. But by now you have probably understood how important and how useful this user parameters are can be. Right. So this linear color is for ground crack color. And the values that I'm using is ten 0.4 and 0.08. Let's assign it on the initialize particle on the color ground. Crack color. And let's see how it is. Right? So it is dissolving away way too fast. Way too soon. I'm actually going to increase the lifetime to 5. Probably it even needs more. But it's also eroding way too soon. So all the dynamic materials parameter. I'm going to select all of these keys with right click and say they are in auto mode. And for the last key, the handle I'm going to push it down like this. Not that much. Exactly. Yeah. This way we can see the crack on the ground being eroded. That will look much better. Makes more sense. So you can see the cracks for a little while. Let's see how it is in here. Yeah. It's bright, it's strong. It's good. But we can do is on the Niagara Emitter ground plane. Add a initial mesh orientation on the particle spawn so it has a different rotation every time we use this explosion. I'm going to set the orientation to none, because I like to use a random ranged vector for the rotation down here. X and Y are 0, but z is between 0 and 1, and if we save this, it will apply to the Niagara system as well. And if we go to our scene. To our level. As you can see, it has a different rotation every time it spawns. It looks good. That's all right. I think it's a little bit too big. So 2.1 for the initialized particle. Yeah, that's all right. Looks much better. I'm going to save this Niagara system. I noticed we didn't rename this, so I'm going to rename this to Ground Crack Underscore Bright because there's going to be a dark one. It's going to stay below this bright one. So. With Ctrl D I'm going to create a copy of this. I'm going to duplicate this ground crack. Right. I'm going to place it right here next to the bright and call this one dark at the end just so we can distinguish them. I'm going to select both and press isolated. And. Oh, yeah, totally forgot about this. Forgot about this little detail that the ground crack is not going to be perfectly aligned with the bright one. So what I'm going to do is disable this initial mesh orientation after all. Right. So on the dark one, the particles, I'm going to remove this color. I'm going to say it's totally black. Zero zero for the RGB. Leave the alpha at one. So so it's visible. Otherwise it will be transparent. And in the mesh renderer we want to make sure that this is below the bright one right. So on the rendering section we have this sort order hint. And we can say it's -1 This way. As you can see, if you look to the left to the preview, it automatically becomes bright because the dark one is below. And I'm also going to disable the dynamic material parameters because these are one will not be dissolved. As a matter of fact, do not forget to disable scale color on the bright one. One will be eroded, the other one will be faded away. It will look very nice. You will see in a moment. And now this dark one will live longer. So you can see that mark on the ground for a little while. So let's try a lifetime of 6.5. And let's see how it goes. All right. So yeah, scale color cannot fade too soon as it is doing now. So on scale color let me just expand this. I'm going to say the first key is at 0.5 of time and value of 1. And the last key. I'm going to fix the handle push it up like this. And let's see how it goes. Yeah, exactly like this. We can see the bright one eroding away and the mark on the ground stays there. The dark mark, the burnt mark. Here's a very curious thing. If on the first key we say the value is 1.5. The alpha will become more predominant, stronger. Let's say it's 3. Actually, as you can see, it is become very dark. Too dark as a matter of fact. I'm going to leave it at 2. Let's see how it looks. I'm scrolling up and down and yeah, that looks very interesting. As you can see, this is what we need a burnt mark on the ground. I'm going to say the bright one leaves a tiny bit less like 4.7 and the dark one a tiny bit more like 6.7. Very small adjustments. Yeah. All right. That's very nice. I'm going to disable isolated. And I'm going to save it. And now on our map, on our level, we can see how it looks. And yes, that's definitely an improvement. We are working on the dissipation and it's starting to look very nice.
34. 3.29 - Ground Mark Texture: So as you can see, we have a beautiful ground crack, but it's still a little bit too alone. We need to add some burn marks around it to complement the whole idea. And once again, for that we are going to use Material Maker. It's super useful and it's a great way for you to practice a few more things. So let's go ahead and create a new material. And what's the good? We are going to use the Voronoi noise. It's quite useful. And since we already know we want this to be in a circle shape, let's connect this to a circle map and it will transform this to a circle shape. But this time let's increase the X. Let's stretch this in the X, something like 28 for example. As you can see, it's super stretched and we can increase the intensity to around 1.2, 1.4. Along those values. So it becomes a little bit brighter. From here now, just like we did before we want to mask these out. So we are going to use a circle shape just like we did previously. And we want to increase this fall off the last value to around 0.7. And then the radius could be 1, 1.2. No problem. But in between these, there's something that we can do, which is add a blur. So it doesn't have that crispy look. You know, it's a burnt mark on the ground. It should be a little bit blurred. So let's connect this to a Gaussian blur and increase the grid size to 2048 by 2048. And the sigma, which is basically the amount of blur, we can leave it between 30 and 40. As you can see, it blurs this out. It looks like a blood stain in some way. Awesome. Looking good. But these on its own, it won't look much like a burnt mark on the ground. We need something that really catches the impact feeling of the explosion. Basically, we need some stretching lines in a circular shape. So for that we can use another noise, this time the value noise. And lets already connect to the circle map. We want this to be circular. And to get the stretched lines, we can increase the scale X to 30. And then decrease the scale T to 2 or even 1. And as you can see, we get some really nice stretched lines. Gray scale it. If we increase the iterations, we basically get a more detailed noise texture. Let's set it to 8 or 10, more or less. And yeah, as you can see the circle map, we can increase the repeat to 2. So we can have a little bit more rays. That looks nice. And there's actually another way to mask things out for example. You could use a gradient. We can control the direction of the gradient and if you hold control, you can even snap it to 15, 30, 45 degrees and so on. The way we mix these two together is with a blend mode. As you can see. Well, we are using the normal blending mode, but this one doesn't work anyway for our specific case because it's circular. So we want the radial gradient. And the nice thing about a radial gradient is, for example, let's say that this key is around 0.3. And then. The last key. It's going to be black. Exactly like this. And if you connect it to the source, one of the blend. And change the blend mode to multiply. As you can see, it's masking our noise. Great. Just push these keys to more or less. Around here we have a very bright edge in our radial gradient because of this curve right here. If we change to the last one, for example, it becomes smoother. That's nice. That's better. And the nice thing with this technique is, you can control the mask with this radial gradient. And that's awesome because you can do some pretty nice tricks. For example, in our case it's blending nicely. But if we switch this curve to the third one, we get a much smoother gradient as you can see, much better. Right. So let's join these two the Voronoi and the value noise with another blend node. Connect it like this. And switch it to a multiply blending mode. And for example, now we can control the amount we want this to blend. And 0.7 is a good value for what we are creating. There's another cool thing that you can do after the blend down here. You can connect this to a power node which is inside a math node. Here it is the POW value. And for the B option for example, if you increase it, you will get less and less white values. That kind of adds a different feeling to the whole thing. Yeah, I'm going to leave it at around 1.2. More or less. And if you go to the preview 3D yet we don't have anything. Let's connect this to the albedo and then connect it to the transparency. And here we go. It's looking very nice as you can see, similar to a burnt mark on the ground of an explosion. That's what we need at this point. Great. So let's save this file. I'm going to call it the Ground Impact zero one. Press save and then we can export this. So let's go up here to file export material Unreal and not Unity like I did. Sorry guys. We can rename it to Ground Impact zero one as well and press save. This is the exported texture. And now with Ctrl C I'm going to copy that texture. I have already cleaned the other files that Material maker exports, Ctrl C on this texture. I'm going to open the folder of the textures of our project and paste it there with Ctrl V. And now in unreal I'm going to say import. Yes, indeed. With F2, I'm going to rename this texture, add the T underscore as a prefix, and at the end I'm going to remove the underscore albedo. And now let's create a new material already. We can for example with Ctrl D duplicate the underscore ground cracks zero four and rename it to ground impact zero one. Underscore erosion. Open up these materials so we can assign our texture. Exactly. In the main texture, we can say it's the ground impact. All right, looking good. Let's save this material. And in our next lesson we are going to use this texture in our explosion.
35. 3.30 - Applying Ground Mark: So now that we have the texture and material ready, let's go ahead to our Niagara system of the stylized explosion. And we can start by duplicating the ground crack dark with Ctrl D. I'm going to select these three emitters and choose with right click isolate it and I'm going to rename this one to Ground Mark underscore dark. So the idea is pretty much there. All we got to do now is change the material, the override materials. Switch it. Swap it with the ground impact zero one. And here we go. It's already visible. The idea is that this will be bigger than the ground crack itself. So on the initialize particle, let's try a value of 4. Yeah, that seems about right. And lifetime. We are going to leave it the same, so it fades away at the same time as the ground crack dark. Let's just disable isolated so we can see it in action on the level. And. Yeah, look at this. I think these textures are awesome because they really add that burnt feeling, that burnt mark to the ground. Very, very nice. For this one. We can even turn on the initial mesh orientation so it can have a random rotation every time it spawns. Since it's not going to match any other texture, that's totally fine. Let's save this. And. I'm going to show you now how to create a variation of these textures for another round mark, but this time a bright one. So let's have a look on how we can create quick variations from this ground impact. So if we don't want to mess this up, what we can do is go to the folder where we save this material, press Ctrl C and then Ctrl V. And we created a duplicate. And now we can rename it to Ground Impact zero two for example and drag and drop to the Material Maker. Otherwise it will open another material maker as you can see. Okay, now we are free to do whatever we want to this. For example, I'm going to decrease the scale X of the value noise so we don't get too many rays. To around 19, even less probably, and then increase a little bit the Voronoi scale to 32. In the X. And I want to make this Voronoi a little bit more visible. So, I'm going to go to the shape and increase a little bit the radius. And decrease the fall off. And then in this power node that we have here, I'm going to increase it to around to maybe 1.75. So it dissolves away the value noise. Okay. And I think that's pretty much it for the blend. I'm going to set it to 0.82. So we get a little bit more of the Voronoi and that's it. We can export this. Let's go up there to file export material and unreal engine. And this one is going to be ground impact zero two. And now in our folder navigate to the folders where we have all of the textures. And yeah I've already deleted the material by the way. But what really matters is that we copy this texture to our project. Ctrl C, Ctrl V I have already the folder opened of the textures of our project. I'm going to click import on this bottom right panel. And on the materials now folder, I'm going to duplicate this ground impact zero one. Rename it to Ground Impact zero two. Delete the one at the end and I'm going to change the main texture. With the ground impact zero two I'm going to click this folder icon. So it opens the location of the texture. And I'm going to rename it because I forgot about it. I'm going to add a underscore and delete the albedo at the end. And that's it. Nicely organized. We are ready to move on. Just save this material. And in our stylized explosion. I'm actually going to duplicate this time. The ground crack bright, because it's going to have the same properties where we use the erosion as well. I'm going to place it here in between. And rename it to with F2 ground Mark bright. Select these four isolated. And on the mesh render of our ground. Mark Bright, I'm going to switch the material to the ground impact zero two underscore erosion. And it might seem like there's nothing there. But it is. In fact, as you can see. Perhaps a bit too small, but we will see that in a moment. What's important is that this one lives a little bit less than the ground crack bright like 3, for the lifetime is enough, so it fades away before the crack. And I think this one should be brighter. So I'm going to remove this color with the arrow. And down here I'm going to click the plus sign and search for a linear color. And rename it ground mark color. And I'm going to copy this ground crack color up here. But I'm going to duplicate the values. So 20, 0.8 and 0.16. And I'm going to assign this to the ground marked bright color. Exactly like this. Very nice. Let's see how it is. Okay. Yeah. It's not that visible. I'm going to set the size to 3. The mesh uniform scale to 3. And I'm actually going to double the values for the color, like 40 and 1.6 and 0.32, because it isn't quite bright, it isn't quite there yet. I'm actually going to increase the G value because I think it is too red, like 3. 10 is way too much. It's yellow. Like 5. Yeah, 5 is still a bit too yellow, I believe. You'll see how it looks. So I'm going to save this and go to the level and. Yeah, I think the size is nice, but the color is a little bit too yellow. So I'm going to say the G value is 4. I could actually do this in the level directly. But you know it's fine like that. Yeah, I think that looks nice and it blends well with the rest. And it's another nice touch. As you can see, we add many layers to our explosion, to our effects. Obviously there's effects that don't need this many layers, but this is an excellent exercise because you see a lot of details. We create them. Really think it's a great exercise. So that's it for this one. On our next lesson we are going to be improving our dissipation. And we are going to add some smoke trails coming out of these cracks.
36. 3.31 - Smoke Trail Mesh: So in order for us to add some smoke trails coming out of the cracks, we are going to need a new mesh. It's a very, very simple one. So let's open up blender a new file. I'm going to turn on screencast keys. And we can select everything and delete so we can have a clean scene. This process is pretty much the same. And with Shift A, or up there on the drop down menu, we want to add a plane. With R, we can rotate it and press Y so we can lock it in the Y axis, 90 degrees. You can literally type 90 on your keyboard and then press enter and it will rotate 90 degrees. And the idea now is that we enter in edit mode with tab. And we want to select these two vertices at the bottom. And with S lock it in the Y axis press the Y button. We want to scale it down something more or less like this. With B, I'm going to select both of these vertices at the top. And we G. I'm going to push them in the Z axis. And then we want to divide this with Ctrl R. You can scroll up or down to add more divisions. We can add three divisions just like this. Looking good. And now it's pretty much done. It's that simple. We can select this top vertex. And turn on proportional editing on this icon up here. Once you do it, you can press G and then lock it in the X axis, and you can scroll up or down to increase the influence of the proportional editing. And one thing you will notice, is that this is not helping as we increase it. It deforms weirdly. We want to create an arc by the way. So we want to change this curve here. The way it influences and we want to select the sharp one. And now. Yeah, I'm going to push it a little bit back. I'm going to increase the radius until we have something very similar to this. That looks good. Nice. Let's get out of edit mode by pressing Tab. We are in object mode now. As you can see if we try to scale it. The pivot is right there. Not very useful. So I'm going to enter edit mode again with Tab. Select these two vertices at the bottom and with Shift S cursor to selected. And then get out of edit mode with Tab and with Shift Ctrl Alt C select origin to 3D cursor. Our go up here in object dropdown menu and set origin exactly like this. Great. So lastly now the scale is all right. It comes from the bottom of the mesh. That's useful. And now in object we want to say shade smooth. Exactly. Looking good. We can rename this to Smoke Plane zero one. And finally press Ctrl A to apply rotation and scale. And that's it. You can also go up there, here in object to apply rotation and scale as well. All right. So that's it in file. Now we can go to export select FBX. Navigate to our folder to our project and content. Gabriel Aguiar Prod, models. Rename these to Smoke Planes zero one and check selected objects. And that's it. Export FBX. Back in unreal. Now we can on this bottom right panel say import. Here we can say import all close this message log. And that's it. Now in our next lesson we are going to see how to use this with the rest of our explosion.
37. 3.32 - Applying Smoke Trail Mesh: And now that we have the mesh for the smoke trail, let's see how to apply it, how to use it. And then we will see texture and shader adjustments. This technique is widely used to create some awesome trails as well. By the way, right. So in our Niagara system we don't need any new Niagara emitter. We can go to the plus sign on the track in the parent emitters. Start with the ground plane. It's already a mesh and it has pretty much all we need to get started. Right? I'm going to place it below the ground crack. I'm trying to put this in a hierarchy mode. Keep things organized. Let's start by renaming this with F2 to Ground Smoke. I'm going to isolate this on this icon and. Let me just scroll back here on the timeline and yeah, okay. So if you think about it, that's the first, the first thing we need to do is. Replace the mesh, right? So on the mesh renderer instead of the plane, we want the smoke plane. Exactly this one. Yeah. It has the ground crack material applied. Let's also take care of that. And instead of M underscore erosion texture like I did, do not select that one, select the Mi underscore stylized impact zero one underscore erosion. We should never use the original materials, only the instance. It's a good practice to keep things organized. So yeah, make sure you use the Mi underscore stylized impact zero one. And the cool thing is that as you can see this is mapping. Well. And why is that? Well if we go back to blender you will notice that despite this texture being horizontal, it's mapped in a vertical way which is great for us. This is exactly what we need. But why is it happening? Well, in blender, if I open a new window here and up there, select UV editor and enter edit mode. You don't need to do this by the way. I'm just showing you that if I select the left vertices here on the UV editor, they represent the top of our smoke plane, as you can see on the right window. And if I select the two vertices at the right, at the far right, they represent the bottom of our smoke plane, which means that any texture we apply here horizontally will be well mapped vertically to this plane. Which is exactly what's happening back there in unreal. Essentially, if we add a texture like this horizontally, something like that, it will be mapped on the smoke plane like this. I can give you another example. If in our texture we have an arrow pointing to the left, just like this. For example, will it be mapped on the right? Well, it will be mapped from the bottom to the top just like this. That's why it's working so well in Unreal Engine, because the UVs are horizontal. Despite this being, well, vertical mesh. Yeah, it's pretty cool. UV's are extremely useful, and once you get an idea on how they work, you can do a bunch of cool stuff. So what do we need here? Let me just get out of isolation mode. Well, we need to spawn these in a range in a certain area in a radius, and this won't face the camera. That's correct. That's all right. What I'm noticing now is the mesh is intersecting the ground. It's going below the ground cracks. And it should. We made sure that the pivot is at the bottom of the mesh. What's happening here in Unreal Engine is that if I go back to the level and open Content browser and double click this mesh. We can see that indeed it is below the ground, below this grid, which represents the ground. And why is that happening? Well, it all comes down to how it's made in blender. If we go back to blender, the wall mesh in itself is below the ground. The fix is super simple. If we select this mesh, press G, lock it in the Z and push a value of only 1. Then press enter. It will be at the root of the ground of the world position. And now with the mesh selected, we can go ahead and re-export this. As an FBX replace the current one we have in our project. Export and make sure you always save these files by the way. I'm going to save this one because I forgot in the last lesson, but it's very important to keep saving this stuff. You never know if you need to change something. Now back to unreal. Yeah. We can import again. And as you can see, it updates automatically. And it's at the root of the grid. It's it's looking good. It's exactly what we need. And if we go back to our Niagara system. The smoke. It is beginning exactly where the ground cracks start. Great. So as I was saying, we need to instantiate a few of these meshes we did in a certain radius. And if you forget about it, we need a couple of things. The first to increase the rate, the count, and then a certain location, a certain radius for them to spawn. Right. So let's see how we can do it. First, in our initialize particle we can take care of the size. It's constant. It's pretty much all the same. And it's kind of boring. Let's make sure it's random instead of uniform. I'm actually going to press this arrow. And then we can choose random non-uniform. And I'm going to give you these values because it's the ones that I've tested with. And they work well. But feel free to test different ones of course. So 0.4 for the minimum X and Y and 0.33 for the Z minimum, for the maximum max. Wait. Actually it's going to be minimum of Z 0.25 and maximum of 0.35. And then a minimum for the X and Y of 0.3. And a maximum of 0.4 More like that. It's more like that, yeah. Right? So like I said, we need to increase the spawn... the count, right. How many of these meshes we want. And we can do it in the spawn burst instantaneous. In here we can say spawn random between like 5 and 7, 4 and 7. Yeah, those are good values. They are probably all overlapped. So let's take care of the location on the radius they are going to spawn. We can do it in the particle spawn with a spawn location node module. It is set to sphere, but we have a few other options like cylinder, which is very useful where we can say the height. It. How tall it is It's flat. It's going to become a circle, basically. Then we can play with the radius something like 200. It seems like a good value. Let's say it goes. And if this is happening to you, which is the following. There is only one mesh. As you can see, even if I isolate this and then turn on the stats, show the particle count. As you can see the last one, it's set to one particle only the current and the max. And we made sure that the spawn burst is random, right? Things like this may happen. So one of the first things you can do is force it to compile. Up here. If that doesn't fix at all the problem, you can try to close and reopen Unreal Engine, or you can disable recalculate random each loop. If you disable it. It's going to be fine. I think this is a tiny little bug in Niagara in this version of Unreal Engine 5.3, but once we disable it, it becomes all right. So that's it for this lesson. On the next one, we are going to make a few more improvements to our smoke trail, more specifically on the shader. We are going to create a mask.
38. 3.33 - Texture Erosion Material Part 3 - Mask: And as you may have noticed, every time we see the smoke coming out of the cracks, we also have these hard edges, which doesn't look very good. And that comes all down to the shader to how the shader is done. So we kind of need to mask this out to fade this at the end so it becomes smoother. And we can start by duplicating this material. The stylized impact zero one and rename it to Mi underscore smoke trail zero one underscore erosion. Because we need to change how the tiling is done and a few more things. The tiling can be 0.25, for example. We are going to reuse this texture. And the main texture speed X of 0.6, for example. And then we can assign it here on the ground. Smoke. In the mesh renderer. Here we go. It's starting to get better. Look at all this spaghetti moving around. All right. Cool. So we need to adjust those hard edges now. So on our content browser, let's go to materials to the originals folder. M underscore erosion texture. The fix comes after the main texture. After that, we want to mask it so we can show only what we want by using another texture, where the white values will show what we want and the black values will hide it. More specifically, transparent values. So with Ctrl D I'm going to duplicate this node, the main texture node. Let's multiply the R with the RGB. We can as well multiply with RGB up there, RGB with RGB. Maybe it makes more sense in your head. But since this doesn't have any color, it all comes down to the same. And then we multiply the alpha. After that, it's a matter of replacing their connections like this RGB and alpha. As I was saying, we don't have any texture, but it's also very important. Every time we touch a shader that already is being used, it already has instances, it's very important to keep it the same. We don't want to make any changes. We want to create new functions, yes, but functions that by default do not affect what's being used with this shader. Otherwise you may mess up other effects. Right. So. For this mask right now. What we need is a square, white square. I'm going to open up Krita. I'm going to create a new file with with 128 by 128 pixels. And on the content we can actually say it's white. The background. And that's it. We have our square. We can then export this directly to our project. I'm going to navigate to contents. Gabriel Aguiar Prod, textures and we can select PNG call it the square zero one. Back to our project, we can say import. Yes, indeed. And now we can assign the square 01 Why are we doing this? Well, as I said, we don't want to change anything that is already using this shader and why it means that it keeps being visible while black or transparent will fade out anything. So if we add a completely white square, we don't change anything, right? This way we make sure that nothing is changed. I'm going to click this folder icon and rename it with F2 add the T underscore. That's it. Now, let me just explain to you what we are going to do here in blender. Let me open the UVs and the right vertices represent the bottom exactly. So let's imagine that we have a texture that it is an arrow pointing left, which is going to be represented like this on the texture. Exactly. And what we are going to do is we are going to create a fade between black and white or between transparent and white. And we want to fade this part right here. So we don't have that hard edge in our smoke. Right. So that's what we are going to do. And the rest will be white. What is white is visible, what is grey is a little bit less visible. What is dark grey is even less visible, and so on. Right. So. In Krita. Now let's create a new file with Ctrl N with a resolution of 1024 by 1024 pixels, and the background can be black this time. And then create. On this empty layer we are going to select the gradient tool. This one. And up here we are going to press the add button to create a new gradient. We can call it grayscale. Zero one. The first key is going to be white, and the last key is also going to be white. The difference comes in the opacity. First key is going to have 0 of opacity and the last key 100% of capacity. Now we can push it to more or less around here. And we are basically saying that anything from the first key to the second key will be faded. Let's go here right at the top. And while holding shift, let's drag this to the bottom exactly like this. That's it. We can actually save this. Krita file just in case. I'm going to call it gradient horizontal zero one. And then we can export this as a PNG to our project. Call it gradient horizontal zero one as well. Exactly. Let's go back to unreal. Let's import on this panel. And to see these in action, we can go to our smoke trail. The instance this one. And yeah, the mask doesn't appear. Probably because we need to save the the original erosion texture material. Let's save it. Exactly. And here we go. We have the mask. And now we can assign our gradient horizontal zero one. And. And nothing really happens. Oh, yeah. Sorry, guys. There's a very simple mistake. This one is supposed to be horizontal, not vertical like I did. Super Sorry. So let's go back to Krita. And I'm actually going to delete this layer. Create a new one. Select the gradient tool. Make sure we have the gradient that we created selected. And now, from the left to the right, from the extremities, we are going to create this gradient and then export. Replace the one we have in our project. Graded horizontal zero one. Import yes. And? Yeah, here we go. So as you can see, we have the black values at the left. Why it is black? Because this gradient is in alpha mode is in translucent mode and not additive. If it was additive, black would mean transparent. So it's very simple. This fix. If we go back to our Krita file we can hide the black background. Export again as a PNG. And replace our gradient. Horizontal zero one. Yes. In Unreal. Now we can import again. And if you look to the left now, it is faded. Not that much, but in comparison to the right it is nicely faded, right? And if we go to our level, you will notice that in action we don't have no longer that hard edge at the end. That's very good. Very useful stuff. Looks a little bit more professional and a little bit more polished. For example, if you go back to our krita and create a new layer on this plus sign. And in our gradient. Now up here, let's actually edit this gradient and push this key to the right. We are basically saying that we want our trail to be more faded right. And now create a gradient, hold Shift, by the way, to create a straight gradient. Export as a PNG and call it the gradient horizontal zero two by the way. And in unreal, import, yes, indeed. And in our material of the smoke trail. Let's replace this mask with the gradient horizontal zero to. And as you can see on the left here, it's a little bit more faded. So I hope you understood what this does. As you can see, I'm going to compare this. The one was like that and the gradient two is like this. And you notice the difference in smoke now looks a little bit better, right? So that's what a mask can do. It's really powerful stuff. You can hide. You can fade stuff. You can make things look a little bit better. It's for polishing stuff. It's awesome and it's very useful. Let me just go to the textures folder and with F2 rename this to T underscore gradient zero one and T underscore gradient two two. And that's it. That's very much it on our next lesson. We are still going to make a few more improvements to this smoke trail. It's still too persistent. We need to make a few more adjustments to the size to the color, and you are going to see the real process that goes behind polishing visual effects. We're going to take our time. I'm not going to use default values that I have in my other project. So you can see that sometimes my thinking process when it comes to polishing stuff like this.
39. 3.34 - Smoke Trail Improvements: So I think it's also important for you to see the process that sometimes goes behind building a final effect. The back and forth. There's a lot of back and forward. So that's what this lesson is all about. And now we are going to improve the smoke trails. So, first I'm going to start by adjusting the lifetime because the explosion happens and the smoke pretty much disappears. It should live as much as the ground cracks or a bit less. So I'm going to say it's random lifetime between 6 and 8. And the radius. I believe it's a little bit too big. I'm going to decrease it to 160 and I think it should be even less. But we will see. And now we need to see how it is in the level. Right. So I'm going to go back there, press reset. And first thing that I notice is that it's too predominant meaning that it's too visible. It's dragging too much attention to the smoke. Only when it's pretty much dissolved is when it's good. So first thing I'm going to do is I'm not going to use the erosion on the particle update. I'm going to disable it here. I want to fade it away with the scale color which is already doing, but I still want to use dynamic material parameters on the particles spawn. Want specific values from the beginning. For example, erode now can be random. 1 is very little. It becomes a white stripe basically. So I'm going to say it's random between something like 3 or 2 and 5. And the soft edge factor 10 or even 20. So every time it intersects the ground, it becomes a little bit faded. And now I want these to have random alpha. So on the color on the initialized particle I'm going to say random range linear color. It's going to be white for both. But the alpha, the value. I'm going to set it to be between 0.8 and 0.2. In here it seems all right, but I know that in level it's going to be different. So I'm going to decrease it to 0.8 and 0.4. When to save it, which is unnecessary because these updates automatically in the level. And yeah, as I was saying, it's still too bright, too visible, dragging too much attention. At least lifetime is all right and it leaves for a nice amount, but for some reason it's too white outside of the Niagara, probably because of the light settings. So I'm going to say the alpha is between 0.6 and 0.2. I'm going to go back to the level and it's still too visible. I'm starting to doubt the erode values, so I'm going to go to the dynamic material parameters. And the minimum is going to be 2.5 and the maximum 10, which is a lot. It's not even visible inside Niagara. And now in the level. Yeah, it's still too visible. Also, because we are using white at 100%. And have only noticed that after recording this. But it's all right. It's going to end up nice. Okay, it's still too visible, so sometimes it looks all right, but there's other times that doesn't look good. I'm gonna isolate this one. And I'm going to say the maximum erosion is 8. But what I really want to fix is the size I'm going to, I think it was a little bit too large. I'm going to see if it is the X or the Y. X makes it longer, so it is Y. Any the Y axis of the scale, I'm going to say it's between 0.1 and 0.3. Or 0.2 and 0.3. Let me see how it is in the in the level. How tall it is, it needs to be more random. Z maximum 0.4. And I want a little bit more of this smoke. So I'm going to increase the count to 5 and 8. I'm basically only adding one more trail. In terms of size, it's. It's all right. Maybe a little bit too tall. So 0.35 and 0.15 for the Z. And a little bit thinner, like0.15 and 0.25 for the Y. Yeah, that seems all right. Still think this needs to be a bit more eroded The minimum value. I'm going to set it to 3 of the erosion. It's still too visible. So on the color I'm also going to say that the minimum 0.5 and 0.1 for the alphas. Yeah, there's a few of them that are pretty much invisible at the beginning. And I think there are two curved. And the X kind of controls that. So I'm going to say it's between. 0.2 and 0.3 in the scale. I'm going to save it. Why not? Okay. Yeah, I think it's getting there because this smoke right here is just a nice detail. It's not something that should drag too much attention. By the way, this technique we are using for these smoke trails is highly used and highly recommend it to create nice trails for projectiles, for example, or for characters or basically trails. Okay. So the color I'm going to say the minimum is 0.2. And in the erode I'm going to say the maximum is 7. Yeah. I'm basically closing the range. Make it a little bit more uniform. And that's pretty much it. Yeah, I think it came out nice. I could spend a little while adjusting a few more things, but I think a lesson only for this is already enough. And now you know that sometimes there's a lot of back and forth. There's plenty of back and forth testing, trial and error. So that's it for this lesson. On our next lesson, we are going to add a new feature to our erosion texture shader so we can distort our smoke.
40. 3.35 - Texture Erosion Material Part 4 - Distortion: Let's now have a look at how we can add distortion to our erosion texture shader. A distortion will help us distort basically any texture we put to the main texture. For example, if you have a look to our smoke. It looks nice. It looks all right. But once you start looking at it, you notice the pattern. And the distortion will help us break that pattern, even though it looks nice just like this. But it's a nice plus for you to learn something new. And you also see how we can edit shaders without messing anything else. So I'm going to go to our original erosion texture material, this one. And it's all going to happen back here. You see, if we mess with the texture coordinates, which is basically the UVs, we are already creating distortion. Since this is how it maps to a mesh, if we add something to that, we can create distortion and many other things as well. So I'm going to push this back here and and to make your life easier, we are actually going to need the same process we have here which is the tiling and the speed but for the distortion. So I'm going to copy these nodes, these three up here the time, the speed, the two speed scalars, the append, the multiply Ctrl C and then Ctrl V back here I'm going to push them right down here. All right. And we can rename this two instead of main text it's going to be distortion tiling X and then distortion tiling Y. And down here it's going to be distortion speed and distortion speed Y The values that they have is all right. 1 for the tilings and 0 for the speeds. And for the tiling, just like we did for the main texture We kind of need to multiply this with the texture coordinates with the UVs. This way we can control the scale of our distortion texture. That's what this will do. Just like we did here, it's pretty much the same. And now we need a texture parameter 2D for our distortion texture. Let's call it distortion. We are going to create a texture in a moment, but basically the tiling and the speed are going to be connected to the UV, just like we did for the main texture. So we kind of need to add these two together the speed and the tiling. And then we can connect to the UV of the distortion texture. So at this point we are able to tile our distortion texture and control its speed, its direction, its pan, where it moves, basically where it scrolls. But we kind of need this to influence our main texture, right? And if we add the distortion to the UVs to the texture coordinate. We are essentially creating a lot of distortion. We are totally distorting the UVs, the texture coordinates. I'll show you in a moment the preview. So as it is right now, this is super distorted and if we connect this to our main texture would completely distort the texture and it wouldn't be recognizable. Plus it would change any effect using this shader. So we kind of need to control the amount of distortion we want. And for that we have a very specific node. Super useful. It's a lerp also known as linear interpolation. And here we go. We have the linear interpolation. The way it works is that the alpha controls how much A and B are blended with each other, and A and B go from 0 to 1. And if I say the alpha value is 0, it's going to be A, which at this point is totally black because it's set to 0. But if I set the alpha to 0.5, it's going to be a mix of B and A, so it's kind of a dull red. But if I set to 1, it's going to be a very strong read. So the Alpha controls how much it blends between A and B. In our case, this is extremely useful because we can say A is the texture coordinate without distortion, it's the UVs without distortion, and B is the UVs the texture coordinate totally distorted. Make sure alpha is at 0, by the way, which is no distortion. We don't want to change anything that is already using this shader, because now we are going to connect this right here. We are going to replace this connection. Oh, we got an error. Oh yeah. We can't multiply float with vector3 basically. And since distortion is going to be black and white it's going to be grays. We can use the R channel for example, or the B or G or alpha indeed. Oh, and as you can see the preview now compare it to the texture coordinate. The this one. As you can see it is totally distorted. Add node. And if alpha is at 0.1, we see a little bit of that distortion. And if it is at 1, we see the we see the texture coordinate totally distorted, the UVs and the preview also reflects that. As you can see, as a matter of fact, if I switch this to a plane and if I say the alpha is 0.1, we will have a little bit of distortion. Which is very nice. 0.2 a little bit more and so on. Normally we don't go above 0.2, 0.3. By the way, how would we control this? Well. We already have in place a dynamic material node. Dynamic material parameter. This dynamic parameter has a few more values that are not being used, for example the B channel. The blue channel. We can indeed call it distortion amount and then make 100% sure that it is 0, so we don't change anything that is using this shader. Make sure the B is zero and this can be connected right back here on the lerp nodes to the alpha. So now we have a way to control how much distortion we want directly in Niagara. If we double click on this line we can create a nudge. And we can drag it down here just so we can keep things organized. Can create another one right here. Push it more or less like this. Again, make sure the blue channel is set to 0 and that is called distortion amount. Make also sure that the A parameter of the lerp is texture coordinate without distortion, and that B is for texture coordinate, totally distorted. This way, alpha will control how much distortion we want, and then we have all of these options to control the distortion scale, which is the tiling and the speed the scroll. Right. So we are missing now the texture, the noise, the distortion map. Fortunately we have here Material Maker which is super ultra useful because if we open it up we can create a quick noise. Plus it's tileable noise. It's a seamless noise. For example, with right click. We can now search for noise. We have a bunch of them. And I'm going to use the FBM one. You can even then test a few different noises, as you can see. But for me, I'm going to use the value 1. I'm just going to set the X and Y to 8 and that's it. With scale of the X and Y to 8. FBM noise. Set the value and then we can connect this to the albedo. As a matter of fact, there is a cool trick where we can directly export our preview 2D just by using right Click. Here. As you can see, we have export and then we can select the resolution. How awesome is that? Really really cool Material Maker is awesome. Let's export as 1024 by 1024. You need to navigate to your project folder, or you can export to somewhere else, and then copy and paste the texture and export this as a PNG. Rename it to noise value zero one for example. PNG. Let me rename this again. Noise value zero one. Okay. And then copy and paste the texture to your project. And then press import. Just going to rename it to T underscore. That's it. And now in the original erosion texture material in the distortion I'm going to say that it's T and underscore noise value zero one. The texture here for the distortion. I'm going to save it. And here we go. That's very important. As you can see, the smoke is exactly the same. We made changes to our shader and everything is still the same. Now we can use those new functions wherever we want without affecting what's already using the shader. So now on the ground, smoke the dynamic materials parameter now as a new option, which is the distortion amount. And I'm going to say something like 0.1. Yeah, we can actually go to our material instance of Smoke Trail. So the distortion speed is 0.4. As a matter of fact, we can undock this so we can see the changes in action directly in Niagara while we adjust our material properties. And I'm going to make a few tests. For example, distortion speed of 2. 1 looks nice. 2 looks a little bit too fast. Can then make the texture smaller, like 0.5 for the tiling of the x and y. Maybe a speed of 0.6 on the X. Well, essentially, I think personally I like 0.2 for the speed of the X and tiling at 1. And the distortion amount at 0.1. If we save this and go back to our level. You can see it in action. It's very subtle. I know it's super subtle, but what's important is the technique that you have learned and how to edit shaders without interfering with what's using that shader, right? Plus, you had an overview of how to manipulate UVs, how to manipulate texture coordinates, because that's super useful. So I hope you have enjoyed. And in our next lesson we are going to add a few more elements, like an orange floating ring to our explosion. We are now entering the final moments of our course.
41. 3.36 - Ring 02 Mesh: All right, so we have a
nice explosion going on, nice smoke, nice aftermath, cool textures, cool particles. Let's now ornament
this in a way that it looks like it's
pushing air around it. We are going to add some
very subtle orange rings as the explosion goes up. If I open up here, this ring mesh, because we
are going to need a mesh. This one, this mesh
specific mesh, as you can see, it is a cone. It won't look that
good unless maybe if we rotated 180 degrees, maybe it would fit still. It's easier to
create a new mesh. Plus it's a simple one. You get to practice
mesh creation, which is so important. Let's open up
Blender, a new file. Let me just turn on
screen cast keys. And the idea is to
select everything with a and press Delete Clean Scene. Then we shift, or
up there on a menu. Let's add a sender on
the bottom left panel. Let's say that the Cap
Field type is nothing. We want this to be only a
ring right now in objects. Let's go ahead and
select Shadesmoot. We don't have these faces. I'm going to drag a new window. You can see how
the UVs are going. They are super important. Exactly. I'm going to
enter into mode with tab and let's turn on UV
selection up here. Just make sure that
the top vertices on the UV editor represent the top vertices of the
cylinder on the right. Yeah, the idea is to add
a few edge loops here. Let's enter into mode
with tab control, you can scroll up, we want to add two edge
loops like this. Then press Enter, Escape, stay in the same position. Now I'm going to select
everything and I'm going to scale it with
a value of three. You can literally press
three and then Enter. Then I'm going to scale it down, but only on the z axis, a value of 03, right,
we have a ring. The idea now is to scale
this top edge loop. And the bottom edge loop,
we're going to select them. You can also select them
with B, by the way, I'm using shift out, but you can select
this vertices. And then with scale
them up a little bit, not a specific value. Something more or less
like this seems all right. If this was for mobile
or something low, we would have to be
very careful with the amount of faces
we are using, which is a lot at
the moment already. I'm still going to add a new edge loop right in
the middle with control R. I'm just going to scale it down so it creates this
nice curve as you can see. And that's pretty much it. I'm going to get out
of it mode, right? Let's rename this to ring 02. Lastly, in object mode, let's press control
or go appear in object actually and
apply l transforms. We are good to go, Let's press control to save this blend file. Then let's go to Export. And choose FBX. We can directly export
to our project, to the models folder. Ring two, exactly.
Let's go to Unreal. Let's press in part.
Yes, and then impart. All close this message. Log in content
drawer, not browser. I was always saying
browser in content drawer. Let's rename this to SCM,
which is static mesh. Underscore ring 02.
And we are good to go.
42. 3.37 - Orange Floating Rings: Back in our Niagara system. If you have left this gap here, you did well because now we are going to add with right click by the way, because you can also add emitters with right click, the dust mesh This emitter right here. Push it more or less around here, align it with the others, and let's rename this with F2 to floating ring bot, just bottom short for button. So yeah we are going to have three rings. I'm going to isolate this. And first thing we want to do is switch this mesh with the ring zero two. Exactly. Here we go. It's already looking like something. Another thing we can do. We could use this material. Indeed. This one wouldn't work. It's clipping because of the tiling. But another thing we can do as a good practice is click on this folder icon and duplicate this stylized impact zero one material. Now I'm going to call it floating ring zero one underscore erosion. So I know it is specifically made for this ring. You can also drag and drop, by the way just like this to the explicit material. And it will replace the existing one with the newer one. And I'm going to double click to open this up. Place this window more or less around here because we want to make a few adjustments, like for example, the main texture tiling. Let's make it shorter, 1 its default value and it looks smoother. We don't need that much repetition. Besides this, we can play with the main texture speed X a value of perhaps 0.5, maybe a tiny bit too fast, but we will see how it goes along the way. Now, what I'm going to do is specifically flatten this a little bit in the Z. I realize it's a bit too big. So 0.5 for the Z on the initialize particle on the scale mesh. Yeah, that looks better. And if you wanted, you could increase the X and Y, make it larger. For example, something like that. Right. So from the beginning on the timeline, let me see how it is. Yeah. It is dissolving away because we have this dynamic material parameters in the update particle. The particle update, I mean and it is animated the erosion. You can use this as it is. It's totally fine. What else, can we do right here. Well yeah the lifetime is big. So let's decrease it to 0.8 for now. And I'm going to press this plus sign so we can take care of the color search for linear color. Since it is the only user parameter we are going to create, because we could create an enormous amount of parameters if we wanted. So I'm going to rename this to Floating Rings Color. And for now the colors that I've tested are 1 for the R, 0.48 for the G and 0.25 for the B. And now in the color. Let's search for floating or ring and let's assign the floating ring color. Let's see how it is. Yeah, that looks all right. It's dissolving nicely as well. Eroding. All right. This is going to look good. I'm gonna get out of isolation mode so we can see where it is in relation to the explosion. And yeah, as predicted, it is well, close to the ground. Too close to the ground. We have not yet seen how to offset particles. So it is a good moment. In the initialized particle there is this position mode. And we have this. And we can turn this on and say the Z is going to be 70 for example. All right. Yeah that's exactly what we need. So it's actually fitting. Very well. Let's now add two more rings. We can press Ctrl D to duplicate this one. And we'd have to rename it to Floating Ring mid. And the first thing we can do is to push this up on the Z. Something like 160. And increase the lifetime to one second. It's going to create a cascade effect. And I'm going to decrease the mesh scale because the explosion at the top is as a smaller radius to 0.85 for the X and Y. And I'm gonna offset the spawn bursts of the floating ring bottom by a value of 0.1. Spawn time. And on the floating ring mid, I'm going to say 0.2. So 0.1 on the bottom and 0.2 on the middle. And I'm noticing that it needs to be a little bit bigger. The middle one like 1 perhaps. Right. So that's it for this. Let's see how everything works together. So let's duplicate this floating ring myth for the floating ring top. And I'm going to increase the spawn burst time to 0.3. The mesh scale. Yeah, I'm going to decrease it to 0.9. And increase the lifetime to 1.1. Let me just compare these values. 0.8 and then 1. Yeah. Let's make this 11.2. The floating ring top increments of 0.2, 0.8, 1 and 1.2. And oh yeah, let's push it up around the Z axis like 240. Yeah, I think this is our most there. I'm going to decrease their lifetime to increments of 0 to 1. So 0.8, 0.9 and then one. I'm actually going to push the middle one on the Z axis to a value of 180. And the top one, I'm going to increase it to 260. 300. Yeah, 300. But with a smaller radius on the mesh scale X 0.85 for the X and Y. Yeah, that's a little bit better. On the initialize particle mesh scale. I'm going to make it thinner as it goes up. So the middle one is going to be 0.45, and the top one is going to be 0.4. 0.35. Yeah 0.35. That's all right for the top one. Now, there's one thing that I don't really like. It's the scrolling speed of the shader. I'm going open up the material. The floating ring material. And say the main tex speed X is 0.3, something much slower. Yeah, something more like this. What I'm noticing is that they are appearing really out of nowhere, abruptly. So let's smooth that with the scale color. I'm going to turn it on for all of the three floating rings. And for the first scale color, I'm going to pick this curve. I'm going to push the key in the middle to 0.2. I'm going to fix this handle. And then with right click. I'm going to add another key. More or less around here. I'm going to say the time is 0.8 and the value is 1. And for these last two keys I'm going to select them and right click I'm going to say auto. So it becomes smooth and we can control their bezier handles. Yeah, that seems all right. It would be nice if we could copy this curve to the other scale colors, which is possible, but I totally forgot when I was doing this. Sorry, guys, I'm doing it manually on the scale color of the middle one. I'm going to do the same. I'm going to select this last curve. Push the first key to more or less 0.3, 0.2 around those values, and then add another key at more or less 0.7, something like this. So now I'm going to do the same for the top one scale color of the top one. All right. I think it's pretty much there. I'm just going to offset the spawn time of the floating ring top to 0.35, 0.36, and a very weird value, but I think it should come a little bit later. Let's save these and see how it is on the level editor. Just gonna hide the gizmos with G. And yeah, I think the position, the timings, I think they are right. But just like it happened with the smoke trail on the ground, I think it is still too predominant. So what I'm going to do is. On the floating ring color. I'm going to decrease the alpha to 0.4 or 0.5. Along those values. Yeah. Something more like this. Exactly. Something a bit more discreet. Yeah. Don't worry. We will make final adjustments at the end of the course. I'm going to review pretty much everything and make a few more adjustments, but that's essentially it for this lesson. We are getting really close to the end. On our next lesson we are going to add something very cool, which is some particles with the trail smoke.
43. 3.38 - Particle Trails Part 1: So in this lesson, let's learn a new trick where we are going to add some trails to particles, also known as ribbons. We want them to come from the center and then fall down. Basically a particle burst which we already have an emitter for that. So on our Niagara system down here we right click I'm going to add an emitter. And in parent emitters we can choose the particle bursts. I'm going to isolate them. And if I scroll back and forth on the timeline, yeah, they are super tiny, really, really small particles compared to the explosion size. I think they are really small. So. On the initialize particle, let's say, yeah, we don't want this to be stretched by the way. So I'm going to select random uniform. We want their size to be uniform but random. Let's try something like 5 for the medium and then 30 for the maximum. So yeah, they are still stretched and distorted. Let's go have a look at the sprite renderer. Yeah, it's still aligned to velocity or velocity aligned. Let's say the alignment is unaligned which will basically face the camera. There are still stretched, as you can see, and distorted because of the scale sprite size bit. Let's disable this one. All right. Round particles. Nice. Well, they are too many. So on the, spawn burst instantaneous, we can say the spawn count is actually random and integer random. Between something like 10 and 15. That should be enough to create a nice effect. Now let's make sure that they really are punchy. You know they have a good initial velocity. So on the add velocity, the maximum can be 2000 and the minimum 750. For example here we go. That's more like it if we get out of isolation mode. We can see that, yes, they are indeed fitting well with our explosion in terms of size and in terms of motion. Cool. None of them are going below the ground at the beginning, which is also nice. All right. What else we can do? Well. Let's take care of the trails. And the way we do it is actually we right click. We want to start with an empty emitter. An empty emitter doesn't have anything on the meter. Update on the particles, spawn on particle update and on the render. It's a blank emitter and doesn't have a parent. By the way, it's going to be unique in this Niagara system, and with F2 we can rename this to Trails and the other one to Particle Trails. Let's select both and isolate them. And let's go from the top on this empty meter. Well you are also going to see how to set up an empty emitter, how to make it work more or less since this is for a ribbon, but you get an idea. For example, in a emitter spawn, there's actually nothing we need. But on the emitter update we want to update the state of the emitter. So let's search for state. We have the emitter state which will take care of the life cycle. And a couple of things. On the particle spawn we basically want to say well we need to initialize something right? It is spawning a particle. So let's search for initialize particle, which is what we already have in all of our emitters. And in the particle update. Well, it needs to update something the states of the particle. So let's search for state particle state. This is where it will take care of a very simple thing, which is to make sure that the particle is killed, is destroyed, and after lifetime has reached 0. Lastly, on the renderer we already know what we need, which is some trails, in this case ribbons. So let's add a ribbon renderer. And nothing happens at the moment, right. We need to link these two particle systems. We need to say that the trails are going to follow the particles, which is something that needs to be continuously updated. So on the particle update we have something called events. We can create an event, generate an event on collision, on death and on location by exclusion. The location one is the one we want. It is not going to collide, nor do we want to spawn something whenever these particles die. So let's go with the location event and we can adjust here the rate, the number of events it will send per second. More or less. We get this error on Niagara log. We can even see what is happening. It says that before the particles.id parameter can be used, the required persistent IDs option has to be activated in the emitter properties. It specifically says where it is. If we go up here to the properties we have here, an option that says requires persistent ID, which is basically a number that each particle is going to have, and it's going to be a persistent number. So the trails can follow that number and apply a trail to that particle to that number. As soon as we turn this on, everything will be all right and there's no more error. So if we are generating an event now, we need something to listen to the event to search for that event. Let's put it that way. And on the trails up here we have a stage button. If we click it, there's only two options available as default. And it is an event handler, something that will handle events. We want to add it. And up here then we will be able to say what's the source of the event, what's the event we want to handle. And we have particle trails, as you can see, which is the only one that generates an event on this entire Niagara system. And then we have the location event, which is also the only event being generated, but still nothing really happens. Well, first we need to say that the spawn number is going to be one. It seems like it doesn't do anything, but it will allow us to spawn trails on particles on all of the particles. Well, besides having a handler, we also need something that receives the location event. It's a bit weird if you ask me, but that's fine. In this Receive location event module, we have a few properties that we can basically receive. We can inherit, but still nothing happens. There's no trails behind the particles, so there's something missing. There is indeed. But just out of curiosity, if we want to control the wide of the ribbon, we can do it on the initialize particle. We can already do that. As a matter of fact, we can say direct set and say it's a value. Something like well let's try 60 and we will see how it goes. Yeah, they are still not visible. They could be very small and maybe we wouldn't see them. But no, they are still not there because there's still something missing there. Generate location event is all right, but perhaps the event handler is missing something. So let's have a look at that module. I would say the syntax is not very appropriate, but the execution mode is set to every part, which at first glance seems to be fine. But instead it should be spawned particles. And as soon as we switch this, here we go. We have some trails now. Following the particles. Awesome. They are huge indeed. And they are using the default material. But it's a beginning.
44. 3.39 - Particle Trails Part 2: Now, for example, we can switch that material with the better one that we already have. As a matter of fact, the smoke trail zero one is perfect for this. Here we go. We just need to make a few adjustments. Of course. So let's get out of isolation mode. See how it is with the rest of the explosion. Yeah, the trail is a little bit too large and the particles are a bit too small. So I'm going to say, in the trails, in the initialize particle that the ribbon wide is 40. Perhaps even less. 20. It is a bit too small. Let's for now settle with 25. And let's say the lifetime is random between something smaller so the trail isn't that big, like 0.3 0.3 and 0.8. And now the cool thing is that on this receive location event, this basically inherit values. We can inherit the color as soon as the particle fades, it trail also fades away. So let's say the color is apply and it has apply RGB and apply Alpha. Nothing really changes at the moment, but let's add a new color for the particle trails. Linear color. Exactly. I'm going to give you some values that I have here. Let's make them bright so it can be something like 25, 4 and 1. And let's assign it on initialize particle on the color. Let's search for trails. Particle trails color. And as soon as it compiles. As you can see, the trail is inheriting the color as well, which in our case it's not very useful. So on the receive location event I'm going to turn off apply RGB. And they go back to their default color, which is white at the moment. So for the trails, I'm going to decrease their color, the alpha to 0.5. I'm noticing that the trails should be inverted. If you are noticing that now, don't worry, we will fix it later on. So here's something we can do while holding Alt we can duplicate this scale color to the trails to the particles update. Just a nice, cool trick that I wanted to show you. They are faded on the wrong direction, but that's something related to the shader that we'll fix in a few lessons. We can adjust the curve on the scale color. Select this one straight to zero, from 1 to 0, and on the particle trails on the initialized particle. Let's actually say the sprite size. The minimum is actually minimum of 25 and maximum of 50. Maybe it's a little bit too much, but we will make a few adjustments later on and we will see. Since we have this material on the ribbon render, we can take advantage of the erosion functions that we have created on the shader and use a dynamic material parameters for the particle update and say the erode is something like 2, for example, which will look, which is nice. We may need to increase the ribbon wide on the initialized particle to 60, but that's essentially it. And if you look closely, you will notice that these specific material, when applied to these ribbons, well, it looks like it's scrolling in the opposite direction. We could fix the material itself, but we would change whatever is using it. So instead let's click on this folder icon and duplicate the Ctrl D this material. And then well, revert this speed -0.2 for the distortion speed. And assign it here. Oh, yeah. Sorry, guys. Let me go get the material back. Open it up again. Yeah, we can leave the distortion speed at negative, but we also need to set the main texture speed X to a negative value like -0.6. So it scrolls in the opposite direction. Yeah. Exactly like this. Looking good. And they fade out throughout the end. But as you can see if we actually disable the apply alpha. Just to show you that if we disable it, they don't fade the ribbons along with the particles. They stay on for a little while. While if we turn it on they will fade with the particle itself, which looks much better. Let's get out of isolation mode now and see how everything works together. Let's save it first. And go back to level editor. Yeah, well, oof, they are quite big. The trails and really, really too noticeable. What I'm going to do is say that the erode is actually 3. Yeah, perhaps that isn't enough. On the color, the alpha. I'm going to set it to 0.25. And yeah, that doesn't change much. There's something going on here. We will make a few more adjustments later on, but for now, what we can do is actually increase the detail, the quality of the trail. Be careful with this. If it is for low end platforms, it will impact the performance a little bit. Let's set it to 2 and the trails will become smoother now. And I'm actually going to disable the scale. I don't think it's that much. It adds that much. Oh, and the dynamic material parameters. Since we are not animating any of these values, we can set it in the particles spawn. Just drag and drop it to the particle spawn. Okay. So that's what we have at this point. If we disabled the scaled color, it doesn't actually look that good. I'm going to turn it on and leave it that way. And I think the wide is way too big, so I'm going to decrease it to 40. And I think now it fits a little bit better. We still have a little problem with how it's fading, but we will fix that later on. What we can try is decrease the color to 0.5. Yeah, I think that looks a little better. But like I said, we will make a few more adjustments later on. And in our next lesson we are going to add one of the final details. One of the final elements, which is a shockwave, a big shockwave of smoke.
45. 3.40 - Shockwave: I think it would add a really nice touch to our explosion. If we added a shock
wave This way, it will look a little
bit more impactful. It's very easy to add one
with what we already have. We want a big shock wave
on our Niagara system. We can actually start
by coping with control. C the smoke ring. This one, I'm going to paste it. Well, you can be next to the ground marks
for some reason, probably because it's
close to the ground. I think it's all right
if you place it here. It's just in terms
of organization. This control V here and rename
this to smoke shock wave. First, let's isolate
the burst is all right. Yeah. What do we have? We initialize particle. Yeah, the lifetime, it's
going to be shorter, like 06. Let's try that value. Let's increase the mesh
scale to something like four for the x and y
and decrease the Z, make it flatter like 06. Let me just see
if this compiles. Well, actually we can
already say that the curve, the first key of the
scale mesh size, is going to be zero. We want this to grow from zero. What I'm going to do
is make sure that the last handle points a little bit down
something like this. Yeah. Well, scale
color we don't need, we are erosion on the
dynamic material perameter. Okay. This as compiled, the first thing I'm noticing is that I don't think it
needs that much detail, that much repetition
on the tiling. What I'm going to do
is on the mesh render, click the folder icon to find this material we control
create to duplicate. I'm going to add 02 at
the end. That's enough. If you press this icon with
a narrow pointing left, it will apply selected material on the content browser
just like this. It's a nice short cut, right? I'm going to open
up this material. I'm going to say the main text tiling the X is going to be one. We can see it's
updating automatically, Maybe 215 will create a Sam, it's 1234 and so
on round numbers. Yeah, I'm going to
leave it at one for now. I'm going to close. We can actually add a little
bit of speed on the X, something like 02 or maybe even less like 01,
something like that. It's all right. I'm going to save this material,
I'm going to close it. I'm going to test
with everything else. I'm going to get out
of isolation mode. I don't really like
that round shape. Let me see how it
is in level editor. It's interesting
but personally I don't really like
how round it is. Compare it to the rest,
it has a lot of detail. The smoke, it's tiling
quite a few times. What I'm going to do is
open up the material again instead of one for the tiling in the x. I'm going to say two. I'm going to save it. Think it will look nicer if it has
a short lifetime like 04. And if it is a
little bit bigger, like 45 for the x and y of the mesh scale
and four for the Z, it is even flatter, almost close to the ground. Here we go, I think that makes it feel more
punchy, more impactful. I think that's enough, pretty
much for the shock wave. Right. On our next lesson, we are going to make
a few adjustments overall to the trails to
the smoke on the ground. We are going to polish
this a little bit more.
46. 3.41 - Adjustments Part 1: All right, so let's make a few more adjustments to this. We are very close to finishing this course. The explosion is pretty much done. We are now going to polish it a little bit, but there isn't much to polish. Essentially what we are going to do is fix these trails and the smoke that come from the cracks. Well, for the trails the fading is inverted. It shouldn't be faded when it's closer to the particle itself, it should be the opposite. So it's actually a simple fix. If we go down here to the trails on the ribbon render, let's click the folder icon on the material so we can open up the material where it is. And we are going to create a duplicate with Ctrl D I'm going to add a 0.2 at the end. And then I'm going to click this arrow icon pointing left. So I assign this new material to this ribbon renderer. Good. Now I'm going to open up this material. And as you can see it is faded on the left. So to fix is related to the mask. So on the content drawer, on the textures. I'm going to press with, right click on this texture so I can say. So we can say show in explorer. This folder will open up and it is this text right here. We can simply open up Krita. And drag this texture. Drag and drop it to Krita. It will open it up and all we got to do is press Ctrl T. And we right click. We want to say mirror horizontal. So we flip this text or basically horizontally. And then in file in export we want to export as a PNG but let's call it gradient horizontal zero three. We don't want to replace the existing one because it is used for the smoke coming out of the ground, for example. Back to unreal. Now we can say import and all the textures folder. We can rename this to F2. Let's add a prefix to underscore. Nicely organized. That's essentially it. Now on our system on the ribbon renderer let's find this material and let's open it up. And let's replace this mask with the new one the horizontal zero three. Here we go. It is now faded on the right. If you look closely you can see in here on the material on our edge. Like a seam. Like an artifact. If you see that in action, if it happens to you, it's because of how it wraps, of how the texture wraps. Let me just open this a little bit more. All right. So in here if we go to the texture section there is this advanced dropdown. We can click there and say that. The X axis tiling method instead of wrap. It is clamp. Let's switch it if we go back to our material. As you can see, we don't have an artifact. So let me show you again. This is how it was. Wrap mode for the x axis tiling. We can see that very very very small hard edge. And now if we switch the X tilling method to clamp so it doesn't repeat itself, it is now perfectly fine. And that's it. Let's save the text. So save the material. And if we look to our particles, it's finally looking good. The only problem is that it's scrolling in the opposite direction, but that's an easy fix. If we open again the material, we can say the main text styling is negative and sorry, not the tiling, not the tiling, sorry. The speed -0.6 in the main text speed and -0.2 and the distortion speed x. And then save this. Here we go. It's now scrolling in the opposite direction. Now it's a proper trail and it looks better. Right. So we have fixed that and it looks good. And I'm noticing that the particles. Particle trails are a little bit too big. So I'm going to decrease their size the minimum to 22. And to maximum to 40. Yeah. Yeah, that's all right. It looks nice. Now we still have a little problem with our trails. They are a bit too persistent. They drag too much attention and that looks weird. So what's essentially happening is if we increase the alpha to 0.15, for example, or 0.01, it doesn't make any difference as you can see. So there's something happening here. Even if in the scale color we disable scale RGB. Nothing changes that's not influencing the color. We are just excluding that option, making sure that it doesn't affect our smoke trails. So there's something happening with the shader. Even if we set the alpha to 0.01, it's still the same transparency values. Still, it's still quite persistent. So it's related probably to the material. If we set the alpha to one, for example, it's still the same, right? Okay, so let's see what's happening. If we open the material itself in the general section. In material property overrides, we can override the blend mode. Instead of translucent, we can use additive. And what will happen now is that dark colors will be transparent. For example. Let's try. We may not see the difference, but it is there. For example. On Niagara system and initialized particle of the trails. If we say the color is 000. We won't see the trails because additive blend mode cannot render black colors. So the trails become transparent, and this is an indication that we can control the transparency right here. For example 0.05 for the RGB. It's a good value. It becomes very dull the smoke. And that's exactly what we need. We don't want to drag too much attention to the smoke trails. There's more important things happening. So let's create a range for this range. Linear color. Let's say the first minimum is 0.05 RGB and the maximum is 0.10.1. Go back to our level editor and it looks really nice. It fits. I'm actually going to say that the minimum is even lower, like 0.2 like 0.02. So you can have randomness. Some trails are more visible than others and that looks very nice. That's a nice touch. The smoke is just a really nice addition to the particles. Cool.
47. 3.42 - Adjustments Part 2: Another thing that we can do is pretty much the same process we have done here for the ground smoke. If on the ground smoke on the mesh render, we select this folder icon to find the material. We can say that in material property overrides instead of translucent is additive. Save this material. And now we can do use the same method. I'm going to say the alpha is 1, 1 for these two colors, and let's control it with the RGB very Values like 0.05 and 0.2 for the maximum. Let's see how it is. Oh. All right. So yeah, that's too much. They are too visible. Once again I'm going to say 0.01 for the minimum and a maximum of 0.1. Let's see if that made a difference. Hmm not really, +nipk Not that much. That bit too visible. Yeah. I'm going to make sure that the scale color is all right on the dynamic material. Yeah. We have 3 and 7 for the erode. Okay. So for the color let me try 000 to see if this is working really quick. Yeah, the smoke disappeared. So that's working all right. Yeah. It's set to additive. It cannot render black colors. So let's try some very very small values like 0.01 and then 0.05. Okay. Yep, that fits nicely. But I'm noticing another thing, which is the radius. It is a little bit too big. So on the shape location I'm going to decrease the cylinder radius to 120. So it's more focused on the center of our crack. It should be even less perhaps. But that's all right. I think they spawned in a nice location. They are random. Yes, indeed. But yeah, perhaps they leave a little bit too long. Some of them should be already faded by now. So I'm going to say the lifetime, the maximum is 7.5 and the minimum can stay 6. All right. Now we could do something crazy. Like, say, the maximum of the second burst is 100 and the minimum is 50, and we get plenty of smoke, but I think that's too much. So I'm going to say ten for the maximum and 8 for the maximum. I want to see a little bit more smoke, but I'm going to add more variation to this. So what I mean is the size is going to be more random and the color too. For the color we can say it's 0.005. And for the mesh scale the minimum, we can say it's much smaller 0 to 1 and 0.15 for the X, 0 to 1 for the Z, and 0.15 for the Z. Here we go. Nicely random. The transparency is also all right if we get away from this a bit further away. Yeah, it looks really nice and I think it fits a little bit better. So I'm going to save this particle system because that's pretty much it for the adjustments. I think the explosion came out great. And obviously you can play with this however you want and try different values for different particle systems. Create new particle systems and so on. You can do so much more now. You have learned so many techniques. You have learned how to create shaders for erosions, either with Voronoi, either with with texture and how to use them on Niagara, how to create smoke trails, how to create cracks on the ground. So many more things. You have learned quite a few techniques I believe. I think it was quite productive. On our next lesson and last one probably we are now going to play a little bit with color and create some color variations.
48. 3.43 - Color Variations: And on what is probably the last lesson, let's see how we can create some color variations thanks to the user parameters that we have created along the way. For example, if we wanted to create a green version of this super easy, let's press Ctrl D here on the outliner section. Call this one underscore green for example. And down here we have this user parameters, which is all the parameters we have created in this case. Like I said a few times, we are, we only did create color parameters, but you can expose as many parameters as you want to control here directly on level editor. For example, let's switch the R value with the G value. So R becomes 2.4, G becomes 10. Then R becomes 0.48 and G becomes 1 for the ground crack color. R becomes 0.1 and G becomes 10, and so on 4 and then 40, 1 and 3, 0.45 and 2. 6 and then 20. 4 and 25 and then 4 and 25 again. And now here we go. And that's how easy it is. We have now a green explosion that looks from a very nice chemical reaction. For example, let's create a blue one. It will look awesome. Press Ctrl D on this original one. Underscore blue. And now let's switch the R value with the B value. So it will be 0.7 and then 10. Just look how beautiful this blue is already. You can create color combinations then. Obviously. That's really nice. Let's continue with the conversion 0.25 for R, 1 for the B. Ground cracks 0.08 and then 10 for the B. 0.32 or 0.445 and then 40 for the B. And so on 0.5, 3. 0.23 0.23 And then 2. For the impact ring color. Particles color 1.5 and then 20. 0.8 and then 25. 1 and 25. And here we go. A beautiful blue version. For example. Now the floating rings could have a different color. Let's say something purple. You can even only touch the HUE slide bars if you don't want to mess the saturation and the Value numbers. Something like this. For example a bit of purple. Little bit of pink. Violet, you can increase the saturation on this slider. Or even the value to 10, so it becomes brighter. Actually, you can even make this a light blue. It will fit very well, I believe. Yeah, look at it. It's very nice. Imagine just how many parameters you can expose and then play with them on the inspector. For example, we could say these particles trail are also light blue. It will add a nice touch and so on. Just to show you how amazing this is, the possibilities with this user parameters. They are really fantastic. We have now a orange explosion, a beautiful orange explosion and then a green one. And then a blue one. In a matter of minutes thanks to the user parameters we have created, right? There's plenty of parameters in here. If you open this make new, we will have so many stuff. You can even change the material of a particle system directly in the inspector, directly on the level editor. And then there's common which is floats, booleans, integers and so on. And vectors. There's plenty of stuff you can do with this technique. I just wanted to give you a glimpse of the possibilities when it comes to create visual effects for games for abilities, you can then create many, many more variations if you plan your Niagara systems carefully. Right? So that's pretty much it. I believe this is the last lesson we will see, but I hope you have enjoyed this course. There's just one more lesson, which is the conclusion one, where I want to give you a few tips, directions and what not.
49. 4.1 - Conclusion: So after all these lectures, you finally arrived at the last one. And if you truly finished the course and followed through each lesson, congratulations! Very well done. I hope you have enjoyed it and learned something new. Really, if you can leave a review that would be awesome. Just a few words sometimes goes a long way. Now what else can you do? Well, I'm a bit biased when I say this, but I'm going to recommend my channel. Gabriel Aguiar Prod. It reall has a lot of videos teaching VFX for games and some devlogs about Rabbit's Tale, a game we are developing at Golden Bug Studios. But even though it's mostly Unity tutorials, I have recently started to expand the free videos to Unreal as well. So yeah, I would recommend sticking around. That's going to be plenty of cool stuff. Plus, I actually had a few people saying that they were successful in building in Niagara, what I teach in unity. So yeah, it's a great source of knowledge. And if you are looking for a huge library of visual effects, from shaders to projectiles to stylized effects and a lot more for Unity and Unreal two, then I recommend checking out my Patreon page. It's a huge library of assets. Or even my website GabrielAguiarProd.com GabrielAguiarProd.com There's really a lot of assets in case you want to use them in your games, or even just study them up close and see how things work. That's how you learn sometimes as well. And I recommend definitely to share your work on social media. You never know on YouTube, on Twitter, on Artstation, Facebook, Insta, feel free to share the results and tag me too if you feel like it. I would love to see what you come up with. There's also my discord server. Gabriel Aguiar Prod. where you can share your results or expose your doubts and questions. Besides this, I also recommend Real Time VFX forum. It's a great place for VFX artists to share their knowledge too. And if you want to challenge yourself, there's a new challenge every month, then I highly recommend to check out my other courses. We have a lot of cool effects that you can learn for unity and for Unreal too. Like for example, creating an entire ability set for Thunderlord, a Moba game character. Or, create this Orb explosion. And lastly, this one. The beginner course, of course. With AoE attacks and projectile skills. And lastly, I attached to this lesson two projects. One is the stylized explosion I created before recording the course, and the other is the stylized explosion I made while recording the course. You can open them up and see how things are set up, and maybe clear any doubt you may have. And to conclude, I hope you have learned something new, truly, and I hope you have had fun doing it and enjoyed this adventure. Stylized effects are awesome and you can do a lot of things with what I have shown you. These techniques are very useful. You can create very different types of effects with these concepts. And of course I would really appreciate your feedback. A word of appreciation is always welcome here on Udemy or any of the social media platforms. It's always very much welcome. So yeah, that's it guys. I hope you have enjoyed it once again. And well, stick around. Check out my YouTube channel. Thanks for watching and keep on learning.
 Gabriel Aguiar Prod, Game Development