Transcripts
1. 1.1 - Introduction: Hi and welcome. Thank you for joining the Beginner to Intermediate course about Unity Visual Effect Graph. Where we are going to create some sparks to get started and then we will proceed to build these awesome Orb Explosions. With a few variations, I'm Gabriel Aguiar, your host and founder of the YouTube channel Gabriel Aguiar Prod., which focuses on creating visual effects for games. This is a VFX Graph course, and it's a bit more intermediate than beginner. I would say. If you are new to this area, I highly recommend to check out my previous course, the Beginner Beginner to Intermediate level, which will prepare you very well for this one. You will learn about visual effects fundamentals and then proceed to create effects like sparks, an AoE attack, which is awesome, and some Projectile effects with their respective impacts. you will get some experience and you will feel more confident for this one. Now, another thing I need to mention to you is if you haven't already, then check out my YouTube channel. There's many and many tutorials there about visual effects for games, and they are single lessons that will help you to get better in this field. Plus, all the projects created for those videos are available in my Patreon page. And by supporting me, you get access to all of them and you can use them however you see fit to study or in your projects, or in your games. Now, finally, about this course, I decided to create a short VFX Graph course accessible to everyone, because recently I also created this extensive course where we create these four magic abilities for Thunderlord. A fictional MOBA game character. So it's a really big course. And I decided to create this smaller one so you can learn visual effects graph in an organized manner while you create some pretty cool effects too. We are going to use VFX graph. So, what better way to start then having an overview of these amazing tool. So if you haven't already, I hope you can join me in this course.
2. 2.1 - VFX Graph VS Particle System: So what is VFX Graph? What can it do and what can it not do, when to use it, when not to use it? In Unity, there's essentially two very important tools to create particle effects, and both are particle systems. Of course, there's other tools like Shader Grpah, Line Renderer and the Trail Renderer, but they have different purposes. And yes, we are also going to use them. So, like I said, there's two important tools, and the first one is the particle system previously known as Shuriken, and the other one is the new VFX Graph. Both of them have advantages and disadvantages. And no the particle system will probably never go away because it can do stuff that VFX Graph cannot and it's very well optimized for effects with fewer particles. And it has always been used in every game made with Unity. So it's a great particle system. But there is this new baby, this new kid on the block, which is VFX Graph, and many people want to learn it and it has a really bright future ahead. And by the way, if you know the particle system, VFX graph will become much easier because there are terms, there are key words, there are techniques that are the same. And that's another great reason for you to check out the previous course that I made, the beginner to intermediate level, because you will get a good knowledge of how the particle system works. Anyway, moving on. So first, let's see the pros and cons of both, so you can have a better perception of when to use them and what they can do and why they are different. So on the left we have the particle system shuriken and on the right we have VFX Graph, each with the pros and cons lists. So the first question is how do they handle particles? Well, Shuriken uses the CPU to communicate to the GPU how to render particles. While the VFX Graph uses the GPU directly. That's the first big difference. One uses the CPU and the other one uses the GPU directly. And this means what? Well, it essentially means that the particle system cannot handle very well thousands or millions of particles because it will overload the CPU with requests to the GPU. While the VFX Graph can spawn thousands and even millions of particles more easily because it communicates directly with the GPU system. That's our second point. CPU handles thousands of particles and GPU can handle millions. But why can a GPU handle the millions of particles easily? Well, it can handle particles easily because the GPU can do something called parallel computing, which is the ability to carry out many, many calculations at the same time. And that's the key to understanding the difference, because if shuriken uses the CPU, then it can also handle physics very well and even spawn lights. On the other hand, as it is now, VFX Graph cannot do it, especially collision detection. That's a big disadvantage of VFX Graph, but do not worry because in many visual effects we don't use collision detection, which is great. So that's the third point. On the left we have physics very well calculated and lights very well balanced as well. And on the right, not really well. But if the effects graph can communicate directly with the GPU, it can also have direct access to shader properties, which is super useful, the particle system also could access shader properties, but it was a little bit more difficult. And that's the fourth point. Easier access to shader properties. That's a win for VFX Graph. The fifth point, and this is a major win for the particle system, but the VFX Graph is slowly catching up. The fifth point is particle system works on every platform. Either it is mobile. Either it is Consoles, WebGL, PCs, everything, while VFX Graph only works on a few mobiles, for example, at least yet. I have read somewhere that they are trying to support more platforms, but as it is now, the platforms in which it can run its kind of limited. And there's a few other things. But these are the main points, the political system actually as a faster workflow, for example. Personally, I think I can build effects a bit faster with particle system, but that's just my opinion. VFX Graph has some pretty cool things as well. Like it's easy to create Decals or Heat Distortion. It says only and HDRP, but that's not completely true. - It's also possible in the Universal Render Pipeline, but it's not as simple as in HRDP. A very important win for VFX Graph is the simplicity of creating customizable parameters. It's very simple to customize a VFX Graph. It can also be very modular. You can create a VFX graph that can be used in other effects as well, but yeah, that's basically it. So here you go. You have the pros and cons at least the most distinguished pros and cons. And what's important for you to remember is that particle system use the CPU while VFX Graph communicates directly with the GPU. And as we have seen, there is advantages and disadvantages to that. Anyway, let's proceed with the VFX Graph because it is a prospering tool. So let's see how the VFX Graph works in practice. Let's have a quick exercise where, as usual, we create some sparks.
3. 2.2 - Getting the Project Ready: So attached to this lesson, there is the Orb Explosion project. It's a zip file. Once you download it, you get this, you can unzip it, you can extract it. I'm actually going to move the project outside of this folder. Just like these. Now, if you haven't already. We need to install unity hub. You can Google it and click on this link and then download it on this button. You probably need to create an account in the process. But once you got that done and Unity Hub is installed, what you really want to do is press the add button and navigate towards the Orb Explosion project. You can select this project right here and please make sure that you follow this course with this unity version. It will make your life easier. That's only because of that. And you will learn in a more comfortable way and without worrying if Unity has changed something. And it's going to be different from this course videos, from discourse lectures, you can go to installs and in the add button if you do not find it at least a similar version. If you don't find a similar version, you can go to download archive. And in here, as you can see, you can go to the Unity 2020.x and I'm using this one, the Unity 2020.3.11 If you really want to follow this with exact same version, you can download and install this one and well, your life will be easier to follow the curse. Once you start that version, you can open up the Orb Explosion project.
4. 2.3 - Quick Project Overview: OK, so in this lecture, we are going to have a quick overview of the project. This is what you have, or at least you should have once you open the project. And in my case, I'm using a 2 by 3 layout. It's my layout. I've created this layout. If you want to follow with the same, you can use the 2 by 3. You only need to set this to one column and that's pretty much it. I have also added the project down here and the console as well, but that's the way I usually work. So no big deal. I'm actually going to close the game window. We are only going to use the this view for this project. If you want to hide the grid, you can click on this button. I usually don't like the grid. And if you are like me and don't want to see gizmos, if you want to see the effects perfectly, you can click on this gizmo's button and it will hide the icons. Now, what we have here. Well, if you open it up, we have a global volume, which is basically post-processing effects. We have a bloom, we have a vignette, we have motion blur, only a few processing effects. If you want to know how to create one, you can right click and in volume down here, you can create a global volume and then you will need to create a profile where you can add bloom, you can add other effects as well. So that's that. As you can see, I have the global volume profile down here in the Settings folder. Next, we got a camera, very simple camera, and it has a simple camera controller. So whenever you press play, you can move the camera around, just like if it was a first person shooter. Then we got some lights. We got the scene where we have the mountains and the ground. And well, for the sky, if you go to window in rendering, in lighting. You will notice that in the environment I am using this sky material for the sky box, and if you select it, you will notice that it's a skybox cube map that comes with unity, it's a shader that comes with unity. And I'm using this texture down here. The blue sky, as you can see with the nice clouds and these nice blue gradient. It's pretty cool. What I also think it is worth mentioning is we are using in this project a fog effect if you disable it. This is how it looks. It looks ugly. But at least, you know, we have fog in our scene. Now, the last thing you need to make sure is that in the package manager, if you go to Unity Registry, make sure that you have Shader Graph installed and Visual Effect graph as well. We are going to use them a lot and they are very important for this course. And yeah we are also in the Universal Render Pipeline, by the way. OK, so I think that's pretty much it for this project overview. One last thing you can do is go to edit and in preference, make sure that in the visual effects you have experimental operators/blocks turned on. Oh, and by the way, in project settings, if you go to graphics. As you can see, we are using these Universal Render Pipeline asset. Which is also in the settings folder. And you can turn on depth texture and opaque texture. We may need it in future bonus lessons anyway. That's pretty much it for the oh, and if you want to turn off this selection outline, every time you select an object, you can do it in. Gizmo's right here. I'm going to turn it off. I don't really like to use it. And that's it for the project of review. In the next lesson, we are going to have a VFX graph overview.
5. 2.4 - VFX Graph - Overview: So let's have a Visual Effect Graph overview, and the first thing we want to do is go to the prefabs folder and with right click create a Visual Effect Graph. We can name it to vfxgraph_sparks. We are going to create some sparks while we do an overview of how visual effect graph works. Now, we can create an empty in our scene. We can name it to vfx_Sparks_Loop. Make sure you reset the transform, so it is in the center of our scene. Now, I'm going to push it more or less around here in front of the cube, which, by the way, has more or less the same height of a person, and then we can parent drag and drop the VFX graph we created. Yeah, make sure you parent to the vfx_SparkLoop and then reset the transformer, OK, just like this. Perfect. Now, as you may notice, our anchor is in the middle of this VFX graph, and that's not very useful. We can switch it up here instead of center, we can say it's pivot. And now the handle is exactly where we need it to be. I'm going to turn off the gizmo's up here and to open visual effect graph we can press the edit button, while we are selecting the vfxgraph_Sparks And I'm going to drag this window, I'm going to dock it to more a less around here and I'm going to make some room, where we will have the scene on the left and VFX Graph on the right. Now, if you don't see nothing in your VFX graph window, you can press F to focus on the particle system. And up here we have two buttons, one for the blackboard panel and the other for the target gameobject panel. Well, the blackboard, if you press the plus side, it is where we are going to add properties like floats, colors, gradients, booleans and so on, and then we have the target game object. And it's useful for a few reasons, as you may notice we can, that because as it is now, it is attached to the vfxgraph_sparks. I'm going to press the detach button, and for example, if I select the vfxgraph_sparks in the scene view, we will have display controls, right? And now we can attach these vfxgraph_sparks, and the cool thing is that if we select another object, the play controls in the scene disappears, but the target game object, it's still there. And it's very useful because if you are selecting another object, you can still play the effects graph at the same time. As you can see, we can play, we can stop it. And there is also another cool feature, which is the play rate if you decrease your kind of seeing the effect in slow motion. And that's very useful. When we are creating visual effects that require precise timings, you can slow down or speed it up. I'm going to leave it at one hundred. Now, let's move on to the main event, which is VFX Gref, these nodes that we have here and this is where people may get confused. So let's go ahead and simplify this. This is mainly divided into four main parts, this Spawn area, up here, the Initialize Particle, the Update Particle and the Output Particle Quad, also known as the renderer. So what does each part do? Well, it's simple. The first part, the Spawn area handles the quantity of particles. And how are they spawned? Are they spawned with a constant spawn rate like now? It's spawning16 particles per second, or is it a burst of a 100 particles or is it a periodic burst, you see? So that's basically the spawner. Then comes the Initialize particle, which besides controlling the capacity of this particle system, it handles how the particle it is initialized. Remember, this is per particle, which gives us a lot of control, one how each particle works. This also gives a set of instructions to each particle when it's spawned. Basically, we can initialize a particle with a certain velocity, within a certain area, we can give it a duration, which is known as lifetime, we can give it an angle and many more things. We spawn the particle. And then we initialize a few variables with the particle. But if after the particle is spawned and initialized, if you still want to change its behavior, then you will use the update particle section where you can change many more properties as well. But continuously, it works basically like the update method that any C# script in unity can have. You want your particles to keep moving around like flies. You do it here basically. And after you have done all of these, you still need to show the particle you need to render the particle, which is what this last section is meant to do. And like I said, a particle can be a texture or mesh, basically a 3D object. And among other things, basically here you control the aspect of the particle. Is it a flipbook? Is it tiny or big? Should it fadeout? Should it grow smaller? We can even make direct changes to a shader in a much more intuitive way. Compared to the particle system. Which is quite an improvement. The particle system could also interact with the shader, but it was not that straightforward. So these are the four main parts of the VFX graph. We got the Spawner, the Initialize Particle, the Update Particle and the Renderer. Now let's see all of these in action and let's see some good tips and tricks while we create a few sparks.
6. 2.5 - VFX Graph Sparks - Spawn, Motion & Bounds: So let's get started with the sparks and we are going to create a VFX graph that can be used as some looping sparks or as an impact. And as you can see, currently, we have a constant spawn rate, which is continuously spawning 16 particles per second. So it's already looping. So if we disable this constant spawn rate and press the spacebar, we can search for burst and we get a periodic burst and a single burst. We want the single burst because this allows us to, for example, to spawn 15 particles at one time, as you can see. Now, wouldn't it be cool if we could use this two whenever we wanted? So let's turn on the constant spawn rate and then. The way we do it is we create a property so we can use it in inspector. We are going to create a boolean. And we are going to call it loop, is it going to loop or is it only going to be an impact? Make sure the value is true. So, yeah, as you can see we have it already in the inspector, and it's useful because we can create several prefabs and they all have different purposes. So we've got a loop boolean. The way we use it we can simply drag and drop it. Around here. And if we press spacebar, there is a lot of notes, but. If you go to operators, we got the logic section, which can be used to program basic behaviors, and in here we have a branch. It's basically an IF. Let's connect the Loop boolean. Well, if Loop is true, we will spawn 15 particles per second in the constant spawn rate. Let's copy and paste the branch, with Ctrl+C and Ctrl+V Connect the loop, and now we say that if it's false, well, it will spawn 25 particles in a single burst. You see what we are doing here. Now, what will happen, as you can see, if I enabled or disabled this loop boolean. Now, it's false it only spawns a burst of particles. And when it's true, it loops continuously. And that's exactly what we want. We can use this vfx graph for some looping sparks or simply an impact, but it's also going to be useful to controlling in the inspector without opening the VFX graph. The sparks rate, the sparks amount. Right. So let's create a float, call it sparks rate. Default value of 50 and connect it to the true and to the false. Just like this. So now that we are able to choose between a loop or a burst, now we need to control the motion of the sparks, right. And we could do it initialize particle. We want them to go straight forward in the X in this case until they hit the ground. And as you can see, we have this set velocity that is already adding motion, already adding velocity to the particles. That's why they are moving. But we don't want these values, for example, if we increase the Z range between 5 and -5, as you can see, they will go sideways. We don't want that much, we want between -1 and 1. And for the X, it's actually going to control how far they will go in this case. Let's set it to be between 20 and 5. Great, maybe a bit too much. But as you can see in the scene, if we start moving around, sometimes we see the particles, sometimes we don't see the particles. And that's only happening because of these bounds of this capacity module that we already have here in the initialize particle. If you select it, as you can see in the scene, we have this box. And if you look closely, you will notice that the particles are not being constantly spawned. There are a few gaps because it reaches the maximum capacity and then it waits for a few particles to die and then it keeps on spawning. So we need to increase the capacity to something like 1000, for example. And if you want this to be always visible, we also need to increase the bounds, as you can see, if the box is not, in our view, in the scene view, unity disables the VFX graph immediately so we can increase the box. Something crazy, like 100 in the X, and it will be always visible, for example, it's maybe a bit too much, but. It's only for demonstration purposes. That's enough, so the particles will always be visible, at least. OK, so now that we have that fixed, as you can see, the particles are living for way too much. You can decrease the maximum to 1.5 and as you can see, they don't go that far anymore. What will be also useful is to create a float so we can control this in the inspector. We can call it sparks lifetime. And the value in this case, it's going to be the maximum, as you can see, we have a minimum and a maximum in the set lifetime. But we only need one float, because if you connect the sparks life to the maximum, then we can multiply it by 0.5, for example, and we get half of 1.5, which is 0.75 Maybe a little bit less like one third. This way we get a range between 0.5 and 1.5 seconds for the lifetime of each particle. The Update Particle, we are going to use it in a moment, for now, let's take care of the aspect of these particles.
7. 2.6 - VFX Graph Sparks - Shape & Alignment: We have this main texture that we can click here and, well, let's use the default particle. It's more than enough for this exercise. And we got the blend mode, we got Alpha and Additive. Alpha is useful to render dark colors and additive well, it will basically add on top of whatever it is in the background. You can learn more about that in the previous course than I made, VFX for beginners. But in case you have any questions, please feel free to ask them here on the site. So they don't have quite the aspect of sparks. They are round and we want them to be stretched. So the way we do it is, with a set scale, we want to control the X and Y, we want to squeeze them in the X and stretch them in the Y or the opposite. But as you can see, they are always facing the camera and they are not correctly oriented. That's because we have this Orient block that is setting the particles to face the camera plane. And if you click on this drop down menu, you will notice that we have several modes and there is one the last one which says along velocity and as soon as we select it the particles now will be aligned with the velocity vector. And that's exactly what we want. But in my case, I stretched the particles in the wrong axis. I'm going to switch this. It's going to be 0.5 for the X and 2 for the Y. And as you can see now, they are much more stretched. What we can also do is make this random in the inspector uniform random. Now we can say that in the Y it's going to be one. It's going to be between 1 and 2. And in the X is going to be between 0.2 and 0.5, for example. Maybe, yeah, what's also happening is that they are starting small and that they grow, and that's not exactly what we need here. And it's happening because of the set size over life, it's controlling the size of the particles through a curve. So if you click on this curve, we want to switch to this one. It starts big and then it shrinks until it becomes really small. As you can see. But now they are a little bit too big. But instead of adjusting the set scale, we can use a set size and it will be much easier to control the size. But as you can see, the set size, despite increasing or decreasing the value. The particles don't change the size. And that's because the way VFX Graph works, the next block influences the previous one. And in our case, the block that comes after the set size is the size over life. And if we select it. By the way, most of the times when you select one of these blocks, you will have some more options in the inspector and sometimes that can be quite useful to find new options. And if you look in the inspector, we have this composition option that is set to overwrite, so it's basically overwriting any previous value. That's why the set size does nothing. We need to change the composition to be multiply. We want this to multiply any previous value. And as soon as we do it now, if we decrease that size to something smaller, as you can see, we control the size of the sparks without changing the set scale, that's useful. For example, let's create a new float. Call it sparks size, remember, it's maximum we always input here, I'm going to set it to 0.7 maximum. Connect it here. And yeah let's make the sparks thinner by decreasing the X in the set scale, 0.1 and 0.3, looks better. So, yeah, we already got something going on. We almost got the Sparks motion right. We still need gravity, but we already got the aspect of the sparks more a less right in the next lesson. We are going to control the color. We are going to improve the aspect and add gravity to this.
8. 2.7 - VFX Graph Sparks - Gravity & Color: So now let's see how we can add color to this, if you look closely, you'll notice that we have set color over life set color over life, which is basically a gradient. As you can see, if you click it, we get this HDR gradient editor And and the nice thing is that we can create a property, a gradient property and call it sparks gradients. Connect it down here to the sparks color over life. And for example, if you have a few gradients, you can choose one of those gradients. But I'm still going to show you how to create a very nice gradient. Let me just do a control Z here. So let's delete this first key up here, which is for the Alpha. Also, delete the second one, push the first one a little bit around here and now for first color. We can choose an orange and then increase the intensity so it becomes really bright, as you can see, really cool. And for the last key, well, for the last key could actually leave it as it is. Look at this, it's already fading out nicely and it looks cool. They are just a little bit too big. So in the X, I'm actually going to make them even thinner by setting them to 0.05 and 0.1 in the set scale in the X, maybe 0.15 also decrease the minimum Y to 0.5 0.5 So there is a few sparks that are not so stretched. Now, what are we missing here? Well, we are missing gravity here, they need to go down to hit the ground. And if you think about it, gravity is something that needs to be continuously updated. Right. So if you go to the update particle and press space bar, we can search for gravity. We can actually search for force. And as you can see, we will have a few forces. I recommend that you stop and try them just to test them out. But the one we want is gravity itself. So yeah I'm going to select gravity and the force being applied is in the Y axis because it's the vertical axis. But what if we wanted to make this gravity a little bit random, I know it's not realistic, but we can do it by searching for a random number outside of this box. Enough, for example, we can copy this value to the maximum and for the minimum, we can say it's -2 for example, and now it will be a little bit more random. You can also turn off constants. So it's not always using the same values and that's pretty much it. We have fixed the color and we are using gravity in the Update Particle, which is where it's supposed to be. Next, we are going to adjust the start position and see how local and world space working VFX Graph.
9. 2.8 - VFX Graph Sparks - Set Position & World and Local Space: And now you may ask, well, they are always being spawned in the same position, how can we change that? Well, first, if you think about it, it's something that you can do initialize particle, right. We can set the particle to spawn in a specific space and location right at the beginning. So if you search for position with space bar in the initialize particle, you will have quite a few actually. And let's search for set position, I recommended, to try a few, by the way, If you can pass this and try a few of these ones. But the one we are going to use is the set sphere. If you don't see the gismo of the sphere, make sure you have the VFX graph selected in the scene and also select the set position block. OK, and as you can see, you can shrink it down here in the scene view, or you can open this arc sphere to enter more precise values like 0.1, for example. And then you can spawn it in the surface of the sphere or in the volume. Or in the thickness and so on, in our case, we can set it to volume, doesn't make much of a difference because we want this to be small. 0.1 in the radius. So that's how you change the initial position of the particle. Now, as you can see, if we rotate these sparks, we don't see any sparks being left behind, they are always. Following the rotation of the object, they are local, they are not in World Space, and that's exactly what we need to change VFX if we want to leave a trail of particles behind. As you can see, we have this local on the top left corner of each section. And if we go to the initialize particle and click on this local, it will change to world. And now if you rotate the particles, they will be left behind because they are because they keep on following their velocity vector in a World Space instead of being in Local Space. But if we didn't have this set position, let me turn it off. As you can see, they go to the world origin, which is zero zero zero, the way we could fix it? It's very simple. We could simply use a set position. But if you look closely set position as a W, which represents world while the other blocks have an L, which represents the local space, if we click here, it will sell it to local space, in other words, to the target game object, to the object that is in scene. And now we get the same effect. If we rotate it, they are also being left behind. So, yeah, as you can see, we have blocks that can be in local or world space and VFX Graph itself can be in world or local space, but we will see more about it when we get to the collisions part. For now, I think it would be useful if we could control the sparks velocity in the inspector, so this time we don't want a float, we want a vector3 sparks velocity. And we want to connect these sparks velocity to the maximum, actually, we need to change this, we need this to go from minimum to the maximum. So 20 here and 5 up here. We can copy these values to these sparks velocity vector3. And connect it to the B option. Now it's going to be a little bit different than what we did with the floats where we simply multiplied it, and that's it. Now, to get a minimum, to get a range, if we multiply this directly, for example, with 0.2 We could not control the Z, which is basically the spread the radius. So what we need is to open these sparks velocity vector3 and we get access to the X, Y and Z, so For X, which is how far we want this to go, to get a minimum, we can multiply this by a quarter, which is 0.25 and connect it to the X. For the Y axis, well we can do pretty much the same thing. But for the Z, since we want this to be a spread, we want to be negative and positive, we cannot multiply it by a smaller volume. We need to create a range from the Z. So what we can do is use a one minus node (USE A NEGATE INSTEAD). It will basically convert any positive number to a negative one, which is useful in our case, because if we create Z now, as you can see, we get a radius, we get a range. That's very cool. You can also play with Y it will go a little bit up, and the X will make them go further away or or not. But that's what we need. And Z we need the one minus to create a range. I'm going to push this a little bit up to leave the sparks gradient below, and I'm going to go up here and press save, because that's pretty much it for this lesson. We have seen world and local space. We have seen set position, how it works and now how to create a range for the sparks velocity. The next lesson, we are going to see how to use basic collisions and how to trigger events, which is quite useful. You are going to see.
10. 2.9 - VFX Graph Sparks - Collisions & Trigger Events: So, like I said, the vfx graph can do some basic collisions. They are nothing special, but let's have a look. So, for example, let's make sure that the sparks hit the ground. And once again, if you think about it, collision is something that needs to be continuously updated. Right. And we got a function that takes care of that. Right. We got the update particle section. So in here, if you search for collide with spacebar, you will notice that we have a few. We even have a depth buffer and assigned distance field, which are quite interesting for more complex collisions. But for us, in our case, a simple, collide with aa box is enough. This is literally a box. And here's also a good example of local and world space in VFX Graph, for example, if I push this VFX Graph a little bit back. And then select collide with aa box, as you can see, it stayed exactly in the same position. And that's because, as you can see here, we have this W, which is world, it was set to World Space. Let's click here and set it to local space. And now, well, now it goes to the origin of the VFX graph and we can push it a little bit down, as you can see. You can do it also in the box here in the center and inside. You can control it here, for example, let's set it to -2, precisely. And the X we can set it to 25, that's enough. And Z also 25. So we can create a square shape and we can offset this in X like 12. And here we go. They are colliding. And now we get this bounce and friction options. Bounce, it's well, if you increase, the bounce it will bounce even more. The friction is if it's higher particles will not drift a lot, they will hit the ground and stop almost there. If it's low, they will slide. So a low bounce 0.1 is enough. The friction we can say to 0.5 so they don't go that much farther away. And then we got the lifetime loss, which is important. If we increase it to 1, particles will immediately die as soon as they hit this collider, it will set their lifetime to 0 immediately and the particle dies. It's tragic. We can make it lose a little bit of life time, like 25 percent of the remaining lifetime. It as. Now, once again, if you rotate these sparks, you will notice that the collider since it's in local space, it will follow the object itself and it will not stay in world position. That's another example of local and world space in VFX Graph. Just going to go ahead and set the maximum of the gravity of the random number to -15, so there is a few sparks that falls quicker. Now, what else we can do? Well, now let's try the triggers, which is also something that needs to be continuously updated. And in the Update particle, if you press spacebar and search for trigger. We have 3 options, Always, On Die and Rate. Always and On Rate, they are very similar, but the Die one Die is the one that we want to use, it will trigger only one event on that, as you can see. And if you push a line from here, we get a GPU event and then we could theoretically. Push another line to create a spawn. And it's basically the same as we have here, we can use a single burst, for example, and then we could use initialize particle and so on. But there is a simple way. Let's let's delete this and with spacebar, let's search for simple and we get a few options. We want to start with simple Heads and Sparks. And as you can see, it's beautiful. Look at this. But we don't want this left side. We only want this GPU event. And we can drag it to less around here and then connect from the trigger event on die, and now as you can see each spark will spawn a beautiful blue particle. Pretty cool, right? Now, let's make sure that these blue particles spawn whenever the sparks hit the ground and only whenever they hit the ground, it's a good exercise. So and by the way, we can inherit values As you can see, we are inheriting the source position and the source velocity. We can inherit a few more things. But we don't need the source velocity. We can remove it. We also don't need to add a position and we don't need turbulence down here, which is a force, and now it disappears. That's normal because these particles are set to along velocity. And if they don't have velocity, they are not rendered. But we will fix that in a moment. For now, let's change to the default particle. You can also remove the set scale X and the set scale Y, we don't need this. And yeah so let's change the along velocity to face camera plane, and as you can see now, the particles, they are being spawned every time one of the sparks dies, and that's not exactly what we want. They are also in the wrong position, but that's because they are said to local space. If we switch it to World Space. The particles will spawn exactly where the sparks died, but as you can see, it's also spawning particles whenever a spark dies in mid-air and we only want to spawn blue particles when a spark hits the ground. We are going to fix that in a moment. For now, let's decrease lifetime to 0.2 and 0.4 So they kinda bleak. And now if you see this in slow motion, as you can see. Whenever one of the sparks hits the ground, it doesn't spawn a particle immediately. That's because the lifetime loss is set to 0.25 on the collider. Here in the collider, if we increase the lifetime loss to 1, this slider here, as you can see now. It spawns a blue particle. Exactly when a spark hits the ground. That's exactly what we want, but if you look closely, it's also SPAWNING particles whenever a spark dies mid air. So how do we separate the sparks that die in midair from the ones that died when they hit the ground? Well, for that, we need to get an attribute from the particle itself, we need to know its age. So if we search for age over lifetime, which goes from 0 to 1. If we compare this value to 1, if it's greater than 1. Then it means the particle is dead. And it only dies when it hits the ground and the lifetime becomes 1 when it collides with the ground, because we have set the lifetime loss to be 1. So with a branch now, we can say that, well, if it's true, if the particle is dead, then we can set it to 1. If it's true and we can connect it to the trigger event on die. But if it's false, if the particle is not dead yet, then don't spawn. Then do not trigger any events. Now, as you can see, we only get blue particles whenever a spark hits the ground and dies. Because with lifetime loss is set to 1 in the collider. So that's a good example of how powerful vfx graph can be and how tricky it is also. But that's that. And it's pretty cool. And we could do the opposite, like spawn only particles when they die. midair if we set it to less or equal. As you can see it only spawns blue particles whenever Sparks dies in midair. OK, pretty cool, very nice. Now we can basically play with the set size of the blue particles, make it random. You can also use a set size over life, which we need to set the composition to multiply. We can make it go from big to small, so it looks like a flash. For example. And then we can use the sparks gradient as well. Here we go. We got a little bright flash whenever a sparks hits the ground and we could spawn other particles as well, which is actually a good exercise for you to try. Oh, and if we increase the size, as you can see, we get a cut on these particles that hit the ground. And that's easily fixable by turning on used soft particles. It will blend whenever there is intersection with the geometry. It will create a nice soft fade between intersection and the particle. Pretty cool. Very nice. So, yeah, guys, that's it for the VFX graph overview, you can do many more things, obviously, of course. But this was a good exercise, I think, for you to get started. Now, let's move on to the juicy parts of this project. So let's create the orb explosion, which is really awesome. And that's going to be our next chapter. Oh, by the way, let's create a prefab out of this simply drag and drop to the prefabs folder. And know, if we want to create an impact of these sparks, it's very simple, select prefab press Ctrl+D Ctrl+D to create duplicate. We can call it sparks impact. Drag it to the scene, disable the loop one, and now we simply need to turn off. Loop in these parks, impact and out, as you can see, every time we press play, we get this nice impact of particles, these nice burst of particles there, and you can see very versatile VFX graph.
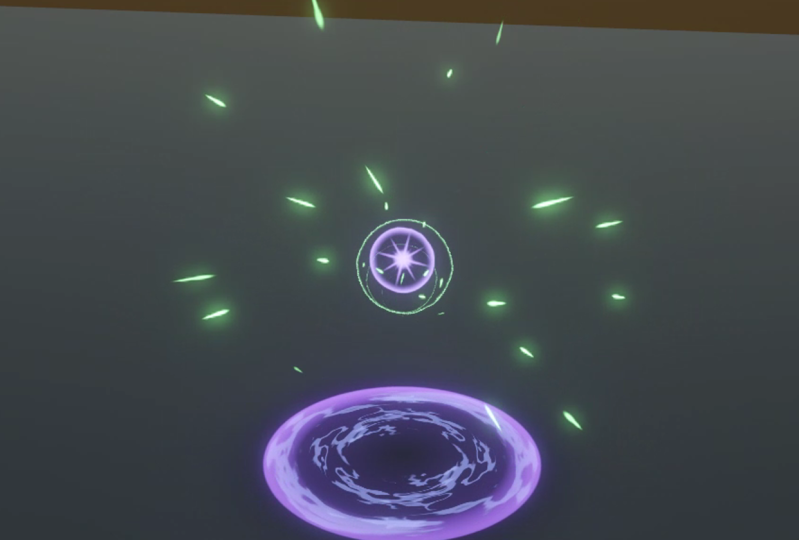
11. 3.1 - Starting the Orb: So let's get started with the Orb Explosion. First, let's just close these sparks and disable them as well and then we can create an empty. For the vfx_Orb_Explosion. And we can reset the transform so in the center of the world. And this Orb explosion, it's going to be divided into three parts, the first part is the vfx graph Orb are then we will have the Ground AoE, which is the circles and then the explosion. Then we want to start by creating a VFX graph with the right click in the prefabs folder. Then we can parent this to the empty, we just created. Make sure the VFX graph is a child of our explosion, by the way. And make sure the position is zero zero zero and then we can drag and drop these empty to the prefabs folder, to create a new prefab. Then we can start by pressing the edit button to open these VFX Graph. OK, so we are starting with Orb, and if you think about it, we only need one particle, right? We only need to play this one time. It doesn't need to loop. We want it to go up and then crash in the ground. So we don't need this constant spawn rate, we want a single burst of one particle. And then we want the orb to go up and then go down, but we don't want to use the set velocity. We want to use a set position and offset it in the Y, as you can see, so it starts more or less around here and then smacks on the ground. So it's going to be useful to control this offset, this Y offset we may need to adjust it. So let's create a float and call it Y offset. The default value of two and connect it to the Y value of this set position. Well, for the lifetime, we actually need this to be constant, so we want to turn off the randomness. And we also want a float, a property, we can call it lifetime. Default value of 3 seconds. We will have an anticipation of 3 seconds before the climax. Right, we are starting with something, look at this, we will take care of the aspect in a moment. For now, we want to control the size of the Orb right. Let's use a set size down here. And a float for the size. Default value of 1 for now. Yeah, nothing changes because the set size over life is set to overwrite, we need it to be in multiply mode. Now, like I said, we need this to go up and then smacks on the ground, hits the ground, right. And the way we do it, you may think that since it needs to be updated, the movement of the the orb, that we are going to use the Update particle. But that's not correct, because we can tell the particle to move in a certain way without the update particle. particle. And the way we do it is by using a set position over life. But we don't want to overwrite the previous position the Y Offset that we use in the initialize particle, so we want to set the composition to multiply. For example, if you drag this multiply position over life block to the initialize particle, it will not work. Neither it will work in the Update Particle. It only works in the output particle quad, after spawning, after initializing, after updating the particle, we can tell it to follow this movement. That's super useful because we have three curves now for X, Y and Z. And in our case, the X, we want it to be 0. We don't want this to move so we can delete this key and the last key. Then with right click, we can copy this to the Z. And we only want this to move in the Y, as you can see, it's already moving a little bit up. And it's going to be useful to control this curve, to control this motion in the inspector. So there is another property that is super useful that we can create, which is an animation curve. We can call it Orb Movement Curve. And then connect it to the Y of the multiply position over life. And here's what we want, we want to drag this second key to the value of one more or less at 0.1 We can push this end of the first key up so we get a curvature like this one and then we can with right click, add the key right here and push it more or less around here. Add another one. Push it up here. Can create something like this and then towards the end, it goes a little bit more up and then it goes down like this. Goes up to around 1.5 Remember that 1.5 is multiplying, the Y offset, it's going to be 3, basically. Anything multiplied by zero will be zero, right? Which means it will be at ground level. And if we play this now, you get pretty much what we want. Want to go up and then it stays there a little while and then hits the ground. That's very close to the motion we want. We will fix that in a moment. For now, we can change this main texture to the default particle. And set the blend mode to additive. And one last thing we can do in this lesson is create a gradient for the Orb. Orb gradient. Connect it down here to set color over life. And I'm going to use this gradient that I already have here, but it's very simple. For the Alpha, we have 4 keys. As you can see, and for the color, this blue one. This is the color I'm using at an intensity of 4. The first color is a little bit purple. With a lower intensity at around 2. And then the last key, it's an orange with a higher intensity around 5. And since it fades in and fades out, we get these nice little particles floating around and hitting the ground, very cool. Now, we only are missing the orb texture, right, so that's what we are going to do in our next lesson. Oh, let's just select everything. And then with right-click create a group selection we can call this the Orb Add, which is additive and then paste it it down here. We want to rename this Output Particle Quad You will see why towards this project. You will you understand why we are renaming the output particle quad. It's important. Let's save it. And that's it for now.
12. 3.2 - Orb Texture: So in order to create the first texture for the orb, We need an image editing software and I really like to use Photoshop, but you can also use GIMP, Krita or any other similar software. If you have any questions, please ask them here on the site. So, I'm going to start by pressing Ctrl+N to create a new file. And I'm going to name it Circle01 And let's make sure it's 2048 by 2048 pixels. And the first thing I'm gonna do is select the black color. And the first thing I'm going to do is select a black color. And then with the bucket tool, I'm going to paint this background to black. And then with Ctrl+Shift+N I'm going to create a new layer, the black background. It's only to have a better perception of what we are doing, since we are going to create a white texture. Which we will give color inside Unity. So on these new layer, I'm going to select the gradient tool. If you're using Photoshop, you can press and hold and the gradient tool will appear. And then up here, I'm going to click here on the gradient and we are going to create a new gradient. The gradient, we're going to create, the color. The first and last key, they need to be white. And now up here, this keys control the alpha, the transparency. And we are going to create a bright edge. So the first key needs to be 0 of opacity. The second one, 100 of opacity and then, and the last key also 0% for the opacity. Now I'm going to create another key more a less around here. But it's going to have very low opacity, like something around 30 percent. And the second key is going to be close to the beginning. So it's really a bright edge, something more a less like this. Now the idea is to click more a less around here. And if you hold Shift, you can create a straight line. More a less of this size. Something like this is more than enough. Now the idea is that we go to filters. And in distort, we want to select polar coordinates. And in here we want the rectangular to polar option. And once we press Okay, this will transform into a circle, as you can see, with a really nice bright white edge, and then it fades towards the center. You should get something like this. Make sure your gradient is more or less like this. Of course, you can deviate a little bit with the polar coordinates technique. You can create a lot of stuff. Now I'm going to hide the black background. And safe this Photoshop file directly to the Unity project, more specifically to the textures folder. Make sure you have Circle01 as the name. Otherwise, it's going to get confusing for you. Now once you are in Unity, we want to select the texture, the Circle01, and then we want to turn on, Alpha is transparency. So in the preview we can see what it is and then press apply. Now back to vfx graph to the orb additive in the main texture, we can select the Circle01 and it's going to make a lot of difference, as you can see. Now I'm going to increase the size to 1.5 Actually, we don't need to increase the size to 1.5 because what's happening here is that the multiply size of over life, the curve being used, is not correct. What we need is to increase a little bit in the beginning and then, kinda add a little wobble to the orb. So we can create an animation curve in the Blackboard. Rename it to Orb size curve. I'm going to push it above the gradients and then connect it to the multiply size over life. And now in here, we want to start with this first line, which is set to one and more a less around here, we want to create a key and then push the first key all the way down. To around 0.2 0.2. We can create another key more or less around here and push it to around 0.28, more or less, a little bit above 1. And then another key. You see something like this. You see what we are doing here. We are creating the wobble motion and yeah, for the last key. We can do something like this, it goes way up. Yeah. That's interesting. That's interesting. By the way, now you need to select the orb size curve if you want to change it. But what I'm going to do is push this. But what I'm going to do is add a little bit more frequency to the wobble. So I'm going to add a few more keys. Similars to this ones that we have, something like this. And I'm gonna make sure it's always below 1. The value. Only towards the end it starts increasing. As you can see, when we remove this key, we don't need it. Okay, So, yeah, I think that's much better. Look at this. Very interesting. It kind of gives that anticipation that something is going to happen, to the little Orb. It's breathing. You know, very interesting. So for this lesson that's it, we have created a texture and we have add the Orb size curve movement. But we are still missing a few more elements like for example, a flare texture. So that's what we are going to do next.
13. 3.3 - Orb Flare: So, yeah, I'm going to go back to Photoshop and we are going to create a very interesting texture. We are going to see a few more tricks. So I'm going to create a new file and call it the Flare01 And it's also 2048 by 2048, which is a good resolution. It's more than enough. Once again, I'm going to paint the background to black with the bucket tool and then create a new layer with Ctrl+Shift+N and now the idea is to pick the brush to B for shortcut select white color. And then make sure the hardness is at zero and the opacity is at 100% the size, it's going to be more or less of 1100 pixels, more or less, and then more or less in the center, we are going to click only one time just like this. Now we can press Ctrl+T and while holding Alt, we can squeeze it just like this. More a less to around this size. Then with right-click on the layer, we are going to duplicate this layer. And again, with Ctrl+T while holding Shift, I'm going to move the cursor to the corner and rotate it just like this, 90 degrees we created a cross basically now we can see both layers while holding shift and duplicate again and now rotate it with Ctrl+T 45 degrees while holding Shift. So it snaps and then press enter and then press Ctrl+T again so we can decrease a little bit the size of these ones. Cool. Now, let's do the same, let's select this two last layers and duplicate it and this time rotate it while holding Shift a little bit, but only -30 degrees, like this and then shrink it down it down just like this. You can also decrease a little bit the opacity of these two last layers. But we are still missing a little glow, but it will look better with a little glow inside. So I'm going to create a new layer Ctrl+Shift+N Pick the brush tool and click only one time. Yeah, that's really big. I'm going to make it smaller the size of this brush, yeah something like this. OK, now, as you can see, we need to center this. And it's very simple. If you select the first layer and then while holding shift, you select everything, even the background, and then you can press V and these align options will appear up here. We want to select this one and then these want to align vertically. And now, everything is nicely aligned, what we can also do is select all of the layers except the background and press Ctrl+G to create a group. And we are going to call this the original layers with right click, I'm going to duplicate these original layers and hide the first group, the original group, and now while holding the duplicated group, I'm going to press Ctrl+E to merge all of the layers into one. Because now what we really need is to go to filters and there is a very nice trick that if we got to blur and select radial blur and add a small amount like, 13, for example, make sure it's Spin and the quality is Good, and then if you press OK, we get this very nice flare, blurred flare that looks very interesting. You are going to see how useful this texture is for what we are going to create, this beautiful texture. Now we just need to hide the black background, press Ctrl+S and save this directly to the Textures folder of our project. Make sure it's called Flare01. And now, now we can also select the texture and turn on alpha is transparency and then press play. So now the way we use this flare texture with our orb is actually very simple and something that we haven't seen yet. Because a VFX graph can have more than one output particle quad Basically with one VFX graph, we can output several different types of outputs, like a mesh, like a texture, like a trail using only one. But it will always have the same settings in the initialize particle and in the update particle. So that we can do is copy this output particle quad You can select everything, press Ctrl+C, just going to drag it to the left and then Ctrl+V And add it to this group, simply drag and drop, move a little bit to the right and rename this to the Flare Add and then change the main text to the Flare we just created. All that is left to do now is connect the update particle to this new output particle quad and as you can see, looks very nice. We already have the Flare inside of our Orb, and it adds a really nice touch. Yeah, so that was simple and useful. You can output two different textures or even meshes with the same VFX graph. And we have the Orb more a less ready. Of course, we need to add a few more things, but it's a start. So let's move on to the next part, which is the ground aoe the mark on the ground. Don't forget to save this VFX graph orb, by the way.
14. 3.4 - Starting the Ground AoE: So now that we have the Orb going on very well, let's create something for the ground, a ground AoE area of effect. And we can actually start with the vfx graph orb that we already have simply press Ctrl+D to duplicate it, in the prefabs folder, and rename it to Ground AoE Now we can drag and drop it to the VFX_Orn_Explosions, make sure it's parented to that object and that the transform and rotation are zero. Now, let's press the edit button to open the ground aoe Well, for a start, we don't need this flair additive, we just need this orb output particle quad Which we can rename up here to ground circle add. Copy and paste it to the output particle quad. And as you can see, it as few things, this should be in the ground so we don't need. to offset it in the Y we don't need the set position. We can also delete the Y offset property. Down here, we don't need this multiply position over life. We can also remove the orb movement curve property. And now, if you press play, as you can see, it's always facing the camera, which is correct because of the Orient block we have, but we want this to be parallel to the ground. Oh, and by the way, let's remove the Orb from the size curve name and from the gradient in the properties. OK. So this Orient block, we can delete it, this is perpendicular with the ground, it's vertical, which means we can control the rotation of this, the angle more specifically, and we can do it in the initialize particle, with a set angle if we set it to 90 degrees in the X. If you press play, you may not see it. You probably won't see it because as you can see, it's there, but we don't see it because we are using the soft particle. Which as soon as it intersects geometry, it fades out, in this case, the entire quad. But as you may notice, it's still intersecting the ground and it kind of glitches because it has the exact same position of the ground. So what we need to do, in the inspector, we can select the vfxgraph_GroundAoE and push it just a little bit in the Y axis. 0.1 That's more than enough. Now, as you can see, we see the entire circle and it's pulsating exactly the same as the orb. That's fine for now. What we need is to increase the size. Let's make sure it's 6 that should be enough. Yeah, exactly Look at this, maybe it's a little bit too big, but that's because of the size curve. But let's decrease it to five. OK. Let's also fix the size curve. We don't want this to wobble that much, so I'm going to push these keys up and make them a little bit more consistent, make sure they don't pass the one value. And the last key. I'm going to push it down as well like this. And add another key, because we still have some space, yeah, as you can see, it goes up and down. It's a nice wave And if you press play, it looks really nice. It adds a little bit of motion, so it's not so boring and static in the ground. That's that's cool. And if you play both together, which we actually can do by selecting the vfx_Orb_Explosion simply enable and disable it. And it will play both of the VFX Graphs. And as you can see, it's looking very nice. But there's one thing that we can change, which is the gradient I think it would look cool if it's always orange like I did in the original. So, I'm going to remove this blue key and this purple key in the beginning and I'm going to click more or less around here and push this to the beginning. But I'm going to decrease the intensity a lot like to 0 This way, it will become brighter and brighter, maybe pushed this key here and decrease the intensity to 4. That should do it. Let's try it out. Yeah, it starts nice. And then it becomes a really, really, really bright. I'm actually going to add a key in the middle with a lower intensity of around 1.7 So it only becomes brighter towards the end. Yes, exactly like this, that's looking very nice. Actually towards the end it's a bit too bright. I'm going to decrease it to 3.7 And let's see everything together. Yeah, that's really nice. I think we got something nice going on. And since we have the Orb and the Ground now, what are we missing? Well, we are missing the climax, the explosion! So that's what we are going to start in the next lesson.
15. 3.5 - Starting the Explosion - Sparks: So for the climax, for the explosion part, as you can see, whenever the Orb hits the ground, we want to do something with that. And we can start by creating a new VFX Graph with right click in the prefabs folder. You can name it vfxgraph_Explosion and attach it to the Orb explosion, as we have done. And make sure it's zero zero in the position and rotation. Now le'ts press in the edit button to open this VFX Graph And we got the default particles right and we can start already by creating a group. And this is going to be for the sparks hit. This explosion will have some sparks flying away really fast. We are going to start with that. It's simple and easy to begin with. So copy and paste it down here to the output particle quad and well, let's start from the beginning from the spawn. We have a constant spawn rate. And if you think about it. We need this to play only one time, right? It's not going to loop, so we need a burst, but we don't want this burst to fire immediately, to spawn immediately. So we need to delay it. And if you select the spawn block in the inspector, we'll have to delay mode. And we can set it, to before the loop. Loop is just an expression in this case, it's just a burst we want. Now, it will be useful to control this delay in the inspector, so let's create a float and call it delay with a default value of 3 seconds. And then we can create another float with the sparks count. Let's set it 20. And connect it to the single burst. Yes, so as you can see a press play and after 3 seconds we see the particles, but for now we don't want any delay, While we are creating this effect, we don't want to wait 3 seconds to see how it is. So let's set it to 0. And well, for the sparks itself. We can use this set velocity if we set it to, the X, to be -5 and 5 as well as Z and the Y be between 5 and 1. Maybe we will get an interesting motion. Let's leave it as it is for now. And let's add some gravity already in the update particle. OK, that's interesting. And make sure it's random between well. Between 0 and -10. Yeah, that seems like a nice motion. Well, for the lifetime, we also want a float, it's going to be useful if you want to customize this in the inspector. It's a nice habit that you can pick up while creating effects with vfx graph, you can create properties and it will be useful in the future if you want to adjust the timings and other things. And since it's a range, this is going to be the maximum, so 0.4, maybe it should be more. We'll see. And for the minimum, we can multiply this by a third, 0.33 Yeah, something like this seems OK. Now, for the aspect of the particle itself, like we did in the exercise, like we did in the last chapter, we need to shrink this in the X, with a set scale 0.2 0.2 should be enough. And we want this stretched particles to be aligned with their velocity vector. So in the Orient block, we can select along velocity. Here we go, stretched particles and change the main texture to the flare, for example, or to the default particle if you want. Let's control the size with a set size. Before the set size over life. Which we need to set to multiply the composition and we can already select a curve that goes from big to small. This one, for example. And the size we can set it to 1. Actually, we can make it random and then create a float so we can control it in the inspector. SparksSize The maximum, it's going to be 1. Multiply it by 0.2, 20% and connect to the A, which is the minimum. And yeah, they look interesting for now, probably a bit small, but we'll see. Let's also make sure the set scale is random. Between 0.1and 0.2 for the X and 0.8 and 1 for the Y or 0.6 for the Y minimum. Yeah, and 1.5 for maximum. So there's a bit more randomness in their size. Yeah, that looks nice. Now for the color, we can use a sparks gradient, a property, a gradient. And connect it down here to the set color over life. We are going to use an orange for the first color with a intensity of around 4.5 and for the last key, the color. You can delete it and create one here and drag it to the end and set the intensity to 0. More or less. And in the middle, we can create another key, but with a low intensity like 1.8. And if you want to save this gradient, you can do it right here in the new button. By the way, looks great. Nice punhcy orange glow. If you go to the initialize particle and use a sphere so they don't all spawn in the same position because this is going to be an area of effect, so they shouldn't spawn in the same position. If we use a sphere, as you can see, we get a very weird motion. And that's because of this set velocity. It's great for when we don't have a set position sphere or a cube, it's great for that. But in this case, we need a sphere, we need a radius. So let's remove the set velocity. And what we can do instead is go down here to the Update Particle and use a conform to a sphere. Basically, the particles will try to conform to a bigger sphere. We can increase the radius to 10 of this one. And decrease the sphere in the initialize particle to 0.75 or 0.5, even less. But as you can see, they are going down below ground and that's not useful. So you would probably offset the conform to sphere and push it up into Y and you would think they would go up but they will not because they are going to the nearest point, which in this case is below them. So they go down instead of going up. So instead of offsetting these positive values, we need to offset these negative values like -0.3 -0.3, for example, and now they will go up and we don't have pretty much any particle going down, as you can see, just a few. But that's not very relevant. Now, the nearest point is above them. So that's why they go up. What else can we adjust, maybe we can increase the attraction force to 100. Yeah that's very interesting. And well, for now, I think that's it, we got a starting point. Maybe just increased attraction speed to 20. And decrease the stick force to 20 well. And offset it -0.15 instead of -0.3 They should be a little bit more stretch in the Y I'm going to stretch it to 3. Yeah, OK, I think that's pretty much it. OK, so that's looking good in the next lesson, and we are going to create an hemisphere to create the explosion wave.
17. 3.6 - Explosion - Hemisphere: Now, before we proceed to the hemisphere explosion, let's just decrease a little bit the gravity of the sparks, the maximum to -6 Yeah. So they go a little bit more up. So for the next part we are going to use Blender, which is a free 3D software. You can Google Blender and go to their website or click on the download link and then you can download Blender and install it. I am using Blender 2.91.2 Can always go to archive, search, archive Blender and download older versions if you want to follow along with the same version. And I think it's very important to mention that in my case, if I go to the key map, I am using Blender 2.7 Blender 2.7 keys shortcut. Well, because I always use a blender with this shortcuts. And I'm selecting with the right click, by the way. Oh, and one last thing, my space bar is used to search and I use it quite a lot, by the way, as you can see. But don't worry, I'm going to turn on screencast keys so you can see where I'm clicking. And I'm going to make sure that you don't get lost and mention everything I'm using. OK, so let's select everything with A and then press Delete. We don't want any of this and we want. And let's Shift+A to add a UV Sphere and without unselecting the sphere, we want to click down here in the Add UVs sphere panel. And as you can see, you can control the segments and the rings of this sphere. If you want something a little bit more low poly, you can do it here. I'm going to leave it at 32 segments and 16 rings and then with spacebar I'm going to search for shade smooth, as you can see. You can go to object and you will find up here, in object. The shade smooth as well. And now I'm going to press 1 in the numpad so we can go to the front orthographic view and press Z to see through and with Tab, I'm going to enter in Edit mode, so we can edit the vertices of this mesh and I'm going to unselect with A and then press B to select this lower bottom part of the sphere and press Delete to remove it. You can say Vertices. Yes. And we are left with this hemisphere, which is exactly what we need now in this bottom left corner. I'm going to drag a new window. As you can see, this cross appears, which means you can drag a new window. And then up here, I'm going to select UV Editor. UVs take care of how the Textures are mapped to the meshes in case you didn't know. But it's basically how is the texture going to be mapped to this mesh. And what we are going to do is activate this UVs sync. this UVs Sync Selection so we can see what we are selecting in both windows. As you can see this, top vertices represent the top part of the hemisphere and this bottom edge loop represents, well, the bottom of the hemisphere, and that's how it should be. It's very important. It is like this. Now, what we are going to do is occupy the whole UV area. And first, we need to go to UV and constraint to image bounds, so we don't drag this outside of the UV area. And now, while holding Shift+Alt, I'm going to select this bottom edge loop. And then I'm going to press O to turn on proportional editing, and as you can see, we get this circle, which you can increase or decrease the influence by scrolling up or down with the mouse wheel. We don't want to push the top vertices only the other ones, as you can see, just like this now with Shift+Alt. I'm going to select this vertices and push them a little bit up, I'm going to decrease the influence of the proportional editing by scrolling down, I'm going to push this a little bit up and this one too, a little bit up. OK, make sure it's like this. Now I'm going to press Z. To get out of the see-through mode and then press Tab to get out of the Edit mode and go to the Object mode and now we can simply rename this to Hemisphere 01 And we can save this blend file directly to our project, directly to the models folder, more precisely. Let's just rename it to OrbExplosion_Meshes. Because we are going to create another one. OK, let's save it and go back to unity, as you can see now, it is imported and now how do we use it? Well, we can start by typing simple and select the simple particle system. And down here, I'm going to rename this dome shockwave, but I made the mistake because and down here I'm going to rename this to Dome Shockwave. Copy Create a group. And renamed the group. Now once again, we don't want this to constantly spawn hemispheres, we just want this to spawn one time, so. And we also want a delay before the burst, so if you select this spawn block in the inspector, we can say delay before loop. And then connect the delay. Remove this constant spawn rate and add a single burst. With 1 for the count. Down here, we don't want this to move. The lifetime, we want it to be constant, we don't want randomness, let's turn it off and let's create a property, a float, we can call it dome lifetime. I'm calling it Dome, but you can also name it hemisphere, for example, or you can stick with the names that I'm using. And then I'm going to connect this to the set lifetime 0.4, by the way. For the default value, OK, so I made a mistake. We don't need this ultimate particle quat rename this, but what we need is to drag a new line from the update particle and says we are using a mesh with what the output particle mesh so we can use the hemisphere. As you can see, we have a mesh input option and if you click here, we can select the hemisphere that we have created. I'm going to slow this down, as you can see. Oh, it's right there, it just as the wrong rotation, so to fix it first, let's actually increase the size with the set size. We can actually create the float for that and call it dome size. Default value of 4 for now and connect it to the set size. Yeah, probably a little bit too big, but we'll will see. And we need to rotate it correctly, so up here in the initialize particle, we can use a set angle. And say that it's 90 degrees in X. Actually, -90 degrees. OK, OK, all right, here we go, we are starting to see something now, it's a shockwave. It's a dome shockwave, right? Hemisphere shockwave. So we need to control the size of this over lifetime. Don't forget to set the composition to multiply, by the way. It's going to be useful to control these in the inspector. So let's add an animation curve to the blackboard and call it the dome size curve. Select the curve from small to big, connect to the multiply size over life. As you can see, it keeps on growing constantly, and that's not a very interesting motion. So for the curve, we are going to push the last key to around 0.5 always at one of value. Make it curvy like this and then add another key towards the end. But it grows just a little bit, and as you can see, it grows faster in the beginning and then it kind of slows down. It gives a really nice sensation, really nice motion. By the way, this is big let's decrease the Dome size to 3. And for the main texture, we are going to create one. But for now, we can see the flare, for example. Yeah, why not? Nothing special, OK, but we got the motion, we got the hemisphere, and that's a good start. In our next lesson, we are going to create a proper texture for this, which is a Noise texture.
18. 3.7 - Explosion - Noise Texture: So I'm going to show you how to create a very interesting texture, a noise texture. So let's start with a new file call it Noise01 2048 by 2048 pixels. And let's start by creating a new layer, Ctrl+Shift+N And paint it to white with the bucket, too, as you can see, or you can use the background. Now let's go to filter and we have this Noise drop down menu and we want to Add a Noise. You can select a uniform and turn on monochromatic and the amount around 120 should be enough. Now we need to press Ctrl+T because we want to increase this like really a lot, as you can see. Even more. Yeah until it's more or less like this. Now, let's press M and select all of it, then press Ctrl+C, and then Ctrl+Shift+V, copy and paste it to a new layer. We can hide the previous one. We are doing this so we can have only this square and nothing else. And now we want to blur this, so we are going to go to the filters. And in Blur, we want to use Gaussian Blur first, very low, something around 6 should be enough. Just a little bit like this. Exactly. I'm actually going to increase it a little bit more like this that Ctrl+T. And then I'm going to go to filter again. But this time we want to go to Stylize and select Wind. And make sure the method is Stagger, very strong wind and the direction is from the left and then press OK. Wait a little bit and you get this awesome effect. We actually need to increase it much more. OK, until it's like this, that's looking nice. You know, if you want, you can press Ctrl+L To control the dark, greys and white values, I'm going to leave it to more or less like this. Increase a little bit dark and increase a little bit to white values as well, and that looks fine. I'm going to press OK now and we need to make sure that this is tillable, that this is seamless. So first, we need to press M to select the Marquee tool, we want to select everything, press Ctrl+C and then Ctrl+Shift+V You can delete the previous layer, by the way. So we get only this square and then we can go to filters and offset these. First, we are going to offset this -1000 horizontally. As you can see, we are seeing the seam, this hard edge, which we want to fix the way we fix it, by the way, you can delete the previous layer. We only need this one. And to fix this seam, it's very simple, we need the healing brush tool. You can press left mouse button and hold so you can see more options. I'm going to increase the size and decrease the hardness to 0. And with Alt I'm going to click more or less around here, it will inspire itself from whatever we click. Then I'm going to pass with one stroke, just like this one time. You may need to wait a little bit, but after that it looks very nice. Pass again, a little bit down here and fix a few of this, spots that didn't go so well, just like these. Until we don't see any hard edge, basically. Once you have fixed this, we need to offset it back. We can go to filters and in other, but this time we need to offset plus 1000 horizontally until it goes back to its original position. But we also need to offset it vertically, -1000, only vertically, just like these. And now with the same tool, with the healing brush tool, I'm going to press Alt more or less around here and then with one stroke, you can hold Shift, by the way, to create a straight line. I'm going to pass around here. You may need to wait a little bit. And as you can see, this one really went well, just going to pass again right here on the left side. OK, and it's looking remarkable now, the last thing we need is to offset it back to its original position, which is +1000 vertically. OK, fantastic. All we got to do now is save this to Unity to the Textures folder. Make sure it's Noise01 and now in Unity, what we can do is, well, first I'm going to copy the Dome Shockwave name and paste it down here to the output particle mesh. And now we can select for the main texture the Noise01 we just created. And would you look at this, look at how awesome it is and how well it fits in our atmosphere. Very nice when we can make it additive if you want. But I'm going to leave it at Alpha so you can see the dark values and you can also turn On use of soft particle. So it blends whenever it touches the ground. And it looks fantastic. But we need a few more things. By the way, if you want this to rotate, you can do it in the update particle with a Add Angle and say that the Z is something like 0.4 And now as you can see, it will rotate nicely or -0.4 to rotate in the opposite direction. OK, looking good. Very nice. So let's see how we can start that master shader. By the way, don't forget to apply the changes to the prefab from time to time and press Ctrl+S As well. So in our next lesson, we are going to start to create the Master Shader. We are going to create a distortion effect for this.
19. 3.8 - Master Shader Graph - Distortion: So in order for us to control the distortion of a texture or the dissolve of a texture, we need a shader and a shader is a little program that can communicate with the GPU and tell it how to render some pixels in your screen. So in our case, we are going to use shader graph, which is a built in node-based tool from Unity, and it's quite useful. So with right click in the shaders folder. Let's go to create and select in shader, blank shader graph. We can call it Master Shader VFX Graph. Double Click to open it up. I'm going to drag it to this side and in here we have the graph inspector and the blackboard, and we need to tell the shader what's the target. In other words, where is it going to be used? Is it for the universal render pipeline? Basically, you can use it in materials in the scene anywhere. Or is it for the visual effect graph in our case, since we are working with vfx graph The target is going to be visual effect graph, as you can see. And now we can leave the material as Unlit, because we don't need it to be influenced by the light of the scene, otherwise we would select Lit. OK, so now in the Blackboard, where we can add properties, the first property we need is a Texture2D for the main texture, the texture that we are going to use. And now in the graph inspector, we can set the node settings for this property and in our case that select a texture and we can set this Noise01 as the default one. We can drag and drop it to the scene, but we need to sample this. And if we drag a line from here and search for sample, we get a sample texture2d, that's the one we want connected to the texture input. We can already connect it to the base color. But if we want this to be distorted, we need to distort the UVs. So if we search for UV with spacebar, by the way. We want to add something to this that will distort the main texture. In our case, if you press spacebar now and go to procedural, we have a few things and one that matters is the noise section. We even have shapes. In the noise, we want to select in this case, let's go with the simple noise. Gonna set the scale to 50 and then connect it to the add. And if we connected this to the UV, as you can see, it gets totally distorted the main texture. So we need a way to control how much distortion we want. We can, by the way, create a new float for the distortion scale. The default value can be 50. And then we can connect it to the simple noise and we can control the dark values and white values with a power node. As you can see, we can also create a float for that, a distortion power float, with a default value of 1, it could be useful. Let's connect it to the power. And connect these to the add, but we still need to control how much distortion we want. And there's a simple node that can do it. It's called the Lerp node, a linear interpolation node. You see, we have an A option and a B option and then a T option. And T will control how much it will output, how much it will blend between A and B. Once we get closer to one, it becomes whiter. Once we get closer to zero, it becomes black. It's blending between the A and B option. So for the A option. We want the UVs without distortion. And for the B option, we want the UVs totally distorted. Now we just need a float to control the distortion amount. And we want this one to be a slider between 0 and 1. 0 is no distortion and 1 is completely distorted. Let's connect it down here to the T input of the Lerp and now if we connect this to the UV input of the main texture. Nothing happens because distortion amount is at 0, and that's correct, so let's test this out, let's save this Shader and let's go to the VFX graph explosion. And in here in the dome shockwave, as you can see, we have this shader graph option for the output particle mesh. If you don't see it, you can go to edit. And in preference, you can select visual effects and make sure experimental operators / blocks are turned on. You probably need to close and then open up unity. So this takes effect. So for this Shader Graph option, if you click here now, we will have the master shader VFX graph that we created. And as you can see, it's pretty much the same thing, but now we can control the floats we created. But as you can see, they have a very strange name. That's because if we go back to the shader and if we select the main texture, we need to rename each reference of these properties. So we simply need to copy and paste the name, for example, and then add an underscore. So there is no conflict between the name and reference. We can do the same for the distortion scale, distortion power and distortion amount. And then save this Shader, and if we go back to the vfx graph, we got very nice names that we can control and that we can play with. So let me play this and pause. Now, if I increase this amount, as you can see, there is much happening because the scale is that one. So let's increase the scale to 50 or 30 and then increase distortion. As soon as we increase the distortion it gets, we create this very beautiful distortion. We have a seam right here. I know we'll fix it, but it would be great if we could animate the distortion and we can. It's very simple, actually. Basically, every time we need to animate something, in shader terms, basically we need to use a time node. And then a tiling and offset node. If you connect these to the simple noise, you will notice that if you play with the offset, we are indeed moving the texture, the simple noise. So we want to animate this value, which means we need a vector2, because we got X and Y and we can call it distortion speed. I'm going to push the distortion amount up here, before the main texture so it makes more sense. And don't forget to copy and paste the name to the reference of the distortion speed and add an underscore. Now we can drag it down here and if we want this to be animated, we need to multiply it with the time variable and then connect to offset. And if I increase the value of the distortion speed we get an horizontal scrolling, good. Let's leave it at 0, the distortion speed and then. Let's save the shader and go back to vfx graph Now, if I play this and pause it we got these Y value that we can increase or -0.1 -0.1 And we get a really cool animation, actually, let me stop the add angle that we have in the update particle, so you can see this. So 0.1 scrolls down and -0.1 or -0.2 scrolls up Then we can scroll it a horizontally -0.1, for example. And maybe decrease the distortion amount to 0.1, that's enough. OK, yeah, the distortion speed -0.2 for the X and -0.05 for the Y. Looks very cool, despite the seam, despite the hard edge that we have there, looks very nice, so that's a very cool start. In our next lesson we are actually going to move on to the dissolve part. We want this to dissolve away instead of simply fading out.
20. 3.9 - Master Shader Graph - Dissolve & Color: So for the dissolve part, with what we have done, it's fairly easy to get a dissolve. All we got to do is go up here to the sample texture2d of the main texture and connect it to a power node to the A option. And if we create a float, we can call it dissolve amount Copy and paste to the reference, add, then. If you connect this to the power node and connect the power to the base color. And to the Alpha, oh, and don't forget to press the save button from time to time. Let me just play this. As you can see now, we have transparency as well when it's dark because we have connected to the Alpha. And if we increase the dissolve, here we go, we got a really nice dissolve going on, only the gray and white values are left behind and it looks pretty cool, actually. Another thing we can do is the color, take care of the color in the shade of the property, a color property. Push it all the way up here. Rename the reference, set the mode to HDR so we can increase the intensity and it will glow and set default color to white with alpha at 100, then we can drag it around here and multiply this with the power node. And connect it to the base color. And to the alpha as well. If we save now, we can go back here and as you can see, let me just play and pause this, you can actually select an orange and then increase the intensity. And what we get is a very interesting effect, as you can see. Really beautiful. Mixed with the noise texture that we created, it's very nice, we get a very nice result. The cool thing is that we can also use gradients with this, so let's create a dome gradient. And drag it around here, and as you can see, this is a color and we cannot connect gradient colors. So what we need to do is sample the gradient. As you can see, just like this, and now we have this time variable, we need something to animate this time. And if you think about it, each particle as a lifetime, a specific lifetime in this case, the dome as a lifetime of 0.4 So if we search for age over lifetime, we get the lifetime of the particle and we can connect it to the time and connect this to the color. Now we just need to create a cool gradient, for example, the first color can be blue and we can increase the intensity to around 5 a lot. And then the last key, we can delete it and add another one around here and push it to the end so we get the same color. Actually, we can leave it more or less around here and decrease the intensity to 3. And then add another key, but this time decrease intensity to something like 0 and push this alpha key to around here, so it takes more time to fade out. And if we test this out, what we get is a really bright dome fading out and dissolving away. It's very cool the effect if we decrease the dissolve amount, it gets bright in the beginning, as you can see. Yeah, very cool, looks very nice. We can also animate this dissolve amount, basically with the same way we animated the gradient. We can sample a curve. And for the time, we already have the age over lifetime right here, you can connect it like this And now for the curve, you can select this one, but for the last key, we can edit and say the value is going to be like 15 can make it curvy like this. So it takes more time to dissolve in the beginning and then dissolves away really fast. Now we just need to connect this, sample curve to dissolve amount, and if we test this out, what we get is a super bright dome that then fades out, as you can see, if I play it in slow-motion, it's super bright in the beginning, probably because the curve starts at 0. But it's something that it's looking very nice, let's see how it plays with the rest. We need to delay this 3 seconds, by the way. OK, we got something going on. We obviously need to make a few adjustments, but it's a good start, we got the Orb, we got the Ground AoE and then we got the Explosion. We can actually increase the ground aoe to 5.5 the size. And in the VFX graph explosion, we can say that the dome size is going to be smaller, like 2.7 2.7 And that's a little bit better, we can decrease to 2.5, actually. OK, that's much better now. We don't want the dome to be much bigger than the ground aoe. We are going to have more a less the same size. But yeah, that's pretty much it for this lesson, we are going to make a few improvements towards the end what we are missing here is a bright flash, an impact. So that's what we are going to do in the next lesson.
21. 3.10 - Explosion - Flare Hit: So for this part, the impact, the bright flash, we already have the texture, we just need to create a proper VFX Graph with a small lifetime and a few more things. So, still in the VFX graph explosion. Let's start with a simple particle system. By now, you should know that we don't need the constant spawn rate it's not going to loop. We need a burst. One particle is enough. Let me close all of these properties, because we will need to create a few properties. Now let's go down here. This is not going to move. It's going to blink only basically we can remove the set velocity. And for the lifetime, we can make it constant, turn off random and then add a float. For the flare lifetime. With the default value of 0.15, as you can see, it's going to be superfast. In the update particle for now, let's leave it as it is and the texture, we already got the flare that we created earlier, quite useful. And it's super small, so let's create a set size before the set size over life. And then create a float for the flare size. 8 for the default value. Yeah, we don't see anything because we have the set size over life. It should be set to multiply instead of overwrite and for the curve, we want this to go from big to small, we can start with this one. And then pushed the handle a little bit up of the first key end of the last key as well, just a little bit. And if you play this out. We get a nice bright flare, basically, as you can see, we have a cut, it's intersecting with the ground so we can turn on use soft particles so it becomes smoother when it intersects with an object. OK, but it's in the ground. And I think it would look nice if we offset this a little bit in the Y if we push it up. So what do we need exactly? We need a set position. And we want to create a new float for this, a YOffset we can can call it, Y offset and push it up here below to delay, the delay and Y offsets are going to be used in the sparks, in the dome, in the flare and in other things that we are going to add. The other properties are like local properties for specific elements. So for the Y offset we can connect it to the Y of the set position. The default value of 1.8, yeah that's too much, 1.5, it's also a little bit too much, maybe 1. Let's leave it at 1 for now. We also want this to be random, the rotation, so let's use a set angle in initialize particle. We can select only the Z for the channel and make it random. Between 360 and -360, so it's completely random every time it spawns, the rotation and then in the output particle we can add a little bit rotation over time. So with an add angle, we can set the Z to -0.4, for example, and it will rotate a little bit. That's looking nice. So for the color now, we can actually create a flare color property. Choose an orange color, increase the alpha and increase the intensity to around 3. And instead of set color over life, we can use a set color only, that's more than enough. It's already shrinking down. We don't need to fade this out, it's super fast. As you can see, that's a very nice flare. Awesome. Well, we can create a group now, select everything right click group selection and call it Flare Hit Flare Hit And yeah we still need the delay before Loop, so let's select the Spawn, and in the Inspector, you can select before Loop. Connect the delay. And if we try everything together, we need to wait a little bit. It looks very nice. Let's just copy and paste this flare hit name to the output particle quad down here. And. Save this VFX graph just in case, and now let's try with everything. So, yeah, the flare really adds a nice punchy of feeling. I just think the orb could be a little bit bigger, like 1.2 Let's try it out. Yeah, that's nice 1.1 should be enough. OK, that's better. For the explosion, the flare, the offset, the Yoffset. I think it should be smaller, like 0.7, it was a little bit too high. And since the Orb goes directly to the ground, it should be lower. That's nice. Let's apply the change to the prefab and that's looking very nice in our next lesson we are going to add a shockwave.
22. 3.11 - Explosion - Shockwave: So for the shockwave, we already have the elements we need, we are going to reuse the circle with the master shader, so we can start actually by copying the dome shockwave. It already has most of the necessary elements and I'm going to push it down here because down here we will have the ground elements section. Well, first, this time, we don't want to put a particle mesh, but we want to output instead. A particle quad, just like this. Where we can already assign the circle as the main texture the Circle01. And we can also use the master shader VFX Graph just like these. And then we can already make a connection from the gradient to the color. And by the way, you can duplicate blocks from one section to the other by simply holding control, you can drag and drop this set size, for example, and it will create a duplicate. We can do the same. We can connect the Dome size. And we can do the same while holding control, drag and drop the multiply size over life and it will create a duplicate. For this curve. We actually want this to grow, this curve goes from 0 to 1. Actually, we can add a little curvature just like this, a small one. Especially towards the end. It will add a nice touch. And we can add also a little bit of distortion amount like 0.1, and then we can delete this output particle mesh we are not going to use it. And yeah, if you play this, as you can see, something weird is happening. We have this big delay first. Let me just close all of these properties. And then add the shockwave count a float. And another float for the shockwave lifetime. And another for the shockwave size, as you can see, I'm being methodical about the way I organize my properties. It's always count, lifetime, size and gradient. And if there is no count, then it's still lifetime, size and gradient or color. So for the size, let's try 12 and remove this dome size. Let me just align this OK. We can delete this Dome Size Curve down here. And up here for the lifetime, we can drag and drop the shockwave lifetime. Give it a 0.45, 0.4, something like that. And for the shockwave count, let's start with 1. Yeah, as you can see, if you play this, we get this white square and it's mostly happening because we have connected these directly to the Alpha in the Master Shader, this is a problem from the shader we created. And from the alpha. What we can do is split this last node so we get access to each variable, the RGBA and connect only the A which represents the alpha and then save. What will happen is that the circle now on the ground will be fine, it will work really fine, as you can see. Let's offset the shockwave with a set position instead of moving the VFX Graph up. We can offset it 0.1 in the Y. OK, we've got a nice shockwave going on, really cool, but if I pause this, as you can see now, the dome shockwave is no longer transparent and the black is rendered well as black. We will fix that later on in this project. But for now, we will leave it like this. Now, let's add some distortion speed down here. 0.5 in the Y for example. And we can also use this curve for the dissolve amount, as you can see towards the end it dissolves away. Which is an interesting effect, if you want to leave it on or you can simply have a constant dissolve amount, it's up to you. I'm going to leave it with a curve and I'm going to decrease the shockwave to 0.4 in the property. And actually, this dissolve curve, what I'm going to do is. Push the first kill a little bit up and to the front to around 0.25. Yeah like this so it doesn't dissolve too fast. Another thing we can do, is add some randomness to the angle of the shockwave, so let's set this set angle to be random, uniform, random. Between 360 and -360 in the Z. And the X is going to be the same, -90 OK, cool. I'm also going to decrease a little bit of distortion amount to 0.05 Yeah. And well, I think the gradient is a little bit too intense, but we are not going to create a new gradient property just for the shockwave. So what we can do is multiply the one we have with a smaller value like 0.5, and now it will be a little bit less visible. Or you can increase it up, and it goes crazy. Yeah, I'm going to leave it at 0.7, I think that's a good value. It looks cool. Now let's see everything together. Let me just set the delay of the explosion to 3 in the inspector. And now. Yeah, yeah, that's interesting. We got something going on, I'm just going to rename this output particle quad to Shockwave. And rename the group as well because. I'm going to save this now and why it is important to rename the output particles? Well, it's important because whenever we go to the project, if we select one of these vfx graph in this case, the explosion, as you can see, we have the output render order. Basically, this will decide what is being rendered on top of what. First thing being rendered is always at the top, and then we got the last thing at the bottom, which means that as it is now, Shockwave is being rendered in front of everything. What we can do is select VFX Graph in the project, the explosion and drag the shockwave all the way to second place, which means it's going to be rendered after the sparks it. As you can see now, the shockwave is clearly being rendered behind the hemisphere, but that's just a little detail towards the end. We may need to adjust it a little bit more. OK, so that's it for this lesson. We got a shockwave and it adds a nice touch, but we still don't have an aftermath, a dissipation whenever the explosion happens. There's nothing left on the ground, for example, like a mark or like some flying particles or a cool flipbook. We don't have any of that. So we are going to start by adding a ground blur and then a ground mark.
23. 3.12 - Explosion - Ground Blur: So for the ground blur, we need a new texture and in Photoshop, I'm going to create a new file and call it Circle02, 2048 by 2048 pixels. I'm going to paint with the bucket tool the background to black. And then create a new layer with Ctrl+Shift+N. And I'm going to select white for the color and pick the Brush tool. And I'm going to use the default this one brush nothing special, and now while holding Alt, I can go up and down with the right mouse button and control the Hardness, as you can see. What we want is something around 50 percent of hardness. And then we want to simply click one time more or less in the middle, I'm going to increase it a little bit more, actually, the size. And now we want to align this by selecting this layer and the background and then we can press V and align it it up here, and that's simply it. That's it. Now, what we can do is save this directly to unity without the black background. By the way, without the black background, by the way, don't forget to hide the black background. Then you can go back to Unity and select the Circle02 and turn on alpha transparency. OK, and now we can use this texture with VFX graph. So how do we use it? Well, you can actually start by copying the shockwave and And paste it to around here. I'm going to rename this to Circle Ground AB, which is Alpha Blended. Copy and paste it down here to the output particle quad. So, yeah, we have the ground section down here, like I said. And we don't want to use the master shader VFX Graph, this is going to be a subtle mark on the ground like it was burnt. We don't need the multiply size over life. And we can change the texture to be the Circle02 OK, so it's really big, as you can see, and it's also being rendered in front of everything. So if we go to the project folder and select the vfxgraph_explosion, we can drag this circle ground ab, to be the first one rendered to be behind everything. So it doesn't get in the way just like this, so yeah I'm going to remove all of these nodes. And set the size to be 4 or 5, I'm going to try to find the exact size, maybe 5. Yeah. And for the color, I'm going to select really black. OK, that's something now we don't need this add angle. This set angle, it doesn't need to be random. -90 in the X and zero zero, that's fine, and I'm going to remove the shockwave lifetime and the shockwave shockwave count. And I'm going to create another float, but this time for all of the ground elements related, I should have called it ground life time, but I'm going to call it CircleABLifetime And set it to 2 seconds and then connect it to the set lifetime. And then I'm going to create a circle AB size default of 7, actually, and connect it to the set size. I'm going to set the playrate back to 100 and press play. Yeah, it's really dark and it disappears out of nowhere. So what do we do when it disappears out of nowhere? What do we do when we want a fade? We use a set color over life. After the set color. And for this gradient, I'm going to yeah, you don't need to set these bottom keys to black, by the way. But you need to remove this alpha key up here and add another one more or less around here so it's visible for a little time and then it fades out slowly. Yeah, I'm going to set it to white and remove this last key, because we already have a set color up here. Let's just set the composition to multiply of the set color over life as well as the alpha composition. Otherwise, it will overwrite the alpha values that we are going to control in a moment and we need it to be less visible. So let's use a set alpha. With a value of 0.8, yeah, maybe less, and it should be bigger, like 12 the size. 11, actually. OK, set alpha 0.2, nope, 0.5. We can actually control this with a float in the inspector. It could be useful. So circle AB alpha default value of 0.5. And that's it. We have now. A mark on the ground, a little mark on the ground in the next lesson, we are going to create a proper texture. So it seems like an explosion really burned the ground.
24. 3.13 - Explosion - Ground Mark: And once again, it's another texture where we don't need to paint anything or we don't need drawing skills, what we need is to start with a new file. We can call it GroundMark01, make sure it's 2048 by 2048. And this time we can actually double click on the background layer and it will convert it into a new layer, you can press OK, and now we can go ahead and go to filters and use the add noise. Once again, we want to make sure it's uniform, monochromatic and around 150 the amount. Once you press Ok. We are going to need to scale this up with Ctrl+T and you can hold Alt and Shift to scale proportionally. More a less like this. And we can press M to select the Marquee Tool, select all of these press Ctrl+C and Ctrl+Shift+V And we need to scale this up again. I'm going to use the M to select copy and paste it again to a new layer. What we are going to do this time is stretch this vertically a lot with Ctrl+T like this. And then press, OK. And now we need to copy again this with the Marqee tool, M for shortcut, Ctrl+C, Ctrl+V, delete the other layers, yeah we want only one square. OK, so the idea now is to make this circular because we are creating an AoE, right? It's an orb explosion. So what we are going to do is go to filters. Once again, we can use one of the techniques that we have used, which is polar coordinates in distort distort. Make sure it's rectangular to polar and then you can press, OK, we get this very weird texture right or an hard edge right in the middle. How do we fix it? Well, we can go to filter and in blur we can apply a radial blur, but with a very small amount, maybe less than 10. Make sure it's Spin, by the way. And then you can press OK, and it will blur a little bit everything. And we no longer have hard edges. Now, what we need to do is go to the Marquee tool click and hold so we can select the elliptical Marquee tool. And now make sure you are more or less in center and then you can click, drag, press Alt and then Shift to create a proportional circle and select only the circular part like this, you can press Ctrl+C, and Ctrl+Shift+V to paste it in the same position. Can delete the other layer and we are left with this, we are almost getting there right, guys? It's circular at least. Now, how do we use this to make a mark on the ground and burnt mark on the ground? Well, we can simply double click on the layer 4. Make sure you are in the blending options and now down here, you got this blend, if it's gray and if we start clipping the dark values till we are left only with a few marks, it's up to you now to decide how much you want. But as you can see, we are left with just nice texture. It's very cool and very useful technique. But we still need to make a few adjustments, can go to distort in filters. For example, we have the pinch option, as you can see it will. Stretch it a little bit more in the center. I'm going to do a Ctrl+Z, that's not exactly what we want. But we also have a Spherize option. And that's what I'm going to use the amount. I'm going to set it to actually negative values like -50 or -40. It's up to you to decide if you want it to be more stretchered in the center or not. You get the idea. You can see the effect in action. I'm going to leave it at around -50. Then press, OK, and now we can save these Photoshop file directly to the Textures folder. And if we go back to Unity, we can turn on alpha is transparency. And now we can reuse this VFX graph for the circle ground ab, copy and paste the group, rename it to Ground Mark AB.. Also renamed the output particle quad, and then we can select for the texture the ground Mark, we just created. OK, so, yeah, it's really big. So let's multiply this circle AB size by something like half of the value 0.5 maybe. Yeah, size is good, but if you look closely, we have an ugly problem, as you can see, it's very perceptible the cut all around this texture. We need to fade this. We need to make it smoother. There's a very simple technique, if we go back to Photoshop, I'm going to press Ctrl+T decrease a little bit the size, not too much more or less like this, around 5 percent. And then we got the smudge tool, this tool right here, if you select it. You can set the strength to 30, by the way, that's enough. And now the idea is that we push some of these parts of the texture that are all around from the outside to the inside. And sometimes as well, from the inside to the outside. We can decrease the brush size and do this all around the texture, sometimes from the outside to the inside, sometimes the opposite. As long as you are aligned with the center, you are good to go. And sometimes you can even pick the erase tool and erase some parts. The idea is that you make the transition smoother and that we did not notice the cut all around the texture. Make sure the brush strokes are aligning with the center. Once you have passed with the smudge tool, more or less around the texture and maybe use the erase tool to remove some of the unnecessary parts, once you got that, then you can press Ctrl+S For example, up here, I've decided to erase this. it was too persistent it was too much. And also this part. And then with the smudge tool I can always make it look better. And blend this nicely. And actually, if this takes a lot of time for you to save. You can remove this layer zero because it's really big and it's making your Photoshop file a little bit heavier. I'm going to delete it. And I'm going to go back to Photoshop and. And the difference is huge, as you can see, it looks much better already just going to remove this part here. You can always make adjustments to cool things that with Photoshop, you can have the Photoshop file inside Unity. Make the changes press Ctrl+S to save and it updates automatically. And that's super useful. OK, so as you can see, we have a nice thing going on. I think it's a bit too visible, the circle ab alpha I'm going to multiply it by 0.8 Yeah, maybe even less. OK, looking very, very nice. There's one last thing that we can do to improve this by a lot, and it's using the flare texture. It's a quite useful texture for this effect. We can go to the circle, ground AB, push this a little bit to the side. Copy and paste it. Connect it to the update particle, and in here, we want to select the flare01. But this time. We want to make it bigger, like two times. Yeah, exactly, and the Alpha, we want to cut it by half or even less, as you can see. Actually, the Alpha, I'm going to multiply it by 1.5 It was not that perceptible. And decrease the ground, Mark Alpha, multiply it by 0.7 or 0.6, so it's not too visible. We got to create a nice balance between these 3textures and that can be hard sometimes. But I think we got it right. Yeah, that's very interesting. And they blend in very well with each other. Something impactful just hit the ground. Very nice, looking very good. Hope you also have achieved something cool in your side. By the way, please share here on the site. Feel free to do it. OK, so our next lesson is going to be focused on creating a flipbook, because as you can see in the middle, we have nothing much happening besides the mark that we leave on the ground every time this explodes. There is not much happening. So we are going to create an impact flipbook to fix that, and it will look really cool.
25. 3.14 - Impact Flipbook - Frame 03: So for some of you, this is going to be the hardest lecture, hardest class, but don't worry, I'm going to guide you through. I can't obviously guide your hand. But I'm going to try my best to give you tips and necessary tricks. You need to create this flipbook, and it's going to be fun. You'll see in the end, you will have a nice flipbook of an impact. So, we can start by creating a new file. And this time it's going to be useful. If you have your graphic tablet around, you can try to follow with the mouse, by the way. And I'm going to call this the ImpactFlipbook01 with 2048 by 2048 pixels for the resolution. And I'm going to paint the background to black. And then create a new layer and call it the frame 04, we are going to start in the middle of our flipbook, we are going to create 6 frames. So it's more a less in the middle, actually. Let's call it frame 03 And now we want to pick the brush tool I'm using the default one and I'm going to select white for the color. Make sure the opacity is around 30, 40 percent, something between those values. And as you can see I've hardness of zero, and I'm going to start more a less with this size and without lifting the pen or the mouse, I'm going to do a stroke to the left, then more or less around 30 degrees, another at 60 degrees, and then another up at 90 degrees and do the same to the other side. Want to have more or less the shape. I'm actually going to use Ctrl+T to shrink it a little bit down and then center these. More or less like this. We should do a little bit down, doesn't need to be that way up. OK, I'm going to pass again the same settings for the brush and then a third time. And a fourth time, as you can see, but always from the center towards outside. And make sure it's brighter in the middle. More a less like this. OK, now with the erase tool. At 100 percent. I'm going to try to balance this, as you can see, it was a little bit stretch and here. And remove some of these excess. Make some cuts here and there. OK, exactly like this. Now, we can pick the smudge tool. With the strength of around 30 percent. And I'm going to push some of these white values outside, as you can see. We have seven pointy ends and I'm going to do it for each one. But not for the one in the middle, and then I'm going to create some cavities, I'm going to push from the outside to the inside, as you can see. So we are starting to have some spikes. Actually, I need to rotate this a little bit. It was a little bit tilted to the right. Yeah. We want it to be parallel with the texture boundaries. OK, like this, looking good. That's a very nice start if you want, you can create a new guide in view down here and say it's vertical and you can type 50% Oh, nice. It was right in the middle almost. OK, now it's in the middle. I'm going to pick the erase tool and remove a little bit more, not that much. And then I'm going to pick the smudge tool. Make the brush size bigger and push only the grey values all around this impact texture, as you can see. And now I'm going to push from the center to the top. You can use shift to create a straight line, a straight brush stroke like these. I'm also going to push from outside to the inside. With a very small brush size. And then from the inside to the outside. Right in the middle of this spikes, as you can see. Looking good. So that's our first frame. We don't need to spend more time with this, we will need to make a few adjustments so they fit with each other. So that's a very nice start we got here. In our next lesson, we are going to create the frame number four and frame number two, basically the next and the previous one and maybe the fifth frame as well.
26. 3.15 - Impact Flipbook - Frame 02, 04 and 05: So let's start by doing the next frame, the fourth frame, but first we need the timeline. We can go to window and select timeline. So as you can see down here, we only have one square, each square represents a frame and we can click on this icon to create a new frame. OK, so we get two frames. Now, let's duplicate the frame 03 and call it frame 04 On this frame, we can hide the frame 03 and down here, if you go to the first frame, we can hide the frame04 and for some reason it disappears in the second frame. OK, we can show it up like this. So the way we can do this, we need to imagine that this is going to dissolve, disappear so we can start by removing a little bit down here, just a few clicks with the erase tool is enough, erase tool at 30 percent of opacity. And then this is also going to expand, right? So with the smudge tool. Around 40% of strength. I'm going to push all around, as you can see, this gray areas, maybe a little bit of the whites inside as well. Push it down here to help. So, yeah, as you can see, we have a big difference now between frame 3 and frame 4 but it can also go back and forth to see what needs to be expanded. In this case, my left side still needs to be smudged. I'm actually going to go to the first frame and. With the layer frame 03 selected, I'm going to press Ctrl+T and decrease a little bit the size. Otherwise when we get to the last frame, we don't have more space. OK, so let's move on already to the frame 02 let's duplicate frame 03. Rename it frame 02, I'm going to push it down here in the order of the layers, make sure you maintain everything organized and down here we can create a new frame on the first frame. I'm going to hide frame 03. On the second frame, I'm going to show frame03 and hide frame 02 and on frame 3, I'm going to hide frame 02 and show the frame 04 It may seem a little bit confusing, but you get the idea right. Each frame can only have one layer visible. And why are we doing the frames 02? It was basically a duplicate, a safe copy, because now we need to remove a little bit from the frame 03 just a little bit. So it makes sense with the next frame. As you can see, I'm also going to use the smudge tool and push this just a little bit, as you can see, we kinda have 3 lines. So I'm trying to mimic the beginning of those three lanes just like this. All right, that's that's nice. That's very good. Make sure it makes sense between each frame. We need to balance this very well. OK, so now I'm going to go to the first frame down here and in the layer frame 02, I'm going to press Ctrl+T And while holding Alt, I'm going to set the anchor down here so we can decrease it just a tiny bit. Like these around 5% or six, maybe even more. So in the first frame with the layer frame 02 Now, the idea is to do the opposite. We need to make it smaller, right? So we are going to use the smudge tool to push this down a little bit. Not too much, as you can see. You can also push the white inside. Make sure you go back and forth to see where you need to push it a little bit more on the left, in my case. OK, very nice, I have pushed a little bit too much, so I'm going to do is, select with the smudge tool, but with a very low strength like 30 or 25 and push just a little bit these great values all around. Just like this, OK? Not too much. And if you want to see all of this play a little bit slower, we can select all of these frames while holding shift. Click here and select other, and then we can can say 0.05, for example, or 0.06. OK, and now we can see this a little bit better, it was too fast. OK, so now let's do the frame 05 So I'm going to add a new frame down here. And duplicate frame 04 and call it frame 05 And the idea with this one is to push even more with the smudge tool. From the inside to the outside, as you can see, we are going to push these lines and then also push the. Outside, a little bit down, because I want to push this all outside, I'm going to push it inside first. Just a little bit and then push it outside. But I'm pushing more from the whites, instead from the greys. OK. And I'm also going to pick the erase tool and remove a little bit from all of these white areas around. Not too much from the inside on the around. And then with the smudge tool, I'm going to push even more. From the inside to the outside. And if you go back to the other layers, oh, yeah, we need to hide frame 05 On the other frames, yeah, I'm going to push this even more around this area, I always make sure that to go back and forth to see where we are failing. So, yeah, I'm going to do a few more adjustments with thee smudge tool. this takes some time. I'm going to hide the layer 04 in the other frames. And now if we play this, we've got a very interesting start going on with only four frames, the remaining two frames, the first one is to make it really brighter and smaller. And the frames 06 is to pretty much dissolve it away, which is what we are going to do in the next lesson.
27. 3.16 - Impact Flipbook - Frame 01 and 06: So let's do the first and the sixth frame, and I should have already mentioned it, but we need to save this from time to time, of course, and this Photoshop file, we can actually save it to the textures folder, as usual. No problem at all. OK, so before we proceed to the first frame, I just noticed that we need a little bit more of white in frame 02, in the layer. OK, that's better. So I'm going to pick the brush tool, at 40 percent opacity and add it. That's a few times here. And before removing a little bit from the bottom of the frame 02, let's duplicate it and call it frame 01 I'm going to push it down here. I'm going to select the other frames down here and hide the layer frame 01 And then I'm going to add a new frame down here. And hide frame 02 and show the frame 01 layers. OK, they are identical, so on the first frame. We can use Ctrl+T and shrink it down while holding Alt, we can move the anchor down here. And then shrink it a little bit, something like 10 percent, maybe more, OK? A little bit smaller. OK. Don't forget to hide frame 01 in the other frames. Make sure in each frame you have the proper layer active. And now with the smudge tool we can do the same technique that we used for frame 02, we can shrink this down, push this down. Make it smaller. Especially on the gaps between the spikes and the spikes as well, a little bit. Everything must go a little bit to the inside of this texture. Let's see how it is. OK, that's that's nice. Yeah, it's starting to look like something very nice. And just not starting from 05, I'm going to align this a little bit better, these holes here inside, I'm going to make them a little bit more symmetrical. Just going to keep pushing with the smudge tool. And then in frame 04, I'm going to do the same thing, but not so predominant. Just a little bit like this. Cool. I think we are ready to move on to the last frame where we will pretty much dissolve these away. So let's add a new frame down here. And duplicate the layer frame 05 and call it frame 06. You can hide this new layer in the other frames and on the last frame. Actually, I'm going to make everything a little bit smaller so you can have more space on the last frame simply set the anchor down here and shrink this a small amount. On each frame like this. For the third frame as well. And the fourth. And the fifth, which is pretty much already touching the boundaries. Yeah, OK, I think now it will look nice, the last frame, it should be even more, but. So I'm going to pick the smudge tool and for the frame 06 I'm going to do the same, start pushing outside even more. From the inside, as you can see. And erase a little bit all around this texture. It's the last frame, so we pretty much need to dissolve this. We only have, like a white ring, very thin, not so thick. Not so predominant. Push this a little bit outside. And now let's see how it is with the others. OK, that's very interesting. Very nice, I'm comparing the fifth and sixth layer. I'm going to push a little bit more outside from the inside. Yep, like these can go outside as well. I'm going to erase it. Just like these. Actually, I'm going to make this smaller from the frame 03, a little bit. Shrink it down, frame 04 as well, put the anchor always at the bottom. And that's it. And the fifth frame as well. OK, I think it's very well balanced. Of course, there's always room for small improvements, but let's move on to the next part, which is exporting these frames and creating a flipbook ready to be used in VFX Graph.
28. 3.17 - Exporting the Impact Flipbook: So we are ready to export this and we are going to do it in a moment, if you want, you can hide this guide. You can go to view and in show you can turn off guides, and have a better perception. on how it looks. Once you are satisfied with what you have, basically what you want to do is select all of the frames down here. And hide the black background. Like this, and then we want to click on this timer and set it to 0 to no delay. We don't want any delay between each frame when we are exporting, otherwise it will create a duplicate. Then we want to go to file and in export we want to select render video. In here, let's start from the top, we have the name of the frame of each frame, we want it to be ImpactoFlipbook01_ like this. And then we want to select a folder, I'm going to export this outside of the Unity Project of the Orb Explosion project, I have here an elements folder. I'm going to select it press OK And then we can create a new subfolder, you can turn it on. And this new folder, it's going to create, we can call it ImpactFlipbook01_3x2 In this case, we have six frames. It's going to be 3 by 2. We want to make sure it's Photoshop image sequence. PNG for the format. Start at zero, number of digits 1 using document size 2048 by 2048. What's important is down here in the render options now in the Alpha Channel we want to select straight unmatted so it renders with a transparent background. And now you can press render and wait a few minutes. It will export in the meantime, we can go to Google because we are going to need a software to create the flipbook to create the spritesheet and I like to use the software, which is called glueit. you can Google it like this very basic software. Kinda old, but it works fine. It works well. It has always helped me. It never failed me. That's why I'm still using it. Let me know if you don't find the link. Let me know. By the way. We want to click here and then up here in the code. We want to download the zip file. Once you have download it, you can unzip it and you will have this glueit master folder and in here you have the glueit software you can open up and it's very simple. The first step is to add the frames and click on this ADD button, navigate towards the folder we created towards where we exported the frames. Exactly. These ones, we want to select all of them. And then press open. And the next step is to say the number of columns the size in this case, it's going to be 3 columns, you can press the big button that says GlueIT. We can close this preview window, which is big, and then save the flipbook. We can save it to the folder where the frames are going to name this ImpactFlipbook01_3x2 Now, don't forget to save this Photoshop file. OK, and now let's go back to Unity. In here now, what we have in the Textures folder is the impact flipbook 01, the Photoshop file. You can turn on Alpha is Transparency for that, we are not going to use it for now, but the cool thing is that now let me open this preview window. As you can see, we have this frame, which I think it's frame one. And if you select another frame to be visible like the fourth frame and then press Ctrl+S if you go back to Unity, now that's the frame that is going to stay active and we could use it in Unity. Just a curiosity. So let's navigate towards the frames folder and now we can drag and drop the impact flipbook 01 3 by 2 by 2. And turn on Alpha is Transparency. And in the next lesson, we are going to see how to use this with the vfx graph.
29. 3.18 - Using the Impact Flipbook: So let's see how we can use this flipbook that we just created. Well, first, we can start, actually. With a flare hit. Select group, press Ctrl+C nd Ctrl+V to create a copy. And we are going to rename this to Impact Flipbook or Impact Flip. And the first thing that really matters down here in the output particle quad, so we can use flipbook is to set the UV Mode. We have flipbook and flipbook blend. Let's select Flipbook and I will show you in a moment what's the difference between them. Down here we have the size, which is a 3 by 2 that we added to the name of the impact flipbook. Now we can simply drag and drop it or click on this icon and search for it. What matters that you added the Impact flipbook as the main texture. And for now, let's disconnect up here the delay so we can see this in action as soon as we press play. It has a strange rotation because we are using set angle. We can actually remove it. We don't need it. And we have also the set position which we don't need let's delete it. And for the lifetime, we are actually going to add 0.05 to the flare lifetime. OK, up here, I think it's all right, we can remove this add angle. We don't want this to move. We just want to play the flipbook, see how it looks. And yeah we don't see anything right now. Oh, there it is. It's acting very weird. We actually need to offset the flipbook and we can do it either with a set position in the initialize particle or with a set pivot, we can also control the pivot of things. So let's use a set pivot. The pivot is basically in the center of this image basically around here where the anchor is and we want to place it down here. That's the only thing we are going to do, which basically means we need to offset it in the Y something like -0.5 No. Oh, yeah, that's too much, -0.4, maybe a bit more. We will see. Now, to animate the flipbook, we got something called a set index over life, and it uses a curve. And in this curve we want to say how many frames there are. First we want to select this line and in the last key we want to press with right click and select edit and say that since it's 3 by 2, we have 6 frames, but it starts at 0. So we can say 5. We got 0, 1, 2, 3, 4 and 5, which is 6frames. Yeah, exactly. Now, if you press play we get a nice impact flipbook, we don't see it very much because we have this multiply size that is shrinking down this flipbook. Let's disable it for now. OK, here we go. So, yeah, it's kind of big, but if I slow this down, as you can see, we can see each frame. Right. That's because we have flipbook selected in the UV mode. Here's the difference. If we select Flipbook Blend. And press play, as you can see now, it looks much smoother because Unity, vfx graph is creating in between frames, it's blending between each frame and it creates that smooth transition and it looks much better. So, yeah, we can leave Flipbook Blend. Now, you know what difference it creates a smoother flipbook. It looks pretty cool. OK, so we need to fade this out a little bit towards the end, so let's use the color of a life and set it to multiply the composition. For the gradient. This third key, we want to delete it And then add another key, more a less around here with Alpha at maximum, actually, we can we can delete this first key. We don't need any transparency in the beginning. We just need a little bit towards the end. Yeah, we actually only need one key here, OK. That's looking better now for the size. We can also use the flare size, no problem. What we need is to multiply it with a smaller value like 0.5. Maybe, i think the size is interesting, so up here let's add the delay to see how everything looks together. Press play, and yeah we don't see, everything happens at the same moment. That's the problem. So we need to add a little something to this delay, something like 0.1 should be enough. We are going to add a delay to the delay. OK, yeah, now we can see the flipbook and. And it looks very interesting, it's a little bit too big, but we'll fix that in a moment. Now let's see everything together. Yeah, uh, now we got something going on, look at it, it's already looking very cool, nice impact. Nice aoe, very cool. Let's let's just use this, multiply the size of our life so it grows a little bit in the beginning, just like this with this curve, as you can see, it starts at around 07, more a less. With this curvature let's turn it on OK, and. I'm going to use a set scale because I think it should be wider and not so tall, actually 1.1 in the X and 0.9 in the Y, so it isn't so tall. Let's see everything together. Let's see the explosion. Yeah, that's the size we are looking for, maybe a little bit smaller, like 0.45 Down here in the flare size. Exactly. That's looking very cool. The idea is that the impact flipbook doesn't go outside of the dome shockwave. And we got it that's looking supercool now we just need something similar, but for the ground. So that's what we are going to do in our next lesson.
30. 3.19 - Impact Ring Flipbook: All right, so it would look to add an impact on the ground as well, a ring something similar to the impact flipbook, but with a circular shape. And there's a very simple trick that we can do to create that texture. You can go to the textures folder and duplicate the impact flipbook 01 to Photoshop file, where we have all of the frames press controlled to duplicate it and we can rename it to Circle Flipbook 01 or ring flipbook 01. Let's open it up in Photoshop. Here we go, we have all of the frames of the impact flipbook, but now the idea. Let's select all of the frames and turn on the black background. The idea now is to, let's go to the fifth frame and with Ctrl+T. We want to push this up. As you can see, only the bottom part. We are going to shrink this vertically. And them we are going to go to transform and we want to select Warp. With this now, we want to push this point right here a little bit to the left and up and this point right here, a little bit to the right and up. To create kind of a circle, as you can see. Now we can duplicate these frame 05 Press Ctrl+T rotate it while holding shift 180 degrees and push it down here, as you can see, we kinda have a circular shape and try to align them. So that's the trick we are going to do to create this flipbook. I'm going to select both layers. Now we can select both the layers and push it up, so it's center with the file. OK, more or less like this. Let's do the same for the sixth frame, the last frame, let me hide this new layer on the other frames Also hide on the last frame, now with the frame 06 selected in the last frame. Let's press Ctrl+T and shrink this down, just like we did previously. Press enter and now let's let's go to edit and transform. We want to select warp technique and do the same. Push the scale a bit to the left and up. And push this one to the right and up, a little bit so it becomes a little bit more circular and press enter. Now, let's duplicate this frame06 And with Ctrl+T we can rotate it while holding shift, 180 degrees. Exactly like these, make sure you align these correctly and let's select both the layers and shrink it down until it fits. Actually, let's center it first and then shrink it down. I'm going to go to the other layers and hide the layer frame 06 copy Exactly. Here we go. We are starting to have something I'm going to make. The last time, a little bit smaller, the last two frames. And the fifth frame as well, with Ctrl+T selecting the two layers. Make it smaller. OK. OK. Now, let's repeat this process, but. For the fourth frame. Shrink it down with Ctrl+T Use the warp technique. Duplicate the layer, use Ctrl+T to rotate it and align it. And then, select both of the layers and align them as well, center them with the file. By the way, you can go to view and show guides if you want to align this correctly. As you can see. Let me just hide this new layer on the other frames. Make the fourth frame smaller. Even smaller. OK, so we are starting to see some growth, let's do the same for the third frame. Shrink it. Use the warp technique. Duplicate the layer, rotate it. Align it. Center this. Hide the newly duplicated layer on the other frames. Shrink it down. OK, like this. Shrink it even more, this third frame seems cool and playing back and forth to see if it's centered, to see if the size is correct, if it's looking good. You know what, these four frames are enough, so what we can do is delete frame 1 and 2. Press this icon to delete the frames down here. And now we can select all of these frames down here and hide the black background. We are going to export this. In file export render video. The name of each frame is going to be the ImpactRing01_ Select the destination folder. Create a new subfolder with the name ImpactRing01_2x2, it's only four frames. It's going to be two by two. In my case, impact ring zero two because I already have an impact ring zero one and make sure Photoshop image sequence is selected PNG for the format. And then down here, straight unmatted. Press Render wait a few minutes and then we need, again, the Glueit software. Add the frames of the ring. Maybe wait a little bit for Photoshop to export the last frame. OK, now select all of the frames added. Say the number of columns is 2, glue it, close this preview window and save this impact ring. 01_2x2 OK, we got a flipbook for the ground. Now we can navigate towards the impact, ring two by two and drag and drop it to the textures folder of our project. OK, looking good, I'm going to leave this frame. As the preview one. Now, I'm going to select the impact ring the one, two by two and turn on Alpha is Transparency. And now I'm going to select the impact Flipbook group, press Ctrl+C and then Ctrl+V paste it down here to the ground section. I'm going to call it ground ring impact. Copy and paste it to the output particle quad the name. Now, the main difference is that since it's going to be on the ground, we don't need this Oriente to face camera. We can remove this block. Go up here and rotate it 90 degrees in the X or -90 degrees in the X. Let me just disconnect the delay. Oh, yeah, it's. With the wrong rotation, it's 90 degrees in the X and not -90 degrees. Maybe. We can also remove the set pivot we don't need it. It's on the ground. We don't need to offset this. And the flipbook size is going to be 2 by 2, let select. The impact ring flipbook for the main texture. The set tex index over life, in this case, the last key you can press F, by the way, to see the whole curve, it's going to be 3. It's zero. One, two, three. Four frames Starts counting at zero, don't forget. OK. Yeah, there's something happening here. We will see we don't need the multiply size over life let's disable it for now. OK. Let's turn off use soft particle. OK, that's the problem, it was fading out our Ring flipbook, but now it's intersecting the ground so we can actually use a set pivot. Or simply drag and drop from this one while holding Control, create a duplicate. And here we go, we got the impact. OK, now what else we need? Well, we need to increase the size 0.8 0.8 instead and the gradient, it should be more visible. I'm going to push this key to the right. And we can also turn on multiply size over life. Maybe push it a little bit down. 0.5, the first key, I'm going to set the play right to 100 and I'm going to connect the delay up here to see everything played together and let's see how it is looking. Oh, it's being rendered on top of everything, so I'm going to go to VFX Graf _ Explosion and in the output render order, we can push the ground ring impact to be after the circle ground, maybe to ground mark ab and to circle ground ab As you can see now, it's being rendered before everything else, the dome and the shockwave looking good, but we don't need to add anything to delay. So let's connect the delay directly to the delay before loop. And... ok it needs to be bigger. That's the problem, I can see it now. Let's try 1. Maybe even more 1.3 Exactly. Look at this, it's awesome. 100 exactly. 1.3 multiplied of the flare size, that's the size we need. Let's see everything played together. I'm going to set the delay of the explosion to 3 again. And I'm going to play everything, to see how it looks with orb. Ok Yes, very nice. That's looking fantastic with both of the flipbooks and it fits very well with the mark on the ground. The ring flipbook. Yep. Looking very good, awesome. So in our next lesson now, what we need is to make a few improvements to the Orb. We are going to add some particles flying in and then we will make final adjustments to everything. And that's pretty much it.
32. 3.20 - Orb Particles In: So for this lesson, we are going to create some particles that will simulate the arbor gathering energy. We will make them fly inside of the arm. Good and nice twisted motion. I'm going to press a deed to open up the RBV affects graph. And in here, let's start with a simple particle system. Select everything and create a group with right-click. I'm going to call it particles In, copy and paste, put particle quiet. And well, the difference with this part consistent is that we are going to constants pound rate, but it's not going to loop forever. So if we select this pound block in the spectrum, we will have the loop duration and loop count, which they are said to infinite, but we want them to be constant. The loop count is going to be one. But for the loop duration, we can use the lifetime. As you can see, for three seconds, it emits particles and it's a start. For now. We also want to control the lifetime of these particles. So let's create, so let's create a float. Let me just cause a fitting. You've got particles lifetime, but default value of 0 that's going to connect to the b, which is the maximum, for example. And multiply these by 0 dot 33 for the minimum. So the live between 32 and 0 for now. Okay, Yeah. Another thing we can change is the main text down here. Actually, let's create a very simple Spark texts to, let's go to Photoshop. I'm going to call this park 001 2048 by 2048. And it's so simple that we only need to paint the background to black. Create a new layer. Pick the brush tool and select a white collar. B for the brush. And up here, when I leave Ardennes at around 25 percent, I'm going to make it more or less of decides make sure it doesn't go beyond the boundaries. Smaller, okay, like this. And then I'm going to duplicate this layer. And a control T. I'm going to push this down while holding Alt. I'm going to squeeze it and make it a little bit taller. As you can see, something like this. I'm going to select both layers and occupied wall space as much as I can without cropping these textures. And then I'm going to select everything with the black background, press V and aligning type here, as you can see. Now we can simply add black background and go back to Unity and save this to the text as folder. And then go back to, okay, now we can assign, let's just turn on Alpha's transparency for this part, 0001 applied changes and now we can assign it here in the main text. For now it doesn't look like much, but we can already go ahead and say that we want this to be aligned at with velocity vector. So they rotate towards where they are going. And in this case they are going to go from the outside to the inside of the arm. And let's control the size with a set size. We can create a float as well, call it particles size. Default value of 0, that 85. We can make the set size random by the way. And far the minimum. We can multiply these by 0 dot-dot-dot three, which is the third. Okay? Now we want to stretch this. First. Let's set the size of our life to multiply and make sure they go from big to small with this curve right here. To stretch them, we want to set scale. And we want to stretch them in the x, 0 to 10 to two for now. Okay, so far the motion, we want this to go from the outside to the inside of the art, right? So we don't need the set velocity. What we want to use this sphere, want to use a set sphere, position sphere. In here we have the radius and the center. As you can see. You can offset the sphere if we connect to y of sets to here, well, the particles should be there. We don't see anything because they don't have motion. Remember we align this to the velocity vector and the velocity vector is at 0, they will not be rendered. So let's first decrease these radius to treat or 85 more or less. And then we want this to conform to a sphere, right? So in the update particle, Let's search, Let's add one confirmed to sphere. Like this. As you can see, we also need to offset this. We can connect to Y offset variable property. And here we go. As you can see, as soon as we connect the start, going from the outside to the inside to radius can be smaller, 0, that one for now. And attraction speed can be bigger like 20. And attraction force 200. As you can see, they go really fast. It gives a really nice sensation. But as you have nots, they are also kinda floating, kinda heartbeating around the sphere and we don't want that, it doesn't look that good. We want them to go into the sphere, into the arm and disappear. And in the update particles or something else that we can use to make sure that they don't go beyond a certain radius. And it's a keel sphere or a kill box. In this case, we are going to use a kill sphere. And as you can see, we can also offset these dissenter just connected the Y offset. And now every time one of these particles touches this kill sphere, which we need to make small extra that five day die. And it seems like it enters the arm. Now. Okay? But we also want this particle system to stop emitting particles before the arc goes into the ground. And we can do it with a simple curve. What we want this to control the rate, the constants pound rate with the curve. So with this curve, we are going to create Marla's this graph right here. We'll right-click. We can select broken. You can control the handles of the Bezier curve independent of each other. As you can see down here, we are going to crop this instead of stopping at one, we want this to stop at 0 dot nine. And then these spike right here, we wanted to push like way above. Let me do a right-click here and say like tiny 0 dot 75 and value 70. It's going to emit 70 particles per second at its maximum rate. Here we don't see nothing right now. And if you connect it, well, it kinda doesn't work because we need to animate the curve. We didn't have time variable. But in this case we cannot use the age, the lifetime of the particle because the particle is not yet barn, right? That's something that we do in initialized particle and below that. So in this case we need something else. We need something different. If you search for time, you get a bunch of time notes and properties. But the kinda dot work for what we want. What we want is in this bound state. In here we have this pound total time. If you connect it to the time, as you can see, it kinda works, but it's super fast. As you can see. Part cassava rays appear in the RB still there. We kinda need to give the cessation at this gathering energy, right? So it needs to play for a longer time, but we can do is slow this spout total time down. You can multiply it by a third, 0 dot 33, which is pretty much the amount of time that we need. If you'll take a close look as you can see. Exactly, That's exactly the time we needed. And as a matter of fact, so we are controlling the concepts pound rate through a curve, which is great and quite useful. I'll just add a little problem right here, where it connected the Y offset to the radius, we just fix it. Why offset to the y of the center. Here now we see the particles coming from everywhere. That looks great. By the way down here, let's remove the setColor of a life. It's add some color to this. Let's create a part cuz color property. 100% of alpha orange with a density of 465 along those values. Okay, that's super bright. Maybe far is enough. Okay? That's much better. And the set scale, we can make it random between 0 and 1 and 0, 2 in the x and z, and one in the Y. Now you can increase the particle size here to 0 dot seven. But that's okay. So let's add a different motion to the particles. Let's make them go crazy a little bit. Where we do it is in the update part, we had constantly update their position and we got a turbulence note, turbines force. That will help a lot with that. If we increase the intensity to 100 heads, you can see you get it's crazy motion, which is a little bit to match the frequency. I'm going to leave it at two. We're going to decrease intensity to 60. And that's looking fine. I'm going to decrease also the radius of the sphere. Yeah, that's a little bit too crazy for now, but that's very interesting. Okay, so let's just create a curve. Far the concepts pound rate of the particles I'm going to call particles pound curve. May actually going to save this curve up here, create a new one in the cog icon and edit the particles bound property. I'm going to sign it just like this, this one and connect it here because we want to adjust this. As a matter of fact, I'm going to push this last key to be 0 dot-dot-dot 188. So it stops emitting a little bit before. And that's it. Maybe the curve actually it should be like this this angle right here to create the ramp. Oh, and by the way down here, let's make sure that they have a random Alpha. So let's add a set Alpha set to random between 01. What we need to fix down here is make them a little bit thicker in the x. Scale, 0 to three and 54, the minimum of two y. And for the particles pound curve, actually, I'm going to make sure they are starting right at 0 because it seems like there is no part because in the beginning. And then I'm gonna go back to Photoshop and make this upper part wider because they are going to be stretched. Okay, that looks a little bit better. Maybe the crystal lifetime to 35. Let's see IDs with everything else. We met a lot of adjustments. It's kinda hard to get it right sparks. This part goes fine. But here look at this figure, it looks very interesting. That's an interesting result. I'm just going to adjust here. The gradient of the are going to push the last scale bit to the left and increase the intensity. Or the ARB should be brighter. Actually, that saved those adjustments for the next lesson. We are going to adjust a few things are, and make use of the master shader that we created. And then we will make some more adjustments to the ground AOV and to the exposure.
33. 3.21 - Improvements: Orb: OK, so here we are for the improvements of the Orb, what we can do, start with actually, is we can distort a little bit the Orb with the master VFX graph. So let's assign it here in the shader graph of Orb additive. Master shader VFX graph. Exactly. Got this amount at 1. It's crazy. Let's leave it at 0.05, for example. Just a little bit. As you can see, that looks very interesting and can also increase the speed. It's static to 0.5 in the Y or -0.5 So it kind of goes up. Yep. Looks good. The scale actually can be something around. 25, all right, and we don't want to set color of life because we need to use the color in the shade, so let's remove it. And up here, we want to sample the Orb Gradient. As usual, we want the age over lifetime. And then connect it to the color of the shader. And here we go, we still got the. Orb gradient going on, looking good, and it's distorted, it's animated. What we can also do is repeat this for the flare. Add the master shader VFX graph. Distortion around 0.05. 25 for the distortion scale and -0.05 for the distortion speed, obviously you can test different values, you can play with this values guys, don't just copy my values, test a few things and then we can connect the sample gradient . I'm going to copy. Ctrl+C Ctrl+V Delete the set color over life down here and connect the sample gradient to the color of the master shader of the flare.. And as you can see, we get distortion in both of the Textures and it looks fantastic when we get closer. OK, let's push this a little bit to the left, we want to add a few more output particles down here. Let's also make sure that this is inside the group. OK, so let's make room. I'm going to copy this orb additive and connect the update particle, we want to add the black background to this so it makes a little bit more contrast, copy and paste to around here. And let's select the circle 02 texture. We can remove this sample gradient, we only want a black color like this, we don't see much happening because we don't have connected to the update particle. We want to set this to Alpha as well and then connect the update particle. Oh, as you could see, now it's being rendered on top of everything, and then let's go to the VFX graph _ orb in the project and we forgot to rename it to orb AB, but it's the last one. We want to make sure it's above the Orb additive. Let's actually rename this to orb Alpha Blended. So, yeah, make sure it's the first one, so it's behind everything else. The size should be bigger 1.5 Let's give it a try. Maybe 1.7 OK, 1.7 seems to be cool, but we kind of want this to fade out, so let's use a gradient. We want to delete this last key down here. The first key is going to be black. Yeah, this grade should be fine, let's give it a try. Oh, we need to sample it and then use the age over life time and connect this sample gradient to the color. And let's see how it is we probably OK. OK, OK, maybe we need to fade this out. I'm actually going to decrease the second alpha key to 200 200 and the third alpha key to 200 as well. We want this gradient. Yep, that's looking very nice. OK, so that's it for the contrast, one of the things that we can do is add some shockwaves going from the outside, the inside. So let's create the new simple particle system. Create a group and call it shockwaves. Copy and paste to the output particle quad as usual, and. We want to use this circle, 0.1 that we created. And also the master Shader VFX Graph. With a little bit of distortion, like 0.1 or 0.05 And the distortion speed at around -1 for the Y. Yeah we need to control the size of this, so. Let's add a set size and let's add three variables shockwaves, lifetime, shockwaves size Actually, two variables, let's see, and the shockwave size could be 2.5. And the set size to be random first. Connect it to the B and multiply. With 0.33 for the A For the minimum. We want them to go from big to small, so they kind of look like they are going inside the orb just like this. Let's make sure it's multiply the size over life. We don't want this curve over life down here. Yeah, we can actually create a new gradient shockwaves gradient. Connect it to a simple curve and use the age over lifetime. For the time. Connect it to the color of the shockwaves we will fix the color in a moment. For now, let's use a set position and remove the set velocity we want to offset. These shockwaves. Connect the Y. But yeah in this case, these shockwaves really need to follow the Orb, we are going to fix that in a moment, For now the lifetime is going to be 0.3. And for the minimum multiplied by the other 0.333, a third as usual. Let's make the rotation Random, with a set angle. Between 360 and -360 in the Z OK, that's something it's always spawning particles, so let's select the spawn block and in the inspector. Make sure that the loop duration and loop count are Constant. And we can connect the lifetime here. Yeah, that's probably enough or we can copy this whole set up. And paste it around here, make sure it's in the group. But for this curve, I'm going to press A to show the whole curve, and instead of being 70, going to set it to be 20. Let's give it a try with 20. And connect it to the constant spawn rate. OK, I think that's looking interesting. Let's create a gradient for this. I'm going to push these alpha keys more or less to around here and for the first caller, I'm going to use this blue. With no intensity. Yeah, we want this to be discreet. And. And we also wanted to have a smaller distortion scale like 30. And the dissolve amount could be random, like between 2 and 10, for example. Turn-off constants. OK, so in order for this to follow the Orb, we need to make a few things. We cannot make the same thing as. the Orb where we used the multiply position in the output particle quad, and it kind of goes up and down until it smacks the ground because these particles have a much shorter life time. So we kind of need to tell them whenever they spawn, where the orb is? And we know where the Orb is, for example, let's create a multiply position here. We know where the Orb is, because of Orb Movement Curve. Let's push it to around here and sample this curve. And for the time, we cannot use the age over lifetime because it doesn't have lifetime part yet and it will not work, it will move up and down really fast and then smack on the ground because it has a shorter life time. So we need to tell it where the orb is and the time is going to be a periodic total time. The period is basically the lifetime of this particle system and the range, it's going to be between 0 and 1. So basically, these shockwaves are going to spawn, according to this curve, for as long as three seconds. They are basically going to spawn where the orb is, as you can see. If we select everything and play together, this is what we get. As you can see, we get these nice shockwaves following the orb, and that's a really useful technique sometimes because the lifetime of these shockwaves is smaller compared to the Orb. So that's how we tell them where the position of the Orb is. All right. So that's it for the improvements of the Orb, in the next lesson, we are going to do pretty much the same and make a few improvements. But for the Ground AoE.
34. 3.22 - Improvements: Ground AoE: So for, the ground aoe, let's also add some contrast to this first open up ground aoe VFX graph, and we could also use the same particle system to spawn another texture. You can push this to the left Ctrl+C to copy and then Ctrl+V to paste it. And we are going to rename this ground circle ab bit because we are going to set this to Alpha in the mode, but for this texture, we are going to use the circle 03, or if you want to create another texture, for example. I'm going to stick with this one and. For the gradient down here, we don't want to use this gradient, we want to say that the first key is going to be black and we can delete the last one or make it also black. OK. And now we can correct the update particle to this output particle quad and see how it is. OK. Yeah, it's probably being rendered on top of the ground circle additive. So let's select the VFX graph on the Ground AoE and push the Ground Circle AB to be the first one to be rendered before the circle ground additive. So now we can see the. To be rendered before the ground circle additive. And now, yeah the size was a little bit too small, so let's multiply this one with something like 1.5 1.5 Yeah, exactly, so it's super dark. We need to control Alpha, we can do it here in the gradient, we can go to this key and say it's 150 150 and this third alpha key, you can set it also to 150 for the Alpha. Yep, that seems enough, as you can see now, a little shadow around, a little black and it adds a nice touch to this ground. aoe, as you can see. If you want, you can make it even more transparent in the beginning, as you can see, then it gets a little bit darker towards the end. OK, that's cool. Now, let's copy this entire ground circle additive, the vfx graph, let's delete the ground circle AB, because now we are going to take advantage of the master shader. We are going to call this one ground spiral, for example, copy and paste down here and then assign the Master Shader VFX Graph. But we are going to need something extra. We are going to need a mesh, so let's open up these OrbExplosion_Meshes, double click it to open directly blender and for the mesh we want is a circle for the ground because we want to control the UVs of this circle. What matters here is the UVs. Otherwise we would use a quad. So we want to start by pressing Shift+A to add a cylinder, then press tab to enter in edit mode. And then we could press Ctrl+Tab to switch to faces. We want to select the top and the bottom faces and delete them, press, delete, and that's it. Now I'm going to do a Ctrl+Tab so we can select the vertices. And while holding Shift+Alt I'm going to press select to select this entire edge loop, all of these vertices up here. I'm going to scale them down to 0 with S. I'm going to turn off proportional editing. It was on, by the way, make sure it's off and then I'm going to press G, lock it in Z and type -2 -2 So it's the same level as the rest, as you can see, we got a circle, but the UVs are in a rectangular shape. It's different. Now we need to fix this UVs, let's let this bottom edge loop and we G press Y to lock it and push it down. So it touches the boundaries exactly like this, one last thing we can do is add another edge loop in the middle press Ctrl+R, one time just like this. OK, now let's select everything with A, press G Z to lock it in Z and push it up 1 press 1 on the numpad. OK, so it's at the same position of its own pivot and rename this to circle 01. And since this is already saved to unity directly, all we going to do now is press Ctrl+S and we can go back to unity. It will update automatically. All right, so once again, as you know, as you remember, we cannot use meshes with the output particle quad We want an output particle mesh. We want to output a mesh, you can copy and paste the ground spiral name while the control we can drag the set size, we can drag the multiply size over life. And that's it for now, let's also select the Master Shader VFX Graph. And we can delete this output particle. Let's drag the size connect it here. And also drag the size curve, so it has the same motion as the rest of the ground aoe. So for the mesh we want to use the circle01 we just created. And we probably don't see anything, but if we go below as you can see, so what we can do in this case is first, let's make sure it's smaller because it's way too big, we can multiply the size by 0.45, more a less. We will see. Yeah, that's OK. That's actually a good size. Now, the way we fix it, turn it up is rotate it -90 in the X, so it faces up as you can see. And as you may notice, the default texture is being totally distorted as well as you can see, and that's going to be useful, you will see, because now if we go to the main texture in assign, for example. The ground mark we get this nice distortion, as you can see, if we select circle, you can try different textures, we get different feelings. The impact flipbook is actually pretty cool. I think it's frame 04 that I'm using. I'm going to leave it as it is for now. And the cool thing is that if we increase the count up here to two particles, well, we will have two circles. Right. And they are overlap. But what if we wanted to rotate? Only one of those particles, 180 degrees, what we can do is, as you can see, if we set it 180 in the Z, both particles will rotate, right? Exactly. So what we want to do is if you think about it, there's probably something that identifies each particle being spawn, probably an index. And you press space bar and search for index or spawn index, we get this attribute, which is pretty much a list of each particle. This vfx graph is spawning. In this case, it's a list with two particles. So what we can say is we can divide this number by 2, for example. We can get the even and odd numbers if we divide by 2 and if we compare this and say that. If it's equal to 0, it's even number, right, it's an even number. In this case, it would be the first particle, which is zero, so if it's true, then we can rotate it 180 degrees. If it's not true, then don't rotate it. Connect it to the Z, the first particle is being rotated 180 degrees and the other one it's not because spawn index is zero, One, two, three, four, five. And the second particle is one. And this is very cool because now what we can do is create a different feeling. If we increase the dissolve amount. We can play with these functions that we got here, we can increase the distortion amount to 0.15, 25 for the distortion scale. Because look at this, it's awesome what we can do with this. Such a cool technique, we can also add distortion speed. Negative values will seem like this is being sucked inside. Positive value seems like it's a puddle being pushed outside, as you can see. And that's an awesome effect. I'm going to leave it at 0.5, dissolve amount at 5 distortion scale at 25 and distortion amount at 0.2 And we can rotate them, we can add some rotation with an add angle, as you can see now. 0.7 for the Z for the Z, really creates a nice motion. So let's take care of the color now. It's simple as we know, we simply need the gradient, to sample the grade. And then the age over lifetime. And that's it, we got color, as you can see, so cool, such a cool effect once we got the right tools, we need to make it smaller, 0.4 maybe you can try different textures as well. Of course, it's up to you, by the way, if you want to decrease the Alpha. And only the alpha of this gradient, what we can do is open up this gradient, connect the X to the R, X is basically R. Y is basically G and Z is G and W is A. So what we can do is decrease the Alpha directly like this. Or since it's fading in and out, we probably want to multiply the W by a smaller volume. So we only see a little bit of this ground spiral and it doesn't drag to much attention, and then you can try different textures, for example. And you get some very interesting effects just playing with these, basically. I'm just going to add a little glow inside by copying pasting this ground circle additive. Connect the update particle and Call it ground beam additive, but in this case, we can actually use the default particle. And we get a little glow in the middle. We can decrease the Alpha with a set alpha after the set color of life. 0.4, as you can see, looks cool, we can increase the size, multiply it by 1.3 And it looks awesome. I'm going to play a little bit more with the. Oh, ground mark really looks cool for the ground spiral. With a dissolve amount of six, very interesting, rotate it slower like 0.25, yeah that creates an interesting effect. Pretty cool. Tricks Now, let's see everything played together. OK, we've got a shockwaves going in, kind of crazy particles, and then the ground aoe. Looks great guys. I hope you have enjoyed these cool tips and tricks I've showed you, in the next lesson, we are going to make a few improvements to the explosion.
35. 3.23 - Improvements: Explosion: So in these last improvements lesson, we are going to add a little something extra to the explosion. We are going to add some flying particles in the aftermath, in the dissipation. So let's set the delay of the VFX Graph Explosion to 0 and then open up vfx graph. in the edit button. So on this explosion, now we can start by copying the sparks hit particle system, can press Ctrl+C and Ctrl+V to around here, and we can call it the flying particles copy and paste it as well to the output particles quad. We need this to emit particles for a little while after the impact. Which means we need the loop duration and the loop count to be constant. We can select spawn block and an in the inspector. Just like this, OK, I'm going to set the loop duration for now to 0.5. And we can leave the single burst. But we also want a constant spawn rate, and connect the sparks count and we'll see where this goes. All right, so it emits a few particles for half a second and we also have the single burst, we should have increased capacity, by the way, I forgot about it, but you can do it in your side. OK, and then we want to offset this a little bit, these set position in the sphere, in the Y, so it isn't touching the ground, something small like 0.2 is enough and increase the radius because it's an AoE to around 2.5. And for the lifetime. The maximum is going to be the minimum. And for the minimum, we can multiply it by 3. These ones are going to leave a little bit longer. They are going to stay there flying around. You get the idea. So in this case, we actually don't need the gravity. Nor the conform to sphere. We want to control the emotion with a set velocity in this set velocity, we can say it's random. Since we need them to go up, we can start with the y axis. Something like 0.5 and 2. And for, the X and Z, we can say -1 and 1. All right. We got something going on. We don't need them to be stretched. So, the Orient block, we can set them to face camera plane and we can remove the set scale. It's stretching them we don't need. And. For now, let's leave the flare texture. It's big, but it kinda looks good if it's smaller, I guess let's try. So in the Sparks size we need 2 multiply, for the minimum, We can multiply something small 0.01 and for the maximum 0.1. That's too small, so 0.02 and 0.2 It's a little bit better. Yeah, we are going to keep the flare in this, it looks nice. I think the aspect is more a less there, what we need now is to control a little bit their motion. We want them to go crazy. Every time I want to add a twisted motion, I use a turbulence in the update particle. Maybe with an intensity of 5. Yeah, that kind of looks cool, it's a little bit too large, maybe 2, for the set position in the sphere of the radius. Yeah, 2 is enough. Look at this. It's awesome. Increase the drag so they don't get dragged too much by the intensity. So they kind of drift away slowly. OK, so that's looking pretty cool already. I also noticed that the sparks could be a little bit bigger in the inspector, I'm going to increase it to 2. Yeah the flying particles also get bigger because they are using this size variable. But that's fine, I'm going to add a little delay to the flying particles so they don't immediately appear, they are dragging too much attention. I'm going to add 0.1 to the delay. Exactly. You get the explosion and we see some flying particles, and I'm going to add some randomness to the Alpha so they are not all really bright. We want to have some of them less bright to random. Between 0 and 1. OK, still a bit too big, but I'm going to do is set maximum to 0.15 Yep. That looks nice. Now I think the sparks gradient, which is also used in flying particles, I think it could be brighter in the beginning. I'm going to push this keys a little bit to the right. And for the first key, and I'm going to add another key in the beginning like this. But this time it's going to be like 6 for the intensity, really bright. Yeah, like this, they shine. By the way, you can always go back to original values, for example, if you disable the Spark size, it goes back to 1 which was the original value. The only downside is that if you try to turn it on, you will not get the value that you had. I think it was 2 I'm gonna set it to 2.5 see how it is. Yeah, kind of big, but I think for the sparks is good, the first ones that are stretched, so I'm going to do instead is in the flying particles, I'm going to set the minimum to 0.01 and maximum to 0.1. Exactly like this. The stretched particles have a good size. Maybe they could be less bright 0.8 for the maximum of their of their alpha. Yeah. Actually, 0.4 and that's it, I'm not going to change it anymore. We can apply the changes and then we can try it out. Yeah, I think we nailed it. Nothing could be provided, shockwaves going to the Orb. Could be a different texteture. But the idea is there, you can improve that if you want on your side, all you got to do is create a new texture, try different things. Learning is a process of trial and error. So don't be afraid to make mistakes and to try stupid things. Let's put it that way. Try different things, see how it goes. I'm sure you will enjoy and learn more instead of copying everything that you see. So that's pretty much it. Now for the Orb explosion, the main exercise is done. I hope you have truly enjoyed this. I think it came out really nicely that you have learned actually some pretty cool techniques and interesting tricks with VFX graph. It's quite powerful, as you have seen. Especially when you can create basic programming behaviors and a lot of customizable variables actually in the next lesson. We are going to take advantage of all of the variables that we have created and make a few variations of this are explosion, see what can be done. But other than that, I hope you had a great time. See you in the next lesson.
36. 3.24 - Orb Explosion: Variation 01: So with what we have done in this lesson, we are going to create kind of a different effect. So first in the prefabs folder, let's duplicate the vfx_Orb_Explosion with Ctrl+D. We can name it to _v2, second version. For this one Let's imagine that we wanted this to explode mid air. Basically, the Orb won't go up. It's an Orb that is placed somewhere and then it explodes. Let's drag it to the scene and disable the original version for now. Which means we can set the Y offset of the Orb to 0. Exactly, it stays on the ground because our prefab is at the ground level. So let's push our prefab a little bit to the Y, a little bit up more a less around here like this. So if it's an explosion mid air, we also don't need the ground aoe. So let's disable it for now. And on the VFX graph explosion, we also don't need the Y offset, let's set it to 0 and let's play all of this together and see how it is. OK, so as you can see, we have this marks on the ground that are flying in midair, since it's no longer an AoE, we need to make a few adjustments and you will see how easy it is to adjust this to create something totally different. So let's open the VFX graph explosion in the edit button. And we have down here this ground effects, we have the circle ground AB, the ground mark and so on. Actually, the first thing we can do is change this name instead of circle AB, we can call them ground lifetime, ground size and ground alpha. It's basically the marks on the ground, right? And if we don't want to use them, we can create a new float called, ground count. With a default value of 1. We can connect this to the circle ground AB. Which spawns two marks on the ground and the ground mark AB, we can also connect it here in the single burst. For the ground ring impact, let's actually leave it as it is for now. Now in the inspector, we can say that for the ground count, we want 0. And what will happen if you play all of this together? Is that we no longer have those ground marks flying mid air. Right? Look at this, the only thing happening here now is that we have an hemisphere, We have this dome that it kind of looks strange if it's supposed to be a midair orb explosion, we don't need it. We need to change it. And it's actually super simple. As you can see, we have dome lifetime, dome size, dome size curve. We can now go ahead and add a mesh property. And call it the dome mesh. Make sure you assign the hemisphere to this dome mesh as the default one, and we can push it up here below the dome gradient or above the dome lifetime actually makes a little bit more sense. Now let's find the dome shockwave particle system. And down here in the output particle mesh, we can connect the dome mesh variable. You can save this. And now in the inspector. We have the hemisphere, and we can change it, for example, to this sphere that comes already with unity. Now, what will happen if you play all of this together is that we have a very small sphere, actually. And fortunately, we already have a variable that can control the dome size, let's increase it to 5. If we set the delay to 0, to test this out quickly, as you can see, we have a cool explosion. Going to set it back to 3 the delay and play all of this together. OK, so with just a few changes, we already have something totally different that looks super interesting. But we have this impact flipbook, which is kind of not in the right position, so let's go ahead to the impact flip particle system and down here for the set pivot. We are actually using the flare properties, which we shouldn't, but let's keep it that way and as you can see, flare size, flare color. So we are going to create a new float and we can call it flare pivot Y, with a default value I'm going to push it below the flare color, with a default value of -0.4 -0.4 And then connect it here to the set pivot, to the Y. Like this, so we can now basically say in the inspector, that we don't want any offset, let's see how it goes. OK, so, yeah, actually, we kind of need some offset, as a matter of fact, we could use a totally different flipbook. We have the ring impact flipbook that could fit very well in here. So let's actually create some properties specific to this impact flipbook. Let's create a texture2d property and call it the impact flipbook. Let's select the one we are using, which is the impact flipbook 3 by 2. This one. Let's create another property, but this time for the flipbook size, which means we need a vector2. We can call it the impact flipbook size. It's going to be 3 by 2, which is what we have, because we don't want to make any change to the other orb explosion. The original one, we want to keep it intact as much as possible. So for this impact flipbook size, we can connect it here and. We can connect the impact flipbook texture property to the main texture right here. We can save this and now in the inspector, in the orb explosion v2, we can say that the impact flipbook is actually going to be the impact ring flipbook. Which means it's 2 by 2in the flipbook size. Oh, actually, we need to change the curve as well. We have this set tex index over life, which is animating the flipbook, and we need an animation curve. We can call it impact flipbook curve. And remember, we don't want to make any change to this, so let's see how the curve is. It goes from 0 to 5 straight because it's six frames, right. Let's make sure this one is the same. OK, click here. And for the last key, we can say it's 5. And then we can connect it to the set tex index over life. We can save this and now in the inspector. We want to adjust this curve, so it plays our flipbook, which is 2 by 2, properly, which means it goes from 0 to 3. It's only four frames exactly like this. Now, if we play all of this together, what we get is something really cool. As you can see, we actually don't need any offset after all. So, yeah, this flare pivot Y we can set it to 0. But most importantly, let's change its name because we already have created impact flipbook properties. Let's call it impact flipbook pivot y and push it down here. And yeah, we actually need any offset after all, for this one. But what we need instead is to actually control the size of these impact flipbook so let's create a float and call it impact flipbook size. Unity automatically added one in front because we already have a property with the same name. That's fine. That's totally fine. We can push this property above all of the other impact flipbook properties. And make sure the default value is the exact same we have in this set size. In my case, it's 3.6 And replace this flare size exactly like this. Now, in the inspector we can increase only the impact flipbook, in this case to 5. And if you play everything together. Just look at this, it's awesome. We have pretty much made only a few adjustments and we have. Kind of a different effect. So that's how powerful vfx graph can be. How customizable it is, and how useful that can be. Let's apply the changes to this orb explosion v2 Let's enter the prefab and remove vfx graph. Graph ground aoe. We don't need it and then go back to the inspector. And the cool thing is that now the original one is intact and it's still the same just as we left it, because we made sure that we didn't change any of its original values. Really cool. And in the next lesson, the last one, we are going to create some simple variation of this, as well as play a little bit with the color.
37. 3.25 - Orb Explosion: Variation 02: So let's play a little bit more with this, and for example, we can duplicate the orb explosion v2 v2 and call it simply explosion. We can also use the elements we created, only for an explosion an impact something similar to that. So let's drag it to the scene, enter in prefab mode and we can delete the Orb VFX graph. In the inspector now, if we want to use this as an explosion or as an impact, we don't want any delay, we can set it to 0 and we get this instant explosion, which is also quite useful. But for example, what if we don't want to use the sphere? We can say none for the mesh. And we get also a very nice result. It's quite versatile, for example, let's increase the sparks count make it go crazy a little bit. We've got a few more sparks, and let's imagine that we actually want this to be on the ground. So we don't what this impact ring. We want instead the other one, the impact flipbook one, or you can even create a different flipbook, which is awesome. You simply need to create a flipbbook and assign it here. The size is 3 by 2and in the curve. The last key is 5 for the value. If we play this together, well, we kind of need to offset this, right? We already have that property. We can say it's -0.2 and decrease a little bit the size of the flipbook in general. Exactly. Look at this, it's also a fantastic option, and if you create different textures, you get different feelings, you can even create properties for each texture and then make this completely customizable. For example, we want a bigger impact. A bigger flare size, we can set it to 9 And let's actually make this one purple one, you can say purple. Here we go, it looks cool as well. We can even increase the shockwave count to 4. And decrease the lifetime, so they are a little bit faster and also to criticize to 10. And sparks, let's make them purple, we can remove these two keys in the center the first key can be this purple around here. And the last key, can be a little bit more blue. Something like this looks totally fine. And here we go, we have something different. Different colors and for a different purpose, maybe we are reusing what we already have done and we could put this very close to the ground like that 0.1 in the Y. And we get a nice impact with a shockwave and some particles. Maybe nose are the tree, actually. And yeah, it's something. We can apply the changes. And as you can see now, we have three different variations. With only three VFX Graph and we could keep on adding properties, so this would become super customizable. One last thing that we can do, which is fun as well, is change the color of the Orb explosion, we can create a duplicate with Ctrl+D in the prefabs folder, and call it purple. We can drag it to the scene. And for the orb gradient. It's actually going to end in a purple the last key. And then we go to a deep blue. And we start with a light blue, for example. Maybe for the particles color you can be a little bit more yellow instead. OK, that's a start if you go to the Ground AoE, you can make similar changes. We can actually copy this caller from the last of the hour gradient and based it. To this key of the ground aoe gradient. The key, the middle can be a deep blue and the first key can be a light blue. Oh, actually, we need to decrease the intensity of the purple key instead of 5, maybe 3 is enough. Look at this, it's awesome already just need to change the color of the explosion, for example, the dome gradient. It can start as a purple. Then it goes to a deep blue as well. And then to a light blue. And for the flare color, let's leave it as it is for now, let's see how it goes. OK, we need to change those colors so the flare color maybe can be a purple. Something around here. Let's see how it is. Yeah, it's still very interesting, we can actually make the particles blue, this sparks gradient, we can remove these two kids in the middle, the first key can be purple as well. And the last key can be, let's push it more or less around here, make it blue. And increase a little bit in intensity and then add another key in the middle, but this time a deeper blue like this. And yeah it looks interesting, but we still need to change the particles of the orb, the color, instead of yellow, maybe we can make them blue as well, light blue. Here we go. That's very interesting as well, we create a different color palette, maybe it could be used with the mage character. The variations of this can be a lot, especially if we increase the public properties of your VFX graphs. As you can see, we don't have properties for each texture. But if we would have, we could create a lot of variations only from 3 VFX Graphs. So that's the power of visual effect graph. I hope you have enjoyed. We are going to have a conclusion lesson, it's just a few last words. The main part, of course, is done. And I hope you have enjoyed. See you in the conclusion video.
38. 4.1 - Conclusion: A Few Last Words: So after all these lectures, you arrived finally at the last one, well, first, if you finished the course and follow through each lecture, congratulations. Well done. I truly hope you enjoyed it and that you have learned something new. And now what? Well, if you are in for a bigger challenge, then I recommend you this course that I recently made where you are going to create 4 abilities for a MOBA game character, a fictional one called Thunderlord. You are going to create a Projectile throw, and Earthshatter, which is so cool. This Hammer Punch and then the ultimate ability, it's all done in VFX Graph and you will learn quite a few things, as you can see, this requires several elements to make this up. You will even learn how to create smoke simulations or how to create some cool trails. And that's just to name a few things. So if you are interested, check out my profile. It's probably there. I think it's a great and extensive course with vfx graph. By the way, attached to this lesson, there's two projects. The first one is the original version, basically the first version I made before recording the curse. And the second version is the course version, which is the one I used while recording the course. You can download them, unzip them. And I recommend that you open up with Unity Hub, at least with the closest version possible of unity, otherwise things may not work out right. Anyway, what else can you do? Well, I highly recommend you as well to check up my YouTube channel. I'm always posting new videos every two weeks, and there's so much stuff in there that will certainly help you to get better on this field. Or maybe if you want access to a big repository of visual effects from Shaders, to Projectiles, to VFX Graphs to Explosions, there's so many things in here. Well, I recommend you then that you check out my Patreon page or my website, Grabriel Aguiar Prod, and you will be supporting me as well, which is great because I can keep on doing this and give you cool things and you will get access to so many cool assets that you can use in your projects, study up close, use in your games. You can do whatever you want with them. You will get access to tons of assets. You can also share your results and social media on YouTube or Twitter or Insta or Facebook whatever's popping. You can build up a portfolio in Artstation, which is a great place where people try to find artists for gigs and stuff like that. There's also this forum here, real time VFX, which is actually one of the best spots for game visual effects artists. You can post your stuff, share your work, you can even ask questions and get answers from professionals of this field. There is also monthly challenges if you want to put your skills to the test, by the way. And well, now, to conclude, I really hope that you have learned something awesome that you enjoyed, most importantly, that you really like this, course. I put a lot of effort and time into making this course so you can learn and have a great experience and yeah I would obviously appreciate your feedback. A word of appreciation is always welcome. So, yeah, that's it, guys. And thanks for watching and keep on learning, I guess. Bye guys, stay well.
 Gabriel Aguiar Prod, Game Development