Transcripts
1. Introduction: In this course, we're
going to learn how to develop a multiplayer
to the pixel off platform on using blueprints
and Unreal Engine phi phi recreating a mini version of the well-known 2D
game Maple Story. This course contains
everything you need to know to get started with multiplayer to the
game development in Unreal Engine five, including and Unreal Engine five, overview and navigation. Importing to the assets
environment design using tile maps, right? Some flip books to
animate the pixel assets. The fundamentals of blueprints, character creation and
movements such as jumping, running, and hitting a camera
system for the character, creating enemies by
working with AI. Blinding mechanics for
ropes and letters. Health damage and death are both the player
and the enemy. And experience and
leveling system, creating user interfaces,
loading combat, text, visual effects and
sound effects, and useful resources
that will help you out in your game
development process. I'll also provide you the
finished project so that you can inspect it as you wish while following the course. My name is most affair
and I'm the CEO, game director, and
designer of pixel helmets. I've been working in
Unreal Engine for the past eight years and have recently released
fan tail on steam, which has received
very positively. I've also spent two
years developing my personal project board craft. And currently I am directing and programming my
company's new title, which is an unannounced
3D platformer. At the end of this course, you'll be able to
confidently create your own multiplayer 2D
game project from scratch. I designed this course
for anyone who's interested in creating
games and Unreal Engine five struggles with
creating a game that will live up to the current
industry standards. I hope you'll enroll and
join me in this course. And remember that I'm here
all the way throughout the course to help you out.
I hope to see you soon.
2. Downloading Unreal Engine 5: Go Install Unreal Engine five, you have to go to
Epic Games.com. So, right, Epic Games.com, inside of your Internet browser. And inside of here you have a blue button to the
right called download. So clicking on this
download button, it will install the
Epic Games launcher. Now I am going to cancel the installation because
I've already installed it. And here is the
launcher on my desktop. So I'm going to launch
the Epic Games launcher. Now it will ask you to
sign in and you can sign up with a free Epic Games account if you don't have one, you can also sign in with
all of the other options. But I am going to sign in with my Epic Games account because
I've already made one. So clicking on here, I'm writing my e-mail, running my password. And once you login to
the Epic Games launcher, this is what it looks like. Inside of here, what
you want to do is click on this Unreal Engine tab. And inside of here you
want to click on library. Instead of library, you can view all the Epic Game are all
the Unreal Engine versions. And you can click on
this plus button if you want to install and
Unreal Engine version. So clicking on it,
you can see this one appears and clicking
on the number, you can select which version of Unreal Engine you
want to install. Now you can see I've already installed the
Unreal Engine 55.2. This might be a different number at the time you're
watching this video, maybe it's 0.4 or 5.1, and that doesn't really matter. This course is going to work on any version that you
have installed here. So just make sure that
you install Unreal Engine five down here you can see
your previous projects. So these are my previous
projects and this will be empty if you haven't
used the engine before. So once you have installed Unreal Engine five,
Let's move on.
3. Creating a New Project: Let's go ahead and launch
Unreal Engine five. Once you have
launched the engine, this window will appear. Here. You can open up
your recent projects, but right now we're creating a whole new project
and a whole new game. So clicking here
on the games tab, you can also see an unrelenting, you can make things
like film and video, automotive, design,
architecture and so on. So very cool. But right now
we are interested in games. So clicking on here and
to the right you can see different templates
that you can start with. So for example, you can start with a
first-person template. If you're creating a
first-person shooter, you can start with a
third person template, a vehicle template and so on. But you can see there
is not one for picks slot or a 2D game.
And that is okay. All of these templates, you can actually create them yourself from scratch if
you know what you're doing. So this is not very
difficult to create. And what I usually do for my
projects, for my courses, I usually start with
a blank project because I want to teach you
everything from scratch. And once you learn
everything from scratch, you're able to create all of
these templates yourself. So let us create
a blank project. And for the coding we
are selecting blueprint. The target platform is desktop, the quality preset is maximum. And for this data consent if this is ticked for
you Just on tickets, so we don't have anything here. We just want a blank, blank project and now select
a name for the project. And for this one we are creating a small version
of a maple story. So let us call it
Maple story like this. And you can, of course select
where you want to save it. But I just save it in
the default location. So go ahead and click on Create. Once the project launches, this is what it looks
like and it says, Would you like to
update this project? I'm just going to
click on update. And for the plugins, I'm just
going to click on dismiss. And this is probably
not open for use on. I'm going to quickly hide it. Your engine probably
looks like this. And now that we have
created our first project, Let's move on to
the next lesson.
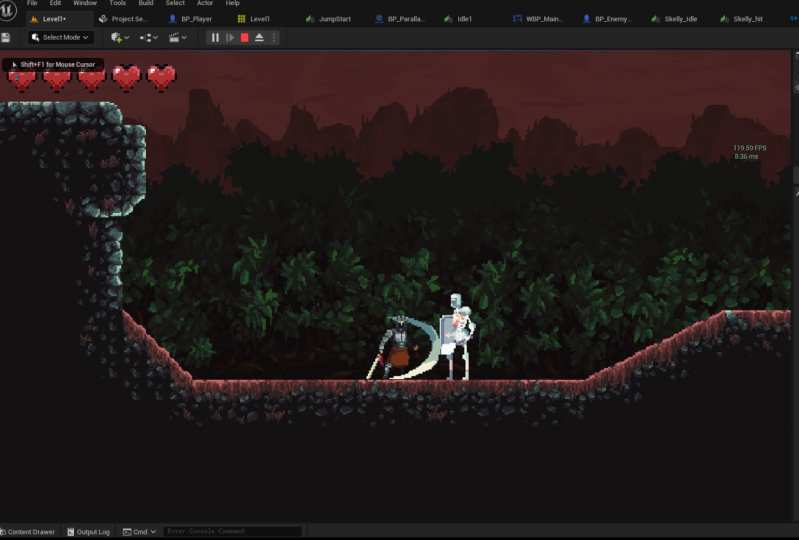
4. Unreal Engine 5 Overview: Before we start creating
our 2D project, let's take a quick
overview of this engine. The most important thing here in the middle is the viewport. And inside of the viewport, you can view your
game of visually. Remember, this is a 3D engine, so we are inside of a 3D world. This is the default startup map inside of Unreal Engine five. And here inside of the view
port you can navigate around. So holding your
right mouse button, so holding down your
right mouse button and clicking on W
on the keyboard, we'll move you forward. And holding the right
mouse button down and clicking on S will
move you backwards. Clicking on D will move you to the right and clicking on a
will move you to the left. So remember to hold the right mouse button
and you can see, you can look around, you can move with W. D is an a, and this is what I
use all the time. This is how I navigate
around inside of the engine. But you can also hold
the right mouse button and you can hold the
left mouse button. So holding both buttons
you can see you can move around
like this as well. Holding only the
left mouse button, you can move forward and
backwards like this. And holding the
right mouse button, clicking E on the keyboard, we'll move you up and holding
the right mouse button and clicking until I will move
you down on your keyboard. And as the last thing, you can zoom in and out
with your mouse wheel. If you have that on your mouse, you can zoom in and outs. And again, the most
basic control I use is holding the right mouse
button and clicking on W, D, S, and a. So this is how I find it, the easiest way to
navigate around, but you're welcome to
find your own style. That is okay. Next we have a few buttons
up here in the viewport. So clicking on the
first one over here, you can, for example, show the frames per second
and you can see how, how many frames per second your game is running
at right now. So enough about that right now, Let's remove the FPS. There's also something
called a game view. And the game view heights all the icons
inside of the game. So clicking on this one here, you can see the
icon disappeared. The shortcut is a G on the
keyboard, so click on G. You can view and hide
all of these icons. And this is pretty cool
when you actually want to visualize your game
without any icons. You can imagine if you
have a large game, you can have a lot of icons
inside of your level. So clicking on G, you can view your game without
all of these icons. You can also go to the
immersive mode down here, the shortcut is if 11, and this will maximize
the viewport. So click on G will
hide the icons. Clicking on if 11 will minimize
or maximize the viewport. And you can actually
view the game here in full-screen without any icons and you can see
what it looks like. So I will click on F7 again, and I'll click on G
again to view the icons. Next, we are inside of
the perspective mode, but there are also something
called orthographic views. So we can view the
game from the left. So this is what it looks
like from the left. If you zoom out, this is what it looks like from
the top and so on. Let's go back to the
perspective mode. I just want to show
you that this exists. So let's go back to
the perspective mode. You have the view
modes here right now we are watching
it in Dalit mode. So with the lighting, we can also watch it
without any lighting. So clicking on unlit, this is what the
game looks like. Without any lighting applied, you can use it in
the wireframe mode. You can go back to the
lead mode and so on. Next, very important, we have different tools that
we use all the time. The first one is
the select tool. And before I do this, I actually wanted to spawned something inside of my level. So let's go ahead
and click on this quickly Add to Project button. Clicking on here going shapes. And I just want to
add a simple cube. So clicking on this
cube and it will add it to your viewport
here in the level. Select tool is just a tool
where you can select items. So self-explanatory. Clicking on the move tool, you can move items. So clicking on this
box here or this cube, and you can see a
pivot point up here. And you can drag from the different size and
you can move it around. Or we can click on this, this white circle in
the middle and you can move it to all
directions all at once. But if you want to move
it to just one direction, you can drag these arrows. Next you have the rotate tool. And again, you can
rotate this box by dragging on
these angles here. And then you have the
scale tool where we can scale the box on
different angles. And if you want to scale
it uniformly again, you can click here
in the middle. And you can scale it
to all sides at once. Now, it is very, very important to remember the
shortcuts for these tools. So clicking on q
on the keyboard, we'll select the Select tool. Clicking on w will
select the Move Tool, clicking on E on the keyboard, we'll select the Rotate
tool and clicking on R will select the scale tool. And you can see this
makes it a lot faster. Instead of clicking up
here and moving it, clicking up here again and
rotating it and so on. This takes forever. So clicking on w, For example, we can move it like an
E. We can rotate it. Clicking on our maybe
you want to scale it up, click on W to move it
above the ground again. And you can see this is a
lot faster to work with, so you don't have to click
up here all the time. But remember that you
can use the shortcuts Q, W, E, and R. So if you want a full document
of all of these shortcuts, you can find them on my website. Next we have the snapping tools. So this one is the
move snapping. So you can see when
I click on w for my move tool and I move my box, you can see it's not
moving smoothly, it's snapping to something. And this is the snapping
tool if you disable it. So clicking on here, you can see now I can
move it smoothly. If I enable it again,
I am snapping now. You can also increase this
snapping by clicking on this number and then
increasing the number. Now you can see it
snaps a lot more. And this is very useful
to use if you want to place items like beside each
other at a specific place. So another shortcut
is you can hold Alt on your keyboard and
you can click and drag. And this will basically copy paste the item just like that. And maybe you want to place items like this,
like holding Alt, dragging and placing
them like this. This is very cool where you
can use the snapping here. But if you want to move
something smoothly, you can just disable it. And maybe you want to
specifically place it like this or whatever
you're doing here. Next we have the
rotation snapping. So again click on E. You can see it rotates
every ten degrees. You can disable it, and now we can rotate
it smoothly. Again. You can also increase
the snapping amounts, for example, every 30 degrees. Now it snaps every 30 degrees. Now you can set them
down again to normal, for example, ten here, and it wasn't until here. And the same applies
with the scaling. You can do the snapping
for the scaling as well. The last thing we have
is the camera speed. So you can see when I move
my camera in the viewport, Let's say you have this
large open world and it will take forever for me to move
all the way over there. This is how you can
increase the camera speeds. So for example, you
can put it to eight. Can see now I can move a
lot faster in my world. And this is very useful to use once you have a large world. But I doubt that we
will use that much for our 2D game because we don't really have that
large of a world. But in a 2D game, maybe you want to focus
on something very small. And here it is very
useful to reduce the camera speed to
something very slow. Because maybe
sometimes in 2D games, you are looking at
very small details. And this is good to set
it to very slow so it can actually move
close to items. Okay, enough about the viewport. This was the most important
thing inside of the engine. This is where you
can see the game. Next we have the Details panel, and inside of here you can
view different details about items you have
selected in the viewport. So you can see when I select
the ground down here, I get different details. When I select this cube. Again, different details. Details such as location, where is this cube located
inside of my world? What is the rotation
of this cube? What is the scale? And remember we
scaled this cubes. I'm just going to increase my camera speed a
little bit again. So this cube here, remember we scaled
it up and down. And if you want to reset it, you can just come down here to the scale in the Details panel. And you can write
111, just like that. And now we are back at
what this cube was. So it was at the scale of 111. If you have rotated, you
can see we have rotated the cube by ten degrees
and the z-axis. And you can see what x is, it is by holding
the mouse over it. So the red one is the x-axis
and the green is the y-axis, and the z is the blue one. The blue one up here is the Z, the X is this red arrow, and the green one
here is the y-axis. Again, you can reset the
rotation by writing 000, and now we have reset
their rotation. And if you want to place the
cube at a specific location, you can edit the location here. You can see the
location edits when you move this cube like
this in the viewport, just look here at
it's the y-value now. But if you want to place it
specifically at 1 thousand, you can also just One
thousand like this. And you can see
the cube has been placed specifically
at 1 thousand. So very useful to use the
Details panel over here. If you have specific numbers
you want the items to be in. And if you scroll
down, you can see all of these different details that you can view and edit about this item that
you have selected. So don't worry about all
of these details for now. We are going to work with all of this later
in the project. Up here in the World Outliner, you can see what you have
currently inside of your level. So right now, if you
click on this cube, for example, you can see it also selects it inside
of the outliner. If you select this cube
over here at selected, automatically inside
of the outliner. You can also select the items by clicking out here
in the outliner. And I use this mostly
when I want to find a specific item and
I click on that item. For example, the direction
light is the sunlight. And when I click on it,
I can see that it is down here with all
of the other icons. So very, very basic. The World Outliner displays all the items that you currently have inside
of your level. If I click on this cube and I click on Delete on my keyboard, I click on this cube also, and I click Delete
on my keyboard. You can see they disappear
from the World Outliner because you don't have them
anymore inside of the world. Up here we have the toolbar
with the basic buttons. So clicking on the file, you can create a new level. You can also save the project and you can
create a new project. Inside of the edit, you have the editor preferences. And inside of the edit
tab preferences you can edit settings
about your editor. For example, when
I select this box, you can see the selection
line is orange. I can basically click
on here on this, this orange color over here. I can click on it and I can
actually change the color. And you can see I can change the selection color
inside of my viewport. Now I have never had the need to edit anything inside of here, so I'm actually going
to close it again, but it's nice to
know that you have that option inside of
the project settings. You can edit settings
inside of this project. So for example, you can edit the startup icon
for this project. You can write a company name, you can write a support
contact e-mail. So for example, when you
release the game on Steam, people know who to
contact if they have bugs inside of the game or if they actually
want to contact you. You can also add a movie. So, you know, when
you open a game, you have that startup
movie, maybe five seconds. So you can actually add
one inside of here. So a lot of things that you can edit here for this
project specifically. So the editor preferences
are settings for your editor and the project settings are settings specifically
for this project, the Maple Story projects
we are creating right now. And then we have plugins and we want to work with
that right now. So don't worry about this. Next inside of window, you can open multiple windows. This is very useful if you
have multiple monitors. For example, we can go to Viewport and click
on View port two. And this opens a
second viewport here. And I can see here this
viewport, this is very useful. I can view my game in
full screen and I can put this inside of my other monitor. And now I can view
this game here. And on my second monitor, I have this viewport that I
have opened all the time. Don't worry about all of this. We won't touch this until
later in the project. And at the end
inside of the help, you can view the documentation
for Unreal Engine five. I think it's a bit lacking right now and hard to understand, but you can take a
look if you want to. Down here in the toolbar, you have different tools
that you can switch between. For example, you can
create landscapes, you can create foliage, such as grass and
trees and so on. But we don't really want to
touch any of these tools, because remember,
we are creating a 2D game and not a 3D game. So let's keep these
tools for now. For this button, you can
add different items. We added the sphere or the cube, actually the cube
inside of here. But you can also add other
items such as lighting. And you can add cinematics. So cameras, you can add
volumes, visual effects. And we will add some
things inside of here. But again, remember, we
are creating a 2D games, so we won't be using
all of these lighting. But I would say the cool
thing about creating a 2D game inside of a 3D engine. You can imagine, you can create a 2D game with 3D
lighting effects. There are some cool things
that you can do inside of a 3D engine when you
create 2D games. Over here are the blueprints. This is the coding and we
will work with this later. So don't worry about that. And over here you can click on the Play button
to play the game. And right now we don't
really have much going on. So there is not much to see. Clicking on escape will
quit the Play Game Mode. And as the last thing, what I want to show you
is the content browser. And this is where all the files that we will be
importing will be. So if you go down
here to the left, you have something
called a content draw, clicking on that button, this window will appear
inside of this content draw. All of the items that we
import will be inside of here. So all of the
characters we have, all of the music, all of the visual effects, all of the files will be down here in the
Content Browser. And right now you can
see you have to click down here to have this open. And I think for me it's a
bit annoying because when I click on something on the
viewport, this will disappear. Some people think this is cool, and that all depends
on the style. But I think for me it's
a bit annoying that it disappears all the time when I click on something over here. And also for the course, I think it will be great to
have this up all the time. So I am going to click
on dug in layout. This is also how it was
in Unreal Engine four. And this will stay
up all the time even though I click
on things over here. And I prefer to have this up
all the time so I can see my files inside of
the content browser. You can click on this Add button and you can add
different things. For example, we can
add a blueprint class, and this is the
programming that we will be doing later on. You can also add things
about the animation, things about blueprints,
foliage Effects, user interfaces for the UI. And this might look
overwhelming because you have so many things
that you can add, but you're only going to use, I would say about twenty-five
percent of all of this. So don't worry about
all of these buttons. You will not be using all of it. And I would say that
you should just start learning the
basics and just move on from there and make it easier for yourself
here and the paper 2D, this is what we will
be working with. So this is the pixel art, the 2D game that we
will be working with. You can also add items inside of the content browser by
right-clicking here. So you can see, you can
see the same thing. I usually never click
on this button. I just right-click over
here to the right. You can also add
different folders by right-clicking here. And at the top you can click New Folder and you
can make new folders. And I'm just going
to delete this one clicking Delete on
my keyboard for now. And if you want to,
you can go ahead and click on this cube deleted, delete this one as well. Now we know the basics of this engine and
how it's built up. So it's a lot easier for us
to work with our project.
5. Creating a New Level: To create a new level, Let's first create a folder. Over here in the content folder. Let's right-click and
click on New Folder. And let us just call it maps. Instead of this maps folder
over here to the right, you can right-click
and then you can click on level. Now
let's call this one. I'd like to give all of my
files that I create a prefix. So I'm just going to call
it map to begin with. And this makes it easier once
you have a lot of files, you can actually
search for them a lot easier by writing the prefix. So calling it map, and
let's just call it main. I just call it the main map. I don't know what name I
want to give it right now, so let's just call it Main Map. And up here, by the way, you can save all, so save everything. And if you have done edits
inside of this level, so before we edit cubes, so if I add a Cuban deleted
and you're trying to save, it asks you to save this map here because
you have done edits. And actually we don't really
want to save this map because we're not going
to use this default maps. I'm going to double-click on
my new map that I created. It's going to ask me to
save this level here. I am going to click
on Don't Save. Now I'm inside of my
new level and you can see here in my outliner, World, Outliner, don't
really have anything because you don't have anything inside of this level right now. Now before we end this video, let's set this level
as our default map. So I'm going to edit and
inside of Project Settings, you can click on maps and modes. And here you can see the
editor Startup Map is currently that default
open world map. Clicking on here and changing it to our map that we created, both the Startup Map and
also the default game map. Just like that. Now when you close
it, and let's just click file and save everything. Now when you close the
engine and open it again, it will default
open on this level.
6. Importing the Environment Assets: Let us now import the
environment assets that we will be using
in the future lessons. So over here, I'm going
to right-click in the content folder again
and make a new folder. And let's call this one assets. Instead of this assets folder, I'm going to right-click
and make a new folder. And let's call this one
environments in wire remains. Okay, so it's very good to
stay organized inside of your project because once
the project becomes large, it will be a pain to navigate around If
you don't know where the files are located inside of this environment folder,
I'm going to click on it. We want to import our files. I have given you this
course materials. So inside of the
course materials, if you can go inside of
the Environment folder, inside of here, I have provided
you some of the files. There may be more files
that you see here. I'm just putting these files inside of this folder as I go. So what I want you to
import as just this one, the t dragon road and the one called sea dragon
road, BG for background. So these two here, you can just click and drag and place them inside of
the Environment folder. Remember, if your files is
still in a rare or zip format, you can't drag directly from
a zip folder inside of here you have to extract those
files to your desktop maybe, or whatever location
you want to. And then you can just, just
like a normal folder here, drag them inside of the project. Okay? When you're inside of the project here
you can see we have our two textures and
when you click on them, so for example, I click on this PGY1 and dopants
on my second monitor. This is the one that
we will be using. Now this one might have, you can see when I
zoom in, it's blurred. It's not really picks a lot. And as you know, pixel art
is not blurred it like this. It's very clear
pixels that we want. And this is what we are
achieving right now, because you are again inside of a 3D engine and the 3D engine blows it out to
make everything look good. But in the case of a 2D game, we don't really want
it to blur out. This is very easy. Just click on both of them. So click on this one
holding Control, clicking on the second one, I can right-click, go to Sprite actions and say Apply
paper to the settings. And this will basically
remove that blur effect. So when I go back
here and I zoom in, you can see the blur
effect is gone now and you can see
every single pixel. And now let's click
on File and Save All, and that was it for this video. So very important to take
from this video when you import a pixel art files,
remember to right-click, go to Sprite actions and
apply pepper 2D settings to remove that blur effect that
the engine ads by default.
7. Creating a Tile Set: Now that we have
our assets ready, we are ready to
create a tile set. And in the next
video we are going to create something
called a tile map. So the difference
between a towel set and a tile map is that Tell
said you can imagine it. If you are painting
the towels set are your colors and the tile
map is your canvas. So we need to tell sets
to create a tile map. Let's create the towel sets, the colors that you are
actually wanting to paint with on the tile map
that we create later on. So let's right-click
this first one here. These ones, these are the tiles. Let us right-click it. Let's go to Sprite action and let's click
Create towels set. I'm going to rename it. I usually delete that tile
set and the end here. And I just call it
ts or towels set. And let's do the same thing
here with the background. Go to Sprite actions and
apply another place. Very great toolsets. And again, let's rename those two tiers
from the beginning. So now we have to tell sets. Let's go in the first
one here, our tiles. So now we can see these are the tiles and we can't do much here instead
of a towel set. Remember that tile set, we only created it
so we can actually use those tiles to
paint on our tile map. And now you can click on these different
tiles and you can actually see the towels
when you click on them. They will be displayed
here to the right so you can view the towel and
what it looks like. But the size is not correct. You can see here the
tile size to the right. You have to set that
to 30 pixels by 30 pixels because I
know it's 30 pixels. I compose them
inside of Photoshop, so I put them together
here in one texture. So I know that the total
size is 30 pixels. Pixels. When you download things
from the Internet, they usually specify
how large they are. So this is where you set them. So 30 by 30. Now this is correct and when
you click on the tiles, you can see this is
what they look like. And we will use this later
to paint on our tile map. Let's close this down
and let's go over to the title set
for the background. The tile size is also 30 by 30, So we have to change
this to 30 by 30 pixels. So this was the important thing. We set our tile size
inside of this tile set. And now that we have
those tile sets, let me actually right-click
inside of this folder, make a new one called textures. And I want to place
this texture inside of my textures because
we're not really going to need this anymore. Don't delete it because these are actually derived
from this texture. Remember we right-clicked
and created a towel set. But I just put them
inside of textures because then we don't really
have to see it again. Also, the same thing with
this background one, move it inside of this folder, and we only need to
see these tiles sets. So let's click on File, Save All, and let's move on.
8. Creating a Tile Map: We can now right-click
on our tool set. And when you right-click, you can see here
you have the option to create a tile map. So let's create a tile map. And again, I'm going to delete that map here at the
end that it puts. And I'm just going to call it TM for tile map as a prefix. And you can double click the tile map to get
inside of here. Here before I do
anything to the right, remember you have to set the tail width and
height to 30 by 30. So just make sure
this is correct. And this is just to set
it the same as this one. So whatever you set
here inside of the set, you have to set the
same thing inside of the tile map as for the
map width and height, you can choose how large
your map should be. So how wide should your map B? And for this one, I think I'm going
to go with 60 and the width and 40 and the height. So this is the map that we will be working
in to the left. You can see the towel sets. So right now, the active
tile set is this one, the dragon road where
we have our tiles. And you can click anywhere
here, select something. And when you select
it here on the left, now you have it here as a brush
inside of your tile maps. So I can click here and
you can see when you click your paint it
on your tile map. There isn't a quick
way to delete it. You have to delete
it but one-by-one. So clicking on e to
choose the eraser. And you can also click
on up here the paint, razor and fill tell clicking
on e to choose the eraser. You can erase those
and clicking on B on the keyboard to
choose the paintbrush. So B for the paintbrush
and clicking on IE to erase these brushes again. So whatever I also
liked here to the left, you can now paint it
here on the tile map. And inside of the tile map, it consists of layers. So if you have worked inside of Photoshop, you
know what this is. If you want to change
a name of a layer, you can click on F2
on the keyboard. You can right-click
and change the name, but I usually click on
F2 to rename things. So clicking on F2,
and for example, I can call it the base layer. I can make a new layer
clicking on this button. And I can, for example, rename this to background's
in the base layer. If you have this selected, let's just paint some
random tiles here. Let's pretend that these are the ground
tiles that we have. I can now go to the background and let's say I want to
paint the background. And let's say just to randomly, my background is this. I can paint this. You can see it's now on the foreground because
this is how layers work. So the front one will
be in the front. So if you want this
to be the background, you have to put it
beneath the base layer. So click on the background. You can click on this arrow. It says Send backward, and it will put it
backwards here. And now whatever you paint, you can see you can't
paint on top of these because this
is your background. Now, when you click on the
base layer now you paint more. You can see, you can paint
in front of your background. Because remember this
is the background and these are two
separate layers. So if you click on the eye
here on the base layer, you can see this
is the background. You can also hide the
background and so on. So very, very useful. We will be using those
to paint our map. And this is basically
it for the tile map. So nothing complex.
We have some tiles. We can draw our map here
and make it look awesome. And we can use those
layers to paint it. So the background, the base, we maybe have a
foreground and so on. Remember to set the width and height of your map as you wish. I want mine to be 60 by 40, and the tower would
have to be 30 by 30 because those tiles
are 30 by 30 pixels, you can just delete
the background. So clicking up here, clicking
Delete on my keyboard, it crushed my, my engine. Let me just restart it. It happens sometimes
with Unreal Engine. So sometimes it just
crushes randomly. So let me get back to my, to my tile set and you can see
it all already deleted it. So this happens sometimes, so Unreal Engine, I
have to recreate it. So creating the tile map, I'm just going to create
the whole thing again, okay, now I am
back where I'm at. I have set my settings
here and we are back. So let's move on to the next lesson and let's
design the environment.
9. Designing the Environment: Let us now start designing
our environment. So to get started, let's
go back to our tile map. And inside of here, if you have no towel set
selected here to the side, as you can see on my screen, you can click on
this small button. This is also where
you switch between your background tiles and
your normal cells here. So let's start with these
normal tiles for now. What I'm going to
start with is just calling this layer four bays. So I'm going to click F2, calling it that base layer. Inside of here we
are going to paint. But before I paint,
what I like to do here in the map heights, I like to add a bit more
tiles as buffer tiles. Because when our character is, you can imagine this is our map and these
are the boundaries. When the character is
standing here in the game. And the camera is like this,
watching the character. The thing here beneath the
map here will be dark. And we don't want the player to watch this bottom part here. I want the character to be
standing in a way where the camera never goes
below this line here. I like to add a bit more tiles than what I have written here, just to have some
buffer tiles so the camera and never
goes beneath the ground. So I like to add ten
tiles to the bottom here, and also ten tiles
to the top here. So the camera and never
goes above this line here. So what I can do is, so ten plus ten is 20
obviously, and it's 60. Something very cool
and Unreal Engine. You can actually write
plus 20 and hit enter, and it adds it automatically
and it says 60. Now, I don't think we need
a buffer here and here because what I am going to do is I'm going to
stop the camera. When the player
walks it this way, I'm going to stop
the camera here. So it never goes
behind this line, but we can always make it
larger if you want to. Okay, so let's count here. We have added ten buffer, ten buffer tiles here. So 123412345678910. So over here at, at 50. So if we paint a towel
here, I'm at 50. So the buffer tiles
go to up here and the actual tiles are
above right here. So what you can do is just take these tiles here and
start from the left. So you can just select
multiple tiles. You don't have to
select one at a time. You can select,
click and hover and select multiple tiles at once. And you can place
them here inside of our base layer that
we have created. So now I have placed this, you can keep placing like this. But as variety, I'm going
to click Control Z to undo. As variety, you can see
you have a couple of them. So you can randomly choose another one like
this and place it. It can choose a random one, place it, this gives
tiles a bit of variety. So you can see here that
you have a bit of variation and you can tell that
these are the same title. So I'm going to just
select randomly here. Doesn't really matter
which ones you choose just to try to
select random ones. So we eliminate that repetitive patterns that we
see sometimes in pixel lot. So very good to have different tiles that
you can place her on. Okay, I'm going to
speed up this process. I'm going to do this
the whole way here. And you actually also have
to do it all the way here. So just keep doing this. This will take
maybe five minutes. Alright, so now I'm
finishing up here. I'm doing the last tiles. So now I have finished
this bottom part here. Okay? So when you are
done with this part, you already to create
the grass up here. So down here for the
grass, the same thing. You have some variation
that you can add. And you can select, click and select
all three of them. And remember also to select this top part because
if you click here, you can see you are
missing the grass up here if you are not selecting
this top part as well. So clicking both, select
both this and this above it. So these six tiles. And then you can just,
just like before, click here and select another variation
and click beside it. And just keep going until actually I don't want you to do it
all the way here. I want you to stop
somewhere around here, so I'm just going to
fast-forward a little bit. Okay. So I'm going to stop here and
I stopped at around 3947. This these are the
coordinates you don't have to do exactly like me, but if you want to, this is the coordinates
I'm stopping with. You can do your own design. That is fine. You're not required
to do the same thing. But what I want to do here, we have some ramps down
here in the texture. And we want to add those tiles. I want to add a ramp here so
we can have some variation. So again, you can click here
and select like this here. And you can add
the ramp up here. And then again, let's
continue with the tiles, select those, and just
continue just like before. Keep selecting a
variation like this. You can see it takes some time, but it's also, I think
it's the fun part. You can be creative with
the map you are creating. And you can create
something cool looking. So we are missing
some tiles up here. Now. Let's go ahead
and just like before, just, let's fill
those empty gaps. Alright, so this part is done. Now, what I want to do as the last part is at
a platform appear. So let us, again, to add a platform, let's
select this bottom part. So selecting one of those, you can see you have
variations here as well. So selecting the bottom
part, I don't know. Yeah, we actually need to select the bottom part here as well because you can see there are some small tiles that
are beneath this. So again, just like
the grass where we select six pieces here, we have to select six
pieces here as well. And for the platform, we just have to eyeball it, see where the character is. And I believe something
like up here. And again, let's pick some variations and just
add those together. Remember to select
all sex and not, not just up here because else you're missing the
tiles down here. So select here, do
some variations and do the platform going
to skip a little bit ahead. Alright, so now that I have
this long platform up here, you can add the grass
and just like before, just select what
we did down here. Select variation. And now we're missing those
tiles here to the right. I couldn't really find them. I tried and tried and
I couldn't find them. But what we can do
is just add some of those tiles to end
this part here, because this is cut off as you can see and it's
not looking good. And I don't really have
the, the cutting part. These, these don't
really work with this. So we have to do our own and
let's just use this one. So what I'm going to
do, you can see here, if I select this and I
add it on top of this, like here, you can
see I'm deleting my current tiles and this is
not something we want to do. Remember, we had layers
we could work with. So you can create a new layer. And let's call this one brands. And with this front layer, we can now select these
tiles here, for example. And for example, over
on this side you can see now you can click and add it and you don't delete the tiles that you did before. And this is because now you're painting on this front layer. You're not painting on
this base layer anymore. Remember to select
this front layer and paint on top of it up here. And also select
those tiles here, just the three down here. And let's add it on top of here. And you can see
it kind of works. It's better than nothing. So now we have the towels
closing that cut here. And I'm going to
select the next one, add it on top of it, and select that bottom
part to go with this one. I now can see we
have a platform. It could be better if we had the closing titles,
but it's fine. It's only for practice. Okay, so the next thing you can add here is the background. And what we can do is
add another layer. And I'm actually
going to call it sky. I'm just going to use
this layer just for the sky and put it, you
can click on this arrow, remember, and put it in the back because
we want this to be an background for this guy. Remember now we are inside
of the normal tiles. You want to switch
to the background. Again, you can click on this
small button and you can switch between the background
and the normal tiles. So going to the background, you have this small blue one. This is actually the sky. So just clicking on this one, clicking on G for the fill tool, or you can select it up here. Remember you can select
the tools up here. And then remember to
click on this guy first. And in here, you can
click on top of hearing, can see you fill the gap
and now we have the sky. Now what we can add here, it's a little bit bland, so we need to add some
background items. Now, you want to make a new
layer because if you paint, Let's say you wanted
to pin this grass and clicking on B to select the brush tool and you
append it here you can see the sky is being removed because you can't
paint on top of it. So let's create a new
layer and let me just call it background and
narrowly background. These are just back props. Let's just call it
background and let's see if we need to
change the name of it. So let's, let's try
to design something. So I'm going to start
with this building. So just selecting
all of this building here and just placing
it somewhere here. So it looks a bit
interesting like this. Okay, so now we have this
one and you can even add a light pole here. So this is just about
being creative, tried to do whatever you want. You don't really have
to follow me here. I'm just trying to
create things as I go and I'm going to skip
a little bit ahead. Just like before. Just select whatever you
want added somewhere. Maybe you want to add
this light pole up here. So try to do your own thing and I'll see you
in a little bit. Alright, so I have added
a couple of items. You can see my map
looks like this. Now, I have added. There's a grass over here. I've just added it
here to the side. So it looks a bit cut
off and interesting. And I've added those
items up here, the flowers and just the
one side I added before. So I don't like to add too much inside of the environment. I like to keep it
simple because it will be clustered if you add too much to the environment
and it will not look good in my opinion. So now we have these
minimal items that we inserted inside
of an environment. Now what I want you
to do, I want to fill the background here
so it's not too blue. I want to fill it with
this large backgrounds. So go ahead and select
this large thing here, just like that and you can
see you can place it around. Now we don't want to place
it on top of our items here. So I'm going to add another,
another layer here, and I'm just going to call
it BG for background 01. I believe we need to make two
of them and you'll see why. So BG 0102, I'm just going
to move 0 to beneath the 01. And this one, instead of
calling it background, let's call it BG props, so background props or
something like that. So clicking on the first one, the background is 01. I don't want to add the whole
thing up here like this. What I want to do is just, I just want to add it like this. So I only see the tree
without all of the, without all of this
building down beneath it. So only seeing the trees and filling the
background with it. So for the background 01, let's try to see if we can make it look interesting,
something like this. And 0 to, I don't think we
can still fill it with 01. Actually, we can fill it here. Let's actually fill 0 to first, click on 0 to, I just want
to visualize it better. So something like this, maybe. Let's try 01 again. The reason why I'm
not doing 02 again, because remember
you can't paint on top of your layers like this. So going back to
0101 was over here. So now we can paint over here
without affecting anything. So something like this. I think that works,
that, that looks good. So let's go back here. I'm just selecting
the eraser so I don't have to watch all of this. But you can see here now, if the character
is walking around, this is looking good, our
background is filled. You can, of course,
I don't have clouds, but you could of course, if there to make it more
interesting at clouds up here. But I think that's okay. That's like when we
walk around here, it doesn't really look bad
and it looks interesting. You can even adjust
your props here, the background prompts
that you place before. You can adjust them
if you want to. And this was actually at for
designing the environment. So the reason why I
didn't add anything here, or maybe over here or over here. We could use some of these empty spots to
add portals later on so we can teleport to different areas and I can show you how to do
a portal system. And with that said, let's
move on to the next lesson.
10. Removing the Flickering: Now let's go back
to our tile map. I want to show you something you can see here when I move around, when I right-click
and pan around, you can see that the sky is flickering and so are my tiles. It's very subtle. But for example, you can
see here the line here, it is cutting off my tiles. So sometimes the tiles
are also flickering. And we want to remove
that flickering because this will also
happen for you in game. So let us close
this tile map here. And what you want to do is these tiles sets simply
right-click on the towel set and click on condition
Title XI texture. Now it's going to create
something new for you. Just press Enter and it
will create this for you. So these are padded, so it automatically pads
the towels for you. So you can see here doesn't really look different
from before. But the differences is if
I go back to my tile set, now if I click on my tile before it selected the
tile here at the sides, but you can see the engine automatically padded
your tiles so they will never flicker
because we have those pairings on
every single tile. The same thing it did for all of the other
tiles that you have. Let's do the same thing
for the background. Let's right-click on the towel set and click on
condition towels, sheets texture, and
let us click on Enter. Okay, So now I'd finished
painting my second texture. It took some time because it was such a light texture and it almost seems like your engine has crashed, but it has not. So going back to the environment and clicking on my tile map now, you can see when I zoom
in and I move around, you can see the
flickering has gone away. And this also
applies for in-game. So we have removed
that flickering. So whenever you import some
towels to add for your maps, remember to right-click
on the tile set and click on condition
towel texture. And it will automatically a
pad this texture for you. And you will remove all of
these flickering problems.
11. Placing the Tile Map in the Level: Let us now place
our level that we created here inside of our map. So closing this down, remember we made a map here, a level called main. So double-clicking on that to make sure you're inside of here. You can also see it. Here to the right, you are
inside of the map main. Inside of here, simply go to the environment and click
and drag your tile map. So not the towel sets
but the tile map. So click and drag and you can drop it here in
the environment. Remember our navigation from before you can right-click and hold WD is an a to move around. And you can see this is the
tile map that we have added. Now I like to remove this grid because I can't
really see what's going on. So clicking on this tile
map in the Details panel, you can go down and find
here under rendering, show per child grid
when selected, I am going to uncheck
this so I can see my map. And this is the map
that we have created. What I like to do is
I like to place it at the location of
zeros, zeros 0. So this is my initial map. I like to start at 000. This is simply it. We created the map. And since this is a 3D engine, remember this is
not a 2D engine. You can see here if
you look at the side of your tile map, these are actually layer tile. So remember inside
of the tile map, we created our layers over here. And so you can see all of these layers stacking together
here in a 3D environment. What I want to do,
I want to separate those layers because later on, we want to make
sure we don't have a problem when the
player is moving around. And I'm going to go
down here and here, and this separation per layer, I'm just going to increase it to something extreme so you
can see what's going on. So something like 50
and I'm going to save. You can actually see
these layers now, they are separated
from each other. Now what I like to do
here in the separation, I like to write ten and I want to show you
why I write ten, or you can also write 15. That's okay. It doesn't really matter. But I want to show you why
I'm not going with for, why I'm going with ten
instead, for example. So clicking on here, you can see now we have
separated the layer. So you can imagine
as the character is standing here on the
ground, on these tiles. You're technically
standing on this, this base layer that we created. There are ten pixels from this layer here to
the front layer here. So now the separation, since we wrote ten, the separation is ten
pixels for each layer. So you have a freedom to add things in between
these layers. So for example, if
you want to add an item in front of these
background perhaps, but you want to edit behind
the player walking around. Obviously, you have to select the number that is
between these two layers. So the larger you
make these layers, the more freedom
you will have in placing items beside or
between these layers. So I don't think we
need more than ten. I never needed more than ten, so I'm going to write ten
instead to make sure that my, my ground tiles are at 0 because this will make it easier for us later on when we're programming. I simply want to push
this layer here. These are my tiles, two in front of here,
so it's in the middle. So you can see here
at the pivot point, when you have the
Move Tool selected, when you click on it, you
have the Move Tool selected. You can see if you want to
move in this direction, you have to move it by ten. And now it's actually correct. Remember, our snapping tool is snapping to
every ten degrees, ten pixels rather not degrees. So now it's actually not correct because with the snapping
we made it to ten. So you can see now it's, now the background is at 000. When you write ten
here in the y, you have the dose, dose novel tiles as 000. And this will make it
a lot easier for us later on when we
are programming.
12. Post Process Volume: Alright, so the problem
that we have right now in our level is that the lighting and colors
are not correct. So as you can see
here, if I open my tile map and if
I zoom in here, you can see the difference
between this tile map, the correct colors and
what it looks like. And this is our level, so it definitely looks wrong and the lighting
is too strong. And this is where the
post-process volume comes in. So up here and
quickly add button. Let's click up here and
then go to visual effects. And let's add this one
called post-process volume. So the post-process volume, what it is, It's just
like in Photoshop. When you put an image
inside of Photoshop, you can edit the image scholars, you can edit the saturation, the brightness of
the image there. Same thing goes here
in Unreal Engine, we use a post-process volume to change the lighting and
the colors and so on. So almost just like
color grading. So we have the
post-process volume and what we want to do
is scroll down here. And we want to take this
one called infinite extent. What this does is it
affects the whole world. If you don't press this, this will only work whenever
you are inside of this box. So for example, just to
demonstrate it for you, I am going to
increase this bloom. So going for the intensity
of ten, so very extreme. And if I go here
inside of my box, you can see the bloom is taking effect,
that dreamy effects. And if I go outside of this
post-process volume box, it goes back to normal so
you can see the difference. Okay, So instead of
going inside of this, not this box here and maybe like trying to make this
box fit the level. We don't really need to do that. We just want to click on this
one called infinite extent. And it will affect
the whole world. So we don't need to be inside of this box for it to take effect. Okay, So what we want to do, I'm just going to place this
post-process volume at 000. Actually, it doesn't
really matter, but I just like to do that. And then let's start going
through all of these settings. And it took me around
six to seven hours to actually nail this down with
all the correct settings. So here in the bloom,
Let's set it to 0. We don't really want any
bloom inside of our level. Next we are going
down to exposure. And inside of exposure, Let's take the minimum brightness
and maximum brightness. And let's set both
of them to two. So 22. And then let's
go down to Lens Flare. Let's click on the intensity
and set it down to 0. And we don't really
need a lens flares. Next we're going to click on image effects and
further damage effects. We can set the vignette to 0 before we do any color grading. Let's skip that a
little bit for now. They're going down
and I'm going to find the ambient occlusion. But the ambient
occlusion we want to set to 0, we don't need that. And the motion blur as well, I'm going to set to 0. Okay, So we don't really have more settings to
play with down here. So let's go back to
the color grading. And again, I spent
seven hours doing this. So justify come with
random numbers. It's not because I'm
guessing correctly, it's because I've been trying my way to find the
correct numbers here. So here first in the
global, we can click that. And let's take this
one called saturation. So you can increase, you can see you can increase and decrease the saturation
of the image. And for this, 1.980 was
the perfect number. And let's scroll a little bit
down here at the shadows. So clicking on the
shadows and taking both the saturation and the
contrast and the Gamma. So what is saturation? We want to go with 0.9. And with the contrast, let's go with 0.9 for the Gamma, Let's go with 1.01. And let's go down now. And in the mid tones
we don't really have anything but in the highlights, if we click on that one, just wanted to take this one
called highlights minimum. So I'm going to set it to one. And then we are going
down to miscellaneous. I'm going to take this
one called Tone Curve amount and we're going
to put that down to 0. You can see that changes
a lot in our colors. So going down to
0, and this should fix all of our problems. Now let's click on the tile map and you can
zoom in and take a look. And you can take a look
at our level here, and you can see they look
perfectly the same Now. They're small problem is now, and we will fix that
in the next lesson. As you can see,
these are pixelated, but you can see
there's some sort of a smoothness inside of our level, not too pixelated. And this is because of the anti-aliasing that
we have to remove. But you can see
here, if you go to the live mode and you go
to the unlinked mode, this is what the correct
texture looks like. So this is what it looks
like without any lighting. So if you go back
to the lead mode, you can try to compare the two. So this is what we're
trying to achieve. We're trying to achieve the elite mode being the same
color as the unlit mode. So very close to each other. The only thing is that
the live mode is more smooth out because of
the anti-aliasing. And we will fix that
in the next lesson.
13. Removing Anti Aliasing: Alright, let's move
the anti-aliasing, which is causing
that smooth effect inside all of our level. And we don't really
need any smoothing when we are working
with pixel lot, we want to watch
the true pixels. So we are going over to edit and let's go inside of
our projects settings. Inside of here, we can scroll down and let's find
this one called rendering inside of
the engine rendering and inside of here. Now, this is anti-aliasing, but this is for mobile and we're not making a mobile
game right now, so this doesn't matter. But I'm going to go down here. And we want to find this
one default settings while we're at it. Let's actually remove a
couple of things that bloom. We already set it to 0, but we can always
disabled here as well, the ambient occlusion as well. This one, the auto exposure and we can also remove
the motion blur. So all of these removed. And this is the important one,
the anti-aliasing method. I don't know if you can
see a difference if I just put it here on
the side and you can see if something
happens when I disable it. So this temporal
super-resolution, if I click None, you
can see the difference. Of course, you can
keep it on if you want your game to be
smoothed out like this. But for true pixel art, you actually don't have this. So clicking on none will
see the true tiles, how they are created in
the pixel art software. So now if we go in the
unlit mode and the mode, this now remember
this is what we're trying to achieve,
the same colors. You can see there's
no difference now, and this is what we want. We want the Lit mode to
be the same as the unlit. And if you want to see the
difference clicking on this post-process
volume that we worked with in the previous lesson. We can click on this
enabled to remove it, and you can see the difference. Now this is the onLoad mode. This is a true colors. These are the live mode. And when we enable it, we make it just like
how we want it.
14. Adding Collision: Let's now enable
collision for our tiles. So what collisions are, are the thing that actually
make those tiles walkable. So you can imagine if we add
a character in the future, the character right
now cannot walk on these tiles because
they have no collision. So the character
will actually follow through the tiles and
fall through the ground. So we need to add a collision so the character can
walk on these tiles, and this is very simple to do. So let's go over
to the tile set. So let's go to
Tulsa dragon road. And inside of this tile said remember the only thing we did last time was just to
set the tile size to 30. Bacteria can actually
also add collision. So clicking on this button
called colliding tiles. Now you can view
the collision. Now. Right now you can't see
anything because we don't have any collision. So clicking on the first
tile here, and this one, for example, you can click
on this one called Add box. And now you actually
added a collision. So if I click Save now, and I just wanted to show you that it actually
added collision. So if I click on, show up here and
click on collision, now you can't see
anything and this is because inside
of the tile set, you have to remember to
click on Refresh maps. This will refresh all
of your tile maps. And now you can see it
actually add collision. Now can see these boxes up here. And this is the collision, we just add it and we
have to do that so the character can actually
walk on these tiles. Technically in programming,
that character is walking on these small boxes, but it looks like the character
is walking on the tiles. So going back here and we have, there is unfortunately
not a method where we can select everything
and click up here. We have to do it manually, but we want to take a long time. So click on here, looking at box, very simple. We're just adding
collisions to these tiles. And you have to do
this for all of the tiles that you have used. Just like that. For example, we don't
need to add collision for these tiles because
we haven't used them. But if you have used
them in your map, you have to add collisions
for them as well. So we don't add collisions
for these ones because obviously the player is not
going to walk on these tiles. So if I save here
and refresh maps, you see here the
tiles are additive, the collisions are added, and we don't really need to add collision down here because then the player will
never go beneath here. So we don't really need to. Now, I want to make my
collision box is larger because you can imagine when the player are walking
here on these boxes, there is a chance that, remember this is a 3D engine. There is a chance that the
player will be pushed in a way where the player
will fall here to the side and fall
off the ground, falling off the collision boxes. So just to eliminate that risk, I want to increase the
collision box is length. We can do that inside
of the tile map. Inside of the tile
map here we can go to here at the bottom,
collision thickness. Let's set it's 254. Now let us click on Save. And when we minimize, you can see the
collision boxes are a lot longer and we don't have a chance for the
player to fall off the ground because
that is covered now. Okay, let's add collision
to the rest of it. I think we believe, I believe we are missing this part here. So going to the tool
set and inside of here, Let's also add collision two. This one's actually we
are missing those, so, so adding a collision
box up here, do the same thing with this one. We also need to add
a collision here, so the side, so
clicking Add box, you can see here to the side, we don't really need collision all the way if I refresh
the map so we can see it. Now it added collision
all the way over here. We don't really need that. We only need to cover the tile. So what we can do is
clicking on this one and then licking and hoovering and selecting both of
these vertices. And we can click and drag. So just like our viewport, I will maybe disabled
the snapping. Let's see. Or actually it's fine. Just like this, that is perfect. Doing the same thing here. I'm going to add
collision box and taking these two vertices and
reducing them like this. So now you can refresh the map and you can see
what it looks like. This, what looks like. So the collision is two here. And if we feel like
this is too much, we can always go back
and make it smaller. So now we're missing this one. Let's add a collision box. And let's select
these to move them closer to the same
thing over here. Move them closer just like this. And again, remember to
click on Refresh maps. The last thing is we are missing this slope here because
this one we also used. So I'm going to click on this first one and let's add a box. Now this one is a
bit more tricky, so let's select this vertices. This vertex up here, clicking on Delete on your
keyboard will delete it. And now we only have
three vertices. Now this one, you can
move down just like this. And let's move on
to the next one. So this one here,
click on Add box. We want to move this one down, maybe just like this, and also move this
one to the side. We don't really need
collision all the way here. And I'm going to reduce my snapping because it won't let me move it here
in the middle. So I'm going to reduce it
to five instead of ten. And I think something like
this works out for me. Now we're going to
click on this one. You can see slopes are a bit
more tricky to work with. So clicking on this
one, we want to add a small collision here so
the player doesn't fall. So clicking on the
Add box again, we can select this vertex, click on Delete on the keyboard. We can take this one
and move it closer. So if I can hit it here, moving closer and then
taking this vertex and moving it down
just like this. And then we can take the
next one here and add a box. We can take this vertex
and move it down. And this one we can just let be. I think this is a good curve. And the last one,
there is a small bug. I tested it out earlier. We also have to add a very small collision here else the player
will actually, if I refresh the map
and I can show you, the player will actually
get stuck here. At the top. There's a very, very small
gap that we can't see. And we have to add
a collision here. And obviously this is because
I've tested this before. What we just want to
do here is we want to delete the vertex up
here, just like before. We can move those very closely. Now to see the specific
number for this, you can go down here. And the, and the
index collision data, going down two shapes. Clicking on this index and
watching these vertices. You can see when I move
this vertex up here, this number of changes. So I just want this
number to be 14.9. So you can see that if
I remove the snapping, the closer I move it down. The last number is
15, obviously here. So I want to move
it to a 5.9th, 14. And this one as well. So very, very, very close. This one, if I just move it to see which one it
is, It's down here. 14.9. And I don't know why I said
15.914, just like this. So both of them are 14.9. So there is a small
college in here which makes the player not
go through the ground. And this is because
I tested it before on my preparation project. So now we have all
the collision set. I just remember, remember
always to click on the Refresh Map and click
on Save, save everything. And now you are good to go. So you can take a
look at your map. You can see there is
collision up here. We might need to
reduce this one. Maybe it's too far out. And you can also watch it here. But we usually we have
to have a character to run around the world and test this before we can say for sure. But now we have the
initial collision done and we can move on to
creating our character.
15. Creating Sprites: It's now time to import
the character assets. So I have provided
for you here again, inside of the course materials, there is a folder
called characters. So clicking on that folder. And let's start with Serena. What I want you to do for
now is just import the idle, the jump, and the
run animations. So first, before we do that, let's go over to
the assets folder. Let's make a new folder
called characters. And then inside of here, Let's make a new one
again called Serena. And then in here we
can import our assets. So I want to drag the
idle jump and run, drag them into your project. And when you let go, you
import those textures. So actually we are
going to create something called
sprites and flip books. So let's make a new folder and I'm going to call
it the textures. And I'm going to have these
inside of this folder. And all of the, all of the flip books that we
make will be out here. So instead of textures, remember when you import
textures, and again, if you double-click
on them and zoom in, you can see Unreal Engine is
smoothing out those pixels. And as I told you before, you have to select all of them. And if you want to
select them like this, you can click on one hold shift and
click on the last one. It will select all of the ones. And you can right-click
sprite actions and apply paper to the settings. As before, you can
see it removes the smoothness and you can
see the pixels more clearly. Now you can see the texture
comes with this animation. So you have the animation, you have the running animation, and they are put
together in one texture. And now you have to create
sprites out of those. So let's start with the idle. You can right-click
and inspired actions. You can say extract sprites. And in here, you
have to go here to the top right and click
on grid instead of auto. And then you have to specify
how large the grid is. Now, I made this
in Photoshop so I know the grid is one
eighty, one eighty. And if you download
something from the Internet, they will tell you how
large this grid is, one eighty, one eighty. And it will extract those
animations as single frames. So clicking on
Extract down here, you can see it extracts them to single frames and these
are called sprites. Sprites are static images. So here in our level, you couldn't really drag a
texture and drop it on top of here because you can see it replaces whatever
you are dragging, dragging it on top of. So I'm going to
click on Control Z. But sprites are
static images and it can actually drag those
inside of the level. So if you have something
statics, for example, a barrel that never moves, you can actually add that
here inside of your level. But our character
has animations, so we don't really want to drag static images because these
are actually animations, but we will work with the animations later
on in the next video. So let's delete.
I'm going to delete this material that it created whenever I dragged this texture on top of it, just like that. Now, I'm going to
rename the sprites. Usually I delete
this in the front. Just remember you have to pay
attention to the numbers. So this is number 0123. So you have to do that in order. And here, the first one, I'm going to call
it S for Sprite is idle and 01 just like that. So we are a bit more organized. This one is 02 now and
0304. Just like that. So now we have the idol. And let's do the same
thing with the jump. You can do it yourself just
for practice if you want to. You can right-click
here and go to spot actions and
extract sprites. Select grid up here, and again, 180, extract the sprites. And again, pay attention
to the numbers. It says 0123. So don't think that you can
go in here and call this 10, because this one
is number three. Sometimes what I do is just
click away from the folder. So click away somewhere else
and go back to the folder. And you can see it sorts
them as you want it to. So this is the first
one, is r1, 01. And doing the same thing
with the other ones. So it does take a little bit of time to organize your folders. But in the end, when
they are organized, you'll have an easy
time working with it. Now the last one is the jump. And this one you can see the
jump only has one animation. So it doesn't make sense
to right-click and say extract sprites because you
really only have one sprite. So the thing you want to do is right-click and just click on Create Sprite instead of extract because you
only have one sprite. And let's call this one is jump. Alright, so now we have
created our sprites. Let's save everything, and let's move on
to the next lesson.
16. Creating Flipbooks: So now that we have created
sprites for our character, now it's time to
animate those sprites. So what you want to do is, for example, let's
start with the idle. You can select all of them. So either one, you
can hold Control. I'd go to three or four. Or a quicker way to do this
is click on the first one, hold Shift, and click on the last ones on
the number four. And we'll select the whole
thing here in the line. Now you can right-click. And up here it says
create flip book. So clicking on Create flip book, it will create one. And I usually, instead
of S and the front, I usually write FB
for a flip book. This is the idle flip book. You can now double-click
on the flip book. And you can see now
this is animated, but right now it's
animated too quickly. So I want you to
change the frames per second here
to the top right. So I played Maple Story yesterday and I saw how
quick the animation was, and it was about two
frames per seconds. So writing to, and you can
see now it's animated. This is the idle animation. Now, let's do the same
thing for the run. To run number one to four, it can right-click,
create a flip book, call it FP run. And you can double-click
on it again. And for the run animation, it is six frames per second. Of course, you can
make it faster. For example, if
you're, if you want your character to run this fast, or just have the animation be
this fast, you can do that. But for me, I'm trying to imitate Maple Story
as much as I can. And it looks like they're
animation is about six frames per second,
just like this. Okay, Let's close it down. And the last one
we have the jump. Now we can create a flip book
out of this and we have to, because later on when we are
creating our characters, the character wants and
input of a flip book. So we can't really
use this jump sprite. Remember, this is a sprite, this is a flip book. We have to make this
into a flip book because the character later
on needs a flip book. So even though it's one frame, we have to create a flip book. So let's right-click and create a flip book
out of the jump. And let us call it
FB, jump, like this. And obviously this
is only one frame, so I'm going to just change
this one frames per second to one and we can close it down and we can go ahead
and save everything. So now we have created
our flip books. I'm going to move those flip books out
of the texture folder. So I'm going to move them to Tsarina here and
click on Move here. So now we have those flip
books and these sectors, we don't really need
to see them again. This is why I created a Textures
folder just so it's more easy to look at because we only really need those flip books.
17. Blueprint Introduction: Blueprint is the visual
scripting language in Unreal Engine. And when you are writing
blueprints, believe it or not, you are a programmer.
You're programming. Instead of writing
traditional lines of code, you can code the whole game by simply adding notes and
connecting them together. So it's a visual
scripting language. Blueprint is as powerful as any other programming
languages out there, whether it's C plus, plus C-Sharp or any
other language, you can create whatever you
wish by using blueprint. Right now, we are creating a
mini version of Maple Story. But you can also create
Fortnite, Metal Gear, Solid, rust, or even Aldon ring. You can program any
idea with blueprints. So the only thing
that's limiting you is your imagination. Whatever you want to program, you can do that with blueprint. And it's also optimized and
runs nicely with that said, let's jump right into learning
the basics of blueprints.
18. Blueprint Classes: Let us now talk about
blueprint classes. So here in any random folder
I'm going to right-click. I just wanted to show you the
blueprint classes for now. You can right-click and up here, you can click on
Blueprint class. You can also find this
under Blueprints, this one called Blueprint class. So the same thing, but it's
faster just to click up here. So these are the
different classes that you can create
in Blueprint. And I want to start
with the first one. The first one we have is an actor and you can see the description
here to the right. It says that an actor is an object that can be placed
or spawned in the world. So a very simple
actor, for example, it can be a table, it can be a chair, it can be a hammer. So anything that can be spawned into the
world, just an object. The next one is a pawn. And upon is an actor that can be possessed and receive
input from a controller. And what this means is upon, is something that the
player can control. So in another course I made that you can see
here on the website is that I am creating a ball
or a sphere. Moving around. This sphere that's moving
around is upon because I wanted the player to control this fear to move around
with the keyboard. So n upon is an
actor that can be possessed and receive
input from a controller. So you have to make whatever
you want into a pond. If you want the player
to control that object, you can't make an actor and want the player to
control that object, that you have to make it
into a point instead. Next we have a character. And a character is
a type of ****. So you can see there
is a relationship. So a character's actually upon. A character is a
type of **** that includes the ability
to walk around. So whenever you want
to make a character, it's just you can
imagine a human with two arms and two
legs walking around. You have to make a character. But if you want to make your character something
like a ball or a sphere rolling
around in the world without it doesn't have
two arms, two legs. You can go ahead
and create a point. So this is the easiest
differentiation. So when you have a
character, two arms, two legs walking around, you can go ahead and create
a character instead. Then you have something
called a player controller. And apply controller
is an actor that is responsible for controlling
upon used by the player. So you have to think of this. This is not really the controller
that you have at home, or your Xbox controller or
your PlayStation controller. This is, you can imagine this as the brains of the character. So this is the brain
of the character. Every characters
that you spawn in the world will have
a player controller. And inside of here
you can add codes such as a user interfaces. Or if you want to make
a single-player game, you are creating
awesome movements. You can do that inside of here, but we will be working
with all of those letters. So don't worry about this. This is just the basic
explanation for now. Then the last one I want to talk about is called the Game Mode, and this is almost
self-explanatory. The game mode base defines
the game being played, its rules, the scoring, and other facets
of the game type. So for example, if we
have a shooter game, you have capture the flag. You have how much time
you have per round. And for example, in Maple Story, if we wanted to make an event, for example, we can define how much time this event
will take and so on. So just the rules of the game. For example, in
Capture the Flag, when you capture the
flag from a team, it will give you some points. And these points can also
be written down inside of the game mode because it's
the rules of the game. Now, since we are working
with 2D right now. So all of these are 3D. Since we're working with 2D, you have to click on this, this one called all classes. And here you can
search for paper. You can see we have a lot
of classes and these are just the basic ones that
we use all the time. And you almost never go in here unless you are working
with advanced stuff. For example, a saving
and loading system, which we will do
later on, hopefully. In all classes here, you can search for paper. And paper is just the pixel
lot 2D here in Unreal Engine. So for example, instead
of this actor up here, which is 3D, we can create this one called
Paper sprite actor. Or we can create
a flip book actor if we have a flip book, remember, flip books were the animated sprites
put together. So if you have an animation, you want to use a flip book. If you have a static item, you want to use a
sprite and then you also have a character. So instead of using
this character up here, because this is a 3D character, we have to use this one
called a paper character. And this one includes
a flip book. We made flip books for
our character that we can put here inside of
our paper character. So these are the basic
classes that we want to use, and mostly we are not going
to use those up here. We are going to add
a player controller and Game Mode because
these aren't necessary. But for all of these
were mostly going to work down here in
our paper character, paper sprite and our
paper flip book.
19. Game Mode & Player Controller: Let's now start by creating
our first blueprints. So to do that, let's go
in the content folder. You can right-click
here and let's make a new folder called blueprints. And inside of this
folder, and by the way, you can give a full dose colors. So if you can
right-click here under Blueprints folder and you
can click on Set color. Sometimes I do that just
to organize myself, I just select a blue color. So I know it's blueprints
just like this, for example. And you can see it
clearly inside of here. You can again right-click
and select Blueprint Class. And let us create a game mode. Every game that you create have a game mode and
a player controller. These are the basic things
you start with in a game. So let's create a game mode. And let's call it g, m as
a prefix for Game Mode. And I usually call it
the name of the game. So Maple story for this one. The next one, again, right-click Loop and class. Click on player controller and call it PC for
player controller, again, call it the
name of the game. So Maple Story. Now, obviously,
you have to create multiple game modes if you
have multiple game mode. So for example, in
Counter-Strike, you have something
called death match. You have captured the flag, you have five versus
five players. So you have different
game modes. And you can create
multiple game modes. You can, of course, instead of calling them the game name, you can call them for some
dn, Capture the Flag. So calling it the name
of the game mode. But for this one we only
have one game mode. So I'm just going to
call it Maple Story. Now to make this game
mode work on our level, you have to, let's
first save everything. So File Save All. And let's go to Edit. And inside of the
project settings. And in the project
settings you can click on maps and modes up here. So remember in maps and
modes previously we edited the startup
map to our mat mean. So now what we want to do is also set our default game mode. This is the base one
that the engine uses. So I'm going to click on it and then click on
GM Maple Story, this is our custom one. Then I want you to click on this small arrow beside
selected K mode. Now you have to change
the default classes. So we can see here it says the player controller class,
we just made one. So clicking on here and
changing it to PC Maple story. We also have to define
our default pond class, but we don't really
have on right now, so we will skip this for now. And let's close this down. Now, inside of this
map you are in, you also have to remember to
go to the World settings. So if you don't have this
world settings open, you can click on Window. And then you can click
on this one called World settings to
open the window. But here in the world
settings you also have to remember to change this
game mode overwrite. So clicking here, clicking
on GM Maple Story, and I'm going to click on
this arrow just to make sure that the player
controller is correct. Just what I set it to in
the project settings. So PCM able story. You can also see here, if you double-click on the Game Mode, you can see here to the right inside of the
class defaults. Here to the right, you can
see if I make this smaller. It says player controller
is PC, Maple Story. It said it automatically
because we did it inside of the
project settings. Okay, we don't really want to work inside of here right now, so let's close it down. So now we have created the basic game mode and the
basic a player controller. So let's go ahead in the next lesson and
create the character.
20. Parent & Child Blueprints: So now it's time to
add the character. Just like what I've
told you before. Right-click here and go to blueprint classes or class here. When you click on all classes
here, search for paper. Now instead of making
this character, remember we are working in 2D, so we have to make
a paper character. So clicking on that one
here and clicking Select. Now we have to
call it something. And for now I want
to explain to you what parent and child
blueprints are. So first one here, let's create it and
call it character base. Now we have a character base here and let's right-click it. And now can see it says
Create Child Blueprint class. So let me create it and I want to explain to
you what I'm doing. So PPE, let's call
it bp player base. And let's make another one
here from the character base. Right-click on it again and
create Child Blueprint class. Let's call this
one VP enemy base. Okay, so what I'm
doing right here is let me actually
save everything first. So what I'm doing
right here is we created a base character, and from that, I right-clicked and created child blueprints. So what child
blueprints are is when you code something
inside of character, Today's, that code will automatically carry
over to the child's. Remember enemy base and player base are both
child of character base. So what have I code
or I do inside of character base will also be applied to any base
and play a base. This is very useful
so you don't have to code the same thing
over and over again. So if I, for example, want to quote something here, and I want the same
thing to be here, and the same thing to be here. That would be a
lot of work and it wouldn't be as optimized. Instead, I created
called blueprints. So whatever I do inside
of here will also automatically be carried over to the enemy and the player. And for example, in
the character-based, you can double-click on it. And we have something called a character movement components. So inside of here, for example, you can control any
movement of the character. For example, how fast
should your character walk? And if I write, for example, let's say 200 instead of 600. And compiling is just saving. We will talk about that
in the next lesson. So compiling and saving here. And if I minimize this and
open my, let's say player. And I look at the players
movement component, you can see it automatically
went down to 200. Because remember it is a
child of character-based. So whatever I do inside
of the character, it will be applied
on the player. So if I go back
here and I click on this small arrow to
go back to default, and it goes back to 600. Now if I go to the player, you can see in the player it
also changed back to 600. So this is very useful. And what we want to do now, inside of the player base, we want to right-click here. And now we want to
create the players, because now we have a base for the players.
Let's right-click. And I want to create
this one called Tsarina. And we also have another
character called Luke. We will work with them later, but we can create him right now. So create again
Child Blueprint from the player and call it BP Luke. Okay, so now these two children, whenever we code something
in the player base, for example, the movement, we don't really want to code the movement here
for the for loop. And then we want to code the
same movement for Serena, because these two players, they have the same movement. They are running the same way. They are jumping with
the same button. For example, clicking
on space to jump or clicking on the keyboard
arrows to run around. We don't want to do that twice. We just have to code this
inside of the player base. Now, it wouldn't make sense to code the movement inside
of character-based. Because remember we
have an enemy base and the enemy is not really walking
like you as the player, the enemy is not
using a keyboard. The enemy doesn't have a
mouse to look around with, so it doesn't make sense to
code the players movement inside of the enemy because
it's artificial intelligence. It doesn't really have a
keyboard, it's not a human. So it would make
more sense to code the players movement
inside of player base. Alright, so now we
have the parent and child blueprints created. And again, remember, if you
need any help with this ever, you can always go inside of my Discord server and I'm more than willing to help
you out with all of this. So let's right-click now
and create a new folder. And I'm just going
to call it player. And I'm making a new
one called enemy. So we are staying organized. I'm going to put this enemy
base instead of enemy. We are going to
create ai later on. And then putting Luke, the player base and
Serena inside of player. So now with that done, let's click on
File and Save All. And let's move on
to the next lesson.
21. Blueprint Graph Overview: We continue, let's take an overview of the
blueprint graph. So let's go to our Blueprints folder inside of player atlas. Just go into this one
called player base. Now it's going to
open like this, but you have to click on Open full editor, a
Blueprint editor. And this happens
whenever you don't have any code inside of here yet. So clicking on here and you can see this is the blueprint graph. And inside of here you
have the Event Graph. And inside of the event graph, this is where you write
all of your code. You can see here, Unreal
Engine provides you with very simple
events by default. And to navigate around
inside of the event graph, you can hold the right-click
and you can pan around like this and use the mouse
wheel to zoom in and out. You can also right-click
to add functions. Later on we are going to
use this to add some code, but don't worry about this. This probably looks
overwhelming for you. There are a lot of
things that you can add inside of here, but we will be working with that throughout
the whole course. Apart from the event graph
where we write the code, we also have a viewport. And inside the viewport, this is where we add our items. So you can see here
to the left we have something
called components. And inside of this
component tab here, for example, the sprite, we are going to add a
flip book here so we can see in the Details panel, just like I told you about
here in this Details panel, when we click on things
here in our level, we can edit items and
edit for example, the location, the
rotation, the scale. We can also edit things
about the collision. This is the same thing here inside of the blueprint class. When we click on a component, we can add settings about this component
inside of the details. So for example, the sprite. Later on we're going
to add the character. And you can see when I click on this source flip
book, you can see, we can see the animations for the character that we created
in a previous lesson. So same as before. We have a details panel
where we can edit settings and later on we are going to add
more components. And this can be done by
clicking on this Add button. And you can see you can
add a lot of things. For example, a cube, a sphere. You can add lighting, audio and lots, lots
of things. Down here. We can see our events that we
created in our Event Graph. So if you go back to
the Event Graph here, you can see Unreal Engine
gives you these by default. And you can also see these
events called Begin Play, actor, begin to
overlap and take, and you can see them here. Later on when we add functions, you can also see
our functions here. You can see the macros, you can see variables, and I'm going to explain
those in a later lesson. And after that, we also have
this toolbar over here. The most important thing is
this button called compile. And whenever you write any code, so if I just write
something for fun, you can see here it gives you a question mark and it says
dirty needs to be recompiled. So it tells you that
you have to click on this button whenever you
are done writing your code, I have to click on this button. And this button is, it just checks if the code you have written is good or not. So if I click on it and it
gives me this check mark, it means I don't have
any errors in my code and I am ready to press
play and play my game. But if you do something wrong, it will give you a
cross and it will tell you you have
done something wrong. And when you get an error, it will give it to you down here and the compiler results. You can see here it succeeded. Right now we don't
have any errors. But if you have an error, it will appear down here and it will tell you what
your error is. Now I am going to
select this node right now this was
just for testing. I'm going to click on delete. And again, here in the toolbar, you can save your project. Of course, you can
search for blueprints. You can go to the
Class Settings, go to the class
defaults and so on. And we will be working with all of that throughout this project.
22. Events & Functions: Let's take a look at
events and functions. I'm going to go back
to my bp player base. So inside of here as default, Unreal Engine gives you these default events and events are always
marked with red. So I'm going to hover over these right now and I'm going to click on Delete on my keyboard. I don't need them right now. But you have this one, the very basic one called begin play. This event. It tells you what should I do whenever I click
here on the play, whenever, whenever I
begin playing my game. So for example, very simple. You can drag it from this execution pin and
dragging out and saying print. So searching for print. This is the very basic function that you'll learn
from the beginning, and it just prints some
text to the screen. So clicking on this function. So this is a
function and you can see it by the f up here. So this is an event, this is a function. You always, always in Blueprint
need events to fire code. And the code consists
of several functions. Always needing an event
to fire code else, your engine doesn't know when
you want to fire this code. So if I had this disconnected
and you can do that by holding Alt on your
keyboard and clicking here. This will disconnect them. If I headed like
here, the engine, we'll never know when
to fire this code. If you don't have an
event coupled up with it, I'm going to drag it here to the other execution
pen and connecting it, clicking on compiled. Remember to do that. You can also here, instead of compiling and
saving all the time, you can click on these
three buttons are dots and say Save on compile,
unsuccessful only. And what that means is
whenever you compile now, automatically saved for you
if this check mark appears. So now what happens
is on Begin Play, my screen is going to say hello. I'm going to minimize this
a little bit and you have to look here up to the top left. So clicking on play, and you can see nothing happens. And this is actually a
small mistake by me. So let's actually
add the player base. Remember earlier I actually told you that we want
to add the pond. So let us click on
the cross here. Let's actually do it now
before we forget it. So going to edit the project settings and in the maps and modes
going up here again, remember I told you that
we needed to add this later on when we create a
character and we have one now. So clicking on here, and let's make our
character Serena for now. We are going to code it Serena. So we're not going to create
a player base right now. So we want to spawn Serena
into the world later on. So I'm just going to select my default poem
class, just Serena. But later on we will have a
character selection screen. And when we have
that, we just make it to none because then
the player selects the character and
they will spawn as either a Tsarina or Luke depending on what
they have selected. But right now we don't have a
character selection screen. So I'm going to spawn
as Tsarina by default. I'm going to click on Crosshair, go to the World settings
and make sure here and the overall game mode that
Serena is also applied here. Now, let's click on Play again. And you can see my
screen says, hello. Now falling through the ground. You can see here I'm
pulling through the ground because I don't have
a player start. And we can add one as well, just so we don't fall through
the ground going here. And they quickly add button, going to basic and adding
this player start. So this is where
we can start here. And if you click on G, you can remember to show
and hide the icons. This is the player start. I am going to place it
in my world here at, let's do the y 0. So it's here in the front. And then we can, I'm going to make it smaller right now because if you have this capsule is in the middle
of your collision tiles, it's going to say bad size. I'm going to reduce the scale
down here to 0.25.25.25. And then I'm just
going to drag it down here close to the ground. Now when we click on Play, you can see where falling
through the ground, but we're not
falling all the way because we have our collision. Okay, So back to the blueprints now we
said Hello and you can see here to the top-left that
it says Hello on my screen. So the code is working
right now and it's going through this player base. Other events that we have is
something called event tick. So you can search
for it here if you right-click in the graph
as I told you before, you can search for it here. And if you just write event, you can see all of
the events that we can apply to our code. For example, event hit, or if your actor begins
overlapping something, or if your character has jumped, you want to do something. Maybe if you begin
playing the game, this is what we have right now. And maybe this one
called event tick, this is what I want
to show right now. This one is something that
you should never use. And whenever you use it, this is probably because you have to use it at some point, but try to avoid this, never use it in your game. What I mean by that
is because this one runs your code 60
times per second. So if I click on
Control X to copy this and Control V to
paste it down here. If I connect this here,
so the event sick, you can see her when I click
on Play this place so many times and it plays
60 times per second. So it can imagine if you
have some code that is being played 60
times per second, your game is going to lag. And if you have
multiple of those, your game is going to
like it anymore and the players will feel the leg. So try to never, never, never use this. There is always a
better solution than using an event six. I'm going to delete this one. I never use it in my games. And there are some times
where you have to use it, But this is whenever your game is very
large and you get into a situation where you actually can't do anything
else than doing this. But I would say a
very large game, use it this only one time. So never, never use this. Try to delete it. Don't even think about this, this event. And as you can see,
there are a lot of functions that you
can add to your game. We have data tables, so we have groom, we have layers and so on. So a lot of things that you can add your probably we'll
use 10% of all of this. So don't even worry
about all of this, even though it
looks overwhelming. Again, if I go here and
write print string, there are another
function called delay. So I can delay here. If I write delay, then we can delay by two
seconds, for example. And then we can print
another string. And here I'm going to call it finished, something like that. And you can click on this
arrow to make it play longer. For example, I want to play it for ten seconds on my screen. I want to make the color red. So you have some variables
here that you can change. And I'm going to compile, remember to do that. And then you can click
on play on your game. I can say it says hello
and after two seconds, it's going to say finished. So very basic,
this is Blueprint. You can see it is very
easy to work with. And once you learn the basics, you can create a
very powerful games. So now in the plant-based, let's actually
delete everything, compile and save,
and let's move on.
23. Variables: We continue setting
up the character. Let's talk about the last
thing called variables. And this is the
main principle in programming in blueprints and whatever language
you are writing. So let's go to the player base again and to the left
as you saw before, there's something
called variables. And I want you to
think of variables as containers that contain
some sort of information. They can, for example, contain how much healthier
character has, what type of weapon
your character is holding, your movement speed, whether you have coins enough to buy an item in the shop or not. So a container that contains
how many coins you have. So variables are containers that contains
specific information, whatever information
you're trying to store. And to create a variable, you have to click on
this plus button. And when you create a variable, you have to give it a name. And to the right, you can see
all the type of variables. For example, create a Boolean. And let's call this
boolean has weapon. And I usually start
my Booleans with a b. And this is because this is usually what's done
in C plus plus. And when you drag this out, you can drag it into the graph. And when you let go, you
can either choose to get this variable to set it
to something specific. So let's just get this variable. So now we have this variable
and if you compile, you can see here down
in the Details panel, you have some settings that
you can change for it. You can change the
variable type, you can change the name
that we just said. You can add a description
and replication. We are going to
touch that later on. This is multiplayer. And now it says please
compile the blueprints. And we're going to
compile up here. And it's going to show you
what the default value is. What a Boolean is,
is something that can be either true or false. So it can be either
false like this or I can take it and the default
value will be true. For example, we can check if the player has the
weapon or not. And we can maybe start by
default to being false. So the player does
not have the weapon, but later on when the
player picks up the weapon, this one we are going
to set to true. Okay, so for example, let's take an example here. Let's do the begin
play event again. So if your rights begin
play leaking on here. Now, let us take this and
we can say print string. Now when we print this string, what you can do instead
of saying hello, you can drag this
and plug it in here. And it's going to tell
you, I'm going to convert this Boolean variable
into a string, because a string is actually
a variable as well. You can see here there is
a variable called string. So you can drag
this and it's going to convert it into a string, which just means into text. And I'm going to print
this text to the screen. So now when you plug
the variable in, you can now click on play. And it's going to say false, and this is the value
of the Boolean. So later on, let's say
after five seconds. So I'm going to do the delay
node and do five seconds. So after five seconds, I actually want to say the character has
picked up the weapon. So I can drag this
and then say set. I can connect it here
and set it to true. Now, let us, lets us do
the print string again. So I'm going to click on
Control C, Control V here. And I am going to connect
my variable now, the value. And it's going to print
that to the screen, compile and click on play. So it's going to say false. And after five seconds, it's going to say
true up here, okay? So it's going to say false
and then it's going to say true because we set
this to true later on. And this is how we set
variables dynamically. One, the player later on
walks into our weapon, we are going to set that has
weapon to true for example. So let's delete all
of this for now. So we have this Boolean
that can be either true or false and you can
check things with it. You have the other
ones, you have a bias, you have an integer,
integer 64 and a float. All of these for
our numeric values. So for example, let's try
to create an integer. Let's drag it out. Again. Click on Get. Instead of clicking on
get and set all the time, you can click and drag and
hold Control on the keyboard. This will get it automatically. You can also hold Alt on the
keyboard and click and drag, and it will set
this automatically. So instead of dragging and
clicking on getting set, you can either hold
Control or Alt. Okay? So all of these numeric
values, so the integer, integer 60 for the float, the byte, all of these
are numeric values. And if I compile and
I click on this here, you can see it is a number, it takes a number in this one, we could maybe change
the name of it, click on F2 to change the name. And this one could
say amount of coins. So maybe we are
collecting coins. And I'm going to
compile says please compile the blueprint compiling. And here you can see
the amount of coins. So we start with 0, and
as we walked into coins, we are going to add coins
into this variable. So we have some operators. And if you click
and drag from this, you can actually save,
for example, Plus. And you can see
we can add coins. If you will write minus, you can subtract coins. If you write the divided sign, you can see it says divide. We also have the
multiply like this. So for example, we can
say plus like this. And in Maple Story you
can collect the coins. I believe it's called micelles. Micelles, I'm not sure. I'm not really sure
what it's called. So let's just call it coins. And for example, I can add, every time I walk into it, I can add ten coins like this. Now if I just drag from here
and write print string, now I can connect this
to my print string, and it's going to
convert the integer to a string which
is a text variable. Now it's going to print out ten. So let me just make the
duration a lot more here. Let me make the color red. This compile save. And when I click on Play, you can see it says ten up
here because I have ten coins. The integer. Very cool. You can write numbers. We can use these operators
to modify these variables. And another variable
type is the float, very important one, we can say
for example, layer health. This is what we can call it. We can drag it out, holding control, getting
it automatically out here. So if you compile now, the cool thing about
our float compared to an integer is that a float
can hold decimal places. So for example, I
can write 50.5 here. And the default value,
as for the coins, if I try to write a decimal
places, for example, 50.5, it's going to convert it automatically
to 50 because you can't write decimal
places inside of an integer. So whenever you want a
number with decimal places, you have to select a float. This is the only one, but if you want
something that is a full number without
decimal places, you can choose an integer or something that is
larger and integer 64. As for the bite, you can
only set the number. If I change the variable here. As for the bite,
you can only change the number to a maximum of 255. So for the player
health now it's a byte. Again, if I write
decimal places, it's not going to accept it. It's only the float that
accepts decimal places. And this one can only hold
the number 200 up to 255. So if I write 256, it's going to
change it to 255 so I can write any
number, the knees 255. But if I write something above, it's not going to accept it. So you can imagine
the uses of these. For example, if I have a character selection
screen and I have, let's say I have maybe 60
hairstyles and Maple Story, I can use the bite. But if I have, let's
say Sunday I have 600 hairstyles for some reason. I cannot use a bite
anymore because I can only have up to 255 hairstyles. Okay, So these are
the numeric values and we also have other values. We have the name, the string, the text, and ask for the
name. Let's create that. And if I drag the name out here, you can see every
single variable that we create have
different colors. So if I just create
random variables up here, and I change this
one to a string, change this one to a
text, whoops, texts. And we can drag those out. We can, for example, call
this one achievement ID. We can, we can call the
second one server name, and we can call the
last one chat message. Okay, So the difference
between these you can try to compile and you can see when you click on
these variables, it is just some texts
that you can write here. The same goes for
the server name and the same goes for the player. The player health Ashley, we need to compile. Now compile this
is the wrong one. I'm going to drag
this one instead. And you can see here
this achievement ID, it says none right now. So all of them are
texts variables and you can write some type
of texts over here. The difference between those
is you always have to choose this name variable
whenever you have some sort of texts that
never changes in game. For example, achievement ID. Maybe an achievement
that you have is called ID 273 or whatever
random number you have. This ID, you will never have the need to
change it in game. And this is where
you can use a name, because whatever you write here. Can never be modified in game, but this is not the case
with the server name. So for example, if I
write Maple Story, best server, join now,
or something like that. Now this text that I write here, you are able to modify it. For example a and example I can give you is a server name. So if the player writes
this as the server name, we can actually modify the text that the
player rights here. If you drag from this
string variable, and if you just write string, you can see all of the functions that you
can use with a string. If you scroll up,
you can see this is the category called string. And in here you have
all the functions that you can use
with this string. So for example, you can check if the written text here is empty. So if the variable is empty, and if it is empty, you
can see the red one. Remember it's
actually a Boolean, so it can be either
true or false. So for example, if the
server name is empty, you're going to give an error to the player telling him or her to write a server name because you can't create an
empty server name. We can drag out again, we can write string and we
can check again. For example, you can make all the characters to
lowercase or to uppercase. Or you can even split the
text. And maybe some. What I use it for is if the
player writes a bad word, for example, the inward, and I don't want the player to write that in the player name. I can drag here. And I can say find. There is something here in this string called
find substring. And I can write to the inward. I don't really want to do
that here on the video. And it's going to find that word inside of
the player server. So whatever the player
has written here, it's going to find that word. And if it does, you can
do something with it. And in that case we can use
the one called replace. So we can replace also, we can just do that instead,
find the substring. We can also do that. So replacing the inward
with something else and you can just leave it
empty and it will show that replace it with nothing, which means it deletes the word and it doesn't put
anything inside of here. Very cool stuff. You can modify the string
variables as you wish, but you can't do that here. If you drag from this
and knew right name, you can see in the name you don't have much that you can do. So you don't have the is empty, you don't have the replace. So you can only modify strings
and not the name variable. The last thing you have
is the text and the text. The only thing I
want to say about this differently from
the string is that, uh, texts you can localize, so you can translate it
into different languages. Let's say you want to
translate your game into German or Japanese or Chinese. Whatever text you
want to translate, you have to use a text variable, whatever you write in
a string variable. This cannot be translated
later on in the game. So before you start
making your game, think about, do I want to
translate my game into German? When I'm finished? If I want to, whatever text
you want to translate, you have to write it
into a text variable. As for the server name, I don t think we need to
translate server name. For example, let's say we
have finished our game. It doesn't really make sense
to translate a server name. This is just what, whatever
the player rights. But as for a chat
message, let's say, for example, someone says, hello, how are you? Or maybe an NPC saying that? And now we want to
translate this message into Japanese because someone from Japan needs to see
what this means. So we're going to change
this into Japanese. But if you write this here, into here, you
can't translate it. You have to write it
into a text variable. And then you might
ask, why are we not just using
this all the time? Why do we even have
to use this or this? And this is for optimization. The name uses less memory
and then comes the string. And the one that is most
expensive is the text. Of course it's not
going to affect anything if you just use
one or two in your game. But if you have a large game
you have been working on for three years and you only
use this all the time. Of course it's going
to affect your game. So this one uses the
least amount of memory. So always try to go with this. If you have texts that
never changes, for example, an achievement ID, but
use a string after that. And for example, you can also
use it for a player name. Because the player name, again, you have to
modify the name. If they write a bad word, you have to check for
it in their name. And as the last thing, if you want your game to
be translated and you have some texts that
needs to be translated, then you have to write it, write it into a text variable. Alright, so enough about those. Let's delete this for now. And again, you can create
more value variables. And the last ones we have are the vector, rotator
and transform. We can use this later
in the project. I'm not going to
cover this for now, but for the vector, very, very simple
if you just create it right now and
click on compile. You can see it comes
with three numbers. And usually what we
use a vector for, we usually use it here. If you click on anything here, you can see in the location we usually use a vector to change or check for a location because the location has three numbers. And we usually use vectors for that because it
has three numbers. For example, we can set the characters location whenever
they take a portal, we can set it to a
specific location. The same goes with the rotator. If I change this to a rotator, it has three values, just like here in
the Details panel. Whenever I click on anything, they have a rotation. So this is a rotator and you
can set or get a rotation. And as the last thing
you have a transform. And this is used
whenever you are spawning things into the world. So for example, you are spawning the character
into the map. Then you have to
set the characters location where you want
to spawn the character, what rotation that
character should have, and the scale that the
character should have. Alright, so these were the most important variables and I'm going to delete all of them. We are going to create
more custom variables. And I want to cover these very
basic ones to begin with, because this will make it
very easy for you later on. So I'm going to delete
everything here. Let us compile. Now. Let's move on to setting up
the character and you will learn all of this step-by-step
during this course.
24. Setting up the Character: To set up our character, let's first go back to our Blueprints folder and
let us set up Serena. So instead of player, we made this blueprint class
called Tsarina. This was a paper character and this was a child
of player base. Here for BP Tsarina, we have to add those assets. Remember, we made those
flip books and we can add those to our
blueprint class. So going back to the
player folder here, clicking on Serena,
when this opens up, this is because it's empty. So it's, the Details panel is
filling the whole screen so you have to click on Open
all Blueprint editor. And we're inside of here. You can see we don't really need to code anything right now, so I am going to the viewport. Here. Serena's flip book will
appear. Once you add it. You add the flip books
here to the left. You can see we have a
sprite and we can actually add Serena's flip
book inside of here. We also have character
movement where we can control the movement later
on when we add movement. So let's click on the sprite
and here in the flip book, there are two ways
to add a flip book. You can either click
here and select it. This would be the
easiest way right now. Or if you minimize this a little bit and make it a
little bit larger. You can also go to
your assets folder, and you can also click and
drag and you can see it highlights this for you and
you can add it to that slot. So up to you if you want to
add it this way or this way. I can see we have our flip book added and
this will work already. So if you just test it here, if you just click on
Compile and Save. And again, it makes sure
that you don't make a mistake here over in
the project settings. Just like before when
we added the game mode. Here. Remember that you also had the default **** class to Serena because this is what
we are testing right now, just to make sure that you
have followed on that lesson. Okay, so now you have to add a player start again to spawn. So you have this arena
can also check it here in the world settings to check the Default Pawn Class for
making sure it's Tsarina. And also that you have a player
starts here in the level. So clicking on Play now, you can see we are spawning
inside of the level, but we can still
see the character, but the character
is actually there. And this is because
it doesn't know the view you want because
you haven't added a camera. Let's go back to Tsarina here. And on this bright, you can click on it here and actually click
on the capsule. We don't want to attach
the camera on top of here. So click on the capsule
and click on Add. And first one we want
to add is something called a spring on a
spring on him here. You can imagine this as
the holder for the camera, so it's holding the camera. We can the spring arm
and then again click on Add and clicking on a camera. So here, camera. So we have this burning arm and the camera is inside
of this spring arm. So it's a child of
the spring arm. And you can see the camera
is a bit wrong, rotated. We're currently watching
the character like this. So we have to rotate the camera. And remember, many people make a mistake by
clicking here and rotating the camera by
pressing E on the keyboard. You can see you have
these different tools. Again, just like you
had in the viewport. Many people make the mistake
of rotating the camera here, but you actually have to
rotate the spring arm. So clicking on the
spring arm and rotate, rotating the z so the
camera is in front of it, so minus 90 degrees. Just like this. And let
us compile and save. You can click on Play now
and see what happens. So clicking on Play. Now we can see, you
can see the character. So the camera is working, but the default
settings are wrong, so we have to edit them. Alright, so let's
finish all of this up. So what you have to do is click
on the spring arm here on the camera and you
actually have to change the camera
to perspective. So what you have to do
here on the camera, you have to change this to orthographic view because
we're not working with 3D. We're working with 2D. So clicking on
orthographic view. And here for the ortho width, you can change how close
you are to the camera. So the lower it is, the lower the number, the closer you are
to the character. You can see this
is very huge now. And the larger it is, the further away you will
be from the character. So you can see here, if you just tried on random large number, you will get further away. So what do you want to do here? I tested it in Maple Story, I played it and I tested the camera length
and it's about 1304. Again, this is something I eyeballed and when I
tested Maple Story, so maybe it is 201,250,
maybe it's 1300. I can't say that for
sure in the real game, but it looks like
it's around 1304. I tried to play the
game a couple of times and testing the camera. And next what we want to do is click on the spring
arm and disable this one called do collision testing because it
will bug the camera. So taking that away, clicking on compile,
clicking on Save. Now, when you click on Play, you can see this
is the character. And if you remember, we can click on FL1 to
maximize the viewport. This is what it looks like. Right now. The player is
not starting on the player start and it might have something to do
with our collision. So if we go back here on Serena, we have this capsule here you can see this
capsule and this is the collision capsule,
this capsule component. So we have to make this
smaller to fit our character. Else it will collide with the tiles and it will
not work correctly. So you can change this
capsule half height and it can change the radius to
fit our character more. I'm going to write 16 down here. And the capsule radius, I'm going to write 33 years. So it's a bit smaller and
it fits our character more. Now click on Compile and Save. Let's see if that
was the problem. So I'm clicking on Play now. And it was the problem, it was colliding with this. You can see here we have
collision data up here, we have collision data up here. Capsule is too large, it is colliding with
these two here. And it's bugging it out. So it makes it start
here on the top instead. But now that we have fixed our collision capsule,
the size of it, at least, we can now
click on play and you can see the
character is here. Now the small problem
that we have right now, you can see the feet of
the character is behind the grass and we want to have the feet in
front of the grass. This is a very easy fix. Remember, we have our
tiles here at 000, because when you look up here, and again, you can also
just a nice trick. You can click on
this snapping tool. And you can increase the number. And by increasing the number to something like, let's say 100. You can see the middle line
here that I'm interested in, this very middle line. You can see the medulla and
goes through the tiles. So this second
layer that we have, that we made before, and the second layer, remember
we have a foreground. These were the foreground. And the middle area
that we have at zeros, zeros 0 is our tiles. And right now, our spawning, our players start has the
location of 0 in the y, but we just have to
push it a little bit further forward so the character
is not behind the grass. So what I'm going to do is I'm just going to do this down. I'm just going to write
one here in the y because 0 is basically on the
level of those titles. But if you write one, technically we are in
front of those tiles. So if you just write one
for the place dot in the Y, and you can click on Play. You can see now you are
in front of the grass. So now that we have
set up our character, let's move on to the
player movement.
25. Basic Player Movement: Let's now create the
basic player movement. So let's go back to the Blueprints folder
inside of player. And remember what I
said before about the child blueprints and
the parent blueprints. So the best way to do this
is code that movement inside of player base because if you hold
the mouse over this, you can see the parent class
of Tsarina is the player, and the parent class for
Luke is the player base. So if we coat the movement
inside of player base, Serena and look will inherit
that code because they are children blueprints
of this player base. Okay, so let's go inside of player base, encode
the movement. So clicking here. Now let's open the full blueprint editor. And now we are inside
of this event graph. And again, you can right-click, hold, right-click
to navigate around. Now to code this, let's start with
the very basic one, and it's called add
movement input. This is the one
you always will be using in every project if
you want to add movement. So right-click and you
can search for movement. This is something that's
really useful sometimes when I code and I don't know
what the function is called. And I also did that
when I was a beginner. I'm just thinking of
what do I want to do? Maybe I want to do
something with location, so I just right-click
and search location. Then I try to skim around. Sometimes it takes a
long time to skim this. But then I find it. For example, I wanted to get this actors location and I want to use this
information for something. And this is what you can
do when you're a beginner. You don't really have to know what all of these are called. You can try to search for
what you are trying to do. So for example, it can
solve search for rotation if you're trying to do
something with the rotation. So right now we are
trying to add movement. So searching for movement, you can always try
to skim through, I know what it's called, but I wanted to see if
I can find it it now, the movement is a bit
difficult to find here. As movement input, this is
what we're trying to find. So clicking on Add here,
add movement input. Now remember what I said before. You can't run functions if
you don't have an event. And we want the event to
be the keyboard keys. And then you want to go to edit here and project settings. And inside of projects settings, you have this one called inputs, and this is where you
add your keyboard keys. So clicking on inputs. Here in the access mapping, you also have this one
called Action Mapping. The difference between
the action mapping and access mapping is, you can think of the axis
mapping as being continuous. A continuous click, a
continuous movement. So all the movements
will be down here. And for example, clicking
W to move forward, clicking D to move to
the right and so on. You have, those are
access mappings. However, if you just want a one-click events, for example, you press the space bar to jump, or you press the mouse
button to shoot your weapon. These are action
mappings, movements, they are access mappings,
and one-click events. They are up in the
Action Mappings. Here always add the movements
to the access mappings. So we want to add, for example, move
right and left. So since this is a 2D game, we are moving to
the right and to the left on this platformer. And down here you
have to assign keys to what you want to use
to move right and left. You can either click here and click here and find the key. But another useful
method is clicking on this button and then clicking
the key on your keyboard. So I'm going to click
on D on my keyboard. This will move the
character to the right, and I'm going to click
on this plus button, looking on this
keyboard and clicking on a on my keyboard
to move left. And you have to set the scale
to minus one for the left. So you can think of it as
two different directions. So it's plus one when
you move to the right and it's minus one when
you move to the left, just like a graph
with x and y axis. Alright, so let's close the project settings
and let's go back here. Now when you have added
the axis mapping there, you can now right-click
over here and write the same name as what you have called it in the
Project Settings. So I call it move
right and left. And you can see here, I
can see the axis events. So you want to add this
one called Access events, not the axis values. And you can see events always
have this icon as well. So I can click on it. Again. Events are always
marked as read. So you know this is an event. Now you can connect it to
the movement input here. The next thing you
have to learn about functions is that target. They are very important. And you can see here
it says up here, the target is ****. So it wants to add
movement to a pawn. And remember our character. We are inside of the character
here, the player base. And this blueprint that we made, it is a character, It's a paper character. And just like before what I said here in the Blueprint Class, a character is a type of ponds. So it is actually
a type of phone. One will create a character that we already have
the correct target. You can see it says self. Self means this blueprint. You are in already, so you are trying
to add movement to the blueprint we are in
already, so that is correct. And as for the direction we
want to add movement to, you can right-click here and
say Get control rotation. So we're trying to get the
rotation of our controller. And then we can say
get forward vector. And now we can connect it
here to the world direction. So we're trying to get the forward direction
of our controller. Now as for the scale value, you can connect this
axis value to it here. And now you have the movement. So let's compile and save,
and let's try to move. So clicking on Play now, I'm going to person D to move to the right and click on
age and move to the left. So you can see we have the
movement kneel down now.
26. Player Jump: Let's now add the
jump for the players. So clicking back here
in the player base. And remember we need an event. So going back to the edit and project settings inside
of here in inputs. Now, since the jump
is a one-click event, we are going to add it here
in the action mapping. Remember it's only
movements that we add in Access Mappings. Here, clicking on the plus
for the action mapping. Let's add it here. Let's call it jump. And I'm going to add my
spacebar to it here. You can add another
button if you want to. I'm going to close it down. And now we can
right-click and say jump. And here you can
see it down here in the Action Events saying jumps. So click on here, and now we have our events. Next, you already
have a built in function inside of Unreal
Engine called jumps. So you can drag from this
execution pen and write jump, and you already have this
function called jumps. So clicking on it. Now, compile save. And you can click on play. And you can see when I press
on space, you are jumping. Obviously, we have to add
the animation Slater, and we also have to
edit the movements. So how much we are jumping
and what the gravity is, what that is for later. So let's go back
now and I want to show you something
for optimization. So I'm going to add
a print string here. So it's going to say Hello
every time I click on jump, if I click on Play now
and I click on space, you can see to the top-left, it is saying Hello every
time I click on space, now I'm clicking space all
in all what I can now. And you can see
you. I can click on space and jump even
though I am in the air. And I don't want to do that
for optimization's sake. I don't want to run
the code all the time. I just want to run
the code once. And when I land on the ground, I allow the player
to jump again. Because if I allow the player to press on space all the time, you can see we can
spend the code. This is not really optimized, so I just want the player to only run this code
whenever the player can, when the player is underground. And we have something
called is falling. So if you take this Character
Movement Component, you can click and drag it
into this event graph. And you can see this
is also a variable. Remember before you learned
those very basic variables. But this one is actually also a variable if you drag it here. So now we can do something
with the character component. You can drag out from it
and you can say is falling. And now we can check if this is checking if the
player is in the air. And remember the red
pen here is a Boolean. So you can drag from this
Boolean and you can click on b, and it can make this
one called a branch. A branch is, is just checking if this value is true or false and you can do
something with it. So now you're saying you're taking the
character movement, you're checking if the player is falling and if it is true, yes, the player is falling. We don't want to jump because the player is
already in the air. But however, if the player
is not falling anymore, so it's checking, is
the player falling? It says no, the player
is not falling. Okay, Then you are allowed to jump because you
are on the ground. So now you can see
if I compile and click on play actually let's add a print string up
here so you can see that the player is falling
and we can't really jump. Actually, that's down here. That's a better example. So it's only going to say
hello wherever we jumped. So let's click on jump.
Now. Click on space. You can see I can't
spend my space. I can only run the code
whenever I am on the ground. So this is optimized. So now that code
is optimized and the player cannot run
the code all the time. However, to make it easier
for myself reading, I can delete this and
I can unconnected by holding Alt and clicking
on this execution pin. Now, instead of doing it here, I want to have it to the
true because I can read it better if I have this
function set to true. But now we have to do
another Boolean here. So it's now saying, is the character falling? What we want to say if we
hook it up to the true, is the character not falling? If that is true, so the
character is not falling, the characters on the ground. We can jump to do this just
to make this the opposite. We can drag here and say nuts. And you can see not
this one not equal, we have to use this
one NOT Boolean. And what this is saying is, if the player is nuts falling, if that is true, then go ahead
and you are able to jump. And I think this
is a lot easier to read than having this to false. Alright, so the last
thing I want to teach you is a
creating functions. So before you can see, we have a lot of
functions that we can add that are premade, but you can also make
your own functions. And I want to make this one into a function and you
can shorten this one. And we usually do this
to clean up the code. You can right-click on here. And you can say
collapse to function. So it will, instead of you going here and
creating the function, it will actually
create it for you. So selecting all of these three, right-clicking and saying
collapse to function. Now you can see it
made a function and usually I write F as a
prefix for functions. Let's call this one. Is not jumping. So this is what it is. It's checking if you're jumping. It's just saying now
you can double-click. By the way, I maybe
I did it too fast. You can double-click on
this created function. And now you can see the
function here. It starts. I'm going to drag this
down here so it's more organized just like that. So this is the function. It starts here, it ends here, and it gives a return value. And the return value, if you go back to the Event
Graph, will come out here. This is the value that
is being checked here. So this is a bit more organized. You are hiding this
code inside of this function and only
this function will appear. Now remember, you have to add those to the execution
pen because in blueprint, you can't really do like this because you
have unconnected, an unconnected
function and this will never run if you
have it like this. So the best way would
be to do it like here and then run it
through the code. However, you can make
this a little bit better. I know I have given you a lot of information inside
of this video, but I want to teach you
the best method of coding. Here you created
now this function, and it's running correctly
through the code. So you can see if
I click on Play, nothing is really
wrong with my code. I can jump and it's
working perfectly. But you don't really have to connect it to
execution pins here. Because usually in
these blue functions, you can see we have
green functions and we have blue functions. The green functions
just give you some information that you
can use for something. For example, here we've
got the control rotation. We got the forward vector, so the forward direction. And then we are getting
this information and we are using it as
our world direction. So green functions are
used to get information. And however, the
blue functions are used to set information. So we have set functions
and we have get functions. For example, the jump
function is setting the jump. And here we're not
really selling anything. So if you click on
this function we made, it's not really
selling anything, it's just getting if the
player is falling or not. So it's getting information. So it doesn't make
sense to have it being blue light here
and you can change it. So we can click on this function and you can click on
this one called pure. So clicking on pure just means I am getting information
from this function. I don't really need to set it. I am not setting any information,
I'm just getting it. The player's falling or not. So going back to the
graph here, now, you can connect it back like this and you can see it's
more optimized. Now. You're just getting if the
player is falling or nuts, and if the player
is not falling, if that is true, you
are able to jump.
27. Player Movement Animations: We're now ready to add the movement animations
for the character. I hope you are
fully awake because I have a lot to teach
you in this lesson. So if we go back to our player
and inside of player base. So we want to add
the animations here, so we are adding the movement, but we also want to
add the animation. But now it's getting a
little bit more complex, but because now we are getting
an actual multiplayer. If I minimize this first
before we do anything, I want to teach you
about enumerations, let's right-click
here and let's make a new folder called
enums for enumerations. You can go inside
of this folder, you can right-click in
here and blueprints, you can create this one
called enumeration. Enumeration is, is just
a list of anything. So if you just make it
and I can show you, usually I start enumerations, prefixes by writing E, and let's call it
movement States. We are creating a list
of movements states. So an enumeration is
just a list of anything. You can click on
this button up here. You can see every
time you click on it, you add a list or you add
an item to that list. So an enumeration is just a list of whatever you
want to make a list of. For example, groceries. You can write your Apple, oranges or cucumber or
whatever you want to write. You can write cars, for example, a list of cars. You can write them here and
maybe the models of the cars. You can write a list of weapons
and a list of anything. I'll list of items. But for this sake, we are writing a list of the running or movements
states here rather. The first one I'm
going to call idle. So we have an idle animation, and then we have a
run rights animation. We have a run left animation, and then we have
a jump animation. And we also have
a fall animation. And actually we
don't really have a fallen emission
because we only made, let's go back to the
Assets Character. We made an idle animation,
a run animation. Even though it's called run, we have both run right
and around left. And then we have the
jump animation here. But we don't really
have a fall animation. But in Maple Story, the full animation is the
same one as the jump. So we're just going
to use this jump on as our full animation as well. So let's click on save all. Now we have made
our enumeration, we have made the list. Now let's go back
to the player base. Now here you can add
the enumeration. So if you create a variable and let's call it
movement States. And you can change
the variable here. And to find your
custom variable, you can call it whatever you called, the enumeration file. So e as a prefix and you
can write movements, date, and you can see, you can
see your enumeration here. They are usually this
dark green color. So this one E movements state
this is our enumeration, clicking on it, and now it is
a variable you can compile. If you want to see
what it looks like, you can always get it
out here and click on, Get this as getting
the information. You can look here, click on set and you can see
you can set it to all of these different list items that you have set
here in the list. So if you add one more
thing and click on Save, you can see here this new thing actually I need to compile
here, Compile and Save. Now I can click on
it and you can see the new list item
that has been added. So this is how you add
things to the left. You can also delete it out here. We can save, again,
Compile and Save. And now you can see this is
the list that we have. Okay? So basically what we want to do is let's take this axis value. Now let me print
it to the screen so I can show you
what's going on. So now let's print. If you drag this axis value and connected to
the print string. Now it's going to print this
axis value whenever you run. So if you click on
play and you run, you can see it's
one when I moved to the right and it's minus one
when I move to the left, remember this is what we wrote inside of the project
settings and the inputs. One to move right. I just want to move left and
when we are standing still, it is 0. Okay? But this information
that we have now, we're getting a lot
more clever now. So when it is, when this is equal to 0, you are standing
still, you're idling. So taking this out and
writing the equals sign, or you can write
equal if you want to. You can get this operator
here saying equal. So if this number is equal to 0, and I can drag out here again
and write b or a branch. If this number is equal to 0, if that is true, what
do we want to do? And ultimately what
we want to do. We want to set this
list item to idle because now we know
that the player is idling because the player
is standing still, the axis value is equal to 0. But if it is not equal to 0, this means you are moving. Yes, you are moving. But if I just copy paste
this control C control V. Are you moving to the right or are you moving to the left? So this, we also have to check. So for example,
you can drag from this axis value and you can say, the greater sign like
this, is this greater? So you can choose this one. It's this axis value, is it greater than 0? And we can drag this year, I'd be for the branch. And whoops, it zoomed out. I don't know what's
happening like this. So if this x value
is greater than 0, this means we are
moving to the right. So let's connect this
one from the false. So now what we're saying is
this x value equal to 0. If it is, then it's idle. If it does not, go
ahead and check this one, then down here, what we are checking is, is the excess value
greater than 0. If it is greater than 0, then you are moving
to the right. However, if you are moving, if it is less than 0, then you are actually
moving to the left, like this because
it's minus one. Alright, so this is
the main principle. Now we have to do a
little bit more work to make it work in multiplayer. I'm going to move this jump, jump IF function here, jump logic down here. So I have more space up here. So this one I actually want
to make into a function. So I'm going to go down here and I'm going
to right-click. And you can also, you saw here if
you wrote events, you could select
an event to add, but you can make
your own events. So if you write costume, you can see you can
add a custom event and you can call it
whatever you want. I'm going to call this
one set movements state because this is
what we are trying to do. So set movement state and
we have now this event. Okay, so I want to
take one of those, so I'm going to click Control X to cut it and paste
it down here. Now, alternatively, what
I want you to do is set my movements state
here and the event. And a cool thing
you can do here. You saw, you could
add variables here, but you can also add
variables to functions. Can see all of these
pre-made functions. All of these are
actually variables. So you can click on
this custom events. You can add a new variable, but you can also easily
added by dragging this pin and drop it on top of
your custom function. You can see it automatically creates this variable for you. If you wanted to
add it manually, you could always
click on the plus here and you can give it a name. So for example, name. You can see it changes name here and you can select again E. Movements stayed and you could have selected
it like this. I'm just going to
delete this one. I was just showing you. So compounds Save now. So now what you can do up here. So now instead of having
this enumeration written, you could take
this out and write the name of the event
that you wrote down here. So this is how you
call a custom event. Sets movement States. And you can see called function here, set movements state. Now, instead of having this
enumeration running directly, it's actually going to
run this event which sets this variable to whatever
you are selecting here. So this information that you are choosing here is
going through here. And it's setting
your variable to whatever information it's
going through up here. Alright, so very,
very cool stuff, but we have to do a little bit more because we are
in multiplayer. This is not a
single-player game. This would have been worked
perfectly in single-player. But in multiplayer, usually we don't set variables
on the clients, so we have a client
and the server, and usually the server, which is the guy
who makes the game. So if I play Counterstrike, I create a server. I am the server. Imd, the true game. So I have the
authority of the game. And you hear sometimes that
there is cheats or hex, that's called
client-side attack. So what we usually do is
set variables through the server because the
server controls the game, you always have to remember
that in Unreal Engine, server has the control of the
game and whatever you do, whatever logic you write, you have to run it
through the server. The clients are all
the connected layers. So you'll make the server, you are the server and all the players that connect
to you to your server. They are called the clients. And if you don't run all the
code through the server, so if you don't check
whatever you are doing, for example, jumping or doing
this setting a variable. If you don't check it first, with the server, the client has an easier
time cheating in the game. So if you just run this through the client and set
this variable, the client has an easy way to
cheat inside of your game. So always remember, the server has the authority of the game, that the server
is the true game. The server checks if you
have shut the weapon, then the server says, yes, this client has actually
shot the weapon. Then go ahead and apply
damage to that character. So the server always has
to check that information to make sure that the client is not doing anything illegal. So another example, just
before we continue, for example, the client, so the connected layer. Shoots an RPG and furthest RPG who have to
check through the server. The server checks. Does this player actually have an RPG in the hand and
shooting the weapon? Then the server
checks and says, yes, this client actually has an
RPG in the hand and shut it. Then it will send
that information back to the client
who shot the RPG. And it will tell
that client you are allowed to shoot that
weapon because yes, you have the RPG in the hand. Rule engine. You have this
authority where the server has the authority and
whatever the client does have to be checked
through the server. We can just set it here. This is, you can see here this is the client
and you can also check it here if you right-click
and write print string. And remember print string is so, so powerful even though it
is just printing a string. Let's compile and save. And you can see what I'm saying. Now, instead of
clicking play now, let's click on these
three buttons and let's change it to a
number of players. Now we are inside
of Multiplayer. Lets write two.
Here in net mode, click on this one called
play as listen server. Let us click on
these buttons again, and I'm going to click on
this one new editor window. So this is what I'm
going to play now. I'm not going to play in the
selected viewport anymore. So clicking on new
editor window. Now we can see we
have the server. You can see it on the top
here. We have the server. I have created this game. And you can see the
client connected to my server that
I have created. If I click on here, you can
see I can move as the server, and I can also move as
the client over here. So now we are inside
of multiplayer. And as you can see here, the client hello and the
server also prints hello. This means this information. It means that this event is running on the server
and the client. They're both saying hello. And when I set variables, I only want to set
it on the server. I want to make sure that
the client is not cheating. So I never want to set
variables on the client. And let's delete this. And so let's right-click here and say another
custom events. Let's add custom event. Let's call it S RV per server. I usually call them as R V. And let's just call it the
same name as this one up here. Says movement states. Just like that. Now to make it run
through the server only, you have this one in
multiplayer called replication. So clicking on here and
click on run on servers. So we just want to run it on the server and
click on reliable. I'm going to disconnect
this by holding Alt, disconnecting these
and connecting the set over here with this. And now what we can do
here is run this events. So up here, running
is our v like this, and connecting these
inputs just like that. Okay, so now it's going
correctly actually. Now what we are doing is we are checking
if the x value is 0, so the player is idling
if that is true. And this idol information. Now we are running
this event called set movement state,
which is this one. So we are setting this
information in South the idle. This information is being
printed out to the server. And the server is
setting that variable to whatever you have written here or whatever you
have chosen here. Okay, So this is the
correct method to do it. So now what we have to do here, so let's delete those. And again, you can
just write the name of this event here to
call the event sets. Movements, states like
that and select this one, not this one, so this one here. And let's copy it,
paste it down here. So if, if the axis value
is greater than 0, it means, if that is true, it means we're
running to the right. That's false. We're running to the
left, just like this. So now it's more
correct. Okay, So now we have set the
variable what now? Because you can see if I compile and save and save everything, if I can click on Play now, nothing is really happening. And that is okay. Because essentially
what you are doing right now is you are
setting this variable, but you really haven't
defined the supervisor. If I go back here, you haven't really used this flip books. Remember, you are just setting this variable to
whatever information you are setting it here too. So for enumerations, we have something called
switch on enumeration. So just as a test, if I just drag this
enumeration out, and if I drag it
here and say switch, you can see a switch
on enumeration. What it is, is basically, it just gives you an
execution pins depending on what you have written
here on the list. And you can do
different actions. And you can see here,
when we are idling, we can run this flip book. When we are. I go back here. If we're running to the right, I can run this run
flip book and so on. So we can do different actions
depending on what we are, what we have set
this variable to. Okay, So inside of
multiplier again, you can click on a variable. And here in multiplayer,
just like before, where you have
replication on the event, saying run on servers are running on the
client specifically. Also for variables, you
can replicate those. So as you can imagine, if you set a variable
on the server here, the client has to know about
this information somehow. And this is what you use
this replication fork. Because if you set that
variable on the server, how would the client note? Because the client has no chance to know what you
have said it too, because you are the server. You have set the
information on the server, but you have to send
that information back to the client so the client knows what the server
has set it to. And this is where the variable
replication comes in. So if I click on this
and click on replicated, you can see these
two spheres appear. This means I am setting the
variable on the server, and now I am sending
back that information to the client so the client knows what the value is
for this variable. This is what replicated does. Now a little bit complex. The last thing I want to
teach you about before I blow your brains out is this
one called Rep, notify. And this creates a
function for you. So if you click on retinas die, you can see here
it automatically creates this unwrap function. And what that does
is it's going to run that function every time
you set this variable. So every time you
set this variable, it's going to run this function. So I'm going to double-click
on this function. And I'm going to
drag this movement stayed in here holding Control, dropping it here, and
now dragging it here, saying switch on enumeration. Just like that. Every time I am going
to run this code, run it here through the
server setting this variable. Every time this value changes, it's going to run this function. So what I want to do
with this function is change the flip book. Because remember in the sprite's actually not here we are inside of
the player base. So if I go over to
the player Tsarina, remember in the sprites, we have this one called
source flip books. So it is a flip book
that we are changing. What we have here is something
called sets flip book. And now it's going to tell
you it's for the sprite here. And you are going
to click Okay, Yes, this is for the
sprite and it will create that
automatically for you. You could also just have
clicked and dragged it from here and saying flip book, that is the same thing. So we're going to set this
flip book to the idol here. When we're idling, when we
are running to the right, I'm going to copy paste this, connecting this to the
target, like this. When we are running
to the right, we are running the run
animation or running flip book. I'm going to copy paste
this a few times. The run left is actually
also the run animation. And the jump is the jump
animation like this, jump, lipid like
this, and the fall. We don't really have
a new animation, so I'm going to connect my fall here and just
use the same here, the jump flip book. Okay, Remember to
take this bright, you can either do like
this and connected to multiple places or
maybe sometimes it's cleaner just to use
multiple ones like this. You can also do that. Let's just do that
for this one here. I'm going to copy paste
this a little bit. And connecting the
last one here. I'm going to make this
cleaner later on, but let's just work with it now. Compound save, clicking on Play. Now, you can see here, if I run to the
right, I am running. If I run to the left, see, I'm running But I'm not running the correct direction
when I'm jumping. Jumping correctly. And this is because remember
we haven't really made the jump animation and we will be doing that right
after this lesson. But let's focus on the running. So running is working, but I'm running the
wrong direction when I'm running to the left. And this is because this is
a sprite and you have to rotate your image for
it to run correctly. So I just want to rotate this
sprite when I'm running. So when I run to the left here, it's not running the
correct direction. So what you can do
is take this sprite here and you can say rotation. Remember, when you don't
know what you are doing, just search for rotation
and you can try to skim through those and
see what you want to do. And the one we're using
is set relative rotation. We want to rotate it. You can put some minimize
and click on anything here. For example, this
player start and click on E for the
rotation tool. And you can see you
have to rotate the z. So if you want something
to turn to the other side, you have to turn the Z by 180. So I'm going to click
on Control Z here. And the z, you have to
rotate the sprite by 180. And you can call connected here. So it's going to rotate it
before it sets the flip book. And remember, for the run, right, we have to
rotate it back. So copy pasting this
code is getting messy, going to move this way. So here we are going
to rotate it back. So setting it to 000 and
connecting run right, like this. Now, it should work
correctly if I compile and actually I
forgot to add a target here. So let's copy this, paste it here like this. And you can see when
you have an error, it, it writes the arrow here and
it says you need a target. Those Compile and Save. Just like that. And now let's play and see if I move to the right,
move to the left. Because he now our animation
is working perfectly. And now we're missing
the jump animation, and we will do that
in the next lesson.
28. Player Jump Animations: Let us now do the
jump animation. So let's go back to
the player base. And in here, in the Event Graph. Here we did this
movement with the ILO, with the run right and
what they run left. What we haven't really
set the jumping. And further jumping
if we drag this one called set movements
state again, so dragging this one here
so that movement state, we can drag it out two times. So we have both the jump
here and also have the fall. We have to check
if the player is jumping or if the
player is falling. It is the same. It is the same animation
in Maple Story. So it really doesn't matter. But if you are creating
your own game and you have two different animations
for the jump and fold. This would be really
nice to know. So again, just like
before down here, in the jump logic, you are checking if the
player is falling or not. So we have to do the same here. If we go back to
the Event Graph, we have to do the same here. So before we idol, I am going to hold Alt and
click here to disconnect this. I'm going to move this
a little bit further away because now we
can add the jump. So I'm going to take the
character movement and check if the player is falling. So we're getting, if I can find it here is falling,
getting this one. And let's create a
branch like this. Now, we're checking if
the player is falling and if the player is
falling, we are jumping. So we are in the air. And if the player
is not falling, meaning the player
is underground, then we are not in the jump. We are just going to run that running code
just like before. But here we are jumping
if we are in the air. So now we have to check. Is the player jumping or
it's the player falling? Which one is it? We can do that if we get the
velocity of this actors. So I'm going to
right-click and right get the velocity, like here. And we're getting the velocity. And now this is a vector. You can now break this vector. But because what I'm
interested in right now, if we have the player here, I'm interested in if the player is jumping up or falling down. And again, this is the z, the blue arrow here is the z. In the z axis. I want to see, is it going
in the plus direction, which means that
the player is going upwards or is the
plane going downwards, which means the z is actually
in the negative value. So I'm going to end up
player base, this velocity. I can take this vector
and I can say break. You can break this vector
onto the x, y, and z. Remember a vector, if I
can show you back here, when we created a
vector variable, a vector consists
of three numbers, just like the location
here, three numbers. So if I go back, let me
just delete this one again. So we are breaking this
vector into the x, y, and z because we're only
interested in the z value. I want to check if
this is going upwards, which means it's in the plus, or going downwards, which
means it's in the minus. So I'm going to take
this and say greater. So is this greater than 0? And creating a branch
again like this. So if it is greater than 0, this means the player is
jumping because you are going upwards if it is
not greater than 0, so it's in the minus means
you are falling down. And if the player
is not falling, you will just run this
normal running code. Okay, So let me just move
this a bit closer now. Now we have this jumping
logic and we can always, usually dedicate a whole lesson for a cleaning all of this up, so don't worry about it if
it looks a little bit messy. But here we can just
compile and save. And now I want to
explain it to you. Let's actually just click on
Play and see what happens. So if I click on play and I jumped, you can see I'm jumping. It's working. Awesome. Okay, so what's happening is you are checking here and
then move right, left. Before you are running
this move animation, you are checking if
the player is falling. And if the player is falling, it means you are jumping. Okay, that is fine. So yes, you are jumping. It is true. You are falling. What then? Here you take the velocity
of this character and you are breaking this vector because we are only
interested in the z value. We're checking if the
z value is above 0. If it is, you are jumping. If the velocity is under 0, meaning you're going down, that means you are falling. Okay, so what happens here? You're running
this event and you set it to jump this information, you're sitting here, we'll go
through this event because this is ultimately the
event you're running. Set movements States you recall you're
calling this event. So it's running
through this event. It's putting this information that jump that you
have set it to here, running through the code. It's going through the server. The server is setting
this variable. And remember, we set this
variable to a rep notify. And again, if you don't
remember a notify, because right now you
are the server and the server sets the variable. How would the client
know what this variable is if you don't do
anything because remember, you are on the server and the client can't
really see what you're setting it to unless you are replicating
this inflammation. So you are replicating the information back to the
client so the client can see the value of
this set variable. So whatever up notify is, it notifies all of the clients
what you have set it to and it does that through this
Ribner onReceive function. So a rep notify whenever you set a variable to rip notify, it creates this unwrap function. And inside of here,
whatever you code here, all of the clients
will see that change. This is why we are setting
the flip book here. Because we want
all the clients to see that I am in
my idle flip book. I want all the
clients to see that I am in my jump flip
book and so on. So you're sending all of this
information to the client. Now, the information
was set here, is jump, went through the server
here, set the variable, and it's going to go inside of the unwrap function
because every time you change a
rep notify variable, it's going to run
the unwrap function. And since you set this
value now to jump, it's only going to run through
this jump execution pin. It's going to
ignore all of these because it only sees that
now you have set it to jump. So it's going to run
this execution pin, and it's going to
set the flip book of this bright to jump. So therefore, when you
click on space and jump, it will set your
flip book to jump. And to test it out. You can see it, It works. I can see it on the
client as well. To make sure it works. I also need to run around
as the client and jump as the client to see if I as the
client and allowed to jump. Because remember,
the server checks whatever you are
doing as the client. So now you can see I
can jump as the client. And also if I take this
a little bit down, you can see the server
can do all of that. Of course, the server, again, the server has the
authority to do anything in the game because the
server is the true game, the server checks all the
clients for what they are doing and the server
is able to do anything. So it's more like the client. We have to check with
the client as well. If the client is
able to do all of that and the client is able
to do all of that as well. So it's working perfectly.
29. Custom Variable Input: Now I want to show you some
custom variable inputs. So if we go back to
the player base, and here inside of your
unread movement function, you can see here before we
set now the idle flip book, we set the run flip book, we set the jump flip
book and so on. But what if we go
here to look, now? If we spawn, look
into the server. So now we can see we are
responding as Tsarina. And that is, that is great. But what if we spawned Luke? Luke doesn't really
have this flip book. Look. Isn't this girl flipped? We have to make another
flip book for Luke. And how do we use Luke's flip book instead
of Serena's here? And this is why we almost
never hardcode stuff in games. Usually I hate
hard-coding like this. This is called hardcoding
or just select a variable. Instead, just right-click here and promote this to a variable. And now you can call this a variable, something
for example, I can call it idle, flip, not-so-good
space like that. I will flip book. Now I have this made
into a variable. Now, if I compile, and you can see if I
click on this variable, the default right now
is this flip book, because I have selected here, we have selected
the run flip book. Now if I right-click and
promotes a variable, It's going to set
that as default. Now we can remove this
as default for this one. Now, let's me just
click on Clear. So clicking on the idle, flip a variable
that you just made. You can also see it made it
into a paper flip book type. You can click on here,
I click on Clear. Now the default
is nothing. Okay? So from here, how do we
know what flip book to run for Serena and how do we know
what one to run for Luke? Now, since you made
it into a variable. And remember we are
inside of player bass. Player bass is the parent for the for loop and for Serena. So this is the parents. Every variable you
make inside of the parent will also
appear in the children. So if I click on Tsarina first, and if I go to the class
defaults here to the right, you can see I have both
the movement state and the idle flip book
because in the player base, we have both the
variables movements, state and the idle flip book. So here for Serena, for example, I can choose the idle animation
for the idle flip book. But if I go back to Luke now, and I opened the full
blueprint editor for Luke. If I go to class defaults, I can choose another
idle flip books. Right now I don't really, we haven't imported it
looks animations yet. But I can select a
custom idle animation. And here I could select Luke's idle flip book
if I have made it. So instead of hard-coding stuff out coding variables here, I usually make it
into a variable. And you can now set those animation constantly
depending on if you have, let's say you have ten
characters now we can click on all ten characters and set them as a custom flip
book here for the idle, you can again go back
and right-click here and promote this to a
variable for the jump. And then you can set
the jump flip book for each of the characters. So we can see if I right-click all of those,
promotes a variable. And if I right-click here, if I just promote all
of them to a variable, you can see I get a lot of
variables and you can save yourself space from all of those variables by
using a structure. This is what we're going to talk about in the next lesson, we're going to talk
about structures. So I'm going to delete
those again here. If I just delete them, I don't want to make
too many variables on these animations. It is called that you can
make a variable out of those, but you can actually
use something called a structure which
is more efficient. And I'll show you how to
make one in the next lesson.
30. Structures: Mega structure. Let's now right-click and
make a new folder. I'm going to make a
folder called structs. These are for the structures
and double-clicking that and instead of here you can
right-click inside of blueprints. You can make this one
called a structure. So creating that, I will
show you what that is. Let's start with the
STS, the prefix. And for this one, this
structure is going to contain all the variables
for the players. I'm going to call
it player info. So all the information
about this player. Now inside of the structure, you can add as many
variables as you want. For example, the first one, let's call it idle animation. Without a space.
Actually, I'm just going to call it like this. I'm going to click on new
variable and I'm going to make one for
the run animation. And let's just work
with that for now. So here's the right. You can change the
animation type. And for the
animations, remember, we are working with 2D, so it's paper flip books. And if I can find it here, if you just write paper, this one paper flip book and
select the object reference. The same thing with this
one paper flip book. Now, when you create
a new variable, it will set it automatically to pave a flip book
because this is what you selected previously,
the jump animation. Let's add the fall
animation as well. Okay, so we have
these animations now. So before instead of right-clicking and promoting
all of those to a variable. And you see here we had a
lot of variables down here. You can save yourself
space if you put all these variables
inside of a structure. Now the structure we can
use is called player info. So later on we can use it to something like the
player's name as well. If you have a thumbnail
for the player, we can put the image here. If you have some
jumping sound effects, we can also create a variable
for the sound effects. So all the player information is inside of this structure. Now to use a structure, you can go back to
the player base. And inside of here you can make a new variable and
you can call it, let's call it player info. Now let's change this
type to whatever you call it here
is t player info. So it's t player info
and you can see it here. This is the structure. If you're Compile and Save, you can now drag out
this structure here, click on Get Info. And you can drag
from this structure. And what usually, usually do
is click on break structure. By breaking this structure, you can see all of the variables that you have
added to the structure. And as a very, very cool thing, now that you
have this structure added, remember when you add variables, now let me delete this
flip book for now, the idle flip book
that we made earlier up here, I'm going to delete it. So now we have this only. So now what you can do, very cool stuff is you can now
plug those in to the idle. So this one was the idol here, and this is the run animation. So I'm going to plug the
run here, the run here. This is the jump animation here. And the fall animation
is the same as the jump, but we can just plug it in here. Okay? So now I can see you have
all of these variables in a structure and it
looks a lot better now. And just like what I told
you before, you can, when you add a variable
to the parent class, the child class will
also inherit it. So if you go to Serena now, and you can click
on class defaults, you can see this
player infrastructure. And if you click on it, you can see all of these
variables and you can set them costume lead to whatever flip book
you want to add. So for Luke, we can also do the same
whenever we add loops, animations, we can add Luke's paper flip
books here as well. So to make it work, Let's
go back to Serena and you can click on idle here
for idle animation. For all the run animation, you can select run, the jump, you can select Java. And for the fall, it's just the same one as
this jump like this. So Compile and Save,
save everything. Let's try it out.
Let's click on Play. And now when we run around, you can see all
the animations are working and we are
using now this rupture.
31. Finalizing the Character Movement: So as the final thing, let's actually
finalize the movement for the player and move on. From here, let's go back to
the player, the player base. And what I want to do is just edit the character movement. So clicking on the
character movements, let us set the scale, gravity scale to one. So right now when I jumped, I think my characters flying
a little bit too high. So it's like the gravity
is not high enough. So I'm going to increase the gravity scale over here in the movement
component to 1.9. Remember in the pleural
space, when you change it, it's going to apply
as well for Serena and for Luke as well because they are children
of the player base. So here in the gray scale, 1.9 and S for the movement speed for
Maple Story, I tested it. I was playing the game
and I think somewhere about 155 in the walk speed. And you can see if
I click on Play, now we are working a lot slower. And it's more like Maple Story. This is the speed that you
will be running with it. So if I make it larger,
you can see it here. So this is more
like Maple Story, the jump, but I think we should
jump a little bit higher. So I'm going to go back to player base character movements. And down here in the
jump Z Velocity, I'm going to send it,
set it to 500 instead. Okay, so let's compile and save. And I think that is
it for the movement. So if I click on Play and see this is the movement
and it can jump. So right now we're
getting blocked by the character as well. We have to remove
that so you can see it's bugging
out our character, pushed, our character bec. But let's actually go
back to the player base and clicking on the
capsule components. So this is doing the collision. And let's scroll down and you can see this one
called the collision. Let's click on this collision preset to see what's going on, and this is all
of the collision. So now let's actually click on here and click on costume
because we want to edit this. So now we can see the
pons. This is what it is. This is a pawn. The ponds
are blocking each other. And we don't want that. We want the points to
ignore each other for now, let's just ignore each other. Let's compile and
let's see if that job. So click on Play
and running around. I can see I can't
block myself now. So if I take this client, so that is fixed now, okay? So the ponds cannot block
each other anymore. So this is what we want. And you can see
everything's working fine. The jumping, I think I'm
jumping high enough. But again, this is your game. If you want to run faster, if you want to, the
camera to be closer. Remember you could
edit the camera if you went to Tsarina and
actually we added it wrong. I can see I added the
camera inside of Tsarina, but we need to add in the player base because
Luke also needs the camera. So this is a quick fix. Let me delete this spring arm. Delete the camera. Let me go
to the player base instead. Click on the capsule, add the spring arm. At the camera, like this, just search for the camera. So now we have the spring
arm and we have the camera. And again click on the camera, go up here, change it
to orthographic view. And remember, you
can change how close and far away the camera is
by changing this value. And it was on 130
for just like this. So now both Luke and
Tsarina have this camera. So before we end this, let's go through the code just fast because I want to clean things up so it's not a real mess. So just checking here, this is what it looks like. And to clean up the code, you can also double-click
on these pins. By double-clicking,
you'll create this reroute node, reroute pin. And you can double-click
here and make it look a little bit cleaner. And I think this is looking
fine and looking here, maybe just, just placing
it up here, like this. Another trick is you can select whatever you want
here and click on Queue. This will straighten out all of these notes that
you have selected. So selecting them, Clicking on Q will
straighten them out. So we have the jump and we have the fall here beside each other. And let us move that a
little bit further away. And we also have
the walk animation. I think this is, this is good. Now what we can do, I
can move this down, and I can move
this down as well. Again, you can
select all of those, click on cue to straighten
them out like this. And you can also potentially
do it with this one. Or I think maybe like this and we can
move this further down. Like that, this probably
looks a lot better. And we can make move this
further away so they're not clustered on top of
each other like this. And maybe you can move this
as well on top of here. Like you can also
create reroute snows for execution pins
if you wish to. But I think I'm going to let
it be like this actually. I'm going to put it closer. I think this looks a
bit weird like here. Okay, so now we have
corrected this. And another thing is you can
hover all of these nodes. You can click on see
to create a comment. So click on see. You can call this
one player movement. She can also be more
specific of what you mean. So Claire movement, I'm
just going to call it something short
just for the course so the videos don't
get too long. Slow movement WAS actually, it's not a 3D game, so right and left, for example,
something like that. And for this one, these are also the
movement stage, so we can include
them in the comment. I'm going to click and drag
the comment down like this. And now down here
we have the jump. I'm going to click
on see and say jump. And put it down here. Okay, so it's a bit
more organized now. And you can also go to
the unwrap function. Don't forget that you can
also go to the functions and organize those functions. So this one looks like a little bit messy because
of those lines, but we've gotten to
really do much about it. So we can't really make a
more structures like this. So I think this looks fine, but you can always
try to separate them a bit further
away from each other. Try to put them like beneath
each other, like this. Okay, I think this
looks fine for now. You can always, if
you want to try, you can create reroute notes. If you want to. Hear for some
double-click, tried to, I can even make to
reroute notes if you want to try to clean it
as much as possible. But I think I'll let it be here for now we know what
it's doing right now. You can also make a
commentary if you want to. And let's compile and save. And now everything's working. And clicking on play here. And it's getting dark and I know why I forgot to
rotate the camera. So going back to player base here first in the spring
I'm again removed. They do collision testing. And in the viewports, let's click on the spring arm. Let's click on E to rotate. And let's rotate this
90 minus 90 degrees, so it's in front of, so
we can see the character. And now let's click on Play. And now everything is
working correctly. We can jump, the
movement is working. And again, you have to check
it on the client as well. So if I make this smaller, you have to check
it with the client. And the client can
jump and run as well so you can
play together now. And now everything's working and let's move on
to the next lesson.
32. Creating the Second Character: We're now ready to create
Luke as the character. Now I have the
important this for you inside of your
course materials. Again, if you go to
your course materials, characters Luke and
inside of Luke, I want you to import these here. So let's go to asset
characters here. Let's make a new folder
and call it luke. Now let's import whatever
is inside of this folder. And you'll probably have
more animations here. I'm going to add animations as I go
along with this course. So drag them in to your content browser and
you have imported them. As an exercise, what
I want you to do, try to do this whole process yourself because this process is like what we have been doing previously in the
previous lessons. So try to, try to apply
paper 2D settings, try to extract the sprites, tried to make flip
books yourself. Try to import them into the
Luke blueprint character, paper character that we created. And so try to do this all of yourself and see if you succeed. And if you still
have a hard time, let's go together here
and follow along, but try to do it yourself. It's very good
practice to try that. It doesn't hurt anyone. You can just come back here
and we'll do it together. So if you're not
sure of how to do, it's still yet, we can
try to do it together. So again, I'm going to
click on all of them. Right-click production,
apply paper to the settings, and then going through each one. So the idle, I'm going
to extract the sprites. I'm going to go a little
bit faster because we have been doing this
previously now we'll Tsarina. So grid rising the 180 by 180 to extract the
sprites like this. And again, I'm going
to rename them. Alright, so I have
extracted all of them into sprites here. And I have also
created flip books. So remember you could select, run for example, and right-click
and create flip book. So I have created this
three flip books and now I have to change the
frames per second. And for the run or
for the jump rather, let's just make one
frame per second. And for the idle, it was two frames per second. And for the run, I
believe it's six. I'm just checking
with Tsarina here. Yeah, six frames per seconds. So we're doing the same thing. Six frames per second like this. Now, let's make a
new folder here. So right-click, make a new
folder called Textures. And I'm going to take
all of these here, both this brights and the
textures inside of here, we only have the flip books. The next thing we can do is go to blueprints player, Luke. Now we're going to
add the flip book. So open full blueprint editor. And let's go to the viewports. And inside of here, clicking on the sprites and then
adding look here. So the idle animation over here. We have again to adjust this capsule so it
doesn't collide with our, all of our tiles. I'm just going to refer back to Serena to see what hers was. Or maybe a better
thing we can do is do it in the player base. So it applies for
all the players If you have more players. So 33 by 16, I'm going to go back to default and just remember
the numbers 3316. So I'm going to do that
inside of the player base, so we don't have to
do this all the time. Maybe we add a lot more
characters later on. So clicking on the
capsule, writing 33. And we have to change this
number down here actually first else it's
going to allow you. So 16 by 33. And when we compile these child blueprints
will all be at that size. Alright, so that should be done. And remember in the player base inside of our unwrap function, we added this structure. So remember you have
to have to tell a look what animations
the character has. And remember, when you make, when you make variables inside of a parent blueprint classes, they will appear in
the child default here in class defaults. So here you have to
select just like Serena where we selected
those animations. You have to do that
as well, or Luke. So now you can see
how cool this is. Every character we can
have our custom, idol, our custom run, our custom jump, and our custom fall. Further on. Let's do this. And for the jump we have a
jump and for the fall we also use the same thing here. Okay. So I don't think we're
missing anything. Let's try to play and
see what happens. And let's go to the
World settings first. Remember we have selected Serena as the
default class right now because we don't have a character selection
screen just yet. So let's click
here and change it to look instead so
you can test him out. And let's click on Play. Now respondents look and you can see Luke is working as well. Everything is working nicely. So we have both look now and
we have Tsarina in the game.
33. Adding Jump Sound Effect: Alright, so for the
jump effect, again, in the course materials I have
imported inside of audio. I have imported this
one called SF6 jumps. So we have the jump effect
and let us make a new folder. I'm going to click on
this content folder. And out here, Let's make
a new one called audio. And inside of here, Let's go back to audio and let's drag it into this folder. And we can play it and
see if it's too loud. I think the volume is nice. So here when you import a sound, let's actually go
and try to code this thing and I'll
show you how to do that in multiplayer. So ultimately, what you want
to do here in the blueprint, Let's go back to the
player, the player base. Now, if we go back
to the Event Graph, maybe you are
tempted to do this. So here for the jump. Now, I'm going to
do it the wrong way so you can learn from this. So here in the jump,
in single-player, I'm comparing single player and multi-player so you can
see the good practices. So in single-player,
what you want it to do is like
here in the jump. When I present jump, obviously, we will make this
sound effect here, but this is wrong
in multiplayer. And I'll show you why here. To make a sound, we
can say play sound. And you can either play
sound at a location or play sound to d. So if you want
people to hear the sound, so what the difference is if you play a sound at a location. So if you're a player, is standing over here
to this side and jumps, the sound will be heard
from this side here. So if a player is standing here and here's your jumping here, they will hear the sound
coming from this area here. But if you play sound 2D, so if you choose delay sound 2D, it will not lay at
a certain location, but it will play
like a 2D effect. Usually we use this
as UI elements. And if you want a sound to be heard at a
certain location, we use the play
sound at location. It all depends on if you want
people to hear you jumping. And let's say we
want to do that. So ultimately you want it to
play sound at a location. You want to select the sound. And instead of selecting
the sound wave, Let's actually go back
here to the Audio. Let's right-click it. And let's create a queue. And let's call it as C
for sound cue and jump. You can double-click
it now to open it up. And this is a sound cue, so you can click
on Play up here. And it can hear the sound. A very cool thing is if
you want variation here, you can drag from this. You can see these are the
sound notes that you can use. You can drag here
and say modulator. You can also see
the modulator here. So clicking on modulator
and what that does is it changes here sound
every time it's played. So we choose the pitch, minimum and maximum here. So for example, 0.9 to 1.1. And every time you
click on Play now, it's going to change
the pitch of the sound so it sounds like it's a
different sound every time. So you can see it's a bit of a variation you
can do sometimes. But I want the sound
to be the same, so I'm just going to
delete it and do this. So I think this is fine for now. And let's close this
sound cue down. So here plays out at location. Let's select our sound cue. And what is the location? And that is just where
the character is. So let's right-click and say get actor location like that
and connected here. So we're getting this
actress location wherever you are and you're
playing the sound there. Okay, So you're
attempting to do this, and then you click play and
you jump here. It works. And this is the
wrong way to do it. Because remember you are
in multiplayer right now. So whenever you do this, the others are not
going to hear it. So remember we have this server
and client relationships. So you have this as the server and you have
this as the client. And you want to
play the sound and then roll it out to
all the clients. So the server place the sound and throws
it out to the client. So let's go back here and again, just like what I've
told you before, we need to check everything with the server so the
clients don't cheat. The server is the true game. The server has the authority to do anything
inside of this game. So every code you do
needs to be checked by the server and then replicate
it over to the clients. So let's see an example of this. Let's go back to the player. Let us just delete this one. So maybe you are
also tempted to say, okay, so before we made
this movement here, and we went through
the movement states, then this movement state
went through the server. And the server set
this variable. And it's going to run an
on-ramp function because remember this variable was
replicated as a rep notify. So with the server is
going to notify all of the clients of the
change of this variable. Inside of this unwrap function. All of this is going to be
replicated to all the clients. So maybe you're
attempting to say, okay, all of this is being
replicated to the clients. So I can add my place
sound here and it's going to be replicated
to all the clients. So we have a jump here. We have the jump flip book. And maybe you're
attempted to add the play sound at location
over here instead. You can do that and
it's going to work. All the clients
will hear you jump. So if you are the server, if you're the
client, that's okay. They're all going to
hear you jump in. This is also working correctly. But there is a small
mistake and I'm going to teach you that this is the
last thing in multiplayer, and we have something
called a multicast. So if I go to the event
and I'm going to tell you the difference between an on-ramp function
and a multicast. So we know that we have
something called a multicast. So if you click on
the server event, we set it to run on server. But you also have something
called a multicast. So let's try to create
the code first and I can explain it to you more
easily after that. So let us move this
jump logic down here. And here I am going to
make a new custom events. Let's add this custom
event and let's call it MC for multicast. And I'm going to
just call it jump because we want to make
the jump sound effect. Okay? Now you can click on this replicate and
select multicast, and then select reliable. And here, Let's add this one called play a sound at location. Let's now for this sound instead of hard-coding it like this. Remember we added a structure. So basically the structure, it contains all the
player information, so we can even add
sounds in here. So in this variable here I
can click on Add variable and call it a jump As effects
for jump sound effect. And let's add a sound cue, because ultimately, this was
a sound cue that we created. So it is a sound cue. Let's search for sound cue. And it's here, object reference. Okay, so now we have
a jump sound effect and we can use that
from our structure. So again, you can go back to, let's go back to the
player. For Luke. Since we added this, every single character can have their own custom sound effect, but we don't really have
that in Maple Story. So let's add this
jump effect, or Luke. For Serena, I'm going to add the same jump effect
or sound effect here. Okay, so we have those
added now in the structure. And let's go back
to the player base. And now I want to
explain to you what a multicast is
before we continue. So it was not wrong
to do this here. So the server's set this
variable here and you go back to the unwrap function and then you add the
sound effect here. This will work like the older
clients will hear you jump. The server will hear you jump. So this will work. However, the
difference is between an unwrapped function
here and the multicast. The multicast here,
does the same thing. So the multicast, you
can imagine it like it costs all the information
back to the client. So the information goes to the server and the
server sets a variable. And then you can run
a multicast to cost this information back
to all the clients so the clients know
what's happening. So here you can
run the multicast. So let's click here and
add a DMC jump here. And the most important
thing to know here is multicast events can only
be run through the server. You cannot run this up here, for example, this is
not going to work. Remember, we are still
in decline to know. Again, if you want
to know if you are currently on the client
or on the server, you can print a string simply. So this is very basic
printing a string. And whoops, I drag
this by mistake. And here, Let's click on Play. Now, you can now see that both the server and the
client is saying low. So I know I am not
only on the server, but I'm also on the client, so I'm both on the server and
the client on this event. But if I print the
string down here, and since we are running
this event on the server, it is only the server
that's going to say hello. So I print string is very useful to know where you actually
are at currently. And a multicast can only
be run through the server. You cannot run a
multicast on the client. This is not going to work. And this is also
telling you up here. Server. So this is only
going to work if it is the server that you
are running it from. So now we can multicast the jump sound effect to all the clients so they
can hear that I'm jumping. So what's the difference between this and the unwrap function? Because they are doing
the both the same thing. This one is also
working like when you add the jump sound effect
here is also going to work. So what's ultimately
the difference between this one and this one? The difference is that if
you are standing far away, let's say you have a
large open world map. If you're standing far away and you're playing a multicast, this is the correct way to
do it here for the sound. Because when the,
when the player who's standing far away
comes close to you, they will not hear
the sound anymore because you have maybe
jumped like ten minutes ago. So, but if you do it here
in the unwrap function and the player is standing far away when you jump, that's okay. The player cannot hear it. But if the player
comes close to you, like ten minutes later, the player will hear the sound effect even though
you jumped ten minutes ago. Unwrap function will
update the player. Even though you did
that thing like one hour ago or two hours ago
or however long it is ago. And let's say a player has not connected to your server
yet and you jump, the player connects
ten minutes later. Then that player who's
connecting can hear you jumping. Even though you're not jumping, like you're standing still, but you jumped to
ten minutes ago, that jump sound effect will be heard by the
connecting player. And this is not correct because you jumped
to ten minutes ago. You haven't jumped right now. This happens if you add
it to the unwrapped. So what I want you
to take from this is the unwrap function is
used for visual changes. So you can see here the flip
book I'm in, for example, if I'm running or IM, let's say dancing,
jumping, whatever. All the visual effects
are done in the unwrap. So let's say I have
a traffic light and it's changing from red to green or red to yellow to
green, that traffic light. You want to add. The visual effect changes
inside of the unwrapped. Because if a player connects
five-minutes later, and let's say you're a light, takes five minutes
to change color. Let's say it goes
from red to yellow. That player who
connects to the server can see that your
light is now yellow. But if you add visual
changes here, the multicast, that yellow color
will still look like red for the
connecting player. Because the multicast only
updates for connected players. It only updates for players
who are close to you. So if a player is
standing far away and the light changes
from red to yellow, that player who's standing far away comes close to you now, and that player will
still see the light being read because you are running
this through a multicast. This only updates
for players close to you and for players
connected to the server. So what we usually use
unripe functions for our visual changes because this should be visually updated
for players who connect. So let's say I
connect ten minutes later and ten months later, I can see you are in the, let's say here in
the running state, or maybe you're holding
a different weapons. So if we have more
flip books here, but I don't want to
hear you or I don't want to hear the jump effect that you did ten minutes ago, it doesn't make any sense. So any sound effect,
any visual effects. So for example, a
particle effect, a fire effect and so on. I want all of these to
be in the multicast. This is the correct
way to do it. All the visual changes
are done in the unwrap. So here we are
through the server, we're running the multicast. And again, the multicast can
only run through the server. And instead of setting
the jump over here, let me just connect it here. A very good practice
in multiplayer is to run these variables all the way back to the initial events so
it will work correctly. So dragging this sound
and adding it here, underpin here, so it creates a variable automatically for me. So if I click on this multicast, you can see it creates
this variable. And I'm just going to
call it here instead of sound jump S effects. And I'm going to drag
this location as well, put it here and call it
maybe player location. So now I can do the
sound effect here. And remember for
the sound effect, we had our player info. So let's drag our structure. And from here, let's say break the structure pen so
we can see the variables. I'm going to move
this a little bit so we have more space. Okay? So this one here, I'm going to click on this
arrow to see my variables. You can drag from this
jump sound effect and it's automatically going to
play whatever you have. Insert here in the
jump as effects for Serena and
four look as well. So remember to do those. And going back here. Now, for those that
you are not using, you can click here on
Hide unconnected pins, and it will hide them for you. That's a bit more
clean to work with. And what is the location? Again, gets player or not get
player, get actor location. And like this. So now it's going
to work correctly. So now that we have done this, let's try to compile
and save everything. And let's click on Play
and see if it works. Alright, so to complete this, now, instead of
doing it up here, this will be playing constantly because right now this is set through
the movement state, which place all the time here. So instead of doing that,
that will hurt your ears. So let's take this and let's make a new
one called server. So custom palettes server jump. And this is going to run
through the server like this. And let us connected together. So the server is going to
run this multicast events. And remember we had
this structure. Let's take it out and drag out from this and
say break structure. So we can see the pins. Here. You can click on
this small arrow. I'm going to move this a bit the other way so we can
see what's going on. And now I can drag this jump as effects
into this variable. And remember, you have to, in Tsarina in the
class defaults, you have to add the sound
effect here to make it work. As well as for Luke, the class defaults the
sound effect here. Just make sure they are added. So this one works as well. For the pins that you're
not using anymore, you can click on the this one and click on Hide
unconnected pins. That will be a lot cleaner. And the player location
again click and drag here and saying
gets actor location. So like that. So now you have
this Jump, jump event here. Now you're not really
running this event anywhere. So remember you don't, you haven't really
cold this event. So phi and actually
before we continue, let's click on this. Replicates reliable
before I forget here, and just to make sure
the other ones hazard. So if I click on Play now, you can see it's not
really making a sound. And this is because we've
never defined this. We've never called this
function or this event here. So to call this event, let's call it down
here in the jump. So now we can do that. So server jump. So now what do we jumped? It's going to go
through the server and we can take this down here just so
it's more organized. Groups. I'm going to drag
that down like this. Okay, So now what's going to happen is I'm going
to click on jump. The jump sound effect is going
to go through the server. And then that's
going to go through. And actually I'd like to take my variables all the
way through here. So I'm going to click Control X to cut them and
paste them over here. And let me just run this
through as well, like this. I like to run them all the way back to the source event here. Now, we can here
select our actions. So like, let's connect this
back in here, like this. So now this is going to
go through the server. The server is going to check, are you allowed to do this? And if that is correct, it is going to run through the multicast where it
costs the information, the sound effect to
all the clients. And then remember, the multicast is for all the clients that are close to you are already
connected to the server. For the players who
are not close to you, they will not have this played later on when
they come close to you. And for the unconnected players, when they connect to the server, they will not hear this if you have done this five minutes ago. So this makes sense. And ultimately the players
who come close to you, or the players who connect
ten minutes later. They will only see
the changes here. And we want them to see that. We want them to see our
updated to flip book. That is fine. But we don't want them to hear a sound that is played
ten minutes ago. So this is something that we run through a multicast instead. So let's click on compile and just make sure
everything's correct. Let's try to click on Play
and see what happens. And you can see the
sound is playing nicely. Alright, let's go out
of this game here. Let's make it a little
bit more organized. So for this jump, I'm going to include all of these
nodes here together. Because now all of
this is jumping. And for this one here, Let's make this
smaller like this. Let us compile and let's save everything and let's
move on with the course.
34. Blueprint Interface: So before we move on
to the next section, I want to talk about
Blueprint Interfaces. Blueprint Interfaces are used
to organize your project. And there are also easier
to work with when you're talking about Blueprint
communication. And what do I mean by
Blueprint communication? What I mean is sometimes here in the player
base, for example, if we go back here, sometimes inside of
the player base, you have to use something
from the game modes. So right now we haven't really done anything
inside of here. And if I go to the game
mode and I opened it up, at some point we are coding
something inside of here. So at some point in
the player base, we need some information that is stored inside of our game mode. That information we can access by something called
Blueprint communication. So this blueprint actor is communicating with
this blueprint actor. So these two Blueprints will
be communicating together. And this is where Blueprint
Interfaces come in. But right now, I don't want
to talk too much about Blueprint communication because
we haven't used it yet. But we will be sorting
out our events. So here in the player base, what we made earlier is this
one set movements state. Instead of making custom
events like this, Let's go ahead and a
Blueprint Interface. So let's right-click
here and let us go to blueprints and create
a Blueprint Interface. Actually I need to
make a folder for, so let's make a folder
called interfaces. And inside of here, let me right-click blueprints
and Blueprint Interface. Usually I start with
int or interface. And right now we want to make
one for the player base. So I usually call them the
name of the blueprint. I want to use them for. I want to use it for
the player base. I'm going to open that now. And you can see it's basically
a library of functions. So inside of here in the graph, you can't really do anything. You can't drag this. And you can do anything. You can see you
have your functions here so you can add
a new function. And you can see the details about this function down here. So just start with, let's create this one
called set movements state. So instead of creating it
like a custom event here, Let's go to the interface
and let's make it here sets movement states like this, compile and save everything. Now to add a
Blueprint Interface, you have to go to
that blueprint, so we are going to use it and the player base going
to the Class Settings. And here you can see
implemented interfaces. Let's search for it like this, and we can choose
the interface here. Now let's compile and save. And now it's giving
you an error. And this is because you've
just made an interface. You can see it here, the one you made set movements state, and now it's because
you have two of them, so it's giving you an error. We're going to delete this one. But remember here, if this
doesn't appear for you, remember to go back to the interface and
click on compile. Very, very important that you always compile your blueprints. So let's go over to
the player base. Now, let's delete this set
movement States and compile. And now it's giving
us a lot more errors. And it's actually these ones because we have to replace them. But let's not worry about
these arrows for now. Now, this interface, we have
made some movement state. We can call this by
right-clicking and saying sets movement States. And now we can see we have this event is set
movements state. So if you click on it and
this icon is at Pier, this icon means that it is
from a Blueprint Interface. Because remember
we made it inside of here set movements state. So whenever you add the interface inside
of your blueprint, it will appear here and you
can call it as, as an event. And you can also see here, we can't really drag it out. So that doesn't work. So we have to right-click
and search for the name. The cool thing about interfaces
is if you make a new one, let's just call it random. I just wanted to show you
when it is like this. And you go back to the
blueprint or the player base, you can see this
random event here. If I right-click and write
random and find the events, and you can see here,
event random here. But if I, if I put
an output here, so if I click on random
and I add a variable here, so I click on this plus button and let's just add a
random variable here. If I compile now and save, and I go back to my player base, you can now see it's
not yellow anymore. So if i, if you add an
output to an event here, it into a function. So now we can actually
double-click this year. And you can see it's
a function instead, just like when you created functions up here
is not jumping. For example, we
created that earlier. You can also create functions inside of interfaces
and use them. So when you add an output, two functions inside of here, they will become functions. And if you don't add an output, they will become events. So very, very good
to remember that. Events are yellow, the
functions are this color, so let's delete that random one. We don't really need it for now. Let's compile and save. And let's go back here and connect this set movement state. Now we had here the
movement stayed. And just like before for
the customer events, we can't click and drag and add the variable automatically. So you can see here,
if I click and drag, I can't add it automatically, so I have to do that myself. So Blueprint Interfaces, they take a bit more time to set up, but there are more optimized. Your game will run a lot faster. So let's go back to the
Blueprint Interface. Click on this one and
let's add the inputs. And it was called
E movements state. So that was our enumeration. So let's click on here, and let's call it movement
States just like that. And now you can see it
doesn't let me do that. So I have to compile
and let me try again. Sometimes it, It
bugs out like this. I'll probably have to close the project
and open it again. Alright, I've just closed
and open the project. So let's try again, clicking
on here, movement stage. It doesn't let me
still do it here. I think it's because in the
player base we already have. Let's go back to a player base. Let's figure it out. I think it's because we already have this one called
movement state. Let me delete all
of those like that. Maybe you can take a picture for you so you can remember
what it was saying. But now let us
compile here, save, go back to the interface, and now let's try to
change it Movement states. And now it led me, it's probably because of
the other functions there. So now that we have it, you can see it added that
to our interface of event. And again, just like
before, we can connect it. And now we can call it up here. So I have to remember
what was here. It was idle when
the movement was 0. So running the name event
movements state here, so sets movement States. And you can see here, you can call this function
saying int player base. So calling it from
the interface, I can do it up here. But I found out when I was
working that it is much better to select this one
under int player base. When you select it
through the interior instead of coal function, this one automatically updates. Whenever you update it
here in the interface, it's going to give you an error if you select the other one, just one automatically update. So I always select this one. So the idol here, I can
just click and copy paste here and connected bags. So it was run rights
and then run left. And up here it was jump. So when it wasn't plus it
was junk and it was fall. So just like that. So now we have implemented the Blueprint Interface and
we have the function here. And it's a lot cleaner
and you can have all of your functions for
the player base. Maybe you already guessed it. Later on we are going to create more Blueprint
Interfaces, one for the game mode, one for the player controller, and so on, whenever we
killed things in there. Okay, so now I can't see anymore custom events
that we made here, so everything is good
and that was it for now. So let's move on to
the next lesson.
35. Widget Blueprint Introduction: It is now time to talk about the spawning system
and begin with, let's talk about the
widget blueprints and Widget Blueprint is
where you create the UI. So what we want to start with, let's make a new folder
here in the content. I'm going to right-click
make a new folder and let's call it UI
for user interface. Inside of here,
Let's right-click. And down here in
the user interface, you can create a
Widget Blueprint. So creating that one and selecting Widget
Blueprint up here. Writing WB for Widget Blueprint. And the first thing
we're going to create is the
character selection. So Character selection. Okay, So you can
double-click it now. And to begin with, I
want to talk about the interface or overview
of what this consists of. Instead of here in the middle
you can see the graph. And again, you can
right-click and pan around to move
around in the graph. This is where you design the UI. And the second part of this
consists of is the graph. So you have the designer
will design the UI. And then you have
the graph where you add functionality to the UI. So you can see, this
is familiar to us. These, this is where we code. Here. We can see our variables
and functions and so on. You can also see the
different details about, for example, a
variable we click on. This is very familiar to us now. And in the designer, what you have here is the graph. You have the elements you
can use to design your UI. And then you can see all of the elements that
you add down here. Again, you have a details
panel where you can change details
about the elements. For example, you can
change the font style, the font size, the image
is style, and so on. Just for a small practice
before we ended, let's try to add something. So for example, you
have a text block, so we have the common,
common assets here. You can try to click
through them and see what you have over here. Don't feel free to add
things into the UI. You can. It's always nice to try it out. So what you can do is
what I usually start with in when creating UI, I usually create a canvas panel. So if you search up
here for Canvas, you have this one canvas panel. So you can drag it out
and place it down here. It will add it to the
UI just like that. And you can see the
canvas has been added. Now this is a very basic thing. You add a canvas, the canvas, you add different elements. So for example, we
can add this text. You can either add
it by clicking and dragging it
down on the canvas. And you can see the
text has been added. Or you can click and
drag and place it anywhere here inside of the
canvas and you place it. Usually what I
like to do is just dragging down here and
then I click on it. So let's just delete one of them by clicking Delete
on my keyboard. You can click on that
text, for example, and you can see different
details about this text. So you can change
the position of it, so it can click and drag and
you can change the position. For example, we can write one hundred and one
hundred and the y. And you can change the
color of the text. You can change the font here, selecting what
type of funded is, how large the fund
is, and so on. So you have different details. You can change
about the elements. The most common
elements are here. In the common, you can
try to, for example, dragging a button
and you can see what things you can
change about a button. So always nice to just drag
them in here, an image. We always use images so you can try to get
familiar with them. You can see, you can scale
them up here with these pretty assemble stuff so you can click and drag it around. You can click on this
brush, for example, for an image and you can select
what type of image it is. So for example, clicking here, I can select, Let's
see my sprite. And you can see the sprite
has been added as an image. And you can change the size
for the image over here. You can also change the
color of the image. So you have a lot
of options that we will be working
with later on. Other cool stuff before
I end this here, you have something
called a horizontal box. A horizontal box here, we can drag that in here. And let's, let me delete
all of those for now. Click on Delete. So we have this horizontal box. I'm going to drag it over
here and scale it up. So in this horizontal box, wherever I place in here
will be placed horizontally. So if I take this text and
place it down here in the box, you can see now it's inside
of this horizontal box. And if I add one more text, or actually let's add
an image instead. Let's add an image on
the horizontal box. Now you can see
it's adding things horizontally so they are
not overlapping each other. And if I add another text, now you can see it adds
elements horizontally. So now I added, I added
this by mistake down here so I can click and
drag it into this box. And you can see adds
elements horizontally. There. Same thing goes for
a vertical box. It adds things vertically
below each other. And if you want pieces
to overlay together. So for example, we
have a button and we have an image on the button. We use something
called an overlay. So I can add an overlay here. And let me just add a button. So if I click on button
or search for button, add it to the overlay. You can see now my button
is on the overlay, and now I can search for image and place it
on the button here. So now you can see I am overlaying things on
top of each other. I have a button and I have
an image on the buttons. So for example, I
can choose an image here and you can see
now I have an image on my button so you can
see it doesn't look great because I have to click on my overlay and
resize it and so on. But we will be working
with all of this. I just want to introduce
you to the UI. Feel free to just
search for things here, tries to put this
progress bar in. See what happens if you
increase the percentage like this and try to play
around with the UI, it's always nice to play around. And when you're finished, go ahead and delete
all of those including the canvas panel and
compile and save. And then let's move on to the next lesson and start creating the character
selection UI.
36. Character Selection UI: Let's start creating the
character selection UI. So over here in the
Widget Blueprint that we created earlier, Let's click on that here. So the thing we want to create, I went ahead and
created it beforehand so I can show you what
we are trying to create. And it's always nice to see
that goal we are aiming for. We're aiming for
creating this character. And then we have two
buttons where you can spawn either a loop or Serena
depending on what you press on. So this is the thing
we're trying to create. And then we have a background
which is blurred out. So this is the goal
that we have to create. And it's always nice to envision this in your mind and
try to break it down. So again, I talked about a vertical box and horizontal
box in the earlier lesson. And for example, these
two buttons are inside of a horizontal box because they
are late beside each other. The image and the button
is inside of an overlay because you overlay things
on top of each other. So very basic stuff, so very good to envision
what you're trying to make so you know which
elements you are going to use. But let's go over and
create our own thing. So first we have to
import some assets. Let's first here in the UI, right-click and
go to New Folder. Let's make one
called backgrounds. Let, let's add another
folder called Buttons. Let's add another
one called Fonts. And the last one, let's call it images. Maybe we need one
called icons later on, but that is for later. So over here in the backgrounds, I've provided for you these
course materials here. So in the course materials, jump ahead and find the UI. And also here these
are the folders. So in the backgrounds, you
can drag that in here. And for this one, don't right-click and
apply 2D settings. This is not a pick, this is not pixelate. This is basically just an image. So let's go back and
inside of the buttons. Here, let's import
all of these buttons. So we're not going
to use all of them, but you have a variety
if you want to use different colors in
your version of the game. And then let's go to fonts, and let's go over and back here, go to the funds and go and
add all of these funds. And then it's going to ask you, do you want to create those funds here and
just click on Yes, All it will create
funds for you. And the last thing is the
images or the images. And let's go back
and add the images, which is a fluke and Serena. So adding them here,
I'm going to apply to these settings because these
are actually picks a lot. So right-click on those and apply paper 2D texture
settings. Just like that. If you're wondering where
you can get fonts like this, you can always search
for Google fonts. I use this to make
my video games. So fun. Google Fonts search for that. Inside of here you have awesome free fonts and you can use them commercially to release on
Steam or any other platform. So all of these are for free. Whatever you find
inside of here, you can try to
search for a fund, tried to find different styles
specifically and so on. So very cool website
if you want it, go ahead and find
it in Google fonts. Of course, you can buy fonts for money and import them
inside of here as well. So let's click on File
and save everything. Now that we have everything, Let's go back to the
Widget Blueprint and we're ready
to start in here. So first what I want
to do is I want to add a vertical box. Let's search for vertical
and add it here. And actually before we do that, actually I forgot to
add the canvas panel. So add the canvas panel
always as the first element. And then let's add
the vertical box. We always need a canvas first. Now we have this vertical box where everything will be inside. So we have, again, if I take this back here, we have the vertical
box where we had this title and under it
we have the buttons. That's why we're
using a vertical box. And first-year,
we need to center this piece in the
middle of the screen. And to do this, this is
where you use anchor points. Very important to
use anchor points and set them for all
of your elements. So click on this anchor
and setting it to the middle of the
screen like this. Now in the position
if you write 00, you can see it aligns
to this top part here, but we want it to
be in the middle. And this is where you can
play with the alignment. You can see the alignment in the x and alignment in the Y. And it looks like if
you write 0.5 in each, it will align in the
middle, just like this. Alright, so let's begin here. Let's create an overlay
and place it here in the vertical bugs because now an overlay is where
you overlay items. So I want to overlay an image
and a text on top of it. So let's search for image. Drag it out here, place it in the overlay and you can
see now we have an image. Let's select what
image we want to use. Now, this is just the background
that you want to use. I'm just going to use
this one called button. Actually this one flat
button, Black Square Flat. So using this one and I'm going to make it fill this
whole segments. So you can see here you have horizontal and
vertical alignment. Horizontally, I want to fill
it to the whole thing here. So now, depending on how
large your vertical boxes. Basically going to
fill the whole thing. This is what vertical and
horizontal alignments are. Then I'm going to use some text, and I'm going to drop the
texts on top of the overlay. Here. I want the
text in the middle. So I'm going to align this text to the middle
here, to the middle here. And let us call it
here in the text. Select a character. Just like that. Now, we can select the
color, I think it's fine. Then we can select
things about the font. What I want to make it is, let's use this one
called Source Sans Bold. So using this one here. And I'm going to
make it 14 in size. Usually, when I look at
when I create the UI, is it's usually most correct when you have
Zoom Plus two up here, if you look at that, so
if you zoom out and in, usually it's around
Zoom Plus two, but sometimes I correct them after I add
them to the game. So select character and
let's make some shadows. I like to have some
shadows on my text. So down here in
the shadow color, you have to update alpha here the alpha is basically the
opacity of the shadow. So if you write one, you can
see you have shadow for our 0.5 opacities like 50%, I'm going to write 0.35. So 35 per cent shadow and the shadow offset
I'm going to write 22. So it's a bit further away from the text, something like this. What I'm going to do
now is I'm also going to add an image up
here just for styling. So I'm going to add an image
up here under overlay again. So now you're overlaying
on top of each other. I'm going to select
the blue one now, the button, blue square flat. So what you can do now
is you can decrease the size here in the y,
so it make it smaller. And I also want to fill it
horizontally like this. I'm going to make the size just five pixels, just like that. And if you want to visualize your UI without
these dashed lines, you can click up here. And I think sometimes
it's cool to do that so I can see what my UI
actually looks like. I just did that for styling. You can click on
this image here. You can also make it smaller. So if I click on
this image here, you can make smaller and the y. Just in case if you
think this is too large, I'm going to make it
something like this. Now this, this text doesn't seem like it's
fully in the middle, because when you
make it smaller, you can see it almost reaches this line faster than down here. So going back to 61, I'm going to push this
text a little bit down. So up here in the padding, we can push things to the sides. So from the top, I'm
going to push it. You can imagine someone is
pushing it from the top. I can push it to pixels. So you can see, if I wrote ten, you can see it's going down. Someone's pushing
it from the top. Here on the right, someone's
pushing it from the right. So this is what
it means. And the pairing here from the tub, I just wanted to push
it down to pixels, so it's further down like that. Alright, next I'm going to make a horizontal box so I can have these two
buttons down here. So searching for horizontal. And I'm going to drop it on
top of my vertical bucks because I wanted under this
thing here that I created. So this horizontal box, I wanted to have two buttons. Let's create our first one. The button consists of
a button and an image. So let us make an
overlay first because we want to overlay two
elements on top of each other. We want a button, first button, and let's put
that button on the overlay. And then we need an image
on top of the button, just like this here. So putting it until the overlay. So we have two elements
overlaying each other. So clicking on the button, let's select the style. So over here in the
style, in the normal, let us select the button and I want to use the
blue button here, button, blue square, this one. Now, some settings
we can change. The tint is great. I don't want it to do that. So I'm going to change
the tint to fully wide so I can use the
true colors of my button. And then instead
of rounded bugs, you can see there's a weird
line around my button. And this is because
it's a rounded box. I'm going to change
it to a box instead. I can see it looks a bit low
resolution, it's blurry. And it can do that by, you can do that by increasing the margin to make
it look more clear. So 0.5 is the maximum
margin you can do. So it goes between 0.10123450. So 0.5, the best one to use. In this case, if I zoom out
a little bit just like that, this is what the
button looks like. I need to do the
same thing here for the Hubbard and pressed. So instead of going here and finding this same
button again and again, as small trick, you can right-click and
you can copy this, and then you can right-click
and paste it here. A shortcut for this.
You can see if you hold Shift on your keyboard and
right-click, you can copy. So hold Shift,
right-click and copy, and then hold Shift
and left-click. And you can paste it here.
So it can do that with this. You can do that with
the tint color as well. So right-click shift
and right-click to copy Shift and left-click to
paste it on these two. To that. Same thing with the margins
are very quick workflow here. As for the tint when I hover. So when someone hovers
over my button, I want them to, I wanted to
change a little bit of color. So something like this. Okay, when you're
happy with this, you can click on Okay. And here in depressed, I want to have a bit of a darker color when
someone presses the button. And now we have the button
here and here for this image, let's put it here in the middle
of the button like this. Let us select the image. And what I want
to use is here in the images we want to
use Serena for this one. I'm going to, you can
either find Tsarina here in the images like this or
you can click and drag. Sometimes it's a faster
way like this year. Okay, so we have the image here. I'm going to push it
a little bit upwards because you can see
we have this down here and I need to push
it a little bit up to make it look like it's in
the center of the button. So again, what I've
taught you about padding, we're pushing it from
below, from the button, I can push it to pixels
upwards, just like that. What I want to do here, I want to click on
this horizontal box and I want to click on Fill. So now I can see
the horizontal box is actually filling
the whole thing. And the same thing
with the overlay, I want to click
on fill the hole. Overlay fills the
whole area down here. And as far as this button here, Let's click on it
and let's click Fill it horizontally and
vertically, just like that. And then we need some spacing
from between these two. You can see they are put
together and we don't want that. So up here you can
search for spacer. This, I want to put it between the ear and the vertical box, between the overlay and the
horizontal box over here. And you can see it's between
these two elements now, selecting that, and this
is the x and the y, and it's in the y, we
need some spacing. I'm going to make
it ten, like this. And you can see now we have
some spacing between them. You might think,
why did you fill the whole thing down here? And I liked my UI to be dynamic. So what I mean by
that is if I click on this vertical box
now for I resize it, you can see my UI
resizes dynamically. Resize I do over here. So instead of defining, if I click on the button, instead of defining the
size by this image. And later on I find out that
I like this to be larger. Instead of going here
and resizing stuff, I'd like to just click on my, my top element and just resizing it and
making it look good. So that's a week we got to do. And I think it's also
cleaner to do it like this. We have that button now
we need another button. So if I click on this overlay
and I click on Control D, or you can right-click
and click on duplicate. That is the same thing. So now we have two buttons. Now for this image, I want to use the red button. This one, red
button, red square, right-click while
holding Shift to copy, left-click while holding
Shift to paste them. Okay, so now I have that
and for this image, I need to change it. So I'm going to drive
look to this image now. I'm going to add a spacer
between these two buttons. So a spacer between these
two overlays, like this. And now this spacer is in the x. I'm going to rise
15 for this one. So now I have two buttons and they're put nicely together. Now I can drag this out
and make it larger. I can also resize it over here. I think something like this
would be very fitting for me. Now, if you'll click
on the vertical box, make sure it's in the middle. You can see it's not
fully in the middle. Now, I'm going to
change this position in the x and y to 00,
just like this. And now it's inside
of the middle. So let's compile and
save everything. So the last thing we need to do here now that we
have our buttons, we need to add a background. And this is simply
just an image. So if you minimize this here, and if I just drag an image
here behind everything, I want it to fill
the whole screen. Again, you can
click on the anchor and click on this one to
fill the whole screen. And now we can just write
0 in the offsets here, 00. Now it fills the whole screen and you can change
the background. So inside of my
background's folder, I can drag my background. And now it is filling
the whole screen here. Now I want to blur the
image. And you can do that. If you'll write blur up here and have this one
called background blur, I'm going to put that
here and you have to specify the amount
of blur again, you have to click on
the anchor points, make it fill the whole screen, right 00 and the offsets. And you can write the
amount to blur it with. Now we can write
ten for example, and you can see
nothing's happening. And this is because the
background blur needs to be beneath the image to be on
top of it, like this here. So now we can see the blur. And this is how you blur images. And I think a blur of ten is
working nicely for this one. So now what I would
advise you to do, you can, for example, click on this text here. If I'm making a serious project, I'm actually changing the
names of all of these here. Because if you go to
the graph, you can see, you can actually see the
elements that you have created. So you can see all the images and the two buttons
that you have created. So let's go, for example, to this button if you
click on it here, and you can also select it here, you can change this
button to btn. I usually use that as
a prefix for buttons. And I call it for Serena. And I click on the other
one and call it n. Look, this is very good to do because if you go
to the graph now, we can actually see what
these elements are. This is the button for loop. This is the button for Serena. I have no idea what these are if I don't
give them a name, so it's impossible for me
to know what these are. And sometimes we don't
really need variables. So you can see these
are actually variables that you can use here
in the Event Graph. But sometimes we don't
need them as variables. So for example, this
title box over here, we're never going to
change anything about it. So I don't really need
it to be a variable. So this is where you can uncheck this one called is variable. So it can uncheck it. I
can do the same thing with this one up here is variable. And I think we can
also do it with these. Let's actually do it. So hold Control,
select both of them, remove this variable,
Compile and Save. And you can see in
the graph now we have removed all of these. Now we have a single
image that is left. We can try to guess that images and that is
probably the background. So if you look at it here, image 1026, it's called
the same thing, 1026. And we don't really need
to change it either. So I'm going to remove
this is variable. And this makes the whole
thing look a lot cleaner. So I like to stay clean
inside of my projects. And it's probably
only the buttons that we need as variables because we're going to use them for when the player
presses the buttons. So this was it guys for the
character selection screen. I hope you've had fun
creating this UI, and let's move on
to the next lesson.
37. Adding UI to the Viewport: So let's go ahead and add
our UI to the screen. So we made this character
selection screen and we want to add it
here to the viewport. So when we click on Play right now, nothing really happens. We're back here
with our character, but we want to add the
character selection screen. So to do this, we usually add a UI in
the player controller. So let's go to the blueprints, and now let's use
our player control. I believe we haven't
used it yet, so it's still empty, open full blueprint editor. And inside of the
player controller is where we add UR is so very
important to remember. Let's delete these
default events. We can always add
them if we want to. Now, very important
to understand, UI is something client sided. So it's only you as the player who's going
to see your own UI. So every player in
the game as a UI. So maybe you have an
experienced bar down here. You have some
leveling down here. I don't know, some random UI. So all the UI that you
have is client-side it, so it's not server sided. So all the UI is individual
for each player. So let's go back to the
player controller here. And the first thing, let's do a custom events. So let's make a custom event and call it initialize widgets. And again, I told you before, instead of making
those custom events, it's good to use a
Blueprint Interface, but let's actually make
it first and then switch it up with a Blueprint
Interface after that. So let's make another one, another custom event
and I'm going to call it CL, initialize widgets. So this is going to
be a client sided one who haven't used
a client sided one. The only thing we use if we go back to the
player base now, the only thing we use so
far is a server-side, so executing on the server. But for the UI, they are
running on the client. So clicking on Run on owning
client and then reliable. And now to create UI, we say creates widgets. Ui is called widgets. We create widgets.
So create widget. And this is how you create
a UI inside of Blueprint. So let's connect it up here. And now you have to select
which UI you want to create. And obviously we
don't have much. We only have this one,
character selection. So this is the one
we want to add. So now that you added it, it's always nice to right-click here and promote it
to a variable so that you can use that
variable later on when you want to hide or
show the window again. So promotes a variable. Let's call it WB,
that's my prefix. You can choose
whatever you want. And I'm going to call
it character selection. So this is the
character selection Widget Blueprint variable. Now to the viewport,
so it's visible. You can see here if
I click on Play now, nothing happens and
this is because you need to add it to the viewport. So if I go back here, I have to drag from
the variable and say add two viewports. And you can see this
one called Add to Viewport. Just like this. So now if you click play and nothing's
going to happen because remember you have to call the event LCD engine doesn't
know what you're doing. So running from
this custom event, maybe you're already guessed it. We have to call our
client-side event here. So CL initialized widgets. It's going from a
normal event going into the running on the client. So from the client
you are creating the UI and it will be displayed. But of course we have to
run this event as well because the engine doesn't know what when you want
to run this event. And I just want to run it
here at the beginning play. So whenever I click
play on the game, I want to show my
character selection here. So let's call this event here, initialize widgets
just like this. So now when I click on Play, it's going to run this event. This event will run this event
which runs on the client. And then we are going to create the UI and then add
it to the viewport. Let's save everything. Let's click on Play. And you can see when
I click on Play, now my UI is on the screen. However, you can see I
can hover on the buttons, but my mouse is not visible. This is because in the
player controller, you have in the class defaults. You have to click on this one
called Show mouse cursor. So clicking on here, Let's compile and save and
see what happens. Now I can see my cursor, and you can see now I can see my UI and
click on the buttons. You see we have a
small bug here. I can hover the button you
can see changes colors. But if I hover over the image, I can't hover it anymore. You can see the hover
effect disappears. This is because my image
is blocking my button. We have to fix that. So
going back to the UI here, and this is very important. This image is currently
blocking this button, so I can't press it. And let's select both this
image and this image. Let's go down and you
have to change this one. The visibility in
their behavior. Disability, change it
to none, hit testable. And this means that it doesn't matter that
this image is there. I just want to ignore it. So the mouse is
going to ignore it. You can see here by play now, and I hover over the
image, it doesn't matter. I am still hovering
on the button. So this so you have to set
elements to non hit testable if you don't want them to block your interaction with
buttons and the world. Okay, so before we finish, instead of doing this custom
event initialized widgets, let's actually make it into a, a Blueprint Interface
and then you can have some exercises
from that as well. So let's minimize it and try to do it yourself
if you want to. This is the same
method as we did before going to
interfaces folder. Now we had made one
for the player base, so we have to make a new one
for the player controller. So let's right-click, go to blueprints here and select
Blueprint Interface. And again, I usually
call it the name of the blueprint I
want to use it in. So we want to use it in the player controller like
this and click on it. And now let's give this function a name and call it again, initialize widgets
just like that. Compile and Save. And let's go back to
the player controller. Remember, again, remember
to compile here, very important, compile save. Let's go back to the
player controller. And inside of here, Let's
go to Class Settings. And here in the interfaces, let's add our interface
for the player controller. And now you can see
it appear here. You can then write
initialize widgets. And you can see the event
initialize widgets here, and it comes from a
Blueprint Interface. This is what the icon means. Now we can connect it up here. And we can also call the event
here, initialize widgets. And again, I'm going to
select this one under int player controller,
just like that. So now it's working perfectly. Again. If I click on Play, now, it's going to work as it should.
38. Character Selection Functionality: So let's now go
back to our widget. Let's go in the UI and
the Widget Blueprint. And inside of here we now want to add functionality to the UI. So to add functionality
to the UI, remember, this Widget Blueprint is divided into a designer and a graph. And the graph is where we add our functionality
for the buttons. So clicking on the designer, you can click on
one of the buttons. So let's start with Serena
clicking on that button. And if you go down
to the button, you can see you have some
events that you can add. For example, what should happen if I click on this button? What should happen if I
hover over the button? What should happen if
I uncover the button? So we have different events
we can add for the button. Now, I want to use
this one for now, what should happen when
I click on the button? So clicking on the plus, and you'll add this event here. Now, you can delete these
ones if you want to. These are the default ones. We can add them if we want to. So selecting them, clicking
on Delete on my keyboard. So I'm just going to
have this one for now. So the workflow, before I start, the workflow we are
going to work with is when you want to
spawn the player, you're going to press
on this button. This button is going
to take you to an event in the
player controller. So we have to have an event here and the player controller for spawning are
selecting the character. And when you select
the character, it's going to go
through the game mode. And very, very
important to remember that game mode only
runs on the server. So you can't come here and make a custom event and set
it on run-on client. This does not work. The game mode only, only exists on the server. And this is very good
because we can use the Game Mode to check
what the client is doing. Again, remember,
in Unreal Engine or just multiplayer in general, the server checks what
the clients are doing, so we prevent cheating. And the game mode is very
good to use for that because it only runs
through the server. So we can run things through
it here and then spawned a player in the game mode
allows us to spawn the player. So let's go back to
the Widget Blueprint. Having an event in the
player controller, the controller is going to throw us over to the game mode. The game mode, when
it sees that, Yes, you are allowed to
spawn the player, it's going to throw that information back to
the player controller. You might ask, why
are we not adding this, this code here? Why are we adding it into player controller instead
of the player base? Because this is the
player we want to spend a player and
it's Player Specific. Since we don't
have a plenary at, remember we are
spawning the player. So this, this code doesn't
exist when you are here in the selection screen because you haven't
spawned the player yet. So you can't add code here. It won't work because
this actually doesn't exist yet if you
haven't spawned the player. So you can't, we can't do
the code inside of here, so we have to do it in
the player controller, because the player
controller spawns whenever the player
connects to the server. So if I'm playing Counter-Strike or if I'm playing Maple story, when I connect to the server, it automatically creates a player controller
for each player. The player controller
exists even though my **** has not respond yet. So let's go to the
Widget Blueprint. And inside of here, we want actually let's start
with a plaque control. I think it will be
easier for you here. So here, let's make a new event, make one here, and
let's call it. Let's call the Select Character. Now, sometimes when I get confused of how I
should do a mechanic, I usually start from the back, so this is sometimes I
think it's very nice to do. Sometimes you can
start from the back. So what are you trying
to achieve in the end? What I'm trying to achieve is this one called spawn actor. This is the one we
are going to use. Ultimately. We want to spawn an actor, you want to spawn the character. And here, this is the
character we want to spawn. And let me make an event down
here called spawn layer. This is the ultimate event we want to end up with a result. So you can start from behind. And instead of starting up here, actually sometimes it's a
lot easier to understand. So going, going back is
a lot easier sometimes, again, spawn the player. This should come
from the game mode, because as I said before, when you click here, it's going to go to the
player controller here, the player controller
is going to throw us inside
of the game mode, and the game mode is going
to throw us out here, will respond to player. I'm going to drag Is
variables on the event here. And instead of class, let's change the name of it, call it player and
spawn transform. We can just call it spawn
transform, That's fine. So we have the spawn
player event here. This is going to come
from the game mode. So let's go back to
the game mode now. So we're working backwards
going to the game mode now, I'm going to delete this
event so you can begin play because we don't
need them right now. Compound save, and
I'm going to make a new event here, custom events. Let's call it
request spawn layer. Just like that,
requests bond player. And it's going to run our Spawn player from the
player controller. But right now we don't have, we don't have a variable
for the player controller, so I can't call this event here. Remember? Now it's getting a bit
more advanced because we need to use this
event spawn player, which is in the
player controller, we need to use it
in the game mode. And this is called
Blueprint communication, as I told you before, we use Blueprint
Interfaces for that. But right now, what we can
do is just click on this plus we can add the
player controller. And then as the variable, we can select the player
controller and we call it PC. I think PC Maple Story, we called it yeah,
one PC Maple Story. And then let's create actually from the
player controller. Now if you drag on it, because now that the variable is this blueprint class here, we can now call
this spawn layer. So if you drag from this
and say spawn layer, Okay, now we can call
this event here. And just like before, I'm going to drag
those back again. So dragging the player back here because this one
request spawn player, we are going to
call it here from the player controller again. And S4, the location. I usually break this down. So remember a
transform variable, if I make one and
show you down here, a transform variable is a variable where we can see
the location, rotation, and scale, just like
in our viewport here, when we click on something, we can see the transform. This is the transform variable. So we always need that to define where the player should spawn, how the player should be
rotated when spawning, how large the player
should be one spawning. So let me delete
this one for now. And instead of having
the inverse transform, you can drag out from here
and click on this one, make this, we'll break it
down into these three. So the location,
rotation and the scale. And I usually just let
this be in the game mode. This is also how you
prefer as a programmer, some people do it differently, but I usually have, I usually make the transformer and break it down like this. And then I just hook up the location out here because the rotation is the same and the scale is the same. So this is what it looks like. We can also, instead
of location, we can call it spawn location. Just so you're not confused
later on what that is. Okay, so now I have this one
called request spawn player. Now out here in
the select player, this is where it's going to
be because select player is going to throw us over here. And to communicate
with a game mode. Again, I said before, the game mode only
runs on the server, so you have to run
this on the server. So we know how to do this now. So let's make a custom
event and call it S RV, select character. And already from up here, we can run that event. So SRB select character and remember to run
it on the server, this one, select character
and click on reliable. So now we have this
select character. It's going to run
through the server. And remember, we
are going to call the request spawn player. And again, we need to
communicate with our blueprint. We need to use the decay mode here inside of the
player controller, I'm going to teach you how to communicate what Blueprints. This is something we
haven't touched before. To communicate with
the game mode. You have to say, gets
game mode. Very basic. Now, get the game mode. This is not your,
your game mode here. This is just a general
game mode in the engine. When you say get Game Mode, you then have to define. You can see here, if you
hold the mouse over it, it says returns to the
current game mode base. Now when you get the game mode, you have to define which game
mode are you talking about, because this is just
the general game mode. And we have something
called casting. So if you drag this
out and say cost to cost two means like which, which Blueprint I talking about. I'm talking about
TM Maple Story. So cost to Maple
Story, this one. Okay? Now as Maple Story, this means now I
can use everything that is inside of
this blueprint. Now, for example, I can use or I can call this
request spawn player. So if I drag out and say
request spawn player, you can see I can
call that event now. Or let's say if I made an event called a
variable called hello, and it's a transform, I can go back to my
controller and say, Hello. I can see now I can get
that variable as well. So this is how you
communicate between blueprints so I can get
the General Game Mode. And I tell it, I am
specifically talking about GM Maple story because sometimes in games you
have multiple game mode, so you don't only
have one sometimes. This is what I'm talking about. As for the player controller, what you can do here is
say get player controller. And you can see, you can get the player controller,
same principle. Then you can see, now this is a general player controller
and you can see cost too, because I'm specifically talking about this BC Maple Story. Bc maples. You can see this is how you communicate
with blueprints. Now, this good plaque control
lies for single-player. I will explain it
to you in a bit. So let's delete this one here. And instead of costing, so now you know what costing is. Instead of costing, I like
to use Blueprint Interfaces. The problem with casting
is that it creates hard references and it will
lag your game, many of them. So if you have a large
game you have been working on for a year and you have a lot of casting like you cause
to this you cost to that. And you're doing it a
thousand times in a game, it's going to slow
down your game. Now I'm not saying
it's bad to use. I use it sometimes and you
should use it sometimes. But whenever you can use
a Blueprint Interface, I would recommend that you use a Blueprint Interface
so you don't create these hard references, which will slow down your game. So first you have
to think about what are you trying to reference to? What we're trying to
reference to the game mode. So we can actually
use this event here. Okay, so for the game mode, we have to actually make a new Blueprint Interface
for the game mode. Now, let's go to interfaces, make a new Blueprint
Interface here, and then call it ends game mode. Now this one here, the function we want to make
is called, I'll make it. Then I can show you
what I'm talking about. I think it's a lot easier. So let's call it
get's Game Mode ref. So we're trying to get
the game mode reference. And this is a function, so we're creating an output. Here. The variable you
want to select is whatever you are trying
to reference to. Trying to reference
to my GM maple story. So my game mode, and let's
just call it game mode. Okay, so now I have the
function and let's add again. He came out to our
camo blueprint, the interface to a
game or blueprint. So let's go to Class
Settings and select. He came out here
and compound Save. And again, you can see the
interface appearing over here. And as the Game Mode. Now we have to define
what is this game mode. And I'm just going to
drag and say self, what self means, whatever
blueprint I am in. Right now, I'm inside
of the GM Maple Story. So now it knows g, m, k mode, or this game mode
means GM Maple Story. So this is what self means. So self just means what, what Blueprint Class
I am in right now. Okay, now that we
have created this, we can now go back
to the controller. And instead of doing casting, we can now call this function here called Get Game Mode rough. So let's drag from here
and say Get Game Mode ref. And as functions when
it says message, this means it comes from a Blueprint Interface and
this is the correct one. So always see if it says
message before you select it, if it comes from a
Blueprint Interface. So selecting it here. We have the game mode now and we can do whatever we want
just like before, for example, calling this
random hello variable. So saying hello, you can
see now it works as well. So just to explain it quickly, what happens is you get
the general Okay mode, and then you say
get Game Mode rref. And this is the function
that we created here. And it knows what the Game Mode is because inside of here, we set the Game Mode variable
as the self-reference, which means it knows it. Gm Maple Story. So this is GM Maple
Story we are using. Alright, so that's the game
mode ref we now want to use. Let's actually delete this
variable before I forget. Let's call this one called
Requests spawn player. So over here, request
spawn player. And I have to define my player. And I don't want to do that yet. I want to define my player over here because when I
click on Tsarina, my player is going
to be Tsarina. And when I click on the button, Luke, I want to define
my characters look. So let me just drag
this and continue here. And as for the location, we can also continue
and drag it here. And then you can
see it over here. Select character,
I'm just going to continue plugging them in there. Now we can call this one
called Select Character. And this is where I want to
call in the Widget Blueprint. Now, the Widget Blueprint, I have to call this
select character. So now we are going
to practice again with our Blueprint Interface. So in the Widget Blueprint, you can say gets
player character. Now, this is good to use in single-player because you can see the player and
this index is 0. But you, as you connect as players and the game
in multiplayer. The player to connecting
should be planned X1. And then the third guy
connects to the server, and it is planned x2
and 3406 and so on. So as more player connect, they will have
different indexes. So we can't really use
this in multiplayer. This is only for single
player and multi-player. We use Get Owning Player. And if you hover the
mouse over it, it says, gets the player controller
associated with this UI. It's going to get this
player controller, your player controller, you as the player that
you have connected, it's going to get your
player controller, which is associated
with this UI. So now we have the player
controller, and again, we have to say get
player controller ref, and who haven't made that yet. Remember earlier we made an interface for the
player controller. We can use that click here. And just like before, let's
click on Add function and say gets layout controller ref. And now we can add an output. And just like what
I said before, what are you trying
to reference? This is what you should
have as the variable I'm trying to reference
my player controller, PC. We call the PC Maple story here and call it
player controller. Okay, so now remember to go into the controller and you have to define the
player controller. So just like before, drag from the year and say self. So the player controller is defined as this PC Maple Story. Now what we can
do in the widget, we can get the Owning Player. So now we have the
player controller, and now I have to
specify what player controller are you talking
about specifically? I am talking about and we
made this one called gets player controller ref now here. So now we have the player controller and the thing we want to
do inside of here, we want to call this events select player, select character. And we can call it
here select character. And you can see we can
select the character. So when you click on Tsarina, we want the character
to be Serena. When we click on Luke, we wanted to pleasurable look. Here instead of using the Select Character,
has the normal event, just like what I
told you before, let's actually make it into
a, a Blueprint Interface. So going back, this is
the player controller. So going to the
player controller, Let's make a new function here, call it select character. And let's make two
new variables. One is the player and the other one is
the bond locations. So I'm going to delete
this one here for now. I'm going to compile. Let's go to the here,
to the interface and the Select
Character we just made. Let's make an actor here. So the variable is actor, and it is a class reference because it is something
we're are going to spawn. So a class reference, and let's call it player. And the other one is the spawn location
and it's a vector. So vector span location,
just like this. And we can now end
up like controller, call it saying select character. And it is here coming from
a Blueprint Interface. And we can connect it together. Now, since we have this one, we can now go back to the Widget Blueprint
here and call it again select character. So very good to practice. I usually don't make
it directly inside of the player controller or
in the interface because I want to teach you
the difference. So let's do this one. So like character, this
is the function here. Just like that. And you select
Serena as the character. Okay, so now go back
to the designer. Click on Luke, the button here, go back down, click
on unclicked. And as Luke, I'm just
going to copy paste this whole code
again, copy paste. And I'm going to set it
to look instead here. So when we click on loop,
it's going to spawn look. When we click on
serine, that's going to go and sponsor arena. So let's go through the code. So when I click, I am going
to select my character. I'm going to run this function. This function is in the
end, the player controller. So I'm going to run this
function, this event here, select character is going
to go through the server. The servers, then going to
go through the game mode. And it's going to
request one player. And again, I want to make this into a Blueprint
Interface function, as you can see here
in the game mode, this is just a normal
function for now. So we can see it takes
a little bit of time to create the
interface functions, but very nice to do that and it keeps your project
optimized and clean. So request spawn player, Let's go back to the game mode interface
function or interface. Let's call it a
request spawn player. Just like this. And for this one we added, Let's go back to the game mode. We added the player controller. We added the actor
as the player. We added the spawn locations. So let me delete it for now, compile save, and let's go back. I'm just deleting
them before I make them so it doesn't get bugged. So here let's create three
different variables. The one was the
player controller, the other one was the player. And the third one was
the spawn location. On the spawn location is a vector and the
player was an actor. And it is the class reference because we want to
spawned the player. The player controller
is our PC Maple Story. Now this one request
spawn layer, I'm going to call
it here request spawn layer, Indie Game Mode. And then now we can
reconnect it like this. So the target is the player controller and
this one in the location. Okay? So before we are
going to click on Serena, it's going to go
through the game mode. Here are the player
controller, sorry, this electric charge
is going to go through the server and now we need to
call the correct one here. If I delete it, we need to call the request spawn player
because we just made it. And I'm going to select
this one message. Remember to select message when it's a interface function. You can also see this icon when it hits an interface function. And then again reconnect those. And now you have to define
what is the player controller. Because even though in
the game mode you have called the plaque
control here and call this function here. You haven't really defined
what the player controller is. And let's go back. Now. This is empty right now. So let's just drag from this. Remember we are inside of
the player controller. We can just drag and say self. We are just talking about
display controller here. So it's going to go
through this event. And then in the game mode, request spawn player,
it's going to go. And we run it through
the game mode because we don't want
the client to cheat. We're checking all of this and it's going back to
the spawn player, to the player controller. It's going to spawn the player. And it's going to
spawned a player here. Now instead of small
player, again, we can make it into an
interface function. So it contains the player as the actor and spawn
transformation. Going to delete it, go to the interface for the
player controller. I know there's a lot
of things happening, but if you get this down, try to watch this video
twice or three times, you'll get an like you'll
be an expert at this. So try practicing and
I know it's difficult, but once you see this
twice or three times, this will get a lot easier. I had a hard time when I
started out doing all of this. So let's do the spawn player. And we had, now I almost forgot, we had the player as the actor and we also had the
spawn transform. So this was a transform and
the player was an actor, and it was a class reference. Okay, so let's go back to
the player controller and six spawn layer
events bond layer. And now we can connect it here. I connect dose and
connect this here. And remember this comes
from the Game Mode. So you have to also change it in the game modes,
probably going to bug. And remember, it's also from
the interface functions. So we need this,
this icon up here. So let me delete
it and say spawn. Actually, let me drag from the player controller
spawn layer. Now I can click on this
one spawn player message. And let's connect them
back here, just like that. So we're going to
spawn the player. And we are going to go back to the player controller and it's
going to spawn the player. Okay, So when we spawn a player, we have to do a last thing. We have to use something
called process because you have
spawned the player, but you haven't told the
engine that you want to control this player and this
is what we call possess. So let's reference
to the player base. This is what we need to, because we need to reference
to an actor. What are you trying to control? And we're trying
to control this, this spawned actor which is a player base now because
now we have spawned it. Here. We have now the
reference to the player base. And I believe we haven't
made an interface for it. Actually we have
one player base. Let's go inside of here. And
let's make a new one again. Let's say gets layer rep. So we're getting the
player reference just like what we did with the player
controller and the game mode. And we are trying to
reference the bp player base. Here, let's call it layer. And again, remember to go
back to the player base, go back to player, player base. And inside of here, we will find the Get Player ref. Just like before,
what is the player? The player is self. So whatever blueprint we are in. Now, what we're trying to do is here in the
player controller. So we need to reference
to the player base. So gets layer REF. And this is because now
this is the player, this is the actor,
but you have to define this as this
is the player. And as the player, I want to possess
this respond players. So you have to do this in Blueprint so you can
tell the engine. Yes, I spawned the actor, but I actually want to
control this actor as well. Okay, so now we have
done all of this. So a lot of code in this video, I apologize for
making it too long. I know sometimes it gets hectic, but we couldn't make
it shorter actually. And I tried to explain
everything that I go through. But now that we click
on play and click on the button, you're
actually spawning. But this UI still
staying on the screen. And let's move on
to the next lesson where we remove this UI.
39. Removing UI from the Viewport: Now that we have finished
our Character selection, let's go ahead and remove
the character selection UI. So when I click on
the button now you can see the UI is
still staying up here. So let's remove that first. Let's go over to the UI and
the Widget Blueprint here. So when I click on Serena, when I select my character, I want to remove the UI. And this is very
easy to do because now we have set everything up. I can take this
player controller, what I'm ultimately
trying to do. Remember, we added
the widget here. We added initialized widget. We added the character
selection widget. Instead of adding two viewports, there's something
called removed from parents and this is
what I'm trying to do. So I need to get a
reference for this variable inside of
the Widget Blueprint. So we already have
this one and we have the get layer control
our reference. So we already have the
player controller reference, so we can easily
call this variable. We have access to
this blueprint. Now, if I drag out
from this and say WB, and you can see we
have this variable that we had over here, gets WB Character selection. The only thing I need to do
is say remove from parents. This is how you remove
UI from the viewport. So very easy, very short video. I'm going to copy paste
this for Luke as well. So copy paste down here. And let us connect it
together just like that. So now we're moving Dui. Let's see what happens. If I click on Play now, I select the character. You can see I'm
actually spawning. We haven't really set
a spawning point yet. And if I open my
other screen here, the client, and if I click
on loop for example, you can see I also spawning as Luke and I have spawned
as Tsarina over here. Now, the location
for, as you can see, the feet are bugged and this
is because we haven't set a spawning location yet. And you can also see we spawn
as the character over here. And this is because
we now have to go again, I told you before, in the project settings and in the maps and modes
and the game mode. Now that we have a
character selection screen, we can remove this
default point class. We don't want to spawn
as any character. We just want to select None. And we select our own character from the character
selection screen. So we don't want to spawn
with a pre-made character. Let's close it down
and I'm going to save everything to make
sure that's working. And I'm going to
the world settings and just making sure in the world settings that The Game Mode also
says none over here. Now when I click on play and
spawn as look for example, you can see we don't have
a character over here, but because we're not
spawning there by default, now this is working. And the next thing we want to do is create a spawn location, because now we don't really
have a spawn location. We're just spawning
out of nothing here. So we want to add
a spawn location, and this is what we will
do in the next lesson.
40. Creating the Spawn Location: So for this one
location and we want to spawn the player at
the player start. So before it worked, because we have set this default ON clause to
one of the characters. But right now when
you spawn a player in the UI here in the
widget blueprints. If you go again to the
graph, as you see here, when we spawn the player, we spawn them at zeros, zeros 0. And this is why they
are responding here. To the top-left. We have to define to spawn
them here at the player start. And I want to create spawn
points in the game mode, because remember the game mode
only runs on the server so that the player controller cheat if something
is inside of here. This is the whole
purpose of multiplayer. We're trying to
stop declined from cheating here at the
beginning place. So when we start
playing the game, I want to define this last
dot as my spawn points. We can say you get
actor of class. And what this get
actor of class is, it lets you get whatever is already spawned
inside of the level. So very, very
important to remember what is already spawned
inside of the level. This player start is already spawned and we can
try to search for it. So get actor of class, we can get whatever is already spawned and you can
search for player starts. And you can see here, player starts, you can select it here. So it's going to select
a player starts, it's going to be a
lot more difficult. So imagine if we had
multiple players stats, then you had to define which
one are you trying to get, because right now it's just
getting one of one in random. But this is okay for now, for this purpose, we're just
getting displaced out here. We only have one spot
point right now. So let's compile and save. So as this player start, I am going to get the actors
location to location. And then I am going to
make this into a variable, promote to a variable and call
it player spawn location. Okay, so now we
have this variable, player spawn location
inside of the game mode. So now we have
this one location. Now we can use it
inside of the player. So inside of the player base, inside of the event graph here. So now we can spawn the player at that location we
created in the game mode. So when we spawned the
player up in the top here, before I do anything,
let's say sets. Actually, let's make
a custom variable. Let's call it set
player spawn location. So we're going to set
this bond location inside of the player here. And I want to run this
through the server. So it's not cheating. And saying servers set glare, spawn location and run
it through the server, runs on server, reliable. And what we're trying to
do is we're trying to say, like we tried to use this one
called set actor location. This is the ultimate function
we're trying to use, set the actress location. Remember, you have to do this
inside of a rib. Notify. Because remember
just like what we said before in the
unwrap function, this will update for
all the clients because right now you are running
this through the server. So what we're trying to do here, so let us just make it
and maybe it's a lot more clear if we make it
first over here, what we're trying to do
is we're trying to get this last one location
from the game mode. So just like what I said
before, get Game Mode. And then you can say
gets chemo graph, which we created earlier. And now as the game mode, you can take this one
called last bone location. Now we have this
variable inside of here. Let's actually right-click and promoted into a new
variable inside of here. And I'm just going
to call it the same thing, player spawn location. But this time, since
I am in the server, let us now replicate it to
the clients because let's actually run this here
and I can tell you why. So server player set
plasmon location. And let's do the begin play. And when I start playing the
game and the Begin Play, it will run whenever you
spawn the character. So when I click on play, the beginning play for the
character has not yet played. But what if I click
on the player? Now the beginning play
is going to play. So whenever I spawn my
character, this will launch. So for the begin play, whenever I spawned
the character, I immediately want to set
the player's location. So sets layer location, spawn location,
actually not location. So player spawn location. And let's make this one into a Blueprint Interface as well. So set player spawn location. Let's delete this one here from the player base and let us go to the interface player base. Let's make a new function called set player spawn location. Let's go back to the
player base and say Set layers bond locations. So let's call that event. And connected here. When I began playing the game, I will call this
event over here. So set the player spawn location and then it's going
to go through the server and
through the server. It's going to get
the game modes. The game modes spawn
location here. And I'm going to set
the variable here. But remember, you are running
this through the server. So the client has no
chance to know what this variable is because this is only running on the server. So only the server you can see up here I am the server now. Only the server knows
what's going on right now, the client can't see
the spawn location. And just like what I told
you before with multiplayer, you have to replicate this
variable back to the client. So when the server has
finished doing the logic, the logic has to be replicated
back to the client. So the data has to go
back to the clients. And just like what we
did with the mood state, we made that on ramp function. We can click on this variable
and replicate it back to the clients with the rep notify. So we're going to notify
all of the clients. And again, I told
you before we use the rep notify whenever
we have visual changes, and it is a visual change, we are responding the character, we are moving the character from this point where
respond to the character. So at this point over here,
so it is a visual change. So you have to set that visual change so all
the clients can see it. I'm going to do a rib notify, so all the clients can see it. And what we want
to do in here and the on-ramp letters
bond location. And actually just for my OCD, I see that there are
spaces between here. I'm just going to
delete it again. I want to change it
before I do anything. I'm going to remove those spaces down
here in my variable. Like this. I'm going to press again on retina ossify,
just like that. Now here in the unwrap function, let us now take actually we are inside of
the character already, so we can just say
set actor location. This is what we want to do. So the actress location
and the location is, we want to set it to
this updated location, so this player spawn location. So let's go over here
to the unwrap function. Drag this plasmon location. I just plug it in in
the new location. So this is the new location
we want to set the actor to. Now, all the clients
will be able to see that the character is changing
position to this new location. So now let's click
on Play and see what happens if we have
messed something up. So clicking on play here, and you can see I am now spawning down here,
so this is working. And if I go back to
Luke lips to look, so this is the clients. Let's make look for example. You can see now this actually spawning correctly
and I can play like they can play
together always good to test and see if it's
bugged are not. Before we continue. You can see this is working,
responding correctly. So just to go through
this very quickly because sometimes I'm concerned that
this might be confusing. So let's start here in the UI. Here we click on
Serena, for example. Let me drag those
closer to each other. So here we click on
serena to sponsor arena. It's going to go to the player controller and
select the character. So it's going to run
this event here. And it's also going to remove the character selection screen. So it's going to this
select character to the player controller. So let's go to the plaque control and
see what's happening. In the player controller,
which is here. It's running this
Select Character Event there select character is
going through the server, and then the server
is then calling this event here in the game mode because we
wanted to prevent cheating, we want to check if we are allowed to spawn
the character. Going through it again
mode, requests bond player. It's going through
the game mode. And then it's going to throw us back into the player controller. And in the player controller, we are going to
spawn the player. And we are going to control
the player as well. Whenever you spawn the player, it runs this begin place. So whenever the
player just spawns, it's going to set the
player spawn location. It's running this event here, and this event is going
through the server. Again, we are preventing
declined from cheating. The server. Needs to check if what
you're doing is correct. So you can see the
method here is where all we're always trying to set
variables through the server. So I'm just going to jump
right into the server. And then endless server, I am doing all of
that coding logic. Server. It's going to set
the place location. Actually, it's going to get to the player's location
from the Game Mode, which we made up here. So we got this actor class play starts and we got
the access location and we made it into a variable. So now we know the
specific location for this player start here. And now we've got
that, that location for this spawn points. And then we made it
into a new variable inside of the player base and called the player
spawn location. Now replicated it
into a rip notify, which then takes you to the unwrap function because
every time you change the value or a rep
notify function is a wreck notify variable. It's going to run the
rep notify function. So now you can see we
set this variable. Then automatically
we're going to run this unwrap function. And the only thing that's
unwrapped function is doing is setting our actors location. Again, we are using a rep notify because this is
what we do in multiplayer. Whenever you have a
visual changes and changing the location
of a player from this point to this point
is a visual change. All of the clients can see the visual change by doing this, just like what we did
with the movement state. So we said the flip books. These are as well
visual changes. So changing flip books so the player can see that
changed flip book. That is a visual change as well. So I hope this was clear. Again, if something
is confusing and you need something to be
clarified a lot more, you are welcome to join
my Discord server, and I am more than
happy to help you out. So let's continue from here. Let's save everything. Let me close this down and let's move on to
the next lesson.
41. Creating the Camera Actor: So as you can see
here right now, I am inside of Maple Story and the camera and
Maple Story there. It is not like ours right now you can see
when I move around, the camera is
following smoothly. It's not really attached
to the character. So when I am moving around here, you can see it's following me, but it's not really
attached to me. So it moves like this
smooth movement. So this is what we are
trying to achieve. So back here at our game, instead of having the camera attached here and
the player base. So we have currently this
camera attached to the player. We have to make a separate
cameras so we can follow the player smoothly. Now, of course, you can
keep the camera like this if this is the
place that you want, but I'm trying to
replicate Maple Story as much as I can so we can
practice from that as well. So let's start by creating
the camera actor. So instead of having
the camera attached, let's make it into a
blueprint instead. So right-click, make
a blueprint class. And let's just make an actor. And let's call it BP camera. Okay, so clicking
on here, VB camera. Let's again go up here
and add the cameras. So first, just like before, let's add a spring on those. So this is the holder
of the camera. And then we are going
to add the camera. So just like before,
nothing new. Click on the spring
arm. I'm going to rotate it minus 90 degrees, just like before,
Compile and Save. And I'm going to remove this one called Remote do
collision testing. I'm going to click on the
camera and change it to an orthographic view and
set the width to 1304. And this is not
really something new. This is what we also had
done here in our camera. So these are just
the same settings I'm trying to go with. Okay, so now we have the
camera and I'm going to go to my player base and I'm going
to delete this camera now. So now that we have
created a camera, we can spawn it in
the next lesson.
42. Spawning the Camera: So the thing we're
trying to do is we're trying now to spawn
the camera ecto. And the goal is to spawn in the camera every time
a new players bonds. So let's do the spawning
logic inside of the players. So whenever the player's bonds
into the level, they'll, there will be a camera
spawning so that it can follow that player just
like what we had before. So here again, over in
the beginning place, so this is when our
player will spawn. Here we are going
to say spawn actor. So very good to remember
all of these tools. Spawn actor is used whenever
you spawn something. Just like over in the player controller where
we spawned the player. You can use this bone actor
again to spawned the camera. So let's say spawn
actor of class. And previously I told
you that we have to go through the game mode to spawn something so
we prevent cheating. This is okay right now
for this camera to do it directly from
the client as well. Because this camera
is just player based. It's not something global, like adding players
to the level. We're just adding a camera for the player to be
followed around. Spawning an actor here. And we have to choose
the camera and we called it BB, BP camera. So just searching for camera. And this one BP camera here. We now have to select the
spline transformation. And I'm going to drive
from here and click on Make transform, just like that. And now we have to define at what location we want
to spawn that camera. And I just want to spawn it
at the player's location. So we're already
inside of the player. So we can just say
get actor location. And the target is
self because this is the character we are
currently controlling. So we are getting that spawned
character and we're just going to that location
of this bond character. I'm going to move this
a little bit here. The rotation is this one
and the scale is this. That doesn't really
matter right now. And as for the spawning, I want to click here, and let's click on
this one saying try to adjust location
but always spawn. This just makes sure that even though we are
colliding with some, something, at some point, we are just spawning
the camera anyway. And actually I think
we have to do that in the plaque control as well. Here, if you still have it
at default for the player, just remember to set it to try to adjust location
but always spawn. That will prevent us from the player being not able
to spawn at some point, but we're trying to adjust the location but still
spawning the player. This collision will be
a problem as default, like this whenever
we have enemies, because there will be enemies
and you will be colliding. So always bond even though we have some collision tried
to adjust the location. Okay, let's go back
to the camera here. So now we have
spawned the camera. Now you can see here, even though we have
spawned the camera and I'm going to click on play. And also remember to remove the camera over here if you haven't done so
in the previous lesson. So removing the camera, spawning a new camera. Let's try to click on Play now. And now you can see here that even though we have
spawn the camera, we're still embarked
here in the view. And this is because
even though you are spawning a camera, you have to, you have to tell the
engine that you want that new camera
as your new view. So if you drag out from this
and say Set view target, you can see, you
can't really see anything even though
you're searching for it. But if you remove the
context sensitive, you can see this is the
one we are trying to use. Set you target with Blend. And why is this happening? Why is it not
appearing over here? You can see if you hold
your mouse over it. It says that the target
is a player controller. Context-sensitive just
means for the context here, for this pen you're
dragging from. This is not really a
player controller. This is the camera. So if you're searching for something that needs
supply control, I'm not going to show you unless you remove this
context sensitive. But however, if you get
the player controller, so let's try the other way. Let's say it's controller. So this is how you get
the player controller. In multiplayer,
you are inside of the player and you just
say get controller. And it says returns
controller for this actor because we want
our player controller here. We have the controller
and let's use the get black
controller REF that we created with our
interface previously. So let's say player
controller ref. Now we are talking specifically
about this controller. Now let's connect this together. And from here, as the
player controller, we can say set view target. You can see, I can see it with the context-sensitive edit
and this is what it means. Now it knows what
you're talking about because the target is
the player controller. So something that you
have to be aware of. Now, let's click
on this one here says View target with blend. Now it needs a new view target. And the new view Chocolate
is just this camera. Just to make everything like you can take this and
connected here, that is no problem.
This will work. But sometimes I like to organize things and I'd like to
make them into variables. So I'm going to
right-click here and promote to variable and
call it black camera. And actually I already created it from previously I
was testing something. So let me just
delete the old one, compile and let
me make it again. Layer camera. Okay, So now let me connect it. And now as this variable, you can just simply know
that you have the variable. You can simply
click and drag this variable and
connected like this. So you can either
do it like this or you can do it like this, that they both work. That is the correct way. I just like sometimes
to just do it separately like this to
make everything cleaner. Again, It's okay to set this variable even though we
are running from the client, so we're not running on server,
which I told you before. We have to set
variables on server. I am setting this
specific variable on the client because this
is client-side it, the camera that will
be following around the character is only going
to be seen by that character. All the other characters, all the other clients
doesn't really care about the player character or
the player camera. Rather. The player camera is
something specifically to you and all the other players don't really care about it. Just like the UI,
the user interface, your user interface, other
players don't care about it. They have their own interfaces. Okay, so we have this camera. We have now set the
view target with blend. And I'm going to organize
this a little bit better, like this before
it gets too messy. So something like this
here and I'm going to pull this closer like that. Okay, So let us now
click on Compile, Save, and click on play
and select a character. You can see even though
we have the code, I know we have the
code correctly, but you can see it's
still messed up. And why is that? This is because
sometimes it takes, you can see here it says
error or sometimes it takes a second for a character
to spawn in multiplayer, there is a small, small delay. And this code, this
whole code here, runs so quickly, it's insane. So you have to give time, sometimes for the
character to spawn. So here we are setting the players spawned location
whenever the player's bonds, I'm going to put a delay node. So let's try to pull
here and say delay. And sometimes this
is trial and error. I know this code is correct, so sometimes I get confused. Why is this not working? And I might think that there is a small delay from the players spawning to actually
adding the camera. So it can't, it can't
find the player. This is, it's trying
to spawn it here, but it can't find the
player controller because you have to
give it some time here. So let's delay by 0.05. So very, very small delay. If you write one, this
means it's 1 second. So 0.05 seconds. So very, very slight delay here. Let's click on Compile and Save, and let us try to
click on Play now, click on the character and you can see the
character spawning. So the delay helped a lot here. Let's try to spawn the client. And the client is
also spawning and just to make sure that
they see each other. If I make this smaller. Yeah, so everything is working
and just trying to spawn. Now we get an error. I'll try to see what that is. Let's try to click
on Play now and leave as the server
and look here. Look can also spawn as well. Okay, so we get an
error here and I want to try to see why
we get that error. Okay, so sometimes the, the code runs too fast here, so instead, we played it here so we don't
have any errors. So everything is
working perfectly now. And sometimes the code runs
fast here and it's going to not being able to find the bladder control
other variable is empty. So here what we
want to do to make sure this is not
going to happen. Let us now drag from here from the player
controller and say is valid. And you can select
this question mark. So if the player
controller is valid, we can go ahead and
set this camera. And if it's not valid,
don't do anything. So we can try to do that here, and that will fix the error. So I'm going to
double-click on this pin. So it's not too confusing. Just to organize things down
here, something like that. And let us try to run
with that code instead. So let's compile save. So now if this player
controller is valid, Let's go ahead and
create the camera. If not, let's not do
anything that prevents it from giving those errors
when the variables empty. Let's click on compile. And now let's click
Create this character. Let's create Luke. See everything is
running smoothly. I'm going to click on
Control or escape. You can see we get no errors. Now, also very nice to check
if something is valid. You can also do that with variables sometimes
when you need to. So if I just pull this
camera for science, we can right-click it and we can click on Convert
to validate, get. This also works. So we could actually have made this plaque control lines to a variable and we can
check it like this. If the player controller is
valid, you can do something. If it is not valid,
that don't do anything.
43. Updating the Camera Position: Now it's time to update
the cameras position. You can see here when
we click on Play now, we can go with the character,
we can move around, but the camera is static and it's not
following our character, and this is what we want. So let's go back to
the player base, and let's do that
logic inside of here. So I have two new
tools to teach you. It is about timers and
it is about a timeline. So two very essential
things in Blueprint. So let's do that here
at the beginning place. So whenever we begin playing the game and we
spawned the camera, and we attach our self, our view to that camera. Let's also go ahead and update the camera's view so that it follows the
player all the time. Now, before I make a timer, I actually want to
make an event tick. I wanted to show you
this and before I told you to never use
this tick event, because this runs 60 times a second and your game
will be un-optimized. You can do a lot better
than using this. I'm going to use this
right now and we will switch it up with a timer. And this is what I
told you before. You can do other things than
using a tick at some times. And what I mean by that is
that you can use timers to avoid using texts which runs your code 60
times per second. So we can use timers
to avoid that. But let's use a tick now. And I can show you
how we change it up later so you
can learn from it. So the thing we're
trying to do essentially is we are trying to get
display camera that we have. This is the camera
that we spawned here. We are trying to get this camera and just
set the location of it. So this is what we're
essentially trying to do. We're trying to set
the location of it to the player's location. So if we make it very, very easy, we can just
say get actual location. And the actual location is self, which is this player. So the new location of this camera is the
player's location. So it's going to follow
the player all the time. And since this runs
60 times per second, it's constantly going
to follow the player. Now, let's click on play here. And you can see
when I run around, now we're following the
player just like before. So this is essentially
what we're trying to do. And of course this is going to give you an error because you are essentially
running this event before you have run this, this camera, respond
this camera here. And you can avoid that again, just like what I said
in the previous video, you can convert this
to a validate it gets. If it is valid, you can go
ahead and update the camera. Okay? So this runs, don't even take, this runs 60 times per second and it's
following our character. But we want that
smooth movement. We don't want it to follow the character just like before. Because we did this
already before. We want to follow the
character smoothly. And to follow
something smoothly, you can use a timeline. Because timeline you
have to think about it whenever you
want to move from 1 from point a to point
B in a smooth way. So for example, if you're
opening a double door, you're opening the
double doors smoothly, or even just a single door if you're opening
the single door. So moving the door from
point a to point B, That's smooth movements
you can do with timelines. For example, if you have
played Maple story, when you drop items or when you kill something and
they drop items, they drop it here, like the item flies into the air
and falls on the ground. That smooth movement
also is a timeline. So any smooth movement
from point a to point B, you can use a timeline. So let's search for timeline
and let's learn about it. So let's click here at timeline, and let's give it a name
and I'm going to call it layout, camera position. And double-click
on this timeline. And inside of this timeline, we can add a new track. And the thing we want to
add is simply a float. And I can show you why
we are adding a float. Float again, just like
the variable down here, afloat is just a numeric
value with decimal places. That is simply what it is. So for example, 25.2
and that is a float. So let me delete
this one down here. So let's add a float. And let's try it. Let's name it movement alpha. Okay, so let me
right-click now in the graph at two points. And I want to select this
first and at the time 0, so at 0 seconds, I wanted it to be 0, so 00. And the length of this
timeline up here, I want you to just be 1 second. For the second, at
the time 1 second, I want the value to be one. And you can click on
these two arrows to make it fit the screen here. So after 1 second, I just want it to be
the value of one. Okay, So I can show
you why we're doing this and what we
can use this for. I also want you
to click on this, use the last keyframe like this. So let's go back now. Now
we have this timeline and you can see the movement alpha, the load that we created is now being shown over
here and we can use it. And the thing we want to use
is something called a loop. So the loop here, it is. Linear interpolation. And it goes from
point a to point B. And it needs an Alpha. And you can see we created
this Alpha and what it means, it smoothly goes from
point a to point B. So it's going to
play this timeline. Whatever value you plug in
here from point a to point B, it's going to loop
from this point to this point smoothly
because it's going to go like this to the point B. So we can imagine this is
point a, this is point B. And after 1 second, it's going to go to point B. So smooth movement, this is the alpha here, this
is what it's doing. So we have to specify what is point a and
what is point B. Point a is wherever the
camera is right now. So let us get the camera here. And let me just pull
this down a bit and say gets actor location. So point a is wherever
the camera is right now. Actually we need a loop for the vector because you
can see this is a vector, this is a float, so that
is not fully correct. So let's write loop, and let's select this
one called vector, going to delete this one. So here, get the actual
location of the camera. So point a is wherever
the camera is right now, point B is wherever the
character is right now. We're trying to move the
camera for from where it is right now to wherever the
character is right now, which has good actors location. And this is going to happen
smoothly because we have this alpha going from point a to point B smoothly like this. Okay, so let me delete
all of this actually, let me just delete it. Let me delete all of this actually will just
make it from new. Now, I want to play this
from the start here. So not, not play here. I want to place from this
town start down here. And now let's connect it
up here in the update, we want to just, again, just like before, we want to
set the camera's location. So set actor location. The new location is this one. And we're going to
update this like here. So it's going to go
from point a to point B smoothly because we
have this timeline added. And through this update, it's going to update this location all the time
from point a to point B. So this is going
to update 60 times per second because we
are using an event tick. So let us click on Play now
and click on Tsarina here. You can see when I move now, it's moving smoothly just
like in Maple Story. Very cool effect. Okay, So now this is working
as it's supposed to. Awesome. So this was easy. And you can see, of
course we're getting errors because
this is working on take and we could have
prevented this by again, making this is valid node. But let's not do that. I actually want to
show you how we can not use the event sick because this is now
running 60 times per second and you can
optimize your code. I don't like it when I
see this in my project. So let's move this
a little bit down. So to prevent using tick, you can use something
called timers so it can control how much it's
going to run per second. Let's say set a timer by events. Okay, So what does that
mean now you have to specify how many times are you
going to run every second. For example, if you write one, it's only going to run
one time per second. If I write 0.5, it's going
to run two times per second because it's going to complete
this event in 0.5 seconds. If R is 0.2, is going to run
by five times per second. So essentially how you
calculate this is just writing one divided by 0 to the
number you've written here. And you can see that gives five, it means this code is running
five times per second. If you write 0.08, it's going to run 12.5
times per second. And as for the events, the event tickets
running around 0.1516. So this is the event tick. It's running at
0.0017, like this. So for example, you can optimize your code by running
it like this. So it's only ten
times per second instead of 60 times per second. So you can see you can optimize
the things using timers. You cannot, you can choose not to run at 60
times per second. So let's connect this here. Now, you need an
event to run it. So here what you can say, you can drag from this event and you have to make a custom event. And let's make this event, let's call it updates
layer camera position. So now we can connect our code. Let me delete this event tick. And let me connect this code over here
from the player starts. Now let me click on Compile, Save, and click on Play. And now actually let me
click on this looping, because if you don't
click on looping, this will play only one time. So let me click on looping. And if I click on
Play now, my camera, It's lagging because it's only following me five
times per second. So it's only updating our
position five times per second because we have
written 0.2 here. Now the number I came
up with is 0.03. This was like this, made it smooth and something above that will make it
actually runs slower. If I had to take this up here. And you can see this is now
running 33 times per second. So a lot better than running
at 60 times per second. So every second you are running it 30 times less than a tick. So try to balance
this and try to have a balance between how your game looks and
your optimization. So sometimes maybe you want
to make it 0.04 instead. And that makes a huge
difference because if I write 0.04 here, so if I take it up here, 0104, you can see it goes from
33 times per second, running the code, who
only 25 times per second. So it does make a huge
difference to go from 0320403 was the best
result a visually as well. So it doesn't like too much. So if I compile and save
and just play around here, you can see it runs nicely
just like the event tick. But now we're only running it 33 times per second and not
60 times per second. So a lot better than before.
44. Stopping the Camera Movement: Alright, so now let's see how we stop the camera movement. So when we play the game
and we go to the side here, I want to stop the
camera movements so we don't go over this edge here. So I want to to stop the
camera somewhere around here. So we never go to the edge. When the player walks. From now on here to this point, the camera is just
going to be stopped and the player is just
going to walk around. So this is how it
is in Maple Story. So let's see how we
stop the camera. And essentially I tried
different methods and I always try to find the best one because
I'm not satisfied, even though two of them
methods are working. I tried to find the best one
if it was me making my game. And what would be the
best solution for this? So the best one
for this is we can add something called
a collision box. One, the player or
the camera interests this collision box and
event should happen. So to add collision
box, we actually have change this tile
map into an actor. So let's do that
here to begin with. So let's go to the
Blueprints folder. We can just do it out
here if you want to, or we can make a folder. And we can always
just make a folder. Maybe sometime you
have more maps, it can stay more organized. So tile maps. Let's right-click here and let us make a new
blueprint class. And if you down here
search for Talmud. Again, you can get this one
called paper tile map actor. So let's select it now and
call it TM for tile map. And let me just call
it dragon road. This was the map,
what it was called. Now, our tile map is a blueprint actor instead of just being a tile map out here. So double-clicking it, waking
under render component. And let's just
select our tile map. And it's this one
called tile map, a dragon wrote here. So let's compile and save. Now for this tile map, we have to add two
collision boxes. So this is essentially
what we're trying to do. So let's add a new component. Let's search for collision. We have this one called
the collision box. And this collision,
collision box, you can see here we
have different events. So what should happen if you begin overlapping
this collision box? And we're going to
pause the camera. So let's cover the area
we want to pause it when. So let's go up here. And we have bucks
extent, extent here. And the value is I'm going
to put in a 650 in the x. So it's going to
extend out here. And 500 and DY. And I'm going to put
1 thousand and the z. And this is just some
numbers I test it out. You can just make them larger. Essentially. Let
me actually just make this 50 maybe in the, the moving, snapping and
just try to eyeball it. See if I'm going to make my camera speed
a little bit faster. So just going to
eyeball it and make it equal, just like this. So it's coming down here
and it's going up here. And doesn't really
matter because the only thing
we're interested in is this area because the
player has never done here, but I just like to be
structured like this. So essentially, we're
just trying to make this bugs large enough. And actually I think it needs
to be a lot less than that. Let's test it. So it's dx, that is the most interesting
one depending on where the player
is going to stand. So let's make 600
for now in the x. And let's copy paste this. I believe we can do that, so let's duplicate it here. And let's take this second
box and let me move it over to the other side of
the map. Just like that. So now it's on the other side. Okay, so now we have these
two collision boxes. We can always test
it out and see if we need to make them
smaller or larger. So let's compound Save. So now what we can do is let me actually
rename them first. Let me call this one
left collision box. So if I could spell
like this and the other one, right collision box. Okay, so for the left one, Let's click on it and
let's go down and click on component
begin overlap. So what should happen when I begin overlapping
this component? Let me delete these
standard default events. So overhear, what we usually
start with is for overlaps. So when we overlap
something here, we don't really have a run-on
server and run on clients. So what we usually do
is we use this one called switch has authority. Again, I told you
before the server has the authority of the game. The server can do anything. So authority means if I am the server and remote means if I am the client,
what should I do? Okay, so just making
sure that this, this overlapped component
is run on the server. And usually what
happens is whenever you have collision boxes over here, whenever you have
collision boxes, you usually want to switch has authority and then
run it on the server. Because again, you
prevent cheating. We're just making
sure that there is actually an
overlapped box here. Because if you just
run it on the client, Sometimes the client can
make achieved where they, they overlap with this box, even though this box actually
doesn't exist on this box. Actually overlapping. Maybe it's here,
they are standing here and they still
overlap it from there. Cheat. So we're just making sure we run
into on the server. So authority means
I am the server, so switch has authority. And here we can run the code. What we want to do is we want to pause the camera whenever the player has interacted
with this collision box. So we don't really have an
event called post camera. So let's do that in
the player base. And what we want to do is we
want to post this camera, and we haven't really
made it variable yet. So let's do that for the
time we want to pause this timer is
essentially so we don't want to run this update
position code here. So let's right-click
on this value. Promote your variable. And let me call it updates
player, camera, position. And I usually like
to say handle at the end because it's
a handle at a time. Her hand, update player,
camera position handle. The thing we're trying to do is let's make a new custom event. And instead of just
making it like that, let's actually do that in
our Blueprint Interfaces were almost expert in
Blueprint Interfaces now, so let's create it here
for the player base. Let's go to the player, actually not here and
the interfaces per base, Let's make one called. Let's make it pause, pause, layer, camera,
Compile and Save. So let's go back to the
player base and let's call it post their camera. And actually I needed the
events pause layer camera. So event Pause
player camera here. So we want to call this event. So if I go back here
to the tile map, now, we are running this
collision box event and we want to call the
player. The player. We can call this by using
this one other actor. Other actor means
whatever is overlapping, this collision box
overlapped components, the collision box
and the other actor is whatever is overlapping it. So we are walking inside of it. It is the player.
And just to make sure that it is the
player overlapping it, I usually do that just to make sure we don't make
a mistake here. I usually do. Actor has tagged. So actor has tagged, you can give the actor attack. So let's give it the tag player. And what that means is
here in the player base. If you go back here, and if you go, I believe it is in
the class defaults. So here if you search for tag, you can see we can add a
tag to this layer base. So let's add a tag and
let's call it player. So whatever pawn a collides
with this collision box. So now remember, when
we have the enemy, the enemy is also upon. The enemy here is also upon. So just to make sure it's not the enemy colliding with it. And it's only the player. We can say actor
has tagged Player. And if that is true. So if the actor has
the tag player, which we then set here
and the player base. So all the connected players
will have the tag player. We will run this code. So if it is true, we
will run this code. And what we want to
do is we want to run this pause layer camera. The other actor
here is our player. So let's define specifically
what player it is. And then again, we can say gets layer REF because this is
the one we made earlier. And then we can say
pause layer, camera. And when you select
this message because it's an interface function. Okay, so let's go back here and do something
with this event. And I am going to run
this on the clients because you don't really want
to run it on the server. Because remember this camera
is only client's specific. This camera only runs for
that specific player. All the other players don't really care about your camera, they are not going to see it. So I'm going to run it on
the client, so custom. And let's call it CL for
clients, pause layer, camera. Let's run this one. If I click here, let's run it on owning
clients like unreliable. Remember to do that. Now, what we want to do is we
want to get this variable. The thing we're trying to do is saying pause timer by handled. So when we walk into the
box, we want to pause. When we walk outside of the box, we want to unpause the camera
or to the timer again, so it updates again. So this is what
we're trying to do. So we actually need
a Boolean here, because here, when we overlap with the collision
box, we're going to pause. But however, if we click on
the box again and we go down, we have this one called
n-component end overlap. So when we go out
of the box again, I'm going to copy paste
this code here, like this. We don't really have
to do ripe that again. So other actors
connected to here. Now the actors are also
connected to here. So whenever we leave the box, we want to unpause. We don't really, I mean, you can go ahead and make a new event, but you can actually just
use this event to do both things by using a Boolean. So remember a Boolean as
if it's true or false. So let's make a Boolean here, clicking on this one. And the Boolean should
just say pause. And if it is paused, so let's drag from here
and click on B or branch. So if it is pause, if this is true, then we should pause. And if it is not true, we should unpause like this. So it can do both things
inside of the same event, just like that by
using a Boolean. And obviously we have to
run this event up here. And then we have to run
this Boolean through here. So we need to make a Boolean and our event or in our interface. And now this is bugging out for some reason.
I don't know why. Let's compile and save
and make it again. Sometimes that happens,
seal pause, like this. Okay, so let's do that
in the interface. Let's suppose player camera, Let's make a new inputs, a Boolean, and let's just
call it pause again, Compile and Save,
and let's go back. I can connect those together. And now if you go
back to the tile map, you can see we have a Boolean. So when we enter the overlap, we want to pause. So setting that to correct. And when you leave it, let's call this event again,
pause player camera. And we want to unpause. So leaving this false. So now it should work.
Whenever we leave, we are going to take this. We're going to check if it's the player who is
actually leaving this. We're going to set this
boolean true or false. And depending on
what the value is, it's going to run here. Depending on what the value is, it's going to pause or
onPause that timer. So let's actually before
I could click on Play, Let's check first
these collision boxes. So the left and the
right collision box, you can go down here and
check their collision here. So what are they colliding with? And just to make sure that
everything is correct, you can click here and you can see it overlaps with everything, even the pon, it overlaps with the ponds so we can
make overlap events. So that is I think yeah, that looks correct. That's fine. Now, we're finished
with the code, and now what we need to do, Let's go ahead and delete
this old Talmadge. And would that deleted? Let's place our new one. So let's go to the
tile map here. And let's place the new one. And let's again place it at 000. I'm going to make
excellence get closer here. Again, just like what
I told you before, let's move it by ten. I believe it was ten. And just to move, we have these five
layers, 123456 layers. And I'm going, we have this second layer on my
zeros, zeros, zeros. So you can see it here. It's on my zeros are 0,
but it's not, it's not. The first yellow layer is
the second yellow layer. Now at 0100 is it is that you can see we
have the collision boxes. So now let's click on play
and spawn as Tsarina. And let me walk to the
side and you can see it's actually stopping.
So it's working. Now if I go to the right, actually it's not
working and that is because I forgot to even add it. So let us go back to the
tile map here and let, let's actually add
the second one. I even forgot to
add it actually. So clicking on the right
one, they can overlap. Doing the same code as this one. You can copy, paste
it down here, connecting it here, connect
the other actor here, connect the other actor here. And click on the
right box again. And if you leave it, so
if you end the overlap, you are going to copy this one and then connect
it back in here. So other actor or director here, and it's going to unpause. Okay, So essentially,
essentially going to work now, hopefully. So let's test it out again. Moving to the right, it's going to stop the camera. You can see there
is a small bug. When I enter the box here. It's going to follow
my character for some reason before it stops. So it follows my character
and then it stops. I don't want it to do that. This is something
we can improve in the next lesson
because it's actually, it's pausing here,
but it's updated. It's finishing updating here
on get the actors location. So it's following
the actor a little bit more and when it finishes, it then stops here. So we're going to improve
that in the next lesson.
45. Improving the Camera Movement: In this lesson, we're going to improve the camera and movement. So what we talked about here
is when I go to the right, the cameras stops,
that is all good. The problem is it
follows the character, it sticks to the character
before it stops like this, and then it stops for
some weird reason. And this is where we are
trying to improve now. So here it's doing this logic because of the good
actor location. So even though we are
posing the timer, it is finishing this
update here is finishing, finishing the timeline
player camera position. And it's still getting
our player's location and trying to set the camera's
location or according to that. So the way we can fix
this is by making a temporary variable for
the good actor location so that the camera will not
get our actors location anymore when we are here at the start of
our collision box. So we're going to
tell the timer, this was the last
point that you should update to and you should not
follow me anymore over here. Okay, so the way we do this, let's make another timer. So let's, And by the way, let's actually make
the function first. So it looks more clear. So I'm going to make a function. So clicking on the plus up here and writing f for function. And then let's call this one, gets current player location. Now with this one, the most
simple thing we're going to do is basically just getting
the player's location. So get actual location. I'm getting this
actress location, and I'm just going to
store it in a variable. So very simple thing. So right-click, promote
to a variable and write current layer
location. Like this. This is, this is the only thing this function is going to do. So restoring the
get actor location in a temporary variable
that we will be using. Let's get back to
the Event Graph. And here let's create
our second timer. So let's say set a timer. And this time instead of
setting a timer by event, Let's set timer
by function name. So this, we can do this as well. So let's connect this and
you can see how this works. So now it's going
to ask you what is the function you want to run? And it is this one. I'm just clicking here,
copying the name. And you have to copy the
name exactly how it is, both with caps, lowercases, uppercases, and so on. So copy it exactly as it is. And if you ever change the name, you have to remember to
change it here as well, else it will not work. The time I'm going
to set here is 0.1, so it's going to update
ten times per second. And I'm also going
to set it to looping and right-click on this timer
promoted to a variable, and let's call it get's
parents layer location handle. Okay, so we have
this time around, right now, this time
around now running. So instead of good
actor location, let us use our current
player location. This is the one
we just actually, this one, current
player location. I was looking at. This one got confused. This is the spawn location. So it gets this one
current player location. I'm going to drag that
out and put it here. Okay? The trick is now is whenever we reach
this collision box here, whenever we reach it, we are going to stop this timer. So instead of stopping
this update here, we're going to stop this timer. So the trick is, and actually let me remove all of
these grid lines. It's annoying me a little bit. So go down here again in
rendering and clicking on here. So when I reach this
collision box line, it's going to stop the timer. And when I stop the timer
here in the player base, It's not going to update this, get current player
location anymore. It doesn't update anymore, it's going to get stuck
here at the start. So this is the trick
for doing this. So instead of stopping this
timer here in the post timer, Let's delete this
one and let's stop this one called get
current player location. Location is not going to update anymore whenever we reach here. And the camera going to
only also stop there. So this is the trick. Let's connect those here. Now. Compile and Save. Now, let me click on play and test and see if
everything is correct. So if I walk to the side, you can see it's not following anymore and stopping smoothly. And if I get out of here, It's also going to
follow smoothly. If I go to the right, it's stopping smoothly as well. So we're stopping the get
current location here, that our current location, we are stopping the
variable update over here, so it thinks the
player is still here. This is what's
essentially happening. That camera thinks that Player is still here because
we stop the timer. We start the timer again
when I leave this box. And again here, I stop the timer here for
updating the variables. So the camera actually
thinks we're still here. You can see it's still
clipping through so we have to adjust the
collision box size. So if I minimize this, go back to the tile maps
and go to the left box. And now let's adjust
it a little bit. We have to make it a
little bit larger. So in the x, Let's try 625, maybe six, Let's try 650
and see what happens. So six hundred and fifty, six hundred and
fifty, click on play. I when I walk here, It's
going to stop here. Okay, maybe we can add
a little bit more, but it's stopping the air
so there is no problem. Yeah, I think this is good. So now it's stopping
here at the edges. We're not seeing that
black edge anymore. So now that is fixed. And walking here. And the same is for this one. However, we can still
walk off the edge and this is what we are going
to fix in the next lesson. Alright, so before we end this, let's go back to
the player base. I need to structure this
a little bit better. So let me just push those. Remember to organize
your project always because it's going to
be a mess. Trust me. You have been working
for a couple of months and you don't do this, your project will look like a mess and you'll regret
it at that point. So just try to put
everything nicely together. I'm trying to grab
these variable. So putting things
nicely together, Double-click on this pin to make a reroute node like this. So now it looks
nice and organized. And this one, I mean, I think it's looking great. Now. You can also, we can even push this a
little bit further down. There is space for this one
to be all the way over here. And this one we can put just below here because
they belong together. I'm going to go over here. This is organized as well. And we can always put a comment. So over here, we can take
this and say updates, updates the camera movements
so that it follows a player. You can try to write
whatever you want. So I'm just trying to think
up something out of my head. You can even change the color of the
comment if you want to, change the size, if you want to. And for this one we are setting the players spawned location. So let me comment that as well. Let's say searching the layers, initial spawn location.
Just like that. So try to stay as
organized as possible. You can even common data out. And I think this looks perfect now let's
compile and save. Okay, So that was it for now. Let's move on to the next
lesson and add the boundaries.
46. Adding Map Boundaries: Let's now add the
boundaries for the map so the player can't
walk off the edge. This is very, very easy. This is a short video, probably here in detail,
map dragon road. Let's go back here. And just like before, let's add two more
collision boxes. So let's add a collision
box here to the left. And just like this one,
I'm going to make it, this is the x, the y and z, and the z, I'm going to
make it 1 thousand again. They're just copy paste
this and I'm going to drag it down again like this. Let me reduce the camera
speed a little bit. I think this is good, so let's try this. I'm going to rename this
and call it left bounce. And I'm going to duplicate
this and call it right bounds. And let's drag this
one over to the right. Like this, I believe. Okay, The thing we want to do here for those
in the collision, so if you click on
one of them and go down to collision here and click on this
small arrow here. I want you to click on this
one and click on custom here. And now here you
can change things for the pons so our
player is upon, and instead of overlapping, I want to block my phone. I don't want the point to go
beyond this collision box. The same thing over here. Clicking here, clicking costume and clicking on Bullock the. But Let's try to lay that. That is probably the
only edit we had to do. So let's go to the right and see if we are
getting blocked. We are at sea. We can't even go further. Awesome. This is working and you
have to test this to see if the balance
are large enough. They're going to the other side. And hopefully that
will work as well. And that works as well and it
stops perfectly like this. So this is how you add map boundaries where
we're basically just blocking the character from falling off the ledge
with a collision box.
47. Creating the Enemy Flipbooks: Now we're going to move
a little bit away from the player and we are going
to implement the enemy. So as the first thing I have given you here in the
course materials. So if you go to the
cost materials, to the enemies, I have provided
for you these textures. There are probably more
textures in your folder. And again, I'm
just putting those in as I move on with the course. But for now important, the pig idle and move and
the snail idle and move. So let's first go to
the Assets folder. And inside of here, Let's
right-click and make a new folder and
call it enemies. Inside of here,
I'm going to make a new folder called textures, so you can try to do it
yourself if you wish to. This is something that we have done a couple of times now. And you can click and drag those textures inside
of the textures folder. Select all of them, Right-click, Apply paper 2D texture settings. So we removed the blur. And let's start with
this snail here. So we have the idle, we can right-click and
we can create a sprite. I'm going to rename it to
S4 sprites and snail idle. And then let's do
that for the move. So right-click and let's extract this price
because we have multiple. So selecting grid up here and then writing integrate 90 by 90. So that is the cell
width and height. This is what I did in Photoshop. This is why I know how
many pixels it is. So let us click on extract now. And now I'm going
to click away from the folder and into it again. So they sort automatically
like this from 0 to seven. And now I want you
to rename this. I'm going to skip this part. Okay, so now that I
have rename them, I can select all of
them and right-click, create a flip book and
call it for FB snail move. I'm going to click on
this snail here and set the times are frames
per second to six. So that is the speed
it moves with. The same thing I'm going
to do with the idol here. Right-click, create a flip book, and let's call it F be snail, idle, and double-click it. The frames per second is just
one because it's one frame. And I'm going to take both
the snail here, this one, the Ireland, the
move and move them over to the enemies folder. So we have them out here
apart from all of this. So I'm going to do
that as well with the pig idle and pig move. And I'm going to skip this part. I made now the pig idle
and pig move flip books. So now I'm going to click on
the pig idol here and set the frames per second
to six, like this. And do the same
thing with the move. Set the frames per
second to six. Now let's save everything. Let's click on those two and drag them out to
the enemies folder. So now we have the flip
books for these two.
48. Setting Up the Enemy Pawns: To set up the enemy points. Let's go down to blueprints. And let's go over to our enemies
folder that we made way, way back in this course. So remember the enemy base. We made that by right-clicking
on the character base and we created a child
Blueprint class. So the base is a child
of character base here. So here for the enemy base, Let's now right-click and
create another child. And now we're going to
call this one VP snail. We can right-click on
the image base again, create a new child, and
let's call this one VP pick. Let's turn to this snail here. Let's double-click on it. And here for the snail, we click on the sprite. And here in the
source flip book, we select the snail idle. I'm going, I'm
going to search for idle and select this snail here. I'm going to do the
same thing for the pig. Clicking on the sprite. And here search for idle
and select the pig idle. So now we have the pig and
the snails setup here. Now we need to
reduce the size of this capsule and let's try to
do that and the enemy base, so it applies for both of them. So let's click on
the capsule up here. And here. Let's change it to we
have to do it here first. So 15 by 15 maybe. Let me just go back to the
snail and see how it looks. It looks, it looks fine for now. We can always adjust
it in the game. Can see it's a bit
small for the pig. So when doing it in the base, since it's the parent
class of these two, it will automatically
apply this. But if you need
individual changes, you can just click on
this pigs capsule. You don't have to follow the
parents. It changes here. You can always just do the individual change for
this pig specifically, maybe something
like this instead. Let's do 2323,
something like this. This one is not really
very important right now. We have to test it in game
and see what it looks like. So we have to test this
before we know it works. So the last thing I want
to do is right now, our enemies are colliding
with our players, so they are blocking
our players. I believe so. So let's try
to take a look at that. So BP enemy base, we can click on the capsule here and check the collisions. And right now it
blocks our character. So let's actually,
they don't only block our character
because enemies also upon, so they block each other. So let's go to here and the
collision present upon. Let's click on the Custom here. Let's now click.
So for the pons, let's just click on
overlap because maybe we need to do some overlapping
events later on. So let's just overlap the
pons so they don't block each other when they are
walking around and also don't block our character. And this was it for those now. And we probably have to
do more stuff later, but I think this was
it for this course. So if we put this at 0, you can see what it looks like. This is now the
enemy that we have. And of course there
is no movement right now we need to
add the movement. And this is something
that we will be working with in
the next lesson.
49. Navigation Mesh Bounds Volume: Okay, so now that we are working with artificial
intelligence, we have to tell where all of
these AI can move around, because right now the AI doesn't really know
where they can navigate. You haven't really told them where they are
allowed to move. And this is what we
will be doing here. And this is very
simple actually. Let's go up here and
they quickly add button. And the volumes
you have something called a navigation
mesh bounce volume. This is used for
artificial intelligence, for AI, and it tells
where they can move. So now it creates this box here. Let me just put
it as 0 in the y. So it's all over here
in our tile map. And then we need
to make it larger. So going down here in
the brush settings, let's make it larger and dx, so it fills the whole area. And we can move it down like
this, so it's underground. And if you click on P,
So P on your keyboard, you can see a green
line appears. And if you click P
Again, it's heights it. So it says setting up here. Whoops, setting up here called
navigation and the show. And the shortcut is P for it. And it will show you where the AI is allowed
to walk around. So right now, this is green. They are allowed to work here. They are not allowed to
pass this line here. And right now the AI
is not able to walk up here because we don't
have a green line. And this is because you have
to cover that area as well. So let us in the z, let's make it larger and I'm just going to
move it up like this. So it covers both. This area is now the green, and this area down here
is also green like this. So there are some small
settings we have to adjust just to make sure
everything is working out. Here in the re-cast
navigation mesh that it made when you added the navigation mesh
bounce volume. Over here in the draw
offset, I'd like to add 0. And this is basically
just where you want this drawing to be at. And I just liked
0 instead of ten. So not really
something important, but I just like it like this. The next thing is, the most important settings is here in the agent max slope. I'm just going to put that up. You can see what happens
if you put it down. It means they can't
go up that slope. This is what it means. And I'm just going to
put it up because I want them to be able
to walk on that slope. And this is the step height. I'm going to put
that up as well. And I don't think we need
to adjust more settings. We have to try our
navigation volume to make sure it works. So let me just
File and Save All. And before we finish
these edits here, you have to build the
navigation balance volume. So clicking on buildup here and clicking on build or
levels you have to remember to build before this
actually takes into action. Okay, so now the building is
finished so very quickly. And the building usually
takes a long time if you have lighting
in your scene. So if you are working
with a 3D game, but you can see
this took no time. We don't have any lighting. This is very fast to do. And now that we have our
navigation bounce volume done, we can now move on to working with the
movement of the eye. So we can later on test to see if this is
working properly.
50. AI Controller: Just like we created a
player controller here, now we can create a
controller for our AI. So let's go over to
the Enemy folder. And inside of here
you can right-click and create a new
Blueprint Class, C here, inside of here you can only see the player controller. So the controller is something more advanced and
not really advanced, but they haven't included
it here because it's, people don't usually work with AI and one day start
working with this engine. You can search for it
here if you click on all classes and you
search for AI controller. And you can see this one
called AI controller. Let's select it here. And I'm going to
give it a prefix of AIC for AI controller. And I'm just going to call
it for an Emmy like this. So let's save everything. And now what I'm
going to do is I'm going to click on
this enemy base. And here in the base class
defaults to the right. You can see here
how to possess AI. I'm just going to switch to
place in world or spawned. So maybe you spawn the enemies and the AI will be possessed. And the AI controller class, we have to change this to the AI controller
class we just made. So it's not going to
use the default one. We want to use our own. And this was the only
thing that we had to do. So now we have our
AI controller and you can click on it and
see what it looks like. And just like our
player controller doesn't really contain much. The only difference
is it contains an action component and a
path following components, but nothing really we are going to worry about
right now or use. So let's close it and move
on to the next lesson.
51. Blackboard & Behavior Tree: Let's now create a blackboard
and a behavior tree. So if you right-click over
here in the enemies folder and you go to artificial
intelligence, you can see we have
something called a blackboard and a behavior tree. So let's click Create the Blackboard first,
creating it here, calling it dB for Blackboard, and then writing enemy. And if you double-click
on this blackboard, you can see it doesn't
really contain much. We can create a new key
which has just a variable. And that variable, you can see
some information about it. We can switch between the behavior tree and the
blackboard over here. So not really much
going on and we don't really need to
use this right now. So let's create a behavior tree. You can see we can't
click on it and this is because we don't
have one right now. So let's close it down. Let's right-click again. Go to artificial intelligence
and create a behavior tree. And let's call this one BT
enemy or behavior tree enemy. Now, you can double-click
on this behavior tree. And inside of this behavior tree is where you build up the AI, like how the AI is behaving, how it's moving around. So to start off with here
in the behavior tree, you can drag out and let go. Then as the first thing you
do in the behavior tree, you have to choose a selector. Something very important to know inside of the behavior tree is the code is executed
from left to right. And I'll show you how
I need to make some of the nodes here so you
can see what I mean. So starting off with the root, you can drag out and
making selector. And the next thing is
to make a sequence. We have a selector, we have a sequence, and now we are going
to add our code. So you can see here, if
I add something random, I'm just going to show you, I'm just going to add the same
thing over and over again. You can see, you
can see the notes. They have numbers. So we
have number 0, number one, and it's going to execute
the code from left to right. So here we're
starting at the left, we have number two and then
number three and number four. If I move this, this way, you can see it switches
to number three, it switches to number two. So the code is always going
to fire from left to right. Very, very important
thing to remember. Okay, So what we want to do with this behavior tree
is we want the AI, so our pig or a snail here. And the level we wanted to find a random location on
this navigation mesh. Once it finds a random location, it's going to move
to that location. So just like in Maple Story, where the enemy is just
moving around in the level. It finds a random point
on the navigation mesh, and then it moves
to that location. Maybe it waits for two seconds. It's like in the idle mode and then it moves to another point. So we have to start off with finding a random point
at our location. And then after we find
the random point, we have to move to that point. So before that, we have
to find a random point. And this is what we will be
doing in the next lesson.
52. Finding a Random Point in Movable Area: But let's now make
our enemy find a random point on this movable area on
this navigation mesh. So let's go back to
the behavior tree. And inside of here we don't really have something like this, so we have to create it our own. And you can do this by clicking
on the new task up here. So clicking on new task, then you have to save that
task and I'm going to call it, I'm going to remove
this, so BTT. And then let's remove all
of this and let's just call it bind random location. Okay? And you can see
the task it saves here. So you have all of the tasks. We can even make a new
folder or all of your tasks. So here inside of the task, you always start with
something called receive, receive, execute Ai. This is the event you
always start with, and you always finish
with finished execute. So you have these two always in a task here in the
behavior tree. And then all of the code
goes in-between these two. So the main function we are trying to use
inside of here is called get random
reachable point in radius, you have some other ones. So get random point
and navigable radius. I want to get one
in reachable point. So maybe you have some
navigation up here. So if the enemy is down here, you have some navigation up here that the enemy cannot reach. And I don't really
want to bug it out. I'm going to use this one called Get Random reachable
point in radius. So I'm going to click on
that and it's going to look at our navigation mesh. So what is the origin it
should start searching from? And I just want to
search from wherever the snail is or the bigger. So let's put a snail
here so you can visualize it a little bit more. So we have the snail inside of our level here walking around. So where do you want to start searching? Here at the origin? I just large and
trustworthy snail is here. So here in the controlled pawn, This is the enemy
that's walking around. And remember, we made before, get player ref and
get controller ref. I don't believe we have
one for the enemy, so let's go ahead and make an, a Blueprint Interface
because we actually need a reference of
this enemy base. Because we need to
use it here to get the actors location and
inserted as the origin. So here we need a reference to the Blueprint Interface
or the enemy base, where we say gets
enemy reference. Let's go back here and let's make a new
Blueprint Interface. So this is the same method as what we've been doing so far. So right-click, go to blueprints and select
Blueprint Interface. Let's call it E ends enemy base. Let's go in here. And let's
call this one gets NME. So get the enemies
for reference. Now, in the output, what are you trying to refer to? You are trying to refer
to BP and interface. So, so like that. And you can call it for enemy. Okay, now remember to go to, to the enemy base and inside of here go to Class Settings and then add that interface you just made called end enemy base, Compile and Save, and it
will appear down here. Now who is the enemy? The enemy is just self wish, which means whatever
blueprint I am in. So the enemy is just
this enemy base. Okay, now we can go back to the task and from
the control pond, we can now say gets
enemy reference. So if it is the snail
walking around, it knows now that
it is the snail. This is the enemy reference
that we have here. I'm just going to right-click on that enemy and
promotes a variable. I'm just going to call
this variable enemy pawn. Like this, just to
say more clean. And so this origin
now we can take this enemy **** and
we can say gets, get actor location like this. So the origin is
wherever this enemy is. So now the origin
is from this enemy. And it's going to search for
a point around that enemy. This is the radius. Now we have to specify how large is the radius it
needs to search in. Now, this radius, we could
just insert a number and say 50 and are 100 units. But maybe you have
different maps. So imagine you don't only
have this map in your game, but you have several maps. Some maps are
larger than others. Sometimes you need to search
for points further away. So we don't really
want to have like a solid number written
here in the radius. Usually what I like
to do for my games, I like to get the size
of this navigable area. And with this size, this size differs from map to
map because you can imagine this navigation
mesh bounce volume is larger or smaller
in other maps. So it's just going
to get that size, whichever map you are in, and it's going to search
within that area. So the way you do this is, let's move this a
little bit away. The way you do this is again, get actor of class and you
use get actor of class. Again, we have used it before, but if I need to
explain it again, you have to use this, get an extra of class. You can get an actor which is already spawned
inside of the level. So the navigation
mesh bounds volume is already inside of
our level right now. So we can just search
for a nav mesh. If I can see here nav
mesh bounce volume. So now we have the
navigation balanced volume. Now we can drag from this
and say get actor bounce. Okay? Now we get the actor bounds. And what we can do with this
is we now need the radius, but here the radius, you can see the bugs extent. You can actually print it out to the screen and see
what it looks like. But we need to run the behavior
tree before we do this, I'm going to show
you this later, but for now, let's
try to finish this. What we are trying to do is
finding the radius here, but you can see the bugs
extent is a vector. I'm going to break this vector so I can see the x, y, and z. The only thing we are
interested in is the x. Because you see
here the red one, the red pivot point, if you remember from
before, the red is the x. If you hover the mouse here, there were only actually
interested in the area on the x. We don't really care about
the Z or the y here. We're trying to
find a point within that size here.
But let's go back. The only thing we're
interested in is the X. So let's, I'm actually
going to divide this box extent by two
because I tested it a lot. And I think this size, like searching the
whole navigable area, is just the large size. And I like my pawns to just
search within a smaller area. I don't like this snail to
search in the whole area. Sometimes it moves from
this point of the map, then it moves all the way to the other side of my
I don't like that. I like the snails
sometimes it moves from here to here only. So that is maybe the
maximum movement. So I like to divide
this box extends before I actually do this
dose divided by two. So it's a lot smaller in area. You can see here when
you write divide. So if I just drag again, maybe I did it too fast. You can write the divide
button and you can click here. You can see now it's a vector, but I don't really need that. I just need to divide it by two. So let's right-click
on this pin. And you can convert
this pin to an integer. Now it's just a number, so we can divide it by two. I can connect it back
here to the break vector. Here. Now the x is divided by two. And now I can plug that into
the radius, oops, like this. And let's bring that down,
something like this. So now we have this
random location. Again, the only thing we're
interested in is the x value. We want the Z value to be the same because I still want
my snail to be down here. And the y value should
be the same as well because I still want
my snail to be here. I'm only interested in
moving it to the x-axis. So the thing I'm going
to do is I'm going to go back here and break this vector. So now we have the x, y, and z. So x is whatever point
it's found in the x. And let me right-click
and say make vector. Now we can reconstruct this vector so the x
should stay the same. This is the random
point is found. But I want my y and
z to stay the same. Actually, I'm just going
to copy paste this here. And I'm just going to
get my actress location again and break this
vector x, y, and z. So I can use those values. I'm just going to
plug the y and the z. The y and the z stays
the same as the, as the poem that we
have the enemy ****. But it is only the exits going to find a
random location in, and this is the only thing
that's going to change. So the Y and the Z is always
going to stay the same. All right, so this is the final result and
we need to plug this in somewhere and use it in
our behavior tree over here. This is where the
Blackboard comes in. So let's go back
to the Blackboard. Actually, I think we can turn it on here and
the behavior tree, so you can either find the blackboard inside
of here and open it. But just like before, we can
also do that by going to their behavior tree and clicking on the
blackboard up here. So let's make a new key, and let's make a vector. This is what we need. And let's call this
vector the x location. So we are only interested
in the X location. And just making sure
this is a vector and we don't really need
to change anything here. So let's save it here. And let's go back to the task. And then here we're going
to make a new variable. This variable, I'm
just going to call it vector because it's a vector. And the thing you
need to do here is searched for Blackboard. And select this one called
Blackboard key selector. We can compile and save. And then now you can take
this vector out here. This is the, the
blackboard vector. And you can say sets Blackboard, blackboard value as vector. You have to select it now. And what it's going to
do now it's going to add that this value
here into this, this vector that
you have created. So let us now add it here. So now this is the result, and let's connect it. So it's going to go
from here all the way over here, like this. So now it's connected. And let us finish, execute. And remember always to click
on this success button. So very important. Compile and Save. Now let's see what happens. Let's now go back to the
enemy behavior tree. So clicking on the
behavior tree. Now what we can do
is we can go down here and search for our task. So just writing for BTT
and we can find this one, PTT find random location. And now we have to tell it, it's this x location we need
to use in our Blackboard. But you can see here,
I can't really, if I click on this
task, I can't really, I don't have an
option to do that. And this is because in the task, you have to click on this
vector and you have to click on this one called
instance editable. Remember to do that
or else you will not be able to see it. So go back to the enemy. And you can see
now we can select a vector and the vector we want to use is this x location. So now it's going to
find a random location and it's this vectors. So now we have the result. It's going to move
to that location. And at the end what I want
to do is just say wait. So sometimes when
it finds a point, it moves to that point. I wanted to wait a little
bit before it moves again. Here in the wait time, I'm just going to write 0. I found that to be the
best way to do this. So the wait time is 0, but the variation
is three seconds. So sometimes they
wait 0 seconds, sometimes they wait
three seconds, sometimes they were two seconds. So sometimes they can wait 0 seconds so they don't
wait, they just move again. There are random variations, is three seconds or sometimes
they wait three seconds. But now it's going to
find a random location. It's going to move
to that location. And then it's going to wait
for up to three seconds and then go again and
repeat this process. Okay, so to make the
whole thing work, we have to go back to
the player controller. And inside of here,
Let's begin play. You have to say
run behavior tree. Else your behavior tree
is not going to work. And then you have to select
which behavior tree it is this one going to compound Save. And now let's put an
enemy into the level and see if it works or if there
is something that I forgot. So just strike an
enemy into the level. Let us click on Play now,
select the character. And right now what
I look at my enemy, I can see my enemy
is not moving. So there is something
wrong and I need to find what I did wrong
inside of this process. Alright, so the way I go
about this to debug things. So you can see here
when I play again here, the AI is not really
moving. Something is wrong. And let's actually
put it up here. Maybe it's inside of the ground and it's still not moving. So the first thing I do
dislike when I debug, sometimes the navigation
mesh bounce volume bugs out, so it's not going to work. Sometimes I actually deleted and I tried to do this again. So I don't know why in Unreal Engine sometimes
it works out. Maybe this is not the problem, but we can start here. And so in the volumes, Let's add the navigation
mesh bounds volume again, put it to 0. And in the box extent, I'm going to increase it
again, something like that. And then increase the, the z. Okay, now I have it again
and in the re-cast here, I'm going to set the
again draw offset to 0. And we set the agent height to actually the agent max loop
289 and the max height 289. Then I'm going to save and
build everything again. Okay, now we can try to click on Play and it is still not moving. So the next thing, what
I'm trying to look at is, is it finding a point in my, in my behavior tree here
on my task actually. So to begin with, what I
usually do is I'm just going to print out
to the screen. So print string is the best thing you
can do for debugging. Because when it prints a
string to your screen, you know that, that
this code is firing. This code is working.
So if I click on Play now and you can
see it says Hello. So the task is
actually saying hello. So trying to run the code, so nothing is wrong here. So let's move on with the code. Over here. Let's try to see if
it finds this point. So let's print out
to the screen again, connected from here now. Because now we know, now we know this part of
the code is working, so it's launching this task. So over here, let's now
print out this value. So it's going to print
this vector and see if we actually found
something here. And you can see in the X, It's actually finding
different locations, but it's actually working. So it's finding those
locations correctly. So it's fine, it's
those locations and I know my AI controllers working as well because this
is the one that's running the behavior
tree we made. And it might be a moving
and then waiting instantly. So this is also a, something that can happen. So here in the behavior tree, maybe it is moving and then it is waiting instantly
for some reason. So let me just connect this
and just connect these two. Let me Save and
then click on play. And if I look at
my behavior tree, you see here I'm
playing the game now. And I think this is what's
happening ultimately because I don't really see
anything wrong in our code. It's finding a random point. It's trying to move
to that point. But you can see here our
behavior tree is going insane. It's actually moving
to that location, finding a new location, moving, finding, moving, moving,
finding moving, finding. It keeps doing that. It
finds a new location. Even though the
location is far away, it kind of moves small step before it
starts reaching for, searching for a new location. Again, I think the
Blackboard key here is set to self actor that this
might be the bug here. So let's go back here, exit play mode, and let's
click this move to. So I kind of forgot to
change this here location. So let's connect this back here. Let's click on Play. Now. You can see, now it's
actually working. So the snail is moving around. It has moved to a location. It's waiting for up
to three seconds and then it's moving again. So this was the bug. And I don't want to delete this from the video
because I want to show you how you
debug things because you are going to
run into problems. And when you do try to use the print string to print
a string to the screen. And when it prints a string, you know that that code
is working because it's firing the decode for you, it's firing the event. You can also try to find
out the location to see, is it finding a random
location or not? Then the last thing, obviously was the
behavior tree is solid. It went insane. And this is because
it was moving to that cell factor
in the Blackboard, which didn't make sense. It was supposed to move
to that x location. So now it's working here. But you can see, of course our animation is not
working because we haven't added any animation for the snail or for
any of the enemies. So let's do that in
the next lesson.
53. Enemy Movement State: Alright, so what
we need to do in this lesson is we need to change the movement state for this enemy so that it
changes the flip book. Whenever it's moving, it
has the movement flip book, and whenever it's idle, it has the idle flip book. So actually the same process
that we did with our player when we're moving and
stopping. So same thing. Let's go back to
the enemy base now. And inside of here, Let's delete all of
these default events. And the thing we want to
do ultimately is create a new variable and set
it to is moving. So actually I'm going to
write a B in front of it. For Boolean is moving
this boolean here. If I drag it out, we want
to set it to rep notify. So remember, all
the visual changes needs to be interrupt notify and changing the flip book is a visual change so all
the clients can see it. And this is what we want to do. So here in the unwrap function, remember it creates
an on-ramp function when you do something
to wrap notify. And inside of here,
Let's just take it. So not right now,
I'm just working backwards so you can
see what I mean. So this is the end result, is moving is set to true. So creating a branch. If this is set to true, we are going to take this
sprite and set flip book. So now we're going to
set this flip book two. So if it is moving, we are going to
not idle actually. We're going to move here. If it is moving,
we're going to move. And if it is idling, if it's not moving, we are going to idle like this. But now you can see
we have to select, we have to select
the pig as well. So we need to do
this dynamically. So if you have two enemies, this is only for one enemy, it's only working for the snail. We also need it for the pig. And remember, like we
did with the player, you need to make a structure. Let's go to the
structures folder. Let's right-click and
make a new structure. So right-click and let's
find it under blueprints and structure and call
it s t animal info. Inside of here, we're just
going to create two things. We're going to create
the idle animation, and we're going to create
the run animation. We can just call it
the move animation. We just call it move,
move animation. And this is obviously a
paper flip book like this. And this is also a paper book. Okay, so we have these two, and you can guess it maybe
later on we can add health to the enemies so we
can actually make a new variable later
on and call it health. So all the information about the enemy is going to be
stored inside of here. So how much health they have, how much damage they do, and how much gold they
give you and so on. So all the animal information
will be down here later on. So let's now go back
to the enemy base. And now we can add the
structure and the variables. And we can call it animal info. We can select it here and
we call it st animal info. And this is the structure. Now we have this structure, we can drag it out
and just like before, breakout from it and click on break to see all
of the variables. Then you can add the idle. You can see we have the ADL
up here and they move up here going to be a mess because it's going to
be crossed like this. I like to stay clean
in my project. So what I'm going to do,
let's try to have the idle up here so we can reverse
this by saying nuts. So not b means NOT Boolean. So if this means now is if
the enemy is not moving, so if this is moving is false, so if it is not moving, then we are idling. So let me delete those flip
book and connected here. So what we need to do here, so if you are not moving, if that is true, you are idling. So we are connecting
idle up here. And I'm going to copy
paste this down here, her neck, the sprites. There's connect false down here and connect
them move down here. So when we are not
moving, we are idling. When we are moving, then we are in the
move animation. And to get this working,
you have to go. So now you have
these two variables and you have to set them. And remember when you add a
variable to the parent class, so we are inside
of the enemy base. All of the Child
Blueprint Classes will inherit that information. So Pig and snail are
children of enemy base. So going to the pig and opening the full
blueprint editor here in the class defaults. You can see the animal
info variable is here because you added it
into the parent class. So here you can select the
idle animation for the pig. So search for idle, take that and for the moon, and select that. Move animation. The same thing here
for the snail. So open it up, open the full blueprint editor
class defaults animal info, search for idle,
and add the snails, search for move, and add the
move for the snail as well. Okay, So we have that now, and let's go back to the base. So this is the final
result that we will be aiming towards. And let me just move this closer like this so
it's more organized. Let's go back to
the Event Graph. So now we have this
variable we need to set, and we always set these retinue to fight
through a server. Let's make a custom
value call it server movement
states like this, and we will run it through the server and is reliable
and we can now connect this. Now remember these
server variables, we have to run us through
a normal variable as well. And it is called movement stage. So let's actually create one directly inside of a
Blueprint Interface. Because now we have one. Let's go to interfaces
or the enemy base. And let's call it here. Movement states. Let's compile. And here in the enemy base we made a variable
called is moving, so we need a Boolean. So let's create a Boolean and the input called D is moving. Let's compile and save, and let's go back
to the enemy base. So now we can call it
saying movement states. And we can call that events. And we can now run that
server event from here. Okay, So now we're
working backwards. So we start from this
event movement state. It's going to go
through the server and then set this disrupt
notify function. And depending on if
it is true or not, it's going to set
that flip book. So we need to run
this event somewhere. And I believe the
best, or I find, I found that the best way to do this running that movement state is here in the behavior tree in the end defined random location. So when it's found
a random location, let's go ahead and
say is moving. So we're going to set the
movements state to be true. And then it's going to go ahead and move to that location. So here we already have
a reference to our pawn. So this is very easy. We can take this and say Set
movement state and select that message because it's a Blueprint Interface.
Just like this. And actually this is a player
base that is the wrong one. Let's go back and see
what do we call it. Actually, I just called
it a movement state. Let me, let me call it
set movement state. I think that is a lot better. So calling this one as well, set movements stays
like this. Compile. Let's go back to that and
say Set movements, States. And here it's in the enemy base, not in the player base. So anyways, message
selected here. Now we've said the movement
states to be true. So now it's moving. But we have to set it false at some point because
now if you click on Play and you can try it out,
you can see it's moving now. And let me just
reduce the movement speed a little bit because
now it's moving so fast. So for the snail, Let's go
to the Character Movement. And I'm going to set
the movement to 45. I just did it a lot and
I think Forty-five was a good number for this
metal story snail. So you can see it's moving,
but when it is idling, it will never stop like in
the idle animation flip book. And this is because
we have never set the boolean to be false. So it doesn't really
know when to play that idle animation flip book could see when it
idles, it still moves. So we have to set, if I go back to the interface, we have to set this to
false at some point. Let's do that over here
in the behavior tree, we can do that as well. So it moves to that location
and before it weights, Let's go ahead and put
that boolean to be false. So let's make a new task here and just click on
this one down here. So we make a new task. And this one, I am going to
call sets movement Boolean, set movement ball, which
means that movement Boolean, this is the only
thing that is doing. Again, just like what
I told you before, we have to start with
a receive execute Ai. And we have to finish
within finish executes. And we have to put it down
success when it's finished. And the only thing we're
doing is taking this saying gets enemy, gets
enemy reference. So we're getting that enemy reference here and in the base. And from the interface
we can just drag and say Set movements states
here and the enemy base. And the only thing we're
doing is just setting this boolean to be false because now we're
not moving anymore. We have finished moving. So let's go back to
the behavior tree. And here we can drag and say BTT and select that one
set movement boolean. Okay, so the thing is doing now, it's finding a random location. It's moving to that location. And when it moves and
finishes that movement, it's going to set
the Boolean true, false, so we're not
moving anymore. Then it's going to wait here. So now let's click
on the platelet. Actually just add a
few more enemies just so I don't have to wait
on that snail to stop. So clicking here, and
you can see it's now, this one is in the idle
and it works fine. Now it's in the idle one. And then when it moves, it's in the movement flip book. So now it works perfectly. So what we can do now is we can just add a
few more enemies. So holding Alt and
dragging will duplicate. And you can just duplicate a
few enemies on this level. How many you want. I'm not going to place actually,
let's place them here. Why, why not? Let's go to the enemy and I'm going to place
the pig up here. So harder enemies
are on top here. So let's put this at 0. And actually, instead of 0, we have to put a one so it
doesn't lie to the tiles. But let's add, for example, for pigs up here. And yeah, I think, I
think that's fine. So let's say let's
click on Play to see if everything is working as opposed to the pigs are too quick. So let's go back to the pics. And further pigs I'm
calling I'm going to set it to 90 year. I think the 90 I tested
that out as well. But the pigs is a good number. And you can see they
are behind it tiles. So actually we have to move
them a little bit forward. The fastest way to do this is select them here
in the outliner. So these are the pigs. These are the snails. Hold Shift, select the last one, so we have all of them and
set it to one here in the Y. And click on the player. The player instead
of one, I want them to be in front of the enemies. So clicking on two on
this player spawn, so we are in front
of all enemies. And now let's click on Play. And this is what it looks like. So we have the pigs
running up there. The idling is working fine and the movement is
working fine as well. You can see these snails
are a bit on the top. What you can do is
click on the snail. The thing is, when you
increase this capsule, it's going to push that snail upwards so it doesn't look
like it's on the ground. So for example, for the snail, if you're just trying to
11 down here and up here, click on compound save. And you can see now
it's on the grass, now it's not flying up. The problem is now and we're going to fix it in
the next lesson, you can see it's still moving, like it's, it's
actually in the idle, but it's moving like this. They are bugging out. This is because the idle
animation is pumped out. So I spent a couple of time
to see why it was doing this. And I still have no idea
why it's doing this. But I think my theory is it's
trying to find a point in the navigation and then it is bugging out because it's
actually still moving. It's not idling, but it
can't move to that area. And this is due to
this capsule here. It's doing some weird collision and it's stocking the enemy. So let's move on to the next
lesson and fix these bugs.
54. Fixing Movement Bug & Clipping Issue: Okay, so to fix that last
buck from the last video, we have to go to, let's start with this snail. So let's try to
increase this capsule. How far to 2828 upon that was the best number to
do it for these snails. And let us move this snail minus 18 to see if it
is on the ground. So moving it down to minus
18 is moving on the ground. And just to check and see if it is bugging here at the Hill, they seem to be
moving smoothly now. Alright, so that looks,
it looks fine now. So if it books out, you can increase this capsule
here and it can move down this snail to make it walk
on the grass if you don't, it's hovering on the grass. And for the pigs, what I did is I made that capsule 30 by 30, and then I move
that pig by minus eight so that one
is larger as well. This one is large now, so I found this was the best solution to fix
that bugging problem. And now we can see everything is moving correctly and we
don't have a problem. Again, if you have
the problem where the enemy is moving and still
idling in the same place. You can try to the capsule size and then move down the enemy. So now we have done
all of this progress. Great job so far.
You have actually progressed very far
inside of this course. And the next thing
we might do is damage or maybe we
need a ladder up here. So I'll see you what I'll
do for the next section. And so far, everything
is looking good. If you want to add more
enemies, you can do so. If you want to do
it yourself, again, you can't release this on
Steam or anywhere else. This is just for
educational purposes. But if you just
wanted to practice, I use this website called maples that I am a maple simulator. So you can just click down here and create a new character. Or you can create a
new monster here. A mob can see here
you can create maps. You can select what type of mob you want to
create, maybe a slime, something else so you
can create more maps, you can then, after you do that, I usually flip them horizontally
because they have to be in this direction
before it can work. Sometimes you need
Photoshop to rotate them. Then you can just
download the spreadsheet. And then you can use that
slime spreadsheet and you can import them here
inside of our projects. So if I go back here
and our project, you can just import those
textures again into the assets, enemies, and you can do
the whole process again, and you can add more enemies. So up to you what you
want to do with the game, you can try to play around
and have fun with this. So let's say, Well, and let's
move on to the next lesson.
55. Adding the Rope Sprite: Hello everyone and welcome back. In this section we are going to work with decline
being mechanic. So great job for
making it this far. You have been doing
a lot of progress. And you can see we
have been doing a lot. And in this section for
the client being mechanic, we have a lot to learn. So let's go ahead and start
adding the rope sprite. In the course material. I have included for
you, the ropes bright. If you go to the
Course Materials and then you go to the environment. And inside of here you have
this texture called rope. So let's go back to
our constant folder. And inside of the assets, and we already have an
environment folder. So inside of here,
inside of textures, I'm going to upload my rope, so drag it into the
textures folder. Okay, so inside of here,
Let's right-click. Go to Sprite actions and
apply paper to the settings. Let's try to click on it
and then create a sprite. So nothing new so far. This is what we've
been doing so far. I'm going to call it as a rope. Okay, so now we have
this rope sprite. So, so far we have been
making flip books. And as you can see here, the rope is obviously
not a flip book, it's not an animated rope. So let's drag it here
to the environment. And now we are working
with a sprite. I believe this is
the first sprite we're going to add
into our environment. And before we add the sprite, like you can drag the sprite and add it to the
environment like this and maybe set
the y to 0 or one. And you could just
place the rope like this and everything is
good and the rope is added. But the problem with this is
we are going to add code to the rope because our player
is going to interact with it. So let's delete it here. And I'm going to make it
into a blueprint instead. So whenever you
have something that the player is interacting with, you should automatically think of making it into a blueprint. So let's go to the
blueprints and this will allow us to create some
code for the rope. So let me right-click
here and make a new folder and
call it climbing. Over here. Let's right-click
and go to blueprints. And then actually just click
up here, Blueprint Class. Clicking here again, search
for paper down here. And we want to make a sprite. So before we created flip
books and tile maps, but this time we also
created characters. This time we are going
to create a sprite. For this one, I'm going to
call it lime being base. So this is the base blueprint
for client being just like what we had for
the character base and the player base. We now have a client being
based because it's fine. You have a rope right now, but in the future, what if
you wanted to have a ladder? What if you wanted to have a
pipe like you have it like an industry industry map, then you'll maybe have pipes that you use as
letters or ropes. So we have a clamping
base and then we can add a lot of climbing objects. So ladders, ropes, pipes, whatever you want to
add to your game. So let us now right-click this climbing base and create
a Child Blueprint class. And from this we are going
to create the BP rope. Okay, let's file and
save everything so far. So for the climbing rope or further rope here,
Let's double-click. And inside of here we have the render object or
remember render components. And let us select our row here. So searching for rope
and selecting our rope. Alright, so now
this one is added. And what we can do here is we can now drag our blueprints, dragged into the level. Let us set the location to 0. I'm going to set it to
one because remember the base tiles are at 0 and I don't want to
bug everything else. So I'm going to set this one to one and let us move it here. I don't know, maybe
something like this. And I'm going to move
this enemy so I can actually see where
I'm placing this. So something like this
and a bit down so that, that part is hanging
on the tiles up here. Now you can see that
the rope is actually interfering with our
navigation mesh, so our enemies cannot
move here anymore. So let us click on
the climbing base. We don't want that. So
click on the climbing base. Let's remove it from all
the client being objects. Inside of here clicking
on the render components. Let us now, let's just hear in the collision or no
collision at all. And the player can not
step on top of it. And it will not generate
any overlap events. The overlap events
we will do later on, we are going to add
collision boxes. So it's not really the
render component itself. It's the collision boxes that we'll be doing,
the overlaps. So you can see now it's
not overlapping with anything and
everything is fixed.
56. Rope Overlap Event: Let us now work with the
rope overlap events. So for the rope overlap events, we need a collision box. So let's go to the
climbing base and add one. And the reason again, why we are adding it to the Colombian base
and not the rope is because whenever we create later on a lot of
climbing objects, all of those objects will have this collision bugs because all of these clumping
objects will be children of this climbing base. So whatever we add
here will apply to all the children here in
the render component. Let's just a collision box. So search for collision and add this one called
a box collision. And let me just
call it collision box and Compile and Save. And we don't really
need to do more here. So let us minimize this and let me go
back to the rope now. And let's open the
full blueprint editor. Go to the viewport. And inside of here
we have to adjust this one so it's filling this rope here in the box extent I'm going
to make it right now 55, we actually have to
test this in game. So, but for now we can
just set it to 55. Or maybe if you want
to make it larger, you can, you can even do 1010. And let's actually do that. Let's, let's try to do
ten instead of five. Negative five is too
small for this number, maybe something like
50 again, or 6065. Again, we have to
test this in games. I'm not sure what it will
look like right now. So something like
this where we have placed it like 40 in the z and 101065 here for
the collision box. So I'm going to go back to the climbing base and
for the collision box, going down to the collision, the only thing I'm
going to change it, this one can
characters step up on, I'm going to click and no, I think everything
is fine for now, so let's not touch
anything here. Now to make the overlap events, you can click on
the collision box again just like before. Go down to the
bottom and click on this one on component,
begin overlap. So what should
happen when we begin overlapping the box here, I'm going to delete
the default events. So what should
happen if we begin overlapping this collision box? And you can see the
collision box is this one, this square here that we added. So what should the lock when the player is coming here and jumping on that collision
box, what should happen? First off, we need
to check if it is the player that is interacting
with our collision box. And before that I'm
actually going to say switch has authority. Because again, for collisions
we add which has authority to make sure that it is the server who handles
all of this information. We don't want the player
to cheat because again, the authority is the server, the remote is the client. And if the client
does all of this, so if we remove this
and we just code here, the client has a large
chance of cheating and we don't really want to have the clients
cheating in our game. So switch has authority, the server has the
authority over anything. And the server will check if the clients are
allowed to do this. Switch has authority and we then have to check if
this is the players. So the other actor,
which is the player, Let's drag here and
say actor has tagged. And if the actor
has the tag player, and let's make a branch here. Authority. So like this. So it goes through the server and it checks if
the actor has the tag player, which means is the player. And let's just make sure that
our player has this tag. So going back to the blueprints, player, player base, I
believe we added it before. Let me check on the class defaults and here
you can search for tag. And here we added earlier. So just make sure that you have the tag player added
to your player base. So now if the tag or if the
actor has the tag player, which we do, if that is true when we want
to do something. And I'm just going to run
an event called can climb. So when you collide with
this box, you can climb. But if you don't
collide with this box, it means you can't
climb because there is no client being
object near you. So let's go back. Let me open it up again here. And here we can say, we can run an event
saying can climb, and this will be inside
of the player base. So inside of here we have
to make an event first, and let's just work
down here for now. Let me make a custom event saying a storm events
saying Can lime. And this one we
can actually make into a Blueprint Interface. Actually, let's do that
right away instead of doing all of that work. So let me go to the
Blueprint Interface and let me go to
the player base. And in here, let me add a
new blueprint function. And let me say can climb. The thing we want to
add here is a Boolean. So I'm going to
add two variables. First, a Boolean
saying can climb. And let me add a B here
for Boolean can climb. The second thing is I want to define the client being object. So client being. Object. So is it a letter, is it a robe or whatever it is? So the climbing object is, again, what you made here. This climbing base. If you look up here, it is a paper sprite actor, so we need a reference of that. So let's go back and say paper sprites actor
here, object reference. So now we have the can climb
and the object reference. Okay, so Endo player base, we can now call it saying can climb line and you
have that event here. So this is what we
ultimately want to run. So here when you collide
in the climbing base, when you collide with
the collision box. And it is the player. We want to call that event. So to call events from
the player base, again, we have to drag from the
other actor and say it, play out reference
that we made earlier. And then we can say, can climb. So now we can run it and
remember it is message because it is a Blueprint
Interface function. So here can climb. We have to take this because
now we're overlapping. Yes, we want to climb
or yes, you can climb. What is the clamping object you can drag from
here and say self. Because remember you are
inside of climbing base. So if it is a rope, if it's a ladder, it's going to give us
self-reference and define itself automatically because you are inside of here already. Okay? So we need a finished
overlaps or end overlap. So clicking on the
collision box again, going down and clicking on
n-component and overlap. So what should
happen when you end overlapping with that component? I'm going to copy paste
all of this again, we don't have to write it. Again. I love copy-pasting code. So just connect, remember to connect all of those
and can climb. It should be just removed
because you can't climb anymore because you
have ended the overlap. As for the Alembic object, I'm going to delete this
and what this means, it's going to empty decline
being object variable. So the variable will
be empty because we are no longer
colliding with anything. And that makes
sense. So let's go, let's say everything here. And now it's going
to go through to the player base and
play this event. So for this event here can climb instead of
directly doing it here, remember we are playing
in multiplayer, so we have to run it
through the servers. So making a new custom events
called as Harvey and lime. Because remember when
you set variables, you have to do that
through the server to make sure that the
client is not cheating. So again, let's
click on the server, run it on the server, reliable. And now you can just
run that server events. So you can see this is the same pattern as we have
been doing all along here. Like the same thing
with the jumping, or it goes through
the server and then goes through the
multicast with the sound. And here the same thing
with the move misstate. It goes through the server
and then it sets the variable so it's the same pattern we
are doing all the time here. I would say just keep practicing and we will get a lot easier. I know it is very difficult
from the beginning, but now let's run it
through the server. And the server is now going
to set these variables. So again, we need
two variables here. One is a Boolean
saying can climb. And the second one
was a paper actor, which is declining objects. And it was the paper
a sprite actor. This one paper is bright actor. Okay, so now we can
set the variables. Let's right-click on
this clamping object and promoted to a variable. And I'm going to remove
that space down here. So now we have the climbing
object as a variable. And let's right-click can
climb promoted to a variable. And I'm going to remove
that spacing down here. And it says we already
have that variable I, and I think it's
the function here. So let me just put
a B in the front, so it's a Boolean and now
we can write it here. So can climb and pumping object. Remember we are in the server, so the client have no
idea what the values of these variables are set to because you are setting
them on the server. So when I play as the client, so you have the server here. But if I play as
the client, now, I have no idea what
the can climb is. So I can actually just printed
to the screen so we can actually see and we can
learn together from this. So dragging this boolean, I'm going to print the
value of that Boolean out. So now if I'm the server, this is the server now
and I lived with it. You can see it says
false right now. This is because we're not
really running it through. So let's do that now. Let's connect those. So the event, so it's going from this collision box
to the line here. It's going to set it to true. So can climb is set to true. Now, it's going to go to the player base and
let's connect those. And it's going to go all the way through here and it's
going to print it out. So now it's going to say true. Let's jump here. And you can
see it says true when we collide and says false when
we don't collide anymore. So this is correct. Now let's play as
the client here. I'm spawning as the client. And you can see as the client, it is saying true. But it's naturally the client
saying it's the server. You can see it's printing
out as the server, but I am the client. This is the problem. I, as the client have no idea of what these values are because
I can't see them. The server has not given
me that information. This is why it's so important
to replicate things. This is the base of
multiplayer and Unreal Engine. So let us click on this
variable and replicate that information back to the clients so the clients
can see what the value is. Ok, So now that they
are replicated, let me delete that
are in string. So now if you click
on play and you as the client will play
as this character, even though you are
jumping and you see it is the server
printing them out? That is correct. It is the server actually
setting those variables. But now that you are replicating
them back to the client, the client can actually see the true value of this
if it is true or false. So remember to replicate variables that need to go
back to the client as well. So for this can climb, we can drag from this
Boolean and make a branch. So now if you can climb, we have to do something. If you can't climb, we have to do something else and we will be doing that
in the next lesson.
57. Up & Down Movement Input: Let's now give the player
the ability to move up and down on this rope
here. To move up and down. Let's go back to
the blueprints and let's add the movement
inside of the player base. So inside of here,
so far we have this one called move
right and left, but we need a new one
called move up and down. So let's actually
make a new inputs. So let's go back to Edit
and project settings. Remember we did
that a while ago. So I hope you can remember this. So going to the
project settings, clicking on the inputs. And inside of here
we have this so far. Let's make a new access
mapping and let's call it move up and down, right and left if you want. You can also hear
Lipsky made wrong ones. So here I want to click
on this plus here, you can add more
buttons if you want to. So for example, the right arrow and the left
arrow on your keyboard. So both da and also right and
left works on the keyboard. And remember for the left
you have to write minus one. So just in case you want
it in your game as well, you can even add a controller
as well to play with, but we need a little
bit more setup there. So let's focus here on them. Move up and down. And we can use W to move
up and S to move down. And again we have to write minus one for the S.
So going up as one, minus one for the going down. If you want to, you can
add your keyboard keys. So up arrow, down arrow. And let's do a minus
one on the down arrow. Okay, So now we have
moved up and down. Let's close it. And inside of here
I'm actually going to write it as the
first thing up here. This is our main event. So let us write, move up, down, and let's select
this axis event. So moving up and down. So before if you go back here, you said get control rotation and then you got
the forward vector. Maybe you can already
figure it out. So what we are going
to write here, so gets control rotation here. Then you want to
get it up vector. So now we're going
to go up and down. Let us add, again, add movement inputs,
just like before. Let us connect it here, and let's connect
the axis value here. Now, if you compile
and click on save, and you click on play. And if you click on
the up and down, you see nothing is
really happening, but you have your code written. The problem is here in
an unreal is that the up and down is
only going to work whenever you switch
your movement mode. So in the character movement, you can see we have
different movements modes. Right now you are in
the walking movement. So we have fixed our
walking speed and so on. So we are indeed character
movement walking. But as for going up and down, you actually have to switch
your movement to the flying. So you're actually flying. Technically. We have to switch
it to that and we will be doing that
in the next lesson. So not right now. This is the reason why this
is not working right now. But before we ended here, let me actually add
this boolean here. Since we already made it. We only want to move up and down whenever we are
applying beings. So we're not interested in doing that if we are not climbing. So I'm going to drag it here
and make a branch here. So if this Boolean
can climb is true, then we are going to run
this code because it doesn't really make any sense to run this code if
you can't climb. Alright, so this was it for
this video, very short. But later on we are going to add now in the next lesson actually the climbing conditioning. So we are setting some rules at when the player
can climb burnout. So let's move on to
the next lesson.
58. Climb Conditioning: Now let's add some
conditioning and the rules for when
the player can climb. So let's go back to
the player base here. And instead of the player base, let us go down to this one where we left off. They can climb. So if you now again, let me just remind you
here in the blueprints inside of the climbing
and climbing base, this is where you interacted with the beginning
overlap collision box. And now I can climb is true. So what happens when
they can climb is true. When the cow can climb is true. You want to check if the
player is pressing the W key. So moving upwards because
the player wants to climb, because we don't really
want to climb here. If the player is not
pressing up or w, we only are interested in client being whenever the
player is pressing up. So this is something
that you have to check. So let's go back here. And when you press up
here in the movement, so remember it's
going to go plus one. If you click on S moving down, it's going to go minus one, like we said previously. So actually I'm going
to make this into a variable so that we
can use that later on. So let me right-click. Actually, we can't
really set it directly. We can only do that
in single-player. So again, we have to run
it through the server. So let me make a new event here, custom event and call
it said Z axis value. Because remember, z is, we are moving up and down
and this is the z-axis. So set z x x, z axis value. And let us run it
through the server, server set z axis value. I'm actually we can do this
through the interface, Blueprint Interface
and the player base. So let me actually
do that instead. Interfaces player base and
let me make a new function, call it set z axis value. And obviously there's, the
value is a float here, this is what we're
trying to set. So let me create a float
inputs loads, okay? And let's call it Z axis. And let me, yeah,
z-axis is fine. Lets me go back to
the player base. And inside of here, let's call it set z axis value. And this is the
interface function. And now it's going to
go through the server. So let's set this one to
run on server and reliable. Let me just move this
down a little bit so we can see what's going on
and let me move down. Okay, let's run this
server event here. Set x is z axis value, and we need a float. So let's create a float here. And let's call it z axis. And now what we can do is
we can right-click and promote this into a variable
and call it z axis. Here. We have the z-axis and
let me connect all of those. And now we can call it up here. So if can climb is true, we are only interested in updating this whenever
we actually can climb, but because before we can
climb, we don't really, we're not really interested if the player presses up or not. We're only interested if the player presses upper naught
whenever they can climb. So let me here say set
z axis value here. And actually let me call it
from the set z axis value. Let me actually call it
from the int player base. And like this. And now we have connect this,
we have to connect this, the axis or this axis value
to the z-axis down here. And let me just run it here. Okay? So now we have
everything connected together and this axis value is going to update through
this set z-axis value. It's going to go down here
and then down on this value. Remember what I said before, you have to replicate
this in order to have this information
sent to all the clients. Else is only the server who knows the value
of this variable. Alright, so let's
go down here again. So can climb, if
can climb is true. So now we are interacting
with the rope. Let's take this z-axis here. If the z-axis is greater than 0. So meaning the player
is pressing up. And we can actually just
delete this and just say, if the z-axis is not equal to 0, then we want to do something. So let me just do this. And then we can
make a branch here. If the z-axis is not equal to 0, then we want to make a new
boolean saying is climbing. So let's make a
new boolean here. Saying B is climbing. So now, before we had this
one called can climb, but now we're actually climbing. So we're making a new
boolean called is climbing. And again, we have to run
it through the server so we could just do it here like
this, because remember, we are already inside
of the server, but I think we will
be using it later on where we actually are going to use it here through the client and it needs to
run through the server. So let's actually just
make an event for this. Let's make a new one
called a custom event. And let me just do it directly inside of the interface here. And just call it,
set is climbing. And it is just going to
take a Boolean as an input. Is Vi, is climbing. And let's go back
to the player base. And here we can say
set is climbing. And we can call that
event we just created. Let's make it go
through the server. So let's make a
new custom event. Same server set is climbing. Give it an input of
a Boolean called is line being like this. Okay? And this one actually can climb, but I'm going to put a B
here just for good practice, just making sure everything's
correct and can climb. It has a B here, so that's cool. So here set is climbing and we're going to run it through
the server, reliable. And the only thing
we are going to do here is set at two, is climbing. So we made this variable, drag it out, set it here, and let's run this through the clients to go
to the servers. Servers set is climbing
and connect it up here. Okay, so we're going to
set this variable here. And the thing we want to do with this one is not replicated. Replicated is only
used when you want to send information to the clients. However, again, rep
notify is used when you want to change
something visually. So not only information like
here and the z-axis value, we only wanted to
send information. However, here we want to do
visual changes because we are going to change
the flip book to the client being flip book. So we are going to change this replication to
wrap notify because we have some visual changes that we need to
declines to know about. Okay, so here we are
going to add it. So if the z-axis value
is not equal to 0, meaning the player is
pressing up or down, then we want to climb. So let's do that. Let's
say set is grinding. We can now call this one, set is climbing and we can do it to true because
now we want to climb. However, here in the fall. So let me actually drag this a better way here in the false. So we can climb. But now we have left the rope. So now we can't climb anymore because when you end
overlap with the bugs. Here, let's say we are already climbed being
and this gets false. We have to set this to false
as well because else we have nowhere in our code
right now have we specified when this
will be false? And if you are climbing on the rope and you'll
leave the row, then this one is
still set to true. So let's copy this and place
it down here like this. So let's say we're
already climbed being, so let me take this is climbing and let me
say branch here. So if we are, so here, if we leave the collision box
here in the climbing base, if we leave it and
it's set to false. If we are already
climbed beings. So if there are, if there is climbing
set to true, Let's go ahead and
set it to false. Just making sure that
this is set to false. And we're still not
climbing just like that. So let me move this
forward and move this up and organize
this a little bit more. Again. When something is
not structured correctly, you can select them and click on Q on the keyboard to make
them a line like this. Okay, So we have a
small problem with this and maybe you can
already figure it out. Let me just compile
here and let me print this to the
screen like that. And actually let me move, let me go to the client being
based actually to the rope. So let's go to the
climbing the rope. Let me go to the
viewport and just increase this to 80 or
something like that. Something large. And let me place the player
up here instead. Like this. Let me click on Play. And now actually I want to print it to the screen as well. So going to the player base, now we're going to print
hello. Yeah, that's good. So let me click on Play. And now if I click my
mouse key down and I move, you can see if I move. And so let me move first. So clicking on a to move
and then I click on S here. You can see it says
Hello because it can check that when I'm running, then I collide with when
I'm running and then collide with my box here
and it's set to can climb. It can see that I'm pressing my z-axis so it's
not equal to 0, which means It's actually
going to set to climb beings. So this is running correctly. However, the problem
right now we have is if I'm standing at the rope
and I want to go down, if I click on S to move down, it is not really going to check. Because remember, this
event is only run once. It's only run whenever
you collide with the box. What if you are already
colliding with the box? What do if you're
standing on the box? This has never
gone to run again. This is only going
to run whenever you leave the collision and
then you collide with it. Again. This event here
is only going to run once if you are not pressing the Down button at the time
you are colliding with the, with the rope, this
will still be 0, so this will never check. So if I click on, if I
go back to my game here, click on S to move down. This is not really
going to work. So we need something to make it continuously check here
whenever I'm standing on the collision box here to continuously check if this
is equal to 0 or not. And again, we use
timers for this, we already used
the timer up here. So continuous checking,
you can always use timers, very good tools to remember. So let's hear, disconnect
this and improve this code. So let me make a timer, set, timer by events. Let's connect it here. Now we
can make an event two runs from here and drag it
out and say lime inputs. Actually let's make
custom events. That's what I meant. And
call it climbed inputs. So this client input, it's going to check, is this equal to 0 or not? And if it's not, then
go ahead and climb. I'm going to organize this a
little bit more like this. And for this one, for the timer, I'm
going to loop it. And for the time
it's going to loop, I'm just going to write 0.1, which means the whole
loop is run every 0.12, which means this is run
ten times a second. Whenever I'm a client being, I don't really want to
check this anymore. So I'm going to promote
this to a variable. And let's call it
check limed inputs. And I'm going to take this and say Lear and invalidated
timer By handle. So whenever, whenever
we have checked here, so we are checking for input. So whenever we are
seeing that the player is pressing up and
down on this rope, which means we are
going to climb. And at that time we don't
really want to check anymore. Because the whole purpose
of this is just checking if the player is pressing up and
down on this collision box. So we can then just
stop this time. And remember, if you
don't stop the timer, I'm going to show you. So if you just print
Hello all the time and you can like debugging
with the halo is so useful. So clicking on S
down to move down, you can see it's printing
Hello all the time. Of course it's tops
when you don't press S anymore because you're
not really moving down. But if I press, it
prints all the time, I don't really want
to print it all the time whenever I'm climbing because this is only useful
to check if we already, if you actually want
to climb the rope. So if we're already
climbed being, we don't really
want to check this. And this is where we say clear and invalidated
timer By handle. Because now we can now say, when this is true, we
are going to set it to climb and go ahead and
remove this timer. So if I click on
Play now and I go here and click on
S, hold it down. And of course we have
to print something, so I'm going to put in something so we can actually
see what's going on. I'm going to click on Play, click on S to move down. And even though I'm
holding it down right now, it only said hello once. This is how you make something
optimized and blueprints, remember to stop the timer whenever you don't
need it anymore. Else is going to run forever and you don't
really want to do that. So for the timer here as well, just to make sure that it stops, Let's copy this code. Let me go here. So if can climb is set to false. So whenever you end overlapping with the collision box, we are. So if you're already climbing
and you'll leave the rope, let's just remember again
to stop this timer. So just making sure that the timer is not
running anymore. So this was it for
this video here. So we have a lot of things done. We have set the timer up to continuously check if the
player is moving down or not. So the whole process
is just to explain it very quickly before
we end this video, just in case you need
a full explanation. So what we are doing
here initially is the player is going to
jump here on the rope. The player is going to
touch this collision box. And what the player touches
this collision box, this event will play. The event will run
through the server and it's going to check
if the actor has the tech player just to
make sure that the player is actually touching the
rope and not someone else. And this is, if this is true, we're going to call
can climb event, which is inside of the
player, player actor here. We're going to set can
climb boolean to be true. So we want to climb, and what is the thing
we are going to climb? That thing we are
going to climb itself, which is whatever thing
you have placed here. So in this case, we
have placed their rope, which is a child of
climb, climbing base. So by writing self, it automatically knows
to go here to the rope. And this is the actor
that we are climbing. So it's going to
go to can climb. So we start here. The information
here, the Boolean, you set it to be true, so it's going to be
down here to true. The information is going to
continue here on the server, sending those variables and
selling them to replicate it. Because we are
interested in giving this information to the clients because we are on the
server right now, the client have no
idea what this value is if you don't replicate
it back to the clients. Now, if they can climb is true. We are going to check if
the player is actually pressing the down button
to climb the rope. If the player is pressing
the Down button, we're going to set, this is climbing to true. When we do that,
it's going to go to set his client being
going through the server, going through the server here, and then setting that
variable to true. Now we have encoded this
yet we will be doing that in the next lesson. So we have set this
to wrap notify, which then again, remember a red notify creates
an on-ramp function. Here we are going to code
a lot of things such as changing your flip book to
decline being flip book. So the player visually can
see that you are climbing. And if I go back here, So if they can climb is false. If you're already, if you
have already said the is climbing to be
true, that is true. We are going to set it to false because you
can't climb anymore. And we are going to
stop the timer anyway. If they can, climb is going to be false and you
will not find it.
59. Updating Player Movement Mode: Hello and welcome back. So there is a small bug
right now before we start, you can see if I move
over here to the side, all of a sudden my sprite disappears and if I
go back, it appears. So very, very weird bug
that we have right now. Let's fix it actually,
before I move on to fix this weird bug, I found out that if you go to the blueprints and
go to the climbing, climbing base here, let's face it for all the
clamping objects, you can click on the
render component. And if you go down
to rendering here, you can click on Advanced. And if I just minimize this, you can also see
disappears whenever. Let me click on G to
remove all of this. You can see it appears
when I'm here, it disappears when I'm here. I found out here in the rendering
under render components that you can go to
translucency sought priority, and write one, Compile and Save. And you can see that
it appears so this bug will not appear anymore. Alright, so the thing
we want to do right now is we want to update
the players movement. So right now we have
the correct thing, we are doing the correct thing. But right now, we can't
really live up here. And this is because we want, we should change our
player movement mode. So let's go back to
the player base. And inside of here, Let's
begin coding the thing inside of our isClient
being unwrapped function. So going inside of here, Let's first drag the
variable and write a branch. So what should happen
when you are climbing? So the player hits the rope and presses the W
button to move up. What should happen? The first thing we want to do is take the character
movement component and then drag from here and
say Set movements mode. This one. And then this is, we're going to set
this to flying because when you are climbing,
you're actually flying. By default right now
we are walking around, and this is the walking. Whenever we are jumping. Remember here in the jumping, if I go back to the Event Graph, whenever we jumped, so if I can find the code is somewhere here. So for the jumping
code over here, you can see earlier
if you remember, we made this a pure
function where we checked if the character
movement falling was not true. Falling is whenever we are jumping here and
the movement mode, if I go back to the
unwrap function, the falling is whenever
you are jumping, the walking is right now
when we're walking around. However, when we want to climb, we have to set it to flying. So we are actually
flying around. And just before I forget, let me go to the character
movements and go down here to the
flying over here. Let me set the flying
speed to 1 fifth. I tested it in Maple story, so I played Maple story
today to check it out. And it's about 115 speed. You have to test it in game
to see you can just let it be 600 and you can actually test
and see how fast this is. But I'm going to change
it to 150 right now. And breaking acceleration
if you don't put that on. So if you click on
W and you let go, you're still going
to fly upwards. I don't want that. I want like Wonder
player that releases the W button to
not climb anymore. I want the player to stop completely and not
slide upwards still. I'm going to put
that to something high, like 10 thousand. So some just a random
number, Compile and Save. And when the player
is not climbing, so when the player has
let go from the rope, I'm going to copy
paste this and set it to falling because
really walking, because I want the player
to fall from the rope. So something like this. And if you, again, if you want
to make this look better, you should probably move this
platform and bid upwards. So this is actually not
hitting the ground. So let's go back to
the player base here. So when the player
is not climb being, we are going to
set it to falling. Now let us set our flip book. So let's take our sprite here. Let's say set flip book. And let us connect it first
up here to the climbing. So when we are climbing, we want to have the client being animation and let
me copy paste this. And when we are falling, we want to have our
jump animation. So the jump animation
we have right now, but declining, we do not, so we need to prepare that. So here for the falling, you have that jump animation. I remember we have
two characters and we want to make this as
dynamic as possible. So let us take our structure
again. Let's break it. And here we can now take
our jump animation. Taking this jump animation
and connecting it here, hiding all the other
pins like this. So it looks a lot cleaner. So now we have this ready, but as for the flying, we don't really have a
climb animation right now. Here in the course materials in the characters in Tsarina. You can see I have
prepared the climb for you as well as in Luke. So let's go ahead and
minimize this here. Let's go to blue, actually here in the
assets characters or Serena first
and the textures. And let me import the climb and do the same
thing for the for loop. So go to Luke texture. Here. We have Luke and the
climb, so important, but both of them
right-click on this 1 first and apply paper
to the settings. Do the same for Serena. Right-click, apply paper to the settings, and
right-click here. And let us extract the sprites. The grid is one eighty, one eighty clicking on extracts. And so this one, you have to rename
them to S lime 01. This one is actually 0202. And this one, Where's
the other one here? 01. And do the same thing for Luke. So right-click, Extract sprites, grid, one eighty, one eighty. This one here is like 01 and the other one
is climate 0 to. Now, you can select
them right-click create a flip book called FB climbed. Drag it out to Luke's folder. And let us set the frames
per second to four. So let us set it to
four like this and do the same thing for
Serena here for the client, right-click, make a
flip book called climb. Place it outside of this folder. Here we're going to change the
frames per second to four. Now let's save everything
and we have to remember to add it to our structure
here in the player base. So we haven't done that yet. So let's go to the
structure and blueprints, structs player info, and
let's add a new one, a new variable called
choline animation. Now, if you want to add, we are going to make
it more dynamic. So you don't necessarily
have a rope. You can also have a letter and that will have
another animation. So we can either call it climate emission or to be better, or you can call it
a rope animation. And later on if you want, you can add a ladder animation. And that is another animation. So robot animation,
Let's call it paper flip book or the variable is a paper flip book, like here. And let us save, let me actually move this up, so drag it up above
the sound effects. Yeah, I actually wanted to sound effects to be down
here at the bottom. So Robin emission,
save. Over here. Let's actually save
everything, compile and save. And you can see the
rope animation appears. Let me click on it again, click on Hide unconnected pins. So up here, what we want to do is copy paste this structure. And you can, like, you can see whenever you hide unconnected pins and it
just hides like this, you can now see them anymore. You can click on it and click
on this default category and you can select this
one is the flying, so it's a climbing, this one rope animation
and you can see it appears and you can
connect it here. Now remember, you have to
connect the rope animation because we haven't
specified what it is yet. So you have to go to
both Serena and Luke. So blueprints player. Let's start with look here. Remember in the class T false, you have to set the
rope animation. So if climb for Luke, let's go to Serena. For Serena, it's going
to look like this. So rope animation. And then let's find hearse. This one FP climbed. Okay, So now they
should be working. Now, let's go back
to our player base. So now what we're doing is we're sending it to flying mode. So we should be able to move up and down here in
the graph, I go down. So we should be able to move
up and down because now we are in the flying
mode and we can climb. And let me go back here and then we are setting the flip book. So let's actually try to play it and see if I'm
missing something. Always good to test it out. So let's save
everything. Let's play. Now, if I go here,
I click on down. You can see I'm actually moving. But the problem is this collision tile is
stopping my character. So let me actually try
it from the bottom here. Fall down. And if I go to the rope here, you can see I'm actually
going up and down the ladder. The problem is here, the title is stopping us from going up. And this is something we want to fix that in the next one. But I believe in
the next one again, we remove those collisions
so we can move upwards. We also have a small bug
where we can walk to the sides even though
we are walking here. So let's go ahead and fix that. Let me click on escape and
let me open the player base. And up here, actually let
me go to the Event Graph. Let me just close everything. I think I have a lot of
open, a lot of things open. Now, here in the Event Graph, I'm going to right-click and
say close tabs to the right. So I only have that
open right now. So over here in the
move right and left, we don't really want
to move right and left whenever you are climbing. So we can add a
Boolean for that. So if I just drag it
back here and we can use the one is climbing and
you can write a Boolean. So if you are not climbing, you will, you will be able
to move right and left. But two, if you are
climbing a rope, we don't really want to
move right and left. So something simple like this
can fix a bug like this. So just using a Boolean, sometimes you can
prevent some code. So always remember booleans
are very, very useful here. And you can see I can't
move to the right and left. And also our animation, climbing animation is
working perfectly. Now, I can't, I can't
move away from my rope because I believe
my collision box is very long right now. So let me go back to the rope. Because we were testing here, going to the rope here. And let me just reduce
this to something like 65, something like that. Clicking on Play
now you can, good, actually let me put my
player starts down here. We don't really need to
fall down all the time. Here. I can climb, I can move down and I can leave my rope here. Again. You can put this platform
higher if you want to, or you can just make the collision box a
little bit smaller so you don't necessarily have to go all the
way down here. So something like 60
and I can move it up, something like this. So clicking on Play again. And we can jump and
we'll leave the rope whenever we are
somewhere around here. Okay, So very cool. We can now move up and down. And you can also see
we are sliding a little bit when I
move to the side. Sometimes I'm actually moving away from the rope,
something like this. So now I'm moving up
and down the road, but we will also be adjusting the client
location later on. So don't worry about
this, but for now, you can see we can jump while
we are here on the rope. So let's fix that as well. So let's go back to the player
base and for the jumping. So let's find the
jumping logic again. If you are not
falling and you are not aligned being we don't really want to jump
when you're climbing. So let's take this.
And here we can say end here and Boolean. And you are not climbing. So nuts, Boolean. Again, if you are, if you're not falling
and you're not climbing, we don't really want to
jump when you're climbing. Let me move this forward and let me click on this one and click Hide unconnected pin. So it goes up again and
connect this one instead. So if we are falling,
we don't want to jump. If we are choline being, we don't want to jump either. So we have to check for
these two to make sure that we can only jump on your
nullcline being or falling. So let me just move
this closer and we can test it out again,
Compile and Save. We can play, go on the road. And if I click on space, I can add jump here. Okay, so now this is fixed and let's move on
to the next lesson where we actually make a climbing
objects enumeration. So instead of making the, the rope only you can
actually add letters and animations for
those as well.
60. Climbing Object Type Enumeration: Okay, so, so far here in the on-ramp is climbing function. So far we have added
that we should switch to the robe animation
whenever you are climbing. But what if you
also have a ladder? What if you have something else and you need a new animation, you need a ladder
climbing animation. Maybe you have two
animations in your game. Now we want to make an
enumeration to fix this. And I like to make
my game dynamic. So in the future when I
want to add something, I can do that in two minutes, not in 30 minutes. So let us make everything
dynamic right now. It takes a bit
longer to do this, but it will save you so much time when you have
created your game. Always try to do these
nice things for your game. Try to do good coding practices. And you can save so much
time whenever you create a DLC or whatever you're trying to create updates later on. You can do that in two seconds. So let's try to make
an enumeration first. Again, enumerations are
very, very powerful. So far we have created
these moving states. So let us actually
right-click here, go to blueprints and
create a new enumeration. Let's call this one E
climbing object type. If I could spell so here
type and click on it here. And let me add two
types for now. I don't really have
more than that. So I have a rope and I have a ladder like this,
so save everything. And let's go back to the line being here
and climbing base. And let me add that
variable to my variables. So calling this one
line being object type. Now let's add this type
to our enumeration that we made called
climbing object type. This is the enumeration. So what we can do this
now that remember when we add variables to the parent, Blueprint class will be
added to all the children. So clicking on the rope here, you can see in the
class defaults, I can now see this enumeration. And you can change the type for each thing that you add here. So this rope is
obviously a rope. But if you later
on added a ladder, you can actually
change this to a lighter and it will know
that this is a ladder. And when it knows that
this is a lateral, it knows that it should
play the lighter animation. So let's actually code
that information in. So this one is just a rope. So I just set my new
enumeration to rope. And let's go back
to the client being base and we can add
it here actually, actually not the climbing base. Let's go back to
the player base. That's what I meant. Going to a player base. And in the ears
clipping is climbing. Unwrap function. This is where we want to add it. So let's move this
a bit further away. Here we wonder reference
to our client being base because we want
to use this variable. And remember we already
made a variable for this. If you go down here, when we said can climb, we added remember
that self-reference. So we are actually already
defining that climbing base, which we need to call this
function or this variable. Now, we can create a Blueprint Interface and
say gets client being base. You could do that
if you want to. But for this game,
this is very minimal. I don't, I don't want to bother because we're
not really going to use it as much as the player base and what
we have been using it for. So I'm just going to cost, I said before is okay to cost as long as you don't
do it all the time. So let's go back here
and we can just to take this reference here, let me find that the
clamping object, let me now drag it
and say cost too. So what is the climbing object? The clamping object is when we cost to
something we can say it is specifically talking
about this BP climbing base. So the climbing object
is specifically this blueprint because
remember this reference, if you hold the mouse over it, It's just a paper sprite actor. And we are defining that
this paper sprite actor is specifically this clamping
base and S decline being base. I can now access whatever information I
need inside of here. The thing we need
is this variable called climbing object type. So let's go to the player
base and drag from this and say choline being get
climbing object types. So now we can use that variable. Just like before.
Remember what we did. So if you remember here, actually, it's over
here to the side. On the on-ramp movement States. We created these movements
states a long time ago. And you can do
that, the switch on enumeration to select which animation
you want some place. So we are going
to do this again, going to the player base, the isClient being unwrapped. And inside of here we can drag
from this and say switch, switch on this enumeration. So what should happen
when it is a rope? So what should happen if
we have this set to rope? We want to play this animation. So this is the rope animation. Okay? And what is it is a ladder, if it's a letter, we want
to play another animation. So lets me copy paste
this down here. And now we don't really
have an animation for it. So we can go to
the structure here and you can add a new animation called a ladder animation. We don't really have
one for the game. I'm just showing you how
you can do it in case you have or you want to learn
how to make it dynamic. So creating a paper
flip book here, letter animation, I can
just move it up here. Now what you can do,
I'm just going to put a random animation just
to see if it works. So I'm going to the
player to Tsarina. If I just save everything
actually I need to compile for to appear so saving here
and going to Serena. And for some reason it's
not really appearing. I think I need to compile
in my player base. So here, clicking and compile. Remember very
important to compile. Now going back to Serena
in the class defaults, you can see it appears. So for the lettering animation, I'm just going to
put that pig here. The pig idle. Something very random
just to see if it works. You can do that on Luke as well, going to Luke and just putting some random pig idle animation
just to see if that works. So now it is on letter and we can try to click on Place if I go
back to play-based, making sure
everything's correct. So let's hit this or
connect this here. For the latter animation, I'm going to connect
it down here. So now we have both. And if we are just calling, so removing the client, if it's false, we're
just going to jump away. And let me click on Hide
pins again, just like this. Okay, so now this should work. So if I click on Play,
now, I am climbing. You can see this is working. And what if I change
this to a another rope? But what if this was a ladder? So I changed this climbing type. This is actually a ladder now. And if I climb now, you can see the animation is changing. So depending on if you
have a rope or you don't, this will change
the animation to whatever the animation
you have added here, depending on if it's a
rope or if it is a ladder.
61. Custom Collision Channel: So the problem we
are facing right now is a farm clamping
here on my rope. Actually let me change
that animation. That looks so weird. I need to change this into a rope again. So if I go to the blueprints, go to the climbing the rope and actually changing
it back to a rope here. Okay? The problem we are facing
right now is if I am climbing here and
if I go to the top, I can't really go up
to the top part here. And the reason is this
collision tile here. Remember we have collisions. These collisions tiles, they are blocking my character
from moving up here. And so we need somehow to tell these collisions to turn off
whenever we are climbing. But we don't really want to
turn it off for every one. If we want, if we turn
it off for everyone, all of these enemies will
fall from the ground. And so will all of the players who are connected with you, they will fall from the ground
if there are no collision. So we want to remove
it specifically for that client being player. And the smartest
way to do this is creating our own custom
collision channel, which is very, very easy. So I'm going to teach
that to you right now. We can do this by going to Edit and going to the
project settings. And inside of here, we
can go to collision, which is here under the engine. And then here in the object channels, these are collisions, so we can just click new object channel,
clicking on it here. And then we have to
give it something here. So let's just call
it line being layer. And the default response, let's just set it to overlap. Click on Accept. So now we have a channel. So what does this mean? What does this appear? And this actually appears. Let's go back to the
tile map that we created in the tile maps folder. This is where we have
these collisions. So inside of here, remember in the render component
for this tile map here, if you go down to the collision, you can see Alice's find a collision here,
Collision Presets. Let's click on that
arrow to see it. You can see that it's actually
blocking all of us here. And we just created
this climbing player. See how easy it is. It just appears here. So whenever you create
a custom channel, it will appear here. And you can actually set it to a setting depending on
what you're trying to do. So, so far, all our
player is a pawn. And when the player is upon, we are getting blocked from all over the collision
that is under tiles. And for the clamping player now, we set it to overlap by default. Remember you can
always change this by clicking on up here
and saying costume. And you can always change
it to something else. Just because you said it here in the Project Settings,
in the collision, just because you set
the default to overlap, of course you can
just click on Custom and change it to something else, but it will just be on
overlapped by default. So here I'm going to go
back to block all again. By default now are climbing
player is set to overlap, which means I can
actually now actually let me remove all of
these lines here. So by default, I can now, if I am the client being player, I can now go through all of these collisions because they will not blocked me anymore. They will overlap with me. So we have to tell it the engine now that whenever I am climbing, I want the player to be
this choline being player. I don't want my
player to still be a pond because
even though I made this channel right now when
I'm climbing my character still upon and it's blocked
by these collisions. So we have to tell that we
want to change our channel. And if I go to a player
now player base, you can see it here on the
sprite or on the capsule. Here on this bright
you can see I am upon, so object channel is pawn. And remember here and the render object ponds are being blocked from the
collision channel. So we have to change
those settings. And let's do that
in the player base where we have the client being, we are only interested
in doing this whenever the player is climbing. Let's do this before
changing the animation. So let me move all of
these animations to the side, further away here. So whenever I M line being, I want to take the player. So taking this
Capsule Component, you can see the capsule component
here is set to costume, but down here in
the object channel, it is set to a pond and we don't want the capsule to overlap. So let's go back
here to the capsule, less drag this out
here in the world. And we can change
this collision type. So if you'd go down, you can see this is
the object type. And always good to
look at the names because then you can actually
know what it's called. So if you just drag from
here and say collision, because this is what we are
interested in changing. I remember it was
called object type. Let's try to see if we have a function called
set object type. And here set or is it here
Set collision object type. So clicking on here. And if for some reason
made one for me, let me just delete my old one
and let me connected here. So whenever we are climbing, I am interested in changing my capsule which is colliding. I want to change it to
a line being player. This is the custom
one we've made. And whenever I am not
climbing anymore, I want to change
it back to upon. So you can copy,
paste this down here, connected back like this. And let's move it away. Here. You can change it
back to a poem. So we're just
changing it over to a clamping player
whenever we're climbing, but we are changing it back to **** when we are
not climbing anymore. Now let us compile and save, and it is as easy as this. So let's try to see
if we have any bugs. So now you can see,
now I can climb through it because I'm
a climbing player. Object channel and
my collisions. And I can go up here, and now I can just
walk around because now I am in my pawn
object channel now.
62. Adjusting the Climb Location: Okay, so the small problem
we have right now, whenever we walk and jump, sometimes it lands on the rope. Sometimes you can see it lands
on the side of the rope. So not really specifically
on the robe here. So we have to adjust
the jumping location whenever you are jumping
on top of that rope here. So let me go back here and
go back to the player base. And the best way to do this is continuously
updated somewhere. And the thing I'm thinking
about when I do this is what events do I have that continuously update
that I can use? I don't really want to
make an event tick. I don't really want to do that. So we have some timers, but these stop whenever I set my client being
so whenever I'm climbed being what is
updating continuously, this is stopping
when I'm climbing. So the thing is here when
we move up and down, this is still updating. So I'm still moving up and down. So let's actually do this here. After we add the movement input. We only want to adjust the location when we
are choline being. So let me because here
if I don't do that, it will adjust the
location whenever I'm just interacting with
the rope and can climb. So let's drag this here and make a Boolean or
actually a branch. Whenever I am climbing, I want to adjust my
client being location. So the thing we're trying
to do is we want to set the player's location
to wherever this, this actor here is
this rope actor. So wherever this actor is and when we are
jumping on top of it, I want to set the
players x location. Remember the x location is
what's going wrong right now. Because either the player is too far to the left or too far
to the right of the rope. So it's the x location that
we need to adjust here. I want to set my
players x location to be the same as this
actors x location. So if I go back to
the player base, so if I'm claiming here, I want to adjust my location. Let's take this object
or clamping object. Let me right-click and say
Convert to a validated get. Because remember if you are
not overlapping anymore, if I go back to my logic so you can see why
I'm doing this. Going back to the climbing base. Remember, when you are
not climbing anymore, you are setting this
variable to be nothing, which means you have nothing
inside of this variable. So this is why I'm setting
this just to not get any bugs. So I'm just seeing if
this variable is valid, if it contains something
and if it do, if it does. So let me take here the actors location,
yet actors location. And then I'm also getting
the players actor location. So get actor location. And this one, the
target is self. Remember we are in
the player base, so this is the
player's location. This is the object's location. I'm going to break for both of them so I can use the X, Y, and Z because I'm only
interested in the x here. I'm going to break the
vector here as well. And I'm only going to
run this code here, adjusting the player's location whenever We are not on the rope. But if we have
adjusted to the rope, then I don't really want
to run this code anymore. So if the x of the rope is not equal to the x of the players, so if they are
different, that is true. So I'm going to connect
this as valid here. If that is true, I'm going
to adjust the location. So I'm going actually to
make a new event here. Remember, this is running on the client and when
we adjust a location, this is a visual updates. And we have to do that
through a rep notify. So let's make a new
event down here. Let's call it custom event. Actually, let's make it into
a Blueprint Interface first. So let me go to the players
Blueprint Interface. And let's make a new
function called Adjust, line being location,
compound Save. I don't know if we need
any input right now. I can't think of it right now. Let's just make it and we can always add variables
if we want to. So here let me call it saying
adjust, climb location. And this is a Blueprint
Interface function. Let's run it through the server. So custom server and
adjust the line being. If I can write
climbing location and let's change it to run
answer and reliable. And from here of
course we can run this server event, just
climbing locations. So now what we want
to do is up here, if this is true, if the, if the location of the rope and the x location is not the same as the x location of the player. We want to adjust the
player's location. So adjust climbing. We want to run that
event essentially. So here we want to adjust
the player's location. So ultimately what
we are trying to do is we're trying to make a
vector. So let's create it. Now. We're trying to make a vector
called climbing location. And let's turn it into a vector
because it's a location. And this one, ultimately we want to set it to a rep notify. And inside of this unwrap
clamping location, the only thing we need to
do is set actor location. This is what we're trying to do. The target is self, so we're trying to set
the player's location, this new location, this adjusted location.
Let's connect it here. This is the thing we
want to do ultimately. So setting the player's location to this adjusted location, which is at that ropes location, that ropes x location. So if the x of the
rope is not the same, acts as the player, we want to adjust the location. So how do we adjust
the location? First again, I want to take
this clumping object again, you can make a
validated get just to make sure it is valid. So again, let's take, actually let me copy this again. We are actually going to
write the same thing. So we are getting the ropes location and we are getting the
player's location. The only thing we're
interested in is changing this x location because the y location this way
we're not really interested, interested in adjusting that. We're also not interested
in adjusting the z. We're only interested in
adjusting the x here. If I go back to my blueprint, the only thing we're interested
in as adjusting this. So let me take my climbing
location vector here, connected and drag from
this and say make vector. Now, what we can do
here is we want to set the player's location. Remember this is the, ultimately the player's
location or setting. So we want to set the player's
location to the ropes x. Then do y and z. We just want them
to stay the same. We don't want to have
the y and z of the rope. We just want the y and z
and the z of the player, whatever it currently is. So we are only interested
in adjusting the x. All of that information
is going to go into this vector right now. And whenever it is going
to set tour rep notify, it's going to run
this function here. So now we're going to set
the actress location. Okay, so let's
click on Play now, when we jump on the rope, Okay, now this is
actually perfect. Let's go back to jump here. Perfect as well. Okay, so when we
play the game now, I'm going to play as Luke on the server and
Serena on the line. So just making them a little
bit larger like this. So on the server and now
I can jump on the rope. I'm adjusting my
location nicely. Z however I jumped, it's adjusting my location. Alice's ID on the
client to make sure everything is working
so I'm jumping, it's adjusting my
location correctly. You can see on the server, there's some bug here. I am client being, but somehow my animation
is not playing. I think it will fix
itself later in the lessons where we are
posing and updating. You can see now it works. So we are going to pause and update this Columbia animation because obviously
we don't want to play it while we are jumping. But initially we
are going to set this jump animation,
play it and stop it. I think it goes throughout. The thing like it goes wrong with is here in the player base. It like it plays. Even though we have placed a Boolean here on the
move right and left. It's actually playing the
animation here before or after. Here in the, in the
on-ramp is climb being after we set the flip book
to climbing or ladder, it's still going through
here and playing. So later on we are
going to stop and start the animation depending on if the player
is jumping or not. So I think it will fix itself. Later on we will see. But for now, let's just
let it be like this. So everything is
working correctly now and the jumping is fine,
everything's good. We are adjusting the location. So let's compile,
save everything, and move on to the next lesson.
63. Removing Climb Up Spamming: Okay, So we have a small bug that we need to fix right now. And if I go to the
client being and to the robe and let me
go to the viewports. I'm actually going to
increase this here and put it up here so I can
actually climb from the top. So now I can play as the server
and I'm climbing up here, climbing to the top, that
is working perfectly. But the problem is now
if I climbed down, you can see that is
working fine as well. But now if I'm up
here and I click up, you can see I can calm
down, that's fine. But if I click up, I
can actually spam it. And it looks like this. I mean, it's not really the
biggest problem of your game, but visually, I think we can
make the player do this. I think it's a
little bit stupid, so let's fix that. Like remove this client
Bob spamming up here. So let's go back here. And to do this, I
think the best way is to add another collision box, which then denies you to press
the Up button if you are. So let's add a collision box up here on the top of this rope. Let's do that in
the climbing base. And here in the render object, Let's just add another
collision box. Search for collision
at the collision box, and let's call this one
upper collision box. The thing we want to do initially like here
and the player base. The thing we want to
do is we want to make an event saying can climb up. And this is basically
just a Boolean. So let's make a Boolean
called and climb up. This is actually the
thing we want to do and we will set
it to replicate it, obviously because
all the clients need to know about this. And so can climb Bob, this is what we're
trying to set, and obviously we're going to
set it through the server. So let's make a custom
events going through the server saying
set can climb up. And let's connect it here. And now we need a, we need a normal event
here, not a server. So lets me actually
remember to run this on the server,
clicking unreliable. So we want a normal
one called set, can climb Bob and let's do that inside of the
Blueprint Interface. End up player base
Blueprint Interface. Making a new function here
called set can climb up. Let's do a Boolean.
Do the same thing. You can climb up. Okay? Now we can go back to the
player base and call that event set can line up here. And now we can run the server
events through this one. Let's see where it
is, can climb up. And let's connect it. And now it's going
to run through this. So this is what we're trying
to run and we're going to set it to false when the
player can't climb Bob. So let's compile and save, and let's go back to
the climbing base. And in here we have this
now upper collision box. I'm going to move
it a little bit up, so it's up here so I can
see it compile and save. And we can go back to the rope and we can actually
adjust the size. I don't think it
should be that large. I mean, it doesn't
really matter, but maybe let's change
it to something like 25. Think, can just try. And I'm just going
to put it over here. So when the player is
standing up here on the ground and hitting that box, you can't press the Up button. Okay, so let's compile and save this and let's go
back to the climbing base. So now clicking on this
upper collision box, Let's go down to the bottom and click on this one on
component begin overlap. So what should happen when
you overlap this box here? What should happen is
you can't click on the up button and
you can't walk up. Again. Let me just
copy all of this code. We are doing the same thing. We're going through
this server with checking if it is the player, and if it is the player, Let's call this one called, we call it set can climb up. So set can climb up and it's the message because it is a Blueprint
Interface function. So can climb Bob is set to
false because when you are hitting this collision box, you can't press the Up button. However, now let's make the second one is when
you leave this box. So when you are underground, for example, you can climb up. So let me connect this together. Other component is this
one over here as well. You can climb up
whenever you are not overlapping with
this box anymore. So the thing is, now
we have this Boolean. And so in the player base, Let's see where we can use it. In the player base
we can use here when we are checking the
client being input, we don't want the player
to climb whenever this is set to true and they
are up there on the ground. So can climb up here. We can say, instead of just
saying is not equal to 0, we can just delete this and
upgraded to something else. So if it is lower than 0, meaning the player
wants to climb down, we don't really have
a problem with this. The player can climb down. However, when the player, and now we can take this again, I can actually just, whoops, I can actually just drag from this and say if it
is greater than 0, which means the player
is trying to climb up. Here is the problem we have. So if the player
is trying to climb up and they are allowed to, so can climb buck. Remember they can't climb up when they are
colliding with that, that collision box up here. So if it is greater than 0, we can say end. And they can climb buck. Then we want to go
ahead and climb. And what we can do
here, we can just say, what can drag from this and say, or this one or Boolean. And then we can connect this
here and connect this year. So what we're saying is if the, if the player is pressing down, which means the z-axis
will be negative. We are able to climb. If the z-axis is positive, which means the
player is pressing up and we're actually
able to climb up. Then we're going to climb. So it's either this condition here or this condition here. This is what it's
saying ultimately. So now we can climb up, so it's checking now, can you actually climb up? And this will fix our
issue with the spamming. So let me compile and save. I can just click on Play
and see what happens. So when I climb up now, I have a small bug. You can see I can't climb Bob, so I'm actually going to go back and see what I did wrong. So the Z-axis can climb
up is going through this. And it's setting that value. And let me go down here to see if I have said this correctly. The problem is right now is
actually this needs to be true by default because by
default you can climb up. So we have to compound safe. So remember too, that can
climb up as true on default. So we can actually
climb up here. So you can see now
we can climb Bob. And if I climb Bob here,
I can walk around. If I click on the up button, I can't spend anymore. But if I click on
the Done button, I can climb down the ladder. So now it's working.
We can't spam up here. We can simply just walk down, but we can walk up
and down, down here. So that is no problem.
64. Pausing the Climb Animation: So the final thing
in this section, I want to pause the
client animation whenever I am not climbing. So when I'm climbing here
you can see the animation is still playing and I
don't want to do that. We also had a buck
previously where I as the client by play. And I just make it a
little bit larger here. When I climb, you can see my character is
looking weird here, the animation looking weird. So maybe it's going
to fix itself once we pause and
play the animation. So let's try to do that. Let's go back to
the player base. And inside of here, I
want you to do this in the movement up
and down because it's continuously going
to check I am moving up or moving down on or
just standing still. So what I'm going to do now
it's getting a little bit of a mess and we need to clean this up at the end of this video. So let me move this
down over here. So I want to update this whenever I am climb
being because before I'm climbing and I don't really want
to do anything. So after this one, I am climbing. Let's
disconnect this. So before we adjust
the location, Let's play and stop
the animation. So let's take our z-axis here. The z-axis is simply
going to tell us, is the player
pressing up or down, or is the player standing still? So if this is not equal to 0, which means the
player is moving, we want to play the animation. To play the animation,
you can take this sprite here
and you can then, you can say Play, and it
plays that flip book. But remember, you
can't just play the flip book because
you right now, you are in the auto
plate from the client. And this is a visual update. Again, we are in
multiplayer so we need to run it through a rep notify. Because if you do this, only one client will see it. So let's remove it. And now we need to make it a new event called the pause,
climb flip book. And we can set that
to true or false. So let's go back to the interface function
for the player base. Let's make a new function. And let's call this one. Pause, climbed. Suppose climbed, flip book. Let's make a variable
here at Boolean. I just call it pause,
climbed, lit book. And let's compile and save. Okay, So let's call it here, pause blind, flip book, and we want to run
it to the server, call it pause limed flip book. Now, this one is also, also has a Boolean called
pause blind flip book. Okay? So here I'm just making
sure that I have B in front of my Boolean
just for good practice. And okay, so now we
have this event, run it on the server, reliable, and we want to
promote this to a variable. Promote this to a variable
called pause, choline, but flip book and I'm going
to put a B in front of it here and removing the
spaces just like that. Okay, so this one
is a rep notify. So clicking on here,
clicking on rep notify, compile and save. And let's run the server
run through here. So pause. I have many now. So let me just search, pause, choline but flip book. Let me run it through here. And ultimately what we
are trying to do is we're trying to go to
that pause, climb, flip book, checking if the
pause is set to true or nuts. So if the pause is set to true, we want to take this
sprite and say Stop. Here, the flip book. When you hold the mouse over it, it says stop playback books. So we want to stop
the animation. So when the pause is true, we want to stop the animation. One of the pause is false, meaning we want to
play the animation. We can say start
or actually play. So it's called play. So we're going to
play the animation. And now let's go back
and code that logic. So now we have that event ready. So when we are climbing and the z-axis when
we're pressing, when we're pressing up and down means it's not equal to 0, so we actually want to
move it if that is true. So let's connect it here. If that is true, we want
to play the animation, meaning that we can call
this event Pause, climb, flip book, pause,
climb, flip book. This one here. So we
can set this to false. So because setting it to false, meaning that we
don't want to pause, we only want to set
it here to pause it. So when this is set to false, it's going to unwrap notify
here are Honorlock function. And when it's set to false, it's going to play
the animation. Now I don't want to play
the animation constantly, only want to play it whenever
it is not playing already. So what you can do is take this bright and then you
can say flip book. And now we can see
we have, let's see, we have as reversing is playing, this one is playing. We want to check if it
is already playing. And let's say, let's say nuts. So, whoops, not this one. It is not B, which is this one not Boolean. So now what we're saying here, let's write an end
Boolean as well. So now what we're saying, if the player is
pressing up and down, so the z-axis is not equal to 0 and the animation is
not playing already. Then go ahead and play the
animation because we're not really interested
in keep spamming. Play this animation one. We are already playing
the animation. So when you are not already
playing the animation, so when the animation is not playing and the players
actually pressing up and down, we want to go ahead and
play the animation. So let me just move this ahead. We are running in
problems with the space, so just organizing
things a bit here. Okay, so the next thing
we want to check for, we want to say now, is the player standing still, meaning the z axis is equal to 0 because the player is
not pressing up and down. So if this is equal to 0 again, and if the animation
is already playing, then we want to
stop the animation. So and Boolean again, connect those together
and make a new branch. And take the false here. So we are checking, is the z axis equal
or not equal to 0, meaning the player is moving. If it is false because the
player is actually not moving, it's going to go
down here and check, is the player not moving? If that is true. Like it's also going to check if the animation is
playing already. If that is true, then go ahead and pause
the playing animation. I'm going to move
these down again. And like this. Now we are going to
play the animation or pause the animation
if it's already playing. But we are standing still. We want to actually pause it because we don't want to play the animation while we
are standing still. And as the thing when
everything is false, we want to just
adjust our location. So let's put that down here. And so when we are moving here, if we're moving, but the animation is already
playing. Let's go down here. It's going to go false,
it's going to go false. And then we are just
adjusting the location. So it's initially focusing on playing our animation or
posing our animation, and then it's going to
adjust our location. Okay, so I think we don't
really need more here. So let's see if
everything is fixed. Let me click on play as the
server and let me jump here. You can see I'm not playing. If I move up and
down, it is playing. Okay. It looks like everything
is correct now. Awesome. So let me now go as the clients and open it here. That is working as well. Now let's see if we still have that bucket or we
might need to fix it. So let me move it here. Now we still have that box, so I need to take a look
at where it went wrong to fix that bug because sometimes it appears and
sometimes it doesn't, so we have some bug. And I think if we just go here
and move the player base, let's just test it quickly here. So if I have the player
standing here and I go to the player base, and I disconnect them, move right and left. Maybe something is going
wrong because we are also setting animations here. So let me click on play. And if I play as the server, actually not the server, the client, while I
have the service bond. By jumping click on up. You can see the full
animation is obviously not updating because I have
disconnected that event. But it is playing correctly. It seems like we don't, we never have a
problem on the ladder. So there is some decode initially is correct
all of the code, there is just these updates
that happen even though we told it that we only want to play this when
we are not climbing. So I'll see what I
can do about this. So I believe the best way to
fix this bug is if we go, so it is playing this animation, but sometimes it
goes through this and sexually playing
the on-ramp function. So we can try to go to the, remember we made
that movement state here, this movement is saved, is actually running that unwrapped movements
state function. So going to the
movement state function here before it can change, it also has to check if
we are climbing or not. So let's take our client being. Is clumping here and
let's make a branch. And now it's going to say, let's write a nut Boolean here. So if we are not climbing, you are allowed to do
all of these movements. However, if we are climbing,
don't do anything. So something like this here. So let's now compound save and pray that everything is correct. So let's try to jump
now and it is working. Let's try again a
couple of times to just make sure that it is working. Okay, so now that
fix the problem. Now it's working and
if I am the server, and they can see each other, so now I'm jumping
as the server, you can see that works as well. So both the client and the
server can see each other. And again, just, just to make
sure that it's not bugging. So here in the player, I just wanted to check my
collision on the ladder. So as sprites, I'm not
generating any overlap events, so that doesn't really matter. We, the overlap events are coming mainly from the capsule. So clicking on the capsule, looking down on the
Collision Presets here. So the poems are ignoring each other and the line being players are
overlapping each other. So actually I'm going
to change this one too. Ignore each other.
So the players on the letters will also
ignore each other. And you can always
change it if we need to, but that is what
we can do for now. Okay, so now everything
is working and you can see the camera right now. You can see it's bugging out. And this is because you just
have to be careful not to place it inside of this collision box or
it can make it smaller. I'm going to place it outside because we are already
in the overlap. Now, let's click on Play. Play as the player and the client to make sure
the game is working. So we have the client here
and we have the player here. So the player response
now the server, place, this guy here, the character
place, Tsarina here. And we are moving around. And this is looking good. Now as the server. That is looking good as well, and they can't block each other. Okay. So everything is
looking correct and I can't spend the
Up button here. Both the player and the client
can span the Up button. Ok, so everything is
working correctly. And let's try to
play now S2 clients, sometimes you have to
test it as two clients to see if that is working
correctly as well. So playing, Serena and Luke, walking over here, jumping in on the letter that
things are working. The client and the server. So clicking spam up
here doesn't spam. But that's good. Everything is working and the client, the camera is working. You can see it's adjusting
the location of him. Just like that. So everything
is working correctly now. And of course, if we encounter
any box in the future, we will be fixing those. But for now, it seems
like everything is working and there are
no really no bugs here. So the next thing
we can do is we can work on the
health and damage. And this will be really
interesting because now we can get damaged
from the enemies. We can apply damage to them
and it will be a lot of fun. So let's move on to
the next section.
65. EXTRA: Cleaning Up Your Code: So I wanted to add
this extra video because I think it's very important that we
clean the project and I think it's getting
a little bit messy. So let's go ahead and
clean some of the project. The first thing we can do is go in here in the player base. And here we've finished our
climate system and so on. So we have some events
here that we can clean up. So here starting from
the move up and down, you can double-click these pins here to make a reroute node. And I usually do
this to make it look leaner so we can click here
and make it down here. And instead of
having two of those, because this is
initially coming, coming from the same thing. I can just drag
from this one and connected here and I can
delete this one here. And for some reasons pumping out it won't let me delete it. Let me close it and open it again and delete it.
So now it works. Okay, so I'm going
to move this down. So try your best to clean
all of this up here. And I can move this
all the way here. If you want, you can
make two of them. You can make one here and one here and connect it
like this if you want, if you think this looks cleaner, I think this is
looking good now, maybe move it up. No, I think this is good. Over here. We can move this snot like this. We can move this
up like this here. And this part of the code. This is like This
is looking good. We can move it a bit up, maybe further back,
something like this. And I think this is
looking fine so far. So down here we have the
calculation of the z-axis. And I'm going to move it beneath this because
they belong together. I'm just going to
move it up here. Then we have the can climb code. I'm going to move
all of this down here so they can climb is
almost cleans or it's actually, it's actually fully clean so we can just drag this closer. This is the can climb, but I think they can climb. This should come as
number two because this is one of the initial
codes as well. I'm going to move this down. And I'm going to
take this part of the code listed beneath here, just make sure they don't
collide over here to the side. Then we have can
climb here as well. This is actually the server, so actually need to move
this a little bit down, but can move this, can climb above it. So it starts here and
goes down to the server. And then we have the is
climbing and we have the pausing the flip book and posing the flip book
comes from up here. Maybe I can place this up here, or I can make space and just place them beside
each other over here. I like to putting
things together so they're not too spread out, but I think these are way
too close to each other. So I'm going to, I'm going to pull this down a little bit. This is, this up here
is the main code. And we have some
events down here. So this is adjusting
the location, which is happening over here. So adjusting the location, I can again just put it side here just to make
it look cleaner. And I can select all of this. I'm going to move it a little
bit down again, like this. Okay, So we have
the set is climbing and can climb up
this climb being, I'm going to just actually
we can just let it be here, just moving it closer so
it's not too far away. The same thing with this one. And what we can do with this code and just move it a
little bit closer like this. We can take all of it here. And then we can click on, see. Let's call it climb. Climb being maybe you haven't call it something
better or maybe climbing mechanic or
a whole line of text. You can also make,
remember we can make enter comments as well, so you don't have to
only do it out here, you cannot as well. Do it in here, give them
colors if you want to, if you make your own rules. Sometimes what I
do for my games, if it is coming from the server, I make a comment and then
this comment will be read. So all the red comments
inside of my game, I know this is the server, so something can do. And if it is specifically
for the client, I do maybe like pink
instead of red. So you can try to
make your own rules and make everything
organized here. I'm going to make this fit here. So now we have declined
being mechanic, we have the jump. This one, I'm going to
clean up a little bit more. So moving this closer. So initially just
very, very important, tried to make your
code a lot leaner. Now clicking on this one, hiding the connecting because
I don't really need it. And I'm going to move all
of this, but further away. So there's more space here. Okay? Something like this. And now what we can do is just move those under each other. Okay, so now we have this, and actually this one
is a bit messed up. So let's take this pin
here and move it this way. Instead of having so many, I can just double-click here, and I can connect
it here over here, and connect this one down here. So I can delete this one. And now we have those
connected to all three. So a little bit more clean that before this one we can drag a little bit back
so we can see the line. I think everything
else is looking good. So we can move this, the front like this, and we can move this a bit further away
so they're not colliding. Okay, so I think this
is looking grades. And remember when you
clean everything out here, remember also to check
your functions to make sure that everything
is looking good. I think like basically
everything is looking good here. We can move it a
little bit further away so they're not
colliding like this. You can either
double-click on this one and make it like this here. Okay? Now, I can move this away, and here you can do the same. So I can move this a
little bit further away. And this one further away. You can even just
double-click on this one, move it down like this, and click on q. Two. Them attached together,
something like that. Something like this. I mean, it's gonna be
a lot more cleaner. Maybe you can just move all of this away except for
this one like this, that will look a
bit more cleaner, but that is looking good so far. Okay? So when you have
cleaned everything, so try to check everything, try to comment everything
very important when you come back like
three months later, you have no idea
what all of this is if you have not
committed any of it. So remember to clean the code, try to comment everything
and make sure you understand what has happened
here, what you have coded. The second thing is you can
clean up your variables. So what you can do here, for example, the
climb being here. What you can do
here to the right, you can add a category to them. So I can just call this
category climbing. And you can see it adds it
automatically to a category. And it can do that for all
the other client beings. So this one can climb Bob. I can select the category
now and select line being. And it will automatically
gather them together up here. They'll climb being
location is also climbing. The pause climbed and
the check climb as well. So both of them, I'm going to change
them to climbing. Now we have can climb
is also declining. And then we have
the climbing object is also the climbing. And we have some
other thing here. We have the movement's state. This one, for example, you can call a player movements. And we have the layer location. So this one maybe call
it player properties, something like that or location. So current player location. We can also change the
player properties. Update player camera. So this one we can call
the layout camera. So everything about
the plug cameras in here and the plant info. Maybe we can change it to
play properties as well. Layer spawn and location to
play a properties as well. And the player camera, we can change to the camera
and we have the z-axis. This is the movement.
So maybe you can just change it to
the player movement. So now you can see
you have organized all of those and when
you minimize them, you see how clean this is. When you have a
large game, very, very important to clean
all of your code. So you know what's going on. Okay, so let's save tried to do that with all of
your blueprints. And the next thing we
can do is out here. What we can do out
here in the outliner, you can group things. So for example, we
have the pigs here. I can select all of them and
I can create a new folder. And I can call them enemies. And I try to find
all of my snails. So from this snail
to this snail, I can hold Shift and
click on this one, drag them into the
enemies folder. And now we have all the
enemies you can see here. Okay? And now we have the,
we have the rope here. Maybe you can add it into a
folder called environments. And I don't think I spelled
it correctly, like this. And we have this one. This is also the environment, so I'm going to move
it inside of here. We have the player start
with the navigation mesh. Maybe you can call it volumes. And this is the
navigation mesh volume. Post-processing, I
can actually make a new folder called
post process. Okay, So we can move
this recast also inside of the volumes
and the player start, we can just let be out here. We don't have to put
it inside a folder. So now you can see this
one is organized as well. If you want to go
to the next level, you can even rename things. So for example, it
can rename those. But I think it's fine for now. Okay, so the last
thing you can do also, you can go to the
Blueprint Interfaces. For example here.
Remember those. You can also give a category. So for example, can climb, you can again give it a category
just like the variables, and they will all
be in a category. So very important to do
that for your own projects. Clean all of your code. And I just wanted to
make this extra video just to clean it
up a little bit. And now I think it's a
lot cleaner to work with. And yeah, that was
it for this video. So I'll see you in the next one.
66. Preparing the Flipbooks: Hello and welcome
to this section. It's now time to work on
the health and damage, both for the player
and for the enemy. So we have a lot to do
here in this section. So let's get started. First of all, here in the course materials I've
uploaded for you some, some surprise or textures that
we need to prepare first. So going to the character, I have this one
called The Death. So let's go over to the assets
here and go to characters. I'm just going to upload
it out here because this is the same for
both serine and look, we've just uploading it here. Right-click on it,
apply paper texture 2D. We know all of these
things now going to look, we have that step effects. So going to look in textures, and I want you to import
that step effect as well. Same thing with Tsarina here. I can see that I've already
uploaded it for Luke, and let's try to upload
it now for Serena. So this one step effect
uploaded for Tsarina here and apply paper
to the settings. And before we make
them into sprites, I want you to go to,
let's go back here. Go to enemies. And inside of here, Let's take the pig
hits and pick death. And let's go to the enemies
now and the textures. And let's upload the
pig, it and death. And also the snail
hits and Snail debt. So these two as
well upload those. And for all of those
that I've uploaded, again, apply paper
to the settings. And I want you to make flip
books out of all of these. So the death HIT
or both of those. And the sea death here. And also Luke stabbing, this one called looks
tab anserinus step. So I'm going to skip
that in the video. We already know what to do here. So I want you to create sprites out of those
and flip books. So the greatest 180 by 180 for the characters
and for the enemies. When you extract the sprites, the grid is 90 by 90. Okay, so here I've
finished the flip books. So for the pig death, I've said the frames per second, two for now, I'm not sure
about the four here. Maybe it needs to
be six or slower, so we'll have to test
that in game later on. And for the pig head, remember to set that one fewer
frames per second to one. I believe this will
affect the code later on, so set it to one. And for the snail
heads or snail death, I have said that one
to eight frames per second for this snail hit. I've set it to one
frame per second. Also very important
to do that here. And for the depth here and the characters have set it
to eight frames seconds. So this is the death animation. And for Luke, the stabbing is
through frames per second. And the same thing here for Serena is stabbing is
two frames per second. Okay, So now we have all
of these flip books ready. Let's actually, before
we end this video, also apply them
to the structure. So let's go over to
our blueprints in the structures and open
the player information. Now, you can see here we don't have a attacking animation, so let's click on Add variable. And let's say attack animation. I'm going to drag
this one up here. Maybe I want to drag it
right after the jump here, doesn't really
matter, but it's just me writing here,
paper flip book. It's a paper flip book here. Now saving. And let's do the same thing here
for the animal info. So the animal now we
have the idol and move, but we also have
the Hit animation. We have the death animation. I actually have that
for the player as well. So let me first change that
into a paper flip book. Again here and here. Like this. Okay, so now I have hidden
deathless actually add that for the player as
well while we are edits. So let's add the
death animation. Let me just move it here
above the sound effect. And remember that is
a paper flip book. Okay, I believe we
have everything here, so let's save everything. Let's go to the player. Go to Luke and click on
open full blueprint editor, click on class defaults. And here in the class defaults, let's find the player info here. And you can see
they can't really add them here even though
we added them, remember, you have to go to
the player base, click on compile, click on Save, and you have to click on
compile inside of here. Because you have added the
structure inside of here, the variables inside of here, it has to compile here. The same thing with the enemy. Before we can add those
in snail and pig, you have to go to the
enemy and Compile and Save. And now we can see them. For a look, you can now click on class defaults and
you can see we have the attack animation. And let's just search for step. So Luke, step, further depth. We can take this one
called FB death. This ladder of animation. We didn't really have anything. This was just for testing. And if you want again,
I told you you can, you can go to that
website called maples. I am here and create a character and try to use
your character or just make. You see here, you have some
animations that you can do. And you can just select the ladder animation and you
can see what it looks like. Or you can just put the rope animation
here if you want to. Let's actually do that. So it doesn't look weird. I think it's called climb. Okay, so let's go to Serena now, going to players,
Tsarina, not here. Layers Tsarina and opening the full blueprint that
it's an NDA attack. Again, search for step, select Salinas, Serena's,
and for the letter. Let's search for
those climbed. Here. Add for the death animation, just search for death
and select this one. So now we have
everything selected. Now let's do the same
thing for the enemies. So let's go to the enemy. Let's go to pick first open full blueprint editor
in the class defaults. Let's find this one
called animal info. And here in the hits, we can search for pig
hits and the death. We can search for pig death. Do the same thing
now for the snail. Open the full blueprint editor
and inside of animal info, let's add the snail hits, and let's add the Snail debt. So now we have everything
added here in the structure. So with these things added now, let's go over and do the
players attacking input.
67. Adding the Attack Input: Now let's go ahead and
add the attack inputs. So first, let's go
to Project Settings. And inside of input here, Let's now we have
only the jump so far. So clicking on this plus and adding a new one called attack. And I'm going to
click on here and click on my left control
on the keyboard. Now I'm going to use
the lift control as my attack button, but this is only a course, so you can choose your own
button if you want to. I believe in Maple Story, it was either this
or the Alt button. So I'm going to choose the less control
button on my keyboard. Close it down, going into blueprints and inside of
player and an N player base. So let's do this
attacking movement or logic here in
the player base. So what I've done
here, I've just, from the previous video, I've just selected all of my nodes and click C
to create a comment. And I've just called this
one movement and I've changed the font
size to seventies. I just have all of my movements. The thing we have coded
so far inside of here. And so we can save some space. And now we can do the
attacking down here. So down here, what
I want you to do is I want to right-click
and say attack, whatever you called it inside
of your project settings. Select it here. And now for the attack, we want to make it go through
the server because again, this is multiplayer and we want to make sure the client
is not cheating. And so what I'm going
to do is let's actually create a here and the Blueprint Interfaces
and the player base. Here. Let's click on Add, and let's make a new
function called attack. And let's just make
a new variable here. Here called B is attacking. So we're just checking if
the player is attacking. Now you can see here sometimes it's bugging, is attacking. When I write it here and click on Enter, I'm going
to delete it. I don't know if it does that
sometimes for no reason. So I'm going to
delete this here, delete it, and make
a new function. Now I can see if I click
here and click on Add. It all of a sudden works. I don't know why it
does that. Sometimes. Let's rename it to attack again. Over here. Now we can do, we can call it now
saying attack and selected here the
event attack. Okay? So we want this to go
through the server. So we're going to make
a new custom events called server attack. And this one is also going
to have that Boolean called B is attacking. Let's call, actually let's
run it through the server first year and let's call
that server event up here. Like this. Let's connect it. And now up here we can call that attack from the
end player base. Okay? And now let's set
this to be true. So whenever you click
the attack button, you're going to set the
attacking boolean to be true. It's going to go through
the server and the server. You can right-click here,
promote this to a variable, call it B is attacking. And now the server is going to set this variable to be true. And obviously I want
to replicate it to the clients so they
can see my change. Okay? So the thing we
want to do here is we don't want the
player to be attacking. If you're already attacking, that wouldn't make any
sense cells you will be able to spam
attacking all the time. So what we want to do is take this Boolean and make a branch. And let's actually do a
notch here, so NOT Boolean. Now what we're saying is if
the player is not attacking, so if this is false, the player is not attacking. We can go ahead and attack. But if we're already attacking, we don't really want to
spam attack on top of it. So only attack when you
are not attacking already. Okay, so it's going
to go through the server and it's going
to set the variable. Now what we want to do is
play and attacking animation. And remember, a long, long time ago we made this movement state here where
we change the movements. So let's add a new
movement here. We added one to the structure. So let's actually go to
the enumeration now, because here in the enumeration, if I pull it up again, we only have these now. But in the play structure here, we have this attacking animation we added in the previous video. So now let's add that option
here in our enumeration, which we also created
a long time ago. Here in the enums, in the movement States. Let's click add enumeration
and add the attack. Now for this tag lets, you can drag it up
if you want to. I'm just going to
let it be down here. And now we can see that
oxygen is available. If you can't see it, remember to click on this
arrow and it will appear. Now let's copy paste
this set flip book, and let me connect
it to the attack. And now again, remember you can't just
go in here and select step one of the stab animations because since we want to make it dynamic
for all characters, they have their
custom animations. We have to find it here from
the structure that we added. So clicking on the
structure, you can see, you can't see any pins. And this happens when you click
on Hide unconnected pins. But you can click on
the check mark here. So the attack animation. And now I can click on this arrow and you
can see it appears. Now I can drag this
attack animation and login into this
one down here. Okay, so that is fixed. Now let's compile and save. What we can do now is go
back to the Event Graph. And here we want to play or attack animation
because remember, you can just say set
movements States. This is what we have
been using so far. And here you have to pay
attention because now you can see we have something
called set movements state, and the enemy base as well. This is what the enemy, this is for the player. So pay attention to
what you're selecting. This one, we want to use
that one from the player. Wants to play the
attack animation whenever the player attacks. And now, before we
do anything up here, remember the moving right. We don't want to move right and left one the player
is attacking. So I'm going to take my
a is attacking Boolean here and say nuts. So what I'm going to say here is if the player
is not climbing. So let's do an AND Boolean and the player is not attacking. So if the player is not climbing and the
players not attacking, you can go ahead and
move right and left. But if the player is attacking, we don't want to
move right and left. Let me just drag this to
the side so I actually have a bit more space to work
with like this here. Okay. Now let's
compile and save. And now you can see there is a small mistake and I'm not going to tell you
about it right now. I'm going to explain
in a little bit. So let's click on Play now. Remember before
we click on play, remember to set it on
play as listen servers. So here, plays listened to over. Let's click on Play. I'm going to attack. You can see it's working. Alright, it's fine. It's attacking. We haven't set
the attacking to be false, so it's going to attack forever. So this is what can the
server now on the client? Again, I'm going to
click on control. But you can see
sexually not working. I can't see my animation. Remember, this has, this is a visual change and it has
to go through a rep notify. Right now you are running this
event through the server. So the client have no
idea what you're doing because the moment
you go to the server, the client can't see all of this information unless
it's replicated to it. This information
the client can see because you are
actually replicating. But this one just running
through a normal function. And it's not really going to the client and you're
running it through the server so the client
can actually not see all of this you're writing
here unless it's replicated. So what I'm going to do is
change this one instead of replicated to a rep notify because this is a visual change. So let's change it to
Eric notify instead. So we can notify the
client about this one. Here and the is attacking. What I'm going to say is take this Boolean
again, say brands. So if you are attacking, I want to play this movement
state attacking animation. Let's go back and make
sure everything's correct. So this is yeah,
so let's try now. Click on Play. Now as the server again,
click on control. This should work. Now if you go to the
client, I click on control. Now, you can see
it's also attacking. The server can also see
the client is attacking. So remember, this is very
important in multiplayer. You have to go through a rep notify if it's a visual change. And if you play it
directly in the server, the client, the client
can't see all of the things you're doing here unless you are actually replicating
it to the clients.
68. For Each Loop: So the thing is now
we want to apply damage to all the
enemies that we hit. And to do that, we are going to use something
called a for each loop. So what we haven't
used loops yet, and I don't believe I have
explained that to you yet. So this is just a short video
explaining what loops are. So let's begin here. Down here we said before we are going to attack and it's
going to the server. Now, all the logic is
going to be inside of the server because we want to make sure the client
is not cheating. So let's do that inside of here. But we're going to do, is we're going to use a function called get overlapping actors. So we're going to hit something and we're going to get all the overlapping actors, so all the actors
that we are hitting. And for this one, we are going to do
a for each loop. This is the one
we're going to use. And let's connect that one. So which actors are
going to overlap? We're going to take a look at the enemies because these are
the ones we want to attack. So get all of the
overlapping actors, get all of the
overlapping enemies. And for each of those enemies, so now it's going
to take each enemy. So let's say in my level here, I had five enemies stacking on top of
each other like this. And I clicked my
attack button and I actually hit all
of these five. So what is going to do now? The overlap is five. So you can see all
of five enemies. And now for each single enemy, What do you want to do? And what we want to do, applied damage to
every single enemy. This is what the loop body is. Now, you're going to do an action for each single
enemy you have hit. The thing we want to do
is just apply damage. Now, I want to make
sure that this code is not run whenever I
don't hit anything. If you don't hit any enemies, we don't really want
to run this code. So we're going to say is, we're going to take this
one and say length. So checking the length. And I'm going to take
this and say not equal. So we can do that by
either writing not equal or saying an exclamation
mark and equal. This is awesome in mathematics,
meaning not equal. So if this, the length of the overlapping actors
is not equal to 0, meaning I have actually
hit something. Then you can go ahead
and execute this code. However, if the length is 0, then don't do anything
because we really don't want to run this code
if we haven't hit anything. This is very simple
a for each loop, it's going to take a look at
all the overlapping actors. So maybe we hit three enemies. And for each of
these three enemies, we want to apply damage. And we will be doing
that in the next lesson.
69. Player Applying Damage: Now let's get into
the player blueprint again and see how the
player can apply damage. So here inside the player base, this is what we did
in the last video. So doing the attacking here. And by the way, if you
have not seen it before, you can see what we've
been working with so far. The variables, they are like circular here in the pin here. But this one is a square and it has a lot of small
squares inside of it. And this is called an array. And you can see it here when
you create a new variable. For example, I just
called this whole random. You can see when you
click on the Type here, the variable container here, we can actually change the type from a single to an array. So what is the difference
between this one and this one? So, so far what we have
been doing, Let's, for example, say
players connected. For example, let's take
players connected and let's change it here
to bp player base. So let's say what we
wanted to do with this one is store them all
into a variable. So you can't just take
this here and set it here. Like when a player connects, you set this variable. This variable can only
contain one information. So for example, this variable is if the player is
attacking or not. And let me see if we have
other variables here. This variable contains the
movement state right now. So when you set it to fall, it will set that
movement state to fall. So you can't have multiple information
at the same time inside of these variables. However, you can
do that when you change it into an array. So in order to store
players connected, all the players connected
in one variable. So not only one player, you actually have to
change it into an array. And if you click on
Change variable type, you can see they become
like this square. And what that is, is
now the array you can, you can imagine it
as a large box. And I told you before, you can imagine this
normal variable as a box with some
information in it. This one, you can imagine it as a large box with small
boxes of information in it. So I can now store all the players here,
all the variables. And what I can do here is I
can take this and say gets. And I can actually get one of the players and do
something with it. So an array is just a
large box containing, for example, all of
the players connected. Maybe I contain all of the pons, whereas if it is
just a circular one, so just a single
normal variable, it can hold, only
contain one information. But if you have an array, it can contain
multiple information. So for example, all the players that are connected
into the server. So here, the overlapping actors, it contains all of the actors
that have been overlapped. And let's say I
attached to those. And these are five enemies. Now, with these five enemies, I can now break them
down here in my loop. Now I have every
single enemy here. And now what we want to do
with our loop is we want to apply damage to every single
enemy that I have hit. So if the length is not 0, meaning we have hit someone, we want to take care
and say Apply damage. This is how you do
damage to something. Use this function
here, apply damage. Now we have to specify what
you want to apply damage to. So who is the damaged actor? That is the enemy, and
the enemy is here. Remember, you took all of the overlapping actors which are the enemy base, so the enemies. And for each enemy, you want to apply
damage to them. Okay, So what is the
damage you want to apply? And we actually have to specify what damage
the character does. So let's go back to the player
info, our structure here, player info, and let's add a new variable
called base damage. Maybe later on we can
upgrade that damage. So this one is
called base damage, and we can move it on top here. It doesn't really
matter, but I just like to structure
things that way. So for the base damage, Let's go back to the player
base Compile and Save. In the class defaults
Actually you can just not in
the class default, you can just click on it here. If we find it here in the
player properties player info, this is the structure
and clicking here. So by default, I just want the base damage to be
maybe something like five. So doing five damage every
time you hit something. So now that we have
that set and let's take this one here and
let's break it. And we can now use
this base damage and plug it into this here. Now, later on if you want to
make upgrades for a game, and we probably will
do that for our game. And not really in
the base course, I'll probably be adding
a bonus sections to develop more and
more and more on this game until it
becomes a huge. But maybe I've already
recorded that. So take a look at
my bonus section at the time you're
watching this video. So here we are applying
the base damage. However, later on
if we want to add upgrades and later on we want
to increase that damage. You can just make
a new variable. Call it damaged, multiplier and Compile and Save as Default. Now let's change it to
actually to a float, and let's not change
it to an ArrayList, just keep it into
a single variable. Let's drag it out. And by default, remember
to set it to one. So the damaged
multiplier is just one, which equals the base damage. Now, we're going to say, is this multiplied
by the multiplier? And then we connect it here. Now, later on, if
we do upgrades, we can just increase this
multiplier, for example two. So it's going to say the
base damage times two, which then applies more damage. But for now let's
just do one here. I'm going to move this
a little bit of weight to stay more organized. Now the event instigator, if you hold the mouse over it, it says the controller that was responsible for
causing this damage. And this is the player. So we are inside of a player and to get the player's controller, you can just say Get Controller. And get controller is
a function that says returns controller
for this actor. So the player's controller,
you can get it this way. For the damage type here, you can just change
it to damage type. All of the, like the damage closer we don't really
need right now. Alright, so this is
how you apply damage. And if we save everything here, now in the enemy base, what's going to happen is
if I go to the enemy now, here in the enemy base, we haven't really done
much inside of here. But here you can say event, any damage, and that is an
event we haven't used yet. Any damage is just
going to receive any damage that happened to that point and we can
do something with it, for example, we can subtract from the
health of that enemy. Now before we end
this, let me actually do something with
the collisions as well because this is if I
go to the viewport here, actually let me go to
one of the enemies. So are the snail. Open the Blueprint editor. I think this hit box is way too large and when the player
jumps over the enemy, the player will get hit when
you enter this overlap. I only want them to be hit whenever you are very
close to that snail. So I think this
one is very huge. So what we can do
here is just add another collision
that's responsible for damaging the player. And let's go to Add here and
let's search for collision. Not actually a spherical lesion. Let's choose that one. I think that's
better in this case. And let's change the name
to this one to collision. And I want you to
make it actually, let's add it not here, I'm in the snail,
that's my mistake. Let's go back to the player
base and add it here. So collision, collision sphere and call it collision because we want it on all of the enemies, not just the snail. Now let's go back to the snail and now you can make it
smaller to fit that snail. Snail, we can just make
this sphere radius smaller. You can also drag it down. And maybe let's make it 20. Then I can see this is 20. And if also you can also
see it from the right view. Remember we talked about the orthographic views in
the intro, the right view. And you can change this from the wireframe to oblique mode
and you can see the snail. So it can also adjust
it here on this view, that's sometimes a lot better. But 20 I think is
a good hit box. Let's go back to
the perspective. Now what we want
to do is just take the collisions for all of those. So let's compile and save. Let's go back to the enemy base. So here in the capsule, I want to go down and click
on this collision preset to check if all of the collisions we are
working with are correct. So I think this one is fine. We don't really have
to do anything here. So clicking on the collision now and clicking on this
collision preset. So this one, just like before, remember in an earlier lesson, we had that problem with
the snails bugging out, like they are walking
close to the ramp. And that was actually
due to the world static here overlap and I actually
don't want them to bug out. I'm going to firstly, you can characterize
step on top of it. No, you can't. And let's do custom here. And then let's just
ignore the world static. So the pattern is not going or the snails not
going to bug inside of it. Clicking on the sprite,
making sure that it is not generating
any overlap effects. And I believe this is done here. So let's go back to
the player base. Now for the player base,
we are going to add a collision where you can
detect it, the attacking. So let's make a new
collision here, and I'm going to attach it to the sprite so you can see
why I'm attaching it. So first, I'm going
to just add one here. Collision, let's say
the collision box. And I'm going to go to the
right view, lead mode. So now I can see where I'm adding it actually not
in the player base. Let's, let's do them in the pleural space because all of the players are the same. So it wouldn't make sense to do it in Luke and then Serena. So let's do the size
inside of here. The reason we did
the size inside of the snail is because all of
the enemies are different. But for the players, they are all the same. So let's do the size
here in the player base. And what I want to do here, Let's do the x first. And I think something like 20. And for the y, I
can't see it here. Maybe like 20 or 25,
doesn't really matter. Let's just make it 20. And for the Z here, so how much up and down? I think 30 is a good number. So let's try 30. And let's move it a bit
closer to the character. What if the enemies are
inside of this collision? You are able to do damage. Now if you actually,
before we do that, let's go to the collision and check out if
everything is correct. Okay. So everything is correct
except for one thing. So here, again, can play or step on top
of this. No, you can't. It will generate overlap events. And now let me set this to custom because I need
to add something here. Now you can see before
and the enemy base. Now if you click on this
collision that we made, you can see that the object
type is world dynamic. Now the problem is if
you have this world dynamics it to overlap right
now for this collision box, as if the snail walks close to you and then overlaps
with this box, this snail will do damage to your character and that
doesn't really make sense. Why my, my, I want the enemy to walk into me here in this capsule before
it can do damage. Not really when it's
overlapping my attacking range, that wouldn't make any sense. So here you can see
the end of a base. This is an object type
of world dynamics. So I'm actually
going to the player here for this
attacking collision, and I'm going to set it to
ignore the world dynamics. So it's not really going
to collide with me here. I only want it to damage whenever It's
blocking my capsule. And you can see my capsule has the world dynamic two blocks, so I am going to be
hit by that enemy. Now clicking on here, Let's
change the name of it. Let's call it a tag collision. Let's compile and save and
let me click on Play and I can actually show you something cool so we can learn
from this as well. Now we can see if you
want to view something. So if you want, if you want to view the collision because
you are debugging, you can click on that
collision and you can remove this one
called Hidden Game. Hidden game, remove
that, click on Play. And now you can see
that collision box here in front of
you and their game. And you can see when
I turn this side, the collisions actually
actually behind me. So we need the collision
to follow me on each side. And this is why it's important. If you want that, to include
it here in the sprite. So it's actually
attached to the sprite. So it's a child. And you can click Play and it's going
to rotate with this bright. So it can now see now it's
actually following correctly. So very cool thing
to learn from this. I'm going to let this be not hidden in games so we can actually see what's going on. With that. I believe I don't have anymore. So let me check this
capsule here for the player just to be sure
if this thing is correct. So right now you can see capsule is set to ignore is the
bone which is the enemy. I'm actually going to
set overlap because we want to be
damaged by the arm. So it doesn't make sense
to ignore the bone. That is correct now
and for the sprites, this part is not
going to generate any overlap events
just like that. So let's say where everything, I believe everything is correct. So now in the player base, we are applying damage to every single enemy
that we are hitting. The problem right now, which we will fix in the
next lesson is if I attack, it's going to attack forever. So let's go over in the next
lesson and fixing this.
70. Stopping the Attack Animation: So back here at this code, so far we have set the
is attacking to be true. And if it's attacking is true here in the
unwrap function, it's going to set that
attacking movement. Now we want to do something
when the attacking is false. And what we want you to do is we'd want to copy paste this. Now you can do this,
just set it to idle so we are not
attacking anymore. And we have to at some
point set this to be false because so far we have just
set it to be true up here. And this is now true, but we have not
specified anywhere in our code when it will be false. So let's actually do this. So here let's say before we
do anything with the enemies. So let's say yes, if i here, if I overlap, if my length is 0, if I don't hit any enemies, I just want to stop attacking because I didn't hit anyone. So I'm going to take this
and put this to false. However, if you just do this, it's going to do this at the
same time you're attacking. So you can see I'm
going to click attack and actually at the
same time I am attacking, it's going to stop my animation. So instead of doing this like instantly and let me
just play it again, actually, I don't
need to hit anyone. So clicking here, you can
see I click on Queue, but nothing's happening because I'm instantly going from
setting a true to false. You have to wait a little bit
before you set it to false because you have to wait for the attacking animation to play. And you can do this
in a very smart way. You can take the sprite
here and say flip book. Now I can get the length
of this flip book and it says get the length
of the flip book in seconds. You can get how long this
flip book is playing. You can actually delay. Remember we use that delay node. So let's connect
the delay to this. So delayed the code for however long this animation is going
to take, going through that. And after it's complete, let's go over and
set it to false. So now if I click on
play and you go to that character and lets
me not if anyone here. So if I hit now, you
can see it's working. So that is correct.
Now I can hit and it stops my animation
after sexually played. So you can make this animation again slow and faster by going to the assets two characters
to Luke, for example. If you increase this
stabbing animation, of course it's going to stop that animation a lot quicker. So now it's controlled by
the frames per second. So now that we have the
attacking done, remember here, when you are finished
attacking the enemies, because now if I play
and I hit enemies, you can see it's playing
forever because I haven't specified when I will stop
if I actually hit enemies, because this one is just when
you don't hit any enemies. When I hit enemies, again, I'm going to do the same. So I'm just going to drag this here when this
loop is completed. So when you have applied
damage to all enemies, I'm going to stop
my attacking here. And this will happen
very, very fast. So it will just look like
you didn't hit anything. Because like blueprint code is running so quickly, it's insane. So now if we don't hear anything or if you
complete your attack, you're going to stop attacking. So let's now see here, if I hit anyone, you can see it's now stopping the animation after
I hit the enemies. Or even if I don't hear
anyone, it's going to stop.
71. Enemy Receiving Damage: Alright, so now that
we have coded a lot of the tech animation and
we're now applying damage. Let's actually go to the
enemy here, the enemy base. Here we want to call this one, this event called any damage. And we want to apply
damage to the enemy. So what we want to do is here, we want to actually first
go to the structure and add health for
the, for the enemy. I believe we didn't do that yet. So let's go to blueprints and structures and in
the animal info. And here let's add
a new variable, call this one health. And for this one, Let's go and click on float. And for the health,
I'm just going to drag this one on the top. Okay, so let's save this and let's go back to the enemy base. Now, compile and save. Now for this structure, you can drag it out
and you can break it. And now you can see we have this health variable
and by default, the snail health, I don't know, we can put it to 25 or 15. Let's do it to 15. Actually, our player
damage is five right now, so three hits will
kill the snail. So let's go to the
class defaults and here and the animal info. So for this snail specifically, it has 15 health. And maybe for the pig. If we go down to the pig, pig here, this pig, we are going to put the
pigs health maybe 230. So it's double the strength
of the enemy or the snail. And also for this one, I'm actually just change
the collision a little bit. For this one like we
did with the snail. Maybe just decrease it like 25. We can do that later. Like we can check
and see if that is too large and too small. So now let's go back
to the enemy base. Now the health is either 30 if it's a pig or it's
15 if it is a snail. But now it's going to
do that dynamically. So the damage we applied here
before and the player base, the damage to the base damage we applied is equal to that
damaged that comes out of here, and the player does
five in damage. So what we can see,
what we can say is this health which is 15
for the snail right now, subtract that, like subtract
the damage, which is five. So now the health is ten, because 15 minus five is ten. Now, this is the updated health. This is the ten health that
is left from the snail. And now I'm going to
teach you a new thing, a new cool thing that not many actually
know to begin with, are many actually do a mistake even though there are
advanced to blueprints, is how you set, like how you set variables inside of structure dynamically. Because right now
you have all of these variables
and that is cool. You have set them here
in your structure. But how do you actually
change the value? So now, let me remove those. So now the health
right now here is 15. How do you change it to ten dynamically here
through gameplay? Do that by dragging
from this structure. And then you write sets. And here at the bottom you say set members in animal
info in the structure. So now it has to like what, what member do you want to set? And to the right, if
you click here, again, you can see all the pins and
I want to set the health, this is what I'm
interested in setting. So I want to update that
health in this structure to this new health which is ten now after
applying the damage. So I'm going to connect it here. And now you are, you need to set that variable
again because you can see this is like
a rotated square, which means this is just
a temporary variable. You have to set it again, and it's not like
the circular pin. So that means I need to take my animal info and set
this animal info again. Now, all of these other
information here, the idle animation
move, hit and death. It's going to set
it like the same. The only thing that's going
to change is the health. And since this is running
through the server, I actually want to replicate
this to make sure my client also can see this edit because this any damage
you can see here. It says authority only, this event only
fires on the server. So remember to replicate that information back
to the client as well. And this is actually
all it like. We don't really need to do more here to structure it
a little bit more. Maybe I can just drag
those a little bit of way and just put it
up here actually. So try to be as
structured as possible. Click on this pin, maybe
structure it like this, and I'm going to bring everything
closer, just like that. Click on q. Okay, so now we have this, and if you want to see if this is working
or not, actually, we need to test it as well
to see if it's working. I can now print here. A print string. I can print
the amount of health. So you can, either, you can do it from here, so you can drag this
and print it out. You can also see if your
structure is actually updated. So we can break this again. And now we can print that new health that you
set over here in this. So let's compile and save. So now whenever it's
going to get hit, it's going to tell you the
damage or the healthier. So for example, I'm
going to this snail, I'm going to click on hips. And you can see up here
it says ten health left. And if I don't know if
this is the same snail, now it has five health left. Now if I hit another enemy, it has ten help lift. So it's correct now, it has ten health left
if I haven't heard it yet and if I hit it
again, it has five. If I hit it again, it has 0. So now it's actually
working correctly. The problem is now,
if I hit it, you say, you'll see it says
minus five, minus ten. So it keeps, it keeps
going in the minus. And we have to fix that. So what you have to do here is when you are minusing
here subtracting, you need to use something
called a clamp. Clamp. And we're going to select
this one called float, because we are
working with floats. So we are going to
clamp the value so it can never go below 0. So what is, what is the value? The value is this one
we want to clamp. Okay? What is the minimum? We don't want to go below 0. So the minimum is 0. And the maximum is
just the amount that this enemy has in health. I'm just going to drag this and set it to this as the maximum. So whatever we said
from the beginning, then we are going to
set that health here. So instead of going
here directly to here, it's going to go
through a client, makes sure it's not below 0. And then we are going to apply
or edit that health here. Okay, so something like this. And let's compile with me, double-click on this
pin to make it a bit more organized,
Something like that. Okay, Compile and Save, and now let's click on
play and test it out. So now if I hit someone, so if I hit that and
actually hit this one here, 10500, It can see now
it can't go below 0. I know we can always make this snail die
every time I hit 0. So let me test it with these
pigs so we can see 25. And now you can see it prints a lot of numbers and this is because I'm actually
hitting multiple enemies. This is working now. This has 2015, this
other one has 20. So you can see I'm hitting
all the enemies and it's working when I'm overlapping
with multiple enemies. Again can go below 0. So this is working
perfectly now. Just to check if the player
base also needs clamping. We don't really need to
clamp anything here. The only, the only thing we need to climb business health, and we probably has to do
that as well for the player on the enemy damages the
player, which has later on. So now this is
working. I'm going to delete this code here. And this is the,
basically the ****. So you can see it's not
really too complex. We're just taking the health, subtracting the damage from it, and then setting it
inside of this structure.
72. Enemy Hit Animation: Now it's time to do the
enemy hit animation. So, so far we just
hitting the enemies and they are not
playing an animation. So we have to do that now. Now for the animations, we have this one actually
we create a lot earlier because we
created the task, you're actually find
random location. And here we use this one where we set the movement
state to moving. So this one here
and the enemy base, we can actually change
it because we don't really have only now the
moving and the idle. We also have the hit effect. And let's just convert
it just like the player, the player we have this one,
unripe movements state. Let's actually change it to
a movement state as well. I think this is more like it will serve us a lot
better than a Boolean. So the way we do
this again, let's, let's just use the here
and the enumeration. Let's just use this one. We don't really have
to make a new one. So inside of here,
because the player will also have a hit animation, actually, we're not going to use that for the player here. We're just going
to make an effect, but you can just either you can make a new enumeration
for the enemy. I'm actually just
going to use this one because we're mostly
using the same thing. I'm going to add this hits. And I'm actually also
going to add the death, but we're not going to
code that right now, but I'm just adding it for now. And what we want to do now, now let's go back
to the enemy base. So in the enemy, enemy base, Let's now save everything and let's add that
movement state here. So call it movement state. Let's change it to
eat or enumeration, which is called E movement
state selected here. And now let's drag it out. And this is what we want to set here instead of is moving. And now we need instead of
a Boolean, Let's delete it. We need an enumeration here
called movement state. So the same thing. And let's change the
name to movement state. Let's connect it here. Whoops, I didn't
hit it like this. And now again, remember
this is a rep notifies, so we need to make it
into a rep notify. And over here, let's disconnect this by
holding Alt and clicking. Now this one is from the
Blueprint Interface, so we need to change
the Boolean here. We can just click on
it and delete it. So let's go to the
Blueprint Interface here, and this is for the enemy. And here set movements state, I'm going to delete
it here and make a new one called Selecting the enumeration
movements state and call it movement States. Now again, it's going to
bug out for some reason. It's a bit annoying sometimes
that this bugs out. Sometimes you can close
the engine and nuts. And actually sometimes you
can just delete this here. I'm just going to
delete it. Yes. Now, click on Add. Let's see if that works now. That works now, I don't
know why it does that. Sometimes, let's
say set movement, dates, Compile and Save. Let's go back to
the player base, actually not the player base, the enemy base here. So instead of a
here, the movement, Let's compile and save to make sure everything is correct. Let's connect it now. Okay, So set movements
data's correct. Now we're going through this, It's going through the server, and now it's going to call
this onReceive function. So let's take this moving state and say switch has authority. So just like what
we have been doing so far, which has authority. So if you are, let's take them down so we don't really have all of those. The thing is we
have only the idle. So let's take this bright
here and say Set flip book. Now we only have the idol and let me copy paste this
a couple of times. Here. We only have three things. We have the idle, we have, they're running, so moving. And we have the hit effect. We will be having
the depth later on. So for the running, I'm just going to
use the run right. So either use the run left or on right, That
doesn't matter. I'm going to use
the run right here. For the head. I'm going to use this one. So let's set these animations. Let's take our animal
info, break it up here. So break. And let's take it here. Now for the idle, I'm going to plug it in here. And for the move, I'm going to plug it in here. And for the hits animation, plugging in here for the death, we will wait with that too. Later on, click on it, hide unconnected pins, drag
it back and compile and save. And now we have
everything, correct. Now makes sure if you
have forgot to do that, make sure to go into each
enemy and make sure in the class defaults you have set all of these
animations here, else it will not work. Okay? Now let's go
back to the base. And here, now instead
of is moving, actually, let's go open your, we actually have to
change something here. So in the enemy base, go to your enemy now. And inside of here. And defined random tasks. Remember you set
this movement state to moving and not moving. But right now, actually
it's not a Boolean anymore. It is the movement state. So I'm going to hold control and click here to remove this. And this one we're going
to change into r1, right? Remember hearing the enemy base. It is the run right
that we are using for the movement in
the behavior tree in this task we are
going to move here. Remember in the
behavior tree also had this one where we set the
movement boolean to be false. So here, instead of being false, you can set it to
idle and you can see it's already fixed itself. So let's go back to
the behavior tree. Now I'm going to
rename this instead of set movement Boolean. Let me just rename it, go back to my tasks and rename this to set
movements state, because it's not really
a Boolean anymore. It's nice to stay
organized like this. Now, everything is correct. Now let's go back
to the enemy base. So now we have changed everything
into a movement state. Here I want to play
the Hit animation as soon as I receive
damage as the enemy. So I'm going to drag this
little bit of way like this. I'm going to say set
movement states. I'm going to call this
one from the enemy. Remember it's not
from the player, it's from the enemy. So selecting it here and connecting it and
connecting it here. And I'm going to play my, my hit effect like this. Okay? So clicking on
play just to test it out and clicking on my player. And I believe I can't
test it out right now. So if I click on hit, you can see it's hitting
and it's all like bug. But sometimes it stops
the animation because actually it's still inside
of your behavior tree. But you can see it's working. So let's test it for the player, Let's for the client. So here for the client, you can see the change that
the player did of the server. So for the client,
it works as well. If I look at the server, I can see that change
done from the Kline. Let me just to make sure
I don't have any bugs, change it to play as clients. So both of them are clients. This is a Klein,
this is a client. And let me select this
player, omega smaller. It's always nice if you have
two screens because you can put one client on one
screen and the other one here. Because I don't really like I can't do that here
for this course. I have to have everything
on one screen. So clicking on this one
here I'm hitting you can see the changes applying it can both clients
can see the change. Okay. So that is correct. Everything is working.
We don't have any box. Let me test it for the pig here. And you can see the pig is
also working for the pig. The problem is they're
moving right now. So let's just do that very, very quickly and we can
actually do a quick fix. So here, when you attack
and when you get hit, Let's take this
movement component and say Set movement mode, just like what we
did with our ladder. So set movement mode. Remember for our letter
we set it to flying. But for this one, let's
just set it to none because we don't really
want to move at all. Let's compile and save. And here as this client, let me go up to the pigs. It's a lot easier to see
here hitting that enemy. And you can see
now when I hit it, it's not moving anymore. Okay. Nice. And the reason why it's moving
all of a sudden is because it's still running
our behavior tree. And right now it's set the
movement mode to none, so it's stuck here. So this is working
correctly and we have to do some more code to make
it look more smooth. So now that the
animation is working, Let's move that closer. The next thing is we want
to stop the behavior tree whenever the enemy's head because we don't want
to be walking around.
73. Stopping the Behavior Tree: Okay, so to stop the
behavior tree from playing. So this is, remember this
is the behavior tree. It's playing all of the animation still
whenever you get hit. But we want to stop
this animation. The reason why I
do that is after we hit the enemy in Maple Story, the enemy is going to
chase you all the time. So when I click here on play
and I hit this snail here, this snail is going to chase me. It's not going to go this way and it's not
going to go this way. It's actually going to look for the player and it's going
to find me and chase me. This is what we're trying to do. Before we do that, let's
us stop the behavior tree so we don't want to run this anymore whenever
the enemies hit. Here. Before we do that, let's take the sprite and we want
to stop the logic whenever it has finished
this Hit animation. So again, just like before
with the attack animation, for the Hit animation,
we can take the sprite and say flip book. We can take the length. So how long this flip
book is playing? We can do a delay node. Delay it with however long
this Hit animation is. And after that,
I'm going to take this movement component
and I'm going to say stop movement immediately. So stop everything
you're doing like this. And then after that, you want to stop
the behavior tree. So right now this one is only stopping the movement
of the enemy, but you also want to stop the
behavior tree completely. And this is done by getting
the controller of the enemy. So remember in multiplayer you can just say get controller, because right now we are
inside of the enemy. So we are getting the
controller for this enemy. We have hit. And then we are going
to say gets NME ref. Remember we made get
enemy ref a while back. If you don't remember, try to go into the interface and take a look at
this one enemy base. This is the enemy
of ref you made, which you hear made a
self-reference too. So you can reference
the enemy here. With this controller
that you have. Now you can drag from this and you want to
get, now you have, you have the controller, what you want to specify, just like before we
said get enemy ref. Well, this controller,
you are talking specifically about
this AI controller. So we have to specify
that we are talking specifically about
this AI controller. So to do this, now, remember I could
just say cast too, because casting you
are referring to a blueprint like this. But for the AI
controller, it is, it is a big blue, blueprint, just like the
player base and so on. So I'm going to create
its own interface. So right-click here. And in the blueprints, remember here you can create
a Blueprint Interface. Let's call this one. Let's call it AI controller. So instead of player controller
is now AI controller. And here let's say get controller or actually
let's call it get ai. Prologue ref. For this one, let's
do an output, and the output is AIC enemy. This is what we call
to the API controller. Let's call it AI controller. And now we have that variable. Now remember to go into the, into the enemy here and
into the AI controller. And remember to go to the
Class Settings and Add that AI controller
Blueprint Interface. Here, Compile Save. Now you can see the function. And here we're going to
do the self-reference. So just like what we have been
doing so far, nothing new. Now that we have this added. Now we can do a reference to that AI controller
without costing. So if I go to the enemy base, now I can say get aae,
control our reference. Okay, Now, as the air
controller reference to stop a behavior tree, the only thing you need
to do is take from this and take the brain
component of that ai. So getting the brain component
and saying, Stop logic. Now it's going to stop
the behavior tree. What is the reason? I'm just going to say hits
for the enemy's head. It doesn't really
matter for us here. So the enemy's head
and it's going to stop that AI controller. Okay, so when I click
on Play now and I go to the player
and I hit that enemy. It's going to hit that enemy and you can
see it stops completely. It's never going to
move because I've actually stopped
the behavior tree. Now you can make it moving
after, after we hit it. So it's not a fully static. You can just copy this,
that movement mode. I'm going to go back
here and paste it. Now it's going to go from
none again to walking. So now we're going to walk
again after you've been hit. And remember we set this delay. So however long your animation is for the header animation, you're going to delay it. Remember, an easy
mistake I can imagine is here and the assets enemies. So for example, for
the snail hit effect. Remember again, I said
before this was very important to change the frames per second for this heat effect, even though it's one frame. Because if you're going to
set it to 15, like default, this delay here is
going to be very, very small, so we're not even going to notice
this animation here. So sending it to one,
meaning 1 second. So it's one frame per second. And it's going to wait 1 second, and then it's going
to play that. Okay, so setting it to
walking now we can play. Now whenever you're
going to hit it, it's going to play the
head animation and then it's going to switch
to them walking mode. But right now it is
in the walking mode, but we haven't really specified that it should
actually run again. So let us do that before
we end this video. And remember, we can just use the set movement load or
not motive states rather. And here in the enemy base,
set, movements state. And let's set it to run right, because we want to
be running again. Okay, so that should
be it for this video. So let's just play and
see if it's working. So now I have the enemy and it's going to go in
the walking load. Now it's going to be
stuck right now because we haven't told it
where to walk to. And this is something
we're going to work with in the next lesson, where we tell the
enemy that you're actually going to
chase the layer.
74. Enemy Chasing the Player: So now we want the enemy
to chase the player. So when the enemy is
getting hit by the player, it's going to go over and
chase that player that hit it. So first off, let
us save everything. Let me actually close
all of this down because it's getting a
little bit too much. Let's start from
the beginning here. So here in the enemy, I want you to open
that enemy controller. And here in the
components clicking here and write sensing. So you can see we have
something called on sensing. So it's going to
sense our player. This sounds like, this
sounds like a Skynet. It gets a little bit creepy now. So we have the pons sensing and it's going
to sense the points. So the player, and the only thing I'm
going to change here, you can see what it can do. For example, it can hear noises. So if you're making like a sneaking game like
Metal Gear Solid, you can have this
warm sensing to sun, sends noises when you knock
on the wall and so on. So pretty cool stuff. But the only thing we're
going to change here in the peripheral vision angle, I'm going to put it on
180 so it can look 360. Let's compile and save. That's the only thing we had to do. Now Let's close it down. Let's open the enemy base. So here in the enemy base, when the, when the enemy
is getting damaged. All of this we did in
the previous lessons. So now the, the point
is moving again. So what we want to do now is
we want to chase the player. So when you start moving, you
want to chase the player. The thing we're going
to use is called ai move to this one. Ai moved to. So it's going
to move to the player. Now it's going to tell you
here the point, who is moving. It is just self, it's the enemy. So I'm going to drag
from this and say self. That is the pond. Okay,
what is it moving to? It's going to move
to the player. But we don't really have a
reference for the player here. Here you can see instigated by, and this is what I
was doing the damage, and this is the controller. So this is actually
the player controller. We can use it in
drive from here. And right-click this and
say promotes a variable. I'm going to call it player
controller, connected here. And remember to replicate that information so the
client can also see this. So now we have the
plaque control line. We can now get the
pond from that. So taking the player controller, staying, get controlled on. This is what you can
do in multiplayer. So you have the
controller and you can get that controlled on from
that player controller. So now we have the player, and now you can see
get actor location. So now we have the
player's location and it's going to chase towards
that destination. So it's going to towards
the player's location. Okay, who is it chasing?
Who is the target? The target is the player. So it's simply just this one. This is the Player Pawn. So we're just going
to connect it here. And what is the
acceptable radius like? When it reaches that radius, it's going to stop because you have succeeded in
chasing the player. I'm just going to lower it a
little bit, maybe two units. So just a little bit
lower than before. Okay, I'm going to
move this over here. And just to organize
things a little bit more, maybe this one is up
here and double-click that so it's more visible,
something like this. Okay, So very, very, very, very easy node to understand. So it's going, so
this pond is going towards the players
destination, location. And it's chasing
this player here. Okay, so I'll success, we have to do something. So what should happen whenever
you reach the player? And this is something
that we will be improving on later on. So not really right now. So let us try and test it out. So let's see here, Let's Play. And now we can see if
I hit, for example, this enemy and I can run. You can see now it
actually reached me. And if I do that again, let me actually remove a lot of these enemies
because now that we are working with the
enemy, you will see it. Whoops, I delete
the whole thing. You will see it a lot
more clear what I'm actually working
with just one enemy. So I'm going to delete all of these enemies and I'm going
to add them later on. So maybe I just need
one picked down here just to test this,
both of them out. And I can click on Play. Now, let's test it. For example, on this big
I'm going to hit it now. And it's going to chase me
forever until it reaches me. So very cool stuff. Now it's going to move to me and when it moves to me is going to stand still to
actually damaging me. Now it doesn't do anything else because we haven't told it on success what it should
do whenever it reaches me. Now I could maybe just drag from this and just keep looping forever and maybe it's
going to give me an error. Let's try to play here. So unsuccessful, it can
just keep tasting me. So if I hit this snail here and it chases
me and it hits me. And if I go away now, you can see it chases
me forever now. Now it's my pet.
It's not my enemy. I have a snail as a pet. I can have the pig
as I've had as well. It's going, they're going
to follow me forever now. Okay? Like you can imagine this, you can also make a pet system where you just
follow the player. So you can see all of these
tools that's useful to know these tools so we can use
them the way you want to. Okay, pretty cool stuff.
I'm going to delete this. Now what I want to do here, I want to actually do that in the next lesson where we improve how the enemy is walking around it when they
reach the player.
75. Improving Enemy Chasing the Player: Alright, so I want to improve
that code a little bit. So whenever it moves
to the player, I don't want to keep moving to that player and keep
chasing the player. I want to make the movement feel a little bit random,
even though it's not. The thing I want you
to do here on success, I want to use something
called Move tool. And let's select this one called moves to location or actor. Okay, so now it
moves to the player, and whenever it reaches
the player is going to run this function called move
to location or actor. And I'm going to use this
one, dislocation here. So let's break down
this location. Minute break, Let's
make a vector. And that allows us to
see the X, Y, and Z. And here now, here in the
controller, it needs, it needs the AI controllers, as you can see when you
hold your mouse over it. So we can't say get
controller and add it here. It's not going to accept it. It needs specifically
the AI controller. I'm going to say AI controller. And you can see we have this one called get AI controller. And who is the controlled actor? Remember we are inside of
enemy base so we can just say self like this. So what is the location here? Who am I moving too? Now for the goal, we don't
really need to plug to anything because it says
move to location or actor. And I'm just going
to use the location. What is the location
we're moving too. But I want to do is here, I can actually show you. So if the player
is standing here, so let me just take
Tsarina for example, so we can visualize
it a lot better. So Serena's standing here. So when the enemy
reaches the player, I want the enemy to move 100 or something like that
units to that direction. And then the enemy will
go back to that player. And when you reach
that player again, I want to move 100
to that direction. So it keeps moving like this. Because right now it
just moves to the player and it just stuck like this. But I want it to move around the player all the
time like this here, so it keeps chasing the player, but it has a little
bit more movement than just being stuck
here on the player. So if we go back to
the enemy base here, so what I'm going to check
when I need to check first, if is like this enemy
comes from this side, you need to move to this side. However, if the enemy
comes from this side, you need to move to this side. So I have to check on which side is the
enemy coming from. So I need to take
the player first. I need to know where
the player is. We can do that here. Take this again. Actually, I'm going to
copy paste that code here. So we're getting
the player control over getting the control points. So the player, and we're getting the location
of the player. I'm going to break that
because the only thing I'm interested in is this red pivot, which means the x-axis. So I'm only interested
in the x-axis. I don't care about
the Z or the y here. So let's go back here. I'm only interested
in the x-axis. Now I have the
player's location. I'll also need the
enemy's location. And I can just say get actor location because we are already inside of the enemy, so the target itself. And let me break that as well. Break that vector so I
can see the X, Y, and Z. So I'm going to ask, is this x, so it's
the players, x. Is this less than the
location of this enemy? And what that means
is the enemy, the enemy standing here? It's going to ask,
remember, here, if you take a look at the x, if I go to that direction, It's going to be around 0. So it's going to get
in the minus here. If I go this direction, you can see it's going down. So i'm, I'm asking right now, is the player's location,
the x location? Is it less than the enemies? And right now it is, because right now the player
standing here, the enemy standing here, this X, you can see the x here
for the player is less than the one for the enemy. It means the enemy is
actually coming from this direction, if that is true. So what should
happen if the atom comes from this direction? And that's something we have
to specify here right now. So here we can make a branch. And let's move that a
little bit away here. So we can make a branch
and see if that is true. We want to, like,
if that is true, we want to move this enemy too. Like minus five hundred, five hundred minus 100 units. Because remember when you reach the player and if we
say move the location, you are minus 100, meaning you are going
to minus 100 in the X, meaning the character
is actually going to, or the player at
the enemy is moving 100 to that location because
you're minusing here. So this is what
we're trying to do. So we're saying here, we're saying then
take that is true, then take the enemies x location and subtract
100 from that. And now this is the
new x location. Y and Z, we're not really
interested in them, so we're just going to
plug them in as they are. So now what we're saying
is it's the players are, now, is the player's x location? Is it less than the enemies? Meaning the enemy standing here and the player
standing here. If yes that is true, then go ahead and move that enemy minus whatever
the x is currently, which is here, minus 100 units. That is our new goal location, which means your new goal
locations over here. So the enemy is going to
move from here to here. Okay? So very, very
easy thing to do here. And the other thing is, if it is false, we need to take this and say, then you are going to
move 100 plus 100 units. Because remember, if it's false, it means the enemy
standing here. That means when you
reach the player, you want your new goal to be plus 100 and x because you
want to move it this way. Plus 100 makes it 800 and
something over here, okay? So if you're standing the other
way you want to plus 100. So that is your new goal here. So if I just drag these here, so the x, the y, and z, we don't
really care about. It's only the x we're adjusting. And that will be our new goal. But instead of copy
pasting this code, now, if you see
yourself doing this, like you can see you, you just copy paste code and they look 100% the same except
for one value. You can actually make your
code a little bit better. You can do something
called a Select load. So what you can do here
is instead of doing this branch and doing like this, you can see this is
the same code and it's actually bad coding practice because you're just
copying pasting code, which is almost the same. So it can do this a
little bit better. So instead of here, you can do, let me
disconnect this. And here instead, now we're either adding or
subtracting 100 from this. We can derive from this and say select and use this one
called Select Load. And now this Boolean, let's connect it
to here instead. So now it's going to say
it's the player's location, this x location less than
the enemy's location. If that is true, again, if that is true, we
need to subtract. So instead of just doing these, we can actually just say minus, I'm going to say one minus 125. I think I tested
with that number. I think that's the best one. And if it is not true, which means the enemy
is standing here, we want to add 125. So you can see here
we don't really need to do all of
this copy pasting. Now it's going to
do it automatically for us so we don't need to copy, paste the same code. It's going to select, Take, take a look at this if
it's true or false. And it's going to
do that number, like it's going to minus
or plus that number. And we can't really add, like we can't just connect it directly here because it's going to set it
to these numbers. What we need to do is take this x value and we need to
add that number on top of it. So here we need to
add that number. So for example,
let's say the x is currently 600 for the enemy. Then it's going, if
that is true here, it's going to say
600 plus minus, which means just
minus 600 minus 125. And it's going to set that
as the new x location. If the enemy here, if this gets to false, so this was true
and this was false. It says 600 plus 127, then it's going to
move to this location. Okay, so doing that is a lot better than copying
pasting code. So when you see yourself
copy-pasting code, there is probably a
better way to do it. Again, you're welcome
to go to my Discord. I am willing to help you out
with all of these things. It's nice to have
all of these good, good practice things for
when you are coding. So you don't like it, so it's good to stay
clean like this. Alright, so we can actually
remove this branch. We don't really need it anymore. So let's actually test it out. So now we actually
have to do something because when you move
to that location, we have to repeat the movement
here and move finished. Let's drag this pen
and just repeat that. I moved here. I'm going to
double-click on this pin to make reroute nodes. Actually make it look a bit cleaner so it's not confusing looking something like this. Now let's compile and save, and let's play and see what happens if we have
forgot something. Again, I'm going to that here. And let me actually
delete that player, the player here, play again. So like Luke are going
to hit that nail. It's going to move to me. When it reaches me, it's
going to move 125 to that location when it
reaches me again, 125. You can see this is
the movement that we added and this is phi, drag it up again here. So when it reaches me, it's going to move either minus 125 to that current X
location tags are plus 125. It's going to move to that location when the
movie is finished, it's going to repeat
that movement, which means when it's
standing, for example, if I go back to the game, when standing here, it's
going to then chase me again. And then when it
reaches me again, it's going to repeat
that code again. So it's going in that circular
movement all the time. And I think that's a
little bit smoother to do the movement like this
because now when I move away, again, it's going to chase me. So everything is
working correctly. Chase me now when it reaches me, it's going to go 125
to that direction. 125 to that direction. 125 to that direction at keeps going and going to chase
me again if I walk away. So very cool movement
and we can try that with the pig here. You can see that pig move like
the pig attack animation. Actually it's working fine. Okay. So it's going to chase me now. And they keep facing
me and now they're going 125 that direction. And there is like there is
a small bug with that one, we might need to fix the
ramp collision here. It's probably a colliding
with the static here. So what you can do
here in the base, you can click on the collision, can actually just
ignore everything except for the Po1 and
the client being players. So just move them from overlap
because we don't really need to overlap with anything here for this collision here. And for this capsule. We can't really do this
because now it's going, they're going to fall
from the ground. Probably. You can see there is no enemies because they are falling
through the ground. So you have to have
that in the capsule. So clicking on the play now, let us see, this is the
snail, the pig here. Okay, and let's
move that location. Oops, I didn't hit it. Okay,
I think it's working now, so now they're not
bugging here on the ramp. Okay, So very cool. Now we have a very simple, very simple AI movement. And it looks very cool,
looks random as well, even though it's a
very, very simple code. So it looks random as well, even though it's not
related to random. So very cool stuff that
we have made here. And yeah, that was
it for this video. I hope you've had fun. I had fun creating this and let's move
on to the next one.
76. Enemy Applying Damage: Okay, so now we are ready to have the Enemy do the damage, because so far is actually only the player that
does this damage here. So only the player
is doing the damage. We need the enemy to do
damage to the player as well. And to do that damage, we don't really want
to code it here on any damage because
we want the enemy to apply the damage even though they are not
being hit by anyone. So if the player is
walking into the enemy, even though the player
has not hit them, they can still do damage. So let's just make
a separate event here called Start
applied damage. And we'll actually
want to do that right away whenever they
spawn into the level. Okay, So let us go back to the interfaces and
in the enemy base, let me make a new function here that will start everything. And let's call it
starts applied damage. And let's just make a
Boolean where we say the applied damage and this
can be either true or false. Yeah, that is it for now. So let's compile, save, and go back to the enemy base. And what we can
say here is we can right-click and
we can say start, apply damage, and we can
call that event here. Now this one, again is going
to go through the server to make sure it's not the
client is not cheating. So server starts apply damage. I usually just call
them the same name as the normal events
and run on server. Reliable. And now this boolean here, we need to add it obviously
again, be applied damage. Now we can say, we can, we can write a branch here and say if this
is true or false. And with that, we
want to do something. So we want to start applying the damage whenever it's
true and it's false, we don't want to
apply damage anymore. And when do we set
it to true or false? So let me actually just run that server function here first, startup light damage
here and connected. So when do we want
to apply the damage? We want to apply
the damage whenever the player is colliding
with the enemy. So when the player, if
I go back to the enemy, if I go back to a snail, when the enemy is colliding with this small
collision box here, we want to start applying
damage to the player. Before that, we don't really
want to apply any damaged. Remember, we are
optimizing our code, so we don't want to apply
the damage 24-seven, I only want to apply
damage whenever the player is interacting
with the enemy. I'm going to the enemy base here and going to the viewport, clicking on this collision, going down to the
bottom and then clicking on n-component
begin overlap. So on component
beginning of a lab, what we have been doing
just like before, we want to run it through
switch has authority to make sure it's the server that
is running this event. And again, I want to make a new one this time end overlap so we can do that the
same time as well. I'm going to check if what is overlapping with
it is the player. So again, actor
has tagged layer. We know, we know the player has the tech player and we
can make a brunch now. I don't think I've
explained it yet, but you can also make a
branch if you just hold, hold B on your keyboard
and then click, you can actually make
branches as well. So very cool shortcut
that you can do. So if the tag is player
here for this actor, we are going to apply
damage and we just, we're just interested in
running this event here. So it starts up to lie damage
here in the enemy base. And we're going to
set this to true. Now when we end overlap, where you just want
to copy paste all of this code and we want to
stop applying the damage. Okay, so this is how
you optimize it. Now for the applied damage, what I want to do is I want to continuously
applied damage. I'm going to show
you why are actually not showing you why I can actually just explain
it very quickly. So if the player is by just take the
player, not the snail. So if the player is standing
inside of this enemy here, under player, I'm
walking around, I'm walking into the enemy. I'm getting hit. I'm losing health. But if I stay safe inside of this sphere and I never
end overlapping with it. Even though I'm standing
for like ten seconds, I'm not going to apply damage because on end and
begin to overlap, you are going to apply damage. But remember, this is, this event is only
run once because this is only run whenever
you begin overlapping. And this is going to be run
once because this will, this event will be run one time. And this is when you begin
overlapping the enemy. But we want to
continuously add damage to that player if you're not
moving away from this enemy. Like maybe it gives you a damage every two seconds if you're just standing still inside
of this enemy. We want to check
all of the time if the player is
actually standing in here and we want
to apply damage. So here we're, we're
kind of already checking if the player is
standing in this box here because we're starting to apply damage whenever the player is inside of this collision and we stop applying
damage here. Remember, again, maybe you
already guessed it when you want to apply damage
continuously, so the word continuously, you have to use a timer. So just like what we did before. So set timer by event here. We're going to drive from here
and make it custom events. Let's call this one
applied damage. We have this custom events and we want to
apply some damage. The damage we want to apply. Let's actually do
looping and I'm going to check every 0.12 era. So this means you are applying
damage ten times a second. And this will make sense later, like we're going to reduce this. But the thing we want to do, let's move it down here. The thing we want to do is
again, get overlapping actors. So we're interested in getting
all of the player base. So getting all of the
overlapping players, we want to apply
damage to all of them. And let's drag from
this and say for each. This method, if we've already done from the player
to the enemies, now it's on the
opposite direction. Now it's the enemies applying
damage to the players. Just make sure you
have player base selected here and not enemy
base or something else. So for each of these players, what do we want to do? Now? You can also check the
length if it's equal to 0, but that doesn't really make any sense because you're already kind of checking if the players
standing in here or not. So for each of these
players that are standing inside of
the collision box. Again, we want to drive from
this and say Apply damage. Now who do I want
to apply damage to? The damaged actor? It is the player. So it
is just this guy here. And we have to specify how
much damage each enemy mix. So we have to go back to the structure in
the animal info. And here we need to add a
new variable called damage. Let me just drag
it up above here, below health, and let me
change it to a float. Save here and the enemy base
now we can compile and save. So now we can go to the enemies. So in the pig here, we can set one damage. So let's click on
the class defaults, go to animal info. And so this damage, for example, the pigs are doing 15 damage. Or maybe, maybe let's
say 20 damage actually for the pigs and
here for the snails. If we go back to class
settings for the snails, maybe they do, let's
say they do ten damage. Let's compile and save. Okay, So now they
do ten damaged, the pig is doing 20 damage, so double the damage. And here what we can do
is take the animal info, break it up, and take
that damage added here. And now it is dynamic. So whatever enemy it is, they're going to do
their amount of damage. Okay, so what is the controller that is responsible
for this damage? So we are inside
of the enemy base, so we just need the
controller of this enemy. Again, you can drag and
say gets controller. And that is it for the damage type list changes
to damage type here. And that is all the
things that we need here. So now we're actually applying
damage to that player. Now, later on, we are going to add a god mode so the player is not being damaged ten times a second because this is essentially what's
happening right now. The player is getting damaged
ten times per second. But we're going to add
God mode later on. So there is a period of time that the player
will not be damaged. But for now, this is
all that we had to do. And let's move on
to the next lesson.
77. Player Receiving Damage: Alright, so now we have
to code the player receiving the damage
from the enemy. So now let's go back
to the player base, and let's go to the Event Graph. I'm actually going to drag
the event graph over here and right-click and say
close tabs to the right. So we only have that open now. So now we only have
the attacking done, and now we actually need to
do any damage inside of here. Let's right-click
and do any damage. Now we have this event. So just like in the enemy Here, in any damage, we need to
subtract the player's health. And I'm actually not sure if we did that one.
I don't remember. So let's go to the
structure and instead of player info, and we haven't. So in the player info, you need to add a new
variable called Health. This one you can take, You can make it into
a float, move it up. I'm going to move it to the top. Actually, save here and the
player base you have to compile and save as
default for the players. I'm just going to click here, they all have the same health. So I'm just going to put a
default value for all of them. For example, for the health, Let's just do something like 70. I don't know, it's
just a random number. So just 70. Let's
compile and save now. And for the split info, we can now take it
and break it again. And what we want to do, I'm just going to
hide everything and just show the health. This is the only thing I'm
interested in right now. So I'm going to take
the player's health, subtract, subtract, subtract
the damage from it. So for example, this snail
is going to do ten damage. So it's going to say here, whatever we set it to. So 17 minus ten is
going to be 60 here. So this is the new
health, just like before, we need to set the
health over here. So dragging from this structure, we need to write set,
select set members. The thing we want to update
inside of this structure, we need to update the
health variables. I'm going to select it here
to the right, put it here. So this is the new value. And just like before, before I do this again, let's clamp this value so
it never goes below 0. Let's right-click and say climb and select this
one called clamp loads. So the minimum value is 0. Actually let me just connect
to the value up here. The minimum value is 0. And the maximum value. Now you can't just
go in here and connect this because right
now it's actually going to. So what you can do for
this maximum, again, you can drag from this
health and connected here. So this is the max health. Then you can connect
it inside of here and just connect those. I'm going to drag this down
actually let me move it a bit forward and drag
this down like this. So it's going to clamp the value and try your best to make
it as clean as possible. Sometimes it's a bit
difficult actually, and something like this. Okay? So something like this. We're clamping the value now, making sure it's
not going below 0. And you again, you have to
set here in the outer struct, you have to set that player info structure
again and replicate it. So the client can also see it just to be sure that
info is not bugging. And now the player is
receiving this damage. So again, you can
print it to the screen because we don't
have UI right now, we will do that later. But you can break this structure and added the health here so we can display
this new health. You can print it to the screen and you can see if it's working. So I'm going to
play this player, I'm going to walk
into the enemy. You can see it's damaging me and it's going to damage
me ten times a second. Remember we have that
timer on the enemy saying apply damage
of the 0.1 seconds. So ten times a second. You can see it's
never going below 0, so that is correct. It's always stopping whenever
I don't collide anymore. But you can see we actually maybe have a small problem here because when it collides
with my attacking collision, It's actually applying
damage to me. And I don't want to do that. I only want to apply
damage to my character, so we have to fix that. Okay, so I've played around with the collisions and just to
save you a bit of time. So here in the player base, in the capsule tried to make
your collisions as mine. So just to explain
it a little bit so we can understand it as well. So we are generating
overlap events. Here. The only thing
this capsule is four, so this is the player's capsule. We just want to apply
damage to the player. And remember when you go to the enemy and click on
that collision box, this is the box that needs
to apply damage to us. You can also see this box
if you click on it and you click on hide in game and you remove that so you
can see it in game. So if you click on Play now, you can see that box
around the enemy and this is the box that's going
to apply damage to us. So this box here,
remember, this box, if you go to the collision, it is a world dynamic. So this is the most
important thing we need to overlap with. It is not ****, so
the capsule is ****. But this one is a
world dynamics. So going to a player base, we need to block the world. Dynamic. Blocking, meaning I want
to like interact with it. It doesn't mean, it doesn't
mean we ignore this, ignore this ignore over
a block is I want to actually make an event from it. So we are going to block
the world dynamic, meaning we are going
to interact with it, as well as the world static, because the static is, are these tiles on the ground
and if you remove that, you're going to fall
through the ground. Everything else we can actually
ignore, so distractible, so we don't have any vehicles, physics bodies, other poems. We don't really need to interact with other pons here right now. I believe nuts. Because the damage is actually coming from this world dynamic. Not really the enemies capsule. It was the enemies capsule then, correct, we need to
not ignore the pond. But right now it's coming
from this collision, which is a world dynamic. So this is why I'm
ignoring everything and only keeping these two on. Now for this bright, we're not generating
any overlap events. So let's skip this
one. For the attack. It is a world dynamic and we're ignoring everything
because the only thing we're using this attack box
is to do damage to the enemy. And we want to do
damage whenever this box here is interacting
with this small collision. And remember again, this
is a world dynamic. So we want to
interact like when we overlap with the world dynamic, we want to apply damage, which is the enemy here. The enemy is collision. So that makes sense. Let's
go over to the enemy now. So the enemies capsule, we are blocking everything, but we're overlapping
with the pons and the client being layers. And let's go to the collision. Here. It is all dynamic. We're actually ignoring
everything except for ****. Because the way the enemy **** is doing the damage is by
walking into the player. And it's actually not walking
into this attack box here. It's walking into our capsule
and our capsule is upon. And this is why I need
here in the enemy to overlap with the pawn
collision response. So very important to take a look at all
of the collisions. What object type are they? If it was pawn, then I had to go in here
and overlap with pawn. And if it was, let's say it was choline being player and I wanted
to do damage, then I had to go ahead and
overlap with climbing player. Tried to take a look at that, tried to play around and see how it works. So
let's save everything. Now. Let's click on Play. Let's Plays this player. If you're interact
with my box here, I'm not receiving any damage. That's good for you. Interact with me. I'm receiving
damage because it's interacting with
my capsule here. And here. If I, now, you can see if I go
back to only my attack, attack collision,
it's not applying damage unless it's
actually walking into me. So that is working as intended. Now, this code for the player receiving the
damage is also working. So let's actually
delete this for now. So now that we have that done, we don't really want to
apply damage all the time. So let's create some sort of a god mode in the next lesson.
78. Player God Mode: Okay, so let's add a god
mode for the player. Let's go into player base now. Let's make a new variable
called God mode. So be God mode, and it's just a Boolean
that we can use here. We have this boolean
called God mode, and we want to set this God mode whenever we are
gaining damage here. So just before I actually
calculate all of this, I just wanted to take my variable God Mode and
I want to set it to true, because now we are in God mode. We don't want to be
damaged just like that. And remember to replicate
this to the client as well. So you can see you are inside
of the god mode state. So for the god mode here, we have to set it to true, but we have to set it
to false at some point. And you have to put some
sort of a duration. So let's actually
make a new variable called guard mode time. And let's change it to a float. Let's compile and save. For the guidebook, China time. I'm going to set it
to 1.5 seconds so the enemy can't damage me
for the next 1.5 seconds. I'm going to take this
and say delay like this. And I'm just going
to set a delay after I calculate my health. And then here I'm going to
set my God Mode to be false. Okay, so now we're sitting
to true when we get damage and after 1.5 seconds
we're setting it to false. Okay, so here, let's go
back to the enemy now. And here you actually have to
check for it as a Boolean. Because now we're just applying damage ten times a second. But instead, you're going here. You're doing a, get
overlapping actors and you're gaining
all the players. Now for each of this player, you have to check if the
player is in God mode. So taking this and
saying, first of all, obviously you have to specify communicate with this
player, player base. So we have to say Get layer REF, the one we have been
making a long time ago. Let's connect it
as actually let me disconnect this for now so
we can see what we're doing. So now we're doing taking
this and saying God mode. So we're getting this
God Mode variable. And only when the god
mode is not true, we can do damage. So we can say nuts, Boolean. So if the God mode is false, if we are not in God mode,
let's make a branch. If we're not in God mode, we can go ahead and
apply damage like this. However, if we are in God Mode, don't apply damage,
don't do anything. As this, this is the
whole God mode code. So again, very powerful to
use booleans like this. And yeah, so now we have
to connect this again. Who is the damaged actor? Can just drag it here
from this player. You don't have to do
it from here now. You can just do it from here. That is a bit cleaner now. Now let's try actually
to test and see it. And I believe we have
deleted our print string. And let me, let me actually, we can just print a string here. So print string and
let's print it here. Actually. Let's break it first. Let's take the health
and print it out. So just before the delay, I'm just going to print out. And then I'm going
to take this delay, go back to this print string, going back to that delay here. So I'm just going to print out
this value before I delay. Let's see what it does. So let's click on play. I walk into the enemy, I'm getting damage to 60. And only after 1.5 seconds
after the garden mode, I'm being attacked again. This code is working now. Awesome. Let's delete
this and connect it back. Okay, so now we have the God Mode functionality
added to the game.
79. Player Hit VFX: So now we need to add
a blinking effect for when the player gets hit. So over here in the player base we are inside of here again, we have to do some sort of a damaged effect for
the blinking effect. So let's go here and
make a new events. Now we have to make it inside
of our Blueprint Interface, but I'm not sure which variables I need to work with right now. So let's just make it
as a custom variable or custom events and we can just change this into a
Blueprint Interface later on. I'm going to call it damage VFX, which means visual effects. And I'm just like
for this video, we're just going to make
the player blinking when you're getting damage
from the enemy. And obviously again, we have to run this through
the server to make sure the client is doing
what they are allowed to. I'm going to run it
through the server reliable and I'm going to call the server one up here
called damaged VFX. Okay, And down here, now, this damage effect,
so far we have been using the rep notify variables. But I'm going to remember
here for the jump. So if I go up for the jump, we used a multicast. And if you don't remember, this is a long time
ago we've used this. A multicast is doing the
same thing as a rep notify. So showing all of this
information to the client. But the multicast will only
cost this information to already connected players or players standing close to you. So it's player standing
very far away from you will not see the thing
the multicast is doing. This is okay to use for a
damage effect because you're just blinking for two seconds or wherever, how long it is. And then that blinking
effect is going to go away. So it doesn't really matter for the players that are standing at ten kilometers away from you or players who are
not connected yet. It is okay that they don't
see this change because it's just a blinking effect and you will go back
to normal again. So let, let's make
a custom event and called multicast damage VFX. And let us run this
on the server. Reliable, actual,
not on the server. Let's run it on multicast. Reliable. And the multicast we're going to run it
through the server. Again, remember, a multicast, you cannot run it anywhere else except for from the server. So let's call it here
MC damaged V effects. You can't, you can't
call this one up here. This does not work because
this is not the server. This is both the
server and the client. So going down here, putting that multicast down here running through the server. Now the multicast is going to do that, that blinking effect. So for the blinking
effect, very, very simple. Let's start working with it. Let's take this sprite. And when it wants to do
is here on the sprite, we want to change this color. If you click on the
color for the sprite, you want to change this alpha, which makes your
character is see-through. If I cancel here, if I click
on one of my characters. So if I click on Tsarina
and I go to viewports, here, I click on, on her, and I click on the sprite color. And then I take the volume down. You can see here the player is getting actually
not the volume, the Alpha, sorry, my bad. The alphabet here you can see
the player gets invisible. The problem is right now
the player goes from fully visible to going
fully invisible. So there is no in-between
and we need that. And the thing that's
causing it is because of this material masked, unlit, a sprite material. We actually have to change this. So let's try to
change it here too. So I can show you
when you click on it, you can't see anything. And this is because you have to click here on this settings. And then you have to click
on Show developer content, show engine content,
and show login content. So clicking on
Show of the three, you can see these
folders appear. We don't really
need to use them. But now if you go to
Serena and color here, you can see now you can see a lot more materials if
you're right, unlit. Because we are working
with pixel lot, so we're only
interested in unlit. Use this one called
translucency, or translucent unlit sprite
material instead of masks. Choosing that one. You can
see now when I click on this bright color and
I take my alpha down, there will be an
in-between value, so it doesn't go directly
invisible to visible. There is actually an
in-between level here, and we can make that
blinking effect going up and down like this one, the player gets damaged. Okay, let's put it
back to one and let me click on that arrow to
go back to default. I just want to go back to my mask because this
is the default one. We're going to change
this through code. So going back to my player here. So first we need to
change the material. So going here,
seeing set material, selecting it here. Now. Specify what material is it. Now we don't want to, again, change it directly through here. Remember, we are in the multicast and I like
to or not like I have to take all of my variables
to the very basic event here. So this material, you can
drag it and put it here. You can continue adding
it to your events. And this is the main event
that's going to run it, which is over here. Because whenever you
gain any damage here, we are going to call
our damage the effects. And you're going to run it here. And this is where you
select the material. And we want to select the
one called translucence. And go down at the bottom, translucent unlit
sprite material. Make sure the unlit one. Okay, so now we have changed our material, okay, What now? Now we want to change the Alpha, but we want to make
a blinking effect. And this is done
through a timer. We can use a timer
again to do this. So set timer by
events. Make one here. And it's going to loop
a couple of times. And how long, how much
time is it going to loop? And I found a good way to do it so we can take the
god mode here. Remember the God mode is 1.52. So if you put here, it's
only going to make that blinking effect
every 1.5 seconds. And I think that is, I need
to make it a lot quicker. So I need to divide this number. I found the way, like the best number is 16. So it's going to do this
like divide this by 16, which means 1.5 divided by 16, and that is 0.09. So it's like writing 0.09 here. It's almost like writing 0.1, which means ten times a second. Okay, so it's going
to blink a lot here, so you can do it that way. So whenever you change
your God Mode timer, it's going to
change accordingly. So we can do it here. So
it's kind of dynamic now. So I'm going to set my
material down here instead. So instead of doing it up here, I'm going to drag
this set material. I feel disconnected from here. I'm going to let
it be connected up here like this and I
need to make an event. So drag down from
here and say damage. Let's make a custom event
first, damage affects loop. And now we can
connect our material. So first we want to our
material to be translucent. Then we want to take this
bright and set the color, color set to Sprite
color, is it called here? And now we want to set
this bright color too. Now, we can't really
change it here again, remember you have
to run it through. So drag from here, put it inside of this event. And now, instead of
saying new color, I'm just going to say color. And again, drag them through these events until it lands up here where
you can change it. Okay, So for the color, I'm just going to click here. And I'm going to
change the Alpha. This is what I'm
interested in to 0.5. So it's half of see-through. So our player character
will be half see-through. Okay, so we're changing the
color and the material. So now the player is half see-through and then
we want to delay it. So I'm going to put a delay
node and I want to delete. Let me take this God
Mode timer again. I wanted to delay it, let's say divided
by 16 again here. And actually I want
to divide it by 16. These can't be the same. I want to divide this by eight. It's just like writing here. For example, you want to
run this every second and you want to delay
this by 0.5 seconds. And then you want to
copy paste this code because now you are see-through. But I want to go back
to my normal mode because remember we're
making a blinking effect. So going to my see-through mode and then I'm going
back to normal. And I just want half of the
time of what is up there. So let's actually
change this to eight. So it's going to say 1.5
year divided by eight. And here for the delay, I'm going to make
it a lot quicker. So divided by 16. So you can try your way
through this and see what works for you if you
want it to blink faster. Obviously, you have to
increase these numbers. If you want to blink slower, you have to reduce
these numbers. So we're going to
delay it by 16 here, or God Mode time divided by 16. And then we're going to set the materials to what
they were before. I'm just going to
copy paste this and now we can just set the
material over here. We don't have to go through all of these things,
I believe not. So let's just try that. So if you just write unlit, you have just like
this one called masked on Let's bright material. This is the default one. And the new color. Here in the red is one, green, one, blue one. This means it's a white color and the alpha is one as well. So everyone, everything
here is one. And let me compile and save. So now let's check if we have everything and we
don't get anything. So let us try it. Let's try to play the game. And if I walk into the enemy, you can see I'm actually
having that blinking effect. There is a small mistake. I'm actually going dark. I'm not going like
my own colors, so I'm going to click here. And this is because
this is not white here. So 111, now it's white
because if it's not white, sexually dark here
and if it's dark, your character will turn dark and you can't
see your pixels. So going 1.5110 and alpha. Now let's try again. And you can see now
you can see the pixels when you're blinking,
just like that. Okay, so now it's
actually correct. And at some point
we actually want to stop that blinking effect. So what we want to do is here, we want to stop it after
the God Mode time is over. So after this 1.5 seconds, we are not in our gut mode time anymore and we want to stop it. So let's make a new
timer for that and say set a timer by events. And for this one, I'm just going to
drag from this event, make a custom event. Let's call it stop
damage, the effects. And this one is very simple. It's just going to like
after 1.5 seconds. So connect the god more
time to this timer. So after this God Mode, time is over, we are going
to take this handle. So let me right-click here, promote this to a variable. And let's call it damage
the effects handle. And let's connect
those like this. So now we have a
variable from this. Now, after the God
Mode time is over, we are going to take this timer, which is this one here. We're going to take
it and say clear and invalidate
time or by Handel, which means delete
this stub, this timer. So after the god mode is over, we're going to stop
this code here. And obviously we don't
want to loop this. This is just going to run once. Okay, so let's compile and save. So let's try it out.
Let's click on Play and let me run into the enemy. I'm going to blink. And after the
godmother times over, I'm not blinking anymore. And if I walk into
the enemy again, It's going to blink. I'm going back again. Let me actually, this is the client. Let me go back to the
play as listened server. I want to play it as
the server and clients. I'm going to minimize
it just to make sure that I haven't bought anything. Always nice to test things
out in multiplayer. So as the player now, as the client, I'm blinking and it's working as the server. I'm blinking us working on both. Okay, so it's working nice. And again, you can
switch to the client, make sure everything is working. I'm just taking a look
at both of them here. So Serena and Luke, if I walk into it, I'm blinking. Okay, So it works. Awesome. So now the code works. You can always tried to
organize this a little bit, so I would advise you to do so. Let me just these
closer together. But this one we can drag it up here so it's
not too confusing. And with this
sprite, quick here, may care reroute node
as well as here. You can make a reroute
node like this. And for this one you can
make a rewrote note as well. Something like this here. So it looks a bit
more organized. This one I can actually
just pull down here. And this sprite, you can
make a reroute note as well. So always nice to
stay organized. I can't say that enough
because at some point your project will be very large and this will be
very difficult to read. So something like this. Now you have all
of that finished. Okay, So now this is
the damage effect. And now for this damage effect, now you can, now, for
the damage V effects, you can turn it into a, a Blueprint Interface Event. But let's actually
wait with that in the next lesson because we
are going to add an impulse. So let's move on to
the next lesson.
80. Player Hit Impulse: Alright, so as last thing
for the damage here, I think we need to add an
impulse to the damage. So when the player
hits the enemy, when I walk into the enemy, instead of only blinking, I also want to
push my character, so it gives that impulse. So let's do that. The way you do this is by taking the character
movement and you say set impulse and actually
not set impulse. Let me just search for,
I think it's called add impulse here, add impulse. And you want to add
that impulse here. So let me drag this back
and add the impulse here. Just like this. So now for this ad, for this impulse again, we have to drag
it through these, these events here,
just like before. And now you can set the impulse. Now you have to
remember to check this velocity change here. And let's compile and save. And now we have added
some impulse now, but this impulse,
you can try it out. For example, I write 500 in the z and you can
see what happens. You can try to click on Play, always nice to test it. So whatever you're
doing, try it. You can see now when
I hit the enemy, I'm being pushed upwards
in the z by 500. Like this, I'm adding impulse. Okay? Now we can make something
fun here for the impulse. Now, I'm going to use the same method as what
I've been using before. So let me see where I
actually used that method. It might be the enemy base here. Over here. Actually,
we have checked where the enemy is standing
compared to the player. And we're moving that enemy. I actually want to
do the same thing. So for the player, like if
you're coming this way, I want to push my
player backwards. If I'm coming this way, I want to push my player
backwards this way. So depending on which
side of the enemy you're hitting the enemy
or the enemy hitting you. You want to be pushed
backwards to that side. So just like the UN base, we're going to use
this same method. So I'm going to go back
to my player base here. And the way we can do this is I'm actually going to
move this a little bit down, so I have more space here. I'm going to now get
the player's location. So get actual location. Remember we are inside
of the player right now. So get actual location with a self-reference
and the targets. I'm going to break
it because we are only interested in the x value, because the x value
is this here. We were only interested in that. Now I need the location for my, for my enemy and we
can get it from here. So we haven't done this so far. So we can do it from
here instigated by, remember we are
receiving damage from the enemy so we can get the
controller for the enemy. So I can right-click here, promote this to a controller or variable and call it
enemy controller. Let's connect it now. And I can click here and
replicate it just to make sure that the
clients can see the value of this variable. And now we have the
enemy controller. So we can take this
controller and C gets controlled ****. So now we have the
pawn of the enemy. And we can say get
actor location. So now we have the
location of the enemy. And I want to break
it again because I'm only interested in the x-axis. Now I'm going to
ask myself here, is this x for the player? Is it less than what
it is for the enemy? Well, that means again, is if my enemies standing here, and if my player
is standing here, I'm basically just asking the players x value
lower than the enemies. And in this case, it is
false because my character, if I can actually hit it and not hit the, now I
can't hit it here. So let me find it here. Serena. Like this. Now for the player is going
to be false right now because the enemies x is actually
lower than my player. Here in the player,
right now we are asking, is my player lower
than my enemy? Which is false? So let's again here from the impulse
before we do anything, let's drive from here
and say make vector. Just like before. Instead of copy
pasting our code, if we go back to the enemy base set of comb facing our code, we can just use
this select float. So drag from here and
say Select loads. Now what you can do is here and the
interface you see here, we did the plus here
because we wanted the location plus whatever
we were moving to. In this case, you're
just applying a force like you're just applying an
impulse, for example, 500. So we really don't care about the values for
the x and y and z. We just want it to be static. So here for the z, let's just add
something like 300. So we were gaining an
impulse of 300 upwards. For the x, we're
not really going to take this and say
plus this and so on. Because this one is just
the aesthetic impulse, for example, something like 300. It's either, for example, 300 or minus 300 depending on from which
direction I'm coming from. So now we have to determine, I'm going to connect it here. We have to determine
which direction is which. So let's say here,
I'm standing here. Let's see, Let's am standing
here as the player. I'm now asking, is my x value
lower than the enemies? I'm going to take a look
click on this player. You can see it's 615. Click on this enemy is 710. So right now, yes, my x for the player is
lower than the enemies. So it's actually
going to be true in this case when you walk
in. So it's true now. So I'm walking
here to the enemy. I actually want to
be pushed backwards. And now my backwards is actually
just minus 300 because I can see pushing the player backwards is going in the minus. It's going to lower this number. So here I'm going
to write minus 300. And obviously if you're
on the other side, so it's going to
get false, meaning, I now need to do this here. False meaning here. Now you're going
towards the enemy. You're getting to go pushed away and pushing
the player away. This, this side here is
going to say plus 300, which means you're going to get pushed away this way here. So it doesn't make sense here. Let's say One, 100. And now it's going to
apply either minus 300 or 300 in the impulse. Okay? So let us just organize this a little
bit better, like this. Okay, so now we have this code applied and I believe we
don't miss anything now. So let's click on Play
and see what happens. Now I'm the player. I'm
walking towards the enemy. I'm going to get
pushed this side. That is correct.
Now, I'm going to go from this other side
here. That is correct. I'm going to get
pushed this side. If I'm going from this side, from this side, I'm going to
get pushed this side here. So now I'm getting pushed the correct direction now. Okay? So now we can make,
sometimes you can make funny things like
you can see here. You can add a, an impulse. The enemy pushes you away
while you are jumping. So we have a lot of force. If you want, you can lower the z value force to 150 maybe, let's see what that looks like. Maybe it's too much in the z. I can do something like this. Or you can just, I
think it was funny. Maybe it's something
like 250 instead of 300 or fix
something like this. You see it sometimes like when
you already have velocity, you can get pushed away. If you want, you can set your own velocity to 0
before you get damaged. This will fix the problem, but I think this is,
this is fine here. Now you can see here
this, this pig here. If I hit it and I go here, sometimes it bugs out
here on the ramp. And this is because just like try to watch the earlier video where we fixed the snail so
it didn't bark around here. We didn't really do it for
the pig because the pig is, you can see it's bucks now. And we didn't really
fix it for the pig, only for the snail
because the pig is actually running up here. But you can just, just like before when we fixed it
in the earlier video, I believe in section
one, are the enemy. When we made the enemy, you can just
increase the sphere, collision sphere and then
pull down the enemy. And that will fix the problem. Okay, So now we have
this push effect. I'm blinking effect whenever
we are getting damaged. So now we are ready, like we have all of the
damage effect done. Let me just organize this here. Let me pull this over here. So now that we have
all of this finished, we can actually start working
on the players death. And after that, I believe
we can do the UI. So let me just drag this closer, makes sure that the enemy
base is also organized. And I believe everything
is looking good. If you want to, you can
comment everything. And again, you can
organize all of these things here
inside of categories. And I think everything
is looking good. We can pull this down like this, make it look a
little bit better. I don't know,
something like this. And yeah, that was
it for this video. And let's save everything and let's move on
to the next one.
81. Player Death: Let us now work on
the players death. So, so far we have been doing the heat effect and when
we walk into the enemy, we're getting hits
and losing health. But we haven't worked
on the death so far. So this is what we have so far. Let's now quit the game and
get started with the deaths. So we have a lot of
things to do here. So let's go to the
player base first. And inside of here we want
to make a new custom event. And this is the
damage V effects. I'm actually going
to comment it out so we don't get confused here. And I'm just going to call
it damage the effects. Then we have the damage here. This is where we want to code. The main thing. So let me
move this damage effect down. And this is the attack. I'm going to comment
that out as well. Falling it that sac. Okay. So here for this, any damage. Let me take a look here. So here we are calculating the health and
we're setting the new health. And what we want to do here, we want to check if the
health is 0 because we want to call the death event
whenever it is 0. So let's first make
the death event. What should it consist of? So let me move this down here. Let's make a new event called and we can just make
it into a custom. Actually, it's only going
to contain a Boolean, so we already know that. So let's go to the
interface player base here. And let's just call it death. And we can add an input of
a Boolean called B is dead. So the player is dead. And here we can call that event called dead or death,
not, not dead. And here what we can
do is we can call a custom events called
actually what I found out. So very cool stuff. If you right-click,
instead of writing custom, you can write T dots and
on your right T dots, you get automatically
this custom events. So very, very quick
shortcut here to make the custom events and let's make it into
the server deaths. So going through the server, make it run on the
server reliable. And let's run the one
from the server up here. And then we have to make
the Boolean b is dead. And let's run it through here. Now what we can do here, we can right-click and
promote to a variable. And we can call it be. Is that, alright, so this one, what I want to do, I want to, so when we get hit by the
enemy and we have 0 health, we want to set our
death animation. And by the way, I
have changed so, so far in the video. I told you before that we needed to extract our death animation. But I realized it was
actually better to make this death animation
into one single frame. So if you're watching this, you're probably only
have one frame. So let's, let me delete
all of this here. And let me only import this one brain death animation here that you have in
your course materials. And let me apply paper texture
2D and create a sprite, call it S death, and make a quick
flip book out of that so-called death or dead. Let's just call it
death instead of debt. And the frames per second
is just going to be one. I don't think it
matters for this one. Let's close it down
now we have that. I'm going to go fast here to Luke and Serena and
the blueprints player. I'm going to add those down
here and the death animation, just to make sure, also make sure that you
have added them here when you open the full blueprint editor class defaults. And just what we've
been doing so far. So down here in the player info. And I'm going to add
my death animation again here for Serena. Okay, so we have this added now, compile and save everything. So we want to play this, this flip book here
whenever we are dead. So going back to the
player base, now, whenever this is, so again, we are doing a visual
change, setting a flip book. So we need to go
through a rep notify, since this is the server
and this rock notify, the only thing it's going to do. Let's first take this is dead
and make sure it is true. So when it's true,
when you are dead, we want to call the
set movements state, or the player that
movement state to death. Okay, so that we're
calling death and just to make sure that
we have that set. So going to the unrest
movements states and here that we haven't
said that so far, I'm going to copy
paste this flip book. And let's connect death here. And if you haven't edited, at, edit it yet, remember
here in the, this is an enumeration
movements states, and this is the one
we made earlier. So if you want to edit, if you haven't edited before, you can go to the
enumerations movement state, and you can add death here, and it will appear
in the list here. Alright, so for the animation, let us click here and we have a death animation for
the, for the structure. And let's click on
it so it appears. And we can drag
from it and added. If it doesn't appear,
remember you also have an, an arrow here. You can click up and down. Sometimes they hide. If you don't need those, you can actually click on Hide unconnected
pins and you will hide those a little
bit more clean. You can make this a bit cleaner. It looks a bit messy right
now, something like this. Okay, compounds saved
now we have that added. Let's go back to
the Event Graph. So whenever the player is dead, so whenever this is set to true, it's going to play
our death animation just to make sure that
the player can not move. I'm going to take the Character Movement
Component and say stop movement immediately. I just wanted to make sure that the character is not
moving, just like that. Okay, so now that is connected, let's also make sure
that the player cannot move whenever
they are dead. So going to the Event Graph, I'm going first to my, this one move right and left, taking this is dead. And again, just like before
writing a NOT Boolean. And from here, just
clicking on this Add pin, then you can add more of them. Now can actually
connect this as well. So whenever the player, if the player is climbing, you cannot move left and right. When the player is attacking, obviously you cannot
move left and right. And also when you're dead, you cannot move left
and right is that we have to add it to things that we don't want
the player to use. So for example here as
well clumping up and down. And we can say and
here and Boolean here. And we can add these attacking and connect it here instead. So we need to structure
this a little bit. Now it's getting a bit
messy, but that's okay. We can always clean it up soon. Let me copy paste. This is dead as well, and we can edit for the jump. So here for the jump, you
cannot jump if you're dead. And the last thing
is the attack. So the attack is down here. You cannot attack
if you're dead. Okay? Just like that. Just to make sure that
we don't have any bugs. So we check with
Booleans just like this. Okay, so now you
cannot attack, okay, So we have this dead and what should happen
whenever you're dead? Let's do that later. So when do we want to
call this event here? We want to call it
whenever the health is 0. So the any damage here, the player is getting damaged. And we are re-calculating
the health here. So now we have the
updated health here. So let's take this
and say break. And now we have this health. And I can say equals, this is equal to 0. What should happen? I'm going
to unhide the other pins. So what should happen
whenever they health is 0, we can make a branch here. So when the health is 0, we
want to call our death event. So writing death, calling this that event here and
setting it to be true. Okay, so now this is true. Whenever it is false, we want to do something else, meaning we're not dead, we're just got hit. So I'm actually going
to remove this from here because we probably
need to add it here. We don't want to give, we don't want to remove
the God Mode and also have this delay before we check if the player
is dead or not. Because remember, if you
do this, it like this, then you are going
to delay the code. So you're calculating
the health, you're going to delay the code. And if you're dead,
you're actually going to die after this delay, which doesn't make any sense
because you're already dead, but there's delays your death
and it doesn't make sense. So let's actually look, click Control X to cut it and
paste it over here instead. We're just calculating
the health like this. And now down here we
can do this code here. If your health is
not equal to 0, we are going to delay it here
and remove the god mode. Or if you are dead already. So if the health
is 0, then we're going straight to
the death event. And we still want to keep the
God Mode to be true here. Because when you're
dead, we don't want the enemy to hit you. So I'm still keeping
the god mode on. Okay, so let's see down here. So the depth is going to relate. Let's actually play the
game and see what happens. So let me click on Play. And now we can place this character, you're
getting damaged. Actually let me put my
character's health down so I can test this and I don't have
to get hit a lot of times. So let me check what
I put the damage for. Remember in the enemy, for the snail and the pig, you have added damage. And let me check
what the damage was. The damage for the snail
here in the animal info. The damage was ten
and it was 20, I believe, for the pig. So let me just put my
health for the player. Here in the player info. Let me just put it to 20. So I get one hit by the pig, but I get two hits by the snail. So clicking on Play so I
can test that quickly. Now we can see. I died. And actually my, my tomb here is
blinking when I'm dead. I don't like that, so
it's blinking here. And I don't really
like that actually. So we have to restructure
that killed a little bit. Because when we get
damaged here in the, any damage, this is enemy base. Here in the player base. We are getting an impulse and we're getting
that blinking effect. I actually want to do it
whenever I am not dead. Because when I'm dead,
I don't want to blink. I don't want my tomb to blink. So we actually have
to separate it because I actually
liked the impulse here. I like the impulse, but
I don't like to blink. So we have to separate it. So let's separate this effect. So here in the damage effects, I'm going to do a custom event, and this one is going
to be an impulse. So actually I'm going to turn those into Blueprint Interfaces. So I'm going to go to the
interface and player base here. Let's make one now
called damage impulse. And the other one we had. So let's go back. The other one is
damaged via effects and it takes the color and
material as inputs. So let me make a new one
called damage the effects. Okay, So the impulse
takes a vector. So down here, vector, and I'm just going to
call it the impulse. And the other one, the damage
via effects takes a color. And you can see here, if
you click on the color, you can see what type
of variable it is. The material is
material interface and this one is a linear color. So you can go back
to the interface and choose here material. And it was called the material. I don't think there is something called
material interface. It was actually a
material interface, so we have to select
this one selected here. And the other one was
a linear color here, and this one is a linear color. Okay, So just calling
this one color. And now it's going to be, again, I'm going to delete this, Compile and Save,
going to buck again, and I have to delete it maybe. So let's just call it
layer color instead. And this one, player material. Okay, so Compile and Save. And now let's go back
and call it here. Call it damage,
the effects here. And material goes in here, the linear alert goes in here and the impulse
has been separated. So I'm going to
click on the server one and remove them pulse, it will remove it from here. And this one multicast, I'm going to remove
the impulse as well because we
don't want it here. I'm going to remove that impulse from here and just
paste it up here. Instead. I'm going to make a new
event it remember we just made the damage impulse. So I'm going to call this
damage impulse event. Again, run it through the server as Harvey damage impulse. And this one will have
here this vector. I'm just going to plug
it in like this and connect it up here
called the server-1. And let's run it through
the server first down here. And let's call the
server damage in polls. Okay, So now they are connected. Now we have separated them. And let me reconnect this multicast before
I forget this one, actually, this one, I'm
doing it wrong here. We need to add a multicast. So again, at a multicast,
damage impulse. And again we need a
vector down here. And let's run it through
a multicast and reliable. And we have to run the multicast here through this server. So this one. Okay, so now we have that edit. I'm going to make
a bit more space. So we have space for that event. Just like this. And now let's see if we are
missing something. And I think this is
looking good so far we can move this a
little bit closer, doesn't make sense to
have it that far away. Like this. Alright, so now we have the
damaged impulse separated. So what we can do up here, now, it's going to give
you an error because we don't really have
an impulse here. So let's go down
and take a look. So we have damaged impulse, impulse, the effects, okay? This one is giving an error. Let's delete it. I don't know why it's not deleting
the impulse. So let's search for
damage. Impulse. I want my impulse to be here. For my impulse, I want it to
be here. So this is correct. Let's just plug it in. But I want my color
and not to be here, but I want to play my color
whenever I am not dead. So I don't want the
blinking effect. I don't want to play my blinking effect up here when I'm dead. So let's play the blinking
effect here instead. And it was called
damage UV effects here. And for the damage
via effects again, you have to select a material, either remove them here. So again, click on Settings, show developer content,
show engine content, and show plug-in content. And now you can
select the material and it was called Sharon, sluice and C are translucent and go down and
find it here translucent, unlit sprite material and
change the player color to 1.5110 in the alpha. Quick, okay, so now we
have it like before. And if I go down and
take a look here, so the material is set to
whatever we said and then we're going to set it
back to the mosque unlit, which was our normal color. Okay, So that looks good. Now let's actually test and
see if this is good now. So let's play. Now we're getting hit. That's nice. I don't like I don't like the
blinking effects, so that's nice now. And I'm going to try it
as the server as well. So Plato as listening server. And just to make sure. Okay, so now we are a tube and
that looks great. So that is all that we had
to do for the player death. And the next one, we're going to
create the menu I, so we can actually have
some user interface and update our health.
82. Creating the Main UI: Let's now design the
main UI for the game. So, so far we don't
have an in-game UI. So let's go to the UI. And in here Let's
right-click and go to User Interface and create
a Widget Blueprint. And select this one,
widget, user widget. And let's call this one WB made. So this is the main UI. Double-clicking on it here. First, again, we have to search for Canvas and we need to add a Canvas before we do
anything inside of here, what I want to create
right now is I want to create our
Health Bar down here. So the main result
we are searching for is actually doing this here. So it's always nice to visualize and know what you're
doing before you do it. So when I look at this, we have an overlay because we have health bars on
top of a background. This means we have an overlay
and then we have two bars. So the Health Bar and the experience bar on
top of each other. And I can tell myself, this is a vertical box. Remember we use the vertical box and this because they
are aligning vertically. And yeah, let's try two. Let's try to start here. So first we need an
overlay because we need a background with health
bar on top of it. So when you added
it goes up here, let me just, you can redesign
the anchor point here. Remember to do that. So on the overlay, put the anchor point
to down below here, because this is
where we want it. And let me just drag it down for now, down here somewhere. So here we want to add first the background and the
background is just an image. So search for an image editor
on top of the overlay. Click on that image
and let's change this image to actually
you can see I get a lot of weird things and this is because we have enabled all of those in the
previous lesson. So hide the show
plug-in content, hide the show engine content and hide show developer content. Let's go back here and click on this images so we can
see our own only. And let's select the
one called button, Black Square flat. This one. You can fill the
whole thing here, so a line horizontally
and vertically. So it fills the whole thing. I'm going to duplicate it. Control D to duplicate, or we can right-click and click Duplicate and
selecting this image. Now, now I want to change this one to button's
blue square flats. And I want to make
the y to five, actually only five, you
can see nothing changed. And this is because we have this selected
vertical alignment. I'm going to select
this top alignment. So I'm just decorating
my background. I can remove all the dashed
lines by clicking up here. So I'm just decorating
a little bit. I'm going to click on Control
D on the image up here. And I'm going to align
it at the bottom. So now I have this
awesome design. And what we want to
do now is have luck. If I take a look at this before. We need now a vertical
box where we have these two progress bars
on top of each other. So let me search
for a vertical box, add it to the overlay here. Now, let's search
for progress bar. So progress bar here, you can drag it into
the vertical box. And what you can
do now is you can, now you can see, not much can be seen because you have
to add it actually. So in the style for the progress bar and I
think for the vertical box, let me actually align it
here in the center first, this is the vertical bugs
Clicking on the progress bar. I'm going to change
the background image. Let me change it to
this one, black square, dark flat, so it's a bit
darker than this color here. Then what I want to do
is I actually want to align my vertical box here
all the way horizontally. So my progress bar is
aligning all the way. And what I want you to do now is head here to the right and left. So here to the right. So I am pushing it from
the right, I'm pushing it. So it's not here at the edges. I'm going to pad it with
maybe 203030 maybe, and to the left 30 as well. And we can try to add, Let's go back here
for the progress bar. Let's go to the bill
image and marquee image. And let's add a red
one for the health. So this red 14 key
as well, a red one. So now you can see
it's a lot bigger. And if you increase
this percentage, you can see here this
percentage is filling, but it's not really read
like what we choose to. And this is because you have
to go down the progress bar and the Fill Color and Opacity for some reason I
have no idea why it's blue. So you can make it. Here, if you just write 111 or you can just increase
and decrease these sliders, just make it white here. And if it is white, you can see your true button color or progress
bar color will appear. So this is the progress bar. Very cool. And right now it's
aligning on lot here. So vertical box,
we're aligning here. And for the progress bar, I think this is good for now. We can always change the size
if it's too large later on. So, so far it's looking good. However, we're actually needing an overlay because remember, we have the text on
top of the bar here, so we actually need a text here, so actually needed
an overlay first. So let's drag in an
overlay inside of this vertical box and put this progress bar
into the overlay. So we can also add text on top of it here
and the overlay. So we have progress bar
and a text on top of it. On the text, I'm going to
align it in the middle. And let's call it 100%. So for example,
this is the health. I'm going to change the text to, let's try semi bold. Semi bold, actually bold, maybe Source Sans Pro Bold. And I think let's actually
go with the black one. Black. And this one the size, I'm going to reduce it to 14. So very small text here. I'm going to give it an outline. So here in the outline settings, so I'm going to put it to one. So it has an outline. If you want to, you
can also add shadows. So first here in
the shadow color, you have to go to the Alpha. And if you write one, the shadows fully appear. And if you write 0, let me raise your 0.35. It means thirty-five
percent shadow. And I'm going to move
the shadow offset two to two so it's
a bit more away. You can see if you add more, it's going to go a bit
more away from the text. So 22 is good for me. Okay, so what you can do now, you can always decrease the size by decreasing
this y here. I think it's too large. So decreasing the
y. So something like this, maybe like 42. Yeah, I think that's
good for you too. I'm also going to copy
paste that up here. And now it looks good. So this is our Health Bar. Now, what we can do
is compile and save, and we can duplicate it. So we can click on the overlay. We can click Control D.
Now we duplicate it. And let me add a spacer between these two spacer
between the overlays. And this spacer is
maybe ten and the y. So there's a bit of
space between them. Maybe 1515 is good. So this is the experienced bar. So instead of red, Let's
change it to yellow or green. That is usually the
standard for experience. And let's change it back here under the Health Bar, it was 42. So let me copy that
and paste it here for 24242, like this. And for the experienced bar. And maybe it's going
to say something like 23 experience that you have out of 150 which
is needed to level up. So something like that. So now we have that UI said. And again, remember to
click on the overlay, change your anchor to down here. And you can try to adjust
this position on the x and y. I'm going to enable
the dashed lines so I can actually see
where it's placed. I don't know,
something like this doesn't really matter for now. Let's compile and save
for the responding. We want to do something like this where it says you have been slain by and then it says
what you have been slain by. And then you press
okay to respond. So again, we need an overlay to put some
text on top of it. And we need a button
with an overlay because we have a button
and text on top of it. So let's go back here and
let's add an overlay first. Searching for overlay, I'm
going to minimize this here. I'm going to add
it to the canvas. This overlay is going to be
placed in the middle here, middle, up here on top. And I'm going to write
0 and the position. And you can see it aligns
not in the middle what it aligns here at this corner. So you can adjust this
alignment here I can see it's 0.5 if you want to align it
perfectly in the middle. And maybe for the position y, I can say 100s, so
it's down here. So now what you can do here
in the overlay, again, you can add an image
on the overlay. You can fill it horizontally and vertically and add this
black square flat. And again, you can click on Control D to copy it down here. And then you can change it to this one and align
it vertically. You can align it on the top. And I'm going to change
the size to five. Here. Again, we are doing that design. Click on Control D and
aligning it to the bottom now. So we have this one again. And I'm going to remove
these dashed lines. What you can do now is you
can add text on top of it, and it is inside
of a vertical box. So adding a vertical
box to the overlay. And now we can add two texts. So this one text. And the second one, the first one is going to say, you have been slain by. Then it's going to say by
what, for example snail. And the other one
is going to say, press Okay to respond like this. The first text up here, I'm going to change the
font to semi bold here. And the size is going to be 12. And then I'm going to align it here to the middle actually, on the same thing with this one, I'm going to align
it to the middle. And for this second one,
I'm going to change the font to bold. I'm going to change
the size to 18. The first one, I want to
add a shadow as well. So I'm going down here
and for the shadow now, if you want to do the same
thing for both of them, you can select
one, hold Control, select the next one, and you can just do the
same edit for both. So here in the shadow
color and the Alpha 0.35. And for the shadow offset, I'm going to say to two. So it's a bit more what
you can see there is a subtle shadow effect
now in both texts. Now can see they're not
really in the middle, even though you align
them to the middle here. And this is because, remember they are inside
of a vertical box. So the vertical box needs to
be in the middle as well. Clicking up here and putting that vertical box in the
middle will fix the problem. Now we can make
this a bit larger to not have this context
condensed space. So just try to resize
it however you want. That's up to you. It doesn't really matter. Something like this.
Maybe it looks good. And let me just resize
it down like this. And now you can add a
spacer between these two. I think they are too close. So let me add a spacer
between these two texts. And the spacer can be made
or something just like five. So there's a bit of a
space between them. So now what we need, actually, we need this button here. So you can see we need
this okay button. This okay button
is actually in a, we need to add a vertical
box because we have this year and vertically
we have a button. So we actually needed to put the whole overlay
in a vertical box. So vertical box put
it down here and you can drag this
overlay into it. Just make sure
this vertical box, you haven't placed it
into this overlay. This mistake can happen. Just minimize this and make sure you have them here
where they should be. Let's drag this
vertical box now. Now we have a vertical box. We can make the
anchors later on. Let's add here in the vertical
box, we have this overlay. Let's add another overlay
With the button and the text. So let's search for button here, and let's search for text. Here. We have the button and
the text for the button. Let us add a blue button, so this one called
Blue Square flat. And again you can right-click
hold Shift while you right-click copy and hold Shift while you left-click
to paste like this. Or you can just
right-click and click copy and you can see the
bind here as well. I'll be Paste. I'm going to do the
same thing here. Change this rounded box
into a box instead. Right, hold Shift,
right-click to COBie, hold Shift, left-click to paste. And for this margin, 0.5. And I'm writing 0.5 so
it can tile correctly. So I'm going to
right-click this here, copy paste this margin. And for this tint color,
for the normal one, I'm going to move it up to the
white so there is no tint. And for the Harvard, I'm going to just put
it slightly here. And for the breast, I'm going to just put it a bit darker
than the hovered one. This is depressed one.
Now, I think this is good. Okay, So we have this and for the enlightenment,
so for the button, actually this overlay,
the whole overlay, it's, it's align correctly
that right now. So going to this button, aligning it here,
filling it horizontally. And what kinds of pellet
vertically, That's okay. For this text, we are going
to align it in the middle. Going to change
this font to bold, and changing the size to 14. And I'm going to
add a shadow again, 0.35 and putting the
shadow after 222. So we have the same consistency, the same design, and we
can just write okay here. So there needs to be a
space between the button. So let's do a spacer. Let's add a spacer between
the, these two overlays. We can do maybe like 20 or 15. I think 15 is good. Now you can see the button is large and this is because you have to click on
the vertical box. Now, remember you
made it to fill. So here you made it
feel actually also. You see here we made it feel
horizontally and vertically, which means if we click on the vertical box and resize
it, it should resize. But that is not really
the case right now. And this is because we have
to click on fill here. So right now it's set to auto. We actually have
to set it to fill, so it's going to fill
the whole space. I'd like to do my UI dynamic like this so I can
just, instead of folk, instead of doing the
re-sizing here on the images, I like to just fill
it so I can click on the parent's parent element and I can just resize
it like I want, and it will be a
lot easier for you. Okay? This as actually
this is also good, like advanced because
later on when you have multiplayer and
names and so on, they can be longer than your UI. So this will stretch
automatically, however long the
name is, and so on. So this is actually very,
very good practice. So let me just
something like this. And I think, yeah, I
think there's good. So let's now a line is correctly Click on
the vertical box. You can see the
anchor is over here. Click on the anchor, putting
it on the top middle, and writing 00 in the position. Again, I'm going to align here 0.5 and writing 100 and the y. So it pushes it down here. So this is what it
looks like so far. Let's compile and save. So now we have created the UI
and I think it looks good. Let's save everything, compile and we can add more stuff
if we need more stuff. But for now, I
think this is good. Let's move on to the next video.
83. Adding the Main UI to the Viewport: Let's now add the UI to
the player controller. And remember, the UI
is client-side it, and we do that in
the controller. So inside of the
player controller, we do all of the UI. And it is client-side it, which means it's only
you as the player. You will only see your own UI. Another player receives
their own new eyes. So it's not like you're
not sharing you are, you're only looking
at your own one. This is what client side it means like running
on owning client, it only runs on your PC, on your, on your screen. And it doesn't make
sense to share. A UI doesn't really make sense. You can only see
your own health. And if you want others
to see her health, you can always share that
information if needed. So now, here and the
player controller, what we did before is
we initialized widget, which means here in the
character selection. So whenever we click play, the character selection appears. Want to do now as well. Not like we don't want to add the menu I to the viewport directly because we have the
character selection screen. But what we want to do is add the main UI after the
character selection screen. But we want to initialize
the widget as well. So let's first take this
one again, create widgets. And again, we do that in the client running
on owning client. Here, Let's select the menu I would just made
as compound save. And let's right-click
promoted to a variable, Let's call it WB made. That is all that
we had to do here. We don't want to add it to the viewport because
if you do that, it's actually going to add the main UI to the
viewport as well. You can see it
added the main UI. We don't really want to do that. So let's remove that. And if you don't add to the viewport, you can see you edit
it as a variable, but you haven't told the engine that you actually
want it on the viewport. And we don't want it under
view port right now. But we want to do is
whenever you click on or select one
of the characters, it's going to add the
main UI to the viewport. So what we can do is we
can close this down. Remember here in the
character selection screen in the graph, we designed these
two events when you click on one of the characters. So let's actually do it here. Let's, we already have
the player controller. So we can just call this
WB main we just made. And here you can search for
x and our search you can write to right now
we are removing the character selection screen when we select the character, but we want to add this
to the viewport as well. So we want to add our
character, our main UI. I'm going to copy
paste this down here. So now if we select
Luke or Serena, we are going to add
this to the viewports. I'm just going to
make this flips, make this look a
little bit better. Something like that. Okay, so
now we are going to add it. So whenever I click on play, I'll select loop for example. You can see I now have
my UI on the screen. Again, I don't really
want this to be, to be available whenever I just spawned because this is the death message
or respond message. So what we can do is
go to the main UI. We can select it here, select this parent
one, the vertical box. You can see this is the one. And what we want to do
with this one is here, down here and the visibility. Let's change the
visibility to hidden. We don't want to
see it right away. So we're going to hide it as
well as this progress bar. So the health is at
100% to begin with. So I am actually increasing the default percentage to 100. And they experienced
one is at the bottom, like 0 experience
when you start out. As for the number this is
100 per cent to begin with, and for this one, it is 0 out of something. I don't know yet, so let's
not add anything here. Now when you click on Play,
now you can see it's correct. Now it doesn't display
that message up here. And we can see our health
and our experience here. I'm going to resize
this a little bit. I think this is too large. Something like this. My OCD is triggering. I don't really have OCD, but maybe I have
something like this. I think it's a lot
better. Looking good. We can move this a little
bit down here in the y. Something like this.
Okay, looks perfect. Now we have the health
and the experience looks interesting. And then we have the death. Anyway, I actually want it
to appear whenever we die. And we will be doing that when we are working with
the player respond. So this is what we have so far. And the next thing we can do
is update this health bar. It is very easy because we
already had that logic. So let's move on
to the next video.
84. Updating the Health Bar: So to update the Health Bar, let's go back to the UI
and go to the main UI. This is the Health Bar we'll be updating here so for the
progress bar to make it easier. So here in the graph to code, you can see all of these
has rubbish names. So let us just change this
progress bar name to Prague. I usually call that
as a progress bar. And then health. So we know it's the progress
bar for the health. And this one, I'm going to
change the name to TXT for text and the health one. Let's change it to
Prague experience. We will be using that
later, not right now. And this one called
TXT experience, Compile and Save for
this button up here. Let's also change the name
while we are edit button. And just, okay,
this one up here, we also want to change later on because we're going
to change the name. I'm going to call it TXT. Slain by, let's call
it slain by compounds. Save. Now you can see here for this text we
also want to set it, but if you click on
this progress bar, for example, and
go to the graph, you can see the progress
bar is a variable here. But we also want to
change this text here. But if you click on the graph, there is no text. And this is because
texts by default are not variables and you
have to take this one up here called S variable, and then it will appear
here in the graph. However, there are
a lot of images. Images are by default variables, but sometimes you
have to clean up your project so you have to click on this
image, for example, and remove it as a
variable because you don't really need to modify
this in the game. Also for the background here, I can remove it if you want to, can clean that up as well. So remove that background
is a variable. Just remove all of those here. This Compile and Save. And you can see your project
is a lot cleaner if you only have the variables
you will be working with. So let me delete
this default events and let's make one called, Let's make a custom event, and let's call it update health. So what I usually do for the UI, I never create
Blueprint Interfaces. I mean, you can, you can just go in and create one for it. But it doesn't really
make sense because you usually don't have many events. And you will have to make
a lot of interfaces. Like you have to make
one for every single UI. And I don't want to do that, so I usually just make
custom events for them. So here for the update
health, what we want to do, we want to take the
progress bar for the health and say
set percentage. This is the thing
we want to update. And you can see
what it's called. If you click on the progress
bar and you go down here, you can see it's called percent. So if you just search, search for percent, if you
don't know what it's called, you will see this one here. So we want to set
the percentage, but we also want to
update this text called health, also called setText. So we want to set
this text as well. So for this percentage, I'm just going to run it through this event and we can call
it again another place. Let me just call it
percent instead of in-person for this texts, it's just going to be a percentage of whatever
is going through this. And you will see what
I mean later on. But for now, let's just drag
from here and say present. And for the float you have
something called as percent. So it's going to convert
this as a percent for text. And then we can plug it in here. So it's going to display
as a percentage here. Now we can always try and test and see if this is
working correctly. So now that we have
this compound sale, so remember we handle UI inside
of the player controller. So let me go back to the
blueprints player controller. And inside of here. So ultimately we want to call it here from
the player base, because the player base, we are checking like
we are calculating the health here over here. And we actually want
to display that, like update the UI from here. It's going to go from
the player base to the player controller and
to this one at the end. So let's create the one at
the player controller now. So right now at the
player controller, we are initializing widgets. We have this character and
we have the player spawning. So now down here, Let's do another one. And let's call it. Let's make a custom
one and we can make it into a
Blueprint Interface. And a bit, I just wanted to
see what we can do here. So make it into your
client blindsided, update, update, health bar, and let us call that event. So taking here in the WB main, remember, the event here
is inside of the main UI. So we already have a variable
in our player controller. We just made it up here. We just made that variable. So we can now use this
variable and we can call this event
called update health. Let's call it say that health. And now you can find it here. Next we want to do is just go and take this
percentage into it. And this is what we need. Like, let's actually
change this one into a running owning
client and reliable. So now what we need to do is we want that
custom event up here. Let's make it into a
Blueprint Interface. Let's go back to interfaces, to the player controller. And here, let's what
did we call it? Update health bar. And let's call it here,
updates health bar. Let's add a float here
and call it percent. I believe it was called present and
let's call it here now, let's say Update Health Bar. And we can call this
interface events. And now what we can do
is call this client sided one, update health bar. And let's run this through. So now this one we need to
call through the player base. So let's call it here. So to update the health, Let's now actually go back
with the player base is here. So we are subtracting
and we're calculating. We need to do it here. So we actually need to move this a little bit further away. And now we need the
player controller. And let me see what
we have made here. We had the enemy controller. We don't have the
player controller, so we can actually make
a reference to that, let's say get controller, because we are already inside of the player so we can
get the controller like this and then say
gets layer control our reference because we want to use this player controller here. Where is it? This one? Specifically, we are referring
to that PC Maple Story. And from here we're
going to call that update health
update Health Bar, I believe it was called
and it is a message. So remember message
here because it's a Blueprint Interface
function here that we made. So it's a message when you
click on it, Compile and Save. So now we need to plug
something inside of this percentage
and for this one, so the present, remember, you can't just let me
just break this up here. Actually, we don't have
to do that all the time. We can just use this one. Let me disconnect this for now. So now using this health, we cannot just plug
it into percentage. Because for the UI, if you take a look at the
progress bar, for the UI, your progress bar is actually
going from, let's see here. It's going from one to 0, so it's not going to 100%, it's going to 0 to one. So if you have a
percentage divided by 100 to reach that number. Else if you just plug in 100%, it's always going to be
100 like this because then the maximum number is actually one and
the minimum is 0. So 0 to one. Remember not to 0 to 100. So let's go back to
the player base. And so what I need to do, Let's make a new event
called max health because we need to take a percentage and in
order to do a percent, we need to know
what it was before. Let's do a max health variable. And instead of
doing it down here, you can actually just do
it in the player info. So let's go to the structures as a player info and let's just make a new health variable. Let's call it max health. And let's say at
sometimes like in RPGs, you can upgrade this max health. And this health is
just like we're just using this health to
modify it all the time. But this makes
health will always stay at the max and you can upgrade it with
upgrades later on. So we have the max
health and let's actually go to the player
base compound save. And in the player
base you have to set what that max health is. So let's just set it to 20. Max health is 20. Let us now go. Let me just compile everything. Let's go back to
the player base. So now we have the max
health as a percentage. You have to take this health
remaining and divide it, divide it by the max health. Now you'll get that
percentage number that you can plug into here. And now that you have this
update health in percentage, now this is going to go
through the player controller. So you're calling this
from the plaque control of their health is going to go
to the player controller, is going to go
through the clients. Because remember, UI
is client-side it, so it's going to go through
the client and it's going to update the health which is here. And it's also using that
number that you have. For example, when you are at max health number
will be here at 1 and the progress bar here 1 when you just
do as percentage, I believe that it
multiplies it by a 100. So it puts it here in the text. But we actually have to test it out and see if it is
working properly. Now as percentage. And now you
can connect those and ask, is, is this health here? Is it equal to 0? So let's
say again equal to 0. We can just delete here
and connect this instead. You can just continue
what you did before. Now you're going to update the progress bar,
save everything. And before we continue,
I believe that was it. Let's actually just try
and see if it works. So it's at 100 and this one
is going to one hit me. So I'm actually, we can see
we have a mistake here. But let's try to fix this later. So let's actually see
what that was caused by. This one. You can see
it hits me and I have 50 left because it
hits me for 50. And when I have 0, I am this tomb and
nothing's happening. So this is actually
working perfectly. And if I increase my health, so let's say we go to
the player info and we increase the max
hills to say 50. And we also start with 50. So let's play now. And now you can see
it's working perfectly. And if I go to here, it's
going to damage me a lot more. And then he's going to kill me. So now this is
working perfectly. The percentage bar is correct
and the percentage here, the text here is also correct. For that bug under letter, I actually need to fix this. So when you jump, some reason it's not grabbing. I can see it's
getting stuck here. And let me just try to jump on the ladder with
this pig here. So it is working
if I'm not moving, but it is bugging out. If I jump from the side,
which is very weird, maybe it has something to do with the collisions we added. So let me actually,
let me see here. So when we deep up here, let me go to the choline
being up and down. So we're doing some
climbing and we are, we have this unwrap function
called isClient being. How much it actually just print a string here to see if this, like if we're missing up
through the collisions we have. So now it's going to say Hello. Yeah, you can see it
says a lot to times. It's actually not
four times if I just make this for ten seconds. So I can explain. You can see here, we are
going to jump on it. It's actually a says two times, one from the server and
one from the client. And we obviously have
another one from the server. So it's actually does
three times here. We have multiple collision, like it's not supposed
to do this three times. So this code is only
needs to be run once. So there is something with the collisions that
we need to adjust, which is causing this problem because we only need to
collide with it one time. So let me click on
this capsule for the player and take a look. And we are ignoring
everything except for the dynamic and static. And let me take this
attack collision. Maybe it said that
the attack collision, we are ignoring everything
except for the world dynamic. And let me take a
look at the ladder. So let me go back
to the blueprints to the line being
blind being based, taking a look at the
collision box for this one, Here's overlapping
everything. And this render component
is set to no collision. So this has no collision. So the player, just to make sure the sprite has no
collision as well. Actually it does have collision
but no overlap events. So let me try for
this collision box. Let me go to costume and
do like we can ignore the world dynamic and let us try to click on Play
and see what happens. Now you can see it's
actually working. So let's test that a couple
of times just to make sure that doesn't block
out all of a sudden. Let me play as the client. So let me pull up the client here and make sure that
it's working as well. That is working. It's
adjusting our location. Okay. So everything's working. And the problem was we have we had two collisions
lining with it. So for the collision, it was the one that
was colliding with it. Because remember the attack
collision is a world dynamic and the ladder collision is set to overlap with
the world dynamic. So we have to ignore
the world dynamic, which means we need to ignore
this attack collision. And this will not
mess it up anymore. So this was the fix here,
a very simple fixed. So just set it to
customer and remove this. So ignore this well dynamic and this will fix the problem. So with that, we have fixed that problem and we also
updated the Health Bar UI. Let's go to the next one
and update the death tax.
85. Updating the Death Text: Now let's go back down to
the UI and go to the main. Here we want to
update this text. So it says you have been
slain by and it says snail. So we have to update
this text here. So click on this text again, remember to set it to
variables so we can edit it and go into
the graph here. And I'm going to call this one, make a custom event and call
it display death message. And we can also look at like
we can display the message and we can also
update that texts. So taking that text, first, we need to
display that message. Remember it's hidden by default. Let's take what we want to do. I believe we need to make
it into a variable as well. We want to have this
vertical box displayed. Remember we set it to hidden. So we need to, let's
change the name of it. So VB for vertical box and
let me call it respond. Respond or death message. Let's call it death message. And let's put it into a variable
so I can see it in code. So going to here
and taking this, now what we can say is
set the visibility. And now what we can
do is set it to visible. And let's connect it. So now it's visible. And the next thing we want to do is display this text here. So setText actually changed the text that just like what we did up here with this one. However, with this one, now I'm going to teach
you a new thing. So you have something dynamics. So it's going to say you
have been slain by snails. So I'm just going to copy paste this text and place it here. Then I was going,
you have been slain. You have been slain by snail. However, this snail,
sometimes it's a pig, sometimes it's a new enemy
you have added to your game, so it is not
necessarily a snail. So when you have
dynamic texts like this that needs to change
during gameplay, you have to drag here and use something called format text. Use this instead. If you have some dynamic text that is
not static all the time, I'm going to paste my
text again in here. The thing you want
to be dynamic. So this text is static. All of this, the
only thing I want to change is this snail here. Sometimes it's a
pig or sometimes it's another enemy
that you have added. So to do this, you have to
write these curly parenthesis. These two curly parenthesis. And in the middle, you can
just write whatever you want. Press Enter, and you
can see you have a variable here that
you can plug into it. Now. You can write whatever
you want inside of here. For example, here what
we are trying to do is to set the enemy's name. So I'm just going to
call it any name. You can see it
changes accordingly. So you can write anything
inside of curly parenthesis. This is the dynamic text
that we need to change. This text is going to be the enemy's name and we haven't really specified any
enemy names before. So let's go back
to the structure. Remember we have this animal, animal info, very useful. We can have info of the animals. So let me just call this
one actually not snail, let me call it name. So we have the
enemy's name here. And let me change
this to a string. Compounds save and let me
put it up here at the top. Now when you do this again, remember you can go to enemy, enemy base, Compile and Save. Now you can see it in
all of the enemies. So going to the snail, for example, in the
class defaults. Now we have this name
string variable here. And you can just
call this one snail. And let's go to the pig here
and set the name of it. Let's call it pick. You can even give it a name like you can call it victor or
whatever you want to do. But remember, this
is for all the pigs. So they're all going
to be called Victor. So let's call this one pig. And let's do that. Okay, so now we have the
name here and it's a string. So let's click here
and say string. And let's call this
one enemy name, tangent into a string. And now we can
connect it down here. And you can see
now you can drive a variable through this
into this format text. So now that we have this, remember this is UI, so we have to go to
the player controller and then call it here. But to make your
code a bit better, you can go to, let's go back to the main here. Like this display
death message is going to appear whenever
your health is 0. Remember you are
already checking for the health here in
the update health. So you can actually just make it easier for
yourself instead of just doing another event here and the player controller
saying updates, death message or
something like that. You already checking
for the health. So you already know
inside of here, whenever it's 0 and
whenever it's 0, it's going to display
that death message. This is what you need. So here in the percentage we can just say equals to 0. And we can make a
branch after this. And if it is 0, you are going to call this one called
Display death message. So we can just say
display that message. And now you have it. However, you have to drive this again through all
of these events. So I'm going to drag
this enemy name travels through here. Now it's going to the
player controller drivers through here, the client one. And here you have to
go through this one, but you can't do
that because this is a Blueprint Interface function
called Update Health Bar. I'm going to go back to
the interface controller called Update Health Bar. And let's add a string
here called enemy name, Compile and Save enemy or
the player controller. We can now connect them. And remember now
it is all the way over in the player base. So let's go back to the
player, player base. Now, you can see it
in the player base. Let's go down to the code. And you can see it here now
when we update the health. So actually I'll have to
give it the name as well. So clicking over here, remember we added it. So this one is actually
the player info. We added it into the enemy
info or animal info. So for the animal info, this one here we
need to call it. So let's do that in the player. So how do we call this? Remember, it is stored in the enemy base, base blueprints. Do we have something
that we can do to call the enemy base blueprint as this one player connected is actually an old one
that I need to delete. So do we have
something that we can call the enemy **** from? And yes, we have, remember we
have the enemy controller. This is the one that
we defined here. Whenever we get, like
when we receive damage, this is from the enemy. So we already have the
controller of the enemy and we can see it gets
controlled on, and this is how we
get the enemy base. Because now we can say gets
enemy reference like this. And from here we can
say animal info. Now we can get it here. And now we can break it and we can get the name
as simple as that. So clicking on this
name here, like this. So we have to include
this in our code. So we can see here, we can include it here. So let me move all
of that like this. Let me just included down here, we can just clean it
up on a little bit. It's a bit messed up right now. And we can plug the
name inside of here. So now what is actually
working correctly? Hopefully, we can test that out of course before we believe it. So now let us I'm just trying to organize
these a little bit better. Something like that. You can also move those
closer like this. And double-click here to
make a railroad node, make it look a
little bit better. Like this here. And you can even, for this one, you can even double-click
here and do this instead. So something like this, it
looks a bit more clean. Yeah, this looks good. So now we can compile and save. So now we're setting the name. It's going to go through the
player controller. Here. It's going to go through,
it's going to go through the blind-sided event, is going to go through
the update health, which is then going
to go through here. All the way to this end is
going to go through here and set this enemy name. And it's going to be dynamic because you have
already defined in the snail what the name of
the snail is and in the pig, what the name of the pig is. So now it should work. But however, we cannot
test this right now. Actually, the economy
we already set it to display is just the response
that we haven't defined yet. So let me just hit the
payer so I can die quicker. Now you can see it says, you have been slain by Pig. Press Okay, to respond. And then you can click on
okay, we have a small bug. You can see the button cannot be pressed on top of this okay, text and only be
pressed out here. So let's fix that. And I want to make this
a little bit larger. It's a bit too small. So let's go back to the menu. I go to the designer. Want to make this a
little bit larger, so you can click on
the image, this one, and make the size a little bit larger and make that
vertical box larger so the button gets larger.
Something like that. Now what we can do is
for this, okay, here, remember the thing like
when bugs out and it blocks your button here and
there isn't a block sets. You have to go down here
to the visibility for this text and set it to none
hit testable self only. And this means you cannot
hit this with your mouse. So your mouse will ignore this. And this way you can just
focus on the button. So remember to do that with elements that are
blocking or buttons. For example, if you're making a, an in-game shop or something
and you have icons, you have to do that
for the icons. So now you can see
I can click on the button even though
I am on the text. I'm just going to
say the name here. So now everything is
working correctly. The next thing we want to do
is when you click on this, okay, we are going
to respond to play.
86. Player Respawn: Let's now work on the
respond for the player. So let's go back
to blueprints and go-to player, player base. So inside of here we
have coded all of this, any damage so far. And we have set
the players death wherever the player dies, but we have never specified when you will not
be dead anymore. And we want to be dead
whenever you just click on that Okay button
inside of the main UI. So let's actually do that first. Let's now go first
to the main UI here. And inside of here when
you click on this button, so clicking on the button here and going down to the button. And then you can see all of these events so unclicked whenever you click
on the button, click on this plus
to make that event. So whenever you click on this okay button, what should happen? I just wanted to set
my death to be false. Now as practice, now that we
are so far in this course, try to do this yourself. Try to set a, tried to communicate with this blueprint and try to
set it to false yourself. If you'd like, if you fail here, you can always follow with me. And let's now do it together. You can pause the video if
you want to do it yourself. So what we want to
do now is we want to communicate with
the player base. We want to get the,
the pons somehow. In UI, remember this
is client-side it, so every single point, every single connected
player has this UI. So I can just
right-click and say, Get Owning layer pawn. So Get Owning Player, gets the player controller, get Owning Player Pawn gets the Pawn Control on ****.
Hit owning platform. And you can see it says gets the Player Pawn
associated with this UI. And from here we can just
say Get Player Reference. And what we can do now is
we can call this death here because this is made
inside of the bp player base. So we can just call
this death events. And it is a message because it's a Blueprint Interface function. And we can just set it to false. And remember, we have to
set that death message to be hidden again because else is going to be displayed
on the screen. So set the visibility
to hidden, like this. Oops, like this. Okay, so now that is fixed. Okay, so now we have said
the death to be false. So let's go back to
the player base. I have I'm not sure what
we did here actually. Yeah, we only like
We didn't do much. We only set this to
be false and true. Is that here for true,
like when you're dead, it's going to show that
to flip book to you. So what we want to do here, let me just make a branch. So what should it do when
you are not that anymore? So when you are responding. So firstly, I want to set my health back to 100
because right now it's 0. So I'm going to take my here in the Properties,
my structure. Again. I want to set my health bag, so set members here and select
that, select the health. Now we want to set the health. What do you want to set it to? You want to set it
to the max health. So I'm going to break it now. Remember we made a
max health variable. So now we just want to connect that makes health
inside of here. Let me just hide
these other pins. Okay, so now we're
setting the health to the max health and we are
back at full health again. So let's connect it. So let's connect it to the false because if
you're not dead anymore, this is what the folds mean. Here. We have to remember, we have to set the player
info back here like this. So now we have the
full health setback. The next thing we need to do, we need to update the UI because even though we are
setting this variable, remember, just like before you have to update the progress bar. So it shows you you
are at 100 health. Again, what we can do for this, we can copy, paste this here. So get controller, get
the player controller. So these two here or I can
just write it if you want to. So we are getting the
player controller here. And what you can do here is
what the player controller, again, you can call
updates health bar. Here as the message. I believe it was
the message here. Yes, that was correct. And did I actually
call it as a message? Yeah, I did here. I just want to see if I made a mistake up here. So now it's correct. And for the percentage, again, you can take the health
divided by the max health. So again, just like
before, take this, break it up and take
this health and divide it by the maximum
health, just like before. So same code here. And then you can connect
it into the percentage. As for the eliminated, we don't really need it. Like you're not going to display this UI when you're alive
and you're not dead. So it doesn't really
matter what it says because it's hidden anyway. So I'm not really
going to do this here. So okay, so now we
have updated the UI. What next? The next thing is,
you have to respond. So where do, where
are you responding? And let's remember, like some
time ago we made this one, I think at the beginning
of the course, set player spawn
location and we set it to that player starts. So let's use this one set
player spawn locations. So we are going to spawn there. I go down, it's here. Let's do set player spawn
location as this one. And the reason, like
if you get confused, sometimes hear set player
spawn. Let me show you. So here, you could have selected message
and none message. And this is a Blueprint
Interface function. And maybe you wonder why did you not select this message here? Why did you select this one? There isn't as if you are like this is the blueprint
we are coding it in. And if the Blueprint
Interface function, if it is actually made
inside of the player base. So if I go to this, the interfaces and
the player base here, you can see we already
made it inside of here set player spawn location. When you are calling it inside of the blueprint you made it in, you don't really have
to select message. The message is just
for communication. And you would have selected
message if you were calling it from the player controller
from somewhere else, you would have selected message. But if you are calling
it within itself, then I'm just going to select this one
without the message. Okay, So now you are
spawning the player. And remember we are still
having the god mode. We never removed
the god mode here. The god mode is
only being removed when you are not dying,
but when you are dead. Never set this to false. So let me copy paste this
code here that the delay, now after the delay here. So the reason why I'm
giving the player at delay, so we are responding and you're actually having God
mode while you are responding because I
don't want to receive damage right away
when I respond. So I'm giving the
player a chance to respond and not received damage. And I believe that was it. I'm not sure if I
forgot something. Let me actually
just click on Play. Let's see what happens. So when we are dying, let me actually go to the pig. We die faster here. We are dead and says you have
been slain by Pig press. Okay. When I press Okay, you can see I respond. And let me just die again
to see if this is bugged or not. It's working correctly. Now again, you can see
these ones are bugging. You can again try to
re-scale and downscale, upscale the collision boxes. These are the ones
that sometimes make them bug here in the ramps. So now when I click Okay, you can see I can respond. I actually want my player blinking when I
respond because I want to know that I am in my
God mode when I respond. So let me take this
blinking effect, which we made here, and we added it here, actually damage via effects. Let me copy a copy
of it here and let me paste it right
after, right before. Actually, right after I respond, I can just do it here. So when I respond,
I play that effect. And then I remove that God
mode after that effect. Let me click on play. And when I die, I click on Okay. You can see I have
this God Mode Effect. And then I respond, I think this is a small effect. I'm actually going to hide
these collision boxes. Again, we don't really need them anymore, I don't think so. So let me click on
this attack collision and hide it in game. And go in the enemy base here and click on this collision and
also hide it in game, compile and save everything. So now that everything
is working, you can try to test the game and see if everything is
working as it should. We can always take this client. So before I ended, I actually want to
write with both. Here, see if both the client and the server can
see what's going on. So you can see the server can actually see the client died. And as the server now, it's a bit difficult to
have both of them on one screen. So now both died. And if I click okay as
the client respond, okay, and if I click
Okay, it's the server, I respond as well and
I'm blinking correctly. When I attack, this is
working when I check here, it's working when I
woke up the ladder. It's working for both. Okay. So let me try it
as the client now. Play as the client to make sure everything is
working before we move on selecting Tsarina
here on this client. And on the second client, I'm going to select Luke. And let me just walk
into this enemy. Here. I'm dead. I'm going to walk here. I'm also did. Okay. So it seems like everything
is working now. And walking up. The letter also works. Okay, so no books right now, so that is cool. Everything is working
as it should. So we are ready to move
on and let's actually work on the enemy now so
we can kill the enemy.
87. Fixing Existing Bugs: We continue, we have a couple of books that we need to fix. And I've written
all of them here. So as I was testing
the game and I found the seven bucks and I think we should fix them
before we continue. So the first one is a death
bug during attacking. So if I go over here
and play the game, and I walked into the enemies, so let me just lose
my health here. Now, if I attack
right before I die, you can see I spawn like this. And this is supposed
to be a tomb. And if you want, you can try to fix
this yourself. Try to think where
might this be? Like? What is this going
around before? Because when we attack and
when we die at the same time, we go back to this idle state. So try to think, if you want for yourself where this bug
might be happening. And you can use a
print string node to try to debug your code. Always nice to use a
print string node. Let's click Okay, and
let's leave this. So to fix this bug now, let's go to the
attack code because it's essentially happening
when we are attacking. So we are setting the attack to be true
when we are attacking. And then after some time, so we die in between here, so we attack and we die. And remember we have this here. This is the attack is complete. We are delaying the code
with this animation and after the code we're
setting it to false. So when is attacking
is set to false, it's putting our character
in the idle state, so it's actually happening here. The only way we checked
for the depth is up here so we can't
attack while we are dead. But what if we already attacked? So what if we are already
here and then we died? That is not being
checked right now. So we're ending
up here and we're ending up being in
the idle state. So we can try to take
this year is dead, this Boolean and try
to check here as well. You can either check here
or you can check out here. So attacking has to be false. So let's actually do it here. I think this is the better way. So here is attacking. If it is set to false, then you'll check our use. Are you dead? Actually, let's do
note that because that is better to read, I believe, for myself. So if you're not dead, again, you can just
go ahead and idol. However, now, if you are dead, Let's copy this and put
you in the death states. Just like that and that
should fix the problem. So if we play now
and I lose health, I attack in the meantime. Whoops, I didn't die. I take it in the meantime. You can see now it has
fixed the problem. And if I click Okay,
I will respond. Okay, so that was the first
book that we have fixed here. So this is fixed. The next one is that the animals are getting stuck on the ramp. And if I just copy
paste a couple of animals and we have seen this
before previously in there. Other lessons and I just
want to fix that problem. So if I just copy paste
a lot of enemies, and hopefully this
will very quickly. Now we can see here, this pig
here is stuck on the ramp. The pig is just
running into the room. And the snail does
this sometimes. So the snail, you can see
the snail delete here. So they are getting
pumped sometimes. Let me actually fix
this before I continue, I'm just getting a bit
annoyed by that bug. So let's go to the enemies. And the thing is, we actually found
a solution before, so we just need to
do the same thing. And the solution was, if I just go to snail, for example, we can
start with this one. The collision here are
actually this capsule. Here is what's doing it. So if we increase the
size of this capsule, it will prevent the bug. So I found that 35 by 35 length, increasing this capsule to 35 as a minimum will
fix the problem. And remember you have
to drag down the snail. Snail will be
floating like this. So dragging down the snail,
maybe something like this. Maybe that's too
low. Maybe, maybe that's a little bit too low. I think. Minus, minus 25 maybe. Okay, so something like this. Now the snail is up here
and you'll notice that the snail old never
buck anymore if you just let it run
for some time now. And let's do the same
thing with the pigs. So going to the pig here. And I'm going to
click on the capsule here and increase the
size to 35 by 35. Also take down this
pig a little bit more. And let me try to see
what that looks like. It's running on the ground. It looks good. And now if we let it
play for some time, It's not going to bug anymore. So if the pigs are going to go. So this ramp, you can see
they are running nicely. So this should be fixed now, this is the fixed for it. So increasing the capsule and then dragging down this pig. So they look like they're
running on the ground still. So that's fixes the second
problem that we have here. The third one is
that the enemies do not detect the attack collision. We have had some problems
with this before, but I didn't look at it
very seriously until now. They can see if I
attack by tech here, you can see that there are
not detecting my attack. And they're only detecting my attack if I come very close. So if I am standing
inside of the enemy, they are actually detecting me. But if I'm a bit
away from the enemy, they're actually not
getting attacked. Okay, so we have to fix this. So I tried my best to use this collision, SR
attack collision. But since this
collision here has the code where we actually
go back to the interface, let me close down the
snail and the pig. And if I go to collision here, remember we made this code
where we apply damage. And so this collision
will always apply damage. So like doing it the
best way will actually require us to make another one called the head box
where we hit the enemy. So let us just create
a new collision. And let's create a spherical
region with this one, let's call it hit box. So we're just going to
use it as a hit box. I'm just going to
drag it out from this collision here
to this capsule. So the first thing is go
here into the capsule. So let's check our collisions just to be sure now that
we have this hit box. So the collisions
for this capsule, the only thing that we
want with this capsule, and you can see here
the reason i'm, I'm creating this hit
box and I'm not using this capsule because
remember this capsule, we actually increased
the size here. This is the size of the
capsule and I think the hits, hit box is way too large, like we can use this
capsule to hit the enemy. But I think this hit bucks is way too large and
I don't like it. So you can see if I click on it and I click hidden in game, if I remove it, you can see
how large that hit box is. And I think this
is way too large, like as a head
bucks for a snail. So I'm not going to use
that hit box and we can decrease the size else there'll be stuck
inside of the ramp. So let me just
hide it again here in the interface capsule. Actually it was inside
of the snail here, the capsule, and I'm just going
to hide it in game again. Okay, welcome back
to the enemy base. So what we want to
do this capsule, Let's first ignore everything. The thing you don't
want to ignore is the world static and
the world dynamic. And this is just to not make the point fall through the
ground because the ground, these ground child
collisions down here, they are world static. And if you just remove that, you'll actually
fall to the ground. And since I'm just using this for collision
this capsule here, I'm going to remove,
generate overlap events. I'm not using it
for overlap events, so I'm just using it to block these wells static and dynamic so it doesn't
fall through the ground. So essentially we're
not really using this capsule for
any overlap events. Let's go down to the heat bucks. So this head box I am
going to click on No, Can character step up on? I'm going to click No. And I'm setting this to cost. Whoops, not no collision. I'm going to click Control
Z and custom here. And I'm going to
ignore everything except for the world dynamic. And remember here in the player, so they attack
coalition that we have. If you go down and you
look at the object type, it is worth dynamic. And this is why I'm,
I'm overlapping with dynamic because I want to overlap with my
attack collision. This is set to world dynamic. Okay? So this is what I'm
overlapping lists. So now this is correct and
let me go down to the sprite, make sure that it doesn't
generate any overlap events. And I go to the collision here. So this is what is
damaging our pond, which is our player. And I'm actually going to change this instead of world dynamic. I'm going to change
this to a **** because essentially
we're not using this potent capsule here. So I can just as well just
change this to a point. So this is basically
our Po1 collision here. Okay, so let's remember that. Let's remember we
set it to pawn here. So let me go now to
the player base. And here on the
capsule component, just make sure that you
ignore everything again. The only thing is
the world static and the world dynamic that
you're overlapping with. And remember, we just
changed this one, this collision that will
be damaging us to ****. So we actually need
to overlap with it elsewhere will not get
any damage from it. So upon, we are
overlapping with it. And for the sprite, it's not going to generate
any overlap events. And for this attack collision, it's just going to overlap
with world's dynamic. And let's go back and
see if that is correct. So it's overlapping
with world dynamic. And this is our hit box and our head box is set
to world dynamics. So that is correct. There are now overlapping each other because this
is what dynamic, this is what dynamic. And they are both overlapping
with world dynamic, which means they are
overlapping with each other. So this collision should
be fully correct now. So let's now click on play
actually before we do that, you can click on this
attack collision. And you can remove hidden
in games so you can see it. And it can also go to the enemy, click on the head box. And you can try to
remove a hidden in game. And let's also go to the pig
and adjust that hid box. And for this head box,
I'm just going to, let's just do maybe the same as this collision
size here, so 25. And again, you can hold Shift and right-click
with the mouse to copy and paste it here. And then I'm going to put
the location the same here. So right-click. You can copy it
here, paste it here, and now the collision is here. So this is the head box. Let's do the same
thing for the snail. So let me go to the viewport, click on the head box actually
the collision copy this, paste it on the head box. Copy this up here, That's the location, and
paste it on the head box. Let's click Play now. And now you can see these are the head boxes now that is
a lot better than before. So now you can see I'm
getting damaged like this. Okay, So that's nice. Let me try again. You can see I'm actually
getting damaged here. Like even though I'm
on this collision, that is actually another bug, so don't be tricked here. So let me actually just, you can see here, I'm actually not getting
damaged right now. If I stand inside of my
attack box like this, you can see it's working
so it's not colliding. However, there is a small,
there is another bug. And if I attack now, you can see I'm
hitting my enemies. Okay, so it's working fully now. There is another bug now. You can see if I gets damaged. Now, I'm actually getting
damaged on my attack religion, which is not supposed to happen. This, for some reason, this only happens
whenever I get damaged. You can see. But if I
just reset the game, this is actually our next block. So if I just reset the game
and I just move over here, you can see I'm not
getting damaged. I need to remove
some of the enemies. Actually, I have way too many. So let me just delete
a lot of them now. It's a bit, it's a bit hard to show with all
of these centimeters. So let me just put a
snail here instead. Something like this. And let me click on Play now. So now if I stand on snail, you can see I'm not
getting damaged on my attack collision box. However, whenever
we get damaged, now all of a sudden
we're getting damaged. Another attack, collision box. There is a small bug. All of a sudden changes. And this is actually
our next one. So here, the enemy
attack range box. So all of a sudden it attacks
us in our attack collision. So I spent half an hour trying to take a look at
what that might be. And I thought maybe it
was the collision boxes. And that was actually
not true like the collision boxes,
they're correct. It doesn't make sense
that it is a bug there. And actually this is a small, small, silly mistake
from my side. Maybe you're already
remembered it while you are doing the videos. I might have forgot it, but you can try to fix it
yourself if you want to. But all of a sudden, like
when we get attacked, We are all of a sudden
just receiving at sex on our collision box. And the reason for
this is if you go to the enemy, go to
the Event Graph. Remember we made this
collision events. So when our player
collides with the enemy, we are applying damage. So this is happening
correctly now, like from the beginning. So whenever we walk
into the enemy, and that doesn't mean
to our collision box, but we won't walk into the
enemy with our capsule. All of a sudden we're applying damage to this one as well. This is because we have
never told when to stop applying damage because
we have this end overlap. But that doesn't really
make like it is correct. But up here, remember we made this start
applying damaged. This is what it's running. So this is set to true. And if it's true, it's
going to apply damage. But when we set it to false, we have never specified what to do here when
it's set to false, so it keeps applying
damage all the time. We actually have to tell it
to stop applying damage. So let me do that. And that is just a
small mistake by me. I think I just was talking in that video
and didn't notice. Let me promote this
to a variable, this timer promoted and call
it apply damage, handle. Okay, so let's take
this handle and say clear and invalidate
timer By handle. So now it's going
to stop this timer every time we set this to false. So every time we will
leave the component, the collision components
is going to set it to false and it's not going
to apply damage anymore. So we have to collide with it
again to apply the damage. So let's try to click
on Play now. And now. This is working
correctly like before. But if I get damaged and
I stand in front of it, you can see it's still working. And this is because
it has to walk into my capsule again before
it can do damage. Okay, so this is working
now as it's supposed to. This was the next bug here. This is fixed. The next one is that the player can't be damaged on the rope. So if I'm standing on the
rope icon been damaged, and this is a very
easy bug to fix. So if you just go to
the enemy base and you go to the collision here, like the enemy is
colliding with the ****, but you also want to collide with the client being player. Remember, we've made
that custom one. So this is just fixed. So that was a very quick fix. Okay, so the other
thing is, now, let me just add more enemies around the strokes so we can
see the buck a lot quicker. So let me click on Play. Okay, So if I'm standing here, you can see what the problem is. I'm getting damaged like this. But I want to actually push
my player of the rope here. So if I just go to my layer, layer base and we
have this any damage, so we're receiving damage, but I want my player to
stop being on the rope. So what I'm going to do
here in the climbing, I'm going to take
this one is climbing. Remember we made up here
in our climbing code, we made that one called is choline being whenever
you are climbing. So if I can find it actually. Now, this one, we
made it down here. So is climbing
here, is climbing. We made that one
set is climbing. So let's actually use
that one down here. So just asking the code, if you receive any damage. Are you climb being
already if you are, we want to do something else. If you're not,
let's go ahead and just do whatever we did before. So if you are already climbing, let me take this is climbing and set it to false because I don't
want to climb anymore. And then let's just go
back and do whatever for let's try to
see what that does. So let me go on this
rope stand here. And you can see now
it's working correctly. There is a small bug now we
like when we move around, it's it's like pausing our flip books so the
animations are not playing. And remember, in
the client being, if you go back to your code, you had something here. We used called pause,
climb, flip book. And we use this pause whenever we're not moving on the rope, we're posing the flip
book so it doesn't look like you're climbing while
you are standing still. So we need to do that as well. So let me go down here
and just continue here. Instead of just doing this, Let's do, can climb back up. Excellent at this one. It can climb here. Let's take this one as well. So set can climb to be false. Set is climbing to
be false and set. Let's see the pause one here. Pause, climb, flip
book to be false. So both the can climb
is climbing and pause binding flip
book is set to false. So let me just move the
code, something like this. So we're doing this,
we're initially just removing the
climbing mechanic. And we're, I think
we're good to go now. So let's try to
play down the rope. And you can see it's
working correctly now and I can jump on
the rope again. And if I do that, stand
here and get damaged. If this snail hits me. So when I get damaged here, you can see it's still working. Okay, So that bug is fixed now, the death and damage. And there's actually
a small book still, like if you're
standing on the rope. You can see, I look like this. If I actually die on the rope. And this is
essentially happening because if we go back here and let's go to isClient
being actually the unwrap function is climbing
if I can find it here. So it's, when it's
climbing is false. It's going to set
it to this here. Let me just hide. This year. It's going to set our
jump flip book here. But we don't want to do that. We want to play the death. Let's try to take this. Boolean is dead here. Let's check for if you're
dead already now here, actually I'm going
to say not that because that is better to read. So let's, let's
connect those for now. And now we're saying, are
you climbing? Yes, I am. Are you not quite so if
you're getting hit by an enemy and you're
falling off the rope, then this will be false. You're not climbing anymore. Okay, We're not
playing Bing anymore. Then you're going to
check, are you dead? If you're not dead, okay. Let's go ahead and just
do the same thing as before, where you fall off. However, if you are dead. So let me just drag this here. If you are that, let me just strike this. If you are that now,
let's take this here, the set movement mode. And I'm going to set it
to walking instead of falling upon collision again, we have to go back to
this pawn collision because before we were
the climbing player, we have to go back to the
pawn collision channel here. And instead of setting the
flip book to jump animation, we can just say movement mode. And that movement modes set movements states for the player here in
the int player base, set the movement
mode to be deaths. So now we're dead because
this is going to be false, which means if you're not dead, okay, you're going to
do the same thing. However, if you are that you're going to do this down here where you set the Walking mode or the movement mode to walking, and then you're going to
set it to death here. So let us play this code. Let me actually just spawn a bit more enemies just so
we can test it quicker. And now we're going to get
damaged a little bit here. And now on the rope, you can see I'm actually a tomb. Now, this is working correctly
and if I click on Okay, and I can walk around, I can do the same thing
as I was doing before. I'm getting pushed off the
ladder. If I'm standing on it. I mean, you can
just make your game not being pushed up the letter. That's up to you. You can also just received damage
under letter. Well, I think it looks a
lot better if you just push it off the letter and you get this tomb
whenever you die. So this is working
correctly now. So that was the sixth. And the seventh one is Respond
Okay, button is focusable. What I mean by that
is if I click okay up here, and then I die. And this is something in the UI. So fy, dy and click on space
on my keyboard or Enter. You can see I'm
clicking the button. So if I click on space and if
you don't want to do that, I don't want to do
that for this game. So you can go to the UI, go to the main menu. Now, on that main
menu, the menu I. And here for this button,
if you click on it, there is something called
is focusable and says sometimes the button
should only be mouse clickable and never
keyboard focusable. And this is what's happening. So if I click on
it with my mouse, and then later on we
can just click with the keyboard like
space to click. Okay. You can keep it if you want it, but I'm going to remove it, which means I can only
click this with my mouse. I can't click Enter on
my keyboard or a space. And sometimes it's
annoying like if you have an inventory system, you just want to click
on the tabs with your mouse and not with
your inter and space. Maybe you're trying
to jump in game. And you can't jump because this is being
focused and it's clicking, okay, instead of
jumping and so on. So it's going to make
a bit of a mess. But in this case
it's okay to have it as focusable when you're dead. So it can just click
space to respond. But I think I'll just remove it. And I'm also just teaching you about this interaction
here so we can remove this is focusable and let's compile and
save, and that was it. So if we just click, let's actually play it as
the listened server as well. We haven't done
that just to make sure I'm on the ladder
letter and I do this. That's looking correct. And if I just take up the client and let's
see what's happening. Let me minimize this a
little bit so there's space. Okay, so now we
are the client and the client also
being pushed away. The server can see that. Okay, So it is
working correctly. And let me see if I die here. And I do. Okay, So that is
working correctly. Now, let's click on Okay, and let's close that down. So all of the bugs are
fixed and you can see it doesn't take too much
time to fix these bugs, but always nice to
try out your game. If you want to debug, use the print string node, tried to see if it's
your collision, tried to check with Booleans. So for example, if the players that we don't
want to do a certain action. So there are some things
you can check for. And now I can close this down. We have fixed all the bugs. Let's save everything, and let's move on to
the next lesson.
88. Removing Player Chase on Death: Now let us make the
enemy stop chasing the player whenever
the player is that. So let's go to our Blueprints folder and to enemy and inside of enemy base. So inside of here
we have this logic where the enemies
chasing the player, but the enemy is still chasing the player whenever
the enemies that are the players that we have
to make it such that the enemy stops tastes chasing the player
whenever the players that. So let's do that here. We have this logic
Seeing AI move to, so we're moving to the
character and what the enemy reaches the
player here on success. Instead of just going
to move to directly, let us try to check if the
player is dead or not, because we already have that. So this will be easy. Let me move all of this to the side so we can
write some code here. What I want to do is just
check if the player is that, remember we already have
that player controller. And we can say gets
controlled pawn. Here we need a reference
to the player base. So saying gets player reference. So just like what we've
been doing before. And let's connect it here. And here I want to use this one called is that, that we made it. So get that Boolean. And let's write another Boolean just so it's better
for readability. And let us take this
and say branch. So now we're asking if
the player is not dead, then go ahead and do
whatever you did before. So going to that new location. However, if the player is dead, we want to do something else. Now let me drag this code
a little bit closer. Now that we have this code here. Maybe something like this. Okay, let me move
this closer now. Okay, so we have this code here. And now we can say if
the player is dead, so not dead is false, meaning the player is dead. We just want to remember before we did this with the stub logic, so we stopped their
behavior tree. Now we can just do the opposite. So we can just start
with the logic. So it can just copy
paste this if you want to just copy paste it here. And let's connect it. So we want to start logic. Again. We want to start
the behavior tree. And now it's going to go and
loop the whole thing again. So let's try to click on
Play and see if it works. Let's play here as the server. So I'm going to hit
something here. I'm going to get hit. So right now these
are chasing me. And actually I'm going
to read all of these two. Now I die. And let's see if they go. You can see they're not
really chasing many more. All of these that I hit
went their own way. So it's actually
working correctly now. So now we have stopped
chasing the player. Whenever the, the players
that so unsuccessful, we are checking if the
player is dead or not. And if the player is not dead, then we are going to loop that event here
that we did before. However, if the players
that we're just going to run the behavior tree
again, which is here, which means we are
going to run that find random location and
whatever we did before, before we hit the enemy.
89. Enemy Death And Respawn: So here inside of
the intimate base, let us now work on
the enemy death. So now we have finished
the player death, but now we need the enemy death. So just like the player, Let's go ahead and make
a new, new event here. And let's actually
just do it inside of the Blueprint Interface. So going to the interfaces
in the enemy base, and let's add a new
function called death. And again, we need a
Boolean just like before, and let's call it B is dead. And that is bugging out again. I'm going to delete it. I don't know why it happens
so frequently right now. Let us just say b is dead. And let's call it death. Just like the player. Let's go back to
the interface now. And in here Let's
right-click and say death and call that event. Then we need a
custom event again, it running through the servers and make sure the
client is not cheating. And let us run it through
the server and reliable. And now we can run
the server one up here, so server death. And let's add a Boolean down
here so we can connect them. Call it is, D is
dead, just like this. And now we can do
something down here. So let me promote
this to a variable. B is dead. And I can already think that
we need to change this to a wreck notify
because we need to play the death
animation for the, for the enemy and rep notify. Remember we are going
to notify all of the clients about
the visual change. So all the clients can see the animation for the
enemy when it's dying. So this is what we
need right now. So up here, now we're going to add before we
do anything here, Let's actually go up here
and see when the enemy dice. And I'm going to hide the unconnected pins here
to make it look cleaner. So here we are calculating the health and we're
setting it here, so it's around here. We are delaying the animation, we're stopping the movement. Then we're stopping the logic. And let's actually do it here. So I want to do it right
after this delayed. So when we hit the enemy, it's going to get delayed. It's going to finish playing that Hit animation
before it dies. Unless you a copy, like copy this and reconnect this here and let me place it here after this top logic
doesn't really make sense. It doesn't make a difference. I mean, it doesn't
make a difference. But I think it's cleaner
to stop the movement, stopped all logic right
away before this delay. Sometimes, like it
doesn't make sense to organize your notes so they
come in in the correct order. And now it's going to delay this animation and right
before I start walking, but because maybe I'm dead, so I don't want to start
working right away. So here is a good position to check if the enemy
is dead or not. So before you start walking, check if the enemy is
dead or not because it doesn't make sense to start
walking if you're dead. So let me select all of this and move it here to the side so I have some room to work with. Now, let's take the animal info. Or we can actually just take
it from here and say break. And then we can take the
health and say equal. And let's drag it all the way here and hide unconnected pins. I can just double-click to make a reroute node and
make it a lot cleaner. Okay, so now we can say here, so if the health is equal to 0, we want to play
the death events. If it's not 0, let's just go ahead and do whatever
we did before. So here, whenever it is
0 and the players dead, Let's play the death event here. And the enemy base is
dead is set to true. And we also need to take the head box and
the collision and disabled those
collisions just to make sure we can't hit a dead enemy. So taking this and
saying overlap, and you can realize
you're down here, we have something called set
degenerate overlap events. And what we're trying to do is if you click on this hit box, and if you go down here, we're just trying to
disable this one, generate overlap events because if it went disabled this one, we cannot generate
any overlap events and therefore we can't
hit the enemy anymore. So let's set this to false. Let me just copy paste this one more and connect this one. So we have the head box and the collision set to false
so we can't hit them. And after that, we need, we need to have a
response time or a delay before we
spawned the enemy again. So let me just make
a new variable here called respond timer. And let's go to float. And let's take that respond
timer and say delay. Now we're going to delay
with that respond timer. And for now, let's just
set it to five seconds. So let's compile and save. And by default, Let's write
five seconds like this. So after five seconds, the enemy is going to respond. If you want to. You can also add it
to the structure. So every, every enemy. Will have its own respond timer. You can do that as well. I'm just going to
put it in here, not too important right now. So just five seconds
for all enemies. However, if you want to
make it more dynamic, you can add it here
to the structure. And for each enemy you can
have a separate respond timer. Now what we're going to delay the code with whatever
amount of seconds I'm going to move this down
here, actually like this. Okay, So after delaying it with some amount
of seconds here, we need to set the health back to 100 or whatever
it was before. Because right now it's still 0. We actually need to define what the max health
for the enemy is. So I need to go back to the
structure, animal info. And just like what we
did for the player, Let's add a new variable
called max health. And let's add it down here below this health and
changes to a float. This health is something we change during the
game all the time, but this one is going
to stay static. So let's save everything. Let me go to any base
Compile and Save. And let me go back
to the enemies. So first the pig here. For the pig, I am going to set here in the animal
info class defaults. Let's set the max health
to something like 30. So starting just like this one. And let's go back
to the snail here. And for the snail,
let's just start with 15 as the max health, just like this one.
Let's compile and save. And now let's go back
to the enemy base. And here we can take
the animal info again. We can say sets. Remember we're
setting the variable, so we're setting
this Health value. What are resetting it with? We're setting it with
the max healthier. So let's drag here
and save break. Let's take the max
health and plug it into health and hide
unconnected pins. So what we're essentially
doing is we're taking the max health value that we
wrote here in pig, snail. And we're just setting
this health value back to the max health because
now the enemy has respond and we just
want it to have that Max health value. Okay? Something like this here. And after we set the health, let's remember to
take this animal info and set it here to the
structure like this. And then we want to specify where do we want to
spawn the enemy. So let's actually
do that down here. Let's make a new variable
here called respond. And let's actually do it through
the Blueprint Interface. So let's go here and make a
new function called response. Let's compile and save. Let's go back to the enemy base. Call it here, respond. Let's, let us make it go through server respond as of course, calling its server like this, and then running it through
the server and reliable. And let's run the
response up here. The thing we want to
do with the respond, remember here in
our behavior tree in defined random location, we actually just want
to do the same thing. So we just want to find
a random location. So it can actually, can even copy paste actually, let's just write it
again just for practice. So let's get actor of class, get actor of class. We just want to get our
navigation Bound Mesh, nav, nav mesh, bounce
volume, this one here. Now we want to get the actors bounds so we can see how large the
navigation mesh is. And from that, let's break it tears because we're only
interested in the x-axis. Remember, we are
making a 2D game, so we're only interested in
the size here in the x-axis. I don't care about
the Z or the y. So we won't do it. We just want to use
this x value here. What we want to do here, we want to say get random
reachable point in radius. This is what we want to use. Remember, there are other ones, so get random point
in navigable radius. However, I want to use this
one in reachable radius, because if the enemies up here, the enemy is up here. The thing is, if
you have it set to reachable point here in
radius, it will spawn. It will keep spawning up
here in the platform, so it doesn't
randomly like this. If you have some
enemies up here, they don't randomly
spawn down here. So I want to keep them up here. And this is why I'm
using reachable here. Okay, So further radius, let's just connect this
x because now we have the bounds of this
navigation mesh here, and this is our radius. And the origin is just
wherever the actor died. So let's get actor location. The enemy here, get
the enemy's location, that is the origin you
are going to search from. Essentially, let's
make a new variable. The thing we want
to do here is make a vector column called
spawn location. And this vector we're
going to set to a rep notify because we are trying
to do a visual change. We are trying to
spawn the enemy. And inside of this rib
notify spawn location. We're just going to say
set actor location. This is what we're trying to do. Trying to set the
actors location to a random point in
the navigation mesh. So we're trying
to spawn it here. The actress location and
set actual location is a visual change because you're changing the actress location. And this is why we put it
inside of a rib notify. Let's go back now
to the Event Graph. And instead of here, this is
what we're trying to set. We're trying to set this
variable to the random location. But again, remember, I'm only
interested in the x value. Let me actually drag
this down here. So I have more space. We're trying only to, like we're only interested
in the x value here. So break it up here and let
me make the vector here. So I'm separating
the values so I can change them and not directly
plugged them in here. For the x, I'm interested in dx, so I just usually just plug the accent because
this is what we want. And for the y, I want
to keep the actors y. So the actual location. I'm going to break it. And I'm interested just
to keeping the actors, like the enemies y
location to be constant. I don't want to
change it up here. And as for the z location, we can again use this, but we can use this
bone z location. And what I want to do, I'm just going to say plus, and let's try to say plus 20. And let me explain
why I do that. For the z location. Remember the z is up here, this is the z location. I'm just saying 20 because sometimes there might
be a chance where the enemies bonds here and it will be stuck
in the ground. I'm just saying plus 20 whenever
you find a new location. So it's going to
say plus one t n is going to push
that enemy up here. And it's going to
spawn the enemy here. And then it's going to
drop the enemy here. Because remember,
the enemies have gravity so they're not
going to stay up here. Sometimes. I'm just trying to avoid
the issue where they are spawning inside of
our collision mesh. And I say plus 20. So this one up here. And they're like, I don't
think you'll notice it. Like we noticing them when
they spawn up here because it has a gravity and it
will fall down here. And if you'll notice, just decrease this number
to something lower. If you make it
something very high, you will notice because it
will fall from the sky. So I think 20, it will be not noticeable. Just like this. And
now let's connect it from here all
the way to here. Let me push this
down a little bit. So now we're setting
the random location, and let's actually
use it up here. So after we set the hips to 100, we want to call the response, is that we are going
to respond it. It's going to find
a random location for enemy and it's
going to respond it. Then, remember we stopped
the like when you're dead, you stopped the logic here. So we need to start their
behavior tree again. So I can again just
copy paste this here and connected
and say starts logic. So now we're starting
with logic again, you're running the
behavior tree. Remember to enable the
collisions again here, so they are not disabled. Again. Let us connect them like this. So now essentially
what's going to happen? Let's actually pull the
complete actual Not yet. Let's go to the death here because we
haven't done anything. And the only thing for now is to just go to this unwrap
function for the dead. And what we want to
do is let's actually take this and check if
the players that are not. So if the player is dead, we just want to play
the death animation. So let's take this
and we have this one called set movement states. Actually set. Let's see, You said
movements states. This one for the enemy. Said movements state,
and let's choose death just to check if we
have actually made it. So going to the unripe
for the movement States, we actually haven't
hooked it up. So very important to check if your code is actually connected. So let's copy paste
this flip book. Let's connect the
sprites to the target. Let's connect this death here. And now for the death animation, Let's take this structure and let us hit this pin here
called death animation. We made it a while back
and let us connect it. Now, down here, let me hide unconnected
pins just like this. Now it's connected. And let me check
here for the pig, if we have set the
death animation, so we have here and the death
animation for this snail. Let's check it in
the class defaults. And we have said the
death animation here. Now I'm going to check the
speed of the animation. So going to enemies. And this one's going for time. Actually, I'm going to choose
three frames per seconds. So 1 second, we'll play
this whole animation. And as for the snail, Let's check it out here. So eight frames per second. Yeah, I think that's fine. We can always change
it if we need to. Let's go back to the
intimate base and go to the unwrap
function for the dead. So we're going to play
the death animation and that is about it for now. So let's click on play and
hope everything works. I'm going to hit it now. And actually let me check my my hits damage because I don't want
to do this forever. So let's go to Let's
see where we made it. We made it instead
of blueprints and the player, player base. And then let's go to
this player info here. And for the base damage. So the health for
the snail is 15. I'm actually going to put
ten as my base damage. So I hit the snail two
times and it will die. So hitting the snail, the other snails
and all of those. And you can see it is dying now. We just need to pause this animation so it
doesn't play forever. And you can see it
actually spawns over here. Okay, so I don't think
we need to, like, we don't need to pause
this death animation. You can do it if you want to, just like what we post with the rope animation
for the player. But I believe we will make a fading animation and the
fade will make it disappear. So it doesn't actually
matter if the, if the enemies animation
here is post or not. But you can see here
they are spawning, I know of in the ground,
so we have to fix that. Or it's because the walking
mode needs to be set. So let's actually like right
now, I think it's fine. Let's work on the fading. Because with the fading, we might be using that to set the Walking mode
and nuts inside of the death animation because
you can see it's working, but it's because
you can see here, if I go back to the enemy
base and inside of here, Let's go to the Event Graph. And remember we said the
movements mode to none, and we have never set
it to walking again. So this is why there are stuck like they're not really
stuck in the ground. I believe I believe it's because we don't like we
haven't said this to walking. And you can do this
right now inside of the death animation or
the death event here. But I think we will
make a fading effect. And with that we will
set the Walking mode. So let's move on
to the next one.
90. Enemy Respawn Fade: Alright, so here in the base, Let's now make a fading effect
for when the enemy dice. Let me see if we can
structure this better. Now we have the death
animation here, we have the spawn
responding animation. You can just try to make
the fade animation here. I'm going to go back to
my Blueprint Interface and make a new function called, let's call it actor fade. And let's do a Boolean
and just call it be fade. So just to see if it
should fade or not. Let's go back here and scroll that event called atrophied. And let's make a server events. So custom events going through the server called atrophied. And let's run it through
a server reliable. And let's run the
server event up here, actor fade, and let's
make a new boolean. So all the same things that
we've been doing so far. Now let's connect
it up. Okay, so now we have this actor fade. Let's promote this
to a variable. And I don't know if we need to make it into a rep
notify for now. Let us just let it be
like this for now. So what we're trying to
do is we're trying to feed the enemy when it dies. So over here and
the enemy death, I'm actually just fade it
here before I, actually, after I set this to false, we can just feed the enemy
before the respond timer. So let me not remove, but move this here and call
the actor fade event here. So Actor fade. And
let's set it to true. Okay, so what should happen
when the fade is true? What is true? What I need to do
is call a TEM line. So remember we did
a timeline before. Let's do it now again. So clicking here, and let's
call this one leading actor. And let's play it
from the starts. So what we need to do here, the aim of this timeline is to fade the color for the enemy. And remember to make
the fading effect, you have to go to that enemy. And again set this
material to a translucent, unlit material because
you can't fade this color directly like it
disappears all of a sudden. You can't like there
is no in-between step. It's just appears and
disappears like this. So we have to set it
to translucent again, just like the player we did
with the blinking effect. So let's go to the
enemy base here. And actually, let's do
that over here in is dead. So let's do that before we fade. So when the player is dead, Let's go to is dead. And here we can take this
bright and say Set material. And let's set it to what's
called translucence, translucent, unlit
sprite material. So now we're sitting
back and let's set it. Remember to set it back here whenever the player
is not that anymore. So to masked, masked
unlit sprite material. Okay, so now we said
the material to this and we can feed the
player or fade the enemy. Let's go down to
the timeline here. Okay, So we are trying
to set a linear colors. So let me make a new
variable and call it actor fade color. And let's make the
new variable here into a linear color here. And let's take it and set it. So this is what
we're trying to set. I'm making it into a wreck. Notify. Because remember
this is a visual change. We are changing the, the alpha of the player, meaning we are making it opaque. So going here and setting
it to a retina phi. And what we're trying to do
here in the unwrap function is we're trying to take
this sprite and say sets. I believe it was first
called Sprite color. Yes, it's bright color. This is what we're
trying to set here. And let's take this actor
fake color and connected. So we're going to set the
color and we're going to set it over time because
we're updating it constantly through
this timeline. And what we're trying to do is, let's use a loop note. So it tried to use a loop node. And searching for loop, you can find this one
like we can use this one, but I believe that better idea, like you can break this. You can see, take this
and you're right, make, make linear color. This way. You can change the alpha
here through a float. And it can actually just use a loop node because
this is a float. However, a better way to do it. There is actually a loop for
a linear color specifically. So it can use that instead. And you can loop
through linear colors. Instead of doing this
here, let me delete this. And here for the loop you can
just connect it like this. And for the first color, so we start with
being just ourselves. So here 1111, all
being set to one. This will make just the pixels like we just have our
character without any color. And the second one. I just wanted to do 1111 again, but for the Alpha, so the opacity we
want to set to 0, actually 0, so it's
going to disappear. It's going to go from 0 to one. Like this one is 0 and
then it's going to one. So it's going to
fade from 0 to one. And we want to do it smoothly. So instead of just
writing one here, if we just do that
without anything else, it's going to, it's going to actually just going to disappear
when we start the game. But we want to go, want to
go from 0 to one smoothly. And this is why we
use a timeline. So double-clicking
on the timeline, I'm going to make a
new float track here. Let's call it fade alpha. Here, Let's right-click
and make two. Actually let me make three
dots here and you'll see why. So at the time 0, I want the value to be 0. Let's actually make the
length of this 1 second. So at the time, so
the last point here, so first is 00, the last point at the time one, I want it to be one. And this one at
the time of 0.75, I want it to be 0 still. So I don't want to fade
the enemy right away. I want to fade it
about 0.75 seconds. So it's going to play the
animation a little bit, and then it's going to
fade the animation. This is how you
can do it as well. So you don't have to do it like this where it just
fades over time. I'm just going to be
unfaithful like this until it begins fading quickly here at the
end of the animation. So let's go here and let's
connect the alpha now. And now we have this
smooth timeline which is going to
fade our animation. And now what we can
do is we can go up here to our code
after the death. Let's actually, now actually
we already made it here. So Actor fade, let me try to play it and
see what happens. If I play it now. And I kill some enemies. You can see they fade and
it doesn't really matter. Like our animation is
still looping like before, but we don't really see it because we're fitting the enemy. So if I try to
kill this one now, you can see it
plays the animation and then it fades after that. What's pretty cool. And let me actually, before I do anything else, let me remove my the
collisions here. I don't want to
see them anymore. So going to the pig,
I believe we just clicked on one of those so the head box should
be hidden in game. Actually, I believe it's
done through the enemy base. So here hidden in game. I just wanted to
hit my head boxes like this and let's sell. So hit or hide the players attack
collision hidden in game. Okay, so now we have
this fading animation, but remember we have two
unfavored at some point. I'm going to unphased right away when I find my spawn location. So right before we
start the logic, let's start the
unfolding process. So Actor fade, I'm going
to call the same event. And instead of having
this ticked like before, now we have it unchecked. And this means it's
going to unfold. The way we do this is here.
What is the timeline? The timeline is here. Instead of playing from start's, let's actually make
a branch here. So let's take this and make
a branch and connected. So if it is true,
if we are fading, it's going to play from the
start like we did before. However, if you are
not fading anymore, so it's going to go false. I actually want to play
this reverse from end. And it's going to go from
this invisible to visible. So it's actually going
to fade in my character. This is was essentially
doing if you're setting it to unchecked
and you add it here, the unchecked one, which is the false to reverse from end. Remember actually I
want to do it here. So the walking mode,
remember we haven't set the, the movement mode. So if I go back here in the, any damage, we set the
movement mode to none. I'm going to copy this. I'm going to go down
here, paste it. And instead of
setting it to none, I'm actually going to
set it to walking again. Else it's going to get stuck
and never, never move. So now we have the working mode, so I'm trying to see
what we're missing. So we actually, there's
a thing we're missing. The thing we're
missing is We've never specified when the character
is not dead anymore. So here we set that to be true. And remember we have
to set it to false because here is in, is dead. We set here in default, we set the material
back to mask. So we have to do this, and I think I'll do this. So instead of doing it here, so you can't, you can't just
go in here and say this. Because remember you are, you are playing a, an actor fade, which
is a timeline. And you're actually
going to set, like if you set this up here, the death, you are going to set. This material to masked unlit, which doesn't give this timeline a chance to change the color
from invisible to visible. Because remember when you have the material as
default to mask slits, you can't have that
smooth transition with fading the enemy. So if you do this up here, it's going to do
this instantly it right after the actor fade. And it's going to change
the material to mask unlit, which doesn't give the timeline at chance like time enough to do this here to
this transition from, from like the fade in effect. So let's actually do it
here in the timeline. So when the timeline
finishes on fading, we can then set this
death to false. And we don't want to do that all the time
because remember, even though the field is set to true and you're playing it here, it's going to play this to false because we don't really need to do that whenever you're fading, which has done here, we don't want to
set it to false, like the death
because we also have a response timer and their
needs to go some time. I'm going to do a Boolean here. This one, again, the feed. And let us just make a Boolean. Actually it's sort of feed that is not really explanatory. Let me change it to
after fade instead. Let me set this one
to replicate it because remember it's
running on the server, so the client needs
to know about this. And let me take this actor fade, set a branch and let
us connect it here. So when the enemy is fading, we are going to not do anything. But when the enemy is
not fading anymore, which means you are over here. Then we are going
to run this code, run this timeline, and
the timeline finishes. We're going to say, yes, the actor is not fading. It was set to false. Then we're going to actually
set this to false as well. So now we can do it this
way instead of up there. Alright, so now let's
compile and save, and hopefully we have
fixed everything. And let's click on play and
let us killed some enemies. So we have a lot
of enemies dying. And let's see if they
respond correctly. So now this one
respond to this one, respond. These ones respond. Okay, So it seems like
everything's working correctly. And if I just hit them once, they're going to and you can see there's actually
a small mistake. I believe this one didn't like there is no generate
overlap events with this one. So the problem here with
the overlapping issue is I forgot to set them to true. So we set them to false here, but at the end, I forgot
to set them to true. So we need to generate
overlap events. So let's compile and save. Let's go back to
playing the game. And let's try again.
So let's hit them now. They're going to die. Obviously, we need some
sound effects very soon. And you can see they're
responding correctly.
91. Enemy Level Placement: This lesson is a bit different. We don't, we're not
going to code anything. And now we're just going to place the enemies
around the level. And you can do this
with the code. So you can just make
a spawning event and just spawn all
of the enemies automatically when you joined the game and set it to
like random locations. But I believe if you can
do something without code, then I suggest that you do it without code
because remember, coding, you are going to use
some memory of the game. And why are you going
to do that when you can just come here and just
place them for free. This is very optimized. You don't have to write code. So whenever you can avoid
writing all of this code, try to avoid loops. Try to avoid writing that code. So if we could, for example, avoid writing this code, I would never have written it. But since we already like, since we need to write this, to make it function,
we have to write it. But for the spawning events, like instead of making a
spawning code for the enemies, if you can just come in here like if it fits for your game. Of course, some games need
spawning code to make it work. But for this case, we
have replaced enemies. Since we have
placed the enemies, we can actually
just take and just place them around
wherever we want. And that is it. So we don't really need to code anything here for
the enemy base. So if I go back, the thing we did
with the enemy base here for the response is we're basically just hiding the enemy and then unhide
aiding the enemy. Again. We're not really removing the enemy permanently
from the game. However, remember, in your game, if you're making
something custom and not following
this course fully, if you want to
destroy the actor, like remove it completely
from the level. Because if you just
feed it like this, if you fade it, You're nuts. Like the actor is
basically still there. If I just go here to the enemy and set the head box
to not hidden in game. And you can actually see
like if I play the game now, I hit this enemy
here and a dice. You can see the collision box is still hear the enemy
is still here. It's just on faded. So this is okay to
do in this situation because we have like a
specified amount of enemies. For example, I only need
four snails and my level. So I just fade it and
respond it somewhere else. However, if you just
want to destroy it completely from the level
and never have this ****. Because if you have a
pond spawned still, it will still run
this blueprint code and it will be un-optimized if you keep spawning
enemies and you never remove them
from the level. So if you want to
remove it completely, you can use this one
saying Destroy Actor. Destroy actors is going
to remove it completely from the game and it can
try to see what it does. So if I just kill this here and it's going
to fade in somewhere, let me just kill some more
and kill this one as well. So you can see now they're
actually like they're responding somewhere
else and after the response code, they're
getting destroyed. So now they are removed
fully from the game. This is optimized because
then you don't run all of this code for
that enemy in the game. However, for this game, I just have four
enemies all the time. And I just fade it and
respond it somewhere else. So I'm keeping
these four enemies. I've never spawning five enemies
or six or seven enemies. So if you do that, remember
to destroy the actor. If not, if you're
just doing this, you can just respond it
somewhere else and the level. So now we can avoid
writing code for the response here so we
can just replace them. So what I'm going
to start doing here is just putting this at one. And sometimes you see enemies clipping through each other. And this is because they have, all of them have one in the y. So sometimes they just
go into each other. They clip like this. You can see there's some
clipping happening. And this is because they
have the same y-value. So what you can
do here manually, it will take some time,
but you can just write, for example, one for this one, the second one, I'm
going to write 1.1. And for the third one, I'm going to write 1.2. So there are never going
to clip each other. You can see now they're
front of each other. They're never going to clip.
And you can just do that. So hold Alt and drag to copy, and this one is 1.3. And drag again 1 for this 1.51. So something like this, and you can place it up here, drag it again, 1.6. So I'm just going to
have these enemies. And up here for the pigs, I'm going to add
some pigs up here. So 0 and the y. For the y, I'm actually going
to start with one again because the player are
actually not the player. These tiles are at 0, so I don't want them to
be behind the tiles. This is why I started one. And let's drag it
again and say 1.1. And sometimes like if
1.1 is not enough, you can just say 1.1.15
or something like that. So 1.2 for this, 1.31, for this one, we can always check
if they're clipping, we can increase this
size between them. And for the player, the player is starting at two, so the player is always
in front of the enemies. Let's click on Play. And let's check it out and just try to see if
there are clipping. Let me actually go to the
enemy base and disable that collision or hit box
hidden end game here. So I can see them more clearly. So now you can take a
look at them and see if they are ever
clipping one day, go through each other. And sometimes when they clip, you can just increase
that separation numbers. You can just increase
the y value. I think it's looking
fine, looking good. Again, you can increase
the separation and the y if you want to. But this is a more, this is a more
optimized way to do it. If you can get away with
something by not programming, you can actually do that and
it will be more optimized. But sometimes you have to write code and you
can't really avoid it. So now that we have placed to all of the enemies
in the level, Let's save everything and let's move on to
the next lesson.
92. Hit, Death & Respawn SFX: We have reached the end and it's almost time for the
leveling system. And before we do that, let's actually add
some sound effects and do something
interesting here. I think it sounds a lot better if when you add
some sound effects. Let's go to audio. And I've included these
for you inside of the course materials
and we have those here. We only use the jump so far. So just select all of them
now, except for the jump. And let me drag them into
my audio folder here. And then we have all of those. Let's click file and save all. Now what you can do is you
can take this level up right-click and you can
create a sound cue ball. It's sound cue level up. And we're going to
use that later. You can click on play to
hear what it sounds like. Just some stories,
sound effects. And for this attack, you can right-click
and create some Q, call it attack and do the same thing with
the attack hits, call it attack, hits. Right-click for the
death one and create a sound cue and call
it sound queue, depth. The jump we're already made. So going and the level up. We did this one to pick death, sound cue, pick death. And let's do that for
the snail death as well. Sound cue Snail debt. And we have a respond one, this one respond,
sound cue, respond. And let's see if we're
missing anything. So we have the text death
now, we have everything now. So you can also do
it for the music. We have some music
called sound cue music, actually just
called Tennessee's, I'm going to call it genesis. This is the music. Okay? And I'm not going to plug it in right now because I
think it's going to be annoying when we're debugging the game and we keep
playing the music. So I'm going to keep
this one out for now. So the first one we can do is when we're attacking
with the player. So let's go to the player
and go to the player base. And so for the attacking, we are doing this here. So we have the attack. We are going through the server and remember sound effects. They have to go either
through the client. So if you want a sound effects
to only be heard by you, you want to like call a custom events and run
it through the client. However, if you want the
sound effect to be heard by everyone around
you, you have to. Actually, I forget
to use my shortcut here for this custom event. Very quick shortcut. If you want to make the sound effect to
be heard by everyone, you have to run it
through a multicast. Multicast if everyone
should hear it, lined, only if you
should hear it. I think all of the clients
should hear these sounds, so let me just do that. So let me make a custom
events and call it MC attack. And for this one
we're going to say play sound at location. So we're going to
play the sound at the location where the
player is attacking. And I'm going to just
drag these variables in the events and call it attack
S effects for it sounds, sound effects and
location is fine. And now we're going to play it. Remember, multicast can only
be run through the server. For the attack, we have
two different sounds. We have 14. Here, let's see for the attack. And we have one for
the attack kit. So whenever you hit something, so let's, let's do it over here. So here we're checking for
actually hitting any enemies. And if we are, we're going
to play the hit one. So over here, let me actually
just call MC attack. And let us push this code a
little bit of way like this, and you can always
make it closer later. There were playing
this sound effects and it's going to
play this hit effect. What you can do
to make it better actually to keep the
consistency of this game, we can go to structure and player info and just
add variables for the attack effects
and choose sound cue. For the next one, you can
just do a tech hit S effects. So we have to attack,
attack sounds. And let's actually do
here in the player base, instead of doing it separately
inside of Luke and Serena, let's actually just do it
here in the player base because I just have one
sound for all the players. So let me go to player info. Just set them here instead
of in each character. Now I just search for
a tech and attack hit. So just all the characters will have the same sound effect. So let's go back to
the player base. And here, now we can
take our player info. Great kids, and let us just hide unconnected pins and
just show my attack. Actually a tech hit for this
one. And connected here. So what is the location? The location is just
this player's location. So we get actual
location and connected. And whenever, actually,
instead of doing this, I believe that we
are going to get a bug because this is running on the server and the client will never be able to hear this. So the server when
I hit something, I'm going to hear
it, but I believe as a client are not going
to hear anything. Let's try. Actually,
it isn't working, so we can actually do this. But if you want to, you can also maybe sometimes I
think it's a lot cleaner to just save this and actually just run it
through here instead. But let's actually just
keep it like this for now. Let's just Control Z. I'm just going to
keep it like this. Let me copy paste it here. If it's working, Why not? Let's drag it here
and connect it. And for this one, actually, what am I trying to do
for this attacking? We actually need to go through
the delay here, like this. Okay, so down here, we're going to play
the sound effect where we don't hit anything. And down here, let's take
this copy pasted down here. And instead, we can
show the attack, attacks effects and get the actors location down here
once again, just like that. So now what we can play and let me just
play us to clients, just to be sure. Playing us to clients.
Now are hitting. You can see. And if I don't hit yeah, that sounds nice. Okay. The next thing is we want
the snail and the pig depth. So let's go to the enemy and let's see
where we play this. So we're had this any damaged
running through the server. It's then going to play
this death event here, and let's actually
add it to that. So death is going to go through the server and from the server we want
to run a multicast. So let me put these
two together, but this down and over here I'm going to
make custom event called MC death and
run it on multicast. Here. Again, play sound, location M and just
call it enemy death, or just death or no immediate effects.
So things like that. The location. And now for this one we can
call the multicast death. And for this multicast death, let us now actually let
me drag all of these, always have the
space problem here. For this one, for
the enemy death, let's actually do
the same thing. So for the structure, we can add a new variable
called S Effects. And let's make it
into a sound cue. Save here. And let me go to, now let me go to
enemy base first, compile and save, and then
go to the enemy, to the pig. And then we need to go
to the class defaults to the animal infill
and then you have to select the deaf sound effect. Let me search for pig
and select this one. Pick that, compile. Let's go to a snail. And the snail we're going
to use this snail, death. Let me go back to
the enemy base. Now what we can do is drag
this animal info, break Kids, hide unconnected pins
and I can use this one, death as effects connected. And where's the location? Remember we are
inside of any base, so we can just say
get actor location because it is wherever this enemy is, like this. Okay, So let us compounds
save when we click on Play and see if it
works. If it dies. Yes, playing the sound of it. So this one was actually
playing a couple of times. That's funny. It's because we have to
actually do it here like one, the enemy is actually
dead. That was funny. It was playing multiple times. So we can take this
and say branch. And only when the enemy dies, we want to play the sound, not when it responds. So let's click on
play and try again, just to be sure that works. And actually there is a small
bug while I'm testing this. You can see it actually
works my character up here. We need to fix that. So let me actually just try the sound first before
we fix anything. So let me stay up here and play. They have a bit more health, so I have to try again.
Okay, that works as well. Awesome. So the sound works. We need to fix that
letter issue in a bit. The next thing we want to do is play the players death sound. So going to the player
base, going to the, any damage, and when
the player dies, so here in death, when
it's set to true. So let's go back to
death down here. I set to true, we want
to play the multicast. So let's pull this up
here to make more space call a custom events
multicast death. Let's run it through
the multicast reliable and then play
sound at location. So we're doing the same
thing all over again. It's good for practice just
to do it again and again. And all of a sudden you'll see yourself and expert in this. So let's do the
death as effects. And for this one again, we need to go to the
structure to the player at a new sound called
death sound effect. Save. And all the players have
the same sound effects. I'm just going to click on this and the player, player info. And change this
down here to death. And this one. Okay, so going to this one,
the depth is set. Now, let me actually just
hide unconnected pins. And over here let's call
them multicast death. Now we're calling it here
and put this text effect. Let's now take the player info and let me make some more space. Here we can see break and
Haydn connected pins and we can just use the death
as effects here. And this one, we can
say get actor location. And let me actually drag it up. There is more space
to work with. And drag all of this down. Just like that. So now we're
playing the sound effect. Let me actually die
and test it outs. So if I just run into
these pics here, you can see you have
this sound effect. And also now we need a
response sound effects. So let me go up here and
take a look at the code. Maybe you just need to put
it in the death false. So let's just take
a look at the code. So when we are
dying or not dying. So this is not that anymore. And replaying this, and let's see where
we actually set the death to be false. I don't remember actually
where we did it. So let's try to like what you can do
now to find something. This is a good teaching example. If I like right now, don't remember where I
actually did the false. I can right-click and
say find references. And then I can just like this is just finding references
inside of this blueprint, which I think is
fine because I think it's used inside of here. But if you want to,
you can click on this. Find in all blueprints. That's actually going to find this used function in
all of your blueprints. So it can actually do
that to track down where he actually used
the death event again. So here I found it in
the Widget Blueprint in our main UI. So double-clicking on it here would take
you to the menu I. And this is actually where
we did it, where we clicked, Okay, and it said the
death to be false. Now let's do it over
here then in the death. So let's go back to
the player base. And when the debt is false, Let's play the
multicast death where it's like it has the
response sound effects. So what we can do here is
just instead of making a new one called
multicast respond, we can just use this death one. So I'm going to pull
this away a little bit. What we can do down here is
called the multicast death. And now what we can do is
go back to the player info, make a new variable called
response sound effects. And it's a sound cue
going to the enemy base. Now, clicking on
the player info, setting the sound effect to
respond and compile and save. Now let's go to the, let's go to down here actually
take this player info, break it either unconnected pin. So I'm going to use
the respond one. And then we can just
connect it here and get actor location again. And now we're going to play
the response sound effect. So let me try it, and I believe it will work. So it plays that Santa Fe. And if we click Okay. And you can see I'm
having that response and effect. Okay, Awesome. So that working on the client and it's probably
going to work on the server as well because this is run through the server. So these were all
the sound effects. If you want to, you
can also go ahead and add the music here. This one. You can just play this
one and this one is probably going to
play client sided. I don't think you should
play this through a multicast because
the players are naturally hearing the
sounds together like they're not sharing
the same soundtrack at the same second. Just play this through the
clients and try to practice. Maybe just try to go in
there and do this yourself. But I'm just going to do
this probably at the end of this course because it's a bit annoying to play
the music all the time while I'm,
while I'm speaking. So let's click on
File and Save All. And let's move on
to the next lesson.
93. Fixing the Ladder Death Bug: Now let us fix that
ladder bug that we saw in the previous video. So here on the top. So when I get damaged up here, I'll get stuck inside of,
actually let's try again. I'll get stuck here inside
of this collision box. And this is because, so let me actually
close this game and go back to the
player and player base. And the reason for this is
here in our isClient beings. So when we set is
climbing to false, and is that it's not true. You can see here we are changing the collision type to ****. And remember earlier we made
this climbing player in order to bypass this, these collision boxes up here. And when we change it to is
like collision type to ****, then we're actually
getting stuck into these collision boxes. So this is what
we're trying to do. So we have to do some little re, or small re-programming here. So clicking on this one,
let me hide this pin. Okay, so to start with this, Let's actually go back. I found the best solution
to do this is to go to the tile maps and inside
of the tile maps here. So we have something called
insight led nationally, minimize this and go to the
climbing and climbing based. So in the client being made, we made something called
upper collision box. And here we set if you
can climb up or not. And you can see that box here. This is, I don't know if you can see it visually like this
is the bugs actually. The one above the letter. This is the one we added, which makes so that
you can't climb up. So we can span the Up button. When you are on the
ladder, if you remember, you can try to watch the letter video if you
don't remember, but it's one that we added. And instead of adding it here, let me actually do
something else. So in the tile map
that we added, so this actor going
to the viewport, Let's actually make
a collision box around this platform is that we're defining
this platform. To do this, let's click up
here and add and search for collision at a box collision and let's call it
deny, climb up. So we're denying the player
pressing the Up button, so they spam the
ladder up there. And the good thing about
making it in here. So even if we add ten
letters or ten ropes, this is going to work
for all of them because it's a box covering
everything here. The best way to put this here
is actually now let's go to perspective and
let's click on the right view and then
go to Lit mode up here. And you'll be able to
see this a lot better. And let me just zoom
out a little bit. Okay, So this
collision box here, the best way to do this
is you just have to cover this platform so you can try to go with the
x here, right? A hundred, two hundred,
three hundred eighty. And you can just try
to cover this area. So maybe 375, just
a bit smaller, something like this, or 73 AT just to make sure
that it's actually covers the area
out here as well. And for the collision box
Y and Z, maybe it's 35. I think it's already
covering a lot of it. And just try to cover just
just right above the grass. You don't have to
go insane with it. So I'm going to
remove the snapping. And just like the upper
line is just above these collision boxes
down here on the grass. Okay, so I think that
covers it nicely. Let's compile and save, and let's go down
to this and click on this on component
begin overlap. So click here and say
actor has tagged. And again, let's say
it's the player. Inside of here. We have to again run it
through an authority. So switch has authority, making sure it's the
server running it. Let's make a branch. So now we're asking,
is it the player? If it is, let's take this and
say gets player reference. And we just want to
call this one again. Can climb up. This one, remember
to choose message. Can climb up, so not can climb, but can climb up message. And whenever you are
colliding, remember, whatever you colliding with
this box we just added here. You're not able to
press the Up button, like to climb because then
else you can spend the rope. So taking it and
putting it to negative. So that is correct. The next thing is clicking here and clicking on end overlap. And let's just copy paste this code and connect them here. So other actors down here, other actors up here as well. And let's put it to true. So now you can climb up when you are not inside of that box. Okay, so now we
have the code here. So let's go to blind being base. And instead of climbing base, Let's now delete the code here
because we don't need it. Let me actually delete this
box entirely. Remove it. Going to give you errors and
remove all of this as well. So now we moved the
code to here instead. This is what's going
to set it instead. So the next thing
we can do is go to, let's go to player base and take a look at the
client being code. So the client being
code was up here. And inside of the
climbing code we had this one called set. Set can climb up. This is the one we
just moved over here. So what I want to do, actually let me go back. Where is it here? What I want to do
in here is now ask like making branch here
and write a NOT Boolean. So if you can't line up, which means you're actually colliding with that box
here we just added. So if you're colliding with it and also asking
if you are climbing. So let's get is climbing. And it is here is climbing. And write an AND Boolean. Let me actually just
make it so I can explain it to you a lot better. So connecting this here. So what I want to do here. So if you cannot climb Bob, which means you are colliding
with this box here. If I just move it over so it can actually have
them all together. So if you're colliding
with this box, it means this is false, like you can't climb buck, which makes this true here. So if you can't climb up
and your client beings, so you are still on the ladder. So you are under letter, but you are also
overlapping this, which means you're up here. Then we want again to remember
before we set it here in the isClient being too
is to clumping player. This is what we want. Because when you're
climbing and you begin overlapping this box, you want to disable the collision boxes up
here so you can climb up. This is what we're trying to do. So let me go back
to the Event Graph. Let me first close this down and to make it easier for self, let's actually create
an enumeration. So here, let's right-click go
to blueprints enumeration, and let's call it
a collision state. So what I'm going to use this enumeration called
Collision State for. I'm just going to make
a list of two items, same collision on
and collision off. Very, very simple, very
simple enumeration here. So just to listen remember, and enumeration
is just a list of any items that you want. For this sake, we just want
the collision on and off. This is just the list. Let's close it down and let's actually go back to
the player base here. Now remember, we can't
just take this capsule. Whoops, we can just take
this capsule and say Set collision object
type and then set it to climbing
player for example. We can't do that because
remember we are running this through the server so
the client will have a bug. So if you click on
Play now and try and actually try to
see if this works. So playing as the
client, I can climb up. You can see I can climb here, but it will bug our character. And instead of
doing it this way, you have to run it
through a rep notify just to notify the clients
as well for these changes. So let us take, Let's
save everything first and now we can
use our enumeration. Let's make a new variable. Let's call it a
collision states. You can also call it something
else if you want to. But I'm just going to
call it Collision State. And I'm changing the variable
type to E collision state, whatever we call it here
in the enumeration. So E collision state, this is what we
called it out here. So now let's compound save. And I'm going to make
this replication into a rep notify and then
unwrap function. I'm going to take this
collision state and say switch on enumeration. So we have done this a
couple of times now. When the collision is on, I want you to take
my capsule and sets collision object type
to be pond because we want to collide with
everything like this. When my collisions
of I'm going to copy paste this and set it
to climb being player. So it's going to put
the platform collision, actually all the
collisions of the ground. So very simple enumeration, just turning on and
off the collision. Now we can use this very useful. So we can take this collision
state and set it here too. So now let's think
actually I thought we were doing when we can't climb up, which means we're colliding
with that box up here. And we are climbing. It means we want to turn off
the collision because we are climbing and we want to
bypass that platform. However, if we are not hitting that box here or if
we are not climbing, then we want to turn on the collision because maybe
if we're not climbing, even though we're
touching this box, if we're not climbing,
maybe we're standing on top of here and then we don't want
to turn off the collision, else will fall
through the ground. So we want to turn on
the collision if we are not climbing or if
we're not touching. This box up here, it means we're down here
and then we actually want our ground to be on.
So this is correct. Now, another thing is, I mean, you can try to play
it and see what happens. So playing it here. I can go up here. And if I get hit, you can
see I'm still getting stuck. And the problem is here in the
Colombian unwrap function. Remember we had all of these. I'm actually going to
delete all of them. And I'm going to reconnect
the pins like before. Because we don't really
need them anymore. And you can just move
all of these closer. Okay, so let's compile and save, and let's try to play now. See if it works. Now can see, I can climb and I'm playing as the
client right now. So I can do this. The other bug right now
is I can't climb down. I'm trying to climb
down, but I can't. But you can see
the death worked. Everything is working. The problem right now is
like it's working right now. And if I jump down
to the ground, I can walk again. If I jump up here,
I can walk again. The problem is I
can't walk down. So we have to fix this. So we have to go to
the Event Graph. And the problem is over here. So can climb is set to be true when you can climb and
you're trying to climb down. So this is what, remember, we made this timer
where we check if the player is
trying to climb down. And yes, when you climb down, but we haven't really
turned off the collision. So let me copy
paste this up here. So here in the timer. So when you actually
begin climbing, so it's clamping set to true. I want to turn off my collision. And up here when we cancel
the isClient being. So when you're
finished climbing, I can actually set
this to be on again. So setting it up here as well. So now all the problems should be fixed if we
have done this correctly. So let's try again. I can climb, I can walk, I can
climb down as well. Everything is working
and if I die up here, I'll just get pushed. That works as well.
And if I die, that works as well. So I think it's an easier way to handle the collision and let's try to get
knocked off up here. That works as well. I can clamp down and I
can also die up here. Yeah, that works as well. Okay, So this is an
easy way to do it, just making an enumeration
with the collision on and off and then switching
it onto a rep notify. And so in the notify function, you're just putting the
collision on and off depending on what
you're setting it here. And remember the on or
the rep notify variables. You can only set notifies
through a server. Events can state that's enough. Because remember, you can't just get in here and set
it through this one. You have to be on the server before you can set
unread functions. So very, very important and this is what we're
doing to always check if it's the server
you're running through and if it
is, That is correct. Yeah. That was it for this fixed. And let's move on
to the next one.
94. Adding Experience to Structures: Let us now create
our leveling system. So first, what we need for
the leveling is here in the structure and the
enemy info or animal info, we have to give enemies experience because
obviously every, every enemy is going to give some sort of experience and there'll be different
from each other. So writing experience here in the structure and changing
it to an integer. Like you can, you can
put it into a float. But the experience, I want, you don't really have a comma, so you don't have
decimal places. And therefore we don't
really need a float. So these are whole numbers. And I would like
if you have a game with something
giving, for example, 20.5 experienced than you would have to set it to a float. Else I'm just going
with an integer because these are just whole
numbers that I'm doing. And for the experience, I'm actually going to put
it right below the damage. So this one is going to specify how much experience is
every animal going to give. So let's now go to the enemy
here and then we base. Let's remember to compile
and save like just before. And let's go to the pig and open the full
blueprint editor. And inside of here for the
experience for the pig, let us, for example, get, let's say 20 experience
every time we kill a pig. For the snail, every
time we kill a snail, Let's get, for example,
ten experience compounds. Save. Whoops. Okay, So that is
done for the animal, the structure for the animals. Now let's go into the player. The player will
need two variables. So first we need a level. So what is your level currently? And let us put that
into an integer. These are whole numbers. And let us also do experience. So how much experience
do you have right now? And this is also an integer. Let's put these. I'll put them right below
the base damage up here. Okay, so let's save that. And the last thing. So right now, let me
actually first go to the player and player
base and Compile and Save. And here in the properties and
the player info structure, the level as default, you're going to start with one. So remember, you're not
starting with level-0, you're starting with level one. So remember to write that
here as foreign experience. We will be updating that later, so don't worry about that. Let's close it. So the last thing
you have to define how much experience
you need per level. So you kinda have
like you need a list of what experience is
needed for what level. So we need that to actually
make a new structure. Let's right-click and let's go to blueprints and
create a new structure. And this one, I'm going
to call it level info. So it contains information about what experience we
need for every level. So it needs just two variables. We need the level. And this is going
to be an integer. And this one is
called experience. So how much
experience is needed? And this is going to
be an integer as well. So to two very basic
things, what is the level? And instead of experience, we can just call it
experience required. So it's more explanatory level and experience
required to level up. Let's close it down. And in order to work with
this structure, we actually have to
work with data tables. Tables. We are going to work with those in the next lesson. So let's move on.
95. Introduction to Data Tables: Now that we have this
level info structure, let us begin working with data tables and
they are so useful, you'll see that they're nice to use and they're also very easy, not, not really a
complex concept. Let's go to folder,
create a new folder, call it data tables, and have all of our
data tables here. Right now we're just
going to have one, but I liked to be structured. And now you can right-click
here and miscellaneous. And here you can select
Data Table, this one. Now it asks you for which structure should
I make a data table? And then you have to
specify the structure. And the one is this level info
that we made clicking on. Okay, and let's call it
d t for data table ups. And I'm going to call
it level info as well. And double-click it. And here we are inside
of a DataTable. Now you need a new value, so you have to click
on Add up here. Now to add some value. This value gives you a row
and then you can see the, the variables that you created inside of the level
info structure. So every time you add a new
variable in your structure, it will be here in
this data table. So what this data table is, you can just imagine it just as an Excel excel document
where you have, for example, the level
and experience required. And then you just make more
rows and define those. For the first one
instead of new row, I'm just going to
rename it to one. So clicking on F2 to rename
and clicking on one, we can also
right-click and click on Rename. That's up to you. So here we start at level
one, obviously not 0. So here you have to write how much experience is
required to level up to two. So 50 experience to
level up to two. And then let me add a new value and that the row I'm
just going to call two. And this is very important. We are actually
going to use those, so be sure to call
them 1234 and so on. So for this one, at level two, you need 75 experienced
the Love Lab. And this one I'm
going to call three. At level three, you
need 100 to level up, and let's just make five. So at four, you need 125 and this is for suitable
for you need one hundred, one hundred and twenty-five. And at level five
and level five, you need 150 to level up. So we can just define how much experience
you need to level up. And obviously, this is
where game design comes in. You have to balance
all of these numbers. So now let's close it down and this was it for data tables. So you can go ahead
and save everything. And let's move on
to the next lesson.
96. Data Tables Through Google Sheets: So the cool thing
about data tables, you don't really have to do
this manually all the time, like create all of these rows. Sometimes you have,
for example, if, let's say you have
items just in fun tale, the game I released on Steam. So in farm tail, I have like all of the items
you can buy from the shop, I actually have them
inside of a data table. And this will take so much
time to do because if you have like ten or 20 variables
for every single item, it's going to take forever. And this is why using
Google Sheets is actually a lot faster and
I would recommend that. So here in Google, like if you make
an account and you go in here and go to the drive. So in here in the dry, you can just right-click and
make a new Google Sheets. And inside of this
Google Sheet now, I can take a look
at my data table. So if you just minimize, if you don't remember
the structure, you just go back
to the structure, take a look at it, and then you have to just
write the names here. So for example, if I go
back in my Google sheet, you have to write
the exact name hero, also with the capital letters. So for example, I
can say, let's, I usually start with the
row number and actually just right Here.
Let's just try that. So this number here, and I'm actually going to just change style here just to
make it look a lot better, just for my own sake. And up here is going to be bold. Okay? So up here we have the first variate
variable saying level. And the next one is saying
experience required. Going to make this larger. So something like this. This could be my,
my Google Sheet. Now, this is my data table. So at row at number one. So we have level one and
this doesn't really matter. I just make them as row numbers. So at level 23, and you can see it's a lot faster because
I can just drag like this. So now it gets all of that. And if you're new
to Google Sheets, you can watch a
tutorial on YouTube. It will take two minutes. So selecting these
numbers, for example, I can drag down and have
those listed automatically. And the experience
required, I can just say, for example, we start with
50 and then I can say 75. And I believe it can
do that automatically. Let me try. It can do that
automatically as well. Sees that you're adding 25 on top of it and it just
does that automatically. You can see this
is way faster than going in and entering every
single number down here. This does it
automatically for me. And you can even make
formulas in Excel to balance your game
so you don't have to enter every single
number manually. But obviously we have to test the game to make sure it works. Now, let's say this Google
sheet was fine and good. And now what I'm going
to do is click on File, go to download and
go to download as a CSV, very important CSV. But now it's going to download. This is my downloaded file, so now I can rename it. And what you need to rename it to is this same name
as the data tables. So if I go to here, it's called DT level info. So just make sure you
have the exact same name, DT level info with
the capital letters. I'm going to drag it in and drop it here on this data table. And actually, I think I need to, actually I don't need to, but if you didn't have it, so you can see if you
double-click on it, you can see you get
all of these entries. Very, very nice. It did that
automatically and it can actually now use
this information. And I can see it's so
much faster to do. Now what I said before, we can actually also delete it. So if you don't have anything, if you didn't make it yet
and you have the structure, let me save everything first. So going to that data tables, you can actually just
drag it in here. Then it's going to ask you, you are importing
this data table, data table row type. Then you have to select the
level info here, the one. And I'm just going to
say ignore extra fields. Sometimes I do have extra
fields to calculate my formula. So it should just
ignore extra fields. And extra fields are just like
if it just looks at your, at your variables up here. If you have something, like if you have another
variable that actually do not exist in your structure, this will be ignored. So this is what it means. And ignore missing fields. Actually, I don't want to, because what if we're
missing something? And the Import Key field
is just our numbers here. So let me try to do that. So our number here
is my input key, and you'll see what this
key is used for later on. So doing this, and
let's try to do this. Maybe it can't, maybe it
can sometimes at bugs out. So let's apply and double-click. Now we can see it works out. So now you can see
all of these entries. And it looks awesome. So now let's save everything. And I would recommend to
use Google Sheets every time you make a game
and you make a project, it's so much faster to use. You can probably
optimize these numbers. Maybe you don't really need
this row name and you can just like the input key field. You can just write
this level here. And you can do that just to minimize all of these rows here. But now this is working. Let's move on to the next one.
97. Creating a Function Library: Alright, so the next
thing we need to do to use this data
table in our code, we need to make it
through a library. And this is something we
haven't learned before, but it's very easy. Don't worry. Let's right-click now. And let's make a new
folder and I'm going to call it libraries. This is the last new
thing we will learn here. So let's go inside of
here and right-click. And here in the blueprints tab, you have something called
a functions library. So, so far we have learned
about the blueprint classes. We have learned about
the structures, we have learned
about enumerations. We have learned about
Blueprint Interfaces, and now we're going to make a
blueprint function library. So you can see we have
been through all of these. And this one is also a
library macro library. So very similar. But let's just worry about
the function library for now. So let's click on it. And I'm just going to call it function library,
just like that. Let me go inside of it here and say now the function we want to make is called
gets level info. So we're trying to get
that level information from that data table here
we're trying to extract. So this is what we're doing
in the function library. We're trying to extract
information from this data table and we
can use that in our code. So here, get level info. I'm going to make it to pure. And remember when we
make something to pure, it's like making them into
these green function. So if I go to player base just
so you can see an example, and if I just look around, for example, this gets control. Rotation is a pure
function and this one, the blue one, is an
unsecure function. So the pure function,
you don't have these execution pins because you don't really need them here. Remember, whenever you just
need to get information, you don't really
need execution pens. Execution pins are just
for setting information. So for example, you're
setting the movement input, you're setting the x is
the z value in this case. But here you're just getting,
get control rotation. Get a vector is just
getting information. You don't really need
to set new information. Here, gate-level
info I'm getting. I'm going to set it to pure. And the input is
going to extract from whatever key
inputs you put here. So the key input
is just a number. So I'm going to make a new inputs and it's
going to be an integer. And I'm going to call it level. So it's trying to see. The thing I'm going to do
here is in the player base, it's going to take a
look at the player info, take a look at what
level you are. And from that level, like it can see the number one. From that level, it's
going to tell you what experience are required
to level up to two. So this is what
we're trying to do. So what this level
and the thing we need to use is called Get Data Table. Get data table row. We're trying to get a specific
row out of this level. So if we're level four, it's going to go to four. And then it's going to
get that a table row and use this information 125
in the experience required. So let's try to do that. We can't just plug
it in like this, but we can say two string. So we're converting it
into a string first, and then it can do it. So first converting it to a string and then
converting it to a name. And then going inside of
here, Let's connect it. And the data table we
want to extract from, we only have one. So selecting it here. And then let's drive from
here and say return. And we add a return node. And this is the information
now this is the table. Now it knows like if
we're in level four, nose out here in the information
that we are level four. And we need this much
experience to level up. Here. Let's just call it level info
set of outgrow level info. Okay? And the cool thing about
libraries you can actually, these are global functions. You can call them anywhere. If I just go in my
player base now and just say yet level info,
you can see it. It's here from the
functions library, so it's a global function
you can use anywhere. And you might, you might ask, why don't we just code everything or many
things inside of here? It's actually
expensive to do this. I've read a lot about it. And some people actually
a lag their games. If you have this function
library is very heavy. Their game is lagging. So it sounds like this is very, very heavy to use if
you have a too much, but in cases like this where
we actually need to use it. And sometimes like what you need to use this for
is you just have to think, is there a function
that I have to use in 50 blueprints are in five
blueprints all the time, then you should probably go in and make it in
here, for example, getting the level info, we can use that in our player
controller, in our UI, in our player controller
or not like control the player base and the
enemy base and so on. So we can use it in many, many places and it's probably a good idea to make it in here instead of a specific blueprint. Okay, so you can see here I
can just say gate-level info, and now we have
to plug something in here so we can plug
this player info, for example, I can just
show you very quickly. So for example, we can take the players current level
and we can plug it in here. And now for example, if
the player is level three, it's going to extract
this row number three, and it knows you need. Now you can take
it from here and break it up and it
knows your level three. And you need here, you need 100 experienced
to level up. So very, very cool
method to do it in. So we have, if I just
explain it very quickly. So you made a
structure here called level info and you
made these variables. And after that,
we just went into Google Sheets and
made this here. Now you can drag this info and drop it into this data table. I'll just here in
the Content Browser. And then you have to select which structure this
data tables for. And we did that. So it just create this for us. Then you go ahead and go to the function library
and create this one, get data table row. Then you select which data table and what is the row name? Their own name are
just numbers here. Like if you edit the row
name to hello for example, it will not know like
if you're a Level one, it will not know what this is because your
row name is hello. It's not a number, but
we have it as numbers. And it's going to know
that for example, if your level three, it's going to put this information out
and this information, we can actually call it
here and use it anywhere. So let's save everything and let's move on
to the next one.
98. Adding Experience on Enemy Death: Hello and welcome back. So now we're going to add experience when
the animal dies. And here I am in
the player base. And first we have to
create an event called ad experience because we want to add experience
to the player. So we want to clean this
up a little bit later, but let's just add it
here where there's space. Let's go ahead and
make a custom event. And let's do that through the Blueprint
Interface function. So let's go to the interfaces, to the player base, and let's make a new function
called add experience. And here the input is just, just the integer because
it's just the experience. And let's call it
experienced to add. Let's compile and save, and let's go back
to the player base and save everything here. Now let's right-click
and call ad experience. And this one, again, let's make one running
through the server called ad experience to make sure the client
is not cheating. Let's run it through the
server being reliable. And let's call it up here,
Server AD experience. Now again, we need an integer
called experience to add. And let's connect them up here. Okay, so we have this
event here and we don't really have anything to
do with it right now. But the thing is when
you kill an enemy, you have to plug in how
much experience you have to add for the skilled
or slain enemies. So let's go over
to the enemy now. So inside of the
enemy and enemy base, inside of here, let's find
where we kill the enemy. So we kill the enemy. This is the any damage. And so here we're checking
if the health is 0. And if it is, we're going to go ahead and set it to death. So before we do that, so here is where
we kill the enemy. We're sure the name is dead. So here I'm actually
going to call my ad to experience event here
and the player base. So to get the player, we already have a
player controller. We can say gets controlled pawn. And then we can say Get layer reference because we're trying to reference
the player base. And let us connect it. Whoops, let us connect it. Just like this. May actually just pull it up here instead. Okay, so we have this now
and now we can drag from this and say add experience. And it is a message because it's from a Blueprint
Interface function. And how much experience
do you want to add? Remember, we made in
the animal structure, we already made this, so we can break it here. Let's hide everything for now, and let's click and
click on this experience because we already set how much experience
every animal gifts. So now we just want to
give that experience the enemy will give on a dice. So just moving it here. And then we're going to
continue with our code. I'm going to move it a little
bit up, just like this. Okay, So now we're adding
experience when the enemy is killed and the
experience is going to go through to the
player base here. And it's going to
go through here. So now that we
have this created, we are ready to update the
experience for the player.
99. Updating the Experience: Okay, so let's now go ahead and update the experience
for the player. So now we have the experience, how much the enemy gives, and it's going to go through
this ad experience events. Now here in the server, we're now ready to
update this player info. So let's take this player
info and let's break it down. Now, let's hide everything and just take this one
experience that we made. So this is how much experience
the player has right now. And obviously you start with 0. So let's take this experience
that you've gained and say plus and add it with the current experience
that you have. So if you have 0 and
the pig gives you 20, you'll now have 20
because you have added them together and this
is the new value. So let's set it here to the
new value so it gets updated. So let's take this info. Let's say set members, and let us connect it up here. Now what we can do with
this is actually drag it down like this
and take it up. And now, what, what
do you want to set? We want to set the experience, and this is the experience
we want to set it to. This is the updated number. And then remember to take this player info
and set it here. So now you have updated how much experience your player has through the structure. So this is actually
as simple as this. Now you have the
updated experience, like how much
experience you have. And obviously it's not
going to be updated in the UI because we haven't
created a UI yet. But you can print a string
again and see if this correct. So you can break this up
again and hide everything, take the experience and you
can always print it out the screen to see the new value
so you can click on play. And here I can hit enemies. The server's going
to say ten now. And if I kill the second one, it's going to say 20 because every snail gives
ten experience. If 3040 because it
just killed too. So you can see this is
working perfectly now. So now that the experiences
of the incorrectly, we're going to see how we can
update the level as well.
100. Updating the Level: We're now ready to update
the level for the player. So I hope you're fully
awake for this lesson. There are some math
that we have to do, not really too complex, but we just have to be fully awake and
know what we're doing. So now that we have updated the amount of
experience the player has, we're now ready to check if the player has exceeded that experience
needed to level up. So remember we made
this one called gets level info previously. And from that, we can break
this up and we can try to see if the player has this
required experience required. And we have to specify what level is the
player currently. And we can do this
by clicking up here, and let's do this level here. So we start by level one
as default and let me just drag it here
and do this here. So trying to see like here we, we are writing one because the player is level
one and it's going to go through this
data table and it knows that we need
50 experience. So this is going to say 50 here in the experience required. So what we're going to do is
we're going to take this, and actually let's take
this experience first. Let's take this here and say, is it greater or equal? Is it greater or equal than
the required experience? And let's make a branch up here. And let's connect
it. So for example, I kill someone and
let's say I have 200 experience and they're
required is maybe only 150. So I'm just asking, is 200 greater or equal than
the required with this, which is two hundred and
one hundred and fifty. That is, we have to
level up the player. If that is not it, we don't do anything. So we just maybe just update the UI or whatever
we're trying to do. I'm going to hide this here. So this is the thing
we're going to do. So if it's true, we're
going to level the player. It's false. We're not doing anything except for maybe
updating the UI, which we will be doing later on. Okay, So for
leveling the player, let's say is true. You have more experience than
their required experience. Then you have to, Let's take this player info. And let's first take
this experience. So let's say we have 200. Let's subtract it. Subtract it from the
experience required. So let's say you have
200 subtracted by 150, which is required maybe. So that gives you 50
experienced left. So first we have to subtract that experience and then
love, love the player. So let's, Let's try to make some reroute notes to make
it look a little bit better. And actually instead of
doing this from here, just to make it cleaner, I don't like the look of this. We can just push this
bit further away and break this up and
say the experience, because now it's updated. So take the
experience from here. And now we can say
this thing here. This experience subtracted
from the needed experience. And we can take it here and
place it down like here. And instead of this
level from here, we can just hide this again, just to make it look better. We can actually just
take it from here just so they're not too
far away from each other. And let me just plug it in. Okay, So something like this, I'm going to drag this up just to make it look
a little bit better. Drag this may be down so they don't collide
with each other. Okay, something like this here. So we're asking, is this experience that
we have right now, is it larger or equal than
the experience required? If that is true, we're taking the experience and we're subtracting it from the
required experience. So maybe 200 minus 1 fifth. We have 50 experienced
left, for example. And now we need to set
the new experience. So we're going to take
the splitter info again and say set members and we want to set the
experience to this number 50, maybe that is what
the number is. And then we have to level
up the player because the player has exceeded
the required amount. So let us actually
double-click here and make a reroute note to
make that look even better. Something like this.
Okay, and here we have now updated
the new experience and let's set the
structure first. Now that we have
set the structure, we can break it down here
and we can hide everything. And we could take the
level and say plus, plus, plus, plus means. You can see it. Add one
to the specified value, then set it just like this. This means this is the
same thing as doing this. So taking it out here and
say plus and writing one, and then taking that and setting this value
just like this. This is the same thing. So just taking out saying
plus-plus to edit and set it. And then we obviously have to update our structure
with this number. Now we have a new level. So again, you can
drag out from this here and say set member. And now we want to set the level two and new number
here, just like that. Okay, and remember again to set this structure just like this. So now we have updated
the experience, you have updated the level. And what I want to do now, remember like you can kill many enemies
and maybe you have exceeded that
required experience for both level two
and level three. So let's say you killed
an enemy that gave you so much experience that you level two level sub
instead of one. So we have to check
again like it's okay, like you subtracted
that experience, but you have to check again, is this new experience that
you have in your pocket, Again, higher than their
required for the next level. Because maybe we need to add
two levels at once instead of one if you have
met that requirement. So we're going to
drag from this, and actually I'm going to
drag to this branch again and double-click to make
reroute notes just so it is. Looking better here. Something like that. I'm going to drag
everything up like that. Okay, so what we're doing
here is we're checking again, is the, is the
experience that you have right now with this
updated experience. Like even though it's going to take from
it and experience, remember we have
updated our experience. So this experience now
we'll have the updated one. Is this higher than the required again
for the next level? So it keeps checking
if it is required, like if we have
higher experienced than the required
room experience, if not, it's going to go
to false and do nothing. So it's not going to add
anything to our level. So this is basically it. This is the code. So we have like we're, we're adding the experience
when we kill an enemy. Then we're checking if we are at the experience required for
that level to level up. And it's going to
take that information from the data table because of this level info function that we did, Function Library. And then it's going to update our new
experience because we're subtracting that
experience from the required because we
are leveling up. So we don't really need
all of that experience. And with that new experience, are we again, meeting the required experience
for the next level? If not, we're just
going to maybe update the UI or wherever
we're going to do here. So now that we're
finished with this code, let's actually go ahead and create the leveling
or the level of UI.
101. Creating the Level UI: To create the lovely URL, let's go back to our
UI folder inside of the Widget Blueprint
main that were created. And let's just add
the level here now. It's up to you where you add it. And this is just a
course like you can just do the design you want. But here let's actually
just add a level displayed. So let's take, I want to add
it right beside this UI. So I actually have
to add a horizontal, horizontal box so they
are aligned horizontally. So I'm going to a
horizontal box. And then I'm going to put this overlay into
horizontal box. And I'm going to put another
overlay into horizontal box. This is where I want
to design my level EY, just dragging this
horizontal box the way and it's looking like this because
it's not filling. So I'm going to click
on this overlay and clicking on fill here, so it fills the whole thing. And with this one, this is the leveling, leveling display. And here I want an image as the background,
just like this one. I'm going with the same design. Having this image
set to black square flat and filling
this whole space, I'm going to put a space there between these two overlays. Just make sure when
you minimize them, the spacer is outside
of the overlays. So here in-between. And this is spacing
in the x-direction, so maybe something like ten. Okay? And here, let me
duplicate this image and let me select the
blue one now blue flat. And again, just click on this alignment on the top
and make the size to five. Duplicate this, make the
alignment to bottom. So we have this same
design as before. And now I want to add some text. And the text I want to first add a vertical box because
I want to texts. And the first one is
going to say level. So here it's going to say level. And the second one
on my vertical box, it's going to just have
that level displayed. So level one is the start. And I want to put that
in the middle and put this one in the
middle as well. And the whole vertical box I want to put in
the middle as well. Now you can select both texts so we can add them together. And for the font-family, I'm going to select Bold. For the size. I'm just going to let it be 24. And this one for the shadow, I'm going to set
the shadow offset 22 and change the alpha to 0.35. We have some sort
of basic display, and you can see this is
very small and narrow. It's getting pushed
away from this. So you can click on
this second overlay, click on fill to fill it out. And if you don't want
to fill it this much like the same size
as this one here. You can just change this fill
number right now it's 1. You can write 0.5 and
it can make it smaller. I think I'm going with
0.4 and I'm going to make my horizontal box a bit larger because I think
this is way too small. Something, something like this. And what we can do now, just make sure the
anchor point is correct. So clicking on the anchor, putting it down here instead. And then writing zeros 0 and
the position you can see it aligns beneath our window.
And we don't want that. So again, play with the alignments and this is
the why alignment here. And this is just set to one,
and it will be up here. Now, for the position, I will be putting
it at maybe 30 in the x and minus 30 into y. Minus 30 is going upwards. Now we have our
leveling display. Now, just to make it easier
for us in the variables, I'm going to click
on this number and calling it the next level. And for this one, we don't really need
to make it into a variable because
we don't need it. Just making sure I'm clicking on this text here because
we need to modify it, make sure it's set
to is variable. But this one for this
level also makes sure it's set to is variable. And this one's called texts
experience. Texts level. This progress bar is
called prog experience. And yeah, that's all about it. Like we have everything we need and let's save everything. And in the next one we're going to add functionality to this UI.
102. Level UI Functionality: So here I am back in my
main UI and let's now add functionality to this
experience leveling system. So the thing we
need to do is let's go over to the graph
and code something. So here I want to
right-click and let's make a new custom events and let's
call it updates experience. And this one is going to update the experience and the level. So it's going to have
that experience. And if we have the
required experience, we're going to update
the level as well. So now I don't know what we need to put here in the inputs, like we need to figure
that out for now, let's just let it be like this. And the first thing
we need to do is take this progress
bar experience. And just like before,
with the Health Bar, say set per cent. And this is going
to ultimately set the percentage for this
progress bar here. So it's going to fill out. And usually like here it
starts as 0 by default. So we're going to set the
percentage by something. And then after that we
have this experience. And we're going to set this text as well on top of
this progress bar. So this is this text on the top. And remember when we
have dynamic texts, just what I taught you before, we need to use format text. So again, same method, rag out, save format text. And we need two variables. We need how much
experience you have, and how much experience
is needed to level up. So let's make two
variables here. Let's make a curly brackets and write experience,
experience. So this is the
current experience. And then, then like outside
of the curly brackets, I'm writing a slash. And then we make
new curly brackets and call it experience needed. And make like finish it
with curly brackets. So we have two curly brackets. We have this one here, we have a slash and
this second one. So now we have two variables we can set as dynamic variables. I see that we need, like in the player info, maybe we need just a player
info here because instead of plugging all of these
variables in here, we actually just
like we can use, like we can update all of this information using
the player info. So I'm actually going to
create this as an input and writing layer info,
just like this. And let us call it player info. Actually, let's do it from here. So with what we have so
far, Let's try it out. Let's take the split
info and break it up. And now we can use
this percentage here. Remember this is the experience. So how much experience you
have right now divided by the required experience
that you, that you need. So let's hide all
the unconnected pins so we need the
required experience. Remember, the function we made
in the library is global. So we can just say get the level info and you
can access it here. You need to specify
the level of a player. We have that here in our
structure like this. And now you can break this up. Now you have the
required experience. The experience you
have divided by the required experience will
give you the percentage. And actually, there is
a small mistake here. Like when you do it like this, it's actually going to show
0 because remember this is an integer and this is an
integer and this is a float. Like it's going to process
this data correctly, but the number is going to be displayed wrong
because remember, when you divide integers, it's going to give
you a whole number. It's not going to give
you a percentage, like you don't have decimal
places or integers. So if you say for example, the experience you have
is ten divided by 50. And that number you get is
a decimal place number. That is not going to show
this number will be equal to 0 because integers cannot
have decimal places. So the correct way to do this is first convert this to a float. So say two floats. And do the same thing
for this one to float. And let's delete this. And now we're going to say
this experience divided. And now we're operating
with a float instead. So make sure to make
it into a float first else you will not get
those decimal places, but you'll only
have whole numbers. So now we have the
decimal places. Let's double-click and
make a railroad node here. And now that number
that we have right now, we can use it in the percentage. We'll update the
progress bar correctly. Okay, So this is finished now. And the next thing, let's actually first
click on this one and hide pin just to make
it look a bit better. So next thing is
we need to update the experience that you have
and they experienced needed. This is very easy because
the experience we have is just this experience. Let me double-click and
make a reroute node here. And the experience needed
is just this one required. So I can just double-click
and put it here. And let me actually just
drag this down so it doesn't overflow the whole
thing with the lines here. Something like that. This looks a bit more
cleaner, better to work with. Okay, so now we have
that information set. What we need to do next is update the level display
for the players. So taking this text level, so now we want to
update this level here. So taking this level
and say set text. And now this is also
very easy because we already have the
level for the player. We can just take this
one or you can take this one that's up to you
and plug it into here. And again, make a reroute node to make it look a lot better. Something like that. So now we have actually
all the information we are updating, the percentage, we're updating the dynamic
text on this progress bar. And we're also updating
the leveling text here. So now we can compile and save, and now we can use this
update experience in our player controller to update the player's
experience and level.
103. Finalizing the Leveling System: Hello and welcome back. Let's now finalize
the leveling system. Let's go to the
player controller. Remember we do the UI updates
in the player controller. So going to the player
controller here, and now let's just
make it down here. We have the update
health bar up here. Let's make a new one. For this one, I'm just going to call it update experience. So actually let's go back
to the interfaces first in the player controller
Blueprint Interface. And let's make it here
called update experience. It's going to remember to take the structure player info as the variable because
that is the one we made. And let's call it player info. Compile and Save.
Let's go back and call it here, update experience. And now again, run it
through the clients. Remember it's not the
server now it's the client because we're handling UI and
UI goes through the client. So custom events
and going through the client, saying
update experience. And let's make it run to an
owning clients and reliable. And let us add the player
info variable here. So searching for player info. Now we can write it up here,
Cl update, experience. So now it's going to
run it through here, run it through the client, and the client is
going to run that widget blueprints function
we made here in WB main, here called update experience. This is what we're
going to do now. Now you can drag from here. And actually we need to access
the Widget Blueprint main. And we already remember have that as a variable in
our player controller. So let's start from here
and say Update experience, and you will see it here. So call it here, connect them, and then connect them here. So now it's going to go and
feed that information into, in here and update
everything for us. Now we haven't specified
where we will add this. So update experience,
Let's actually go back to, let's save everything and
let's go back to the player, bass player, player base. And remember, we made this
ad experience events here. And this is what we
want to add down here because if you have leveled up, then we are updating
the new experience. We're updating the new level. And then it's going
to check again. Do you need to level up again? If yes, it's going to again update the experience,
update the level. Then after that it's
going to say no, you don't need to
level up anymore. You are not you're not meeting that required experience
for this level you are in. So just go ahead and
update the UI here. The UI again, it's
now the function we need or the event we need to access this inside of
the player controller. We can now say Get Controller. We are inside of
the player base. And here let's say gets player controller REF
that we made way earlier. Let's connect it here. Now, let's drag from this
and say Update experience. This is what we called
the interface function. And it is a message because it's a Blueprint
Interface function. Now it needs the information. So I'm just going
to drag from down here and drag this
player info into it. And now it's going to
update the experience. So let's compile
and save element actually just give the
player a lot more help. I just don't want to
die all the time. So setting the max
hills to maybe 500 and the current
helps to 500. And let's play now. Okay, so now I'm the
player, I'm hitting this. We can now see it updates. But initially you can say
it says 0 out of 100. That is not correct. So we need to do
an initial update. Remember that your UI is only updating whenever
you gain experience. So when you're spawning, you're not updating your UI. You're only updating it
whenever you kill something. So let's actually do
it up here in the, let me copy paste
this code and let me go up here and do it in
the beginning place. So whenever I just
begin playing the game responding the player
responding the camera, we're setting the camera view. I'm going to do
it here actually. So right after you
set the camera view, I'm going to add this. And I'm going to update my
UI as an initial update. So right here,
something like this. Okay, and now let's
compile and save. Now let's click on play. And you can see it does in initial update and you have
that correct information now. Now can kill something. It gives you ten experience. The bar is also updating. Awesome, and let's
see if we level up. So I'm going to kill
a couple of more. Now it feels like a game. When all of the
elements come together. Now we can see I'll make sure
that leveling up to level two and my kneaded
experience is now 75. And if I keep killing, it's
going to now increase it. So now it's updating
correctly actually. And if I go up here and
fill some of those here, okay, so now I can see
I have 70 out of 75. So let's see if it
calculates correctly. So if I think every pic
gives like 20 experience, so if I just kill one, it should say 15 now. So let me kill one. I don't fall off. It says 15, so it's actually calculating correctly
and it leveled me up. So that is nice and everything
is now updating correctly. So the last thing we
need to do is just add a sound effect and a visual
effect for when we level up. So we'll make it a
bit more interesting.
104. Level Up SFX & VFX: But the final thing here
in the leveling system, Let's go ahead and
add some sound and visual effect for leveling up. Let's go back to
the player base. And inside of here, Let's go down to
our ad experience, and let's now add a multicast. So let's right-click. Do a custom event. And let's do multicast. And I'm just going
to call it the same. You can call it level up or
I'm just going to call it an experience because I'm
including it up there. And I'm going to change it
to a multicast reliable. I'm going to play sound
location just like before. And adding those variables in. I'm going to call it
level up sound effect. Okay? And we also want to play like a visual effect
for when you level up, but the visual effect
is a flip book. So in the course materials
I've included for you, this level of texture
that you need to add. So here in the
character's level up, Let's go here to our
assets characters. And let's drag in this
level of texture. Again, right-click it and
apply paper to the settings, and now extract those sprites. And the grid for this is I
believe it was 180 by 180. And now click on extract. And now I'm going to
rename all of those. So now that you have them
in front of you here, now I'm going to
click on all of them, right-click and
create a flip book. And I'm going to call
it a B level up. Okay, now I'm going to
double-click this flip book and set the frames per
seconds to eight. And you can see it's
looking a weird. And this is, remember, you can maybe figure it out, but it's probably because
this have this material. So let's change the mask
material to the translucent one. So searching for translucent. So we have been using it
a couple of times now. Translucent, unlit
sprite material, you can see it looks
a lot better now. So let's close this effect down. And again, if you don't
see those materials, remember to go to the
settings and enable the developers content engine content and
plug-in content. If you're finished
with them, you can always away from them like this. So you don't see all of
these extra folders. Sometimes it's annoying to
see all of these folders. So I just click away and I
have it more clean like this. So I just show them
whenever I need them. So let's go back
to the player base and now we need to play
that level up effect. But this is a flip book and we can't really change the
characters flip books. So we have to change. You can't change the
characters flip book. So we have to add
another component here. So let's add a new component. And let's call it or just
search for flip book. So paper flip book. I'm going to call this one, maybe you level up
level of V effects. You're going to just call
it something like this. I'm going to attach it
to my sprite for now. For this flip book,
Let's change it to, Let's find our level up here. This is the love, love effect, so we have it here. And at first, we don't want
to show this all the time. So I'm going to actually
go down and invisible. I am going to remove
this visible here, so it's not visible in
the game to begin with. So what I want to do when I
level up is I wanted to take this and set visibility
to be visible. I'm going to connect this here. After it's visible. I'm then going to delay it by some time and then set
it to invisible again. I'm going to delay it by the
time of this flip books. I'm going to take this
and say flip book, and we can choose this one, flip book length and delay. And after we delayed, however long this
flip book is playing, we're going to set it
to invisible again. So take this visibility here and hook it
up with this one. Double-click to make a reroute. Now just to make it look better, then you can set the
visibility false here. We're hiding it again, whatever. We finished one loop
of this flip book. And I'm just not sure if this is actually going to
play from the start, so we are setting it to visible. But what if the what is this flip books actually playing in the middle when
we set it to visible? So I'm actually going to
remove this from here. And let's actually set
it through code here. So we're setting it to visible. And then let's take this flip
book and say Set flip book. Because we just want
to show it from the beginning whenever
we want to show it. And then we have to
choose which flip book. Let's not do it here. Let's
just drag it into this event. And instead of calling
new flip book, we can call it level
up the effects. And let me drag this up
just to make it cleaner, opening it up here instead, we have the VFX as
effects and the location. And making a reroute
node, actually, you can make a reroute
note from this one to make it look better, like this. And yeah, that looks good now. So we have this ad experience with effects and
we have to add it somewhere and we have to add it whenever the player levels up. So going up here to
the ad experience, we have to find where
the player levels up. And again, if you
remember the code, the player levels up. Here, we can just change it
here at the end of this code. This is the leveling of effect. And let's take this, actually take this
here and say MC, MC ad experience like this. And you can take this here and
make another reroute node. Or you actually, I'm going
to put it up here instead. There is no space down here. Just like that. Okay, so something
like this here. And now we have this ad
experience and we have to choose the visual effect
and the visual effect. You can just add it to the
structure if you want to. So let's go back
to the structure. Go-to player info added here. Call it level up as effects. And at the level of the effects, the effects or the V effects, I'm actually going
to put it up here. And this is just because
I want the sound effects to be together and the
visual effects if you have more to be together.
Let's change it. This V effects to a flip
book, paper flip book. And the sound effect
is a sound cue. And remember we already added
a level of sound effect. So compile and save everything. And let's go to the player here. Player info, and let's set the level up sound effect to be the same for all
players because we don't really have more
than one. So here. And the level of V effects, we can click here
and say level up. And we can choose the
one we just made. And now let's compile and save. And let's go and
actually choose it here. So let's take, we can actually break it here from
this player info. We already have it here. So let's break it. And let us hide everything
and just choose the level of its effects and the
level of the effects. Plug them in here. And then we have the location, which is the player's location. So take it here and say gets actor location. Just like that. And I don't believe we
are missing something. So I'm going to hide these unconnected pins
and compile and save. Okay, so now we have this
leveling sound effect and we can try to click on Play
and see what happens. So clicking on the play
button, playing us here. So now trying to level up to see if this is actually working. And I'm trying to go up
here to level up faster. So there are some bugs
with these animations. Later on we're going
to fix actually in the next lesson, I've found it. I can see I actually leveled up. And there were some effect play. So let's try again. Nice. So you can
see the effect is playing and the sound
effect is playing as well. You can see this
is the bug that I actually want to fix
in the next lesson. And now it's looking,
actually looking nice. And if you want the effect
to play on top of your head, remember, you can go
back to the player. And since you just
added it as an effect, you can just go ahead and click on this level,
level of VFX. And remember this is
just a flip book, you add it so you can just drag it up here above your head, announced going to
play above your head. And whenever you level up
is going to play up here. So save everything. This was it for now. Now let's actually
go ahead and fix the final bugs that I found
while I was playing the game. I was playing for
about half an hour and I was trying to find bugs. And I found two of them. So let's go ahead and fix those. And we're finished, almost
finished with this game.
105. Fixing the Final Bugs: Okay, so let's now fix the two books that
we have currently. So the first one is that if you're standing on the letter, you're able to attack and
we don't want to do that. So let's go to the player
a and player base. And what I've edit
inside of here. So in your attack logic, you just have to
add this Boolean. So right now we have, is that if you're
already attacking, we don't want to attack. If you're already dead, you don't want to attack. The one you need to add. Click on this plus
here and add this. So if you're already climbed being you don't want
to attack either. So very easy fix, we just have to check for this. The second thing is sometimes the enemies bonds in
the death animation. And this is because we
forgot to add walking mode. And let's go back
to the enemy base. So I was spending a lot of time trying to
restructure this code. So it can try to see
here and copy this. So in DNA damage, we have display controller
and I actually moved this health calculation
first before anything else. So try to disk and
I believe these were first like in front
of this healthier. But I think structurally it just makes more sense to
calculate the health first. And after you've
calculated the ****, you can set the
movements mode to none. I believe these
were the opposite. So this was here
and this was here. But I think it will just
make it look a bit better to set them working mode first before setting
the hidden state. The other thing is,
if for the logic, I found that it is better to use this AI controller
instead of, instead of get controller. And getting the AI controller, I found it's better to
use this AI controller, which we also did use here, and the move to
location or actor. So using this AI
controller and taking the brain component of this
and then stopping the logic. Okay, So we have this here. And then I'm going
over to the delay. I believe we had a
stop immediately. Stop immediately function here. You can delete this and we're actually going
to add this later on. So this is what it looks
like right now, very simple. And now we're delaying
it, just like before. We're asking if the
enemy is dead or not. If the enemy is not dead, it's going to go and set
this walking and run, right? I believe we did
that before as well. The move ai is the same, everything is the same. And then I have added
something new here. So if the enemy is dead, we are like instead
of restarting logic. So try to delete that
if you have that now. So if you have the
Get controller and start logic
or restart logic, you can remove that. And instead, I made a new, a new event here, I made one called restart behavior tree. I think this is a lot better
than restarting the logic. Because sometimes when
you restart the logic, you're actually
restarting this logic and not the behavior tree. And this is why I'm, I'm specifically going to
restart the behavior tree. I found that this
box a little bit. And the thing like
this will work perfectly if we
actually went here. And remember I talked before, you could destroy which
removes this actor completely. And if we did that, we
wouldn't have this problem. So this is just this
project specific. So only for this
project I'm doing, this will be a problem. But if you actually
destroy the actor, this will not be a problem. But this day I move two
will still be run somehow because they stop
logic and start logic just starts this logic
instead of the behavior tree. So I made this one called
restart behavior tree. And it is just a
function or events that actually made inside of the enemy base
interface function. So if you go to the
interface and enemy base, I made this one called
restart behavior tree. And I called it here
in the enemy base. And then I made a
line sided events. So running on owning client and reliable and then
calling it up here, of course the client one. So it runs down
here and down here. I'm stopping the
movement immediately. And then I am stopping
the logic just to be sure that the
logic has been stopped. And then I am taking my AI controller and going
to get a reference to my, to my AI controller. Actually made here. We made in the interface
ai controller, we made this called
Good AI controller ref. I'm getting that so I
can get a reference to my AI controller. And inside of here instead
of my AI controller, let me go back now to
enemy air controller. I made this one. So before we had this run
behavior tree up here. And instead of doing this, I'm actually making my custom
event called run AI tree. And when I begin play, I'm
just running this event here. And the reason why I
made this event is because I actually
want to run it as well at some other points. So not only in the begin play, but I want to run
it here as well. In my enemy base
whenever I start. Restarted their behavior tree. So I'm running this run AI tree. We just run this behavior
tree just like before. So this is what, what's
essentially happening whenever we are
restarting behavior tree. So I've edited up here, I'm running this
restart behavior tree whenever the player is dead. So if the enemy is chasing
us and the player dies, it will restart
the behavior tree. Okay, So if the enemy dice, we are adding the experience
just like before. We are setting desk to be true. And here, like Just before
we respond or anything, we are removing the
generate overlap events. Then we're fading the character. After that we have
the delay timer. We're laying some time. We're setting the health
back to the enemy. Then we are enabling the
generate overlap events. Then I've added this one, the set movement to walking
and to write before. This is why the enemy was spawning in the death animation. Because remember over
here in the beginning, we set these movement mode to none and the movement
state to hit. When the enemy dice. We've never said it back. So when the enemy dice and response just set it back to walking and the run right here. The enemy response. Remember to like, I
have also moved this. I've moved the
respond after this because I want to make sure that my generate overlap events are set to true
before I respond. Then I respond, and then I
asked her fate set to false. And then I've added this one called restart behavior tree. I believe that death
function was also here, so I deleted it. And the reason is
the death functions already run down here. So remember we had
this actor fade. And when the actor
fading is finished, and when it is set to
false meaning over here, when it's set to false, and when the actor
fading is finished, it's going to run this death. So it doesn't make sense to
have this death up here. So deleting that from here, and I just added this
restart behavior to read just to be sure
that it's working. And down here, I
also believe we had the run rights are walking mode actually
the working load. You can delete that
from here because now we're already having it up here. So we don't really need
to have it down here. And this is what it's looking like and
when it's finished. So when death is set to false, I'm also running restarting
the behavior tree just to be sure that
it's not bugging. Also, try to leave it out from the code and
see if it works. If nuts, to reconnect it again. This is what it looks
like right now. And if we play the game,
and let's try it out. So it's looking a lot
better now with the code, like nothing is bugging. I've tried to play
for 15 minutes. So I've just changed
the health for the enemy so I can kill
them a bit faster. But it looks like
everything is working now. They're not spawning
and stocking. They're not spawning with
their death animation. And we can think through
playing the game like so. Everything is working
correctly, as you can see. So awesome. And these were the
bugs for this. And if the enemies again, our clipping through each other, you can increase this separation between them as I
told you before, I did this here as well
because there were clipping. So I clicked on the
first one, said the E21, clicked on the second one
to 1.2, then the third one, so 14 and clicked on the
fourth one, answer to 1.6. So I can increase it by further. Like if you see them clipping, you can always increase them. But yeah, now everything is
fixed and hopefully let's actually test the ladder just before we end this. I
didn't not do that. So attacking on the letter
is not impossible either, only if I fall off the ladder. So you can see only when
I'm knocked off the letter, I'm actually able to attack. So standing on the
letter itself, I'm not able to attack, but if they knocked me off
and I tag, I can attack them. Alright, so this was it for this lesson and let's
save everything. And let's move on.
106. Creating the Floating Text UI: Hello everyone and
welcome to this section. In this section, I was thinking about creating name plates, but instead let's actually create a floating combat texts. I think it's more interesting at this point to create that. And I'll include the name plates in my future extra videos. For the floating combat text. It's just some texts. When you hit the enemy, that text will appear
and it will show you how much damage you
have done to the enemy, because right now the player
has no chance to see it. So it will fly up and tell
you how much damage you did. And if the enemy hits you, the enemy will show you how much damage it did
to you as a player. So let's start doing that. Let's start working with the UI. So going over to the UI folder, and here we can right-click and create a new user
Widget Blueprint. Let's create that here. And let's call it w
b and floating text. So this is the menu
I will be using. In here. This UI will be very simple. Let's again start with
the canvas panel. Always start with a canvas panel when you are creating UI. And inside of here, Let's search for an overlay actually averages quantile box. And I will show you
what I'm doing here. So horizontal box and the only thing we
need is an image in the horizontal box and a text inside of the
horizontal box. So it will just be some image
and this will be an icon, obviously this image here. And then some texts showing
you how much damage you have done all of the
enemy has done to you. For UI that where you don't
need the whole screen. For example, we only need
some floating text up here. Instead of going with screen, then you have to
change it to desired. Desired is just being
this part here so you can see the
canvas disappeared or actually it didn't disappear. It's still here, but it just resized itself to
this content here. So with the image,
let's click on the image and let's
actually import that. So again, in the course
material I've included for you in the UI and images, this sort and this blood icon. So let's take those, Let's
go to the UI images. And inside of here, Let's go and import these two. This is not pick slots, so we don't need
to right-click and apply vapor 2D settings. So now let's go back here and
click on this image here. Search for blood for example. Like this. And now I can see it's
not in the correct size. So clicking on this horizontal
box so I can resize things like this so it
displays more correctly. And clicking on
this one instead of filling horizontally
and vertically, Let's do in the middle. And for the size, I'm just doing a 44
around 44 pixels. So a lot smaller than before. And for the text, Let's
click on it and let's ride, for example, some damage. For example, I did
Two 135 damage. This will be again change dynamically depending
on your damage. Let's change the font to black. And I like to use
these very heavy fonts because when you are
in the playing area, I want the text to
be very visible. So choosing that and
aligning it to the middle. And also down here for
the justification, also aligning, aligning
it to the middle. Actually let's align
it to the left because it should be on the
left part of this image. So the longer this text will be, it will be this way. So that's actually correct.
Let's, let's just keep it here at the left for
the justification. And over here for this size, Let's try something like 30. So a little bit larger. And let's actually,
before we do anything, let's add a spacer
between these two. So let's search for a spacer at them between the
image and the text. And let's set the spacer to something like ten,
something like this. And for this one,
let's add an outline. So in the outline size, I'm going to put one. So we have a small outline. You can see here
this black color. Instead of being fully black, Let's actually just
make it a bit grayer. So just a slight effect. You can see the difference. This is the old one,
this is the new one. So a very, very
slight difference, not something very heavy. For the shadow. I'm actually going
to apply shadows. Well, let's apply 0.5 maybe. And if that is too much, we can always reduce it. So 0.5 and it will
apply shadows so we can actually see it more
clearly in the environment. And as for the color,
we can actually change it dynamically
so we don't really need to change
the color here. And now we have to align
the pivot point correctly. So instead of being aligned up here for the horizontal box, Let's go up to the top and
anchor it in the middle. And let us do the
alignment 0.5 to 0.5 and do the position
0 is 0. Just like that. Now it's aligned
fully in the middle. And maybe if you
didn't understand what this alignment
was, like, if you, if you have it back to 0, you can see it always lines
to this top left corner. So 0.5, we can see it aligns
in the middle to the x. And here it aligns in
the middle to the y. So you can see it
aligns to the middle. If you write 0.5 to 0.5, if you write one, you can
see it aligns this way, 0 or lines this way. So 0.5 is in the middle. And you can see we still
have some random space here. And this is because if you
click on the horizontal box, you can see the size is
not like the text here. So you can just click on
this size to content, and it will automatically size to whatever
you have in here. So if you have your
damage a lot higher, you can see the horizontal
box is going to automatically size
to that number. So that is a very cool
trick to size to contents. So now we have this
combat texts and it's ready clicking on
the horizontal box, you can see it's aligned in the middle and it looks
fully correct now.
107. Adding UI Animation: Let's now add some UI animation to make it a bit
more interesting. So we haven't worked
with animation before. And if you don't have this app, sometimes it's hiding
like this here. So you have an animation tab or we can find it
here in the window. Animations. You can find it here as
well if it's closed. But down here, you can
just click and drag and you can see this
animation tab appears. So we want to create an
animation for this year, and I want to move
the whole thing, both the icon and the text. So I'm going to click on
this horizontal box and let's actually change
the name of it for now. Let's call it HB
for horizontal box. And let's change it to floating
text so that they are. So now we have this. So
down here in the animation, you can click on this
button to add an animation. And let's call it
loading text animation. Now, you can click on this animation and then you
can click on Add Track. And then you have
to select what do you want to add animation to? And I want to like
you have to select the thing you have to
add the animation to. For example, I select this horizontal box
and I click here. And now I can click on this horizontal box to
make an animation for it. The thing is we want to do is first we just want to move it. So it's going like
when I hit an enemy, it's going to go from here. So here over time, for example, over 1 second, so the
text is going to fly up. So this is the main thing
we want to do right now. Here on the horizontal box, I can click on this Add drag. And I want to change
the transform. Transform. You can change the translation, which means whatever we
want to do right now. So changing the position of the text, that is translation. And you can change the rotation, the scale and this year. So let's start with
the translation. Let's click in here. So for the translation, I want to go from 0. And it's actually in
the opposite way. It's upwards, it's this way. It's in the minus. I want to go from 0 right now. I think after 1.5 seconds. So I want to make my whole
animation 1.5 seconds. So after 1.5 seconds, I'm going minus 150 in the y. So you can see
created your points. So you're going
from here to here, you can see how easy it
is to make UI animations. We did it like if you're
setting yourself doing it, you can do it in 15 seconds. So very easy, going
from 0 to minus 150. Okay, so that looks interesting, but I actually wanted
to do a bit more for the rotation right
now. It's fine. It's starts with 0,
but after a 2.5th, so 0.5, I want to do
five in the rotation. And then after 1 second, I want to go to 0, again. Clicking on 0 here, you can see it adds a new point. And if you ever need
to move these points, you can always click on the point and you can drag
it to somewhere else. If you want it to be
longer or smaller, you can always do that. So just like that, you can see if I
just remove this, if I click somewhere
else as well. Now you can see it flies up, it turns five degrees this way, and then it turns back. If you want it to turn more, you can always write
ten if you want to. You can see now it
turns out a lot more. But I just wanted to keep it
on file for now and we can always change it if it is
too small of a change. So I also think it will
be more interesting, like if the text comes into
our phase one, it appears. So after 0.3 seconds
clicking on the scale, I want to make it a size. So it starts with one here, and then it appears
to size of two. And then after 0.6, I actually want it to go
back again to one here. So when it's spawns, it does. This comes into our face, goes back again and goes up. Okay, so that is
looking interesting. But as the last effect, I actually think it
will also be more interesting if it
disappeared over time. Here at 1 second, I am going to now it's actually another
transform because it doesn't really have a
visibility function here. So clicking on the
track up here. And while I have it
here on 1 second, it isn't really important. You can always change
it if you haven't done this one and you need to
change it to 1 second. Again, you can just click
and drag these points. So having a tear on 1 second, I'm going to click on the track. And then the one
called render opacity. For this one, I'm
going to start with one. So that is correct. Then going to 1.5, I'm going to write 0, so it's going to disappear. Now we can see the animation. We're going from this. And then it's going to go up, and then it's going to
disappear slowly, like that. So very smooth animation. And you can always click
up here to play it. This is what it will look like. So very interesting
animation that you can do. And you can do
whatever you want. You can click on this
track and you can actually see what you can do
as well for this transform, you also have a shear animation and try to think of whatever animation
you're trying to do. And I think this is a
simple and cool animation that we will be working with. So this was it for
this animation and we can compile and
save, save everything. And let's move on
to the next one.
108. Floating Text UI Functionality: Now that we're finished with
the UI and the animation, Let's get started on
the functionality inside of here and
the Widget Blueprint. Let's now go to graph, and let's delete
these default events. Now, instead of
here, I am going to right-click and make
a new custom event. Let's call it update. Loading text. Updated floating text. Very, very simple. It's going to update our text. So clicking on this text, Let's actually change
the name first. Let's change it to
TXT loading text. And let's click
here is variable, else it will not
appear over here. And let us take this
text now and say that text like this. And now we can take this text here and drag it into
this function or events, because this event we will be calling elsewhere
to update the text. So instead of here,
I'm just going to call it floating text. We can also change the
color of the text. So when the enemy hits us, we can have a red color. When we hit the enemy, we can have a blue color. So we can also make
the color variable. So taking again this text, we can, if you just want, like if you don't know
what the function is called and you know
what you want to do. You want to change the color just to add color and
see what happens? And this is how you
find it the best way. So you can see here
we have something called setColor and opacity. So choosing that here. And now in the
color and opacity, you can drag from this
and make slate color. And now you can see you can
change the color of the text and you can also change it fits a foreground are
specified colour. This is the default. You don't have to touch this. You can actually
change the color here. So with that, we can actually just take the
specified color again, plug it into our event. We will be changing
it elsewhere. And let's just call it
floating text color. And the last thing we want to do is we want to change
this icon as well. So it's blood when we
are getting hit and it's that sort icon when
we are hitting the enemy. We also want to change
this dynamically. So let's first change again the name of it and
call it image, loading text and maybe
icon floating text icon. Let's compile and save, and let's go to graph. And instead of here,
Let's now drag it and say this one is
called Set brush. If you just search for
said brush from texture, and this is a
texture and this is why we say Set
brush from texture. So let's plug it in
and you can see you can find all of
your textures here. But we want to
change dynamically. So let's drag this
texture and do it here. And let's call it
floating text icon. And let me just organize
things a little bit better here so
you can double-click. Actually, you can
also just drag this one upwards here. I
think that it's better. And drag it here. Press on cue to
align everything. And I think this
is looking good. So this is what we have so far. That is the functionality. And remember, we want
to play our animation. So up here in the
Event Construct, you can write event construct and that is just
likely to begin play. Remember we use Begin Play
and our other blueprints. However, it is called Event Construct when you
are dealing with UI, this is the same thing. That's just like whenever you play the game and you
construct the UI. So over here what we want
to do is you can see our animation, floating
texts animation. This is what we created. Get that variable here. And the simplest thing we can just drag this and
say Play Animation. Now we're going to do
play the animation. We don't really need to do more. So that was that. Let's try this a
little bit down. So now we have the
functionality of this UI here. Now, with this functionality, we can actually call this
elsewhere and update the UI.
109. Creating the Floating Text Actor: Okay, so we have to create
a floating text actor now. So when you damage and
enemy or the enemy damages you and you want to
spawn this UI here. If you want to spawn
it to the world, remember you need
something to spawn it in. You can't just spawn some text
up here without anything. So we actually need an
actor and we need to spawn that actor whenever
the enemy is getting hit. And then we remove that actor whenever
the text has finished. So going to the blueprints
and inside of here we can right-click and we can
click on Blueprint class. And then we can just create a simple act or not a paper one. We actually want to
create a normal one here. I tried with the paper one
and it actually did not work. So we have to use a normal one. And doing that, let's
call it PP floating text. And let's click on it here. And what we want to do here, we don't want to add
anything to the viewport, but up here in the components, let's click here and
let's search for widgets. And you can see you have
something called widget here. And this is a 3D widget. So it's not like the UI
over here that we did. When you add a component
here you can see it actually also asset
to the viewport. It is a 3D Widget
and this is how you do things like showing
you I in the world. So I talked about
nameplate earlier. We will be doing those
in the extra lessons, but doing the name plates, that will be the same thing. Doing these 3D widgets
because we want to display them in the world and maybe they should
follow the character. So here we created a widget. And you can see to the
right in the widget, in the Details panel, you can change some settings. So firstly, you have to
choose the widget class. Looking here, you have to
select the one you just made. So the Widget Blueprint
floating text. And I can see it appears
here, the viewport. So let's compile and save. And instead of doing world, so if you choose space world, it will appear like
this in the world. Like a character
can actually rotate around this text
and see it in 3D. However, I just want
it to be screened. And what screen means is just, it will always be facing
us on the screen. I don't want it to
look like 3D text. Screen will be the correct one. And I'm going to say
draw a desired size. So however, we made it
in our Widget Blueprint, and that was it for this one. So this was actually
an easy one. So let's go to the Event Graph and add the functionality of it. So let's delete
these default ones. And for this one, I'm going to right-click and make
your custom event. I don't want to make a Blueprint Interface function just for this floating texts
because I don t think I need more stuff in here. So let's make this one
a custom event here, and let's call it
display floating text. And for this one, I am going to take this widget. Let's actually rename it. Let's rename it to
floating text widgets. So I'm going to take it here. And then we have to say
Get User, widget object. And now we have to cast it to past to whatever you are
you have chosen here. So the WB floating text, a cost to WB loading text
and then connect it here. And now we have access to
that Widget Blueprint, so you can call
anything from here. And remember the
thing we want to call from this Widget Blueprint, let me actually make
it larger here. The thing we want
to call from it is this update floating text. So here we can search for updates loading texts and you can call that
function from it. And just make sure that target
is this WP floating text. And this is all the things
you need to update. And now I'm just
going to drag it here again into this event because we will be
calling it elsewhere. Just like this. And this one actually I'm going
to run it as a multicast. So this is, remember
what I said before. A multicast can only run
through a server event. So you can imagine you will have a server event somewhere. So we will be creating
a server event later. So this is running now through the multicast and it will be displaying this information
to all of the players. And the reason why
I'm calling this in the multicast and
not in a rep notify. Again, this combat text
will appear and disappear. And for players that
have not connected yet or standing far away, this information will
be irrelevant because it will disappear
after 1.5 seconds. So it doesn't make sense to a rep notify because remember, Eric notify is something
that notifies all of the clients also when they
connect ten minutes later. So if you do it in a rep notify ten minutes later
when they connect, they will see all of this spamming combat text that will appear and disappear
after 1.5 seconds, even though it happened ten minutes ago. So
we don't want that. We saw a multicast will
only show it here and now fell for the other
connected players that are close to you. So playing this multicast, it will display this
floating texts. And remember, this is an actor. An actor when you spawn
it into the world, you have to remove it at some point because even
though you're playing this text here and this
animation disappears like this. Remember you spawned
an actor and this act, this point actor will
not disappear by itself. So we have to destroy
this actor at some point. So I'm actually going
to take this here and taking my floating animation. So I'm going to call this here. You have something called
get and time because I want to delete this actor after this animation
has been played. So I can get this time. So 1.5 second. I can actually get it like this, taking the animation, getting the enzyme which is 1.5 seconds. And I can now put a delay
and connected here. Now with this, I can
then destroy the actor. What that is doing is I'm
going to update my text and I'm telling it to wait for however long this animation is. So if you at some
point want to change this animation to five seconds, this is very cool because now it just changes automatically to five seconds because it's just getting the end time
of your animation. And we're delaying it. And then we're destroying this actor here because
we don't need it anymore. So that was it for this
floating text actor. And now let's
actually move on and do the larger
floating texts logic.
110. Floating Text Logic: Now let's work on the larger
uploading text logic. So what we want to do is display a floating text again
when the enemy, the enemy hits you and
when you hit the enemy. So depending on who
is hitting, who have, for example, if
you hit the enemy, I want the text to
be above the enemy. However, if the enemy hits you, I want the text to be above you. So we need to do it for
both the player base here. And we also need to do
it for the enemy base. And remember, we made a
parent for both of them. So remember here, the
character base is apparent for both the player
base and the enemy base. So we did that in the
start of this course. So let's actually code this inside of the
character base because then we can use it in both the enemy base
and the player base. And now you can see how
useful it is to make a parent for all of these items. So at a later point, if you want to make the
enemies drop items, and I also think
we will be doing that in the extra lessons. Just take a look at my course. Maybe I have already
made a lot of extra lessons at the time
you're watching this course. But for the items, again, we want to create, right-click
and create an actor. And then we want to
create an item base. And from the item-based, we want to create, for
example, quest item base. And from Quest item-based, I want to create quest items. So very, very good
practice to create a base blueprints
because then later on you can use them
to your advantage. So let's go to the
character-based and do the floating text. So let's open the full
blueprint editor. I'm going to delete all
of these default events. And here Let's start creating our display font
text custom event. So calling it display
floating text. And we can create it into a
Blueprint Interface function. But right now I actually don't know what variables we need. So let's just start
doing a customer. You can always switch it out. And let's go down here, make a new custom events and
run it through the server. Because remember in the
floating text here, you made a multicast. So we have to run it through the server and we
have to do it here. So running it on
the server here. And let me actually
give it a name. So server display loading text. For this one, we're going
to call it up here again. So we are used to this by now and I have not called
it something correctly. So Display, and let's try again, server display floating text. Okay, so here what
I want to do as a variable actually
want the actors. So if it is the enemy
or it is the player, because remember this
is a character base. So I have actually
no idea right now if it's the player or the
enemy getting damaged. So let me search for actor
in the variable here. Choose this one actor. And let's change the
name to damaged actor. So we need to get
who is damaged, is the player or
is it the enemy? Now we can right-click on this damage and promote
it to a variable. And let's just call
it damaged actor. Now we can set the
replication to replicate it. So the client can
also see this value. And we obviously have to drag this into this event as well, because this one will be calling
elsewhere at some point. So now we have this one
and I want to spawn my floating texts actor at the location where the
actor has been damaged. So let's take this
damage to actor. And actually the
thing we want to do, let's actually just create
it so you can see it. I think it will be
confusing if I start here. So the thing we want to
do is spawned this actor, so spawned the BP floating
text. Floating texts. So we are trying to spawn
this floating text. And down here you
have to select, try to adjust location, but always spawn just to make sure that it's
always spawning. And for this spawn transform, we have to drive from here
and say make transform. Now we're breaking it up to see both the location and
rotation and scale. And this is what
you're trying to do. We're trying now to spawn this floating text above
the damaged actor. So we're trying to take this damaged actor and
say get actors location. Because remember
this is an actor. So getting the actors location, we can just plug
it in like this. However, I want to spawn it a
little bit above the actor. I don't want to spawn it in
the middle of the actor. So I'm actually going to say
break and break this vector. So I can see the X, Y, and Z. I'm actually doing
the same here. I'm taking this and
saying make vector. And now the x is the same, the y is the same.
It's only the z. So up here, if you
want the text to be a little bit upwards,
it's the z-axis. So I'm taking this
z-axis and I'm saying plus maybe 30 or
something like that. You have to test that out and then you'll be plugging
it in like this. So the x is the same,
the y is the same. And I'm just adjusting
the z value to be a bit above the actor. Let's drag this up and organize
this a little bit better. So now responding this floating
text at this location, so the rotation is the same, so zeros is 0 and the scale is the same here we don't
need to touch that. Now, here we can promote this to a variable and we can
call it floating text. So now this is the actor that we spawn whenever
we hit the enemy. Okay, So from this actor, remember you made
this multicast and now you actually have a
reference to this actor. You can drag from here and say display floating text,
display loading text. And it's not from
the character base, it's just called
function up here. And make sure the target is BP floating texts to make
sure it comes from here. Now you can actually
update this text. So very cool. You can call this event, it goes through here, and then you can actually
update this floating texts. However, remember, I told you before that we will be
changing the colors. So for example, if
the player hits us or the player hits the enemy, the enemy, or it will
display a blue color here. However, if the enemy hits us, it will display a red color. So we can't fully do it like
this because we actually don't know if this damaged
actor is a player or not. So what you can do, you can either take this
damaged actor and say actor has tagged Player or
actor has tagged enemy. Because we all, we already
know what actor has tag is. We used it before. However, I think later on, if it was a like a real game, another course maybe
you have tons of maps, tons of damage characters, and you actually
need more variables than just player and enemy. You can actually
create an enumeration over here that will
be a lot better, a lot more dynamic, and then lot easier for you. So let's actually do
that in the next lesson.
111. Floating Text Enumeration: So for this enumeration, Let's right-click and let's create a blueprint enumeration. Let's call it a
floating text type. Inside of this floating
text type enumeration, Let's add two things. Let's add here, call
it layer damage. And let's call it down
here, enemy damage. So it can be either layer damage or it can be enemy damage. Now we can take this
enumeration and go back to the player base or
character-based here. And now let me delete this
floating texts for now. So before I call this now let's actually add
it to this event. Let's add this enumeration. And it was called E floating
text type selected here. And again call it
floating text type. For this enumeration,
Let's drag and say switch. Remember we already used
that a couple of times. Now, switch on enumeration
so we can check whether it is enemy damage or player
damage that has been applied. So if it is player
damage, remember, it will be spawned above the enemy because
the player damage, you damaged the enemy. The damage will spawn
above the enemy. So I'm going to take this
damaged actor and we can say get enemy reference because we want to get this actor now. We want to spawn it
above the enemy. Now. You can do it like this. And for the, for
the enemy damage, you can try to think what we can do and maybe you
guessed it already. Let's take this damaged actor. And now let's say
Get Player Reference because we want to spawn
it at where the player is. So if the enemy
damages the player, we want to spawn the
damage above the player. The players reference. And from here, we can now take this floating text and we
can drag and say again, display loading text and
we can call this function. Now we can add it up here. Let's copy paste it down here. And you can drag it
again to the targets. And let's drag it a bit down so we have more space to work with. Just like that. And if you want to, you can
double-click to do make, reroute node and make
it look a little bit leaner. Something like this. Okay, so now we can
update this text depending on if it
is a player or not. And let me drag this so I can actually see
what's going on. And now we can drag
this and all of the logic that will be updating these two
will be between here. So first off, for
the floating text, it will be the amount of damage. So this is the player damage. We need to show it how much
damage the player has done. So now in the enemy, remember we already have
this, any damage events. So let's go to the
enemy, enemy base. And inside of the enemy base we already have this
any damage event. So from this any damage event, we already know how much
damage the player has done. So let's right-click
on this one and promoted to a variable
so we can use it. And let's just call it
player damage amounts. Let us connected and
remember to replicate it. So the client can
also see this value. We have to do the
same thing later on. So let's do this same
thing for the player here. So for the player, when the
enemy damages the player, we also need to do here right-click promoted
to a variable, and let's call it
enemy damage amounts. Okay, So we are promoting those who are
variable because we actually want to use them. So replicate this one as well. Remember to do that. Now, let's go back
to the player base. So how much did the player
damaged this enemy? Then we can take
this from the enemy and say player damage amounts. And now we can just connect
it here and it's going to convert your float into a text. We can do the same
thing down here. We can say enemy
damage them out. And we can again plug it in. And it will now display how much damage the enemy
has done to the player. Now, as for the
floating texts color, you can click on here. So I'll make it
blue for when the, when the player hits the enemy. So this is the Blair damage and it will be
displayed as blue. So sliding this up there and just choosing
something random. And for the saturation, I'm actually going to write 0.5. I don't want it to be too
blue. So clicking OK. And for this one, you can try to do the same. So just to choosing a red color, maybe more pinkish like this. And then setting
the saturation to 0.5 like that and clicking OK. So Now for the floating icon, so when the player
damages the enemy, I want to show the sword here. So searching for sore, you can choose this,
however, for the enemies. So when the enemy
damages the player, I want to search
for this lot icon. So now we have, it's
being dynamic here. Alright, so now we are
finished with this logic here. This was the hardest
one actually. So now we have this full logic. So we have to call
this event somewhere. And we will actually be doing a floating texts
library function because that will
be easier to call. Remember we already did
something inside of that library and we have
to call this event. And it's going to go
through the server. It's going to take
this damaged actor. So this time is actor we will
be plugging in later on. And it will take this
actor, take the location, spawn the floating
text actor above the enemy or the player
depending on who got damaged. And then if it is blurred image, so we have to set that
as well later on. If it is player damage, it's going to take the enemy and show the
player damage amount. And also display this floating text
through the multicast. And if the damage
is enemy damage, it's going to go and take the TSP layer because this
is the damaged actor, it's the enemies
damaging the player. And it's going to take
this enemy damage amount and it's going to throw
it into this multicast. Multicast is going to run here. It's going to take this Widget Blueprint and
it's going to update. So let's go back to
our widget blueprints. It's going to go
this event here, going to update the
text, the color of it, and also the icon of the text. And after updating those things, it's going to wait until
this animation has finished. And then it's going
to destroy this actor because we don't want
to keep spawning it l. So the game will at
some point a lag because you don't
remove your actors. So now all of this has finished. Let's actually move on and let's continue and actually finish it. So here is the event
we want to call it.
112. Floating Text Library Function: Alright, so we're almost finished with the
floating texts. So now let's go
to the libraries. We already made one and go
to the function library. And inside of here, Let's
add a new function, and let's now call it
display floating text. And the reason why I'm
actually creating it inside of here is because
this floating text, maybe we need it in many, many actors and I don't want to make it in every
single actor. So again, a good thing to use a library for
is when you want to call a function in many
actors, blueprint actors. So display floating texts. I can imagine even though I
haven't created my gainfully, I can imagine I'll be
using this in a lot of actors and this is why I'm
reading it inside of here. The floating text, again, it needs the input of an actor because we need the damaged
actor we created before. And we need the
floating text type. And this is the enumeration. So let's first select
the actor variable. And then let's select
the floating texts. This one the enumeration
floating text type. Now from this damaged actor, we have to call the event from the player or the
character, character base. We have to call this one. Let me actually turn it into a Blueprint Interface function. So let's go to the interfaces and we don't have one right now. So let's right-click and
Blueprint Interface. Now let's call it
character base. And inside of here, let's say we need to have this one called gets
character reference. And this one is going
to have an output of character base selected here. And let's call it character,
Compile and Save. And now let's go back
to the character base, go to the Class Settings and Add your Blueprint Interface
inside of here, character base,
Compile and Save. Remember to compile
in here as well, so else this will
not appear for you. So clicking on it here. And for this one we're
just going to say self. So we have done this a
couple of times now. So with this we have now
we can get a reference. So in the library we
can actually drag this and then refer
instead of casting, we can now say gets
character reference. And from here we can
call this event called. Let's go back here,
display floating text. Now actually we also need
this one inside of it, and I'm going to delete this. We actually can do it now inside of this
Blueprint Interface, I'm going to delete it and
call it display loading text. So compounds save here and
here we can search for search. We can create new one called
Display, floating text. And actually before I finish it, sometimes it pokes out. So let me first create
my inputs here. Actor or damaged actor, rather so damaged actor. And the second one was
floating text type. And let's find the enumeration. And then find the damaged actor, which is just an actor. Just like that up there. Just play floating text, just like this,
Compile and Save. Now in the character-based,
you can right-click and say display floating text, and you can select it here. And now it's a Blueprint
Interface function. You can connect them. This now in the library, you can now call this
display floating texts. Okay? All right, Good From here and
say display floating text. And it is a message because it's a Blueprint Interface
Event here. So damaged actor, it
is just this one. So I'm going to click here
and make a reroute node. Actually not make a reroute. Notice it looks a bit weird. So just doing this. And for the floating text, I'm just going to do this. This is simply what
it's going to do. Now the last thing, we can
now use this function, we actually are finished. We can use this library
function to call it elsewhere. So now let's go to the enemy. The enemy. Here. When the enemy gets damaged, we want to spawn the
actor above the enemies. So here, whenever the
enemies getting damaged, you can now say, you can right-click and say whatever you called it
inside of the library. So going to the library and you called it display floating text. So you can right-click
here and say display floating text. And you can see it's here from the function library that
display floating text. Now, you have to connect
it here and you have to specify what is
the damaged actor. It is self, it is the enemy. And what is the floating text? It is, it's actually
player damage. So that is correct
actually right now. Let's copy this here. Let's go back to the
player base now. And for the player, if
the player is getting damaged here, Let's paste it. And who is the damaged actor? It is the player self. What is the type of Damage, it is NME damage. So now it's going to actually play it and I
will show it for you. So let's click on Play for
now and see what happens. So I'm actually going to
play as the server here, as a listen server.
As the server. Now, you can see
when I get damaged is actually getting displayed
when I hit the enemy. It's going to show
that damage here. So very cool. However, if I play as the
client and I get hit here, you can see nothing is
displaying and this was what we will be talking
about in the next lesson. So for this client, I'm not going to worry
about it for now. But for this player here, you can see the client damages
showing on the server. But if you go to the client, it's actually not showing
anything on the server. You can see that it's now
displaying correctly. And let me actually show you
what's happening right now. So Wendy, now we're
inside of the players. So when the player gets damaged, we're calling this function
here from the library. So we're specifying who
is the damaged actor is, it's the player itself. And this is enemy damage
that is happening. Now it's going to go to
the function library, and it's going to
go through and call this display flowing texts
from the character base. Character base. Now
calling this event here, going through the server, the server's going to
set this variable and we're trying to find this
damaged actors location, responding this text in
the actress location. And when respond
to text, we check, is it clear damage or
is it enemy damage? If it is pleasure damage? We're going to do this here. Call this multicast from
the BP floating text. And we're setting
it depending on if it is enemy damage
or player damage, the colors and the icons. So this event is from the BP floating
text, which is here. Now it's going to continue
with this multicast. Passing it to all players is taking this Widget Blueprint. And then it's going
to go through and update the floating
text in that widget, which is over here. And now displaying that widget, It's going to set
for this event here. It's going to set the text and the color of the text
and setting the brush. And after it does that, it's going to wait until this, this animation
here that we made. So it's going to wait until
this animation has been finished before it
destroys the actor. Because if you do that before, it will never show the texts because it will
destroy it quickly. So this is what's happening. You can see it's a lot of steps, but once you get
really good at it, this is actually
very easy to do. So going through the
function library, going through the
character-based, the character-based going
through the server, running the multicast here. And after the multicast, you're actually updating
this text here. Okay, so we're finished
with the combat text. And the reason why the client
is not receiving all of this is very easy and it will probably take one
minute to explain. So let's actually do
that in the next lesson.
113. Actor Replication: Okay, So why is that? The client can not
see this damage here. So when I get damaged, I can see it as the server
and I damage the enemy. I can also see it, however, if I am the client, so if I actually open
up the client here, so as the client, I can actually not see
this damage here. Why is that? And this is because
of actor replication. So, so far we have
replicated that variables and we have
replicated events, but we have not replicated
blueprint actors. So let's go to the floating
text here, Vp floating text. Let me click on the class defaults for
this floating texts actor. And you can click on this
one called replicates. This is what you're missing. So clicking here and going to
the floating texts as well, the widget During
down to the bottom. And you have to click on this one called
component replicates. Remember we are in multiplayer. So click on Play. Now at
clicking play as the client, you can now see the client
can see it as well. And this was the only
change that was wrong. So just these two check marks. And maybe right
now you're asking, why did we not do
this before? Why? Why do we have to do it now? Like why did all of this work? Without us clicking here? And this is because the character
we've been working with is replicated by default
in Unreal Engine five. So clicking on this player, you can see are actually
the character-based. So clicking on the
character base, you can see here in
the class default for the character base, this replicates is
already checked for you. So the characters inside of Unreal Engine are
replicated by default. And this is why you didn't
have the need to do it. If you remove it, you will see a lot of bugs in your game. But this comes at
checked by default. And the actors are not
replicated by default. So if you create
an app after that, everyone should see you actually have to remember to replicate. For example, if you're
creating weapons. So for example, in a 3D game
or in a 2D game, if your, if your enemies
dropping weapons or the player is wrapping
weapons to the other player, that weapon actor has to be replicated else the client cannot see that dropped weapon. So after replication, just
like when we replicate it, all of these variables we
did in the other blueprints, remember to replicate
the actor as well. If you need a whole,
the players to see it.
114. Cleaning Up the Project: Now that we're finished
with the game, let's actually go ahead
and clean up the project. So remember to check my
extra lessons section. I will still keep
updating this course. For example, I will
add nameplate to drop the items you
can lose those items, for example, health potions, health bars above this enemies. We will also add stats so
we can get more strength or more health and updates and maybe quest the
requesting system. So a lot more things, maybe even 200 plus
videos that we are able to do if we
didn't start from here. But this should give
you a good base of how to create a multiplayer
2D platformer. So we learned how to
create all of this, like importing the assets and applying paper to these
settings to them. Creating paper flip
books, sprites, actors, and importing them to the level of
creating tile maps. And we've included
a letter system and attack system and a lot of things that we could
read in this course. And in the extra
lessons session, I will be adding more stuff. Again, like the health bars, the RPG stats system, maybe a questing system. So a lot of things we can
still add to this project. But now before we ended, let me actually go ahead
and clean up the project because I don't like to
just leave it like this. So let's go to the player base, for example, we can start with the player
base are actually, let's start from here. So for the assets, we don't really need to clean everything. Everything is actually
cleaned up already. And let's go to the audio
that is good as well. Let's go to blueprints now this is where the cleanup
is mostly ads. So let's start with
this BP camera. And for this one we don't
really have anything. So let's close it down. And the character base, we don't have much here either. Just check here. If, if everything is
sorted out and you like how you did things or you need to add, rewrote nodes. So for example, I just
like to be structures. Sometimes I'm just taking this reroute nodes
and moving them. Also remember to select all of it and click
on C to add comments. And you can call
this floating texts, for example, just, you can do
this a lot better than me. I'm just doing it
quickly for this course, so just doesn't take forever. But try to write a long text here
explaining what you did. Because if you're going back to this project
six months later, you will not be able to
remember what this is. So trying to write, maybe floating texts for the damaged actor and blah,
blah, blah, whatever. You can see, you have
a lot of space here. If you want, you can change
again the comments color. You can change the
size of this text so you can make it
larger if you want to compile and save. And now you can go to
the floating text. Here. I think everything
is looking good. And I'll just let it
be like this year. They're going to get mowed
region really do much here. And in the player controller you can actually clean
this up a little bit because we didn't have or
we didn't comment anything. So here, for example,
we can select this and say initializing widgets. I usually also do on
here and say begin play because then I know
where my beginning play is. If I have a lot of code, Xia Lai, initializing widgets. Okay, so now we have those down. Now. Let's take this. Now we're selecting
the character here, and these are together. So let's take all
of this and I'm going to call a selecting and spawning the layered character. Just like that. And
we can go down here, this is updating the
Health Bar and experience. And let me just select
this and say updating the health and experienced bars. If you want to, actually this is looking good,
but if you want, so sometimes you can
always drag this and put it here on the side instead. So we have it more
compact together, but I don't think
this fits together. Selecting a spawning,
I'd just like to put things that fit
together here on the sides. So I'm just going to
drag it down here again. Now, if you want to again, you can click on the
variables and give them a category if I
can find it here. So this one you can call widget, for example, Widget, Blueprint
or something like that. So just a category and
doing the same thing here, Widget Blueprint and
they're going to be in their own over here. So try to do that with
all of your projects. For example, the biggest one
is probably the player base. I am going to clean
this up on my own. So I'm not really
going to add anything. I'm just going to drag things. For example, clicking on here, clicking Hide unconnected pins, and then taking a look here and maybe I'm unsatisfied with this, I'll drag this down. So try to clean up your
project as best as you can. Try to comment everything and put them together
where they fit. Because right now you can
see it's a bit of a mess. So you have to
comment everything. And in the next lesson, I'm
actually going to show you very useful resources that I'm using for my own
personal project.
115. Useful Resources: In this lesson, I'm actually
going to show you some of the useful resources I'm using
for my personal projects. I just created this for fun. Created this project here. Or you can loot items and you can have an inventory system. So a lot of things
that you can do, you have a leveling
system like we did. And you have coins and you
can go to the shop over here. And inside of the sharp,
you can actually buy stuff. So for this project, you can see for this code, again, I'm using
the same methods. So going to the player, the player base, I'm actually going to show
you my player base. So this is the player base
so far for this game. And I'm just going to show you resources that will actually help you while you're coding. So we can see the
lines are like this. I actually liked those
lines a lot better than, than here in our project where
we have these curvy lines. I actually like using this
plug-in where the lines become robotic or wherever
it's called, like this. You can find it in
the marketplace. So going to the marketplace
and inside of here, you can search for
electronic notes. I believe it's called
the electronic notes. And let's see if we
can find it here. Maybe I just searched
for electronic notes. And this is actually the one. So clicking on this
electronic notes, this is actually the
one I'm using and you can see a lot of pupil
actually using a two. This is the one and you
can see you can choose different styles for
your blueprints. So you have different styles. You can actually have darker
notes if you want to. But this is the one
I'm using and it makes my lines here electronic. And I think this is a
lot easier to sort. So I think this will make everything look a
bit better to look at, an easier to look at actually. And you can see here
I don't even need to create reroute nodes. This will do it automatically
for me in our project, but the normal curvy lines, I'll have to create
reroute notes for this. But I don't really
need to create reroute notes for this because
you can see when I drag, it automatically
does this for me. So very cool assets that you
can use in the marketplace. Very cool stuff they
have been doing. So I'm using this. The second thing is the one
I'm using is this one called, Let's see, or it is
auto size comments. So this auto size comments
is very cool to use as well. It auto sizes the comments
to the notes that you have. So you can see here, I
have these nodes here, and if I drag something, you can see it all the sizes. My comment depending on
where I'm dragging this. And if I do something, for example, I can
print a string here. You can see it automatically includes it inside
of the comment. So very cool stuff. And this is also like you
can customize the comments. So if I write something here, let's write a couple of prints strings inside
of this project. And when I click on see, now I've customized it. So when I click and
see, you can see it has a lot more space on the top
and the bottom and the sides. I actually did that manually. And the comment is
written in the middle. And also I customize the size automatically to 28, like this. So you can see very cool. And also for the common color, you can automatically
choose what colors. So for example, for
this project I'm using blue if it's
client-side, it, I'm using red if it is
running through the server and paying if it's running both the server and the clients, for example, a multicast. So you can see
here, for example, a running through
the client as well, running through the server. It will be red and throwing
through the client again, it will be here
through the blue one. So all the sides comments, very cool to use for
your project as well, just to make it more organized. And yeah, I don't
really use much more. I usually just use these two. You can also use the one
called Auto Note arranger. I think it was a bit
like I didn't like it, so actually I'm not using it. But a lot of people I think
are using it as well, actually not a lot,
actually a couple of them. But I think it's arranged my notes and nuts
as I wanted to, I'm actually not using that. And the last thing, even though this is a 2D course, the last thing I
want to show you here, ultra dynamic sky. So if you're planning
on creating a 3D game, this one is a lifesaver and you can see a lot of
people are actually using it and it will create dynamic is guys
for your project. Again, you can check
my page, my courses, I am doing 3D projects as well, 3D courses and the blueprints you have been using here in 2D. So the good thing about creating 2D games in Unreal
Engine is that now you're a lot better at
using blueprints than before. So now, these methods that you have been learning
here in a 2D game, you can actually be using them inside of a 3D game as well. So even though all of these blueprints are done
now inside of a 2D game, It's not really much
different in a 3D game. So now that you have had your
practice in this 2D course, you can actually use
what you've learned as well in our 3D courses. So this is the good thing about using Unreal Engine
and blueprints. All of the code is
naturally going to waste if you all of a sudden wants
to switch to 3D games, because a timeline is a timeline and it is used for
the same thing in 3D, as well as custom events and getting the
actress location. We have to do that
in 3D as well. So all of this is actually
the same in a 3D game.
116. Future Course Updates: Now we are finished
with the course. I hope you've had a lot of fun. I've had a lot of fun
creating this one. Again, if you want to extend
this course yourself, if you want to add more enemies, you can go to this website. This is where I got it from. Maple stood IN and you can just create more monsters here. You can create mobs,
you can create paths, characters, and it can
actually create more monsters. So you can see we added those animals and
now we did it so dynamically that you
can actually just go to the enemy and right-click
and create a new enemy. And it will be added
automatically. Just remember to click
on the enemy and also the animal interval here, all the animations, the health and the name and
experience and so on. And also remember to of course, add a drag and add the
enemy to this level. So even though we are
finished with this course, I will be doing future
updates for this course. I will be adding a
lot of more things, a lot of RPGs things. For example, we'll be adding
Health Bar says that system, maybe a skill system as well. We'll be adding a quest system. So a lot of other systems that we can still
add to this game. So I will keep
updating this course. And if you want a remember, you can go to my page here and take a look at
my other courses. I am trying to release one every month or every one
month and a half. Take a look at my other courses. And remember, you can
always go to my Discord and write to me if you
have a wish for a course you want to see, or if you need help with this course or any
other courses, you can go to my
discourse and we can have a chat or you can write with all of the other people that are actually
taking this course. You can write with them
in the Discord servers. So a very nice community that
we have inside of there. Also remember that I
have a YouTube channel, so you can also go to my
YouTube channel if you want to watch three videos
regarding this subject. So I'm also very active. They're adding
videos frequently, so go to my YouTube
as well and see if there's something that
will get your interests. So with that said, thank
you for everything. Thank you for supporting
me and I hope you've had a lot of fun and I'll
see you in the next course.
 Pixel Helmet, Game Developer & Publisher