Transcripts
1. 1.01 Introduction: In this course, we're
going to learn how to use Unreal Engine
five by designing a realistic game ready
environment from scratch using
Quicksort mega scans, this course will
cover how to use and navigate around in
Unreal Engine five, how to set up your
first project? How to use quicksort
omega scans to create realistic, game
ready environments, but textures and materials are and how to work with
them in Unreal Engine five out to design a level using all the tools in
Unreal Engine five, how to do lighting the
correct way out to optimize your
environment so it's ready to be used in games. How to add audio to
your environment, how to create
cinematic presentation of your environment
for your portfolio. And finally, we are going
to learn how to use the programming language called blueprints within
Unreal Engine five. At the end of this course, you'll be able to confidently create your own game
ready environment and Unreal Engine five
to implement in your current or future in projects, I designed this course
for anyone who is interested in creating games
in Unreal Engine five, using the best and
up-to-date practices that will live up to the current
game industry standards. I hope you'll join
me in this course. And remember that
I'm always here to support you
throughout the course, and I hope to see you soon.
2. 1.02 Downloading Unreal Engine 5: The download Unreal Engine five, you have to go to
Epic games.com. So write that in your
Internet browser. And to the top right there is a blue button called download. So click on that Download button and it will install the
Epic Games launcher. Now, click on it and
installed the launcher. And I've already
installed the launcher, so I'll be back with you
whenever you have installed it. Once you have installed
the Epic Games launcher, go ahead and run it and
you'll see this login page. So you will go ahead and login with whatever
account you have. But for me, I have an
Epic Games account. If you want to create one, you can sign up here. It's for free. So I'm going to sign in
with my Epic Games account. And once you have signed
into Epic Games account to go ahead and click on
the Unreal Engine tab. And inside of here, you will probably start
in the new section. You will need to go
ahead and click on the Library tab up here. Now, here you can install
Unreal Engine five. So you can see here it
says Engine versions. And down here you can see
my previous projects, this will be empty for you if you haven't done
anything here. And down here, you can see
all the Marketplace items I have bought or downloaded
up here to install it. Unreal Engine, you can
click on the plus here. And when you click
on the Plus button, you see this gray box and
clicking on the number up here, you can select what version of Unreal Engine you
want to install. So for me, I have already
installed Unreal Engine 5.2. If you have a later
version that is okay, go ahead and install the
newest version that you have. You can still follow
along with this course. But go ahead and
click on the Plus, select the version
you want to install. And then just go
ahead and click and uninstall and
install the engine.
3. 1.03 Creating the Project: To create a new project, let's go ahead and
launch the engine. Now when you launch the engine, this window will
appear so you can see your recent projects that
you have created before. And this, of course, will be empty if you haven't worked with Unreal
Engine before. So what you want to do
is we want to go down here in the Games tab because
we're creating a game, you can see, you can also
create videos and Architecture, Automotive and so
on, Unreal Engine. So it's not only
games, but for us. Let's go over to the Games tab. And here you can select between different
templates. So e.g. if you want to create a
first-person shooter, you can create this
first-person template and this third person template for third person
games and so on. So you can see you have
different templates you can create as a starting
point in the engine. However, what I like to do is I like to create
everything from scratch because I want to
teach you everything and how you can build a
project from nothing. This is why I like to start
with a blank project. And all of these templates
that you can see here, you can actually
create them yourself from a blank project if you
know what you're doing. So since I like to teach you everything and I want
you to know everything, I want to start from
a blank project. And over here we have to select
the programming language. Doesn't matter right now, just select Blueprint and
the target platform is desktop there quality
preset is set to maximum. And as for the startup content, it just gives you some
starting content, e.g. sound effects, visual
effects, and so on. For now, I'm just
going to take it off so we don't
have anything here. And down here you have to select where you want
to save the project. If you click on this folder and then you have to
give it a name, e.g. I'm just going to
call mine beginner. And let's go ahead and
create the project. Okay, here we are
inside of the project. And before we do anything, let's move on to
the next lesson.
4. 2.01 Viewport & Navigation: Alright, so before we start with the fun parts in the engine, let's take a look at how
Unreal Engine is built up so we can understand what
we're doing inside of here. And to begin with,
let's take a look at the viewport and how we can
navigate around inside of it. What you see here in the middle, this window here, this
is called the viewport. And the viewport is where
you see your game visually. So right now, you
can see in my level, I have this landscape. And to look around, you can hold your
right mouse button. And holding your
right mouse button and moving your
mouse, you can see, you can look around inside of that landscape while you are holding your right mouse button, you can click on W
to move forward. So you can see now
moving forward. Now if you want to move faster, you can click on this camera icon up here,
increase the speed. And now when I hold, right-click on my mouse and
click on W on my keyboard. I can move around faster
inside of this landscape. You can hold, again, the right mouse button click
on S to move backward. Like on D to move to the right and click on a to
move to the left. So this is the main, the main way I navigate around the inside
of the viewport. I just hold the right mouse
button and then click on W, D, S and a. What you can do also
is you can hold the right mouse button and
click on cue to move down, and click on e to move up. And you can also hold the right mouse button and the left mouse button
at the same time. And you can move
around just like this. Usually I never use all of this. I just hold the
right mouse button again and just click on W. He SNA and I just navigate around the viewport
just like this. But it's always nice to know
how you can move around. Sometimes on my laptop, what I usually do is I hold the left-click and holding the left-click and
moving the mouse, you can move like this. Sometimes I do that on my laptop when I don't have a mouse, but usually I never use it. And this is actually
it for the navigation. So the last thing
you can, of course, use your mouse wheel to
zoom in and zoom out. You can see I can
move it anywhere, chiming in with my mouse wheel. And I can also zoom out as well. Alright, so here inside
of the viewport, right now we have a landscape. This is the starting level. This is what it will show
you in Unreal Engine five. And up here we have
some different buttons. So if we click up
here, you can e.g. show your frames per second and see how fast your
game is running. Right now in Unreal Engine, 120 FPS is the maximum, so you can't get above that unless you package the
game and release it. So showing their face, you can click it again
to remove the FPS. And very, very important, we have something called Game
View and immersive mode. So game view, if
you click on it, it actually removes
all the icons. You can see here, I have
this pivot point right now. And this is because I've
selected the move tool. So if I have, let me actually go close
here so you can see these icons and I can click up here and click on the game view. It removes all the icons. The game view is simply
removes all the icons so I can visualize my game
without any icons. And the shortcut for the game
view, you can see it here. It's G. So if you click on G, you can show the icons. If you click on G Again, it can hide the icons. And again, the reason for this is sometimes you
actually want to see your game without any icons to see what it truly looks like. And this is why it's so nice to press G to remove the icon, see the level as G again, to show them again if you
want to continue your work. So down here we have
the immersive mode, and this is simply making
this window full screen. So clicking on this here, you can see now my
screen is full screen, and if I click on G, Now it is in the game view. And now I can see what
my level truly looks like in full screen
without any icons. And if I want to show the icons again,
remember click on G, click on F 11 to remove
the immersive mode, because here the shortcut
for immersive mode is of 11. So FL1 to enter the
immersive mode, and F11 again to get out
of the immersive mode, the last important button here, if you want to take a screenshot and show your friend what
you have been doing. You can click on this one
high resolution screenshot and you can just point your
view at something e.g. I want to show my
friend this part here. And I can click on capture. And it will take a
screenshot of this, which you can send
to your friend. Next we have the
different view modes. So right now we are in
the perspective view. If you click on it, you can see you have orthographic views, so you can view the
game from the top view. If I click on the top view, this is what it looks like. And if I zoom out
with my mouse wheel, now I have zoomed out. This is actually the
landscape from the top view. Doesn't look of
much because this is just a landscape
without any items, so it looks a bit flat. So what I usually use these
views for is if I want to place something very specific
inside of the level, e.g. if I go to the perspective mode, let's say I wanted
to place an item specifically here and I
want it to be precise. So the way I do this is
I go to the top view. I place it here,
whatever I want. Right now it's difficult to
see what this landscape, because everything
looks the same. And if I go to the
right view, e.g. you can see this is the
landscape from the right view. You can see you can
use this to place items precisely
somewhere in the level. Else. I usually
don't use this only when I need to place
something precisely. Alright, let's go back
to the perspective view. And here we have different
view modes as well. We have the Lit mode. Right now we can see
the game with lighting. We can also see the
game without lighting if you click on the
unlit mode here. And this is what it looks
like without any lighting. If you click on it again, you
can see it with wireframes. So the triangles
of the 3D models, and we can also switch
to detail lighting. We can switch to
lighting only and so on. So you have different view
modes that you can use. Later on, we will
be using lumen, which is the new lighting
system and Unreal Engine. We will also be using
optimization view modes to see what the game looks like and how we can
optimize the game. But for now, let's go
back to the Lit mode. And here this button, you can show and hide
different things, e.g. you can show the
collision and the level. You can click on it
again to hide it. You can show the navigation. We don't really have
navigation right now, but you can show and hide things inside of your level
if you wish to. Over here to the
right, you have very, very important tools that
you'll be using all the time. So the first one is
the select tool, and this one allows
you to select the items inside of
your level, e.g. just as a test, let's click on this button here. Let's click on shapes and
then select this cube. So we're just going to
use this as an example. And now you can see I
can select this cube, but this select tool, I can also select my
landscape parts here, select this cube again. And what I can do is
also switch to this one, which is the Move tool. Now when you click
on the Move tool, you can see if it points appear. And these pivot points allow
you to move the object. So if I just decrease
my camera speed, it's a little bit
too fast right now, if you click on one
of the pivot points, you can move it in that
respective direction, e.g. the green one here. You can see if you
click and drag, you can move it this direction. If you click and drag
on the blue one, you can move in that direction. And if you click and
drag on the red one, you can move in this direction. If you want to move it in
two different directions, you can just hold it. And inside of this square here, where these two,
now you can move it in these two directions. You can also hold it on the
ball here in the middle. If you can see this white
ball in the middle, you can hold it here
and you can move it in all directions at once. And you can see here
the pivot point has different colors. So you can see this
pivot point is green, this one is blue, and this one is red. So what does it mean, the green, blue and red. This is the x, y, and z axis. You can also see it here
to the right, the red one, if you hover the mouse over it, this is the location. This is the X. So if you hover the mouse
over the red, it says x. The green one is the y, and the blue one is the z. So this is the z-axis, this is the y-axis, and this is the x-axis. Alright, so now we know how to move an object around
inside of the level. The next tool is
the rotation tool. So if you click on
it, you can now rotate the item in
different axes. So rotating it
around the y-axis. Remember the y-axis
is the green one. The x-axis is the red one. You can rotate it round. The z-axis is the blue one. And you can rotate it
around as well like this. And the last thing here we
have is the scale tool. Clicking on the scale tool, you can scale it in
different directions. So if you click
on the box, here, here and here, you can scale it in these three directions. If you want to scale
the item uniformly, you can click on this white box in the middle and scale it up, and it will scale in all
directions at the same time. Now, very important to know
these tools have shortcuts. So if you click on Queue, you have the Select tool. If you click on w, Usually I
never use this Select tool. Maybe you need it sometime
for your own project. But however, three ones
will be sufficient, so it's good to know that click and q you
have the Select tool, but clicking on the W,
you select the move tool. And clicking on e, you select the rotation tool
and clicking on are, you select the scale tool. So it's always nice
to know click on W, you can select the move tool. You can move the object
around inside of the level. You can then click on E to rotate the item just like this. And then you can click on R if you want to
scale it down, e.g. clicking on E to
rotate it again. Just like that, clicking
on W to move it around. You can see it's a lot
faster to work like this. It will take a lot
of time if you just have to click up
here all the time, rotate it and then click
up here again to scale it. Click up here again.
You can see it's very tiring and it takes some time. So click on W, E, R on your keyboard. This is a lot faster
to work with. Over here to the right, we have the snapping tools. If you click on W to select the Move tool and
move it around, you can see it's not
moving smoothly. It's like snapping to a grid and this is
what's happening. You have this enabled here. If you click on the icon and disable it, you can
now move around. You can see now it
moves very smoothly. And if I enable it again, if I click on it, I can move it around and
it snaps to a grid. I can also increase the
snapping by clicking up here. You can decrease the snapping or increase it just like that. E.g. I. Can move around now you can see it
snaps a lot more. And I can click on it again
on this icon to disable it, and I can move it smoothly. So this is very useful
if you want to place items at a specific distance
between each other, e.g. I want to place this item here. And then a trick, you can copy this by holding
Alt on your keyboard. And then dragging. Holding Alt and dragging
will allow to copy it. And you can see now I can
place this item here, e.g. I. Can again hold Alt, drag it, and I can
place it here. Then I can see they
are placed at a, at the same distance
between each other. And this is how the
snapping is very useful if you want to design
your level like this, the same thing goes
for the rotation. If I click on E and I
click on one of the items, if I wrote it around,
you can see it rotates every ten degrees. And I can decrease and
increase this snapping. And I can also disable it
by clicking on the icon. And now I can
rotate it smoothly, and the same goes
for the scaling. So if I click on R to
select the scale tool, I can scale it, it snaps. I can disable the
scaling snapping and I can scale it freely now. I can also decrease and increase the snapping
for the scale. And the last thing
here, just like before we decreased and increase
the cameras speed. So if you want to work
with something very, very close, you can see
it moves very slowly. Now, this is useful
for if you have a small object you want to edit details on
just like this e.g. and you're working here. And now when you have this landscape and you
want to move over there, it will take forever
with this speed. You increase it to
something very, very quick. And you can move over
here and you can then decrease the camera speed. Again. I'm just going to
go back and put it on one, which is the default. Now, if you want to, if you're lost in your level, you want to get back to an item. You can always click
and click on it here, or you can click on it here. We will talk about
the outliner later, but clicking on an item, clicking on F on your keyboard will
take you to that item. Alright, so this was it for
the viewport and navigation. Please just try to play
around inside of here. You can try to get
the feel for it and it will get
easier with time. And you can also click
on these objects. You can move them around. Remember that WE are keys
tried to scale them around, play with this snapping, and just play around so
it gets easier for you. And let's move on
to the next lesson.
5. 2.02 The Toolbar: Alright, now it's time to
take a look at the toolbar. The toolbar is up here and
there are a lot of buttons. But just remember
in Unreal Engine, you don't have to learn
every single thing. You just have to learn
the most necessary thing to begin with and everything
will come slowly. So up here in the toolbar, we have the File button. Like in every software, we can create a new level. We can save our progress and we can also
start a new project. This is the most important
thing inside of here, and then inside of edit. The most important thing
is the editor preferences. Inside of the
editor preferences, you can change things
about this editor, e.g. you can see in the viewport, if I click on something, this orange selection
line will appear. You can also change the
color of this line so you can make it pink or whatever
and you can see changes. So I'm just going to click
on cancel so you can change things about this editor. Honestly, I've never used this. I've never had the need to change anything inside of here. So you can just take a
look if you need to. So going back to the edit, there is the Project
Settings and this one we'll be using
throughout the project. You can see inside
of here there is a lot of buttons that you can click on and it contains
a lot of information. However, again, you don't
need to learn this right now. It's not necessary. There are only a few
things we need to know, e.g. maps and modes. You can change the
default map in Unreal Engine when you open up the engine and in
the movies, e.g. you can add a movie when
you open up your game. So when you're releasing it, and you can see there are a
lot of things you can click around just to discover
what it contains. However, again, all of
this is not necessary. So let's go ahead
and close it down. Next we have the window. And the window,
it's nice to know that you can open
multiple windows, e.g. here in the Details panel, I can click on this second one. I can open a second
Details panel. You can see I have a
details panel over here. We're going to talk
about it later, but now I have a
second Details panel. And this is useful for if
you have multiple monitors. So I can take this and push it over to my second monitor
and I can work here. And also what I use
mostly is the viewport. So I opened a second viewport and it opened here
on my second screen. You can see I have it here as fullscreen and I put it
on my second monitor. So while I work in my game, I can hear when I work on
my game on my main monitor, my second monitor,
I can watch my game here with full screen like this. Okay, so very, very handy
to know that you can open multiple windows over
here next year in tools, we don't really have something to important, so let's skip it. And the builder as well, the only thing is built all levels which
builds the lighting. And we will be
doing that later in the course and deselect
and the actor, we don't really have
anything important. And in the help you
can always view the documentation and get some support or report
a bug and so on. Right down here we have
this save button and this saves the current level
you are in right now. Over here we have
different selection modes. Now we are in the
selection mode. You can also change
to landscape mode and you can create
landscapes inside of here. But we are going
to do this later, so don't worry about it. We're going to use
the landscape tool, we're going to use
the foliage tool, and we're also going to
use the mesh Paint Tool. So these are the different tools that we can select between. But for now, let's go back to the selection mode over here. Very important, there
is a button where you can add elements to a level. So before we added
this cube here through this button and
then shapes and cubes, and you can add different
shapes to your level. Later on we will be
adding lining as well. You can see you
can add lights to your level and also
add cinematic stuff. So cameras and actors. And in the visual
effects you can add something like a
volumetric Cloud. You can add fog, who can add a sky
atmosphere and so on. We will be working with a lot of them later on in this course. But as practice, again, just go ahead and add
whatever you want. Just go ahead and
add a cylinder. Go ahead and add a point
light and see what it does. It doesn't really
hurt to just look around and try to add things
and see what happens. Over here we have
the Blueprint editor and this is the level blueprint. The blueprint is the
programming language inside of Unreal Engine. But for now, let's
not worry about it. Over here we have cinematics
and then we can play here. You can click on Play. This simply place the level. Right now you can see
nothing is going on, so we don't really have
much going on in the level. I'm going to click on Escape on my keyboard to quit
the play mode. Clicking on these three dots, you can change different
settings, e.g. instead of playing it
inside of the view-port, sometimes I like to play
it in the new editor, so it opens a new window and it opened on my second
monitor, just like that. And every time you click
on Play now it will open a new window. And if you want to
change it back, you can always click here and down here we have
multiplayer settings. We're not really worried
about multiplayer right now. And in the advanced settings, you can always
change the width and height of the window
that opens up. If you need to, center it to the viewport when you
open it up and so on. Then in this platforms button, you can package the game
and release it to e.g. steam. So e.g. here in Windows, I'm
on Windows right now and I can package the game. And then when you package it, it makes like an
EXE file which you can upload to steam and
people can try it out. And as the final thing
and the toolbar, there's this Settings button, very important here is the
engine scalability settings. Right now, my engine is
showing epic graphics. This doesn't really affect
the game at the end. This only is nice. Or when you have a fast
or a slow computer. So if you have a slow computer, you're going probably with
the low settings here you can see the lightest
changed and so on. And your computer
becomes less likely. If your computer is slow, it can't really run
this epic settings, but for me, I have
a fast computer, so I'm going to run
this epic settings. And I've not really had
the need to run cinematic, but you can, of
course, click around and see what happens
when you click here. And cinematic is
very, very heavy. I'm going to change
it back to epic, though it's very nice to know
sometimes you're lighting is off compared to
me, just like this. And this might be this
engine scalability settings. You have To a bit higher for the lighting to be
looking really nice. And the same thing with
the material quality and the preview rendering level. And as the last thing, if you wish to know this, you can hide this viewport
UI if you wish to. So if I click on it, you can
see all the buttons here and the UI and the
viewport disappear. And sometimes I do this. What I want to take a
screenshot like this, or I want to make a small movie where I move my camera
without having all of the UI. So clicking again on f
11 to minimize it here. And then clicking up here. And I'm going to
show my eye again.
6. 2.03 The Details Panel: A details panel contains details about items
inside of your level. So five, e.g. select
this cylinder here. You can see in the Details
panel over here to the right, it displays details
about this cylinder. So it displays the Static Mesh, which is just the 3D model. It displays the material
which colors this 3D model. And then I can see some settings about the physics for this, the cylinder, the collision, the lighting settings and so on. So I can see different details about this item I have selected. I can also see the location, rotation and the
scale of this item. And this changes
every time you select a different thing inside
of your level, e.g. I'm going to select
this cube here. And now you can see, now it displays this Static
Mesh for the cube. And I have more items inside of my level here in the middle. I can't really see them, but I'm going to click on
them here in the outliner, which we will talk about later. But e.g. if I select
this directional light, which is over here, again, remember you can click
F on the viewport. It will take you
there are medically. So the directional
light is the sunlight. And when I click on the sunlight here, the directional light, it displays the
intensity of the light, the source angle,
the temperature. You can see e.g. if I
reduce the temperature, it becomes warmer here. And if I increase the
value, it becomes colder. I can change different values. With this directional
light that I've selected, I can increase the intensity, so it's very intense. It can also decrease
the intensity. So it's very dark as well. So very cool. Everything you select inside of your level has a detailed, you can change about it. E.g. I. Can change
the location for this volumetric clouds
that I have selected, I can change the location, e.g. remember, when you
select the move tool, you can move this icon around and I can
decrease my snapping. And you can move around. You can also move it around
by clicking and holding here. So this is the x,
clicking and holding and moving your mouse and
clicking holding, moving your mouse, you
can see you can also change the values over
here in the Details panel. And usually what I do here is if I want to write
a specific value, so let's say I wanted to specifically place
it at 100 and dx, I can click on it and I can
write 100 and my keyboard. And I can click on Enter. And now it's precisely
100 value in the x-axis. So usually I write numbers
here if I want an item to be specifically at a
specific location, e.g. I. Want it to be in the
center of the world. I can write 00.0, and it is now specifically here in the middle of the world. And that is basically it,
very, very important. The details panel is
something we will be working with every
single lesson. So just clicking on
things we can change different values
within these items that we have selected. But for now, let's move
on to the next lesson.
7. 2.04 The World Outliner: Hello and welcome back. So now let's talk
about the outliner. Over here to the right
we have this outliner, or it's also called
the World Outliner. When you select
things in your level, you can also see that it's selected inside of the outliner. Know e.g. if I
click on this icon, I can see that it is the
skylight that I have selected. The outliner simply displays every single thing you
have inside of your level. So all of this that
you can see here is something I have
inside of my level. You can either select items by clicking on them
in the viewport. And you can see I have
selected this cube. Click on the, let me
just go over here. If I click on the
second cube here, you can see I've selected
the second cube. I can also just select them by clicking on them
in the outliner, you can see they are
getting selected in the viewport when I
click on them here. And what I usually use this
for is if I have a couple of items inside of my level and there is something
I can't find, e.g. let's see. I can't
find my sunlight, whereas it was the icon. And this is very handy. You can go to the outliner. The sunlight is called
the directional light. You can click on
it and you can see it has selected it,
It's over there. I can click on F If I want to, and it will take me there. Oh, very nice to
know. Everything. Single thing you add
to the viewport or add to your level will appear
here in the outliner. And you can also select the different items by
clicking on them here. You can also hide and show them. So e.g. let's, let me
go back to the cubes. You can click on
this eye to hide them so you don't see
them in your level. They are still there. You can click on the
I to show them again. So sometimes you need to hide
and show different things just to see if there's
something behind them, e.g. you are designing and you
can also enable them. Again, I last thing
what you can do is e.g. you can hold Shift
and click here, and you can select these cubes. You can click on this
folder icon and it will create a folder and put
them inside of this folder. E.g. I. Can click on F2 on my keyboard and call them cubes. Now I have a folder
called cubes here, and this is how you stay
organized inside of here. If you want to add
a thing into it, you can click and
drag this item into the folder and it will
be added here as well. So it's always nice to
stay organized as well. As the last thing you can
also search for items, e.g. I want to find my find
something called light. I can see I have a point
light inside of my level. This is something I added a previously in the
previous lesson. I can also search for cube e.g. and I can see all of
these three cubes. And you can click on this X
to remove the search word.
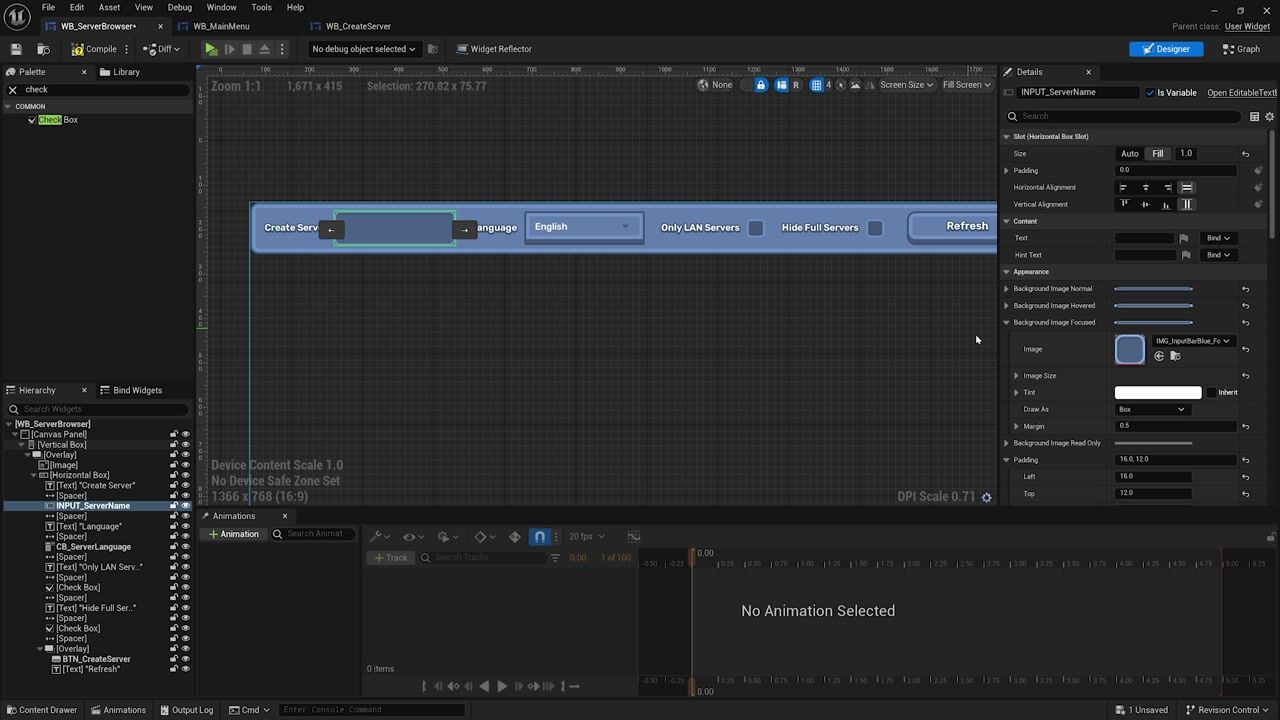
8. 2.05 The Content Browser: Down here we have
the Content Browser. So right now, it's probably not looking like this for you. I will right-click this
and click on Close. And this is probably
what it looks like for you if you haven't worked
with the engine before. So down here you can see a
button called consent draw. If you click on this content, draw a button, this
window will appear. And usually what I
do is I click on Dunkin layout
because you can see if I click on something
in the viewport, this window will disappear and I have to click down here
again to make it appear. And if I again
continue to work in the viewport, it will disappear. I think it's a
little bit annoying, so I'm going to click on it
and click on duck in layout. And it's going to
stay up all the time even though I'm
working in the viewport. So the content browser, also called the concert draw. This is the same thing. It's simply contains all of
the files for your game. So if you have audio, if you have UI, if
you have icons, if you have 3D models, if you have textures, all of the files you
have for your game will stay down here in
the Content Browser. In the Content Browser, you have two sections. Here are all of the files
that you can see and you can also view them
here as larger icons. So e.g. I. Can right-click
here and select New Folder. And I can e.g. call it icons. Let's say I wanted to
import some icons. And now I have this folder. If I click on the Content, you can see this is the
same folder, icons folder. So clicking on
these icons folder, I can right-click it now. And I can set the color
e.g. to a new color. And I can choose a color
and then hit Okay. And this is very cool because
now you can stay organized. And if you want to
remove the color, you can always right-click
setColor, select layer color. So inside of this Icons
folder, what you can do, e.g. here in this section
you can right-click. And now you can see you
can add a lot of elements. You can add a blueprint glass, which is the programming
language in Unreal Engine five. And you can add a new
level, a new material. You can add something that
has to do with animation. You can add something
with foliage, e.g. grass, and so on. If you're working
with a 2D game, you can add a sprite, a tile map, a tile
set, and so on. So you can see there are a lot of elements that you
can add to your game. And just like before, you don't have to learn
every single thing. When I started out,
I probably only knew 15% or 20 per cent of
all of these components. So very important
to know that just focus on the most important
things right now. And during your
time in the engine, you will learn all
of this slowly. Okay, So e.g. let's
create a new material. Clicking on this material here. Now we created this material. What you can do over here
in the settings tab here, you can click on the
Settings and e.g. for the thumbnail size, right now I have a
fork, a monitor. So these icons are usually large for me and
the medium size. So I can change
them to small size. And now you can see
the icons are smaller. You can also just hold
Control on the keyboard and scroll with the mouse
wheel to zoom in and zoom out. And that will also increase and decrease the size for the icons. You can also change the
view for them, e.g. if you want to
list view instead, or if you want the
column view instead. But usually I just stay
in the tiles view. I think it looks nice. And up here you can
search for items e.g. I'm now searching in the Icons folder because I have selected the Icons folder. Let's say you have a
lot of files here. It's really nice that you can search for something
you're looking for. E.g. I'm looking for
all of the materials. I can write material. And now we can see it highlights the search warrant that
I'm searching here, and it will show
you the results. Now if I click on the X here
to remove the search word, if I click on the
Content folder, you can actually search
the whole content folder. Imagine if I had a
lot of folders here. And let's say I
wanted a material, so I write material. And it shows me the file
here that I just created. So very nice to
search for things up here if you have
a lot of files, and that was it for
the content browser. So we will be working all the time down here when we import the files and also when
we create new files. But for now, let's
click on here. Let's click Delete on my
keyboard and hit Delete here, delete everything, and let's
move on to the next lesson.
9. 3.01 Creating a New Level: In Unreal Engine five, there are two ways to
create a new level. You can either go down
here and select one of the folders and right-click
and select level here, and it will create a new level. The difference between this and the second method is
you do it this way. It will always create
an empty level. So if I double-click it here, and now it asks me if
I want to save this, this map here, I'm just
going to select Save. Now you can see this
is my new level. It is dark because it's empty. Here in the outliner you
can see it doesn't contain anything and it doesn't
contain lighting either. This is why it's so dark. So this is the first
way that you can do it. The second way is clicking on File and selecting new level. When you do it this way, it will give you the option
of creating an empty level, just like what we did here. So we didn't get to this option when we
right-click down here. And the second
option is to create a basic level with
an open world, empty level or create an open world like the
one we started in width. So e.g. let's just select
this basic one and Create. And then let's go ahead and hit this save button because we want to save this current level. And now you have to
save it somewhere. I'm going to right-click
and make a new folder here. And let's call this one maps. And inside of this maps folder, I'm going to call this one. I usually give my
files prefixes. So if it's a map, I call it map to begin with. And let's call this one street. We're going to make
the street level. And let's go ahead
and click on Save. And now you can see it has saved my street map inside of here. These are the two ways
that you can create a level if you do it
this way over here, you have the option to select
which one you want to make. And if you do it down here, if you right-click
and select level, it always creates
an empty level. So I'm going to go
ahead and delete this new world that
I made before. And I'm also going to
right-click this folder other and clear the colors so
it doesn't have any color. And now we are here
inside of our new level.
10. 3.02 Post Process Volume: Let's go ahead and add a post-process volume
inside of our level. What a post-process volume is, you can imagine it just
like in Photoshop. In Photoshop you add an image to the program and then you
change the colors of it. You can change the hue, the
saturation, brightness, and just the overall look of the image that you
can change in Photoshop. The same thing here applies
for a post-process volume. So post-process volume
changes the look, the image for your game. So you can change the
color of the game. You can change how bright
it is, what it looks like. So it really changes
the look of the game, just like what you do
with images in Photoshop. So what you can add a
post-process volume is you can click up here and quickly
add to project button. And then you can either add it through the visual effects. And here you can see
the post-process volume or you can add it through
the volumes as well. You can find it here
and you can find it down here in the
post-process volume. So clicking on the
post-process volume, you can see it over here. Remember if you don't
see the icons like this, you can click on G
on the keyboard. Remember g was the shortcut
for the game view. Down here, click on G, shows you and heights
you the icons. Here you can see we added now the post-process volume and it comes like a box like this. So what you can do here, e.g. here in the Details
panel you can see you can change settings such as the bloom and the
exposure and so on, e.g. the bloom, if you
click on the arrow and you click on the intensity, and let's just set it
to something very high. E.g. five. You can see nothing
happened in the level. If I set it to zero. If I set it to five,
nothing really happens. However, if I move my
camera into this box, you can see now it
changes the look, this is the bloom. If I set it to ten, e.g. something very high. And if I go back here
outside of this box, you can see it is
not applied anymore. This is because if you go
down here in the settings, there's something
called infinite extent. And if you take this, it will apply to the level whether you
are inside of the bugs, are outside of the box. It doesn't matter if
you have ticked this. It will apply to
the whole level. So what is, it's
useful for like this? Inside of this box, you have a dungeon, e.g. you are making an RPG game
and you have a dungeon, and you only want
this dungeon to be dark and have no light, e.g. and you want to change
the look of the dungeon. So what you can do
is you can take the Scale Tool, click on R, and you can scale
it to however large this dungeon is or area is that you want to
change the look for. When the player
enters the dungeon. It will change the look. If the player gets
outside of the dungeon, it will change the
look back to normal. If you want to just have the same look
for your whole game, you can click on
this infinite extent and it will apply it to
the whole game as well. So I'm just going to
re-scale it down. What you can do is
you can go up here. In this scale, you can
click on this small arrow and it will reset
it to the default. Doesn't really matter
how large it is when you have selected this
infinity extent. But I just like it to
have it to default. And you can also click
on this small arrow for the intensity here. And it will reset
that bloom intensity. And I'm going to
uncheck this again. You can see you have a lot of
things that you can change. You can change the
temperature, e.g. if you increase the value, it will become warmer. If you decrease the value, it will become colder. It can also give it a tint, like a purplish tint like this. You can change the
saturation e.g. and make a desaturated like
this, make it saturated. And you can see you
have a lot of things that you can change
about the shadows, the colors, and the ambient
occlusion and so on. So a lot of settings
that you can change, just like in Photoshop when
you are changing an image. I'm just going to reset
those two default. Just like in Photoshop
when you are changing the look of the image, you can do this using a post-process volume inside
of Unreal Engine five.
11. 3.03 Camera Exposure: Alright, so before we continue, what I usually do is when
I create a new level, I add a post-process volume. And the reason I
do this is I want to change the exposure settings. Because you can see here, if I go down and let us just
take this infinite extent, have it enabled so it
affects the whole level. And you can see if I click
on my directional light, this is the sunlight. And if I set the intensity
to something like, let's say something
like ten or 15 or 20. You can see it
adjusts the lighting. If I set it to one very low, you can see it's dark, but it
lights it up automatically. We don't really want to do this. This is nice for cinematics, but it's not really
nice for a game. We want to have the
lighting to stay the same. So if I increase it
to something like 15, it shouldn't automatically
adjusted like this. And this is why we
need to disable the camera exposure or actually just set
it to a constant. So this intensity, I'm going to set it to six, just like before. And for this
post-process volume, I can click on it and then
go down to exposure and then select the minimum
and maximum exposure and set them both to one. So 1.1, so the exposure
will always be one, and now it doesn't change it when we
changed the lighting. And this is what wants
to do because in games, when we are lining the game, we don't want it
to automatically changed the lighting for us. Now if I hit the
directional light now and I set the
intensity to 15, you can see it doesn't
automatically change it. And if I set it to one, something very low, and it doesn't
automatically change it. Now it stays one. Even if I'm close to the ground, I'm away from the ground,
it doesn't matter. It's not going to automatically
adjust my lighting. And this is how
we want it to be. So I'm going to change it
back to six just like before. And now that we have fixed
the camera exposure, we can go ahead and click
on File and Save All. And let's move on
to the next lesson.
12. 4.01 Introduction to Quixel Megascans: In this course we
are going to use quicksort omega scans
to design our level. And if you haven't
heard about it before, Quicksilver omega scans is
a large library containing realistic textures
and surfaces and foliage and so on that we can use to design
the environment. So how they make these
surfaces is they go around to locations and they actually take images of real life
locations, e.g. this damaged concrete
floor is from real life. They're taking it with high definition
cameras and they're going to apply it here to surfaces that we can
use in the game. So this is how we can create
hyper-realistic games, and this is how they create realistic games
right now in 2023. And you can see the
library is very large. It currently has 17,700 assets and it will
increase daily. You can see here they're
constantly adding new services, new 3D models and new decals, really plants and so on. So you can click around
and you can check it out. And all of these
assets are for free. You don't have to
pay for anything. And this is because
they have partnered up with Unreal Engine,
with Epic Games. And now you can use
all of this for free inside of Unreal Engine. This is a really, really nice you can see you have so many surfaces that you
can choose between e.g. if you want something with soil and then you
can select e.g. you and wants
something with mud. And now you can see all of these surfaces that you
can use for your game. So just go ahead and click
around here and explore. And again, it just
like I said before, everything is for free. And when you are ready, let's
go over to the next lesson where I will explain
all of this UI for you.
13. 4.02 Quixel Bridge Overview: Alright, welcome back. We are back here
in the engine and inside of the engine
without going too quick. So omega scans over here, we can actually access it
inside of Unreal Engine. You can right-click
anywhere here, and you can see this button here called add weeks old contents. So clicking on Add
quick slow content, it will open this one called
the Quicksilver bridge. And what you need to do here first is you need to sign in. So clicking up here, I've already signed in. So you can click on sign-in and then sign in with your epic Games account or another
account that you already have. And once you have
signed in right now, I don't know why
if I maximize it, the UI will become very, very laggy and I can't really
scroll down right now. So I'm going to minimize
it just like this. And then I'm going
to scroll up again. And now we can see right
now we are in home. And what you can do inside
of quicksort bridge is you can select the asset
you want to use, e.g. the first thing is
we have 3D assets. And this out of three 3D assets, you can see different
assets, e.g. for a street, crops, industrial and so on. Or you can select 3D plants. And this is really going to save your time because if
you're an artist, you know how difficult
it is to make 3D plants. So all of these are
from real life and they will look really nice
when you add it to your game. E.g. if you want grass, you can select that lawn. And you can select what type
of grass you want, e.g. if you want this one
or this one and so on. Really, really nice. You can try to click around and see what we have
inside of here we have surfaces which are textures that we can
apply to e.g. a. Ground. And then down here
we have collections. So if you click on collections, they have made some
collections, e.g. if you want to make
an urban street, if you want to make ice
and snow environments, if you click on it, e.g. the ice and snow on, they have gathered all of the assets for the ice and snow, which you can use for your game. Down here we have
the metal humans and let's just give it for now. But this is a new
feature that has, that has been released
not too long ago. And down here you can
see your favorites. So what you can do is if
you like an asset, e.g. let's go back to 3D plots. Let's go to climber. And let's say, I liked this one. I really liked it. And you can click on this small heart and it will
save it to your favorites. And when you do this, if I
go over to my favorites, now, it is saved over here. If I go down, this is the one. This is the plot. If you want to remove
it, you can always click on the heart again,
up here on the top. You can also search for assets. So if I go back to
Home here, e.g. let's say I wanted
something with mud. I'm going to create e.g. a. Actually, let's, let's say
I want to create a jungle. Though. Let's search for jungle. And now it will show
you all the assets that has the jungle tag on them. E.g. if I go to 3D plants, and here you can see all
of the jungle plants, e.g. I. Want a garden plants. And let's select
the flower grass. And e.g. I. Can select this
or this, or my jungle. So really nice. You can search for
things up here, e.g. I want something to do with mud. I can search for mud. And right now there is nothing because I'm inside of the 3D
plants flower less. If I just click on the X
up here, it will appear. And let's say I
just want surfaces. I don't want 3D models
and all of that. So I'm going to go
up here and search for surface like that. So now it's only going to
show me the mud surfaces. And here you can see all of the mud surfaces that
I can use my game. But you can also do is you can click up here on this button, and you can also change
it up here for the types. You can change it
into a surface, you can change it, and
what size you want, e.g. this is very useful for 3D
models if you don't want, let's say you're
searching for rocks and you want very small rocks. You can search the size here. You can filter your
searches up here. So over here to the right, you can preview whatever
you have selected. You can also set it to favorite, just like what you
did over here. And you can also select at what quality you want to
download this asset, e.g. low quality, medium and high. And over here, it tells you if you have downloaded
it or not, e.g. if I select the low-quality, it asks me to download this asset and whenever
I've downloaded it, so you can see if I
click on the medium, I have already downloaded this. It now tells me that it's downloaded and I can
add this to my project. And whenever I
click this button, it will add it to my. So it's very, very easy to use. So this was it for the
quick cell bridge. We are going to use
it to add our assets. And let's move on to
the next lesson where we find our assets for the game.
14. 4.03 Finding Our Assets: Let's now go ahead
and find our assets that we need to use to
design the street level. So first what I usually
do is I find my surfaces. So going to surface, and the surface is the texture we want to
apply to the ground. So here we have asphalt. So clicking on it here. And I want something I think something between fine and rough because we're going
to mix them together. So let's go over to find. And over here, you
can scroll down, you can click on them and
see what they look like. And you can scroll down
and see what you like. What I'm going to
use is this one. I've already set it to favorite and it's
called Correct asphalt. So I'm going to use this
and I'm also going to use this one down
here, fine asphalt. So I'm going to mix them
together in the engine so they have a bit of a variation so it
doesn't look the same. So this one find asphalt, this one correct as well. Again, you are welcome to choose any of these surfaces
as you want. You don't have to follow 100%. Just go ahead and be creative. Have fun with it. While
you are learning. Go ahead and select another
one if you wish to. But for me, I'm going
to use this one right? Asphalt and find asphalt. And I also want to use
another one that has mud on it so I can add
to the street. So you can also go back to surfaces and then
you can select e.g. ground over here
or moss or rock. You can choose whatever
you want to do. So selecting ground, e.g. and you can select forest
ground or anything else and just maybe
finding a mud surface. You can also again,
just up here, if you just search for mud
and you search for surface, you find all the surfaces
and you can scroll down here and find
whatever you want to use. Again, I've already chosen mine. I've scrolled down. And in the favorites, I've saved this one
called Muddy asphalt. You can also search for muddy asphalt and you will
find this one as well. Alright, so this is
what I usually do. I select three surfaces so
I have the finest fault, the correct asphalt
and the muddy asphalt. So we are going to
mix those together to have some variation
with the environment. Next, we need 3D assets
for the environment. So going back to home
selecting 3D assets. And down here we have
something called streets. So clicking on it. And here
I want to add barriers. So clicking on barriers. And here in the barriers you can select that barrier
that you want to add. So I'm going to add this
one metal barricade. And I'm also going to use this
one old concrete barrier. This concrete barrier. So I'm going to use those two. I'm going to go back here to
my street and I'm going to go to perhaps I have selected
this one is slow stop sign. You can again click on
the favorite if you want to use it and you
can download it later. But for now we're just
choosing the assets. I'm going to go down and we
have to select the sidewalk. So click on the sidewalk. And I have selected this one
modular concrete median, even though I'm not using
those in the course, but maybe you need them in your, so I'm just going to
select this here. And then again, I'm
going to go back to the streets and going down. And I'm also going to add a
street cone or traffic cone. So selecting one of them, I have selected this one. I'm going to set it to favorite because I
haven't done it yet. Setting it to favorite. I'm going to add
this cone as well. And let's go down here and we don't really want
to add more here. So I'm going to go back to
streets, maybe going back to, perhaps just taking a look
at what we have in prompts. And I'm also going to
add this fire hydrant. So I'm going to add
it to my sidewalk, going ahead and setting
it to favorite as well. Again, you are free to choose whatever you like
inside of here. Alright, so the final 3D
models I want to add as well. I also want to add rocks. So if I go back to 3D
prompts are three assets. And I go down here and
maybe I select nature. And instead of nature, we have rocks clicking
on that here. We can select what type of rock. I'm just going to
select a granites. So selecting this and I'm
going to add these to the forest ROC and the
small finite rock. I'm going to set
those two favorite, again, choose whatever
you like inside of here. And now that I have
all of my 3D models, what I like to do
is I like to go back and I like
to select decals. So now we have
selected 3D assets. We have also selected
our surfaces. We are going to select
the 3D planned in a bit, but let's first select decals. What decals is, they are just images that you can
add to the environment to break it down and have some interesting story
inside of your environment. E.g. I want to add
blood because I want to create some sort of a
mysterious horror streets. And now down here you can
see all the type of blood. It's graphic contents, so you
have to click on it first. I'm going to add some blood. Again, choose whatever
blood you want. I just selected this by
random and this one as well. So I have two blood here, and I also selected two more. So this one here, I have selected as well. And the last one is
this hand smear. I'm going to add to
the environment. Again, just click on them, see which ones you like. And then if I go back to decals, so click on decals again. I am going to go down and then selecting this one
called streets. Clicking on it, I want to add painted lines to my streets
so it's not a blank. So clicking on painted lines. And then you can go
down and take a look. Again, choose whatever you
want to add to the street. But for me, I just want
to add some lines. I'm going to go down. And I have favorited this because I want to edit
the right road line. I'm also going to add this one. Again. I'm choosing two
different ones because I don't want my lines
to look the same. Very, very important
in game development. You don't want to copy
paste the same thing else, the player will see that you just copy
pasted the same thing. I'm going to add these
two for variation. And if you go down, I also chose a third one. And it is this one,
the painted lines. I'm going to add them to the
side of the environment, to the side of the street. So I have these
three painted lines. And the final thing now
that we have our decals, now if I go back, by the way, you can actually let me
add graffiti as well. I believe I have done this. So if I take a look
at the decals again, and if I take look
down here, graffiti, if I click on it
and I scroll down, I actually added one. I don't know if I
have favorited it. So if I go down here,
I have something. This one, Yeah, he's
watching this graffiti here. I want you to add it
to my street as well. So go ahead and set
it to favorites. Again, choose whatever
you like here. And now if I go back
to home and I select 3D plants because I want to add some foliage to my street. So 3D plants, and if I go down, I want to add grass, e.g. and selecting wild. And if I go down, I have
selected this one, wild grass. I'm going to add
to my environment. Again, select it,
whatever you like that fits with your
environment here. That was it for
all of the assets. So now we have 3D assets. We have three plans. We have surfaces,
we have decals, and imperfections
are used for making, as the name says, imperfections to
your environment. But we're not really going
to use this right now. And if you click
on the favorites, you can see all of the assets that you have set as favorite. Again, my UI is very laggy when I maximize the
screen, I don't know why. Let me know if this happens for you as well. It's really weird. But you can see here now, we have all of these assets that we are going to use
for the environment. So let's move ahead to
the next lesson and talk about the quality
versus the performance.
15. 4.04 Quality vs. Performance: When we work with
game development, we have to think about
performance all the time. So we can just go
crazy with the quality because else we will have
low frames per second. I want to click on the different
items you can see here. You can choose the quality
you want to download them in. If you click on it, you
can see the low quality, medium quality,
high-quality, and night. For the low quality, usually the texture is
2000 by 2000 pixels. So two k textures and the medium quality
is for k textures, quality is eight K textures. And then we have non-ideal, which we will talk about
in the next lesson. But when you click
on any model here, it's really tempting to
click here and just select the high-quality
and go ahead and download it and adding
it to your game. And of course, your game
will look crispy and it will look really nice and high-quality
and professional. However, your frames per
second will be really low. And when someone
tries out your game, it will be very laggy. So it's not always
nice to just go with the highest quality,
selecting it, e.g. here with the road line. It's not really
nice to just select the highest quality,
downloading it, adding it to your game, yes, the game will look better
than everyone else's game. However, it's
really going to run poorly and it's
going to lag a lot. So what you want to do
is you want to select the quality that still makes
your game looks really nice. However, you are
still thinking about the performance
and it runs well. So usually what we do is we can start with the
medium quality. And the medium
quality is a fork, a texture which is more
than enough for our game. Again, a fork, a texture for an asset like this is
really, really high. Usually you need it in
under one K textures. So for k texture, for this is really high. Good thing about Unreal Engine, even though you
import it as a fork, a texture, you can
actually reduce the size of it later
inside of the engine. So when you were
making a cinematic, it's always nice to have it
in such a high resolution. However, if you're making it a game optimized environment, it's really nice to
set the quality down, but still making it look nice. But again, thinking
about the FPS as well, so don't get too tempted to just select the
highest quality. We are going with
a medium quality, which is still very
high for this and we are going to
reduce the quality. However, I'm going to show
you in the engine how you can reduce the quality and
memory it's using. But still keeping
their really nice, crispy look to the game and
still looking realistic.
16. 4.05 Introduction to Nanite Geometry: So in our real engine five, there is a new feature called
non-ideal for 3D models, and it did not exist before. So clicking on one of the 3D models so you can see
you can choose the quality. And the last one is
called Night is really, really nice because it has an efficient way to
render triangles. It before when you select e.g. high-quality and you
add that to the game. It stays at the same triangles as you have created
the model e.g. here in the engine. If I click on the Live Mode here and change it to wireframe, you can see my ground here, if I selected, contains
these triangles. And these triangles just stay the same wherever I
am in the screen. If I'm close, if I'm far away, it has the same amount of
triangles in the game. And if you're an
artist, you know that the more
triangles you have in the game than more memory
it's going to use. And the more it's
going to like if you have a lot of triangles
for one model, it's going to lag a
lot because you have to reduce them and make
it more efficient. So this is how some people
make their game slag. They add too many
triangles to a 3D model, which is not necessary. They could have made
the same 3D model with less triangles and
still look the same. However, if you add
too many triangles, you will lag inside of the game. Here for another night. It's so clever that if
you get close to it, it adds more triangles
to show you the details. So it's really high detail. And when you go away
from a non-IT model, it will reduce the
amount of triangles because you don't really need to see it in that high
detail anymore. Because you are far away
from the model anyway, you don't need all of the small details that
you can't see anyway, nano is very, very clever. It changes the amount of triangles you have
for the 3D model, and you will see
that as well when we add those to our level, though it's doing that logic, something called a
cluster calling. So it's creating clusters. And if you walk away
again from a model, it reduces the amount of triangles and it will also
save your performance. So non-IT is really
groundbreaking and this is what we are going
to use for this course. And you can see here, this
is only done for 3D models. So if I click on this line here, which is just an image, again, this is a decals. Decals are just images. If you click on
it, you can see we don't really have
no night because now that is for 3D
models, not for images.
17. 4.06 Importing Assets: Alright, let's go ahead and import the assets who are games. So clicking on the first
one, the first drug, I'm going to go
ahead and select it here and select
the night quality. And go ahead and
click on Download to start downloading the model. Can see I've already
downloaded everything. This is what this
checkmark means. It's going to take some time to download if you
have slow internet, because nano is really
heavy to download, but it's really nicely
optimized in the game. If for some reason
you have a very, very slow internet or computer, just go ahead and download the low quality or medium
quality as you wish. But we are going to use
nano site for this course. So going to select night, go ahead and download
everything and for the other 3D models as well, download them as night. So clicking on
every single modal, click on Download and S4, this wild grass here. Go ahead and click on the medium quality
and select Download. And for this graffiti here, for this decal, select
all decals here, each one, and select
them to set them to a medium quality and go
ahead and select Download. Now, medium quality
is probably still too high quality for this because we're not really
needing this much quality. I think low will be sufficient. However, we are going to optimize it inside
of the engine, so don't worry about
it too much here, but go ahead and download the medium quality and do the same thing for
these road lines. For this modular concrete. Again, click on here, select Nana might go ahead
and click on Download. Or the surfaces, select the medium quality
and go ahead and select download or
this fire hydrant. Again, this is a non-IT models. So click on that night going ahead and
selecting Download. But this cone as well, so night download and
this barrier as well. And the surfaces again
select the medium quality. And these blood stains
select medium quality. And for this dashed
painted line here, select medium quality as
well and hit Download. When you have selected or downloaded everything,
click on it. Let's go ahead and
click on the finite, because this is
what we downloaded. I'm going to go ahead and
click on this Add button. So clicking on it, it's really heavy to download
this and add this. But when it's added, you can see it down here. It automatically created
folders for you. You can see how
easy it is to add pixel content just
with a single button. You can add the, the 3D model. And you can see this
is the 3D model. If I double-click on it, you can see how
high-quality it is. This is this 3D model that
we have added to the game. And this is night as well. So let me go ahead
and close it down, like on the next model. And I'm going to click on Add, wicking on the stop sign. I'm going to click
on add as well. I've also added this stop sign, the mental barricades here. And going ahead and
clicking on the grass, remember selected the
medium quality here. And selecting the
medium quality and go ahead and click on the ad. And as you can see
here with foliage, very easy when you click on Add, if Chris this folder
for you will, with all of the foliage assets. Alright. Almost added everything. So going down here again, clicking on the bloodstain, and I'm just adding everything, clicking on it here, selecting medium quality that
I have downloaded. And then clicking on Add. And then going to the next one, going down, selecting
next bus, stain, it going down here,
clicking on Add, and just keep, keep adding all of the
assets to your game. And the last one here is this smear clicking
on medium quality, leaking on Add and
it will be added. So now I have all the assets. I can go ahead and
close down the bridge. I can click on File and Save all to save all of
the edit assets. And now you can see them here. So now I have download all of these three models
that you can see here. It takes some time to download
if you click around here. And we have the decals, which are just the images, the blood that we can
add to the environment. We have the grass,
the foliage here. And lastly, we have the
surfaces which we can mix together and add
to the street as well.
18. 5.01 What is a Texture?: Okay, so now that
we have imported all of our items
before we continue, let's take a look
what Quicksilver omega scans has imported for us. So the first thing here, the circle one here is
called the material, and we will talk about
in the next lessons. The next thing is the 3D model, and this is called
a static mesh. We can also hold
the mouse over it. And you can see at the
top besides the name, it says static mesh. And for this one, if you
hold the mouse over it, it says material instance. Now over here we're going
to talk about textures. So this is a texture, this is a texture, and
this is a texture as well. So what textures
are usually when you model something
in a 3D software, let's open this one, e.g. when the Modeller is
modelling this model here, it's going to look
gray initially. So here I just removed the
material up here and you can see it looks great
with the checker pattern. This is actually what it looks
like when the Modeller is modelling the model inside
of the 3D software. And when the Modeller
is finished, they put it inside of
a coloring software. And when they color it, it becomes all of
these colors, e.g. a. Better example is this barrier
here you can see we have this red line and the
gray areas down here. Initially it looks like this. When they put it inside
of a coloring software, it looks like this. And when you export it
from a coloring software, it becomes, or it gives
you all of these textures. The first one here is
called the albedo, or also called the base color. And the base color is simply just the color of the 3D model. So the red line here, as you can see on this
concrete barrier, if I drag it into the world. And you can see it here. This red line is
this red line here, and all of the other details. So this is just the
color of the model. The next one is the normal map. And the normal map
texture is just going to define details
on this model here. So you can see if I click
on this material instance, you don't have to
follow right now, I just want to show
you the normal map. And if I just minimize
this a little bit, and here, the normal
map strength, I can set it to zero. And you can see there
are small bumps that disappear, e.g. down here, I set it to one. You can see they appear if I put it to five, e.g. very harsh. You can see it a lot more. If I put it to zero, it looks more flat. So the normal map
is just going to push out this detail that
we need for the model. Sometimes you might notice
when you open a texture, this will become blurry. And that is okay, it is because the texture pool or the texture memory
is way too high. You can see if I hold the
mouse over this texture, it's using 287 mb, so it's using way too much
memory, texture memory. And you can also see
the dimensions at the bottom, almost 8,192. So it's an eight K texture. And we don't really need that. We're going to adjust
those a bit later on. But for now, it's
okay if it opens up and it looks a
little bit weird. But the normal map is a map that pushes out all the
details on the model. So if you only apply
that base color, it will look flat if you
don't apply a normal map. And the last one here
is the roughness. And the roughness
just defines how wet or glowy this model will be. So e.g. if it is raining, you want to adjust
the roughness. If I open up this
material instance again, and I have a roughness slider, just to show you over here
it says maximum roughness. And I can set this one to zero. And you can see
it becomes shiny. And usually this is done whenever it's raining
in the environment. So we have some glowy effect. Usually it's not set to zero, utilize it to 0.4, e.g. you can see the
difference 1-0, 0.4. So there is a difference. It looks more wet
when it's raining. And it gives it
that nice effect. So this is a roughness. This is the texture here, so I'm going to set
it back to one. And for the normal strength, I'm going to set it
back to one as well. And yeah, let's save everything. And these are the textures. So every single model that
we have inside of here, you can see if you click around, we have the base color,
we have the normal map, and we have the roughness,
texture as well.
19. 5.02 Texture Properties: Let's now talk about
the textile properties. So if we go ahead and open up the base color or the
Albedo texture here, you can see you have things that you can adjust
inside of here. These adjustments are very
important sometimes when you want to fit a models
together in an environment. Because sometimes when
you put models together, they don't look like they are
from the same environment. Maybe you need to adjust
the brightness of them, the color of them, and so on. So it's very nice to
have these adjustments. So when you open
up the albedo or base color and texture
inside of here, you have these adjustments. Let's say this barrier was too
bright for my environment, then you would go inside of
here you can see we have a brightness slider or a
number, and we can write e.g. two, and it takes some time to adjust and you can see it
is a lot brighter now, if I write 0.5 and it takes some time to
adjust and you can see it's less bright. And it depends on what you're trying to do with
the environment. You can play with these sliders. E.g. if I click on this small
arrow to go back to normal, I can change the color of it. So in the hue, e.g. I. Can write 50. So the hue goes 0-360. So 02,300.60 is
the same as zero, so it's 359 would
be the other way. So e.g. if I write
200 and the hue, and this is normal in e.g. a. Software like Photoshop, you
would know what a hue is. You can change the color. You can see now it has
a different color. And I can write e.g. 300 and it will have a
different color as well. Okay, so let me click
back on this arrow here. And you also have
the saturation. You can write zero to D, saturate it and maybe
you want to write 0.5. You can see these lines disappeared because
now it's saturated. If R is 0.5, you can see
it like this as well. We have these sliders very important that you
can work with. Sometimes e.g. down here in
the decals when we add blood. So if you just drag one of
the decals into the world, can see this is blood. And you can double-click
the albedo or base color, and then you can
adjust the brightness. Maybe you think this
blood is too light. I want it to be darker. And you can write 0.5 e.g. here you can see it's
a lot darker now. And if you write one again,
you can see the difference. Also the brightness
curve, the same thing. If you write 1.5, you can
see it's a lot darker now or 0.5 and it's
a lot lighter. So we can play around
with these here. Very important to use when you are designing
the environment.
20. 5.03 What is a Material?: Okay, so, so far we
have talked about the textures and
also the model here. Right now, let's talk
about the material. So the material is what puts all of these
textures together. And then this material
is applied to the model. So you don't directly
apply textures to models. You actually put them
inside of a material before you apply
them to that model. So e.g. if you click
on this barrier, you can see down here in the Details panel it
has a material slot. And this material slot
contains this material. Now you can click
on this icon to find this material in
the Content Browser. So clicking on it,
you can see it takes you to this material. And this is actually
a material instance. If you hover the mouse over it, it says material instance. What is the difference? And let's talk about it
in the next lessons. But for now let's focus
on just the material. Let's right-click here. And you can see you
can create a material. So clicking on it. And I just call it whatever
it's called right now, I just want to
showcase what it is. So you can see that
this is the material. And if I open it up, we get this material graph
or we can add some inputs. And when we are finished, we can drag this material
and plug it into this model. So right now I have this barrier
selected, this one here. I can click and drag it
into the material slot and then I can apply it
on top of this model. So right now this
material is empty. We don't really have anything. This is why it looks so weird. Let's actually go ahead
in the next lesson and talk about this
material graph.
21. 5.04 The Material Graph: Let us double-click
this new material that we have created. And you can see it takes
us to a material graph. And this is where we plug
in all of our colors and textures and so on to
make it look nice. So let's right-click here
and the material graph. And you can see all of these nodes that you can
add to the graph, e.g. if you're working
with a landscape, you can click here and
you can see these are the landscape notes, e.g. you can just click on one
to see what it looks like. And it creates a node for you. And these nodes can then be
plugged in to these inputs. Okay? So this is how you
work inside of here. It takes a whole other course to just work with materials. Some people do this full time as a full-time job
in big companies. So they only work inside of here without working
on anything else. So you can see it's very huge. If you click on each of them, you have a lot of notes
that you can work with. You can create rain, you can create water, and you can create a lot of cool materials inside of here, also working with landscapes
and 3D models as well. Okay, but for now, let's not focus on all of these
complex things. Inside of the material graph. What you can do, e.g. you
can click and drag on this texture and drop
it inside of here. And this will create this texture sample of this albedo or base
color of texture. Now what we can do
is we can click and drag and plug it
into the base color. So the RBG is red, green, and blue channels, and
they make up this texture. So plugging it in,
clicking on Save. And if I minimize it, you can see it gained the
color before it was black. Now it has this base color. And remember, we did take and drag this material
on top of the model. Remember to select it first. I'll click and drag
it on top of here. It will be applied. So if
I open it, I'll begin. You can see I can now plug in a normal map if I wish
to, and I have one. So I can click and drag
and plug it into here. And then plug this
normal map here, and it will give it
that won't be detailed. And if I save here, you can now see my
model looks nice. If you e.g. wanted to
change the color of it or you want to change
the saturation of it. You have notes
like this as well. E.g. if you write three or hold three on your
keyboard and click here, left-click, it creates
this constant. Can also right-click and
search for constants. And you can see you can
create a constant in two vector and constant
three vector, e.g. this is a constant three vector. And with this one, we
can actually change the color of this texture here. So the way we can do
this is the way you put two things together
inside of a material graph, you use a multiply. So if you right-click
and write multiply, you can see this multiply node. You can also do
this by holding M on your keyboard
and left clicking. It will create a multiply
node automatically. So you put these two things
together with the multiply. So dragging this to the a
and dragging this to the b. Now they are put together and you drag this into
the base color. Now we can actually
work with colors here. So if you, you can see
right now it's black. So this one's going
to be colored black. The white color is 111. Just like this, you
can also click and change the values down
here if you wish to. 111 is white, which means
just the base color here. So if I save again,
it's going to go back. Okay? So the way we can do
this is you can click here and you can change the color
if you wish to two, e.g. something like this, very green, I click Okay, and then hit Save. And you can see now we have changed the
color of the model. Now if you want to
desaturate it, e.g. you can right-click and
write E saturation and select this one again to put two things together,
use a multiply. However, you have
this plug-in here, so you can just click
and drag it here. And the fraction means the amount you want
to be saturated with. If I just click and drag
this away a little bit. So the amount we want to
desaturate it with, again, if you right-click
and write a constant, right now we don't really
need a constant three vector. This was just for
changing the color. However, the fraction
is just one number, so a constant will
be sufficient. You can also hold one on the
keyboard and click here, left-click and it will
create a constant. You can see these are
used all the time. This is why you have
shortcuts for them. And if you just
plug it in, right? E.g. I want to do the
saturated by 11 means 100%. Remember to click and drag
this into here, so it applies. And I can see it
is the saturated. If I save, you can see
this will become great. Now it's desaturated. And if I change the
color back to 111, so it's normal and I save
it still desaturated. And if I write 0.5, so it's only half the saturated. You can see it is going back to a bit more color than before. Okay? So this was it for
the immaterial graph. This is very, very
simple stuff I just wanted to introduce to you. But as you can see, if I click on one
of the materials, so if I go down to one of the random materials that has been created
with the mega scans. If I double-click on it, you can see this is the
material from mega scan, so it's a bit more complex
than the simple thing here. But you don't really want
to worry about all of this. This is just wake. So doing their, their material and they
are working great. So don't worry
about this for now. I just wanted to introduce
to you what a material is. And let's jump over to
the next lesson where we will talk about the
material instances.
22. 5.05 Material Instances: Hello and welcome back. Let's now talk about the
immaterial instance. So, so far we have
been working with the material, a normal material. So you can see here it's a bit annoying every time
I have to do this, if you click on this icon here to go back to the
material we created, you can see it's a bit
annoying to go back inside of this material to
change something, e.g. the tint. And you can see it doesn't change automatically. So if I change it to
something here, e.g. orangey, and if I hit Okay, it doesn't change automatically. I have to hit Save before it
changes and it takes effect. So this is a bit
slow and annoying. So we have material instances, they make your
workflow a lot faster. If I go back and set this to 111 and let me close this now
and just click on save. Yes, I want to save this. If I right-click my
material and up here you can see I can create
a material instance. And usually I give them the prefix of MI for
our material instance. And you can see this is
also done with Quicksort. They do this as well. Let's call it new material. If I double-click now on
this material instance, you can see it doesn't
open the material graph. If I open the novel material,
it opened the graph. If I open that
material instance, it opens view here. I only have some settings here. I can't really do
much inside of here. So how can we use this material instance
to do anything here? So what you can do
is let's actually, instead of applying
the main material, we usually apply the
material instance. So taking this material
instance we created, I'm going to apply it
on top of the model. Let's now open up
the material graph. And the thing we want
to work with e.g. we want to change the
tint of the model. What I can do, I
can right-click and then convert this
to a parameter. If I converted this
to a parameter and I call it, give
it a name, e.g. model Tinder or just tints. Just fine. Let us save. Now when you open up
the material instance, if I open it up, you can
see I got a new login here. I can work with the tint now. So I can do this. I can take it and I can now
just play around with it. And you can see it
updates instantly. So this is the nice thing
about material instances. And yeah, it's a bit
ugly with this blurb, but we are going to fix
this in the next lesson. So don't worry about it for now. But what we're going to do is
you can see here the tint, I can now change it instantly. And this is why it's
so nice to work with material instances compared
to a normal material. Okay, so let's go back here. E.g. I. Also want to have a node here or a plug-in
for the saturation. So let's right-click this
amount of desaturation. Let's convert this
to a parameter. And let me just call
it the saturation. And let me put the default
value to one or equal to zero. So it's not saturated
at G saturated at all. And if I go back to my material instance and I look at it here, and I click on this saturation
that just appeared. I can now increase and
decrease the value. And it gives my updates like
it gives it automatically. So I can instantly
see is happening. So I don't have to save anything
to see what's going on. This is really
nice to work with, and this is how you create
material instances. You can also do this with
these textures samples. So you can right-click and you can convert
this to a parameter. Let's call this one base color. And it can also right-click
this normal map, converts to parameter and
call this one normal map. And the nice thing about
this is now let's Save, it's going to take
some time to save it. Let me take another model, e.g. I want to have this
barricade here. So if I take this
here beside it now, now let's go back to my
material that I created here. And I'm going to apply the material instance for
this one here on top of this. And I'm going to take and drag and plug-in my material
instance here. So now I can see
it's a bit messed up because I'm using
the wrong textures. But what I can do now is I can open up my material instance. And now you can see we
converted these to, to a parameter as well. So I can click on this
for the base color. For this barricade. I can plug in this here, this texture, and this
normal map as well. And I can also go over
to my metal barricade. For the muscle barricade, what I can do is I can actually
go back to the concrete. I need to create a new
material instance. So I'm going to double-click or right-click this
material instance. And then I'm going
to duplicate it. I'm going to call it
material instance, e.g. metal barricade. I'm going to drag
this on top of here. Now I'm going to double-click
this metal barricade, go to the metal
barricade folder, and then I'm going to drag the correct textures for its ok. So now I can see it is
correct now because I have now plugged in this metal
barricade on top of here, and I have plugged in the
other one on top of here. Now the cool thing about it, you can see I only
have one material, this is the main material
or both of them. And then I have the
material instance which derives from this material
here, the parent material. I have these material instances. And for the barricade, e.g. I. Don't want to desaturate it. I want it to look normal. And for this other one, I want to desaturate it. So I want to write
it, right one, e.g. you can see I can change values easily and it is really
fast to work with. This is why we create
material instances. As for optimization, it's
not really doing much, but it's just going to save you a lot of time when
you have a lot of models and you can change
things quickly like this. You can also see it's done
with the Quicksort omega scan. So if I click on their
material instance, I click on their material
instance and I open it up. You can see down here it
says parent material. And if I click on it here, if I click on the icon down here to take it to you here
to the Bunsen browser. This is the main material. If I open it up, you can see
this is what it looks like. And if I double-click
this as a function, you can see what it
looks like as well. So this is the parent
material that makes up this material instance. Alright, so now that we have
talked about all of this, Let's go ahead and delete this, these materials that we created because we
don't really need them. And I'm going to delete
these maps from the level. Well, this decals click
on G to view the icon, and click on the
icon and delete it. Let's go ahead and
save everything, and let's fix the textures
so they don't become blurry.
23. 5.06 Adjusting the Texture Size: Okay, So sometimes you can
see when I pull out that this model here and level, sometimes it becomes blurry when I'm working
with these textures. And this is because you are using the texture pool memory. So in Unreal Engine, you can't just take this these textures and use
them in eight K resolution, like your whole level consisting of eight K
resolution textures. Yes, it will look very nice. However, you have a memory
pool for the textures. Your game will lag and no one wants to play your
game because it's so laggy. So not only does your
game need to look good, it also has to perform. And this is why it's
sometimes becomes a bit blurry when you change
some settings. I don't know. It just happens randomly. Sometimes. If I
change it back here, sometimes it gets blurry. And this is because
you're using up the texture memory pool and you have to reduce these textures. Now, this is usually done in the game
optimization section. We also have that in the course. However, I need to do this
now or else we will see all of these blurry
textures all the time while we are
designing the level. And that will be a bit annoying. So let's start with
this barricade here. Let's actually delete this here. Let's start with
the first 3D asset. Let's take out this 3D
assets into the level. And this is what
it looks like also viewed from the other parts. This because of the
sunlight, it looks better. Now what you can do is you can
open up the first texture. And Fortnight, as you can see, it is an eight K
resolution texture, and it is using 43 mb. Unfortunate three megabyte
is a lot for one texture. Remember you also
have the normal map. It's using up 87 mb and it's using 43
megabyte here as well. They just, this model is
using so much memory, about 160 megabyte or
something like that. Now click on the first one. What you want to do is
here in the LOD bias, you want to change this
so you're still keep the detail what you are
reducing the texture size. So if you write five, e.g. something very high, you can see it takes
some time to load, but when it loads, you can see it changes details
inside of this modal here. Another one, very
clear to see it here. If I take this other
barricade here and I open up the base color and write
five or four, e.g. for you can see it
becomes blurry. It's not like before
the detail is lost. And if I write zero, you can see the detail is back. Now what you want
to change it to is something that still
keeps the detail, but you are reducing the
texture size and we don't use so much memory and the game will become optimized so
far, right, one, e.g. and you can see here, it's now a fork, a texture. It is important as
an eight K texture, but right now in the game, it is a fork, a texture. You can see there
is no difference. If I write a zero again, a frog one, there's not really
a noticeable difference. So why, why do you have it as an eight K
texture in your game? It doesn't make any sense. So let's make it into two. Now. If we change it to two, it will become into
a two k texture. So you keep getting the
half of that number. So if you write zero, now, if you're right too, there's
still no difference. So took a texture is fine. If I write three now, this is now a one k texture. And if I write for, it is now 500 pixels. And now we can see
it's very blurry. So this is not the way to go. I think with this one, since it's a large model, I want to go with two. So a two k texture. Usually it's still
very high for a game. Usually in games we
use one K textures or most models and just a few ones we're using to
create textures. And this is because
the model is large, so it's maybe nicer to
use a two k texture. So now we can see we reduced
this resource size to 2000 before it was 43,000 you, so you can see how much
resource it's using. But changing it to two here, making it into a two k texture. You have to do this as
well for the normal maps. So changing it into two, making it into a 2k a texture, and doing it as well for the roughness texture,
just like that. So now you can see instead
of using 160 megabyte, we are using two
plus five plus two. So we have reduced it under ten almost or maybe
it's ten right now. You can see how much
we have reduced it and it still looks nice. It's not because it looks awful. And we have to do this
for every single model. So now we did it for this one. I'm going to do it for
another one and then you have to do it for
all of your models. So you have to do it for all
of the static meshes here. Again, just like before e.g. this one here, drag it out
and take a look at it. Open up the texture here. And the LOD bias, e.g. a. Ride three. This will change it
into a one k texture, I believe, one k. And you can write zero again to see what it
looks like before. And then changing
it back to three, and there's really
no difference. So what I want to
do is I want to test if I change it to four, so 500 pixels
instead and see what it looks like and it
still looks really nice. I think maybe for this one, since it's a smaller model, I want to go with
a four LOD bias. So if I write zero and
I write four again, just to make sure I
think it's looking nice. I'm going with four, so 500 pixels instead
of a wonky texture. And you can see it's
still looking nice. Now it's using 100 kb. It's very low before it
was using 43,000 kb. So you can see how much
we are optimizing this. Remember, you have to
do this as well for the normal map and the roughness
so far in the LOD bias. So writing for here and opening
up the roughness as well, and writing for here as well. And if I close it down now
and I save everything, It's sometimes it takes
some time to save because these are
very huge models. They are eight K textures, so we need to wait for
it a little bit to save. Alright, so now it
has finished saving, and as you can see, it still looks really nice. Now it's game optimized. So don't just go with eight K textures and use
up all of the memories and the models will become
blurry because you are using too much resources
on the textures. As you can see, we reduced
it to 100, almost 200 kb. So really, really nice. Now you have to do this
for all of your models. Just switch between
the LOD biases and see what looks
nice and what doesn't. And you have to do this
as well for the plants. So the plants, as you can see, you also have textures here. But you can do again without one of the
plants into the level. Take a look at it closely. G, to remove the icons and
remove all of these markings. And just change
again these textures to see what it looks like. The bloodstains, the same
thing, but the detail, the decals here in the level, then open up the textures again, change up the LOD biases. And I'll be back with
you and show you what I have done when I'm
finished with all of this. Right now I am finished. I've placed all the
models and I have reduced the texture
sizes for them. And as you can see, they're
still looking the same, but now they are a lot
of game optimized. So if I click on e.g. one of the 3D models,
the fire hydrant. You can see I reduce this
LOD bias to a one k texture. And the fire hydrant is still
looking detailed and nice. So this is what I
want you to do. Go in every single
model here, e.g. for the stone, one K texture is usually what we use
normally for games. However, if you can see that
something can be reduced to a half k texture to that e.g. for this stop sign here, if I click on the icon
here to go to it, I open up the albedo. You can see I have reduced it to a half k because you can see
it's still looking nice. We don't really need
a 16k a texture. So whenever you can
reduce it to half K, go ahead and do that. And it is usually
low or small models. Usually with large models, you need maybe a two k textures. So for this one,
if I click on it, I click on this icon, go to it in the Content Browser. And if I open up the albedo, you can see this one is
a to K texture because if I make it into one case
or if I write three here, you can see it becomes blurry and it's actually
not looking good. So I will make it into a
two k texture for this one. So usually for larger models, you'll make to create textures. But as a standard, you go with a one k texture. And if it's looking bad, try to K. If it's still
looking good with a half k, go ahead and go with the half k. So go ahead and click
on all of them, also the blood and so on. So everything, just
put them here in the level and then go ahead
and change up all of these. So far. I have done a 16k
a texture as well. We can always increase
it when we are painting the ground right
now, we can't see it. If you want to see it, you
can always click and drag this asphalt to this ground and you can see
what it looks like. This is naturally what it
looks like because you can see the cracks are way too large
if you double-click it. And in the material instance, you can click on
the tiling here, apply it, and open it
up for the tiling, e.g. 1010 here and the x and y. And you can see now it
looks a bit more normal. So it was a bit too
large for this ground, which can see what
it looks like when I made it into a one k texture. It still looks nice. I go back to a, to k1k, half a K, maybe it
becomes a little bit blurry now in half k. So
I'm going back to point k. They'll try to, try to reduce the texture
sizes for everything. And for the tiling. I'm just going back to 11. We will change this later. I'm going to apply it
again or remove it here. And let's go ahead. You can, if you want to remove
it from the ground here, click on the ground and click on this small arrow and it
will reset it to default. And once you have reduced
everything, save your game. And let's move on
to the next lesson.
24. 6.01 Importing the Ground Mesh: Alright, now that we're done
with all of the basics, let's go ahead and delete all of this and start
eating environment. To delete all of this
very quickly instead of clicking on every
single thing here, let's go over to the outliner. Select the, you can also delete the floor here we are
going to replace it. So clicking from the floor hold Shift and then click on the last one to select
everything here. As you can see, however, just make sure you're
not deleting things. You don't want to delete e.g. the post-process volume. We can hold Control and click it to remove it
from the selection. Just make sure it's
the things you want to delete and then go
ahead and hit Delete. And now we have deleted
everything except for the lighting and the
post-process volume. And I'm going to
drag this one into the lighting folder just so I
don't delete it by mistake. We are going to replace
all of this later because we have a section in the course
where we do the lighting. So this is just temporary
so we can actually see the level because if we
don't have anything here, everything will be dark. You can see if I
delete everything, the level is dark and
we can't really work. So clicking on Control
Z to get it back. Okay, so now we are ready
to import the street. So before I do this, let me go over to
the content folder. I'm going to right-click
and then make a new folder. You can call it assets or 3D
models or whatever you want. Inside of here, I
have given you cost materials under this
video on this website. So if you take a look and
go ahead and download it, I have given you cost materials
and inside of here you have something called SM
street. And SM street. Sm stands for static mesh. This is the short for static
mesh in Unreal Engine. And this is just
the street 3D model that I have made for you. So click and drag it into here. Just make sure some
people get confused on sometimes why they can't drag it into the
Content Browser. Just make sure this
is not a zip file. So if you get it as a zip file, when I give it to you, make sure to extract it to your desktop or
whatever, any place. Just make sure to
extract it from the zip file and then drag this into the
Content Browser and the folder here right now
I'm in the assets folder. And this FBX import
option will appear. And we don't really
want to change anything here except
for this one. It will create a
material automatically. However, we are going to apply a material to it so we
don't want to create one. So I'm going to hit do
not create a material. And also we don't really have
textures for it right now. So I'm also going to uncheck import textures and
everything else is fine. So just go ahead and click
on Import are important. All that is fine. And now we can see we
have this SM street. You can click and drag
it into the level and you can set the
location to 000. That's what I like to do. So it's in the center
of the viewport or of the level rather. And this is the streets. So this is the 3D model
that I have made for you in the 3D
modelling software. And this will be the
beginning of our levels. So now that we have
the street place, let's go ahead and place the sidewalks in
the next lesson.
25. 6.02 Adding the Sidewalks: Alright, so to
continue the street, let's go ahead and
place the sidewalks. So here in the
mega Scans folder, if I go to three assets and in the modular
concrete median kits, here we have the sidewalk. So you can click and drag
this sidewalk into the level. And here it really helps if you have this snapping enabled. Remember this is the
movement Snapping. So when you drag you snap here, I'm going to increase it to
something like 100 or 500. Let's try 100 for now. This is just to make
sure it snaps together. So I'm going to drag the
sidewalk anywhere here, maybe the start of
this here, e.g. you can hold Alt
on your keyboard. While holding Alt, you
can click and drag and this will copy
this model for you. And you can see it's not
really snapping together. There is a small distance, so maybe we need to
change it to 50 instead. And then we can now snap them
together, just like that. Now, the sidewalks
are snapped together. And we have to do this
a couple of times. Now you have two sidewalks, you have this one and you have the second model,
which is this one. And you can see they are a bit different and usually we add different models to break the repetitive pattern in games. So we don't like to copy paste the same thing because it
just doesn't look too good. I'm going to copy this or
take this second model here and place it and
continue the sidewalk. So just go ahead and just
make it a bit different. E.g. this one. Now you can hold Alt, click and drag and
copy this over here. You can maybe take this again, hold Alt, click and drag. And here we go. Now, if you want to
copy it really quick, you can always just
select everything. You can select everything by clicking on one and then holding control and then clicking
on the other ones. And you can always hold Alt and copy paste it
to the second one. And if you want it to
look a bit different, you can hold e or click E
and rotate it 180 degrees. And you can place it
just like before. Maybe I want to delete this one. I want to delete this one. And you can, I'll copy
this one here, hold Alt, copy it here, and maybe
copy this one here. Okay, so it looks a bit
different that unlike the models to look the same, look copy pasted, this is looking now a lot
better if you wish. You can always use this as well. I'm not going to use
them for my environment, but you can always
use them here, e.g. if you wish to, however, maybe I'll use them, maybe not, but for now, I will
just not use them and see what happens later on when we are designing the level. And yeah, that was it
for the sidewalks, even though we a bit
of a space here, it doesn't really matter. We are going to work with
the landscape later on. So we have this landscape tool, so it will fill this whole area. So don't worry about this
small space for now. So this was it for
placing the sidewalks. So let's move on to
the next lesson.
26. 6.03 Creating a Blend Material: Let's now talk about
the blend material. So what a blend material is, we can put different surfaces together to break the
repetitive pattern. So e.g. you can see here, I imported the surfaces,
define asphalt. Asphalt and the correct asphalt. E.g. if I click and
drag this material for the finance felt on
top of this street, you can see this is what it
looks like, and obviously, it looks like the
tiling is not correct. This needs to be a
lot smaller because right now it looks
like low resolution. But imagine if it just
looked like this. And this just looks especially
here for the correct one. If I click and drag
this correct one. And let me actually
just reduce the size if I double-click on this
material instance, like on the tiling and e.g. let's write, I believe it
was 12, 34 this street. And I can show you why later on. But you can see here, it
looks very repetitive. I can see this line repeating over and
over and over again. And it just doesn't look good. This is why you blend multiple
materials together, e.g. this muddy asphalt as well. If I click and drag
it on top of here, and again double-click on it. Set the tiling to
something like 12, 30. And if I zoom in, you can see this part here
repeats with this part, this part, this part. And you can see it's repeating again and again,
these boxes here. And it doesn't look good. So this is why we
create, lend materials. So to create a blend material, Let's right-click and open
up this little bridge here. So opening up Quicksilver bridge and inside of
Quicksilver bridge, just go ahead and click
on any surface here. So going to surfaces and just clicking on one
of them by random e.g. this one, you have this button here before you download
any of these surfaces. So just select a random one and click on this
button down here. This will create a
blend material for you. It will mix multiple surfaces together so you can
have some variation. So this streets that we have, we are going to paint it with
the final assault rectus felt and body asphalt to
make it look different. So to create a
blend of material, you have to select your three surfaces inside of the engine to easily do this. You can see they are
in separate folders, so it's a bit difficult
to select all of them. You can see every
surface starts with MI, which is the material instance. If I go to the
surfaces folder and I search for MI for
material instance, you can see now I can see
all of the three surfaces at once and it will be a lot
easier to select them here. So very, very important when
you create a blend material. The first material
you select will be your base material that will be filled on top of the street. So I want to have
this fine asphalt as my main base material. And the second one on top of
it will be the correct one. So I'm going to hold control
and click on the second one. And while I'm holding Control, I'm going to click
on the third one. So this will be the top layer, this will be the mud
on top of the streets. Again, select the first one which will be
your base layer, that will fill the
whole thing as a base. And then hold Control. Select the second
one, the third one. The third one will be
the last top layer. And then clicking
here on this button, and then clicking on
Create Material blend, you can of course just change the name for the
material if you wish to. E.g. you can call it BIM for blend material and we
can call it a street. And it can also choose
where you want to save it, but I'm just going
to save it here. It's fine. And then clicking
on Create blend material. So right now every
time you do it, it actually gives you
this error saying current material
lending setup doesn't support more than three
material instances. And this is, I found out after researching a bit
because this is actually the first time I'm
doing this inside of version 5.2 of Unreal Engine. It's working in 5.1. So I don't know why this is bugging, but after researching, I've found that this is
a buck right now in 5.2. Because you can see I
have selected three here. And if I don't select
anything and I click on it, you can see it says select two or more material instances
to perform this operation. And if I select two e.g. this and this one, and try to do it. And it says it doesn't
support more than three, which doesn't really make sense because I have
only selected two. This is working in
Unreal Engine 5.1, but for some reasons
bugging 5.2, that is okay. We can do it manually quickly. So if you just select
one of them, e.g. the fine asphalt
as my base layer. I'm going to just
select one of them. Click on this button again and create material blend again, give it a name if
you wish to mind, is called PM street. And create a blend material. And you can see here it creates this folder for you,
the blend materials. So we can now go ahead and
close this down for now. So inside of this
blend material, remember to click on the X for the search words so we can actually see what's
inside of here. And let's double-click and
open the blend material. So what the blend material is, blends multiple
surfaces together and as you can see here
in the blend material, we have a base layer, then we have a middle layer, and then we have a top layer. So before we talk about
the properties here, Let's actually fix
this issue that we had here in the base layer, we have this fine asphalt. That is correct. For the middle layer, we want the correct asphalt. So clicking on the
correct asphalt, I'm going to minimize
this a little bit here. And for the correct as well, this is the albedo
or base color. We can click and
drag it into here. And for the normal map, we can drag it down here. And for this last one, we can click and drag it here in the middle,
just like this. Okay, so now this is fixed. Let's go to the model layer. This is the final one, this is the top layer. So before we can click and
drag them on top of here, we have to apply them
just like ease up here. We have to click on the
top layer, the middle one. And if I just maximize
it a little bit so you can actually see
the names of them. It's easier. So this is the Albedo map and we
can click and drag. This is the Albedo map. We can drag that into the slots. And for the ARD
map, it's this one. So click and drag it into here. And the last one
is the normal map. Click and drag it into here. So now it is correct. This is what it was supposed to do when
we click the button, but for some reason it's
bugging right now in 5.2. But they'll probably fix
it because remember, this version of Unreal
Engine is actually in preview and it's not
fully, fully released. So you can see here
it says preview one. So they're probably
going to fix it quickly. But you can do this once
they have fixed it, right? So now let's save everything. And now we have
this blend material which it has created for us. So before we paint this
material on top of our street, let's actually go ahead and talk about the properties
that it has.
27. 6.04 Blend Material Properties: Alright, so here we are
inside of the blend material. And remember the blend
material is simply a material instance which we have been taking a
look at previously. And this material instance,
the blend material, has all of these properties
which we can work with. So first up here we have some adjustment layers
that we can work with. We have a puddle layer
where we can actually paint a puddles and water on the
ground, which is very cool. Then we have the tiling and
the tiling is very cold, we will be using it
because you can see if we don't tile the texture, it is very, very large and blurry and it doesn't really
make sense right now. This is why we have to tile it. And you also have
other controls, e.g. if you apply this
adjustment layer, if you click on it
for the base layer, you can see you
have more controls that you can work with, e.g. the roughness, this
is how it looks. So if I take this
blend material and click and drag and apply
it on top of the street. Now we have the blend
material applied. You can either do it like this
or it can click and drag, select the street first, and then click and drag this material here in
the Details panel. So this is the same thing
that you're doing. So e.g. here for the roughness for the base layer ticket here and write zero.
Now it's very smooth. So if you go close
to the street, you can see it looks like
it's it has been raining. And if I set it back to
one, it looks rough. Again, the roughness you control depending on usually if
it's a rainy weather, you write something
like 0.4 e.g. or 0.5. So you can
see it's a bit wet from the rain and it gives
it that cool effect. And let's put it
back to one here to have all of these
properties and we will be working with those during the design
of the environment. So for now, let's
disable this one. Let's close it down. Let's save everything,
and let's move on to the mesh painting tool.
28. 6.05 Mesh Painting Tool: In order to paint on
this street here, we need to use the
mesh painting tool. So remember we made this
blend material consisting of three different materials and in order to paint the other, the middle layer
and the top layer, we have to use the
mesh painting tool, clicking up here, and then
selecting mesh paints. And now instead of
the mesh bench, you have to click on paint. And here you can see we
have different channels. So first up here
we have the size. So how large do you
want the brush to be? You can see if you
increase the size, increase the brush size as well. And right now when I move
my mouse, you can see it. It's very weird. It's actually not the painting
on the street itself. So I have to go back
to the selection mode, click on the street itself. So click on the mesh and then go back to
the mesh pin tool. And you can see, if
you go back to paint, again, you can see now it's
painting on the ground. So remember to select the
mesh you want to paint on. Now it's painting on the street and you can see if I
increase the size here, it increases the
size of the brush. I can also increase and
decrease this strength in which it paints on the ground
and the falloff as well. You can increase
and decrease it. And you can see
this inner circle, There's an inner circle
creating this fall off. Okay, so in order to paint the middle layer
and the top layer, make sure you have this black
color on the paint color. You can switch between
them by clicking here or clicking
on swap up here. Just make sure the black
one here is in the front. And this will make your paint. If you click on
swap and you have this white one you want
to be able to paint. So just make sure you
have this black one here. And I'm going to decrease
the size a little bit and increase the strength
to one so you can see it. And now I'm going to
remove those channels. So the red channel,
very important here. The red channel is
the middle layer. So if I open my street, my middle layer is
this correct asphalt. So if I am going to paint now, you can see I'm Mel painting
the cracked asphalt. And if I disable this and
enable the green layer, and maybe you have
guessed it already. The green layer
is the top layer, which is the muddy asphalt. So I'm going to take
this green layer, which is the top layer. And now I can paint, and this is the muddy asphalt that I'm painting currently. Now you might wonder
what is the blue layer? We only have the base layer, then we have the middle layer, which is the red layer. And then we have
the green channel, which is the top layer,
which is the mud. So what is the blue one? The blue one is actually
puddles and water. So right now you can see
nothing happens when I paint. This is because in
the blend material, you have to go to the top and enable this one,
use huddle layer. And now you can paint. You can see I've
already painted here and it appeared
when I enabled it. If I hold Shift and I
paint it, deletes it. So if you hold
Shift and you have the respective channel
selected, e.g. the green channel
is the mod one. And if I, you can see if I tried to hold Shift and
erase this, I can't. But since I only have
the image selected, I can hold Shift and
erase the mud layer. And if I want to erase this one, I have to select
the red as well. You can have multiple
channel selected, hold Shift and delete it here, or you can always click
on Remove here as well. That works as well. If you want to fill one
layer, you can e.g. select this one the
correct asphalt, and then select Fill and it will fill it on
the whole thing. You can always click
Remove again to remove it from the mesh. So clicking on the blue and
this is creating puddles. And you can see a very cool
looking puddles right now. It's looking very
cheap and bad because this underneath layer here
is not tiling correctly. We have to fix that
in a later lesson. But you can see how
cool this puddle is. Very easy to make and
it will look better. Wants this, the street
actually looks good. Let's hold shift and let's paint here to delete
the puddle layer. You can try to play
with the size. You can try to play
with this string. So if I reduce the strength
and I take the red channel, which is the correct asphalt, I can also take the
falloff down a little bit and you can try to
paint and see what happens. Maybe take the strength
even further down. You can see now it takes a
lot more effort to paint. And sometimes this
is good because subtle painting changes is a lot better than
very harsh ones. This look more realistic. Yeah, and that was
it for the pen tool. So very, very easy to use. You'll switch between
those channels, make sure you have the
black bar selected here. And then you can increase
and decrease the size, the strength, and the
fall off as well. And you can paint, there's
something you don't like. You can always select
the channels, these e.g. hold, Shift and paint
to erase them here. Remember it can also increase
the strength to erase a lot faster though in
order to paint on a mesh. If you just paint something e.g. this correct asphalt, you
can see now I'm painting. In order to paint on it, it needs to have vertices. So if you have a custom
model without any vertices, and I can show you
what vertices are if you have not modeled before. If you don't have
vertices in your, in your model, it will
not be able to paint. And let me actually show you, here is 3ds Max. This is where I modeled this street here you can see this is the
street I modeled. Now if you click on it
and then I right-click, convert it to an editable poly. And I select this one
which is the vertex view. You can see all of
these dots that I can see is our vertices. And this is actually
what you're painting on inside of Unreal Engine here. So if I did not
have any vertices, you would not be able
to paint anything, e.g. as a test, I can show you
here if I create a new plane, so selecting Display and
creating a new ground. Let's say I go to the
details here and I decrease the length segments
and the width segments. And I just put default
material on it. Actually, this
Street doesn't have any vertices only
here in the corners. So if I add some
segments to it, e.g. five segments and five segments. This way, I right-click, convert it into
an editable poly, and I select the vertex view. Now we can see this one has a lot less vertices
then this plane here. So when I paint on this ground, it's going to look
very low resolution. This is because when I paint
on the ground here, e.g. it's not going to show anything. It's only going to paint when
I paint on top of a vertex. Here, as you can
see on my grounds, if I have this paint selected, you can see these
small dots that I can see are actually my vertices. So if you don't
have any vertices, you will not be able to paint anything with this
mesh painting tool. Now very, very
important to note. Just make sure if you
have a custom model, makes sure to add
some vertices if you want to paint on top of it. And with that said, let's go ahead and hold Shift
and I'm going to erase everything now that we know how to use the
mesh painting tool, Let's go back to
the selection mode and let's move on to the next
lesson to fix this tiling, because right now it
doesn't look good at all.
29. 6.06 Adjusting the Ground Tiling: Okay, so now let's just this ground tiling because right
now it doesn't look good. So in order to
adjust the tiling, you can open up the
blend of material. I can actually just remove
the puddle layer for now and remove the
adjustment layer for now. We're going to work
with those later on. So down here, you can
see for the base layer, you have something
called tiling. And we're telling is you
can title this material so it doesn't look so
low resolution. So e.g. if I write ten by ten, you can see it looks
a lot better now. And if I go close, let's say I'm a character standing
on the street. And if I look down
on the ground, it looks a lot better. However, you can
see, if you are, if you have a good eye for art, you can see it's still
stretching here. It's not really
looking good at all. It's still looks low
resolution and I can show you how to find the
correct tiling for this. So e.g. I. Know what the tiling is right now because I
designed the streets. So here in my 3D software, if I click on the
street I designed, you can see that the length is 30 m and the width is 12 m. So if I go back here
and I write 12 and dx, because that is the width
and the height, 30. You can see if I
am a character now standing on the street
and I looked down, the street is actually
looking correct. So this is 12th by 30. And I know this because I
designed the street and I made it 12 in the width and
30 and the length. And that is why
it is 30.12 here. However, let's say
you didn't know. Let's say you've got
a custom model and a custom street and you
have no idea what it is. So the best way to do
this is if you go up here and you create a new
shape, you create a plane here. You create the standard plane
that Unreal Engine gives. You. Can see it
creates it down here. So in the location you can always write zeros, zeros, zero. To bring it up here. I can just move it up slightly. Now, this is the standard plain
edit is one by 11 by one. It's going to show you
the correct tiling. Now if I just write
one by one here, this is what it was before. And I take this here and
I apply it to the plane. So now you can see
what it looks like. This is actually what it
needs to look like correctly. So you can use this as a
reference and then you can make the tiling on your own
street the correct one. So let's say you didn't
know that it was 30 by 12. So what you can do here
is you can double-click, right-click here, and
you can duplicate this. And this one again, apply it to the
street down here. This is our main material. And you can apply this
one on the plane up here. So now they are using
different materials. And the reason I do this now because I want to
adjust my tiling on the ground beneath it
without adjusting my reference. Which I can do here is go
to my main material now. And I can go down to
the base layer tiling. And now I can say
e.g. 1010. Now you can see I'm not adjusting this. When I'm adjusting
the tiling down here, I'm not adjusting the
tiling up here because this one is the other
blend material. I'm actually not affecting it. So the best way to do this is you can take a look
at the reference. You can even remove
the snapping and bring down the reference
right above your own streets. Then what you need to
do is you need to tell your own street like
this reference. So take a look at this reference and tile it as good as you can. E.g. you can write ten by ten and maybe you can
take a look at it. You can see here, this here
is very stretching the y. Maybe you can adjust the y so it needs to be a lot higher and
maybe something like 1020. And I can see it
gets a lot closer, but you can see if I reduce the camera speeds so I
don't move this fast. You can see this one's
still looks low resolution, so you still need to
tile it a lot more. So maybe in the y you can say 25 and it looks a lot better, but still, this
is how you do it. You keep tiling and
tiling until you are very satisfied with both. The reference is looking
compared to your own street. If I write 12 by 30, which is the correct one, you can now see they
look similar together. And sometimes if
it is hard to see, you can compare similar
patterns here on this mesh. So e.g. you can take a look
at very, very small detail. So e.g. these stones here
on the asphalt can try to compare them to the
Stones over here and see if they
are similar sizes. So very good to look
at the patterns as well and see if they
actually fit together. So e.g. this part, does it fit with this part? And if it's too large to small, you can adjust the
layer as well. But that's how you do it. This is how you
take a reference. Just use the plain from Unreal Engine and compare it with the model
you are working on. When you are satisfied, you
can delete this plane here. And you can also
delete this other copied when material because
we don't need it anymore. Remember that you also need
to tell the other layers. So this was the base layer, and now you go to
the middle layer. Now these are all the same, so 12 by 30 and the
top layer as well, toilet by 12, 30. And let's save everything. And now if we go back and
select the mesh painting tool, paint, and we select
e.g. the red channel. And let's actually
go back to Select, select this street,
go back to paint. And now I'm going to
increase the camera speed because now it's very slow
and decrease the size. Now if I paint here, you can see it looks a lot
better if I go close to it. Now it looks like
the correct size, as well as the multi-part. If I paint, now,
I go close to it. It looks a lot more
correct than before. Now, let's delete everything. I'm going to click Remove here. I'm going to go back
to the selection mode, save everything, and now we're ready to move on to
the next lesson.
30. 6.07 Adjusting the Ground Textures: Before we can paint
on the ground, we have to adjust the colors for the surfaces so you can see if I go back to the mesh pains, I select my street
and I go to paint. And let's e.g. paint this layer first, the cracked asphalt. And let's also paint the
other one, the mud here. And you can see
these two surfaces. You can clearly see that this
surface is not the same as the street and it doesn't
look good when we paint the correct surface
on top of the base surface. So the goal here is to make this correct surface look like the same as
the base surface. So we can blend them
together and it looks like one surface, one streets. And also I want to adjust
the brightness and so on for the smart because I think it is too bright for
this environment. So we have to adjust this
first, I had to do this. Let's go back to
the selection mode. Let's now open up the blend
material that we have made. And inside of here, up here you see we have
adjustments that we can take. So we have the medullary
adjustment layer just met and top layer
adjustment for the base layer. I am satisfied, so I'm not
going to change anything. I wanted to change
this middle layer to fit the base layer. I'm going to click here on the middle layer adjustments and enable it here to the right. And do the same thing for
the top adjustments as well. And you can see when I
enable the adjustments, these options down here at Pier, which was not there before it, and see if I disable
it, they disappear. And if I enable it, they appear and now I have
more control over the color. So down here in
the middle layer, Let's start with
the correct asphalt here and adjust this. So over here what we
want to do is we want to take the controls and
the tint for the albedo. Remember the albedo also
means the base color texture. So if I click on
the small arrows, you can see we have numbers
so we can play with e.g. such the saturation
of the surface, the brightness, the contrast, and also the colors. So the red color or green color, the blue color and
also the Alpha. So the way to do this, you can see when I play
with the controls, I can reduce and
increase the saturation. I can play with the
brightness and so on. And we have to make it
fit the base layer. And we can actually do
this very easy if I just write one as
default like before. The easy way to do this is if we click on the
link mode up here, then we go to buffer
visualization and click on base color. And the reason we do this
is now we have eliminated all the lighting and
all the other elements. And right now we're viewing
the true base color. So this is what it looks like. So if we can make this base color of the
correct asphalt look the same as the base layer here and the base color visualization. Then when we go back
to the live mode, it will also be the same. So this is a very
easy way to do it. Going to buffer
visualization like on base color and try to adjust them so they fit together here. Alright, so to start with, the first thing I can
see is that the crack, the asphalt is way brighter
than the base layer. So over here, the brightness, we have to reduce
the brightness. So if I click and drag, you can either write
a number e.g. 0.5. You can see it becomes darker, so it is a higher
value than 0.5. The way I do this, I
don't write numbers. I just click and drag and
adjust the slider like this. And when I'm, when I'm
satisfied, I stopped. So if I just slide it like this, try as best as possible to have the same brightness
as the base layer. So maybe it's something
like 0.63 like this. I am satisfied with that. And what I can also
see is there is a bit of redness inside of
this correct asphalt. So down here at the red color, you can increase or decrease
the red color as well. So I'm going to go back
to default as one. And then I'm going to
reduce it slightly. Not much, just slightly to
see what it looks like. Something like this, e.g. 0.93, okay, and you can
see it already looks nice. So before if I uncheck those, this is what it looked like. And if I take them again, this is what it looks like now. Now, let's go back to the, let's go back to
the live mode here, and let's go to
the Mesh pen tool. I'm going to paint this correct. The asphalt just slightly
on the ground to see what it looks like
when I painted suddenly, I'm going to reduce
the strength. I'm going to reduce
the size as well. Then actually, not this one. I have to paint the red channel. I'm just going to delete this by holding Shift and painting, selecting the red
channel painting that cracked asphalt just
slightly to see what it looks like when it blends in with the
other surface. You can see already looks nice, almost looks the same. However, you can see if I look in this angle
on the lighting, I can see the difference
between those two. If you remember from
the previous lessons, the way it's
affecting the light. The lighting like this is
because of the roughness. So if I open up
the blend material again and I scroll down, you can see we have this one, middle layer roughness maximum. If you increase and decrease it, you can see it helps
on the environment. So this is the roughness. Remember I said the
roughness is our wet. It looks so if you decrease
the roughness a lot, it looks like it has
rained on this spot. So we have to adjust it slightly so it
fits the environment. So it was one by default. I'm going to reduce this
slider slightly up and down, just adjusting it
until I think it fits. I think something
like 0.85 is fine. Just like that. And you can see it looks
a lot better now. So this is what it
looked like before. And if you check it, this
is what it looks like now. So now it fits a lot
with the environment. You can also see it looks like
a part of the base layer. So if I zoom in, you can see now they fit nicely
these two layers. And we can paint them on the street and give
it that variation. So very, very nice. Okay, so now this is finished. Let's go over and
adjust the mud layer. So let's save everything for us. Crash all of a sudden. And let's go over to
the top layer now. So for the top layer, again, remember to enable the
adjustment layers up here. Let's go down and
the top layer here. And let's enable the albedo
controls and albedo tint. And for this one
initially again, it is very bright. I'm not going to
fully work inside of the buffer visualization
because I don't want it to look 100% like
the base layer. I just want them to be a bit darker than what
it is right now. So I'm actually going to eyeball it here in the lead
mode right now. And I'm going to
reduce the brightness. And I just want darker mod, I don't want it to
be that bright. Maybe it's something this and
you can see it's very red. So I'm also going to reduce the red color here so
it fits a lot better. Now maybe it's something
like 0.776, just like this. And again, I'm going
to play around with the brightness and
maybe 0.0, 0.25. I want dark mud like this. And again, you can see it looks a bit weird under lighting,
just like before. Remember this is the roughness and before I actually
work with the roughness, let me try to make
it fit better. So now that we have eyeballed it to make it look like this, Let's go over to the
buffer visualization and base color again, just to make it fit a bit more. And I think there is
slightly blue color. You can see the base
layer has more blue. This has more green in it. So to make it fit better, I think I'll increase
the blue slightly. You can see when I
increase the blue, it fits a bit more with
this, this street here. So not too much else, it will look too blue. So I think if I
decrease it, maybe 1.1. So very, very slightly. If you write one,
if you write 1.1 to see very, very
slight difference, almost not noticeable, but
it's still noticeable and it helps you giving that effect to fit the environment better. So let's go back to the
live mode and let's go ahead and adjust
the roughness here. So if I click on the
roughness, top layer, roughness max and I reduce the
roughness until I'm happy. So it can reduce, reduce and increase it, and see what it looks like
compared to the environment. And I think something like
0.8 is fine for this one. You can see this is
what it looks like. Again, I like to go
back to the mesh paint. I like to paint it very
subtle to see what it truly looks like because this is not how we want to paint it later. What we want to pin it
is very, very subtly. So if I again, use very
subtle strength and size, and I select the green
channel for the mode. And I just paint slightly
to see what it looks like. Something like this. Okay? So this is
what it looks like and just zooming in to
see what it looks like. I think it fits really
well with the ground. So this is what it
looks like now, but you can see
how easy it is to make two surfaces fit together. So now we have this mod, which we can apply to the street and we also have this
correct asphalt. And the only thing
we did was just enable these
adjustment layers up here and go down to the
albedo controls albedo tint. Just play around with
the brightness and the colors to make
them fit together. So very, very easy stuff. And then play around
with the roughness. Look different in the
lighting like this. And you can see when we
added the roughness, this was before the roughness, and this is when we
added the roughness. It fits the environment
a lot more than before. But now that we have adjusted them, Let's close everything. Let's go back to
the selection mode, save everything, and now we are ready to paint the ground.
31. 6.08 Painting the Ground: Let's now go ahead
and paint the ground. So let's go back to
the mesh paints. And I'll click on this Remove icon to remove everything that
I have currently. And now we are ready to paint. So going to the brush tool, how I usually do it again, remember to have the black color and the paint color
else you can't paint. The first thing I want
to do is just focus on this middle layer and I
want to draw cracks here. And the way I do this, I usually start with
a low size here. I don't go too large
because you can see if you paint too large, it looks. You can see the pattern
that repeats every time. I usually just
paint with a very, very low brush here. And also, I usually
use a low strength. So you can see when you
click and hold your paint, it takes some time
for it to paint. If you have the
strength to high, you can see a pattern way too much and it doesn't
look realistic. So usually I go with about 0.12 some, somewhere like this. You can see you have
to click many times your paint and click
many times to paint. But you can see it's a lot more realistic looking than
this one over here. And what you can do, you can
also play with the falloff. So you can decrease
the fall off and fall off just gives
it that fading effect here on the edges
you can see when I paint it, adds them suddenly. You can play with that as well. I think I'll go with something
like 0.4 and the falloff. And you can always increase
and decrease the strength if you think it's painting
way too fast like this, you can decrease the strength
and see what it looks like. So this is how you
paint usually. So I'm going to
remove everything. I'm going to reduce
the brush size, the sizes like this. And I'm just going to suddenly paint the cracks just like this. And sometimes if you
paint away too much, you can hold shift on again, hold Shift and paint to
remove them again suddenly. And now you can see
you can suddenly remove the paint you have done, but sometimes very cool effect. You paint something,
then you hold Shift, and then you click
while holding Shift, and you erase what
you have painted. And sometimes it gives
that nice effect, which you can use, e.g. this small effect here. So again, paints,
hold, Shift, erase. If there's something
you don't like, keep painting like this and just try to apply this layer
to the whole ground. So I'm going to
fast-forward this video. I'm just going to paint this whole round here with
this correct Asphalt. Okay, so now I have spent about 15 to 30 min
painting the detail. And you can see here
if I full-screen it, you can see I have
painted subtle, subtle detail on the ground. Nothing too crazy. So pinching it with the low insensitive
brush, just like this. And if I think something
looks similar, again, I erase it
and paint again. So just keep painting. Take your time with this. The more time you spend, the better the result will look. And you can see it's very,
very suddenly painted. Sometimes what else to do? I just take an overall look on my street by
doing this like e.g. I think this angle. And I take a look at the
whole street like this. And if something is looking
weird, I hold Shift, I paint slightly with a low, low intensity here to
erase. And not so fast. I don't want to erase
all of my detail. Erasing very slowly. Hold Shift, just click on weird detail that you
can see along the road. And now I think this
is looking good. So you can see very
subtle Greg breaks up the repetitive pattern that
we had with the base layer. So now we have to do this
with the model as well. So switching over to
the green channel now, I'm going to increase
the strength against the zero-point wealth,
something like this. And 0.12 here as well. Actually, this one
might be a bit lower, but let's just try to paint. What I want to do
is I want to paint this model on the side
of the sidewalk here. So maybe this is way
too, way too much. So reducing the size
of the brush to 0.08. And then I'm going to
paint along this sidewalk, and I'm also going to do
it over here as well. Alright, so now I've painted
on both of the sides. So what you can do now
is sometimes you can, again hold Shift and erase slightly some of the detail just to give it a
bit of a variation. So not everything is painted. And sometimes you can
even paint further out. So e.g. you can paint
like, let's say over here, we can paint a bit further
out if you wish to compare to the other parts and just breaks that
repetitive pattern, you can see we have just some slight difference on this part compared
to the other parts. And again, if you think something is painted
too much, you can hold, Shift and erase just slightly to give it just
that slight effect. The more unique you make it, the better the result will look. So just go ahead
and keep painting. You can even paint further out. Maybe sometimes you want
to paint all the way over here and just hold
Shift tried to erase. Sometimes what you
can do is reduce the strength so
it erases slowly. And you can try to make a
very cool detail with this. So you, wherever you
want you can see this very slight detail also
looks cool on the road. It breaks it slightly. So just keep painting here on the sides and hold
Shift to erase. What I also want to do is I want to paint on the sides over here because we are going to have a landscape later on and
the whole landscape is mud. Now to blend it in
with the landscape, I'm actually going to fully draw the mud over here without
any racist over here. I'm actually going
to extend it to something like over here. Again, we can change it up a bit because we are going
to add barriers, but something like this here. So we have some mud
on the streets. And again, use the erase tool, pen tool, just give
it some variation. So it's not a straight line. And you have to do this for
the other side as well. Just go ahead and paint the
mud, something like this. And again, remember
to keep painting, keep racing to give it
a bit of a variation. So I'll pause here and I'll
keep painting the mud, and I'll show you the
final result, right? So now I have finished
painting the image. So as you can see here, I've painted here, and I also use a
slightly larger brush. I think it looks better
when I was painting. So you can see here these
edges look like this. I think they look cool. And you can paint like a variation alongside
this sidewalks. So whatever you
want, just make it slightly looking
random, just like that. And now we have the
cracks built-in. We have the base
layer and we have the mud painted on
the ground as well. Now we are ready to give
the street more detail. We can add the lines to
make it look better. So let's go back to
the selection mode, save everything, and let's
move on to the next lesson.
32. 6.09 Street Lines Decals: Now let's go ahead and
add the street lines. So for the straight
lines, remember we added those as decals. So let's go to the mega Scans
folder and go to decals. And down here we have
the painted line dense and we have the road line here and
these two road lines. So if we just drag them out, actually not this one, it's this one he calls are just images. So if you click and drag
them into the world, they can be added to the world. So again, decals are
just images you can drag into the world and you can have some detail
inside of the world. In this case, we are having
some detail for our streets. So let me just go ahead
and delete those for now. What I want to do
is I want to enable my snapping to maybe
something like 100. And clicking on this icon
to enable the snapping. And I'm going to drag one
of the large lines here, the road line,
dragging it out here. And as you can see,
this one is very large. This is not the correct size. And what I have done for you
in the course materials, I've actually included this
guy for you, SM dummy, so a static mesh dummy character that you can use to reference. So e.g. in the assets, I can drag this here, click and drag it, put
it inside of here. And don't create materials
and do not import textures. Let's just go ahead and
click on Import All. Now we can click and drag this dummy character
into the world. And as you can see, the painted line is way too large compared to
a human like this. And by the way, you can
see that this decals is adding the detail on top of the character
and we don't want that. So if you click
on the character, you can always search here
in the Details panel. If you just search for cow, can see this one called
receives decals, you can put it off. And now the character does not have these Tikal
details on them. Alright, so click
on G, so I can see this decal icon here
in the decal size. Let me just click on the X here so I can remove
the search word. So down here in the decals size, we can reduce the size. So click and drag to reduce
the size of the decals. And right now you can
see nothing's happening. I'm going to click on Control Z. And this is because I have
to click on this lock icon. Because if you don't
click on the lock icon, you have to adjust
every single one of them by themselves. And we don't want that. What I want to do is
I want to click on the lock so it scales uniformly. So when I click and
drag on this x, it's going to scale
uniformly together with it so you can see all of
the values changes as well. So what I want you
to do is I want, just wanted to reference it
to the character and see how large the character
is compared to this line. And I think something
like 40 is good. If you're at 14 dx, if you are using
the same one here, I think 40, I'm just
comparing it to his foot compared to this one. I think something
like 40 is fine. So what you can do
here is you can do the same with the other one.
You can drag it out. I think it's this one. This is the other one. And for this one,
try to write 40 and see what it looks like
compared to this one. And they look fine. Okay, So now they look the same. So now I'm going to drag this
one here and drag it out. Just maybe two or three. Right now I have the
snapping to 100s, so I'm just seeing if I
should drag it three times out or two times to see
what the street looks like. And I think two times was a lot better because
something like this here. So what I want you to do is
I want to hold Alt again and click and drag while holding all so you
can copy paste it. And sometimes I don't
want the same line. So I'm going to do
is I'm going to hold Alt and copy paste this one. Maybe paste it again. Hold Alt, copy the other one. I just keep copy pasting. And I just want you
to make it a bit of a variation so the player
can see the same line. So we have two different lines
here that we are adding. And over here, the last one I'm going to hold Alt and drag, and I can see it's
on top of them. That is. Okay, but I don't think
it looks so good. So what I'm going to
do is I'm going to push all of them one step back. So the easy way you can do this, you can either click hold control and click on each
of them to select them. However, remember
in the outliner you can click on
the first one here. And you can hold Shift and
click on the last one. And it also liked
all of the lines. You can then click and
drag and move them back. Just one step, maybe two steps. You can see what it looks like. I think one step is sufficient and this is
what it looks like. Now we have the street
lines added to the ground. And if you wish, let me see if I'm going to
add this one as well. So we have the other
one as well here. And again, a reference
to the player. Go ahead and reduce the size. However, for this one, I can't reduce it uniformly. It's, you can see
it's stretching. It doesn't look good. But I'm going to do is remove this lock and try to remember
to change it here in the y and just change it slightly so you can see what it looks like compared
to the character. Maybe something like this. Again, I'm just comparing
it to the foot. So the x is 128 there. Why is, let's say 24. And these z-axis is, let's say 138, 138
for this one here. So if you are using the same, these are the value. And if I drag them out, you can see this is
what it looks like now. What you can do with this, you can add it to the
side if you wish. I'm going use the
snapping slide. Actually remove the
snapping for now, just so I can place
it correctly here. And let's try to
I want to drag it just slightly beside
the sidewalk, maybe something like this here. And what you can do, again, you can enable the
snapping and you can hold Alt and drag and then
see what it looks like. However, for snap,
you can see there is a lot of a lot of space. So what I'm going
to do for this one, I'm actually going to
disable the snapping. And I'm going to try to
eyeball the distance, the distance between them. And when I'm satisfied, I'm going to hold control here. So like the second
one, hold Alt, just copy pasted and just deep copy pasting
it to the whole streets. Just eyeball the size is
between lines, right? So now as you can see,
I have placed the lines here beside the sidewalk
all the way to here. And instead of just doing
the same over here, let's copy paste them. So let's copy these ones here. So like them through the
outliner and then hold Alt and just drag
them over here. I'll just try to eyeball how
far the distance you made it here between those tried to make it the same
with this one. So clicking on G
to see the icons, try to drag it. Sometimes when I drag,
while I'm dragging, I press G. So I removed the icons and I can
see a lot better. What I'm doing, this is
how you add the detail. And now what we need to do is maybe we need to
change the color for this sidelines because they don't fit with the mud
that is beneath them. And remember what
I told you before. You can open up the base
color texture here. And inside of here,
if you scroll down, you have these
adjustment layers. And remember what you can do if an increase and decrease the brightness and
see what's happening. You can see it already
looks better like this. So try to reduce play with this, play with the hue and see what happens with the colors, right? To play with the
alpha and see what happens if you're at
zero, you're right one, maybe this 110, this one, you can play around with
the VG curve as well. If you increase it, you
can see what's happening. So just try to play around
with these sliders, right? So I took 5 min to play
around with the values, and this is what I came up with. So now I can try to show
you how I did this. I tried to reduce
the brightness up and down because I think
it was too bright. So e.g. this one, the
brightness script. It was one. I think this is way too bright compared to what
is underneath it. And this one was one as well. So this is what it
looked like initially. So what I wrote is 0.7 at first. And then I tried to increase
the brightness curve. So the more you increase it, you can see if I
write 1.1 and 0.21, 0.3, it keeps looking
a lot better. Now you can see it
integrates more. You can see all of this. Much detail becomes
integrated into the detail. So if I write one
and I write to, you can see the difference. The mud becomes a
part of the lines, so it looks a lot better. So I wrote two here and the
partners curve and 0.650, 0.6 was a bit too dark
for me, like this. It's a bit too dark. And 0.7, you can go
with this as well. It's fine. And so I think 0.65 up
here looked a lot better. 0.6 was a bit too dark. And also here for the RGB curve, it is one by default
and you can see it's still slightly bright. So what I did was just
increased the RPG curve. And you can see, the
more you increase it, the more it looks like the modest indented
into the decals. However, if you increase
it way too much, you can see that it
becomes too dark. So 1.25 was fine for me. You can see the mod is
like inside of the decals. And as for the hue, this is a very,
very slight detail. If you write zero, It's
getting more yellowish. E.g. if you write,
you can try 100. It gets green, 202, 50 because it changes
colors and the hue goes 0-3 five-ninths from, so it's like 360 degrees colors that can try to
keep changing it. See what happens, see what
color it changes too. But usually at zero, right now it's this color. And if you go towards 350, So you go backwards from
359 and you go backwards, you're adding a red color to it. So 355 compared to zero, I just gave it a
slightly red color to it so it fits a lot
better in the environment. So this is what it
looks like now if I close it and let me go ahead and save everything
before if something crashes, just in case and this
is what it looks like. So if I full-screen it, unless percent ionic character
standing on the ground, and I take a look down
here at the ground, it looks a lot better
compared to before where it was way too bright and
it's more believable now. So what you can do, I'll actually let's do that
as well for these lines, I think they are too bright
as well for the environment, maybe we can make them
look a bit better. So clicking on the road
line here, one of them, and opening up this
first base color for one of the lines. I'm just going to try to adjust it to see
what line it is. So if I write zero for this one and this one that we are
adjusting right now. So I'm going to write one again. So same thing, just like before. I just want it to be a
part of the environment. So I'll try to make the brightness curve as
two, just like before. And to make it look better
or take more effect, you have to reduce the
brightness as well. So 0.9, 0.87. You can see already
that it looks more a part of the environment
compared to this line here. And just as you can see here, that the environment
we're creating, we are adding much
to the street. It looks like this street has been abandoned for some time. So it will be weird to
have freshly made lines. This one already
looks a lot better. I'll, I'll try to increase their RPG curve just like before we can see if
we increase it to 1.5, it becomes more a part
of the environment. But I think maybe one point
to just a slight difference. And you can already see if I full-screen it and
take a look at it. That looks a lot better than
this fully painted line. And we're trying to tell
a story with the street, were trying to tell that this street has been
abandoned for some time. Let's actually do this as
well for the other one. So let's go back to the other
one and let me go down, try to apply the same settings. Hopefully they work. So 0.7 here and two
points is zero for the brightness curve and for
the RBG curve, 1.2 as well. Now they look the same. Let's save everything, and let's take an overall
look at the street. So I full-screen it
and remember it. Press G to remove all of the icons and you can compare
them to the characters. So this is what it
looks like now. We have these mud lines. We also have the lines in
the middle of the street. And I think it fits a lot better with the
environment this way.
33. 6.10 Adding the Barricades: Let's now add the
barricades for the streets. So let's go to the three assets and then mega Scans folder, and let's find the
concrete barriers so you can click and
drag it into the world. And remember this is the barrier that we
imported previously. Before I do this, let me
actually delete it and let me enable the snapping just so
I can see where it snaps. And if I let go, it snaps like this and I don't
think it looks good. So I'm actually going to
remove this snapping. I'm going to move it upwards. It says slightly
above the ground and it's not inside of the sidewalk, just something like this. And then I'm going to click
and drag and just snap to maybe this part
of the sidewalk. So it's at the end of it. I'm also going to
push it inward, so it's on top of the sidewalk. Maybe it's something
like this here. Okay, So now what you
can do is if you want, you can enable the
snapping or can hold Alt. I can drag and drop it. And this is what it looks like. And so as I want you
to do is just place this barrier all the way on this sidewalk and the
sidewalk as well. And to make a bit
more of a variation, go to the old concrete
barrier as well, and click and drag it and it
can place this one as well. Remember to push it
upwards just like before, and then move it besides the other sidewalk and try
to place them together. You can even chain, you don't need the
snapping like here. You can even change
the positions of them. You don't have to be
precise with them. Naturally, like in real life, they are not precise either. You can try to place them
by hand, just like this. And try to make a bit of a variation and place
the barriers on this side and this side on
the sidewalk as well. Okay. So I have placed the last one on this first sidewalk and I can see there's a
bit of a space. So instead of
placing another one, I'm going to select all of them. So hold Control,
click on all of them. And I'm going to
push it this way, just slightly this here and
maybe something like this. And if there's still
a bit more space, what you can do
is you can always try to push them away
from each other, something like this, and
try to make more space. It tried to tried to use up all the space that you have
here on this sidewalk. So just try your best. Put them together. They don't have to be
perfect and sizes. And this is where the
first one looks like. So I'm now going ahead and
putting it on the other side. Again, you can copy
paste if you want to, but I think I'll
add them manually. And also another trick
what you can do, you can see this one is
different from this one. And the way I did this is you can click and drag
and copy it again. And what you can do is if you
think they look the same, you can rotate them, click on E on the keyboard
for the rotate tool. And then you can rotate
them 180 degrees. And then you have
this other side of them and it looks
a bit different, so you don't have the same
scratches on each of them. I've done this as well. For this one you
can see this one. This one, they don't
look the same. And this is because
they are rotated. So you can rotate them as
well to give them a bit of a variation as you
can see here as well. Okay, so now I have added the barriers here
on the other side. So now you can see
I've added them on this side and this side as well. So what you can do for a bit of a variation and a bit
more interesting. E.g. you can take one of the
barriers here, this one e.g. and rotate it slightly, maybe something like this. And then you can also
move it forward and try to replace it like this. I'm going to remove the
snapping for the rotation tool. I'm going to take
it back a little bit and try to place it
as best as you can hear. This is just giving
the environment a bit more variation
compared to before. And it looks at bit
more interesting. So maybe something like this. So not all of the
barriers look identical. Some of them also have
a slight rotation. You can do this for other ones. I think I'll keep it like this. However, if you wish to, you can try to do it
with the other ones. Just slides. Just a slight rotation will help giving this environment
a bit more life. Alright, so this was
it for these barriers. Now we have another
barricade that we need to add the
metal barricades. So clicking on the
metal barricade. And I'll add the metal barricade
over here on this side. So taking this metal barricade and adding it to the
ground, again, rotate it. I'm going to sit with the
snapping on for this one. I'm going to rotate
it 90 degrees so it's facing towards us. And tried to place
this metal barricade here at the end of the street. And the story for the street is, we're trying to
block the streets so people can't go either way. And we're going later
on to fill it with the landscape mode here. So try to again copy paste this barricade to place it as best as you can inside
of this environment, which you can do
sometimes again, you can click on the barricade. And instead of having it the
same rotation like this, you can break it up by rotating it slightly
this way, e.g. or you can even move
this one forward. You can move this one
slightly backwards, which you can also do. You can rotate it down. So if I wrote it back,
you can rotate it down. So it's nice to
decrease this way. And you can move it up
and it is falling down. E.g. someone has knocked
it down or something like this and you can rotate it to something
like this, e.g. and place it in the level. So try to these barricades
on this side of the street and also this
side of the street as well. Right now I'm finished
placing the barricades. As you can see here,
this is what I've done with this side. I'm trying to rotate it
slightly it each way and try to move it forward and
backwards so they don't line up together perfectly. And it gives us really look. And this is the other side. I rotated this slightly so it's leaning towards the sidewalk. So we can always just zooming, try to take a look
at how it's placed. And also for these ones moving, it's slightly forward
and backwards so they don't look fully lined up
and it looks a bit better. This is what I have right now. These are the
barricades on the sides and these are the
barricades on the street. And it will look a lot
better later on when we add foliage because we
are going to add grass here on top of them. So they look a lot more
integrated and a lot better. And this was it for now. Now we have added
the barricades, and let's move on
to the next lesson where we can add the props.
34. 6.11 Adding the Props: Now we are the final
step before we can add the landscape
and the foliage. So now we are going
to add the prompts. For the prompts, what
we have uploaded here are imported
from mega scans. We have imported the stop
sign here, this traffic sign. And we also important
the traffic cones, and we imported
the fire hydrant. So let's start with
the fire hydrant. Again. Just drag it out into the
environment and just place it anywhere in the road where you are in the sidewalk
where you see fit? I'm going to place mine
over here on the sidewalk. And again, you can
rotate it as you wish. Whatever, you feel like, something like this is fine and adjust it as
best as you can. Maybe something
like this here in the middle of this
sidewalk tile. So something like this.
I think I am satisfied. And when you have
placed this one, go ahead and place the traffic
cones are the stop sign. I'm going to place
the stop sign first and it doesn't really
matter where you place it. That's up to you. All the environment
assets that you have. Just try to be as
creative as you can. For me, I'm just going
to place it here. And you can see it's receiving decals from these painted lines. So again, click on the model. If you don't want it to
receive decals, click on it, search for e kel over here
in the Details panel, and untick the receive decals so it doesn't
receive the decals. Now, you can rotate it. I'm going to put it here on
the sidewalks so it's like it has fallen and here it is on the sidewalk
and I'm going to rotate it. I'm just making
sure that it hits the sidewalk and it
doesn't look weird. So something like
this. It looks nice. Okay. So I have this stop sign
that is falling here. And what you can do can also, if you want tilted a little bit, I think this is fine here. I'm just going to move it closer here,
something like this. The last thing is, I
have traffic cones. Again. Click and drag the traffic cones and place them around in
your environment. And what you can do actually, I'm going to place them
over here. I think. I'm going to place one here, and I'm also going to
place one here as well. What you can do for this one, you can also rotate it. So it's laying on the ground. Again. Push it upwards so it's
above the ground here, the foot of it, and then rotate it so it hits the ground
on the other side. Just like this. Then you can rotate it around, see what you like. What I've done. I have placed two cones here
that's laying down. And this is on this side
and the other side, I have placed too as well, and these are standing. So I have two here
that looks normal, and I have two here
that's falling down. And that was it for the prop. So I don't have more
props for my environment. And if you have more prompts, just go ahead and place
them around in your level, try to make the level as
believable as possible. And we are going to add
some decals later on, some blood on top
of these cones, and we're going to give
it more life later on. We also have this forest rock, which we will add later. But let's not worry
about this for now. Let's move on to the next lesson and create the landscape.
35. 6.12 Creating the Landscape: In order to fill out this empty space here
around the streets. Right now you can see the street is floating and
nothing is around it. So in order to fill it, we need to create a landscape. And in order to do that, you have to click up here
and select landscape. And then over here, this is the landscape creators. So you have to fill
in this information. Now it asks you what
material do you want to fill this
landscape with? So we need to find
one of the surfaces. And what I want to use
is this third here, because I want to transition from the landscape
to this street. So I'm going to fill it with this dirt that we
have made here. So go ahead and find it here in the surfaces, this
muddy asphalt. And I'm going to click and drag and plug it into
the material here. And then as for the
location right now, this road here is at 000. I'm actually going
to put this at zero. Now if you do this,
it's going to overlap with this treat and it's going to be inside of this street and I
don't want to do that. So what you can
do is maybe write something like minus
one or minus two. And it's a bit
beneath the streets. So I'm going to try
to write minus five. I can always bring it slightly upwards if
it's too much down, because this one you can change when you have created
that the landscape. As for the section size, this is how, how large
these sections are. And you can change them and make them smaller if you wish to. Now it's going to use more resources if you make
more of these squares. However, when you
sculpt the landscape, when you have created it and sculpted use called
the hills, e.g. it's going to be more
high resolution. If there's quotes are
very large like this, then you're sculpting will
be in low resolution. So what I'd like to
do for this one, I'm not really going
to sculpt anything, but I usually go with 15
by 15 as the beginning. And we're not really going to create anything here
in the landscape. I just want to fill this scene so it looks like
a full landscape. So what you can do is down here, you have now the quads and these are the
sections per quad. And now you can increase
the number of components depending on how large you
want your environment to be. I don't want my environment
to be too large. Maybe I want it to be 12 by
12, something like this. And maybe this is even too large so we can make it
like 11 or ten. Let's make it ten by
ten, just like that. And down here it tells you
the overall resolution and also how many components
you are creating here. So let's go ahead
and click on Create. This will create the landscape. And as you can see,
it filled it with the material that
we apply to it. And now you have this brush
that you can see here. And now you can also
sculpted the landscape. You can see here you have
selected the sculpt by default and you have
the tool strength. This is almost like the mesh point we have
been working with. So we have the tool strength, the brush size, and also
the falloff. And e.g. if you click and
drag, you can see, you can sculpt the landscape and make something look cool. I'm going to click on
Control Z because I'm not really interested in sculpting
the landscape right now, but you can play
with this if you want for your environment
to sculpt it, you can sculpt it,
you can erase, you can even smooth notes. E.g. if you sculpt something, you can click on smooth
and you can click on it and smooth out the sculpture. You can see now
it's very smooth. And we're going to click on
Control Z again to go back, you can make a ramp
if you want to. You can also use flattened e.g. if you have sculpted something and you'll regret what you did, you can click on flattened
and click on here, e.g. click and drag,
hold and drag here. You can see now it flattens the sculpt you have
made any console, make ramps, erosions,
hydro noise, and so on. But for now, I'm not really
interested in sculpting. So I'm going to go back to the selection mode here and
clicking on this landscape, Let's remove this search word. And over here, again, you can increase and
decrease the z value. I told you before,
the z-value controls how far up and down
the environment is. So right now you can
see this is what it looks like and I
think it's too far down. So maybe if we write minus one, so it's right above this street here and it looks like now it's part
of the streets. But as you can see, it's using the default settings
for this material. So we have to make this mod look the same as the
blend materials. So what we can do is we can go back to the blend material. We can open it up. Then we can take a
look at the top layer, which is the mud layer
and see what we did here. And then go back to the muddy asphalt and
open up that material. Because now you have to make these adjustments in
here so it applies. They'll go ahead and enable
the albedo tint and control. And I'm just going to
copy the settings. So over here in my
blend material, I can hold Shift and
then right-click here. Or you can also just right-click without holding Shift
and click on Copy, but this is the shortcut for it. Hold Shift and
right-click to copy. And then you can go over to
the muddy asphalt surface and it can hold Shift and
left-click to paste. This was the albedo controls. I'm also going to copy the tint. Hey, them on the tint over here. And I'm also going
to go back and take my maximum roughness, go into the muddy asphalt, taking a look at the
maximum roughness and pasting the
value here as well. So now I'm going to take a
look at the environment. And now you can see it's
blending with the environment. It's still has a
bit of an erosion. So what we can do
is we can click on it and try to write zero. You can see what happens
if you write zero. This happens and it
doesn't really look good. Maybe we can write -0.1 and now it's beneath and it's
looking a lot better now. It doesn't have that, but look to it. So now we have the environment and the street put together. And what we can do now to make the scene look even better, just take this barrier
here and copy it. So hold Alt, click
and drag to copy it, and then drag it down to
the streets like this. And what you can do is you
can rotate it as you wish. I'm actually going to enable the snapping up here
so I can rotate it 90 degrees and then you can drag it and place it on top
of the environment. So you can place it here, e.g. if you wish, and you can
have that nice transition so people will not notice
that you are now transitioning from the
street to the environment. I'm going to put this over here and it doesn't really
have to be straight again, just try to be as
creative as you can. I'm going to disable
the rotation snapping and just rotate it
slightly like this. Move it forward. And maybe you want to put
another barrier over here. So the small one, I'm
going to hold Alt, copy it here and let me push
it down to the streets. And again, you can click and
drag or just rotate it here. Click and drag and
push it forward. And maybe something like this. So it doesn't really
have to be perfect. You can do something that looks interesting like this here. Okay, So now I added the barriers at the
end of the street. So this is what it looks
like on this part. And I also added this one
on top of the sidewalk. So I just rotated a bit
and place it on top of it. And I added this part as well to the end of the street
or the sidewalk. So I think it looks
a lot better. I'm actually going to do
the same so you can see it. I'm clicking on the
modular concretes, putting on the snapping and then dragging this
one over here. And let's rotate it. Actually let me put on the
snapping for the rotation, rotated 180 degrees and then move it into the
sidewalk like this. You can hold Alt and
copy and paste it here. You can also use this
one if you wish to, but I'm just going to
use this one here. Now, this is the other sidewalk. I rotated it down, I put it down on the ground. And this one is
in this position. So now we have both sides. We have this one and we
also have this one as well. It's going to look a lot better
once we add the foliage. So we're going to add grass all over this place
here, all around it. And we're also
going to add rocks, the other parts of the sidewalk. But for now, this is
what the environment looks like and now we have
filled the empty space. So remember to save all of your progress and let's
move on to the next lesson.
36. 6.13 Preparing the Foliage: We are now ready to
work with the foliage. So we have grass that we have
imported from mega scans. So if you take a look at the mega Scans folder and 3D
plants and the wild grass. So this is the grass I imported. You can also import
other foliage for your own project
if you wish to. It's the same process as I
am going to go through now. And for the grass, if we
just click and drag one of these grass foliage or grass models out
here to the streets. And we then take a look at it. I'm going to press
G to hide all of these lines here so I
can see it clearly. If I go close, you can
see how nice it looks. So this is the grass
that we're going to add. It is really high definition. However, you can see if I
move away, the grass changes. So you can see if I
move close, I'm away. It changes and it
doesn't look good. It looks low resolution right
now you can see it here. This is called level of detail and level of detail what
it's supposed to do. So right now when you're close, you can see it in high detail. When you are further away, you can see it and lower detail. And when you are more far away, you can see it in
even a lower detail. What level of detail means? It means that the player
doesn't need to render all of these details if
the player is far away because you can't see
all of these details anyway. So this is what the
engine is doing. It's trying to reduce the detail so your game
can perform better. And it does that if
you're moving far away, it reduces the
details on the grass because you don't need to
see every single detail. However, the problem right now is it's doing it way too close. This is not supposed
to happen this close because the player should not
be able to see this change. It should happen maybe
to grasp that is this far away where the player
can not see it anyway, like standing here and
cannot see it anyway. So right now this is
not supposed to happen. It is happening way too
close and the players is not supposed to
see these changes. Let's actually fix
this so we can, so we can make it work and look better for our environments. Right now we have a
smaller environment, so I don't really
need these changes. So what you can do is you
can click on the grass and you can look down here
in the Details panel. And you'll see this one LOD, which means level of detail, which we have been
talking about. Here for the screen size, you can write zero and you will remove the level of detail here. So if you are close to it
and you are this far away, you can see it doesn't change
and we can keep the detail. You can, of course not set it to zero if you still wish to have this effect but further
away in your environment, let's say you are this far away and then you want
it to take effect. And you can reduce it to a lower number
which is not zero. So right now I just want zero because I just have
this small environment then I need to edit
in and I don't want the LOD to take effect. So running zero, we'll fix this problem and doing that
for all of them actually. So e.g. open the
next one and go down to a low d and in the
screen size zero. So you have to do this for all of them and I'm going
to do it right now. Alright, so now I
have made all of the screen sizes to zero
for all of the models, and I am currently
saving the project. So you can see the last one. I have also made it the
screen size of zero. But now whenever you place grasp on the environment to click G to remove all of this and
you look at it far away, close, it looks the same
and this is what we want. The next thing for the grass
is it looks way too green. So if I take this cross here and I move it to
the side, walk e.g. let's say we moved here. I'm going to remove
the snapping. Let's say it's over here. I think it looks way too green compared to the environment
we're trying to make. So what I want you to do
is also change the color. And remember again, the same process as what we've been
doing in this course. Now we're trying to
repeat ourselves because you've almost learned everything that
you need to know. It's very, very simple. Again, just go into the material for this, this grass here. And inside of here you
have the color overlay. So clicking on the color
overlay so you can change the color and let's minimize it. And e.g. this is the red, green, and blue
for the right e.g. you can reduce it and you
can see what's happening. If I reduce the green and you
can see what's happening, you can change the
color of it here. So I'm going to write 0.50, 0.5. This was the standard. I'm just going to increase the redness and then
decrease the green. So e.g. let's, let's
first decrease the green. I don't want it
to be this green. I'm going to reduce it and
just reducing its slightly. Take a look at it like this. And I'll reduce it
a bit further down. Maybe it's something like
0.37, something like this. And maybe increasing the
red slightly, not much. Maybe, maybe
something like 0.55. And you can take a look at it. This is what it looks like now. So before it looked like this. And now it looks like this. So it looks more like dead grass or the
grass is about to die. And I think it fits our
environment better. We can always change the colors more if we later on figure out that maybe we need less
red or more green and so on. Always change it later on. But for now, this looks good. And remember this is a
material for all of the grass. So when you change it here, it will apply to all of them. So when you drag them
out to the environment, you can see that it has applied the color to all of your grass. So this was it for the foliage. Let's go ahead and
delete everything, and let's save it all. And let's move on
to the next lesson.
37. 6.14 Adding Foliage: Now, time to paint the foliage. Up here you have another tool. You have the foliage tool. And this is used to paint the foliage because
as you can see, it takes a long time. If you have to click and drag every single foliage into
the level like this, it will take forever for
you to make all of it. So let's delete this and we have something called
the foliage tool, which will add it automatically. And let's click up here
and the folded tool. And as you can see now we
are on the foliage tool, so we have the
Select, de-select. You have the lasso, which is also some sort of
a selection tool. And then you have a
single or you can put a single foliage here. You also have the paint, which is the main tool. Here we will paint the foliage. And as you can see in the paint, we have the brush size. So how large do you
want to paint with? And you have the paint density. So how much foliage do you want to paint within this brush size? And also the erase density. Okay, so right now you can see
we don't have any foliage. So let's go to here
and the foliage. You have a foliage folder. So don't click on it and edit this foliage elements,
Static Mesh voltages. They'll click on the
first one, hold Shift, and click on the last one
to select everything and click and drag them
into the foliage tool. Though sometimes it adds it automatically when you
import from Mecca scans. But if it doesn't, you
can just click and drag them into here
and down here, the number it tells you
how much of this grass you have painted in the environment right now I don't have anything. Everything is zero because we haven't painted anything
inside of our environment. So to paint, you
have to tick them. So you have to take
whichever you want to paint. And now you can see this brush appears when you have
selected at least one. And if you just click and paint, you can now see that
you are painting this grass and it is
very easy to paint. And here it tells
you how much of this grass you have painted
into the environment. So let me click Control
Z to remove it, and click on the first
one, hold Shift, click on the last one, and then I'm going to
take all of them so I can actually paint
all of them here. So the next thing I can
see when I can paint, The grass is standing still. And in order to make it
look better, click on, let's actually go back here, like on the material instance. And then down here
at the material. And since you have enabled
grass wind, clicking on it, it will make the
wind move actually, let me go back to
the selection mode so I can remove this brush so you can see and then
enabling the grass wind. And now you can see
the grass is moving. It's moving way too
fast right now. So I'm going to take the
intensity and right, maybe 0.1 right now. And it can even pull
it further down, 0.05 and you can even
put it further down. So 0.02 or 011,010.020, 0.03, I think is a good number, so let's keep it as 0.034. Now, this is how you enable win, so you can play with
these settings as well. Let's close it down for now. Let me go back to
the foliage tool. And if you hold Shift and paint, just like the mesh painting
tool here, you delete. So if you hold Shift and paint, you will delete those assets. Alright, and now we
are ready to paint. So again, the pain density you can see if
you increase it and paint to paint a lot in this
brush you have selected. And if you reduce the intensity, you can see you're not painting as many elements as before. Try to adjust this for your liking and also adjust
the brush size as well. So what I want to do is I want to add right now to begin with, rest here along this sidewalk. So the brush doesn't
need to be this large. So maybe something like 30. So very, very small,
something like this. And just try to paint here. Very, very important to
know performance-wise. It's not really good to paint too much foliage because foliage is very heavy on the engine. And that's why you see
sometimes games don't have much foliage because
it's really heavy. So painting something
like this is really not recommended
because again, foliage is very heavy and
it will reduce your FPS. So try to make it look good, but don't overdo it. I'm just going to paint here
slowly, something like this. And if you think sometimes, if it paints way too many
foliage elements in one spot, you can always reduce
the pain density. And if you paint something like here on top of the
sidewalk and it looks bad, you can hold Shift and click
here and it will remove it. So removing those small details, so try to paint. And then if you make
a mistake here, just hold Shift, click on it
here and just try to remove. Sometimes if you paint
something and you don't think it looks good,
again, hold Shift. Just click, remove some of
them and just keep painting. So just keep painting,
deleting, painting, deleting until you are
satisfied with the environment. So I'm going to paint
like this here, all the way here
along this street. Another very cool
trick that you can do is if you click on all of them, actually just one
of them for now, let's click on one of them. If I click on this
icon, this icon does, is it gives you options for this instance that
you have selected. And what I like to do here, sometimes the most used options inside of here is the z value. So let's say you're
painting a tree and the tree is way too high
on your environment, then you can actually
reduce this value. So the minimum can be e.g. minus ten and the
maximum minus ten. So now when I paint something, it's actually
beneath the ground. So if I take a look at z0, it's beneath the ground down here because I set it to minus ten so it
moved the foliage. So this is very nice if some of your foliage is
above the ground. However, in this case, this is not our problem. So I'm going to
click on this again. And the other one, very cool. I use it all the
time is the scale. So instead of having
everything the same scale, you can increase the max scale. So e.g. if I
increase it to five, you can see when I paint, some of them are very large, some of them are very small. And they are, they
vary in sizes. Very, very cool to know. So here what I usually do is maybe I put it to three or 2.5. So I paint to see what it
looks like here using three. And I think it's still
a bit too large, so maybe 2.5 as the maximum. So this is what you can do. You can increase the scale so it gives it a
bit of a variation. So not all of them
is the same size. Alright, so these are the
settings I'm going to go with. I'm going to paint
along this sidewalk, and I'm also going to
paint just between here, over here, between
these barricades. So it gives it that nice effect. And again, sometimes if
you think it looks bad, you can always hold
Shift and delete them and just repaint the grass. Alright, so now I have
painted here along the sidewalk and I actually
use the scale of two. Sometimes some of the grass
was too large at 2.5. So as you can see here,
I have painted alongside this this sidewalk
and the street here. And I've also painted on the mud that we
created over here. And I've placed grasp
between the barriers, so it gives it that nice effect. Now, if you want to
add single detail, you can also go to
this one, single. And then e.g. let's
say let's say I was missing something here and I wanted something here.
So I can click here. And you can see it adds
that single detail. I'm also going to take the
pen tool and simply just take a look at the sidewalk
and see if I have made a mistake or not. And if I have just
hold shift and paint just along
the sidewalk here. So you remove all of the grass that you painted
on the sidewalk, and we don't want that and also going to do
it on the other side. So hold Shift, paint along
the sidewalk to remove all the excess grass and say some grass are here,
they are too large. They are going
through the sidewalk. I'm just going to let
them be for this course. But if you want to, you can remove this one because it's not
really a realistic. And also be careful
sometimes you can actually paint
on top of this, e.g. this looks weird as well, so I'm going to hold Shift
and remove this one as well. And just try to take a
look at your environment, see what, what it looks like. If something looks very weird, try to remove it and
repaint other detail. Alright, so now I'm satisfied
with my environment. So what you can do
now is you can draw the grass around this
environment as well. Again, I'm going to create
a small environment, so I don't want to
draw this whole thing. I'm just going to increase the brush size up here and
try to play with the density. I'm going to increase
the density slightly. So maybe something like 12. Let's just see what
it looks like. But what I want you to
do is I want you to paint this area
around the sidewalk. So when we are viewing
the game, we are. This one is not empty out here. It also has some details. So when you were making e.g. cinematic screenshots,
we're also having a tail out here
so it's not fully empty. So I'm going to
actually to increase my density slightly again. Just increase its density
and see what it looks like. See if you're
satisfied and try to paint the details around
your environment. Should go down full-screen it. Take a look at what it
looks like out there. I'm going to paint
some detail out there. And I'm also going
to paint detail for the grass around
here as well, right? So now I have finished
painting the environment. So as you can see, I painted
the grass on the edges. So I painted it all around the environment just like this. And I'm not doing
the whole landscape because I'm just
doing a small scene, as you can see here
for this course. So you can learn these
different tools right now if we fullscreen and if we want
to take screenshots, e.g. the environment is
not empty outside. We also have some grass
so it doesn't look bad because before it was
really, really empty. So this is how I did it, just painting around
and sometimes using the single tool to
paint single foliage. If I think something is missing, then you can remove foliage from places where
it doesn't fit. So that was it for the foliage. And let's save everything and
move on to the next lesson.
38. 6.15 Adding Rocks: Let's go ahead and add
rocks to the environment. So in Vegas cancer we
uploaded or imported the forest struck and we
imported these small granites. So taking a look at the
forest struck first, you can click and drag
it into the environment. And this is what it looks like. The other one is this
one small granites. You can click and drag it. And this is what it
looks like as well. So what this one again,
just like before, we're just repeating
the same process. Click and drag it
and place it in the environment
where you see fit. E.g. I. Can click and
drag it into here where it blocks the sidewalk,
something like this. And if you want, you can also take the larger granites
are not finite. The forests drug. You can place it here as well. Maybe placed them
together if you wish. Though what you can do is
place this one over here, something like this, and
rotate it as you like. And then you can take this
one and lay sit beside it. I tried to make your
own environment, try to make it as
interesting as possible. So I'm just going to place these rocks around
in the environment. Okay, so now I have added a couple of rocks
around the environment. So you can see I've placed them here around the environment to give it some sort
of a variation. And sometimes you can
place one and you can even use the scale
tool to scale it down and just give it a bit of a variation and
just place it like this. So scaling it down also
breaks the repetitiveness. Just place them around. And
then I'm going to go to the foliage tool
because I'm going to hold Shift and delete
some of the details. So I'm going to
reduce the brush and I'm just going to
reduce the grass which is beneath the disrupt because right now it doesn't
really make any sense. You can see this grass here
coming out of the rock. I'm going to hold,
Shift and delete. And actually I'm deleting
way too much here. And you can see, I can't
delete this grass. The rock is in the
way I'm trying. So what you can do is remove
this Static Mesh option. So you're not under static mesh. And now I can hold
Shift and Delete. Removing that Static
Mesh option helps you. And I'm just going beneath the rock and removing the grass because it doesn't really make sense that the
crisis beneath it, it makes sense if
it's like this, but not if it goes through the rock, doesn't
make any sense. So just try to remove
it as best as you can. So now I'm satisfied
with my results. So now let's go back
to the selection mode. And this is what we have so far. So let's go ahead and save the progress and let's move on.
39. 6.16 Adding Puddles: Alright, so if you wish to add puddles to the environment,
you can do that as well. I'm not going to do it for
my environment, however, I want to show you
the option so you can actually see
that you can do it. So if I go back to my blend material and let me go back click on the Blend
material for the street. And down here you have this
option called use a layer. And what this does
is you can puddles, water puddles on
your environment. So enabling it. And then if I go to the Mesh paint tool
and I go to paint, and I select the blue channel. This is the puddles. Remember to have the black
color as the paint color. And now you have to
select the street. So I'm going to go back
to the Select mode, select the street, and
go back to paint mode. Now, if I paint, you can see I'm painting
puddles on my street. You can do this as well and
it looks really, really nice. So e.g. just like before, if I reduce the strength
to something like this, I would use the
brush size as well, reducing it maybe further down. I tried to pinch really
suddenly you can see you can create really cool looking puddles
on your environments. And what you can do
with this as well. Now that you have
enabled the pot layer, you can go down at the bottom
of your blend material. And these puddle layer options appear when you
enable the puddle. So very, very cool. You can, you can try to play
around with all of this. E.g. let me just paint a lot more puddles so we can try to play
with these values. E.g. you can play with the
liquid height of zero. And it just gives it
that height here in the puddle if you
paint running in one. You can also see the opacity. So far I zero, I write one. It gets really opaque and
you can't see through it. You can see very cool the sun. It also looks like a, like a puddle here. So it's really, really cool. You could try to slight
instead of writing numbers, what I like to do
is just click and drag and see the
values, what they do. So e.g. you can just click
and drag on all of them. The roughness as well. You can see what it looks like. Really, really weird looking. We can try to play with
the roughness as well. And I play with the
liquid fall off. So you can see what
the fall off here. The falloff is, this
here, the edge. So you can try to play
with that as well. Down here, what you
can do is you can actually give it waves as well. So if you click it
and you increase e.g. the wave speed and strength. The wave speed, you
can increase it and maybe not too much
away of strength, you can increase it as well. So you can also give the
puddles here waves as well. So you can try to play around with these values and
see what they do. Just play with them. See what you like,
what you don't like. And for my environment again, I'm not going to do
anything with puddles. However, you can do that if you wish for your own environment. And again, you can change
the color up here so you can see when you change colors, you can change the color
for the puddle as well. So really cool to play
around with this. And again, I'm going
to delete this. I'm not going to do any
puddles for my environment. So what I'm going to
do is just hold it. I'll just increase the
size of the brush, increase the strength as well. Hold Shift and paint to remove
this from my environment. And then I'm going to go back to the selection tool to
move everything out. Let's move on to
the next lesson.
40. 6.17 Adding Blood Decals: Before we finish up
the environment, Let's add some blood decals. So if you go over to
the decals folder, I imported it from mega scans. So if you maximize it here and you can see
the bloodstains here, there are three blood stains
that I have imported. I've also imported this
one, the hand smear. Again, it's just like the other decals that
we have been adding. So it's the same process. You can try to do it yourself without watching this video. And if you want to watch
this video, let's continue. So you can drag this decals again just like before
into the level. And I'm going to
use this character to resize this as a reference. So again, over here to the
right and the decals size, let's drag it down
and resize it. And as you can see, it's
not resizing uniformly. So I'm going to click
on Control Z and clicking on this log first
and then resizing it. So it's resizes uniformly. Going to take a look at this character and
trying to resize it, maybe something like this here. And just try to place it
randomly in the environment. E.g. I. Can place it near
these cones just too. They tell a story with it. So let's just place
it anywhere here. Now for this rock here, I have removed the decals, so I actually want it
to receive decals. So clicking on it and then
searching for the kel and I'm going to take it again
here, receives decals over. You can see I removed it. The reason was it was
overlapping here, so I'm just going
to drag the rock away from these
lines, so it's here. Then I'm going to click on G, click on the icon for
the blood and just move the blood around
until you are satisfied. And maybe something
like this here. Okay. So when you're satisfied, you can take another bloodstain here and drag it into
the environment. Again, resize it as you want. So resign, resizing it down and then just placing it here in the
environment and just drive, I'm going to drag the other one here into the environment, again, resize it, and then
place it wherever you want. I'm just going to drag
this one and place it besides the other one. But as you can see, this, this plot here, it looks a
bit different from this one. They have different colors. So what you can do
is you can open up the blood for this one here, this one that we clicked on. And then you can go down
here and the color overlay, and then you can
adjust the colors. So e.g. for this one, I'm going to reduce the red. So just like this. So it looks like a bit darker, just like this blood here. But you can do it
instead of only doing it inside of here. The other option you have, remember you have a texture
here, that base color. And here you had the
brightness adjustments that just like what we did before
with the straight lines. So over here for
the brightness e.g. you can decrease the brightness. So 0.7. And I'm actually going
to do it this way. So I'm going to remove it
from this color overlay. And I'm going to go back here. And for the brightness, I'm just going to make
it the less bright. So you can see now
they fit together. I'm just going to
play with the values until I'm satisfied. And I think something like this. So I wrote 1.15 for the brightness curve and
0.6 for the other one. You can do this as
well for this one. So I'm going to go into
that folder as well. I believe it was this
one just to make sure I'm going to drag it
out. Yes, it's this one. So we can again, I'm
just going to do it inside of the Albedo texture. So I'm opening it up again, down here, tries to adjust
it until they look similar. And for this one I just
set it to 0.7 and 1.1, click and drag them around. So just try to
place them randomly and just trying to tell a
story with your environment. So e.g. you can even bracket
here on the sidewalk. And just half of it is on the sidewalk and
half of it is on the street or something like this until
you are satisfied. And you can even take
the rotation tool and rotate it around. I'm going to disable the
rotation snapping and just rotating it around slightly
so it's not fully straight. And maybe something like this. So I'm going to place
some blood around the whole level and it's
just the same process. Try to place them, rotate
them around if you wish to, and just play around with it. You can even place
them on here so I can just show you lei, how to do this as well. So e.g. if you want to place it, let me take another one. This one, e.g. you want to place it on your assets that
are not the ground. What you can do again, click
on G to C, This decal. And you can see it looks stretched if you
want to put it here. And this is because
you can see when I put the decal
up, it disappears. And if I push it
down, it appears. So this box down
here at the bottom needs to be on the asset
you're trying to edit too. So I'm going to
drag it here and I have to click on E
and rotate this box. And I'm actually going to
enable the snapping so it rotates 90 degrees,
just like this. And now you can see it
stretches on the ground, but it looks correct on this
asset. And that is correct. So we're going to drag
it here and I'm going to reduce the size of
it so it fits this, this asset, move it into this asset so it has
contact with it. And then I'm going to move
it slightly down and maybe rotate this decal,
something like this. This is how you add
decals to assets as well. Just remember to
rotate them and have this box to be in contact with the asset you're trying
to edit too. Okay. So I finished up adding the blood decals to
the ground so you can see I just put the blood
around the environment. So on the street
here or a sidewalk. And I put two together
as you can see here. And then I put some
here beside the cones and on the rock and as
well on the sidewalks. So you can just try
to add small details, tell a story with
the environment. And e.g. I. Added some
here on the cone as well. And I also added it to the
middle of the streets. Do this part of the
street as well. And lastly, on
this part as well. So it tried to add, add them as you want
for your environment. And when you are finished, Let's move on to the next lesson where we
finalize the environment.
41. 6.18 Finalizing the Environment: We are ready to finalize
the environment. And for this one, I have a graffiti that I imported that I also want
to add to the ground. And I'm going to delete
this character now. I don't need him anymore. So I'm going to hit
Delete on my keyboard. And then I'm going to drag
this graffiti into the level. I'm going to rotate it
and something like this. And I'm going to
size it down a bit. I still want it to
be slightly large. So you can imagine if
someone has painted this or spray this
on the ground. So it's slightly
larger than normal, maybe something like this here. I'm going to drag it down
right above the line here, something like this here. Next, I also want to
change the color of it. So I'm going to go to the
material, material instance. And inside of here, Let's
go to the Color Overlay. And what I want to do is reduce the green colors so it
becomes more orangey, or maybe it's
something like 0.4. So you can see the
difference if you remove this and you add this, it was just a slight difference. You can also raise your
0.3 if you wish to. But there's 0.4 is fine for me. I'm going to save this
and close it down. And that was it for
the environment. So just try to assets you want. And also, if you want to add more assets to the environment, you can always right-click and go to add quicksort content. And of course inside of here, you can try to find a more 3D
models and more 3D prompts. And you can just follow
the same principle that we have been doing. And yeah, so this was
it for the environment. Again, if you need any help, I'm happy to help you out
in my Discord server. Or you can visit the pixel helmet.com and I will
help you out as well. So try to finalize your
environment as you wish. And let's move on to the
next section of the course.
42. 7.01 Light Types: Welcome to this
section here we are going to work with the
lighting because right now, even though our
environment looks great, the lighting looks bad, which also makes the
environment look bad. So we need to work with the lighting and make
it look a lot better. But now we have the
sliding elements edit and we will actually delete all of them so we can
make our own from scratch. And you can learn how
to light from zero. And in Unreal Engine, to add a light, you can click
on this button up here. And remember this is how we edit our post-process,
the volume here. But for the lining,
you can go to lights and then you can see the
different types of lights. The first one we have
the directional light, which is very important. This is the sunlight, so the direction light is the
sunlight in Unreal Engine. Then we have the point light
and the point line two, you can think of it
as a light bulb. If I can click on it here, and I click on G
to see the icon. You can see it's a
light bulb. If you e.g. have a street light, you can
add this light bulb to it. And mostly this is used
for interior lighting. So if you have an indoor
environment and you have a lamp, you can add this to the line. So let's go ahead
and delete it again, and I'll go back to the lives. Then we have a spotlight. And as the name says, the spotlight and
we usually make those to focus
unimportant detail. Or if you have a spotlight
in your game, of course, then we'll have a red
light and direct light, as you can see here. If I can click on G
and move it upwards, it's a light that lights
in this direction. So if I rotate it to the ground so you can actually
see the light. So the whole square here is
a light, lighting downwards. And you can imagine if you have been to a football stadium, they have those slides
on the football field. So this is the type of light and I'm going to
delete it again. And then the last one we
have is the skylight, which is the light from the sky. Apart from these slides, we also have something in the visual effects
that we will be using. We have the sky atmosphere, which will simulate the sky
and also the light from it. And then we have the
exponential height fog, which we will add to the
environment as well. And lastly, for the lighting, we also remember added
the post-process volume. This is usually done in the end when we are
finished lighting, then we can change our
image or our game, what it looks like, e.g. we wanted to look colder or
warmer or slightly brighter. We can do that as well in
the post-process volume. These are the lights. You
can find them on the lights. These are the ones
in visual effects. The most used ones are the sky, atmosphere and the fog. And then at the end we use
the post-process volume to change the image slightly and give it the field
we want with the game.
43. 7.02 Adding the Lights: Okay, so let's go ahead
and add the lighting. And what I'm going to do first
is here in the outliner, I'm going to click on the
direction light hold shift, and click on the
Volumetric Clouds to select all of them here. I'm actually going to
hold control and click on the post-process volume to de-select it because I
don't want to delete it. This is the one we made. And remember, the only thing we did with this one is changed the exposure so it doesn't
change the lighting for us. So let's delete everything else. I'm going to hit
Delete on my keyboard. And now as you can see, my environment is dark and the
only way I can see it now, if I go to the unlit mode and
I can see the environment, okay, so now we don't
have any lighting. If I go back to the live mode, now we're going to
add them one by one. And if you haven't added
the post-process volume, remember we did it
by clicking up here visual effects and
post-process volume. You can also find it in volumes and clicking on
post-process volume. And the only thing we did
is if we go down here, we clicked the infinite extent so the changes are applied
to the whole level. And then we went up here and
set the exposure to 1.1. This is the only thing we did with this
post-process volume. Now to add lighting, again,
Let's click up here, go to lights, and let's
add the directional light. Again. This is the sunlight. As you can see. Now the whole thing is bright. Okay, cool. So right now in this lesson, I don't want to adjust anything. We're going to do it later. But for now we're
just going to add the slides and then we
can adjust them together because I don't like
adjusting lights one-by-one because every
time you add a light, it changes the scene and you can't really predict what
it's going to look like. So I'd like to add
everything first and then adjust them afterwards. Let us click up here again. Let's go to lights, and this time we're
going to add a skylight. So this is the
light from the sky. And what that skylight
does specifically is it takes the light from
the sky and add sit here. And the skylights is also used to make these
shadows slider. If you have shadows in your environment that
are very dark, e.g. these shadows, you
can make them lighter using the skylights so the
direction light is used as the sunlight of the
skylight takes the light from the sky and it makes
everything look more realistic. And it also makes
these shadows lighter, so it's not this dark. We're going to
adjust this later. So let's click up here
and go to lights. Right now we don't really have a street lamp or interior
design or anything. So we're not going to
use a point light, and we're not going
to use the spotlight and direct light either. They don't really fit
to our environment. However, what we're
going to do is we're going to go to
the visual effects. And here we're going to add
a sky atmosphere. Again. This is, this is taking light from the
atmosphere up here, e.g. this redness here. And it's going to apply
to the environment and it's going to
look a lot better. But for now, we don't
really have a sky. This is from this
guy atmosphere, as you can see if I apply it, this is from this
guy atmosphere. And it's looking like this
because we don't really have a sky up here
with clouds and so on. And we're going to add
this in the later lesson. But for now, this is
the sky atmosphere and that was it for now. So let's take this guy and a
skylight and sky atmosphere. I'm going to click
here and scroll up and add them to
the lighting folder. So now we have those
together and I'm also going to drag the directional
light into here. So they are together and a lot easier to work with if you want. You can also put
everything else together. So I'm going to hold
Shift, select them all. Click on the folder icon. And you can just call
this one environment, e.g. environment. And then you can see it's
a lot better to work with, so it's not that messy. So now you can work
with the lights easier. Okay. So that was this for the light. It was the direction
lights for the sunlight, the sky atmosphere, and
the skylight for now. So let's go over to the next
lesson and add this guy.
44. 7.03 Adding the Sky: Okay, so in order
to add the sky, we don't really have on Unreal
Engine that looks good. So what I want you to do is open up the Epic Games launcher. And inside of here, Let's go to the marketplace. And in the marketplace
you can find things that are for free and
things that cost money, things that are
really nice to use. So you can try to
find and see what people are doing and releasing. And they are actually released some really nice
stuff sometimes, so you can use that for
your games as well. But for now, we're
going to go up here in the city products and I'm
going to search for sky. And there's one called good sky. So if you scroll down here, you can see this one good
sky, and it's for free. So you can also click
the free tag up here, and it will appear this
one, the goods guy. Click on it and then
click to download. I already downloaded it. So this is why it's
saying Add to Project, but for you it will
say download if you haven't downloaded it yet. Now, if you have downloaded now, click on Add to Project. And as you can see, it shows you the projects
that you can add them to. However, my project
is called beginner, and I can't see it here. And this is because
if I go back here, if I click on don't add, it says it's with maximum. The version is 5.1
of Unreal Engine. Remember right now I'm
using Unreal Engine 5.2. So right now it's
not compatible. However, we can actually
still add it and it works 100 per cent. So clicking on Add to Project, then click on Show All Projects. And now I can see my
beginner project. And if you click on it, it
says it's not compatible. So now you have to select
the closest version, and I'm going to select 5.1. And then I can click
Add to Project. And it will add it
just like in 5.1 and we don't have any bugs and
everything is working. So if I go back to my
project and inside of here you can see it made a
new folder called goods guy. This is the sky that we added. If I click on the
blueprint folder, and now if I click and drag this into my level
and I drop it, now you can see we have a
sky that we can adjust. And in the Details
panel we have a lot of settings that we
can work with as well. But again, I don't want to
adjust anything for now. We're just adding stuff. So we're going to adjust
these settings later. So let's move on to the next
lesson and add the fog.
45. 7.04 Adding the Fog: Alright, so before we start
adjusting the lights, Let's go ahead and add the
fog because the focus is going to change the look
of the scene as well. So clicking up here and go to visual effects and add this one called exponential height Fog. Now you can see nothing happened and this is because the fog is nuts in a high
density. So e.g. in the **** density
you can write five. And you can see now
it's very foggy, e.g. you can write two or one. Now you can see it added a lot
of fog to the environment. I'm going to click on
this arrow for now. I don't want to
adjust it right now. We can adjust it later, but now we also have
fog in the game, which we can play with with
all of these settings. So go ahead and
save the project, and let's move on
to the next one.
46. 7.05 Lightmass Importance Volume: In order to tell Unreal Engine where to focus on the lighting, you have to tell it through a light mass importance volume. Because yes, you can live
the whole environment, however, you don't really need the lighting that
is outside of here. We just need the lighting
that is inside of our level. And imagine if you
make a game level, you have to define where
your game level is because it doesn't really matter with the lighting that's
outside of here, you will never use it anyway. So this is also
for optimization. You have to tell the
engine where you need the lighting
to be focused on. Let's click up here
and go to volumes. And then let's click
on this one called light mass importance volume. And it's going to
tell the engine were to focus on the lighting. So let's move it down into level just right
above the ground, like this here in the
middle somewhere. And what you need to do is you
need to increase the size. So now we need to encapsulate the area that needs to be
focused on with the lighting. So e.g. it doesn't really
need to be specific, e.g. something like this. And then in the y, I'm going to accept selected like this. And in the zed value, I'm just going to
increase a slightly. You can see it's very
low to our environments. I'm just going to
increase it slightly. I'm also going to move
it upwards because we don't really need to focus
too much below the ground. So now you can see
I have encapsulated my environment that I need
the lighting to focus on. Again, it doesn't
really need to be very specific and this
is good enough. So now we have told it through a life mask importance
volume or to focus on. And we can click and drag this into the lighting
folder as well. Let's save everything
and let's move on.
47. 7.06 Introduction to Lumen: In Unreal Engine five, we have a new learning
system that is called lumen. And simply what luminaires, it gives you a lot more
accurate in lighting and it makes everything look better because it's
more accurate. And it tries to gather the letting information that
is around your environment. And it reflects it on top of your 3D assets that you
have placed in the ground. Now to showcase it,
you can click on this post-process volume
and you can go down. And you can see here in the global illumination
and reflection, lumen is on by default here in Unreal Engine 5.2 and
also if 5.1 as well. So clicking on these,
this one, e.g. and we can change
it to screen space. You can see the
difference clearly here. We can see if I put it to lumen, it gets a lot
lighter because this is taking the lighting
from the environment, e.g. from the ground, from
these barricades. And it's reflecting it on
top of these 3D assets. So you can see a lumen is a lot better to use because
it gives more detail. You can also see
this barrier here is giving some reflections
on top of this grass. If I click on None here and see the different actually screen
space is better to use. Then I switched the lumen. You can see the
difference clearly. Now, this is why aluminum is
so groundbreaking right now. It gives a lot more accurate
detail and it makes your scenes look a lot better and more realistic than before. We can also showcase it a lot better by creating a material. So if I just create
a random material, now, you don't have
to follow along. I just wanted to show you. So if I right-click down here
and I create a material, and now this material, if I open it up and inside
of here, Let's right-click. And I'm going to make a
constant three vector. Now we made this before. Remember you can also
make it by holding three on the keyboard
and the left clicking. Then you'll make a
constant three vector. And then you can connect
it to the base color because I just wanted to
give it a basic color. So clicking on it, and I'm going to give it, you can see if I write 111, it becomes a white
color like this. Now if I save this
material and I go up here and go to
Shapes and sphere. And this sphere I'm going
to pull up to my level. So it's inside of my level here. Now I'm going to take my
new material and i'm, I'm clicking first
on this sphere. I'm going upwards. I'm taking this new material, dragging it into
this material slot. So it's now using my material. And what I want to do
here is I want to give it a very strong light so you can see that it's
reflecting the lighting. Now what I want to do
is I want to give it a very strong color so you can actually see that it reflects. So instead of the base color, I'm actually going
to disconnect it. And I'm going to hook it up
into the emissive color, which is giving
that glowy effect. I'm going instead of 111, I'm going to give it
a very strong colors. So maybe ten in the red
or even 20 in the red. And now you can see it has a
very strong color, e.g. I. Counsel, right,
ten in the green, and it has this color. Now, if I save this, it should apply to this sphere. And now you can see this
bright color appeared. Now what I want to show
you is with lumen, you can see that it takes
the environment and it reflects it on top
of the three assets. And this is why it makes
your game look a lot better, because it's so realistic, it takes whatever is inside of your environment
and it actually reflects it on top of the assets and makes
everything look better. Now if I go to the
post-process volume and I take off lumens, so I use green space. You can see it's not
really that radius, It's reflects, but it's
not really accurate. And if I click on their
post-process volume again and switch it to lumen. Now you can see how
realistic it is. So this is why we use lumen. It, it gives you a
lot more detail, however, it is also
more expensive to use. So if you have a slow computer, it's going to be very slow. However, for this
course we are going to use lumen and I will
show you later on how we can optimize our
game to run a lot better. But for now, let's
answer it again. This is on by default, so we don't really have
to ticket right now. And let's click on
this material and let's delete this
materials as well. I just wanted to show you what lumen is in the next lesson. Let's go ahead and adjust our lighting for
our environment.
48. 7.07 Adjusting the Lighting: Now that we have added all
of the lights to the level, let's go ahead and adjust them and make the lighting look good. So the first thing I usually
start with is this guy. So I'm going to drag it
into this folder first. And as for this guy, the time of the day, I usually select 12 and
that will make it daytime. You can also select
something like 16 or 18. And you can see the
sun is going down. And I'm just going
with 12 for this one. And there are other settings
that you can play with, e.g. the style of the
clouds and so on. But I'm just going to
stay with the default. I think it's fine for now. However, again,
it can just click and try all of
these settings out. But I'm happy with
this guy here. So let's continue with this. Next thing is the
directional light. So now that we
have set this guy, I'll go to the
directional light, which is the sunlight. And as for the sunlight, this is the intensity of it. So we can write one
to see what happens. You can write 234. And
something like three is about like the sun going
down or it's almost dark. So this is way too
dark compared to the environment we are in
or the sky we have here. So I'm going to
scale it up again. It was ten by default. However, for this one, I am going to set it to seven. So let's try seven instead. So I'm going with seven here. And down here we have
something called indirect lighting intensity and
volumetric scattering intensity. For the indirect
lighting intensity, you can try to scale it
up and see what happens. So if I scale it up, you can see it lights
all of these dark areas. So if I set it to one, if I set it to six, you can see the difference. So what happens is
ultimately it's bouncing the light and it's sliding
all of these assets. So if you reduce it
and increase it, you can see the difference. So I like to have this not, not as one by default, but I like to increase
it so it actually bounces the light and
it removes all of these dark areas and it
makes the environment look better for the indirect light I'm going to set it to for now, for the volumetric
scattering intensity right now if I set it up,
nothing is happening. And this is because we need to adjust exponential height fox. So I'm actually going
to drag this into the lighting photo
folder as well. For the exponential height fog, I'm going to go down here
and select volumetric fog. And the reason I'm
doing this is because later on we are going
to make God race. And what God race are
here from the sun. If I can find the sun up here, when the light hits down, there will be some light shafts. So light's falling from the sky to the ground and
it looks like God race. We're going to create God race. And in order to do this, we need volumetric fog. And as for the
scattering distribution, if you hold the
mouse over it and read the last sentence, it says, in order to have
visible volumetric fog light shafts from the side, there, fusion will need
to be closer to zero. So let's actually
just write zero here. And as for the cutoff distance, you can see this is the sky, this is the fog over here. And if I increase and reduce
the fog height fall off, you can see what's happening. However, I don't think I
want this in my environment. So what you can do
to remove this, if you want to remove it, you can just write one here
in the fog cutoff distance. So if I just write one, it will remove this over there and I'm
just going to click on this arrow to make it default because we don't need anyway. Okay, so that was
it for the fog. So now if I go back to my directional light
and now when I increase and decrease their volumetric
scattering density, you can see the
difference if R is zero and if I wrote for, you can see the difference and also bounces the
light over here. Okay, so now that we have
the fog here finished, and for the directional light, we are finished as well. Later on we are going
to change the colors, but we are going to do it inside of the post-process volume, so don't worry about it. Okay, So as for the lighting, I'm going to set this
slide to movable. And I'm going to tell you
later why I'm doing this. Just making sure it's
movable right now over here. And clicking on the skylight, I'm going to set it
to movable as well. And then S for the skylight, you have to go down here. And since we changed
this guy and everything, we usually price here recapture. And just to make sure
that it's taking the correct light from the
sky and from the environment. Because sometimes when
you change things, it doesn't auto update. Sometimes it does,
sometimes it doesn't. So you have to click on
recapture just to make sure. Now, for the skylight,
very, very simple. The skylight is used to
make shadows lighter. So you can see here, if I go up and change the intensity to, to, all of these shadows
are getting lighter. If I write five, you can see now they're
getting very light. So what you're using
the skylight for is just making the
shadows lighter. So sometimes if you e.g. write 0.5, you can see the
shadows are very dark. And let's say you're making
a first-person shooter, and it's very important
to have lighting, so you don't want dark areas. And this is where you increase the intensity scale
of the skylight to make the shadows brighter because you don't want
them to be too dark. So you can see now I
can see beneath here. And if I wrote 0.5, because
see now it's very dark. Okay, so by default it's one. I'm actually going to
increase it slightly, so maybe 1.5 instead of one. And you can see it has
this slight difference, but it looks a lot
better than before. Now for the
exponential high fog, you can increase and
decrease the value depending on what environment
you're going with. You can see here if I
increase and decrease it and the maximum I can
increase it to is 0.05. However, this is just a slider. You can write a number
if you want to. I can write 0.7. If I want to increase it
a lot. I can write 0.3. If I slide, you can see here
you can only go up to 0.05, but don't let it
fully or you can go to a lot higher than that. Okay. So I wanted to stay
with 0.02 as the default. And I think it's,
it's very good. There's a lot of fog
and you can press on the eye here to hide it and see it so you can
see the difference. And I think there's
a lot of work, so I'm not going to go
any higher with this one. Alright, so we're
almost finished. So what I usually do when
I'm almost finished, I click on build and
build all levels. And this will just build
to the lighting inside of the level and make sure
that everything looks good. So sometimes the
lighting doesn't look like that. Bill
to the lighting. So the meshes that are standing still are building the
lighting profile and so on. So you have to
build the lighting. And it will take some time
right now because we haven't optimized our level
two became ready yet. So usually it takes
a bit of time, but let it just go here and I'll be back
with you right now. I have finished
building and I get some errors while I'm building. But that is okay right
now we are going to fix all of this in the
optimization section. Let me just close it for now and this is what my lighting
looks like now. However, there is one thing I don't like currently
and it's the shadows, how they are falling, like the sun is directly down. I want to make it a
bit more interesting. What I'm going to do
is I'm going to go up and let's actually minimize
the Environment folder. And let's click on the
directional light. Over here. I'm going to rotate
the sun so it gives more interesting shadows. I'm going to click
E on the keyboard to select the rotation tool. I'm going to remove the snapping because I want to
move it freely. And let's rotate
it this way, e.g. so you can see when
you rotate the sun, you get a bit more of a interesting
environment instead of just having the
shadows directly down. So I'm going to rotate it, rotate it to
something like this, and maybe rotate it a
bit further this way. Just slightly. Something like this. Okay. Try to adjust it
for your liking. And when you are happy, just go to the skylight again. And I'm going to click on recapture just to make
sure everything is good. And that was it
for the lighting. So you can see how easy
it is weekly we can make lighting from scratch
and how we can make it good. So the only thing we did was
to adjust the sky first. So setting the time of the day and that will adjust
the lighting up here. And then over in the skylight, remember to press
on recapture in order to recapture
this environment. And then over in the
exponential height fog, we made it into a volumetric fog because later on we
are going to make a god rays and we need to have volumetric fog turned on
or else it will not work. And then changing
the cutoff distance, remember that we'll
change it over there. If you're at zero,
you'll get them back. However, again, you can just adjust it here if you wish to. And maybe you wish to have this fog for your environment,
that's up to you. But for me, I'm going
to remove it and set the cutoff distance to one, and then we adjusted
the directional light, and this is the
whole environment. So remember again for
the directional light and the skylight set
them to movable. And we're going to talk about these mobility options later on. But go ahead and click on File, click on Save All. And let's move on
to the next lesson and make God's grace.
49. 7.08 Enabling God Rays: It is very simple to
enable the god race. So to enable them, go ahead and click on
the direction light. And inside of here,
you can go down and enable the
light shaft bloom. And when you do this, if you go down here, the lighting is falling. You can see here if I if I
disable it and enable it, you can see the difference. And if you go between
those barricades, e.g. I'm going to reduce
the camera speed and I'm going to
reduce it further. Now, you can see here if I move, you can see the god rays
falling down in order, like if it's not
working for you, remember to click on the exponential height fog and enabling the volumetric fog. Now for the bloom scale, you can increase it and
see what happens now. They are very, very visible and maybe we're not going with
that much of a bloom. So lets me reduce it. And what I'm going to go with something very, very subtle. I don't want to overdo it. Maybe it's something like 0.1. So you can see when I'm
moving around here, I can still see the
light shaft bloom here. If I move between those, you can see it very clearly. And I just want
this subtle effect. I don't want to overdo it. I think this very
subtle effect when you move through the
environment looks good. And that is how simple
it is to make God raise. So you can see it looks if I
increase the camera speed, you can see it looks
normal up here. However, if you go down
to where the sun is actually falling down and
hitting, you can see it here. So now we have the
god raised enabled. And let's move on
to the next lesson.
50. 7.09 Adjusting the Post Process Volume: Let's now adjust the
post-process volume. So let's click on it. And inside of here, Let's
start from the beginning. So we have the mobile
depth of field. Let's give it for now. And we have this
one called Bloom. If you click it and you
set the intensity to zero, you can see what happens. There is a slight difference. If you set it to very
high, something like five. You can see bloom gifts,
that dreamy effect. I don't want it to be that high. I am, however, going to add
some bloom to my environment. Just remember if you're
making this for a game, loom also takes performance. So try to balance your game, see if you can really afford to go with Bloom
and if you can't, just let it be zero
here, however, for this environment, I am
going to increase it slightly. So something like
something like 0.80, 0.8, you can switch 0-0, 0.8. Just be careful you
don't disable it, because when you disable it, you actually still have
bloomed turned on, because the default
value is 0.6. And if you have turned it off, you can see nothing happens. And this is because
it stays on 0.6, even though you turn it off. If you really want
to turn it off, click on it and set it to zero. For this environment again,
I'm going to go with 0.8. And for the exposure, remember we set the exposure
so that's taken care of. So I'm going to go down to the image effects and I'm
going to change the vignette. Or the vignette is, is
this dark border around your image or your environment to make it look more cinematic. For games, usually
I'll put it to zero. So if I'm making a serious game, you can see you put it to zero and you remove it
from the screen. And this is what it looks
like in full-screen. Okay, so right now I'm just
making a cinematic shot. So I'm actually going
to increase it. So you can see when I
increase the vignette, you get this dark border around your edges and it
looks more cinematic. So I'm going to make
it something like 0.4, so not overdoing it. So you can see the difference
if I write 0.0, 0.4. So it looks a bit more
cinematic than before. Now let's go down here. And in the color grading, you can change the color of
the game and how it feels. So clicking on the temperature, I want to change it slightly. Clicking on the
temperature here, you can see when I reduce it, it gets more cold. When I increase the temperature, it gets harder here
in the environment. And what I want to do is click here to go back to default. I want to decrease it slightly because I
think it's too warm. Just decreasing it's slightly until I have a bit
of a color effect. And I'm just going
to write 6,200 here. So we can see the
difference if I take it off and take it on. So very, very slight difference, but it gets a bit
colder than before, and I'm also going
to add a tint to it. So clicking on Tinder and you can see when
you increase it, you have this reddish
tint. For the tenth. I just want a very slight tint, not very strong,
just a small effect. 0.02 would be fine for me. And you can take it and uncheck it and you can see
the difference. I'm not sure if
you can see it on your screen when I'm recording, but it's a very, very slight difference and it's
tinting it slightly red. Now, down here in the global, you have more options so you can increase the
saturation, e.g. so you can take it and
increase the saturation. And now I can see your
game is very saturated. So if I write one, this is the default. And I just want to
increase it slightly. You don't have to do
this for your game. It's just for this scene. I'm doing it. So maybe 1.05, very,
very slightly. You can see if I uncheck it
and tickets, the difference, actually, maybe 1.1 can be
a better option as well. So the saturation is
very, very slight. However, it does make
it more saturated, and sometimes I think
it makes it less boring when it's a
bit more saturated. However, don't overdo it
because it also hurts the eyes. If, if it is too saturated, I'm actually going
to decrease at 1.08. And then you can increase
the gamma and the gain, e.g. usually, I increase the gain to make the game a bit brighter
if it's way too dark. So click on the gain. You can see if you
increase the gain, the overall level and
image gets brighter. However, I'm going
to set it to one. I don't need anything here. And you can do this for
the shadows as well, e.g. if you want to
increase the gain to remove the shadows so you
can increase the gains. And now you can see the
shadows are lighter, but it also looks more flat so you have to be careful
with these settings. I'm going to disable it for now. I don't need this. Now we are finished with the
post-process volume. However, I'm just going to
change my scene slightly. I'm just going to
take this blood hold Control and drag and just
to move it over here. So I'm going to place some
blood on top of this graffiti, something like this here. Now I'm also going to copy
this blood and move it over top of this graffiti, so it looks a lot better, something like this here. And then I'm going to
change this color slightly. So click on my graffiti
decals and then going up, going up here and clicking
on this small icon. So it takes me to it in
the Content Browser, I'm going to open up
the material instance. And inside of this
material instance, remember we changed the
color of the green, we reduced it to 0.4. I'm going to reduce it to 0.35, just slightly more
orange or this graffiti. And now for the blood
you can see here if I go down and look this way, you can see the blood
shines like this. I'm not sure if it does
that in real life as well. However, I don't like
that it shines this much. And remember when it shines, it means we have to play with the roughness
for the blood. So if I go over to the blood, let me click on the
decals and then let me click on this
icon to take me to it. And then open up the
material instance, go down and find the roughness. Let's see if we
can find this one, the roughness intensity. And let's set it to something
like a two instead. And you can see if I
write one and our O2, you can see it gets more rough. And if I look at this angle
and I write one or two, you can see now we can
see it more clearly. However, I'm going
to add a bit more. I think 2.5 might
be a good number. So it's slightly shiny, however, not too much. And I'm going to do this
for the other ones. So opening this one up, they're going to the
roughness intensity, putting it to 2.5 and doing
it as well for this one, roughness insensitive to 0.5. And I'm also going to do
it for the hand smear and setting the roughness
and intensity to 2.5. Now if I minimize them, you can see the difference. Now they don't shine too much. They shine slightly in the sun. But I can see them more
clearly like this. And I can still see them
more clearly from up here.
51. 7.10 Static vs. Stationary vs. Movable: Okay, so for the lighting, we have the mobility options. So if you go up and
find one of the lights, e.g. the direction light. You can click on it. And here in mobility you
can see something called static, stationary and movable. Now what is the difference? Now, if you can hold the mouse over it, It's very explanatory. It says aesthetic light
can't be changed in game. And what that means
is if you are in game and you have a
day and night system. So we have a system
where the sun rises and the light moves in
the game dynamically. This cannot be if you
use a static light. So you can see the static
lights says it's fully baked, so it's prebaked, you
can't change it in game. It stays like what
it is right now. So if I set this to
static right now, and in the game it
will look like this. You can't change it
during the game. But the good thing about
the static light is it is not expensive as
the movable lights. So performance-wise,
static lights are way, way better than movable lights compared to compare
them performance. So this is very good
for performance. However, remember, you
can't move the shadows. A stationary light will
only have its shadowing and bounce lighting from static
geometry baked by light mass. All other lighting
will be dynamic. It can be, it can change
color and intensity in game. So what that means is if
we choose stationary, it's going to bake all of these shadows so
that you can see here. However, if you have a character
running around, so e.g. if we go back to the
three assets and I drag this dummy
into the level. Now, if I set the
directional light to static, remember these are
fully baked lighting. This means if this character is walking around in the level, is shadow will not follow. His shadow will still be here because this is a
baked lighting, though we have baked
the shadow and we can't bake a new shadow
during gameplay. So during gameplay if
you have moving objects, it's not good to put it on static because you can't
have moving shadows. However, if you put
it to stationary, it's going to bake all of these sliding for
this environment, this environment assets
that are standing still. However, it's also going to consider the objects
that are moving. So this shadow will be correct when the character
is moving around, the shadow will follow correctly if you are
choosing stationary. So you can see here in
the stationary down at the bullet points
it says it can't move. So again, if you want a day and night system in your game, you can't choose stationary because the light itself here, the sun, if I can find it here, the sun itself will not
move during the game. It will stay the same. However,
it will bake lighting for moving objects so they can move around and you can see
the shadow following. So this is the
difference between the static and the stationary. And you can see here it says
Allows partially big lining and the dynamic shadows
from movable objects, they will be visible as well. So you can have dynamic shadows. This is what it
means if you have a movable object running around, this is a dynamic shadow. No dynamic shadows are not
possible if you choose static. However they are possible
if you choose stationary. Again, you can't
move the lighting itself in the game if you
want the night system. Now, the last one here we
have is the movable light. And movable lights can be
moved and changed in gain. So again, if you want
a date night system, you can use a movable lights because then you can
change the light itself. During gameplay
says it's totally dynamic and the whole
scene dynamic shadows, and it's the slowest rendering. This means that
this costs a lot on the performance compared to the stationary and the static. However, this is necessary if you needed the night system, you can't do it with static
and stationary lights. But if you don't need this learning to move
during the game, Let's go ahead and
set it to stationary. And if your environment doesn't contain moving objects like
a character running around, just go ahead and
put it to static. However, the good thing about the movable light earlier
when we did the lighting, I told you to put it on movable is when you have
a movable light while you are lining the environment and you click up here
and do the building, you only have to build once. Once you have built once
here for the movable lights, don't have to build them again when you
change the lighting. Because how it works
in Unreal Engine is if you change
lighting around e.g. the intensity scale
and you change all of these settings and
they are not movable. You have to click up here and build the
lining so it builds the correct shadows every single time you change one
of those settings. However, when you
do the lighting, I like to set it to movable and I just go up
here and build once. And I don't have to do this
again to see my results. Now when I'm finished lighting and I don't really
need it to be movable, I can change it back. So right now, I don't need
a day and night system for the directional
lights aren't going to put it on stationary instead. The same thing for the skylight, put it to stationary instead. And you can see
when you put it to movable and stationary
it, the light changes. This is because it needs
to build the lighting, as I told you before. But again, the stationary is a lot more efficient
performance-wise. So I don't really need
a day and night system. I don't want the light
to move in game, so I'll put it stationary. Later on, we will have a
character moving around. So we need it to be
stationary and not static. So again, directional light, stationary, skylights
stationary. And then I'm going to click on the sky atmosphere and put
it to stationary as well. I'm going to click on the
exponential height fog and put it to stationary again. And just checking the other
options here for the sky. You can't really put it. So that was it. Everything is stationary. Let's go ahead and,
and click on Build. And let's build all the levels and wait for it to be finished. Okay, so now it has finished
building the lighting. And again, these errors we will fix in the optimization section. So let's close them down for an hour after building
the lighting. This is what it looks like. Now I think the shadows
are way too bright, so I'm actually going to
reduce my skylight again. I'm actually going to reduce it. So if you write one,
you can see the shadows are more clear and the
environment looks a lot better. I'm actually going to increase it to maybe something like 1.2. So before it was 1.5
and reducing it to 1.2. This is what it looks like. So just a slight difference, but it makes my environment
look a lot better. And now we are finished
with the lighting. So this is what it looks like. Again, if there is some settings that you need to change
this, change them, e.g. for the directional light, if you want the light to be more intense or if you want the
shadows to be brighter, you can change the skylight. And if you want this guy
to be something else, you can go ahead and go to the
goods sky that we added to the level and change the timing
and the clouds and so on. But I think this is
fine for the lighting, so this is what it looks like and this is the whole level. So you can try to go
around and the level and see what
everything looks like. I like how bright
the shadows are, and I like how the lighting is falling
as well from the Sun. So I think this looks better. And now that we are satisfied, Let's move on to
the next section.
52. 8.01 Foliage Optimization: Hello and welcome to this
optimization section. So now that we have
designed our environment, remember we are
still making a game. So we need to optimize it
so it runs like a game. It doesn't lag for the player. So right now as you can see, if I click up here and
I click on show FPS, you can see right
now the FES is 90. And if I zoom out to
view the whole scene, you can see my FPS is around 40, 45 to 50, and that
is very low FPS. And if you don't know FPS, frames per seconds, so that's how many frames per
second you're running. And we preferably want
it to be over 100, 150, right now it's
50, so it's very low. And if I go down into my
environment like this, you can see it's
still around 60, 70, so it's still very low. So we need to increase
the frames per second. However, just remember that
this is not totally true, so this is not the best
representation of the frames per second because when you open other things
on your computer, this can be affected. So right now I have my OBS, which is my recording software
to record this course. I have that open
and I'm recording. That will also reduce my FPS. So if I closed my
recording software, this would maybe be FPS more
than what it is right now. And you can see if I open
something else, e.g. I. Go to this concrete
barrier and I open it up. You can see my FPS is lower. If I close it, my fears is 90. And if I open this up, you can see my SPSS 65. So this is not the best
representation of what the frames per second will
truly be in your game. When you want to
see the true FPS, you have to click up here and the windows and then
package your game. And it will package the
game and make an EXE file that people can
play, e.g. your friends. And when that EXE file is made and you open
the game from there, then that will be the true FPS. But for now this is the
FPS inside of the engine. And it also changes if you change the scalability settings. So if you go to the engine scalability settings
and change it to e.g. medium, let's say like this. You can see it's a lot
higher than before. And if I change it to
something like Epic, the FPS will be lower. So again, just remember this
is an okay representation, but it's not the best because every time you
open a new window, it will reduce and you don't get the real
frames per second. You have to package the
game and try it from there. But right now, let's
try to fix this. Let's try to make it higher
than what it is right now. And the first thing that
we can do is optimize the foliage because you can see if I zoom out and I
take a look here, my frames per
second is about 45. And if I on the foliage, so if I can find it here
and the environment, this one instance foliage actor, if I click on the eye, you can see my FPS is around 115,100.2120 is the maximum
FBS and Unreal Engine here. And inside of the engine, you have to package, again, package the game
to see what it is. Truly because when
you package the game, you can get up to 500 FPS. Fps. However, inside of the engine it is locked to maximum 120. So you can see, I
can't get more than 120 even though I'm looking
at very close objects. But we can still fix this. Again, This is
lower than what it is right now because I'm
recording this course, I have my coding software open. If I didn't have it open, it would be 120 for sure. Okay. So let's turn on the
foliage and you can see how heavy the voltages if I
turn it off, It's 120. If I didn't have my
recording software open, and if I open it up, you
can see how low it is. So now let's go
ahead and fix that. The first thing we
need to do is we need to open the foliage. So if I just go down
here, so I don't like, and I go down here and I find the foliage here in 3D, plants. Grass and open up
the first grass. Now for the foliage right? Now, it's not night. You can see if I go up here and the lips and I
click on wireframe, you can see this, these
are the non-IT models. And if I get closer, they get more detail. If I get further away, you can see it reduces
the amount of triangles. This is why nanometers so good. When you go away from an object, it knows that you don't
need as much detail. So it reduces the
amount of triangles, which will give you less detail, but also better
performance for your game. This is y and then
I just so great. However, the foliage
right now is not an NIH. So if you're far away, it doesn't matter, it's still keeping the amount of triangles. And if you're close, it's still keeps the amount of triangles. We need to make it an NIH, so it reduces the
amount of triangles. We are moving far away. And this is because
we don't need as much detail when you're far away because we can't see
the model up-close Anyway, so we don't need every
single small detail. So let's go ahead and click on the first foliage
and click on Enable. And then I'd support
and then preserve area. Now in order for it to work. Now let's close it
and click on Save. In order for it to work, we
have to do something else. But for now, let's do
it for all of them. Now you can click on
every single one, e.g. click on the next one
and click on Enable, nano support and preserve area. But it will take a long time if you have a lot of foliage. So let's select all of them. Let's right-click and
then go to asset action. And here there's
something called bulk edit via Property Matrix. And click on that one. You can edit it all of these settings all at
once for all of them. So here in the
nano its settings, I can click here and I can say enable here and preserve
area is enabled as well. And I can close it down. So now it's actually
enabled for all of them. So you can see if
I click on one of them here, it's enabled. So these settings that
you can see here, they can be edited all at once if you just
select them right-click, I said action and bulk
edit via Property Matrix. So a very cool detail that you need to know
so you can save time. Okay, now that we have enabled nights where you can go ahead
and click on Save first, okay, now that
everything is saved, Let's go to Edit and open
up the project settings. Now instead of the
project settings, in order for an NIH
to work correctly, we have to go down here, down to platforms
and select Windows. And here you have to enable SF6. So if you don't
have this enabled, you have to enable this one. And when you enable it, it asks you to
restart the project. So you have to
restart the project if this is not enabled for you. Now and this is enabled, Let's go up here in
the project settings. So in engine, you can find
this one called rendering. And instead of rendering, Let's go down and just
make sure that you have virtual shadow
maps enabled, nutshell maps, but the
virtual shadow maps that you have this one enabled. And then also make
sure that you have generate mesh distance field. You have this enabled as well. This will make your
game run a lot faster. And then when you have this
selected click up here and select global tracing
instead of detailed tracing. Tracing is good for
cinematics are very can see here for global
tracing, you can see it says, when using software ray tracing, lumen will trace against
the Global Distance fields, which is the one you
just enabled here. And it has the fastest tracing. So this will save your
performance as well. So let's change it to global
tracing, tracing instead. And let's close this down. So this was it for the settings. Let's close them down again. Go ahead and save everything. And let's go up
here to the foliage and select all of these folders inside
of the foliage tool. Select all of them. Down here. You can change them to movable because
when you build the, the levels earlier, we
got an error with these, with these voltages.
What's that era? Just go ahead and make
them movable like this. And that will fix the error. And let's go ahead
and save everything. And now that it's saved, let's now go out here. And you can see
before it was 45 FPS, but now you can see
I am getting 95 FPS. However, again, remember I am recording with my
recording software, so this is a lot lower
than what it will be. So if I close my
recording software, this will be at least
105 or 110 FPS. And also remember
that I'm running on the epic scalability. So if I put it too high, e.g. you can also see I
get a lot higher FPS. So if I didn't have my
recording software, this will be 120 FPS for sure. So you can see this
effect FPS as well. However, again, to
view the true FPS, you have to click up here and package the game to
see what really, how it really plays in wanting it is making
that EXE file. But as you can see, we made
it a lot better before. It was 45 FPS, so we increased it by 50 FPS, just by these small
changes to all of these voltages are
finite right now. And that was it for the
foliage optimization. So let's move on to
the next lesson.
53. 8.02 Level of Detail: Unreal Engine. We have something
called level of detail. And what level of detail is, is when you move
away from an object. So from this barrier, e.g. if I move away, that detail on that mesh will be lower because
the player is far away. So you don't need to render
all of these small details. And when I walked
close to that object, it shows me every
single small detail. So this is what's called
a level of detail. When you move away,
it removes a lot of the details so
the game can perform better because the
player doesn't need to view the
small details anyway, because you can't see
them, you are far away. And if I go to up here
and click on Wireframe, this is actually
what's happening. When I move close, you can
see the triangles increase, and when I move
away it decreases. So this is actually level of detail that you can see here. The level of detail for these
assets are decreasing as I move further away because I don't really need to
see all of this detail. And you can see they're getting larger and larger and triangles. So it reduces triangles. So my game can run better and my frames per
second can be higher. On my, I move closer. It increases the
triangles because I am now very close and I
can see all of the detail. Level of detail is already enabled like this
automatically in nano, right? It is not automatically enabled
for non nanobots meshes. So you can see here, all
of this is not nice, so we don't really have
anything to test it on. So I opened up my bridge here and I'm just going to download this rusty
metal barrel. I'm not going to
download it as night. I'm just going to download
it normally as none, none, none IP model. I'm going to hit
download and then I'm going to add this
to my projects. So once this has been done, I'm going to go into the mega Scans folder and
going to three assets. And here is the rusty metal
barrel that I have added. So again, I added it as
a non-finite models. So I'm going to
close it down here. I'm going to place
it into my level. Now, for this variable here, it is none night and it has a low d is you can see if I
click on one of the models, I click on this icon to view
it in the Content Browser. And if I open it up, you can see over here to the
right in the LOD settings, if I click on Advanced
and then I'd models only have one level of detail model. And if I open up this normal
one, so if I click here, click on this icon
and open it up, I click on Advanced. You can see it has multiple
level of detail models. So when these 3D models are made inside of the 3D
modeling software, without non-IT usually
the modeler has to make multiple models in order to
make this level of details. So what the modeller
does is they make it in high detail and then
they muddle it in lower detail and lower detail. And this is what it is. These are multiple models
of the same item here, but lower and lower resolution. And this is just doing the
same thing as the night. When I move further away, it's going to, if I go
back to the wireframe, you can see if I
move further away, if you can see it here
at the triangle slower. So if I move here, you can see the triangles get lower
just like the night. However, for the
non-nested models, it's not going to do it
automatically like this. You can see they
automatically remove. But for these, you have to set
it to a specific distance. So you see at a
specific distance, they reduce to
that second model. And at a specific distance, the reduced to that third model. You can see the LOD level
of detail you set how far away the player will
be and then you reduce the detail
for that model. For this, you can see inside of this model viewer up here, you can see right now
I am viewing LOD zero, so the highest detail, and you can see that if you
click on the wireframe, this is the highest
detail model. And if I move further away, now you can see I am
now viewing a low D1. And if you go to the wireframe, you can see that is correct. It's actually reducing.
So you can see here, if you move further and
further and closer, you can see it
reduces to LOD one. So now it's using
this one, a low D1. And you can also
view them manually. If you go back, you can view them manually by clicking here. This alert is zero. Elodie one, LOD two. You can see how less
detail the tears. And then Hello D3, which is the lowest detail. You can see. It's very, very low detail
compared to a load is zero, which is the highest resolution. Again, this is done
because you can save performance when
the player is far away. There is no reason to see
this high detail model. You can use the
low detail models and the player will
not even notice, and this will save your
performance for your game. Now, if you aren't using
non nights models, I can show you how you can
set up these LOD distances. So if I go back to
alert the auto for now, you can see when I've
moved further away, it switches a low D. However, sometimes
in Unreal Engine, it makes it way too close. So when I move away and I'm
still close to the model. I still want it to view
it in the high detail because the player can
still see the changes. So for a load is, it's not
good that the player can see the change in the model
when they are still close. So right now you can
see here I can see this line because it
changes to a low D2, which is very low detail. But the player is
still too close. I don't want it to
change this close. I can see the bad
quality model from here. So what I want to do
is I still want to, I want to change
it to a low D21. I'm maybe over here so
I can't see it here. So what I need to do is I need to go down in
these settings and you will find this one called
auto compute LOD distances. I'm going to disable
it because then I can change this screen sizes
because right now I can't. So I'm going to remove this. And now we can see that I have the option to change
the screen size. Screen size, you can
see it, it helped here. So e.g. let's say I wanted to change the model to a low D1, one arm over here. Actually, let's say over here, right now the screen
size is around 0.08. So what I need to do is I
need to go to a low D1. And right now you can
see the LOD is 0.2. So I'm going to
change it to 0.08. And then let's say for LOD two, if I switch to load into, let's say I want it to change
to a load D2 one, I'm here. So zero points, zero. Let's say 0.030, 0.0, 3.4, LOD the last
one is over here. Maybe when I'm standing here, like the players
standing here as 0.02. So I'm going to go
to a low D3 to 0.02. And now they are all correct. So now if I go back to LOD auto and let's move
close to the model again. Now it's using my
own screen sizes. So if I move further away, you can see it's not
changing like before. I have to go to 0.08. In order for it to
change to a low D1, I have to go further away to 0.03 in order for it to
switch to as alluded to. This is a lot better
because now I can't see the changes
as the player. And it's tricking my
eyes because I still think I'm looking at
the high quality model, but I'm not, I'm looking at
the alluded to right now. So this is how you work with
LOD is for your models. And this can save a
lot of performance for your game because
you don't need to view the high level
model when you are this far away because you
can't see the detail anyway. So just remember if you have
none, none I've models, go ahead and every
single model and try to set these screen sizes. Hello days. Now, if you have a custom model, sometimes Unreal Engine does a great job to create a
low-risk automatically. And you can do it down here. Right now you can see I have four as the number of alleles. However, I can still
make more e.g. let's say I wanted to six
Elodie use instead of four. Then you can click
on Apply Changes. And now you can see up
here I have more options. Now I have six LEDs
instead of four. So LOD, five is the lowest one. You can see it's very,
very low detail, but Unreal Engine created
it for you automatically. This one you can
maybe use if you are this far away because you
can't see the changes anyway, this will be very good. So here you can see
Unreal Engine can actually create a load this
for you automatically. If you have 3D models, you've created yourself,
you can use that as well. But for now, let's just
delete this barrel. I just wanted to show you what LOD square and let's
delete this one. I'm also going to delete
this folder here. But as you can see, non-IT is very clever. It's doing this
automatically when you move further away from the model and when you move close
to the model as well.
54. 8.03 Texture Size: Let's now take a look at the
texture sizes for the model. So let's go to the first
one, e.g. this barrier. And we already did this
in the previous lesson because we had to do it else
the models will look blurry. But you have to go in every
single model that you have. And let's open up the first
texture inside of here. Remember, we set the low T bias. So when we imported the texture, it was an eight K resolution. When it was an
eight K resolution, you can see here the
resource size was 43,000 kb. And when we changed it
to an LOD bias of two, reduced the maximum in-game resolution for this
model to two k texture. And we reduced it to a around 3,000 kb in
the resource size. For games, you don't
really need to bump it up to eight K textures
because you're going to like for sure and the
game will not be great. Players will not play
the game if your game is lagging to need to fix
these resolutions. And remember the way we
did it is now let's, let me actually
close it and open a better model so that
you can see it better. So e.g. for this old
concrete barrier, I think it's more visible. So if I open up the texture and this one again,
we reduce it. Hello de-bias of two. And let's say I reduced
it way too much. So let's say I reduce it
to an LED bias of five. And when you take a
look at this model, you can see it is very blurry
and it looks horrible. Though the way we did this is we started from LOD bias of zero, which is the main
texture at eight K. And then we wrote one. Then when you write one, you have this resolution. Then it becomes for
k. And you can see when I write zero,
this is eight K. And when I write
one, this is for k. There is really no difference. So what's the reason
for you using this? And it doesn't
really make sense. So we have to have it
to save resources. Again. I'm going to have it
again to see if I can save even more resources. And it still looks the same. And if I try to have it again to make it into
a one k texture. So let's write three. And now you can
see it's actually becomes blurry on my screen, so that doesn't look too good. So I'm going to redo or reduce. So I'm going to make it higher
back to two here and here, I am going to use
an LOD bias of two. So this is what you needed to
do with every single model. Just tried to increasing, increase their low
de-bias until it becomes blurry and you
don't like the change, then just keep that LOD bias where you actually
liked the change. Here you can see we saved
a lot of resources. We reduced it from an eight
K texture to a 2k a texture. And it still looks
good in our game. So you have to do this
for every single one. And also remember, this was the Albedo texture,
the base color. So you have to do it for
the normal map as well, change their low de-bias
to that as well. So when you change it
on the colored one, you have to do it like set it to the same number for
the same model. So on the LOD bias is to, for my Albedo texture. It is also true for
my normal texture, and it is also two
for my mask texture. Just make it the same
for the same model, don't make it different. And going back e.g. to this rock here,
opening up here, you can see my LOD bias is three and it is a one k texture. So I have to make it one k
here as well for this one, and also for this one as well. Just go around in
every single model if you haven't done that
in the earlier lesson, and reduce the resolution
for every single model, but still keeping that great
look for every single one. But you can see I reduced all of them and they still
look good in my game. And this is what you
have to do else, your frames per second
will be very low, and the game would like.
55. 8.04 Optimization Viewmodes: In Unreal Engine, we have some optimization view most that
we can take a look on. First, I'm going to
disable this FPS. I don't need it anymore. So the next thing we want
to do is click here on the live view mode and then go down here in the
optimization view modes. And the first one is
called light complexity. So clicking on it, you
can see this view here. And if you don't see it,
if everything is black, remembers to click
on Build and then build all levels to
make it correct. So here in the light complexity, you can see how complex your lighting is
inside of your scene. You can see a scale down
here from black and blue, going all the way to
purple and white. So down here, this
is good lighting. This is low, this is high
performance lighting. You're not using
as much resources. However, if you're up here in
the red, purple, and white, then you are using too many
resources on the lighting and the lining will also make
your game leg and run slowly. So as you can see
here, the whole scene inside of here is down here. So the game or the scene that we have here is very optimized, so we don't have any
problems with the lighting. However, you can see here
just to showcase it for you, you can click up here, go to lights and e.g. I. Can add a light bulb. And this is the light
bulb and this is the area it in capsules. And I can also reduce
the radius here. And you can see this is the
light is affecting the scene. Now you can see it gets more
complex as I add more light. And if I copy it, if I hold Alt and drag to copy this slide, you can see when they
are not overlapping, it's not too complex, however, if flights overlap, so now we can see we have
many lights in one area. We have the sunlight, we have the light bulb, and we also have the
other light bulb. Now you can see it
gets in the red area. This is okay. However, I still prefer to reduce this amount of
redness in my game. And you can see if I copy it
again, it gets peripheral. If I copy it again, now it becomes white. And if your whole
game looks like this, this color, this is a problem. This was going to
like your game. So you want to stay, want to try to stay in that orange area and
maybe that red area is okay if it is just
a small scene that you have or small area in
your game that has this. However, if your whole
game is red, purple, and white, then
this is a problem. I'm going to delete
these spotlights again. But for this scene, it
looks like this right now, so it's very, very optimized, so we don't have a
problem with the light. Now, the next one is called
the light map density, and we will talk about
it in the later lessons. So let's keep this one
for now and I go into my stationary light overlap. I remember our skylight is stationary and our direction
light is stationary as well. So we are in the green area. You can see this scale
goes from green to white. So we are in the very, very low resource section, so we are actually very
optimized here as well. So we don't have a problem with the stationary light
overlap as well. Going to the shader
complexity here, we don't have a problem as well. And usually in the shader, we use that if you have water in your game or if you have
like a wind effect, usually visual effects that
you have in your game, they use a lot of resources and this is a good to see here
in the shader complexity. However, you can see
here the ground is the only thing that's
using performance. However, it's still
using a low performance. So I wouldn't really
be worried about this. So you can see everything
is looking good, still, still in the good
area of this gradient. So let's go ahead and
go to the next one. Instead of going to
the, I never use this shader
complexity and quads, Let's just view the quads alone. So clicking here in
the quotes alone, you can also see we are down here in the lower
end of the scale. So what the courts are is these triangles here that you model in the modelling software. So if you increase
it, you can see this, this 3D model as a
lot of triangles. And if I move further away, it becomes more green here. And if I move further,
further away, you can see there is a
limit, it stays here. However, if you have a model
that has a lot of triangles, it will be here in the white. So also, when your Modeller
is doing the 3D models, just make sure you don't have too many triangles that will
like your game as well. So this is performing good. We only have this character and this character is actually
we're not using it. I'm going to hit Delete
on my keyboard to only have this year and
everything is looking great. So you can see our scene
is really optimized. The lighting is fine, the stationary light
overlap is fine, the shader complexity
is fine as well, and the overdraw
is fine as well. So it's very important to check these optimization view mode when you are doing
your game just to make sure you don't have to complex lighting
and you also don't overdraw on the squads these triangles so that
you see here in your game. And let's actually move
on to the next lesson, where we will talk a bit more about this light
map density view.
56. 8.05 Lightmap Density: In this lesson,
let's take a look at the light map densities. So if you click up
here and you go to optimization view modes and you click on Light mapping density. You can see here
for an NIH models, we don't really use
light map density because it's calculating
it automatically. However, for models that
are not right, e.g. this ground that we imported
from the beginning, this, remember this is
a custom 3D model that I made as the street. This one, as you can
see, if I de-select it, so I don't see this pink color. So if I just select
something else, you can see this light map
density is looking blue. And what the light
map density is, it defines how good the shadows look when
they hit this model. So you can see how good these shadows look when
they hit the 3D model. E.g. I. Can go to Assets up here and we can import
this dummy to our level. Remember this dummy here
is not finite as well. So if I go to Lit mode and I go to the light
map density here, you can also see if I
select something else, you can see it also has
a life mapped density. It is not black like
the non-IT models. This is because this
mesh here is not finite. So the light map density is
simply tells you how good the shadows look here when
they hit that 3D model. So when they hit the
ground here that I have, I have to increase my light map resolution if I want the shadows
to look better. So if I have, if I go back here, if this is too low resolution, if the light map resolution
here is way too low, the shadows are not
going to look good. So how do we do this? We can click on
this ground, e.g. click on this icon to find it here and it's
actually down here. And let's open it up. And if I just select
something else, so I don't see this pink color, so I can actually see the color
of the light map density. So the light map density
again goes from blue, which is very low resolution, and then it goes up to white, which is very high resolution. So let's hear in the street, if I just search up
here for light map, you can see here that I can
see the light map resolution. And you can see when I
change it to numbers, nothing is really happening. And this is because
I have to change this light map coordinate
index to zero first. And then I have to remove
this generate light map UVs. And then I have to close
it down and click on yes. Now you can see my
random value that I applied is working right now. So if I open it up again
and I search for light map, now over here it
was 64 by default, and it was like this. Now, this is usually
increased and decreased by increasing
and decreasing it by half. So if I want to decrease it, I want to decrease it by writing 32 because this is
the half of 64. And you can see now
it becomes more blue because now it's
lower resolution. And let's say you want
it to lower it even more than you would
sit here, right? 16 because this is
divided by two. So keep dividing by two
if you want to lower it and keep multiplying by two
if you want to increase it. So a very cool thing
here in Unreal Engine, instead of writing
the number 16, I can actually write, divide it by two and it will
automatically calculated. So if I hit Enter
on my keyboard, it will automatically
calculate 216. So now you can see this
has very low resolution, and if your models look like this in the light map density, this is way too low resolution. And let's say I
wanted to make it very high just to
showcase it for you. Now you can see it's very, very red and this is not what you want to go with.
This is very bad. So let's lower it. Let's go back to 64. Just like before. The goal here is
we want to make it look almost the green. And this is a perfect area. So again, multiplied
by two to increase it. Now, it looks like this. And maybe this is low
resolution, maybe it's good, but let's actually increase
it to see what it looks like even in a
better resolution. So this is what it looks like now with a resolution of 256. And let's actually
multiply it by two again to see what it looks
like now it becomes green. Now this green is not bad. It's actually good. However, what I like
to do for games, I like to, again, if I just divide it by two, I like to stay in this area. So I like to stay in the blue area where it's
about to get green. And if you look at the shadows, they actually look good in game. So I usually stay with this. The bad thing about going
way too high is, again, it's going to use a lot
more resources and it's going to make it slower
to play your game. So I usually try to stay in this area to make the
game more optimized. So now that you are happy
without light map resolution, I'm going to copy,
paste this here. And the minimum life map
resolution, just like this. And then close it
down and hit Yes, and it will save
it to the model. So again, this is a good area. I want to stay in the blue area, but not too blue, not like this. This is way too low resolution.
I like to stay here. What we're about to get green again for the
light map resolution, it will make your shadows
on the ground look more high resolution and it will make your
game look better. Now let's try to adjust
it here for this dummy. Let's go. Even though we don't
really need this dummy, but I just wanted to showcase
it for you because all of the other models are finite
and we can't really use them. So let's go back to my density. Now for this money, again, open it up, click here for this dummy, and open it up. Now let me select something else so I can actually
see the color of it and search for
light map resolution. Now for this slide,
map resolution, again, remember to set the
light map or in index to zero and set this one to off
so you can actually see it, close it down and let
us save everything. And now let's open it up again
and search for light map. Now you can see it is around
the red area, orange area. So what we can do is I
want to decrease it. So if my model looks like this, I am going to decrease it. So let's, let me write 32. This is the half of 64. Now this is what it looks like. Now if we make it half
again so far I'd 16. This is what it looks like. Now. This might be okay. So I would test my game to see if this is looking
good in the shadows. So if I hit Lit
mode and if I e.g. have some items that are casting
shadows on my character, and if they look fine, I would stay here at 16. However, if the shadows
are actually looking bad, I'd go into light MEP resolution and maybe increase it to 32. Again, remember,
green is not bad. It's not because green is bad. I just like to stay low, as low as possible as I can to make my game perform
even better. So e.g. or writing
32 is fine as well. However, running 64,
this is way too much. You shouldn't be in
this area. So e.g. 32 would be the maximum I
would go with for this model. And this is what it looks like. So when you have a lot of
models and they are not night, you have to click on every
single model and adjust their light map densities to make your game more optimized
and perform better. And also when you have very
low light map resolution, you have to increase
them in order for the shadows to look
more high-quality. Now you can see we
optimize the ground. We can also optimize this
landscape if you wish to. However, I'm not really using
this landscape for much. I just need my street ground because this is the
most important ground. The other one, we're not
really seeing too much. But if you want to increase it, you can click on the landscape. And you can scroll down here. And you can see this one called Static
lighting resolution. Now if I go to my,
again, my life, my density, and click on something else so
I can see it here. Actually, I can't do that. Let me click on
the landscape and let me adjust the static
light resolution, e.g. right through here. And you can see it got
into a bear resolution. If you noticed, if I write one, this is what it
looks like prior. Three, if I write six, this is what it looks like now. So if I click on something else, you can see it
becomes more green. If I write ten, e.g. this is one, what it
looks like, still looking the same as before. If I write 12. Now this is
what it's looking like. So you can see this also gets better if you increase
the static light. However, for me, again, this we'll use a lot more
performance because now the shadows are
going to look better on the whole level here. But I'm actually going
back to one because I don't really
need my landscape. I am just focusing
on this street. This is my main detail,
my main environment. So I'm just going with
the static resolution of one for the landscape. So when you are done adjusting
the light map density, so light map resolutions
for your model. Let's move on to the next one.
57. 8.06 Fixing the Wrapping UVs: Right now, if I go to build
and build all levels, I get an error that we
need to remove first. So you can see here
when I finished building my level,
I get this error. It says that this model, e.g. it has a wrapping UV. And what you need to do
here is click on it. It takes you to the model. So you can see here,
if I click on it, it takes me to that model and
it's this concrete barrier. And I'm going to open up
this concrete barrier. And then I'm going to
search for light map. And then you can see
these options here. What do we need to do is
change this light map coordinate index to one in
order to remove this bug. And you can see here,
when I write one here, sometimes it works,
sometimes it doesn't. As you can see right
now, it doesn't work. I write one, it takes
me back to zero. And this is because you have to take this one generates
light map UV. And then again, you
can't change it yet. You have to close
down this model. Then click on Yes here, so it saves it to all
the, all the changes. And then I open it up again
and I search for light map. And then I can write one here. And I can close it down
now and save everything. And now that you have
made this change, now when you build, again, it will remove that book. And now when I click on Build again and try to build my level, now we have to do it for all of the other models that
has the wrapping UV bug. But now let's see if the concrete barrier
also gets that bug now. And we can see here and
now it has been removed. So this is how you fix it. You have to click on this
small grenade first. Now for this next
one, click on it, open it up, search
for a live map. Set this one to true, and then close it and save. And then again, open it up, search for a light map, right one in the light
MAP card at index. I have to do the same thing
you can see I also have the fire hydrant,
the same bug here. So opening it up for this enabled the
generated light, my PVs, and then close it down and then open it up again when
it has saved here, the open it up again, search for light map and then set the light map
for the next one. And let's close it down. Let's close this down as well. And let's save everything first. And then let's go
ahead and click on built and built all levels, all the wrapping UVs
errors are gone now, but as you can see,
I had new errors. It says that the
instance foliage actor, it's a large actor that receives a pretty
shallow and will cause an extreme performance hit unless dynamic cast
shadow set to false. So this one actually let's go back and this is just the
foliage that we have added. And let's go to foliage tool. And inside of here,
select them all. So click on the first
one, hold Shift, click on the last one
to select all of them. And let's go down here. Remember we set it to movable. So this is why it's
saying this era. So let's try to set
it to static and then go ahead and click on
Build and build our level. However, now it's
going to take a lot of time because for
static shadows it has to bake all of the shadows that are
inside of the level. Not like the movable. Though. It's going to take some time. Maybe for me, it will take
maybe five to 10 min, so I'll skip ahead
until this is finished. Okay, so now it has finished
building the level. And now as I can see, it says that the
total light map size is too large for these actors. And it also says that
this has wrapping UVs. So you can see
here all of those. I'm actually going to, it's actually only showing it
for this variation of them. Now, I'll try it
just for this one to change it here as we did
before clicking on it. And then searching for light map and generating the light
map UV closer Down Save. And now I've built
the level again, and now the wrapping
UVs are gone. However, these are still there. So let's try to reduce the total light map size and
see if that fixes the issue. So let me open up the first one. Actually, we can do
it for all of them. Just select the first one, hold, Shift, click on the last one, right-click, and go
to our selections and then bulk edit
via Property Matrix. We can edit them all at once. And inside of here, click on this Static Mesh and you can see the light map resolution
settings here. So let's try to reduce them to something like 16 and
see if that helps. So let me just close it down. Let me go ahead and click
on Build or levels. And now that I built again, you can see the error is fixed, but I get a new error
saying that the instance meshes don't yet support unique Static lighting
for each LOD. And the LOD OnePlus,
maybe incorrect. Almost all the light map UVs are the same for all LOD, right? So I fix this issue and I'll
let you know what I did. I tried some things and just to see what
fixes that issue. The first thing I did is
just click on the first one, hold Shift, click on the
last one to select them. All. Right-click. Go to us at actions and bulk edit
via Property Matrix. And inside of here
for the LOD settings, you have this one
called LOD group. So right now for
you it says none. But I want you to
change it to foliage. And just like that, so just write foliage. And when you have done this, then go over to the Static Mesh. And in this Static Mesh, it, it was changed back to 64
for me for some reason, even though we set
it to 16 over, let's just try to set
it to eight years. So I'm going to write eight
with a static mesh here. And I also realize we don't have an option for the minimum
light map resolution. We need that as well. When you write eight here, close it down, then you have to edit it for every single one. So click on it here, search for light map. And then you see this minimum
light map resolution. You don't have an
option for that in the property matrix, so you
have to change it here. And actually I'm maybe I
wrote nine by mistake. So let me write it here. So the minimum has
to be eight and the light resolution has
to be eight as well. So when you close it down, go ahead and click on
Yes to save it for this LOD and open
up the next one, search for light map,
write eight as well. So just do it for all of them. Just make sure it says here on the minimum lighting
map resolution as well as the light
map resolution. And then go ahead and click
on File and Save All. And that should fix the issue. So now when it has saved, I'm going to build here. So now it has saved. Let me click on Build and
then build all levels. And now I'm going to wait for it to build and I'll skip ahead. And now when it,
when it is building, you'll notice that now it is
a lot faster than before. It doesn't take too
much time like before. And this is because we set the
light map resolution 64-8, which is a big change. And that will make this one
run a lot faster than before. You can see, before it, it made 1% every second or 2 s. And now it is a
lot faster, right? So now it has finished building and it's
encoding the textures. And as you can see, we don't have any
errors anymore. And the shadows are there. They're looking fine and everything is looking
good, just like before. And I can open up the frames per second just to take a look. And you can see
we have high FPS. And because we
applied night before, he can see, even though up
here and doing all of them, I have 100 FPS and remember I have my recording
software open, so this will be a lot
higher if I close it down. And you can also see
the FPS is good here. This one for me would be 120 If I didn't have my recording
software open right now. Okay, so everything
is looking good. I'm going to disable the FPS. And let's move on
to the next lesson.
58. 8.07 Limiting the FPS Usage: The final thing we're going
to talk about here is how to limit your FPS usage. Because when I, when I released my game
farm sale on Steam, it used way too much resources even though it was optimized. However, it's still a
burned your graphics card because there was no
limit to the FPS. So if you had a really
good graphics card, the game would run
at 800 FPS and your GPU would use
all of the resources. So remember to
always limit the FPS because it will use a lot of performance when you
release it on e.g. steam. So just talking
from experience, it was a really bad
experience to release a game without limiting the FPS because I didn't
know at the time. So clicking on the
project settings. And over here you can
search for smooth. And if you search for smooth, you can see this one,
smooth frame rate. So having this on
will save your life and writing as the maximum
frames per second. E.g. if you're making a
first-person shooter, maybe your maximum
FPS could be 200 or 150, or something like that. However, if you're making like an RTS game or building game, maybe you're 60 FPS
would be sufficient. So e.g. for this one, I will just write 150, 50 FPS. And for the minimum, I'm
just writing 30 FPS. Okay, So now there's, this will save your life
when you release your game. Because even though people have a really high end graphic card, they are not going to burn their graphics card
because you have limited the amount of the
FPS one-year released again. So now that this is on, let's save everything and let's move on to
the next section.
59. 9.01 Importing Sound Assets: Now that we have finished
designing the environment, Let's go ahead and add
some sound effects to it just to make it a
bit more interesting. So here and the course materials I've given you
this sound effect, which is just an ambiance
sound of some birds. And for this one to import it, Let's go ahead and
make a new folder. Let's right-click
the constant folder and make a new folder. I'm going to call
this one audio. So if you have sound
effects or music, you can add it to here. I'm going to go back to
my course materials. And again, I'm going
to click and drag this into my content browser. And then I'm going
to import it. Now. It's going to import like this. However, in order to use it, you can't use it like this. You have to make a sound cue, but you can play
it if you want to. Right now, it's very loud, so I don't want to
press this button. But this is how
you import audio. Very, very simple. And it has to be
an audio WAV file. So you can see here, the file itself needs to be Dutch WAV. This is the file format
that Unreal Engine accepts.
60. 9.02 Creating Sound Cues: Let's now create a
sound cue so we can use the sound effect
inside of our level. Now you can right-click
this sound and then you can go to create queue
up here at the top. When you click this, it
creates this sound cue. And usually I give them
the prefix of SC for sound cue and giving them
the name they have birds, ambiance, something like this. Okay, So let's open it up. And inside of here, this is the sound cue graph. Instead of here you
have your sound effect, which is this one. And it's just going
inside of this output, which you can see you
have some details, you can change for it. The most important
one up here is the volume for it right
now it's very loud. So you can reduce
the volume here, up here in the volume
multiplier, e.g. you can write 0.4 instead, and then you can play it. You can play it either down here or you can plate
up here as well. Now can see it's lower. However, I still wanted
to make it a bit lower. So maybe 0.2, maybe
something like this. I just wanted something very silent just in the background, some birds being there. Now, inside of this sound
cue, you can right-click. And you can see on your
right-click you have all of these notes that you can use in order to
manipulate the sound. So you have e.g. the most, most used one is
this one looping. So if you have a sound
that is not looping, you can use this one. Now. We have this one here,
the sound effect, and this is actually a
looping sound effects. Someone made it in a sound software and
they made it looping. So it's possible to loop this. Now instead of using this one, you can actually click the sound itself and then hit
this one looping. So now this sound
effect will loop forever and you'll hear
these birds forever. So the sound doesn't stop all of a sudden
inside of our game. Now, you can also right-click, and usually I use this a
lot called the modulator. And this is used
for sound effects. So you have a sound effect, e.g. if you have a weapon
that shoots a bullet, let's say this was a
weapon shooting a bullet. You can connect it to here. And then you can connect
it to the output. And the modulator plays the sound differently
every time you play it. E.g. let's say it's a bullet,
you're shooting bullets. Every bullet sound
will sound different. E.g. you can make this 10.9. This is the pitch minimum and
1.1 as the pitch maximum. This is what I usually use. And every time you
play a sound effect, it will sound
different because it's changing the pitch every
time you play the sound. So right now, you can actually hear it
under sounds as well. If I played fast, can hear every time
I click on Play, it sounds different than before. So this is what a
modulator is used for and you have a lot of other notes
that you can play with, however, not really too
important right now. So now let's go ahead
and save our ambience. And let's close it down. And let's go ahead in
the next lesson and add this sound cue to our level.
61. 9.03 Adding Sound to the Environment: There are two ways in order to play this sound
inside of our level. The first and easiest
way is just to take the sound cue and drag it into the level and drop
it inside of here. If I click on G to see my icon. So you can see now I have this icon and this is the
sound cue that we have added. And down here you
can see details about the sound cue
that you can change, as well as this volume if you want to increase
it and reduce it. So sometimes a bug that
you need to notice is sometimes if you have
a lot of sounds in your level that you're
adding like this, e.g. let's say you have
four different sounds. Sometimes when you
play the game, I heard that a lot when
I'm creating games. Then you, some of the
sounds will be muted, e.g. this sound and this
sound will play. However, your other two sounds will be silent and
you won't hear them. This is an issue here in
the Project Settings. So if you go to the
Project Settings and you just search
up here for audio. Here you can see maximum
concurrent streams. And this is how
many sound effects here that can be played at once. You have to increase
this number in order for it to not bug e.g. you can increase it to
six concurrent streams, and then you can have six
sounds playing at one at once, and it will play correctly. So just remember
to increase this. If you experienced box with
sounds like this out here. But for now, we just have one sound that we
want in our level. And now we can see if
I click on play, e.g. here, if I click these three buttons and
lay in selected viewport. Now you can see I can
hear my sound when I play the game and if I hit Escape. Now, this is the first, the first method you can
add sound to your game. The second one is
through Blueprint and we are going to go through
a blueprint section. But for now, just to show you
the very, very basic thing, clicking up here and then clicking on Open
level blueprints. And inside of here, I'm not going to explain too much in detail because we
have a section for it. But if you can right-click
here and this graph, you can actually pan around. And if you click and drag
from this execution pen, and you can say lay sound to D, and then you can go ahead
and select your sound cue. Then go ahead and
click on compile. And now let's close
it down and I can see I don't have
it in my level. I only have it here in
my level blueprints. And if I click on Play, you can also hear
the sound effect. So these are the
two ways that you can add sound effects
to your game. But for now, let's just
delete it from here. I'm actually just going to do it here through the very basic way. And we are going to learn blueprints later on
in another section. So now that we have
the sound working, let's go ahead in the
next section and take a look at the presentation
for this level.
62. 10.01 Adding a Camera: Now that we're finished
with the scene, let's go ahead and take a look
at how we can present it. So first let's take a look
at how we can add a camera, because right now we're
just in this flying camera. However, we need to add a camera if we want
to present it. Now there are two
ways to add a camera. You can either click up here and you can go to all classes. And you can see this one
called a camera actor. However, I am going to present my scene so I want to
cinematic camera actor. You can see, I can see this one, sign camera actor, which
is the cinematic one. I can also see it up
here in the cinematic, and I can add a
sign camera actor. Now, this is the
first way to do it. The second way to do
it is just to click up here and then go to
Create camera here. And then you can see
you can either create a camera actor or
assign camera xa. So what I usually do is I tried to find an angle
that looks good. E.g. let's say this looks nice. And I click up here and
go to Create camera here and sign camera XR because I want to cinematic
shot for my scene. So clicking over here, now you can see it creates
this cinematic camera. And I can see this view because I have
selected my camera. So if I click on something
else and I click back on it, you can see I can
view this camera. Now in order to view it
through this camera, you can right-click the
camera and go to pilots. So when you pilot it, now you are inside
of this camera. So now when you're moving, you're actually
moving the camera. Now, if you don't want to
move the camera anymore, you can click on this eject button and
this will stop piloting. So clicking on that
button will go outside of the camera and leave it
wherever it is here. Now a very cool trick. If you like a shot and you're afraid of
moving the camera, let's say you have
used some time too. This placed here and you don't want to move
the camera anymore. And you can see sometimes
accidents happen. You move it by mistake. In order to lock it
in this position, you can right-click
this camera here, or you can right-click it
in the outliner as well. That's up to you. And then you can go
to transform and then luck actors movements. And this way, when
you try to move this, if you click on the
camera, you can see you try to move it. It gives you that, that icon that you can't really move this
camera right now. And this is because you
have locked the movement. You can go over here again
and right-click it and go to transform and then click
on Lock again to unlock it. And now you can see you
can move it freely again. So very good to look assets if you don't want
to move them anymore. And you can do this
with everything. So we can also do it
with these barriers. Let's say you're
finished the level, you don't want to move
anything. You can click on it. You can right-click go to transform and lock
the actor movement, and then you will not be able
to move this rock anymore, though very, very
handy thing to know. But for now, let's
work with this camera. Let's go to the next section and adjust the camera settings.
63. 10.02 Adjusting the Camera Settings: Alright, now let's take a
look at the camera settings. So if you click on the camera and over here in
the Details panel, the first thing is you can see
what type of camera it is. I'm actually going to
switch it to DSLR. And if you don't know anything about cameras, that is fine. The SLR is just
this basic camera. You can buy e.g. a. Nikon
or Canon in real life. So clicking on it. And then I'm going to choose the type of lens and
the type of lens. This 185 prime millimeter is a very good one for making
the background blurring. So you can see it's
very blurry right now. And if I just right-click
here and I pilots my camera, by the way, if you
have two screens, what I usually do myself, I, I open up here in the window to viewport and open a second
view port like this. And then I go here
and I right-click this camera and I piloted
here in this viewport. And now you can
see I can work in this viewport and I can
see what it looks like. So if I move it here
in this viewport, you can see what it looks
like through the camera. So very neat way
to do it as well. And I put this in my second
monitor and I can view it here on my second monitor
and I can work like that. But for now, let's not do it. Let's just do it here on my main screen since I'm
recording this for you. Now you can see I can blur the background
if I do it like this. E.g. let's say I wanted
this character in the foreground and I wanted everything else
blurred in the background. And the way to do this is
here in the focus settings. So clicking on this arrow, then you can click on this
Draw Debug focus plane. This one will help you
where you are focusing. So if I decrease this number, the manual focus, so click
and drag to decrease it. And until it becomes
this purple color. So I can see my DBA plane. You can see this is the
plane that we're seeing. This is what we applied here. And this plane helps me to
see where I am focusing. Right now. I can move this plane here, so it stops here
on this character. This means the camera is now
focusing on this character. Now if I remove my
Debug Play and you can see if I make it full screen. It is now focusing
on my character. If I click on G to remove
all of these icons, it is now focusing on my character and all of
my background is blurred. So what you can do here is
try to find a really cool, really cool shot, e.g. something here, e.g. this grass or these
cones or whatever. And then what you need to do is go over here and open this, debug it plain, try to
focus wherever you want. E.g. I. Want to focus on this is cones and this blood
on the ground. And then I remove
this debug plane. And you can see if
I full-screen it, click on G to remove everything. This is what it looks like. And let's say you
are happy with this. Now, let's take a look
at the next lesson, how you can take a
screenshot and e.g. send it to your friends or
put it on your portfolio.
64. 10.03 Taking a Screenshot: Let's say you place this
camera and you really want it to take a screenshot
of this shot here. And you want it to send it to your friends or put
it in your portfolio. So very, very easy way
to take a screenshot. You can just click up here. And then you can go down here to high resolution screenshot. And now you can just click
Capture and it will take a picture of this screen without all of these
buttons up here. Now just to make sure here
that you have written 1.1 just means the size of your current
screen resolution. So right now I have
a four K website. Just move my camera by mistake. I'll just move it back here. Now, this camera
that I have right now is in for K resolution. So right now, if I
have written one here, it is now in for K
resolution. If I arrived e.g. two here. Now it will be
in eight K resolution. If I click on capture, just be careful if you
make it way too high, e.g. like three or four, it will crush the engine. And you can also see the, they are trying to tell you that don't try to
make it too high, you will crash the engine. So usually what I do, I just use it on one, maximum two if I really need to, however, I just stick to one. Most of the time. You can
just click on capture now. And when you click on capture, it takes a screenshot. And you can also see it here. If you click on this link, you can see it opened
inside of this link here. If I maximize it inside of my project folder and
inside of the saved folder, it has a screenshots folder. And inside of here you can see this screenshot that I took. And it opened here on
my second monitor. And this is what it looks like. So really, really cool
screenshot that I can use e.g. for my portfolio, every you
can see this cone is flying, so don't use something like
this for your portfolio. This will be embarrassing. I would just go here and just rotate it slightly just
so it doesn't float here. Okay, So this is the
easy way to do it. And that is, it's very, very easy to take screenshots
here in the engine. And let's go over
to the next lesson.
65. 10.04 Making the Camera Work on Play: Alright, so right now when
we click on play here, you can see we're
just starting here in our basic camera where
we are right now. And when I click on play, I actually want to
start over here because then I can hear
the sound effects. Let's imagine you want to
record with the sound effect. And I'm actually going to reduce this ambiance slightly
so it can hearing me more clearly
here in the course. So if I click on Play, I want to hear the
sound effects when I, when I tried to record it and they don't play unless I
actually click on play here. And when I click on play, I want it to start on my
camera because I have this really cool shot that
I want to show people. And in order to
click on play and start from this
camera, they're very, very easy way to
do it is click up here and go to Open
level blueprints. And inside of here, again, I am going to go through a
section with blueprints. So for now, this is very basic. So with this event that we
have right now, begin play, this just means what happens
if I begin playing the game. And you can drag from this
execution pen and let go. And then you can search
for sets, view targets. And right now you
can see we don't really see anything useful. So if you click on this and
remove the context sensitive, you can see this function called set view target with blend. So we can set our
camera as the target. We want to see through this one. I'm just going to
move it down for now, just to move it out of the way. And if you hold the mouse
over this, it says, this is a player controller
object reference. And if you drag from this and
you say layer controller, now, I don't want to get
it from the player state. This is multiplayer. So this is a bit more difficult. So let's go up here and you find this one here
for the player. You find this one get
player controller. We get the players
layer controller. Now this one is asking
for the camera. What do you want
your new view to be? I want it to be the camera. As the easier way to do
it is just to click on this camera and you can
rename it if you want to. You can click up here and
you can just rename it. If you click on F2, e.g. I. Can call it main camera
or whatever you want. And then over here, while you have selected this, you can right-click here. And if you just click on
context sensitive again, you can see it up here. Create a reference
to main camera. And this is because
I have selected, if I click here and I can take this and plug it into here. Now it is going to work. So if I compile and if
I click on Play now, you can see it now starts
through my camera and I can also hear the
sound effects from it. So this is the way to do it. This is how it works.
Very, very easy. You can even click on FL1
to make it full screen. And let's say you have OBS open, you want to record
it for YouTube to showcase it to someone
like 10 s or whatever. And this is how you make
the cameras start on plate.
66. 11.01 What are Blueprints?: Now that we're finished
with the environment, we are ready to
begin blueprints. So what are blueprints? Blueprints is the
programming language inside of Unreal Engine. You can either use C plus
plus or use blueprints. And the good thing about
blueprints is that it is a visual programming language and I want to showcase
it to you here. If I minimize this, this
is my other project. I'm actually working on this
on my free time just for fun and hopefully it'll
be a game later on. But as you can see, I have coded this and
you can go to the store. You can buy different
things from the store. You have the featured items, you have the frames
that you can switch between and you can
even purchase one. You can see here, all of this
is done with blueprints. And if you go to
the inventory, e.g. you can choose one of these things and it displays down here
and you can equip it, then it can go back and we
have a saving system as well, so it saves your choices. And it can also click play
and play the game and so on. So all of this is
done with blueprints. And with blueprints,
you can do any game you wish for whatever game you're
thinking of right now. If you're thinking on Fortnite,
Counter-Strike empires, survivors or anything else, you can do it with blueprints. Blueprints is very, very
powerful and it's just like every other
programming language. And I can actually show
you what it looks like. So if I just enter one
of the blueprints, this is what it looks like. So it might look overwhelming because I have a lot
of things going on. And actually I've
been working on this for about five months. So obviously this would
look a bit overwhelming. But for blueprints,
you can see it is a visual programming language. It is not texts like
you're used to in C plus plus or C Sharp
or anything else. It is just some boxes
that you put together and they become a code which
then works as a game. So a visual scripting
language, again, is blueprints are very, very powerful and you can make
anything with blueprints. Now, it is very easy to use. Now I want to teach you
the very basic steps. Obviously in this
course we're not going to go in depth
with all of this. We're just going to get started. So get familiar and
please check out my other courses on
pixel helmet.com. I make a lot of new
courses as well as in-depth blueprint courses and multiplayer courses as well. So also a lot of
people are asking, should I learn C plus plus or
should I learn blueprints? And if you don't know any
programming language yet, and if you don't know
C Plus Plus yet, I would say go ahead
and learn blueprints. Again. Trust me, you can make any game you
want with blueprints. So any game you'll
find on Steam, you can make it 100% with blueprint if you know
what you're doing. So it is very powerful. The only thing that it likes in blueprints is if you want to make a Battle Royale, which is, I would say as an
Indie developer, you would never want
to make a belt or yell because it takes so much
time and resources. But if you want to make a
battle royale where you have 100 players in one map, then C Plus Plus is a lot
faster than blueprints. However, if you're
not planning on that, if you have ten players, let's say 20 players on one map, then blueprint is just
as good as Plus, Plus. There's no difference. Later on, if you note C
plus plus in the future, you can actually combine
blueprints with C plus plus. This is what's so good
year in Unreal Engine, you can actually combine
these two languages together and make
the game like that. Okay, so now we know
what blueprints are. It's a visual
programming language and let's close all
of this down and let's get into our own project and learn how to get started.
67. 11.02 Blueprint Class Types: In order to make a blueprint, you can right-click and then you can go to Blueprint class. And inside of here, you have different classes
that you can make. That first blueprint class is, you can see here it's
called an actor. An actor is an object that can be placed or
respond in the world. So just an actor, e.g. if you have this barrier,
this barricade here, if you have like a table or glosses on the
table and so on. Just an actor, just an object that can be placed in
spawned in the world. So this is the simplest
Blueprint class. The next one we have
is a pawn and upon is an actor that
can be possessed. This means that you
can control the, this blueprint class and receive
input from a controller. So you can actually, if you want to move an object, e.g. a. Ball rolling around,
you can actually make upon in order for it to roll around so
you can control it. If you make an actor, again, this is just an object that
can be placed in the world. This cannot be moved
by the player. If you want something that you can move
with your keyboard, W, D, S and a e.g. you have to make upon
else you can't move it. Then you have a character and a character is a type of pond. So you can see there is a
relationship between these two. Character is a type of **** that includes the
ability to walk around. So you can think
of it if you have a character with arms and legs, that is this character
here you need to make. However, if your character is a ball just rolling around
without arms and legs, you have to make
a point for that. So whenever you have a
character with arms and legs, you can just go ahead
and make a character because it has the ability
to walk around and you will get some
movement options here with this blueprint class. Then we have a
player controller. And a player controller
is an actor that is responsible for controlling
upon used by the player. This is actually not like a PlayStation controller
or an Xbox controller. You can think of it as the
brain of the character. Inside of here I usually code my user interface so the player can see the UI as well as
spawning things inside of it. So spawning e.g.
if the player is bonds like a weapon that you drop by pressing
the button, e.g. and then first-person shooter, it drops the weapon
on the ground. Then this is done inside
of the player controller. So you can think of the player controller as
the brain of the character, and we will work with
that later on as well. The Game Mode is, you can see here it defines
the game being played, its rules, scoring, and other
facets of the game type. This is self-explanatory
Again, mode. Here you use usually define
the game rules, e.g. in a first-person shooter, how many can be in one team? How much does one
round steak, e.g. 50 s or milliseconds and so on. And for these two, Let's not
focus about this for now. It's a bit more
complicated. Usually e.g. extra component, we can use it to make inventories
and so on. But let's not focus with those. Let's take a look at
those up here first. And now that you
know the different, the different Blueprint Classes, let's close this down and let's move on to
the next lesson.
68. 11.03 Creating our First Blueprints: Alright, let's now create
our first blueprints. First, let's go ahead
and make a new folder. So down here in the
Content Browser, let's right-click on
the content folder. And let's make a new
folder called blueprints. Again, it's very nice
to stay organized. And usually I also give them colors if it's a very
serious projects. So you can right-click e.g. here, setColor. And we can set this
one to a blue color, e.g. just like that. And you can adjust the color, whatever you want,
just like this, e.g. you can click Okay, and
you can see it's a bit, It's looking a bit
more organized. So clicking on this blueprint
here, Blueprints folder, you can again right-click
and go to Blueprint class. So what we want to
make usually for game, you start by making a game mode. This will define the rules. So creating the game mode. And usually I give them G-M
as a prefix for Game Mode. And I call it the
name of the game. So let's say our game
is called beginners, so I call it dm beginner. Then I right-click again, go to Blueprint class, and let's make a player
control as well. So in a game you'll always have a game mode and
apply controller. So let's go ahead
and create that. For this one, I'm
going to call it PC or player controller. And again, call it
the name of the game. So beginner, and
this is just me, this is what I usually do. You can also call it e.g. BP for blueprint and call
it player controller. That is up to you
what you want to do. But usually I just call him this and the game, the
game name here. Then as the final thing, Let's right-click again and
let's go to Blueprint class. And for this environment, I just want to make a
ball rolling around. And I just want to
introduce you to blueprint without getting
very, very complicated. So let's go ahead instead of
creating a character, again, remember a character is as
the ability to walk around. What do we don't
really need that? We have a ball rolling around, so we just make a pond because
upon and be possessed, which means can be
controlled by the player. Let's make a pawn and let's call this one
VP for blueprint. And let me just call it salt. So BP ball here. Okay, So these are the first
blueprints that we made. And without doing anything else, Let's move on to
the next lesson.
69. 11.04 Setting the Default Game Mode: In order for us to
use our game mode, the player controller and
the ball here for our game, we have to set them as the
default game mode first. And the way you do this first, let's go into this game mode. So double-click on
this game mode, and it opens here on
my second monitor. So here to the right
of your game mode, you can see you have something called layer control, our class. And instead of using this default black controller that comes with Unreal Engine, let's click here
and change it to the player controller
we just made. And the same thing with
the Default Pawn here. Instead of using the default one by Unreal Engine,
let's click here. Let's use the D people as
our default ON clause. Okay, So you have to
click on compile. And what this means is, it means it tried to find, find some errors in my code. Obviously we haven't
really written any code. So it's going to say checkmark,
you are ready to go. I didn't find any errors. This is just to find your us, just in case you code and
there are some errors on neural engine will tell you that you have to
fix these errors. But right now we clicked it. We have no errors.
Let's close it down. And the second thing
we need to do is go to Edit and then
project settings. And inside of here
you have something called maps and modes. In here you have to change
the default came out instead of using Unreal
Engine default Game Mode. Let's click here and
use our own game mode. And you can see here,
our own game mode has BP bowl now and the PC beginner as the default player
controller because we just set it down here
in the Game Mode. Here as extra information
if you want to. Maybe you noticed every
time you start this engine, you spawn in that default map. In order to change this, you can go here and
the editor Startup Map and change this to
your own map Street, as well as the game Default Map. So the players, when they
start playing your game, they spawn in that street map as well. Let's close it down. And as the last thing here, since we made this map, before we made these changes
in the project settings, we have to go to World
settings tab here. If you don't see this tab, you can click on Window and then you can click on
world settings to view it. Inside of here, Let's go
to the game mode override and click here and change
it to our own game mode. And if you click on this arrow, just makes sure that the BP ball is the
default Pong class. And apply controller
is PC beginner. Okay, everything looks fine. Now this is our default
Game Mode and player controller and **** that
we can use for the game.
70. 11.05 Blueprint Class Overview: We continue. Let's take a look at
the blueprint class, what it looks like inside
of this blueprints. So let's open up this B
people to take a look. Here. This is the blueprint class
that we are in right now. In the middle, you
can see the viewport and inside of here, this is where you can see what the blueprint class looks like. Without following, I can just quickly add something
inside of here. Can see when I add a sphere, this is actually just like
adding a sphere out here. If you click on that button and then shapes and then sphere, you can see we have a
sphere and the game. However, inside of this Blueprint
Class, very, very cool. The items you add
inside of here, you can add code to them. You can't do that if you
just do it this way. You can't add code to this ball here you have
to use a blueprint class. Inside of here we
added a sphere, and you can see that
inside of here, and you can see it
in the viewport. And the cool thing is you
can navigate inside of the viewport just like you
navigate inside of here. So nothing new about this. And you can, these buttons
are also familiar to you. You can click on it,
you can move it around, you can rotate it and so on, whatever you wish to. But you can see here
in the viewport, we can see the components, as you can see here, we can see the components that we
add to this blueprint. So e.g. what people can do
with this is we can add e.g. a cube and we can
take the scale tool. We can do like this. I can again go up here and
add another cube, e.g. make it this way here and something like this, whatever,
something interesting. And let's say I am building a weapon sharp for an RPG game, you can actually build
the shop inside of here and then you
can use it, e.g. you can see if I click and
drag this into the level. Now I have this
blueprint class here in my level and I can code
something to it, e.g. if the player walks close to it and presses the EE
button on the keyboard, they enter the shop, so something like that. So this is the
viewport and you can see what the blueprint
class it looks like. I'm just going to delete all
of these components for now. So up here it is the components
and you can click on add. And you can see all
of these components that you can add to
this blueprint class. You can add shapes, you can add audio, you can add a particle effects, you can add cameras and so on. But we will be working
with that later on. Down here you can see your code. You can see the events, you can see functions. This will be talking
about later on. And you can see
macros, the variables, and something called
Event Dispatcher, which is a bit more complex. So down here you can
see find results. So sometimes when you code, you have a lot of code
and sometimes you want to write something that you don't
remember, but you can e.g. remember that you've made
something with coins. And you can click
here, click Enter, and it tries to search
for that code you wrote. So this is very cool. You can find code if you
forgot what you did. And this icon here, it finds it in all blueprints. So you can see it opens this. And instead of just only finding it inside of
this blueprint class, it's going to search
for coins in all of your created Blueprint Classes. And it will find
the results here. Over here to the right. It is well-known. The Details panel, just
like out here, e.g. if I added that sphere again, you can click on it and you
can see this Details panel. Nothing really new
about it here. The compile button
is just to see if you have errors in
your code or not. So here it says, please compile. It says dirty needs
to be recompiled. So if you just click
on this button, Unreal Engine is going to check if you have any
errors in your code. If you have errors, it
will show it down to here. And the compiler results, maybe this compiler results is actually over here
for you right now. And I've just put it down here, just it works better
for me down here. So it will tell you if you have any arrows and
you can click on it. If you don't have,
it will give you that checkmark and
everything is good to go. And over here you can see the class defaults
and you can see the Class Settings
and class defaults and you can change some
settings about this. But we don't really
want to worry about anything about
this right now. The last thing is you can play the game again, click on Play. And now you can come play here and play the game just
like this play button. It's the same thing here. Let's go back. And
the last thing inside of this blueprint class, you have the Event Graph. And inside of the event graph, you can right-click
to navigate around. There, just right-click and
hold and navigate around. And inside of here, this
is very, very important. This is where you
code your blueprints. So this is where you
write all of the code and give this blueprint
functionality. So the viewport is where you build the things
you need to build. And then you have the Event
Graph where you write your code and then it
gives it that e.g. immovability and
some function to it. So this is very, very simple. Let's go ahead and click on it, this fear, and let's delete it. And let's move on to the next lesson where
we set up this ball.
71. 11.06 Setting up the Ball: Alright, so let's go ahead
and set up our bolts. So let's double-click
this blueprint class. And when it opens like this, this is because
your blueprint is empty and it contains nothing. So you want to click up here on this button open full
blueprint editor, and it will open like this one. Okay, so the first thing
is here in the viewport. We want to make the bowl. So up here in components, click on Add and then
select the sphere. This is our ball
that we want to add. Okay, Very, very simple. Next, what we want to do is we also need a camera
because the player needs to watch this player or the ball through the camera. So clicking on this
sphere like up here and search for spring. So the spring arm is a
holder for this camera, so we need this holder first. Then click on this spring arm. You can see if I click on
something and then add it. Add, a new component is
created like a child. So you can see this is
inside of the sphere. So we need the camera inside
of the spring as well. So clicking on the spring arm, click on Add and
search for camera. And you can find it here
at this camera now. And now you can see
it has been added. So what I want to do is click on the spring arm and then click on E on my keyboard to rotate. And then I want to
rotate this 60 degrees. Actually, I'm going to
put this snapping on. Now, going to try again. So maybe something
like 60 degrees. Okay, So now this is set, remember to click
on the spring arm. Don't click on the
camera and rotate. This is not what we want to do. We want to do it
through the spring up. Again on the spring arm, you can see in the
Details panel, you can change the length
of this spring arm. So how far away should
the player see this bowl? I'm just going to set
it to 600 and you can always in the game see
what it looks like. And if you want, you can reduce it or increase it depending on how far or close you
want to be too, this ball. Alright, so let's see if
we can play this game. Let's take a look at what
the ball looks like. So I'm going to delete
this one for now. And the second thing is we need a player start component
in order for us to spawn. So clicking up here, go to basics and we have this one called
the player starts. So this defines where we
ordered the player stats. If I click on G to see my icons, I can put this down. It doesn't. It can't be beneath the ground. You can see if it's
in the ground. It says bad size. So it has to be above the
ground just like that. And just put it somewhere here. It doesn't really need to be
precisely above the ground. Summary is fine. It's okay. If you click on Play, you can see that
we start inside of this view and we
need to remove that. Remember, we made it inside
of the Level Blueprint. So if you click up here and
go to Open level blueprint, this is the camera that we made. So what you can do here is
hold Alt and you can click it. And holding Alt and
clicking it will disconnect this execution plan and
go ahead and compile. And that is fine. Now. Now we have
disconnected this code. So if you click on Play now, you can see we spawn as this bowl and this is how
far away you are from it. So if I minimize this, I click f 11 to maximize it. This is what it looks like. I think the arm length for
the spring arm is fine. However, you can see here, the ball is flying up and we needed to
land on the ground. And we need to add
physics to it. So opening up this poll again, you can click on the sphere
and click on this one. Simulate physics that will make it have gravity and it
will land on the ground. So click on Play. Now. You can see now our ball is landing on the ground
and is working. However, we can't move because
we don't have the moving, moving logic yet, but
that was it for the ball. So now we have
this ball working. And remember you have to
have this game mode working. You have to have it, set
it here in the game mode, overwrite in the
previous lesson. So everything works
here in our level. Okay, now that we have
set up our basic ball, let's click on Save
here, save everything. Remember to do that. And let's move on
to the next lesson.
72. 11.07 Input Mapping Context: Now that we have set up the ball and
everything is working, Let's go ahead and add
the movement to the bowl. So the first thing
we need to do it here in the Blueprints folder. Let's right-click and
go ahead and go to the input and select this one called an input
mapping contexts. So go ahead and call it IMC
or input mapping contexts. And I'm just going
to call it default. Now in order to use this, if you double-click it, you
can see what it looks like. It's simply just this view and you can add
some buttons to it. Now, if you click on this
plus for the mappings, and you click on
the small arrow. You can see here,
if you click here, you haven't anything, that
you can't select anything. And in order to do this, you have to create
an input action. So down here, right-click
again, go to Input. And you can see this one
called an input action. So go ahead and click on it. And I'm going to
call it a movement. So we're just trying
to make movement here. So I'm going to open
up this input action. And the only thing we
need to do in here, you can see here
this one value type. I'm going to change it
into an access to D. And this is because
we're moving up and down and left and right. So we're moving x and y axis, so we have to access,
we need to move it on. We need this one axis to D. Now, if it was like a 2D game where I only can move left and
right and a platformer, this would be an access one
D that would be correct. However, for this, we are moving up and down,
left and right. So we have two axes,
we're moving on. So let's select access to D, and let's save this one. Let's go back now to the
input mapping context. And what we can do here, now we can click and
select this input action. Now, for this input
action, you can see here, you now have to select the
keys you want to move with. So if you click on
this button and e.g. to move forward, I
want to use the W key. So if you just
search for w, e.g. you can see it W here, because I'll just go here
and click on keyboard. And then you can see all the buttons that you can
select from your keyboard. However, just click
here, search for w, that will be the easiest way, and then you can select it here. Now what you can also
do if I delete it and I create it again just
to show it to you, you can click on
this icon and then you can click on W
on your keyboard, that will automatically
assign it here. Now let's go ahead and
click on the Plus again. And I want to add
the S key to my, to my movements so
I can move back. So click on this icon and
then click S on my keyboard. Clicking up here again
to add a new one. I'm going to click on here
and D to move to the right. I'm going to add the last one. And clicking on this icon, clicking a on my keyboard
to move to the left. So now we have the
movement forward, back, left, and right. Alright, so that was it for now. Now we have to do
other things here, but we're just going to
take it step-by-step, so it's a lot easier for you. And so we have this input
mapping contexts setup. And we made this input action, which we added up here, and we added the keys. And later on we will
use this inside of our code to add the movement. But for now, we're going
to add the movement now. And let's take a look
at the blueprints and I want to explain it
to you before we continue.
73. 11.08 Blueprint Flow: In order to use Blueprint, Let's take a look
at how the flow is. So if we just open one
of the blueprints, Let's open up this BP bowl and go to the Event Graph where
you can see the code here. Again, remember, you
can right-click and hold to pan around
inside of this graph. So instead of blueprint, it has a chronological order. And what that means is
you start with an event. So an event here, this one
is called the begin play. That means what happens if
I begin playing the game? So what happens if
I click up here? This is what the event does. Then you have an execution plan. And from that execution plan, it has to be connected to your code in order
for it to work. So you can drag here e.g. and if you click and
drag and let go, you can see this menu appears. You can also make it appear by right-clicking here in the
graph, just right-click. And then you can see all of these things that you can add. But for now, let's not
worry about this right now. You can click and drag this
execution pin and let go. And then you can search e.g. for prints. So if you write prints
and you can see this function called
print string, and that just prints a simple texts to your screen when you
start playing the game. Right now it's
going to say hello, and I can actually click on this small arrow and I can
change some settings, e.g. how much time should this text stay on the screen for 10 s? I can just write ten here. And I can change the
color of the text. E.g. I want it to
be this color here, and I'm going to click on, Okay. Now when you are
going to click on Play, you can see here, up here it says hello and it's going to stay there
for 10 s because this is what I set
it to and this is the color that I have added. So in blueprints that
the code runs in chronological order
meeting it starts from an event and then it's going to execute
the code out here. And if I just copy paste this, so if I click on it, control C and then
Control V to paste it. So I'm just going to
connect three of them. And this one is going
to be called one, this one to this 13. Then I'm going to click on Play. And now I can see it
prints 12.32 my screen. So you can see it runs in
a chronological order. The code runs starts
from this event, then it runs this print string, then it runs this one, and then it runs this one. The code can never run this. And then this one without
running this one first, because remember this
one is connected. Bit code is running in a
chronological order like this. It can never jumped from here to here without
running this one. So this is very important
just to understand the flow of blueprints
and how it runs. Just a very important, it runs in a
chronological order. So this is how we need
to write the code. Now, in the next lesson, let's take a look at the events and functions
and variables.
74. 11.09 Events, Functions & Variables: Hello and welcome back. This is where we left
off the last time. So in blueprints you have events and you can see them
as red nodes here. So a red node means that this
is an event. In Blueprint. You need an event
to run the code. If I hold Alt and click
on this execution pen, I can disconnect my code. So you can see
here if I click on Play now, nothing happens. So you can't play code
in Unreal Engine. This code that you have
written will never be played if you have not
connected it to an event. So you need an event. In this case, this is the simplest event
in Unreal Engine. It's called the Begin Play. And it just says what
should happen if you begin playing the game and other events that you
can see down here, it puts default events
for you down here. What should happen if the actor begins overlapping
with an element? So this is the
other, other events. And the last one you can
see here is event tick, which is just an event that
runs 60 times a second. So you can see if I take this
and I connect it up here. So now I can compile and
I can click on Play. Now you can see this
code is actually playing 60 times a second. So this one we never, never, ever use in your
game because this is really un-optimized and
it will like your game. So this event sake, I never, never used because it
is so un-optimized. Imagine you have
to run the code, it's 60 times a second. It will like your game. So please never use this in your game unless you
absolutely have to. And you can always find
solutions and not use this one. Really, really un-optimized
to use this one. Now let's delete those for now, I'm going to select those and
hit Delete on my keyboard. Now if you right-click and
you search for events, you can see up here,
if you scroll up, all of these are events
that you can use here and Unreal Engine or here
in blueprints, e.g. event on actor released or
actor on conflict, e.g. if you click the actor with your mouse, what should happen? Any damage is used for if your character receives
damage from an enemy. And then you can
do something with it and you can do something with the damage that they received
and things like that. But as you can see, you need an event in order to run
your blueprint code. Now after the event, the code you are running, they are called functions
and you can see that with an F up here in the title. So these are functions. And if you right-click, you
just click on these arrows to see what are
under the subtitles. You can see all of these are functions that you
can add your events. So the blueprint code
you are writing is simply consisting of functions
that you've put together. And the last thing we have
are these small pins. As you have noticed, these are called variables
and you can also see variables over
here to the left. If you click on the plus
here to add a new variable. Now you can give
it a name, e.g. I. Can just call this random. And then you can choose what
type of variable it is. Now, variables are just
containers that save information. This is simply what
a variable is. It just contains
information you have. If you click here, you have different type of
variables, e.g. the first one is
called a Boolean. And if I just compile,
you can see here, if you make a variable
it says lease compile the blueprint to
see the default value. So if I click on compile and you can see her now
in the default value. It is just a checkbox
I can take and untick. But what a boolean
is just a variable that is either true or false. And this is what is
simply as, so e.g. how you can use it in the game. You can use it by saying, is the player dead or not dead? Player have M0 and the weapon, or does the player not have M0? So this is what it's used for. If the player has
MO, you can take it. If not, you can uncheck it, and you can change these
dynamically during gameplay. E.g. you can click and drag
this variable into the graph. You can let go. And then you can either get or
set this variable. So e.g. let's click on gets. Now you can get
this information. So if I just, let me just delete
all of this for now and click on this arrow. Now, instead of
writing a string, e.g. instead of writing
some text here, you can actually click and
drag and plug it into here. Now you can see here,
if you, if you noticed, if I click on this variable, you can see they have
the same colors. So all of these pins have
matching colors with those. So the red ones are
actually Booleans. You can see I can check
and uncheck them. So these are Boolean variables. And this one, you can
see if I click here, you can see this is a string and this is the same color here. String is simply just some
sort of texts you can write. And now, when I tried to connect a Boolean with
a string variable, Unreal Engine is
going to tell you, Hey, these are not
the same variables. I am going to
convert the boolean to a string to print
it to the screen. So I'm going to say, Okay, fine. And it creates this for you. Now. We can try to compile at right now if I
click on this random variable, it is set to false. So I have unchecked it. But now if I click on Play, you can see it prints
false to the screen. And if I just go back here
to my code and I tickets, so now it is true. And if I click on
Play, it says true. So it can also print the values for these variables
inside of this string. And then later in the game e.g. let's say you
picked up a weapon. You can check this and
let go and say set. And let's say e.g. let's say this Boolean,
what's called has weapon. And if I connected and we
can set has weapon to be true when the player has,
has loaded the weapon. This variable can be
used in order to save information that we can
use during the game. And these functions,
as you can see, if I just spawn a
random function, all of these functions
has variables, all of these pins are
actually variables. And if I just spawn another
one, so you can see e.g. get actor time dilation. You can see this green one. If you click here. This is a float, and a float is simply a
number with decimal places. So if I just select float here, you can just select them
and see what they are. So selecting a float and I can compile and click
on random here, this variable, because it's just a number with
a decimal place. And usually e.g. I. Use this player
health. So we can e.g. call it layer
health and compile. And the default
player health is 100. And let's say the player
takes damage and the health will be 55.5 and so on. So whatever, this
is, just a number, so it contains information
which is a numeric value. And then you have
other variables, text, string and so on. But let's not focus
about this for now. And let's not get too complex. So for now, let's delete
everything and I just wanted to briefly explain
all of this. Let's compile. Let's save everything, and let's move on to
the next lesson.
75. 11.10 First Steps in Blueprint Graph: Let's now start doing the code. So we edit this input
mapping contexts and the input action, and we added the keys inside of this input mapping context. However, we need to add this input mapping contexts to the ball in order
for it to work. So let's click on this BP ball again inside here
in the Event Graph. Let's right-click and
I'm going to write begin play because I want
to make my big enclave. And again, so clicking on
this event again play. So what we want to
do here first is right-click and say
Get Controller. We are trying to get
the player controller clicking on this Get
Controller, selecting it here. And remember we made a
player controller earlier. This one called PC
beginner emitted. We didn't really do
anything inside of here, but we made this one, which is our custom
player controller. The right now we're saying yet the controller
for this BP bowl. Now when we get the controller, we have to tell
Unreal Engine which specific controller
are we talking about? And we're specifically talking about this one PC beginner. So we have to drag from
here and say cost to, this is what it means cost to, we're trying to get this
specific blueprint class, the player controller
that we made. So cost too, and it's
called pc beginner, the costume PC beginner. So we got the control law. You can think of it as
a general controller. And then we told
our neural engine, we are specifically talking
about this PC beginner. And when you cost to
this level controller, now you can access everything
that is inside of it. So we can derive from here
and just write enhanced. This is something I never
remember the name of. It's new and it's so long, enhanced input local
player subsystem, but just try to enhanced
and click it here. We're trying to get this
input mapping context. Now, when we have
this written down, you can drag from here and
say add mapping context. Now, you can connect it. Remember that the code will never run if you
don't connect this. So doing it like
this, it's wrong. It never works so we can click
and drag and connect them. And now the code works. So remember to connect
these execution pins. Now inside of this
ad mapping contexts, remember, for the
mapping context, you have to click
here and we have to select our own mapping context. And now you can
click on compile. And this is the only thing I
wanted to do with you here. Just as a practice. Here we started with an event. So if this was
disconnected here, this code will never run. So we have to connect it. And we just simply
got the controller. We said Get Controller. So we're trying to get the controller for this
blueprint class here. And the control of this
bone is this PC beginners. So we told the Unreal Engine, I'm specifically talking
about this PC beginner. This is what's caused two means. Then we've got the enhanced
input local player subsystem. And from this one we can
add the mapping contexts. And remember to select
the mapping contexts. And now it should work. So let's save everything. Remember to compile
to make sure you don't have errors in your code. And let's close it down and
continue in the next lesson.
76. 11.11 Ball Movement: Okay, So now we're ready to
do the movement for the ball. So let's click on the ball. And inside of here,
remember you make this one input action
called movement. And for input action, you can actually use
those as events. So if you right-click here, and I call this
one eye movements, so whatever you have called it, you have to write the name here. So I call to action so I can
right-click and write IA, action or movement,
sorry, eye movement. This is what I called it. And clicking on this one, this arrow, you can
see this symbol. It means event, so
this is an event, so I can click on it. This is the event
that I've made. This is the input action. Now for this input action, you have to plug
in the code here. So triggered what
happens when I click the button and remember
the input action here, if I open up the input
mapping context, the triggered is simply going to play whenever
I click on W, S, E and a, remember we assigned these keys to the input action movement. So if I just write
a print string, if you can click and drag
and write print string, just like before you print
something to the screen. And I click on compile
and I click on play. And this is really nice to check if this event is working. Because if you have not
blocked all of this in that we did in the last
lesson, this will not work. So this one will let us know if this actually
works right now. If I click on play
and I click on W, you can see it prints
to the screen. And if I click on D, you can see it prints
to the screen as well. So everything is working here. Let's delete this one for now. Now for the ball movement, we are going to use physics now, it is not a character. If this was a character, I would write here, if I would right-click and
say add movement inputs. And this one is used
For characters. However, remember, our
character is just a ball. It is not a human being
walking around, e.g. but we can't really use this one called add movement inputs. So let's delete this for now. The thing we're going to use, I'm going to take this fear. I'm actually going to rename it. If I click on F2
and I call it all, I'm going to take this ball
and drop it into here. And you can see
it is a variable, just like before what
we did down here. Let me actually
delete this one we used earlier as an example. But as you can see, this
is a variable as well. And this variable contains the information about
this bowl here. So this is the
ball that we have. This bowl. I'm going to take it
and write add torque. And what torque is, it is simply physics. We're going to add some force
that will move this ball. I want you to select this
ad torque in radians. Now I know it's very confusing if you haven't used
blueprints before, because you can see there are so many functions that
you can use and how should you know what you should use and what they are
called and so on. Sometimes when I don't know what something is called, e.g. I want to add
physics to the bowl. I can right-click and
just write physics. And then this is
how I did it when I started blueprints
a long time ago. They're just running physics and I'm just running through. Do I have anything
I can add here? E.g. I. Can right-click and say damage. And I can try to see if
there are any functions e.g. apply damage. I
can use this one. You can try to just
write the word you're thinking of, e.g. jump. And then you can see
nothing is called Jump. I can remove the context sensitive and I can see if
there is something e.g. it is jump providing
force or can jump. So you're checking if
the character can jump. You can see this
context sensitive. This means, is this relevant to this
Blueprint Class I am in? Because you can see if I jump, I can't see anything. And remember, this one
is not a character. If you see up here,
this is a pawn and this can jump is
specific for characters. This is why if I right-click and have this context sensitive on, I can't really see it
because it is specific to characters and you can't
use them here in ****. Yeah, so just try
to write the word. This is how I
usually did it, e.g. if I want to find something with animation and I just
write animation, and I just tried to read
these functions one by one. It will take a bit of time, e.g. get loop animation or get
Play Rate of this animation. Or it can even lay a montage, which is an animation. So it will take some time
for it to begin with, to figure some things out here. But again, you're very
welcome to visit my website, pixel helmet.com and take
a look at my courses. Ira, I make everything
from scratch and I'll, I'm trying to cheat you every
single function here that you can use for your games in multiplayer and
single-player as well. So that will help you as well. Okay, so for this torque here, we're just adding
some force to move the ball and I'm going
to connect it here. Now we have to specify in which direction we
want to add this force. So this yellow one, if you click here on
this variable here, and you click on
this variable type, you can see the yellow
one is called a vector. A vector is, is simply a variable that
contains three values. So x, y, and z axis. And you can also see
it here as well. So if I click on one
of the assets, e.g. on this barrier, and you can
click on the Details panel. You can actually see
the location consists of an x, y, and z. This is actually
a vector as well. So here the vector
we can right-click and split this struct pin that will make it available for us here that we can
modify the X, Y, and Z. Because if I right-click
and say recombine, I can't really modify them one-by-one if I wanted
to add values to them. So I right-click and
split the Struct Pin. I can now modify x, y, and z. I am going to do the same
here and the action value, remember the input action here, we selected access to D
as the variable type. So now what we can do is we can right-click
this action value. We can split the
struct pin as well. Now I have the x and the y-axis
that we are moving along. Alright, so now we need to
know how do we move forward. So I'm going to
apply this for us, but how do I know if x
is forward or Y or Z? So what should I apply? A force to the x1 is you
want to move forward. This one is moving
left and right. So what should we connect it to? The thing you should look
at here and the level, e.g. let's say I add a sphere, so I add a here and the
shapes, I add a sphere. So the level. Now when you want to move
something with torque, so with force you are
rolling this bowl. So if I click on e to
select my rotation tool, I can see that if you rotate
this along the y-axis, you're going to move
this ball forward. Because in Unreal Engine, the x-axis is the forward axis and the x axis is
pointing this way. So this means if I click
on the rotation tool, and if I rotate the
ball at the y-axis, if I rotate it this way, it's going to move forward. So this is the
y-axis that we need to move it on to make
it move forward. So if I go back here and
I have to connect this, move forward and the back here, the x-axis, I have to
connected with the Y. So I rotate the ball on the y-axis to make
it move forward. Now, for the y, in order to
make it move left and right, I can click on the ball and
you can see left and right. Remember, the x-axis is forward. So this is forward and
this is left and right. So I have to click on E,
and I have to rotate it around the x-axis in order to make it
move left and right. So I have to connect
this one to the x-axis. And just remember to. Now you can see if I click on compile and I click on Play, let me actually delete this
one so it's not confusing. So if I click on Play
now and I move by pressing W, nothing
really happens. And this is because
I have to click on this one, x acceleration change. And the reason I
do this is so it ignores the weight of the ball. Because if you
click on the ball, you can see to the right, it actually have a mass and
this bowl is heavy right now, and this is why it's not moving. If I click on this,
I remove this, this mess and I don't
take it into account. And now I can move the ball. So if I click on play
and I click on W, you can see I'm moving forward and the camera is
moving forward as well. So if I just go back here, I click on this spring arm. Remember the spring arm is the
whole loaf of this camera. I can click on this
rotation and just say, keep it to the world rotation
not relative to the bowl. So keep it to the
world rotation. And if I click on Play again, click on W to move forward. I am moving forward right now. However, I am very, very slow. It's moving really slowly. And I have to make it, I have to apply a
force for it to move. So if I go back to the Event
Graph here and the torque, instead of just adding it here, I'm going to drag
from this y, e.g. and then I am going
to say multiply. So we can write
this star symbol, or you can simply
just write multiply. And you can select
this one here. We're going to multiply
this value by, let's say 20 e.g. and then we are going to
connect it to this torque x. So now I'm going to
connect it here. So I'm going to multiply
this number before I add it. Just like that. I'm going to do the same
thing here with the x. So we'll drag it, say multiply, and I'm going to
multiply it by 20, e.g. you can also multiply
it by Thursday if you want to move
faster and so on. But for now just running
20 and I can just connect it to the
y, just like that. And it's always nice
to stay organized. Just try to move
here, code around, make it look nice, and click on compile. Now let's try to
play the complaint. And if I click on
W to move forward, you can see it is working. If I click on S, it is
moving forward as well. So something is wrong if I
click on as it moves forward. And now what we can do here
and then mapping context. If I go back here, if I click on S, I wanted
to move backwards. Here in the modifiers, we can click on this plus, and then we can select negate. Negate means do the opposite of what the W is
doing right now. So selecting a gate, and now we can click on play. And if I click on W
and move forward, if I click on S,
I move backward. If I click on D to move
right, it moves forward. And the same thing with the a. So we have to fix those as well. So this, these two
moves forwards as well. So the thing you have
to do here and the modifier for the left and right, you have to click here
and say to world space. We have to do this
as well for the a here and two world space.
And then let's try. Now, let's play. Moving to the right, I click on D, it actually
moves to the left. And if I click on it to move to the left, it works correctly. Okay, So just moving to
the right doesn't work. Again, remember to click
on the modifier and click on negate because we may want to move
the other way. Let's click on Play.
Now. If I click on D, I moved to the right. If I click on a, I
move to the left. If I click on W, I'll move
forward and S moved back. And I can see I can actually
move the ball correctly. Now let's fix some small issues. You can see the ball is
taking these decals. So if I move over decals, it's actually picking them up. So what you can do, just
like before what we did, looking on this ball up
here, search for detail. And you can uncheck this
one called receives decals. And also to make it
more interesting, what you can do
here for the ball, you can also change what it looks like here in the elements. So if you click here,
you can just select another material to go through. E.g. I. Select this material to make the ball look a bit
more interesting. You can compile and then you can click on Play and
see what it looks like. Now it has a different view. So you can also select a new material for the ball to make it look a bit
more interesting. Now you can see there
is a small book and you can see there
are no collisions. So I can go through my objects. And this is not
supposed to happen. So let's go over
to the next lesson and fix those collisions.
77. 11.12 Adding Collision to Objects: The only problem left we have in our environment is that we
don't have any collisions. So we can walk
through the objects easily and we don't
want to do that. We want to make this
object's lock our bulk. So what you can do here,
up here in the show, you can click on collisions
to view the collisions. And you can see only the
ground has collisions. So you can see these lines here. These objects don't
really have any lines. This means there are actually no collisions for these objects. Let's click up here
and just remove this collision view for now. In order to add collisions, Let's start with this
barrier of a barricade, e.g. let's click on it. And I'm going to
click on this icon to take it to me here in
the console browser. I'm going to open
up here this model. And what you can
do here is again, click up here in the show, and then you can show
the simple collision. This will show you
what collision it has. I see nothing happens because it doesn't contain
any collision. I'm going to let this be applied so it can actually
see when I add collision, now what you can do is up here
in the collisions button, you can now create a collision. This is very, very simple. So e.g. for this one, it looks like a box. So I'm going to add
a box collision. And now you can see when I add a box collision, this green, this green line comes
up and this means now this one has collision. Now if you want to
make it more complex, if I click on Control
Z to undo this, you can click here and
you can try these ones at these wants, these
simple collisions. And what these do is
they give it that round edges here and they
make it a bit more specific, but I don't really need that. I'm going to click on
Control Z. I'm just going to add a simple
box collision. Now this one has collision
and you can also adjust it by clicking
on this collision. You can click on the
R for the scale tool. It can scale it up and down
in different directions. You can even remove the snapping and you
can try to adjust it. And remember I said here
in the orthographic views, I usually use them to do
something specific for now, e.g. now I want to specifically place it to this model so I can
click on the right view, e.g. I. Can zoom in and I can try to scale it as best as I
can for this model. I can now go to the front view and try
to scale it this way. Now you can see these are
the graphic views are really nice when you are doing
something very specific. So if I go back to
the perspective view, this is what it looks like. Okay, so we don't
really have to do this. It actually does a great job already when you do it
from the beginning. I'm going to close
everything down and now let us save everything
before we do anything else. And now here in my level, if I click on show again
and I click on collision. Now you can see these, these barriers have actually collision now compared
to the other items. So now they have collision. And now if I just hide it again and I click on
play with the ball, I hit this area. You can see now it's
actually blocking my ball and I can't
move past it. So this is something
that you have to do with all of the elements e.g. let's take a second one. Let's take a shape
that is more complex, e.g. this rounded one. If I click on it and I click on this icon for it
to take me there. And I can open it up here instead of you can see if I
add a box collision to it. And here it is applied. You can see this one
doesn't, isn't really good. There is too much
empty space here, and it will really perform
better in the game because players don't really like when the collision is
not too realistic. So if I click on
Control Z, and up here, what you can do is you can add these ones with the
rounded edges, e.g. this one called 26 DOP. You can try this one out. You can see this one has a more specific one that
looks a lot better. You can try this one to ten
DOP that works as well. So the simpler the collision, that better the performance. And also it will just make
your game a lot better. So you can see here, this one is more realistic. Instead of just adding
a box collision, we added one where we
rounded out the edges. Now this one looks good. Now we can close it down. And if I show the collision, now see it is applied
to this one here. Now, you have to do this for
all of your, of your assets. Clicking on this one,
licking here, opening it up. Adding here in the
collisions for this one just adding a
simple box collision. And you can see it is edit
and I can close it down. So very, very simple. And if I click on Play now, because he's the sidewalk, and the sidewalk
now has volition. And actually I need to add
it to these two sidewalks. So we also used another
one. This is the one. And if I add it to this one
as well and I can click Play, you can see that all of the
sidewalks now have collision to them and they also
block the ball as well. So you have to do
this for all of the assets that you need
to have collisions on. And usually Unreal
Engine is really good to add collision when
you import custom models. You can see here
this, this ground, this tree that we imported
automatically has collision. And this is because
Unreal Engine is actually good at
adding collision. However, for some reason, assets from mega scans, when you import them,
they don't have collision and you have to add
that for them as well.
78. 11.13 What now?: First and foremost, I would say a really good job on
completing the course. You will have learned a lot from creating decals,
importing models, adding them together, doing collisions and blueprints
and all of these things. You have learned a lot
during this course. And it has been really fun
doing this course with you. You can do now is you can try to visit my website,
pixel helmet.com. I release a lot
of courses there, including multiplayer and
single-player as well. And I tried to teach you every single thing
inside of there, e.g. how to make a game from scratch
and how to code it with inventory is saved system
multiplayer steam, how to release a game on Steam and try to combine
it with steam, the steam friends and
all of these things. How to make a platform,
our 2D games. So try to take a look at my website and try to
continue from there. So now that we know how
to design an environment, I would say try to focus a lot
more now also, how to e.g. do professional
lighting if you want to be a lot better at lighting, or how to try to
prototype a game, how to code a game from
scratch using blueprints. So trying to make a whole
game by using blueprints. So try to visit my website. And I also have a discord server that you can take a look at it. And I'm always here
to support you 2047. So I hope to see you
in my next courses. It has been a lot of fun
doing this one with you. And thank you so
much for being here, and I'll see you
in the next one.
 Pixel Helmet, Game Developer & Publisher