Transcripts
1. Door Systems and Interactive Portals Introduction: Welcome to Unreal Engine Five Blueprint Mastery door Systems and Interactive portals, the only comprehensive
workshop dedicated entirely to crafting advanced
door mechanics and interactive portals. There is truly nothing
else like this out there. A full all in one door workshop where you learn
to design, build, and animate a wide range of door systems in one
structured convenient place. Too often game developers
hit a wall when trying to create interactive systems
that go beyond the basics. Synchronizing animation
for double dolls, designing complex puzzles or implementing
teleportation mechanics can feel overwhelming. This workshop solves all that by combining everything
you need in one course. Imagine learning step by
step with all the tools, resources, and guidance
you will need to succeed. From collision based triggers to multi level
teleportation systems, you will unlock
the full potential of unreal engine five
looping programming. In this workshop, you'll gain
access to 41 lessons and over 8 hours of exclusive content that you
won't find anywhere else. You'll start with the essentials like looping interfaces and game mode setup
before progressing to advanced techniques including
synchronized animation, locking mechanics, and
complex puzzle systems. We will start with
the essentials like blueprint interfaces and Gamo setup before progressing
to advanced techniques, including synchronized
animations, locking mechanics, and complex puzzle systems. By the end, you even master
teleportation mechanics and dynamic VFX ensuring your door systems
polished and immersive. But what makes this
workshop truly stand out is the exclusive Sci Fi
modular level key to create professional
quality projects. By the end of this workshop, you will master
blueprint communication for advanced interactivity, build immersive
door systems from simple animations to complex
multi level transitions, implement safe states to ensure your mechanics
persist across levels and add professional
grade finishing touches like sound effects and
dynamic particle systems. Whether you design
your first project or expanding your portfolio, this is your chance
to gain skills you won't find in any
other single course. Join the only complete door
systems workshop available, and let's bring your ideas to
life with real engine five, Blueprint mastery door systems, and interactive portal course.
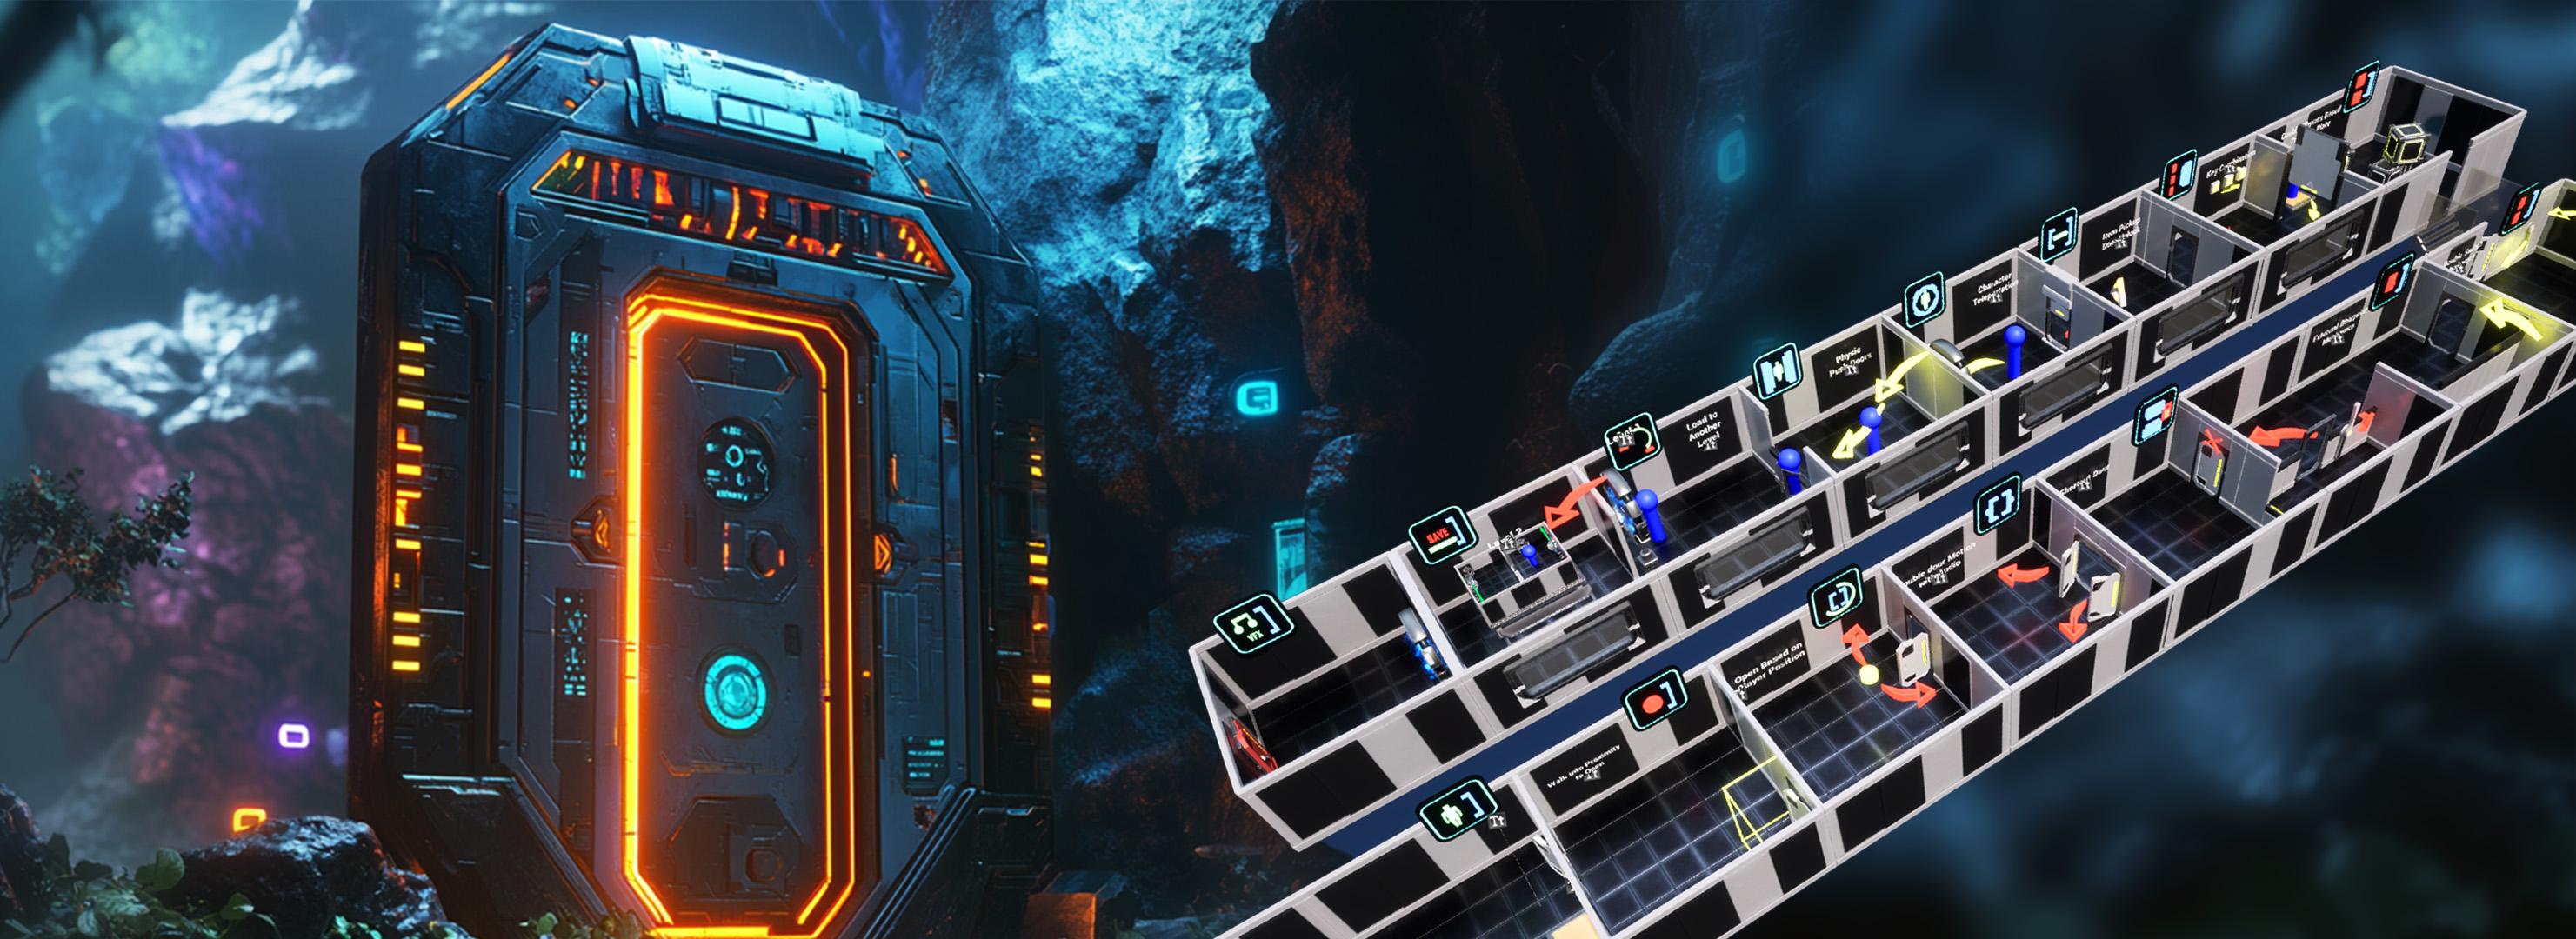
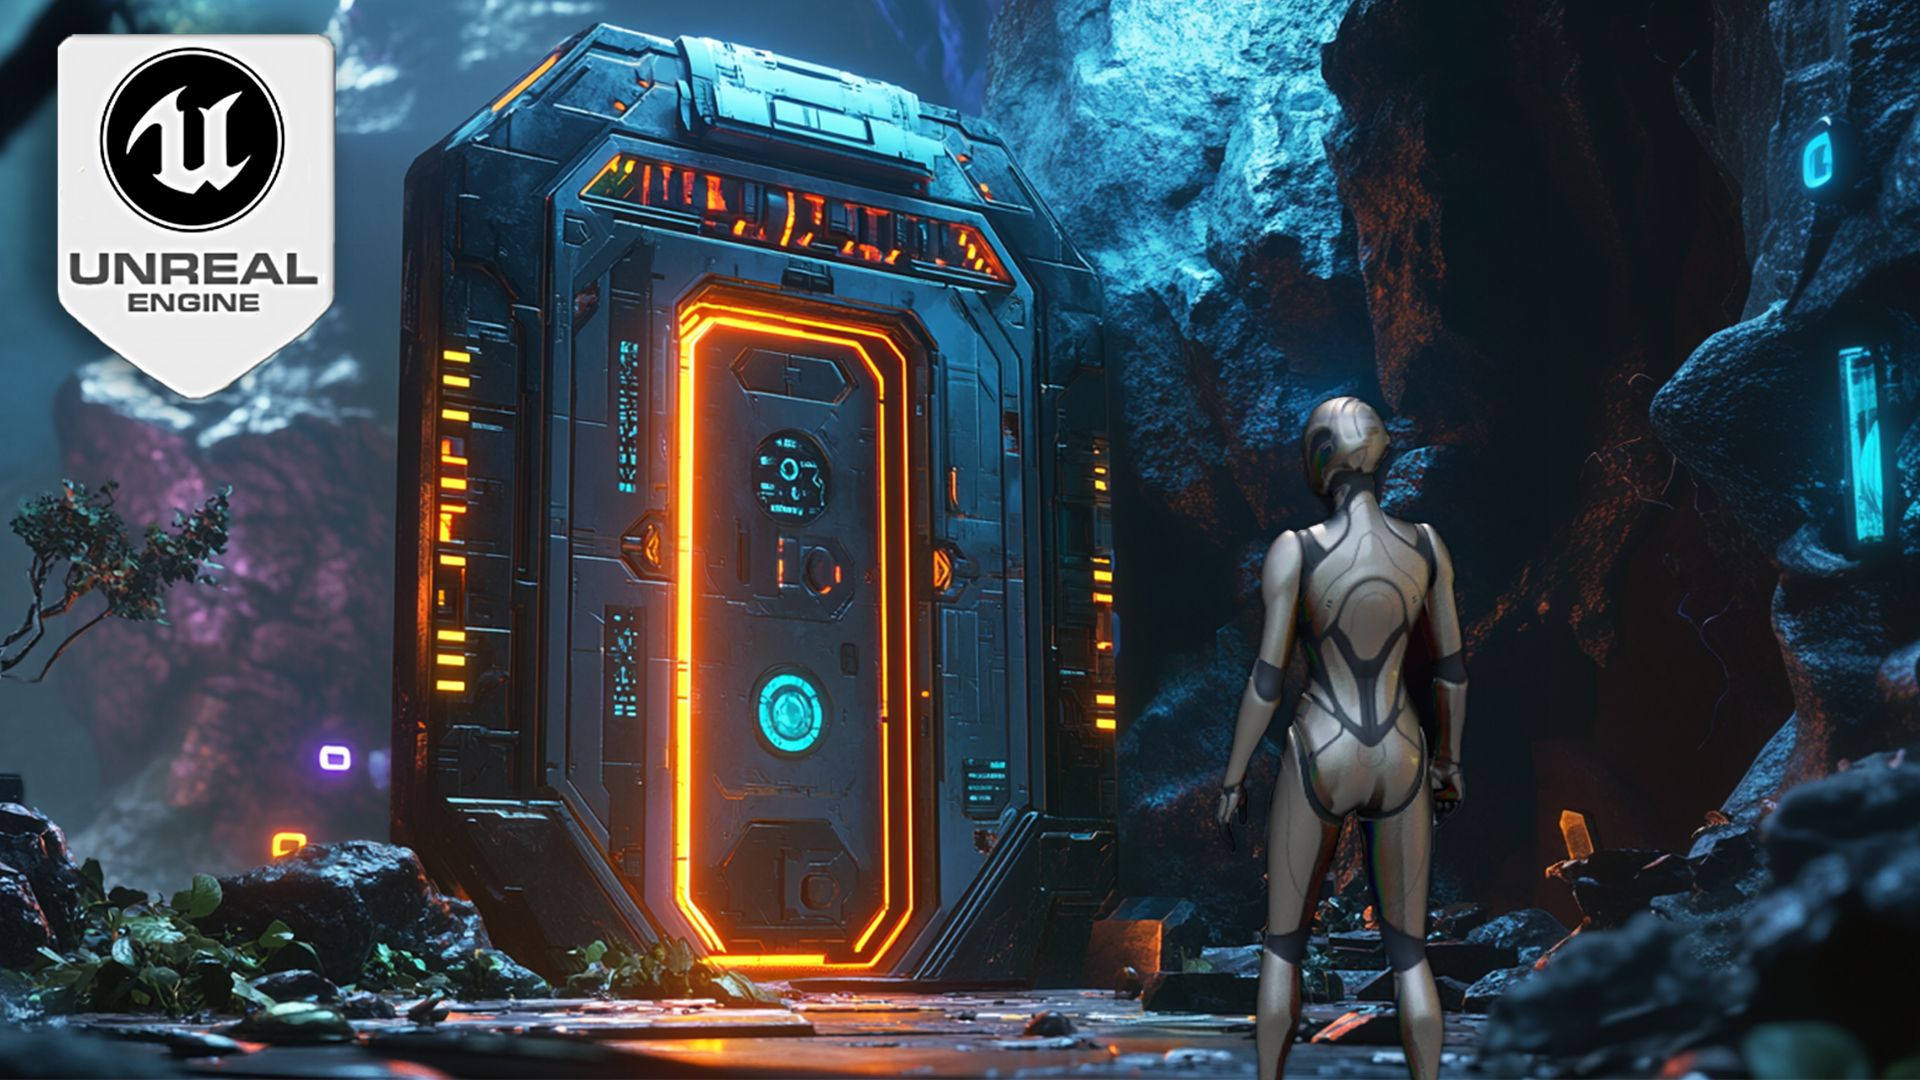
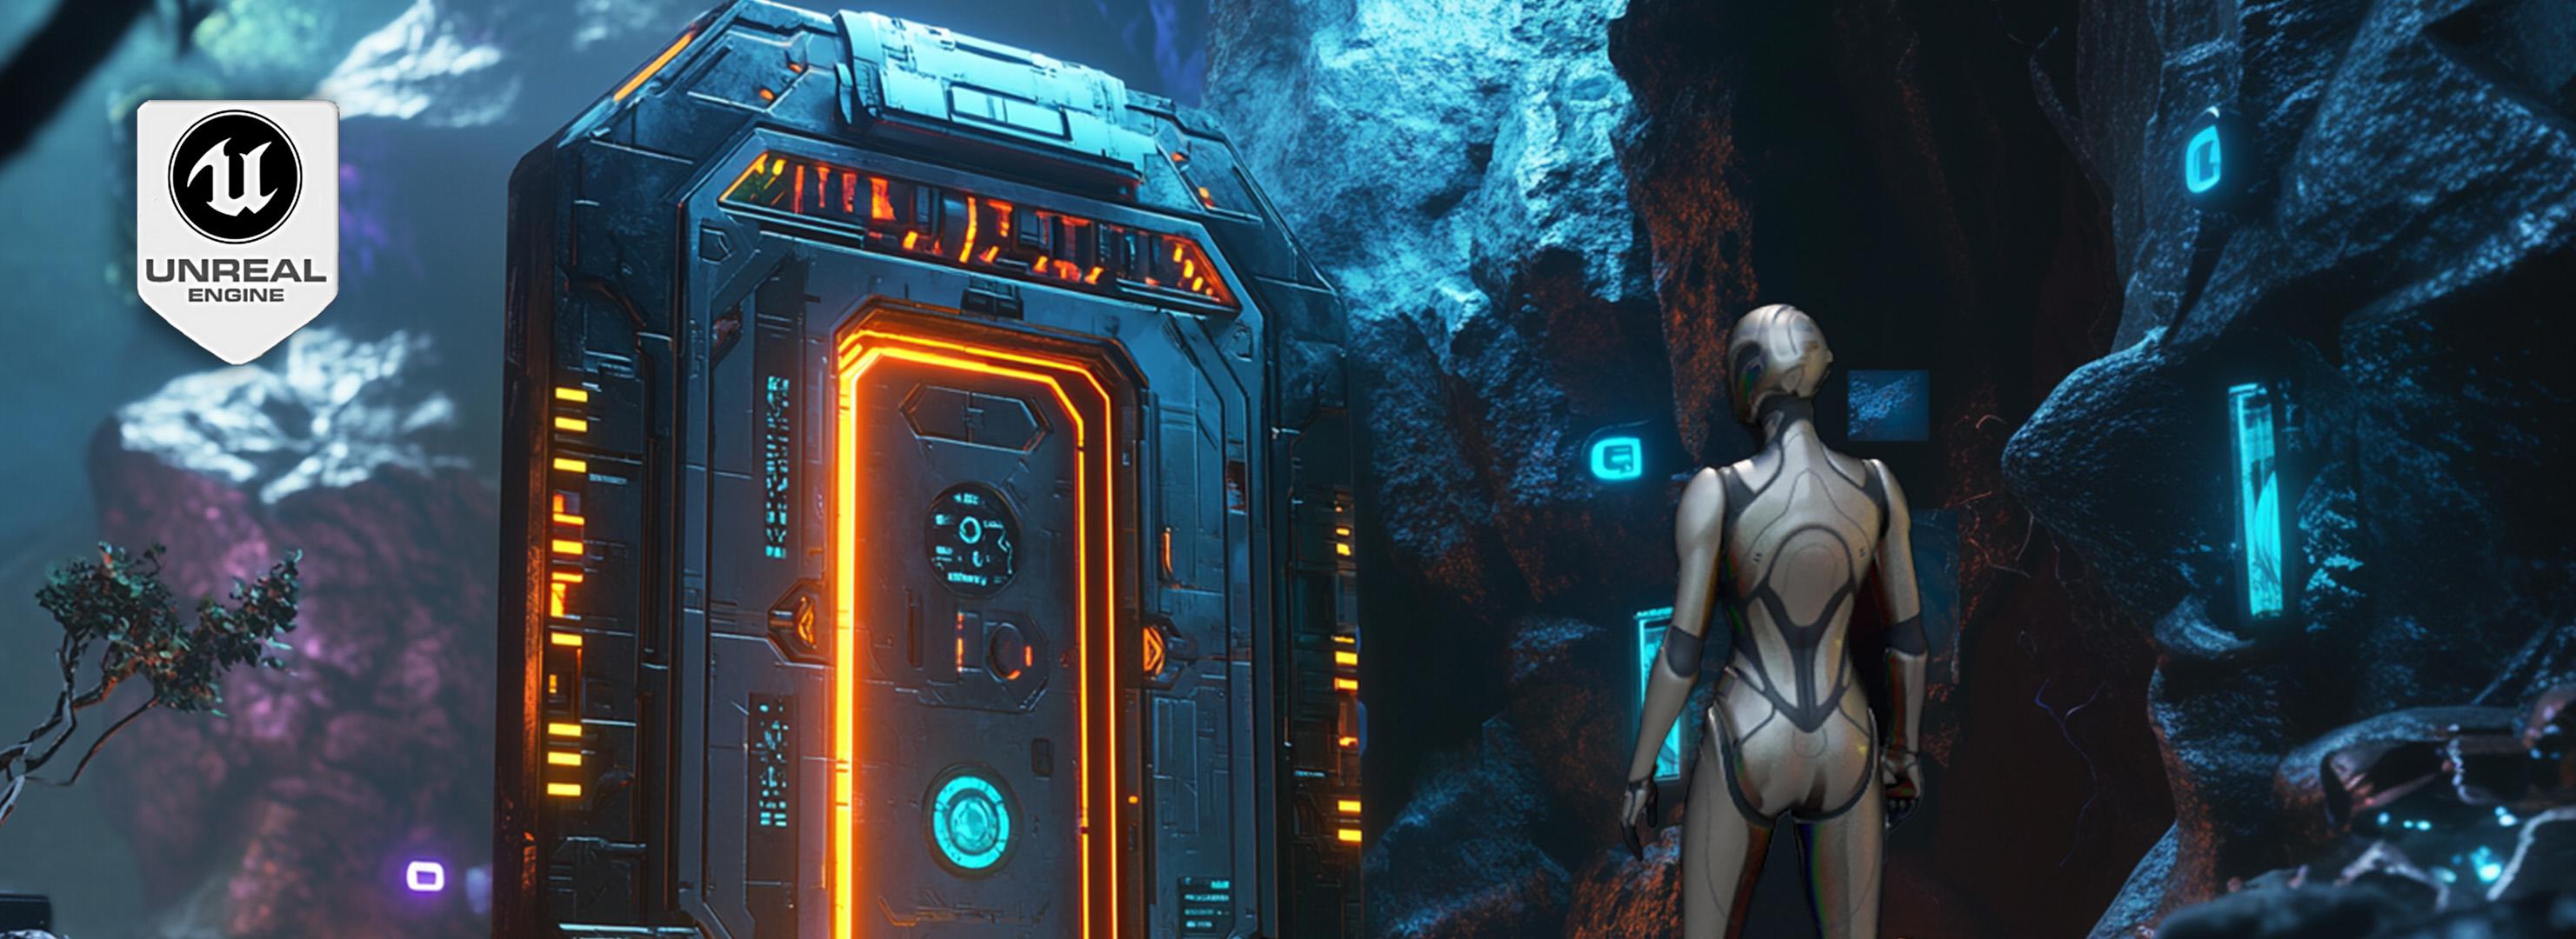
2. Introduction to Unreal Editor and Adding the Third Person Template: Hello, and welcome to real
Engine five Blueprint Mastery, Door Systems and
Interactive portals. Let's begin by extracting our downloaded Doors
Resource Pack. Going to right click
on it, and I'm going to use WinRAR and extract
two Doors Resource pack. Now, if you have WinZip, the process is kind of the same. You choose a destination
and it extracts it. Now, for me, it
extracted it here to the desktop that I
have downloaded the file. And before we go on, let's check on Unreal Engine
Library on Unreal Engine tab that we have 5.4 0.4, which is the project version. If you are in above
version, it's five. Now, let's go to our project. I'm going to double click
and open the project. This might take a while depending
on your computer speed, but we have included the derived data cache and
the intermediate folder, which host files that
make this process easy. Such files as shaders that have been loaded before when we
were creating the project. Now, for those who are new, let's explain what
we are seeing here. First of all, this
image is our viewport. We can move around by using the left mouse button and
moving the mouse up down left right and using WSAD to move in world space
like a video game. Q and E also elevate
and de elevate. I'm not sure what word
this, but anyway, our character, our not
character, our camera. Now, this, as you can see,
is a little bit slow. So if I use the mouse wheel
while holding right click, I can go faster with mouse wheel up and I can go slower
with mouse wheel down. This can be indicated over
here by camera speed. I can also change it by
changing the value here, but mouse wheel seems to
be a little bit easier. Now. We won't go into further
detail about many buttons. I will explain a few, but I will do when
we open our map. So to do that,
let's go down here, which is the content browser. And here we can see our
assets maps and sounds. These are included in
our Doors resource pack. Now for assets, we
can see a few assets, but we will demonstrate them
later on the correct map. On sounds, we can see some sounds that we have
to use in this tutorial. And on the folder maps, we can see the pre made maps. If we really quick
go about them, let's open Tutorial two map. It's a small room that we will use later as a transfer room, and we're going to go to the
tutorial map with no number. And here we can
see our assets and our level that we will
use to build our doors. Now, first thing first, let's start with continuing the explanation of what
we're seeing in this screen. As we can see, it's a lot of information, but
don't be scared. It's very simple things. Here, we have the outliner,
which as you can see, it's pretty much
made in level one, level two, level three,
and some extra items. These are folders that we
have categorized the items that we are including in this resource bag and
on the next folders, we are categorizing it based on levels that we will
be creating the doors. You can also see a
lighting folder, which has the lighting props, and we can see some new folders
over here that actually have nothing and the
folder playground that was left behind. So, um, let's begin with
explaining these empty folders. Now, when I have a folder that has something,
first of all, it has an arrow and we can
see inside its contents, where these folders
have nothing. These also folders have an eye next to them,
which is closed. If I try to click on
them, nothing happens. So these folders
are kind of empty. We can delete them
we don't need them. So the next thing we need to
see our extra items folder. I'm going to click on it, and I'm going to
click on the eye. Now, you can see the items
disappear from our view. This doesn't mean that they're
not loaded in the game. If I press play, we could
clearly see the items. I press play, and this
is in runtime the game, and the items are there. So closing the eye over here doesn't mean that we are
losing them in game. It just means that we can
work without looking at them. Right now, we're going
to close the eyes of every level except Level one, because we're going to use
them as we progress editorial. Now, for the extra items, let's open the eye and let's
see what we have here. The speed is a little bit high. Okay. Fix it with a mouse
wheel, and we can see now. We have a double door and in different measures
that we can use, go to undo the changes. We have a frame, the
same thing for the door. I think this is the door
that moves this way, and we have a light above it, some triangles that we're
going to use for items, a saloon door that we're going to be using for
our physics store, a switch that we're
going to animate. A button that we're
going to animate, a trigger button, which is
made also from two meshes, as is the button, a
portal, some boxes, and some other types of doors, a glass, this is a shelf. Now, it's a staircase. I
think it's a staircase, some walls, some floors, and this is a small
demonstration of all the assets. Yeah, it's separate pieces. But again, we have
this on our level. Now, to continue to explain what we see
over here, as we saw, the play button is
used to play the game, to start whatever
we have created, and escape is used to stop. Now, the next thing I want to talk about
that we're going to be using is when I select
anything over here, we have a detailed stub. So when I bring something to the world and I want to
see its own details, it's instance because I
can have like two floors. If I'm going to use Alt and I'm going to
drag this R over here. So this duplicates the floor. If I use this floor
and this floor, these are the same mesh, but these are instances. They have different details. In example, the location of
these two blocks changes. This is Y 600 and this is Y 980. And if I change this, scale, it changes to
this single instance. So these are the details of
the instance I'm selecting. There is various details based
on what we have selected. So everything for details of the selected instance
is over here. Now, another thing
that happens in outliner is that when I'm
picking something over here, it actually selects
the instance. And if it's far away
or I don't know really where is the thing
that I have selected here, I can press F. And it
will zoom in as much as possible to our mesh right now because I have
selected this mesh. If I selected another actor, it will zoom into that actor. Now, be careful because if
I selected the sky sphere, for example, and press F, it will lead me outside
the sky sphere to feel it, to have it all in the screen. Now, let's go back to some item. We'll go inside past. And I think we have explained a few things about
what we are seeing. We are more versatile
of using unreal. And before we leave
one more thing, I'm going to go to
Content Browser and I'm going to go to the
at button over here. Because I want to add a
feature or content pack. This is a way to add the
features and content packs that Area offers for free when
we are creating a project. And the content,
the feature I want to add right now is the
third person template. So we have a character
that we can move around and a few other things that we will explain
to the next lesson. So for now, I'm going
to press Add Project. This might take a while. When it's done, it
will open a window. Here it is, open a content browser window
that we don't need, we can close and we can close this and now we can
see new folders here, the characters folder,
the level prototyping, and the third person folder. But we're going to explore
this in the next time. Goodbye for now. See you then.
3. Blueprint Interface Basics Gamemode, Character Spawning, and Level Blueprint Setup: Welcome back to
Unreal Engine five, Blueprint Mastery, Door Systems,
and interactive portals. So last time we left off with downloading our third
person character with adding to our project, the third person template. Now, let's explore what we have in the third
person template. We have a folder of blueprints. We have a folder of input
and a folder of maps. The maps has the third
person template map, which if I open it
and press play, I can see the third
person character. I can move some boxes around. I can jump and that's
pretty much it. Now, when we go to Our
map and press Play, there is none of that. We can see no character
jumping around. We have just a camera moving. Well, why is that? The reason is because there is inside the third person holder, we can see the
folded blueprints, which has the third
person character that we were using
and controlling, and it has the BP third
person game mode. What is a game mode? A game
mode is a special blueprint that as rules
specified per level. Like, on this level, we will have one game mode. On the third person
map template, we have another game mode. Well, we will have the
same, but right now, we have no game mode here, so it is a default game mode. It's not a third person
template game mode. So how do we change the
game mode on our map? Next to the details over here, we can see world settings. Now, if you cannot
see world settings, we can go to Window and enable it over here,
world settings, and it will or appear like
this somewhere on the layout, or it will appear
docked over here, which as you can see, you can
dock it anywhere you want. You can even dock it over here. But this is the
most usable place. Anyway, how do we change the world
settings, the game mode? How do we override
it? Well, there is this option game mode
over here that we can set game mode override and select our BP third
person game mode, and it will be that's
it, basically. If I press play now, the
character will appear. I will appear
dropping and dying. Now, why didn't it
appear wherever I want? Well, I can control this
first of all, with my camera. I can press play here, and
the character appears here. But why in the other map was appearing always in
a certain place, even if we didn't have
the camera there? Well, the reason is because game mode has some
extra functionality, some functionality
that we are going to override later on the tutorial. But that functionality is
about spawning the character. And which character, it depends on another functionality
called default pawn class. And here we can see
the default pawn class is the BP third
person character. If I said this to none, press play, almost nothing.
I can't even move. I'm going to change this back
to third person character, and we need to set
a player start. How do we do this? A new
button over here appears. Well, it doesn't appear, but we're going to
explain it right now. So I'm going to click on it, and this is the
button to quickly add something to your level, something to the
viewport, basically, because later on, the
viewport ph multiple levels. As you can see in my unreal, there is a level tab here, which is called sub levels, but we won't get into it. Now, let's go here and
let's add a player start. This is our play start.
This is how it looks like. It has a controller and a
flag and this capsule shape, which is a collision, actually, a capture shape collision. I'm going to bring this
pair start somewhere here. I go to press end, so it goes to the ground. And I'm going to press play. Now, you see, we have
our character over here, and our camera doesn't
matter where it is. It could be like over here, pressing play,
character is here. Now, how this is controlled, we're going to see it later on some next tutorials because
we're going to override its own functionality
in the functionality of how the game mode
chooses a players start. Now, we have created
a player start. We have added our game mode
and it sponsor character that we will be playing
and testing our code. But before we dive
into the first door, let's again close
all the levels. It doesn't seem to save. This seems to be a
temporary setting. There are other ways to hide visibility through
code and assets, but we won't do this now. So before we dive in into
blueprints and start coding, let's explain a little
bit what are blueprints. Well, blueprints is the real engine visual
scripting system. And what is a scripting system, a visual scripting system? Consider having
blocks of code with ready behavior and just connecting that
logic in the order you want to use code has
been rewritten so many times and it's not always efficient
to reinvent the wheel, rewrite the code that has
been written so many times. URL offers a blueprint system, which is ready blocks of code in a visual representation
that do certain things, and we arrange them in a
special order that it makes sense for the machine to
know what we ask it to do. Saying this means that we have a lot of different types
of blueprints, as well. For example, there is a
level blueprint that we will use to control our first door. But besides that, there are widget blueprints
which control the UI. There are actor blueprints that do specific
things in our game. For example, our switch
will be an actor. There are character
blueprints that is our character that we are
using and controlling. There are animation
blueprints that control the
character's animation. There is the game
mode Blueprint, which is the special
blueprint about the level. For example, what are
the rules of the level? It can host some
multiplayer logic. It has specific ask. That's why it's game
mode Blueprint, the player controller blueprint. I know this might sound
scary to someone new, but it's just a system to
categorize functionality. We have the system
for the widgets, we have the system
for the characters. We have the system
for the animations, the system for the
multiplayer and gameplay. It's all categorized
into specific systems, a very well optimized
system that real offers. Now, let's begin by opening
our first blueprint, which would be the
level blueprint, a blueprint dedicated
for this level. I'm going to go to this
button, a new button. But when I press it, we can
see some options to create a new Blueprint class to convert selections
to blueprint class. But what we want is to
open level blueprint. This is not a typical image
we see on a blueprint, typical layout, but it is
enough to explain a few things. Right here, we have
the event graph, which hosts the functionality
of our blueprint. This is the place that we
write a lot of our code. Next to it, we can see
the details panel, which right now are
selecting the class default. Over here, we can see the
debug for our blueprint, which we will use when
we are going to be debugging the code
that we are doing. And on the left side, we can see my Blueprint tab. In other blueprints,
we would see a components tab and some other tabs over here,
a construction script, which is used for
posting code and logic when we are running the blueprint on the
editor before the map. We're going to demonstrate
a little bit of that logic. And the view port, which actually,
let's go see them. Talking about them
without seeing them is not a good point. On the content
file, I'm going to right click and
create a new folder. And I'm going to name
this folder blueprints. Also, I'm going to
color code this folder. I'm going to right
click on it, that color and set it to blue. And inside this Blueprints, I'm going to right click
and go to Blueprint class. And here we can see the different types of blueprints we talked
about earlier. The actor, the pawn,
the character, the player controller,
the game mode based, the actor component,
sync components. Different there's a
lot of classes of blueprints that we can create. What we're going to select
right now is just an actor. I'm going to name this PP test. And let's open it. Now, as you can see, this is the difference with
the tutorial map. Right here, we have
just the invent graph and my blueprint and details. Whereas here, we have
the components tab, the viewport, the
construction script, and the invent graph. That has nods to demonstrate
some functionality anyway. And here we have
the components tab. This is what I wanted to
explain that in the viewport, we can add things
to our blueprint. For example, we can add a cube, and we're going to program this tube in this blueprint
to do some behavior. Whereas here in the level map, because it's about the level, we do not have
this viewport hub. And the reason is
that the viewport of the tutorial map basically
is this viewport. Everything in this level
is basically a component. It's not, but it can be
a component of this. Saying this, let's bring
a duplicate of a door. I think this is, this is
the door with a handle. I'm going to bring this door. I'm going to press Alt
and bring it over here. And I'm gonna rotate it. Like this. No, I want it from
the other side. Like this. 90 degrees. Go to details -90. It's fine. Now, this, as you can see, is not snapping very well. But what I'm going
to do is over here, we have the snapping
point at ten. Gonna choose five,
go to lower it. And I think it snapped well. Yes, well. Now, I'm going to go
to the tutorial map, and I'm going to right click
and create a reference to Prop pack EU six or six. You mean? Now, this is this
because I had selected. When I have something selected, let's say, for
this wall example, I can right click and
bring a reference to it in the level blueprint. We don't actually need the wall. I'm going to delete this.
We just need the prop pack. That's the door let's call
it the door from now on, and this is door one. I renamed the wall. This is why it's in level one. It
shouldn't be in level one. This I choose this. This is supposed to
be in extra items. I'm going to move it
from here to Level one, and drag and drop it here. Would be easier
to close the file maybe and rename it
here to door that good. This is wrong wall. And we have the door here. So right now we renamed it. By compile here, you can see it changed the name here also. So what do we want to do with
this door? We have it here. What we will do is
program it to open and close based on how
close the player is. No how clo. Actually,
the player will come close to it, door will open. The player will go
to another spot and the door will close. Anyway, I think I said too
many things for this lesson. Gonna see you in the next one. But my
4. Fundamentals of Blueprint Programming for Beginners: Where we left off is with
adding this door over here. We copy it from door, we pressed out and dragged it, and we brought it here. We also created a reference
to it, our level blueprint. H. Let's begin doing
something with this door. And by doing something, I mean, basically rotate it
to make it open. How I did this was by
selecting the door, pressing E, and as we can see, it changed to the rotator. With pressing R, it
changes to the scale Imo, and W brings the moving. We can also see these
selections up here. What we need to do move this
door basically rotate it, and this is a static actor, actor being the keyword. Why is that? Because as we said, in blueprints have some
prescripted behavior. I pull a cable from
this from our reference of the door and ask for actor. What we want to change is
the rotation so rotation. You can see we get a few
options about rotation. Get the actor rotation, we can set the actor rotation. We can set the relative
location and rotation. We're going to talk about
relative and the difference between relative and
world in a later lesson. But right now,
we're going to just use the set actor rotation, which is a world rotation. I'm going to choose this
node of set actor rotation. Now, this node has an
execution and for output, our return value, which is red, red is pollen, we're going
to talk about it later. A rotation, inputs, and
a teleport physics. Lean can see things
are color coded, and this brings us
to a new subject. What are variables? Variables are like little
blank cells of information. What type of information
is the variable type. We left the M
Blueprint explained. So what does my Blueprint host? My Blueprint contains
information about our code. As you can see, it shows you elements that belong
to blueprint, variables, graphs that are here, we have the category graphs. If we go to, go to graphs. You see there's
already some events, this gray out event for us. If I double click on this, I can be led to every event. So an event exist in our graph, we can navigate directly
to it from here. We can also create new graphs
to things for example, this will be the
butting graph or the movement graph or any
other graph we wanted. So we could have different
graphs with different events, but I cannot have the
same event of graphs. Right click and bring
the begin play event. I can bring it here and
I can have it here also. It will not work though. I drag from here and
type print string, which is a node that
prints just a string and connect it here and also
connected to the other graph. I try to compile,
you'll see I'll get an error bound more than one
function with the same name. We cannot have the same
event in both graphs. They need to have
a different name. You actually don't need
the blueprint test, but nice to show thing. The next thing we need to is function category.
What are functions? Well, in North, there are reusable blocks coding blocks of logic that can have return outputs inputs can be called multiple times
from different places. The blueprint from
other blueprints. They're ideal for performing
specific reusable tasks. They have some specific
rules though function must complete the logic
before returning. They have to complete
whatever is happening in here or they have an output. And if I click here for outputs, I want to get this value. Whatever is happening
inside here has to finish or its continue to run. For example, if I bring
this function over here and I connect it here, this will have to finish its operations for
the code continue. The next one. The
next category is macros that we won't
be needing intial, so we won't bother
with them is kind of like functions which, as I said, kind of like functions,
but more versatile, we can have multiple
execution inputs. And that brings us to
the point of execution. As you saw before, I
connected this cable here. When I talked about the
set actor rotation, I said that there is an execution input here
and an execution output. These executions need to be
connected for our code run. This wouldn't run
because this is empty. And as you can see, events like begin play have only
one execution output can be considered
like do something. Do something begin play, do something on tick
that we saw here, do something on
actor, begin overlap. We also have custom
events that we can create on our own and call
them in our code. O now we need move our door
with our set actor rotation. So our door rotation, let's go details at -90. Round this up from
89.999 to -90. Let's say that when
we begin play, let's delete the function. Let's say we want
the door to go zero. So now, if I press play, the door is not zero. And when I press Stop, I can see the reason Y
in error message log, which is mobility of
door not set to movable. So I'm going to
click on the door. Here on its tails, going to go to mobility
and use movable. So now if I press Play,
the door is open. I think this is it for this one. Going to continue the next by
5. Using Timelines for Smooth Animations in Unreal Engine: Hello, and welcome back
to real Engine five, Blueprint Mastery Door Systems
and Interactive portals. Previously, we left
off with OD OpenRdor. We used our Door reference
or begin play event, we use the preset logic
of set actor rotation. And we set actor
rotation to 000. And when we press play, we can see that the
door is now open. I wanted to open
it the other way, I could put two -180 and
it would open other way. What if I wanted
change it every time, but I wanted this to
happen too, for example, I had four of D references, and I want them all to
have the same rotation. What I would need
here is a variable. So to this, I can
overhear the plus button, or I can right click here directly and promote
this to a variable, which is called new rotation. I could rename it by
using the variable here and changing the
rotation of door. Now, as you can see, it appeared here to
my blueprint tab on the section variables. Let's show the creation
of the other way. I'm going to delete this, and I'm going to delete
this variable also, and I'm going to add a variable
and pull it to rotation. If a drag and drop it
here asks me to get or set means that we are getting the value
that this variable has. That means that we are going to get the variable a new value. If I select set, for example, we can see as some input
pins and output pin. We can see also that it's in color because this variable
is of the type boolean. I click and see a bunch
of variable types. The most common
ones are booleans, which are yes or nos, which is basically
encoding terms, it could be zeros and ones. So a boolean, that's what it is. A zero and one, true or false. Next, we will have integers
would be the whole numbers. For example, one, two,
three, four, five, six, or minus one, two, three, four, five,
six, unlimited amount. Well, not unlimited.
They do have a limit. I think the limit
is something to the quintilion and the flows, which would be the numbers
with decimal points, basically, these are
the real numbers. Then we have name
and string and text. Strings are all the characters, and name and text
have specific rules. Now, vectors, vectors are here are three point
floats, basically. If I bring a vector, if
I create a vector here, let's change the variable type. We can see it has XY
z. It's a three point. I can split right here, right click on the node on
the pin over here and split, can see three floats, basically. That's what a vector is. It can become a color. It
can become a movement. It can become anything that
three points represent. It can become a location. And what we have here
is a specific vector, which is called a rotator. If I go here and
select a rotator, which is below vector, and change the variable type. I don't want to set it. I want to get it. Now, a quick shortcut
would be if I drag and drop here with control
pressed, I'm getting a getter. If I drag and drop here
with an alt pressed, then I'm getting a setter. Now, if I connect this here, I compile, I need to
compile always and save, and I'm going to go to
the variable and change this to, let's say, -60. Now pile again and press play, and we can see the
door is halfway open. Course, if I go near
it, nothing happens. And now we do have a variable to change the
rotation of the door. So if we had plenty of
doors, for example, we could use this variable over here to change
the rotation. If we want to see
this happening, what we can do is
put a delay here. Which is a node that creates
a timestyle in our code. Like, it waits the amount
that we have set in duration to complete and
move on on the code. So let's say that we will wait for 2 seconds before
this happens. Let's go back map. Let's play. Let's look at the door.
And in 2 seconds, the door moved and opened. So this is a delay node
that has to do with time. So since our code runs in
blocks as we can see of logic, a logical thing to think would be to put a
small delay here, change the rotation
a little bit, put a small delay,
change the rotation, but put some small delays that the eye couldn't
catch, for example. Well, there is a
scripted behavior. There is a written behavior
already for this for us. As in many programming
languages and as in blueprints, well, great programmers
have created tools, so these behaviors
are easy for us. What we would do to
achieve that effect that every every some amount of time move a little bit
would be called a timeline. We're going to search
for a timeline and press Add timeline. As you can see, this is a more
complicated node compared to the simply delay or even compared to the
set actor rotation. It has plenty of inputs. Play, play from start, stop, reverse, reverse
from end, set new time, new time, the amount
that we are setting, and update and finished
and a direction. The direction has a new color, and that color we
haven't see here. It looks like the bite it could it could translate
to bite, to be honest. This is why they
have similar colors. But this is, as we can
see when we cover, an E time direction AM. The E in the beginning
starts for EAM, which is short for enumeration. Basically, it's a
preset list that we have created that cannot
change in runtime. It's a list of whatever we want. Certain the specific one
is called direction, and if let's do an equal node. Equal Enum we can see here the options it has
forwards and backwards. There is plenty of
ways to use nums. The most common one is with
a switch that you can see it's switch on E
timeline direction, the same name as the enumeration here because they're
enumerated specific. They need to have the same
enumeration connected to them, which has a forward
and a backwards. This could be connected,
for example, to update, which means as long as the timeline is
running, do something, or it could be connected
to finish when the timeline has finished
doing whatever it's doing, did they finish going forward or did they finish
going backwards? We're going to use
this pretty soon. Or now, we're going to just delete this because we're
not going to need it. What we're going to need is to when we are
updating the timeline, connect the set actor rotation. Let's delete. Actually,
let's not delete. Let's just connect from
completed to play. When the delay has
been completed, play the timeline and move
our actor, rotate our actor. Now, what do we play though? There is nothing. We haven't
set anything to play. We won't be dealing with
the set new time and new time because it's
a little bit more advanced than what we
are doing right now. So what we need to do
is enter the timeline. As you can see, this is
a very special node. So if I double click on it, we open it over here,
and right here, we have the event
graph, and here is the timeline, specific port. We have a truck that we're
going to see what it is. It's going to be
adding something like Tessian system,
like, for example, a flow truck what
we're going to be using what I'm
going to do is I'm going to press Shift key
and click on here to create a point and shift click
and create a point here. Now, these two points
have a time and a value. If I set the time to
zero and value zero, this would be the middle
of our Cartesian system. If I go to the next
one and press, let's say how much time
door would take to open. Let's say point 0.5
and value of one, we can see that this went to
value one in the time 0.5. Now we have a slope that we
can drive something with it. The rest of the buttons,
as you can see, is the length button, which if I zoom
out in 5 seconds, it stops the timeline. I could set this 2.5, and it will stop
the timeline here. But there is another button
over here, use last keyframe, which even if I add a
bigger truck in 5 seconds, it would notice that
the last keyframe is at 0.5 and it would stop
the timeline here. Now, if there were
more tracks again, it would take the last key
frame from the longest track. Now, of course, there are
some options like autoplay, like loop and other
things to do, which we won't be
needing right now. The only thing we're
going to need to do is name this new track, click and press F two here, and I'm going to pull
this door rotation Alpha. Going to save. I'm
going to close the timeline because we
don't need it anymore. Make sure that we used the last keyframe if
you have 5 seconds, and I'm going to close this. So now we have a new pin here, the door rotation Alpha. This is the value
0-0 0.5 seconds 0-1. This will run for 0.5 seconds. It will be updating
for this amount, and this will correspond 0-1
value in this 0.5 seconds. Now, how can I
connect this here? There is no green pin. Well, what I can use is, again, a new node with prescriptive
behavior called alert node, which is a mathematical
node, an larp, which is an interpolation
from A to B, basically, and I can
connect the B here, which is my destination
and my original rotation, which was -90, I think. Then I can connect
this Alpha here. I can choose also
shortest path if needed, but it might mess
sometimes things up. So based on your rotations, you can choose if you
check this or not. I'm going to go to Mar
Map and press Play. And this is to -60. Let's put it to minus 180 because we want
to open inwards. But it did work.
We saw it working. Yes, the door is
opening on its own, waiting 2 seconds, and this timeline is
animating our door. I think this is
enough for this one. Going to see you in
the next one. Goodbye.
6. Creating Interactive Doors Opening with Collision Triggers: Hello, and welcome back
to Unreal Engine five, Blueprint Mastery Door Systems
and Interactive portals. Previously, we
explained a few things about the timeline
and how it works. We added it to our
tutorial map blueprint. We use the begin play event. We use the delay, and we
played the timeline to set the actor rotation based
on a larp of a rotator. We created a variable
for our new rotation, and we also inside the timeline, created a flow truck
0-1 using 0.5 seconds. We also clicked on the
use last keyframe, so the length of the timeline is irrelevant to how long it lasts. It takes the last keyframe. Now, this happens
when we begin play. But what we want to
do is this to happen when the player
goes near the door. How would we do this? We have this collision detection system, which means we have a system to understand
when an object, let's say, for example, a player is colliding with something. For example, the wall, why can't we go outside these walls? It's not that they're
solid or something. We tell the game to the
program that for our pawn, for this character,
this behaves as solid, for example, it stops
me from moving across. So how is this happening? Let's go to our quickly add to the project button and
search for a trigger. Trigger box. Let's
bring it here, and let's check its details. I have make it a little bit bigger so we can
see some things. When we search the details, there is a specific tab called
collisions. Here it is. And this tab, we can see
this collision presets. So each object in unreal, like the wall, the
collision trigger, the capsule, the player
pon when it spawns, has its own presets. We have a way to assign an object type that
defines what type of object is whatever we have set it see this
one is word dynamic. Let's put this to custom. So we can change a
little bit this. Custom, I can change
how this trigger behaves beyond its
original preset. Like the original
preset was trigger, I think, it is trigger. And with custom, I can
say, No, you know what? You're going to
block wall statics, or you're going to block pawns. If I press block
paws, press play, we will find up here this
oh, yeah, here it is. See, I cannot move past it.
It is blocking the pond. Whereas, if it was
overlapping the pond, then I would just go through it. Let me see where
the collision is. Let's make this visible. If I go here and
press visibility. No, actually, hidden in game. If I unclick this, I can see this on the map. So you just happen to
work at the same time. We haven't programmed this yet. So another thing about collisions is that they
are usually invisible. They are always hidden in game. So for example, our door, we have this trigger
in front of it. And it will be responsible
for opening and actually, for just opening the door, let's just make it a
little bit bigger. Let's move it here. Maybe a little bit
bigger, wider. Yeah, I think that's
a nice place. So let's go use this collision. I have the trigger selected, I'm going to go the
level blueprint. I'm going to right click and create a reference
to the trigger box. I'm gonna compile. Now, how
do we use this trigger box? Well, as we saw on the
collision presets, there is three main responses, overlap, block, and ignore. Let's put this back to trigger collision
defaults already. So what we want is
not when ignoring, not when blocking because we don't care about
these channels, and they're pretty much set off. But we want when we
are overlapping to do something when probably the
player overlaps with this. We can check player
is overlapping. Yes. Let's go back to
our trigger box and type drawable and type overlap. And we can see a bunch
of commands for this. We can get overlapping actors. We can get overlapping
components, which is different than actors. We can overlapping actor. We can ask, is it
overlapping our player. But we can see some other things assign and bind over here, assigned on actor begin overlap, assigned on actor end overlap, bind event on actor begin overlap and event
on actor end overlap. There isn't really
much difference between assign and bind. They both use bind basically. Let's call assign first. Assign on actor begin overlap. And let's also call bind. So bind overlap. Bind event on actual
begin overlap. As you can see, they
both call bind. The difference is that a sign creates also an event for us. Well if we call bind, we have to create
the event ourselves. And to do that,
we just draw from event and do a custom event. Why we draw from event Because binding on a trigger box
requires specific inputs. This is not just
any custom event. It is named custom event,
but it is not any custom. You can see it has
these two inputs here as it has this one also. If I create a custom
event on its own, you'll see that it has nothing. I have to create
these inputs myself. But I do if I do
creates these inputs, like I'm adding two inputs, they should be of type
actor object reference. You'll see that I am able
now to connect it here. I can compile and it's
working because what this requires is basically these
two actor object references. So since I created
them, this is all fine. If I remove them, let some do. So yeah, you see, it doesn't have the inputs, so it cannot delegate. It's not compatible. Anyway, let's
continue explaining on what these two actor
object references are. Overlap actor means
our trigger box, basically, whatever trigger
box collision we have used. Other actor is the
actor which overlapped. So what we need to do right now is delete all this and move begin play a
little bit further. We're going to disconnect this. I'm going to use Alt and
click to disconnect it, and I'm going to
connect this here. When the game begins, bind something to this trigger
box when it begins overlap. So that's something.
What should it be? First of all, we need to ask if the other actor
is the player. To do that to test if the
other actor is the player. There are various ways. Right now, we're going to
do it with a casting node, which is a little bit more
expensive than other ways, but it's a good way
to show casting. So what is casting? Let's first call it. I'm going to call
cast to third person. Character. Basically, it's
asking, are you this? The object that is incoming is the object that
we are asking for. So we are casting to it. The reason we are casting to it is usually because we want some information
from that object. Again, there are other
ways better than casting to do that
in bigger scale, but for us right now, it
won't create any problem. So, for example, if I wanted the velocity
of the character, I could type here
velocity get velocity, and I would get the velocity of the third person character
or something more specific. Like if I wanted to check capsule collision.
Apsu component. Here comes com, which is
a character specific. We know that every
character has a capsule, so I can get that information
from the character. Now, if we had anything instant specific
in this character, for example, have an HP, we could get the HP of
that character from here. Whereas if we didn't do that, I couldn't get, let's
say, capsule again. There is no get capsule
component because the other actor might
be any type of actor. But with casting, we are
asking cast to third person. Are you a third
person character? And if you are, so if
the cast succeeds, then we can get some
information out of it. If the cast fails, it means that it's not what we are asking for. So we're going to ask, is what is colliding
the other character, the third person character? If yes, then we're just
going to play the timeline, and that would be it. Let's compile. And let's go near the door and
the door opened. I think this is
enough for this one. On the next one, we're going to do the closing of the door. We're going to put something
here to step here, we open the door, step
here, close the door. But that is for this one. I'm going to see
you on the next. Goodbye.
7. Advanced Collision Techniques in Unreal Engine: Hi, welcome back to
Andrea Engine five, Blueprint Mastery, Door Systems
and Interactive portals. On the last lesson, we
left off with creating this collision that when the player goes near,
the door opens. And to do that, we useri
the level blueprint, and we created the bind event to our trigger box
on begin Overlap. So when our player
is overlapping, we are triggering this event. We are checking if it is our
player because it could have been something else
with our cast node, and then we are
triggering our timeline. Now, let's put this a
little bit in order. And let's create a similar
system to close the door. So I'm going to
select our trigger. I'm going to copy and paste it, Control C control well. And I'm going to
move it over here. Actually, I could have
done the same by just using the t and
dragging from an arrow. So copy paste or Alt and
drag would be the same. Now, I'm going to make
this a little bit smaller. I go to bring it a bit forward. And now I'm going to create a reference to it by having it selected in the viewport and going back to our
level blueprint, I'm going to right click and create a reference
to trigger box two. Now, again, we need to use the binding event on
Actor begin overlap. So I'm going to use this
event, copy paste it here. I'm going to connect
the trigger box because this is the target. Target refers to
who, for example, I'm binding this event
to and from the event, I'm going to create
a custom event. Let's call this close
close, do Tigger. I'm going to bring it over here. I'm going to copy the cast to
the third person character. Gonna place it here and I'm going to connect
these two reverts. So let's go and play. And when we go near the door, it will go to open the door. If I go over here, it's
going to close the door. Maybe one trigger is
a little bit bigger, but it's fine.
Yep, it's working. So what we are doing basically
is the same timeline, we are reversing from the
moment that the timeline is. For example, if we go directly to this box,
nothing will happen. It's a nice way to
demonstrate also something. If I press Alts, I'm ejecting on the viewport. Be careful that this only
works on this viewport. If I run a stand alone game, if I play on new
editor Window Pie, if I press Alts,
it doesn't work. I cannot eject from here, but I can eject from a viewport. So let's just play in the
selected viewport, right. Now, I'm going to alts and
eject from this viewport, and I'm going to bring the
tutorial map over here, the tutorial map blueprint. Actually, a little bit bigger, right. We need this. And this is debugger reals way to debug visually
the blueprints. You're selecting which blueprint
you want to see working. Because if I had two of
these blueprints on our map, now, I couldn't have
two level blueprints, but if it was another
type of blueprint and I had twice of
it or 100 times, all of them would appear here. So I need to know which
one I'm debugging, which one I'm seeing to debug. So I'm going to select
the tutorial map. And let's zoom out the
code a little bit, bring it over here,
and I'm going to go back to our game
with pressing F eight. Now, I didn't need
to actually eject, but it was a nice
opportunity to show eject. Anyway, F eight, back
to our character. Now I'm moving the character. And I'll go through this one. You can see it's triggering. It's overlapping. It's running, but nothing is happening. Nothing is happening because
it's already in the end. So this triggers for like
a fraction of a second, a frame to just check
that it's in the end. Where if I go here, it triggers for the whole time. If I go here now, it
triggers for the whole time. And this is the way that
you can see your code, how it's running,
where it's stopping, where it has some problem. Sometimes it's worth having
two screens for this, and the same screen can be a bit of a hassle, but it is doable. Anyway, we're going to put
this back here, press stop. The next thing we will do is somehow to say to the
player player step here, step on this place here
to close the door. So to do this easily, I could just bring a text
over here, just text, texturner actor here we are going to bring it
somewhere I can see, I need to rotate 90 and
bring it maybe over here. And if I go to its details, as we said, each element
has its own details. Now, the text has
its own detail, which is called text. Whatever I type here,
we can see on the map. So step here to close the door. If I wanted to put this
in a different line, let's keep capitalizing every
letter, every first letter. What I could do is go to here, I can just shift Enter, and we go to the line under. I'm sorry, this is distracting. I need
to make this bigger. So having horizontal alignment, vertical alignment can
also manipulate our text. I'm going to leave it to center and text bottom. I
think it looks fine. I'm just going to move
it like this and maybe make it a little bit smaller 24. Well, 20, 20 seems fine. And I'm going to move
it. No, it was fine. So this is one way we
can see some text. Step here to close the door. But if I wanted to make the
text appear above the door, in a certain time, I would still need a collision
box to do that. Now, we could fill
the world with trigger boxes and using the level blueprint,
we could buy them. But what if I wanted to have just a trigger box that I can do plenty of things with it, and depending on my needs, I could change its
functionality. This is where an actor
blueprint comes into play. This is the difference
between level blueprint, which is a blueprint responsible
for the whole level, and we have the actor blueprint, which is responsible
for its own self and doing the things that
it is supposed to do. So let's go to our blueprints. Let's create a new
one, not use test. Let's choose blueprint class. Let's choose a Noctor and
let's call this PP plot text. Let's enter this blueprint. As we said, the level blueprint is responsible for
the whole level. So its components theoretically
could be the whole level. But this blueprint has this viewpoint, and
as we described, this is where we can see visually some parts
of our blueprint, what our blueprint is
consisting of, for example. And where we place them is
the component stub over here. So for this blueprint, we're going to need
a trigger box. A trigger box in blueprints, though, it's not
called a trigger box. It's called a collision
box collision or a capsule collision
or a sphere collision. This is the default
classes we have available. They are 99% almost the same. They are almost the same, but they're not the same. This is why they're
called trigger boxes, and these are called
box collision. Anyway, let's move forward
by choosing a box collision. In this case that we are inside
this blueprint blueprint, I don't need to reference the box collision somehow because it's inside
the blueprint, whereas in the level blueprint, I need to reference this
trigger box from the world. Right now, if I bring this
blueprint inside the map, We can see the box collision. But I don't need to
reference this inside here because it is belonging
to this blueprint. When I need to call
it in my event graph, I can just drag and
drop it from here or I can drag and drop it from
variables and components. Remember variables, components
are also variables. And since we have
the behavior of the trigger box
close to our minds, let's examine the behavior
of the box collision. As you can see, it has a very different
detail stub over here. And if I go to Viewport
and select it, it has more close to the other one where
with a few differences, like for example,
these events over here before we needed
to call Bind on event. So we can do this
from here also. So Bind on overlap. And we can see these
events existing here also begin overlap and
overlap and everything else. But since it's inside
the blueprint, Areal gives us these events
that we can directly use. For example, I want to on
component begin overlap. I can click on this and
it creates the event, so I don't need to bind it. A little bit extra info if I was calling it from another
blueprint, for example, if I had a reference
to this, let's say, I have this box selected, I bring a reference
here to this box. Now, from this box, I can get my from
this blueprint, I can get the box component. I go down the list, get box, I can bind here, because if I click here, we can see there is no events
as it was in blueprint. So if I want to bind from
somewhere else to this box, I still need to bind like this. Let me finish the demonstration. So I'm going to bind on overlap, and then I would
create a custom event. And as you can see it has more options than
the trigger box. This is why I'm saying that
it's not exactly the same. Anyway, this is just
extra information. Let's go back to our blueprint and I'm going to
delete this box. We don't need it
because we do have this event ready for us. And in the parenthesis, you can see which box it is. For example, we had
five more boxes that say this is box
15, 15 more boxes. We can see that this is box 15. Now, I think this is a good
stopping point for this one. I'm going to see you
on the next. Goodbye.
8. Controlling Text and Lights with Blueprint Programming: Hello, and welcome back
to Unreal Engine five Blueprint Mastery Door Systems
and Interactive portals. So previously, we started to create our low text
Blueprint actor. We added this
blueprint in the map, and we added a collision cube, a box collision
inside the viewport, inside the components
of the blueprint. And we demonstrated a little bit the nod of component
begin overlap, box 15 versus the nod
of the trigger box, which was a little bit simpler. Now, let's continue
building this blueprint. The next components
we're going to need are a point light and a text. Text render. Now, the point line, we needed to make the text a
little bit more visible, if it was hidden or not, not hidden, not
visible to lighting. And well, make it stand
out a little bit better. And the text tender
would be the text that we add to our text, like the same way we added
step here to close the door, which actually we should bring. I'm going to use Alt and
drag some surface here. And Okay. Maybe put it a bit lower. So the player knows where
they're supposed to step. Let's make this a
bit smaller too. It's fine. It's fine here. Yeah. And now we need to put
this text above the door to say step closer to
the door for it to open. Since we want to use
this plenty of times, we are going to use the
construction script, which, again, it's unique
to blueprint class. Well, to most blueprint classes, as we said that the level, blueprint is different compared
to a simple blueprint. Most blueprint classes have
the construction script. Construction sprint is used for doing things in the editor. It's very good to use for procedural generation
and randomization, customization of assets. For example, right now, we need to customize our text. Like every instance of this blueprint we're going
to bring to the world, if I duplicate this. We want the text to say other things in one instance and other things in
the other instance. So this is the same blueprint, but we have two instances
with different text. One way to do this would be to utilize this
construction script. We're going to get our
text trender over here, just drag and drop it. Quick tip for this would be if I hold Control and drag and drop, I'm getting a getter. If I'm holding out, I'm getting a setter. As you saw, I drag and drop it from here,
it's the same thing. It's our text trender. If I rename this textnder M, you can see it's getting
renamed also here. So components tab, components
list in variables. We won't bother
with a setter, yes. We're just going to
use the one getter, and we're going to set text. The difference between
this set text and getting this set text render M would be that this
refers to the value, let me choose the text render. The value of text where this refers to the entity
of text render. So this would change
if I have preset it variables with text renders, I could change it like this. Anyway, a little bit confusing. Right now, we're
just going to do the value of the text render. Again, different
details when I'm here, different details when I'm
selecting it from here. I don't need to be on the viewpod would
be the same thing, but different details from a variable perspective and different details from a
component perspective. Now, let's continue. Construction script, we need
to change our text value. So I'm going to promote
this to a variable. And it already named
it for us value. We're going to add the
text in front of it. Text value. And what we're going to do is
use this button over here, instance editable or find it over here and use
the I over here. You can see it auto
click Instance editable with the e over here. We're going to also expose
it on spawn just in case we are spawning
this blueprint. Well, we're not
going to spawn it, but if you want to
spawn this blueprint, you would have this exposed. Now, going to compile
and save and go back to our map and demonstrate
what we just did. We have this text value and we whatever we put as a value
here would be our text. Right now it's empty. So
if we go to our viewport, we can see that
there is no text. It actually disappeared.
If I press here one, two, three, we can
see one, two, three. So whatever we add as a
value to this variable, we can actually seed
corresponding to our text render, and this is happening
through construction script. Now, this means that it happens before the game runs
before I press play. And another thing is that we pressed instance Edit
and expose on span. So if we click on these blueprints and go
to the details over here, let me make it a
little bit bigger. We can see on the category
default a text value. To be more sure, let's
type my text value. And we can see that this
changed the name value. So this is our variable. So whatever I write
here, like, hello, hi, it's going to
become the new text. And here we can see the
definition of instantiating, like one blueprint says hi, the other blueprint
says nothing. And type hello and
this one says hi, and this one says hello. So making the variable public
or exposing it actually instance editable gives us the opportunity to change
the variable over here. Now, the category default,
it's another thing. When we go to the
variable itself, we can see there is a
bunch of details here. One of the details
is the category. We can categorize our variables and keep like these
ones are components. They're on components like list. If I add this one to a category
called let's say text, now we can see that this
belongs to the category text. As well, if I go outside
here and actually, I need to compile
to see this change, we can see that instead
of default, it says text. We could do a bunch of settings here to set the position
of the point light, the text, and box, but we won't be going that
far into construction script. What we can do, though, and it would be as is to bring the point light
and set intensity. And let's say, give it a
default value of 1,000 and now promote this to a variable let's leave
with new intensity. Let's change the
category also to light and also set color. You might want to set
up different color. Let's set the default
value to white. Yeah, white, white,
no. And let's promote this to a variable, new light color and instance
editable also and category. Now, instead of changing
the category here, what I can do is just
drag and drop it here and it entered
this category. Now, let's bring this here. Actually, I can just
duplicate this. Now, having this
option instead of one and dragging another
cable is also valid. It doesn't create a problem. It even makes it a little
bit clearer on what is what. The other thing I
wanted to explain is why I pressed a default value here and
then promoted to variable. Well, when I do it this way, if I compile, the
promoted variable, new intensity keeps the value that I had as a default one, and the color would
be white also. So now if I go, I didn't click on this
to be Instance Editable. Let's expose them on spawn, maybe for some more advanced
use and compile and save. Let's go to our map,
and now we can see the text category and the
light category over here. We don't actually
need both of them. We just need one for now, and let's set up a little
bit the positioning. So what do we want
to achieve here? If I have it selected, I can choose the components
of this blueprint. If I choose this door, I can choose the components
of this blueprint. If I choose the wall,
I can choose in the details the components
of whatever I'm choosing. What I'm going to do
is choose the box. So when the player moves towards the door because there's
nowhere else to move, will trigger this box. I think this is a
nice place to put it. The player might jump. So let's make it a
little bit taller. So they will go
through this box. Let's get the text. Let's hoops. I'm going
to get this from here. A rotating 90, and
let's set a text. Also let's say come close to open the door. Nothing changed. Okay, my mistake. I must not
do that to the text render. I must do that to the blueprint, my text value close
to open the door. Alrighty. And let's move
this text above the door. And let's make the phrase
a little bit shorter. Let's just name it
approach to open. Again, it's a mistake. It
should be on the blueprint, not the text render because we override this text
render from here. So not much the No,
approach to open. I think open needs one
P. So approach to open. Let's select the
text later again. Place it a little bit better. And let's bring also
the light above it. So it makes the player look at the new light spot it spot. I think setting it up. Let's
see how it looks. Great. The next thing we should do is a little bit
of functionality, but I think this is a good
stopping point. We set it up. We created the other components, we set it up on the map, and I think this is a
good stopping point. I'm going to see you
on the next one. Goodbye.
9. Programming Interaction Hints with Blueprints: Welcome back to
Unreal Engine five, Blueprint Mastery, Door Systems,
and interactive portals. Previously, we created
our BP flow text. We actually added a few
more components and created the construction
script that controls the text, the color, and the intensity. We added it to our map, and we used the
components themselves. We chose the blueprint, and then from the details, we chose the components
we wanted and move them to the space accordingly
where we want it. Let's continue with
the coding part. When the player overlaps, let's ask again if it's our
player when the other actor. This time, we're going to do
it a little bit different. We're going to go to
our content browser, we're going to go
to a third person, and we're going to go to
our folder blueprints and open our BP third person. On the third person, there is the code that moves
or player around. There is the construction
script and the viewpoard. The viewboard consists of the character mesh, the capsule, a camera Boom ****, and the camera, and a
character movement component. Now, what we want is to use the capsule and go to the
details and search for Tug and add the Tug P now, what are tags? Tags are simple labels or
identifiers, if you wish, that could be assigned to
blueprint actors or components and help categorize and identify objects
in the game world, making it easier to filter and find or trigger specific
behaviors in code. For example, right now,
what we're going to do, let's save and compile.
Let's go back to. We're going to ask if
not the other actor, but the component we overlapped. Does it have the tag?
Does actually has tag. Component has tag,
and we're going to choose because that's the tag
that we entered over here. Going to close this. We
don't need it anymore. And if the component that overlapped with
the box has the tag P, then we will use a branch, which is an I node. So basically, if
this if is correct, if it's true, the condition, our condition right now it's the component has tag,
it goes from true. If not, it goes from false. So it's an Is statement
with a condition. And of course, it
needs the execution. If we have the component tag P, then we fire the true branch. If not, we fire
the false branch. If it's true, we're
going to need the text renderer and we're going to need
the point light. We're going to draw
a set visibility. Now, this is a
node that controls the visibility of a component, we should turn it
to true and go to our details in the text render
and search for visibility. And turn into pulse, and the same we do
to the point light. As you see, I
changed the entity, the component I'm clicking on, and it kept the tag over here. So this is very helpful. I'm trying to turn light off, render off, compile and save. So this will turn the
visibility of both to true. Let's go test it. If I go
play, I can see nothing. I pass here, approach to open. Perfect. Step here to
close, approach to open. Let's make our second
level visible. Going to click on the
eye on the second level, and now it's visible. And let's actually, if we enter this room,
let's duplicate this. I'm going to just select this
and drag it over here and select the bottom thing
also and drag it over here, maybe a little bit
further over here. I could copy the text also
going to rotate and with alt, I'm going to duplicate it
and drag it over here. So yeah, I think it's fine. Let's go select our new trigger, go to our tutorial map, bring the reference
and connect it here. So that would be it. Now we bind this trigger also to this event. So if I'm gonna play, I can
go here, approach to open. Actually approach to open, and I'm going to step over
here and close, open, close. Great. Our next door will
be the one that we press E, and it opens. So let's bring our
collision actor here. Actually, I'm going
to bring a new one. Flow text here. Let's set for text press to open D. Let's put space here. Again, if I wanted to
change how it looks, the text, I could
select a text render. I could change the options here. I could change the color, and we haven't exposed
all these variables. We just exposed what
the text would be. Where do we want to collide? Let's say when the player has walked through half of the room, let's say somewhere here. Again, to move this, I'm just selecting it from the details. Let's put the light
somewhere here. And let's bring the
text. What is the text? Oh, it's not visible. This is why I can't see. So I'm going to go
to search visibility in the details of the text. Gonna turn into true. And now I have the text. I kind of don't like this, so I'm going to just
change some settings. Gonna sent it to center and next to center. Alright. I think this looks better. Yeah, that place is fine. We can paint big
it another time. Now, let's check if I need to set it back to
invisible, the visibility. Right? Let's test it. Let's move to this door
and there is no text. I'm closing the door.
And this appeared great. Now, the only thing we need
is to open to make this door. So let's begin with
creating the blueprint. Gonna right click, go to Blueprint class and
select unactorblueprint, because we don't need to possess it, we don't
need to move it. It's just an entity with
some functionality. So actor blueprint, go to
call it PP one way door. Oops. Maybe one way to. So let's open this blueprint. Actually, let's create
a folder for the doors. Let's have a folder called
doors inside the blueprints, and I'm going to drag
and drop it here. And let's bring it in the world. We're going to set
it afterwards. And another way to
open the blueprint besides double clicking here
would be from the outliner, choosing the blueprint I want to edit and if I have
bring it in the world, I can just click over here, Edit Blueprint, or
I can just select Open Blueprint Editor from selecting the asset
and over here. So I'm going to open it. And for this blueprint, we're going to need
three components. Let's add a collision box. This will be detecting whether the player
is in range or not, so it can open the door or not. And we're going to
need also an arrow So we know where
the door is facing, which is the front side
then which is the backside, and we're going to
need a static mesh. So for the static
mesh, actually, because I don't want to
be searching the assets. Since we have it here,
I can just select this browse to the
sorry, not this arrow. The details here, I'm
going to de visibility, and I'm going to be
selecting the door. And on the static mesh, I can see which static mesh is the entity of
the static mesh. Gonna go here, and
here is the door. Now, I'm going to go back to my blueprint and
add static mesh, and it has already
selected the door for me. Great. Now, it's a
little bit of P boot. It doesn't really matter.
I'm just going to bring it over here. And the rest we can move from the map itself by
selecting the blueprint. That's rotated 90 degrees cause the movement is going
to be on relative space. Now, what does this mean? When I rotate the door here, first of all, I rotate
the whole blueprint. So even if I rotated the
door some other way, it would be in local
and world space. This means I'm rotating it
based on the coordinates and the Cartesian
system of the map. Which is based on
the XY Z axis of the map and the locations that
we can see everything is. So location and rotation would be relative to the
coordinates of this system. But what we're going to do is we're going to be
rotating this part, which I actually
parented to the arrow. Now, make sure that these
things are not parented, and if that happens, they don't have
an arrow here, we just drag and drop
it to the root. We attach it. We do
not make a new root. So everything is an
entity on its own. For example, if I
attach the arrow to the door and move
the door around, then I'm moving
the arrow with it. If I detach it, you
can do that also. Like if something is attached, if you drag and drop it
on itself, it detaches. So now if I move the door, the arrow, as you can
see, stays there. Now, I'm going to be
moving this door in a relative location,
relative rotation. Different than set
actor rotation. As you could see, when
I move the actor here, the pivot point was the center,
the center of the actor. Whereas I want to move
the door based on its own pivot point on the relative rotation
in the blueprint. But I think I digress. I think we should see it in action, and we would leave this
one for the next course, the next lesson. So I'm
going to see you then. Goodbye.
10. Groundwork for Player Interaction with Doors: Welcome back to
Unreal Engine five, Blueprint Mastery, Door Systems
and Interactive portals. Previously, we finished our
setup for our BP flow text, we added some code that if the overlapping other actor has a component
that has the tag P, and that is what is overlapping, then turn the visibility on. To do this, we added a tag to our character
capsule component. So in the third person,
the blueprint third person BP BP third
person character. In the capsule component,
we search for tag. And added the tag
P. Another place that tags could be added we
discussed is also actor. We didn't demonstrate it, but if we c to class defaults
and search again for tag, we can find that the actor
has its own tab for tags, where we can see also the
tags of other components. So let's close this. Then we proceeded by setting up the BP flow text
for the next room, and we started
creating the new door, which is the BP one way door. So in this blueprint, we left a little bit
offset the rotation. I can see. This should be zero. Not minus zero, but zero. We changed a little
bit the location because the Pivot is
a little bit offset, and we explained that we
are going to be moving the door based on the cartesian
distem of this blueprint, which is the local
relative space and not the world
Cartesian system. So world location
rotation and scale. Yeah, this is a very
big difference. The world location and
the relative location, the world rotation, and
the relative rotation. These are very scale of course, important to distinguish
between because, for example, if we were rotating,
let's say, correctly, the door in the word location, let's say this was
correctly pivoted, for example, we
could move the door. This way, so it pivots
with the actor correctly, and it opens like this and
using the world rotation. Well, this would mean that this door would
open only this way. If I wanted to make it this way, it would still will not work. It wouldn't work like this. It would go up to the world
rotation that we set it. So this is important
to distinguish. So let's go back here. Let's set this to be
somewhere in the middle. It's fine. Now, what are we going to do for
animating this store? We're going to go to
our tutorial map. We're going to steal
the timeline from here. We're going to copy it and
actually just a timeline, and we're going to
go to our graph and paste it over here. Since we copy it and paste it, it has our values
inside 0-0 0.5 0-1. So this is our Alpha drive. Now, to do the relative
location compared to the world, and this is why I
didn't copy this, which is set actor rotation, and we are putting a target as this actor and
giving a new rotation, we need to get our door, which is prop back door one
and set relative rotation. It's a very similar node. As you can see, it has
also swept in teleport as this one has only teleport, but it means it's sweeping
if it's not teleporting. And we're going to
connect this here. In the previous case, we larped through a rotator. But at this case, I want to just right click here
and split the rotator, and I'm going to
just larp afloat. So I'm going to
larp here from 02, I think let's go to the door. Let's rotate it.
I think it's -90. Opens inwards -90. Okay. We could have seen
the arrow here also. So original, so from
zero to -90 from A to B. Now, how do we call this? In the other blueprint, we just use the
collision over here, and we called the open door. So again, we could have
used the collision. Let's bring it's a box again so we can bring even
collision begin overlap. And we could just say
that when the character has P. Then we put
a branch again. The way I brought
the branch so fast was selecting B and clicking. This brings a branch. So if it's true, then play. And then we have a
collision door again. But when we collide with
it, it should open. We don't want to do this.
We want to press E. So since we will not be creating a whole system for inputs to change binds to add
binds and everything, we'll just be using
E to open doors, what we can do is use
the player controller. So I'm going to get
player controller. I'm going to explain in a second and enable input from
the player controller. The target should be self and the player controller should
be on player controller. Now, the way I move this was by pressing troll and just dragging and dropping
it wherever I want. If I press Alt and click,
it disconnects it. If I have something
connected with control, I can connect it somewhere else. Now, what is a player controller and what is enabling input? A player controller in
Unreal Engine is a part of the game that processes
player input such as keyboard controller
actions and translate them into commands for
the player character or any other object in the game. It acts as a link between the player and the
game word, basically. Normally, the controller
would only get direct inputs, but we can enable input on other actors to allow them to
react to specific actions. For example, here, we're
going to be waiting for the E action to open the door. So to achieve that, we're going to use our
collision over here. I'm going to disconnect
with pressing out and clicking these things. Actually, I do need this, so I'm going to cut and paste. And I'm going to
connect this here. So if our player has
collided with a cube, then we will enable the
input here, Ops, mistake. This should be here. Target should be self. We are enabling input to this actor to this door and the
player controller is the player controller. But when we leave this box, we want to not enable input
to disable it basically. So I'm going to select the box. I'm going to click on the
on component end overlap. Go quickly click. I'm going to copy paste this.
Going to connect this here. And going to copy and
paste the controller also and call disable input. Going to set the target to self and connect the
player controller. So now, how do we activate E when pressed
E? Well, this is easy. If I we click and type keyboard, we can see there is basically
all the keyboard buttons, which if I call E, let's find E. Here it is. I call it, it creates
an event on its own. So since we have enabled input, this will do something. Demonstrate this for a second. Let's put a print string here. It says hello. So I'm
going to play on the map. If I'm pressing E
now, it does nothing. If I go next to
the door and enter this collision and
press E, it says hello. If I leave, it does
nothing again. So this only works while
it has enabled input. Now, if we had other
executions with E, we have the override
parent binding, which will override whatever
EE is doing in other things, and it will consume also input. There is also modifiers, like if you want to have
shift and E at the same time, anyway, there is a lot about it. But that is basically
an input node. To animate our door, we could just directly
connect this here. But then we would be only
able to open our door. If I go like this and press E, I can only open it.
I cannot close it. But I think this is a good
stopping point for this one. I'm going to see
you in the next. Goodbye.
11. Coding the Player Interaction Door System: Hello, and welcome back
to Unreal Engine five, Blueprint Mastery, Door Systems
and Interactive portals. Previously, we
talked a little bit about the relative rotations
and we finished with our timeline and set
relative rotation by using a lap on a float because the X and
Y will not change. Only the Z, the Yo
axis will learn from zero to -90 to set
relative rotation. And it will always
be at that rotation. So we have the arrow to tell us where the front is and where the door
will open towards. If we wanted to
open it this way, the only thing we
would need to do would be to change this -90 to 90, and it would open
towards 90 degrees. The next thing we did was to enable input with the player controller
through this blueprint and disable it when we begin and end overlap when our
player begins and end overlaps using the component tag P. Then we demonstrated
an input node, the E button that when we press it while we are in
the collision tube, it works and it
makes our door open. Let's continue with making the door be able
to open and close. In some lessons ago, we spoke a little bit
about enumerations, that there are pre set lists that they cannot
change during runtime. Let's go create one of this because the one
that we showed is already existing from
the engine from Unreal, and it's about direction. We could use this, but
let's make it a little bit more advanced for
some other users also. We're going to we click
and we're going to go to Blueprint and from Blueprint, we're going to
choose enumeration. Now we're going to call
this E door state, and I'm going to open it. Over here, we have the button
that adds enumerators. As we said, it's
basically a list, and as you can notice, it names them different
because it cannot have twice the same enumerator. I I turn this to zero,
it will pop an error. Numerator zero, new enumerator
zero is already in use. Let's have open. Close. Opening. Actually,
one P, and closings. Now, I'm going to save and
I'm going to close this. Now, I have this list over here, but how do I bring
in the blueprint? I can't just drag and
drop it? It cannot create a nod from this type of asset. So to do this, I'm going to go to
our variable stub and I'm going to press the plus
button over here to create a new variable and go
to variable type over here and search for E D state. I wish I was typing and here it is in the category
IAM enumerations, it's our enumeration Dor state. I'm going to click on this
and I'm going to name the variable also door state. The way I did it was
by clicking on here or you can always press F two
and it will go to Rename. Let's bring this over here
and let's explore a new node. This node is the switch node. As we said previously, the switch node needs to be connected to a
specific enumeration, the switch on
enumeration, basically, because there are switches
based on integers, for example, based
on many things. If we type switch on, you can see everything with
an E is an enumeration. A lot of Niagara things, but there is plenty of
variables to switch on. Most usable one is actually
the switch on string. So we can customize our cases. Like case could be open. Like we could have
it with strings, and we could have how open. And then it would depend on what is incoming from a string. Again, a string is a variable
type which can take well, basically text, any text. That can be a number,
there can be a letter, there can be a symbol,
anything that is a text. There is also a text variable, but it is designed for a
different kind of use, more for localizing content. It is optimized for displaying different types of texts
if they need translation and formatting for
different languages. But for us right now, this is just an example because we're going to
use an enumeration. So when pressing E, I want this to do something different based on the
state of the door. Now, we need to set a default
value for this. State. The first value that we have
in our enumeration is open, which we do not want. We want it to be closed. So I'm going to say it to
close and compile again. So the default state when
it is pressed is closed. So when the door is closed, we're going to play from start. When the door is open, we're
going to reverse from end. While we are playing, we could actually change the
state over here and say that when we could
connect it over here, and then over here, and then I'm going
to duplicate this and connect it over
here and over here, and this would be closing
and this would be opening. So when we are pressing E, if we are on open state, we are closing the door and we are reversing
the animation. If we are on close, we are opening the door and playing the
animation correctly. But I want to demonstrate
the do once node. So, as we said, this update from the
timeline runs constantly. This means that this runs
every frame, basically. Every frame, it runs whatever comes out
this execution end. If I do once over here, it means that it will
do this execution, and once it reached this point, it will just stop here
after it has done it once. To do it again, we would need to reset. And if I have click this
start Close button over here, this means that it would need to reset before it does it once, whatever we have out
here and complete. So, this means that if, for example, we want to
change, let me cut this. Open goes to reverse from end and close goes
to play from start. So it's opening
and it's closing. Yeah. Now, I'm going
to paste this here. If I wanted to change this
while the timeline runs, I would need to do it once, and I would need to reset it when the timeline has finished. So I'm going to put
readout node here. Going to put a readout node also here and I'm going
to connect it here. Now, I can use this
enumeration instead of this one to just determine where the door is
closing or opening. So I'm going to
switch one timeline. And if it's forward, it means we are
opening the door. If it's backwards, then it
means we are closing the door. And this would run once, and when the timeline
has finished, it will reset, so it's free
to do it again next time. Let's go test this.
Let's go play. We are approaching the
door. We are moving here. Press it to open,
press it to close, and nothing is happening. And the reason is pretty
simple because in the end, we didn't specify if we
done opening or closing. So what I'm going
to do is I'm going to to a sequence node. Now, what is a sequence node? It sounds like it's going to do some things in an
order, which it will, but it doesn't mean that it will wait for one line to finish
and then move to the next. It will run all the
pins simul in an order, but they will fire
almost simultaneously. Like, if I had a print
string here that says hello. And I had a print
string over here also. That says, actually,
let's number it. One, two. Let's move this a
little bit higher. Gonna put a delay here. And I'm going to put
another string over here. Let's say this is three
and this would be four. So what we are supposed to see here would be one,
two, three, four. But what will happen is that
we will see one, two, four, three because the three
has a small delay here. Let's make this 1 second. Actually, 0.2 was predefined the I don't have
an exact number, but imagine if a frame takes
16 milliseconds to render, and it does the whole
calculations of the game. Imagine how fast
every node runs. So 0.2 is plenty of time. Let's go test it. Let's go press play, and I need to go to the
door to test it. You see one, two, four, three. You can see it again in the log, one, two, four, three. This tells us that
this doesn't wait for an execution to
finish to run the next, then one, then two, then three. I'm going to delete all this because it's not really needed. And I'm going to remove some execution pins.
We just need two. And let's connect this
one to the reset, and let's duplicate this
functionality over here. Let's also connect
the direction to the switch and change forward, it's going to be open, and backwards, it's
going to be close. So now we should be able to
see the door open and close. Yep. There is something
missing though. A player should be informed that they can open
and close the door. And to be honest, we are very close to the door
to start opening. Like the collision
is very small. So when I'm here, this happens. So I think these two things
are going in the next lesson, and I'm going to see
you then. Goodbye.
12. Designing a Simple UI Widget in Unreal Engine: Hello, and welcome back to Unreal engine five Blueprint Mastery Door Systems and
interactive portals. Previously, we finished with the opening and
closing of the door. We created a state. So when we are pressing E, we switch based on the state of the door using this
enumeration E door state, which we have open, close opening and closing. And when the door is closed, it reverses the timeline
or when it's open, it plays it from start. We demonstrated to once node
that while this is running, we are doing this
action once and we are resetting it when
the timeline has finished, and when the timeline
has finished, we are setting the door
state to be open or closed. We said that the collision box over here is a little bit small. Now, instead of
changing to every door, I'm going to just go
over here and I'm going to select this box, and I'm going to extend
it a little bit more. This seems fine. Maybe a little bit more because I don't want this to be too much because
if it's too much, the player will be able to open the door from a greater
distance than desired. We could have other
mechanics checking for this, but for now, this will do. So more complex mechanics
would include line traces and distance checkers
from specific points. Let's consider this fixed. The next thing we should
do is have a way to tell to the player you are range and open
or close the door. So what we will use is a widget. We're going to create
a blueprint widget that we will add
to our viewport, and when the player
is near a door, it will say open or close
according to the door state. So let's begin by
creating a new folder in the content folder
that we will call UI. And I'm going to color
code it to a light blue. Great. Now, inside here,
I'm going to click, I'm not going to
go to blueprints because there is no
UI blueprint here. I different category, a unique category
called user interface, which we can see font, slate, brush, and other things. But what we want is
a Widget blueprint. As with the other blueprints, there's plenty of classes that we can preset that
we can choose from. But what we want is
the user widget. We're going to click on this
and we're going to name it WG door W JD, I
think that's why. And I'm going to open it. Now, instantly, we can see that this is not a usual
blueprint interface. This is something different. Well, not exactly, because
we are on the designer tab. Over here, there is a graph tab, which is more familiar than when compared
to the designer. We do have, though, a difference of events. We have preconstruct and
construct instead of begin play. Like, if we go here,
we have begin play and event actor begin overlap
and tick is the same. Now, preconstruct is kind of like the construction script. It's like running this, but not exactly also. Too many details, I think. Let's focus on the
designer tab for now, and we're going to move to
the code a little bit later. So what are we seeing here? Here we are seeing basically
a visual representation of resolutions and how our
widget looks on them. It doesn't snap right now because we have
nothing in the widget. Second thing we see is the
detail stub and a palette. A palette has some UI
elements like a border, like a button, like a checkbox. These are the common
ones, sliders text. It has also some more advanced, like features like
inputting textboxes, combo boxes, lists, ways to
actually set up the visuals. One of them is the canvas. What is a canvas? In short, it allows us to set a location and scale in the viewport in the
screen size that we want. That doesn't mean that it should necessarily be taking
the whole screen. It could be a canvas that
is a smaller widget, but it's a reference
based on space. Let's say, for example,
if I bring a button here, I can say where it is
and how big it is. Whereas if I didn't have the canvas and just
bring a button, then there is no
reference point to it. This just a resolution undo. I'm going to delete the button. Basically, that's
what a canvas is. It has a lot more details
and characteristics, but in a nutshell,
that's what it is. For our case, we'll be using something very simple
besides the canvas. We won't be using
buttons or anything. We will just be using some text. And to make that text
take a certain shape, we will use a horizontal box because we want to put
two text elements, one which could be the
button to press and one which would be the text
that says open or close. So even having them separate helps if we were to change
the button, and of course, to change the text close or
open versus we will have to type every time to
type open, close. Now we only have to
type open or close. Small difference, but
in a larger scale, it would make a difference. Now that I have
the horizontal box and I want to anchor
it in a certain place, I have this like a flower here
that tells to the engine, try to place it somewhere here. There is a lot, a lot more
functionality to anchors, like I could have the anchor
set in the middle and then give an offset to the box that
it's based in the middle. There is sizing the
box, however we want. Right now, we won't be
bothered with these things. We will just make it
to kind of look okay. That would be it let's make the resolution
a little bit more correct because I had let it in some random resolution which is not very valid every time. So I'm going to put it here. It's the resolution. I think if you consider that the player
is somewhere here, I think if it appears maybe more to the left
center it towards. Yeah, I think that
place is fine. And I'm going to
move this anchor. I'm going to break
the anchor also into corners and set it over
here. Yeah, that's fine. That's fine. Where
it should appear the open or close and the
button that we use. We have our horizontal box, and we need to put
some elements in it. I'm going to choose a text. I'm going to add it to
the horizontal box, and I'm going to
add another one. The first text would be easy. I would say just E. The second text, actually, let's put also this symbol over here and one space and
one space before the symbol. Yeah, it looks better
with this symbol. Now, the next thing, it should say open or close. So let's say open and close. It does look okay. We
can't leave it as it is, but let's toy around
with it a little bit. Let's say that I want close to be a little
bit more to the left. What we're going
to do instead of changing sizes to fill and horizontal alignments
and everything, we're just going
to go down here, which is the render transform
and just move it a little bit to the left, by 20, 20 seems fine, maybe 15 renders translation. This is the option,
and this moves it a little bit left
or right, up and down. You can scale it, you can
seal it, you can angle it. This actually angles everything because I haven't chose this. This needs to change 15. Yeah, I think it looks okay. Let's go see it in action. Let's go actually add
it to our viewpoard. I'm going to compile and save
and let's see our widget. The question comes is, how do I bring a
widget, of course, to my viewpoard, which is just a few notes and it's there. The other question
that comes is, where do I put this code? Where do I use a code that
brings a widget into play? Well, we could put
it on the door. This means that every door
needs to create a widget. Not a very optimal behavior. I could put it on
the level blueprint. This means this widget
would exist in this level, and it would be
created only here. But we are going to have a level that we are
transitioning to, and we need this widget to be hold it there,
being both levels. So I could use game instance, which runs across
the whole game. But if I had main menus, if I had other levels that
I wouldn't use this widget, this means that
this widget would be in the instance always. So the common denominator that I can use between
two levels right now with what we are dealing
with would be the game mode, because this level will
be using this game mode, the transition level will
be using that game mode. So putting the code here right now for this example,
makes sense. So I'm going to browse to our game mode from the world settings. It
is the third person. We could find it here also. So inside third
person, blueprints, third person game mode, if it opens like this,
it's not a problem. This is just basically the defaults of the
game mode blueprint. If we go to, let's
say, for example, our door and go to
our class defaults, we can see these details here. So since we haven't
opened the blueprint, this is data only blueprint. We haven't done
anything else to it. It shows only the
default values. We can click over here, open full Blueprint
Editor, and toda, we can see construction
script, viewport, which in game mode, has very specific uses and we
won't be bothered with. And what we need is
the event graph. And what we will do is
called the event begin play which runs when
the game begins, and we're going
to create widget. Now, for the class, we're going to select the widget door, and for the owning player, we're going to get the
player controller. We could have different widgets that belong for a local cop, for example, and their owner would change based
on the player index. If I leave it as e, we won't be able
to see the widget because we just created it. We just made a
variable out of it. It has not been
called on our view. To do this, we need to add to viewpot so this would bring
our widget into view. So I'm going to compile and save and go to Tutorial
lock and press Play. And here we can see our widget. Basically, what we're
checking is if it's in a nice position when we want
to open and close the door. I think if it pops
right there, it's fine. You can place it
anywhere else you like. And I think this is
it for this one. I'm going to see you on
the next that we will be implementing the mechanic to
show and hide the widget. Goodbye.
13. Programming UI Widget Visibility Based on Player Actions: Hello, and welcome back
to Unreal Engine five, Blueprint Mastery, Door Systems
and Interactive portals. Previously, we ended up with finishing the designing
part of our widget, which I have closed. So no, I haven't here this. We created a Widget blueprint. We named it WG Door. We added a canvas panel
to our hierarchy. Well, this is one point
that I didn't explain well. Over here, we have
the hierarchy, which shows us which elements
are inside the widget. It's kind of like the components tab in blueprints,
but for widgets, and the hierarchy here tells
us which widget is first, second, which belongs
to who basically. Also, I didn't explain
much the horizontal box. I think it's kind of
self explanatory. It allows widgets to be
laid out horizontally. If we hover over allows widget to be laid out
in a flow horizontally, if we cover anything, if we select anything
and hover it, it will give it gives
us a tool tip about it. Come on, do the thing. I just doesn't want to. So yeah, basically,
in the palette, it's easier to see
the tool tips here. It has to be on the icon itself. We have created the widget. We have added to our
viewport through we created and added it to the viewpoard through
the game mode. By the event begin play, we created the widget, and then we added
it to the viewpod. Now, we hosted it
to the game mode because it's going to be
shared across levels, and we want this widget
to exist in every level. But we don't want to be adding the widget on the viewport
when the game begins. We want to add it to
viewport when we call it. What we will do is promote
this to a variable, which is our widget reference. When we are creating, we're
getting a return value, which is a reference
to what we created. And I'm going to name
this wg dot Rep. As you can see, the theme
with the references is a little bit important
in programming. Calling references, having ways to reference something
like we had in the level blueprint that
we were referencing the trigger boxes when we have the reference to
the other component, which we ask if it has a tag. References are a thing. References are the
Alpha and Omega, if you will, of object
oriented programming. Now we have stored a
reference of the widget. So we're going to
create a custom event. I'm going to call this Widget. I'm going to connect it
to the out viewport, and I'm going to bring
the reference over here and connect
it to the target. Because if we just
out of viewport, it would probably trigger
an error or do nothing because there would be no target because target itself
means a game mode. It's not a widget, so it
cannot add it to viewport. But the widget reference in Cam added to the viewport and
this will work correctly. Now the next thing
we do is create another custom event and
call this remove dot widget. I'm going to drag a cable from the widget reference and
say remove from parent. This is the way we are removing widgets from the viewport,
one of the ways. So let's go utilize
these two functions. Let's go to our one way door. Let's go to Event graph. Let's go to our collision. So when we're colliding
and begin overlap, we should show our widget. To call this, I need to have
access to the game mode, so I need a reference
to the game mode. Thankfully, Unreal Engine has a nice way to get the game mode. It's called G game mode. But this returns
a generic value. We have a specific game mode. We have the third
person game mode, or we have the doors game mode or we can have any
kind of game modes. This returns only a
generic game mode, game mode based
object reference. To check if it's our game mode, we're going to need to cast. So we're going to cast to
third person game out. As we said, cast is
asking something, Are you this thing, basically, is this object this
kind of object? So I'm going to convert
to a pure cast, which just removes
the execution pin and makes it a
little bit easier. If we succeed and our game
mode is the game mode because the success is like
when it was impure cast, it was like cast
fail, cast succeed. Now we have a BollonT tells
us if it succeeded or not. So if we succeeded, then we can get
some information. We can get some functions and events from the third
person game mode. The event we want right
now is to add the widget. Over here, and I can just
drag another cable and say, remove dot widget and
connect it over here. I'm going to compile and
save and let's go test it. Gonna go to the first door, it opens, second door, we have a widget, and
it's getting removed. Nice. But the thing is that
our widget doesn't correspond to what
it should be saying. Like, right now, it should be
saying open and right now, it should be saying closed, which is correct, but it's only 50% correct. It's
not always correct. So let's fix this. And to do that,
we're going to go to our third person game mode, and we're going to
create a function. So what is a function? Basically, it's a set
of actions or logic, if you will, that is reusable. It can be used multiple
times and can be called simultaneously
many times, and it will run specific
tasks every time. Like an event if
it's called again, they are typically
you the new call, whereas functions
will just run again. An example about that
practically would be multiple overlap collisions, like for example,
many bullets hit you on the same
fragment of a second. That will be cued in order, which one hit first and
which one it it second, et cetera, if it was functions, they would all run
executed immediately. They will be stacked and
immediately executed. So basically we could
have created an event, but for this scenario, we created a function. Now, another thing about
functions is that of course, they have inputs, as we
can see in their details, but they also can have outputs. For example, if I
wanted something to know if it succeeded or not, I could have an output of a
Bollian and as you can see, it created a return node. And that boolean could
be true or false, for example, if something I
didn't hear succeeded or not. I'm going to delete this
and I'm going to delete the return note because
we don't need it. We're going to compile and save maybe one more detail about functions and
that will be it. Functions, they cannot have
time things inside them. They can call
externally time things, but they cannot have
a delay in here. We cannot have a timeline here, can not have timers. So time is something that
cannot be in a function. Now, our function,
what should we do? Let's call this up
date, widget, text. And we're going to need a
new input of type string. I'm going to call
it with jet text. Now what this will do, we're going to get our
Widget D reference. I'm going to get it here,
and I'm going to get text. Actually, let's
go to our Widget. Let's go to our designer. Now, we want to change
this text over here, the text that says close. If we see it on top
of the details, there is name we can put or
we can actually put it here, but I'm going to
choose to be here. Let's call this Widget
text. My widget text. Now, next to it, there is a button
called Is variable. If it's not clicked, then this means
that it is static. It cannot be modified, whereas if I click is variable, it can be modified through code. There is a lot of reasons for this to happen
behind the scenes, but let's not go into
too much detail. Let's go to our game mode again, not the event graph in our game mode in the
function Widget update, and we're going to
get my Widget text. And from here, I'm going
to set text as we did with the text renders in
the BP flow text. I'm going to connect this to, this is a text. We can change this
string to a text. And can connect directly. If I left it string,
it wouldn't matter. I would auto translate
it to text string. But why not make this part
a little bit more clear, and I'm going to
just change it to text and connect it here. So we have a function
that changes our text. I need to compile the widget because we turn this
two is variable. I needed to be compiled, t's save also, and
now it's fine. I think this is a
nice stopping point. We're going to continue
in the next one implementing this new function. Goodbye for now.
14. Updating UI Widgets with External Blueprint Inputs: Hello, and welcome
back to Unreal nginFb Blueprint
Mastery Door Systems and Interactive portals. Previously, we added
the functionality to add the door widget or remove the door widget based on if we are colliding
with the door collision. To do that, we use created
two custom events, and we used the at viewpod and removed from parent
and connected them to the reference of the widget that we stored
in the begin play. Then we went to our
BP one way door, and on begin overlap and end overlap events of the collision, we added the ador widget and
remove door accordingly. By getting the game mode and casting to our third
person game mode. Next, we created a function in the third person game mode, which we called
update Widget text. Now, this function had
an input of Widget text, and it sets the text through the reference
of the Door Widget, and we got my Widget
text from it. Now, let's continue by creating the system that will
update the Widget text. To do that, let's go to our
one way door and create another function
that we will call again update widget. Text. In this function, we
will get our game mode, and we can do the game game
mode and the game mode, and we could cast two third person game mode and
convert to pure. But what we can do since we are using it so often
in this blueprint, we can go to our begin play. We can copy this code from here. Actually, I'm just going to
cut this code from here, go to begin play, paste it here. I'm going to connect it as
a casting node this time. And I'm going to promote
this to a variable. And as you can
see, Area named it already as BP third person
Game Old very convenient. I'm going to compile, and it
says that it cannot compile because the target from these two functions
got disconnected. This is what I meant before also that target refers to who
is supposed to do this. And self right now, does not have an ador
widget function. Even if it did, the target the predetermined
target of this function would be target is
BP third person. So even if I create a
custom event, add the jet. You can see this will
still hit an error because the target is P. We called
this from the game mode. To make the error go away, we will just bring our reference
from our variables over here and we're going to connect this here and
connect this here. And I think this string
variable is not used anywhere. We can always find references. My name. No, it's
not used anywhere, so I'm going to delete this, and I'm going to compile again, and now the error is gone. Let's go back to our
Widget update Widget text. Now, we don't need
this. We can bring just our game mode reference because this is storing
basically the game mode, this instance of the game mode, and we're going to
update rigid text. Now, we do have our
function over here, we need to populate what kind of text it will be appearing. So to do this, we will get the door state. We're going to switch on Dor
state because this is what controls and we can actually
let's show another node. This would be much better. Let's connect this over here. There's another node that we
could create some text and then adding the text there
and setting that text. We could do like basically a
string or this time a text. And we could have a bunch of
setters based on the switch. So we could have this one on this case, this
one on this case, this one on this case, and then connect that text over here. Now, the other thing we can do, there is another node
that we can use on specific variables
that's called a select. Select nodes has
an wildcard index, which means it can become
some types of variables. So if I press here, we can see the types of
variables it can become. And as you can see, it can
become an enumeration. So this means I can
connect this here, and this gives me a choice for each element for each
enumerator, basically. So when the enumerator is
open, it gives me this choice. When it's closed, it
gives me this choice. Now, let's feel what
we need for each case. For open, we need close. For close, we need open
and for the other two, we need nothing because we are not interacting with
the door at that point. So we're going to compile, save, and let's go test it. Actually, no, we need to cod it first because just creating
it doesn't mean we code it. When should the widget update? Of course, before we
add it to the viewport. So I'm going to just
spring from the functions, I'm going to drag
and drop it here and connect it over here. I'm going to copy paste it
and connect it below also. And the widget should update
also when well, basically, the next points that we should update is whenever we
are changing state, since our state
affects the widget, what the widget is
supposed to say. So I'm going to drag
and drop it here and I'm going to connect
both of the cables here. And as you can see, I can have two executions
connecting to one node. Now I'm going to do the same. I'm gonna copy this and paste it here to these two executions. One would be the update, and the other one
would be the finish. Now, let's go test it. No press play opens open. We have that E over there that is not doing exactly
what we want. It doesn't disappear. But, um yeah, let's fix that. So what we're going to
do is pretty simple. Instead of updating the widget
on the timelines update, what we're going to do is we're going to be removing the widget. So I'm going to copy
this code over here, BP third person game mode and remove door and
paste it in the end of um of the timeline of
the update of the timeline. The next thing we need to do is after updating
this Widget text, we should also add it to the view portagym
of Cypress paste. I'm going to press copy, and I'm going to paste this
here and connect this here. And this should
work. Let's go test. And it works. Awesome. I think
this is it for this one. I'm gonna see you
the next. Goodbye.
15. Programming a Two Way Swinging Door System: Hello, and welcome back
to Unreal Engine five Blueprint Mastery Door Systems
and Interactive portals. Previously, we finished with
our widget system to show close or open based on if our door needs
to open or close. So we created this function, update Widget text inside our VP one way door which is calling the function we created
in the previous lesson, update Widget text from
the game mode and fills the text corresponding
to the door state. Now. Because we have this pesky E over
here on the widget, we ended up adding some code to remove the door
widget while the door is opening or closing and also adding it when the
door is open or closed, when the animation has
finished from the timeline. So now let's continue
to the next door. So I'm going to make
the level three visible and go over here. This door should open opposite from where
the player looks at. So to do this, we are going to duplicate
our current door. But let's save also. You saw this little
asterisk over here, this white asterisk.
Let me do one change. Where is the door,
here is the door. You're going to this here. So the asterisk appears. You see this asterisk
over here means that something changed
in the blueprint and it needs to be saved, that this asset has not saved. This is what this
asterisk means. I'm going to save again, Control Shift S for save everything, and I'm going to
duplicate this blueprint. Going to call it BP, oppose it from player D. Spelling might be
correct, might not be. We will never know. So I'm going to open this, and this is the same blueprint. This is a duplicated version
of the blueprint we had. But before we start
doing some changes, which will not be a lot. Let's go to the tutorial map and bring one new of the float text. And let's select
our point light. Let's bring it over
here, over here. I think over here is fine. Also, the collision box
collision is making bigger. That's fine. And
lastly, the text. But, let's fill the text first. Let's select the blueprint. Let's go to my text value. This door opens
opposite from player. All right. And now
let's select the text. I cannot see the text. It's because it's invisible. Yeah, instead of doing
this every time, let's just modify one thing on the blueprint. Let's
open the blueprint. On begin play, let's
bring the text and set visibility to false. And let's go to my text
render and make visibility. True. Let's compile and
save back to our map. Now we can see the text, and when the game begins,
it will disappear. I'm gonna bring this over here. I'm going to go back
to the blueprint, go to go to the
text to format it. Let's increase the size
here a little bit. So shift enter here. Shift enter here, and
Tada is selected again. Yeah, this is fine. Maybe
a little bit smaller. Now, because this
scales into a segment, basically into a snapping point, I can disable this from
up here and just do this and enable it again to
enable the snapping points. So let's bring our new
door over here also. So opposite on player,
go to bring it here. Which side should I turn it this way or this
way, this way. Let's keep the same bot. Yeah, that looks oka Yep. It's fine. So let's
go to functionality. Not a lot will change. Let's find the door. We're gonna close
the other blueprints that we don't not need anymore. I don't need this.
Save the game mode. Yeah, just the opposite door, and that will be it. Now, what we want to change
is basically on the timeline, whether this angle is -90 or 90 based from where
the player is standing. We could have multiple
collisions and checking from each side if the player is in this
side or this side. But there is another
more quick way to do this and more easy. We're going to create a function
to calculate direction. And in this function, we are going to get
our actors location, so get at location. And we need the location
also of the player. To get the player
in this scenario, we can just get player
home and from this, we also actually, we can just duplicate this and connect here. So we're having two locations, the player and the
door location. Now, the door has a front side
because we have the arrow. And if we open the player, the player also
has a front side. Now, let's go back to
our calculate direction. From these two locations, we need to find the direction from the door to the player. Is it behind me or is
it in front of me? So to get direction unique unique
direction vector from two. This produces a vector result, which means that based
on where I am standing, the Y and X and Z might
be minus, might be plus. Let's demonstrate this. I'm
going to do print string. I'm going to connect this
here and let's go play. Let's put this here. Now, let's go through the
door. This one opens. I forgot to connect
this function. Let's connect it on
pressing E, actually. So I'm going to calculate
direction. Here. So when I'm pressing, you see all the variables
except Z are minus. But if I go over here,
they are minus again. Well, now the X is positive, though, because I'm
on the other side, if we take the centers
into consideration, right here, the X is plus, whereas here, it's minus. So I can't really tell
which should be it. If I go from the other side, the Y will also be changing. If I had this store over here, then the Y would get minus, the Y would get plus over here. So this really doesn't
finish the job. What we need to do is
create a dot product. And what is returns a product. This doesn't really
explain as much. So what basically
is a dot product? It's a way to compare
two directions. We have the direction
of our actor here, and the next direction would
be the forward vector. Get forward vector. Here it is. Not this one. Sorry. The actor forward here it is, get actor forward vector. So basically, this is
the front of the door. So we have this
direction and we have the direction from the
door to the player. So we have this direction
and the forward of the door. Now, based on these
directions, the dot product, it tells us how much
these two vectors, these two arrows are pointing
in the same direction. If the dot product is a
high positive number, they're pointing in
a similar direction. If it's a negative number, they're pointing
opposite direction. And if it's zero,
they're pointing at the right angle
to each other. Basically, what it does is it calculates the cosine of
the angle between them. That's what dot product does, and it gives us a float as a
return negative or positive. And this is what we'll
be using to check if it's greater or equal to zero. And if it's greater
or equal to zero, we're going to create
a new variable. Going to call this open angle. We're going to change
it to a float. Going to bring a
setter over here. And again, we're going to do
a select node, select float. Now, you see, if
I drag the cable, select, I get this
one, select float and I get this one select. This one has the white card, while the other one has
a bullion by default. So I'm going to
connect this here. I'm going to connect
the result of our greater error equal to
zero from our dot product. And this would be, I think A would be
-90 and B would be 90 forward of the
door is positive, so it opens opposite. Yeah, I think that is it. Now, where we're going to connect this
calculate direction. If we connect it
to the beginning over here, we're not
going to do that. Going to be calculating
direction every time. So when I go opposite
the door to close it, it will bug out. I will change the direction. But if I connect it only
when the door is closed, let's connect it to play
from start and of course, bring the angle over here. Now, this way, it's only calculating when
the door is closed, and when it's going
from open to close, it's going to use the same angle that it calculated before. Now, let's go test it. We could be bringing the
player start with us. Okay, it opens this
way, closes correctly. It opens this way,
it closes correctly. So now we have a door
that opens and closes. Okay, I pass through
it game physics. Now, we have a door
that opens and closes, like where the player
is looking at. Okay, I think this
is it for this one. We're going to continue
the next double door. It's going to be the same but
double on the next lesson. Goodbye for now.
16. Creating and Synchronizing Double Doors with Blueprints: Hello, and welcome back to Unreal Engine five
Blueprint Mastery, Door Systems, and
Interactive portals. Previously, we finished
with our double way door, basically, our opposite
from player opening door. What we did basically
was we created a calculated direction
function that based on the actor location
and the player location, we got a unit direction. We calculated the dot product with our actor forward vector, and we compared if
it's greater or equal to zero to calculate
the new angle. Then we added this new angle to our larp in our
timeline as the target. Now, let's do the same
four at double door. Let's make the
level four visible. And let's bring actually, I can bring this one. Yeah, I can bring this one.
Let's bring it over here. Let's move the light
this way this time. And also the text. Let's rename the text. Let's select the blueprint.
Can't see anything. I didn't select the blueprint.
I selected the root. So this is a double law. No. Let's move it a little bit. We have to do the
enter thing also. We a variable. Oh,
I hid from me. So I think this is fine. And let's create our new
door blueprint doors, and we will duplicate the
opposite from player. Now, let's call this BPW door. And let's open it,
compile and save. So what we have to do in
here is pretty simple. We're going to duplicate
this mesh over here. I'm going to click
and duplicate or I could copy paste,
and that would be it. And then what we're going to do is get this mesh over here. We're going to need some room. So I'm going to move
this over here. Gonna duplicate this relative
set relative rotation, and the larp and we're going
to connect it over here. And we need the Alpha. We need to connect the target, which is the new mesh. And what we need to do also
is multiply this by minus one because we're going
to negate the rotation. So We also need to fix the
static messages over here, and it's time to
select the new door. So I'm going to
compile and save. I'm going to go back to the map. I'm going to go to
our Tuggle door over here. Going to select
the first part. I'm going to find it in the condat browser through this static mesh
option over here, pressing this button,
and there it is. I'm going to go back
to our blueprint, select the first door and use selected asset
from content Browser. Now we're going to do the
same on the next one. And select the next
store and import this. Now, from what I
see, there are kind of set opposite here. So this would be this one
and this would be this one. I think they're nicely spaced. Now let's move them to the
center of the blueprint. Yeah, that's fine.
Let's increase also the size of the collision. That's fine over there. And let's test it out because I think this might
need to get opposite. So let's go back to our
room and bring the new door in going to rotate it. There is a big possibility
that we will see some fun animation because
I swap the doors around. But if we don't
test, we don't know. So I'm going to bring the
players start over here so we don't run across
the whole level. What is the store?
Oh, I must have deleted this by
accident, bring it here. Alright. Anyway,
let's start here. Let's play. This is a
double door open, close. Yeah, it opens opposite. It opens towards me
instead of away from me. Yeah. So we could leave it as or we could
just swap these two. Pretty sure there was a way
to do it faster. Less clicks. But anyway, yep. And we have a double door. Now, it's fine that we
have a double door, but let's start adding
some sounds to our doors. Let's add an opening
and closing sound. So from open, we want
to play sound to D. This is a node that plays a sound that
we can define the sound, but we cannot manipulate
it afterwards. It doesn't have an output
to save the sound. So it's just has very
few settings over here. We're going to use
the pitch multiplier, and for the sound, we're
going to find the door open. Door open to, this one. So now, what we're going
to do with the pitch, we're going to do a
random float in range to make the pitch of
opening a little bit higher, normal to higher. And the higher would be
one point let's say 15. And we're going to
duplicate this code. If I put it after
calculation or before, really doesn't matter, but I'm going to
put it afterwards. Let's make some room here. And instead of
multiplying the pitch with random floats
of one to 1.5, we're going to do a lower. So 0.8 to, let's say, 0.99, which would make
it sound like heavier, like a lower pitch, basically. So let's test this out. Yep. We have a
sound in our door. Bread. I think this
is it for this one, on the next one, we're
going to start with our shortcut door.
Goodbye for now.
17. Programming a Shortcut Door for Faster Access: Hello, and welcome back
to Unreal Engine five, Blueprint Mastery door Systems
and Interactive portals. So last time we finished
with our double door. Now, let's open the next eye. Here we are on our
shortcut door, which will be a door that from
one side, it doesn't open. It says locked. And
when you go from the other side, you can unlock. To do this, we need to
do a very small prework. We need to go back to our
enumeration I Dor state, and we need to add
an enumeraator, and let's call it
locked. Gonna save. But as it won't really change anything in
the previous doors, like having locked here doesn't do anything because this
door cannot be locked. But even on Update widget, it doesn't type non here. I was expecting to say
no something like this, but it seems it's
keeping it empty. So it didn't really affect. But maybe in other systems, adding to enumerators
after you have used them, it's not recommended. Now, we added the locked
category into an enumerator. Let's go to the door folder, and let's duplicate the
opposite from player again. Let's call this one BP short
cut door. Let's open it. Again, we need to change a
few things, but not a lot. So the first thing we will do is separate the animation and sound part to an event on its
own, so we can call it. Just want to put this up here. And I'm going to
create a custom event and call it door animation. And connect it to the switch. We want also to change the
default door state to locked. Compile and save. And now we need to create a mechanism to check if the door is locked. And this is pretty simple. We're going to bring
our enumeration. We're going to do an equal num, not equal operator because
we turn it to a byte, and we want it to
be an equal num, so we can choose from
the enumerators. So I'm going to choose locked. I'm going to put a branch
again with B and click. And when it is pressed, I'm going to check
if it's locked. We need some room
over here. All right. Then if it's not locked, we're just going
to animate door. Door animation. We're gonna
play the door animation. But if it is locked, we need to create a
mechanic or the lock rules. So we're going to create
a customer event. Call it short cut
dog lock mechanic. Already. And we need
to call it over here. So shortcut, lock mechanic. Now, whenever we're pressing E, we are checking if it's locked, if it's locked, the
mechanic is playing. Let's check if the player
is on the front side. And what we can use is basically
the calculate direction. We just need basically the
ankle that is calculated. But I want to demonstrate
something else. I want to copy this
code over here, which tells us that if it's
above or equal to zero, it's in front, if it's less, it's on the back side. And what I'm going to do is
create another function. And I'm going to
call this function is front side, question mark. And I'm going to make
this function pure, and pure functions
always need an output. And I'm going to rename
this output to front side. I'm going to paste the
code that we copied. And connect this operator
this result over here, and we have this function. Now, let's go call
this function. I'm going to go to our
shorter door mechanic and bring this front side. As you can see, it's really different compared to
the other functions. Let's see the
calculate direction. It has an execution input
and execution output. This one is just green. It's just like the get
player controller. It's like component has
tag. Looks like this. This is because pure functions only execute some operations without setting something inside setting any variable or
anything inside here. As you can see, it's just pure mathematical
expression function, and it has an output
of a boolean. We don't set anything. We could be setting
local variables because functions have these
local variables over here that exist only in
the function while it runs and then they disappear almost but every time
the function runs, creates these new variables, and every time it uses them, it releases them afterwards, which is very optimal. So pure functions
should not have things that are being set unless
they're local variables. This is the resume of it. And of course, they do
not require execution, and they have a result
of some action. So I'm going to
press a branch here, going to connect
this here, and we are asking if we
are in front side. Again, this could be done
if the angles are -90, we would have been
in the front side. So I just wanted to demonstrate
this pure function. And we can also put a not here and not
bullan and negative. So the true will mean unlock, and the false will
mean not unlock. If it's false, we are
in the front side. If it's true, we are
not in the front side. We are in the back side because
we put it this not here, which makes this
bullian opposite. If it's true, we want
to set the door state. And this would be closed because after we unlocked
the door stays closed. Then we can play a sound. Play sound I think it's
called Dog and Lock. Yep. And since this door
is supposed to be locked, let's go to the door and we have to demonstrate it
to the player somehow. Going to select a door, and I'm going to change the material to I think it's door one locked. Yep, here it is. Door
one locked, so it's red. And when we unlock it, it should change color. Going to go to even graph over here when we set it to close, we play the unlocked sound and we're going to get our door. We're going to set material. And then we're going
to select door one. And as you can see, there
is an element index. I DR had more materials, then I could select the
appropriate index to change. But we have only one material, so we just change
element index zero. The next thing that should
happen is to update the widget because it will go from
locked to open basically. And we have to set here also
that it's saying locked. When the door is locked,
the widget says locked. But what if I'm standing in
a site that I can unlock it? It should be saying unlock. So to do this, we're going to do a select. I'm going to do a select text. As you can see, we
already had this option, the one with a
Bleian if B, pick A, if A is true, and the
one that is select, which has the wild node. Make sure you use the
one with a boolean. I'm going to bring the
east front side again. I'm going to connect it here. And if it's front
side, let's say, seems locked from
the other side. And if we are on the other side, it should say unlocked. Now, let's compile and save. So which we update correctly. What is left to do is to do something when the
player tries to open it, presses E, the door is locked, and it's standing
from the wrong side. So what we're going to create
is a door rattle animation. But we're going to do
this in the next one. I think this is
enough for this one. I'm gonna see you then. Goodbye.
18. Adding Visual Effects to a Shortcut Door: Hello, and welcome back
to Unreal Engine five Blueprint Mastery Door Systems
and Interactive portals. Previously, we started
with our shortcut door. We added enumerator, a new enumeraator to our door
state, the locked state. We saw that it didn't change anything in our
code because it's not recommended to add
new enumerators after you have already used
it in a bunch of places, but it didn't matter for us because we have
a very small code, and we updated the
widget to say, not in the double door in
the new shortcut door. We updated to say, if it's in the front
side of the player, seems locked, if it's on
the backside, unlocked. And we created this es
front side pure function with the code that we used
in the calculate direction. We also separated the animation of the door from pressing E, which leads to checking
if the door is locked. If it's locked, it's playing
our Trcetlock mechanic. If it's not, it's
playing the animation. When we are on the
backside of the door, we are unlocking the
door and we are changing the material because we set the material to be
one with a red glow, but now it when we unlock it, it will be the normal one. But we left it off without
creating a rattle. So let's create the rattle. Let's make a new custom event. Let's call this custom
event door rattle. And here we will need
a timeline again. I'm just going to copy
this timeline over here, and I'm going to press
play from start. But I think we do have
a sound for a rattle, so I'm going to just
play sound with di first and then play
from start to timeline. And I think the sound
is called rattle. Yeah, door rattle cue. Here we are. Now, let's
figure something out. How long should the
door rattle for? I think 0.5 it's fine. Let's make it a little
bit more. Let's say 55. Not 0.55, not just 55. I would rattle for 55 seconds. Well, depends on the person
who's trying to open it. Let's say 0.55, and
let's set the value to zero because on the
beginning and the end, it should be on
the same position. Like the player is trying to
open it, but really can't. Now, how we are going
to create the raffle? Well, for me, the solution
right now it's pretty simple, but the rattle will
not be really perfect, but it's going to be a rattle. I'm just going to
persift and just click random points below one and above minus one and maybe move them
a little bit closer. Let's say he's pushing. And let's see, he
does a pull here, and then he does a big push. And it keeps pushing this way and then releases
and then drags again, and then pushes
again, one last time. I don't know,
something like this. You can play with it a lot. What we can do to
make it a little bit smoother could be used
the auto function, and as you can see,
it makes it smoother. But in my opinion, having harsh back
and forth might look better for someone
trying to open a door. I'm going to leave it
like that. If you want, you can select them all
and do the auto thing, selecting them and doing auto to interpolate
between the points. Now, what do we do on the
update with this Alpha? Well, of course,
we're going to larp. I'm going to larp. This
will be Alpha 0-1 0.5. That's a comma 1.5. Y zero to 1.5. So these are the degrees
of the rotation. I'm just going to copy
the rotation node also and this one, the door mesh, also,
the door reference. Now, I'm going to
connect this here. Now, because I used negative values over
here, minus from zero, this 1.5 will also
be counting as a negative minus point like an imaginary set point
on the negative value. So this will go back
and forth from this. And if it was more degrees, I think it would
look not this good, not that it will look
very good right now, but it's more normal to have
small degrees over here. Now, one last thing
before we go test, let's connect the door
rattle over here. Let's call it rattle and let's compile and
save, and let's go play. I haven't added the
door on the map. There should be
something missing. Let's add it on the map. Now,
this is the double door. This is the shortcut door. Where is the front
arrow over here. We could change the arrow color, so it doesn't match the gizmo, this gizmo over here or
make it a little bit bigger and thicker, but it's fine. To do that, you just go to the components of the blueprint, select the arrow,
go to its details. Now, for me, this setup was created
for something different. I'm just going to change
it to make gameplay wise. A shortcut door
makes more sense. I'm going to select all this. I go to push them over here. It's going to make
them a little bit taller and push them upwards. I'm going to delete
this. I'm going to bring this over here. Maybe over here. At this
you don't have to do. It's just for me, it makes more sense a shortcut to annoy the player
going around things. So having to do this distance compared to this
distance is greater. So the player thinks, Okay, maybe I should lock
the door like it's really worth unlocking the
door, going from here to here, instantly then going
all the way around. Anyway, development issues. Let's progress. Let's
bring the player here. Let's test the door.
Okay, it's rattling. Seems locked from
the other side. Yeah, I'm going this way. If we go all this way around,
can I jump from here? No. Okay, I unlock it. I'm never doing this way again. I'm just gonna go straight
to the next room. Actually, everything
is unlocked right now, so I cannot won the game. But anyway, I think this
is it for this one. We're going to continue
on the next with creating a switch and a door that
opens with that switch. Goodbye for now. See you then.
19. Building a Lever Blueprint to Unlock Doors: Welcome back to
Unreal Engine five, Blueprint Mastery, door Systems,
and interactive portals. Previously, we finished
with our shortcut door. We created a custom event,
then we played a sound, then we created a new timeline, and based on this timeline, we set the relative
rotation again. And we call this
event over here. Now, it's time to go a little bit deeper
into this project. We're going to open Level six, and it's time for our door that is communicating
with a switch, just some extra information
before we go on. Everything that we have
created are objects. And when we were creating
a new blueprint, we were selecting a class. This is the class BPW door. This is the class
BP one way door, et cetera, et cetera. The same goes for this too, not for the enumeration. The enumeration is
just a variable. It's an enumeration. So why am I talking
about classes? A smart definition would be
that they are objects with specific properties
and behavior that allows developers to
create multiple instances. That would meaning that we
can have two of this door. They have the same behavior, they have the same properties, and they're completely different
instances of this class. Saying all this, what
we have done up to now, for example, in the
beginning over here, we used the class references to do something in
the level blueprint. We used the door class over
here to rotate this actor. In other examples, we didn't really called any other actor. But again, one example would be the casting that we do for
the player in the collisions. Actually, we don't do casting. We did casting in
the beginning here. This again, requires the class. It asks for the class. Are you the BP third
person character class? If you are this class, I'm getting some
information out of you. What the next step needs, this door is something we
call a blueprint interface. I'm going to arrive
click and go to Blueprint and go to
Blueprint Interface. I'm going to call this BI Ds. Now, what is a
blueprint interface? Essentially, it's a way to run functions on different classes that can implement
their own code. Not exactly common, but I
can call them to any class that implements I
think it would be better to show it as an example. One more thing, it's one of the most optimal ways for
blueprint communication. Like a blueprint needs to communicate with
another blueprint and they don't know
each other exactly. They don't know which
class it's each other. Let's duplicate our locked
door, our shortcut door. I'm going to duplicate this, and I'm going to call
this switch door. So now, let's go back to
our VI doors and open it. And as I open it, you can see it looks
like a blueprint, but it has on the other side the M Blueprint tab and details. This is because we can only
see one function here, the one that it created us. If I add more functions, we can see another function. And the only graph
that exists in here is these
functions, basically. Which, as you can see, they
don't have an execution. The execution will be created in the blueprint that
will be hosting them. So I'm going to delete this one. I'm gonna name this unlock door. Now, what we can do in here
besides naming a function, we could put inputs
and outputs and say that this function
runs always like this. It has always this
inputs and the outputs. Let's save, compile, and let's go to our switch,
switch, this one. So how do implement the
interface over here? We're going to go to
our class settings. We're going to go to interfaces. We're going to press
AD and we're going to search for BI dots. Now I'm going to compile,
and as you can see, a new category appeared in the my Blueprint
top interfaces. And if I open this, we
can find the lock door. And if I double click it, we create an event for it. Now, if this had an output, it would make it a function and I would
enter the function. Now, what happens when
we unlock the door? Well, when you unlock the door, we do have that code
somewhere here. Yeah. We will not need
all this mechanics, so I'm going to just delete
this part, the shortcut lock. We need the door rattle to take the position of the shortcut
door lock mechanic, which doesn't exist anymore. And we need this code. Let's cut it and
paste it over here. And the material
is the correcton. So coding wise, this door is ready
because when we press E, two things will happen
or the door will be unlocked and it
will open or close, or the door will be locked, and it would rattle. As you can see, we
are calling from nowhere this
unlocked door event. This is because we will call it through the other blueprint through the switch with
using the interface call. Now let's go create
that Blueprint switch. We're going to go
to Content Browser. We're going to go to
our Blueprint folder. We're going to right click
and create a new actor. I'm going to call it BP
switch. And let's open it. Let's begin with the components. Let's add, of course, a box or lesion. Let's add a text. Render actually, no. We do not need a tender. We need two static meshes. So I'm going to
select static mesh and I'm going to duplicate this. Now, for the first static mesh, let's compile, save,
go back to our map. Let's go to our props, and let's select
this one over here, which is the prop pot lever one. Let's bind it. All right, let's go back to the
switch and let's apply it. Now, for the second static mesh, we're going to do the
same los them up, select the second one, bind it, go back to the switch,
and add it over here. Actually, let's add an arrow
because yeah, I thought so. These are kind of pivoted wrong. So I'm going to rotate them 90 degrees and deliver it
is a lever, not a switch. Anyway. And also, I'm going to rotate this 90 degrees this way. So it looks up
because we're going to be animating it to go down. Let's compare and save. And now we do need some
functionality from the doors. So I'm going to go to any
door doesn't really matter. I'm going to go to
double door right now. I'm going to find begin play, and I'm going to copy this cap game mode and
making it a variable. And I'm going to go
box to the switch and paste it over here. And this variable, as you
can see, doesn't exist. When a variable doesn't
exist, it's gray. To make it exist, we can just create a variable over
here and name it or we can just right click on it
and create variablu as third person game
mode and it's done. The next thing I'm
going to do is unparent this arrow
from the static mesh. But that's not what
I wanted to say. What I wanted to say
was that I'm going to select this the static mesh one, which is the lever that
we're going to turn. And in the begin play, I'm going to bring
it over here and I'm going to get a
relative rotation. So I won't have to
calculate anything. I'm just going to store
this variable from movaiable and connect
it over here. So we're going to use
this variable now to rotate the switch, the liver. But before we start animating, let's finish with copying
the behavior we want. We also want the
collision behavior. So I'm going to get
all this over here, I'm going to control, and I'm going to paste
them over here. See, update Widget text.
We need these two. So I'm going to just create a
matching function, confirm. But this function
is kind of empty. But it doesn't matter because we need a different to do
different things this time. It's not a door. So what we will basically do is
create a variable, call it sold and bring
a branch over here. If we are solved, we're going to get our third
person game mode and go to remove widget door widget. Well, it's a liver
widget right now, but we named it door widget. Doesn't matter. And if it's not solved, then we're going to update text. And type use. So the player knows that
they can use the trigger. And this functionality
now is copied, and we also kind of copied the update widget text
at the same time. A quick reminder. What this does is that when we are
overlapping with the player, we are enabling input
in this blueprint. We are updating the widget and
we add it to the viewport, or we remove it and disable
input when we end overlap. I think this is
enough for this one. I'm going to see
you in the next. Goodbye.
20. Implementing Remote Door Unlocking with Blueprint Communication: Welcome back to
Unreal Engine five, Blueprint Mastery, Door systems
and interactive portals. Previously, we finished
with our switch Door. We created a blueprint interface that we explained is the way for blueprints to communicate
when they don't know who the other blueprint is, what kind of plus the
other blueprint is, and we implemented it into
our BP switch door by going to class settings
and implementing it to implemented interfaces. We pressed ad and
we implemented it. Then we got the
unlock Door event that we created in the
Blueprint interface, and we connected the chain of events that we want to happen
when the door is unlocked. Well, now it's not a door. Well, it is a door, actually. And then we went and
continue to change the pressing event to always
rattle if it's locked, and if it's not locked, we will unlock play
the unlock animation. The open animation. Then we went on and created
the BB switch that we copied the functionality of overlap
of the box collision. We added the box collision. We added two static
measures also and an arrow. And from what I can see, the arrow is wrongly rotated. I'm going to reset it to
default. Now it's correct. Let's continue with the
animation of the switch. So we're going to use
the E from keyboard. And the first thing
we're going to ask is is the switch
shot? Is the switch? Has the switch actually turned? If it hasn't, then we're
going to say that it has because this will pass only one time and it
will play the animation. Now, over here, we're
going to update widget. So it stops showing
the text use, and we're going to play sound. That we're gonna mess around
with the pitch again. We're going to do a
random load in range. And we're going to
go from 0.8 to one. And the sound would be, I think there's a switch. No, it's called lever
ever Q. Here we are. And now we need a timeline. So a timeline. We're going to enter
this timeline. We're going to create
a new flow truck. Let's sit click and
create two dots. The one will be times 0.15, and it will be one, and the other one would
be zero, zero. Now, I'm going to press these two buttons to
fit it horizontally, vertically, and I'm going
to press as key frame. Also, this time, I'm
going to select both, and I'm going to
use the auto curve. So the movement is a
little bit smoother. Now, when the timeline plays, first of all, we need
a little bit of room. We're going to need to change
the rotation of the lever. So we're going to get
our static mesh one. We're going to set
relative rotation. I'm going to connect this
here and I'm going to alert and I'm going to use the
relative rotation we have. I'm going to connect
the Alpha here. And for the B, what
I'm going to do is I'm going to make the rotator. I'm going to go to -90, and I'm going to
break the rotator. No axis, sorry. And I'm going to core roll
and pitch to stay the same, because we rotated it around
to look towards the arrow. So right now, it will keep the
same rotation that we had, and it will change the Z to -90. I'm also going to select the sorted spot so it
does a small movement. The next thing we're going to do is we're going to get again, the static mesh and we're
going to set material. So when we are finished and
it has ended the animation, it sows the props on material, which turns this
yellow to green. Now, the interesting part, how do we send the
message to the door? Well, as we said, we have this blueprint
interface that can send a message to any
actor that has it. It can send a message to
any actor, basically. But if the actor has the
blueprint interface, it will do something with it. If it doesn't, it
will do nothing. So I'm going to create a
new variable over here, and I'm going to have
it of the type actor. So this means it
can be any actor. Any actor that I can
select and populate this variable can become the object that I'm
sending the message to. I'm going to call
this door actor. And remember the
instance editable. I'm going to click on it and
expose on spawn, of course, I'm going to compile
and say, now, I'm going to bring the switch and the door into the level. Let's bring the switch here and let's bring the door also. That was not the best location. Let's put it over here. I think that's a nice
height, a nice place. You can place it
whatever you want. Now, I'm going to select the box collision and I'm going to bring it
a little bit forward. Make it a little bit bigger. So when the player
is inside here, they can interact
with the switch. Now, how do we get
that reference? Over here, we will
find not over here. Sorry, I have
selected blueprint. I had selected the box. So back to the blueprint. Over here on the details, we can find this door actor. I can use this pick
actor from SN. And I can select
any actor I want. Like right now, I
selected the wall. I can select this story, but it won't do anything. We will send this code
that we will implement. Basically, let's code do this. You just going to
get the actor and say unlock door message. And as you can see, it has this little
envelope over here. This means it sends
this message. Now, I could ask if this actor
does implement interface. I could select the
interface that I wanted, vidor and if it didn't
could put a branch here, and if it didn't
have the interface, then it wouldn't send
the message basically. I could also ask if it is
valid actor in case I forget, for example, to select an actor and this
variable is blank. I could have a
print string here, print string, switch
doesn't have an actor. It's not a switch. It's a liver. Maybe I should rename
this blubrid. Let's go. So I'm going to call
this liver door. I'm going to go here and
name these two liver. Okay. So this would make it
pretty sure that we have an actor and we have also the interface
implemented to that actor. We can have another
error message here that's saying actor
doesn't have interface. Doesn't implement interface. And now we can have
two error codes. I'm going to compile and save.
I'm going to go over here. I'm going to rotate this door to the collect rotation and place it is it okay? Maybe a bit higher,
and it's fine. Now, let's bring also the text that we
describe the doors. We haven't put one here also. So let's do that. Let's bring a new low text. Let's set the message, go this way and having some
arrow, some ask arrow. And let's rotate the text. Oops, not a blueprint,
the text itself. And bring it over here. I'll make it a
little bit smaller. And also bring the light. Alright, and now the collision Let's press play. All right, it works. Going this way. I'm locking the door,
coming this way. And the switch goes to our
wrong place, we will fix that, and the door doesn't open
because first of all, I didn't select the door
on the switch actor. So I'm going to select
this door this time, and let's go to the lever, not switch and change this. So it's not Ya that we want, and it must be pitch. So I'm going to connect
this here and s -90 here. Let's also bring this over here. So, wrong way again. Not the correct way.
So it's not 90. It's 180, and it's plus 180. Third time is the charm. Yay. Connect animation. Now, the door unlocked,
and we can move forward. So let's bring the
text here now that it works, let's bring a new one. Gonna bring a floating text. And I'm going to put for text. Use the lever to open
the door. All right. And in the shift enter
to go one line below. Gonna select the text.
Gonna move it over here. Now, this time,
I'm going to bring the light above the liver. So this place lights up. The player sees where
they have to go. A little bit of game design, even if it's not needed.
Always good to have it. And I'm going to
increase this here. Gonna bring it over here.
Yeah, here it's fine. This room is ready. Now, we're going to
continue on the next with using two levers to open a
door, but in a different way. Right now, the lever sends a message to the door
that says unlock. The next one will
be the opposite. The door will be asking the
two levers, Are you solved. I'm going to see you
then. Goodbye for now.
21. Creating Multi Button Puzzle Mechanics for Door Systems: Hello, and welcome back to Unreal Engine five
Blueprint Mastery, Door Systems and
Interactive portals. Previously, we finished with
our liver Door, basically. I think we called it lever in
the end. Yeah, liver door. It didn't update here because
it doesn't autodate names. So we can update it. Also, one thing
that I noticed is that in the update widget text, it shouldn't say seems unlocked. I'm going to delete
this, I'm just going to say locked. And
that could be it. So now we finished
with the liver door. What we did was we
added a few texts also, and we finished with the
animation part of the liver. And we added some error messages also just in case the
door actor is not set. Now, let's continue
to the next part. Let's make our Level
six, I think, seven, our level seven visible, and this is the turning
point afterwards, we're going down way. Let's begin with updating our blueprint
interface for dogs. We're going to add a new
function called SOD. This function, we're
going to use an output, and we're going to name it SOD. This we will use to our liver. So we're going to go
to our liver and go to class settings and add an
interface which is BI dots. Now, we're going to
go to interfaces. We're going to compile actually first interface name
collision blueprint because of the boolean solved. Let's call this boolean is sold. Yeah, you can't have the
same name variable twice, and if it's belonging
to the interface, it also belongs to the blueprint and this creates a problem. I have to compile this first, and now this one, and it's Uh, let's double click solved and bring the I solved
and connected here. So now, whenever solved is cold, we're going to return
our I solved variable. Where do we call this I solved? Let's go to our new door. So we're going to
duplicate the liver door. I'm going to call this
multi puzzle door, and we're going to open it. Not a lot of things
will change here. The only thing we will
change is that we will create a new function. Let's call this check
puzzle answers. And it will also have a boolean
output or puzzles solved. Okay. We will build next. Now what we're going to do is
use this event unlock Door, which because we copied, it became a normal event. Let's go to the interface. Let's call the interface one. This happened because we
duplicated the blueprint. So we're going to go to
our event unlock Door, and we're going to bring
the check puzzle answers. And if this returns true, we will unlock the door. If not, we will so
rattle over here. And instead of calling
this from the switches, we will be calling it when we press E and the door is locked. So when it's through, we will was called
unlock door event. Now, when I call it
inside the blueprint, Cedar it doesn't have
this envelope over here, but it has the target
at different color. This happens when you are
internally calling a blueprint. A blueprint interface function. So now, to continue with our function check puzzle
answers, first of all, we need to create a
reference to the puzzles as we did for the switch back here, we need to do for the
door and the puzzles. So how do we do this? We're going to create
a new variable of type actor object reference, and we're going to
name it puzzles. Now, why puzzles? Up to now, we've been
using single variables, which means they have a
single type container. And why say this word container? Because we have three more
different types of containers. If we select the variable
puzzles and go over here, we can see make this
variable container array, set or map, which is the other three different
type of containers. So one container
is a single one. The second one is array,
third one is set and map with specific rules on each one. But the basic functionality
remains the same, keeping a list of elements, a list of variables, basically. We're going to be using array, which holds one
type of variable. Map can hold two
types of variable, and set is every variable basically in the list
has to be uniquely. Now, we'll select the first
type of list, the array one, and one more important thing
about these lists is to think that every variable they hold in the list has
a specific order. For example, if I compile this, we can see puzzles
and array elements. And if I click one
array element, I have one array element here. Second one, third one, and these ones are
in a specific order. This is zero, this
is one, this is two. The same follows for the rest of the list
also that they keep a specific order and always keep this order
unless we change it. Now, when I said that the set actors need to
have a unique element, it means that the first element has to be not the same
as the second one. For example, if
this was integers, it would have been one, two, three, it couldn't have
been one, one, one. Let's demonstrate
this for a second. Let's change the variable
type to integer. And let's compile, see
it resetd the elements. So I added zero. If
I try to add again, I cannot because
zero already exists. If I turn this to
one, then I can add. If I try to turn zero to
one, it won't let me. If I try to turn one to
zero, it won't let me. So I have to turn this to two, for example, and then
it added zero again. So when it goes on, it's very counterproductive to
fill sets manually. Anyway, let's go
back to our array, which can hold
multiple times one, for example, have to
compile to do this. Multiple times
zero, for example, and it should be of type
actor without type. Okay, so an array of actors. So we have this little
nifty list of actors, which is not populated. We will make it incense editable and we will
expose on spawn also, and we need to compile
and then go on our map, and let's bring our new actors. Let's bring two livers, one over here, and
one over here. And let's bring the new door
also multi puzzle door. I will replace
them better later. Going to fill the puzzle array. So I'm going to press this
button over here, one more, and I'm going to select
the first one to be this one and the second
one to be this one. Now, if order mattered, it would matter the
way we select them. But in our case, we will just be checking if both of
them are solved. Now, we didn't need
to actually build the actors right now because the code would be let's go
make the code, actually. Let's go to check puzzle Acers and now we will
bring our new puzzles array. Now, we will
discover a new node, which would be the
for each loop. Now, besides the four each loop, there is also a four loop and a four loop with break and a
four each loop with break. And of course, there is
a reverse for each op. Now, what is a loop? Because the most common word, as we can see here, is a loop. A loop lets you repeat actions multiple times as
fast as it can run. As we can see, it
has an execution in a body loop and a completed
node as the execution nodes. And all here are the same
with the exception of break. Break is that we can call somehow to stop
whatever this is doing. For example, in things we are searching for something
and we find it, we can stop when we found
it and complete the loop. And the other difference is that these two each and
for each loop with break, we have an array input, whereas these ones
we set manually to do something a
specific amount of times. For example, if we
wanted to happen twice, it could be a loop 0-1
because loops and arrays, that's also something
important and the other containers begin
with zero as the first index, the first number
of the elements. We will have element zero, and then we will have
element one and element two. So this is also important. Now, let's delete this and
let's make our for loop work. So what we're going to do is, and here comes the
message is solved. We're going to ask is solved. No, we called it solved. Yeah, solved message. Now, this returns us
it solved or not, the puzzle that we're asking. And also, just a reminder why we used an interface call because
this one is of type actor. So it means it can
become again everything. It can become one switch and
one lever and one switch. It can become one button
and one switch can become a door and a switch or anything.
It can become anything. Whereas if we have
the class type instead of actor over here, we had like P lever, P lever. If we had this one, we
could only this array would only contain liver
doors and we would be able to get information
directly for them. But this makes it
able to get any actor that implements this type
of blueprint interface. Now, let's complete
the logic on this. We're going to put a branch here because if we just connected, the return node over here, we would constantly for every body return if
it's solved or not. But this function is about to check all puzzles, not only one. So the return node should
happen in the end. Now what we will do is that the first time we find a
puzzle that is not solved, we're going to promote
this variable, but a local variable this time. So it only exists
in this function, and we're going to
disconnect it actually. If one of them is false, we're going to break
the four loop. Yeah, use the loop
each for loop with break or with break. Okay. With control, I'm just
reconnecting all the pins. Okay, so when we find one
puzzle that is not solved, we will turn this off and we
will break the four loop. So what we also need to do is give it a
default value of True. So if this never breaks, then this will return
this new variable. Actually, let's give
it a name also. Let's name it all solved. And this will complete it. Now, let's explain
it a little bit fast again from the
beginning what we are doing. We are going through
our puzzles. We have set a default
variable, local variable. This means that
whenever it runs, it begins as solved. Even if we turn it off the
next time this will run, it will begin as through
because it's a local variable. Now, we're going through our
puzzles with a for loop. We check if they are solved. If they are not solved, we turn this variable off and
we are breaking the loop, and we are outputting
the result. So let's go test this store. Let's set the switches. Place them in the wall.
Well not in the wall but. Is this just inside? No, it's opposite also. So we rotate it. And the door is also opposite. Yeah, I think it's fine.
Maybe a little bit. This way. Okay, I'm
gonna get the players start. I'm gonna move it here. No play. Gonna use
the one speech? Oh, let's rattle the door first. It's rattling. Second
switch, and it unlocked. Great. So we're done
with this door also. Supposedly, we can't close. Oh, maybe maybe this door
shouldn't open this way. Maybe and just Go to pen graph. Oh, it opens opposite
from the player. Okay. You know what? We're gonna leave it
as E. If you want, you can play with the angle. Actually, we can
just disconnect this and go towards 90, I think. Yeah, I'm not gonna
leave it as E. I can't I'm sorry. I
can't live with as. Doing this. Yes, it
works correctly. Because putting the
angle always 90 disables basically the
calculate direction. Anyway, we are done and we reached the time that we
will make the physics items. I'm going to send
you the next one.
22. Programming a Pressure Switch for Door Activation: Hello, and welcome back
to Unreal Engine five, Blueprint Mastery, door Systems
and Interactive portals. Previously, we finished
with our multiple puzzle, multi puzzle w. We
added two switches, and we added an interface, a new interface function to
them that we called SLP and we implemented that when SLT is called because it's a function
with a returning node, it's returning the ESL
status of the switch. Named also to E salt the
solved variable that we had because I named SL also the
variable of the interface, which led to an error because
we can't have two names, two variables with
the same name, a returning one and a
variable of the blueprint. Then we went on and modified a little
bit, the liver door. We actually in the end removed the open angle and set
90 to the timeline, and this way we bypassed
the calculated ection and it opens towards us and
not towards the stairs. We also changed the
event unlock door to check for puzzle answers. Now, we also called
the unlocked door from our interaction because the switches are
not calling the door. Seeing this, we also created this check puzzles
answer function that needed the puzzles
array of actors, which was the new variable, the new container variable
that we encountered. Which is basically a
list in a certain order. To populate this, we added
the actor in the map, and then from the
actor default details that we expose this variable, we added two with a
plus symbol over here, array elements, and we chose them to be these two switches. So when we are checking
if the puzzle is solved, we are using a four age
loop a new node that we used to go through the list of puzzles and asking
if they're solved. If they're not solved, we have a local variable, which means that when
the function runs, always resets to
default variable, and the default was true. So when it runs from solved
and it's not solved, it returns to falls, and
it breaks the forage loop. Now, it's time to
do the switches. So let's open our new map. Level eight. Oh, we haven't put
the text here, and the collisions are a bit up. Let's fix the
collision first. Let's select the switches and
move the box a little bit outside to make it easier
to collide with the player. We want to do the same
for the other box. Yeah, that's fine, I think. And also, let's increase the box of the door a little bit
because when the door is open, I should be able to
close it only a bit further and maybe make it
taller because of the stairs. Yeah, I think that's fine. All
right, let's bring a text. Let's actually duplicate this. It's fine if we do.
Let's put the text. If I double click on the text, or if I manage to select a text while having selected
the blueprint, I can just click on the text. I instantly focus on the text, and I'll bring it over here. And let's change the text
to use the use both. Both. Levers to unlock the door. Alright, let's also bring the
light. Where is the light. And the collision, let's turn
it a little bit like this. Maybe somewhere here. Yeah, I think that's fine. So when we enter, uh Yeah. I think if I was coming
from K, it would be fine. I think I just go inside of it. Yeah. Use both rivers
to unlock the door. Oh, there are two rivers
over here. Great. Now, new room, let's start
with the physics items. Let's make these things move
because this is funnier. So let's select them all. And it's pretty simple. We can just go to details. Gonna search for physics. Simulate physics, and we're going to leave the settings as they are because they're
perfect for what we want to do. So now if I go to them, maybe we should move
the head start. So now I can push
these boxes around. Great, but we should do the
small puzzle with the boxes. This is not enough. So what we're going to do is we're going to
create a switch, first of all, using
this mesh over here. So let me go back to the room. Let's go to content, and
let's go to Blueprints, right click New Blueprint
class type actor. And let's call this BP switch. Yeah, because this
is the switch. The other one was the lever. One is confusing these two. Now, let's open the BP switch, and let's add to Srtic mesh. It's going to duplicate
this. Select the first one. Going to anchor it over here. Let's go to the switches. Details. Physics. We're going to search for this static mesh. And we're going to let's implement it to
number one, actually. So this is this one and the one without number
would be the base. Search it again back
here and implement. All right. Now, the next
thing we will need is, of course, a collision hub. So collision box. And we're going to scale
it to be the size of the internal brick and push
it upwards to the point that it doesn't touch the box
because we don't want it to be triggered from
the static mesh itself. So we're also going to
make it thin like this. Maybe a little bit thinner. I'm going to disable. I can
actually do it from here. I'm going to do it 2.2. No, 0.16. Yeah, I
think that's fine. So something has to
come this close into contact to be considered
that it's on the switch. This is what we
will use this for. This is what we'll
say to this blueprint that the switch needs to go down. There is
something on you. So I think this size, this close to the box is fine. Okay, let's go to event graph, and we're going to need
the two overlap events begin and end overlap
from this box. So gonna get the begin overlap, and we're going to
get the end overlap. Now, this time we
won't do the casting or the other component has tag because we will
have two switches. We will have let's
go back to our room. Let's bring them
to the game level. So one switch will be,
for example, here, and let's say the other
switch will be maybe here. Yeah, let's put it here. So the one, we will have
to put a box on it, and the other one, we will
have to stand on ourselves, and then the door will go up. And when we move
out of the trigger, the door will come down. So we will have a
certain amount of time to go past this door. So if we start here, maybe there is more
chance to fail. But so basically we are making a small gameplay
mechanic here at the same time. So since there is a chance for the actor to be
on top of the switch, and a box at the same time
would be on top of the switch, we can use something
different this time. Let's go back to the switch, and let's get our box and
get overlapping actors, which gives us a list with everything that
overlaps the box, everything that overlaps
this collision over here. There is a class
filter if we needed to just search for a specific type, and this would return only a
list of that specific class. But for us, we care for
kind of everything. So what we will do is we
will use, as you can see, this icon over here
also is an array icon. This indicates us if we go back to the multi
puzzle door, you see, we have this icon over here, whereas here, we have it
with middle empty box. Basically, this empty box is
just a connection symbol. So if I read out,
for example, here, we can see the box got filled, but this is empty. It's just to say this isn't
connected to something. What we're going to do
is we're going to get the length of this array. And if it's equal to zero, then we do something
or we don't do something untrue or false. Basically, on overlap,
if it's not zero, we will create a timeline that we will play the animation. On end overlap, if it is zero, we will reverse the animation. But I think this is a good
stopping point for this one. I'm going to seeing
you the next. Goodbye.
23. Designing a Gate Door with Blueprint Systems: Hello, and welcome back to Unrealizing five Bluepin
Mastery Door Systems and Interactive portals. Previously, we finished
with the collisions of the multi puzzle door. The store that takes
these two puzzles, these two switches
to get it open. Now, we also added this text, this flow text blueprint that
we will light this text, and we went on and
enabled the physics on these boxes and created
the switch blueprint, which we added two
static measures to represent the bottom part and the top part of the switch and a box collision that we made
it three D parallelogram shape above the bottom,
a very thin one. Then we went on and
used the begin overlap and end overlap events
of that box collision. We created a branch
that the question, the condition this time is we are getting all
overlapped actors. And if this is length
more than one, then we ask if this is
basically true or false, more than zero or less than
zero, because it's equal. So if it was less, it's
impossible to be less, but if it was less, it would still go
to true than false. If we wanted to be
zero and above, it could be below,
equal to zero. That would be covering
the under zero. So let's add the timeline. Go to draw cable and
press Add timeline. Now, let's enter the timeline, and let's create a flow truck. Let's create two points. The first one, of
course, zero, zero, and the second one, let's
say, 0.5, two, one. I'm going to fit it with
these two buttons and use La key frame and
compile and save. Now, what will we do in update? Well, similar to
the change rotation that we used this time,
set relative rotation. This time we will use
set relative location. We're going to get the
first static mesh. We're going to set
relative location. We're going to
connect it to update. And we're going to split this vector because we
only want to change Zen. So for this, we're going to larp and we're going to
connect the Alpha here. Now for the value, we need from 02 maybe minus ten. Yeah, minus ten is fine. So go to undo. So minus ten. And this would trigger
it to go down. If we go to test it,
let's press play. And I stepped on
it, it went down. Now, it doesn't go up,
maybe we should put this a little bit more
into the ground because the character doesn't seem
to be able to easy to go up. So I'm guessing that this
box will also be hard. Yeah. So we're
going to grab this. We're going to push it down here and we're going
to do the same hoops. Same for this one. We're just
going to push it like this. Yep. All right. Now, let's go back
to the blueprint and let's create the
opposite direction. So we're going to use
the same question. We're going to copy it and
paste it and put it over here, and then we're going
to use the reverse. So we're going to
compile and save, and let's test it out. Let's compile and
let's press play. And goes down, it comes up. It goes down, it
comes up. Great. Now, as we have a bullion in the liver that
it says is solved, the same we need
for this switch. So let's create this
variable is solved, and let's bring it over here. Now, when the timeline
finishes and it goes forward, so switch on timeline direction,
we're going to set it. It's solved two through. And actually, we can also
change the material. We're gonna get the
static mesh one, which is our prop pack, the trigger box, this
one, the orange one. And we're gonna set material We don't
need two references, set material, and
this is, I think, pressure plate
pressure plate on. And we're going to
copy this also and set it off when we step
off the trigger box. Well, when the trigger box
has nothing standing on it, we also need to sell is
solved off. When we step off. We won't wait until the
whole timeline has finished. Well, this is actually
more of a gameplay design. Like if you wait
for the timeline to finish and then turn it off, or if you turn it off
directly when you step off, it is a developer's choice. It's not a mandatory thing. So we are doing it when we instantly stepping off instead of waiting for the
button to go up. And this should be
pressure plate plan, not on. All right. So let's go test this.
Turns green, turns normal. Turns green, turns normal. You see if I step too fast, then it turns faster because it continues to
play from where it was. Now, let's bring a box on a button and see
that it doesn't work. The reason it doesn't
work is that by default, these boxes in their
collision settings, have the generate overlap
events turned off. If I turn this on, it means that this box will not
ignore this collision. But we don't want this
to happen in every box. We just want this box, the one with the colors
and it says push. So the other ones do nothing, and this one we do something. So let's turn this on
generate overlap events. Let's compile, let's press play, and let's push this
box, and it worked. And if I sit here,
this works also. And the next step would be to make everything work together
and create the door. Now, let's push this one on just to demonstrate that
it's not working. Yes, it's not working, but if I step, it's working. So let's continue with duplicating
our multi puzzle door. So let's go to our
multi puzzle door, as it somehow to find it. I can press over
here. No, actually, I need it in the
content browser. And the way I'm going manually. Oh, yeah, this button over here. If I press this button,
it leads me to it. So duplicating this,
and let's call this BP multi switch
door. Let's open it. And what we will not need, we will not need an input. This door opens on its own, and we will not need a rattle. This will not be needed. We will need the door unlocked. And we do not need
the beginning, we actually do we can make
a widget for this store, like do something
to open this door. So basically, let's
go to update Widget. This store will have two states. It will have closed. Let's set close by default, and then opening, basic
closing and opening. But let's set close and
open. Doesn't really matter. So when it's closed,
we will say, but both switches
need to be pressed. Let's capitalize the first ones. Not pressed, actually, need
to be on every other case, we don't need to say anything. So compiling save, we do have error because we're calling rattle when there is no rattle. And of course, we do not
need the front side. We do not need to
calculate directions. Doesn't matter that it's used. We're going to delete
it where it's used. So we need when it's
open to be opening, when it's close to when
it's close to be opening, when it's open to be closing. And we don't need to actually
be from start and end. We need it to continue
from where it was. So this will go to play, and this will go to reverse
because this door will be going down when the
two switches are off, and when they're both
on, it will be going up. So we do want it, though, to play a sound
when it's doing this. So we're going to play sound. And play sound. The first one would
be door lift, and the other one will
also be door lift. But we want the
one that is going down to be a little
bit more deeper sound, so it will go to 0.8 inch. So it sounds deeper. And this will believe uses, and that would be
it from the sounds. Now, the next thing we need to do is actually
change this model. So we're going to go and
find our model over here, which is not pretty
sure which here it is. This is supposed
to be prop pack. I'll find it from here. Yep, we found it. And let's
go here and put it in. It's pivoted wrongly,
but it doesn't matter. We will just I don't
like the side. Oh, it has the wrong material. Yeah, because I
changed the door, but the material
was kept the same. Now, I can press this over
here to return it to default. And this is something
that happened. If you change the mesh,
the material is kept the same from the previous mesh you had unless you have
a default material, which changes it to the default
material of the new mesh. But if you have overridden the material in
the previous mesh, it will keep the
overridden material. Anyway, let's
continue, Let's bring the door a little bit
more to the middle. I think that's about fine. Gonna press a bit up. Okay, compile and save. And let's bring it
in the map also. Go to blueprints, go to doors, and multi switch door. We could have named
it something else. Is the front side is
the front side, right? Cook could be a
little bit bigger. We could make it a little bit. It stretches it a
little bit, but yeah, I'll make it I like
it a little bit bigger. It's too big now. Never, as you can see, never do that on the blueprint because when you're doing
it on the whole actor, you are also making smaller
than the collisions. So even if it looks nice, it might not work correctly. So if I wanted to do this, I had to go to the prop
itself and then do it. Yeah, I think that's fine. Making it a little bit larger
and a little bit smaller. I can do that inside
the looping also. I can undo all these changes
and just do it here. Alright. Let's make the collision box
a little bit bigger also. All right. So that's to be
a little bit higher, too. He. Now, this door will be
only unlocking this way. So if we started this way, we would have been blocked. It doesn't matter. Now, I
think this is it for this one. On the next one,
we're going to do the coding to make the two
switches, open the door. Goodbye.
24. Implementing Cheats for Gate Switch Door Mechanics: Hello, and welcome back to Unreal Engine five
Blueprint Mastery, Door Systems, and
Interactive portals. Previously, we
almost finished with the visuals of our sliding door, sliding updoor with the
multi switch mechanic. Now, what we did was we finished with the timeline,
playing from the beginning, playing or reversing with the overlap begin
and end events. And when it's finished, we said that it's solved. But when we end overlap, we said that it's not
solved instantly. We are changing
also the material and we are using the
set relative location. We also duplicated
our multi puzzle door and deleted some things, and we kept the door
animation, the switch. We added a play sound, and we connected
it to play and to reverse instead of play from
start and reverse from end. We also deleted the E input. What we need to delete
is the add Door widget. Actually, we don't
need to delete the Addo widget completely. Let me undo. Okay, we need to add it to closed because only
when the door is closed, we want it to show the widget. Now, thinking about this, there must be a bug everywhere. So let's go play test
it a little bit. I think there is a
bug that when we are closing the
door and step away, I will show the widget.
So I'm closing it. Yeah. Because we are
adding the widget, irrelevant to if we are
inside the collision or not. So to fix this, we need to change a few things. But we're going to
do this later on. Now let's continue
with the door. What we're going to be fixing is add some rules over here, and in every blueprint, we will just send
reference to the actor. Now let's continue with fixing the multi switch
door with completing it. What we need to do is go
to our unlocked Door. First of all, let's make it interface because
we duplicate it. So I'm going to double
click on Unlock Door, create the interface event. Gonna bring it here
and delete this one. Now, what we need to check is update Widget text and change it to remove Widget. So I'm going to copy
the code from here. I'm going to paste it over here. So when we are
unlocking the door, the widget always gets removed, even if it's on the view. And, of course, call door animation because
when we are unlocking, we need to call that animation. The next thing we will
need is a lock door, the same but for locking. So we're going to go
back to our BI doors, and we're going to
create a new event, new function, and we're going
to call this lock door. And we're going to
go to our door, and we're going to call
the interface event. And what we need from here, this actually needs
to be closed, yeah. So when this is closed and it runs the door animation,
it will run open. So we need the opposite of this. We don't need the
sound here because we already playing
a sound over here. We do not need the
material change also. So there was a few things
that we needed to remove, but we do need everything else. Well, actually, we don't
need the remove widget also. So this needs to
be turned to open, and then we are running the dog animation, which
when it will be done, it will be open, so it will play the closed sound and will
reverse from wherever it is. Now, we do need to
call these events. We actually didn't need this, so I'm dealinging what
do we call these events? Well, pretty simple on the
switch that we created. When we finish
pressing the button, we call, well, we do need
a reference to the door, so we're going to
create a variable. We're going to make
it of type actor and we can make it of type actor because we have the
blueprint interface. Let's call this door and make it instance
editable and expose on spawn so we can edit it from the editor and also when spawning it from
another blueprint. I'm going to select this
and select the door and select this and this and
select the door also. So now we have a
reference to our door. Where is the switch over here. And we're going to get
this door reference and unlocked door message. Send the unlocked door
message over here. And then we need to send
the log message over here. So we are ending overlap. We are sending that
this is unsolved, we are setting unsolved, and we are sending lock Door. And when we are
beginning overlap, when the timeline has finished, we are sending unlock Door. Now, theoretically, this should
work. Let's check it out. Need to push this box first. All right. I played the sound, it shouldn't have
played the sound. So a nice situation
to use the debugger. Let's see what's going on. So I'm going to find the
door, multi door switch. I'm going to eject. I'm going
to bring this over here. I'm gonna undock
it, fix the zoom. Make this a little bit smaller. Make this a little bit
bigger, a little bit more. Here it is. Select the
multi switch door of it. Like this again.
Back to tutorial. Let's see what it runs. A eight to repossess. So this was okay, first of all, it's
doing rotation, which it shouldn't be. But why is it running
going to inject again. So, the problem is over here, it passes that the
puzzle is stored. Well, right now, it should
be solved because we have this But here, it passes that it's solved, which is not true. We don't have an array puzzle, so this is why it's happening. It says it's true
because there is no selected puzzle pieces. That's an interesting bag. So maybe a code there
that if it's zero, it shouldn't open
would be necessary. Let's move this to the switch. Alright, I didn't open. I move here, it still doesn't. This triggered the
pulse, so it's fine. Okay, first of all, let's
change the rotation thing. It shouldn't rotate. Also, I forgot about this. We shouldn't be setting
relative rotation and doing it in the
wrong blueprint. Going to go back
to the switch too. So deleting the relative
location, keeping the lark, deleting the open angle,
set relative location. Connected here, connected here, split the new location,
connected here. So the doors original
location is by. This is a little bit complex, so we should save
it on begin play, get relative location promo to variable, connect
it over here. Begin saves the variable. And we're going to
bring this variable. We're going to split break. We're going to connect X here. We're going to connect Y here because we want them
to stay the same. And from Z, we want
this to go two -13. Let's say, 260
Rackley seems okay. We will see in
wordspace later to 60. So now the door shouldn't
um at least trotate. It doesn't go up because it
needs this to be solved. But I think there was a bug
wasn't going up anyway. Okay, a new parenthesis. Let's create some code to bring this tube into this
position whenever we want. We're going to copy this
location of the tube. We're going to go to the
level blueprint that we created this code over
here and we're going to choose keyboard one. And we're going to
click and create a reference to this box
because I have it selected. And I'm going to set location. I need to paste this here. Actually, I'm going
to promote this to a variable and compile
and paste it over here. Now, you see, I could paste this whole vector because
this is a vector, basically. I can copy it from here and just paste it in a new variable. I couldn't paste it here, there is no way to
paste it over here. I can paste it the X, but it paste
everything in one box. So just connecting this, let's call this box location. And let's connect this here. So basically, right now, if I move this box, press one, it goes back up here. Great. Now, we could create some codes to paste it
exactly where we want it. So let's do that for number two. How to do this? I'm
going to place it there. I'm going to eject.
Gonna select it. I'm going to copy
again this location because if I move this box now, it still changes location. It does update live. So I'm going to stop
playing and go to Tutorial Map and
press keyboard two. And I'm going to create a
new variable type vector. Going to compile,
paste the new value, call it box, trigger, location, and I'm just going
to duplicate this code. And it's a nice opportunity
to show you another thing. When I have a vector like this, I can right click on
the vector and say, replace variable with
box trigger location. So if I had other vectors here, too, let's add more, two more. I could replace them with them. So if it's the
same type variable and you are in the
same blueprint, you can have this
option over here. So trigger location, spine need to connect the target because who
am I setting location? Let's play, and I'm
awesome at pushing boxes. All right. I think this
is enough for this one. We're going to debug it on the next lesson. I'm
going to see you then. Goodbye.
25. Debugging and Optimizing the Gate Switch Door System: Hello, and welcome back
to Unreal Engine five, Blueprint Mastery Door Systems
and Interactive portals. Previously, we
almost finished with our multi switch
door that slides up. Now, I kind of finger
what happened wrong. In the switches, we didn't
I didn't put the interface, so we need to put the
I VIDor interface. And on the function solved, we need to connect that is solved and it seems by mistake, when I clicked on the door
and I undo some actions, I remove the puzzle pieces, so I'm going to add them again. The first one is this
switch over here, and the second one is
the switch over here. Make sure you have
selected the switches and not the ground or a wall. So, theoretically,
now it should work. So if I press two,
the teleps there, and if I stand here, it
goes up very, very fast. So it goes down very, very fast. So this doesn't give
me enough time to run. And the widget is a little
bit as you can see, it's the back that it
just shows it even if I'm not overlapping
that we will fix later. Now, it doesn't
also say anything while the door is closed. So let's fix this box. Let's start with the widget that is showing E when I'm
overlapping this. And actually, let's make it
a little bit bigger also. So since this story
is only this way, I'm just going to
bring it over here and make it a
little bit smaller. And that's fine. Now, why does the
widget say nothing? Basically, because the default
is closed and unclosed, we say nothing, and I upset
on opening to say something. So this is a mistake. Now, it does say E, but we won't bother
with fixing the E. Both switches need to be on. So press two, this now
it should just say E. It No, it shouldn't
because it's closed. So what we're going
to do is make the timeline a little bit bigger. Is this the correct one? Now, this is not
the correct one. Multi switch door. Here it is. Let's go to the timeline. Set these two. Let's
give it some time. Let's say 5 seconds. But this would mean 5 seconds to go up and 5
seconds to go down. So this would be a slow door. So I'm going to press two. This, it's a slow door, slow going up and
slowly going down. Alright, now, let's fix the
bag that when I step up, it plays the sound. What we're going to do fix this, and we're going to use
a new node for this. We're going to go to our door, multi switch door over here. On close. No, on open. So basically, when we are closing the door, we're going to get
the timeline itself, which we haven't done before. Timeline is also a variable. We can find it in
the component stub. We can find it as
a variable itself. So this is a reference
to the timeline. And if we give a name to our timeline because
this is also available, we can press F two
on the timeline and say animation timeline. As you can see, it
changes also here. So if we had a
bunch of timelines, we could find them over here. So I'm going to get this
as a getter variable, and I'm going to get
layback position. So what does get
Clayback position do? Basically, it gets
the current time of the timeline
when it's playing, it has a current time, and that returns it. So what we're going to do is
we're going to use a branch. We're going to do
an equal note here. If this is zero, then do not play. Do not play the
sound, basically. Let's connect this here and false will go here because
it's already playing. When it's not playing,
we're going to reverse. There's no reason There is a
reason to reverse because we are setting the state to close because we
are setting open here. So let's test it. No sound. So it's working. There is sound. There is sound. If I put this back on,
there is no sound. So it works. Nice. Let's bring the text box. Let's bring a new one because
these are over modified. Let's start with
the floating text where we should put this
should put it here. What will it say? First of all, let's say that it will say
this is a sliding door. I haven't selected this. This is a sliding door. All right. Let's
put it over there. Et's also make it
one shift enter. Maybe I'll make it a
little bit smaller too. Yeah, this is fine. Let's bring the light also. I think that's fine. And the collision. When should the player collide with this? Hmm. Whatever you want. I'll just do
something like this. And I think it's fine.
Maybe maybe more like this. Yeah, that's fine.
So let's pone. This is a sliding go. We see this when we are
entering from here, we see this, it's
a sliding door, and we figure out the puzzle. Great. Now, Now, to
sum up what we did, we created a switch Blueprint, that we added the
interface of BI doors. In the event graph, we created an animation
with a timeline, and we trigger the events on begin overlap and end overlap
that based on the rules, they send a message
to the door that I am solved and try
to unlock the door or I am not solved
and lock the door. Then we created the
blueprint of the door, which is the multi switch door. And based on the message
that it's sending, it's either unlocking the door, which is trying to open it with playing the
door animation, or if it's getting locked, it reverses the animation
and it's locking the door. Now, let's continue
to the next room. We're going to open
the little eye. So there is probably
something wrong here. So we're going to
open both eyes. Level nine and level ten.
Basically, it's fine. Level nine level ten,
doesn't really matter. So here, what are
we going to create? We're going to create kind
of the same mechanism, but with two doors that they
will go to go up and down, and we would have three buttons that they have to be
pressed in order. Besides that, we will have also a separate blueprint that decides if that puzzle
is solved or not. And the door will be
communicating with that manager, and the manager will be
communicating with the door. So the buttons themselves will have no interaction
with the door itself. It is another example on how to do a mechanism
that opens a door. But I think before we go on, we should fix this bug that
enables after the door is closing and fix all the
rest because doing it towards the end will be more work to do in
every blueprint. So over here, the
blueprint appears. The widget appears. And we're going to do this in
the next lesson. Goodbye for now. See you then.
26. Groundwork for a Button Puzzle Sliding Door: Welcome back to
Unreal Engine five, Blueprint Mastery, door Systems
and interactive portals. Previously, we finished
with our sliding door, our multi switch door, we said before we go on
on the button door and the manager to fix the
widget in all doors. So I'm going to
close everything up here with just close to the
right top to the right, and I'm going to go and open each door in its own
order. Doesn't matter. We just want to
have them all up. And I'm going to save. And also, we're going to need the
third person game mode, which we find in third
person Blueprints game mode. So we have this door
widget, at Door Widget. And from this door
at Door widget, we can actually find references wherever it is by
using the right click, find references by name, and then using these two
vernaculars, actually. So using this, a new search will open that will show us everywhere that this function exists, this event exists. So what we can do
is create an input over here that we will call. It's going to be the type
box collision component. I think this box collision would be let me see,
collision component. Now, I'm guessing box
collision will do fine. So I'm going to name this box. Collider, maybe needs L, to be honest. Not sure. I'm going to leave it
as it doesn't matter. And I'm going to get overlapping actors
from that collider. And I'm going to
check with the class to third person character, if this is get length, of course, just length,
not get length. And if this is above zero,
going to bring a branch. I'm going to add viewport. So hopefully this
will fix the issue. Now, the only thing we
have to do is go to each blueprint and find the ad doors that we
can actually find from the search box, where did the search box go. They close it. I might have
closed it. Here it is. So we can just double
click on each of these and just bring the box collider and click on the
next one is the game mode. So I'm going to come on this one and pick the box collider. So this way, we won't
miss any of them. We don't have to search
actually manually. We can just go to each event. Now, this is not recommended. There could be better
ways to do this. But it was a fine way to add
the searching or blueprints. Like it created a
reason to do this. Well, this not being
very good option, but I hope it works. It's not a lot, but it
is a formidable amount. We did I connect
the correct one? Yeah. Lastly, these two, and there's nothing
else on the list. Yep, that's the last one. So I'm guessing this time, let's test precinct
two over here, another door with tos, and it didn't add the widgets
because I was not in here. So I'm guessing that
if I'm in here, yep, it did update it. Great. Now, from what I see, while
it's opening or closing, it still shows the E, which is a behavior we
don't want it to do. So some more problems to solve, we'll go to multi switch
door. This is the one. So when I'm okay. So if I'm closing, we should maybe we should
add this to everywhere. But it's fine. What we need to do is actually
add this switch state here and say that if the
door is closing or opening, actually, just to this one,
I think, not to everything. We don't need to show
or close widget. Doesn't matter. Let's
continue with the next door. Now, let's begin creating
the assets for the new door. So we're going to need
one actor blueprint that we're going
to call PP button. I'm going to call
I'm going to need also an actor blueprint
that we're going to call PP puzzle manager. And then we're going
to need a new door. So we're going to
go to our doors and duplicate the multi switch door. I'm going to call it
buttons puzzle door. Now, let's autosave
since it popped. The way this is going
to work is we're going to have first of all, the door, which will not be it, but doesn't really matter. It's going to change later. We're going to have
the door we're going to have the save this. So I'm going to save all,
something I forgot to say. This button says everything, but we can also control sifts. And we can also find
save all over here here. So we're going to need three
buttons. Let's go back. Let's bring three buttons. One, two, three, actually, two, three, and we're going to need also the button manager,
the puzzle manager. I'm going to bring
this here. This can be anywhere in this map
doesn't really matter. But I'm going to
have it over here, so we know that's the manager. Now, the way it's
going to be working, it's that the buttons
will know about the manager and the manager
will know about the door. That's actually how
it's going to work. Let's create these references. So I'm going to close everything here and just open the buttons, the manager, and the door. Buttons puzzle off. Okay, I
need to lock them up here. Not a separate window. All right. And to the not
the door to the buttons. We need to create a
manager reference. So a new variable, you're
gonna call BP manager. Gonna search for BP Manager. An object reference,
and we're going to call this puzzle manager. Now, the next thing we need is that the manager
knows about the door. So in the manager, we're going to create
a new variable. We're going to call it. We're going to find are and we're going to call
an object reference. Going to make it an
object reference, and we're going
to call it of PP. Notice that here,
I used an actor, where here, I used
the manager itself. The reason is that we
don't need to create new interfaces and anything for the manager. It's
just one manager. If I wanted to have
plenty of managers and sending them their own messages, I could have created this as an actor and made an interface to send
messages to managers. We also need to make
these variables editable. Since we need to get a
reference in the editor. And let's go to the editor. And now that we
make them visible, why am I not seeing this? Because I haven't compiled. Okay, now that I
compiled, here it is. So I'm going to
select the manager, and here I'm going to
select the manager, and here I'm going to
select the manager. And the manager
should know the door, so I'm going to select the
door and I'm going to save. Now, let's go to our bottom. Let's open the blueprint. We need two static meshes. Going to duplicate this,
and for the first one, let's go find our
button. Here it is. I'm going to select
the bottom switch. I have to find it in the browser and then pass it over here. And for the other one, I did them opposite.
Doesn't really matter. Gonna find it on the browser
and place it over here. So now let's go to the door. We're going to need a
second static mesh. I'm going to duplicate this one. And let's select the first
one and go to our map. Find the door opens. Like this, and find
it on the browser, and go to the door
and pass it here. Get the next one, find
it in the browser, go to the blueprint and
pass it here. Oops. Yeah, these are the
correct materials, right? And I'm going to move
them a little bit higher to the left. And this one a bit smaller. And maybe here and a bit longer. All right. Let's
go check the door. It's kind of okay, a little bit to the left.
I think that's fine. Maybe a little bit forward
a little bit more. Anyway, I think it's fine over there and the buttons
need to rotate. This one and this one gonna select them all and place
them a little bit higher. Maybe these a little bit out. This also and I think we are
ready to start programming. But we're going to do
it on the next lesson. So goodbye for
now. See you then.
27. Building Button Puzzle Mechanics for Interactive Doors: Welcome back to
Unreal Engine five, Blueprint Mastery, Door Systems
and Interactive portals. Previously, we finished
with the visual part, the setup of our scene, and setting the visuals
and the message of our blueprints for the new door. Now, let's continue with
programming the manager. Let's open the manager. Let's go to the event graph. And what we need here
is two custom events. And say button on another
custom bend button on. Now, we're going to
do something tricky, but also not a lot necessary, but it's a good way to demonstrate another
variable container. We're going to use the
map variable container. So we're going to
duplicate this Gr BIP, and we're going to
name it puzzle pieces. So we're going to go to containers and choose
map container. Now, as you can see, a second variable type
has appeared over here, which we're going
to set to bullying. What did we actually
create over here? What is this map container? Well, the map container follows the rule that the set
container follows. This means it cannot have
duplicate first variable type. By saying this, I mean, the second variable type can be multiple times the
same, doesn't matter. But the first variable type must be always different,
cannot be the same. And, of course, this list corresponds to the way
things are inputted. For example, right now, we made it instant Edit
and exposed on spawn and we will add three variables. I have to do it from here
because every time I add one, I cannot add another one because non variable is
the first variable and it considers it
something unique. So I cannot add a second none. So adding the first non, as you can see, I cannot
add a second one, but if I choose one
of the buttons, and the order here is important. So the first button is the left one from the way we
are looking at right now. So I'm going to add
a second variable. The second would be the middle one and the third variable, the third one would
be the right one. Now, since we have an
order of one, two, three, and we have a
corresponding of button, we can set a code of which is the correct way these
buttons should work. So let's go back to
our puzzle manager. Let's create another
vari br that we will call correct password. And it's not going to
be of the type map, it's going to be
of the type array, and it's going to be
of the type boolean, container array,
and type boolean. We're going to compile and save. We're going to add
three elements. And let's say the first one and the last
one should be on, and this is the
correct password. We could expose it on
a spawn and editable, make it editable, so we can set whatever password we
want from out here. Now, remember, as many
puzzle pieces we have, that many password correct
array elements should we have. For this type of puzzle
that we are making, the way we are making it. Now, let's go back to
the puzzle manager. And what we need to do is add an actor as an input
on both these events. So we're going to place
this plus over here. We're going to add actor and here we're going
to add also an actor. And let's name it puzzle and let's copy paste it
to the other event also. So what we're going to be doing is when we are
turning a button on, we're going to be
adding to this map. Now, why we're
going to be adding? Because maps have
the unique property that when we add something
that already exists, it just updates the value. So when we are
turning a button on, we will be adding something. We will be adding that
actor which already exists, and we're turning
its bullion on. When we are removing when we
are turning off the button, we will be adding the
same but turning it on. So this will be
updating our value. Now, the next step
would be to have a branch that we will
connect to both. And here we will have a condition that we
will create a function, but let's not create it yet. The next thing we should do
is get our Dor blueprint, say, unlock message
or log message. And connect to true or false. Because if the puzzle is
solved, we are unlocking. If the puzzle is false,
we are locking the door. Now, let's create the condition. For the condition, we're
going to make a function. We're going to call
it puzzle solve. Actually just puzzle solved. Doesn't need a question mark. I don't like having
question marks in variables or functions. And this one will
have an output, and it will be pure because we're not going to
be setting something here. The output would be
bullians say puzzle solved also and compile and save and what we will do
here, it's pretty simple. We're going to get
our puzzle pieces. Now, there are two ways
to get values and keys. We call the first one, kiss, the second one values. So we got the kiss, get kiss, and we got the values,
actually just values. So as you can see, this
one gets our kiss, the first part, and this one gets the values, which
is the second part. Now, we're just going
to get our values. And we're going to get
our correct password and we're going to
compare the arrays. As you can see, I
chose the identical. I pressed equal,
but it also brings this identical. This
is what we want. These two arrays, because
this is an array output, we want them to be identical. If they are identical, it means the
password is correct. If they're not identical, it means the password is wrong. Let's compile and save,
and pretty much let's bring the function also
connect it over here, pretty much, that is the
whole code of the manager. That would be it. Now, let's continue
with the button. I go to compile
and save this one. And before we go to the bottom, actually, yeah, let's continue
with the button first. Let's press at component
and add a colon cube that we're going to need to check
if the actor is in front. Let's bring it over here so we don't have to resize
it externally. Let's make it a little bit
bigger than the button. Yeah, I think that's
a fine distance, and compile and save. Let's go to event graph. And actually, let's
go to the DR puzzle, and we're going to copy
these events over here that they show us the widget
and enable the input. We're going to go back to the button and paste
them over here. The update widget, we're going to create a
matching function, confirm, and we're
going to go into this function, compile and save. It has this problem with the
error with the game mode. We need the game one
from the begin play. Let's bring that quickly. So we go to begin play. Actually going to copy all
the go back to the button, and face it over here and
create this variable, and now it will compile. Now, back to the update widget, we kind of have this
code over to our liver. So if I open the liver
and go to the widget, you can just copy this and
go back to the button. And paste it over here, connect this over here,
and the I solved, we're going to use it or
if it's pressed or not. So I'm going to create
it as a variable, and let's rename it to EEO. And let's change us to
let's Or you know what? Let's make it a little
bit more pretty. Let's duplicate this
update Wigen text, and let's set this
if it's on, turn on. And this will be turned on. So now we know exactly what it's doing when we
are pressing it. And let's not forget to connect the third person game
mode, compile and save. Back to the even graph. And let's create our input
E. Gonna put it over here. We need some room. So I'm
gonna put it over here. He bolt E, here it is. And the first thing we're
going to need is the timeline. So I'm going to add timeline. I'll explain to you in a second. So the reason we
need the timeline first is because we need to
ask if it's already playing. So I'm going to bring the
timeline component over here. Going to ask playing. Because if it's already playing, we don't want to be able
to push the button again. So I'm going to put a branch, go to connect it here,
go to put it here. And if it's false, then it means the animation
of the button has finished. So this is the time
to play a sound. Play sound. And the sound we
will play is button. Now, the next question, the next question would be, if a button is on or off. So I'm going to
connect is on here. And if it's on, I'm going to set
it to it's not on. And if it's up, I'm going
to set it to it's on. And then I'm going
to connect it to the timeline to
play and reverse. But there needs some
explanation for this because this timeline will have
a different flow track. So let's leave this
for the next time, and I'm going to see you then. Goodbye.
28. Finalizing the Button Puzzle Sliding Door with Blueprints: Hello, and welcome back
to Unreal Engine five, Blueprint Mastery, Door Systems
and Interactive portals. Previously, we
created our manager, and we started our button. So our manager,
it's consisting of a puzzle piece map
that in one variable, we have the buttons
that need to be in a specific order and the second variable
that is a boolean, which we turn on and
off by adding it. And we are adding it
because as a map property, if we are adding
the same element, then it just changes the value. Now, the same we're doing
for removing, not removing, turning it off the
value the second value, the boolean, with
adding it again, but adding it off. In a function that's
called puzzle solves, we got the values of the map
and we check if the arrays, and we checked if the arrays are identical to the
correct password array. Make sure that you have
selected each button in a correct order when you were adding them on the
map puzzle pieces. Now, then we went on and copied
some code in our button, basically the behavior of the box that when we
overlock the box, we are enabling
inputs and updating the widget and adding it to the viewport and removing
it from the viewport. And we also change the
update widget to say, turn off and turn on. Now, let's continue with our pressing event that we are checking if the
timeline is playing. If it's not playing, we
are playing a sound, and we are turning the
button on and off. Now, I said that
this timeline needs a few explanations why we
play from play and reverse. And to be honest, even
if I had them this way, it wouldn't really matter because what we'll
be doing inside the timeline is we're
going to create a flow truck that
starts from zero, goes up high in one, and then goes back to zero. So first variable would
be zero, second variable, let's say, for a button, let's say the total should be a quarter of a
second, it's a button. So 0.12 somewhere there, 0.12. Let's say 0.12, value is one. And then at 0.24, value is zero again. Let's fed it to screen. You see, I didn't
fit it completely because I had selected this one. So to fit them
all, I'm selecting them all and then fitting them, and select use last kin frame. Now, since we got
this up and down, it doesn't really matter if
I'm playing it reverse or playing it from the beginning. It matters if it was the first actually,
this is what matters. The first time, it
shouldn't be reverse. It should be on play because if the first
time would be here, it would actually want play. So yeah, the first time matters, the first time matters
to be from play. So from falls, we're turning
it on and we're playing. Now for the movement, we're
going to get our Top mesh, and let's go bring it over
here. I'll drag and drop it. I'm going to set
relative location. We're going to split this up. Let's check the location. It's zero, zero, zero, so if I move it this way, -1.6. I think that's a little bit low. It won't show much. So maybe at least
three minus three. Yeah, I think minus
three is fine. So back to zero, and we're going to lurk
on the wide direction. From 02 -0.3. And for the Alpha, we're
going to connect this. And now, because we have
this slide up here, it means that we go from zero
to -0.3 and back to zero. Now, we have to indicate to the player that the
button is on or off. So we will get the static mesh, and on finish, we will
change the material. So we're going to set material and let's
connect it to finish. And from material, we're
going to select and the selection will be based
on iso and if it's false, it's going to be the
material it has now, which is this one. And if it's on, we
must have a props on. So props on here it is. So we put props on on true
and props off on false. Now, what we're going to
do is update our widget. So it turns on. It says, turn on or turn off. And again, based on its
own, let's bring it again. We're going to branch and we're
going to get our manager, and we're going to
say button on if it's true and button off
if it's not true. And for the puzzle piece, we need a reference
to this actor. So to do this,
we're going to just drag a cable and call self. And this is how we
bring a reference to the actor that
is doing something. It requires to reference itself. So retrospectively, these
two could be the same event. Like if we had one
event and it was adding or removing and instead of checking
for the puzzle piece, we were sending a boolean, and that boolean is on
would work just as fine, but we wouldn't have
used the map variable, which was a nice demonstration
for this variable. So all variable type that's also v. I think we can
go and test it. So let's play. Let's move
the players start over here. And at least I think
we can press buttons. It's turning the widget off
when we are pressing it, so, after a little bit
of soul searching, I figure out what's happening, and what's happening is
that we copied the door. So when I call lock
and unlock the door, if we go to the doors code, we are removing the widget. So this will be fixed
when we fix the door. So our butcon is
pretty much ready. We are pressing, it turns green, we are pressing
again, it's turning. And let's not waste time. Et's go start begin on the door. So let's open the
door blueprint. We actually don't need
a widget in this store, so we don't need even
a collision tube, so all this code can go away. And also the game
mode is not needed, but the relative
location is not needed. So we're going to
delete this also. Let's create the variables. We actually don't need
any of these variables. We can clear them all safely. Let's keep open
angle that we will rename it. We don't need this. We don't need the third person. We basically just need the
door and the door angle, and we don't need
the functions also. So good by functions. So let's remove door animation, and let's just make the
door unlock event unlock door because we copied and it deleted the events
and the lock door. And basically, we don't
need all this code also. We do need a branch, and we will change
position in the end. We don't need the widget and we don't need the
door animation. So we're going to bring
these two events, and we're going to
keep the timeline and the code that comes with it. Now, we really don't care about the state because it's a direct
message, lock or unlock. We won't need this branch. We will keep this one which has the code of is the
timeline already playing? Let's bring it over here. And the reason we
want this branch is because if the timeline
is on zero again, when we are locking the door, we shouldn't play again
the lock animation. We shouldn't play
not even the sound. So we're going to connect
the forts to the sound, and I'm going to connect
this to the sound, and we need to choose a sound. And the sound is
slide door tube. So we're going to select it. And of course, for
the locking side, we're going to change
the multiplier to 0.8. When we unlock, we want to play. And when we lock, we want to reverse. There is some code
here we don't need. And let's move this to
the side because we need some room to do
the same almost the same or the second
part of the door. So I'm going to bring this here. I'm going to copy paste
the set relative. I'm going to connect this
here, connect this here. And I'm going to duplicate
the larp and connect it to Z and also connect Alpha. And this open angle, let's name it open displacement. And let's bring it
over here and let's connect it here and here to B. So that's our target. Well, actually,
one of them needs to be multiplied by minus one. So let's check
which one is which. So door number one
is the bottom part. So this will be going down. And the displacement
is around, no, no, no. This is also a lot. So we're going to minus ten because it didn't
start from the beginning. So yeah, minus ten from 124. So 130, if I add 130 plus 130, that's 230 plus 130. No, sorry, I did it wrong. I have to go in the end
of this and add 130 Yep. So 254. 130 seems to be the
trick. So let's go here. Let's say displacement, we
need to compile is 130. And the second one
is the first one. Yeah, the first one is the one
that needs to be opposite. So we multiply this by minus
one to make it negative, and we connect this here. I think this is it and
we can go test it. Let's play. Let's put
our own coat first. No. No. I did something really weird. So, and to be honest, it makes sense because
the values are not zero. We have not zero
out these values. And this is my bad. This was supposed to
be the slide door, and I added the open
up and down door. I don't know how to explain it. So I'm going to actually
delete the second part, and I'm going to just
put the correct door in. Gonna select the first part. And yeah, because this
is the slide door. Gonna select this, find
it in the browser, and put it over here. Fix the scale also. Now, it was moving very
slow because we had copied from the timeline from the
sliding door, the upending. So it's 5 seconds. We can change this to 0.5. And that would be it. And we do not need the
second door set relative. So we connect back this here
and delete the second larp, and the displacement
we'll see right now. This should be on Y, not on Z. We're not going up and down, we are going left and
right, so this would be it. If this is on zero, 00, let's say it moves here. So minus 140. So let's put minus 140 here, minus 140 and compiling save. Let's go play. It's not
correctly positioned. Yeah, I think that's
fine. Let's play. All right. Alright,
it's working. Now, as you can see,
because these two buttons are really close to each other, and if I eject and
so collisions, when I exit this one, I have already entered this one, so it removes the widget. Let me demonstrate again. If I'm here and I go here, it removes a widget, and we cannot see it. So what we can do is move
this a little bit further, maybe here, move this
a little bit further. And this would fix it. Another way to fix
it would be to make a system that
checks this out. I don't really hear a sound
difference on unlock. Maybe this should be
lower point pipe. That's a lot. So let's leave it 0.7, and I think it's gonna be fine. And maybe the door should
be a little bit slower. So let's make it 1 second. I think that the amount of
the sound playing should be the amount of the door moving. Yeah, maybe 1.2, but let's leave it as is and we are
ready for the next room. Which would be the door
that unlocks with an item. We won't be creating a
whole inventory system. Let's bring this over here too. And we actually
need a text here. I'm going to copy
this over here. And pretty much it's good. We're just going to
change the box size, and let's set it like this. That's fine. And let's
change the text also to say so the puzzle to open the door. And it's fine as is. Maybe double kick
it, move it at bit further. Okay, it's fine. Now, next door, the next door
will be using inventory, and what is an
inventory, basically? Basically, it's a
list, nothing else. Then you have in this
list some elements. And from these elements, you
either show them into IUI or you manipulate them through your game
with other things. We won't be creating a UI
that represents this list, but we will know that we
have the item or not. So we're gonna leave this ball the next time.
Gonna see you then. Goodbye.
29. Creating an Inventory System with Pickable Items: Hello, and welcome back to Area Engine five Blueprint
Mastery Door Systems and Interactive portals. Last time we finished with our buttons door that
opens by sliding. Now, what we did was we
created three buttons, and we created a manager that we store the information
of the buttons. The manager also holds
a correct password. So when the buttons are in a correct order
or correct state, the door can unlock. Basically, the door unlocks. When they're false, they go
back to locking the door. Now, let's continue
with our inventory. As we said before, an
inventory is just a list. So what we're going to do, we're going to go to our
third person character inside third person
folder blueprints, third person character, and we're going to create
a new variable. And we're going to
call it inventor R. This variable will
be of the type string, and it will be an array. There is plenty of
rules about what type of container would
the inventory be. But for us, a string will do as we will give just
an ID to our items. So let's continue by
creating our item. We're going to go to Blueprints. We're going to right click. We're going to create a new
blueprint class type actor, class actor, and we're
going to call it BP item. I'm going to open it.
I'm going to close all these things we don't
need the character also, we just created the inventory. We won't need to
do anything else. That would be our
inventory, this list. Having a user
interface to represent this list would be the visual
part of the inventory. But besides that, it's
basically a list, and that list would be able to call stats
about the items. But we won't go into data tables and
everything right now. So let's just go back to our item and let's
add its components. So first of all, we're going to need a static
mesh to represent the item. We're not gonna
set it right now. The next thing we're going to
need is a sphere collision. Now, why a sphere is not a cube, a box Because it is a little bit easier for items
to be spherical collision. For example, with walls with Al the player doesn't
detect the pattern. There is a lot of hypothesis about why it should be a
sphere or not or a box. I personally prefer
a sphere for items. The third thing we
will need would be a rotating
movement component. When I click on this,
we will see that it becomes a little bit
left to the hierarchy. If I close this, it doesn't belong to the defaulting root. Well, this is because this
is an independent component, is a behavior that
can be attached to a blueprint and we can create our own
blueprint components. Let me show you really fast. Go Blueprint class
and we can make a blueprint an actor component. Let's call this my
actor component. I pressed space
instead of way this, and let's dit my
c As you can see, these components are separate
entities and they do not belong to the faulting root. Don't delete this because
we don't need it. And here we could
have some behavior scripted for all the actors. For example, the
widget behavior could have been so we wouldn't have to repeat the colliding and
everything with the actor. Talking about this,
repeating this code. Let's open multi switch
door doesn't matter really. One door that has this
behavior of the widget. So we're going to copy this. We're going to go to item, and we're going to
paste it over here. I'm going to create
a matching function for the Widget update, which let's just fill
it in right now. I'm going to go to the
other function over here. Going to copy this
and paste it here. Promote is still available because this is the
third person game mode. Gonna say here, pick compile and the box needs to
change to the sphere, huh? Now, we have an issue. This is a sphere, and
this is a box collider. We could just change this. But what we're going to do
is just enter this function, change this to instead of box collider to actor component. An object reference. I'm gonna disconnect this. I'm gonna trust to
a component box. I think this is box component. Convert it to a pure
cast. Let's put a branch. Actually, no. Let's
just keep it as it is. Let's connect it here, and then I'm going
to cast to sphere. Sphere is not spread like this. Cast to sphere component. I go to bring it under it. So if it is this, we're going to do this. And can I do this also? Okay. So we do need to convert
it to a pure cast. I'm going to disconnect
these things. I'm going to convert
this to pure cast. I go to connect this
also to a pure cast. And I'm going to do a select. I'm going to connect this here. So if it's true, if it's false, we do this branch, and I'm going to
connect it here. So over back to our item, we can connect the spear. So what did I just do right now? What I did was go to our
outdoors event. I changed. Let's still the box
also use collider. The type from box component from box collision to
general actor component. Then I went ahead and asked, Is this component a box? If it's a box, then all good,
get overlapping actors. If it's a sphere, then all
good, get overlapping actors. I think this is a
little bit of overkill, but let's check if it works. So I'm going to go back a door, where is the very start. Let's press play. It doesn't seem to be working. All right. So I did bien testing. It was working, if I pray now, I just needs to recompile
these blueprints. Like, I opened the liver door
and this wasn't compiled. It had a warning
because things changed, but they didn't change much, but they did also change. So if we go to each
blueprint and compile, actually, we can just
save all I think. We say all, does it compile all? Have a crash. Yeah, you see, because
this wasn't compiled. Area really doesn't like
doing this in blueprints. In neither in SE plus plus
or any programming language, you have to really
compile things. But Blueprint compiling
is much faster. You just press the
compile button and it happens instantly. But this is why also they say there shouldn't be
many changes to the code. Like when you have a core code, you shouldn't change it much. I think that's it. I think
I compiled everything. Great. Now, I'm going to close
all the ups to the right. I'm just going to keep the item. And let's fix the other errors. Now the other error is
that we are searching for a box overlap where we
have the sphere overlap. So I'm going to
click on the sphere, go to the overlap events, begin overlap and overlap. They are basically
the same events just for the sphere
instead of the box. So I'm going to control and
connect these cables here. Make sure you connect
it to the correct ones, other component and
not anything else. I'm going to bring this
here, bring this over here, and maybe I should have written the code
from the beginning, but we would still
have to change this. So changing this to a
general actor component and casting to the spear
component and box component seems to have worked. And now we can have any collider basically
between these two, or we can increase this or make a different
system here basically, or a previous step. So now that we have
the update widget, we actually need one last part. We need to get the game mode. No, sorry, not that game
mode and cast to GM. No, to third person game mode, convert to pure cast. And I'm going to bring a
setter and set this now, let's go set our
static measures. So to do this, we're going to go to
Construction Script, and let's create a
mini item ID system. Let's call it item ID system. So we will have a new variable. We will have it to be string, and let's call it item ID. Now, we will make it instance editable
and expose on spawn. Now, we will get
our static mesh. We're going to set static mesh because this is
not this set static mesh, set static the function
set static mesh, this is set the component. We want to set the function. So why the function? Because this is a
component static mesh, and we want to set the
mesh of this component. We're going to do a
select let's bring. We cannot do a
select and string. So what we will do
is switch on string. I'm going to delete this select. I go to duplicate this and
connect this over here. Let's have two cases, and let's go to case zero
here and case one here. Now, for the static measures,
let's go to our map. Let's select our empty
not collar triangle. Going to close the game also. We don't need it. I need to
find it and add it over here. The same one for
the next triangle. We're going to find it
and add it over here. Now, let's make the cases. So I'm going to have
this say ID one. I got here by selecting
the switch on string, and the second one
will say ID two. And I'm going to remove
the has default pin. This got disconnected
because I changed the name. So our correct item is ID two. Let's set a default ID, ID one. And if I compile now
and go to Viewport, we can see that we have
this triangle over here and that our
collision is very small. So let's increase the
collision sphere. Let's set a radius of
150. Maybe that's a lot. Let's set it 120100. Yep, 100 seems to be okay. Let's compile and save, and let's bring our
item to our world. We have one item here
and one item here. Now, I want to change this
item to be the correct one. I'm going to go to ID over
here and select ID two. And tada, it became
the other item. I think this is
enough for this one. I'm going to see
you on the next. Goodbye.
30. Groundwork for a Sci Fi Door Requiring Key Items: Hello, and welcome back to Unreal Engine five
Blueprint Mastery, Door Systems and
Interactive portals. Previously, we started
to create our items, and we start the game mode
on begin play as a variable, and we copied this code for the begin overlap and end of the box and change
it into a sphere. Now, we also changed the add Door widget
function to event. Instead of being a box collider
to be an actor component. And then we use this actor
component to cast to check if it's a box or if it's a sphere and get the
overlapping actors. This is the wrong
construction script. We want to the item
construction script. We created an item ID and switched based on
the ID, based on string. And in the case one of ID one, we set the static mesh of
the item to the triangle. And in case two, we
set the static mesh to the triangle that
has some color. Now, let's continue with the code for adding
it to an inventory. What we're going to do is
exactly the same thing. When we press E, we will be
interacting with this item. So we're going to
bring E keyboard. All right. And what we want to do we
want it to happen only once. So the press thing
we do is do once. And we don't care
about reset because we do not have an
inventory that will get full or anything like that. Now we need a reference
to the player. And not only the player, let me close the game out. We don't need it,
not only the player, but the instance of the character
that is in the world of the third person template,
third person character. So we're going to
get player pane. This gives us the
current instance of what the player
is possessing. Then we're going to cast
to third person character. So basically, we are getting the current paw
and we are asking, are you the third
person character? Since we know that in our game, this is always going
to be the case. I converted it to a purecast and I'm going to get inventory. And this is the
current inventory of the character that is
running around the map. To add something here, we're just going to
press Add because this is an array function, but it doesn't work
like the map ad. In this case, if there was
an item that shared the ID, it would also add it as
another entity to this list. So if I had, like, two of ID one, then this list would be populated with two
versions of ID one. So this basically would be it. This would be updating
our inventory, and when we do, we
just destroy Actor. And this would destroy
the actor on the map, so the item would disappear. And that's it. That is the whole have an item, pick up an item that we will do. So let's go test it. Let's go to our map and
bring the players start. Back here, and we can pick up this and
we can pick up this. Now, just to demonstrate it, let's go to our item. And from here, let's
before we destroy, let's do a for loop. For each loop, and
for loop body, we're going to print string, which will be the array element, meaning the ID we
just added here. I think I did this silently, but I think you got it. So when I pick the first item, it's going to be ID one,
when I pick the second one, it should be both of them. Yeah. So our
inventory is working. Let's connect this back here. Let's delete this debug
and compile and save. Now, for the door, we're going to copy the
multi switch door. We're going to go to Blueprint
Doors multi switch door, and we're going to duplicate. And let's call it item D. All right. Well, maybe item
door is not a good name. Let's name it key door
because it requires an item. Let's consider this item a key. So key door. Let's bring the key door also
onto the level. And let's open it. Now, this time, I'm going
to use the correct door, the one that we wanted. I wanted to use before, which is this part over here. I think the bottom
part should be one. Now, actually, the top
part should be one. So find this and place it here and I'm going to
reset its location also. And I'm going to
select the next one, find it and duplicate this, Control C, Control V, and also set it over here. So now I'm gonna fix the
rotations also. All right. Actually, no, the
rotations were correct. This is the arrow over here. So this is the front side. So I'm going to
bring it up here. Move it a little bit this
way and also fix this. I think this one, Oh, no, we do have the behavior
of the widget. It's okay. Compile and save. Let's update our
animation timeline to include the second door. So I'm going to move
this over here. It's pretty much easy. When you get the hand
of it, what does what, what is where, it's easier to manipulate the code and
add the remove things. So we're going to duplicate the set rotation set location because these
are moving dolls. They're not rotating dolls. And I'm going to bring the
second door over here. And we do need this larp
node again for the set axis. We do need to
connect it to Alpha. And for the values, we have a relative
location here. Let's just delete it. It's not needed. So let's
go to begin playing, delete this also and the variable and the puzzles,
we do not need them. And the open angle,
we don't need it. This variable, I think
it's not needed. Yeah, it wasn't. If it was, it would say it, and
that would be it. Let's set the stage to locked and go back to
the values. So values. This one starts at let's
round them up to 51 25. And this one is
at, again, 51 25. Okay, they are a bit
stretched. So let's fix this. All right. So this is 115. Is that the correct
one? It will do 115. It will do. Okay,
so we start 51 15. So this is door number two. It goes y is 50, and this is 115. And the next one is 51 25. Again, Y 50, and a would be 125. Now, for where they go, this one goes to 20. So 20, and the bottom one goes to minus four minus five. Minus five. Great. We have our animation complete. The next thing we will do
is clear the code because this door doesn't unlock or
lock from another place. We will be using again the press E to be checking
if the player has the key. So we don't need the check
puzzles for answers, and we didn't need
these two functions, these two events also. The events I just deleted were the event locked Door and
the event unlocked Door, which are coming from
the interface that we copied and the check
puzzles function. Alright. So we are clear
to go and start coding. But I think this is something
for the next lesson. I'm going to leave
it here for now. Goodbye.
31. Locking and Unlocking Doors with an Item Based System: Hello, and welcome back
to Unreal Engine five, Blueprint Mastery, door Systems
and Interactive portals. Previously, we finished
with our door animation. We added the new static mesh. We set the numbers
that need to be set, and we also cleared the code of the key door because we copied it from the multi switch door. Now, let's continue
with the press E. So we're going to keyboard E and start programming. The first thing we need to do is check if our door is locked. So I'm going to bring a branch. I'm going to connect
it over here. Gonna bring the door state and check if the IAM is
equal to locked. If it's not, we're going
to animate the door. So we're calling door animation. Now, if we are not, if it is locked, then we need to check
the lock mechanism. So let's create a
customer event. And name it lock mechanism
that we're going to call here. And our E is complete. Now, let's go and program
the lock mechanism. What we need first is a new function that will
have an output of a boolean. And let's call this key bound. Inside this function,
we're going to get layer paw and again
cast to third person, so we get our current inventory. We're going to get
inventory from our cast. Now, with arrays, except for AD, we have another special
node that is called point, which can find an item, an element of the array within the array and return
the index of that item. Which will be the
item. We're going to promote this two variable. We're going to call
this required item. We're going to make
it instance editable. We're going to expose
it on span also, compile and save, and
if I bring a branch, we need a bullion somehow. We need to have a true or false. So the question
here would be that is the index greater
or equal to zero? Because if it's
in the negatives, it means it didn't find it. If it goes to minus one, it means item isn't found. And I'm going to connect
this condition over here. If the item is found, I'm going to remove
from remove index. Now, make sure you choose
the remove index and not the remove item because these two work
completely differently. As you can see, this removes all instances of item of
an item from the array, where this just removes
the index we are calling. I'm going to connect
this to true. And now we have one return node. How do we do this? Well, we
can have two return nodes. This is the magic, and we connect this here and
we say key is found, and we can connect this here
and say key is not found. And of course, connect
the index over here. How duplicated this I control
C controlled copy paste. So basically, let's copy paste these two over
here over to pure cast. So we do not have that
many cross cables, and it can make a
little bit more sense. Now, what do we do? We get the inventory, we check
if we can find the item. If we can't, we return
we found no key. If we did, we are removing it and returning
that we found a key. And let's name this
function, check or key. And let's bring it over
here to our lock mechanism. Then we need a branch. If we did find a
key and removed it, we should set the door
state to close from locked. We should update Widget, but we haven't set the texts, and we do need a variable to say locked and set it
to false actually, we don't need this variable. I don't know why we need
it. There is no need. We do have the state. And talking about
state and widget, let's go fix our widget update. And we need the door state. We need a switch. And we do not need this select. We will just copy this three
times when it's locked, it will say locked. When it's closed,
it will say open. And when it's open,
it will say close. Actually, let's have
it fourth time. That would say nothing. So in worst case, we see that E. So we know it's bugged during
opening and closing. You see, things like
this is just a few node, basically, an extra node. But when you're
playing and you see a bug that you have
designed to be bugged, like, oh, it's showing a
widget while it's opening. Why? And it makes it
clear what is the fault. So having a few deebug hints
for you is always good. Now, let's continue with well, we do need to show the player that the
door has been unlocked. Let's just do it by
adding a place out here. Let's not at the unlocked sound. I don't really don't like
the unlocked sound for this. I mean, it's it's
kind of key sound. So maybe the buttons sound. Let's use the button sound. So we have a way to tell to the player that the
door has been unlocked. He should try again and
this time it will open. Now, when we are in falls, we should rattle the door, but this door cannot
really rattle. It's placed very wrong. What was this? From what I saw, the bottom one is
to go into 115. All right. Let's place
it all correctly. Right? It doesn't seem
to be a tight door. I mean, it does have these
spots maybe to shoot from. I don't know. So
we place it here. We are unlocking
it with our key. We should play a sound
here, it shouldn't be lift. It should be the Sci Fi door. Here it is. So Sci
Fi door over here, Sif door over here. And on clothes,
multiplier 0.8 pitch. It's fine. All right. Now, back to the rattle. This door doesn't
rattle basically. This door should do something else and
something else that we're going to do is
change this color and make probably a sound. But let's leave this
for the next time. We're going to see
you then. Goodbye.
32. Adding Visual Effects to Enhance Sci Fi Door Interactions: Hello, and welcome back to Unreal Engine five
Blueprint Mastery, Door Systems and
Interactive portals. Previously, we finished with the code to check if our door is locked or not by using
the E key and a branch. And if it's locked, we are
triggering the lock mechanism, and if it's not, we are
triggering the door animation. Now, for our lock mechanism, we used a check for key function that we are getting the
inventory of the player. We are finding if there
is the required item, and if it is, we are removing it
from the inventory. If it's not, we're returning
that we found no key, and we found key if we did find. Then we created a branch, and based on this, we use
the door stayed close. We updated the widget, and we played a sound to express to the player that
the door has been unlocked. And we talked about creating
our new rattle mechanic. Let's call it custom
revent and call it rattle, which won't be a rattle, but it will be interesting. Now, what will be the
interesting part? The interesting part is that we will use a new node called D N and it's a little
bit hard to find. I think I passed it, here, this do N. As we
have the do once, this is a node that allows execution to pass a number
of times and then it stops. This is useful for
limiting how many times an action can occur during
gameplay, for example. Right now, for our rattle, what we do is four times, we're going to be switching
the material of the door. I'm going to get both
of these going to get material actually set
material get material, set material and connect them both here and do a select from here
from the material. What will I use for index? Well, I'm going to
use a flip lock node, and select the is A. And then I'm going to
connect both of them here because I want the execution of the flip
flop to be the same. I just want to differentiate
between A and B. When it runs from A and
when it runs from B. And for the material
for the folds, we want the original one, so that will be door
vertical, vertical. And then I'm guessing this is
going to be door vertical. Red. Yep. Now, if I connect this flip
flop directly to the D N, this will happen so fast
that I won't get to see it. So I'm going to
put a delay here. Maybe a little bit more room and connect the delay
to the flip flop. Now for the delay, 0.2
is a little bit big, so I'm going to turn it to 0.1. To call the D N again, I'm going to call rattle. So rattle is being called here. It runs and it call itself, and it will run a
total of four times. Now, since a player
can try it many times, we do need to reset this. So I'm going to make a custom
event and call it reset. Do rattle. And we will be
resetting every time the player tries
to open the door. So reset, do rattle. Let's play a sound
also after we start to rattle actually before,
let's play it here. Play Sound to D. And the sound would be denied. Yeah, permission denied. Let's play. All right. We do have an issue
with the widgets, but I think it's because
all these are overlapping. So I'm going to get this a
bit further away, maybe here. Yep, it's working fine, getting the wrong
item, not working, getting the correct item. It's still not working. And that is because we haven't given the door a required item. So ID two is the required item. Let's get the wrong
one. It's not working. Let's get the right
one. It opens. Great. It is a little bit slow. This is the slowest
door ever created. I closed slowly.
So let's fix this. Let's go to our timeline. And let's set this to,
I don't know, 1 second. Using last keyframe, all good. And let's also change the material of the door
when we are unlocking it. Let's make it green.
So I'm going to go to our open over
here, we play sound. The door is unlocked
and get the top part. This one set material. That could be vertical open. Compile and save.
What happened there? I think it must be loaden
shader or something. So it's open. I closes. When it finish opening, it doesn't show me the widget. When it's opening and okay, so let's go to the key door. Update widget text,
door when it's closed. I am I am not overlapping. Okay, so this is the issue. The code is correct.
It is there. It's just that the box
is a little bit small. Actually, I'm going to
change it from here. Yep, I think that's fine. So getting the key again. All right. No, it's still not showing
the widget when the door is closed on open. Okay. So I'm just going
to connect this here. And they both add
back the door widget. I want to see the
negative again. Ah, I really like the negative. Right. It's working
correct. Great. And now we hit a brick wall. So I'm guessing it's the time
to do the teleport door, which we will use this
awesome teleporter, which has a party glue too. To do that, we're going to
create a new blueprint. Let's go to folder doors. Let's create a new
blueprint class of actor and let's call it BP teleporter. Let's compile and save, and let's begin by adding the components
of the teleporter. Of course, we will
need a collision box. So box collision would
be one component. We will need static mesh
for our teleporter mesh, and we will need a particle. I think it's Niagara particle. Here it's a Niagara component. Add a Niagara system. And we also need an arrow. Now, let's select our mesh that will be the
teleporter mesh. Let's bind it and
set it over here. And we do need to
rotate it, right? And for the Niagara partigi, we're going to
select the partige. We're gonna find it also
and add it over here. Now, let's rotate this
Yep. I think that's it. And our box should be a
little bit bigger and wider, a little bit more in front. Yep. That's fine. And let's bring
our teleporter to the map. Right? And let's make the
next room also visible. Maybe move it a little bit here. And let's also duplicate it here and let's rotate it
to face the correct way. There is a reason for that that it needs to be facing
the correct way. But we're going to continue
with this on the next lesson, and this is where we're
going to leave it this time. Goodbye, see you
on the next one.
33. Creating a Teleporter for Within Level Transitions: Hello, and welcome back
to Unreal Lensing five Blueprint Mastery Door Systems
and Interactive portals. Previously, we finished with
our key requiring door, and we started our teleporter. We added a few
components and meshes, and we added the Niagara
particle and the collision box. Let's continue with
programming the teleporter. We're going to use the begin overlap event
of the collision, and we're going to cast two third person character because only our
character should move, and we want a reference
to the character as well. Now, how do we move our
character from here to here, where we could set
location of the actor. But there is a special
note called teleport. In unreal engine, and
it gives us two inputs, destination and destination location and
destination rotation, which is good because
when we're teleporting, we want to rotate the
character in a certain way. So it doesn't teleport
and looking backwards, for example, towards
the teleporter door. But before we go on and figure
out where this should be, let's also play a sound, which would be the
teleport sound. We have this sound, but
I really like this one, the VR teleport sound. Now, this is included in the
engine in case you can't see it in your content
drawer in settings, you can enable engine content. Somewhere show engine content. I didn't have it clicked, but this should be
making it visible. Now, let's continue with our destination location
and destination rotation. What we will use for this is we're going to
create a system over here using a scene so we're going to add a
scene, what is a scene? Basically, it's just a point. So we're talking about this point that we can
move left right up there, and we can create a reference
to it because it's let's call it the teleportation
capsule root. This will be the
teleportation capsule root, and we can have we can
reference it where it is, where it's rotated towards
two and everything. But we're not going
to do only that. We're going to add a
capsule collision. That will be parented
on the scene. So whenever we move the scene, we move the collision also. Because it's not added
in the correct place, we're just going to
reset its location, transform, and it will
snap to the root. Now, we're going to also
increase this to be player size. I think player is I can't
remember anything to see. I'm going to open the
player, select the capsule. Yeah, 90s half size. 90 is half size, and radius is 35. That is going be slim. So 35 radius. And right now, we
know exactly where the player capsule will spawn. And let's also add an arrow. I'm going to select
again, the root component because I don't want
it to add to the capsule. I want it to add to
the root component, and arrow and also
reset its position. And now we can see clearly where the player is and where
they are looking towards. So I'm going to set
this over here. Maybe it here more front here. I think that it's coming
out and it's dropping here. Yep. Maybe more through the air. All right. Let's continue. Now, we don't want ourselves
capsule and root component. We want the targets, capsule and root component. So what we're going to do is going to create
another variable, we're going to call
it target, the port, the and we're going to expose it and make it span expose on
spawn also insens editable, and it will be of the
type P teleporter. We're going to compile
and save and go to Teporter from the details, we're going to select
the other teleporter, and for the other teleporter, we're going to do the
same with this one. Maybe it's a little
bit far away. So going to select the root. Yeah, I think that's
a good distance. And now in our BPA
reporter, let's compile. And for the destination, we're going to use this
target reporter. Going to get arrow because
that's what we need. We don't need the capsule
or the spots, to be honest. Arrow will make the job. Make sure it's arrow
one because arrow is used for the
original blueprint. So we're going to get transform. But we're going to
get world transform because we want it to be in a world location and rotation. This time we're not using
local relative location or rotation because we don't want it to be
relative to the blueprint. We want it to be
relative to the world. So, for example,
if I go here and select this teleporter and
select the root and rotate it, I want it to be
rotated towards here, based on the world, not towards here, based
on the blueprint. Now, what is also transform? Well, a transform is structure of elements of
three vectors basically. And if I break it, we can see that it
has a location, a rotation, and a scale. So I'm going to connect
the location to the destination location and the rotation to the
destination rotation. And this will conclude
our tele portal. Let's bring our
capsule over here. Let's press play. And
we are teleporting. All right. I think this
is it for this one. I'm gonna see you in the next. Goodbye.
34. Designing a Physics Based Door with Blueprint Programming: Hello, and welcome back
to Unreal Engine five Blueprint Mastery Door Systems
and Interactive portals. Previously, we finished
with our teleporter door. We created a system using a capsule and a root
sin component and an arrow. We actually just
needed the arrow, but we have the capsule
to see the collision of our player and the root
component to move it all along. Now, we use this arrow to get the transform
that we broke to the three vectors and use
the location and rotation to use the teleport node for destination and
rotation destination. And then we play the sound. And all these were triggered
by the overlap of the box of the teleporter.
That's pretty much it. Now it's time to create
the physics store. We're going to go to
our folder doors. We're going to right click.
We're going to create a new blueprint
class of type actor. I'm going to call
it PP Physics Door. And we're going to open it. Now, for this blueprint, we're going to need
two static meshes. And let's select the message. Actually, it's just one. It's gonna be populating both, and we will just
rotate one of them. And move it a bit. These doors should
not be touching. Let's move them to the center of the blueprint a little bit. They should have a
gap between them because since they're
gonna be physics store, it's going to be bugging it
out if they are touching. Now, let's compile and save, and let's bring our
actor into the world. I think it needs a little bit moving somewhere
here. All right. The next thing we'll do is go enable physics
to these items. So I'm going to
select them both. I'm going to go to
the physics tab. Where is the physics here this and select
simulate physics. But that is not gonna help us a lot because
if I go and play now, we can see they just
bumping around. This is not at all.
This is just rubble. So that's what we want. Thankfully, there is
something called physics. Constraint, which is what
we will be using now. The tool tip says this is effectively a joint that allows you to connect two
rigid bodies together. You can create
different types of joints using the various
parameters of this component. Okay, the keyword word here, it creates something like
a joint, like a hinge. It allows us to control the rotation and the
movement limits, such as mechanical
arms, for example, or rag doll behavior
in more advanced. But for us, we will
just use it to set the limits to
create a dynamic door. So let's continue with how do
we use physics constraint? First of all, we need
to name the doors. And then we're going to need
two physics constraints. So we're going to have one. Let's add an arrow. So we know where front is. Okay, front of the
blueprint is this way, but we really don't
care about that. We're just going to
rotate the arrow and unparent it from
the static mesh. Just go to rotate
this All right. And call this door
and this one DR. So this would be constrained L, and this would be constrained. And compile, they're opposite in order, but it doesn't matter. What we're going to do is select the first
visit constraint. And I'm going to go
down to it settings and say component one name. Here, we're going
to use the door L. Make sure that this door L is exactly the
same as this one. No extra spaces, capitalization
might be important. I'm not really sure because if it's not, it will not work. Now, as you can see, it has already taken
the shape of our door. Basically, it shows us
the bounds of the mesh, but it shows us also with this line over here that
where our pivot is. So we're going to move to
this corner over here, and this is our pivot. The next thing we see is the round circles
around the pivot point. Which we should move a
little bit further here. Okay. Now, what
are these circles? Well, let's go below and we
will see some angular limits. Now, for us, we only
need one motion, so we will lock the second one, and we will lock the twist. Also, we only want it
to be on this rotation, and we're going to set the
first rotation with a limit, and the limit would be 90
45 is a little bit small. And you can see it shows us
the limits of the rotation. Now we're going to
do the same for Dor R. Let's one of this over here. Let's go name R. Let's set this to locked, and this one's limit and 90. But it is opposite. We do need to rotate it. Ops. Okay. And let's
rotate it 180. So let's go test it. It's not gonna work perfectly, but it's a good start. Let's bring we cared here, and we are passing through, and the door is flipping
around like crazy. Now, there's plenty of
options to fix this. We will toy with a
few simple settings. For example, first, we
have to fix one setting. Over here, I'm going
to select both. We have the angular motor, which we have the
angular drive motor. It's using slurp right now, which is, as it describes, alert between the current and velocity and the
target orientation. But what we want is
a twist and swing, which will decompose
the path a little bit. So the next thing we
will do is select each of the doors and go to
the physics settings, and we will enable mass. We will make them a mass of 80. You can play around
with the values, and we will increase
angular dampening also. This will hopefully fix A with the swinging. All right. Now, the only problem is that
they are left like this. They do not return to
their original position. So, this should have been
fixed by the swing and twist. But probably, yes, I missed I didn't click
the swing option, so it doesn't have a
target orientation, because the swing
and twist makes it have a target orientation. It means where am I
trying to return to? We could play with target
velocity and everything, but this is what we need to make them return into
the same position. So I'm going to compile
and save and press play. When it opens and returns
to the same position. Now, you could play a
little bit, but the values, make it more realistic. I don't know. When
there are two doors, it brings a little bit of depending on the
player's speed also. Ports, but I think it's fine. One door is too easy. No, one door is fine, two doors are a
little bit too hard. So this will be for
the physics store. We're going to see you on
the next lesson that we will do the teleport
to another level. Goodbye for now.
35. Programming a Level Change Door with Transition Effects: Hello, and welcome back
to Unreal Lenzing five Blueprint Mastery Door Systems
and Interactive portals. Previously, we almost finished
with our physics store. It seems I forgot
to add the sounds. Let's open the physics store, and it was a nice opportunity to show another collision event. This time, because this door doesn't really overlap
with the player. I blocks the player. We will
use the component heat. So I'm getting component
heat from this door, and I'm getting the component
heat from the other door, and we're just going
to play sound. And connect both to display
sound and for the sound, we're going to use
the Physics dot Q. And we're going to play
with the pitch again. We're going to do a
random float in range, and it's going to
be from 0.8 to one. And now, We have an awful sound because
it hits too many times. So my guess is that this sound needs some
concurrency settings. What are concurrency
settings? They're over here. It's a setting that controls
how many instances of the sound can play
simultaneously and allows us to limit or
manage overlapping sounds. Also, when a sound
can start and stop, and there is a lot of settings
to toy with in there, but our main use would be that. So I'm going to go to
the folder sounds, and I'm going to create it seems we have
already created them. So here it is physis do C which has some settings
already preset for us. Max count how many
times it should play. Re trigger time when
it should play again, limit to owner, like
limit to owner. This means the blueprint that
is playing it, basically. So if you had two blueprints, they don't seem
to this max count of one wouldn't be the same. They would play
twice the sounds. Yeah, there's a lot
of settings in here. That's what we will be using. So if I add this over
here, right now, Yep. The sound is much better. Now, another thing
that I noticed is that I really never
explained and never kind of used the rotation
component of the items. It does work, but if we
play and show collisions, you'll notice that
the collision is also moving around, which right now, it's not a big problem, but
if we had many of these, it would create a
huge frame lack. What we will do is we will enter the item blueprint and go to the construction script and get this rotating movement that it is let's explain it
since we didn't. It is a component that
makes the actor rotate. It makes the rotate based on the rules and the settings
that we input in here. By default, it's rotating in
local space and 180 degrees. Now, there is a way
to make this to be responsible for a
certain component and not a whole actor. And that node would be
set updated component. So we're going to
connect both of these here and we're going to connect the static
mesh over here. Actually we just kind
of copy paste it. So this rotating
movement will now only rotate the static mesh component and not the rest of the actor. So if we go and play and eject, we can see that it didn't work. Got a live testing. It's amazing. What is the item? Here is the item set updated
component, static mesh. Oh, I think it's because I connected it to
the construction script. It should be on begin play. Let's refresh. Yep. So you can see the triangle only moves. Yeah. So updated component doesn't really work on
construction script because it needs the game to
run to do something. So since in the
construction script, the game is not running, so the update component
doesn't really do anything. So this is why we needed
to bring it to begin play instead ofstruction script
because this is inactive. It's on the editor. We can see it doesn't rotate. Anyway, let's continue. We are going to duplicate the blueprint for
the teleporter. And let's call this
level changer. And let's bring it over here. And from what you're guessing, it pretty much has
the same setup. We need the same setup because we're going to be
porting in and porting out, so we do need all
these functionality. Now, before we start
programming this, let's just also create a simple
widget with an animation. We're going to go to right click in the widget
folder and go create a Widget blueprint
and user widget. Gonna name it W you fade. Because when we are entering
and leaving the world, we should be fading in and
out so it doesn't look bad. We're going to add a canvas
and we're going to add an image we're going to anchor the image to be full screen and zero
out the offsets. And the color should be black. Now, how do I make animations? There is a tab over here when I'm inside the
Widget blueprint. If I'm not, the tab
is not here anymore, as you can see, but inside
the Widget blueprint, a new tab appears here, which is called animations. Let's add a new animation. Let's call this fade. Animation. Let's call
it my fade animation. It shouldn't come with spaces. My fat animation and let's
double click to enter it. Here we have the tab
with all the animations. And here, when we
select an animation, we have the settings to use it. From the settings, we are going to select the Add button and add Image because I have
the image selected. If you do not have
the image selected, then you need to
select it basically and then press Add
and for this image, here we have our animation
track that we use a 0.5, so 02.5, maybe that's
enough of animation. We're going to add a new
truck to this image, and it's going to be
of color and opacity. Actually, let's just
do render opacity. Why complicate things. Now, it starts as a default with one where we
want it to be zero, and in 0.5 seconds, we want it to be one. So 0-1. And that
concludes our animation. Let's compile and save, and let's close the fade. Widget we won't need it yet. Let's actually close the
items and the physics store. And the character and the
key door and the teleporter. Let's open the level changer. Since we're going to
be changing level, we do not need the
teleport anymore. We don't need the location
of the other actor, but we do need to
create this widget, as we did in the begin play
of the game in the game mode. Let's open it to show
We created the widget, and then later on, we
decided when to add it to the viewpod or when to
remove it from the viewpod. Now we want to just create it Owning tier should be
the Taer controller, and the class should be paid and we will add
to Viewport instantly. The only problem is, we actually
need to open this again. So I'm going to open the widget, and I'm going to search for opacity then the opacity and set the default
value to zero. Because if I let it
to be one as it was, then the moment I add it, even if the animation is not even if the animation
plays right afterwards, then I would see a black screen, and then I would see the fade. So it would be not
the desired effect. Now, let's play the
fade animation. How were going to do that? We're going to call from
this widget, the fade, get my fade animation, and from that we're
gonna play animation. Now, using this animation, we're going to do get and time, and we're going to add
a few seconds to it. Like, let's add 1 second to it. Maybe one is a lot, maybe 0.5. And we're going to do a
delaying ad and connect this. So whatever happens
happens after the animation of
the fake has ended. Now, connect the sound, and we're gonna
open level by name. And the name, it
should be the name of the next level Tutor Map two. It should be exactly copy
paste here or typed, but it must match exactly. Now, we do need to connect the widget to the target
because it's playing animation. Okay, it's playing
this animation, but who is it playing?
The animation. Compiling save. Let's go
test what we created. It won't really work
completely. Let's play. And as you noticed, Okay, of course, first of
all, we don't have a spone, we don't have a player, but
the sound didn't really play. The reason is that we are just playing a two D sound
like we normally do, and this is not enough
for this situation. Because we are changing
level, this entity, this play sound only
exists in this level. The moment we try to
open another one, then a procedure starts that is destroying the
things in this level. How can we play a
sound that we will be persisting through level? What we need to do
is spawn sound to D, which, as you can see, has a
bigger tool tip over here. This function allows users to create audio components with setting specially for non
spatialized, non distance. Anyway, it has a
bunch of other rules. But what we care for
is if we open this, it has a persist across
level transition. So I'm going to click
this, and I'm going to use the teleport sound. I'm going to use the
teleport VR one. I really like that
one. But this sound will not play instantly. It is just spawned. It doesn't mean
that it will play. We brought it into the world, but nothing else happened. To do this, we're just going
to from the return value, this is an important part
that it has a return value as play sound to D doesn't
have a return value. This gives us an
entity to manipulate, to promote a variable, and do things with it. But what we want to do
right now is just play. And then we connect
the open level. And now, if we try to play,
we have a sound playing. But to be honest, the sound should be playing
before the delay. And then we open the
level. All right. Now, we won't be using
this node, actually. We won't be using just
an open level node. We will be creating a system that when you enter
from point A, the system knows
that it leads to point B and from point B, it goes to point C,
and maybe we will have a system to tell to the game that if I
teleport it from here, I'm teleporting back there. Maybe we will
explain it better in the next one because I think this is a nice stopping
point for this one. Goodbye for now.
36. Setting Up a Dynamic Waypoint System for Interactive Levels: Hello, and welcome
back to Unreal Engine five Blueprint
Mastery Door Systems and Interactive portals. Previously, we started with our teleporting door,
our level changer. Now, we added widget paid that when we trigger with
the overlapping box, we bring it into existence. We create it, and we
add it to the viewport, and then we play the animation and play a sound that we spawn, and it's going to be persistent
across level transition. And after a small delay, we opened the new level. And this brings us to discuss about three new things
that we will encounter. The first thing is
the game instance, which is a global class, a class that is being created
when we first run the game, and it's been destroyed
when we end the game. I mean, end the game by
exiting the application. So this is used to hold
basically global variables. It's a good way to
demonstrate it and how to access it
during gameplay, during anytime we
want, basically. There is plenty of ways to store this data a little bit more
complex like player states, and for us, it will
be a good example. The other thing I wanted to
talk about is a structure. We talk a little bit
about structures that transform is a structure, like if I create a
transform variable, is a structure of
basically three vectors. And if we break it, we can see these three vectors. Well, a structure,
by definition, is a custom data type that allows us to group
different variables, right? Now, this structure had three different variables
of the same type. Ours will also have two
variables of the same type, but it is a structure
of our own, a variable that contains the information we want
to customly containing. So first of all, we're going to go to Blueprints. We're going to click.
We're going to go to Blueprint tab and
select structure. Going to name this
ST level change. And it gives us a
variable by itself, and let's create another one, and they're going to
be the type a string. Actually, it could
be of the type name, but let's leave them string, and we're going to name
this current level, and the other one next level. And this is basically
a structure. We could have, for example, another one that says load
player health and another one that says player has ability to jump or whatever we wanted. It's our structure,
our kind of variables. So we're going to save this,
and then we're going to create going to go to Miscellaneous
and go to data table. And here, it requires
pick arrow structure. We're going to choose our ST
level change and press Okay. I'm going to name
this DT level change. And let's open it.
What is a data table? It's a collection of
structured data using the structure that we created that we selected for it to use. It organizes in row and columns that allows
us to easily store, manage, and access
this kind of data. Each row will be corresponding to one instance
of the structure, and it will have
its own variables. Let's create a few rows. Actually, we need more
and for those names, we're going to use exit. A, actually, exit A, tutorial. Let's say exit A tutorial. This would be exit, B, tutorial, and the other
one would be exit. A, transfer, and the
other one would be exit, B, transfer. All right. And I did one mistake. We don't want current level. We want to go back to the structure before we
do many more changes. We want this to be saying two
players start, basically. Player start because what
we're going to be changing is which player start
will be chosen. Like, for example, if I
left from player Start A, I will go to next levels player Start B or
player start A. When I leave from
player start B, I will go to next levels, play start B and back and forth. So we will create a loop that
I'm going from one door, coming back to the
same door that I came from and choosing a next door, going back to it's better
to show, basically. We're going to be
entering from this door. We're going to be
exiting from this store. When we entering this store, we're going to be exiting
from the last door Oops, not this one, this
one, over here. Let's fill in this information
to our data table. Going to be player start. When we're selecting each row, we can see down here
the row editor, which we can add
the information. The next level is
going to be common. But for more maps,
it will be useful. So our next level is
Tutorial Map two. So everything would
have Tutorial map two. Actually, not everything. These ones would have just tutorial them up, which
is the first one. Tutorial. Sopped.
Going from this level, we're going to tutorium two. Coming from Tutorialm map two, we're coming back
to tutorial map. Now, what is this player
start that I'm referring to? Let's first fill it, and then we're going to
be explaining it. So for the first row, it's going to be
exit a transfer. Gonna copy this. The next one is going to be exit B transfer. And I'm going to copy
actually the names I make this exit B tutorial and this exit A tutorial and
this exit B tutorial. All right. Now, the same way we use tags for the player pawn, the same way we can use
tags for the player starts. And if we go through the
details of the players start, you can see it has a very special object player start tag, which is different than the tags that we
have set already. So this would be the
start player start. Now, let's duplicate this. Let's add one over here. Let's make it overlap with this, which is the exit All right. I think this is fine. Then we will have
one more over here. And we do need a
teleporter here. So I'm going to
just duplicate this and rotate it like this
and bring it over here. All right. Let's overlap the
players start with the exit. It doesn't really
matter the exit, to be honest. All right. And let's do the same for
the tutorial map too. Gonna save selected. Now for this map, we also need to set the game mode override. So third person game mode, and we're going
to bring a player start This looks kind of huge. Yeah, I'm far away from
where I'm supposed to be. Alright, so we need to
teleporters here, too. So we're gonna go to blueprints,
doors, level changers, not teleporters. This over here. All right. Let's duplicate all this and let's rotate them. Okay. Let's compile and save, and
let's return to our map. No, we didn't add the
tags on the ones, so selecting the first one. First one would be this way. Let's get the tag. The
tag is Exit A transfer, and the other one would be Exit B transfer and
copy pasting the names, so no mistakes happened. And I think this would
be for this one. And we're going to
continue on the next binding all these together. So it starts making some sense. I'm gonna see you then. Goodbye.
37. Overriding Gamemode to Customize Player Spawn Functionality: Hello, and welcome back
to real Engine five, Blueprint Mastery, Door Systems
and Interactive portals. Previously, we finished with our data tables and
our structures. We also finished with adding
tags to our player starts. We placed player starts
wherever we want to enter and exit the doors, and we added the tags to
the player starts that are corresponding to
with this start, I shouldn't say start nice. Early mistake caught on, this should say exit a tutorial. All right. Now, we will keep the
player start right here. For now, we also did
the second level, the Tutorial two level. We added the player starts here and the corresponding tags. I'm also checking for mistakes. Exit B transfer. All right. And now let's go on and
create our instance. So I'm going to right click. I'm going to go to
Blueprint class. I'm going to search
for instance. And I want the game
instance. Here it is. I'm going to select
it. I'm going to call it GI doors Tutorial. And then we need to go
to project settings. And search for instance. And instead of game instance, we want it to be GI door
tutorial in game instance class. Now, I'm going to
close the settings. They don't need to be
saved. The autosave with every change we do. And I'm going to open
the game instance. And here we will create
a very simple event. We're going to make a
custom event and call it level transfer and
create an input to it. It's going to be of
the type string. It's going to come from. We're going to be promoting
this to a variable. And we're going to
start with Get Data TB. Not get data table row names, get data row plane. And this is the
node that retrieves us the information out
of our data table. We could have a variable here with the data tables we want, but we will just use it manually select it manually from
here, DT level change. Now, the own name, where this come from
will be our row name. As you can see, from string, it auto translated it to name. The next thing we'll
do is we're going to break the level change. We're going to promote
this to a variable, and let's call it active layer. Start and then we're going
to open level my name, and we're going to connect
next level to here. So what did we do? We created
a level transfer event. We started the came from, which will be the name of
our current player start, and then we found that corresponding row
in the data table. For example, this one
would be Exit A tutorial and the next player
start that we're saving is Exit A transfer. So Inside here, we are storing exit a player transfer
to active player start, and then we are
opening the level that we are supposed to open. Now, when we open
the next level, this information over here has stayed here as it is
because as we said, the game instance is
a global blueprint that stores information
through level transfers. Let's go back to
our level changer and change this open level. To call from the instance the new function, the new event. So we're going to
get game instance. And this is how we find the game instance as we
did with the game mode. We're going to cast
to GI Drs tutorial. We're going to make
it a pure cast. And now that we know that
this is the instance, we can get some information, which is the transfer
level transfer event. But as you can see, this
event needs this come from. So we're going to promote
it to a variable, and we're going to
be exposing it on spawn and make it
in IstansEable. We need to get this player
start plug and let's copy it to come from
in the teleporter. And actually, we do not
need the target teleporter, so we can safely delete that. And to be honest, we do
not need the capsule or the arrow nor the root. Yep, already looks better. And lastly, remember
that in the start, I said that we will override
the functionality where our game mode has a preset function on how
to find the player starts. We're going to overwrite this behavior and
create one of our own to override a behavior
that is already prescripted, precoded in any blueprint. We can go to the
functions, actually, not press the plus button, but over here, it appears
as an override symbol. So pressing this, you can see the functions that we can
override in this blueprint. We can select the choose
player start here it is. Now, the logic of how this will work will be get all the player
starts that we can find. Search for the
active player start. If you cannot find it,
choose the start location. We will make some code to search for the
start location also. Basically, that would be it. Now, how do we do this? Let's go back to the
third person Gao. First, I'm going to create a local variable
that's going to be of the tapullan and colli
player start not bound. And when we begin the blueprint begin the order of operations, I'm going to set it to true. Then I'm going to
get all actors of plus and the class
could be player start. Now, this is a node that is a little bit heavy
because it goes through all the actors of the
level that are loaded. But since it's happening
before the level starts right now, it's fine. Now, from this list, I'm going to pour each. And I'm going to check if I'm not going to check
I'm going to get the tag player start tag. I think it's called G player
Start tag and I'm going to compare it if
it's equal start. I'm going to select
a branch here. And this will be saving our
start the first player start. So I'm going to promote this to a local variable and name
this start location. Now, I'm going to promote again because if it's
not the players start, then I'm going to
get game instants. I'm going to cast to GI. I'm going to convert
to Pure cast, and I'm going to get
active players start. And now from this
play start tag, I'm going to compare if
these two are equal. If they are, then
that's our new start. Let's name this player start. So if it has the tag start, it is the start location. If it has the tag of the
active player start, it is the players start. We also need to set players
start not found to falls. And now in the end, we need to check if we found
a player start, if we did then Yeah, I promoted this to a variable and up to
a local variable. So I'm going to
delete this now and promote again to local
variable layer start. So I'm going to
connect this here. E. Let's bring the
player start here. And if we have not found, if this is not true, so it's false, then player start is the player
start we found. If the player start
is not found, this means that we didn't
find the active player start, then we're going to
set the player start, not get to the start location. Naming convention
here is not the best. Let's go test our
system. Let's compile. Maybe I need to
compile this too, of course, and compile
again. And let's play. So now I'm being hasty, I need to add the
players start tags. All this says also start. So this is exit B
tutorial. All right. The other ones we checked in the beginning of this lesson. So theoretically,
this should work now. We are here, we can go back. We can go back, so we can't
go back. I see nothing. So I'm guessing I haven't added to the next
level the player tags, the door tags to
the teleporters. Yep. That was it because
right now it was trying to figure out what to
do, but it couldn't. Alright, let's go back
to the original level. So going this way and
going this way, it works. So if I go this way, we reached the last room. But there is some
more things to do. Okay, this was not correct. Let's see what it all came from. But I just pasted this. Alright, it works. And
I'm off to nowhere. Why am I off to nowhere? First of all, it says trans
It says something weird. Exit B transfer. But I do have the same
mistake everywhere. It should be working. Ts. Let's test it again. Okay. So I'm guessing there
was some spelling mistake. Yep. We've got a transfer
system that works. Great. I guess this
is it for this one. I'm gonna see you in the next. Goodbye.
38. Groundwork for Save Systems to Preserve Door States: Hello, and welcome back
to Unreal Engine five, Blueprint Mastery, Door Systems
and Interactive portals. Previously, we finished with our multiple portal network
dynamic waypoint system. I don't know how you
want to call it. We finished from
teleporting from this level to a new level that is the
representation of this. We exit here and we
can go back and forth. From this gate to this gate
and this gate to this gate, and then from this gate to this gate and this
gate to this gate. But all these are in
a different level. So to do this, we created a data table
which their own names correspond to the tags
of the incoming level, the level that we
are traveling from, and it has the player start
names also of the level we are going to and also
has the next level. Now, all this is based on a structure that is
from two drinks. We use this in an event. In the game instance, which we said again, it's a global blueprint, and we created the level
transform that you come from the come from
comes from the gate, and we get that come from, which is corresponds to the
row name of the data table, and we get an
output of that row. Through the columns,
through the structure, we get the next
active player start and we open the next level. Now, when a level opens, we override the
choose player start. And we created a
small function that searches for all the
player start actors. And then if one of them
has the tag start, and it stares another one, if it finds it, that it has
the active player start tag. So if it has its
tags, it's all good. If it doesn't, then
we will get an error. But if it has its tags all good, if it finds an
active player start, it set that player start
as the default one. Now, let's continue with using this system to
demonstrate a save. So what we're going to
do is we're going to add the door here and
on the other level. Let's choose the one side door, which is very simple,
not this one. In any case, yeah, one way door, this one. We're going to
bring it over here. Well, here is relative. It's a little bit bigger
than it's supposed to be, but we're going to
make it a bit smaller. Maybe a bit bigger this 0.5. Let's say, 0.7. No, 0.6. I'm guessing 0.55 Yep. All right. It doesn't
really matter. I put it opposite, but just gonna rotate
it and it's fine, 'cause we're entering from here, so front side
should be this way. And I need to fix it again. So 0.57. Yeah, 0.57. That kind of fitted instantly. All right. Now, let's go
to the transfer level, the tutorial map two. Where is the level over here. And let's add the door again, which is the one where
is it one way door. This time, we need to make
it bigger. Would it be five? Five, it's a lot. Two, three, 2.5, 2.2 seems okay. Let's ring around. So maybe 2.4. Yep, 2.4 seems fine. All right. Gonna leave it as es, even if it has gaps, doesn't
really matter. So this door should be
able to save, for example. Let's go to Map. Let color code the maps so
you can find them easily. Okay, red will do. So what we want to do is be able to enter from here,
enter into this room. Open the door, maybe come
back or go the other way, and this door should
still be open. So let's begin in
a reverse logic. Let's start from door. What would this door need to
be loaded to load its state? Like we will need to set
somehow the door state. And depending on
the stored state, because we are saving on only full open or
only full close, we would need the final
degrees of open or close. So we would need to set
the relative rotation. Let's get the larp also. And let's go make some
room for these nodes. This would suffice. I wouldn't need a larp here. I would need a select And that would go
based on the state. So when it's open,
it's -90 degrees, -90 or -90, yes. And when it's closed or whichever
other state, it's zero. Well, for us, we are just
loading open and close, so opening and closing don't
save the current degrees. And locked would be zero also. But how does this
door know which door? If I had ten of these, how does it know
which door it is? For that, we would
need to create a custom ID. I'm
going to delete. Is this text used anywhere? Find references? No. But for
the D, I won't use this. I will use a string. Let's call this door ID. So this door ID
in the save file, would say, Okay, ID, this door has its stayed
open or it stayed closed depending on what it
has s. To call this change, we should create a call in
the blueprint interface. So we're going to go to
our Blueprint interface. Make load door. And this load door needs to return at least the
state of the door. So it would need to have a variable that is the
door state enumeration. But when we're
having a save game, we might have more than
one thing to save. We might have if it's locked
like the key item or no, no, that's a bad example. Maybe we would have
opening degrees. So maybe we would have different
things to save and load. So again, this is where
structures come in hunt. We're going to
create a structure, a new structure in blueprints, structure, and let's
call this ST door, save. Let's open it, and for
the first variable, let's set door state and
let it be E door state. And let's have another
variable that it would be the door IE. And this would be string. And to be honest, if you want
to change the order here, we can see this icon over
here, it becomes a hand. So we can drag and drop
them above and below. It's better to have
door ID first. I'm going to save
this structure. And in our BI doors, I'm going to put an
input of door stats, and it will be this structure. D, door, save. So now this structure gives
us when we load the door, it gives us all the information that we have saved for the door. Right now, it's very simple. It has just two variables, the ID and the state, but it could get more
complex as we wanted. So now let's go
back to our door. And compile. And let's implement the BI, I doors, the
blueprint interface. And now we have
access to this No, we don't because I haven't compiled the
blueprint interface. But now that I did, we do have
access to this load door. So I'm going to
bring this up here. I'm going to connect this here. I'm going to break the structure as we did with the transform, and I'm going to connect
the door state over here. Basically, this would be the
event that loads our door. When the door is
called to be load, which we'll talk about it
later in another lesson. This is all that it
needs to be loaded. Now, one more thing
when we are saving the door and we will explain more things in the next lesson. When we are saving the door, we need another function. Let's call it get door starts. And in this function, we're going to have an
output of the ST door save, and let's call it door dots. We're going to compile and
save and go back to our door. And double click
on get door stats. We're going to split
the structure. We're going to connect
the door ID over here and the door
state over here. So this function is used to get whichever door
starts with bonds. Now, again, if this structure
has more variables, we would have to connect more
info into the return node. I think this is it for this one. We're going to explain the
save mechanic on the next one. Goodbye.
39. Creating Save Game Mechanics to Maintain Progress Across Levels: Hello, and welcome back
to Unreal Engine five, Blueprint Mastery, Door Systems,
and Interactive portals. Previously, we started
with our Dor Save. We created a new structure, is holding the door ID
and the door stats. Also, we created
two new functions in the blueprint
interface, the load door, and the get door starts, the load door has an
input of door stats, and the getdor stats has
an output of door stats. Then we went on in
the Y Way door, we created the event load door from the blueprint interface. We broke the door stats. We set the door state to
the saved door state, and we set the relative rotation based on the stat that we load on the door
state that we load. We also filled the
get door starts with a new variable that is called the Door ID and the door state. And the door ID should be
an instance editable and exposed on spawn so we
can fill it on our own. Because when we are
saving the doors, they need a unique ID. So when we load the doors, they know which door is
which so they get loaded. Now, speaking about
saving loading, we're going to need a
new blueprint type, save game object blueprint. To create it, we're
going to click. We're going to go to Blueprints,
new Blueprint cross, and we're going to
search for save game. And it's here. Going to select it
and name it So Doors. Yeah, so Door. Let's open it. Now, this is the file that is getting written
in our computer. It is a serialized file. It has this property
being serializable class. It is there to encapsure game data to be
stored persistently. This can have any
kind of data we want. Right now, we need a structure, an array of
structures, basically, because there could be
many doors, SD door, save. And let's make it a array. Let's call this door door save. Starts. Door save stats. Yeah. Let's close
this. We're not gonna need the SO doors anymore. We're going to call
it but not use it. And let's go to
our game instance to create our save mechanic. Now, the first thing we will
do is create a custom event. And we're going to
name it save Doors. And the first question is, does save game exist? Now, this node has slot
name and user index. We can have multiple
slots to save. So we're going to
promote the variable. It could be slot name one, slot name two, slot name three. But when you are
loading and saving, the slot name must be the same that we will demonstrate
this better in action. So let's give it a default
name doors save one. Let's put a branch here
because it's different when we don't have a save in this slot and different when we do have a slate in the slot. It's like overwriting
the save and saving a new item in this slot. Let's start from the
new item in this slot. So on folds, we're going
to create save game. And the save game object
would be the SO doors. We're going to promote
this to a variable. We're going to call
it save game object. Now, we won't have a complex mechanism
to detect our doors. What we will do is just
get all actors of class. We could have of tag, but class is fine. And let's search
for one way door. And from all the doors
that we find for each we're going to
get door starts. So now, every door that exists, basically, it gives
us the stats. And since it's the first save, the first time that we save, we can just get our
save game object, get our array of
door save stats, and just add all these
stats over here. So no one would think
that we've done saving, like we passed the information
to the save game object. We got the starts and add them to this array.
Well, not exactly. We do still need in
the end of this for each loop to save game to slot. And here we do need
a reference of the slot and the slot name. So again, this is why I said
that these are correlated. They're bind together that we
are checking for this slot, we should not change
the name of the slot until we complete all that
we are doing with this slot. This would be just the case that a save game doesn't exist. What if a game save does exist? Then we're going to load game on slot and the slot needs
to remain the same. And why we are loading because we do need the
current save data. So we want to
manipulate this data. So next thing is to
cast to our save game SO doors because the game
that we loaded from the lot, we have no rise just
a safe game object. We don't know which one it is. So right now, we
loaded the SO doors. Maybe we had other saves, too. We had a save for bindings. We had a save for
character stats. We had a save for quests. This one is for the doors. Again, we're going to go
through all our doors. So I'm going to copy the get all actors from class
and the four loop. Actually, I did need to
get doors touch too. Now I'm going to
create a variable, a Bolling variable
and call it New door. I'm going to set
it through here. Then I'm going to get our save game object that
I haven't set. Yeah. After the casting, we should set our save game object
to our doors. Save because this is the save that we are
manipulating. We got it. We got it load, whereas
we created it before, we saved it instantly
because it's SO doors, but now that we are loading, we didn't know
which type it was. So we cast it to SO doors, and we saved it as the game object that
we are manipulating. Now, this object has our
array of door starts. And for each of the doors, we want to pull each
loop to get the ID. And what we're going to do is
get also the ID that we got from the four loop of all actor class of doors and
check if they are the same. Sorry, not this equal
has an exact string. And if they are Then we just set this array element. From here, set array element from the array because we
don't want these stats. These are the save stats. The ones we want are over here. Going to make a readout
node to make it more clear. And I read out here and I
read out here and over here. The stats that we are saving, the new starts are coming
from all the actors of class, the ones that earn the map. The starts that
we are comparing, if they have the same
name are from that list. So if they have the same name, we need the index of that list. And then we turn the new door off because
this door is not new. I already exists. Now, when this four
loop finishes, we're going to ask the question
is it still a new door, or did we find one
and change the stats? If it is still a new door, then we're going to
add to this array. Let's read out this over
here and this over here. Go to unspagt fire a little bit. And wait. Now, it's not a new
if it is a new door, we're going to add to
the door starts from the saving game,
add to the array. And we're going to
add the stats that we just got from the
doors from the map. All right. Now, this would be our
save to comment it, a press and I will
type save game. So now, this has a comment. I know we didn't
comment anythings, but we should at least
show commenting. I think this is it for this one. We're going to continue with the load game on the next one. Goodbye for now.
40. Programming Game Loading Systems for Saved Progress: Hi, welcome back to
Andrea Engine five, Bluepin Mastery Door Systems
and Interactive portals. Previously, we finished
with our save mechanism. We checked if the
game already exists. We used a slot name to do that. And if it exists, we load the game, and we cast to check if it's our save game
objects that we created. We store to a variable. We go through all our actors. We get their stats. We set a new door variable, and we for loop all the
save doors that exist. They are the same if the
door already exists, we store the new data and
we check the new doors off. If it doesn't, we just
add it to the list. Now, maybe I should have started from the force branch as we did, and we create a safe game. We get all the doors
of them up and we add them to the list
of the safe games, and then we save the
game from slot to slot. Something that we did not do
over here that we should. So I'm going to copy this save game object and save slot because we promote
them to variables over here. And in the first loop, after we go through all our
actors on the map, then we will save to slot. Now, why we do it over
here and not over here? Because this is a
nested for loop, it means that for
each one of these, do something for
each one of these. So when this finishes,
when this finishes, it still has to go through
every door that it has find. So when it has gone through all the doors that it has find, then we save to slot. Now, let's continue
with the load game. So I'm going to create
a custom event. Gonna call it load. Going
to call it load loads. And let's begin coding. So first of all, again, we will ask does
save game exist? Because if it doesn't,
there is no point, not the new doors,
the slot name. There's no point of
loading anything. Only if it's true,
we're gonna load. If it's not, there
is nothing to load. We're going to load
game from Slods. And the slot should
be the slot name. Now, again, we need to cast to O doors and promote this
to the save game object. The next thing we do is
get save Dor save stats. I'm going to promote
these two variable. Then we're going to get
all actors of the door, one way, one way door, because this is the
one that we're saving. And we're gonna pour each loop and we're going to get door
starts. Not this one. On the message one because the other one was kind
of an internal call. Now, we will do the same
with the door safe stats. We're going to a for loop.
So we're going to create our nested loop again
and we're going to compare the names
of the doors we just loaded over here compared
to the doors in the level. So we're going to equal exact. We're going to branch
And if they are equal, then we're going
to get this door. This is the door reference,
and we're going to load door. Again, not this one, the message which will set the stats
of the loaded door. All right. And this
would be load. Like our doors this finds the door that we
are it is in the map, then it will run this function. It will set the state, and it will set the relative
rotation accordingly. And now comes the question, when do we save and
when do we load? And how does the game know if it's a loaded game
or a new game? We will create a
very simple system. We will make one bullion
into our game mode, one variable of type Bullion, and we will call
this loaded game or checkpoint or
something like this. When we start the game,
we want this to be off. But our first save, our first checkpoint would
be when we change the level. This is why I kept the
level changer blueprint on. I messed something up. Yep. Okay. So in this blueprint, when we change the level and we use the GI
tutorial to do that, we are going to set
the loaded game to through and also we're
going to save doors. So when we pass
through the level, we are setting that
the checkpoint is on. When we come back, it's still
on because the game mode, the game instance is global. It holds the stats that
it has set in there. And when we come
back, we will load. When that load
when will we load? Well, inside the game mode, since the game mode runs
every time a level is opened, we will ask, W is the
game mode? Here it is. Let's go to begin play. After we make the widget, we're going to get game instant. We're going to cast to GI. We're going to make
it a pure cast, and we're going to
get load that game. So if it's a loaded game, we're going to put
a branch here, we're going to load dolls, which is a function that
loads all the dolls. Now, the last thing we need
to do is go and ID our doors. Let's give one ID to the first
door, this one, this one. Let's give it F one. I don't know why F,
but it's a fine ID. Let's say that this is F two. Now, since we want this door
to correlate to correspond, not correlate to the other
door in the level two, they need to have the same ID. So this one would
be F two as well. Was it a capital? Hmm.
I'll go check right now. Yeah, use capital. Okay, so these stores share
the same save file, so they will share
the same state. Hopefully, everything
will work out. So let's go test. Let's
check it's closed. We're passing through here.
We are opening the door. Let's pass from here,
and the door is open. So our safe load works. And if I start the game
again, they should be closed. So yes, they're closed. And the moment I pass from here, I left it closed, so
it will be closed. Right now it's saved it in the closed state,
so it's closed, passing from here, opening the door, exiting the other way. I can't really see from up here, but I can eject, and it is open. So our safe load mechanic
works perfectly, and I think this will
conclude this one, and we're going to
continue on the next with our VFX door. Goodbye.
41. Designing a Door with Functional Handles for Immersive Interaction: Hello, and welcome back
to Unreal Engine five, Blueprint Mastery, Door Systems
and Interactive portals. Previously, we ended with
our load and safe mechanic. We called our load game in our third person game mode
that when every level starts, since the game mode is running, we asked the question,
is it a load game, a variable that we saved in the game instance, loaded game. Then if it is, we
loaded the game through our event that we created in
the game instance as well, which loads the game using
kind of the same mechanic. But instead of save, we load each door. Then we went on and added the change on the level changer, the save doors and the
loaded game to true. So the checkpoint, the save game starts when we are going
to the next level. And when we come back, the game still is a loaded game, and we can see the
effects of save and load. Let's continue with
our final door, the VFX door that we will
duplicate the one way door. Let's go to our doors. Let's find the one way door, and we're going to
add a handled to it. So I'm going to duplicate this. Let's call this VFX
door, and let's open it. Now, to make it more special, we're going to change
the color to door red. And we're going to also
add a new started mesh. That will represent the handle. So let's name it handle. And for the static mesh, we will use the liver. I think it's one. No,
two. Yeah, the liver two. So let's place it in place. Let's rotate it. Let's
bring it over here. It is a little bit big. Gonna make it half size. So 0.5 scale. And bring it bit forward,
and that's fine. Now, in the begin play, I'm going to store its rotation. So get relative rotation, and I'm going to promote
this variable and call it handle original
relative rotation. Let's also add the
sounds of the door, so we can actually
copy paste them. Let's bring this over here. Let's close all the tabs to
the right, compile and save, and let's bring Let's
opens double door. Yeah. This one had the sounds. So I'm going to copy
paste the sounds from here to the VFX door. Going to close the two.
We don't need them. And I'm going to close
should be the lower pitch. No, that's actually open. A. So that goes to play from start and the lower pitch should be from open
because it's closing. And actually, you
know what? Let's just connect it to reverse and play. So the door is more lively. It opens and closes while it's doing the opening
or closing animation. And to make that more complete, let's change the
widget update to say close while opening and
open while closing. All right. And we do not want to remove the widget when it's
opening or closing. So this should go to reverse and closing should go to play because when
we are closing, we are opening and when we
are opening, we are closing. Okay, I think this will do it. Now, let's add the
handle animation. We will do it before
the once, of course. We will bring the handle and we will set relative rotation. Going to add it over
here. And we're going to learn a rotator. Actually, you know
what? We will not use the handle
original rotation. We will just what is
this weird rotation. This should be -90, 90 and zero. All right. Yeah, that rotation
was really weird. If it was saving that rotation, it would be very hard. Now, why this happens, there is something
called Gimbal ok and something called
quardans of the screen. And sometimes these things
can mess up a little bit. So let's go from -90 and -90. To let's say 40. No 400, 40 and -90. I think it should be -40 also because it's 90 if
I rotate it downwards. It's positive 40. But here, it's minus. Even if we see positive
on the axis down here. Anyway, let's compile and save. And for Alpha, what we will use, of course, shortest path. And let's create
a new flow truck. So at the flow truck, let's call this handle drive. The first one door
Alpha drive. Okay. So I have to do this by mouse if I just
zoom it zooms out, controlling chief
doesn't do anything. So two points,
actually three points. One is zero, zero. The next one would be, how
much is the first time line? Half a second. So the handle should
be half of that. So total would be 0.25. That could be zero again. And the middle of
that would be 12.5. So 125, and it would be one. Let's compile and save, and let's connect our handles
our handle to our alpha. So this means it will rotate
down and rotate back up. And that would be our handle. So let's bring our door here. Make it bit nicely because it
has that glow Express play. We have to travel. All right. And it opens opposite and
the handle stays over there. But we can see it is animating. Alright, so let's change
toward where it's open. Let's set that to 90. And let's make the handle
a child of the door, so it moves with the door. And also, let's bring
our player start over here so we don't have to travel
three times to come here. So right. Anything open, close while we are
opening and closing. Let's move it little
bit to the side. And let's add something more. Let's add an actual
visual effect to happen when the
door has finished. But let's do this for the next lesson. I'm
going to see you then. Goodbye.
42. Finalizing Handle Door Mechanics with Particle Effects and Visual Enhancements: Hello, and welcome back
to Anreal Engine five, Blueprint Mastery, Door Systems
and Interactive portals. Previously, we started
with our VFX door. We changed to make the door open and close while
it's closing and opening with E by using the switch and using the opening
and closing outputs. And we also added handle a handle in the door that we
parented to the Srtic mesh. And we animated it using
our timeline by setting the relative rotation of the
handle to a static rotator. Now, we said that we're going
to add some visual effects, but let's add a few more things. For example, let's add
a sound to the handle, and this time, we're going
to use an audio component. So to demonstrate its use. So let's call this D sound. So, what is this
audio component? As the static mesh
components and as other components,
it's a shell. It's a shell of a type. So this type is audio. It's empty, so we have to set what type of sound it plays. And we're not going to do
this on the detail stuff, we're going to do it on
runtime because since it's an audio component of the door, it doesn't disappear. When we play sound to D, it creates sound
and it disappears. Now it's a component. So it's a sound that we have it as a variable in components. You can actually find it
door sound right here, audio component, and reuse
it and change it every time. I'm going to bring it over here. And when pressing E, I'm
going to do a sequence, and I'm going to stop, first of all, whatever sound
is this door sound playing. The next thing I'm
going to do is I'm going to set a new sound. So I'm going to use
the set sound node, connected over here,
maybe a little more room. And for the sound, I'm going
to choose door handle. The next thing we need to
do is just play the sound. And that would be it. But let's use the door sound, the audio component
for a second use. I'm going to copy
paste all this. I'm going to go in the end
of the timeline finish. And when I'm closing
the door, not always, just when I'm closed the
door is closed, not open, we want to make some room
to make this more visible. Let's get this over here. And on the close on the
backwards of the timeline, basically, we are going
to connect this logic. Let's bring it over here. So now, when the door
is actually closed, it will play a closed sound. So let's choose door, close. So now, our handle
plays a sound, and when the door
is actually closed, it's actually playing
a sound that is closing that it closed. I heated close animation
finished, basically. Let's test this out.
Let's compile first. Let's play. Okay. As you can see, when it tries to play the sound of the handle, it gets overetn by the
sound of the door closed. Alright. Now, this is happening
because we are stopping the door sound and we are playing a
new sound over it. So since this sound
hasn't finished, where is it over here, hasn't finished
playing when we are closing the door,
it gets stopped. What is it? Over here? It gets stopped. It
says a new sound, and it plays a new sound. The next thing we will do is, uh go to our map and demonstrate a little bit
the get all actors with tag because we
demonstrated the get all actors of class that we're getting all the
actors of the map, and then we filter
out the class, and then we figure out which
actors are the ones we want. Now we're going to do it with
a get all actors of tag, which doesn't go through
all the classes, all the actors in
the map, just goes through with the actors of tag. It's much more optimal node. To do this, first of all, we're going to bring
our particle system NS fireworks in our map. Let's place it somewhere. Let's not activate it. So I'm going to go
to its details. As you can see the
particle by default is activated the moment
I add it to the map. Now, if I go over here in
the details and search for auto active will be turned off and now
no more particle. So let's also search for tag and go to Actor tanks
and add the tag P. Gonna move it over here, move it over here, right? This behind the door. Okay. Now, let's activate
this particle. And let's do a trick. Since I want this to happen, again, only when
the door is closed, let's activate the
particle like when the door has closed completely, then the particle activates, not when the door is opening. But I do want this to be
common in both functions. Now, I could separate
this and actually add it somewhere here or after here because it
updates the widget. But what we can do is just to show a little
bit trick here. We're going to do
a sequence again. And now we can have this as
a separate functionality, separate logic for when
the door is closing. Now, I'm going to do
get all doors with tag. And the tag will be P for
particle that we just created. An interesting thing
would be to see that this one is getting all actors of tag,
not all components. We have our component in the player on the
capsule that is again P. And here we have an
actor with a tag P. An actor is not a component. So this node over here would not look
for the player class. So if I do a print string here, for each two, and actually,
I don't need to do it. I can't just do a print string and get the length of these. And connect it with
the print string. What we should see when I press play and open and
close the door is one. As you can see, it
doesn't search. It doesn't find the
character component that has attack P. It's just search for actors. That was just a demonstration. We do not need the print string. But what we need to do is get the first
copy of the array. This is another array
node that we can get a number from the list. So we're going to cast to
Niagara system, Niagara actor. Because we did get the actor, but we don't know what
type of actor it is. We only have a tag. If it was Gepoactors of class, we could filter out the class, and then we could have
direct access to that class. But now that it's
GetOactos of tag, we need to cast to our result to ask if this is the
class that we want. And from here, we're going
to get Niagara component. I think it's on the bottom, yes, and set activate. And as you can see,
I again needed to get the Niagara component
because if I draw from here, activate you can see it directly leads me
to Niagara component. This is a Niagara actor, but what I'm activating is the Niagara component
of that actor. So I'm going to set reset. Also, this means play the
particle from the beginning, and let's play a sound
when this is happening. And to do that, we're going to we're not going to play
the sound endless. Let's play 100 times,
100 fireworks. It won't correlate to the Particle, the particle will stay alive after the
hundred sounds played. But 100 sounds, I think
it's enough to make it. Okay, so we're going to do N. And instead of
finding it here, which is a hassle, go to press N and
click. Just bring D N. Going to set the N to 100. I'm going to do the
delay over here, so it doesn't play one sound
after the other instantly. We're going to do a
random arranged float. So we give it a little
bit of randomization. Let's do 0.5 to one. And let's play sound to D. That we're also going
to play with a pitch. We're gonna do random
float in range. And it's going to
be from 0.9 to 1.1. For the sound, we're
going to choose fireworks and then we're going to need to
call this again. I'm going to create
a custom event and call D and fireworks. I'm going to connect
it over here and I'm going to do fireworks. So this creates a small loop
that will play 100 times, and then it will
not play anymore. But before we go test it, let's also add a little
bit of a cinematic. Let's add something that we can see the fireworks
in our player. To do that, I'm going to
bring a camera camera actor. And I'm going to right click
on the camera and pilot it. Not Pivot, pilot, camera
actor here it is. So now I'm actually
moving the camera. You can see up here,
pilot actor camera actor. So right now I am
basically the camera. So I want a nice view
of where I want to see maybe could be over here, to be honest, we
could see everything. And I'm gonna trust
to came Actor. And how do I possess
this camera? How do I change the view? Well, there is a very
simple node called Bt view Par get Blend. But as you can see, I
cannot call it from here. The reason is that I need to get player controller first
because this is a controller. The controller has a
camera and manager. This is who is
supposed to do this. So if I'm just dragging from a random execution,
it cannot give me this. It can actually, if I do set view target with blend
and turn off contaity. I can see it here. You
can see game player. Now, because player game and camera manager are children
of the player controller, they are included here
in a very broad sense of how classes work and
inherit from each other. Anyway, we're going to do a
set view target with blend. And if I turn off contentity,
I still can't see it. Ah, here it is. Maybe
everything something wrong. Anyway, from the player
controller, we can get this. Now, the new view target would
be our camera actor ops, and the previous one
would be our controller. I go to compile and save, let's set the blend
time to 2 seconds, 2.5, and let's test it out. So gonna press play
gonna open the door, and when I close it, we
are supposed to blend view target and
see the fireworks. Okay. The fireworks worked, but the camera didn't
because I left the tug pin. That was anticlimactic. So second time is the charm. We're gonna open and close. As you can see, I can
still move the character, which is not a big deal. But if we wanted to stop this, we could just go over here, get controlled p
and disable input. But I do like that I can move
the carpet, to be honest. And now I cannot
move the carpet. Now, you see, the
open has stayed, so there would need to be a new code here to
remove the widget, which actually we can easily do. Kind of copy paste this. The remove widget
from the game mode. Et's clear it out
a bit. Let's play. Yep. The widget is removed, the door is opening,
and we have fireworks. All right. Now, let's get the player
start in the beginning. The player start
with a tag start. So our map is complete. And let's run through it. We go here, we approach
the door, it opens. We step over here, it closes. We use the level
blueprint to do this. We created then a
door blueprint that opens with E and closes. Then we went ahead and
created a door that opens and closes and
opens opposite the layer. We made it a double door and
we added some sound to it. We made a lock from
the other side door, a short cut door. That the player needs to
be on this side to open. We went and made a
puzzle door with a lever that it needs a
single lever to open, and the liver opens, sends the door sends the door, the message to unlock. And then we created a two lever system that the
door checks the levers. We created some physics
over here with the boxes. I think it was two,
yes, the cheat, we're pressing two, and we have the sliding door over here
with two pressure switches. We have a small puzzle with buttons that the door opens and closes if
the puzzle is correct. We also have an item door. If you pick the wrong one first. And then we have the telepot. To another location of the map. We have our physics store. We have a teleport to another
map that we demonstrate the save ability that we can
see the door is open here. And if I go through again, we close it, go over here. I'm going to eject, and
we can see it closed, and we are changing levels
through all this procedure, and then we have our VFX store. That has a handle creates some fireworks
and changes our camera. And I think this would be it. Congratulations
on making it this far in the Door series tutorial. You master the essentials and are ready to face the
challenges ahead. Thank you for following along. Your journey doesn't end here, so stay curious and keep exploring until the next
time, happy earning.
 3D Tudor, The 3D Tutor