Transcripts
1. Introduction : Okay. So here we are, unlocking your inner artist and how to begin drawing
the portrait. My name is Braden Messer, I'm an artist author Youtuber, and today I'm going to be the one that
teaches you how to draw. This is number one of a three part series
that I am making where I'm going to teach you
how to a portrait. In this class you're going
to learn how you can use the Luis method with the Sorrow method by fusing
those two methods together, give yourself a really awesome proportionally accurate
render of a reference photo. And here's what that's
going to look like. This class is comprised of
seven different lessons. The first lesson being where you begin to draw
your lumus head. The lumus method is essentially a mannequin that you draw in order to give you structure so that you can begin to place your
facial features. In lesson two,
we're going to move on and I'm going to
show you how you can place the ear and the
contour lines of hair. We are then going to move on to the next lesson where
we compose the nose. And I'm going to show
you how the nose and the eyes work together
so that we can get a really accurate
placement of that nose. Then the next lesson,
we're going to break down the eyes and
I'm going to show you how to use frame lines
so that you can build that underlying structure for your eyes and how they
plug in to the nose. Now we're going to move
on and I'm going to show you how the mouth
is constructed and how we can use the sorrow
method and plug in those planes throughout the two dimensional ahead that
the Loomis method gave us, so that we have an extremely
well structured portrait. Then the next lesson
is going to be all about hatching and
cross hatching, bringing value to the drawing in different respects
and introducing volume, giving ourselves form. We're then going to move on to building out the hair
and I'm going to be explaining line quality and
how you can begin to leverage that technique in drawing
the hair so that you get the most dimension out
of it that you possibly can. And then we're going
to wrap everything up, we're going to go over
final detail work and finish this portrait
off with a bang. Yeah, that's pretty
much what to expect. Now I will say that
if you find yourself watching this class and doing
your project and thinking, man, this is great, I'm just, this is really working for me. Then I would highly
encourage you to pick up my book,
Drawing the Portrait. Step by step Lessons for Mastering Classic
Techniques for beginners. I will provide a link
in the description of the class so that if you want to pick that
book up for yourself, by all means you should
definitely do that. Now, I'm excited for your
projects and your reviews. Make sure that after you upload your project for the class
that you leave your review of the class by leaving
the review that allows me to showcase your project
in my monthly newsletter, which comes out in the
first half of every month. So it's a great way to showcase your art and
get your name out there. Because the newsletter
goes out to thousands of fellow artists
here on skill share. All right, that's it. That's all. I hope
to see you in class.
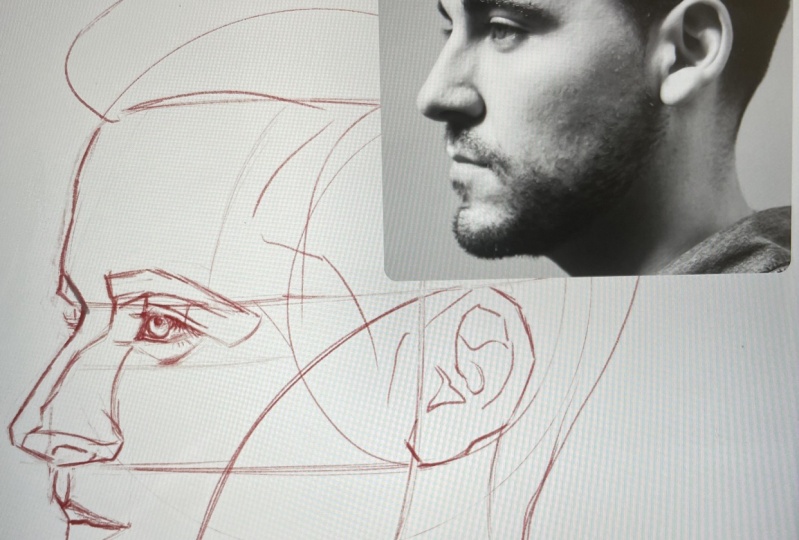
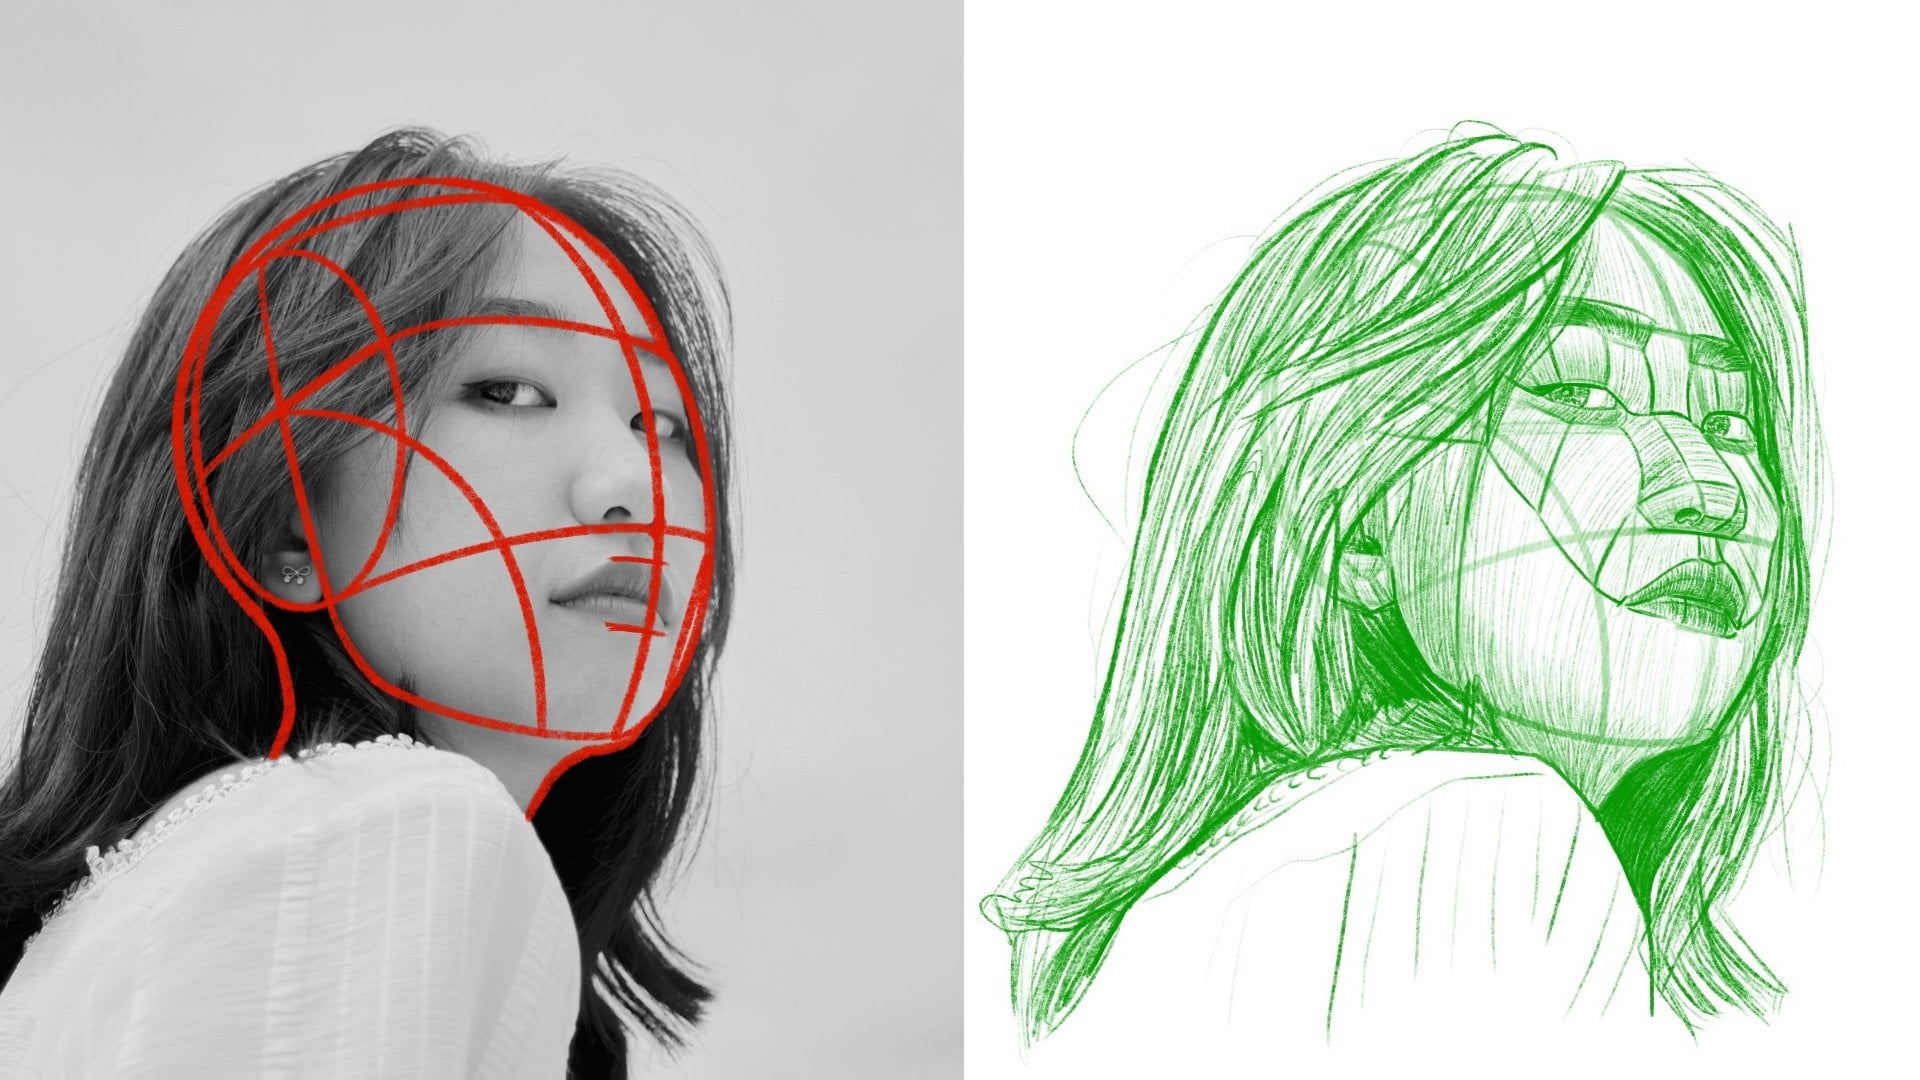
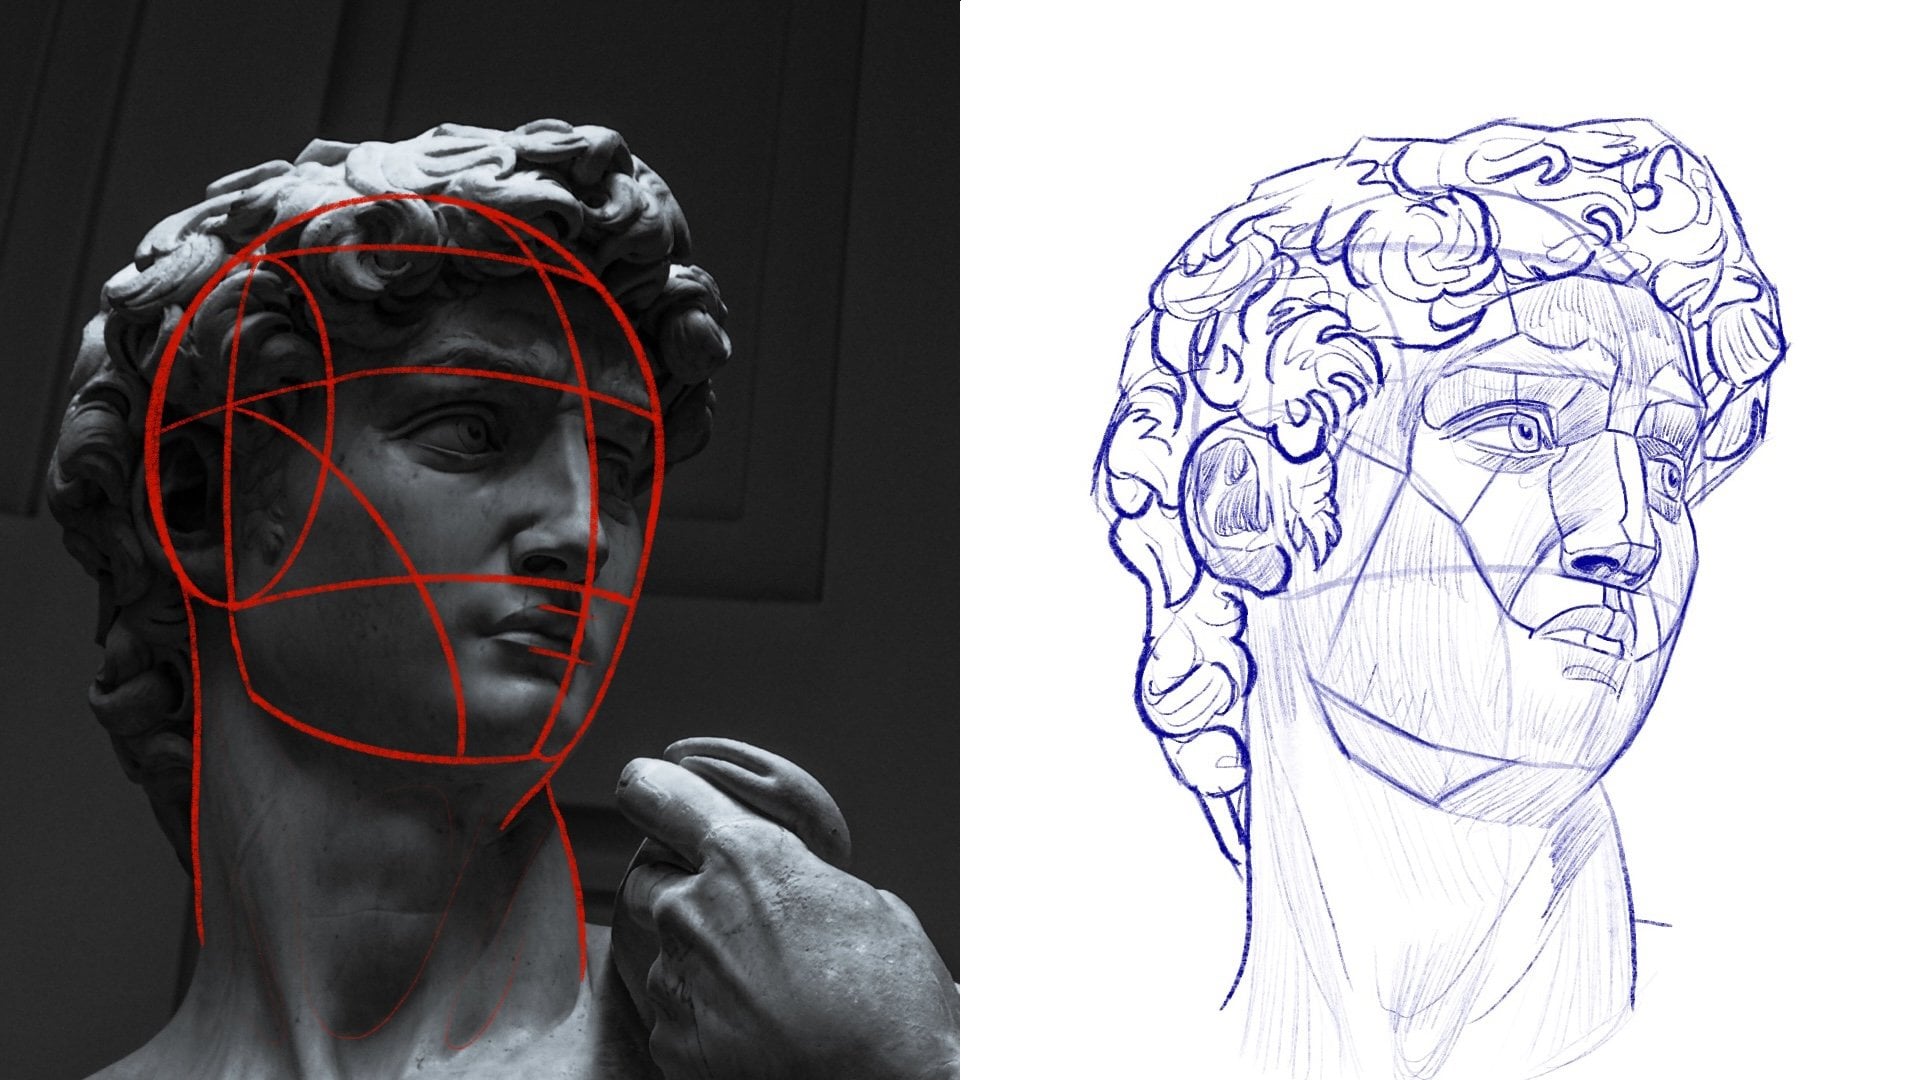
2. Drawing your Loomis Head: All right, step
number one is that we want to draw a circle. There's two ways to do this. You can either use
a compass tool, which will give you a
perfect circle every time, or you can draw it manually. Be aware that it does
not have to be perfect, so long as your circle's height
is relative to its width. Then step number two, we
want to draw our oval. Now when you're drawing this, I want you to visualize
that the top of that oval needs to align roughly with your
subject's hair line. The bottom of that oval needs to align roughly with the bottom
of the subject's nose. Then we're going to
place our vertical, horizontal axis lines. And this helps give us
a better understanding of the head as it sits in space. Then once we have the
axis lines established, we are going to pull
over our hair line. We are going to extend the horizontal axis line
over for the brow line. And then we're going to
bring over the bottom of the oval to establish the
bottom of the subject's nose. Effectively, what
we've done is we've split the face into
two equal sections. And then the bottom section, from the bottom of the nose to the chin will
be equal distance roughly we are
going to establish that with the center
line of the face here. And then we're going to extend the vertical axis line down. And then connect those two. And that gives us the
jaw of our subject. Now the center line is the far line of this face because we are
dealing with a profile angle. Okay, then what we're
going to do is take your eraser and just erase this initial part of the circle, even back to about right here. And then we're going to
extend the bottom of the neck on the back side, and then the front of the
neck on the front side. And then we're going to draw
in these anchor points right here for the top lip
and the bottom lip. If we look at our
reference photo, we can see that his lips are fairly small and they're
pressed together. Then we have our cheek
playing line right here that more or less is lumos head. And this gives us the
foundation that we need to draw the rest
of the portrait. Now for me personally, what I like to do, just so I don't have a floating
head in space, is I like to draw in
the collar or the shirt of my subjects for here,
get this color right. I'm just doing nice short
polls with my pencil. Now, the thing with
polling lines, whether you are doing longer
polls or shorter polls, is when you do shorter
polls like this, it helps you estimate the proportions that you
are laying down easier. You can actually see
proportional discrepancies sooner by doing shorter polls like this
versus if you were to do one long pole while you're
committed at that point, it's very hard to adjust
without having to erase. Okay, just be aware of that. Remember the only reason why we're drawing in
the shoulders and the collar is just to give the portrait a little
bit more dimension. We're not going
to be focusing on detail work with the collar
or the shoulders much at all. But I just want to lay down
the foundation while we're here so that we have it moving
forward with our portrait. The main goal of lesson one is to iron out
our alums head. Now if you struggle with
any part of this lesson, I would guess that
you're probably going to struggle with
placing the oval, oval placement and oval height extremely important
because if it's off, then the rest of your facial
features will be off. Okay, So just be aware of that. Now, go ahead and take like
a needed eraser and just hit your loomis head ever so lightly so that it's more
or less transparent. And we're going to move
on to the next lesson.
3. Place your Ear & Hair Outlines: All right, so this
is where we're going to start having some fun. We're going to place the
ear and then we're going to place the basic contour
lines of the hair. All right, referring
to reference to the one that has the lumas head over the
original reference. Right here is where we
want to start drawing the contour lines of
the subjects ear. Now the way that I
like to do it is I like to start with the
outer edge of the ear, which by definition is
what contour lines are. Right, but just go
nice and light. The reason why we want to
start with the subject's ear is because it is very easy to place on our lumos
head initially. Then what we can
do is we can use the subject's ear as
the basis for gauging, proportionally speaking,
where the rest of our facial features
need to live. This will also help us, especially when it
comes to the hair, to give us a little
bit more concrete idea of what our subjects
head shape looks like. All right, now once we have the outer lines drawn
in for the ear, then you can go in and
you can start to draw in the contour lines
of the inner ear. And this will give the ear
a little bit of character and it'll make it more accurate
to your reference photo. Okay, But yeah, something
just like this. It's important to ensure that when you're
sketching your ear, just go nice and light out of the two grips
to hold your pencil. I would recommend using the
overhand grip for this. All right, now that we have that ear placed
on our lumas head, I then want to start to establish the contour
lines of the hair. Now bear in mind this reference has more
or less a fade haircut. And because of that,
his hair on the sides, in the back of his head are
going to be very short. The lines that we
are using don't need to have a very
thick quality to them. In fact, the thinner the better. But then just like
this, we're going to go up on the front
side of the ear, and then we're going to
go on the back side. Notice how the hair line protrudes away
from the lus head. All right, remember the
lumus head is not absolute. It is just a mannequin for
everything to fit onto. All right, so think of it
in that context right here. We're going to go up to
this hair line that we established with the
underlying lumus head, and we're going to use that as our basis for pulling
our hairline over. Just like this. Right? Just like that. Okay. And then right here
where the hair ends, I'm just going to pull
up and back up and back. Just like that. Yeah, that's looking
pretty good. But now what we're
going to do is I'm going to pull this line, I'm going to pull it all the way back and I'm going to connect it to the backside
of my subjects hair. Look at what we've
accomplished here. We have the contour
lines for the ear, and we've placed the ear
on the side of the head. Notice the placement of the ear. It is in the quadrant
of the side oval. When I say rear, of course I mean rear to the
front of the face, that's where the
majority of it lives. Then we have drawn in the basic outer shape via contour lines of
the subject's hair. All right, now let's move
on to the next lesson.
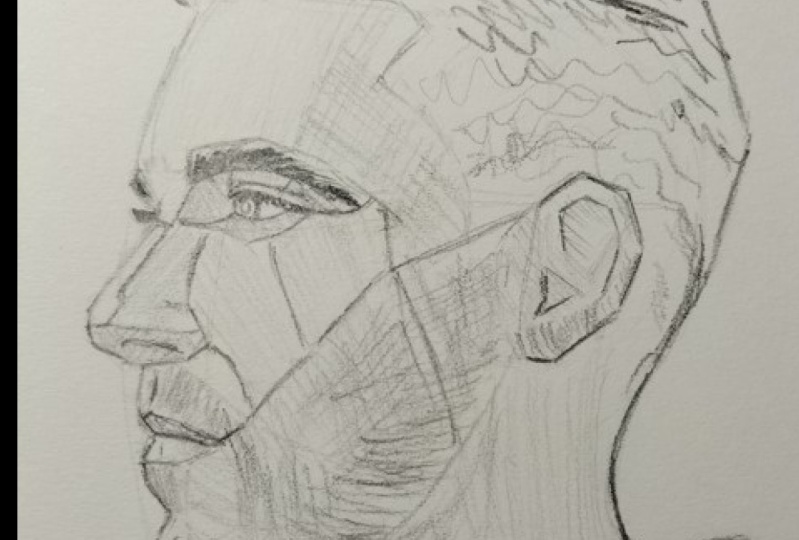
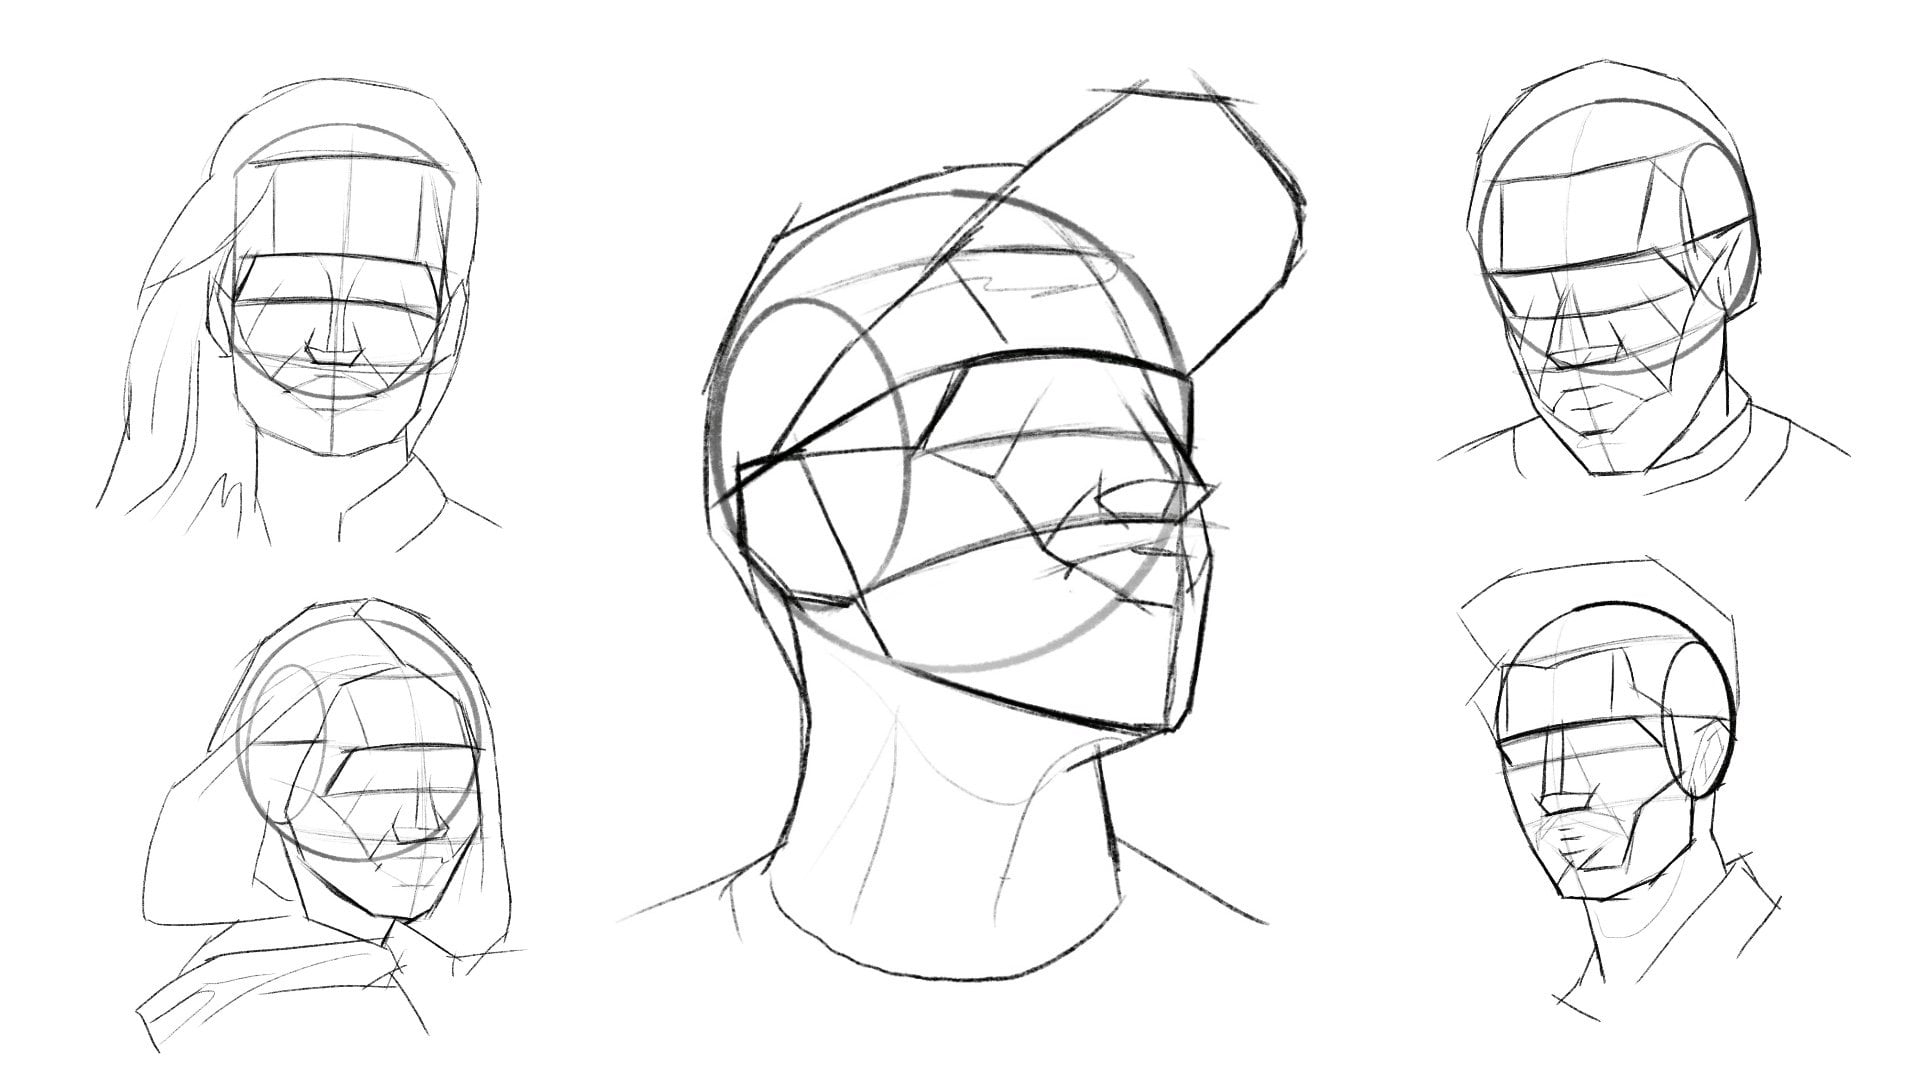
4. Draw the Nose using the Asaro Method: All right, when it comes to
profile angles, specifically, they are unique in
the sense that unlike most other angles where we start with the eyes and
we work our way down, I like to start with the
nose because that gives you a good focal point to build the rest of
the features off of, given the nature of
the profile angle. Notice right here, what I like to do is where
the temple resides, I'm going to put in
a diagonal line, real light, then I'm going
to solidify that brown line. Now the reason why I'm doing this is because this gives me a rough guestimate of where the subjects eyes are
going to live Then, not to mention, it helps me
understand the eye cavities, where they actually are
in relation to the nose. I have my temple line, I have my brow line. And then I'm just going to
lightly pull this line over, being sure that I adhere to the natural slope of
my subject's face. Okay. Something just like that. Now, I'm going to begin to build my nose from
the bottom up. Keeping in mind this eye cavity that I've just placed
on my subject's face. Refer to the SRro head model. Notice how we've
switched and we're using the SRrohad
model in reference to as compared to the
first two lessons where we used the
Lumos head model. All the first plane that we want to establish is of course, that bottom plane. Now on profile angles, you don't necessarily have to start with the bottom plane. You can go up just like
this and we can figure out exactly where that outer edge of the nose ridge plane lives. All right, so just like
this, now that we have that, we can begin to draw the
bottom plane of the nose. And this will start to give
our nose some dimension. Okay, something just like this. It's going to beef this
line up a little bit. There we are. Then of course have the nostril
something just like this. I want to make sure
that this has a fairly thick line quality to it. Then I'm going to draw in the other side of the
nose ridge plane. And this will effectively complete my nose
ridge plane for me. And remember when
it comes to noses, the ridge plane plugs
into the bridge plane. The bridge plane, of course, lives in between
both of the eyes. And I'm going to cover that more here as we move on
to the next lesson.
5. Draw the Eyes using the Asaro Method: Okay, so now we're going
to build out the eyes. Step number one is from the
top of the nose ridge plane. We want to draw the far side
of the nose bridge plane. The bridge plane effectively
is an upside down V. And then the top of
that V plugs right into the corners of
the subjects eyebrow. Okay, Now when it
comes to the eyebrows, they are going to fall in line with that brow
line respectively. And then we're
going to just bring out like we did with the hair, the outer shape, right contour
lines of the eyebrows. At this stage in the drawing, we are not worried about detail. We are making sure that
through contour lines the proportion of our facial
features are accurate. Okay? And contour lines allow us
to be able to see that. But just like this, right, we want to make sure
that the eyebrow has that arc to it that
the reference photo does. When it comes to eyes,
it's always best once we establish the eyebrows to build them from the top down. Okay, this profile angle is a little different simply
because we started with the nose and we're using
the nose to gauge the eyes, almost every single other angle. You're going to use the eyes to gauge the nose. All right. Of course the
underlying lumos lines are there to help as well. Okay, we have about the
corner of the eye right here, roughly notice this
guide line right here from the corner of
the nose up very light. And then we're going to
establish the slope plane. Then these are what
they call frame lines. Okay, we have this
one right here. And then the second
one falls in line with the temple
plane right here. And then we have the third
frame line that stems off the corner of the
eyebrow and comes in. Now we're going to connect all three of these frame lines. Technically there's four, if you count this one right here, pull this line down
just like that. And then once we have all those frame lines
connected on the top, we're going to very lightly, referring to our
reference photo, establish the bottom of the eye. We're going to place the iris, right? Just like that. And then of course
we have the fold of the upper eyelid
right there, okay? And then just some nice
light lines to help give the bottom of the
eye some framework. And then I'd just like to outline on both sides here,
something just like this. Okay? If this is too fast, go ahead and pause it, catch
up, and then play it again. And then of course, I'm going
to establish the pupil as well, but that's pretty much it. So let's move on to
the next lesson.
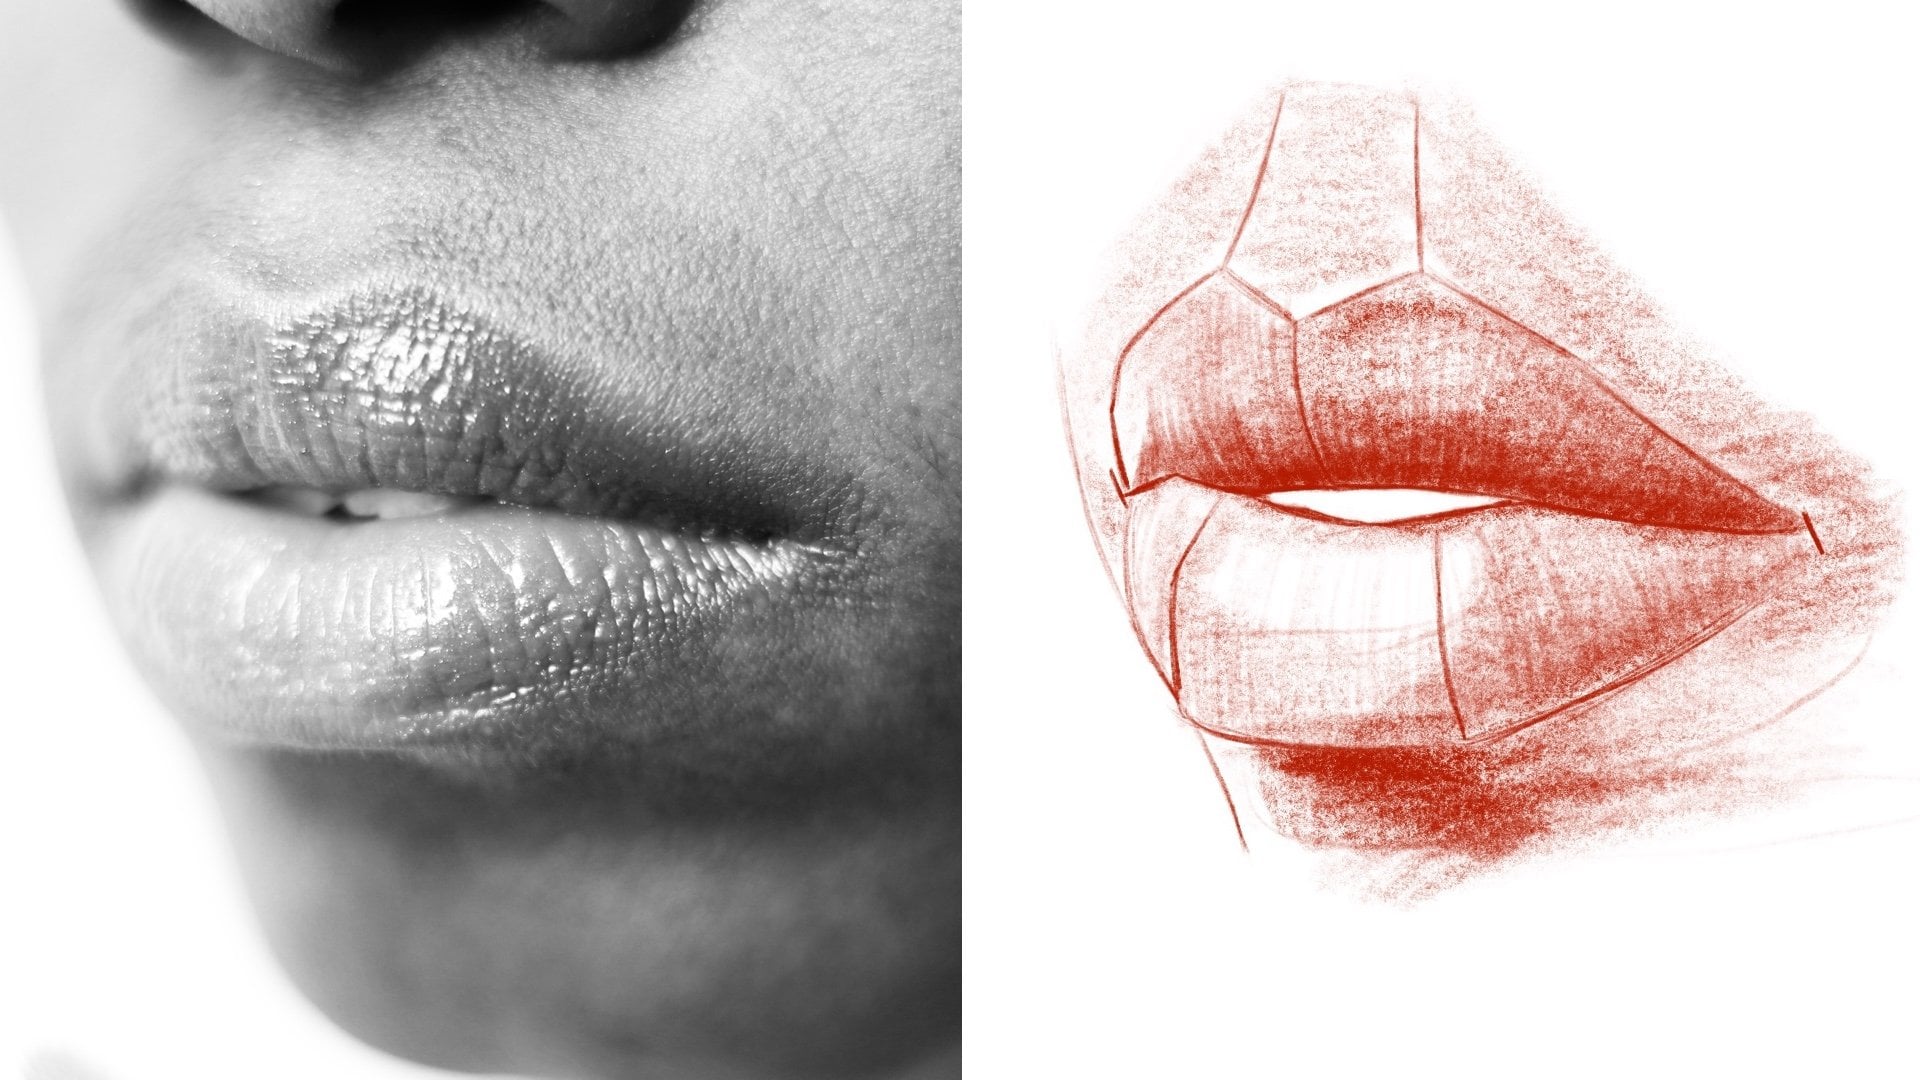
6. Draw the Mouth & Asaro Planes: All right, this is where we're going to
draw in the mouth. And then place our
sorrow plane lines right off the
bottom of the nose. We want to first draw
our filtrum plane. The filtrum plane is drawn by two parallel lines
that come down. And then they join and they form what's known as the cupid's bow, which is the top center
of the upper lip. And it looks like
the top of a heart, which is why they call
it the cupid's bow. Then we want to draw our
line in just like this. Remember we're adhering to
the anchor point lines that we drew in our lumos head step. Then extend this line down, the one that comes
from the corner of the eye to the
outside of the nose. Pull it down right about here. And this is a good anchor point for the corner of the mouth. Then we're going to extend
a line from the anchor point up and plug it right
into the cupid's bow. That is a really good
way to make sure that your mouth falls in line
proportionally to the nose. Okay, You can use feature upon feature to gauge
the next feature. Then we pretty much
have the top lip drawn with the bottom line here. Then we have the outside
edge of the bottom lip, and then it comes
down like this. When it comes to this line, don't make it too thick, right? Make sure that it has a
nice thin line quality about it because it's not really defined in the reference photo. To be accurate to
the reference photo, we want to make sure
that we adhere to that. We have something
just like that. Then what I would
recommend doing is because the value on that
upper lip is so low, let's go ahead and hatch that. Let's just nature of how the
light casts across the face. So I'll make sure that
that is of a lower value. All right, that
looks pretty good. This subject has a
very small mouth. Okay, so now what
we want to do is we want to solidify the outer edge of his chin and we're using the lumas head underneath
to help us gauge that. All right? Yeah, something just like that. We're going to make
sure that this plugs into our existing line. Okay, so now we have the
basic shape of the face, but we don't have any
framework, right? This is where the sorrow
method really will help you, especially if you're
just starting out in your portraiture and you want
to give yourself that edge. But first before we do that, just because this
subject has a beard, it's nice and short trimmed up. It's more or less stubble. I'm just going to do
a nice line here. I'm going to pull
down his side burns and then make sure that I know
where the edge of that is. Right here for his mustache. Where his mustache plugs
into the rest of his beard. Then of course, he's
got a little bit of character just like this. I'm just doing very
nice light lines. I'm not pressing very hard at all when it
comes to your project. You don't have to press hard. Just make sure that it's almost transparent
on the face, okay? Because we don't want
to take away from the SRroplanes that we're going to establish
here in a sec. Okay. So we are referring
to reference to, we are looking at our so
ahead model and we're extending this line from the corner of our
subjects mouth. We're going to go pull it like this and now we're
going to extend it up to the corner of the nose. All right? Something
just like this. As mentioned previously,
these sorrow planes are meant to frame your portrait for you In the next
couple of lessons, when I show you how to hatch
and cross hatch and start to give your portrait volume
by introducing value, you'll know exactly
where to place them. Now we're going to extend this line up
and the right about here is where it extends up
into the center of the eye. Okay? Something just like this. Now, when you are placing
your sorrow plane lines, try to imagine what that
underlying form looks like. So that when you go to pull
your line on your paper, it will have that little
bit of form to it, right? You don't want to
do a straight line. Do a line that flows
right. Give it a bend. Whether you give it
a bend this way or that way, like say this line, I'm pulling it and I'm slightly
bending it to the left, pulling it up and slightly
bending it to the left. And then this plane
goes straight back, right across the top
of the ear. Right? Something just like that. Then right here at this
last intersection, roughly where the highest point of the subject's cheek lives, I'm going to pull this line down all the way to my
subject's jaw bone. Something just
like that. But now what we've done is
we've given ourselves the necessary
framework needed so that we can go ahead and
hatch appropriately. So let's move on to
the next lesson.
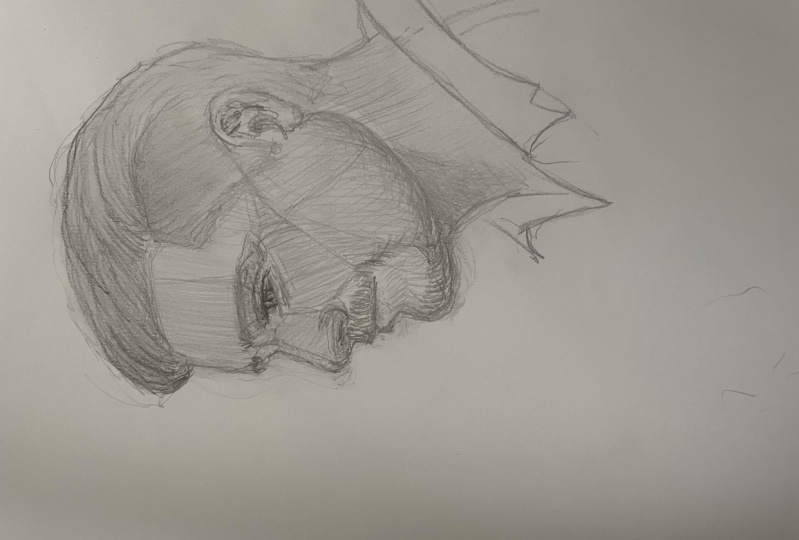
7. Initial Hatching & Value Building: All right, so look at the ear. And I'm going to
start hatching, okay? Now, hatching is a
fascinating study simply because you
would never think that basic line work like this could bring out character
and form and value. But it does, the
trick to it is pay attention to the direction that I am pulling my hatch marks. Okay. Now, right here, notice how I'm starting
to cross hatch. There's hatching,
which is where you pull your pencil across
the paper one way. Then there's cross hatching, which is pretty much what
it sounds like, right? You pull a line counter to the line that you just
pulled so that they cross. What that does is that
effectively lowers the value. Now, there's different
ways to lower the value depending on what it is that
you're trying to accomplish. But like say for the neck
here, I'm doing really, really long hatch marks
where as opposed to the ear, because I was working in
a much smaller space, I was doing much
shorter hatch marks. But principally what I'm
doing is exactly the same. I'm just doing it to
a different scale. Anywhere where I want
to lower that value. I'm going to cross hatch but
like see the forehead here. I'm adhering to the planes that my sorrow plane
lines framed for me. Now you still want to hatch areas of the face
that have a high value. But the trick keeping
that high value is that you only want to
hatch them once, okay? But notice how I am
hatching individual planes. Depending on how the face flows, I am hatching those in
different directions. Now, this is a crucial
step in this class. But I would say that if
I'm moving too fast, then just pause the class, catch up to where
you're comfortable, and then resume the class. But notice how the
eyebrows here, I'm just hatching those
and bringing those out. It is also important to be aware of that when
you are hatching, I would recommend using a
light to mid pressure control. Now, pressure control is really a personal preference
when it comes to hatching. You don't have to use a light pressure control
if you do not want to. Like Say for example
the eyebrows, I pushed a lot harder for those because
I only wanted to do one pass and I wanted my
value to be low already. Where if you want to do
multiple passes, right, If you want multiple
layers of hatch barks, then you can start off with a nice light pressure
control and then slowly build The
approach that you use in that regard will definitely
develop as you develop your confidence as
a portrait artist, especially if you're just
doing sketches such as this. Because the hardest
part of drawing a portrait is not the hatching. It's not the blending, it's not the detail work, it's
the proportions. That's one of the reasons why these classes are structured
the way that they are is so that you have a rock solid
foundation upon which to detail and bring out the
character of your portrait. Right, Just like this.
Notice this plane. I'm just pulling this
down just like this. Never mind the speed
at which I am moving. I have a lot more experience than I've been drawing
for many years. Just focus on the technique. Once you iron out the technique, trust me, speed will
come with that. But don't think that you need to go at the same speed as me. Just go at your speed,
whichever is comfortable for you and your drawing
will be better for it. But now we've
gotten to the point where what we can start to do now is we can start
to crosshatch. Notice the chin right here.
Notice what I'm doing. I'm going through and
I'm trying to lower the value of his stubble
in certain areas. This is going to do
a couple of things. It's going to bring out the
character of his beard. It is going to lower the value, but it's also going to bring out the character of the
subject that we're drawing. Okay, but when it
comes to beards, make sure that you give them a little bit more attention than you give other
aspects of the drawing. Simply because the beard is a wonderful practice in the
sense that the growth pattern across different subject
matter will be different. Especially if it's a short stubble like this
gentleman here. Or if it's a longer beard. The way it flows is something that you can
use to your advantage. As far as practicing different
approaches like this one, I'm just making sure that that flow and that growth pattern
goes sideways and back. And then right here,
notice the temple plate. Notice how I'm cross
hatching here, but I'm not cross hatching
on the forehead or the nose ridge because the way the light is casting
across my subject's face, there is no need
for cross hatching and lowering the
value in that regard. Okay. All right, so let's
move on to the next lesson.
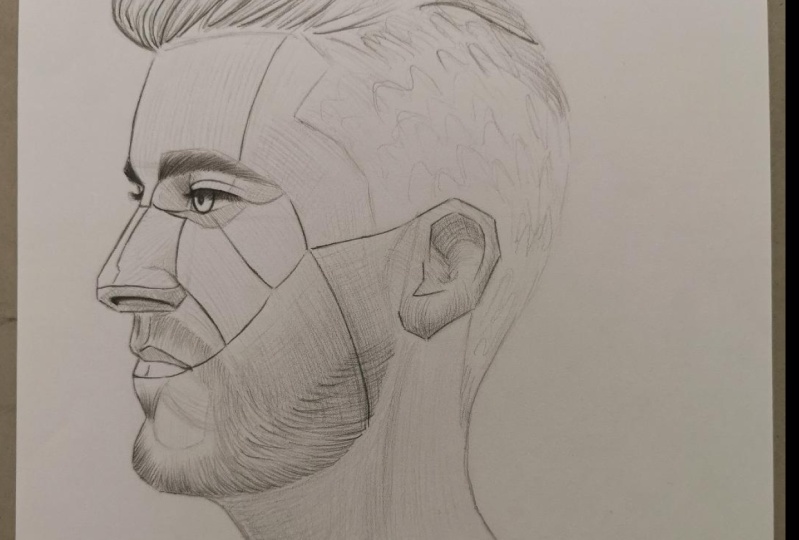
8. Hair Segments & Final Detail Work: All right, so the final
lesson now what we're doing is we are adding in what I call the
segments of hair. When you think of hair, hair
has different segments. They both mean the same thing, but they are all
compiled together. When you have different sections that are brought together, what that creates on the
subject's head is flow. What we are doing here
is we are bringing out the flow of
the subjects hair. The hair is longer on the top. What we can do to but that character on
paper with our pencils, is that we can thicken up the line quality across
the hair so that, that flow comes out and is more easily read by our viewer. Okay, Now, once that is done, we then want to go back
over our portrait. We want to give
it a second look. Leonardo Da Vinci was
famous for setting the expectation that
when you thought you were done with a work of art, you would want to leave it. He would leave certain
paintings for many days, and then he would
come back to them and he would be able
to look at them with fresh eyes and
understand and see certain shortcomings of the work that he didn't notice before. You can very much do that with your own drawings
as well. All right. Take the best practices
that you have from Masters such as Da Vinci and your art will
be better for it. Okay? But different line
qualities throughout the hair. If you actually look at
the hair in this drawing, we have extremely
thick line qualities throughout the top of the head. Then we have extremely
thin qualities on the side in the
back of the hair. That is intentional and
the reason why we do that is because that accentuates
our line qualities. It is very much a
neo way of drawing. It is a way that you
can use line work specifically to
make your drawing pop and give it character that it
wouldn't have otherwise. Then throughout the
eyebrows and the eyelashes, we just want to go ahead and
we these up just like this. Okay? And then right here
in the ear we can always go back through
and we can re, hatch specific areas of the
drawing that we feel needed. Okay. A couple of things are going to
happen when you do this. One the value is going to lower, so it is still very, very important you understand the underlying form that
you're trying to bring out. Of course, that
will be dictated by the direction that you're
pulling your hatch marks, so we want to be very
conscious of that. But that is really
what needs to be on the forefront of
your mind as you go through and you
detail out your drawing. Okay? The more you hatch, the more that value will lower. Now, there is such a thing
as hatching too much, and I would actually argue that when it comes to hatching, less is more, unless you are going for
a specific aesthetic. But like say right here
on the cheek plane, when we're pulling this down, notice how that value lowers. And then here on the neck, we have a shadow that we
could bring out as well. And then up here on
the temple plane, we're just going to hatch this. You can hatch as much or
as little as you want to. Like I said, I hope if
you got anything from this class that you more thoroughly understand how to structure and build your
portrait from nothing. Because that is
the true challenge of drawing a portrait that is accurate to
the reference photo. But that's pretty
much it for this one. I hope that you enjoyed it. Stay happy, stay healthy. And remember, never
stop drawing.
 Messer Creations, Artist | Author | YouTuber