Transcripts
1. Introduction : Hello. Hello, my name
is Braden Messer. I'm an artist author Youtuber, and today I'm going to
be the one to teach you how to draw portrait
drawing basics, A guide for beginners. In this class, you're going
to learn how to begin to easily draw the portrait by using the Luis
and Sorrow methods. What does that look
like? We're going to start off by using the Lumis method to create the foundation
of our portrait. From there we're going to fuse the sorrow method so that we can easily build out the features of the face from a
plan perspective. Punching in the nose, the eyes, the basic framework of the
lips, and then of course, framing the underlying form of the facial features
of each reference. We're going to be using
multiple angles for this one, so that you get a really
solid understanding of how to use the lumos and sorrow methods with
each other across five different subjects
and five different angles. But if you find yourself
enjoying this class, then I know for a
fact that you would love my book, Drawing
the Portrait. Step by step Lessons for Mastering Classic
Techniques for beginners. I will leave a link
in the description of this class so that if you want to order that for yourself, by all means I hope that you upload your project or projects. Also, it'd be very nice if you could leave a
review of the class. That way I can showcase
your project in my student feature section of my monthly newsletter that comes out the first half of
every single month. That newsletter is seen by thousands of your fellow
artists here on Skillshare. So it's a great way to get
your name and your art out there amongst like minded
artists in our community. That's it. That's all and
I hope to see in class.
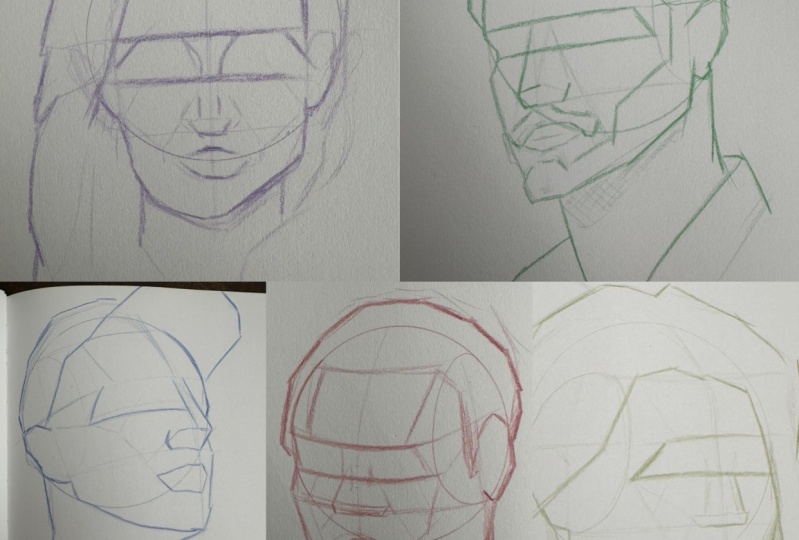
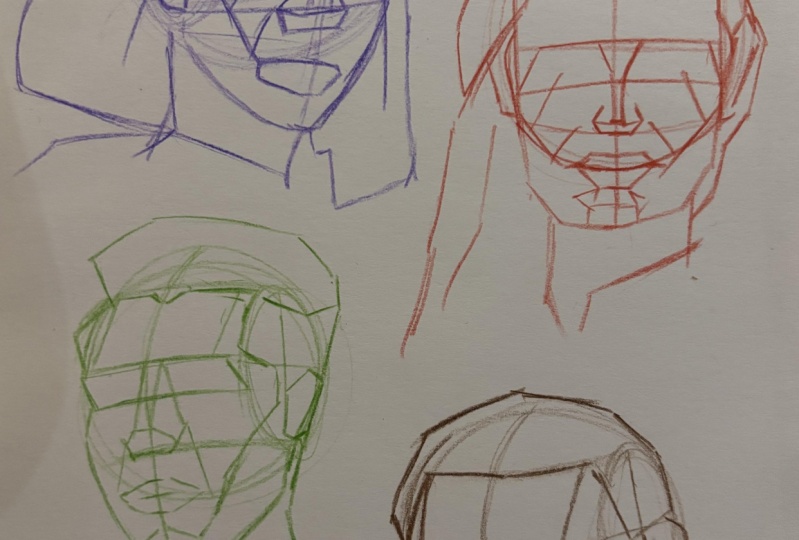
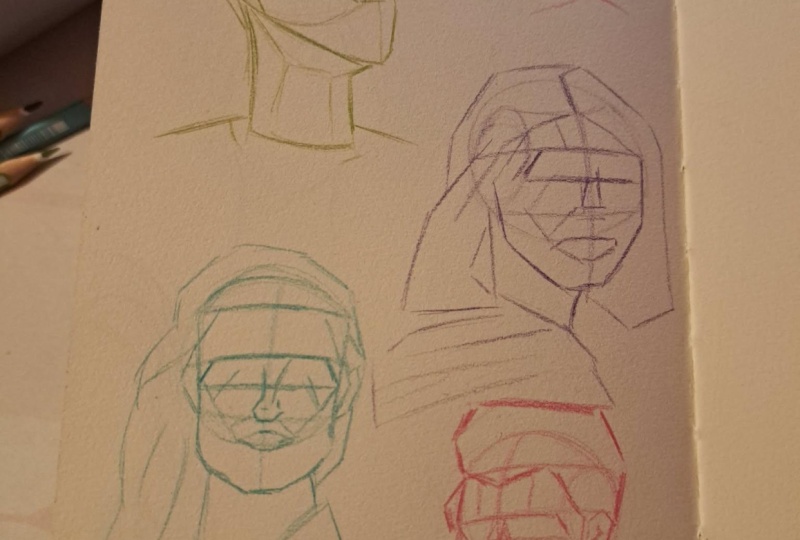
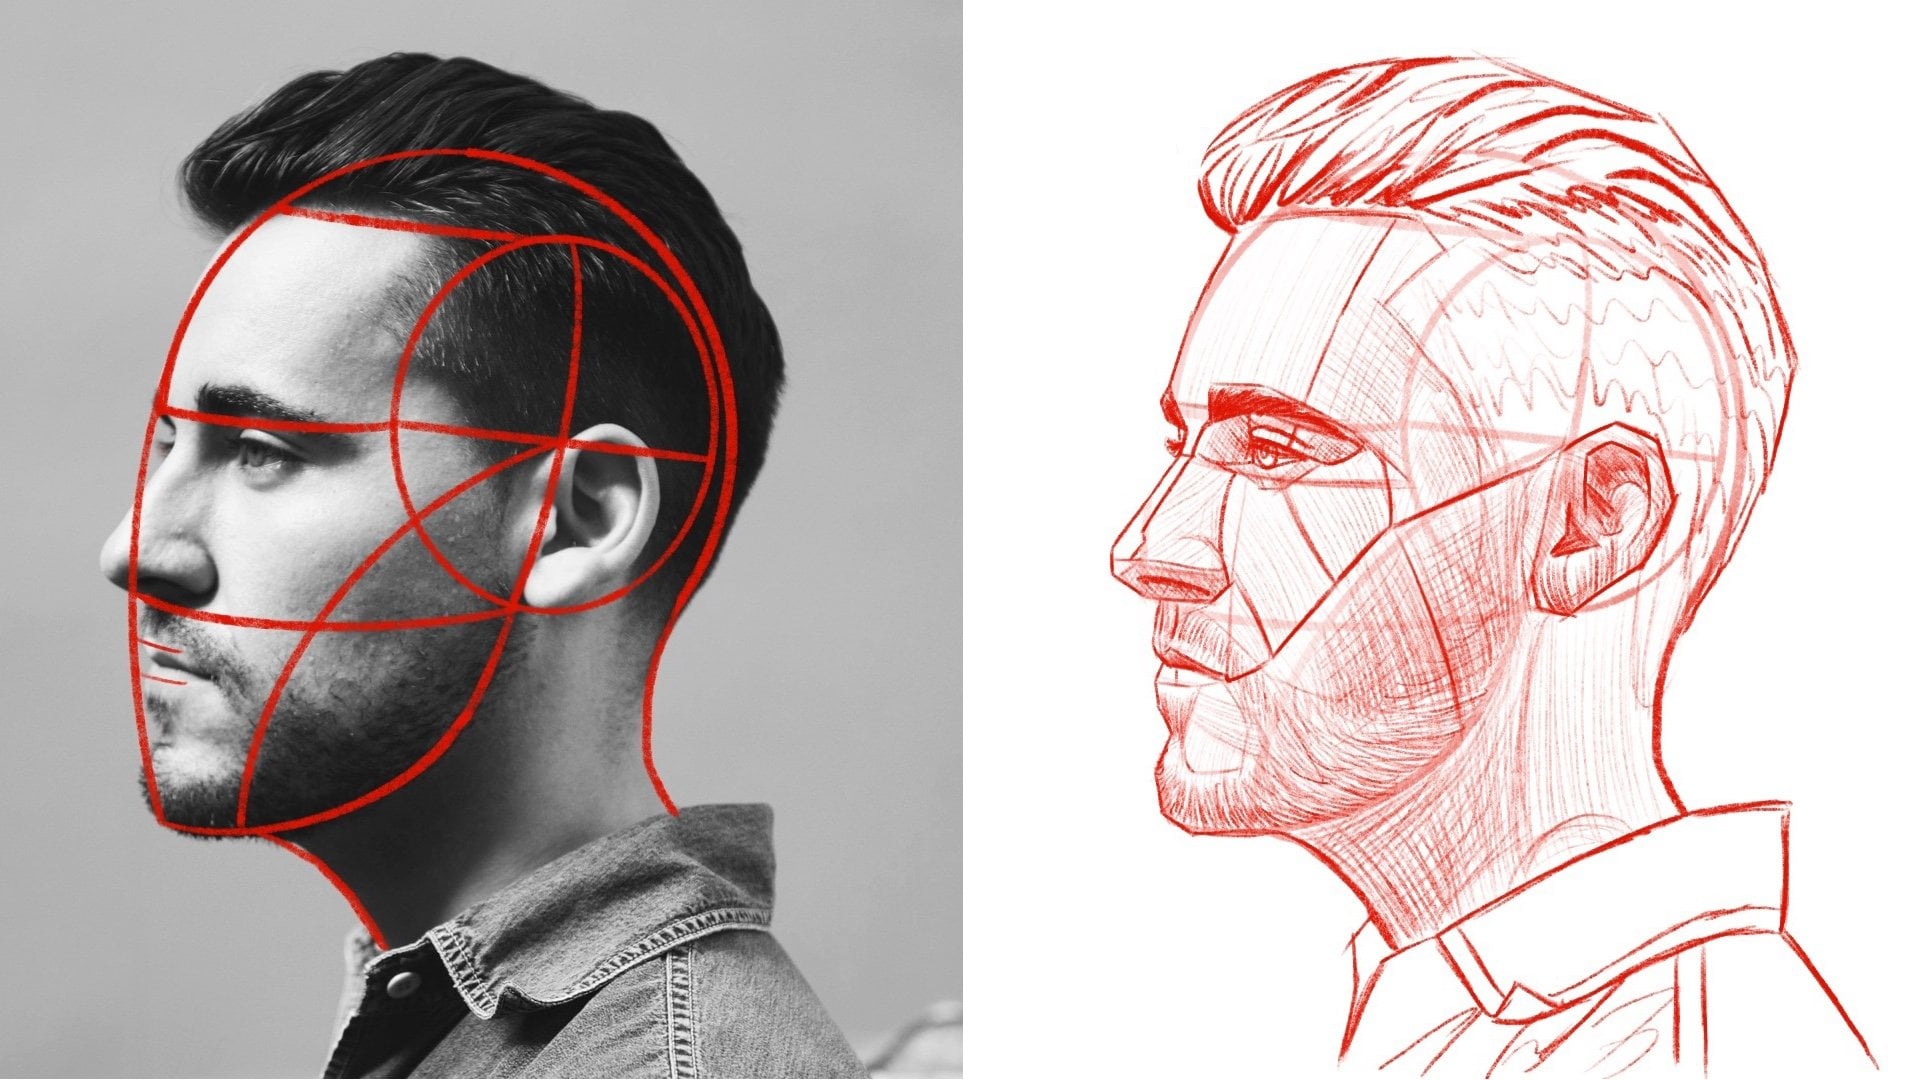
2. 3\4 Angle Looking Left: Okay, step number one is that we want to
establish our lumas head. We're going to draw a circle. If you want, you can
use a compass tool, which will give you
a perfect circle every time with relative ease. Or you can draw your circle manually. The choice
is up to you. Step number two is that we want to establish
our side oval. Now effectively
what this does is this slices off the side of the initial circle and
elongates the cranium for us. The top of the oval
should align roughly with your subjects hair
line bottom that oval. Share a line roughly with the bottom of your
subjects nose. All right, Now this lumos head is going to be a very
minimal lumos head. There are certain lines
that I am not going to place throughout these
five references, but you will always need
your horizontal axis. Refer to reference
number two that has the lumos head over
the reference, You can clearly see how the horizontal axis line follows the eyes that
we just pull that over. And that gives us our brow line. The top of the oval
gives us our hair line. And then right here, the bottom of the oval extended over. That gives us the bottom
of our nose line. Okay, then right about
here, let's pull this down. Do nice short light poles, and this helps us to identify
the center of the face. Just going to pull
this down the right, here's where we're
going to switch from the lumos method to the
sorrow method. Okay? When it comes to profile angles and drastic three quarter
turn angles such as this, we want to establish that nose all just like this pulling down, we're going to draw
in that bottom plane. We have the bottom
plane and then we have the nose ridge plane
here, roughly. Then when it comes to the eyes, you have roughly where
the temple lives. So pull this line down and then just pull this
straight over. Okay? What this does
is this gives you where those eyes are going to live on this generic sketch. All right, and then we're
just going to pull this down, solidifies the far
side of the face. We're going to pull that down to the bottom of the center line. Then right about here is
where the jaw resides. So we're going to
pull that down. And then we're going to connect
that to the center line. And then we have the bottom of the jaw,
the top of the throat. So we want to establish that. Then just do some basic
line work here for the ear. Remember this is
just a rough sketch. This is to get you to start to understand how you can begin to draw the basic framework needed
for an accurate portrait. But here we just got the
neck and then the shoulders so that we don't have a
floating head in space. Then here on the back side we have roughly
where the hair is. We can just beef up some of
these lines here on the nose, we are not worried
about detail work, but right about
here is where you have the basic
outline of the lips. You have the top
of the upper lip, you have the bottom
of the lower lip. And then just sketching
some rash lines here, 123. Then here we have the so plan. This extends off the corner
of the lip up to the nose, across at the top of the
cheek up to the eyes, to the temple, and
then straight back over the top of the
ear, Just like that. Okay. Then of course you
have the temple plane here, up on the top right here. We're just going to
sketch these in. The speed at which
I am moving is the same speed that I want
you to try to adhere to. Okay? Because the faster
you can sketch these out, the more confidence
you will have. And it's going to be very effective for your
muscle memory. But just like this, this was the challenge
for less than one. Right here was drawing
our subject with the hat. I want your lines to be longer. Okay, long lines. Long poles, because what we're going
for is the basic shape. All right, so that's pretty
much it for that one. Let's move on to
the next lesson.
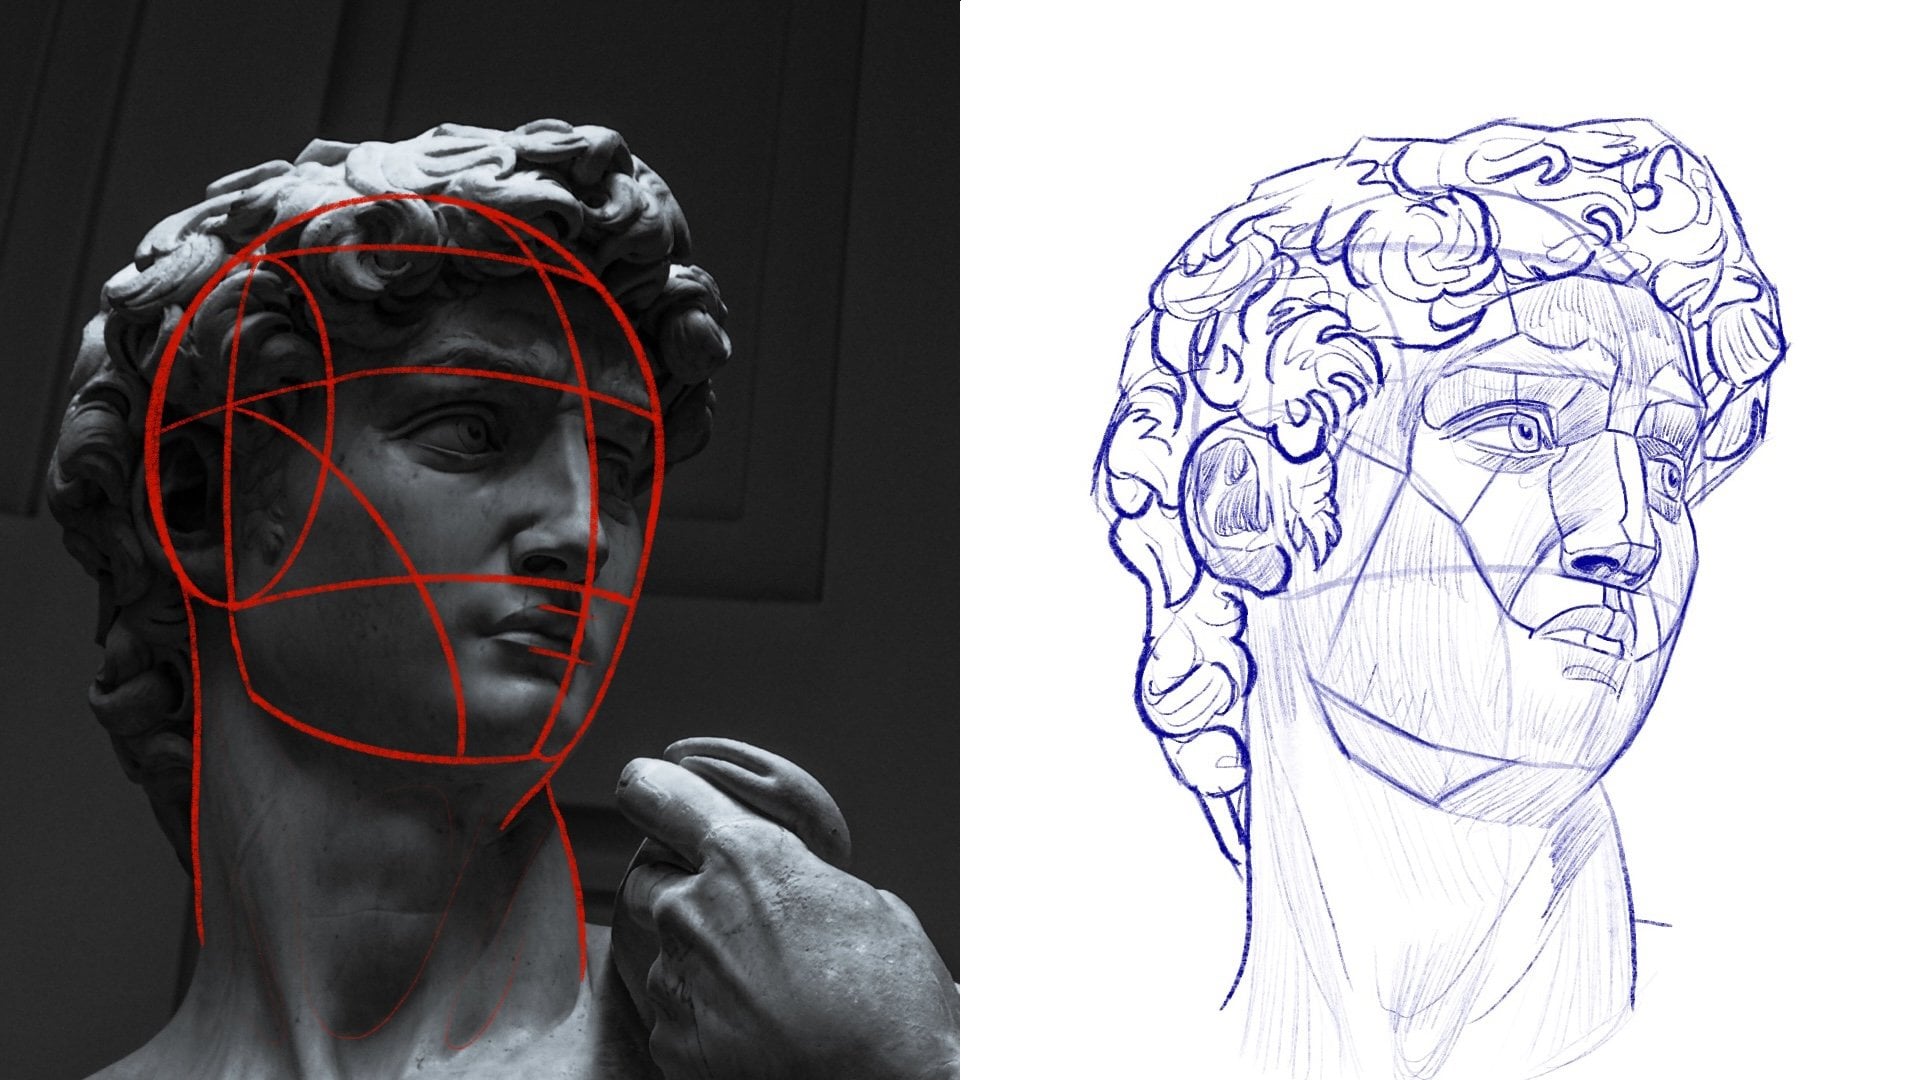
3. 3|4 Angle Looking Right: All right, so lesson number two. As with lesson number one, first step, let's
establish our circle. It's important to note, as
well with your projects, that your circle does
not have to be perfect, so long as its height is
relative to its width. Okay, remember these are just the basics of how
to establish a portrait. In this entire class, it's
all about the basics. Once we have that drawn, then we're going to
place our oval in order to get a sense for exactly where these lines need to live. Refer to reference number
two where I have overlaid the um head on top of
the reference photo. Once you've done this,
go ahead and hit your circles with a
nice needed eraser and make it more or
less transparent. Remember this
horizontal axis line right here on the side oval? This is going to align with the direction that our
subject is looking. All right, so once we have that, we're going to pull this line over like that for
the brow line. We're going to go up to the top. Pull this line over for
the top of the oval. And what that is, is that
aligns with the hair line. Then the bottom of
the oval, right? We're going to pull that
over and that is going to align with the bottom
of our subject's nose. Once we have all three
of those lines drawn, we are then going to place
the center line of the face. Okay, we're going to
go all the way down. We're going to make
sure that where we end, that center line
falls roughly with the same width as the spacing between the hair
line and the brow line. And the brow line
and the nose line. Then on the far side
here, we're just going to pull this down and this is the basic shape of the far
side of our subjects face. We're going to bring
that down and meet that with the bottom
of the center line. And then we're going to
continue to pull this line up. And then we're going to
bring this down to plug it in to the back of the jaw. Notice how I did this one. Slightly different from
the first one, right? There are multiple avenues
to get to the same result. The goal of this
class is to show you all of those different ways that you can accomplish
the same thing. All right, as far
as beginning to draw your portrait, Then
here we have the neck. And now what I'm going to
do is I want to draw in the basic two dimensional
shape of my subjects hair. We start on the inside, right here, and we're
going to work our way out. And remember we're doing nice
broad strikes on the paper. Pull this up, here's
the part of the hair. Pull this up and
over, connect that. Now we're going to
pull down and over on the other side of the
head, just like this. If this is a little
too fast for you, remember you can always pause, catch up, and then
resume the class, right? But just like this, we're pulling this
very, very quickly. She has a hoodie on, so
we want to draw that in something just like that. Because once you have
this basic structure, the rest is fairly simple. As far as placing those
features right here, we're going to switch from the loomis method
to the SRO method, and we're going to use reference to that has the SRO
head model in it. And we're going to
use that to help us place the SRO planes
of our subjects nose. Now that we have
the bottom plane and the ridge plane
drawn in for the nose, we then are going to
go across the brow, come down at an angle
for the temple, and now we're going
to pull that line over right in there. That is where those
eyes are going to live. Okay, when it comes to the lips, right, we have the
corners of the mouth. And you can guestimate
where those live, based off of the
width of the nose. And then just do some
nice light lines for the upper lip
and the bottom lip. We're not worried about detail, this is just more
or less getting a good solid foundation of where everything is going to
live within your portrait. All right? Yeah,
Something just like that. Then right here
we're just going to place our sorrow planes. Okay. Real quick.
We're extending from the corner of the
mouth up to the nose. Across the cheek at an
angle up to the eye, through to the temple, and then back across the top of the ear. All right, let's move
on to the next lesson.
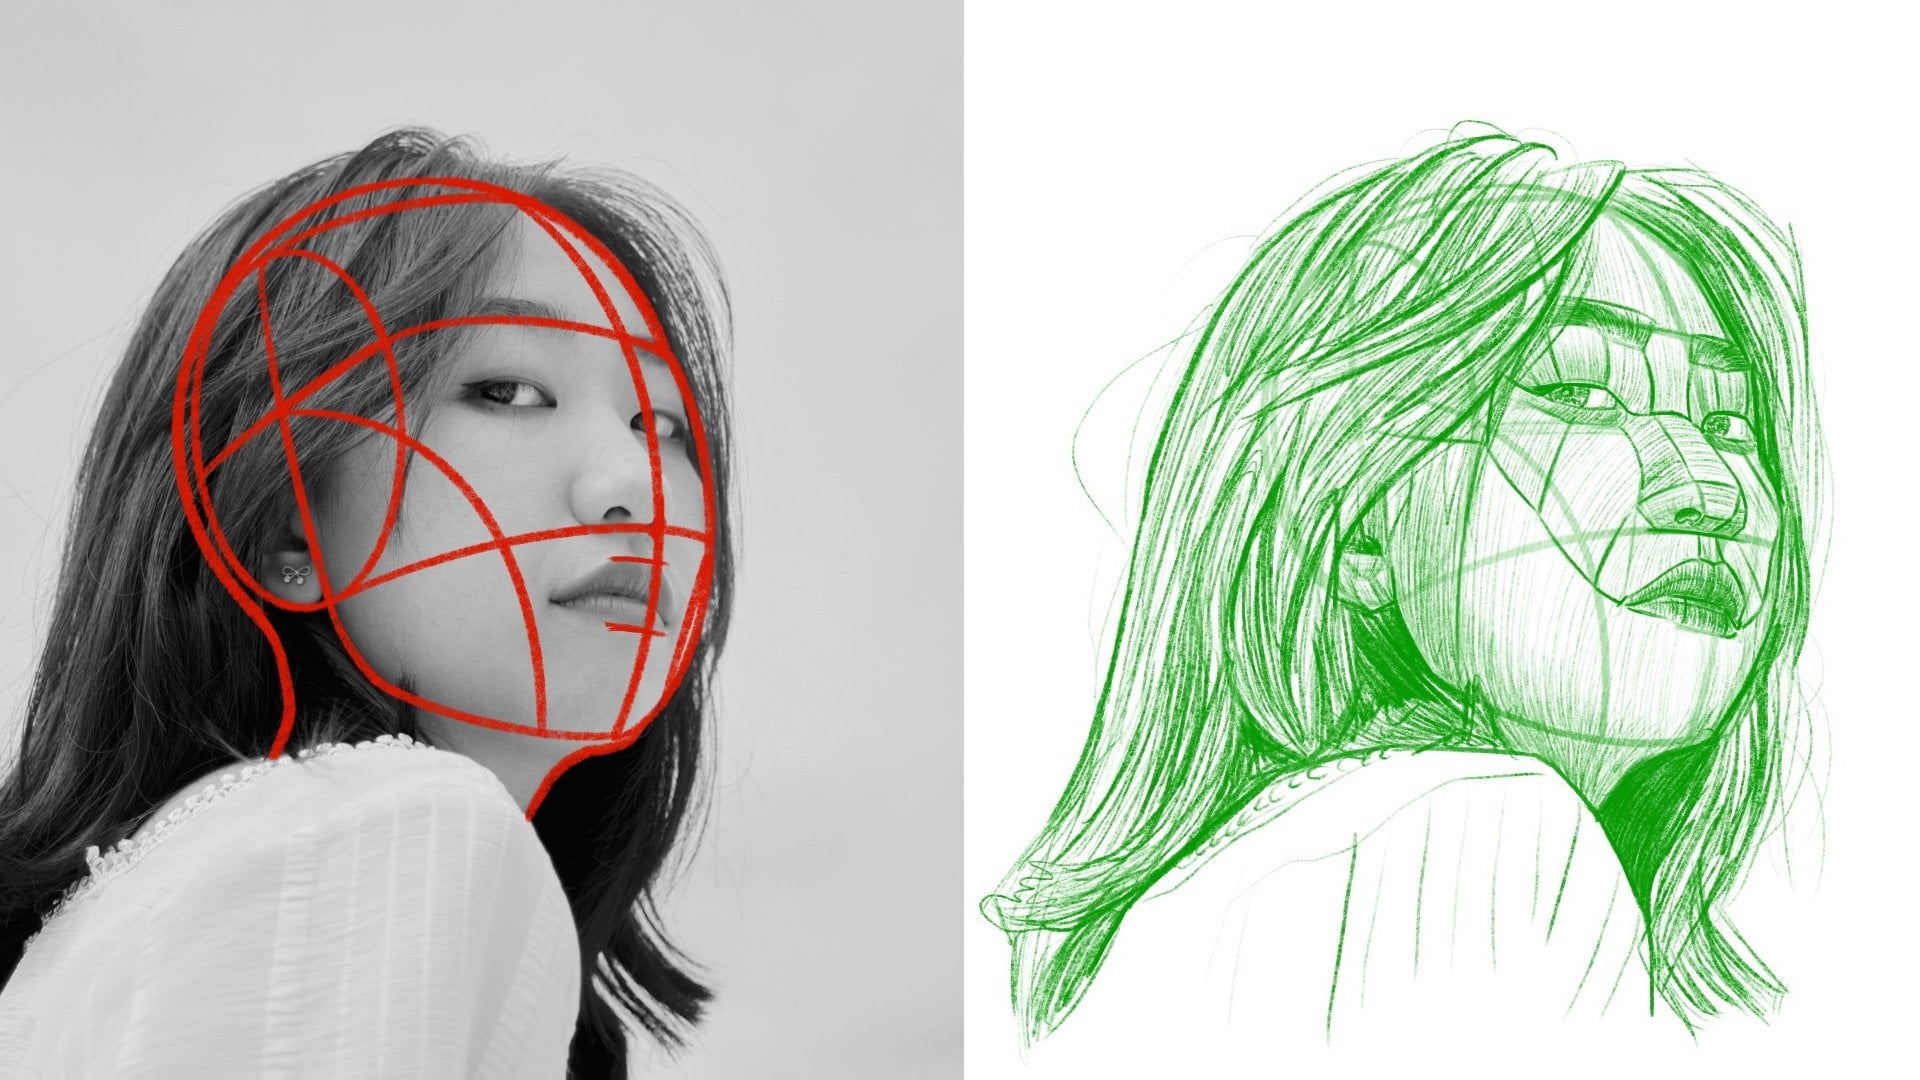
4. Straight On Angle : All right, lesson number three. So we have a subject
looking directly at us. As with the first two, we're going to draw
our initial circle, which signifies the
cranium of the face. Now notice because of
the nature of the angle, we're not going to have ovals. In fact, what we're going to
do in their stead is going to slice off each side
of the initial circle. Okay, The ovals exist, but you aren't
going to be able to see the vertical or the
horizontal axis lines. But I'll show you some
tricks for this angle. All right, because
the top of the oval and the bottom of the oval still aligned with the same
features of the face. We can use that to gauge
exactly where the hair line, the brow line, and the nose
line will live. All right. The brow line is
always going to be right smack dab in the
middle of that oval. Establish that. And of course that hair line on
the top of the oval, bottom of the nose
line on the bottom. And then right here,
we're going to draw in the center
line of the face. Okay, so pull this down and
then right about here, it's going to be the
bottom of the chin. And now we're going to extend the jaw line off this
side, just like this. Notice how I'm drawing it guys, Like just look at how
I'm pulling the lines. I want you to do the
exact same thing. There's a reason why
I'm drawing this way, and it's because when
you do shorter poles, you allow yourself to see proportional
discrepancies faster than if you were to do longer poles. Then just like this,
we have the neck, and then right about here
is the bottom of the ears. The ears will always exist from the nose line
up to the brow line. That is the space
that ears always reside on a human face
using the Lummus method. Then here we have
our temple lines. They're going to come
down off that brow line. And then we're going to pull
this over just like this. This is the bottom of the
area where the eyes side. Okay. Something just like this. All right. And then we can
thicken up these lines as well if we want
to, just like this. And I'm actually
going to think up the top of the brow
line right here. Then I'm going to
pick up the bottom of the section as well. Now we're going to switch
from the Loomis method to the SRro method so that we can identify those basic
plans of the nose. We start from the nose line and we're going to
work our way up. We have the bottom sides. Right about here is where we establish the top of
that bottom plane. Then right here we have the nose ridge plane that goes up. Then here we have the top of the upper lip and then the
bottom of the lower lip. Then we have the
corners of the mouth. On this one, what
I'm going to do is I'm actually going
to start placing the soro planes that extend
from the corners of the mouth up and then they connect to the nose and then they
go up across the cheek, then up across the center
of where the eye would be. Then they continue on up. Now you're not going to
be able to draw them at this angle simply because
of the nature of it. They disappear as they move up towards the
top of the ear. But that gives us pretty much the basic framework
that we would need for underlying form to
frame the subjects face. All right, now what
we're going to do is we're looking at
reference number one. And just like with
the last reference, we want to draw in the
basic shape of the hair. Essentially, by definition,
what these are, these are what they call
contour lines, right? They are the outer framework of the hair as it
sits on her face. Now, with these, you can use much longer poles because
hair tends to be wavy. So we want to make
sure that we capture that character in
this basic sketch. But something just like this, then you can go in and you can just do a nice light sketch for roughly where the
lips would rest, okay? But that right there is all of the basic
framework that you would need so that
you could start to go in and really
bring out the detail, start placing the
features and whatnot. All right, let's move
on to the next lesson.
5. 3|4 Angle Looking Down: Okay, for this angle, first step holds
true to be the same. We're going to
draw a circle that gives us the beginnings
of our cranium. You can clearly see how the lumus head lives on this reference in
reference number two. Step number two is
we want to establish that side oval and look
at the lumos method. Here you can see how the top of the oval extends
for the hair line. The horizontal axis extends
over for the brow line. And then the bottom of the oval extends over for the
bottom of that nose. We're not going to place
the vertical axis, we're just going to do the
horizontal axis line here. We're going to pull that
over for the browdline. Then we're going to do
the exact same thing for the top of the oval,
for the hair line. And then we're going
to do the exact same thing for the
bottom of the oval, for the bottom of the nose. Once we have all three
of those lines drawn, we're then going to place
the center line of the face. We're going to pull this
down of equal parts, and then this right
here is going to be the bottom of the chin. A. Notice how these lumus
heads are stripped down. They're extremely basic. This just goes to show you the
versatility of the method. Then here we have the section where the
eyes are going to live. Now we're going to switch from the Lumus method to the SRro method so
that we can start to place the nose based off of where that center line
is and then that nose line, we know that this is
where the nose resides. We've got the bottom. We're
going to work our way up this specific angle. It's more or less a
three quarter turn. So we want to pull up on the
far side of the nose here. Now right here we have the
bottom plane of the nose. If you have any
questions about this, refer to the SRO ahead model. Those planes in that
model are exactly what I want to bring out for this
subject. Just like this. Now we have the far
side of the face. Just want to bring that
down to the bottom of the center line, just like this. Now we want to extend this
jaw line up just like this. Yeah, it's looking
pretty good then. Just so that we don't have
a floating head in space, you know me, we're going
to place our shoulders. We have the neck that goes
into this turtle neck here. We can place that
roughly if we want. You can add as much or as little character to your
sketch as you would like, but I'm just keeping
it as basic as I possibly can for the
sake of the class. Then here, this is where
we're going to draw the contour lines for the
ear, just the outer shape. Then if you want to,
you can go in like this and give you a
little more character. Then we have our temple
plane right here. It extends down
from the hairline. We have that on both sides.
Okay, Just like this. All right, and then the
corners of the mouth, just like this corner. Then that corner, we're going to identify the top of the
upper lip right here. And then we're
going to bring out the bottom of the lower lip. Then we're going
to do some really nice light strikes,
just like this. And then we have the center of the lips something like that. Now we're going to place the
so planes just like this. Remember they come
off the corner of the lip up to the nose. They go across the cheek. This one goes up in, across the center of the eye, then it continues to go up to
the temple, just like this. Then it continues up over the top of the ear,
something just like that. And then of course,
we can extend those lines on that far
side of the face as well. You're not really
going to see them once we go past the line that goes across the center of the eye because of
the nature of the angle. Yeah. And then of course we
have the contour lines for the outer shape of
the subjects hair. Okay. Again, just like with
the first three lessons, just the outer shape use
longer strikes for this. This is where we're going
to be able to bring out an accurate representation
of the shape of our subjects head with
their hair existing on it. Okay, We're just going
to bring this line down, something just like that. Okay. If you can sketch out basic rendering of your
portrait like this, this is really the foundation. This is the hardest
part, believe it or not, for drawing portraits, setting
these proportions right. Because when it comes to
layering, blending, shading, all of your detail work, that is actually
easier than this. If you can build up your
technique in this regard, you're definitely going to
give yourself that edge. All right. Let's move
on to the next lesson.
6. 3|4 Angle Looking Straight : All right. Last but
certainly not least, the final lesson,
step number one, we want to draw that circle when you're going
to place your oval. Refer to reference number two, the one that has the lumas head overlaid with the
original reference. And you can clearly see the placement that
needs to be done. All right, the top of that
oval aligns with the hairline. The bottom of that oval aligns with the bottom of the nose. I know it's a lot of repetition, but that's how you grow, right? Okay, so that is where our
oval is going to live. We're not going to place
the vertical axis, we're just going to do
the horizontal axis, right? Just like this. Remember that horizontal axis follows the eyes of our subject. Now we're going to pull this
line over, just like this. There's the brow
line, We're going to pull the line over
from the top of the oval, and there is our hair line. We're going to pull the line over from the
bottom of our oval, and that is the bottom
of the subject's nose. Then right here, we're going
to extend this line down, nice and light, and this is
the center line of the face. We're going to
make sure that the space in between right here, the bottom of the
center line and the nose line is roughly
the same length. The two sections that we created between the hair line
and the brow line. And the brow line
and the nose line. All right, then
once we have that, we're just going to strike
the paper like this. We're going to pull this up
on the far side that gives us the basic shape of
our subjects face. Now one of the
things that you can do is you can go through with an eraser and you can erase this part of the initial circle. All right, that gives you a better visual and doesn't
confuse you with all the lines. But here let's switch from the Loomis method
to the SRro method. What I'm going to do is rather than placing
the nose first, I'm actually going
to do the eyes. This is a way that
you can section your portrait on paper so that you can
start to understand, okay, well this is where my subjects eyes are
going to reside. And of course
you're going to use the brow line because the brow line is the
beginning, right? And you can build your
eyes from the top down. As with the nose like this, we want to build the
nose from the bottom up. We have our bottom line because it's a three quarter angle. We're going to extend
that far line up. We're going to pull
this line down. And this gives us our
ridge plane, roughly. Okay. Then we're just going
to pull this line like this and this gives us the
bottom plane of our nose. Then we have called a slope
plane on this side, right? And then we have the
top of our upper lip. We have the bottom
of our lower lip. And then these light lines
give us, like with the eyes, a basic understanding of where those lips are going
to live on the face. Okay. Something just like this. Yeah, something just like that. Then of course, this specific
reference has a beard, a nice trimmed up beard. So we want to make sure
that we speak to that. And that'll give our sketch
a little bit of character. Like how in lesson
number one we gave our subject his hat, right? That is something
that is specific to that reference and that brings out all the character
of the individual. So we want to make sure
that we speak to that. But just nice light lines, they don't have to be anything
crazy, just like this. Then right here we have
the center of the lip. Then of course, we want to
place the contour lines of the ear so that we know
where that ear lives. Okay, Something just like that. Then for the hair, we want to use that hair
line of the lumos head as the gauge for exactly
where this hair lives. And then just so we don't
have a floating head, right, let's place the neck. And then he has the
collar here of his shirt. Like I said, if I'm going
too fast, by all means, posit, catch up, press
play, and off we go again. But I hope you're
starting to see that it doesn't really matter the
angle of the reference. It also doesn't matter
exactly how you draw out these basic
features of the face. Whether you start
with the plane for the eyes or whether you start with the nose.
It's truly up to you. You do have a lot of
versatility with this approach, but the stripped down version of the lumos
method and then this very fundamental
sorrow approach will give you pretty much everything
you need to start to place your
features accurately. That's the big thing,
you can't do this, it's going to be very hard for
you to do much of anything else you can go through
just like I'm doing here, and you can thicken
up these lines, you can vary these line qualities
throughout the drawings. I will say that if you have any other questions about how to start drawing a portrait, you can go to my home
page here on skill share. And I have a plethora of
different classes for sketching, both traditionally
and digitally. I hope to see you
there. Stay happy, stay healthy, and remember,
never stop drawing.
 Messer Creations, Artist | Author | YouTuber