Transcripts
1. 0 Introduction: Hi and welcome to the Adb
Illustrate or 21 mega cost. My name is Wollen, Pe, and I will be
your instructor. Digital illustration is a genius invention
and intricate art, one which has helped revamp the design world
into what it is. One of the major tools
which has been at the helm of this
revolution is a to now the complexities of this really powerful
tool can seem daunting to the movie designer without the right guidance. It will take even years to
master this very powerful. Fortunately, I've
been working in the professional designs
piece for years. Over the last seven years, I've worked on hundreds, if not thousands of
designs in a illustrato. I've worked with
big clients too. I've worked with luxury brands, celebrities, multi
million dollar corporations, and lots more. In view of this, I
decided to create this two in one mega cost
to help designers at the early and more
advanced stages get a good hand on Adb
Illustrator as in depth, as practicable, yet in
the easiest of ways, the shortest time possible. This mega course is made up
of two B Illustrito causes, the Fundamental and
Advanced Causes. These are stand alone
courses on their own, all on Adb Illustrito, focusing on different levels of experience with the software. And also created to feel like two parts of
a single cause. The fundamental cause is aimed at helping total beginners learn the basic principles
and workings of Adbustrito in design. While the advanced
course seeks to build up the learners knowledge into more advanced concepts
in Ab Illustrito, we start by getting
familiar with the interface of Adblustrito and learning how to draw
out ideas Using the powerful tools
Illustrito provides, we will learn about
tips to speed up our workflow like using
short cuts and actions. We will learn about brushes,
different types of them, and how to create and use our own custom meat brushes
on our illustrations. We will even learn how to export our custom
meat brushes so as to use them on a different
computer or even sell them. We will learn a lot about
colors and patterns. Clipping and opacity masks, shape blending and
effects typography, graph visualizations, geometric
grid based designing. D, isometric designs,
even creating an emissions using B illustrator and after effects and lot. This metal course takes advantage of the
power of practice. Therefore, we put
everything we've learned into practice by having assignments and
class exercises in each module and even real
world projects to work on. By the end of this medal course, you'll have learned all
you need to know about a Ellos Frito with
Advanced and Visit. You'll have created
several designs of your own and we'll
be able to tackle even the most advanced
vector projects available in the
design world today. Lobby the training and I'll
see you in the first lesson.
2. 02 Interface and Navigation: Hello, guys, and welcome to
the course on B Illustrito. I'm very excited to welcome
you to the first video, The Court now in
this first lecture we're going to be
learning about navigating the interface of
B Illustrito and getting our interface
set up so as to start creating interesting
designs in subsequent videos. And we're also going to learn how to create
new documents, how to import documents
and work other files. All right, so when you open B Illustrito for the first time, this is the interface you see. Okay, see this interface. And from here you can
create a new document. From here you can open
existing document. From here, you can select
recent files you've worked on. You can select recent
files you've worked on. From here, you can start the project with an
existing template. Now, this is a letter template. This is a postcard template
with the dimensions under. As you can see now these
dimensions are in points, right? And then we have
other templates here. We can even click here
to see more templates. Okay. Now what we're going to do is create
a new document. Click on Crete, new
as you can see. We now have templates
to select from, but what we're going
to do is print, print, and select letter. Okay. Now, mind you, if you want
to select other templates, we have more templates
here you can choose from depending on what
you want to create. But for me, I'm just going to select the prints
and collect letter. Now we have the preset
details here, Okay. Now the file name
can be maybe new then Now we have the
width here and the T. The units of measurement
here is points, and there are also many other units of
measurements like the pixels. We have the picks, we have the inches, and we have the fit
feet and inches and many other unit types. Here, I'm just going
to choose the inches. Okay, We have what
we call art boards. I'm just going to choose one. Art board is more like a works piece where
your work will appear. We have the orientation, we have the portrait orientation, and we have the
landscape orientation, depending on what you want. Okay, then we have
advanced settings. We're not going to look at
Advanced settings for now. After you have everything
the way you want it, you just click Create. Now this is our new document, which Illustrators
created for us. As you can see, this is what we call the board is now the board. As you can see, we
have only one board because we've selected only one. Coming to our right hand side, we have the property spaniel. But if yours is not like this, just come on. Windows. Common work space, Essentials,
Classic. Choose essential. Your workpiece should
look like this. It still doesn't look like this. After you essential class, it does come again to
Windows and then work space, and then Reset
Essentials Classic. When you click Reset
Essentials Classic, all you're going to have
is something like this. Now, on our right hand side, we have what we call
the properties panel. And we have the library
selecting the properties panel. We're just going to go through
the things we can see. Now this properties
panel show us the properties of
selected items. Selected item in this
case is the art board, because we don't have any
other things selected, the artboard is a selected
item. As you can see. We have the unit of
measurements as inches. We can also select other
units of measurements. We have number of
art board as one. Then we can also edit the board. Now when we click on
Edit the Artboard, you can see that we
now have this look. Then this two here, which is called Artboard,
has been selected. Now with this two, we can increase the size of our
artboard. We can reduce it. We can also move our board
depending on what we want. A rather increase or size. You observe a change in
the dimensions, right? You can just do this and have the change in
the dimensions. Yeah, with this tool selected, we can also create
new art boats. We can also create new,
we can just come to an empty space like this and
draw out the size of our. Now we can see we have
what we now call to, you can keep creating
as much boats as you want depending on the projects you're
working on. Okay. Remember, each of the boats
will contain a design design. You'll have to create
the number of boats, depending on the number of
designs you intend to create. Now our select here, which is identified
by this black arrow. It is a selection to
just select it and then click on the board. Now click on this albot,
see at board one. Click on this one,
you see a put two. Click on this at put
three, at put four. Now we can basically see the properties of each of the art boards that
we've created, right? And when we come here, we can see that we
have four boards. Okay, now we have rulers, which we can enable here. When we click enable, you can see the rulers
have been able, and they work based on the units of measurements
which we've selected. We have grids, we
have transparency. Here we have other options. Here we have documents setup where you can actually
set up the documents. Again, we have precepts where
you can actually just mix settings to the project based on the project or based on A to B Illustrator as a whole. Okay, now that's for
the properties panel. For now, what I want us to do is look at some other
panels and edit the panel we have here
to fit our projects, to fit our purpose
of the course. Okay, we have here which is called the color
and the color guides. Okay, we're going to lift them. Just the video we have here
which we call the switches. Okay? We have brushes here, we have symbols here. Then we have the stroke here, we have gradient, we
have transparency. Then we have appearance. Okay, We have graphic
styles, we have layers. We have all, many
other panels here. We're just going
to leave them the, but we're going to
come on our layers and just click here
and drag it here. We're just pulling
out our layers panel. We're just going to click here
to get the remaining back. Now what I want you to do is to come and click
on libraries here. And drag this out like this. And then just click
on this X button, this icon to eliminate
the libraries. Then just bring your mouse here and drag your layers
panel to this point. And then just leave it,
this just target like this. Now you can see we've transferred our layers
panel from here to here. This is one thing you
can do with your panels. In other illustrator,
you can actually shift them based on what
you want to achieve. Okay, for me, I would like
my layers to be here, so I can see all the
layers I have as I walk. This is also something
you should do. Okay. We are of course going
to look at all of these other panels in
subsequent videos. Okay, for now we are
looking at our, our tools. These are tools to box.
These are our tools. If you're convocant
with other B products like the design Photoshop, you'll be able to identify some tools here and there
are similarities, right? All those other
products also have their tool bar or the two box at the left
hand side like this. Now there are two
very important tools I want us to look at right now. This is the Quick Selection two and the direct selection to, if you click on the Quick
selection to just come on this rectangle and
click drug, drug, drug. Just drag three copies, right? Then click back the
selection tool. Now this tool allows us
to select cool objects, then just move them around and resize them and rotate them. When we bring our mouse to
the edge like this, sorry, I'm zooming in using
the mouse wheel porton, the control or command. And the Alt rather. The Alt key. And the mouse wheel key. I'm just ruling the
mouse wheel while, while pressing down Als
to zoom in and zoom out. Okay, To pan left to right
or to move left to right. I just hold down
the control key and the mouse wheel
that's on the PC. If you're on the mark,
you'll be holding down the command
key, right? Yeah. So the selection
tool enables us to select whole objects
and move them. You select whole objects
and move them while the Direct selection
two enables us to select what we call Core Points. Now when we click on our object, you can see 4.1 234. These are the points that are necessary to make
up a rectangle, right? Or a square ship. Now when we click on
the whole object, as you can see, these
points are all blue, right? But when you click
on Direct selection two and come and click on
one of the points here. You see that the point
which you've clicked turns blue while the others
remain white, right? So it means this point is
now active, no selected. It means you cannot
move it up and down. You can move it up and down. Okay. Yeah, move it up and down. Now, as you can see, selecting this co point gives us also properties by
your right hand side on the properties panning
on why selecting this, you can see that it's an O
point that has been selected. And you can see the
transform properties, which is the location
on the x axis and the value on the y axis, okay? Value on the x axis and
the value on the Y axis. And you can see the
appearance of the whole ship. This is whole ship and
this is the field color. Now the field color is the
color inside the ship. While the stroke color is
the color outside the ship. Now as you can see, the
stroke color is black. The field color is white. Yeah, St color is black.
Field color is white. The stroke has a value that
the thickness of the stroke. As you can see for this
object, the value is one. When you increase it to, let's say it, you see that
the stroke keeps increasing. Inside, we have what
we call the opacity. Opacity is basically how
transparent the object is, and we can see that opacity
is at 100 right now. Then we click and drag it down and see the opacity of
the entire ship reduces. It means the object
becomes transparent. Here are effects,
but we're going to look at this in Fdulscens. We have other options. Here we have the Align options, which bus align our objects. Let's just click select on
the object and align it. This now our object
is aligned based on, based on our our
selected artboard in relation to our
selected art board. Okay, this aligns it to the middle of our selected
art board in the Y axis. While this aligns
it to the middle of our selected artboard
along the X axis, this aligns it to the edge here, to the edge on top edge below
this, to the right edge. That's what the Align tool does. Okay, now you know what our selection tool and our
direct selection tools do. We have many of the
tools here which we're going to look at very
much in for the lessons, but come here and select our object again once more
and then drag it out. Now when, after dragging it out, you can see that here we also have the field
color and the ste color. We have the field color
and the shoe color. You can select here, click and choose a color instead of the one
you have here. When you click okay, you can see that the
color has been replaced also for the stre
color. Click and come. Let's see, we want to
make this blue click. Okay. Now you can
see the ste colors replaced with this
little icon here. We can swap between the
field color and tree color. Okay, Lets click here. And the field color becomes the stre color, and vice versa. As we click the portion here, this portion here makes us
have no field or no stroke. Okay, when we have the stroke selected here
and click this button, turns it to an empty stroke,
also with the field. When we have the filler
and we click the button, turns it to an empty field, I'm just doing with control Z. Okay? This other tool here choose us the
color of the object, gives us the color
of the object. And this one talks
about ingredients, which we are also going to
look at in for the lessons. We've just had a quick
introduction to the tools and the panels and the works piece in setting up our projects. Right now, the next thing to
look at is our menu here. We have our menu
here, the menu bar. And we have the file here, where we can create
a new document. We can create a new
document from a template. We can open files. We can open recent files. We can close, we can save, we can save, we can Save a copy, we can export, we can use scripts, We can set about document, we can set up color modes, we can exit, we can print and
do a whole lot of things. We're going to look at these
and we're going to work with these options very
well for the lessons. Now we have the edit, which we have the simple undo, redo control Z for undo, and then shift control Z, redo or shift command
Z on the mark. For red, we have
cuts, we have copy. We have, we have piece in front, we have pieced in back, we have pierced in place. All these are just explanatory. Now, of course we are
going to look at, we're also going to
use these options over and over again in
subsequent videos. I just want you to, to get
familiar with them just a bit. We have options here. We're not going to look at this for now. We are going to look at them more in depth for the lessons. In fact, we have a whole module
just to look at options. Object menu takes care of
our typing and our font, also going to look at
this in further lessons. We have the selection
which no to select stuff. When I select this and come on selection objects or
based on field color, you can see it's going to
select this other one. Because I've selected,
I've asked adult to select objects
based on the color. Every object that has a similar color with
this will be selected. That's one of the things you
can do with the Select menu. You can use to select all
objects you can select, You can reselect, you
can inverse select. We are of course going
to use these options. Also in Foden, we have the effects which we
are going to look at. Also in Foden, we have
the view options on the view menu options guiding what we look at
our viewport, right? This is our viewport
options on our view menu. Enablers, edit what appears in our viewport,
things like rulers, things like zooming
out, fitting to screen, things like perspective or grids guides and so
on and so forth. Okay, we are of
course going to use these options or some of these
options in Ford lessons. And then we have this other one which is called the Windows, which of course we used the other time to set up
our interface right now. These options here help activate other panels that are not presently
on our viewports. Things like let's magic
wand for example. This is the magic one panel which is not important for now. Let's see Align Panel. You can see it is the
align panel we can do all aligning with this panel, you can see brushes. And of course we have
brushes here just pops out. We have ingredient
see gradients out. Many other panels which our viewports cannot
handle for now. We can also, we also set
up our viewport for now, it's the essentials classic. Reset the panel,
other workspace. We can create new
work space based on the panels we have
on our work space. Presently, we can
manage work spaces. We can choose
different presets of work specs based on what
we want to achieve. Finally, I want to just
look at some other concept, the simple concepts
here to illustrate. Now we've looked at zoom, how to zoom in using
the mouse wheel. We also have a zoom tool here which you can
use to zoom in out zoom in our objects. Then we have the Pan
tool here which you can use to this gives that pan around interface. We also have a shortcut for the, that's using the space bar key. When you pull the space bar key, you then see that the pan hand just appears when you click. You can drag while
using the space barky. You don't always have to come
and select the pan to here. Okay, let's select the two of the right click
and click group. Now this is a way of
grouping objects that we then work with them as we can just select
our selection to them. You can see we are
moving the two of them as one because
they're in a group. When we use our quick selection two or direct
selection to rather, we can also select
individual points that without having to select other parts of the
group, we can group. And we can also,
we click on Group. There's one other thing which
you have to know about, which is the isolation mode. We have a group and when
we click on a group, then see that all parts of the design get graded
out. This get grid out. And we cannot, you can select any other parts but just the objects which
are in the group. This is a way to
isolate certain groups so that you work on them
individually without having to affect the other
parts of the design. To get out of the isolate mode, you can click on
your works piece. Let's say you can just click here on this back one
level to get out, and click to get out. That's it for the
isolation mode. You can also enter
isolation mode. It's one object, okay? It doesn't have to be a group. It can be one object
just to, just for now. This is all you need to do to get started with illustrato. In our next lesson, we should start
working with some of the tool to create
something amazing. To create amazing designs, to get familiar with
the Austro even better. See you in the next video by.
3. 03 Your First Drawings in Illustrator 1: We're going to start creating some very cool designs
in our Los Frito. So the first one we're going to start with is this design. Okay, so as you can see, this design is quite simple with just simple shapes,
okay, and colors. So this is what we're going to create in this lecture, okay? What you have to do is start
a new project file, okay? When you start a
new project file, then you'll be in the
same page as I am. Okay? You have to use
the letter preset. What you then do is
come to file and then come to please. Okay. Now, please enable us to please reference or an image
in our project. It's just like you're trying
to import a reference image. Just click please. Then
it's going to open the file and then you just come
to project files, right? This project files, that's in
your project folder, okay? In the court folder rather. When you come to
this project files, this is the one you're
going to choose. This one that says your first
drawings in Illustrator. When you select it
and you click please, it's going to enable you
to please your drawing. You're just going to click, click and drag, and release. You see that your drawing is
down placed in Illustrator. Okay? But this is not the
kind of place we want to use. Okay? In this case, because what we're
trying to do is we're trying to make this kind
of a reference image. So there is a very easier
way to do this, okay? Just delete and then come
here file and please again, when you come to the
project full lock, just click the file
you want to import. And then you see where it says template, click template, okay? So when you click template
and you click please, it's going to import it, okay? But what does it do? It just puts it in a new layer and then
turns down the opacity. Okay, so we can
now draw over it. Okay? And then it locks the
layer so we can select it. And now we now have layer one on which we can do our designs. Okay, one other thing you can do is you can
unlock the layer. When you unlock the
layer, you see that you don't be able to
select your file. Okay, And then the
next thing to do is just fit it on the art board, then lock back your layer. As you can see, we can't
select it right now. The next thing to do
is to start drawing. But we are not
drawing on the layer, so we're going to select layer one on which we want to draw. Okay, can you see here? We can just see different ships. Different ships. I'm just going to take you through the
process of achieving this. The first thing you
want to do is come here where it says rectangle, okay? Hold your left mouse button to open the options so you
can see other options, Okay, Not just rectangle, we have the rounded rectangle, two we have the ellipse two,
we have the polygon too. We have the start tool
and we have the flat two. For now, let's use
the ellipse tool. When you click the ellipse tool, drag out, you see we are now
able to draw an ellipse. Okay? We are not able
to draw an else, but the way we're
dragging it out, we are not going to get a perfect shaped ellipse,
a perfect circle. Rather, what I want you
to do is wild holding it. Just hold down shift, Okay? When you hold down shift, you then see that scales
up and down evenly, okay? Scales up and down evenly. Holding down ships helps you create even sizing
for your ships. Okay, just hold down
ship and then release. Now come to your
selection two and then try to fit it in
like this again, Why holding down shift? Drag it down to reduce the size. Okay. But if you want to reduce
the size from the middle, holding down shift,
hold down shift, and then hold down Alt. Also you see that you can now
reduce it from the middle. The reduction is even from
both sides. From all sides. You just try to fit
it in like this. Just try to adjust
it, make it bigger. I think I have it perfectly
lined out right now. As you can observe, my ship
has a field color and color. Field color of white and
str, color of black. But my reference image doesn't
have fill color of white. It's pole, right, Pop. What I would do
is I'm just going to come here. Come here. Okay. I'll come to my
property panel and then just give it Nootkejt.
Give it no stroke. And then for the field color, you just have to come here to this point and just
select Popula. Let's just drag it out to see if it's going to fit better. Yeah, I think this will do. Just control Z to
bring it back and I'm just going to adjust
this to align better. Okay, so as you can
see we've been able to please our first ship. Which is this ellipse. Now we have many other ships, we have a triangle here. We have a rectangle here. But this rect go, I'm
just going to come, hold down this two and select the rectangle to
come. And click here. And holding down shift, I'm just going to
grog like this. Okay? Now this rect, what I've done here is I have given it a St color
and no field color. Okay? Just come here, come to St Color and
select this color. Okay? Come to Field Color, and click here to
make an empty field. The next thing you would like to do is increase the stroke size. You can see I'm increasing
the stroke size and it's getting filled up. I'm just going to
reduce the size bit. Move it down with my arrow keys. Muzzle fit perfectly. Actually, muzzle fit perfectly. Muscles be similar. I think this would do it. Then what next? Do the line too. If you hol, here, you then see the line to the, the spiral to rectangular grid. To the polar grid to. Okay. But what we are going
to use is the line segment. Just click on the line
to just click here. And holding down
shift to this point, okay, It didn't perfectly
feel to this point. I'm just going to select
the direct selection tool, this anchor point, and drag it out while holding
down shift. Okay? Everything happens
in the street way. As you can see, the stroke
is too large. What do we do? Let's just adjust this one to the stroke is too
large. What do we do? We just reduce the stroke here. Reduce it to this point. Maybe maybe a little bit bigger. Something like this is perfect. Also the stroke color. Click on the color and then
just choose a black color. Now the next thing we do is we like to duplicate this line and create this pattern
here. What do we do? Come to your selection two. Then all you need to do is
the copy paste in place. It pieces it at the exact place way
where you've copied it. Okay, It means it places it
on top of the existing one. Just come here,
bring your mouse to this edge and then just click
and drag this way, okay? When dragging, just hold
down shift to make it align specific angles, okay? Like one T 90.45, and
so on and so forth. But this is one that we need
that we're going to use. Just make it align to
180 degrees, okay, And then select your bot file, your boot lines
and come to copy. And then pierced in place. There's a shortcut for this,
which is Shift control V. Shift control V or Control. Okay, Shift control
V or control. Control. And shift control V
control is pierced in front. It's going to place it in
front and in the same place, while shift control V is
going to do the same job and also pieced it at the same location in a
different project file. Okay, let's have a
different project file and want to place it in the
same location as this one. So we can use shift control
V. Just select then just come to this edge chair and out why holding down shift
so as to align perfectly. Then for the third one, just select all of them
and copy piece in front. Then out to drawing. This will do it when we go. Sorry. What did I do?
Just reset my box piece. Mystic. Reset Essentials. Classic. Yeah. And I don't
need libraries, right? To include libraries.
And bring my lease. What next do we do? We have another ellipse. Here we have another ellipse. Now just select your ellipse, or we can just
duplicate this one. To duplicate this one, select, then you can in front duplicated a short
cut of doing this. Selhu, another shortcut for duplicating your
fire or your object. Just resize it bigger and to
fit the drawing perfectly. Then come and select your color. Let's just make this
color less for now. See what's happening better. We can now choose a blue color. Let's choose this blue. Let me just show you one thing. First of all, let's just group the ships to the one,
to the appears one. Let's assume we
want this ship to come behind this ship, right? We want these ships to
come behind this ship. Even though that's not the
ideal situation in this case. I'm just trying to
show you something. Let's assume we want the ships
to come behind this ship. What do we then do is
just click on them and then then send backwards, which will send it
one step backward. Okay? If we keep doing
send backward sack, keep sending it behind
when we are satisfied. Okay? When it appears
it finally sends it behind ship because
as you can see, we have plenty of
other ships here. So it's actually sending it behind all the other
ships we have. If we just keep doing send back, as you can see, it has now send it behind this
particular ship. But let's assume we want to do as we want to send it back
to the last position. All we need to do
is to send back, to send it behind all
of the layers again. But that's not the ID
situation for now. We just arrange bring front. Now the next thing to create is this ship and the way I
created this is I just meet. I just made a rectangle. I made this rectangle like this. Okay? Then I made my color. I give it no stroke and
then made my color. Okay. What I then did, I came and selected my Quick select my
direct selection too. And then selected
this anchor point and this anchor points. When I select this anchor point, you'll see this
little circle here. When you just click on this
cycle and drag it out, you see what happens then
makes our edges rounded. It makes our edges
rounded in relative to how much we drag it in. You can see how I was able to achieve that rounded effect. What I want to do right now is I want to
see through this. I want to make the
discolor right now, so I can just
replace it later on. What I do is come while selecting the file and then
come and just swap, okay? When you swap, it makes the
field color transparent. And then the stroke color, the field color,
it just exchanges. Just move this one, okay? The next thing is
select your ellipse to drag out like this. Let's just give it a
white strew color. You can swap it later on. And then come and duplicate
our ship piece in front. Then we size it down, this an orange color,
this color shade. Then do I need to do?
All I need to do is to just select and swap
back the colors. Okay, Make the field
color the shoe color, and then the shoe
color the field color. Okay, I'm just going
to click this button. There's a short cut to do this, which is shift x. Shift X. If you shift x, it's going to swap the colors. This is what we've achieved
so far, I just disabled. The reference layer, so you can see what we're
having so far. Okay? Okay. We're
pretty much doing a good job now on the next one is spiral. Okay? The spiral. So just come here and pull down the left mouse poten and
click on the spiral two. Okay? So when you click on
the spiral two and just click on your artboard, you didn't see the options
for your spiral. Okay. Your spiral design. Now we
have the radius as 50 points. We have the keys 86 and
segments 77 in style. Just going to leave the
settings and just click okay. But you can also check them for yourself to see
what effects you get. This is now in the
spiral I've created, might not be very similar.
Perfectly similar. Going to suffice.
Reduce the size to fit in more
perfectly then just reduce the stroke size. Let's reduce the stroke size. I feel this is okay. I'll work with this then. Now we are coming
to these ships. Okay. I consider them the most complex for this
tutorial. Why is that? Because we're going to use a
tool called the Path Finder. The pathfinder can be
found on the windows, then path finder, click on
Pathfinder tool, then open. Now this is the pathfinder
panel, or the pathfinder. To. What the pathfinder does
is it creates part. Let's just make an
example by creating this ship right down, all to duplicate the ship. Now we have two ships here. Okay? What the pathfinder does is the pathfinder
has many modes, okay? It has the ad mode,
the subtract mode, the intersect mode,
the exclude mode, the divide mode, the trim
mode, the merge mode, the crop mode, the outline mode, the minus black mode,
and so on and so forth. Now, these modes will give
different effects when used. Now if I have an arrangement like this
and then use the Ad mode, what happens is it just adds
the two ships together. Okay, let me just confuse you. If I have them like this
and then use this mode, which is the minus front mode, then minus the one in front
from the one at the back. This is now what
we have. Then when we select them and intersect, we see that it cuts
an intersection. It's now deletes the other parts which do not intersect and then mix the parts which intersects
a hole for this one. This is the opposite of
the intersection mode. Then we have this one
which is the divide mode. Now this divide, when you click, you see that nothing happens. But what happens is a
illustrator divides the edges, divides the ships, and creates intersections based
on the edges. You can just come here
and drag it out down. This is a hole because it cuts the ships at the point
where the pot intersect. That's how this
divide effect works. I'm just going to
undo then let's see, this one stream trim. See what then happens. We have this key now you can explore
all the other options. But for this Ese, what we're going to use
mostly is the divide. What I did here was
came and created a rectangular two out like this. Then what I did was selected
the direct selection two. The shortcut is you can just hit to select the
direct selection two. And this one, the shortcut is V, you can just hit Select and V, this is then I just came on this C point and drag
it out like this. Then choose a blue color. Selected this color, this blue. Right. Good for
this other parts. For this other ship here, what I did was I selected the ellipse two and kind
of created this ship. Okay. A perfect
circle like this. And let me just make this stock as to see
what I'm doing here. Just drag it out and kind of duplicated the ellipse again. And what I did was control
C. Control V. Control. Right. And just made this
one little bit smaller. We have two of
them for this one. I'm going to this pink fl, and make the colors
bring the colors back. What do we then do to make an intersection in the middle or cut in the middle, because
that's what we have. I selected the first one, selected the second one, and minus, minus the second
one from the first one. Then we can see that when we take our ships
away like this, we can see that this part has
a different color, right? Control. All you need to
do is to select them. And then it divide. When you hit divide, we then
have division like this. We don't have them as
separate points, Okay? Now we can just make the show colors so you
can see what's happening. As you can see this
part control V to bring the selection
to this part. Now we have to double click to go in because they are more of a
group right now. Part now has a popular color, has a popular color, while
the others have blue. We're going to ungroup them so as to have more
control ungroup them. Okay, Now this one
is a triangle. How do we create a triangle? Just come to our
ship and come to polygon polygon and click here. It then gives you the option. Do you have the reduce Now the sites will tell us how
many sites the polygon has. In this case, we want
just three sides. When you click three, we
have the polygon created. Just drag it in, please. And increase the size like this. Okay. Yeah, it fits perfectly. Now. Just bring the color
back and bring it back to. Now what we want to
do, want to create a, want to use the Pathfinder tool, the divide option
to select this one, and select this guy and divide. Now we have them
as separate parts. Good. I'm going to swap the colors so as to see
what's happening beneath. Okay. Select your selection to group them, because they are
now in the group. Yeah. The next thing to
do is to add our colors, right, for this one. For this one orange color. Okay? For this one we
have a yellow color. For this one, we also
have a yellow color. For this one, we
have a black color. For this one we have
a lighter blue. For this we have this dark blue. And for this one we
have this purple. All you need to do is just select your shapes and
swap the colors back. Sack swap back and swap, select this guy, swap, swap back, swap back swap. Yeah, this is what we have
so far As you can see. We have been able to create
our ship for this last one. Select your recangle two, this last one D it out the color grey, make
this colorless. Just select boots, ankle points, and drug them out like this while increasing
the size of our. Finally we have our design. Our first design
completed, yeah, we have our first design
completed with this, we've come to the
end of our video, in our first design, in a dub illustrator. Hope to see you in the next.
4. 04 Your First Drawings in Illustrator 2: Hello guys, come back. In this lecture, we're
going to be learning how to create this design in Adulto. Okay, we're going
to learn one new, two which is the
shipbuilder two which will those in creating this
design just come on adulto, create your new file and
import your reference file, which we did the last time. All you need to do
is come to file, then please come to
Project Files and see this one which says your first drawings in
reference image two. Select it and click on Template. And then you're going to place it just like we have it here. Okay, Now the first thing to do is of course to
come to direct angle. To create your angle like
this or your square. Okay, Now how does
the shipbuilder work? Okay, let me just demonstrate
how the shipbuilder works. Let's assume we have two ships, or let's say three
ships like this. We have them with
different colors. Let's give this guy no stroke
and make this one green. Let's see. No stroke and make it range this guy. No stroke. Let's say you want
it to be black. Okay, great. Now this
is the ship build. This is the ship builder
to the one you see here. This is the ship builder tool. When you select the
two, first off, you have to select the ships
you want to use the tool on, then select the tool. Now what the tool
does is it creates ships based on the
arrangements of ships. We have our works piece. Okay, When we select the
ships and select the two, we can just click on one ship
and add it to another ship. Now you see the pot
ships are the same. I'm just going to do also
now the ships are the same. You can just drag it
around all of them. Now all of them are on
the same ships. Okay. What you can also do with the
ship below two is you can minus ships from each other. Okay? When you pull down
Alt, then click here, You see that it has
minus this intersection. Okay, I was going to undo
and then just hold down Alt. When I hold down halt
instead of this icon, it's going to show
the minus icon which signifies subtraction. Okay, The plus
signifies addition, which means it's
going to add ships together while the minus
shows subtraction, which means it's going to
subtract ships from each other. When I alt and drag
the ship like this, we can see that
it has subtracted this whole ship from
the one we have here. One other thing we can do with the ship builder to
is to add colors. Okay? Let's assume
we have color. Let's assume we
choose the color. Here. We can use the Shibuler
to to add the color. Okay? Give display the color and just base on the colors we want, we
can choose the color. And okay, basically this is how, this is one of the uses
of the ship below. Apart from creating ships
based on intersections, the arrangement of the ships, of different ships
which we have, it can also be used to add
colors to specific points. Okay, just delete this
demonstration we have here. Come on, ellipse, ellipse. Let's make it this big. To make it bigger now let's give it a true color, let's swap the color and make
it a true color control. C control and reduce
the size like this. Why holding down all and shift
reduce the size like this. Okay, then let's just
control C. Control again. Just make this one smaller. Okay, we're going to
increase the size literan, but let's work with this first. The first thing you want to do is select this and
swap back the color. And give it, let's see, blue color, select this guy
and swap back the colors to. The first thing you can do
is just select both of them. Select both of them and select the Shape Builder to
and cooling down Alt. Click here. Now we have a
cut in the middle here. The same thing you can do here. Select this one, give you
the field color back. Select the other ship and
select your ship builder to pulling down Alt minus this
ship from the entire ship. Now as you can see, we now have two different ships. Of course, we want more
courts at this point, right? Just select the both of them come to windows and part finder. And let's just divide, okay? When we divide, we then have our separate ships
like this, okay? Just swap the colors
to us to see what's going under for this other one. All we then need
to do right now, just make it bigger, as big as this. Then just send it to
the back right click And send to back it appears beneath all
these other ships. This one we need to
give it a nucleus. The group them for now. And then give this guy
orange color, orange color. Give this guy a purple color. Give this guy a yellow color. Let's choose this
sheet of yellow. All you then need to do
is to select all of them. Just select each of them
and swap back the colors. Now when we disable
our template layer, we then see all sombness,
enable it back. And we can just do the same thing for
this other part, okay? You can actually create
them from scratch. I recommend we do so. We can also actually just
group them together and then duplicate them like this
and then them like this. And fit them together like this. Fit them perfectly that
instead of doing everything, I feel we should
do it once more. We can just swap the
colors on group. Just swap all the
colors so as to see what colors we have to
use for these ones. Okay, for this guy, we a brighter shade of
orange for this guy, we use yellow for this guy. We use a brighter
blue for this guy. A purple back our colors. Finally, we have
this shape here. And of course you know how
to achieve this, right? We did it in our last video. Just drag it out like this. Give it a black stroke. Then control C. Control F, which is copy and
piece in front. And then make it rotated like this while holding down shift
of and select both of them. Control control F, hold down shift and
route it like this. Then select all of them. Again, control C,
control and adjust them. Here we're done with
our second design. Looks very perfect. This video we were able to
work with the Pathfinder tool. Again, also we were able to learn about the
shipbuilder tool, that will be it for this video and see you in the next one.
5. 05 Your First Drawings in Illustrator 3: Hello guys and welcome back. In this lecture, we're
going to be creating this amazing dog illustration. Okay, so we're going
a step further. We're going to
learn how to create this illustration while
learning the Pin tool. Okay, so in order to start, just come here and please, please, please then
come to project files and your phrase
design in Illustrator. Key reference image three, select it while clicking
on template and then import this is
now what we have. All we need to do is
come to the artboard two and resize our artboard to fit
into what we already have. Okay, then selection two. Then while on the first
layer, layer one, just come to your ship two. And then rectangle two, what I want you to do is just
come to this edge and start drug out to create the body. Okay, drag out to this
points to create the body. Then let's just give
this zero stroke. Or let's just instead give it a white stroke, give
it a white stroke. While selecting
our anchor points, this one just drag
down like this. The other one select and
drag down like this. Okay, the tool I want you
to learn about today is the P. This pinole is
used to create ships. It's used to create
parts with precision, using anchor points and handles. When you just set the
paint and start to draw, you start to draw, just
click, click and drag. Just click, click, click. What you then see is
when you click and drag, it creates a curve while
giving you these handles. Now these are handles
that can be used to adjust the look of this
curve, of this curve. This is what you can
do. This is what you can do, this is what you can do. But when you just
click and click, what it does is it
creates enco points. Okay? These en
points just precise, I just direct, didn't have
handles like this one. Okay? So these are
for sharp angles. While click and drug, we give you curves. Okay? Click and
gives you curves. Click, give you sharp angles. Do that, how the pin to works. Then just delete this. Let's see, we set the pin, Click, click, click,
click, click, click. When we come to this point, close the ship, we would then see this circular icon appear. This tells us that if we click, we will be completing the ship. When we click, it's going
to join the ship as one. Okay, It's going to join all
the parts as, as one ship. If you just select
this and swap back, we then see that we have our ship complete.
Just delete this. Where we want to
use this ship to, or this pencil for the first
time is this steel here. Just click here, come here, just drag it out like this. Come here, let's just click here and come to
the end like this. It all depends on how well or how comfortable
the situation is. I think this will do,
this will suffice, crack our anchor points
a bit or our handles a bit to make the ship
even look better. Select your pen back and
come to where you stopped. Now when you come,
you then see that a line appears under
the two icon right now. This line, this
diagonal line that appears tells you
that if you click, you'll be continuing drawing
from where you stopped. We just click and you can
see that it has joined with the existing path to
finish up the drawing. For this again, we're
just going to swap the colors as to see
what's happening below. And then for this
other shape here, all I'll do is also select
the pin two and just come on. Click. Click. Click. Click. Here and just complete the
ship while selecting the ship on stroke and give it a zero stroke and common color
and give it a field color. After you do this, just select the boot ships and then
select your shipbuilder. Click on a ship builder to, while holding down Alt, you can delete these extra
parts you don't want. Then the next thing to
do is to create the leg. Click your rectangle to
just the leg, this, okay? After which we select the white color and just
swap the colors like this. Then select our anchor points. Come to this anchor point, select it, and grab
our cuff like this. For these parts,
I'm going to create erect angle and drag it
out like this. Okay? Just give it a pople color, pop color, stretch it out. Then make the anchor points rounded or make the edges rounded while holding
down Alt and shift. Just drag the ship to create these extra ones.
This will suffice. Now what else is left? We have to create this other
leg here. This other leg. What I'll do is I'm going
to select this one. Hold down Alt and shift and
drag it out. You know what? I'm just going to select
these other ones, Drag it out like this
for these parts. All I would then do is come
and select my anchor points to my direct section to
sell these anchor points and them out like this
to reduce the size. Then select your rectangle. Two creates ship. This while giving
it an orange color. Then you swap the
ship like this. The next thing to do
is select this guy. Select the ship builder to hold out this extra part
we don't need. Yeah, we're making
progress, progress now. We would like to
create the head. For the head, I want us
to just use the pain. Click, shift, Click here, here, click and drag. Okay. Click and drag. Then what you should then do
is after you click and drag, you see that you still have kind of a curved continuation. If you wanted to
turn back to street, all you need to do is to
click your last co point, which is when you click this, you see that it's now uncle, it's not rounded any longer, just click and drag
this point and click. Then come here,
complete our circle. Or our ship like this. Even though the ship
is not completed, we need to still click our
last anchor point and then just come here so as to create
this head ship like this, for this one we can just click here and to
complete the ship. Now as you can see, we have our sh,
we have our ship. When we finally come
to add other colors, we'll see how
everything comes alive. Now, the next thing to
create for me is this year. For this year, I'm just going
to select the peniln shift. Click here, click
here, just click here. And then finally
complete the ship. Select our ship, give it an orange color for
this other year. We just have to click here. Cool. Down shift, click here, then come to this point. Click here, come. And this final point,
like this, perfect. Of course, this ship has to
be below the head, right? Let's just select the
head and select this guy. And right click
and bring them to front because we want
them in the front. Now we have this. Or you select your ellipse out
the eye like this. Finally, select
color for this nose. Select your ellipse to click. Click and drag it out like this. Mustn't be perfect.
Drag it out like this. Click back here, click
and complete your ship. Now I'm of course to go back to our select to go back to
our direct selection tool. Select this one, select
the existing ship and then come to the
ship builder tool down. Just let what else is left? I think we haven't created
these ships right now. Come to your ellipse
to for this one, just drag it out like this.
Just drag it out like this. Come to your selection
to just drag it out manually to
fill the ship right. For these other ones,
all you need to do is wooden olduplsr ship like this. Increase the size to
make it appear perfect. Halt and also duplicate the sky. Increase the size
to make it perfect. Finally, halt to bring the
sky and reduce the size. What else do we do?
Select all of them. All these ones. And
select the mean ship. Then select the ship below
two and doll minus the ships. Yeah, we have our
design complete. All we then need to do is
to swap back our colors. I'm just going to
disable our ship here. Let me just ble it so as
to see what's going on. Come here, swap our colors back. Come here, swap you back, okay? Come here, swap you back, okay? Come here, swap you back here, swap, swap back, swap back. Remember, you can use
the shortcut which is shift X, okay? Shift x, shift x, shift x, and shift X. For this one,
finally we shift X, Okay, Here we have our design. The letter, select the whole
design and bring it out. Shift of course, and
drag it out so as to see what's happening more
clearly for this guy. Just select the ones and right click and
bring them to front. They appear on top of this guy. For the colors, I
think I'll just make them become more
similar to this one. Yeah, that's what
we have so far. Now we can enable our Lia and just drag it out to
fit in more perfectly. What's left then our
background is left. Our background is the
last thing to do. So just select your
rectangle to and out this, select your selection
to come to colors. And choose this purple color, right Click, arrange,
send to back. Now we have our design complete. Yeah, that's it for this design, and that's it for the Pin tool. In our subsequent lessons, will learn even newer tools and techniques in
Db Illustrator. See you in the next video. Bye.
6. 06 Your First Drawings in Illustrator 4: Hello guys and war, come back. In this lecture, we're going
to be creating this design, or this BA illustration
in Adb Illustrito. We're also going to learn
one new drawing tool, which is the Covito tool in Adb Illustritot's
open Adbustrito. Then come come to place
and choose this design, this one, which is your first drawing in Illustrito
Reference image four. Okay. And make it a template
please. Now this is it. I'm just going to use my
artboard tool to fit it in more perfectly perfect. Okay. Now the covture
two can be located here. This is the coviture two. It's very similar
to the pen tool. Okay, Just that it
works with curves. When I hover around
the coviture two, we see the curvature. To create and edit
curved and street lines easily. Let me just demonstrate. When you select the curvature
to click on an empty piece, you have this point, okay. You can move this point to wherever please
you want it to be. Okay, This is where the
first cove point will be. The next thing you have to
do is then click and drag. You see a curve is
now being formed. Click and drag. Click and drag. If you do not want
curves to be formed, you can click,
click, click, click. Then instead of curves, angles will be
formed. Double click. But if you click and drag once, it's going to form curves
instead of angles. Double click for
angles, click curves. Basically, this is how the
coviture tool works and it's very similar to the pencil
to create our design. Now we're just going to start drawing out our points, right? For this first point, I'm
going to double click. Come here, and click to
create this curve like this. Come here, and click here. Let's just click here,
double click here, then click here, click,
click, click here. Click Our first shape
has been drawn, and we can use our selection
to to edit anchor points. Okay? Just fit them in
more perfectly if we want to this just to make the drawing fits perfectly. Now we have our first one. Just select a grey color and
then swap the colors, okay? The next one we will
handle is this one. Come here, double click here, and then come to this point. And drug come to this point. And drug also come
to this point. Double click, come here
and click on Drug. Come here, click come
here, and click. Very simple, We have
our second ship. We can use our ankle
point here to just make this ankle softer and slid back our coverture two. And then now we'll work
on this other guy here. This one is just a circle, just an ellipse,
complete ellipse. Click here and click here. Then click here, and click here, and complete the circle. For this other part here, just click here, click here. Bring it this way, click here, sorry, double click, click, click, click, click, click,
click, and complete. Double click, It's to complete. Now, I want us to make fewer adjustments to
the points like this. Now we have two ships and we'd like to delete
these extra ships, right? Like we did before. Select the two ships and
select our shipbuilder two, and then pull down and delete
the extra useless piece. So that we have just this ship. Good. Now the next one
would be the head. The head is also like
a complete circle. Just click here, click here. Let's click here, and
click here, okay. And finally, click
here, Perfect. Select our ankle 0.2 of it. Out this, okay. The next thing to create
is this white mid ship. No, select covert to click. Click here because it's Angular. Then come to a point. Click, click, click,
click and drug. Click for the other points
of this other ship. We click, then click. And I'm going to undo
the double click rather. Come here, double click. Let's just this, we'll come back and edit this ankle
points here. What's next? We just click and click. Perfect. Now we can come and
make some adjustments to our ankle points
like this, okay? Perfect. And for this one, we can just adjust it like this. Okay? Perfect. For the
last part which is this, we just click here, click here, and Rug click here, double click here, click here, and Rug gets to this point. Click here, and just complete the design
like this. Perfect. Now let's color our ships. Okay, for this one, I will choose this
sheet of brown. Now these colors might
not be available on B Illustrator because
they are custom colors. Okay. And we're going to go into seeing how to
create custom switches, cost colors in our
switches, in little videos. But for now, if you really want to create
something like this, you can just come to to
that double click to open the colopica two and just
manually adjust your colors. Your colopica, as you can see, I'm dragging it down right
so as to change the color. When you have the
brown like this, you can then use this icon or your mouse to choose the exact
color you want to keep. But any color will
suffice for this project, just use any color
of your choice just because we have
one specific color. And then all the others are
sheets of that color, right? This is what we have now. Now for this guy, we just
swap the colors, okay? This guy as swap the color, but this guy has
to be at the back, center, back this guy. We will choose a brown
color, brighter brown. Then swap, swap,
yeah, then swap. This guy should be at
the front like this. For this one we will choose
a brighter color and swap, probably select all of
them including this guy. And send everything to the back so as to enable or see this one. For this guy, I'm
just going to swap him and bring him to the front. For this guy, I'm
going to choose a white color or brighter green and reveal white Should
work better for this guy. I'm going to choose a
darker brown for this one. Finally, I'm going to choose
a white, Swap the colors. Now for this, here we want
it to appear at the back. When we disable our
reference layer, you can see what we have. I want to create a background. Just select your record. Let's see, a brown
color, shade of brown. Just drag it out like this. Send to back, just going
to choose another color. When we see send to back should go to the
back of everything. But we need it on a separate layer because
we don't want to be selecting it because
it's a background. Come to your shape panel
here and create new layer. And then grab the new
layer below. Like this. Click on this guy and then select the layer
and piece in front. Okay, let's just maybe
change the color of this. Let's use this one then. We can now click here, this empty space to
lock the layer so we can select it any
longer. Okay, good. Then do we do what
we then need to do? Reflect this shape here, flip a copy of it to
the other side of the transform and reflect
reflect options are here. For axis, it tells you whether to reflect it along the horizontal axis
or the vertical axis. For this case, we want the vertical axis and then we
want a perfect reflection. We're going to
choose 90 degrees. Okay. Instead of Ok, we will choose Copy,
because when we click Copy, it's going to keep the original
version while creating a copy with the reflected
attributes copy. And then rug while hooding down shift. Drag
it out like this. Yeah, perfect, same thing
you'll do for this guy. So select transform and
reflect, and then copy. Just drag it out like this. Okay, drag it out like this. This just checking to see if everything
aligns perfectly. Let's work with this, right? Yeah, this will work. As you can see, we now have
our design, our beer design. I want to add highlights
and shadows to our design so as to give it more from our reference image. If you look closely, you'll be able to see some
shadows and highlights. That's what I just want
to add for this purpose. I'm just going to come here, we can add them with either
our pin two or covature two. Okay, I'm going to
use the pin two. I'm just come here out
of the ship like this, then have something like this. Okay, why selecting it? We select the main
ship and then use our ship bul tool and
while holding down Alt we can delete the
extra mediate ship Pm. We have this one here. We can use the direct
selection tool to at our points even better. Okay, let's choose
a brown color. For brighter brown or let us
choose the same brown color. And then I chose the color to make it
look like a high light. Right, so the next thing
we need to do is to bring the layers on top of the layer. We now have it looking
like a highlight. Okay, I just want you to go
about and add the remaining. Okay, just the pen
or curvature tool and the ship builder tool. You can add as many of
highlight and shadows as you can so as to give the
drawing more depth. That'll be it for this lecture. In the next one,
we're going to create one last drawing using the
tools we've learned about. See you in the next by.
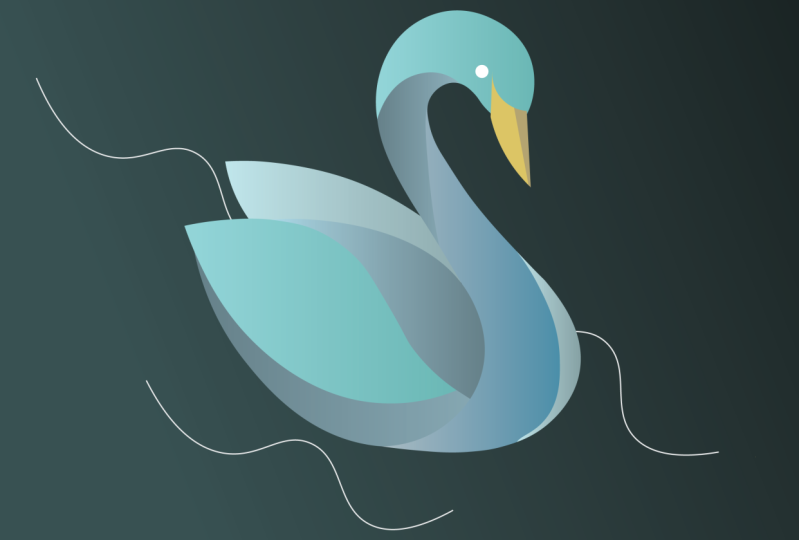
7. 07 Your First Drawings in Illustrator 5: Hello guys and welcome back. In this lecture, we are going to be creating this
bird illustration together using the tools which we've learned
in previous videos. Okay, we're going to together create this amazing
bird illustration. Go into a B illustrator
and then come to file. And please. And then select
our reference image here. And the template, click
template, please. Now the next thing
to do, like always, is to use our artboard
to adjust our art board charged pod to fit into
a reference image. Yeah, in order to begin by
selecting our near one, we have to use our
coviture tool. Right? To select the covture, to zoom in using
the old and mouse. We then click here, come to a point like this, and click here,
Come to this point, click here, and click here. I'm just going to use the direct selection tool to just bits on our arc
points like this. Okay, good work. Bits on our arc points to
make them look even better. Perfect. Select our two, and continue, sorry,
select our two. Okay. Okay, I'm just going to click here to
see if it works well. Yeah, do just come here, come here, here, come here. Double click here, double
click, double click. I'm going to, I'm going to
remove the field color. I'm going to move the
field color like this. And then double click here. And kind of click here to create this curved
ship like this. And then click here, okay, click here,
and click here. Finally, click here
to complete the ship. Okay, then for this ship, we're just going to choose, let's choose this sheet of blue. And then edit it to
make it look very pale. Okay, I'm just going to
select the direct selection to make our ship
look even better. Okay, But this look
even better. Okay. Move it out. Must be perfect. Mustn't follow the
template perfectly, okay. We just want to have
the best ship we can. I think we can work with this. Now for this other line, we select our ship two. That's for the wings right. Coviture two rather. Then come here,
double click here. The double click here. Then click on Drug. Let's click and drug.
Click and drug. And then click for this, we're going to make the
blue darker perfect. Then for this other part, we'll take our
curvature to click, click, Click, Click,
Click, Click, sorry. Clues, We can just adjust our points to
make them look better, to make our drawing look better. Yeah, this will work. Then we just have to select this guy. And
select this guy. Come to our ship builder
tool and pull it down. All delete this guy. This is now what we have. Then the next thing to create is F here, here, select, click, click, click, click, click, select it, our red color for the beak. We can click, click, click, click here
while drag perfect. Then let's do the ice first. For this, we can just
use to that've to the covet perfect and make this white. And copy and then paste in front while reducing the
size to something like this. Then making this color Ppp. Yeah, for these other ones, all we need to do is use
a rectangle to this. Then this select
the both of them and use a gray color fit. Just use the computer
to click here, click here, click and drug, click and rug, click
and rug, click perfect. Then we will just use a right
color and we can pull down holes and duplicate it
like this. Perfect. Now all we need to do is
just swap our colors, back swap our colors, back swap our color, back swap our color
swap this guy, the move it to the park, swap this guy, swap this guy, swap this guy, swap this guy, and swap this guy. Just check our reference image. You see, yeah, we've
done a good job. Even we can walk on this color in the colors
of the legs, maybe. Let's make this while
sending them to the. For this guy, we can
make the color brighter. Yeah, yeah. And then for the reds, you could make them bit pale. Okay, little bit pale. Yeah, this is it.
And as you can see, it's not too complex.
Nothing too complicated. If we want to go an
extra step further, we could add highlights
like we did before. Okay, I'm just going to add
highlights for this guy. I'm going to make
it looks like this. Okay? Make the
color we brighter. And then select boats. And use our Shuler, holding down Alt and
deleting the extra space. Okay, so we've created
this highlight here for this other guy was
going to use the court. Then click, click, click here, double click here, double click, Select the new ship,
on the old ship, and then use the ship
Bul tooling down Alt. Delete the excess
for this new ship. Just make it brighter. Ok, brighter. Now you can just come and try to make this one look
better like this. Okay. If you would like to
turn an ankle point like this into a curved smooth point, all you need to do is to click convert selected anch
point to smooth icon. Click it. It's going to turn it to a smooth point with handles. If you want to turn a smooth
point to ankle point, you have to click Smooth Point to a point with
sharp angles, right? You have to just click this
and it's going to convert. I think we need to
create a point here. Okay. To help us It,
our Shape better. Yeah, that's our highlight. Just select this. Come
to Shape Builder. Okay. Okay. Okay. We
can't actually delete because it's part of
our background image. If we just remove our
background image, we see that everything
looks perfect right. Now. After you're done
with the drawing, I would like you to just
go in and try to create more shadows and highlights to give our drawing
more depth, okay? Okay. I've done this first
and second one for you. Just do the remaining and see
you in the next video by.
8. 08 Assignment 1: So in our last few lessons, we got introduced
to be illustrator. We learned how to use a lot
of tools, diverse tools. We started with the
simplest of them, which we had, shape tools. Okay, so we created
designs with those, and then we built
on that knowledge, we got introduced into newer
tools and even came to the point where we started
using the pen tool and the coviture tool to
create really nice designs. Right. In this video, this is actually an assignment. Okay, I have created
this one for you. All you need to do is to
just replicate this design. Okay? You can just come to file and please and
choose the design. Here is the reference image. You can make it a template. You can choose it again, Have it side by side so that you try to draw what I
have drawn here. If you by any chance encounter some difficulty while drawing, of course, this is the main one. You can just go in and see how I have laid out everything. Okay, this is the assignment. Just try to create this with different
color combinations. You can use the
ones I have here. You can use other ones. You can use your
color combinations. Just try to have as
much combinations and feel free to share
your work with me. I'll be glad to see what you
are able to come up with. That is for this assignment,
that's all you need to do. Just use the knowledge you've
gathered over the course of the last lessons to
create this illustration. Now see you in the next one by.
9. 09 The Pencil Tool: Hello guys and welcome back. In this lecture,
we're going to be learning about the pencil tool. Okay, So the pencil
two can be found here, so just hold down your left mouse button and where you see the shipper
to just hold it down. And then the pencil two
will be the second one. So just click on the pencil two. And this is the
pencil two, right? This is the interview
of the pencil two. This is how it looks. Okay? And I have gone in and created this
cool illustration. Okay? This dog themed illustration or this pet
themed illustration. Okay? Where we have this
dog thinking of a bone, we have this crown on its head. This wanting of a bone, dis, wanting of money. With crown, we have a pulse. We have, I love pets
and so on and so forth. Just very cool illustrations. Just with the pencil too. Okay. So how does the pencil to work? The pencil to enables
us to draw out stuff. When you select it,
just draw out stuff. We see zooming. We didn't see what we now
have with our pencil too. Okay? So with this, we cannot go to our properties. We can increase the stroke
size of our pencil too. Okay? We can choose
brush presets. Okay? We can choose
brush presets, which we are of course going to look at later on
in more details. Okay? But for now, just know that these are the
few things we can do. The pencil tool. Just delete this and select
our pencil tool again. Now, when you select
our pencil tool and B, click on it, we see
pencil tool options. Okay? These options will help define how our pencil
tool will act. Okay, Now we have this
slide here, Title Fidelity. Okay? This will help us to smoothen out our drawings if we drag it to
the extreme end. Okay, When we drag this
to the extreme end, it helps us smoothen
out our drawings. When I click, okay, and I draw this and I
select my drawing too, We can see that because I increased the fidelity
to the maximum, it has made my drawing
very, very organic. Okay. That's just how it works.
That's just how it works. I'm just going to take
my time to import, to import this image
without the illustrations. I'm just going to please now
when I please, as you know, I can drag it, I'm going to drag it and come to my layers creates a new layer. This odd layer going to lock it. I don't select it,
I don't select. We're just going to go through
how to use our pencil to, to create amazing
illustrations like this. So I'm just going to
increase the struck two, then select our pencil to
the increase the change. So color to white. Okay. And then just try to
draw out and see what we have. So you can see now our crowing. Let me just make the
shklitt bit bigger. Yeah. Our drawing is now
more visible, right? I can even make the
Sk even bigger, and let's make it 66. Yeah, for this one. For the crown, you could
just draw a crown like this. Okay. See, you now have a crown. If you want to draw
a straight line, just hold down shift and then draw and have a straight line. But for this I'm just going
to leave it like this. My drawing might be
rough in some places. Okay? But this is just
to illustrate to you how to use the
drawing or the pencil to create my circles
here for my crown. Okay. Then we have an
illustration like this. We have one like this
that comes like this. Yeah, We can just have
nice cripple effects. We even have this one which
is more like an arrow. We are going to
come to this later, but you get the point. Now for this one,
we have a boon. If your drawing
doesn't come out well, you can undo it and just
try to create a new one. Then we have
something like this. Okay, this. Right? Yeah. We're
making progress. After doing our drawings, we can still select our drawings
and adjust their sizes. Just the sizes, maybe make
this smaller, perfect. We also have a bone illustration
here. My drawing is bad. Just a bone. Just do perfect. Ah, it's
still not good. I'm still not satisfied with it. Let me try it once more. This one is quite big though. You know what? Just going
to delete this guy. Select this guy here. While selecting our ankle
0.2 I can actually select ankle point here and it can
make the boon longer, longer. Select this ankle point and just just the edge
curve like this. Even do same here. All these are what we can do to our drawings after using
the pencil to go back to our pencil to
then just create this cloud ofs
mustn't be perfect. This is good and we
just have circles. Is pointing to our very
lovely looking dog. I'm not satisfied with this guy. I'm just going to delete him. I'm going to bring
this one here. We can be okay having some progress for this other guy he's
thinking about. He's thinking about some cash. Just drag it like this. Perfect. Then have some clouds. Perfect. Then thoughts coming, coming, we get the point. Then we then have
an outline like this, another one like this. Just be creative. It mustn't look
as exact as this. Just be creative with it. You could have
other things added. Okay, so I'm just going to pause for now and
then just try to show you one more option which
you can use the panel now. This option is called
the Stroke. Okay. Now this is the Sky panel. Now, click, double click when you come here and
click on Show Options. It's going to show
you the Strk options. Okay, with the stroke options, you can actually modify the
strokes of our drawings. Remember, these are just
shapes with strokes. Okay, we have a stroke color and we have a stroke thickness. Now with the options here, we can actually edit our stroke. We have the width which is 678. Adjust the width.
Here we have the cap, now it is set to both cup. We have the rounded cap, we have the projecting cup. Let me just create one line here for you to see how the
hooting works, right? For this, we have the bot cup. If we choose the rounded cup, you can see the changing
happening here, right? Both cup, rounded cup, projecting cup, okay,
projecting cup, rounded cup. Both cap. And then for the corners,
we have this one which is called the Tam, just going to create
a corner here. You see how it works. We have this one which is the default called
the met joint. Then we have this one which
is called the round joint, so you see how it's
changing, right? And then we have this one which is called the pavo joints. This is how it works,
Joints, rounded joints. And In ta joints, right? And then we have the other ones. Not too important. We have
what we call dash lines. Okay, when you enable
this, just creates dashes. And you can edit the dashes
by changing the value here. Let's make the 16 can change
the value of the gaps. It means the dashes are 16 points long and the gaps
are ten points long. Okay, let's make this 20. You can see the dashes
are two times the gaps. Okay, That's the whole
thing behind here. Now you can also create
more variations. It creates dashes within dashes. Okay. Just to bring it
back to the normal, just go through these
options on your own. We have here which is
called the arrowheads. Now these arrowheads are
just what the name imply. Arrowheads. Okay?
When you come here, you can choose a head
for your line and you can choose a
til for your line. Okay? Depending on where
you want it to be, you can choose a head
and head or tail. Tail. Head and tail, just depending on what you want. Okay, These are the arrow heads. Then finally we have
what we call profiles. The profile just create
a line like this. These profiles are of the
way our lines will appear. Okay, The profiling of our line. Let me just choose this one
so you see what's happening. Let's just check the dash line. You can see that the profile created similar to the one here. It has tipping edges. We have many other
profiles. We have this one. Let's just make the strip bigger to see what's
happening even better. We have this one. We have
this one. This one. Okay. These are the profiles
we have for this guy. Actually going to
give it a arrowhead, just like how we
have here, right? Arrow head and a tail. Head and a tail. Yeah. Perfect. Okay,
I think the tail we here is this one. Yeah. The arrowhead and
the tail. Okay, perfect. Basically, these are what you
can achieve with a pencil. Just go in and just try to
create, add more things. Make yours as
impression as possible. And we'll see in the
next video, bye bye.
10. 10 Working with Brushes: In this lecture,
we're going to be learning about the brush tool. Okay? Now, as you can see, I have gone in and added some more effects to our
initial illustration. Okay, I added some
brush effects, added some more drawings. Okay. Some more to do to make
illustration even better. Okay, So the first
thing I need you to do is come and open this file. Come here, click open.
Come to Project. And then this file which
says working with brushes. Okay, just open it,
you have this drawing. The next thing I need
you to do is come to our initial drawing and
then just free this layer. Just unlock this layer and mark, you select our entire drawing, that's the initial drawing. And hold it in drag, like this non release. So we're dragging
it to our drawing. Right, our new drawing, so we can practice on it. Perfect. I want to separate the background from the layer which we
have our drawings on. As you can see, they are all on the same layer. All right. Just click here. Come to Edit and Cut. And then just come in
the layer beneath. Keep in front, everything looks perfect. Just
lock the layer. Start. How does the
brush tool work and where can we find
the brush to now? This is the brush to, you
can see Pint brush to. This is the paint brush to
and selecting our layer, you can just grab
there. You see it? It works just like the pencil to which we just
looked at. Right? Let's just select them and delete and select
tool once more. It is used to draw out lines. Used to draw out lines. Okay, just like the pencil too, But we don't use it
to fill our species. We don't use it to
fill our species because it doesn't
do a good job. Okay? If we try to use
it to fill our species, we can see that all these lines have anchor points and it just
makes our work very messy. In order to fill species, we can use the blob brush tool. Okay? It's a brush tool, but it does not create anchor points like
the brush tool does. It only creates who objects. Okay. As you can see, this is on the brush
to the brush tool. This can now be seen as a whole objects on
the brush tool. That's by the way,
on our brush tool. When we click the brush tool, we then see a
similar option with what we had on our pencil tool. Did they work just similarly? Now we have the fidelity once more when we drag
it to smooth it, then helps us smoothing out
our drawings like this. Okay. I actually
find the brush tool easier to use than the
pencil tool. Okay. That's just the
brush tool for you. Okay, let's select
the brush too. Let me just look at some
other illustrations which I added came here, made this ship here. I made one other one at
this point. All right. Okay. For perfect, this other
random shape like this one, like this, I came here and made. Okay, made this guy
look like this. Okay, perfect. Now, what else did I add? Iman added stuff like this, added some random
drawings like this. Okay, just made the
whole thing look busier. Just Okay, you get
the point, right. Depends on your creativity
and your ideas. Yeah, How did I add
the brush effect? The brush effect, you see? How did I add them?
What I did was I came to windows, came down. Now you see where it says
brush libraries right now. These are the brushes. Now these are presets which
you can use on your brushes. I added, one of the ones I added is the vector p.
Okay, when you click, you see that the panel
appears with the brushes, with the brush presets. Let's say I want to
even activate more, just come here, come to
brush libraries then. Let's see, we want
artistic paint brushes. Now we see that they have been
added to the Pana, right? We can navigate through them. You can even drag this one to
come before the other one. What I wanted to
show you the last time was the brush options. Right now, the brush
options we click here. We see that the
art brush options are out the name of
the brush preset, which is the grunge brush, to park 01, then the width. We have many other options. Actually, it all depends
on the brush you pick. It all depends on the brush
you pick, if not directions. Directions depending
on what direction you want the brush to follow. As you draw, we
have the key color, you can change the,
we have the flip, we have all other options. When we come on a
brush like this, we have some options different
from the ones we just saw. Now this one has what
they call the angle. The angle at which the brush will draw the line. We
have the roundness. We can make it oval like this. We can make it
around. We can create the size, so on and so forth. Just for you to know, let's just try to make our
drawings more interesting. Brush presets. Select this guy, and come on this. And select this one. And see how it looks so
we can reduce the size of our stroke and
test more presets. Let me select this guy and
reduce the stroke size. I think I'll just
go with you guy I don't like this part is empty. Just go with something. Just go with this guy. Maybe increase the size bit. Then just use the anchor, 0.2 Come here and
make the softer. See it softer? Same here. Make it softer. Same
here. Make it softer. Sorry, Make it softer. Okay. Yeah, perfect. What else do we have? We have these ones too. Perfect for me, guys. We have a lot of brush presets you just go
and check out for yourself. I can't cover all
the brush presets we have in this video. Okay, okay, perfect. We have the other brush presets. Let me just select this guy and give it
this preset and see. Yeah, let's use this
one for the pause, sell, it doesn't
look too perfect. Remember, we're trying
to make it look. Then we have some other presets. Let see artistic rose borders. We have the decorative
other, many others. Let me just. Okay, there's
this one I'm looking for. Okay. Let's choose artistic ink. And let's see how it looks here. I'm not feeling this one. I'm feeling it. One thing, you also have to know
about this brush. Precess? They can be
used as single entities. Okay? What do I mean
by single entities? They can be used as art assets instead of following
a path broaches. How do we do that? We just
come here and drag it out. Okay, when you come
and drag it out, you have the effect. You don't have the effect. Instead of following your bush, we can use these guys
for our graphics, drag the guy out. Some of them are
very heavy, heavy. Really heavy. It's
this heavy because I was applying it to
this existing brush. I'm just going to delete that, P. Okay, let me just select this guy to see
which one we used. Which is, this is the Dran
brush vector p. Right? Let me just look for it,
see if I can get it. Good. Brush presets and
vector vector p. This is it. We can, let's like this here, like this. Let's make our drawings
more interesting. Okay, perfect, perfect. The next thing to do is
to have this effect. This brush effect. We'll just select the drawings
and then come on. The grunge brushes and the ones we deem fit.
This is cool for me. Like I told you
before, we can use the blob brush tool to
fill our brushes, right? To fill in the empty specs, right? Yeah, we can do that. We're going to just
try to do that here and use other methods also
to fill these other places. For that we come to brush, then click it for this guy, we're going to use
a purple color. Can we make this
big come instead? And select a bit brush. Not to satisfy it, but I'm just going to
use it like that. As you can see, we filled in, we are filled in our
drawing and we can select it and just
choose a color for it. Choose a color for it, and then bring the drawing in front. Okay, we can do same with other, with all other elements
in the design. And then bring
this guy to front. Just feel free to do the rest then for the ones
when you select them, I'm going to choose
the ship builder to. Now, like I told you before, the ship builder to can also be used to select colors, right? If we select the color here, we can just fill it in. The ship builder to and
then choose another color. Then fill it in.
Choose another color. Fill that color in,
and then let's keep filling how we want
it to be filled. Right. Okay, Perfect. Perfect. Perfect for this guy. Your direct selection to
click the ankle points and just kind of petits like
this to kits even better. Okay? Mm hmm. For this crown,
we're going to use my Shape builder tool here. I think it won't
work for this one. We're just going to use
my block tool instead. And then our raw out select you, choose a color for you and then bring the mean guy to the front. Okay, we can select this guy and duplicate it and
reduce the size. Instead of redoing the
drawings over and over again. This guy, same thing. Change the color,
change the color, and bring the mean
ships to the front. Just go on and try to
complete the design. Just going to close
the libraries here. Just complete the
whole design your way. Okay, pieces of left out. Just fill them in and try to add as much details as you can. Okay, we're going to delete
all the other elements. Redundant elements. Yeah, we have come to
the end of this video. Okay, so I hope you've learned a lot concerning the brush tool and how to use the brush tool. See you in the next one. Bye bye.
11. 11 Assignment 2: Hello guys and welcome back. I'm very much excited to
have you Till this level of the course and in the past videos we
really learned a lot. We learned about the
brush to the pencil, to using the brush options,
using this and that. We've learned so much right now. This is an assignment
which I want you to do. I have this image here, okay? All you need to do is come here, open file and come
and select this, assignment two. Okay?
Assignment two, just come and select it and
this file will be open. Okay? So from what we've
learned from the last video, we've learned about the
brushes and the pencil tool. I just need you to
create custom doodles. Okay? Just like we did before. Just create illustrations with the pencil and brush tools,
just like we did before. Okay, we used bones, drawings of Boons, crowns
and so on and so forth. So just be creative or you can browse online to get
more ideas Okay. So as to know what
to come up with. So I'm very eager to see
what you will come up with. Okay, Yeah, so that's
all these assignments it is all about. Just do
your drawings, of course. You have to create a
new layer and then lock this guy before you do your drawings on
this layer, right? Yeah. So hope to
see the drawings. Feel free to share them with me and see you in the
next one. Bye.
12. 12 The Width Tool: Hello designers,
and welcome back. In this lecture, we're going
to be learning one new tool, very interesting too, which is the width to, this
is the two here. This is the two. And from here you can see
what it does, right? Vary the thickness of
strokes along their parts. It varies the
thickness of strokes along the apart as,
as what it does. And we're going to demonstrate the width two with a line here. Okay? Select the two. And select the two. Select the width two, Come on your stroke and
click and drag. Now, can you see
what's happening? Can you see what's
happening when we leave it? We can see that we've illustrated something
that looked like a leave with our width. All right, So it tiers the boots ends and varies
the width, Right? Okay. Again, we can have
something like this. Depending on what you want
to create and depending on where you choose or where
you choose to put it. The we give you
different designs. Okay? Different designs. You can see we are having different
designs depending on my location of, of effects. Okay. You can see this is
what the who does for you. Perfect. Perfect. Very simple but
interesting tool, right? Yeah, perfect. This is the two for you. I have come up with a few drawings here to use
for demonstration purposes, so as to demonstrate to
you the effects of the W. I'm going to select them
to make my stroke at. And when you select my width to, when I come to the drawings
and just grog like this, you can see that immediately
the sizes increase, right? You can just undo and bring the sizes and make
it happen here. This also happen, I can just, I'll just use my direct
selection to try to make this come deeper as to
meet the other one. Right? And then the next thing to do is select our drawing here to create this defects. So we're trying to illustrate
and do just a perfect job. Okay? Perfect grout, gouts, draw routs, draw groutsry gut the bits draw grouts, perfect for this one. So rays, perfect. As you can see, we now have our beautiful leaf
design cut of the, it can do seem with this guy. Dry it out. Draw it out. Draw it out, perfect. Yeah. So this is what we've been able to come up
with with our tool. So there's one more
thing I want us to do. I want us to fonts to create
a type with the with. What I want you to do
is just come here, pull and click the
rectangular grid tool does this tool do This
tool creates grid. When you click, you see
that the option come out. And then we now have the size, which is the width
and the height. We all have them at 100 points. We have the horizontal dividers, we have the vertical
dividers, we have the skew. What? We're going
to do it at zero, well we don't want
to skew effect then. That's for the horizontal
and also for the vertical. Immediately, you see. Creates this for us, this kind for us. Okay, that's of course with
the settings which are 12, 345-612-3456
Right, conflict. What we want to do is we don't
want to use these options. We just want to, we
want to make this 0.0 and then so that it one. Okay. We want the grid lines to serve as our
protection for our funds. Right? All you need to
do is to select and then out drug out like this as to get a tiny
piece in between them. Come to edit, come to objects,
then transform again. This will do the
previous action and the short cut is
control D. Comdr mark, right to control D.
When and control D. We see that we have
another box here, the same distance
control control. What I want us to
write is Flora Flora. Okay. You can use any tool you deem it
fit to create this, but I would like to
create a Cosi fonts. Okay, Cosi create to use my pen tool so as to have
quite a bit of control. Okay, the F to select connect this guy and
just make more interesting, select our anchor
points out like this. And then use our
pen to back again. Just creates an like this. Okay. Perfect. Create other. The other part of the letter
said this will stand for and then we want the
next one which is okay, the L should start. You can use any tool
you're most familiar with. You can use the Cove
tool if you want. You can use the pen
tool if you want. You can use whatever too. I'm just going to
use the pen tool. Grab this out like this. The next letter to create
this letter For this, I'm going to use the Covet two. Click. Click. Click. Click
here, sorry. Click here. Click here. Click, yeah. Just click here to
complete it. Okay? Perfect. Then the next
one is the R. I'm just going to tick this
guy and bring him this. Okay. I'm going to select
this guy. Shall use this. Let me just, yeah, let me just select this guy. Drag him like this too. And what I'm then going to do is just select this ankle
point and delete it. Select my pen to connect to the previous point and
drag it out like this. Drag it out like this release. Come on and do some
to adjustments. Yeah, finally the leg perfect, floral, and then we have
the litter to create. What can we copy from
our existing ships? Let me just copy this. Sky here. One other, looking like
this does look good. I don't feel it. Let's
just create a new one then select our co point here. Just adjust it like this depends on what
you want to create. Type of courts or whatever type of fonts
you want to create. Then we want the spots. Finally, we're going
to the last word, letter select, and draw it out. We have our fonts
floral repeating. Just delete the grid which we
created. Just delete them. Ovulate this guy, make it
to create some of design. The next thing to
do is to use our two to achieve some
nice effects, right? Let's start with this guy. Come to two, let's just
come to the middle here, create this kind of effect. Perfect here. Perfect Sam here. This fine Sim here, here. This guy here. Of course, you can,
you can create several points depending on
what you want to create. It all depends on what
you want to create. Here could have a point like this all depends on what
you want to create. Really, this guy, you want to make this guy. Oke, this guy smaller. Who knows? Make this guy bigger. Okay? And just this, this, this, finally, this. Okay? Nothing too interesting. Just for demonstration purposes, we definitely can come
up with better than. Okay. The next thing
I want you to do is select this guy
that says Flora. And please now we can just drag out our designs like this. Then just group this group or control for group
range into fronts. This is what we then have. We can reduce the sizes sizes. When we reduce the size, of course see as we reduce
the size, we get thicker. We don't want this to happen then you just want the
size to be this thick. The thing you can do
to avoid that is just come here to object,
expand, appearance. You can come again
and just expand. Okay? What it does is
it breaks this point. It turns it from stroke
to an actual ship. It turns them from
strokes to actual ships. The problem with
this is you can't go back to edit the strokes. The only thing you can edit is the anchor points now of the
new ship it has created. We don't want to
do any more edit, so that's why, that's why we
expanded the whole thing. For this, you can come select your color or whatever thing
you want to fit it to it. One other thing we can do is just a bit copy
piece front. Okay? Just use your arrow keys
to shift it's backwards. Okay? And then make, and
then just make this Dak. You know
what I want to do. The next thing I want to do is just select range,
Send backwards. It appears like a shadow effect. Not too attractive for me, but you get the point. You get a lesson trying to
pass onto you here, right? Yeah, that's just what
we've been able to create. Just the tool is a great grito, you can just knock
yourself out with the as much things as you want. In the next video, it
will be an assignment. Most probably, you'll be required to use the
two to create stuff. That should be the next per
video, not the next video. The next video should be on the blend ship to
the blend ship two. With this, we've come to
the end of our lecture. See you in the next one.
13. 13 The Blend Shape Tool: Hello guys, and welcome back. In this lecture, we'll be learning about the
blend ship tool. This is the blend ship tool. Okay, What the blend
ship tool does is it blends between ships. Okay, it blends between ships. It can blend between one
ship and another and creates a line of ships blending from
one ship to another. Let me just demonstrate it. Let's assume we have
a red angle here. Let's me this color
this ship here. Okay, let's make
this blue color. Let's have one of the one
here that looks like this. Let's say we have
this green color. The blend ship like you can see here can end the blows blend between this ship to the
ship and this ship to the ship or whatever
arrangement we want. Okay. So this is an
example of something of a blend between three ships. So these are just three ships. This is the first
ship, the second ship on the third ship, okay? So it can blend the colors. It can also blend the
ship of the ships. Okay, the form of the ships. All you need to do is
to come here and then just double click to
open the blend options. Okay, it's the blend options. And then now you can
choose smooth color. You can choose specific steps, You can choose distance. I'm just going to
choose specific steps. And then let's, let's
make this ten then. Okay. Now when I
choose my first ship, okay, Then I blend it
with this second ship. You then immediately see that Abels Frito has blended
this ship to the ship. That with the forms of the ships and also the
colors of the ships. We can then do this
guy to this guy. And as you can see, it creates a perfect site
blending between these ships. Okay? You can even
play around the ships, try to edit them, and everything falls out
just perfectly, okay. The more those steps, the more complex are drawing. Let as we have this guy
and then let's see. Starts the star is this color. We have this guy to
be discolor, right? When you double click on your blend ship two,
blind ship two. You have the blend options
like you know it now. Let's just make 50, Okay, let's just make this 50. So you see what then happens, like your tool,
like the blend ship to click here and click here. Now what can you see? You can see a perfect blend. Because the ships are, the steps are much rather not just ten steps
like we have here. We have more steps and therefore a more unique way of blending, more unique blend. That's the way this tool works. We can use this to create very amazing design,
very sweet designs. We can edit the color, color, different adjustments
to our design so as to get the
ideal stuff we want. Let's just get this
out of the way. Come here and just
select your pen. Try to create something like this and
something like this. Okay? Skip, get out, then come here and also
create something like this. Then select this guy, give him st color purple. This guy give him color of pink. This
should be pink, right? Yeah, it is magenta pink. Yeah, this is what we have now. Let's, let's make it 30. Let's make it 30.
Then select this guy. Select our blend shape to
click here and click here. You can see now we have
a blend between booths. Let's just try to increase
their stroke sizes. You see better.
We have this one. What I'm going to do is I'm
just going to click on it, come to objects, come to blend, and then come to release. When you release it, then releases the blending
you've done. I'm just going to
make the stroke. Two were to go again to make this 100 101st One. Click here and click
here. What do you see? This is a more interesting look, my own opinion.
More interesting. When I increase the stroke size, we can see a more
sweet look again. Imagine just use a
clipping mask mask. Don't worry about
that. We're going to lend that in for lessons. Just them in control seven. Boot in control
seven, just to trim the design to the work piece. You can see that we don't
even know that there is another part here. It looks cool, right? These are the things we can
do with our blend shape. Do this and even more. In for the lessons, we
are going to really use our blend ship two to
create very nice designs. Most probably in
our last lessons. Okay, we're going to use most of the things
we've learned in discourse to create
very nice designs. And the blend ship two will be one of the
things we work with. Okay, that will be
it for this video. All of these files would made
available for you so as to see for yourself a hope to
see you in the next one.
14. 14 Assignment 3: And will come back
to this third and very simple but
interesting assignment. In this assignment,
I want you to use the knowledge you've
acquired on the width tool. Right on the width you're
going to come up with, you're going to come
up with font designs. Remember how we handled
the font the other time? We just created the
rectangular grid and then just created a duplicate and control
control control. What I want you to do is to
come up with font designs. We can use the To to give you
different looks. All right? Just going with interesting
fund designs from just from, probably not from Z
will be way too much. Just use your discretion. Whatever letter you
want to stop at, just stop at that letter. But you create funds just
like I'm doing right now. I'm just creating a Yeah, this will suffice and should
be something like this. Okay, So this is
mine, this is mine. I'm just giving you an example. C and then D. C, okay? Just something creative and out of the box, okay? So let's just stop
at D. And this guy, this guy, this guy looks
more like an E than a C. So I'm just going to want
you to look to C, okay? We're just going
to look like this. Now. We have BCD. Bcd, okay. I'm taking our, we can just maybe something like
this and something like this. This just depends on
your creativity, guys. There's no rule for this. It all depends on your
creativity and what you want to, what you want in
your fonts, right? I'm just creating
random designs. Are. Yeah. So these are mine for now. Just come up with yours
and I would love to see what you are able
to come up with. Okay, and that will be it
for this assignment in this module and see
you in the next one.
15. 15 Exporting from Adobe Illustrator for Print: Hello guys and welcome back. In this lecture, we're going
to be learning how to export our designs from Dub Illustrito for the purpose of printing. Okay, So just come to file
and open this design, this file rather this 13 export from Ad Illustrator for print. Okay, Just come on
your export from Dub Illustrator folder and select this one which
says for print. Right? And then just open it. So when you open
it, you're going to have this on your screen. Now before you export for print, there are a few things
you have to conclude on. And there are a few
things you have to check. So the first thing is the format to which you
would like to export. Generally, there are two formats that most printing
companies use. Most printing companies use the PDF format and
also the Pec format. And I'm going to show you how to export in boot formats
in this video. The second thing you
have to check is the column mode which
you want to export in. For the column mode,
I recommend you also confirm with your printer which column mode
they will accept. Because there are
two column modes, we have the MYC column mode and we have the RGB Colum Mode. Don't worry if you do not understand much about
the column mode. We have a separate module in
this course where we take a dive into colors and look at even the CMYK and RGB colors. Okay, so generally, for
bit printing presses, the CMYK columnude
is usually used, but for smaller machines, the RGB columude
will work perfectly. So how do you reach
into columnudes? Just come to file and
document columnude. Now you see it's
parrently at RGB, sorry, purrently at CMYK. And as you can see it
here, it's CMYK, right? Just come document and change the RGB if you would like
to use an RGB column mode. Okay, So this is just the
simple thing you have to do in order to change
the column modes. So these are the first two
things you have to agree on, the column mode and the format to which you would
like to export. And finally, you have to check
the document size, okay? A higher document size could slow your system's performance. If you're dealing with a very
complicated design, okay? You could lower it doing the work or doing
your design fees. And when you want to export, I recommend you use the high, which is 300 PPIs. Okay? You can also choose custom resolutions where you can choose higher resolutions. Okay? So this
resolution figures will guide how high resolution
your design is. Higher PPI values will generally help you achieve higher
resolution designs. Okay, so in order to
export your design, let's assume we have everything
set the way we want it. We have the color mode, we have our resolution, and we know the formats
we want to export. So let's export in the
GP format for now. So in order to do that,
just come to file and go to export and then port us. Come to the folder and just
choose the format here. In this case we're choosing GP. Select Pec and then
click on Use Artboards. As to select the
Artboard we want to use, and as you can see we
only have one Dbodre. This is artboard one, okay, bot one, and click Export. Now this optional comes in, comes up where you are asked to choose the color mood again, which is CMYK or RGB. We choose greyscale. It's
going to export grey design. Okay? It's not going to have colors going to be
black and white. I will choose our CMYK
then for the quality, this would determine the
quality of your design. Okay, Just keep it at ten, let's keep it at maximum, it doesn't cost you anything. Then for here, just
leave this as line. Okay? And then for resolution, just take it to 300. Get 300, or you can use others to take it even
higher if you want, 300 will do, then
just click Okay. B, Illustrator will create
a document for you. As you can see, this is a
document ready for print. This is the process you
go through in order to export J pec format image. Now the next one is
to export a PDF. In order to export the PDF, just come to file
and save us, okay. Now you then choose
how to be PDF, okay? And save. Then the PDF
option will pop up. There are presets which
you can choose from. You just choose
the high quality. If you choose the high quality, we can just save us here. It's going to create a PDF file. Going to create a PDF file. But the PDF file is going
to create, if we do this, going to be probably
very high in size or high in
size, Not too high. Probably as you can
see, it's 835 KB. This is okay. It is okay. But if the size is too big, you can just come
to see PDF again. Let's just make
this one and sus. After choosing the high quality, just uncheck this box. If you uncheck this
box and click Save Us, it's going to create a smaller
but very usable version. So you can see this one
is 835 and this one is 88.6 KB size. The quality has not reduced. The quality has not reduced. It's just that this one it's created is more of A
to B Illustrator file. Okay? This one is more
of a general PDF file. Okay? And we want a
general PDF, right? This will work.
This will suffice. These are basically the two
steps you take in order to export your designs out of B Illustrator for the
purpose of printing. Okay, And that will
be it for this video. Okay, in the next video, we're going to be learning how to export for web and
screen purposes. We hope to see you in the next.
16. 16 Exporting from Adobe Illustrator for Web and Screens: Hello guys and welcome back. In this lecture, we're
going to be learning how to export for screen and for web. Now there are diverse ways. There are several
ways of exporting for screen and for web. We're going to look at all
of those ways in this video. Just come here and
then open Select. This other one here, this other one which says 14. Open it and you're going to have this design opened
in order to export. For screen for web, we only use the RGB format, That's a recommended format. The RGB column mode, that's a recommended
column mode for export for the sake of
screens and in the web, Okay? The first method of exporting, which we'll be looking at is
just going to file Export. Export. When you export us, you're going to
choose the format, whether it's GP or PNG. Png will be if you
have transparency. All right, if you don't
have a background and then more format other formats. Here we have the Photoshop
formats, we have the SVG, the IFF, the format, We have the Targa, and
we have other formats. Okay. I'm just going to
choose the peg and export. Now this option, this dialop
box now still pops off. And then for color mode, you'll just choose the RGB
and the color like this. And sorry, the
quality like this, that's the maximum or
we just make it high, or we just make
it nine or eight. Okay. Just know that with a higher quality comes a
higher file size, right? That's just what
you need to know. The now line for
this resolution. We could choose
150 or 301 Export. Now, right now, there's
something I forgot to do. We're just going to
cancel and we do that. Export. Export us, we
forgot to choose the boat. Okay, we're going to use, if we choose all going
to export all our boats. Export all our outboards
in a single design, in a single Pe image. But we don't want to
export all our boats, we just want to export one. The first boat which is about one, right?
That's this one. Okay. Just choose one here. And then export for quality, we can make this
nine and resolution. We can just make this
150 or 300 just. Okay. Then A, B Illustrator would then do its magic
and create a file. And you can see we now
have a file created. Now we can send this
to our mobile devices. We can use it on the web
and so on and so forth. We can even print it okay, using machines that
accept RGB color modes. Then the second way to export
is come to file export, and then export for screens. Export for screens, and
then come to art board. It's going to show you all
the artboards are available. You can export them or you can select the one you want to export by simply
checking this box. If you check this box und, it's going to export
artboard one. Check the booth of them. It's going to export
the two artboards. You can click to change
the name of the artboard. Okay? Maybe you
make this EI one. Okay? Then we have what
we call the prefix. Now you can choose a prefix in order to differentiate
your designs. Then what else? Here you can click here to go to the location where you would
like to export your design. Then for the resolution, we can come here
where it says kill. Presently we have it as one X, which is just the same size as this one doing to export the
same size as what we have. We have two X, which will
do times two of the size. We have three x times 12 size. We can actually choose
resolution here. We can type in
custom resolution. Let's say 35350 PPI. Okay, then for suffix, we can also put suffix, maybe I to further
differentiate our designs. That's in the case where
we have multiple designs. Okay, where we want to export multiple boards or
multiple assets. Okay, now we have, we format and we can choose PNG, so it exports the
whole board as a PNG. Okay, we have PDF. We have SVG. For this, we can choose any of them
depending on what we want. A, and then just click
export Artboard. When you click export Artboard, it's going to
export the artboard to this location
where we have chosen. Then the next way to export
is export selection. Okay? How does this one work? Let's assume we want to
export this asset only, okay? This one, just this one, when we select it can come
and file Export selection. It's going to export the particular asset
which we've selected. It's going to export just
the particular asset or the particular item which
we've selected if we see counsel And then come and
select the whole sign here. And come to file and
select Export Asset. It's going to export the one we've selected. That's
this one, okay? As you can see, the one we had selected
before is still here. And we can just check this box to export
all of them together. And you can then
choose the format, duplication, size, the prefix, the suffix, Just like how
we did before in this case, let's see, we want to
export a PNG image. Okay, so let's assume we
want this to be a PNG image, that's without a watermark, that's without a background. All the then do is selected. Let's PNG. Okay, just make this resolution. Let's make this 250 PPI. Then we won't write anything
for prefix and suffix, and just choose PNG here. And export assets. Now to exports our assets then creates a folder with
the name 250 PI. Okay, that, and with
our assets export. Now the last and final way to export is using a tool
called the Asset Export To. Okay, we can find this tool on the Windows Asset
Export or Asset Export. As you can see, it even
saved our history of the previous exports we did
in order to use this file, just select this guy on group, we have them separate assets. In order to export
using this tool, all you need to do
is select your file and drag it in. That's all. Just drag it in and
select it from here. And choose the resolution, choose the format
and the prefix. And then export. It's going to export your assets like this. Yeah, when you click Export, it's going to allow you to
choose location, right? To select this location. And now you see it has
exported in this folder. Perfect. Let's say we
want to export this guy. And we select them like
this and just drag them in. You can see that it's going to view each of these ships
as individual assets. Why does it do that?
Because they are not group. Okay. They are not groups. If they were group,
if they were joint, using the Pathfinder tool, going to view them
as a whole asset, just select them and delete. In order to export it, you have to select them all and just group and then drag it in and everything will
work out just perfect. With this, we've come to
the end of our video on exporting out of a illustrito
for web and for screens. Hope to see you in the next one.
17. 17 Color Modes: Hello guys and welcome back. In this module,
we're going to be learning about colors in to be illustrator and colors
as a general term. Okay, now in this
video particularly, we're going to be learning
about column modes. Okay, so there are
two column modes available for us as
designers to use. These are RGB and Myk. So these are the
two column modes available for designers. The RGB columnde
stands for red, green, and blue, which are the
three primary colors, and all other colors be derived from these
three colors, right? Then the CMYK stands for Cyan, magenta, Yellow, and Key. Now this key is also black. These are the two
basic colomudes. Now, what are the difference
between these columdes? The difference is
RGB stands for red, green, and blue, which are
the three primary colors. Like I said, this columnde
is used for screens. Okay? Whether it's
your computer screen, your laptop screen, your tablet, your tablet screen,
or your phone screen. You have to understand
that colors are displayed in RGB or images
are displayed in RGB. And then when it
comes to prints, that's paper, prints,
print on paper. We use the CMYK
column mode, okay? Because the printers only understand this
color format, okay? The printers only understand this color format in order to display our design
in prints, okay? Even though there are very
new generation printers that use the RGB. But if you're talking
about large formats or big printing projects, or big printing
presses where they use the traditional
concept of printing, they always use the CMYQ column modes to generate a prints. Okay, so how does the
computer generate images with the RGB column mode? All right, that's a very
valid question for that. Let me just bring in an
image to help explain this. Okay? So let's just bring in, let's see, this image. An image will work
actually, okay? You understand how the computer generates images with
our color mode, okay? Now, we have to understand
that in each of these images, in an image, there is
what we call piel. Okay? The piel is the
smallest structure of color that up the whole image. I don't know if you,
if you understand, but pixels are quite popular and it's a
quite popular word and it's something you
shouldn't have problem grasping right now. When I zoom into this image. Depending on the
resolution of the image, depending on how
high the images, you zoom into a point
where you see pixels. Right now these are pixels. Now you see a pixel just a box. This pixel just a box. Okay? All these places
are amiable pixels. All these places
are amiable pixels. Okay? Depending on how
high raise the images, Like I said, you'll see pixels. Okay? Now we can't
see anything here because this whole place
is just white, okay? But at the edges where there is a blending between
the white and the blue, you'll definitely
see pixels, okay? So what happens is in
each of these pixels, we have the RGB colors embedded in them in
different intensities. Okay, So we have a
mix of the R, G, and B, the red, green, and the blue in
diverse intensities to generate this particular color and to generate this
particular color, and this particular color, in this particular color, okay? All pixels have a percentage of, of the colors to be
able to generate image. Then there's one
thing that makes the RGB color stand
out from the CMYK. What's that? It's called
light. It's called Luminant. That's the secret ingredient
that the RGB column would has this light makes
the RGB colors pop out, they look more vibrant
than the CMYK. As you can see, this
project is an RGB project. How do I know? When you
look at this, please? You see RGB, it means
this is an RGB project. And as you can see, the colors are quite vibrant. If I turn into a CMYQ
project right now, you see that the
colors get washed out. Okay, And we're going
to do that in a minute. But I just want to show you how RGB Illustrator understands
this concept and helps us, even in the presets it creates, when we want to
start a new project. Okay, when we create
a new project, we see this presets, right? We see the print presets, we see the web presets,
the mobile presets, the Fmmission, illustration, or the art
and illustration rather. And whatever print
presets right. Now, when you come to the
print presets and choose one, you then see that the
CMYK color is selected. Okay. Automatic.
Because Illustrator knows that because we're using
this as a print project, it means we are
going to print we're selecting a print preset. It means we are going
to print the project. Therefore, the CMYK is the
most suitable for this. Okay. So that's how a illustrator understands
the color motor. And then if you come to, let's say Web, you then see that it's RGB that
has been selected. It's also RGB. Film and video is also RGB.
And why is that? That's because we are going to interact with these
designs on mobile devices. Okay, so it means the RGB
color will make more sense. That's why it's
selected automatically. But you don't have
to select it here, because there's a way to
change these colors, okay? There's a way to
change the colors. And let's say we want to
change this color from an RGB to a CMYK color, right? So, how do we do that? We just come to file and then come to
document color mode. Now it's RGB, and if I
turn it to CMYK right now, you're going to see that
the colors just feed out. So you see that the
colors feed out, right? Because this is how
the CMYK works, this is how it handles colors. Okay? Just going to do that
to take it back to RGB. Okay? Then finally, you have to understand that the
RGB column modes, bigger column mode
than the CMYK. Okay? Because nowad printers, most new generation
printers use RGB, okay, then it's also used on screens, it serves wider purpose. While the CMYK is not
suitable for screens, that's what meets
the RGB standard. If you're not too sure
of the whole thing, if you're not sure of
which column to use, just stick to RGB. Okay. Everything will just go fine at the end
of everything. You can always convert your RGB to your CMYK and your M RGB. That's just all you need to
know about RGB and CMYK. For now, the next lecture, we'll be diving deeper and learning more about
colors in Abt.
18. 18 Color Swatches, Color Panel, Color Picker & Color Guide tool: Hello guys and welcome back. In this lecture we're
going to be talking about four really
important color tools in would be Illustrito. Okay. We're going to be
talking about the switches. We're going to be talking
about the color panel. We're going to be talking
about the color picker. And finally, we then round up
with the color guide tool, or the color guide panel. Okay, now we're going
to start with switches. Switch, what are
switches? Right? Just come here and
see for yourself. This is what we call the
switches or the swatches panel. Let me just drag it out
like this from here. Okay, this is what we call
switches. What do they do? They just hold presets
of colors and patterns, ingredients which we can
basically apply to our graphic. Okay, that's just what do we have different
presets of colors. When I just create a ship, for example, just come
and choose a switch. Okay, immediately,
color is then applied. You can see there are different colors under the switches. We even have this one which
says new colors, right? We have different ones. We even have patterns, we have patterns,
we have gradients. I know we haven't spoken
about ingredients, but we're going to learn about ingredients at the
end of this module. Okay? We have different
colors, different colors. There. We have different colors. We have these ones which
are called groups. Okay? Anyone you see with this
folder icon here is a group. These are groups. These are. And that's just
how switches work. We can create our switches, we can create our groups, and we can togo between views. Okay, This is a
more condensed view with the color of values. Okay, well, this is
a more graphic view, I say because we then see
the colors more clearly. Right? Okay, now there
are a few icons here. This one is for delete. Okay, so you can
delete a switch. And then we have this one which enables you
create a new switch. We have this one which
enables you create new group. We have show switch kind menu. Okay? So it can show
all the switches here. Then it can show
colors, watches alone. Okay? You remember it said to switches enabled
patterns, right? We can enable just colors, we can just ingredients, we can just patterns, we can enable color groups. Okay, let me just put
this as all for here. You can see different, different presets of switches. Okay, let's come
here in this please. You can actually come here also and then see
the different presets. Right? That's the
library of switches. Now let's just come here
and choose this ancient. Now, immediately
this library panel opens up and you
can see the colors under this ancient library, right to the guys. We're going to look
at them when I come here again and celebrations. You can see that we
have the color groups, right, These color groups
on the television. And as we click
them, they just get added to our switches here. Okay? Remember we
can select them, Delete, delete the
switches if we don't want. Okay? Then we have many other
ones. We have patterns. For example, let's see Nika's animal skin and
then you see them here. Just add them to shape here. Now you see that this one
is called the Alig, right? Yeah, call Ali. So it's more of an
allgto skin pattern. We have this one which is
more of a cheetah, right? Yeah, and then this
one elephant skin. We have this one which
looks like a giraffe. Then this one which looks like a liar pod or jaguar
rather than the peacock. And so many other
patterns, right? This one looks like
the zebra pattern. Then let's come here again and see if we can get other ones. Okay, let's see pattern. Sorry. Let's say, patterns,
nature and foliage. Yeah, this is what we get
for foliage patterns. Very nice patterns
already made for you. Then If we were to
access it from here, it's basically the
same thing, right? Just that we can actually move from one preset to another, from one library to another. Patterns here, the hundreds
and hundreds of switches, I won't even scratch
the surface with these. We have a lot of them. We have this one which is web textile and so
on and so forth. Now, how do I create
a custom switch? Right? How do I add
a custom color? I click here, which
is the color picker. To then just select
a nice color. Let's say I like this
color and it's not here in the switch and I want
to add it to the switch, right? How do I do that? Come okay, just come here
and basically new switch, if you click on new switch, you then see that
you're then asked to type in the name
of the switch. Presently we have just
the color values. Okay, We have the R
B color values is six and is two oh
nine and blue is 226. Right? Then if you want to
give it as this you click, if you do not want, you
can just type the name. Okay. Then we can basically
it further edit the color. And as you can see
as we increase or decrease the color
channels, they appear here. Okay. So the RGB color
just being edited and it's updated and the values are updated
here before your eyes. Right. We can choose
other color modes. Okay, we have the green scale, we have the HSB, we have the CMYK, we have this one,
we have this one. You can do your
experiments with them. I'm just going to
give this as RGB, right then I'm going to give the name new switch immediately. You see that? It's
now added here. It's now added here
physically there. This is what we can
do with our switch. Okay? And we can
just keep saving our colors so that we
can use them later on. There are many of the
switches which we can use, which we can use, and as you can see
as we just click, they are then added
to our switch. Okay. Now I spoke about
the color picker panel, and we've actually been using this panel without knowing it. Okay. Now this is how you
get into the color pick. Just click and now you're
in. How does it work? You just slider
here where you can select the color you want. Okay? And then you
have this one, so you can edit it and use whatever sheet of
that color you want. And we have the
live preview here, and this one is
the present color of the selected sheet, right? So if you want to just, let's say you just want to go
back to the selected color, you can just click
here and it goes back and maybe you
want to edit it. Okay, so that's how it works. And then we have the codes here. These are what we
call the color code. So whatever color you
create has a code. So these codes can be copied
and used somewhere else. Right? And then when it's
used somewhere else, let's say on the website, you're going to get
exactly this color. Okay, You're going to
get exactly this color. One other thing you can do here is you can
actually change it from this view to
just switches, okay? So you see them as switches. And you can basically
select, select, select, select, select whatever
switch you want. Okay? As you select it, you see the
values, right, the values. And when you select, you can just go back to color mode and do
your adjustments. Okay. If you're okay with it, you can recreate a switch
and have it stored. Is it? That's just it for
your color picker two and your color
switches. Or your switches. Now, the next thing we have
to look at the color panel. Okay, this is the color panel. Just select this guy. Yeah, this is the color panel. This is how you should see
your color panel right now. We also have options here. We can create a
switch from a color, from the color which you've
chosen, which you've sampled. Our color panel. Come here
and create new switch. Okay, as you can
see, it's now added. To a color panel. Okay, come here.
Great new switch. Okay, it's now added
to a color panel. Okay, now there are
different modes here. We have the grey skin mode, which just shows you gray.
That's black and white. Then we have the RGB,
which shows you RGB, H, SB, CMYK, which works with CMYK. And then Web Colors. Web RGB is just
another color mode. Then we have inverts. The inverts, I don't see
every option here is useful, might never use some
of these options. We have inverts, we
have complement, then let's just go to RGB
and then Show Options. Now when we click Show
Options, what do you see? You then see that you can edit the colors
here with this slider. Edit the values of the colors, then probably
create a new search with what you've come up with. Or you can copy the
color mode here, the coloqdlode, you can copy it just like
how we copied the cold. In this, please, you basically togle
between the stroke and the field color
like we did before. You can between the stroke
and the field color. Okay? You can toggle between the stroke color and the field
color like we did before. Basically, that's it
for the color panel. Just close these guys here. And then the last two
we're going to be looking at is the color guide two. Okay. Color guide, where are you? This is the color guide panel. And how does it work? Right?
How does this panel work? Now, the color guide
panel helps us to to choose different
other colors. Let's assume we make a
selection of a color here. Let us go with blue, right? This sheet of blue, what
the color panel does, it helps us choose
other colors that can blend well with
our selected color. As you can see,
as just selected, this blue, the colors
here just changed, right? So it uses the principle
of color theory, okay, To helpogenerate
other colors, okay? Based on concepts
like tints, shades, how well the complements, complimentary colors,
and so on and so forth. So that is what this tool
uses to helpogenerate colors that would blend better
with our selected color. Okay? If we select, let's say this color here, okay? We didn't see that the color go immediately generates
colors for us. Okay. There are of course, options for the color pan we have here where we
can actually choose whether it should show
us tint or sheets. We click tints or sheets
is what we get here. We can actually choose
whether it should show us the warm and cool
complements of that color. Here we can choose
the vivid stroke, muted complements of that color. Okay, so all these are
concepts of color theory. That's how this tool works. Let us select tints
and sheets right now, and then we can actually edit our colors with this
tool right here, right? We edit our Cos with
Tool right here. We can choose different
other presets, different other presets,
you're going to see different other presets which the color guide tool uses to generate these colors for us. Okay, we can have complimentary, we can have a complimentary to, we can have analogous colors. Then we can have triad. We can contrast, and
so on and so forth. All these colors will
actually blend well with our selected color. Okay, we're going to use
this simple design here to just help us illustrate
how these colors blend Well, let me just start by selecting
the color I would like. Let me go with this guy. Okay, good. Now we can just come here, select this guy, and just give it this
color right here, which is the mean color. Right. Now for this one, I want something a
little bit dark. You can see I can choose
this shade of the color. For this guy, I might
want something, choose this shady, want something
very choose this shade. And finally, for this guy, I might want something
bright as you can. With the E of the color guy too. We've been able to select
colors that fits perfectly. Okay, with this design. This guy, let's choose something
dark. Yeah, let's walk. That's perfect now
for these guys, let me just make use of this. One's okay. Let's see what we can come
up with for the background, let's make the background, let's just use this
as the background. And then for these guys, can have something like this. This guy like this. Right guys, take a look at this. This is all by the aid
of the color guide. So we've come up with this. We could also have different
variations, right? Just we have
different variations. For example, we could see, we want to see, we want to use this
preset right now. We have other colors
we can choose from. Now, in fact, we can completely change
the look of this design. We can make, this can make, the guys can make this guy Dak. Hey guys. Now for this one, yeah, we could just leave
the background as this. And for this guy, maybe take this shade
of you and yeah, maybe you can just,
it's a bit darker. This also works as you can see. Just by using the color
guide to we've been able to create color selections. Okay, two different
color selections with just the colors the color
guido help generate. You can see for yourself how
the color guide tool makes work very easy for us to
be illustrator with this, We've come to the
end of this video. Now in the next lecture, we'll be learning about other
color tools. See you there.
19. 19 The Eyedropper tool and Live Paint Bucket tool: Guys, and welcome back. In this lecture,
we'll be learning two really interesting
tools in B illustrato. These are paint tools
and the enablers achieve good painting
of our artwork. Okay, in Ab Illustrator. Now, the first tool
is the ydropato. The second one is the
live paint bucket two. Where can we find these tools? We have the drop
tool as this tool. Just click this tool and you can see it is the Ydropatol.
What does it help us do? It helps us sample colors. Just Crete this shapes. And so we can see what the
hydro pato helps us do when we select our ship
and select the hydro pato. We are then able to select colors in our view port, right? So we can select this
guy and the hydro part to automatically
select our color. Okay, now we can
see that with this. No, we can create a new switch. With this color, we can
just create a new switch. Okay, And when we come
to the color guide to, we can see that the color guide automatically creates colors that will rhyme very well
with our selected color. Okay, so that's just what
the hydro pato does. The shortcut for this color
is instead of coming here, always to click it, you can just hit to
activate the tool, select your ship, hit activate the tool and
then sample your color. That's just how this tool works. Okay, we have the other two which is the live
Pint bucket two. How do we access this
to just come here and hold your left mouse
button to see the two, the live Pint Bocket two. Before I show you what the
live Pint Bocket two does, I'm just going to color this graphic with
our eye drop two. Okay? So this is
a simple graphic. I've created credit cards
and with some type here. Right? I'm going to use this to basically generate the colors which we would then
color our graphic here. Now what do we do? We select our graphic, insect, the eye drop two and just
come on sample color. We can see that we're making progress right immediately we
sample this color. And this is one of the most basic work flus most designers follow in
coloring their artworks. Okay? And works that
are similar to this, where you have an image and
of course there are colors in the image which you can sample and use for your
graphics, right? I'm going to use that work
flow to color my graphic here, to select this background and we want something
bright, okay, We can sample this color, or this one, maybe this guy. Just keep sampling till you
get what works best for you. Right? I'm just going to work
with this guy here, okay? For this one we want
something, something. This guy should do a good job. Scholar should do
a good job, okay? As you can see, we are
having a good design, common life for this guy. We can use this color. Yellow, one looks like yellow. Maybe for this guy, we
can use this color. Okay? Maybe this color. Then choose something
similar to this. Okay? Oh yeah, we can
just use this guy here. As you can see, there is no
single way of doing this. You can just keep sampling
till you get what works best. I think I'm okay with this. I'm okay with this. And you can see how
we've been able to use our drop to to
generate colors, to sample colors for our work. If we combine this
tool with the color, we then see that we are being provided with many other
options which we can work with. You, select this guy. Let's see. When we sample this color, the color go immediately generates colors for which
we can work with, right? We could just maybe. This guy here and work
with some of these colors. Means we can select this
guy and give it this one. Maybe select this guy. Maybe give it this one. This guy should be this color. This guy could be this color. This color could be color color. As you can see, all these colors have been generated
by our color guide to how to work in B Illustrator, just how to work as
a designer, right? You have to use all
the tools available to you to achieve the
best results possible. You can come here, maybe
tweak this color bit. Come here, maybe choose something
brighter can come here. And just this guy. Brighter. Yeah.
What can't we do? Right? We can do a
whole lot of things. Yeah guys, this,
we've come to the end of our illustrations
on the drop two. Okay, we've done with
the ydroput two. With this, we're going to come to the live pin bucket two. How does the live
pin bucket to work? Right? Life pin bucket
two works by helping us color our scenes color. I'm just creating different
ships right here to illustrate to you how the live pin bucket
will work, right? So let's say we want to use the live pin bucket
two on these ships. When we select the ships, we just select the life
pin pocket and then come click our artwork here
to make it active. Then after we click our
artwork to make it active, we then just come and select whatever color
we want to use. And click and then get
applied immediately. See wherever we
select the colors, whether it's from
the color picker, from the color guide, from the swatches, wherever
we just pick the colors, we can immediately
add them to our work. Okay, and you see that's
it for the pin bucket. As simple as this may look, it can really be
game changer for you can really be
a game changer for A lot of designers use this to really come up with
outstanding work. We're going to delete this. I
have created this guy here. And we're going to use
our live pin bocket to help color our
character here. Okay, now how do we begin? Just select all
and cause activate your live pin bucket and come on click here to get it activated. What I'll do is I'm
going to pin the face. To pin the face and I'm
going to pin the skin. Right? This is the skin. I'm done. You're
going to see how everything comes alive, right? So once you just click, the whole ship gets filled
with your desired color. Okay. Then we want it to
be the sea here. Cha, no you don't want it here. Control Z A. I'm also going to
color everything that has to do with the
fast color for now. Okay. Yeah. And then
maybe we choose a darker sheet to
color this guy. Okay. Then these
are the guys we can use brighter one. Okay. Then we can use black
or this eyebrow. And also we can then call. You see I'm dragging it. Drag it. It just fills
the whole piece, right? It drag, drag it, good. Okay, now for this guy, for the glasses I want
to give it I want to give the glasses is color. Okay. Don't worry
about the shrks. We are just having them on
so we can have a guide. Okay, when we are done, we're just going to
remove all the shrks in our drawing common life. Good. And we could choose a brighter shade of
black to color these guys. Maybe even she, actually maybe you could make don't you know is good. It the initial do see here. Okay. Maybe you could make here. Here a little bit, right? Okay. And maybe not. And then we can just
then select everything, come to gradient and I'll come
to stock and then deceive. As you can see, we now have a very cool head completely colored using the
life pint bucket to. Okay, that's it for this video on the eye drop two and the live
paint bulket two. The next lecture will be rounding up with
color gradients. Okay, You're going to
learn how color gredients work and you're just
going to learn all about color gradients in P Illustrator to see you in
the next one And bye bye.
20. 20 Color Gradients: Hello guys, and welcome back. In this lecture, we'll be
learning about ingredients. Okay. So what are ingredients? Ingredients are
basically a combination of two or more colors. Simple, simple as that. Okay? In B illustrator, we have three types
of ingredients. We have the linear ingredients, we have the radial ingredients, we have the free form
ingredients. Okay? And when you come here, you see the gradient panel? Okay, I'm just going
to close this. Okay, so we have the
gradient panel here, and we have three types of ingredients as
you can see here. We have the linear gradient. We have the radial ingredient
and free form ingredient, and all these ingredients
just tick after their name. Okay, for the linear ingredient, we have it in linear way. The blending between the two
colors is in a linear way. Okay? Like for
example, this one. We have this color
and this color. So we can see that there
is now a blend between the two colors in a linear way from here to
here. Okay? From here to here. That's what a linear gredent is. Then the radial gradient
has the same blend, but it's in a dial. Okay, Then for the
free form ingredient, it's a more complex
type of ingredient. And we are of course
going to look at it last. Now we also have the ingredient here which helps us in
editing our ingredients. Okay, let me say the ingredient to we
see these points now. These points are what we can use to modify our ingredients, to modify our ingredients
as I'm doing right now. We can modify
ingredients from here. Also, we can see the sliders here and we can
just modify them. We can double click on the
points and change the color. You can see we now
have this blue color. And of course, we have a lot of options here to choose from. We have switches to select from. Okay. We have this eye dropper to which we can use
to sample colors. So that's how it works. I'm just going to choose the sky here or maybe
this other one. Yeah, We also have which Iboss creates a new switch
with a selected color, right? Which us delete the
switch or selected. Okay. Some other things we can do here is we
can delete points. Right. Now, for example, when we click here, we see
that we deleted that point. When we click here,
we delete that point. Now we are left
with three points. Okay, This slider here can be used to smoothen
out our gradient. Then we have other things like the gradient angle and it's the angle of the
gredient right present. We have it at zero degrees, we can have it at 01:20 You
can see it's modifying here. We have 135 depending
on what we want. Okay, Depending on what we want. We can also just select
one of the points and then edit the opacity. Okay, we can edit
the opacity so that it appears less okay, on our image, so that color
appears less on our image. So we can see it's
transparent, right? Transparent, And
even the location, let's change the location
to see how it works. So we can see that it chooses a location along
this path, okay? Basically that these are the options we get to
play with for this guy. We have the same
options only that this guy is a radial
redient, right? You can zero and you can
see this part transparent. Just take it back to 100. And this is just how the
radial gredient works. Okay, use the ingredient
to ingredient. We can achieve
very nice designs. These ingredients, ingredients, we can achieve nice tents
and we're going to use them for the lessons to achieve really
cool designs, right? As you can see,
these are some of the things you can
do with your redent. Now we are coming
to this guy who is the big boy here is called
the free form ingredients. And it's the complex
type of ingredient here. I'm just going to
drag this ship. This just to Board Now when we select
the free from ingredient, which is this guy, and then
click Edit Ingredients. We can now see that what it does is it doesn't work like
the radial or the linear, but it gives us the ability
to drop points on our shape. Okay, so we can drop points, we can just add a point. And we can see that
click on this point, we can edit the color. Okay. The color then when we, we can use the color picker two. Okay. Yeah, we can just
keep adding points. Chose the color. Pick two
is probably brighter. Okay. Yeah. These
are just what we can do with our free from
ingredients right then. Apart from points, we
can also add lines. We can add lines with the lines. Let me just create
a new, a new one. Give it a red color for now, and then come and
select this guy. Okay? How do the lines work? Right now, when I select
the lines, you know what? Let me just make our
art board this big. The shortcut for your
artboard is Shift Shift. Give you the board, help you select your board. This, Okay. Now when we select the free form and then
edit the predents, the choose lines
instead of points. We can all come and
then just keep going and creating points along
a line, along a path. Now we select each
of these lines, or each of these points rather. Select each of these points
and assign a color to it. Okay, Select the points
and assign a color to. We can have the lines
and also the points on the same ship. Right? We can have,
as you can see, the point for the points which, which come along the line
for the line option, right? And we all have them
on the same ship. Can just at the color
come a change of color. Okay. Just keep doing that
to get what you want. Okay. There is a lot we
can achieve. These two. Lot we can achieve these two in fact is one of my best features in one of my most favorite
features in B Illustrator. I like gradients. Yeah, you can see we have come up with something very cool
here, very interesting. Using the line type of free form gradient.
You get the point. You now understand how all
these ingredients work. That has brought us to the end of our module on colors
and color tools. The next module
we'll be learning about Fountain and Typing. Not to be lost. See you in the next one.
21. 21 Basic Type: Hello guys, and welcome back. In this lecture and in
subsequent months to come, we're going to be learning about type and pontine
in B Illustrito. Okay? Now what we'll be learning is how
to use the type two, how to create amazing
type effects. How to modify our types, okay, And do a whole lot
of things in Aporeto. Now, want to create
types in Adblorito, we have to use the type two and this is the type two here. As you can see after I over around it, you
can see the name, type two text at a point
or in a container. Now, when I say the type two, we see it like this. Now just click on my Artboard and then
I have a sample text. Let me just scale this up
by holding down Shift. Now this is a
sample text, right? Okay, I'm just going to
double click on it and type, let's say lust treta trato. Okay? Now there are two
types of types to ilustreto, we have the point type, or we have the point text, and we have a type. Okay? Now, this type is an example of what
the point type is because this is just how it is when you click it allows
you to just keep writing. Just keep writing. Just
keep writing until when it falls off
your art board. Right then for the other type, just undo this, kick us
back to what we had. Then. For the other type,
which is the era type, it gives us a container
with the type in it. Just click the type two. In order to create
this type of type, all you need to do is to
just click Hold and Drug. Okay? You have to drag, Drag to the size of the
container and then Release. Now we can see that
Lustrito automatically fills in our container
with a sample text. Okay, so this is just
please under for your text. Okay? These are the two types, two basic types of types. Alto. Now what's the difference? The first difference between
them is for this guy, you can just keep typing
and keep typing, okay? And it's suitable for
logos and headings, while the other one is more
suitable for body texts. Okay, text. Let's assume you're
writing or you're creating a magazine
or newspaper. Okay? Or even just a postcard
with some texts in it. Okay? You might want to use this type of, this type of type. Okay, let's start talking about some of the
modifications we can make to our area type. Okay, let's assume we
have this other one. I just duplicated this
by holding down Alt and shift and dragging it
to the left hand side. Let's assume I just
delete everything here. I didn't have any right up here. You can see that
this guy stops here, but when I drag it down, you can see that we still have enough sample text
at the bottom. Let's assume I want it to end here and
continue here, right? All I need to do is to
come here and where we see this red box. This red box. All I need to do is to
click he then come to the next please just click. We can see that
when it ends here. It then continues
with a right up here. As I address the box
here, for example. It then continues to go
down in this other box. Okay? So it means they
are working together. They're working together.
So that's how to do this. When you're designing stuff
like magazines or newspapers. You like to use
this feature a lot. There's another, there is a way to, let me just delete this. There's a way to convert your point text to your era text and your
text to your point text. And then one thing you have to note about
them, for example, is for your point text,
when you try to scale it, you see that the
whole text scales up. Right? When you try to scale
using the frame, right? You see that the whole text
scales up and down like this. And then the front
size reduces, okay? So that's one thing you
have to note, okay, For this guy, when you
try to scale it down, the front size doesn't reduce. Instead the container
size reduces, okay? So you see, can see the
container size is reducing, but the front size
is not reducing. If you want to reduce
the front size, we have to select it. Then come to a
property panel and then just maybe reduce
the front size like this. We're going to come to
the property panel. A bit like I was saying before, if you want to convert
this guy to this guy, you introduce, select him. Then you see this button here, or this circular icon,
right click, Click. It then turns from white
to blue, turns to blue. It simply tells you that
this is an area type. Skill it. When you
skill the container, you see that the
container is actually crabbing out the name. It's not just reducing the
font size like before. See what we have. Now it's paving, basically
like this guy here. So how do we convert
this one to this one? The same thing we have to do, we just have to double click. And it's now a point type, so you can see it's now
scaling up and down. Okay, let me just do All right. Yeah, once more. Okay, so let's now
come and see how we can just make changes to
our type here, right? We make changes to our type on the properties panel even though we have a separate panel. This also now this
is the type panel. Just come to Windows,
then come down to type, and you can see that we
have the characters. And when you click
the character panel, you see that our type
panel just appears. You see what we have is basically almost the same
thing as what we have here. Right now. We have
the character, we have the paragraph
which is similar to this, we have the P type, and so on and so forth. When you come on the
windows and check, also see other taps that we can use to edit
our funds and our types. For now, we're just
focusing on this guy. Okay? We'll be using this
and this concurrently. Now when I select my text, I then see that here
we have the funds. Okay. With this, we
can change the funds. Just click here, you see a
list of funds, like working, let me just work with
this guy here as to give enough room for the funds, okay? You can see now we have
the fonts installed on my computer so I can
just keep scrolling and keep testing out
all the fonts we have. Okay? To see which one
is more suitable for me. When I see a font that I
like, I just select it. Okay? Or if I have one
already in my mind, I can just come here
and then type the name. Okay, let me see. False. Okay, so I've
selected false. There is the name of the font. False. Just type the name. And it appeared right because
I knew the font and I've used it and I personally
installed it on my computer. So it's a custom font. It doesn't come
with a lot Street. But of course you
can install fonts. You can download funds
from the Internet and install on your computer and then be able
to use them here. Now when you click here also, you're going to see that we can apply filters in case when
you click on filters, we can see that we can
classify our funds. We can filter our ponds based
on classifications. Okay. We have the Sun Serif
classification. So if we click this,
it's only going to show us phones that are under
this classification. We have the Serif, okay? If you click this guy,
it's going to show us phones that are under
this classification. And this other one
is the slab serif, and then this one is the script. Okay, Kind of calligraphic. When we select this guy, we see all the
calligraphic ponds here. And this guy is the kind of black letter,
boutique script. And these are the ones. This one is handwritten and depending on the
types of funds you have, you need to have classifications
of those funds, right? So you can just select the classifications you
have and then illustrate, filter the funds based on your
selected classifications. And when you don't,
you just clear all and everything should
come back to normal. You can even cre,
create favor, right? Okay. You can see I have
some favor right here. So you can create favor rights by just hovering on the fund and then clicking on the star icon. So you're just going to add
it to the favor, right? Okay. So this is how to
select funds. Select funds. We also have the
style of the fonts. Let's assume I choose
something like clash display, which has a lot of styles. When I choose something like
clash display and come here, you see that we have pulled, you see that we have
the extra lights. You see that we have the light, that we have the regular, we have the medium, and
we have the semi medium. Okay, the pull, of course, here you can see the type of, the types of the font
you're selecting, right? Then here is the font size. We can increase the font size
or reduce the font size. Here you can control the
distance between each piece. As you can see, as I
increase the value here, the line size between
all the sce size between each line is then
increased for this guy. Here, you can increase the
spece between the characters. Okay, here it's at 200, can make it 100, make it -100 depending on what
you want to achieve. Okay, we have here where you
can align to the middle, to the side of the artboard, the bottom to the top, depending on the line. Of course, for this
guy is the paragraph, it's work based on a
scenario like this. Let me just reduce this, then. When I come to paragraph we can see that we have this guy here. It's aligned to the left. You can see that
this guy allows you to get centralized, centralized. This guy aligns it to the right. Then this one tries to
achieve a box look, tries to fill the
space up properly. And so also this one but while centralized right
and then this other one. Same thing but while
aligned to the left, to the right rather and
this guy, you get the 0.1. Other thing we have to
understand about the types and punting in able is we
have the type menu here. Okay, we have the
type menu here. When we click on type menu, we have other options that
enable us to modify our types. Okay, When we click here, we have more phones from A. So you can click here
to go online and get phones from your
Creative Cloud account, okay, From B subscription. And then we have the
fund option here, where you can actually see all the funds and with
the ones you used recently and all
the others that are loaded on your computer and
you can actually select them. Okay? Just like you can do here. We now have all the
recent funds you used. We have the font size. We have a lot of other options, convert to point type
and so on and so forth. Some of these options, we'll be looking at
them in our next video. Okay, we can actually
find and replace funds. We can actually change the kissing of our
funds of our type. Let's assume we want this
guy, the lower klose. When you select lower keys, we can see that it's
now lower keys, right? We want it to be title keys. We see that the first
letter is then capitalized. The want, if we want it
to be sentence keys, we then see that it's
treated like a sentence. Okay, Let's, let's
assume we have Illustrator right to be right. And then we want it
to be a sentence key. We have it like this
as a sentence key because in a sentence
after Illustrator, the next word will start
with a small litter. Right? If we choose
the title Keys, it's going to capitalize the
first litter of every word. Okay? The first
litter of every word. That's the difference between the title and the sentence keys. Okay, for now, let's just
make this capital letter. Okay, so basically we've covered all that we
need to know for now. The next lecture
we're going to dive even deeper and learn more advanced stuff
we can do with the text tool and the text
feature in illustrator. See you in the next video.
22. 22 More Advanced Typing: This lecture we'll be learning more advanced type and
fontin to be lost. Frito, come to your type tool and instead of just
clicking on it, just just left click and hold. And you can now see different
types of type tools, right? We have this guy, we have
this guy, we have this guy. This guy. This guy.
And we're going to look at all of them. Now, just come to your ship to, and select your ellipse. Okay? Then just give it the color. What I need you to do
right now, just come here. Instead of clicking on it, just hold it like before. This guy area type two. Now when you select this guy, just come here and click, okay, the size is too big
ten for example. Instead of leaving, like just
delete it and try to come and create another
shape. Let's redo it. Just come here and good. So as you can see, we have our text
following our ship. Okay, we now have our
text following our ship. Let's make this lights probably. Let's change the font
size or the font type. Just select a random font. We can see what we have now
clearly this is our type following a set ship right now to the second tool is the tool
that makes this possible. If you want to have your
font type follow a set ship, you have to use that
front right there. It's more of a type, okay? It's more of an era type
instead of a point type. Again, like I told you before, era types give us an area, okay? So you're basically
telling your type to follow this area,
spherical area, okay? So this is the tool
you use for that. Let's assume we want to have even a more
interesting ship, right? Let's assume we want to
have a ship like this, okay? Ship like this. Even if we had a
ship like this and still want our type
following our ship, we can make that
possible with this tool. This tool. Let's just a
address our ship to make it look more cool. Come and select Tool. Just click on the ship now, as you can see our type has followed the ship.
Our object, right? Yeah, this is one of the cool things we can
achieve with the type to. We have many other options. We have this guy which
enables our type set path. Okay, let's assume we
have a path like this. We want our type to
follow this part. All we need to do is to click. Yeah, we have a type
following the path now. Now, in a case like this, let's assume we want to move it to the left hand side
or the right hand side. We just come and click on
this line in the middle. Just click on it and drag. Okay, Just click on it.
I'm not getting it. I think we just need to
maybe reduce our type. So let me just write
something shorter, straight up and then
increase the size. Yeah, as we want
to move our type, all we need to do is come here and then move it like this. We just need to select it. And then now you see this
line, this line here. Not the white box but this line. This is the line you just
use to move your text. And we also have the same
line here in the middle. The same line in the middle. And then when we drag it to
the bottom, drag it down, you can see that the
orientation now changes, right? Okay. And see that
the orientation now changes just by dragging it, drag it up, back,
drag it back up. We can see that we now
have what we had before. The next two we have is
this guy here, okay, Which enables us create vertical texts when
you just click on it. When you click on
your work work area, you see that it
automatically creates a vertical type for you. You can increase the size, okay? Can increase or reduce the space between them
with this guy here. Then you can even come
to your menu here and type orientation and change
it back to horizontal. Okay, So you can create
horizontal to vertical, and vertical to horizontal. Let's make this zero, come here, make this horizontal. Okay, so that's the
vertical type two. We also have the
vertical area type two, which is similar
to this guy here. The two we used to
create this guy. Only that instead of creating
it in a horizontal manner, it's going to create it
in a vertical manner. Vertical orientation. So let's try it and
see how it goes. Right, Create your
ship and come here, select it and click on the path. Now my computer is
dragging a bit. I'm just going to
give it some time. And we can see that it
now created the tool. And if we type, even though the
computer is dragon, but keep creating our type, we can see that it's filling in the ship in a horizontal
manner, right? In the horizontal manner. We can of course keep using our options here to
further edit our. Right. Okay, just how
we can see that changes are being made as it
using the options here. That's just how this one
works. Going to delete. You need you, we have this guy vertical
type on a path to. You're going to type it
on the path just like this guy but in a
vertical orientation. Then finally, there is one other one I
want us to look at. I'm just going to
select this guy here, come to type and make this
then just make it per case. Then come here, click here, and come to this touch type two. Now how does this one work? It works by modifying the
character we've chosen. When we select it and
click on the character, it enables us modify
the character, can reduce the size
of that character. Rotate the character. Let's see if we want
to select select. We can rotate like this
and reduce the size. Select M, bring it here. T M, select this guy. Move him. Okay, select you,
make it bigger, the guy, just move this one's there are some of the things you
can do with this tool. Okay? Select him, the
size, bring them. Just have your phone with this. Basically, this is what you
use this last 24, okay? Yeah, this is what
you use this last 24. I want to just select
our path type here and then just come here and so
we can look at one option. Okay, there's this option
called type on a path. Again, you can see
apparently set to rainbow. Let's just click here
and then enable preview, so you can see how the
changes have been made, Right? Rainbow, This rainbow. This is okay. I think the best way to see
the effects of this guy is to just something like this. Okay, let's just create a
type along a circular path. Okay, Let's get you, let's see designer
for life, okay. Then let's move
the guy like this, let's make it centralized. Okay. Move like this. Okay. Now. Okay, one more thing. Let's just make this bold. And come to your type
and type on the path. Choose this two chose
type on the path. Then we can see the
changes that will be made. Right? So let's
preview and skew. We see what happens, right? We can choose the
path to align to, should be the line, which is what we have here. Should be the center, which is what we have here. That's the center of the path. She'll be aligned
to one step up, that's called the descender. And then the ascender
one step downwards, depending on how
our type is set up. Right? So we can make
this line okay for you. See what happens for
rainbow is normal guy, for three D bon. You see what happens. See
the changes that happen. Then stair step, okay, we can mess with the speck,
mess with the space. Let's make this study
and see what we have. -36 Okay, so you get
the point, right? Yeah. And then we have
this odor guy which says gravity, right. Good. So these are some of
the things we can do, some of the more advanced
stuff we can do with our type. I'll type two. Okay. So I have created this stuff here and
we're going to recreate it. We're going to
recreate this logo. It is basically using all
what we've learned here. So I started with this guy with a path right
looking like this. Okay, then let's just come to our stroke and
let's give you a stroke. Let's give you a
stroke, a black stroke. Then come to stroke the profile. Just boost up the
stroke size bits. Okay, I think we should
modify our ships. Okay, This will do.
Okay. The next thing we want to do is just
control C, control. Let's duplicate
the current ship. It reduced like this
and boost the stroke. Okay, We move it down bit. Okay, for this other guy, we still have to duplicate it when you see control
F because we'll be using it to create our
phones. Okay, Our type. If we use it to create our type, we're going to then see the
complete line disappear. Okay, So we have to
duplicate it. Just click. And then what I
typed is ferrous. And of course, I moved
our stuff like this. Okay. What phone did I use? I used the ponte.
Just copied it. Come here, Pi. Okay. We now have our funds. We can increase this value. Increase the sky, correct? Just make it bigger. A little bigger. Yeah. So what next is left? We just have to create
this guy, right? This guy. So what did I do? I came here, created our path. Give it a stroke.
Okay, the stroke then just duplicated it because it's the same
thing for up and down. Ok, we need to create them
separately for this guy. All I did was I typed this
traditional blue wing and just copy it instead. Then come here, piece it, Then just move your
guy to the front. This to the top like this. For this other one, copy everything I'm using
control to copy. Then come here and those pits. Okay, only that for this guy, you need to drag him down. Sorry to come here. Drag down like this. Perfect. Then
probably just I just, I just take like this
and what do we have? We have it set up on the same
points as the other one. And then what I then did was I just selected the boot of them. Just give them just give them made them kind of
aligned to the S line. Right to the center line. Okay. Then yeah, just made them aligned
to the center line. And then created
this guy since 1990. And then finally this ship. All right. Just an S funds. Okay. It's quite simple if
you know what you're doing. It's very simple if you
know what you're doing. Yeah, basically
that's what I did. And now we can see that we created a very cool logo
for a brewing company. Yeah, that's it for this one. In the next video, we should
be taking an assignment. Okay, see you in the next video. Bye bye.
23. 23 Extra Modify and Manipulate Texts: We come back in this lecture, we'll be learning how
to modify our type. Okay, So I'm
duplicating this guy. Bringing him downwards, Yeah. Now, this last
extra step gives us the ability to modify our type. It gives us a great
deal of flexibility. It also has its downside. Now, what's the downside
when we cross this line? When we do what
we're about to do, we won't be able to modify
our text like this, add new, let us or use
panel to edit our font. Or change the font size, font orientation or whatever. Okay, now that's the downside. But it will be able
to tone our type to ships and do every other
modification we can do to ships. It means we can
modify anchor points, We can modify, we
can add gradients. We can add a whole lot of
things after this is done. Now what's the process?
What do we do? It was free to the
thing we have to do. Just duplicate this guy here. The thing we have to do, come here and click on
Create Outlines. When we create, click
Concrete Outlines, what it does is it converts our text to ships and
then groups them. Okay, We can now
right click on Group. We now have another group here. We can go into our group
by double clicking. Now we can see that we have individual ships
created from our text. Okay, now with this, when we hit A or come to
the direct selection two, you can see that we
now have Ancho points. If we can select anchor points, maybe do extra
modifications, right? It gives us a great
deal of flexibility. We drag this, then
this like this. Yeah, you can see we are now having very cool
front design here. You can even use this
as a logo, right? Can use this as logo. Just come on, Maybe I'm going to create the
new logo illustrated. I'm just going to come here and duplicate you
again, of course, by holding down, Create it
and grab it or enlarge it. And then select this core point. And then maybe do
something like this. Select this guy to do
something like this. Okay, this stuff we've done, we have achieved
something cool, right? Yeah, so as you can see, we've totally changed
the look of our fonts. Can even come here, make this guy maybe
something like this. Come and select,
Use our Sibulolt. Delete this guy. Yeah, we are
now modifying our phones. Okay, We can do this with all our letters,
all our letters. We can just keep modifying them till we get
what we want to get. Okay, perfect. Now that's the actual ability
this option gives us. Okay, of course, we can
come and add colors. We can even use greetings. See, for example,
you use this guy K. We can do who love things with this K Perfect. Arrange to buck. We give this. As you can see, we started
with a type and we extra modified it to even
create this logo, okay? So some of the things you can do stuff like this with this, we've come to the
end of our lecture. See you in the next one.
24. 24 Assignment 4: Hello guys, welcome
to this assignment. So I've got two designs
for you here to do. I have this one from
the previous video. This is just for you to
take an example from. You're going to create
a logo like this, okay? You're going to create
a logo like this, but with words of your
own choice, okay? So you don't have to use
plenty ferrous here. You can use whatever
brand name you want and use whatever
design you want, okay? The idea is for you to be able to use the type of tools which
we've spoken about, okay? The idea is for you
to be able to use the type tools which
we've spoken about. Type tools on the path, normal type tools and
so on and so forth. So just use them to create
a logo like this, okay? Then we have this other
one, Pros Creatives, okay? You're going to
create a logo design. You don't have to
use these funds. You can change the funds. Use whatever funds you want. But the word here is PC, okay? It's Pros Creative PC. I need you to create outlines. When you've gotten the funds that you are satisfied with, you create outlines and then
you modify the fonts, okay? Or you modify the type,
just like I did here. To create this logo, you have to modify
this and create a very cool logo with the word
PC with the characters PC, right, which stands for
Progress Creatives. And then just work on this guy. Also make it very cool. Make it very nice. I'd love to see what you are able
to come up with. Okay? So I'm expecting you to work on this guy and
work on this guy. I'll be it for this assignment. See you in the next one.
25. 25 Masking in Illustrator: Hello everyone.
I'm welcome back. In this very brief module, we'll be learning about
masks in a Ellos Fried. Okay, so what are masks? Masks are basically
used to reveal certain parts of an image or an object while hiding others. Okay. So they're just used to reveal certain
parts of an image. Let me explain to you
what I mean by that. So I'm just going to come
here to file then, please. Okay, let's just
come to this folder, this mask and
clipping mask folder, or this mask folder, and then select this girl image. Okay, so let's
assume we're doing, we're creating a poster. Maybe a fashion poster
or make up poster. Okay? And let's assume we
want to just make this, okay, we have this image, we
have this image here, and we actually want it to just appear
in a circle, right? While having probably a
font type here, maybe. So we type, just make it big. Let's assume we want,
this image does appear in circle.
How do we do that? We use marks to do that. Just create your circle. Okay? Then make sure your
circle is on the image. Okay, on the image. And just select both of them. And right click and clip mask. That's all you need to do in your image will appear
in the circle, right? Basically, that's
how masks work. For masks to work, the ship has to
be a vector ship. Okay? The ship has
to be a vector. It can be a font, okay? But it cannot be an image. It cannot be an image. It has to be actually a
ship that has parts, right? It can also be a
font, like I said, it can't be an image for the
part that will be masked. It can be an image. It can be a vector. It can be whatever you want. Let's assume we want to mask
this word Fashion week, maybe into a circular
or something like that. You can just set the word
of them like this click. As you can see, it's now inside. What if we want to
adjust our image? What if we want to
adjust our image? All you need to do is
to double click on it. And as you can see now
we can adjust our image. This transformation guides, we can resize our image image, we can rotate our image key depending on just
what we want to do. Then if we want to
release our masks, we can actually release it to enable us see our
image in full again. We can just right click and
then release clipping mask. Okay, that's just, it's very simple and
that's how masks work, right? Just as simple as that. Just come here and
import the other image. Okay, let's import this image. Create a mask with it. All right, let's
release this guy, because I don't like
the way it looks. Release it and they
just copy this font. Send this to the buck. Okay, come to your
artboard tool and create a new art
board by clicking on Just click on the image to
create a new art board. Let's type Mitch right ch. We'll create a
clipping mask with this image right,
with the word Mitch. Let's just at our fonts. The spacing just make
the size bigger. Now we have a shortcut
for cleaving masking. We don't always have
to select and write. Click. We can just select
them and control seven. Control seven and everything
will go perfectly. Yeah, this is what
we have. Perfect. Nature. Yeah. Then I would like us to
work on something else. Let's assume we have
another art pot. All right, just delete
this guy. Let's see. We want the word nature, but we have the characters
as separate entities. Okay. On their own, let's create outline to separate them. And then on group to have
them as separate entities. Okay? And then why do we
want to do like this? Maybe because probably
because we want to just create a very
nice design, right? Okay, we increase this guy and this guy and just play around with the
entire design, right? Maybe this is what
we want to achieve. This is what we want to achieve. Fine, we're going to achieve it. And then we're going to
create our clipping mask. Perfect. Let's come here and
please our image once more. Then Irene, send to the back,
let's select everything. Country seven, right?
Wow. What do we have? We can see that it doesn't work. Seven doesn't work
because we have them as different entities on
it won't work in this case. What's the solution to this? The only way we can solve this problem is to
combine these paths. Combine these ships.
And we can do that by making them a
compound path. Okay? We can do that by making
them compound path. Now let's just adjust our design further,
adjust our design. Turn our ships to, how do we turn them
to compound masks? Just select all your ships. Okay, select all your ships. We come to objects and then
come to compound path. Then Nick, as you can see, we now have them as
a compound path. They are now the
same. They're no one. Okay? When you select this guy and select this guy
and control seven. We then see that
our clipping mask, no no, works perfectly. And we have what we
wanted to achieve. Nature we can do clipping masks for whatever
type of ship we want. The ship doesn't matter. All that matters is that we
follow the, all the matter. We fully should make sure. We should make sure we
have a setting like this. Okay? We should make sure we
have a setting like this. What do I mean? We should make sure we have the image behind. Okay. And then the
ship a poll, right? Then select all and
control several. And we see that no
matter the ship, we can create clipping masks. No matter the ship, we can
create our clipping masks. This is just all you need to
know about clipping masks. We are definitely going to use clipping masks to be
designs in the future. With this, we've come to
the end of our video and of course our module
on masks in abuso. Okay, see you in the next one.
26. 26 The 3D Effect and Panel: Hey guys and welcome to this module on three
D and materials. Okay, we'll be
learning how to use the three D effect
and materials in B Illustrator in order to apply the Tre D effect or you just
need to select your ship. Okay, And come to Effects. And then go to three
D and Materials. And then choose one of these. Okay, so maybe you can
choose Xrude and Bev. Then immediately this
three D panel comes up. Okay, let me just
cancel this in, Delete okay, and
draw another ship. Now, apart from coming here, we can immediately come to the windows panel,
to the windows menu. And then come to the three
D and materials panel here. And just activate it. Okay? And then it's
going to pop up. Okay. You don't have
to always come here. You can just come to Windows
and activate the panel, and then when you
select your object, you then click on the
one you want, okay? Now this is the extrude, which was the one we
used the other time. Okay? If we do, we also have this guy
which is plane. Okay? We are going to look at
all of this in details. Okay, Let me just choose this guy and show
you one other thing. When I select it or when I apply the three D
extrude defect. And I come to this panel here, which is the appearance panel. Come to the appearance panel, you then see that your
effect is now visible here. Okay, from here, you can
disable your effect. You can enable your effect. You can delete your
effect, duplicate it. You can do a whole
lot of things. The effect you apply
to your ships, effects that affect
the appearance of your ship, all be here. Okay. So you can see stroke, you can see field color,
and so on and so forth. Okay? So in order to edit it, you can just click again. You can just click once and
the panel will now open. Okay? So these are the types
of three D effects we have. Okay? We have the plane effect, which basically turns
your selected object into a three D plane. Okay? And then we have the
extrude panel which, which extrudes
your three D ship, or rather your selected ship
or for your selected ship. Okay. That's what this guy does. And then this other
one, revolve. It works. It revolves the ship and we're going
to look at examples. And this other one
called the inflate, it just inflates it like a
balloon, as you can see here. Let me select this guy. Add the plane tree effect. Now we can see that
it has no thickness. It's just a plane, okay?
Just a three D plane. This is suitable when we want to add images symbols
on our D object. And we're going to look at
examples for you to know. This just acts like a plane
doesn't have any thickness. You can only rotate it. So you can rotate it here. Okay. Then it has other options, which we're definitely going
to look at now for this guy, when I extrude, we can
see that immediately an extrusion is
created and then we can of course, do our edits. Okay, for this guy, let me just increase the
size of my art board. Okay, I can spitz them out properly now for this
ship, when I revolve. When I revolve, we
can see what happens. Okay. Then turns it to
what one could see. It looks like you do not. Right? Yeah. It revolves. Okay. You might not fully
understand how this guy works, but when I create an example
with something like this, okay, I'm just
throwing out a ship. Now, I just want to explain the revolve effect
properly for you, okay? So let's see, We want to add the revolve
effect on this guy. Okay, So that we understand how this effect works very much. Select the ship and
then click on Revolve. Okay. Now we see what happens. It revolves it around the path. Okay? This one solves as path. If you come here to
offset direction, okay, drop domina and
then select right edge. So what do you now see? Downturns it into what
looks like a container. So now you can see
the similarity between the ship here as
it's highlighted, okay? That's the profile of the
ship and then this guy, so basically uses this symbol here or our ship here as a profile for the
revolving effect, okay? So that's how this
revolve effect works. And then for the inflate, it just inflates
it like a balloon. Like I said before,
when I click on the inflate takes some time, then we can see that
it has inflated our shape to look
like a balloon. Okay, perfect. Now let's go through each and every option
now for this guy, now we have the three
D clean, right? The options we have here
are the rotation options. When you come here, we
can see that we can route it to fit the front. We can see it's
facing the front. We can fit the back.
Okay. Can fit the left. Okay. We won't see this
one now, since it's clean, right, But it's facing the left, it can't fit the right. Can't fit the top. And of course we won't see this
one too because it's plan, it doesn't have thickness on. Now we have the other ones
which will give us looks like this, looks like this. We can actually rotate them
using these sliders here. Apart from this, we
can use the gizmo here to create custom rotations
based on what we want. As you can see, the Gizmos
to create rotations, Rotations, when you
highlight the chism, you would then be able to
select and then rotate, okay? For this other guy, we
have more options, okay? We have the rotation
options which are completely the
same as the ones here. We have even more if we just
close this option here, we can see that first
of all, we have depth. Depth controls the depth
of our ex, as you can see, a adjust the depth slider, the depth of our
extrusion being adjusted. Okay, then we have this guy which is called
the cap right now. It enables us to open the
cap or just leave it closed. Apparently it's closed
and then if we click, we wouldn't be able to
see that it's now open. Now we can see through our
ship, we want it closed. And then for this other option, it's called the Pavle effect. When we click on P, we then see what happens, right? It puts a profile on our ship. Now we have different
types of bevel effects. We have the classic,
we have the round, we have the convex.
Okay, convex. We have the step also,
depending on what you want. Like I said, it's
basically what you want to design that will drive you
to using one of these. Again, we have the
classic outline, we have the round outline, then we have the square outline. Let me choose the convex. Start with convex. When you choose any
of the profiles here, you see that we now have
what we call the width. This will it how sharp or how wide the
profile here is, Okay? As you can see, as I'm taking, it's towards 100, it's
becoming thinner. Then as I drag it towards
zero, becoming wider, right? And then we have the height
which does what it does, as you can see, it
creates the height. It adjusts the height to
be longer or shorter. When I reduce it perfect. Then we have what
we call the copies. I think I duplicated
this. Delete this one. Then we have what
we call the copies which duplicates the
profile. Be proof. Right? So we can now
have two of them. The slider which controls
the spacing between them. Okay, perfect. You can create complex
designs with this. You can even have three.
You can have four. You can have as
much as you want, Just type the amount you want, and then you're going
to have them perfect. Then we have the spacing,
like I said before. Then we have this
option bevel inside it. Bevels it inside. We have reset, which will bring everything back to the original. Okay, that's it for Pav. We can use the port in here to remove the Pav or activity, depending on what you want. Now, let's talk about the
revolve options, right? Revolve options. Now the options we have
here are the rotation, which are similar to the ones
we looked at here and here. Okay, We have this guy
also with *** cap. We can sit through it, but since the rotation does not
allow us to situate, see what's happening,
we have this guy, okay, which is the
direction of the offset. Now we have it at right, that's why we have this design. We have it at left. We have something different. We have the direct
opposite of the pull file. Perfect. Let's just
keep that at right. Then come to offsets. You can see that offset
controls the offset, right? Yeah. Then we have
the revolve angle. We can see that this. We can cut our ship and
we can complete our ship. The revolve angle mediately with a 364 complete revolving for the last one
which is the inflate, we have just the
depth and the volume, then the cap and
finally the rotation. The depth, the volume,
then the rotation. Just go around and see
what you can come up with. That, of course we are done
because we're not done yet. You can come up with a whole
lot of beautiful designs which just tweaking just
the objects options. Okay, the next thing
we will then be looking at is the
material options here. As you can see, we are
presently on objects. All right. We have the materials here. We have the lighting. Okay. We can edit the materials. We can edit lighting, and we can even render. Okay. These are the
render settings. We can activate
render settings here. We can activate or
retracing rather. Then we can render. We can choose the quality
of the rendering. We can even edit our
Raster settings. All right, remember
we spoke about Raster settings at the time. We can change this
to higher resolution for a better rendering. Now for the materials, we can see that we
have materials. Here we have all materials,
right? Different materials. We have the material
which is the default one, which is the one apparently activated on the, on the ship. Right? And the default material. And you can apply colors
to these materials, right? To this material,
to the default one. So we have other materials. Okay. Now these
are dub materials. The dub materials derived
from Dubs Substance library. Okay. Those who are
conversant with substance painter will be conversant with these materials. Okay, so these are just substance materials so you can actually add custom materials. Okay. And C, the file format
accepted this SBS ER. Okay, so this is the
native file format for substance materials. Okay. There are a whole
lot of materials. You just go through
these on your own. You're going to go through
each and every one of them. You can just go through
them on your own, but just for a few, just apply. This guy you reach look
like a brick. All right? So applying the materials can require a bit of system
performance, okay? So you have to have a good
system to be able to run this. Now we can see how
it looks here. Doesn't look good for me. You can use this guy, okay? So this is what we have
with this material. Like I said, it all depends on what you
want to achieve, right? It all depends on what
you want to achieve. So we're not going to dive
into these materials for now. Okay, Now we have
other options here. Other material options here. Okay, Which enable us
edit our materials. So we have materials properties, we have roughness, we
have the metallic. The roughness affects the way light interacts with our object. It could either be shiny, we could make it shiny
by taking it down, or make it more dull
or more normal. That makes sense by
dragging it towards one. And then we have the metallic, which is very self explanatory. This will make it look more
metallic as you can see, even before day before.
That's what the Okay, and then let me select we custom material to see if we are going to
get extra options. Right. We're definitely
going to get extra options with
custom materials. As you can see, we now
have a custom material applied and we now
have extra options. We have custom textures
applied and we have extra options like this
one now is the resolution, so we can change it
from one K to two K of. The higher the resolution, the more taxing the work will be on your computer and
we have the brick color. My system has been working
for a very long time, so it's responding
not too well to load. Okay. For this guy, we change the resolution. Okay. We have one K, we have two. These other ones we can change the color
of the brick here, click here, and then change
the color of the brick. It might take some time to load. Okay, Let me just
change this guy to one K. It's less
tasking on my computer. We have other options depending on what materials you choose. Okay? Now, remember this
guy is a brick material. That's why we have these options
related to brick, right? We have all these
other material, all these other options to just help us edit our
material properly. Now we have these other ones here which will help
us with the scaling, with the rotation, with
the density, okay? When I increase the density, you can see that it's
editing the UV mapping. The UV mapping, okay? Or how the material
appears on our object. The skill of the
material on our object. Then we have many other
options here which I want you to just go and
check out on your own. I'm not going to go
through all these options. Should just choose
our default material and continue other things. Now, coming to lighting, we have different
presets for lighting. The standard lighting, we
have the diffused lighting, we have the top
left lighting here, we have the top right lighting. And all these are all
self explanatory, plus you can see how
the affect our ship. Here we have the
color of the light, we want white light, you want red lights on, the intensity of the light. And then the tission light, you see what we get as
we adjust the stuff. Then we have the
height of the light, at the height of the
light from our object, right then we have the softness. Then we have the
ambient intensity. Ambient intensity. Then we can activate shadows,
can activate shadows. I'm not going to activate
shadows for this one. Then finally, we have the render settings right
now, the render settings, we can just come here
and then retracing, then come and choose
the render quality. We can make it low,
medium or high. Then activate reduced Noise. Let's try medium and
then click Render. Need to take some
time to render. As you can see, we now
have our rendered image. Now have a rendered image now we can use this in our graphics. You can use this
now graphic design and other works to
be Illustrator. Let's try to render
this one also. When you just come
here and click here, it's going to render
low settings. It's going to render with
lower settings automatically. If you want to render
with a high settings, you have to come here and then
select the high settings, activate, select the higher
settings, and then render. But of course, you have to
also know that selecting higher settings will also require higher
system performance. Now we have a better and
even cleaner render. Right. As you can see, we don't have much noise on our ender. We don't have any noise on
our ender unlike this one, which we have a lot of noise. Right? That is about this. We've come to the
end of our video on the three D matters panel. In the next lecture, we'll start creating
really cool stuff. Okay, we start turning
our two D shapes, our two D objects
into three D's, and creating nice designs with them to see you in
the next one, bye.
27. 27 Turn 2D Shapes to 3D: Hello guys, and welcome back. In this lecture,
we'll be turning our designs here, our
illustrations here, into three D. Okay, turning our illustrations
here into three D, and we're just going to create
nice designs from them. Maybe at the end of our designs
might create the poster, we might create these just playing around
with the whole stuff. Okay, now for this, I'm going to maybe
adjust my color. Do I like this color? Maybe choose a pop. Pop. Okay. Popular or popular? Yeah. Maybe something darker. Okay. Let me just walk
with this one, Okay? Now we're going to, we're going to turn our
ships into treaty. As you can see, all the ships
are to D ships. All right. So we're going to
turn our ships into treaty to see what
we can come up with. Now we have this guy here. We can see this is the ship and this is just
a compound ship. All these guys are
joined together as one. Okay? So all of them are
joined together as one. So I'm just going to
apply the effect now. That's the three D effect. So I'm going to use
the extrude effect. To use the extrude
effect and immediately see that extrusion
has been created. Right. First thing to do, activate the pebble. Then. Yeah, we're going to work
with the classic Pblejtdue. The width, this. Okay. And come down to t. Then let's just play around to see
which one fits best. Select this guy here,
isymmetricpymmetric top perfect. Now select these other ones. These other ships here they are also compound
ships, right? Also compound ships. Apply the clean effect. Click on plane, then
choose the same Tion. Choose for the first one, the top, isommetric top. Okay. You can see we now have three D effects
applied on boot Now, just adjust it to fit properly. Adjust it to fit properly. Yeah, as you can see,
the making progress just increase the width, then the height like this. And for the I think the
previous depth was okay. Now what I want you to
do is just the symbols, symbols then come to light. We want light to really
have much effect on them because they
are going to be white and they're just
meant to reflect light. Just increase the
intensity of the light. Then for this one, I think we are pretty much done. Next thing to do is just
come here activity, Retracing this high render, a high just click render
to take some time. As you can see, we now have our D keyboard keyboard to let me just check how
much roughness we have. Okay, I think I am okay
with the roughness. I thought I had some
metallic effects on it, but I think everything is
cool. Everything is cool. Now for this other guy, we just select him, that's the letters
and the symbols just come and render.
You render them. Just select the here activity,
you're retracing high, and then render, boom. After rendering, you can now
see that the pop out well, okay, we're done with this guy. Go to the other ones. Now for this guy, I want to
apply an inflate effect. Click in Fl, bring it here. And play around with the play
the depth to what you want. There's basically
no rules with this. Just what you want, you can just do what you want. I'm okay with the rotation.
What do I do next? Just come and activate my
retracing and click on Render. It's going to take some time
to render and we're done. We'll see the effect.
Very sweet looking. All right, perfect. Now we're going to work
on these other ones. Maybe I should make my, maybe I should create
a new art board. Just create a new
art board here. Create a new art board. Okay. So I can have these
other ones for this guy here, I'm just going to
give it a background, then arrange send to back
while selecting this color. While selecting the color, just come to your color
guide to see what suggestions lost has given us to blend well
with what we have. We have this background,
we have this one. We have a couple of
them, a number of them. And I'm just going to
go with, with this one. Okay? I'm going to go
with this one and adjust my artboard beats to the side and move the
background like this. Just come and
create a type here. I love keys. But we're not going to
write type love because we're going to use this guy
here to represent love. Key. Come and make
your phones bigger. Centralize the whole thing, increase the speed
between the lines. It appears like
this for the type, just move this block. I'm using Montserrat font. Just select the block
font if you have it, or you can choose any
font that looks good. And I feel like kind of increasing the
size of my artboard towards the left
hand side perfect. We can just make
our front bigger. Okay. Then for this guy, we would choose this color or
this one or whatever color, that will look good, right? Yeah, this color
would do perfect. So this is our first design
using the three D effect. Okay, now we have all other
ships here. Other ships here. I'm just going to use, I'm going to create the three D effect
with this guy here. Then I'm going to allow you to create the remaining, okay, maybe with this other
guy and this guy, maybe. Okay, maybe this one. I'm just going to do this once and then you then
handle the rest. And then we'll see
in the next video. Now for this guy, I'm
just going to apply the inflate effects
on it quickly, okay? And of course, you can maybe
create a rotation like this. Or adjust the rotation
from this slider here, we make it look like this. Perfect for this one. You can see that there's
a cut in the ship right when we apply
our inflates. You can see that we now have the effects, adjust
your rotation. Maybe something like this.
Perfect for the other points. We just give them
an inflate effect. Also just arrange
them like this. Maybe make them bigger. I think we won't
make them bigger, I'll just maintain the size and just do these other guys. Now what I want to
create a right, I want to create a for this one. We're not going to use
the inflate effect, we are instead going
to use the ex. You're going to extrude
ships like this, give them an extrusion
of 76 pixels. I'm going to copy this 76 points rather then create an extrusion. Again, the pieced 0.76 this
guy also create an extrusion. Maybe 76 will do o for all these other ones,
just create extrusions. Extrusions but the
extrusions, right? Let's make this
120, for example. 20 for this guy. Put an extrusion also, then make the depth 20. Let's select this
white ship here. As you can see, this
guy is also cut out to select the white
ship for this one. Maybe I'm just going
to give it a plan, just inflate it instead, like this for the mean ship, that's the main amount
I'm going to extrude. Okay, And then remove it. This depth, maybe we
reduce the depth to 20. Let's try bringing this
guy forward to get here. Okay, let's leave it like this for now. Then for this other one, I'll just add an
in fleet effect. Perfect. Now we're
going to just start adjusting our ships to
make it look more like a. So I'm going to drag
this one to this point. This guy, I'm going to
just send him to the bark, It can look like it's at
the other side just a bit. Just this guy. Then just try to create an
accurate perspective. I think we can start to work with them
arranged like this. Okay, let's select this one and then come and
give you the bebe, select the round,
it look like this. And Seem also with all of them. Give all of them a Bev and
then select the round. Okay, perfect. Seem with these guys be round, we might not be seeing
much happening here, but after we render it, we'll see what's
happening better and give this guy also a Bev round. Seem also with this guy round. Yeah, we're pretty
much done with this. You can now begin to render. All right, so select this guy. I'm feeling that
maybe I shouldn't use the highest quality of rendering because it
takes time to render. I just go with the
low quality for now. Yeah, let's just use
the low quality. I think this is
good, manageable. Perfect. Select your
ship and click Render. Okay, Select your ship and click Render. Select your ship. Click Render. And what? Select your ship. Click Render. And what we've always done. Perfect, Select your
ship and click Render. Perfect. Then, okay, we have these guys to do,
Select, click Render. So let's click. And
as you can see, we are now having
a better visual on the effect here.
Same with this guy. Click, Render. Click and Perfect. Perfect, perfect. We now have all our shapes in three D. Okay, and I feel like doing
one more thing here. Was going to create
a, an ellipse, Give it a brown color, then just come and give
it an inflate effect. Come to materials, then
give it a wooden finish. Which one will select? Let's select this guy.
Give it a wooden finish. This large wood perfect for density under materials
properties. Just increase it. Yeah, we want to leave
all of the settings, but of course you
can, you can adjust them for yourselves to see if you can get
something better. Okay. I'm just going
to leave mine like this and render perfect. With this, we have
been able to achieve our treaty, our treaty effect. Now we can just select this guy, drag it here to create
the background. Then maybe this one
them up for this guy. Just send it to the park. Okay, one final thing to do. One final thing to do. Select this color so I can see what's to be
illustrator suggests for me because I moved upwards. It's just trying to update
the effects. Now it's done. When I come to my
color guides to, I am now given different
options to choose from. I think I'll go with this one. Finally, what I want to do
is come to your ellipse, to then create an ellipse, bring it to the front, of
course it's at the front. And then come to your
gradient to and give it a dialredientjt, black
and white gradient. And then come here to
revise the gredent. Then come to the white channel. Select, come to opacity, then give it zero. What do we want to, we want to create a shadow
effect on the ground. Just reduce holding down Alt, Reduce drug and reduce your shadow or your
ship like this. Okay, let's reduce it like this. Then select while selecting it, select also the
background layer. And arrange send to the back. To the good, send to the back, okay, This is what we have. We can come on opacity, okay? Or come here, either
of the places. When you click, you
see this now opens up and you can just
choose multiply. Just adjust the slider
for the ingredient here that's too much. Or rather, just select
this guy here and give it a 70% opacity. Yeah, this is what we now have. We can also duplicate it for
this other ship here, right? Yeah. So with this, we've come to the
end of this lecture. Just go about and create the treaty effect
for these ships. In the next lecture, we're
going to go about and create some cool designs with what we've created so
far and even more. Okay, see you in the next one.
28. 28 Poster Designs with 3D Characters: Hello guys, and welcome to
the third video on the module on three D and materials
in a dub illustrito. In the last lecture, we were learning how to create three D objects
from two D ships. Right. And as you can see, I've gone on and
imported some of the ones we've created
from the last video. Also, I've worked on this logo, a illustration ad
illustritologo. I've imported it here. Also, I have gone ahead to duplicate this Artbo so you can have these
guys to work on. Okay, I'm going to use this ones in this
video, this file. Just go to your projects folder
and then select this one, which is the tread poster
design and with character. Okay, just select
it and open it. It's the one we're
going to be using. Okay, now we're going to create poster design here
with this character. And then we're going
to basically turn this guy into Tre D,
this design here. We're going to turn
it into treat. These are the things we're
going to do in this lecture. Another start, we're going to turn this character into tread. Okay, It's going to be quite simple you need to
do is to select your ship and then choose either the
extrude or the inflate, depending on what you want. Okay. I'm just going
to choose the inflate and see if I get what
I want. All right. Yeah, I think I like this. Select each and every part of this design and just
add the tre D effect. Either the inflate or the extrude will do
a good job here. Select this guy, inf
like the inflate, better for this, okay, Adjust the volume of bits. And then select this one, also in flit, right? This guy in flybejust, volume Bitel, this
guy also in flit. Then adjust the volume, Also the depth volume. Just play around
with the settings to see what works best. We're not doing any
custom rotation for this, we're just going to
use the front view. Sellefllso should be inflated basically. That's okay. The eyebrows also maybe inf inflate
effect also work. I was thinking of the
shoot but let's just walk with inflate what we can just do this for the eyes also
perfect for the mouth. Maybe you have the effect applied to every part of the design except
for the glasses. I don't want the inflict
effect on the glasses, I just want the
glasses to be okay. Now I feel I should make. Soldjust the volume here. Perfect. So as you can see, the process is quite simple and we now have our three
D character. Right. The next thing we need
to do is to just render. Come here, Re, select medium. Okay. I just want to use
the medium for this one. It's done and you can
see some noise here, but I'm not going to
do anything about it. You can do something about it. Maybe you can use the
high if you want. We just going to use the
medium for time sake. Okay. To select and medium also you observe
that the bigger the object, the bigger the object
we're applying, the three D effect on the
longer it takes to render, the longer it takes to render dude, I will select this one. Tracing and Render. And then select the
fees Ricin and render. Good. Select the Ear
Ricin and render. Select this other ear triene. Render. Select this guy. Risen and render. Okay. And then select
the Eye and render. Got the eyebrow render, so we can see that we're having an error here
on this eyebrows. I'm just going to
delete this guy. I'm just going to
delete this eyebrow. Maybe I'll just duplicate this one and bring it
to the side here. Then for our eyes, we have to render our eyes. It shouldn't take too long. The second eye retracing render. And then for the nose
trice and render. Then finally for the mouths vitrine render. Okay. I think I'm having
an error here also. I don't know why it's like this, but what I'm going to do is I'm just going to select this guy to be K and then route, hopefully the problem
should be gone. Okay? I think the problem
will not go away. We might all be forced
to use something else. Let's try, let's try
using the extrude effect. Okay, let's try using the extrude and then just give
it a P, then round depth. Just play around with
the sentence basically and then come and
give it render. Let's see, we're still
having the same issue here. We still having the same issue. I really don't know why
it's behaving like this. Let's just, let's assume we do not have
this issue, right? Let's assume we do
not have this issue. So we can just
finish this video. The next thing you
have to do is to come and create a
mask like this. Okay, over your ship. A drawing over your
ship, just like this. Okay, select everything
and control seven. Okay, seven to clip mask. Right for clipping
mask like we saw in the clipping masks tutorial
clip mask has to cut this other down part
that looks ugly when we come something like this, maybe this white
color then duplicate. Okay, let's make ga and
send this to the back. Then maybe I'm just
going to come and select color here
that illustrator should suggest some
colors for me. The color Guide to.
Right, I'm just going to come here and try to see if I can get more
colors or better colors. We're going to try
out some of these. Let's work with
this one for now. Then, what do we want to type? Add lustre, reduce the size for, make bigger the size of the B. Then centralize the whole thing. A, come here, align
it to the middle. Then we can use the thick
version of this font. Very thick one. Maybe the extra
bold or the block should use the block and then
choose some colors here. And then basically choose
different colors for this guy, maybe something like this. Okay, Just try it out
and see manageable. So what I want to do is I
want to use this one here. I want to use it is going
to update, maybe not. So we'll just arrange
and bring you the front. Just reduce the size to
cover the, the letter B. Perfect. So it's to
be illustrator. Okay. I need to then bring this guy
here and just place it here with this one, and I'll
see this one perfect. Now for these guys, we'll give them an extrude, come the rounded preset, and then just come and use
front here, rotation, okay. Then just adjust the
height like this, we can do seam for the
next two ships, okay. Front, front, the rounded, rounded. And then for this
one which is white, I would like to increase the reflection of light or the interaction
of light with it. Just increase the
intensity of the light. Then this, maybe we
give you an inflate, Either inflate or
extruded volume of trach. The volume bite, perfect. Then we need to turn
this guy into a ship. Let's just come to
object and expand. So we see that we've turned
it into a ship, right? Seem also with these guys
here with the ships here, expand then let's infltI'mjing
to leave them in flying. Leave them as the default
rather for this guy. Also in flu, the volume in flips to the William, and we forgot this guy here, M, Maybe I should just
delete this symbol. Okay, so for the other one, give it an inflate also this guy flits volume inflates the volume. This guy, that's
just group them and group them, Group one, group simos, Simos ones. To select all of
these ships in flits reduced to volume, okay? Do it, select these
other ones and in Flits. Volume select. This one inflates, let's reduce the volume bits. We are basically done
with all of them. What do we do next? We just need to render
them and that'll be all I just want to increase or edit the
color of this one. Let's make it closer to white. Okay, get closer to white. For this one, I'm going to, okay, it already has a
color, almost white. It's in between white and blue. Okay. Okay, I actually forgot
to add the effects on this, and this actually forgot to add the effects and inflate. Okay? Is the volume okay? The volume again, for this guy. I will give it another
inflates effect. The volume should of
course be reduced to I'm satisfied with
everything I have. Now guys, all I need
to do is to render. I'm going to use, I'm going
to use the default render. It doesn't take too much time. Okay, we're going
to select render. Going to take a short
while to render. It's done, Selander, I'm just going to fast
forward the video while I render every ship here. And we'll be back when
I'm rendering everything. Okay. As you can see, we're done with our
rendering and we now have our cool designs completely
ready for a final touch. Maybe I'll just tick this
guy and bring it here. Maybe reduce the size and
wait for it to perfect. Maybe for this one I'm just
going to bring it here. Maybe reduce the
size also perfect. Then for final touch, I just want to add another
shadow effect, right? Instead of creating a new one, I'm just going to select
this guy all down, hold and duplicate it. And bring it here. And just
drag it out like this. Okay. Drag, select it and select our ship,
our background. And send wood of them to the bark that it appears
below every other thing here. Yeah, this is it. This is what we've come up with. Perfect guys, that will
be it for this video. See you in the next one.
29. 29 Assignment 5: Hello guys and welcome back. So in the previous
videos we just learned about three D in adulto, Okay? Three D materials in a do So. This is the last
video in the module. And this video is an assignment. Okay? This is an assignment. And just come here and
open the assignment. Assignment five file. Okay? Just open it. Okay. And it will bring you to this, please. Okay. Now, this is
a girl character. All I need you to do is create a poster design with
this character, just like how we did the
last designs, right? So just create a poster
design with this character. Okay, Turn the character into three D and create
a poster design. And of course, you can also
use some of those elements. Some of those extra
elements we created. Okay. You can also use them
in your poster design. And I would love to see
how you go about it. I would love to see
the color combination. Yeah. Just use the
color guide tool of course, to generate colors. Right. Feel free to share
a project with me and I'll definitely love to see
what you come up with. So that will be it for this one. Okay, we'll see you
in the next one.
30. 30 Distort and Transform Effects: Guys and welcome back. In this module,
we'll be learning about effects in Ab Illustrator. Okay, so there are
two categories of effects in Illustrator. Just come to effect and click and then you
see the effect. Okay, we have the
Illustrator effects here and we have the Dub
Photoshop effects here. These illustrator effects are
native to Dub illustrtoka. These are the native
effects of Adbusto, while the Photoshop effects have their origin from Photoshop. Okay, if you're familiar
with Photoshop effect, you definitely are familiar
with these effects there under filters
in Photoshop. Okay, we're going to look at
each and every one of them, or most of them in this module. Okay, in this video
we'll start with the one we call the
distort and transform. Okay, when you come to effect, you see that we've covered three D and materials
in the Pvous module. What we'll cover in this one is the
distort and transform. Okay, just select
your ship tool and create a ship and we'll
look at how they work. Okay, Now come to effect distort and transform
and then free distort. Now the way this
effect works is it gives us a preview of what
we currently have selected, which is shape in this case. Then it gives us the ability to edit the anchor points to just the anchor
points like this. You just select the
anchor point and edit and just edit
it the way you want. We still have a preview of
how the original one is. Okay, this is the original one. This one with the dashed lines. And then this is how we are editing our
anchor points to be. Then we click Okay. We see that it then turns our ship to look like
how we've edited it, while our original ship handles that these
ones are still intact, like how the wear when the ship was a
squared ship, right? So that's just the way
this effect works. And you can edit the angles like this or
the edges like this, okay? And do a whole lot of things. But basically it is
just a simple effect and this is how it works. Nothing special, nothing much. I rarely use this effect, okay? But this is how it works. When you come to the
appearance panel, you see that all
your effects are. Now this is the new effect
which we just added. If we click this
eye button here, we are going to togle
the visibility. So we're going to off it. And we see that we now have
our original ship on it. We now have the effects applied. We can delete, we
can duplicate it, and we see the effect
of duplicating it here. Okay, we can just click on it. And then it gives us the
ability to re, edit the effect. Maybe we want to add more adjustments or we
want to do whatever. It just gives us the ability to do whatever we want to do. Okay, just delete and
create another one. Come to effects transform
and plower and blot lock and blood turns our ship into
what looks like this. Depending on the
ship and depending on what you want to achieve. Okay, This is a square ship and it has turned to
look like this star. Okay, we will have a star ship. Let's see what it does
to our star ship. Effects Bloods, We can see what it does
with our starship. Okay, let's use lips effects. You can create very nice
ships with these effects. Very interesting ships. Okay. Yeah. So basically it is what
the ship does for us. And of course we can add
multiple effects on single ship. You can add multiple
effects later as we want to add the free distort effect. You can see the preview here. Okay, You can see
that we've been able to add another effect here. This is the distort, or rather the free
distort to then, this is the pluck
and blot, okay? You can bring them above and
below each other and you can see the effect is here. In the live preview,
we have the rough on. Which is the ruffin, kind
of us roughens are edges. These are rufens are
shaped like this. We have the relative mood. We have the absolute mood. Okay, Claus. Okay. Maybe you want to create a cartoonish tree
or something, okay? Okay, So we've used
this to create a tree, change the color, can
bring it to the front. Maybe even duplicate
control, C control. Okay. Come to appearance, you increase the size, then send it to
the back to back. Then probably do more
adjustments like this. And then walk the color, change the color
to a darker one. Yeah, the sky is your limit, your imagination is your limit. Okay, We have the next
one which is effect. This transform effect basically is a transform effect, right? The transform effect, those
transformsions to our ship. As you can see, okay? We can move our ship
practically and horizontally. We can scale our ship. We can rotate our
ship, our ship. We can even duplicate
our ship by. All right, so let's just
try something out here. Let me just use this. Why it's not moving. Why my ship not moving? I don't know why
it's not moving. I'm just going to delete you. Since you
don't want to move. Look at the tool I've selected. I'm supposed to be
on my selection to, I guess that's why
it wasn't moving. Just come to my
select two and grab it and you can see
that it just moved. Now let's see what
we can do with the, let's see what we can
do with this tool, which is where is it? S, which is the
transform tool, right? The transform effect. Let's just give it
put, let's see, 15 degrees and let's
20 cap perfect. We can see what we
now have by just adding the transform
transform effect. Okay? You can have
stuff like this. Let's take this guy
and give it a effect. When you come here, you can actually apply
the last effect here. If I just transform, you can see that
automatically takes the last effect with the settings and just
applies it to the new one. Okay, let's assume you
want to add to this guy. Yeah, looks ugly. Yeah, that's what the
transform effect does. It transforms our ship. It transforms our ship. And it gives us, gives
us the ability to, to add different copies. Sorry, I added an effect by mistake, we
didn't look at it. But this is the
crop marks effect. It just creates a crop mark
on the edges of our ship. Okay. But it's not a
very important effect in my own opinion. It would be good for printers, people who would like to
engage in printing so that you know the boundary
of your design. Okay, so you can just add
it before printed to show the boundary of your design
so that when it's being cut, the cutting machine should
follow the boundaries, right? So that's just the importance
of this effect and nothing more into effect and transform. Okay, let's try something out. Let's try moving
our ship by one. And that's horizontal
and vertical by one. Okay, let's create 50 copies. Okay, with this, we can see
that we've now created, okay, we can actually expand our ship so as to try
expanding our ship. Let's try on doing or rather on grouping Now after
expanding our ship, we can now see that we now have each of these ships
are separate ships. We can select this
guy and maybe change the color. Change
the color to black. Okay? Or maybe select
all of these guys and change the colors to grey. Okay? And then change
the mean one to blue. After we change it to blue, we can see that this now
looks like a shadow effect. Like a long shadow effect. Okay, using the trans
transform effect. This long shadow effect. Okay, select all and delete. Come and get another ship. Distort and transform. We have this guy name the tweak, Tweak our ship like this. Some of these guys just
do crazy stuff, right? Yeah, yeah, you can see
the options it gives us. I have never used this effect, but you might have
a need for it. This other one, twist effect, it gives us the ability to
twistleur ship like this. We can see that we twist
ships by an angle of tan, angle of 830 degrees. And this is what we've got. Perfect. We can have a star, maybe then this guy looks
ugly. Let's have a star. And come and add
our twist effects. Let's see we want
by 360 perfect. Now we can see how
these effects work. They just work by modifying
or distorting our ship. That's the distort
and transform. Now we have the
final one which is the zig zag. What does it do? Just gives us zigzags. Our ship is zig zags. Yeah, that's basically
what it does. So we have a smooth mode. Makes the point smooth. I may have the corner which
makes the point sharp, then expand. Object,
expand, Appearance, expand. And yeah, maybe you would
like to add another effect. Okay. Effect. And then maybe another effect, like I said. Okay. Like I said, to have
multiple effects. Multiple effects. We want
to add the rough. Okay. So we can see how
much crazy stuff we're creating here
by just adding multiple effects plus the Plc blues and the rough. Just two effects. Let's
try adding another one. Let's, we want to add the
twist. It makes sense. Let's make this 15% 61% Yeah. I think this is cool
guys, Your imagination. Is it Your imagination is your limit. There's
no limit to this. You can keep creating
and keep creating, and keep creating,
And keep creating. Yeah, I think we've
come to the end of video on the
distorted effects. This might come handy
in your design. This might come handy in one
of two things you're doing. Feel free to explore more. As we go on, we're going to
look at even more effects. Okay. We get to see
the stylized effects, that's this one here. We get to see rap
effects and so on and so forth and how we
apply them to our designs. Okay, that'll be it for this lecture on the distort
and transform effects. See you in the next one by.
31. 31 Stylize Effects: Hello everyone,
and welcome back. In this lecture, we'll
be learning about the stylized effects now. Create a new, a new
ship. A simple ship. And then come to
effects and stylize. Now these are the effects on the stylized. There
are six of them. We have the drop shadow,
we have the feather, we have the inner glue, we have the outer glue, we have the rounded corners, and we have the scribble again. Let's have the drop shadow. What it does is it adds a
shadow to our selected shape. Okay, so we can
edit the opacity. Here. As we reduce the opacity, let's say to ten, you can see that our drop shadow reduces depending on
what we want to create. Then we have the offset
on the offset, x and Y. The adjust where our
shadows are located. The distance of our shadows from our main object in
the x and y axis. Okay? As you can see, I am adjusting the offset
and our shadow is moving. Okay? The further it is from our object or the
higher the offset rather, and then the farther
it is from our object. Okay? Then the closer or
the smaller the offset, the closer it is to our object, This gives depth to
our whole object. Okay, It shows depth. And then we have this
one which is the blow, just the amount of
blurriness our shadows. Okay. The smaller
the ship there, the more visible there
thick our shadow is. Then of course, this is
not realistic, right? Real shadows don't
appear this, this sharp. So we have to add
a little bit of blurriness to it
to be realistic. It all depends on what
we want to achieve. Actually, there's
no root to this. And then we can just leave
this as color which is black. Or maybe give it another color. If red works, okay, I'll give it blue. Okay. Then we have darkness. Darkness will just
make it black. The percentage will determine
how dark it will be. Just leave it at color. I
know that color always works. And then we can choose the
different colors you want. That's choosing color. While the darkness will only ensure that you
have a dark shadow. We increase the opacity. Boom, this is what we have. We have other effects. The feather effect.
Now this effect, add a feather to the
edges of our ship. It makes the edges of
our ship less sharp. It makes them feathered. You
can see the preview here. The edge more smooth, smoother as we
increase the feather. When I bring it to a
background like this, you can see the effects. Of course, increasing the
raster document resolution of your image will
increase the quality of the effects because they are
actually raster effects. Right? This is how the
feather effect works. Let me just create a
black background here, turn to black and
come to my layers. And just give the
separate layers, put it on the separate layer and grab this down
and lock this layer. We can see how these effects are working on the black background. The yellow shadow is not working
well on this background. Just leave it here. Then let's come here and just
create, let's see, E. Give it a white color key. Let's choose old font. Just create outlines. Okay. Now when you come on
effects and stylize, we have other effects
of the inner glue. This gives our ship
an in glue, okay? Is black. See you can see. This is how it works. All right. It creates an inner glue that's inside our
ship. Inside our ship. So as we increase the
opacity of course, it increases the blurriness and see what we are achieving. A, make it center. We see how it then works, right? Yeah, that's how the
inner glue effect works. Just deleted. Who just select this
guy and delete. We have other ones. The outer glue, make
this green again, maybe blue, make it green. We now have the
inner glue, right? Or rather the outer glue. It's the direct opposite
of the inner glue. The inner glue creates
the glue inside the ship, while the outer glue
creates the glue outside the ship on increase the blurriness and see
what we are achieving. Right? And then, yeah, that's it. We, of course, can add multiple effects just like we did before. We have this one
which is the route on the rounded edges or
rather rounded corners. It increases the rounds, the roundness of our corners. So as you can see, this
is what we get increase. Yeah. Okay. Then we have this other one which
is the scribble effect. The last one is the
scribble effect. This is what the scribble
effect goes for us. It gives us pop up menu which gives us presets
to select from. You can choose this one, which is called the
childish dance. This is the other one, I don't know to
pronounce this word. We have the sharp sketch, We have the snot,
whatever swash we have, the ties, zig zag. Okay. Then we have been given settings which we can manually create what we want,
the look we want. Okay. Make this too. Okay. Then we have
coviness which increases how cov, our scribble. Then variation we have the sing of our drawing. Right? Variation of
this piecing also. Yeah, that's it. We have two effects on this guy. We can release
instead of release, let's just come here and expand. Okay. Then we then
see that it turns the scribbles into
sketches, into real lines. And we can just maybe on group, we have them as a group. We can furthermore
change the color of these guys which
make them darker. Green. Okay. Okay. Yeah, have
something like this. Instead of this, we could
even the inner shadow. Instead we have
the inner shadow. Since we expanded the ship, we didn't have the
effects any longer. We create an EEE or maybe I, in this case I is add to be illustrator instead
of an outer glue. Maybe we add an inert glue. Okay, just reduce lowliness. Perfect. Maybe we just
deleted this one. Bring this guy here then, maybe. Created the scribble
effect on it. It turns out that the ing completely disappears.
Why is that? I want it to mean, let me just duplicate the
ship to see what happened. I think why it happened
like that is because I still have it as a type. I haven't expanded it, let me just create outlines. I haven't expanded it to select a ship and come and
give it a scribble. I think the same thing is
happening. What will happen? I'm just going to, let me
just delete first. Come here. Instead of just giving
it an effect like that, let's just create
outlines first. Okay, let's further
expand if necessary, then let's just give it
an in glue first enough. I'm very sure this in glue will not be visible
because of this color. Let's just turn into black. Yeah, this is in glue and let's try adding
the script effect. See, it still disappears. Okay, I don't know
why like that. Okay, so because of that, I'll just control that
duplicates the layer and then add the scribble effect on the separate layer,
on the new one. I've not even seen the
outline very much, but one thing I have observed here is so much is happening here, where you get the point. We mustn't add all the effects, but I don't need to
create something. Let me try releasing
this one in. Just select this guy.
Select this guy. And Pathfinder, we apply the
Pathfinder effects. Yeah. Okay. Even the way it is,
this is still cool. That's without even adding
the scribble effects. All right, and what if we
added describable effect? If we add describable effect, we call add the describable
effect and give it another color maybe. Okay, The reason why it
wasn't showing was because describable effect is taking
the color of the inner glue. Okay, What if I do it like
this and then release, or instead of release,
just come to expand and expand appearance then. And bring it forward,
maybe like this. Okay, Then we give
it black color. What I wanted to create
something like this. Nothing too special.
Something like this. Yeah, there are a lot of cool effects under the style
lines. We've looked at them. We probably should
create a poster design with some of these effects after we look at the other effects. Okay, at the end of this module. Okay, yeah, that would
definitely do that. Yeah. With this, we've
come to the end of this lecture on the
stylized effects. As you can see, there
are six of them and we've learned what each
and every one of them does. Okay. Yeah. So see you in the
next one. Bye bye.
32. 32 Wrap Effects: Lecture, We'll be learning
about the rap effects. The rap effects deleting
everything here. Select your ship, your type to then come and create
an area type like this. Okay, now let me just
change this color to white. Change color to white. Maybe we should
make our artboard bigger so as to accommodate
a lot of things. Now I'm going to
increase the size of my ship here, of my background. Okay, then just
select this guy now. Now the rap tools, or rather the rap effects
are also a type of effects that create distortion to our ship or to our
selected object. Now, common effects. And the rap, right, and then just click
on Immediately, we see what it does. It creates a kind of form or
ship with our entire text. Okay, that's what
the effects do. We have a number of them. We have the okay,
which does this. You see what the arc lower does. We have the preview here, so you see what
you're expecting. And then we have the arc upper. Okay, We have the arch,
or arch whatever. And then we have the bulge, okay, which makes it to
just bulge out like this. Then we have the shell lower, which, which creates
this distortion. Then we have the shell upper, which creates the opposite. Then we have the F,
which creates a flag. Then we have the wave, which
gives us a avy design. Then we have the fish, which shapes our ship in
what looks like a fish, in a pattern that
looks like a fish. And then we have the
rise, which does this. Then we have the fish
eye, which does this. Then we have the inflate, which does this, okay? Then we have the squeeze,
which does this. And finally we have the
twist, which does this. Select the, select the arc. So we can see some
of the options here. Now we have the bend
which determines the level at which
our bending occurs. Okay? It's either
towards 100 or towards -100 This is -100 and this is 100, the
opposite of each other. Okay? When you have it at zero, we have no bend. Then we have the distortion. We have the distortion
towards the horizontal, out to
the horizontal. We have it toward the
vertical, out to the vertical. Depending on what you want. You're given the opportunity to create whatever
design you want. Okay? So I just prefer to
leave this as 000. Just simple distort, simple
bend like this, okay? Okay, Now I just want to duplicate this guy
holding down Alt and dragging down for this one, just come here and make it -39 -39 What I want to do is just come on
the properties and then give it a paragraph
like this towards the right. And we're going to leave
it at aligned to the left. Okay, The wrap make this
guy -39 Okay, 39 then. Okay. Okay, now this
is what we have and then we can now it's
arranged like this. So it looks like the type is coming and flowing
like this, right? Yeah, we move it
to the left bits. Okay, To create a
clear demarcation. Yeah, so this is just
what I wanted create in. Okay, Then maybe we
could have the wave. With a white color. Just have it aligned to the
mele like this. Maybe we can even control
X can have it separately. I have the word wave
separately so that this one could be small in
size. This guy. Maybe we could even apply another rap effect
to the word, right? Maybe we could give it,
just leave it like this. And then maybe come and expand. Okay. And then come to effects and give it
a stylized effect. We give it out glue, let's make the
color black first, then give it an outer glue, stylize outer glue or
rather an inner glue. In glue glue. So we could have where we
choose whether center or edge. So an inner glue would do okay. Okay, the wave. Let me just try adding
another effect. Let me add the scribble effect to see if it's going to work. This time it's totally
destroying our glue effect. Okay, let's just contra
control and maybe give you the scribble and give
you the scribble and expand. Okay? Give it a black color or white color depending
on what we want. Or maybe a red color, maybe just change
the stroke to one. Okay? Yeah, this should work. This should work, Yeah. We could work with this.
We work with this. So the wave, okay? Basically we've looked at
everything about the wave, the wave effects, all right? Yeah, we've looked at everything
about the wave effects. These options here are just
same as the ones we looked at as we looked at here. They are just the same
thing. It's just that we are able to select the one
we want directly from here. Okay, yeah, that is
for the wrap effects. And see you in the next one.
33. 33 The Shape Distort Tools: Hello guys, and we come back and this lecture we're
going to be learning about some very interesting
tools in Db Ilos. These tools are called
the ship distort tools. They can be found beneath the. We just come to the W
and just click and hold, and you're going
to find them here. Now these are the tools. We have the Wap two, the 122, we have the poker too.
We have the blood to. These are the one, okay? We're going to look
at them individually, separately during the
course of this lecture. Now, come and just
create a square. Okay, tab with the square to come here and select
your wrap to. Now when in this
two we see what it does enables you to distort
your ship like this. Drag it goes in, drag it out, it comes out, drag it out, it comes out, drag it out, It comes
out, it comes in. Okay, you get the point, right? This is just what
this tool does. If you don't click, you're
going to see options. These are the brush dimensions. You're going to be able to
choose the width of the brush, the height of the brush,
the angle of the brush. Now we have it at
zero, the intensity, this at minus 120, then we will definitely
see a difference. Now we also have the detailing. We have the simplification
to simplify in detail. Basically, this
is what this tool does in distort our
ship like this. That's just what it does. I think it's quite similar
to the smog tool in B, Photoshop, to those who are
familiar with Photoshop, it's quite similar
to the smog tool B. You could make an
argument for that. This is just what
do you can create. All sort of ship, just
keep modifying to get what you want. Perfect. Delete you. And that's
it for that tool. And we're going to
come to the next one which is the most interesting. In my own opinion, this is the tel to. Now what this two does
is very interesting. Okay, interesting. Just look at what this
two is going to do here. Select the two towel to then just come here without
selecting any ship, Just click and hold
and release two Dos. It creates this circular
twirling effects. And you can actually modify the brush size by
holding down Alt, the bush side, and
ship by holding down. Also, if you hold down
Alt or Option on the Mac, just grab your mouse like
this in the ship you want. You're going to
modify your brush to that ship and then when you release it's just at
that you click you. Then get your to start in
the ship of your brush. In the new ship of your brush
right when you come in. Click you then see that you also have the brush dimensions. Of course, we have the angle, we have the intensity and
whatever to get to zero. We have the bush bush, let's make it a 100 bush height, make it 100, have
something square, then we have the
toll th the detail, we have to simplify and
so on and so forth. O this to our imagination
is our limits. There's no limit to
this. Very nice to. We can modify texts, we can create custom phones. We can even create
floral floral designs. Let's assume we are create this. We're now using our
direct selection two to get this edge
like this one like this. Then maybe even making
our chip bigger, then getting the two, this edge like this
guy, like this. Then let's see. We then use transform effect to create a rotation rotation
of 15 degrees. Let's just. Ten copies. Let's give
it 11 copies. 11 copies. 11 or 12 copies should
do 15 degrees and 12 copies maybe just come and give it a
stroke instead of flybe. Increase the stroke size like this to maybe we want
to reduce the size. We can't reduce the
size but no problem. We just want to select this guy and then just come
here and give it a approach side of
300 by 300 and okay, okay, then see that we're
creating something cool, right? Maybe we come here, okay, see how dynamic
our design is becoming? Very cool design,
like I said before, the imagination is your limit. This tool is very cool. There is no limits to
what you can create, create, maybe expand them. Then on group, just come the
guy here, the big boy here, give it 100 by 100 or 200 by 200, okay. Then with this,
we can just start creating distortions
to our ships. So you can use to even
design funds, right? Yeah, to even design funds, To modify your funds
and so on and so forth. Just do crazy stuff. Very nice too, okay? I'm liking what I'm seeing. You will even have maybe
different colored ships, blue or maybe purple. Or maybe Marion. Then I have another
one, maybe yellow. Okay, It's like this two, it's come on, blend
them like this. See, blend them. This, blend them like this. Blend them and move a perfect. Yeah, with this, to our
imagination is our limit. Our creativity is our limit. Okay, that's it for the two. We have other tools.
Here we have the plot. Think the interesting 12 to they are not as
interesting as this 12 too. In my own opinion,
this is what you do. All of them have the
options you can tweak. This is what the plug, it creates an intrusion. If you drag it out, it creates an extrusion As simple as that. Then we have this
one, the blood, to drag it out. It creates an extrusion. Drag it out. It
creates an intrusion, drag, it creates an extrusion. Just play around with
them to see what they do. Okay, Then we have this
guy which does this. Okay? So you might find
a need for this, but honestly, I haven't. In fact, I haven't worked with this to this
particular one. I think I've used the 12
to a couple of times, but some of these
ones are just weird. We got this other one
which is called the crystallized and just
creates crystalline edges. Just create crystalline
edges like this. It's creates them inside it out. Okay, you get the point. Of course, if you double
click on the tool, you're going to get
options like this. You can play around
with these options for yourself to see what they do. And finally we have
this one which is called the Ruin cool tool. It creates in cools, let me create a new
ship and try it out. It creates in cools in that depends on what
you want to create. Just holding down
my mouse release, you can increase the detail. In other options we
have, the complexity. Maybe we make it at six,
the horizontal, 60, vertical, 100, whatever,
okay? And see what it does. You can see, just turn, just messes up our ship, creates a whole lot of points. Okay. Yeah, you
might find the need for this to Depending on the project you're
working on, of course. Yeah. So that'll be
it for these tools. As you can see, we've
looked at the good, the bad, and the ugly. These tools, I think this is the best one in my own opinion. But the 12 to the good
and the best for me. Perfect guys. And with this, we've come to the
end of this lecture. See you in the next one. Bye bye.
34. 34 Effect Gallery: Guys, and we'll come back. In this lecture, we'll
be learning about the effect gallery
in a illustrator. Okay, On the effect you see
on the Photoshop effect, we see the effect gallery. So it's a Photoshop
effect or it has been burrowed into a illustrator. Okay, let's just come
and import some images. Just come to file please. And then go to your
project folder. You'll see these images
which I have uploaded. Okay. Now just select
this guy, please. Gl please. And then just
drag it out like this. Okay, and maybe we just
delete this layer. Can delete this layer and
just maybe adjust our, our image to fit
to our artboard. Maybe just edit our artboard
to fit perfectly like this. Now, while selecting our image in order to use the effect gal, just select the image,
come to Effects and click on Effect. Gallery now opens up, and then you can just drag it out like this
to make it bigger. On the left hand side
here you see preview. The preview of your image, right, of your selected image. On the left hand side,
you see the effects. Here you see the sliders where you can
modify the effects. Just come here and fit in view. You're going to fit your
image right in view. These are the effect, there are different full dials of effect. There are different
categories of effects. We have the artistic, we have the art strokes,
sory brush strokes, we have the distort effect, the sketch effects, we have the stylized effect,
texture effect. We might not go through
each and every one of them, but we just do our best under artistic come under pencil
or colored pencil rather. And you can immediately see that the effect
has been applied to our image and it gives
it a pencil effect. Colored pencil effect, just like the name implies
with the sliders, you can modify the
intensity of the effects. Stroke pressure and then
the Piper lightness. Yeah, And 2.2 forth. I don't like this
effect. I'm going to apply the cut out now. This cut out gives
it a sketchy effect, like a cartoon sketch effect. And you can modify the
effect with the sliders. This one is the
number of levels, that's the number of
levels of the effect. You can see with the
higher number of levels. We have more details, right, in our sketch. The lower number, this
whole place as one color. We just have a few colors. Okay, We just have
a few details. Okay, Then we have what is
known as edge simplicity. When we increase it, we have the edges become very simple. It becomes more and
more like a drawing. More and more like
a rough drawing. Okay, Rough sketch. When we decrease the simplicity, we get a lot more details. That is for simplicity
and then H fidelity. You can see the many decrease
you get sharp edges, row sharp edges and increase it, you get more details. Okay. It all depends
on what you want, it depends on what you want. In Photoshop, you can
actually add effects here. But I just found out
that in Illustrator, you cannot add the effects. You can add multiple effects
that multiple effects from the effect gallery in
Photoshop you can actually do by just clicking
on this plus icon. Unfortunately for
Illustrator, we can see that it just blow just grit. Okay. But nevertheless, we can make do with
what we can work with. Right? We have all the effect, we have the dry brush. Okay, Dry brush. And just come around and play with the sliders to see
what you can achieve. We have the film green.
I think I'm liking this. A it just makes it
look like a painting. Like a sketch, like
an artistic sketch. And then we have the film Green. Okay, film green. We have the fresco. There we have the F brush size, We have the brush details. Okay, there we drag
the more details. Then we have the texture, you drag it to the
right hand side. You're increasing the
texture of your effects. You can see what we've been
able to achieve this effect, we have a whole lot of effect. We have the neon glue ups, we have the palette knife, we have the plastic wrap. It gives us a plastic look. Okay, we have the poster edges. We have the rough pistols
and so on and so for, depending on what you want. And we'll have the
sliders, of course, which you can it for this image. I'm just going to maybe go with one and then we'll
look at other images. All right, maybe I'll
go with the cut out. I'll just go with
the cut out and give it this level of detail in. Then for simplicity,
we're going to add this. Yeah, I prefer this settings, and I'm going to click Okay. And immediately
Illustrator applies our effect to our image. Let's please another image. Let's come and choose
this one, Okay? And drag it out like this. Okay. Now, come to
the effect gallery, and then, and then, let's see what we have here. Let's fit it to
view immediately. We can see that the cutout
effect has been applied. I like the way it has
applied this effect here. I'm just going to click okay and bring in
the same image to apply another kind
of effect to file, Then bring in the same image, okay, and drag it out. For this one, I'm
not going to apply an artistic image effect. I'm going to be applying
a texture effect. Just fit it to
view for this one. Let's try applying the
stainless glass and see. Okay, we can see what we get
with the stainless glass. It gives us this stink stained glass effect
stainless glass. We have the cell size,
the border thickness. Okay. We have the
light intensity. Okay, good. We have this other one. I don't like this one. The one I like the
most, the glass. It's the one we're going
to be working with. First of all, let's take a
look at this one texturizer. This one gives our image
some level of texturing. It makes it textured, textured. I still prefer the
stained glass. Yeah, just going to make our
cell size 12 and just click. Okay. Immediately.
Illustrator as our effect. You can see how effect. See how effect we can even. Let's try bringing
them over each other. Whenever I move the image, it loads the effect over again. Set this guy ran to back. Then just Properties and click on Opacity to give
us a blending modes. So we can see if we can try blending the two
layers together, the two images together, we can see that it's taking
a toll on my computer. These effects are graphic
intensive, right? Immediately. You can
see that it now blends. Effects for us. Okay, it blends the two
effects for after just giving it a dark effect or a
darkened blending mode. Let me change the blending mode. Multiply, so we see
what's happening to Lod. We see what's happening
under multiply, right? Okay, so let's try other ones. Let's try lighting. Let's try screen. Yeah, I think I Okay, let's try this other
one over. Okay. I think I'll just go
with dark effects. Yeah, I think with
the darken effects. So I like this effect and that's the one
we're going to use. We have the second one, the sketchy effect With
the cutout effect. The cutout effect, yeah, we could even add a frame to
our image, to our images. Maybe add frame, remove the field color and
then give it a bigger stroke. Then maybe the green color. Okay, we reduce the size like this. Sorry, the size of
the, of the frame. Perfect. Okay, we could do
some for this guy if we want, or we can just come and create
maybe something like this. Just give it, sorry. Just give it a blending mood. We change the color. You
change the color like this. Then maybe come give it a type can convert the orientation
to critical and maybe let's use Montserrat, okay? Yeah, something like this. Maybe even increase the
size of the little o, then decreased a size like this. Okay. Then we have love, make this bigger.
Bring it to the fonts. Just have it like this. Okay. Yeah. And then maybe maybe choose
a different color, different blending color
for this other ship here. Yeah, We have a cool
poster design here just with the effects
with the effects gallery. And some blended ships
and some text, right? Yeah, for these
other options here. These actually effects from the effect gallery, the artist, the effects from
the effect gallery of these other ones are all effects from the effect gallery. You can just go
to them directly. Let's assume we want
to apply the cut out. Okay, have the effects edited. And we already have the effect, we already know the effect. We can just select our image
and then come to artistic. And out immediately will be applied directly
to our image. We don't have to then go to
effect gallery again and we have one final effect we might want to learn about
which is the blow effect. The blow is a very
popular effect. It's just a blow, right? We have the Gaussian blow, we have the radio blow, we have the smart blow. I'm not going to
go through them. You can go through
them on your own. But the blow effects has a lot of importance
in graphic design. It gives depth,
it gives realism, helps in a lot of scenarios. Okay, But we're not going to
check them out this course. This, we've come to
the end of our video for our lecture on effects. In the next one, we shall be looking at
an assignment, okay? Yeah, all the files will be made available to you so
you can follow along. Okay, see you in the
next one. Bye, bye.
35. 35 Assignment 6: One and welcome back.
In this lecture, we're going to be taking
an assignment, okay? Just come on your file. Just come to file and open
this project named assignment. Okay? Just open it and you
should be brought to please. Now I have either two images. These images will also be
made available to you, come to please and you
can find the images. These are the images
I've imported. Okay. Now what I need you to do
is to create three designs. You're going to create
three poster designs. Okay. Now you're going to use the effect,
we've learned here, that's for artistic,
that's for effect gallery. Okay. You're going to use
effect gallery effects. You're going to use distort
effects on these two images. You're, you're going to maybe posters using
the effect gallery. Maybe texts and some of the little manipulations you've learned in the previous lessons. And maybe on this other one, you're going to use
some of the effects, like the wrap effects
to create texts, posters, okay, Maybe
with a black background, with glues and some
other stylized effects. Just be creative with it. I don't want to give any rules, just be creative with it
and just use the effects. We've learnt to come up
with nice designs and I would love to see what you can come up with or
what you come up with. Yeah, that would be it
for this assignment, and see you in the next one.
36. 36 Transform Options, Repeating Shapes and Long Shadow: Hello guys, and welcome back. In this lecture, we'll
be learning about the transform options
under the Objects menu. Okay, and this is
quite similar to the transform effects
which we just looked at in the last module. Okay, so let me just show you, let me just remind you of
the transform effects. These are the transform effects. Okay, we have the horizontal
scale. The vertical scale. The horizontal, vertical move, the rotation, and
then the copies, and so on and so forth. This helps us to create a
transform effect on our ship. Now the transform option
is very similar to this. Okay, so we access this option by coming to object
and then transform. Now we can move. Now this move enables
us to move our ship. Okay, now we can put
the position vertical, position. Let's see, 50. Let's say 50 horizontal, okay? And then the distance is here between the vertical
and the horizontal, right? And then we have
the rotation, okay? This is now the rotation. And we can, okay. And then the original
ship will be copied, will be transformed,
the move property will be modified to this. And we can also click copy so
as to create a new object, a copy of the
original object with the move property. Now
we have other ones. We have the rotation, they reflect the skill and the share. Now we have this other
place which is called the. In this place, we are now able to transform each
of the properties. Just like how we are able
to transform each of them using the transform effect. Okay? We can transform
each and every one of them to come to transform
object transform, and then transform each
and then we can see that we are now able to transform
each and every one of them. We can transform the scale, the vertical and resital scale. The move, okay, Regal,
then the rotation. Okay. Then we can copy. We can modify the
original and we can change the point of rotation. Right? That's the
point of anchorage. Okay. Using this limit
at the middle end. Yeah. That's about the
transform options. Let's just try to
create something cool with this transform option. Come here and create an ellipse, and then just duplicate this
ellipse holding down Alt. I'm going to drag
it to this point. What I would then do, you select the boot of them and then come and select my ship
builder tool holding down Alt. I'm just going to drag
this and delete them. Now for this ship. Well selected, come on ingredients and create
ingredient field. Then just disable
the stroke color and maybe rec to this point. And then come to objects and then transform, transform each. Now I want to make
this 45 degrees, I just want to make
it 45 degrees. That's all. I don't want to change the
scale or the position. What I would then
do is copy, copy. And you can see we've copied the ship now while
it's still selected, just come to object again
and then transform. Now you see transform again, control D, right, or
command D on the mark. Now what this option does is it creates the last transform. It does the last transform. And when you just click it, we can see that
another transform has been done to this ship. Come and control D
and control D, okay? Now, instead of just doing this by coming to objects
and transform, we can do a control D, right? Control, control, control,
control, control, control D. We can just
keep eating control D, and we can see that with this, we've now created a pattern,
repeating pattern, okay? That's one of the
importance of this. We can use it to create
repeating patterns. Okay? We can even
use it for stuff like long shadow effects. Okay, let's say we
have here written, we can use it for a
long shadow effects. Just come and use the bold and then come
to object and expand. Okay, well, selecting your ship, just come to object
and then transform. And then come to transform each. And we want this to be zero. And what we want to adjust
here is the position, okay? You just want to make
this two and this two. And then click Copy. Now what it does is it creates a copy with the new
positions, right? And then we can now duplicate the effect and keep
hitting control control. And here we now have
a long shadow effect. For the mean ship. We just
come and make it maybe yellow. I think we circle the wrong one. You can just make it yellow
or give it another color. And just bring it to the
front arrangement. To front. Yeah. Now we have a long shadow. We can now select everyone, every of the ship and
maybe select the mean guy. Just come to a pot finder
and just unite everything. Just add them and now come
to your direct selection to. And all you need to do now, just select the
unneeded anchor points and delete them like this. Select them. Delete, Okay. Select delete. And do that to all the anchor
points that are not needed. Just delete them so we
can have a street shadow right select and delete. Select and deletes seem also with this one's deletes. Deletes effects, we can just
adjust our mean shape to fit like this and we now have
our long shadow effects. Maybe just make this gray
color instead of two black. I think it's of
greyish like this. This is now a long
shadow effect by which we've achieved by using our
transform options here. Now there's one more
thing I want to try out and just come here and
then come to your star. And create a star. All right, create
a star like this, then you can use
any other option. Any other ship also
must necessially be a star while selecting the ship. Come and give your
ship ingredient few. Okay? I want this gradient to be darker at the middle
and brighter at the edges. I'll just work with this one. Okay? Now, while
selecting our ship, go on objects and
transform each. Let's make the rotation
20% And also the scale. Let's make the scale
of 95, 95 maybe. Let's make the scale 90.90
for reason vertical. And then let's create a copy. Creates a copy and come to
object transform again. And let's just keep hitting
control, control control. As you can see, we now have
what looks like a flow, right? A flowing pattern. Just come here. First of all, let's make this bigger,
this is bigger. And come here and just create a square ship in the
size of our board line. And then select every ship. Select all the ships, right click and create clipping mask. This is what we now have. Okay? You can use this
method with other ships. Okay, You can use method
with other ships. Let's just come here and
add the Pl blot effects. We have something like
this to start with. Make the ship bigger again, probably adjust the
effect once more, maybe to make it look even slimmer and look
like this, right? And then the next thing we're then going to
do is to come here to object transform
and then transform, each still having
the same settings. For the last transform, we're just going to use the
same settings actually, okay? But instead of having
move I will just make move zero because I don't
want to apply move right. Just click okay. Okay. Okay, we should have
the copy instead of the O. Use the copy, That's
the mistake we made. Let's do come here, transform each,
having it like this. Let's copy this time. We can continue at control D or command D on
the mark and we'll see this beautiful repeating
pattern being formed. What next can we do? We can just like this and then just select
everything, right. Click mask and perfect. Of course, we can play
around with the colors and to have a different feel, right? Yeah, we've come to the end of the lecture on
transform options. In the next lecture,
we're going to look at more options or more effects
under the Objects menu, and see you in the next one.
37. 37 Assignment 7: Hello guys and welcome back. Okay, so this video
is an assignment on what we just learned
in the previous video, which is using the
transform option. Here I want you to create a flowery pattern using
the transform option. So maybe you could
have a star star with a number of, of points. This particular one has, I think, nine, okay? Depending on what you want,
actually guys from the star. Maybe you could even
play around with the, with the corners
here with the edges. Then apply your
transform option. You transform effect, that's of course choosing
ingredient which you want. And just apply the transform option control
D and so on and so forth. And then get your nice pattern. I'm doing the cool
assignment for you already. Just create something cool. Just create something
cool pattern, just like the ones we
created in the last video. Maybe have three of them.
Just create three of them. And I would love to see
what you can come up with. Okay, that'll be
it for this one. See you in the next. Bye bye.
38. 38 Gradient Meshes: Hello everyone and welcome back. In this lecture, we'll
be learning about gradient meshes and how
they work here in alto. Gradient meshes can
be used to create colorful backgrounds
and they can also be used to create objects
with different shading. In Adulto, I'm going
to show you how that works in a bit for stars. Let me just introduce the
gradient mesh to show you how the whole thing works while selecting
my rectangle two, I'm going to draw out
a simple rectangle. Okay? Now the gradient mesh
two can be found here. Now this is the mesh two. As you can see we
have mesh two, right? So it's a Brian mesh two. So just select it, then
come to your ship. And immediately when you come to your ship and come to an edge, you see the plus icon or the
plus symbol rader appear. When you just click, you then see that we have
a new edge in the middle. And then if you come here also, we see that we have
the plus icon. And time we come
close to the edge, we have a plus icon or a
plus symbol rader. We click. We then see that we
now have our ship divided into four
different boxes. Right now, what we can
now do is come here, come to our direct
selection to select it. And then come and select
these anchor points. Okay? If you select the
anchor point instead of moving it or doing whatever, you just have to
select it and then come and assign a color to it. Okay? You can select
multiple anchor points and assign colors to them
like I'm doing right now. Okay. That's all that the
redient mesh tool entails. You just allows you to
create Ancho points, okay? To divide your mesh into
whatever subdivisions you'd like and then come and assign
colors to each anchor points. That's just how it works, okay? And this can be very handy
in a lot of scenarios. These anchor points,
we give it a blue, this guy give it a darker blue. Select this guy, a brown. Come here and give color color. Okay, You can see I am already creating an
interesting background. All right. This is one of
the uses of gradient meshes. So we could just have a
background like this. Maybe select the
artboard to Cbt, our art board like this to
fit our background, right? Then maybe then have
a text ingredient and give you the white color. Okay, you can see now with this, we've been able to create the simple ingredient
colored background. Now for one of the uses of
the gradient mesh tool, you can use it to make
beautiful backgrounds, beautiful colored backgrounds. But that's just one of the uses. We have other ways we can use this tool and I'm going to just show you one of them
in the next example. Now come to your file
and then come to please. Then in the project
flees to me to image. Just select it, please. Just draw it out like this. I want to put it on
different background. Okay, one, I'm just going
to lock this layer, create a new background
above it so I can draw over the one background. Okay. Now, while on this layer, get the pin two, I just want to get
the pinto and draw out the shape of this tomtom. Going to draw it out roughly,
nothing too special. Remove the field color.
Keep drawing it out. Even it out, Yeah, we have a basic representation of our tomato fruit right now. Select drop two and just
give it a random color. That's from the tomato fruit. Right, let's swap this to
make it our color so we can have enough
space to draw out the remaining ship
here. Now select your And then just come
and follow this, this other ship come
and try to draw it out. A, draw it like this, mustn't be perfect. Just for demonstration purposes, right? Musn't be perfect. I just pick the eye dropper two and maybe sample
a green color here. And also swap the guy, swap the field
color to the color. And just select your boot ships and take them out of the film. I want to create a color pelt. Okay, with the colors
of our fruit here. Now, just create a box here. Remove the show color, and then maybe give
it the grandom field. Then create three versions. And also, and then select all of them and create
another three version. Okay, for this one now I'm going to select the
first one and I'm going to just try to pick the darker
tones of the tom to cold. I'm going to choose this guy
here edge from the edge, so it's a little bit darker
to select that color. And then select this other one. Then select a brighter tune. I'm going to sample
this tune here and get this guy and maybe pick
something in the mid tunes. If we really want to sample
all the colors here, we might be forced to
do more than three. We might be first
to go very bright, the very dark P This. So with the five tunes, we have basically represented every color representation
of this tomato fruit. Select this guy here and try to sample three sheets
of this green. Okay, so we're going
to choose this one, then maybe sample
something in the tunes. Okay, maybe something like this. Then come on, get this one
from the bright side, right? We can just hide this guy for now and
then work on this one. The next thing to do is select our greenthu gradient
mesh tool and just come to the ship and try
to add some divisions. Okay, we can add divisions to represent the structure
of our tomato fruit. After you click, we can see
that we are giving handles. So we can just come and drag the handles to create a
better representation. Okay, So this is basically following our ship
or our object. The main object we're
trying to create, right? We just come here
and add another one. Okay, We add another one. Yeah, this one is
going this way. Add another one, maybe zooming
and just add another one. Just going to undo this one. Try to add one like this. I like the way the handles are. I like the way everything
is structured so far. Maybe add one here. You have to understand
that there the handles, the more the ability you
have to tweak things, okay. So we can come and
create one here, maybe create one here, one here. In places where there
are more colors, you might want to, more color variations
you might want to have. Divisions. Okay? Just for
you to know with this, I think we are ready
to start painting. We start painting, so we're going to come
and select this tool. And you can see that whenever
I select this tool and just select one of
the points here, I can actually grab the points. Okay, I want to do, I want to grab the point away. I don't need to use this tool. I can still select the mesh too. And then come on, click
the point and drag it, so we can actually
see a preview of it. While dragging, we want to
drag this guy to the edge, like this to the edge. Okay, so this would do guys. And then now we can select
our direct selection two. And I have an alternative to
select to using these two. That's the two beneath it. This is the last
two. This tool is used to select
multiple Ancho points. Okay, This guy is used to
select just one Ancho point. But if we want to select
multiple Ancho points, since we have multiple
of them here, we have to use these two. You have to use these
two. Okay? So first of all, just sell the two. And when you sell the two, just come ahead and drag out
area you want to select. And we can see that we
mistakenly drag into this area. All right, we don't
need this guy, we need this one. Just drag it out like this. And we can see that all our
points have been selected. When we select them, we just go to our hydro paton
or hit on your keyboard, and then just come
and give it a color. Okay, let's give it a
flat color. First color. Maybe you can give it this one or whatever color you want. Let's just start working
with this one, Okay? Then the next thing
we can do is look at pleases and then give you
drag select your hydroptwo, start working your way. Okay. That's
selecting the colors that are prevalent
in those areas. For this please, I just want to come and select
the two points here. Maybe give you
this bright color. For this one, I might just
give it this other color. That's the very
bright one. Right. Okay. We can progress. And I feel that somewhere around here we could have this color. Okay? And maybe we'll have
this guy to be darker. Okay? Darker like this. Then around here, maybe around here people have very dark. It very dark here. Okay? And then maybe even select
this guy and just come on, tweak the sheet to
be darker, right? Because of course we have
it very dark here already. You can see that we are already
achieving our ship now. It's already looking close
to what we have here, right? It's really looking close
to what we have here. That's just after some few steps of tweaking with our mesh tool. Now I'm just going to come
towards the edges, sorry. Towards the edges to select this guy so I can
see what I'm doing. And come towards
the edges and let the points here maybe too dark, we give it even
darker sheet of this. Ok, that works. Yeah, we can see
that we are already adding a lot of depth
to our drawing here. To select these guys at the, and you can select your hydropatud, Come on, just sample
the colors here. Okay, perfect. Then take this else. Where else? Okay, come this way, just come on, sample, sample this dark color, or maybe not want
to sample this one. I'm just going to add my
cap here. That's this one. Okay? I'm going to
bring my colors to this point and then maybe
sample this guy here. Okay. Right away. Our ship needs more
points at this. Give more darker points at
this pere here, give it. We already have the
color that way. One other thing to do
is you can just come and add more points, Right? More points. We have the ability to put in more
colors, add more points. Okay, Maybe select all of
this and give it this color. Maybe these guys at
the very middle, we might want to give them a really dark shade of this color, dark
sheet of this color. Maybe just calm down here. Yeah, I think we can
just put our cap now. We mean to create meshes
for our cap, right? Just come on, click
random, click randomly. This is not a very organized
shipized ship like a square, so there will be a phony
behavior of our ship. As you can see,
that will matter. We still do what to do
anyways. It's common. I'm okay with what we have here. Okay, so just select
your lasso to, maybe we should isolate this one so we don't get to select these
other ones here too. Just sell your lasso to come and drag out some points here. Some selection here.
Give it darker shade. Okay, then select this guy. Give it something darker to maybe we need the very bright ones at
the edge, like this. Like this. Okay, perfect. And then maybe select this one, give it very dark shade. Okay. Already I think what we have is K. We don't need it
to be too perfect. Perfect, good. So this is quite rough but
you get the point. We can see that we've
almost replicated what we have on this, please. All right, Just using the
redient mesh to this, we see how this tool works. Right? And not just
for this fruits, but we can create a whole lot of things
with this mesh tool. Okay, we can walk on cucumbers, we can characters, just something that
has to do with different sheets of color. Some places like this
might be brightly sheeted, some might be dark, and so on. And so that's just the
use of the tool guys. One of the things I forgot to mention, which you should know, is that the green tool has its options under
the object menu. When you create a
sheet like this, maybe give it a red color
and then come to objects. We see that we have an option here to
create gradient mesh. If you click here, then going to immediately see that
your ship has now been subdivided into certain numbers of rules and columns
which we have here. We have this other one which is apparent and then we have
flat to center and edge. You can try other
options for yourself, but I'm going to stick to
flat when we just Okay. You can see that now we are now able to select these points, just like we did with this one. We're now able to
select these points and then give them a color. I give them a color. Okay. That's just
for you to know, so you can access the
gradient mesh options here. And of course, you can also
use the Gredent tool here. That's it for this lecture guys. We've come to the end
of our lecture on gradient meshes and see
you in the next one.
39. 39 Assignment 8: Hello guys, and welcome back. In this assignment,
you are required to use the mesh tool. Okay, which we just
learned in the last video. That's this tool to
create this banana fruit. Okay, you're going to
create an illustration of this banana that's with the highlights and the
shadows in the mid tones. Okay? All the sheets. Okay. You probably sample the colors like
how I did before. Sample different
aspects of the colors. Okay. Then just to use them
to sheet your illustration. Okay, We're going to do, in this assignment, I would love to see what
you can come up with. You will get the file, that's the assignment file, and also the banana image
will be made available for you in the project file
so you can also get it okay. And see you in the next one by.
40. 40 Patterns and Repeat: Guys and welcome back. In this lecture we're
going to be learning about the repeat effect at
the repeat option here. Also we're going to be
learning about patterns. We're going to be making some, some interesting patterns
all here In adulto starting, I'm going to start with angle
or rather a square ship. Let's centralize the ship
and then give it the color. Okay? I'm going to
come to my color. Let's, let's choose
this color. Okay? And then go to the
color guide tool. I'll, I'll just choose,
maybe this preset. Just give it a nice sheet. Just play, There's no
specific rule specific rule. Just play around to get
the colors you want. With this, I'm just going
to come on effect and select the Plc and blood effect and just edit it like this. Yeah, I like this
shape to click. Okay. Maybe reciting the bait. Maybe boost up the stroke. Okay. Maybe give it another color, more
interesting color. Yeah, I think I'll
go with this one. Let me just copy our
ship and bring it here. Now we're going to start off
with the repeat effects. Okay, we're going to start
off with the repeat effects. To activate this effect, you have to select your ship. Come to objects, then repeat. Let's see Dia. And immediately you
see what it does. It gives us the ability, it repeats our ship in
dial manner, right? And then it gives
us this point here. Now on this point,
when you drag it up, you see that the reduce expands. Okay? The diameter expands. The circle expands and reduces. When you bring it in, and you can see that
when we bring it in, we are now having very
interesting ship. Okay? We can drag it
out, bring it in. We can adjust the amount
with this other icon here. Okay, this, if we
drag it like this, we're actually
reducing the size of, of our ship, right? We're reducing the size
of our ship perfect. When we come here,
we see that we can increase the sizes or
the amount rather Here also, I'm just going to
come to objects, then release so we can
have our ship back. When I come to repeat
and choose the grid, we can see that it repeats
it in a grid format. It repeats it in a grid format. And yeah, so this is what we have repeated in a
grid format, right? The ones will add to
the number like this, so it can keep going
infinitely, okay? Or reduce to the number
this, okay? Perfect. So with this, now we now have a very simple pattern, okay? Very simple pattern
can increase the size like this or do
whatever we want. So I'm going to go and
just release my ship, drag it to the middle once more. When I select the options, we can see that we now
have options, right? And then we have the di, we have the grid.
We have the mirror. Okay. This on mirrors our ship through
the selected angle. Okay? We can adjust our
sentence and do whatever. We have the flip rules, flip columnes, we have
the grid type, okay? And we can now click Okay. When we now come and
choose the grid format, or the grid option, it actually creates it
with our new settings. Creates it with
our new settings. These our new settings, new
settings we just updated. These are created based on the new settings we just updated. That's how it works o you can create simple
patterns with this. We can even use it to furthermore enhance our
process of creating patterns. I'll just show you an example in a minute to release it
once more and centralize. Okay, then come and select our guy and give
it the dial repeats. Maybe have it like
this. Like this may reduce the size like this. Okay, let's reduce the quantity. Let's make it five, Let's give
it five, quantity of five. Make it look like this.
Generally. Yeah, the trick here, we're going to come and maybe expand it so as to make them
separate shapes, right? They are linked together
with the repeat option here, but when we expand, we
actually separate them. And then when we write Click,
we can actually ungroup them and work with
them individually. Like this with this can come and just basically adjust our
colors. Can adjust our colors. We give this blue come here
and give it this color, that color like this. Okay, let me just try
increasing our stroke size. Maybe we should have a stroke
side of three for everyone. Okay, let's give it a
stroke side of three. Okay? Okay. Now we will just create more
color variations. We can choose this one
presets, this color presets. And I don't like the blue here. There's no specific
rule to this. You just have to create or set the colors what
you feel is nice. Okay? I don't want to spend
too much time on this. I'm going to just try to
do things very quickly. Again, I'm going to
leave this guy like this while selecting
the three of them. We can, we can group
them. We can group them. When we group them, we can see that when we now go to object
and then pattern and make, we are now able to make a pattern from the
arrangements of ships. Right? And we can see this one in here that the new pattern has been
added to the Swatch panel. Okay. We still know that the
new pattern we are about to create has been added
to the switch panel. Any changes made while
in pattern edit mode will be applied to
the switch upon exit. Okay, so we can hit. Okay. Immediately we see that
we now have our pattern. Okay. We can select three ships and adjust them like this, and the whole pattern just
gets adjusted, Right? Yeah. Perfect. We didn't have
our pattern options here. We didn't have our
pattern options. We can choose the
name of the pattern. We can see flowers. Okay? And then we can choose the tiling type.
We have the grid. We have the brick by row. We have the brick by column. We have the column. We have the To do what
their name imply, he arranged them in hexagonal wan,
increase or reduce. And we can see that the spacing between them keeps getting adjusted increase or
reduction in the values. I want to keep this
at 01:35 by 135. Okay. Well, let's
say 120 by 120. This will do. Now. We have other options here. We can actually select how
we want them to overlap, if they overlap,
if ships overlap, But fortunately or unfortunately for us, they don't overlap. We won't see these
options do anything. They are actually for
overlapping ships. Funny enough, we can
just make them overlap. So we can see how
the options work. As you can see, the
changes are being updated based on
what you select. We have an overlapping
change here, but we don't want
any overlap, right? 120 by 120, good. Then we have the copies, we have one by one,
which is the original. We have three by three, we have five by five. We have seven by seven. I'm just going to choose agreed. Agreed arrangement be okay. Maybe 100 instead
of 19 by 100. Okay. Then we can keep choosing
the copies we want. And when we are okay
with our settings, we can just click X, Okay. And then here we
now have an option whether to cancel the project
or click for you to be Sid. And our pattern then
disappears, right? Yeah. We now have it
in our switches panel. As you can see this pattern, if I make this bigger, let's see if we can
make it bigger. We then see that here
is our pattern, okay? We can create a
ship, for example, then select our pattern, and we now have our
pattern on our ship. This is basically how to create
a pattern in Illustrator. Okay, Now we can keep increasing our ship
to have more patterns. Okay? We of course observe
that as we resize our shape, our pattern does not resize. Okay? We just have the pattern maintaining the same size as the original.
It's not resizing. In order to make
the pattern resize, what you need to
do is to come to the transform panel here. Transform come to the
transform panel, come here, and then we see where we
have transform objects. Only now we have to make transform patterns
or transform boots. When we transform boot, you can see that we
are transforming objects in the patterns. Okay. Then we see
patterns are fun, can transform the boot of them. Okay. That's how you do to enable you be able to
resize the patterns. Okay? Yeah, we have
our first pattern, Just keep this at one side. Maybe work on another
pattern here. I'm going to drag this
guy here and I'm going to come to my appearance and make a little bit of adjustments
to our pattern. So click Ok. What I want to do right now is I want to create these boxes, this, let's have
them like this also, let's just group them, control G. Then have this guy centralized like this and
have them also centralized. We have a perfect
arrangement on group them. We're going to do
some adjustments. We choose a very nice color. Coming to our color guides too, for field color loser to blue. We can get some cool
sheets of blue here. Make it just the color we make. Sorry we make it then
for our patterns, we can just recreate
the struck size and then give each pattern a
different stock color. Thank you. And then a different field
color also, of course. Maybe choose a different preset. Let's go with this
guy and this one. Make it like this.
Then I would like to make circles with middle
ellipses in the middle. This K, maybe I'm going
to choose my Dro. Pat, select this guy. Select this guy.
Select this guy. Finally, select this guy. Perfect. Now we can
just resize our ship. Okay, Resize our ship. Okay, We can reside ship to
this and just group our ship. And then select your
ship and come to objects pattern and make. Okay, now we have a new pattern with the heights 80 by 80. Increase the copies.
Let's name it. Cool stuff, okay. Maybe choose a
different tiling type or a different kind
of tying instead. And then maybe this
kind of tying will do. Just close your panel and
now we now have a new, or rather a new pattern. Select your re, drag
it out like this. Maybe we should just board
something like this. We can have a ship this. Now remove the stroke, then come here and
select your new pattern. Select your new pattern. And boom, we have
our new pattern. We have two patterns, the
first and the second. Now I'm going to just adjust our art
board to square. Okay, You can have
the dimension here. I think. I'm just
going to do this man. Okay? Okay, I should then just welcome my skiing
options. Right? Have a copy of the artboard
here and have our second, our second pattern instead. Perfect guys, with this, we've come to the end of our lecture on
patterns and repeat. Just go ahead and try creating new patterns, new
interesting patterns. And I would love to see what you can come up with with this. We've come to the
end of this lecture and see you in the
next one. Bye bye.
41. 41 Assignment 9: Hello guys and welcome back. In this assignment, you
are required to create a pattern following what we've
learned in the last video. Now, you remember this pattern from the last video, right? You're going to use the method which we learned in
creating this pattern and the other one to
create your new pattern. Okay? And that's what we're
going to do in this lecture. In this assignment. That's what you are required
to do in this assignment. Yeah, so that will
be it. And I would love to see what
you come up with. See you in the next one.
42. 42 Shape Blending: Guys and welcome back.
In this lecture, we'll be learning
about ship blending, Not to be illustrato. If you recall, in one of our past lectures we spoke
about the blending tool. Okay, which is this tool. We spoke about the
blending tool. We learned how to use it and how to do a whole lot
of things with it. I mentioned furthermore that for the lesson that's
in the future lesson we'll be learning more about the blend tool or the blend feature in
to be illustrato. In this video we're going
to be doing that and we're going to use the
blend option here. We won't be using the
tool in this video, but we're going to
use the blend option here under the object menu. You come to blend, okay, and then these are
the options we'll be using in this video. And we're going to create some really interesting designs. And yeah, so to help you recall properly the blend to had to do with two or
more ships, right? So we have one ship here, and let's say we
have another ship. Okay, Like this and maybe
with varying colors. Right? And then you just
have to now select, select the blend to, and then kind of blend from
one ship to another. Right? And then here, there you have it, right? So it's blending from
one ship to another, from one color to
another. Right? Now, that's the same thing we
are going to be doing here. Okay. Except that we're going to take it a little
bit more advanced. Okay. I started by creating this little illustration
of litter and litter. And I'm just going to duplicate
the whole thing here. I'm just going to duplicate the art board so you can come and try it
out for yourself. And of course the file will
be made available for you. Okay, now I have
this illustration, then I have this
whole illustration, and then I have
the objects here. And I just added
ingredient feel to them. Okay, I just added
ingredient feel to them. Just come to ingredient field. Just come to gradient tool. So you see the gradient
colors, right? And there are two
vary ingredients, even though they
are quite similar. Just create the
gradient you like. Okay? It can be any
ingredient you want. Okay, The blend option works by you selecting the boot of them and then
just come to blend. Then go to blend options. Okay, now we have
different options. We have the smooth color, but we want to be choosing
those specific steps. Okay? And then the number of steps here would
determine the number, how smooth the blending will be. Okay, So if we have more steps, we'll have a better blending
between both ships. Okay. If we have less, less steps, we'll
have less blending. So let's just start with
it, because let's see it. And let's hit, okay. And then come again to
objects and then go to blend. And then now we see that it has blended from this ship to
this ship in eight steps. Okay? But of course
we don't want E steps because we want
it to be very smooth. So I'm just going to
then come on the object, blend and then release. When you release it
doesn't blend again, just select the boot of them. Okay, to blend to objects and
then blend blend options. Now we want this to be, say, 3000300 steps, okay? Then when you come to blend, then make you see that. Now we have a smoother blending, so I'm just going to
select it and hold down a maybe duplicated two times
to have actual copies. Then now the next thing we're
going to do is very cool. Again, we're going
to take the objects and make them follow
the parts we have here. That's the tricky,
we're going to take these objects and make
them follow these parts. We have the advanced stuff. Remember, we can do
this with this tool, that's why we're
using the objects and blend options here. What do you, how do you do that? Then just select
your blended object. And then come and
pull down Shift. And also select this guy here. Now go to object, then blend. Then you see where it
says replace sine. Okay, just click replace sine, and boom, you see
what we now have. We now have our blended ships following our selected path. Okay, Then we can select this guy here,
come here, object. We please pine and we
can select this one now. And then just come to object
and reverse front to back. Okay, so that we have
this cool design. And then I want to
bring it to front range and bring it to front,
it looking like this. Okay? I like it
looking like this. What we can then do is This guy, given the, select the guy select the path, come to object, blend
and replace pine. Then you see how cool blended. For this last one I want
to duplicate and bring. But what I want to do is
I want to just reduce the size because we don't want it to be this big, there won't be enough space. I'm just going to reduce
the size like this. Then while selecting it, select the path with
the object blend, Replace pine like it, like this. Let's try. Um, given this, see I prefer this, I prefer this version from here. Maybe we can even
make it bigger. Okay? Let maybe move it to
the front or to the top. Okay. Or move it under. Do like this, maybe
reduce the size. It just depends on
what you want to do. Okay, yeah, you can see we
now have a cool I design. I'm just going to remove
this guy out of the frame. We can further more add
even cooler effects. Right? Remember, we can add multiple effects in
to be illustrated. We can add multiple effects, and this just makes it cool. Let's select this guy
and go to effects. And let's try adding the
Plc and blood effect. Okay. Let's then maybe
give it this value. We can see how it's
beginning to become. Okay. We can something
cool with this now. Okay, yeah, we can
see how it has the modified our ship
to look beautiful. Then select this guy and
give you the same effects. Okay, Yeah. Do you
just do the Sam? I'm just going to do the
same with the remaining. Okay, So I like what we have so far. Let us give you the background. Okay. Maybe black
background or maybe not. Maybe just go to
our color guides to try to get some inspiration. Maybe let's choose the sky. Then just try to get
some inspiration from our color guides to like this. And maybe we just
give you a text lust, we make the text eager j. Maybe we change the color j. Maybe we just have
a comment like this and B. This will do. Yeah. I think I like what we
have we've created so far. That's basically how to
use the blend option here. You can furthermore expand your ship and have
more control over it. Just go and just create your own version here and play around
with the tool. Furthermore, to see what you can come up
with by yourself. This, we've come to the end of the lecture on ship blending.
43. 43 Assignment 10: Hello guys and welcome back. This video is an
assignment and you are required to create
a poster like this. Okay? That's using the blend to create something of this nature. Okay? It mustn't be I, it can be a word or whatever
thing you want to create. Just create something and
use the blend to maybe add one effect or the other to create more complexity
to the whole thing. Okay, I would love to see what you come up
with in this assignment. Feel free to share with
us your results and yeah, we'd love to see
what you can come up with and see you
in the next one.
44. 44 Vectorizing an Image: We'll come back in this lecture. We'll be learning
about vectorizing. We'll learn how to
vectorize an illustrator. So that's how to
turn an image into a vector illustration
automatically. We don't have to draw
the images manually. Okay. It just happens automatically
with a B illustrator. The first thing we
have to do is to come and then please our image. I'm going to use this image in the project for the girls image. Open it up and just
drag it out like this. Okay, I'm just going to resize my artboard to fit my image. Okay, And then the
vectorizing process takes a tool on our computer in order to just explore
all the features. I would like us to use a lower arrays image because
this image is quite high. I'd like us to use a lower arrays image and
then come back to this one to finally do
what I have in mind. Image it's, let's place it so we can see
all the options we have. In order to vectorize an image. You go to objects, image trees. Then automatically we see that the image turns into
a vector image. Right now, the next thing you have to do is to just come to this to your properties panel and where you see image trees, you see where it says presets. Okay? So now apparently we
have the default preset set. You just click here
and we're going to have the image
trees panel out. Okay? And then when
we have this out, you see up here we have a number of presets which we can choose and go
with immediately. And we also have the ability
to create settings or to choose presets and kind
of change their parameters. Okay. So I'm just going
to go through some of the presets so you see how
they work automatically. Okay? So this first one
is called the auto color, so it's just going to create an automatic
vectorization with colors. And then we have the
presets here where we can modify, right? We can modify the
number of colors. Do we want less colors or
do we want more colors? Okay, now you see what we have. With more colors, we have
more details, right? With less colors, let's
see, four colors. We have just very few details. We just have four colors. One to three, maybe four
or something like that. But when we have more colors, we definitely have more details. Now you can see this one is looking almost like
the original image. And we then have this other guy, which is a high color preset. Okay? You see this one
gives us 85 colors, okay? And it's very detailed. We almost will not
know that it's a vectorized image when
we look from afar. Then we have this guy, which is the low color color, just gives us 16 colors. 16 colors. Then we
have the grease kill, which turns it into a
Cresci illustration. And then we have this guy, which is a black and white, which turns it into a black
and white illustration. Then we have this guy,
which is the outline, which turns it into an outline illustration
for all of them. We have what we call
threshold, okay? For the colors, we just have
colors threshold, okay. But when we just
come to default, for example, we have
what we call threshold. The threshold determines how much of detail we want, okay? How much of our
original image we want. Okay? Now this is
black and white, and we have a blue threshold, so the image is
almost disappearing. When we have a high threshold, we're going to have
more of our image. Okay, Then we now,
yeah, let's see, we choose default, and then for this one we have what
we are going to view. Okay, Are we going to
view the trecing results? Are we going to view trecing
results with outlines? Okay, It's going to put out the trecing results
and then create outlines around the edges. Okay, and then for this one, are we going to just
view just the outlines? And then are we going to view the outlines with the
source images so we can see where our vectorization is happening in our original image? Okay, And then are we going to choose just the source image? Okay, that's what this guy is. We can use this eye putting
here to talk between the source image and the
present vectorized results. Okay, When we hold, we see the original image, and when we release,
we see our result. And then we have the mood here. Of course, right now it's
black and white, right? Because of the
presets we've chosen. And we have the threshold
like I showed you before. And then we have this
advanced option, just come under
this option here. And then you see
where you say ignore, you're going to see that it ignores the we ignore white. Okay? We're
going to see that. Ignores the white
and then kind of makes it a transparent
something. Now if you go take
it above image, you see that it's
transparent, right? That's because we no
longer have any white. That's how this guy works. For these other
ones, we're going to see little detail
adjustments for the part. When we take it to high,
we're going to see details on the parts, right? Okay, when we take it to blue, we are going to see that
there are no much details. And also this one for corners, it's going to create
little adjustments. Our corners, you can see the
opts happening right then. For noise, we have more noise. All of these are just to create more details to our illustration
or our vectorized image. Okay, now we have this
other preset here, which is maybe tricolors. Let's say tri colors.
It breaks down our image into tricolors. It vectorizes our
image into tricls. We can actually adjust
the number of colors. Let's say ten. Now we see
what's happening, right? And we still have our advanced
options here to play. We have this one to toggle between the trition result
and the source image. Okay, now we have the pillets have limited full tune
and so on and so forth. Okay, so I'm just going to
take it back to Limited. Then we then choose, let's say six colors and just adds three more colors
to our three colors. And 16 colors adds ten more
colors to our six colors. Okay? So it's going
to be more detailed. Right? Then we have
shades of gray. All these are just presets. Okay? And then we have
black and white logo. Okay. Then we have sketched art. The sketched art automatically
removes our weights. So we can see that in
white is active here. Okay? And we have the
threshold where we can actually adjust the threshold. Right Then we now
have lo weights, we see the effect we have. Line art just creates an illustration of
lines around our edges. We have technical drawing, you might not want to
use some of the process. I'm just going to delete this guy and now you
get the point, right? Select your image,
right From here. You don't really have
always go to object. Okay? You don't always go to object and then image trees
can do it right from here. You can just come
select your image and then select the one you want. I just want to, I don't want to start with the
three colors. Okay. It's telling us that
that Triscin may proceed slowly with
this large image. Would you like to continue and Okay's going to take some time
because the image is high. When it's done, we're going
to have our image tried. Good. Now you can
see that we now have our image vectorized into
three colors. Three colors. We can divide it into
triclors 12.3 Okay? Perfect. We can have
more if you want. Let's choose six colors
and see what we get. She's going to take some
time and we're going to have our results perfect. Now we see that we are now
giving six sheets of colors. Okay, our illustrations have been breaking down
into six colors. Cool. I don't like this, but I want to try other precept. Let me try taking this
to ten At ten colors. So the higher the colors, of course, the longer
it takes, Right? Yeah. Perfect. Now we have
ten colors assigned to. Okay, we actually have 30 here. Why give us 30 colors? I actually wanted you to be ten, but I'm just going to work
with what we have now. We see what we have now
and I kind of like it. We're going to come
here and ignore white. Okay. T going to remove
all the white slices? Yeah. So all the white
places have been removed. Now if I have a background, if I create a background
and send it to the back, you then see that these
places are non black. Right, My background color. So I'm not going to assign my background very subtle color. I think I'll go with this
color just like this. Yeah, we now have our images. We now have our vector
illustration from our image. Now selecting the image
if you want to conclude, things just come here to expand. And then now we have it
officially a vector drawing, so we can group. We now see that we
have the ability to select different parts, right? Select different parts, okay? Different parts of our drawing. Okay? I just want to come
and create another image on top and maybe change the
plan mood and multiply. Let me just play around
with the plan moods to see which one I
would like to go with. Yeah, maybe over. Okay, so I like this plan mood. Let me try changing the color H. So let's go with this
guy. I'll go with this guy. Yeah, maybe we then add
a text or something. I love dogs. Give this title is. And then let's come
and choose a font. You know what, I'm going
to just create a filter. And filter all the funds
by the cursive type, and then choose from the
many course funds I have on my computer. Love dogs. I think I'll just
go with this one. Okay. Then we do something like this. The size maybe we change
this eye to, We love dogs. Increase the size of dogs. Okay. Perfect. Can
now close this panel. Yeah, I like what
we have so far. Maybe give it a
drop shadow, right? Maybe give it a drop shadow. Okay. Instead of black color, maybe we give it
dark purple color. Then the blow. Okay. Just use the the offset is good key. Yeah. Guys, I'm going
to leave it like this and I like what we have. So what we've made so far. Guys, feel free to import your images and try
creating some cool stuff. I'd love to see what
you can come up with. In the next lecture, we're going to be taking an assignment. And that will be
it for this one. See you in the
next one. Bye bye.
45. 45 Assignment 11: Guys, and welcome to this
assignment in Db Illustrator. This assignment we based on what we learned in our last lesson, which is factorizing an
image in Illustrator. Okay. Where we created this Posta with the
factorized effect. Now what you're required to
do in this assignment is to come and please this image. Okay, I have this image
of two dogs here. We just come and create
a posta with this image, similar to the one
we created here. Okay, okay, create the pota
and you will have effects, maybe blending effects
like we have here. You can have texts and just
bring in your creativity. And I'd love to see what
you can come up with. Now that'll be it for this one and of course, this modulo. See you in the next one.
46. 46 Windows Explorer Logo: Hello everyone and welcome back. And this module, we'll be creating some real life designs. Okay, we'll be recreating
some real life designs. So we're going to take
real life designs okay, randomly, and then
try to recreate them. Most of them will
be logo designs, and then one of them will be a poster design I
did some years back. Okay, so we're going to start with the Windows Explorer logo. Okay, so the first
thing I need you to do is to go and import the file. Now I have this file uploaded
in the Projects folder. Okay? So just come to
the Projects folder. Okay, come on please, your file, and then just come and select
the Windows Explorer logo. That's this Windows
Explorer new logo design. Okay, This one, Just
come on, place it, then let's use template so
it places as a template. Okay, So please and then renounce that it's
placed it as a template, but it's quite, it's
bigger than our Bod. Just come to layers and unlock the layer And just
resize it like this, rec it like this, perfect. Then the next thing I
would like to do is I'd like to import it again, but not as a template. This time I just
want to import it as a normal image so I can be
able to sample the colors. Please, let's just please here. Okay, now this is our
design and we're going to recreate this here
in Illustrator. The first thing I'm going
to do is select my covert. To select my covert to come to the edge like
this and just click on, then follow the curve. It mustn't be perfect at first because we have the ability to actually to actually
work on our path. After we are done drawing, just try to redraw
the design like this. Just follow it okay from edge to just
follow it like this. The way I'm doing,
just like how we've learned in the video where
we covered the coveture took some places will
need more points, some will need less points in. I'll just click it
here and click, click, Click on, and
so on and so forth. I want to click once again, This smaller cove tends
to have more points. Okay? Because we're dealing with a more intricate cove here. Okay? I just want
to create one here, here, and here, and finally one. Let me just make it okay. Did it to make it
that I did control Z. To make it a sharp edge, right? Because I want it as
a sharp edge for now. I'm just going to go
about and try to fit my design perfectly. Okay. Select the ankle points and just try to feed your
design perfectly. Okay. And so far, so good. I think I like what we have
for these sharp edges. Select them and the curve like this seen with this guy
like this, this perfect. So, so far so we have our Cough or rather we have an
overall sample of our ship. Okay. And we can make do with this. We
can make do with this. Maybe I'm just going to
this cough like this, confuse, drop this
one to be like this. Okay. So I like what
we have so far. Let me just do, let me just Unlock or hide this layer
to see what we're having. Yeah, I think we're having
something better now. The next thing to do is to
get these curves right. I'm still going to
use the cove to Okay. I'm going to click here. Bring it here. Okay. Click here, click here. I'm going to hit my escape key. Take this to fit
my drawing better. We're going to need
more at this point, we see how we have, this place is been. We're going to just spend
some more time here. Maybe I'm going to just delete this point and just try to
use this tool this time, the pencil, and see if I
can create it to be more, to be more perfect. I think I've missed
the holting up. Okay. Let's just, let me just
keep playing with the with the handles and try to
fit the holting better. If I can't, I'll just delete it and start all the way again. Okay. I think I'm
having progress so far. We don't need to delete. Yeah, I think I like it is now. And maybe we can move
on to the next part. Okay, so the next
part is this one. Tick in my core two. And then click, click, click, click on, Keep clicking
to make your perfect call. Okay. Hits skip. I think this guy is perfect. Now the next thing to do,
you select all your ships, then select your ship. Then all, just delete the
random redundant parts. These parts you don't need,
delete them like this, pull down all and click on
the parts that is needed. Yeah, now we have
them all deleted. I'm coming to my color guide to select a color and just add, select a random color, give it to this guy. And select maybe a better sheet, another sheet, and
give it to this guy. Okay, we now have our
three ships like this. Okay? Now I'm going
to select all parts. And just to remove
the stroke and, and now we have our
ships right now. The next thing to
do is to sample these colors and
create the gradient. You know, this is kind
of a ingredient because we have a mix of
discolor in this color, mix of discolor in this
color, color in discolor. Okay, Some of them are
so two ingredients like this one and this one. This one is more shot. Okay, some of them
are less conspicuous. We're going to just sample them. Anyways, we're going to create two boxes for each ingredient. Hold down alt and duplicate
your boxes to the lower side. Hold down Alt and duplicate
to select the first one, the eye dropper two,
this color here. Then go back to the, select the second one, drop two, sample
this color here. Remember we can use the key on your
keyboard for drop two. I'm not going to be coming in to the two box to
keep selecting it, I'm just going to
be using shortcuts for drop to for the select two. Sample this, then this one. Guy. Okay, then this one
will sample this guy. And this one will
sample this guy. Okay, now we have it perfect. The next thing to do is
to create our ingredient. Okay, just come
to your gredient. Give this ingredient. Apparently it's on the stroke, so I'm just going to
remove the stroke. And click the field and
then give it ingredient. Okay, now the first color. Come here and select
this first part. And select this eye drop two, then give it the green. Okay, Let's just
select these colors. And drag them here so we know that they are the first one. Okay, Give it the green
because the green is here. And select this one,
and give it the blue. Now we need to edit ingredients
to look close to this. Okay, now let's just
free style here. Try to edit it look like this. Maybe the angle,
something like this. Let's just keep free styling. I'll keep modifying
rather, okay. And okay, so maybe this will work, okay? This should work.
This should work. Yeah, this ingredient
should work. Now the next guy is this one to select and
give it ingredient. Then select this guy, give it, select this guy. Select drop to give it
the other guy here. Okay, perfect. Am I sure we don't need
to edit the ingredient? Okay, maybe let's give it
-61 Just like the other one. Okay, let's just leave it
at minus zero for now. This guy give it the gredient, the first color pick
the first color, the second color pick the
second color For this guy, I'm tempted to just come and try to edit the color sample
what we have here. Let me just do
something like this. Yeah, I think it's better now. Probably resample the
first color also. Maybe just, I'll just work with like this
because I'm going to add a drop shadow to them. Okay. So I can just
delete my colors now. And I think we are
more than 80% done. Give me more than 80% done. I like what we have here. The next thing to do is to
add these drop shadows. Okay, to add these drop shadows, the shadows you can see here, just add them and we'll
be done with the logo. Now, select the first
guy to effect stylize. Effect stylize and
then drop shadow. Okay, Now we see why
it's fishing right now. We need to this point. So are going to bring
offsets like this. Okay? Maybe this guy should
go back a little bit. Then maybe let's
boost up our blow. Okay, Now select
the guy in arrange. Bring to front, the shadow
appears here, right? And we can see that the
shadow is too much. Just come to your
appearance panel. Let's reduce the opacity to 25. I like it like this. Maybe we can even make it 30. Okay. Yeah, I like that. I
think we'll work with 30. Then the next guy is this guy. We need to add a
drop shadow effect. Stylize and drop shadow, let's okay. And then select it. And select the one on top. Arrange, bring to front. We have drop shadow here. But I think we need to
do some adjustments to drop shadow to offset. We need to bring it like this. Maybe make this guy 40. That's the opacity. And
let's see what we have. I like what we have.
I like what we have. We are almost done. Okay, We are now almost done. The last thing to do is to
kind of stop the shadow, the drop shadow from
falling on our art board. Because as you can see,
the drop shadows are just confined to the areas. These areas, they are not
falling on the mean art board. Okay, not on the
white background. So how do we do that? What we have to do now is select all our ships and in all down halt and duplicate
them to the side again. Just come to your
appearance panel and delete the drop shadow
effect we have. Just delete all drop
shadow effect we have. Okay, we don't have
any drop shadow here. After we delete them,
just select all of them. Come to your properties
and the path finder, just unite them as one. And then pulling down all
drag it to fit perfectly, just like how it was
before. Yeah, it's perfect. Now the next thing we're
going to do is select everything Right
Click, clipping mask. And now as you can see, we now have our shadows
confined to the part. Okay, yeah, we are now 100%
done with our logo redesign. Or redraw rather. Yeah, so I can now delete the
original log in with this. We have come to the
end of our lecture. I hope to see you
in the next one.
47. 47 Twitter Logo: Hello guys and welcome back. In this lecture,
we're going to be redrawing the Twitter logo. And we're going to
follow the steps we just followed in the last video. So the first one is to go
ahead and import our logo. Our logo which is this guy. Okay, everything will be found, of course, the project folder. Okay, Now we have to import
the logo as a template. Once more, just come to file. Please set the
logo and template. Now we have it very big, we just need to resize it
to the shape of our layer. Select the layer and drag it
to the shape of our layer. Centralize it perfect. The next thing, local layer. Select the mean layer. We're going to start
with the covet re two once more. Click. Click. Click on. Do not worry about
the looks for non, we're going to full it open. Uh, and make it to better. Okay. Now, I just did
the last click I did, I'm going to remove the stroke, sorry, the field color. And also for the
stroke, I'm going to maybe make it very
small, like this. Okay. And then then I'm then
going to come and click. But I'm going to do click this time because it's
a sharp corner, right? I'm going to click and then click once and continue
clicking once. All right. So click once, click on, click, click, click, click, click, click, click, click, click, Ok. We are clicking on at point
where there are coves, right? And clicking at point
where there are no caves. Hope you remember the logic of the two, how the two works. Click, Click, click
on and click. Click on and double click. Click ones and double click. Click, Click on, click ones and then click. Click on and click on. Double click, click,
click perfect. Maybe we need to just try to
fit parts of our ship well, but overall we've
done a good job. Okay, so we're just going
to fix some minor parts. Well, okay, maybe you
just do this one. Take this guy up,
these anchor points. Okay. So far so good. I think we have done a good job. Maybe just try to
fit this guy closer. We've done a good job. Now the next thing to do is to create our circle,
right ellipse. Come and select ellipse. Just draw out a circle
or an ellipse and just align to the mid evenly. And using your eye dropper
to now sample mean color. Select this guy. Arrange
send to back for this guy. Sample the white color. Yeah, we have our Twitter
logo. Quick and simple. Now we can delete the guy, maybe resize this one bit, select everything and group. Now we have our Twitter logo. Perfect. We can see how simple
it is to redraw the logos. The idhest thing is actually
creating them from scratch. That's the hardest thing, and that's not what we're
doing right now. If you want to learn how to create really powerful
logos from scratch, I advise you buy my
course on logo design. Okay? I have a separate
course that deals with logo designs
in a illustrato. Okay? And with this, we've come to the end of this lecture. See you in the next one.
48. 48 Google Logo: Guys and welcome back. In this lecture, we'll be
redrawing the Google logo. Create your new file, your new I file at the low set of file. And come on please. The design, the design. We need it as a template
and we need to resize our design and lock the Liao. The next thing is
to place our logo, but this time not as a template, we can sample the color of. The first thing to do is select your coach or two like usual. And then click, click, click, Click on. Maybe let's just undo. And let's remove the feel. And let's give it a
very small stroke so we can see what
we're doing very well. Let's divide this into three key instead of
two as I did before. So click on, click on, click on. Now you see we now have a
better, okay, this one. Let's just divide it into two. Click click once. We now have a better cover
for this guy. It's quite big. Let's do four. Let's divide
it into four clicks. Click on, click,
click on, click on. For this guy, let's
do it into three. Let's divide into 33. Click on, click on, click, perfect double click. Now I'm holding down shift, that's why you see snapping to the 45 degrees and 90
degrees like this. Okay. So I'm holding down shift. When I hold down shift, I'm very sure I'm going
to have a street line right to double click
and double click. Now for this guy, maybe let's just
click twice to click on and click once this guy, you can click three times. Click, click, click once. For this guy, you can
click twice to click on. Click once this guy, we can click three times, two times, click,
click, click on. Finally, now, without even
needing to adjust our curve, you can see that we've perfectly
been able to represent the drawing because of the multiple Ancho
points which we added. Okay, adding multiple
anchor points gives you the ability to
create smoother designs. Okay, that's of
course, using the To two. That's for you to know. The next thing we
do is just select your pencil and then
click here once, and just try to come on. I'll follow the line
here like this here once for this guy,
click click on. For this guy, click on,
Click once, Perfect. Now what next we, all we need to do is
select all our ships. And then the ship
below to right. And then holing down at, we shall delete our
unneeded parts. Okay, I'm using the mouse wheel, of course, to zoom in and out. That's holing down at. And using the mouse wheel. Perfect. Now what we have now, we can just sample the colors. That's the Google colors. Let's use eye to sample this
red and duplicates guy here. And sample the yellow. Sample the green,
and sample the blue. Okay, this guy. Now let's come to our color
guides to select all of them. Come to ship, ship
below to okay, selecting our color,
fill it in here. Okay. Then for this guy, everything guides to then select our shipulo to selecting
our color, fill it in here. For the green guy, select,
select everything. And then select our Sipulo to making sure it's
selected it in here. Same with the blue guy,
sell everything here. Select the Sipulo, making sure it's selected. Fill it in here. Now we can delete
all of these guys. You select everything
here and just remove. Okay, and boom, we're done
with our Google logo design. Okay, again, maybe
hide the template. Lea Perfect. With this, we've come to the
end of this video. See you in the
next one. Bye bye.
49. 49 Instagram Logo: Hello guys and welcome back. In this lecture we'll be
withdrawing the Instagram logo. Okay, So you just go ahead
and import your file. Instagram logo. Okay, And
then just draw it out here. And we have to import one as a template like we did before. Template please. Now it's been pleased perfectly, so we're not going to
adjust anything here. The next thing we are
going to do is select your rectangle tool and drag rectangle around
your main ship. Just remove the stroke. Just adjust it to look
better. To look perfect. Okay. Now the next
thing we'll do is just keep duplicating our rectangle to copy this
part and every other part. Okay? We're just going to them out with thin lines like this. We can make the lists, we see what we're
doing Better select the guy control C
control, that's a copy. And pets in front. Okay, Cont control. And let's pull down your Alt shift and just
drag it down like this. Then contra control
drag down like this. And the contra control
drag it down like this. Okay, And for the last guy here, we just need an
ellipse like this. Perfect. Now, very
simple thing to do next is select your
ship and just come to this little coverture icon here that controls the
curve of our edge. Okay, just drag
it out like this, select the guy, and
drag it out like this. Yeah, I think we, we forgot to draw this one. Just copy and piece in front
contra control the dt. This. Then draw out like this
to create a curve, right? Then do same with this guy here. Finally, this guy here. Maybe we can just make it
bigger, a little bit bigger. Then drag out like this. Maybe drag it out this,
drag down like this. Yeah, let's just hide this
layer to see what we have. So far. I like what we have. Maybe we can do more
adjustments to this guy. Let's just leave it
to it's like this. And I like what we have Serrel all your ships and
come to your ship build. What do we do next down? Okay, And just minus
all these places. White. Just minus, just click
them and minus all of them. Okay. Then the next thing we do, we select everything
and then come to object compound path and make making all of them
into a compound path. Okay? It means they are
just acting like one. Now as you can see, the next thing will be
to sample our colors. Just create an ellipse
with these colors. We have two colors
here. We have this guy. We have this guy, select
the first ellipse, your drop to, and sample
the edge like this. Select this guy, drop to
sample the top like this. We do, I don't think we need
to sample anything here, as it's supposed to blend the boots colors to give us
this color at the middle. Let's just try out select redent two or rather gradient panel. Open red panel and
give it a gradient. The first guy give
it the pop color, the second guy give
it this color. Okay? And then just remove the stroke. I think we actually
think we need a middle color
because the blend, it is not really giving us
this middle color here. Just select this guy
and duplicate it. Drop two and come to the middle and sample
the middle color. And select our ship to ingredient and create
dent in the middle. Just come here and just click, create redent in the middle. Select drop two, give it
this color in the middle. Boom, we see that we now have the colors
lined up perfectly. Now we can set the ingredient
to try to the angle, or we can just come here
and do it like this. Minus 135, maybe not. So let's just drag the
angle numbers like this. Okay? Using the mouse wheel
to see what we have now. I think I'm satisfied
with this one, maybe 140. I'm satisfied with 140. We will between
14145 with 145 key. And now we can
delete our colors. We delete every other thing. Yeah, we now have
our Instagram logo. Now we can see, yeah, we now have
our Instagram logo. And with this, we've come
to the end of this lecture. See you in the next one.
50. 50 Animal Planet Logo: Guys and welcome back. In this video, we're
going to be withdrawing the last logo which is
the Animal Planet logo. Okay, Now come to your
file and place your logo. Okay, I'm going to place
it like this and then I'm going to place it
again as a template. Obviously it's too big to
select the guy and skill it. This just centralize everything
and lock your layer back. Now this is very simple,
just like the others. All we need to do is select a Curvature two and
just come and start. Click, Click, and just remove our stroke and give
it a very thin stroke size. Now of course you know the anchor points the
better the curve right to. We're just going to keep
doing our thing here. Just keep adding the points. And of course for this guy, click at the points, at the points, that will click. Click at the point,
at the points, on points, one point as click, click at the point, at a point and double click
at the point and click click. Then at a point, at the point we're going, we're having what we should have at this point
at the places. Just let the two ankle
points and grab them down at this perfect select your two back and continue adding
points and adding points. Click then at the point
and click, and then click. And then, no, maybe you should click at this point
instead. At the point. At the point. Okay. And there will click and they will
click at the point. At the points. Okay. Okay. Okay.
Okay. Okay. Like what we're having here,
we're making progress. You just keep adding
the points there. The points the better the curve. Now we do with go by just adding multiple
points around the ship. Okay. I select the guy here
using your eye porto and sample color here and we done
now for this animal planet. I don't want to just
leave it like this. I want to create
the animal planet. But unfortunately
for us we do not have this phone, right? And I really do not know how
to get this phone right now. I might have it, but
I want to just use a different method to create it. Okay, So we're going to
trace this look right now. Select the image to objects
and image trace and make we now have
our logo, right? But I think there are a more
adjustments we should do. So let's activate
the Imageres panel, then come to advance and let's
see what we can do, right? You can see that edges like
this are being carved out. I presume they're supposed
to be streps to be street, but they have been
carved out here. Let's boost the
corners like this. K can see that immediately. We now have street corners. We don't have them coved out. Again, they're all straight. Now I'm just going to work
with what we have here. The next thing to do then
is just ignore white. Just click ignore white. Now we can see that our, we can see that our white
has been completely removed. If we just expand,
we don't see that our image is down here. Our test logo is down here. We can just select it, carry it complete on
our design like this, adjust it to fit better, and maybe centralize it or
align it to the center. Yeah, we now have the Animal
Planet logo complete and done to see your file and
marvel at your awesomeness. And with this, we've come
to the end of our lecture. See you in the next one.
51. 51 Skull Line Art Poster: Guys, and welcome back. In this video, we
are going to be recreating a very cool design. Okay, now this is a line art poster design I did a couple of years
back for a client. I actually did 50 of them. Okay, And we're going to
recreate one of them. Just come here to
file and please, and just drag or select
the line art poster, the score poster, drag it out. This is what we're going
to be creating, right? And this was achieved using the blend function.
Be Los Frito. Remember we spoke about the blend option in some
couple of videos back. This is what I used to
create this design. Actually created it from
a real score image, but unfortunately, I did
not have that image. So we're just going to create it from this image we have here. While selecting our
file, our design. Just drag it out
to the middle of our dashboard of our artboard. Maybe resizing the bit. Okay, I have to serve
as our template. All right, the next thing will
be to create a new layer. We select this layer, just select the guy here, instead of select the object and just reduce
topacity like this, maybe 56% And then lock layer so we can comfortably
draw over it, right? Selecting our second layer. Come to file and
come to your pencil and just try to draw out your She click and then
holding down Shift, I'm just going to click here so as to achieve
a straight line, right story ullous field color. And then for the stroke, I want to give it a
stroke of 0.5 for now. And then continue my drawing. I'm just fretting
out the outer shape of my call design here
using the pain too. So I'm just drawing
out my scholarship. Okay, fulling it up. And I'm just going to first in the video
and we'll come back after I am doing out the outline guys, this is what I have so far. I have the outline
drawn out so far, even though I have this
little detail here. Okay, the next thing I'm going to do is to try
to create details. Okay, try to create details that maybe draw out this
line like this, then draw out this
line like this, and bring out the eyes and the nose and some vital details. Okay, So I'm just
going to do that quickly and come
back after I'm done. So I have my detail
in done and when I just hide the layer, you're going to see how
I have everything done. Okay? So that yours
should look like this. I have the the left eye. I have the nose, and
I have this part. I have the overall
head like this, I have all the parts
just lined up like this. Okay? Now I want to also create the duplicate
of the sketch, right? So I have a pack up. Just select everything
and Alt and drag it to the left hand side now
to bring back our layer. Okay, and now the first thing I have to do is I have to understand the blending
I'm going to do, okay, I'm going to
blend with this, I'm going to blend
this with this. I'm going to blend
this with this, with this, and so
on and so forth. And you're going to
see how we're going to do all this in a minute. Okay. I want to also
use this opportunity to share with you 121, final two. And where is it
where the Cass two, It's just under the S two. Just hold down the eraser two. Okay, now you see
the Caesors two. We're going to use
the Esos tool in this project. Now
what does it do? Let me just explain to you
what the Esos tool does. So let's assume we
have a line like this and we want to
cut our line here. We can make use
of the Esors two. To do that, we
select the Esos two. Just come to your
line and click Now. We can see that the
Esor two line divides our line into two
different parts. Right? That's the importance
of the Esor two line. We're going to use the Esor two to achieve some important
cuts in this project. So the first thing we
want to cut is this. At this point, select the
sors two and cut here. Okay, Then your
selection to go back to, your selection to
select the mean ship. Again, I want to create another
cut at this point, right? Select your sors two and
create another cut here. Then the next thing is you
want to blend this guy. The guy select the both
of them to your objects. To blend blend options. Then from smooth color,
select specific steps. Then let's try 50 and see
object blend and make. When we just hide this one, we can see that 50
is a bit too much. Okay. A bit too much to do. Then while selecting
them to blend, again, options, and let's
change this to 30. Objects blend and
make I like 30, 30. Just select your
direct selection tool. I think we can try to make
some adjustments here. Because we're having this
sharp look which I don't like. Maybe this could help get down like this. Okay, I think I'll just
leave it like this. I'm just going to
leave it this way by for me I think of
this layer, okay? So as to see what I'm doing
properly for this guy. I'm going to control control
just like this, like this. Then give it a field color to swap the stroke
with the field. Then this guy here,
this guy here, we want to actually blend them, but we want this one to
actually reach the ground. Let's continue our shape to the ground. Just bring it here. And then use our
anchor point selection to fit it here perfectly. Let's select the guy
here and the guy here. And just go to Object
Blend, then make. This is what we have, right. Let's undo and just
make the steps 45. Okay, we need to work with 45. Now the next thing I want us to do is I
wanted to crop out, wanted to cut out this
unwanted one here. But first of all, I'm
going to select this guy. Go to my direct selection tool and try to fit on the line
more perfectly, right? Do see this one, good. Now maybe for this one I'm going to create a curve like this. And it's creating a
new problem here. Let me just try to fix it. If it doesn't work,
we're just going to go back to the way it is. Or it was just work with
it like this, right? Select this guy and
go to properties. And instead of properties, go to objects and expand. Okay, Now we can see
that it then tons all our lines into
real lines, right? We want to do the same
with this one here. Object and expand. Perfect. We want to just
bring this guy out a bit. Okay, and then we want
to select this one. And then come and select this line here for the
nose, which we duplicated. Let's just go to, so
there, holding down Alt, Let's try dragging
out to delete, but it's not working
well because it's deleting line, That's
not what we want. So we're just going to
select them individually. You see this, Something
that will take time, but if achieved, it's
going to look nice, right? As you can see, after creating
some space, I can now, instead of using Alts, using the minus, I can
just drag it like this. We're going to make
everything white, right? Just like this. Remember the other time
we were doing all? That's why we're having
this subtraction here. Okay. We're doing to do plus. Yeah. So far so good. We are making progress now. We can bring back our
black ship if we want. And we do want bring
back our black ship. Okay. Maybe resize it a bit. Okay, then we work on this one. Select your ships.
This guy here, maybe we want to group this one. So we can just select this very one without having to select every
other part of the. To select this line. And select this one. And go into your sibular two. And holding down Alt, you can drag, as you can see, it's now cutting the
lines from here, right? So hold Alt and drug, old drug, drug. Keep dragging this. As you can see, we now have, it's looking nice here. Now the next piece will be blending this line
and this line. This line from here to
here, and this line. Okay? So what do we do? We need this single line. We need a single line. One thing we can
do is you can just group the whole thing
and select the line. And control C control. Okay. And then what we need to do is to just isolate it so we can cut it at the
right points we need. All right, right click and
isolate selected path. Now we can see
it's in isolation. Select your sess to and then
just cut it around here. Then come here and cut
this guy also around here. Now, setting this to select your unneeded ships,
just delete them. We now have this
guy and this guy. The next thing now is to let's just duplicate this
one control C control. We don't need to duplicate it, but let's just duplicate
it in case I slit the path also and then use
the Sess from here and delete The unneeded part for this guy. Let's just cut it
using the Esos. Too short covers to when
you hit on your keyboard. You're going to have the
sores to cut it here. Okay, then select the
redundant or unneeded part and just delete it. Okay, perfect. Now select this guy. Select this guy, put your blend. Let's hit and see what we have
here. I will go with this. I like this, it, it what? Next do we do? We just have to
expand our blend. And then select this
guy here, right? And then go to our Sibulo tool and minus this needed parts. Now we now have
this part, right? I like what we have so far. The next one I would like us
to handle is this part here. Just come and try
to make this fit better. Yeah, I like this. Then for this guy, we're going to duplicate
this guy and also this guy. Let's just, let's select
the boot of them. Then control C control. Okay, that's to
duplicate them and then right click and group them. When we group them, we
will now be able to isolate them as a group. Okay, we'll be able to
isolate them as a group. What then do we do? Use
our Sss to cut this guy. He cut it here. Delete the needed parts. Then this other one, cut it around here. Okay, Delete the unneeded parts. This guy caught it around here. Delete needed parts. Yep, think we're done. You know what? Let me just blend and I think we'll encounter
a little problem here. Not a big problem. Okay.
Yeah, let's just blend. Select the pot of them, and then we can see
that it's too much. But this is the
problem I was envio, We can see that it's not
reaching the top, right? It didn't reach the top. So we can actually cut it. What we can do instead
is just drag this one. That's what I
wanted to do, but I wanted to see the problem first. Before doing it, we need to release our
blend and we do it, but this time it's
fewer points, right? Let's hit 20 and make
it looks better. Expand, Sorry, we are
in isolation mode, so let's just go out of
isolation mode by hitting a skip and then
selecting our blend. Now just come to
objects and expand. Then select this guy here. And then select your shipuler to just delete the
unmediate parts like this. Perfect. Now the next
thing we need to do is, let me just check
what we have in here. I'm just checking how I
came about with this. I came about this, what I did is blended this guy with
this guy, like this. Blended this guy with this guy. That's what we're
going to do now. Just hide the layer. And now we have this guy, right? Perfect. Now we need one
coming in like this. What I'm going to do is I'm
going to select this guy and go to isolation mode so I can create another one,
so I can put another one. So I'm just going to
follow this line here. Let's follow the line, okay? And we still need to
draw it to a certain points, maybe to this point like this, and then maybe even. Extend this guy.
Extend this guy this. Okay? Maybe just extend this one also. So, meets this point, sorry. And make sure it's
joined with that one. Now what we need to do is select this guy and this guy to blend. But of course, we need
more points, right? Do blend blend options. Let's make this 50 and see. Select the both of them
and make okay, 50. Make it even more. I want to make it even more. Okay. I'm just going to release the, make it 60. Okay. To blend. Make 60, so I'm going to work with 60. Heating skip, I have come
out of my inion mode. Select this guy
control C control. Just reduce the size Like this. Okay, let's just
see what we have. We must not reduce the size or we can still reduce the size. Yeah, they just reduce
the size and give it a black field,
rather black field. And just shift it away, all the points selecting
the mean guy here, we just go to
objects and expand. Expand it. Okay. And then let's
select the group. And select the guy inside. And put your shipbuilder
to pull down Alt. Delete one to first. And then like this, like this, like this. Yeah. I like what
we have so far. I think we should
trim these ones. I just came out. Okay. We
should just trim them. Okay. That's with line. Select the line and select them. Then go to your shot.
Them out like this. Perfect. Now we can now drag
our skate to its point. I like what we have so
far, we can progress. The next one is the next
and last one is this. All right, so first of all, I'm going to just control and reduce the size like
this like we did here. And swap the colors. That's the field and so colors, right then let me just peep the original to
see how I did it. I basically did it the
same way I did this one. Okay, so what next do we need? We need this line
here to control C and control, and
then isolates. We then need to extend
the line to this point. Okay, select this guy,
draw it out like this. Okay, we need another point. We need another line rather, to this point, I get to
cover the other parts. To just use your pentol and draw at the point
or the line rather. I'm going to extend this one also and then select
the boot of them. Object, blend, and
make perfect skip. Now we can select this guy. Just expand and select the whole of them.
The whole group. And select the guy inside, this one inside with
your shipbuilder, pulling down Alts, let deletes, and then draw out like this. Perfect. I like what we have. We have made progress so far. As you can see this, we have basically withdrawn
our advanced line out. Right? We call it advanced because it's not
the normal blend. The last things left
are what I call them tentacles line structures. So these are just the
last things left. And to draw them, we draw our pen. Maybe create a new layer. Just lock this layer and
maybe lock this layer also. Okay, the mean layer we drew on. Okay, we're going to lock it and create a new layer and lock all the hoolaers and hide the mean layer we worked on so we can see
what we're doing, right? Select your pencil. Select your new layer. Just draw them out like this. We are in our image. Okay. Um, maybe we can do
a little bit of twitching. Okay. And then go
to the next one. Take your pencil, throw
out the ship like this. I also need to do
it like this. Okay. So I can use the co points
to create the cove. We'll select ankle point, and just drag it out like this. Seem here, Seem here. Okay. Perfect. Go back to your pencil guys. I feel I should just
take my time and do this as to not make
the video too long. Since this part
is the last part, it's not the advanced part. The advanced part
has been done with. This is just about your
drawing lines, right? I'm going to fast
forward the video and take my time
and all of them. And when I get
back I'll be done. Just take your time and
draw all of them too. And we'll see at the
end of the drawing. So I'm done with the
drawings and as you can observe some of them we're
just duplicated and routed. Just fitted in a different way. Okay, Like this guy was
reflected and I had this guy. This guy was reflected and
I had I think this one. Okay, And rotated. So I just did all this
so as to save time, now that you get the point, the next thing left, okay, I need to
unlock this layer. The next thing
that is left is to cut out the unwanted parts
to create what is needed. Okay, to create what is needed, I'm just enable our image for you to see what we
are working towards. Now what we need to do is to
just cut out the parts and so as to create this clean feel. Right now, I'm just going to
select all parts like this, all our drawings and go
to the ship builder tool. Then use maybe Al to just cut
out some of them like this, like this and then
use my plus to just add the whites together. Maybe this one just use
a to cut out the points. Yeah. Okay. Seem for this guy, we need to add them like
this and this one here. Okay. Now I can also just
add everything up like this. Okay. The points, finally this guy, you can just stick subtracted. We have our first ship
perfectly drawn out. Right now, we're going
to do the same thing with all the others. We just fast forward this, okay? Because of course you can
definitely do this, right? So I'm just going
to fast forward and come back when
I am fully done. At this point, I'm done with all my ships and I'm
done with my drawing. I like what I have
here and a ship, our art pod to fit
the drawing better. Yeah, this is what
we have now guys. Basically, you've seen how we're able to create this from scratch from beginning
to this point. It's all about blending. This can be called
at once blending because we're using blending
to actually create an image. Okay, it all boils down to the basic
principles of blending, which you've learned with this, We've come to the
end of this lecture. See you in the next one. This is actually the last
lecture for the course. So see you in the
next video. Bye bye.
52. 52 Adobe Illustrator Interface Refresh: Hello everyone and
welcome to the course. I'm very much excited
to have you learn with me in this course
on Adp Ills Trito. Now in this lecture we're
going to be learning about the interface and
the tools of Aposto. We're simply going
to be brushing our knowledge because this is not a begina cause a
key is not begino cost. We're not going to be
learning very basic things. This course is meant for intermediate and
advanced lenars. It's more of build up to the beginner course we
have on Ab illustrido. If you're coming
from that course, then you're going to find
most of the things we'll be covering in this
lecture familiar. Okay, because we covered
them in the beginner course. It's basically the interface and the tools of Ab Illustrido. If you're not coming from
that course, feel fine. You can continue with the
cost as far as you have some basic knowledge
of Ab illustridokay. If not, I will advise you
to go and take that course. That's the one for
the very basic lets. Okay. That's people who are
very new to Ab Illustrito. Okay. I'm going to assume
that all of us taking this course have a
beginner knowledge of, at very basic knowledge of alto. Okay? In order to start now, I'm going to create a new
document like usual, okay? Now, whenever you open abrio, this is the first interface
you see, okay here. Having some presets which
you can choose from here. You being able to
create a new document, open an existing document, and then you seen your
previous works here. Okay, Your previous works here. What I'm, I going to do now, I'm just going to, let's
say, create a new document. Okay. Then I'm just
going to choose, come on, I'm going
to choose this one. Come on. Okay. Now the size
is 1366 pixels by 768 pixels. On the Colum RGB, we have RGB, we
have CMYK Cold RGB. And then I'm just
going to click Create. This is now file okay
is the art board. And then this is the board, of course, created in
the size we've selected. Now, I'm just going
to, of course, brush through the whole thing
because I'm assuming you have a beginner knowledge
of what Loreto is. Okay. B lostto is the file where you create a new document or you open
an existing document, you see you, see you please. That's basically important. Then you export and
do a whole things. We have D, we have objects. Okay, these are just the menus. Okay, is the menu bar here, which is the Windows menu. Now, in the Windows
menu, of course, we know that the Windows
menu takes care of, um, the panels of the interface. Okay, and then the work
piece of the interface. So we can activate panels here that panels
bind features, okay? We can activate them
and deactivate them. And we can choose from
work pieces, okay? When we come to Workspace, for example, we have the essential. And it's going to just edit the workpiece
to the essential. Okay, then we have
the automation. We have the layout. We have the painting,
for example. Now this is what we
get with the painting. It activates the
brushes, the Sk, the symbol, and
many other panels. The color panel, the color guide too, and
so on and so forth. And then we have the
properties here. We have properties here, okay. We also have a properties panel. We also have a properties panel. For example, if we come on windows and we choose box piece, and then Essentials Classic, we're going to see the
Properties panel here. Okay? Your Essentials Classic would probably have
libraries here. Okay. In order to make
mine just like yours, I can just come in Windows
and reset Essentials Classic. It's going to take
it the initial it was what I did was I
had to just remove this libraries and then I brought layers to
this point Okay. To this place. Okay. So that I have layers instead
of libraries. So you have to note
that whatever you create or you select rather
on your works piece, you're going to have properties relating to what
you've selected. If we don't have any selection, we're going to have properties
related to our artboard. Okay? To We have no selection. The documents units which
are in pixels. Okay. Have them in points, in pickers, in inches, in feet, and so on and so forth. Then we have the number
of bots, which is one. We can have multiple bot, we can edit the O. It's going to select
the boat tool here, which we can use
to move to resize our board to duplicate. We can just hold a duplicate, the Dbo to have a copy, so that when we now come, we see that we have
two out pots here. We have the number of boats. We can select about one, We can select two here. And then we can edit them. Okay? Can navigate between them using these icons
here, these buttons here. Now of course we have
the rulers and grids. We have the guides,
the snap options, and so on and so forth. I'm assuming you in one time or the other have come in
contact with these options. Going through them
again and again and again will not be needed. That's it for the windows. Now we have panels. We have many other features to be illustrated which
we can activate here, which we can activate here. For example, let's
see the brushes, some of them are
just docked here. And then when we click on them, we have them opened again. We have the, the clog guide. We have, we have the switches, we have the brushes,
the symbols. We have the stroke, we have the gradient,
the transparency. Then we have the appearance
panel, the graphic styles. Then we have other ones, like the asset export,
the art boards. Then we have this other
one which says comments. But to me I'm not
going to be using it. It's useful for me. Yeah, these are some of the
panels we'll be working with. Of course. We are going to
be working with a lot of other panels in the future. Let's come to tools. Let's come to tools by
your left hand side. Of course, we have the
tools in a Illustritok. There are a lot of
tools in Aostrito. Looked at a lot of them
in the beginner course. If you have some
experience with Austrito, definitely have used a number
of tools. A lot of tools. Okay, we definitely
have used tool, I'm very sure you
know what tools are, are used to do things. If you like the selection to, we need to select
objects and move them, move them around
in the work area. You can move them
around the work area. We have the tire selection tool which is used to select points. You can select the point
and you can move the point. We can use the edge curve
tool here or icon here. And the angle or the
curve ness angle, he, you can use this tool
to select the archer point. Now when you come
here to this point, you see Edit tool bar. Okay, now we have here opened and we can see
all our tool bars here. Now all of them are activated. That's why you see
them in this kind of grey faded out style. All of them are
activated. Why is that? Because we are in the
advanced tool bar setting. Okay, so this is the
advanced toolbar setting where all the tool
bars are activated. When you come a Basic, we just have a few
of them we can do, some of them are activated, some of them are not activated. That's Basic and
advanced tool bars. We can also create
our tool bars. We can have a new tool bar, then we can call it my toolbar. My. Okay. Now we have our tool bar here.
New tool bar here. Now, we can now add
tools to our tool bar. Let's assume we are drawing, and then we have
specific tools which we want to use, which
we want to use. So let's say we have this
guy, we just drag it here. Okay, see that now. It's now grid out.
We have this guy, which is a direct
selection tool. Drag it there, or we can
just drag it on here in order to create
this drop down any way you can select
between the two of them. Okay, that's one
thing we can do. We have other tools
here which we can add to this tool bar. Okay, We also have this icon here where we can choose
basic advanced new tool bar. Managed tool, tool bars. Right? But what I'm interested in doing is
adding more tools to. To my new too. I'm just going to add this
guy here. Add this guy here. This, I'm just doing this
to demonstrate for you. We can add more tools
to my tool bar. Okay, Then of course, we have them in categories. We have the selection tools. Okay. Then we have
the draw tools. We have the type tools, we have the paint tools, we have the modified tools, We have the navigate tools. The navigate tools will
help you navigate around your work piece and the type to help you
in printing types. Okay. That your ponting and
styling and you're typing. Okay. Then we have the paint tools which will
help you in painting. And then we have the
modified tools which will basically modify the ship. Okay, We have the
selection tool, of course. Colors
select objects. And then we have the draw
tools which will draw out shapes right objects. Now here is now
our new tool bar. Let's just come here
Windows and then come to to Tool Bars. Now let's click on Advanced
number, Click on Advance. We see that this guy is now out. We deactivated Advanced. Now we can just tick this guy, which is our new tuba,
and then tuck it here. Now we have our toolbar,
custom tub, right? So we can just use our
custom tub to create our drawings or whatever we want to use it in creating
what we want to create. Then we have this
one for the board, this one for the start, to this guy delete points
and so on and so forth. That's with our custom tool bar. You can try it out
and maybe delete it. Come to fire tool
bars, then Advanced. We can also come and
manage our tool bars. We can delete our tool bars. We can select the tool bar, the custom ones delete. We can select them, delete, add new tool bars we can add to keep adding.
And we can delete. Okay, we can okay, we see our changes
that we can cancel. That's it. About managing our tool bars
and creating new tool bars. Now, let's just have a
round up of our tools. Here. We have the selection two, we have the direct
selection two. You know what they do. We have the group selection
two. We select groups. We have this guy,
which is the magic 12. It's also a selection two, select objects with
similar colors. Let's assume we have
this guy with red, this guy with red. Then see we have this other guy. When we select this guy here, come on, click here. We see that we're selecting
the ones with similar colors. That is the use of this
tool bar, this tool here. Now we have other tools. We're not going to go through
all of them in this video. There are too many tools. We're going to go through the important ones as we use them as we
advance in the course. We are going to look at quite a number of them,
quite a lot of them. Then of course, if
you want to learn how to use the tools in details, you can check out the basics
on to be Illustrator. Then we have the pen tool. Now, this tool is used to
create drawings, right? It's a pen, you can just
click and it creates a point. Click and create a
point. Create a point. You can click and drag
and turn your point to a cove, gives it handles. When we click this
direct section to come on selection
of this coved point, we can see handles here down. The handles can be
used, of course, to edit the covture
of your curves. We have other tools
under the pin two. We have a Anch 0.2 which
is used to add points. Okay, we can see that
we're adding points now to our ship. You can move these
points, we can turn them to curves and do things. We have the Delete 0.2 which
is used to delete points. Okay? Then we have
the Anch 0.2 which is used to turn Ancho points into a curved points like this, or curved one into an
angular one like this. Okay? Then we have the
curvature two, which is used to Draw, draw ships. Draw curved ships. We can click, click,
click, click, click. We can see that we are
creating a curved ship. Click, It creates a point,
click creates a point, click creates a point,
click ones and drug, it creates a curved ship. Delete, I'm just going to
delete one board here. Come on, edit, select
copy, and delete. Now we have other tools here. Of course the pen to other types of rather is used
to create types. If you can click and then
we're going to look at types in a separate video. We have other type tools here. We have the line to
the line segment two. We have the, we have
the spiral two, we have the
rectangular grid two. We have the polar grid two. We're going to look
at all of this, of course they are just to
what CD create for this guy, the line segment two, we just use it to create
a line segment. We have the just
used to create an, then we spiral two, which is used to
create a spiral. We have the Ctangular grid Tune, which is used to create
rectangular grid. We have the polar grid which is used to create a polar grid. We have the shape tools, we have the rectangle two, we have the rounded
rectangle to the ellipse, to the polygon, to the
star, to the flare. I'm very sure you know what all these
tools are used for now. We have the brush to and we
have the block two brush to is used to create
drawings like this. Okay. Just pints just
like using a brush. The Blob tool is also a brush to just that it works
in a separate way. We're going to be looking
at the two later on. And then we have the ship to the pencil to the pencil two. Then we have the ship
to which the ship two, create custom ships for us. We can do this and
create a square. We can do this, create this. We can do this and create an ellipse and so
on and so forth. That's what this two
does, the ship two. And then we have the pencil two, which we've used here
to create this drawing. Then we have the smooth two
which smooths our drawing. Okay, Smooths our
drawing, smooths out. Okay. Then we have the eraser two which
erases orawingk like this. The joint two joins, two points, two joints. Let's say we have this guy
here and we have another one. Clues when you set the both
of them and select the joint. We joined them like
this then yeah, we have the eraser to the sors, to the knife to all
these tools are used to cut for the sors too. We have to just come and cut
and see that when we did it, we now have a segment
of it like this. The knife to it's also
used to cut out things. We have rotate to. The reflect to rotate tool is
used to route just like me implies the route like this. And the route then the reflect tool is
also used to reflect, that's flip, all
of these things, We can actually do them by
clicking and then going to transform, rotate,
reflect scale, and share, and transform each which will enable us
to do the whole thing, that scale and move and rotate, and do all that transform stuff. We have this guy which
is a scale, Shahip. And we have the W, which is used to kind of do
stuff like this. So we select this guy and the need to kind
of do stuff like this. Okay. What's happening? We have you like this with enables us kind of
increase the width of our, of our shape like this. Okay. So it helps us do stuff. We edit the profile
profiling of our stuff. That's what we do. I
have other tools here. We have the wrap to the
12 to do stuff like this, it distorts our ship. This just draw a normal ship. Sera rectangle, yellow color, yellow field can
come and set this to see what the 12 tool does. All of these tools distort
our ship in certain ways. We have this one, the free transform tool. The all of them transform to
our ship in certain ways, the pups distorting our foam certain ways by putting
joints on them, on separate parts
of, of the ship. We have the ship bul two, which helps build
a ship like this, connect two ships together
or subtract them on. We're looking at all
of this in details, each of these in details. That's when we start handling
the project as a whole. I just want to refresh your mind about these
tools in this lecture. So that's it for the ship two, we have the life
paint bucket two, we have the live paint two, we have the perspective two, which is used to
create perspectives. Okay, then we have the mesh two, which is used to create meshes. Okay, Now with this meshes, you can now create
gradient meshes. Okay? Now this gredient meshes, you can select points and give it a whole different
color like this. Maybe give this
guy a blue color. This is what we now have. Give this sheet of blue. Now that's the use
of the mesh tool. Okay. Of course, if you are
coming from the other cars, again, you know all
of these tools. We created several
projects with these tools. This should not be a
problem for you is just refresh to your
existing knowledge. We have the gradient to two, helps us create gradients
and edit gradients. We have the Hydropato, which he choose colors
from existing colors. You can select the guy
here, select the hydropero. Then select other ships
or the colors around. And it's going to adapt
to what we've selected, the blend two, which helps
us blend between ships. Ok, let's sky blue color. We can use the plan to select the bend to select
this guy. This guy. As you can see, we have blended these three ships together. Okay. We have other
tools here like the symbol sphich symbols. We have the column graph
two, which creates graphs. We have a whole of them here. And then we have
the artboard tool of course, which
we've looked at. We have the other one,
slice side selection, to have the hands used
to navigate around this. We have the zoom two which is used to zoom in and zoom out. Okay, This is just refresh to your memory
again once more. In the subsequent lectures, we're going to, like I said, work with these
individual tools and learn very advanced ways
of doing things with them. Okay, with this, we've
come to the end of this lecture on tools in
order to be illustrated. See you in the
next one. Bye bye.
53. 53 Shortcuts: Welcome back. In this lecture we didn't be learning
about shortcuts in a dub illusdo as advanced or pro lenners
or intermediate leners. We have the desire
to create works, but not just to create works, but to create them in the
quickest time possible. Okay, We like to take shortcuts. We like to speed able workflow. Hence, the use of shortcuts. These shortcuts will help
us speed double workflow and get us creating
amazing stuff in new time. In order to start, I'm going
to create a new document. I'm going to choose one
of these presets here, the article two, to
just reduce the size. I'm not comfortable
with the big size here. Now this is our new document. The first shortcut we're
going to be looking at in this video is the
move to move to. There's a shortcut to
selecting the move to. Let's assume we have one of the other tool selected
not to go to the move to. All you need to do, is
it okay when you hit, you have the move to selected. I need to create
maybe some ships here and then just use the
squelion to okay, let's say I've been working
on the quick selection two. Suddenly I want
to go to the move to select the whole stuff.
Okay, the whole ship. All I need to do is to hit V And I'll be able to access
the move two immediately, so that the first shortcut. The second one is the
direct selection two. In order to select the
direct selection two, all you need to hit is
when you hit keyboard, you need to select the
direct selection tool. This too, of course, enables
you to select on points. Okay, now the next shortcut I want us to look at
is duplicate shortcut, which enables us to
duplicate the item we have. The easiest way to do
this is to just select the item and then hold
down Alt and Drug. Select the item, whether
with the direct selection to or the move to do at the, and you have a duplicate
of that object A and Dell's quickest way
to duplicate your object. And we're going to be all of these shortcuts in
subsequent videos. Right. I strongly advise
that you take seriously. Okay. And I'm going
to provide you with a PDF file with these
shortcuts written down so that you can
just take a look at the PDF file and
recall the shortcuts. Okay, so that's one of the documents you're going to have attached to this video. The next shortcut, we're
going to be looking at the shortcut for
opening a new file, for creating a new file. What that shortcut? It's control plus n. When
you hit control plus N, you are then brought to this place where you can now open or create a new document. You just select a preset or put in your
custom settings with the name of the document
and of course the height, the units of measurement, the orientation, the amount of art boards and so
on and so forth. The color mode, the
raster effects, and so on and so forth. And then you click Create in order to create
your new document. When I hit Create,
you're going to see that we now have a new document. Okay, Yeah, that's the shortcut control
plus n for a new file. Now we have the next
shortcuts control for. Let's see, you have your work
done and you want to se, hit control and you are now
able to see the document. Okay? Now the next
shot is the X. Is letter X rather. Okay? Letter X is used to select either the
field color or the stre color. So if I hit X right now, we can then see that we now have the stre color
selected when I hit X. Now we now have the
field color selected. So just keep hitting
X to switch between the St color and
the field color. Okay, let's assume
we have a field, we give it the field color of
red and Str color of blue. Okay, let us increase the Str. Okay, We have a field color
of red and strclor of blue. We want select the field color. Okay? Because the shoe
color is selected here. If you want to select
the field color, just hit X And then we can now edit the field color
to maybe blue or green. As you can see, now, the
field color has changed. If you want to select
the shoe color, you just hit X again and you are now able to
select the stroke color. We have another short
cut for swapping the field color with the stroke color and also the shoe color with
the field color. That control is control X. Or rather shift X rather, we have shift X. If you hold shift and then
hit X, you can see that. You're now swapping
the field color to the shoe color
and vice versa. Okay, let's say we're drawing the ship out and then let's say we didn't
have a shoe color, but we only have the field color and we just kept drawing. Let's say we're
tracing a drawing, okay, from a undrawn document. Okay? And then we have the field color,
obstructing our view. Right? We want to get rid of the field color so
as to see what we are creasing out properly. What we just need to
do is to hit shift X, which will now turn the field
color to the shot color. Okay, then when we're done, we've achieved what
we want to achieve. We can now hit the shift x pack to bring back the field color. That's one of the application
of this shortcut. Let's delete everything here. And then we now have the next
shortcut which enables us. Let's say I have a drawing here and we have a field
color to eat. Or let's say we don't have
a field color to eat. Okay, we have the next shortcut which enables us give
our ship a field color. Okay, now this is the comma
key on your keyboard. Okay, When you hit comma, you can now have the
field color applied. Okay, hit comma, you now have
the field color applied. And then we have the next one, which is the period
or the full stop, which then gives
our ship red feel. Okay, The full stop gives our
ship ingredient feel okay. We have it as the
gradient field, and then we have the next one, which is the four slash, which gives it now
feel okay, no field. And also remember that if we
have the stroke activated, instead we're going to have all of this happen to the stroke
instead of the field. So it means if no hits the
period or the full stop, our ship is then
given the stroke. Okay, that's the
gradient stroke. Okay, because we have
the stroke activated. And if we then hit
the comma, sorry, if we didn't hit the comma, let's say we
increase our stroke, then we then hit comma. We didn't see that our stroke
is being given a color. Okay, that's just
for you to know. The next shut we're
going to be looking at is short cut for ingredient to. Okay, let's assume we have ingredient added
to the field here. And then we want the
ingredient too so as to be able to edit ingredient. Right, all we need to heat is G, which will then bring
up the ingredient to. And with the ingredient to, we can now edit our ingredient. It, ingredient rotated, expanded,
and so on and so forth. Okay, that's letter
for the ingredient to. Now, the next shortcut
we're going to be looking at is the
rectangular two short cut. That's this two.
Okay? That's when you hit letter M keyboard. You are then able to
select the rectangle two. Then we also have a shortcut
for the ellipse two, which is L. If you
hit L in a keyboard, you all to select
the ellipse to. So for rectangle two, L for ellipse two. For rectangle two,
L for ellipse two. Okay? The next short
code for pin two, which is this two here. Now the short code is you
hit P on your keyboard. You'll be able to select
the recton Gl to, Ok, select thetan Gl to
perfect other shortcuts. Let's say we hit P and we
have the pin two selected. And we just draw
out ship like this. And let's see, now
we want to add an Ancho point or
subtract Ancho point. Okay, now we have a
shortcut for that. If you want to add an
anchor point or into heat is the plus key
on your keyboard. And now you can see that the Ancho point Pinto
has been selected. And we can now add new
Ancho points to our ship. Okay, What if we want to
subtract points from our ship? What we need to hit
is the minus key on the keyboard and we can
subtract points from our ship. That's using the subtract
or delete anchor points two, sorry. Perfect. Now the next two
we're going to be looking at is the rule to. Okay, rule to. Now the short cut for the
rule two is control R. Okay? This is control R. Then
it brings up the rule to now you can measure your stuff. Using the rule too.
When you just come to the ruler tool like this
and click and drag. We can see that these
lines then come out. Now with the lines, we
are able to measure stuff out and align
our design properly. Okay, we can drag
them out from here. Drag them out from here. Okay, that's the
rule to perfect. Of course, the ships guides will not be rendered
out if you export a design with them
on the design. Okay, but you can
just delete them. When you are done,
you select and keep. Delete, Select. Delete. Delete everything
that was going to delete that after of course
you're done using it. Now, the next two, the next
short cut rather we're going to learn is the copy shortcut
which is control C, okay? Control C and the piste, which is control V. Control C, control V. Then we
have the piste, which is control, sorry, the piece which is
control V. Okay? Apart from the piece,
we have the piece in front which is to control. If I control control, it's going to piste in front, going to piece what it
has copied in front of the existing or
the original copy. Right? And then if you
want to pit at the back, you have to control
C and control B. Okay. It's pieced it at
the back of the ship. When you change the color, you see that it's actually
at the back of the ship. Right Then we have the
Ydroper two, the drop two. And this tool can be activated by just
clicking the litter. Okay. So you can just
click the litter and have the Ydropa two selected if you, uh, conversing with Illustrator. You know what the Dropper
tool is used for, even though we're
also going to use it practically in other
aspects of this course. But the Dropper tool
is used to sample colors, right? Sample colors. So you can sample
this color, color, color, that color,
so on and so forth. Okay, that's what the
Hydropat is used for. And just heating eye will activate the two
on the next two, or rather the next shortcut
is the pan shortcut. Okay, Moving around your design. We achieved this by holding
down the space bar and clicking the mouse so you
can cool on the space bar. Click and hold the mouse, and then just move around. Okay, zoom in, hold
down the space bar, and just move around. That's the pan. Now, in order to zoom in and
out of your ship like this, how easily I do this? I hold down the Alt and of
course use the mouse wheel. Okay, hold Alt and
use the mouse wheel. Then we have other aspects of the zoom control which we can explore with the control
plus control minus control. Control minus control
plus to zoom in. And control minus to zoom out just plus to zoom in and
control minus to zoom out. We also have the zoom too, and it can be activated
by hitting Z. When he click the mouse button and click Drag in and drag out, you'll be able to zoom in, zoom out using the zoom to. Okay. Then for fitting your
artboard to the screen, you can just click
control plus zero. Control plus zero.
Fit your artboard to the screen to your view. Okay, let's assume you're
working on a big project. And let's say you are
outside a place like this. All you need to do to zoom on your artboard is
to control zero. When you control zero, then zoom in or you fit the view
to your artboard. Now to check the preferences, you just hit control
key for preferences. Now these preferences
are settings that control the way your
illustrator works. Okay, let's hit control key once more to bring
up the preferences. And then we can see where it says keyboard
increments, right? And it trans at one. This will control
how far you can move your item using
the direction keys. Okay? When you direction key, when you hit the
left direction key, you can move your item left, hit the right one, you
can move your item right. Hit or hold down the directional
key on your keyboard. You can move your object up. And then for the down, you can move your
object down, right? Then when we hit control key and adjust the keyboard increments, let's make it ten and hit okay, and try to move our ship. Now we can now see that
it covers more speed, moves faster, or covers more
room than the previous time. Now let's just make this 100. So you see the difference
clearly when I select the guy. And now move like this. As you can see, now it's moving. It's covering more space. Okay? It's covering more
room. More move room. Okay. So just keep it at one. Okay? Then I have
another short cut. Let's assume we have
lots of objects here. Okay, let's assume we have
a lot of objects here, all in this shape,
all in this layer. Okay? We have all of
them in this layer. And let's see, we want
to select all of them. Okay, when we select one, we see that it's highlighted here with
this blue icon here. Select this guy. It's
highlighted here. It's hard to select
all of them at once. We can just maybe, maybe click here and then will control click,
click, click. Then if we have a lot of them, you can see that it's
going to be Pin. As to try to select them all. The easiest way to do this, click Hold Alt, and then just click here just on A
and click on the Layer, and everything will be selected. And click on the layer,
everything will be selected. Let's assume we
have another layer, then we have some other
ships in the layer. Let's assume we
have this guy blue. This guy is blue. Okay, we
want to select everything. All we need to do is
control everything in both layers will be
selected. That's control. But if you want to
select the guys in this layer selected. So the next shot cords will be probably
the last one which I usually use to to select items or
objects which are behind, which are behind another object. Let's, let me just give
you a demonstration here. Let me just create
different objects here. Let's see. We now have a
bigger object here. And let's say this
guy is popular color. And we want to select the
objects behind this guy, right? We want to select one of the
objects behind this guy. Let's just reduce the opacity to make the items a
little bit visible. So this is the guy, and then we don't want
to hide the ship. We don't want to hide it.
We don't want to delete it. We just want to select the items behind the
object without hiding it. Without deleting it,
distorting the position, the present position, right? All we need to do is
hold down control, then click on the object
we want to select. So let me just hold down control and then
just click click. Now we can see that
we are now able to select the object, this layer. From there on we can
maybe increase the size T. Select this guy again, all we need to do is just
come here and double click. We now have the guy
we can move the ship. Can move the ship by coming to the edge here
and just dragging it. If you try to move it
from the middle here, you are going to select
the ship in front. Just down control and club, click multiple times in case of just double clicking once
it's not working for you. Okay, right click
and do other stuff. Maybe you want to transform it, maybe you want to, let's say share it or
something like that. You can even do that. Okay. Yeah, that's the last shortcuts. I of course, like I said before, I'm going to provide you
with a PDF file attached to this video so you can just look at the shortcuts
and revive your memory. With this, we've come to
the end of this lecture. See you in the next one.
54. 54 Working with Actions in Illustrator: Everyone, and welcome back. In this lecture, again, you'll be learning about
actions in a illustrido. Actions are automated tasks which a illustrido
helps us perform, okay, so as to prevent us from having to do them
over and over again. For example, things that we want to do over
and over again, we can turn them into actions
by recording them, okay? Then whenever we want
to perform those tasks, we just have to click on the
actions and then play them. And then ab illustrato performs those actions
for us automatically. These can help speed
up our work flow lodo. To start, I'm going to
create a new document. I'm going to choose from
this preset here, Perfect. Then to start, I'm going
to create an ellipse. Maybe give it the field color. Ultimate actions is
they don't work on every effect or every
task you want to do, but they have a lot
of uses and you're going to find them
really helpful. Some of the tasks
I have observed, they do not work on.
Uh, maybe effects. You can create actions for
some of these effects, but in general, other things, you can create actions for them. I'm just going to start by
opening up the actions panel, come to Windows,
and then Action. This is the actions panel. Then we have Default Actions. Now these are actions
that come with Adobe Iusted when you
just open the folder, you didn't see them
when you click on an action and then come
to Current Selection. When you click on plea,
you didn't see that. The action then happens
or the task happens. Like for this one, we
can see that it has reduced the of the
selected ship by 60, okay, To maybe 60% o 60% As you can see
here, that's the action. It just helps us
reduce the opacity. So for example, if we
have a lot of things, we don't want to keep manually going to
reduce the opacity. We can just select click select
and click. What did I do? We can mean a mystic. We can just select and
click select and click. And you can see that
it's easier to do that instead of just
selecting and then going to adjust the opacity. Okay? This is as simple as an
action can be, okay? There are quite a
lot of actions here. There are quite a lot
of actions. We have this for the opacity 60, we have opacity 40. And screen, I guess this one
gives it the 40% opacity. And then maybe the
blending mode. Screen, Okay, let me
just try it out and see this is the opacity at 40. And then as you can see, the blending mode is
now on screen, right? That's what it does. We can have many other actions besides
some of these actions. You see this box, right? This box can be activated here. Not all of them will have
the activation for this box. Okay? We won't be able to activate this box
for all of them, But this box helps us to
further modify our action. Okay, For example,
if we have action, let's move, let's try this guy. Okay, let's have it
without the box. Just remove the box. And then click on our action, on our move action,
and then play it. So we see that it
then moves, okay. It moves by default value, which was used when
creating this action. Okay, Now what if we want to be able to the default value, the value of the move right now, that's where this
box comes to play. So let's assume we
have it here now, and then we have
the box checked. Now when we click here, we can see that the
option now comes up. And we can now manually put
in the position of the move. If we do not want the
original, which is 66, we can maybe put
100 and then okay. So that's the use of this box. It has its importance
in many actions. Some actions might require it, some actions might
have it as optional. Okay, so we're going to look at. Many other options so that you get familiar with how
the whole thing works. Now what I want us to do
is to have a little bit of walk through for
the action panel. Okay? Now, this is the
action panel we have here where we can create
a new set of action. Like this guy here is a set. This guy here is we can
have a new set of action, okay, by clicking on
this folder icon here. When we click on it,
we can maybe name it, my new sets, my set, okay? Now, all the actions
will be when selecting this set will then
be created under this set. Okay? When we select our set, we can come here to
create new action, then create new dialogue
box will then pop up. We can type in the
name of the action. Maybe we want to have
it times what we want. Skill times two. We
want to be able to skill our ship by two. Okay, Now we didn't
have the set, which is my new set, which I've selected here. And then we have this
function, a lust. He gives us the ability
to add a shortcut key, or a short function to our
action that's optional. Of course, we can
just have it like none and we won't
have any shortcut, we'll just have it here. And we can manually click, but we have a shortcut
to shift function two. Let's shift function
two and then color. Maybe give it red or whatever. Color and record. Okay, now after
clicking recording, we can then do what we
want our action to be. Remember Illustrator is now
recording whatever we do. Okay, What I want to do now is right click and
then go to Transform, then go to Skill. Then I just want to kill this
by times two, by 150 then. Okay. Now we can see here that
we now have skill, right? We now have skill. We can
keep doing other things. A, B Illustrator will
keep recording them here. But I just want to
stop here right now and then click
on Stop Playing. Stop recording. When I click here, now
we have our action. For that box, we
should be able to actually activate our box. That's this box here. We can activate this box
when we select a new shape, we can now play our action. Because we have
our box activated, we can now edit our value. Maybe we want it to be 200 now. Okay, this is now. But when we do not have
our box activated, when we click it,
it's going to take the default value which the action was created
with, which is 150. I'm sure you get the gist. Now just going to select
everything and delete. We can have actions for
a whole lot of things. Let's assume we have
our design here and we want to save
it as a PDF file. We can come to file, save copy, then maybe actions. Then come to the file
type and click on PDF. Right, with this we
can no save PDF. Okay, Perfect. Okay, I'm actually supposed
to record the seven. I'm supposed to record the
seven of which I didn't do. So we don't have any
action on seven. Let's just create it quickly. Let's come here, click Create, New Action, then let's name it. Saving, Saving PDF, copy, copy. Then let's give it a shot. Let's give it two, but this time it's control shift the yeah, red, maybe green. Then record with this. Now we come to file, save a copy of the PDF and then just receive it as actions. Just replace it. Yeah, now we can see that. We now have it sived as a copy. All right, and now we can
click on Stop Recording. Whenever we want
to see a PDF file, we can just select this action. Select this action,
and then please. Okay. We actually need to
get this box checked in this case because we have to write down the name and then
select other options, right? Because we are sev, so that's why we need to have this box checked after
having this box checked. When I click on right now, we can see that now it
enables us to see our stuff. Okay, so let's just add some
random letters to our name. And then now we can see
that we are now able to save our dile with
this action, okay? Actions can work for
whole of things, Come work for a
whole lot of things. We can create opacity, just like how we saw with
this guy here, okay? Now I want to try using, using our short cuts, okay? I'm just going to
try control F two. Control F two. And now we can see that we are now able to see, just like how we indicated
for this guy here, when I have shift F two
would then be able to scale just like for
this other action here. As you can see, the
shortcuts are also working. Now I want to try something
out, something interesting. So I'm going to come here, come to my shift and then set the start to
just create a star. Star. And then just
come and give it. Then maybe make this guy this color and this other
guy color like this. And maybe just common edits, the colors make this
guy maybe brighter. This, then I want to
make it a dialdientI. Want to make it a
radial ingredient. Let's just reverse
the ingredients so that the brighter
parts are outside. Okay, what I want to do is
first create my new action. We select my new sets, then create new action. I'm going to name it
Flowery Ship. Flowery ship. I'm going to create an action
for flowery ship design. Okay, I'm just going to give it F three and control F three, give it a random
color and record. Now what I want to do is right click transform and
transform each. And I'm going to make this 15% going to reduce the size of the scale by 85% And then
I'm going to click on Copy. Okay, now the next thing I will do is I'm going to
click Transform. And transform again, The shortcut for
this guy is control D. I'm going to keep
control control D, okay, until I achieve this very beautiful shape,
very beautiful design. Finally, I'll just select everything and
group them perfect. And then the next thing I'm going to do is
I'm going to stop my recording. Me.
Stop my recording. Stop recording. Now we
have our new action here. Let's try it out, right? Let's try it out. Let's
create the guy here. Maybe for this guy, we're just going to grivase ingredient. Then let's select the guy and come to our flower
ship action and play. Then we see that this
box now comes up. I'm going to click on Copy. As you can see now we
now have our action. The last action or the
last task did not go down. Well, that's the group one. I don't know what happened, but at least we have the others. This will have took a
bit of time to perform, but we can see that the action feature Lotto has helped us to automate this task and perform the tasks a
very short period of time. So I'm going to
create this ellipse and then come to effects, come to distort and
transform and then give it a plot blot and to it's to see something
like this. Okay? Something like this. Okay, Then I'm going to just reverse
the gredent here, then select the guy. And select our action and plea. Okay? Perfect. I feel
like doing another one, but this time the
gradient colors reversed. Okay. Now, with
this guy selected, go to the actions and activates, and as you can see now we
have a beautiful ship, okay? The possibilities
with this guy is limits are very limitless, okay? Your imagination is
the limits to this I to create another quite
interesting ship, okay? Maybe we have
something like this. Then let's give it the action. Let's see, I make a
mistake, control Z. So do once more, select the action and plea. Okay. Perfect. I'm going to do, I'm
going to have it with a reversed gradient select copy. Let's I selected out before
it's finished, right? So let's try the new action. Let's try to have the action. Where is my actions panel? Here? Okay? Okay, so let's try to have the action with our ingredients reversed. Okay? Okay, we actually
did this here. Actually did this
here. I feel like adding more effects so as to
have more interesting ships. Okay, so we're just going
to go to my distract and transform and then maybe
give it as a bit of twists. Okay, a bit of twist and yeah, maybe I give it something
like this and then try to give it the action copy perfect. You can see what our actions
are enabling us to create J. So actions, your workflow, will be very much optimized
and you'll be able to achieve your
tasks very quickly. With this, we've come to
the end of our lecture on actions and see
you in the next one.
55. 55 Useful Tips in Illustrator: Hello guys and welcome back. In this lecture, we'll
be learning about some useful tips and
functions in a Illustrator. Some of these functions are just little things that many
people do not know about. Okay, and can better
your workflow. In Ab Illustrator, I'm going to start by creating
a new document. Okay? A new file. Okay. Create new. Then going to choose maybe
this custom nine by 9 ". Let's change the column mode
to RGB. Doesn't matter. Then create. Now let's duplicate
the art board. Choosing the artboard too. I'm going to hold
down Alt and drag this artboard while also
holding down shaft, drag it like this. The first thing I want
you to learn about, I want to learn about
is symmetrical drawing. Okay? You might want to stuff and then
want to use symmetry. What I mean by symmetry
is, let's see, we have a straight
line here, the middle. Let us align the line. Let's see, we have a straight
line here in the middle. Then you want to
draw something here and also have the symptom
being drawn out here. You want to draw something here. I want the symptom being
run out here. Symmetry. Okay, You are drawing
them symmetrically. This line serves as a
middle point where we have draws on our left
and right symmetry. Sometimes symmetry is
important in design. Some people use symmetry for designs depending on what
you want to create really. But symmetry can
be important and I'm just going to show you how
to create simple symmetry. In other illustrator,
let's assume we want to create a
symmetry whereby we draw stuff in this piece in
the left hand spice and then we now have the same
thing on the right hand side. Okay, what you do
now is just create a line like this O to
serve as the center line. Just align it to the middle. Then come and select your line. Just come and click
on this icon here. You get to select the line. Then come to Effects, okay, then distort
and transform. Okay, then just come
to Transform Effects. This transform effect,
what you're going to do is you're going to add effect to the layer such that
or whatever you draw here will be reflected
here automatically. It's more of a reflect effect. Okay, after adding
the transform effect, just come here and
leave the angle at zero and reflect x and
then make one copy. What I want to do is I
want to draw on this side. Okay, when you
draw on this side, you then take the points. You see these points?
You're just going to bring it at the right
hand side because we're drawing at
the left hand side. Okay, It's going
to reflect what we have here in this place. That's all you need to
do and you don't click. Okay, let's come and try it out. Let's try using our brush too. And then when we draw here, we can see that we now have
our symmetry perfectly. Anything you do here will
totally be duplicated here. So let's say we want to add
ship, ship, ship, Okay? This is called the
one point symmetry. There are also more
complex forms of symmetry, And all of this can
be achieved by simply adding the transform effect,
just like I added here. Yeah, I'm not going to
do much here. Too much. You want to have flow. Okay. Depending
on what you want. Maybe you want to draw
a guy drawing pad. You want to draw your character. Okay, then give him, yeah, give it, okay. Color the eyes like this. Okay. Then the nose, mouth, eyes, neck. Yeah. That's symmetry for you. When you are done,
you can just come, you can actually hide
the middle line, line in the middle, so
you can actually hide it. And then when you are, you
can just select stuff, come to objects and
expand, expand. You now have it as a drawing. You can come and take your sta, selection to maybe adjust. Okay, things what
you want to achieve. Okay, that's it about
this form of symmetry. So let me just take you
through the second form of symmetry which is the
four point symmetry. Okay, I'm going to be drawing in one place and then it's
going to duplicate, Do in three places. To do that you just create your line once again
and then centralize it. Okay, Centralize your line and, and give you the
stroke in level. Feel how do we do this
shift X, right shift X. Then it replaces the
stroke with the field. Then you control C, control copy and pens. And then you just like this then make sure it's
aligned properly. All you need to do
now is just create a new layer for these guys
to select the two of them. Control X for cuts, come here to the new layer
and control for Pete. The next thing you do
is select them like this and go back to your
effect and transform. Okay? And this time what you want
to do is first of all, it one, okay, One copies
and then reflect. Okay, That's all you
have to do for now. Then you click Okay. Then while selecting Go, and add another effects. Another transform. Effects.
Yeah, add new effects. Then for this one, you just
make here 90 degrees, okay. And make the three copies and click okay. Then that is it. When you come to your
pencil now and draw, you see that we reflected
right now, have everything. Some designers use this
to create beautiful, beautiful art. It's symmetry. So this is just how
you go about it. Deleting, creating
something new. I'm not creating
anything specific, I'm just playing around to
see what I can achieve. A, really creating
something specific, that serious, just
for you to understand how symmetry works and how to create stuff using symmetry, or how to create
a symmetry effect in how to be illustrated. I'm just going to maybe duplicate the art board again and have another
one here for this guy. I'm just going to delete this one so that we can
look at all the stuff. Okay, now the next
tip I want to give to you is how to change the
direction of a path. Let's say I draw a path, this using the pencil, of course draw a part
like this or whatever, We maybe just use a curved part. Instead. Let's draw a part
like this and it has a stroke. Right now, this part has a
direction. Has a direction. And the direction
goes like this. Because I started drawing
it here and it here. Okay? To make this
direction more glaring, I'm not going to use
a uniform profile, I'm going to use this profile. Okay? When I now increase
the stroke size, we can now see that this
is the direction, right? This is the slimmer point. And then this point, this
is the direction, okay? Now, how do we change
the direction? How do we make this guy the guy and this
guy, the slim guy? How do we do that? We can do that simply by just coming
to the pentel again. And then if this is the direction I want here
to be the direction, just click on this, please. Now you see that the direction has changed from here to here. Samson, see we can keep
changing the direction. Right now, the
direction is here. Right now it's leading here. While this is the T,
this is the head. And the T, if you want
here to be the head, just use the pin click. Here is the head and
here is the til. Then there's another thing
you might want to learn, or you should learn. Let's assume we have different
objects like this, Okay? Then we. Let's say we have three or four objects, objects like this. Then we want them to
converge to a point, we want them to
converge to a point. And we have not been able
to perfectly do that point. Because we have to, we've not been able to actually
achieve that, okay? There's an easy way to just
make this happen, okay? The way I'm going to do this is by selecting all the points. Okay? All the points
and then go to objects and parts, the average. It gives us the
option here whether we should use the
horizontal axis of vertical axis or boots. When you click Boots, we're just going to have them merge on both the horizontal
and vertical axis. As you can see, they are
now all merged to a point. These are just simple tips that you might find
useful in your D, D use of B. Okay, So the next tip I would like to share is
how to align stuff. Okay? I know we know how
to align objects. We know how to align
objects to our art board. For example, for this object we might want to align
it to the middle. We can just click Click and we are now being able to
align it to the middle. Okay, and then when
you come here, you can actually choose
whether to align it, the art board of
which we just did, or align it to a selection. Okay. It means there
will have to be, let's say, two objects. Let's just arrange,
move this to the park. Okay, So maybe we
have this as yellow. So we can now choose
Align to Selection. Okay, Align to Selection. Right, Align to selection. We can select these guys and then align them to each other.
Align them to each other. They're no longer
being aligned to the art board or they're
being aligned to each other when we C the boot of them are aligned to the
middle of each other. When we click, this
guy is aligned to the topmost part of the other ship and
so on and so forth. Okay, so that's another tip, how to align stuff. One other thing people
do not know is we can actually on points, we can actually align points. That's when we're
working on something. And then we just have some
of our ankle points, please. Abnormally. Okay, let's say we have the ankle
points maybe move down a little bit and
we actually want it to be on the same level
with this one, okay? We can actually align them together and have
them on the same level, because actually doing it
might or might not give us an accurate result to the best
way to have them aligned. The best way to
adjust it rather, is to align the ankle point. Okay? How do we do that? All we need to do is select the both of them and
just align like this. Okay? They are now
on the same line. So if we have something
like this and we want of them to be
aligned like this, all you need to do is
select the boot of them and click this
Align option here, and we have the ankle
points aligned, okay? Okay, so that's for
the align function. The next tip I
would like to give you is color related tip. Let's assume we
have a box here and we have red color on it. Let's say we have this
sheet of red on it. When you come to the
color palette here, or rather the color swatch here and will down
shift and click, we see that this
option comes up. Now we have it as an RGB color and we now have the levels
of the various channels. Now for the red
channel, we have it at 02:16 The values for
the various channels. For the red channel,
we have it at 02:16 For the green
we have at five, and for the blue we
have a 35, 36 rather. And we now have the
color code here, which it means we can copy this color code and go
and pitch it somewhere. Maybe we are doing a web design and we want
to copy this color. We can just copy the color code and go
and piece it there, and we will now have
exactly this color. Okay. Doing logo design and we
want this particular color, all we need to do is to
copy the color code. Then when you hold down control and drag this points like this, we see that we are now able to brighten or darken the color. Okay, we're now brighten the color by dragging it
down, darkening the color. That's of course
holding down control. That's it for this little tip. Then the next tip I want you to learn is also
color related tip. Let me just adjust the color. Let's see this sheet
of pop the color, then come to color pilot, and then just come here
and create a new swatch. Now these are new Swatch,
we can give you the name. Okay, but we don't have
to give it a name. This is now what I
want you to observe. There is this check box here
which is called Global. When we uncheck it, we are
not creating a global swatch, But when we able it, we're creating a global swatch. What's a global swatch? A global swatches,
more of a color that remains constant along
different objects. Let me just maybe address
the color bits like this. You can just click okay. Now we now this color and
we now have the new swatch. Now if you can observe properly, you will see that we have this little right angle
triangle at the edge, at the lower edge
of our new Swatch. Okay? Now this is
the icon that show, shows us that it's
a global color. Okay? How do global colors work? Let's assume, let me just have another one here and give
you the normal color. Let's just our guys, like this guys, you can see that for these ones which have a normal watch, we can just select
the object and you choose a different color. Come here, choose
a different color. But for our global colors
or for our global swatch, when we come to our global
watch and try to it, when we try to it, can we try to edit it
to be dark, bright? We will then see that we now have it edited across
all our objects. Can we now have it edited
across all our objects? You know how we edited
across all our objects. Like you can see right now, like these other ones. The other normal switches, for example, this one that has the both of them applied here. Let me just try it out and
try to edit the switch. We then see that it only
affects this object, whereas for global
colors it affects all the objects with
the global color. Just delete, let me
just delete these pods on important this guy one, maybe even the layers because they have
that effect on them. Okay, drag this one
to the front here. Let's delete this
one. Delete this one. Let's assume we have,
let's say, a logo. So let's assume this is a logo. Okay, Let's assume this is a logo and we are
working on our logo. We're trying to perfect stuff. Maybe maybe we have some path finder effects like this and we're just trying to come up with
a very nice logo. Maybe we even have a name. We're going to look at a lot of these things in details also that some of these things I'm
using without explaining, remember, I'm assuming that you have some knowledge
of bus Frito, Okay? But in our subsequent lessons I'm going to explain some
stuff over and over again. Let's assume we're
trying to create a simple logo, let's
just name this. We are in our process of
creating a logo design. One thing very common with logo, with logo designing is that
while working on your logo, you might want to be able
to visualize it from afar. You remember you're
working in close range. You want to be able to
visualize it from afar. You want to be able to
do some changes while you see it's in a
different window, right? The tip I'm going to share
with you will enable you create a new window, you just come to windows
and then new window. Now when you do that,
we've now created a new window of the same job. Okay? Of the same job. Okay? We can still
come to windows, then come to a range, and then come to maybe tile. Okay, Along with this, we now have the both of
them here, tile like this. We have this original window here and the new window here. Now we can now be working
on our logo design. Maybe this one in close
range in this window, while we see the
changes happen here. Okay, so we move this, we can all see it up here. Maybe change some anchor points, this guy, and we can
just see it up here. Okay, That's something I do
a lot when designing logos. Okay, I'm just going to just close this
window and then need it. The next tip I would like to share with you is
a very simple one. Let's just have a
ship like this. Let's shift X to give you a stroke instead
of a field color. And let's make the stroke five. When you select and
you scale down, I think the option is on. This is actually the option. This is the option. I want
to give you a tip on. On default we don't
have this option. We don't have this option and effects on default, we
don't have this option. If you have a scenario
like this where you have a ship with a stroke
and you try to scale, do you see that? Your stroke remains constant? Okay, You might want to be able to skill the object along
with the stroke, okay? You might want to
be able to skill the object along
with the stroke, and this makes it
difficult, okay? Now when you have
this option checked, this skill stroke and effect, when you have it checked
and you try to skill, are now seeing that you
are now being able to skill the stroke with
the object, okay? It's very simple
but very important. When starting out, I came
across this, I didn't like it. I had to figure out a way to skill the strokes along
with the object, okay? And we can simply do that by
just checking this box here, just so that's it for this tip. Very simple, but
very important tip. Then the next one has
to do with patterns. Okay, Let's assume we have a
pattern on this ship here. This is just a default pattern. You might want to be able
to repeat only the pattern, the ship and not the pattern. All you have to do, the ship come to
objects and transform. And then let's see route. Right now we have this option which is
transform patterns. Right? Let's just try
to rotate it like this. And now we can see that it's being rotated with the pattern. Okay. Now when you
uncheck this guy, we would then see that
the pattern remains constant and only the
ship gets rotated. So that's it for the
rotting, for the scaling. What you need to do is just
come to windows and go to the transform panel. Bring up the transform panel, and let's close this. Let's just put windows again and bring up
the transform panel. Now in order to do that, just come here and then where you see transform objects only and
transform patterns only. When you come and click
transform objects, come and click on
transform objects only, and you try to scale the object. We then see that the
pattern remains constant. Okay? The pattern remains
constant while the objects, when you select
transform patterns on the transform together, okay? They can transform together. And then when you
select transform boots, they also transform together. That is about scaling up your objects without
affecting your patterns, and also rotating your objects without rotating your patterns. Now, the next very simple tip
I would like to give you is a way to precisely
transform your object. Okay, let's assume, let me just give it a normal
color, phenome color. Let's assume we want
to divide our ship. Okay? Let's, we want
to divide our ship. I want to move our ship, or we want to transform
our ship generally. Okay? On the properties panel, we have the transform options. And when we click here, we have more options. These options deal with the
width and the breadth here. And you can see that they
are linked together. Anything you do here will be
affected to this other guy. We also have the rotation, so that's the angle of rotation. We have other ones. Let's assume we want to move these objects and move it by
twice its position on the x. Let's do 4.5 multiplier
by two, multiply by two, and let's now, we
can see that by the x it's moved by two, okay? And now we have it at nine. We can actually transform our objects by just using
mathematical functions, okay? We can use
mathematical functions like multiplication, division. We can even divide
divide by two. We now have it at the
initial position. When we come here, we can
make this divide by five. Now it's reduced by five. Remember they are linked. Okay, we have
everything happening. Even that's the little tip I have for you regarding the
transformation of objects. Now on the last and final tip I would like to share
with you is something very simple Git tool which is related to
the type tool here, we actually looked at this
in the beginner course. It's a very simple thing, really just scale up this type like this,
maybe reduce this. Yeah, this tool enables us to transform each of the letters without
using the options here. And it gives us a great
deal of flexibility. Now, this is the
touch type tool here. In the touch type tool, when you just click
on a type here, it gives you the
ability to scale up, rotate, even shift it like this, and do a whole lot of things. This is the tool,
the touch type too. We are also going to
look at this again when we are looking at typography in one of the common modules. But I just felt I
should show you this one again com rotate. We can scale, we can move, we can do a lot of
things without having to use the options here. When we use our options here, they still affect our type here. Okay, that's just
the tip for you. This. We've come to the end of our lecture on tips
and functions. In the coming modules, we'll definitely start creating
some really cool stuff. Okay, see you in
the next one. By.
56. 56 Working With Brushes Refresh: Hello everyone and welcome back. In this module, we'll be
learning about brushes, some advanced level
stuff using brushes. At the end of the module, we'll create a co design,
a very cool project. And we're going to also have an assignment which I
will require you to do. Another start. We're going
to start with preset here. Choose this common preset here. Now, in order to use brushes, we have to select the brush to. Now this is the brush
to the paint brush to very sure you're familiar
with the print pint brush. To, to use the pin brush tool, you have to do select
the pin brush tool and draw what you
would like to draw. Just draw freely
on your art board. Okay. Now when you double
click on pin brush tool, we have the paint
brush tool options. Now we have here
which says Fidelity. This controls the level of smoothing illustrator
would do to your drawing. Okay. If we have it at zero for example or at very
accurate means, it's going to be very
accurate to what you draws. Very accurate to what you draw. Very accurate smoothing
to make it look okay. But if we now boost
up the fidelity. Okay. We can see that we are
now having had to be lost. Frito, help us edit
the smoothness of our drawing of our brush to make sure we achieve
something really cool. Okay, that's one
thing you have to do. I like keeping it
at smooth, okay? Everything comes out
better with smooth. Now we have other options
here which for example, this one says keep selected
and edit selected path. What this does is
it enables us to continue editing our
selected path, our drawing. Okay, so when we draw a line, we have the drawing
we just did selected. If we just uncheck it, for example, and we draw, we'll see that
it's not selected. It's not selected and
that's how it is. Because of that, we won't be
able to continue editing. In order to have
this option check, we need to have this option. Also check this slider. Here we make a illustrator continue editing the parts
based on a distance, distance of 20 pixels. In this case, it can be
lower, lower the distance, the easier it will be for
blotto to continue 18. Okay, that's just
for you to know. That is for the brush options. Now when you have your
brush to selected, we have here which
is the Bush panel. Bring it to this point. Going to do it out. This is the brush
panel. In this panel, we can see more about
our selected brush. We can see other brush
types which we can select. We can actually create new
brushes using this panel. We can edit our existing
brushes using this panel. We can access brush
libraries using this panel. And we can see brushes that we've created using
all using this panel. This panel is very important. When we select a
brochure and you draw, we see that we now have
the brush applied. So this is more of
a stitch brush. Okay, Even if we
used, let's say, a pen tool and just drew a path like this and come here
and select the brush. We then see, then
applied to our path, it's applied to our
path like this. Okay. Yeah, let's see, this brush selected. Let's this brush
selected. We have this. We can double click
this and go to Options. Okay, we can see
the type of brush, and this is caligraphic brush, and these are the
options for the brush. We can have an angle, we can have a roundness, we can have a size, and
so on and so forth. So let's assume we just do this. Yeah, apply to the current, to the current line. We can see that the
effects have now been applied if we're going to
be using this guy now. We can now see that it gives more like a
calligraphic pen. Just get everything. I want us to take a
look at the types of brush and how to
create a brush in B. Illustratojust going to come
here and select my ellipse to grow out an ellipse like this and give it a field color. This is our ellipse. What I want to do is
I want to show you the types of brushes
and also create a new brush from this ellipse. Now I just need to
select my brush or my ellipse and drag it to the
brush panel and release it. Now you can see that we
now have this menu pop up and we can see the
types of brushes. We have scaly graphic brush, we have scatter brush, we have art brush, We
have parton brush. These are the types of brushes. We also have Bristol brush, and we're going to look at them in the course
of this video. Let's say we want to
create an art brush. We don't see options here
where we can choose the width. We can either be fixed
or can be based on a pressure that
when you're using the pressure pen drawing tab, this will come handy. And we have all the ones here. We have the rotation,
the width will be Titan. We cannot leave that fixed. We have brush scale options. We have scale proportionately
scale to fit, stroke length, scale
between guides. You can just come and check these options and
see what they do. No, these are the
directions, okay? The default one.
Then you click okay. We don't see that
you have a brush. Let me just try to be weight. This is the type of brush
created here, Okay? There are many other
types of brushes, many other types of brushes. I'm going to delete
this like this, and also delete this guy. Now, in the next video,
we're going to be learning about how to create the
different types of bushes. Okay, I call them
custom brushes. That's what we're going to
learn in the next video. We're not going to look a lot into creating
these brushes. I just wanted to show you
the types of brushes. That's why I tried
creating one of them here. I just want you to get familiar with the
brushes panel here. Let's select this brush
now that we just created, we can delete it using
this button here. We can click here to
create a new brush. Then we can now click here to save brushes and
access other brushes. Now we have different
libraries of brushes. We have, for example,
the artistic brushes, we have the calligraphic
artistic brushes. Now these are similar to
this one we have here, and this will help us
create calligraphy. Let's just select this guy
here and write something. I'm going to improve the
size of my artboard so as to have enough room to
what I want to write. All right, so let me
delete them first. Let me choose a
more dramatic one. Let me choose this guy.
Let, see what we get. Good, your brush to and good, bad should be, Let me reduce
the size like this. Okay, then maybe, let's try
other calligraphic brushes. Give it this one.
Let's try this one. Increase the stroke size. Let's try this other guy. This one will give us just the normal thing we're used to. Okay, um, the Tate, the stroke size to one. Good vibes, not too perfect, but we get the point. These are some of
the things we can do with artistic brushes. Calligraphic brushes,
you can write, yeah, there are even more
categories of brushes. We have the artistic
other ones like artistic, artistic pin stroke, pen brush. We have the watercolor brush. And so on and so forth. Let's just keep adding them. So what we have on ground
to see what changes we get, see this how this one works. Try here. We have the brushes, We actually have a lot of them. Prunes, I really
like the ones also. We can use them
to grow stove up, maybe set the die and
give it a growing bush. Just use this one. Maybe we just use this one, the struck size. Okay. In our beginner, we actually use these brushes to create
some really cool. Okay, let us keep looking
at some other ones. Let's look at the ones. We can actually drag them out. We can actually drag
them out like this, and they act like
stand alone objects. Actually drag them out like this and maybe
increase their size. Then objects expand,
expand the group. Yeah, they are actually
just one group. One object. Yeah. As you can see, we can now use them
as standalone ships, not necessarily as brushes. We have these other ones, they are called the hand bush rather the hand drawn brushes. Okay. And we have
decorative banners. Okay. So this one's
just walk like this. They actually banners. We criticize again. Yeah, We get Yeah, As you can see, I
just dragged it out. So it's also possible
to drag them out. How they must stand,
Illumin objects, come here, let's take a
look at some other ones. Let's look at image brushes. You see these are image brushes. They are made from images. So it's from there we
got this stitch brush which we used when
starting the video, right? Okay, this guy is
our stitch brush. Now, let me just see how
some of these image brushes work so you can see
how this guy works. It's also similar to stitch, yeah, it's more of a
stitch, wolf stitch. And we have this other guy which looks like
a flower, right? When we come to look at how
to create constom brushes. You're also going to learn how to create brushes like this. That's using custom images. You can actually navigate
from category to category or from library to library
objects, portents. Good delete. This was a basic round up, or I'll call it a refresh of the tool and how to
use the ph libraries. In the next lecture, we're
going to be looking at even more advanced stuff, C D.
57. 57 Creating Custom Brushes in Illustrator: And welcome back.
In this lecture, we'll be learning how to create
brushes to be illustrito. Okay. I'm going to start
with this common preset. In order to create the brushes, you need to use
the brushes panel. Okay. We looked at the brushes panel in
the previous video. We're also going to use
it to create our brushes. Okay, We also looked at
the types of brushes. In the previous video. I'm going to start
with an ellipse to shift x to swap the colors. And I'm going to remove
the shot color here and reduce the size this much. To create the brush, we have two ways. We either drag it in like this, like how we tat the other one, or we select the brush and just come here where
it says new brush. And you click, now you see
all the types of brushes. We have the calligraphic, we have the scatter brush, the art brush, the prestol
brush, the pattern brush. Okay, let's start with the calligraphic, let's
select calligraphic. And okay, now we see
that the options come up and we are able to edit
the options for the brush. We have the angle, we're
going to make this, let's say 120 maybe,
and then the roundness. And you can practically see from the preview
here what you get with the changes
you make, okay? Then we have the size peak peak. We can actually choose if we want these changes
to be random or fixed, or based on the pressure
we get from our pen. That's our drawing
tablet and we have these other ones you can
just kick to fixed for now. Again, just click. Okay. You can actually write the
name of the brush. Maybe you see our new brush
stand for calligraphic. Okay, When we select
our brush to the draw, see that we are going
with our new brush. Here. We have it
here, our new bush. Want to click it? We are
now able to also edit. Maybe we want the
ankle to be like this, maybe the roundness little more to the oval
site and just okay, you'll be required to specify if you want to apply
them on the existing ones. When you do, you see
what we now have. Calligraphic pens or brushes can be create some really
beautiful art works. Okay. Mostly writing. I just increased
the artboard size. I'm certain my purse to leak in. Let's write something. Let's see, Happy Christmas. My writing here is bad. I'm just going to delete this
one and try to write again. Okay, we can see that Illustrator puts the smoothing effect
for us automatically. That's because we have taken
the fidelity to smooth, right, from our
previous video, Christ. Okay, we're going to create a new new brush and come here, calligraphic brush for this guy. I'm going to take the
angle to this again, then for the roundness, I'm just going to bring
it a little bit B, I'm going to leave every
other thing same, okay? This one should give us
a more dramatic effect. Let's write, let's try to increase the phone
size and the sky. I like it, deletes. Start with a stroke of three, so we can see how sweet
and nice it's looking. Okay, I know of course that
we can duplicate our letters. All right. Kind of edit them. Using the direct selection tool, we can kind of
move ankle points, do stuff like this. Okay, If we want here I have good, then Vipes, fat, let them give it a bit of rotation the scale
it down a bit. Good wives only was going to make this school
really big and dramatic. You see? Was going to repeat it till to the bits. I'm just going to maybe make
this lead to be bigger. Okay. Yeah, I like
what we have here. Good vibes only. Maybe we can just have
something like this. A increase the stroke sizes. Perfect. I'm really going
to take the art board to, and duplicate this art board so as to create all those tough. Okay, The next we're
going to look at is, the next we're going to
look at is scatter bus. For this I'm going to
use a symbol symbol. Just come to this symbol panel. If it's not open here. Come to panel, then go
to symbols, symbols. Now come here and go
to the libraries. And let's look for
something flowery. Okay, Sorry, I am currently
at the broches panel. Let me just talk it here. We need to be on symbols. Come to libraries, and
then let's check flowers. Now, we're going to use some
of these flowers to create a scatter brush so you
can see how they work. Right? I'm just going to drag them out like
like I did this one. Just select the symbol
and drag it up like this. Just up and select, drag it out. Sku, drag it out, Kupe, drag it out. Skept's take this guy skill up, lead. Now these are the symbols we're going to use for
our demonstration. Okay? Now the next
thing we have to do is select them and
just expand them. Okay? You might need to do this a couple of times
for some of them. Let me see. Just okay, expand, select. Expand and expand. Expand. Let's let this
guy finally expand. I think we have done
justice to all of them. If we do not expand them, we are going to get
some errors while trying to create our
brush to open to fronts. This guy to front, I want to be behind. I don't know why
it's not. Let me just work with what
I have like this. So I think we need to group some of them because
after expanding, some of them cease to be groups. All right, let's try it now. Let's every one of them maybe ski down bit.
Ski them down a bit. And then come to the brushes
panel and click here. And then we just cut a brush. Okay, now we have the size, the space in between them. We have the scatter,
whether it be fixed or random based on the pressure pen and
we have the rotation. I'm just going to
randomize all of them. Just try to create something. I think the best thing to do is them just make them
fixed for that. We just create the brush first. That's okay. Now we
have created our push. Let's just shift
these guys here. Use the push to draw out, to draw out on the art. But now what we can then do is just come double
click on the scuttle brush. And then let's now
make some changes and see as they get effected
on our drawing here. Okay, When we have the size,
when we change the size, we can see that the
sizes increase. Okay. Then for spacing, I
think we just keep the size as default,
almost as default. Okay. For the spacing, we can maybe
reduce it or increase it. Maybe we should reduce the
species, then the scatter. I think what we have
evidently is still good. What we have here like this, the default is still good. Rotation maybe? Yeah, something like this. Then we can see that we also have here which says
rotation relative to. We can make the
rotation relative to the pitch or to the
path being drawn. Okay. And you can see
the changes as I, I'm going to leave
it at path and then. Okay. Whether I should apply the changes and
then just click Apply. I don't take my brush. All our artwork created
based on our new settings. Okay. In fact, we can saturate our art board with these
flowers and create a very nice background
and uses as a very nice background. Perfect. It's possible to expo the
let me just try exporting. File export. Let's export. And then we, we use peg, then use to and we want
to export only port 222. Let's, let's name this background export went we, we choose the color mode. Rgb. Just going to make this. 300. Okay. Our art board has
been exposed now. This is what we now have. We can use this to serve as
a background if we want. Okay, perfect. Now on the next type of brush, maybe I'll just use the art to separate the two art
boards and create a new one. Duplicating this one. Artboard one. Just delete
work we have here. Next we're going
to be looking at screting Bristol brush to create the ellipse and shift X to give it
the field color. When you come, just come here and then choose
the Bristol brush. Even though we have
the art brush, let's just create
the art brush first. When you create the art brush. Okay, we of course
have our options. We can change the name, we can stretch to fit length
scale proportionately, so on and so forth. We can select a key color, let's just use things, okay. And okay, now we
have our new brush. And when we take our brush tool, you can see that this is
how the art brush works. This is how the art brush works. It stretches our ship
and creates a brush, stretches our ship in
the path of the brush. That's simply how
the art brush works. Let's try some of the
options to see what we get. Skill, proportion, Italy
is what we now get, okay? Basically, not much,
but you get the point. You get the point. And
that's it for the art brush. So I'm just going to create
this guy again and give it a fill color and come
and create my brush. Now I have the next one
which is the Bristol brush. The Bristol brush and Okay, And we have options for the Bristol brush.
Just hit, Okay. And then create a Bristol brush. We can see what the Bristol
brush looks like, right? Create this effect of, let's see, color,
water color effect. This effect. That's what
the Bristol brush does. Now click on it, and let's try to change some of the
settings so we can see what we get for increasing
the size is what we get. The Bristol length,
this is what we get. Okay? The bristo
density is what we get. The thickness is what? Opacity we have. This one we call the stiffness. So it's either
flexible or rigid. We are now asked whether to replace or to apply.
Then we apply. Yeah, this is now, of course we can
change the color. Get I would like this effect. I'm going to try to
use the block too and see if he's going to
work with this brush. Back to the pin brush too. That's it for the push. Finally, we're going to
be creating the final one which is called the pattern
brush for this guy. We are going to be
importing some images, Go to file and go to open. Then drag out all
of these images, all of the selected ones. Them out like this.
All of them excluding this guy and excluding
the background. Okay. Just drag them out. Okay.
Open. Actually have them a different
documents were going to gram the existing
one projects. You know what, I'm just
going to close them all and I'm going
to import them. There are actually other
ways of bringing them. Of course by now we can either please them or
we can just drag them. The simplest way is
to just drag them. So I'm just going to drag them
the drag them into a debt. They are now imported. This we have here, this artwork we have here has a way of consuming
our memory space. In order to clean up
some memory space, I'm just going to
dig the whole thing. Illustrator, it's
now smooth again. We're going to create
brushes with these images. These images for this guy I actually wanted to
create the pattern brush with. I've changed my mind. I'm just going to delete. I'm not going to, because I think it's not going to go down. Well now this is a bell. This is a dumb
bell for this guy. I want the size of this part
to fit into here to here. Okay, I'm just going to
reduce the size like this. Let's try to fit in perfectly. Maybe scale it up a bit. I'm going to drag this guy to this point so that we
have the other half of them or the other
end of the dumb. What I'll do is I'll just reduce the sizes of these
images like this. Now, whenever you import an
image into Illustrito and you see this X outline
across the image, what Illustrator is telling you? That this image has a
link outside Illustrator. Okay. It's not fully
in Illustrator. It has a file outside
Illustrator which it links to. There's what we call
embedded image. This function called
embed image helps us to bring our images
fully into Illustrator. And with that we can take
the file of the illustrator, like the file we're working on, and send it somewhere to a different computer
where we do not have that image copied and we'll
still find our image inside. Okay, that's one thing we
can do with embed image and in order to create brushes also we need to
embed our images. So that's what we're going
to do now select the image. Come to property Spanel
and where you see embed, just click on Embed
and you can see that we no longer
have the X outline. Select each of them
and just embed bed. Now if we try
creating the brush, let's say we just Dg it and
we try creating the brush. Okay? The pattern brush, we can see that we won't be
able to create it, okay? It means we really have to embed the image to embed perfect. Then the next thing
to do is of course, to our brush, right? To drag it here. And pattern brush and okay, now we can see the option
for the pattern brush. Let's give you the name Rude
because it's a road image. Then the scale fixed is okay. Basically must reduce
the scaly pit. Then we have
nuclearization method. We have tint. That tint
and stretch to fit. Now we take our brush too and just drag
holding down shift. You can see we've now turned
our image into a brush. When I zooming, we can see
that what Bost did just took these images and multiplied them along the length of
our brush, right? We can even do curved
shifts with our brush. We can see this white line here. It's just an error
that happens when your image is not
properly cut. Okay. Of course, if your
line is so curved, you are definitely going to get this error even if you
have a good image. That's one thing
you have to note. Yeah, that's it for this guy. And you can see that we can simply just create
our rude design, right, using the brush and
everything goes perfectly. Yeah. To select everything and delete. For this guy. This guy is up. Just select the guy, come and click, and
use your pattern. Now we can see that this
is what we have, right? And the settings just leave
everything they take. Oh, and, and we can see
that we are now able to create a very beautiful
design using our custom. You should definitely
take time to pin. That's how our pattern
brush work known. For the last one,
we have a um bell and what we have here,
just delete this guy too. We have a dumb bell. And then we have three parts to this, we have three parts, okay? The first one is the middle, or rather the first
one is the left side, then the middle,
then the right side. We select the middle, drag it in again,
select paint brush. Okay, let's okay, now we have our bellow. What if we want to have
these guys at the edge, at the left and right
edges of our bell? Right, because doesn't
have the shaft right. It has the head and
the other head. Right. So what you do is select the first one
which is this one. And drag and just
hold down Alt and CT. It's like the second
one, drag it, hold down Alt and leave it. Okay. Then we use our
pain, our paint too. And just do we see that
this is our dumb bell? We've achieved our dumb bell. And we can use a pain too. Create a stroke like this and
just come and give it this. Yeah, you can see
it looks perfect. Good. Yes guys, that will be it for the pattern brushes and for all the other
types of broaches. I'm just going to
leave this art board in an illustrator file so
you can have access to it. I would love you to just go in and try and make
sure you create. Just try to create this and
many other, maybe three. Okay. You can just think
of or whatever word you like to have and then just create it using the
calligraphic pen. Okay? And also
practice, and practice, and practice because that's the only way you'll get used
to whatever you're learning. That will be it for this
lecture on custom brushes. And see you in the next one.
58. 58 Adding Grain Texture Using Custom Brushes: Hello and welcome back. In this lecture,
we're going to be creating some custom brushes, some really cool custom brushes. And we're going to use
them on our artwork to add highlights and
shadows to our artworks. Okay, now these are
custom brushes. These are green brushes
and they kind of a very trendy and modern way of adding shadows and highlights to our artworks to make
our artworks come to life. Okay, so in order to start on, need to start with a preset. The common preset? Yeah. Yap. Then next thing I
will do is make my art board bigger,
something like this. Then now I will need to
come to my ellipse too, and start creating the brushes. Okay, Right now I'm just going to create one
ellipse, one circle. Remove the stroke and give
it a black fill color. And then what I'll do is
come to my Lias panel, create a new layer. Then drag it beneath
the first one, and then just come and
create another circle. This, then give it the stroke, shift X the stroke. And then this new layer will serve as a
guide for my brush. Remember, we're
creating noise brushes. Okay, This will serve as
a guide and I'm going to populate the species
with these dots. Okay? I'm going to have
a variety of them. I'm just going to use one. I'm going to also
this guy and have some other ones just increase
the size of our board. We can have four
versions for this layer. I'm just going to lock this
layer so you can select. I'm going to start
with this guy here. I'm just going to start by creating this one and
then show you how it works. I'm going to select
the guy and the Alt, Duplicate, Duplicate, date. We can select all of them. You can copy and paste. Copy and paste. Okay.
Copy and paste. Okay, copy and piste. So the images to complete the
whole area with the shapes. Okay, for this first one we're going to
have the same size. All of them will
be the same size. For the other ones, we
might have varying sizes. But for this one, all
of them should be the same size as a struck. Thank you. I'm just going to
quickly show you how the works just off this layer
and select all of them. And then go to your brush panel. Your brush, just
click on a new brush, we're going to use
this cut brush click. Okay, now we have the name here. Let's just use the default name because we're just
experimenting. And then for the
colorization method, let's just give it a T
for now. Just click okay. Then come to your brush
to select your brush to try to pin. Now you see what we
then have, okay, just select your brochure and then let's try to
edit these options, okay, because we are
not just trying to Achieve this organized look, trying to use it to paint
shadows and highlights. It's not going to be just
this clean and organized. Again, the thing we do
is make all of them random and try to play a while. The preview, of course, is on. Let's try to play. We reduce
the size that we have. We're going to keep the size
like this in the space in, we're going to play
around to see what we can achieve, the scare. See what we can achieve, okay. Then for tsion, I think we can work with this. So we can just click
okay and apply. Now when we come to our
brush tool and try to paint, we can see that our, our changes have been
made, have been affected. Okay. So this is just how we use them. And then let me just take
time to show you how we will apply them to our drawing
or our ship, right? Maybe we have a ship like this, then we have colored pop. Okay, yeah, then we have
no stroke on it right now. Do we need to paint inside
the ship? Inside the ship. And Illustrator
gives us the ability that we see these
three options here. This one. This one allows
us to draw normally. We selected whatever
we're going to draw is going to be
outside the ship, which is the normal
way of drawing. This guy selected, we're going to be able to
draw behind the ship. It means when we come, for example, we come and
select this guy here, we try to change the
color, maybe draw. We'll be going behind this ship, behind the ships, behind
and behind and behind. Then while for the last one, which is draw Inside, when you select your ship and
you click on Draw Inside, you're going to see this guide. Okay, this shows you that you
can draw inside your ship. You just select what you want to draw. You need the color. Then just now, we can see that we are now
drawing inside our ship, not outside our ship. This is what we're
going to use to add these shadows and highlights our custom brushes.
Just select a brush. And actually before
we select a brush, we'll need to sheets
of this color, right? The dark sheet. Out the bright sheet. We need to have some dark
sheets and some bright sheet. So let's duplicate the guy. Okay, then let's just duplicate a third one for this
one, come here, down shift and click, and
then down shift and try to brighten or darken our color. Remember how we did
it the last time? Just darken the color. Then we can even darken it. If this method is not working, we can come here and just
try to do it manually. Yeah, the dark shade. Let's try to have
a bright shade. Let's come here and
brighten up the color. Maybe we could even
have a brighter shade brighter than this one. Maybe we should have one other shade which is
not as dark as this one. Brighten up right now
when we select our pins two and then select our eye
drop two and something. Now we can draw inside our ship. We don't grow inside our ship then why not see
the option to grow inside? Yeah, right now when
we select our ship, we see the two options here
and we see this clip group. Okay, now what happened when we tried painting inside the
first time, the other time? To be illustrator turned our
ship into a clipping mask. Okay, that's why we were able
to draw inside the ship. That's why we were able to
draw inside the ship in order to continue do paint inside. Right now we won't be able to just take the
pin brush tool and paint inside because
when we selected right now we see that this
option is down graded out. The best thing to do is right click and then release
clipping mask. When we release clipping masks, we then see that it's no longer a clipping group
or a clip group, it's now a normal ellipse. Our option is down back. What you need to
do is in inside. Okay. As far as you see these dotted lines
around the ship, it means you can paint inside. I'm going to select
the paint brush. First of all, I'm
going to select this, sample this color, then
select the paintbrush tool. Just try to start
painting inside. Now we can see that we are
no painting inside our ship. Okay, I to choose this guy so we can add a bit more light
to our dark sheet. Okay, maybe no tick this guy on. Just the brush. Try to create the sheet. Then finally, maybe
this one brush to create this might
not be perfect, but you get the point. You get the idea of
using our paint, our custom brushes to add
noise to our drawing. What we're going to do next, we're going to take
our time to create three more variations
of our custom brochure. And we're going to use these
broches to add texture, light, and shadows
to our artworks. Okay, I'm going to use two artworks which we created
from the beginning cost. I'm going to make
them available, the projects folder so
you can download them. Okay, so we can all walk along. What I would then do now is
just delete this one here, since we're done, you
don't get the point. And I'm going to unbark
our guides here and just try to continue
creating these brushes. Just keep, I want
to add more here. Of course, I'm just selecting and holding down
Alt and dragging. That's what I'm doing. I think I'm okay
with this one here. The next one will be
similar to this one, but we'll have the P and not close to each
other like this. We just have them far
away from each other. So we're just going to
delete some of them here. Selecting randomly and
hitting Delete. Delete them. I can just delete a large
chunk of them and just try to kind spread them
out like this. Okay. Olsen, spread the outs. I think this should
do this other brush. For the next one, I'm just going to select everything here, go down out and rack them here. For this one I'm going to
make some of them, make, some of them to be
of varying sizes. Some of them, some of them even smaller than what we have. Randomly smaller. So we're going to just
take out time to this. I'm going to take my time
to do this and I'll come back after I'm done and
satisfied with all the others. Okay, that's with this
one and this one. I'm going to fast forward
the video to when I'm so we don't meet
the video long. So guys, I've been able
to complete my brushes. I'm just going to
zoom in so you see what I have done, okay? And you can just pause the video and try to
replicate what we have here. Okay, so you can follow along. The next thing I'm going
to do is I'm going to import or open our projects. That's the ones we're going
to use. Just come to file. Come to open. Come
to the folder, the project folder
that's brushes and textures and you're going to see add green 01 and
adding green 02. Okay, just select the
both of them and open. Okay, these are the projects we're going to add green two. Okay. Now the first
thing we do is I think we should reduce
the size of a bit because it will affect
the size of the brush. And I actually want
us to be able to work with tiny particles. So what I'm going
to do right now, I'm just going to
import these projects. Into our new projects, right? Just import them. I'm just copying
them past in here. Then we're going to create
new artboards for them. So I'm just going to
close these guys now, I'm not adding the shadows in these original files
so you can be able to access them as the R and import them here
and do the work. Okay, so you can access
the files just as the R. Next thing
I'm going to do is create art boards to
select the art board to just draw out
one of random size. Okay, let's just
duplicate this one. You can see that we've
duplicated some of the objects touching
the first lots. I'm going to delete them. We need to arrange
our objects properly on our output perfect. Now, for the ones
I really want to reduce the size of the brushes. Really want to reduce
them because they will be used on the artworks. And as you can see, the
artworks are very small sizes. We need to reduce the size
of the b of the brushes. Just reduce the size. I'm just going to increase
again, one other thing. You have to understand
that reducing the sizes will also help
performance because using large brush sizes will
slow down the computer. Now we have our brushes. I'm just going to
create them right now. There's one other thing
that you can add to your brushes to make
them really look good. You can add more variations
by adding an effect. Just come to effect
and then you start and transform the rough effect. When you add the roughen effect, you then see that you then
have them not just round, you have them in
different ships. In the ships are not just
regular round ships, ships are squared
and zigza rough. That's one thing
you can do and I'm actually tempted to do that. Let's do that. I guess I'm just going to increase the
size and maybe one. I want the effect
to be very subtle. Okay, let's use smooth
and see what we have. Smooth, smoothen
the whole thing. Maybe with smooth, we can increase our size
and it won't look bad. Right? So let me just okay, see what we now have. Yeah, what we now have. They are not regular
ellipses or circles anymore. They have been given
the roughen effects. Okay. And you know what,
I'm just going to do the same thing for the
remaining to come to effects. We can just apply the
last effect here, okay? Instead of going to
distort and transform. And then roughly again, you
can just come and apply it. It's going to just apply the
same settings we have here. We can do that for
these guys to then for these guys to perfect on. The next thing we'll
do, we just expand the object, expand appearance. Select them. Object,
expand appearance. Select object,
expand appearance. Okay, object, expand appearance. Then now it's time to create, to create our brushes. Just maybe more more. Okay, need to do this. The next thing I'm going
to do is select our brush, our chips here, and
drag them here. Remember, there are
two ways to do this. You can either drag them, or
you can just come and click The new icon here. B here. All right, so we choose the scatter brush. Okay, We have no, let's noise one. Okay? Okay then let's
quickly the brush. So this is our brush. Click on it and just come
make all these random, right? Just like we did before. Try to change settings
to achieve newer looks. Let's come to
colorization and tens. And select and apply. Try our push now and see
what we can come up with. What we have a new bush
like what we have. Select everything
and now we don't. The first brush, I'm just
going to select them and group them and have
it kept at one side. I'm going to make this
file available so you can also look at them for or
see them for yourself. Right. That's the
brushes I have used. Next thing we do, we
select these guys, click concretes and scatter. Let's Noise to. Okay, let too, let's try to pin randomly the double click on your random. Random. Random, random. And for this guys can let us
play with random settings. So there is no specific
way of doing this. Just keep playing with
the sentence till you achieve what you think is right. You know what, I think? I'm just going to use
what we have here. I'm going to use
what we have here. Oh yeah, piecing the trick. Okay guys, I'll just go
with what we have here. Okay, So I'll go with what we have here.
And then click Okay. And apply strikes and yeah. And yeah. We now have our brush. We pint get to select everything, just drop to the left
hand side of this. Now the next guy is this one. Select them and
then cut a brush. The name will be
Noise She Right? Okay. And let's come to your brush to Oh, care. And then let's of course
with them run gum. Sure. Yeah. I'm okay with this one and
there's drug everything here. And I'm going to group them. To group this group. Yeah. Take all the groups to one side and finally we
have this one to select everything and click and scat
brushes the noise for okay, these are to pinks what we have double click and just
change everything to run dumb. Let's play with our settings to see what we can come up with. My thought should be tints like all the Ok. We can group this guy and
bring it to the side. Select everything and delete. Now we can start painting
on our drawings. Just delete this to
useful right now, let's start painting
on our drawings. Let's start with this one. Let's group them. This guy, then we're just going
to paint inside. To paint inside,
let's use this one. Push the need, so let's give
you the darker tint and see we are achieving to choose
another person. Let me choose this
guy, this county one. Let's change the scenes
again, Make it brighter. Let's it very closer to, very close to the mean color. Let me y droplet to
choose the color. Let's make it very closer
to the mean color. Okay. Was going to make
it proprietary Paso Pitts Hydro per two. Okay. And then let's
choose the grabo again so we can
make darker tins. This time darker, maybe. I'll choose a different brush
this time, choose the sky. This is the first brush
we created using it, using these other ones. The new ones you see
the size of the brush. As you can see, we have
given our ship some shadows, some tunes, and some highlights. And we can keep going on
and on and on and on. Okay, all we need to do is just select hydro
sample the color, make it darker or brighter,
and then we paint. I'm just I'm going to
choose this method of making my colors right in this. I'm okay with what we have here. With this, we're done
with our first ship. Now we can move to the next one. Now we can move
to the next ship. The next ship will be this ship. To select the ship,
click Pint inside. Inside selected two,
sample the color. Let's make it darker. Let's use our pints
to start pinching. I'm pinching in the
wrong direction. I'm just going to make the
shadows at this point. Okay. Really, we can just use one brush to
do the whole thing, but having, uh, multiple brushes will make
the whole team interesting. So that's why I'm, I'm using multiple brushes for this one. We're just going to make
the teams a bit darker. Make the color a bit darker? Yeah. Okay. And then I think I have an idea. Maybe I'll just saturate
the whole thing with the tune so that I now have
this color as the highlights. Okay? But I now have this mean color as the
highlights and sky. So what I need to do
now is just to sample this color and then Pint. Okay? Perfect. Yeah. I like what
we have so far. Okay. The next ship
we'll be using, we'll be handling it. This ship? This ship. The next
ship will be handling. Try. Yeah, this is the
ship will be handling. To select the ship
and then go inside and sample of the colors darker. Use your brush to pin just this brush. Make
the color darker can just create
this shadows here. I feel like using a brush like, thank you, this one. So I'm just going to do the same thing I did here right now. I'm just going to populate
this piece with the tone and then I'll just use this
mean color as a highlight. Some one still highlights guys, I like what
we have so far. Now we're left with these
ships or five ships. I'm going to use this one now. I'm going to use this one. Sample your color,
make it darker, really darker for
brush, then let's paint most at times to achieve
effects like this, designers tend to
download brushes. Prefer to download brushes, that's another way
of doing that. But I feel a simple way
is just to create yours. Why don't you just create yours? Yeah, we can see that even the ones we
created are really good. You will easily compete
with some of the ones you have out there for sale. Okay, that's the importance
of creating your own brushes. I like what we have here. Let's move to the next ship, and this will be the next ship. Set the guy pins inside. Let's just make the color dark. Let's make it brighter. Let's just make it brighter. And pins at this
side. Let's pin here, let's make a darker color pink. Do this ship on
the next one with this yellow inside, darker. Going to the shutters. For this one you're going
to use since that same color walk with this
one now version, sorry, hens, darker color. Lastly, we are going to work on this one to select the
sheep and paint inside, then give it darker. She push inside, I feel like just making a brighter sheet and
painting here so as to make this color stand out from the red color O print brush. Perfect. So, so far so good. I like what we able
to come up with. Yeah, the level of
detailing you can achieve by just creating your
own brushes and using them. Now, we have the
second one here. This will be class. I just want you to come and use the brushes we've
been able to create, give highlights and
shadows to this bird. I'd love to see what you
can come up with with this. We've come to the end
of this lecture and I'm sure you've learned something new and
something interesting. I hope to see you
in the next one.
59. 59 Exercise1 Adding Grain Texture to Our Artwork 1: And war come back.
In the last lecture, we learned how to create
our own custom brushes. Okay, our own custom
Noise brushes, and even use them on artworks. Now in this lecture,
we're going to be actually doing
something cool. We're going to be creating
a character figure and then using our custom made brushes to add shadows and highlights and
texture to our character. Now the projects folder, you come across these files
here. I have two files here. These are what we're going to be creating in the
course of this video. Now is our character. You can see this is
a modern trendy way of character illustration. I'm sure you've seen characters, we just look before if you are a good follower
of illustrations, right, So this is the character we're
going to be creating. Okay, first of all we're
going to draw the character. And then the second
video that follows, we're going to add
these green effects, the green highlights and
shadows to these characters. When I zooming, you
see all the detailing. You can see that a lot of work has been put into
this character. Okay? This particular
one has the background, while this one just has
a plain background. Okay, and we're going to be
creating this in this video. Come to other Los D, then let's come and open. When you open, you're going
to see this exercise one, just open exercise one. Just come to the project
folder and open exercise one. All the files will be
made available to you. This is the character we're
going to be creating. But I would like us to draw out the character
from scratch so that hopefully you get to refresh your memory on the
tools we're going to be using. Okay. In order to
add the greens, one thing I will have to confess to is that I made some
changes to the brushes. I made some changes
to the brochures. If you import the brusches
from the previous video, or if you come and
open this file because this file will be
made available to you, you'll see that these are the
brushes we created, right? Four of them. These are
the brushes we created. And what I did is just came
and I spread them out a bit. Okay? I observed that when we have them in this
kind of circular ship, this kind of specific
ship, and we paint, we just get our painting
take this circular form. And that's not natural for
brushes like this, right? So what I did was I just
spread them out a bit. So this, this guy, this one is this guy, and this guy is this guy, and this guy is this guy. Okay, so how did I do that? Let me just give you a quick
tutor of how I did that. We have them as a group, right? What do you need
to do is duplicate this by holding them all and
drag, just ungroup them. And then just spread them out like this. Spread
them out like this. While spreading them out
the bounding box, okay, That the blue square
around the ships might interfere in such a way that instead of trying to
drag it out like this, you then make a mistake and just maybe scale it like this. Okay? That's because we
have this bounding box. You might not
experience it here, but when you come to
start dealing with very tiny particles
like we have here, you are definitely going to
experience that problem. Okay? That's one of the problems you might experience
in order to sort this. You can just come
to your view and then where you see bounding box. Okay, hide bounding box. You can just click and
then we have it hidden. Okay? If you also want to
hide your anchor points, all you need to do
is control it and then all heating so
you'll freely be able to spread your ship or your brush out
like this, okay? Without any interference from the bounding box or
the anchor points. Okay, So that's one
thing you need to note. So just do this for all the other brushes and then let's have them
look like this. So you can have them
look like this, okay? And then one thing I didn't
cover from the last lecture is how to export
our brushes, okay? Our custom brushes
so as to use in other projects or so as to
sell them in the market, okay? Because of course,
there are people selling brochures there,
people selling brushes. You can buy brushes, you can
get some of them for free. And these people are
people like us who just know the skill of creating
custom brushes, right? So in order to kind of have these custom brushes as
separate files so you can import them into future
projects or sell them online, all you need to do is copy them. Okay. So we're
going to presently just try to create them
as a custom library. Okay? So just copy all of them. I'm just going to go and
turn on my bounding box. Okay? Show bounding box. Okay? And maybe control H to
bring back the anchor point. Okay? And then just
select all of them and just control and we're going to create
a new document. I can show you how to turn the custom brushes
into real brush files, which you can use
in future lessons and also sell them online. Okay, now select the guy. Go to your brushes
and just add them. We make them scatter. Let's make it Noise brush one, of course, you need the steps. We just come and take our brush
to try to draw our stuff. Yeah, this is what we get. Then just come and let's make everything here random so as to get the best
settings for our brush. Okay? Okay, and then for colorization, let's make it tints and Okay. Okay, now we're done with the
first one you can delete. And for the second one
you just select and add and then scatter
brush, Let's see. Noise brush to and
colorization Tes and. Okay, let's with our brush. Let's draw with our brush. Of course you can
see that it's taking the ship I was talking
to you about, right? It's taking the circular ship. But of course here it's
a little bit better because we've spread
the wilting out. Let's try to work on our brush to see how
we can make it better. Turn everything to random. Just try to play around
with the options like this. Yes, and okay. Now we're done with this
one for these guys now. Just select them and create
a scatter brush and Noise. Three, okay, can take a
brush to painting like this. Okay. I'll select everything and come and change
everything here to random and play around
with the settings. Okay, apply. Then finally we have these
guys here. I'll select them. Create a scatter
brush and Noise Four. Okay, and then use
our brush tool to make painting like this. And try to our options. Everything should be random. And then this guy
should be tints. Let's try to play around
with our settings. Right, you guys, I'm okay with our certain here. And click Apply and
delete everything now. From now on, you can now delete
everything we have here. And then what you then need to do is come to your
panel, brushes panel. And select all the brushes here. And just delete them apart from your custom brushes.
Delete them. Okay, Deletes. Deletes. Okay.
You can't delete this one, These other ones you can
definitely delete them. Yeah, we have this one here
which we cannot delete. And then we have the
other ones which are our custom meat broches. This one which we cannot delete. Next thing to do is just
come here and see Broch. Okay, now let's go to our U. Folder just created. New folds library. Let's make it our
custom library. And then go inside and
name of noise brushes. So when we go to
projects folder, we see that this is library. Now this is our library. Okay. Now this is our library. Now all you need to do
is just close this file. Now let's try to import our library and see what we
get to create a new file, a new project rather. Then let's have an ellipse here. Let's remove, then
give it be okay. Now all you need to do is come here and drag in your custom. Don't drag it in here. Don't drag it to this piece. Just come here and drag it
into the project panel. Drag and drop. Now we can see that we now have
our brushes here. We now have our brushes here. And you can start
to work on them, to work with them immediately, so you can create your ellipse, okay, Then draw inside. And just select your
brush right away. You can start painting now
you can start painting. You see that's how to create your broches
and export them. That's how to export
your brohesow. We are going to recreate this drawing here
and then we're going to add the textures to make it look like
what we have here. Okay, the first I'll do is cont duplicate this art
to the side like this. Then just delete
what we have here. Deleted. Let's come to file and please then here we
have the images. We're just going to please this one without the
noise background. Just please and drag
it out like this. Perfect. Now we're just going to
trece out this drawing. This will just come to layers. Create a new layer. We're
going to work on this layer. For this one, I'm just going to reduce the opacity
of the drawing. It's going to be positive
drawing, maybe to 45. And then I'm going to lock the layer and select
our new layer. We're going to draw
on our new layer. The next thing we'll do
is just kick our pencil and then try to start
drawing right away. Starts to this part
of the hair here. This is how we draw
in Illustrator. I'm very sure you are
familiar with this. After drawing the parts, I want to see beneath it and I want to maintain
the color. All right. I'm going to first of all sample the color we
need, which is this color. So I'm using the hydro. Okay.
Why selecting that part? I'm using the hydropo, Hydropojust, going to
click Sample the color. Okay. I'm then going to use
shift X to change the color. To change the field
color to the true color. And then we're just going to draw out this part of the hair. Wouldn't be as exact as what we have here,
just make it close. I'm willing to close the ship here and take my
direct selection to, and try to play around
with what we have here to make it look perfect. Of course, I'm using my mouse
wheel and Alt to zoom in, zoom out and move around my drawing like
what we have here. All you then need to
do is select the ship, select hydro and sample the
purple color for the head. And shift x zero and shift X to swap the
with the fill color. And real going to arrange
and send it to back so it's behind this
hairy bone here. And setting the pento
going to mount, draw the mining of the hair. You mean part of the hair? Kay, For my direct selection to, and I'll try to play
around with the handles to achieve a more fluid look perfect. And we should also take this behind our rep to
arrange and send Park. Perfect. Now, let your pencil and continue your
drawing for these parts. I'll just start here, then come here and try to
create the head like this. For the other parts of the head, we can just create it
like this select drop to just sample the
color here, of course. Send it to the backreen buck. You can send it to the
back by also using this shortcut here and shift
control, open bracket. Okay? You can use this
for your shortcut. Okay. The next thing
will be to draw the ear. Maybe I should use the covet. You get a taste of how the coverture two works
in case you do not know. This is how we typically
use the coverture to very sweet and easy to use to we're going to eye
and sample this color. Then of course send
it to the back. Instead of swapping the colors. Let's just leave them
like this because there isn't much work to be done
here any longer for the neck. I'm going to draw out like this. Come and click on the last point to make
it an angular point. Okay? To eliminate
the other handle. And then give it an
angle like this. So we can draw a
straight line like this. For this one, sing
to draw and crack, Then zoom out, zoom in it
for your hydropat sample. Arrange back. For this one we will do similar. We can just start by, we can just start from here. So we can handle these parts first and then draw this, drag it out like this, because it's going to interfere with my
remaining drawing. I'm just going to shift X to a shoe color instead
of a field color. I'm going to use my two, that's my direct selection to, to try to even out
my curve like this. Then come here a ankle 0.2 and I'm going to add
an ankle point here. Select your two, Select
your ankle point, Let's drag it out like this. Perfect. Select this guy also. And drag it out
like this, perfect. And maybe this handle like
this, like your pencil. And continue your drawing. I'm just going to stop here. You stop here. I continue drawing the hand here because
it is a different shape. Okay? And just stop here. And then make this,
of course, an angle. So you can draw
these other parts, like this control to undo and let's try to get it
perfectly for this other one. I'm also drawing
it out like this. I'm drawing the breast. The breast is a separate
ship entirely on its own, the hands like this. And keep drawing. And finally to draw
this and continue. Now we use for your
direct selection tool. And let's try to even out
of growing like this. Perfect for your pencil. Just go back to your
direct selection tool. I feel it will be good for
us to work on this part. So here we have our
curved icon here, right? And we can just drag to
increase the curvature. And really I'm supposed to
cover some of the features of this curved function here. Because we just covered
the one feature, which we give us a
curve when we drag. But I haven't covered
the other features which can be seen when we
double click the point. Okay, so when we double
click the point, we have some other
features which we can use. So I'm just going to
maybe come to this later. So let's just
continue our drawing. Continue, leak and drug. It's like you eat to try
to even out your drawing. This. Sorry. Perfect. And for this guy, let's give it this color
shift x to give it a stroke. It doesn't interfere with
the remaining work we have. Let's try to draw the hand now. Click, click, click, click. You can just leave
it as this literal. We're going to add
the stroke profile and so on and so forth. Now select a pencil, and let's try to create
this part of the hand. Okay, and we can just bring
it here like this, perfect. The next stem will be
to create the breast. The breast is just
what we have here. Perfect for my
direct section too. So even of the drawing like
this, Like this, perfect. Let's continue to draw the
lower part of the drawing. Me to start here, come here and just draw
it out like this. And kind this, this, close it out like this.
And let's just make the preps here more cov, like the drawing
perfect for this guy. We need to give
this field color. And one thing we do need
to sort, okay, range. And puck puck, One thing we do need to sort is
this leg, Okay? So this one is kind
of a different leg. This one is kind of
a different leg. So what I'll just
do is I'll select the whole thing and
create a duplicate. And I will now use
my shape builder to and als delete
these other parts. Delete, sorry, Kind of use my two and delete
this ankle point. So we have this line that this, then for this one I'm
just going to take my, my shape bul too, and just delete this guy
that's wiling down all okay, and clicking, that's
what I would do. And then for this guy, I really want this one to
have a cut here, right? So what I'll do is I'll
just come here and take my caes to knorr, not my caso. I'm just going to what I'm
just going to come and take my pen tool and draw out
a drawing like this. Align like this rather. And select this guy
to align it here. Select this guy. Try
to align it here. Now site the both of
them and then just go to my path finder and then divide. This is divide, divide that. We'll now have this
as a separate, as a separate ship. I think it didn't
divide properly. Why didn't it divide properly?
See what's happening. If it's not going
to work properly, we can do this as well. Just drag it like this
and select everything. Yeah, divide, Delete
the lines here. Yeah, we can also just come here and create another
divide, select and divide. Just come and delete
the met here. And delete this guys here, what we can just Sean points and delete an
points and deletes. Now we have the
street line here, then we need to do Come on, just align
these guys here. After which, I'm going to
close my path finder and just align these other ones
here that other leg aligns, you have here arrangeent back. Now we can furthermore
delete the unneeded part of this by just clicking to
go to isolation mode. And just using,
just drag in this, maybe even delete
this one. Perfect. Just skip to it, back to normal mode and then
select the boot of them. Duck the boot parts and shift
X to give you the stroke. Right away, we can see
that we have a problem on this ship and all we need to do is just come
and join this part. The part, Yeah, we have
everything perfect. No, no. Select a
pencil and try to draw out the shoe here. Give it this color. Of course, the next
leg you can shift X for the stroke, perfect. Now we need to grow
the hands here, right? To click and drug
all those deletes. Click and click. Rug, sorry. Control Z. Sometimes my computer turns
Y on the keyboard to Z and Z to Y. I really don't
know why it does that. And that's why when
I do control Z, right now you see it's in
this mode instead of undoing. Okay? When I experience
this problem, all I do is now control
y instead of control Z. You might get to experience
this a little bit more often. There's a drug behind
this, like this. Then sample the color
here you're drawing. And let's see, send it backwards again. Just draw this one out. When we come to add color and arrange everything perfectly, we're going
to deal with that. Let this guy give it a black
color and increase the sky. Two, put it down maybe three. Then we have these parts here. Click these parts here. Drug. We can just select
the boots of them. We can even just bring
the points here. This other one also bring
it here at the meet at this juncture, perfect. Select the boot of them and boot the properties on a profile. And give them this profile. Then you can also do this here, the properties, maybe we
should increase the stroke. Then we need to draw
the box, right? We need to draw the box, and then we need to draw the flow at the bugs come
and get this guy. A guy, Yeah, this guy. Here. Here, select all of them and just
come on some Who? Here? Maybe we'll leave it at one and then try to create
these other parts here, shift X. Maybe we'll
give it a darker color. Let's just sample the original. Okay, I sample the shift X N. Next for this guy will be sampling
a brighter shade. Let's see it with the stroke, so you can draw the
blood lines here. I'm just hitting skip
to end the drawing. When I draw it, Skip, I can end the present drawing
and continue drawing it. Skip. I keep skip
just for you to know, in case you don't know, we
continue our drawing here. Click, click, click, click, click, click, and then
sample the color. It's for your penillklkamp, this color stroke shift X. Take your pen and now try to create these
guys in the middle. Click, click, select
the boot of them. I give them your stroke. It pen, click, click, click, Click the sample dark. Click the guy here in history, the lea is locked
so you can click. So just give it a stroke. She then click, click, click, click, click. Give it sheet here. Let's just give it
a stroke instead. Then your pin to click, click, kick, click
and click. Perfect. Now for this guy, okay, for these guys, let's hit and give
them this stroke. Or they just select all
the strokes here or all the ships here and give them a black color or
this sheet of black. Okay, we can now bring
back our colors. Shift X. This one needs
to be above this one. To select the ship, select the strokes ten to front. This one needs to
be behind this guy. He ran Parker. This guy looks perfect. Here, this guy looks perfect. Also, this guy
shift to the color, color and try to at this guy. For this one I'm going to shift and then send
it to the park. We shift X, We have what
we are looking for. Now for the. I feel
like copying what we have here because I don't
want to waste a lot of time. So I'm just going to unlock this layer and drug
everything put down. Al. Bring it here to the most
complex part of this, it seems I've done something.
I'll just copy it again. I'll just copy again
Al and drop. Perfect. Now you know what I'll do. I'll just lock this layer, select this guy, select
the background layer. Control X to copy and come here to this layer
and unlock it. And then control to pit in, please just lock back
this layer is other guy. The most complex thing here is using the ship builder tool. It's a very simple drawing. Just the leaf like. Okay, the leave,
then for the holes, all I did was I used paint to
pated structures like this. Maybe give its go green color. Then select the vote of them. Arranger, transform and reflect. Copy, something like this. You get the point. Now
select all of them and then come to your ship
builder to click it. And then hold down Alt. Click, click, click and drag. Now we have the cords
here and I just duplicated and rotated them
and just added this effect. Basically, that's what I did. Not much. I'm just going to hold down O and
bring this guy here, because I forgot to
copy the one here. Perfect. Maybe I
will reflect it. Okay, perfect. I'm going to delete this guy
and we're going to start working on bringing all
our colors to life. Select this guy, shift
color going to on it. And sample color for the body to shift,
bring the color back. And for this guy to shift X. And you know what I'm
going to do to bring it to the front. Perform that. I'm going to control C, Control copy and
piece in please. Instead of giving it a color now or fill column to
give it a stroke color, boost the stroke and then
give it this profile here for this guy. Arrange bring to front shift
X and control C control. Then give it a so color
shift X instead of this. Give it a black color
boost the stroke and give it nice
profile for this guy. I'm going to shift X sent
to back for this guy, I'm going to shift X S to back ***, shift X back. This guy also shift X and
we need to send it to back. Maybe you send to back. Perfect. Now we left
to this shot shift. If we just hydro lia here, you can see that we have
achieved our drawing. Achieved our drawing. You can compare it with
what we have here. Maybe these strokes
should be a little bit the stroke by one
for these guys. We could make them one
more pixel ticker. Just select all of
them up the stroke by one pixel and select two for this guy. I'm going to send
it to the park. This guy and this guy, I'm going to send them to the park. They appear behind this hand. With this, we have come to
the end of our lecture. We've been able to
redraw our character. In the next video,
we're going to paint our character with
our custom brushes. See you in the
next one. Bye bye.
60. 60 Exercise1 Adding Grain Texture to Our Artwork 2: Guys and welcome back.
In this lecture, we're actually going to be
painting on our character. Okay, we're going to
add those shadows. Add those highlights that make the halting look
good and texture. Okay, like this. We going to turn our
character to this. Yeah, go back to our
Los Fredo first thing, first select your character. Then select the draw
inside function here. Activate the draw
inside function here. And when you see the box here, you know that now
you can draw inside. We're going to start by
selecting our brochure. Select the brochure.
I have my brushes here. Have my brushes here. Select the brush, of course. I'm going to have this copy here so you can access the
file and then follow along. Okay? You have to
know that using this brushes add width to your drawing a
width to your project. And it might
eventually slow down. It will eventually slow
down your computer. Just have to take note of that. If possible, do not overdo it. I'm going to take
my brush now select my brush and then maybe
sample my color and shift X. Then select back my brush when I pinoon't be able to see painted. I just need to make this
darker again when I pin. Now you see my painting
appears now inside my ship. We're going to undo this then maybe make it a
little bit darker. I'm going to come to stroke
and I'm going to use a smaller stroke
here in five first. Immediately, you
can see that I am now pinting inside my ship. Inside my ship, we're
going to pin around this. Give it that shadow. Look well. To change my brush to something more dramatic guy and shifts, I want to reduce the size. This. There's no specific way to do this and right way to do this, Just make sure you use the right brush size
and then make sure your highlights in your
shadows come to life. Right? I'm going to keep
painting. Keep painting. Maybe just take this
to one too much. Going to do it outside
so we can have the after math effects here. That makes sense. The
next thing I'll do is brighten up my color, right? Colella mean color And then
try to brighten it up. Then select my. I'll
just use this scanty. Maybe I'll just use this. Maybe we should increase our 0.5 cheap growing already. As you can see, growing is
beginning to come to life. Let's compare it to
what we have here. You can see that we even have bright sheets here brighter than what we are
currently having. I will not go to the
extreme with this, just going to be moderates was a little
bit extreme on this one. Don't go too extreme,
more moderate. Perfect. Next thing I'll do is select, sample this darker color. And want to use the sin brush
to just add life to this. Maybe Ken smaller chook
and then just this. And maybe I should make it darker and try to
follow the edges. It perfect guy. So I like what we have here. May not be as
dramatic as one here, but I think this will suffice. Next we select our selection, can then click out of
our inside function. The next thing is to
select the other part of the hair and then grow inside. If you do want to add drawings or more painting to the
ones we have done already, all you need to do is
just come and click. When you double
click, you get inside the ship and now you can
maybe add more drawings. Okay, so that's the way to add more drawings or edit
what you have done. Perfect. Click and you are
now out of the ship. Select a next ship and draw inside Tick a brush
and start to draw. Maybe make this then
use the stok size. Start to draw. Let's compare with what
we have here, our key. Let's continue our drawing. Let's just brighten up this guy. Sample our main drawing. And just brightening
up so as to add, sorry, let's give it, one thing you can do is
just keep selecting the 22. When you select about the two, you can put the stroke size
and it's going to non works. You are experiencing some of the problems I'm
experiencing here. Perfect. We have the shadows, we have the mid tunes, and we have the highlights. We even pet another
layer of highlights. Make this brighter
again and just maybe change the
brush to this one. Make this brighter and
select your stock size. Yeah, we have another layer
of high bright highlights. That's the way to add she, the way to shed
color your artwork. You have to have the
highlights. The mid. Tunes The shadows. Maybe I should add more shadows
to this point to eye. And select your eye
dropper to take your paint and do this. Okay. We can even make our smaller, maybe 1.50 0.15 rather smaller. Perfect, perfect, perfect, perfect. Now we can go out of our ship, set the pen tool, and
go to the next ship. Now this is the next ship and
grow inside your brush set. Maybe we do shift
and remove the, select your brush once more and just give it that you want. 0.00 0.25 and darken it
up and start to pins. Perfect. I'm going to
leave it like this. I'm not going to do too much
here to go out of the ship, select the next ship, go inside and shift
X your brush, select your guy here, and then give it the
stroke size you want. It turned out that I
clicked the brush too, and it brought out the options, but I'm not going
to edit anything. Going to continue
my painting. Tah. And then I forgot to
change my stroke size. Maybe 15. Okay. Just
throw it out like this. Maybe even 10.1 and throw
it out like this. Perfect. Perfect. I like
this guy here on. The next thing is to
pince the neck, right? The neck. And select
your guy and go inside. Select your pints, brush
to select your preset, change the size
and start to draw. All right? I want to take
this even smaller 0.15, I want to hear the shadow beneath the head so that the head will pop out. Okay? Maybe something like this. Really guys, you can
just use one brush for this one bush for everything. You can use one bush
for everything. But in order to add flavor
to the whole thing, of course, you can
use multiple brushes. I'm just going to sample my color and get
a brighter sheet. And select my brush gives 0.150 0.15 perfect. Let's go out of the two. And now let's work
on the big guy here. That's the shed. Okay,
to select your guy, go inside, select your pencil. Um, select your brush preset. And change the brush size. Okay. Right away you can
start painting because I'm going to just undo and I'm just going to
start to paint like this. Maybe this color is to show. I'm just going to sample that's got here
shift to bring it to the. So just dark color to go back to my brush and
choose the size in 25. And I want something
more intense, right? So I'm going to
choose this guy here. Select this guy here, sorry, this guy here, 0.25 continue. I'm going to focus on making
this part very subtle. It won't be so it was
going to be subtle. Remember we have looking. So at this point, we even have the bulk of
the shadows around here. I'm making a mistake
with my painting. Maybe we can just leave them here and have other
ones here also, not going to maybe make this darker then here also, this outlines the breast. I'm going to choose
this brochere to add flavor to the whole thing. Okay, so we don't just have specific broch.
Just one broch. I'm going to. Okay, sorry. I'm going to use my brochet. Just control and try to have the bigger ones
around here. Perfect. I like everything going so far. Go out of your ship and
select the next ship. I'd like us to walk
on the breast. Remember we have brush and
then the ship has no stroke. Okay, it's the ship we are
going to be drawing on. Select the ship. Go inside, be stroke size. And then I sample my color. Sample, color the
hell out of it. When we be undoing some
of the painting here, I don't want them to
exceed the parts out. My system is experiencing some slowness and
that's very common when it painting with
these kind of bushes. Want to take my brush to
continue painting like I've been doing perfect. So I kind of like
what we have so far. Select your selection
to go out of the two out of the ship and We are doing something really
good here, I must say. I forgot to paint
around this part of the ship because the hand will definitely be casting
shadows on the bodies. And because to
reflect here, right, just click back into the ship. Your pin to I didn't
go back into the ship. The ship and click
go back like a pin to Let's continue painting. I think we need to
reduce the size. Okay, let's keep painting like this. Maybe we make it even bigger. Make the stop even bigger. Yeah, this should
work, Should suffice. Let's go out of our ship
and see what we achieved. Like what we have so far. Perfect. Next thing
to do be to select the next ship and go
inside the select your brush to shift and darken your color and undo and just give it a tiny shot. Just pin. Just pin.
And pins and pins. Let's kind of blend things here. Good at T. I walk space back
and to the last one. Yeah, I think I like what I have so far
and I won't do more. Maybe I'll just add one
more layer of amazingness. Okay, one more of shadows. Okay, let's maybe choose of the brush and
select the guy here, see bodies messing up. Select the guy here, pins around the edges
to create more shadows. Stop here. Good,
because they need to inside into the
body ship to blend it, maybe I should just do it. Okay. Okay, so go
into the body ship and it's here to make it look like this. Okay, go out of the ship. Yeah, we know how the
perfect blend here. I'm done with the
body in the hands. My next target will be here. This hands here. To select the guy and go inside the ship. And the bush shift
and select Pint. Change the yeah. Maybe brighten it
up or darken it up. Just messing around with
your shape painting. Maybe choose this
more intense brush, perfect then I would
like to brighten it up, Sample my color and shape. Brighten it up like this. This guy, choose the scanty one. This one? Yeah. I'm just going to leave the
whole thing like this. Like what we have so far. Go out of the ship and
select the next ship. The next ship shift. Tell you the bit
confusing I'm feeling we should walk on the second
hand, that's finish work. Work on this guy. What I'm
going to do is I'm going to walk on the drawing first. Just or maybe delete this guy. And delete this guy. And select this
guy, the perfect. Select this guy too,
and create the coveect. Finally, select the guy
and go into the ship. Select your brush shift, X, S, the color, and click it. Daryl your brush And
select your size guys. I double click the
brush to lick in, and I didn't need to click, so I just okay, and, and then let's start
to draw to paint, right? Perfect. I'm going to brighten
up my color bits rising up my color to shift. Just rising up my colors. Blue and B for brush and pins here to reduce
the stroke size 0.02 Then maybe make it even more brighter. Maybe the stroke
size to 0.15 then. Yeah, see that we're achieving
better highlights, right? Yeah, I like what
we have so far. I feel like darkening this part up more so that we have the
highlights in the middle. Okay, I'm going to do, I select the dark guys here, sample the dark Gci. Hits for push to
continue painting. Going to, of course,
reduce the shug size 15. Then we're going to paint perfect. Go outside the ship and yeah, like what we have so far. The next guy is this
guy is the big guy. The big guy. I can see that we are not able
to go inside the ship. It turns out that the
big guy is a group. It turns out that the
big guy is a group. So let's try to group it. See, yeah, now we can
go inside the ship, now we can go inside the ship. So go inside the ship and
then take your brush to shift X and make the
color bit darker. Okay, and then
select your brush. Reduce the size, and
we can begin painting. Maybe we should make
the size bigger. We need to undo some of the, the paintings and make the
size of 0.5 I like 0.5, so we're going to work with 0.5 To work with 0.5 from now, maybe we're going to reduce it. We are trying to paint some
other intrigued parts, right? Mm. I'm going to keep painting, if you like, you can use
other brush presets, but I'm just going to
stick with this one. Okay? I just want to
get this done quickly so the video doesn't
become uncessially long. Okay, so I'm going to reduce those truck size because I
want to pint places like this. I want to add some
shadows, places like this. I'm just going to add my shadows just to make
this part stand out. All right. You get the point. Like what we have so far. And maybe I'll just add
another level of shadows. Maybe K darker. Make it darker so as to have
better shadows at the edges. You make it more dark just so that the
edges can stand out. One other thing guys. I need to clear demarcation
between these two legs. So I need to demarcate them with a more precise brush to
select the guy to the color, you know, I think I will just. Smaller size 0.15 and just might not be really perfect because it's interfering with the other
parts of the drawing. But you know what, we
don't have to make it too precise, right? So we can just come towards, maybe just come towards and pin. Just doing, you know what, I'm just going to use my brush. This brush and I'm just
going to use it to I just need to do not and
change the stroke size. Then select my brush size. Just going to just make. So make it. So just make it
so I'm going to make it. So I think this will work
better. Work better. Maybe we can just up like this. Look into these other parts
of the leg in so manner. Okay, perfect. Now we're left with
this other parts of the leg to go
out of the ship. Let the guy go inside the ship. Your pint brush to
let this guy here, let your size and begin
to pint for this one. Maybe a little bit of darkness. A little bit more darkness. We do us to differentiate this
guy from this guy, right? When we do this, see that we now have a shadow casting
on the leg behind. Another effect we should
have achieved here, but it's not still bad. Just select the brush once more. Let's make the painting more. Now, as we build up to
the end of the leg, we're going to let my
eyedropper and try to sample on the brighter sheets.
And then brush. I like what we have so far. Go out of the sheep
and let's do the legs. These legs, okay, select
the leg. Go inside. Select the brush to shift
X Nick, Select your brush. Brush size pins. Good guys. I'm going to leave this one at
this out of the ship. Select the next guy. This guy go inside the ship and push to shift
eggs, make it darker. Select your guy here. Smaller size spins, we are doing with the character. The only parts left
are the parts here. The guy go inside the ship, select a pin, shift X, make select the brush preset and make this darker pin, maybe even bigger, 0.5 in. We need to make. This shall stand out so
that ship stand out. Right, for this next guy, you need to select the guy, go inside the ship, shift X, make this
maybe even key. Select the paint
brush and then size. Right? And then brush size. Yeah, maybe we select the more intense will
change the size to 0.15, more intense painting
around the middle ship. Yeah, I like what we
have towards the end. We can actually make our ship sample the bright color she X, make the ship make
the sheet brighter. Select your guy back. So sorry guys. I tend to keep double
kicking the B to Okay. And I don't want to
make any changes. Just can then select your
shook size and then pints. Pint around the edges. Yes guys will be the
end for this ship. Go out of the ship. Set
the next ship, this one. We're going to use the
same brush shift X and make even Dak smaller, Shook, and then pins. Perfect. Select the selection to
go out of your ship. Select the next guy, go into the ship. Select your brush to
select your brush preset. Select the size of the S, and then make this
and then Ptsd. Sample my color shift X and
then make it a T. Sorry. The paints, so my, my shot is big now Pinto. I'm looking to paint all around, all around like this
and then come on, darken my color so as to
be precise in the middle. And then just select this guy. And so as to be precise
in the middle, right? Maybe even reduce my size. And then paint like this. Now the next one is
to work on this last, this last to select the
guy go into the ship, your pain and your brush. To shift X N, select your push your brush and then select shot size paint. Needs to be more intense at the end so as to differentiate
it with the white bug perfect. Just go
out of your ship or maybe just biting the color, maybe to sample shift X and
bright in the color bit. The brush. And let's just, let's just pins perfect
and go out of your ship, select the last ship
and go inside shift X, darken it up, bits, select your guy here, this guy. Or maybe even use
the smaller ones so we can focus on the middle. Just the middle, like this, like this, lots like this. Sample mean color. She make it even. And stroke size
needs to be, sorry, I double click the brush again to select stroke size
needs to be small. We can see that 15 can see that we're having
some nice highlights here. Basically, that's it. I don't
want to do too much here. That's it I docked out. Again, I'm just
going to talk it in. Okay, Selection to and
go out of the ship. Perfect. Now we're completely done with our character and we
can see the details. We've been able to add very beautiful shadows
and highlights. The next thing left, the flow
is here and the flowers. And then maybe do
that background. In order to just keep
this video shot, I will ask you to complete the remaining, you
get the point. And of course you've
gotten the steps. You just have to select the guy, go inside the ship, Select your brush, to
select your brush. Reset, Change the shut
size and then pin. Okay, you then do the leaves. Do the leaves and
do the flow, right? So I'm just going to import the one I did with
the background. I do the background so you can see how the
background look like. Perfect. This is the one
with the background. Just going to skin it up and
you can see what I did here. Just put this ship and we had the mean
background as this color, you are going to be responsible for quitting the ship also. And then just painting in the
ship, the two ships, right? Just like we did here, all the files will be
made available to you and I would like to see
what you can come up with. This will come to the
end of this lecture. See you in the next one.
61. 61 Assignment 12: Hello guys and welcome back. In our previous videos
in this module, we learned about the brush tool. Okay, we learned how
to use the brush tool. We refresh our memories on
how to use the brush tool, how to create custom brushes, how to export them, how to import them, how to use them on our artworks in this video
or in this assignment. Okay, so this is an assignment. In this assignment,
you are going to come up with an
artwork just like the one we have created
in our exercise project. You can go on Pinterest. You can search on Google. Okay. Of the creative sites, you should be able to get
concepts which you can work on and come up with
something amazing. Can be a cartoon character, can be a character like this. It can be maybe an object
or a set of objects. Whatever you can come up with, just come up with something and use the brushes which we've created here to just give it this greeny texture look with the highlights
and the shadows. I would love to see what
you can come up with, share your project with me,
and I would love to see that. See you in the next one. See you in the next module.
62. 62 Clipping Masks: Hello guys and welcome back. This module is about masking. Okay, in this lecture we're going to be
learning about masking. We're going to be learning about clipping masking
in this lecture. And then in the next lecture, we're going to be taking a
more advanced type of masking, which is called opacity masking. For the first one which we're
going to be looking at, which is the clipping masking. It's basically a simple
way of revealing part of a text or an object
or a picture. Using ships in B Illusto, using vector, ships
in Ab Illustrito's. It's really a very
simple, basic concept. I'm very sure most of
you know about it, and we even covered it
in our busy course. Okay, so I'm just going to
go through it over again. I'm going to start by
creating a new, new document. What masking does is
it helps to reveal parts of a picture
or of an object. In order to demonstrate,
let's just come here and go to the project folder. Okay, in this project folder, we will go to the fourth folder, which is the masking folder. Okay, which has the name skin. Now, just come and
import these two images. I'll just choose one
of them for now. And then please see Now. Masking enables us to reveal parts of this
image if I take a ship. Okay, then draw it out
on the image like this. Then select the boot of
them and right click you. Then see where it says
clipping mask, right? If you click clipping mark, you can see that the image is
now buried within the ship. Okay, within the ship. Only this part of the image is revealed when you double click. Now you then see that we
can now move the image. We can now move the image, but when we do not double click, when we just click
and try to move, we see that the
whole mask moves. Okay, so that's itable marking. And when you select the mask, you then see these
two icons here appear and with the
name clip group. Okay, now it means that this
is now a clipping mask, it's now a clipping group. And when you come
and click here, you'll be able to
edit the image. It means you are going
inside the mask to edit it. That's how masks work. We also have what we
call compound masks. Let's go ahead and
please the second image, we also have what we
call the compound masks. And these masks work as a compound objects
work in compound objects. Let's assume we have this
ship here and this ship here, and this shape here, and
this ship here here. We just have them
arranged like this. Maybe this one is bigger. We want to create a mask using the S. We want to create a masks on this image
using these ships. When we select them and
maybe bring them here, then select everything and right click and
make clipping mask. We see that we are
not able to do this, I'm just going to undo. In order to do this,
just select your guys, your ships go to objects
and go to compound path and then make you're making
these a compound path. It means they will
be acting like one. It means when you select them. Now, when you select
everything now and right click and make
clipping masks, you then see that you are able to create your
clipping mask. That's it about clipping
masks, Very simple topic. I'm very sure you
have experience with this topic because it's
a very basic function, every basic user of B Illustrator
should know about it. Ok, you can duplicate. We see that we now
have the mask here. Of the masks here, that's one of the ones
duplicated. The one duplicated. So you can just select put
down all the duplicate, Bring it, maybe recite it a bit, and go out of the group. And we see that we now
have the mask here. This is just all I have for
you regarding clipping masks. Now in the next lecture,
we'll be looking at a more advanced type of masking. Okay, see you in the next one.
63. 63 Opacity Masks: Hello guys and welcome back. In this lecture,
we're going to be learning about opacity masks. Okay, so what are opacity masks? They are similar to the clipping masks which we looked at in the previous video, only that they affect the
opacity of an object or a ship. Okay, so I'm going to select a common precise here to
start and how they work is you use an image or an object or a ship to
actually generate them. Okay, so I'm just going to
explain that in a minute. I'm going to please file, just come to the project folder. Let's please this
first image here. Just draw, you don't please. Okay, then come again and
import another image. Let's import this one please. Okay, what opacity
marks do is they use one image to generate a
mask around another image. Okay, using the opacity channel, I want to use this
image to generate my opacity mask in this example. Okay, we're going to see the effects we can achieve with this
in a short while. Select the image,
bring it on top, the other image, okay, the mask has to be on top. For this example to work, bring the mask on top and then select the both of them and come
to transparency. Transparency. Yeah,
this is transparency. Just come to the transparency
panel where you see, you just click mask immediately. You see what we now have. Now what has happened
is a illustrator has shaded out the part
with the dark color. Just select the guy
once more and release. I can explain this better. Okay, now I'm just going to duplicate the image here
to the right hand side. When we look at this image, we see that here
towards the end, the image is dark. Okay, the image is dark. If you have any
experience with masks, maybe you have an
experience with Photoshop. And you know about opacity
masks in Photoshop. You know that black
color conceals while the bright
color reveals. Okay. It's just like having us change the color of this
image to black and white. Let me just try to
change it to black and white to come here and embed the image And the edit, edit colors and convert
to green skeld. You can understand better
now this is black and white. And in the principle of masking the black colors will
conceal the image, while the bright colors
will reveal the image. The whiter, the bright
part is that this part, the clearer image,
will be revealed. Okay? Okay. We can still select this guy and try to
create the mask again. It's going to work
just like this one. Select the both of
them and make masks. Now we see that we
now have our image. One thing we can do
is we can actually duplicate our image control. You can see that our image
is now more visible. Right? One other thing we can do is come and make the background. It's possible to
make the background. We're going to see that
our images fit into the background because we actually used the background
to generate the mask. Yeah, this is what we have. This style is very popular
in the design world. Okay, this is how
they come about, this retro ground
field in designs. Okay, we can also
use the gradient map to our opacity maps,
our opacity mask. Let's just create this guy now a ship and give it a gredent. This is ingredient and I'm
going to make this 90. And for the black color, I'm going to give
it an RGB color, noted green scale color. And then I'm just going
to draw it out like this. Okay? You know what, I'm just going to reverse the gradient and then
please another image. We're going to please
this image right now. Now we have this. Okay, I'm just going
to use my gradient map here to generate
the opacity mask. I'm bringing the gradient
to the front and I'm selecting everything and going to transparency and then
mask. Now we can see that. Image then fits out according to the brilliant is now if
I give it the background, maybe give it a white
background or black background, whatever color it is. Let's say give it a white background and
just send it to the back. We can now see that we have our image feeding
into the background. Feeding into the background. This is how we can achieve
this in a illustrato. This is used a lot
in posted design, use a lot in the design world in order to achieve this into this is how you go about it. Now we can see that when
we bring our image here, it's actually feeding, Actually feeding into the background. That's to show you that here
it has affected the opacity, has used our gradient to
actually affect the opacity. With this, we can maybe select
the background and then maybe give it color
color this color. And as you can see,
we are achieving this uniform look and the image feeding
into the background. This is how you can achieve
this using the opacity masks. Okay, all you need
to do is come to the transparency
transparency panel and then create
your opacity mask. Now we can see that we have the image here and we have
the mask here and there. Boot linked. Okay,
we are boot linked. You can actually
invert the mask. Okay, so when you
invert the mask, you then see that
it's inverted, right? You can invert it, it's inverted and then
you can release it. Okay, this guy also. We can actually invert the mask. Let me just delete
the one cupicd, we can actually invert the mask. You can see what's
happening, right? Perfect. Now, I'm just going
to do more stuff here. I'm just going to please the other mask
which is this one. Okay? Just going to please it here and maybe try to generate
the positive mask with it on more of the images, this drug perfect. So what I'm going to do
right now is I'm going to, just to make the image appear on top this time so as to see what effect
we can come up with. Okay, select the boot of them. The boot of them and make masks. We can see now on the effect
we have come up with. No, maybe we can also invert
the mask, see the effects. We can come up with
more of what we called it an inverted effect. We don't need it like this.
We don't need it like this. We just release and
let's do it normal way. Arrange send to back
the boot of them masks. This is what we have achieved. Yeah, that's opacity
masks for you. That's all you need to
know about opacity masks are going to try to
do this color to see what we get perfect. I like what we have and you can see this ground effect
we've achieved. Okay, that's opacity
masks for you. And with this, we've
come to the end of this. In the next lecture,
we're going to be using our opacity masks to actually add more detail to a posted design,
retro posted design. So we're adding this G
to our poster design. See you in the next one.
64. 64 Exercise 2 Retro Poster with Opacity Masks: Hello guys and welcome back. In this lecture, we're going
to be taking a poster design and giving it a retro feel, that retro grungy feel that retro poster
designs usually have. We're going to give our
poster design that feel, that detailing using
the opacity masks which we've learned
in the past video. All you need to do right
now is come and click open, and land on your project folder where you see Grange vectors. This file just click
on it and open. Okay. These are the files we're going to be using to
generate our masks. Remember I mentioned that
we can generate our masks using either objects or images. In the last video
we used images. I think we used one object also. That's a squared shape and we
give it a gradient, right? Yeah, we can actually
use objects. Now, these are examples of compound objects because
they consist of a lot of vector shapes coming together
as one the compound shape. So just come to file and then come and select
this retro pusa here. All you now need to do is
just please your retro pusa. Then we are going to now apply the effects
to select this guy. One thing you have to understand
with these retro files, these kinds of files, this vector grange files, is that it consists
of a lot of ships. If I hit here or select
my direct selection, we'll be able to see that we have thousands of arc points. Okay, We have thousands of them. To show you that the
work is very detailed, there's a lot of detail. These are vectors,
these are not pixels. These are vectors.
That's to tell you that there is
weight in this. Okay? That's why your system
might, while doing this, just duplicate this guy at
and drag it to the left. Drag it on the poster. Perfect. The next
thing I'll do is I'll select my postage
and send to back. I'll adjust my poster. Maybe adjust the size like this. Then yeah, maybe adjust
it again like this. Yeah. Perfect. Next thing
I will do is I'm going to create this ship and
send it to the buck. Arrange it. Send to the buck. I'm going to hit eye for my eye and select
this color here and just make my background fits a bit more
with the push star. What next do I need to do? I
need to do is select the guy here and I'll select
the push star design. And then go to my transparency
panel and make mask. It didn't work out well.
It is not what we want. So we're just going to release and try to fix the problem here. The problem is that
our mask image or our mark shape is black. Green. Rather, we don't
want to be grip of course, because darker colors conceal
darker colors conceal. We don't want this color, we just want it to be white. Actually, I forgot to
change the color here. Just come and change the color
and then select our image. That's our P, K and
finally make mask. Now we see that we
have now achieved our retro design,
our retropielk. I want us to do one last thing. Just come here and drag this other guy to the push
that's holding down shift. I'm just going to fit it
on our design like this, and in to arrange it, keys' just going to scale it up. We can see that it's taking
a tool on my computer. Okay. And I'm just going
to drag it down like this. Okay, Next thing I'm going to select both of
them like this. And arrange and send
to pack so that the all P behind
our mean design. Right finally I'm just
going to select the other one and I'm not going to
create a mask with it. All I will just do
is give it a color. Okay, I'll zoom in, use my drop two and sample
one of these colors here. And then I'm just
going to go back to my selection two and zoom out. Now we can see that we have been able to achieve this retrophin, like what we have so far. I feel like actually
changing the color, maybe making it a
little bit darker. Okay, Maybe just hit and
try to sample this one. Then go back to your selection. To what I want to then do is make this color a bit brighter
than what we have here. What we have now. Just
brighten it up a bit. Okay? Okay. I feel like
making it look even brighter. So I'm just going to select it and try to make it
look even brighter. Okay. Let me make sure
I'm selecting it's okay. And then try to make
it look even brighter. To zoom out and Yeah, I
like what we have so far. So what I would
then do is select my whole design and
come to Edit Copy. What I want to do
is I want to create a new file and pie our design. Okay, So that I can scale it up. Because right now it's on
a very little size here. And I can now close
this file and not save, now I can just control
V to paste design. Just scale up our design. Scale up our design gradually. It might take some time
because of course they are vectors and we're dealing
with a lot of things here. It might take some
time to scale up, but you can eventually
scale up the design. And then finally,
I think I'll just use my art board too and just fit the
art board to my design. Now we can zoom out and
our design is done. Just come to file export. Come here. We can
see it as retro. Yeah, now we can see its. Where is our file?
File? Should be here. Now when I click and open, we then see that this is
what we were able to create. This is the original, this
is the one we came up with. Okay, That's how you create the retro grunge feel
on your designs. With this, we've come to
the end of our lecture. See you in the next one.
65. 65 Coloring Tools and Techniques: Hello guys, and welcome to this module on
colors and patterns. Now in this module,
we're going to be dealing with colors
and patterns. Okay, for colors,
we're going to be talking about coloring
techniques and tools. Okay, for patterns,
we're going to be creating patterns
from our sketches. So we're going to draw out patterns on paper and
then sketch them, how to be illustrated. And we're going to use them
in some of our artwork. I know that coloring
and coloring tools and techniques are quite basic
stuff to be illustrator. And I know that a lot of you have knowledge in
some of this stuff. I'm going to just
try to stick to the more advanced stuff. Okay? And maybe just have a quick brush on the
more simple stuff, and then try to stick to the more advanced stuff in order to start going to
create a new document. I'm using this common
preset here now. This is the new document
that just created. As you can see,
it's RGB and yeah. So the first thing I
would like to look at now is the switches panel. I know you know about switches. You should definitely know
about switches, okay? Because of course, this
is not a beginner, cause switches are
very basic stuff and we use them in past
videos, right? What are switches?
These are switches. These are switches. In switches, we can find our
colors, color presets, which we can immediately just assign to our feel and strokes. Okay? We can access
the switches here, We can even access them here. Also on our properties panel, where we can come
and click here. And then we see our
switches, okay? And we can click here also and have access to our switches. Okay? And this will be applied
to, of course, our stroke, and this will be applied
to our field colors. Okay? So what's special
about switches? Okay? So first of all, you have to know that apart
from adding colors here, we can do some other stuff here. We can delete switches. Okay. We can delete
some switches. We can create new switches. Like we did in one
of our past videos. We spoke about global
colors, right? You remember, yeah, we
can create new switches. We can create new color groups. Okay, we can come here
and show all swatches. Show color swatches alone, which will show only
color swatches. It will remove pattern swatches
and gradient swatches. And sorry, we also have show gradient swatches which will only show
the gradient swatches. Show pattern swatches
which will only show the pattern swatches and
then show color groups. Okay, just going to take this
back to show all swatches. Now one thing you
have to know about swatches is that have
what we call libraries. Okay, We have the
library of switches. Now when you come here, you see the library
and you can see switches and you can be able to then load
them into new projects. But we're not going
to be receiving any switches right now. We can load of some
of the libraries. Now, when we come
to art history, we have ancient,
we have Baroque, we have all these other
categories of switches, right? We can just activate
this guy, the ancient. We can see a set of colors
that depict the ancient art. Okay? We can see them here. And we can use
them for our work. We can use them for our work. We can add them to our switches. Okay? We can use
them for our work. We can add them to our switches. And when you see
this, it says Egypt. This one says me, potomia, then this one says partia, and so on and so forth, right? These colors are categorized
by their history, right? Whenever you double click
on the switches like this, you see that they
appear here when I double click on this
one, for example. And then come here. We see
that they've been added to, they've now been added
to our switches panel. And then we can use
them from here. Now, we can also
navigate our switches by using these buttons,
buttons here. We can activate other switches by just going to the
right or to the left. Okay. That's one way
we can access them. And we can also
access them here. As you can see, we have the
other one, Celebration. We have this other
one color books. Just a lot of, a lot of very endless switches. And we can see that some of
them here are global colors. Actually most of them
are global colors. You can see all of them
are global colors here, because they have this
little triangular shape at the bottom right. Yeah, Yeah, that's
it about switches, we can just take
them and immediately apply them on our artworks. There are thousands of
switches in to be illustrator, and you can, of
course, create yours. For example, we want to
turn color into a switch, you just come and add it here. And of course, you can
edit the R channel, the channel, and the B channel. It's RGB, right? You can edit the R channel, channel and the channel. You can even change the name of the color and or of
the switch rather. And you can change
the color type key from process color to
whatever type of color. And then we have
column which is RGB. We can choose,
these are the ones. Then when you're done K, and immediately
you see that it's added to your swatches panel. Okay. What about
patterns, right? We said touches
have patterns also. Now, when you come here, you come to patterns, you
see basic graphic patterns. We see these ones. Okay? These are just
basic graphical patterns. So let me just try to go
through some of them. Okay? Some of these
patterns are really good and can serve very
well in your design. It depends on what you want. We have these other
ones which are basic graphics line patterns. They're just line patterns
just make the bigger. Okay. Then these other ones. Okay. Sorry, the patterns. Yeah. Apart from these ones, we have these other ones
which are text graphics. Text shows all depending on
what you want to depict. Then we have some other ones, which, for example, we have decorative and then we
have decorative legacy. Some of these patterns
are very nice. Okay, apart from these ones, we also have the
decorative pattern of phone star patterns. So these are the
von star patterns, It looks like the painting. Apart from these ones, we have other patterns as well. We have the natural patterns. We have the natural
animal skin patterns which are patterns of different
animal skin illustrated. When you're working on projects that have to do
with animal skins, this could come handy. We have these other ones, patterns which are
natural foliage patterns. Yeah, that's it about patterns. And all of them can, of course, be found on the swatches. Perfect. Now, we're going to be looking at
the color picker. I know it's very simple stuff, but we're going to be
looking at it anyways. Let the ship and just come here and this
is the color picker. When you double click, we
see that the color picker comes up and you can
immediately just change color. Okay, mix color. And you see the preview here. This is the new color and
this is the old color. This is the color code which
you can copy and piece, maybe in another project
or maybe sent to your web designer or whatever. That. Just about this two. The color picker two we have here which will show
us swatches instead. Then here will show
us the color models. Now these are the color models. There's a lot you can do here. Maybe you are done selecting
the one you want to select. Just click Okay, and you can see that it
has appeared here. Then just come here and just
create your Swatch with it. We leave it as a global color. Okay. Immediately
you see that color. Your new color has
been added here. That's it. About
the color pick two. Then we also have
the color panel. Now this is the color panel. Let's we have ship
here, let's see. Random color. Now we don't see that we have
this color wheel, we call it color wheel
or a color spectrum. Rather we have this spectrum
and this hydroper two where we can just immediately
sample colors, right? We can just sample colors and we have the color immediately
appearing here. And of course we have
other options here which when we click
Show Options, we have these
options where we can no edit our colors with
the sliders, right? And we can of course swap from our field color to
show color here. We can just edit our
color like this, okay? Of course, we also have a
color code update in here. We can assign a black color, we can assign a white color, we can assign new color, we can give it a color back. There are many other stuff here. For example, the mode, we have the green scale, which we just turn
the holding into a green scale between
black and white. We have RGB, which we look at. We have HSB, we have CMYK. Then we have web colors. We looked at color modes
in the basic case, where we looked at RGB standing
for red, green, and blue. And then CMYK standing
for Ion Margent, Yellow and key, right
key, which is black. And we looked at the uses
of each of these modes. Rgb, which is used for screens to display
colors on the screen. And we have the CMYK, which is used for prints. So these are the two most important color modes
you need to know about. You can just read about
them if you do not know about them or go and check
the previous course. If you haven't, then we have this guy which
inverts the color, which shoes
complements basically. That's it about the color panel. Of course, we can create
a new color swatch from here and just delete. We can do a whole lot of things. Now, the next rather
more interesting tool we're going to be looking
at is the color guide. Okay, the color guides tool is one of the more
interesting tools, in my own opinion. One of the more
interesting color tools in my own opinion. Now this is the
color guides tool. How does this tool work when you come and assign a new color? Let's assign a new color, Let's just assign this color
available. And then okay. What the color guides tool
does is it comes and gives you different complements
of that color. It has this side of the panel, which is the left hand
side which has the sheets. Okay? It has this other side of the panel, which
has the tints. And then this middle part, which has the active colors. Okay? Or we would
say the mid tones. Okay? Then this other
place has presets, which we can choose from, which will complement
the original color based on certain rules of
the color wheel. Okay? This is basically using color theory to
suggest colors for us. You can just go
through all of them, we're going to go
through some of them and you see that all of these colors original color. When for example, this guy has the
background and then cut control to have
another one here. Let me just select
this guy here now. We can now see that we can cover design with some of these colors or all of
these colors on it. It's just going to make sense. It's going to make
sense because all of them complement each other. On the color wheel,
maybe I want to create. Small design. Now let's see. I want to see, to be too, okay? And I want to just up, maybe change the font style. Give this font style. I know we haven't looked
at type in this course. You know what type is. And maybe at least have
some experience with type. Since this is not
a beginner course. Now I'm going to
select the guy and I'm going to just
create outlines, okay, to destroy the text. So I can furthermore
modify the text. Just similar to expanding
here. Group to the group. Now, I'm going to
select some of, some of these texts
here and assign some, some of these suggested
colors to them. Right? I need to maybe
give it to color, give these guys this color. You can see that these colors blend with the
original color blend. They are not totally off. They kind of blend in some way. Okay, So that's what the B
color guide to can do for you. Okay. So we're going to be using the color guides to
in subsequent videos. In subsequent lectures. Okay. Like we did in
the beginning courses. In the beginning
course, we actually use the color guides to a lot. And we're going to
also do so now. We can choose from
other presets here. Okay, let's choose this guy. Let us group them like this. Okay, let's just control. I can see the Group
Command control also. We can give it this color
select and give it, now we can see we're
having harmony. I'm going to use
this other guy here. This guy, this color, this guy, this color, this guy give you this color. As you can see,
it's not going off. We're having some harmony. No matter how you
do, we're going to have them complementing
each other. So that's the use of
the color guides to, let's choose another preset.
Let's choose this one. This color, this color,
give this color. You can see we also
have harmony here. Let's choose the last one. Let's try choosing colors here that will blend
with each other. It's good that if you
have a bright background, you should then have
darker color selections on the elements on
the background. If you have a dark background, you shouldn't have
brighter colors so as to differentiate your background
from your design elements. So that's a common design rule. Okay, that's a
common design rule. Yes guys, that's now we're
going to be moving to the next tool and this is the
Recolor artwork tool. Okay. Now, in order to
demonstrate this too, I'm going to open a file. It just come to your
project folder. Come to this folder which
says colors and patterns. And you see this recolor at work had to be illustrator file. Just select the file
and click open. Now it has opened the file. As you can see, this is just
an info graphic design. One thing you have to notice, this design has a lot of colors. Okay? It has a lot of colors. It has purple, it has
green, it has yellow. It has this sheet of
blue, this sheet of red. All the color. It has
black. It has white. It has all the
colors you'll need, okay, for a design. I just want to use
this design to demonstrate the recolor
artwork tool for you. Now, the recolor
artwork tool can be found in three different places. Physically, you can see it here. So all you need to do is select the design the group
and then come here. When you see this
color wheel icon here, it's the recolor artwork
tool. Then click it. You can also access this two
in the color guides panel. Okay, you can access
this tool here. And finally, you can access this tool by going to Edit and then edit colors and
then recolor artwork. When you click recolor
artwork, this is what you get. This looks confusing
or complex at first, but it's not too complex. And we're just
going to go through the recolor artwork
panel right away. Now, what does this panel do? What this panel
does is it gives us the ability to edit our colors. To edit the colors
of our artwork. It helps us to add a
lot of variations. Okay, we can have this
artwork with the colors, the recolor artwork
to just helps us to maybe have
different variations. We have this guy and
have another kind of color theme and have
another color theme here, maybe even four
different color themes. And the recolor
artwork to gives us the ability to just
change colors together. Just does it
automatically and then does it in accordance
with the color theory. So that's one very good thing about the recolor artwork tool. I'm just going to
have a duplicate of the work here and then
select this guy here. And then go to the recolor
artwork tool right now. Now, when you open the
recolor artwork tool, we see here which says a sign, and then we see the
other one which says it with this please. We can edit active
colors in this place. We can also edit the colors. Okay? We can edit the colors and do a whole lot
of things here. Right now, I'm just
going to start here. We are giving this
wheel where we can just basically change, edit colors and we can see the changes happen right
away on our design. Right? Okay, I'm just going to cancel this and
open the tool again. This time I'm going to just walk through some features here. Right now, you see this, and then in this place you see color groups.
And we have grease. We have the bright.
Now the brights contain all the colors here and the great
green colors, right? If we do not like
changes so far, we can just click reset
and we're going to have our colors back to the original. Now right away, we
can just create maybe a new folder name the folder, let us leave the name
as at work colors, we can now make our changes. Let's just come on
randomly change colors. This, we can
basically go back to our original stuff by just clicking on this new
folder we created. Okay, with our original colors. Let's say we're
editing our colors. We liked what we have. We can of course,
create a new folder with our new colors. Maybe we can name it new. Now we can see that
by just clicking, we're able to go
back to our colors. Okay. The new colors we had, the new color theme we have. So that's one way to
save our changes. We can delete, of course, we can select the new
one and just delete. And it's going to
delete the changes we have made right now. We see a whole lot of things here and we're just
going to go through them. Now, when I select
our color here, we can see that here, it says current colors. This is the current color. And then based on the
changes we've made, this is the result we've gotten. So this color has been
edited to this color. This color has been
edited to this color. This one to this color, and
this one to this color. If we just simply click
on this icon here, we can see that we no
longer have it edited. We can basically see the
changes that have been made and then decide on whether
we want to keep it or not. Here also, when we click here, we then see that this color that has been
edited to this color. Here. When we maybe click here, we see that it's
no showing here. We then that the changes was made here or the change was made here and we
also have this guy, basically this one shows you the original and then on
shows you what you've been able to achieve by
editing it right now. We have here that says
colors and we have here, we see it's in. All right. All the
colors are active. We can actually
reduce our artwork. Let me just cancel
this and start afresh. We can actually,
we can just reset. We can actually
reduce our artworks, or rather our colors, to a certain number of colors. Right now, this artwork, as you testified with me, has a lot of colors.
Has a lot of colors. What if we want to just reduce these colors to a
certain number of colors to illustrator using the recolor artwork tool
can do this for us. Okay? But in a very
systematic way, it doesn't do it just randomly. What if I click coming and
then click five colors? See that immediately
the changes are made. Now we've been able to merge all the colors to five colors. B, illustrator does this
based on color theory. The calculations
are quite complex. But it does it based
on color theories. And then it just joins
the colors to make sure that we have
just five colors. And we can keep going down
and go and green down, you can see maybe one color. And it has joined
all the colors, and now says that, yeah, this is the best
color we can have. Now we can, of course,
keep this in our color. Okay. Using the tools here. Sliders here, you can
keep editing them. Okay? And we will then have different shades of this color. And of course, we can see that the initial differentiation
still remains intact. When we see them, we know that this
is a different, this is a different sheet,
is a different sit. We can all see that this
is a pop color, right? That's one good way we can change the number of
colors in our artwork. And when we come here, we can actually choose
different color modes. We can edit the sliders
based on those color modes. We have RGB, we have HSB, we have CMYK, we have web
colors, and so on and so forth. And then we have this one
which says global adjust. Now, this one will enable us adjust the saturation
brightness, brightness, and then
the temperature. Then the luminosity, luminosity. This slide, they
help us do that. We can maybe just go
back to what we have, okay, and just add more
colors to the whole thing. By clicking all, we see that
all our colors are on back. That's one great feature, had to be illustrated. Now we can actually edit colors
by adding them like this. So we can see that right away and see if
it's going to work. Let's just click on this two. Now when I click on this two, and then click on one of these, we can see that it highlights the
particular color for us. As I click here, we see that this color has been highlighted. This color has been
highlighted here. Okay? So I just want to
try doing something. Okay. So now we have this
color highlighted, right? So let me just try
adding it here. Can see the right the
way we have it changed, and then we have it
added to this one, and Illustrator kind of does
its calculation and gives us this one to replace the
one we just took out. Right. One we just added. Yeah, that's a illustrator
for you. Perfect. We also have presets. We also have presets. We have presets. Now, the presets will, of course, will give us the ability to add,
for example, swatches. In this case, let's
just click here. And now we can see
that with this preset, we've been able to
add color libraries. We can add color libraries. We can add single colors. Okay. We single colors, okay. All of these are just switches. All of these are just swatches. You can have two colors. Illustrator enables do a whole
lot of things with these. Okay, let's hit color
to see what we get. Now, I'm going to come
to my color library and then choose a particular
color swatch. I'll just go with
the art history and maybe this time I'm going to
choose pop art. Let's see. What we get is what we got. Color choose all come to
color library for art. Let's jot this time
and see what we get. Now we see that it has been
able to now substitute the colors for us using the
Baroque color Swatch library, which we looked at previously. And we can see how it
blended everything. And everything looks just fine. Okay? And when you
come to edit colors, you can see the work
being done here. Okay, we're just going to go through some of
these tools here now. This tool enables
us to of course, pick out the color
we select here. Okay, so we're going to see it's highlighted in the
work area here. Okay, so when we
click the color, we see it highlighted here. Okay, now this
tool enables us to randomly change satuation and
brightness of the colors. And this tool enables us to randomly change the color order. Okay, I'm just
going to click this and just start clicking. And we can see that randomly we are creating
different color orders. Different color orders randomly. That will be illustrated. Just keep creating different
color orders for us randomly by just clicking these two and then by
clicking this guy here. We now get different brightness and saturation of these colors. Okay? Randomly, as this
is very important to, very advanced, too
important to already, you can see what we are being able to
achieve with this tool. Now, when you come here, you see different presets. Just like we saw using
the color guide. Took different presets
based on color, based on color theory, and you can keep choosing
and keep choosing. And keep choosing, okay. You can choose and then select your color and edit your color. You must not go with what
is being given to you. You can still edit the color. There's a lot of things
you can do with this tool. I advise that you just explore the tool more and see the things
you can come up with. Of course, we have
this other Gcia which changes the color
built on our hue. It has hue forward,
hue backward, then has lightness
dark to light, and lightness light
to dark, okay? A lot of these things
are to make it very easy for us to
achieve stunning colors. Of course, we can add
our switches here too. We can see that it
identified the color preset, the color swatch we are
using, which is the park. Right. We can maybe change
it to kit stuff and metal skin tones and
so on and so forth. So that's it for the
rework artwork tool. We're going to use this tool
to color our patterns in our subsequent lectures where we're going to explore
even more stuff. Okay, with this, we've
come to the end of our lecture on colors and
see you in the next one.
66. 66 Patterns: Hello guys, and welcome back. In this quick lecture, we're going to be having
an introduction to patterns and how to create
them in B illustrito. In subsequent lectures,
we're going to actually draw out
patterns with our hands, maybe pattern elements
with our hands. And we're going to
bring those drawings into Adb Illustrito
and treat them out. Okay. And then create
patterns from those drawings. So these are what
we're going to do now. In this one we're
going to just have an introduction to the whole
system of patterns, right? So in order to start, just come and create a new document, I'm going to use this preset. And then just go and
create some random ships, create an ellipse,
give it this color. Let's boost up the
stroke by this. They just the stroke like this. All right, that's of
course the Sk color. All right, now I'm going
to have another ship, maybe a star, but I'm just
going to have three points. Okay. So this is the
star were create in. Then going to have the
ship arranged like this. My color guides to give it this color shift X to swap the ingredient
with the stroke, with the field and just
remove the stroke. I'm just going to
remove the stroke and then create another shape here. Now this one will
be maybe polygon. Yeah, this polygon. And for the color, we'll go to my color guides
to choose something else, maybe give it this color. Okay, Maybe boost up
the stroke a bit more. Then finally to choose square here. And for the color, just going to choose
random color. So you have to note
that I'm not trying to create something
special at the moment. Nothing specific. I'm just
creating random shapes, right? And then finally we then
create our final shape. I just want to have
a ship like this, shift X and then boost
up the stroke like this. It just edits the
handles like this. Perfect. Now what do
I want to do then? There's one cycle of them. Reduce the size a bit
and then selecting them to go to object,
go to pattern. And then now we then see this message which tells us that the new pattern has been
added to the switch panel. Okay, okay, we can
see that immediately. The Lotto now creates
a new pattern for us, from our shapes right now. This is the pattern box. And everything we do here
will be replicated in all the other pattern boxes or all the other pattern pieces. Right now, we can
bring this guy here, bring this guy here, bring this guy here.
Reduce this piece. This, okay. And we can even come
and add more stuff. Maybe we can come and add
this, edit the color. Maybe something close to orange. Maybe add another one here. This guy could be blue. We add another one here. This guy could be green. Add another one here. This one could be for. So I'm just doing
random stuff here. Now we have the
patterns panel here. Now we have this
guy has the name of the pattern, says new pattern. We have the pattern
or the tile type. We have the grit tiling, we have the brick
by root tiling, which would give us
something like this. We have the brick by column tiling, which
would give us this. We have the hex
by column tiling, which would give us a
hexagonal arrangement. We have the hex by tiling, which give us this
hexagonal arrangement also. Okay. That's it about
the tiling type. We have the width, we
can increase our width, we reduce our width and height. We can see the
changes right away, We can connect them. Whereas, so that when we reduce or increase
one of the sites, we have the other one
increase or reduce in proportion to the
one we are reducing. Right? And then we have this one which will actually
size the tile to art. Okay, We move tile
with Arts and all of this will just help us
in making adjustments to the size and the
position of our, of our patterns, right? And we also have this
overlap feature here which will enable
us determine how our patterns will
overlap with each other if they overlap, okay, So let's say
we have this guy here overlapping with
this other pattern. And we now have the ability
to make them appear above or below depending on what our overlapping
looks like, right? So we can see the changes spin
made, just going to undo. Okay, So we can see what
the overlapping does. Now we have the copies
which will enable us how the copies we want
created nine by nine. We have one by 33 by one. No matter what you want, you're going to be
able to have it here no matter what type
of copies you want, what type of arrangement
or alignment you want, you're going to be
able to have it here. Dim copies to 70% Let's
see what this guy does. It actually deems our copies. Okay, we don't want to
our copies totally. We would want to see them. Maybe 70% opacity that we see what we are doing
before we conclude. Right? We have save a copy as tile edge copy
and so on and so forth. Some of these options ain't
really important like that. When you are satisfied
with what you have, all you need to do is
click save a copy. Do. When you click on Done, you now have your
pattern created when you come and come to
your rectangular for example. Then come the switches,
then come here. You see that your new
pattern has been added. Now let's just
remove the switches. Now we can see that your
new pattern has been added. New pattern has been added. When we skill, we see
that our pattern is killing with our shape. Why is our pattern
killing our ship? What we want on, we want our ship to skill
independent of our pattern. Of course, we can do
that by coming here. We learned this in one
of the previous videos. We can just make our ship
skill alone and we can make our pattern skill
with our ship if we transform object only. We can now see
that we're able to transform or skill object
without our pattern. When we click on transform
booth or transform pattern on, we can see that we can now transform our pattern
with our shape. Okay, Now this is an
example of what we call a seamless pattern
because it's seamless. Seamless, what I
mean by seamless, it keeps repeating itself here. It doesn't have an end. It just keeps repeating
itself Depending on what surface or yeah, what surface you
want it to cover. Okay, so it can keep repeating
itself and keep going, Keep tying, and keep going. That's what we call
a seamless pattern. I'm going to take
this guy to both and close the
transform panel here. Delete these guys guys. Starts it for an introduction
to how patterns work. In the next lecture,
we're going to be creating more
interesting patterns from our drawings and
doing more cool stuff. Okay, so see you in
the next one. Bye bye.
67. 67 Trace Your Hand Drawn Pattern Elements: Guys, and welcome
back. In this lecture, we're going to be tracing our drawn pattern
elements in B illustrato. I'm just going to
start by creating a new document using
my preset here. And first things first, we're going to import our
drawn pattern elements. Go to file and please. And then come here and draw
pattern elements one, please. Now we have our
pattern elements here. We're going to just
select this guy and duplicate to the right hand
side so we have two copies. Now what I want to show you is two different ways of drawings,
of treating this guys. I'm going to treat this guy here using what we
call image trees. Okay, we're going
to just vectorize this drawing and just treat the whole thing and
it's the quickest way. Okay, this other one, we're going to use
our paint brush tool to draw out our patterns. I'm going to create a new
layer now for this guy. I'm going to select this
guy and just reduce the color rather the
opacity like this. I see behind it. I'm just going to reduce
it to maybe 40 or 33. Okay? Maybe 36. Just to see what's
happening here, while also giving me the room to see what I'm
going to be drawing. I'm just going to
top this guy away. And now we're going to start by using our pin brush to draw
out our patterns, right? So I'm going to lock my layer here and dowd
on this new layer. Come and select my pin brush
to click to see the options. And I like what I have. Maybe I'm just going
to keep selected. And I did parts selected
so that while I draw it can maybe continue
drawing like this. I don't know, Maybe
I should just undo or check the
feature, right? Maybe I should check this two. So as to draw normally
I'll need select my pints burst and
then just draw. If I'm not okay with my drawing, I'll just undo the
drawing and draw. Okay, with this
guy. For this one, I'm just going to draw and
try to make it more perfect. Okay, do not do need to take my time
to make sure I get something cool, really nice, perfect for the middle guy. I'm just going to draw
like this for this guy. I'm going to draw like
this. So grow like this, grow like this, like this, like this. Do I don't want
it extending out. Yeah, I like what we have
so far, and for this one, I'm just going to grow, keep growing. Two. 12, Kim, I'm okay with this guy. And then go to the next 12. That one, I don't
like this one either. We're going to start
from the side here. Okay. And hopefully we'll
get something better. It's a bit small, so I'm just going to
manually Increase the size. Increase the size and yeah, I like what we have so far. It's like my pin bush
to draw out my guys. Okay, next guy draw. And finally we have this one
here here. Okay, it's you. I'm just going to
do, draw it perfect. Now we have these little
circles inside them. We're going to
draw them quickly. Do perfect. Okay, I'm just going to
work on this guy now, so maybe I'll reduce
those truck size bits. Okay, well, maybe I'll
just keep that one. Okay, sorry. I'm just going to start
with this part first perfect, then row these parts, and then row these parts. Finally the parts. Then we have this part here. This part, finally we have this part. Perfect. And we're done with
most of our work. We only have two left, This guy in the
sky with this one, starting with the middle here. Sorry, I'm starting
with the middle here. Okay, I'm just going to
do it. It's too big. Okay, Then we have
this sky here. So I'm going to just
go with this one. Okay? Then we have this guy. This one. This guy. This guy here. Finally we now have the flowers, right? Something like this. Just red one. We have this, we're just going to do. I'm just going to draw
it like this and this. This one. To draw it like this. This two. Yeah. I think I'll just to again and try it one more time. Okay. I think I'll do it again
and try it one more time. Just go with this one. I'm
just check like this and yeah, I'll go with what I have here. Maybe I'll just, instead
of just going with it, I'm just going to expand it. This, maybe drop the sky. Yeah, what I have here, even though I would like to
extend this one copint out, and I like what we have so far. We have two more elements. We're not going to draw
the sky because it's basically a repetition
of this one. Okay? We have these two elements. Take your brush to
this part like this. Let's just draw the branches
before going to the leaves. I'm starting with this leaf. This, this guy, I think I will just select the guy we cheat bit.
Reduce the size. So this other guys, I'm just
going to reduce the size. Yeah, reduce the size to maybe position for these are
the ones them out quickly. Perfect was going to see what
we've been able to achieve. Perfect. Then finally we have this one set
my pin brush to the better we even have this. Then for the body, I'm just
going to have it like this. I won't really
follow what I have in my drawing perfectly. I'll just manage what I have. Just manage what I
have here and do the right hand side and
unfortunately for me, I have to restart this one. Maybe I can just yeah,
I have to restart. I have to restart. I can
just restart like this. I'm finding it out to complete. Yeah. What I will do is I'll just select
my direct section to and just complete
it manually. That's one advantage of
using the thin brush too. You can use your
direct selection tool to complete stuff, right? Because you actually have
them as anchor points and handles like how we have them
here when close this layer, when I hide this layer, we see that we've
been able to trese, our drawing like this
K, it looks good. So we're just going
to do the next one. Now, for this other guy, I'm going to use a
different method. Okay, I'm going to use
the image tries method. Whenever you import an
image into the illustrato, you see this image button here. Now, this button helps
you tase out your images, it helps you vectorize
your images. We learned about
vectorization of images in the beginner course. It's quite basic
function, the illustrato, you can vectorize your
images by coming to objects and then image tries the Mick click on mics
that my images large, a large image and
this will a more ram. Okay. I'm just going
to click okay. And we can see that
it's now processing my image and
immediately it's done. We have our hand drawn
image vectorized. Now let's just undo our vectorization
and come to Windows. And we can access
the images panel. Okay, we can see the images panel here. Anyways, just select
your guy here, and let's hit imageries. And okay. Now when we
come to our properties, we can click and we'll then
see the image trace panel. So this is the
image trace panel. And we can do changes, we can make changes to our work, to our vectorized art
using this panel. We can just drag it to
the left like this, it's going to load
before moving. Finally with this panel, now we can basically see that we have the
default preset set and we have the tracing results of which these are the
tracing results, right? And then the mode
is black and white. It came, but we have
other modes as well. We have the color mode, we have the green scale mood. We have other presets here
which we can try out. But for this lecture, we are trying out other presets. We can check them for yourself. What we are doing this lecture, is we're trying to crease
them out as black and white. When we click on Advance, we can see that we have many other options
which we can edit. We have paths, we now
have low and high. When we click on high, we see that it makes
changes to our paths. Then we have corners. The more we click, the more we ad just, we'll see changes being
made to our corners. And even the other one
which says noise, right? This will increase the noise. If you look closely, you see the changes
that are being made. Okay? But I don't want to take note of these changes
or give them priority in this video because
I just want to achieve something decent
and go on with the video. Let me see. Basically I think we'll just leave
these settings like this where you can
explore them on your own. Later on Ok, if you
click on Ignore White, it's going to just remove
all the whites species. Going to remove all
the white species. And we're going to leave this as objects which we can
basically add colors to. We don't want to ignore all the white species
because I want to use the white species
as my colors. Okay? Want to add colors to
the white species? What I'll then do is just close this imagery spanner
and click and expand. It's going to expand our ship. We now have them as real ships. We now have these guys
as a group group. We now have them as separate ships And we
can take this guy out. Okay, can take this guy out. These are all separate
vector shapes. So as you can see,
within a few clicks, we've been able to change
our drawings into vectors. Unlike the other place
where we had to draw everything with our
hands for this one, we just clicked on
a few things and we are now able to change
our drawings to vectors. I'm just going to
select everything here you go to just control X, control x to cut, then come on this layer control
as to piece them, please. And then what I'll then do is
just delete this guy here. And delete the layer as well. We only have one layer and
we have these drawings on our layer perfect. So that is for this lecture. In the next lecture, we'll be
basically adding colors to our drawings to our ships and then turning
them into patterns. Now, see you in the next one.
68. 68 Make Custom Patterns From Hand Drawn Elements: Hello guys and welcome back. In this lecture, we're
going to be adding color to our drawings here. And after which we're going to create our patterns from them. Now, these ones are of course the ones we created
using images, while these ones were created
using the paint brush tool. We're going to start
with the ones, okay? So when I take them
outside our art boat, you see that they have these white
backgrounds. All right? Okay. These are also vector ships and we're going to be using them to add colors. When I just change
the color like this, you can see that
immediately the color of this part of the flower changes. Right? And as for
the other guys, just draw them out like this. You can see that they don't
have white backgrounds like the other ones here on just
the ones are just lines. Okay? They're just line arts. We're also going to be
adding colors to them, but we're going to be
using some other tool. Okay? We're going to
start with this one. These are flowers, right?
These are flowers. This is a T, this is a leaf
and, and so on and so forth. So it's more of a
flowery pattern. Okay? Now, I'm just going
to start adding my colors. I'm going to select these guys here and just give
it color here. Can we start with this color? And I might change the colors
or modify them later on. Okay. And for this one, I'm going to give it
this color, this color. Then just come to
the color picker, to the my color like this. For this one I'm going, I'm going to give it an
orange color to some, I'm just going to hit the drop
to select the color here. Maybe make it brighter. Make it brighter like this. If I'm not satisfied
with what I have, I can go to my color guides to select more colors. As you can see just
this outline here. Using my color guides too, I'm going to give it this color. For this on I'm just going to select them again. It seems I selected
something off for this one. I'm I'm just going to play around with the colors to see
which one fits best. Maybe this one fits best, maybe this one fits best. For this one, win
to contra control, just reduce the size. The control reduce, we have this feeding
effect here. Contra control, reduce the size, then make it even brighter. Maybe increase the size a bit. Yeah, this is what we have now. Perfect. And I'm
going to go on and just change the colors for this. Maybe I should just
work on this guy here, since we have some
green presets here. Okay, I need to add this color. And then let this one here, maybe give it a red. If a red won't work,
I'm just going to the, the one that works here. Okay. So I'll just leave it at
this one for this guy, I am going to delete it because it's basically
duplicate of this one. Then for this ones going
to give it a green color, darker green, and
brighter green, this ones will carry
a brighter green. I'm not too satisfied
with the green. Yeah, for me to select
this sheet of green and then just select a sheet here. A sheet of it here. Maybe we'll work
with this for now. And I feel like having
a duplicate of this, actually feel like having
a duplicate of this and maybe totally
changing the colors. Maybe even giving the
whole thing one color. Okay. Maybe this color perfect. The next thing for me will
be to work on this guy. We give this color, so let the outline, we give it this color, then
now we work on this one. For this one, I'm just going to sample this color for now. Then I want it to be
closer to yellow. It's closer to yellow. And also for the
other four ones. Then for this one I'm
going to make this guy here maybe make it brighter. And then for this one I'm going to make them a
very bright sheet. Okay, very bright sheet of this. This will do for me
for the outline. I'm going to use
this color here. Perfect. I kind of feel that the combination
here is of a bit, don't know why, maybe I
should just change the ones. I don't know. Just try to create some fusions
and see if it will work okay for this ones. Let's see if we'll be
changing work better. If you know what, I'm
just going to give it darker shade of purple. And for the, maybe I'll
just then give it this one. For this one, sample
this color here. Maybe for this one we'll just
sample one of these colors. Also, this guy, then
I'm just going to maybe sample one. Okay, good. So there is no
specific rule to this, We'll just keep trying out stuff and work with the
one we think is best. Okay, then for my guy here, I'm going to give you
something close to blue. Okay? Something close to blue. And then we'll build
up from there. Maybe this guy will be a shade. This guy, something
close to this, Well no, Give me this one this
color for these guys here. You give them the screen. This screen for this one here. I feel maybe I should give them something that
stands out better. Maybe maybe something
that stands out better then for the body. I don't know. I don't know. Should we just work with this? Yeah, let's just work with this. Since we have other green
elements in our arts. Let us work with this. This one, This bright color, silver. Good, I like what I'm having. Especially this feel we've
got here, this new color. Let me try and see if
it's going to make sense. Just to, like I said before, we just keep making edits and seeing what we
can come up with. So there's no specific rule. Your creativity here will help you on your
creativity much more. I'm not really satisfied
with what we have here. Really. I'm not
really satisfied. I'm just going to e, trying
to come up with the best, keep trying to come up
with the best casing to randomly keep
changing colors, keep sampling colors,
keep changing colors randomly until I come
up with the best. When I am satisfied
with what we have, the nib will continue overall. I'm kind of satisfied with most of painting here,
our coloring here. I feel these two, that this guy and this
guy are a bit off. Okay? And I'll just keeping them till I come up
with what I feel is the best. Okay, I'll just fast for the video so that the video
doesn't get too long. And I'll come back when I finally decide on
the colors to use. As you can see, I'm done
adding the colors on my drawings and I like what I have been able
to come up with so far. Now I will just duplicate
these guys and put them in the side so you can access them in case
you want to copy my colors. The next thing for me would be to transfer
these colors here. How do we do that? We
don't do that normally. Okay. We have to use some other methods,
some other tools. Because these are not shapes like this one.
These are parts. And we cannot just add colors like we did
here, for example. Okay, let's see if we want to sample these colors,
for example. Or let's see, we want to sample
the stroke color, right? We select and then maybe hit eye and try to
sample immediately. You can see that it has turned this fold drawing into a ship. It has given it a field color
instead of a stroke color. How do we do that? I'm going to do and then do it correctly. What I would then do
is select everything, then go to objects and
expand appearance. Okay. Now it has torn
this path into a ship. 50% of the job has been done. I can even select
them and come to the Pathfinder and just add
them or unite them rather. Okay. Now, when I
select my guy here and hit and sample my color here, I'll see that it's now sample. Okay, and what of
the ship inside? Right. I will then use
my ship builder to. Okay, just come and double click shipbuilder
two and make sure this gap detection is checked and then the gap
length should be large. Okay? This will enable
us to detect gaps. And still fill those pieces with colors even with the gaps. Okay. After I select my ship, all I need to do now
is just come here, select the one I want to
copy from right away. I then see that my color
has been copied here. If I come to the
colors panel, okay, I would then see my color here, and then I see my coloqude. Right? The easiest
thing I can do now, just copy my colodeI. Copy my coloqude with
control C. All right. Click and then select copy. Okay, and what next? Like to select my ship. Come to my ship build two. And now we can just fill
our ship with the color. But you can see that we are now not able to fill it with
this particular color. Instead we're filling
it with this color. That's why we had to
copy our color right. When I come here and select everything here and
control V and Enter, I then see my desired
color being copied here. Now I can just come and click, and you can see that my
color gets filled, right. So that's a very easy way to copy these colors right away. Now for the ones I'm
just going to copy them and just bring
them here, right here. I'm going to select
everything here. Come to objects,
expand appearance, and then just add them
or unite them rather. And then hit, I sample the color while
selecting your guy. Before you select your
guy, just come here and then copy your
color code control. C, select your guy,
consider the ship, build the two,
then come on piece your color wood and then you
now feel in your colors. For fact, now we can
delete this duplicate. Maybe bring this guy,
just duplicate it. And bring it to the site
here. I didn't duplicate it. We duplicate it one more time. Just kill it down a bit. Now we have all of these. We will then select all of them. And expand them. Expand appearance unites. And hit Sample. This guy key for these guys, we just come in sample
or copy the coloqude. Then select these guys here, select the Shibul to piece the coloqude and just
fell in the pieces. We keep doing the same thing
for the rest of the ships. Select your guys here, then come to your shipbu piece, your coloque, and
feel this piece. Select these guys here. Rather let your color first, copy the colo code. Let your guy sib two
and then fill in. If not colo your colo code and fill in the color
Sam. This one here. Copy control V, Enter
and fill it in. Now we can delete this one. Then go to the next ship. I want to use this one. Duplicate it inside the
Select everything here, Object, expand, appearance,
and then unites. I just want to copy it's to the side so
as to make this one. For this one I'll
just copy it also. Now for this one,
I select the ship it and then sample my color. Select this guy,
copy the color code. Select everything.
Go to my ship piece, my color code and
fill in my colors. This guy copy of the colo, Select my ships ship builder to fill in my colors,
then just delete. Keep doing the same thing till I am done with all my ships. So I'm just going to forward the video since you
now know the steps. You can just do them
on your own and we'll meet when I'm totally
done with all the ships. Yeah guys, so I'm done
with adding my colors. For this one I will
need to duplicate them. Conte control a bit so as to achieve this pattern,
sample this color. Then conroe control F the
size sample, this color. Then control C, control
the size sample, this color perfect, perfect. I'm just going to go ahead and group all of
these ships together. Control select all and control
all Control select all, select all control here. All of them here. Control
also with this one's control. Finally, with this
one's control G, we to do the same thing here. Control, control, control, control, control, control. Finally, control
st, perfect guy. Right now, I'm just going
to go ahead and try to start creating
my pattern, right? So I'm going to scale this down. Scale this down also. Then I'll just try to
distribute my shapes around. I'll get this guy in the middle. Reduce this one to this guy. Let me try flipping it, increase the size a bit. This guy is going to do them in this manner and shape for this guy reflects. So we see what we have. I like what we have, and yeah, I like what we have so far. K perfect. Now for this guy, I'm going to have them arranged
a little bit differently. Maybe this guy would
not be in the middle. Maybe this guy will
be in the middle. Will have this one here. Then this one here. This
one here. This one here. This. Maybe this one will be kind of like this. This one kind of like this. Maybe this one transform
oh sorry, will reflect it. This, yeah. So we have the booth
of them design the boot designs arranged
in their own peculiar ways. What I want to do
right now is I want to create art boards
for each of them. For this guy, I'm just
going to edit my artboard. Reduce the size like this. Okay, reduce the size like this. Okay, let's edit
the artboard again. Pull down holes the artboard, then delete these.
Let's keep the, from now on we can
create our pattern, so let everything go on. Objects can, and Mick Okay, let's just move. Okay, We need to move it. Let's give it a new name. Let's see flow. Okay, and then for
the green type, let's just play
around with them and see I want discrete
type, brick by column. The brick offset, see one by 41 by 31 by two. We will go with one by two. Then let's width and height. Let's just just the
dimensions to see. Yeah, we can add stuff. All right, remember we added
stuff from the last video. We added some things, some other, some other elements. They all appeared in, in our pattern like this. So maybe we even add a ship
or a path like this, shift x. Okay, Then one like this, The sample, this color shift x. Because the stroke size, I feel this stroke is too thick. Maybe 0.50 0.5 You can just duplicate
this guy here, can see control in, we'll just move it
around the sample. This color, this color. Right away we can see the
pattern we are creating. Beautiful pattern we're
creating perfect. Just going to reduce
the stroke K, we select both of them. Just reduce stroke size. So I like what we have so far. Maybe increase the
size like this. Guys and then for the copies, I'm just going to make
this nine by nine. And so far so good. I think
I like what we have so far. I'm just going to close the patterns panel
and click on Done. Now our new pattern
has been added to our switch panel.
To our switches. Okay. Now if I draw a new ship, come to my switches
to the last pattern, we can see that we have the
flowers pattern applied perfect. I'm going to create the same pattern with
these other ones. Okay? I'm going to create similar pattern with these other ones. Now, objects, the first of all, I want them to be in the middle. Then objects part
and then just name them flowers to the grid type. I'll give it brick rule or maybe brick by column for the. I'll just increase
the S for this one. Let overlap, just try
making things overlap here to see we overlapping options copies. Let me give them nine
by nine. You see? But I don't like
the arrangements. I feel it's too rowdy. So I'm just going
to increase my, with my maybe do a bit more adjustments to the positioning of the elements. And then I'll just use
my paint brush to, to randomly randomly draw. And we can see that it's
using my pattern to feel that's what I want. I just want to use a
normal color sample, this color and shift x and
just reduce the size of, So maybe 0.02 Maybe I will
just sample another color, a brighter one
instead and shift X. Maybe this time I should
just a different profile. Okay, instead of this uniform, I'm realing to choose
this other profile, that tip to the end front. I don't know why
it's not working. Okay. It's because
it's a brush, right? It's made by the brush. So that's why it's not working. So no problem. Just go with the normal one. Okay, Now we're
going to do more, sorry, we're going
to do more growing. You should lead to details, just make a patterns
more interesting. I think I'm done with this one. I like what I have so far. I'm just going to the panel and Perfect. Let me just copy. Just copy this pattern to this other art,
put to control C, control V. Okay, And just align now set
the new 1, second one. Yeah, you can see what
we have come up with. We can now add a background
to our pattern because these patterns come as
transparent patterns. Right? To add a background
to our patterns, addcgrodi field color copy to the other board and
change the colors and arrange send to park this. Now we can go to our color guide panel and
maybe change the colors, change the colors grown, maybe even criticize
to fit like this. I really do not like this color. It's not standing out for me, it's not the best for me. I'm going to try to get
something that works for me. Let's see if the
color guide panel, or the color guide too, can
suggest something good. I feel a brighter color, brighter background color,
should do the trick. Maybe this one. Let me
try something dark. I don't like what
I'm seeing here. Let's just something bright. Okay? I'll just
leave this one for this other one to try
selecting something different. Okay. Going to keep trying
my luck to see if I get a good color for this one. I'm just going to
leave it this color. This background color. Yeah, try this,
11. Try this one. I'm just going to leave it
at this background color. All of these will be sived here so you can
have access to them. Yeah, control control S for we've come to the
end of our lecture. We can see how we started having just sketches of
these elements and then turning them into these patterns that we
can all see with this. We've come to the
end of this lecture and the next one we're going to see more stuff that we can do with these
patterns. All right? Yeah, see you in the next one.
69. 69 Recolor Our Pattern and More: Hello guys, I welcome back. In this lecture we're
going to be using the recolor artwork tool to add more color
quality to our work. Okay, and we looked at this
tool in a few videos back and we saw the
possibilities of this tool, what we can use this
tool to achieve. Yeah, in this video
we're going to just use it to add
more variations, create more versions of our artwork, different
color combinations. Okay, now I'm going to zoom
out a bit and just select my Edit to tool and select
both bots and duplicate them. We have duplicates
of our artwork. Now I want to start with this one to the Recolor
artwork tool here. First of all, I'm
just going to cancel. I'm going to give it a
bit more space. Okay. I'm going to select and then
go to the two right now. Right. I'm going to
just create one group. I will give you the
name. New group. I shouldn't have hit Enter, we start again. New group. He's going to click out, right by clicking on this icon. On this icon, I can immediately start creating variations
for my pattern. Okay, color variations
for my pattern. Okay, we can see that
we are going through a lot and lot of variations
for this pattern. Just when I just come
across one, I'm covid, I'm going to stop and
look at other features. Okay. The possibilities of this two are limit less. If we keep scrolling, we will really never come
to a conclusion. Let's just select one
randomly and just see what are the
features we can look at. No, I have this guy. There is one feature we didn't look at from the past video, which is the swap
color features. This feature we can
actually swap color. Let's assume we have this color. Let's just choose
this guy here to show us what object has
this color, right? Let's just click here. And we can see that
it's telling us that this object at once
with this color, right? When we click on it, we can see them highlighted. And when we click on it here, we can see the just
come up and go away. Okay, it's this guys, right? So I'm just going to click away. And let's see, we want to
swap them with this color. Just click and swap. Immediately, you can see that these colors have
been swapped, right? These colors have been swaped. When I take them back,
just observe she and this sky because they are the ones with
the boot colors, right? When I swap, we can see
that the colors swap, okay? That's one other thing we
can achieve with this. You can just keep
swapping to see which one is best for you. That's one thing
you have to note. Now I want to walk
on the background, I want to walk on
the background. I'm going to look for
the background color, Now I'm going to click Click. You can see this
on the background. You can see this
on the background. This is not the background. Okay. We're going
is a bit far away. I'm, we're going
to keep clicking till I get to the background and I couldn't get
the background here. So we need to click away
to look one more time. This seems to be the background. Let me try this. That's not the
background, you see? That's one other thing here. It might be hard
to get the back. Let me try this guy here.
This is not the background. I don't know why I'm
having difficulty getting the
background this time. I'm going to try one more time you guys. I'm not sure I even
selected the background. Let me cancel this. Okay. I need to select the background
in order to have it. Okay. I absolutely need
to select the background. I'm just going to make select and make sure I select
the background and I'm going to try again
color guides to Okay. Now I think I've
selected the background. This time it's like the
other time I didn't select the background to create
new group and call it new group Okay measures. Can I keep making this
mistake? Create new group. Let's leave it at new group. Let's leave the new group. Let me just start changes by clicking this two right away. Let me reset this
thing and start again. Let's assume we want
to work with this. Now, like I said before,
we can swap colors. We can actually swap colors. We're swapping between this
guy and the background. It now turns out that
this is the background. Select this guy, we can
the background, right? This time we selected
the background. Remember we can just click, of course, and edit the color. Or we can come and edit
the color here, right? And we can swap the
colors like this. I don't want to
keep the color like this and work on
some other colors. I want to work on this color. I want to work on this color. Let me look for the color. Let me click out one more time and I look at
the color properly. Let me this is the color. Yeah, this is the color, This is the color
I want to work on. I'm going to click out
of the tool and let's see what we can come up with, what changes we
can come up with. I'm beginning to like what I'm seeing, like what I'm seen. Yeah, I think I'll go with this. I don't like this guy here. I don't like this color. I don't like it. I'm
going to look for it. I don't like something.
We look for it. So this is it. Can click out
and try to edit our color. Right? A. Okay. Yeah. I like what I have so far for this guy. Let me see. I want
to walk on this guy. I want to work on this guy. Yeah, it's the one
got it this time. And we're just going
to click out and try to see what I
can come up with. We can testify that apart from a blow street of having to edit the colors automatically
using the color theory, we can of course, select these colors and
modify them on our own. Just like I'm doing right now. I like this guy and we
cannot move to the next. Okay, The next will be this one. Let's see if we work
on this guy here. For that guy, I'm
just going to use this guy now to look
for the color, right? Yeah, so this is the color. And I'm going to click
out and try to see what we can come up with a. Yeah, I like this one. Okay, perfect. So we're going to keep looking
for one particular one. Let me click out again. Yeah, I was trying to
work on this one again, but I think I will just
go with what I have now so we can see what happened. I just click here and it took
me back to my new group, the original group I created
to see that's a problem. You have to make your
changes first and then create the group. You have to make
your changes first, and then create the group. You have to make
your changes first. Okay? And then create the group. Okay. That's the mistake I made. I'm just going to, I'm just going to choose
some presets, Okay? Of course you get
the point here. You can swap colors, you can edit colors, You can locate colors and change them. Okay? I don't have to
do this all over again. Okay? I don't have to
do this all over again. We're going to go with preset and then I'm going to create a new group way with this presets. Okay, not so perfect, but I guess it will suffice. We can now see group now, we can name this new group one. When I click this
guy, we are here. And when I click back, we are now in our new group. You see we have to
make the change first before creating the group. I have this guy and this guy. I'm going to keep
editing, right? I'm going to keep editing. Maybe I will. Just a preset. I'm going to add the presets. I'm going to come to
nature and see flowers. Okay. I don't like
what I have so far. Maybe foliage, and
then when I come here, of course you see that we have many other presets
which you can choose from, which are based on the color wheel perfect. What I want to do is I want to just reduce the saturation, maybe the saturation and then have this as a group two. When I click okay. We now have a change of I can
of select them like this and then come to recall artwork panel or two and select another
second little group. Now we can have
different variations. Let the guy give it
one, let's give it one. Now we can see that we now have four variations of this
particular artwork. Of course, we are okay with the color of
the background or whatever color we can,
of course, change. Perfect. Perfect guys. Now we can see how we've used the recolor
artwork panel or tool to actually create these beautiful variations
of the same pattern, the same pattern, the beautiful color variations
of the same pattern. You can see these are looking good. These
are looking good. And you can use them. You
can use them on prints. You can print them. You can even sell. You can
sell patterns. Yeah. And with this, we've come to the end of this lecture. I would like you to go
ahead and have variations, or color variations for
this other pattern. Remember I did this
for this pattern, this first one or
the second one. I want you to do the same
thing for this other pattern. That's the first one
we created with this, We've come to the
end of this lecture. See you in the next one.
70. 70 Assignment 13: Hello guys and welcome back. In this video will be
taking an assignment. This assignment will cover
all the things you've covered or most of the
things you've covered in previous videos that's in this module and in
some other modules. Also, I'm going to
start by creating a new document to demonstrate
this assignment for you. I'm going to go to
File and import the drawn pattern elements which you're going to
trace. This is it. You can find it in
your projects folder. It's titled hand drawn
pattern elements two. You're going to place it on your artboard and then
trice out the work. Right? You're going to treat it
out maybe using imageres, or you can use the
paint brush tool like we used in the previous video. And then you're going to color it and create patterns from it. That's the first thing
you're going to do. And then you're going to use the recolor artwork tool
to add more colors to it. Okay? You're going to have different variations of colors to it. And then finally, for
this theme assignment, I would like you to
come up with a sketch. Okay? A sketch of anything
could be a pet themed sketch, it could be whatever thing
you can come up with. And you can also use
pintrh to gain ideas. You come up with that
sketch and then you use this pattern in your sketch. I also want you, apart
from using this pattern, you could also use
the noise brushes which we created from our brushes video to add
more green textures. Green textures, of course, you know what I'm talking about. We learned about shadows
and highlights, right? And tunes of all
these green textures. You can add them also to your illustrations and I would love to see what
you come up with. Okay, that's it
for the assignment and see you in the next one.
71. 71 Assignment 14: This assignment is
aimed at helping us work better with
the recolor artwork. To, in order to do
this assignment, I have provided the
file to go to open. You see this file,
this retro poster? You have to open it. Yeah, this is the project.
This is the file. You have to use the
recolor artwork two to create different
color variations of this design poster. So that's what the whole
assignments is about. We could just select
the two again, maybe create a
variation like this. From there on, you could select the whole design
or parts of the design. Select the whole
design. Could start, it may be parts of the design, maybe this part of the design. Then go to the
recolor artwork tool and start making
your variations. Right? Okay, make variations. See we like something. Okay, let's say
we like this guy, but we want to make changes
to the color of our music. Right? Okay, let's say we
want to make changes to this color, this color. Okay? So we then select this color
and maybe change this, maybe make it even
brighter like this. Then probably select
the whole design now, and then try to get
some more variations. All right, so the essence of this whole assignment is
to get you a bit more familiar with the
recolor artwork too. Okay, that's just the essence. So I need you to create three
variations of this artwork. You just have to duplicate. You just have to
duplicate the artwork. So this will be the original and then the three different
color variations of this artwork. That's just what I want you
to do for this assignment. I'm just going to save it to us so that when
you open the file, you're going to have all of
them four land out like this. Yeah, that will be it
for this assignment. Feel free to share
your projects with me. I would love to see
what you come up with. See you in the next
one. Bye. Bye.
72. 72 Shape Blending Roundup: Guys and we come
back in this module, we'll be learning
about ship blending and also the three D effect, all in db illustrito. In this particular video, what we'll be
learning is the ship blend effect or ship blending. So we have the ship blend tool which can be used to
achieve this effect. We have other ways we can
achieve this effect also. Now, ship blending is quite popular in Db Illustrito
amongst designers, even though beginners might
see it as a bit complex, okay, but really
it's not complex. Ship blending is a bit
popular in Db Illustrito. We even looked at ship blending
from our previous course, from my previous course
and to be Los Do, which is the fundamental
course in that course, we even created this artwork
using ship blending. Ship blending has to
do with blending ship. In this case, we
blended this line. Okay, To create this line art, you can check that course out if you're not
coming from there. Okay. In this course, however, we're going to be taking
it a bit further. Okay? We're going to be learning a few things which we didn't
learn in the last course. Okay? In order to start and
I'm going to just create a new project and show
you how this thing works. In order to put your
ship blend effect, you have to have
some ships, right? Let's have two different ships. An ellipse and
square for this one, giving it this color, and for this one and giving
it this color, this color. What ship blending
does is it blends between this ship and this ship. Okay? In terms of their color, In terms of their ship, in terms of the sizes. That's what ship blending does. There are two ways to
activate this effect. The first one is to
use the ship lend to. One other way is to just go
to objects and go to blend. And you see the options here we can make and we can release, and we can look at
the blending options and we can expand, we can replace pine, we can reverse pine, we can reverse front to back. We are going to look at all of these options in
this video and more. In order to start, I'm going to use the Plentleno. Click on the first ship and
click on the second ship. Immediately you can see
that we now have a blend between these two ships
in terms of color, in terms of their ship make up. That's how the
made up as a ship. This one is a square and
this one is an ellipse. And also in terms
of their sizes, we can see this one is
bigger than this one. And we have a blend
between the sizes also. That's how ship blending works. If you just select
the guy now and double click on the
ship blend two, we'll see this option come
up and we see that spacing, we have smooth color. We can change these two steps when we click on Ok or
when we just make this, let's say 50 and okay, we'll see that blending
is now smoother because there are more steps between this ship and this ship. Okay, So that's
how routing works. If you make the steps even more, let's say 500, we'll see that the blending will
become even Smooterkay. We can't even see any
demarcation between ships because we have
increased the steps. So if we take our direct
selection two and try to edit one of our ship, maybe move the guy or
even edit anchor points, we see that the whole
ship is moving, right? The whole blended
ship is moving. And it's been modified. As you can see. I have now
modified our blend and I have met this guy
kind of a trip. Okay? And you can see that
the blend still holds, right? Let us see. We have a background into back and
selecting the report. Let's select this guy. Now we see that we don't have it coming
out of the background, right? So that's cool. That's one of the things you can achieve with the blend effect. Now let's create another ship. Let's see. This time
we have a star. We have a gradient this time. Okay, give blue, give
it yellow or red. Okay, then the other
guy is a rectangle. This guy will give its yellow and then maybe
this shade of blue. All right, so let's select our plan ship to click this
guy. And then click this guy. You can see how it transitions between this ship and this ship. Let's make the
steps even bigger. Let's make them 500. Let's just make them 200, so we don't stress our computer. Now you can see the blend. Okay, I'm just going to
increase my blend to say 350. Okay, we have a smoother blend. Now what I want to
do is just take my brush to and draw
something like this. Then select the two objects. That's my blended shapes
in the brush stroke. Good objects to blend
and then replace spine. We then see that
our blended objects are now arranged
along this path. Arranged along this path, yeah. That's one of the
things you can achieve. Let's say we make this Paa, we can see the beautiful we have now achieved
by simply doing this. Yes guys. And it's also
possible to apply effects on this and achieve even cooler
ships, even nicer ships. Let's see, we add the come effects and then
we add the distort effect. The block effect. Just start to edit
our effect to add more more blots to the ship. We'll then see how dramatic
our ship is becoming, right? Yeah. So this is a very
nice way of achieving really abstract complex
ships in to be illustrator. When I select my
ship and come to objects and click
on reverse pine, we'll see what happens. Okay, reverses it, so that's
the reverse pine option. It reverses the whole thing. And if we click on our ship, then come to objects and reverse front to back,
we'll see what happens. It turns our ship
from front to back. Okay, that's bringing
either this one to the front or to the back, depending on its
present location. And we see the whole
effect ticking ship here. When I undo it, Z, we see the change, right? That's the effect
we get with that. I'm just going to
select everything and did it and then come and
look at something else. Now, we spoke about
compound parts. In the last, we didn't learn about using this
effect on compound parts, we only spoke about using the effect on separate
ships like this. Let's assume we have
compound parts like this. Do understand that the
more complex you go, the more complex the
hooting becomes. Right? And also the more
taxing to be on your computer creating something abstract. Compound path to
sect the whole guys and come to object and
compound pattern make, We have this as a
compound pattern and a single ingredient field
has been added to them. Okay. The next thing I'll do now is come here the rectangle and create the compound
paths with the rectangle. Make it like this
guy, make it this. All of them move objects and compound path and
k for the median. Feel. Let's choose
some different colors. Perfect guys. Select the two of them to object, blend, and make. We see what happens. Okay, this looks very shabby, but we are not done
yet to come back to object and then blend
and blend options. Let's choose specific steps. Let's give the 250. Okay. We see now that it
took some time, but we now have this very
abstract looking blend between the two paths, right? It looks very abstract
but also looks cool. What I'll then do is
I'll take my brush to and try to create a path. So that was going to do
something like this, create a path like this so
that the guys will follow. Select the guy here,
select the boot of them. The boot of them with objects, blend and replace pine. And this might take some time. Yeah. Now guys, you can see the very cool and abstract
looking stuff we've been able to achieve here just by creating this blend on
complex compound ship. Now select the guy and double click and make this,
let's say 350. Let's add 100 steps. Okay? We can see that the
blend is non smooth, right? Non smooth. Increase it to 500. 505, 1,500 And of course it's
going to take some time. Again, it's, so, all right, these are some of the complex
stuff we can achieve. Imagine adding effects
now like a blood effect, just like we did before. That will make it look
even more complex. Imagine the background image then having a
background engine buck. Imagine having a
background like this. Apart from just having
a background comp and piece in place. Control C, control F, then
just bring it to front. Jump in front and
select the guy here. And control seven to click mask. You can now see how
everything looks more organized all within our B. We can select the
background, for example, select the background
and try to maybe edit the gradient color to see what better color is we can achieve. Okay, I think what we had before is, okay guys, these are some of the very cool stuff you can
achieve with ship landing. So we've come to the end of the introduction
on ship blending. I'm just going to see this
file so you can have access to its ship blend. Let's see, abstract background. Let's see, instead of
abstract background, I think I'll just see it
as compound ship blend. Okay, compound ships blend. Okay, compound path blend. Okay? Upshot background, compound blend, blend. This perfect guys, with this, we've come to the
end of this lecture. The next lecture, we're going to be learning about
the three D effects. Okay, we're going
to be looking more into the three D effects. See you in the next one.
73. 73 3D Effects Roundup: Hello guys and welcome back. In this lecture, we're
going to be talking about three D in
how to Illustrator. So we're going to
create a new document. In order to open
our three D effect, we have to create an object, for example, like this one. Remove the stroke,
give it the color. In order to activate
our three D, we either come here to effect and then
three DN materials. These are the three D effects. Or we come to our windows and then go to
three DN materials. We then open the three
D and materials panel, which is this panel, it enables us to add
the three D effects. Now, when you come to effect and look at
three DN materials, you then see that we
have these ones extrude and pebble revolve
in fleet materials. And then we have this one which is called the Red Classic. Now under the Red Classic we also have Extrude
and Bev classic. We have Revolved Classic and
then we have Rotate classic. Now what's the difference
between these two? The difference is
this tread classic is the old type of reD
in Adb illustrido. Okay, so in La versions
of Ad Illustrido, we do not have the treats and we do not have
this tread panel. We only have this tread
classic as a Tre D. Okay. But when Adb Illustrito
was updated, we now introduced
this new red Okay, and also the treat panel. This old one, which was the only treat
available at that time, was now made the Tre D Classic. This treat classic actually has some features which the
normal three D do not have. Okay, so there are
some features that they didn't want to disband, they just made it
into tread Classic. Instead of totally
disbanding the tread effect, you just made it into
tread classic and then add this new Tre D
be illustrative. We start by looking at
this new Tre D. Okay? Also you have to understand
that this new Tre D, that's the ones, are the ones
linked to the red panel. This tread classic is not
linked to the three D panel, Okay, to the Tre D
and materials panel rather than treat panel
D and materials panel. That being said, I'm going
to start accepting my ship. Actually, I'm just going to
create multiple ships. Okay. The next ship I'm going to
create will be this ship. We have this ship, then I'm also going to
create this other one, other one, maybe
even another one. What I'll just do here is I
will divide this one by half. Select the both of them,
go to my ship builder to them and drag like
this to delete them. Perfect, I'm just going
to experiment the Tre D here and we will then look
at the Tre D classic. We also looked at thre D from the fundamental
cause we looked at it in details if you like, you can check that cost. If you're coming from that cost, you definitely understand
what we mean and you can skip parts of this video. That's the part where we're only going to be covering
the Tre D and materials. That's the new treat
you can unfold to. We covering the three D classic because we didn't cover
the three D classic in the last cause. Select your ship, go to
effect and extrude Embb. When you extrude Embb,
it's then going to give the object this
three D effect, okay? This extrude effect, okay? You can either extrude and
you can select this one, which creates a flat plane. All of them have
different options here. And you can select this
guy which extrudes. For the extrude, we have
an extrusion depth. You see what happens, right? We have this cap where you choose between this
one and this one. Open the cap here
and this close it. Then we can choose,
you click Bev. We'll see that we now have
a Beble on our treaty ship. And we can choose the profile
or the ship or the Bev. We can see that this guy is classic and this guy is around. This guy is convex. I'm just going to
try to go through all these options
as fast as I can. Okay? I can look
at the other one. You can see all the
shapes of bevel, right? Or the profiles. Yeah, that's what
we can achieve with them and we can achieve
a whole lot of things. We can determine their
width with this one. The width and the size or rather the height and also the amount
or the quantity or copies. Right, we have three copies
and we have four copies. Now you can see how the update, we can even determine space
between the copies, right? The spacing. We can
make the spacing big. We can make the spacing small. Then we can choose whether
to pavel inside or outside. And then we can reset to
the normal, remove the Bbl. And then we have this other one which
controls the rotation. Now for this one
we have presets. We can choose from
presets, right? There are different presets
we can choose from. We can etitme like this,
manutme rotation, okay? These are what we
can achieve these. Now, when you
select any of them, you have different
options for the cap, you have different options here, but the rotation remains
the same for the plane. You don't have some of the
options we have here like depth because the plane does not have a depth and we also
do not have this cap. And also we don't have the bevel because we can't be the plane, right, but we have the rotation. When you look at revolve, we don't have some of
the options we have here like the depth and the cap. We have some other ones
like the revolve angle. Then we have the offset. We
have the offset direction. And, and so we also have this
guy which is the inflate this guy. We have
the depth option. We have the volume. We have volume of which we
don't have in other ones. And we have cap and
the Pavle is not activated and the
rotation is activated. I'm just going to
stay on the Pav, choose rotation like this. Maybe for the depth,
I'll reduce the depth. Perfect. Now we have the
material options here. Now whenever you create an object and add
the tree effect, it's been given the
default material, now they call it
the material here. And we can add other materials like this
one is the Cape material, this other one, whatever
the concrete material, we have a lot of materials here. The materials consume more
system power as you add them. We also here where we
add new materials. The materials have to
be substance materials. If you're familiar
with dub substance, the materials have to
be in that format. You can select the material, maybe a custom material, and delete here. That's one
of the things you can do. Also, when you come down here, you are then able to
edit the material. Here we have
material properties, we have parameters, the
resolution of the material. You can choose a
higher resolution. Then we have the pink color. Different materials will have
different sets of settings. This particular one has three or four different
pin colors, right? This is more of a
marble material. Then we have the pin roughness. The pattern, you can
see how it's updating. Then we have the
pattern up intensity. Then we have the Stein density. Then we have all
these other ones. We have position offset, position of set Y and X and
many other ones we have materials properties where
we have height range, we have height position
and so on and so forth. I advise that you go
through them on your own. Different materials would have different sets of settings.
I choose this one. Now you see we don't
have those colors. We instead have ha
green color variation. Definitely different materials. We just have different
sets of settings. You just go through
them. Then we have what we call lighting. This is how the materials
will be lighted, or this is how our
shape would be lighted. We have this guy,
which is a preset, it's the standard lighting. We have the diffuse lighting. Of course, you can see the
changes being applied. We have the top right lighting, which will send the
light from the top left, and then we have the
right, which will send the light from
the right, right. Then we have the
color of the light. We can change the
color of the light. We can change the
rotation of the light. You can see the effects. We can change the intensity, make it very intense
or less intense. We can change the
height of the light. Basically, that's the height of the light from the object. The lower the height, the less effective the light
will be on the object. And the higher the light
effective it would be. Then we have the softness, softness of the light. Then we can activate
ambient light or not. Then for the inmbent light,
we have the intensity. And then we then have shadows
which we can activate. Of course, you have to know that adding a lot of settings like shadows require system
power overshadows. We have position of the shadow, should it be behind the
object or below the object. We have distance from object. Shadows can increase the shadow bounds objects and
so on and so forth. Finally, we have what we
call render settings. Rendering will enable us turn our raw image to a
more refined images, going to add sharpness, going to add lights, going to bring out the
beauty of our materials, Basically going to add a
lot of life to our object. Those who have experience with red red design will know
what I mean by rendering. This is where we choose
our render settings. We can enable retreat and
then it's going to render. Then we can choose the quality. We can choose the
render settings, the render settings, these
are the Raster settings, rather we can choose
the resolution. We can choose all
these other ones. We can choose the
render quality, whether it's low render or medium render
or high rendering. Just know that rendering
requires system power. The more powerful your
system is graphically, the more easily it would
be for you to render. Then we have this
reduced noise and we have Renders Vector Render. I'm just going to
maybe choose medium. Okay, when I come
here I will render. Click Render, Inspino Render, or if I have the setting set, I can just click here
in going to Render. So I'm just going
to click Render, and we'll see how our
render gets completed. It seems our render
did not complete. Let me just click here and
see when I click here. We then see that the
rendering has started. Yeah, now our rendering is done, and we can see all the
effects come to life. Now when we zoom in, we see that our shadows now
look very realistic and our object really looks more realistic than it
was looking before. That's the effect of rendering. I'm going to delete this
guy, create another one. I'm just going to try to create different treaties
with the ships here. Different types of treaties for these ships, for this guy. I'm going to select the guy and maybe make the color
a little bit darker. Then come and click on Revolve. Now we see what has
happened, right? Illustrator has
revolved our ship and we now have
this three D ship. When you come on revolve, we see some options like the revolve angle,
right now it's 360. As you reduce the revolve angle, it's going to reduce
the revolving effect. Okay, 360 is a
complete revolution. Then we have the offset. This is the effect we
get with the offset. We have the offset direction. We either have it from the
left or from the right. So this is the effect
we get from the left. When we click it from the right, we'll see that we get it to create something
similar to a pool. Right, We have the
cup just works, similar to the cup
in the extrusion. Basically, these are
the features we get. The revolve type of treat, we can really apply it
to different objects. Let's add the revolve
to this object. And we can see that
it has revolved it into a sphere, right? We see it has revolved
it into a sphere. Let's try revolving this
guy and see what happened. We can see that it has
revolved this guy into this. Do not ship, right? Yeah, that's the
revolve effect for you. Let's try revolving
the sky revolve. You can see that it has
revolved this into a sea Linda, when we come on the ship, we can actually rotate it
using the gizmos here. So we can just click and drag. And it's going to basically
rotate our ship like this. Perfect. Now let's try revolving
something interesting. Let's try doing
something interesting and then adding the
revolve effect. Okay, I'm not creating
anything specific, I'm just trying to
create something dramatic so as to see what interesting shape our revolve effect can give us. So I'm going to make
this guy darker, then I'm going to
revolve perfect. Now we see the beautiful flower we have been able to
create with this effect. I'm going to just change it to the right and see what
we now have here. So we see the effect we've been able to create. Very nice. And the possibilities
with this two is limitless possibilities are limitless revolve. We see what we have
come up with, right? You see what we have
come up with, right? So that's the revolve
treat effect for you. Let me try other ones. Okay, let me click the inflates. It has inflated this and
it's more like a balloon. It's more like a
balloon now because it has been inflated and you can also apply this to a
ship like this inflate. Now we have what looks
like a balloon, right? In the last, in the fundamental
course at the lot course, we created a lot of
projects using this effect. But in this course
we're not going to be creating a lot of projects with this particular type
of tre D. If you really want to see more of this, I advise you, check that
course that's already. If you're not coming
from there, what else? Basically, that's
it for this effect. So I'm just going to
delete everything and then start to check the other one. The other one we spoke about, that's the three
D Classic create. This guy give you
the darker color. Okay, let's see what the
three D Classic has to offer. Click on the Effects, the three D and Materials, and then three D Classic, and then click on Extrude
and Pebble Click on this, we see this is the
three D classic. This is how three D used
to look in B Illustrator. Now we have given it
the extrude effect. Now we have the
extrude depth here, where we can choose how far
we want the extrusion to go. Then we have this one, which is the Bev K, so we can now see the
different Bev profiles. We have this one, complex two, we have here for the
height of the beveling. We see what we are
achieving, right? Yeah, we have
different profiles. You can check the remaining. We have this extend
in Bab extend out. We have the surface now. We can give it wire
frame suffice. Okay? We just see it in
wireframe mode, right? We can also give it, just close this guy go to appearance. We can also give
it new sheeting. It's not sheeted,
just flat, it's not. She also give it, we can also give it the Dif
sheeting, which is this one, and the plastic sheeting
which would then give it this kind of nice finish. And basically that's
it for this one. And of course we can
choose the rotation. You can choose
different profiles or different presets
for routation. Of course we can manually
edit our rotation like this. Key Perfect. Let's try to, let's just
click the one we've created and go back
to our effects. Now when you come
to more settings, you then see where you can edit. Light will affect three D here or three D ship
here on this please, you can actually manually to direct the
effects of light on our object as you
move it around. You then see the effect
of light on our object. We now have here where we can determine the
light intensity. We have the ambient
light intensity. We have the high
light intensity. It's going to determine how much high lights
we have on our object. And then we have
the highlight size. We can make them very thin, you can make them very large. Okay, then we have
the blend steps. We can increase the blend
steps for smoother blending. Then we have the shading
color, this is black. Then we can also choose
the custom color, so that we select the custom color we want
to use for shading, basically that these are the
things we can achieve this. Okay, now let's look at
another feature of this red. I'm just going to
create a ship here. And effects red. And material is pretty classic, we can extrude Now let's make
our extrusion depth bigger. Then let's come to this
place where it says map art. Now what map art
enables us to do, this enable those
puts on designs or objects or symbols rather
on our treat objects. Here we can come here it's symbol and
then choose a symbol. Let's select this guy immediately you can see
that it's now on this face. We can increase the
size by dragging. Like this can hold down
shift to make it even. Okay. That's one of the
things we can achieve. And we can navigate through the surfaces by
just clicking here. And it's going to
highlight the surface. Highlight the surface, okay. We're just going to add
them on the surface. We can see that these
three surfaces, for this one I'm going to
put this symbol, the symbol, and just increase the size of this perfect. And then for the last side, no, going to select
another symbol. Let's select this one.
Increase the size. We're going to select
another symbol instead. Just choose this one. Pull down shift and drag it, drag, this has to
fill the space here. You see that we have now
added symbols on our ship. Now there are other
options here. This one will actually
apply shading on our symbols depending on the direction of
lighting or the effects. Rather of lighting
on our object, it's going to apply
shading on our symbols. Then we also have this one which makes our
geometry invincible. With this, we now have
our geometry invincible. We can just okay and okay. And now we have symbols
around our object. How can you make
custom symbols or symbols you have created
be applied on our object? Right? Because we have
just been able to have access to the symbols that are to be illustrated
provides for us. In order to do that, we
have to come to symbols, these are symbols, and
then add our symbols. Let's assume we want to
create a symbol from next, I lost, and just
increase the size. All we need to do is just
select it and drag it here. And we now have our symbol. Now we put in the
name of the symbol. We can just ignore
everything and click. Okay, now we have it
here as the symbol. When we select part, let's say we want
to add it here. We select the guy and go. And now you see our new symbol
here can reduce the size. Just please it And okay, perfect, everything
known is perfect. Now that's how to
create a symbol and add it to your ship. Yeah guys, with this, we've come to the end of this lecture. See you in the next one.
74. 74 Exercise 3 Fur Poster Design: Hello guys and welcome back. In this lecture we're
going to be creating this amazing posted
design in a dub loreto, mainly using the ship blend two or the ship blend
effect in Adblorito. Okay, while in Adulto, I'm going to open
the project file. The project file can be seen
in your projects folder. Okay. Open and go to the projects folder on
ship, blending and effect. And come and select
the four poster and click now this is the project
file and as you can see, everything is here,
neat and clean. In order to start, I'm
going to create my art pod. And I'm going to duplicate
this one we have here so that we
get the same size. And then I'll just
delete everything here in order to start. I will actually
duplicate the ship here, which represents
the four effect. As you can see, this
represents the four effects. I'm going to select
the guy here, Go to object,
blend, and release. When I release,
you see that I get the initial objects we used
to achieve this, okay? Select the object,
the two objects. And these are the objects we
used to achieve this, right? So I'm going to just
shift them away. Then while selecting the guy, I'm just going to give
the path a stroke color. That's the main path that
the blend follows, right? I'm just going to give
it a stroke color. As you can see, this
part was actually created using the
brush tool here. All I did was just came and did something like
this, something like this. And finally, yeah, basically this is what I created in case I'm just going to delete this one and work with this one. What I did was I
just made a blend, right between this
guy and this guy. Select my blend to click, click, and then click on it. And we're going to
choose specific steps. Let's make this 300 perfect. The next thing to do is
select both of them. Go to objects, land,
and replace pine. I feel that we need more of them to make the
holting smoother. So I'm just going to select
Click instead of 300, now going to make it 500. We can see that it's a
little bit smoother. I'm going to work
with this guy now. I'm just going to bring the ship in the middle,
Centralize it here. The only thing I had to
do was add one effect, one effect, made this
holting appear like this. Okay? One effect, give us this whole four effect
we're seen here. What's the effect
I just selected, the guy went to effects and
then distort and transform. And then we added
the roughun effect. Now all we just need to do
is boost up our details. Maybe our size bits just
boost up our details. Let's have the
details at maximum, then increase the size again. With this, we can see that we have achieved our effect here. Can increase the
size a bit perfect. Now if I click absolutely, you're going to see
it reduces in size. If I click relative, you're going to see
it increase in size. Now these are just mods, okay? The moods based on the sizes. The moods of the sizes. And then we have details
which are responsible for the minute details that make up the four look
okay, or the four effect. Basically, that's what
we did to achieve this. And then we had our background. Now we have this background. I'm just going to pull them out and bring it to this artboard. We centralize it,
a line centralize. Then we now have this
other background which is behind the mean
background select. Centralized, then finally
we have this group. Okay? I'm not going to create them from scratch because we haven't learned about type. I'm going to copy them. Alt and drug then centralize. That's all I did
in creating this. Yeah, that's all. With this, we have now
been able to create this trendy looking poster
with the four effects. Now on the possibilities
of these two. This function and this effect. That's the plan effect.
Very limitless, okay? All you need to do is
to use your creativity, creativity and you need to come up with
something amazing. I feel like just
doing something else. Because this video
was really shot. Let me give this guy ingredient, and this one also ingredient
maybe for this guy. I'm going to change
the color a bit, okay? Then I feel like making
them compound paths. Let's make this guy look like
this guy look like this. We reduce the size
here of this one. Let's try to maybe give this guy a different
color from this. I just want to see
what we can achieve. Okay? We duplicate it. Make it small.
Maybe move it like this for this one.
Duplicate it again. Make it bigger. I move it here. And maybe give it
a different color. Give it this color, this color. I'm just trying to see
what I can achieve here. Now I'm going to select
everything here. Good objects, compound parts. And for this one I'm just going to go to the ones that
intersect each other. I'm just going to
unite them like this one we can pound part. Okay, one thing with
compound paths in guises will be able to have one gradient,
right? One gradient. Just totally forgot, instead of using this
gradient, let's use this one. And see for these guys, we select all of them,
let's unite them. Okay, I'm going to use my plan to select this
guy. And select this guy. Then click on my Plan to Specific Steps and make
this 400 for example. Okay. And then I will
just ate my body, my art pod so I can have a
new artboard for this one. And I will just
did this one here. For this one I'll just have
another spline like this. Sorry, just want to redraw so it's not
something specific. I'm just free styling here. Okay, so let's see
what we come up with. Okay, you said good of them. Object, blend. You please plan and
this is what we've got. And then for this guy on, let's add one effect. Let's add the roughen
effect and see what we get. The size. We don't need
to make it too big, we just need to
increase the details. So when you make the
details too much stress. Your system out the sky, the size of its I
think I depictdms. You can see we have
another version of the four and I feel we can do more work
on the coloring. All right. So maybe you give
it the darker color here. It's taking time to Yeah, so I kind of prefer
this color, this new color. I kind of prefer the color. Let me see if we can
achieve a better coloring for the other
ingredients here. Okay. You guys, I think
I'm okay with this. All I would then need to
do is bring in my text. Just arrange them to the
fronts and centralized Yeah, we have another
another file export to Just put one exports. This is not a part one, this is a B four. Okay. 124, I think we don't have three.
This is at bode four. I can export 42 used. Let's try at four seek. Let's see, at three, it's actually at three. At four and then. Okay, when we go to our fire line, we see that we now have
a new four poster. Okay, yeah, so that's how
we create these posters. Okay, that's it for
this video guys, We'll see in the next one.
75. 75 Exercise 4 Creativity Poster Design: Hello guys and welcome back. In this lecture,
we're going to be creating this poster design in Adbustrito using the
three D classic effect. And I have two versions here. I have this version which has the write up completely
flat in color key. There is no shading to it. And we have this other version which has some shading
applied to it. Okay? All of them
will make you know that the write up
was made out of Phi. Right? And that's what
we're going to be achieving right away
in Adb Illustrito. Open up the Lost
open and come to the Projects folder and choose the Creativity poster
and click on Open. We have the file here. These are the two versions. I'm going to start by duplicating
one of the artboards to have the artboard
where I'm going to quit mine or create
a new version. Then delete everything here. So the first thing
to do is to come and select the ellipse tool and
just draw out an ellipse. I'll give it a color so I
can see what I'm doing. Give it a color and come and
select the rectangle tool. And draw a ship like this. We can see that we have drawn the ship on the other half
of the ellipse, right? Set the booth of them
and builder to hold down old lit the left
side of the ship. Just centralized
everything like this. The next thing to do
is select the guy, Maybe give it a
bright color effects. The extrude effects
classic revolve. Now this has created
this sphere for us. The next thing we should do
is just bring to the middle. And one thing I
think we should do is increase the size like this. Stretch it like this, as to
give it this spherical ship. Okay? It's not meant to
be a perfect circle. If you remember from our
previous video where we learned about the red and how to
map objects on our red, we learned that we need
to create symbols, right? Because it's only
symbols we can map. It means we need to tone
this text to a symbol, this text to a symbol. When you come to symbols, all you need to do is to drag in the text and you need to
type the name and see it. If you just look at
the symbol panel here, you see that we already
have it because I created it to create this effect here. Okay, The next thing I'll
do is select the guy here. Go to Appearance, and
double click then, not changing any
other thing here. All I'm doing now is click on
Map Art and come to Symbol. And select this symbol. Okay? Just drag it to this
side like this. Just key it up to the
point where we are, okay? Okay. Yeah. Basically this is
how I achieved the effect. All I then did is made
the geometry invincible. Right? And then
click Ok. Let's just click okay for now and
give it a background. I'm going to select
the background here and drag them already. You see the effect
has been achieved. All right, perfect. Now that's for the first
version, which is this one. For the second version,
all we needed to do, all I did was I clicked on
this shade art work and then I just reduced the
light intensity and bits also the high
light intensity. Okay. Basically, that's
it for this one. Okay? And then we're done. I don't want this particular
one to have the shade in. I'm just going to
remove the sheeting. Since you understand how we
have been able to achieve it, Then the next thing will
be to select our elements, copy them to our new art board
and just centralize them, maybe make this
guy a bit bigger. Yeah, there we go. We have our effect
clean and looking good. You guys will be for this video. See you in the next one.
76. 76 Exercise 5 Elephant Line Art: Guys and welcome back.
In this lecture, we'll be creating this artwork which I created some
years back for a client. Okay, we're going
to be recreating this B illustrator again. Basically, we'll be
using the blend tool or the blend function which we
learned in our past video. Yeah, let's just jump
into Abl Street on now and start by
creating a new project. Let me just to tore it here. And then we import our image, right? Our elephant image. Actually, I created this from a real elephant image
when I created this. But since I don't
have that image, I can't find it right now. We just use this one to
recreate the effect, which will definitely be easier. Please then select the guy, then we just drag like this. The next thing
we'll do is reduce our out pod to fit our drawing. Okay, then select our drawing. Reduce the opacity
of our drawing. We can see what we are doing, but don't get distracted. I'm going to create a new
folder and I'm going to lock this folder and work
on this folder. We use our pentol now to just draw out one part
of the elephant. I'm going to draw out the
left part of the elephant. And when I'm done, I'll just reflect it to create
the right part. Okay, perfect. I'm going to start by drawing
the uttermost ship here. So we start with this guy. Click and just take my time
to draw out the elephant must be very perfect or
must be perfectly the same as the reference image. To use my section to try to edit our handles like this. Then the next thing will be to create other parts like
this one. For example. Let me go to other parts. Okay, so click and rug perfect. The next part will be this part just
click and drug. Kate said the
pencil click, drug, click, drug crock. Then we need to
create these parts. Then the next one will be. Pat this. Just this guy like this. Can you just kind of
adjust the path like this, this, this chick. And next part will be this guy. And then we'll just create
the, the tusk, this. So I'm just going to shift x to give it a fill color
instead of a stroke. I'm going to just please
this one more accurately. But just it, it like
this shift its this. This. Okay. And I think I'm okay
with what we have here. The next part guys, will be this part. That's the leg. I want to just a shift X to give you this Sk for my Ancho point to, for my direct
selection to rather then as common these
parts like this, it ran ring and o. This other part, I'm
just going to duplicate this part and just
extend it up like this. Use my direct section two and it's a path to look like this. And for this one I'll just draw out line like this and
select the boot of them. And use my ship two Alt, click Alt, click Alt and click. I'm just going to select
the two ships here. You see these are two
separate ships, right? What I would do to join them
is to select them like this. Select the outermost anchor
points, the boot of them. To select object path, Join, select boot of them. Object path then join. Or you can use control
or short cuts. Then we'll walk down
on this other paths of the tusk trunk rather
Click, click, drug. Okay, just drug like this
to smoothing it out. Then click, click and drug. Click and drug. Key. Perfect. Let me just extend this one. Points and just to
handle room like this. Perfect. So we're done with
almost all of the job. Okay. Click and drag. Yeah, we have this part then, then create these parts. Let me just hide this, lea, to see the progress. Okay, so we have the parts we haven't created. Sorry, here, I
won't join it here. I'll just create it
as a separate ship. Just created as a
separate ship like this. Then you then have
coming like this. And then how come like this, this and then for the I
have the I come, this, this per shift, maybe reduce the size of bits for this inner
part of the eye. I'll just draw it
out the pencil once more and shift X for the Shook. I'll just complete the path
like this for this guy, I just walk on the bit Y. So far, so good. I
like what we have. What we then do is just
select everything for now and select the ones that
have the field color. Give it a profile and
give it this profile. Then we have to increase
the size now that the size, increase the size to
maybe two for now. Okay, You see that we've
been able to achieve a nice effect now we start creating our
blended ships, right? We start creating
our blended ships. Just start by
creating this part. Click, choose your reg section to select the anchor point. And just edit it like this. This adjusts like this now. Then give you the profile. Give you this profile
a simple file so maybe I can do more adjustments to this
ending part of the Sk. Yeah, perfect guys,
the next thing I will do is I'll
create this one. This one basically just give it the same look
as this one here, size and the same fire. Then what I would then do
is just select the both of them and objects land. And we see that
we've made a blend between the two ships, right? Just select the blended
ships and click on the tool. Then choose specified steps. Let's just increase the steps
to 20 and see what we get. I like what we have so far, even though it's not
blending perfectly with the original or with
the reference image, I'm still going to
use it like that. And what I can now do is
just walk on this part so as to have all
these other parts attached to the line here. I'm just going to pre. Yeah, we are now
done with this one. All we need to do is to select
objects to path to blend, rather then click Expand. When we click Expand,
it's going to turn all of them into strokes, into separate strokes when we select them and
select this guy. And then choose Sheer tool
and hold down a well, then be able to delete all
the parts we do not need. Okay, we can just mark D and deletes multiple guys. And as you can see, we now have the parts created
for the other one. We just deletes and deletes
to have them eliminated. Let deletes, deletes, deletes. Here we have this part created. Going to the next part,
which is which is this part. All right, this part, the press to this is
to divide the ship. I'm going to go
down or clicks it. N choose the Sesors tool
with the Orson cut our ship. We can just cut like
this. We can click here. We can click on the part like this and
we have it cut out. We can click here
and have it cut. The next thing then to do will be to select the boot of them. We can simply use our
blend tool, right? So we can click, Click, create a
blend between them. But I do not want to
just use one step. We use specific,
specific steps, right? Let's make this ten
to see what we get. Click and click, yeah. And as you can see, we now have a desired to look. Let me try to walk on the parts like this to see if these errors will get the way. I'll just ignore them for now and go on with
the rest of the work. Perfect. The next thing
guys will be to create MC. To create this, okay, we need to create a blend like this means we need to
create a new shape here. Okay, we can start from here, start from here on this. This finally, like this, we can give our profile here. Maybe even increase the size and just blend it up like this. Now we can sell, click, and have this blend here. It's a bit too much, but
I like how it looks, so I'm not going to change it. We're going to move
to the next thing. The next thing will be
having a blend here. Here. For this one I think I'm for this one I'll blend it in this and then
create this one manually. I'm just going to
draw it out manually. To select the guy, the stroke can give
it the profile. Yep. And we have, it's looking
cool now for this guy. I just want to adjust
it a bit so as to that it flows with
the present shape. To me, it's flowing
very perfectly. Undo the changes to see,
To me it's not flowing. I think we'll just leave it
and go on to the next thing. To the next thing will
handle this part. The Tusk drug, like this drug like this in both of them. The strong side of
two and this profile. Then I also want to just
extend this guy like this and then select
my plan to click. Click and put my pen
tool and click here. And you see that it's
been adjusted, right? So just let the guy click on your blind to
Let's make this 15. Yeah, I think 15 will work. Just expand our ship so we can
cut out some of the parts. Choose our ship to Alt. Delete old and delete. Delete an deletes. Okay, let's keep delete in for most of the
parts like this, sorry, we have to be careful to make sure we delete
the stroke, not the ship. And finally we delete. We need to also delete, sorry, we need to also delete
these tiny parts. We just keep making
this mistake. So we're just going to
click and delete manually. And delete. Perfect. So I have a feeling
that this is, yeah, it's too thick.
Let's try one. Let's try 1.51 0.5 1.5 would do now. We'll go to the next part. For the next part, I
just want to create this one here, Okay? So and drug and then increase the stroke size. And I'll give you this
profile this time. And I just want to, what I
want to do for this guy now, I want to expand it so I can edit two an
points here and here. Select Expand Appearance, and hit Select an Points
It here, like this one. Drag it here. We can manually make
everything look better. Yeah, if we disable, we'll see that we're
achieving good progress. Okay, we can enable our parts, our reference image then I
feel we should work on this. Work on this, I'm just going to manually draw
it out like this. Just hit shift X for the stroke, make this perfect. So I hit for the ankle
point to grab this guy. I just adjust it to make it look better or closer to
what we have here. Okay guys, I'm just
going to give this guy a profile right now and
increase the stroke size. Then then select
the pot of them. Here to blend. Let's choose blend options. Let's make them, let us blend with the ten steps that we have already set
and see what we have. Okay, this is a bit
different from the original. What I like here and
I'm going to keep it. I'm going to keep it. Let's go on to the next thing. Next thing will be
this part here. This part here. This part
I'll do is select this guy. Control C control and
click and isolate part for the Ses to hit here like this and just
delete the remnants. We have this guy
in, this guy sell. Yeah, perfect. The
next thing to do, create the blend here. This blend. In order to do this, I'll just, I'll use two parts. I can actually use
one blends from, let's say, a ship that looks
like this to this one. It's something
like this blending this guy, it might
not look good. And I can do it in two parts. This guy to this guy, from this guy to this guy. If you understand
what I'm seeing, just this one now, I'll just adjust
it to look better. Then have it in please. Then let's have one
that looks like this. So we just into this for now. Let's have one that looks
this last line here. Okay, I'm going to hit Sea so I can cut my
ship here and delete this. Extra parts here. Drag like this. Yeah. Then for this one
I'll just try to land it to look better. I like what we have so far and I'll just take the guy here, give you a stroke of two. Give you the profile, select this one, give
you a stroke of two. Give you the profile and
select the boot of them. I didn't need to select
the boot of them. Actually, select to click. Click, click, click.
What am I doing? Yeah, I now need to
just click then. Let's give it 50. Yeah, I think 50 should do. Let's reduce. Let's reduce. Let's reduce to 40. Yeah, let's use 40. Just expand this one. Why is it I shouldn't have
used the expand function. I should have just come
to plan and then expand, expand on the blend. Okay, so I select everything
and I select this guy. And I, yeah, I select this guy and then I select my ship builder two and
start cutting out stuff. All right. Cout stuff out, it out, it out. And I forgot to make my ship extend to this
part so you know what? We just undo everything I just did do so as to drag my ship
to this part. Okay. So. Select drug. Just adjust it like this. Perfect. I can
select everything. Now go to objects, go to blend, and then
expand, perfect. I can select my ship here. And then also I need
to select this ship also in this ship
to my shipbuilder. To shortcut for
this guy is shift. For the shipbuilder shift
we can just do shift this, the drug, drug,
drug, drug, drug. Then for this one which is drug, like this drug, drug, drug. And we also need to drug here. Now remember we're
holding down Alt. All right, we're
holding down to delete. Perfect. Yeah, we're achieving our
objective two by two. What if I increase
the stroke size? I'll just make it
to perfect guys, we're doing a good job on
the next part to this part. Let's handle this part to hide
the just ingle the li and, and then draw our part. Perfect. Now, blend this one, This one I need to just
my part like this. You select the guy, you
read the Sg of two, you read the profile and
then ship, blend, Click, Click, then we select click. And just give it, let's see, 20. Okay, perfect. I like what we have here so far. We can now, these are the parts, the head here and here. Let's work on the, let's work on the
head first part. For this part we just need to create this guy like
this, click and drag rock, then just give it a streak of two and profile. So let's just select
them instead this time. And I want to just two
bits of adjustments. I think we need to
smoothen out the F here. The point here. Select
the guy, select this guy. Good object, blend and kick. Give it 15 steps. Yeah, the steps are
a bit too much, but you know what, I'm just
going to leave it like that. Okay, so that we have some parts being more
dense than others. Next thing will be objects don't I don't need
to use to expand. On the object, I
only need to use the one on the blend to expand. Okay, after I expand, I'll just select this
guy here and I'll hit shift them for my **** builder and then I can start to
delete the unwanted parts. Perfect. So I like what we have so far and I will just take
time to create the next one. I actually should actually delete some part of
this one too. Maybe. See. And just it from here. And delete. Yeah. Perfect. The next part
will be this part. We have one of them, one of the parts here
we just need to create the other one which
would be this one. This one other thing I
can do is just expand, expand and the other guys expand on group so that I can steal one of
them or two of them, one here and one here and use them for my blending instead of starting to
create new drawings. Right, I'll just control C control and then
control to group them. And click and isolate group. Now I can edit them for my cuts. And I'll just cut
here and cut here. So I can delete this one, select the two, come here
and delete this one. Then I can select the co points here to objects,
parts, and join. Okay, and it's skip. Now I have this new guy
on top which is separate. To do now, I can just create my plane
between the two parts. Like this, good objects blend. Nick, taking a lot of time. Now for this guy, I'll just click and reduce
the blending to, let's see, five, perfect. Yeah, I think I like what you to come up with here.
For this part. We will not create anything, we just need to fill
out the other parts. Right? And we'll be done. I'll just open my
reference li then do this part for this one, just click give the stroke of two or we'll give you
the profile first two. Let's give you the stroke of one because it's
not long enough. I just address to the
bits and then create one other one here for this one, I'll make it long so I can
just the relevant parts. And also for this one, I
think I'll just make it long so I can cut the
unrelevant parts. Like my plan to click Click, I need to give this guy a
profile to select my plan to click click, click 20. Now we can expand the
Select these guys, select this guy and shift M. And then we can hold them out and just cut perfect. We also need to them, from here select them. Shift M, D, and cut. Perfect. The last thing to do
will be to create the parts for the leg
and also for the trunk. So I'm going to do
this right away. Select or click and drag
and crete my parts. Just just okay, select the guy
and give it a profile. Go down for this one, we'll just control C. Control click and isolate
part and hit C. Let's come and cut it here. Okay, just select and
just delete this one. Let's ko, We can click and
we can click and click, and then go to objects L
and then click on the two. Let's give this 50. I feel that we can
give it even more. Let's make it more dramatic. Let's give it 65. Perfect object,
blend and expand. Just select these guys
here so I can help them. You can help them shift for but the ship build two and
hold on, drug deletes. I'll just on two. Deleted one here which
I shouldn't have C deleted two which I
should not have deleted. Being to delete, I
won't delete these two. I'll just for Lita you guys we have a word. Look around here
for this reason. I'll just redo this part.
That's from here to here. I'll just redo it. Just select this guy. Delete.
Select this guy. Deletes drug and deletes drug and deletes and delete. Delete. I don't like how the part
looks. You know what? I just feel like we doing the part from here to here
and then from here to here. I think that's the
approach I took in the original design. I actually did this
design years ago. I can't remember everything
I did exactly for this guy. I'll just click and
drag like this. Then select everything. Give you the streak of two. Give the profile. And
then I plan to click. Click Perfect. Now I'll just click and
then give it, See, 25. Okay, perfect. Now
for the other one, we can just click and give you the profile
and stroke of two. Also the blend. Then blend it with
this one, right? So flex. I'll just 20, 20. Let's give it 15, perfect. Now we can just expand, while object blend and expand. Click Object Blend and Expand. Now we can select these parts and shift for shipbuilder to
delete the unwanted parts. So I just hit se just got
from here and deletes. Then finally we have the leg. For the leg which just
creates the drawing net. Thank you guys. I'll then create the other ship will
be used for the blending. Let me just create it here. And we'll move the position
something like this. And set the main guy, the Glu guy, for the lower guy. I still feel we can do better. We can do better. Let's
try to create it better. Okay, Select the both of them. And give them, you know what, I'll just shift this guy
first to this point. Then select the both of them. Give them stroke of two in
profile. And go to Blend. And then click on the two
and make the steps 25. Okay, I feel we should
make them even more. Let's make them 35. I think we should
make them even more. Let's make the 50. Yeah, I'll just
leave them at 50. And to objects and
plan and expand. Then we tim the unwanted path. Shift them, Select shift them. Just draw, Lets draw. Deletes. So I'll just select
these other ones here. Shift them and instead
of cutting them, I'll just give
these guys a feel. Instead, bring them above the objects in the front and
give them a white field. Yeah, we have them
looking at these guys, we've come to the
end of our lecture. The next thing we have to do is simply duplicate
our design, right? So I can group and
transform reflect. Then we copy, copy. And then just arrange it
to the right hand side. This perfect these guys, we've come to the
end of this lecture and see you in the next one. I'm just going to
see if it as pants, pants so you can have access
to the original file. Okay. Yeah guys, and that's
it for this one. See you in the
next one. Bye bye.
77. 77 Assignment 15: Assignment, you will be
required to create two designs. Okay? You'll be required
to replicate this design, and this is a line art design. And you're going to
use the skills you've learned from the
videos in this module, especially from the last video which is the elephant line art. Okay, You're going to use
the knowledge you learn from that video to
create this design. Here, the bulk of the
job has been done. Okay? Because initially it was
created from a real image. The bulk of the
work has been done because I have been able to create all the parts
that will be blended. Okay. So you don't have to decipher all of
that on your own. All you need to do is just
create the parts and blend them using the skills you've learned from the
previous videos. And then the second one you have to create is a design like this. Mustn't be this concept, but something similar, okay? You can use different effects to depict different stuff,
all different things. Okay? Okay, so that's the second one you'll
be required to design. Okay, see you the next one.
78. 78 Typography Round Up: Hello guys, Welcome back. In this module, we'll be
learning and expanding our knowledge on texts
in ab illustrido. Okay? So I'm going to start
by creating a new document. So I'm going to choose
this common template. Okay? And then I'll just
adjust my composition size, or rather my artboard size. Then we're going to
start with the text. Now, in order to create
a text in a illustrido, we need the text to. This is the text, I'm sure
you knew about the text. To this is the text. We have two types
of text to be lot. We have the point text and
we have the area text. Okay, If you click
on the text too, I just come and click
on your artboard, for example, and
then start typing. Okay? We see that this domin text
has been written for us. Let's assume this
is just what we've written and maybe we
just go and sell it. Okay, Let's assume this is
what we've written just by clicking on the type tool and then clicking
on our artboard. Now this type of text we just created is
called the point text. The characteristics
of this point text is that you can just click and
just start typing, right? And just keep green and green and green and green
and green and green. And maybe you can then go to the next line by hitting Enter
and then continue typing. Okay? You can just
keep typing till infinity with this type of text. Okay? Then there is the other text which
is called a text. Okay? Now this one gives us a container in which the
text will be written. Okay, then let's just
say we click on the text now and then just
come and click and hold and drag and release. See that our box is
filled with text and this is what we now
call an area text. All of them have their
characteristics and we're going to just look
at some of them right now. Now for this guy, we can see that if I click on
the edge like this. And then how shift for example, and then drag, We
can see that I'm scaling the text up and down. I'm scaling the text and I'm scaling actually the text size. Okay, that's the font size. As I do that, when you come to
your property panel, you see here we test character. You see that the values
here keep changing, because that's the values
for the font size. Okay, now for this era text, let's try doing
the same and see. Now as you can see, we cannot scale our text and the font size
is still the same. We cannot scale our
text like this. We can only scale our
text by actually clicking and increasing the font size
like this. Now, why is that? Because this type of text
doesn't allow skill like this. When we just scale
our container, we are either making more room for the text or
making less room for the text. Okay. Now when I scale it down, you'll see this red icon here. Okay. At the edge. It means there isn't
enough room for that. Should have been in, please. Okay. It means there isn't
enough room for the text and we should expand
it to have more. Now as I expand it, you can see that the red
icon now disappears. Let's assume we have it
like this, We have another. Let's assume we
duplicate this guy here. And we want a continuation
from this guy to this guy. What we need to do is
to click on this icon, and you see that our mouse now has this new look right now. We can just come in and click, and we can then see that it
continues from here to here. This is very, this feature is very handy when
designing stuff like magazines and
newspapers, okay? Because you need sometimes
to continue your writing your text from one
paragraph to another, okay? Now, this is what you
can do to continue that. You can see that as I
reduce the size here, I reduce the size here. It keeps filling
up the space here. Okay? It keeps filling
up the space here. That means the two of
them are connected. That's one of the features
you get with the area to. It's possible to
change our area, our point text and our point
text to our area text. All you need to do is
double click the we've changed this point
text to an era text. Now as you can see, as
I increase the size, it's no longer
increasing, right? So also with this guy, all you need to do is
double click this guy here. And you need to change it from an era text to a point text. Now you can see I am able
to increase the size. So that's the two
types of texts. And also the differences and features going to
create one point text. Scaled it up to show you
more about the features. Of text in a busto. Now, selecting the guy, we to go to Windows. And then click and then go
to type and then character. Now they window here, okay? The type panel here. The type panels here are
what are responsible for controlling all the
features we get with the type function in
a B illustritoow. After clicking, we can see
that this panel now pops open. Right now, this is
the type panel. In this panel, we
have many features which will enable
us edit our text. Now when I come here, you see
that we have hide options and it has reduced the
options that are available. When I come here
and show options, we see all the
options available. Now we have many other
options which we can either enable or disable. We have this guy, which
is the touch type two, and we see it disappears here. Now the touch type two is another type of text two
which can be found here. And we're going to look at everything in this
video because this is more of a round up of the
text feature in adubloto. If I select the guy here, we can see that we can reduce the size here and
increase the size. Let's assume, let's see, we have two paragraphs or
multiple lines rather, I'm going to copy this guy go down and pi go down and pick. Let's see, this is
what we have. We have three lines of text. One enables us to increase and reduce the
species between them. Okay? We have many
other options here, like this guy reduces and increases the species
in between them. We have this guy which increases the
stretchiness of the text. As you can see here, we
have many other features. Let me just try this one out and we can see the changes
that have been made. I don't really use this guy. We have this other one
which increases how stretched or how
squashed this texts are. Okay. It's basically
posit this one, we have this guy
here, let's see. We have this like
this and we want to, we can see that we are able
to move our text up or down. Up or down the line.
Okay? And zero, just keep it at the middle. We have this one for repeating
our characters like this. Perfect. Basically, these
are basic stuff, right? So I don't want to spend
too much time here. These are the ones which
will tells this one will it reduced in size, then the other one which will
turn into the power off. Okay? Just like using
ten recip of two. So that's what it can do here, as you can see the call
it superscript, right? Then we have this guy
which is subscript o, which will come below's
basically the opposite. We have this guy which
will line our text, and this guy which will
strike through our text. Basically, these are the
most important features. You can choose language here. We have other features
here which might not be really for now. Now we have here which we can change our text font, right? Then we are now able
to choose our text. We could choose Montado,
this guy, Okay? We could make them fight, right? We come to our fern, we can see that we
already have some fights. We remove them from
fights like this. Okay? On checking the star, as you can see, we
now have no fight. We can basically add these guys by clicking
here, Click here. These are some of the
things we can do. Now we go to our fight,
we see them here. We have filters where the funds based on the classifications and
based on the properties, and we can see this guy, we are filtering it based on the classification
of San Serifs, okay? It's going to show
only series funds. We have this one which
will show the serifs, other ones which show
slap script funds. These guys here we have, these are the ones which show the black letter Gothic script. We have the other ones
which shows funds. We have the other ones which
show the handwritten funds. The other ones we show
decorative funds. These are the
classifications of funds, and we use these filters
to filter funds. We have the properties here, We have the light weight. We have the regular
regular We fund, we have the heavyweight funds. Okay? Basically,
you can use all of these to filter funds. Okay? We remove the filters. Now we see that
this one will show the funds that we have
added most recently. Okay. Basically these are the
features of the text Panda. What have we looked at? Look at some of the, you can see that we can enable some of these
features, all from here. To then for here, we
can choose the type, okay, or the classification
of that particular font, whether we want it
regular or italic bold. All depending on what
the font provides. Okay? All depending
on what the Ponddes, some fonts will provide
just the regular, some pons provide
different other options. Okay. We have the paragraph
here which will enable us let's quite swat de, just go here. We have this, okay? Yeah. So guys,
this one will give us our text aligned to the left. This will centralize it. Align to the right. This will align to the left, while justify with last
line aligned to the left. And then this one will be to
the middle and the right. And this one will
fill all lines, okay? Now all of this are basic stuff, it had to be illustrated, okay? And we're going to keep going gradually to do
more advanced stuff. Guys, there are a few shortcuts
which are shared to you. Just two short cuts. Let's assume we
have our text like this and we have
the size like this. I want us to check
two short cuts. One will help us increase the size of our
text immediately, and the other will help
us reduce the size. To increase the size, we
just have to color control. Shift, period. Okay, Full stop. Put control and shift,
and then period. And you're going to
increase your font size. And when you hold on
the same control shift and you're going to reduce the size of your
phones, okay, increase. We have to do with
period or the full stop. Then for reduction, you'll
have to do with the. The next thing we'll be
looking at is character tiles. Okay, just come to Windows, We come to type and come
to characters tiles. What are character styles? Characters tiles are
basically character tiles. Let's assume you're working on a text design with
a lot of text. Okay, let's see, we just
do something quickly here. Let's see, we have a paragraph, okay, this guy here. Let's see, we have this guy. Let's see, we have this guy, and then we have this guy. We have this guy. The guy. This is meant to be
a text based design. And the paragraphs
have their own style. Okay? Let's say they
have the same style, they have the same font size. What I mean by style
is the same font size, is the same color, the same settings,
basically, okay? And we now have headings, let's say we have headings, let's say we have
numbers, for example. First of all, let's
say we have one, okay? This number, this one is blue. We have two and
we have 3.4 okay? And the shortcut for
this guy is right. You just go to the text to 344. Let's assume for one. Let's see design, design. Let's now see for 23, for three, let's
assume we even have this guy in different
funds, okay? Let's assume we just
have all of them, may be in different funds, okay? What character styles
do is to help us set a style for particular parts
of our type designs, okay? For example, let's, we want all our headings
to look like this. We can come here while
selecting the mean guy we want, maybe even doing all
our changes like this. We can come here and just come to our character
styles and then click on here, Create new style, okay? And then it's going to
create a new style. Now this is our new style, okay? So if we have this guy now and then
give it our new style, okay, it's going
to automatically take the settings of this guy. It means everywhere
we have a heading, we can just simply
create our headings and then just apply the
style to our heading. In fact, we can now even create our headings
while in this style. Okay, so we can basically choose our styles before
we even create stuff. So let's assume we want
to work on this style, just click on this style, okay? And then just start creating. Anywhere we create our stuff, it's going to be in this style. Anything we create, it's
going to be in this style. Okay? You get the point. Anything we create is
going to be in this style. Okay. One thing you
have to understand is that Alo Streetor comes
with a default style. That's why every time you let's start to create
a new project, let me just delete
this style here to select the style and delete. Yeah, that's why anytime
you come and start, let's say Typopo always start with a font, you always start with a
particular phone style font size. Even if, let's assume guys
that we close this guy, now let's close it and
then start a new projects. Let's start a new project, then come and take the texture
and then start to create. Let's start to create
something that you have started with 12 font
size regular and my red. Right Now this is
the default style. Now you can see it has
the default style. It's called normal
character style. Okay, Now this is
the default style, and always it's going
to start with this. So for those I'll be
asking the question like, how can we change the font
style we want to start with? Okay, We want to
start designing with, let's assume we have a
particular phone style we want, or a particular
color phone we want. We don't want this black, okay? And we want a
particular settings, which we always
want to start with. Okay? And then
every time we start we just get this one
which we don't like. How do we change that? Okay, We can change that by changing the
settings for our style. Okay, so it's possible to change the settings
for our style. Okay, so that's the way you can change your default phone style. Let's assume we just come
here and click again. Now come to this please. And then from busy
character format, you can now change your
phone style, right, for the normal default style. Let's assume we want to
start with Montserrat. Sorry, I'm typing it.
I will just need to go through all of them
and pinpoint the phon. I'm looking for M. This is the guy we want
to restart with. Start with medium
type for fund size, we want to start with 14, We have want to restart on
the line of funds, okay? Basically, for now
this is what we want. This, please now come to advanced character
format and see other settings now we can of increase the horizontal scale and vertical skill and other settings which we
of course have here, right, Have in our
character panel. You can increase them here
or we can edit them here. I'm just going to
leave this as one. Great, We have character
color and as you can see, apparently it's at black. We can choose from
switches here. If the defer color, which you want is not here, you have to create
it as a switch. You have to addit
to your switches and it's going to appear here. You just choose the color. There are other features here which you can
edit if you want. And I'll just click okay. Now guys, this is now
our new character style. So it means every
time we kind of come to create a new text, it's going to appear
in our style. Okay, so let's try creating
a new document and see if our style please
right tick effect. When I come and select my
text and then start to click, we can see that it's
not saved here, it's only saved
in this document. So what we need to
do is we always need to kind of edit our
style based on the document, okay, based on our document. And we can see our styles. Library here, that's in a libraries if you have
an Ab subscription. Okay. So that's how
to see our styles. In order to use the
styles we want, we will have to recreate them. Okay. Every time we open a
new document or we import the ones we've created which are currently received
in our libraries. Okay, Let us when receive
them in our libraries, we can import them into new documents and then
they will take effect. So that's how we
receive our styles. That's about styles. Okay. The next thing I want
us to just look at now is the other types
of text tools. Other types of text tools. For example, if you come
click and hold here, we have this area
type two which will enable us to type in an area. Right? So let's assume we
have a ship like this. We have it as this two. We can come and click and we along it to
type in this area. It's just going to create an area type two with the
area we have created. Even if, let's say
a ship like this, you're going to
create this area type two with this ship, custom ship. So it doesn't always
have to be square. It's going to create it
with any ship we give it. Okay, that's about this guy. And this guy is a
type on the part two which will enable
us type on a path. Let's just give
this guy a stroke. And now select our
two and click. You can see that
we have now typed on this path with this guy. You can come and click. You can come to this line
and M our line like this. Ok? So we can cream stick. We can, we can move it
along the path like this. So you have to come to
the middle to this line. And you can move
it along the path by moving to the
left, to the right. And if you drag it down, you can see that you have changed the alignment of the
type on the path. So that's it for this one. I'm just going to be fast guys because this is close
to basic stuff. We even covered this in the
fundamental cost, okay? If you're coming from
there, this is just more of a repetition from
what you've learnt. We have this other guy which is basically the
opposite of this one. This is horizontal type two. Why this is a vertical type two? If I click to type vertically, while the other one we are
able to type horizontally. Okay? We can still create
an area type this guy. But it's going to, of course, be in the horizontal alignment,
not vertically, okay? Going to be created
horizontally, not vertically. While we have this other guy, which is the vertical era type
two, similar to this guy. What's the vertical sense? This guy is the vertical type on a path similar to this guy. But of course on
the vertical axis we have this other one which
is the touch type two. I was talking about the touch
type two the other time. I said it can be activated here. Just come here, touch type two and you're
going to see it here. You can activate it here
and you can access it here. Also, if we have a text, we can just come and click
our touch type two here. When we click on the text, it's going to create
this box around our text and scale that
particular character. We can do other stuff to
that particular character. We can rotate it, move it up, move it down. We can scale it freely. So that's what this tool does, you can explore on your own
to see what you come up with. Okay, let's just do
some more nucleation. Character here. Characters here. Okay, take it up, down, scale it up. Okay, you can see what
we've come up with just by using our
touch type two. Basically that's it for a round up of our
text feature in also, even though we still
haven't looked at one other thing,
very simple stuff. This is just the menu
here, the type menu here, which can be used to control some features
of our type here, Okay? Now, if we have this and
go to our type menu, we can see that we can
find funds on the, okay. We can look at recent funds. Recent funds, okay. My computer has a lot of funds. It's Dragon Here we have
fun. We can see the funds. We have recent funds that
the recent ones we've used. We have the size, okay. We have these other ones. To type two, you can actually
convert a type two to an era and an area to type two
using these options, okay? A type options. See these options, control your era type, you can control the width, the height, the rules
and columes, whatever. Just explore the set. In this we have the change, change the sing of our type. Now we can change
to the upper case. You can see it's non upper case. We have the lower
case, the title case. We just capitalize
every first word. Then we have the
sentence case which capitalize the first word.
These are the kissing. We have smart punctuations
which will help us when we are dealing with
being grammatically correct. Right? This guy, which help us create outlines just basically
destroying our text. Just expanding. Here we have optical
margin alignment. We have insert
special characters. We can insert
special characters. We can even find characters
and release them. Insert Fill it please. Without text, we can
please with text. Presently please without text, There's no point in
filling this please. With text type of orientation, we have horizontal,
vertical. Okay. There are some features which
should only be available for types on a path path here. I'm just going to click
Path to give it a type. As you can see, I
didn't really choose the type on path to, I just choose the text two And then we created
this on the path. It's possible to create text on the path, chose the normal. Just click on the
path and you're going to have the text there. If you come to type, let's see, type on the path options, this type on the path
and just come here, basic type on a path options, you'll see that the
present effect is rainbow. Let's just on preview. The present effect is rainbow. We can leave it as normal
and we have other effects. You can just see
the effect applied. We have three D rainbow. We can see the effect applied. We have state, we have gravity, we have aligned to B. There's one which
is called ascender. Then there is this other guy
which is called descender, which will align it to the top of the path or
the bottom of the path. And we have the
center, which are aligned to the
center of the path. We have the line which
are aligned on the path. We have the shire, different options,
spacing values. Of course we can flip and
we can make basically, that's just it for this video. We've been able to
specifically round up our refresh on the type
tool in Illustrator. I'll see you in the next one, Will then be looking at some more advanced stuff all
here in to be illustrato. See you in the next one by.
79. 79 Text Wrap and Distortion: Hello designers
and welcome back. In this lecture, we're
going to be learning about the test rap effect
in a B illustrato. This is a very interesting
effect that comes with a B illustrato text feature. This effect gives
us the ability to distort our text in very
interesting shapes. Okay, and designers
are fond of using these effects to create very
nice design impressions. And we're going to work
with these effects, with some of these effects in the same module where we'll be creating
real life designs. In order to start, we're going
to create a new document. We'll start with this common
preset here and go to just create a simple point text. We're going to of course
use this, my text. Just reduce the conning by
75% increase the font size. And I'm going to just have
three copies of this guy here. Okay? I don't need to recreate them when
we distort our text. I'm going to just
drag this one below. Drag this guy here, and I'm
going to start with this one. In order to access this effect, we have to click on your text. And come here where you
see this, this icon. Okay, As you can just
hover on the icon, you see what they
say is K enfla, You click on this
drop down menu, you'll see that there are
actually two options. The first one is with wrap and then the second one is K mesh. So if you click on the first
one which is kit wrap, this is the icon
you're going to see. If you click on the second
one which is kit mesh, this is the icon
you're going to see, but we're going to
cancel this one for now. Okay, this is the icon you see, but what we're going
to use is K wrap. Okay, so let's cancel it. And just click on the
icon here, K wrap. Now immediately you can see that we have rap options, right? We have the style, we have
the horizontal and vertical. We have the bend slider, we have the distortion sliders, we have horizontal distortion,
vertical distortion. Now we have a couple
of presets here. We have the already, you can see the effect, it's given to our
ship or to our text. We can bend it like this. We can bend it like this.
We can do it vertically. We can do it horizontally and
so on and so forth, right? Yeah, that's effect you get. We have the distortion here, which we can choose horizontal and which you can
choose vertical, all depends on what we want. K00, we're just going
to look at the Re, meaning we have the lower, you can see the effect we have, the upper, you can
see the effect, we have the arch, you can see the effect we
have the bulge. And you can see the effect. These are very interesting
effects and there's no limit to what you
can achieve with them. We're going to use them in
Fs in the exercise parts of this module where you're going to see how I apply
them to real life designs. We have the other guy,
this is the shell lower, this guy, which is a shell opper opposite the shell lower. This is just what it's like. Okay, If you're okay
with it, you can click. Okay. We have the F, okay. Just turns our ship into a flag. We have the wave which turns the inside of
our ship into a wave. We have the fish, okay? This is the ship of fish. We have the rice,
which looks like. We have the fish,
which looks like. We have the inlet,
which looks like this. And of course, there
are sliders for all adjustments you
might want to make guys. We have the squeeze,
which looks like this. We have the twist, that's basically what you
get with this guy. Of course, you know that
when we go to effects, we can actually apply some
of these effects on ships, even on texts, right? We can apply them here also. These ones are
peculiar to our text. These are the effects
we can apply. And we can just come
here and edit them. If we're not satisfied
with the one we applied, just keep editing them to
see when we are okay with. Now we can also use our direct selection tool
to edit them manually. Here we can see effect
coming up just by editing the mesh here
to us by a best. That's it for the first
type and I'm going to just look at the
second type very quickly. My ship, select my text, come here and this is now made with mesh so we
can see that it gives. Us a mesh, an envelope with certain rules
and certain columns. We can increase them.
You can reduce them. You can increase them.
We can reduce them. The level of increase
or reduction you make gives you more
level of control, right? Or more level of flexibility. Now, when you do okay, just come and select Selection. To here, click on the points and make your
adjustments manually. You adjustments manually. The more points there, what I say control, the more complex the hoofing is, the less points, the smoother it will be To a large extent. Okay, You can just manually
your ship here, guys. That's what this effect
brings to the table. That's what this effect brings. The table we have here where
we have the number of roles. And we can of course,
increase them, increase them, making the
whole thing more complex. Okay guys, we can type our
text, give it something else. You can see that our texts
are going to be pleased. Right? That's where
you get with this one. And we finally have
the last one which we're going to look
at now for this guy, when you centralize my ship, I'm going to create an ellipse
centralized my ellipse. What I'm going to do is
picture my ellipses above. Arrange, bring to front. Okay. And then site
the booth of them to objects to envelope and then
click on me Top objects. You can see that it has adopted
the shape of our ellipse. This is similar to what we
did with the treat effect at the time where we created this
text with a shape, right? So let's try to see
if we can come to pass here without using
the actual treat effects. Let's see, we created something
similar to this guys, then we made a text like this. Now the text read, I can't really recall
what's the text read. Let's just create something
random. Let's think. Let's think in box maybe. Let's leave it like this guy and just centralize everything. Let's change this
to most in case you don't have it's a font and you can feel
free to download it, just need to use this. Most alternatives alternates,
whatever that means, to just reduce this landing and bring it here the
size maybe to this. Now make sure my ellipse or my sphere is above
the boot of them. Objects elk distort and
make the top object. And you can see it old
control at the short control. See that guys, we have
achieved our effect. We perfectly achieved our effect without having to create thing. Okay, so just let your guy, and with this we've come
to the end of our lecture on the text effect
in a dub illustrato. Next video, we should start
looking at real life designs. Okay, we're going
to really replicate some cool designs here
in Adb Illustrito. I'm really excited to get into that section with you to
see you there. Bye bye.
80. 80 Exercise 6 3D Blend Text Poster Design: Hello guys and welcome
back to this section. We are here in the most
interesting part of this section, because we are going to be creating really
interesting designs. We get really cool designs
and we have a lot of them. We have about four of them
which we are going to create. This is the first one you can see on your screen right now. Going to just go to Adbloreto. Start to create this design. To see you in Abloretoowtreto. The first thing we should do, we open our design. Okay, we should open our design. So the first thing you
can do is come to open, and then you can
see where it says Three D blend Text
P Star Design. Right now this is the design, you just click on it
and click on Open. Now we can see our
design life and direct. The next thing we'll do is
try to replicate our design. I'm just going to close
some of these tabs here. Okay, we don't need this one. Just close it. We're going to start with
creating a new art board. And we're going to duplicate
the one we have here you to to pull down Alt and drag to the left, to
the right rather. Just delete everything
on the board. Guys, I'm going to
start with my text. I'm going to start
with this text. Now, I used a phone named
I think rather display. I use clash display. What I did was I created
my first text which is create a front size. We have 1204124 centralized and I had the spelling error create is the
right spelling. And we're just going
to use clash display. Clash display, is this bold or is this black,
or is this medium? See bold, large display, bold display. Yes, it's correct. And we're just
going to centralize the whole thing properly. The next thing is to
paint our text right. Give our text the right color. I'm going to start by choosing this color here.
Sorry about that. I'm going to put
it back in please. Okay. Now, this is our
text centralized again. Our line again. Okay. Perfect. Now, how did
I create this guy? All I did was I
duplicated my text, drag to the bottom, arrange center the back. Then we just need to give this guy a color color that
blends with the background. We're going to give it
this exact color, right? We choose the drop to
choose this color. The next thing we do is we
blend between the pot shapes. Right now, the blending now
creates this tre D effect. Just wait and see.
Select my blend. Click, Click, Select My Shapes. Click on the blend, and
then go to specific steps, or specified steps rather, and give it 300. And now immediately
you can see that our red effect has
been achieved. All we now need to do is manually come and select
our ship Make at the back. And just move it to
have our red effect edited in the way we want it to. Use my direction
keys on my keyboard to just make the hole
ting, more refined. I feel we can work
with this guy. We click the holding
again and centralize. Centralized. Perfect. Now the next thing I will do is I'm going to duplicate
the thing here. So control, okay,
And bring it up. This moving down shift key. Then we're going to release our blend release and we're going to delete
this guy in front. Delete, need to
bring this guy in place and we need to give
it a brighter colors. It can stand out because it's
just too much blend here. I'm going to give it a
brighter color. This color. Let's try. Let's even come in at here, one of our swatches. Now we can see the
demarcation, right? Let's properly place it. Now, we need to give
it one more thing, which is our stroke. I'm just going to brighten
up my color a bit. Okay? Yeah, I like
what we have so far. Select the guy, come in here
and give it a white stroke. You can see that I chose
the wrong clash display. I choose the clash
display variable, that's why we're having this
weird stuff happening here. I'm going to choose the
right clash display, clash display variable. C display. Delete this guy here. Clash display variable. We need to do the same to
the ones under click select. Actually for this guy, I'm going to write
click transform. Going to move, I'm going
to move horizontal. Vertical by 2022. Small transform vertical. Let's just move this by 120
guys, we have it out of. Please select everything here. Both of them. This guy
and this guy, rather. Let's just select
them individually. We have clash display, display. The guy here, Smoky
display, perfect. Now we just have to centralize
our guys on more time. Bring our good guy
here back in place. Let me just arrange the guy, make sure everything
is nice and perfect. Next thing I'd like
to do is just reduce the struck size to 0.5 Hey, we want a very thin
struck size already. You can see we've created the main character
of this design here. Now I'll just cool down, all duplicate my background here and centralize it already. You can now see how
the last text here, that's the last one
on the background, blends with the background. I see it's actually coming
out of background, right? You can see a demarcation like how you can see
sharp line here. That's because it's the same
color of the background. That's the subtle effect
we're looking for here. Now most of the job is done. All I need to do is
to get this guy to this place Alt and duplicate
it to the site like this. The next thing will be to
create this text here. Now this font I used is
what we call it is Arizona. What I typed, typed always. The message is always create. You're to put it here, centralize it, or
align it like this. We're going to bring it here, pulling down shift
rather, bring it here. And we're going to
hold down Alt to draw another version
here for this guy. I'm going to shift X to
give it a shock instead. We're going to then also pull down to bring
another version here. Now we're going to blend
between the two versions. First of all, we need
to reduce the Sk, the opacity of this guy
to take it to see 15. I think it's lower than 15. Let's make it six. We can see how really
subtle it is here. Let's make it six. The other guy. The other
guy with a stroke. Remember, good to
objects, good to blend. We can see that immediately
we have adopted the exact copies we
want. Adopt four copies. Let's try changing them to I think I'll just leave it
at four immediately, guys. You can see that we have
achieved our design. Most of our design, I'm going to reduce the positive
guy to three. Perfect. I love what
we have so far. The next thing we'll do is
to copy our other guys. Remember these other guys? All we need to do
is just copy them. We don't need to recreate them. They're just, you know, to create texts,
very simple stuff and they're all cooped. Just copy them. Come
and piece them here. And just centralize
the whole thing. Boom. We have our
design replicated. You can hit control for safe
and even export your design. You come in to file export and export us on
and so forth guys. Basically that's
how we create this. Sing can post a design
and in to be illustrito. Basically, that'll be
it for this one guys. You can go ahead and try to
create variations. Okay. Maybe color variations and try to do more stuff
on the same design. Okay. I would love to see
what you can come up with. Okay? But for now, I'm going to go on to the next design to see
you in the next one.
81. 81 Exercise 7 Advanced 3D Text Poster Design 1: Designers. And welcome back. In this lecture
we're going to be creating this beautiful
poster design. Now to be Loss Trek, be creating this one also. There are two and they're
just different variations. Okay, this guy is
a double tread. The main shape is a tread, which is followed by treaty. And then when you zooming, you see that the
individual characters are also tre D. Okay. We just learn how to
create both of them. And this one is
more of a one week, three D because only the
texts from the tread. Okay. Just go to the
illustrator and come to open, click open and choose this file. I didn't shoot the
file properly. The file is titled
Advanced three D, Text poster design one. That's a file, you have to open AdvancereD text
poster design one. Okay? First of all, you have to understand that
this is an L shape, right? We're trying to
create an L. This is how we modified our
letter L to look like. Okay, L here. I did this so that
our long texts can be able to
fill in this part. Okay. That's why I did this. I didn't delete everything
because definitely, you know, to create
this guy all I did was came created a text. I just created L, L then give it text block. The skilled it up,
skilled it up. Then I expanded, then
use my direct selection to select this anchor point and just increase their
size like this. That's basically what I did. I'm going to delete this one. I'm going to start by
creating a new output, an existing output,
old drag to the right. Then delete everything here. And then grab your ship. Please centralize,
keep everything clean. Now this is we're going to be using this one
will appear under, while this one will
appear here and here. Just like how you see it
here. How did I achieve this? The first thing we
have to do is we have to come and show ourselves where we want
the demarcation to be. When we look at here,
we can see that the demarcation is around here, almost at the middle of the data of how that's what
you have to come determine, just come and your rectangle to that demarcation like this. We're going to use
this demarcation similar to what we have here. I'm just going to
now fit everything in perfectly to
make sure no part is missing out like
this and this. Perfect. Okay, I think
something is missing out here. This is the first
step you need to do. Of course, you need to come and type the whole thing here. Since you have the text already, there is no need to type and we are going to use
what we have here. Okay? The next
thing I'll do guys, is to select this guy. Put on a and duplicate it. Because we want to have
two versions, right? One for this side and
one for this side. The next thing I'll do is I'll come and click
on this guy here. Just drag this other
parts like this, we have an exact cut at the same point where
this guy is ending. Okay, the next thing we'll do
is select the both of them. Control seven for clipping marks. Select the both of them. Either right click K, clipping marks or
control seven or good to object clip marks and make. Okay, that's the next
thing you need to do. We have them like this then
have this other guy here. The next thing we
have to do guys, is to come and create
them as symbols. We have to come and turn
them to symbols, right? Set the guy here, drag him here, maybe give it L one. Let's limit L one, okay? The second symbol, L two, okay? And the third one, L
three, okay? Perfect. Now the next thing
we'll have to do, let our guy here and then go to effects and ten materials, Classic and extrude Guys, let's try some appreciates here and see what we
can come up with. I don't think we
have any appreciate to give us this guy directly. We have to just editing by ourselves the whole thing to give us what we have here. Let's have it like this guys.
Let's have it like this. Let's just make extrude
depth this big. I want to just zoom in so I can see what I'm doing very well. Just close this panel like this, then start doing the
Tre D tweaks again. I'm going to click
there option there. And then let's start trying
to mess this up a bit, Okay, so do this and do this. Just continue trying to the D to help us achieve
what we have here, right? So we are quite close to
what we need to have. Well, I'm not satisfied. We need to do more. Again, there's this option
here for perspective where we can make our ship have
perspective, right? So if I, okay, for example, you see the perspective,
but you know what we want to do, obviously. So we're just going to
remove perspective. We need to work with
what we have, okay? And just address the
lighting like this. Then keep seeing what we can come up with if we can come up with a
better arrangement. Okay, let me just compare
with what we have here. Select the file,
that's this guy. Ally, see the settings we have? We have 41, -36, -27 right? 41, -36, -27 41, -36, -27 Use the exact values so as to skip all
the back and forth. Okay, now the next thing
we do is we map our, to select the guy. Click three D, then let me just check also how much extrusion
we have here. You see that we have 127. Select the guy, Click here, 127, okay. And click also. Click again, and then
just come to map. Let's try mapping. Okay, let's
start mapping our t, okay? Start with this one. Come here and click this guy, And see if it's, it's not one. Let's click the
second one in here. It's the one we're looking for. Just arrange it like this, okay? And we really want to
make this fit properly. In order to do that, we will
have to zoom in really well. We zoom in really well. Okay, let's, let's do this. Let's just expand our view here. You know what, I would want
to just isolate the sky. Okay. I practically
see what's happening. I'll click on my treaty again, go to Map Out and just try
to make the sky bigger. Then I'll manually come and fit my design more properly kit. Okay. I feel we can
work with this. Then green to go to the next
side, which is this side. And go and pick my L one just down while holding
down shift, ski down. Okay. And then rotate
holding down shift again. So we can see that we til the wrong direction.
Let me rotate it. Let me just sell down to the
size of our our board here. So we just teach it now,
Holding down shift. Okay. And finally, yeah, finally we've got what we want. So just just now. Sorry guys, my part. Okay. We can see that
our design disappeared, so we're just going
to add it again. Ski down, holding
down shift there. Okay, I think we added the
wrong guy, this one instead. Scale it down, down
shift. Let's see. No. Yeah, I think we've
got it right this time. So we just ing to scale
it up at Ski it up at this and try to align it sk up. Let's try to align it and
see if we're getting it right so we have
more skilling to do. Skill it down bits, okay? You know
what I want to do. I want to zoom in so I see what's happening
very closely. Kay? See we're achieving progress. We are close to getting
what we desire. Okay. I will just
activate my treaty again out and just
continue skilling. Okay. I have to go
to the right side. Right. The right
side. Let's see. So guys, I think we are
achieving progress. Yeah. Maybe we just want to
scale this one down, okay? And then, okay, we
shouldn't have done that. Yeah, I think right now movies, it's just a matter
of you being able to get the right
thing done, key. It takes a lot of
practice to get it right. So I'll just kick it
up again so as to see more closely
what's happening here. My view is better now. I can see bigger guys. I think we've got what we need. Let me look at it. Yeah, I
think we can work with this. We still have gaps here. We should have gaps here. And let's see if we
can make it better. So activate map, arts
scale, this guy up. Let's see if we can make
the things better, right? Okay, good. Let's go to
the other side and see. Okay side. Let's see if we can
make it better. Okay. Tradition requires a
lot of Locke perfect. You might get it perfect, we might get it perfect. Just try to cancel
everything and start again to see if we
can make it better. But actually, I just want
to achieve perfection. First of all, let's
handle the guy on the it, under the guy so that we then
under the remaining guys, the stubborn ones
just down shift, I want eat, all right? Yeah, Walk, criticize, just
drag, drag it down like this. It make it feel this piece good. Perfect, like this. What I try to make things
here, feed a little bit more. Okay, I'm going to shift
my view B to the left. And then put my treaty once more and then expand this ship. We expand the view really well. Okay, Expand the
view really well. I think we are closer to
it now. Closer to it now. Yeah. Guys, I think
we're closer to it. In fact, we can
make do with this, but let me just try
to see if we can make the last side better
down this side. Let's try to, you know what, I'm going to just okay this
first so that even if I mess up in this other
side and we cancel, we won't have to affect the object we did here.
We get the point. For some weird reason, sometimes it doesn't
want to l down. Okay. I think I
got it this time. I think I I'm going to
go with what we have. Okay. As you can see, at least we got at least 98% 97% We'll make it so we
don't spend all our time. Come again to Map Art. This time we're going to shaded work and
we're going to make our geometry invincible.
And click okay. Okay. The next thing we do is to
bring in our background. Select this guy out gram
to please centralize the. Link them to the middle. Now you see that our
design is now out, right. All we need to do is
get the lighting. The lighting for this guy
is coming from this side. For this guy is coming
from this side. To select this guy and try
to match the lighting. Okay, let's try to match the lighting and see if
it's going to look better. I think we'll go with this
lighting for the blend steps. Let's just make it the maximum. And basically this is
it for this guy, okay? Now as you can see,
we got it, got it. Next thing to do
is just this guy start to copy. Won't copy it. We're going to actually
create it from scratch. You see how everything
shifting, X, shift X. I'll just
take my time to align the size control for
ruler and dragon. See it now? I can see you just
drag a guy and fit everything more
perfectly for this one. It's actually at
the right place. We need to make our centralize
our ship first of all. And this guy a
little bit bigger. Perfect. Centralize
it. Centralize it. And just use these points. This is widgets to carve
the thing like this. Okay, Next thing we'll do is actually copy our
text, right, them. Okay? What it's here is creativity,
Sk creativity scheme. That's just what I wrote. We took my pencil click. We're not clicking inside, we're clicking on the line. It's still doing the thing, so I'm just going to use
the type on the Path tool, We can click on the line. Perfect and control for pets. We have our design. It's perfect. The only thing left
is we're going to copy and centralized or a line. Boom guys, we have
our first design. For the second
design, what we need to do is simply duplicate our outboard shift to
bring it to the side guys. Then what you need
to do is to come click with objects and
expand appearance. Expand appearance. You
can also expand anyone. You can write, Click
and group them. Now you can select
each of these, let's each of these
parts separate parts. You see you can select each
of them on a separate parts. What would you select
this guy using? Your right arrow button
click two times. Left arrow button
click two times, down arrow button
click two times. Yeah, we've created
this demarcation and all we need to do now is add our D effects
on each of them. D Classic and D.
And belts front. We have front. We need to
increase front working. Let's make this guy 54. See, Just see what
we get by adjusting the guys when we make
this guy five, see that? We don't get an extrtion, right? You see you don't get an Ext. This, which is similar
to our reference image, we want this guy to
have the mean lighting. We want it to be brightest. What we'll do is it
clear there D again. And then make the
lighting like this, okay? For this guy, you're going
to maybe we make it ten, then reduce the extrusion. Maybe let's make
the extrusion ten. Also see, okay, maybe we
can make this 11, 13. Okay. This guy just walk on the lighting and Okay, perfect. Now for this other guy, let him go effect D class. And let's give him
the phone again. Let's try to address
our options here. For this one, I
didn't just want to make things too complicated, go the same setting
needs to be zero K. You guys, we then need to increase the steps,
blend the steps, and then, okay, as you can see, we now have our tread like this. The last one will
be this guy here, extrude it to the front. Let's do this. See? No. Yeah,
this is the one we need. Perfect. I think for this one, we'll make it the darkest. Let's just see if
we can make dark. It doesn't really matter.
Doesn't really matter. You can see how
we've been able to come up with these effects now, these amazing looking
tree effects, that's the power of treat. Now, things like this might
look very complex at first, But I tell you once
you just figure out the little itty ties you
need to take care of, you're going to discover that these are
really simple stuff. But of course they look
complex for this one guys, thanks for staying till the end and we'll
see in the next one.
82. 82 Exercise 8 Advanced 3D Text Poster Design 2: Hello designers,
and welcome back. In this, we're going to be
creating this amazing poster. This is Design Beast. Okay, design beast. And this is what
we're going to be creating in this video. Back in a Db Illustrator. We need to open the
project file right open. Come here where it says Advanced Text
Poster Design, right? Click on it and click open. Boom, we have our design. First things first, Ato, duplicate, bring to the left. Then just delete. We have here. The next thing we'll do is
come here and create dips. Create an dip. Let's
remove the stroke. Let's give it the sky, this field color, centralize it. Let's just it down
a bit like this. Perfectly okay. Now we need to create our text. If you can look closely, you see that I used
this font Angella. Okay, I'm just going to
create my, Take my text. Click and great design. Click text, Perfect. Select all, scale it up. Scale them up rather. And bring them to the middle. Them to the middle. Design best, both of them. And give them perfect. Let's just this font
to the site like this. Just things up like this. The guys, the first
thing we need to do is come and tick this two. That's to go knife to rather's around our
points from the middle. We can use any shape. We could do something
like this with the whole thing more interesting.
Something like this. So that the whole thing
much more interesting. We do it so that we have a little bit
more interesting, right? I now have them divided
into two, right? So we have two separate ships
for the first guy design, bring it here, Ski it up for the other
guy to bring it up. So them up. And then we need to
give them a color. So we're going to
start with color. You know what I'm going to do? I'm just going to take
this one a bit to the upside, select this color. Okay? So that's the
first in the puck. Okay, Then we need a
second color wood of them. And try to come here and choose. You see this small font that
has been highlighted, right? This one. I'm
willing to click it. And you see the color of
the font, right? This one. When you bring your
P to the middle, you see this front highlighted. So you're going to
sample the color. You can use it. Maybe we just create
actual ships with these colors so you don't have
to keep duplicating texts. Right, perfect. We just delete this guy.
Just delete this guy. The next one we do, guys, is the guys to the
front are front, the ships. The words, right? Not the type, right?
Bring the ships to the front. Jumping to front. Now select these guys and then go to objects and
envelope these thoughts, remember and make
with top objects. All control C. What we
now have a control C. Select the other
one, all control C, this is what we now have. Perfect doesn't look
exactly like this one, but it's still sweet and
perfect to work with it. The first step has
been done now. The second step would be
to select both of them. Control C, control. That's copy and pit in please. And then pull down your
Shift and Alt down. Just reduce the size. And then not yet, just click, Select
the front here. Double click to enter inside the ship, inside the envelope. And then select your type. Then hit and just
sample the color. Then click outside,
Select, sample the color. Hit your kept you guys, the next thing we do is I think we should
make this even bigger. Yes, quite big. Select the boot of them
and reduce the sizes. Let's see. Like this, select the ones on top and
arrange them to fronts. What you do is just
select two ones on top. Object blend, then click on two specified
steps and give it 300 k perfect Do seem for the ones under select the boot
of them objects to blend. Click on the two
specified steps, 300 perfect Already you can see that this effect
is coming in life. It's coming in life.
The next thing will be to select the
two ships on top. Pull down Al and grab
them to the right. Now we want to just released
right now to release object, select everything and
select the ones on top. And delete so that we
delete ones on the right. Then for the ones
what we want to do is we the different color. As you can see, I
made a mistake. I actually used a different
color for this one. They aren't the same
colors up and down. The ones blue are blue are. I'm just going to
click in this guy. Let's change the color. Blue, color, blue, bright blue. Something
like this will work. We then need to bring
the ones on top of them. Then align them properly. Now we just need to now make
our colors here brighter. Go inside. Click, make
your colors brighter, one going to make
it bluer brighter. Click out, and you can see
that we stand out now, very similar to this one, but it still works. Go into your ship here
and we're going to make this one a bright green. Right? Okay, yeah we have it. Next thing we do is
to give it a stroke. Give them a stroke them
then give them a stroke. For this one, select the guy. Give it the sim color this guy, and give the sim color. What I'll then do is come to my ingredient dent tool and I didn't need to give
them the same color, really, we just
come to the stroke here to the ingredient
and then just give them ingredient
map like this. Okay? But of course
for these trucks, right, we can see that it seems the gradient is
not having effect. I don't know why. So I'm
just going to undo now. I can see that my she
is not well aligned. You know what, I'm going
to remove this ingredient. Okay, I think the
redient was the problem. I'm also going to
remove the ingredient. Then let's try giving
this guy ingredient. We can see that it's all black. Remove the ingredient
inside the ship. Select the guy, give
me ingredients. Let's see. I know the problem
guys. We need to expand. We didn't expand, and we can't
give ingredient to a text. It's just going to
be blank, right? We need to expand
the ones in front. We have actually expand them. Grab them. Here we are just
going to select the guy. Object. Expand. Okay,
this guy object. Expand. Selective
him the redento. See that the redent is now
applied, right? Perfect. Select them and keep them back. Please guys, I want to reduce the
sizes of the ingredients, maybe 0.5 then compare them
with what we have here. Actually, there's no need
to reduce the sizes on two reduction and
try to fit our ship more perfectly good guys. The next thing would
be to actually make our ingredients
more interesting. Okay, the guy like
this guy like this. Come on, add one ingredient
here for this one. I'm going to see for
this ingredient here, we select the drop. Just give it this color.
Okay, for this one, just give you the black. Give you the black. For this one, I'll
just make it brighter. Some of my color make it
even brighter, black. I'll make everything
look like this, regardless of how
shabby this looks. When we check our Agredient, we'll see that it's
quite interesting. It's quite interesting.
It's a bit too much. Really going to delete
some of the points here. Some of the colors
are very sharp. You don't even need to use very powerful blocks like that. If you just get some interesting colors,
they should work. Let's see how they look. Not bad. I think
we'll work with this. These guys, maybe
add one bright, so one bright guy, This one could be something, maybe blue. Just kick out and see. Yeah, I think we work with this. Not perfect, but we
can work with it. So that's the first step guys. The second step will be
to copy our backgrounds. Grab them, please. Perfect. Some girls
going to centralize. Align them to the middle. Select them separately. Okay, Align to the
middle. Perfect. I think I will just
make my guy bigger. Bigger should work. And I'll just control
to group them so I can select them as a group and
centralize everything. Okay, The next thing I will
do is T is to design Beast. All right, Design Beasts Sky. And then we give it a
field color shift X to convert the field
color to the show color. And bring this guy, align it to the middle. Let's copy this. Let's copy the font size
which is 70.6 Let's give it 70.6 Okay, Next thing will be to hold out and drag it down to this point. Then reduce the
opacity to say 119. Okay, then now take your brush your blend
tool and click and click. Perfect. I'm going
to just this guy, I'm going to reduce
capacity more. Let's and C work good guys. Good, we are making progress. Maybe I will reduce
the overall capacity. Yeah, I think I need to
reduce overall capacity. See, after which I increase last guypacity by to click out. Think we are making progress
and reduce it to 4092. Perfect guys. Now the next thing will be to copy this guys. I actually added
one more effect. Select the guy, go effect with you up and
give it this one. We'll just keep scrooling
down to see this guy added. Think I added this one? Yeah, added actually
added bulge. Okay. We could make it this way. We could make it this
way so we can see how our rap effects are making waves here
and here, right? Helping us create these
square cool designs. At first, you might
think the effects are very busy and uninteresting. But if you really discover
creative ways to use them, you're going to use
them and love them. Okay, Next thing will
be to copy our Gci. Pete, align to the middle and boom your down with your
design is amazing. Just ****. You can save your
work control S, and export your work. Later on with these guys, we've come to the end of this video where we created
this amazing design. And feel free to
make variations. Feel free to play around, create your version, do do that. And I would love to see
what you can come up with. See you in the next one.
83. 83 Exercise 9 Advanced Text Poster Design: Hello designers. And come back in this lecture. We're going to be creating this beautiful pus star design. The black hole. Okay?
The black hole. So we're going to be creating
this tree hole effect. And assuming you see that
this is a hole, okay, And then we have the
word black filling up this piece like this and
yeah, normal style, right? Basically, this is what
we're going to be working on in this video. Open illustrato. Just come and open the file. Open the file,
you're going to see advance three D text
design to where is it Advance Text design, is it? Click open. Here we
have our designs. First things first shift for you to duplicate your
ball to the right hand side. Your direct selection,
selection two, and then delete everything. The next thing we have to
do is to create our text. Right, Come to your text. Fortunately, I didn't
back ups of our text. So we're going to create
everything from scratch. I think I used the
Montserrat fonts. You can already tell that I
like the funds very well. Okay. Like the thickness, Morata, black, not alternatives. We need the realest, we're going to
create our text now. Black hole, black hole. You can see that our
block is blacker here. Let's see what we
make this black, black make more sense? Yeah, it's going to
make more sense. So we're going to use it.
Maybe I should see whatever. We have the black here. Let's just we have the right. Just scale up your hole. Then if you look
at the hole here, you see this is a box. This is curved so I want to
make it a box just like that. For that I'm just
going to expand, come here and expand my ship. Just come here and
create my rectangle. And set my rectangle to create a rectangle to fit everything perfect and conduce
control F s down to create a Let me just give you the program color and see if everything
works well for me. Basically everything
works well for me. I'm just going to
select the guy, take shape the two hold
and delete and minus. Then for this guy,
we just click, Come in here, don't
need to group this. Then delete here. We have it like this, Select the whole
thing, bring it here. Then it's a color, maybe we need to
group this objects. Group, let's group the guy. Then go to effect D, classic extrude and bebo, let's just stick it to, I feel we need to make
it even brighter for the steps, just steps 256. Let's okay. For now, we can come in here and just make the whole thing
brighter, change the color. Bright, Greek, brighter, green Guys, any color work. Actually, we will even work more on the whole thing
because we need to edit. I'm going to scale the thing up, drag it down, then still
select my ship. Go to. Extrude pebble, then I'm just going to
increase the pebble by see 90. Let's see, 70. Let me see if I can make the light in a
little bit better. You see these draws? I'm going to click it. Okay. Now I'm still
going to select my guy. Come here and make sure
the draw activated to do it like two
more times because sometimes for some weird
reasons it just gets selected. Just do it some more. So make sure it's checked. Then while selecting your
objects and expand appearance, then put your direct selection
to select these guys. This guy control X to cut them, control X control sheet
V to piece them, please. Then what you need to do
is to go your objects and got your compound parts and
make them compound parts. That's control control seven is for clicking Mask and
control for compound parts. So you can see the
compound parts, right? The next thing you need to do, the next and only thing you need to do to select everything. Ok, then just go to objects, clip marks, and make. You can see immediately we
now have a hole on our ship. We can drag it in. Please
keep it in please. You can even centralize
it properly. Make it bigger if you want. Right now what I
don't want to do is I want to make my colors pop up. Keep my sheets, that's my dark. Make them darker,
selecting them, using the direct
selection to select them. Then make them darker so that it pops out even
more then for these guys. Let's see if making them
brighter will work. We might just make the darker. This works. Next we'll do is select
backgrounds and drag them here. Let's just group the
backgrounds together. Control so we can
select them once and make sure they are centralized or they're aligned
to the middle. You can see that most
of our work is done. Just show, maybe make
the bigger the downside. Then we want to make this block look
similar to the right. What we do is drug. Drug here, Drug here. We have points of demarcation. The next we want to do
is just a guy here. Objects, expand our guy here, need to fit here. Fit them here. Then
what I'll do is guys, expand, increase the
size of this one. Increase the size. I'll
then click on Group. And then just select this guy. And reduce the size of our L. Really reduce the size here. I should have reduced the
size of this even more. Increase the size of the L. Then select the L. Just
increase the size of, we actually need to shift them. We need to speeze them out, so let them see them out. Going to speeze them out,
just like we did here. Okay, see them out then we need to skill
the gays them out. Okay, go to Skill the Gays up. Maybe it's too much, maybe
we'll just this guy up select making progress. We
are making progress. I'm just going to
reduce the guy. We scale this guy up a
bit, shift this guy. I think we'll just work
with what we have here. It's quite similar to this one. The size is very, we can
make it to our sheep here. We don't even need to say
that we can treat it. It's just a simple, we can
go really black field color. Yeah. Good to go. For some reason, black seems
to be a little bit of, I don't know if it's my eyes, basically, you can the guy down and make everything look clean. Yeah, we do this, we can delete these guides. Now, finally, we just copy this, our usual guys and come
and piece them here. Centralized this. Finally guys, we're done with our nice
post design. The block. Maybe I should
just put here THE, THE, this one could be
lights, regular medium. So it's going to
be the block role. She's going to just be like like like a movie cover
or a movie poster. Okay, a block perfect. With this, we've come to
the end of our lecture. We were able to create this
amazing poster design. Okay guys, and that will
be it for this video. See you guys in the next one.
84. 84 Assignment 16: Guys on the wall. Come back. In this video, we're going
to be taking homework. Throughout this module, we
have learned and refreshed our memory on texts
in Adblostrito, Okay, on typography
in a Los Tritore. Able to create some effects, were able to learn
a lot of effects, a lot of things
about typography. And hopefully you learn
something new, right? We took on some projects and we were able to create
really nice designs, really amazing text
based designs. Okay, so that's the aim
of this whole exercise, to create text based designs. Okay, and that's what
we're able to achieve. We're able to create about
four designs in the past. In the last video, I think
four or five designs, and that was absolutely amazing. Now, in this assignment, you're required to create
at least two designs. Okay, two poster designs. With whatever knowledge, which you've learned
from the past video, you deem fit okay. If it's the tre D you use it, If it's the blending,
you use it. Whatever guys, whatever
you can come up with, just come up with two amazing
poster designs at least. Okay, you can come up with more. That'll be cool, but we should come up with just two at least. Okay, Share them with us and we'd love to see what
you come up with. Okay? To be absolutely amazing to
see what you come up with. So see you in the next one.
85. 85 Graphs and The Graph Tool: Hello designers and work on B. In this module, you're
going to be learning about data visualizations
in a B illustrato, we have what we call
the graph tool. In a B illustrato, we use the graph tool to
create data visualizations. Data visualizations can come
very handy when you want to visualize data or present data
graphically pleasing way. This skill can find importance not just
in the design world, but also in other fields
of life like accounting, like statistics and
so on and so forth. So you're laying a
very vital skill here. Okay, now we're going to start with the common preset,
like I always do. Then in order to start, you have to select, you have to come here
to this tool, okay? You're going to see,
you're probably going to see on this tool, that's the first one, this Colum graph two. And the shortcut is now if you are not on the advanced
tools, you won't see it. When we click Visit, you see
that it's not here, right? It's an Advanced to
according to a lot, come here and click Advanced and you're going to see the two. If you click and hold, you see all types of graphs, okay, Which you can use to
visualize your data, okay? But we're going to be
covering just three types. You can of course, just go and
see the rest for yourself. Actually, they're not
something too complex. Once you understand
how one works, you basically understand how every other one work will work. Okay, I'm just going to come and click on the pie graph here. This one enables us to
create a pie chart. Enables us to clear
the pie chart. If you just come down to your
artboard and drug release, you then see that have a
pie chart and you also have a spreadsheet where
you can type in your data. Okay, for this one, let's just make here
to be, let's see. Let's give it the name Facebook. So let's assume we are creating
a data that has Facebook, Instagram, Twitter, and maybe what's up. And then for this, please. Now we now have
the values, right? Let's say we have that here, 25, and here we have 3200. And we don't click Ok. We
can see that immediately, it creates a graph for us based on these values
which we've put. Okay, Then we have what's up? Okay? I think this guy and this, this Facebook is the
biggest, of course. And you can see that
the graph for Facebook or the space for Facebook is
bigger than all the others. Basically, that's how
it creates our graph. Depending on the values
and depending on the data, we can have multiple data. We can maybe another, let me try having another data. So you click just, we see that we have to, we now have two sets
of basically to chart. Okay, now we can just
delete everything here. Delete, Delete, so
that we have one. Then we have some features
here for this one. We are choosing the cell styles. We're choosing number of
decimal, okay, decimal points. Okay? We have two digits here, we have column width,
seven digits, okay? And we can revert to
the previous version, then we can call
transpose column, okay? It basically changes the
way the Holton looks, okay? Go back to our normal one, then We have this one where
we can actually import data. We can import data files, okay? And use the data
directly from the file. That's basically
the features you have with this graph two, okay? Graph two. Now there are different types of graph
two when we just close it. Now we come to our
properties panel. We see that we have what
you say, quick actions. We have graph type click. We see that now we are able to choose
different graph types. We can choose this Colum is going to display
this data for us in. Graph type, you can
choose another one, Maybe columns tax and it's going to display the
data for us like that. You see basically these
are the types of graph, the types of graph tools, okay. Now you see how
all of them work. I'm just going to teach you
how to edit a few of them. Basically, when you learn
how to edit a few of them, you definitely know how
to edit all the others. We can see all of
them work, right? We have this one which
is the line graph, this other one which
should be the area. Some of these ones
require more data. To choose something,
we're going to actually creates an area graph. We have many other ones, and so on and so forth. Let's choose the pi again. You can see that as we choose, we have other options depending on the type
of graph you choose, The type of graph you choose, we choose the pi should be one
of the most simplest ones. Then we have some options
here on this type, Add drop shadow and click. Okay. You see that we've not
added the drop shadow here. The drop shadow is not smooth. We can remove our drop shadow. See, it's now out. Then we
have some other options. You can check all these
ones on your own. You click here. We
still come back to our data where we
can edit and change. If we want to change, we have this option here,
which is the Recolor. Click here. You are then
brought to the recolor artwork. To remember the two when we're looking at
colors and patterns. This one now add
color to our graph. Now we can immediately
choose to pre. Just like this web color group, we can keep playing
around with the colors. See which one we like. We sit down, we like, okay, yeah, we accept the changes. Now we can see that immediately, Illustrator has created
this basic pygraph for us. Basically, that's what you get. Okay. But definitely there is a way we can go even further. You click, do, write, click, just select the guy
who objects and group. If you group, it's going
to tell you that you won't be able to make
changes your graph. If you click, we don't see our bounding box means we
can make further changes. We can further customize our chart to make it
look even better. We can add dents. We can just keep on grouping. Grouping, because
there are a lot of groups here, group, group. See that? We can
select them, right? Select them musically. And then work on
our data, right? Work on our graph, right? Okay. We can even give them, maybe ingredients,
can do some edits. We give you the background,
we change the font style, the font type Lynch back, stuff like this stuff. Just different color color. You guys, that's it for some
of the things we can do. Give it a different font style, different font and different
font styles and so forth. Guys, let's see Clash
Display Clouds. Please also free font
which you can download and use creates things as simple as this with this chart. Let's try to look at
other charts and see if we come up with
something Good. Let's look at the graph first. Let's just come and date
for the line graph, we would want to
have two things. We're comparing just two
things which you're comparing. For this one we won't
have anything delete, and for this one we
will have Facebook, Twitter, Mr. Gram. And what's up then? For this other one we
have maybe the moons, January, February, March. Yeah. Okay. And so on and so forth. And then we now have the Here. Okay. July. Then we now
have the mean deta here. So we might have just
give them random figures. I don't have time to start giving figures.
That makes sense. Okay. Random stuff. Okay, so let's click. We can see what you see. We now have a line grow. I think we have one figure
that is outrageous. That's what's causing this is, it's supposed to be 45. Now we see we now have a more
organized line line graph. Now we can, from here on start maximizing
our stuff, right? Editing our stuff rather. Maybe a group, maybe recall. We can even recall
the color, okay? Already you can see
what's happening. We can change the graph type. Let's try out the graph type. Let's see this one, they call it scatter. We have other graph types. We have this one. This should
be the area graph type. We have the line, if you looked at, we
have this other one, the stacked by how the
detail we visualized here. Let's try to see how you look. The pie charts, right? You look under the pie chart. Let's look at the
column under column. Let's see if we can. We really do not need to do
any changes here. Let's try to add shot,
see what's happening. Basically guys, you
see how you are now able to edit all
of the data, right? All of these types
of graphs, right? And then come up with
something amazing already. If you are not looking for
something really graphical, these graphs are ready
to be used, okay? You can use them
already to visualize data that do not require
high graphics, okay? They have color, they
have the right values, and so on and so forth. That's how to go about
creating the stuff, so we can group and start
to tweak things around. Okay, it's good
that you've learned how the whole grafting works. Now in the next video, we're going to create
graphs and try to add the graphical vibe to them
so that they look better. They look better and
everyone is happy. Okay, now, and that's
what we're going to do in the next video. See you in the next video by.
86. 86 Pie Charts: Hello guys and welcome back. In this lecture, we're
going to be creating a pie chart and giving
it that graphical look. Okay, now I'm going to start by opening our project created. Come to the project folder where it says graph Visualization. Okay, so you see pie chart
at the lustrat file. Just click open and our
pie chart will be open. This is what we're going
to be achieving right now. What I want to do is just shift, go and drag to the side and just just delete everything now. Okay, then what? We're
going to start with this. What I want to do, I just want to bring this guy on a
different background. Just going to control
x and control. I'll bring this background
work on this background. Next thing to do is come to our graph tools and
choose the pie graph. Just hold down shift
and perfect Facebook. Facebook. Then we have Youtube. And then we have what's up? So this is supposed
to be data for the top best social
media platforms and the amount of active users. Okay. For Facebook, I
think it's 2.9 billion. Let's just use 2.9
billion might be wrong, but for tribute, 2.5 Okay, Let's just use random figures. Try to estimate
for what service. Let's see, 2 billion and
then for int 1.8 Okay, with this we just click Ok. And immediately you see
that we have our graph now. Just close this guy. Let's just give our graphs
some random colors. Okay, Let's just give our
graphs some random colors so we can know how to differentiate
them better. Okay? And that's okay. We're not going to
use these colors, they're just for
differentiation. Now, next thing we will
do is come and group. Tough on group. Yeah, for the ones we
choose, clash display. Clash display funds. Clash display. We don't
want the regular, we want just the sky, We
don't want the variable. We want just this guy. Let's choose a gray
color like this, may be even brighter. We can make medium. Just trying to copy
what we have here. And then for this one group starts to grouping
them one by one. Group. Group, group, yeah, we have them separately now. Okay. The next thing will do, just shoot them like this. Then we want to separate
them like this. Okay? Separate them like
this, this, like this. Just like how we have here. Just like how we have them here, we can further more
separate them. Okay? With the direction tools. Right, The keys rather. So with that being
said and done, we'd like to get the colors. Okay, These are the color, these are gradient fields. You can see them here. So I'm not going to recreate, just going to sample, select this guy and this guy, and then sample the color. Select this guy, Instagram. And this guy. The
sample the color here. Then select this guy. Just what's up and this guy then the color. Select this guy. Sample the color. We
now what we want, select these guys and
remove the ste, color. We don't need a stree color. Okay. Then basically we're almost done with what we are
trying to create. I'm going to create an ellipse, just holding down
shift and out and drag into my dim selection two. I'm just going to leave
it in this color for now. Select everything here. To group them, con control
copy and piece in front. Then expand it like this. I'm going to write
click Isolt group. Now I'm going to choose
my direct selection tool. I'm going to delete some
of these points here. Delete for the remaining. Just going to
select all of them. We can select each
one and shift X, shift X, shift X and shift X. All of them give
them a white stroke. And maybe even come to the stroke panel here and just
give them this round cap. Okay, I feel that we should
cut some of these guys. Just cut bits to align them
with demarcation here. Cuts guys. We cut not much of a problem. So I'm just going to double
click out and select everything here And drug. I think this is where
we need to cut. And instead of
cutting, I think I'll just control again and let, and then try to cut some
of these points here. Delete, select, delete, Select everything. Let's give you the white
field, color and shift x, so color create to give you
this cup size like this. Perfect for these guys. We're just going to select them and just them up like this. Perfect. Basically we're done
with our work guys. All we need to do is
just arrange guys, centralized them like this
and then copy the background, right background, copy
the background old, have them look like
this basically. Then just select this guy
for the hydropotolan. Sample the column here. Basically we're done with creating this
beautiful pie graph. Okay, for this other one to duplicate what we've
created so far. Duplicate everything
we've created so far, to the right hand side. Okay. And we guys, this
guy, for the colors, I'll just choose a section
two and choose colors, which we'll just replace by
sampling the colors here. For Instagram, we choose
guy, sample this colors. Sample this color. Because we want to add the three D effect, we would need to be normal color gradients because they won't work well
with ingredients. Perfect. Now all we need to
do is select our guys here. Select our group here,
The D materials. Yep, here's our effect. I think we might just need
to do some more things. Maybe we should
remove the stroke. Okay, so that the
effects work better. So we now we see
that we now have the shading even at the site like this for our blend steps. Let's increase them then. We can make this, we believe
that plastic sheeting and then basically try
to the profile. Let me just hit okay
and see what we have. We can see that the profile is a little bit different
from this one, but we're not going
to change it, we're going to use
this one and we can just, sorry, grouping. We can just expand instead. Okay, the expand Okon. Okay, you know what, Let's just do this
right from here. Let's what I wanted to do is
on it to offset them a bit. K, I think twin them before the D effect
would make more sense. Let's go out and effects. D, give it classic. And first steps, blend steps,
Repeat them, basically. Okay, here is what we now
have, our treaty effect. Okay. Basically this
is how we create this nice graphical
look while still visualizing our data to be
illustrator pie charts. With this, we've come to
the end of this lecture. See you in the next one.
87. 87 Line Charts: This video, We're going to
be working on line charts. Line charts here in Los To. In order to start, let's go to your folder and open the file. Is it line chart? Click open. This is our
line chart right now, what we want to do right now
is just duplicate our board. I'm just going to
ungroup everything here and delete everything here. Basically, this
pie chart here was copied from our pie chart, so we are not going
to be deleting it. Let's just start working on
our line charts immediately. Come here, come to line
charts, Just drag it out. This, drag it out like this. Now we have Facebook, Youtube. What's up in come
board for this column? We need to leave it
empty because we are dealing with
two columns, right? X and Y, Xi, one. Facebook one. This one. Well, nits Mr. Graham. And then for this other
one, January, February, March, March, April me, June, and July will be the last. June, July. Perfect for for theta. Here we just have to
use random figures. Right? Let's just put
in random figures. So let me see if I'm going to like what we are going
to come up with. I don't like it, but just
to speed up the video, I'll just try to just
do it, style the key. Okay, it's quite messy.
It's quite messy. Let's just see guys, let's see, let's just ground for now, Let's event for you guys. We can shift X so we see
what's happening in the Wnt. Click shift X and back guys, this is just for
demonstration purposes. We don't need them
to be too perfect. We're just going to work
with what we have now. We're not changing anything. Here. We go to the color. We give it a custom color. Okay, first thing we need to do, we should copy our key here. Key, show your key here. Let's copy your key here. Because we will use it
for something important. Let's give it a black
color to start with. Then for Instagram,
let's go and make sure our colors with what
we have here, right? So for this guy, this
other guy which is black, you actually select multiple
files, multiple lines. Let's try to group them. Yeah, we actually have group, our stuff here doing on group. Forgot to own group,
group, group. Then we delete these guys. Okay, delete these guys. We actually need to delete
these guys also below. Okay, we don't want
to line under select. Delete. Then we need to
make sure this line is this color because that's going to be
the one for Facebook. I eliminate this. Give the field color,
give something like this. This, again, this one
we need to give it, we need to give it
this color because we actually changed it. It's for phasebook, right? We need to give it that color. Just select, then click
here and release, right? So that it's now the same as
the field color drug here. Finally we have them. Just now we can
delete these guys. For these guys, you might need
to still do group, group, group one, group one group one, group one group. You selecting let, then just
doing everything please. We forgot to select this guy. Everything please. Perfect. Then for this, Pons
need to actually change them outside fund which
is clash display. The font size should
be reduced to C 28 27. Then we need to just
delete these lines. And then to repeat the line
to align with the number. This again, let's control D. And from control,
repeat our action. The ones, the three on
top winds to fill it in. Okay, now we are
basically as done. It's our work here. All we need to do now is just
give it a background color. Fronts here need to
be bright colors, need to be bright colors. You know what I'm going
to do. I'm going to just shift x so as to see on the needs and change the
elements bright colors. Okay, for you guys. Give it one stock of one. Or 0.50 0.675 And then let's make the color then. For this one, you need
to make the colors. We need to make
the colors. This. Select the guy here now. And shift X and bring
back our colors perfect. I just want to expand our ship for this one. We just
select them again. Back shift X back. You see we have what we
are looking for now. Looking to bring this guy to the right hand
side, like this guy. With this, we have
come to the end of this lecture. See
you in the next one.
88. 88 Area Charts: Hello designers
and welcome back. In this lecture, we're
going to work on the last graph type which we will be looking
at in this module, which is the era graph. Come and open your file and then see where
it says era graph. This project file. Just click it and open loto. Now this is our area graph. And first things first, we do shift for our
output to hold. Drag it to the bottom. Just delete most of this guy. I think I'll just
give it a background of its own shift X
or control X rather. And control bring
it to the bottom. Okay, then. Okay, I think physically
we can lock this layer, we can delete this
layer group and delete. Okay, we really do not need to delete
most of these layers. Okay? So we only need to delete the graph itself because we are going to be using most of
these things to delete. And then come to your graph too, and you see area graph insect. It draw out your graph, perfect. This guy, you won't
have anything. You won't have anything. This guy will have,
Facebook will have you. What's up for this guy who have inter ground then
for this one, Of course. January, February, March, April. Perfect For the data, I really want to take time to make sure this thing
comes out perfect. Okay, I'm just going to
put in random figures. Okay, so just like we
did in the other one, I'm just going to put
in random figures. Okay. Special. Lastly, if we do not
like any of the graphs, we'll just go back and
change the figure. I think I like
what we have here. Just go with it. That's what
demonstration purposes, not special. So it out. I want your properties color and I'll just
give you a new color, new set of colors guys. Right? If I just go and just keep this guy to
the site like this, I can just group
objects and group. Okay, just keep on grouping. Sorry, grouping. Grouping, Perfect. Now, all I'll just do is
come and sample this colors here, set the guy here, sample the one under this
should be 90 degrees, this should be 90 degrees. But unfortunately, our
2090 sample this guy. It 90 degrees, this guy. Sample this guy, please. Okay, could this
one sample disc? Perfect. Now we need
to edit something. Yeah, I think the
first thing I will do, yeah, we just need
to edit something. We need to delete these lines. To delete the It seems the lines are
behind to reach. Seem to park? Yeah. No,
I can access the lines. Delete them. You can also delete this one. Can delete the line here. Basically just try to mimic
what do we have here? I won't copy this
one because I'll, there'll just delete this ones because they are not needed. The front side, you can
see that are fronts here, clash display medium 54, clash display medium fit four, clash display medium 24. Then definitely we have
brighter colors. Bright color. This guy also bright
color basically guys, it for this one range going
to maybe group arrange. Yeah, you can see
how quick and easily we've been able to
achieve our A graph. Now we deleted this one. Yep, we have our era
graph. Neat and clean. Guys will of course come to
the end of this lecture and we are going to take
an assignment in the next video to see the bye.
89. 89 Assignment 17: In the last videos
in this module, we learned about the graph
two and how to create graphical visualizations
of graphs to illustrator. Okay. To illustrate our data and also make it look
pleasing graphically. Okay. We learned about
the line graphs, the pi graphs, the area graphs, and so many other graphs. Okay? Now, we only took three
of the graphs in details. Okay? That's the graph, the line graph, and also
the area graph. Okay? And we looked at how we could customize them to make
them look better. Right now, I wanted to create graph visualizations
in this assignment. Okay? Using what we've
learned in the past videos. But we are not going
to be creating area graphs or line graphs or pie graphs in
this assignment, you're going to be
using two or three of the ones we didn't cover. Okay? Remember there
are many other graphs. Let me just open the file
here so you can see. You see there are a lot of them. There are column graph two, we have stacked
column graph two, and we have the bar graph. Okay? You're just
going to choose three of any of
these ones, okay? And create your tail
visualizations with them. And I would love to see
what you come up with you. Feel free to share
your projects with me and I would love to see
what you come up with. And hopefully I'll give
you some feedback. Okay, so that's it for this assignment and see
you in the next one.
90. 90 Grids and Grid Tools in Illustrator: Hello guys, and welcome back. In this module,
we'll be learning about geometrical grids. Okay? And grid beach designs
not to be illustrato. Okay? Now grids are very popular among
professional designers. Okay? And they help us achieve geometrically balanced
proportioning in our designs. Okay? And they can be used to achieve very cool
geometrical artworks. Even lo, good designs. Okay. And so many other
sorts of designs. Okay, now we're going to learn about all
this in this module. So right now I'm
just on Pinterest. Okay. If you don't
know Pinterest. Pinterest is a platform
just like Instagram. Okay? But let's say business, just like a picture
based search engine. Okay. It's just like picture
based search engine. Okay. And we can really find amazing creative
works on Pinterest. Now, I've just searched for
grid based illustrations. Okay. Right away you can see
some of these illustrations. Okay? Most of them have
been created with grids. Okay, So let's look at
this one, for example. Now we can see that this
is a geometrical artwork then it's been created
with grids and you can see the balance in
the artwork right? We can see a lot of balance. We can see the left side is
balance with the right side. And the upper part
of the design is balanced with the lower
part of the design. Okay? This is basically
a search engine. Like I said, if you
click on the image, it's sticking into the website. You see this is linked
to Skillshare.com Okay, Yeah, we're back
on our main page. Now you can see a
lot of designs. All of these have
been created with grids, with the use of grids. Let me open this one. You see this is very amazing, very nice. All of these have been created
with the use of grids. Okay, look at this one, also created with
the use of grids. And we're going to
create art work similar to this at the
end of the module. Okay, after we've learned
a lot about grids. Yep. There is another one. Another good one. Okay, I'm looking for a low good design. I would like to show
you a good design. That's what's grid
of your grids. Okay, let me just.
Good design here. Good design. Yep. Right
away we can see some. Let's look at this one. This definitely leads
to a blog article. Okay, so if you click
here with blog, but let's just look
at the image here. We can see that this is a grid and this is
an isometric grid. This is a type of grid,
an isometric grid. And of course, we're
going to look at all types of grids and
how to create them and use them in illustto in
the next video probably. But this is an isometric
grid and we can see that this logo has been
created using this grid. Okay? It's been created
using this grid. That's the way we use grids
to create logo designs. Okay, now we can
also see this one. You can see that all
of these have been created with the help of a
grid, as you can see here. Okay, We can really create balanced designs and really
amazing designs with grids. In fact, most pro logo designs have been created with grids. Well, I'll see a lot of them have been
created with grids. Okay. Just make everything very easy for designers,
for illustrators. Okay, so just come on
your own and see all of these designs and
more understanding of the whole grid thing. Okay, let me look at this logo. We can see how this one has
been created with the use of grids, right? Very nice. So we can see the balance, We can see the professionality, and we can see everything
that grids have to offer. That'll be it for this
one on Pinterest. I'm just going to go into Illustrator and start the video. Okay, We're going to start
learning more about grids. I'm going to start with the
new document and we're using the common preset here. Okay? When it comes
to creating of grids, we have a number of
ways we create grids. Okay? We have a number
of ways we create grids. Now the easiest one will
be to come to this, please, this line to this line segment to
just click and hold. Right away, you can
see this last tools we have this rectangular grid to and we have the
polar grid to. These are the first. Most easy way to create grid. I've just selected the
rectangular grid too. I just click and drag. We can see right away that
I have now created a grid. We can see that this grid
has a set of columns. And set, what do we
call them, rules. Right now, we can start
creating using our grid. We can just take
probably our pinole. When I come to where
two lines intersect, you can see that it now
tells me intersect. Then when I click, I will now be able to click, Just continue drawing
what I want to draw. This is probably the
easiest way to create, the quickest way to
create the grid. Okay, now you can see what
I've created using this bit by just clicking and clicking and clicking from one
intersection to another, that's probably the easiest
way to create the grid. Now if you come here again, you see this pull grid to
this is another type of grid. It's a poll grid. You can edit everything
we see here. And we're going to do
that just in a bit. I'm going to delete them. I'm going to click and
select the rectangular grit. Again, when I come
here and click, we can see that this rectangular
grid option comes up. And of course the click
on the two le game, we can see that the same
option comes up right now. These options will control
the type of grid will create. Right now we have the width, we have the height, and
all of them are in pixels. So that's the height and
the width of the grid. So let's make this 1,000
pixels by 1,000 pixels. 1,000 1,000 1,000 Then we
have horizontal dividers, of course, which are the
horizontal dividers. Then we have vertical dividers, which are the vertical dividers, depending on the number we
put here, let's put ten. We have certain number
of rules and columns. We have this one which says, we're going to look at
it in a minute, not now. Basically that's all we can
fill the grid with color. Or we can just like this
when we click and drag. I'm holding down Shift now
to create something squared. Okay, I leave it. We can see that our
grid has been created. Right? I'm just going to come
and create another grid. Okay, I'm going to hold
down shift and drug. Okay, I'm just going to
release my shift and then start messing around
with some shortcuts. When I hit, we can see that we have our horizontal
dividers coming down, right? So these our horizontal
dividers coming down and I hit. So we can see that we are
now able to bring them down to adjust the species from
the top to the bottom, okay? So the top species
are bigger now, and then as it comes lower, it now reduces in size. And when I hold down
V or hit V, okay, then see that we are having
the opposite horizontal, up and down, Down. And V for up, okay, down and V for op. Okay, Then if we hit X, we see that we're not messing
around with the vertical, right X and okay, and V, X and C. Okay, so these are now the skews. Okay, Let's say I
double click on this two now and
then check the skew. We can see that the skew
has been meshed with, now it's 40% and 40% here, it means if I draw it now, you see that it's 40% to the horizontal and 40%
to the vertical. Okay, so that's the skew option. So sometimes you
might want to create stuff and you might want a
grid that looks like this. This is the way to create it. You would have to mess
around with the que. It's also possible to add
grid, mean by add grids. To combine grid rather, you can combine
multiple grid and we're going to
look at this also, but for now you know
what the skew does. We're just going to look
at the polar grid tool. Now, the polar grid
creates this type of grid, right? The polar grid. If I hit the same, we can see what's
happening, right? And if I hit V, we can see what's happening. We are now messing
with the lines, right now messing
with the lines. If I hit X, we can see that we're not
messing with the circles and see we're also
messing with the circles. Again, I didn't talk about this other shortcut shift and the keyboard
directional buttons. If you hold down
shift and hit right, we can see that we're
adding these dividers, right? The line dividers. And if we hold
shift and hit left, we are reducing them
also with the circles. If we hold down shift and go up, we see that we're adding
them hold shift and go down. We see that we're reducing them. That's the shortcuts
for this tool. You have to know
that if you create your grid and would
like to mess around with the horizontal
and vertical dividers like we did with the
shortcuts just previously. You have to know that you
won't release your mouse. Okay? You have to
hold your mouse. While doing that, I'm
holding my mouse. I'm reducing the rules
and columns like this. That's of course with
the directional keys and holding down shift, okay? I want to mess around
with their positions. We know what to do, right? X and C, V, X and F and V. These are the shortcuts
for this one, okay? Now that you know,
we're now going to be talking about other ways
to create our grid. We've looked at two ways. This is the first
one which is in the rectangular grid tool and we've seen the
shortcuts for this. We have the second one which
is in the polar grid two, and we've seen also the
shortcuts for this. I'm just going to create a grid with our line
segment two right now. I'm just going to
click our line segment to get out to this one. Then I'm going to
draw a line holding down shift from top to bottom. Okay, then do you
select the guy, hold down Alt and drag it to the left or to
the right rather? To create a duplicate, we select the boot of them. The boot of them. Go to Options, or rather Object
and blend and make. Okay, Click on our Blend
to go to specific steps. Now we can see that
we have 882 steps. We don't want that, Let's
make it ten and okay. Now we can see that we've now created the vertical
lines right. Okay, what we don't need to do is just right click transform. Rotate. Okay, let's
rotate it by 90. Let's copy now. Immediately you can see
that we have now created a perfect rectangular grid just by using the blend to immediately we can
group these guys. Or we can just put
object, blend and expand. And we have our grids
perfectly created like this. We can ungroup them and start
to use them right away. As you can see, this is another interesting
way of creating your grids. Another interesting way
of creating your grids. One other way of
creating our grids is to come to our objects. We just know what, Let me just remove
the field color and give you the of two pixels. Select your ship,
come to objects, come to path and
split into grids. If you click, we'll
then see this option. We do click Preview, so
we see what's happening. Now we can see the
rules and columns. Right now we have number number. Presently we have just one. If we add this, we'll see
that we have a new rule. We add this, we'll
see that we have a new column and we have
other options, right? Let me just add 44. We're going to see what
these other options do. Let's look at gotta.
When I add the gotta, we can see that there
is a demarcation. It's creating a gotta in
between the rules, right? And we have the ones for column. And we can see that
we're creating a gotta in between the columns. Okay, let's just make
this 28, 28 and yeah, now this is the total, which is in pixels, of course. The total width and the
total height, right? Height and width, right? Let's just make this the same as this was the same basically. That's how the
options here work. And we can add guides. Okay, These are the guides. We can add guides just
okay, Right away. We can see that our
grids have been created, okay, with a bit
of style, right? We have them as separate ships. This guy we can see that we
have them as separate ships. They're not linked each other. That's another way of creating
these grids right away. We can just select the boot
of them or all of them. Rather control, we
can use them as one. We can use them as
separate objects, maybe to do separate things. You can give it a color. Kim tries in the
Shibular to add colors. Minus adding random colors. I'm not doing anything
beautiful and specific. Okay, now we can see that we just
created our grid and we added colors to
get to the boxes. This is interesting
way are creating our grid just by going to
path and split to grids. We're going to use all
of these options very well in further lessons
in this module. Okay, lastly I'm going
to show you guys the one last way I
create grids to. That's by going to view and then coming
here to Show Grid. If you click Show
Grid, we can see that we now have our grids. Now these grids are of course, inherent to a lot to
the default grids. We can actually modify them. Modify how they look so that it fits to what
we're trying to create. Right, Let's go to View again, and we always make sure snap
to grid is on snap to grid. We'll see that
everything we create, we snap to our grid, so we can see that
adllustrator now intelligently snaps
everything we create to our grid boxes. Okay? It's easy to create something that has
a good proportion, okay, that's proportional
to our grid. Okay, Perfect guys, that's the snap to grid feature. And how do we modify
these grids, right? So I'm going to just hit
control key for my preferences. Now, the preferences,
like I said in one of the initial videos, I think one of the
earliest videos in this course controls of
course our settings, right? The whole settings
of how a stall work. Everything can be controlled
from our preferences. We looked at the keyboard
increments the other time. This time we're going to
look at not smart guys. We're going to
look at guides and key guides and grids so
we can control our grid. Will look from here. Now we have the color,
the color of our grid. We can make this blue, right? We can see that our grid has changed color
control K. Again, we can see that we can change
the style from line to dot. Zoom out, we'll see that
we have tiny, tiny dots. That's how our grid will be. We see that they
still snap, right? Even though they are barely
visible, they still snap. They are barely visible. That's one way of
creating our grids. Let's control again,
see some other options. We just take this guy
back to the line. We have the grid
grid line every. Okay, This is basically telling also the size of our grid lines. Okay, let's just okay, and go back to our preferences
and change this guy. It's 72, 84. Let's make it 200 so we
can see the difference. So we can see that
our pets a big okay. Bigger in size and control
these subdivisions will control the number
of sub grids inside each and every one of these
bigger grids there are here. Let's make this 20. You can see how plenty,
plenty, plenty, 20. 2020 times 2020 times
20. That's probably 400. There are 400 boxes
here, 400 boxes here. That's how to control our grids. So we're going to
take this back to 72, this guy back to eight. And I'm going to just
change the color, change color back to
light grey and okay, we have everything just
like how we had it before. With this, we've
come to the end of this lecture where we had a brief introduction of what grids are and how grids work. Okay, just going to go
to you and hide my grid. Perfect. So see you in
the next one. Bye, bye.
91. 91 Grid Types and Usage Techniques: Guys, and welcome
back. In this lecture we're going to be learning
about the types of grids and the usage techniques
of these types of grids. Okay, so I'm going
to start by opening a new project with the
common presets as usual. And from our last video we learned about two
types of grids, right? Even though we didn't see
the other types of grids, or there are types of grids, we, that we learned about two different
categories of grids, right? We learned about the
rectangular grid tool and also the polar grid tool. So definitely, you
know that there are rectangular grids and
there are polar grids. So these are the first two types of grids we're going to look at. I just created a
rectangular grid. It consists of rectangles
both horizontally and vertically arranged
in a grid structure. Right? So that's all about a rectangular grid and the
most popular type of grid. Okay? We also have
the polar grid. Okay, Let me just
duplicate this one board. We have the polar type of
grid, which is this guy. And we can see that it's
just a circular grid. Circular divisions,
okay, from big to small. And we also have
lines which divide across the circles, right? So that's all about
the polar grid. Okay? And of course all of
these can be removed or added. We adjusted just
like how we saw from the last video where we kind of adjusted everything
with short cuts. Right, And I'm just going to duplicate this 12 more times. So we look at the other
two types of grids now. The next one is the
hexagonal grid. How does that one work? Okay, It's made up of hexagons. Going to create
that type of grid. Right now, I just
created one line here. I'll just create duplicate
to blend the boot lines. Click, Click, we've
created our blend. Click on the brand
to go to Steps, and let's make this
50 steps, okay. Now in order to create this hexagonal type of
grid, you have to write. Click, and then we go to
transform and rotate. We have to rotate it
along 60 degrees, right? And we then hit copy
at the original guy. You hit copy to
repeat it, Duplicate. Okay, when we do this, we write click again
transform and we have to reflect this to 90 degrees and we
have to copy again. Now we have to make sure that the lines are
aligned further follow. What I'll do is I'll just
expand all of this blend. Expand, Select the
guy blend, expand. And finally, this original guy blend and expand.
Blend and expand. I want to turn on smart guides. Smart guides are to, you know, to snap to point. Snap to point here. Basically. Let's work
with the settings. Come on, make sure
they are aligned. This is the guy. You have
to, you have to pick the one that goes
across like this, the original guy
or the mean guy, the first guy we created. And just make sure
it's aligned here. Okay? Make sure
it's aligned here. We have to select them
and see where the met. And just around to see if
it's perfectly aligned, and as you can see, they're all aligned at the same point. Okay. What next we
control to group this? We can expand the size, we can come to our pathfinder. Okay. These are just extra steps to clean up the whole thing. We mustn't do everything. Okay. The mainting
has been done. These are now the
hexacuna grids. As you can see there middle
of hexagon, we have 123456. Hexagon has six sides, right? When we create a ship like this, we observe that we
now have six sides. Okay, Yeah, this
is now the aces, the idea of the hexagonal
grids, six sides. We can just select all
of them and come and divide and just give
them back thetral. Now when we come
and the new group. So we can just enter
by clicking Delete. Deletes Dt. Finally dragons perfect. I'm going to scale them down. The bits, as you can see, we have fated our grid, right? Our hexagonal grid. And everything fits
into our art board. I'm going to reduce the size or the thickness of our stroke to 0.5 We can start creating stuff with our
hexagonal grid, right? The last tuple grid is
the isometric grid. In order to create this, just do something similar to this. We need to create this time
along this axis, okay? Remember this one we created
along this axis, right? For this one, we going to create our first ship along this axis. We create along this
axis and drag it, just blend to click, click, click, and just double click and make this
50 just like the other 150. The next thing we have
to do is right click transform route, not reflect, and we route along
60 is also a, sorry, I shouldn't have copied
it Ted, the original one. I'm just going to tet once
more and click Copy this time. Then after that, we're
going to click and then and reflect along 90. Sorry, I should
have copied again. Reflect, copy. Perfect. Now we're just
going to expand all of them. Expand, expand. And think this guy is
the last one. Expand. Now we do what we did here, we'll make sure this one
comes to this point, right? Make sure they are intersecting. Let's use this one. We just drag it here and make
sure they are intersecting. Right, the boot of them. We see that we still have
some little movement to do. We have to move this
guy to this point. Move it again. We see that we are just be almost there. Yeah, we see that
we are there now. We just let everything group precise divide and
give it a stroke back and we can go into the ship and start to
delete the unneeded parts. Delete. Delete. Delete. Delete. Okay. I think we can
delete even to this place. Okay, Also here, here we give the 0.5
and as you can see, you guys, we now have
our isometric grid. Now with this grid, we can
maybe take our pencil, just come and start creating
our isometric shape. And I'm going to show you what we can create with this one. Just now guys, we can see that this, we've created an isometric ship. Now this is an example of what we can call
an isometric ship. We have three sides visible. It's a three D ship, We
have three sides visible. And this shading gives us an
illusion of three D. Okay, this is more of a fred. We can also achieve something similar to this using
our three D effect. I'm just going to
demonstrate that, give this a color and go to
effect three D and materials. I'm going to just
use the classic. And of course you can
also get this with the normal tre D to use the
classic and extrude and Pv. When I just come to
preset and I choose isometric top for example, we can immediately see
that we have this, right. Choose 25, 30, let me just 40, okay. I think for maybe 36 or 35, I just want to make it
look like this one, okay? In proportion already. You see that we now have. We now have the same thing. We have basically
the same thing. Okay? So that's how the
whole treaty works. We can now see that if I
adjust my lighting here, because we can see that we have two parts brighter
than one other part. Okay? We have the
brightest as this guy, and then we have this
other one bright, this other one darkest. We have this one
as the brightest. We have this one
brighter than this one, and we have this one
darker than all of them. If I click with you, we see that we just have
the same thing here. We have the same
thing, everything proportionally aligned. I select this one and
just give it this color, this guy, and give
this color this color. What I need to do, actually, is to expand our three D. Okay? So you can select and give them the individual
colors of the sides, right? Immediately. Now we see that we have exactly what we have here. Now this is the one we got from our thre D effect and
this is the one we created with the isometric grid. Here we can see that we can't
even differentiate them. That's the isometric grid. And what you can achieve
with isometric grid, one of the things
you can achieve with the isometric grid. O kay. And of course
you can do Two D Stove also like the logo we saw here. I don't know if it's still here. My network is as of, okay, the logo we saw the other time, it's a two D logo, but it was created with
the isometric grid. So let's see. For example, I duplicate this one, okay? I just take my blend to, sorry, my ship builder to
the color and just start to do something like this. I'm not creating anything
special in specific. I just want to show
you an example of what we can create
which is in two D. With this grid, we can
give it this color. You can see that because
of how big the grid is, it's taking time to
effect my changes, Effective when I click on
this guy and shift down control X to cut it out and come on
control V to piece it. We can see that we've created a two D logo with
an isometric grid. It doesn't always have to
be three D. We can create two to also this grid. That's what they did in the
other example we saw on Pinterest guys already,
we've created this logo. And we can see that one thing, using grids give you balance. Immediately, this icon
can serve as a logo, as a logo on a, It's balanced enough,
aesthetic enough, we just have to give it
the meaning and boom, it's now logo design. And this was created with the isometric grid just to drive my point that it doesn't
always have to be a D shaped. We create with this
one a perfect guys, right now we're going
to try to combine grids and see what we can come up with by
combining our grids. Like I said before, it's possible to combine
grids, right? It's possible to
combine grids and to create ships from
these combined grids. I'm just selecting
the polar grid tool. We're going to try to
create a polar grid here. I'm going to reduce those lines. Maybe we'll just give
them like this one. Use them like this, and
have them like this. Give it, yeah. Now we can see that we've combined these two grids, right? We've combined the
rectangular grid and we've combined
the polar grids. I'm just going to duplicate so that we have several copies. Now we can start creating stuff. Okay, let's assume we want
to use the shipbuilder, maybe just select the shift X. Send both of them, the ship
you to select your color. Let's see if we can start
creating something interesting. Okay, we're going to start by
having something like this, then creating some
random stuff guys. Nothing special in particular. To have this one like this, maybe this one like this guys, basically just then select
my direct selection tool and click in the species and
control to cut them out, to piece them and I'll just reduce the size
like this. Boom. You can see that immediately, we now have our design
from our combined grid. It doesn't look too
good for where you get the point sent back
where you get the point. Right. We've just created a
logo by combining two grids. Okay, we just combined rectangular grid and
also the polar grid. I'm going to delete this guy
and see if we can come up with something
better. Okay, what? In fact, I'm going
to edit my grid. Let's give this five by five. Okay, let's give this six by six and see what
you come up with, a six by six, Okay, and draw the
guy like this. Okay? Centralize our
shape, our grid. Then. Pull up, let's
draw from here to here. One holding the mouse. Let's just. Okay, let me just remove
every thing here. Make this like this. Okay. I'll just release everything to have our combined
grid right now. With this combined grid, we could have something
similar to this. We could have this. You just try to make sure all these two boxes are
filled so we don't have a weird instance control Z guys. Immediately, we now
have agreed to shift X or control X control V. We now have this design with
a grid, right, like this. Bring it down,
remove the stroke. Maybe then objects
transform each, maybe rotated by 15
degrees and skill it by T T. Okay, And let's copy control
control contratrod. You can see what we've created. Not really. So this isn't anything
serious, okay, just try to use the
transform effect here. Okay, But that's a
possibility right now. Let's look at creating some
of the stuff. Random stuff. These are just random things I'm creating by combining our grids. And we're going to combine all
of the types of grid also, not just, not just the
rectangular and polar grids. Okay, just starting
with this one, maybe we can have
another one here, K, then something like this and something like this. Common cuts. Sorry, Common cut, everything control X, sorry, I did shift X instead
of control X, control X, control V, shift X, Y. We can see what we've created
by combining our grids. All right, maybe just
cove all of all of these edges like this with the color to shape and
give it a background. Yeah, we've created a
very weird logleke. That's the possibility
of combining our grid. Okay, let's look at some
other things we can do. Let's look at combining
multiple polar grids. Okay, let's look at combining
multiple popular grids. I'm pulling down all and just dragging this one to the
left to duplicate it. Let's assume we have this selecting the boot
of them and then slur tribu dragging
this guy like this, she's a different color
dragging this other guy. This probably maybe
not up to this, maybe. Let's just stop here. Perfect. Yeah. Remove control
X, control V. We see the ship we've now
created by combining the two. What do we call them? Grid guys. Grids. I'm going to
I put another one. We don't want any skew
here for these guys. Let's make them three and just draw like
this, centralized, centralized centralized aligning to this point to this other bottom. Let's just do it manually. Then need to reduce the size. Bring it to the left
and going to pull down at bring it to the
right like this. And then wind hold down
Alt and drag it again. Let's see what we can create
with this, your ship. Sl the color. Let's see what we can come up
with this, right? Let's try to have one color, this and then another
color like this. She may be choose this color and
have one connects. And finally we have
this other one. Maybe we choose a
different color, this other one connects. Okay. Just sample this
color, sorry. Okay. I think we can just fill
this one like this. Okay. This one. Sample this, sorry,
what did I do? Okay. Just just so we can have
it on our color guide to. Okay. With this ship too. Just. Like this already. You can see what we have
come up with by just adding, or by just combining four
of these grid ships. Right? Four of these grids. So I'm going to just
select everything here. Okay, We didn't
combine this one. Okay, So we'll select
everything here. Control X, control V. Right away we have a very beautiful ship
to delete this guy, Bring our ship, let me just
circling and group them. Okay, then bring our
ship in the middle. Yeah, we can see that
by simply combining four of our polar grids, we have created this
very beautiful ship. Maybe we could even have
another grid here which we can, which we can use to
just arrange our ships. Let's just delete
this guy something. Let's see what we
don't need to put in. Let's see, we have three here. In three here, okay?
We have it like this. It's possible to start just filling the pieces with our
ship, with our new ship. Okay, pull on Alt
and drag it here. Control D. Control D. Select everything. Drag it down. Control Control D. Basically, we could just draw the dice
and feed them properly. I think the lines are
not big enough and I think the problem is coming
from the art board, right? But you get the
point. You get what? I'm just trying to
hit this pattern with this cool design we've
just created with. Okay, The possibilities
of these are limitless. Possibilities are limitless. You can create very
interesting droometric ships. You can create a whole lot of
things with the grid tools. Okay, we just looked at
the four types of grids, which are the rectangular grid, the polar grid, the
hexagonal grid, and also the isometric grid. We've also looked at how
to use these grids, right? We've looked at how to
combine these grids, how to use them with
our ship tools. We can use these grids
with our ship tools. We can use them with
our line tools. With our line segment tools, we can a whole lot of things. All right, so let's
assume we want to use this Arc tool, right? All we need to do
is to click here, click and hold, and drag
it to the next point. And you can see that
we've created this arc. The possibilities
with these tools are extremely limitless, and I will want you to
explore on your own to see what you can come up with
and discover for yourself. In the next lecture, we'll
be diving deeper into creating more interesting stuff than what we did in this video. Okay, so see you
in the next one.
92. 92 Geometric Designs with Grids in Illustrator: Guys and welcome back. In this lecture we're
going to be diving a little bit deeper into the grid. Thing to be Lstrito by
creating some artworks. Okay, just a few
simple artworks with both the single grid and
also the combined grids. Okay, I'm going to start with the common preset like always, and then we're going to
start with the single grid. The single grid. So
we're going to start by using the
rectangular grid tool. And I'm just going to
click to see the settings. And I'll just leave the
width and height the Sam, and I'm going to use
nine by 99 by nine, or eight by eight. Let's use it by eight. Okay, so we're going
to draw a grid like this and
centralize everything. Then we're going to take
my shape tool here. I'm going to click
and drag to create a shape size as one of our grid boxes to give it a
color here, a field color. Just reduce or just
eliminate the strip color. Okay, Now I want
to select this guy here and just drag it like
this one, like this, okay? Then the next thing I will do
is just duplicate our ship here and bring it
down like this, okay? And just let both of
them click Transform. And then let's rotate. All right. Let's, let's see 90. And then copy perfect. I just want to have a bit
of mix of color in here. I'll give this
color in this guy. This color, this one. Give this color, this
color, this other one. Let me try to see if you can
use more interesting colors. I'll sample this one. Let's see if P here
will make more sense. Okay? I feel it's
better for me, better. Then the next thing
I want to do is to create, create
something like this. Okay, something like this. Then I'll just come
here, drop like this. Then just transform,
reflect, copy, bring, point. Let's use a different
color combination here. Green is to shout, let's use something that
compliments for this one, Let's just something
more interesting. Let's just use this color. Okay. Okay. We can select the
boot of them. Let's team. Let's see, by zero,
let's try one. Okay, copy. Just bring them this. Perfect. Now I'm just
going to fit this one. Be maybe just crack it down. Don't why it's like this. Maybe the grids are
not that perfect. Okay guys, I think we are good
to go select the booth of them down, bring control. I think we just need to.
So I'm just going to drag this one to this point, okay? And set this to and hold Alt
and drug them like this. Then for this one. Now for this one I'm going
to set the boot of them a drug like this and
control control D, y. And this is what
we want to create. For this one, I'm going
to set the boot of them A and bring
them to this point. And for this one, both of them will alton bring
them to this point. What I then want to do is
K, this one like this, control D. Okay, this one
like this A, then control D. Let's see if having them in
the middle here makes sense. Okay, Let's try something
more interesting. Instead of this, I'm
just going to what? Jublicatemltrk them, okay? Then what I want to do
now is let all of them to my subu just create
another ship here. So that I can select the
direct selection to shift and control X to cut that ship out and control V to
piece it outside. Okay, I'm just deleting
everything else. Let's remove the stroke. And now we can use this ship independently
in this please. Right? Just fit it in please. And reduce the size bits. Reduce the size. Like this. And let's give it color. And you can see that we're adding it to the struck instead. So we're just going
to remove the Tk. Let me delete this
guy and do my delete. I just deleted to see
what we came up with. Right. Maybe I'll
choose a custom color here, something like this. I'll just go with this. Now
the next thing we have to do is just duplicate
all our ships. Maybe I want to, this guy, this fit like this, perfect. I won't do any more changes. I'm just going to
select everything. The select grid. Pull down al D to the
bottom like this. Okay? Control control control D. This is what we have. Might
not be too perfect grid. I think we didn't really
align everything perfectly. But if I delete the
grid right now, you can see that we have our artwork and
it looks perfect. Control G to group them, just centralized them and maybe we use my artboard
to fit our design. Yeah, we have our ship pattern which we created
with our grid tool. All right. Yeah, this
is perfectly nice. I like what we have here now. The second one will be a design with a
combination of grids. Okay. I'm going to
create a new bo, select my Art Alt and Drag to have a duplicate and
delete everything here. Now for this one
I'm going to use the rectangular go and
also the polar grito. I'm going to select the
rectangular grid to double click to make this nine by nine. Okay, Maybe we need to adjust our
artboard bit. Okay? Perfect. Now the next thing we need to do is
create our polar grid. Click here, and then
let's make this 80. Okay? Click here and
gray, we have grid. I think I want to, maybe we should add one
of these line divisions. Right click like this. And shift shift A, right mouse button,
right keyboard button. I just keep doing this. Right keyboard button instead. Shift right keyboard button. I think I will just do it this. Release my mouse now I can
start creating with my grids, select everything and
go to the ship built. Let's try picking a color. Let's now start to apply
our ship build ships. I'm looking to color the red. Then I'm just going
to take my time here to try to create
something nice. Okay, so you can just
observe what I'm doing. Okay? I don't have a design in particular
I want to create, but I'm just going to try to
achieve something cool here. Let's see this work. Let's go with that, this. Okay? And then let's have this. I'm working with symmetry here. Want my left side to look
like my right side, right? So I'm just going to do this. When we're done with everything, we come and add colors to
the whole thing, right? But for now, we
just need to have a shape created perfect then. I really wish we had a
diagonal line going like this. Okay. Since it's actually
something we can create, we can create one like this. Let me try creating. See,
I'm just going to do this. Okay. And the same for here. Okay, so select
everything once more, ship you to, let's just
do this and do this. Perfect. Let's come to the port. See what we can
come up with here. Let me just do this. Maybe I'll just stop here. Do this and feel this one. Sell this points. And so
also with this one. Okay. Like I said once more,
I'm not creating anything specific or
anything in mind. I don't have a particular thin in mind I'm
trying to come up with. But hopefully we're going
to create something that makes sense, design wise. Okay, that's what
we're creating here. When I'm done, you can then see what I've created and
then try to recreate it, or you can even create
something better. Okay, that's what
we're doing here. We have this, this, let's just try this one. So far, so good. I think
we're making progress. And of course, we're
almost done here, guys. This one, what we have now, I think we do. I will round up and apply different colors so we can see what we
have come up with. Maybe one final touch here. This other. Yeah, I think we're done here to select everything
and reduce the size. I will just take my time. Okay. I can see that we
have some flows here. I'm going to select
everything again, my ship tool and
try to fix some of these flows we have
here. Flows like this. It, this time self colors. I'm just going to
the right color. You see we also have one here. So we're going to
zoom in randomly and see if we have flaws. And if we do, we just fix them. I think all our flows
have been fixed. With that being said, we
are going to ships out. I'm selecting my
direct selection and then selecting
inside our ships. So I'll just make sure I have
selected every ship here. Yep, I selected every
ship. Control X. Okay. Sorry, I didn't
select the one in the middle to
select control X. Just come to the
site and control V and then scale them down. Then select everything
here and delete. Just bring our in ship. I think we can as well
group control and align to the art board and remove the stroke and scale up. Yep, we can see our artwork. Yeah, I think we did. We did quite well.
Perfect. I'm just going to other colors here. Just going to other colors. Let me select this
color for now. When I come to my
color guides too, we can see that we now
have different colors. Let's look for
complimentary left. Okay. I contrast. Okay. Even choose
something different. This color. Okay. Yeah, this color. Okay. So this color
will do then. I'm just going to that
randomly and change the color. These guys like this and let's give them
this other color, like this one sheet
and some same color. Then we select this
one pole colors and this other ones colors. Maybe we could even mix with some other sheets
of blue, right? Maybe this sheet give
this on this sheet. Then maybe you could just create a background in this background. We have it on the
different layer. Control X control, drag
it to the lower side. Reduce the size like this
and give it a darker color. Darker color would do. You can have it like
this and just lock the layer and continue
applying our colors. This guy, this guy
who use this color. Yeah. Basically I think this is it just going to align our artboards to
each other properly. This layer slot
need to unlock it. Then align our artboards
to each other. Perfect. Yeah. With
this we have come to the end of our lecture
on grid usage. And we've been able to
create this artwork and this artwork during the
course of this lecture. I'm going to just see it
in the project further, so you can have access
to this work Also, in the next lecture,
we're going to be creating something even more, mind blowing,
creating a pattern. I'm going to use all the
techniques we've used, or we've learned rather in
past lectures of this module, to create that even
more after that. That'll be it for this one guys, and see you in the next one.
93. 93 Exercise 10 Geometric Grid Based Artwork: Hello guys. I'm welcome back. In this lecture, we're
going to be creating this geometric artwork. Okay, It's been created with the grid and
we're going to just do just that in this
lecture parking lot. First thing we do
is open the work, go to your project folder
and you're going to see this geometric
artwork. All right. Click on it and open. This is our artwork. As you can see,
it's just made of ships with different colors. On the grid structure. The grid structure, the
first thing I'll do is create my artboard and
I'll just duplicate existing to I'll just will and drag to the
right hand side. Get my selection to then
delete everything here. Okay. The first thing we're going to start with
iscreting the B's grid. Okay? Now come to your rectangular grid
tool and click in. Four by four is what
you're going to be using. Four by four, okay? Rather three by 34 by four, because we have 1234, okay? 12343 by 33 by 33, vertical dividers and
three horizontal dividers. I'm going to give
this black stroke to centralize it or
align it to the middle. Then just Kyle holding
down shift and old scale to fit our art board. I'm going to give
you a stroke of two. I'm going to just have
it on its own layer. We're going to lock this layer and do my art work
on this layer. Perfect. The first thing we're going
to create is this guy here. This guy here. How
did we do this? All we did is we created a
line like this one, like this. Then of course the color is red. And we can see
that it's actually color Stella, color of red. And then we just blend that. Take your plan to click
here, click here, work. Click here, click here. We can see that we
have too many steps. Let's make this E seven. Let's just make it eat. We're actually going
to scale it up. Everything will look perfect. Select everything,
then. Control C, control and just
rotate it like this. Perfect, select everything. Object, blend, expand. Then we will just route
our ship like this. Maybe skated over bits bigger, make it even bigger from here. Now we have our ship. I think we will need more blend. But unfortunately,
we've expanded our ship, so there's
nothing we can do. So we're going to work
with what we have. Maybe we're just
going to increase the stroke size so that
it fell more space. Then the next thing we'll do is just create another square. Remove the stroke, then we'll use this as
our clipping mask. Select everything
in control seven, we can see that we
now have it clipped. We now have the whole pattern
clipped in our new shape. Right? We can of course adjust
our boundary like this. Perfect. So we have
created the first one. For the second one, we can see that the ship or the square is
divided into two. We have the parts which consists of one third of the whole ship. Okay? It's been divided
into three, right? This one has two
thirds of this one, and then this one has one
third of the whole ship. Okay? So what we do is created
a ship here the size of our box give you this color
and the shop color because of Grid here, we can say that everything is snapping
perfectly, right? Everything is snapping
perfectly grid. The next thing we do
is come to object path and then split into grid. Now we can preview and then
we can add our columns. We can just add three of them. And okay, now we
have three of them. Now for this one, for these two we just set the
both of them go to our pot finder and then
just join them and give, yeah, we don't need
to give it any color. We just adjust our
ship like this. We can then sample
our color here. And then stick this
guy duplicate it. And use our blend
to blend between. This work on our blend
steps, make this ten. Let's make it 12 or 13. 13 should walk here, and 13 it is okay for me to. The next one will be this one. And what we need to do is divide this guy
into three, right? Object part, split into grids. Let's see preview, we need
to increase the rules. Okay, right away we
have this into three, for this one, the middle, we're going to sample one
of these colors here. Okay? Then we're going
to give it this, this, right, perfect. Then control, control rots
while giving it this color. Okay? Of course, this guy
will come to the front, arrange and bring to the
front for this other one. You can see that
this color is this, this ship is that color. We need to change it and we need to come and create our ellipsis. Then come and choose
the color here. Just align our
ship this perfect. Then select the guy
control control reducing size, Sample. The guy here, control sea
control F, reducing size. And choose the white color here. For this one, we're going
to select this guy, and we're just going to delete. Delete, and then we are
going to split the ship. Click here, come get the middle point. Is
the middle point. Okay. Just click
the middle point to set the both of
them and then divide. Now we can select each one using our
direct selection tool. This one, this color, this one. Give it this color. Then we also need to
duplicate the ship. When you select this guy, we see that they are all
in the group, right? To control C, control F, and this just reduce
the size like this. Now we can give this color, select one, give
this color perfect. The next one will be this
ship, we can see that. We can see that the squared ship here is divided
into four, right? This one divided into 41 to 34. We create the ship, this key fits
everything perfectly. Select the guy, little objects, then part split to Grede. Okay? Then for this other guy, we see that they are
divided into 33, right? Three here, three here. Select the guy to object
and then path and split into greed preview 33, okay? And all of them, all of them should
be given this color. Okay? And even the background has to be the blue color, right? So we are not going
to just select Ankle points like this. Okay. So let the guy side
the ankle points, the guy select this ankle point, just drop like this, drag this perfect. Now we have all our
ships done now. Just create another ship for
the background for this guy. I'll give it this color
arrange and send to park. Perfect. Then we then create our next ship Here we can just set this guy control
control and take it down. Give it this field color and
shift to give it the color. Increase the stuck
size to three maybe. And just teat it like this. Let's reduce the
size to this point. And control C control. Increase the size on the side of the new
one to this point. And we should also have a duplicate of this
guy contra control. Okay, for this one, let's just bring it here
because we're going to use it to mask the shape. Right circuit Blend to
click here and click here. Click and give it 1010. Should do, ten, should do. I'm just going to
expand so I can increase the size of my stroke. So structure of four is perfect. We need to arrange into front. Gets in place. Select
this other guy. Control seven. Perfect. Next one guy, we're
starting with this one to control C control reduce the
size, choose this guy. Control C control
reduce the size. And choose this control. C control size, choose this guy. Control this size. Then choose whites. Perfect. Okay? We also need to have
this blue in the middle. Control C control, and
just give it perfect. The next one will be this guy. Right? All we need to do
is to select this guy. Maybe we don't need
to select this guy. We just need to come and create. We give it the color here, and the color is blue. Blue. This one needs to be white. Actually, we can
just take this one, the size like this, pull
down old to duplicate, and just blend between them. Click As you can see we have too much
right now, maybe ten. Okay, I think we'll
work with ten and then object expand and just
drag them to this point. And then create a blend. Also click and click, of course, let's just reduce
the size. Let's make it ten. I think ten will do perfect. Now I'll just reduce the size of the overall thing even though our ships here are
smaller than are here. Not bad. We'll work
with what we have. The next one will
be this box here. Let your at angle to create, create your perfect box and
fit everything perfectly. The object path
split into breeds. Preview to two. Okay, for this one
we're going to give it a background color of this and then control C control
and give it this color. Then choose our direct selection to click this edge like this. Click this edge, perfect. Going to just do the
other guys, for this one, I'll give it this
color for this one, I'll give it this color for this one, I'll
give it this color. We're going to transform
and reflect this shape. Copy, perfect,
arrange and bring to fronts perfect and give
it the white color. We're going to just let
the bottrole control F and rotate them like this, grab them to the bottom, try to fit things
perfectly perfect. For this one, we'll give
it this color perfect. Now go on to the next guys. They are quite similar
to what we have here. They're just the
opposite, right? We're just going to set
everything here, them out, and to the bottom fits
everything here perfectly. Then ranging front select to this perfect for the
colors of the background, we're going to select this guy, this color, Select this guy. This color, this color, this guy. This color key. Let this color color, let this guy this color. Okay, We'll just be
a little bit faster so that this video
doesn't get too long. Okay, Now for this other one, you see that they
are divided into, into two right there,
divided into two. Unlike this one which
are divided into three, this one is divided into two. All you need to do is to put your box box, a perfect box. I think we just have a
duplicate of this box so we can copy it the next time
we need to create a box. Okay, we have it here. For this one we'll have 22, a division of 22 object path
split into grids to two. Okay, for this one we just need to duplicate it to the right,
to the left hand side. And just repeat this
one like this, sample, this color shift X to
give it the strip color, Create a strip color like this or a stroke size like this. I think we need
to make it began, we can bring it to
the site like this. Then you need to Cta a few
more times to this one once, then give it a
white strip color. This should be 26, 26. We absolutely do not need white. We need this color. We need this color. White
shift x to give the stroke. And then 26 perfect. I think one, okay, one last. The other one needs to
be, actually needs to be field color so we can just sample this color and
everything will be perfect. The next thing we
need to do is to just group our ship together. So click Ok, click this guy, click this guy, and click
this guy and control. Then we just bring
back our ship. Select the ship and
select this new group. And control seven to crab it. Okay, I think we need
to get rid of this. Please click inside and
you know what we do. We use our to select this
guy and let it. Okay. And we can as well delete
this one and just go out. And yet we have our
ships non perfect. The next one will be to
create this ship here, right? So what I did was I came here, sample this color, then
click it down like this. Control control,
reduce the size. Just turn it this way,
keep it like this. Sample the next color,
which is this one. Can we make it pick? Perfect. Control, control F guy, reduce the size and sample
this color, perfect. The next thing will be
to create this one. All right, this one. What did we do? We just
control C control. And then give it this color and just is around this
side like this. And shift to give it, so then we increase the
size of our six pixels. Will be. All I need to do now is
delete the unneeded parts. Let me just do this for now. Delete this part, drag it back, and increase the size like
this just fits perfectly. We now need to create
a blend, right? We now need to create a blend. Pull down all drag, don't need to do. Let's duplicate and just
reduce the size like this. Just bring it to
the edge like this. Perfect. Now we
can put our blend. Select your blend to click. Click what's happening? Let's just group it onto. And just go into the
group. Go into this group. Let's try it again.
It doesn't work. We click another alternative. Clicks who? K steps. Let's make this. 1010 is not bad. Yeah, can work with ten
control, C control. Bring it to the front. Select this guy
In control seven, we need to expand the ship. This blending. Expand,
Select the ship on top, control seven, we now have it. I think our blending is too
much, but we've expanded. The best we can do is just go and reduce the
size of the strips. Five El perfect. The next thing would be to okay, to create this guy here. This guy here. It's very simple. All we need to do is to reduce
the size like this. Okay? Sample this color shift X. Give it the stroke
size of maybe 15152. To reduce the size like this, contrail shift X. The next thing we need
to do is como se, control drag it down. Just give this color, just shift x to give
the field color. For this one, we need
to do one more thing. We need to expand
it, then expand. Then after we expand, we give you a stroke
color rather of white. This perfect what we now, we'll just increase
the size a bit. Guys, you've done with this one. Let's go to this box here. This one divided into two. And this one is just
divided into one. Okay, so we start with this one. Just come and bring in our box. Fit it here perfectly, dude, divide our box into 22. Okay, 22. Okay. This guy click, click
the united as one. Okay, So we're just going to delete this to co points
which are not needed. Okay, For this one
would make it white. Okay. We don't really
need to make it white. I think we use it for this box. Okay. These boxes.
For these boxes. Okay, let's just delete
or make it white. Anyways, we're going to create something new for
these boxes, for this one. Now we're going to
control C control. And we're just going to give you a random color first and then come to object path,
split into creates. We're just going to increase our rules by four and
our columns by two. Perfect. Let's just
give it this color and believe we can
start messing with our corners like this key. Okay, I'll just open one first. Then finally for this one, now we need to
change the colors. So we just need to
change this one. This one, this one
give them this color. And then one, we don't
need to change the color, we just need to create the ones. In fact, I think A, we change the color,
we just need to create some other ones, okay? Just need to create
this then old crack and control for this one. Now we need two
more colors, right? We need this blue
and this blue also. The first blue, then
the second perfect. All we need to do is
select both of them, or the three of On a control,
control, control. D. Control. C. Just to control for just one of them because the speech
remaining is not much. I'm just going to
drag them like this. Perfect. Now we're done with this guy and we're
left with this one, right for this one,
I'm going to just, let's just use this
one, this ship now, let the guy click here at the edge key so that we have this one
control C control. Or reduce the size. Really cannot reduce the size
because we have our way. We have it that's curved
like this, right? We just reduce the
curve a bit and then give it a color
and reduce it to where we want our caving to
begin at about this point. Perfect. Select the line here. Looking to zooming. Just
select it like this. Perfect. We actually need to do
for the other guys, what I would do is to
use a different tool. To use the line as act. Click here and click Drug. Okay? Don't have it. We want it. Let's create
here and track like this. Perfect. You see it's
created this perfect, right? So we're just going
to give it color. Give it this color.
We're going to shift X for stroke color. Just pull down O and
reduce the size like this. And then boost up
the stroke size, so maybe 45o the size like this. Then we're just
going to control C, control and reduce
the size like this. My blend. To click here and click here. Why am I always
getting this arrow? Just going to group them again. Control G and isolate them. Click here, click here. Then I'm going to give
it steps of Eso steps. Okay, let's make it ten. Ten is okay for me. Maybe I'll just increase the stroke size or
expand them first before increasing the
stroke size. Five or six. Yep, I like what we have so far. Next thing will be to
create this guy which is just one control, C control given this color
and then sent to the park. Finally, we now have the park Brown is which
color is this guy? Okay. Send it to
the back as well. I think we made a mistake
with this other one. It should be this
color blue color guys. We're done with the first two, the first two rows right now. We're going to then
go to this one. You can see that
we need this guy. Okay, We're going
to just fit it in perfectly then split it. We're going to split it
into two first or into three first object split, preview, then we're
going to just join, we need to just split this one. Now into the tree for this one, we're going
to sites like this. The anchor points
like this, This one. First select this guy. For the ones we
need to have them, we need to have a
white background and we already have a
white background, right? We're just going to
move the guy out of the W. And then we need
to create a line. And give it this field, the shift x to just
give it a stroke color. Boost it up like this fact, bring it here. And then draw another
copy to this point. Drag another copy of this point. Then we use our blend
tool to blend two ships. Make this 1013. Let's use 13. 13 is
good for this one. Just bring it, bring
to front and select. Then maybe we should
expand this guy first to expand sent seven. Perfect. Just arrange it, Perfect. Maybe even reduce
the size like this. Perfect. Now the
next one will be, and these are just this box divided into four right object
path split into grid 22. We have it for this one. We're going to give it
the background color. This background
color for this one. We're going to give
it this background color for this one. We give it this background
color for this one, we're going to give the colors. All we then need to
do is to control C, control Pict, all
of them, and just Play around with the curve,
with the edge like this. And then then change the color,
right, Change the color. We do this for this one, we do. Give this color, this one
just just the corner, and give it this color. Then we have the other one here, which are simple ellipses
to create your ellipse. Make sure everything
fits perfectly. Give it the white color control. C control the size. I control C control the size. Now we have perfect, perfect. The next one will
be this guy here. This guy, Very simple. All we need to do is to
create this, we created here. All right, so what I would do, just drag the guy here,
increase the size. Let's see if it's going to work. All right. We're going to
go inside the ship and see. And try to release the blend. Okay, this is not what we have. I'll actually delete a
lot of things here and we're going to start creating
them all over again. The guy here, increase the size, this color, this color. Bring it to the right
hand side, blend. Then let's make it nine. Let us make it nine. Okay. Then we actually need the
sizes to this big. Okay. When duplicate, when we
duplicate like this, we then bring it to the
side like this. Okay? So we don't have them
offset like this. Okay? Just like how
we have it here. If you look at here, you
can see that they're not just on the
same rules, right? Some are farther than others. So what we would then do
is just let all of them, and try to make this look a
little bit, even like this. Okay, select this guy, take it to the lower side, then take your blend
to click Click. We shouldn't take this approach, we should actually
expand the ships. First, select
everything and expand, then click and click. I really do not like.
Okay. You know what, we shouldn't even
take this approach. We shouldn't even
take this approach. What we should be doing is
selecting the both of them. Just duplicating okay, because
blending would not work. So we can control
control perfect. Let's just do, And
then just one. This perfect. I just feel we have. Let's just instead
delete this one. Okay, Now all we need
to do is group them. Control and then the fit this
other guy on top like this. And just control seven. Perfect. Yeah, let's just
give them like this. We don't need to do
any more changes because we're
actually going to be removing this white
or the black stroke. Okay, The next thing will be
to create the square ships. All right, We create our ship, copy our ship and
bring it to front, fit it in perfectly. And then select the pencil. Let's just add a pointer. Let's add an anchor pointier. And now we can delete the
other points. Select. To just did stand like this. We have our ship
sample the color, then control control to the
sample the white color. After the blue color, control control sample
the blue color, we need to fit our ships more
perfectly. Both of them. Then to be more perfect
then we need a circle here. The color will be
this color perfect. Next one will be this guy.
And it's very simple. Click, select, sample your
color for the stripes, we're going to use this one. We're going to use this
one to pull out and the Y, Let me just, sorry. Let me just see
what we have here. So, for these guys, let's try to this one, let's try to think we are good to go to fit
them perfectly like this. Okay, let's go out. I just it our mask, okay. And then send the ship to
the back to back. Perfect. We need the ones, so I'm just going to
copy this one here. Belong at deed,
change the colors. Click, Sample. Click. Okay. Same color. We just need to change this one. Perfect. And then we are now on
the last rule, right? We need to copy one of these. I think, yeah, this is the guy, so we need to just
copy this guy. Bring him here,
increase the size. Just drag this and then
just go inside our ship. Just go inside our ship. Just make Stroger stroke, Iga, we think our ships are too much. All we can do is just redo the blend with fewer
steps. That'll be all. I'm not going to do that. I'm just going to use what
we have because of time. Video is getting too long. I just want to finish the
video as soon as possible. It my background
and send it back. Yeah, we have this now. We need to create this guy. Right plate this one,
please. Just eat. Sample the color we can. Nope, control again. Just this time. We're going to click on this point and
click on this one. Click on this one, complete
selecting the guy to use two. Just click on this one, then what we
wouldn't do of them, and just divide, okay? And now we can pick
this guy out, okay. We can pick this guy out to the guy and
sample this color. And with this one, we're left with this one. For this one, I'm just going to bring in this guy like this. Okay? Just fit it in perfectly. I think we might
need to extend at board or maybe adjust some of these ships to fit
our art board. Okay, This one we
just need to create ellipsis to drag to the middle And increase in size,
increase, increase. We can just increase this one, the shapes to stand,
sample colors here. This one should be white. Then just duplicate this one. Range into front and
sample of color here. Just bring it here. Finally we are now
in the last box. All you need to do is select
this guy and bring it here. We won't change the
background this time. All we then need to do
is just cover one part of the ship, the white field, this arrange everything like this. Just give it a
white felt sample. White few. Then we only
have this one left. And we did something
like this here, right? So we can just copy and
bring it please and just tie into front sample the color. We're done with our design. It took some time
but we're done. Delete just in this layer, unlock the layer and
just dital grid. Now we have an exact replica
of what we have here. With this, we've
come to the end of this lecture and see
you in the next one where we'll be looking at more applications
of grids in design.
94. 94 Exercise 11 Sequence Logo Design: Hello guys, welcome back. In this lecture we're
going to be creating this logo design with
grids in a dub Los Trito. Okay? So I call it sequence. It's actually a
nonexistent company. Okay. So the not thing is
particular company logo design. So I just created to show you the doings of grids in a Dorito. Things you can achieve
with grids when it comes to logo design
in a Los Reto. Okay? So this is the logo
design to create it. We have this one, which is just the icon. Okay, We have this one which is kind of the
black and white, not really black or dark
sheet, this other guy. So these are what we're going to be creating to be Illustrito. Come to Illustrito open with your project folder
and where you see Grid Sequence Logo Design. So click on it and open. Now we see that this
is the whole design. Right here we can see
the grid of formation. Okay, The grid I used to
create the logo design, it's a combination
of about two grids or three grids. Okay. Yeah, three grid, it's a
combination of our three grid. I'm going to create a new
board, delete everything here, Then come to the polar grid, And it's the one I
used when you click on the polar grid and
you see this, right? I'm going to click and drag, and pull down shift and
heat up on my keyboard. We can see that this is now out. I'm going to release my mouse
and release my keyboard. Now this is the first grid. Is the first grid we are
going to use, right? We're going to combine
this with two other grids, combined this with
two other gods. I'm just going to
go again to my P, and then this time I'm going to remove the division. Okay. This time I'm then going to just scale this
other one like this. I had them arranged like this, like this and this. We can see here,
that's this one. It's all grouped right now, we can see the
intersection here. And that's what we have here. I think we have bits
above, so we can have it, maybe even increase the size of bits this perfect. So we then have another copy, this time to the right
hand side, right, perfect. And finally we now have
another line segments. Goes from here and cut across our intersection at this
0.0 down to this piece. Then comes again from here. From here to this point, this is what we have, right? Basically, this is what we
used in creating our logo. Now, select everything with your color guides to
select the sherill, Some different colors,
some different colors. Now you select this guy, Not join the first one. This other guy joined it like this and finally this other joined this. Perfect basically
dies with this. We have created
logo, click, click, control X, then
control V just pieced it outside and then we can delete this unneeded
part immediately. We can see that we have the
first part of this logo. It's just right, just like the Windows Explorer
logo we created in. Fundamental cost. Now when
you have it like this, all we then need to do is have a ruler guide to show us where the B is going
to select everything here. Control Group, just
repeat like this, like this, it like this. Then just pit the right hand
side and repeat once more. Already I can al see a second logo coming out
of this second logo. For this one we
just have it like this, can look like this. Really, this perfect can both of them just make sure
the fall on our like this. As you can see, we now have our logo designs to
control G. To group them. Yep, we have everything
now perfectly created. The second logo I was
thinking of creating, let me see if I can
remember to undo this. That one was something
like this, right? Yeah, I think
something like this. All right. Think we hadn't
rotated it this far. It was. And so you can just
see that guys, the possibilities with
this is limitless, okay? The possibilities with
this is limitless, okay? This will serve as
representation of MMC maybe. Okay? That could be an
abbreviation of a company's name. Okay? We have it
like this, maybe. The size of this one, like this, it centralized, Centralized
in the middle of this range. That's between this line
and this line, right? It centralized like this. As you can see guys, we
now have another logo, different logo just from
the concept of lines. Okay. Maybe we could even
something like this. The possibilities of this
is its totally limitless. We now will have our typo which is sequence creative. It's align, everything, this, I think, I then I
expanded everything, but I met this semibold. I think this is semi bold. This should be semibold. Okay, after I made the semibold,
I don't meet this guy. The E in the middle made it
extra black. I made it black. And then I just
expanded everything. Then from there on, I started messing around with
this corners here, the anchor points here. I did this for all and also
some of these other ones. Ends, and the U, and also the. Okay. Select this. What else am I missing? Okay. Okay. I think we did
this for you here, but for this other guy, we didn't really do that. We just extended these up. She, Okay, like this F and we stopped
on top of the E. All right. And then just I think we did this then we just had this. Basically, that's what
that's what we did. Yeah. We can just select
everything and group the size. Maybe give it the color, may give it a brighter color or even a darker one,
doesn't matter. Delete. That's our sequence logo created for this other one. We could also name it Sequence. Maybe name it sequence. Or we could give it
a name that starts with and ends with
something like that. Maybe a complete name that
starts with M. We see, because we see that this is, it looks like M. This looks
like this is how easy it is to create amazing logo
designs with the grid. To, with the grid concept
and grid generally in a three guys. That's it for this one. You could then create
different versions, could create different color variations like
how we have here. That's how to create true logo designs with the grid to see you
in the next one.
95. 95 Exercise 12 Twitter Logo Design: Hello guys and welcome back. In this lecture, we're
going to try to decipher the Tweet logo design here in a Doblorito using grids, okay? We're going to see how
to create something like this and even from
scratch, okay? And we're going to see how the grids we are lined out
for this particular design. Okay. I'm going to
go to all reto click open and where you see
grid, Twitter logo design. Just select it and open here. Already, I have created the
grids here With this grids, we can create this design, this logo here, which is
the Twitter logo design. Okay? We can see that
this logo has been created with polar
grids right now. These polar grids do not have subdivisions or lines
dividing them, right? They are just polar grids similar to this,
just a lot of them. Okay? In order to create
this from scratch, what you or as designer would normally do is to first
of all have your sketch. Okay? First of all, new the concept of what you're creating. In this case, this is a bird. You just first of all,
have your sketch. When you have your sketch,
you snap your sketch and bring your sketch into a design software
like at the Loreto, and then try to fit in these polar grids
into your design. You perfect geometrical shapes, like the grid into
your imperfect sketch. It might not flow all
that well altogether, but when you finally succeed in creating your
concept with that grid, you're going to see
that you achieve a very beautiful and
geometrically perfect, or accurate shape or design. Let's assume this
was sketch, right? So let's assume this
is just my sketch. I have it in black color
or grid color shaded. I want to create the grid concept for
the grid layout for it, and I want to use my polar grid. Okay, we have my grid here. All I would then need
to do is my grid into my design because I know
that this will require a bigger segment of
a cycle to create. I'll just increase the size and everything fits like
how it's going to be. Of course, I'll just keep doing this for different
parts of my logo. It might not fit perfectly
because of course, my sketch might not be
perfect geometrically. But when I'm done and I finally
have the layout I want, I will then use my ship builder to to build
my ship and we're going to have a geometrically
pleasing ship like this one. Here we can arranging our polar grids along our parts, our logo parts like this, like this and this. Basically, that's how you will
follow this from scratch, but this is not from scratch. We just try to decipher how
the grid was for this one. And I'm going to just create it. I'm moving this
log here so as to see from time to time how
everything will be created. Right, everything and
let your ship color. Just tired to start
filling the ship like this of this. As you can see,
we have the head, you have the body
parts like this. Then we continue with other parts like this guys. So as you can see, this is now what we have. What I did, I should
have actually duplicated this grid so that
you can do it for yourself. Should have actually
done that. So I'm just going to undo everything I did here so as to have a
copy of this for you. So I'm going to just
duplicate this just here so you can come
and have access to this one and do it for yourself. I'm going to just redo what I did here on the second board. Set everything ship
builder to select my Twitter color and just
start to add our ships. For this one, we had something this perfect. Okay, we now have, this one is on first kit. We have it like this
instead, and then like this. Then this fit. Then we can now cut our ship. Then just delete this one now, of course, remove our stroke. Yeah, we can see that guys. We've been able to
coin out design here from our grid here. So that's how we can create
a design, this grid. Now, this is a
very complex grid, depending on the complexity of the ship you want to create. Your grid might be complex. You guys, now you get the point. And that will be
it for this video. In the next one, we're going
to be taking an assignment, So see you in the
next one. Bye bye.
96. 96 Assignment 18: Hello everyone, and welcome
back to this module on grids and grid based designs. In our past lectures, we learned about grids,
the types of grids, how to use them and do a whole lot of
things in Blow Street. We learned about logo designs, we learned about
geometric patterns and so on and so forth. And we created a lot of things during the course
of all of this learning. Now in this assignment, you're going to be putting all that you've
learned into practice. Okay, You're going to be
creating two designs. One geometric design, and you're going to come up with
one logo design. Okay? So the geometric design similar to what we created,
that's something like this. But of course, with
your own touch. Okay, and try to make it better than what we have created here. Again, you're going to come
up with a logo design. Okay? Just similar to
what we've created here. Mustn't be like this.
Okay. You can of course, come up with something better. This isn't good
enough, but all you should be looking to
do is combining grids. And yeah, using grids. Combining grids,
and just creating really interesting
shapes and designs. Okay, that's what we're going to be covering,
this assignment. You can come up with as
many designs as you want, but the piece number is just one local design and
one geometrically artwork. Okay. You can come up
with as many as you want. Okay. The more the better. But you're required
to come up with 11. Yeah. And that will
be it for this one and of course for
the module as well, we see in the next module.
97. 97 Getting Started with Isometric 3D Designs: Hello guys, and welcome
to this module on three D isometric design
in order to be illustrato. Now, in the last module we
learned about grids, right? And then we created
four types of grids. We created rectangular grids, polar grids, hexagonal
grids, and isometric grids. Now, in this module
we're going to pick out isometric grids and then
work on them in details. Okay? And we're going to be
dealing with three D, okay? Now we're going to create three D designs from
our isometric grids. And we kind of
looked at a basic of what this is all about
from the last module, where we created a treat ship, a simple treaty ship, from an isometric grid. And we compared it with a ship which we actually applied
a tre D effect on. Okay? And we saw that it
just was the same thing. Okay. We even learned
how to create the grid and we learned
a whole lot of things. Now in this lecture,
we're going to take it a little bit deeper. Okay, We're going to learn more. We're going to create more
tre D ships in isometry. We're also going to compare
some of those ships with the traditional tre D effect
in order to be illustrator. And we're going to learn other things like
creating circles. Okay? Or ellipsis in red isometry. Okay? To start, I'm
going to create a new project, a common preset. And we're just going to
start by creating our grid. We're going to
refresh our minds by creating our grid,
isometric grid. We come to our rectangular
grid to remember, there are two ways
we can do this. We can do this by starting with a line and line
and then blending them. We can also start with
our rectangular grit. Click on the rectangular grid
to the width h, 500 pixels. To create this one, we
want vertical dividers, but we do not want
horizontal vidas for these vertical dividers. Let's, let's make
them, yeah, 25. Okay? Let's make them 25. For vertical dividers,
we want the zero. We want skew to be 0% okay? Now when we drag, we can
no see how ship created. Now we can centralize
it or align it to the middle and select your grid. Click Transform and Route. Now we have to rotate this
by 60 degrees, okay, Copy. We have to reflect the
rotated version Transform, Reflect, and we have to reflect
this by 90 degrees, okay? 90 degrees. And then copy. Now we then need to bring
the guy in the middle, okay? We then need to make sure it's aligned in the
middle, Like this, Okay? Now we can see that this
is a perfect one, okay? We don't need to do
any further thing. One last thing we could do is select everything
with the properties. Just go to your path
finder and divide. Okay, from now on we
can just basically delete the unneeded parts
by dragging a group. So we have to go into
the group and delete. Delete. Delete, probably. So we're just going to
go a little bit further further into the ship to delete more of those
unwanted parts. Okay, so delete this one. I think we kind of deleted
a little bit too much. Let's undo for now and just try to take it a
little by little. Okay, so I think we have deleted quite much. Let's just delete this one. And yeah, with this now we
have our isometric grid. We can just go out of the
group and now scale it up. Now we have our isometric grid. Align it to the middle. Maybe resize our art board
like this right away. Guys, we can start creating our stuff with our
newly created grid. Now we're going to select the grid and just
give it the stroke of 0.5 and create a new layer, lock this layer and we can start working
on our new layer. You are using our grid. Right? From the last video we
created a shape like this, a simple cube with
isometric projections. Okay, so something
just like this. We specified how the
shading should be, even comparing it with
the three D effect. And we saw that the
three D effect gave us a similar shading with what we created here in
isometric, okay? And of course, we had
to properly position the direction of light
on the three D cube, making it similar
to the direction of light we are proposing here in order to achieve the
same kind of shading, right? Of course we said light
was coming from the front and coming towards
this direction. When I just move
these guys here, this was the illusion. Light was coming
from this angle, was coming from this angle like this, it's coming like this. Then this would definitely
be the darkest, please. Isymmetric projection
inable to see once again three points right, this top and this
side on this side. Let me illustrate this
again with our D effect. I'll just remove the, remove
the stroke on this shape took me just give it this color and then
give it a three D effect. Then come and choose the
isometric top projection here. Right guys. We can see that the effect of light is
similar to what we have here. Maybe sample this
color, color, color. We will then
immediately see that we are achieving something very close to what we have here. And of course, we
can do more work on the lighting to make
it more perfect. We definitely agree
that this is better. That's it guys,
for this example. And we're going to look
at even more examples. Okay, we're going to
create more complex ships. Let's create a
more complex ship. Let's have that. We see how we create the isometric projection
for that ship. All for this ship I'm drawing. So give it the shop so as to
see what's happening here. Okay, So this is meant to
be a more complex shape. Okay? And turning this into an isometric D will
be very simple, so we just have
something like this and give it a brighter
shade of the color. Okay? Then we walk our
way to this point, which could be a
little bit darker. Generally, we want this part to be darker than
all the others. Maybe like this. Basically, we just keep
building up like this. Okay? This one will have the same color as
this one because the top, we have to understand this is the first side and this
is the other side. Okay. The shading has to
be even across all sides. We have to create
the part separately. This one will, this shading. This big part here, we have this shading. This other one we'll
have this shading. And then for this one,
something like this, this, this, for this
one we'll give it, of course, sheeting, right? Then for this one I think we
will need to give it, okay. Need to give this
guy this sheeting. Actually sheeting. Okay? And if we were
to apply shadows, we definitely have probably some shadow casting
on this part here. But we don't have shadows
for this example. And you see how we've
been able to come up with the three D of this guy. That's using, of course, the isometric grid which
we just created, right? If we were to create this guy in two D and use the
three D effect, will still come
up with something very similar to this, okay? Something as exact
as this. Okay? So the possibilities of this grid is very
limitless, okay? And like I said again before. We do not just use this for only three D like we saw
in the other example. I created a two D logo, the same thing and we saw one of the examples on
Pinterest, right? Yeah, that's it guys. There's one other thing I would want us to cover before we end this video that's learning
about isometric circles. Okay? If we were to create an ellipse in isometric
projection, how will it be? Okay? We knew that this
is an ellipse, okay. But if we wanted to create an ellipse in isometric
projection will not serve, Okay? Because based on the rules
of isometric of isometry. Rather we want the surfaces or the edges of the
circle of the ellipse, the edge of the ellipse,
we want it to touch 1234. Okay? All the four points. All the four edges of this guy. Okay? All the four edges. That's this edge, edge,
this edge and this edge. The pass of the circle
has to touch them. Okay? Or the edge of
the circle rather. I just keep mixing these terms. The edge of the circle or the
ellipse has to touch them. If we just maybe expand this one now we can see that it's not touching them perfectly
because it has to touch them at the middle.
At the middle, okay. One way of doing this
might be to see, we want to probably
adjust it like this, like this and just
drag it like this. Okay? This would work,
this would work. It's basically touching,
you said this would work, So this would be one
way of creating this. This might not be as accurate
as the second way. Okay? Because there might
be some errors, some parts might not be touching
and so on and so forth. Okay. More complex
approach to it are easier approach to
it would be to first of all create a square like this. Just like what you
would create if you were going to create
a cube, right? So you have to
create this, okay. And make sure of course you are touching all
of these vertices. These vertices, right? You have to touch all of them. Then the next thing
we will do is to come to effects and come to Stylize
and come to round corners. We have to on our preview and then just start
increasing the size. Immediately you see we'll start
from something like this. Gradually increase it to the point where it no longer
co, and then we just hit. Okay. Now we can see
that it has perfectly touched all of the edges. Perfectly touch all
of these edges. That will be the
perfect way to create ellipse or a cylinder using
isometric projection. This is an ellipse, if
we wanted a cylinder, we just need to bring
it down like this, maybe to the next please. Then we have a few more
adjustments we need to make. Maybe we just change
this color and send to the back to make a cylinder. We would want to just
come concrete sheet lines like this and this. This two shapes here. This one, this ellipse here, we have to be the same
shape, both of them. Okay, We actually have
to expand this first. We apply an effect to it. We actually have
to expand it for everything to shape to
take effect, right? Go to objects and
Expand Appearance. Click Object, Expand Appearance. Okay, now we have the
whole effect applied when we select our
shape right now. Instead of our shape
and just unite them. We now have it like this. Let me just make sure
everything is to perfectly. Now. We can bring this
guy to the front. Bring to the front, and we see that we now have an ellipse. The easiest thing
to do now is just apply ingredient
to the ship here. Because this will
be a curved surface and it's impossible to
have it as a flat color. Okay? Because light has to be
coming from one direction. If light is coming
from this direction, this place will be lighter than this P. If light is coming
from this direction, this place will be
lighter than this place. One place has to be lighter and one place has to be darker. I'm just going to give the dark place this
color basically. Let's just give boot places the same color and just try to add this ingredient
afterwards. I'm going to make
this one brighter. I'm holding down shift and just trying to brighten
up the color like this. Right away we can
see that we've now achieved this curved
illusion here. This is how to create
a curved shift with isometry in blustto
reduce the size. Maybe even group them. Could keep going up and up
and up and up the size. Keep going up and up
and up like this. Perfect look guys, Be
it for this video. Not meant to be a long one. So in the next video,
we'll be diving deeper in the process. We'll be creating some
really amazing designs. Okay, Isommetric designs
in B Illustrator with what we've learned so
farkus for this one. And see you in the next one.
98. 98 Exercise 1 Modern Isometric House 1: Everyone, and welcome back. In this lecture, we're
going to be diving deeper into three D isometric drawing. And we are going to be
recreating this guy, this design you can see
on your screen right now, of course, this is
three D isometry, We've been studying this or
talking about this right from the last module and
even up to this module. We're actually going
to create this design using three D
isommetryerB Illustrator. Okay, just come to
Illustrator and open and then come
to the folder there, D isometric design in
Illustrator folder. And you're going to see this file which is the
three D isometric house. And you're going to,
this is now our design. We can see everything was
created here, perfect. Now, this design takes quite
a long time to create. For that reason,
we're going to be dividing this video
into two parts. In the first part, we're
going to just create this upper part of the
house and this one. Then the second
part of the video, we create the rest of
the parts of the house. When we come to our layers here, we can see that we
have two layers. We have the background layer, which contains the
whole illustrations, and then we have the grids. This is the grid we used
to create this design. Okay, I'm just going
to shift to activate my Art boll tool and just drag this one here to
create a duplicate. Okay. And then come on, everything we have here, this new one, because
we are going to be creating our
new artwork here. I'm just going to
activate my grid, and I'm going to activate this guy and move my grids here. I won't be creating these grids because of course we know
how to create grids already. These are just isometric
grids and we learned how to create them in our last lesson, even in the last module, right? Just shift this T to the right
hand side and I can now on my layer now I'll just grab the grid layer
beneath background. Greg, I'm now going to please my design because I will be drawing from this one, right? I'll
be drawing from it. So I just want to keep
it closed. Do the file. Just come and click
this guy, please. Just draw it here like this. One thing I want to
do is I want to crop it so that this white
part will be eliminated. Right? Just select my
ship to here, Drat. Address the ship like this. This. Then select
the boot of them and control seven to clip mask. Then now we can bring our draw in here and start
to make our drawings. Right now from our last video, we learned that we just need to come and use
the D as a guide. This creates our D, right? This is how we learn
from glass view. This one pin, actually go
further and create this. It's not going to be as
simple as the last video, of course it's not going
to really be complex because at the end of it
is just very simple stuff. Once you just learn the basics, you then see that you'll be able to create all of this
with new stress. Start with the pentel here, just start creating
the upper part here. I'm going to just use eight
boxes or seven boxes. Let's just start with,
let me see, 12345678. Let's just start with eight
boxes, 1234, 56e, 245678. Like this and this. Just click this one. This, just join it
here like this. Just give it this color. Select the shape and control C control to
copy and piece, please. And just drag it in
this for this guy, I'm just going to shift
X to give it a Skus, going to reduce the
size like this. And shift X to give it a field back. I'm
just going to select. Go to my properties and
subtract using the part finder. Okay, now we can
see that we've now created this box here. This box here. If we see
that we need more boxes, we're just going to add
them manually by selecting our anchor points and just
dragging them manually. But that's not the
case now we're just going to start
adding other parts. If we see that we
do need exercises, then we'll just
add them manually. Just click in and add the
other parts for this guy. I'll just come here and, and sample this color. Now, from our
knowledge of isometry, this guy should be of a different
shade than this, right? So let's make it brighter
then we need the floor. Just click. When we come here, we see that we actually
have a hole here. We actually have a hole here
which leads to the roof. Now we can do this like
and this and like this, but I do, I do not want
our bot to be this small. There's something
I'm going to do. First of all, let me just
create it like this. And then I'll just select this color that the
roof color here, the floor color here. What I want to do
here is shift X. I want to be here, The lines to be here and here. But I want them to be
at the middle here. Because bringing them this
far will be too much, going to select the
root of them like this. When I reach the
middle, you see that, It tells me that that's
the point of intersection. Because now you see
this intersect. It's telling that
that's the middle of middle of F and
middle of falling. To do the same
thing for this one here. Drag it like this. Okay? I feel I should
just redo this. When I am using the Penu, it's easier to locate
the middle parts or the middle points if I'm just
hovering around like this. You mean to see where
it says intersect? Or you know what? Instead of that, I might
maybe start from this point. You see where it says
intersect, right? This is the middle point, and this is the middle point also. Perfect. Now, we can just draw like this across
the middle point. Let me just click here first. Just come to this middle point. Click this middle
point and click. And now this middle
point and click, I'm just going to delete
the extra less points on. Just select your field color. Then my direct selection
tool, this guy delete. This guy. Delete also. Perfect. Now we need
to create this part, this part that leads down
inside the building like this. I'm just pulling shift drag in, then hit eye for your droplet
tool and sample the color. Then we're going to create
this other part here which is going to complete the shape. As you can see, this one is a darker sheet than this
because of shadows, right? Okay. So what I mean by
shadows is the inside will not be of the same sheet because there
is a shadow being cast. Because it's a darker part. Okay. You get the point. We're going to go ahead
and create the next part, and that would be this part. So I'm just going to choose, I'm just going to use
five or six boxes. 12345 boxes. Okay. Maybe we could even us boxes. Let's just walk with five
for now and see how it goes. We sample this color. At the end of
everything, I think we'll just use six boxes. I think six boxes
should do the trick. For this one, I'm going to
use this number of boxes, same number of boxes, you just need to
sample this part. We can see that we have an error here because we do not have everything aligned
perfectly like this. Align everything perfectly. Select your anchor points using your direct
selection tool. Let's draw the one box lower to see if we get the proportion
we're looking for. I think we're starting
to get what we want. Just extend this other part. We'll make this four boxes, maybe 1234, just like this. You know what, we
need to actually shift X and shift X and drag the co points
here to fit properly. Perfect. Now we wouldn't
create these parts 1234 here. For these parts we
see that it has to be, we have to create an extrusion. We probably will move
this other part. For that we, let's just
create the other ones first. This one we start
like this and this. Perfect for this one. We are going to just shift
x and create it like this. This shift X again, select this guy and shift
again, select both of them. And just we have
looking like this. So far, so good, we
think we can progress. What we'll do then
is just select this points here, here and here, and drag them to this
point. It's possible, yeah. I think we even
need to grab them further away, like this. Perfect. Of course, we will need to
address this one also. Perfect. We continue to advance and can see that we
actually need this part. We actually need this
part now in this part, we then treat it like this. I have a feeling that
we need one more step, either here or add
one more step here. All right, we're just going
to see about that later on. Now, let me just see what
we have achieved so far. We shift x, I want to
just join this one. This one, click, click, unite. Perfect. Let's delete this
one, this anchor point. Delete. I think we deleted something that
we shouldn't have, Okay? Okay. Yeah, everything is good. Perfect guys, we now need to create the inner part
of this thing. Shift x. Okay, Give me this.
And just click. Click. And just try to create
this inner part, that's illusion of tree. And of course we have
to give it this color. And then we then need to create the floor. We need
to create the floor. The floor needs to have, okay, not the floor yet. We need to create this
other part of the wall, which will be a darker
shade of this wall. Cubicle of shadows. Right? We click here.
Sample that color. From what I can see, I think we might need to be
bigger because we have 123. Okay, We only have one. We actually need
to be bigger guys. That's one thing we do
need to correct right? Now. Let's first of form complete and see properly
what we need to achieve. 123, right? So first of four, let's
just shift x and shift x, let's just do this.
First of four, we're actually on
the right path here. I think we're actually
on the right path. We won't move them further away. Again, this just put a lot
of things into perspective. What I want to do now, I just want to extend
the points a bit. Shift. I just want to extend the points a
little bit further. Okay, perfect. Yeah, these
are the ones will do. What I want to do now is just shift x and select this guy and just subtract this
guy. And subtract. I see that we actually have a little error here,
but it's no problem. We need to fix that later on. Guys, let's create our
completing part here. This is it. Let's just shift x in the area I was
talking about is this. If we bring this to the front, like range and
bring to the front, we can see that we now have
this line. This we line. It's actually because
we subtracted two ships to give
this cut, right? So you didn't cut properly. So I'm just going to
select my Cesor to, you can hit for the cesorI'mt
Another one, ya delete. Delete. I'm just going
to select my soon. That's my direct
selection to delete part. You can see that we've cut this one click delete,
and we've cut this one. We have this middle one which
we can now delete are we have our arrow
corrected for this one. Of course, we give
it this color. We also have another arrow here. Guys, maybe we don't even need, we just need to our
point here effect. The next one will
be a flow, right? You need a flow click. Just create a flow like this. We don't need to complete
any ship click like this. Then just being to
give this random ship, random ship for now, and then just sort this out. Zoom, just fit this
guy perfectly. The guy we want ankle
point and fit perfectly. Then for this one we actually
want it here perfect. Then we need to
create another point here to add an ankle point, then drag it here. This just give it our
flow feel and perfect. The next one will be
a flow around here. Also, before that happens, we need to bring this
guy to the right. Are to bring this
guy to the right. We need to it like this. Right away we can see that
something is lacking, right? This wall needs to
extend to this part. For it to appear just
like what we have here. It means we can the mystique in the presion of wall first place. We should have actually
extended it to this part. We could work with this like this and just
create another valuation of the hooting or we
could start trying to fit things properly. All right. Those are two things
we can do actually, after looking at it properly, I think we actually
did the right thing. We did the right thing. We just needed to
extend this a bit more. Sorry about that guys. We didn't do
anything wrong here. We actually did the right thing. We just needed to
extend it a bit more. And it's going to look perfect. Shift x and make sure the
guys are aligned properly. Perfect. Go back. We can see that we actually did the
right thing here, did the right thing
for our flow. We want our flow to extend
to here, extend to here. This probably make this perfect. Okay? We can just let the two of them and
just unite them. Perfect. Now we're done with
this part and this part. Remember we said the down parts will leave them for
the second video. I'm just going to
create this other part, then we move to the next thing, for this one, you
can see that we started here, around here. Let's start from here and see, we created something like this, this perfect. Now, just then, I
created the other parts. So we're just going
to keep seen, make sure we're doing
the right thing. Right. I just discovered that we need to bring this
part even further, even further like the boot of them. Just bring them down
like this, them down. Let's arrange this guy
here like this and see the key guys. Now we
can sample this color and just extend this one so
we can hit P and discrete. An extra point here, just got fit it in
here like this key. We need to make some of these points align
very perfectly. We can hit once more, create another point here. Just drag our new points
down like this perfect. Then select the boot of
them and drag them down. This other guy here, like this perfect. We also want to shift X. And shift X, and
then this guy here. Okay, we actually need
it adjusted here. First of all, I'm going to just create an extra point here. Okay, create an
extra point here. Select this guy here, like this. Okay. So as to have
a darker sheet here, this side, create
a darker sheet. What we have here,
perfect this sky. Shift X sky. So you can shift X. We can see that for
this one to work, well, we have to bring this
guy here like this, then we actually have
to extend it out. This might be getting a
little bit complicated key, let's arrange it to the front. I assure you that when I'm done, you'll see that this is very simple. I'm really
going to delete this. And so we create
this guy like this. Okay, let's see. You know, we can do this just sample of color here. It's red, this other guy, a sample of color,
that's this color here. You can see we are now
achieving what we have here. Perfect. Now the next thing
we want to do is just click. You can click here, maybe cl, cl, cl here. Now we actually want
to go very straight. We actually want this
to go very straight. All right? You actually want
this to go very straight, and we've aligned this. We can see that we're not achieving exactly
what we have here. So we might need to
reduce this size. We might need to reduce, we can, but we might need to
reduce this side. We need to reduce
this size so as to make this guy look
like a central point. So this will be 1234, and this will be 1234, right? This is what we
might need to do and this is what we do, okay? We are probably not getting
numbering of boxes here, right, or whatever, but still yet we're going to
achieve something amazing. We're going to achieve
something very close to this. Okay. Yeah, that's it for
this other one known. I just need to put a straight
line from here to here. Both of them. Both of them. Go to my heart finder and divide it for my direct
selection. To select this guy. Click, actually need to hit
for the individual ships. Select this guy and color
said this other guy. Sample the color. I know we have this other part that is unaccounted for as
compared to this. But no problem. We're going
to work with what we have. Okay. We didn't have time on our hands and we're just going
to work with what we have. Okay, Perfect. We have this part of the roof. For this other part of the roof, all we need to do is to
put on a noises like this. We now have the other
part of the roof. We can give it a shadow, give it the black color. Just reduce the
opacity like this. And bring this guy
up to the front. Perfect. We're done with this. We're done with this. We're
done with most of this. I think finally for this part we will need to add the windows. For the windows
to shift Shift X, we're going to create
them like this. Quick click, I'm just going to
sample this color. We probably might want
to just this guy a bit. We don't need to see how
it's been aligned here. This guy should probably
fill in three species vertically instead of two
species like we had it before. This is the perfect guy. Now for this one, click on it, I click transform and reflect
around 90 degrees and copy. Okay, so we're going to have it here for this guy. Shoot X. And I'm just going to align
it here like this, perfect. Now we can put back
our field colors. Okay. But I want to handle one more thing before putting
back our field color. One of the things
actually need to reduce the size of this window. Actually need to reduce
the size of the window. Then shot X. Then finally we need to do this. Comp here please. You
have to know that. You have to understand that I'm aiming at the middle
points, right? So whenever you hover
around the middle point, you see it says either intercept
or what do we call it, or C. I think you just see. You just know that
that's the middle point. Okay, so click, create this guy, and just going to
sample this color here. Perfect. We're going to
create the one along the other side. Let me see that. It says Intersect, right?
And this is the middle. And I'm going to come and
sample this color here. Now we can click
on the mean window and shift X click
on this guy and shift X click on this guy and shift X and
click on every other guy. And shift X. Right now we
have the window extrusion, perfect to select
the boot of them. Click, transform and
reflect, and copy. And then we just want
to place it here. Perfect. And then just drug these call points like
this till the end. Like this. Perfect. Now
we creating this part. The part, okay. There might have been
some little errors. But the point, the point is that you learn how we have
created the holt. You make sure you achieve
100% of what we can see here. As you can see, there is
a lot of similarities. Okay, there's a lot of likeness. That's the most important thing. Maybe we're left with
this tree and this guy. I'm just going to create
them for the tree. We learned how to create ellipses and
isometric projections from the previous video. Okay, I'm just going to
start by doing that. Sample the green color here, then let the guy go to effect, stylize rounded just
around the cons. Perfect. Now, set
my pen from here. First of all, actually, I need to expand
this appearance. Okay, so as to make the effect of the permanently
part of the ship. So click Expand Appearance, and we can see that there are
no effects applied again. And now we can read our other part of the tree, like this, perfect. Maybe even extend the
height like this. It's like the boot of them unite the create this
part of the stem. The stem, okay? Give it this color shift X and
to make it the shot colored size for the cup. Just make it round cup and basically bring
this guy to the front. Yeah, we now have a tree. We need to give it
a shadow, right? Just let your paint
just draw down shading. Just draw randomly
and shift X to give a few colors at the
both ships with your shipbuilder to them
out The delete this part. Select the guy and
sample this green color. Put your color picker and
just make it a darker shade. We have our three, select all of them
control to group them. And we have our isometric three. We're going to keep it
at one side for now, but we're also going to
duplicate one of them and just bring it here, perfect. And we have the other parts. Okay, Which is this table here. Okay? This table.
For this table. We're going to create
it by yourself. Okay, You're going to
start with an ellipse. Just like we learned when we
come back in the next video, we're going to continue
from where we stopped. Okay, that's of course
with this table created. Okay, just go ahead
and create this table. After you're done, you come
back to the next video. And we'll continue from where we've stopped to see
you in the next one.
99. 99 Exercise 1 Modern Isometric House 2: Hello guys and welcome back. And we're going to continue
from where we've stopped. So as you can see, I've
gone ahead and created my table and just brought
it to this point. All right, so hopefully
you have done so also. So I'm going to continue
by creating the flow here. That's this flow you see. Just come here and
start here and here, and just come forward
down to this point. I'm just going to shift X. And then click click here. Let's fill it in
like this, Shift X. And I'm just going to
sample the color here. You see that this
is a darker shade as compared to the
other floors here. Perfect. Now we're going to
create this other parts, which let me start by
creating it like this. Click here, click here. Then we're going to pit
the top of our wall. All right, so for that
we're going to start here. We start here, sorry. Click click and then
come down here. Click shift X to just fill
color at color rather. Click, click, click,
fill it here. Perfect. I'm just going to give
it this color here. Perfect. We can see
that we now need to create this auto
one here, 1212456. You're going to
start if we want. If we need more affect the fact. Now we need to
create steps here. At this point this should actually
be a bright shade of green one we used
for the floors. You should actually be
brighter shade of it will do. Ok. We actually
need one more step. I guess it should be this color. That's this color, right? It's kind of looking
here like it's blue. But won't mind it for now. Just going to read this color. And then finally we can
see that we need to then create one which is
the sheet of blue, right? Perfect. And just
perfect position. Make this perfect. Then this will be the next step. This little extrusion here. I'll be the next and
final thing to creep. Starts this guy here. Maybe we need to go that far. Yeah, we do, we do. Just make sure
everything is lined up correctly. Some of this guy. Perfect. Now for
this other part, we need to actually
create an ex, like this, like this and
give it this color perfect. Then we actually then
need to meet one. This 1234535. Actually be six, I
don't know for now. We'll find out later. Okay, perfect. Maybe this one
line out properly. Perfect Guys, the next thing we'll just handle
quickly is the steps. Are these steps here? We just handle these
steps quickly. For the steps we start like
this, we just come here. We start in here at
the middle here says intersect click says intersect
click click Intersect. Let's keep clicking. And green, we probably need one more step then we need the
footings, right? Are you something like this? This, Yeah, there's some pool,
this color here. And then arrange send
to back. Perfect. The next thing we'll
handle this opening here. Okay, opening here. We'll handle this opening here. For this, we'll
control C control, just reduce the size like this, shift X, Bring this one here. Bring this one here. Perfect. Now we give it color, That's this color shift X click click this
range to fronts. And just fits everything
in here perfectly. Yeah, just fit point properly. Do seem for these other
points here perfect. You can see now we have
the parts created. We're just going to walk
on the other parts, that's the doors here,
the windows here, and so on and so forth. For the windows,
I'm just going to duplicate this window,
date this window. And I'm not going to try to achieve exactly
what we have here. I'm just going to
duplicate them in front. X, this, click, click, click, and arrange
them properly. And shift X we come up with. I think I'll just move
it down one more level. Let's see. Yeah, this actually
this actually works. You can see that the windows
here are smaller guys. We are not trying to achieve
exactly what we have here. Whatever, just what we have. We're going to quit
another window. But I think, okay, this window is actually
meant for this. Please. At least let's, let's just
bring the window here. Then another version to get another version.
And bring it here. Put it in please. Now we can select all of these core points
and bring them down here. This perfect. Finally, we can uncreate
the door, right? Select everything out
and bring everything down here, the Perfect. Perfect. Then we wouldn't select every anchor
point below here, just drag them down. When we select and shift X, we see that we now
have our doors. We have our windows, perfect. Now, the next thing left is this balcony protection, right? This balcony real here's
what we're going to create for that pin. First of all, we're
going to shift X O shift X penil here. Just click here,
rack for this one. We might want to use our eyes a bit more to get
the percussion. And then we need to
pull down shift and just click up like this, create the other
one, set the side. Just complete the
shift like this. For this one we need to
give you the white color. I think before I do that, I'll just create
the other parts. Right click here, click here. The other parts like this just use our eyes to
achieve the propulsion. Perfect, select. They just give them white color. Remove the stroke, just reduce. So you can shift shift shift, this one shift X
for the floor here. Now we can see that
we've created this guy. We probably might
want this guy to be in front range front
also with this guy. Select the guys, this other one. Arrange front. That's it. We might even want
to make this guy taller. Yeah, we might want to
make this guy taller. So select all the
anchor points here. Select on here, Get,
select this one. Select on here. This final one. Grab them. Perfect.
Select the guy shift X. This one shift X. Yeah, I think we'll just work
with this even though it's not like I quitted here. It still good. The
final thing for the reel here is to create
the extrusion for this one. Also, we're going
to use our eyes. We're not going to
be using any grids. Select sample of the color
here and also the opacity. Let me just start from here. Click, click, click, click. Just click here.
Complete your ship. Let me give it the color
shift, X. Perfect. No, we don't need this part. We need this other part. For this one, I'm
going to cap this and reduce the opacity. Perfect. Just to lose street that this is
a glass. All right? Perfect. So the final parts of this design is the flow here. That's the mean flow.
In order to do this, we can just start
the pen as usual. And start from here, click here, come here, click,
then come here. So we sample this color
and send it to the park. I think we actually need to extend this guy, okay. And extend this to
the guy like this. I think we can leave it as this. Or maybe not, maybe we should just follow what we have here, making it and just adding
another point here. Perfect. Now we actually need to create a
cut here for that. I'm going to and create
on line one point here, one point here, shift x. And just let this one here
drag it down to this point. And I'm just going to
adjust this one to meet this shift shift. I like what we have so far. Finally, for this one, I think I'll just reduce the extrusion to
something like this. This is better for
me. And from here on I'm just going to add
the lower extrusion. That's this one. Okay. Click, Add Like this. I actually observed
that my lighting isn't correct for this one. For that design, my lighting that's on the ground,
it's not correct. And I'm just going to
show you that quickly. What do I mean by that? You can see that from here, this part of the
ground is darker and this part is brighter from
all other parts of ours. We can see the light is coming
through this direction, right, right is coming
through the right. Displace has to be brighter
while this is dark. That's the error I made here, and I'm just going
to correct it. Displace has to be brighter, this has to be darker. Select the guy and give
it the darker shade. We now have it
perfect for this guy. I'm going to duplicate you and bring you here for the tree. I'm going to duplicate
you and bring you here and just arrange,
bring to front. And finally I'm going
to add the green. Okay, the green ground up. Click click just complete and give
it the green ground. Arrange and send back and select your own
call point here. Create this very
subtle covectus, just make it a little bit more conspicuous this
point basically guys, we are with our design, with our isometric design, okay, did the sky and we can hide our grid and everything control
G and just bring it here. Now we've come to the
end of our project on this beautiful isometric
modern house design. Okay. The next one we're
going to be looking at something even more
complex than this. This will definitely
take longer than this. I will divide the video
into differently parts, okay, as to enable you to assimilate better and not
get bored doing the video. Be it for this one and see
you guys in the next one.
100. 100 Exercise 2 Digital City Isometric Design 1: Lecture. We're going to be
creating this artwork here. Okay? I call it the digital
CT, isometric drawing. Okay? As you can see, this is a tread
isometric drawing. And we have the tall buildings, we have the pull grams or
the light beams going up. Okay? We just have some
digital digital illustrations. We have these characters here doing some stuff
and so on and so forth. Okay, that's what we're going
to create in this lecture. This is a big one. It's going to take
a lot of time. What I have decided to
do is I have decided to create each of these
parts individually, in separate videos, so
that we don't get to board and we don't take too
much time on each video. Okay, it's just
going to be a set of shot videos that make
up the whole project. Okay. Go to Illustrator and come to open and where you see three
D isometric digital. It's the one we're going
to use, It's the file. It's going to be under this. That's the three D isometric
designs in Illustrator. Fda, Open. We'll see that. To now opens our file. This is our file. We're going to just
start right now. One other thing you
have to know is, okay, I didn't come up with
every idea here. We got some concepts from some
artworks in the internet. That's something you
should probably know. Okay, In order to start, we're going to define what we're going to cover
in each video. In this video, that's
the first video. We're going to create this guy and we're going to
create this guy. This ones. We're not going
to create this ones, we're going to just
copy this one. That, this little character. What I mean, if we're going
to create this skyscraper, skyscraper probably
with the skyscrapers basically all the
cylindrical skyscrapers. What we're going to
create in this video. Okay, so to start I'm going to come and enable my grid here. Table background, you can see that we have a massive grid here which we've used to
create our artwork. Come to my article two and just drag this guide
to the left hand side. We can see that our
grid did not copyright. So I'm just going to delete
everything we have here. We're going to unlock
our grid there. Let's hide this one so we can
select our grid peacefully. Just move the whole thing there. But we don't want to duplicate our grid to have enough room just to this size so that we can have enough room to create everything
we want to create. Just adjust my grid point. Perfect, Let me my layer
here and start creating. I'm going to start
with this guy here. This guy, I'm just
going to Alt and drag and see what
we have here first. And first we're
going to start by creating the circular guys. We're going to come here, we're going to use
boxes for this one box, the yeah, we're going to
just select this color. I feel you should even
use more than four boxes. We can actually resize
them after we're done, but it's also good that we just start with
the correct size. So let me just use
three boxes for now. I'm going to just lock my
layer here, three boxes. I'm then going to apply
my effect, right, my stylized effect
around the colors. Perfect. I'm going to expand
my appearance perfect. And then I'm just going to
put guy to this point here. Perfect, right Way we can see that we are
making progress. I just want to even extend
it further to this point. Perfect. And then come and create the other
parts of the ship. Right. The other parts
of the sky, Screeperk. What we need to do after
this is select all of them. Just come to the
part finder and it then we can see that
right here have. Our United ship. Perfect. The next thing
will be to select the guy down Alt. Bottom from what
I'm saying here, it seems we shouldn't
have created, just compare to
what we have here. We can see that it's
actually too long, so we don't need
to be this long. I was going to select
all our ankle points and try to bring points. This. Yeah. So we just need to work
with this one points. Like I said before, we
can of course increase their sizes after we're done
to select the guy here, I get to the ground. One other thing, I do not buy these guys coming out. Like I think we
can just continue. We can just continue. Let's just join our ships. Right click here, down shift, click here, then click here. The outermost parts,
right shift, click here. Just join everything like this. Set this to unite them. Arrange, sent to the park. And how we need to ****, we need to give it
ingredient field because it's a curved shape. Remember when we
learned how to apply ingredient field to create the illusion of coveness, right? Just like how we have here. That's what we're going
to do here, okay? We're going to choose this
guy going to just reverse it. And then choose the
darker guy here, the brighter part here. But for now you're going
to choose the same colors. So we need to come and our
color, make it brighter. Even choose a preset here, this perfect for this other guy. Not waste time. Another lost. Just going to be sampling
the colors we have here. Just sample this
color. Even this one. I could just, we
don't waste time. Video is very long and we don't
want to see any time now, we need to just create
the auto parts. This other one is like this. Like this ellipse effect style lies on the colors perfect. And just bring this
guy on top of this. For this one we're going
to give it this color 'justrolC control
give you the size and this color shift x shift x to see where
there put aligned. I think this will do
to shift x shift x. I think the aligned very well. We're not trying to achieve
a very perfect design. We're not trying to mit this 100% That's for you to do so we're going
to duplicate this guy. Then alternative, then contra control the size. Just sample the color here. To sample the blue color here. This color, you see that we can sample the color because
ingredient is on top right. What we do is we
group this so as to sample the color perfect. Then we just contraseontrol F. Control C, control then it on top like this and we to make
this darker sheet of blue. This sheet here, this guy will have to be
this sheet guy under. We actually have
to move it under. This will be on top under this one will control, see, control and reduce the
size and give it gradient. Just bring it down to
the middle. Like this. We just need to expand
the appearances of this guy so as to apply
our effects properly. You know what I will
do. Just control C, control the size,
sample this color. Don't control C control, and then sample this color. And just tick it up. And just please this one here properly perfect for these guys. I'm going to take my
pencil like this. I think the problem here is we still have our effect object,
expand appearance. Then select our
shape in the night. Perfect. Just to backwards to backwards a couple of times
we have it like this. Perfect. We should
reduce the size a bit more. This is perfect. We can delete this
one right away. You can see that
we now have the. So we can wooden and grab our skyscraper to look
around like this. We're now going to create this
circular outlines, right? To select this guy. Control C control. And just right
click, isolate path. Just come and take your
direct selection to delete parts on top
and give it shift X, Give just increase the
size of the Shook this. Okay. Just take it up. Just for this one, I think we'll just
delete this one. And the ones we'll just
delete then we just clean up the ship and we
just come to objects. Yeah, I think we
can't actually do this because it's not
a complete shape. Right? So we're just going to drag and expand it like this, or increase the size like this. Perfect. Now the
next thing we'll do is to just compare it
with what we have here. Object, expand, okay? And we're just going to have this lines like this. And then select everything. And come your part,
finder and divide. Take your direct selection tool and delete the unwanted parts. One also delete these
unwanted parts also. We can take this points
here and drag it like this. This curve right slo this
one here, this curve. Perfect guys, we can
go out of our ship and we can give it
a different to, similar to this key. Now we just put the
first one here. Pull down all and one to
the bottom like this. Just blend to click Blend
to click the first one, click the second one, Blend. Blended Ships. Click on the
blend to two steps, this 20. You can see that we don't
have enough blending. Click this 50, make
this 30 or 305-30-5305. Will at least 38. Let's 38 38. We can see that we've now
created our first for this one. Light beams that we up, we're going to create them later on. This is the main thing. And just select everything in group and we can now
delete this one. Now we have our
first shape created. As we create them, we're
just going to keep them in this side. Right? I said in this video
we're going to create 123. Okay. All these ones that are cylindrical and circular shape, they are the ones
we're going to create. The next one will be
this one, Stanton. Actually, very simple.
Just an ellipse is actually four. We're
going to make this four. Going to choose this color. What do effect stylize
around that corner? Okay. Now, I'm just going
to give it a shout color. The shouting colors,
see what's happening. To object, expand appearance. The next thing will be
bring it down to orange'm. Going to do is give
it a mean color. Set this guy, and
select this guy. Perfect. Just this guy. By perfect. Now I want to have
this guy bottom again. Another version at the
bottom even longer, so we could just reduce
the size like this. Okay, for this one, now we are going to finish
creating this ship here, right, by clicking here, click here, creating
it like this. Coming to this parts, clicking here, click here, click click, click, just joining it and selecting
it with the one. Then part Finder and Unite, Range back, we have
the one we can select. This guy, also control F, Just pull them out
and shift size, shift X to give us the stroke we have on the
outermost part, right? Just increase the stroke
to two pixels here. We now have it select not yet. Just select your
pencil and click here. Drop to the bottom click, click here, D to the top, and click here and
complete your sheep. And I'm just going to select
this guy here, R Park. Select the root of them. Just unite them and
sample this color here. We could actually reduce
the size of this one. This will do perfect. Bigger, actually
work. Set everything, control G to group. Let's just reduce the size to look like the
one we have here. Perfect. I'm going
to take a side. We can see that. Now we have this other one which is quite similar to
what we created here. I duplicate this one. Instead of creating a new one, I'm just going to duplicate
the existing one here. I'm going to group. Delete this guy here,
select everything. Maybe use my direct selection to select all the
anchor points below and just push them up The
select everything here. Size like this guy to puck. We also have the same
error here to puck. Perfect. Now already you can see that we've achieved this by just
duplicating that one. All right, for this guy, we're going to set F P the size. This. The same sucks on what else is left. We just need to create
these stripes, right? Just like how we
created the ones here. Set this guy con, control islet, the guy to direct
selection to delete all of the Gecht X
and then increase the size to say just need to increase the size. This pulling alt and
shift object expand. We just bring it
up a bit and just try to cut out the
unwanted parts. Let everything divide. We can see that this first video already is taking too long. Imagine we using one video
to achieve everything. It's going to take hours, okay? And that's not what we
want. That's why we're going to be dividing the
video into several parts. We need to have the
first one here. The second one will be on top. We need to blend, just like
we did the other time. Take your blend, to
click the first 1. Second one, we have a blend, selecting the guy here. Quick blend. Two steps, give the 20 steps. Let's see, not bad, think we should just
reduce it to 16. 16 or 17. So good, 17 we do. Just go out and
just expand bland. Expand, expand your
blend actually. But we have to select
the mean ship now. Just give it the same
gredent color as this. Okay. Then for our blended ship, we have to give them
the same gent color as we made a mistake. Same gredient color.
Okay. We didn't really expand the ones. I think we should
just expand them. Group. Expand them. There is no we bring to
delete the Meines object. Expand then now you
can select the guy. The Okay guys, Let's just
work with what we have here. Okay, I don't want to make
things too complicated. Select everything
here and delete. Now we have our new shape. We can group everything. We have our three shapes, right? Perfect. Now we are going
to post for now and combat, later on we're going to
create more buildings. Okay, so that'll be it for
this one you in the next one.
101. 101 Exercise 2 Digital City Isometric Design 2: Hello guys, on welcome back. In this video, we're
going to be creating two more buildings. Okay, This one and this one. Okay, so we're just choosing
buildings that look alike. Okay. And creating them. So I feel we should also
create this bridge. Let me just see can group
everything as I should have. So let me try grouping them. See, So we're going to group them. And then to keep
them to the site. And fit them in please. And fit it in please, Mother. We're going to create
these guys in this video. So the first one is this
guy. This is very simple. Just a simple box. This, we definitely want
to increase the size. Just select the
anchor points here. Lock them like this. Maybe that's too much.
Lock them like this. Let's compare what we have here. Okay, I think we should have
even left them D like this. Perfect. Then this one. This one. Let me just compare what
we have here with what we have here. We got it. And next thing we'll do is simply to other
parts of the extrusion, So I won't go too far for now. Click, click, click, wing, the colors we have here. Let this guy, this color, set this guy sample this color. You can see that
this is darkest, sample the same color, perfect. Now select our call
points and drag them. This will do perfect. Shift X and shift X. The next thing we'll do
is create our windows. Click Click here is common sample color here. These are supposed to be
the windows with lights, space colors. We can see that these
are really big. We really need to reduce
the size of this guy. Shift X, and shift X, select the guy and reduce
the size drastically. Perfect. We also want to
have another copy here. I think we want to
bring this one. Yeah. Perfect. For the other parts, we'll just click Transform, and reflect, and copy, and just bring it. It has to be here. Actually. Here. Perfect. So we can now just
give them back their few colors and then
start adding the windows. Right click your blind click, click, click, blind steps. Let's make this see satisfied. Let's make this five.
Let's make this five. And C, let's see,
1234, 567e1, 234567. Let's make this six. Let's check six is O K This guys, let's control to group
them for this one. Let's expand them, let's
both of them track to the bottom and just click here. And click here. Let's make this 20, not satisfied. Let's make this 22, 22. We'll do the same
thing for this one. Click here, This is probably
202-20-2202 perfect. Now we need to, we also expand this because we have many other colors
which we need to add. In fact, the predominant
colors are blue colors. The predominant
color blue colors. We're just going to select
everything and give the blue color in,
select randomly. And apply the orange, brown color, which signifies
light lighting in the room. Okay. Signifies that there
is lighting in the room. So I'm just going to
select randomly here. So perfect. Come down here and you can see it now
for plate or colors. I'm going to do this
also for windows here, just random selection, specific sample the color
and work with this. The next one to
create is this one. Actually I forgot
to create this. 1, 2, 3, 4, 5, 6, 7, 1, 2, 3, 4, 5, 6, 7 on the seventh
floor, 1234567. Starting from here, we need to add it here like
this, like this. And can just, sorry,
just like this. Now I can just
delete this one here and let this one to
serve as the door. We actually need to
create this structure. Just control group. You need to create this
bridge structure here. This is basically shift, shift X basically pitting
something like this. Shift X basically creating
something like this. Yeah. Something like
this. Right. And then let me just It's calm like this. I'm not It's to look just
like what we have already. Statement of that. Do you able to just this
litter on for now, let's just try to finish up. Shift X, shift X, shift X and shift
X, sorry. Shift X. Perfect key to this. We'll have typically created
this, well, you know what, I'm just going to delete this
guy and copy this one here. Time is not on our side. I'm just going to dra this
one here and arrant front, we can see, yeah, that we have it aligned now. You can see light
is coming here. So this one is brighter, right? The entrance here is brighter. Then here. We now have
its blend into blue. Just control to
group everything. Now we're going to create
this one, all right? It's just a square,
basic square. It's the basic of them all. Three by three, okay? This phone will have this color to drag everything to the
lower parts of the Cred. Then create the parts, let's just sample
this colors here, then create these parts. Now, it shouldn't be
this long. Chili. Okay, perfect guys. Now we can see that we
now have our shape. All we need to do is to
copy our windows here. We're going to go
in to our ship. Copy them, control
C and then come out and control V. Just align them, this shift shift. Align them like this. Perfect for this one. I'm going to just
delete the door here. This, let this guy in the sky put them Alts
and just drag them down. You can push them up a bit. Perfect to shift X,
shift X perfect. Now, we don't need
them to be this much, we can just delete some
of these mediate ones. Perfect next. Okay, as you can see the they actually three
here. Actually three here. If we like we can
use them just they are like adjust them. Let's just adjust them.
Just adjust them. So we're going to select our
ship here and shift X right, going all your ships going. Not in yet. Thank you. I guess we need to
use the direct selection to just parts and drug and
select all our ships. Move them here and just Alt and drug and
create a duplicate. To this point then. Yeah, perfect. We see that we can
select everything and we can simply just make
sure it's centralized. That's all shift X and now
we have them three here. Select and transform
and reflect copy. Just have them in
the other side. Just going to shift X, shift X. And see how we align
them properly. Perfect, shift x shift X. Perfect. Select everything
here and control to group. Now as you can see, we have do created
the two parts. Okay, perfect. Delete this once. The next thing we will create, in the next video, we're going
to be creating this guy. And maybe this guy, okay,
maybe the two of them. That's all we're going to
be creating the next video. See you guys in the next one.
102. 102 Exercise 2 Digital City Isometric Design 3: Hello one. Welcome back. In the last video, I
said, in this video, again creating the two guys. Okay, but on the second thought, I think I will just be creating
this one for this video and then create another video
for this one separately. Because this one
may take some time. Not too much time though, but I just want to create
them in separate video. Set the guy in a
drug to this point. And then we're going to
start by creating a ship. Our topmost ship. This mustn't be perfect for status must be
perfect at first. But when we tweak
and tick and tick, we're going to have it
just the way we want it. This is 1234123. We should add one
here, make it four. Then we should have three. He like this, so perfect. I want the next
thing would be to create this part, right? So did your pen too during those starts to throw
out the extrusion. Good. So I'm just going
to sample the colors. This guy, this sky perfect. And we can set everything
onto G to group them. Let's sky this to select the guy here and
sent to the puck. Then select the guy again. Alton Drug sent to the puck. 1234. Finally Alton Drug, seen the puck. Finally Holton drug Rene
Jans into the puck. On this one will have the sites extruded or extended
down to the bottom. Perfect. Let's just sample the colosi because I can see that they are
known ingredients, not the ones we used before. Okay, everything is perfect. But for this guy, we need to
change the colors, right? Perfect. So you can see that this really
didn't take time. Okay. The next one
will be this one, and finally this one. So we're going to start
with two by 22 by two and are just
going to extrude it. Downwards maybe? Yeah, downwards this. And then I'm going to just
sample this, colors this. Then let's bring this guys up. Even the perfect suck,
everything, everything. Sequental, use the
size set like this. Select this guy then while selecting squalus,
the size, like this. And select this
guy here, perfect. We can select
everything and group, we can actually
just duplicate it. And keep the other one here. So we can use for
these other parts, you can just one
perfectly like this. Yeah, perfect. Come in here and just delete
these unneeded parts. Just select the direct selection to select all the
Unc points here. And drag them down like this. Okay, drag them a
little bit too much, so you should work. And then this one. First of all, I want to really
align this to our grid. This, if you can insulate the uncle points and
drag them like this, we should make it bigger. Yeah. So this should work perfect. We need to sample our colors. I sample this one. For this part we're
going to control C control and reduce it evenly. Size and just sample this color. Go back to your
direct selection. I think we just need to
reduce it a bit and just drag this part up
a bit perfectly. We've got it to control, control A, reduce the size. Just go to your effects. Rounded corners. Just increase it like this
and give it this color. We see control it. Give it this color. Perfect. Select everything. And control to group. Yep, we have a group. We can just bring it
in here like this. Perfect. All we then need
to do is select everything. Control, group, everything,
and keep it at the site. Delete this one here. We now have created our next
building, that's this one. In the next video,
we're going to be creating this one and probably even tackling
one of these. Either this one or this
one. Okay, this one. This one afterwards. Yeah, that'll be it
for this one guys, and see you in the next one.
103. 103 Exercise 2 Digital City Isometric Design 4: Come back in this
lecture. We're going to be creating this building. Maybe we're going to create another one
apart from this guy. We're going to be
creating this one also. Okay, yeah, just
duplicate it out again. Duplicate the wrong one. Good, We're going to be creating these two buildings in
this video for this guy. Starts with the top always. We're going to start
with the top to E, number of grids, you
can just starts, random number of
grids like this. Select the boot and
control G to join them. We need to just dig
this one perfect. Now from what I've seen, we might need to
reduce our for ship. First of all I'm just
need to fix this error. Perfect, Reduce the size. I didn't need to
do this like this. I can just do this from
our anchor points, basically, let's
reduce one box here, also by one box here. Let's see what we get. Ten, the next ten to create the inner extrusion
control the size, let's just give it the
color for now for this one. Let's shift control, Shift X, fit things here, quick to shift X, Set the boot of
them with your pathfinder and subtract building to
fit the guys properly. So it's possible that I
shouldn't have reduced the size like I did before from
what I'm seeing right now. We shouldn't have
reduced the size. Okay. But that's not a
problem going to concrete, Manly and quickly. Okay. This one finally. Perfect. Create the extrusion inside. Okay. So quickly, just
create it quickly. To select my direct
selection to. I'll just sample the colors
by heating eye for the drop, two for perfect. I'm going to create
my, that's the flow. Yep, that's it. I'm going to just sample
this one perfect. Next thing we do is
create this guy. But we have actually created it from one of these guys here. From here we've
created from here, you're looking to
green copy, then Pete, Just reduce the size bits for the coloring for the top. We'll just make it this color, make it brighter here. Perfect sites get this
color even darker here. Perfect. Next thing we do is to create the other parts
of our building. Good guys. So the next and final step will be to create the guys here. These guys, I don't
want to copy. I want to create
everything from scratch. So click Start from here, Go click here. Just fit it in like this. Then we need to create
these other parts. Fit it in this. Here
we have our parts. Now we can select
Everything Group, and drag it to the points shift, shift shift please. This one here. Grab this one. Perfect shift X perfect guys, now we have everything
lined out perfectly. He now set everything
and control group. Yep, we now have our ship. Perfect guys, you can
keep it at the site. And we focus on this one. This one. Focus on this one. And this one is
similar to this one, So I'm just going
to copy this guy. Group this guy and select
all other parts here. I think they are
still a group group. Just delete all of these
other little parts. Perfect. Now we can just reduce the size to fit with
what we have here. Probably what we
have here is longer. Longer longer. The effect of duplicating
this is that we might not be able to get it properly
aligned on the grid. You might not be able to get it properly aligned on the grid. That's the effect of
actually limits copying it. Rather, let's try to see, we can align everything
on the grid. We've been able to
partially align it to the. We can see that we're
having a hard time. If we had just created
it from scratch, we wouldn't even be passing
through this whole thing. Nevertheless, we'll just
work with what we have. I'm just going to duplicate. See, yeah, just this part which I
copied the other time here. Maybe I'll reduce the size. Select this guy and sample
this color for this other one. Just create an ellipse. I think we have a lot of ellipses we don't
have to recreate. We can just come copy this one guts Ptv.
Bring it here. You see control left.
Reduce the size. Okay. Maybe change the
direction of the gradient. Yeah, that's it for this one. We didn't extend it
because we just copied on the ships and we're
finding it hard to align it with the grid.
But that's not a problem. We just use what we have. The next and final step
would be to create the stripes shift shift X. Just going to create
it right away. Or create them right away because we didn't align it to the grid start from scratch. We might have to use
our ice at some points. Some critical points, this shift X, shift X and shift X. Let's just select this here, K and this one here. Let's just select this one here. Let's select the ankle points. Just try to move them
up, them up the bits. And just hold the alter
rack to the bottom. Take blend, click, click, click blend to specified steps. And 15, let's try 20 Perfect. I can select everything
to them and bring it to the right hand side
and delete this guys. We can see that we've now
created most of our buildings. When we come back
in the next video, we're going to try to create
one or two more and then try to finish this up in the
next one or two videos. After that bet for this one guys see in
the next one, Bye bye.
104. 104 Exercise 2 Digital City Isometric Design 5: Welcome back. In this
lecture we're going to be creating two more buildings. We're going to be creating
this guy and this guy. So I'm just going to drag the building here for reference. Propositesi'm going to
start by creating this one. This one under. I'm just
going to start by creating. Yeah, let's just create
one under. Okay. We're going to start
here three by four, K. Right now I just did
three by 33 by four. Let's do three by
412-34-1234 Okay. And then 123. Yeah, like this. Let's okay. This is to actually, let's just get here. Bring it here again. Hit the sun for this color. And then this book like this sum this color, it's oh, here. Okay. The sun for this color, it's P. Sample this color. And finally, create
this box here. Sample this color. For this
one, sample this color. Now the next thing will be
to create this one, right? So we're also going
to use by four, just like we did
here for this guys. Pop'. Just going to
select and dry up. Then I'm going to start
creating from the bottom. This time he was
going to click here, 12, 341-123-4123, This perfect's going to bring
it at the medium like this. Yeah, this is perfect. Now, the next thing, sorry, nesting will be two. Duplicate this guy
and bring it below, Arrange, send to back. This will do from here on. We just want to feel up the
pieces. Select your pen. What I want to do right now, we just shift X, create this inner species because we're actually
going to need them. Because we're actually going to reduce the opacity and
make this transparent. So it's good that we
have the inner species. I'm just going to
give them this few. This few then for
this one, sorry. Yep, I'm going to
leave it at that. And for this one, finally, I'm going to leave it
like this and then hit P And you know what, I just want to create
the floor first. Shift X chair, perfect. You just want to create these
other parts for the flow, you can do shift X and just basically arrange and send
everything to the park. Basically send every other
thing here to the back. Then common creates these
other parts of the box, we select this color. Then finally select this color here, perfect. Then shift X. Now we have everything
laid out perfectly. Select everything and just put your capacity
and just reduce capacity by 73% group. We're going to drag
this guy up right now. Maybe we should
reduce our posit even more, this guy on top. We're just going to sample this. Okay? Perfect. Now we're going
to work on the other ones. Again, these are simple boxes. Okay, Let's do them, so let's do them four by four. Okay, perfect. And we're going to
just control C. Control reduce the size
like this for this guy. We shift X, just reduce
the size Like this. Shift X, shift X and shift
X select bout of them. Do this, we're going
to extrude this one. I'm just going to
select this guy and give it this feld color or redientl, some color here. It's for pinto. Hit I. And sample of color
here, it for Penton, Somep color here, it's Pop the color here. Perfect society, we
now have our ship. Okay, I think we have to sample
this color for this one. We have to sample this color. For some reason we see that
there's demarcation here. I'm just going to
create this man, maybe. Thank you. So this is good. I select everything and we
are just going to extend. Yeah, we actually need
to extend our ship. This. I'll select everything
and just group them. Reduce the size like this and then just increase
the size like this. And now we have to bring
them to the middle. And then like this
and then control D to redo what we just did The
final ship to create is, sorry, something like this. So we're going to be
mess around with that. This one here. Let's see, 150. Thank you guys. So I think
we can work with this. So I'm just going to reduce the size and select our anchor points here
and drag them down. Then just group everything
control and bring everything like this like we see here. We can't actually
have everything go below like how we see that.
We see what we have to do. We have to actually
create the whole thing. Just do we have to
actually create the whole thing
fit in like this. Just go inside, so
everything perfect, just kits the whole
group to the points. So just go inside the ship, select everything
just for this one. Let me see how I did it. Yeah, for this one
it has to be below, has to be below ships,
below our ship like this. And see also for this one
has to be below our ship. I think we'll just
delete this one. We need to show we're
done with this ship. We're just going to go to
the next one for the beams. Guys, let me just
do the grouping. Look at these beams. They are simply light beams. And we created like this, you can see sample this as
you can see the just field. And then this point has
an opacity of zero. The entire ship also
has a low opacity. That's how you've been
created to arrange to park. Perfect. I'm going to just so
everything in group and have them and have it at the right hand side
to delete every other. Yeah. Let's create this one. Hold on, old guy is very simple. All we need to do
is create a square and create the intrusions. Right. So let's make the square. Let's make the square four
by 412-341-2344 by four. Okay. Perfect solete. We can just select all our anchor points
here and drag them down. Perfect. Now for
these other ones, we'll just shift X
and try to create, and we have this other one here. I'm just going to
create them also. Shift X and shift X and shift X. For this one, I'm
just going to give its random color for now. Okay, The next thing I want
to do is create the Cots. So I'll just extend
lines here, bits perfect. So also with this one, perfectly old, select this
guy, select this guy, select this guy to
your pathfinder and subtract from here on, we can just shift shift X
so as to see what's inside. So click go. This low click, click, click and join. I'm just looking to do
the same thing here. Yeah, guys, select this guy, shift X, this guy also shift X. Give it a different
color shift X and give it a
different field color. Shift X and give it a different field
color, then shift X. We just want to cut
these ships out. This, select this guy. This guy, this guy.
Select this guy. Cut. You might need
to just come in, walk a bit on the extra
points like I just did here. Select this guy. This
guy cuts zoom here. And just delete redundant
points like this. Yeah, we can just add
the parts like this. The parts then the parts didn't really fit this one. Well, sorry, just fit it. Okay, so the next one
will be this pots. And finally we have the pot perfect. Now we're going to work on this one and it's
going to be simple. Okay, sorry. It's going to be this
one, right to you guys. You can see that I have not created our last
building for this video. Control G to group them. Just shift it to this point. Yeah guys, and that
will be for this video. In the next video, we're
going to be creating our last building which
is this main guy. It's the most complex building here and we're going to
create it in our next video. Okay, so see you in the
next video. Bye bye.
105. 105 Exercise 2 Digital City Isometric Design 6: Guys, and welcome
back. In this lecture, we're going to be creating
our last building here. This is the building. I'm just going to duplicate
it to the side. This is the biggest building
in the most complex. Okay, we're just
going to create this now this video, this lecture. Let's see, 1234567 boxes. Let's do seven by seven, okay? 1234567 by 71234567. Okay. So okay, and then just drag it down at this arrange
and sent to buck. This one will give
you this color. Well, this one.
Okay. For that one. We'll just give it this color
for now and strike it down. This will work. So we're going to
create the sites now for this color. Here, for the other
parts was created right to some for this color. Now I've created our
first box, right? Is it select everything here? A drop to the bottom. Arrange, send to buck. This should be or
second box up a bit. Tick up a bit more. Let's take, we'll come
in some colors here to group. Now we'll
just pull down old this arrange send to back. Now we want to select this guy. It's going to secure the
size like this shift and give it this
color as colored. Some of this color here, perfect curved edge, right to stylize curved corners. Reduce the cove, to then select this control,
reduce the size. One, just give it the color and control C. Control the size one more time and give it this
color the same color. Maybe a bit more
complete control. F. One more time. Se,
maybe a darker sheet. This sheet control F, sorry. Maybe we just need to reduce
the Cvturepte control. Take it up a bit, come on, sample this column here, then let's concrete sides like this side. Objects expand, appearance
and then unites them. Set one on top, or jump
into front, perfects. The next thing left
we need to create the parts under here
just to be key on. Go inside, set the Sky
control C control F and reduce the size and shift x stroke and give it
white color some color. Here consider we didn't get it. Just work with
what we have here. The effect, stylize coders and give you
the size like this And okay, next thing will be this one
here in the shock of two. See control the size then
give it this blue color. Can see the bed, we can't
select the blue color, we can just give it
this color here. Let's adjust, even
increase the size bit perfect and control C control reduce
the size like this. Let's just delete the
effect, the cove effects. Let's really reduce the size. Let's give it a dark she just try to start
to work our way up. Okay. We can see that we do
not have agreed to guide us. We're going to go out of the
ship for now and try to copy one of the, going
to copy this one. Control group. Let's not group, let's just drag it down and
control group this one. Drag it down like this
position like this. Perfect. Just go in
and then let's select the edges here or the vertices rather the ones here
just start to move them. You select one of them. Just move them up
like this. Perfect. We just then move
the ones which we, if we didn't select properly, we just move them
up this perfect. Then these ones are meant
to be discolor, perfect. Apart from that, we are meant
to create some other ones. Control, control, stick it up. And let's group them so it's a group in
a group, right? So go inside this other group, then just select your vertices like this and bring them down. Okay. And then give
them a field color, that this field color
in this field color. Let's just the vertices
here and take them up. Yeah, you can look
with this and just drawn all the duplicate it like this and
control Decontrol. Control D. Control D. I can go out. The whole
thing is our ship here. Just control Mystic let's it's beneath our ship like this. The net we will be
doing is creating this glass effect here and here. Here, and here. Here and here. You can see
that because I'm not swimming, I'm not getting the
points accurately. Once more, perfect for this
one we choose this color. For this one we chose this color to just let both of
them control and we're going to reduce their is perfect. Now we're done with
this part and let your big guy here all
down out and drag it below are park. I just want to group
the whole thing. Just arrange it like this and compare it with what we
have here. It's not bad. The next thing
would do to be kit, another version version actually needs to be quite big big. That case we're going
to go into our group. Select these guys
and bring them. Select these guys
and bring them here. Select these guys.
Take them here. Disguise them here. So let's try to put it in please and see if we now have
what we want to arrange. Send to back. Let's now
put it in please see, I see that you actually
need to shot disguise back. You select all of them, you can see that they're
not even on the grid. We actually need to be
on grid first of all. First things first, we
are going to put them on the grid here. I'm just going to fit this
one more perfectly, okay? We want to actually take
them back to the before perfect grad she. Now you can see that we
have it. We can better. Yeah. And we can
actually work with this. Work with this. The
next thing to do is to create this ship. This, this one. Okay. You said the guy here. And sample that color. So this one sample this color. And we now need to
create the spots. This part, guys, you also need to create
this part here, right? So. Just shift shift
shift X and shift x. And then fred, come on, Just fit that part. Now let shift X shift X. Let this one shift x, this one also shift x. This one I'm going
to give this few. This one I'm going
to give it this el, Just join this, join this. Then we are going to once again shift X and shift X
O shift X, shift X. We didn't need this guy
to be to shift X, right? We didn't need to
show the stroke. Okay, so that's all
we need to do now. And perfect now we now need to create
these guys, right? To basically shift
x and come here. You can see that it starts
from here, right, goes here, down to the bottom
here, then comes here. So let me do, you're just going to choose
this guy then. Yeah, so we can
also the same here. Adjusted this and this one also. Now we can just blend
between our ships. Let's make this three shift X. Let these guys
expand, transform, reflect a copy shift X perfect guys. So you see guys, we
are almost done. If not done to work right now, the next thing we'll do is just add some of these to details. Actually we need to
change these colors, you change them
to this colorect. We just need to add some
of these lit details. Okay, we have some beam
of light coming here. Instead of recreating the
availability to go in, copy this control C guts of the shape and control V. Now
this one comes like this. It comes out from within
the building like this, right click transform
and reflect and then copy so as to create
the other one that come out from the other
parts of the building. Then for the other ones I showed you how I actually
created these pimps. From the other ship. I won't be creating all of these things. Just copy them. Copy for this one it might not fit here actually
because you might have different sizes
of this cove square. Right? So I'm just
going to refer expand the appearance here
and control C, control and go inside of ship. Just use this tool. A ship like this. Okay. Make
sure we have it like this. Okay, perfect. Next thing we do, we set
ships and just join them. And then it give it the
ingredient color, right? So I'm just going to sample the ingredient ingredient it up. We're just going to
create one more. This one actually needs
to be at the front. We're just going to
create one more for the one inside to control. Just going to full
screen mode, no problem. We're going to control C control and just
reduce the size. This other guy, you can see that we have been able
to fit it bit perfectly. Not to perfectly, but instead
of creating everything to select the points here and
extend them up like this, we can see that the
gradient direction, or ingredient angle
is not proper, 90 degrees to be perfect. Basically, we have not been
able to group this guy. We've not been able to create our last and most
complex beauty. I'll just select
everything here, group them, conclude, and
then select everything here. And delete it to go
back to my normal mode. As you can see now we have our completes, our
building complete. That'll be it for this video. The next video, we're going to be joining all our buildings and we're going to
finish our design. Okay, we're going to copy
some of these things. We're going to create
some of these, okay? These little details on, for example, the ones, they are just squares
which I created and then created the
beam of light like this. These are little details. And also the humans here getting a deleted one
I shouldn't have deleted. And of course the humans here. We're now going to recreate
all of these little details. We're going to copy,
copy, and Pete, be done with guys, that's it for this one. Glad you stayed till the end. It was a long one but we
finally come to the end of it. Now in the next lecture, we're of course
going to be adding everything into our
complete image like this. Okay, So be it for this one. See you in the next one.
106. 106 Exercise 2 Digital City Isometric Design 7: Hello guys and welcome back. In this video, we're going to
be rounding up our project. Okay, from our last videos, we were able to create all
the buildings we needed. This video, we're just going
to copy everything up. Okay, of course, we're going to be adding these
other little details like some of these light
beams that are going upwards. Okay? And some of these
little details here, most of them will just copy them because they
are quite simple to create and of course the people. Okay, we're just
going to copy them. And bring them over here to the one we are creating. Okay. We won't screate
them from scratch. I'm going to start
with this one. Okay. The big is the biggest building or the
most complex building rather. That's the one far behind. Also, we're going
to start with it. Bring it, just arrange it here. Okay, let me bring up the ruler. Just try to make them align. We can see that part of this
one part of the building, that the light beams
are going upwards. So we can either reduce
the light beams. Okay, I can reduce
the light beams or increase the artboard. Just reduce the light beams
with my direct selection to drag the points
down to this, please. And I can just delete my guide. Okay, We mustn't make everything
look exactly like this. Okay? But we're just
going to try to achieve the look as
much as possible. The next one will be this one. This one needs to be approved. This one you say we're just going to arrange
and bring to front. And then try to just fit
it in here perfectly, so this should do it. Then the next one
will be this one. This one we need to also
bring it to the front. We're going to have it here. I think it should be smaller, so we can just make it smaller. Then for this one, I
actually want to make the lower side of
the building go down as to cover the other
empty parts of the art. As you can see here, we have it all the way
down even though this building is
actually helping cover some of the
parts of the building. So I'm just going to take my
direct selection to select all the anchor points below. And just pull down, she de this. Perfect. Go out. Then we need to take our
next shh, which is this car. Here is our next ship's not
really in front of this one. We can now do this. We can just select the
both of them and re front. Okay, so that we have this
one in front of this one, the boot of them physically
in front of this one. And this one in
front of this one, just like how we have them here. Just move this one to the right. And then this one, I'm
going to just bring it down like this. The next one will
be this building. Let's fix this building. This one, bring it here. It's just going to be
behind this building. Just select it and move it
to the right hand side. Maybe move it up or
Ski it up. Skip. Let's move it up. Move
it to the left hand side of Next one just down, perfect. The next one will be this guy. This one in front range. Front. Just fit it here. Fit in perfectly. I actually need to bring the lower parts
of this building. We below the pot just
like how we have it here. I'll have them here. We just double click to go into
the ship or the group. And take my direct selection to select all the anchor points beneath them like
this and click out. Then the next one
will be this one. Select it. Bring it here. Luckily enough, it's already
behind all these outliers. All right, just bring
it up here like this, basically. That's it. Then we have this one. I feel we should
increase the size a bit. Let me just compare it to
this one we have here. We have to increase
the size like this. This will do, bring it here now. We then bring this one. Arrange bring center back. Now we have then this one. This one will be around here. We'll move it to
the left hand side. Yeah, and this look is perfect. And finally, we have this one. And this one should be here. Arrange to front. Just move it to the left
hand side like this. Perfect. The next thing I want
to do is to bring the human figures, the
ones we have here. I just want to bring them, copy them, and bring
them over here. So we will hold Alt and drag this one into fronts going fit. And then take this guy old and drag to the
right hand side. Arrange and bring to fronts this guy holds and bring to
fronts are bring fronts. This guy bring here
and bring two fronts. Then we have this guy and this one can sell the boot of them all and bring them here. The rant fronts, basically. I think that's all for
the human figures. Now, the last thing left are
our beams, our light beams. We're going to start
with this one. We're going to create
them from scratch. To select your pen, come here, click. Click on. Basically we want to
join it with this ship. We want to have a
copy of this ship, give it a different
color, Black. Need to just select this guy
with my direct selection to control F. And
then select this guy. We're going to draw this guy. We have to actually expand our ship to apply
effect, to expand appearance. Then select this one.
Just drain them. For this one we can just
shift x to see beneath it. And then hit for hydro two. Sample the color here. Let's just like this. So that we can come and
add the gradient field. For this gradient field,
we're going to make this 90 for this guy to
sample this color, this guy sample the whites. For this other channel, we're just going to
reduce it to zero. Now we can delete this one. Then select the ship and just reduce the opacity
of the entire ship. Maybe 606022 should
do basically that's all except for these
are the ones which are those simple ellipses with
ingredients applied to them. You see the gradient applied, it's just ingredient between
this color, this color here. That's the color we have here. And this blue which is
the background color. Okay? And then the blue kind of feed so that it
gives this illusion of the parts being behind the
beam. Okay, The beam of lies. Okay, Let me just copy the background so we see
what I'm talking about. Just copy the background. Like this old we can see that the background
is also ingredient feel. Okay. Also ingredient feel. This is it, it's dial gradient. This is
what I'm talking about. I, I made it like this so that we see that this place now looks like it's behind
the light beam, right? So if it's behind
the light beam, it's not going to
be as visible as this other place which is
in front of the light beam. Okay, so that's what
I did Now I can just let this guy drag it down. Just reduce it. That's the size. One other copy down
and reduce the size. Perfect. Now we
now have this one. We see that this is just a cube. These are just cubes with
light beams falling from them. Just hold in to the point. Then we can actually bring them to the front
of our light beam. Here. We can select them. Then select every other thing. And arrange to front perfect, so that we can
easily select them. And ubicatem basically
for this one, for this guy we can just
guys and bring them here, reduce the size like this. Perfect. Basically, that's why I did. For most of these other ones, I just duplicated this
one P. Then for this one, for this light beam, this
kind of control control expanded it like this to
the down side like this. And then arrange to
back Okay, range. Let's set the range park again. Then we just need to
reduce the opacity. Perfect. This is
what we are perfect. We actually need the beams
to go right up like this. Ofectse other guys should
do right up like this, maybe the size of bits perfect. Then this one, we have
one other beam here. It's just going to be like this. We see that the gradient
has been applied. We can just reduce the size
of the opacity For this one, it's not the proper
gradient actually. This other guy here should be this color blends like this. For this guy, this guy shift control X and then go into the ship and control go out. We see that it's down
behind this here one. We have these other ships. Now these are these
just an ellipse and just stroke with
dashed lines applied. Right? That's what they
did here. Just copy them. This halts the same thing here. Just let them halt drug. Basically, that's
all we need to do. This one just going to, I feel like dragging
it way behind. But instead of that, I think we can just
do some other thing. We could bring this lotion here. For this one we have now. I think if we plead with the angle to work
better, let's see, 135. Let's bring it to minus 135, not giving us the rest. Let's bring it to minus 10. Let's, let's use this to see how that's
holding down shift and just using the mouse just to see how the hood movement
will become. Right, Okay, I think something like this
should be better. -60 -60 should work well. We can also reduce the opacity. Yeah, this will work
well. It blends well. And basically, that's
all we need to do to be done with our
shape or with our design. Rather the next thing
I'll just do is select my artboard to crop my
artboard like this, like this and this. Yeah guys, that will be all. Let's go to view and trim View. And you see that we have
not trimmed our board to our design or we have now
trimmed our design to our key. Then just go to five. Export can just peg and
so on and so forth. So basically guys, this will
round up the video for us on this mega project
which is the digital. Okay, this will come to the end of this lecture
and also this module. In the next video,
we should be taking an assignment and see
you in the next one.
107. 107 Assignment 19: Hello everyone and welcome back. In this assignment, you're
required to recreate or use the knowledge you've learned on isometric projection
or isometric drains to create two things, okay? The first one will be a
three deiommetric house, like this one we created here. Then the second one will be a logo using the isometric grid. Okay? You remember one
of our post videos that I think in the last mode where we started
learning about grids, we actually created
a simple logo with the isometric grid, and it was more of a two D
logo with the isometric grid. Okay. That was to explain
to us that we can create both two D and tread
stuff with Metric Crete. Okay? One of the
assignment will be Tre D, which is to create this one, and the other one will be two D, which is to use
symmetric Cred to create a two D logo design. Okay, I would love to see
what you can come up with. Feel free to share
your work with me and I'll try to give
you my feedback. Yeah, that'll be it for
this assignment guys, and see you in the next one.
108. 108 Make Animated GIFs in Illustrator: Hello guys, and welcome back. In this final module, we'll be learning
about an emission. Okay, Now, this is more
of a bonus module, because an emission is not really a feature in
a Db Illustrator. Okay, But it's
actually possible to create some sort of basic
admission in a Db Illustrator. So these are very basic
admissions, and we call them ifs. Okay, that's GIF, and that's the format in
which they come in. In this module, we're going to be learning about
an Emission and also we're going to be
learning how to create gifts. Okay, so that's kind of what we'll be looking at in the
first part of this module. Okay, now in further
parts of this module, we'll be learning about
more traditional ways, more professional ways of
achieving an emissions by using some other software
like after effects. Now I have a court on after effect, and you can
check that out. But notwithstanding, we're
going to take our designs in a illustrato and try to animit them in to
be after effect. Okay, that's the next aspect of this module which we're
going to be looking at. And with that, I kind of
aim to give you a kind of basic knowledge
of how an emission works in general and also in to be after effects
and illustrator. Now what we're going
to be creating, the gift we're going to be
creating in this video, is kind of a logo admission. Okay, now we're
just going to start by creating a new document. And I want my document to be in the size 1920
pixels by 1080 pixels. Okay, so this is
a full HD preset. That's a full frame size. Now for this number
of art boats, we have to put the number of
frames we want to create. Okay, now I'm just
going to put 30 here and I'll
explain later on to 30 and create now we see that
it has created 30 frames, 30 different artbots for us. Okay? Now I just
want to give you the concept of how
admissions are created. Okay? So you have
an understanding of what we are
trying to do here. Admissions work in this way. If you want an
admission, let's see. Of this ball, this point, down to this point, okay, Along this path, okay? So it has to fly along this
part, on land here, right? What has to be done
is you have to create several images of this
ball down to this point. We have one image here,
the next image here. The next image, The
next image, just okay, just like this and this and
this, down to this point. And then these images
are now combined together using a software. Using a software
like after effects. Okay, Video software. They are now combined
together to form a video. When the video please, all of
them together like a video. While in the real
sense, they are just different images
coupled together. So that's the same thing
we are doing here. Remember we have different
frames right now. These frames are kind of a
representation of what we're trying to achieve in
an emission form. For each movement, we
will represent them here. So from here to here, 12345678, like this and like
this, like this. Okay? That's how
animations work. That's the basic way of
our animissions work. And I'm going to talk
about this again when we go into how to be illustrated in the last
video of this module. Okay, so I'm just
going to import one of our projects and we're going to
admit that project. Let's go to our module line, creating designs
with geometric grid. Okay, then this
logo design here, This is our grid
sequence logo design. That grid sequence logo design. That's this guy. Open it. We're going to copy
one version here. We're going to
copy this version. Control C. Come here, control. Now this is our local design. We're going to centralize
it and we want to create a gift for
this logo animation. We're going to emit this logo
and create a gift for it. I'm just going to close this original version
with copy from here. And we're going to start to outline the kind admissions
we want to create. Now we have 30 frames to work with or 30
images to work with. Each image will be a step further from
the previous image. So that's how admissions work. The way I want to create
it is first of all, I just want to have a
copy of this guy here. I'll just group them then I'll just delete the
right up here for now, and so that we work
with this one. Okay, so let's centralize this one to the media
like this then. How I want this to
happen is I wanted to start from being
very small and then just expand
and keep rotating till it rotates to
its actual shape. Okay, Maybe it's going to
rotate a bigger size than its actual size and then just resize down to its actual size. I'm going to do this, so you can see we're going
to start by reducing this guy to this size, okay? That will copy it. Or maybe even rotate it
first like this, okay? This. Then copy it
Control C and come here. Click on this next award
control to piece it in place. You have to piece them in place. Then for this one you're
going to increase the size of bit and you're going
to rotate the bit. Then copy control and come here. Control then
increase the size of bits and then rotate the bit. Then then come here and control increase the size
of bit and rotate the bit. Okay, This is the mission
we want to achieve. Remember, gives a just for simple kind of
mission control. Click here, control F, then increase the size and
thus rotate it once more. Copy, right? Both control F, increase the size
and rotate it again. Copy, Click control, increase the size and
rotate it once more. Copy click control, increase the size and
rotate it once more. Copy click control, increase the size and
rotate it once more. Copy click control,
increase the size. And once more, if
we want to cause a delay in a slowdown
in our admission, we can duplicate the same
frame multiple times. Okay? It will cause a
Pus in our admission. For this one we'll include
it again and rotate it and then we'll copy for this one. We won't do any adjustments to it so that we
reduce the speed. Copy won't temperate it again so that we have a pause
and there will not copy. And then and then we
just start reducing it. Rotating it back. Okay.
Copy control, Turn it back. Copy control, you see? Turn it back. Copy control. Copy control, I want to just copy control piece
the same thing, so we have a slow down
then then copy control. Then the last ones will
move them like this, maybe increase them a bit. And just like this so that we have our text
fit in here perfectly. Copy, copy again, please control and we'll just
increase the size of bits. I think this will be the final size control control basically. Let's just delete
this last two boards. We work with 28 to
delete the boot. We're done with the admission of the logo elements
of a logo icon. Now for the text on group, let's copy everything here. Let's control V. Let's Pete, let us group them once. Once we can centralize the
control C, Let's centralize. Didn't group properly centralized for this one. I actually want the admissions see how it's going to
look the same size. He let me look perfect. So let me just keep
a copy of this. One of the mean, the complete
text on the last frame. Okay? Now what we have to
do is what I want us to do is I want us to have
each of these texts, each of these characters
scaling from little to big. Okay? Across our frames, we might really not even
start from the first frame. Let's start this frame. Okay? We want to start
from this frame. From the first frame. We
might have some problem here. We start from this film
because the size of this one might interfere with the positioning of
our letters here. We can actually start
from a film like this one where we won't
have any interference. Actually, we can actually
start from here, but then starts from a
lower please. Right? So that when we are done
we'll just move it up. I'm just going to
do the cool thing. We're going to start
from this guy here, or this guy here in the middle. Okay, we're going to
start from this guy here. And then what we now do, we just, we just cut the ones. Okay, let's group everything. We just cut the ones and
leave the first letter. Just cut them. Okay. You know what? Just
piece them back. Let's copy everything. Let's copy everything
control C. Let's delete these ones and then leave the first
letter for this one. Let's just reduce the size bit. Yeah, let's reduce the size, then let's come here
and piece control F. Then let's now leave
the mean size. Okay, for this next one. Now we're going to reduce
the size like this. Okay, then we're just
going to delete this one. Then we're going to
come here control, then leave the mean
size like this. Now we'll now take from here and delete all of this ones and
reduce the size of this one. This, okay, you get the point. From here, we'll just
control F. Here was Q, right here, was Q. Here will be the normal size. And we'll delete this guys
and make one small size. This, yeah, like this. We have EQ, have the U here. Control will now have
the normal, this one. And have again come
here and control. Then we now the
normal C and E and just reduce the size of N.
Then we now click control F, and we have normal. Now remove the last
and reduce the size of click and control. Now we have normal. Now reduce the size of this last control
and we have normal. Okay, let's now copy
the holing once more. Control C, control
the control again. Now for this, this one, I think we can do it from here. You can just copy this guy. Just move it to the top bit. Then copy control C.
Control control this one. And control perfect this. We're done with our mission. We can now export
them as frames. We're going to export
them as separate files are from there on going
to create our gifts. Okay, so if you are
confused about the process, you can watch the video again. And hopefully you fully
understand K because it might be confusing
for beginners. If you're confused
by the process, you can just watch
the video again. But I assure you this is a very simple and
straightforward process. Okay. Now the next thing for us would be to export these images. Well, first of all, I want to give a background
to all our images. Remember they're both and
there are no backgrounds. Presently, I just
want to give them a background to select this guy. Go to copy, edit, and piece all boats. Just piece it on all at boards. We can then see that we have two copies on
the first album, we can just the first one and
select every outboard here and arrange and send back. This is what we want to do now. The next thing we do is
export all our films. Put a file, Export, Export Us. We can choose PNG,
We can choose Pec, whatever form we want to use. But the most important
thing will be to use bots. Okay? So click on
Userdb and all. So it's going to export them
from the first Artbot to the 28th outbo to
create a new folder. Let's call the folder gifts. Okay. Then go in. And now when we click Export, it's going to just take time
to export all our images. Let's use medium,
which is 150 PPI. Okay, so illustrated will take time to export
all our images. And from there on
we're going to use an online if maker
or gift maker. I keep confusing
the pronunciation. So we're going to use
an online gift maker to create our gifts. Okay, it's done exporting. If you just go to your, let me just see something. Try exporting exporters. Actually export Unknown folder. I'm just going to export it
to this admission folder. Okay, let me export it again. Okay, look, let's see. Give an admission. Use all our boats and
let's use PNG and exports. And okay, let's see the file. We haven't seve the file. Let's see the file
in this full time. Let's give it the name. Okay, good. So we have our films here, and if I just move from
one film to another, you see the admission happening. Right? So this is actually
how it's going to happen. Okay, perfect. So that's exactly how
it's going to happen. So we're going to use
an online right now. Go to your browser,
and then come here to this website, Dof.com Okay? If you come to this site, you're just going to click
here to browse your file. Just come to gift Ka. Come to the website,
and then come to Give K. It's a free online gift Ka. You're going to click browse, and then come to the folder and select all your files to
select them and click Open. When you click open,
you're going to click Upload and
make a gift click. And it's just going to take time to upload all your files. We'll give you the ability to create a gift
from your files. We're going to wait for
it to do its thing. Come back when it's done, guys. We can see that our images
have been uploaded. We can see the first 1, second one down to
number 28 here. Okay, we have
everything set now. We do not need to change
any other setting here. We have to range
from one to this. And you don't need to
touch with anything here, just leave it as it is. We now have this delay time. Okay, this is the delay time. We can leave it at 20. And basically that's all we don't need to change
any setting here. And you guys just
click on Make A Gift. And we just allow the system
to create our gift for us. When we come down here, we see that our gift
has been created. Now we see it clean, right? Perfect. Now we can see our gift by clicking
on this icon. Now, it has now
downloaded our gift. Just cut our gift
and bring it to our our folder here
and pieced it here. When you click in Properties, you see that it's a give file. It's a gift file. It
opens with the photos. It's like a video, but
it's not a video file. When you just click and then
you're going to see it. Admit people use this a lot in creating ads on this
very light web ads. Now we can see that the
site is just 287 kb. That's the advantage of gifts. They are very light
lighter than videos. The easy to use perfect guys. With this, you see how easy it is to create admissions with
the help of Adb Illustrito. Now we're going to go into after effects in the next per lecture. Okay, next per lecture, so that we see how to create a proper logo admission
in Ab after effects. See you in the
next one. Bye bye.
109. 109 Prepare your Illustrator Project for Animation in After Effects: Everyone and welcome back. In this lecture and
in the next one, we're going to be
learning how to create a very basic logo
admission after effects. And we're going to be using one of the files we've created. In fact, the last
file we worked on, which is our sequence
logo design, we're going to be creating
an admission with it in a after effects. Okay, now in this video, you're going to be
learning how to prepare your files
for admission. After effect, you Illustrator files for admission
in a after effect. I'm going to start by by
creating a new document. I'm going to use one in 20 by ten TP and we're going to use an art board of 11 board
for screen rasta effect. Let's just make this
300 okay, high, because we're going
to be importing it into B after effect. B after effect. It's not a vector software
like Illustrator, so let's try to make
the Rasta effects high. Going to click on
Create Document. This is our document.
Now I'm going to import our logo animation, our logo design,
that's the grid logo. Come and open the
file once more and then copy the logo control C, control V. Just centralize it. Let's make it,
let's make it big. We're going to reduce the
size when we get into it, but we want to make it
big enough so that we get very high resolution
in after effects. When you want to create an animation from a
file in Illustrator, there are certain things
you have to do before importing the file
into after effects. The first thing you have to
note is the size of the file. Okay? So we can see that this is a full HD document
that's ten by 120, Okay? That's the first thing
you have to note, because it's going to appear in after effects in that size. Then the second thing
you have to take note is the type of admission
you want to create. Different admissions
require different stuff. If you want an emission
with different parts of the logo emitting more
of complex animation, it means there is an extra work you have
to do in Illustrito. The work you have to do in
Illustrito is you have to make sure each of the animitting
parts in separate layers. Okay? This part, this part, this part are in
separate layers. Okay? Now the logo admission I'm going to create is
more of that type, which requires our parts to be in different layers because there will be a lot of movement, a lot of complexity to
a very good extent. Of course, also basic. It's going to be basic
but also complex. A bit of sense, that's what
we're going to be creating. For that, we have to
enable our characters, our parts, in different layers. These are the two basic things you have to look out for in order to prepare your files
for an emission after effect. Now I'm going to select
my logo and then first of all I'm going
to group my logo. I'm going to ungroup
everything, all the parts. Okay, Now we can see that
group everything here. Let's ungroup the characters. Also, when you're
done on grouping, the next thing you have to do is to now come here to your Lia. Then click on your Lia. Go to this menu and click
on a two layers build. Now we can see that we now
have them released to layers. We can actually now
select everything here and just drag them
above our layer one. When we close like this, we'll see that all
of them are in separate sub layers
of their own. We just keep doing this. Now we see some of them
are actually duplicated. Okay, what we will do is
select the layer again. Come here, and just try
to expand it once more. And then select everything, everything and drag
them above that. We might actually need to
delete a lot of things. Here we can see that some of
these things are duplicates. Right? What would
clean up our scene? Delete. Just keep deleting
till you reach the last guy. This might take some time. I really do not understand
why the error happened, that some of the errors you can come in contact with when you
start using these options. I think we might just need to select some of these guys and
delete everything in them. Okay? Just click here where
you see the complete design. Okay? That's not single layers
like this one where you see that everything from
the Tom Neil is completed. Just click and delete. Let's just keep deleting. And for this one now that
deleted one of our last object, we can just undo and keep it. Just continue deleting
the other ones. Let's select the ones now. We see that we can keep
deleting because we do not have some missing parts
from the mean guys. Right, let's set the guys also. Delete. Delete. Delete. So we can see that all of these
layers now are empty. We can select them and
delete them like this. Continue cleaning
up our project. Select Delete. We can see that this
guy got deleted. Do, let's go to the next layer. We can see that we deleted
successfully delete. You might not encounter this
problem, but I just did. I'll just try to clean it up as soon as I can so that we can
move on to the animation. I've never encountered
this problem. Okay, But I think the problem is coming from the
option I choose here. So you can either
choose the release to layers sequence or
release to layers build. Okay, Anyone you choose
and you get this error, you cannot choose the other one. Now we can see that we can select all of these layers
and just delete them. Now we are left with
these few ones. Select, select,
delete, let's sorry. Now, instead of choosing the
other one, the other view, you should try to
choose this one, the sequence you think
it's going to do the job. Now as you can see, we now have these layers
with these parts, right? Okay, This one seems
to be problematic. We can just select delete, delete layer and continue seen. Select this one and delete, okay, And we can delete
the Lia for this one. You can see that there
are a lot of parts. Select the guy and
select the guy. And it seems this guy
is really problematic. But you know what
I'm going to do. There's another way to do this. We can actually
create the list them. Let's see, we switch
these guys off. Okay, let's switch
all of the ones that and just cut and then open
the one with the problem. So this is another
way of fixing it. You can now manually select the object using the
direct selection. Two, click here and shift X. Control X, control X, right? Shift X and then control on the new layer,
create a new layer. Now we can off this
one, create a new lier. Click on the problematic layer, control X to cut. Click on the new layer, control to pit, then
create a new layer. You can now off this
one to see what you're dealing
with to control X. Then control fit,
then cretinulian control X, control
of Cretinulia. Just keep doing that in case you are encountering any problems. Now we have the
two letters here. These two characters, control X, control fits Cretella, the last guy control
x and control. Now we can select all of this, this whole thing
and just delete it. Now we see that we now have
everything in our correct. Let's just try to check them and see if everything
is working fine. I want to bring it
down to this point. This is I want to bring
it down to this point. Now, let's just check them to see if they're
working correctly. Yeah, we see that they're
working correctly. Now let's just check to see if the ships are
working correctly. That's the ships, we can see that this
ship has a problem. Okay, So it means they are duplicated here.
Let's delete one. Let's now see for
the other ones. Now we can just delete
this empty the, you see that this one
is problematic Also, you can delete one, delete the layer for this one, we see that they're
problematic to, you can delete one, delete the lier also for this one
you see they're problematic. So we can delete,
delete the Liao. Let's look at this one. We see that everything
is working perfectly. Now the next thing I
want to do is I want to just arrange them. Arrange them properly. So we're going to
start with this one, then this one is
going to be on top. Then we have this
one will follow. Finally, we now have
this one third. That's for the first ship. The second ship,
we have this one. This 1 second, this
one as all of this is, so I can be able to
identify them easily and work with them
easier after effect. Now for the characters, we are just going to
make sure they are all the right sequence, Okay, So we can see that this is the third character and it
has to be after, right? Then we're going to have the
next one, which is the U. Okay, and then the E. We
see that this is the last. It has to be last here. This one should be the next. Yeah, it has to be after U. We now have before the last, and then we have N. Okay. All of this is just for me to be able to use them just
the way they are. Okay. And to avoid
confusion with this guys, we've come to the end
of this lecture for us prevent our documents for
admission in after effect. The next thing we'll
do is just to see our project control here, we'll just see
animation admission. Perfect. Now we see the next
step will be for us to import our file
into after effects and then create our logo
admission in after effects. And that's what we're going
to do in the next video. See you. Goodbye.
110. 110 Animate Your Project in After Effects: Hello guys, and welcome
back to the cost, okay. Now we are in a B after effect. And this is A Be After Effect is the interface when you
open Adobe After Effects, and this is the
interface you see, okay? This is a after effect, 2022. And if you do not have
Adobe After Effects, you can buy it
from their website or find a way to download it
and it on your computer and, and then, yeah, you can
now open it if you do not have it or if you're not
interested in learning it. This is not a composite
part of the course. If you want to learn more,
you can actually enroll on my cause on motion
graphics in after effect, where we covered everything
about to be after effects and how to create motion graphics to
be after effect. Okay, now this is going
to be a quick one. We are not going to take care of learning
every single function. You're just going to do as I do. Okay? In case you are a
beginner to be after effect, you're going to do as I do. I might not explain why I do some things
that we're going to go first and try to
create the admission. You see how to create it. Okay. So the first
thing you do when you come to be after effects, in order to start a project, you have to create
a new composition. Okay, that's the
first thing you do. Come here, says create a new
completion, and click here. Or come here to this point where it says
Create New Composition. And click File, And then
come to Composition, and then new
composition or control. Okay, that's the way to
open a new composition. If your interface is
not set up like this, you can just come to
Windows and Workpiece and then reset to default. And you're just going
to have everything set. So I'm going to just create
a new competition here. And now you see that we can now put the name of our
composition and the size. Remember in
Illustrator, we choose a full HD that's 1920
by ten ATP right now, this is the preset, and you can just click okay to choose the
size right away. Now we also have some settings
here for frame rates. Let's make this 30, 30 frames per second. A frame is an image, is, it means in 1
second of animation. The 30 images to fill in
1 second of movement. Okay, that's the idea of framed. Then for resolution, it's
the quality of the work. The higher the
resolution, the more graphically intensive
the work is. So we're just going to choose
high or full resolution. For here, there is a way
to change it, literally. And then for duration, we
see that here is the second. Here is ply 12 seconds. Let's make it 20. We now
have the milliseconds, and we have the minutes and
hours for baground color. You can click here to
choose the berg color. We choose white. Okay,
And then Create. Now this is our new composition. I'm just using my mouse. We zoom in. Zoom out, okay. Now the next thing
I'll do here is come here to my composition
and double click here. And then come to my folder, that's my admission folder. Click on the file, that's
the logo mission file. When you click on the file,
just come to Import us. Down here and
choose Composition, Retain Layer Sizes. Click click. It takes time to
import your file, and now you see that it has imported it as an
blo set of file. Here are the layers,
okay, in this folder. And here is the new
composition it has created. If you dou click,
you see that this is now our logo perfect. From here on, we can
start animating our logo. What I want to do
right now is I want to edit the size of
this composition. The type of admission
I want to do might go out of the boundaries, just come to composition again, and then Composition Settings. And I will now be able to edit this composition size for the size and width for
the width and height. I'll just click here to
lock the aspect ratio. It means you'll be
resizing together. I'm going to resize
them like this. And then click okay, and
I can work with this. Okay, The first thing I'm
going to do is I'm going to create an admission where all of these
parts will be moving. Basically, we basically have
the same thing here as this. We don't want to red, we don't do this
over and over again. What we just do is
we'll have this animitd and then duplicate it and route
it to look like this one, so that we don't have to
redo the whole thing. Now, before I start, I'm going to select
all my layers. You can see all my S. I'm
going to select the first one, then pull down Shift and click the last one to
select all of them. Then I'm going to click on
them and then go to Create. And create shifts
from vector layers. Click here and you
can see that it has created no new ships
from the layers. Now I'm just going to
click anyone like this, not just click, click and hold, and then drag to the most part. The second part like this, where you see this
blue line appear. Click it to please
and then release it. And we see that all
the Lias are now brought on top of the vectors. Cannot select all the
vectorlis delete. What we've done is we've created layers that are
to be after effects. Understand very well from
our existing layers. Okay, now these layers have been created to behave like a native, to be after effects layer. It means if you click on it, you to change the color. To change the color, okay, you to change the stroke and do a whole lot of
things with this layer. So that's what we just did. Now to start, I'm going to start by creating a new null object. Now, a null object is
basically a null object. Okay? It means it's empty,
it's an empty object. And what we use a null object
for in after effects is to control multiple parts together, multiple
objects together. So that's one of the
uses of null objects. To go to file or a go to new and the null object and we can see that this
is our null object. We see null one, it doesn't have
anything in it and we have to parent objects to it in order for it to manipulate the
transform properties. Okay, now do is click
on my null object. Then come here and click on this tool which is the pan
behind to click on it. And then come here and
click on snapping. Then come to this
anch point where you see where you see this K, this. Click on it. And now we
see that it's moving. It's moving now, just keep it here at the
middle like this, where the vertical and
horizontal intersect. That's what we want
to do. First of all, the next thing, come here and select our
selection to click, then the whole thing to this
into this last perfect. The next thing we do is
select our guys, first ones. First one you can select,
let's be the first one. Select the first one and
select this tool once more. And then D, the anch point
apparently is at the middle. And drag it like this
to snap to this point, this particular point, we
snap to the other one, to the next layer, click here on the anch point and drag it also to that point. Finally, third one,
the third layer, and click here to drag that particular point
like this, perfect. We have all of them
at this point and we also have our no
object at this point. Okay, now the next thing I'll do is I'm going to
just hide this. Our layer here, layers here. This is our part of the lore. Going to click here to hide. Click here and click
here to fully hide. We're just going
to admit this one. The first one we do is
select all our layers here, and it R on your keyboard
and come to 2 seconds. You see the timeline
is the timeline, the timeline where our
admissions will play on. You remember we
selected 20 seconds for the duration
of the admission. Our timeline is for 20 seconds. Now let's drag and bring to two. And then where you see this bell icon, this
stopwatch icon. Click on it, while
selecting the three layers. Okay, Click on it. And it's going to create this stuff here. This point here. Now these are what
we call key frames. Key key frames. And they help
us to create our emissions. Okay, before I continue, I just want to explain
to you the types of emissions we have frame
by frame admissions. And we have key framing mission. Now the frame by frame
admission is where you are responsible for creating the
frames of the admission. Like the one we just looked
at in Illustrator for the GIF format emission that project we did and I think the first
video of this module. So that's an example of a frame by frame
emission because you are responsible for drawing out each frame of the Animisionka. You draw out each mode
of the anmission, then bring it into a software
like B Illustrator, sorry, like B After Effects, or a Premier Pro, or even that GIF maker, that gift maker
like that we used. You can bring it into
that software and then that software will
be responsible for turning your images
into, into a video. Okay, it's going to combine. Frames into a single video using your frame,
using your frame. That's the amount of
frames or images you specified for second
movement of admission. If you understand that, that's basically it for frame
by frame admission. While for key framing admission, which we're going
to be using here, all you need to do is to
specify the position or the direction or the rotation or whatever property
you're trying to mit. You should specify it
for different timelines. And then the software
will automatically create those key frames
for you by itself. Okay? So let me just explain of continuing
with the whole thing. Let's see. We want to create, let see, we want
to create a new, let's see, ship layer. We, a new ship layer. And we have this ship here. Okay? We have this ship with this true color
in this field color. Now this is our ship layer here. When you hit, it's going to bring up the position
properties for this layer. If you click here and then come to three second
and then click on the layer. And move it here and move
it to one other side, one of the location opposition. We have now been able to
create a key frame admission. If we come back to
our first location and then our admission, we can see that our
admission moves from our first location to
our second location. Now, that's a perfect example
of key framing admission. All we needed to do was specify the positions for the first key. The first key, it is at 2
seconds, and then the second, which is after 1 second tifect creates this movement for us. We can actually explore
these movements as films like we did
with Illustrator. Okay, that's just for
you to understand. I'm just going to a itself
and continue my work. I'm selecting everything
here. That's 123. As we now have our
key frame created, I'm using the space bar and the mouse button
to actually pan around my viewport when I
create my keyframes here. The next thing I'll do is go
to zero second, the start. And then, and select this guy, this rotation to for the two. I'm just going to no
rotate them like this. Perfect. Then what I now is just mess with the positions of the first key frames here. So that they happen
at different times. We play it happen
like this, right? Perfect. Now, this is an
example of a basic animation. Now we can just play
around with them to see the kind of mission
we want to achieve. Okay, let me just, let's now edit the position
of these other ones. Perfect. Now what we want to
do now is select all of them and right click like this
on them, on one of them. And go to Key assistant. And then smoothens our admission and makes it more interesting. Now we see that it starts very slow in the middle and then slows down at the
end. That's easy ease. If we come and click here, we'll be able to go
to what is called the graph editor and then make select our key films
like this and like this. This makes our key
films very interesting. Makes our admission
very interesting. Now we see that we've
modified the speeds of our emission perfect. I'm just going to reduce
the speed of our emission by editing our key films here, like this, moving them. And we select
everything here and just make everything start on the first second like
this, perfect, perfect. And we can do it some
more modification of our key frames just to
achieve more complexities. Okay? Using control Z to undo undo. I don't want guys. I'm going to settle
for this one. We'll settle for this
one pad one more time. Maybe we can just move or
shorten our admission a bit. I like this. Now
on the next thing, select all of them, then come here to this point
to point like this. Then hit for Skill, and it's going to bring
up our skill properties. I'm just going to click on
this stopwatch icon again. Click on it. Then we see that three Qm have
been created here. I'm going to drag
down like this. Come and click here. And
zero. And type zero. We see that all, um, have been edited because
all our layers are selected and we have our ski
value moved down to zero. We have this, I just want to bring this one a
little bit further. Maybe like this. Just see
how everything please out. I like the way the who
thing is starting to look. We select all our key
films, right click, easy ease, play to
see what we have. Perfect. I like what
we are having so far. Maybe I'll just play
around with some of the to see what they can look
like. Okay, perfect. I like this and we'll
go with this now. We can close our layers like this and we
know that these are the layers we worked with right now for this,
our null object. What we're now going to do is select these three layers
which we've worked on. Come here, away you
see the Perente two. Okay, that's, that's this one. The drag like this and drop
it on the null object. We can not see that all of
these guys led by this one. If you move it, we
now move all of them. Okay. Now the next them will be
to duplicate our admission. We need to duplicate
our admission. Now, let me once more, be very sure I want to
proceed with this key filmed. I'm going to hit you all the
key films would then appear. Let's play them once
more. You know what? I'm going to reduce
the duration of this one last key
films. Reduce them. Perfect. I like what we have.
So focus right now, we have to duplicate them and we're going to actually
create another null object. Let's just create an null object when we're done
duplicating them, selecting all of them like this, I'm going to once more
come to edit, duplicate, duplicate, and control
D. I'm going to control, then I'm going to bring the
new ones above the old ones. I'm going to select them like this and bring
them to the side key. Now we need to create a
null object for them to file null object and it's
the null object two, right? Now for this one we have to bring the null
object here, right? Select the null object
and bring it here. We need to actually
centralize it first, centralize copy for the
null object and then bring it here to this point. We then need to select
all our new ships, and once we duplicated
and then come and parent them to the null
object like we did before, we are now connected
to the null object. Now I'm going to just enable
our original designs, our original layers
for this part. And then try to fit
our new designs, our duplicated shapes
to fit like this one. Okay, why select my null object, my two null object,
null object two? I'm going to come
here to this two where it says rotation
two and click on it. Now I will come here and just
my keyboard is misbehaving. It's using for Z. I'm going to select my
null object and just. It's going to be a
little bit hard. Okay, so this will do. So now. We can just click on the
null object and then route in order to eat the whole ships because it's controlling them. Select my selection
to try to fit the new guys with the old guys. Now for the old guys, I'm going to do
something interesting. I'm select them like this. Let me be sure I'm
selecting them. I'm going to just for
transparency or opacity. And then we use the opacity like this so that we
just see them faintly. And that will enable us
perfectly fit the new guys, perfectly fit the new guys in. Take your rotation to begin
and rotate everything to look like the old one perfect. Now we have them perfect. The next thing we do is
select the three old ones. We delete them because
we don't need them. If we come and no
play our admission, we see that our
admission please. Perfectly okay. Now this is our
new logo admission and we're still creating it. We're not done. Not done yet. Perfect. Now we can see that we have achieved a
bit of complexity here because of all these parts that are admitted separately. The admit separately and then come and become one. All right? Perfect. Now the next thing
I'll do is I'm just going to create key frames
on minor objects. These known objects going
to hit for rotation. Then come here to create
a key frame here. Come here and do this sort, just undo it first, create a key frame here. Then come behind, not
ahead and do this. Let's actually take
backwards like this. I'm going to just do this. My takes on practice,
my ticks on practice, I haven't achieved what
I want to achieve. I'm just going to what I'm
going to come here and create a keyframe here
again by clicking on this. I'm going to now
come to the middle and then try to make my, its, my adjustments in
the middle like this. Okay, So let me just split
and see what you now have. As you can see, we are
achieving different versions of our admissions by simply playing around with
our key films. Okay, I'm going to
select everything here. Right click, right click, Key film assistant,
and easy ease. Let's go to our graph editor, select this last key film
and do something like this. That slows down and then
settles. Perfect guy. So I like what we have
so far and we'll just close the objects and then
move to the next thing. Now the next thing will be
for us to oh, characters. Right now, we just select them. We edited them by bringing
them like this. Okay? I mean, by arranging them alphabetically, that's
sequentially rather. I'm not going to select you because it's
a special character. I'm going to create a
special mission for it. And then we're
going to jump to E, N C and 4.44 This one, the last. Okay, let me be sure
we have them perfect. Now, the next thing we'll do, come to our first second, and hit for skill, and create a key frame here. And come to the second. And perfecting up like this. Okay, Now we can select
all our key frames. Clicks and when we play, we see them scaling
up like this. Now I just want to reduce the
duration of our admission. It's too long, too slow, rather perfect. This is
what we have so far. Then what I will now do is I'm going to edit
their positioning. We're going to start with
now we're going to hit, then we're going to
create a key frame here. And then come to zero second. And the object
outside like this, that's to the left hand side
of the screen like this. Okay, Holding down shift, okay, So that we have
a keyframe here. Select the wood key,
frames, clicks. We have this perfect. Basically we want to create
this for all the others. You know what I'm going
to do? I'm going to select to copy this one. Copy, then bring it to the next character,
which is this one. Which is, which is right to it. And then control V and then I don't need to hit, it's actually the position, it's not okay, just on D.
Then it took me back to, before I added as. I'm just going to add as again. Now we see that it's on the
position right now here. And then copy control. Okay, go to edit, copy, come to the
layer and control V. Okay, now we see that
it's pit on the right. Now come to this,
the linh position, control V. This is
now what we all have. Funny enough, mystic, I did, I shouldn't have Pistedll, all the key films
because this key film, we just direct our characters to be in the same position
as the first one. You know what we do while
on the key films like this. Select the second one, bring it in front of the
first one like this, and then select and bring it in front of the second
one, like this in Pk. Perfect. So that when we
now have it like this, we now have it in pace, right? For the other ones, we want the other ones to
come from here. For this on the thing
I would do is I'll just offset the alias like this by dragging
them like this. You can do this or even do it
the other way around this, all depending on what you want. I like this one better. The second version.
Perfect. Now, we're going to work on,
these are the ones. Okay, So we're
going to This one, we're going to keep you. Yeah, we're going to
keep you. And then work on and E. Okay. Now we're going
to start on this. Now for this one we
would want to come here, the key film, I'll
just do something hit. You see the comparison between the position key films
and the skill key films, Right? So there's no way to. Please my keyframes here,
because this is key, the position will be a little
bit smaller in direction. I'm going to select the letters
which I'm going to use, that's the C. And
then we're going to come here key and then
create a key frame for them for position to hit. For position key frame. Then please just
drag them like this. I'm just going to
show you that bit. The first one, we start
with the first one, drag it down to this point, holding down shift, okay,
down to this point. Second one just expose them a bit so that we
see where they are. I can as well. Just
copy, I can as well. Just copy this key from
this new one here. Okay, For this just
and then just, it's for the other ones. Okay? Instead of just doing them individually, it's more easier. Now when I play, we see that
this is what happens, right? And then now just
offset our layers. We just offset our
layers like we did. The other ones start
by taking this guy, the first one behind, and then selecting itself them
and dragging them behind. This select this guy behind, basically is what we now have. Okay, what next should we do? We have to select
all of them here. Click in, Easy ease plea. You see what's happening. Perfect. We can just maybe reduce the tuition for
admissions like this, like this. Just plea with
every other thing, every other setting to what you would want to have to look, you want to have now we haven't
worked on our U, right? U will just enable our U. One thing I want to just
add for our U is an effect. To set the U and go to effect. Good to transitions. Linear linear wipe, lineal
wipe, Venetian blinds. Okay, let's use Venetian blinds. When I select my guy, that's my layer, which I just
added the effect to come here where you see project and now you see effects control. Click on this place. Now you see that we now have the effect
we just applied here. All right, now we have
the transition complete, the direction, the width, and the father for the
transition complete. If we do this, we see the effects on it, right? You see the effect on it.
You see the effect on the letter, right? Perfect. We can start now. All we need to do is come here, maybe come here, okay. And then come on Crete,
the key film here. We can make this 100 and then create the
key frame and then just make zero, okay? Selecting the li you'll need to see the key film
here we just created here, okay, The boot of
the click the okay. So let's see how it happens. Now, how it please out? No, now we can just reduce the duration and maybe adjust the
position of this. Then let's select the layer it for position and let's even add some key
Fm on the position. We will just bring
the key Fm here. We'll bring the key from here and go back
in time and bits. And just like this, okay, let everything
click easy, Ease. Now hit you for
all the key films and let's see how the arranged perfect Just play and
see what we now have. Let these guys, and let's
just play with you, is like this perfect guy. So I like what we have so far and just do some
final adjustments here. Perfect. So I'll just
leave everything it is and then go on
to the next thing. Now we have to maybe adjust
the last E, that's this one. Adjust it like this, it
comes earlier. Perfect. Now we're done with words,
with our characters. What I'll do is I'll
select all our characters. Just combine them.
To combine them. In order to group
them or combine them, we're just going to right click and then come to precompose. Okay? You just have moved all attributes into
new composition and then, okay, now we see that they are now combined
into one composition. Now with this one composition, we can maybe just
adjust appear or the time they appear
on our screen. Okay? Instead of doing that, we can as well adjust the time logo icon
animation appears. Maybe our logo icon
should appear earlier. Okay, appear earlier
before our text. Maybe you'll just,
instead of editing the duration of the positions of this one, that's the text. I'm going to just select all our logo icon
layers and just move them bit for the time appear earlier than we
are appearing currently. See that the lug appears
and then this one appears. Now I'm just going to the text a bit so that they appear after the logo appears so that our movements do not
affect each other, okay? So that our eyes are not just scattered so that our eyes are focused on what is happening from one
time to another time. Everything doesn't just happen
randomly, just at once. So this is a more
better approach to it. We have the icon
admitting first, then we have the text coming. Perfect. I'm very
satisfied with this. Now I'm going to bring my mouse here and drag
this place like this. Then right click. I think we
should even drag it further. Okay, maybe 10 seconds, 10 seconds, then right click. And then go to Trim
Composition to work area. Now we've trimmed our
composition so it's no longer 20 seconds
now 10 seconds. And then come to Composition
and the Composka. Instead of coming
to competition, let's just come to
our new competition, in competition one we created, and then go to projects. Now we see go admission. Let's drag it in here. Now we have our admission
in our new competition. Now we can hit S for skill and reduce the size of
our mission like this. Perfect. One other
thing we can do is we can scale our animation
or our composition. When it's at this point we can create a key
film on our skill. When it's here, we
just skid to see this size that we just have auto movement select
all key Fsl'mjust. Going to do the same thing I
did in the auto composition. I'm going to trim this. Trim comp to work area. Then one final thing I'll do is I'm going to
make this feed out. I'm going to come to
my nine second click here for capacity
create the key, Fum here, then come
to the last second and take it to zero and
set everything right. Click Kim assistance. And A, We see what happens. We see that the mean
animation happens. In admission. Please, please add
and then we have a skisionbt skill admission. In fact, we sold. I think we should ad.
Okay. We actually add easy to kid admission.
I actually wanted to see. We add easy. There's one final thing
we can is motion blow. It is the motion blow effect. Click on it and then come here and just go to
your main admission. Motion Blow for all the, select all the layers like
this and click here below. You can also go into
this precomposition, that's the combined text layers and select everything in motion. Blow gives us some
sense of realism. Makes our motion smooth. If I zoom, you can see
the blowing as it moves. Okay, that's the
effect of motion blow. Finally, we're done
with our admission. I'm just going to
Export admission. Just come to your main
competition and go to File Export Add to render Q, click on Add to render Q. We now have this please opened, this is where we can
render our file. Click on Best Setting, and we can choose different
settings for our mission. Basically, I'll just
leave it as it is. Then click on High Quality here. Now we can choose the format. Now it's going to, let's
choose Quick Time. And it's going to export
it as a quick time format, in quick time format. And then we can take it to
solve like Premier to change the format to maybe
MP four format. We can play on our
phones easily and our computers easily basically is what we need to ensure here. Basically, leave
everything the way it is, then come here to output, to click here, then you
then go to your file, to your folder, and then name it's animation after effect, and then just click save. Then now all you need to
do is to click render. I'm just going to click Render. And we'll come back
when it's rendered. Yes, guy after effect is done
rendering our animation. If we go to our
folder right now, we can see that
this is the file. This is the file.
Okay. If I play here, it might not play
because I think I do not have quick time
per installed. But all we now need to do
is to go to Premier Pro. So I'm going to open Premier
Pro and convert it quickly. Okay, let's open Premier Pro. Good guys, this is
now our project. The next thing I'll
do is go to File and then go to Import. Okay, I'll just come to
the admission full line, Select the file here, that's the logo admission file, the Quicktime file,
that's the MOV file. And then click Open. I'm just going to take time
to import our logo admission. Now it has imported
our logo admission. All we then need to
do is select it, right click, and then go
to new sequence from clip. Now we have a new
sequence from our clip. From here on, if we have music, we can add music
to the background. If we do not have music, we can just go then
to file right away, then go to export,
and then media. Then here on the media, you can see that we have a
preview of our admission here. Okay, now we can
use this format, this Itch 0.264 This is
the empty four format. For preset, we can
just use b tweet. Then for the output name, we can click on the output name. And then go to our
location and make sure it's on our location
and saved on our location. To save. Then basically
that's all we need to do. We can choose to render
at maximum depth. Basically, that's
all we need to do. And then just click Export. Now we see the potential
size of our file which is 12 MB as compared to the
initial file which is 29 B, that's the quick time
format, it's 29 MB. By exporting into
MP four format, we reduce the file size of our admission and
that's good export. And just wait for a prima to
export our project perfect. Now our project
has been exported. Now I'm just going
to go to our folder and you can see
that our project, it's not even to 12 MB, it's just 5.43 MB. Now you can delete this guy. I'm just going to close
primping to save it. And I can now delete this one. I'm going to plead my admission and we'll
see how it please. Okay. This is my admission. This is our admission. Simple, clean and sweet. Perfect guys. That's
how you create admissions in a after effects, that's using your dub
illustrator files into after effects and then
creating admissions from them for this one guys. And all the files and folders will made available for you, so you can follow along. Okay for this lecture guys. See you guys in the next one, which should be the conclusion
of the course. Bye bye.
111. 111 Conclusion: Hello guys and welcome back. Now, this is the conclusion, the last video of the course. And first of all, I want to just appreciate you for
taking the course. Okay? I want to appreciate
you for choosing this course out of all the other courses
I would be illustrative. Okay. Now, that's very
important to me and I appreciate that very much, and I don't take it for granted. So I appreciate you
for taking the course. Okay. And then I don't
want to talk to you about how to improve your skill, okay? Now, that's very important
to you as designers, okay? And why? It's because design is a doing thing.
It's a doing thing. And you have to improve
to get better, okay? Actually improve by doing, okay? By doing and spending
more time around design. And by just doing it
over and over again. So it's very important
and one thing we design is design is a
dynamic thing, okay? One thing could be
trending today, tomorrow. The next thing
could be trending. You have to always
update your skill. You have to always update
the whole thing, okay? So that's one of the most important reasons why you have to improve
your skill, okay? Now, the first way to do, to improve your skill
is by practicing. To practice, and
practice, and practice. If this is actually the first time of coming
into contact with design, then you have to practice, okay? I have over seven years of
experience in this field. And up till the day I still design even if I'm not
going to be paid, okay? Sometimes I just
do it for leisure. And that's why you
have to really have passion for this thing. If you do not have
passion for something, you're not going
to find yourself doing it even when
it doesn't pay you. So that's why you have
to have the passion for it and you have to just keep
doing it to get better. And then secondly, I
will advise you to kind of watch the
course again, okay? Because if you watch it again, you are going to gain
more knowledge, okay? You're going to solidify your knowledge and experience on the things we've covered. And you're going to kind of refresh your memory
over and over again. So if you go through the course again,
that'll be perfect. Go through it even
twice or three times. The more, the better, the more, the better you learn better. And you master the skills
which have been taught. The one other thing
you have to do in order to be able
to stand out and improve in your skill is to go online and
look at samples, look at designs,
join communities. Okay. And look at what
other designers are doing. I have just two of some of these communities
to show to you, even there are a lot of them. One of the many others which I'm not going to be
looking at here, we actually used in the
cost to look for concepts. Okay, Now that's our Pinterest. Pintres is quite a popular one, so you can check out Pinras
again and you get concepts. But the ones we're looking at
here are hands and ripple. This is hands and
this is ripple. And you can really
get very cool designs on these platforms. And I just search
for illustrations. Now we can see some
illustrations here. You can see them.
We can find logos. We can find a whole lot of
things D stuff, branding, posted designs, logo designs, even animations we can
find on these platforms. Okay, You can just look at
the very nice artworks. When you do them
over and over again, you're going to
master your skill. Okay. This is, this is
hands, it's owned by B. Actually, you actually
need an BID to login. I don't want to
log in right now, but I have multiple accounts
with them. I guess. I have two accounts for
Dribble to portfolios rather. Not just accounts,
but portfolios. You can create an account or a portfolio with them and
then also upload your works. When people search,
you're going to see your works like this one
we're seeing right now, we can see very
cool illustrations. Let me just open this one. Very cool illustrations. All of these have been
created by designers. Really amazing people,
really amazing designers. You can see this is drone, it's also drone illustrations. Very nice talk guys. This is one of the
leading platforms. The two that's behind and
drip is also very good. Mostly for designers. For graphic designers
rather than illustrators, but for hands, we even have three
D designers doing crezyingsre three D
engines emissions. We have a lot of things, not just illustrations and they're also big
on illustrations. We can see the very cool
illustrations all here. So you can go in, pick up some concepts, we do them, see what
you can come up with. Create your portfolio. Okay, Create your portfolio so that you can show to clients. Clients will always like
to see what you've come up with before giving you work. Okay. So this is hands, you should check hands up. This is B, also is also a
good one, very big one. And you can also come and create an account with hands,
sorry, with Rib. You will be good to go guys. These are two platforms I
just want to share with you. Then finally, I also
want to look at one more thing which is
how to sell your skill. Because that's very important. You under learn a skill and not learn how to market it, right? You have to learn
how to market it. Now we have online market
places like fiber, like freelancer, like work. Let me just come
here and search for five key fiber is a
very popular one. We have upwork, let's come. Okay, we have, we have upwork and these
are platforms where people sell their skills. Okay. The person we designers, writers, all of these guys, they sell their
skills for money. Okay, that's on
fiver and upwork. There's another one, freelancer. I really have had my share of experiences with all
these platforms I sat with, FivinI said 52015. Okay, 52015. I made a lot of jobs, but at that time, fiber was
really paying very little. I wasn't getting a lot of money. I was paid as little
as $5 I think I got paid per job on five
was $15 When I started, I now got introduced
to freelancer. Okay. Now got introduced with two FelancI, think
after a year or two. And then I now
joined Freelancer, Freelancer.com This Freelancer, I joined freelancer and
I said making money. The first job I made on
freelancer I got on freelancer, covered all the jobs I had been getting on
fivbandonmy fiver account. But years after, I
think fiber improved. I am not on favor presently
because I deleted my account and I moved to
freelancer and later to upwork. But what happened is five
upgraded their services. Right now, people are making
a lot of money on Fiv. You don't have to charge very little if you go
to graphic design. Let's see logo design, you still see people
doing logo for $5 okay. There are people who are
making a hell lot of money on logo designs, even it nats little as logo designs or a saturated
as logo designs. Okay. You can see the guys $20 $15 $15 $400 $400 This is all
for logo designs before. Most of the ones you see are just $5 $5 You
don't see anything bigger than $5 That's as
of 2015 when I started. They just improved
their whole game and they are one of the biggest
in the market right now. Pork is another big one, okay? They also make money on
upwork and freelancer. These are just sites
you should look out for and join in case you do
not know about them. You also get jobs on
platforms like Facebook. You can get clients on
platforms like Facebook. You can advertise on your
Stattos, so on and so forth. You can create a website. Right now, most of the jobs I get from some from freelancer, and most of them are from my website and from the
people I relate with. Okay. So I'm not really
on favor right now, but for these other ones,
I'm on freelance and work. Yeah, I can say they're
really good platforms. Okay. But I don't
just depend on them for my jobs. Okay,
For the jobs I do. I don't just depend on them, but I also get jobs from them. And that's it for this section. I really would love to see
you excel with the skill. Okay, just join these platforms, build up your skill,
learn more and practice, and practice, and practice. I'm sure that if you do all the, the sky is your starting point. Okay guys that we rounded up for this course see you
some other time. By.
 Ukpoewole Enupe, Become a Pro Designer Today!