Transcripts
1. Class Overview: Hello and welcome to the
Bantu for beginners course. My name is Mustafa, and I am happy and grateful
to be you in structural. Let's take a look at our
agenda for our course. Starting section one with the background and introduction, you will learn what Bantu is, the meaning of operating system, the history of Bantu. Bantu pros and cons. In section two, you'll learn to install Ponto
using virtual box. Also, you will learn
different ways of adding and removing programs from
Ponto operating system. In section three, you'll learn about connecting and
disconnecting from the system. Take a look at text
and graphics mood. Learn how to change
your busword. How to navigate through
the file system, determining file time, viewing text files using special
keys, and how to get help. In section four, I will show you the lay obuntu file system
displaying and setting bodies, describing the most
important files on bon, to finding lost
and hidden files. Creating, moving tabbying and moving files and directories. Finding files and bodies
displaying contains files. Understanding and using different link types
in section five, after files processes are the most important thing
on any Linux system, including Obuntu
operating system. In this section, you will take a closer look at those
processes and you will learn multi user
processing and multitasking, process types, interactive
and automatic processes, what demons are. You'll learn about
pipes and have to use them, the grep command, and have to use it for searching a particular information, the sort command, and how
it is useful in sorting the contents of files and
directories in different ways. You will learn about
output filters, process attributes, displaying
process information, the life cycle of a process. Controlling processes with different signals,
shutdown command, managing processes, tuning
system performance, network problems, and disk
input output problems. You'll learn about getting
the most out of your system. Users categories,
system graphical tools, interrupting processes, chetling processes using the
sleeve and the commands. In section six, I will discuss the importance
of mastering an editor. Then I will show you the easy way to learn
the popular Me editor. In section seven, I will talk about Ubuntu
virtual terminals. What virtual terminals are, the use of virtual terminals, How to access and utilize them. Virtual terminal shortcuts. In section eight, you will learn some important basic drops of Obuntu system administrator. How to create a user, how to delete and
disable account adding and removing users
from the user groups. File security ownership in
obuntu files permissions, the chu command using
and symbolic moods. Changing ownership and group. Finding out file properties and changing file
permissions for security. At the end, you will
learn installing cute creator on obuntu as
the bonus of our course. I hope this to be
informative for you and I'd like to
thank you for being.
2. 01 What is Linux: What is Linux? Just like Windows XP, Windows seven, Windows eight and Make OS X. Lennox is an operating system, but the main advantage off Lennox that it is free and reliable. After long periods of testing, most Lennox users come to the conclusion that the next is not only as good, but in many cases better and faster than the traditional solutions. Athletics were not trustworthy. It would have been long gone, never knowing the popular T it has now with millions of users. Now, users can influence their systems and share their remarks with the community, so the system gets better and better every day. It is a project that is never finished in an ever changing environment. Lennox is a project that continues to strive for perfection. I hope this has bean informative for you on. I'd like to thank you for viewing
3. 02 Operating System: operating system. The operating system is the software that manages the communication between software and hardware. Without the operating system, the software wouldn't function. The breathing system is comprised off a number of pieces. The boot loader, which is the software that manages the boot process off your computer. The kernel, which is the core off the system and manages the seaview memory and the referral devices. The colonel is the lowest level off the operating system. Demons are background services, for example, printing and sound that easier. Start up during boot, where, after you look into the disk top, the shell is a common process that allows you to control the computer via commands typed into a text interface. Graphical server is the subsystem that plays the graphics on your monitor. Desktop environment is the beast off the buzzer that the users actually interact with. There are many desktops environments to choose from. For example, Unity General and Kitty. Each desktop environment includes built in applications such as file managers. Configuration tools were browsers and games, and at last, the applications. Lennox offers thousands upon thousands off high quality software titles that can be easily found and installed. I hope this has bean infirmity for you, and I'd like to thank you for viewing
4. 03 Linux History: the Knicks history list revolts, you can call him as the founder off Lennox. He was a graduate student at the University of Helsinki in Finland when he initially developed Lennox Colonel. The story took place in early 19 nineties. In that time, the available operating systems were those Mac OS and UNIX. Let's meet another guy named Professor Tenenbaum, who was a university professor. He used the code off UNIX to teach his students about operating systems. That time, UNIX scoot was available on universities for study purposes. However, this practice had been stopped. This left Mr Tenenbaum without an effective tool to teach his students about the inner working off rail operating system. But he developed a small cologne off UNIX for himself, called Minnix for teaching his students the most. Revolts was inspired by 10 in Bomb and Minnix. Then Llinas made a clone a few nicks and called it Linux. The first version off Lennox was extremely minimal in nature. It was named as Lennox version, or point or two, and released on October 5th, 1991 contest off Lenox Colonel and three Utilities Bish, that is a command line interface object, which is a utility to flushing file streams and GCC as a city become violent. Then he made a historical decision. He published his scoot When the Internet available free for everyone. That was wonderful deviation by which the cooperate software development model has been completely broken. I hope this has bean informative for you, and I'd like to thank you for viewing.
5. 04 Linux vs Windows: next vs Windows. Mac OS uses UNIX school. Your switch from my quest to Lennox will be relatively smooth, so we will talk about them in differences between the Knicks and Windows operating systems . First, I will start with the file system in Microsoft. Windows files are stored in folders under different data drives like C, D and E. But in Lenox, files are ordered in a three structure starting with the root directory. This root directory can be considered. Is the start off the file system and its further branches? I would various other subdirectories. The route is diluted with a forward slash clinics. Everything is a fight. Directories are files, files are files, and vices like printer mouse keyboard are also files. But in M s windows, devices like printers, sit room and hard drives are represented as dr letters like G or H. There are no drives in Lenox. Unlike Windows, all the above file types, including devices, have permissions, which allow user to read it or execute. This is a powerful Lennox picture. Excess restrictions can be applied for different kinds off users. By changing permissions. There are three types off users in Lenox. Regular user administrative or root user and service user. A regular user account is created for you when you install Lennox in your system, all your files and folders are stored in your home directory. As a regular user, you don't have access to directories off other users other than your regular account. Another user account, called Route, is created at the time off installation. The root account is a sober user who can access restricted files, install software and administrative privileges. Whenever you want to install software making changes to system files or perform any administrative tasks politics you need look in as a root user. Otherwise, for general tasks like playing with your files and browsing the Internet, you can use your regular account. Lennox is widely used as a server breathing system. Services such as Apache squid and Mill have their own individual service accounts. Having service accounts increases the security off your computer. Lennox can allow or deny access to various resources, depending on the service. I know that you will not see service accounts in open to disc version, and the regular accounts are called standard accounts. In went to disco in wonders, you can't have two files with the same name in the same folder. Why in Lennox you can have two files with the same name in the same directory provided the use different cases for every user in Lenox, directory is created as forward slash home for this less user name. The concept is similar to see colon backslash documents and sittings in Windows in Windows System and program files are usually saved in C drive, but it limits. You would find the system and program files in different directories. For example, the boot files are stored in the boot directory, and the program and software files can be found under bin directory and advice files in the directory. These are the most striking differences between Lenox and Windows operating systems. I hope this has Bean informant for you, and I'd like to thank you for viewing
6. 05 Linux Pros and Cons: Lennox. Pros and cons. Lennox Pros. Lennox is free If you want to spend absolutely nothing, you don't even have to obey the price off a CD. Lennox can be downloaded in its entirety from the Internet completely for free. No registration fees, no costs per user free updates and freely available source code In case you want to change the behavior of your system, Lennox is portable toe. Any hardware blood for Olynyk system expects to run without rebooting all the time. The security model used in Lennox is based on the UNIX idea of security, which is known Toby robust and off. Proving quality. You can use Lennox to do big things using the building blocks provided with the system. The Lenox operating system and most Lennix applications have very shorted back times. Clinics, schools. The amount off Lenox distributions can be frightening or ridiculous, depending on your point of view. But it also means that everyone will find what he or she needs. You don't need to be an expert to find a suitable release. Another thing is that some off Lenox distributions are not very user friendly and confusing for beginners. Most Lennox users come to the conclusion that Lennox is not only as good but in many cases bitter and faster than the traditional solutions. I hope this has bean informative for you, and I'd like to thank you for viewing.
7. 06 Linux Distributions: Lennix distributions. Lennox has a number off different versions to suit nearly any type off user. From new users to hard core users, you'll find a flavor Flynn ex to match your needs. These versions are called distributions, but in the short form mistress, nearly every distribution off Lennox can be downloaded for free. Burning onto this or you speak thump drive and installed on as many machines as you like. Clinics may appear different, depending on the distribution, your hardware and personal taste, but the fundamentals on which all graphical and other interfaces are built remained the same. The Rennick system is based on glue tools, which provide a set of standard ways to handle and use the system. All gonna tools are open source so they can be installed on any system. Most distributions off our Bree combined back itches off most common tools, such as rpm packages on redhead and the Libyan packages on Debian. So you needn't be a programmer to install a package on your system. I hope this has been informative for you, and I'd like to thank you for viewing
8. 07 The Most Popular Linux Distributions: the most popular Lennix distributions, the most popular Lennox distributions for the desktop are upon to Lennox Lennox meant our clinics Debian, Fedora, Debian and over ensues. Each distribution has a different take on the desktop. Some opt for very modern user interfaces such as burnt Is Unity above and depends Devyn desktop, whereas others a stick with a more traditional desktop environments such as open sues, uses Kitty. And don't think the server has been left behind. For this area, you can turn to read Head Enterprise Lennox open to server centers, Sues integrates Lennox. Some of the above server distributions are free, such as open to server and centers, and some have an associative Bryce such as Red Hat Enterprise Lennox and Choose Enterprise Lennox. Those with an associative price also includes support. I hope this has Bean informative for you, and I'd like to thank you for viewing
9. 08 How to choose the one that fits you: how to choose the one that fits you, Which distribution you used will depend upon the answer to three simple questions. How skilled off a computer user are you? Do you prefer a modern or a standard desktop interface server or disk top? If your computer skills are fairly busy, you will want to stick with a new by friendly distribution such as Lennox Men, Open toe or dbn. If your skill set extending into the above every change, you could go with distribution like Debian or fedora. If, however, you have pretty much mastered the craft of computer and system administration used distribution like Gento. If you are looking for a server, only distribution will also want to decide if you need a desktop interface or if you want to do this very common line. Only the Windows Server doesn't install a graphical user interface. This means two things. You serve around people downloading graphics, and you will need tohave a solid understanding off the excrement line. However, you can install agree baggage on top off the open to server with a single common system. Administrators will also want to view a distribution with regards to futures you want a server specific distribution that will offer you out off the books, everything you need for your server. If so, Santos might be the best choice. Or do you want to take a desktop distribution and add the pieces as you need them? If so, Debian or Ventolin X might serve you well. We will be using open toe for our lending purpose, as it's easy for a beginner toe. Understand? I hope this has been informative for you, and I'd like to thank you for viewing.
10. 09 What is Ubuntu: What is Oubontu? Just like
Windows Ten and Cosx, Ubontu is an operating system. It is an open source
operating system based on the Ban Gu
Linux distribution. It's freely available with both community and
professional support. Ponto incorporates
all the features of the Unix operating
system with an added customizable
graphical user interface that makes it popular in universities and
research organizations. Obontu is officially
released in three editions, desktop server and for the Internet of Things,
devices and robots. It is shipped in a stable
and regular release cycle. A new release will be shipped every six months and upon
to long term support, release will become available that is supported
for five years. The Upontu releases in between, known as development or non LTS releases are supported
for nine months each. I hope this has been
informative for you and I'd like to
thank you for viewing.
11. 10 Ubuntu History: Ubuntu history. Mark Richard Shuttleworth, born 18 September, 1973, is a South African
and British terbiner who is the founder and
CEO of Canonical Limited, the company behind
the development of the Linux based Ubuntu
operating system. Ubuntu is a free and open
source Linux distribution based on a much older Linux
distribution known as Debian, because it was started by
two people named Debra. And an Debian is still a widely respected
operating system, but came under criticism, infrequent updates,
and less than user friendly installation
and maintenance, though these areas have
shown improvement. Recently, Mark took the
Debian distribution and worked to make it a
more human friendly distribution that
he called Ubuntu. The first release
was in October 2004. Ubuntu is officially
released in three editions, desktop server and Core for the Internet of Things,
devices and robots. Canonical Limited
Company promotes and provides support
for Ubuntu Linux. It releases updated versions predictably every sixth month, and each release receives
free support for 18 months with security fixes, high impact buck fixes, and conservative,
substantially beneficial, low risk buck fixes. It generates revenue by selling support and services
to complement Ubuntu. The word obuntu is an
ancient Zulu and cos award, which means humanity to others. Ubuntu also means I am what I am because
of who we all are. It was the choosing
because these sentiments precisely describe the spirit of the Obuntu Linux
distribution. Thanks for viewing.
12. 11 Ubuntu Pros and Cons: Ubuntu Bs and cons Ubuntu Bs. Obuntu is free and open source. Its installation
is easy and fast, probably because the set up
is very small, around one B. For the base version, it's easy to customize. There are fewer viruses on
Ubuntu and this makes it even more vulnerable as anyone would hardly care to install
an anti virus. But it's better to use antiviruses with
Ubuntu for security, with kernel modules
coming every six months. Ubuntu these days is highly updated in terms of
hardware support, mini bugs are fixed. In the following releases, you will have a lot
of free applications. Obuntu offers mini interfaces. You can choose freely from
many desktop environments, from Glom to KdE to
Unity to Sinamon. Excellent, develoble
community and online forums. You can find help for almost
all the issues you face. Obontu cons, lack of games? No Microsoft Office Suite. Unless you use MS Cloud
360 or Deeper Office, it is recommended you learn
a few basic Linux commands. Though almost all things can be done with a graphical
user interface, you may have some problems
with hardware compatibility. For example, with graphic
drivers and printers. Some software like Photo
Shop and Uduqet may not run smoothly with.
Thanks for viewing.
13. 12 The Open Source: the open source in general. Open source affairs toe Any program who sore school is made available for use or modification, as users or other developers see for open source software is usually developed as a public collaboration and made freely available. Open source is a certification mark owned by the open Source Initiative developers off software that is intended to be freely shared and boastfully improved and distributed by others who can use the open source ST Mark if their distribution terms conform to the eyes of insource definition. To summarize the definition model of distribution term is required that the software being distributed must be re distributed to anyone else without any restriction. The source code must be available so that the receiving party would be able to improve or modify it. The license can require improved versions off the software to carry a different name or version from the original software. The idea is very similar to that behind free software and the Free Software Foundation. Open source is a development methodology. Free software is a social movement. I hope this has been informative for you, and I'd like to thank you for viewing
14. 13 GNU: balloon movements short for blues, not UNIX Glue is a free software project to provide a distributable replacement for UNIX. Blue's first announce it by Richard Stallman on September 27 1983 and later published in the March 1985 issue off Dr Dobbs Dorner. The Aim off guru, is to give all computer users the freedom of car being, developing, distributing, modifying and studying software with the understanding that it's redistribution cannot be limited. The goal of the project was achieved in 1992 when Lennox was released under the Snow General Public license. I hope this has been informative for you, and I'd like to thank you for viewing.
15. 01 Ubuntu Try: I want to try. For most, the idea of installing an operating system might seem
like a very daunting task. But Linux offers one of the easiest installations
of all operating systems. In fact, most versions of Linux offer what is called
a live distribution. Which means you run
the operating system from either a CD, DVD, or UP flash drive without making any changes
to your hard drive. You get the full functionality without having to commit
to the installation. Once you have tried it out and decided you
wanted to use it, you simply double click the
install icon and walk through the simple installation
wizard requirements. You will need a two GB or
larger UP T flash drive, Microsoft Wendos
P or later Rufus, a free and open source
P stick writing tool. Got to Google Search,
search for Rufus. Choose your language, then download and install. After finishing, press close. We will also need
an Ubuntu O file. Go to Ubuntu website, choose download section,
choose Ubuntu Desktop, then press the download button. Your download will be
stored automatically. After finishing the installation,
perform the following. To configure your U speed
device in Rufus Lunch Rufus. Then insert your Spicetec. Rufus will update to set the device within
the device field. If the device is incorrect, select the correct one
from the device fields. Drop down menu from
boot selection, select desk or O image. To select the went to O file, press the Select button. This will open a file requester from which you can
navigate to and select the O file from the
partition scheme. Select the master boot record, MBR, target system,
Pius or UEFI. Leave all other parameters with their default values and click Start to initiate
the writing process. If you are asking that there are files needed to be downloaded, agree for the download. You will then be alerted
that Rufus has detected that the Bento Zoo is an
zohypride image. This means the same image file can be used as the source for both a DVD and UP Tek without
requiring conversion. Keep right in O image mode
selected and Ok to continue. Rufus will warn that all data on your selected UP device
is about to be destroyed. This is a good moment
to double check. You have selected
the corrected device before clicking okay. When you are confident you have, the Z will now be written
to your USP tech. The progress part in
Rufus will give you some indication of how
long this will take. With a reasonably
modern machine, this should take
around 3 minutes. Rufus will complete
the writing process and silently drop back
to its default window. Congratulations, you
now have Ubuntu on a USP tech bootable
and ready to go. Once you set up your USP drive to be bootable with Ubuntu, you can then reboot your system, catch the boot menu, and boot from USP. If your computer doesn't
automatically boot from USP, try holding 12 when your computer first starts
with most machines. This will allow you to select the USP device from a
system specific boot menu. It will let you run a live
CD version of Obuntu, which is fully usable. Press the right arrow to
enter graphical installation. A few moments later, you will see the
language selection followed by the
obuntus boot options. Select the top entry. Troy Bontu without installing your live desktop will appear. Have a look around, check
out the new features and enjoy the symbolicity of
obontus intuitive interface. You can still choose to install Bonto after
bossing the welcome beach by clicking on the install Bonto icon on the
desktop background. Or just shut down.
Remove your speed drive and start your
computer like normal. I hope this has
been informed for you and I'd like to
thank you for viewing.
16. 02 Virtualbox Intro: Virtual box introduction. Now I will give you
a short description about virtual box and then
I will show you how to download and install
virtual Box on your machine Cl VM Virtual Box is a free and open source
Hybervisor for X 86 computers, currently being developed
by Orcle Corroboration. Virtual Box may be
installed on a number of host operating systems
including Linux, Windows, Solaris, and Obinlas. It supports the creation and management of guest
virtual machines running versions and derivations
of Windows, Linux, BSD, Solaris and others, and limited virtualization of Macos
guests on Apple hardware, some guest operating systems. A guest addition package of device drivers and system
applications is available, which typically
improves performance, especially of graphics. I hope this has been
informative for you and I'd like to
thank you for viewing.
17. 03 Virtualbox Installation: Virtual box installation and
configuration procedures. Go to the virtual box website, go to the download section. There are versions available
for Windows, Mac, and Linux. Download the Windows version at the top by clicking
Windows Hosts. If your host operating
system is Cosx, then you will click
on Cosx hosts to download the DMG file. After finishing downloading, open the file and
follow the steps. You will see back
to Windows users. After finishing start
the installation, press next to continue
the setup wizard. Choose not to
install USP support, networking or Bythone support. Do this by clicking the gray
icon near each option and select the red X or entire
feature will be unavailable. Then click Necks to continue. If this is your first time
dealing with virtual machines, this will eliminate
the need to install custom drivers which makes installing and uninstalling
virtual box easier. If you have worked with
virtual machines before, you can choose to keep these
options selected and check the default settings
if you don't wish virtual box icons to appear on the desktop or the
quick lunch bar. However, keep the register
file association box checked. This will ensure that
files associated with virtual box open only
with virtual box. Then press next, click Install
to install virtual box, click finish to
obin virtual box. I hope this has been
informative for you and I'd like to
thank you for viewing.
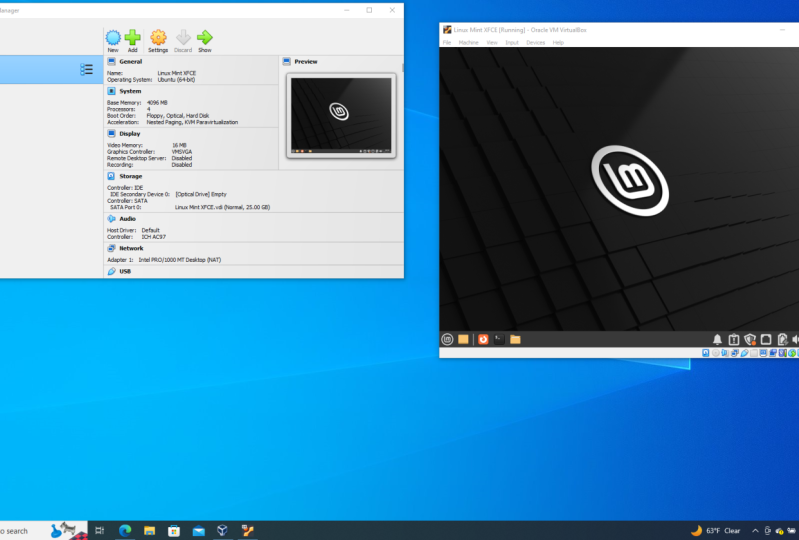
18. 04 Creating A New Virtual Machine: Creating a new virtual machine. After starting
virtual box colic, the new button to start the
virtual machine wizard, give your virtual
machine a name. If you give it Ubontu, the version will automatically
default to Ubontu. Then click next, select the amount of
memory your VM will use. When we choose our
operating system in the brevious system, virtual box
automatically recommends the proper amount
of memory to use. The recommended values are one B if the machine
m is four GB, and two B if the machine
rem is eight GB. Use of Ram lower than four
GB is not recommended, but you can still use 512. For machine M of two GB, Click Nekist to create a new virtual hard disk,
then click Create. This opens a second wizard to create a new
virtual hard disk. Choose VDO, click Neis, dynamically allocate
memory, selection of memory size greater than
ten GB is recommended. Select either fixed
size storage or dynamically expanding storage
depending upon your needs. It size storage is
going to be the size of the virtual hard disk on
the host operating system. For example, a
virtual disk, ten GB, will be ten GB on the host
operating systems hard disk. A dynamically
expanding storage will be only the size of
Ubuntu on your hard disk, but will grow in
size as files are added to it until it
reaches its limit. Click next, then
select the size of the virtual hard disk to
be ten GB. Click Create. Now you are done. You will see your new virtual
machine in the rest. I hope this has been
informative for you and I'd like to
thank you for viewing.
19. 05 Ubuntu Installation: Obonto installation. Now we will install Ubuntu operating system
using Virtual Box. We will do this to keep your old operating
system as it is, so you can switch back to your old operating
system any time you want without
any difficulties. If you want to install Ubuntu directly to your machine,
there is no problem. You can follow the same steps. But my advice is to
start first with virtual box Until you feel free that you are
familiar with Obontu. Setting the Zophile to start, select your new virtual machine. Once you have done this, click the Setting Spoton,
Click Storage tab. Click on controller
IDE optical drive. Then press choose Disc button
to choose obontozopile. Then press Open. Obontozu will be mounted under
controller device. Click on the system
tab on the left. Choose boot order and
keep optical on the top as first priority press. Okay to return to
the main window, your Obonto machine
is ready to boot now. Now to install Obonto, select your virtual machine, then click the start button. Obonto version machine will
start in a separate window. The machine will
boot from selected O and you will see
language option. Choose your preferred language and address install obuntu. Click continue to keep the default keyboard layout
or choose your desired one. On next screen, obonu will give you a checklist and
you will be asked if you need to update
during install and if you need to install
third party software, choose both and click Continue. Next option will ask you if you want to delete all
data and install, or you can also choose to create your own partitions from
option something else. We will choose Erase
Disk and install Obono. Then press and install. Now an alert will appear for writing
the changes to disks. Press the Continuum Potton, select your Time Zoone from
the map, then click Continue. Type your user name in
the first text box. This will automatically fill in the login name and
computer name. Type your bassword and confirm your bassword. Click Continue. Obonto will begin
the installation. Now once the installation
is complete, click Restart. Now to finish the installation, the machine will restart and the installed obuntu will
load from hard disk. Provide abasur to username and login to the main window of Bento installing gist additions. The virtual box Gist additions consist of
device drivers and system applications
that optimize the operating system for better performance
and usability. Once you have
logged into Obuntu, click on the Devices tab
in virtual box select. Insert Gist Additions,
CD image press Ram Pton. When Ubuntu asks to install a program and it
needs a bassword, type your user password
and click Authenticate. Let the terminal program run. When it has finished, press Enter, reboot your virtual machine,
and once it has, click on the view menu and re guest display and
you will now have a full resolution Ubuntu virtual machine
on your computer. I hope this has been
informative for you and I'd like to
thank you for viewing.
20. 06 Installing apps on Ubuntu Intro: Installing software.
In obuntu indo the installation of
a program is done by running the set up dot EXE file. The installation bundle
contains the program as well, various dependent
components required to run the program correctly. In Linux installation files
are distributed as packages. But the package contains
only the program itself. Any dependent components will have to be installed separately, which are usually available
as packages themselves. I hope this has been
informative for you and I'd like to
thank you for viewing.
21. 07 Installing apps on Ubuntu Via Terminal: Installing software on Bantu. We have two methods to
install software on Bantu. The first method, installing
software via terminal, opin terminal by
pressing Control Alt, or by going to your dashboard
and searching for terminal. After opening the terminal, first update all the installed packages
in your system using the command pseudo abet dash. Get up, then press Enter. You will be asking
for root password, write the password
and press Enter. At the end of any command, we must press the Enter
key to execute it. To search for software using
abet, use this command. Abt, cache search. Then application
name such as gam, short for new image
manipulation program. Enter the following command to install the software you want. Here I will use Gam Abbott install game. You can swap out
game with the name of whatever software
you are installing. Wait until the
installation is finished. Now we are done. I hope this has been
informative for you and I'd like to
thank you for viewing.
22. 08 Uninstalling Ubuntu apps using terminal: Installing programs on
Opino using Terminal. Open terminal to open a list of your currently
installed programs, type BKGstto terminal,
then press Enter. Find the program that
you want to install. You will need to know
the official name of the program file rather than the name of
the program itself. For example, VG rather
than the VG antivirus. Here as an example, I'll choose game go image
manipulation program. Enter the abydshget
command type abd, get remove game into terminal. Making sure to use the program's actual name
and press Enter. Type your super user
bassword and then Enter to confirm the deletion, type N, Y and press Enter. Your program will begin
to install itself. Once it finishes, you
can close the terminal. This process may take
a while to complete, depending on the
size of the program. Now we are done. I hope this has been
informative for you and I'd like to
thank you for viewing.
23. 09 Installing apps on Ubuntu Graphically: Installing software on.
Obontographically, click on Dashboard in the side bar, Search for Bento Software
Center and open it. From the bottom of the page, you can select the category of software you want to install. For example, you would select
graphics and photography. An alternate way is to use the search function
and search for the required software from
graphics and photography. We will choose my In as an example from the
list and click Install. You will be prombtted
for the buzzword, Type it to continue installing the software by
pressing Authenticate. After finishing
the installation, press the launch button to try the software
you have installed. I hope this has been
informative for you and I'd like to
thank you for reviewing.
24. 10 Uninstalling Ubuntu apps using Ubuntu Software Center: Uninstalling programs using
Obuntu Software Center Steps, Obinobonto software. Click the uninstalled tab. Find the program that
you want to uninstall. Scroll through the list of installed programs until you arrive at the one that you want to uninstall or search
by name for it. Here the program we are looking for is my bind. Click on it. Click on the remove button. Confirm the decision. If prom betted If
ask it to confirm, Click Remove again, Enter
your buzzword and press the. The broom bit that you see may vary slightly depending
on your version of Opto after removing is finished. Now you can close
bent to software. I hope this has been
informative for you and I'd like to
thank you for viewing.
25. 11 Installing and uninstalling apps on Ubuntu using Debian pkg: In installing
software in Ubuntu, using Debian package packages are manually installed
via the DCG command. Debian Package
Management System. Bcg is the back end to
commands like Abby Get, which in turn are the back end for Goe installed apps like the software center
manual download of a Debian package method. You can use the download
sub command of abet. For example, if my bin
is the package you want, we will use the
following command, my. Once you can double click
on the package to have open in the software
center from where you can install it or
just open the terminal, navigate to the download
location and run this command, pseudo BCG my. Now you have my paint
installed on your computer. To remove my paint package, write this command, do libkG R my paint. Now we are done. I hope this has been
informative for you and I'd like to
thank you for reviewing.
26. 01 Logging in, activating UI and logging out: Logging in, activating the user interface,
and logging out. In order to work in a
Linux system directly, you will need to provide
a username and password. Linux systems have
two basic modes for a system to run in, either quick and suber
Intext console mode, which looks like dose with mouse multitasking and
multi user features. Or in graphical mode which looks better but it's more
system resources. This is the default nowadays
on most disktop computers. You know, you will connect to the system using graphical mode. When you are asking for
username and password login, make sure the mouse pointer
is in the login window. Provide your username
and bussord to the system and click
Okay or press Enter. It's generally
considered a bad idea to connect graphically using
the root user name, which is the system
administrators account. Since the use of graphics
includes running a lot of extra programs in roots case with a lot of extra permissions to keep or
risks as low as possible. Use a normal user account
to connect graphically, but there are enough risks
to keep this in mind. As a general advice for all
use of the root account, only log in as route when
extra privileges are required after entering your username
bassword combination. It can take a
little while before the graphical
environment is started. Depending on the bus
speed of your computer, the software you use, and your personal settings. To continue, you will need
to open a terminal window. There are two ways to launch
the terminal on Obuntu. Go to the dashboard
and type terminal, then click on it, or you can press Control Alt
to launch the terminal. Also, clicking the
right mouse button on the desktop background will usually present you with a menu containing a terminal
window application. The terminal window is your control bannon
for the system. Almost everything that follows
is done using the symbol. But powerful tool. A terminal window should always show a command bombt
when you open it. Once you launch the terminal, you would find something
as Mustapha at Mustafa VB. Colon tiled dollar
sign written on it. The first part of this line, Mustapha is the
name of the user. The second part, Mustapha VB is the computer name
or the host name. The host name helps identify
a computer over the network. In a server environment, host name becomes important. The colon is assemble separator. The tiled sign shows that the user is working
in the home directory. If you change the directory, this sign will vanish. For example, if we moved from the home directory to bend directory using the CD command, the tilet sign will disappear. It will appear again when moving back to the
home directory. The dollar sign
suggested that you are working as a regular or
standard user on obuntu. While working as
root user hash is displayed to disconnect from the system In graphical mood, you need to close
all terminal windows and other applications. After that, hit the logout icon or find log out on the menu. Closing everything is
not really necessary. The system can do this for you, but session management might put all currently open applications back on your screen
when you connect. Again, when you see
the logins screen, again asking to enter username
and buzzword log out to successful to get
into text mode. While you are logged
in graphical mode, base control at six. You know you are
in text mode when the whole screen is black,
showing characters. A text mode login
screen typically shows some information about the
machine you are working on, the name of the machine, and a brombit waiting
for you to log in. The login is different from a graphical login that you have to hit the
enter key after providing your username
because there are no buttons on the screen that you can click
with the mouse. Then you should
type your password, followed by another enter. You won't see any indication that you are entering something, not even an asterisk. You won't see the cursor move, but this is normal on Linux and is done for
security reasons. When the system has accepted
you as a valid user, you will be given a
shell indicated with the same probit that you
would get in graphical mode. Also in text mood, look in as route only to do setup and configuration
that absolutely requires administrative
privileges such as adding users, installing software
packages, and performing network and
other system configuration. Once you are finished,
immediately leave the special account and resume your work as an
unprivileged user. Systems like obontu
force you to use sudo so that you don't need direct access to the
administrative account. Logging out is done by entering the logout command
followed by enter. You are successfully
disconnected from the system when you see
the login screen Again, returning back to the
graphical mode is easily done by pressing
control Alt F One. I hope this has been
informative for you and I'd like to
thank you for viewing.
27. 02 Absolute Basics: Absolute basics after
launching the terminal, now we will have a look
at quick start commands BD print working directory
command used for displaying the current
working directory CD. Change directory command used
for changing directories. If you want to navigate
to the home directory, then type CD, then enter. You can also use the CD command. The root of the file system in Linux is denoted
by forward slash, similar to C colon
backslash in Windows. Note that in Windows
you use backward slash, while in Linux system the
forward slash is used, type CD forward slash to
move to the root directory. Don't forget space between
CD and forward slash. Otherwise, you
will get an error. You can navigate through
multiple directories at the same time by
specifying its complete path. For example, if you
want to move to the CBU directory
under def directory, we don't need to break this
operation into two parts. Instead, we can type CD forward forward CBU to reach
the directory directly. For navigating up
one directory level, we can use double dot here. By using the CD
double dot command, we have moved up one directory
from deb to def directory. Then by again, using
the same command we have jumped from de
to root directory. A bath in computing is the address of a
file or forwarder. For example, forward slash home, forward slash user,
forward slash downloads. This is the path for the
downloads directory. There are two kinds of paths. First, absolute path,
let's say you have to browse the images stored in the pictures directory of
the home folder Mustafa. The absolute file path
of pictures directory forward forward slash Mustafa
forward slash pictures. To navigate to this directory, you can use the common
CD forward slash home forward slash mustapha
forward slash pictures. This is called
absolute path as you are specifying the full
path to reach the file. Second relative path. The relative path comes
in handy when you have to browse another subdirectory
within a given directory. It saves you from the effort to type complete paths
all the time. Suppose you are currently
in your home directory, you want to navigate to
the downloads directory. You don't need to type the
absolute path CD forward, forward slash Mustapha
forward slash downloads. Instead can simply
type CD downloads. And you would navigate to the downloads directory as you are already present within the home forward
Mustafa directory. This way you don't have to specify the complete
path to reach a specific location within the same directory
in the file system. Next LS the list
directory command. This command displays a list of files in the current
working directory. Like the direct command in the SWD command is used for changing the
sword for the current user. The file command displays
file type of file. The cat command throws the content of any text
file on the screen. Exit command is used
to leave this session. The arguments to a command
are specifications for the objects on which you want
the command to take effect. An example is LS TC, where the directory, ETC, is the argument to
the LS command. This indicates that you
want to see the content of that directory instead
of the default, which would be the content of the current directory obtained by just typing LS,
followed by enter. Some commands require arguments. Sometimes arguments
are optional. You can find out whether a command takes
options and arguments, and which ones are valid by checking the online
help for that common, which we will discuss later. I hope this has been
informative for you and I'd like to
thank you for viewing.
28. 03 Using Special Key for the Shell: Using special key,
using Be features. Several special key combinations allow you to do things
easier and faster. With the Gull base, which is the default on
almost any Linux system. You are strongly suggested to make a habit out of using them, as to get the most out of your Linux experience
from the very beginning. Now let's try some examples. Press control to moves to the beginning of
the command line. Press control to end a
running program and return the Brombt press control D to log out of the
current shell session. It's equal to typing
exit or log out. Press control D to move Coursor to the end
of the command line. Control H to generate
Pa space, character. Press control L to
clear the terminal. You can press control to search in command history for
a particular command, press arrow left or
arrow right to move the cursor one place to the left or right on
the command line. So that you can
insert characters at other places than just at
the beginning and the end. Press arrow up or arrow
down to Browse History. Go to the line that
you want to repeat. Edit Details if necessary, and press Enter to save time, Press Shift Beach up
or Shift Beach down to browse terminal buffer to see text that has scrolled
off the screen. You can press Step key at any time for file
name completion. When multiple choices
are possible, the system will
either signal with an audio or visual
bell or do nothing. Also, pressing tab
key twice will choose you file or command
completion possibilities. I hope this has been
informative for you and I'd like to
thank you for viewing.
29. 04 Getting Help: Getting help. Gu Linux is all about becoming
more self reliant. As usual, with this system, there are several ways
to achieve the goal. A common way of getting help is finding someone who knows and however patient and be loving the Linux using
community will be. Almost everybody will
expect you to have tried one or more of the methods coming next before asking them.
30. 05 The man pages: The Man pages. A lot
of beginning users ear the main or manual pages because they are an overwhelming
source of documentation. They are, however
very structured, as you'll see from
the coming example. Reading man pages is usually
done in a terminal window. When in graphical mode
or just in text mode, if you prefer it type the man. The documentation for men will be displayed
on your screen. After pressing Enter Prowse to the next page
using the space par. Or you can use the down
arrow or the mouse scroll. You can go back to the
previous page using the key. When you reach the end, men will usually quit. You get the brom bit pack
type Q if you want to leave the man bag before
reaching the end or if the viewer doesn't equate automatically at the
end of the badge. Each man bag usually
contains a couple of standard sections as we can see from the
main main example. The first line contains the name of the command
you are reading about the ID of the section in which this
main bag is located. The main pages are
ordered in chapters. The name of the command and a short description are given, which is used for building
an index of the main pages. You can lock for any
given search string in this index using
the apropos command. For example, apropo make dire. Apropos searches
for make dire in the main page and displays
the command description. The synopsis of the command
provides a technical notation of all the options and or arguments this
command can take. You can think of an option as a way of executing
the command. The argument is what
you execute it on. Some commands have no
options or no arguments. Optional options and arguments
are brought in between square packets to indicate
that they can be left out. A longer description of
the command is given. Options with their
descriptions are listed. Options can usually
be combined, if not. So this section will
tell you about it. Environment describes
the shell variables that influence the
behavior of this command. You must know that not
all commands have this. Sometimes sections specific
to this command are provided. A reference to other main pages is given in the C also section. In between parentheses
is the number of the main page section in
which to find this command. There might also be author
and copyright information. Some commanders have
multiple man badges. For instance, the best WD
command has a man bridge in section one another
in section five. By default, the main badge with the lower number is shown. If you want to see
another section, then the default specify
it after the main command. For example, man five bestD. If you want to see
all man badges about a common one
after the other, use the option to man command, for example, main SD. In this way, when
you reach the end of the first main badge
and the press space, again the main badge from the next section
will be displayed. I hope this has been
informative for you and I'd like to
thank you for viewing.
31. 06 The help option: The help option. Most grow commands
support the Help option, which gives a short
explanation about how to use and a list of
available options. Let's try this option with
the cat command Help. As you can see, it gives
a short explanation about how to use them and a list
of its available options. I hope this has been
informative for you and I'd like to
thank you for viewing.
32. 07 Graphical help: The graphical He Don't despair. If you prefer a graphical
user interface, the genome help browser
is very user friendly. And it provides painless access
to the man and Fu pages, where the system
documentation and main pages are easily browsable
with a plane interface. You can start it by entering the command genome help colon or by typing yell colon info. And you will get a
browsall info beach about the info command. Similarly, yell LS will present you with the main
beach for the LS command. Note that some ants don't
have separate documentation because they are parts of
another command such as CD, exit and log out. They are part of
your shell program and are called shell
belt and commands. I hope this has been
informative for you and I'd like to
thank you for viewing.
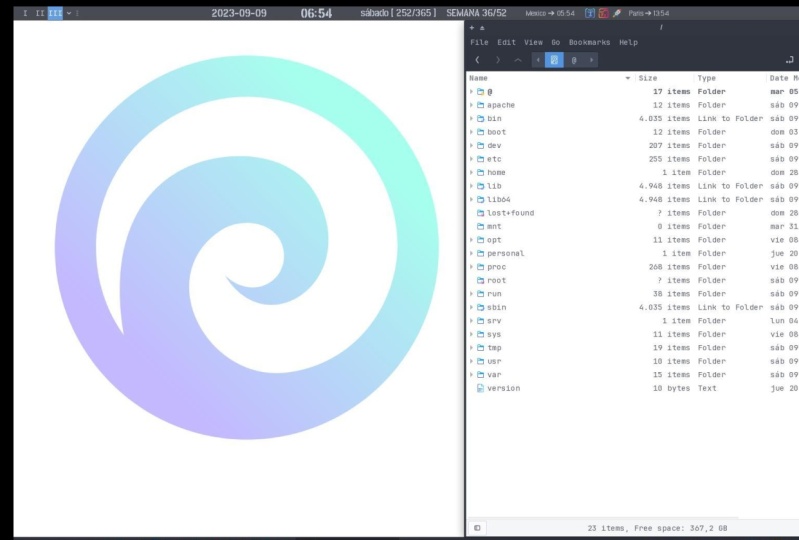
33. 01 General 0verview of the Ubuntu file system: A general overview of
the Ubuntu file system assembled description of
the Oubontu system is that on Oubontu system
everything is a file. If something is not a file, it is a process obuntu system makes no difference
between a file and directory since a directory is just a file containing
names of other files, programs, services, tickets,
images and so forth. Are all files inbot
and output devices and generally all devices are considered to be files
according to the system. In order to manage all those
files in an orderly fashion, we will think of them in an order tree like
structure on the hard disk. While it is reasonably
safe to suppose that everything you encounter on
an open system is a file, there are some exceptions. Directories are files that
are lists of other files. Special files are the mechanism used for inbot and output. Most special files
are in the directory. Links is a system
to make a file or directory visible in multiple
parts of the systems file. Three sockets is a
special file type similar to TCB IB sockets providing
terbcess networking protected by the file systems
access control named pipes act more or
less like sockets and form a way for processes to communicate with each
other Without using network circuit semantics
to display the file type, we would use L option
with the LS command. The file type would
be determined using the first character of each invol line
for regular file, D for directory file, for link file, for
a special file, for socket file,
for name by file, and B for blocked device file. In order not to always have to perform a long listing
for seeing the file type. A lot of systems by
default don't issue just LS but LS Abercse, which is affixes file names
with characters like forward, equal, store, and signs to
indicate the file type. Now, before we look at the important files
and directories, we need to know more
about partitions. Most people have
a vague knowledge of what partitions are, since every operating system has the ability to
create or remove them. It may seem strange that Bantu uses more than
one partition on the same disk even when using the standard
installation procedure. Some explanation is called for. One of the goals of having
different partitions is to achieve higher data security
in case of disaster. By dividing the hard
disk into partitions, data can be grouped
and separated. When an accident occurs, only the data in the partition
that got the it will be damaged while the data on the other partitions will
most likely survive. Mind that having a
journaled file system only provides data security in case of power failure and sudden disconnection
of storage devices. This doesn't protect
your data against bed blocks and logical
errors in the file system. There are two kinds of
major partitions on Ubontu system data
Partition which has normal Ubontu system
data including the root partition containing all the data to start
up and run the system. And swab partition,
which is an expansion of the computer's physical memory as an extra memory or hard disk. The standard root partition, indicated with a
single forward slash, is about 100 to 500 megabytes and contains the system
configuration files, most basic commands
and server programs, system libraries,
some temporary space, and the home directory of
the administrative user. A standard installation
requires about 250 megabytes. For the root partition, Swab
space, indicated with Sweb, or virtual memory, is
only accessible to the system itself and is hidden from view during
normal operation. Swab is the system that ensures that you can
keep on working. Whatever happens on to you will virtually never see irritating messages like out of memory. Please close some applications
first and try again. Because of this extra memory, using memory on a hard
disk is naturally slower than using the real
memory ships of a computer, but having this little
extra is a great comfort. Obuntu generally counts on
having twice the amount of physical memory in the form of swap space
on the hard disk. The kernel is on a
separate partition as well In many distributions, because it is the most
important file of your system, you will find that you have
a boot partition holding your kernel and
accompanying data files. The rest of the hard disk is generally divided
into data partitions. When you perform standard
work station installation, it is usually happens
following a set pattern. A partition for user
programs named slash user. A partition containing the user's personal
data named slash home. A partition to store
temporary data like print and mail,
quiz named slash, or a partition for the third party and extra
software named opt. Once the partitions are made, you can only add more. Changing sizes or properties of existing partitions is
possible, but not advisable. Mount points, all partitions are attached to the
system via a mount point. The mount point
defines the place of a particular data set
in the file system. Usually, all partitions
are connected through the root partition
on this partition, which is indicated with the forward slash
directories are created. These empty directories will
be the starting point of the partitions that
are attached to them during system start up. All the partitions are thus
mounted on a running system. Information about
the partitions and their mount points can be
displayed using the DF command, which stands for disc
fall or disc free in A. To DF is the new version and supports the H or
human readable option, which greatly
improves readability. The DF command only displays information about active
nine web partitions. This can include partitions
from other network systems. To find out which part
a directory is on, using the DF command
with a dot as an option, shows the partition the
current directory belongs to and informs about the amount of space used on this partition. I hope this has been
informative for you and I'd like to
thank you for viewing.
34. 02 Orientation in the file system: Orientation in the file system. When you want the system
to execute a command, you almost never have to give the full path
to that command. For example, we know that the LS command is in
the ben directory. You can check with which LS yet. We don't have to
enter the command LS for the computer to list the content of
the current directory. The bath environment
variable takes care of this. This variable list is
those directories in the system where executable
files can be found. Thus saves the user a lot of typing and memorizing
locations of commands. The bus naturally
contains a lot of directories containing bend
somewhere in their names. As I will demonstrate, we can use the echo command to display the content
of the variable path, echo dollar sign path. In this example, the
shown directories are subsequently searched
for the required program. As soon as a match is found, the search is stopped even if not every directory in the
beth has been searched. If you use programs in other
directories more frequently, you can change your Beth to
look in your own directories. For example, to add
your home directory, we can use the
export path command after the last column
add your new beth. Note that when using the
export command in a shell, the changes are temporary and only valid for this
session until you log out. Opening new sessions even while the current one
is still running, will not result in a new
Beth in the new session. To make it permanent, you need to add export Beth
equal dollar sine Beth colon, then Beth to dire to
your profile or RC file. Note that this will
not automatically update your Beth for the
remainder of the session. To do this, you should run source Elda profile or RC. Now we will talk about the most important files and directories. First, the kernel. The kernel is the
heart of the system. It manages the
communication between the underlying hardware
and the peripherals. The kernel also makes sure
that processes and demons, which are server processes, are started and stopped
at the exact right times. The kernel has a lot of
other important tasks. For now, it suffices
to know that the kernel is the most
important file on the system. Second, the shell, a shell, manages the interaction between
the system and its users. It is a way of talking
to the computer. Like a language, it is very
difficult for a programmer to include all options and possible uses of a common
in the Goe format. Thus, guys are
almost always less capable than the command or commands that form the back end. The shell allows the user to handle a system in a
very flexible way. An additional asset is that the shell allows for
task automation. Just like people know different
languages and dialects, the computer knows
different shell types. H or born Shell is
the original shell still used on Unix systems and in Unix related
environments. This is the basic shell, a small program
with few features, H or born again, shell is the standard shell. Intuitive and flexible, probably most advisable
for beginning users while being at the same
time a powerful tool for the advanced and
professional user on Linux. Beach is the standard
shell for common users. This shell is a so called
suber set of the born shell, a set of add ons and blocks. This means that the
born again shell is compatible with
the born shell. Which means that
commands that work in H also work in beche. However, the reverse is
not always the case. All examples in this course
use beche, the shell. The syn text of this shell resembles that of the C
programming language. Sometimes ask it
for by programmers. The turbo shell is a superset of the common C shell enhancing
user friendliness and speed. The corn shell is sometimes appreciated by people
with ionic background. It is a superset of
the born shell with a standard configuration and nightmare for beginning users. The file TC shells give an overview of known
shells on a Linux system. To view this, you can use this command, ETC, slash shells. Note that H is usually a link to which will execute in born shell compatible
mode when called. In this way, your default
shell is in the TCD file. To switch from one
shell to another, just enter the name
of the new shell. In the active terminal, the system finds
the directory where the name occurs using
the Beth settings. Since a shell is an
executable file, the current shell activates,
it gets executed. A new broombit is usually shown because each shell has
its typical appearance. If you don't know which
shell you are using, either check the line for
your account in CD or type the command echo
dollar sign shell about the home directory. Your home directory is your default destination when
connecting to the system. In most cases it is a
subdirectory of home, whatever the bath to
your home directory, You don't have to worry
too much about it. The correct path to your
home directory is stored in the home environment variable in case some program needs it. With the echo command, you can display the content
of this variable. Echo dollar sign home. Your home directory is
indicated by Telda shorthand for both to home user name. This same bath is stored
in the home variable. You don't have to do
anything to activate it. Assemble application
to switch to your home directory using
one elegant command type, CD tilda images and press Enter. You can check using BWD command. The most important
configuration files and most configuration files are
stored in the ETC directory. Content can be viewed using the command which sends text files to the
standard output. Usually your monitor, the
sex is straightforward. Then file name example for files stored in the ETC
directories RC five, which is the system
wide configuration file for the born again shell. Another example is
the hosts file, which is a list of machines that can be contacted
using the network, but without the need for
a domain name service. The best WD file, which lists local users, use the shadow utilities user, user mode and user tell
to edit this file. Note that editing manually this file is done when you really know
what you are doing. Tab file information
for booting mode, number of text consoles
and others about devices. Devices are generally every
peripheral attachment of a BC that is not
the CBU itself, is presented to the
system as an entry in the deaf directory, for example, CD room for CD drive console, for special entry for the currently used
console about directory. In the Var directory, we find a set of directories for storing specific non
contestant data. All files that
change frequently, such as log files, mailboxes, spoolers, are kept
in a subdirectory of Var. I hope this has been
informative for you and I'd like to
thank you for viewing.
35. 03 manipulating files: Manipulating files. Ls can give a lot of other information such
as the file type, as we already discussed. It can also show permissions
on a file, file size, node number creation,
date and time owners, and the amount of
links to the file. By adding the L
option to LS command, it can list all the
files, directories, and the number of owner
of the file size, modified date and
time, and file name. With the option to LS, files that are normally hidden from view can be
displayed as well. You can type LS LT to
list files ordered by d by typing LS L S berks. You will have a list of
files ordered by file size. You can use R option
to reverse the result. For example, LS LTR LS L berks. You can get more
options for LS command using the manual of
the LS typing man LS. These features allow seeing the file type without
using any options to LS. To achieve this, every file
type has its own color. The color LS default
color scheme, Blue color for directories. Red color for
compressed archives. White color for text files, in color for images. Ion color for links, Yellow color for devices, Green color for executables, and flashing red color
for broken links. The same information
was in earlier days displayed using suffixes to every nine standard file name. The default suffix
scheme for LS, nothing for regular file
forward slash for directories. Ask for executable files. Add sign ball for link, equal character for socket
and Ibe for named Ibe. To find out more about the
data we are dealing with, we used the file
command by applying certain tests that to check properties of a file
in the file system. Magic numbers and
language Stestes file tries to make an educated guess about the format of a file. For example, if we
type file documents, we will see the
type is directory. The file command has
a series of options, among others, the Z option
lock into compressed files. I hope this has been
informative for you and I'd like to
thank you for reviewing.
36. 04 Creating Files and Directories: Creating directories, a way
of keeping things in place is to certain file the
specific default locations by creating directories
and subdirectories, or folders and sub
folders, if you wish. This is done with the
make dire command. Now let's try archive. After creating archive, let's
check using LS LD archive. Here we use option to
list directories only. The first part is the file
type and access permissions net the number of hard links. Then the owner of the file, the user group size, invites, date and time and directory name to create more
than one directory in one line inside the archive. Change directory to
archive the type make 2019, 2020, 2021. Let's check using lest common. Creating directories
and subdirectories in one step is done
using the P option. If we tried without
the P option, we will get an error der 2019 reports new project. After pressing Enter,
we will get an error. Cannot create directory. This is a result of not
using the P option. By adding P to the
previous command, kdyP 2019 slash
reports new project. Let's check LS 2019
reports Presenter. Keep in mind that Clinix is a case sensitive
operating system. I hope this has been
informative for you and I'd like to
thank you for reviewing.
37. 05 The touch command: The touch command is
a standard program for Linux operating systems that is used to create change and multify time
stems of a file. Let's take some
examples of using the touch command to
create an empty file test. You can use the command to check to change or update the last axis idmification
time of the file data. You can use the option, for example, to check here I use the option to show last x time instead of
last modification time. Using the option sets the current time and
it on a file here, if the data file doesn't exist, it will create a new
empty file data. To avoid creating a new file, you can use the option, for example, to check this command will not create the file test if
it doesn't exist. If you'd like to change only the modification time
of the file test, then you can use the M option, for example, to check. It will only update the
last modification time of the test file and the access
time will remain as it is. The touched command
can also create any number of files
simultaneously. For example, to create three new empty files
named file one, file two, and file three, you can use the command to check. Thanks for viewing.
38. 06 Moving Files and Directories: Moving files. Now that we have properly structured
our home directory, it's time to clean up unified files using
the Move command. To move the move file from the archive directory to
the new project directory, we will use this command, MV archive, text archive 2019
reports new project. Let's check type LS. I hope this has been
informative for you and I'd like to
thank you for viewing.
39. 07 Copying Files and Directories: Copying files. The CP
command copy files from one location to another. If the destination
is an existing file, then the file is overwritten. If the destination is
an existing directory, the file is copied
into the directory, the directory is
not overwritten. The sign text for CB command
is CB source destination. For example, CB test 2020. To check LS 2020 done, a useful option is a recursive cab to coby
all underlying files and subdirectories using the Abarcar option
to CB command. For example, Bar R 2020 2019 to check LS 2019 2020. Do I hope this has been informative for you and I'd like to thank
you for reviewing.
40. 08 Removing Files and Directories: Removing files and directories. Rm Linux command is used to remove and lead the file
from the directory. The sign tax used is
RM. Then Options. Then the file or directory
options for the RM command are to remove all files in a directory without
prompting the user. I short four interactive
with this option. Rm prompts for confirmation
before removing any files, bar or lower case to recursively remove directories
and subdirectories in the argument list. The directory will be embedted
of files and removed. The user is normally
bombited for removal of any right btected files which
the directory contains. For example, to remove
and delete a file, use RM followed
by the file name. Press Enter here. Rm command removed and deleted the file test to delete a
directory three for example TMB directory R M I R T MB. This R M command
recursively removes the contents of all subdirectories
of the TMB directory, prompting regarding the
removal of each file. And then removes
the TMB directory itself to remove
more files at once. R M file one, name space, file two, name and press Enter here. Rm command removed file one and file two at the same time. Rm dir command R M di command is used to delete and
remove MT directories. You can use LS to check whether a directory
is empty or not. The sin text is R M
options directory. You can use the option
with the RM di command to remove the directory
dire name and its parent directories
which become empty. For example, RM TMB. Here, RM command will
remove and delete the directory TB if the
directory is empty. I hope this has been
informative for you and I'd like to
thank you for reviewing.
41. 09 Finding Files and Paths: Finding files in a directory
containing many files, you can check if there are any files beginning
with the letter A just by typing LS and pressing
the tape key twice, rather than pressing Enter. There is only one
file starting with A. This file will be shown
as the argument to LS or initial command for
that matter Immediately. A very simple way of
showing the full path of a given executable command
is using the which command. The which command looks
in the directories listed in the user's search
path or the required file. Which command doesn't
work for ordinary files. The senex is which
options program name. The which command is useful when troubleshooting command
not found problems. For example, which LS
press enter, LS is LS. Using the H command
also checks to see if a command is an alias
for another command. For example, which LS here we use to print all
matching executables in Bath. If this doesn't work
on your system, use the alias command
and check the result. Lias LS LS is Elias two LS color equal
to find and locate. These are the real tools
used when searching other boths besides those
listed in the search path. The fine tool is very powerful, which may be the cause of a
somewhat more difficult sex. The file command not only allows you to search file names, it can also accept file size, date of last change, and other file Berties as
criteria for a search. The most common use is
for finding file names. The sex path options
for finding file names. The sex will be path
name search string. This can be interpreted as lock in all files
and subdirectories contained in a given
path and brand the names of the files containing the
searchstring in their name, not in their content. For example, name between codes. Here the system would search for any file names in the current directory
and any subdirectory. Another example, find name test between codes and press Enter. Here the system would search for any file name test on the root and all
subdirectories from the root. If we used this option, find name as tres between codes size plus 1,000 kilobytes. Here, the system would
search for any file in the list that is larger
than 1,000 kilobytes. Another application
of find is for searching files of
ascertain size, As in the next example, where user wants to
find all files in the current directory or one of its subdirectories that are
bigger than 5 megabytes, find for the current
directory size plus five southand kilobytes. Find can also perform
operations on the found files. A common example
is removing files. It is best to first test without the option that the correct
files are selected to search for files ending in MB name asterisk B between Cots and Breast Enter. After that, the command can be rerun to delete the
selected files. Find name, asterisk
domb between codes R, M, open and close care. Practice ph and press Enter. Here we used R M to delete all the files
ending with domb. Later on in 1999, after 20 years of Find,
Locate was developed. This program is easier to use but more
restricted than fine, since its output is based on a file index database that is updated only once every day. On the other hand, a search
in the locate database uses fewer resources than fine and therefore shows the
results nearly instantly. Example, locate Elias
and press Enter. Most Linux distributions
use S. Locate these days, abbreviation of
Security Enhanced Locate the modern version of Locate that prevents users from getting output they
have no right to read. I hope this has been
informative for you and I'd like to
thank you for viewing.
42. 10 Linking Files: Linking files. A link is nothing more than a way of matching two or more file names to
the same set of file data. There are two ways
to achieve this. They behave similarly
but are not the same. First, hardl hard link associate two or more file
names with the same Ude. Each regular file is in
principle a hardlining. Also, hard links share
the same data blocks on the hard disk while they continue to behave as
independent files. There is an immediate
disadvantage, which is hard links
can span across partitions since they refer to nudes and node numbers are unique within
a given partition. Second, soft link
or symbolic link. Soft link is a small file that is a pointer
to another file. A symbolic link
contains the path to the target file instead of a physical location
on the hard disk. Since nudes are not
used in this system, soft links can span
across partitions. Note that removing
the target file for a symbolic link makes
the link useless. I hope this has been
informative for you and I'd like to
thank you for reviewing.
43. 11 Creating Symbolic Links: Creating symbolic links. The symbolic link
is particularly interesting for beginning users. They are fairly obvious to and you don't need to
worry about partitions. The command to make links is LN. In order to create
symbolic links, you need to use the S option. The sign text for the LN
command is LN S target file. Link name example LN S B three space here, 03 is the target file
and is the link name. To check, we can type LS L. In this example, user creates
a link in a subdirectory of his home directory to a directory on another
part of the system. Note that symbolic links are
always very small files, while hard links have the same
size as the original file. I hope this has been
informative for you and I'd like to
thank you for viewing.
44. 01 Multi user and multi tasking: Multi user and multitasking. An instance of a program
is called a process. In simple terms, any
command that you give to your Linux machine
starts a new process. Not every command starts
a single process. Some commands initiate a series of processes, such as Mozella. Others like LS command are
executed as a single command. Furthermore, a common policy in Linux to have multiple users learning multiple commands at the same time and
on the same system. I hope this has been
informative for you and I'd like to
thank you for viewing.
45. 02 Interactive processes: Process types. First, the
interactive processes. Interactive processes
are initialized and controlled through
a terminal session. In other words, has to be someone connected to the system
to start these processes. They are not started
automatically as part of the system functions. These processes can run in the foreground
occupying the terminal that started the program. You can't start other
applications as long as this process is running
in the foreground. Alternatively, they can
run in the background that the terminal in which
you started the program can accept new commands while
the program is running. Until now, we mainly focused on programs running
in the foreground, which the length of time taken
to run them was too short to notice a command occupying
the terminal session. In this case, activated program is waiting for you
to do something. The program is
still connected to the terminal from
where it was started. The terminal is only
useful for entering commands this program
can understand. Other commands will just
result in errors or unresponsiveness of the
system while a process runs. In the background, however, the user is not prevented
from doing other things in the terminal in which he started the program
while it is running. The shell offers
a feature called Job control which allows easy handling of
multiple processes. This mechanism
switches processes between the foreground
and the background. Using this system, programs can also be started
in the background. Immediately. Running
a process in the background is
only useful for programs that don't need
user bot via the shell. Putting a job in
the background is typically done when
execution of a job is expected to take a long time in order to free the
issuing terminal. After entering the common, a trailing ampersand is added. The full job control
features are explained in detail in the bes pho bags only. The frequently used job control applications
are listed here. Using regular means,
run this command in the foreground using
command space. And percent means run this command in the
background and release the terminal means show commands
running in the background. Pressing control
Z means suspend, which means stop but not quit. A Brs running in the foreground. Pressing control
means interrupt, that means terminate and equate. A Brs is running
in the foreground. Every process running in the background gets a
number assigned to it. By using the percent expression, a job can be referred
to using its number. For instance, G person two, where two is the job number. We use the BG command to reactivate a suspended
program in the background. We use the FG command to both the job back
in the foreground. Also, we use the
K command to end a Brusss use command
to kill brs After K, we bot the Brusss
ID or we can use the K command and after
all the Brusss name. I hope this has been
informative for you and I'd like to
thank you for viewing.
46. 03 Automatic processes: Second, the automatic processes. Automatic or batch processes are not connected to a terminal. Rather, these are tasks
that can be queued into a spooler area where
they wait to be executed on a first
in, first out basis. Such tasks can be executed
using one of two criteria. First, at a certain
date and time done using the command which
we will discuss later. Second, at times when the total system load is low
enough to accept extra jobs, this is done using
the batch command. By default, tasks are bought in a que where the unit
to be executed until the system load is lower than
0.8 In large environments, the system administrator may be referred Pitch Processing, when large amounts
of data have to be processed or when tasks demanding a lot of
system resources have to be executed on an
already loaded system. Pitch processing is also used for optimizing
system performance. I hope this has been
informative for you and I'd like to
thank you for viewing.
47. 04 Daemons: Demons? Demons are
server processes that run continuously
most of the time. They are initialized
at system start up and then wait in the background until their service is required. A typical example is the
networking demon X net D, short for extended
Internet service demon, which is started in almost
every boot procedure. After the system is booted, the network demon just
sets and waits until a client program such as an
FTB client needs to connect. I hope this has been
informative for you and I'd like to
thank you for viewing.
48. 05 Linux Pipes: Linux pipes. Anyone new
to Linux might wonder, what role do pipes play in
running the operating system? The vertical power
sample denotes a pipe. If you want to use two
or more commands at the same time and run
them consecutively, you can use pipes. Pipes enables Linux
users to create powerful commands which
can perform complex tasks. In a Jeff. Let's understand
this with an example. When you use command to view a file which spends
multiple pages, the bombet quickly jumps
to the last page of the file and you don't see
the content in middle. To avoid this, you can pipe the output of the
command to less, which will show you
only one scroll lens of content at a time. Tests. Also, you can use BG and More commands
in a state of less. For example, Test by More. More is a popular cross
platform terminal Badger. More can move forward and
backward in text files, but cannot move
backwards in pipes. Here you can view the file in digestible bits and scroll down by assembly
hitting the Enter key. I hope this has been
informative for you and I'd like to
thank you for viewing.
49. 06 The grep command: The grape command. Suppose you want to search a
particular information, such as the poster
code from a text file. You may manually sce the content yourself to
trace the information. A better option is to
use the grape command. It will scan the document for the desired information and present the result in
a format you want. The sign text for
the grep command is options pattern file. Let's see it in action to show the content
of the test file. Test grip Able. Here we use the grep command to search for Able
in the test file. Here grab command has searched the file
test for the string. Apple following options can
be used with this command. V option shows all the lines that do not match
the searched string. Option displays only the
count of matching lines. Option shows the
matching line and its number L option match both
upper and lower keys. L option shows just the name
of the file with the string. Let's try the option
on the test file P. Using the option grab has filtered the string
from all of the lines. You must know that it
is case insensitive. The head and tail commands, these two commands displays the first and last lines
of a Fi respectively. To see the last ten
commands entered til ten to be
underscore history, the command, the
last ten commands entered in the
terminal and it gets them from the be history
also it works similarly. Ten page underscore history. It here will show the
first ten comments in the best history file. The tail command has a handy
feature to continuously show the last lines of a file
that changes all the time. This option is often used by system administrators
to check on long files. I hope this has been
informative for you and I'd like to
thank you for viewing.
50. 07 The sort command: The command. This command helps in sorting out the
contents of alphabetically. The sign text for this command
is options, file name. Consider the contents of a file test test using
the sort command. It will be options
for the sort command. Option for reverse sort, N, option for sorts numerically. F, option for Kiss in
sensitive sorting. I hope this has been
informative for you and I'd like to
thank you for viewing.
51. 08 Filter: Filter. Filter is the output from first command which becomes the but for
the second one. When you pipe two commands, the filtered output of the first command is
given to the next. Let's understand this
with help of an example. We have the following file. File file. We want to highlight
only the lines that don't contain
the character, but the result should
be in reverse order. For this, the following
syntax can be used. File pip, grab a r here, file to show the text file. And grab a to highlight only the lines
that do not contain the character a R to show
them in reverse order. Now as you can see, filtered results are given
to the next comment. I hope this has been
informative for you and I'd like to
thank you for viewing.
52. 09 Process attributes: Process attributes. A Process has a series of characteristics which can be
viewed with the BS command. The BS command stands
for Process Status. It is similar to
the task manager that Bob apps in a
Windows machine. When we use Control Alt delete, the process attributes
viewed by the BS command are the Process ID or BID, which is a unique
identification number used to refer to the process. The parent Process ID, or BB ID, which is the Process ID of
the process that started this process terminal, or TTY, is the terminal to
which the process is connected to see the process status S F. The BS command is one of the tools for
visualizing processes. We will continue
talking about it later. Here we used the option to list information about all processes most frequently requested. And we used the F option to
generate a full listing. When user starts a program, the process itself and
all processes started by the initial process
will be owned by user and not by the
system administrator. Normally, in Linux,
when a program runs, it inherits access permissions
from the logged in user. I hope this has been
informative for you and I'd like to
thank you for reviewing.
53. 10 Displaying process information: Displaying process information. The BS command is one of the tools for
visualizing processes. Bs command is used to
report the process status. It is the short name
for Process status. This command has several
options which can be combined to display
different process attributes. The BS command sign text is S options with no
options specified. Bs only gives information about the current hell and
eventual processes options used with the BS command. We use the option to list information about all processes most frequently requested. All those except to process group leaders and
the processes not associated with a
terminal case or lower. Options to list information
for all processes. We can use the D option to list information about all processes except
session leaders. Option to list information about every process
that is running. Now the F option to
generate a full listing, the option to print session
ID and process group ID, we use the L option to
generate a long listing. We will usually select
particular processes out of the list of all processes using the Grip
command in a vibe, as in this line, which will select and display all processes owned
by a particular user. Bsf, Grip Mustafa. Note that BS only gives a momentary state of
the active processes. It is a one time recording. The relations between
processes can be visualized using the
S three command. The top command. The top program displays a more precise view by updating the results
given by BS with a bunch of options
once every 5 seconds, generating a new list of
the processes causing the heaviest load
Periodically, meanwhile, integrating more
information about the swebspace in use and the state of the CPU
from the Brock file, it displays the total number
of running processes, number of sleeping
processes, stop, the process, number of zombie
processes in the system. The sine text for
the top command is options options used with the top command P option to run in ***** mode and
don't accept command line. Mbo. Option to show command line in the display
instead of just command name. Option to update
display num times, then exit option to suppress display of idle
and zombie processes. Pid option to monitor only processes with the
specified process ID. We use option for secure mode to disable some dangerous
interactive commands. You can press que
on the keyboard at any time to move out of
the process display. The first line of top contains the same information displayed
by the uptime command. The terminology follows, ID, the process ID of each task. The user name of task on R periority can be 20 and that is the highest
or negative to 20, and that is the lowest I, the nice value of a task. Virtual memory used
in kilobytes, RES, physical memory
used in kilobytes, also HR, shared memory
used in kilobyte. For status, there
are five types, Abc, D, Interruptible sleep. Our case or running
our case is sleeping. Abacus, tres or
stopped, And Abarca. Z for zombie percent. Bu is percent of CBU time percent memory
for physical memory used and time plus total
CBU time for common name. I hope this has been
informative for you and I'd like to
thank you for reviewing.
54. 11 Process Creation: Life of a process.
Process creation. A new process is created because an existing process makes
an exact coby of itself. This child process has the same environment
as its parent, only the process ID
number is different. This procedure is
called forking. After the forking process, the address space of the child process is overwritten with the
new process data. This is done through an
exit call to the system, the fork and exit mechanism. The fork function clones
the current process, creating an identical child. The exit function loads a new program into
the current process. Replacing the existing one thus switches an old
command with a new. While the environment in which the new program is
executed remains the same, including configuration of
input and output devices, environment variables,
and priority. This mechanism is used to create all Linux operating
system processes. Even the first process in it. With process ID, one
is forced during the boot procedure in the so called
bootstrapping procedure. The process ID changes
after the fork procedure. There are a couple of cases in which it becomes the
parent of a process while the process
was not started by N. As we already saw in
the BS three example, many programs, for instance, demonize their child
processes so they can keep on running when the parent stops or is being stopped. A window manager is
a typical example. It starts an term process that generates a shell
that accepts commands. The window manager then denies any further responsibility and posses the child process to N. Using this mechanism, it is possible to change
window managers without interrupting running
applications every now and then. Things go wrong. In an exceptional case, a process might finish while the parent doesn't wait for the completion of this process. Such an unburied process is
called a zombie process. I hope this has been
informative for you and I'd like to
thank you for viewing.
55. 12 Ending Processes: Ending processes.
When a process ends, normally it is not killed or otherwise unexpectedly
interrupted, the program returns its
exit status to the baron. This exit status is
a number returned by the program providing
the results of the program's execution. The return codes can then be interpreted by the
Baron or any scripts. The values of the return
codes are program specific. This information can
usually be found in the main pages of
the specified program. For example, the
grip command return is minus one if no
matches are found, upon which a message on the lines of no files
found can be printed. Another example is the best
built in command true, which does nothing except return and exit status of
zero, meaning success. I hope this has been
informative for you and I'd like to
thank you for viewing.
56. 13 Signals: Signals processes in. Because they receive a signal, there are multiple signals that you can send to a process. We use the K command to
send a signal to a process. The command L shows
a list of signals. Most signals are
for internal use by the system or for programmers
when they write code. As a user, you will need
the following signals. The common signals in Linux sect and it takes
number 15 used to terminate the process in an
orderly way sake and T number two used to
interrupt the process, but the Brusss can ignore
the signal sake and tax number nine
used to interrupt the process but a Bruces
can't ignore the signal. Sake takes number one used for demons to reread
the configuration file. You can read more about default actions that are taken when sending a signal to a process
in main seven signal. I hope this has been
informative for you and I'd like to
thank you for viewing.
57. 14 Shutdown: Shut down. Linux was not
made to be shut down. But if you really must use the shutdown command by adding the H option to the shutdown command
will halt the system. While adding the R
option, we reboot it. The reboot and halt commands
are now able to invoked when the system is in run level one to five and thus ensure proper shutdown
of the system. But it is a bad
habit to get into, as not all Linux versions
have this feature. If your computer doesn't
power itself down, you should not turn off the computer until
you see a message indicating that the system is halted or finished
shutting down. This is done to give the
system the time to amount all partitions and take care that being impatient
may cause data loss. I hope this has been
informative for you and I'd like to
thank you for viewing.
58. 15 Managing Processes: Managing processes. It doesn't hurt a common user
to know something about it, especially where his
or her own processes and their optimal
execution are concerned. Now we will study
the daily problems a common user is
confronted with. Actions such a user can take to optimally use the
resources available. This is mainly a matter
of thinking before acting about time taking to execute a command offers a built end time command that displays how long a
command takes to execute. The timing is highly accurate and can be used on any command. In our example, as you can see, the time taking to make this command about system
performance to a user, performance means
quick execution of commands to a system manager. On the other hand,
it means much more. The system admin has to optimize system performance
for the whole system, including users, all
programs and demons. System performance can
depend on 1,000 tiny things which are not accounted
for with the time common, such as the program
executing is badly written or doesn't use the
computer appropriately. X to disks, controllers, display and all kinds of interfaces reachability
of remote systems, which means network performance, Amount of users on
the system and amount of users actually
working simultaneously, time of day and others
about system load. In short, the load depends on what is
normal for your system. There is only one
way to find out, check the load regularly if you want to know
what's normal. If you don't, you
will only be able to measure system load from the response time of
the command line, which is a very
rough measurement. Since this speed is influenced
by 100 other factors, keep in mind that
different systems will behave differently
with the same load average. For example, a system
with a graphics card supporting hardware
acceleration will have no problem rendering
three D images, while the same system with a chip VGA card will slow down tremendously
while rendering. Now what can you do as a user? A big environment can slow you down if you have lots of
environment variable set long search paths that
are not optimized and more of those settings that are usually
made on the fly. The system will need more
time to search and read data. In X Window managers and desktop environments
can be real CBU eaters. Really fancy desktop
comes with a price, even when you can
download it for free. Since most desktops provide
add ons ad infinitum, modesty is a virtue if you don't buy a new
computer every year. I hope this has been
informative for you and I'd like to
thank you for reviewing.
59. 16 Managing Process Priority & Niceness: Priority and niceness. The priority or importance of a job is defined by
its nice number. A program with a
high nice number is friendly to other programs, other users, the system, and it is not an important job. The lower the nice number, the more important a job is, and the more resources it will
take without sharing them. Making a job nicer by
increasing its nice number is only useful for processes
that use a lot of B time, such as compilers, meth
applications and the like. Processes that always
use a lot of inbot, outbo time are automatically
rewarded by the system. And given a higher priority, which means a lower nice number. For example, keyboard always gets the highest
priority on a system. The default value of all
the processes is zero. To start a process with a nice number value other
than the default value used the following sex nice
value process name. If a process already
running on the system, then you can renice
its value using the sex nice value ID. To change niceness, you can use the top command to determine the BID and its
nice value later. Use the renice command
to change the value. Apart from using the
nice or nice commands, the top command
is an easy way of stopping the troublesome
processes and reducing priority. Identify the process
in the nice column, press R and enter the process ID of the process
that you want to renice. Then enter the nice value. I hope this has been
informative for you and I'd like to
thank you for viewing.
60. 17 Managing Process CPU Resources: Cbu resources on
every Linux system. Many programs want to use
the CBU at the same time, even if you are the only
user on the system, every program needs
a certain amount of cycles on the CBU to run. There may be times
when there are not enough cycles because
the CBU is too busy. The uptime command is
wildly inaccurate. It only displays averages and you have to know
what is normal. But far from being useless, there are some actions you
can undertake if you think your CBU is to blame for the unresponsiveness
of your system. Try running heavy programs
when the load is low. Prevent the system from
doing unnecessary war, such as stopping demons and
programs that you don't use. Also using locate in a
state of a heavy fine, try running big jobs
with a low barrierity. If none of these solutions is an option in your
particular situation, you may want to
upgrade your CBU. I hope this has been
informative for you and I'd like to
thank you for viewing.
61. 18 Managing Process Memory Resources: Memory resources when the
currently running processes expect more memory than the system has
physically available. A Linux system will not crash. It will start Beijing. Or swabbing, meaning the process uses the memory in
disk or in swab space, moving contents of
the physical memory, which are pieces of
running programs or entire programs to desk
in case of swabbing, thus reclaiming the
physical memory to handle more processes. This slows the system
down enormously. Since access to disk is much slower than
access to memory, the top command can be used to display memory and swab use. If you find that a lot of memory and swab space
are being used, you can troy first killing, stopping, organizing
those programs that use a big chunk of memory. Second, adding more
memory and in some cases, more swab space to the system. I hope this has been
informative for you and I'd like to
thank you for reviewing.
62. 19 Tuning System Performance: Twinning system performance. While input outbut
limitations are a major cause of stress
for system admins, the Linux system offers rather bore utilities to
major but outbut performance. The BS, VM state and top tools give some indication of how many programs
are waiting for, but output state displays
network interfaces, statistics. But there are virtually
new tools available to measure the bot outbut
response to system load. The IO State command gives a brief overview of general
Embot outbut usage. Each device has
its own problems, but the bandwidth available to network interfaces and the
bandwidth available to desks are the two primary causes of bottlenecks in Embot
outbut performance. I hope this has been
informative for you and I'd like to
thank you for viewing.
63. 20 Network Problems: Network inbot output problems. Network overload occurs
when the amount of data transported over the network is larger than the
network's capacity, Resulting in a slow execution of every network related
task for all users. This can be solved by
cleaning up the network, which mainly involves disabling protocols and services
that you don't need, or by reconfiguring the network. For example, use of submits, replacing hubs with switches, upgrading interfaces
and equipment. Network integrity
problems occurs when data is transferred
Incorrectly, solving this problem can only be done by isolating the faulty
element and replacing it. I hope this has been
informative for you and I'd like to
thank you for viewing.
64. 21 Disk IO Problems: Disc inbot output problems. First, if bear process
transfer rate too low, this means read or write speed for a single process
is not sufficient. Second, if the aggregate
transfer rate is too low, then the maximum total
bandwidth that the system can provide to all programs
that run is not enough. This kind of problem is more difficult to detect
and usually takes extra hardware in
order to redivide data streams over buses,
controllers, and disks. If the overloaded hardware
is the cause of the problem. One solution to solve this is a red array configuration optimized for Inbot
and Outbot actions. This way you get to
keep the same hardware. Upgrade to faster
buses, controllers, and discs is usually
the other option. If overload is not the cause, maybe your hardware is gradually failing or not well
connected to the system. Check contacts, connectors,
and blocks to start with. I hope this has been
informative for you and I'd like to
thank you for viewing.
65. 22 Users: Users. Users can be divided into several classes depending on their behavior with
resource usage. First, users who run
a large number of small jobs are the beginning
Linux user, for instance. Second, users who run
relatively few but large jobs. For example, users
running simulations, calculations, emulators, or other programs that
eat a lot of memory. Usually these users have
accompanying large data files. Third, users who run few jobs
but use a lot of B time, such as developers and the like. You can see that
system requirement may vary for each class of users and that it can be
hard to satisfy everyone. If you are on a
multi user system, it is useful and fun
to find out habits of other users in the system in order to get the
most out of it. For your specific purposes. I hope this has been
informative for you and I'd like to
thank you for viewing.
66. 23 Graphical Tools: Graphical tools. For the
graphical environment, there are a whole punch of
monitoring tools available, such as the Genome
System Monitor, which has features for
displaying and searching, process information and
monitoring system resources. X load is another
small X application for monitoring system load. You can search and
find your favorite. I hope this has been
informative for you and I'd like to
thank you for viewing.
67. 24 Interrupting Processes: Interrupting processes. As an unprivileged user, you can only influence
your own processes. We already saw how you
can display processes and filter out processes that
belong to a particular user. What possible restrictions
can occur when you see that one of your processes is eating too much of the
system's resources, there are two things
that you can do. First, make the process use fewer resources without
interrupting it. Or stop the process altogether in the case that you want the
process to continue to run, but also you want to give
the other processes on the system a chance you
can rene the process. Examples of processes that
you want to keep on running. Or emulators, virtual machines, compilers and so on. If you want to stop a process
because it hangs or is going totally Bs in the way of the inbut
output consumption, file creation or use of
other system resources. Use the command if you
have the opportunity. First, try to kill the process softly sending it
the Sec term signal. Some processes are a
little bit harder to get rid of if you have the time. You might want to send them the Sec end signal
to interrupt them. If that doesn't do
the trick either, use the strongest signal skill. In such cases, you might
want to check that the process is really did using the grip filter
again on the BID. If this only returns
the grip process, you can be sure that you succeeded in stopping
the process. Or you can check
that the process is disappeared using
the top command. Another way of killing a
process, using the top program, you can kill unneeded
or hanged processes by pressing K. Then type the process ID and then
choose between Sc term using number 15 or sell using number
nine and Bress Enter. As you can see the
process kel is removed among processes that are hard to kill is your shell. That is a good thing. If they would be easy to kill, you would lose your
shell every time you use control C on
the command line. Accidentally. Since this
is equivalent to sending a end in a graphical
environment, the Kl program,
very easy to use. Just type the name of
the command followed by an enter and select the window of the application
that you want to stop. It is rather dangerous because it sends a
cycle by default, only use it when
application hangs. I hope this has been
informative for you and I'd like to
thank you for viewing.
68. 25 Scheduling Processes: Schidling processes. A Linux system can have
a lot of to suffer from, but it usually suffers
only during office hours. Whether in an
office environment, a server room, or at home. Most Linux systems are just idling away during the morning, the evening, the
nights, and weekends. Using this idle time can be
a lot cheaper than buying those machines you
would absolutely need if you want everything
done at the same time. There are three types
of delayed execution. First, waiting a little while, and then resuming job execution
using the sleep command. In this case,
execution time demends on the system time at the
moment of submission. Second, running a command at a specified time
using the command. In this case, execution of the jobs depends on system time, not the time of submission. Third, regularly running
a command on a monthly, weekly, daily, or hourly basis using the
current facilities. I hope this has been
informative for you and I'd like to
thank you for viewing.
69. 26 The Sleep Command: The sleep command, the
info page on sleep, is probably one of the
shortest there is. All sleep does is wait. By default, the time to wait
is expressed in seconds. Some practical examples. If you have an appointment
after half an hour, but you are about
drowned in work as it is and bound to
forget your lunch. You can enter this command, sleep 1,800 semicolon echo lunch
time embersend. This will show you a lunchtime
alert after 1,800 seconds, meaning 30 minutes, when you can't use the command for some reason you want to go home. But there is still
work to do right now. Somebody is eating
system resources, you can type sleep
10,000 semicolon. Echo the name of your program followed by
Embersend and press Enter. This will make
your program start automatically after
10,000 seconds. Make sure there is an auto log out on your system and that you look out or lock your desktop when submitting
this kind of job, or run it in a screen session when you run a series of
print outs of large files. But you want other users to
be able to print in between, you can use sleep between them. For example, LB, the name of
the file you want to print. Semicolon sleep
1,000 semicolon LB, the name of the other file, semicolon sleep 1,000 semicolon
LB, another file name. Here we use the sleep
command in between printing our large files to make other users able to
print in between. Programmers often use
the sleep command to halt script or program
execution for a certain time. I hope this has been
informative for you and I'd like to
thank you for reviewing.
70. 27 The at command: The command. The command executes commands at a given time using
your default shell. Unless you tell the
command otherwise. The options to Ad are
rather user friendly. Which is demonstrated
in this example. Tomorrow plus two days at Brombet will be opened to enter the commands
you want to execute. K, Test grip Apple the use control D quit using control D quits the utility and generates the EOT message. End of transmission. Another example, 14, 20 CD. Home Enter control D. Here we use the command to execute commands
at a certain time. The option, send this mail to the user
when the job is done, or explains when a
job can't be done. We can use the Q
command to list jobs. Perform this command before
submitting jobs in order to prevent them from starting
at the same time as others. Also with the R M command, you can remove shadle jobs
if you change your mind. I hope this has been
informative for you and I'd like to
thank you for viewing.
71. 01 The Ping Command: The being command. This utility is
commonly used to check whether your connection to
the server is healthy or not. This command is also used in analyzing network and
host connections, tracking network performance
and managing it, testing hardware and
software issues. The command sign text is options
host name or IP address. The host names and IP
addresses identified in the TC hosts file. Commonly used options for this command option to make ping audible pep each
time response is received. Count option to stop after sending count
Echo request packets with deadline option
ping waits for count eco replay packets
until the time out expires. And option to show network
addresses as numbers. Being normally displays
addresses as host names. Now let's take some examples. Let's try binging Google, Google.com Here the system has sent 64 pytes of data backets to the IP address
or host name of Google. If even one of databackets
doesn't return or is lost, it would suggest an
error in the connection. Usually, Internet
connectivity is checked. Using this method, you may press control C to
exit from the bank loop. Let's try the option three, www.google.com In this example, display quo request three times only because we set
count for three. Now let's try the option, www.google.com Here
the network addresses display as numbers showing
Google.com IP address. I hope this has been
informative for you and I'd like to
thank you for viewing.
72. 02 The Ftp Command: The FTB command. Ftb is file transfer protocol. It is the most
preferred protocol for data transfer
amongst computers. You can use FTB four logging and establishing a connection
with a remote host. Uploading and downloading files, navigating through directories, and browsing contents
of the directories. The sign text to establish an FTB connection
with a remote host is FTB domain name
or IP address. Establishing an FTB connection to connect to the FTB server, we have to type in the
terminal window FTB and then the domain name or IP
address of the FTB server. Once you enter this command, it will ask you
for authentication via username and password. For example, FTB test do rebexnet It is read only used for testing
rebex components to less directory and
download here, username is demo,
password is password. Once connection is established
and you are logged in, you may use the
following commands to perform different actions. Ls command to directories with security settings to display files in the current directory
of the remote computer CD. To change directory to name on the remote computer to a lot file from local
to the remote computer. Get file to download file from remote to
the local computer. And equate command to log out. To abort a file transfer, use the terminal
interrupt key control C. You must know that an FTB transmission
is not encrypted. Anyone who intercepts
the transmission can read the data you send, including your username and
password. So take care. I hope this has been
informative for you and I'd like to
thank you for reviewing.
73. 03 The telnet Command: The ten net command
troubleshooting. If the tennet command
didn't work with you or you received
an error message, like unable to connect to
remote host connection refused. You can do the following
steps to solve the problem. First, installed tenet D and TCBD using these commands in the main operating
system terminal. Second, create the
following file using your choosing text editor. Then add this content
to the created file. After that, use this command to restore telnet server in
the main operating system. Then try connecting again to local host using the
telenet command. If you're still
having a problem, you may need to ensure that
the machine that you are connecting to doesn't block the standard Telenet board 23. If you will need to open the board in
the server firewall, for example, to allow the telenet board 23
in bono fire wall, you can use this command. I hope this has been
informative for you and I'd like to
thank you for viewing.
74. 04 The telnet Command Troubleshooting: The ten net command
troubleshooting. If the tennet command
didn't work with you or you received
an error message, like unable to connect to
remote host connection refused. You can do the following
steps to solve the problem. First, installed tenet D and TCBD using these commands in the main operating
system terminal. Second, create the
following file using your choosing text editor. Then add this content
to the created file. After that, use this command to restore telnet server in
the main operating system. Then try connecting again to local host using the
telenet command. If you're still
having a problem, you may need to ensure that
the machine that you are connecting to doesn't block the standard Telenet board 23. If you will need to open the board in
the server firewall, for example, to allow the telenet board 23
in bono fire wall, you can use this command. I hope this has been
informative for you and I'd like to
thank you for viewing.
75. 05 The ssh Command: The SSH command, SSH, which stands for secure shell, is used to securely connect
to a remote computer. Compared to telnet,
SSH is secure wherein the client server connection is authenticated using a
digital certificate and passwords are encrypted. Hence, it's widely used by system administrators to
control remote Linux servers. The sign text log in to a remote Linux machine
Using SSH is SSH, remote user name, IB address, or remote host name. Once you are logged in, you can execute any commands that you do in your terminal. I hope this has been
informative for you and I'd like to
thank you for reviewing.
76. 06 The ssh Command Troubleshooting: The secure shell command
troubleshooting. If the secure shell
command didn't work with you or you received
an error message, you can enter the
following commands to solve the problem. Then tri connecting to local
host using the SSH command. Followed by remote user name at local host or remote
user name at IB address. I hope this has been
informative for you and I'd like to
thank you for viewing.
77. 01 Text Editors: Text editors. It is very important to be able to use at least one text mode editor. Knowing how to use an editor on your system is the first
step to independence. As an advanced user, you may want to start
writing scripts or books, develop websites
or new programs. Mastering an editor
will immensely improve your productivity as well
as your capabilities. Our focus is on text editors, which can also be used
on systems without a graphical environment
and Interminal Windows. The additional
advantage of mastering a thickest editor is in
using it on remote machines, since you don't need to transfer the entire graphical
environment over the network. Working with thickest editors tremendously improves networks. But if you really insist on using a graphical
text editor, try edit, key, edit,
keri, or edit. These programs only
do text files, which is what we
will be needing. If you blame on doing
anything serious though, stick to a real text mode
editor such as M or Imac. An acceptable alternative is GM, the genome version of them. I hope this has been
informative for you and I'd like to
thank you for viewing.
78. 02 The easy way to Vim: The easy way of
learning the M editor. Instead of reading the text, which is quite boring, you can use the M tutor to
learn your first M commands. This is a 30 minute
tutorial that teaches the most basic M functionality
in eight easy exercises. While you can't learn everything about them in just half an hour, the tutor is designed to describe enough of the
commands that you will be able to easily use them as an old purpose editor in Linux. If M has been
properly installed, you can start this program from the shell or command line by entering the
Vm tutor command. This will make a copy
of the tutor file so that you can edit it without the risk of
damaging the original. There are a few
translated versions of the tutor to find out
if yours is available, use the two letter
language code. For example, this would be tutor for French language
if installed on the system. I hope this has been
informative for you and I'd like to
thank you for reviewing.
79. 01 Creating a User: Creating a user. In Linux, every user is assigned an individual account which
contains all the files, information, and of the user. You can create multiple users in a Linux operating system. First, using terminal, we will
use the command pud user. For example, pud user test. Now the new account
test is created. Second, creating a user using
graphical user interface. Go to the system settings, look for an icon which
says user accounts. Click on the unlocked icon
and enter the Bstword. When prompted, then
click the blast sign. A new window would pop up, asking you for
adding information to the new user account. The account type offers two choices, standard
and administration. If you want the new user to have administrative access
to the computer, select administrator
at the account type. Administrators can do things
like add and delete users, install software and drivers and change the date and time. Otherwise, choose the standard, fill in the full name
username and click on Create. The new account would show
but would be disabled by default To activate it, click the password option
and add a new password. Click Change to
enable the account. I hope this has been
informative for you and I'd like to
thank you for reviewing.
80. 02 Deleting and disabling account: Deleting and disabling account. First, using terminal for disabling and account
using terminal, remove the password set on the account pud SDL user name. To delete an account, use the command pud user del R user name. Second, deleting and disabling account using graphical
user interface. Highlight the user
account and click the minus sign to delete and
you would get this prom bit. I hope this has been
informative for you and I'd like to
thank you for reviewing.
81. 03 Adding and Removing users from the usergroups: Adding users to the user groups. You can view the
existing groups in your Linux operating
system by entering this command group mode
and preste key twice. Now to add a user to a
group, use this syntax, pseudo user mode, Abarcse group user name. We use berks option to add a supplementary
group and we use the option to add the user to the supplementary
groups used only with the abercseG option. For example, pseudo userdb jud where test is the group name
and judi is the user name. You can check whether the
user is in a group by this command, TC group. Removing a user from user group. For removing a user,
use this syntax. Pud de user group name. For example, de jue Judy is the user name and
Test is the group name. I hope this has been
informative for you and I'd like to
thank you for viewing.
82. 04 File Security: File security on Alenex system. Every file is owned by a
user and a group user. There is also a third
category of users, those that are not
the user owner and don't belong to the
group owning the file. For each category
of users, read, write, and execute permissions
can be granted or denied. We already used the long
option to list files using the LS command
though, for other reasons. This command also displays file permissions for these
three user categories. They are indicated by the nine characters that
follow the first character, which is the file type indicator at the beginning of
the file roberts line. As we see the first three
characters in this series of nine display access rights for the actual user
that owns the file. The next three are for the
group owner of the file. The last three for other users, the permissions are
always in the same order. Read, write, excute
for the user, the group, and the others. For effective security, Linux divides authorization
into two levels. The first level is ownership, and the second level
is permission. The concept of permissions and ownership is crucial in Linux. I hope this has been
informative for you, and I'd like to thank
you for reviewing.
83. 05 Ownership in Ubuntu files: Ownership in open to files. Every file and directory in your Linux system is
assigned three types of owner, group and other. First, the user. A user
is the owner of the file. By default, the person who created a file
becomes its owner. Hence, a user is also
sometimes called an owner. The group. A user group can
contain multiple users. All users belonging to a group will have the same access
permissions to the file. Suppose you have a project where a number of people
require access to a file. Instead of manually assigning
permissions to each user, you could add all users to a group and assign group
permission to file. Such that only these
group members and no one else can read
or modify these files. Any other user who
has access to a file, this person has neither
created the file, nor he belongs to a user
group who could own the file. Practically, it means
everybody else. Hence, when you set the
permission for others, it is also referred as
set permissions for war. Now the big question arises. How does Linux
distinguish between these three user types
so that a user A cannot affect a file which contains some other user B's vital
information or data dislike. You don't want your
colleague who works on your Linux computer to
view your personal images. This is where permissions set in and they define
user behavior. I hope this has been
informative for you and I'd like to
thank you for viewing.
84. 06 Permissions: Permissions. Every
file and directory in your Linux system has the following three permissions defined for all the three
owners discussed before. Read, write, and execute. The read permission give you the authority to open
and read a file. Read permission on a directory
gives you the ability to list its content. The
right permission. The right permission gives you the authority to modify
the contents of a file. The right permission
on a directory gives you the authority to add, remove, and rename files
stored in the directory. Consider a scenario where you have right
permission on the file, but don't have
right permission on the directory where
the file is stored. You will be able to
modify the file contents, but you will not
be able to rename, move, or remove the file
from the directory. The execute permission.
In Windows, an executable
program usually has an extension and which
you can easily run. But in Linux, you can't run a program unless the
executed permission is set. If the execute
permission is not set, you might still be
able to see or modify the program code provided that read and write
permissions are set. But you can't actually run it until you have the
executed permission. Let's see this in
action LS L here. As we can see, the highlighted
permissions tells us about the permissions given to the owner user group
and the orlid. Here, the first hyphen or implies that we
have selected a file. If it were a directory, D would have been shown. The characters are
pretty easy to remember. Read permission for
red permission, X for execute permission, and hyphen means no permission. By design, many Linux
distributions like Fedora, Centos, Bantu will add users to a group of the same group
name as the username. Thus, a user test is added
to a group named test. I hope this has been
informative for you and I'd like to
thank you for viewing.
85. 07 chmod Command: The C H mode command. Changing file or
directory permissions is done using the
C H mode command. Say, you don't want
your colleague to see your personal images. This can be achieved by changing file permissions using
the C H mode command, which stands for change mood. Using this command, we can
set permissions, read, write, and execute on a file or directory
for the owner group. And the worlid, the scien
text for this command is H mood, permissions,
file name. There are two ways
to use the command, absolute mood and symbolic mood, which will be discussed
in the next lesson. I hope this has been
informative for you and I'd like to
thank you for viewing.
86. 08 Absolute(Numeric) Mode: Absolute mood. In this mood file, permissions are not
represented as characters, but a three digit octal number. In this table, numbers used
for all of permission types. Number zero means no permission, the sample is dash for
read, right execute. Number one means excutely, the symbol is x. Number two means
right on the symbol is number three means
excu plus right. The symbol is X, number four. Read on the symbol is R. Number five means
red plus excute. The symbol is R, X. Number six means
read plus right. The sample is our
number seven means read plus right plus acute. The sample is our x. Let's see the CH mod
command in action. First let's see permissions
on file test L S L t. Now let's change
permissions on this file, CH mod 764 test. Now to check LS L test. Now we have changed
the permissions on the file test to 764764. Absolute code says
the following, owner can read,
write, and execute. User group can read and
write Word can only read. This is shown as R, R, d, the first dish for the file type because
it is file directory. If it is directory,
it would be D, the next three letters for permissions for the user
or the owner of the file, then three for permissions
for the user group. The last three letters are for permissions for
others or the or Lip. This is how you can
change the permissions on a file by assigning
an absolute number. I hope this has been
informative for you and I'd like to
thank you for viewing.
87. 09 Symbolic Mode: Symbolic mood. In
the absolute mood, you change permissions
for all three owners, but you can also
modify permissions of a specific owner
using symbolic mood. It makes use of
mathematical symbols to modify the file permissions. The blast operator adds a permission to a
file or directory. The minus operator removes the permission equal operator sets the permission and overrides the
permissions set earlier. The various owners are
represented as you as user or owner a group as other, and as all, we will not be using
permissions in numbers 777, but correctors like r x. Let's try an example to see the test file
permission LSL test. Now to set all
permissions, read, write, and execute
to the other users. H equal r x test. To check L S L test done to add the
execution permission to the user group C H
mood plus x test. Let's check L S L test to
remove the read permission from user CH mod minus a test Check done. I hope this has been
informative for you and I'd like to
thank you for viewing.
88. 10 Changing Ownership and Group: Changing ownership. And group for changing the ownership
of a file or directory. You can use this sex a short for change owner in case you want to change
the user as well as group. For a file or directory, use the colon group. Let's see this in action. First, let's check the file
ownership using LSL command. Now, to change the file
owner to move cho, my file. To check LSL my file to change user and
group to moved cho, colon, move my file and to check LS L in case you want
to change group owner, only use the command. Change group C H GRB. Some important things I
would like you to know the file TC group contains all the groups
defined in the system. You can use the
command groups to find all the groups
you are a member of. You cannot have two groups
owning the same file. You don't have nested
groups in Linux, one group cannot be
subgroup of other. Executing a directory means
being allowed to enter a directory and gain possible
access to subdirectories. I hope this has been
informative for you and I'd like to
thank you for viewing.
89. 01 Ubuntu Virtual Terminals: Ponto Virtual Terminal. Ponto is a multi
user system which allows many users to work
on it simultaneously. What if different users need to work on the same
system at a time? How do you do that? This is where we need the
virtual terminals. Let's talk about them.
Virtual terminals are similar to terminal that
you have been using so far. They are used for executing
commands and offering Bo. The only difference is that you can't use the mouse with
the virtual terminals. Therefore, you need to know
the keyboard shortcuts. Virtual terminals enable
a number of users to work in different programs at the same time on
the same computer. This is the reason they are one of the most distinguished
features of Linux. I hope this has been
informative for you and I'd like to
thank you for reviewing.
90. 02 Starting V Terminals & Nav: Starting a Virtual terminal. Let's learn how to access and utilize the virtual terminals. Usually, there are six
default virtual terminals on a Linux operating system, and you can log into them as different users to
conduct different tasks. Let's try starting
a virtual terminal. Press control F six, Enter user ID and Bsword. Now the virtual terminal
is ready to work on. You can navigate between
the six virtual terminals using control Alt and choose
from two to F six keys, F two being the first terminal, while six being the
last virtual terminal. You can work on all of
the virtual terminals at the same time in order to know which virtual
terminal you are working on. Tty given at the top, TTY is the type number which you can also know
by typing the common TTY. The first terminal is the one which we have been
using so far and it can be accessed
again by bracing the key combination
control at one. I hope this has been
informative for you and I'd like to
thank you for reviewing.
91. 03 Virtual Terminal Shortcuts: Virtual Terminal Shortcuts. These are some of the
shortcuts that you should be aware of while working
on virtual terminals. Press home or control to move the cursor to the
start of the current lines. Or control to move the cursor to the end
of the current line. You can press step to
to complete commands. Press control to
the current line. Press control W, to
delete the word before the cursor press control key. Delete the line from the
cursor position to the end. You can type to reset the terminal type history to get list of commands
executed by the user. Press arrow to scroll up in
history and enter to ext. Press scroll down in history
and enter to excute. Press control, log out
from the terminal, press control out, delete
to reboot the system. I hope this has been
informative for you and I'd like to
thank you for reviewing.
92. Installating QT Creator on Ubuntu: Installing cute creator
on Bantu pseudo Abts. Build Essential. The
Build Essential package is a reference for
all the packages needed to compile
a Debian package. It generally
includes the GCC and G compilers and libraries
and some other utilities. After finishing the installation
of build essential. Now to install cute creator. A install cute creator after finishing
the installation. If you want cute five to be the default cute version
to be used when using development binaries like
install the following package, abs cute five default to install the cute
documentation sudeste five. And eventually install cut five D doc HTML five HTML. If examples are missing, you can use this command abit into cut five examples. Now to start cute creator, type cute creator amber sand. I hope this has been
informative for you and I'd like to
thank you for viewing.
 Moustafa Hassan, DevOps Engineer: Cloud, Linux & Python Automation