Transcripts
1. Intro: Hey there and
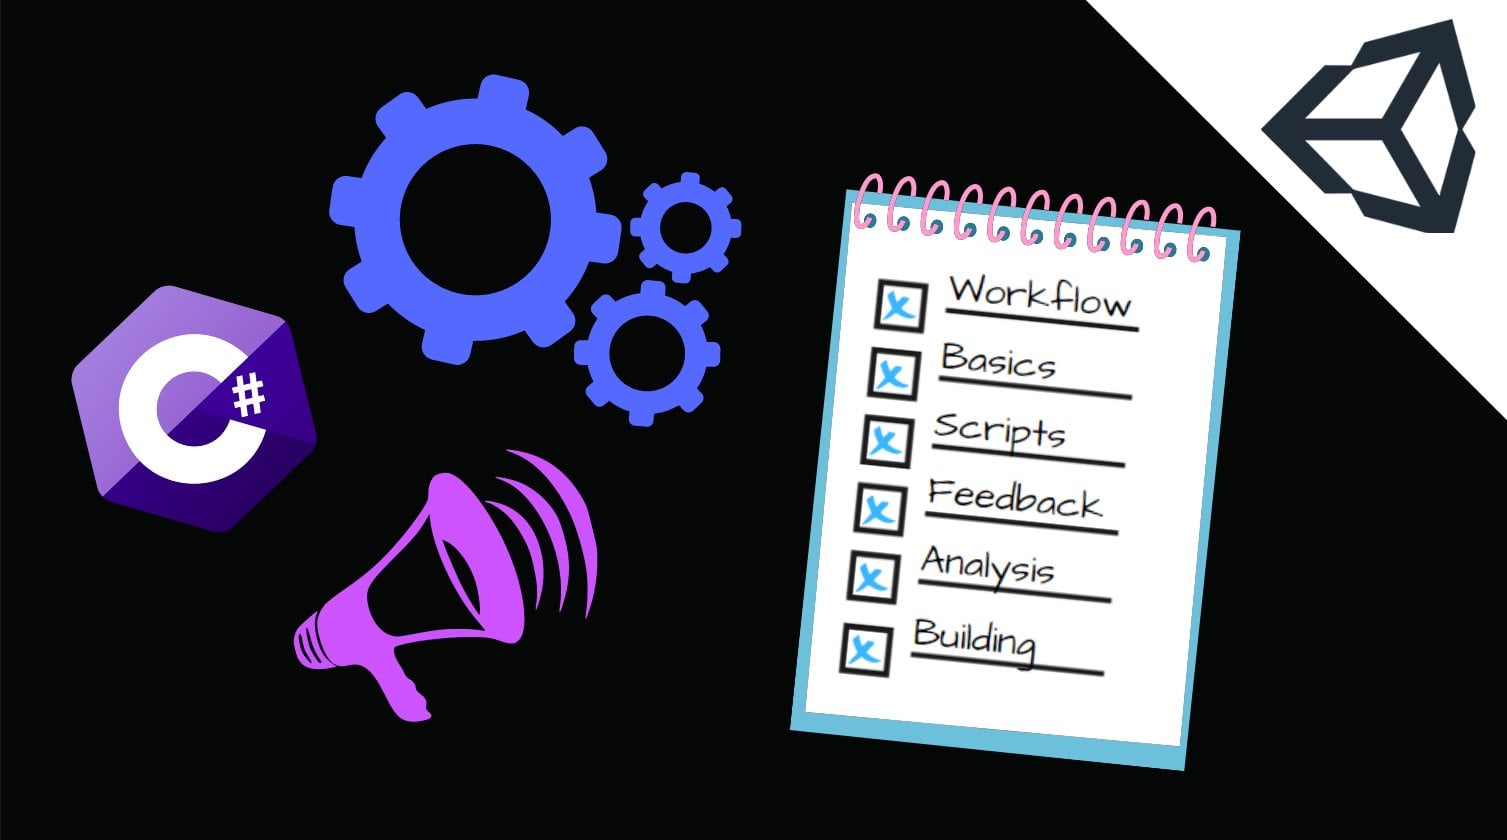
welcome to my course on making your first
ever mobile game using the Unity game
engine integrated with the object oriented
programming language C Sharp. Mobile gaming is a rapidly
growing $1 billion industry. And in 2021, alert mobile
games accounted for 59% of the total gaming
industry revenue worldwide. Creating a fun and interactive game and be an incredible source
of passive income. And the skills needed to develop games or software in general, are in high demand right
now than ever before. If you've made the
wise decision to learn how to develop
mobile games, but doing a wet to start, you've come to the right place. In this course, we will cover all the basics of
C-sharp immunity, which will allow you to make
your dream game a reality with absolutely no prior
experience required. Will also cover all of the primary aspects of mobile game development
and design, from game loops to menu systems and gain feedback
to add integration. Or as stated before, we'll be building our game using the Unity game engine
integrated with C-sharp, One of the most widely used an intuitive tool for mobile game development,
both water. After completing this course, you'll build your
very first Fanta play monetizable game and acquire the skills
and knowledge to improve and change the
game to make it euro. In addition, you'll have
created this black line, right? Building a mobile game can
be a tricky task board. The guidance of an experience, urine if you move out wherever it will be much
less intimidating. What are you waiting for for? Invest in yourself to learn the basics of
mobile development, you can start making
your very first meeting.
2. Setting Up: Hey there and welcome. Now, as mentioned in
the previous lesson, the tools we'll
be using for I'll move on, game
development journey, our unity and C-sharp, which are true, powerful, reliable, and most importantly, free tools for game development. To begin this course,
you'll need to have Unity installed as well as the
script editor such as Visual Studio to code C-Sharp in the installation process for both of these is rather simple. However, I will
briefly go over to avoid any potential
errors that may arise. Firstly, head over to unity.com, forward slash download to download the latest
version of Unity Hub. Select whichever of the blue download links
present on the screen fits your platform and follow the installation
process from that. This application will
allow you to add, remove, and update various installations
of unity on your device. Then launch Unity Hub and
ensure that the version of Unity you are installing as
mobile development checked. I will demonstrate
this process by installing the latest
version of Unity currently available onto my device by checking Android
and iOS Books mode, accepting the terms and
conditions and clicking yes, if a prompt appears, the installation
will then begin. Once that's done, head over to Visual
Studio.Microsoft.com, forward slash downloads the download Microsoft's
very own code editor. Click on the Free
Download button under the community title to install the latest version
of Visual Studio. Once that's downloaded
and installed, you'll be ready to start developing your very
first mobile game.
3. The Basics: Hey, there. In our last lesson, we installed
Unity and Visual Studio. And by doing so, set up our
development environment. Now we need to create the project file for
our mobile game. To begin launch Unity Hub and select the blue New
button under projects. Once the creation
window pops up, enter name for your mobile game and select your
project file location. After this, makes sure to
select the 2D template. Avoid any of the auto-generated
mobile templates as we will not be using
them for this course. Once you've finished,
select Create, New Jersey will generate a
brand new project for you. This may take some time, so prepared to wait for awhile. Once your project is being
created in Unity loads up. The first thing we're going
to do is make sure that Visual Studio is set
as our code editor. At the top of your screen,
select Edit Preferences. Then once this window pops up, go to external tools and make
sure that the version of Visual Studio which
you installed is selected as the
external script editor. If it is not and is not one
of the drop-down options, select the browse option
and find and double-click the dot EXE file from your Visual Studio
installed location. Before we start getting into the layout of the Unity Editor, I'm going to start with few concepts relevant to alcohols, which should make everything
easy as I understand. I'll start with the very basics. Obviously, we're going to be using Unity as our game engine. If this term is unfamiliar, just think of it as
a tool we use to simplify some of the aspects
of game development. Well, this does make some of our game development
obstacles easier. We will inevitably have to write our own code and
logic. At some point. We'll be writing this
code in Visual Studio, the coders that we
installed earlier. This will basically format
and color-code all of our logic to make it easier
to analyze and understand. It will be writing
the actual code in the c-sharp
programming language. Basics of all of
these tools will be covered extensively
in this course. So don't worry if anything
sounds unfamiliar. On top of this, there
are a few unity and C-sharp concepts
that will be useful to understand before
you begin to benefit, you'll gain a lot of the
concepts and C-sharp may be more useful to those who do not know how to develop
in any language. So if you have some
coding experience, you may be able to skip over
a few of the next points. While coding. And C-sharp is an incredibly
lengthy topic that could not be explained in
any short amount of time. A few concepts may be helpful to know before we
start developing, will begin with procedures. Procedures usually
identifiable throughout this course by the
code word void, or areas of our code
that we call at certain times to
accomplish certain tasks, such as calculating high-schools for generating map segments. The other main coding
concept we're going to cover before we
start is variables. You can think of variables. It's like storage spaces for
different kinds of data. The type of data that
can be stored is determined by the
type of variable. For example, an integer
variable to store a number and a string
variable will store text. Now in unity, there are
a few more concepts that may be helpful to
understand before we begin. An object is anything in our game that we can
assign logic to, such as character
will power up school. When we refer to as sprite, we refer to the art
design for a character. In addition, as seen
as unities way of differentiating between
sections of your game, such as the main menu section of the level select section
in different levels. And again, it is however, possible to create your
game and a single scene. And for simplicity sake, we will be doing so
in this tutorial. This is not a problem
for us because our game is not going
to be incorrectly demanding if we weren't making a first-person shooter
with incredible graphics, however, using multiple
scenes, we'd be advised. Finally, when we
refer to assets, we refer to files which
we use in our game such as PNG will MP3 files. Don't worry if this all
seems like a bit much as we will go over this
throughout the course, the only thing that
needs to be sinking into the moment are the basic, basic concepts of
unity and C-sharp. Now that we've gone
over the basics of our game engine and
programming language. Let's get started with the
layout of the Unity editor. When you don't shoot,
the first time, you'll be greeted by this rather intimidating layout door. If that seems confusing
or complicated as it will become much
more familiar with time. In addition, a lot of
the features you may see an editor we won't
need in this course. At the very top of
the Unity Editor is a menu where you can like
many other applications, save your project load
files, access help, etc. We'll get into this menu later, but it's what you're
going to be primarily using to navigate unity. Below this, we have
our scene hierarchy. This is a list of all the
current objects in our scene. Here is where we
store everything. I'm a game from our character to a map components to our
visual design objects. With a few more
complex exceptions. If an object is not displayed
in the scene hierarchy, it will not be in, in our game. Underneath this, we
have an asset's menu, which is list of
every single file stored in our games directory. If we wanted to add a song to our game or a character sprite we imported into this
location in the Unity editor, which then allows us
to add it to our game. On the right is the
object inspector, which allows us to tweak the various properties
of objects in our scene. This includes their position
in our scene, size, rotation, the logic they
have assigned to them, what they look like, etc. Finally, in the center of the
additive, we have our CGI. This will allow us to see
how game and action tested, try out visuals and much more. You can think of
it as a preview of what our players will see
when they play our game, which allows us to test our project without building
it, it all the time. Now the location and size
of all of these areas in your editor may differ depending
on your window layout. If you're using the
default layout like me, you will, should look similar, but you can change
this layer as you get more familiar to
see what works for you. Again, if this all feels
intimidating, do not worry. You don't need to
remember everything that we've gone
over in this video, but it may be beneficial
to watch it again, as you may understand
some of the concepts, the second time around. This is by no means required. However, as we will cover all of these basics
throughout the course when we come across them.
4. Creating our Character: Hey there and welcome back. The last three
videos we've covered the introduction to my course, the basics of unity and C-sharp setting up our
development environment, all the concepts
we need to know. But the time has
come now for us to start actually creating
our mobile game. Now if you look at my screen, you'll see that I'm using the default Unity editor layout. And under assets
I have everything that's auto-generated when
you make your project. And this course Assets folder, which you guys won't have. All this course
Assets folder it is, is, it's all the assets. So the current is
just PNG files, but later on when I add multiple game will also
be the MP3s and befores. If I might need those, anything I'll need for my game and all of those assets I'm going to link underneath this video under
the Resources section. You need to do is
you need to find the resources section
of this video, download the course assets, zip file, extract the zip file, so you just have
a normal folder. I need to put that folder inside the assets folder of
your Unity project. And after you've
done so, your screen should look exactly like
mine on the assets. Now our first task in Unity is going to be creating
our character. This is not going to
be incredibly hot at the moment because
we're not going to add any complex logic. We're not going to
add any scripts. We're just going to make the character that
we're going to use as a main character for
the rest of the course. We're gonna do so by going over here to the object hierarchy, right-clicking and
selecting the Create Empty. Now we're going to
name our player. I'm naming him play up. And on the right over
here we can see all of the properties this
object currently has. Currently its position
on the x-axis, y-axis, and z-axis, which we won't really be
using because it's a 2D game. However, I do recommend
you always make this 0. Now, what we're going
to need to do is we're going to need to
select this tool here, which is the move tool. This depending on your version of Unity, should be over here. If you have an earlier
version, it might be up here, but find the Move tool and you're going to have to
drag this wherever you want. You can also do so just
by changing these values. But obviously we can't
see anything yet because this object doesn't
have anything assigned to it. To make it actually
our character. We're going to add
a sprite renderer, which allows us to add a sprite
which we covered earlier, a PNG file to this object. I already typed it in, but for your case, typing sprite renderer and
select this one over here. And you can see over here this should be all the default
settings you have. And there's a sprite
over here which currently has nothing
assigned to it. These little boxes over
here is what we're going to assign sprites
or audio files, anything to when we're adding these components to our objects. Obviously, you go
into the course assets folder if
you're using it. And we're going to want to
make our sprite a-squared. So click on the player. And we're going to
drag this square all the way over there. Right now. Rather big. Which you might have a problem with if you're trying
to make a mobile game. So we're going to
actually change this property over here
on all of our assets. Select the circle, hold down, shift the square
and the triangle. And we're gonna make the
pixels per unit with 10000. Once that's finished,
we should have a much smallest bright. Now I could keep scaling
that down until I need, but instead, select
this Rec tool. Then click here, hold down
shift and move it like this so that I can scale
my sprite as I need to. Right now, that's a
much better sprite. I'd say let's maybe
make them a little bit bigger. That's much better. By the way, it should
be noted that I am navigating around the
Unity editor using my scroll wheel to
zoom in and out and holding down right-click
to move around the scene. That's primarily how I
navigate the Unity editor. There are different ways,
but that one works for me. Then we can see the scale set these very big flu values and the z scale is set
which we don't need. So let's make that 0. And let's make these 300.32. It doesn't alter or amount
match, and it's just easier for the computer
to store those values. Right over here we have our
sprite, he's just a square. If we click this game
window over here, we can see how this will
look once we play the game. And in fact, if we click
this Play button at the top, it will test our game and
basically run everything. And we can see obviously
it's just a sprites. There's not going to
move, but this is how our character will
look in the game. What's important to
note is that if I make any changes during
this game window, they don't save it. For example, I made him very long and then
clicked over here. That change is not going to save if I did it in the scene view, however, it would transfer over. That's just how Unity works. You can make slight changes to your game while
you're playing it. You can test how they work and then I will see
you won't save. So keep that in mind. Now, our character is pretty
much done for the most part, we've done pretty
much everything we can we can't do much else to it at this time
because we haven't learned any other concepts. But for now, the
only other thing we're going to do is
change his color. Let's make him a nice
yellow character. As we can see that stands out a little better in our scene. Got our yellow character
against the blue background. Don't want it will improve
all of this layer. But if you followed on, you should've created
your first character with a player sprite
renderer component out of the squares pride,
or your own sprite. But I recommend using
the official course Assets folder and change the
color to whatever you like. You can even make
them green or blue. I'm going to stick with
the other phenolics. I like how that looks. If you've done
that, you've taken the first step to making
your mobile game. The next thing we're
going to do is create an environment for this place. So he's not just standing
in the middle of the abyss, but good job everybody. And I'll see you
in the next video.
5. Designing an Environment: Hey there, and welcome
back to unity. In our last episode, we created this player object and assign the position and the
scale as well as a sprite and a color
to this object. What we're gonna do in
this episode, however, is we're gonna create
an environment to make our scene look a
little bit more alive. Before we do that, we
must first make sure that our Unity version is actually building for the
correct platform. We want. In this case, mobile. Gonna go to the top-left
and select File, Build Settings, and then
choose a platform over here. I can select Windows
dedicated several Android as those the three platform modules I installed for this
version of Unity. If I wanted to build
for something else, I could simply
selected and click Platform Module isolation or for simpler ones such as iOS, I can select Install
with Unity Hub. Playstation seems to have some weird documentation needed, but obviously we're not
going to worry about that. I am, however, going to
be booting my game for Android as I found it to
be a lot easier to test, I recommend you to
the exact same thing. Even if you have an
iOS phone like Audrey, I'm going to click
Switch Platform and offer a short loading time. It should make sure
that my project can run unity for Android. We're going to then close
this and go into a game view. We can select the right
resolution we want. I've currently set mine
to 2160181080 landscape. You can pretty much select whichever one of these you want. You can do 1920 by
1080 or even portrait, but I don't recommend you
do so for this course because only rebooting
our game landscape. Now we've got the
right aspect ratio. We're going to make
our environment, but we don't want every single environment object we make to be here in a list because that's going
to get very confusing. Instead we're going to
order them a little bit. We're going to do
so using folders or parent objects in a right-click
and select Create Empty. We're gonna call
this environment. And this is basically
going to store every single environment
object we want. Then right-click on this
again and click Create Empty. And we can see that because we wrote right-clicked
on the object, It's going to create a
child object underneath it. We can call this flow. Then we can see if we
move the environment, the flow moves with it
because it's parented. We're going to set
the environment to 0. We're going to go ahead
and drag the floor down. Now what we need to do is
add a sprite renderer. Open up course assets,
drag the square. And voila, we have a
very square floor. We don't want to square flow. We want a more floor, floor. So we're gonna achieve
this by dragging the y-axis down and the x-axis across to make sure that outflow is stretched
horizontally across our entire. See. If we go to the game view, we
can see that it is in fact covering the entire bottom
half of our screen. Then the next thing
we want to do is add a background or a
sky, if you will. I'm going to go environment, right-click and
create empty move and call this background. Once again at a sprite renderer, drag the squaring
and scale it up. Problem with this, however, is that this is going to go in front of every other object
we have in our scene. To prevent this, what we're gonna do is we're gonna change this order in layer attribute that is attached to
the sprite renderer. If we set this to
something like minus ten, we can see that both our player and our floor jumped
ahead of object. Obviously the flow
is white as is this. You can't really see
that, but trust me, they have if I move
this and make it gray, we can see the floors
in fact in front. So I'm gonna make the
background maybe darkish blue. And we go. Last thing is to make
our floor another color, so I'll make the flu green. We can see there is all very questionable looking
mobile game color scheme. And we have made a very
basic environment, but we're not going
to stop there. We want to add
some more objects. Now, we can keep making
objects like I've been doing this entire time all we can simplify the
process a little bit. We can actually
take these assets and just drag them
right into our scene. And they'll create
an object with a sprite renderer for
us automatically. The problem is this object isn't in the Environment folder
we created earlier, so I'm just going
to have to drag that and place it there. And you can see it moves to write exactly what
it's meant to be. Then I'm just going
to scale this down, maybe make it 0.7
by 0.7 was make sure to keep the x and the
y scale the same if you don't want to stretch things and that's actually
not big enough. So let me make it not
smaller than 0.40.4. Then I'm gonna move it
down and we can see voila, we have a spike. Let's make this spike read. Now this is a very small spike and I don't want once
most five, I want three. So what I'm gonna do, I'm
gonna select this object. I'm going to click Control
C. I'm gonna hit Control V, and it's going to
make an exact copy of the object in the
exact same position. So we see, we can't see it now, but if we drag it out, voila, there is our second spike
and we can actually do this twice and make three spikes, which looks a lot better. Now what we're gonna do
is we're going to go ahead and click our game view
so we can see how it looks. It doesn't look bad. I think what I'm gonna
do is I'm going to go ahead and select the flow, select this rectangle
tool and then drag it down so it's covering the entire bottom half of the screen, which looks a little
better in my opinion. Last thing we're gonna
do is add some coins. So we're going to use
that quicker method we discovered dragging right in. I'm just going to scale it
down using the rectangle tool. And I'm going to put
that over there. I think my coin colors
should be gold. That's orange.
It'll work. Weird. Gold, orange is
gonna be my color. I'm gonna do the exact
same thing I did with the triangles and just copy it across and
make three coins. Then I'm going to
select all three of these circles by holding down Shift and putting that inside
the environment again. Now we can see our
environment is all stored in this one object. So when we move the object, the entire environment
and moves with us. This could be useful
if we wanted to make a weird game where the environment moves
but not the player. But for our case, this is gonna be a
pretty static object, is just used to store all of these different
environment object. Now the last thing
I think we should add is maybe a little
bit of details. So first thing I'm
gonna do is make this slightly lighter because I don't exactly like how it looks now. I'm obviously going to want
to just adjust these by holding down Shift and just moving them slowly up like so. Do the same thing with the coins so they look a
little bit better. We are, and I'm gonna put
the player on the floor, so it actually
looks like a game. Now our environment is
looking a lot better now, but I wanted to move
every single thing, including the player a
little bit to the right. But instead of doing that, I think I'll just move
my camera to the left. Camera is going to
be what's capturing every single object
in the scene. We can see that if I move it, we can see the preview in the
bottom right is changing. So if I wanted to make a
camera follows script, obviously move this
and the camera would capture different
parts of the screen. I'm going to move that slightly
to the left, maybe there. And everything's looking
at a little bit better. In my opinion. Environment is basically done. Obviously, we're gonna need
to add a little bit of logic to all of these
components in a bit. But we're going to get to
that later in the course. The coins and the things
don't really do anything. Now, we could play everything come just
sits there stacking. But we've taken
the first steps to building our environment
using Unity. Good job, and I'll see
you in the next video.
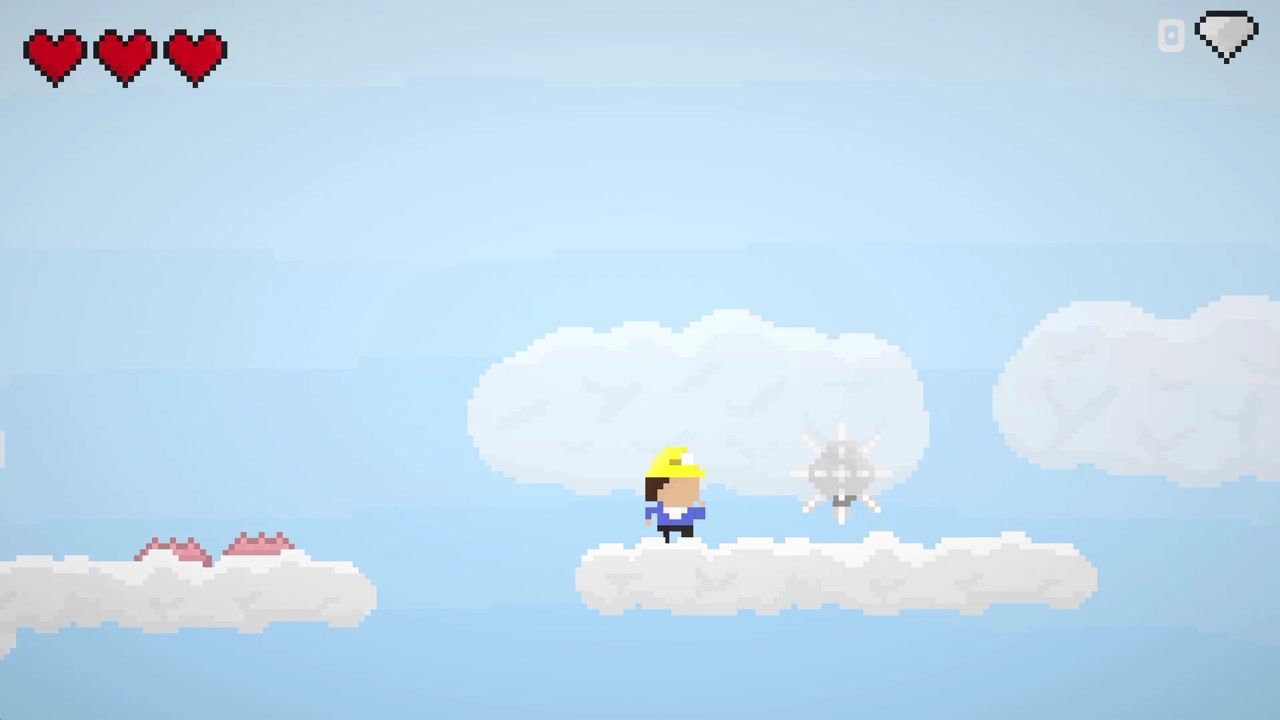
6. Intro to Physics: Hey there and welcome back to
unity in the loss actually, as I'm sure you
remember, we created this very questionable
looking environment for a mobile game. What we're gonna do
in this episode, we're going to actually delete some of the parts of
the environment that we make start a little
too complicated for where we are at this course. And we're going to assign
logic to the ones that left. Let's might sound like
we're moving backwards, but we're not because the
point of the last episode wasn't a teach you how to
make this exact environment. It was to teach you how to
make new sprites, add them, GO game, and order them
using those parent objects. We went over, go
ahead and delete all of the coins and the
spikes in your scenes. You have just the floor of the background and
the player left. Then you can want
to take your plan. You're going to move them up so they're
suspended in the air. Now, this bit of a preemptive
step, but trust me, I've taken multiple takes
of this video now and every single time
I don't do this, it means you can't DC one of the things
I'm demonstrating, go ahead and take the
background and you're going to want to make
that a lot darker. Same with the floor and
same with the plan. Now this doesn't look
great. Yeah, I'll agree. But this is very
important because I want to demonstrate something
with a new component. And this component actually
the way you see it has a green outline
around the object. And we're not going to be able
to see that unless we have darker colors, there's
more contrast. Because obviously
we have library and library and light yellow, which is probably the
three worst colors to have against light green
in terms of contrast. So I'm gonna go ahead
and go to my player. Now that I've made my
thing a little darker, and I want to go and
add a component. And I'm going to add with
cold box collider 2D. Now, I'm sure as you saw, there were two both
clutters here that we can select it from the boss
glider and the box cloud 2D. Pretty much whenever this is the case when we
search for components, if there's a 2D option, we're going to want to use it because we're making a 2D game. The 3D option won't
work like later on. We're gonna add object
quarter rigid body. There's also a rigid body
2D and we're going to use the rigid body 2D
because it is built for 2D games, just
like we're making. I want to go ahead and
choose the box collider 2D and click that. And that's going to
add it to our object. And here you can see that green outline I
was talking about. You might not be able to
see it in this video, but you should be able to
see it on your screen. There should be a green
outline around your plant. Now, this outline is actually
the collider we just added. So here are the Box Glider 2D. We can see we've got a collider material will trigger used by fact they used by
composite offset size. All these properties,
this basically changes how the collider works
and looks on our object. Alkali over here is actually
perfect for our player. It's exactly around the player. The reason that this
takes place is because the player has the exact
same size as the sprite. Now this isn't always the case. Obviously in other
course assets, we can see this square
is exactly filling the size of its container. But if we were using a
circle, for example, and we added a box collider, we can see that it goes
on the outside there. That green line of the
day is currently now on the outside of the thing because that's the
size of the spread. Because we're using a square, we shouldn't have that problem. But that's just something
to note about later. If we want to add a box
collider and we wanted to change the constraints of it, will go to this thing
that says Edit Collider. Then we can change and
scale the collider just as we see fit to make sure that
it fits how we want it to. Now our boss cloud over here is basically going
to tell the unity that when we are colliding with an object and I drag this
down and I go over the floor, That's going to trigger
the collision event and unity is gonna
react accordingly. Now because this is a
normal box collider, what should happen
when we fall is actually going to
stop because it's a known phosphite will
get into another type of loss Claire later, which
is quarter trigger. We can actually change it to
trigger by just taking that. Then it's not going to stop, but it's going to
trigger the same events. So we'll use that obviously. If, for example, you're making
something like a bullet, like a projectile that
goes through anatomy. You'd want to make
that a trigger because then it's not going to stop
when it hits the enemy. It's gonna go through,
but the enemy is still going to trigger an event, you can say, okay,
take that much damage. That's a little a
high-grade now, but we'll get into that later. If we do run the game, however, we can see that
we're just going to stay suspended in the air, not colliding with anything. So we're not gonna see the
effect of their collider. And if we actually
move this down, we can see me go
through everything. Now, this is for
two main reasons. One is because the floor doesn't have a
collider attached to. Two. We not really plotting
with anything. We're just kinda colliding with nothing because it's just a
sprite, it's not a provider. But the second
reason is actually that because we're moving using the s2 collisions won't
take place to even if this was built so that a
collision could take place, we wouldn't see it now,
which isn't great, but it's fine because
we're going to add another component later that
lets us see the collision. So don't worry about
that right now. I was just trying to
demonstrate how this is not going to collide because
you never know collider. However, to fix that, we're going to go
back to our scene. We're gonna click floor. We're going to click, add
another box collider 2D. Let me see again, it goes exactly on the outside
right where we needed to, because this is the
same squares practice. Very cool. Now we have two colliders. And if, for example, we're playing a game
and this one will collide here, it would stop. But because we don't have
any movement in our game, we just have to static
objects with highlighters. It's not really
going to do anything like I said earlier,
if we move it here, this ignores laws of physics because I'm basically moving
it using a same thing, even if I'm in play mode. To actually demonstrate
these colitis, we're going to add another
component and we're going to introduce this component is going to be called
a rigid body 2D. Rigid body 2D basically
is an all built-in one. Add physics to this
object component and see if we hover over
different aspects of a physics. It has the body type, the material, the
automatic, the norm mass, the linear drag,
the gravity scale, pretty much anything relating to physics or at least the
first part of physics, Newton's Laws is in
this rigid body 2D, we haven't got acceleration,
we've got gravity, we've got everything, pretty much everything that we need in terms of physics is going to be covered
by this rigid body. Now this obviously can also help us if we wanted to
make something bound, so make someone collide and
then do something else. We're not gonna get
into that right yet because we're not going
to into fall game. First of all, we don't
want bouncing sprites. And Second Bull, that's
a bit more complex, which we might get into later
when we have collisions. But for now, all
we're going to use this rigid body to
do is test to see if this character will fall and stop because we've added
the two colliders. If I go ahead and hit play, we can see that it does in fact do exactly what we wanted. We've now added physics
to this object. We can actually move this. And we can see that the physics is obviously it's a
little weird when I go up because this is
not really how you should be testing stuff like I can move that up and put
it back and then we can see what I mean. So I actually went through the playback because
I'm moving it so fast. This is a weird way for unity to see these
conditions typeface. Obviously this isn't how anyone will actually
be playing the game. I'm moving in the editor. But yeah, if it was,
it'd be cool to demonstrate how physics
actually worked. This rigid body that
we've added the play is basically all the
default settings here are pretty much
all we'll need. We don't really need to
change too many of these, but I'm going to change a few just to make it slightly nicer. The first thing
I'll do is going to make collision
detection continuous. And this isn't required. This basically makes it so
that you can ensure you saw when I was moving
it up and down 1, it went through the player. And if I have that, if I have continuous
collision detection, this chance of this happening
is minimized because it's continually checking
if it collided there. I think the earners who
went through there was because I was again
moving in the scene. But I think in an actual game, anytime moves over it
would send the collision. That's just good practice. I generally set that
on my rigid bodies, but it's not required. Angular Drag. I'm
also gonna make 0 and I'm going to make
the gravity scale too. I always find that
probably scales of one or a little floaty you flow games To should be
sweet spot like that. You can see that's a
little more normal gravity like once we've
done all of that, There's only one more thing we need to do to make sure that our game for our character has introduced
physics correctly. And that's going to be
freezed this rotation. Now you might not
know what this does. I'm gonna demonstrate
over here if I move this so that he's going
to land on that corner, on that vertex, you can see that the player
is going to fall. Then just like real life
down soften role in falloff. This is very realistic
and it's very cool. But for our game, if we leave this ticked, it just causes problems later on when you
think about if we're moving and we hit
something that we don't display to
be rotating mid, if you take geometry dash for example, you can see that the, while the cube spins when
it jumps the square rather, it never actually changed the rotation when
it bounces off. Things are false or things. That's pretty good practice
for mobile games because imagine we're trying to play our game and then
we fall like that. And we have to keep playing
our game as a sort of sideways squareds.
It's not ideal. We're going to go ahead and
click freeze rotation z. Then if we go back
to that example, move that over
there and we fall. We can see that we
no longer fall. We stay on the edge and we
can actually stay on the edge right up until nothing
is collide anymore, in which case we fall through. That's the beauty of
these colitis and that's what freezing our rotation does. After we've done this,
we've pretty much done everything that we need to in this lesson to cover the basics of an
introduction to physics, we could also add a rigid
body to this floor, but as I'm sure you guessed, then the flow will
just fall just like the player has and
that wouldn't be ideal. And there's really no point to adding our gravity scale of 0 to this floor object because it's just
a little tedious. We don't need it for our game. So for now we pretty much
done everything that we can and we've introduced
physics entire game. We can see now we
have a falling Q, which is very cool. It's going to allow us
to stop the next lesson, which is actually
going to be adding our very first C-sharp script. And we're gonna make it sort of our player can move around.
7. Our First Script: Hey there and welcome
back to unity. The last episode, as
I'm sure you remember, we added a rigid body
and a box collider to, I'll play our object to
make them effected by gravity and collide
with the floor, which we also added
a box collider 2D. Now this is cool and all, but it comes a certain point in our mobile game
development journey. Well, we need to actually start writing our own code if we want the objects to pretty
much well what we want. In this case, I want to
create a movement script for my player to stop making
this game will again, because currently
all it really is is a square that falls to the
ground, not super exciting. Now, do this, I'm gonna need to start writing my own code. This can be a bit of an
intimidating thing to do when you just starting out. But luckily, I have created a cheat sheet code file inside
the course assets folder, which you hopefully
installed earlier. If you didn't, you
don't need it, but I do recommend you install it because it
can be quite useful. If we go ahead and open that up. I have got over here a list of all the very basics of
coding, which with examples. And while most of these
things don't really do anything yet,
this can be helpful, especially later on
in the course when we learn about them for
you to come back and check if maybe something's
not working that you've got the syntax right,
right the top, we have variables and I'm sure you remember from
our introductory video, variables are basically
just storage spaces for different types of data. This x variable stores
an integer or a number. This y-variable stores
string or text. This Boolean variable Z stores or Boolean or true or false. And this rigid body RB stores
a rigid body component, which is the exact component we added to our player earlier. Making variables
like this will allow us to actually reference
them in our codes so we can go ahead and assign that specific rigid body to this variable
we made called RB, and then alter the RB variable, which will in turn alter
this rigid volume. For instance, if I wanted to
change the gravity scale, I could write code that said RBD not change gravity scale. And then RB wherever
it's linked to, which would be a rigid body, which in this case would
be this particular rigidly attached to the player is
gravity scale would be changed. Now underneath this
we have arrays and I never gone
over race before. But we're going to get into
it later in the course. We won't need them now, but
it seems like a decent thing to just at least
go over the stock. Now, what arrays are basically like variables but in a list. So you can see up here it looks exactly like public int x, except it's public integer, and then it has two square
brackets afterwards. What these square brackets
basically mean is that I'm not going to store
one variable in here. I'm gonna stall many variables. And so this public int x
array is basically going to store a list of variables
called x array, different ones you
can say, Okay, the first variable and X-ray, you can assign a
value there, then you can assign a second value, the third value in this section, really useful if, for
example, if you think about, we want to maybe store all
the scores of leaderboard. We don't want make a
different variable for every single school will be better if we make
public integer array, I call it scores and then assign every single player score to
a position in this array. The same here with a string which you can maybe he used to store dialogue or text
or something like that. If this doesn't
really make a lot of whole lot of sense
to you right now. I don't blame you because it'll make a lot more
sense when we do it. But don't worry, I
just wanted to cover the very basics of
what arrays are. Underneath that we
have procedures, which we have gone over
in our previous video. Basically, procedures are just
areas of our code which we call at certain times to
accomplish certain tasks. This void start, this procedure is actually
auto-generated by unity, and this is with
the procedure with Unity calls whenever this
code runs for the first time, this update procedure
is very similar, except this procedure Unity
calls every single frame. We'll get into those a little later when we're writing
our movements script. But just know that
these procedures are just like we talked about, except unities calling them
were not called the knees. Underneath this, we have
another example of a procedure. This procedure is called open chest, obviously
doesn't do that, but I just wanted to demonstrate that you could actually write your
own procedures. Underneath this, we have our new concept called
local variables. And local variables we can
basically write in the syntax. Syntax is that text format. We need to write stuff in
encode to make sure it works. We can write that with the
syntax int x equals three. What this is basically going to do is this is going to make a variable called
x set to three, but this variable
is only going to be referenced inside this method. Once this method runs out, the variable gets
effectively destroyed. If I call this something
like local gar. And then I go ahead and try
and reference local var. And here we can see that
there's nothing cool. If I type it in,
it says the name local var does not exist
in the current context. If I move it inside
this procedure, however, we can see that it
knows exactly what to do. And it doesn't say it doesn't exist because it's right there. We decided right. Underneath this we have our if statements and
these are conditions. This is practically
the fundamental, one of the most fundamental
aspects of coding conditions. If statements, if else, statements, if else,
if, et cetera, again, to all of those now, basically all these statements do
is they check logic. For example, if we're making now jumping script and we want to know if
players landed will check that using an if statement will not exactly
an outpace because it's not great for performance. But if you could theoretically
check every single frame, if player grounded and
if he is, then say, can jump for example, over here we're saying if x
is greater than five or x, x is equal to three. A good example of if
statements is if we were trying to calculate whether the player has
scored high school. So if he did, you could say, if high-school, if score
greater than high school, if your score equal
to new high school, or if highscore is less
than our current school, then run code which
basically says, Okay, this is a new high school. This else statement will only run if this statement doesn't. What this actual code is
saying is if my variable x is assigned the value
three, run this code. If it's assigned to anything
else, run that code. We can actually expand these
statements a little bit by going if x is three, do that. Otherwise, if x is equal
to five for four, do that. Or if x is equal to five, sorry, I put one equal sign
instead of two, x is equal to five. Do that, else, do that. This code is a little
more complicated. It's going to say, okay,
if it's three, do this, if it's full, do that,
if it's five to that, Anything else do this. And this kind of
code isn't great because you can see that the computer has to
run through that. But then that, then, then after for our first mobile game, if we could some
things like that to make it a little bit
easier to understand, it's completely fine as
part of the process. Underneath that is
the final concept which I wanted to teach. Cold loops. And loops are effectively ways of running the same
code over and over again. This for-loop, which you
might have heard before, basically runs a
certain amount of time. What this for-loop
does is it says full x is equal to
0 at the start, while x is greater than three, increase x at the start or
at the end of the loop. What that's basically
saying is we have four, but here we're saying, okay, I want to use the x-variable. And at the start of this loop, I want to make sure it's 0. Then after that I have
a condition which must be met for the
loop to keep running. So in this case, as long as x is greater than three,
keep the loop running. On the last thing,
I have code which runs at the end of every
single loop cycles. So basically saying whenever
the end of every loop cycle, X plus plus, which is basically code for
x increased by one. You can make an x plus
three x plus five. In this case, I
have x plus plus, which means increase x by one
at the end of every loop. What this loop is saying
is full set x to 0, while x is greater than three, run the loop and
increase x every time. This loop is actually
not going to work, we're going to have to change
that to less than three. That will make a
whole lot more sense. This is basically
saying, Okay, well, set x to 0 at the beginning, while x is less than three. Keep doing with the loop
and increase x every time. If we had to write
something in here that Newport execute twice or three times rather because
you can see runs the first time at 0,
then it increases. It's one, it's still
less than three. So it goes again to store
listen to it because again, three, not less than three. So then the loop ends. Underneath that we
have while loops. While loop basically do the
same thing as for-loops, except the condition for a
while loop just needs to run, just needs to be true and the while loop will
continually run forever. So if we're never changing x, this loop is gonna run
from infinity because if we set x to V2 is going to okay, X less than three, okay,
X less than three. Now this is going to change. The for loop will run
a set number of times, but a while loop and
run for infinity, which makes them
a little bit more troublesome sometimes
when we make errors. Because if we have an air of the course this
Lutheran for infinity, it almost, almost
always causes a crash. And that is not great for
our computer or our code. It's not bad, it
doesn't break anything, but just in terms of
our peace of mind, sometimes it causes
the whole unity to have to close and then we might have
not saved something. I would recommend not using while loops until you have
a complete cross with them. I don't foresee us needing while loops throughout
its entire force. And generally speaking,
while loops are rid of a niche thing that you
don't always need encoding, but you do sometimes needed just make sure when
you use a while loop, you use it, right? And so that it does have a terminating condition
because otherwise you can cause a crash
back in ten years. And now we're going to
try our hand at making our very first
script from scratch. We're going to do that
in the assets folder. Go to Assets and we're
going to right-click, we're going to go create,
we're going to make a folder and call it script. This isn't required, but
basically just means that we can put all of
our code in here, so it's all nice and organized. You don't need to do that. That's just how I like
to organize my assets. And right-click again
and we're going to go create C-sharp script. I'm going to call
this one movement. Now, if I double-click the
movement script is going to open it up in Visual Studio
just like I wanted to. And we can see over here in our script we have
three lines at the top, which are all using system
collections and Unity engine. Then a class called movement stored procedure
and an update procedure. Now, I don't know
if I covered this in the previous script, but basically what
this green letters, what these green letters
are, our comments. And that's basically the
way of saying, okay, I don't want this code to run, but I want to have it as text. If I wanted to write
something underneath. This program is cool. Obviously, if I write
that without comments, unity is gonna be
very computers can be like What did he
trying to say here? There's no token syntax error. The name cool does not exist. The name this could not be
found by saying what is this? What's program I while you're using the
IS code word here, what's cool, It's
been very confused. What these two forward
slashes do is tell unity, I don't want this to run. I'm just writing
plain texts so I can communicate something to
someone who reads my code. For example, when
you make this file, unity auto-generate two
comments over here for you. They tell you how often the store procedures
cold and how often to update procedures code they say start is called before
the first frame update, update is called once per frame. That's the Unity
developers telling you what these two procedures
do so that you know, you can also hover over them and it'll tell you the
exact same thing. So basically that's
saying is that unity makes these procedures and they call them on their own. We don't have to call
these procedures. We can use these
procedures that Unity calls to build the
rest of our code. We can delete those
two comments. We can start making our very first movement script using these two procedures. The first thing I'm gonna do is make a couple of variables. The first variable I want is
a public rigid body 2D RB. And that's going to be
to create a reference to the rigid body is stored in the player so I can
make them move. I'm gonna create
another variable, a public integer, and
I'm gonna call it speed. That's gonna be a speed
that the player moves up. I'm going to create
another variable of quality, jump false. That's gonna be the speed at which the player
jumps off the ground. I'm going to create
another variable and I'm going to call it ground. And that's basically
going to tell us, is the player grounded or not? Obviously, we can only
jump on the grounded. Now, as a warning, I'm gonna be writing all of this code using
keyboard commands. I'm gonna say if space is
pressed or if this is pressed, you might be thinking
why we're making a mobile game and that's true. But if I want to test my
game in the Unity editor, I can actually write
keyboard commands, even though I'm Bowden for Android and Unity will be like, okay, just use the space bar. And then when I build
the game for Android, obviously those commands
and never gonna run. So if I write under here update, if I say if the person
passes the space bar, jump, then when I
build my gave Android, there's no way you're
gonna be able to jump because there's the spacebar. But when I'm testing an annuity, it's what I'm going to use to
make sure everything works. That's actually how are we
gonna be doing this course? We're going to build
all of this course tested for computer and
then write the end. I'll show you how
to change all of your input commands so
that they work for mobile, it's actually really easy
because we're not going to have that many controls. We're
just going to have a jump. That jump we're going
to trigger by tapping. But for now, we're
going to do it via the spacebar to make things
a lot easier to test. I'm going to type input, got fgetc key down. And I'm going to open
bracket and stay key code dot space. Then underneath this I'm going to open curly
brackets, which we, whenever we use an if
statement or procedure, we typed the open curly bracket and then we press Enter and
foremost them nicely for us. I'm going to over here,
let me delete those. I'm gonna say comment in jump. Obviously this
comment like we went over isn't going to
run, it's just text. But basically what this
is going to do is I can use this to store code
I haven't written yet. So I know what I must put that. Now every single frame, if I get the Space key down,
I'm going to want to jump. Now. I don't want to jump every single time for us to Space key. I want to jump only when I'm grounded inside
that if statement. I'm going to put another
if statement down there. If grounded. I'm going to open
those brackets skin. Now this isn't what's known as a nested if statements
in an if statement, inside an if statement,
I could actually write this as one if statement. But for simplicity sake, it's a lot easier to read in my opinion, if you do like this. And we can learn
about those compound if statements later on, we're not gonna cover that now. Now if Grounded, we're
going to want to jump, then we're not going to want to jump if
we're not grounded. Now we actually need to
write a little bit of code to make sure that
we can actually jump. I'm gonna go over here and I'm gonna make my own procedure. I'll write public void and
I'm going to call it jump, put parentheses,
and then open curly bracket and press Enter
and inside by jump, I'm going to write
code to make the jump. So I have this reference to the rigid body and
the rigid bodies, what we're gonna
be using to jump, I'm gonna type RV, and that basically retrieves
the rigid body. Now I can do dot and
I can change right? Velocity. That basically means
I'm going to be altering the velocity
of the rigid body. That's the linear velocity. So it's up and down
and left and right. I can make this velocity
wherever I want. I can go equals. And then because I'm putting
in two values, an x value of x velocity
and y value for y velocity. I'll type new vector two, and then open parenthesis and close parentheses
and then semicolon. We always put a semicolon
at the end of our code. What this is basically gonna do. It's gonna say, okay. Set the RB velocity to
wherever I want it. If I go 55, the RB velocity when I jump is going
to go like this. And if I set it to minus 55
is going to be like that. Minus five and minus five
like this, it'll go, whoop. And if I set it to, for example, 05, it'll go whoop. You might be thinking,
Oh, that's what we want because we
want it to jump. But if this is the case, I'll gain would
basically go like this. You jump and the eukarya and moving the jump, we
don't want that. We want to jump with
the same momentum you've been carrying
the entire time. So in other words, we
want to keep the velocity of whatever the rigid body
is in its x-direction. So if you're moving back or
forward or standing still, we want to keep that and we
only want to change the y. I'm gonna make this
y-value jump force. That's the variable
we made over here. So currently is integer is set to 0 because we haven't
assigned a value to it. But we can go into the
Unity editor and we can change jump force to
wherever we want. And that's the speed
with which you jump. And then instead
of putting 0 here, I'm going to type RV
dot velocity dot x, which is basically saying, Okay, make the velocity,
the x velocity. So don't change the x velocity, but make the y velocity
whatever value is stored in jump force, which is gonna be a number which we're going to
assign whatever we want. That's pretty much all our
jump code needs to be, we're going to jump up
and fall back down. This should actually work
if we go into Unity. If we simply remove
the comment from this and put parentheses after, then we're actually
calling this method because we've typed
jump parentheses, we're calling this method. If I had another method
called jumped up, I could type jumped
up parentheses and that would pull that jump up procedure
for because I don't, it doesn't find anything because I have this jump
procedure though. I'm calling me jump
procedure as long as I press the space
bar and I'm grounded. Now, I'm going to jump
up and land back down. Obviously we haven't
finished code, not yet, but if we go into Unity, that should actually work
just how I want it to. The only thing I'm going
to need to do, however, first of all, is I'm going to need a sign a few
of these values. So the first thing I wanna do, if you haven't already
Drag obviously a movement script onto
the player like so. Then once you've done that, take your rigid body and drag
it onto this RB variable. So we have a link to them. Then you can set speed
whatever you want. I'm gonna set five, obviously,
I'm coded that yet, so I'm not gonna do
anything and I'll make my jump false five as well. Then I'm going to
tick this ground of variable because we
can see in our code, I can only jump
when I'm grounded. And because I haven't
actually coded the grounded logic yet, I'm
never gonna be rounded. It's automatically
going to set to false and I'm not going to jump. But if I say ground
true, It should work. Now if I'm playing,
I press jump. You can see I jump up,
which is really cool. We've not coded a very
pathetic little jump. And the reason we use variables
is because I'm sure we can all agree that jump is
nowhere near high enough. So I'm going to change this
jump force and make it ten. See, that's
a little better. I think that's
almost good enough. I'm gonna make my jump
for something like 12. We have a nice big jump
for our mobile game. Now as we covered in
the first episode, if we make changes
during play mode and we click away, they don't save. But I can just remember
what value I had, put that back in and then I
won't have to actually go into my code and change
this variable five or 1270. I can just change the
variable and then I can change whatever
is stored in that, which is really cool. Now we have our jump working. We want to make sure
that we can only jump every time that
we hit the ground. We're going to go ahead and
make two new procedures, and both of them are
automatically generated by unity. The first is gonna be
on collision enter 2D. I'm gonna say grounded
equals fruit. The second is going to be
void on collision exit 2D, and we're gonna set
grounded to false. Basically what this is going to do is this is going to say, every time we collide with
something, make grounded true. Every time we collide
with something or no longer are in
contact with it, set ground to false. And if this works correctly, we should take around to false. And at the beginning, we can go to here and we can see
grounded is false. And as soon as I land
grants extra set to true. And if I jump again, granites
false and then true again. And that's basically
all the script we need to make our jump code. We can press Space
much time as we want. We can only jump
every time we not, which is really cool. Now, this would work. But the problem is this
is a little bit of a sticky situation because if I leave the code
exactly like it is, and then I can live with a coin. I'm technically lighting
with something. Union is gonna be like,
oh, he's colliding. He can jump again, but I
only want to be grounded as long as I'm touching
this floor material. So I need to make a
way to differentiate between this flaw on
all other colliders. I'm gonna do that with tags. I'm gonna go over here to
the floor, click on floor. I'm going to click tag
and then add a tag. And I'm going to
add a ground tag. Then we can go to here
back to the floor and we can assign that
ground tag over here. You can add tie something like I did add tag and then
type in the name. And then we have a ground tax. And now we have a way to
differentiate between whether what we're hitting is
a ground or anything else. Going back to this code, I'm going to go
over here and I'm gonna type collision collider, dot compare tag, open brackets,
quotation marks around. Then I'm gonna open
curly brackets. Say grounded is true. Obviously I could type
equals true at the end here, but that's actually
going to do that automatically for
me because I have. It equals true here. But as doing that
automatically for me, because I'm not
putting anything in, it automatically sends
to true in the same way. I can actually type
this if grounded, that's meaning if
grounded equals true. But instead of writing
if chronic is true, I'm just writing if grounded, it's a simpler way of doing it. Over here. I'm going to say I'm grounded as long as I'm
colliding with the ground, I'm going to copy
this exact code and put it under my exit thing, except changing
this back to false. Now what this is gonna do is basically not
change anything. But if we were to have another
color that we live with, I'm not going to be grounded
unless it's the floor. My team, like a bit
of a weird thing to do now because our
code is working fine. But trust me, it will
save a headache, save us a headache
in the long run. The last thing we need to do is make sure that we're
continually moving to the right because we need to move to our game just
like Azure dash, so that we can interact with obstacles and
jump over things. We're gonna do that using
the speed variable. Now let's update is called every frame like
we've covered before, but we don't want
this update to be called every single frame. We want it to be cold every fixed interval so that
it doesn't change if we running the same
fossil slope that you can use void fixed update board. Now fixed update is
exactly like update except instead of every
frame, it's every interval. So I think it's 0.01
seconds or 0.15. You can set it in your code. But yeah, that's basically
what that's gonna do. I'm gonna go ahead and type RB. Don't velocity
like I did before, it equals new vector two. Except this time, I don't want
to change the y velocity, I only want to change
the x velocity. We can actually copy this exact code of a here
and swap them around. So instead saying RB dot
velocity or x over here, I'm gonna type RB dot velocity
dot y in the y thing. And then for the x,
I'm going to set it to speed on what this is going to do is every single fixed frame. So every integral,
I want to make sure my velocity is
equal to the speed I want to travel out and
keep the velocity of y. And every time I jump, I want to keep this
x velocity and jump. If we go back into
our code and we set our speed to something
slow like to. We run our game. We can actually see this
in action and see it here. We're sluggishly moving
along and if we jump, we jump keeping the momentum. And that is basically
going to be our movements script for the
start of our mobile game. This is the first
step we've taken to making a mobile game as
a really exciting one. If you followed along, good job. If a few things have sounded
a little overwhelming, I completely understand
and I have actually linked my original code in the resources section
of this video so that if yours didn't work, you can fix it up and make
sure everything's perfect. You incur on with
the course because I want you to be stuck
on this video. I do hope however, that this video has
explained this, these concepts quite well. And if you've copied my code
exactly as I like this, you should have exactly
work in program of sodium. Scroll over it so you can pause the video and see if there's
anything you have different. But everything should work fine. Just check you
haven't misspelled anything like
collision or collider. And there's a few
concepts in here like compare tag and velocity, which we covered quite quickly. But that's just
because they're not super important at the moment. They're just used to
move the movement, to do the movement
of our character. We're always going
to repeat them. It's gonna become a
lot more familiar. But if you've gotten
to a point where your character can move
and jump, great job. You've taken a massive stride and you'll move on game
development journey. I'll see you in the next video.
8. Camera Follow: Hey there and welcome
back to unity. In our last rather long episode, we created our very
first C-sharp script and integrated into
the Unity Editor, which allowed our player to move along the scene and jump. This is great. It's a really big step towards making our mobile
game a reality. And we can actually see it in action here, just like
we did last time. So we can move along and jump. And obviously we
can only jump when we're on the ground,
which is really cool. The problem with this is
that once we reach the end, we have noted what happens to the player
because we're just seeing this mean for
us as developers know, players currently plotting to his demise and the
editor into the abyss. But the players will have
noted that happening. So to minimize this issue, what we're gonna do
is we're gonna create a camera follows script. And we're going to make
sure that the camera is always following the
player to make sure that we always know where
we are as the players. Now, we're currently
a bit lost an editor. So I'm gonna teach you
another quick trick of Unity. You can double-click on the main camera and it'll take you right back
to where you want to. You can do the same thing with the player or the environment. Basically zooms in. If we've lost someone else, they were like, Oh, where am I? Double-click the main
camera and you are back. Now. Let's go into scripts and make
our camera follows script. Right-click, create
C-sharp script, and we're gonna call
this camera follow up. Make sure you don't
name your script camera because that's a reserved word. And I did a while
back and I ran to Sony issues and I don't
know what was causing it, but thankfully, you don't have to make the same mistake I
did back in the day. So now go to the
main camera and make sure your camera
following script is a signed to your camera. Also as a general note,
when naming scripts, make sure to not include any
spaces as this will make unity unable to read the script because
this name over here, the class has to correlate
with the name of the file. And obviously this
class named kinda have a space because then
the code won't know what the classes and whether the model behavior
starts and it's a mess. So makes sure it's one word. Now, open up your camera
follows script and we're gonna start by making a variable
just like we did last time, except this time
instead of referring to a rigid body or a string, we're going to refer
to a game object. And this is basically
just a fancy way of saying we're gonna make a variable that stores an object as we covered right at the
beginning of the course. Objects or anything in our game which we
can assign logic to. The player is an
object, cameras and object this environments
even an object, the floor and the
background of both objects. And yeah, pretty much
anything that can have logic assigned
to it is an object. So we're going to create a
public game object player. And this actually going to
allow us to choose one of these objects and assign
it to our script. So if we go to our main camera, we can actually make sure that your camera follow
script is assigned. Mine is. But if it doesn't, remove it and just drag it in. And we can drag the player into this player thing and make
a link to our objects. So the player variable is now linked to
the player object, which is really cool
because this allows us to access all sorts information
about this object, including its current
position, which is really, really cool because
as we play a game, I'm sure you can see the
position of the player. It's constantly
moving and that's why our camera is not
able to track it. If we can move our camera according to the
position of the player, it's gonna be really,
really great for our players to do so. We're gonna go ahead and
delete the start method. We're not gonna need
it for this script. And we're gonna go to the Update which as we covered last time is the procedure that Unity
calls every single frame. Obviously, since we're building
a camera follows script, we want to make sure
that the camera and the place positions or
sink every single frame. Now to do this, we're gonna
go here and we're going to type transform with
a lowercase t. This is basically
unities way of saying whatever object is currently got this script attached to it, access to that transform, the transform attached
to this game object and see if we hover over
this game object, in this case is the camera because that's what the
scripts attached to it. Now move a dot, we can see all the different parts of
a transplant they can do, transform it
opposition, transform, local scale, transform
dot rotation. If anything we can think of, we're gonna need transplant
opposition right now. So we'll go to
transform dot position. We would go equals. Then. Here's where
the Koopa comes. Because we've made a
link to our player. We can type player dot
transform dot position. Then if we hit Enter like that, this is basically
all the code we need to make sure
that our transform, our position is always set to
the position of the player. If we run our game, this
actually looks like this. Now you might be a
little confused. I'm just seeing a blue screen. Yes, You asked introduce screen and the reason for
this is because the z-component of the camera always has to be less than
the rest of the scene. Otherwise, the exact same plane and it's not
capturing anything. This might be a bit confusing because it's a 2D
game after all, why does the z component
of anything matter? And generally it doesn't. But just to make sure
that as a general rule, all of your z components of
everything else is always set to 0 and the camera
is always less than 0. If it's minus one, that's fine. If it's minus a
100, that's fine. But minus ten is a
good sweet spot. Now, we don't exactly
want the camera to always be the
exact same position as the player for
obvious reasons. Instead what we're gonna do
is we're going to only assign specifically the x position
of the camera to the player. And you'd think he
usually has transformed opposition of x equals player, that concept session dot x. But for some reason Unity
doesn't make it that simple, which is little
annoying, but it's fine because it's actually
very simple to do it. All we need to do is use those vector 3s or vector tools that we talked
about last episode. To a transformed
opposition equals mu. We'll type in vector two. We can see it's not
auto-filling because I've got theta transfer
position in the way. So I'm gonna go ahead
and delete that and just tap it again. See the vector 2D,
vector three, sorry. Then we'll open square brackets
and we're going to type in player dot transform, dot position dot x. And this basically means
every single frame, make sure that my exposition
is the same as the players. Now, that's actually the only position that
we want to alter. We don't want to change the
y, we don't change the z. Instead of changing plate or transposition of the y and z, we're going to just make it set to the transformed opposition, dot y and the transformed
opposition does Z. What this is basically going to do is this is going
to make it so that our position is always
set to the PlayStation x, opposition in the y and
opposition in the z. Now there is actually a simpler
way to do this because, because we're only using the transform quality of
our player game object, we can actually use a Transform. Basically says, Okay, I want the position and the rotation and the scale of that object. I don't want anything else, which is great because
that's all we need. We can then take out all of
these transform keywords. Actually it's just that one because these are
referring to us. And now let's just play
it opposition not x. This might seem a
little pointless, but storing a
transformer is obviously a little less than storing
a whole game object. So it's gonna be good
coding practice. We can see it here. It says
type mismatch and that's because it was storing
in GameObject. And now it's storing a transform and it doesn't know
what to do with itself. So just redraw that player in
and it'll sort itself out. Now if we go ahead
and click Play, we can see that our camera is in fact going to be following our player just as we wanted to replay as always in
the center of the screen. And when we jump and we
fall back into the abyss, we can see exactly
why it happens. Now, this might look cool
and it might work fine, but we actually don't want the player to always be in
the center of the screen. We want this to be
a slight offset. I've heard play my games
are the players like they're sharing most games,
you'll find that's the case. We're going to go ahead and
make a offset variable. We'll call it a public float. This the first time
we're using floats, they might sound
complicated and they're just decimals. That's
all they are there. 0.50.20.45. Anything that's not a integer is a float in any real number
pretty much is it float? We're gonna go ahead
and type offset. This is basically going
to allow us to add this offset value
to the players, the transformed opposition of x, which basically will
offset the transform. So if you think about it, if the player is a
position 0, we run this. We're gonna go to
position 0 plus five. So then the player is
gonna be over there. Let's say the players there, the semicolon will be over here. Or if we said two minus
five will be there. We can alter this in play mode just like we've been doing with
everything else, doesn't type of times
if we start our game, we can see over in
front of the payer, but I want to move out of
the play to be about there. And we can actually
save this value, 5.78, go out of play mode, type it right in. Then when we start our
game for the second time, we can see the player is exactly where they should be,
right over there. I'm actually gonna make
it six because I think the play is still too
far to the right. Yeah, that should do the trick. It might be a little bit
too much to the left now, but we'll come across that
bridge when we come across it, you might actually prefer
to have your player on the other side there, which is fine if you do. We can alter that value as we go along our game
development journey. That's the great thing
about variables. But for now we've created
a very basic script that allows the camera
to follow the plan, the job, and I'll see
you in the next video.
9. Character States: Hey there, and welcome
back to unity. Now over the last few episodes, we've created our very
first C-sharp script, allowing the player to
move along the scene. And we've even added a
camera following script so that we always keep track
of where the player is. As a result, our game
currently looks like this. It is in a semi function
of state and we can jump only one wrong
the ground we can jump, which is really
cool, right up till we reach the end
and then we follow. Semi functional might be a
little bit of a stretch. But regardless, in this episode, we're going to start by
creating player states. This is gonna be the first step we're taken to
creating a big loop. Now, if you don't
want a game loop is it's basically the
fact you can play, die play again and
die play when etc, you could continue
to play or loop. And states are going to allow us to determine what
state the plays in. If he's dead, if it's alive, if he's waiting to see if
he can respond after an ad, if he's jumping or falling. Obviously, a lot of those
we're not gonna be using, we're not going to be coding, jumping and following states in. But if we weren't
using a game engine, it might be something
we'd have to do. Luckily, because Unity has this great Rigidbody
component which takes care of all
the gravity for us. The only states work with
focus on in this episode, I'm going to be whether
the player is playing or allowed to move or dead,
not allowed to move. Start by going into
the scripts folder, right-click though,
create C-sharp script. I'm going to call
mine State Manager. Then once that's been created, Google to the player and drag your State Manager
script onto it, like so. Now we're going to look it up. I'll state management scoped and we're going to start just like we usually do by
creating a variable. And this variable is gonna be
called state and it's gonna be a string variable, public. So we can see it in the
Unity editor string state. Now this state variable
is going to allow us to check what state the
player is currently in. We're going to do that. I'm going to reference
the state in other scripts like
our movement script. Obviously right now of
movement script is what's actually telling the player
to move every single frame. This line over here tells the
player to move every frame. But if the play is dead, we don't want him to
move every frame. We want him to stop moving. We're gonna do that by
referencing this script. Now, if you're not
sure how to do this, I don't blame you
because this took me quite a while to learn, but it's actually
quite straightforward. If you've guessed already, all we need to do is create a variable that
links to the script, just like we've created variable
that link rigid bodies, integers, even other transforms and gameObject, we
can do the same here. So we're going to type public. Then we're going to type the
name Bosco State Manager. We're gonna call this statement. Then once we've done that, we're gonna go back
to the Unity Editor. We're gonna go and select
our player object. We're going to drag our state Manager script into
our stage manager variable, which will then
allow us to access this script from this script, which is really, really useful because then
what we can do, we can go over here to fix
update and we can type. If you want to only do it
under certain condition. We're going to call state
manage George state. And we can actually access variables in this state managed script simply by typing dot and then the name
of the variable. I'm going to type
two equal signs. And then we're gonna say playing with a capital P.
Underneath that. We are going to put
our code over here, meaning that every single frame, only if we are in
the playing state, we're going to set the
RB dot velocity to that. Otherwise we're not. This can be really cool
because when we go into Unity and we hit Play, we can see that we
actually don't move. And if I were to enter playing into the state,
I'll start moving. But the minute I changed
something of stock, which is actually
really, really cool, that's gonna allow us, as
I'm sure you can figure out, to make different
states for our player. The way I'm gonna do that is I'm gonna go over to the
statement I just wrote. And now the last thing I
need to do is make sure that this state is assigned based on what I want
the state to be. When I start, I'm always
going to want the state to be equal to playing.
We start moving. But when I collide with something, I'm
going to want to die. When I collide with an obstacle, I'm going to want to
trigger the death state. This death state is gonna be
exactly what it sounds like. It's gonna make this
state into date and then obviously we
will no longer move. And what's cool about this
is actually later on when we add death effects and all
sorts of things like that, we can use the state machine
to simplify that process. I'm going to delete my update because I'm
not gonna need here. And I'm going to create
a new trigger event. Now if you remember last
episode or two episodes ago, we had our own collision events. And this is basically
saying when I collide, do this and this code, obviously as we went over, when I collide with the ground, I want to set ground truth. We're going to create something
very similar over here. We're gonna go void on Trigger, Enter 2D on triggered entity d is exactly the same as
on collider into 2D. It's just the collider
is a trigger. So because our player is going to be using
a normal collider, you might be, why are
we using a trigger? But the reason is
actually because the obstacles we're
gonna add in a second, we're going to use
triggers for that on trigger event activates when
a collider hits a trigger, but it doesn't activate when it collided
head to collider. We're going to go into here
and on our trigger event. Now this is gonna be
quite a long line of code and it's going to be using
quite a few concepts. We haven't really gone over yet. And the reason I haven't gone over them
is because they're not incredibly pivotal at
this point in the course. But unity, Once us to use
them for some reason. We can go over here. If we go here we can see we just said collision dot collider activating wherever it
lives in their dark compared to our checking
the tag is ground. But when we use trigger, we have to type a much longer line of code that
goes like this. If collision dropped, yes, component, open
screw, open brackets. And we're gonna say
polygon collider 2D eat is that's the type of glider we'll be using
for our enemies. Then we're going to put
parentheses, George, compare tag, another open
brackets, and then obstacle. Now you might be going, What in the world
and we just write, and I don't blame you because
this is using all sorts of concepts that I didn't want to teach at this
point in the course. I don't actually know
why Unity makes us use all of these concepts for
such a simple line of code. In my opinion, I don't
understand why unconscious be collision dot Colorado has had just because
usually the trigger, but for whatever reason
usually once it like this and I tried in a previous
topic of this video, do it the other way and it
causes all sorts of problems. So just copy the code
exactly as I have. And don't worry if
it's a bit confusing. Buddha collision
dot fgetc component open or less than sign, then polygon collider 2D greater
than sign, open bracket, close bracket dot compare
tag, open bracket, quotation mark, obstacle quotation mark close
bracket, close bracket. And then we're gonna write
in our if statement, state equals true it. Now, the first thing we're
gonna do to check if this works is we're
actually going to make it so that our collide, we're gonna make a new
collider, a new object. I'm calling it obstacle and see if we stopped
moving when we hit it. So we're gonna go over here
to the course assets folder. And we're going to
click the triangle and drag it into our scene. Like so. Now the first thing we're
gonna do is we're going to scale that triangle down. Move it to about there. And I'm going to make mine red. That's a decent color. Darker red. Master as the scene. There we go. Now what we need to do is
we need to make sure that when we collide
with this obstacle, we treated the dead state. But obviously this obstacle doesn't have the obstacle tag. So to change that,
we need to go here, you've got add tag
like we did last time and type in obstacle. Exactly how I wrote
it, capital O. Then we'll go over here. We're going to click, sorry, not the player, the triangle
we're going to click here. And when you click
obstacle, it now, it has an obstacle tag, but we don't have a collider
attached this triangle yet. We're going to need to do
that type add component, the polygon collider from
earlier polygon collider 2D. And make sure it's a trigger. We can see that's perfectly
around our triangle. If we click play, should reload our
script assemblies, and then we should move,
move, move, move, move, get our player. Perfect. As soon as we collide the
dead state is triggered. This actually gonna
be the start of a really another big stick and I'll game
development journey. We have just created a sort
of mini state machine. This mini state
machine allows us to track when the player
is dead or alive. And I'll show you
how easy it is to expand on this in
the next episode. But if your code is
worked like mine, Great job as always, unlink my original
code in the assets of the resources of the video. If yours didn't
work, but good job. Everyone should be
working, apparently fine. And I'll see you
in the next video.
10. Our Game Loop: Hey there and welcome
back to unity. Last episode, we created our
very first state machine, which allowed us to,
when playing the game, have the player in
two different states, namely playing when
it doesn't hit the obstacle and debt as soon
as it's hit the obstacle. And this might not sound
like a very big chain. This is actually really, really good and it's
a really big step in our game development
journey because it's gonna do a lot of the work
that we need to make a game loop working. And a game loop in simple terms, is basically anything that
allows us to play a game over or win and lose and retry to
explain it in another way, you can think about
a game loop as a process to make
sure that the player doesn't have to restart
the app every time they want to stop the game in,
obviously in our game. Now, if you play our
game and you lose, and Emily, if you
hit the obstacle, the early way to
carry on playing obviously is to
restart the game. We want to change that. First thing we're gonna
do is we're gonna go into our State Manager script. And actually throughout
its entire absolute, we're only going to be editing
the state manuscripts. I'm going to upload
an updated version of the state
manuscript at the end. But we're gonna be editing
what we had from last time. So double-click
on State Manager. When that loads,
You're gonna start by creating a new procedure. So you're gonna go here
and you're going to type public, void die. This very gruesome name for a procedure is
basically going to be the code that we run once the player is dead
or has a dead state. You can see it here
where students we can live an obstacle or died. We just set our state to debt, but we actually want to call
this dead procedure and then do all of that setting inside this procedure for
various reasons. The primary one being
that this way we can add depth effects or
add a timer to respond, which we're going to
do in this episode. Also things. We're going to have him cut that code and paste
it over here. And I'm actually going
to change this to a capital D because I think that looks better if it's capital P and a capital D. Then over here,
under cold DI state, parentheses and semicolon,
now started to die procedure. Now when we hit an obstacle, we're going to call
this procedure. I'm going to set
my state to dead. And everything should work just as it has been
missing entire time. You should have a
working program that does the following. Should run, run, run, go along just like last time. As soon as we hit
that we should stop moving just like
we had it before. So what's actually
cool about this is we can now from this procedure, enroll or respond procedure if we go down here
and we go public, void and we're gonna call
this one with the phone. Put parenthesis open. And I'll respond. Procedure is going to set us back to the position we want
to be at the beginning. We want to make
sure we go back to our spawned 0 starting position. And so I'm gonna set
that strong position to be where I want to
start the place. I'm gonna move to
play it down here. And I'm gonna say, okay, this
is good strong position. It's minus 8.52 and minus 1.69. Go to here and we're gonna go France form like remembering
the camera script code, we refer to transform being the game object
attached to the script. Exactly the same
thing here we're referring to a
player's transform. Dot position equals. Once again, we're gonna
use a vector three, new vector three, open curly bracket,
sorry, normal brackets. And we're going to type in minus 8.521.69. And of course 0. Now, this should all work perfectly, but
we can see it here. It says cannot convert
from doubled fluid. This is basically
because we haven't told unity that what we
store in here are decimals. We've just said. These are
just two numbers that we put. Dots in. Unity is gonna automatically thick get confused
as to what they are. They're gonna think it
was a double is a float. So to minimize this, we're simply going
to put the letter F, lowercase f after
both of these years, you will then know
that these are two floats and we
are good to go. Now before I go back into Unity, I actually have to make
sure that I call this response code from the dye code. Let me go here. I'm gonna cold response, meaning that as soon as I die, I set my state to dead. And then I respond, well, this is actually going
to do is it's gonna make me respond, but I'm still gonna
be in the dead state. And that's going to look
somewhat like this. A go travel along, travel along trouble
in trouble along, die, and then go back here and still be
in the dead state. You can see I'm not moving
because I'm in the dead state, but we don't actually
want that happen. We want to carry on moving. So we're gonna go
Sarah transform, and then we're going
to set our state back equal to claim. This is our very first
instance of what a game loop is because now
we can see if we hit play, we can move along, move along. If we die, we respond back to where we were and
we can play the game. In fact, if we jump over this, which I'm fair to do
that I'm not gonna do. I don't even know if this is possible because I'm traveling at half a mile an hour,
but yeah, it's not. But if we made our
play speed over here, if we made my speech
and my life before, and then I jumped
at the right time. I can actually go over that
and I could carry on playing. Obviously now I'm
going to run into trouble because we haven't
finished building the map. That is the basics
of a game loop. And actually the last
thing we're gonna do in this episode is
we're gonna change the speed to three
because two is just a little bit slow even
for testing purposes. If you have everything
working just like I do, you've made your
very first theme. Now, the only thing we need
to do in the next episode, we're going to add
a slight timer so we didn't respond
immediately, we die and then respond. And that's actually
where our state machine is gonna come even more useful, but against that
in the next step. So what you should have now
is a normal response script. And if it's working
perfectly good job.
11. Timers: Hey there, and welcome
back to Unity. Now in our last episode,
we created our game group, which is another very big step towards our mobile
game being completed. And if we click Play,
we can actually see it in action here at
what we did last time. We'll move along and
the minute we die, we go back to the start, which is really, really cool. Now there's a few
problems with this, however, first of all, there's no time in
the day because we spawn practically as soon as
we die, which isn't ideal. And second of all, we are spawning a little higher than I
originally intended. When I was watching
video back, I realized I entered
the wrong value. I entered 1.69 instead
of minus 1.69. The first thing we're
gonna do in this course is we're going to go
ahead in this episode, brother is we're gonna
go ahead and fix that. So I'm just going to go back to my script which I made
last time and add a minus. Now that should look
a little bit better. But our problem
earlier of spawning as soon as we die is still one
that needs to be solved. If we hit Play right over here, we'll see that we are
traveling on, traveling along. We spill now lower
down but we still spoon as soon as we
die, which isn't great. So to fix this issue, I'm going to introduce
a timer that gives us a little time delay from a
mid-90s T2 and respond again. So we can actually see our
state machine in action. Let me go ahead, Still open
up the State Manager script. And I'm gonna do is
quite a simple process, but it's gonna be using a very unfamiliar term and procedure colder IEE numerator. Now, I enumerated
here, write this down. It works in a similar
way to a procedure. I'll call it delay. Put parentheses, and
then put brackets. Now, to be entirely
honest, I used, I enumerates for very long
time not knowing what they did just as time delay
commands or wait commands. And that is perfectly okay. I enumerators are a little bit more
complicated than that. They have to return a value. As you can see, it's a bit of unfamiliar thing for us at
this point in the course. But for now, all you
need to know about them is they're the two we're
going to use to delay. And we're gonna write code
that says yield, return, new. Wait, a second, open
brackets, one semicolon. Then we're gonna call
the response procedure. Now, the last thing
we need to do is instead of calling
respond directly here, we're gonna call
start coroutine, open bracket, delay, parentheses,
and then a semicolon. You might be thinking, What the **** did
we just programmed? And I don't blame you
because we just added a completely
unfamiliar thing and then completely
unfamiliar command. But I don't really want to
get into every single use of this thing because this is not really that important
in our course. In fact, you can
make mobile games just using these as
time-like months. And for my first mobile games, That's all I did.
All I'm doing here. You can think about it
like I'm just calling a procedure and the procedure is then calling
now the procedure. The only reason procedure
looks different is because it has to be used to
wait for awhile. And I don't want to
get into the whole logistics that now
because it's gonna get quite complicated and
it's not very useful. Just think about it
like start coroutine, which basically is
just a fancy word for store procedure
that can wait, then half a procedure
that can wait, and then start my new procedure. This code might
look a little bit unfamiliar like I've said
before, don't worry about it. If you write it down
just like I have, it should work perfectly fine. And we're not gonna
get a whole lot more into I enumerated
because it's a bit more complicated than we need to
go back into my game now. And I click Play. We can see I should move
along, move along, die. And then after a
second response, which is a lot better than what we had before, which is great. If you've got that
working good job. This was part of short episode
because I just wanted to introduce the
subject of timings. But like I said, it might
be a little bit unfamiliar. Don't worry about it. Just make sure that your code
is working like mine is. I'm obviously going to upload my code as I have been
doing this entire time. So you can download it
if you have a problem. But if it's working good job and I'll see you
in the next video.
12. Generating our Map: Hey there and welcome
back to unity. Now, over the last few videos, we've created a semi
functional mobile game where you can move along. If you die, you'd
respond and you can jump over this
and carry on going. But the problem that arises if you jump over the triangle, you can't do anything to stop yourself inevitably
falling into the abyss. And that's because the
map ends are there. In this episode.
What we want to do, we want to create a map
that goes on forever. Now there are two
ways to do this. One, we could just make this part of the map
move with the player. We kind of always as
a family is that not all do the same and we
never run out of math, but that's quite boring. What we're instead going to
do is we're gonna create a system which spawns
parts of our map for us. When we reach a certain
points, if I reach there, I will spawn a new part
of our map for us, which is really, really cool. The reason this is so cool
is because it allows us to have a varied infinite map so we can change
the height they go, we can change the
length if we want. Obviously will add
all of that later on when we approve
all mobile game. But for now, we're
just going to make it. So they all spoke in
front of us so we can have an actually
functioning map. Now, the first thing
we're gonna need to do is we are going to need
to make this map segments smaller because I think maps segments should
be about that big. Let's make it so that
triangle just puts on. And then the second thing
we need to do is we need to actually make this map
segment into a prefab. In our prefab is you can kind
of think of it as a stamp. I want to copy everything
in this object, make it into a file which I can then put in my game. I do that. It's actually just
take this floor and I drag it into the assets
folder and I let go. It creates an
prefab file for me. And then I can drag
this prefab file into my scene and spawn it
just like I wanted. And we're gonna do
in this with code. But this is really
cool because then if I go ahead and I change
something about this, for example, making this light
yellow, weird olive color. It changes all the
prefab so I can actually update this
however I want to, and everything will
update with it, which is really, really cool. Obviously, we need to make the code that actually
spawns these. But before we do that, we're gonna first add
another collider. Now this part is very important. We're gonna go into our prefab and we already have
a box collider, but we want to add
a trigger collider. We're gonna go ahead and add
an edge collider this time, this is gonna be
edge collider 2D. And it's going to kind
of see a green line. That's how Edge slider. Then we're going to
click on this button here that says Edit Collider. And we're gonna click it and
we're going to drag this, this side over here
where the box appears up to about there. I'd say as long as it's about maybe two-thirds of
the length up, that's fine. Then we're going to
go ahead and uncheck this points menu and
we're gonna copy, we're going to change this to one so it's easier to store. And then we're gonna
copy element one, the same position where they're
both stored over there. And then last thing
I'm gonna do is just move that slightly up. Make sure this is one steel. What I've basically
done is I've moved the one-point government
exposition of that point by unchecking
this points menu. Then just simply taken it and cognitive course
and then made the y-values so that they look like a wall that you
can't go through, which is exactly what we want. And obviously if
I played it now, I would go there and I would stop, won't be able
to go through. So if I make it a
trigger, I'll be able to pass through perfectly. But this does actually create
a few problems for us. I remember earlier when I was editing one of our
previous scripts, I believe it was this state
manager one over here. We can see we have an
unknown trigger event. And if you remember me saying, I remember me saying
that this was a very, very complicated way of getting where the
tag of the object. And I was right,
it's very stupid. And it was not actually
what we need to do. Unity doesn't actually require us to write this
entire line of code. We can actually take
out everything here and replace it with dot
gameObject, dot compare tag. And that will do the
exact same thing for us. And the reason this is
so helpful is because that previous way was getting the collider and then
getting the game object, which was just a
little bit tedious. This way is a lot more simple because then we can just
get the GameObject. I want you to go ahead
and do state manuscript and change that to
dark game objects. So it all works perfectly. You could have left
it like it is, but trust me, you'll run
into problems later. It's not worth it
just changes to D2L object and everything
should work fine. Then we're going to
encounter new script. We're gonna do
something very similar. But first let's just
test that works. If it does, we should be able to die just like we have been. And respond. And you can see it
works perfectly. So go ahead and make sure you change that to
collision of game object. The reason I felt it was
the more complicated method was causing a previous take. I had written it in a
similar fashion to this and unity had told me that that
was deprecated and old. So I assume that was
the only way to do it, but I guess there was
another simpler way. So my apologies for that, but just make sure you fix it to collision dot gameObject
dot compare tag. That's a lot simpler. Then we can actually go ahead
and make our new scripts. We're going to right-click here. I'm going to go create
C-sharp script. We're going to call
this map spawner. We're going to actually add
this script to the player. The reason we can add it to the players because we want to spawn the map relative
to the place position. So if I go ahead and drag
that onto a player like so, we can see I have my
maps, hash the player. Now when I reach points in my
code where I want to spawn a map piece to play will
pass through it and it'll split them up piece
in front of the play, which he did exactly
what I want. So the way we're going to check where we're doing it is with
this collider we added, obviously we have
a trigger glider. So we're gonna say whenever
the pair goes over that trigger Collider spawn new piece the map, which is perfect. I'm actually going
to go into my code over here where I had, I'm gonna go to the
statement of code. I'm gonna copy this onto trigger
vent exactly like it is. Copy it. Then I'm going to open
up my new script, the map spawner script. I'm going to delete these
and what to put it there. Void on trig entity. The only thing I'm gonna do
here is I'm gonna change this tag from
obstacle to ground. You'll remember that was the tag we made for the ground earlier. And I'm going to delete
this procedure and replace it with my
instantiate procedure, which I'm gonna
make an a second. Now that I've briefly going
to avoid prefabs are, I'm gonna show you how to
spoon them via curves. What we're gonna do, we're gonna go to our script over here, and we're gonna go and
create a new variable, public, and we're gonna create a reference to a game object. Now remember, we did
this earlier with our camera follows
script where we first made a game object
and then change to a transform because we realized we didn't need a game object. The great thing about game
objects is we can actually store all entities
in Unity scenes, as well as other asset files which are objects like prefabs. We can store prefabs in game objects and
then spoiling them in via code will go public
game object now called floor. Go over here and I change
this code and I'm make it capital G game object
space and then put it wherever I want to call
it a coal mine flow piece that I'll
put an equal sign. Then I'll write the
word instantiate. I'll open parentheses. I'll type in flow the
variable this time. Then I'll write as, and then again a capital
G game object. Now you might be
a little confused as to what exactly
we're doing here. But basically what this line
of code is saying is saying, okay, we have this
variable over here, which we are going
to link to flow. Go here, scroll down
and drag flow in. Now there's a link between them. So outflow is this object we're going to now
put in are saying, Okay, when we collide with a trigger that has the label
ground, in other words, when we pass that point, I want to instantiate, which means create flow as a game object and store it
in this local variable. I remember we went to the
local variables long, long ago in our introduction
to C-sharp video. But basically they're
just variables that you can reference in just this method
because we're gonna be making the entire
object in this method. That's perfect for us. Basically, what this
line of code is gonna do is gonna
put it somewhere, but we want to
control workbooks. So under the scene, I'm going
to go flow piece transform. Remember that's its position,
rotation and scale. Dot position equals
new vector three. And then I'm gonna walk put in the three positions where I
want our transform to be. Obviously, I know I
want my z to be 0, almost 0 for now. I want my z to be 0 and I want my y to be something on the bottom of the
screen, but my x, I'm obviously always going
to want to be different because if I'm moving along,
moving along, moving along, then I want to spend somebody,
if I always entered say this value minus
four and move along, it was following the
exact same place. Or if I, even if I
ended the value here, minus three as I
got to that one, that prefab which would
have this triggers. Well, I want to just
warn the third piece. It would put it in the same
place, which isn't great. I actually want to
spawn it relative to the place position. Wouldn't do that. We're going to find the
offset just like we do with our camera follows
script with variables. Again. I'm gonna go back
here and I'm gonna type public int offset. I'm actually going
to go ahead and type a y-value similar to this one. So they all spoke at
the same y-value. If I make this minus 4.6417, I'm gonna put that
in my y-value. Then over here, I'm gonna say, don't forget to put your FM so that it knows it's a float. Then over here, I'm
going to say transform, lowercase t, meaning the
transform over there. This is attached to, in this case, the player
which is perfect, position x plus offset. This is going to do this. These two lines of code are
basically going to say, okay, when I collide with something, when I trigger my event, that means I want to spawn
a new piece of ground. I'm going to make a new
variable, local variable, and I'm going to
call it flow piece. And that variable is
actually going to create a new object for me
and put it in the scene. And then this object, I am going to put in a position minus 4.6 for y,
which is around van. I've seen zeros. And then wherever I am
plus a certain value, we can actually
see that in action if I just go ahead
and simply here, and I've put in the value
five for the offset. I don't know if this
is going to work. It might be a little too
close, maybe a little too far. That's why we use variables. But I'm gonna try it out. If I go along here,
go down here. We can see that it is
actually way too close. We can see that these
two are actually overlapping them
here by quite a bit, but we are creating a map
just like we wanted to. So I'm gonna go ahead
and change this to something more like ten. Let's see what that looks like. If I load my game back up again, we can see that I'm creating a map piece almost
perfectly right afterward, which is pretty cool. But I actually want to make the player a little bit faster and I want to make
these math pieces also a bit further apart. I'm going to change this
to 12 and I'm gonna change my place speed to five. What should happen now is I have a map which I can jump across. Lot easier, I'll be
a lot faster now you can see I have to jump across and hit it so that I
land on each new map segment, which is really cool
because the map is gonna be created as we move along, which is really,
really cool and we can actually start to
make it more interesting. But before we do all of that, we actually need to make
a little bit more code to make sure that
we're not cluttering up our object inspector, if we go to here and we
go over here, sorry, I'll hierarchy, we can see the floor plans are
being created there. These flow clones
are the prefabs being in statute in shell game. We can see they're just filling up and they're not
being destroyed. And I don't need this anymore because I have not
using anymore. So what I'm gonna do is I'm
gonna make a new script. And I'm going to say,
when my position, meaning the position,
I'm gonna attach the script to this flow
piece to the prefab. I'm gonna say what
my position is less than that of the player
plus a certain amount. So when I'm this
much further away from the camera, destroy myself. And that's gonna be a
very simple script. And I'm going to right-click
create C-sharp script, and I'm gonna call this flow. Then I'm simply going to
go ahead and open up flow. And I'm gonna say in
the update rules, first thing I need to
do before I do that she is I need to
create new variables. I know what the public
transport with players are. Public transform, just like we used for
the counter-flow skirt, I will call this one player. Then I'm gonna go ahead
here and I'm gonna say player dot transform
dot position dot x. And that's gonna be my one
thing on this tool right here. I'm just saying my
transform position dot x. Now, I'll say if my current location in the x plane is less than the place
conversation and explain. I want to go ahead
and destroy myself. And the way I'm going to
do that is I'm just gonna type destroy like that. Open brackets and then
lowercase game object. This is basically saying
destroying myself because the lowercase game
object is referring to whatever game object this
script is attached to, in which case we're
talking about the floor. This prefab, well,
this is gonna do is when my position is less than that of a
player, destroy myself. But I'm sure that you can figure out that
the exposition of these flow pieces is
going to be less than the player when
they're about there. But we don't want
to draw yet because we still need this floor. Where we're actually gonna do is gonna say what my position is less than expedition
to the player minus and then
another offset value. And we're gonna
make this one minus ten because it doesn't
have to be exact. It just has to be a little bit more leeway so that we know we
don't destroy it. As soon as we pause it. If this works or should happen, is that every single frame
we should be checking if we are too far away and if we are, we should
destroy ourselves. We're just going to
save performance in the long range is really good. I'm gonna go ahead and go to
my floor prefab over here. I'm gonna click Add Component
and I'm gonna write the name of the script
I just created floor. And we can see it's
actually out here. We can add up debt
and then I just need to add the player transform. But it's not that simple
because this isn't a prefab. And then again, we
can't just drag and I'll play a trans woman
just like we did before. We actually need to assign
this via code as well. We'll go back here. We'll type void stock
which we deleted earlier, but we can just get
back by doing that. Then we'll say player equals. This is going to run as soon
as we are instantiated. As soon as we created,
we'll go capital G gameObject dot phi, which means searching
editor, open bracket. And then we'll put quotation
marks and cold as player. Because we can see that our
player is called player. We're actually going to
research integrity now. Dot transform. This is going to say,
okay, when I spawn, look for a player,
GameObject dot find, meaning search for
the player position and then it will not
exactly position, but that's a simple
way of saying position and then put
it in that variable. Now if that has worked,
what should happen? We should start our game. We can see that as soon as
we create a flow piece, we can pause the game and
we can look over here. This flow piece actually has assigned the player transform
to its R coders were perfectly on top of this if we create a new flow
because we can actually see the old full piece
gets destroyed pretty much exactly when
we're done our screen, which is perfect because it means that if you
look on the screen, you can't see any issue with it. It's kinda working perfectly. But as we're doing
an off-screen, the floor pieces actually
being destroyed, which is really, really cool. The last thing we're
going to add is because these focuses being created
right in front of us. That looks a little not great. It doesn't, it doesn't
look too cool. And what we want to do is we want to make it
so that they're actually installed
two ahead of us. So we want to take this
little piece and we want to say move that to head. The way I'm gonna do this,
I'm gonna go to the plant. I'm not changed this offset
to something like 30. Then it will be rather 24 actually, that's
exactly doubled. Once we've set this value, we're just gonna
do one more thing. We're gonna go over here. And instead of having one, we're gonna put two
at the start of the game goes as I'm
sure you're thinking, if we put one there, it's going to school
on too far away for us to jump to, which
isn't going to work. Now if we play the game, we should be able to
find a sweet spot for where we want this to spoon without having
to jump to fall. We hit Play. You can see it gets spawned perfectly where we wanted to and there's always
mapped to jump to. There is never any slightly
bigger gap sometimes, and slightly smaller
gap sometimes, which is our own
little innovative, creative take on this game. The reason these gaps are
happening is because of our two starting things not being
exactly 24 units apart. So obviously, if you want, you can move this
around until you get less gaps or more gaps
wherever you want. I'm going to leave
mine phenomena, put mine about that
because I think the gaps actually add a little
character to our game. If we carry on here, we can see a little bit bigger
gap and a big gap. I've minimized
issue a little bit. They all look fairly
similar as if you want to use my
coordinates, you can. They are minus 4.89888.38, which is pretty good in
terms of not getting a gap. But what's really great
is that we've actually taken a huge step again towards our
mobile game being done. Now we have a game loop
and an infinite map, which means all that's
left to do is make some kind of obstacle that
spawns on all of these, obviously with a
little bit of variety, which we'll be doing
in the next step. And we have a mobile game
which is practically done, which is really, really great. Now I understand this was a
bit of a complicated episode. I'm sure a lot of the
concepts we went over in here were a bit confusing, especially with these
instantiating prefab business. If you need to watch it again,
I completely understand. If you don't want
to watch it again, That's also fine because
we're obviously going to be covering these concepts a little bit in the future when we, especially in the next
episode where we're going to instantiate triangles, make them prehaps as well, and also put them on these block floor pieces
just like we need to. But we'll get into
that a bit later. If you've made it
through episode and yours works perfectly fine. Great job. If you need to download
my code, that's fine too. Just make sure you copy
it exactly across and you should be fine to
have a working game. Great job, everyone. And I'll see you
in the next video.
13. Improving our Map: Hey there, and welcome
back to unity. Now in our last
rather long episode, we made our map
generation system, which is really, really cool. It's another massive step to make it on mobile
game a reality, because now we have
an infinite map which we can traverse when
we play the game. If we go ahead and load it, we can see it in action just
like we did last episode. The map is generated
in front of us and I think we might fall OK.
we actually make it across. We can actually see this
map in action over here, making our new segments and
destroying the old ones, which is really, really cool. Now in this episode, we're going to want to improve this a little bit because, well, this is a very, very nice
map generation system. The map that we're
generating isn't the most interesting thing
in the world because we don't have any
triangles obstacles, we just have green flow pieces being spawned one-off
to one another. And this isn't ideal because it doesn't give us a game to play, just kinda gives us
ScreenFlow pieces to jump to. And as we prove we
don't have to jump. We're going to start this
episode by adding in spawn points on either side
of the green flow pieces. And then we're gonna create
a system where we spoon triangles either on the
one or the other or both. So we have some
variety in our map. Then once we've created our triangle spawned system on either with US born points, we're then going to
get started with a few issues that are going to arise as a result of us
adding in triangles, because I'm sure you're thinking if we add an triangles
and we lose, we're gonna respond, then there's gonna be no
flow to jump too, because we destroyed the rule. We're going to create
a system where we create a floor and
we're going to actually spawn off
the floor pieces underneath a parent object. And then once we die, we're going to be sure to clear that parent object to make sure that we
don't have duplicates. Floor was being
created after another. On top of that, then we
are going to finally make the similar system with the
triangles because we want our triangles to also be
child objects to the floor. We're going to add
that in awkward. And from then on, we will
be able to have triangles and floors so we don't delete the floor pieces
without triangles. And we're gonna be
able to restart the game while
clearing everything. Get started with the
triangles first, if we double-click
or flow prefab, remember this is what
we're spoiling in. This is our stamp. And we go over here at the top, we can actually create a child object just like we did with the
environment long, long ago when we made
that environment object and add a bunch child
Armitage to it. That's what we're
gonna do here. If we go to right-click and we go Create Empty and call this
pause for position one. We can make an object that
we place on this floor. And then no matter
where we flow, that object always stays the same relative
to that position. Which is really, really cool
because this is going to allow us to make sperm
points for the triangle. So I'm gonna put one over here about maybe a third of the way, then another one, it over here, maybe about three-quarters
of the way. So we can see over there
are two spawn points. I might have to adjust
these as I go along, but they're fine for now. These spawn points
are going to be where I'm gonna put my triangle. So I'm gonna make a script now that says when
I make this floor, I'm going to create,
generate a random number and it's gonna say either
put one there or there, or one there and one there. Which is really cool. If I go ahead into scripts on a right-click and
I'm going to create C-sharp script and call this
one right angle spawned. And I'm gonna go ahead
and I'm gonna go to my floor and drag my triangle spawner script
onto my floor, like so. Now my triangle spawned script is obviously empty, so
I'm going to open that up. I'm going to go ahead and
delete the update method, but keep the start method because we're
actually going to be doing all of our coding
in the star method. Now, this is going to be a rather simple script because
we have actually handled instantiating before
and everything in this group we've actually
done before as well. So if I go, I'm going to
first start by making my public transform
position one. Then I'm going to
make another one. I could type the exact
same line again, like this public
transform position two. But simply way of
doing it is just putting a comma and then
writing position two. And that's basically
the excerpt. Any say in public trust whom
I want one composition 11 coopetition to go back
into my Unity Editor. And I open up my flow
script or flow object. Rather, I can see
position one to position two are here and they
have not been assigned. Now, you'll remember we couldn't just drag
the plan because the player is an object and this is a prefab, so it's
not that simple. We had to write code to get the player in our last episode. But with the floor because we
are assigning prefab stood, we can drag it in just like no, actually going to rename
this from position 11 to position two, just
so it's a little nicer. But we can actually drag those writing which we
couldn't do last time. Which is really, really cool. Because now what we can do, we can go ahead and make a
spawner script for triangles. Obviously, we're going
to need to use a prefab just like we've been
doing this whole time. So I want to go public, game
object, call it triangle. Then we're going to write very similar code to what
we did over here. There's game object,
flow piece is instantiated floors game object and the transfer position. That's actually going
to be the exact code we're going to write over here. But this code that's gonna be a few conditions as to how
many and where we spawn them. If we think about
this logically, there are four combinations
which we can split. That means for one
triangle on one side, one on the other, one on
both or one or neither. And we could do this by
writing for if statements and obviously then doing a
condition for every single one. But we're actually
going to simplify this by just making two
if statements. The way we're gonna do this
is we're going to create a random variable which
sets x to be one or two. I'm going to go int x. So it's a local variable
equals random drop range. Open square, open
normal brackets. And I'm going to enter
one value in this case, one, another value
in this case three. This is actually
going to give me a random number from one or
two, not including fluids. So either one or two. If for example, I put an F here, it's going to give
me a random float. So it's either gonna
be 101.101.21.3. But obviously that's gonna
give me a few issues here because I'm
storing any GIS. I'm not gonna do that this time. I'm going to store
running integer from one with a maximum of three. That's going to be one or two. If I make this void update, it happens every single
frame and then I go print x. I can actually demonstrate this process because
this is going to be printing my x-variable every single frame from one to three. We can actually test if this is in fact the random
variables we want, because this is going
to run every time this code is staffing or every time a flow
pieces instantiated. If we go over here,
we'll see right from the start we have a
bunch of ones and twos and threes because this might be a little
confusing at first, I don't know why it's
exactly like this, but for some reason
in New Jersey, when you say 123, it means that's the minimum
and this is the maximum, not including the maximum, so one or two. Now this one or two variable, we're actually going
to set random twice. The first time we're gonna do at the top where we assign it, we say integer x
is random range. And then a few lines
down with and do the exact same thing so that we have another random variable. And then over here we're gonna have our
first if statement, if x equals one and do this. And that's gonna be if x is
one spoon by one Prefab, then we're going to reassign
x and we're going to do the exact same thing if x
equals one and do that again. The way this basically
works is it picks a random variable valid
value for x from one to two. Then if it's one,
do this on the one, does it again and if it's
one again, spawn the other. So we can see from this
we can either have one triangle or no triangles, or two triangles, or one
triangle and the other position. There are four
different combinations that can occur from this,
which is really cool. Then the last thing we
need to do is simply make the code for spawning
in this triangle. And like I said,
this code is gonna be very similar to this code. We can in fact copy that
code and put it right there. Privacy is gonna give
us a few naming issues. It's like what is floors
when change that floor? Triangle. And obviously we don't have
an offset variable either. And this vector three
Transform isn't actually what we want our
transform to E at all. Go ahead and remove
this part of the code. Now we have game
object flow piece, instantiate triangles,
game object. It doesn't make a whole
lot of sense, so let's change that to triangle. Then we're going to have
to type it here as well. Now we've got
GameObject triangle O, we've seen a naming error. Now the reason this
occurs is because we're naming this triangle the same
as the name that triangle, which isn't good coding logic. We're gonna go
ahead and make that a capital T and a capital T. And now we can see that the
air actually goes away. This is a good thing to
illustrate, and C-sharp. C-sharp is a
case-sensitive language and we also showed
two kinds of there. One that you can change
the case and it's a completely different
thing like we've seen with capital game object as
lowercase game object. And also that you can run
into naming areas in C-sharp. Now, over here, my triangle
dot transform deposition, I'm going to want to set to either position one or
position troops over here, I'm certain position one because that's the first time I spawn. But position one isn't
actually a position. It's a transform, so
that's a transform that position and a scale and
rotation, all sorts things. I'm happy to type dot
position over here. That's gonna give
me a nurse at all. Then under copy this exact
code and put it down here, except this time, simply change this to position two deposition. Now this is a bit of a tedious
way of writing this code, but I thought it
would be best to illustrate the logic
of what we're doing. There might be some ways you can simplify this if you show this to a professional C-sharp
about they might be oh, changed that you can
do it in three nines, but for now it's actually
going to work completely fine. Now we could go back to
Unity and test this code, but we might actually
realize that we have forgotten to change
this back to start. We were trying to illustrate something
earlier with update, but if we run this code now, every single frame is gonna
be spoiling more triangles, which isn't at all
gonna be what we want to make sure you
change that back to start. I don't know if you've
changed to update when I did, but if you didn't, that's great as it's meant
to be stopped. Now, go over here back to Unity and we're gonna
go to outflow prefab, and we want to assign a
triangle to spawn in, but we don't actually have
a triangle prefab here. Luckily, just like we
made the floor prefab, making a prefab is very easy. You just go back to your scene, go to the triangle and
drag it in like so. It will make a prefab for us. Then. Ahead and delete this
triangle because I don't actually want
it in my scene anymore. I think it's a bit weird
to have one on the first one and none
of the others. Obviously, they're gonna
be spoiling it as we go, but that's fine for now. And then I'm gonna go ahead
and open up my floor prefab. And I'm going to want to
drag a triangle over here. Now. What I want
to do is I want to make sure that I can play my game and spawn
triangles as I want. But the one problem
with our spawning code will not our code rather
are spoiling system at the moment is that we
have to flu objects. One of them is going to be running the triangle script
as well as the other. In fact, all the
floor books are going to be what's happened
in this one. We're gonna start
the code and it might small triangle right here, which is not gonna
be great for us. But if we make changes on this
one because it's a prefab, it's going to make
changes on this entire prefab which we
don't want to do. We're going to do what's called
unpacking the proof out. And this might sound a little
confusing, but basically, all this is doing is saying, I don't want to reference to this prefab animals
outlet unpack. Basically this means now I
can make changes to this prefab and not affect
the overall prefab. Well, this isn't actually
a pre-fader mole. We've made it back
into an object. So go ahead and remove the triangle spawn script
from your first block. And after you've done that, you should be good
to go because we no longer wanted to spawn
triangles on the first one. But everything else should work perfectly if our code
is working correctly. So let's go ahead and hit
play and see if it does. We can see we have one
triangle spawning over there and one there
and one there, which is perfect
exactly what we wanted. These triangles are
a little bit stiff. I don't know if you can tell. And we can dye and start again. You might be running
into a few issues here because we haven't actually
finished out game loop, but we'll get to that in the rest next half
of this episode. Now before we get into that, I want to first make sure that our positions of the triangles
are a little better. So let's go over here and let's drag a
triangle. We can test it. Let's go to position
one and let's copy the position triangle
and go paste position. You can see it's downloaded, so we're going to move that up, find the new y-value. We want a 4.07 and we're
going to actually add that to both my position 1.074 and
position to 4.5 to seven. Now, you don't need to
do that procedure with a copy and I was just
doing some testing, but yeah, if we run it now, it should work perfectly fine. She was born in triangle is exactly where we want them to. It is we can see where there are a few, not
ones at the beginning, but from now on
Rios point triangle exactly what we
wanted and we die. That's the same
issue from before. Now the reason this
issue is actually taking place is because if you think about it with
spawning fluids all the time, but when we go back to the beginning which those
spawning flows, but there's nothing
for us to land on. And that's actually why I wasn't done with
the first script. I need to actually
remove this script as well from the floor
because I don't ever want to destroy the first floor. I want to destroy
it falls off that and the same with
the second floor. Now the second floor, I can keep this triangle spawner
script prompt because I wanted to make sure that I can spawn triangles from here. I'm going to remove
this full script. But before I do that,
I'm gonna make sure I unpack this prefab as well. Because otherwise
I'm going to have the exact same issue I
did with the first one. So it removed this
full script and go over here and move
that same full script. Now if we hit play, we should be working
pretty much fine. If we die, we can
spawn back to where we started and keep
spooning and things. Obviously, there are a
few ones here that are already there that kind of
spawning over the others, but the gist is there. The last thing we need to do
is actually make sure that these old ones are
cleared so that we know that we are clearing all the old ones so we
don't have duplicate one spore and on
top of each other. And the way we're gonna do
that is by ordering them. So we're gonna create a new
object and we're going to call this spawned glows. So I'm gonna go ahead and make sure that I have the
spoon flows object. And then I'm going to
want to add this as a reference to my
map spawner script in my player that I can make sure I store
all my flaws inside this bone flow script on
the Hoegaarden make that 000 just like we did
with the environment, with our floor and our
background on our floor. I'm going to do the same
thing with spoonful. That once I die I
can clear out this point flows and made sure all
the old rules get deleted. I'm gonna do that by opening
up my map spawner script. And over here, I'm setting
the transfer and opposition, but I also want to set
the parent object, which means I want
to set the object, this object I'm splitting
now is a child too. This might not sound important, but as I just said
before, we'll be using it as storage space. Not so it keeps track of the location
or anything like that. So go over here and
set flow, peace. Dot transform, dot set parents. And you could just
say dot transform, but parents equals thing, but she seems to think that's
an old way of doing it. So this is the better way
they won't know open bracket. And now we need to set
something in here, but we don't have a reference to the thing we want
to store these assets. Let's go here. Public. Electrons form this one storage. Then we're gonna go here and
type storage into there. And we don't need
to say dot parent or that position or
anything like that. This knows exactly
what we want to do. So we have our transform
storage variable and we're doing dot set parent, which is basically
a fancy way of saying put everything
inside there. The last thing we
need to do now is we need to go ahead and drag
that into the storage. And if we do so, we should now see that every single time we
instantiate a flow, it gets put inside this
spoon flows thing. Which is really, really cool
because then if we die, well, I mean there's
no things going now, which isn't an extra
point about if we die, what we can do if we
pull it in game now, we can go into spoon flows
and we can delete all of these old flows which we don't need, which
is really cool. Obviously we haven't quite
organized the triangles yet, so we'll make sure to do
that later in a second, use the exact same method. But now if you go like this, we can see that the
floors gets spawned in the exact same way a normal
duplicate flows are stored, which is super cool. Now, I'm sure you noticed the triangles we're
seeing on their own. So let's actually
fix that up quickly. If we go into assets
and we go to our flow, we can see that the triangles is born from this triangle
spawn scripts. So let's go scripts
triangles born and then do the exact same line of code we just did over here. Floppy start transform
does set Terran, except this time we want
to set it to ourselves. Let's go here and
we'll type triangle, France phone books set parent. And then I'm just going to type transform with lowercase team, meaning the transform
or wherever is run this script because
that's gonna be the floor. Copy that across and
put it down here. Perfect, That should work perfectly fine if
I run my game now, we can see that all of the
triangles are actually spawning inside the
flows over here. Position one, position two. And if we go over here, low one triangles
are inside them, which is exactly what I want. Last part of this
cleaning up code I want to do is I want to make sure that my triangles and everything else is
deleted once I die. That's gonna be a little
more complicated. So I'm gonna go over here to my State Manager
script and we can see that we've got
this dye procedure, but I wanted to
need it from here because that's gonna
be a little confusing. So instead, I want to go to my map spawner script
and do it from there. Does that makes it
a little more sense like which script recording
from we could do. It makes no difference
because the statement of script is on the player
as is the maps Warner. But just for interest's sake, I think it will be easier
if I did it from here, so it's less confusing
in the future. The first thing I'm
gonna do is I'm gonna make a new
procedure and then we'll call it public void. And I'm going to call
it clear storage. Then the sexual easier
because I can go storage or here I have my
storage felt like no storage. I can clear every single
child of the storage. And the way I'm gonna
do this, I'm gonna go dot, get child. Then I'm going to want to
get the child to first, second, third, or
fourth, or fifth. If I type 0, I get
the first child, first to get a second child, but I want to get
every single one. And we're going to do
that using a for loop. So I'm gonna go then I'm going to want to
call a new variable. And I don't have a variable yet, so let's make a local
variable int x. Then I'm gonna say full. And if you remember the for loop syntax, this
should make sense. I'm going to go over it again because I'm sure many
of you have forgotten it because it was above
in 15 episodes ago. I don't know. Four x equals 0. That means I want to get the first child and I
go x less than now. I want to do this for as
many children as storage has alligators storage,
dot child count. That's gonna give me numbers
if it's gonna be one, this code is always going
to run once because it's 0, it's less than child count because it's going
to run once and then it's going to be one
because I'm going to increase it at the end. I'm gonna get x plus plus. Now remember with for-loops
and mistake a lot of people make is they separate the
parameters using commas. So they say x less than
0 comma x plus plus, but we actually use semi-colons. So make sure you have x equals 0 semicolon space
than x less than Child Count semicolon
space X plus plus. And just remember that because that's a mistake
lot of people make. This is actually all
Could we need to destroy every single one of these child objects
because we can go for x less than
storage count X increase. So if we have two children, it's going to be
0 increase by 11. And then because it's too is comparably less
than shortcuts. So essentially in the work
that I've put x over here, storage dot get child x. And we're gonna go
ahead and destroy this. We're going to type
the straw open bracket storage dot
get child object. And if everything should work, whenever we call this state, we should clear every
single one of the objects. We're going to actually
want to call this as soon as we respond. Because if we think about
when we call if we die, we are going to fall
through the floor. So over here in the reframe, the last thing we have
to do is we have to create a link to
the match forms. So we're gonna Republic
maps born up, call it math. And we're going to
go into here to respond and we're going to go math dot Clear Storage. Now before we go
back into Unity, we first have to make sure we're destroying the game object, not the transform because
we can see this code here. It says storage dot get child, but that's going to
return us a transform. To go to fix this, we just simply go child dot gameObject. And that's going to actually
refer to the game object, not the transform component. Just know that if we
say dog get child, that returns the
wrong kind of thing, that returns a
transferring child. It doesn't return
the actual child. Over here we're getting
the game object, which is the actual
child object. We want to destroy the
backend community. I just have to drag
this map spawn up onto the map variable stored in the player to make
sure they're linked. And then if I go
ahead and hit Play, I should see that
this spoon flows is slowly getting populated
by different floors. See there's two and if I die, they should all be cleared, which is really great
because it means that this is working
just as we wanted to. There are no more
duplicate flows, which is really cool. If you've noticed
a few small areas, new game, for example, I've noticed that
sometimes I can't jump on the third floor
or ones after that. That's completely fine. We're going to address
those in the next episode, all the episodes following. For instance, we've never actually controlled whether
we can or cannot jump when we did obviously
don't want that to be true because it wasn't a super important part
of our game at the moment. We will obviously fix
all of those later. By the time you've
completed this course, you will have a completely
working bug-free game. If your test new game now and few things are
a little iffy, don't worry, they will
all get sorted out. And if you have a flow spawn
script, you've done great. Now if you follow along and your code is working
just like mine is, the last thing we need to do is add a little
variety to our map, and we're going to be doing
so later in the course. Obviously, like I said, there are a few areas we
still need to sort out. A few things may improve, but our basic game loop
has actually been created. There are also a few balancing
changes I want to address. Like, I don't think it's
always possible jump of both. So we're going to later in episodes maybe increase gravity and increased jump false and things like that to
those that are game. But if everything's
working and you have a semi functional
game which you can spawn and retries many
times you want great job. You have done amazingly, and I'll see you
in the next video. I'll move our game
is going to be done sooner than you
think. Good yogurt around.
14. Minor Improvements: Hey there, and welcome
back to unity. Now, over the last ten
or however many episodes we've created this
pretty bare bones, but actually quite impressive
mobile game with this, the first or one of
the first mobile games you who've been made great job. It's actually crazy to think how much you've accomplished. You've made a mobile
game from scratch using your own code and you
can generate a map. You can jump over obstacles, you can respond,
you can jump, move. It's really, really great, Good job, everybody,
you've been doing amazing. Now that being said,
there are a few problems with our mobile game
in its current state. And you might have
actually noticed them when you play test in your own build. And there just a few bugs. And most of these
bugs are actually logic errors which
have happened. We've done something suddenly
and then we changed it and then it's created a
little bit of logic error. And they're not the
easiest bugs to notice. But if you can understand the constantly doing
once I explain them, they will make a lot of sense,
so I dive right into it. The first bug you
might have noticed, if you go ahead and hit Play, if I'm sliding along, you don't actually have to
press jumping to slide along, but if you do that, you cannot jump off to present
space. I'm not jumping. This isn't a problem
with my Spacebar. It's not problem
with anything bad. It's actually a problem with
this grounded variable. You can see over
here, if I'm playing, I'll see ground is set to true. And when I leave it set
false and went along again, et cetera, true by
dy I'll risk broad. Now if I go like this, it actually sets the false
and then we can't jump. And the reason for this
is because our ground the variable is
based on whether we are entering or
exiting a collision. So if you think
about sliding over, we are going along, going along, going along, we enter a
new collision over here, and then we exit one. But because we exit afterward, that's going to
override and say, okay, we're on the
ground animal. That's a very, very
simple thing to fix. All we need to do is we
need a slightly change our procedures name so we don't have do it whenever
we enter a collision, we want to make sure
we're grounded. When we're always
on a collision, we're gonna do that very easily. We are going to movement open
up, you'll movement script. And you're going
to want to change this on collision enter two on collision, stay on. Collision state is practically the exact same thing.
It's just as cold. Every single frame that
we're on the grounds, every frame is lunch
around the ground will make sure
that we're telling the game that we're
grounded, that's sta AY. And just replace
enter with stay. So on collision stay 2D. Perfect. Now if we go ahead
and click Play again, we should see everything
should be working fine. We can now jump off,
which is great. Now the second thing
I want to address is UCI I'm doing right now, but I find that sometimes
when there's spikes, it's quite hard to
jump over both. And that's to do with the grubby scale and
the speed will pay. That's not a bug, that's
just a balancing issue. So I'm going to go ahead
and fix that right now. I'm going to go to my player. I'm gonna actually make
the gravity scale three, so it's slightly
easier to control. Then to compensate that I'm
gonna increase my jump force, but not by too much
automate my jump 13. I've actually tested this
and I've found it to be the most efficient
way to fix this area. You can see now, it's
quite a lot easier to control when I want to jump because I'm doing
it more frequently. And this doesn't make the game
slightly harder at times, but it is also a lot
easier to control, which in my mind is
a very good thing. I would recommend that you
go and do that because I've found it to be a lot
better for the gameplay. Once you've done that, you can see I'm jumping
over with these with absolute ease now,
which is really great. Now the other thing I
wanted to make sure that we do is I don't want to be able to jump all carry on moving
as long as we're dead. This is actually really
easy to read as well, thanks to our state machine. If I go ahead and I've
opened up my State Manager, you'll see that
as long as I die, my state is set to dead. The reason I stopped
moving is because I have a movement script here that says if state manager dot
state is equal to plain move, but otherwise I haven't
said anything else. What's happening if
I hit that thing, I'm just no longer overriding
my rigid body velocity. So I just kind of slide. I keep going because of
momentum or inertia rather, but I just keep going. I'm actually write an
else statement else. And then as long as
I'm not playing, I want to make sure my
velocity is always 0. Rb. Don't velocity equals, and I could type new
vector two zeros, but I'm actually just going
to type vector two dot 0, and that's the exact same thing. This is just an easier
way of saying it. Vacuolar theory is
basically to make sure as long as I'm not playing, I am dead stool. And this is really great because that means we're
actually going to be overriding our movement code so that every frame
that we're dead, we're not only going to
not move forward anymore, we're going to stop dead
in place on the x-axis. And we're gonna set
our y velocity to 0. So we can see up here we
stop, which is really great. The problem is because we're
sitting on y velocity 0, every frame that's actually not really going to make it till
we don't move it all out. Unity gravity will still
slowly slide like this. You can see over there,
I'm still moving down. That's a bit of a problem. But I can fix this
very easily by just saying RB dot gravity
scale equals 0. You might think that's
everything sold. But you have to remember
to set this back to what we wanted as soon
as you're playing again. We're going to do
that by going here to claim and setting our
gravity scale to three. As long as they're playing out very scales, or is it three? And when we're not, our gravity
scale is always set to 0. I go ahead and open up
my game once again. We can see that I am just fine. And if I die, like Sir, I stopped and then I'm back to my driving scale,
which is really, really cool because I'll illustrate how
this looks when we die much better in my opinion. Now, the third and final thing or comment if it's
for, for this point. But another thing that I wanted to address
in this absolute, I want you to make
these slightly shorter because I think
these are a little too long. So I'm going to make these 2.8. I'm just going to
change both of these individually because I
unpack them from the prefab, so they're no longer
linked to that prefab. Just go into the prefab
and type 2.8 over here. And that should actually fix
everything else for you, which is really cool. Now we have a little bit more of a jump and we have to jump across them,
which is a lot better. It's like they're
little islands. Now that brings us to
the second last thing I want to change
in this episode, and that is friction. You'll see if I go
like this and I fall, I don't know if I'll be too
heavy, but yeah, perfect. I'm gonna stick over here. And this isn't great. And the reason that's happening is because of my friction. Now I'll place friction is set to the default
friction setting. Because it's set to the
default friction setting, I am basically continuing
to move to the right. I'm trying to know,
but I'm stuffed sides. So as a result, I am just
kind of staying in place. So to fix this, I am going to be making a new physics material. I'm gonna do this
by right-clicking create in 2D and then
physics material today. And I'm gonna call this layer. And all I'm gonna
do is I'm going to set this friction two zeros. Then I'll go to my
player and I'll drag that into my rigid body. You can see what happens
now is as I'm moving along, I should no longer stick there. I should slide write
down, which is perfect. That's exactly what
I wanted to happen. Now we change quite
a few things, but there's one last
thing that I want to make sure that we
address in this episode, it's actually going to be a more optimized way
to fix one thing. Earlier. Earlier, over here we changed
our RV TO gravity scale, but we did it every
single frame. That's really not
great because that means we're overriding
somebody's already happening. It's not good for,
for performance. Instead, what I want to
do is I want to make a procedure that's
gonna do it for me. And I'm gonna make this with a new concept called parameters. I'm going to go into here
and I'll create public void, call it reset gravity. I'm gonna go over here. I'm gonna put RB dog
gravity scale in here. Delete that one over there. Now, I'm going to
want to call this every time I change state. So if I go to my state manager, I had know exactly when my state is dead and where
my state is playing. The first thing I'll do is make a link from statement
I GO TO movement. I already have a
link the other way, but I want to make
a link this way is Algoma Public Movement, and I'll call it move. Then what I'm going
to want to do, I'm going to want to
call this procedure both when I die and move
reset gravity. And over here, move
dot reset gravity. But I'm going to
want to set it to two different things are
here I want to set it to 0, and here I want to
set it to three. And the way we're gonna do that, you could write two procedures, but a much better way to do that is just by using parameters. So I'm gonna go over here to my recent gravity
and I'm going to go into these two brackets
and I'm gonna type int x. Well, this is
actually going to do is it's gonna say, okay, when I went to call
this procedure, I enter a value for
this parameter. It's kind of like
an input value. You can see up here, it
says there's no argument giving the corresponds to the
required formal proud of x. If I double-click this, I
can see where the air is. It's over here. I'm not saying what I
wanted to put x here, enter the value of 0 here, and the value three there. Everything's fine. I have now called this procedure here and given to different
values over here, I've set to 0 and here
I've said the three. Then all I need to do
is go back to movement. And in my reset
gravity I needed said albedo gravity scale equals x. Now we've achieved two
completely different things with the same procedure
using parameters. Now this is a
completely new topic, but I wanted to cover it at some point in this episode
because I thought it'd be useful later on in case we needed basically it's
like input value. So I'm given telling
you what to do and giving you a little bit
of information to do it with. And that allows us to create a much better way of
resetting the gravity. Now all this attributes
I need to reopen Unity. Good, my player makes sure I dragged my movement over here. And if I go ahead and hit Play, we can see now we've achieved the exact same result with a
much better way of doing it. We can see we stop
just like we had, and we start again,
which is great. So this might have seemed like
a bit of a weird episode, but I just wanted
to use it to teach the constant parameters and
fixed all the little issues. And I think you'll
find off this episode, you'll game is a lot
more enjoyable to play. Congratulations, you've finished the base module of this course, creating a mobile game. We've made a mobile game
where you can play it. Have a game loop. You can, when you can lose. But there's a lot more coming and now we get into
the fun stuff. I'm sure you've noticed
we haven't even made our background move
with our player yet. That's a very simple change. Obviously I'm not
gonna do it now. Strong teacher, the
end of this episode. But in the next episode
and episodes to follow, we're going to start
getting ready with all of the actually fun
stuff we're going to add in our school system. We're going to add in visual
improvements, audio, music, everything that actually makes a mobile game pop is coming in the second
half of this course. But at the end of this episode, you should have
actually finished the base core part of your game, which is really, really
cool. Great job everyone. Amazing. And if
you're mobile games working just like mine is
amazing job as always, I will of course,
link all my scripts in the description or the resources rather so
that you can link them. And good job. Once you finish this episode, you're pretty much
halfway there. The hard part of this
course is actually now posture and we're getting
into the fun stuff. Great job everyone. I will see you in
the next video.
15. Scoring: Hey there and welcome
back to Unity. Our last episode, we
said that our game or the core concepts are pretty
much done and that's true. But there are quite
a few ways we can improve our game to
make it even better. Obviously, it's not
even a mobile game yet because we haven't
pulled it to move up. But we're going to change
all of these cool, actually fun part of
mobile game development. Obviously the previous
parts have been fun, but these my opinion, all the best parts of
mobile game development. It's the really creative stuff you can add in sound design, improve your game, how you want, all the really fun stuff. So all of that's going to be in the second half of this course. And that's going to start
today with our school system. Before we add in
our school system, I first want to make
sure that our game, we can make a few
minor improvements to. Starting off, I'm going to
drag the background under the main camera so that I
have it as a child object. And what this can do
is make sure that our main camera is always
followed by a child object. If we go to our game
here and we click Play, we can see this in action. We are now followed
by the background, which is really cool, really
simple way to fix it to. Now, the second change I want to do is I want to
go to my background. And I want to go ahead
and I'm gonna go Add Component Edge collider 2D. And then I can see
my edge cloud here. It's actually almost Hi, I wanted to, I just
want to drag it down. So I'm gonna go offset,
drag it to the bottom at about minus 1.9 or
minus two, if you like. This is basically
going to act as a death wall so that if a player falls through
these gaps, they die. They don't just fall
into the abyss. I'm going to tag this as an obstacle and I'm
gonna make sure to trigger and I'll stay machine is actually going to take
care of all the restaurants. If we hit Play. We can see now, if I fall through here and
a phone to the Gap, I in fact die and I go back to the beginning,
which is really cool. Now those are a few minor
things I wanted to do. But obviously the main
point of this episode is gonna be adding
a scoring system. So let's get right into that. Before we do that, we need to
create unity UI components. So you will obviously
never done this before. So we'll go to Window
Package Manager. We need good here to
this menu Unity Registry if you might be in
there by default. So click here and then go to text Mesh Pro and click Install. Now this is basically Unity
solution two text objects. It is very powerful and easy to use tool
like this over here. And it's actually pretty much the default one they
want you to use. If you're not using this, then its what's considered a legacy or like an older version. So we're going to
want to use this. Then we're going to
right-click here we can go UI text, text Mesh Pro. That's going to create this and it's going to
pop up this window. Click Import, TMP essentials. You don't have to
add the extras. And then if we scroll up, we can see our text over there. Now, I didn't like this canvas. This canvas basically acts as a storage space for
all our UI components. And this is the text. If we move it out of the canvas,
we can no longer see it. So make sure to
keep it in there. Rename your canvas to UI this, what I like you,
you don't have to. And we're gonna rename
our texts to score. Then we're gonna go
to our UI and we're gonna change this
random mode from screen space overlay to screen space camera and then
drag our Cameron, This is my preferred
random mode. You can keep it if you'd like, but I recommend you change it. And then we're gonna
go ahead and move our score to about there. Now this does look good, but sometimes unit has a few bugs where if you
go out and back in, It's actually moved
to make sure you do that and then move it. This is the actually
right position. Now I'm going to prove
this lid on a change this to font size 75 is
quite a bit bigger. I want to make it bold, and I'm gonna go
ahead and make it a lot bigger so we
can store that there. And I'm going to drag
it all the way there. This is going to
act as our score. If I type store and then
enter an imaginary school, we can see over here how
that looks in a game. I think it looks quite nice. We can move it a little
bit to the right, and that's perfectly fine. Now we need to start coding the actual logic as to how
this is going to work. So we're going to create a new object and we're gonna
call this score profit. Then I'm gonna go into script. I'm going to go right-click
create C-sharp script. Nanocoulomb is one school. Now this script is
basically going to tell this text what to display. And we're going to work
out the player's score based on how far they are from the school track
that you see over there. Move, but it's
actually not that. But if we add beauty of gouache, this score tracker we want to position at the place
starting points. I'm gonna go here and
I'm going to put minus 8.52 that in the next thing
and then just move it down. The y-value doesn't
really matter. This is basically an act as our truck and see how
far the player has moved from it or how far the phase moved our distance,
which is our school. So go ahead and make
sure that's minus 8.52 or wherever you are placed on plant-based,
be sure to copy that. Then go to here and drag your score script onto there
and then open it right up. Now, once this is opened, go to the top and we're
gonna import some things. We're going to use
things other than system collections and
generic and murals engine typing using
Unity engine dot UI, first of all, and then also
type using TM product, that's text Mac Pro. This is going to allow
us to write off script how we want to without
getting confused. Then we're going to create
a public transform. And we're going to
call this one player. Underneath that,
we're going to create a public int and pull that school and a
public text Mesh proof. We're going to call this text or rather full-text
isn't better name. Then we're going to go into our update procedure
and we're going to type score equals. And now we're going
to want to subtract out transform and
the place transform, but that's gonna
give us a float. So before we write,
we're gonna write math F dot around to int. And that's basically going
to make sure that we can round whatever the
float value is to an inch. And then
we're just going to go. Player dot transformed
opposition of X minus our transform
proposition that x. And that is going to work out our score every single frame, frame for us, which
is really cool. Then I'm going to go
down here and I'm going to go scroll text. Now I want to store whatever
this score is in this thing. So I'm gonna go to school
text dot txt equals, and now I'm gonna put
my school value in, but I don't want to normally I wanted to talk to strength, which means I'm converting it from an integer to a string. This small amount of code will
actually give us a school, but we want to add
a little more. We want to make sure we add
score in, in quotation marks. Make sure to put it
in quotation marks, a colon and then a space, and it off that we're
going to put a plus. So quotation mark score space with a codon plus
and then school. And that's going to make it
so that it looks a lot nicer. It's not just going
to give us a number, it's going to give us
a score and a colon, just like we have over
here and edit it. Now before we go back to Unity, I've actually realized we're
using the one thing here, women to use a text
Mesh Pro, you GUI. Just make sure you change that. That's just a minor
thing that I forgot to add in and that
will make note issued. Anything else that's
just going to make an issue to your code. Then open Unity and you should see your
school track over here. Make sure to drag your play into the transform and your score
into the text Mesh crew. You buoy. And over there you can see that glitch stage click
again, it'll reset. Now if we hit run, this should actually
do everything for us. We can see how school
starts at 0 and it's actually increasing
just like 12 if we died. So it's back to 0. And that's really, really cool. Now the last thing we
need to do is we need to make sure we have a high-school. The way we're gonna
do that is we're gonna make one more variable. We're gonna go
public high-school. Then we're just going to
have a new procedure. We call it their public void. We're gonna say, if score is
greater than high school, then high-school,
sorry about these. Then high school
is equal to score. That's basically going to make sure that as
soon as we die, we check if our
schools better than our current high
school and if it is within a search on
new high school, we always need to call this
from our state machines. We're gonna go to State Manager
and create a reference to this public school manager for what we've just
caught our school, but it is a school manager. And then over here on the die, we're going to say after
this reset gravity, we're gonna say Score dot n. That's basically going
to run that procedure. So as soon as we die we check our scores greater
than a high school. Obviously, a
high-school is gonna be set to 0 at the beginning. So if we go back into u and d, We just need to assign a value to our reference over here. So if we go to our player, we can see our state machine
isn't a science which makes sure to drag in your
school truck over there. So we can store our thing. And if you click Play,
we should actually have a fully working
high-school system. If you go here to
school tracker, see how high-school 0
and our score is 14. If we die our high-school,
et cetera, 18. And then if we die
before we reach 18, it doesn't get reset,
which is really cool. Now the last thing we're gonna do is we're
just going to make a copy of the score
text to drag it down. And we're going to
call this high-school. Click here. Make sure you change
this to high score. Then we're just going to
have that right underneath. I want to make it slightly smaller so it's less prominent. Think that that
looks good to me. And then maybe
down a little bit. And then over here,
if it's greater, we're just going to
make sure that we set our new public text
Mesh probe. You do eat. We're gonna make one called
High School as heat. We're just going to put
a comment like we did last time, high-school text. Then over here we're gonna say high school text dot text equals high school dot to
string and then parentheses. This is basically
to make sure that we display what our high-school is every time now we should make sure we assign that high school. So once it loads again,
put that high school in, I'm gonna rename mine
too high school, so I know exactly what it is. That should work perfectly fine. We have that glitch
again, but that's fine. Go back into our game. And we can see our
high-school is 453 at the moment because
we're not overriding it. If we crash, then
it's set to 18. And if we go more than that, we can see it is now 27,
which is really cool. Last thing we need to do is add that same texts
we had over here. Make sure to copy that across. So we have score
plus high-school and then we'll just change
this to high school. Then everything should be
working perfectly fine. This short code over here, we'll actually do all of
our high school for us. And with that small method
call from the State Manager, which we've linked,
everything will be working perfectly fine. Just go ahead and open it up. And if we run, we can
see our high schools Carney for three because
that's what entity that if you do that
high-school 18, keep going. Let's try and get
past 18 this time. Only at 29. If I die, it is 37 and it saved if I go to 18 and
smoke gonna overwrite, which is really, really cool. So another great step towards the right direction
for a mobile game. Great job, everyone,
and I'll see you in the next video where we're
going to cover savings so that our high
school is saved even with close and reload the game. I'll see you in the next step.
16. Saving: Hey there and welcome
back to unity, or in this case Visual Studio. Now in this rather
short episode, we're just going to go over a quick saving
system for our game to start open up
the school script you created just
like I have now. Now up here we can
see score is math, F dot round end, player dot transform
that gets us school and we can have our Score
Text been assigned here. We also created this
high-school variable, which is basically
going to check whether we have a
high score or not, which is really, really cool. It's really, really
simple to make sure that we can
save as highschool when we cook the game and we can get it back
once we load it in. And that's using something
called player prefs. Now a unit he has this built-in
system for saving and we can use it for mobile games because while it does store
locally on the device, no one's gonna be
able to do encode that because it's gonna be
on a phone, so it's great. So over here we have a system to see if our score is higher
than a high school. Underneath this, we are basically
a sign-out high-school. And this is basically saying, Okay, you've got a
new high school. And if we've got a
new high-school, we're going to
want to save that. So we'll type in capital P, player prefs, dot,
and then set int. Now we can basically
put whatever we want to call out an integer
inside these brackets. So I'm going to name mine. Score will put a comma and then we put the value that we want to put inside schools. I'm gonna type in high school. If we can see we are saving our high school in the
school play approximate. Then over here at the
top we're gonna say void star under staff when
we start the game. In other words, when
we stop playing again, we're gonna make sure that
we get that integer variable and set the highest score so that we know what
our high school is. Over here. We're gonna say player prefs, dot and getint, open
brackets score. That's basically going to return whatever we
put inside score. And I'm gonna go ahead and set
high-school equal to that. That's gonna be really cool. But he's now at
the start of every game we said in high-school to wherever we saved it as every
time you get a high school. Underneath this, I can
simply say high-school text. We can actually just
copy this line. In fact, drag it over
here, high-school text. And we are now setting the
high-school at the star. We are showing what it is
with these simple what, three lines of code. Obviously we could
also add clay or perhaps dot save at the end. It doesn't actually
do that much. In my experience, I've found that it saves
him without this, but if you want to, you
can do that. I don't know. Maybe it's something
that I haven't run into that it saves. So maybe just put it
there for good measure, but it's not actually
essential in my experience. Then with these four
lines of code, we left, she created our very
own savings system. We have our high-school
saving every time we get a new one and reading it back every time
we start the game, this actually going
to work perfectly. Now in the next
episode, we're gonna go all the visual improvements. And after that, we'll go into all sorts of other
things now again, but it's really good to have
this crucial saving system set into a game with such
a simplistic manner. Hope you enjoyed this
really short episode, and I'll see you
in the next one.
17. Improving Visuals: Hey there, and welcome
back to unity. Now in this episode, this is gonna be one
of the coolest things we're going to add
to our mobile game. We're going to
improve the visuals tenfold even more
than that actually. I mean, if you did
that again right now, it doesn't look bad, but it doesn't look very good. The problem with our game
right now is it's got yellow on blue and green,
and we've got red. It's just not a
great color scheme. I'm just going to keep this as yellow because I think
that the platelets nice, but I want to change
a few things. I might change the
tense of things. So to start, I'm going to make the background black because I think that will
look quite cool. So I'm gonna go ahead and
drag that right to bottom. Now we've got a
black background. Now, the second thing
I'm gonna do is I'm gonna go to the player
and I'm gonna make them slightly more bright like that. I think that's looking good. Then I'm gonna go to
these flow pieces and I'm actually going to change
that color to blue. So I'm gonna go over
here, let me open up the floors and see these
changes take effect. I'm going to make it like a
nice light blue around there. I think that's pretty good. I'm gonna copy that hexadecimal. I can put it on
the other to go to the environment takeoff floors and then pop that right in. I think that looks a lot better. Now the last time somebody go to the triangle and make
it slightly more red. So there we go, That looks good. Now declare game,
I think that is a very big visual
improvement we can see. Now it looks a lot better. It looks more like a
actual arcade game, like an old arcade game than what we had before, the
weird color scheme. But we can actually
make this a whole lot better with the use
of post-processing. If you haven't
heard of it before. Post-processing is basically
these effects we can add visually to our game to
make it look better. I've gone ahead and created
this post empty object, haven't added
anything to it yet. Just make sure if you
haven't done that already, just I can delete
mine, show you. I'm going to go create empty, and I'm gonna call it
a post-processing. That's actually much better. Then let's center it in the middle. Make sure
everything's set to 0. Then I'm going to go into
my Window Package Manager. And I'm actually going to add this post-processing package and this is going
to allow it to you. Everything I want to do is
I'm gonna click Install. And it's just going
to take awhile. Once it's done compiling
scripts in everything, you will be able to start post adding
post-processing CIO game. So there we go, quite quick and I'm going to click on my post-processing object. And I'm gonna go
ahead and I'm gonna click a post-processing volume. So type post process volume. Now this is where we're
going to actually create our
post-processing effects. But before we do
that, we need to add a layer to the camera, which basically enables it so that we can have
postprocessing. So I'm gonna go
post-processing gametes over here, post-processed layer. And this is gonna
be the cool thing. We're gonna go over here
and we've got our trigger. Now the list can
be set to nothing. So that's basically saying, okay, we kind of
post-processing. If we set here, we set what we want to be able to
add postprocessing. So I'm actually going to
set to the water layer, not for any other reason, other than we're not going to
use the water layer. So that's kind of
like a spare layer. We have to make it water and leave
everything else the same. Then I'm gonna go to
my post-processing. I'm going to change
this layer over here to water, which is really cool. Now I'm going to tick
this is global box. And I'm going to go to
profile and we'll click new. That's gonna make a
post-processing profile for us. And if we're going
to gain will be going to be able to
see this in action. I'm going to go here
out effect immunity. And I click gluten. And this is going to be our
first post-processing effect. If I increase the
intensity here, you can kind of
see what it does. Obviously that's a little much, but that's kind of the
general effect of bloom. It adds this nice blue. You can see that's gonna
do wonders for our games. I'm gonna make my Bloom. Maybe something like I link
five is probably a good, We have quite a nice neon
thing going on so it fits. I'm going to leave my throat at one because I think
that's actually fine. And all the other things I'm
going to leave as the ox, I think that's
looking pretty good. I could have, I want
to change the color to something like red obviously. And then I have a red girl, yellow if one of the yellow bar and everything that
looks quite cool, but also add maybe a green
or a blue if the blue one, but I'm gonna leave it as white. And now I might add it
to blue data because, but I'll see, I think white looks good finance on
to uncheck that color. Now I'm going to add my second of my three effects
and I'm going to add a vague net effect on if
I'm pronouncing that right, I'm gonna go here to intensity. I'm going to increase
the intensity to about. You can see kind of
what it's doing that is the natural net effect. I'm going to make mine
something like 0.3. So it's a little subtle, but you can kind of
see it on the edges. If I made it 0.5, that will
be a bit much, at least 0.3. I think it's a
good middle point. Then the last factor
I'm going to add is going to be color grading. This can be quite
a complicated one, but don't worry, we're not
going be using all of these. We're just going to
click over here mode and change this to
Low definition range. And then over here our temperature wouldn't
leave out tint. We can leave, but we're
actually going to make sure that the temperature
is set to 0, which is, then we're
gonna go over here to these three bottom and these
are the ones pretty big change saturation,
brightness and contrast. I'm going to actually
change this to ten, brightness of ten as well. And make sure my
contrast is maybe full. I've even at ten as well,
but I think that makes it look a little less nice. So let's make it full even
through and be better. And we can see now we
have what I think is a million times
better looking game. If I go ahead and hit Play, I can see that this
game, in my opinion, looks ten times better
than what it did. It now looks like
an actual game. This actually looks a lot
like one of the first games I ever made called square root. Yeah, it's kind of what I'm basing this course on, but yeah, you can see how game
looks a lot better now we've got the
light glow effects, and we have all of them
nice visuals that we added. We've got the better colors. I think that's
looking pretty nice. Now, the last thing I
wanted to do is add a death effect and
we're gonna do that with a particle system. Now this is going
to make our game look million times better. Trust me, there's gonna
be a nice effect when we're asking me to explore it and then we're gonna respond, that's going to
look really great. But before we do that, I'm going to want to go ahead and make sure we disabled and enabled my place
for it when I die because that's actually the
first step of this process. I'm gonna go here to my
State Manager script. I'm gonna open that
up and I create a public sprite renderer
and call it spread. Then over here
under my die void, I'm simply going to
go underscore and say sprite dot enabled equals false. And that basically means go to whatever sprites
attached to you, which is going to be this
Player's sprite renderer. Go here and disable
it like that. So it's not going to be active. Everything else is
always C21 work. But then the second thing I'm gonna copy this code
and under respond, I'm going to set that to
be true right at the end. Basically, like we're
doing with a lot of the stuff like our gravity
and everything else. We're just setting it to
be something else off the off state has changed,
which is really cool. Now I just need to
go to player and make sure that I've assigned
my sprite renderer here. So I'm gonna go to the top. And if I try and drag this down, it's not really going to let me. Instead I'm just
going to go over here and I'm gonna click over there and select player. And that's gonna give
me the right one, which is the exact same
thing as dragged it down. Okay. I couldn't because
there was so much in the way. Now I forgot and play my game. I can actually see this in
action is if I go and I'm playing and I round to a spike, my sprite would disappear and then I'll respond, but that
doesn't look very good. We want to add an
effect and we're gonna do that with
a particle system. I'm gonna go Add Component. I'm gonna type in
particle system. As soon as you've added
your product system, click on the player
and click Shift H, which basically puts
it in isolation, uses only thing you can see, which is really,
really useful for us. Then we're gonna go
ahead and we're going to start adding a
particle system. A particle system is, I'm sure you can guess
it's a particle effect. And currently these are
all the default settings, but we don't want those. So we're going to change was
the first thing we're gonna do is we're gonna go to
Texture sheet animation. I'm gonna go through
every single step because this is quite a
complicated component. Took me a very long time
to get the hang of, but I've got a partial larger but now enough to make a nice particle
effect for our depth. Let's go to Texture Sheet
Animation, check it, and click on it and then change this mode from grid to sprites. Then go into course assets and drag your square over there. And now we should almost
be using R-square, which need to go to
renderer and select the material as Sprites Default. And then we are using
normal squares right? Now, go back here and we can
see it's a looping effect, but we obviously don't want
it to be looping because we won't have them once
to uncheck looping. And if we click Restart, we can see this effect goes on for five seconds and then stops. And we can see it going on,
but we don't want it anyway, and we want it to be
like 0.2 seconds. That's gonna be the
Jewish law exclusion. And we also want there
to be a lot faster. So we won't, I'll start lifetime to be something less like 0.8. And we can see all our
products go and then go away. So that would be perfect
and then will respond. Now we also want the
speed to be a lot more. So let's change that
to ten and then the product is gonna be a
lot faster, which is nice. And we want the size to be slightly bigger. So
I'm gonna make it 1.5. And we have these nice bigger
particles, which is cool. Then over here on the emission, this is where we're gonna
change a bunch of stuff. We're gonna make this
rate over time a 100. We can see now that's slightly nicer, but it's
actually not enough. So I'm gonna make this 250. There we go. That's a
nice amount of particles. We can even make it 300 launch. But you don't have to ask him. Now, I'm gonna go to Shape and actually
my shape as a cone, which is perfect for this fact. So leave everything in there. Now I'm going to
change two things. First of all, I want to change
my speed over a lifetime. So check that box
and then open it up. Click on the size, you're
just going to click on this auto-generated
graph over here, then we can see
speed of lifetime, they're gonna get
smaller as they go. You can also choose
that one if you want. It's quite similar, but I
find that for explosions, this one works slightly better. That's cool. Then you can go ahead and
go to color over lifetime. Check it, click on Color. And then you're going
to want to go ahead and click at the end over here, this top one and make that 0. And that's basically going
to give you a nice fade away effect like so. Now the last thing we need to do is actually make sure that the color of these is the same as the color
that we're using. So click on the color,
click on this fine to just go ahead and choose
somewhere in your square. You can see now
it's going to look quite similar, which is nice. Now, there's a few changes we
might find we need to make, but let's test this for now because it might work perfectly. To do that. Obviously we do need to code to say when we want
to do the particles. So press Shift H again,
back into our game. We can see if we play it now it is in front of
the background, which is nice because our
background is minus ten. If it wasn't, we could
change a factor in here that would make it go in front, but it is,
so that's fine. Then we're going to
go into our script. Here. It's still
the State Manager. We're going to create a
public particle system like that on our coal mine PS. Then over here under my diet, I'm just gonna say right
underneath my spider they were almost say ps, dot, play. Then parentheses and semicolon. Well that's gonna do is
it's actually going to let me play this effect
as long as I sign it. So I'm gonna go here to my script and drag my
product system in there. I'm going to minimize
that so you can see it. Now before we test it, let's just go ahead and
make sure that we have unchecked plan awake because otherwise it will play
as soon as we start. Let's go and click it. Then we start,
everything's fine. If we die it should work. We can see that I'm very nice. Particle explosion
fade away effect, which I think is pretty
good at the moment. There are few
changes we can make. For example, I think
that we need to have the color a little
less so at the beginning. So let's make this
alpha down to a 150 on the color over lifetime. Then the last thing I wanna do, I want to actually add
most I'm like it's 500. And I'm also going
to make this size slightly smaller. So
I'll make it 1.2. That is going to be on
new particle effect. We can also make it
a little bit faster, in my opinion, they
make it 15, let me go. That should be better. If we now stop. We should see our particle
effect in action. Minute we die, we can even
pull down here and see it. And there we go. I think
that's quite nice. Oh, she was cut off screen. So let me show you
how it looks like on a normal triangle. Over here. There we are. I think
that looks quite nice. Obviously it could be improved. Maybe try playing
around with it. See you can get yours to
look better than mine. But I think for now that
is exactly what I need. The great news is because
of all our earlier work and into the present moved
if we fall and die, like I'm trying to
illustrate now, just do good at our game. Then it doesn't move, which
is really, really cool. Hopefully after doing these, you have made some
drastic visual upgrades. Steel beam and yours is
looking at whole lot better. Just take a look at what our game looked like
right at the beginning and look at it now
I think it looks a million times better. So grid you've ever, I think that these vision
improvements made in our game look a whole lot
more professional. And we are once again, getting closer and closer to our game being finished
so greater if everyone, I'll see you in the next video.
18. Sound Design: Hey there and welcome
back to unity. Now, as I'm sure you remember
in our last episode, we heavily upgraded our
games visual component. But there's been one aspect of game development
which we've been neglecting this entire time, and that is our games sound
design or audio component. Now obviously this breaks into two main
categories of games, music and sound effects. In this course, or
rather this episode, we're gonna be adding
both of those things. Now, I am only going to be an, a sound effect for
the jump and for death animation and
only one music track. But if you want to
oxidize this video, you can go ham adding as
many new structs you want or extra sound effects because
you're going to be using the exact same process that
I'm going to be using. So it'll be easy to expand. Now to start this, I'm first going to make
a music manager. So I'm gonna right-click
here, Create Empty, and I'm gonna name
this music manager. Then I'm going to obviously centered just like I always do. And then I am going
to want to add my music managed
script onto this. So I'm gonna go and create a new C-sharp script
and I'm going to call this music, manage it. That's actually going
to be a sound manager. You can eat whatever you want to understand me, my music manager. Then I'm gonna go
ahead and open it. The reason I'm naming it music manager is because
that's obviously the first thing we're
gonna be adding, adding the sound yet. Then I'm gonna create
a reference to, and this is what we
call an audio source. This is basically a
unities way of saying an MP3 or web player. So I'm going to go
public audio source, and I'm going to name
mine AS capital a. Otherwise, it's the word as which is obviously
restricted. So AS then I'm gonna go ahead
and create a public void. And I'm going to call it lay. Sure to not have it auto filter on player connect or disconnect. And I'm gonna go as dark clay. Now this is basically
ensures how we can link audio sources. I go here, boy, stopped. Then over here I'm going
to call this clay void. So in effect, I'm saying
as play on start, obviously this is quite
tedious way to get there, which you might have
noticed, but I'm just trying to illustrate something,
so bear with me. Then over here we need to
create an audio source. So let's go ahead
onto music manager, because we're obviously
going to add the music. They're gonna go
to course assets and we're going to drag
the music file in there. Now this music file is a royalty-free song
from the Internet, but you can use
whatever you want. Just make sure that
you are not using Cohen music that is infringed
on someone's copyright. If we see this is royalty-free, go ahead and check this box. And then you're going to
want to keep uncheck play on awake because we're kind
of manually doing that here. Obviously we could just
click Play on awake, but like I said, I'm trying
to illustrate something. Then set the volume
something like 0.5 and the pitch too,
I think about 0.9. That's basically
slowing the song done. I think it sounds
better like this, but you don't have to. You can change the pitch
to wherever you want, really goes up to three
and down two minus three will change this 0.5. I wouldn't recommend
doing it, sorry, 0.9, I wouldn't recommend doing
anything less than 0.4, otherwise it gets
a little too slow. And then we're gonna go into
our music managers still, I'm going to add our
sound manager script or would call it music manager. I'm going to drag
our audio sourcing and we can see if we
uncheck plan awake, but as soon as we click Play, our game is going to
stop playing music. Very, very cool. Now we've got our music script and you can obviously play around with that as
long as you'd like. I have cut this specifically, so it should loop, but if you want to
make it so that you fade in or out, we
use different track. You can obviously
change all of that. Just changed the audio
file you're doing. All this is doing is playing
one file on looping it. If you do change
the music, makes sure to readjust the pitch. Otherwise it might be
but slow feel, taste, but right now everything
is working perfectly fine. Now the second thing we need
to add is sound effects, and we're going to do
those using audio sources. But the problem with using
audio sources is that if you have multiple audio
sources on one object, it gets a little hard to
differentiate between them. So I'm actually going to store audio sources for the player, one player and one
on another object. It doesn't really
matter what I use. I could use the
event system if I wanted to hold a
spawn floors object, which is obviously
a storage space, it doesn't really matter. I'm going to put mine in the
environment because that is one of the most
useless objects. But even though this
one doesn't move, it's still going
to play the audio. It's not like the audio
is affected by how far we are going to go ahead
and add an audio source. And we'll see we dragged
it on last time. That's just a quick
way of doing it. And I'm going to add the dye
effect of this audio source. Then we'll make sure to
uncheck play on awake. And I want to make the
volume also about 0.5. We might have to
adjust these later. We'll see I'm going to go to my player and I'm gonna scroll into the bottom and add
another audio source and add the jump effect, once again, changing
the volume to 0.5 and changing the
Paraguay to false. Make sure that both
play on awake and loop are set to
false for this one. Then all I need to
do is I need to go into my script and create new public void for
playing other museums, I'll go public void and
pull this one, play jump. Underneath our public void. Lei di. These are basically going to be the two other audio sources I'm gonna go here
and I'm going to create as jump as dy. And I'm going to rename this as music so I can
differentiate between it. And of course going to
readjust that there. And then I'm going to
copy this exact code, obviously just
changing which audio. So some things over here, I'm gonna go as
jump the dot play. Here. I'm gonna go as dy dt. Now, if you're
noticing something, these procedures are
quite, quite similar. So we could actually,
if we wanted to use parameters and then
just call one procedure. But I've often found
that using parameters can give you a few issues
in the Unity Editor. And so for simplicity sake,
we're not gonna do that. What I mean by h in
the Unity editor is because these scripts are
being cooled by code, there would be no issue at all. But if we want to call the
script via an objects, you want to click a button
and Coolidge specific void. And we had too many parameters. Sometimes it doesn't let
us correctly reference it. So don't worry
about that for now. It's not gonna be an issue. We're going to run
too, but we could actually rewrite this
as one procedure. I'm just choosing not to because this way it's a little
easier to read. But if you notice
that Great job, and now we just need to go
into our stage manager. We need to make sure
we called fretboard. So go to our stage manager
and we're going to create a public music manager,
look follow-up music. Then we're going to go down to this dive board and devoid. And we're gonna
make sure that we call it as soon as we die. So after the particle system, I'm going to go to music. Play die. Perfect. And then over here I'm
gonna copy this exact code. And we are also going to want to play this
whenever we jumped. But obviously that
is not linked to the State Manager that's
going to movement. So we're gonna do the
exact same process. I'm going to go public,
music manager or music. Then over here on the jump void, We're gonna go music
dot play dice. At this time. We're going to want
to create jumps. So dark gray jump. A little bit of
assigning we need to do before this works. But once we've done
that, everything should work perfectly LC. We've changed the
movement script, the State Manager script,
and the music manager. So let's go and
check all of those have everything
assigned they should. First we'll start
with movement script. It doesn't have a music managers make sure to drag that in. Neither does the State Manager. Then under the music manager, we need to make sure we actually have the right audio sources. So drag as music over there, because we changed
the name, it will reset to make sure you do that. Drag the player has the jump and the environment
has the dye void. And then I'm gonna
go ahead and play the game and you can
see how this sounds. Alright, that was cool. We can see in that short
amount of time, we've actually created a fully
functioning audio system with music and sound. And the great thing
about doing this, obviously we can see over here we have some pretty
useless codebook calling play from
a store procedure which is doing it on its own, which isn't very ideal. But the reason I wanted
to do this is because now we have a link to
our audio and music. And later on when we
create our menu system, we're going to create
functionality to mute all of these audio sources. And that's actually
going to let us do that, which is really, really cool. Stay tuned for that
Good job everyone. Hopefully everything
works and I will obviously my code and
resources if you want, you can change up these audio things to be
wherever you want. Just drag your new
file in there and it will update everything.
And great job. I'll see you in the next video.
19. Menu System: Hey there, and welcome
back to Unity. And obviously in
the last episode we added sound and music target various time making it feel
a whole lot more responsive. We can see that here just
like we did in the last row. So super cool. Now while this is
incredibly cool, Some people might
actually not want audio and sound just like we do. I hope you do at least
because you've had to listen to it for the
past episode in half. We're going to add
a menu system that allows us to select whether to play sound or muted
and also play the game. And it will take us
back there when we die. This is actually going
to be quite simple. It's going to be
probably one of the more complicated things
we're gonna do, probably the most
complicated thing left to do in this course. Maybe you might find adding in, adds a little bit confusing. But other than that
this menu system, it just takes some
getting used to, but after that you
should be fine. So to start, we're
going to first start by making a menu script. I'm going to call
our scripts menu. Then I'm gonna go ahead
and double-click this. Now before I even
start making my menu, I'm sure you can think wouldn't
want to different states. We're gonna want a state
where we're playing game. We're showing the school
and the high school text. And we're going to
state where we're not showing the school and
the high school texts, which is exactly what
we're going to fix. Here. We, we're going to have a
public void and call it menu. Directly underneath
that, we're gonna have another public void
and call it high menu. Then what we're
gonna need to do, we're going to need to create
a system where we can hide, ensure specific buttons and other UI elements
based on what we want. So I'm gonna go ahead
and make that now. First of all, I need to actually
start designing my menu. I'm gonna go here to my UI, and I'm going to make sure to uncheck school and high school. So once this loads and
then click on them, like so, click on check so
we can't see him anymore. And then I'm gonna
stop bowed my menu. So I'm going to go
right-click UI. And I'm going to create a
button with text Mesh probe. Now this is going to
go ahead and autofill. We also can't see because
our post-processing layers a little in the way. But if I go ahead
and scale that up, we should be able to see out, but it adds glowing chords
of our post-processing. I actually currently
see with this new way and there's a cooler
you can hide gizmos. If you go here to the top right, you can take away all
the gizmos in the scene, which is pretty
useful at the moment. I'm gonna go ahead
and rename my button. Then I'm gonna go
here to the US, but I've got a course
assets and you'll see over here you
have a play one. Makes sure that all of these just like we set
the first street, we're getting to a 1000 pixel. You're going to make sure
you do the same here. Otherwise they're
going to be very big. And then go here to
play once you've done that and drag it in and power, we can see a rather
disfigured Play button. Then I'm gonna go to
text and delete it. Then I'm gonna go here
and set the native size. And here we have our play
button, which is pretty cool. Obviously it might
be a little smaller than a scale that up a bit. And then I'm gonna
set its position on the x and the y to 0. Now you might find that these position coordinates
are lot bigger. If we move this to 60, it
only move slides for that. But if we moved our
player to position 60, you can see they go
complete your screening. And the reason for that
is because there are different coordinates. These are UI coordinates and the other one a
world coordinates. So just don't get
confused there. If I set this to 601960, it's not going to
be the same thing. There is code that
you can convert them, but we're not going to need
to do that in this episode. So lucky for us. Then I'm gonna go ahead and
retold it on my gizmos. I can see them again. And I'm gonna make
sure to set that to 0 and move it down a little bit. I think I want my Play button to be the same color as the floor, so I'm gonna go
ahead and do that. I think that looks quite cool. Then I'm going to want to add in my play and Sound Options. I'm going to do very similar. I'm going to right-click
here and go to UI button text message Pro, and call this one sound. Over here, I'm going to
write u1 and quality music, sorry my music and
sound buttons. And then I'm gonna
go here and delete both the text objects
attached to these. Move both of these over here
to the top right corner. Don't worry about these arrows. That's just Unity working
out how the buttons work. And I'm gonna move
the music down there. And then I'm going to
go here and I'm gonna drag music into music
like I did with a play sound and the sound and click Set native size for
both, just like I did. Then I'm always going
to scale these downs. I'll make this about 0.4.4. That looks good to me. And the same full sound phone, which is cool now actually
make sure they're the exact same exposition so they're right
underneath each other. I think that looks pretty good. We now have our game with a
menu system at the top right. We can go ahead
and change this to whatever I think I'm gonna
change these colors. I'll see how it looks
at yellow. Not great. I think I'm going to
make them all blue, but you can actually
make it whatever you want if it huge,
find the share. Yeah, that looks nice or any other color that
will work perfectly. Then the last thing we
need to do is we need to obviously create
a title ballgame. So I'm gonna
right-click on a UI, text texts Mac Pro and
rename this to title. Then I'm going to move this up. I'm going to also want to scale this **** a lot biggest.
I would like that. Make it maybe not that big, but big enough the institution
to move the y down. So then I'm going to
change some essence here. So first of all, I'm going
to set the alignment to the center and the center,
so it's right in the middle. Then I'm going to rename. I'm gonna make sure that
I have before I rename action and make sure my
font size is quite big. So I think maybe one
hundred and fifty million, two hundred, that's
probably good. I wouldn't say new
text over there. I'm gonna go ahead
and actually move both of these
slightly down again. Make sure the title and
the play sound both moved down and we can see that looks a little better
in my opinion, then that we always need to make it the same color so it fits. We could also change
the font if we wanted. Ioc did not install font packs. I'm not gonna be able to, but
I'm going to leave mine as arrow for now. I'm
going to name mine. Who? Square? Now if you can't come up with as brilliant name as cooled
square, I didn't play me. You can name use
wherever you want. Cooled squared is
clearly the best name, but if you haven't
been able to come with something that they
don't feel bad yourself. Not all of us are creative
geniuses like myself. And after we've done that, our menu system is actually looking pretty complete,
which is pretty cool. Now all we need
to do is actually program logically spellings. Because if we hit Play as you need to set
these active again, because that's actually how I came to my plane
that we hit play. We don't want these
buttons in a way because obvious reasons. Then I'm going to go into, we want to go ahead and
program logic to these. So I'm gonna go to my
menu system over here. I'm going to create a
reference every single one. Now before you start,
make sure you go to the top and right using Unity engine dot UI and
using text message protocol, just like we did last time. Then I'm going to want
to create a few ODS and go public text Mesh. You breed. And we're going to call this it because that's
gonna be our title. And then we're going to want
to create a public button. And we're gonna
call this one play, called The next one music. We're gonna call
the next one sound. Then we need to go
over here to UI. I'm actually going
to put my manuscript right on UIs to just
drive that there. Then make sure I
signed my thing. So I play button to play
my sound button to sound, my music button to music
and my title there. And we're almost done. The last thing we need
to do is we need to create a reference to the
score, the high score. We're going to just
add some commas and then put those right
there when they load. But the score there and
the high school there. Now what I need to
do is I need to create logic for when I
want to show which one. So obviously when I'm
showing the menu, I wanted to make sure
that everything except the title and the school is showing sorry, the
school and the high school. And when I'm hiring
menu on to make sure the exact opposite. And I'm gonna do this with
parameters because I know I've mentioned in the
previous episode that sometimes Unity has weird
things with parameters. But I've often found
that that's actually only when you're using
more than one parameter. So I'm going to call
this from code, so it's gonna be fine actually, but I'm gonna go
ahead and go here. And this actually can be a
much better way to do it. I'm gonna go public
void, change banking. And then we're going
to have a Boolean and I'm going to call it x. Now from this, we can
actually set every single one because obviously we
are going to want to set them to be
completely contrasting. Want to say either
all these analogous or both of those and
neither will the others. So I'm gonna go to here,
title dot GameObject. I'm referenced the game
object set active, then open brackets, and then I'm obviously could
enter X here. Then depending on
where we enter for x, I would set the title
active to that. And I'm going to
basically make sure that I set do this every
single one of them. So Tyler Rhodes Family, I'm going to want to
be the same for skull, the same full highscore. And we can actually
call the lines of code by pressing Control D. That's quite useful
then across to the same full play music. And for sound. Obviously this can set them all or nothing and we
don't want do that. We want to set the school and the high school to be different. I'm just gonna put
an exclamation mark right in front of that. And that's basically
going to say not X. Waits code works
is I'm saying I'm entering a boolean x either
yes or no, true or false. And I'm gonna call this
point if we wanted to hide everything
except the school, I brought change menu false
and then it's gonna say ok, So at the title false, the
school not false or true, the high-school not false or true, and everything else false. And obviously if I
do the opposite, it'll set this true, this true, this true and these two false, which is really, really cool, It's really simplified
way of doing this. Then all I need to
do is I need to create a reference to this
menu from my state machine. I'll go public menu. I don't want to call it
menu, so I have a link. And then I'm gonna
go over here to my dashboard where I'm
cooling everything else. And I'm actually going to
say menu, dot change menu. And I would of course,
entered over here so that everything is centered true except the school
and high school. And then under the respond void, I'm going to do a
very similar thing. I'm going to go up here under my thing and set menu to false. Now, what this is
basically going to do is it's going to make
sure that when we die, the menu shows and
then it goes back. That's not entirely
what we want. I'll show you how
that looks now. If we go ahead and hit play, we first before you play, actually we have to
assign readings. So let's go to our state machine and make sure that
we set our menu to Menu and then hit Play. I'm actually going
to mute the audio because I can talk over
so I can talk with us. I'm gonna go to my music manager and I'm going
to go ahead and hit mute on the music and are already the
same with the player. I'm just going to go
here and click Mute. And the same with
the environment. So I'm not having any earlier. If you don't do
this, that's fine. I'm just so I can talk
over it and not being shattered by the very
cool subtract again. Then if I go ahead and hit Play, this is actually pretty
close to what I want. We can see everything
is showing at once. If I die only the menu
shows and then that shows. But obviously the
menu is not very useful for this employee
clicks on here. It doesn't really do
anything which isn't ideal. So I'm gonna change this
code logic a little bit. Instead of saying, have a delay and then
automatically respond, I'm going to call this
respond void from the menu, and I'll show you
how that works if I go ahead and comment this out so that all it's doing is waiting and then
nothing happens. Of course, this is
kind of use this code, but we're going to use it
later, so don't delete it. Then I'm gonna go over
here to my play thing and unbutton, click
and click here. And I'm going to
drag in my player. Let me go. No function. I'm gonna go all the
way down here to State Manager and I'm
gonna click respond. And what this actually going
to do is look pretty cool. We're going to see obviously everything is right
there when we start, which is exactly how we wanted. But if we die, we don't respond. And then if we want to
click this, we do respond. And that's actually pretty close to how we want our
menu system work, which is again, really, really cool. Now there's a few issues. First of all, I wanted to
make sure that these two are disabled when I start because that's not
how I wanted to go. The second thing I
want to make sure that I have is I want to make sure the player is not actually in a moving state at the
beginning of the game. I'm gonna stay in state
manager and I'm going to set my state to idle. I beginning it doesn't
really matter what you put here because we're just
checking if it's playing on on. So you could even put dead,
that doesn't really matter. And then the other thing I'm
gonna do is I'm going to set my gravity obviously
in my move to 0. We start by being
suspended in midair, which is very
similar to the desk day without allele effects. Let's go back into Unity. And we can see how
this looks over here. If I start, I am
suspended and as soon as I click Play I spawn,
which is really cool. If I die, I'm going to have that again and pop up and
everything's working perfectly, which is really, really cool. Now the few changes unmake. First of all, I want
to make it so that you go back to the
beginning and you respond even before you
have all the other effects. So we actually need to go
back to that co-routine. We are going to put that
respond void back in here. But instead of making it one Boyd, we're
gonna change into two. So I'm going to go public void. I'm gonna call this one dot. Again. I miss gonna handle
all of the other logic except setting the
position and setting the pretty much go over
here, we'll change that. And now it's gonna
do is when we die, we're going to go back
to the beginning, but we're not going
to set anything else. Then we're gonna
change our button to call this void instead. Go over here to my button, UI, down to the play button. And I'm going to go
ahead and change that to State Manager stock game. That's pretty cool. Now, if I go ahead
and play my game, I can click, start the game. I could die. And then there's a
delay and I go back. But I don't need to
show just yet either. So let's go back to our code. We're gonna change
that menu logic. Instead of changing the
menu as soon as we die, I'm actually going to
set it when we respond, which is pretty, pretty cool. Now you'll see how
this works in game. Back to my game.
Click over here. We can see we start with
the menu click Play. We can play along a high-speed, obviously saved as
we did a while ago. And we respond as
back we're getting, which is really, really cool. The last thing we
need to change, we need to make sure these
buttons actually web as well. That's also going
to be quite simple. We're just going to go
into our manuscript again. And we're gonna make a new
voice and we're gonna call it change audience, public void. And we're going to call
this change audio. The one's gonna
be changed audio. The other one is
going to be cold. Change music. That is basically going to say whether we want to
change the music. We're not gonna do
this into floats, the public brilliant Music. And 48. Then all going to
do over here is we're going to set them, change them to learn
music equals not music. That basically just
means if it's true, it makes it false, It's
false, makes it true. Obviously want to
put that over there. I'm going to put the
same over here for audio equals not auditor. Then lastly, we need to do
is we need to have an access to our systems which can
actually play the music magic. I'm just gonna go
ahead and create a public music manager. Call this music manage. Then I'm gonna go
music manage dot, and then we're going to find
the audio source I want. So if we go here, we can see that it
was actually called as dire as jump at music. When actually for
audio, I'm gonna set as Guy as jump the mutant
to be whatever audio is. Algo, Dr. Newton equals audio. And I'm gonna copy
this exact code and put that down here, except this time as jump. Then I'm gonna do very
similar thing over there. I'm gonna go down here
and then a set music dot as music equals and then change it
to music over there. This least five lines of
code are actually going to make us have a
very cool system which can alternate
between muted and not muted audio. We'll
go back over here. You need to do a little
bit of assigning first. So let's go and
make sure I'm music manager is linked there. And go to our sound thing and make sure it has
an onclick event. Dragging the UI, click
no function click menu and then select the one over here that
says Change audio. Go here and do the
exact same with music, dragging your UI menu and
this time change music. Now before I play, I'm
gonna go ahead and make sure that I have
actually unmuted all the things I muted earlier so that I can show
it to you because I don't have to be messing
with our game a little bit. So let's go ahead and
unmute everything. And I will show you
exactly how this works. We can see we can
mute the audio with ease and unclicked carry on. We just do the same
with our sounds. If I go here, I can
see that my play a sound has actually been muted. If I unclick that it has not. So I can play with
just sound and music. Very, very cool. Now this is obviously the
basics of our menu system. I think we've made
some quite big leaps in our game, and
it's the last big, big thing we need to
add the next episode we can do monetization and then it's just fixed
now ballgame and we're actually ready to
put it on mobile. So great job
everyone. I hope you enjoy the absolute and I'll
see you in the next one.
20. Monetizing our Game: Hey there, and welcome
back to unity. Now this is the
lost main feature. We're going to add two again,
this is the last step. So what I'm gonna talk about
the completely new feature we're adding and that
is monetization. After that, I'll mobile
game is pretty much done. We just need to obviously put
it to mobile and build it. And we can see everything will work perfectly fine,
which is really, really great mutants,
you've come a really long way in your mobile
game development journey. So great job you've
done amazingly. Now, mobile games always
use ads to monetize. That's a bit of
an overstatement, but practically every single
mobile game out there uses ads of some kind because it's a really great way to
monetize your games. And adding them is
not super easy, but it's not actually as
hard as you might think thanks to Unity's add package. Now, we're going to go through
this process step-by-step. Be sure to follow everything
I do because making small changes can result in weird little things
you have to do. So just make sure you
follow everything exactly. Stop, go over to scripts
and you're going to want to import this Ad
Manager script. Now if you go to the
resources of this video, you'll find that there is an Ad Manager script over there. And you can go ahead
and actually download that and that will give
you the ad Manager script. The reason I didn't include
it in course assets is because it's going to give you errors as soon
as you download it. It's gonna say advertisement
does not exist. That's completely fine. That's just because we haven't
enabled ads on our game yet to do so once you've installed that and you probably do have your two hours there, go to Window, select General,
and select services. Once you've done that, you
should see this thing. It'll take a while to
load and then you'll get these lists of services. All of them should
be off for now. So go to ads and you might not be taken to
this screen right away. Now the reason I
was taken to this is because I'm obviously already signed into Unity because
I've used Unity before. But if this was the first UTI, Portugal, you made this
whole mobile game, you might not be signed it, so it'll ask you to sign
your unitary account. Now, I'm assuming you do have a Unity account because you
installed Unity Hub and I believe you have to have a
Unity account to create one. But if you did not, just go ahead and
create one, there'll be a really simple process. You can obviously do it on unity.com and just
make an account. Then once you've created
your Unity account or your Unity Hub or
account, whatever you need, then just go ahead
and it's going to ask you to create a video game. So you're gonna have just
choose an organization. You might be wondering
what this is. If you go up here to
dashboard, you click here. It's going to take you
to your Unity dashboard. And this is actually
going to be where you can control all sorts
of stuff like that. Obviously, I haven't
signed in yet, but if I would assign, it, will then take me to a
page where I'm able to create organizations
and such like that. So go ahead and make an organization if
you haven't already, and then you're going to have restarting into you
gonna reload duty and the organization will
be there as one of the dropdown options if you have to choose that to
select your game. If you haven't run into any of these problems, don't worry. I'm just saying in
case anyone does. And then lastly, you have
to say whether you are going to be targeting
people under 13 or over, and that is so you
are coppa compliant? Go ahead and click Yes, just for good measure. Obviously, we don't know
enough about copyright yet to be fully making that assumption. If you are planning on
releasing a mobile game, I recommend you do some research
on that because that is a very important law you have to follow when making mobile games. So obviously the
Children's Online Privacy Protection Act. But if you are not, if you're just trying
to finish this course and against that later, just go ahead and
click yes or no. It doesn't really matter,
It's not releasing or game at the moment. And then you'll be
taken to this screen. Now, first of all, click on ads and
that's gonna take a while to load and
it's going to freeze. Maybe it's gonna load your
thing resolved packages, compile C-sharp
scripts, and after awhile it should
enable everything. So ADS is on. There you are. Now we can see we have ads on, it says current version 3.7.5. Now this actually automatically
installed onto Unity. I'm not entirely sure why
mine automatically installed, but a previous
time was doing it. It didn't, so I'm not
entirely sure how it works. I will show you how to install
it in case yours hasn't. But if he always has installed to conversion and there's
a later version available, make sure that you download
the recommended version, not necessarily the
latest version because I found the latest version
sometimes gives me issues. So if I want to make
my game ready for ads, I need to download this
package over here. Like I said, I've
already got it. But go over here to
Window Package Manager if you don't, it's right there. And then find this
advertisement one. And if you have
not installed it, click Install obviously high up, so I'm not going to remove it. And you'll also see that
my arrows have gone away, which means my ads are
working perfectly. The last thing I want to
do is click over here on ads and I'm gonna
enabled test mode because I want to
make sure I'm not using real ads if you're
testing your game or your, the one thing that
you're not actually allowed to use real ads, you have to use test ads, which is exactly what I'm doing. Then I'm gonna go ahead and I'm going to open up ad manager. And we can see all of
these areas should actually go away as soon as
it refreshes if they don't, sometimes Unity does
have issues with it, like for example, might
aren't going away. If I close it and I restarted,
they might go away. They might not use
these little weird. And hopefully by
the time you are using Unity, they'll
have patched this. You can see now my arrows
seem to have gone away. Ok, now that happened. I'm gonna go here and I'm
actually just going to go AD tenant often on. Now, it's important
to keep in mind that these arrows are not as a result of anything
you are doing wrong. This is unity and they have
this really annoying glitch. So just bear with me here. If it happens to
you, just do what I'm doing, either
turn off and on. We'll see if that
works. We can see from me it has in fact work. So now it has worked just
because I turned it off and on. You can see obviously
I've done nothing wrong. There's nothing wrong
with the script. Just unities issue if that
doesn't work for you, you can also try
uninstalling and re-install in the package by going here to Package Manager, then going there and
removing and installing it. So yeah. Hopefully now you should be
at a point where your game has the script and no longer has errors if you have, great. Now the last thing we're gonna
do is we're just going to show an ad every
single time we die. And that's actually
really easy to do. Now before I change that, I'm
actually just realized that my class name is not the
same as my file name, which is an area we
talked about earlier. So let's go ahead and fix that. Otherwise, that's gonna give
us areas in the future. Make sure this is the same, both have uploaded this course, you should be updated, so don't worry, but if it's not, just make sure you have
that and that's what every single script I'll go
over to stay manager and we're going to create any
new public ad Manager. We'll call it add. Then over here when we die
on top of all of this stuff, we're gonna call
our respond void. And as soon as we
respond to underneath this respond void
inside the coroutine, you're gonna go add dots,
show add parentheses. This is basically meaning that
every single time we die, we're going to see a short ad. Now let's see if this was
our actual mobile game. That would be a little annoying
and I don't think it's fair to have all user watch
one every single time. So instead we're gonna
create an integer variable. We're going to go public
and call it add weight. Instead of saying show ad, we're gonna say add weight
equals weight plus one. And that's basically a way of saying, Okay, increased by one. We could also write this as
add weight plus equals one. That means the exact same thing. And then we're gonna say add weight is greater than
or equal to three. Then I want to reset
adequate so it's 0. And I want to go
ahead and show my ad. Wasn't going to do is
this going to mean every single time we die, we're
going to increase app-based. So every third game we're gonna show an
Irish a little nicer. If we go ahead and
go open Unity, we're going to link
this and we're going to test if it works. Google here to player, will find our State
Manager on there. Make sure you click
back to inspect it, but we haven't actually
added our ads into our game. We also need to
create a new object. Let's go create object,
call ad manager. Music manager, just centered dragging your
advantage over there and then go audio
player and make sure to drag that onto your state
manuscript like so. If everything should
work, we should be able to track add
weight over here. If we go ahead and hit Play, we can see just going
to mute that for now. And then over there, if I go
ahead and hit play, I die. I might add weight
is well now one. Go ahead and die again. My aggregate is equal to two. And if I do it for a third time, what should happen
is I'm actually showing here we go, perfect. This is unities were telling
us that our ads are working. If we would now to build
this game and run it, we would actually have
working ads, which is really, really great, great
job around that means that al final addition to our
game is actually completed. This is our finished
mobile game. It's incredibly impressive
how much we've been able to do over such a short span
of time and it great, Great job. That's incredible. And you've done amazingly
in this course, well done to everyone. And after completing the
final video following this, you will have created your
very first mobile game in Unity and C sharp. So incredible job.
21. Finishing Up: Hey there and welcome back
to unity for the last time. Now you deserve a round
of applause because you've created an
incredible mobile game. And if it's your
first mobile game or one of your first
move our games, you've done an amazing
job, great work. We're almost done
with a mobile game. And there are a
few things mean to change before we build it. And then I'm gonna show
you how to build it and test it on an emulator. Or if you have an Android
phone or an Android phone, cube root of IRS, you can
test on one of their phones. I have an iOS phone, but I'm gonna be showing how to
build with an emulator. But before we get into that, I actually need to
change one thing we did write them
getting in the course. If you open up your
movement script, you remember we were
using keyboards. And the reason we were using keyboard shortcuts
for our movement, or keyboard keys rather was because we wanted to
test and all computer. So now we're gonna go ahead and change that because
we want to build it. So delete this and type input dot touch
count greater than 0. And that's going to
check every single frame that you were holding down. If I'm grounding, if you
have jumps so you can hold down and continue the
job, which is really cool. Now obviously we're not
gonna be able to test this because we can't jump. We can't touch our monitor
because we are on a computer. And obviously our UI elements actually work
automatically with unity. Then go to the top here, click Build Settings and make sure you have your
platform correct. I'm going to build for APKs. I'm not going to check that. And there are a few
settings over here. You can set all sorts of things. You can set your resolution what you want to be able
to have landscape, right or left, all
sorts of things. I'm going to leave those now. I'm actually going to
make sure I can only go landscape because I don't
want on game to be portrait. The splash image you
can add if you want. That's just like an
image at the start. Other settings I'm
going to leave now there are a few
publishing settings, but this we can actually leave. We just need to go
here, we need to click Build and we need to go ahead. This is where my project
is stored on my computer. I'm gonna go ahead and save and it's going to stop building. Now that's quite a
lengthy process. So give it a minute. Once it's done building, your game will be exported. If you have run into any errors while trying
to build your game, sometimes Unity does have errors that might
not be your fault, maybe with the module you installed or anything like that, just type them
directly into Google. And I promise you there is
most likely going to be someone there who's had
the exact same issue you have and fixed it up unless countless times and most
of the time it has worked. So just try that out
that should fix up any problems you have that
I have not encountered. Once that's finished building, you'll be all ready to
test your mobile game. I both Androids, I'm testing on the non-player
Android emulator. You can of course use an Android or iOS phone if you didn't, and if you vote for IRS, I believe you can download
a Mac extension onto a MacBook to install and test
mobile games from there. Now, before we test, there's a few things
you have to note. First of all, depending on
which platform you use, if you want to test
your game like I am, you have to make sure
you've set your game ID to the same one that you'll
gain was registered as, which I'm going to show
you how to do now, all the ads weren't work. So obviously, once you put your game before you go to gain, preferably go over
here to services, click on ads and make sure that you have set whichever platform, either Android or iOS, this ID, make sure you've
set it over here to the string game
ID in the Add Magic, go open up ad manager and
make sure that you set it so that your string is
that string of numbers. Once you've done that, ad should work perfectly
in your game. The second thing to note
with resolutions, now, you'll gain might work
perfectly for your device, but there might be a few things that are slightly
off your resolution. If this is the
case, simply change your screen resolution in the Unity Editor and
move some things around. When I was testing
this game item moves some things to the right, but overall everything worked perfectly and my resolution
was pretty much fine. Go ahead and drag that
into the NOX player. You can see it's going to
install my game for me. Learning up. And it says Install Complete. I can then load up my game. Volumes have been here a thing. We can see it's working
fine, that's great. If I go ahead and hit Play, I can jump just
like I have been. And I can hold down, jumped in, and I'll keep jumping,
which is really, really cool effect die. Has that depth that
I started with. I can count the music
if I wanted to all turned off the sound
and carry on moving. I always speak and keep going. And if I die three times, I'll show in a second, I
will see a unity test Act, which is really, really cool. I can go ahead and
skip that once that's done and close it and we can
see I'm back to my game, which is really, really cool. That brings us to the
end of this course. You have created your
very first mobile game using Unity and C-sharp. You've done an amazing
job and give yourself a pat on the back and making it all the way to the
end of the course, you've learned invaluable
skills of unity and C-sharp, and hopefully you've acquired enough knowledge to start making your very own mobile games now or even improve
the one we've made. I'm known for one. We
can use it at an icon so you can just go into your
game settings over here, File Build Settings,
go to player settings. And over here you can select a new icon which you weren't. Obviously there are
different ones, Legacy Round adaptive icons, you can choose ones over there. But obviously, the
Unity editor is now hopefully looking
a lot more familiar. And the world of game
development is now your oyster, especially mobile
game development. Great job everyone. I want to thank you very
much for taking my course. It's been a pleasure getting to teach you mobile
game development. And hopefully you've had a
fun time and learned a lot. You do, of course,
have permission to use any of the resources in this course and anything that we built to mold into
your own mobile game. If you want to improve this and released as your
own mobile game, you can do exactly that. So great job everyone. It's been an amazing experience and I hope it has
been for you too. Thanks again for enrolling.
 Tirion Learning, Software Engineer