Transcripts
1. Introduction: Being a distinctly unique
has always been my passion. And I developed that
uniqueness a long time ago. My speciality is to teach to what mediums together
through a single art piece. E.g. Jacqueline,
graphite shading, while pasting and pencil, acrylic and watercolor
together in a single argument. Hi, I'm done with the Chopra. And I'm an art educator. I have 15 years of
experience teaching Fine out to students from
all across the globe. From basic to advanced level. My classes, you will not
only learn the techniques, but also basic so far, which are essential
to get you started. Vantage of this learning
scale is that it is made for beginners as well
as for those who want to reach the
advanced level. Will also get
perspective knowledge and usage of two-by-two grid. Instead of making
lots of columns. Learning tips for making a
national looping at work. By working on shaded
areas and highlights. These lessons will
help you to create your own masterpiece using
all learn techniques. I wanted to share every bit of my artistic knowledge with
all of you to my lessons. I'm the founder of art ambience, an online Fine Art Institute. So don't miss these lessons
and join me on this journey.
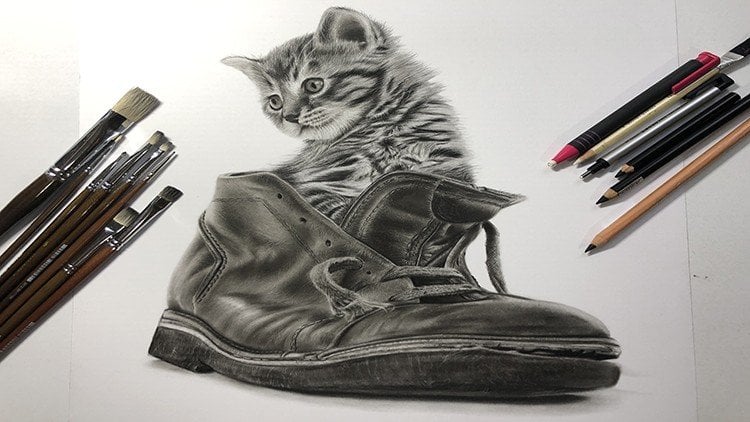
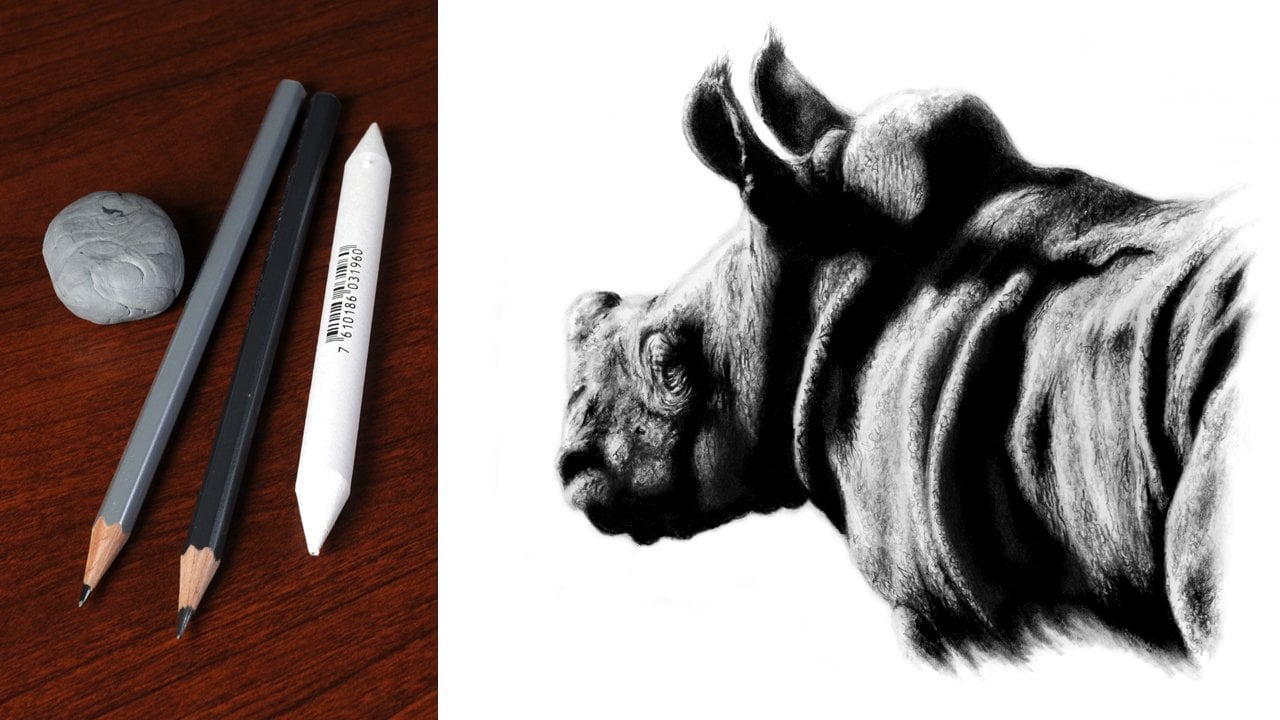
2. Material First: Losing right paper for your
artwork is very important. Here. I'm going to use
A4 size 200 GSM paper. You can use mechanical
pencils for your sketch. You can use, which are
forage graphite pencils. Blending stumps
are also required. So you need a
medium-size and abroad size town and a ten sites
to giving white highlights. Jen white pen is also required. You can use five
or eight number. Giving thin black pen touches. A black micron pen
is also required. To this artwork. I'm going to teach you two mediums together. We are going to use to
be graphite pencils and graphite pencil in
this particular artwork. Or the medium we
are going to learn from this artwork is chocolate. So we get a set of
hard, soft, and medium. We are going to use these
shades in this artwork. And if you have any other
brand chocolate pencil, you can use those also. Giving white highlight, mono
eraser will also be in use. Instead of mono eraser. If you have a pencil eraser, you can use that also. Results are required for
giving proper measurements. Forgiving highlight. Kneaded eraser is also required. So you can use any
brand kneaded eraser. We are ready with
all the materials. Let's start with learning
to art mediums together, promising a lot work. Using late pencil or H pencils is important
because when we make any sketch and we have to erase it at
the time of learning. Few parts. If you're using H pencil, if you're using
your lead pencil, you can easily
erase those things. If you need to make
any corrections. They will not be any
impression on the paper. If you will use any dark pencil, then there will be
impressions on the paper. So graphite pencils
are used to give a smoother feel in your artwork. Suppose if you will use two
weeks into her art work. This is the lightest tone
amongst all the pencils. Then shade increases
according to the number. This has to be. If
I go for it though, like this is my sixth beat. See the difference? There is darkness loves. Use ten. Then again, she has increased. It's to be six, B and C the difference. So this is how you know, before doing any work on, before using your pencils
and your artworks, you know that to be gives this
kind of effect than 6 ft, gives this kind of effect intently gives this
kind of effect. You can use these
kinds of effects in your artwork where
you need medium-term, where you need light tone, where you need the darkest tone. I told you before
about H shades, which are used for sketching. These are to be six B. There are other sheets also
which comes in between. For b. Bye b. In this, you get seven or eight. After this you get 12, be also. So shades are increasing according to the number
to base lightest. Then further, all the numbers
sheets are increasing. According to that, you can give that shading in your artwork. I have explained you
about graphite sheets. Now I will proceed further by explaining to you about
the chocolate shades. So when I'm using my soft chalk, Wilkinson will get
this kind of effect. It will be hard on paper
when you will use it, but it will give them, give us soft effect.
Like these are soft. But the charcoal medium will give a dark affect
different from it. Not so soft and paper when
you will move your pencil. As I told you, you can use
any brand, charcoal pencils. So if they use
other brand for my Hearthstone, launch. The soft fat. This kind of vectors
coming on the paper. This is my heart
charcoal pencil. And then if I use my
neutral job B pencil, then this kind of
effect is coming. You can see the difference. Soft Jaw. Then this is hard charcoal. This is neutral. As you know the
difference of two. Now you can apply
these kind of tones in your actual artwork where
you need specific tones. Next important thing
is using the stamp. What stamp does is
make your dark to light tone or any darker tone or any medium to earn
any lighter tone. It just make your work more
soft and blend it nicely. If I'm using my stamp
on this section, it will make it more smooth. Blend it nicely. If I use my stamp on this, six vetoed, will make it more. Smooth. Blending is done nicely. If I have given dark, too little lighter
tone like this. And then I'm moving my stamp. Then both the shades dark
to light in a smooth curve it you can use all the sizes which you
are having stopped. So we will be using
broad sample, so medium stamp also. And the next is about using erasers for
giving detailed fight parts. You can use your mono
eraser also, as I told. If I move my mono eraser on it for very nice
detailed white line is. If you add available
with pencil eraser, you can give that
same effect from it also about using
a kneaded eraser. It doesn't in the
form of a clay. You can just take out of it. And then if you use it on
a shaded area like this, tap a little bit or
sometimes you can give some details making
it like this. The term different
effects you can get with the kneaded eraser also. So you can use kneaded eraser for giving
some parts in your artwork. For this specific
artwork which I'm going to teach, kneaded eraser. And mono eraser will
also be getting white highlights and giving some black touches
like dictate parts. So if I'm using my gel pen right on this specific
part like this, I can give some slight glossy but because the Lord and giving details, then giving ten lag details, you can use black
mica open button.
3. Sketch Basic: Important to understand
the pig nicely. Whatever you are
going to transfer on your paper. Sketching
is the base. Here. I'm going to
use my A4 size paper. So my dimensions of this artwork is
according to that size. If you are choosing
a small people, then you have to reduce it. And if you are
using a big paper, then you have to
increase the dimensions. You can understand
your finger like this. You can measure it vertically and horizontally and write
down the measurements. And then you have
to double the size. Or Jim, just have to increase the size according
to your paper size. I have made a rectangular shape, which is 16 centimeter vertically and 11
centimeter horizontally. You can keep marking or
five centimeter here. And then draw a line. The next is 16, as I told you, vertically, do mocking, then make a line. You can do marking on two
points to make it straight. Then here you can keep a gap of around four centimeter and
then draw a line here. Four centimeter
marking you can give on two sides to make
a straight line. Here to, to give up
same dimensions. Then horizontally it is 11. So just to marking on
two sides here and here, then join it and make a perfect rectangle according
to my artwork size. Next tip is you can make a two-by-two grid on
your device also, it will help you in giving the same effect in your artwork. You can two-by-two grid. You can divide this 11
centimeter into 5.5. Do a mocking hill. And then say mocking here also. Join them. Now vertically. Divide this 16 centimeter
into two parts by making a mark in your same way
on the other side also. And then join them. It's very easy to make your two-by-two grid
and it will help you a lot in giving the right
dimensions in your artwork. When you have to transfer
your image on the paper, understand each rectangle and what all things are
coming in each rectangle. Like in this rectangle,
part of this, I probe the scale strokes and part of ice coming
in this rectangle. These all things are
coming in this one, eyelashes and all,
and the fibric part. So let's start with a sketch. I'm going to start
with top two parts. Sketching. We will be making just a
layout of all the things. Simple layout of my
blow from here to here. Don't go into
details much first, simple outer shape of the eye, outer shape up the fabric. To start making layout of
each and every section by making a V-shape
your forehead part. This one. Then simple outline. For the I broke the
layout simply shape. Making sketch. Your
drawing should be delight only not too dark. V-shape, slide cocktails. So what I'm observing is
in each rectangular shape, whatever shapes are coming, I'm just falling it. I'm not going into
details right now. But of I in this section is this much part of I
in this section is only this much. This section. Eyeball part is this much, this section I will
put part is this much how much the shape is taking in this part. You have to draw that.
Understand each section and understand the shape, whatever is coming in that
particular rectangular area. I ballpark like, but then lower part of the eye. Have a look from close. I've given up layout of
all these things till now. Each section I have
understood according to my image and according to
the grid I have made on it. So I'm falling that grid and I'm just making each and
everything according to that. Good. You can add a slight
line for the light line. Following that,
you will be giving some shading and then eyelashes. We'll start this much. Eyelashes, very common. This is the cheek area
under age or cheek area. And then big shape. I have given a
general layout of it. No detained strike.
Only basic shape.
4. Shading Top Part: Now I'm going to start with
the top part of the sketch, giving dark tones, light
tones, medium tones. Together. We will be working on all the tones one by
one in one section. The top part of the artwork. We're giving these dark tones. We will be using our soft
chalk with instance. You can use any brand
chocolate and support it. Often used to get the darkest tones and this is quite dark. So
how to get that? Important is that we have to fill it like this. Mostly take one direction
for your pencil. In this horizontal filling, you can just move your
pencil horizontally also. Like I'm filling the smudge. It is not filling all
the areas properly. So how we will cover
all the areas now is we can use our stamp on it smoothly on the site
by using charcoal. Little bit chocolate
particles come. So what you can do is don't do your hand movement
on it to remove it. That will create Douglas Oliver. It was margin spread. You can just pick it up
and just do like this. You can just blow on it. Some particles have come out. So because this today's
make up a join. To make it more dark. We can use a neutral
pencil also a bit. Just to blend them
in a better way. Or you can use your
soft pencil again. I've done almost two layers of chocolate soft charcoal here. In the image. There
is darkness here, then likewise are there. So what we can do is we will work on the
dark parts first. Then we will get graphite
pencil touches with it. You will be learning
that they fight and charcoal how they fit together
in a particular section. And one of the important
thing is don't get graphite shading first and
then go on chocolate part. How important is give chocolate first and then go on to fight. Sometimes you can face
some problem like this. If you are using graphite first when chocolate will not move
on that particular part, so important is use
your dark parts which are then get them
graphite touches. Again, I'm working with my
soft pencil in this corner. As the darkness is little bit
in a Kogi wave. Like this. My pencil should also move like this. Good Til. Then summed up, what
sorts of taxes? Then you can move,
so stumbles on it. Here we'll be happy to maintain
some lightness so that we can differentiate between the
image and the background. Some more darkness hill. So what we can do
is we can apply some soft pencil mode here
and then stamp movement. You can use a flat pencil for these things instead
of using a shop in 11. More important thing
is when you are giving off curvy shape and you are making
particular part of the face like if you're
making a forehead. So important is your
pencil strokes. And some strokes should be
according to that shape. So I'm giving little flat
movement here horizontally. But when I'm working
towards this section, then my strokes are going
into slaves fit in this way. Move that only stump, which is little
bit dark by usage. Light touches, maintain
lightness or sodium. So every bird in this
section we have given 1to1, little bit dark urine, medium part to give
some skin affects. What we can do is using a kneaded eraser, as
I explained earlier, take a small part
of it and you can just gibbs lumps
light touches on it. Give it gives a
property racing and though it is very
it is required, not erase full area. Just mildly lazy it
will do and give up my touch of lightness. Now for these light parts
are giving those bestest. We can use over to
B graphite pencil. First, forgiving, go
light, touch you. You have to erase
the grid lines also. Before going further. You can use your monoid is afforded me. Go through a dope, but to be very mild touches,
don't press it out. Then I'm bringing this
production, my pencil. Get ready to flat to
fill the broad area. Moving. I was stumped
and you get smooth. Stumbled so you
can keep it flat. Change direction. Still. We need to give some more
lightness skill. But not every, but for
maintaining that lightness. In few sections,
we can still use, or again, use our
kneaded eraser. What you can do is staffing.
5. Beauty of Eye: Part 1: Now we will be using
graphite pencils 60 in this section to give
some more dark touches, but they should look little soft and blend it
on the skin part. You can use six B also, if you are available
with ten dB or ATP, you can use that also. Now my 60. Moving in same direction. I'm working on more details of the skin part.
Smallest Monday. And I'm giving
them with my 6 ft. You can again use the stump. Also. Using stump, we can give some
more soft touches. This to maintain the darkness. He'll stop again. Slow movement of some field only to blend dark
and light tones. What fully cover the area. One more thing you can
do with your monetarism. You can give us light touch. You maintain lightness. Video ten stamp. You can
give just medium tone. More here, but maintain
lightness in the corner. There are some strokes
in this section. So what we can do is you can get them with graphite pencil. The standard
direction of stroke. Understand how I'm
moving my pencil. This much I have given to lump little bit details
formatting with my Toby again, you're also might've
just with my cancer. So we can easily use charcoal, angry fight mediums together to get these kind of effects. Your shading. Here, they can give me more of
kneaded eraser touch. Now my sixthly, moving
in the same direction. I'm working on more
details of the skin part. I'm giving them
with my six weeks. You can again use
the stamp also. So next is giving duck buds in the hydrangea using
your soft pencil again as we did the Dr. so I guess use your SoftChalk
for the dark areas. Important is drop off your pencil while doing the
eyebrows should be endlessly. Understand what Stokes, Gabi, some downward, he or
she can move it left. And some six speak with
white pencil strokes also. Use tip of your concern for
giving some thin black lines. In this section, we can give a bunch of other
micro black men also. See the white buds.
The lightness. As I taught you, where
you can use mono result, but giving these
kinds of strokes so loud, that idea has come. We will be using now more
ideas up in this part. There are light
parts and outputs. We can still use
carbon-neutral pencil, also, chocolate ones, to give some
more lending in this area. So just move it slightly
in between the dark, but the light bulbs, which are then getting
more blended together. But you have to be
able to grow that you're right but
should not cover. Some more hair
strokes in this part. I'm going to be strokes
in this section. But these thin strokes, you can use your
graphite pencil. If you want to add a
little darkness here, more after chocolates, you can get some black
ventricles also. Like Robin touches. In-between. There you have
applied chocolates. We've been just use it to
make it little more even.
6. Beauty of Eye: Part 2: As I taught you in this taylor, we have used to be graphite pencil with a medium
tone or the lighter parts. So here again, let's
get part has come. First. We will fill
this part of a to-be. Then we will work on the
dark parts about it. I have filled this time. Now I will work on more
tough but also new section. You can get those numbers by using your new to
chocolate pencil. Gobi, invented little bit moodier. Next is, we'll just dump
the section on that. But I don't like bottles. Wasn't this movement
of your pencil. You'll give depth
in each section, we should understand
the movement. You should understand that
particular shape. This shape. I have used my pencil in
this way to bring Venus. I will be getting some
already, but I just also, just to make it
not too dark also, much as we did neutral tensile posterior
part of your strokes, we will do some opening
it with pencil pure also. And then some strokes we can add on by using,
again neutral pencil. And we can use black men also. Some stuff movement. When it is done. We need to give some
details here also. A lot. Gobbling up the
whole area with Douglas. We can use our in-between. These are all middle
thoughts of overdrawing. Top part. We are almost
done. Middle parts. We will be working
on the I section, Oliver, skin part, yodeling. So Lord, I bought
on the background, which is again with soft pencil. Now before going further. But these shading areas, what we can do is we can do our micro black belts fit
in this particular section. And then we will go for the, for the shading.
Understand each stroke. Next is, we will evoke on these areas the ideas behind
the eyelashes, smallpox. So we will give some dark
to light tones in the spot. In this section. You
can use your use stump. We're just getting
literally medium tone. Just use it. Your
medium tone is coming. There is darkness,
so we can give that again with our soft pencil. Some stumbled upon some slight more touch with your chapter
in this section. Again, use your use stump. Medium tone will come
here. Some soft chapel. There are some light
tones here on the island. So what you can do is again, you can use the USDA for this, but just give us like
touching a little bit too. There's a dark yellow to the difference between this
section and this section. Some of which ability
to bring that in your particular section with kneaded eraser. Just skip this slide, just make it lighter than the
tone which we have given. Like Duchess. There are
some reflections here. So we can give them that are
neutral job with Benson. Yoda again, some neutral
pencil sketches. Next is even more stamped in
the spot and make it smooth. And some medium tone we
will bring feel safe stuff. Go, you can leave
some whitebark, but the stomach, you
can get light touch. But try to maintain whiteness. As there is white portion here. We will not fill it with
shading mode. With Toby. You can give a thin Tasha some more nutrients
and Nickleby, me to bring that 3D bombing. More neutral droplets.
Men's Olympic. Don't press it too hard. You just have to press it to get that median little bit till. There are many debates
in this portion also. So what we can do is just move of a mono is an in-between. And some little bit. These patterns by using our
pencil six, be authentic. Some lightness here and
here. So we can work with.
7. Shading Ending Part: But this portion,
again, the skin part, as we keep on doing skin patch
with Toby for first-year. Again, we will use to be in this section, some movement. In this section. All of us needed, it. Touches some more neutral pencils or just in this section. Some mono eraser
touches in these bots. It's excreted if you
can give some pixels, some stump movement, also. Some neutral pencil
touches in few buds. Some more details here. We will get them
with mono eraser and then white gel pen also, we can use to give them some constant movement between
these white highlights, this fabric, but there
is a curvy shape here. So first we can draw
it with our pencil. That is permanent darkness here. So we will be giving doctrine
bit of a soft chocolate. And then these
details they will get with using monoids off. Before that stump
will also be used. I'm motivated been out on the
spot by using your pencil. You can just give them
like Dutch only this part. Moderator, you can
give ten line here, which is not so visible through this camera,
but you can see here. So you can just
remember you're getting this much some of the portion
of eyelashes coming here. What we can do it just
with more light. I don't. We can give some pen touches up to using stamp here. We can use a neutral
chocolate pencil also to make it more smooth, especially from the sides. And then mono eraser touches that fabric effect. Some small, small white
gel pen touches here. Next is filling SoftChalk
boy in this area. Same way as we are doing on
the top part, middle part. And now we withdrew the bottom media stamp also in this section. Some neutral pencil
touch about the section. On this side of the fabric. There are light
touches in a Coby. I will teach you
how to give them. You can use your stamp here
and just move it here. These dark tones of soft
pencil and make it lighter. And go on this direction. Right side. It will
give a medium tone. You have given
already dark stuff is helping us to
give a medium tone. I'm seeing doctors. Important
is to make them even. On the right side,
there is darkness. So we will apply So chocolate Benson on the right side of it. Next step is to blend them. The dose, medium dose, a job within the dark
tones you have to blend with. By using the stuff. Some mono eraser. The fabric effect, which is like there
is a fault here. We have given now
by using charcoal, neutral pencil over molarity
is of adequate open. One thing what you can do
is you can use your name. Let's not adopt for today.
8. Recap: I have created a unique style of combining what
you used to get. My name's to show my
unique style video or through my first listen. I aimed to teach you
the basics of using the fight and chocolate
medium on people to get. In my second lesson, I have taught you how to make sketch easily by using
a two-by-two grid. And then I taught
you how to make a freehand sketch
using the 3D form. Respect to. My third lesson was about usage of two
art mediums together. In top part. First,
off, the sketch. My listen for and listen
five is about beauty or I have explained each detail fully in
these two lessons. Knowledge comes with deep
understanding of a topic. And then my lessons, I fully show all my knowledge I have about my unique style. In my sixth lesson, I have covered the bottom
part of the sketch. And I have taught how to give fabric effects in these
kinds of artworks. Very excited to see your logic and would love
to give you feedback on.
 Tanuja Chopra, Be Artistically Unique