Transcripts
1. Understanding Masks in Adobe Photoshop: have you ever wanted to learn how to use masks inside a photo shop? Masking is one of the most versatile features that will allow you to do all sorts of need, effects and techniques with your images, artwork and photographs. In this quick course, I will show you the basics of how masking works. Then we will take a look at some awesome coloring effects that you can use with masks. Finally, I will show you how beauty retouching artists fuse mass to get that perfect look for their portraits. At the end of this class, I encourage you to try out this fun feature inside a photo shop, save out your work and then upload your finished image as a project to this class. It's always a blast to see what the students have creative. So if you are interested in leveling up your skills by learning masks inside a photo shop, then enroll now and I'll see you in the first lecture
2. The Basics of Masking: Okay, let's go ahead and start talking about masks inside a photo shop. So masks are a great way for you to edit an image in a nondestructive way. And that is very important as we get into complicated effects and techniques so that we can actually make changes to the image without actually editing the original image and damaging it so that we can't get back and fix it later on. Mass is a great way for us to do this, and we can do a lot of really cool effects with mass. But let's start with a basic understanding so that you know how they work before we get into any types of techniques. So here I have two layers, a blue layer in a red layer. The blue layer is on bottom and the red layer is on top. So think of this as two pieces of construction paper Ah, blue piece of construction paper and then a red piece of construction paper sitting on top of it. Now let's say I wanted to make a hole in the middle of this red construction paper. How could I do that? Well, I could go to my eraser tool and I could start drawing on the red layer and it will create a hole in that layer for me. Now, the problem with this is if I hide the blue layer, you can see I actually literally cut a hole inside of that red construction paper. Or this could be an image that we're working on. Typically, we don't want to do this because we don't actually want to destroy our image or mess it up in a way that we can't get back to it later. And this is how masks really help us out. So I'm gonna undo that. I'm gonna bring my blue layer back now. This time, what I'm going to do is I'm going to go down to the bottom and I'm going to click on add a layer mask when I do. It adds a white rectangle on that layer, and that is my layer mask. Now you want to make sure that when you're editing it, you have it selected and you can see the white rectangle around that layer mask. If I click on the red layer, you'll see that white rectangle moves. And now I can edit that actual red layer, or I can click on the layer mask and edit it. So the way the layer mess works is it works in values from black toe white 0 to 100% where white is going to reveal everything on that layer or show that layer of 100% opaque and black is going to take away or reveal what's underneath that layer or make it transparent. So let's see how that works. I'm going to go ahead and make sure that I have my black selected in my foreground color, and I'm going to select my paintbrush. Now whenever I begin to draw on this mask and you can see that the layer mascots selected in the layers panel it has the same effect. And if you look over at that layer mask, you can see that I've drawn black on that white layer, and it has revealed the blue construction paper underneath. However, the difference is that I have not damaged that red layer at all, and so this is a very great way to do nondestructive editing inside a photo shop. The other great thing about Mass is not only can we take away or show transparency through a layer, but we can use white toe actually bring it back. So if I draw a white line down the center, you can see we can actually bring it back. And if you look over at the layer mask, you can see what I've done there. I've drawn my white line through that black circle and have brought that image back. And so now I can edit this layer in a nondestructive way and make all kinds of cool changes without messing up the original image. Now I'm going to go ahead and select Ingredient tool, and I'm just going to draw a line out through the center of this. And when you do, if you look at the layer mask, you can see the great in that it has created black on the left hand side and white on the right hand side, with every value from 0 to 100% in the gray scale. And you can see not only do we work with white and black, but we can work with any value of gray. So over on the left hand side, where it was black, we've taken away that part of the layer and you can see the blue layer underneath and on the right hand side, where it is white. You can see that it is still there. We can still see the red layer and we can see all the values in between. So not only can we work with white and black, but we can also work in gray scale to show different percentages of transparency to the next layer underneath. So this is a very great tool, and as long as you understand that basic concept, whenever you begin working with any effects or techniques, it's gonna make a lot more sense to you.
3. Color Effects with Masks: Now that you understand the basics of masks, let's look at a couple coloring effects and techniques that we can use. It are pretty cool and pretty common inside a photo shop. So here we have this picture of this purple flower and say, We want to do this one effect where we turn the whole image black and white. But we just see the color pop out from the main subject. So how could we do that inside a photo shop? Well, of course, we would use masks, so I'm just going to duplicate this layer. I'm just gonna left click on it and drag it down to the new layer section, and it'll actually duplicate it for me. You can go ahead and rename this if you want. Um, and basically what I want to do is I want to make the top of this image black and white, and then use a mask to reveal the purple flower underneath. So I'm going to go up to image. I'm going to go do adjustments, hue and saturation. And then I'm going to de saturate this image, so I'm just going to go ahead and pull all the color out and I'm doing this on the top layer. And now all we need to do is at our layer mask, and we can use the same process as before of cutting away using a mass to reveal that color underneath. And this is a really cool effect. When I've used a lot and I've always enjoyed this effect. I think it's Ah, I think it's just really neat. So all I got to do now is just paint on black, wherever the flower is or where I would like to reveal color, um, underneath on the layer underneath. So I'll just start drawing on here and you can see the effect that that has going to go ahead and pick a bigger ah, brush here so you can see this. And it won't be perfect because I'm just kind of showing you the technique here. Of course, I would spend plenty of time going in and tweaking this and making it look a lot better. But this is one type of coloring technique that you can use inside a photo shop, and it's very powerful. It looks great, especially if you spend a little more time making it look perfect and not having so many painting outside of the lines as I'm doing here. And ah, the great thing about Maso is if I do make a mistake, I can go ahead and turn my brush to white. Maybe I take down the radius a little bit so I can get in these cracks, and I can go ahead and fix up any of these spots that I made mistakes. So this is one of the effects that you can use. It's really powerful. It looks great. Um, and it's just a really cool effect. You see it all the time inside a photo shop and they do a couple of different ones here. This is one where used black and white. I'm going to go ahead and delete that layer out. I'm gonna make another copy. And the other thing is, what if I wanted to change the color of this flower? Well, there's different ways that you can make color adjustments. I'm going to pick the easiest one, so I'll go to image adjustments and then the hue and saturation again. And I'm just going to change the hue here. So let's see what would be you know, maybe another cool color that we could do. Um, we could do a red. I like this kind of teal color. Think that kind of cool how that stands out. And I think that would look good against that green background. So now I'm going to do the same thing. I'm gonna add a layer mask. Now, this time I'm going to do something different. I'm going to go ahead and fill this layer mask with black, so it's actually going to reveal everything underneath, and you can see over in our layers panel that it's actually black. Now we can still see the image underneath, which is great this time. Instead of using black to take away, I'm going to use white and bring back and anywhere that I color. We'll see that blue color pop up. So this is another coloring technique that you can use, which is really cool. It it allows you to do a lot of cool things, re color just about anything in your scene that you need to buy using layer mass. And then the great thing again about this whole process is that if I make any mistakes at any time, I can go ahead and fix them with a ah white or black brush or any grayscale colors, and I'm never actually editing the image. It also, I can delete this layer mask and start over if I really make a lot of mistakes and want to start from the beginning. So this is one very cool coloring technique that you can use with layer mess, so definitely have fun with this.
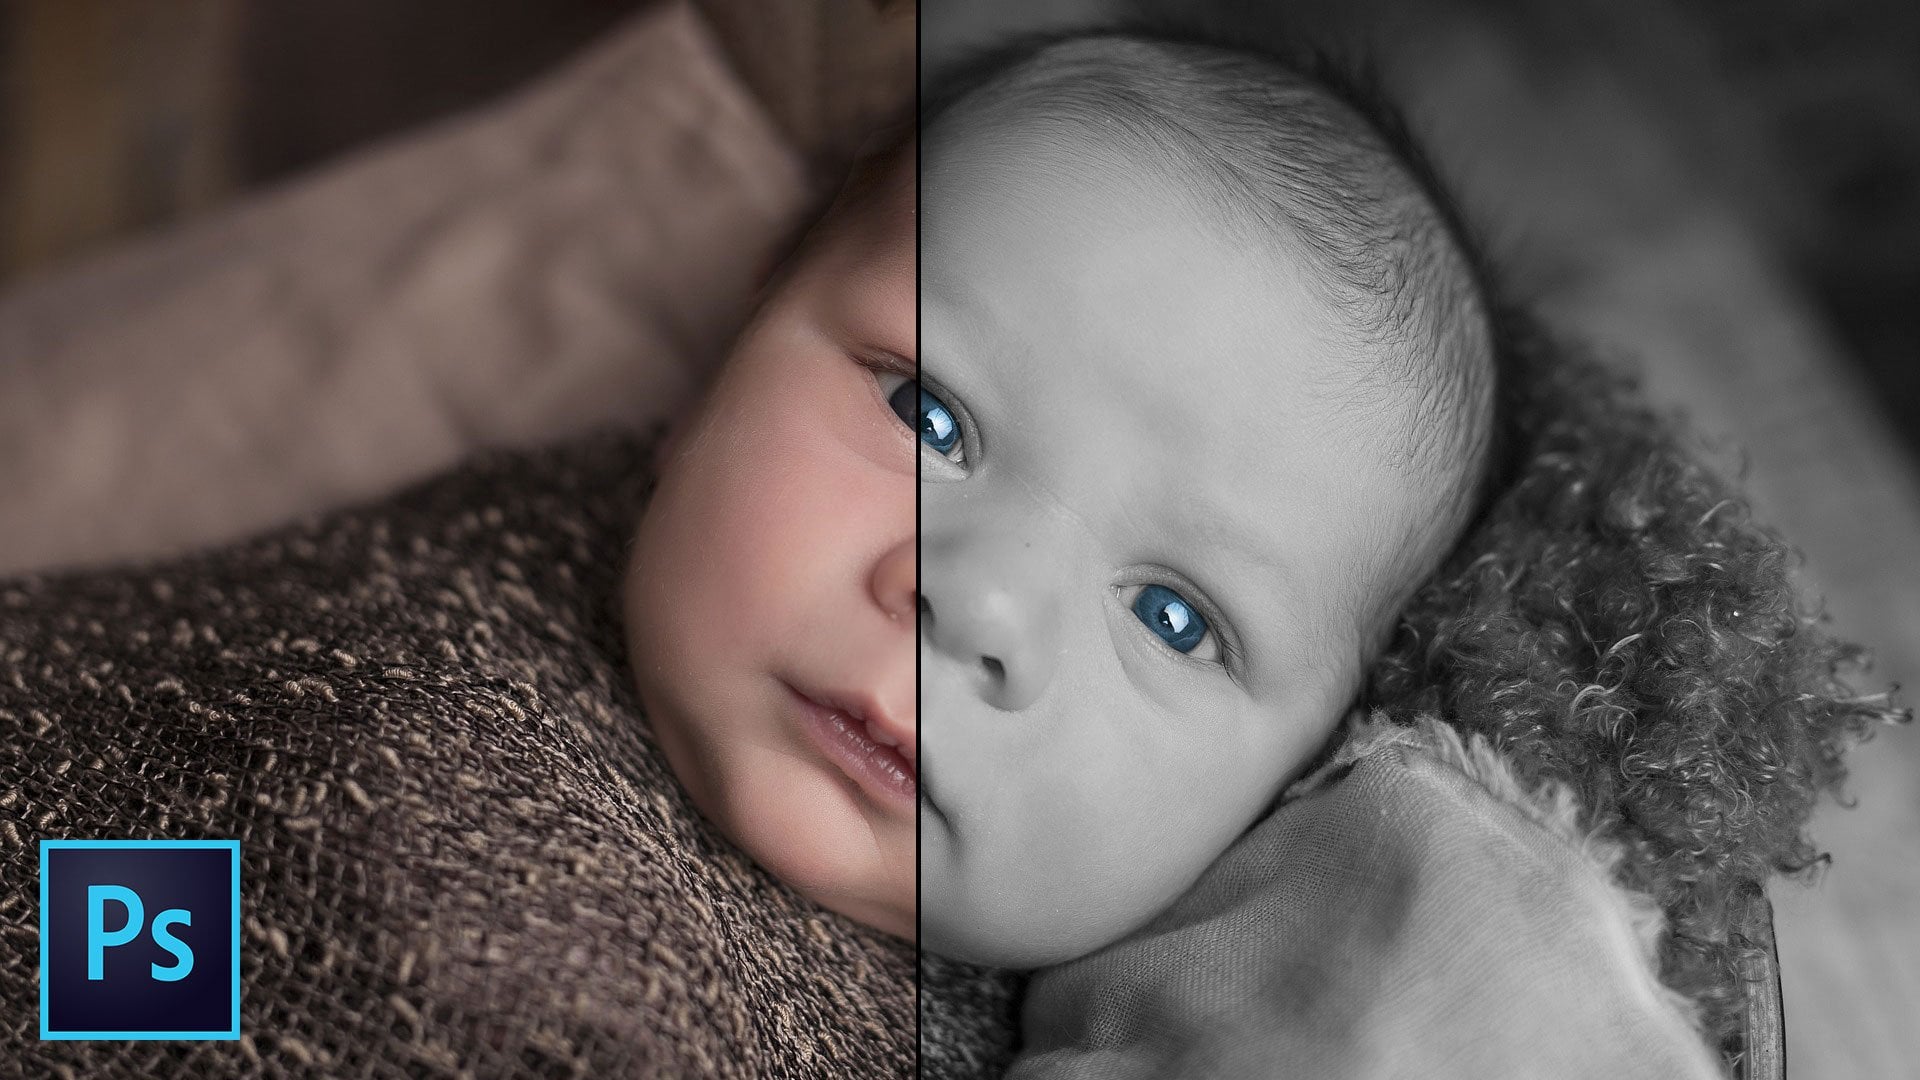
4. Using Masks for Beauty Retouching: in this lecture, we're going to look at a more advanced technique. However, it's not too complicated, but we are going to use a mass to do some beauty retouching. And so maybe you've taken a great photo, but there some imperfections in the skin. Or maybe you see some of the makeup and you would like to just do a little bit of touching up to make that look a lot better. So how could we do that? We could do that by using a mask. So here we have our image. And if I just come in here and I zoom in a little bit, let me grab the hand. You can just see you like around the eyes and around the cheeks. Ah, you see some of the make up some of the pics, elation, some of the pores and imperfections. And we can clean that up by doing some beauty retouching and using these masks here. So the first thing that I want to do is I want to select this layer and duplicated. I can just drag it down onto the new layer option and now create a duplicate for me. I can rename this if I want to and we're gonna apply a blur. So we're going to apply this blur. We're gonna bring back some detail to it, and then what we're going to do is we're going to use a mask to kind of reveal that back to us. So let's see how that works. I've got a new layer. We've caught it blur. I'm going to go up to filter, blur and then go to surface blur. And then once this opens up, what we want to dio is we want to crank up the threshold in the radius until it's kind of just completely blown out. And then we want to go ahead and we want to bring down the threshold until we start seeing some details. So this is a little too much right here. So let's go ahead and bring this down to 100. And until we start seeing some of the details of this actual image, come back into play and you can see that's rendering here. It's taken a little longer than normal just because I've got the screen casting software recording this at the same time, and then I want to take my radius and I want to bring this down until I start seeing some of the details around the nose and the eyes and what have you. But we still wanted to have kind of this blurring looking effect, because this is actually what's going to smooth out the skin. And then we're going to color around with the Mass to make this look a lot better. So that looks pretty good. I'm going to go ahead and hit, OK, it's gonna have toe take a minute to render this out force, and then the next step that we need to do is we need to bring back some of that detail. And to do that, we're going to use what's called a high pass filter. So I'm going to go back down to my layer, my original layer. I'm going to make another duplicate here, and I am going to call this when called details or high pass or something that we know that this is bringing back some of the details. I'm going to throw that on top of my blur layer, so we wanted on top and you can see it goes back to normal because it's a copy of the original layer. I'm going to go to filter other and then I'm going to go toe high pass and this turns it into ah grayscale image. And what it does is it allows us to bring back some of the detail around the nose, maybe some of the wrinkles and just a little bit of this detail. Now, we don't want it to be too extreme, because we whenever we're doing these effects, we want to make sure that they're subtle. We don't don't want people to know that were really doing this. So you want just to have a little bit of subtlety in it without overcompensating it. So I'm going to hit. Okay, now what we need to do is we need to blend the details with the blur layer, and then we'll use a mass to reveal that layer and touch up and do some beauty retouching of this image. So what we won't do is make sure you have details, layers selected, and then goto hard light. And what this is going to do is going to blend in this layer with the blur layer, using ah, hard light effect. So we get some of that detail effects coming back. But not those hard pores and wrinkles and what have you? And if we need it to If we maybe did the, um, high pass filter a little too much, we could go down, tone it down. I could also tone down the fill with the A pass iti a little bit, Um, if it was too strong, so I could take it completely out At 100% you can see it's high detail, so maybe I just bumped this down a little bit, so it's not too extreme now. What we want to do is to group these layers together, and then we'll use a mass to start painting this in. So I'll select details layer, and then I'll select ah, hold shift and hit the blur layer. And then I can hit control Gene, and it's going to group those together, and we're going to apply our mask to this group, and then that's what's going to allow us to do the beauty retouching. So with that group selected, I'm gonna hit the add layer mass bun, as we've been doing before. And just like with the flower image, we're actually going to fill this in with black and then reveal the parts that we want to look smooth. So I'm going to go ahead and swap my foreground to a black cover. I'm going to go to edit Phil and then have my foreground background color selected here. Or I could click on this and hit black if I wanted to. You can see that that changes our mask to black, and it brings back the image because it's revealing everything, since it's a black mask, and now we're going to use white to start smoothing out the skin. And basically, what's happening here is when we use white. We're bringing back that. Ah, those two effects that we just created the blur in the high pass filter that are grouped together. So let's go ahead and switch the foreground, toe white. I'm going to pick a brush and let's do a soft brush because we want this to look nice and soft. Now, if I use 100% capacity here and I start coloring in on this mask and make sure you have the mass selected, it's a little too noticeable. So that's not really what we want We want this to look settle, so let's go ahead and bump this capacity down to say about 50% or so. And then when we start coloring in, it's not such a noticeable effect. But it's going to give what we want here, and you can already see the skin smoothing out. So what I'll do is I'll just scoot in here. Maybe that's a little too close. Move over here and grab my paintbrush again, and then I can just start coloring in this skin. And of course, I wouldn't, you know, take my time and make sure that this looks really good. Since this is a tutorial, I'm just going to kind of go through this kind of quickly. Now I got to be careful around some of the features, such as the nose and the cheeks, because we don't want to blow it out to where it looks flat. So you might need to turn down the A pass ity when you get around those areas and maybe, just maybe, even make your brush a little smaller. But as you can see here, what's going on is I'm actually cleaning up the skin and I'm getting rid of all those pores and imperfections, and it's make making that skin look nice and smooth. And this is this is the basics of beauty retouching. When you hear about magazine beauty, retouching and different things of that nature for celebrities, this is This is what they're doing. And I would go through and I could paint the whole body this way. I could do the arms in the hands and really make this look nice. The face is usually most noticeable. Also, I'm gonna back out here and you can see it's just got a much smoother looking feel to it. And if I turn off that layer, you can see the difference now. It did make it a little flat, so maybe that's a little too harsh. I might want toe bring the whole group down so I could go to 0% here. Or I could bump it up and just kind of get the smoothness where I want it. Or I could go back and use a little less opacity on my brush. So it's not so harsh. But here you can see the difference between the original and the smoothed out version. And if I went through, I could definitely start painting all the skin and get rid of all these imperfections here of the whole image. And like I said, typically, when working with this kind of stuff, you want to take your time, you want to get in there and get the details around all the skin. I'm just kind of jumping through here so you can see the gist of how it works. But that is another way that we can use Max with inside a photo shop.
5. Assignment - Submit Your Photoshop Project: Hey, everybody, I really hope you enjoy this course on how to make masks inside of Adobe Photoshopped. Hopefully, you picked up a couple new tools, tricks or techniques that you can use in your business, your career or just to have fun with. Now that you've finished this course, I have a couple of things that I need you to do. First of all, it would be awesome if you could leave me a review on this course by going up to the top and clicking on the Leave review button. It will also prompt you this when you're going through the class and by reviewing the course. It helps me understand as an instructor what I can do better in future courses. And it lets other students know who's coming to this class if it's right for them or not. So if you could take a quick moment and leave a review, I really appreciate it. Also, you need to go ahead and do the assignment inside of this class by creating a new project so you can go down to the class projects and click on read more, or you can go up to the top and click on your project, and here I give a low description of what I want you to do and you can scroll down. And basically all you need to do is fill out the title, give a brief description and upload an image of you using masks inside a photo shop. So I want to see what you can come up with. And then, if you have any questions, you can write it here in the project workspace. Or if you just want to tell me what you liked about the course or what you liked about creating this image, that would be awesome. I really enjoy interacting with the students. I'm always here to answer any questions, and I really want to see what you can create. So I hope you enjoy this course. Don't forget to leave a review and go ahead and upload your project. Now take care
 Jeremy Deighan, Online Instructor | www.jeremydeighan.com