Transcripts
1. Introduction: Are you fascinated by the
magic of perspective drawing, join our comprehensive
perspective drawing course and unlock the techniques
that will bring depth and realism
to your artwork. Throughout this course, you will explore introduction
to perspective, delve into the fundamentals
of perspective drawing and learn how it enhances the
depth of your creations. Master one point perspective, acquire the skills to create convincing depth using a single
vanishing and viewpoint. Dive into two point perspective. Enhance your drawings with
two vanishing points perfect for intricate scenes and
architectural details. Master three point perspective. Discover advanced
techniques using three vanishing
points to capture dramatic angles and viewpoints. Discover beyond
perspective points. Explore creative methods
to enhance depth without relying on traditional
vanishing and viewpoints. Each lesson features engaging video tutorials suitable
for all skill levels, whether you're a novice
or an experienced artist. This course will equip you with practical skills to elevate
your drawings to new heights. Enroll today and witness the transformative power of
perspective in your artwork.
2. Tools and Concept of Perspective: Hello, and welcome to a new episode of sketching
and drawing with me. In this chapter, we are going to work on perspective together. First of all, I should tell
you what is perspective. For creating that, what
tools you'll be needing. Basically, giving
dimension to objects by lines and one or several viewer points
is called perspective, which actually the
main focus of it is to create a good volume
and third dimension. That in next episode, I will tell you about
them more in detail. The things that you need
are the normal pencil, normal eraser, and ed eraser, and B six, and B four pencils, you could have them
too, but you don't need a sketching
pencils that much. But sometimes we can use them. But the B six pencil is enough. I've already told
you about the dar and I've told you about the
normal pencil. That's it. That's all the tools
that you need. If you have a ruler, that would be
perfect, but if not, again, you can do it. Let's start our perspective together, let me tell you that. We are going to start with
a one point perspective. This point that I'm
telling you about, it's actually the
viewer's point or viewpoint as I contract it. What is the viewer point? The viewpoint is the
place that our viewer is looking at the point that our viewer is
looking at that object. That's the placement
of that viewer's view. Obviously. Another thing which
is very important in perspective is the horizon line. Let me tell you a little
about the horizon line. And maybe some of you
don't know about it. Well, definitely, you've had the experience of
standing on the beach. And when you are looking
far away into the sea, you can see a line that is actually separating
the sea and the sky, which is usually at
the end of your view. That line which
separates the sky from the sea is
actually horizon line. That line is exactly on the
same level of your eye. It's exactly in front of
it and on the same level. Now, let's start working. For example, this
is my horizon line. And this would be my view
point, the viewers point. It means that I'm
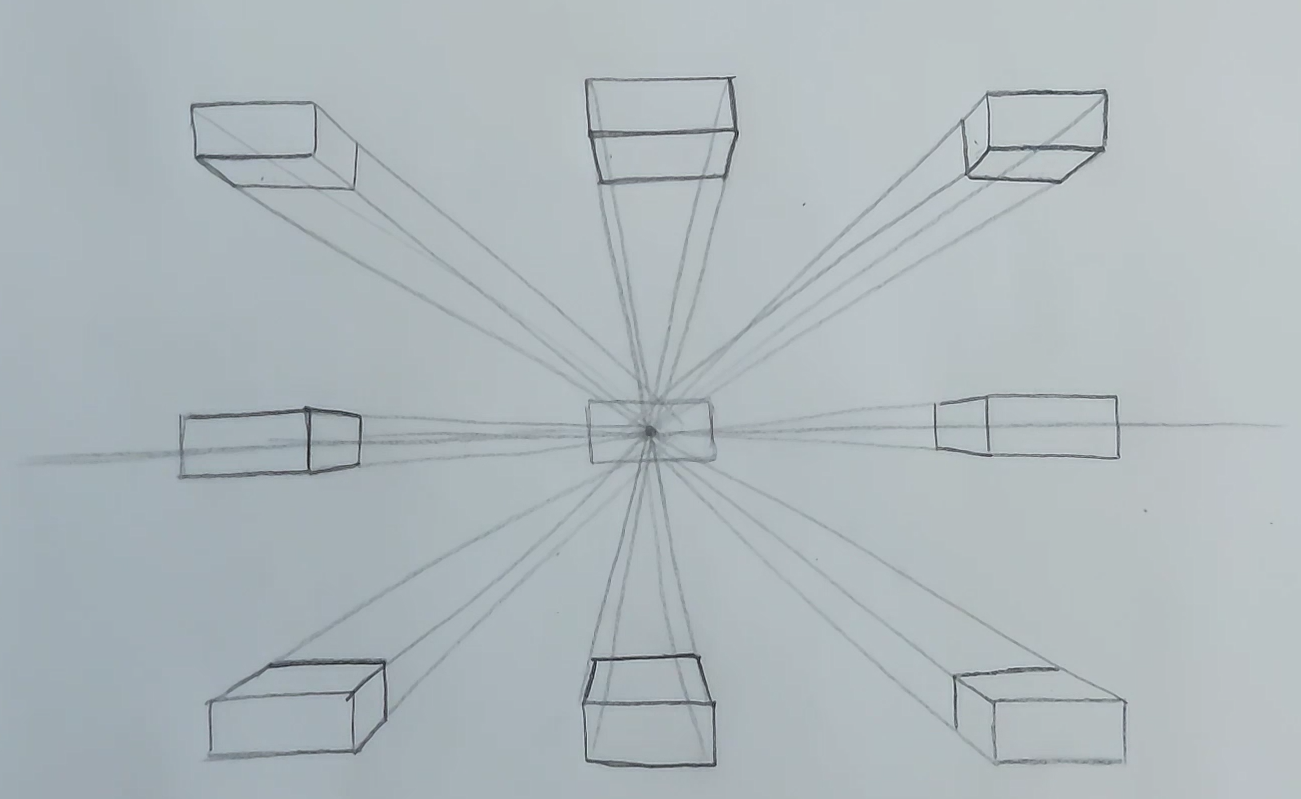
standing right here. If you can imagine cube, a square cube here, if I want to place it here, means that you can
even try it with actually something
square in your own life. For example, place
a box of tissues in front of your eyes in
front of your eyes. When you put it exactly
in front of your eye, you only see the side
which is in front of you. And that's it. From
all of this is square, I can only see one side if
it's right in front of me. But if with the same angle, I keep this box toward left. Let's see how I see it. It's on the same
level, the same angle. It's still in front of me, but I'm moving it toward left. Let's see what I see now. I definitely see the front side, and then from its corners, I go back to the point. Then I can see also this
side of it in this shape. In this angle, I only see
two sides of my cube. Now, if I move it
to the right side, let's see how it's seen. I create a rectangle here. Then again, from these corners, I go toward the point. Again, I still see
two sides of it. I really recommend you that you try with a tissue box as well, placing it in front of you, moving it to the
right and left to literally get this
perspective idea in concept. Now, if I bring it higher
than my if I bring it more above from the point
that I'm looking at it. It would look like this. From all four corners of it, I bring it down to
my viewers point, and these are the
sides that I can see. I can only see again
these two sides. I cannot see the sides
which are in the back. Okay. Now, if I bring this cube above my horizon line above my V point and this time
a little bit to the left. Again, let's see how it's done. Again, from all
four corners of it, I take out a line toward
my V point and this time, I see surfaces in
three sides of it. One, two, and three. Did you get it by now? I hope so. Now, if I
move the same one, it's the same cube
toward the right this time and I place it
above this view point. Let's see how much we
can see this time. It's basically the one
that we have on the left. It's just that I see
the right side here. It's exactly the opposite
for the other side. Again, I see three
sides, one in front, one on the bottom
and one on the side. Now, this time, I want to bring my cube below my viewpoint. It means that if I
keep it below my eyes, how can I look at it
and how can I see it? Again, from all four corners, I bring it to my V point, and I can still see
only two sides. On the situation where
it was above me, I could see the bottom
side and the front side. This time, that it's
below my V point, I can see the top side
and the front side. Then I'll bring it to the right. How is it here? Again, I drag four lines
toward the V point. It would look like this.
Then in this position, again, I can see three
surfaces the front, the side, and this
time the top side. I'll do the same thing
on the right side. I take it to my
Vpoint Then again, I can see three sides. My dear friends, just
as easily as that. You can actually
create objects in perspectives in all
different angles. Perspective is very easy. You have to practice
over and over again to get more comfortable with it and I hope you'll
do that fine. Let's follow in
the next episode.
3. Drawing Curved Surfaces with Perspective: Hello again and welcome to another episode of
sketching with me. This time, I want to tell
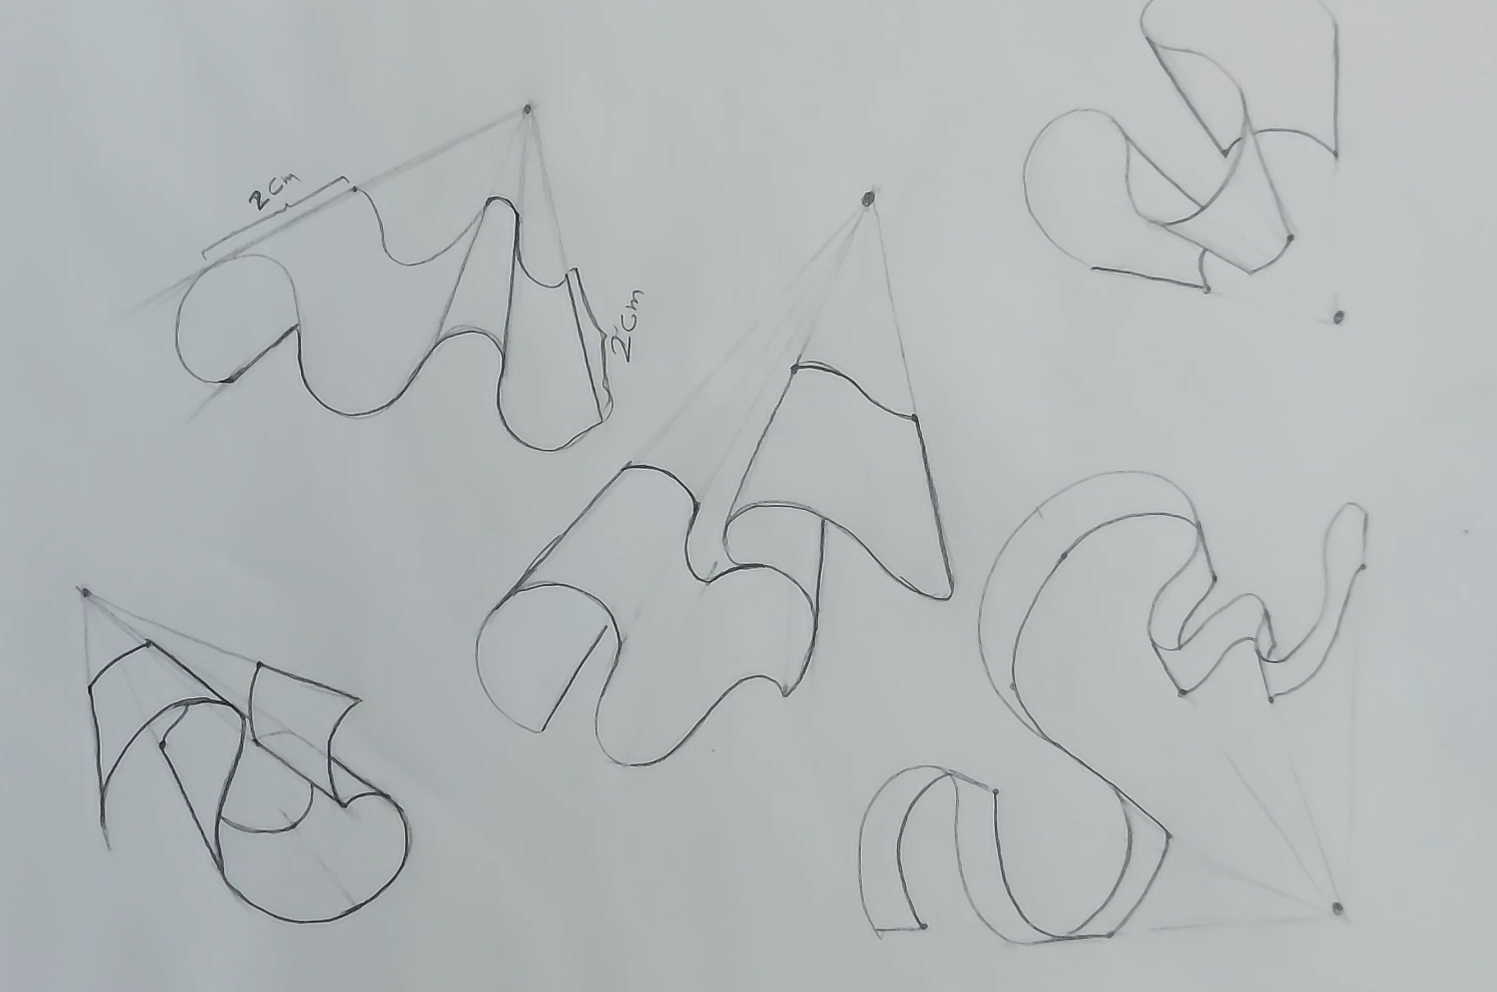
you how you can actually use crooked or folded papers in different shapes
with perspective. For example, I want
to create a paper looking like this and I want to bring it
into perspective. I can place my V point
anywhere I like. I place it here, for example. This can be I don't know, a piece of paper or a ribbon or anything that
can have a shape like this. How can I take it
to perspective? First, I take a line, I drag a line from its
out part, you see. This is the most outer
part in my work, and I'll do it on both sides. Then from here, again, from the beginning point, I create another
line to my V point. I can also take it
from these parts, but because it's behind
it cannot be seen. It's in the bottom. So I drag most of my lines from
the top parts of my work. Okay? Now, first, I should consider
a thickness for this paper. For example, I want the
thickness to be this much. For example, 2
centimeters. You see? This two centimeter,
the line that I create should be two centimeter
in all of these parts. I mean that on all
of these lines that I've created toward
my viewpoint, I should create a
two centimeter line, and then I should create the exact same curve on
the other end of my lines. You see? The exact same shape. For example, if it's a bump, I don't create it like a curve. The shape of them should be
totally like each other. Then again, from here, I consider 2 centimeters and here it goes,
it's this bunch. If you want, you can
also use a ruler, and again, I'll do the same exact shape on
this other end of my lines. And then this side
of my paper has gone below and it
cannot be seen anymore. This would be a general shape of a paper in this folded
or wrinkled shape. Okay. Now, I want to
create another one. For example, I want to
create a paper like this. This time, I place my
V point over here. It's still on the top, but on the left side. As I told you before, from the outest
part of each curve, I actually connect to
my V point and from the bumps and from the
beginning and the end. And also here again. From here, it goes
to my view 0.2. And then from here, it goes to my V point again. I'll consider
another measurement, for example, one point
half centimeters, and I'll do the same
thing on that line, and then I create the exact
same shape on the other end. Exactly what I did for
my previous shape. I have the same thing over here, but because it's behind that, it cannot be clearly seen. This would go behind my paper, that cannot be seen. Then from here, again, I should consider a thickness. So I consider 1.5 centimeters, and then I create the exact
same shape over here. You see, my paper is
being shaped easily. This is why I told you that
perspective is so useful for creating a three D shape and three dimensional shape. Okay. We just continue the same way. Then again, 1.5 centimeters on each line and with
the exact same shape, I connect the two
lines together. You see, it's showing
our folded paper, and it's gone into perspective. Now another shape. Now, I want to take
this into perspective. This time, I put my
viewpoint over here. Then again, from the most
outside part of my work, and I already said that if it's hard for you to create
your lines only by hand, you can easily use a ruler. But from the out
parts of my work, I bring lines to my
viewpoint there. The lower points
don't matter that much because they're
on the bottom and they cannot be seen. Maybe this one. But as I told you, I did
not continue that because it's on the bottom and the
rest of it cannot be seen. I think we've got them all. Every bump you see, you
take it to your view point. Now, this time the
thickness that I'm considering is again
2 centimeters. It's a big shape. I'll go it 2
centimeters and then I'll do the same thing
on this line as well. Then I connect them with the exact same shape I
can see here. You see? It's something like
this. All right. Now here, we've
got 2 centimeters, but it's underneath and
it can also be seen. So we just leave it there. Again, we come back here. It's followed and
it goes underneath. We don't work with it. But
over here, what should we do? Again, as the same amount of
two centims I'll go toward my Vpoint And then I'll do the exact
same shape over here. I should have the
exact same shape here. Maybe in the first look, it would seem a little bit
hard for you, my dear friends. Maybe it is. But after a while, it will get too easy for you. It just needs practice
and consistence. It's just mostly a practice for your mind to get
the shapes correctly. Also from here, if
I want to consider two centimres it
would look like this. Then again, My paper has gone into perspective,
just like that. Again, I'll do the same thing. I'll create several
more for you, so it would be completely
obvious for you. I place my line here. Then from the most outer parts, I move toward my V point. This time, as you can see, my V point is almost
underneath my work. From here, from here, and here from all
these outer parts, I go to my V point. Now I consider again, a thickness for my work. Again, I want to consider
it 2 centimeters. Sorry, one point centimeters. And again, I create all of I
create my 1.5 centimeters. I determine it on all of
my lines that I've dragged toward my V point. If I want to get it from here, it goes underneath, so I
don't create it anymore. So I come down and I
create it just like that. Then This would be my fold
and wrinkled paper. Let me just erase all
of my extra lines, so you can see this wrinkle
in this shape better. Okay. You see? When I do that, you can clearly
see this wrinkled shape. Let's do one more example and
then maybe we can move on. My, dear friends, all of these lines that
we are creating as our primary shape of the paper
can be totally imaginary. You don't have to create any
specific line, you know. Again, my viewpoint is below it. So I create all of these
shapes and then I bring the outer parts of my shape with a line
toward my viewpoint. Then it's the same from here until all of
it is connected. Okay. Now, I want to consider
1 centimeter for that. So the thickness of my paper
is only 1 centimeter now. For example, I consider 1
centimeter here also here. And all the way down. Only one, and I get this 1 centimeter
from all of these lines. Again, on this other
end of my lines, I should connect my points and my lines to each other with the exact same shape I
can see on the other end. Okay. Here it would look like this. Again over here, it
comes like this. Okay. Then from here, we're going
to do the same thing. It really looks like
wrinkled or folded ribbon. It's a shaped ribbon. You can clearly see
that comes down in every way and just
like that over here. Again, I'm going to erase all these extra lines so you
can see it more clearly. If you do. Okay. So just as easy as that, we could actually
create different shapes of paper and bring
them into perspective. My dear friends, it's
a very easy job. It just needs your practice
over and over again. And when you do
that, you understand that you can get a hand of it and it's not
that much of a hard thing. So I hope you've enjoyed
this tutorial and definitely practice a lot and
wait for my next tutorial.
4. Drawing Streets in One-Point Perspective: Hello and welcome to a new episode of Perspective
tutorial with me. In this episode, we are
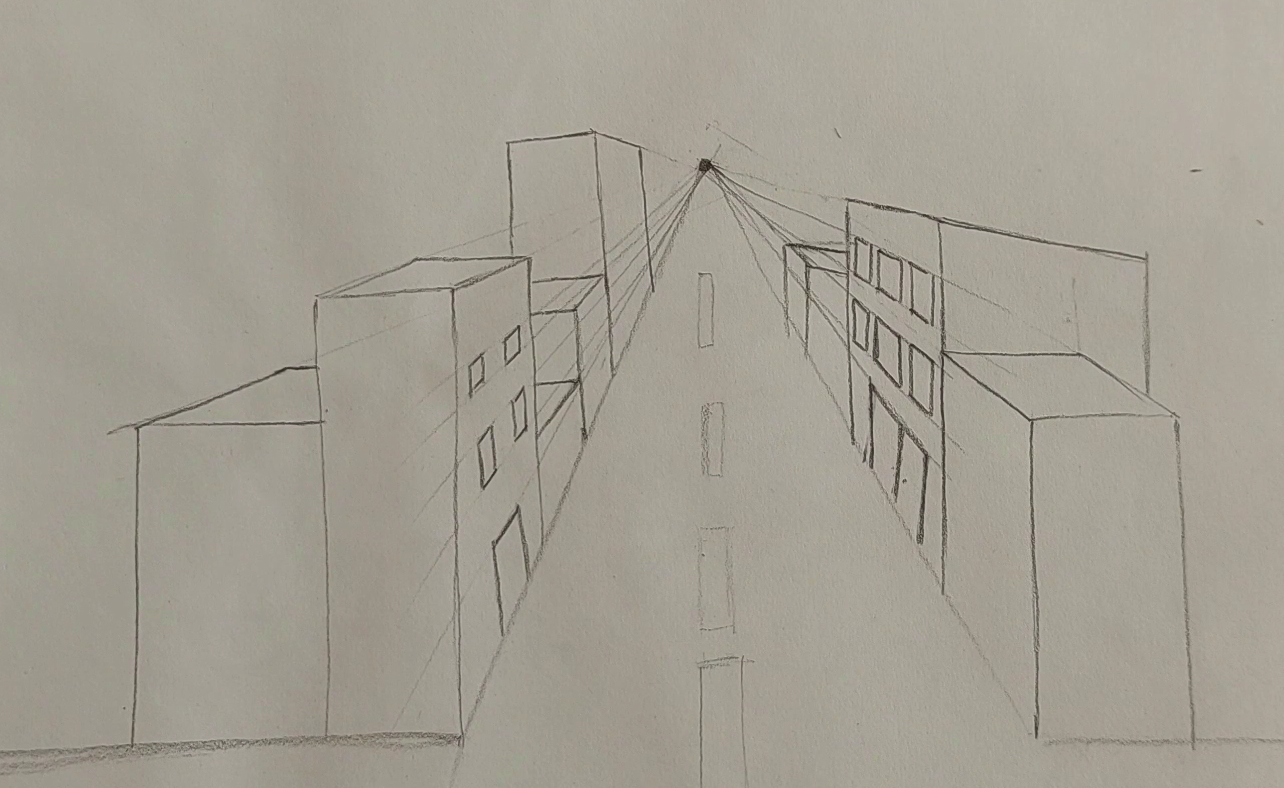
going to learn how we can create work actually
considering one viewpoint, we can create a street
and it's buildings. This is what we're
going to learn in this episode that
how we can create a street and it's buildings and stuff with only a one
point of view perspective. First of all, I place
my viewpoint here. Then I try to create the
shape of the street. Then I also place my horizon line because it's a street if we
need a two lines. I just place lines here, so it would be more
visible for you. For example, you see
this is our street here. And now we want to
work on its buildings. For example, I have a building
over here on this corner. I place a vertical line and then my horizontal lines will
go toward my V point. So this is my surface. Again, from here, it
goes to the point and this would be my
buildings rooftop, see? Now, I want to create the building next you see I come here
and from here. Again, I create a vertical line, my vertical line is straight, and then I create my horizontal
line toward my viewpoint. Again, I want to
create another one, but this one is
between these two. Sorry. So I'll just do the exact
same thing for that. And just like that,
we can actually increase the number of
our buildings here. I go down. I go toward my viewpoint, and then I go down again. Okay. And it's also the
same from this side. Now, my house can
be seen this much, the roof top of my house. On this side, I'll
do the same thing. I bring it here, I come down. I come all the way
down just like that. And then from here, I go toward the point. And this would be my building. I want to create a bigger building or maybe we can say a
thicker building here. So I can create my buildings in any size and in any
height that I like here, so don't worry about it. It totally depends on your own. I'm just doing it
like this right now. It's not really hard job. Okay. When it comes out. Again, over here, I want
to have another building, another house,
looking like this. And here we go. All right. This line should be on the same level and
parallel to this one. Okay. Now together,
we want to start creating doors and
windows on our buildings. So the same way that we
got our main building, each one of the windows and doors would be shaped like them because the whole building
is in perspective, so the doors and the windows will also go into perspective. So if I want to place
my line over here, my door over here, I
create a vertical lines, but for my horizontal lines, I go toward my V
point there. Okay. And this would be my
buildings window. Then I can also erase the
extra lines from my work. I'll do the same
thing on this side. It's the same
process, basically. I'll create three windows here. Then again, I bring it
into perspective to create another set of
three windows. Okay. And from for the door area, again, I'll do the
exact same thing. Just be careful that
our lines should be actually exactly
parallel to each other. It would be much more
easier if you work with a ruler and it would
be, of course, neater. But because it actually
gets the videos speed lower and I want to
teach you faster and more, I'm doing it without a ruler. This was the way
that we actually decorated and created
buildings and a street here. Okay. In the next step, I'm going to teach you
something very interesting. And in this next part, I want to tell you how we
can create something in a two point of view
perspective. Let's do it.
5. The Concept of Two-Point Perspective: Okay. In the first
episode and first part, I told you how you can create the cubes in a perspective
with one point of view. But this time, I want to teach you that how
you can create these cubes with a perspective
with two points of view. First of all, I need
my horizon line, but at each end of my line, I create one point of view, and now I have a perspective
with two points of views. Then I have a cube like here. As you can see in this cube, two sides of my cube
goes toward my v points. This would be my cube here, created with two point
to view perspective. This is from a front view. Now if I want to put my cube
here above my horizon line, again, I create a
line straight one, then I bring my lines
toward my V points, and then again, I
come up and they can see two sides in front
of me that I can see. But also, I have an
inner part here. From this point, I go to
the opposite point of view, and from this one, I go to the opposite as well. On the lower corners I create my lines toward my
opposite point of view, just as much as I come in, And from here, I connected to this side and over
here, you see? This area is my inner part of my cube. S. It just has a hollow shape, almost a hollow shape. Okay. Now I want to create
it on the lower part. If I look at this hollow cube from below my point of
views and my V points, It would look like this. Again, I follow
the same process. From the top corners this time, I go toward my
opposite v points, and it would look like this. Again, from here, I can
go to the opposite sides. I can connect these
parts together. And here would be my cubes shape from a
lower point of view. And this would be the bottom
of actually the bottom of my cube. Okay. It's also ed and it's curved in, so Now, if I want to
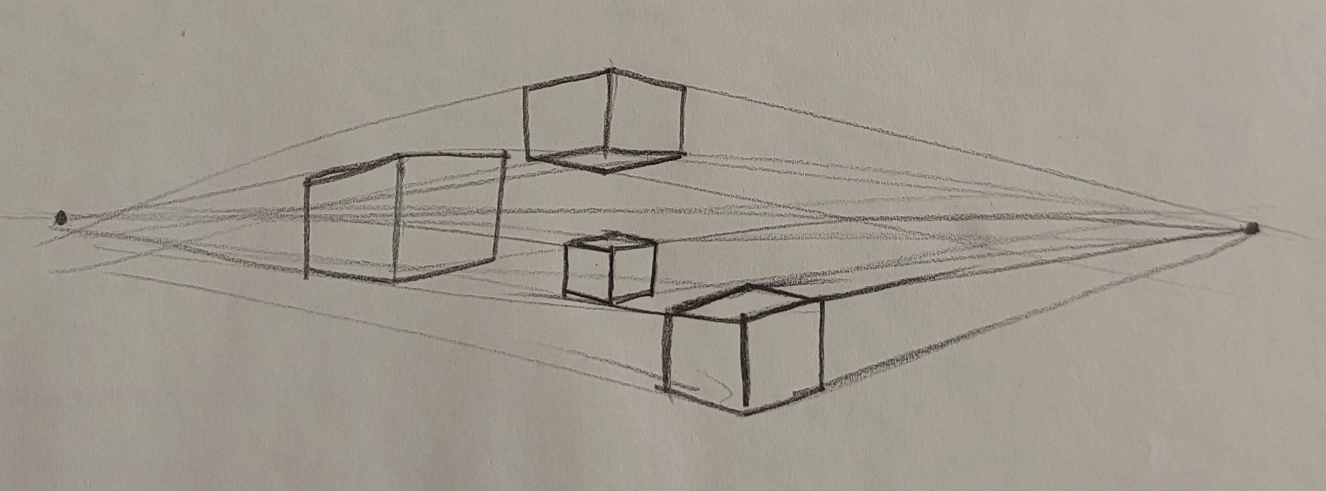
create several cubes, how we can do it,
again, consider. Let me just again
create my horizon line. And I place my cube over here. This would be one of the cubes that I have
right in front of my. I have another cube. I want to have it here. Because my cube over here
is above my horizon line, I can see the bottom of it. I create lines from
its corners from its bottom corners to
the opposite v points, and I can clearly see the
bottom side of it as well. I'll do the same thing for another cube
below my v points. As we did for the upper
example, then very easily. You can create your cubes
based on your v points. You can also have a
small one over here. It would actually look
cute and fun. Okay. Now for creating its top side, it goes on the opposite side goes toward the opposite side. So just as easy as
that, my dear friends, you can create your cubes like this in a two point of
view perspective style. Now, in the next step, I'm going to tell you how
you can create a city or a street with a perspective
of two points of view.
6. Drawing Buildings in Two-Point Perspective: Okay. Obviously, I have a horizon line,
which is straight. Then two points. Now, I also
have a building over here. I bring it down, I
bring this line, I place it right up to here. Then from both ends of my line, I connect it to my V points from the top and
from the bottom. Okay. Now over here. This would be the first
building that I can see. Let me just go over the lines once more so
you can see better. This is my first building. Now I want to create
its next building. If I want to have one
over here, again, I should create a vertical line as straight vertical line, and then Okay. And parallel to this one. Again, exactly, I
bring it to the point, and I'll have my second
building. All right. Now I want to create
another building yet a little bit higher
than the previous one, but not as high
as the first one. Again, I'll do the exact
same process, but over here, this side cannot be done
with the same point of view, so I bring it to the
opposite point of view. I continue this line, and this would be the side of my building side
wall of building. Then for the next one, again, if I want to create
it a bit higher, I'll do the exact same thing and I follow the same process. From here, I go to the
left point of view. Again, we see only a
part of the side wall, and all of the buildings
are done exactly like this. Okay Okay. So it goes from here
towards the point. It's just so easy. You just have to create
enough of them so that you can be
easier with them. Okay. Now let's start working on this side of the
houses and buildings. Again, on this side, I
have a line as well. So I start doing the same thing, but on this side, doesn't have that
much of a difference. Okay. And from here, I move to this other one
to this other line. So this would be the
wall of my work. Again, for the side, I come to here, I go down and I go toward the
other point of view. And this would be
the side wall again, which got created by the point
of view on the right side. Just like that, I work
for all the parts. Now, how do we create
the windows and doors? Let me start from here, again, I just dragged one line from
one of my point of view, and that will be the door. If I want to create the windows, It would look like this. See? It's just been done like that. I want to create big
windows for here. I want to consider
big windows for here. And if I want to, I can also consider some several long
windows, as you can see. And all of them should
be based on the lines that go that go to my viewpoint. In all of the parts, we can do the same thing. S. All of the lines would go toward the point and then it would
be created like this. I can create even some
bricks over here as a side walk off my street. And over here, this would
be sidewalk of my street. I can work on more
and more windows. And also, I can
place more doors. That totally depends on your own creativity and what you want to
add to your city. You can even add some trees or any other details that you think it would look
good in your work. For example, over here, I can create big
and small windows. Let me just work on it as well. Just like that. Okay. This was about our city with our two
point perspective. I hope you've enjoyed
it and you use it.
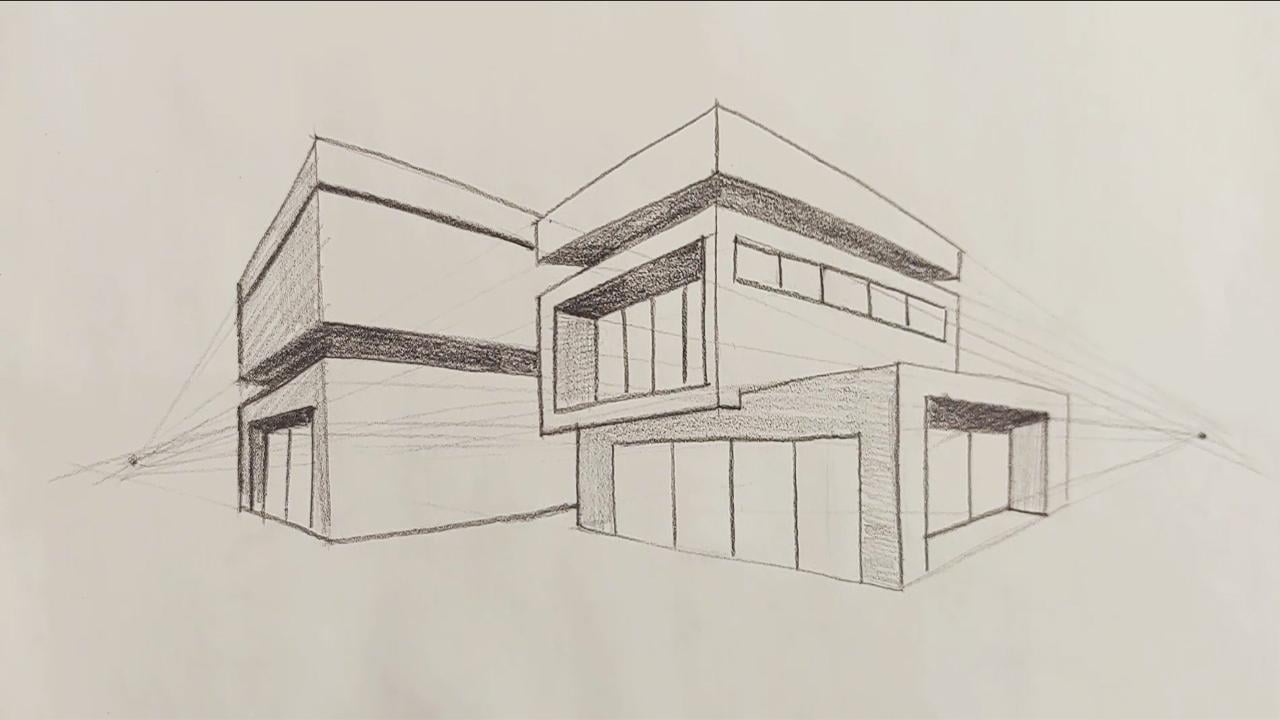
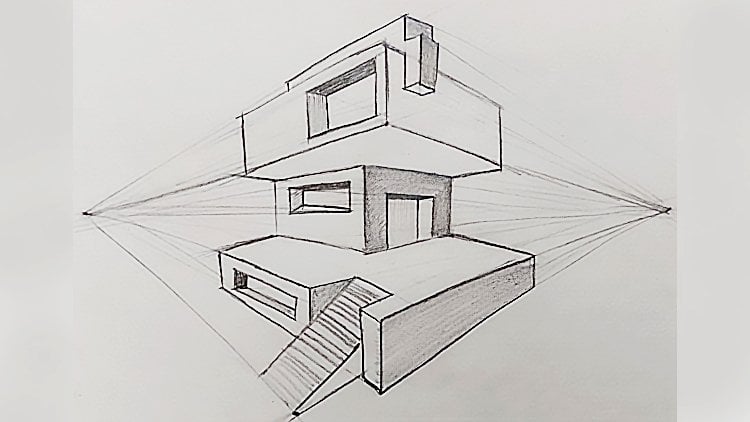
7. Drawing Luxury Buildings in Two-Point Perspective: Hello again and welcome to another episode of
Perspective tutorial with me. In this episode, we
are going to create a very luxurious building
with two point perspective. First of all, I create
my horizon line, and of course, my
two V points on it. One of them over here and
another one over here. Then I start very generally, and when I want to
create my building, first, I should get the
main area of the building. Okay. Here looks
like this. Okay. Now, I have a very general
cube from my work. I'm going to turn
this into a house. I want to create another cube on top of this one, exactly. First, I create the
lines, obviously. Like this. And then from here I go to
my V point on the same side. And from here, I go
to V Point again. And I bring this to here. Then I come up. From here I go this side, basically, I finish
it over here. Now, this would
be my upper cube. And then I erase
the extra lines, so you would clearly
see that how my second cube is
placed on my first one. I want it to be clear for you, that's why I've erased
all the extra lines. Then I make my lines a bit
more organized and neat. Then I start creating another cube for even
above my second one. Basically, I would
have third overall. Again, the process
of making this cube is the same as the ones
we've done before. Then in the continuous
of this lower cube, we'll do this upper cube. Now, the inner
parts are going to the opposite sides and they create a shape like this for us. Over here, I have some kind
of front I so create that. First of all, I
want to get this. And this is my front door. Then from here, I go to
the opposite V point. So I can show that it's hollow, and it's a door. And it will be done like this. Then from here, I
go toward the side. Here would be the front
door of my building. And here would be the ceiling the ceiling
inside of the house. I color it. I mean, I shade it so you can
see it more clearly. Now, I want to create some kind of glass shape
here so from here. I move to my V point. It looks like a very
big window, basically. But it's a glass door. Okay. Now I want to work
on this area over here. Again, I just shaded it so you can see the difference between each side and my work would
actually be more dimensional. Okay. Now, I also want to have the same glass shape
over here as well. Again, I want to
create that there is something hollow over here, so I want to create
the same shape. Therefore, I just create
four sides of it at first. Just like that. Easy. And then from here, I move toward this side. And as you can see, I have created this hollow
shape inside of it, because over here,
we've got glass, we can see inside of the room. So that's why I've created
it like a hollow shape. Now, this would be the
glass shape of it work. This area again should be shaded and this would
be the side part. I'm shading in different
colors again so you can see the
difference better. Now over here, I've
got some windows, so I create them
like that. Okay. Let me I should create these
straight more straight. Just be careful that you
won't create them sideways. It should be created totally
vertical and straight. So this is the side of our vila over here because
I've got a bottom area here, I definitely shade it, so I can give it a volume and a dimension that this
area is on the bottom. Okay. Okay. Here it goes. Okay. Okay. Now, I create another building or another structure
right next to our Villa. So just like the
previous one, again, first of all, I'm going
to create its skeleton. Just like that. And then from here, I move to the other side goes
again to the other side. And I'll just consider a
size like this for it. Okay. Here we go. Then from here, I go
toward this point and my cube will
continue up to here. Now, if I want to divide
this cube into two parts, for example, from here, I want to divide
it into two parts. I'm actually separating this upper cube
from the lower one. I'll create another line. And from here, I go to the
opposite viewpoint, like that. And then I erase the
line between them, so I can clearly show
that they are separated. I also consider a
line shape over here. Okay, now over here, I've got another front door. So I created. For getting its dimension.
I'll just do it. And this is my front door again. Then in this between area would be darkened and blackened. So is this? Okay. Then I also consider a very general shade for all of my work for all of my
structures and buildings. Just to make them look better. And just as easy as
that. It will be done. So very easily with only
two kinds of perspectives, you can create all kinds of different buildings
and structures. I hope you've enjoyed it, and it was useful for you.
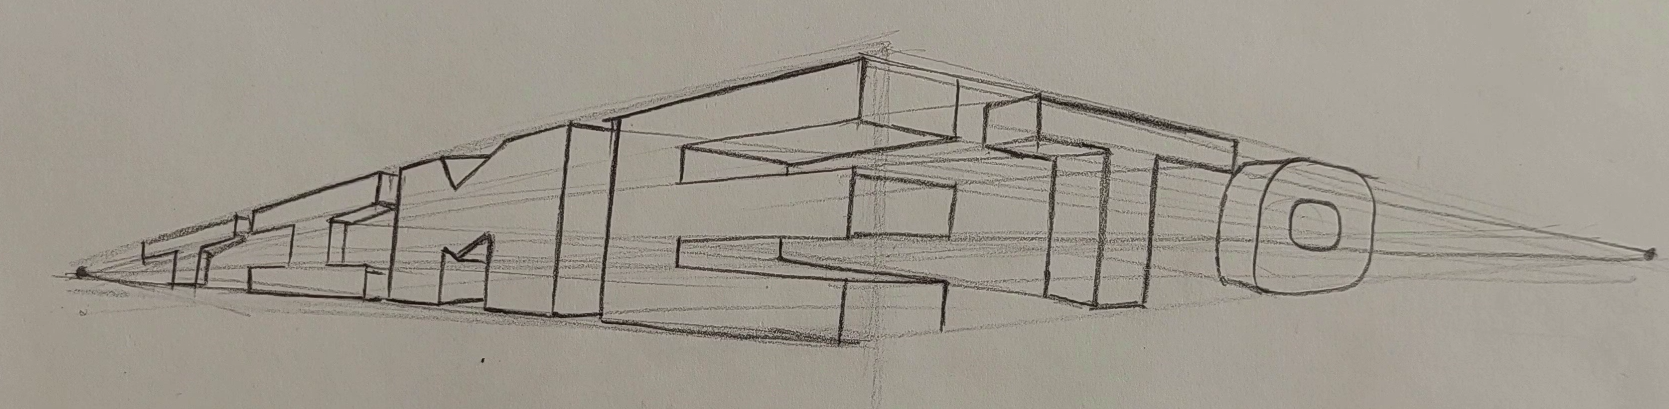
8. Drawing Letters with Two-Point Perspective: Hello again, and welcome to a new episode of Perspective
Tutorial with me. Now, in this part, we are going to work
on English alphabet and create them with
densios in the perspective. I'm going to use my two point of view or two point perspective
for this one. First of all, I create
the lines for myself. Let me just make it or straight. And I place my two points of perspective in
their own placement. Now, I want to create
the time word. I need the alphabet for that. First of all, I
consider the height of my letters so that the height of all of my
letters would be the same. It means that I want to
place a time word over here. So first of all, I come here and I place the T
the T letter, sorry. Let me just erase the tip
of my pencil as well. So we can work on the
smaller parts easier. Now, this would be the t. It goes toward the point and the vertical part of the work
would be done like this. See? Very easily just like that. Now, this is my T shape, the word t. Now for
the next letter, I should use the the letter. Let me determine the
line below it as well. Then on the same
level of this t line, this would be the I come down. It should be totally parallel
and on the same level. So I come down, and again, just like that, I come up to here. This is the I. The next one is
the M. Of course. We're working on time. The
next one definitely would be. Over here, as you can see, I have a shape. Then I come down. And over here, I keep
the V shape again. And it would go like this. Now, the last letter that
I should create is E. I come towards here in order to create my E.
It's really easy. So don't worry too
much about it. Also over here, I
create another line. And from each one
of these parts, again, I move toward the point. See, it would be over here. Okay. We've got the front side of all of our letters. Now, with the point that
we've got on the right side, we want to make volume and dimensions for our
letters. So I use it. I drag it to this
point, see, like this. Like that. Also from here, I'll do the same thing. And like this. Okay.
Now, the lower parts of them come from here
and from this point, I drag another line towards
the opposite point, and this would be the
ending of my letter. Okay. As you can clearly see, it's perfectly on
my horizontal line, so the bottom of it and the
top of it would not be seen, but the center of it and the
middle of it can be seen. This is my letter. For the, I'll do the
same thing. It's easier. I just connect my points to my parts of the letter on
the opposite side mostly. And I'll do the exact same
thing for all of them. S goes to the point and
it connects from here. I also comes down. Okay. The t letter also goes to the point and it will
be worked like this. Just that easy,
we could actually create the time world
in perspective. Now, if I also want to
write a two after it, we want to see how
it's going to be done. First of all, I just place the t then I come down. I've got the O here. We will have it like this. Okay. Now, if I want
to get some dimension for this and I want
to volumize it, I should go toward the
other point from this side. I go toward the left side. This would be one side of my t. It goes from here. This would
be the T. The T leather. And the O is also placed. So that easy, we could create actually the word time and two, we could place them
in perspective and give it a three
dimensional shape. I hope you've enjoyed this tutorial and you've
learned how to create letters each of the letters
in your perspective. S later.
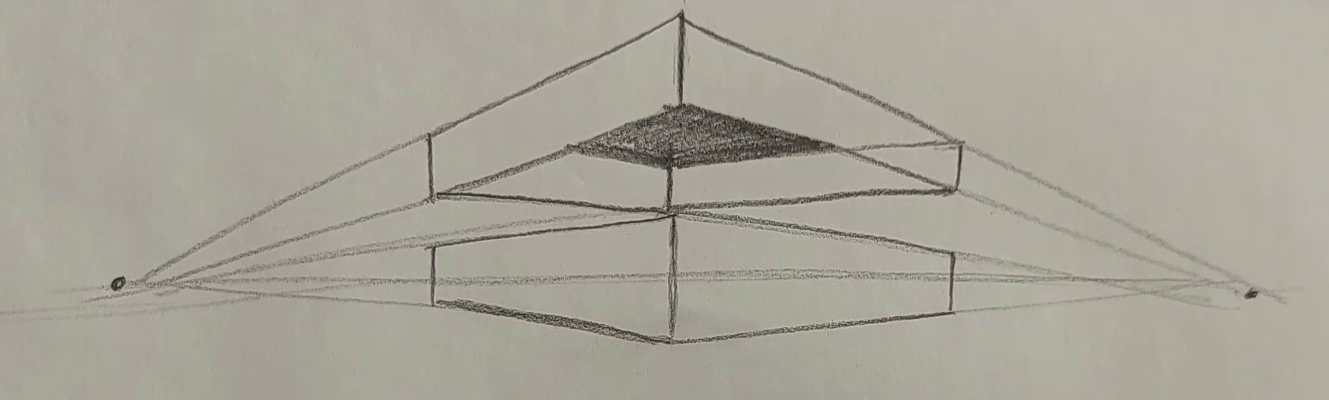
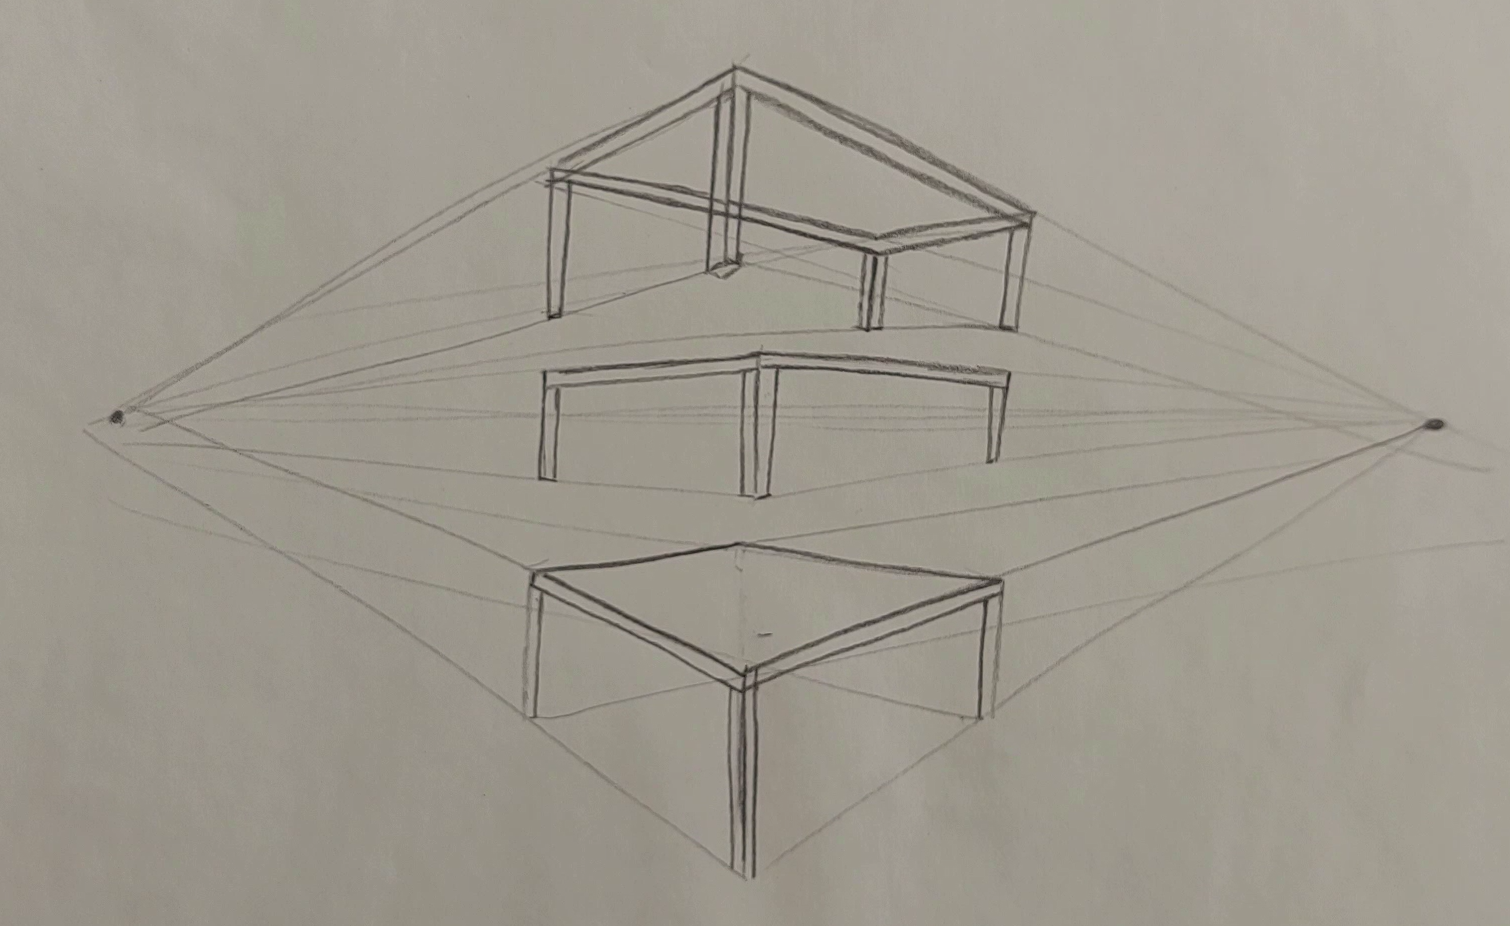
9. Drawing a Table in Two-Point Perspective: Hello, everyone, and welcome to a new episode of Perspective
tutorial with me. In this episode, we
are going to well, create a table based on the principles and
rules that we've learned in the past episodes
for two point perspective. Okay. First of all, obviously, I'll place my two points on
both ends of my horizon line. I've got two V
points viewpoints. Well, the first table
or desk that I want to create is actually here
on my horizon line. See? And then over here, it looks like this. This is actually the top
surface of my table. And over here, these would
be the stands of my table. These are the stands of these
are the legs of my table, and I just place it as the same as I've considered
for my cube. Of course, the one in the back is placed here
and it won't be seen. Then I create another table on top of it over
here, above it, basically, And then from
here toward the side. All right, then. Again, I see the size of
my table is like that. And then of course, I should have the
surface of my table. So from the corners of here, I just connect them to
their opposite v points. And because my table is actually above my
perspective line, I can definitely see the bottom part or
under my top surface. So I can clearly see that. Now, I also give
a small volume to this table just as well. And from here, I take it to
the opposite side again. You see? It would
look like this now. Okay. Yeah. For the legs of my table, again, I'll do the exact
same thing as I did for my previous
one vertical lines and placing them on the horizon. Actually, parallel to horizon, I mean. Okay. No. If I want to bring this leg toward this side
toward the left, the height of this leg, the height of this leg
would be this much, and just as easy as that, we could actually create our table above our horizon
or perspective line. Now, in the next shape that
I'm going to create for you, my table would be
below my horizon line. Again, I create one
line and then I connect them to the V points
as I did before, And when I got the
general size of my table. This would be the surface
of my table that over here, I can clearly see my
table from the top and I can see its surface completely. Okay. So I consider a thickness for the surface and these
would be the legs of my table. Now, I from this line, I go to the opposite view point, this would be my fourth leg, but because I cannot see it and actually it's behind
the top surface, I do not create it at all. So just as easy as that, we could actually
create anything that you like with two
perspective point.
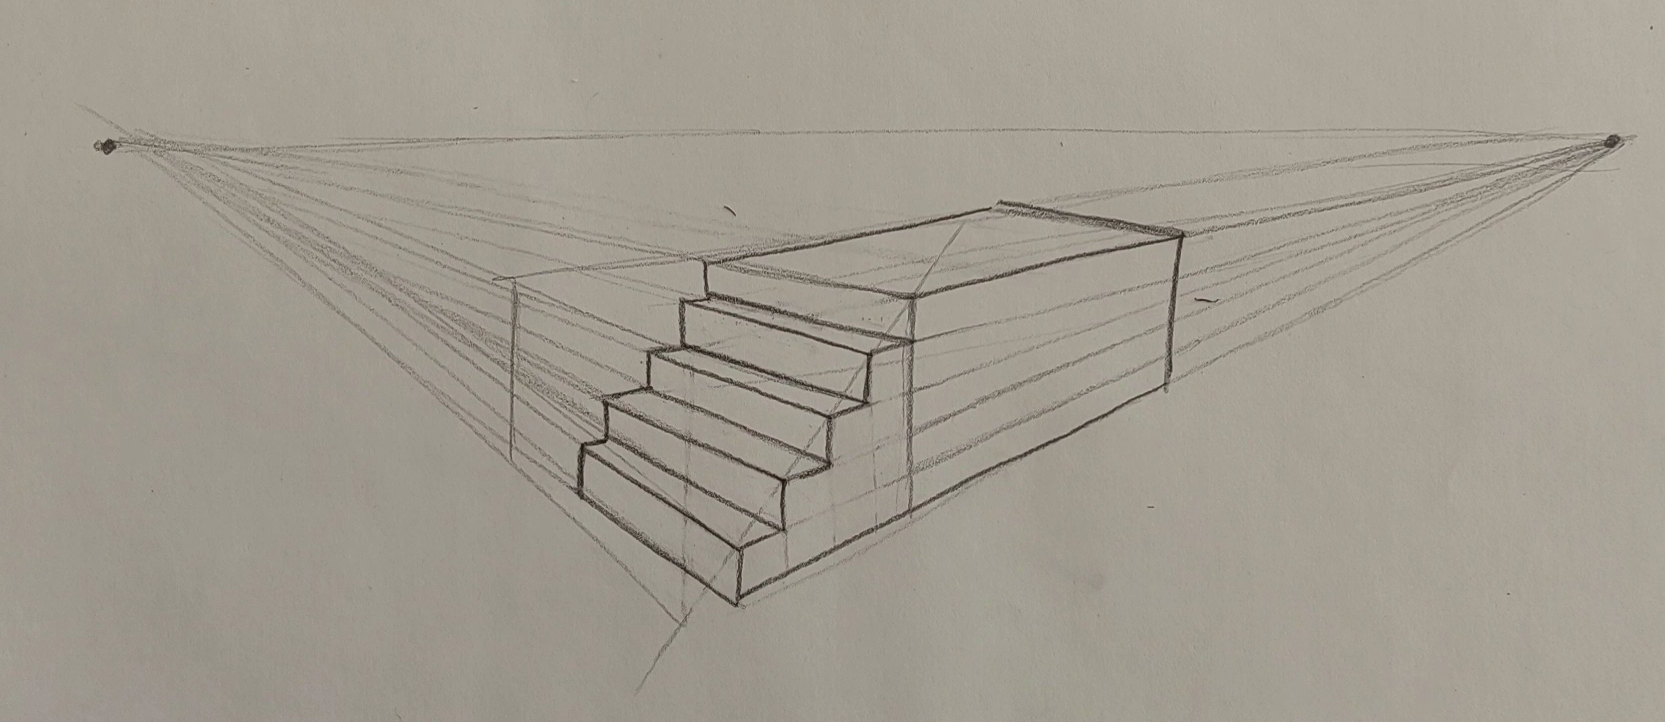
10. Drawing Stairs in Two-Point Perspective: Hello again and welcome to the new part of our
perspective tutorial. In this part, I want to
tell you how you can create stairs with a
two points perspective. Creating a stairs
is actually one of the most challenging parts of learning and creating
it in perspective. But if you pay attention, this would be super easy for
you, don't worry about it. First of all, I create
a horizon line. Then I consider two points
obviously for my V points. Then I want to create my
stairs below my horizon line. How S. I've got a cube
over here from here. I connected to my Vpoints from the top and
from the bottom. First of all, I get the general
cube shape that I need. First I'll create it here. And then from here, I move to the other side. And from here, I come to the left side. Okay. Maybe it's just better if I take this line a
little bit more further, so it would be easier for you. I mean, that the workplace that we want to create
ours would be bigger, so it would be easier for you to see and to do for
the first time. Okay. Now, I will divide my stairs into
two equal parts. And then also from here, I go toward the V point. After that, I will actually
create the second cube, and I consider a sideway
lines for my second cube. Now, what do I want
to do with it? First, I create
several lines for it. For example, I want to
have four lines over here. One, two, three, and four. These are the lines that I
create for my second cube. Just consider that these lines
are basically our stairs. Now, I bring this
line over here. Then I'll create the rest of
them all the way up to here. Now, I think it was actually
clear for you up to here, and my dear friends. Then from between them, I create vertical lines. You see? If I just
continue these lines, they should hit the bottom line. I just create these
vertical lines in between my horizontal lines. Now, I work on each one of these very small cubes
that I've got over here, each one of them would be
one step of my stairs. Now, how it can
get its thickness and its volume. You see? From here from this line, again, I create a line
toward my V point. Over here, I create another straight line again
from the one below it, it brings down and I
connect this point to my right Vpoint it
would look like this. Again, from here, I bring all of my lines toward these
v points on the left, then I create the vertical lines and I connect them to
the right V point. I'll just repeat the same thing over and over again
for each step. You see, just as easy as that. You can actually create stairs. Again, it goes back to the V point and the
process continues. As you can see, our stairs
are coming together. Again, from here, it goes
toward the V points. And the ending part
of the stairs, again, I should do the same thing. Okay. Okay. S. Like this. No. I make the main parts
of my work bolder and then I would erase all the
extra lines from my work. You can have a
better view of it. Just as easy as that, you can actually create even stairs for the buildings
that you're creating. I hope you've enjoyed it as
well and you can use it.
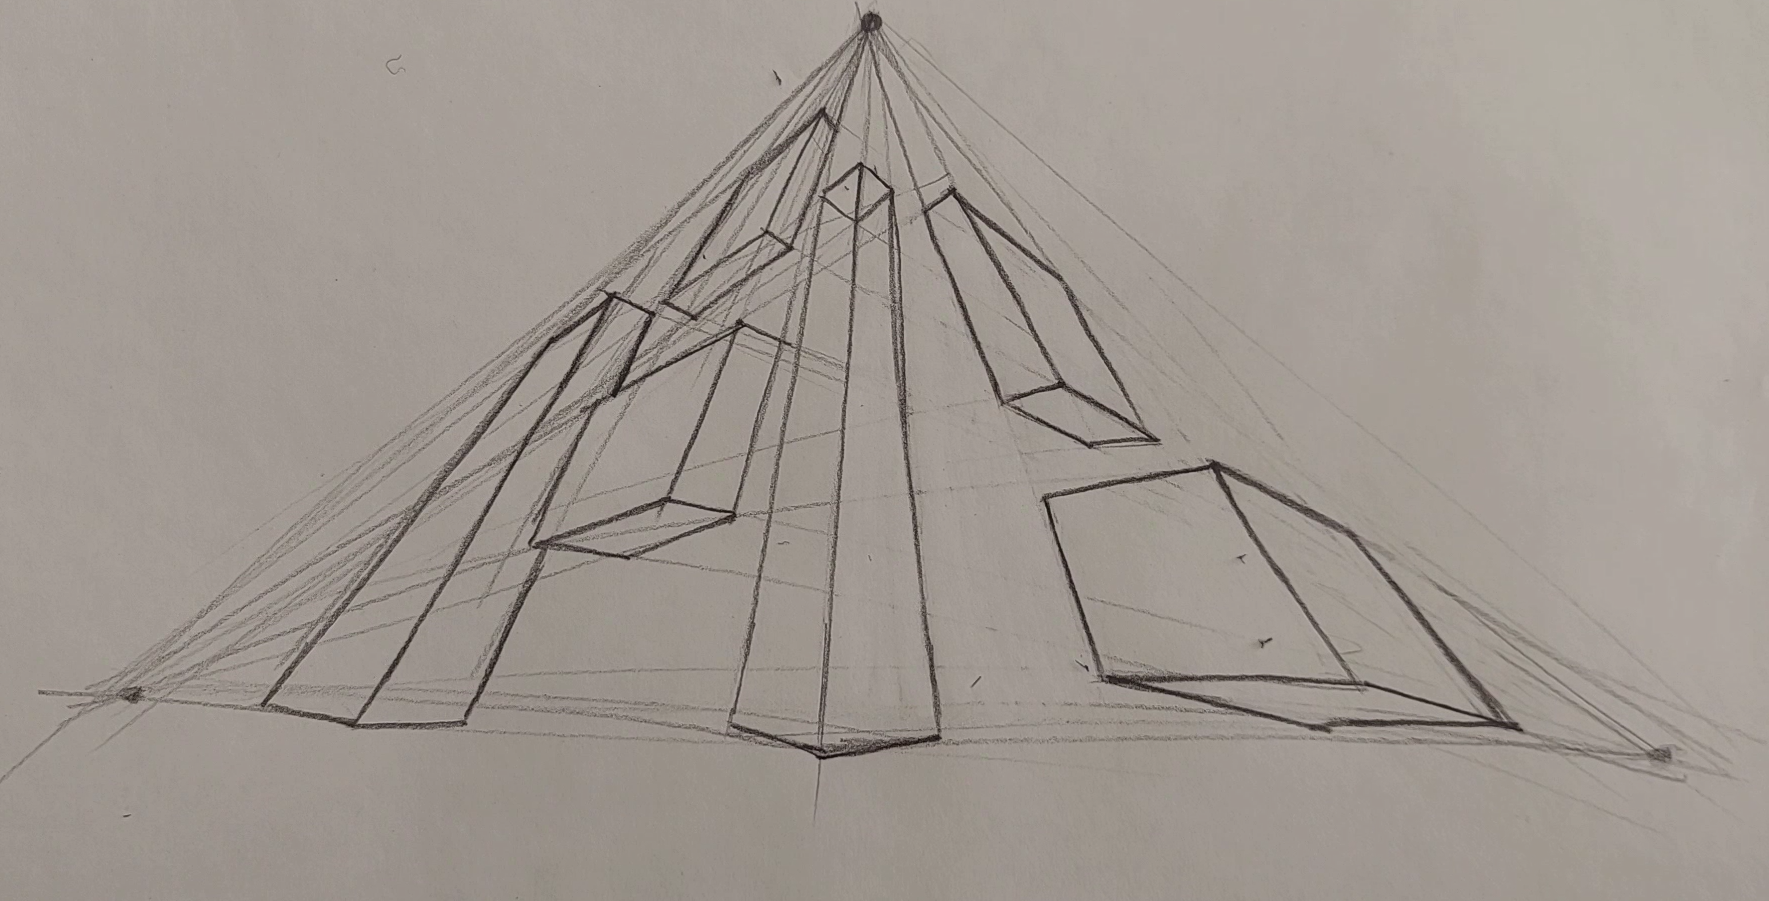
11. The Concept of The Three Point Perspective: Hello, and welcome to a new part of perspective
tutorial with me. In this part, we are going to work on the three
points perspective. We worked on the one point
and second point perspective, and now we've got to the most attractive one, the third point. Now, obviously, we
need three view points in order to create our
objects in this perspective. So I just create a horizon line, one point of view, two of them. And if I place my third
point of view on the top, It means that I'm looking at my objects and my
buildings from below. It means that the
top of them would be smaller and the bottom
of them would be bigger. If I do it on the bottom
part on below my line, it means that I'm looking
at my objects from sky. I see the top part
of them bigger and the bottom part of
them smaller. Okay. First, I've just placed my
third point of view on the above actually
above horizon line. Let's see what should we do. First of all, if I
want to create a cube, I'll create a line from here. Another one from here. Let me just erase it. And then all of my
vertical points and my horizontal points
should actually go there. This third point is
actually my main point. I want to have a
building over here, so I place my V
point over there, and I create my vertical lines moving toward my third point. How can I get the
rest of my building? Well, from each horizontal
line that I create, I move toward my side points. Again, for creating and
making this square complete, I would actually do the same process that I did
for my second perspective, which means two
points perspective. That will be the
rooftop of my building. Then when I continue it down, I'll get my building completely. Now, for getting the
bottom part of my work, I'll do the exact same thing. I come a little bit lower and
below my horizontal line. And then from each point, I go to the opposite V point. Say it's really easy. You just have to focus on that and do not lose
your point of view. Okay. Now, this is the
bottom of our cube. Now, if I want to create
another cube over here or here, let's see how that is done. First, I create a straight
line from the top and then I create another
one over here, see? Now, I get the horizon
line with this point. Then I will get it like this. I get this surface like this. Then again, from here, I move toward this side. Again, for its lower
surface, again, I do this, and then I created
based on my third point. Then just as easy as that, I could have created
one cube over here. I want to create a third cube. For example, I want my
third cue to be right here. This line comes over there, another one would
come over here. Again, I would have a
horizontal line like this. Again, I create
another vertical line, bringing it straight down, and then from these areas, I connect to the site V points. S? Just like that. I've got two surfaces, and for the bottom surface,
it would look like this. Now, I want to place
another cube over here. Again, I place a line here, and as you can see, my cube
is very stretched and long. And I do it like this. Again, I just do it. And as you can see, the bottom part of my
cube is longer and more stretched as it goes
into perspective. Okay. Now I bring it a bit more below my horizontal line as
I told you before, and from each side, I attach my points to
the opposite side. This would be our fourth cube. Now, I also want to create
some cubes on the other side. It's exactly like the ones
that we did on the left side. First of all, I'll do it
for getting one side. Then I'll do it for
getting the other one. Again, I get it. Okay. Like that, I get
one side, one surface. Then again, I come down. From here, I should just
bring my lines down again. For this lower part.
It will go like this. Just as easy as that. You see, perspective is really like playing just
with the lines and points. When you get a handle of this, you can easily work on it. And it's really attractive. I personally love it. It's just the fact
that you should really practice it
and work on it. It goes to the point
again to the side point. The process is the same, you should pay attention to the different directions
and angles, and that's it. You've got your work done. So just as easy. You can create the shapes
with three view points. I just erase some
of my extra lines. Therefore, you can
see all of it better. Okay. Of, I only
do one side of it. And so easily and
beautifully. I'll just do it. S. There is nothing more to it. It's just the way you
play with your lines. So I hope that you've
understood this principles, and it will be nice for you.
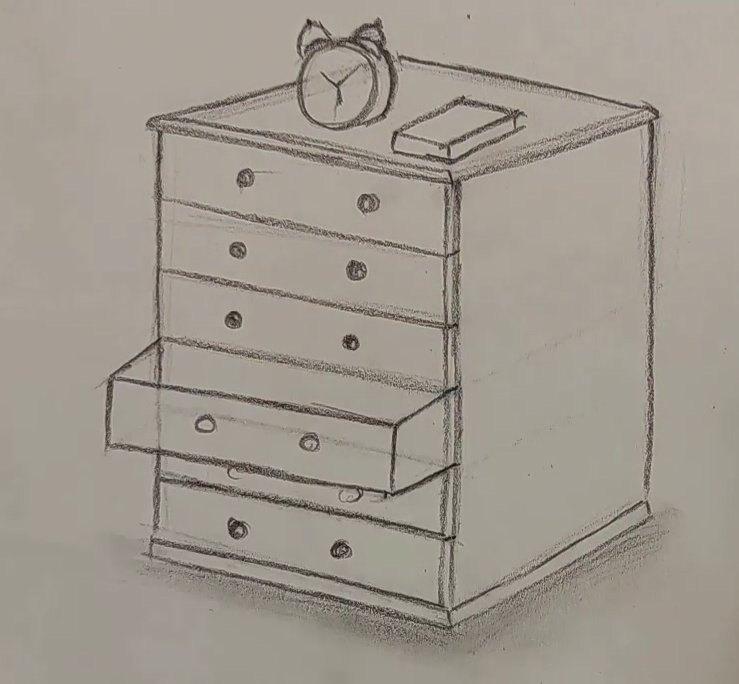
12. Drawing a Drawer Using Beyond Perspective Points: Hello. Welcome to this episode
of Perspective Tutorial. In this part, we
are going to create a closet together with
the help of perspective. But the perspective that we are going to work right now
doesn't have any points. We should consider the points on a very far away part, place, and just the cube that you're creating imagine it
in a perspective. All of your angles
and directions and lines should be
parallel to each other, and it should look like
that it's in a perspective, but we do not actually create the horizontal line
and the points anymore. Because now we are going
to work more advanced. The lower line definitely should be parallel to the upper line. Then again, this line should be parallel
to the right line, the one which is in front of it. I'm trying to create my
cube in a perspective, and again, parallel
to the front line, I create one in the back, and also another one over here, very slowly, Without any V
points or horizontal lines, I could actually create my cube. That's really important to do. It shows that you
are advanced now. Now, up to here,
I've created a que. Now, I want to turn
it into a closet. Now, I just point out
all four corners of its top surface top side, like this. Here we go. And then after that, I create the rest of the lines a bit more toward
inside, do you see? Okay. Now, for my own closet, I want to also consider
several drawers. The number of drawers that you want to have for your closet or your drawer depends
totally on you. So you can have it
less than me or more. Then parallel to this line, I create my drawers. I divide this area into two, then another line over here. Three lines and two
more on the bottom. Now, I've got six
different drawers, six separate drawers. So I work on each one of the drawers very
neatly and organized. Just like you see. Like this. Okay. Now, I also consider
an area over here a very thin and narrow
area for my drawer again. I erase this extra line
from here, making it. And I create lines from here like this. Very small lines would
be placed there. Now. Over here, I should have
the handles for my drawers, so I should create them as well. Well, the shape of it again
depends on your own taste. You can consider a
very simple shape for them or a complicated
one, a designed one. Now, I want to pull one
of the drawers out. For example, this one, and the parallel to this line, I create another line, you see, as the size of my drawer, and I bring it outside. Then I create this shape. And then parallel to this line. I connect my lines together. Okay. And here it is. I erase this lower area, this would be my main area, and this is the drawer
which has been pulled out. It also can have two
handles over here. It's easy, see? And this is also the inner
part of the drawer that we do not want to work
anything on it. So we just leave it. Now, these parts are also the handles for
the lower drawer. And just like that. I also want to add an area below my
drawer set and my closet. Okay Okay. Here we go. We've got it and it's
almost done here. So I make my work and neat. Then I erase this
line from here. Now I can also have
a clock over here, an alarm clock maybe that if I want to even
show this clock dimension, I should create it like this. It doesn't matter
what you create. You can always make it
three D in perspective. So as I told you, it's an alarm clock and
it's going to be so cool on top of this night stand or drawer
or whatever you like. And this is my alarm clock and I also want to create
a book right over here, Looking like this. So I hope you've enjoyed
this tutorial as well, and you can create so many
different things with it. So enjoy and see you later.
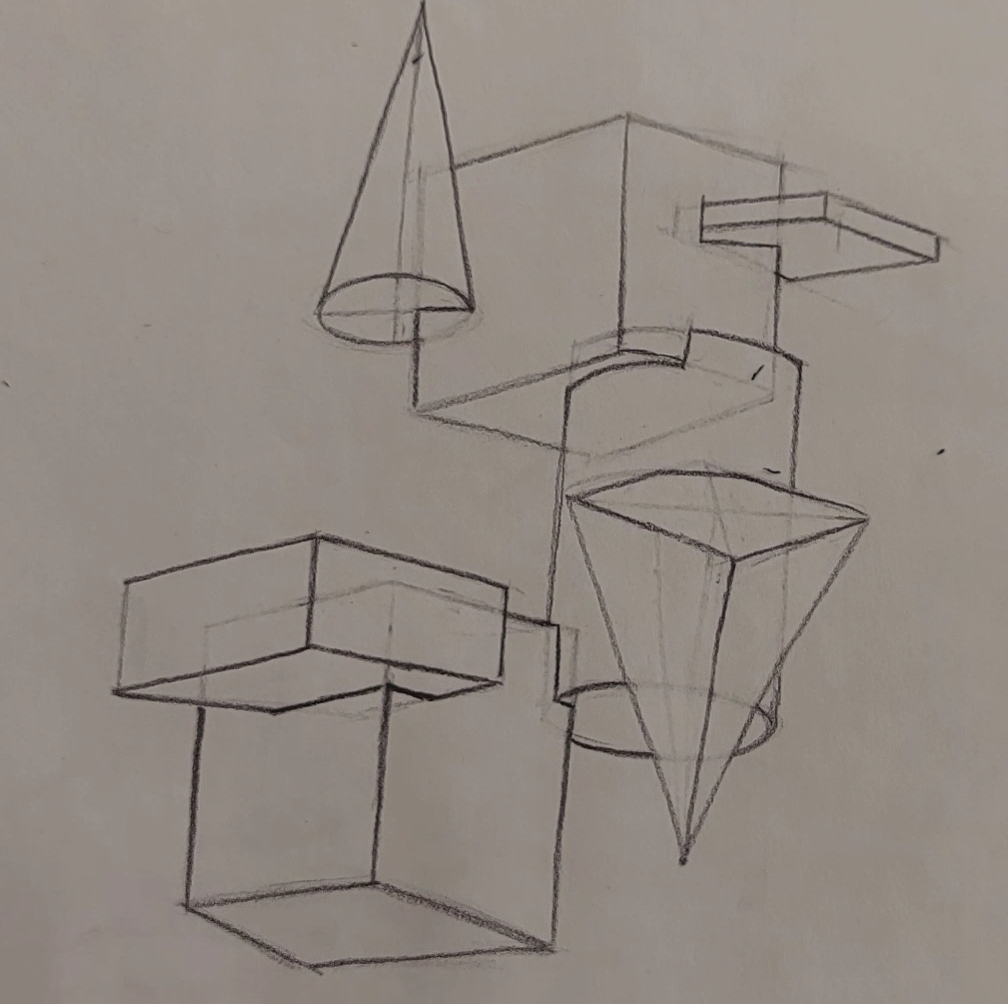
13. Drawing Geometric Objects Using Beyond Perspective Points: Hello, and welcome
to a new episode of Perspective tutorial with me. As in the previous episode, we've created a drawer
without any V points. Now I want to create
some geometrical shapes like cones or cubes,
rectangle cubes, pipes, and so many other things with volume in three D shape, and I want to put
them on top of each other without having
any V points. Let's see how we do it. First of all, I start with a square cube or a normal cube. I just place it over here based on the process that I've taught you in
the previous episode, Considering the
directions and angles, you can easily create a
normal cube in perspective, but without creating the
horizontal line or the V points. We just consider them far
far away from our work. Now. See? One of my lines
over here is not as straight, so it means that it's wrong. If I create my lower
line with that angle, the upper line should be
with the exact same angle. So I cannot just create two different things
with different angles. Now if I have it over here, if I have this line
over here, again, this should be
parallel to this line. All of my lines should
be parallel here. It's very important. It's then that we can
say our perspective is done correctly
without any flaws. All right. So just like that, I have created a normal cube. Now, in the next step, I want to create a very
stretched rectangle cube, and from here I want to
create it inside of it. See? I start from this point. Bring it a little bit higher. I place my line here. And parallel to this line, I create another line, placing my very stretched and
thin rectangle cube here. And parallel to this one, I created slide. Okay. Over here. Okay, what
about underneath my work. You see, parallel to this
line, I create this one, and from the top, I compare it to the bottom and create a
parallel line again. This would be my tangle cube, which is very thin and narrow, and it's like it's coming out of my cube or maybe going into it. Now, my dear friend, you
see right from here, which is the ending
part of the cube. From here, I come
up and from here, I go toward left. And then I go up again. I'm basically cutting this part. You see? Now, it looks like my rectangle cube has gone
into my normal cube like this, and it's been cut,
as you can see. So I erase the extra
lines in order to show the part that
this cube has gone in. Now, for the next
part, let's see. I want to create a
cone from this side, and I want to take it up. Obviously, I have
kind of an oval shape on the bottom of my cone. So I create this oval. I create two lines for it. And then from these
lines, I go up. I go really high. And when I've got the
height of my cone, I just attach it to the sides. Okay. Here we go. So this would be my cons shape. And then exactly like that, I come from this
side of my cube, and I erase this
quarter of my oval. And I also era this
part of my cube. So it looks like my cone is
also jammed into this cube. They're all jammed together. After that, again, I erase
all the extra lines. You should create your
primary lines very lightly. I just create them darker
so you can see better. But you should create
them light so. You can erase them easier. Now, over here, I want
to create a cylinder. Okay. So cylinder is
created from two circles, one on the bottom
and one on the top. Let me just determine the
height of my cylinder. And maybe it's thickness. Okay. See. This bottom part of my cylinder exactly is as the shape
of my con's bottom. You see? I've got an oval over here. It's the bottom of the cylinder, as well as the
bottom of the cone. All right. Now, then
I bring it all up. And I bring this line down and I create the exact
same shape on top. Over here. But as you can see, I've only created
one side of it. Okay. Now, if I want to bring my cube out, how
would it look like? I continue from here. From here, I cut it again. So this part would be cut because it actually
has gone into the cube. From here, also because my
cylinder is curved and round, I'm going to cut
in the same shape of my cylinder and it
would be curved, see? I just work on this
area like this. I can show the surface
is still round, but it's jammed in
something else. Just like that, I also jammed my cylinder into one
corner of my cube. Just put it there. Now,
if I want to create a pyramid inverted
pyramid here from here and I want to jam it inside of my cylinder,
what should I do? First of all, I should
have a surface. On the parallel to this
top line of my square, I consider a line in
order to have a surface. So I consider it like that here. Then I'll complete
this surface here. Just like that. And then I create the dividing lines connecting all four corners together now. Right from here, I bring a straight line down
from the center of work. I bring a straight line down and I come all
the way up to here. This would be the
height of pyramid. And from this other corner, I just go over my
lines once more. So I work on each surface that I want to create
now from this corner, I connect to the
tip of my triangle, and I'll do the same
thing on the other side. Then from here. This was my cube, right from here, I also come up. See? This is a pyramid and this was the height
that we've considered. So it would look like this and inverted an upside down
pyramid on our cylinder. All right. Now, if
I want to show that this pyramid is inside of my
cylinder, what should I do? I'm going to show you right now. It's pretty easy, see? The only thing that I do is that I erase the
extra lines from my cylinder because my pyramid is actually in
front of cylinder, not the other way around. So she the extra lines
of the cylinder. Okay. Now, what do I do in this part? I just want to jam this
pyramid into the cylinder. A part of it, of course, see? The cylinder was
moving like this. Again, I just make
this area around. In order to show that, it's jammed into a round thing. You want to still show
the surface was round. In this way, it really
looks like that it has gone into my cylinder like this. Okay. So one corner of my pyramid has gone
into my cylinder. Again, I erase all
these extra lines to show this upside down pyramid
jammed into the cylinder. You cannot see the parts
behind it. All right. Now, in the next step, I want to place my cylinder
on a normal cube again. So what am I going to do? Well, I place my normal cube, my square cube over here. So over here on the top area. Again, as you can see, I'm creating even this line parallel to the line above it. If it's still too hard for you, you can use your horizontal
line and your V points, but it's better to remove them little by little from
your practices until you can create even complex
shape like this without having a
horizontal line or points. That's when you know
you are totally You have totally
got this subject. So don't forget to practice it. Okay. This would be the bottom side of my square cube. All right. Now, how it comes inside of
my cylinder again, so easy. As you can see clearly, it has gone into my
cylinder and over here, this part be erased as
you can see over here. And then from here, let me just find my
pencil and from here. It's been erased. I should
also erase this part. See? And if I connect
these two parts like this, It can totally show
the shape, so easy. You just have to
pay attention to the angles and to the parts where they are jammed in and the details of
their broken parts. Up to now, we've worked six cubes together in so
many different shapes. All of them are in three D, and they are from the
cue geometrical shapes. Again, over here, I want
to create another cube. Again, I'm going to
place it over here. Just like that. Here we go. I just create my cube very
lightly so that later I can erase most of it because I'm just placing it
into this other previous one. Now, this is the front side of my rectangle cube that
I can clearly see, so it's okay up to here. Now, in this area, this cube comes
right until here. You see, again, with
the parallel level, it will be cut like this and also it will cut
like this again, still on the same level and parallel to the
lines below them. Then this cube of wine will
continue its like this. It's a little like the drawer that we pulled out
of that drawer. It's basically the same
principles and the same process. I just erase my extra lines so you can understand it better. If you create your lines lighter, that would
be better for you. Even if you shade,
that will be awesome. That's totally on you. I hope that you actually learned this process
pretty well. Without even creating
any v points, we could create three
D shapes beautifully. I hope you've used
it in enjoyed it.
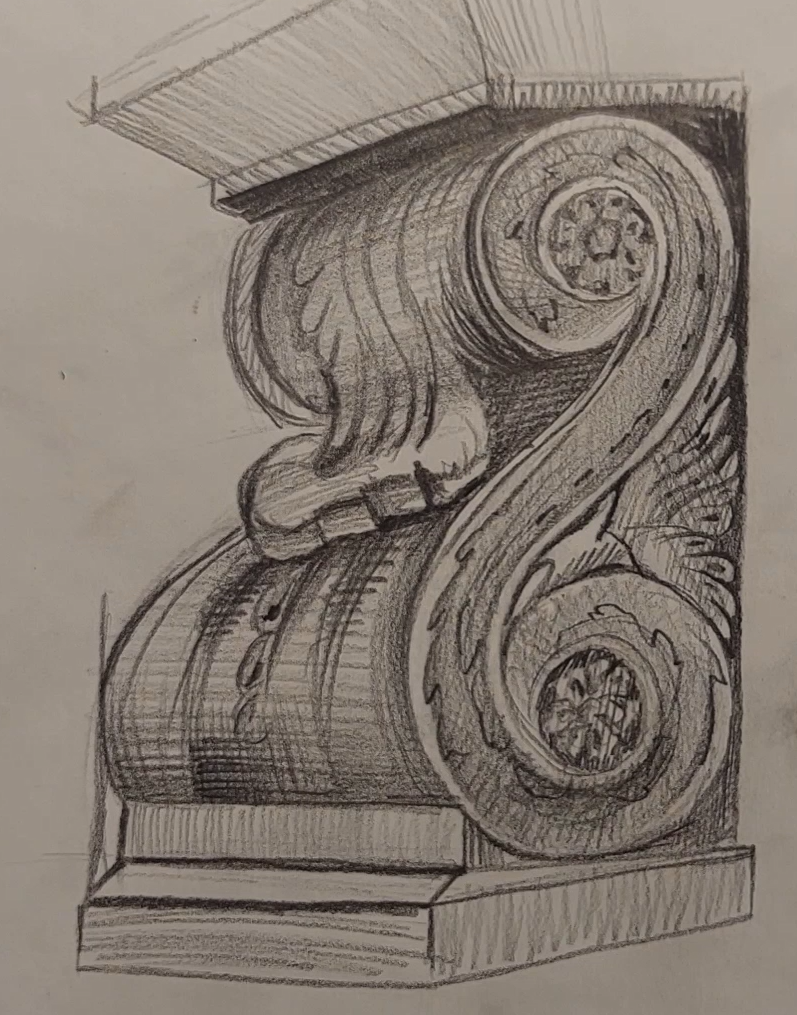
14. Drawing Piece of Molding Using Beyond Perspective Points: Hello again, and welcome to a new episode of Perspective
tutorial with me. Okay. Now in this part, we are going to create
kind of a molding, for example, on a wall on a ceiling or
anywhere in a house. So first of all, I'm going to create a cube. This is the most basic shape, and usually it's easier to work with this. Okay. Okay. And then after I've came
down from the top, again, I create two parallel lines to my top lines with
the same angle. Okay. You see. Over here, I have a twist here, a turn. Means that it comes
inside of here, it just twirls and twists. Again here, it, it comes
down from here, Okay. You can actually create
your twists and twirls and round shapes in any
design that you like. This is my design. You can create a
totally different one that's really on you. Don't worry about
it. It's a corns or molding on the wall. Okay. I've got a shape like this. Now I should bring
it into perspective. We consider it as a
kind of cylinder. So just like a cylinder, I continue and I
create it like this. Then again, on the bottom, I'll do the same
thing. I'll continue. It should come over
here from here. In this area, I've got
a shape like this. This is basically my main line. My twist and turn
would be placed here. You see over here? I just design a
surface like this. On this area, create the exact same shape
until I get to the top. You see? The shapes are
totally symmetrical. Okay. Now, parallel to this side. I create another line like this. I connect these two
lines together, and I come down from here and bringing everything
into perspective. Don't forget about any parts. See, this is a
cores for example, it's on a wall or something. Now let's start working on
the main parts of our work. These were just the
primary steps. Yeah. This would be one
of the main parts. In my twirl and twist. In this round shape. Over here, it will also do
the same thing in the front. I'll do this turn
on the top as well. It has one circle over here. Another one on the bottom. It's like there are holes
in there or something. Maybe they're hollow,
maybe they're not. Haven't decided yet. So I have the exact
same shape over here. I mean, I'm just trying to
create a surface for here. And it would be so easy. Now, for all of these turns, I should use some
details over here. For example, I want to
design it a bit like this. In this part. I have a shape like this, and I add it into my work. These are the designs
I'm having on my urns. And I'll do the exact
same thing for here. Over here, I'll
just continue this. Then with my eraser, I erase this part. Okay. Okay. Now, from here, I go like this. Again, creating more designs
into my corns and wall. I've got to design like that. Okay. Now, in the
middle of my work, I want to also create something. I don't just want
to leave it simple. So I create all of
these shapes here. So, here they are. I just shade this
area like that. Then I also try to work
on the designed areas. Now, with a bit of distance
with a bit of space, I work on these parts and
I'm them or shading them. It's the way I do it. And then all around my
shape all around my ernes. I just create this
shaded or hatched color. I also consider this
designed area on the bottom. It's not simple and it's not. It has some designs, and I'm trying to show them
just to make it, you know. Here we go. And I also shade this area once more in the opposite direction
that I've shaded before. Okay. So I just keep shading. Till I get it. Like that. Okay, then I get my and
then from the sides, I just shade like this. I era the side of the
edge of work, better say. And also, I'll do the
same thing over here. Okay. I also create several
lines in these parts. So I just add a bit of beautiful
shadings into my work. I always makes your work more unique and prettier, of course. Here it goes and we'll continue. All the way. Okay. Now, we do not actually forget about these
middle parts as well. They should be worked on too. We shouldn't just leave them
and only work on some parts. And I'll just do some
designing for here as well. Okay. Here it is. And this front side
should obviously be lighter because it's in the front and it's getting
more light into it. Now, we also consider kind of a shade for
these parts as well. No. It's looking really good. Beautiful, pretty.
It has everything. It has our volume, it has our beauty. It's got everything. Now we can move on to the next, for example, for here
in here actually. With a bit of distance, Okay. From the inner parts. I apply my dark shade
because these parts are really curved
in and obviously, they don't get as much
light as the other parts. That's why these are
going to be darker. And as you can see, we've also got a bump over here, so we also shade it too. It's just getting darker and lighter in some parts
and the other ones. You see? The ones which are more prominent and more in front are lighter and the parts
which are behind other parts or more
in the back or curved in are obviously darker. The hind here is just to control your shades based on your work. Okay. So I should actually
edit this part. And don't worry
to edit your work while you're creating it. As your work moves forward, actually the errors will show
themselves better and more. So you should always edit
your work until the end. Always check your work. Okay. I should just darken the
middle part a bit more. Just to Ted. And here we go. Okay. It goes. So I erase this area
with my to eraser, so I can just give a
separation into that area. Okay. I'm still working here. Shading in different
directions and angles. And it's coming all together. And it was just so easy. You just have to
pay attention to the principles of
perspective, creating, you know, the volumes correctly, the angles and shapes correctly. And the next step is for
you to shape properly. Okay. Now, for the
top part of my work, I start from here, the edge on here. I'm applying some
darkness and I'm dragging it down with actually, I'm dragging these
darkness down, considering the
shape of this area, which is very round. And while I shade, I should keep that in mind, so I shade in the
same direction. I don't want to shade flat in a place that
I know is rounded. It will take away the volume
we were talking about. So don't ever make that mistake. And here it goes. Okay. We also work
on this twist here. This prominent part. Just like that. This area, which is underneath and it's under the
shape is totally dark, so I'm going to shade
it totally dark. It's under and behind. So it will be dark. Here it goes. All right. Everything seems so fine. It's just normal shading on
a very well volumed work. So very easily and
very attractively, we could actually
create some kind of molding and Stuff like that, I also add some more details in order to make my
work even prettier. Again, I insist it was easy. You should just pay attention to the points I've
already told you. Okay. Here it goes. I hope that you've
enjoyed it very well, and I'll see you in
the next tutorials.
 Amelie Braun, Artist & Cartoonist