Transcripts
1. Introduction: Hello my friends. Welcome to the principles of
perspective Design Course. Perspective is an artistic
technique in drawing and painting to induce depth
and space on paper. In fact, it is possible to
draw a three-dimensional image on flat two-dimensional paper with the perspective technique. In perspective
painting, the closer.
2. Introduction of tools and perspective: Hello to all of you, my dear friends and
welcome to one of my new sketching courses. Well, in this course
we are going to work on perspective together. First of all, I should
know demeaning and the conception of a perspective
and how we can create it, and what do we need
in order to do that? Well, for creating
a perspective, you only need a normal pencil
and a ruler and an eraser. We don't need any
other special tools. We can also have your
entity eraser side of it. And obviously normal
eraser would work too. So you don't need
any specific tools. But what is perspective in fact? Well, we are volume
and then we are giving dimensioning two
objects or people with a vanishing point with the help of a
horizontal line. That would be a perspective. So what is the horizontal line? Or on the beach? There is a line
that is separating the sky and see if
obviously have seen that, that is called a
horizontal line. Why is it called that? Because when you stay on the
beach and look at that line, that line is actually on the same level of both of
your eyes and it's completely straight and you are actually the person who is
looking at it would be our viewer point. Okay? So when you are using your horizontal line with the vanishing point or vanishing lines for creating volume or dimension for the
objects are people. That would be perspective. So I have a horizontal
line and this is me or you who is looking on
this horizontal line. Now, let's consider
a cube over here, maybe a tissue box. If I put the tissue box
exactly in front of my eyes, what would I see? I would only see one
surface of this cube. I would not see the top part of it or the lower part of it. The bottom part of it
can be seen either. I only see this. And at the same time that
you're creating this, you can also try it with
an actual tissue box. Now, if I bring it to
the right, I mean, I will keep my tissue box
on my horizontal line, but I'll drag it
more to the right. What would I see this time? Well, I'll see the first surface, obviously, the first side. And then from these two corners, I will go to my viewers
point or my vanishing point. And also from these
other two points, I'll go to the same point. And now this time I
can see two sides or two surface of my cube
or my tissue box. Alright. Now, if I bring this tissue box to the
left, what would happen? Well, again, from the corners
of my rectangle, I would move on to my viewer point or my vanishing
point with two lines. And then again, I would only see two sides of the cube,
two surfaces actually. Ok. Now what would
happen if I bring this tissue box on this
lower area over here, not to derive, not to the left. Only below my viewing point. The viewing point is actually
your eyes, my friends. Now, where would I see again? From the corners,
I would connect some lines to my viewing point. And all of the corners should be connected
to the viewers point. And now, how am I
going to say it? Just like that? I would basically see the
top part of my tissue box. So this would be my cube. Let me get it
completely for you. I would see these surfaces. And these sides. Okay, My dear friends, it might be a
little hard for you to create perspective
at the beginning. But when you get a handle of it, it would be really easy for you. It might look some kind of
geometric shapes for you, but it might seem like geometry. But it would be so fun when
you get a hand of this. I would see the front part
of it and tell part of it and modify bring it
down and to the right. What would I say this time? And my dear friends, if it is hard for you to create these tangles with
only your hands, you should definitely do
them with your ruler. Again, from all the corners. I will connect lines
to the viewers point. Alright? Then again, that
would be the last corner. Then this time, create all surfaces possible
that can be seen. When I get the corner here, it will be connected
to this area, and this would be
my rectangle Q. And this time, I would see
these three surfaces of it. And as you can see, in this way, you can give actual volume and dimension to the things
that you want to create. Let me shade the parts
that are visible for you. The top bar, the left side, and the front side. All these services. So yeah. All of them can be C. Okay. Yeah. I have another cube
on the left side this time. So how am I going to bring it
into perspective this time? Again, just like the times
that we've done it before, it would be completely
the same from all corners of my rectangle, I'll create lines going
to my viewers point, and then I'll connect
these lines together. I come down, I have
a point here and wherever I can connect
it to the other line, that will be the end
of my glass cube. Then I'll make it complete. Then I shaved departs or
surfaces that you can see. I see the right side, the top side, the top surface, and the front side. These are the ones which
are visible for me. Alright. Now let's create
some cubes on top. Imagine that I've brought this tissue box
above my two eyes. I mean, if I raise it
higher than my eyes, how can I say it again? Just like before, I will connect all the corners to
my viewers point. I will create a surface here. I will connect these
lines together. And then I connect
these two parts again together. This time. This would be my
rectangular cube here. I can see the front part of my cue and the bottom side of my cube, the bottom surface. Alright. Now we're going to work on a cube which is above our eyes. But it's placed on the right. So I would come to
the reorder point. Also here. Then again, I'll make
it look like this. When I've created some
points over here, I'll bring it to this
pi, to this side. Actually the connection point of these two lines would be the end of my cube. Okay? Now I see three surfaces
and three sides. On the left, on the bottom, and in the front. Can clearly see them. And less cube would
be the left cube, which is above my eyes again. And again, I go back to the
viewers point like that. And then I come down
just like this. Here we go. This would be my rectangle cube. The procedure is the same for all the cubes that
we've created here. Just you should be
careful that, you know, the surfaces that you'd see should be compatible
to their positions. For this, I see the right
side, the bottom side, and the front side show rid only a horizontal line
and one viewing point. I've taught you that
how you can create objects in nine positions
and nine different sites. Now, the point here is that
to make these into chairs, how would I be able to do that? Okay, My dear friends, imagine that I am
going to create those cubes and I'm going to transfer them
basically into chairs. So I want to create
some legs for my chair. I would do the same
thing for my legs. I will actually connect
the bottom of my legs to my viewers points so I would know how much I should
continue them down. First of all, here, I'll create a horizontal line. Then again from here, I'll bring it to
my mirrors point. And this part on the
bottom of my cube, which would be the back leg, would come up to here. So these are the four
legs for my chair. Then I would have the
back of my chair, which I would create like that. Now, if it wants to go
into my viewers point, it should come down and
actually it should come up and face these lines,
connect these lines. This would be the
back of my chair, which I can continue. And again, I can match it with
my viewers point of view. So this would be the chair. See. You can actually create
all objects and also some peoples and
everything in perspective. Well, the next cube I'm going to transfer and
turn into a chair, is this one on the top-left? First of all, I'm going
to create legs for it.
3. Continue the basics of perspective and paper perspective: Okay, I will place
the legs like this. Then I will create the lines coming from
the viewers point until I hit the legs. I'll create all four legs. And these are the
ones that you are looking at them from below. I mean, they are above your
head and above your eyes. This time, you cannot see the
sitting area of our chair here because we can now see
the top surface of our chair. We can only see the back part. Also not that complete. We can see only a part of it. So I'll bring it up. Then. I'll create, actually I create my veers lines just to
make sure of its position. This would be the
back of my seat. Of these horizontal
lines should go and match to your viewers point. If you only consider this rule, you can work on
perspective so easily. So that's it. These two were actually
the hardest positions. The rest of them would
be easier for you. I would also create
this one for you. So there would be three of them. And as I told you, we do not have any vertical
lines in our perspectives. I'll have back of the seat here exactly like drawRectangle
that we've created at first. And also the legs would be created without going
into perspective. Because it's exactly
below our eyes. See. This is actually the
seed from a front view. Okay? Up to here you've
learned something from perspective and little
thing from perspective. But the perspective world is
a lot more bigger than this. We're going to continue. Okay, moving on. In here. I'm actually going to teach you another way how you can
create a perspective. Now what happens if our
shape is not a cube? Imagine that I want to
create a piece of paper, but I want to create
it in perspective. Imagine that I have
a piece of paper or wrinkled and in
shaped like this. How am I going to put
it in perspective? First of all, I'm
going to create a viewer's point and
it can be anywhere, doesn't matter. I put it here. Okay. Then I come from the outer part possible
of these shapes, of these twists and turns. And I match it to my
viewers point again. From the outer parts of
these turns and twists, I go and connect some
lines to my viewers point. I'll do the same all over here. Then again from all
the outer parts. I'll do the same. Okay? Now
what I'm gonna do this time, I want to create a
thickness for my paper. Imaginative hits
two centimeters. I will bring it down to here, and I will create the
same shape over here. Then again, I'll come up to
centimeters, up to here. And I apply this same
exact shape in this area. This will actually create a
dimension for my paper. Okay? This is actually two
centimeters over here. Again, I will create the
same shape over here. And the last one would be here. I will consider two centimeters. We'd go here. And from here, I will connect
it to this point. Okay? Now it's time for me to erase all the extra lines
from my work. Just like that. Alright. Now we actually have a twist, sudden turn piece
of paper came down, came in, and so on. Okay. Now we might even
create another one. I want to create this type of
paper or a piece of paper, again in perspective just
to make you practice on it. Again, I put my viewers point. This time, I put
it on this side. Then again from the outer
parts of each turn, we'll go into perspective and
I'll connect some lines to my viewers point. Alright. Now, I would consider the thickness of my
paper or this much, this much of actually this length that I've considered here would be the
three centimeters. So I would also consider
this area three centimeters. And then I'll do the same
exact thing on this. Then I'll erase all the
extra lines from my work. Alright. Yet again, I have another
turned and twisted paper. And we could have
created with the help of perspective. Just like that. We're gonna do it one more time. My dear friends, you should be really actually working on it because creating these
types of papers will actually make your mind more
conflicted with perspective. And as much as you
make your mind being engaged with your
practice on perspective, you can do it better and better. This kind of perspective is one of the best
types in order for you to practice harder shapes and more complex shapes here. Okay. So yet again, from all the outer parts
of our outer turns, the outer parts, sorry, the outermost parts
of our turns. We will connect lies
to our viewers point. And you do not have to actually create some of
this slide curves. You just have to work
on the big curves. The big turns and twists. This time I will consider
four centimeters for it. I mean, I'm actually working
on it but my eye because I worked on it too
much that my hand is actually working
like a ruler. So I wouldn't know how
much is four centimeters. But when you are doing good, when you want to practice it, especially in the beginning, you should definitely
do it with the ruler. Because if you get these measurements wrong
even a little bit, your perspective
can really go wrong and it would not be
a very good shape. Okay? And you see when
you have this curve, you should do it exactly the
same way on the lower area. Don't do it the opposite way. Be careful. For example, here
I made a mistake. I made it opposite, but I've corrected it. It should go up and down again, exactly the same shape
that I can see in front. It should have all these ups
and downs on both sides. Hello? Again. From here. I will get four centimeters out. And I don't the same exact
same thing over here. And from here again, I'll get four centimeters. And this would be the
end of this shape. Exactly. I'll go like the opera shape to front chip eggs
basically for here. Alright. Now how can we get to four
centimeters over here? We will get an, almost an imaginary line
toward the viewers point. We'll get four centimeters. And from here we will, I'm sorry, I forgot this area. I'll come down four
centimeters up to here. I'll create the same shape, which has actually gone behind it and we can
not see it anymore. That's the beauty of it. Then from here again, like this upper area, I got four centimeters
down and I've created the exact same shape over here. See how easy was that? Now I'm going to erase all these extra
lines from my work. So I would have a clean outcome. And you can see how it actually
is going to turn out. C. Again, this is a turn into a separate piece
of paper that V could have been able to create with the help
of perspective.
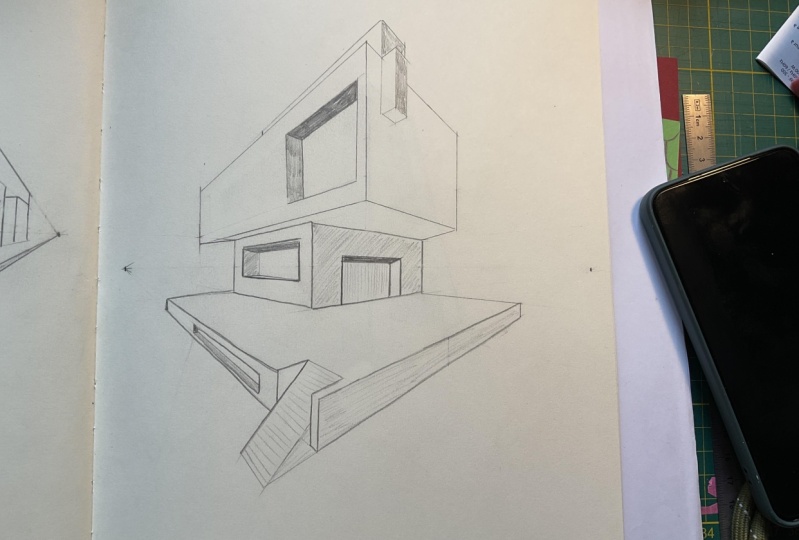
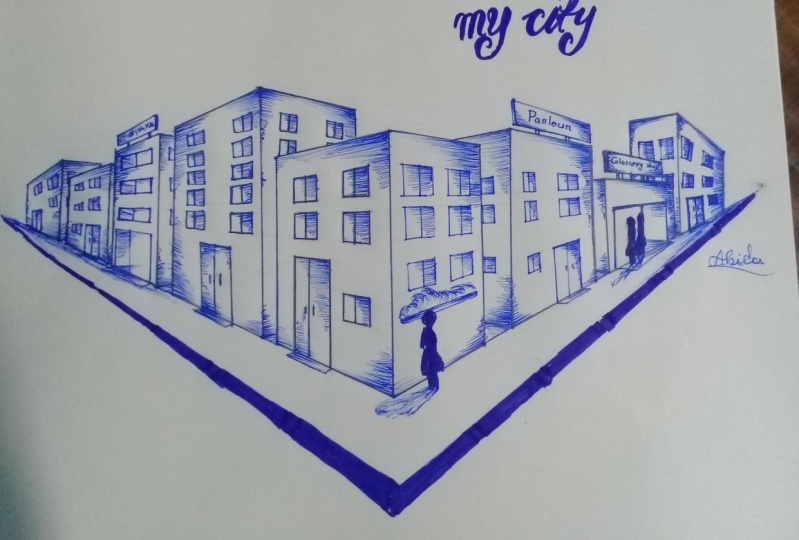
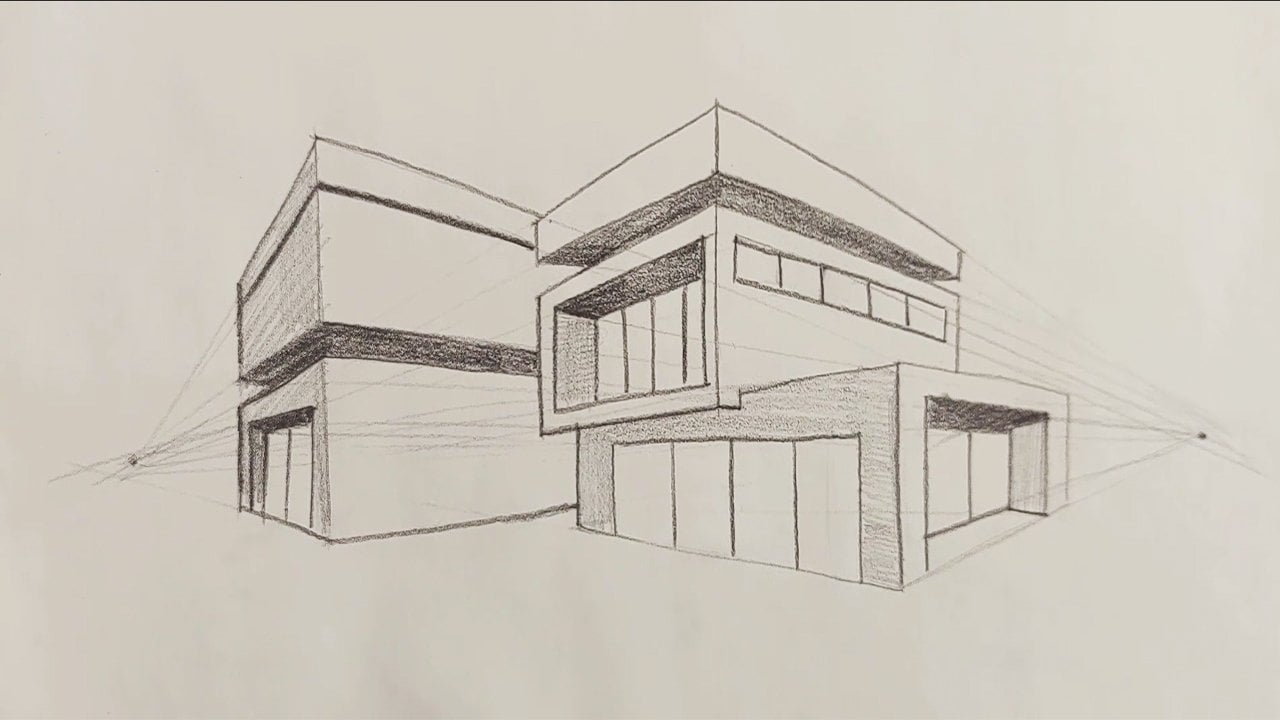
4. One-point perspective: drawing the street: Hello my dear friends. Welcome to another episode
of my perspective, of course, well,
in this episode, I'm going to teach you
how you can create a city with a
one-point perspective. It's really easy. First of all, I'll be creating my viewer point or
my vanishing point. And my paper. Then I'll create a line
as my horizontal line. Obviously. Then these two lines
which I'm creating coming down are deadlines for
the sides of the street. See, the first building that I'm going to create would be here. Exactly in this place. I come here, I come up, I'll create the first side
of the rectangle cube. Then I connect it to
my viewers point, to my v point. I'm going to call it
that from now on. And then on the corner, I will also get it
connected to the V point. This is the first building. I wanted to create.
The second building taller than this one. I'll come a little bit
higher, obviously. I'll connect it to my viewpoint. And then I come down. And the front side of
it would go actually like this straight line. It doesn't actually
unrelated to my viewpoint. It's not related to my viewpoint because
it's in the front. And then I connect
this corner to the viewpoint in order
to create the roof. I wanted to create
the next one shorter. I'll connect it from
here to my viewpoint. I'll come down. Alright, and then I bring it in. You see how easily like
that you could have created three houses
right next to each other. And you can just keep it going. I mean, you can
continue the same way. For example, here I want to
have a tall apartment here. Doesn't matter. Wherever
you are going to create damages have to connect some of your corners
to your viewpoint. Therefore, you can
create your building with a dimension and
do not forget to erase the extra lines of yours because they
might get a bit confused when they
actually be a lot. And again, I'm going to consider
a taller building here. I'll connect it to my viewpoint. That will be extra. So I erased it. And
then I come down, you see these measurements
depend totally on you. It's totally your
choice because this is your city you can create with any measurement that you like. And it's the same on
this side as well. Obviously, I'll create
this front side which is always visible for us. And then again
from this corners, I'm going to go to my viewers
point, to my viewpoint. I'm, again, I'm insisting and I'm emphasizing
on the point that I'm creating it only by my
hand because I've done it a lot more times, but you are going
to practice it. You should definitely create
all these vanishing lines which are going toward your
viewpoints with a ruler. Now I can also create some
distance between my buildings. I don't have to create them
right next to each other. So I will create the roof connecting these
two corners to my viewpoint. Again, I emphasize
if you're going to create these lines from the
coroner's to the viewpoint. You'd have to create them with your ruler in order to
get them correctly. Okay. Then I would also have to say these lines that
you create from the coroner's toward the viewpoint, it should be very, very lightly. I'm creating them a
little bit darker in order for you to see it. I mean, I want it to be
visible for you in the video. You can see it clearly, but when you are
doing for your own, you don't have to
make them too dark, you just have to actually
create them too lightly. So when your work is finished, you can easily erase them and
they would leave no trace. This time. This building did, I've created the top of it is actually on the same level
on our horizontal line. Therefore, the roof
of it is not visible. So we will only have
two signs of it. Again, from here, I'll connect
these two parts together. Okay? Yet again, I'll erase all the extra lines so it
would be clear for you. Okay, That's it. We could actually create
beautiful buildings for a city. Now if I want to create some
windows for this billings, what am I going to do? I'm I going to just create them. Know, obviously I'm
not going to do it. Again. I would have to create some lines from the
viewpoint to the buildings. And all these horizontal lines should go to the viewpoint. You see. Based on this line that has
come from my viewpoint, I can create a door. Here, I can create windows. See so easily. You just have to
follow the lines and make sure that they're
in the right position. You might actually have
this question that why would we need
perspective in our work? When you are working on 3D sketches or when you're
studying architecture, it's very important for you to work in perspective
and to learn perspective. Or even if you are going to be a very professional
sketcher in the future, you would have to learn how
to work in perspective. You can even bring a human
face in perspective. It would be really, really useful for you. Again, I say, basically it's
the way that you can give volumes to your shapes
and make them 3D. Which is very important
when you want to create advanced and
professional sketching. It's not hard at all. It's very, very easy. You just have to be a little bit careful and pay
attention to that. Now, if you want to create
some lines inside of your streets as the
separating lanes actually are not going
to just create them. From here. You will create lines going
to the bottom of the street. And then just like that, you see, I'm connecting
these two lines together. And then as we move further, these lines would look
smaller and shorter. Then I would erase the
lines in between them here I have some straight
lines in my street. I would also have
to grade a son for you over here, just for fun. You see so easily you can create beautiful cities with a
simple one-point perspective. You just have to be
creative and pay attention.
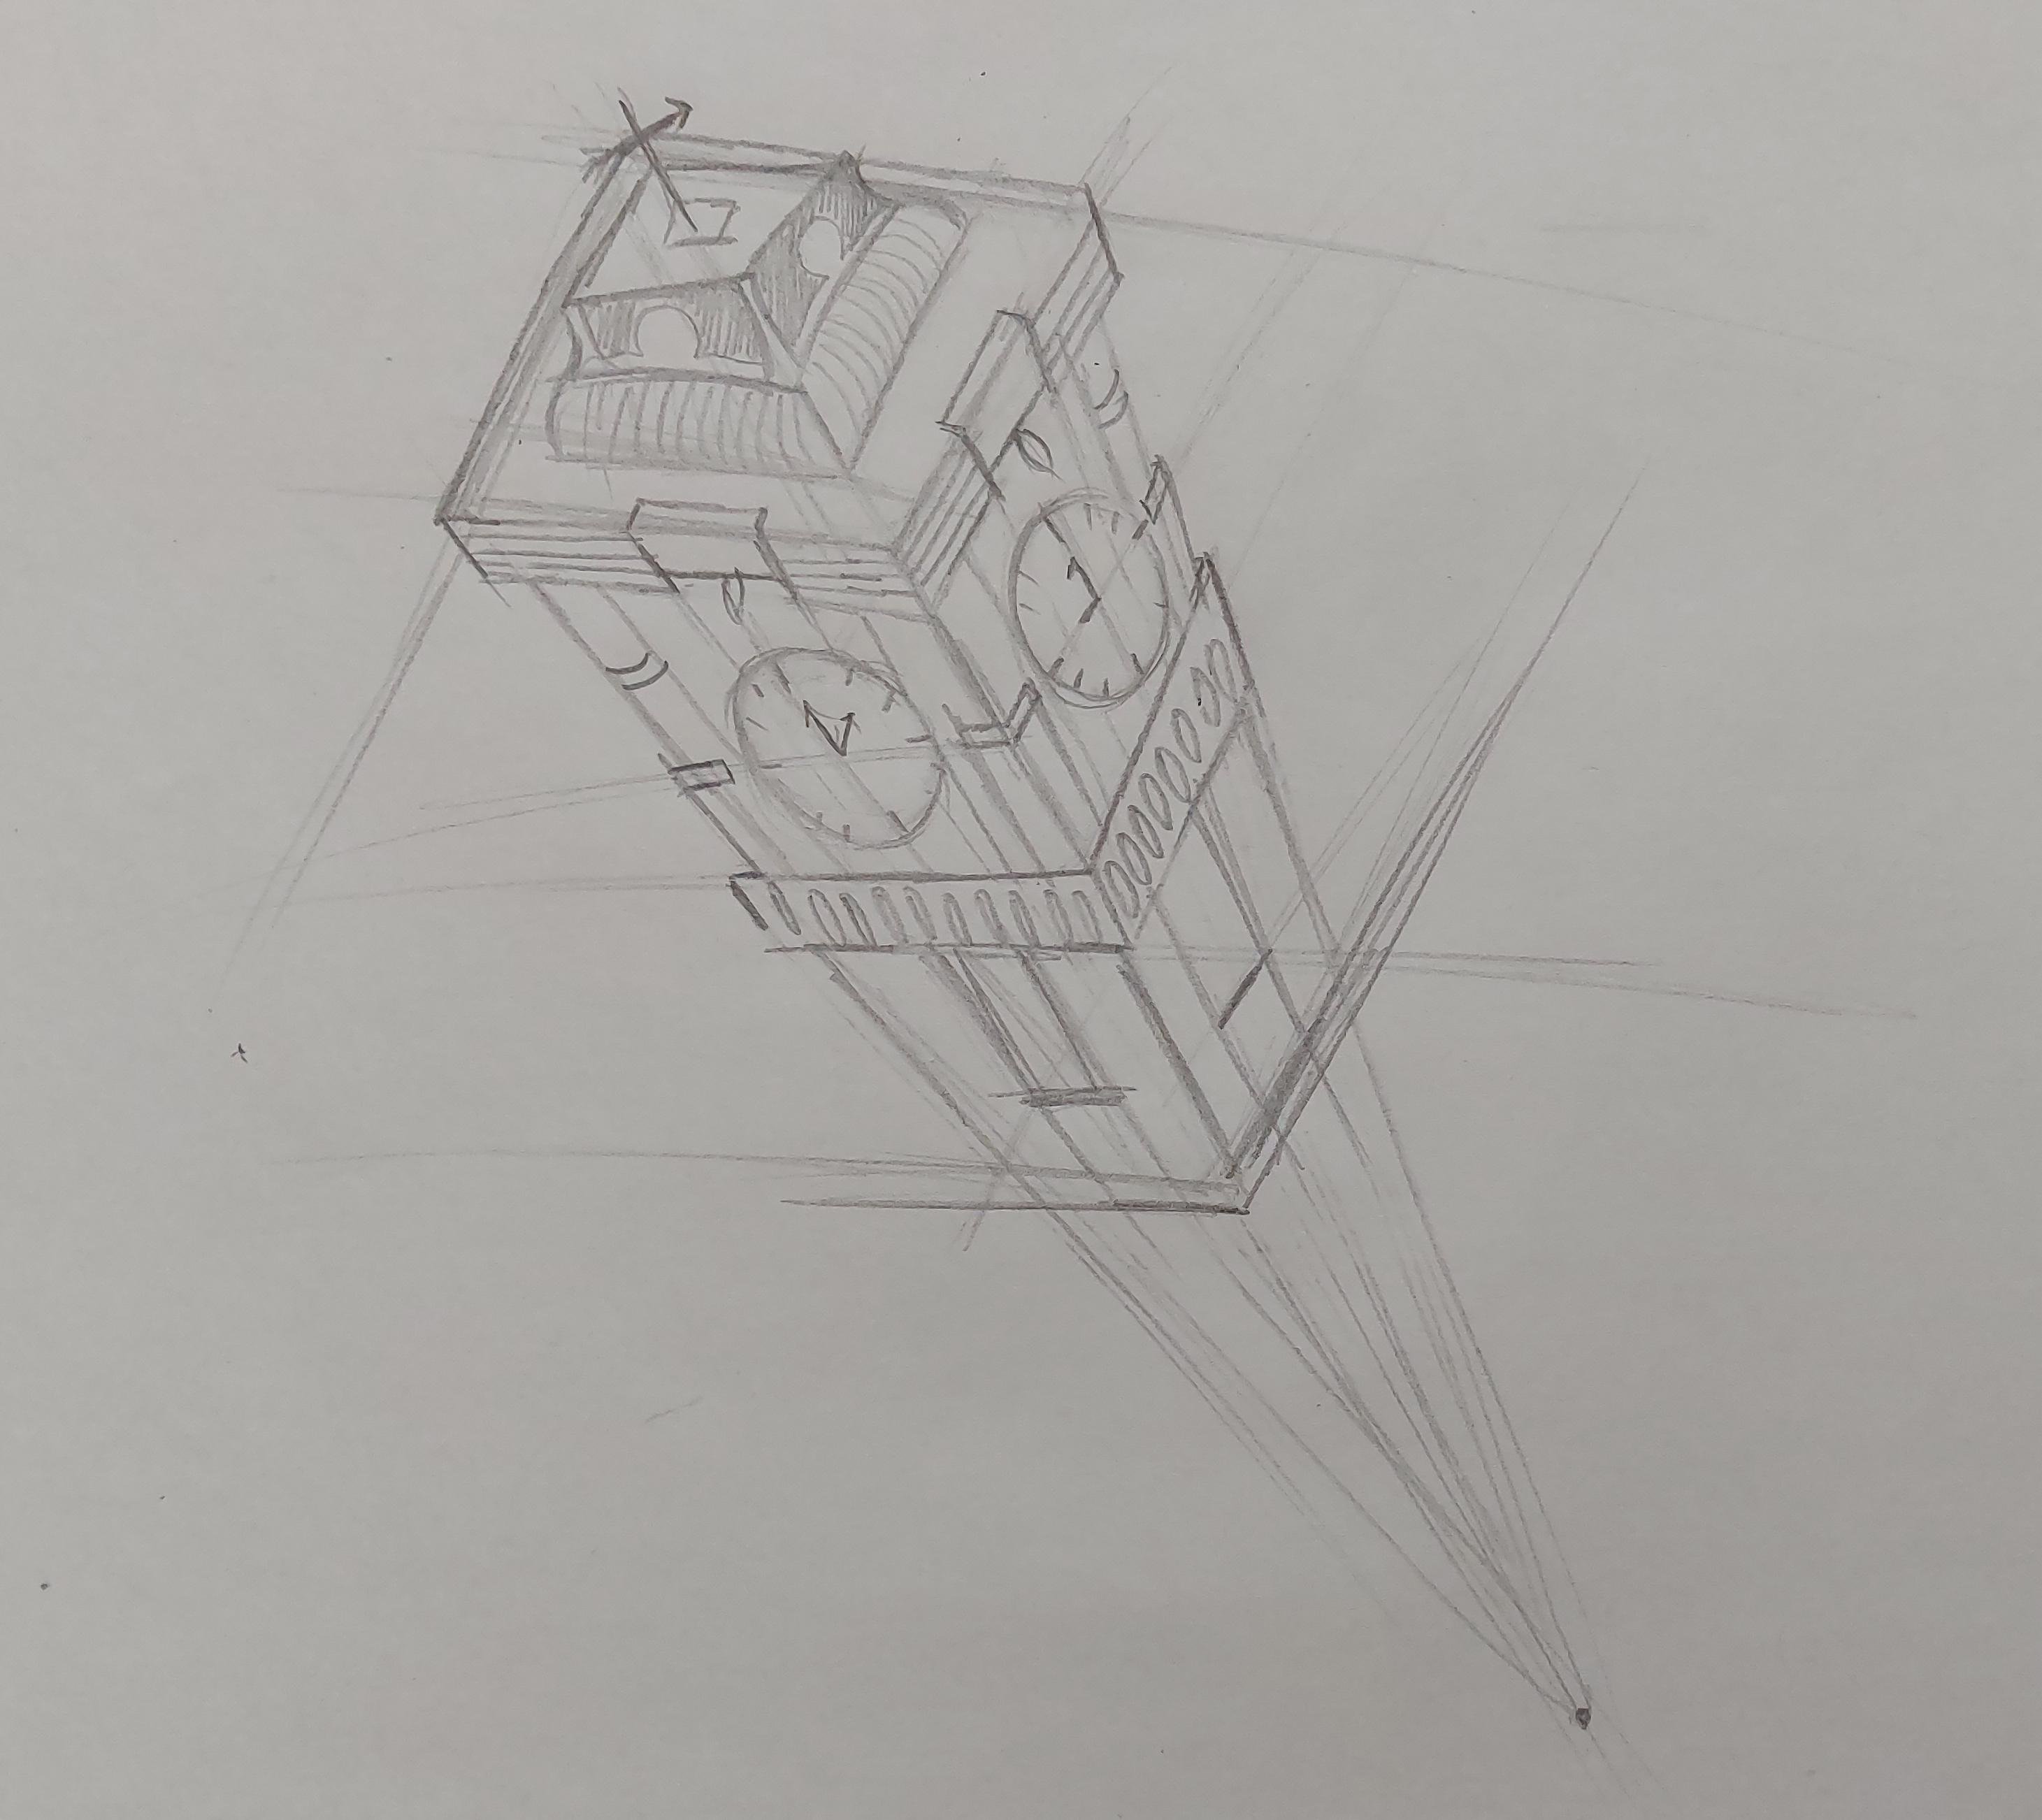
5. One-point perspective: drawing the tower: Hello again and welcome
back to another one of my episodes of
perspective course. In this episode, with
the help of perspective, I'm going to teach
you how you can create a tower or a skyscraper. In perspective, whatever
we want to create in it, and we want to create it in
a three-dimensional way. We should create it in
simple geometrical shapes. First, I have a tower, which looks like a rectangle Q, as in geometrical shapes. First, I will create
my viewers point. And then from that, I'm going to create
two or three lines. As you can see. Now I want to create, it's cute. I would be starting from here. Just like that. I'll create another one for
the corner of this cube. Connect this line to
this corner as well. From here. I'm going to create a
parallel line to this one. And also this line should
be parallel to this one. Just like this. I'll actually get
this top square for the top of my tower. Then from here again, I'll come down, from
here, down again. And then parallel to this, I'll create another
line moving here. This is the top of
our tower up to now. Now what if I want to create
some details to this tower? Imagine that over here my tower is coming
toward outside L itself. So I'll come out of it. Lll. I'll go, I move a
little bit above. And then also from here, I'll bring it out again. See again parallel
to its above line. I'll come to this way
and also from this side. And then from here, from this middle
area, I'll come down. Actually, I'll go to
my viewers point. And now what should I do? Again, parallel to this line. Also from here, I will
create two other lines going toward my viewers
point and create two small lines parallel
to the sidelines. And then I can connect all
these points together. All these points and the lines. Just as easy as that. I am actually creating
details on the tower. Let me erase the
extra lines so you would actually get to
see the actual tower. Because this part is
seen on the top and this part is in below, should come up a little. Again. This part should go
higher because I want to show that these parts
are not at the same level. And then I'll erase
this lower line. So I can emphasize that it's actually looking
like a rook as well. And it can also be useful for people who are
working in architecture. And this part of designing and drawing would be
very useful to them. Now, this is the
top of our tower. And over here, I want to
create maybe another detail. Just remember that whatever
you are going to do, you should bring all of your points and lines
in your perspective. Inside of the top of my tower, I'll create another
square or cube, a cube. And then I will create these
parts with round edges. See, instead of
going sharp eye and creating a complete cube, I'm going to go around on some corners and make
it look like this. Also I create, I can create
another cube over here. And at the end, I will create anything, something which is
on top of my tower. Alright. Again,
as I said before, you can add as many details
as you want for your tower. I can even make some
designs for it. I mean, I can create
some decorations. Okay. And you can create
whatever goes and crosses your mind as long as it looks cohesive to
your tower, of course. We don't wanna go too wide. Okay. I would also want to create three
lines over here in order to add more design and
more decorations to it to make it prettier and
obvious, the more different. My dears, this line
should be raised. Okay, then from here I can
create three more lines. Just as easy as that. I've decorated my tower and
made some designs on it. Now, let me bring down
this, these lines. I will take them down
toward my viewers point. I'll do the same from here. Okay? Now, in this area, I want to have a clock. So I'll create a circle over here as the
shape of my clock. The watch tower, maybe. Then another one over here. I want to have clocks, maybe even on four sides of it, but we can only see
two sites of them. But just be careful. Because this goes
into perspective. It doesn't look like
a complete circle. It's actually a little bit
toward an oval as well. Then I'll erase it. And then even then I want to create the hands of the clock. I would have to
bring one line from the center of my clock down
toward my viewers point. So my lines with Lucas
trait in the perspective. Then I'll create the rest of
the numbers as you can see. And then I can even
create my clocks hands. It gets really easy actually. Okay. Now, here I want to create a shape like
this for my tower. And again, my dear friend, it goes into perspective. And also from here, just like that, it goes
into another perspective. First, I'll be adding this line and then I'll create something
like that over here. Now. Be creating another space
and other shape over here, coming out a little
outside of my cube. And then I bring it down
toward my viewers point. And obviously I'll do the
same from this side as well. I want my tower to
be symmetrical. What I'm going to do from here I'll come to this
part and from here, I'd be moving this way. Okay? Now, again, I can see these two parts going
toward my viewers point, parallel to above, actually parallel to it's
above the line. Dad. I can also have some
English writings over here or any
specific designs that you want to make. Okay. Here we go. That's it. Let me erase
this completely there. So you can easily understand how these
parts are going to work. Until it looks
part of our tower, we just going to
continue like this. Mean you should bring
all of your designs, all of your shapes, all of your decorations
into perspective. And then you can create
that part by part. Whatever we want to create. It doesn't matter if it's even
a circle, its clock hands. It's any design that
you want to create, you should bring it
into perspective. Drag lines from that design, from data point to
your viewers point. And then you can have
everything you want, every designs on
decorations on your tower. And all of them would look
great and realistic and three-dimensional
because they would all go into perspective. I might also want to create, for example, doors over here. It doesn't matter. Whatever, it should go into perspective. That's it. This is a tower in perspective.
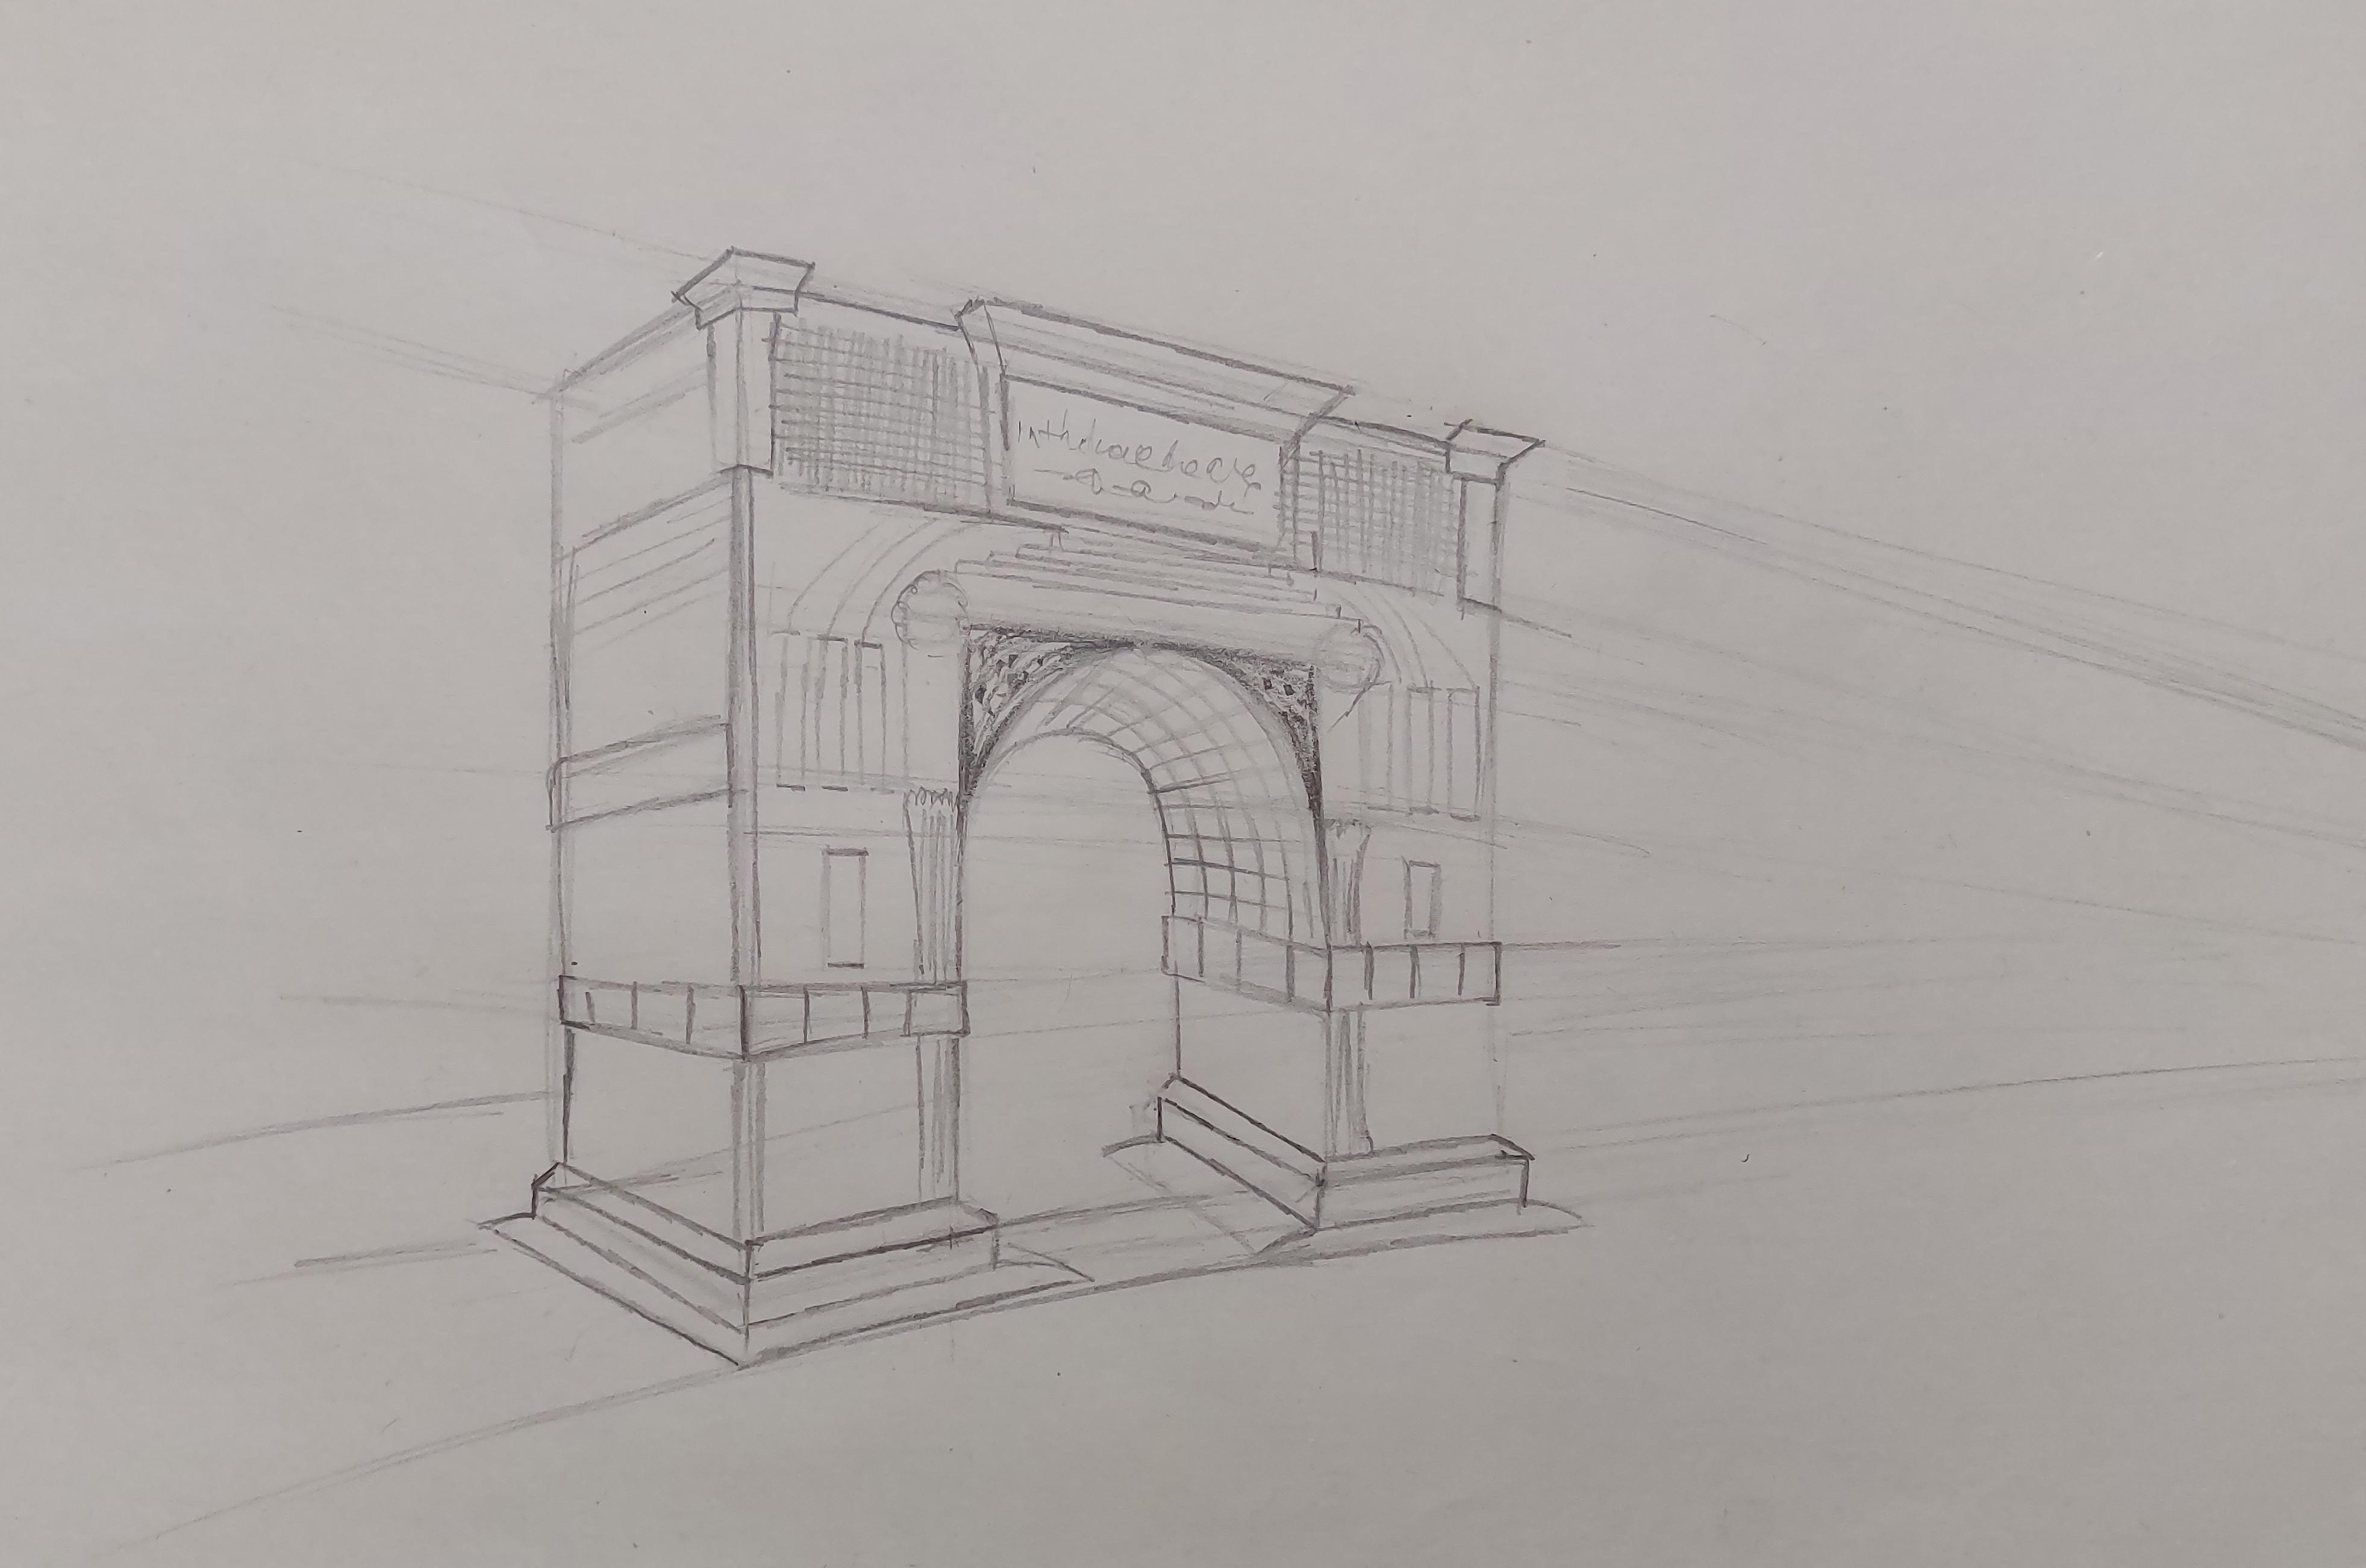
6. Perspective with a distant observer point: Hello and welcome to another one of our perspective courses. Well, in this episode, I want to tell you how you can create a construction like this. You can do it very simply. For the beginning of that first, I would have to create this as a simple geometrical shape, which in this case
looks like a cube. It would look like a cube, which has a viewer's
point in a far, far away. Well, first, I'll
create my cube. Then I can create the
rest of the work. Well, the viewers point
is from far, far away. Therefore, I can only create two vanishing lines which are coming from the viewers
point to my construction. So actually these two lines
are my guidelines to know where my viewers point
would probably be. First of all, I will
create this cube. And from both these lines, I would come down. I will actually bring
these two lines down. And then again, from
here I go back. And also from the top, I'm creating simply I'm creating
a queue in perspective. Then again, I bring
this, these points, these areas toward
my vanishing point or my viewers point, basically. Then I'll connect these
two parts together. So this is basically my cube. And this is a general shape
for my construction here. Now, I want to have it's
opening and its door. And if you pay attention, It's actually exactly in
the middle of my work. This is the medulla, my work. And from here I would come up. And also from this side. Then again on the top. Then I want to connect
these two parts together. I would have to
connect the lines with a line going toward the viewpoint or the
viewpoint more simply. So here we go. This is the center of my work
and a medulla of my door. So if I want to create it round, I will go down like this. Because as you can see
on the top of the door, we have an arc, which
I've created like that. Now, if I want to have
the ending part of why, actually, I mean,
on the other side of my cube, what would I do? This is the other
side of my cube. Yeah, so I will
continue it this way. And parallel to that, I'll create this until
it hits the line. This would be the other side of the door of the arc, basically. That will be round over here. Then let me just erase
these extra lines so your work would be cleaner and you'll just
understand it better. So just like that, I've got a general shape
for this construction. You can easily do that in
some historical places. Even your city hall, wherever you have
any buildings are constructions with
a different design or even with a simple one. You can just take your
sketchbook there and start doing it in perspective
from your point of view. Okay. I've created the
general shape now. I want to create its
details and designs. All the parts that I have
to create is the same. I mean, the process is the same wherever I want to
create anything extra, I would have to create
it in my perspective. So it means that I would have to drag lines toward
my viewpoint. And then I can come back
and complete the shapes. So now I'm just creating whatever I can see
in my picture. You see when we drag this up, it should be parallel to this. Most of our lines, basically, all of our lines
except the rail lines. Even the wrong way, sorry, to all of our lines should be parallel to another
line above them, below there or next to them. So I would want to have something like
that over here as well. First of all, create
this just like that. Move up. And then I'll
complete this area. Okay? Also from here, I would have to go and connect these
two parts together. You see how easily we
just several lines and the help of perspective. We could create some designs and some details for
our construction. Sorry, I got out of
the line over here. It's better to be
parallel to this one and on the same level to this one. Okay. And then for here, it would look like this. Sorry, My dear friends. This area look like this, but I'd have to make
it more organized. I'll have to erase
these extra lines. Then. I can make it like this. Okay. I'm just creating all
these lines with my hand. But when you want to do it, basically you should use rulers, especially if you are doing
it for the first time or it's the beginning of your
work and you're a beginner. So all of your lines would be completely thorough and
they would be exact. So your work would look
as good as this one. I mean, if you're a beginner, you would have to
create a straight line is where do your ruler. Again. Well, we had here will actually
happen over here as well. It would go this way. This would be the bottom of our construction and I will create it with the
help of my perspective. Here it is. Now, I'm going to work on some these upper
parts per areas. I would have to have a shape like this as
separation like this because in here we have another detail and another
design on my construction. I'll bring it into perspective
after I've created a small line like this on
the corner, on the edge. And again also on
the other side, it goes into
perspective as well. And then I will make
it part by part. Actually, I will separate
it and divided into several parts to look like bricks or maybe a stone hedges. I would also get a little
bit out of the way. I'll bring it a little bit
out of my whole construction. So it would look more 3D. It would look better. Also on this side, it would come out of my car. Come out of my cube
a little, I'm sorry. And then from here, parallel to that, it goes up. Because on this side, again, it should go into
its own perspective. Again, I emphasize
please, please do it. Precisely with a ruler if
you're going to practice on it. So all of them would be
on the same level here. Okay? I can even create some
columns over here. And I don't want it
to be too complex. And I don't want
you to be confused. I wanted to be in a
simple way that all of you can create it and all of you would be able to create it. So I create a line for
the top of my column. I continue it up to
this side so I can know where this column
on this side should be. Again, I'm saying that I'll
create it very simple. So you can do it the same way. And you won't be
confused because basically it's a
complex construction if you look at the picture, but we are creating
it more simple. And over here, I'm
going to create a beautiful design
for the top of the arc and for above
the door. Alright. Each one of these lines
goes into perspective. So be careful if I'm just creating them all
at once by now. It's because I want to save some time for you
and show you more. But when you want to do it, make sure that
each line would go into perspective before
you finalize it. Then I get my B6 pencil and I will create
some shadings and some designs over here for
you with a darker color. Just as you can see. Alright. Now I'm going to create several lines inside
of the arc like that. You see, I'm just creating
the lines like this. And then I pay attention
that as I move up, the direction of my lines
should change because it's an arc and it's shaped
around and curved area. Yet again, I will
also have to create several more lines
vertically like that. Again, curved lines,
they would be from the inner parts. We should have more darkness. And as they come forward, it would be lighter. Again. I would not make it too complex for you or
too busy for you. So you would understand
it better and you can create it simpler to be
easier for you to create. Again, It's gone into
perspective and over here, we will also have a tablet. I mean, over here I can have
a tablet with some writing on it and would also
make a framework for it. Again, with my lines
going into perspective. Remember that in all
steps of your work. Then I'll come out, bring them out actually. And I'll shape this
area just like that. Do you see a beautiful
doorway to fill an arc and a beautiful everything
and construction overall.
7. Continued perspective with distant observer point: Okay. I'm going to divide this
area just like that. So I can get a view like this. As you can see, all my
lines are parallel. And then like that, again, I'll create these vertical
lines parallel together. It can happen in
this part as well, but I don't want to create it. Again in here. It would go like this. Here we go. Now, I'll be erasing all
of these extra lines here. Okay? As you can see, it would go like this. So I'd be erasing all
of these extra lines. So my work would actually
look better and cleaner. Here we go. Then I'll be applying
several lines in order to create some design
and shape on this area. And then you, based
on your taste, you can work on here. That's optional. Actually. Here we go. And in here, whatever
we want to do, we will have to do it parallel
to this area above it. Whatever shape we're
going to create. We would have to do it
parallel to the above, to the top areas. You know. For example, here I'll
create a shape like this. It cannot be seen
from this side. As you can see. Here, I will put a small window. It's almost like a window. It's actually hollow. Then I will divide this
area into three parts. And as you can see, all of them are getting into perspective and I'll
be creating all of them with the help of lines
going back to my viewpoint. But because I'm just, I just want to save time for you and I actually go
to handle of this. I'm just creating them faster without doing
them one by one, without connecting
them one by one. But when you want to do it, you make sure that you connect them to your
viewpoint one-by-one, or anything that
you want to add. You can do. I hope
you've enjoyed.
8. Drawing a train with one point perspective: Hello To love my
dearest friends. Welcome to another one of our
sketching course episodes. Well, this time I'm going
to tell you how you can create something like a train or some way with the help of
a one-point perspective. Obviously as usual,
I need a viewpoint. And then again, I'll
create a straight line. In order to confirm the
placement of my perspective. This is basically
my railway line. So this is my railway line. Okay. Now, with some distance, just like that, it would be
the other side of my railway. Well, I've actually erase
my viewpoint because I want the ending of the
array well to be to a point that is not
really determined here. Now, this ray way, I'm going to create
a rectangle cube. For example. This would be different part
of our software or train. So I'll create it
just like that. Then I move it
toward my v point. Okay? Now we are going to
create the train itself. If I want to create
a train well, this front part of the
train, I'm sorry, outweigh. It can also be trained, but now I've decided
to create a subway. Then I bring down, It's actually
windshield like that. It would be the front
part of the software. If you've paid attention, it will come out of the
cabin a little bit further. And then I will have a
shape like this over here. The upper part would
be the windshield. And I would also have
this lower part. And then over here it will
connect to the railway. Alright. Now, different part of
my subway would go back a little and then I'll connect it to this
other line over here. And it would go up a
little bit, almost up. And then again from here, it goes to the V point. Just like that has usual as we always did
in the perspective, everything should go
through dew-point. Pay attention to that
and be careful about it. Then these parts
are for the wheels. Actually there would be
this outweighs wheels. So I would apply
them on my railway. And they are actually
moving on the railway. Now I'm just going to go over
my main lines once more. So you would
completely understand which lines are main for us
and which lines are not, and you can erase them. So we're only keeping the
main allies in order to keep the general shape of our Salt way and then you
can erase the rest of them. This would be the front
part of our soft way. I'll have a darkness over here, which I've shaded in here. This might be the door
of the first cabin and also a small window
like that could be placed parallel to this
lower line of my cube. I will divide this area. So I can have a
windshield basically up over here because I needed for the front
part of my salt way. You see, it's almost look like how we've created those pieces
of paper in perspective, if you can remember, I've created this Wind, show a windshield, this window, exactly as I did. Those pieces of papers
in different shapes. Okay. After creating this, I will actually erase the extra lines so you can see it better and it would be
more clear for you. So here we go. These were the windshields, the windows in front
of the soft way. These bars, there
could be some vents, some air conditioning,
some fans, whatever. I don't actually know. I'm just creating some
details over here. And they can be some. I would want to create the
rest of my subway because the rest is as important
as the front part. We have some kind of these
shapes on this outweigh on the top of it that it
actually provides its power. And from here, it
goes on, it moves on. Alright? For example, again, over here, I will divide this area. And then yet again from here, it comes down straight and
it will connect over here. So this is our first cabin. Then a little bit further. That will be our second cabin. See, just like that. Again, over here, I would have the placement
of the wheels, which I will darken over here. Then with another
amount of distance, I would have the
other placement of the wheels of the cabin would definitely
have some windows. So I'll bring it
into perspective. And I placed the Windows
based on the perspective. And as it goes further, day would be smaller obviously. Are over here. We can have, for example, an exit door that again, just like Windows, I've brought it into perspective and
then I've created it. Or for example, here, we might have another
shave another door. I mean, I'm not really expert on the details of assault
way or a train, but just consider
that they might have a doors or windows like that. This line should not exist here. So again, I'd be erasing all these extra
lines from my work. So first of all, you won't be confused and
you can see it better. And then second of all, my outgo would look actually
cleaner and better. I don't want a messy outcome that doesn't look good at all. So I'd have to
erase all of them. Just like that. Here we go. And you know that how is
the shape of a railway, as you can see, it's divided into several parts. I'm creating these lines in order to show the
shape of the railway, even underneath the wheels. Because the shape out, I think it should be shown even from
underneath our subway. These parts, she'd be like hyphens and it shouldn't
be one straight line. And it would look like that. Very easy. You just have to
bring everything into perspective and
create your shape, your general sketch
part by part. We can also have
another line like this. I can actually continue this
line toward my v point. In order to create some
designs on my salt way. Again, it can have another one and another
line in the middle. In comes down from here. Or for example here, I can create several electrical columns. These are actually
the power generators for our salt ways. These will actually generate
and support the power for our celt way from above it. And as I told you before, they are connected to
these lines that I've already created on the
top of the salt way. The end of our work is not actually going to be
complete because it goes further away and it's not going to be created
from a point moron. It's just the fact
that you know how you can create the dimension of it and how you can create all sides of it and details
and general shapes of it. We're not going to create
it very specifically here in so much details. I was just going to
tell you how you can create assault way a train or even a bus or anything
that is shaped like this in perspective,
very simply. So now you know how to create this general shape easily
and even some details. So whatever else
you are going to add to your salt way,
it's your choice. You can add as many
details as you want, as long as you put
them in perspective. I would also shake
beneath my salt way. Basically I'm
shading the railway and also a little bit over here. So I can show that
this part is below our salt way and it's actually
a little bit curved in. That's it. That's the shading. Alright. So that's it. Over here. We would have
several more hyphens mean there shouldn't
be straight lines. And some are shadings
over here. That's it. You can also go over
all the cabins, wants more and
shaped them better. Add any details if you want. Okay. Here we go. Up until now it's enough
for me and for you. And you could easily
create a salt way in want. In a one-point perspective.
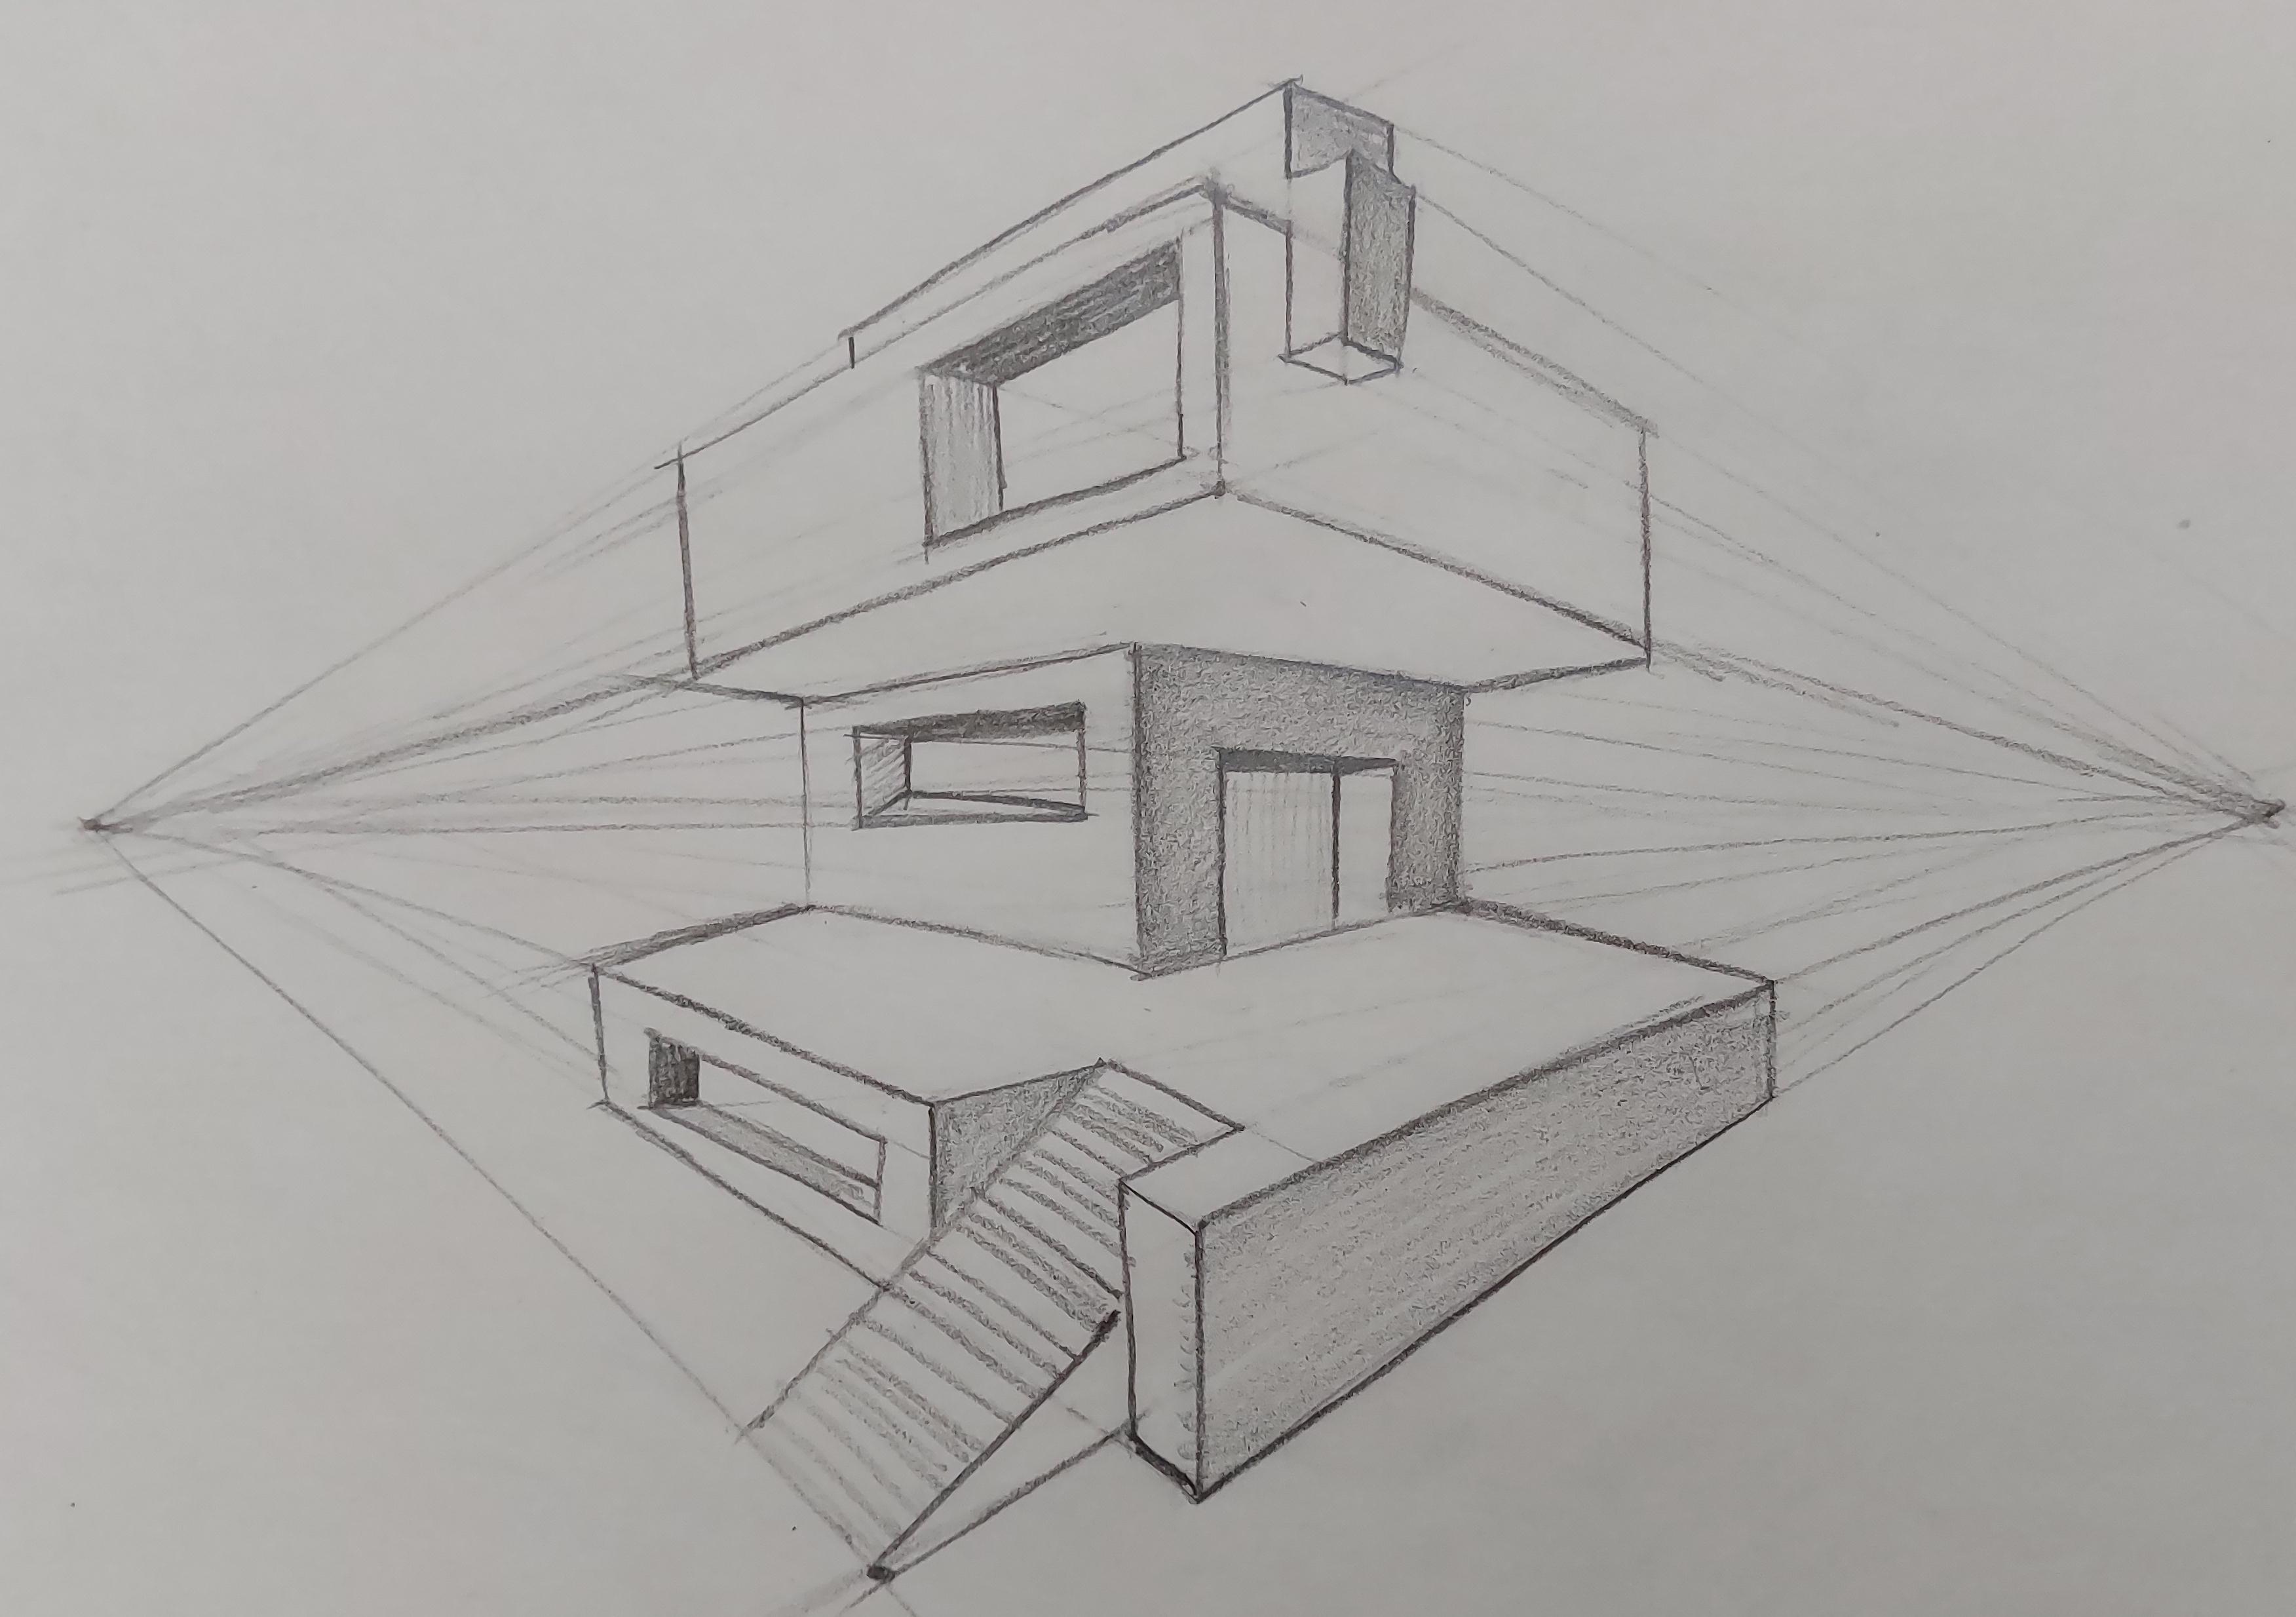
9. Introduction to two-point perspective: Hello everyone and welcome to another one of episodes of
our perspective course. This episode is
very new for you. Why am I telling you this? Because in this episode, I'm going to tell
you how you can create two points perspective. In our previous tutorials, I taught you how you can create anything in a
one-point perspective. But this time we're
going to create everything in 2 perspective. It means that our
shape is going to be seen in 3D shape from
both point of views. Actually. As I told you this time, we would have two points right in front of each
other on a straight line. These would be our v points. Now our perspective. Then I'd be creating
a straight line here. And then from both
top and bottom, I will connect it
to both points. You see? I'll connect the top and
bottom of my line to both dots and points. Well, if I have two points in my perspective and both of them are placed on my
horizontal align. My shape would look like this. If I connect these
lines altogether, this would be the
shape of my cube. In two-point perspective. On the horizontal line, I can only see two
sides of my shape. I only have right and left, not a notch below that
and knows about that. But if I want to create this shape above my
horizontal line, I just connect its top and
its bottom to my both points. And then I'll create these
lines right exactly above. Now I want to have
this lower side of it. I mean, I want to have the
bottom side of this cube. So I would have to connect
the top and the bottom of these sight lines to
their opposite points. So if I have a line
on the right side, I'll connect you to
the point which is on the left, and vice versa. This is their matching
point and this would be the dimension and this
side, dad, they wanted. This time you can see two
sides and one at the bottom, which would make
it three overall. I can also create it as
a shape of a hollow box. Saying, this is the
situation which our shape is above our horizontal line
and above are two v points. I want to place
it on the bottom. This time, I want to create
it below the horizontal line. Then again, I'll do
exactly the same, creating a line and connecting the top and bottom
of it to the v points. Again, I emphasize on
the fact that you should definitely do what I'm
doing with a ruler. Then again, I'll connect the bottom and the
top of these lines to my other viewpoint
on the opposite side. To see this line got wrong, I erase it and it should
go toward my viewpoint. And also here I've got another line connecting
point of those lines. Now this would be the
dimension of my box which is below horizontal line and
also below my two v points. It would just look like this. Again. We have these
sides to look at. I've seen inside of
my bikes like that. And when it goes below, I've seen inside
of it like this. This is visible for me. So now you've learned
how you can create shapes with two points
in your perspective. Now, what should I do if I wanted to create
several cubes? You say in two-point
perspective. First thing that I
should do is to create two viewpoints and a
horizontal line between them. Now I'm going to
start creating them. For example, I want one of
my cubes to be over here. I just chose a lighter pencil. One of my cue to be here. I bring them to my v
points, both of them. Then from these parts. Again, I'm going to connect these parts to my viewpoints because I also want to
have the top surface. And this is actually
a cube over here. Now, I want to have
another cube over here. Imagine that again, I
would have to create all these vanishing
lines to have my Q, C, whatever I want to create, I would just have to connect
it to both of my viewpoints. So I will have my shape. This time I want to have
a bigger one over here. Goes again all the way
back to the v points. And over here, I can not
see anymore sides and surfaces because it's placed
on the horizontal line. Okay? Now I want to have a
rectangle over here. So again, from the top and
from the bottom of any line, any vertical line that I create, I would have to go
to my v points. And just that way, this would be my rectangle cube are imagined that
I want to create a very small one over here. It doesn't matter that where
you want to create it, just to remember
as much as you get closer to your horizontal line
from below or from above, you can see the top surfaces and the bottom surfaces less. You see. Even creating several cubes. With the help of two-point perspective is
basically very, very easy. You have just created
several cubes. Two-point perspective
very easily. The only thing that you
have to do is to connect your tops and bottoms of the lines to your
viewing points. Over here, for example, I would also have the
bottom surface of my cube. Then again, I move more higher and I'll create
another cube over here. Then again, I'll
just do the same. This is my small
cube on the top. Now I want to have
another cube over here. You see all the
procedures are the same. I'm just doing the exact same, exact same thing for all the
cubes that I'm creating. Just the fact that they're
in different positions, but the process of creating
them is all the same. This is the bottom
surface of my cube that I should actually erase the cube which has
gone behind it. If I've erased this one, that would be in front. So basically this cube
has came in front of the cube that I've
already created. And just like that with
this same process, you can create lots
and lots of cubes. As many as you
want in your work. See just that easily. If you practice this
so much and a lot. While your mind will actually
get to an understanding. And then spontaneously,
your mind will order you were to go and your
hand will just move easily when you want to create
a two-point perspective. So remember to practice a lot. Now. Do you remember dad with
one-point perspective, we've created a city, road and some
buildings and stuff. Now we want to have
the exact same thing with our two-point perspective. I mean, we weren't
going to have a part of a city which includes
some buildings and stuff. Okay? Imagine that I have
the two points. I have the horizontal line. And then this would be my
first building over here. Created this tall over here. As I said before, I'll connect them
to my v points. This would be the sidewalk. Then I'll connect
it to my viewpoint. And I'm just going to shade
this area a bit more so I can basically show its 3D shape. I want to emphasize
on it basically. Now, let's create your
building from the tub. I would also connected
to both of the v points. Then consider my
buildings width. This would be my building
which is a bit tall. And it's actually placed on
the corner of the street. Now I want to create another
one right next to it. I will going to actually, I'm going to create some distance between the
two hour flight buildings. I want to have my second
building over here. And this one would
be a bit taller. So it's obvious that from this side it should
go to this viewpoint. It will come down from here. Just like that. Now what about this side of it? It goes to this v point. As you can see, you can not
see half of the building because it's behind the one
which is more in front. Now. The rest of the buildings
are going to be created the exact same way. Just a matter of
their measurements. Either they are tall, they are more wide, or anything else? On here? I would have some
apartments from here, good toward this side. And then here would
have it finished. So this is another building. I want to maybe even
create a smaller building. Looking just like that. Just to remember that now I have too many lines in my work, but as soon as you
erase your extra lines, it would look a lot better and it would actually be
very attractive for you. Then again, another building
would just go like that. Okay? You see, just as easy as that, we've created beautiful
city and its buildings, apartments, towers,
shops, houses, whatever. Now, even if you want to
create the doors and windows, we would have to do
the exact same thing. I mean, remember
when we were working on the one-point perspective, even if you wanted to create
some details and designs, we would go and drag
them into perspective. It's no difference over here. If I wanted to create
some doors or windows, I would have to take
them into perspective. This time. They would be in a 2.1. Okay? Imagine that I want to
have a window over here. So I'll consider this slot and I take some lines out of it from the top and the bottom of
it toward my viewpoint. Now, I can easily to have two
simple windows over here. Again, I want to create several
more on a different area. I just repeat this process.
10. Drawing several buildings and a villa with a two-point perspective: Alright, so as you can see, I've created these windows over here onto different floors. How am I going to
create the door? Obviously, again, I'll create a line from my viewpoint and then that would
determine the height and the measurements
for my door. Well, this would be the
general shape of my work, but for example,
I want to create a sign over here
behind this building. How am I going to do that? Well, I'll create
a line over here. And because it's
on the side which has been created by this point, so I would have to drag these
lines toward that point. And it can also have
any writing on it. That will be the sign which is on this side of the building. You should create your
vanishing lines very lightly. I'm just creating them darker so you would be able to see
them better and more clear. But when you want to create it, you would have to
do them lighter and as much light as
you create them. As much lighter as
you create them. Basically, your work would
be coming out cleaner. Your outcome would be
better looking and obviously neater
without any extra lines or any trace of the lines. I would also want to create
several lines over here, and these would be some tall
windows for this building. It depends on your own
taste because you can create very different details on each one of the buildings. For example, I would have another sign on the top of
my building just like that. It's basically a billboard. And easily, or I can also create the dimension for
this billboard as well. I just match it to
this viewpoint and I'll get to dimension the
volume that I want from it. Well, as I said before, you can work on each one of
these buildings separately, creating any details
on them that you want in very
different shapes. I mean, that also
depends on you. And you only. For example, I would want to create a circular window here. I wanted to create
another sign on this building that also can
have some writings in it. We can also place a big door. Just remember that anything, exactly anything that
you want to create, you should bring them
into perspective by connecting it to the both of your points based on this
side that they're placed it. Okay? So whatever you want to create should be
placed in perspective, going toward your
viewpoints with vanishing lines that
you'd erase later. Alright. So you've also learned
how to create a city, buildings and stuff like that. We'd two-point perspectives. You would see how you can easily create them in a
very beautiful way. And your outcome would
look so attractive. I'll promise you as
much as I like it. I want to work on each one of these buildings
creating windows, doors because I actually
enjoy this work. It's so easy, so simple, and yet it so great looking. So you can also add
anything you want. You can add trees
or other stuff. Alright. Now, with the help of this
two-point perspective, to viewpoint perspective, I want to create
building for you. Well, creating
this construction, this building can be very, very creative for you. I mean, you can just create any construction or any
billing out of your mind. And it will be only by your imagination and
your creativity. You don't have to do it
exactly as I do for you. I just want to give
you a model, a sample. Therefore, you can
see how it's done. And then you can actually
execute these things on your own imagination and
on your own creativity. So you would have lots
of different shapes, designs, and
sketches, which are. Yours and yours only. Alright, so this is my primary cube that
I've created over here. For example, I want to have
another cube right below it. What am I going to do? Well, as I told you before
in previous tutorials, I'll create a cube over here. I'll play some lines in
here, dragging them out. And you see, first, I've created a line
from this viewpoint. I drag it out. And I pass through this
corner and I come down. Also from here, I will create another vanishing line
from my viewpoint. I'll go through this
corner and I'll come out. Okay, here we go. Just, you should save these steps that I'm
using here in your mind. Then again, from this
viewpoint and this one, I'll create two lines
until they hit each other. And here I have another point, which is the connecting
point of these two lines. When I want to create a
cube on top of another, I will use this technique. First. I'm not going to
create the bigger q. As you could see, I just could make by lines go pass and through the
corners of my first cube. And then I could
create **** cube, which is under it. This way, I've just created two cubes on top of each other. Now, as I did here, I've created another cube
below that on there, the first cube, I would want to create another one
above this cubed. So I'll create one line, again connecting the viewpoint to one of the
corners of my cube. And then the other one which
come over here. Got it. You see, it's look like an X. It moves like an X, exactly as we did
for the lower part. We will do it for
this upper area. Then I will just move it up. And I'll play some
line like this. This line should go, actually, I should move higher bit more. This vanishing line. Then again from here, I would also go up. As you can see, just
the same way I put another cube under
my first cube, I'm going to create another
one above it on top of it. This line would be
the end of my work. It can be ending
part of the work. I can also continue my vanishing
line from my viewpoint, from both sides, again
until they hate each other. So I can get the bottom
surface of my cube, which would be this. So this is basically a
three floored building. We have a building here
which has three floors. And I've got it with the
two-point perspective for you. Now. Before moving any further, I would like to erase all
the extra lines here. I don't want any extra
lines on my work because when I start
moving onto next steps, there might get a
bit too complicated. So remember to erase
all these extra lines, leaving no trace behind
because as I told you before, you should create
them very lightly. And that's why. Alright. Now my way is almost clear. Okay? Now what happens if I want to create some curved
area over here? I want to show that this area has been curved in or pushed in. First of all, I wanted to create this curve as
the shape of a cube. So I'll take my pencil. And because this surface is related to this viewpoint,
from this viewpoint, I'd be starting to create my
vanishing lines and creating this square I want here that
needs to be carved in C. I've got my square here. Now, if I want to
give dimension to it and I want to show
that it's been carved in from these corners. I would go to the
other viewpoint and then I can create
these lines for it. I'll erase this line. This way. You can easily see the
dimension event in my work. You can see that this
area has been carved in. This area, doesn't
get any light. So it would be darker and this part would be a bit
lighter, still dark. You can also show the curved
parts with your shadings. Let me just make it more clear. Okay. I wanted to create a shape as a, as a sorry, a rectangle on it. And from both sides, I would move on to my viewpoint. I'll come down as much as I can, as much as I want,
basically also here. And I want to just drag
it a bit more higher. I wanted to continue it. First. I'm going to complete
the bottom part of it. And I will connect these points, these corners to my v points. Just like that. I could have created a
shape like this over here. A beautiful tall rectangle cube. And it actually is a part of my buildings decoration
in front of it. I'd also erase this
area because it's got some extra lines just like that. And then I would also like
to continue this upper area. I don't want to
leave it untouched. And I drag it onto
my other viewpoint. For example, I'll
end it over here. And it should obviously
has another side to, it can be just empty. So I will have to create
it like that over here. This was the top of my building. Now we want to create
actually a door for it, a front door for my building. First of all, create a line and I'll connect
it to my viewpoint. And then I want to get
to dimension of it. I drag it to the opposite
viewpoint as well. When you're connecting your
shapes to your viewpoints, you should pay
attention that which side they are related to. That's also important. I'm just going to shade
this area in order to make a simple contrast
between the parts of my work so they won't be
confused with each other. Just like that. This area
doesn't get any light, so it would be completely dark and this would be inside of the door to create a window
over here in this area. So again, I'll create
a line like that and I drag it and connect it to my viewpoint and
L shape my window.
11. Completion of drawing the villa: Alright. Now, you see, again, I should emphasize that when you are going to
create any of this, you should use a ruler, especially if you're a beginner. But when you practice
it over and over again, it would be really
easy for you and you can just do it by your
hand without a ruler. That's what I'm doing
right here for now. And I've also created
dimension for my window. And these parts
aren't dark price. I shaded in order to emphasize on the depth of the window. Alright, I want to have a
stairway or here first. So all I would have to make
this area more cleared out. I have to create a
depth over here. I will create two lines
going to my viewpoint. Then from here, I'll go to
the opposite viewpoint. And I will make this area
hollow and carved in. Then, just like that, I'll come down that for example, here we can have our
stairs are stairway. Again. From here. I connected the stair to my viewpoint and I will
continue that up to here. So this would be basically the stairway cancer. That's like it. These two lines have actually cross each other and hit
each other over here, which I've created a point. And this area would be
considered as the stairs. So now that I'm going over these lines while more time
making my main lines darker. So you can clearly see the building that we've
designed altogether. So I'd be erasing all
the extra lines as well. After making my
main lines bolder. I would also erase these extra lines on
the top of my building. As you can see, it's a very
beautiful, luxurious villa. Even I might say. It goes, It's got everything
that you might need. Here. We would have our stairway. The stairs would be placed here. I would also like to create
a depth on this area, making it more attractive. Again, from here, I'd be
placing lines on both sides. Then I'd be connecting them together from here and move
on to the opposite viewpoint. And connecting this
line together. Here, again, I would
create a depth. It's only the technique of playing with the
lines and the spots, the points, and the angles. I hope that you've enjoyed this course because
I love this course. I mean, I love this
subject of perspective on never wanted to end because it's so fun, it's so enjoyable. And at the same time, with the simplest
techniques you can create the most beautiful things in 3D. Also shade this area
a bit more just to make a contrast and make
it look more interesting. Also, I would shade over here. On this side. Here we go. Alright. These parts should be shaded. It's not that they should be, but I just want to
shape them in order to express and emphasize on
the volumes at wave created. Alright. And now we're at the end of creating this beautiful
luxurious villa. And you can do it with your imagination,
with your creativity.
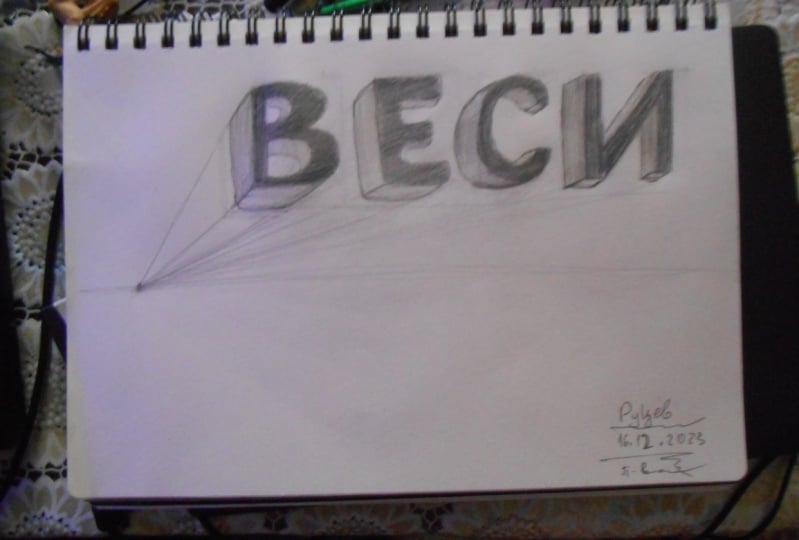
12. Drawing letters with perspective: Hello everyone and welcome to another one of my tutorials. Well, in this episode, I'm going to tell you how you can create different shapes. For example, the
alphabet in perspective, and how you can make them 3D. We two-point perspective. You can actually give them
volume and dimension. Okay? First of all, I'm going to
create a horizontal line. And then on both ends of it, I'd be placing my two v points to determine the alphabet
that I want to create. For example, imagine this time I'm going to sketch
the letter a. If it's going to be over here, it will be like this. It would actually
look like a line. So I'll bring it down. And also from this side, I bring it down to
with a straight line. As you can see, the lower part of my a will
be divided into two parts. So I bring it down. I come toward inside a little, and then I will bring this area up in order to make
these two parts divided. And also it should be parallel to the line right next to it. I'll take them to my viewpoint and I'll connect
these two parts together. Now I want to get the hole which is on the
upper part of the a. Again, I bring it into my viewpoint and I'll bring everything in
perspective as usual. Then I'll be connecting
these together. You see, this is our capital a, but as you can see, it's only one side of it. If I want to get a dimension
from this side of it, I would have to take
them to this viewpoint. On the right side. This would be the
dimension and the surface of my a letter. And as you can see, now, I have a 3D, a ladder. See how easily we could have create the alphabet in a
three-dimensional way. When you get these
dimensions in perspective, there is no place for a mistake. When you are going to
create dimensions, you might be mistaken, but if you create your
dimensions with perspective, there would be no
room for errors. And you make sure that
your work is perfect. Without any mistakes. I'll give you a very, very great volume and dimension. I can also shade this area to create a contrast
and show that, okay, we have another
surface over here. So here is our 3D letter. Okay? So I will shade these areas in order to emphasize on the
volume of my letter. Okay, imagined that I want to create the B letter
in perspective, but this time I want to bring my B letter in
one-point perspective. Well, first of all, for the one-point perspective, I will consider a cube at first. And I'll create a
rectangle cube. And I will connect it to
my one-point perspective. Now that I've got my cube, I can get my letter
from inside of it. I can transform it
into the letter, basically this way. So here we go. So I'm going to create my
letter B inside of this cube. First, I'll create
the front part of it. These are the bumps on the bee. And you can actually do it with any font that you
would like it to be. Any font that you like it, you know, it can be different. Okay, then I'll create inside of my B letter just like that. Here we go. Okay. Now, how can I bring
it into perspective? You see, I just take it toward
my viewpoint from here. Then I will erase the
extra lines of the cube. So I can have a clear
sight with this. And I even want to
round these areas. I want to make the
corners round. Soldier necessity that because
it's in a perspective, it should have sharp
edges or corners. Now, it can have very beautiful rounded
edges and rounded corners. So I would just have
to edit it a little, erase the extra lines
from my rectangular cube. Here we go. So I'd be making my
work more organized. And taking these back. As you can see very easily, you can create 3D
letters, alphabets, or any shapes that you want in either 1 or two
points perspectives. And I would also shade
this surface of my work in order to show another
dimension of the whole shape. Just shading it lightly. Now too much, I want
to overdo anything. It would look as beautiful
and as simple as this. So they've learned it, I hope you've enjoyed
it and it would have been useful for you,
my dear friends. You can create anything
that you can think of. Weird perspective. So practice a lot.
13. Perspective without observer point: Hello my dear friends, Welcome to another one of my
tutorials of perspective. This time we want
to create something like this with the
help of perspective. But how are we going to do that? I mean, how are we going
to be able to do that? Well, first, we should create our primary sketch
as simple shapes. For example, I can imagine this area as a rectangular cube. Same time, we do not
want to work with viewpoint because it's been
looking at very closely. We would want to create this with the help of parallel lines. So what am I going to do? First of all, I'll be creating my rectangle cube.
As I told you. In order to create
more complex shapes, you have to create their primary
sketch in a simpler way. And as I told you, because we are looking at this thing from a very close up, we're not actually doing it with a viewpoint or
a viewer's point. So I'm creating a
rectangle cubed. This would be the lower part, and it goes up
parallel to this line. I'll create another one. Order to create my wall. And on this side,
this upper line should be parallel
to the one below it. Okay? Now we would be starting
to sketch this area first and make some
designs on it. It has been divided
like this over here. And remember when
you're doing it, you should constantly look
at your model picture. And whatever line that
you create on one side, you should have the same
thing on the other side. And I'm actually creating it
with a normal pencil because later I'd be adding this
shadings with sketching pencils. So this would be
the first part of my work that we don't want to work on
these parts right now. This much I'll count
toward inside. And from here, again, I would have to
create another cube. C I get out of by previous one, gets out of a previous cube. Over here. I make some round edges and round corners because I
want it to be curved. Then again, over here, another cube would be created. And I'm just doing them as much as I can see in my picture. It will come down like that. Okay. Then I would have to
move toward inside again to create this lower area, the area below these cubes. Again, another straight line
and it will come down. Okay? Right now we're just doing
the original sketch, basically the primary sketch. And then the rest of our designs would show themselves
when we are going to work on some more
details or some are shadings. Here we go. In here, connect these parts together,
continue these lines. And it would have a
shape like this easily. Then over here. We can also have this shape that we can
see in our picture. It's not a cube anymore. It's a curved shape here, twisted and curved and turned. And based on the perspective
that we have here, this should be done exactly as we did for
the pieces of paper. There is no difference because
the shape is the same. We have created pieces of paper, so I'm going to do the same over here for this part of my wall. Okay. And also from here, I would go down and again with
churned and curved lines. Okay, a line over here, another one. From here. Here we go. Then we will actually make our
work a bit more cleaner. In this area, I have
a shape like this. And sometimes you might not
even be sure what it is, but you can just create it as the way as you're saying it. This is actually
corner of a wall. I'm going to get a B6 pencil
with a very sharp tip. Then I can start
applying the shades. Mean just sharpen my pencil. Then I can apply the shadings. You see. The lower parts of your
work should be darker and the parts which are on top and
in front would be lighter. So this area would be darker
and I'm just shading it. But as you can see, I also don't shade it too dark. I'm just trying to keep a contrast shavings
lighter and darker. I have, for example, a very, very light shade over here
on this side of my work. Okay, then I would
be having a very, very light shade for this area. Okay. Just like that. Then for over here, again, I will have a curved area which has been
carved in basically. Then I'll erase
this part below it. I'm actually making it cleaner. And then from here, I would have it like this. Now that you are
applying the shades, you can actually understand and dimension and the
volume of your shape. You see the parts
that I'm shading darker are actually
placed below them. And they are actually
under these stones. And the upper parts which have lighter shadings are the ones which are on top
or in the front. I just tried to keep the same
process for all parts of my work as much as
I can see them. So I'd be darkening them like that until I get to this
upper area over here. And now we can also
consider it block by block. That's just it. Here we go. It looks like this very
beautiful and very similar to our original design and
our original photo. I be applying some more designed and
organized lines in our work. Then over here, I want to
create these curved shapes. Then I'll be adding
some shading soon them. And as you can see, I'm actually completing
the designs of my work from both sides. As I told you in the beginning, whatever you do on one side, which probably do
the same thing on the other side because it's a corner of a wall and mostly both sides of
the wall are the same. Then the darkness
over here would go up and it would be actually
fading upward as they go. Update would be faded. Then I would have several
lines based on the directions. I mean, I'm actually shading in a way in a direction that I can. Also emphasize on the fact that this is basically a curved area. Either it's prominent
or it's going inside, which in this case
it is prominent. So again, this would be the
lighter area of my work. This part should be left light and then from
the lower area, I'd be starting to shading. See just like that very easily. And then on this very corner, on the edge, we would
have a lot more darkness. Then I moved toward this side, toward the right
side of my work. Again, I will apply a darkness and because it's the
lower part of my work, it's under the stones. It will definitely get less
light and it should be darker compared to the part
which receives more light. When we apply darker
shadings over here, it will show us that this is the lower part or under of
our work or our object. As you can see, as I move up, I failed my shadings and make them going a
little bit lighter in order to keep the contrast
and keep the harmony and cohesiveness of our
whole shading process. These very details can
be very helpful for you. When you're working on
something like this. Be really easy. Okay. Now, I got here. Well, I will darken this
area almost completely. Okay. Then I'll move on. I'll shade this area as well. Then the lower part of it. And yet again, the lower
part of this area. They all should be darker. My dear friends, be really careful about this
side of your work. That all of your lines and even all of your
shadings should be parallel. So if you felt like
that in some place, your lines or your
shadings have got out of that parallel position. You should definitely take your eraser and
edited immediately because it's very important to the whole and general
shape of your work. Then you can also shade these
areas curved like this. Again.
14. Completion of perspective without observer point: Okay. So as you can see, I'm just continuing
the same process. Shading darker for
the lower parts and shading lighter
for the parts which are in front of you or the ones which are
receiving more light. As you can see, the
process and the procedure is the same for the whole shape, but I'm just going
to do it for you. So you can see now I get to this area which is a bit
more shaped and it's curved, so I'm going to shade
it a little different. Then when I'm creating
this term over here, I will create duress of my turns with the same shape and parallel to the first one. Again, I say, it's like
our first episodes that we were talking
about how you can create papers in perspective. So I create the first turn. Then for the rest of them, I'd be creating them parallel to them and with the same shape. And I do it for both the top of my turns and the bottom of them. The top part and
the bottom part. Then I'll shade below
it as well, sorry. K. And we would also have to shade this area inside of our work, inside of this shape, which has a beautiful curve. Alright. I will darken this area completely
and beautifully. And then because this is actually the inner
part of my work, it should be darker comparing to the parts which are more outer. Because when they are outer, they receive more light and they are also permanent as well. But these parts are carved
in and they would be darker. From here. I would also go down with a curve and with
a beautiful turn. And parallel to that, I'll create the same shape on
the other end of this one. Then I will go over the lines
that I've already created, shading them, blending them
more with my whole work. I'll shade these in our areas. As much as I think is necessary. You can shade it or you can even use hatches that depends on you, that how you want
to shade your work. For example, in these
parts where you have some kind of
construction like that, I prefer to use hatches
and shade that way. I think it just looks better, but again, at the end of
the day it's your call. So go on your own taste. And then I would
also have to shade this area on the side. Here we go. I still want
to show some blocks here. They could be stone or
they could be breaks. More likely a stone. And then on the lines that
are separating my blogs, I can use more darkness. And I can also use
my pencil to apply some more strong darkness and actually emphasize
on some parts, making them much more darker. For example, over here, it should be darker. So I'm going to Ron, It's shadings once more. In order to create
this construction, this piece of wall or
whatever you want to create, you just have to
first start with a very simple primaries sketch. Then you should be careful
to bring everything in perspective here that you
don't have a viewpoint, you should be careful
to create your lines parallel to each other with
a compatible distance. Then you can develop it, adding details until you get to the shading
and get to here. And you can also use your
eraser on some parts to fade the shadings of that area in order
to blend them more. And then again, I'm
going to sharpen my pencil because I want to add more darkness over
here in these areas. And maybe even I'll bring some
shadow all around my work. Imagine that here we can
have a shadow of our walls. So just trying to bring
them out a little, don't overdo it by. You can just do it a
little on some parts. That will be cool. For example, in these areas, I think they would look
cool just like that. Okay, so that our work, which shows itself completely. Here we go. And we would also
need a darkness over here, because as I told you, we have a part on the top
of our area over here. So I will apply the same
type of shading over here. Just remember that
it's better if you're creating a shape like this
or a picture like this. You would keep the same
kind of shading for parts, for different parts
of your sketch. Sorry. Going out of my hand
there in the middle. Because I think that
would be just cooler. It makes your work
look more cohesive. If you use the same
kind of this shading. There are some more
lines in order to make our work a bit Ross say, a bit more different. And then with a very, very low hand pressure, I will create these
lines all over. Why work? In order to make my
work an actual sketch? Again, I will apply does stronger darkness wherever I think I need them in my work. So I'll make my work as
attractive as I can. Here we go. Now that we've used
our dark pencils and we've used it
in our sketches. We should use our eraser or our dough eraser on
some parts in order to create some
light on our work. Because we need this
contrast if you want our work to look
attractive and advanced. So I will cut the tip of my editor eraser in order to
make the tip of its sharp. And then I start applying some strong lights into my work. This way, create more contrast. I will have my shading, so I will have my lights. It would look more realistic and more beautiful
and more advanced. For example, some vertical
won, some horizontal lines. This will actually bring your
work into another level. That's what we want here. And it goes like that. Here we go. Wherever you think
you need them or wherever you can match
it with your picture. Create your shadings
and your lights in order to have a complete
and beautiful outcome, which is what we are
having right here, right now for you. I'll shade it outward. Here we go. Then I'm using also my
finger in order to fade these shadings and make
them more beautiful. So as simple as you can see, we are finished with
this sketch as well.
 Amelie Braun, Artist & Cartoonist