Transcripts
1. Introduction: Hello friends. Welcome to the basic course of drawing with colored pencils. Definitely due to the use of different colors in
colored pencil painting. This is one of the most attractive type of paintings among the enthusiasts. In this course, you will
get to know the principles of drawing with colored
pencils in real style. And you'll be able
to sketch all kinds of different objects
and textures. At first, you will learn about the color cycle and
how to combine colors. Then by drawing suites, you can learn it textures
and how to color them. Then you learn how to sketch
the textures of glass. And finally, you finish
this course with a wet blueberry model as
well as colored liquid. I hope this course is useful
for you and you'll enjoy it.
2. 1- Tools: Hello to all of my dear friends. Welcome to a new course of
designing and drawing with me. In this course, we are
going to learn how to create paintings with
colored pencils. This is a very great and
interesting technique that most of you are
interested to this. Before we start everything
for this course, I'm going to tell you what tools you are going to require. The tools that we use for colored pencil technique
of the painting. The first tool is a cardboard. The cardboard should be
assembled cardboard, or it should be Fabriano LR cardboard or
220 g Fabriano cardboard. These two kinds
of cardboards are the most adequate ones for our
colored pencil techniques. One side of our cardboard
is texturize and the other side is very
smooth and simple. You can use both sides of it. But the side which has a texture is more adequate
for colored pencils. It's more appropriate. And other tool is
this paper tape. With the use of this tape, we can actually fix our
cardboard on whatever surface we are putting our cardboard
on and we want to draw on. Okay, after this we are going to work with other
interesting tools. Well obviously we
need colored pencils. They call it personal,
is that I'm going to use in these courses is fabric castle 36,
classic color pencils. So if you want to use the same brand and the
same colored pencils, It's very important that
the fabric castle that you actually get and provide
is from the classic kind. 36 colors are enough. It shouldn't be less than this. If it's more, it's okay, but it shouldn't be
less than 36 colors, but definitely it
should be classic. Again, if you're
buying fabric castle, pay attention that
it should have this QR code on its back. If it doesn't have this, it's not original and it might just make some problems for you. But there is no necessity
that you use this brand. Because I'm going to
teach you a technique that you would actually work easily without being
dependent on the codes of your colored pencils or even you are using
a different brand, you can use it easily. I'm going to teach you
a technique for that. That whatever I use here, you can easily choose it from
your own colored pencils. So just pay attention that the colored pencils
that you are using would not be the
ones that they use, that they have four children, they should be artistic, especial colored
pencils for painting. The other brands I'm going
to suggest two is M view, which is good like
fabric castle, owner, or Picasso, these
are all good brands. Aside from this, you should
also create a catalog for yourself for the colors
of your colored pencil. You can create it on a
cardboard or on an A4 pencil. Based on the number of
your colored pencils, you would have e.g. if there is 36 of
your colored pencils, you should have 36
squares over here. Or if it's less, you
should have less. Okay? Now, you are going to use each one of your
colored pencils in each one of these squares and
then write the code of your colored pencils in
front of each square. So you will, you can actually choose your pencils
faster and easier. The next thing that
we need is a cutter. Here. Well, obviously it has the
use of cutting the cardboard. But sometimes in our painting we have to scratch our paint off of our cardboard with this
cutter very, very lightly. The other thing that
we need is a ruler. Then we also need an
electronic eraser. It's actually one of my favorite tools and
it's very good and definitely you are going to need it a lot in this technique. Another tool that I can give you a hint about is
actually an eraser. Having these erasers are very important in colored
pencils techniques. There are very practical, so I highly recommend them. Another one is
actually white pen. Why it's pen is one
of the tools that we use in colored
pencils technique. Having a black rapid, rapid can be number 32. Or you can even use other kinds of pens
which are like this, so it's also needed. The last thing that we need
is actually H2 pencil, or basically our normal pencil. We actually create our
basic and primary sketch on our cardboard with it. So these are all the tools
that you're going to require in this course. And for colored pencil
technique, That's a start.
3. 2- Color Circle Eiten (colorology): Hello, welcome to
the new episode of sketching and
painting with me. In this episode,
before we start, and I'll tell you how you can create paintings
and other things in colored pencil technique. First, you've got to learn how are we going to make the colors? How we can combine the colors and how we can put them
next to each other. To get a great look. With this circle of the color, I can easily explain it to you. First of all, I have
triangle of color, which includes
three main colors, yellow, red, and blue. These are three main colors. The main yellow domain
read on the main blue. So in the beginning, my color triangle is created
from these three colors. For the next part is C. On
each side of my triangle, I've created another color. See, on the left
side of my triangle, I have yellow and blue. It means that if I combine
my yellow with my blue, which are two main colors, I can create the
main green color. On the right side, I have the yellow
color and red color. It means that combining these two colors will
give me the orange color. And over here, see again, I have my blue color and my
red color on the bottom side, and it will give me
the purple color. So when we get out of this triangle and
get to these sides, are actually cite colors are created from the
three main colors, which are created by
our three main colors. I mean, the main green domain, orange, and domain propel. Why do I say main? Because we have 36
colors or more. And e.g. we have a tonality of purple or green or whatever. You see. Another thing is that in
front of my blue color, I have my orange
color, or better say, a cross from my blue color, I have my orange. So these two colors would be each other's
complimentary colors. So the blue color is the complimentary
color for the orange. It's in front of it. It means that they
complete each other. Why do we say they
complete each other? Okay, I'm going to tell you, see, we have blue color here. Now. The orange color have been created from
our yellow and red. So this orange color, except this blue that we
don't want to work with now has two of our main
colors inside of it, yellow and red. Therefore. The other color, which is
not included in creating this secondary
color of orange is the complimentary color
of this secondary color. To complimentary color
for red is green, which has been created
from my yellow and blue. And red is not included
at all in the green. So it would be its
complimentary color. And as you can see
inside of this triangle, my green is actually in
front of my red, Exactly. And obviously, the same goes
for the yellow and purple. Yellow has actually, the
purple has been created from red and blue and
yellow is not included. Therefore, yellow would be
its complimentary color. Okay. There is something else
that I should tell you in this point that actually we call the purple color
and a yellow color. Almost neutral colors,
because there are no So either warm or cold. Because when we look at them, we both have the feeling of warm and cold at the same time. So that's, that's why they are almost neutral colors,
yellow and purple. Now, if we get out of this, we get to the circle
of the colors. This circle of the color is very important and it's
very interesting. At the same time, I
have my main colors. As you can see. As you can see, the corners of my triangles have their,
their own colors. And also the triangles
that have been created on the sides of the triangle
have their own colors. So I have yellow, orange, red, purple, blue, and green. What are these colors
in-between them? Okay. I have a main yellow color here, and I have one secondary
green color over here. If I combine these
two together, I mean, if I combine this green
with my main yellow color, it would be actually a
green yellowish color. Because our green has already been created
from yellow and blue. So it already has a bunch
of yellow inside of it. And now again, it got combined with extra
amount of yellow color. And because over here, my yellow is more
inside of my green, comparing to the blue. We call it yellowish green. So this is actually
a yellowish green. And on the contrary of that, here I have domain blue
and I have the green again in-between
them. Over here. I have a dark green which
has more blue inside of it. So as I had a yellow color
more on the other side, over here, in this green, I have more blue
comparing two yellow. So this is a bluish green. So again, this would
be our bluish green. See how they were created because it has more
blue inside of it, but say bluish green. If you look at it, you
can clearly see that it color is even going toward
the blue, more than green. And it has, it's more cold
because it has more blue. This is bluish green and
this is yellowish green. Now we get to the purple part. It's the same thing. You see. Peripheral has been created of the equal amount
of red and blue. I mean, if you combine
your red and blue equally, it will give you this beautiful
purple that we have here. Now, If into
combination of blue, I will use one part of
blue and two parts of red. What can we get there? This one, reddish purple. I will have this color
which is a reddish purple. And on the contrary, if you use two parts of
blue and one parts of red, we will get this one,
the bluish purple. Again, it's the same
for the orange as well. I have my main orange here. And if I use two parts
of a red and one parts, one part of yellow in my orange, I will have this
orange, reddish orange. I mean, it's an orange
which is more towards red. And again, on the contrary, if I use two parts of
yellow and one part of red, it will give me a
yellowish orange. It means that an orange, which is going more
towards yellow. Alright. Now we can get to the
part that we can divide the colors into two
parts of cold and warm. Generally from this color, from the yellowish orange
until the reddish purple, we have our warm colors. You see this side. These colors are the
warm colors from the yellowish orange until
or up to reddish purple. If you look at them like that, there won't be no
feeling of cold. But on the other side, from the yellowish green
up to bluish purple, we have the cold colors. Why? Because they give
us a feeling of cold. And as I told you before, yellow and purple are almost
neutral because a part of them are toward
warm and a part of them are toward cold colors. So there are in-between. We cannot clearly say either
they are warm or cold. So they would be neutral. Okay? Yellow and purple. Orange is the
complementary to the blue, green is complimentary
to the red, and purple is a complete
tree to the yellow color. We have our color triangle, which has been created
from three main colors, which are yellow, red, and blue. Just as easy as that. So if you learn this
circle and triangle, it would be really easier for
you to consider the colors, determine them, create them, and work with them. So it's very important
if you learn this completely and very well.
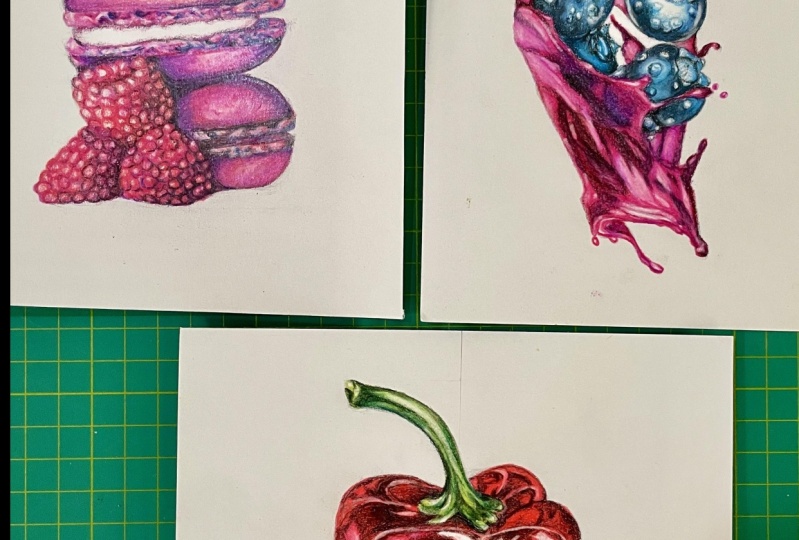
4. 3- The Basic Drawing of Creamy Sweets Geometric Shape Method: Hello again. Welcome
to another episode of painting and colored
pencil technique with me. The first design and sketch
that we're agreeing to work together in this
technique and we are going to enjoy it so much. Are these little sweets. Before we start, I want
to tell you how you can actually
determine the colors and it would be easier for you. So you will not need to have the exact same colored
pencil that I'm using here. And you can choose it
from your own colors, from your own brands. You can easily do it with whatever colored pencil
that you have in your hand and with
watching my videos. Alright, As I told you in
the introduction of tools, whatever colored
pencils you have, you should create a
color catalog from them. If your catalog, if you
are colored pencils or 36, well, this catalog
should have 36 squares. And then right next to them, you should have codes that
it would be easier for you to find your colors. You want to see how this catalog is used
and how we can use it. E.g. I want to have the
colors for this area, for this part of my Sweet. Okay. I bring it up to here. I bring my catalog right next to my painting or my picture. And I can easily say what
colors I have in this area. I have 325, 333. You see these colors are
completely and match. I have 334. And maybe for these parts, I use 337 for small
parts over here. For the lighter areas, I would have 329
and I'll have 319. I can also use it as well
for applying these darkness. I can use my 376
or maybe even 399, which is the black color
of my colored pencils. See, if you have a
catalog like this, you can easily choose your
colors and your pencils, and it doesn't matter what brand they are
or how many day are. You can clearly determined the colors and find
them faster and easier. So there is no need that I would tell you each
one of the codes and you find them or then
after you find them, you see they have a
different color from mine. You would be troubled. So I just show it to you there. E.g. in these berries, I have 327 in these areas. I have 333 in darker areas. For the shadings and
shadows of my work. I have 321 for the parts
which are more reddish. I can even use 392 for these parts which are
going more toward Brown. Also 30001 that I would have
to apply to some places. I should apply my
y's in order to create a contrast and
a beautiful shade. In some parts, I will also
use my bluish purple, which has more blue in it, comparing to the
red, which is 337. I will also have to use color 399 for the shadows of
them and for the leaves. Again, you see it's obvious, I'm going to use these colors. The colors I should use are the yellow, yellowish green, 370. My main green 359. I need 357, which
is a bluish green, a dark green for these areas. Again, I need my 399, my black color for these very
strong darkness over here. And I need to white color
for the lights of my work. Just as easy as that with
only having a color catalog. You can use your colored
pencils very easily and you can determine the colors very fast and easy,
and easy, sorry. And you do not have to
depend on your tutor or onto brand of your colored pencils only by watching the
color, by seeing it. You can choose it from your own brand and
your own colors. First, I'm going to apply its primary sketch
to my cardboard. I'm going to teach you how
you can do that first. Okay? The way that I'm
going to teach you in this episode is how to create your primary sketch with
geometrical shapes. That's the name of this method. I'm just looking at
my sketch generally and transform it into
simpler geometrical shapes. So for this, you don't
even need to have a print, printed picture of your work. You might have it
on your cell phone, on your laptop or wherever. So as I said, I tried to look at my work, my painting very
generally and see that similar geometrical
shapes, e.g. I. Can consider this berry as the shape of a
circle or an oval, which is more narrow on
the top, like an egg. If I look at this sweet, I can consider it as a complete oval or
a deformed circle. And it's also the same. This is my second oval. And each one of these are
ovals and circles here again. Let's apply it on our work
and see how it's done. So I put it right
next to my cardboard. And then I consider,
first of all, I will be having, you see over here. I can also create this
line to guide me in order to create them in
there, right placement. Not to misplace them. Here I have a shape of an egg which has transformed
to a berry later. I actually creating these
very lightly with my pencil. Therefore, when I want
to color it later, my work would not be messy, is very, very important,
my dear friends. I am actually creating
it a little bit darker for you to see
it better in the video. But when you're doing this
yourself pay attention that you should create your
primary sketch very lightly. So there won't be any trace of it After
you erase some parts. And there won't be any trace
of it when you're coloring and it shouldn't make
your colors messy. Okay? I have another oval or
a circle here. Right? Now in this step, I'm not going to do any details. I'm just applying
the general shape of the geometrical shapes
on top of each other. And in the right placement. The next row, which
is my next sweet, would be placed over here. And it would be created
just like this. Okay, over here I
have one berry. Let's see. I applied as a
shape of another egg here. Just like that very easily. And it's almost a big Barry. I created as the same
size as I see it. See the next berry
is placed over here. So I created in the
exact same place. I have its general
shape over here. Again, I insist that right now you should not
go into the details. Just the general shapes of
these geometrical shapes. And the last berry over here, which looks like this. See, right now I've just
created the general shape, like some rocks on
top of each other. Now in nexus that I'm going to work on the details of my work. I'm going to basically
apply the details to the work you see over here. I have one leaf. Here, I would have another. These are the leaves
of the berry. And over here, I can
also add another part. Okay, here we go. Let me just edit this part. I can make it better. And from here, I'll
come up, it goes up. And in this area, I have some leaves bending
backwards like that. Over here. I come and I'll create this
just very, very orderly. I create it. And then I connect these
two parts together. Exactly as I said
with a curved line. Now, I'll create the
lower layer for it. And this would be the
lower part of it. Okay. The second part, again, it's is it soft area? You see? Because the placement of these geometrical
shapes where correct? Exactly my berry would be
connecting to this edge. It means that I am giving right? Then just like that. Okay. I'll erase
this extra line. So it went, make me
mistaken, misguided. Then for creating this vary in the way that I can
see it in the picture. I'll have to create
one more line here, bringing it down all
the way. The same way. Then I get to my second suite. You see this line is exactly on the same level
at the top of this barrier. So again, exactly
on the same level, I should bring a line coming
here and bring it up. And they all be curved lines. This would be the area, the softer area,
the middle area, which includes the cream. I forgot it onto her sweet. Then I have the lower
part of this suite. And then we have the
lower part of our work. Just as easy as that. So for this area, It's the same thing. I'll consider it like
that and create this other bury the same way as
I did for the rest of them. Then we create the upper Barry. I mean, we edit
the upper Bari in a proper way to make it better. So this is the main and our primary a sketch
of our picture which we've created with
simple geometrical shapes. In next step we are going
to apply in the colors. And I'll tell you how you
can do it easy and fast.
5. 4- The Beginning of Coloring Creamy Sweets: Hello again and welcome to another episode of painting
and sketching with me. In this episode, as
I told you before. Well, we are going to color
this sketch altogether. Alright, first thing to do
is to bring our catalog. Now we want to choose the
colors that we want among these two colors that I need for my Sweet is number
319, which is this. See, it clearly
matches this area. You can actually bring
your colored pencil on your work and
determined the color. So this catalog
has the same use. Even if your codes are not as same as my brand or my catalog, you can easily have your own catalog and
find your colors. I need my color 325. And if I put my pencils
tip on these areas, the color mattress totally
than I would have. The color Number 334, my purple. This is my main purple actually, for the dark parts of my work. And this is my color 333
for the darker parts. To color number 329
for these areas which are actually pink and
beautiful also. Okay. Well, maybe we can also
use a bit of red color, maybe color number 318. For these areas. I might just give a tad of red. I'm going to show
you why I'll do it. And also color 327, that we can actually
use this color instead of red because it
has too much red in it. You see, if you look
at these colors, it's the tonality of this area totally that I've got it
with the help of my catalog. And I need my black color, 399, for applying these
small details here. And I need my white color
for creating these lights. And I also need my blue
color for the shading. I'm going to tell you later that why I choose blue
for the shadings. But now, let's just
start up to here. And we start our coloring. Something that I
should tell you, my dear friends is that I've actually dark because of use. So you would be able to see, I mean, I've darken these lines. But if you didn't, actually, if you weren't paying
attention and you've created your primary
sketch, darker. Dan, you should you have to lighten your primary is sketch
before you start coloring. It should be just as dark
as only you can see it. I mean, it should be very light. You would be able to see it. That's enough because if
you leave it that way, it will actually make
your colors messy, especially because
it's colored pencils. I'm gonna put my
picture next to it. You can compare easily. The first thing that I
have to tell you about coloring is that in coloring
for applying the colors, we try to start from the darker colors toward
the lighter colors. So we start from the darkest color that we
have in our colored pencils. To start our coloring,
you see now, I'm just going to
order them from the darker colors toward
the lighter colors. Actually form the darkest
colors to the lightest color, which is my white. Okay. If you place the tonality
of your colored pencils in this way from the
darkest to lightest, it will be easier for you. Now. My black is my darkest colors, so I just get it and
write from these areas. I start applying it from
the parts that I see. Very strong darkness. And as you can see, I'm applying my color very
slowly and very softly. So that's how I do my coloring. Just like that from
these lower parts, which are the dark
parts of my work. And very, very little. And with circular movements, I'm applying my color. Why am I saying that
you're coloring should be in circular movements? Because when you are working with colored
pencil techniques, the direction of your coloring
should not be visible. You should not leave any traces. We are going to actually do this circle Larry
technique for coloring. So you won't leave any trace over your coloring
or any direction. Alright. So I'd be applying
the darkness, darkness here. Very clearly. The parts that these
leaves created, the shadow that these
leaves created on my work. These areas and everywhere, I can see them. Just like that. Okay. Another color that I'm going
to use as my blue color. Why am I telling you the
blue color you see here? You might not see any
blue in your work. But for all the parts
that they have a shadow, we are going to use
the blue color, very, very little of it. Because basically the
nature of a shadow is blue. Shadow means cold, and cold
goes toward cold colors. And cold color means blue. In the shadow places of my work. I mean, everywhere. In all of my works, everywhere I have a shadow. I would have to use the blue color even if
I use it very little. So I should use even a
little of my blue color. The blue that of course
matches my work just to give that shade and cold
of the shadow to my work. But I'll leave it for now. I want to use it
almost at the end. And now I'm going to get my purple color because
it's our first work. I'm going to tell you, this is the color 103 34, sorry. With this color, I
start from these parts. And wherever I see this color, I'll apply it again. And still, I'm using
circular movements. Moving even on the
parts that I've used, my black and little by little, I go up again with
small circles. As I move more toward my lighter areas are actually
decrease my hand pressure. So when I decrease my hand
pressure to color that I leave on the cardboard would
be less, would be lighter. So I will use more
circular movements here. I will use bigger circles
here, just like that. And as much as I can see this
purple color in my work, I will apply it. Well. You might say that
she's telling us as much as you feel this color in your work
or as much as you see it. But how much we should actually apply this
color in our work, because this is a dark color. And if I use it too much
and my work will be ruined. What can I do? See my dear friends? Something's totally
depend on you. First of all. You should be able to see pretty well and
observe pretty well. The second thing
is that you should let yourself make mistakes. I mean, you should allow
yourself to make mistakes several times because making
mistakes in painting, we will actually help you a lot. Because each time that you make mistake in a sketch or in a
painting and you even run it, you'll actually learn from it. And the next time
you'll do it better. So don't be afraid of making mistakes or ruining your work. And don't forget to practice
over and over again until you get to handle
of what you're doing. So don't worry about it. These things will just
come to you after you practice every day and you practice over and
over again every day, Even even if it's a
little, you know, you should have
enough daily practice that even with
looking at a picture, you can get the colors
of it correctly. Okay. Now, I have applied my purple color as
much as I needed it. I get to the next color. I'm using color number 326. And then again, I'll be starting from the
dark part of my work. If you've paid attention, I started all of my
colorings and all of my colors from the darkest area, from this dark point. And then I slowly move
toward a lighter areas. So just like that, I'll go all around it. I move over here. These parts just beneath
our bury, under our leaves. And all these parts. That's it. And over here I can just
see more of this color. Therefore, I apply more of it. Again. I say you should practice. You should actually improve your eyes in a way that even
by looking at something, you can figure out what
colors are used in it and how much of each
color is in there. And then I get to
the lighter area. But I'm using a very, very low hand pressure just to leave a
trace of this color. Then I move on to
get my next color. Color number 327. Again, from the darkest area
of my work, I'll start. And I moved toward the
edges to the lighter areas. With this color, I keep more
warmth feeling to my work. Before adding this color 327. We didn't have this warmth in our coloring and in
our suite are sweet, was more involved
with cold colors. But when I'm using this color which has
more red inside of it, it will actually make by
suite to be more warm and it goes more towards
the warm colors. Alright. Now, in these parts, we should use this color more. So I just do the same. So without being afraid. And clearly, I will apply this color into
these areas more. Also in these parts
below the leaves. Here and here. See, these would be applied
just like that thing. And I say easily, just remember that you should
move your hand in circles. So you would have
circulatory movement and circularity coloring. And remember to control
your hand per shirt. This is very, very important. You should practice it a lot and control
your hand pressure. I'm going to use the color 333. Well, it gives me a dark
tonality of this color. So I can easily apply the
darkness of my work in it. Here we go. Just like that. We will have less darkness here. And here. Here we are. Again, I say when you going toward
the lighter areas, you should decrease your
hand pressure. Here we go. Then I move on to
get my next color. I'm going to use
by red a little, which is number 318. And I just use it in this
way and in this area. Again, it gives my work a little bit more warmth and just applied a little
on the left sides as well. We're going to continue their
arrest in next episode.
6. 5- Continuation of Coloring Creamy Sweets: Welcome again. Well,
welcome to the continuous of the coloring of our
beautiful painting. As you know, it's coloring with color number 318 to give it a bit of reddish tone and
make it even a bit warmer. But I'm doing it very, very faintly and very lit. I'm going to use my color 329. And I'm going to
use it over here. I'm actually applying
a bit more pressure and the darker areas. This work actually makes the texture of my
cardboards to be filled. The technique that
we are working here is real or realistic. It's actually not
hyper-realistic. So it would be exactly the
same thing that you see here. In hyperreality. You should just cover the most of your white areas that
most of the texture of your cardboards almost into
98% and it would be 98%. Like your picture. I mean, it would be too close. Maybe just even one or two
details would be different. But now we're not working
on hyper-realistic. We are working in a hyper, we are working in a
real painting, sorry. In real technique. We don't have to cover all the
textures on our cardboard. I'm going to use my color 316, which is the lightest
color in my tonality. And just like that very easily, I'll apply it on my work. It's really, really
easy to work with. Just apply the color over here. And then I'm using my white color for
this prominent area, which is totally white. And then I'll just continue
it to my lighter area. And I'm actually going to fade
disliked through my work. I don't want just a lighter spot in the middle of my work, so I'm going to
spread it out and fade it into the other
colors blending. I wanted to apply more darkness so I get my blue color 324. And because here I
have my shadows, I'm going to use this blue
color over these parts. You see, I'm using too
little of this color. Then I guess my black color, and I'm going to use
it as much as I need. Okay? So I get to darkness. The final darkness that
I need from my work. Darkness of this area
would be matching here. Here we go. Alright. Then I'm going to get
a dark color which is, which has more red inside
of idiocy for this area. I needed for here, I got my color 327 because
when I put it over here, you see they are really similar to each
other, so they match. Therefore, I apply it
on this area as well. You should do the same thing. I mean, you should
put your pencils onto your picture so you can see dissimilarity of the colors Over the part that
you're working on. Then I give the final darkness, this area of my work. I can also see some
spots over here, and I just said apply them
with the same color like that. Alright, let's move
on to the next area, which is actually this sponge
area right beneath it. I'm going to use my
black color over here and create this
spongy area beneath it. But I'm doing it very lightly. Pay attention to that. Then. I would also
create some holes inside of it with my black color because they are
with black color. So I'm creating these
spots which are actually the holes
of the sponge. And I'm just creating
them in the shape and size that I see them. And of course, in the
amount that I see them too. So in these parts they're more I'll just do it more than I started flying
some dark color here. Okay. Then I'm going to use my next dark color,
which is 327. And it's more close to the color that I'm
seeing in my models. So I would apply it inside of these holes
that I've created. Then with the same color, again, I'll create some spots and
small lines over here. But I'm doing very roughly. You see, all these spots
and lines are very rough. So again, I did, as I can say, it in my picture, will come to my purple color. And then I use it right next to the colors that
I've just created. I mean, I'm using my
purple color right next to the Roth spots and
lines that I've created. Just underside of
them next to them. And also over here because
I have more darkness, I use this color more. Then I get to my lightest color. And I'm using my color 319, and I will apply it to
whole of this area I see. So I'm using my color 327 for the lower area and reddish
color that it has over here. Okay. I'm using it for the red area
over here at the bottom. Okay. Then I'm gonna get some
help from my black color. And then I fade this lower part of my work
downward, totally downward. Then now I'm going to apply some smaller shapes and spots
with my black color again. Then I will use my color 333, which is almost a dark
color for these areas. I mean, I'm using this
to fade these areas. Then I'll get to my
electronic eraser. And with the use of that, I will start applying some
lighter spots in my work. As you can see, I'm just
tapping my eraser on the work and I'm just
touching the cardboard. See, I place it, I instantly pick it up. That's how I create
my y two spots, or better say light spots. Then I'll use my black color to emphasize on
the darker areas. Just to show them more. Now, we get to this cream
area in the middle. Well, because I didn't go
to any color for this area, I would not work on
the coloring of here. I would want to work on
the rest of my sweet see, again, in this lower area, I've got a very strong darkness and it's actually
similar to black. So I apply my black and then I get my color 327 and
apply it here because I've checked it with
my picture and it was a good match. Okay. And then for this
lower sponge area, for this lower sponge area
just beneath the cream. Again, I'm going to
use my black color to create the darkness
that I see over here. As much as I see them. Applying some strong
darker spots here. Just like that. And I'm just doing
it the way that I see and I'm applying
the same texture. Now, I get to the next
color in my tonality. I'm going to use color 327 for it as a inner
parts of these holes. So just like the upper areas that we've done and just
like the upper sponge area, I'll use this color inside of the holes so they can be seen more and it would
give it a good look. Then I apply a general
color for this area. Just like that. I can
also use my color 334, which is a purple color. And then I actually fade
these black colors that I've applied here toured
upside, I mean upwards. And I would note
just leave it so fake in spontaneous there. One of the things that I like to tell you, my dear friends, is that you might actually
do this video's only once. In order to create
a masterpiece, you might actually have to do this whole sketching and coloring even more
than five times. Because obviously
it's your first time is the beginning of your work. So you're allowed to make
mistakes and you might actually ruin your first
or second practices. Because I've had some
students that they had some high expectations
that they wanted to do everything in its ideal form for the first time,
that's not possible. And if they've made any mistake, they've been disappointed. You shouldn't be like that. It's very normal if you make something bad or make so many mistakes in
your first doings. So you should practice it over and over again until
you get it right. Okay, I'm going to use my purple color for this
area and separated. Just as easy as that. Again, I use my
electronical eraser and I start creating
some lighter spots. And then I'll try to get to parse which
have been curved in. I'm going to show
them more and more. I come down and again, I start with my black color and I want to do
some coloring here. And I just apply this color
as much as I can see it. But as you can see, I'm just touching it. I'm not applying it to heart because I didn't
want it to heart. So just like that. Then I'm going to
use another color, which is my purple. And it's a dark ones. So I'll start applying my purple to create these
dark colors over here. These lower areas, obviously. Okay. So I start from the darker areas and as I move on to the lighter
areas, I just decrease. My hand pressure will
continue in the next episode.
7. 6- Second Creamy Sweets Coloring: Hello again and welcome to
the rest of our coloring. With me. For a continuing our work, I'm going to use a lighter color comparing to what we've chose
before, which was purple. I'm going to use the color 333. From these areas just like that. I'll use this color. And I moved toward the light. Like this. Again, moving
toward the lights. The next color would be my
color 329 for these areas, which are basically the edges of the black color that I've
used in the beginning. Then I'm going to
use the color 327. And I'm going to use
it for this area. I just give him more red color to my work, making it warmer. Just a tad of red. That would be enough. So here we go. Just like that. Then the last area, I would be using my color 319, which is the lightest
color in my tonality. And I'm going to use it for coloring all over my work here. Then I'm going to use the white color on the parts
which I have more light. I'm going to use my
color 318 again. As I've worked on
the upper area, I'm going to use it for the
lower area as well just to give it more red color. And I did because I don't
want any difference in the color for the lower area
comparing to the upper area. C. Just like that. Again, I'm going to use my color 327 and I'll create
several spots in my work. Okay, for its middle area, again, I go to my catalog and I see what colors can I use? If you pay attention to
your picture pretty well? You can see a color like this. It's color 330. So I have my color 330. I have a little gray
color, which is 396. Okay. First, I apply my gray color because obviously
is my darker color. The corners on these lower
edges and lower areas. And then I'm going to
use the color 330. So wherever I've applied my black colors
and my gray color, I would actually have more hand pressure and I
apply my colors stronger. But as I come towards
the center of my work, I will decrease my
hand pressure and I will make my colors lighter. Okay. And I would also use a bit of my color
318, which is red. And at last for this middle
area right in the center, I'm going to use
my white color to emphasize on the cream texture. Okay, Now, let's move on to
create our second suite, the lower one, which
is beneath it. And well, obviously, again, we are going to use the same colors as we
did for our first suite. Doesn't have any other
points that I should pay. But the only thing, the only point which is which might be a
bit different over here is that here
on the lower suite, we have more darker colors. Comparing to the suite
which is on top. I would apply my just
dark color over here. Here would be only dark black. As you see. You see, you should not be afraid here. Whatever you see in your work, you can actually apply
it in your sketch. But on the contrary, if you want to apply something
which does not exist on your work or you might not even see something pretty well. That's where you can
ruin your whole work. So again, I emphasize on
the fact that first of all, you should learn how to see
and observe pretty well. Okay? A simple site is much different from
and artistic side. In artistic side, you
should just watch something millimeter by
millimeter, detail by detail. You should actually be able to separate the colors from each other and then combine them together to get
the correct color. I apply my black color. I continued forward,
not too much, but up to a level. Then again, I'm going
to use my next color, which is my purple color 334. And it's my dark color. Darker area. I apply it over here. Just like that. Again, as you can see, while I'm moving towards
the lighter areas, I'm decreasing my hand pressure
to get lighter colors. Then I come to this lower area. And again, as I
see the darkness, I follow the same procedure
and with circular movements, I apply my colors. So here we go. Alright. Now I'm going to
choose color 327. And again, as you can see, I'm using the same
order of pencils as I used for the upper area. The difference is just
that my darker colors are more and they can be seen more and better
in the lower area, comparing to the
lighter colors and comparing to the suite
which is on top. So here we go. So just with this color, I will apply more color into
my work, making it warmer. As you can see, again, I'm using circular movements, small and big, right
next to each other. Here we go. Okay. Now for our next step, I would have to move
on to the next color. Can you guess which one is that? Well, the color number 329. I'm going to use it
for these areas here. And then my last color would
be 319 for these areas. And then I'm going to
use my white color, obviously on the most
prominent parts, and I'm just going
to make them wider. More white. Again, I use my color
327 in order to create some spots
based on my model. Here. They shouldn't be exactly on the same spot,
you know what I mean? But should be on the same area. Just like that. Now we're going to apply
the rest of our work. The sponge area for
the upper area. And I'm just saying
I'm just going to do exactly the same as I
did for the upper sweet. I mean, I'm going to
use my black color to create these holes inside
of the sponge area. I would have my
darkness at first. As you can see, I'm using a strongly right here. Then like this, I
will come down. I will create some more holes on the lower area as
well, the lower edge. So we would apply
all these spots, all these dark and
black spots here. And also maybe even
coloring a bit of here. While I'm have my hands
on my black color. I guess it's okay to move
on these areas as well. Okay. I'm going to
choose my next color. I'm going to use
my purple color. And I'm going to go over these dark spots
that I've created. So I'm going to use
my purple color on and over these black
colors that I've created. So day would look really fake. Basically, I'm blending
the colors into one another to make
them look better. And wherever I see, purple is needed, even
on the lower layer. Well, I'm make it purple. See my dear friends,
this middle area, as you can see, is on the contrary
of the upper one. The middle area of this one. The cream in the middle is dark. And to the contrary of
our previous sweet, then I will use my purple color
right on top of my black. And then I'll use my color 327. And this area. I would also use my color 327, the same color on the
sponge areas of my sweet. So here we go. I would also have to work on this lower area
to select that. Then I'm going to
use my color 319. And then again, I'm going
to use my black color. So here we go. Just as easy as this emphasizing
on the darker spots. Then at last, we will get our
electronic eraser in hand. And then we would be easily applying the lights,
lighter spots. Among our work. Here we go. Okay, so we've done these two suites up to here
and we're going to continue.
8. 7- First Berry Coloring: Hello, my dear friends. Welcome to the rest of
this tutorial with me. Well, in previous
episodes we've worked on these two suites together and we can say it's almost over. Now we are going to work on these beautiful red
berries that we have here. I don't know maybe
their arrest berries. So before anything else, we would have to
determine the colors. So I will put back the colored pencils that
I had for my suites. And I'm going to choose new
colors for the new parts. So I bring my catalog here and
I want to choose my colors from these catalog
for these berries. Okay? First of all, you can see that the main color of our berries, which is dominant over all
the rest of the colors, and more obvious
is the red color. So I need my main red here. 321. I have y right color, 321. This color can be, actually, this number can be another number in
your colored pencils. But the color is
important for us. I mean, when I say this code, I mean, the color of this code. Next color would be this, which has more
orange inside of it. Basically you can say
we have more orange and more yellow in this red and it's not completely
read anymore. This 1318 needed to replace it over here. The next color. Well, we might sum, we might need some of the
colors of the suites here, e.g. the dark color of 327, or this is 377, or even 325, which
are dark colors. And they are also
needed for our berries. And then we use them
in our streets. Or even some lighter colors
like 319 and domain purple, which is 334, 337. And I've already got 319 here. Okay. We also need this color, which is 330, for some very light areas because
they're not actually white. So we might need
this color for them. We also need our white color. You see on some more
prominent parts we need them. We also need to blue color 344 for our shadows of the work. For these areas. The dark shadows and shades
we have on the berries. And another important color that we might need a
lot is our black color, 399, which you can clear it, get it out of your colored
pencils, and that's it. Okay. Now we're going to apply
these colors into each other. Ibs starting from
the berry which I have on top. Everything. I wanted to create a
background for my whole work. And I want to teach you, I mean, I want to teach you
how you can create the general shape of your Barry. I mean, you don't have to create each one of these
circles on your berries. You're going to create
it much faster. But get the same look. For that. I need a background color. Before everything. I sharpen
the tip of my pencils. And then I'm going
to use my color 318, which is my orangeish red. And with this, I'm going to
create a background color, a general background
color for my berry. See, you should not use any strong hand pressure for your background coloring. I insist on that. You should never have a
strong hand pressure. While you are doing your
background coloring, you should just have your
pencil with a medium pressure as just a touch of your color. I continue this way and I will color all areas cohesively. With one hand pressure. You should control
your hand pressure in a way that everywhere
all of your work, the background color that you're creating
with be the same. If you can not control
your hand pressure will obviously a part of
your work would be darker and another
one would be lighter. And we might say that your
work would be spotted. It will have some
spots and stains. So this is very
important for you to control your hand pressure in order to have a clear and
cohesive background color. So I just continue this way and I apply my background color. I'll darken my background
color layer by layer up to the part
that it's needed. I also work on the edges
and I'd be careful not to miss any place or
any spot without any color. Okay. In excess that we
are going to create these small parts
of our berries, these circular small parts. I'm going to use my
color 327 over here. And based on the texture
that I see here, I'd be applying the shapes of these circles, small circles. So basically from right here, I will create these shapes. As I see them. Be careful that you
should not create these circles in one shape. They don't look like each other. I mean, they're
not all the same. If you do that, your work
would not be real anymore. And it's actually some
orderly disorder. In so many places. In painting we say that at the same time as you are going
to create so many things, some things randomly
or without any order. At the same time, you should have or
they're in creating them. Especially when you're
working with nature like creating leaves or
things like this. At the same time as you
are creating and placing them in various
enough any orders, it should have a specific order. Deep down, e.g. these are not all the same size, but they have all
a similar shape. Again, this shapes
are not the same, but they are similar. So we can have the illusion
of these Barry parts here. Always keep one of your eyes on your model and the
other one on your work. Something that I see a lot among students is that sometimes the students will just
forget completely that they are creating their
painting from a model. And they didn't
look at the model anymore from one point on. This will actually make you to create your painting
by your own mind. It's not a problem. It's okay and it's good if
you use your creativity, but if you are
doing a simulation, if you are working on paintings like these, which are real, you should create, it's similar to what you see and what
you have as your model. So you should constantly
keep an eye on your model, and at the same time
you should keep an eye on your work
that you're creating. In this way. Just
as easy as that. So we've created
them part by part. And now in some places
in between them, I would have some more darkness. As you can see. We'll create them. And it will make a good
curve between these parts. We want to demonstrate the curve between
these small parts. And in sketching. And basically inpainting
the depth are darker and the prominent
parts are definitely lighter. So wherever and whenever I've, I'm trying to get a
place darker with one color per cell or different
several colored pencils. Whenever and wherever I'm
trying to apply darker colors, I'm either showing a dark shade or I'm showing a
depth in these parts. Textures like these are
more I forgot about here. We will complete it. This part's background coloring. And the darkness
over here is too much that texture of these Barry parts are
not really visible. So I just do it as I see. Here, we go. From one side, I start applying the darkness
wherever I see them. And I will use my color 327. You see this color matches
this area of pretty well. So I'm actually
coloring and darkening the parts that I want with this color wherever I see them. Okay. Just like that, you see it's really easy. You just have to
practice it enough. So you can get the idea. Here we go. Wherever I see this color
included in any area, I applied exactly as
I have in my model. See how easy it was. I've created a background
color that I've created the pattern of the berry
parts on top of it. That did the trick. See my dear friends. I'm actually applying some
spots all around my work. This is called the spotting. And as you can see, I've applied all the colors
like spot source things, but in their own
placement, of course. Now, in next step, I'm going to use
my main red color, 321, which as I said before, is the main color of my berries. So obvious lesion, apply it. I would give more red to my color from one
side to the other. And do not worry about these lines that you've
created in order to separate these Barry
parts from each other. Because at the end I'm going to apply them
one more time and darker. So you should just
pay attention to the direction of my coloring
and how I'm applying them. So to understand what
I'm exactly doing here, just like that. Very easy. The
procedure is the same. You just have to change
your colors for this area. Then I come to this side and I apply bit more
darkness to my work. Alright, now I get to
my main purple 334. And another thing
that I wanted to tell you just remembered, sorry, is that in the
beginning episodes, I've told you that you
should definitely use semi-professional or professional or advanced
colored pencils. Why did I say this to you? Because the more that you use your the more that you use
professional colored pencils, the more would be
the possibility of having more advanced and
professional painting. Well, some people
might just say, it only depends on how well you've learned
your technique. It's totally true. You can understand
it up to some level. But the tool that you
use is very important, that it should be
pretty well and you would be able to go over your work the way
that you want so it can affect your work strongly. You should learn your
technique pretty well and you should
have good tools. E.g. this fabric castle colored pencils
that we have here, which is very professional. You can either use classic
ones or polychrome in different kinds
of painting methods. And why do I insist on this? Because it has some
oily features, some oily good features, and it has a high color pigment. It means that it gives you
more color and good colors. And it will actually
allow you to apply more layers of colors on
top of each other, e.g. six or even ten. You can not do the same. We cannot do this with
normal colored pencils. You can not bring too many layers of colors
on top of each other. Specifically because
the effect of the lighter colors
in the combination of the darker colors would not show themselves pretty well, a normal colored pencils. So we're going to
continue their wrist.
9. 8- Second Berry Coloring: Alright, welcome to the
next episode of our work, which is completing
our berry here. Previous episode, we've talked about picking the
right colored pencil. And as I told you before, picking a good quality color
pencil will be really, really effective on your work, on the quality of your work. It will actually
help you to show your ability is
better and better. So try to provide
the color pencils, which are at least
semi-professional. They, they shouldn't
be normal and basic. And you should consider
something else too. If you start with a professional
tools in any techniques, it will actually make
you better and it would make you
more professional. So these were the
points that I had to tell you about providing
your colored pencils. Obviously, the final
decision is yours. Then I get my color 327 again, and I apply some more darkness
all around my work here. Specifically in these lower
parts of these very parts, each one of them, I mean, each one of them on
the bottom parts, some of them, they should
have these darkness here. Now, this is sub, I tried to cover the
white parts of my work. You might say that
in the picture, in the model, you have these
white colors. Why two spots? Why should we cover them now? Well, we're going to
create them again later with our electronic
eraser in the last step. So don't worry about them now, for now, you should cover them. Then you should use your white color in order to fade the lights on your work
into the rest of the colors. Or better to say blend
your whole work together. Then I'll make my
work more cohesive. Just remember to apply it on the light parts of your work, not the dark parts. Just as you can see
I've done here. Okay. In next step, I'm going to use my black color again for applying a strong
darkness on my work. Strong and final
darkness on my work. I'd be starting from
these edges and sides to apply the
darkness on my work. So be very careful over here that the darkness
you apply would be, would not be linear
and they should be faded toward one side. Something that I forgot to
tell you about is that in painting we would not leave
any specific lines anywhere. I mean, whatever
darkness that we create with black color or
even other dark colors, they should definitely be
faded toward one side. All of those lines should
be faded toward one side. Should get out of
its linear shape. As we move toward the
left side of our work. I will actually decrease
these darkness. Then in some parts
they should be more, in some others that we want
to show the depth more. Well obviously, you should
use more like this. So just like that, you should apply the darkness
wherever it's needed, even up to the top of our work. Alright. Now that we've applied our
black color, and again, we're going to use our color 327 and apply the final
darkness to the work. I mean, I go over some black
parts that I've created. I go over some darker parts. And this way I'll blend all
of my colors together and I get the depth and
curves that you've seen, how many layers we've
actually applied over here. That's why you need to have good tools and
appropriate cardboard. Okay, Next us that we are going to apply the
lights on our work so you should definitely first clean the tip of
your electronic eraser. I'm going ascending, or you can also apply
to own a paper, to erase it, to clean it. And then you can
bring your eraser to the work and apply the
lightest spots in it. Now, be careful the
light side to you apply. If you are applying
them on the left side, they should be all on the left. So if you create some
of them on the left and some others on the right, it will actually
ruin your volume, ruined the volume of your
shape and also the contrast, the shadings and the source
of your light would be wrong. If you start on the left, place them on the left. You should always consider
the source of your light. Alright. Now I'm
going to use my color 330 and fade these parts on
the sides of it like that. Then I'm going to use my blue color that
I've chosen before. I just go over these
parts so little. On the parse that we
have shades and shadows. I apply a darkness,
or better say, I emphasize on the darkness a bit more with this blue color. Just as you can see here. Alright. Then again, I change it to
my black playing it here. And it would be
just easy as that. Alright. Now let's
work on this berry. On the lower area. The top one on the lower area. I'm going to apply the same way, the exact same way
as I did on top. So I start with
my orangeish red. Red with a touch
of orange color. Or a touch of yellow
color returns, say. And then I use it to create a background color of my work. So first, I'm going to
lighten the primary sketch. It would not make
any mistakes for me or any problems for me. And I started applying
the background color of my work with creating small and big circle,
circular movements. So under area, which my buret is darker, I tried to apply my background
color a bit darker. Comparing to the
rest of my berry. I should be careful that my coloring would have
to be circularity. If you did like this, if you color it with
linear method, it's okay. But if you want to eliminate the direction of the lines or the trace of the
lines from your work, you should apply
circular movements of coloring on the next layer. So anyways, it's better if
you do it right from here, right from the background color. All right. Saying I'll continue over here. And I apply it here. Which is a depth and
a shade of my work. And my berry would be definitely
darker for these areas. So I would apply darker
background color for here. Just like that. So here we go. As you can see, I've almost a cohesive, good background color. And now I move on
to the next step, which is determining the texture of the berry for its dark
parts which are here, I'm going to use my black color. And for the upper parts
which are lighter, I'm going to use another color. So I tried to create
it. As I see. And based on my model, say the procedure is the same. I've just have to change the
colors based on my model. And as you can see,
sometimes these parts, these textures look like ovals, sometimes they
look like circles. And I try to apply these differences on
my work as well too. I mean, as well as I see them. So my work with
look more natural, it would be too fake. And again, I say you
should not create them in perfect circles are
perfect shapes. They should have an order, but it doesn't mean that they shapes should be
totally perfect. So I continue as I go up. I would have to use less of my black color or better
to say using it lighter. So basically I am decreasing
my hand pressure over here. Here we go. Also over here. Okay? Now I move on to
apply my color 327. And then I create the rest of the textures with this color 327. Here we go. So it would be like this easily. Here we go. I would also have to do the
same for this top area. Same texture of my berry. So they should be
applied just like that. See how easy and perfectly
We've got our second berry. And now I'm going to use
the same color in order to create the parts which have this color and
are a bit dark. So I am using this color
wherever it's needed. Just like this. And one by one. I will apply this color
wherever I see it. We're going to continue
in next episode.
10. 9- Third Berry Coloring: Hello to all of my
dearest friends and welcome to our next
episode. Alright. We were working with our
color 327 in order to apply the required darkness
in their own placement so we continue our work. And wherever I see this color, I apply it the same way. K. Just like that. As you can see,
these lower areas, these parts where the darkness is more comparing
to the other parts. Too much dark. Just like that. It would be done. Alright. Here we go. In these lower areas, I should use more of this color. So as I come up, I will have this color lists because this upper area is
the lighter part of my work. So just like that. And then I move on
to my next color, which is my main red. And I use it for the rest of the places
that I've got here. Just like that. As easy as you can see here. You see the procedures are
not that much different. You just have to pay
a bit attention. And obviously, practice,
over and over again. Practice makes perfect is
we always said, alright. And C, I would have to
emphasize on the line between some other
parts with this red in order to show them more. I mean, I'm going over these just to make
them more visible. And also these lower parts. In here, we have too much light. And obviously, I would decrease the darkness
of my coloring as well. Just as you can see now. Alright, here we go. Now, I can move on to
work with my main purple. If you don't remember, this is color 334, which is my main purple. I mean I mean main purple because it has red and
blue equally in it. I mean, it doesn't
have more red or more blue comparing
to each other. So if you're finding
trouble with decodes, this might be easier for you to find if you just
follow the color. Now. If in background coloring, you would apply your color with a high hand pressure and feel all the texture
of your cardboard. In next steps, I mean, the medulla sips of your work or even at the last
part of your work, your cardboard would
be so slippery and the textures of it
would be fool that it would not accept any
more colors on it. That happened into your work. You should be aware that
you've made this mistake. So you should know how
much color you are actually applying
to your cardboard with the hand pretty
sure that you've got. Because if it's more
than one point, you know, it's not going
to end up well for you. Okay? So I'll just
apply it here. Just like that. And very easily see. Very, very easily. Just apply my color wherever
it's needed to be applied. It's really easy to do now. Okay? Now, in next step, I'm going to use color 334, these parts which
have been left white, because I don't want
to leave them white. I'll actually fate them and blend them into my other colors. Now I can even use a
bit of my black color. And I give these areas stronger
shade, stronger Darkness. Specifically for these parts, for these lower parts. Over here. Here we go. K. We are very careful that we apply the darkness the exact same way
that we see them and put them in
their own placement. Not more and not less. Alright. Here we go. Well, in this area, I would definitely
have more darkness, as I will see it in my
model, in my picture. So it goes. Then I get my color 325 and I just move on my area with my 325 in order to make
them a bit more darker. And then at last, I'm going to use my electronic
eraser to create delights. I can see here like that. Easy and nice. So again, I say as the way, as I see the lights in my work, I would apply them. And obviously in the
darker area of my work, these lights can be seen less like this. And at last, I will use my
color 325. And it's done. Alright, we're gonna move
on for the next berry, which is this one, the right, bury the one on the right. And just like the previous
steps, first of all, I'm going to apply one background color
with my orangeish red. So you should erase all the extra lines from your primary sketch so your
word would not get messy. This is my color 318. And I just apply the background color in a literary method just
to make my work faster. And then I go in the opposite
direction and at last, I would apply it in
circulatory movement. So in circular movement, I'll actually fade to trace over my pencil and the
direction of my coloring. Very easy and beautiful. So alright, in these areas, I would have more
darkness as it's obvious. And over here, the same again. But the most
concentration of darkness would be here on the
right side of my berry. See, again, I say
the procedure is basically the same
for all the berries. You should just consider your
model and move on with it. Now I want to apply
its textures. I start from this side and I apply them with my black
colored pencil at first. And obviously later. I would go with other colors. Okay, here we go. Just take it really easy. And remember that you should
control your hand pressure. This is the most important
thing in whole of our work. Controlling to hand pressure. Wherever you need it more, you should increase it, and whenever you need it less, you should decrease it. Over here in these parts,
these Barry parts, the textures are
actually bigger, so I am going to
make them bigger. And I would not intervene. I say, okay, why it's too big, I should make it a smaller know, maybe there are parts
in your work that being your primary sketch or in
the beginning of steps of creating the edits
would be fake for you, but you should not change it. You should create it as
the way as you see them. I've seen this so
many times before that students would just change the details whenever they think this part of their work
is unnatural or it's vague. But actually, when they're done, they see that they work would look unnatural
because they've changed it. I'm using the color 325 and continue the risks of the textures and
details on my work. So again, I emphasize on the fact that you
should not change a thing even if you think it's not looking good in
the beginning stages. Because when you're
done with your work, it will going to look better. Alright? So I'm just working like
that here and there. Completing it. Alright. Now I can start from
these lower parts and I would just start with
my purple color at first. I would apply the darkness
that I see over here. Now you should pay attention to the movement of my hand and the way I'm applying
this color into my work, this is the important thing that you should be
looking for right now. Okay? And then in these
parts is the same thing. I applied the darkness the
same way that I see them. But of course, the
concentration of this darkness would
be more in this area. Alright. So here we go. Just follow the
movement and make sure that you're following
steps in order to make your work
similar to your model. It's very important. And harried goes up to here. We will continue the rest of the tutorial in next episode.
11. 10- Fourth Berry Coloring: Hello, welcome back
to the rest of our tutorial for this
beautiful painting. Now, in this step, I'm going to use my color
327 to work on these parts. And we will give this
area more red color. So I'll just continue this way. And wherever I see this color, I apply it. The way I see. Just like that. It's really easy. You
should just practice to see the colors better. Then I'm going to use
my main red color in order to give some
places more red color. I mean, I want them
to be even more red. It would be just like that. Very easy, very beautiful. You just have to pay attention to the
movement of my hand, my colors, and your own model. Same way for these areas. Who would just apply the
colors in their own placement. Alright, then I'm going
to use my color 319 to go over these areas and fade
them all together completely. Then I use my blue color in some areas in order to
create darker spots. Especially for this
right side of my work, which is a dark side of my work. And then I use my black
color in order to apply the depth of
my work altogether. And be careful, the tip of your pencil should
be definitely sharp, especially in these parts
which we are applying. Very thin or small details should be 100% sharp. So here we go. We would actually be applying the strong darkness and
depth that we see here. Wherever I see more darkness, I would apply more darkness. Same mount. Alright. So forever I've got the light. In the light areas. I'm only going to
apply some depth and darkness with my black
color in some parts of it, not everywhere because I should be very
careful around here because it is a
light area overall. So I should be really
careful with my black color. Here we go into darker areas. I can use more of my black. That obviously we're not
going to work on the shadows, on shades beneath them. And at less, I mean, at the end of our work, we will work on these
shadings and shadows. Right now. We're just going to focus
on the rest of our work and our berries and leaves. Then I'm going to
use my color 325. And I go over all these darkness in order to give some kind
of pink color to the work. And just blend the colors altogether and fade
them over one another. And then at last, I'll use my electronic eraser to apply delights on my work the same way
that I see them. Just like this very easily
and very beautifully. K. And then I'll use it less
in the darker areas, but I use it in some places. Now, we are agreeing to
work on our last berry. And we're almost getting to the end of this
beautiful painting. Just the same way as I created
the other three berries. I will lighten my
primary sketch. Then I would apply a very
cohesive background color. And I'm using the color 318
for this background coloring. It's actually a reddish orange. Is actually an orange which
has more red inside of it. As I've told you
before several times. I'll just continue the same way. I just continue the
background coloring this same way for a while. Okay? And then in next step, just like the previous
barriers that I've created, I start first with
my black color. To apply. The details and
textures on my berries. Are bidder, say my Barry. Okay. Here we go. Applying them all over here. And as you can see, I am very careful not
to misplace anything. And I am trying to
create these things as close as I can to my model. I'm not going to
lie to its source, going to be this easy
in the beginning. But if you have enough practice and if you
spend enough time on it, well, it gets easier and
easier for you each time. Do not give up. If you just couldn't create it for the first
time or the second, you should have lots of practice and it should be consonant. I mean, you should not
just give up on it. That's how you would be able to create these kinds
of masterpieces. Alright, I am going
to use the color 327 for the rest of these parts. Going over them with
this color in order to blend them more
into my whole work. And then I would go over some parts that I've created
with my black color. Now, I'm going to
use my black color in these areas and I would apply it because I want to
show some depth over here. So I'm going to create
the darkness as shapes, all the spots and stains over here like that. And here we go. And I just did the same
in these upper areas. Especially because from
behind this berry, I should have a
different kind of darkness to are these
other barriers. So I can show that perspective in my painting
and show that this bury, the right side, Barry is
in front of this one. So I should give it
enough depth and enough shadings to show
my perspective in. And then I'm going to use my purple color in order to apply the darkness and
emphasize on them even a bit. I'm going to use
the car 327 again to color these areas
completely. See. And I just do the same until
I get to these front areas. Now, for the rest of them, I'm only going to apply it apply this color to the lower
areas of these Barry parts? No, everywhere. Here we are. Then I
get to my color 321, which is my main red. And I would apply it
over these areas. And I have here one-by-one, apply my color here one by one. Okay, now I'm going
to use my color 319 in order to cover all
these wide parts of my work. And then I've done that
clearly and thoroughly. In next step, I'm going to use my electrophilic eraser to
create some lights over here. Just makes sure that the tip
of your electronic eraser is clean and without
any color on it before you apply
it on your work, anywhere on your work. Just like that. Very easy. Here we go. And then again, I'm going to use my
purple color over here. And actually I am emphasizing on some of the darkness that I've
already put here. As you can see, I'm applying more hand pressure here,
strong can pressure. And then again, I can use my electronic eraser to get these slight
lights over here, even into darker areas. Then I will use my color 327. For these areas. Then I will use my main red. And also even a bit
of black color. Very, very lightly
would be applied here. Alright. I would
also have to apply a darkness from here
on my upper bury. That again, I can show
more perspective. And I can see this
berry is more in front comparing to that one. And now we're moving
on to the end of our work and creating
these leaves. In next episode for
continuing this painting, I'd be with you.
12. 11- Leaf Coloring and Finishing Coloring: Hello and welcome to
the last part and the most interesting part of our painting are going to
complete it all together. So we're going to start having
the colors for our leaf. So I get my catalog again. And I'm going to choose
the colors that I need for my leaves from my catalog and from
my colored pencils. Okay, First of all, I'd applied here on
my green colors. I need my 370 from
the lighter colors. 370. This is my 370. I also need my color 363. I would also need my color 359, which is my main
green, and also 357. For these areas. I need them for the
darker areas in addition to our black color. Okay. First of all, I'd be applying the darkness that I have here. And I will start with
the darkest color that I have, which is black. Okay? So I just start applying
the shadings over here. And I am actually
getting the textures of it with my black color
because they are too dark. Alright. Let's kinda
look like this. In this area. Also, this darkness
would come out of here. Simply going this way. And in here, it
will go like that. Alright, now I'm going to move on to the next
color that I have. And I'm going to use
my main green 359. And I go through these
parts which I've created the darkness with my black color and then I spread
it or better say, I fade it toward the sides. And actually I'm applying
a strong hand pressure on the darker areas and a lighter hand pressure
on the lighter areas, as I've told you
before So many times. K. Then I'd be applying
it here a little. And from here on, just do the same thing. I'll continue my work. And it's the same over here. Alright. Now, I
would have to shade these outer parts
of my leaves toward my berry so I can actually separate them
from one another. Then I will use my
color 366, like this. And I'm actually applying
it on the parts which I have used my main green. And at last, I will
use the green color 370, like this. Okay? And I will use my bluish
green 357 for these areas. Okay, and here we are. Then I get my electronic eraser. And in this part, I'm going to use my
electronic eraser and apply these light
textures the way I see them. And it's the same
over here. Okay. Would be like these
in these parts. And here we go. Now I can move on to grab my
black pencil again. And I am going to use it in order to apply
these textures, which are the
textures of my leaf, or better say, leaves. Apparently we have
more than one. This. And very easily we could
actually apply these leaves. It might take some
time from you, but trust me, it
would be worth 80. Now, once you get them all done, you can look at
your outcome and it would be beautiful and perfect. Alright, Here we go. Just like that. All right, my dear friends, for the last move on my
work and just to make it and I get my cutter and I used a
sharp edge of my cutter. And I drag it on
my work to create some lines like hair,
kinda like hair. And I apply it on
my work like this. Okay, here we go. Or in these parts. And we do the same
thing for this berry on top as well. Okay? Now, the only part that has been left is the shadow
and the shadings. On the bottom of our work. I'm using my color
300th to four, which is my blue. So I shade these areas a
little just like this. And this lower area. And I will use my bluish purple. I mean, it's a purple with
more blue in it. 337. I would also use enlists. Hello, my black color. Just like that. And I have this darkness
right from here. C. And I would also use my gray color for
the last part of my work. So I would apply it with a strong can pressure
on the darkness. And as I move on
toward the light, I decrease my hand pressure. So now this is the final
shade of our work. Okay? You see, this was our first tutorial from
colored pencil technique. I hope that you've enjoyed it so much and see you later
in next tutorials.
13. 12- The Basic Drawing of Glass Bell Pepper (Checkered Method): Hello to all of my dearest
friends and welcome to a new episode of Learning colored pencil
technique with me. Okay, In this episode
we are going to learn how we can create shiny things and maybe even glass texture with
colored pencil technique. The model that I've
chosen for this episode and this tutorial is this
beautiful glass bell pepper, which is read as well. So first of all, as usual, we have to transfer our
primary sketch into our work. In this tutorial, I told
you that how you can actually use geometrical shapes in order to create your work. I want to teach you
another way now. In this way, you should definitely print
your model or you can place it in your grid page of your or greatest screen
of your cell phone. Because this way
that we're going to work in together is actually the checkered way is called checkered because
it is going to be checker. So right now, I'm going
to divide all the parts. I mean, the measurements of
the top of my work was 14 cm, so I divide it into half and the seven would
be the middle. So then I connect these
two points together. Let me check this area
one more time to see me. Make sure it's seven
and it's in the middle. So seven would be here. Now, I will attach and connect
these two lines together. Let me apply it here so my cardboard would
not be damaged. Then I'll do the same thing
on the vertical sides. So this would be seven
and also seven here. And then again, I will connect
these two marks together. You see, as you can see, I just divided my general shape, my model into four equal parts. That depends definitely
on your model. I mean, sometimes your
model is very complex, have so many details that you can not do it with
only four parts. In that case, we are going
to divide each one of these parts into another four. And you can just make these
divisions smaller and smaller until the transformation of the model to the cardboard
would be easy for us. Because this model doesn't
have so many details. Four equal parts of division
is okay, and it's enough. So I'm just going to divide my cardboard the same way
into four equal parts. Okay, So I apply it
into my own Cardboard. See, now, next step is that I would
apply it part by part, like a puzzle. Okay? See, in this area, first, I'm going to work
on my first square. I say if this is the, actually the middle of my line or the middle of
this side of my square. I will find it on my cardboard. I will make it into half. And if this is the half
point of my line here, I just make it into half
on my cardboard as well. You see here we have a triangle, as you can see, for the
stem of the bell pepper. So I apply it just like that. And this would be
actually one of my guides through the work. Now I want to consider
this upper area. If I want to consider this. It would be actually half of this area and a little
bit more above. If this is the half, this would be a
bit more above it. I apply this line. And now very easily I can create this part
of my bell pepper. See, just came down this way. Up to here. Now, if this is my
line over here, I have some distance.
Is this much. Then parallel to this one? I will create a line coming up. Now I want to see where does
this end if that's the half of my work or the half of
this side of the square. I have this much
distance from it. So it would be this
much, apply this line. And the end of it would be here. So I'll take this
and I continue that. And then from here, I know I should come down
completely like this. And I come up the
same parallel way. Okay? Now that's the top side. And now we're going
to create this area as well. Over a year. It goes down. I mean, it comes up and goes down again. As you can see, it has
some ups and downs in it. A curved line. Here would be this. You see, I'm just creating my bell pepper part by
part as I told you before, just like a puzzle, I'm going to darken my lines
a bit more so you can see because my hand is used to creating these primaries
sketches lightly. So I'm just going to go over them once more in some places
so you can see them better. I think it's visible for
you and clear for you now. Okay. And we can add some of the details
right now while I'm creating my primaries get just as the shape of
lines and that set. Now, I'll continue this and from here I
come down this way. Remember that as you can see, I am doing my
measuring just by eye and just by looking at
my model and my work. But a few are a beginner. You can use your
ruler for some parts. But when you are used to it, when you practice, you
can do it with your eyes. You see I have two
triangles here, one on top and one
on the bottom. And over here would
be the rest of my bell pepper coming up. And I would say it have it has
been coming to the middle. Just like that. It would be Here. We have already created this
part of our bell pepper. And now we want to work
on the lower areas. Again, I will divide this
side of my square into half. And I'll do the same
in the cardboard. And then this would be the
distance of the bottom of my bell pepper and
to half of my side. So I bring it down from here
and connect it to this area, which is the bottom
part of my bell pepper. And then again, from this side, I'll do the same. I bring it down. Just like that. This is actually a general
shape of my bell pepper. And I'm just going to add some of the details that
I need in my work. Not all of them, not completely, but I am going to create
some of them, e.g. these strong specific light
shapes that I have here. So I apply them. Okay. It wouldn't be just like that. Here we go. Now this is how we've created the primary sketch of
our work, of our model. And I don't think
anything is missed here. And that's it. Alright, now we're going to look for the colors from our catalog. Obviously, the colors that
we need for coloring. And we're going to choose
them from our catalog. Before we go to that, I've decided to erase the extra lines from
my primary sketch. So it would be a bit more
cleaner and I can work on it easier. Okay. Here we go. So be cleaning our work. And that's it. And now we are going to choose the colors from the
catalog, right? From this catalog, I am going to choose my
colors based on my model. If we want to start
from the dark colors, obviously I need black
color a lot in this model. So I'm going to pick it up. We need the red colors, so we pick them up. 321, which is my main
read, 318, tomato red. And we need some more
red colors over here. We can use 327, 319. These are the colors that
I picked up, up to now. So 321,318,327.319. Okay. This is actually a brownish
red which is 30922. For some of other colors. I need to color 30424,
which is a blue, as I told you for some parts of the shadings which are too dark, and I will use the
color 329 as well. This is 329. This is 344. Just to show you
my main read, 321, my orangeish red 318, 319,300,922.327. This one the one that
I'm holding is 329. Okay? These colors
are enough for now. And now we're going
to start coloring. As I told you, we are going to start our coloring from
the darkest colors. So I'll be starting
with my black color. As the same time
that I'm coloring. I'm going to explain
you how you can, how you can create a difference while you are creating the
glass texture in your work. Create a darkness. The way that I see them. Applying the color in glass
textures are a bit different. What's the difference
in between them? While you're working on
these shiny objects like glass that we're creating
is going to look shiny. So in order to show that we
have to actually differ, our way of coloring. If you remember, the previous
texture that we were working on was image
texture and it was normal. So we would apply the
colors in a way that they would be actually
faded into one another. There won't be any
borders between the colors and all
of the colors. We're just blending into each
other and fading into that, fading into each other. Sorry. But this does not happen. In shiny objects like
metals or glasses. Or it will happen less. Because, you know, the feature of glass and metal or these
kinds of shiny objects, is that the colors would
actually be placed next to each other with a high
contrast and so separated. It means that a very dark
color would actually be placed right next to a
light color without any, without too much fading, without completely
eliminating the border. So I'm applying the
darkness the way I see it in some parts
of darkness is less. In some parts it's more. So just be careful about that. You should go through debt. Okay. As I was saying, the difference is that the amount of the fading
and blending the colors into one another is much more less comparing to
other textures. This is one of the
things that can actually create a difference
in the texture of your work. Making it shiny. Right now, we do not need any details and we are going to apply the
general darkness in our work. So do not Zoom too
much into your work because you need to apply
every little detail, every little darkness right now. Just remember to keep the tip of your pencil sharp so you can go through these areas exactly
the way that you want. Alright? Just like that. And it's better if you
would not actually apply your darkness too much. I mean, while you're
coloring with your black, just try to leave some textures of your
cardboard empty so you can apply another layer of color on top of it so
it won't be too fake. And it would look more natural. So while we are
applying your darkness, try to leave some free spaces in the texture of
your cardboard. And again, I say you should pay attention which parts
have more darkness, e.g. here, we started with lighter
and we went in darker. Now I'm going to work
on the next part here, applying the rest
of the darkness. Okay. Dislike that easily. I'll continue. And the part that I
have less darkness, I'll do it in my work as well.
14. 13- Primary Glass Coloring: Hello and welcome back again. We're going to continue this interesting and beautiful
tutorial altogether. And we were working
on the darkness very slowly and smoothly. So we're going to
continue the same way. And wherever I have
a stronger darkness, I apply a stronger, wherever I have weaker darkness, I apply it as well. See, dress like that. Then we'll continue that. And you will have this a
strong darkness over here. Just like that. It will come down. You see, I'm applying
these areas. I am paying attention to the
light areas that I would not ring any darkness
there because if I do, I actually run it because
it would leave a trace. It's like it's a strong color. And I have some
darkness over here which are really strong and
which are completely dark. And here we go. I have some kind of light over here, so I'll keep it right
from the middle of it. I start working my
darkness again. Just like that.
This area is light. And again, over here I
have a strong darkness. See. Pay attention to
these shapes that darkness have been applied
to direction of them. The shape of them is
very important because that's actually how you
can see the curves, the depth, or the prominent
parts of your class if you don't apply them
the way that they are, or if you just do them
imaginary form your own mind. You cannot get the texture
of glass pretty well. So pay attention that you should apply the
darkness the way exactly the same shape and the
way that you see them the same shape and the same
amount that you see them. So you can show
these ups and downs, these curves and prominent
parts all over your work. And emphasize on the
texture of the work, which is glass here. Okay. Now, I will come down over here, come to lower areas. I would also apply the
darkness over here. Again, I say the same
way that I see them. Not more. And obviously
nel two lists. Here we are. I will also apply to darkness for this
lower area, the same way. And then I will continue upward. And I will do it cohesively. The way that you can see here. Okay, Over here
we have this kind of circularly shape,
which we apply. Again. Say wherever you
see it, you do it. Then we can move on to the
to-do these upper areas. Sorry. And that's how it's done. The procedure is
basically the same. Again, you should just take
your time with it and make sure to apply the
shapes as you see them. And of course, the same amount. Then obviously the
ending parts of applying the darkness
last parts here. K. Just like that, we've created
the darkness up to here. In next step, we are
actually going to apply a color which is one
degree lighter than the black. Before I move on to my warm
colors and red colors, I want to use my blue
color, 34042 colors. Some areas see e.g. these parts which
are strongly dark. E.g. these areas, you
might not see the blue. I mean, you might not see
this blue in your eyes, but there is a blue in
the shadows and shadings. Obviously this blue
would be covered later by the other layers of
color that I apply. But you see, this is actually
the color 344, this blue. And it has a kind of
darkness inside of it that each color that you work on top of it doesn't
matter and it keeps the darkness that you want
in a shade in your work, no matter how many layers of color would come
on top of, it. Just keeps the darkness
the way you want them. Okay. So for all these parts
that I have Darkness, which I don't want to lose. This is my just dark area. I mean, I have a strong darkness
here and it's all dark. So I would not work on
these lower areas too much. And it would be just like that. Then around this color
that I have here, around this light, I would
have some more darkness. And over here, the same way. Okay, Now we're going to move to the next tonality
of our work, 392. And then again, I
apply this color from my darkest areas on the places that I've already
applied, the blue color. I would also take some of
this color to the side areas. You see that when I apply it on the blue areas and the parts that I've used, my blue color. Then I slowly move toward the
parts which are next to it. Just like that. In these areas, these areas, over here. Again, these upper areas, and here, I can easily use
this color, which I am. Okay. Here we are. And even if you
look at your work right now, it's called that feeling
of glass texture. Then for these areas, I will also apply
the same color. For the rest of them. We are going to use red color so we can give it that
beautiful reddish touch. Okay. Now I want to use my main
red color, which is my 321. You see me show you here. Here. 321, this is my main
color, main red color. Then I start covering all
these parts with this color. And I try not to leave any of the parts white or uncolored. I'm just doing it
with a higher speed, but you should pay
attention to that. You do not need to use
this kind of pace. I mean, if I'm finishing
a model and work in 2 h, it's okay, you should do it in 4 h. You should finish it in 4 h because you're beginners. And if you rush through debt, you might actually make
mistakes and ruin your work. So do not rush through it. Take your time with it, and do not be obsessed with finishing a model and a work in a very limited time in short-time
doesn't turn out good. Now in these aside areas, I will have them just so AC. And then over here, like this. Here we go. Now I'm going
to work on the next area. These areas. I will actually bring some of this red toward
the wider areas. And I drag it a
bit more forward. So I'll do it just like that. For all these parts here. Also from here, I will bring
some light to my work, but I will not have it until
the middle of my work. Step it right there. See, I can actually cover all of these parts
with this red. And I'm going to take
help from some places. I mean, I'm going to take help
from my reddish orange or orange-ish red for
some parts over here. But of course, even in here, we have some details
and detailing. I say again that we are only working on the general
shapes right now. Not much more. So again, I go to my Color 321 and
I'll continue my work. Then. I'll use my color 327. And I will color here. Not too much. Right. Now. I will also drag some red color from these
parts into my work. And then at last, I will use black
and white colors in order to apply more details. So we're going to continue
this tutorial in next episode.
15. 14- Completing the Drawing and Coloring of Bell Pepper: Hello, and welcome to the
rest of our tutorial where we were working with our red color and we were
covering all the parts here. So we are going to
continue the same way. We are moving on. Just like that
easily and slowly. Again, I say, you shouldn't
not rush through anything. It can only ruin
your work. Okay. Now, I'm going to
use the next color, 327 for these areas. And also 3194 here. Okay? Then I'm going to use color 392 for this darkness
I have over here. And then I would have
my white collar. For here. Even use the bits of my eraser. But basically I will apply my white color here
to create this light. Beautiful light we
have here. Okay? Now I'm going to use
my black color to apply some more darkness
all over again. E.g. these parts. And then I move on to create
the details of my work. Just as you can see. I'm creating to details here. So I would apply these
a strong darkness here. With having some
light and details. I'm just applying
them into my work. Saying these lines
are actually going to turn to become our details. So here we go. Just like that. Again, the most important
thing here is that you observe your model
as much as you can. And if you pay attention,
in some places, I am applying some lines, but I will not fade
them like what I've done in my
previous tutorial. That's why I told you
we have more borders in this kind of texture
like glass or metal. Because we are not facing them. Here we are. In all these parts. I need more darkness. So I'm going to create them. So here we go. Okay. If it pass through this area, we can move on and have our electronic eraser in our hand in order to
create some lights as the shape of a stains and spots in these areas because
we need these lines to create the contrast and show
the perspective of our work. Show that it has ups and downs, prominent parts
and curved parts. Okay. Just like this, I would also have to apply some more lights and red areas. And then I get my white pencil. I applied it upside down. And then I will actually fade these lights with
my white color. So I get my color 321. I go over these areas. Again. I get my black and emphasize on some more darkness between
these lighter spots. Just says this
notch really hard. Okay, then I get my
white color again, right in my hands. And it will look like this. Then again, I take out my black colored pencil and I would apply the darkness over
here with more pressure. These are actually
the final darkness that we're going to create here. And I'm applying them with
a high hand pressure. And comfortably. I'm not really worried here. Okay. Here, as you can see, doing it. And I will continue downward, up to here. And still creating shapes. Here we go. Okay. Now we're going to work
on this upper part of our work and apply the darkness for the upper
part of the bell pepper. And I'm using my color 321 to apply the
red shade all over this area. Here we go. I'm going to use my
black colored pencil to create a strong darkness
on the upper areas. It's not like we've
forgotten them or anything. Now we are going to apply them one by one, so don't worry. Okay. Then in these areas, it would be the same. Now, I get to my
electronic eraser. You see my dear friends. When you apply or when you drag your electronic
erasers tip like this, sideways on ascending,
or even on your nail. You can clean the tip of it. After you've cleaned
it to pyruvate. You are going to create some
very thin lines over here. The way that you
see I'm doing it. Okay? And then I will emphasize on
these lights again. And from here, a light will
come and look like this. Which I'm also going to
darken all around it, but not inside of it. Actually, I am using
my black color around the slide because
I wanted to pop out and show itself better. When it's surroundings are dark. Delight will actually show
itself more and better. We also have some lights
having them here. So wherever you see
them, apply them. Also in this upper
area. We have them. So we apply these very
small lights in this area. Okay. Again, I move on to my color number 321, and I go over some places and emphasize on their
red color again. Now we are going to have
our white pen after we've warmed it up in our hand and we got a bit
of its color out. We are going to use a white pen underlies that
we've already created with our electronic eraser in order to make them lighter
than they already are. Okay. Also, I'll do
the same over here, the same way, making it
lighter and lighter. And also this point over
here, it should be lighter. So wherever you can not get
any color out of your pen, you should just warm it
up on your hand one more time for several seconds and then you can bring
it onto your work again. So I would also apply some
more lights like that. So I can emphasize on
delights of my work. Now we're going to
work on the next part, which is coloring this stem. I start with my black color. It's my darkest color obviously. And with that, I can have
my shades and darkness. So I come until this lower area. And I am just applying my black color all over in order to create
a darkness that I want. Okay. Then I will use my
main green color, 359. This is my main green. And I'm going to use it. And I'll apply it on these parts which I
have my darkness. And I will create this
spots and shades over here. Alright. I move on to have my next color, and I'm using my color 300s. Six is six. This is my next green on the
sides of my previous screen. And also I'm going to use
the green color number 370, which is almost a light green
for these areas like that. Alright. You see, I'm actually cleaning the lights that I have created here. Then again, I get back
to my black color. And I will apply some spots over here in order to show the
depth of my work this time. Just the way you sell. Then I will apply
some light over here and then I cover
it with my green color, which is actually the
green glass of my work. Then I am going to
use my color 319. It's this color. Actually. I'm going to fade
some of these colors toward the white color
and toward the light. Just a little. We should not do it a
strong layer heavily. So just fade some of the
colors toward the lights. Then again, I get my white pen. I just add some final
lights to my work in order to emphasize on
the shining feature of it. And then I clean
all around my work. And we're almost done here. And that's the end of our work. Beautiful. Okay. This was our glass bell pepper. I hope you've enjoyed it
and you can use it a lot.
16. 15- Basic Drawing of Wet Blueberry and Red Liquid (Copy Method): Hello everyone and welcome to another episode of colored
pencil techniques with me. Okay, In this tutorial, we are going to work
on wet texture. I mean, the model that
I've chosen for you, my friends, is
something like that. Well, in this model, I'm going to teach you how you
can create the water drops and width textures with your
colored pencils very easily. But before we get to the point and we start our
whole work first, we should apply and create
our primary sketch. Our two previous tutorials, I've told you two different ways to create your
primary is sketch. First it was geometrical shapes, and the second way was
to use checkers way. Okay, now, in this tutorial, I'm going to teach you
even another way that I'm sure it would be all in your favor
and you'll love it. In this way. We are going to use a B6
pencil or a graph it. And first you should choose
a size of your work. I mean, if you want to
work in an A4 cardboard, you should have your printed
model in an A4 size. So you should match
the size of your model with the size of your cardboard or wherever
you want to work with. Okay? Alright, As you can see, I've already printed it. And I've got my cardboard as the same size as I
have my printed model. Now. You see there I have
my, you know, model. I'd be darkening the
back of my printed model completely like this forever
I have designs and shapes. This is actually covering
from another work. It's like you're covering your model and you are going to apply it
later into your own work. Okay? First, I'm going to darken the back of
my work like that. And I'm just doing it. Okay? Then in next step, I'm going to apply this
paper and place it on the surface that I'm going to work on amine on my cardboard. I place the back, which I've darkened on the cardboard that I
want to work with. And then I would also have to fix it with my tape so it would not move while I'm
transferring the sketch. Here we are. Okay. Now I'm going to use a pen which
doesn't have any ink in it. I'm going to use a
very light pencil. And I'm going to go
over the parts which I would have created if I wanted to create this
primary sketch, e.g. I need this blueberry. So I go completely around it. It's exactly like we are
creating it ourselves, but we're actually covering it from our model
to our cardboard. So wherever I would have
needed in my primary sketch, I will just go over them and I drag my pencil
all over them. Or as I said, you can also
use a pen without any ink. I'm just going over the parts
which I need for my work. Just like that. I'll continue. This other blueberry,
one-by-one, wherever is needed for me, I'm going to create them or
better say go over them. Just as you see. K, This would be our
third blueberry. Okay? Now, we can also talk
about this way a little. And if this is your first time
watching this kind of primary sketch being created, you might say, Okay, if you're going to
learn is sketching, why should we do
this or it's a fake? It would be a copy. And why would we do that? I should tell you that thinking like that is completely wrong. Well, it's fair to say most of our
hyper-realistic artists use this way because they want each little detail millimeters by millimetres to be exact, the same as their model. This way of creating your
primary sketch is mostly used in creating
faces, faces sketches. And as I said before, so many of our hyper-realistic
artists use this method. This is actually an
international methods, so don't worry, you're not actually copying anything or I don't
think that it's a fake. There are also been
some even tools which have been invented
for this method. So it's really common. You might have seen
that some people like architectures use a table. And as they call it, it's a light table. They place their
model on the table. Then they place another kind
of a special paper on it, which is a bit translucent. And when they turn on
the light on the table, the model is actually being placed on their
translucent paper. And they can cover and transform their model into the place and into the paper
that they want. So creating primary sketches can have different methods and I cannot say, it's worthless. Of course, it's very important, but actually our whole work
will start after that. That you'd be able
to create volumes, you'd be create two. You would be able to
create perspectives, great colors, great shadings. I mean, if you
create a masterpiece in your primary sketch, but if you can not develop
it the way that you want, if you can not create the shades enough or
create the good volumes, it doesn't worth anything. So don't worry. Don't say that if I'm
using this method, it's a fake know,
it's very practical. It's universal as
actually really fast. So whenever you just want your
primary sketch to be done quickly and you want to work more on your
details and development. This is the best method, is specifically when you
want to work on faces. Just like Dad, I'll drag it over all the parts that I need. Then I transfer my model, my sketch into my work. Something else I should tell
you is that while you are transferring your model
into your cardboard, your hand pressure
should not be that much. That creates a texture
on your cardboard. I mean, it should not create any dense or any curves or any textures on your cardboard because later when you want
to apply your color on it, it might have some
problems for you. So the best thing is to
control your hand pressure. And I've created whatever
that was needed. And you can also create
the details right now. If you think it
would be hard for you if you want to do
it during your work. And if not, if
it's okay for you, yeah, you can create them later. So just take a look at my work and see which parts are transferred and
which parts are missed. So I place it again. And as it turns out, I have not created this area. So that's exactly what
I'm gonna do now. Creating this spot. Take a good look at it
again one more time. And yes, our whole work now is
transferred to our cardboard. Just as precise as
you can see here. And of course, as complete, you see it's actually been
transferred very clean and very beautifully
without any mistakes. Right? Now for next step, we have to choose our
colors from our catalog. Okay, I want to start with
coloring the blueberries so I get my color catalog. And my dear friends, if you take a look
at these blues, we need all of these blues. 344. This one, the
blue number 343, you see for these
parts, we need them. Number 351 for these
areas, my dear friends. Then 3004244, very, very dark parts
of my work than 349, which is this color. And we're going to
use this color a lot. So we definitely need this one. And of course, number 347, which is the lightest
blue that we've got. And it can be used for us. We should use the
white color 301, and also the black color, which we needed a lot. Right now we're gonna
put away our catalog and we want to
start our coloring, as I told you before for
applying the colors, I'll be starting with
my darkest color. The darkest color that I have over here is my black color. Alright? I take my black color. And wherever I see
this black color, I try to apply it with circularity movements with
a small circles. Of course. Let's see. I'm doing it very, very slowly and very small circles right
next to each other. Then I bring it up. And from this dark area, I will fade it upwards
into the upper areas. Also from here. I'll do this. I bring it into
these aside parts. And also I can see this
darkness over here. Not so much but a little. So I apply it. As I said before, wherever you saved it, you should apply
it and be careful that it would be completely
faded from the sides. What do I mean by that? I mean that e.g.
look at these parts. I apply this darkness and I'm
just fading from one side, but I do not faded
from the other side. But look at here, when I'm applying some concentrated
darkness in the middle, in the center of some place. I would have to fade
it from all sides. So whatever darkness that you create should be faded from all sides or at least one side. Okay. I would also have
some strong darkness here. Of course, in this lower area, which I've got here. And it would look like this. And I would also leave a
trace of the color over here. Okay. I'm going to tell you
the rest and next parts.
17. 16- Coloring the First and Second Blueberries and Drawing Water Drops: Hello and welcome to another
episode of our tutorial. Well, we were using our black to applying our darkness
wherever we need them. So in next step, I'm going to use a blue, a dark blue, which is
close to the mean, which has the darkness close
to the blacks darkness. So I will use my color 344. This is a very dark blue. Then I'm going to use and
I move on these parts, which I've used by black. And I moved toward
the lighter areas. Make sure that the tip of
your pencil is sharp enough. Also, these parts should
be covered with this blue. Alright. Now, we are going to cover all these
darkness that we've already applied with this
beautiful dark blue. Here we go. Just as easy as that. Makes sure to cover
all these dark areas. And we also do the dark coloring for
this area with this blue. Actually, we are
going to complete the coloring with this blue. Now we will use our next blue. And based on my catalog, my color catalog,
I'm going to use my color 349 as my next blue. From these parts. I'm going to apply this
color and move further. I'm actually doing
it on the size of why black colors from this lower area. And also these parts
which are lights. I'm going to go around them and I will not color
inside of them. As you can see, I'm
just going around. So it's very important that while you are working
with your darker colors, you would not go inside
of your own light areas. You can go around them, but not inside of them. I also try to cover the white
texture of why cardboard. And just like that, I will cover everywhere, everywhere that I need. And I color them. Alright. Now I'm gonna do a very light
background color with the same color that I'm
holding in these areas. Because later it will help me
to blend my colors better. And now I'm gonna
take my next color. Number 351. For some areas. No shave River. And it would look like this. And next color would be 347, which is the lightest
blue data I have. Now, because my
painting is wet and we want to show the
texture of that water. I mean, we want to
show that it's wet. It's kinda similar to the glass texture which
I've already shown you. That we have to keep
our strong contrasts. That's why we keep this
wide and we do not cover it in order to have
a stronger contrast. And in this way we can show that glassy texture and we
can show Our work is wet. Okay. Now we will work on the
top of this blueberry, coloring it as well. And then I'm going
to use my color 349 and Atlas 347. Okay. Now I'm going to use my
white colored pencil. And I will color this areas. I mean, I will go on the
edges of this whiteness and I fade the colors
around it into it. Then I will use the color 351. And I create some order than a specific textures
over here in my work. Okay? Alright. Now we want to apply
the water drops. You want to see how it's done. First, I take my
black colored pencil and I will create the bottom parts of my water
drops very, very small. So I am creating my water
drops as small as this, and I'm applying my dark color right on the bottom of them. And here would be the same. Okay, You see, I've created this darkness on
the lowest part of my drops because I
want to actually give them some volume and
have the depth here. I would do the same thing for this other drop
that I have here. You see? We would have to darken the water drops on one side in order to
give them volume. Then I'll use my color 351 and I'll color the
rest of the drops. And in this area, I'll do it lightly. You see, I decrease my hand pressure and
I'll do it lightly. Then. I would do the rest of the
coloring for this lower area. Then I use my color
344 to create a beautiful contrast in my whole work just to
tie it all together. Okay? Now I'll do the
same for this area. A contrast with 344
and coloring with 351. Okay. Now I get my electronic eraser and I
apply some very small lights. See. I'm applying some lights over here as a representer of mine. Water drops. Here we go. Then again, I use
my black color. And I will work the bottom of each one of
these water drops. And just as easy as that we've worked on one of
our blueberries. Now we are moving
to the second one. Again. I want to
do this left one. So I would not leave my work, my hand on the work because
if I do the right one first. After I'm finished with the right one and I want to
move on to the left one. I would have to place
my hand over here. So it might get messy. When you want to work on a painting and you want to
color this specifically, it's better if you
pay attention to the direction that
you're moving on. So you want to place
your hand on any part of your work that is already done because it might get messy. You can place a paper
under your hand. But when you can
do it like this, why take the risk? So I'm going to apply
this darkness upwards, just like that until
the top areas. And I come down again. Because these parts
should also be colored. And I will apply the darkness
that I see one by one. In these areas, I have
complete darkness. So without any fear
of creating mistakes, we will apply our
dark color and make these parts completely
and utterly dark. So here we go. Complete
darkness here. And let your hand move more free because it's okay over here. Now after I've applied
these darkness, I will fade it from two
dark into the light. You see. You just need to control your hand
pressure for areas like this, then you can perfectly failure colors into
the lighter ones. And you can get that beautiful contrast in order to keep the
volume of your work. And at the same time, you are showing the texture, the wet texture of your work. Okay. Then I'm going to choose
my next color, 344. Okay. And I use my color 344 on the parts which I have darkness and
I've used this color. And with a slider, hand pressure, I'll faded
into the lighter areas. Basically, I decrease
my hand pressure. And also from here the same way. So I'll do the exact same
thing on the lower areas. Be coloring just the way I did for here. Alright. Here we go. Just like that. Just as you can see, watch the movement of my hand. And then I'll get
my next color, 351. And I'll use it for
these areas now. 351 is this color. See, I'll use it
for these areas. Well, actually you
can pick each one of your colored pencils and put the tip of it on
your printed model. Just as easily as that. You can determine which
color is more suitable for you for that area. So from here I come up
with the same color. And also from here. Alright, now I'm
going to use color 349 for the parts I have here. I applied on the parts that
I've already worked on. These parts because
they need to blend in more and they need
to be more blue. So I'm using it for here. Okay. Here we are. And the lightest color 347
would be used over here. As you can see, I'm
using it very lightly, very lightly, and I'm practically just fading
the other colors with it. Then I'll use the color 349. And I complete these parts. Okay. Up to here I should color. And again, I use my car 347. I cover over it in order to blend it and faded
into the light. Then I'll use my black
color in order to create some spots and stains
in this inner area. So my work would look
more natural. Okay. Now I will use my white color at the end to make these
parts completely cohesive, blend them together and
keep the glass texture. Then I'll get on with my black colored pencil for
creating the water drops. Okay. I will shade this
lower area like that. And I will close the upper areas with my
black color lightly, and the lower parts would
be obviously darker. Okay. Then I'll use
my electronic eraser. And I'll create some
lights over here. And then I'll use my color 351. And I cover this area. I go over it with my 349
to faded and blend it. And then at last,
obviously I'm going to use my white color to blend all the colors together
and fade them. Okay. Now, in these parts, I will apply and I create
some lights like that, which are more raphe now.
18. 17- Coloring the Third and Fourth Blueberries and Drawing Water Drops: Hello and welcome to the next
part of our tutorial. Okay. In this episode, we're going to work on the other
two blueberries. And of course, the water
drops on them as we did on these two in
previous episodes. Okay, so we're going to do the third blueberry
the same way. We start with the
black colored pencil. And I'm just doing
a background color, or basically I'm applying the
darkness as a background. I would be starting
right from here. Okay. So in circular shapes, I'm going to color this area. At the same time. I'm trying to apply the
needed darkness with the suitable hand
pressure based on the place while
that I'm coloring. E.g. over here I can see
more darkness you see. So I increase my hand
pressure in this area. As I move on to the
light of my work, I will decrease my
hand pressure there. See, just like that,
little by little. We will decrease
the hand pressure. Then I will fade the black
that I've applied here. And I will note, just
leave it like lines. I don't want any trace
of line in my work, so I faded and I would
notice leave it like that. Also from this side, I will apply the amount of
darkness that is needed. But of course, over here
I have a dark blue. But because it's very dark, I'm going to have a light
black on the background. So when I put more
layers of color on it, I can get the dark
blue that I want. From here. I would
also have to bring some more darkness into my work. Just like that. And also from here,
the same way. Okay, here we go. Alright. After we've applied the
darkness of our work, I'm going to use
my dark blue 344. And actually I'm
going to move on these parts that I've
already have my black. And I have a very
strong hand pressure when I'm applying the color
at first in the dark areas. And as I move towards
the lighter areas, I'll decrease my hand pressure. And also these lower
parts of my work should be colored like this. Okay. Then I'll apply the
darkness over here as well. Over here. I can still see two more
darkness over here, which I should go through
with my blue, dark blue. And in here, I'm going to give the needed contrast
to my work. Okay? Then I'm going to
use the color 343. It's actually one level
lighter than 344, which was our previous pencil. And I start applying the
color on my previous color. I tried. Go in the water drops
which are too light. But you can actually
go over, I mean, it's okay if your color gets into some of the water drops
which are a little blue because later you can use your electronic eraser to create delight that
you need over there. But it's better
to keep away from the light or better
say white water drops. Then I get my color 349. And I will use it to give it
the beautiful blue color. At the same time, I am careful about the parts which are going
to be colored lidar. I mean, I'm not going to color dark everywhere with this color. I'm going to stay away from some parts which
are going to be lighter. While you're coloring, It's
very important for you to know where you should
apply your colors, each one of them. I will apply this blue
color in these dark areas, and I just cover the
black so h would get a get out of
it's fake shape. I want it to look more natural. That's what I'm doing here. Okay, Same. Also over here, it
would be like that. We will have our light spots. We get our color 347, which is our light blue. And now I'm going to go over all these blue parts which
are going toward the light. But still I'm
covering it lightly. Nazis strong. Alright. And For the last step, I'm going to use my
white color in order to create the light
area of my work. Again. I take my black colored pencil and I will go around
my work generally. I can show that this blueberry
is more in the back. I mean, I want to emphasize on this fact that this
one is more in front. So it has a shade and shadow for the one
which has behind it. And also, I'm going to renew some of the darkest areas
with my black color, especially around the edges. And I will also create some dark spots in different
places of my work. Then I will use my
color 347 again. And I very, very lightly
colored this area and go over it and faded with
my white colored pencil. All right. In next step we are going to
work on this area. I'll get my color 349. And with a high hand pressure, I start from the darker areas of my work and I move towards
the lighter areas. All around here. I get my color 347, which is my light color. And I also apply it here. Then I get my black to apply
the details of the work. The ones that we can see there. Then I'll use my 347 for these middle areas and I'll color them completely. Then I will use color 300s, 149 to add some more dark
details, creating some lines. And then I use my electronic eraser
to get my light areas. The parts which have a strong
Lights see just like that. Very easy. We also have
small drops over here, so we're going to
create them as well. Then. I'll use my black
color in order to darken on the lower area of
all of these water drops. And I'm actually fading into
darkness that apply here. I would not leave
it as the shape of the lines and very fake know, I fade whatever
darkness I create here. Again, I say on the bottom
of the water drops are on the lower curve of
these water drops. I'll just create them. In the lighter areas. I'll do the same thing
with my blue color 347. And then I get my color 349. To color these water
drops a little. The ones which are a bit blue, the way that I see them
in my printed picture. And then again, I go
with my black color and I apply various
small shadings to the parts which
I've just colored. So these are our
beautiful Water Drops on our beautiful blueberry. Alright, we're going to move
on to our fourth blueberry. We're gonna do it as well. It's exactly like
our previous three. First, I start with
my black color. And I go over these parts
which are strong darkness. And I do them as I see them. Be sure that the tip of your
pencil is sharp enough. If it's not, you can use
your sharpener to do so. We can actually apply the
details of our work better. Because you know, a
lot of your painting is defined by its details. That's why there are
really important. So like that. And from these lower parts, I'm going to apply my color. And I'll create a small circles and I will fade it with circular movements
toward the sides. Okay. Then I'd be applying
the darkness for this top area of my blueberry. Also these parts. This again, the procedure
is same as I said before. The process is
practically the same. You just have to
be careful where you're going to
place your color. As you can see here, the darkness of these blueberry. The darkness of this
blueberry is actually more comparing to
the previous three, because as a matter of location, it's been placed on the bottom, the lowest area,
and therefore it has more shadows and
shading zone it. So based on that, we apply more shadings
into our work, which means more darkness. Just be careful
that you would not go inside of the water drops, the ones which are too light. So especially with your black. Try to avoid the water drops and knowledge color them. Okay. I'll use my next color, 344. As I said, it's
the darkest blue. I go over the parts which
I've created my darkness. So I'll cover them with my blue with a strong
hand pressure at first. And as I come to delights, I will decrease
my pressure here. It's really easy to follow. You should just practice
over and over again. So should not be disappointed
if you couldn't, if you couldn't just get
it right in the first try, should not give up. That's what's important because painting is very dependent
on your practice. If you practice enough, surely you can get good results. And also these lower areas
do the same thing for them. Alright. Now I'm going to
use my color 349. And again, I put another be useful layer of
blue collar on my work. So just like that, I will cover my whole
work with this color. And even these areas
would be covered as well. Do not forget about
this lower area. Midas slip away. Here we go. Then I get my blue color 347. And I started the lighter areas and I start fading the
colors into one another. Or bearer say blending
them together so they would not look fake. And at last, again, I'll use my white color
to fade these areas. We're going to continue
in next episode.
19. 18- Finish Coloring the Blueberries and Start Coloring the Liquid: Hello and welcome to the next part of our
tutorial together. Alright, well, in
this episode we were supposed to be applying
these water drops. But before we do that, I also wanted to create this
upper part of the blueberry. So it would be all done and then we can
work on the drops. So over here we have this darkness and it
will be faded upward. Just as you can see it. In these areas. It's also dark. You can see the amount
of your darkness is actually showing the
depth of your work. And if you get it correct, it can actually make this
circle or depth shape for you. It's got more volume. Also got some water drops
inside of our work. Or at least we are
determining their placement. Okay. Next step is using
the blue color 3149. And I actually cover these darkness that I've
already applied here. The way that you
can see right now. And then the blue number 347. In this way. I would also complete this central
area with my color 349. And I apply some darkness over here just as
you can see it. Okay. Let's move on to the next step in the exercise that
we're going to use our electronic eraser in order to create the
lights that we need here. Especially the strong ones. I like that over here. I have one water drop here, another one over here. And moving on, creating a small and big water
drops. So here we go. And then in next step, I'm going to use my black
color again in order to create the shades in
the lower parts of each one of these water drops around the edges
and on the bottom. So here we go. And then again with my
blue color number 347, I will actually
color them this way. Here we go. They would be darker
on one side and lighter on the other to keep
this beautiful contrast. Then again, I'm going to
use my electronic eraser in order to create these
strong darkness here. Just bring them into my work. Alright. Now we've completed four
of our blueberries, and we need to work on
other two blueberries. One of them is over here, and it's very dark. And we have one over here which has been hidden
mostly in speed covered. And we can just see
a little part of it. So we can actually work
on this last one very fast because it doesn't have too many details because it's
in a very dark position. So I'm just going to
apply its darkness. The way I see them. And also I'll do it from here. It has darkness. As much as this upper blueberry. They're kind of colliding here. And also I can see a
strong darkness here. So here it is. These are also the strong
darkness for this area. As I told you, we are going
to create it very fast. Just be careful that when
you're working in this area, you should place your hand actually with a bit of distance from the work that you were
that you've already done. I mean, you should not
drag your hand over them. Who make your work messy. Then I get my
colored pencil, 349. And I go over these parts with a strong and high hand pressure in order to color
these areas with it. Here we go. Just a piece of cake. Alright. So here we go. These areas would be
darker and darker. Then I get my color 344. And I cover all
these areas with my darker blue because
as I said before, it's generally a very dark area. Okay. Then I get my electronic eraser and I apply several lights here, but before that, I should
color this area as well. With my black color,
I will apply. It's needed a Spots. Okay. Now we can move on to
our electronic eraser. And here it is. This is our last
blueberry up to here. The last visible, actually. Now we are going to
create this liquid which is surrounding
our blueberries. We are going to create them. Okay? So in order to work
on this liquid, we have to again choose colors
from our color catalog, which are related to
this area this time. So we can pick them out
and work with them easier. We have our color catalog here, and let's see which
colors we need. You can clearly
see these colors. I'm going to use the color 337. And until the color number 319, I have all of these colors. 337. Until 319, I have all
this tonality in this liquid. This is my 337 main purple. For these very dark areas. I'm going to just show
them to you one by one to color 334. My color 300 to four
was this I'm sorry. This was by color 334. I just got mistaken there. And then I have 333. It's this color. See 333 for these areas. We have 327 over here, which has more red in it for
these parts of the liquid. It too. I mean, when you want to work
with your colored pencils, you should place them on your
work and you can compare. Then it will be my 325, 329, light pink for
these light areas. And at last we have 319
for the lightest areas. We also need other dark colors. Obviously black is one of them. We can also use color 392. This color we needed for
these very dark areas. All right. We need our blue
color 304 to four. And it's needed for these parts, which are actually
actually these parts. The blueberries are visible from behind the liquid because
it's a bit translucent. And we're going to
use this color, this blue color in those areas. And we need our color 301. Our white color,
definitely we need it. And also 376, which
is a dark brown. And another purple that
I've lost is this 337, as I told you in the beginning, this is my 337, which is my purple. Okay. Let's just start together now. I'm going to put away
my catalog for now. And I'm going to start
and we're going to go the same direction as we did for our blueberries. What do I mean? I mean that we start from the darkest colors moving
toward the lightest ones. So at first, obviously I'm
going to use my black color. I start from the top
and very lightly. You see, very, very lightly. I will actually apply
this darkness here. Don't forget to use
circularity movements. And then as you
move down strong, you actually bring
down the line, creating some disordered lines. And not in one movement. I mean, the lines would
be cut out and cut off small disorder lines, but next to each other. The way that I see them. And I would also apply some
darkness for these areas. Because I can see some again, it's not really ordered. It's more disordered. And maybe even a bit too
random but not too much, should keep an eye
on your model. Then I bring a light
darkness over here. I mean it's dark but
it's not too strong. Then four over here. I should also apply
some darkness. If you look at your
liquid, generally, it's more dark on
the edges and sides, and maybe on the
blueberry parts. Okay, now I've applied
enough darkness for here. I'm going to use
the color 30922, which is my darkest
color after Black. This is actually
a reddish brown. That with this, I'm going to
apply some more darkness as the shadings to my work is actually red with the man
to brown or better say, a brown wood amount of red. And I'm going to apply it
all over the parts which I've used my black color. So I'm going over all the parts which I've
created with my black color. I want the shadings to be right. Also, these areas which need to be done just like that. And I would also apply a very light shading for these
areas with the same color. Also over here, I'm
using the same color, but as you can see, with the lightest hand
pressure that I can use, we're going to continue.
20. 19- Continue Coloring the Red Liquid: Hello and welcome to the rest
of our tutorial with me. Alright. Well, again, I'm
continuing with the same color. As you can see. I'm just
applying some shadings. The parts that I need. Then I get to my
next color palette. And as I told you before, I'm going to use my
dark color pencil in this tonality from
334 until 319. Our darkest color is 333. So I'm going to pick it up and I'm going to
use it over here. As you can see, I am applying a strong hand pressure in order to shape this area and matched a color with
what I see in my model, especially in the edges
and on the sides, that we have these
drops of the liquid, the darkness is more. So I'm going to use
this color more on the edges and sites
as you can see. And I also apply these
small drops which are splashing out as this. And I go over the parts that I've used my
previous palette on. And as you can see, my hand is moving in circles. So my method of coloring
is circularity coloring. Then I can move on
to do the rest. Over here. It's a bit leaner because I just wanted to have a
background color as well. Then we would work on this
upper area, as you can see. Alright, here and tap. Just like that. And we create all the splashes surrounding the liquid as well. I'm going to complete them with the same color that
I'm holding now. I can also color
duller areas this way. Alright. Now I'm going to move
to my next color palette. I'm going to use the
color 325 this time. In order to create the pink color that
I need in this work. Again, with the circle, every method of coloring. I'd be doing this. So from the sides, I'd be coloring darker. And as I move to the center, it would be lighter as
I'm creating a shade. Because later I would want
to have it as a contrast. Now in the center of it, in the central area, it should be light. So again, from this side, icon is strong and dark. And as I get to the center, I go weaker enlight. Alright, now I'm going to
move on to my next color, and I'll use my
color 329 this time. In order to go over
the light areas. I tried to have a
strong hand pressure. So in this step, I can actually cover
all the empty textures, empty white textures
of my cardboard. Then I'll use my color 319 for these areas like this. And also my white. Obviously. Here we go. I'm gonna do the detailing. I forgot to work on
this upper area, sorry. But by 325 I also create this part of the splash
and drops of the liquid. And with the same color. I will add some darkness
to these parts. And then I can move on. Okay, here we go. Now, I can move on
to my next color, which is purple, number 334. And I am going to apply the very strong darkness
that I need over here, which I am going to create them with the help
of this color. So our goal and our
purpose here is to create strong
darkness over there. Okay? Now again, I take
my black color. I start from the top of my work and apply the
darkness one more time. So I can keep the
contrast that I want. And I can show the shiny look. At the same time, emphasize on the
texture of our model. Work, which is a liquid, should be shiny
and it should have a high contrast.
That's about it. Here we go. And I would also shade these splashes of this
liquid going out. And I just shade the
bottom of these drops, two drops of splashes. Then I'm going to use my electronic eraser
in order to create the lights that I need for my
work to keep the contrast. And two cubits, shiny look. Lights are as important
as the darkness. Never forget that you should
work on both of them. You should practice creating
both of them equally. They're both handy for you. And actually always a
combination of them is going to give you a beautiful,
magnificent outcome. Alright? Also firm here. And again, I would have also some
strong contrast over here in order to make
my liquid shinier. Alright. Now I'm going to color, I'm going to use
the colors, sorry, 30922 for these areas. And that's it. We're going to work
on the next area, which is this side. And again, like
the previous part, I start with my black color. Obviously. I'm going to
use my black pencil, which I've sharpened
the tip of it. You should pay attention
to that as well. You should keep the tip of
your pencil sharp enough. I'm going to apply the darkness
that I need over here. And I say it's needed
to be sharp because. Especially on these edges, as you can see on the sides, we have very thin lines and fine lines even
for our darkness. So I'm just applying the
darkness here as shading them. Then I can move on to the next parts to them carefully because
it's a dark color. So try to place them in
their own placement. So like that we have these drops of liquid
which have been splashed. And I've created
them one-by-one, as you could see
with my black color. But very slowly I
took my time there. Alright. Now, we didn't need to use our black color in side of our work
inside of our liquid. And it's flat surface. I get my color 333 and I work
on these splash of liquid. I'm just going to start
coloring them from one side. You see I didn't use any
black inside of this part of my liquid because
it wasn't too dark. I'm just going to
leave it for now. And also as I'm coloring here, I'm going to leave some areas for the next layer of my color, even over here on the edges. And if you can dress, take your hand above
your work and you might actually drag your
hand on your work. Please. Just remember to
place a white paper, an empty paper under your hand so you will
not mess up your work. But if you can hold your hand a bit higher,
So that's cool. Still coloring these areas. Here we go. Alright, and now with the color that I'm
holding right now, I'm going to start
from these parts and dark, dark and upwards. I mean, I'm applying
this color from here, going up from the dark
to the light of Italy. Did I'm going to use my
next Palace of color 325. And I gave my work
more pink color. I want it to be pink because
I see more pink in my model. See just like that. Then I'm going to use
my next color, 329. And I am actually applying
my light pink areas. Just be careful not to
cover delight of your work. It's very important. Then I go with 319, just as this. And then I get my white colored pencil for the lightest
parts of my work. For these lights
shining actually. Then again, I use my color 327 in order to increase the
red color in this area. I want more red here. And then again at last, I use my black color to create a strong contrast on these
edges and in the center. Then my last step would be
taking my electronic eraser and whatever I did on my
first part of the liquid. I'll do it here too, to create a strong lights and
even some other lives among the splash like that. Then I take my white pen
and then I'm going to even add a stronger lights to my work because white pen does, is to create a strong
lights and Southern lights. I mean, they're usually
not faded really well. And that's what I need here. Strong contrast, a strong lights in order to keep the
shiny look of the whole work. To emphasize on the textures. Okay? Also going to create
these drops of the liquid around a splash. And I will shade this drops
from the lower parts of them to create volume for them. And then I'll use my
electronic eraser to create lights on the
upper part of them.
21. 20- Finishing Coloring the Red Liquid: Hello and welcome
to the next part of our tutorial. Alright. We are going to fork
for this lower area. And as usual, I'm
going to start with my black colored pencil for applying the darkness
that I need here. So the beginning is
just like the same. I have a strong darkness here, so I just applied
exactly as I see it. And the darkness of
this area is more, much more than the previous
part that we worked together. So just as much we're going to apply more
darkness into our work. Even if you look at your model, you can see more darkness here because this is a
translucent liquid. And behind it, here we
have blue, blueberries. So these parts are obviously
going to be darker. And just like that from
the sides and edges, I bring the darkness
into my work. And I bring them as the
shape of stains and spots. So it gives a good natural
texture to my work and e.g. here, I'm actually imagining and considering the flow and the
direction of the liquid, which was this way. So I'll do it exactly
the same way. I mean, I drag my pencil as the same direction
of the liquid flows. So I come from these
parts as well. Moving on. Here we are. And again, very strong darkness and
also the rough texture of this area should
be placed so I can show that the water
is splashing heart, you see toward this direction. That's why I've created
those rough textures there. I also have darkness over here. So I created as the shadings. Didn't not be afraid of having the darkness or
applying the darkness. If your work does not have enough darkness and
in the right place, the contrast of your
work will be decreased. So it would not be
shiny and it would not give us the liquid texture. I know that we're not working
on a hyper-realistic work. But even if it's realistic, or simulations should be almost
60% similar to our model. So do not be afraid of creating the darkness
wherever you need them as much as you need them. Okay. I worked on these
areas and I would also have to create the
splashes over here. It's actually behind
the blueberries and I'm going to do them now because I don't want to forget about
them till the end. I also have another part here. You see my dear friends. I am just going a
bit random here. And here we are. Even right now. It has a great contrast and
the patterns are beautiful. And then I'm going to
use my next color, 333. And I use this color
to cover some areas. Actually, I'm
coloring some parts of these edges of the liquid. I leave some parts
white as well. Why am I doing this? Because I want to
apply one other layer. I actually, I want to add another layer of
color into this area so my cardboard should have the capacity of
expecting that layer. The next layer is my
color 392, as I said. And I'm just going to
cover it with this color. Cover the areas. Especially in these parts. I can see this color
palette much more. So as much as I
say it, I use it. It's actually very simple. But in order to suit better, you should have a
lot of practice. And I don't mean only by
creating the colors you should practice and looking at your work and observing it. I use a color 325. Okay. I'm using this color and I'm actually
coloring all over, covering all this area. And I will not leave any more white spots. Okay. Very slowly, I colored
this area as well. And just like that, it's done. Now, I'm going to use
my next color palette. I'm going to use my color by blue color 344 that
I've already picks up. I'm going to apply
the blueberries. Shade, the blue of
the blueberries, which are coming through
this translucent liquid. I'm going to use it in
order to show that there is something behind and it's blue. So I'm just going to give
it a touch of blue color. I don't want to overdo it, but it should be done wherever. I can see blueberries
in my model. I apply this color. And now I move on to
the next color, 392. And I cover these areas very
easily and also carefully. Then I'll use my color 325. And I will complete
these darkness that I've created here because they shouldn't be
left black or blue. So I'm just going to
move over them and cover these areas and make my coloring
complete, more complete. Okay. I color cohesively up to these parts
with the same color. Okay, Then again, I get my black color and I
emphasize on the darkness. I increase the
darkness of my work. Then I get my car
392 for these areas. And also for here. Then I get my white color and I move on these parts
with my white color. All right. Now I'm going to use my electronic eraser
and create some lights that I need over here to create the contrast that is
suitable for this area. But I'm just doing
it very small. And little by little. Notes using too much. Here we go. I also creates some lights
over here as spots and stains. So again, I can emphasize on
the shine of my liquid here. Because I want to show
the texture better. Ideas, stronger
lights in some areas. Here we go. Okay,
we've worked on this part and now
we're going to work on the last part, the bottom part. Before we do that, let me just complete this area before I forget it again because I was
just for getting it. I'm getting my color
333 for this area. So let's just get it over with, complete it and then we can
move on more comfortably. I'd be coloring these areas dark as you can clearly see. And then I use my color 325
to make my work more pink. I want to give it a bit more
touch of the pink color. Then I use my color 327 and I colored
this area completely. Basically I'm filling this area. Then at last I use 319. And again, I go over here. That obviously again,
I'm going to use my electronic eraser to
create some lights here. Okay. You should also apply the lights on the
drops of the liquid. Now, we can move on
to the lower part and we are gradually getting
to the end of our work. So again, as before, I'll get my black
color and I apply the darkness the way I see
it in my work, in my model. And while I'm doing it, again, I keep in mind that
this is a liquid, so I tried to move by hand in the direction of
the liquid flow. It's good if you keep that in mind while you're working on it. I have this this way. And again, I say, you should consider the direction
of the flow and splash. The spots that you make, the darkest spots that you
make should be totally compatible with your model and with the direction
of the flow. This way your work actually comes out nice and attractive. Your outcome would
be a masterpiece. If you go through
all the things, all the hints that
I'm telling you, trust me, it will. Alright. Now after I've applied
some darkness here, I can start from this side
and apply some more darkness just like that. And you know, it's enough that whatever you see you can
bring it in your work. I mean, especially for showing. Your water texture
easily and vividly. You just have to create
every strong darkness, each strong light, and each strong contrast that
you see in your module. And if you pay
attention to my work while I'm going over the edges. Sometimes I'm using
the tip of my pencil, sometimes I'm using this side of my pencil because I want the
thickness of my lines to be different in order to show spot this splash. Alright. That's that. And over here I have
a strong darkness, which obviously I create. And I move on up to here. I actually bring it up to here. Okay. Now we can move
on to the next step. I'm going to use my color 392. And I move over all these
areas with my color 392. I mean, wherever I
used my black color, whenever I had used
my black color. Now I'm going to go over it with this color and make my
colors more complete. And wherever I've
used my black slider, I'm going to apply this
color leader as well. And wherever I had a darker, I'm going to go darker. So here we go. And layer of this color
going through the black. Okay. And even these areas
because they are too dark, I have to cover it with the
same color that I'm holding now because we have
strong darkness here. Okay? Now we are agreeing to work
with our next color palette. I will use my color
333 for coloring. The rest of my work
are bare to save for adding another
layer of color. I also work on here. And little by little from here, I go up and I lighten my colors because I want to fade it and blend it into
the whole lighter areas. So that's what I'm gonna do. And as you can see completely, I've even created a background
color with this color, slowly and lightly, but
I have created that. Okay. Now I'm going
to get my next color, 325 for making this
area more pink. Because I want it to be more pink so I can match
it with by modal. Okay. Now we're
going to continue our coloring and finishing
the work in the next episode.
22. 21- Detail Coloring and Finish: Hello, and welcome
to the arrest and the last episode
of this tutorial, we will working with our 325 in order to add more pink
color into our work. So I'm just easily going
to color this area. And little by little, we move on to the
lighter colors. I get my color 319. And just generally
and completely, I do my coloring. I mean, I go over
all these areas here to make them complete. These areas should
also be colored. And here we go. Then I'm going to
use my white color in order to pop up some
of these lighter areas. And these lights that you can
see clearly in your model. Okay, here we go. Now again, I get
to my color 392, and I use it in order to cover all the white textures
that have been left empty on my cardboard. I tried to cover them
all with this color. Then I will use my
black color in order to create even stronger contrasts. Again, I say because
we are working with a liquid or a glassy texture, we need these strong contrasts. So here it is. Alright. Then I'm going to use
my electronic eraser in order to get delights that
I need for this area. Over here. And wherever
I see them strong, I create them with my electronic eraser, even over here. Okay. And I think we're
going to be all set. All right. Do you see
when we apply the lights, we are actually completing our contrast and
that's the time. You can clearly see the volume
and texture of your work. Then I'm also going to use
my white pen in order to apply even a stronger lights
in some specific areas. Some specific places. These are the areas that
need more stronger lights. So that's why I'm
using my white pen. Okay. There's that and that's how it's done. After applying the lights. I can move on to my black
colored pencil again and make these areas
a bit more ordered. Another splash
drop will be here. And here we go. We've reached the end. Congratulations. We can say that actually
we finished our work. I just get my white color
and my hand again and go over these bars in order to plan all my colors together. I also want to create
some more lights in here. These are actually
the last touch ups. Then I use my car 392 and I go over it because
I didn't want to I don't want it to leave to light. This tutorial has ended. I hope you've enjoyed it so much and it would be really
useful for you.
 Amelie Braun, Artist & Cartoonist