Transcripts
1. Course Trailer: Welcome to the introduction
course to UI UX design. In this course, we're going to learn some of the basics of UI UX design using the free
platform called Figma, who build products together. My name is Amy, I'm your instructor
for this course. I've been a designer
for over three years, working on multiple projects at both mobile and web application on whether you're
interested to learn design. And this is your
first time designing or your beam designing
for some time. And now you're going
to learn Figma. This course is exactly for you. In this course we're
going to learn essential UI and UX
design concepts. And why Figma such
a powerful tool and how can help you in
your design projects. And let's go to the first
part of the course.
2. UI and UX Design: So first, it's important
to define these two terms, UI design or user
interface design is about the
aesthetic experience. To give this a tangible example, think about the mobile app
that you use every day. And UX design or user
experience design has helped decide what features, what things would
be in that product, and how the work and who you feel while you're using them. So still sounds a little
complicated, right? Both UX and UI designers
what we're using, but let's try and break
this down to make it a little bit clearer
user experience and user interface than
the experience involves a lot of
different things. How you feel, where you are, your motivations are in the
moment you're doing them. What happens when
you do something? What did the reaction? There's a lot of things involved in how you experience anything. Now let's look at
the word interface. And interface is a
particular thing you make one or more
interactions with. Think for example, of
a remote control with, but that is one thing that you are interfacing
with to achieve something. So this is the real
difference between user experience and
user interface. So the experience,
whatever you feel, whatever you want into all the different
ways you can do it. And an interface is
that tangible thing that you interact with to
get something specific. Ui and UX designers often work on the same projects and
often at the same time, but they're really responsible
for very different things. Ui designer is responsible for visually representing all of these concepts and ideas in a way the user knows
exactly how to use them. Ux designer responsible for
the overall experience, understanding the users
and helping give concepts and ways of improving the
experience for users. And see you in the second part.
3. What's FIGMA: In this part, we
will explore Figma, learn what it is, and how we can get
started with it. We'll go over some of these
essential topics that will get you ready to design
beautiful UI UX projects. Figma is a leading
design software, helping teams and
individuals create designs faster and
more efficiently. Figma has a few advantages. One most importantly, for you, it's free to get started if
you're working by yourself. Used by many
companies because it also has really
good collaboration. So can have multiple
people working on the same design file
at the same time. Also really fast. It works on any computer, whether you have a
Mac or a PC or Linux, whatever you have,
it works right in the browser and it
also has a mobile lab. So you can preview your
designs on a mobile screen. So there are really no downside to starting
with a tool like Figma. It's a great resource for
anyone starting a new IN UX. So this is the website
you just go to figma.com. I'm already signed in, but you can sign up very quickly even with your
Google account in. Get started using
the browser version. But if you want to
use the desktop app, you can click here
Good desktop app and open your account
with the same way. But before we jump
right into Figma, I want to show you the way I would recommend to get started. So you just want to
start practicing. Now for that, I'm not going
to ask you to start designing something from scratch because I believe that would be
very hard with someone. Especially if you are
a complete beginner in this space and you have no grounding in design principles and
things like that. So the best way for
you to get started is actually to copy
other designs to end. The reason this is so
good is because you can see how the
design was created. So that when you get
stuck on something, you can actually see how
this person who created this achieved a particular effect
or looking sign of figuring. This is totally fine
in the beginning because you're not going
to be selling these. You're not going to be
saying that you design something when you copied
it from someone else. This is just for
your own practice and it's a really good
way to get started.
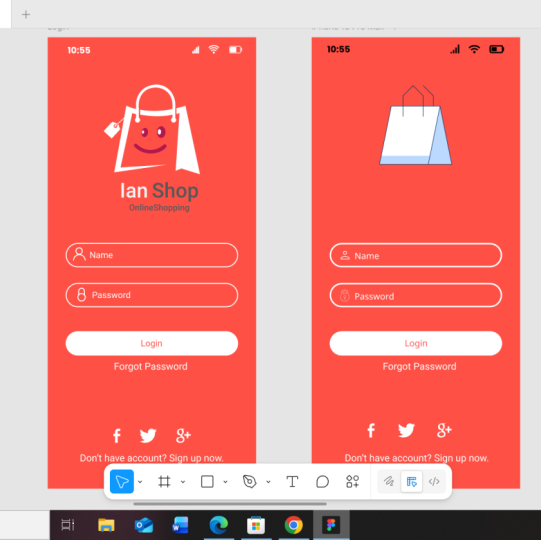
4. Getting started with figma: Get started. Now, do that. I wanted to start
off with a template. And what I literally did was
I clicked into community. So when you look at that, you'll find a branch of UI kits where I can search
for shopping apps. And this is a great
thing about Figma. There are a lot of
free resources in the community you
can use to start practicing to incorporate into your design so you don't
have to start from scratch. And I choose this application online shopping as an example. And I open here. After you can click
this button here, get a copy that says
Copy to Figma account. And I can start editing this. Alright, so now
we have a copy of that file we're going to
use as our starting point. So in Figma, as you can see, I can just scroll up and down to see the different
screens and disk file. And I can very easily
rearrange them. You'll notice that in the
original file they were placed side-by-side and I have more
of a vertical arrangement. And I can move it around with
my mouse cursor like that. And I can zoom in and zoom
out with a pinch gesture on my track pad that way I
can see all of my screens. So let's say now I want to
start coping this design, what I do, well, just
to give you the basics. On the left here, I just
have a layer section. And then when I
select an element, I get the settings for
that element on the right. So we will start step-by-step to redesign this login screen. And as we go we will use specific shapes,
colors, and icons. Before starting, we will
adjust our environment to add a new screen next to
the original login screen. Now the first step to
design a new screen, you have to choose
the frame that wraps all screen
shapes like this. We click here and choose a
frame to redesign as follows, any format for our screen. But what we are going to do
now to prepare the frame, we're going to choose
here in this left part, the type of frame
suitable for our use. And in this case, we
choose iPhone 13 Pro Max and move it next
to that like that. Now we start with
the phone header. And we will use the
plug-ins for the icon. Right-click here
and choose plugins, more plug-ins to manage our plugins to use
during the design. Here you find many
useful plugins. But now we will
choose icon if five. After rendering
plug-in, click Install. Now we can use the
icon at five login. Starting with the Wi-Fi icon. We choose this icon and click on import icon to be available
to use in our new screen. And we finish the rest of the
icons with the same method. Now we resize the icons
and move up like that. You can group it's three icons together to move
in control easily. And the hour simply with
the text tool like this. And we change now the
background color like the other screen.
Select the frame. And here on the right, go
down a bit and click here. As you see this color palette, we can choose a color like that, or use this little
tool, the picker, and then click on the place you want to take the same color. Now we will add this large icon with the same method
as the other. We write shopping and
choose the icon new want. Then we will build
the name field with the rectangle tool. Which one? An ad from here. And we change the color of
its border to white. Here on the right. We choose
this stroke parameter. Then we can increase the border size by
three to be clearer. And now we change
its color to red. But still it is necessary to adjust the border
radius like that. Here on the right
at the top there as the border radius parameter. Now we can add the other
field in the button. Copy paste of the first field because they have
a similar shape. And don't forget to
change the button color. Then we will add these two
icons like the others. Using the icon. If I plug-in. Now we move at
each in its place. But as you see here, the icon has disappeared. You have deselect it
and right-click with the mouse and choose
Bring to Front. Again, it is necessary to change the colors to
white for the two icons. So now we will add the
texts for the two fields and login for the button. And continues to add forgot password just below the button with the same method. But you have to be
thinner than the others. To change this parameter. You select the text and go to the right and click
on this pick list. Then choose the size
you want. For us. Now we will choose medium. Finally, we end with it. This part which contains three icons and the
sentence just below. We're going to choose different icons from
the original screen, which I see are more
consistent with our screen. And don't forget to change the color of the
icons in the header. So we used in this new screen the basic Figma tools and how
to install and use plugins. Still, there are other tools and things to learn and design
with Figma like prototypes. Now you've created
something that's very close to the
original design. As you can see, starting with a template
that's already in Figma allows you to cheat in the beginning and
copy over elements. And you should just look for
free resources that have designs of mobile or web
apps and start coping these. See how you can recreate
these elements. And over time you'll start to internalize all of
the principles. Of course, at some point, it's really good if
you start learning about the actual
theory of design. But this is a way to get started without
being bogged down. So maybe you can switch. You will do a little
bit of practice, a little of the theory, and start applying what you learned. But this is one way to
get started without knowing any theory and
justify coping designs. Now the next step from this would be to start
designing things in Figma when you're
comfortable with it and you can pretty recreate
everything that you see. So you might see an
app that you like that's not already
created and big. So maybe you look
in Instagram or any other app that you like
or watts app or anything. And you can start
designing that in Figma when you'll start to familiarize more and more with the tool. And the step after
that is to look at an app that you think
could be improved. So maybe your banking
app is really, really bad and you've always wanted to improve it
well now you know how to use Figma enough to start putting together a new design. So I hope this video
was helpful for you. And if you have any
questions about next steps, something you got stuck on, contact me in my email and I'll see you
in the next video.
 Amine Abdelkebir, UI/UX Designer