Transcripts
1. Welcome!: Hey there, I'm Chris var1, a professional web and app designer in the following Gower, you and me, we're
going to design an awesome homepage in Figma. If you haven't seen my FIG, my essentials course
leads. Start with that. You're going to need
that foundation before jumping into this bar. Now, at the end of this hour, you're going to have a
complete homepage design for an actual website. But please keep in mind, there is no coding involved. Now in Figma, we're creating the look and
feel of the website. And that could lead them. Codewords are going
to pick up our design and implement that into
a real working website. That's a totally
different thing. And if you have
questions about this, is this coding process. Again, I remember
the essential scores which will clear everything up. Now what I want from you is a perfect replica of my
design in that video. Then with that, I want
to see your version. So please post it to the platform so I can give
you my thoughts on it. I promise my feedback is
going to be constructive. So don't worry
about your skills. We're here to learn. That's no judgment. It's all about having
fun and growing as a designer of gate,
Let's get to work.
2. Set up the desktop version the correct way: Welcome back. Please open up Figma, the standalone version, and
let's create a new project. Call it the LG, short for this
legs, great dotnet. Okay, good. The Frame Tool and click
on the desktop reset. These steps should
be very familiar, but that's the point. I want you to be able to
go through these actions with your eyes closed by
the end of this course, with the frame selected, change the width value to 1920. You can leave the height as is. We'll adjust it as we move down. Next, the grid, like
here on the layout grid, the default value is not
what we're looking for. So head this icon. Now from this list,
choose columns. This is why you shouldn't take
notes with going to repeat the most important
steps lots and lots of times for the
number of columns. I'm sure you already
know it's 12. For the margins. 360, please. Even though the opacity
is set to 10 percent, this will interfere
with the recording. It's distracting. So I'm going to
bring it down to 3%. You don't have to
do that by the way. More than that, I'll add
two guides that will set up or active area
of 1200 pixels. Use Shift R to enable the rulers if you don't
have them active. Now move your cursor
here on the left side, and you'll see this
icon on your cursor. Click, drag and move it
towards the left edge. You'll feel that big
man is trying to help you snap it into place
and zoom out if needed. Repeat for the other
edge of the grid. Basically, this is the
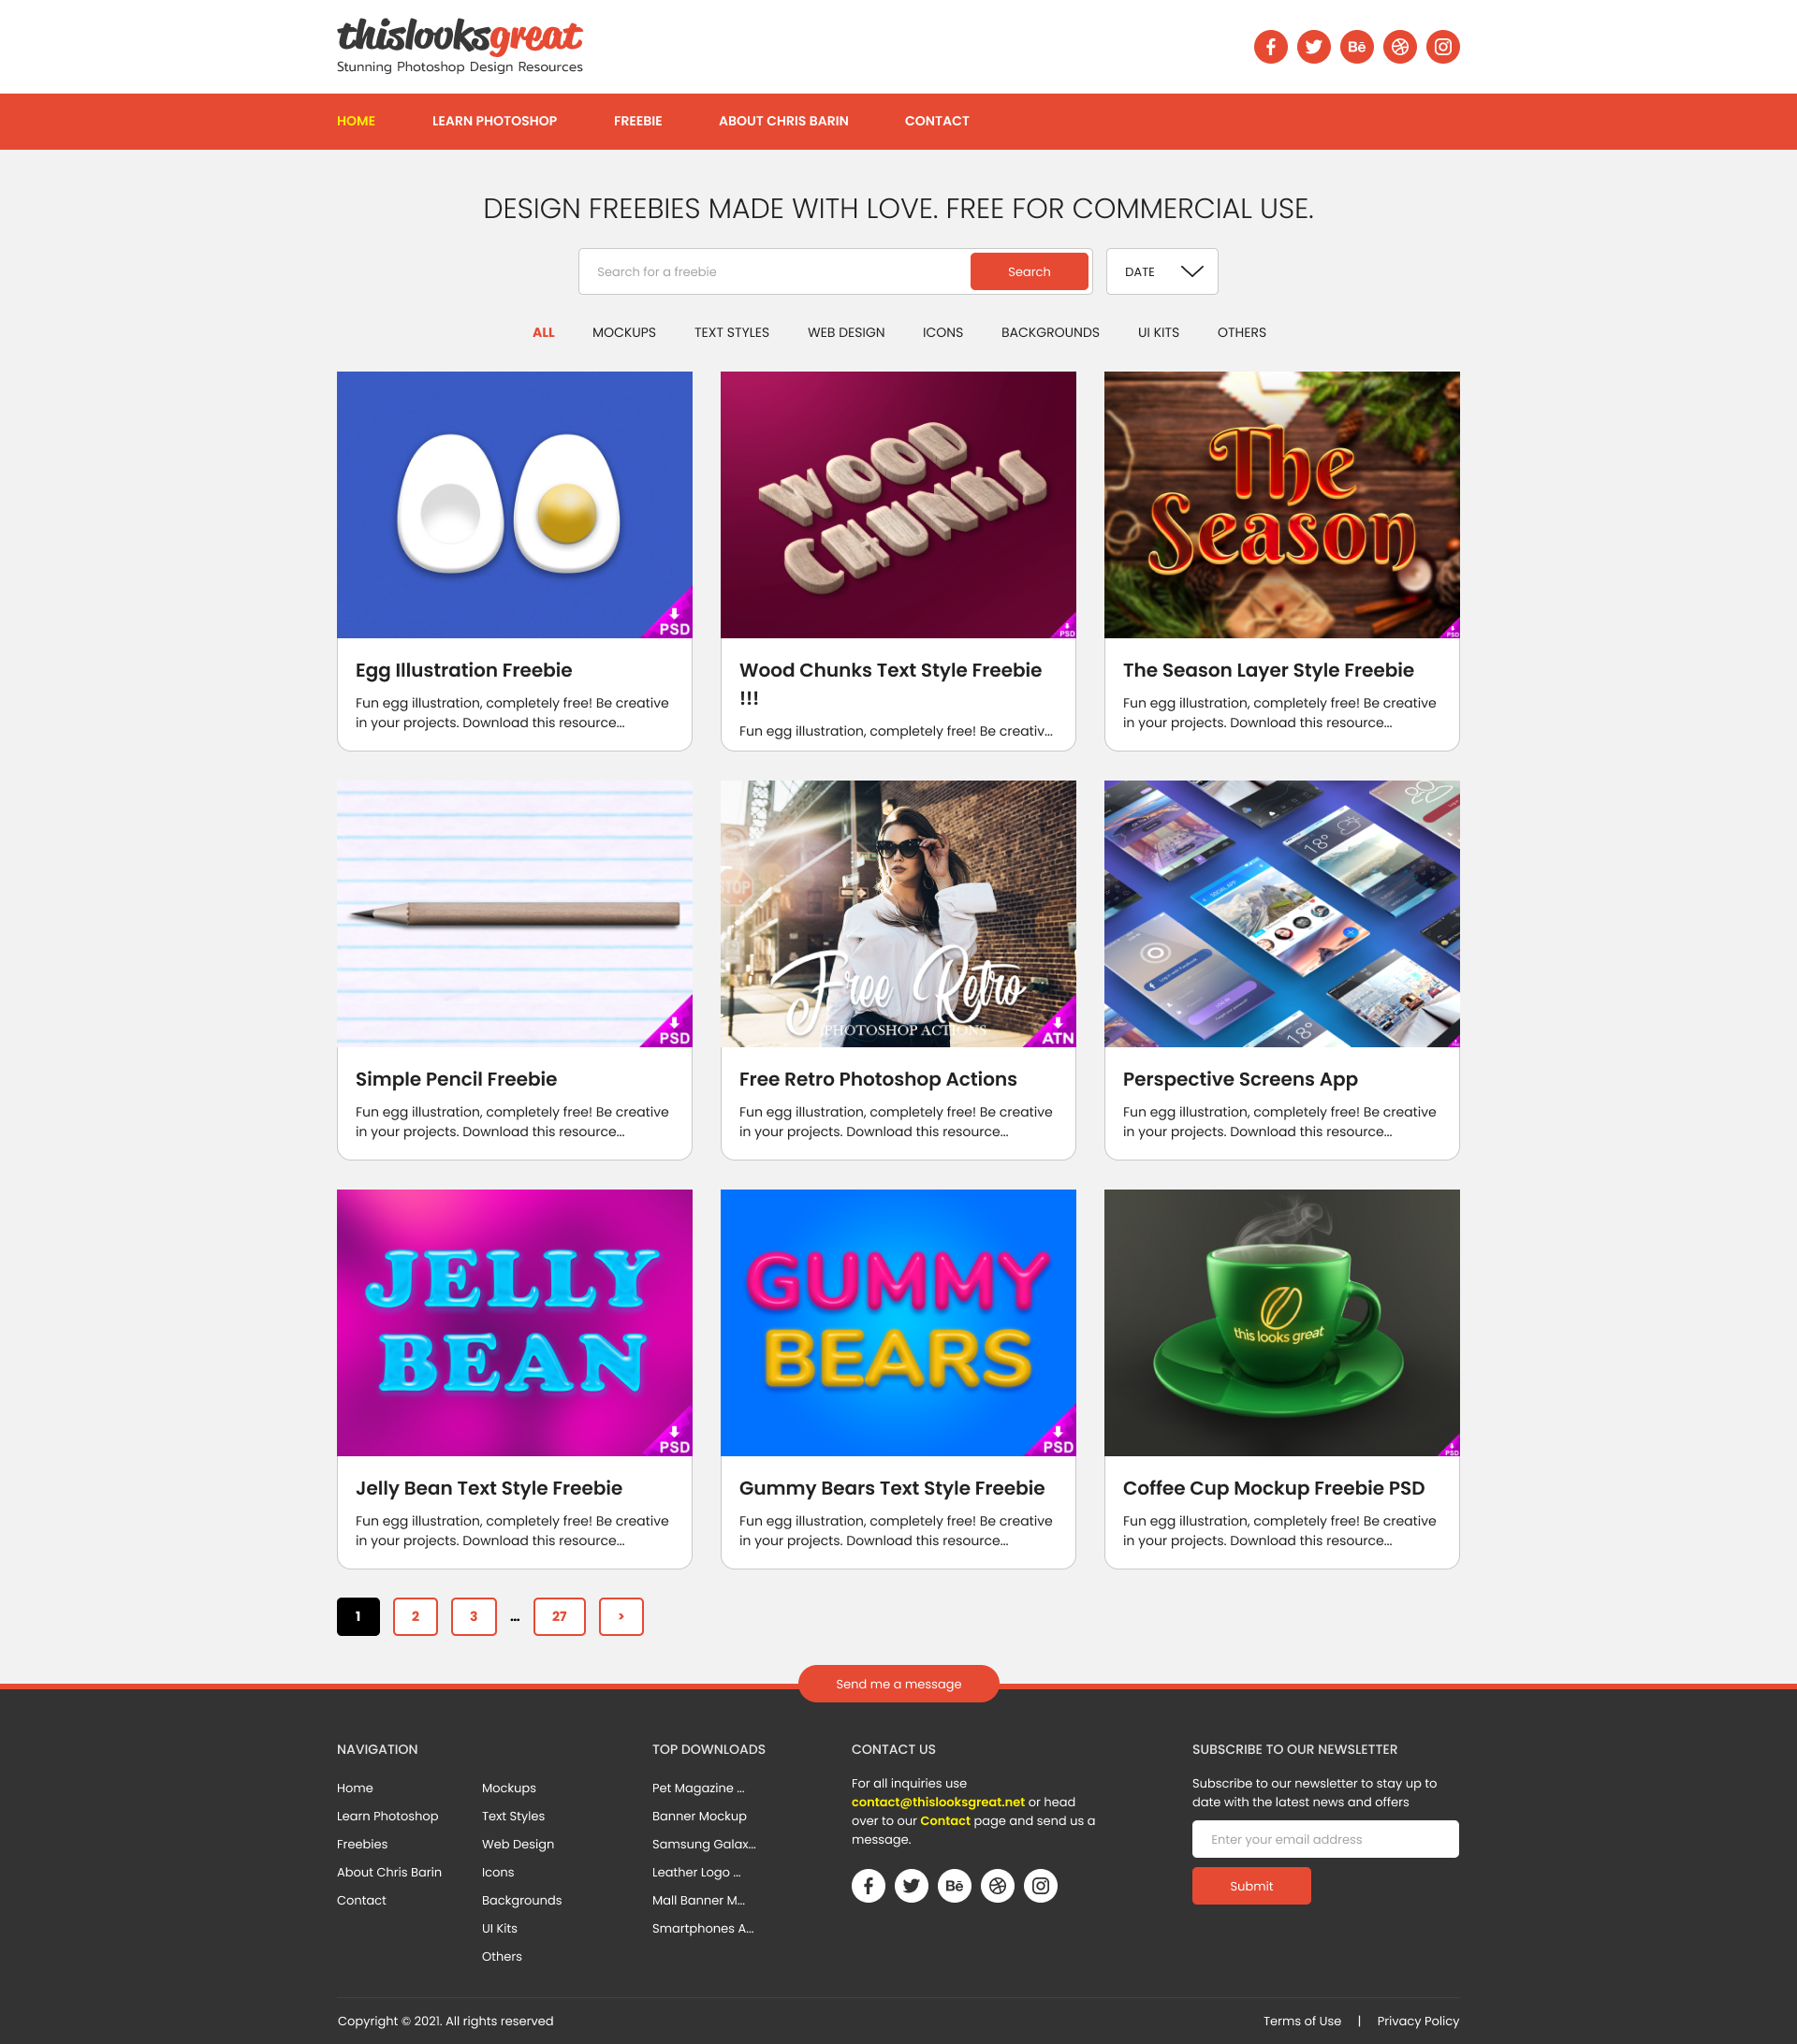
foundation of our design. This is our starting point. Please open up the
website in your browser. That's, this looks
great. Dotnet. From here we want to
download the logo, which can be done in
a number of ways. If your browser allows it, right-click it and see if you can download the image directly. If that doesn't work. Here's my other method. Right-click it and choose
Inspect from this list. So that's inspect. Most well-known browsers
have this option. I'm using Firefox, by the way, in this panel at
the bottom you're looking for the single thing, this part here, logo that PNG. If you move your
cursor above it, you'll see this is a logo
in a transparent format, PNG and that's beautiful, That's exactly what we want. Click on it. And now you can definitely
say that once that's done, please drag and drop it from
your desktop to our design. The great thing about it is that you don't
have to resize it. It's already exactly
as we want it. In terms of placing it, this should be a no brainer. Align it with the left guide. From the top. Leave about 30 pixels
also give her date. Don't worry about
this specific value as we're going to play
with it later on. Let's pause because there's
a very important point. Please always come back
to 100% zoom level. This is like brushing your
teeth or drinking water. It's not debatable,
is not optional. It's not based on your mood. I'm going to zoom in and out
with my mouse all the time. You'll have to do the same thing to check for the
various details. But we always, and I repeat, we always have to
come back to 100%. Now, why am I making
it such a big deal? Because our work is going
to be seen at 100%. We always have to judge our work through the
eyes of the user. We're going to notice all
sorts of fine minute details. But if we zoom back to 100%, those details are the
gut and get lost. So this is a very
common mistake amongst beginners because they
were able to zoom in. They see all those
details and they just assume that the users
will see them as well. And obviously,
that's not the case. And here's the flip side. You zoom out to 50% or
something like that. You add the text field that
says welcome or whatever. Now it's time to
set its size right? 12 is clearly too small. But because we're zoomed out, we might choose a value like 70. Now this seems okay in
this specific context, at this specific zoom level. But when you come back to 100%, and you can clearly see
this is way too big. This is as big as the logo
and it's just one word. So that's how beginners
often fooled themselves, that the view gets distorted because of the wrong zoom level. Okay, please delete the texts and get familiar
with this option. Unsettled, say that
the hotkey makes absolutely no sense
for me. Shift the 0. So you'll have to let go of your mouse to actually
use Shift Z though. It is what it is in other design programs
is controlled one, but that there's something
completely different here. For now. Please make sure that you get used to this drop-down here and that you always
come back to a 100 percent. Let's take a quick break.
3. Create the header: Welcome back. We now have the foundation. Now let's move on to the header. To make things easier, please select the frame and less changes
background-color. I'm looking for the very, very light gray and I have
an exact color code in mind. It's F2, F2, F2. As you grow and experience, you'll soon start remembering
some essential color codes. Trust me on this. Now, hit the escape key
and I hope you can see why the grid system is
a bit of a problem. So please hi that by
hitting this icon here because we need to
focus on what's going on, on the actual Canvas. Now, for the header, we need the pure white
background, figma. We don't rely on rectangles
all that much because we have the Frame Tool hit
F and drag one out. I don't really care
how big it is. All I want is to make sure that the logo is included
in this box. If you did it right, you should see the
logo inside frame 1, which is inside this top one. Okay, Now let's enable
a pure white fill. This is why I chose that
particular shade of gray because it works really well
with these white rectangles. Now about the size of this rain, no matter what it is, Let's change it to 1920. And that's because that's
the size of our project. Now to center it, just move your mouse up
and click on this icon. Okay, now for the height, we don't need a lot, so around 100 pixels
should be fine. Plus or the minus 10, 20 pixels give or
take is always on the table because really
nothing is set in stone. You really have to adjust
as you go forward well, okay, Now top align
it by clicking here. Now the logo needs a bit of work because it's
inside this rectangle. We can click on
this icon here to vertically align it
within the frame. And of course, it needs
to touch the left Guide. Now. Okay, good stuff,
nice and simple. The next step is to
file up flat icon.com, which is again my go-to
website for icons. Again, you do need a subscription
for it and there was no free resources out
there that's comparable. Okay, we need the social
media set for the right side. Please keep in mind that
flat icon is not free, but as the best of
the best by far. I'm sorry to say that. No similar websites
that are totally free. Okay. We're looking for
the icon packs. We could search for Facebook, then Twitter, and
Instagram and so on. But I would much
rather find the pack. That's because being consistent
is incredibly important. So type in social
media and have a look. I strongly recommend you use icons that are the same color. It looks that much cleaner, much better, but of course, that's a subjective thing. Now, I preferred this social
media back, rounded icons. I think these look 10
times better in my mind. I love that symmetry. If you don't like this back, this one is also
a strong second. We want to download
them as SVGs. I'll quickly add them to my
collection by clicking here. This is pretty intuitive, so I won't spend too
much time on it. Now, when you're ready, download the collection
and choose SVG. Png is not a great choice
because it's just not as crest. The quality isn't as
good as SVGs export, archive and drag and
drop them into Figma. Now, I'm going pretty fast, but I hope you're working
along on your second viewing. Okay, we have all
of them selected. Please go get the scale tool and resize them to something
along these lines. So fairly small. Next, zoom into 100% so
we can check on them. Ideally, I'd like
to have them under 40 pixels while you're
scaling them down. Keep one eye on the width field. Well, the width and
height are the same because these are
perfect circles. But you get the idea. Keep an eye on this part when you are happy
with the size, switch to the move to well, now reposition
your mouse between two icons and you will
see some pink lines. I'm going to show
up, click and drag outwards to increase the
distance between them. I want to see ten pixels here, just in case you don't like
this particular order, go above one of these
circles, click, hold and drag the icon
into another place. This is available
because all of them are selected and that the
same type of layer, by the way, I'm on
the move to, uh, right now and there's
nothing else going on. There's no advanced technique here and just basic
stuff in Figma. Okay, now, one final thing. Let's move them in
the correct position. Click drag and don't let go. Look for these two lines. This means the set is vertically centered
in the white frame, but it's also right
aligned with this guide. And that's absolutely perfect. One thing though, don't
leave them black. Click on the selection colors and the color picker
should show up. Choose the eyedropper
tool, this icon here. Okay, now sample the
orange from the logo, and that's basically it. We are done. Congratulations on
your first header. Awesome job. Now let's take a short break
and then we'll continue. Thank you.
4. Create the main menu: Welcome back. Before we move to the main menu, it's best you the name
frame one to head. There was something similar. It's best to stay organized. So again, please rename it. Okay, now, drag out a new frame and it's the
same story as before. No particular size,
just a random one. Before we adjusted,
please enable a fill, open the color
picker and we should have that orange
available underneath. Okay, there you go.
Document colors because the now for the width 1920
is the obvious choice. Nowadays, this is one of the most popular
Main Menu styles. No effects, no fancy gradients, just nice and simple. Center it horizontally and
let's talk about the size. This will hold our
main menu items, but that's about that
and nothing else. So I think 60 pixels
should be enough, all the way zoomed to 100%
and see if this makes sense. And I think it's fine
though we can't change our minds later on
after we add the items. Okay, let's get the type tool
and let's start with home. May get 14 pixels. And let's have a chat about the typeface that
we're going to use. The short answer
is this Poppins. I like it because it has
some character too wet, but it's not all that fancy. It's like a nice fitted shirt, a good medium between
Hawaiian shirt and a formal one that's meant
to be worn with a bow tie. So a happy medium, that's Poppins for me. Now, I wanted to stand out so I will enable the
all caps feature. This is very much in line with the existing version
of the website. Remember, if you want to
disable this all caps styling, click on the minus. I'm happy with it as it stands, but it's a bit too
light for my base. So let's change the
style to semi bold. Looking good so far, please move it in
the orange frame and place it so it
touches the left guide, though is not mandatory. I do recommend you use
Shift a to make this into an auto layout rain in case
you don't like shortcuts, I'll hit Control Z, so I can write leg from this list, choose
add auto-layout. Now again, good stuff. Notice we have some
extra space all around it That's padding and you
can adjust it from here, set it to 0, that will
knock it out of place, but no worries, grab it and
move it backward belongs. Now, the next step is important. Make sure you have home selected and not
the frame itself. Okay, use Control D to
create a copy and duplicate. And because this
is an auto layout, Figma knows where to position it to the right of this item. How does it know that? Select the frame and I'll show you it's this arrow right here. This arrow says that is
going to be horizontal. If you choose the other one, that's going to be
our vertical list. Obviously we don't want that, so change it back. And let's edit this
Double-click to select that. You may need to do that
twice, by the way. Okay, this should
say learn Photoshop. That's my blog, that's
one of the pages. It escaped to commit
the change and use Control D once more. If you have not okay
with the hotkey, just all to drag or Option Drag. If you're on a Mac, this
needs to see freebies. Okay. Now, the next item
is about Chris barren and the
final one, contact. Every website needs that page. Now please have a
relaxed approach about auto layout and
all these hotkeys. If you just want to add regular texts layers and then
spread them out manually. That's totally fine too. All that I asked you
is to make sure that you have the same empty
space between them. Speaking of that, please
select the frame. The default gap is 10 pixels, but that's a bit low, especially considering
how much room we have to play with. So click here and I suggest you hold shift and you
tap the up arrow key. I don't have a specific
value in mind. Sometimes I just freeze dialect. In this case, I'd like
this last menu item to be a bit over the
halfway point of the frame, you may ask, why not
centered this main menu? And it's a simple
answer because users, it would be on the left side. There's a lot more to say,
but that's the essence, will have a deeper discussion
later on in the course. The home item is yellow
in the existing design, you can fire up your browser, right-click and inspect that. And the color code
is FF FE 00 000. As a quick tip, if
you deselect like so, you'll have to double-click many times to get to that text layer. Click once and
you'll have Rimland selected double-click
and you'll have framed to selected
double-click again, this time above home, and you finally have it. That's a bit tedious. So here's a faster
ray de-select. Okay. Now with everything these
elected control glyc home. And that's it. Controlled Likud
and you're done. Okay, open up the color
picker and use that code, FS and FF, FE 00, 00, 00, 00. Great job. So remember, if
you control click a bubble layer that's
inside several frames, you'll immediately
selected awesome stuff. Let's rename this
one to Main Menu, and we're done for now. Thank you so much.
5. Set up the search box: Welcome back. Let's handle the
search box by copy pasting this bit of text
from the existing design. Good the Type Tool
and paste it in. Design freebies made with love, free for commercial use. Awesome. Center the text both in terms of positioning but also
from this place here. This is already in all caps. So let's adjust the size. Let's go with Poppins, sturdy, but I want something
a bit softer. Bold basically means that you're making a
strong statement, but we don't really want that much attention
to this title. So a lighter style
may work better. And in the light seems okay. Please leave about 40
pixels from the main menu. This isn't resonance, don't, by the way, for the Pexels. But we want to hit that
sweet spot between having a compact design and leaving
enough room to breathe. Now to make sure that
you're on the right track, hold the Alt key and
hovered over the main menu. Then use your arrow
keys with what? Without shift. Okay, Now for the search box, Let's start out with our text type in search
for the freebie. And this is going to be a
hint that's inside the box. Even though most people know
how to use a search box, this hint makes it look a
bit better for the styling. Let's take it down quite a lot. I would say maybe Poppins, regular 13 pixels, no
all caps treatment. That should be simple and
straightforward word. Please remember to open up this panel to disable
that setting, the all caps setting. You do that by clicking
on this minus symbol. Okay, we're going
to choose a color after we add the background
for this region. Hit Shift a to
enable auto layout. We could have used
the simple frame, but this is slightly better. Enable a bell by clicking here. Pure white is totally fine. Now, okay, now
let's resize it to something about
maybe 500 pixels, 500 or something
along those lines. Now why 500 pixels? Because the burden is going
to be placed inside it and there's nothing really else that's important
than this area. Something now though like 300 pixels wouldn't occupy
the space correctly, it would look odd,
just way too small. But something over the 750 would be a
massive exaggeration. In case you want to
work with precision, go to the W field
here and type in 550, what, whatever the value
suits you for the height. Remember, the main menu
was 60 pixels, 600. Use the same value here, though. You might notice the H
field is grayed out. That may happen to you. That's because of
one setting here from constraints and resizing. But let's keep going. Let's keep it simple. Go here and drag this downward. Now the age field, the height field is
unlocked because Figma understands with
tryna do something here. The text isn't centered anymore, but open up the padding
setting from this place. The default setting is top-left. I'm looking for this one. Okay? Some people like to
center it like so. But because the search button
is going to be inside it, I think I'm going to
leave it like that. Okay, square edges
are a bit 2005. So let's round them
out to five pixels. And because we have
here in this panel, let's center it inside
this big frame. Now gait, looking good so far in relation to the headline, leave 20 pixels between them. Some texts layers have this bounding box that's a bit bigger than the actual text. So the measurement may
not be 100% accurate, but if you stay consistent and use the
same measuring the world, then that's all that matters. So trust the
measurements shown by Figma and you'll be good to go. Now, it's time to
set up the burden, give the type tool
and write out search. Now you might notice
something a bit odd here, but no worries, I'm
going to explain it. Remember how we
did the main menu, where the menu items
would get placed right next to each other
when we hit control D, That's auto layout in action. Now, let me delete that. In this case here we need
to do the following. Select the frame and in
the padding pop-up window, we have this drop-down here
that you might have missed. Right now it says back, change it to space between. So from back to space between. And there you go. And while we're here, let's edit the padding on the
left edge to say 20 pixels. Okay, the next bed should
be straightforward, like the search text
and headship they or right-click and
choose add auto-layout. Done. Next, add a fill to it. And of course this
should be orange. You'll notice we didn't set up text or colors styles just yet. And that's because so far
there's no need for it. Plus, this is going to
be a very small project, so it's not really needed. Now, change the text white and we round out the
coordinates with a five pixel value to make
this button healthier, change up the batting, then is fine for
the top and bottom 40 should give you a
decent size button. Now I know we have
a different gap for the search box, but
that's intentional. I feel it looks better
that way because we have the same distance all around us button and that's 10 pixels. Okay, now backing off, this is all search box. We still have some
details to sort out, but let me show you why
we used Auto Layout. Grab any edge and resize it. You'll notice it's still
makes sense. No method. Where do you drag from? Less pause right now so you can rewind the video
and work with me. I'll see you in a minute.
6. Create a dropdown menu: Welcome back. We have all search box and the contrast is somewhat decent, but I feel we need a bit more
separation between them. To help us with that, I'm going to add a stroke. Now, this is going to be applied to this frame which by the way, should be renamed to search. So please handle that now, rename it to search
in terms of color, we're looking for
that sweet spot. Not too dark, not too light. I think something along these
lines should work well. The color code is C9. C9, C9. Awesome. Now let's do the drop-down
menu to move it along. Let's duplicate this search box, use Control D and
move it to the side, rename it to drop down
before we dive into it. Now, okay, Now the first
thing that we need to set up is to change
up this text, rename it to date. But you can use
all caps for that. No need to go to the
text transformation. Sometimes it's just easier. Okay, Next, we'll have to
add the drop-down icon. So I'll fire up my
favorite website for that lab icon.com while I
go through these steps, let me underline one key thing. We didn't add anything
to our assets panel. Typically this search button, nor did we set up any
color or textiles. We could potentially do that. But if we don't plan
on using them across loads of pages, why bother? If we're talking about
a couple of pages? Tutorial setting, I'm
more than happy to skip some of these things
that really defocus us, that take us away from
the actual design work. Okay, we deleted the button
and the text layer was moved. No worries. Bring in there though
and shrink it. You don't need to use the
scale tool for this one. If you use this type of icon, this is going to stand the loan. So there's no need
to worry about the icon looking through
10 or anything like that. I'm looking for 36 pixels, though does just a
personal preference. If you've placed icon
inside the frame, the date is going to move
back into its place. Now why does it back that way? If you select the
drop-down frame, you'll see you have
this option set up in the padding window
space between, okay, I'd like this item to
be about 120 pixels wide. Right? Now looking at it, I think I forgot to change the
color of the hand. See, this is a selection here. Date is the default value. This is active. This text here. On the other hand,
this is a hand. This is a piece
of text that will disappear once you start typing. So please control click it
and open up the color picker. While I'm tempted to use
the gray from the stroke, I think that's way
too light for it. So instead, let's go with something around
this color-code. A4. A4, a4. Okay, this is looking better. Now the question is, do we need that extra word between
these two fields? This one here that says
sort by and I say no. Instead, I think I would
prefer a smaller height, but both of these
items, select them. Both 50 pixels should
be a better fit. And I'm going to do something
a bit controversial, but I stand firm behind it. For the search frame, change the padding on the
right side to 50 pixels. And that's because I want five
pixels on all three sides. This should look much better. And indeed it does. Before we take a break, let's center them horizontally. To achieve that, select both frames and
group them together. Yep, our first group
in this course. Okay, you can use Control G or you can right-click
after they've selected. I prefer the Control G
for obvious reasons, It's a bit faster. Next, use this icon here,
align horizontal centers. Now we can ungroup
these items like so. Right-click in the layers
panel and that's it. Basically we're done. And I'm very happy
with our progress. And I hope you're having
a good time step-by-step. We're going to create
this awesome website. I'll see you in a minute.
7. Create the most important item – the card: Welcome back, heels. The most important part
in our design, the card. This is essential
because it takes up around 80 percent of the page. This will determine the
look of our homepage, so it's best to do
a good job with it. Please make sure you work
along on your second viewing. Okay, open up, this looks great. Dotnet, click on any freebie. And once you're then that
page is save the photo, copy the title and
added into Figma. You can leave it
as it is for now. For the description copy
about two sentences, part, and paste it in. But this time, draw out a box. Okay, we've added the text because we're going
to use auto layout, grab both of them
and use Shift a. You'll notice you'll have an auto layout by checking
the layers panel. This is the symbol for that. Right? Now please
add the white fill. This isn't looking all that hop, but no worries, we'll change up these layer styles and
it will look better. The first thing I want to
fix up is the padding. Use 24 all the edges. And that's because this
has a major impact on how the website looks like
and have it feels like. It's all about
these tiny details. For the title, let's
use Poppins, semi bold, 20 pixels, no all
caps transformation. The existing design
has a normal style, but I think I prefer
the semi bold. No matter the case, we
can experiment with everything in just a few
lessons down the road. Okay, Poppins semi bold 20. For the description,
Let's try Poppins regular 14 pixels, no all caps. Again, you don't have to
know this by heart and you don't have to treat each choice like it's
a permanent thing. It's very likely that we're
going to change this up. The key here is to make
sure that description insignificantly smaller than
book title. That's odd. Main thing. Okay. Just in case the padding on the bottom doesn't
look like this, please do the following with
the description selected, choose the second option
here called auto hide. With that selected,
the white box will expand and the 20 pixel
padding should look right. This is why we're
using auto layout. Without it, we would have
had to constantly adjust the background rectangle and
measure things constantly. It's not the end of the world, but still this is much better. Speaking of working smarter, we want to be columns
like in the live version. How are we supposed to do that? Well, there's two ways. Number one, we do some math. 1200 pixels, active
area minus two gaps. Say that the pixels
each, that's 16 total. So 1200 minus 60 is 1140
divided by three, that's 380. So that's the first method. A card should be
380 pixels wide. We would select the
frame and then we would change the w value to 380. Now, here's the second method. If we simply drag
this handle outwards, things aren't really
going to work out. So I'll change something. I'll control click the
description and I'll focus here. This says where. And that's because I drew
that box, I made it. But say I want the text to adjust based on the
width of the frame. Well, we have to change
that to fill the container. And let me explain. This is a text layer
that's inside the frame. So the container is the frame. If we set the text layer
to fill the container, this means it will
follow its width. Here's what that looks like. Select the frame
and make it wider. In just like that, the text is rearranging itself
is like magic. In more than that, we still
have that 20 pixel padding. If I make the
container of nanowire, that text sees that and it
adjusts, grows in height. This is totally
awesome and I love it. And here's another
advantage where they buy, have more texts with
this description. Let me paste something in. And there you go. It looks lovely. And if I remove some of it, same thing, the layout changes. Okay, let me resize it to 380 pixels and let's do a recap. We created two texts layers
for the title I just collect, and then I pasted it in
for the description. I made the box and then I
pasted something inside that. Then for both of them are
used Auto Layout to ship. Hey, I then added a
background fill and I set up a padding of 20 pixels for
the width of the card. I could have done some math, but I chose to add more
flexibility to the project. I did that by selecting the description and I set
it to fill container. Containers simply means frame. In this case, you can think
of it as inside the frame. Okay, with this setting, I can now resize the frame and the description will adjust. But please be aware
that we didn't make any changes to the title. So if we add more lines to it, it's not going to look right. So again, select it and
change it to build container. You can now clearly see
it's edge right here. If I paste more texts, we're going to be good to go. Going back to it.
We didn't set up the distance between
these two layers. So let's do this, select the frame and set
this value to 10 pixels. Finally, move this down
and let's add a rectangle. Make it as wide as the frame, and don't worry
about the height. Okay, looking good. Now where the photo, Let's use Control Shift J. The one that we downloaded at the start of the
lesson is totally fine whether they're
in place and now you can resize
as high as needed. You want to make sure that
the corner is visible. And when you're happy, move it down just a little bit. I hope this was interesting, but don't worry if you don't get this resizing feature just yet. It's not the end of the world. It's an advanced technique
to make you a bit faster. If you can't manage,
that's totally fine. Please come to
this court and ask for help. Thank you so much.
8. How to improve the cards: Welcome back. There are always
choices in Figma. We previously saw how
we can add a bit of complexity by playing with
the resizing feature. We didn't have to do that, but it gave us a lot more
flexibility in case we want to make the card narrower or
maybe add the fourth column, the job will take us
only a few clicks. The job is going to be
done in just a few clicks. If we didn't add
that complexity, there would be a lot
more manual work. It's the same with what
we're about to do. We could duplicate this
card the bunch of times. But then what if we want to
change the corner radius, for example, or maybe
the size of the title. It would be a lot
more manual work. So here's what I propose. Select the frame and
this shape here. Check the layers
panel to make sure that you have the
right thing selected. Now, transform it into a
component by clicking here, you'll notice the symbol in
the layers panel has changed. And this means we're good to go. Please remove it from the frame, just drag it outside it. Typically I would create a separate page for
the all my components, but I want you to
see it right here. Okay, next, drag out a few copies all to drag
is the best way to go. Okay, another one, but this time Center it inside the
frame by clicking here. And finally yet another one. I'm sure that we want at
least two more those. So let's increase the
size of the frame. Select this top one, and drag it down quite a lot. Make it really big. Okay, next, use alter, drag and shift to create
a few more copies. Unthinking grid of
three-by-three. That should be enough. While I'm working
in the background, let me tell you that
it's essential that we change the photos
and the titles. If we leave one single
card nine times, this is going to say a lot
about us as designers is going to say that we're
lazy in any project, make sure you diversify
your content. The goal is simple. You want to make it look like the project has
already been coded. Like this is the live website. Repetitive or the fake content
simply breaks that image, breaks that dream, that mirage, that whatever you
wanna call it, right? Okay, Now back to where
we now have this grid. But I'm not in love with it. So let's go back to the main component that's to
the side of the big frame. Okay, Now please
select the frame, the auto layout that
holds our text layers. Say we want to round out
these coordinates, right? Well, don't use this field here because that would also
affect the top edges. We don't want that. Instead click here. Now with this new line, we can control each corner individually and we
want the bottom edges. So those are the last two
fields go with 15 pixels. And notice how the change
got spread across the board. This is why we added a bit of
complexity with components. I think it's worth the trouble. Now how about we
add the stroke to stroke scholar was C9, C9, C9. No gate. Here we go Much better. Just for the fun of it. Select the title and
tap the down arrow key. This change is available to us because of this
Auto Layout feature. And because it's a component, a gets spread across
every other instance. Again, an instance is a clone. On another note. What if we made the title read? Well, let's have a look. This is how it would look like. But you know what, I think
I prefer a dark gray color, not pure black by the way, but close to it to, to, to, to do to. This is one of my favorite
color codes and it looks a bit more refined versus pure black so that the coordinate, you may not notice it. But trust me, it's a subtle yet
noticeable difference because I like it so much. Let me add it to my colors styles just so we
can practice again, it's not really needed, but I think it's good practice. I'm going to call it dark
text or something like that. And I'm happy we've introduced our first color style
in our project. Remember to work along
on your second viewing. By the way, of course, we do have quite a few layers that need the same treatment. The title, the date, and the drop-down icon. Select the title
with a single click. Then use control shift
click to grab the date. And control shift like once
again to select the arrow. This is how your layers
panel should look like with these three
layers selected. Now. Now please choose dark
text and we're good to go. Here's what I want you
to do before we continue head control Shift K and
replace all of these images. Of course, you'll
have to download them from this looks gray.net. But yeah, replace the
images and after that, please replace the titles
and the descriptions. Let me show you one
situation though. Say the title is really long and the card
grows in height. Now, we could do all
sorts of trickery here, but that would be
really complicated. And I don't wanna do that. Instead, I want you to do this. Remove one line in
the description. This is not a perfect solution. Our settings won't allow
us maximum flexibility, but this is more than good
enough for this point. When you're done, please try different styles
for the title, the description for the padding and see what you
can come up with. This is where you can
play around with things. Take your time and
please have fun with it.
9. Set up the secondary navigation: Welcome back. Let's set up the secondary
navigation that's placed between the search
box and the grid. We previously skip
that because the cards have the utmost
priority in my book. One final thing about them
though at this point, we could do a lot more in terms of re-sizing, flexibility,
even styling. But honestly, that
would be showing up sigmas capabilities
and nothing else. It's so easy to get overwhelmed
by all these settings. So I'll leave the very advanced, maybe at the end of the
course in case you do get this situation where one of
the cards is slightly bigger, go to the main component, select the frame that holds
both texts layers and change this part here
instead of HCG contents, switch it to fixed. That's going to break some
of the previous settings. But again, it's all fine because it's
such a small project. And again, fixing it, making it 100% flexible would require a
lot of complexity. And I don't wanna
do that right now. Okay, for the categories, get the type tool hotkey
D, and write all. Then shift a for
the auto layout. You can see how
the box expanded, does the padding,
Let's drop it to 0. And if we're hearing
in the right panel, Let's set up a
horizontal layout. The next step is
quite important. Please make sure you select the text layer and
not the frame itself. Check the layers panel for that. Okay, Now hit Control D a bunch of times to
create loads of copies. Now the place them one by one, would they exist in categories
from the live version? As with going through
it, please work along on your second viewing and
create the perfect replica. First and foremost, after
you manage the replica, then you can get creative
with a new version, get creative and
have fun with it. Other colors, other layouts, other fonts, you name it. But for now, let's keep it simple by both creating
the same thing, even naming the same
things together. Okay, Now that we
have one item set up, Lee's renamed the
frame two categories. Okay, Once that's done, please use the alignment tools on the right side to center it. Okay, awesome stuff. Let's change up the style
of these texts layers. And here's a tip. After you
have the frame selected, hit the Enter key that will select all the
items in that brain. Okay, now we have
the text region available to us in
the right panel. Poppins regular 14
is totally fine. What I wanna do is add an
all caps transformation. And that's because
I want this to stand out a bit more, less. It will also mirrored
the main navigation. Now, okay, hit the escape key and select the frame once again. This time, we want to adjust the spacing between these items. I'm looking for
something generous, like 40 pixels that's full of 0. To make sure you judge it right, please center it back. And yeah, I'm quite
happy with that. Now we have a few things to do. So we want 30 pixels
from the search box. Use the ALT key and your
arrow keys for that. And 30 pixels from the cards. Now this value,
could you use more? Sure, go for that if
you feel like it. But for now, let's do a complete replica and then
you're going to experiment. Oh, let's not forget
about the color. Please select the frame, hit Enter to select
all the text layers, and then assign
that dark textile. I just about forgot about that. Okay, we're almost done. As an optional step. Let's show that
we're currently on this first category
in the live version, this is shown in orange. So let's do the same, but will also make it bold. Control click it, and then
change the weight from here. But we'll, Okay, Awesome, Good stuff for the color. We first have to break
the link to that style, because again, this
is dark style. That's what this button
is for that bit. And now we get access to the
color picker, easy stuff. Now our shade of orange
should be available here, selected and we're done. If you don't have it
for whatever reason, just use the eyedropper tool. I didn't add that rounded dot because I don't think
it brings a lot to the table and I think it's a distraction from everything
else that's going on here. So let's keep going. But after the short
break, thank you so much.
10. Create the pagination: Welcome back. This part that shows
you the number of pages is called pagination. Let's get to work and
make it in Figma. Start with the type
tool and write out one. Next, enable auto layout with
Shift a and set up a film. I do hope you're beginning to
learn these steps by heart. If not, no worries, we're gonna go through
them constantly. For the padding,
let's use 24 either side and leave then at
the top and bottom. Okay, set up a coordinate
radius of 10 pixels, though we might want to
change this value later on. Okay, now, let's
enable the stroke. Pure black for now is
set on the n side. Pixel strokes work
that much better. I never suggest they use one pixel strokes for the
visible colors in the cards. The grade that we
used is very subtle. So that's why we
can get away with it there, but not here. In this case with this
button, that's no good. Now, Okay, nice stuff. Indeed, I'm not happy with
the coordinate radius, then just isn't doing it for me. So bring it down to
five pixels, please. And I think this is much better. We have to create
several copies. But first, let's
transform it into a component from the
top of the program. Okay, awesome stuff. Drag it to the side
of the screen and rename it to pagination
or something like that. Again, I prefer to not use master the components
in the actual design. And I think that's a
good habit to have. Ideally, you should place
them in a separate page, but this is fine as well. Now, drag out the first copy by holding down the Alt or
Option key on a Mac. Lace it 30 pixels from
the card, that's 300, 30. Okay, next, let's drag
out a few more copies. We're looking for
the five in total. Now, we could potentially
add an auto layout here, but I preferred the classic
way for this element. Okay, five instances
of this component, five clones because we have them all selected
and the same type. Let's adjust the spacing
between them to 10 pixels. Classic. Now, okay,
looking good, but we still have to style them. And let's start with the
stroke and the text. These need to be set to orange. I click on the main component
that's off to the side. And from selection colors, open up the color picker and choose orange, classic stuff. Okay, Now we need the first one to be black because
it's already pressed. Let me show you how easy
it is to change it up, select it, and remove the
stroke to the minus symbol. Then from the same place, switch up these colors. It's as easy as that. Okay, now let's
separate these burdens. We want three on the left
and two on the right. And that's because between them, we want the text layer
that shows three dots. You may think that things
are getting complicated, but it's time to break
out the alignment walls. But first, let's change the text layers to
some other values. Now again, this will
only take a moment. Practice your speed as always. You will see the fact
that this instance with double digits
will resize itself, which is totally fine by me. Okay, now use this
feature called tidy up and that will
sort everything out. Hills there since
as we're getting close to the end of
this homepage design, everything that we're
doing is fairly simple. It's text layers and
rectangles, nothing fancy. We make sure that our
distances are low key and that we use the
same handful of colors. Believe it or not, this
is the foundation, solid decisions,
a good base when working and the decent
knowledge of the program. That's all that you need. Feel free to select all of these guys and organize
them into a group. And when that's done, we have finished this section. Thank you so much and
I'll see you in a minute.
11. Create the foundation for the footer: Welcome back. Let's get to work on
the further you may need to enlarge the
desktop frame a bit more, but that's easy to do. No worries about it now. Okay, now, good The Frame
tool and draw one out. This needs to be
1920 pixels wide. And regarding the height, I would say about 400 pixels. That's a decent size. Will need to edit
some things as usual. For the color, I typically
prefer light footers, but in this case the
original one is dark. So let me use something
like 33 to be. This is another shade
of dark gray I often use and you'll soon start
remembering them as well. In the existing website, we do have an orange bar
that's going across that. For that, we'll use
the Rectangle tool. I hope you've seen by
now that in general, I draw random shapes, then I use the properties
panel to mix it up. So in this case, this is 1920 by six pixels. At think this should be fine. Six is a decent medium. Eight would work as well, but I would prefer
six a bit thinner. And since we're on this side, we can also center it
then top align at. This works well because the frame that we
created swallows it up. By the way, we should
rename it to footer. So we have a bit
more ordered here. We could also group all of
these components together. But again, let's,
let's keep going. Get the type tool and start
pasting all these titles. Navigation, that's the first one in the middle,
top downloads. Then contact us and
subscribe to our newsletter, spread them out the bed. But we're not looking for something in particular
at this point. Just lay them all out. Now. Okay, now let's
talk about styling. Select all of these
texts layers, and we'll keep it fairly simple. Poppins, regular 14
pixels in all caps. There are many,
many details that you can add to make a
design look better. In time. You'll
see what they are, but I can tell you they're
not what you might expect. Beginners typically loved
to throw when photos, huge graphics and
things of that nature. So overboard, way too much. Professionals do this. Instead of using white for these titles or
that's pure white. We can use one of
these light grays. For example, E5, E5, e5. It doesn't seem like much, but trust me, this is how you
show attention to detail. This is how professionals work. Another thing, let's
place all of these items 60 pixels from the top
of the frame, That's 60. Okay? One thing about this spacing, you could also use 40, 50, 60, 70, 80 pixels,
whatever you want. But what about the
gap in between them? Well, up top we have
three columns and we know the exact width because
we did the math. It was 380. Now let's
repeat the math here. 1200 pixels for the active area right up top we have two gaps, but here we have three. The gaps can be any size, but let's use 20 in this case. That's pretty standard. So 3 times 20 is 60, 1200 pixels minus 60 is
1140 divided by four, because we want four
columns, that's 285. So what you can do is you can draw a rectangle
that's that wide. 285. There we go. Now, of course you can left align
it with the left guide. Once that's done, we can add a few more copies and leave
20 pixels between them. Now this foolproof
way of working, but there's even a faster
way with less math. Remember the grid that we
set up at the beginning. Let's select the desktop
frame and I'll enable it. I'll also change the opacity to 10 percent so you can
see what's going on. Now, notice something. The gray rectangles are
as wide as three columns. So we actually didn't
have to do any math. We know that we
have 12 columns in total and we want four areas. So every title should
get three columns. V times 4 is 12. The first one has these three. So the next one has
the following me. Now left aligning
the titles with the first column in each
group is a no brainer. That's fairly easy. So overall, deaths have
you can divide up a footer either by using math to
85 or by using this grid. Now, if you want three areas, three columns, well, that
would mean the following. Top downloads would just move
towards the right column. That's all there is to it. The leader rectangles
and now we can continue. But after that quick
break, thank you so much. And again, I hope you are
working along with me.
12. Adding content in the footer: Welcome back. Let's start adding some
content to the further, the keep things going. I'm going to copy paste
these menu items. Nothing all that fancy. What I want to make sure
is that I left align it and that I increase
the line height to something quite generous. Maybe 30 pixels, so that's 300 something along those lines. Make sure that text is white and remove the all caps
transformation. The more important bit
is this navigation is the title in these items are
the content in that section. So this is a single element. To make sure that we
transmit that to our design. I wanted the items to be
fairly close to the Title, 15, 20 pixels at the most. Well, somewhere along
those lines, maybe 10, that would work as well, but ideally 15 to 20. Now, what I want you to avoid
is a hefty, this dense, which basically breaks the idea that this is a single element. Okay, now for the next column, I'm going to paste my content
and I'm going to leave about 30 pixels in between them. I don't wanna go to the
edge of the third column because it's going to look
weird and crowded as well. One thing you might
have noticed is that the second column is actually
longer than the first one. And this isn't a great luck. Ideally, these items will have the same height or the left one would be longer
than the other one. It's just visually more
pleasing to look at. But because this
is a real project, I'm going to keep it as it is, because that's how it
is in the library. And let me explain
the reasoning. The first column mirrors the
main navigation right now. The other one is the
secondary navigation. Because of that, we
can't really chop off others and place
it on the left one. That wouldn't make sense. So these are the organized
in a logical fashion. We can start
rearranging things at the expense of logic or
the user's experience. I'm gonna say that again. We don't base our choices
on the argument that, Oh, I like it better that way. When we know that goes against logic or the user's experience. Okay, let's keep this going. Top downloads is already sorted, just the bunch of empty space
that you have to delete. Please make sure you don't leave any empty spaces at
the end of the line. That shows a lack of
attention to detail and it's a mistake in my
book is not a big one, but it is a mistake that
tells me and the client that you are not really
all that interested in executing things correctly. Navigate. For the Contact Us section. Please drag out a box
that says why there's three columns and
paste the text inside. Select the email address from the row and make it semi bold. More than that, please
make it yellow. You should have that swatch
underneath the color picker. If not, just sample it
or put it in manually. The idea is that this is a link and it needs
to stand out. You could say, okay, But the left ones are
links as well, right? And indeed you are correct. But in terms of importance, we want to push
this bit forward. This is a bit more interesting. The links on the
left, well, they're, they're mostly for the CEO
purposes, SEO purposes. Few people actually use them, but it's just a part
of any website. So it's a classic thing to do to incorporate them
in the footer. Okay, now do the same
thing for contact, semi bold, and then
make it yellow. Things are moving along nicely. While I copy paste the
social media icons, let me tell you why
you should stay away from very small footers. I mean, those photos that
are incredibly short, like 100 pixels tall or
something like that, that only have a
copyright notice and that's that gives the thing. Most businesses have
various legal requirements that they have to post, that they have to
show in the footer. Terms of service, cookies, GDPR stuff, privacy
policy, you name it. So this is why it's best to have photos like this
one, generous ones. Oh, by the way,
you should select this text layer and
change it up to all high. That's because I
want to copy paste set for the short
description for the newsletter just
in case you're not sure things are
aligned correctly, select both layers and use
the Alignment command. Okay, awesome
stuff. Another tip. When you want to quickly
turn off the grid, don't zoom out and select
the desktop frame. Instead, use the layers
panel. Just like that. Now you can enable
or disable the grid. Good work. Let me show you another
piece of good work. We need the field here, right? Let's copy the search box
from the top of our design. Now, click on the footer and
paste it with Control V. Now position it about 10
pixels from the text layer. That's why I wanted
you to change it to auto height so we
wouldn't have any access. This is a bit too wide,
but nowhere it is. First, click on the button and bring it outside of this frame. Place it on the left as
with everything else, again in general, left align of the thing don't center at, okay? Once you choose an alignment B, it's centered though
I left the line. So again, you should
spec to let the line, this field requires
a bit more love. This is way too tall
for this region. So select it and lower it to 40. So that's for the z though. Make it narrower web as well. If you haven't done so already, use the right guide for that. That should be a
Lebanon's point. Replace the text width, enter your email address. And I'm going pretty fast. But again, if you're watching this on
your second viewing, you should be able
to follow along, pause as often as you
need to know, okay? This is going to be
centered because there used to be a burden
to the side of it. That means we have to select the search frame and change
the setting in the padding, pop up from space
between DO back now. Okay, Awesome, Good stuff. Removed the gray stroke. You don't really need that, especially on this background. You might have
noticed that this is white while the
librarian is dark. The small variation on my end. I'm totally okay with that. Check your distances
and when you are happy, we can call it a day. Don't get me wrong.
There's still so much work to do
on the homepage, but we're going to continue
after the short break. Thank you so much.
13. How to handle visual imperfections: Welcome back. The further is just about done. But you might have
noticed that it doesn't look all that balanced, while it's technically
correct and well executed
according to the math, it just doesn't feel right. Because of that will
group everything into four different folders. One for each column. Use shift to multi-select layers and then use Control
G to group them. So this is going to
be group number one. While I handle the rest. Let me talk about this
situation a bit more. This is one of those few cases where you should bend the rules. Again, the grid system is a nice guide and it
can help us out, but it's not the
end of the world. If something is not perfectly
aligned for developers, this really isn't a big deal, it's not a huge issue. Because of that. I have no hesitation in
doing it the following way. After you have all
these four groups, please select all of them. Next, go to the
top right side and use this feature
that's called tidy up. This will basically
you readjust the space between each folder,
between each group. And just like that,
this looks better. Okay, We have a
few elements left. Select the line too well, so we can add this
horizontal divider. If you have your guides active, this should be an easy job. Have a look here at
the width field to make sure that this
is correctly set up. What beginners often
do is they leave it white or a very light gray. And that's a big mistake. This is like a belt, but for your footer
instead of your bands. Now, do you want your
belt to really stand out? No, not really. So that's why we need
a very subtle color. You might want to
try these grades from the document colors area, but I don't think any of
them are subtle enough. Instead, I propose
something like this. 434343. In the past, some designers used white with a lower opacity, but developers didn't really
like that type of stuff. So I would much rather
uses specific color code. It safer that way. Now in terms of its position, 30 pixels from the secondary
navigation is totally fine. Now all that's left is
a bit of copy pasting, but please don't rush it. It's the last few
minutes of the project. Now, in this part, we could have used
auto layout with that setting called
space between. But the classic way of
working is totally fine. I like to use the alt key
quite a lot to check out my measurements and nudge things into place with my arrow keys. I suggest you do
the same right now. That may not come naturally, but as you design more
and more projects, you'll see you'll start to do it without even
thinking about it. Okay. For terms of use
and privacy policy, I'd like to hit the
Spacebar key a bunch of times to set up my empty space. Then I like to copy that empty space and paste
it on the other side. This way it's
perfectly balanced. The rapid up selected this dataframe and adjust
the size if needed. Yeah, okay. Now to check out the design, hit the play button
when you're ready and have a good look
from top to bottom. This design is an eight
out of 10 in my book. It's nothing credible, right? It's not gorgeous, but it's well executed and it looks nice
and it gets the job done. Meaning people won't have
any issues using it. If you can manage that, a simple eight out of 10, you can easily make thousands
of dollars per month. You don't have to go
all out creative. Oh, here's one detail
that we shouldn't miss. The Contact Us button does
just above the further. Let's copy the burden
from the search box. First, make sure you select the frame and not
the text layer. That's a big thing. So again, select the
frame and then copy it. We know that if we
drag this button above the foot of vein
is going to take it in, it's going to swallow
it up like so. We don't want that. We need the burden
to float above it. The solution is quite simple. Start moving it and then
hold the space bar key. And it's really that easy. That will tell
Figma to leave it. Where do you drop that? Again, you start moving
the layer and then you hold space, find the center. And that's that. Make it look better. Round out the
coordinates by using a very high value
like AD for example. So that's e to z though. That will completely
rounded out, change the text to
something more interesting, like send me a message and
then center it once more. You might want to rename
the frame to burden or the call to action or
CTA or something like that. So we know whether it is LK, fun stuff with just about
done with our project. I'm gonna see you in a second
after that Greg, break. Thank you.
14. Here’s what you need to remember: Hey, there, This is
Chris. How did you do? I hope you manage
to have fun with it because at the
end of the day, that's what it's all about. No matter the end result, you have to stick with
it and do your best even if you're not 100% happy
about your own version, please post them
to the platform. What I'd like to see from you is a different color scheme, different fonts, maybe a
different grid of cards. Now, please be aware that
first you have to create the perfect replica only then at the new managed
to do that on your own. Only then should you move
on to your own version. Now, if you like Figma and you think this is the
right fit for you, please continue to learn. There's a lot more to unpack, but we're going to
take it step-by-step. So with that, I
hope I'm gonna see you in another course
of mine real soon. This is Chris barren
signing out for the moment. They give.
 Chris Barin, Certified Photoshop Expert