Transcripts
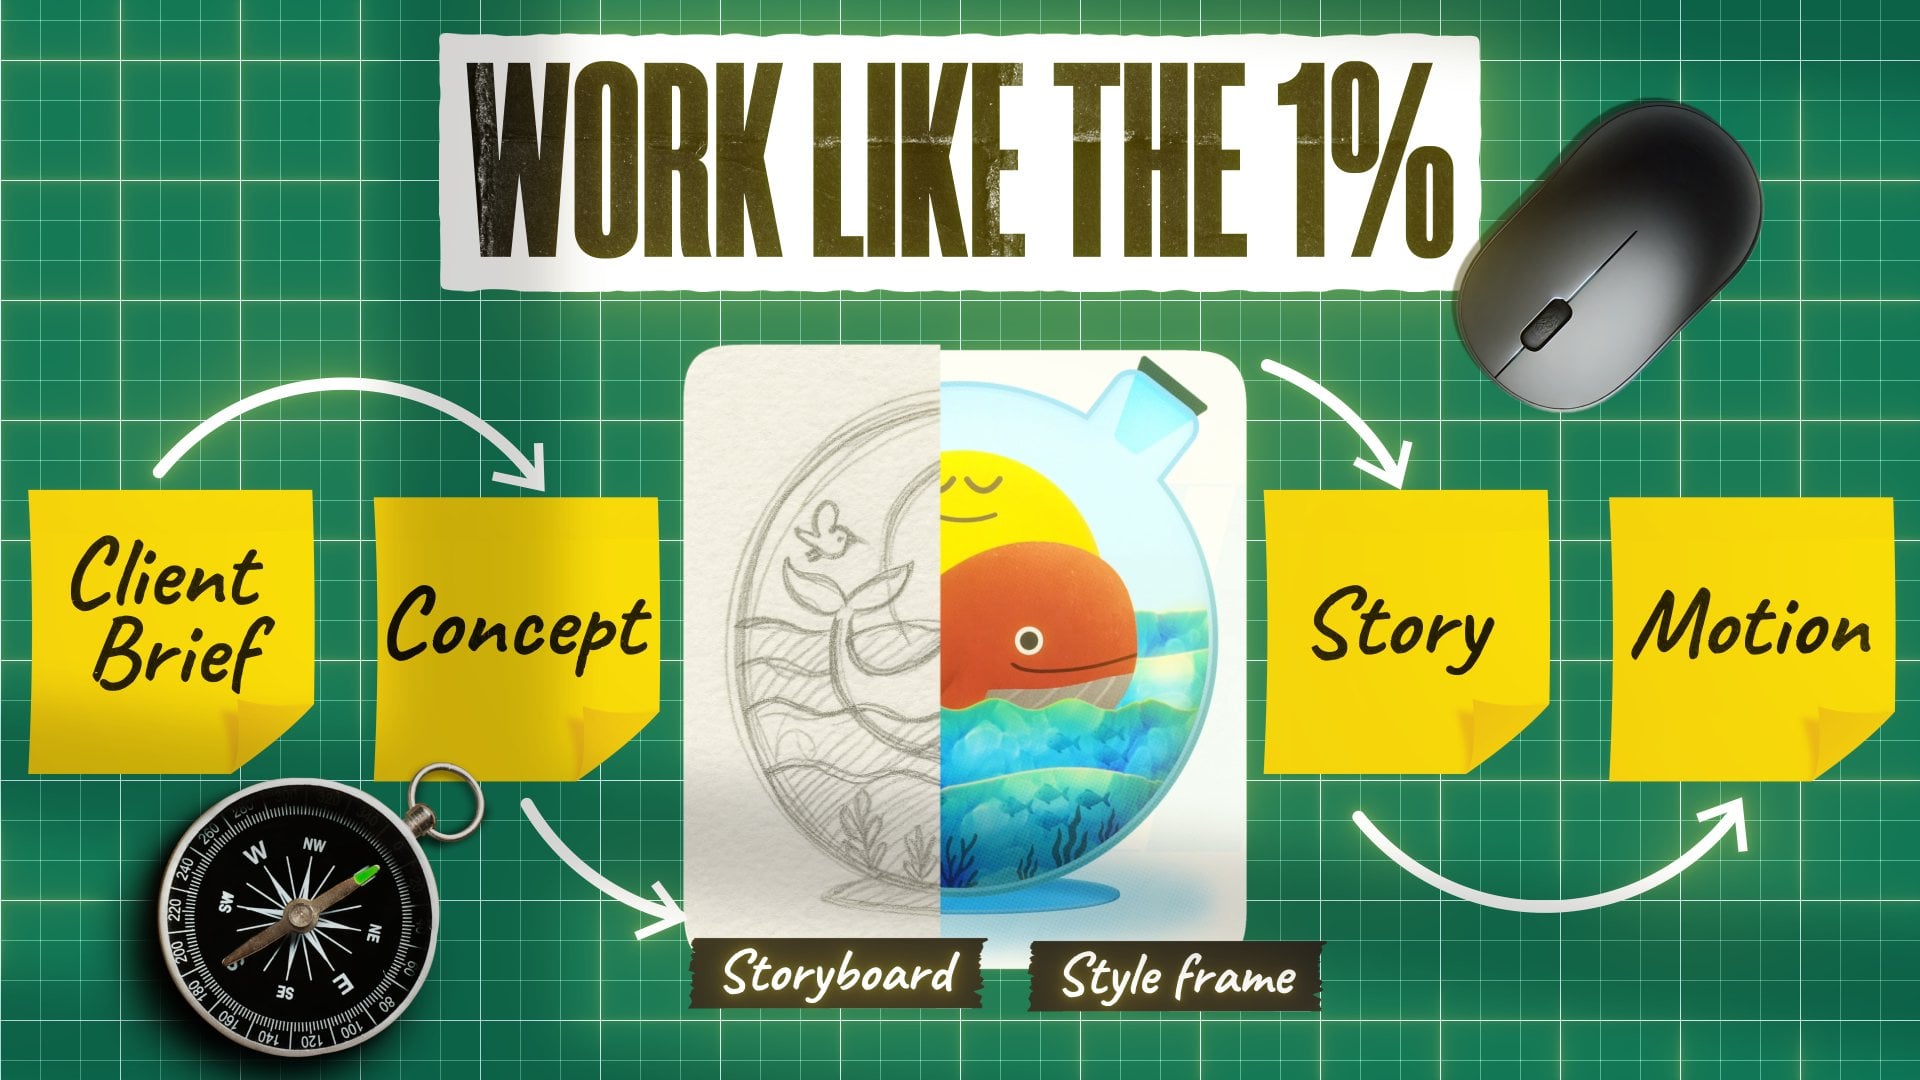
1. Class Trailer: One still photo, a few
layers in After Effects, and suddenly cartoon elements
are living inside it, moving with it and it feels more alive than it was before. That's mixed media animation. Most beginners don't know this is even possible
in After Effects, and this course shows you
exactly how to achieve that. Will learn how to
cut out photos, blend motion graphics
with real images, and add cinematic
camera movements. You can create documentary
films, brand videos, Instagram reels that stop the scroll with this.
Here's the thing. I didn't discover this technique in a studio or a classroom. I discovered it at the
lowest point of my life. I then girlfriend cheated
on me. We broke up. I was depressed. I
stopped working, and I said no to everything. All I could do was pick
random images from the Internet and animate
them just to feel that hope, just to feel something. And it helped me a lot. And then it became one of the highest selling services
that we have ever offered. And that's what's
inside this score.
2. Class project & requirements: Class project, you
can use the pictures provided in the resources
or you can bring your own, and there is a link
for that, too. For this class, you
will need adopt After Effects, Illustrator
and Photoshop. If you are already comfortable
with Illustrator and Photoshop and if you only
want to learn After Effects, keep straight to these chapters. The layers are prepped
and ready to go. So make sure that you
import and follow the steps as provided
in the lectures. Before you start download
all the resources, you will find the
project files in there. So if you ever get
lost mid lesson, you can pick right back up. The shortcut cheat
set is in there, too, keep it on your
phone while you work. It will save you a lot of time.
3. Chapter 1: Separating Layers in PS: We are in Photoshop, as you can see, now, this is the image, the first thing that
you want to do whenever you want to create
animations like this, all you have to do is separate individual objects into a layer, and then you can animate it
in any way that you want. The creative potential for
these techniques are endless. You can create so many things. So let's separate layers. First of all, this
is layers panel. If you don't have that open, just go to Windows and then you will be able to find layers. Now, there are two
or three tools that will be used whenever you
want to separate layers. The first one is called asoTol
Lasso Tool, I'm not sure. But this basically helps
you to select objects. For example, this, it helps us to select the
objects on the screen. But this is free hand, meaning there is no any Photoshop intelligence
involved in that. Whatever you will be selecting, that will be selected, right? And to deselect, let's say
that you have to select this and you want to unselect
or deselect this, the shortcut for that
is Control D. Okay. Control D in After Effects
is duplicate, right? And so for that, we have something called
Object Selection tool. Okay? So in Object Selection
tool, we have three options. The first one is
Object Selection tool, then we have Quick
Selection tool. And then we have magic one tool. All of these are basically
the selection tools, right? And so we are going to go with Quick Selection tool, okay? And see, this is a
quick selection tool. Basically here, Photoshop
determines, okay, this pixel belongs
to this layer, this pixel belongs
to this layer, and then it selects
based on that. So it's not that
accurate as well, right? The best one is this, which is called Object
Selection Tool, right? So these are the two
tools that will be used to separate
layers in Photoshop. If you are not an avid user
of Photoshop like I am, all you have to do
is just remember these two tools because they are the most important
tools that will be used for if you want to
separate layers. Then let's look at this. We have our background here. The layer is locked.
I'm going to click on this and the layer will
be unlocked, right? Now, this is the
properties of the image. As you can see, the
image is humongous is 4,000 by 6,000 pixels. And if you think that this image might be too
much for your computer, if your computer is slow, you can rescale this, then you can start
separating the layer. Or you can do that
later in After Effects. Okay. Now, let's start
by separating the layer. To do is analyze the image
and look at the layers. For example, here, one of
the layer is the background. The second one is this. The third one is
going to be this, and the woman will be here the focal point of
our animation, right? And so let's start by
separating the layer, okay? So the first object that I'm going to select is
this, then this, then we will select the woman, and then we will select this, and then we will clear the
entire background, okay? So how do we start?
Where do we start? So the first thing that you have to do in order to separate the image is all you have
to do is press Control J. So Control J is for duplicating. Here, make sure that you
remember these steps, the steps are going to be the same for each and
everything. Okay? So I'm just going to show
you one image and then you can do that for each and every
image as you want, right? So after duplicating,
I'm going to select the object selection tool which
we have already selected, and then I'm going to
draw the selection here. Okay. So I'm going to
just start by drawing the selection on
this blurred object. Then Photoshop will do
its magic and it will identify the object that we
are trying to select, right? And as you can see, this part is missing from this selection. I don't know what it's
called, but let's call this moving uns because
that's what it looks like, so this part is missing from this selection and we
want that selection, right? So how do we do that? The
best option is to hold shift, and as you can see the
cursor changes to plus, and so I'm going to
move it like this. And I'm going to drag
the selection like this. Then Photoshop
does its analysis, and well, it's done, right? But if you think that well, something still needs to
be done in a better way, all you have to do is
just hold Shift again and then select, okay? So what shift does? Okay? So shift, let me zoom
in. I'm going to show you. Okay? For example, here, the selection is moving
out of the focus, or this is not our
subject, right? So I'm going to
select this. Okay. And so we have our
selection ready, right? Basically, all you
have to remember is that when you
shift plus select, it adds to a selection. And then when you hold onto Alt, and then you select, you basically subtract
the selection. So if you want to remove the
part from the selection, use Alt and if you
want to add into the already existing
selection, ship. Now, that is the first step. The first step is to
select the object, right? Once the object is selected, what we normally do
is we create a mask. So this is layer masks, and I'm going to create
a mask on this right. And so what we did is we selected and we
masked the object. In terms of After Effects, we are basically masking, but here we are using Photoshop advanced tools create that, you can do that in
After Effects as well. But in After Effects
content aware fill isn't that advanced yet and it
can slow your system down. Photoshop is much better option. It's quicker and it's more
accurate than After Effects. Anyways, now what we
want is we want to make sure that this object is
removed from the background. To do that, what we
want is we want to move the selection from
this layer to this layer, and then we will fill that layer with Photoshop's
content aware fill. I'm going to click on
this by holding Control click and that will
activate the selection. Now I'm going to
just click on this. Once that is done, we go
to select, modify, expand, and then expand by five pixels, you can go with three, but I'm going with five, it's okay. You can undo that. I'm
going to hit on Okay. Once that is done,
we go to edit, we go to fill, and
content we fill. Okay, now Photoshop
is working its magic. Now you might think of, well, nothing has changed.
Well, let me show you. Okay? So as you can see, this object has been completely removed from the
background, right? Okay, so this is the object, and this is the background. But background has
this distortion, but don't worry about that. We can change that later, right? Now I'm going to hit on delete, and apply mask layer
before removing, meaning this mask will be
applied to this image, and hit on apply, right? And also, let me undo that. Also, make sure that
you have selected the mask whenever you are pressing delete
and not this one. So if you click on this, you'll be basically
deleting the layer, we don't want that, so I'm
going to redo that, okay? So we have our
first layer ready. Now let's move on to
the second layer. Okay. But before that, let me quickly
explain what we did. So first, we
isolated the object, then we told Photoshop by
expanding the selection. So we expand the selection
to tell Photoshop what is the surrounding
pixels around our object. And we do that so that the content our fill works
in a better way, okay? So it basically fills that empty space in
a much better way. Apart from this phase, I think this has
done a better job. Okay? And don't worry
about the distortions. They can be removed quickly. Okay. So let's move
on to the next step. So our first one is done. Okay? We don't
need that anymore. Now, let's repeat that process
for the other objects. I'm going to press
conto to duplicate. Then I'm going to select this. Then I'm going to just draw
a mask around this object. Um this is not as accurate as I want it to be, but that's fine for now. Now let's move on
to the next step which is to create a
mask on the layer. Once that is done, we are
going to turn this on. I'm going to hold press Control, not hold press Control
and then click on this mask so that the
selection will be activated. And then we will transfer that selection from this
layer to this layer. Then we will go to
select, modify, expand, hit on Okay, then go to edit, fill and content over fill. Okay. Now I'm going
to just delete, apply, and done, okay?
So this is layer one. This is layer two. There is a bit of this distortion here. But don't worry about that.
That's completely fine. We can fix that in post. I'm going to show you how to fix that in the post
because you don't have to do everything in Photoshop because normally when
you get these projects, the projects needs
to be done quickly. If you want to get things
done as quickly as possible, you have to be flexible because the end product
needs to look good. Whatever the means you use, the end product has to look good and it has to
look professional. Okay, so let's move
on to the next step. So I'm going to deselect this. Then I'm going to
press Control J. Okay. Now here, what we want is we want to isolate
this woman, okay? And the better way,
the easiest way to do that is just to
remove the background. So I'm going to click
on remove background, which is quick actions, okay? So if you don't see remove
background here, okay, all you have to do
is go to Windows and then just find properties. Okay. And under the properties, you will find remove background. And of course, if you
have generative AI, okay, you can do
wonders with this. Okay, but I'm not using that. Right? So I'm going to just turn this on and then we are
going to repeat the process. So I'm going to first of all, let's look at the Okay. So there are many
distortions here, so let's fix that distortions
in the selection. Okay? So I'm going
to select this, then I'm going to
hold minus. Okay. And then I mean alt, not minus. Okay. And I'm going to
just remove this Okay. Now, once that is done,
make sure that you like the selection that is done is
nice and it has it's like, for example, here,
you see, these are the portions that does
not need to be selected. So just because you let Photoshop do this doesn't
mean it's right, okay? So you make sure that you
use your own thinking, you use your own mind, okay. Okay. So all you have to do is hit Alt and then select the object
that you want to remove. Make sure that you're
not removing anything that is related to this
woman right here, okay? Okay, so far so good. I'm going to keep this as it is because we
don't have to be a perfectionist here
because we want to make things as
quickly as possible. I think I'm good
with this, right? And that is the
one habit that you have to develop is
you have to keep moving forward despite finding
those little flaws, okay? So I'm going to transfer
the selection to this, go to select, modify, expand and I'm going to
expand by three pixels, then edit, fill, and
content overre fill. Okay. So you might have to
repeat this several times, but you can fix that
really, really easily. So we have the gol
layer as well. I'm going to just delete
this. And we have this. Now finally, the last step is to make sure that
the background, like for example, here, the sky, I want to separate that as well. Let's duplicate this
by pressing Control J. And then I'm going
to select this. Just make the selection, and let the Photoshop
do its magic, right? Now, once that is done, we are going to just look at the selection well
it looks fine, then I'm going to
create a mask on this, so we have this the
background is clean. Then I'm going to Control
click on this mask, then I'm going to go here, then I'm going to go to edit
fill content aware fill. We don't need the modify
here because well, the background is
completely empty. Then I'm going to
delete and hit apply. Then I'm going to
deselect and I'm going to see how looking. It's looking really nice and we don't need to clean
this mess up. All you have to do
is create a new solid in After Effects
and just hide this. We have this, right? Now let's clean this up. This distortion is not
looking nice if you want to go with some
extreme parallax, you might run into some issues. There is a better tool and that tool is called
clone stamp tool. This clone stamp tool, what it does is that
it clones the pixels from one part of the object to the other part of the object. For example, here, I'm
going to hold on to halt, so look at the change
in the cursor, this suggests that this will be the object that
will be cloned. I'm going to click.
Okay. Now I'm going to let go of t after that, so I'm going to just
draw like this. Okay? And as you can see the result the results are stunning, right? Then I'm going to do
the same thing here. I'm going to pick this pixels, and I'm going to just
draw a mask like this. Not a mask, but just stamp it. Okay. And you can also
go overboard with this. Just because this looks right doesn't mean that
you can do that, for example, you pick
here and then we'll see. Okay? So this could
be really tough, but for this image, it's working really,
really well. Okay? Now, let's clean this
up. Okay? So I'm going to select this, then I'm going to
just slowly stamp it. Okay? Now, you have to remember that background
will be covered, right? For example, here
we have this face. I don't like that, so
let's remove that, okay. So I'm going to select,
then it's gone. Okay. Here, let's paint on this. Okay. And this Okay. But like I said, you don't have to go overboard with this, right, because they
will be covered. You don't have to worry
about that at all. So that's it for the lecture, and I will see you
in the next one.
4. Chapter 2: Other Images: Here are the already
prepared layers, okay? So this one is car. Basically, I haven't
renamed that, and that's fine for now,
and this one is the layer. Okay? This came out
really, really well, and there is still some
distortion here, if you can see. So this is the place
where there was this car, but it looks really nice despite these
distortions being there. I follow the same method that I showed you in the
previous lecture. Okay. Then we have
this one. Okay? Now, one of the things
that you have to remember is that now, let me show you the original
image, first of all, okay? So this is the original image. And as you can see,
there are these arrows. Okay. But here, the
arrows have been removed. And the arrows
have been removed. It's because I want
to make sure that I use it in After Effects. Okay? So I'm going to just apply it directly in After Effects. So here we have three layers. The first one is girl, then we have light, okay? So this light has been isolated. I want to give this
flicker effect to it. So one of the things
that you have to remember whenever you
are separating images or even choosing images
is you have to pay attention to the objects in the surrounding
that you can animate. For example, if there is
light, you can animate light. If there is a signboard, you can animate the signboard. So there are endless
ways to do this, okay? But it is up to you on how you present this
information to your audience, how you view it.
5. Chapter 3: Preparing Assets in illustrator: We are in Adobe Illustrator, and if you want to add some
elements to your scene, what you would need
is you would need to create the assets in
Adobe Illustrator. Once that is done,
you bring them in to After Effects and then
you animate that, right? So that's the first way. And the second way is use
AI to generate the images, the PNG, and then you
can animate the PNG. Animating PNGs could
be tough sometimes. You have to work a lot, and this one could
be really easy. So right now, really quickly, I'm going to show
you what to do, how to find the assets. Okay? So the best way to
find assets is online. There is this website
called freepik.com. They always have these
amazing assets that you want. Now, let me quickly show you
what to do when you download any Illustrator file and
how to separate the layers. So I'm going to group this, this is just an example, okay? So I'm going to go
to Object Group, and the pink flour
has been grouped. Now, whenever you
are downloading any Illustrator file from Freepik or from
any other website, you will always have only
single layer or two layers. In order to animate, all
you have to do is make sure that each of this layer
is on its own like this. And the reason why we do
that is because this layer, this leaf or this petal
can be easily turned into the After Effects native
shape layer and you can manipulate and you can do
so many things with it, which a PNG image has
lots of limitations. That could be really
tough and so I have used this asset as well. Right? And so let me show you. So this is how it
will be, right? Once that is done,
all you have to do is click on Ungroup, okay, when it's
like this, right? Now, what we do is we separate the all these elements
on a singular layer. For example, this is
not a singular layer. This is a singular layer. This is a group in that
singular layer, right? So now, what I'm going to
do is I'm going to go here, release two layers sequence. Okay? Now, every layer
will be on its own. Now, what I'm going
to do is I'm going to select all of them
holding shift, and then I'm going to just
drag it out like this. Now, everything is
on its own, okay? So that's how you do it. That's how you separate layers. You also have the sun here. Okay. I have not added
the face here because, well, we are going to create
that in After Effects. And so you have to
plan things ahead. You don't always have to be spontaneous when it
comes to animation. You don't have to play blind. And the better the plan, the better will be the
execution, okay? So just make sure that you
have something to look forward to what the next step
is, what you are going to
6. Chapter 4: Setting Up : The first thing that we
always do is we start by importing the footage
into the composition, right? So to import, all you
have to do is press Control I or just double click on this panel. This
is a project s panel. And also, if you want to
follow along with me, make sure that workspace
is aligned with mine. So I'm going to just
double click here, and then we have this, right? So this is basically
the PSD files that have been prepared
for the animation, right? And the next thing
that I'm going to do is I'm going to just select the image, and import. Okay? Now, this dialogue
box is really important. Import kind, keep
it at composition. You can also choose
retain layer sizes, and I'm just going to go with this and editable layer styles, okay? So what is this? So Import kind is whenever
you change this to footage, for example, we have
separated layers, right? If you change it to footage, everything will be included
on the single layer, and you won't be able to animate them individually
like we can, okay? But when it comes
to composition, you will be able to animate them as a separate layers, okay? And then hit on, Okay, right? So whenever you import
Photoshop file, two things will happen. The first one is, these are all the layers, as
you can see here. These are all the layers that we separated in Photoshop. Okay. And from these layers, this composition has
been created, right? I'm going to double
click on this, and as you can see, we have our composition. The first thing that
I'm going to do is I'm going to rename this
composition, ok? These are all the
layers, by the way, these are all the Photoshop
layers and the icon here suggests that this
is a Photoshop layer. I'm going to reduce the size of the composition because let me show you the
composition, okay? So the shortcut for opening the composition settings
is Control plus K, or you could just grow here and find composition
settings, right? So as you can see, the width
and height are humongous, and this could be
really tough if you are working on a slower
computer, right? So I'm going to first of all, change the name of
the composition. So I'm going to call
this girl flower underscore main. Okay? Because this is going
to be our main comp. So I'm going to change this
to our Instagram size, which is going to be
social media portrait, HD 1080 by 1920, 30 frames per second. Okay? And when I did that, the composition became
just smaller, right? And also keep duration
at 10 seconds. Also. This might be
important for some, okay. So make sure that
the renderer is classic three D or advanced three D. It's not cinema four. If you are using a
cinema four D renderer, you might have some troubles with the camera that we
are going to walk on. Okay, so make sure that
you are matching this. Keep everything as it is, and then hit on, right? Now we have this issue,
because since composition, basically our canvas size is reduced. So how do we do that? What I'm going to
do is I'm going to just select all of them, and then I'm going to
parent them to this layer. I don't know which
layer is this, then I'm going to press
S to bring up the scale. And don't worry,
I'm going to just explain everything
as we go through. I'm just trying to resize
the composition right now. I'm going to just reduce the
composition to here, okay? Now, what I did was I
basically parented. So this is called a Pi WipTol. So basically, you can parent
any layer using this, okay? And this layer will be the parent and these
are the children. So basically, wherever
this layer goes, the children follow, right? But the children also have
their individual wills, right, if that makes sense. And so I did that and we don't need the
parenting anymore, so I'm going to just
get rid of that. The first step is
importing second step is to reduce the
composition size to the standard social
media size so that we can upload it easily and it can be rendered
quickly, right? So the next step
is to precompose the layers onto the
individual precomps. Okay? So I'm going to press
Control Shift C to precompose or right click and here,
precompose, right? So Control Shift C Okay. And here, choose move all attributes into
the new composition. Meaning what this will do is the new composition will
also be of this size, and it will basically retain every change we have made
here into that composition. So I'm going to call
this B underscore PC. Okay? So B is the
name of the object. PC stands for pre comp, right? And then I'm going to
hit on, Okay, right? So we have back here
and you can see already see we have
many distortions here, but don't
worry about that. Okay, we are going to
sort them out, right? And also, we're going
to move this girl here. This is why renaming is
really important, see, okay? Now I'm going to solo this. Okay? So let me quickly
introduce to the switches. Okay? So this is video. This basically hides, okay? This is sound. If it has
sound, you can mute it. This is solo. Let's say that
there are so many layers. I haven't renamed them, right now, and I want to
see which layer is this. But what you might
do is you might hide them and that would
take a lot of time, right? Solo basically solos
the layer, okay? So I'm going to precompose this. Control Shift C, right? Move all attributes. Then I'm going to call this red. B, underscore, PC, and then move all attributes
into the new composition. Then I'm going to
repeat that, okay? So blue front underscore, PC. Then I'm going to call
this girl Windows coe PC. Okay? So we have our
comps ready, right? Now, the next thing
that I'm going to do is I'm going to go into the layers and then I'm going to rename the layers as well. So I'm going to
call this B. Wow. Now it's back wall. Okay. Then I'm going to go
here and I'm going to call this red back. I don't know why I
named it to back. It shouldn't have been.
It should be red front, but that's completely
fine, okay? The point is to remember
because this renaming portion, this renaming part
is for you, okay? It's not for your client. Your clients are not going to
see what's going on, okay? Then I'm going to go here
and I'm going to rename this to Blue front. Then this is called composition
Mini flow chart, okay? If you want to go
back and if you don't know where the
main composition is, and you are working
on many coms, okay? So that could be confusing
because here there are only four tabs open of
the composition, right? But what if you are working on a pre comp that has more
than ten coms, okay? How will you navigate? To the main composition. So this really helps us. So whenever you press
tab wherever you are, you will have this flowchart appear wherever the
cursor is, right, and then you can go on to
the main composition, right? And then I'm going
to rename this. Okay. So we have our
compositions ready, right? That's the first step now. Let's arrange this one as well. So let's call this 00
underscore PC for pre comms, and I'm going to bring all
of the precoms here, okay. But I'm going to
bring the main out, and I'm going to
change this color to red, and I'm
going to click here. So the precoms and everything will be sorted out
based on the colors, right? Okay? So the red color
will be on the top. As you can see here, the
red is on top, right? And that's why here, this color is basically
called the label, right? Then I'm going to
create another folder. Let's call this PS
let's call this assets, because that is what this is. Then I'm going to move this into this and also make sure that you
don't delete this. Okay, this shouldn't
be deleted, right? If you delete this, it will
affect the compositions. Okay. So make sure that
you don't delete them. Then make sure that you save
the compositions as well. So I'm going to save
that now let's look at the distortions and let's see how we
can fix that, okay? So first of all, we have
these distortions, okay? And we have blue front, okay, and the back, right? So the back covers everything. And the distortions are because in the previous
lecture when I showed you, those distortions
were covered, right? And so these distortions, I have kept them intentionally
here just to show you when I said that we will
fix that in pre production, sorry, in post production. And so I'm going to show
you how to do that, right? And so I'm going to
press Control I. Okay. And then I'm going to find the source
image, okay, right? And so this is the source image. And I'm going to go to read back and I'm going
to duplicate this, right, and I'm going to
bring it here like this. Okay? Now, what I'm going
to do is I'm going to just and I'm going to
explain what I did, ok? So don't get confused
just follow my lead. Okay? So I'm going to grab the Pen tool and I'm
going to quickly mask the image like this. Okay. And then I'm going to
send it on the back, right? Now, what I want is I also want the stair to be there, right? So I'm going to first of all, press Control D. Control
D duplicates this. So I'm going to go to edit and duplicate or you could
press Control D, right? And then I'm going
to bring this back, and then I'm going to just
slightly move this down, okay. Although this won't be visible, but I think I still want
it to be there, ok? And so now the distortion
is covered, right? Now, whenever you want
to replace layers, for example, if you
want to replace this layer with another layer, all you have to do
is hold alt and then you bring the layer
on top of the layer, and then it will
be replaced with the layer, that's what I did. And so we basically
covered the distortion. Now I'm going to go back,
and let's look at that. Okay? Then we have this, then we have this, and this. Okay? Also, if you look here, these portions should have been cut and they aren't that's fine because the animation isn't going to be that
complicated here. Okay? So I'm just quickly going to show you the importance
of pre comp. So let's just type in let me just type in the random
word, okay flour. Okay. And I'm going to
put this on the back. I'm going to just
scale this up, right? I'm just showing you
the example, right? And so I'm going to go back. Okay. Right? And
here we have that. So any change you make in this will be visible
here, right? Also, you can do many
animations here and you can also have and do many
animations here, right? And so precomping is
really, really crucial. If you want to become
a professional, you have to use precoms
as much as possible. Precoms potential
is untabbed, okay? I'm going to explain the
transform properties in the next lectures as well if
you are a complete beginner, so don't worry about that Okay, I'm not missing out on
anything like this process is slow and I want to make sure that I don't rush the lectures. Okay? And so that's
it for this lecture, I will see you in the next one. I'm going to get
rid of the flower, by the way, I just
wanted to show you.
7. Chapter 5: Camera Rig: We jump into animating, there are things that I
think I need to adjust. Okay? And the first thing
that I'm going to do, I'm going to copy this, okay. And then I'm going
to go into Girl PC, and then I'm going
to paste it here. Okay? Then I'm going to go back and I'm going to
get rid of this here. Okay? And the reason why I
did that is because I want to this video as
minimalistic as possible. I don't want many layers
hanging around here. The next thing that we do is we create a new solid because
as you can see here, the background is empty. If you don't see that here, it's called togal transparency
grid basically here. This is the color. This color is basically
the color that you set on the color here. But what we want is we
want to create a solid. A solid is a flat one
color rectangular layer that will be using a
background, right? So here, all you have to do
is right click New Solid. The shortcut is Control Y. Then we have this. Okay?
So this is solid settings, and then you can
change the color here, and also you can change the
width and height as well. So I'm going to change
this color and you can also click on preview
if you want to do that. Okay. Okay. I'm going
to go with this color. You can change the
color later as well. Okay? So don't worry about
that and then hit on. Okay, let's call this
BG for now, okay? And I'm going to bring
it on the back. Okay? So we have something like this. Okay? Now, the next step is to turn all the layers
into three D. Okay? So these layers right
now are two D layers. Okay? So how do we do that? So three D layers are basically just flat two D layers
that you unlock to move and rotate in three
dimensional space by adding a Z axis to it, okay? And so this are all the
okay, panels, okay? So first, we have Shi. Okay? So this basically
hides the layer. For example, if you want to hide this you have to click here, and then this will
activate the si switch. Okay? So if I click
this, that's gone. Okay? So that's it. And then we have this is
called continuously rasterize. Okay, this is used for mostly Adobe Illustrator artwork, okay? This is quality and sampling. I don't use this at all.
Then we have effects. The effects applied,
for example, if you apply any
effect to this layer, you will have this box selected. Then this is motion blur, it basically blurs the motion, the animation that you create. Then we have this as an adjustment layer.
Let me show you. So I'm going to create
an adjustment layer, the right click new
adjustment layer or Control Y and CT is
an adjustment layer. So whatever effect
that I apply on this layer will be applied
to the layers beneath it. Without directly
applying to them, okay? Then here, we have something that is really,
really crucial, okay? So this is three D layer. This will allow us to manipulate the layer in
the three dimensions. Okay? So I'm going to just
turn them into three D, right? So once that is done, well, our layers are three D, but you cannot see
any difference, and to see the difference, what you would need
is to view, okay? So here, this is
basically the top view, okay? See? The top view. And if you want to see that, just change this to two views, go here and just change this to two views, and then click here. And then if it is
something else, just change to top, and also make sure that
you have this selected. Okay? If this is selected, you won't be able to see that. Okay? So I'm going
to select this and then change this to
top. Okay and see. All these are basically the layers but the layers
are at zero, okay? So I'm going to press P, okay? So P brings up the
position property. Okay? So let me quickly
walk you through all the transform properties before we move any
further, okay? So here, these are all the
transform properties, okay? For a second for just a second, I'm going to just change
this back to two D, okay? So here, the basic transform
properties are anchor point, position, scale,
rotation, and opacity. So anchor point is, so let me change
this to One view. So I'm going to change this to one view so that I can quickly explain what this transform properties for the
complete beginners. Okay? So the anchor point, this point that you see is
called the anchor point. So the anchor point is
basically the Piote. This is the point from
which everything moves. For example, I have this square. I'm going to just
get rid of this. Then I'm going to bring
this anchor point. So the anchor point, this
is pinned behind anchor 0.2 the shortcut for
that is why you can basically move anchor
point with this. I'm going to move it here, and then I'm going to change
this to rotation. Every transform effects or animation that you do will change in reference
to this point. That is why anchor points
are really, really crucial. I'm going to get rid
of this for now. Then we have position. So position is basically the position of the
layer, by the way. Then we have scale, the scale. Then we have rotation. Okay. And then we have opacity. So opacity is basically
the transparency, right? Now, the shortcut
for this, okay, so let's go through that
really, really quickly. So the shortcut for
the anchor point is A, then the shortcut
for position is P. The shortcut for scale is S, the shortcut for rotation is R, and the shortcut for opacity
is not O, but T. Okay? Also, if you want to
animate in After Effects, this is called time
Very stopwatch, okay? So it basically gives us ability to store the
property value at a time. So for example, if I
just drop a keyframe. So this is a keyframe, right? So keyframes are the marker on the timeline that tells After Effects exactly when and where a property
like position here, should change its value, okay? So I'm going to go ahead and then I'm going
to just change this. Okay, let's change
something else, okay? So we have this really
simple animation, right? Okay. And there are many
key frames as well, but we will go into that
as we move forward. We don't want to, like, eat too much at a time, right? Okay, so let's move forward. The next step is to create a new camera
and a null object. Okay? So first,
let's create camera. Okay, so new camera. Okay? Here, I'm going
to keep it as it is. It's going to be
two node camera. You can use one node
camera, but I prefer this. Okay, then we have the name. You can change the name as well. Then the preset, there
are many presets here. I don't use them,
and I'm not going to enable the depth of field
here because like I said, we want to keep this
as simple as possible. But if you want, you
can enable it later. Okay? Then I'm
going to hit on o. Right? Now we have the camera. And if you have
property spanel open, you can see how many parameters this gives and I'm not
going to go into them. Now, I'm going to
create a null object. So null object will act as a handle that we
parent camera to, and it will allow us to control camera and so it makes
things really, really easy. Okay? So let's create a null. So the shortcut is
control or Shift Y. But I'm going to just right
click and Null Object. Okay? And I'm going to
call this camera Control. And if you want to rename in After Effects,
double click won't work. The shortcut for that is Enter. You have to press Enter. Okay? So double clicking will do this. Okay? We don't want that. Okay. And I'm going to reenter the anchor point
of the null, okay? So the shortcut for reentering the anchor point is
Control Alt home, okay? Then I'm going to align
the null to the center of the composition
before I turn it into a three D because you cannot align three D layers
in After Effects. Then once that is done, you can see that when you
change any layer to three D, you have this, this are
basically all the positions, this is z axis, Y axis, X axis. Now I'm going to
parent this to this. We have the basic setup
for the animation. I'm going to open up
the position property. And if you want,
you can also see whether your parallax
is working or not. And the reason why the
parallax is not working is because each and every
layer is like here. It's at zero, zero, zero. So parallax works only if there are changes
in the Z properties. So I'm going to change
this to two views. Okay? So what we need
is we need to place the objects in a way that it
creates the parallax effect. So I'm going to press this
shortcut on this, okay? So that we can see
more properly, okay? So I'm going to move
this towards the camera, right? As you can see here, Okay, this might be too much. Okay. Now, the scale
has been messed up, so I'm going to press S
to bring up the scale, and then I'm going to just
reduce the size of it. Okay. Now here, like, for example, the slab, this
should be on the back. If you look at the
original image, okay? So if you look at the
original image, this part, blue front is like
in the front, right? So what we want is we
want it on the front. So I'm going to first of all, bring this on top, and this
sequence also matters, okay. So make sure that
you remember that. Okay. Once that is done, I'm going to change the
size of this as well. So I'm going to just
bring it around. Okay, this might be too much. Then I'm going to press
S and reduce the scale. Now let's see if the
parallax works or not. First of all, I'm
going to go here, change this to one view. It works fine. You
can see the change. It's still subtle
and if you want, you can make it, for example, I'm going to change this and
I'm going to scale it up. Okay, so there are lots
of things happening. This is if you want, you can also bring
this, for example, if you want, you can also add this layer here and it
will add even more depth. But I don't want that
because I want to make this animation as
simple as possible because what I want
is I want to make sure that those
doodles and the things and the flowers that we add are the central focus
of this animation. So let's animate this quickly. First, I'm going to
add a keyframe here. Okay. Then I'm
going to go ahead. Okay. So by the way, this is the timeline, right? And this is called
current time indicator. Okay? So you basically move
through the frames like this. And if you want to
see where you are, you can see it here, right? And so I'm going
to move around at 3 seconds or almost 4 seconds. Okay. And I'm going to
drop another key frame. Then this is by the way, let me quickly walk
you through this. Okay? So this is a hand tool. Hand tool is used to navigate. The shortcut for that is etch, but if you want to activate
it and deactivate it, the shortcut for
that is spacebar, if you press space bar, you can easily turn it on and
once you let go, it goes. Then I'm going to move
ahead and this is zoom in, I'm going to just zoom
out and then I'm going to move ahead to somewhere around here and I'm going
to drop the keyframe. We do this because
this principle is basically called
beginning with the end. So let's say that you
mess up any property, for example, you
did this, right? And now suddenly you forget that how do you even get to your previous or the
original position? That could be really
tough as a beginner. So this keyframe will act as a starting point of
the animation, right? So I'm going to just
undo that. Okay? Now, I'm going to go here, okay? We have this really
simple animation. What you always want to do is you start with the
most important stuff. For example, the animation is the most important part here. The doodles that you see on the screen are not
as important as the animation because they
can be really messed up if the animation is
not done properly. Now, I'm going to go
at this keyframe. By the way, the shortcut to move between the keyframes
is J and K, J and K. Right. So I'm going to just
zoom in like this. But I'm also going to
bring this bit down. Let's go up. Okay. Because also don't worry about the animation. It's not like written in stones. For example, if it's set here, it doesn't mean you
cannot change it later. You can definitely
change it later based on the doodles and the
animations we will add, right? Okay. Now, once that is done, let's quickly look
at the animation. Okay, it's really simple, right? Now, let's add rotation
animation, okay? So what I'm going to do is
I'm going to go around here. I'm going to change
this to half for now. Okay? And I'm going
to press R. Okay? So when you press R, it
brings up the rotation. So I'm going to just keyframe
all these properties. But first, I'm going to
start with the X rotation. Okay. Then I'm going
to press brings up the set keyframes on
the property, right? Then I'm going to go
at this frame and then I'm going to drop
the keyframe, right. Now I'm going to change the something like this. So we have this. Okay, so our primary
animation is done also. You can do so many things. For example, if you
are not satisfied with this, you can, for example, let me press R,
and then I'm going to drop two keyframes here. I'm going to drop two more
keyframes here, right? And let's change this,
for example, here. Okay. Also, one
reminder that let's say that you are just
animating it here, okay? And here, this part is
getting cut off, right? So this part is getting cut off. But if you change the position, it might cause some
issues, right? How do you solve that? Okay? So the best and
the fastest way to solve this is to apply an
effect called motion tile. So I'm going to go to
effects and presets. And by the way, this
is just a side tip. I'm not going to use this, but I'm just going to show you, I'm going to apply an
effect called motion tile. So motion tile allows us
to expand the background. I'm going to change
this to mirror H and then I'm going
to change the width. Just like that, our problem
has been solved if you want, you can also get rid of that, but that will cause some issues. Now that issue is taken care of. There are so many things
that you can do here. For example, you can also change this or you can go like this. But I don't want
that, I want to keep this animation as
simple as possible. I'm going to just get rid of
8. Chapter 6: Animating The Sun: The previous lecture, we
created this animation. Now, in this lecture, we are going to add those
elements into animation. So like I said in the
previous lecture, what you always do is you create the animation first and
you fill in the gaps. For example, if you think
that this space is empty, then you have an opportunity to use this empty space to fill up with something really
creative Okay. And so we are going to
do just that in this. Okay. First, if you
see here, okay? So these are all the solids.
Okay, for example, here. So this folder is automatically created in After Effects
whenever you create null, okay? So this null is basically this. Okay? So this is layer name. If I click on this, it will
turn into source name, okay? So this is the
source name, okay? So this null one is here. So if you delete this folders, this will all be deleted, okay. So make sure that you remember
this is really important. So I'm going to create a new
folder and I'm going to call this 02 the score random. Okay. And I'm going to bring
the solids into that. Okay? I like to keep
things organized, okay? And so once that is done, the next step is to import our illustrations and elements. Okay? So let's start, okay? So to import, I'm just
going to double click here. So here we are going to
use this illustration. Okay. So these two are
basically AI generated. And so let's import,
first of all, this three, and then we will import
Illustrator file as well, okay? So I'm going to hold Control
and then I'm going to click so then I'm going
to hit on Import. Also, let's say that
your system is slow and you don't know why suddenly your
system is slow, right? So sometimes what
might happen is all you have to do is go
here and purge, okay? So what After Effects
does is that it stores the disk cache,
cache or cache. I don't know how
to pronounce that, but this slows your
system down, okay? So sometimes you might
have to do that. I'm not going to
delete that right now because it will
take time, okay? So I'm just showing you that sometimes if you
think that, well, my system is slow,
I don't know why, then this might be
the reason, okay? I have 200 GB here. Okay, so it's completely
fine for me now. Okay? Then I'm going to
move this into this. Okay? So we have this. I'm also going to give
this a different color. Let's go with red, right? Once that is imported, I'm going to import
an Illustrator file. I'm going to double click. Okay? I'm going to go to characters, and then I'm going to
select this, okay? And hit Import. Okay. And this one is really,
really important, okay? So it's same as the PSD, but you don't get these
two options, okay? So I'm going to
choose composition, keep footage dimensions
as layer styles, layer size, not styles. Okay? So if you import
this as a footage, what will happen that every layer will be on a same layer, and we
don't want that, right? Whose composition and
heat on, okay, right? And it will create two things. The first one is these
are all the layers, and this is the composition that is created
from these layers. So I'm going to move this into assets because this
one is also important. So make sure that you
don't delete that either. And I'm going to
move this into PC. Okay. Now, let's open this
up. Okay? So we have this. So first of all, this bunny
was just an experiment. I tried to create it, but I didn't like it, so I left it half the way, okay? And as you can see, it
has no details, right? So I'm going to just
get rid of that. Okay? Now we have
this. We have this. Okay. So this is basically
the branch, okay? So I should have, you have to get into the
habit of renaming. And by the way, this is
called snapping, okay? So it basically snaps. The shortcut for
that is control. So whenever you hold control, it will snap to the
bounding box, okay, not the layer, okay?
So we have this. Now the next step is to create the pre comms
from this to precompose. All you have to do is
right click, precompose, or you could press
Control Shift C and then leave all attributes and
then sun underscore PC, and then hit on Okay, right? And so we have this. Okay?
So this is the composition. It's basically 382 by 377. Okay? And I haven't changed
a thing here, and I'm going to bring this
compositions duration down. The shortcut for the
composition settings is Control plus K. Okay. Now, once that is done, what I want is I want to
make changes to this. But as you can see, we don't have many options
to change here, we don't have
anything apart from these basic transform
properties. So After Effects allows us to
create or to transform the Adobe Illustrator vectors into After Effects native
shape layers. And you can manipulate the shape layer as per your wash. You can
change the colors, you can change so many
things here, right? And so all you have
to do is right click create and create
shapes from vector layers. And this will work only for Illustrator files
because if you might try this on like Photoshop
layers, but it won't work. So let's go into contents.
Let's see what's going on. Okay. So whenever you turn vectors into the
native shape layers, we will have these groups. Okay. So these groups are groups from the
Illustrator, right? So for example, here,
these are the two blush. Okay, then we have this element, and also you can
change so many things. For example, if you
don't like the color, you can make it brighter. Okay. If you don't like this, you
can change this as well. Okay? So let me quickly walk you through
the shape layers, okay? So shape layers have many,
many properties, okay? But whenever you convert Illustrator files into
native shape layers, you will have path, the stroke. Stroke is basically, let
me turn this one, okay? So stroke is the
stroke of the layer, then fill is the fill
of the layer, right? And under this, you have many
properties as well, okay? So here we have color. This is basically the color
of the stroke. Then we have stroke width. Okay. And we have opacity. These are the caps. So we have butt cap, round cap, projecting cap, and I'm going to
keep it as it is. Then we have, so this cap are basically the lines
edge, for example, here, let me quickly create
the shape layer or just a stroke,
just to show you. I'm going to create this.
And as you can see here, okay, this is the
butt cap, okay? Right? But I don't want that. I want it to be round, okay? So that's that. Then we have line join. Okay? So for example,
let me add some. And by the way, you don't
have to press any shortcut, the cursor changes to plus, so you can add points to this, and then you can
make changes, okay? And then if you want
to change the join, all you have to do is go here. Okay? And it changes, right? So this can be used for
the character animations. And then we have dashes. Okay, so you can add
dashes to it like this. Okay. So these are the dash is we have
two properties. First is you can add dash and then you can change the dash or you could
get rid of that, right? That's dashes. Then
we have taper. So taper is like that tail. Okay. So if you want to
make this into tail, you can do that with the taper, like that liquid animations
that you must have seen. Then we have wave. This
one is comparatively new. But you can do many
things here, okay? So this phase is basically
the offset here. In many properties, we have offset and you can change this. You can play around
with that as well. So stroke has many properties. Okay. Then you can also, if you look at here,
we have two options. So these options will be
available on the shape layers. First one is fill. And
when you click on that, we have this is solid color. So this is set to none
because we don't want that. Okay. So this is set to none. If you want a fill color, you have to choose this. If you want gradient, so this is solid
color, basic color, basic hue, then we
have linear gradient, and then we have
radial gradient. So if you want to make
any changes to that, you will be able to
see that changes here, and you will be able to change the gradients from here
as well, okay, right? And so I'm going to change
this to none. Okay. And it basically gets hidden. If I turn this on, it turns
it on here as well, okay? And so that's it for
the shape layer, right? Let me turn this on.
Now, the great thing about shape layers is that you also get additional transform properties
of the group. Okay? For example, here, this is the transform
property of the entire layer. For example, if I want
to change the rotation, or the scale, this will
change the entire layer. But let's say, this
one is this blush, right? Let me rename this. Okay, so this is blush one. This is blush too. This is the central part, and this is the beam, right? So like I said,
whenever you change something in this transform
property of a layer, entire layer will be affected. But let's say that
if you want to make changes only to this, for example, let's say that we want to rotate this, right? So how do we do that? Without rotating this? After Effects allows
the individual shape layers to be animated as well. For example, I'm going to go at here and I'm going to rotate it, and it will rotate without affecting anything else, right? So first, let's
animate that, okay? So in After Effects,
you don't always have to animate everything
using keyframes, right? In After Effects, what
you can do is you can use something
called expressions. So expressions are
basically the code you write sometimes not
only avoid keyframes, but it is used for automation. For example, let's say that here and to apply the
expression on any property, all you have to do
is go to stopwatch and then hold Alt
and then you click. Now you have this
expression editor, and I'm going to
add in time star, not B star ten. We have this. This
is the expression. Let me play this Okay. So this is basically a
time expression, okay? So time expressions moves the
layer or change the layers automatically based on the clock instead of using the
manual keyframe, okay? So it basically changes
as the time passes, okay? So now we are going to create the expressions
for the sun. I'm going to select
the ellipse tool. This is shape layer tool, okay. And we have rectangle tool
which creates rectangle, rounded rectangle,
creates rounded, and so on and so forth, right? Ellipse, polygon, and star. So the shortcut for
that is Q, okay. So if I change to Q here, the shape layer changes, right? So what we want is ellipse. So I'm going to click on Q until we get
the ellipse, right? So I'm going to create
a shape like this. And I'm going to
reduce the size. We have this option. The
option is called add. Okay, so these are basically
different modifiers. So it allows you to add specific elements and modifiers
to your shape layer to create or change its appearance without using this
traditional effects, right? And so there are so
many things we are not going to go into
them right now, but the only thing
and this one is the most important thing
and that is trim parts. Okay? So trim parts
allows you to trim the strokes or the layers, okay? So we have many properties here. First one is start. This is the start of the
trimming and the end. And so I'm going to change
this to around here, and then I'm going to
change this offset. So the offset basically
offsets layer, right? So I'm going to bring it here. Okay. And I'm going
to go into ellipse. I'm going to go to stroke, and then I'm going to
change this to round cap. Okay? So we have
the I one, right? And I'm going to I think
I'm going to make this a bit wider I guess. So bigger. Okay. All right. Once that is done, I'm
going to rename this. I'm going to call this I left. And then I'm going to press
Control D to duplicate, and I'm going to
bring here, right? Okay. Once that is done,
I'm going to create a new circle like
this, new ellipse, I'm going to place it in a
way that it looks decent, so we're going to go with
somewhere around here, right? Once that is done, I'm going
to add in the trim parts, okay then I'm going
to reduce it, and I'm going to offset this. Then I'm going to
increase this and offset this until it looks
like a smile, right? Then I'm going to
increase the stroke with I'm going to go to stroke and I'm going
to change this to round cap it looks nice, but I'm going to bring the
eyes bit down like this. I'm going to reduce the
stroke as well, okay. And if you want to reduce in terms of decimal
points in After Effects, for example, look at
the stroke values. All you have to do is
hold control, okay? So, without the control, it changes really
quickly, right? And so then I'm going
to move this bit down, and I'm going to increase
the stroke width. Okay? And so we have the
sun animation ready. Well, it's nothing much, okay? It's really simple.
9. Chapter 7A: Animating Flower: The previous lecture, we
animated the sun, right? Now, let's prepare
other elements as well. And let's open this up, also the are all
the empty layers. They might have
something, but I'm going to get rid
of them for now. Okay? So I'm going to
select both of them. Then I'm going to
press Control Shift C. Then I'm going
to call this flower front under scoPC
Now we have this. Okay. So let's start by creating shapes
from vector layers. Okay? So I'm going
to right click, create, create shapes from
vector layers, right? Then I'm going to
do the same thing, create shapes from
vector layers. Okay? And I'm going to
rename this quickly. So I'm going to
call this branch, and I'm going to just get rid of the outline part here, right? And I'm going to so here, what I want is I
want all of this to rotate around
the center, right? And how do we do that? So
there are many options. The first one is you could
just select the group, right click, and then
you can group shapes. So basically, they will
be grouped, right? And they will have this
anchor point as well. So this anchor point is not the anchor
point of the layer. This anchor point is the
anchor point of the group, and you can change
this anchor point as well by pressing Y, and then you can just move
it to the center, this. Okay, and then you
have this group. Okay? So I'm going to call
this leaf group, okay? And these are all the individual
groups inside the group. Now you also have the control to change them as well,
but we don't want that. We want to keep things as
simple as possible, right? And this transform leaf group is transform property
for this group, okay? So I'm going to add in that
time expression as well. So I'm going to Hold ord, click, and then I'm
going to type in time. Star. Let's go with
one because I want to keep things as subtle
as possible, okay? So this rotates
really, really low. So as you can see here, I have applied gradient to this. But you don't need to
because the purpose of this is to keep everything
as simple as possible. So don't get confused if you see the gradient
fill here, okay. Just make sure that you change your fill to the color
that I have given. Okay. Okay, now let's give
this some more details. So I'm going to just
grab the pen tool, then go here and then just start drawing
the shape like this. Okay? And I'm going
to bring that here. I'm going to bring in on top. Then I'm going to hide this, and I'm going to
bring it here, right? Now, once that is done, I'm going to go into leaf group. Okay. I'm going to
go into stroke, and I'm going to go to
taper and we are going to have this taper at the end, like this. Okay. Now, once that is done, I'm
going to duplicate this. I'm going to bring it here. Then I'm going to bring it here. Then I'm going to select
this and I'm going to move it like this. Okay. So this looks really nice. Okay? Now, let's
say that you don't want to do everything in
the same layer, right? So how would you do that? How would you solve
this problem? Because as you can see,
the layers are increasing, and this is where the problem
solving comes in, right? You have to be flexible
in your process, right? All you have to do is
press Control D, right? Then what you want to do is you want to go into group, right? And then you delete
this leaf group from this section, right? Then here, you delete this
and you ungroup the shapes, the problem here is that the
animation that we just did, which was on the group is gone. The good thing is that now
all you have to do is just apply the same
expression that we applied previously here, okay? And this is the problem
solving because as a beginner, you might think that, well, I have figured everything out. But as you move forward,
you realize that, well, things are getting complicated, and I need to simplify, and that's completely fine. Simplifying is good, okay? And so I'm going to add in
the expression to the layer. But before that, we
want to make sure that the anger point is
at the center, right? So the shortcut is
control allt home, but that doesn't work because our center is
clearly here, right? So After Effects can
do that because it measures things
differently compared to how we see, right? So I'm going to
click on Y and then I'm going to hold control and then it
snaps to the center. Then I'm going to add in the
expression time star one. You can change
this, but I want to keep this as subtle
as possible, right? And so I'm going to
call this pink leaves. And then I'm going to
call this flower head. Okay. I also don't like the
color of this branch as well. Okay? So let's
change that first, and then we will add those
tune like effect here. Okay, so we have this, right? And I'm also going
to delete this. We don't need that now, okay? So I'm going to go
into this group, and I think the
stroke is too much, so I'm going to reduce it, okay? And let's change each
stroke to three as well. But this still feels as if
something is missing, right? And that is those tune
like effect, okay? I'm going to hold this, okay? I'm going to duplicate this. I'm going to bring
it out like this. Okay? And I'm going to
get rid of the fill here. I'm just deleting it by the way. And then I'm going to add in the trim path in
this group, okay? So trim path, I'm going
to just solo this. Okay. Then I'm going
to change this Okay. And I'm going to offset this. Okay. So trim paths are
really, really handy, okay? Don't underestimate the
power of trim path. And I'm going to rename this. I'm going to call
this tune effect, and I'm going to
place it somewhere around here and you can see you can do so many
things here, right? And you might be
thinking, What's the point? The point is this. Okay. And you can do wonders
here by the way, okay? So I'm going to go
into taper and let's change this let's
change this as well. And if you think the
stroke is too much, you can reduce that as well. Okay. Let's say that you
want to do this again, you just duplicate this, change the trim
paths to anywhere. For example, well, this
might not be visible, so let's go with top. And If you're not able to see this, you can hide this as well. So don't worry about that
and you can turn this on, so that you can
see more properly. Okay. Then I'm
going to turn this on and I'm going to move this. And you can offset this
in any way that you like. Okay. So we have
something like this. You can also move it aside. Okay, if you want,
you can keep that. If you don't like, you
can get rid of that. Okay? It depends on
your preference, like I said, right? So this looks good so far. Now, let's add this tune
effect to this as well. So I'm going to just
select the pen tool. I'm going to get rid of this, and I'm going to start by drawing the random
shapes like this. Okay? And I'm going
to increase the Okay, so I'm going to call
this tune effect, and I'm going to
bring it below this. Then I'm going to recenter
the anchor point. Okay. And I'm going
to go into shape, stroke, taper, and I'm going
to change the end length. Okay. And now I'm going to
parent this to pink leaves. And I'm going to place it
somewhere around here. I'm going to go and change
this from the back as well. Okay. And I'm going to
change this to round it. Okay. I'm going to
make it bit shorter. Then I'm going to duplicate
this by pressing Control D, then I'm going to
place it here and I'm going to just rotate
it like this. It doesn't have to be perfect. I'm going to make
this bit shorter and I'm going to change
the taper on that as well. Now, let's say that you
don't want to go into that. Sometimes you have this. You also have properties, but if you don't want to
you can find it there, all you have to do
is search for taper and then you can change it. Okay. Now, I'm going to
do the same thing here, so I'm going to just
draw a shape like this. And I'm going to reduce
this stroke of it. You don't have to
keep each stroke in the same size,
by the way, right? Ban going to change this. I'm going to change
this to zero. Not this, okay? I'm going to bring
it down and I'm going to change the taper. Okay. So I'm going
to change this to 25 or this Okay. So we have something like this. Now I'm going to
repeat this process, and I'm going to
fast forward this. Here, okay? So we have
something like this. This looks nice, but it's
still incomplete, right? Now, Okay? The reason why it's
not changing is because of the parenting, okay? So what you have to do is make sure that you
are at that frame, then you parent each
and everything, make sure that they
are placed well, and then just select them. Also, I'm going to give them a label so that I
can identify them. Then I'm going to parent
this to pink leaves, okay? So you can make many
changes to this. If you don't like this, you can change the
stroke as well. Just don't go overboard. Okay? Okay. Now, if you want, you can also add those tune
effect to the leaves as well, but that won't be
necessary because, well, only this part of this flower
will be visible, right?
10. Chapter 7B: Facial Expressions & Light: So the next step is to quickly create the
expressions, right? Let's create a new
composition for this. So let's call this expressions. Okay? And I'm going to go with 200 by 200 and duration
is going to be the same. Okay? Now we have this. First of all, I'm going to
turn on the transparency grid, and I'm going to just
create a line like this and I'm going to
change the stroke, and I'm going to change
its color to black. Also if you think
that stroke color needs to be changed,
you can change that, then I'm going to press G. I'm going to hold Alt
and so we have this, I'm going to make this smile. This is basically the smile. Now, I'm going to type in cap and then I'm going to
change this to round cap. The shortcut for that is
Control F, by the way. I'm going to call this smile then we are going to
create the eyes, okay. And for the eyes,
we are going to simply use the stroke as well, this depends on your
preference as well, like I said, I'm going to
call this I left, right? So I'm going to
animate the scale. Okay? This is going
to be really, really simple and really fun. This is constrained
proportions, okay? So let me show you quickly. If this value is 100, this value is going
to be 100, right? But if I get rid of this, which is called constrained
proportions, okay, we will have scale
that will go in the both directions without
affecting the other, right? This is X, this is Y, okay? Then I'm going to change. Okay. So I'm going to
drop the keyframe here. Then I'm going to go 15 frames ahead by pressing
Shift page down. Shift pad down moves your
playhead to around ten frames, and then I'm going to go one, two, three, four, and five. Just page down helps you to move playhead ahead by
one frame, right? Then I'm going to
change this to ten. We have this. Then I'm
going to go 15 frames, Shift P down, one, two, three, four and five. I'm going to copy this by
pressing Control C, Control V, then I'm going to
go shift P down, one, two, three, four and five. And then we have AbdolKtlV. Okay. Let's see if its
loops, by the way. And this is work area,
let me show you. Okay? So this is called area. This is work area start, this is the end is called area. I want to make sure
that I preview this. I'm going to bring in
the work area here so that I can preview
it more clearly, okay? The shortcut to
bring the area to the current time
indicator, is B. So wherever this current time indicator is
and you press B, the work area start
will move there, okay? And same goes for the work area. But here, the shortcut
for that is N. Okay? So let's see if it
loops properly, okay? It doesn't. Okay, so I'm going to get rid
of this keyframe. Okay. So the next thing that I'm going to do is
I'm going to copy this copy this keyframe
and paste it here, right? So the reason why I did that is because I want
this blinking to be long and the shutting of the eye has to be
shorter, right? And so that's why I have copied this keyframe
here, right? Okay. Now, right
click Easy is, okay? And so we have easy
is the keyframe. So in short, if I had
to explain easy is, so easy is and the graph editor. So this is the graph editor. These are the tools that used to control the speed of animation, make it look natural. Okay? So the animation that we do on the linear
keyframe, for example, these keyframes, these keyframes are called linear keyframes, and they are called
linear keyframes because they are robotic. They are linear. And when we easy ease the
keyframes, okay, this keyframe
changes, this is used to create that natural
kind of movement. Now, to manipulate the
keyframes and the movement, we have a tool called
the graph editor, okay? So here we have two properties, by the way, C, X and Y, C. Okay, so this is speed graph, and then we have value graph. Okay? They both are
important. Okay? So I'm going to
quickly change this. So first of all, I'm going
to double click here. And what this does is that this locks the outgoing
and incoming velocity. So if I don't do that,
I might mess up, okay? So I'm going to
double click here. Okay, and click on Continuous, and then I'm going
to change this or let's do this here as well,
and I'm going to change. Okay. Let me bring this out. Okay. And I'm going to mimic
this graph here, okay? So I'm going to move this Right. Now let's look at the animation. Okay? Okay, this one looks nice, and I'm going to change
the cap to round cap. Okay. So we have something like this, really
simple animation. Okay, now let's duplicate
this and let's place it here. Okay. So I'm going to
change this to right. Okay. We have this really
cute animation, and now what we want is we only want this animation to
loop only from this. We don't want to use
this entire workspace. And so we want to trim this area into this.
So how do we do that? All you have to do is go to
composition and then trim comp to work area
or the shortcut for that is Control Shift X. Now, let's go into this. Now let's bring in
the expressions here, and let's scale it down. Okay. Now, as you can see, the composition ends here. The composition ends
here is because we basically changed
the composition, right? And how do we solve
this problem? We basically reduce the time of the composition like in
the main composition. So here we have this issue
like the composition s here. What you might do is you might duplicate it and place it here, but that's not efficient, okay? So the shortcut for
that or the best way to do that is using the
time remapping, okay? So go to time enable
time remapping. The shortcut for
that is Control Alt T. And whenever you
apply time remap, you will have two keyframes
on the time, okay? So this is basically the entire
duration of the keyframe. Now, what you can use is that you can tell
After Effects that I want to loop this composition
a specific duration. For that, we are going
to use expression. I'm going to hold
Alt and then click. Then I'm going to add in
the loop out expression. The loop out expression
is used to loop. Now, you can drag
the composition like this and it will
loop continuously. Now, this is a common
glitch in After Effects. At the end frame every time this happens and this might happen because here it's empty. Let's see if it works. And it still doesn't work.
The solution is simple. Whenever you do this
time remapping, you will have this problem. Okay? So all you have to do is just move one frame back
from the main keyframe, drop the keyframe and
delete this keyframe. Okay? So time remapping lets you manipulate the time of
the composition, okay? And we do that using
the keyframe, right? Instead of changing
the overall speed of the animation, for example, if you want to just increase
the blink speed of this, okay, all you have to do is just bring it in and now
look at this, okay? It changes the mood
of the animation. Of course, we don't want that. I'm just showing
you the example. So whenever you apply
time remapping, you will have two key
frames like this, one at the start and one at the end of the composition
that is it applied to, you can do so many things. You can speed up
the composition, you can loop the composition, you can slow down
the composition. You can even freeze
the composition, it is most commonly used
for those speed remapping. Okay, I normally use it for
looping the compositions, o, and you can use it
in many different ways. Now, let's precompose
all of this. Okay? So I'm going to
press Control Shift C, or you could right
click and precompose. So I'm going to call
this flower front underscore main okay, right. So we have this, right. Now, if you want,
you can bring it to the center, scale it up. Okay. I'm going to create
two random shapes, one on top and one on
the bottom like this. Okay. And I'm going to
get rid of the stroke. I'm going to enable the fill, and let's go with this color. I'm going to go into
the shape layer, so I'm going to press Ctoldi and I'm going to bring it here. Right. Once that is done, I'm going to press
Control D, okay? Then I'm going to change
the tract mat. Okay. So tract mat, controls the
transparency of the layer. Okay? So we have Alpha met and then we have
inverted Alpha mat. Okay? So this is
Alpha or luma mat, and this is invert Mt. Okay? So I'm going to
show you. Don't worry. Okay? So I'm going
to change this to first of all, I'm
going to rename this. I'm going to call this mat and I'm going to call
this light Okay. And I'm going to choose
the mat here, okay. And suddenly we have
this option, right? So this is alpha met. And as you can see, the
shape layer appears only in the wherever
there is this flower, this shape will appear. But outside, it does
not appear, right? But if I change this, it will invert it, okay? Right? Now, the next thing
that I'm going to do is I'm going to change
this to overlay, okay? And I'm going to reduce
the opacity, right? So as you can see here, this edge doesn't look right. It has to merge with the
illustration, right? So I'm going to apply an
effect called fast box blur. Okay? So I'm going
to apply this. Now this is effects and presets, by the way, and you can search
any effect here, right? So we have so many effects here, and then I'm going to first of all, I'm going
to get rid of this. This basically repeats the edge pixel and
we don't want that. We want it to spread
around, right? And so I'm going to change
this to around here. You can play around
here as you like. As you can see, it
makes a difference. It's not a huge difference, but it doesn't
look flat anymore, let's say that if
you don't like this, you can change it
here as well, okay? So this is basically
the light of it. There are many other
effects as well. For example, if you want to take your lighting
to the next level, you can also add something
called light suite, but I'm not going to add it. I'm just going to show
you. Okay. So I'm going to just place it here. Okay. And as you can see here, we have this, right? You can change so
many things here. Okay. See? But we
don't want that. I'm just showing you? First, we prepared the sun, then we prepared the flower. Now, I think I don't like
the color of face here. I'm going to change that Okay, I made it just a bit
brighter, right? Also, if you want, you
can also add depth to it, but I suggest you keep things as simple
as possible, okay? So in this lecture, we created this simple flower animation, and in the next lecture, we are going to create
another flower animation. And so I will see you
in the next lecture.
11. Chapter 8: Flower 2 Animation: Lecture, we are going to animate another flower,
which is flower two. Okay? So I'm going to
just bring it on top of this and this will create
a new composition, okay? Right? And so we have this really interesting looking
flower here, right? And as you can see, the flower two composition is here,
and we don't want that, so I'm going to just move it
into the PC section, okay? Right. And then I'm going to bring in the expressions here. Okay. So I'm going to
bring it here, right? Now, as you can see,
the expressions doesn't fit here, right? I'm not having that perspective. This doesn't look right, see? So I'm going to change this
to let's go with 100 for now. And I'm going to change
this to three D, and then I'm going to change
the X rotation on this, I'm going to scale it
down just a little bit. I'm going to press R. Okay. And I'm going to place it
where it looks decent. I'm going to do the
same thing that we did in the previous lecture, I'm going to press Control Alt. If you don't want to do that, all you have to do is
just go on this and then just copy the expression from here and then
paste it here. But I'm just going to show you. I'm going to press Control Alt. Then I'm going to
hold Alt click loop out, compress Enter, drag the composition,
go at this frame, page up, drop a keyframe, zoom in, select this
keyframe, delete. Okay, so we have this
really nice animation here. Now, I'm going to go into
the flower front main. Okay, I'm going to bring
in this light from this. I'm going to press Control C. I'm going to go here, and
then press Control V. Okay. And I'm going to
just double click. If you double click
on any shape, you will be selecting the shape without
going here, right? So I'm going to just
double click here, I'm going to move it here. I'm going to double
click here and I'm going to move
it around here, I'm going to move it like this. Okay. So this flower is going
to be really important. Okay. So I'm going
to press Control D. I'm going to call this Matt. Okay. And we're going to
repeat the same process here. Okay. And I'm going to
increase the opacity. You can try different blending
modes, by the way, okay? You're not like you don't have to do
everything that I do. You can do so many things. And if you want, you can
bring it down like this. Okay? You can do so
many things, right? And so we have this really
simple animation, right? Now, I'm going to
just cancel this and I'm going to go into
the main composition, and I'm going to go
into the girl PC. Okay. And then I'm going to bring
in the flower two here, okay? So I'm going to scale
it up, scale it down. I'm going to place it
here on the back. Okay. Now, what I'm going
to do is I'm going to apply an effect
called CC plastic. But before that, I'm
going to scale it up just a little bit. So like We have it like this. Right. Now, I'm going to apply an effect called CC plastic. Okay. So this basically
adds this you can see, adds this effect of
plastic onto our layer, but this is too much, okay? So as you can see here, this
might be too much, right? So I'm going to keep
softness as 20, and I'm going to
reduce this size. Okay. Right? And I'm going to keep
everything as it is. So once that is done, I'm going to apply in
effect called CC bandit. So CC plastic helps us to create that feeling of the
plastic here, okay? And CC bandit will help us
to bend the layer without relying on those
heavy animation tools that takes a lot of time, okay? So I'm going to go
here and then I'm going to just search for bend. We have this and CC bend it. Whenever you apply this effect, you will have this issue. These two properties are the first one is start
and then we end. With this effect, you
can easily bend the C. The flour is now playing. So I'm going to add in
an expression on this, and this expression is
called wiggle expressions. Okay? And first of all, I'm going to add in
the expressions, and then I'm going to
explain what it is, right. So I'm going to hold
Alt click, right? And then I'm going to add
in wiggle 0.7 coma three, not nine, three, and let's
look at the animation. Okay? It's really subtle, right? It looks nice. See, the point of this
animation is not to take away our attention
from our main character. For example, the woman or the girl here is
our main character. So you don't want to do anything that takes away your
attention from this. So the reason why I'm
placing the flower here is because I want
people to focus here. The reason why are we are
going to place the bunny here is because
we want people to know that this is
our main character. You have to remember
that your main character should be your primary focus. Let's consider the flower
to be secondary character. But the secondary
character makes our main character more important. That's
the whole point. Should not have been
here, because well, that would doing the whole
point of the animation. Make sure that you
remember that. Also you can change many
things here as well. If you want to
change the shading, you can do that as well. Okay, but I think you should
keep everything as it is. But if you think that, okay, this might be upstaging, you can change it, okay? But I don't think
we need that, okay? Right. And so this is our animation. It's really simple,
it's really subtle. Now, let me quickly explain
wiggle expressions. Okay? So wiggle expression
is a piece of code, like I already said that adds the random wiggle
to any property. For example, you can add this to scale, rotation, position. And it saves you time from just adding hundreds
of keyframes. So what is this? So
first, we have wiggle. So this is the expression,
the main expression, and then this is frequency, and this is amplitude. So frequency is
basically the speed, like how many times it
wiggles per second. And then we have
amplitude, like the size, like how far it moves
because you can go overboard here as well, okay? So let me solo this. See?
You don't want that. And so it's really subtle here. I'm going to just
change this back. In this chapter, we created this flower animation
and we added the flower animation
into our main animation. And as you can see here, it looks really, really nice. Okay? So that's it for this lecture, I will
see you in the next.
12. Chapter 9: Bunny Animation: This lecture, we are
going to animate this really cute bunny
that we have, okay? So I'm going to go to assets. Okay, and then I'm going
to just precompose this. Okay? Now, this is bunny. And let's see the
composition settings because since this is AI, we have the little
distortions here, but that's completely fine. This bunny is not that
important because it's going to be a
supporting character, like I said, okay? Now, going to click here and
go to composition settings. I'm going to rename this
to Bunny enter score PC, and then I'm going to
keep everything as it is and hit on, Okay, right? Now, I'm going to rename this. I'm going to call this Bunny. And by the way, if this happens, if you double click
on any layer, this might happen, okay? So all you have to do
is just go here, right? This is the composition. This is the layer, okay? So if you want to rotoscope
mostly, this is used, right? Okay. So now what we
are going to do is instead of going the
Illustrator way, you're going to turn this image into little tiny
animation that we want. Okay? So how do we do that? So what we do is we use
masks for that, right? So masks are basically the
shapes drawn on layer. That hides or reveals
the parts of the layer. Okay? So what I want here
is I want to separate this arm into a
different layer, okay? And then I want to
animate that m. Okay? Now, how do we create
masks in After Effects? Okay. So we have two options. The first one is this
we can, like, see, I double clicked or I clicked on that and we have a mask, okay? So if you click on
any shape here, Okay, you will have a
mask like this, see? But we don't want that, okay, because we want a custom mask, meaning I want only this
part to be masked, right? And so how do we do that? Okay? To do that, I'm
going to use the pen tool, so I'm going to
just select this or you could press G, ok? And I'm going to zoom in. And then I'm going to
just start by drawing a mask like this. Okay? So we have the arm. So I'm going to duplicate this by pressing
Control D, okay? And then I'm going
to rename Boni two by pressing Enter to arm, and I'm going to
select this, okay. So whenever you apply masks, so first of all, let's understand masks really,
really quickly, okay? So whenever you apply mask, it will have five
properties, okay? So the first one is mask path. So this is basically the path
that we have drawn here. Okay? Then we have mask feather. So this softens the edges. Okay. Then we have mask opacity. This is basically the
transparency of the mask, okay? Now it's not working is
because this one is on, okay? So I'm going to just okay. Then we have mask expansion. So this basically grows or
shrinks the masks, okay? And then we have the options
are called mask modes. Okay? So we have add,
subtract, okay, intersect, lighten, darken, difference, and we're going to keep it as it is,
right, for this. But what we want is we want this like this is bunny, right? This is not arm. This is arm. So what I'm going to do is
I'm going to click on inward. And in that way, we will
have a bunny, right? Now, what I'm going to do is
I'm going to slightly adjust this in a way that
it looks nice. Let's say that
these are the edges and the edges aren't
curved, right? And if you want to have
those curves in it, all you have to do is hold
t and then click on it, and then you will have
these busier handles that you can change, okay. Just make sure that you don't overdo this because that might cause some trouble for Okay. Now I'm going to turn
this on, okay? Right? So this is the arm and
we want to animate it. So first of all, I'm going to press Y or you could
just click here, and then I'm going to move the anchor point at this point. Okay? Hold control, by
the way, okay? It snaps. And if you look at the rotation, well, it works, it works well. Now you might be thinking, well, it's getting cut off at
this point. Don't worry. We are going to add this bunny
in this composition, okay? So even if it gets cut
off at some point, we can hide the
distortion, okay? And so that's why I keep
on saying that you have to plan things ahead and
you have to be flexible. You can rely only on
artificial intelligence, and you cannot only
rely on adobelo data, you have to take a hybrid way to get things done as
quickly as possible. Okay? So we are going to
add an expression in this. So here we're going to
add wiggle expressions. So I'm going to hold onto Alt and then I'm going
to click on this. Okay. Then I'm going to
add in wiggle bracket, not nine, bracket, one coma 40. Okay. Now, if you see
some distortion here, you can change it, okay? Also if you want,
you can drag it out, but it might cause
some issues here. See, because we don't want that. So I'm going to just
drag it back like this. That's our Bunny's animation. Now, let's add this into
our main composition. I'm going to go to Girl PC and then I'm going
to find Bunny here, and then I'm going
to bring it here, then I'm going to press R
to bring up the rotation. I'm going to press S
to bring up the scale. Okay. And I'm going to place
it around here, right? Now I'm going to go into the main composition
by pressing tab, and then I'm going to just see when this bunny
should enter. Okay? So Bunny is obviously
not our main character, but I still want people to know that well we have
Bunny here, okay? So I'm going to go somewhere
around here, right? And so I'm going to go
back into Girl PC and I'm going to bring the bunny here. Okay. And then we are going
to add in an animation. Okay? So I'm going to press
P to bring up the position. Now, let me show you some
cool shortcuts, okay. So now let's say that you don't want to press the shortcut, like P, and then you drop
the key frame, right? The shortest way to do that
is all to shift P Okay. This is the shortcut,
and it changes. Basically Alt Shift R will drop the keyframe
on the rotation, Alt Shift S, Alt Shift T, and Alt Shift A. Okay? So I hope you
get the point, right? So just Alt Shift and then followed by the property. I'm
going to get rid of this. And then if you want to see the keyframes on the property, all you have to do
is press U, okay. Right. Then go ten frames ahead and the shortcut
is shift page down. I'm going to go one, two, three, four, and five. We are at the 15 frames, and I'm going to drop the
keyframe here and I'm going to go back and I'm going to
drag this out like this. And so we have really
cute animation like this. Now if you want, you can
move this bunny a bit out. Just make sure that
the distortion is not visible and you can
scale it up as well. Okay. But I suggest that you keep it as smaller as possible. We don't want it to oversage
the main character, that is the girl here, right? And so we have this really
simple bunny animation ready. Okay? And if you think
that the wave is getting not grabbing that
attention that you want, you can switch this back to 40 because that would
be really nice. Okay. And if you want, you can also change the, if you think that this
is too plasticky, you can change this as well.
13. Chapter 10: Butterfly Animation: Lecture, we are going to
animate that butterfly. Okay? So let's get started. So to animate, I'm going to bring this butterfly,
precompose this butterfly. I'm going to just drag this
and drop it on the precomp. And now I'm going to press
Control or you could just go here and open up the
composition settings, right? And so it's going to be
2000 by 2000 pixels. And here the duration
is too long, right? Okay. I'm going to change
this to 2 seconds. I'm going to change
this to zero, and here it's going to be two, and I'm going to
change this to zero, zero, and I'm going to
keep everything as it is. Then I'm going to rename this
to butterfly underscore PC. Also, if you want to
change the frame rate, you can change this to 30. Let's change this to 30 here. Okay, now we have a two
second composition here. I remember telling you that how animating the PNGs
could be really tough, and this is going to
prove that to you, okay? So first of all, I'm
going to rename this. I'm going to call this
butterfly for now. Okay. We are going to separate each individual shapes
here by using masks. So first of all, we are going to separate this part, okay? So I'm going to first of all, change this to half so that you can see more clearly, right? And then I'm going to
choose the pen tool and I'm going to start by
drawing the mask, okay? Now, I'm going to draw
a mask in a way and let me change the color of the mask so that you can
see more clearly. Okay, so I'm going to
mask it in a way that these wings do not get
included in it, right? Now, since this part
is transparent, wherever I put the mask,
it doesn't matter, right? So I'm going to now I'm
going to zoom it in by just using my scroll
wheel and then I'm going to make sure
that I choose well, right? Okay. I'm going to just
drag it out like this. Now, you can also go
ultra specific or ultra, I don't know, ultra
perfectionist here, but I don't think
you should because this animation is going to
be really tiny and well, it's not that important
because remember, our purpose is to get
things done as quickly as possible without losing
the quality, right? Without compromising
with the quality Okay. Then I'm going to
just connect this. Okay? So now we have this. As you can see, well,
it looks really nice and the selection has been done really, really well, right? Now, once that is done, I'm going to duplicate
this, right? Then I'm going to press, and then I'm going to
delete this, okay? Delete the mask. I pressed
Enter accidentally. And I'm going to
log this for now. Okay? And I'm going to
select this part, okay? Also, I'm going to change the mask color so that you
can see it more clearly. Okay, then I'm
going to now here, the only thing that we need
to select is the wing, right? You have to remember
that. Okay, so I'm going to just make
a selection like this. The shortcut for the
Pentool is G, by the way. Then I'm going to press G again, and then I'm going
to just go around here and then connect. So if you don't
connect the masks, okay, it won't work, right? So once the mask is connected, this layer is on its own. Right now, we're
going to rename this. I'm going to call
this wing left. Okay. Now I'm going
to duplicate this, by pressing Control
D, I'm going to go I'm going to right click Transform and
flip horizontal, then we have this, right. Now I'm going to press Enter and then I'm going
to press R on this. Okay? And I'm going to
bring it here, right? Now, what I'm going
to do is I'm going to bring both of them
at the bottom, and I'm going to rename
this to body, right? We're going to
animate this, right? So what we want here is we want the wings to, like,
rotate, right? But let's try that. So well, that won't work, right? So what we need is we
need three D animation. Okay? So we need the
layers to be three D, right, so that we have
better rotation, right? I'm going to just turn
both of them into a three D layer, right? And now I'm going to press
R to bring up the rotation and this is X and Y
is going to work. This is the animation
that we want, right? Also, I want to emphasize the importance
of anchor point here. If your anchor point
is not set well here, let me press Y to select
the anchor point tool. Let's say your anchor
point is here, Okay. S. It doesn't work, right? So the anchor point should be at this point or at this point
or wherever you want, but it should be
placed in a way that this rotates off its edges. And so I'm going to go
at the first frame. I'm going to drop a
keyframe here, right? And then I'm going
to go at 1 second, and I'm going to drop
another key frame and then I'm going to go at
the two second mark, and then I'm going to drop
another keyframe, right? Now I'm going to
change this, okay. Okay, so we have
something like this, then I'm going to move forward, and I'm going to change this. So this is -31, and so I'm going to
go with 31, right? And then I'm going to go
here and then I'm going to copy this by pressing
Control C and Control V, right? So in that way, this
animation loops continuously, okay? So how do you loop? So the easiest way to loop
any animation is to make sure that the first
keyframes value and the last keyframes
value are the same. In that way, the animation
will loop efficiently. Okay. I'm going to add in the position keyframe
here as well. So I'm going to drop
the keyframe here. Then I'm going to press. Okay. And then I'm going
to go at one seconds. Okay. I'm going to
drop the keyframe here and then I'm going
to drop a keyframe here. And so I'm going to change this. Let's we're going to
move this bit in, right? Just a little bit in. Now I'm going to
change this as well. Okay. And let's see. And now at the last, I'm going to just
copy this keyframe, Control C, Control V, right? So let's look at the animation. It's really simple and you can do so many
things here, okay? But we don't need that
because remember, not every asset has
to be perfect, right? Once that is done,
we are going to repeat the same process on this one on like here. Okay. So I'm going to press R to bring up the
rotation, drop keyframe here. Drop a keyframe here and
drop a keyframe here. Then I'm going to
press Alt Shift P. Okay? So Alt Shift P. Then I'm going to go here, drop a keyframe, go here, and drop a keyframe, right? So first we are going to make changes to the rotation, right? So let's do that. Okay, so I'm going
to keep it here. This is -31 and this is plus 31. The reason why it is like this
is minus and this is plus, for example, if I
change this to minus. The reason why this
doesn't work is because basically this wing
is flipped, right? It's flipped and
that's why we have to make sure that we flip
the values here as well. But don't be mindless and
just don't copy and paste, pay attention to whatever
it is that going on here, I'm going to drag this
in bring this in, right? A. This depends on your preference. Just make sure that
you don't overdo that. Then let's animate this. So here it's plus 31, so it's going to be -31 here. Okay. I'm going to drag this out just a little
bit or bring it in, right? And let's bring this in as well. And then I'm going to copy this by pressing
Control C, Control V. Okay, so we have this
really simple animation. Although it is really simple, it looks really, really nice. Right? Now, I don't know if
you can see it or not, but there is something missing. And that is the body has
not been animated yet. It should be. There
should be some movement. For example, if you
move your arms, well, it's obvious that there will be certain movement
in your body. And so whenever you are
animating objects like this, you don't have to
be a perfectionist, but you don't have to be
a stupid person either. Okay? And so make sure that you are taking things
into consideration, okay? So we're going to
animate the scale, and I'm going to explain
each and everything, don't worry, okay? In short. Okay? So I'm going to
animate the scale, so I'm going to drop 12 and
three key frames, right? And when the wings
go down, Okay. The body gets bigger. If you are looking at the
butterfly from the top, the body will be I don't know why I'm
pointing my fingers, but the body will be moving
towards the user, right? And so that's why I'm
going to change this to 110, not this, this. Okay? So I'm going to
change this to 110, and it goes back 200. Okay? So let's look at this. It's working. Okay. And if you think that
this is too much, you can also change this and
you can also do math here. For example, if you
want to reduce this by, let's go with 5.5, you can do that as well. Okay? Just add in minus or plus. Now, we are going
to easy ease. Okay? So what is easing? So to apply the easing, all you have to do is right
click Keyframe Assistant, then you hit F nine or
just easy ease, right? So now, I'm going to introduce
you the graph editor. The graph editor here. The shortcut for that
is Shift F three. So what is graph? So graph shows the numeric value of the property over time, okay? So this is the graph, and there are two
types of graph. The first one is
the value graph, then we have the speed graph. Speed graph, if you are
someone who is self taught, then you must have seen
only the speed graph, okay? Because most After Effects users who are teaching on YouTube, they always prefer
this because well, it get things done faster, okay? So there are two graphs. Like I said, the speed
graph shows the change in speed change in speed
over time, okay? This is the change in speed. And look at this, okay, 36.28. That is the change of value. So this is basically going up, and this is the
peak of the speed, and then it's going
back to zero, right? So that is speed graph. It basically shows how fast a property is
changing over the time, then we have value graph. Okay? So value graph is different. The graph looks completely different compared
to speed graph, and it's because this
shows change in value, not change in speed. If I make a change here, we will have completely
different animation, okay? So if I bring it down like this, look at the value, okay, in that yellow rectangle. Okay, we will have a
messed up animation. Okay? So that's why people
stay away from the value graph because changing anything here could mess up your animation. Both the graphs are
equally important. Okay? And this Okay, so let's quickly understand the speed graph and
how to change it. Okay? So these are
the key frames, okay? This keyframe, these
are the key frames. And I don't know why it's here,
it should be here, right? So the yellow boxes are the key frames and these
are called Bzier handles. Okay. So whenever this
is a linear keyframe, okay let me change this to like, let me go back and let me change this to linear
so that I can show you. Okay? So this is the
linear animation, right? And now you understand why it's called linear
keyframe, right? So I'm going to
just select them, right click keyframe
assistant and Easy Ease. Now the graph has changed.
It's much smoother. The animation was linear. Now it has waves, it has arcs. Okay? Now, let's change this
so that you can understand. Okay? So I'm going
to drag this Bzier handle to something
like this, okay? And I'm going to
bring this like this. I'm going to explain this.
Don't worry about that. The graph is not that
important for this course. But I'm going to quickly
explain this because this is the only part where
we'll be using the graph, if I
remember correctly. Okay? So here, what's going on? Okay? So previously,
the speed was linear, then we changed the graph
from it's now east. Now the speed here goes,
it increases slowly, but it picks up and it goes at the peak and then
it slows down here, then it repeats the same
thing here again, right? And so let me solo this, okay? So see, it's going here, and then it will be really
speedy at this point, okay? Like in this part, it's going to be really,
really speedy, okay? See. Okay. All right. Now, let's mimic this into, if you can also mimic this, so I'm going to drag
this out like this, and I'm going to
drag this like this. Okay? And I'm going
to unsolo this Okay. Now, if you can see the
difference between both of them, okay, that difference is
caused because of the graph. And that's how important and
powerful the graph is, okay? So let's try changing the graph
really quickly so that we can move on further to
our next object, okay? And I'm going to drag
it out like this. Okay. And if you
think that, okay, so let me quickly explain
what is going on here, right? So what is this is this is basically two values for
the same keyframe, right? So this is one value,
this is another value. And it's not a right thing. And the reason why
it's not a right thing is because it changes
the graph, okay? So what we want is normally this and this should
be here, right? Because, well, it's obvious that the starting point should not have two starting
points, right? Starting points should
have only one point. And that's why what
we need is we need both these key frames or both these values to be
present on the same point. Okay? So to do that, what we
want is we want to double click and we want to lock this. We want to lock this, so
this is incoming velocity, and this is outgoing velocity. So this is incoming velocity, this is outgoing velocity, but they are at the same point. And so it's going to mess
up your animation, okay? So I'm going to double click here and then we are
going to lock that. Okay? Now, any change we make here will be
retained, okay? Okay, so that's how
the graph works. And I just wanted
to show you, okay? And I'm going to just
select all of them, keyframe assistant,
and then eases, right? You can also make
many changes here, but this butterfly is going
to be really, really tiny. So it's not that important. There is this term
called major in minor. Okay? You are becoming a major in something that
is not that important. Graph was important. That's why I took a tiny
bit of overtime for that. But apart from that, well, don't waste so much
of your time on that. Okay? Now, we're going to find the girl underscore PC, okay? And then we are going to bring
the butterfly here, right? Also, I'm going to just
move this into PC. Okay, and butterfly,
where is butterfly? I'm going to bring
the butterfly here. Now, here, I'm going
to scale it down. And I'm going to zoom in
and then I'm going to change this to full so that
you can see more clearly. I'm going to place it here, then I'm going to press
R to rotate it. Now I'm going to apply an effect called drop shadow to this. We need a shadow here, so that it feels as
if it's interactive, I'm going to just drop it here. I'm going to Increase this. Then I'm going to soften it. This effect is, although
it's self explanatory, it's really, really handy. It can take your project 1-5. I'm going to increase
the opacity here. Okay. So I'm going to
change this to around 74. I'm going to press Control Alt T. And now we have
this. Now look at this. I can extend the
composition, right? I added this time remapping and then we had
this little glitch, GPU glitch or GPU error here. I stop the recording there. Okay? Now we're going to
continue from that part, right? And so let's add
in an expression. So I'm going to hold Alt
and loop out, okay, right? And now it will loop endlessly. And so we just added
the butterfly to this, and I will see you
in the next one.
14. Chapter 11: Compositing & Adding Text: Lecture, we are going to
fill up all those spaces with our already
created layers. Okay. So let's move up here, right at the first
frame and then I'm going to bring the
sun here, right? And once that is done, I'm
going to bring it down like this and I'm going to
change this to three D. And when you change any layer
to three D, it will move. And this is natural.
This is normal. Okay so don't worry about that. Your layer will be
somewhere around here. Okay, so just make
sure that you bring it back like this, right. Now, what we want
is we want to see the layers in a way that we can adjust
them and we can see, well, what exactly
are we doing, right? And so for that, we have this, which is called
select view layout. Or which is called
view layout, right? So this basically
allows us to split the composition panel into
multiple views so that we can see our scene from different perspectives and
angles simultaneously. This is mostly used for
three D, obviously. So I'm going to go
with two views, right. And now, this one is so
this is the default, basically the default
composition here, and this is the top view, we normally use top view, okay. And here you can also change, for example, I'm going to
just drag this out like this. And okay, so this is basically three D
view pop up, right? And so the three D view pop up, lets you switch
between camera angles like active camera, front, top, left, right, okay, et cetera to navigate our
three D scene, right? And right now this is so we
are at the first frame, okay? And it should have been like we know that they
should not be here. So let's change this to
active camera, okay? And now we know,
well, this is sun. And now let's move it back a little bit or
front a little bit, okay? So I'm going to press P
to bring up the position, and I'm going to just
bring it in front, okay somewhere around here. Okay. Now, once that is done, I'm going to also
move this back. Okay. And now let's look
at this, okay? So it's really simple,
it's really cute. Okay. Also, if you want, you can make changes to the sun as well. If you don't like the
color, you can change this. Okay. So don't worry about that. Now I'm going to go into
the main composition again and we are now going to
add the flowers one by one. I'm going to select this flower, and I'm going to drag this out. Also, I'm going to teach
you an awesome shortcut. This helps us to if you
have messed up your screen, if you have zoomed in too
much, zoomed out too much, and if you want
to zoom out or if you want your screen to fit, all you have to do is
press this shortcut. Anyways, now let's
bring in the flower. I'm going to bring it here. I'm going to place
it on the back. Right? Now I'm going to turn this into
three D, obviously. And well, it ran away
like we expected. And now what we need is we need to make sure that it's placed
at the right place, right? So I'm going to just press P and then I'm going
to change this. You can also change it
manually, by the way, it doesn't have to be like you don't have to always
change from here, you can change
from here as well, but make sure that you are
paying attention here. Okay? So I'm going
to bring it out like this or back, right? We want it on the back Okay. The reason why we
are placing this on the back is because we want this parallax effect
to look better, and then I'm going to
change this place it here, then I'm going to scale it up and place it down like this. We're going to place
this one in the center, not here, I'm going to
just bring it here. I have this habit of
making changes from this. If you don't have that habit, you can just randomly do that. But I have developed this habit. If you don't develop
your own preferences. You don't have to always
borrow your preferences. As I'm going to because
this is too out, so I'm going to bring like this. Now, I'm going to
duplicate this. I'm going to press Control D, and I'm going to place it
somewhere around here. I'm going to bring this on
the back or in the front. Then I'm going to scale it
down just a little bit. I'm going to place it
somewhere around here, right? I'm going to bring
it on the top. Okay. Now, once that is done, I'm going to
duplicate this again, and we're going to place
it somewhere around here. Okay. And I'm going
to scale it down. And by the way, you can
change the size of it. You don't have to not every
flower has to be same size. Okay? So you can change the size of it in a way that
you like, right? So that depends on
your preference. Once that is done,
I'm going to press P and change the position of it. Okay, so let's change this Okay. And I'm going to bring
it out like this. Okay. And I'm going to
bring it like this, right? Now, before we add
another flower, I want to make sure that I have already filled this flower
and then we can change that. Okay? So I'm going to drag
this and bring it here. I'm going to scale it down. Okay, I'm going to
bring it in the front, and I'm going to bring
it up like this. I'm going to basically
replace this flower, this is flower front, and I'm going to just
replace it, right? So I'm going to hold on
to alt and then drop it, and we have this, then I'm
going to duplicate this. I'm going to place it here, but I want this on
the back, right? So I'm going to press P and then I'm going to
bring it on the back. Somewhere around
here, and then I'm going to press S to
bring up the scale. Okay. And we have this. I'm going to bring this
flower bit down like this. Okay? And then I'm going
to duplicate this. Okay, bring this
around here, right? And I'm going to
place it on the back like this right Okay, so far so good, right? Now, I don't think
we need two views, so I'm going to just
change this to one view. Okay. And you can
change that back, okay? So we have this, right? Now, let me change this to full so that you can
see more properly. All right, so far so good. Now, let's add some text here. Okay? So I'm going to select the horizontal type tool, right? And I'm going to type in Bloom. By the way, the type
two lets you create and addi text layers directly
in the composition. The shortcut for that is Control plus T. Now I'm going to choose the fonts as thunder black. I'm going to get rid of this and I'm going to pick the
pink color here, right? But we might choose gradient. Now I'm going to reenter the anchor point by
pressing Control Alt home. Then I'm going to
press S, but first, I'm going to change
this to three D, and that's the
font there, right? So I'm going to scale it up. And I'm going to press S, and then I'm going to
scale it up, right? Now, I'm going to pre
compose this, okay? So I'm going to press
Control Shift C, and then I'm going to change
this to bloom underscore, Bloom, text underscore PC, and just move everything
there, right? And this causes an issue, right, because the layer is
no longer three D, and that's a common problem that you might run into, right? So change that into
three D, right? And bring it out, right? And the reason why
it's not here is because the text has moved because of the
three D option, right? So I'm going to change
that to change it back. And I'm going to
change this color, something like this, and then I'm going to align
it to the center. Then I'm going to first
of all, move this here, and then I'm going to add
in the butterfly here, I'm going to drop it here. Or what you can do is you don't have to always
repeat the process. So I'm going to
just delete this, right, and then I'm going to
find the girl underscore PC. I'm going to press
Control C. Okay? I'm going to go to
Bloom text underscore PC and paste. Okay? And you can place this
anywhere you want. Okay, let's go with L, I guess. I'm going to scale it
down just a little bit. Okay. Now we have the text, and I'm going to go back. The reason why I precomposed it is because let's
say that you want to make any changes to
this or let's say that the pre comping might sound like too much
of a work right now, but I'm going to show you something really
cool and that will prove why pre comping is
really, really crucial, okay? So I'm going to just
go at this frame. Okay. And I'm going to bring it on the back like back back. Okay. And I'm going to press S, and then I'm going
to scale it up. Place it somewhere
around here, right? And I'm going to move the
sun bit up like this. Okay? And I want this text
to be behind the sorry, I want this text to be
behind the flowers, so I'm going to bring
this here, right, and I'm going to
change it. Okay? So I accidentally changed the position scale instead
of the position, okay? Now I'm going to change this, move this around here, scale it up, right? And from this, you can adjust the flowers as well.
So don't worry about that. Okay. So I'm going to change this flowers position
just a little bit, right? And I'm going to scale
up the text. Okay. Now, what I want is I don't
like this empty space, but if we fill it like this, the audience won't be
able to read it, okay? So I'm going to use
something called masks, and I'm going to just show you something
really cool, right? So I'm going to just
draw a mask using an ellipse tool and then I'm going to
just feather it out. Okay? So I'm going to press
F to bring up the feather. And then we're going
to feather it, right? In that way, it blends
in really, really well. Okay? And also, if you think that this color
is not a right one, you can change that as well. Okay? So don't worry about that. So I'm going to go
into this, okay. I'm going to go into properties. Okay, this one looks
much better, right? I had a different hex
code for that, right? And so I'm going to go
back and see how it's looking and it looks
really decent, okay? Now, let's move the sun or let's just resize it a bit down down. Okay, so now we are going to make them look
even better, okay? So let's make these
flowers even better. We applied we have already
applied this effect here. Let's apply CC plastic that we have applied there
to each and every flower. I'm going to choose
this and apply and see this is without and this is with much better difference. It looks really nice with the effect and then I'm going to apply this effect to
each of the flower here. And just make sure that you
don't apply it two times. Okay? It looks really nice. This tune like effect is
clearly visible now, right? And I want to make
sure that I haven't forgotten any flour here, right? Also, I'm going to change
this to quarter for now. We have this really
simple animation. Ready, right? So I'm going
to change this to full Okay. As you can see, this looks
really, really nice, right? The text looks nice. And also, if you
think that the text is not that important,
that's completely fine. You can change the placement
of the text as well. Okay? Let's say that you can resize it if you
want, o, like this. And you can place it here. But the problem
with that is that the butterfly will be
resized as well. Okay? So what we're going to
do is I'm going to go into this and I'm going to
resize it like this manually. Just drag it like this and
you'll be able to resize that. But just don't go
overboard with this, because it might ruin the text or the fonts
for you, right? Now you can start to see the effect in taking
its place, right? It's really nice. I'm going
to move this like this. And if you think that the
text is now not readable, you can drag it out like. Right? I think this is
called adaptability, right? I don't know if
it's adaptability, but you have to be flexible in your process
as you move forward. You have to make sure that you are not getting
stuck in your head, you are not getting
stuck in the process. You keep on moving forward. And if you get stuck, if this
text doesn't look right, you don't get
frustrated and leave, you just sit with
the discomfort, and then you can make changes
and move forward, right? See, this is just
a video, right? It's just a video. Okay, so I'm going to go back because I take it
seriously as well. I'm not saying that
I don't take because animation at the end of the day is just another video, right? And I'm not saying that you
should not take it seriously. But I'm just saying that don't
get too attached with it. Don't get too attached
with the outcome. Okay? It's okay.
You are going to be fine. It's just a video. Also, I'm going to
change this, okay. Let's change its
position so that right? You have to remember
that you can make any changes to
this if you don't like, for example, the glare here, let me change this to the
flower front underscore PC. I'm going to change that,
right, because see, here it's not too much, but because of the light,
it's too much, right? So I'm going to just
drag it out like this. Okay, let's go back and see. Okay. So this one is
much better, okay? And if you want, you can
also change it back. And I'm going to
bring this like this. Because since we already
have CC plastic there, this light, without this light, it can still look nice. But I think the
light was also nice. Now I'm going to teach you
something really cool, right? Let's say that you are
making changes here, but now I have to go back and I have to
see what's going on. But what if I want to see those changes live?
How would I do that? Because this is really
time consuming. And for that, we have
something called new viewer. The shortcut is
Control Alt Shift N or view split with
new locked viewer. The reason why
it's not active is because I have
this panel active. As you can see with this blue line surrounding
the layers panel. If I click here, now
this one is active and now we have split with
new locked viewer, the shortcut is
displayed here, right? And well, so basically, I'm going to go back, right? And we want to view
this layer, right? So I'm going to just
select the composition, press the shortcut,
which is Control Shift, right, and then I'm
going to go here and I'm going to just see, ok? Well, it looks good
without the light, right? S. Okay? So I'm going to keep
it here, right? And I'm going to press G, and then I'm going
to hold Alt so that I can turn this into, like, the circle so this is without, obviously, and this
is with. Okay? So I'm going to go
with it and make sure that you don't close this composition because
this is a live composition. Just close this one. Okay? And so I'm
going to go back, and I think I like this one. I may make changes to this, but we are done with
adding those characters. And in the next lecture, we
are going to make sure that everything looks united,
everything looks nice. We are going to add
some blur, some noise. Okay. So that's it
for this lecture. I will see you in the next.
15. Chapter 12A: Compositing Butterfly: The previous chapter, we set up this entire composition, okay. And now, if you think that everything is merging together, you can make any
changes that you want. With this, Okay, for example, if you think that two flowers
are merging together, you can basically
change them, right? So it's not set in stones. You can make any change
that you want right away. So I'm going to just try and
shift the position of this. I'm going to bring
it on top like this and I'm going
to bring it to side, and then I'm going to press S, and then I'm going to scale it down just a little bit, right? The next thing that
we are going to do is we are also going to add little butterfly
animation to this. Okay? So when the camera is
basically moving down here, we will add a butterfly
going up, okay? So I'm going to find that butterfly that we
already used somewhere. Okay? So I'm going to
go to Gold score PC. I'm going to grab this, and
I'm going to press Control C. Then I'm going to
go back, right? And then I'm going to
press control V, right? Now I'm going to turn this
into a three D layer, okay? And, well, there
goes our butterfly. Then I'm going to
just resize it. Okay. And I'm going
to Press P and bring it up because that might be sometimes bit
troublesome, right? So let's animate this. Okay? So I'm going to press
R to bring up the rotation. Okay? And I'm going to set up this rotation like this. Okay. Now, I'm going to
press P to bring up the position key frame. Okay? And I'm going to go
at around here. Right? Or let's go with here for now. We will change the timing
on the later stages, right? So I'm going to bring and
you can solo this as well, okay, so that we can focus on it in a much
better way, okay? So I'm going to bring
it around here, right? Not here, here. Okay. And as the camera pans, it moves like this, but I'm going to change this to somewhere
around here, right? Then I'm going to press G
to bring up the Pen tool. Then I'm going to just
when the cursor changes, this is basically this doesn't have any handles to
adjust this motion path. This is a motion path and
the points that you see, they are basically the frames, and they are linear, because these key
frames are linear. That's why they are set
at a specific distance. But once we change the
easing between them, the distance between
them will change, but we are not going
to do that right now. I'm going to just this
little arc like this. Okay, like this. Okay, so we have this
really simple animation. Okay, but it's too quick, right? I'm going to drag this, o, and I'm going to drag this out. Like this, okay,
outside of this. Okay? And then I will see
whether I like this or not. Okay, and then I'm
going to bring it below like this. Okay. Let's look at this. This looks really nice. So you can see the solo
version of it, right? It works really, really well. And the reason why I moved this keyframe here is because I want this
animation to be slow. It doesn't have to
be really quick. And if you want to
make it even slower, you can drag this
keyframe like this, and then, you know, it becomes slower, see? And if you think, why isn't this following this
motion path, right? It is following a motion path, but it looks as if it's not,
so don't worry about that. Our animation is still working, and see if you pay
close attention, the butterfly was at this
point, now it's here. Okay? So if you think that
animation is too slow, you can change that as well. Okay? So that's our butterfly.
16. Chapter 12B: Noise & Blur: Now let's add
something more, okay? I'm going to add in a solid. So I'm going to press Control Y, or you could just right click
New and solid Control Y. And I'm going to
call this noise. Okay? Now, I want to change
color on this, right? But there are no parameters here that will help me
to change the color. Okay? So there are
no parameters. How do I change the color? One way is to apply an
effect called the fill, well, but that's
too much of work. So the shortcut is
Control Shift Y, which basically opens
up these solid settings and you can change
the colors here. Okay? So I'm going to just open this up and I'm going
to add the color. Okay. So this is the noise. Once this is done, I'm going
to apply an effect on this. So we are basically
adding the noise here. I'm going to look up for noise, and I'm going to just drag
this and drop it on the solid. What does this effect do? This noise adds random grain or those static
pixels to a layer. Like it is used for
that filmy grain look. It makes our project look
really, really nice. Okay? So I'm going
to amp this up. Okay, this might be too much. Okay, so I think 75
is fine and see. Okay. Also there is this
pigeon in the background. Every time I start recording this pigeon somehow
finds a way because, well, it wants to
be heard as well. Anyways, of course, we are not going to change
these layers into a three D layer because
these layers are just making it look better, right now we are going to
change the blending mode, this is a blending mode option. So blending modes
control how a layer, how this layer interacts with the layer beneath it
based on the color, light, and darkness values. O so these are all
the blending modes. Okay. I'm going to overlay,
change this to overlay. As you expected, it doesn't
look that great, right? So let's change the
opacity of this. I'm going to press
T and bring it down to around 20, right? And what I'm going to
do is I'm going to select let's go
with Ellipse tool, and I'm going to draw a
mask like this. Okay? Then I'm going to
invert the mask. Okay? So we have it
on the edges, right. And then I'm going to
press F to feather it. Okay. And then I'm going to just increase this so that
it blends in, right? Also, if you think that
the color is too bright, you can change that as well. I'm going to bring this
down just a little bit. Okay. Now, these are the tiny things that
makes a huge difference. If you think that the
noise is too less, you can change it as well. Also, let's take this
noise to a next level. Because I don't like
this yellowish hue that we are having
on the edge right. But we'll fix that later. Right now, we are going to create an adjustment
layer, okay. So right click New
Adjustment layer, the shortcut is Control Alt Y. Then I'm going to change
this to blur because we're going to apply the
blur effect on this, right? And then I'm going
to add in an effect called fast box blur
to this, right? And I'm going to
change that to four, and I'm going to
get rid of this. Fast box blur quickly
blurs a layer, and this is much faster option to render than the Gaussian
blur and camera lens blur. If you want to render
it out really fast, this option is much better compared to the
camera lens blur, which I have used in other
courses, but this time, I'm going to go
with fast booxblur because it's really
easy on the system, and I'm going to change
this to full for now. Blur radius shows how
strong or wide the blur is. Iteration is how many times the blur repeats for
a smoother look, than we have blur dimensions. Here we have horizontal
and vertical, then we have horizontal
and vertical. This is basically the
dimension or sorry, not the dimension, the
direction of the blur. Then we have repeat edge pixel. It basically prevents those
dark transparent edges on the layers borders
when blurred, let me turn this on, okay? So what is an adjustment layer? I forgot to explain that. So let me quickly explain
an adjustment layer. So Adjustment layer is a layer in which
any effect that you apply on this layer will be applied to the
layers beneath it, for example, applying
the blur to each and every one of them could be
really troublesome, right? But we applied the blur on an adjustment layer and
now it is affecting each layer without actually applying the effect on them.
I hope that makes sense. Okay. So first, we
apply the blur, right? Now, I need to fix this yellowish hue because
I don't like that. I'm going to change
this to full. And so I'm going
to apply an effect called let me search
for noise, okay? And I'm going to apply an
effect called turbulent noise, and I'm going to just
drop it here, right? So when I apply turbulent
noise effect to this, that effect just went out. Okay? So turbulent
noise generates animated and organic noise
and texture patterns. Okay? It is mostly
used for smoke, clouds, fire, but in this case, we are using it to minimize that yellowish hue
that we had, okay? And so let's look at
that and I'm going to just change the opacity, okay? So this is the noise.
Okay. And this is without turbulent noise. This is with turbulent
noise. Okay? And if you want, you can also change the animate this as well. Okay? So let's do that. So I'm going to apply
an expression on this. So I'm going to hold
Alt and then click, then I'm going to add in
an expression called time. Not eight star and 50, so we have even more
jittery effect. Then I'm going to press T and bring down the
opacity to around 20. If you think that this
is not doing that great. And let's go. Okay? So as you can see, like this texture is
doing wonders, ok? See? This is without, and this is with, okay? It's making our design pop. And also, I'm going to
bring this up like this. Okay. I'm going to reduce this. Now, I'm going to turn this on and let's see
what we can do here. I'm going to apply another
mask here like this. But I'm going to
apply the mask in a way that the
edges are blurred. But when the camera pans down, our main character
is in the focus. I'm going to just invert this
and then I'm going to press F and then I'm going
to feather Okay. So this is fine. I'm going
to drag this out like this. Okay? So the edges are blurred. Okay. And also, if you want, you can animate
the path as well. So if you want, you
can animate this, for example, here is blur, but as the camera moves down, you can animate this as well. If you want to animate that, just animate the mask path. Let's try that, okay? So I'm going to drop a keyframe here. Then I'm going to press
reveals the keyframe, then I'm going to press on Cam control so that we
have the reference. Okay? And then I'm going
to go at this point. Okay, and then I'm going
to just drag it like this. Okay? So let's look at what
is happening when we do this. I don't think this
is a great idea, but I just want to show you how you can try
different things. This is not set in stones. Everyone's creative juices
flows in a different way. Okay? So I just got rid of
the key flames, by the way. Also, I'm going to bring
this out like this because I don't want it to be too circly if it makes sense. Okay. Now, once that is done, I'm going to go to assets, then I'm going to
press Control I. I'm basically importing my personal favorite
texture, which is half tone. So I'm going to
import this texture. Okay, I'm going to
just place it here. Now, the bonding box shows
how humongous the texture is. Now I'm going to press S
and I'm going to scale it down around 70. This is fine. Color now this is this
needs a blending mode. I'm going to change
this to overlay and well it doesn't look great
and it doesn't look great, it's because the color is white. What we need is we
need a black color. We are going to apply an effect on this. There are two ways. The first way is to apply
the fill effect and the other way is to apply
an effect called invert. So invert basically
inverts any color. If it's white, it's
going to be black. If it's black, it's going
to be white, right? Now we have this red color. Okay, so fill effect, well,
it applies the color. Here, the only important
parameter is the color, right? And then I'm going to
change this to black. Right. And I'm going to apply the mask here because this texture
is too much, right? And I'm going to drag
this down like this, and I'm going to feather. Okay, this is fine. Then I'm going to reduce the
opacity of this. I want this. I hope you can see that I'm going to reduce it even further because
this might be too much. Then I'm going to press M and then I'm going to invert this. Also if you want, you can
change the opacity of this. Okay? So Okay, so I'm going to go with 45. It looks really, really nice. Okay, so we have our final
animation ready, okay? So in this lecture, we
added this, this, and this.
17. Chapter 12C: Variations & Puppet Pins: And do so many things here. Let's try to do
that on the spot. I'm going to press or
double click here. Well, let's try
adding the e here. I'm going to change
the rotation of it. I'm going to reduce the size. Let's change this
to three D for now. This is just an example, you don't have to make
any change to this, and I'm going to place
it around here, right? I'm going to scale it up, right? Scale it down, place it here. Okay. And I'm going to
bring it below the camera. Then I'm going to place
it on the back, okay? Not so much, but I want it
behind the flowers, right? Then I'm going to
rescale it. Okay. Now I'm going to press
Control Shift C, and I'm going to choose
leave all attributes. It's okay. So I'm going
to rename this Okay. And then I'm going to use something called
puppet position pin tool. Puppet pin tool lets you place pins on the
layer and you can bend or move the parts of
these layers like a puppet. It is used for character animation and we are
going to do that. I'm not going to change the
the direction of this whale. I'm just showing you an example of what you can do
with this technique. Okay, so I'm going to drop also, make sure that you are
at the zeroth frame. So I'm going to drop one.
Two, three, four and five. So we have five pins here. And when you drop
pins like this, you will automatically have
those keyframes, right? And this keyframe store
the position of the pins. I'm not going to go
much deeper into this. I'm just showing you quickly
what you can do, right? Now I'm going to just move this, for example, here, you can
manually move this as well. It's not so it goes
something like this. Okay. Then I'm going
to go at 2 seconds. I'm going to just
copy and paste. You can do so many things here. I'm just showing you an example of this is the worst thing
that I can do right now. But I'm just trying to tell you what you can do with this. The possibilities are endless. It depends on your
creative juices. It depends on what
it is that you are trying to tell to the audience, and you can do wonders and I seriously
mean wonders with it. Okay. So although the animation is not perfect and I'm not
trying to make this perfect, I'm just showing you, okay. And so, although it's really
bad, but you get the point. Right? You can do
so many things. For example, let's get rid
of the whale here. Okay? I'm going to add
in something else. Okay, so I'm going to
import the flamingo and I'm going to move this here. Okay? So you can add the flamingo as well because it
matches with the mood. So well, if you want, you can add this on
the back here, right? Let's scale it up.
Right? Let's prep and then move it on the back. And let's also drag
this down like this. Okay? If you get
rid of that flower, you can have this flamingo. I'm going to duplicate
the flamingo. I'm going to right click
Transform, flip horizontal. And you can precompose this. I'm not going to rename that. I'm just showing you.
You can drop this one, two, three, one, two, not three. Three. Let's go here, here, here, here,
here, here and here. Now, let's press Control K. I'm going to
increase the width of this then I'm going to press U. I'm going to
select all the keyframes. I'm going to move it here. Because if you are
on the 2 seconds, you drop pins here,
you will create keyframes on that second.
That's why I brought it here. I'm going to go at 1 second, and I'm going to
just do some random. Let's bend this here. Okay? So I'm going to
select all of this. Okay. Then I'm going
to move it like this. You can also change,
for example, let's say that you want to
make major changes to this. I'm going to quickly
teach you this. Okay? So I'm going to change
this type to advanced. I'm going to change
this type to advanced. And whenever you drop a pin, you will have one property,
which is position. But if you change this
pin type to advance, you will have rotation, scale, and whatever it
is that you want, I'm going to just
quickly change this. I'm going to fast forward
this so you don't have to have like a plugin
called Duik Angela. You can do wonders
with this, right? Because I'm going to show
you the animation that I made just using
this technique, but I used a plugin called
Duik Angela and well, see. Okay? And also, you can add the flamingos
back here, right? The point of this video
is just to show you how important it is to
ink outside of the box. Just go crazy. You are not going
to fail at this. So I'm going to get
rid of the flamingos, and we are done
with this lecture. And I will see you in the next.
18. Chapter 13: Car Breakdown!: In this lecture, I'm
going to walk you through all these animations
that we made. So let's start with the
car underscore main, okay? So let me hide this. Okay. So this one is
really fun project and it requires you to think
outside the box, right? When I first started,
I thought that I'm going to animate this one, but that girl with
the flower was more complicated because it had more animations
compared to this one. This one had only
this eye animation. And I'm going to
show that to you because I did not create
that eye animation. I borrowed it. Okay, and
I'm going to show you. Don't worry about that. But
it's really easy to create. Let's go through
this one by one, so I'm going to break this down. But here, first, I
use the same noise. Okay. Let me turn on the bounding box by pressing
Control Shift Etch. Also, you can just
click on this. Okay. So this is the noise, and let's look at the noise. Okay, so we have
the same animation that I showed you, okay? So this is turbulent
noise and the noise, and then I animated the
evolution here, right? And so this is it. Okay?
Then we have the blur. So it's the same thing
as the previous lecture. Then I have applied
this smoke to this, as you can see here, this
smoke also has a three D icon. Basically, it moves and it has a mask on it as
we just blend in. Apart from that, no
effect has been applied, and it's just a three D layer. Then we have the
camera, and this is the basic rig that
we created, right? But here, I made one changes. For example, created the camera, then I parented camera to camera control like we did
in the previous lecture. Then I animated this, okay. So this is the animation, right. But with that, I also wanted
different animation, okay? And so let me stretch this
so that you can see it. Okay? I also created this Zoom out animation
from this text, okay? So what I did was camera is
parented to camera control, and camera control was parented or is parented
to camera Zoom out. Okay? So this is basically
the Zoom parallax Zoom out, okay? And so we have two layers of different animation that is creating this amazing
effect, right? So that's it for the
parallax, it's really simple. Okay. And also, you can create
as many nulls as you want. Then, this one is the most
important element here, right? So this is the plane animation
that goes here, right? Okay. And so let's go into the plane and see
what's going on, okay? So I basically downloaded this plaintpview dot
png from the Internet. Here, as you can
see it is as it is. I don't know why
I have masked it, but there must be some reason. I masked it so that it
blends here as well. And here, what I did
was, first of all, I changed that into
three D, right? And then I just applied an
effect called drop shadow. I already explained that
once that is applied, I change like this is the
most important thing here. So I clicked on
this shadow only. So if I uncheck, we will have different results, so I'm going to check this. The reason why it doesn't look is because of
the blending mode. I'm going to change this to normal and well,
it changes. Wow. I did not expect this
to be this accurate. Anyways, I'm going to
change this back to multiply and then I'm going to change this to shadow only. And that's how I created that. I have a single
animation on that. This motion part that you see is the animation
of the plane. So basically the plane is moving from this to this. So vibrated. These two keyframes,
key frames are not even eased, right? And so that's it
for that. Right. Now, let's see car, okay? So here, there are so
many things going on. So this is the
original image, right? And as you can see, you
can see a person briefly. Like, I don't think
the person is visible, but this is the
original image, right? And I changed it into
something like this, okay? And so the shadow is
still there, right? So what I did is I basically
created this, okay? So these are the window effects, and this is window, okay?
So let me solo this. So I basically created the shape layers around this by just using the
pen tool, okay? Right. And then I
duplicated it and used it as a mat, okay? As a mat for this. Okay? So what are
the window effects? Okay? So let's look at them. So these window effects
are nothing but this stroke that you see, okay? So this is a stroke
animation, okay? Two rectangles moving, okay? This is shape one,
this is shape two. Okay. So these are basically the two shapes and let me press. Okay. And so it moves like this, and then I have animated the
path so that it looks as if it's moving on this
side of the glass as well. Then I have just duplicated it and then the animation
goes on, right? Okay. So that's it for
the window animation. And this is one of the
effect that I have created, and I'm not going to explain it, but I'm just going to show you because as you can
tell explaining, this could really
take a long time. So I'm going to just turn this on and just I'm
going to show you. So this creates
highlights, okay? I don't know if you
can see this or not, but let me change a few of the things so that
you can see, okay? Okay. So this is the
highlight effect or highlight preset that I am in middle of creating.
So let's move back. Okay. Now, this blinking
eyes animation. So I have applied an
effect called key light, because the color was
different on this video. I got this video
probably from the Lot. I don't remember
the exact website. I got this and it's free to use, you can easily create
this animation. I basically applied
time remapping to it after getting
rid of the background, and then I created this
background on my own. I have used this as a mat. This is a mat for this and let me drag this out so
that you can see, Okay. So this is a shape mate, okay? So I'm going to just
turn this on solo, this. Okay? So I just so this is a window that was masked and I applied Alpha
met to this. Okay. Then there is one
more animation. So when the plane arrives, okay, the car basically looks
up or the eyes moves up. Okay. And then when
the plane leaves, the eyes come back to
its original position. That's the only
animation here, right? Apart from that, we
don't need this. And I have also
added this just to give this cartoon
like effect to this. Also, I have applied this cartoon effect
to the car, okay. Although it's not too
much of an effect, Okay. But it gives this
cartoony vibe to it. Okay? I don't know if you can see it or not, but
it's visible, right? But I'm going to go with Phil because I don't want
it to be too much. Okay? So I'm going to go back, that was the car, right? And then we have this, let me turn this on
so that I can see. So the first time
when I made this, I had this, we pray
for love and cars. This was inspired by the
weekend song, right? Anyways, I created this
text, first of all, then I turned it
into a three D. Then this one may sound a bit complex because as you
can see here, the grid. I created this grade. So let me go here. I basically
created a new solid. Once the solid was applied, I applied an effect called grid. Okay, then I modified the grid. This is not that important, but I just changed a few of the settings
here and I made it look even then I
precomposed that solid. The reason why we use grid is to create that perspective,
let me turn this on. So this is the perspective. Now the reason why I used
this and not just change this text into three
D and place it there is because I want
it to be accurate. And so that's the reason why
I have created this grid. Once that grid was created, I changed it into three D, right and so these are the values for the
rotation property, right? And then let me show you, okay? So I'm going to hide
this for now, okay? I'm going to duplicate this. I'm going to turn this on. I'm going to change
this to none, and I'm going to change
this to 100 for now. Okay? And let's solo this so that you can see
it more properly. Okay. So here, let's
change this to two D, and now I'm going to change
this to three D, okay? And now, as you can see
here, it's messed up, right? Now, what I want is I want this text on this plane,
which is the grid, right? So how do we do
that? Now, if you try to parent it,
okay, that won't work. Okay? The option is to hold shift and just parent it, right? And that's how it works, okay? And so once that was done, I basically changed the
blending mode of it. And the reason why there
are many duplicates here for example, here and here, I'm going
to hide this grid, okay? It's because I want
to make sure that the people need to read this, but then I thought that, well, it's not that important because main focus here is this
car animation, right? And then we have the main here. There are not many animations
here except one animation. This effect is called
CC drizzle, okay? So drizzle allows us
to create or simulate this effect of raindrops on any layer that
you apply, okay? So this is without
this is width, okay? And so if you think that Okay. I hope you can see that. Okay? So these tiny water drops, you can play
around with this. It's really easy effect, I tried many things
here as well, okay? So I tried to apply this. Okay. I tried many
different things with this, but I don't think I liked them because
what I wanted was I wanted whales to be here or just sharks to be moving
around here, right? That would have been
cool, but at the end, I canceled that and I also wanted to do
something with it, right? Something like this. You can do so many things
here, by the way, okay? So I'm just going
to get rid of this. This was an adjustment layer
or the solid for the noise, so I'm going to get
rid of this as well. We don't need that. Now
I'm going to go back. And so that's how I created
this. It's really simple. Just because I taught you
that you can apply or use one null does not
mean it's a necessity. You can do so many things here. You can use three nulls, four nulls to control and create many animation in a
singular animation. Okay? So this is the
principal animation. This is the core animation. Right? And this is a
secondary animation. And we use a null to
create that, right? And so that's how
nulls are used. Nulls are really,
really crucial, and I would again say that the limits are
only in your mind. My first idea was to fill up this entire space with animated, like those aquatic
animals, for example, I had turtles, sharks, whales, but it didn't
quite look right to me. But just because it
doesn't work for me doesn't mean it
won't work for you. Okay? So you might try different
things you have to see what's what and you have to adjust according
to your need. Okay? So that's it for this, and I will see you in the
next one where I will be breaking down
another video. Okay.
19. Chapter 14: Girl & Butterfly Breakdown: Now let's move on to the final animation that
I'm going to show you. So I'm going to move into this. Like each and every
video that we did, we have blur noise. So this is basically a
light flicker animation that I have applied to this. Okay. Let me press you
so that I can see. Okay. So here I have created
this tiny bit of flicker. And it's applied only
to this area because, well, I wanted it to
be that way, right? Because you can do that, you can apply flicker to this
entire composition. But well, I thought, why not? Then I have applied
this particle dot MP four and let me turn
this into full. Now there are so many subtle
things going on here. So first of all, we
have the smoke that smoke that was applied in
the previous composition, and then the smoke
also has three D, and here the rig
is pretty simple. It's camera one, and then
we have the Cam control. I'm going to press U,
and here I have not even eased this because I wanted to keep it as
simple as possible. Right then, I downloaded this delivery van from
the Internet, right? So it basically looks
as if S is on the road. And it moves out, we have really simple animation
on this as well. I use that technique that I showed you in the
butterfly animation. Okay. And then we
have this, right? Now, these are the
elements that are really, really important.
Let's look into that. So first of all,
we have the girl, right here, I don't know why
there are two animations. Okay. So the reason why here, it was this because I wanted to create a shadow for
this lady, right? So how I tried to create that was by just turning into
a three D and then, you know, just span it around, move it down, rotate it. Okay, just like
this, scale it up, right, press R, and just
change the rotation. Then what I would have done
was mask it like this, invert it, feather it. Right? And that's how I
would have created or I thought that I should
create the shadow. But the problem here is that there is already a
shadow here, right? And so I just got rid
of that idea, okay? And so that's why this and
I have applied two effects. First one is the fill, and then I applied the
Gaussian blur. Okay. So let's go into this. Here we have two things. The first one is the girl, okay, which is this, and then we have the butterfly
effect applied to it. Now, here, I have applied
plugin called Deep glow two. Now, if you don't
have deep glow, you will have result like this. But you can apply the
native glow to this. But it doesn't give that
kind of the result. Okay? So as you can see, the results are
different, right? And so deep glow two works
really, really well. It's an awesome plugin, right? But for the sake of this, because I don't expect
everyone to have this, and so I'm going to just
disable that phone now, right? And I have this
butterfly dot AVI. So this is a transparent
video, okay. And what I did was I basically
set it up here, right? I rotated it, and
then I masked this. Okay? So I masked its feet to make it look as if it's
really sitting there, right? So without the mask, it would look
something like this, although it's not visible here, but I still know, right? And so that's why I thought, well, it would be a good idea. Integrity, I don't know
if I'm pronouncing it, right, is a good thing to have. Right. Anyways, then
I'm going to go back. Okay? And I'm going
to go into main here. Okay? So there are
so many things going on here, don't
worry about that. Also, I tried to add bunny here as well, but it didn't work. If you like it, you can
place it here as well, but it might take our attention away from our main character. Also, I'm going to
get rid of this because I have two
butterflies here, and those weren't nice, okay? So here first, I have two
bunnies, then I have grid. I use the same thing
that we did there. Okay. So I basically created this perspective
and then I parented this belief or believe
believe to the grid. Okay? So in that way, we have this awesome perspective and it blends really,
really well, okay? So I basically masked it, then I feathered
it to around 502, and I changed its blending mode because without the blending
mode, it doesn't look right. Okay? Now, it looks as if it's literally written
on the road, right? And we have this. So this is the text, universe has your back. Okay. And don't
worry about that. This doesn't do anything. I tried to create
many things here, but it doesn't work, Okay? Then we have the light. Okay, so this is
the light, right? I separated this as well
because I wanted to animate. Okay. And also, we have this This looks like
a superhero, right? And I wanted to show that
universe has your back. I'm going to get rid of
this for now, right? And this one is really,
really important, okay? So if you look at the
original image, okay, this was ingrained in it, and now I tried to
create it on my own. Let's see how I
created that, okay? So here we extracted this arrow, for example, let me try to
get rid of the mask here. Okay? So this is
the original image, and this is the
reference, right? So this is the original image. And what I did was I basically masked everything, every arrow, like the first arrow from this, and then I just animated it, and then I just tacked it, okay? So let me hide this, okay? So it goes something like this. Okay, then we have this
opacity animation. Okay. And then it
loops basically. So it has this and then it goes out, and
then it loops back. I probably saw this effect on a road one time and
that's why I thought, Well, why not?
Let's create that. Then I used this reference, and then I placed
the arrows there. Okay? So that's how I created
this, then let's go back. Then we have no
animation here, right? Okay, so that's how I
created this animation. You can do so many things here. So whenever you are looking at animage that you
want to animate, you have to see what elements
could I add into this. For example, if this is a road, you can add a vehicle. If the road is
from the top view, you can add some shadows
like the plane, right. Always keep saying, I said that in a previous
lecture as well, that the sky is limit
when it comes to creativity because it
depends on your perspective. It depends on your view, right? And also, let's see how
I animated this, okay? So this transform effect, okay? So let me quickly walk
you through this. So I have not changed
anything else. For example, we have opacity, rotation, scale,
position, anchor point. For example, you have
animated the position. Now, you want to
change something or you want to animate
something else. Instead of parenting
it to a new null, you can apply this
effect and you can make any changes
that you want. For example, if you
want to scale it, you can scale it up, okay? And so transform
effect is handy, but it's not that
useful here, okay? And so I applied this opacity
animation to this, okay? And the keyframes that you
see are hold keyframes. So they basically hold the
value at a specific time. The linear keyframe
changes linearly. This holds the value, and the value changes only when you reach
that keyframe, right? And so that's the
difference between the linear keyframe and this are the hold
keyframes, right? And if you want to change any
keyframe to hold keyframe, all you have to
do is right click go to keyframe assistant, and then you can just toggle
hold keyframe, right? And now this is linear. Now this is a hold
keyframe, right? Okay, so that's it
for this lecture, and we are done with this. Thank
 Animator's Oasis, Simplifying the complex!